

lidl Z31915-US Operation And Safety Notes
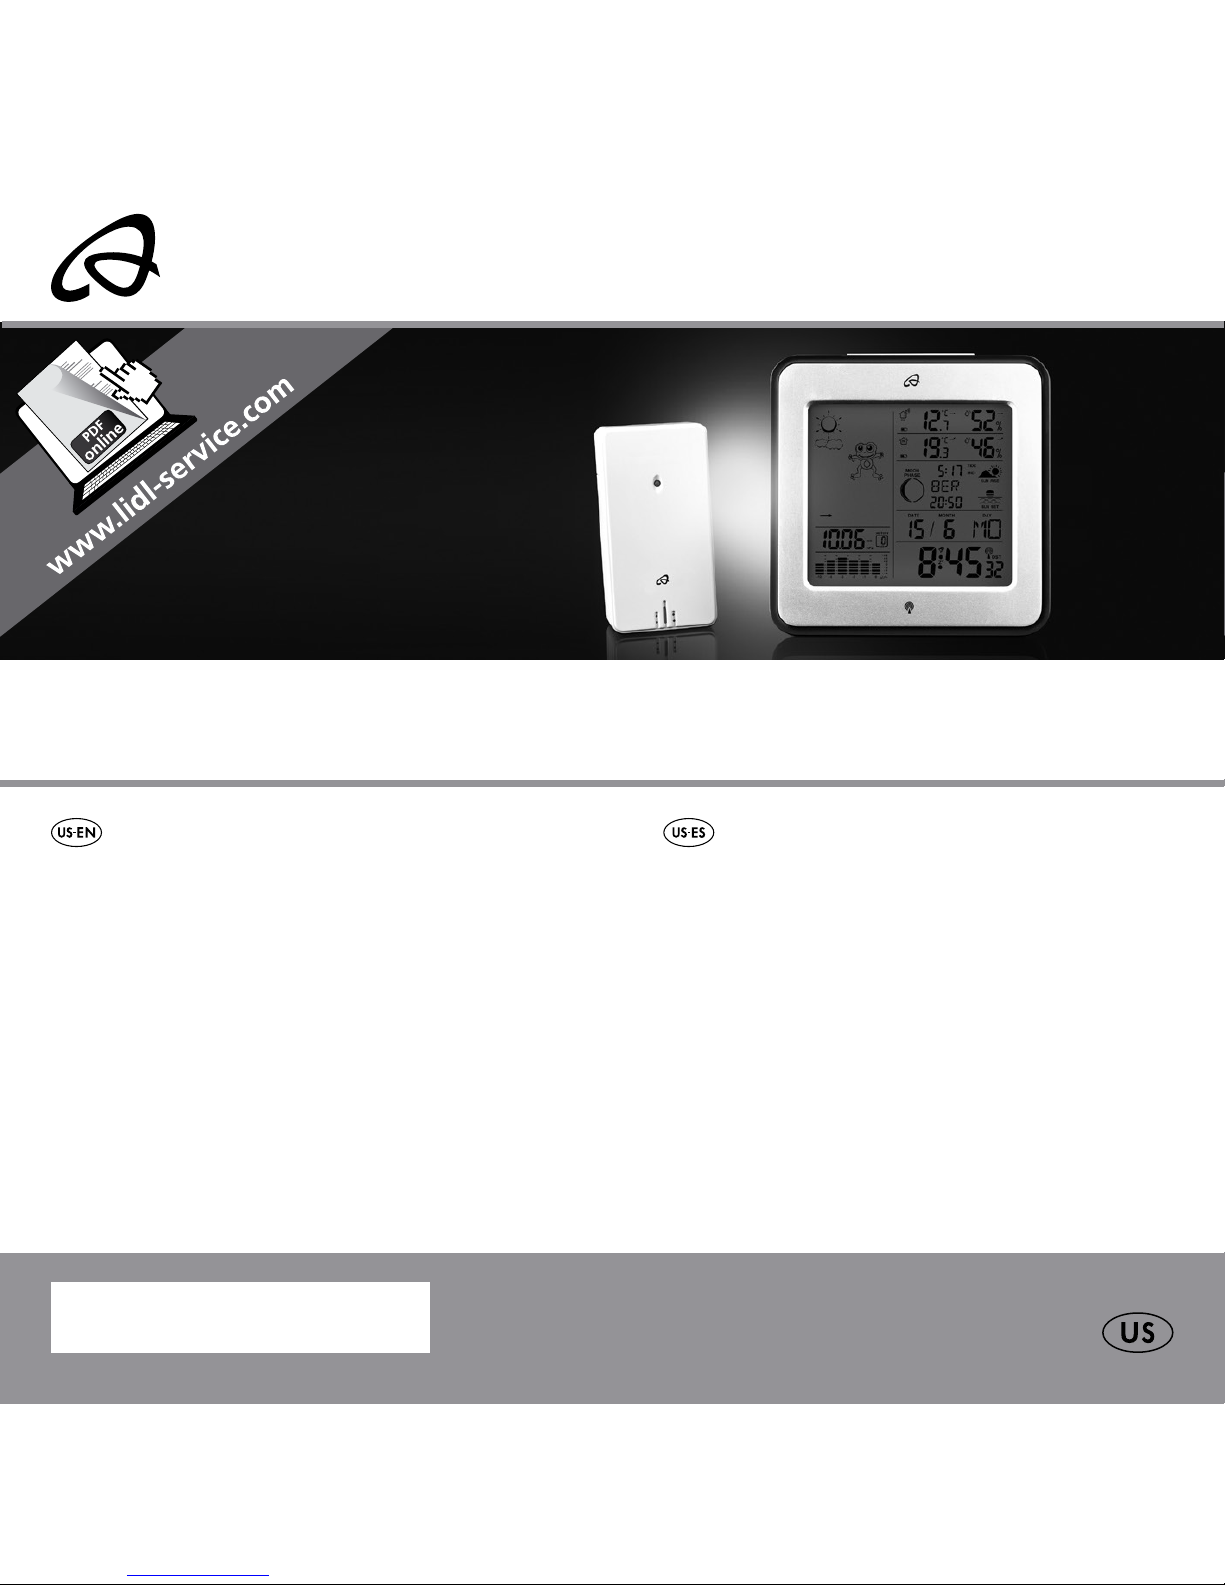
DIGITAL WEATHER STATION /
ESTACIÓN METEOROLÓGICA DIGITAL PORTÁTIL
IAN 282650
DIGITAL WEATHER STATION
Operation and Safety Notes
ESTA CIÓN METEOROLÓGICA
DIGITAL PORTÁTIL
Instrucciones de utilización y de seguridad

US-EN Operation and Safety Notes Page 5
US-ES Instrucciones de utilización y de seguridad Página 46

0.4 in / 10 mm
0.3 in / 8 mm

5 US-EN
Description of signal words ...................................................................................................................................... Page 6
Customer service ...........................................................................................................................................................Page 6
Introduction .....................................................................................................................................................................Page 7
Intended use ................................................................................................................................................................... Page 7
Parts description ............................................................................................................................................................. Page 8
Technical data ................................................................................................................................................................ Page 13
Included items ................................................................................................................................................................Page 14
Important safety notes ...............................................................................................................................................Page 14
General safety information ............................................................................................................................................Page 14
Safety instructions for batteries / rechargeable batteries ........................................................................... Page 16
Before use.........................................................................................................................................................................Page 18
Setting up the devices .................................................................................................................................................... Page 18
Preparing to use the outdoor sensor ............................................................................................................................. Page 19
Preparing the weather station for use ........................................................................................................................... Page 20
Operation ......................................................................................................................................................................... Page 22
Receiving the WWVB radio time signal ....................................................................................................................... Page 22
Setting the 12 / 24 Hour mode / °C / °F / hPa / inHg / Time zone / time / date / language manually ................... Page 23
Setting the alarm time .................................................................................................................................................... Page 25
Turning the alarm on / off .............................................................................................................................................. Page 26
Dismissing the alarm ...................................................................................................................................................... Page 26
SNOOZE function .........................................................................................................................................................Page 27
Preparing to use the weather forecasting function.......................................................................................................Page 27
Selecting the location.....................................................................................................................................................Page 29
Selecting the location manually .................................................................................................................................... Page 30
Lunar phases ..................................................................................................................................................................Page 34
Reading the barometric pressure for the last 12 hours ...............................................................................................Page 34
Adjusting the air pressure indication .............................................................................................................................Page 35
Setting the channel.........................................................................................................................................................Page 36
Displaying temperature and temperature trend ........................................................................................................... Page 37
Displaying the humidity and humidity trend ................................................................................................................. Page 37
Displaying the maximum / minimum temperature / humidity ....................................................................................... Page 38
Temperature and frost alarm ......................................................................................................................................... Page 39
Activating / deactivating the the temperature and frost alarm .................................................................................... Page 39
Background lighting .......................................................................................................................................................Page 40
Battery state display.......................................................................................................................................................Page 40
Changing the batteries .................................................................................................................................................. Page 40
Troubleshooting ............................................................................................................................................................. Page 41
Cleaning and care ......................................................................................................................................................... Page 42
Disposal ............................................................................................................................................................................. Page 43
Warranty .......................................................................................................................................................................... Page 44
6 US-EN
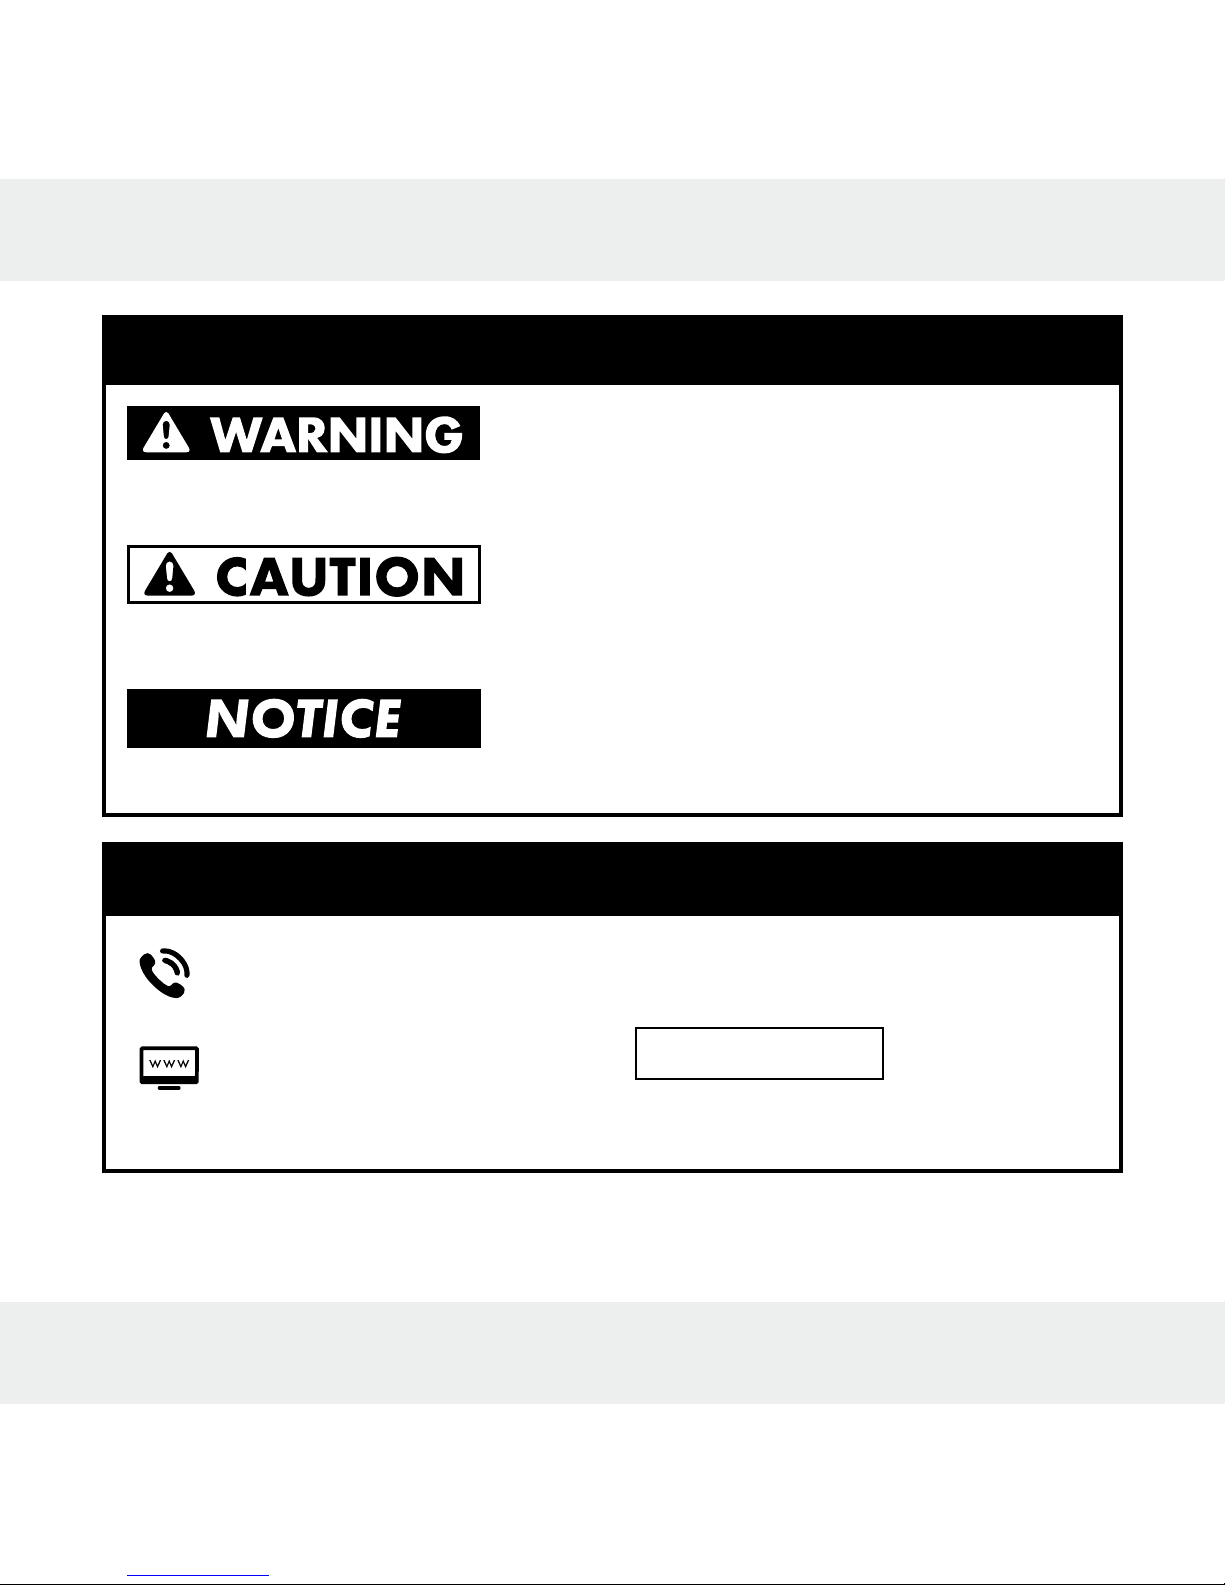
DESCRIPTION OF SIGNAL WORDS
WARNING indicates a hazardous situation
that, if not avoided, could result in death or
serious injury.
CAUTION indicates a hazardous situation
that, if not avoided, could result in minor or
moderate injury.
NOTICE indicates information considered im-
portant, but not hazard related (e.g. messages
related to property damage).
CUSTOMER SERVICE
Call customer service at
1 (844) 543-5872
Visit the Website Customer
Service Platform at
www.lidl.com / contact-us
Visit a LIDL store for further assistance.
IAN 282650
Please have
your IAN
number ready.
7 US-EN
Digital weather station
Introduction
Congratulations on your purchase. You have chosen a high quality product. The instructions for use are a part of the product. They contain important information on
safety, use and disposal. Please familiarize yourself with the safety information and
instructions for use before using the product. Only use the product as described and
for the intended use. Include all documentation when passing this product on to
others.
Intended use
The weather station displays the indoor and outdoor temperatures in Celsius (°C) or
Fahrenheit (°F) and their maximum and minimum values. It also displays the indoor
and outdoor humidity (%RH) as well as their maximum and minimum values. The
weather station additionally displays the weather forecast, the time in 12 / 24-hour
clock mode and the date. The weather station displays the sunrise and sunset times
for that day, along with the lunar phase. The weather station also has two different
alarm functions. The product is only suitable for use in private households and is not
intended for commercial use.

8 US-EN
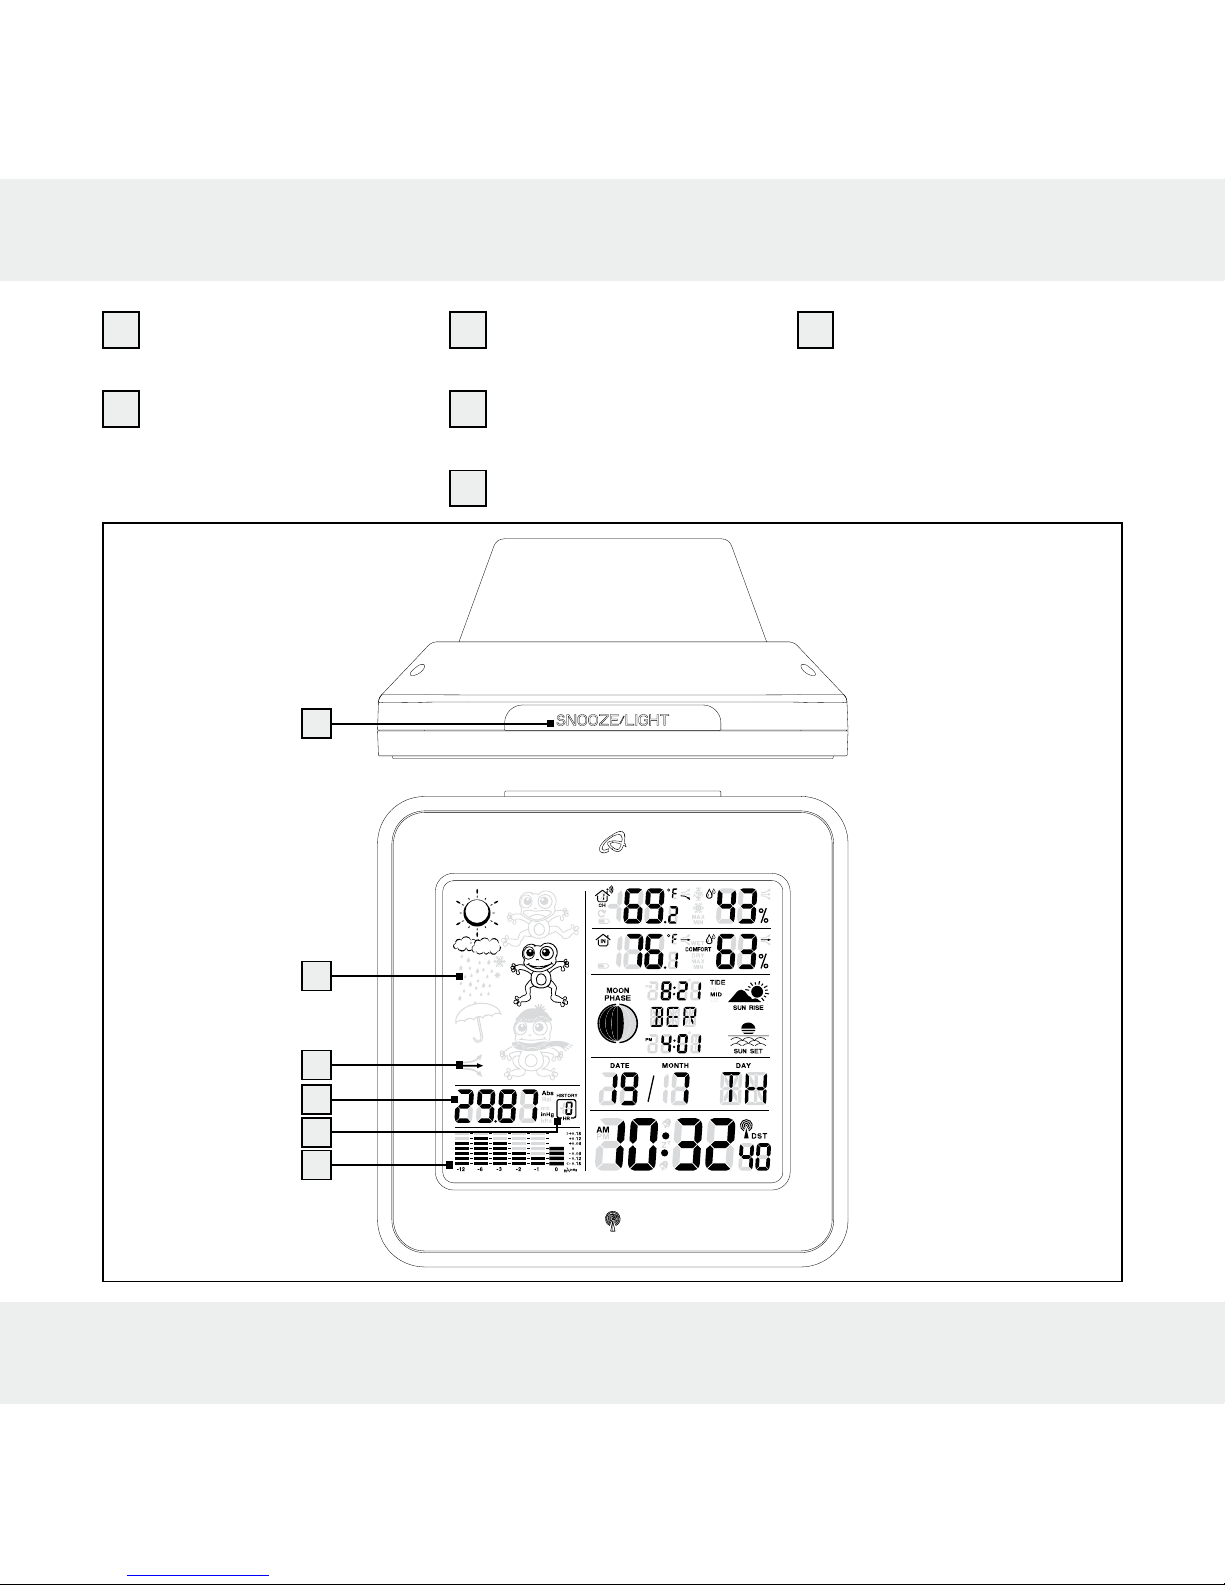
Parts description
Weather station:
1
Date display
2
Month display
3
Alarm 1
4
SNOOZE display
5
Radio tower symbol
6
DST display (daylight saving time)
7
Time display
8
Alarm 2
9
Weekday display
10
Sunrise time
11
Tidal range display
12
Location
13
Lunar phase
14
Sunset time
15
Temperature trend (indoor)
16
Humidity trend (indoor)
17
Humidity (indoor)
18
Comfort indicator (maximum /
minimum)
19
Indoor temperature (°C / °F)
20
Battery level display
21
Humidity trend (outdoor)
22
Humidity (outdoor)
23
Temperature and frost alarm
(maximum / minimum)
24
Temperature trend (outdoor)
25
Outdoor temperature (°C / °F)
26
Battery level display (outdoor sensor)
27
Selected channel
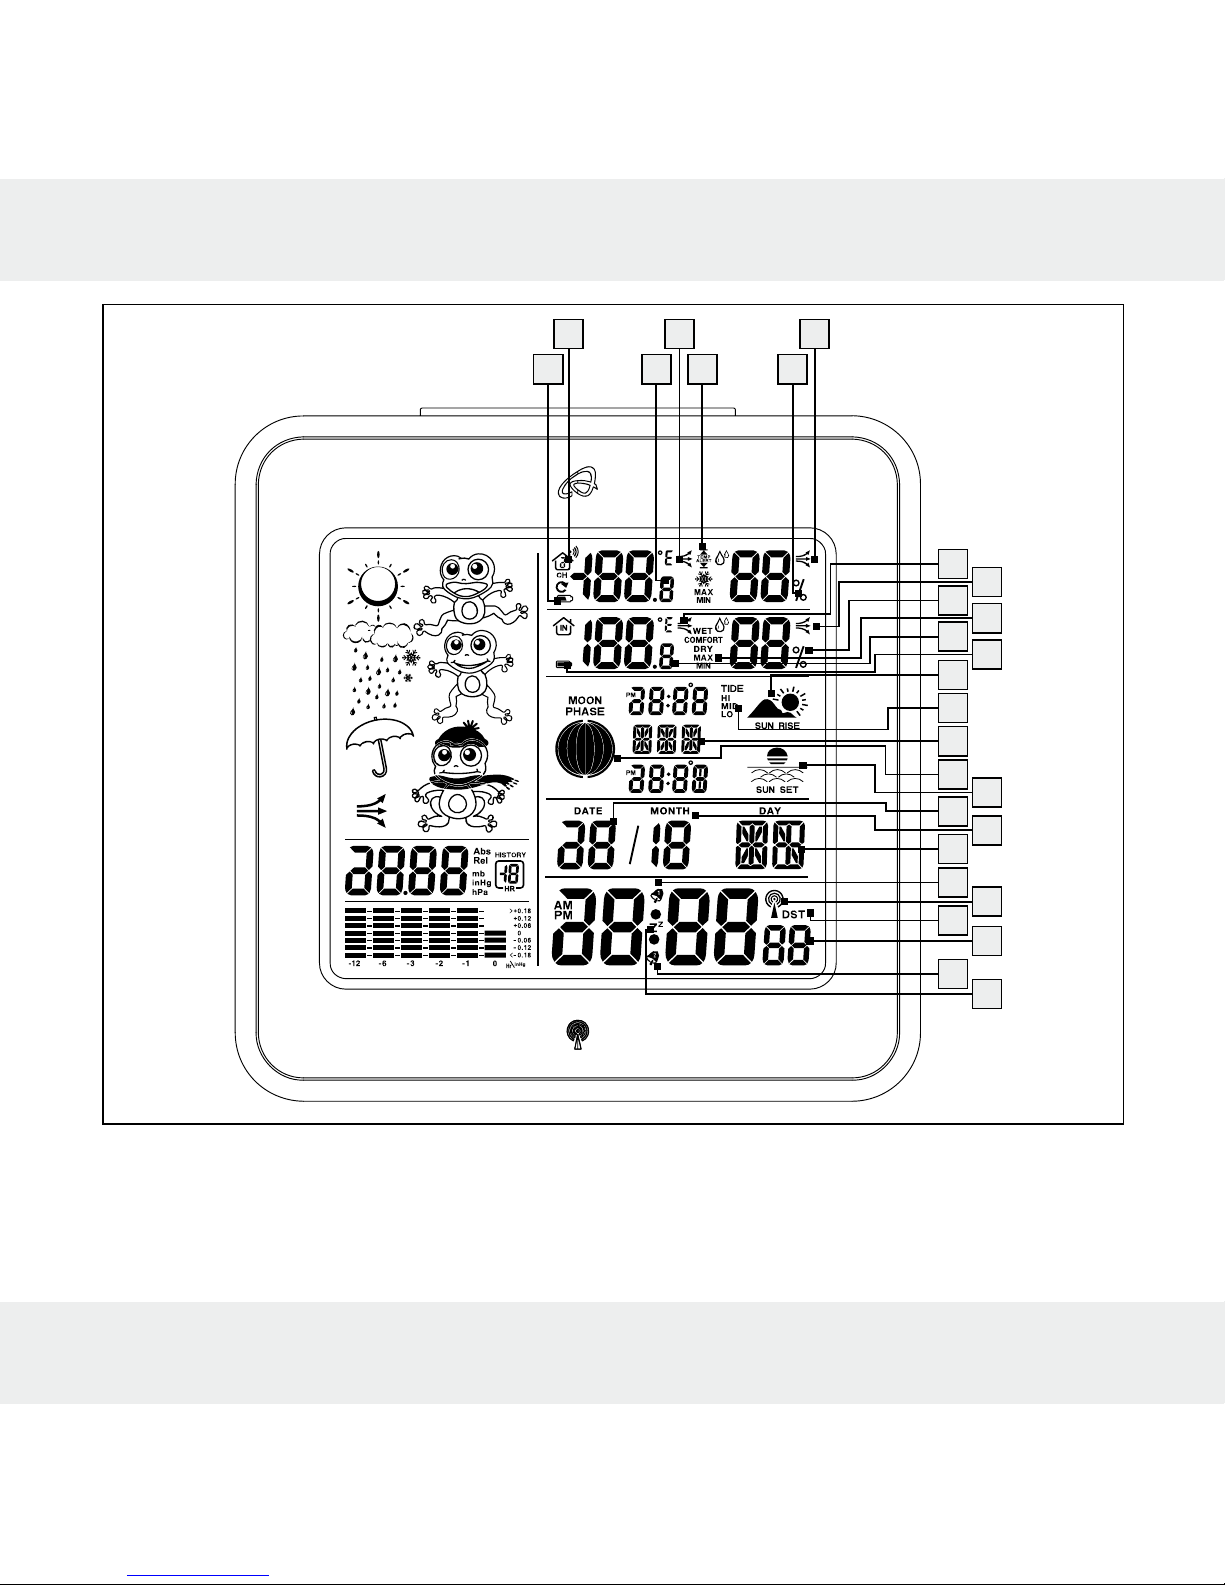
9 US-EN
17
19
15
20
14
2
16
18
13
11
10
1
12
9
3
6
8
5
7
4
26 25 23 22
27 24 21
10 US-EN
28
Barometric pressure
bar graph
29
Barometric pressure
display of the last
hour
30
Absolute / relative
barometric pressure
31
Barometric pressure
trend
32
Weather forecast
33
SNOOZE / LIGHT
button
28
30
32
31
29
33
11 US-EN
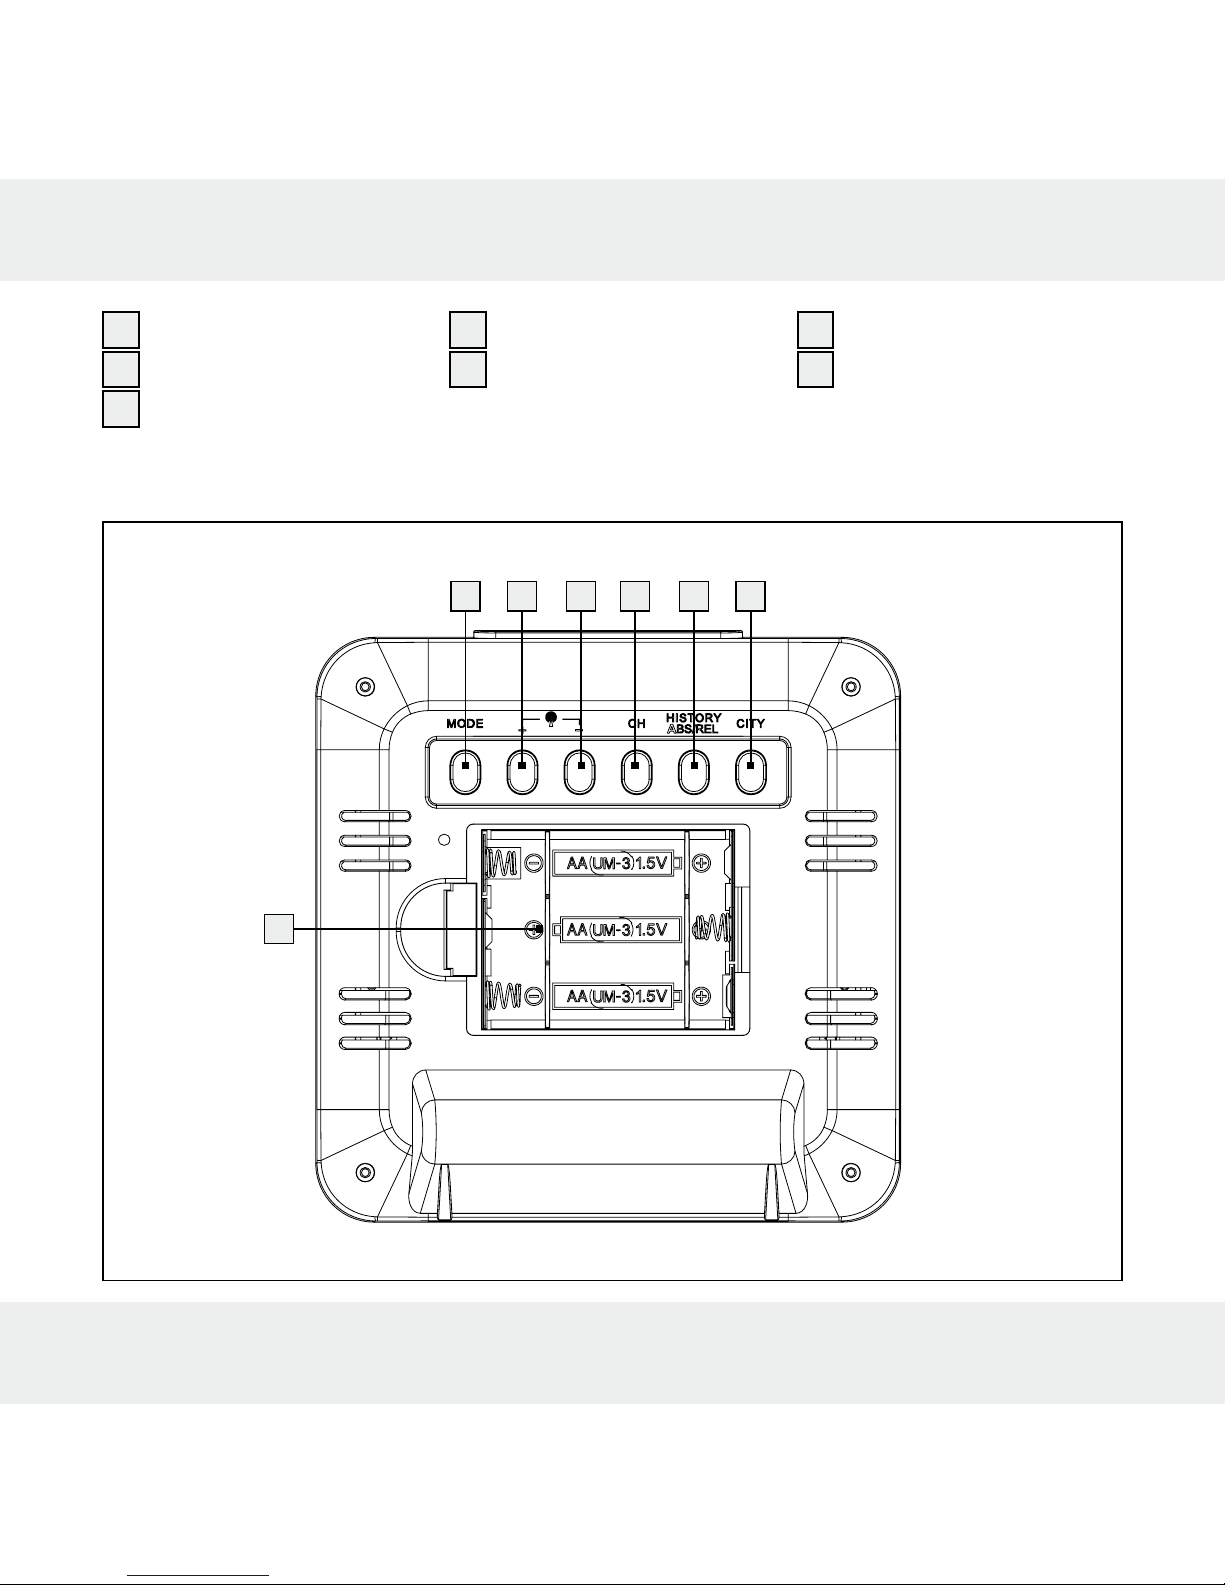
34
MODE button
35
+ button
36
– button
37
Channel button (CH)
38
HISTORY ABS /
REL button
39
CITY button
40
Battery compartment
40
34 35 36 37 38 39
12 US-EN
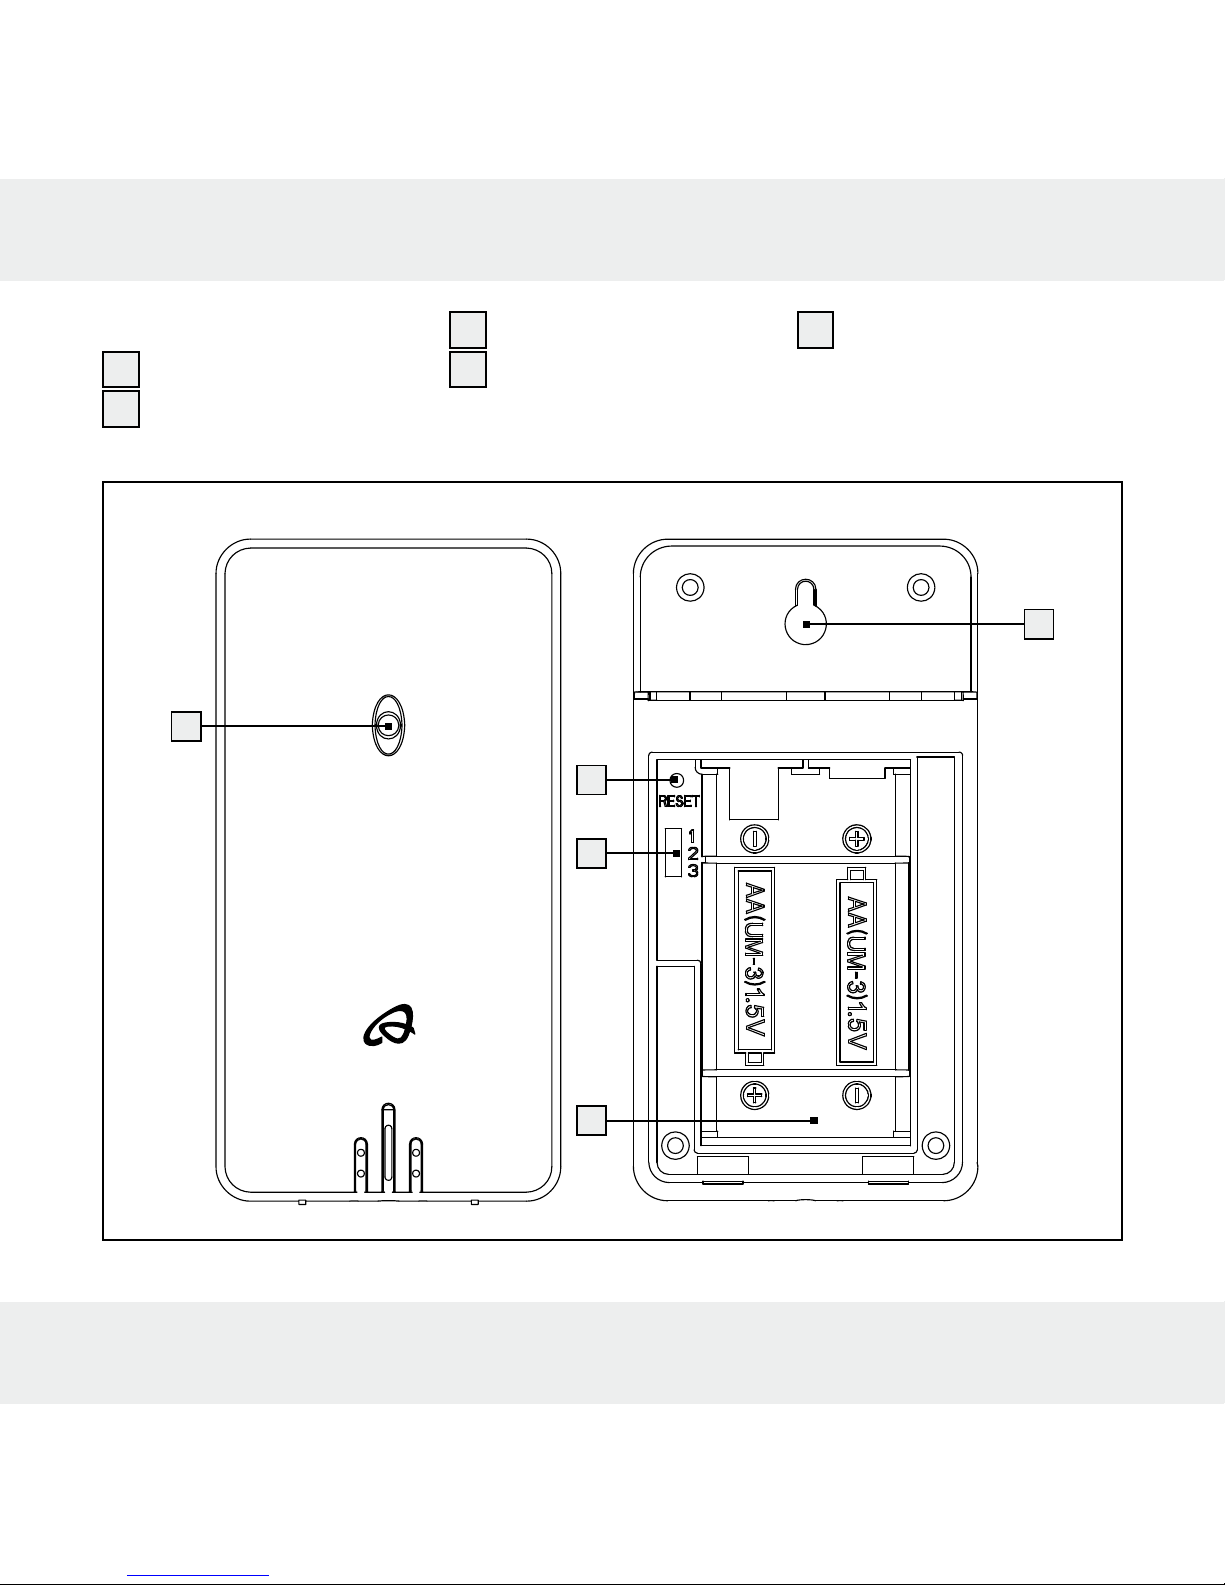
Outdoor sensor:
41
Control LED
42
Mount
43
RESET button
44
Channel selector
switch
45
Battery compartment
42
43
44
45
41
13 US-EN
Technical data
Weather station:
Temperature measurement range: +32 to +122 °F (0 to +50 °C)
Temperature resolution: 33.8 °F (0.1 °C)
Humidity measurement range: 20 %–95 %
Humidity resolution: 1 %
Radio signal: WWVB
Batteries: 3 x AA, 1.5 V
(direct current)
Air pressure range: 25–31 inHg
Outdoor sensor:
Temperature measurement range: –4 to +149 °F (–20 to +65 °C)
Humidity measurement range: 20 %–95 %
Humidity resolution: 1 %
HF transmission signal: 433 MHz
HF transmission range: max. 1181 in (30 meter) (in open area)
Batteries: 2 x AA, 1.5 V
(direct current)
Degree of protection: IPX4 (splash-proof)
14 US-EN
Included items
1 Weather station
1 Outdoor sensor
3 Batteries AA, 1.5 V (pre-installed)
2 Batteries AA, 1.5 V (pre-installed)
1 Instructions for use
IMPORTANT
SAFETY NOTES
READ ALL INSTRUCTIONS. KEEP FOR FUTURE REFERENCE. INCLUDE ALL
DOCUMENTATION WHEN PASSING THIS PRODUCT ON TO OTHERS.
General safety information
Failure to observe the following warnings can
result in death or serious injuries.

15 US-EN
Children frequently underestimate the dangers. Always keep this
product out of the reach of children.
This product may be used by children 8 years and older and individuals with
physical, sensory or cognitive impairments or lacking experience and knowledge
when instructed on safe product use and understand the associated risks. Do
not allow children to play with the product. Never allow children to clean or
perform user maintenance unsupervised.
Changes or modifications to this product not expressly approved by the party res
ponsible for compliance could void the user‘s authority to operate the product.
Note: This product has been tested and found to comply with the limits for a
Class B digital device, pursuant to part 15 of the FCC Rules. These limits are
designed to provide reasonable protection against harmful interference in a
residential installation. This product generates, uses and can radiate radio frequency energy and, if not installed and used in accordance with the instructions,
may cause harmful interference to radio communications.
However, there is no guarantee that interference will not occur in a particular
installation. If this product causes harmful interference to radio or television reception, which can be determined by turning the product off and on, the user is
encouraged to try and correct the interference by one or more of the following
measures:
• Reorient or relocate the receiving antenna.
• Increase the separation between the product and receiver.
16 US-EN
• Connect the product into an outlet on a circuit different from that to which
the receiver is connected.
• Consult the dealer or an experienced radio / TV technician for help.
• Model: Z31915-US-RX / FCCID: 2AJ9O-Z31915R
• Model: Z31915-US-TX / FCCID: 2AJ9O-Z31915T
Failure to observe the following warnings can
result in injuries or property damage.
Do not use the product if it is damaged.
Safety instructions for batteries /
rechargeable batteries
Failure to observe the following warnings can
result in death or serious injuries.
DANGER TO LIFE! Keep batteries / rechargeable batteries out of reach of
children. If accidentally swallowed seek immediate medical attention.
DANGER OF EXPLOSION! Never recharge disposable batteries.
Do not short-circuit batteries / rechargeable batteries and / or open
them. Overheating, fire or bursting can be the result.
Never throw batteries / rechargeable batteries into fire or water.
Do not exert mechanical loads to batteries / rechargeable batteries.

17 US-EN
Risk of battery leakage
Failure to observe the following warnings can
result in injuries or property damage.
Avoid extreme environmental conditions and temperatures, which could affect
batteries / rechargeable batteries, e.g. radiators / direct sunlight.
Avoid contact with the skin, eyes and mucous membranes. In the event of con-
tact with battery acid, thoroughly flush the affected area with plenty of clean
water and seek immediate medical attention.
WEAR PROTECTIVE GLOVES! Leaked or damaged batteries /
rechargeable batteries can cause burns on contact with the skin.
Wear suitable protective gloves at all times if such an event occurs.
In the event of a battery leak, immediately remove it from the product to prevent
damage.
Only use the same type of batteries / rechargeable batteries. Do not mix used
and new batteries / rechargeable batteries.
Remove the batteries / rechargeable batteries if the product will not be used for
a longer period.
Risk of damage of the product
Only use the specified type of battery / rechargeable battery!
Please note the polarity when inserting batteries! This is shown inside the battery
compartment!
18 US-EN
Clean the contacts on the battery and in the battery compartment before in-
serting!
Remove drained batteries / rechargeable batteries from the product immediately.
SAVE THESE INSTRUCTIONS
Before use
Setting up the devices
First install the batteries in the outdoor sensor.
Failure to observe the following warnings can result
in injuries or property damage.
When choosing where to position the weather station, make sure that it is not
exposed to direct sunlight, vibrations, dust, heat, cold or moisture. Do not place
the devices close to sources of heat, e.g. radiators. Otherwise they may be
damaged.
Do not place the devices on valuable or sensitive surfaces unless these are
appropriately protected. Otherwise they may be damaged.
Please ensure that neighboring devices are not operated at the same frequency
of 433 MHz. These types of devices may interfere with the radio connection.
19 US-EN
Do not place the devices next to or on metal plates. Otherwise the quality of
radio wave transmission may be reduced.
Do not install the devices in buildings made of reinforced concrete, e.g. airports,
high-rise buildings, factories or cellars. Otherwise the transmission of the radio
waves between the devices may be severely impaired.
Preparing to use the outdoor sensor
Remove the battery cover from the back of the outdoor sensor.
Remove the battery insulation strip. The outdoor sensor is now ready for use
and the control LED
41
will light up briefly.
Close the battery cover.
Installing the Outdoor Sensor:
Note: You will need an electric drill for this step.
Find an appropriate place for the outdoor sensor.
Note: Be sure to install the outdoor sensor within 1181 in (30 m) of the weather
station. Check that there are no obstacles between the outdoor sensor and the
weather station. These may interfere with data transmission.
For wall mounting:
Hang the outdoor sensor with the mount 42 on one screw.
20 US-EN
Use the included drill template (shown on the fold-out page) intended for mark-
ing drill holes.
Preparing the weather station for use
Removing the battery insulation strip:
Open the battery compartment 40 on the back of the weather station.
Remove the battery insulation strip.
Then close the battery compartment.
As soon as the battery insulation strip has been removed the weather station will
start receiving radio signal.
Note: Do not move the weather station while it is receiving the signal. This may
disrupt reception.
Connecting the weather station with the outdoor sensor and the
WWVB radio signal:
After removing the battery insulation strip the weather station will attempt to establish
a connection with the outdoor sensor. This process can take a few minutes. The
symbol will keep flashing for a few minutes. After successfully connecting with the
outdoor sensor, the selected channel symbol
27
will appear in the LC display with
the channel of the outdoor sensor (if necessary you can change the channel of the

21 US-EN
outdoor sensor as shown under “Setting the channel”). If the connection with the outdoor sensor is not established automatically, this can be done manually as follows:
1. Press the channel button (CH)
37
. The icon of the selected channel 27 will flash
in the LC display.
2. Then press the sensor RESET button
43
.
As soon as the weather station has established a connection with the outdoor sensor
it automatically begins to receive the WWVB radio signal. This process takes several
minutes and is indicated in the LC display by a flashing radio tower symbol
5
.
When the WWVB radio signal is being successfully received, the radio tower symbol
is shown permanently in the display. If the product cannot synchronize with the atomic
clock during setup, you can also set the clock manually (“Setting the 12 / 24 Hour
mode / °C / °F / hPa / inHg / Time zone / time / date / language manually”).
Radio signal (WWVB):
The WWVB signal (time signal transmitter) consists of time pulses emitted by one of
the most accurate clocks in the world close to Fort Collins, Colorado.
Reception of the radio signal generally takes 3–10 minutes.
Reception can be considerably impaired by obstacles (e.g. concrete walls) or sources
of interference (e.g. other electrical devices). In the event of reception problems,
change the position of the weather station (e.g. to somewhere near a window).
22 US-EN
Operation
Receiving the WWVB radio time signal
After connecting with the outdoor sensor or 3 minutes after the battery insulation
strip is removed, the weather station automatically begins to search for the WWVB
radio signal. The LC display will show a flashing radio tower symbol
5
during this
process.
Note: In buildings made of reinforced concrete the reception of the radio signal
may be severely impaired (see “Setting up the devices”).
In order to correct any deviations from the exact time, the clock is automatically
synchronized with the WWVB radio signal every day at 1:00, 2:00 and 3:00.
The weather station’s reception of the WWVB radio signal can also be initiated
manually.
Press the + and – button 35, 36 at the same time. The weather station attempts
to receive the WWVB radio signal. This process takes several minutes and is indicated in the LC display by a flashing radio tower symbol.
If the connection with the WWVB radio signal cannot be established, the search is
stopped.
Note: If the clock of the weather station cannot receive the WWVB radio signal due
to errors, the distance to the transmitter or similar reasons, the time may also be set

23 US-EN
manually. If reception of the WWVB signal is successful, the manual settings are
overwritten.
Setting the 12 / 24 Hour Mode / °C / °F / hPa / inHg /
Time zone / time / date / language manually
The reception of WWVB radio signal where the weather station has been positioned
may deteriorate or be interrupted. If this happens you can set the device manually.
Follow these steps:
1. Press and hold down the MODE button
34
for about 3 seconds. The display
will flash “12 Hr” or “24 Hr”. Press the + or – button
35, 36
to choose the de-
sired hour format.
Note: In 12 hour mode, the AM symbol indicates morning 7. In 12 hour mo
de
the PM symbol in the time display stands for afternoon.
2. Confirm your setting by pressing the MODE button. The temperature unit “°C “
or “°F” flashes in the display. Press the + or – button to choose the desired
temperature unit.
3. Confirm your setting by pressing the MODE button. The barometric pressure
unit flashes in the display. Press the + or – button to set the desired unit (hPa /
inHg).
4. Confirm your setting by pressing the MODE button. The time zone indicator
flashes in the display. Press the + or – button to set the desired value (-8 to -5).
24 US-EN
Note: If you’re in a country where the WWVB signal can be received but the
time is different from your current local time, you can use the time zone setting
to have the product display your current local time. For example, if you’re in a
country where the local time is an hour ahead of Pacific Standard Time (PST),
set the time zone to -8. The product is now still controlled by WWVB but shows
the time as one hour ahead of PST.
5. Confirm your setting by pressing the MODE button. The DSP indicator flashes
in the display. Press the + or - button to set the desired value (ON / OFF).
6. Confirm your setting by pressing the MODE button. The hour value of the time
display flashes. Press the + or – button to set the desired value.
Note: The time and date will be set automatically if the weather station receives
the WWVB signal. You should manually adjust the time and date if you have
no reception of WWVB.
Tip: Hold the + or – button. This will speed up the process of setting the values.
You can also use this fast setting option for subsequent settings. If you do not
press any button for 20 seconds, the LCD automatically reverts to the standard
display.
7. Confirm your setting by pressing the MODE button. The minute indicator of the
time display will flash. Press the + or – button to set the desired value.
8. Confirm your setting by pressing the MODE button. The year indicator in the
time display will flash. Press the + or – button to set the desired value.
9. Confirm your setting by pressing the MODE button. The month indicator in the
date display
1
will flash. Press the + or – button to set the desired value.
25 US-EN
10. Confirm your setting by pressing the MODE button. The day indicator in the
date display will flash. Press the + or – button to set the desired value.
11. Confirm your setting by pressing the MODE button. At the place of the day of
the week display
9
, the language indicator of this display flashes. Press the +
or – button to choose the desired language.
Note: Choose between German (GE), English (EN), Italian (IT), French (FR)
and Spanish (SP) (The default language is English).
12. Confirm your setting by pressing the MODE button.
Setting the alarm time
1. Press the MODE button 34 briefly to set the alarm. The current alarm time will
appear in the LC display.
2. Press and hold down the MODE button for about 2 seconds. The hours display
flashes.
3. Press the + or – button
35, 36
to set the desired value.
4. Confirm your setting by pressing the MODE button. The minutes display flashes.
Repeat step 3 to set the minutes.
5. Confirm your setting by pressing the MODE button.
Tip: Hold the + or – button. This will speed up the process of setting the values.
You can also use this fast setting option for subsequent settings. If you do not press
any button for 20 seconds, the LCD automatically reverts to the standard display.
Note: You can set two different alarms.
26 US-EN
6. Press the MODE button twice briefly if the weather station is in time display 7
mode. Press the MODE button once briefly if the weather station is in ALARM
1 mode. This will take you to ALARM 2 mode.
7. Repeat steps 2–5 to set the value for ALARM 2.
Turning the alarm on / off
1. Briefly press the MODE button 34 briefly once or twice for ALARM 1 or
ALARM 2 mode.
2. P
ress the + button 35. The ALARM 1 symbol 3 or ALARM 2 symbol 8 appea
rs
in the LC display. The alarm has been turned on.
3. Press the button + again. The ALARM 1 or ALARM 2 symbol in the LC display
goes out. The alarm has been turned off.
Dismissing the alarm
Press any button except the SNOOZE- / LIGHT button 33 to stop the alarm.
You do not need to turn the alarm back on. It will automatically go off again at
the set time.
Note: The alarm signal sounds for 2 minutes.
27 US-EN
SNOOZE function
Press the SNOOZE- / LIGHT button 33 when the alarm sounds to SNOOZE the
alarm. The alarm signal sounds again after 5 minutes.
Preparing to use the weather forecasting function
Note: Please take the weather forecast from your local weather forecasting service
into account as well as the forecast from your weather station. If there are discrepancies between the information from your product and from the local weather forecasting service, please take the advice of the latter as authoritative.
The weather forecast is calculated from evaluation of fluctuations in the barometric
pressure and may deviate from the actual weather conditions.
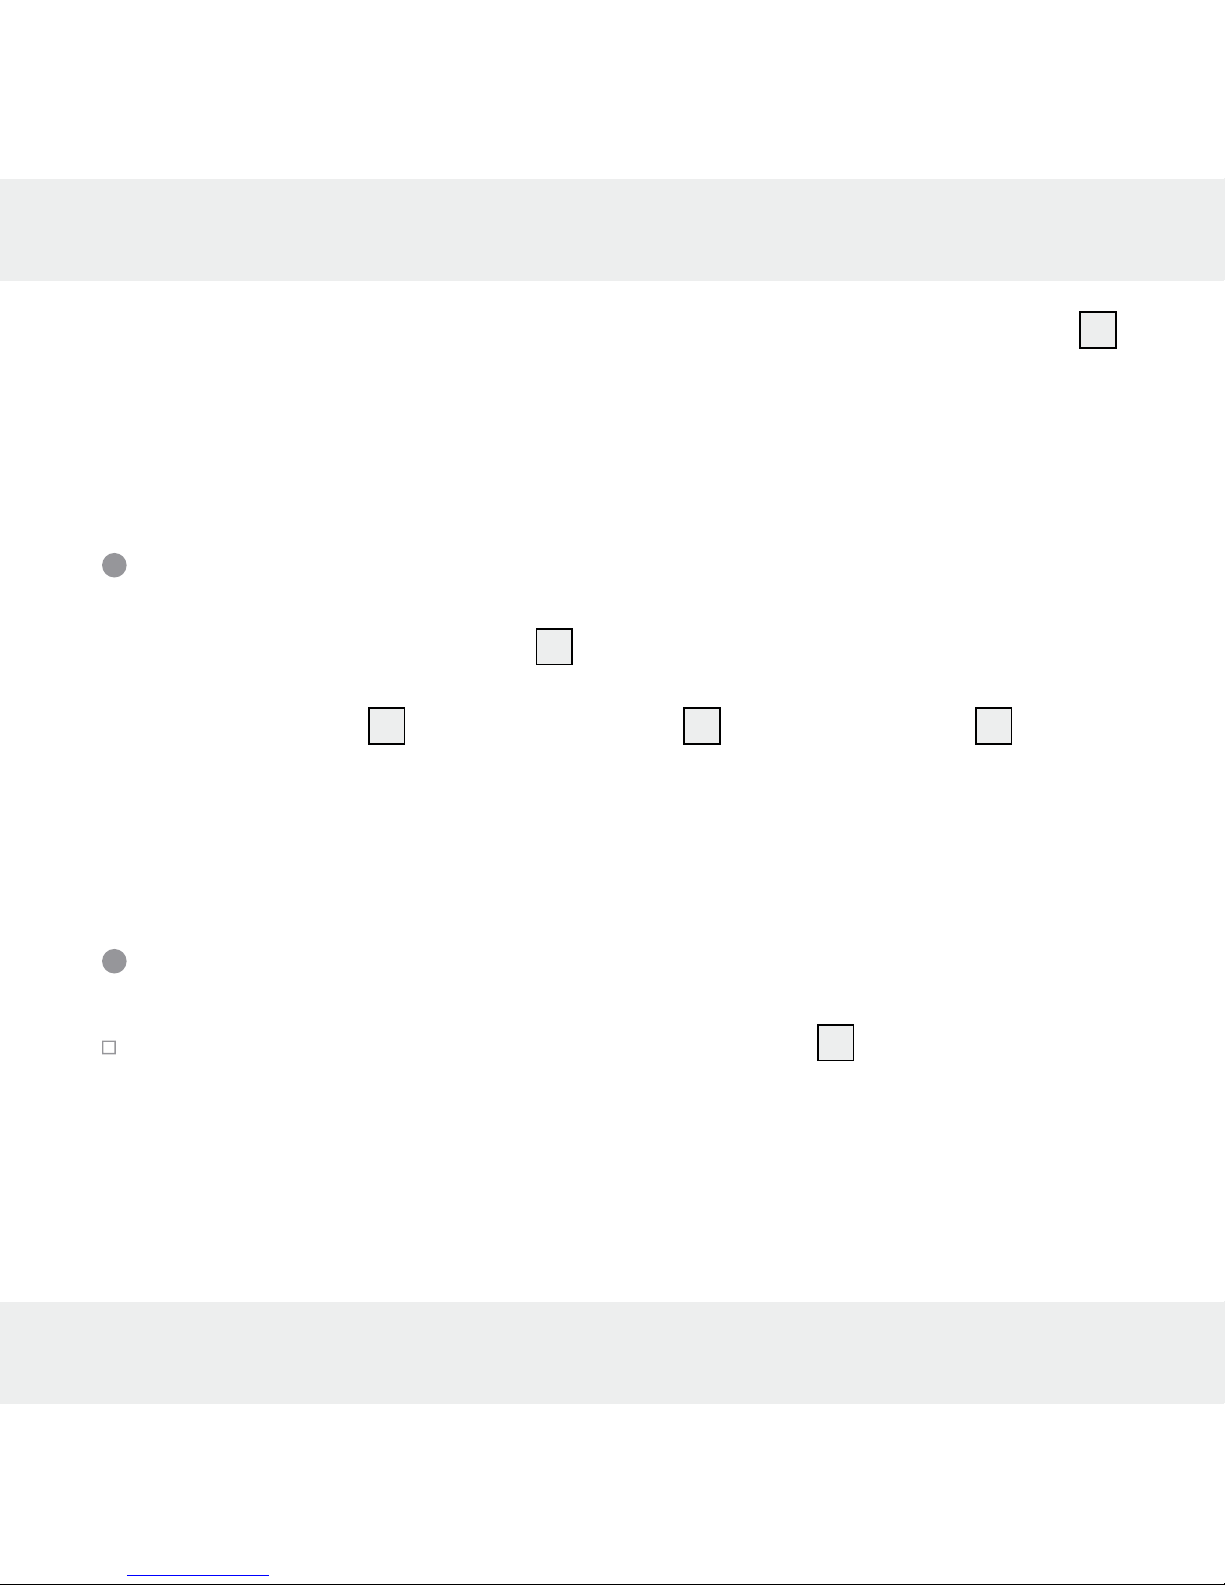
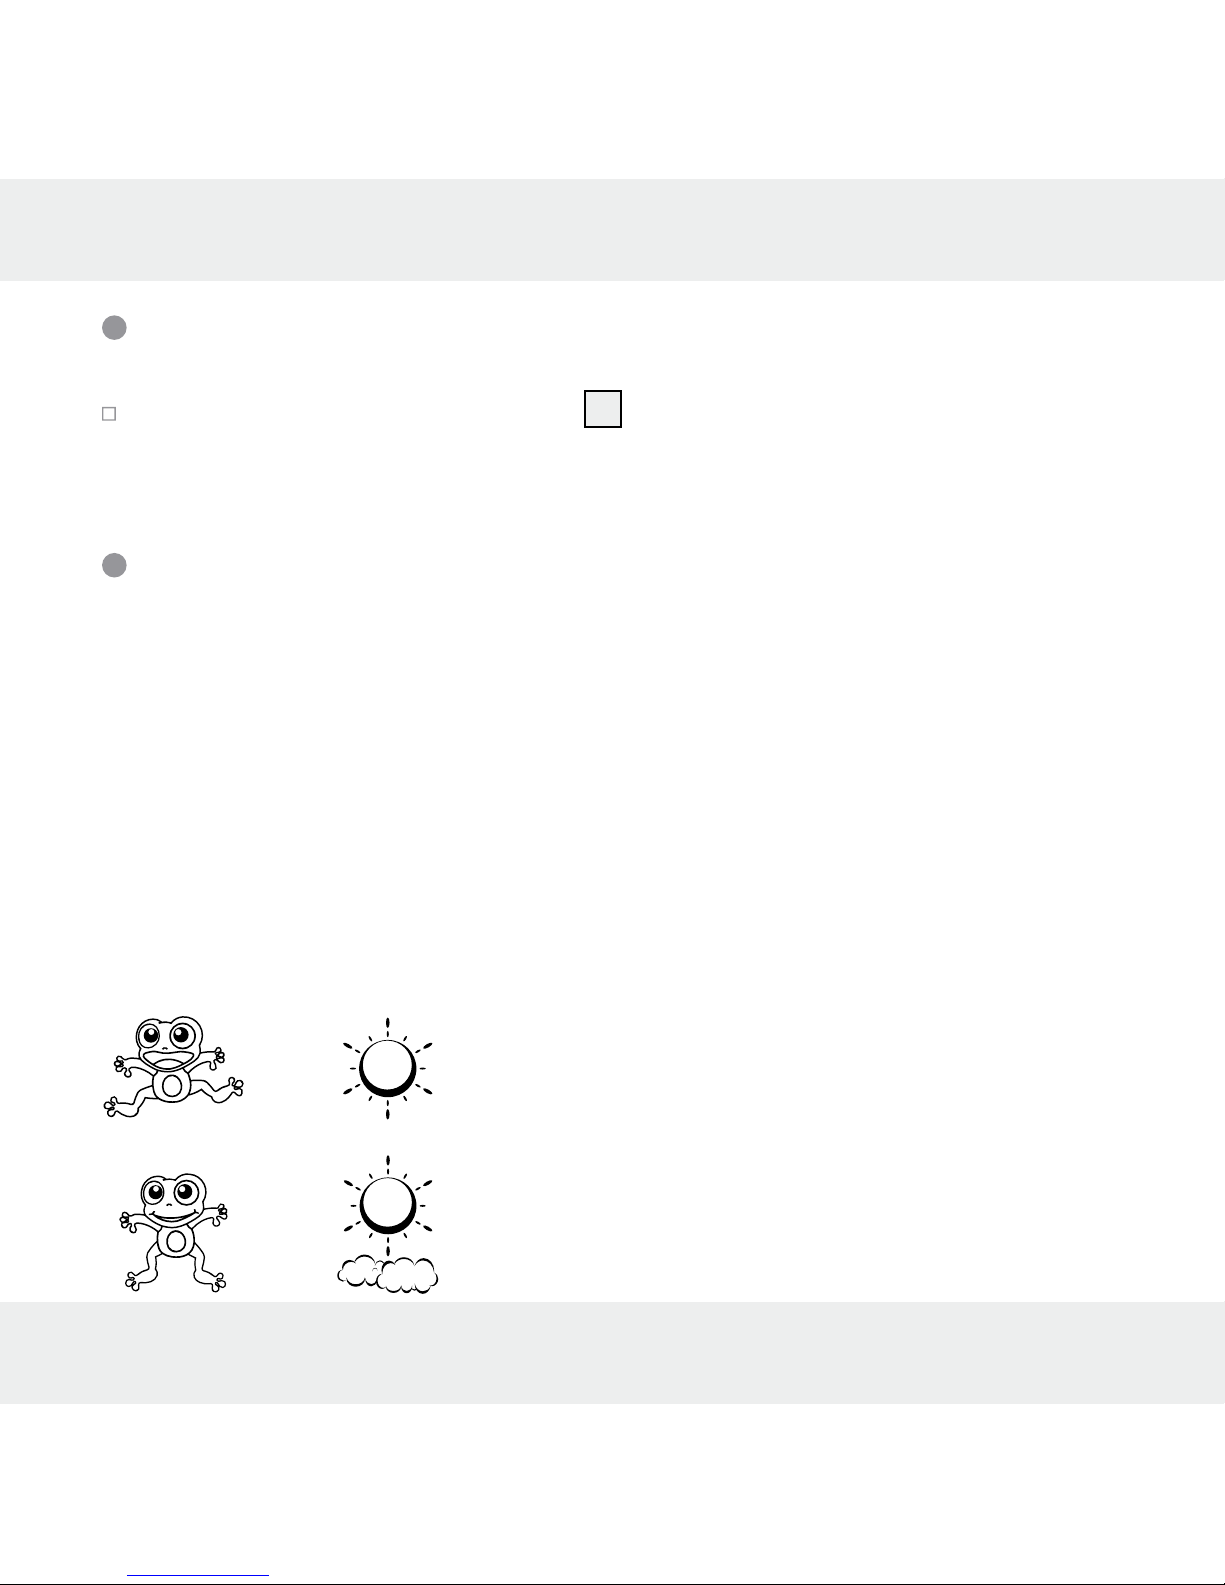
The weather station displays the following weather symbols:
+
= sunny
+
= slightly cloudy
28 US-EN
+ = cloudy
+ = rainy
+
= rain + snow
The weather symbols indicate the weather fluctuation over the next eight hours and
not the current weather.
The weather station can display the barometric pressure trend
31
.
 Loading...