

lidl Z29550 Operation And Safety Notes

4
Stepper z linkami
Wskazówki dotyczące obsługi i bezpieczeństwa
Swing lépcSőzőgép
Kezelési és biztonsági utalások
Swing Stopalnik
Navodila za upravljanje in varnostna opozorila
Swing Stepper
Pokyny pro obsluhu a bezpečnostní pokyny
Swing-Stepper
Pokyny pre obsluhu a bezpečnostné pokyny
Swing-Stepper
Bedienungs- und Sicherheitshinweise
Side Swing Stepper
Operation and Safety Notes
Z29550

GB Operation and Safety Notes Page 6
PL Wskazówki dotyczące obsługi i bezpieczeństwa Strona 14
HU Kezelési és biztonsági utalások Oldal 23
SI Navodila za upravljanje in varnostna opozorila Stran 31
CZ Pokyny pro obsluhu a bezpečnostní pokyny Strana 39
SK Pokyny pre obsluhu a bezpečnostné pokyny Strana 47
DE / AT / CH Bedienungs- und Sicherheitshinweise Seite 55
3
1
3
2
4
56
7
8
4
A
C
B
D
93
2
7
8
10
11
145
4
14
5
MODE
PUSH
AND
HOLD TO
RESET
STOP
TMR REPS CAL TTR
E
G
I
F
H
K
12
13

6 GB
Table of Contents
Introduction
Intended use .......................................................................................................................................Page 7
Description of parts ............................................................................................................................Page 7
Scope of Delivery ...............................................................................................................................Page 7
Technical data ....................................................................................................................................Page 7
Safety instructions ..................................................................................................................Page 7
Important health care advice ............................................................................................................Page 8
Battery Safety Instructions ..................................................................................................................Page 9
Assembly ........................................................................................................................................Page 9
Getting started .........................................................................................................................Page 10
Computer functions ............................................................................................................................Page 11
Switching the machine on and off ....................................................................................................Page 11
Choosing the display .........................................................................................................................Page 12
Choosing the mode ............................................................................................................................Page 12
Specifying exercise objectives ..........................................................................................................Page 12
Resetting the display ..........................................................................................................................Page 12
Replacing the batteries ......................................................................................................................Page 12
Cleaning and care ...................................................................................................................Page 13
Disposal ...........................................................................................................................................Page 13
7 GB
Introduction / Safety instructions
Side Swing Stepper
Q
Introduction
You should familiarise yourself with the
product before assembling and operating
it. To do so, please read the following
assembly instructions and the health and safety
instructions through carefully. Use the product only
as described and for the training exercises described.
Keep these instructions in a safe place. When passing
this product on to third parties, you should also pass
on all documents relating to it.
Q
Intended use
The swing stepper is intended to be a exercise gadget
for use in private households. It is not approved for
installation and use in therapeutic or professional
gyms. Any use of the product other than that described
above or any alteration to the product is not allowed
and can lead to injuries and / or damage to the
product. The manufacturer does not assume any
liability for damage arising from improper use. The
product is not designed for commercial use.
Q
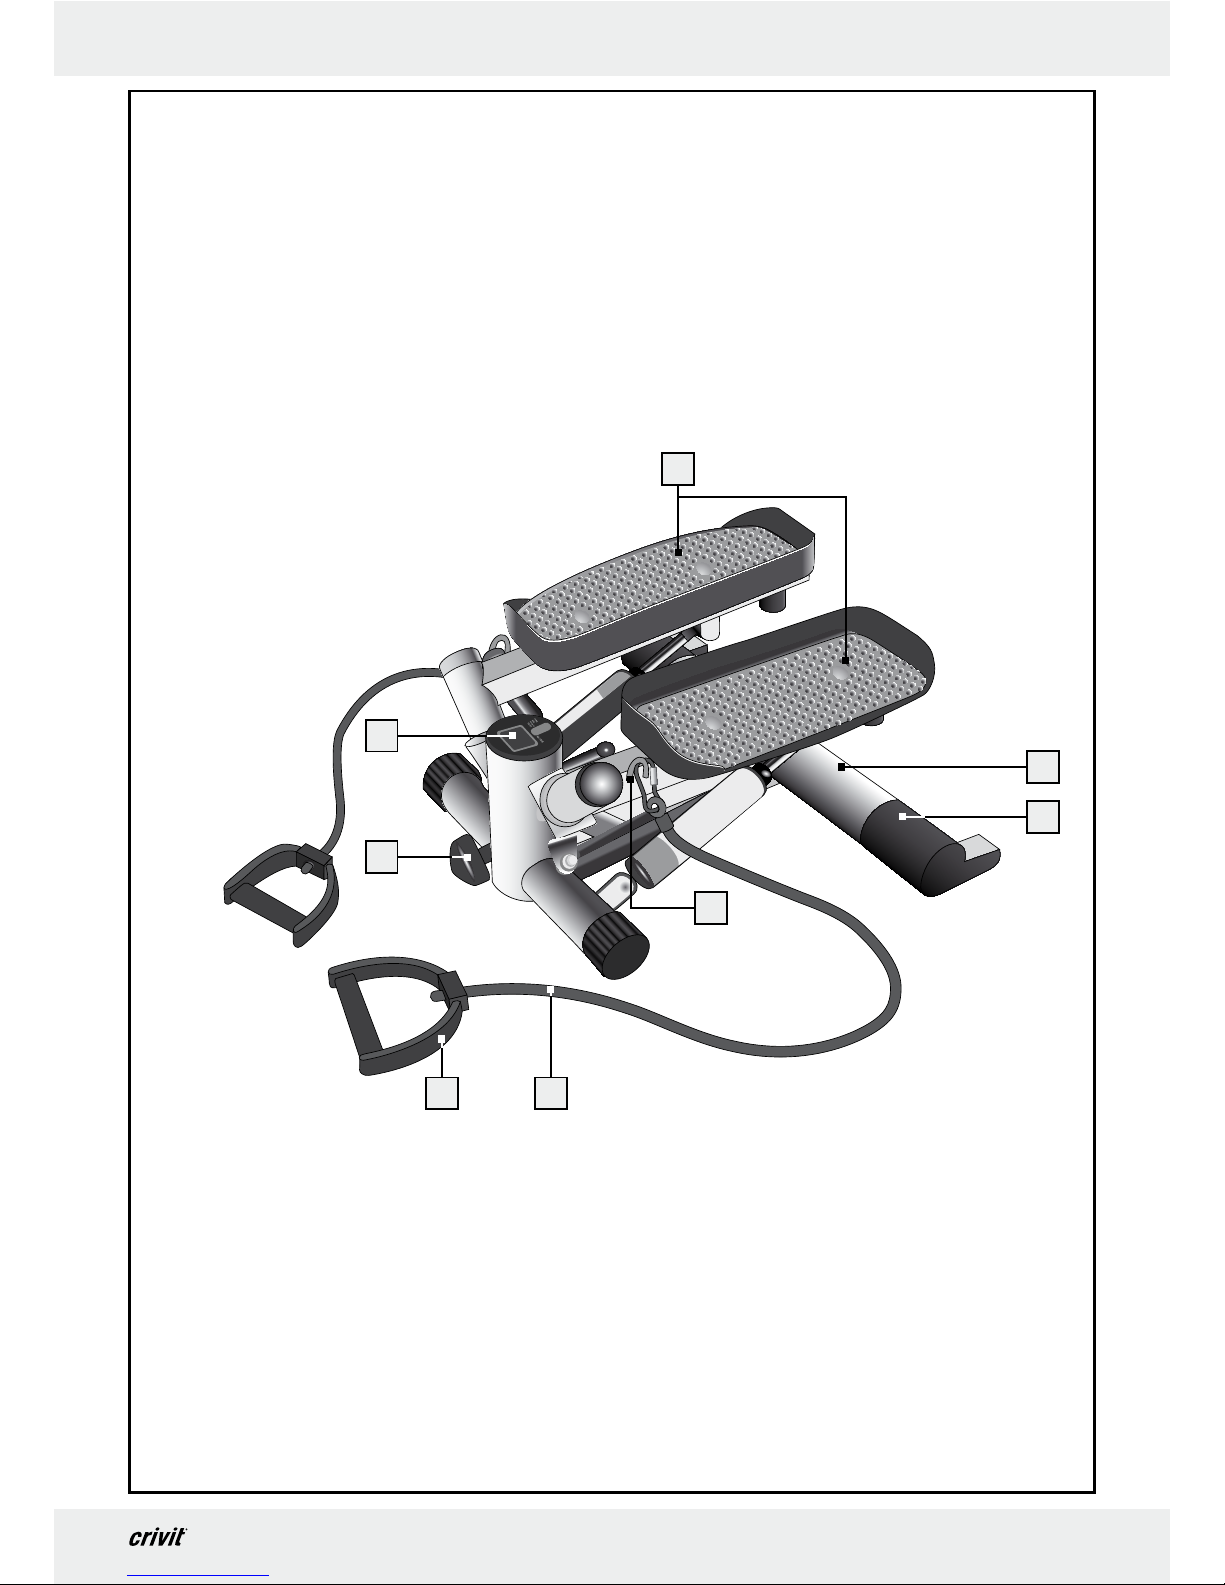
Description of parts
1
Platform
2
Frame pipe back
3
Plastic foot with supporting surface
4
Eyelet (for elastic cords)
5
Elastic cords
6
Cord handle
7
Adjusting screw
8
Computer
9
Self-tapping screw
10
Plug
11
Projection
12
Computer display
13
MODE button
14
Snap hook
Q
Scope of Delivery
Please check the supplied items immediately after
you have unpacked them to ensure that they are
complete and that the product and all of its parts
are in perfect condition. You should not assemble
the product if there are any items missing.
1 side swing stepper
1 computer
1 battery 1.5 V
, AAA, (LR 03)
2 plastic feet with supporting surfaces
2 sheet metal screws
1 adjustment screw
2 elastic cords, green
2 elastic cords, red
2 elastic cords, blue
1 Philips screwdriver
1 directions for use
Q
Technical data
Energy supply: 1.5 V AAA battery, LR 03
Dimensions: approx. 52 x 24 x 52 cm
(w x h x d)
Equipment class: HC (for use in private house-
holds, accuracy class C) / not
designed for therapeutic training
Weight: 9.2 kg
Maximum load
capacity: 100 kg
Safety instructions
PLEASE READ THE ASSEMBLY INSTRUCTIONS
BEFORE USING THE PRODUCT! PLEASE KEEP
THE ASSEMBLY INSTRUCTIONS IN A SAFE PLACE!
J
WARNING!
DANGER TO
LIFE AND DANGER OF ACCIDENTS FOR INFANTS AND
CHILDREN! Never leave children alone and
unsupervised with the packaging material. Danger
of suffocation. Always keep children away from
the product. This product is not a toy!
8 GB
Safety instructions
m CAUTION! Do not leave children alone and
unsupervised! The product is not a climbing
frame or toy!
WARNING!
Danger to life by strangulation,
injuries and / or damage to property may result.
J Children or persons who lack the knowledge or
experience to use the device or whose physical,
sensory or intellectual capacities are limited must
never be allowed to use the device without supervision or instruction by a person responsible
for their safety. Children must never be allowed
to play with the device.
J When setting the device up, choose a place that
offers enough space for assembly and training.
The area chosen should be at least 2 x 2 metres
in size and well ventilated. The subsurface must
be level and straight. Check that the product
has a secure footing.
J Oil might leak out of the hydraulic cylinders.
Place the device on a level, non-slip base in order to avoid soiling or marking the subsurface.
m CAUTION! RISK OF INJURY! Make sure
that all parts are undamaged and correctly
assembled. Improper assembly may result in
injury. Damaged parts could adversely affect
safety and function.
m CAUTION! RISK OF INJURY! Never under-
take any changes to the device while exercising.
CAUTION! RISK OF BURNS! The hydraulic
cylinders become hot when exercising. On no
account should you touch them - not even after
exercising.
J
100 kg
CAUTION! Never overload the
swing stepper. The body weight of
the user should not exceed 100 kg.
Otherwise this could result in injuries and / or
damage to property.
J Do not use the swing stepper when you have
bare feet. While exercising, wear comfortable,
air-permeable clothing and trainers that have a
non-slip sole.
J Never subject the swing stepper to high tem-
peratures or moisture. Otherwise damage to
the product may result.
J Regularly check the condition of all parts and
screw joints. You may have to tighten lose screws.
J Repairs may only be undertaken by authorised
specialists. Only original parts may be used.
J Do not use a defective device until it has been
repaired.
J Keep the stepper out of reach of other people
when it is not in use.
J Check regularly that all the threaded connections
are still tight and correctly seated. Check regularly that the elastic belts
5
are firmly attached
and that the hydraulic shock absorbers are not
leaking oil. Do not use the Swing-Stepper or
elastic belts
5
if you discover anything wrong
with them.
Important health
care advice
m CAUTION! Before using this exercise device
for the first time, you must have a general checkup. Consult your doctor before starting to exercise. Present the doctor with the directions of
use for this product and let the doctor draw up
an individual exercise plan for you.
J You must consult a doctor if you have any of the
following complaints: heart conditions, circulatory problems, problems with your balance,
orthopaedic problems or breathing difficulties / asthma. Furthermore, consult a doctor if
you are pregnant or if you are taking medication that influences your pulse, blood pressure
or cholesterol level.
J Do not exercise if you feel unwell or suffer from
other illnesses.
J Do not exercise immediately after eating.
J Stop exercising immediately if the following
symptoms occur: breathing difficulties, irregular
heartbeat, extreme shortness of breath, drowsiness, dizziness, pain, nausea. Only continue
exercising again after consulting your doctor.
J Do not exhaust yourself completely. At first, you
should exercise at an appropriate range of performance and increase your exercise intensity
slowly.
J Don‘t forget to include warm-up and cool-down
periods.
9 GB
Safety instructions / Assembly
Battery Safety
Instructions
WARNING!
DANGER TO LIFE! Keep
batteries out of the reach of children. Do not
leave batteries lying around. There is a risk of
children or animals swallowing them. Consult a
doctor immediately if a battery is swallowed.
J
EXPLOSION HAZARD! Never
recharge nonrechargeable batteries,
short-circuit and / or open batteries.
This can cause them to overheat, burn or burst.
Never throw batteries into fire or water. The
batteries may explode.
J Immediately remove a spent battery from the
appliance. There is an increased risk of leakage
otherwise!
J Check the battery regularly for leaks.
J Leaked or damaged batteries can cause chemi-
cal burns if they come into contact with the skin;
in such cases you must wear suitable protective
gloves.
J Remove the battery from the product if it is not
going to be used for a prolonged period.
J Make sure that the polarity is correct when you
insert the battery. This is indicated in the battery
compartment.
J Remove any used battery from the device. Very
old or used batteries may leak. The chemical
liquid will damage the product.
J Do not dispose of batteries in the domestic waste!
J All consumers are required by law to dispose
of batteries properly!
J Avoid contact with the skin, eyes and mucous
membranes. In the case of contact with battery
acid, rinse the affected area with plenty of water
and / or consult a doctor!
J Use only batteries of the specified type (see
“Technical Data”).
Q
Assembly
J Make sure the product is only assembled by
competent person.
The swing stepper comes, for the most part, preassembled. The few assembly steps that have to be
taken are described below. You will need to use
the crosshead (Philips) screwdriver supplied.
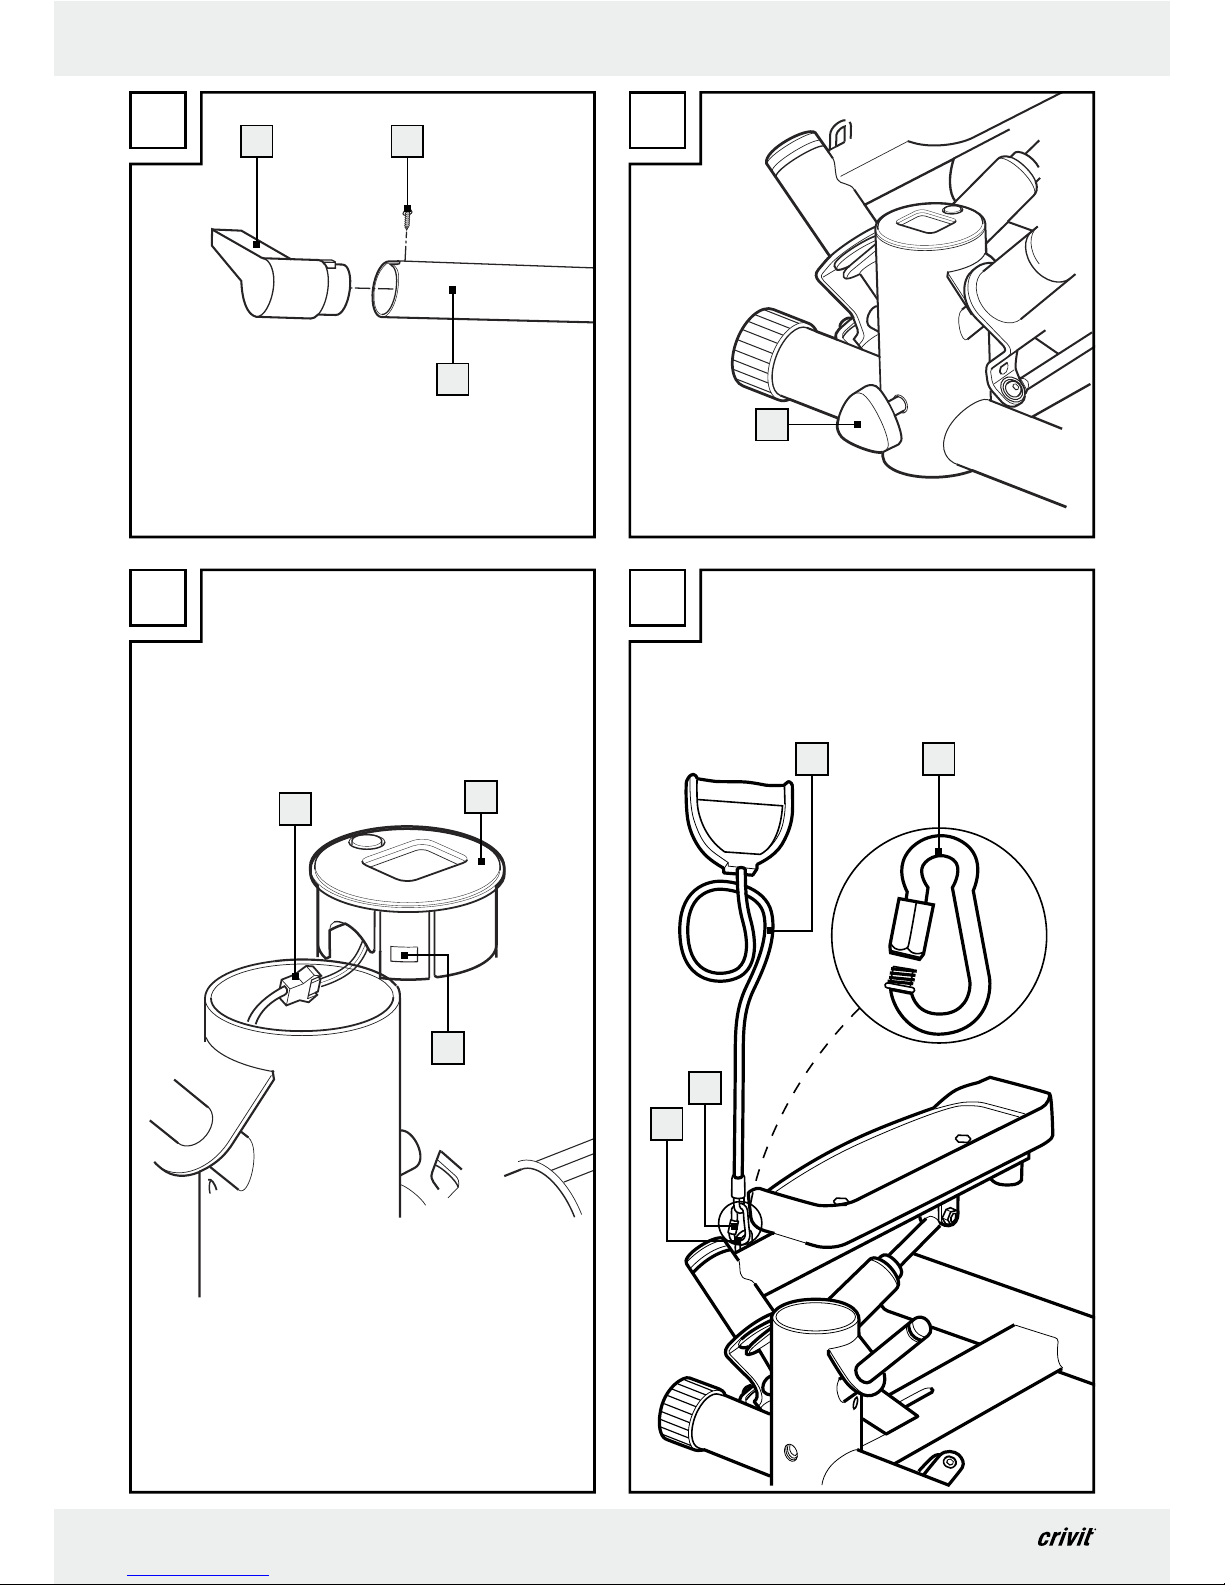
Figure A:
j Insert the two plastic feet
3
into the back frame
pipe
2
in such a way that the supporting sur-
face of the plastic feet
3
point backwards.
Screw the self-tapping screw
9
into each of
the pre-drilled holes in the lower side of the
frame pipe
2
.
Figure B:
j Turn the adjusting screw
7
into the screw
thread on the front frame of the swing stepper.
Note: You can adjust the step height by means
of the adjusting screw
7
. Turning it clockwise
will raise the platforms
1
; turning it anticlock-
wise
will lower the platforms 1 and thus
decrease the step height.
Figure C:
j Pull the computer
8
upwards so that it comes
off the casing. Insert the battery included in
delivery into the battery compartment on the
lower side of the computer
8
. Ensure correct
polarity.
Ensure that the plug
10
is correctly plugged in.
Insert the computer
8
back into the casing
again. To do so, press gently on the projection 11.
Make sure that the cable does not bend or jam.
Figure D:
j Select the desired elastic cords
5
. Three different strengths are supplied for various loads.
See also the table under “Getting started”.
j Now attach the elastic cords
5
. Attach the
two elastic cords
5
by means of snap hooks
14
in the respective eyelet 4. Before every
training session please ensure that the elastic
cords
5
are securely attached.
The swing stepper is now ready for use.
m ATTENTION! The eyelets
4
must not be sub-
jected to transverse loads as they are only designed
10 GB
Assembly / Getting started
for tensile stress from above. Otherwise this may
result in injuries or damage to the swing stepper.
Note: Unhook the elastic cords
5
if you do not
need them for exercising. This will help you avoid
the danger of stumbling. Finally, check that all nuts,
bolts and screws are securely tightened.
Q
Getting started
You can exercise nearly all your body with this swing
stepper. Besides up and down, the exercise motion
also goes sideways. This means that you will tone
your hips, buttocks and stomach as well as the inner
and outer muscles of your thighs in particular. The
elastic cords
5
are to help you improve your upper
arm muscle strength while exercising.
Carefully read all safety and health care instructions
through.
Warming up:
In order to avoid the risk of injuries, you should
always warm up and relax your muscles before
doing any exercise.
j Set aside about 5 to 10 minutes to warm up
your muscles before you start exercising.
j For example, walk or run on the spot and
swing your arms in circular motions.
Exercising / getting on and off:
j Do not put yourself under any pressure. At the
beginning, you should exercise at a level that
does not strain you. Slowly increase the intensity.
j As someone who is new to exercising, start with
just 3 minutes a day. In the first 2 weeks, increase
the exercise time to not more than 10 minutes.
After that you can increase the intensity.
j Press one pedal all the way down (until it is
lying on the base frame) by firmly pressing the
foot down on the platform
1
. Now step onto
this platform
1
with the appropriate foot and
place the other foot on the platform
1
that is
up in the air.
j Use the exercise device as if you were climbing
stairs.
j Keep your breath as calm and as measured as
possible.
m ATTENTION! Always pay attention to your
body’s reactions when exercising. Stop exercising immediately if you feel any pain or feel ill.
j Do not stop exercising abruptly. Gradually slow
the step speed down.
j In order to get off the device, press one plat-
form
1
right down and first remove the foot
on the other platform
1
that is in the air. After
that, get off the other platform
1
.
Note: The way the device behaves depends
on speed and step movement. The amount of
force increases with step speed.
Exercising without the elastic cords
5
for
calves, thighs and buttocks, Figure F:
j Always carry out the running or stair-climbing
movements at a steady speed.
j While exercising, move the arms backwards
and forwards in a natural motion. During the
exercise period, gradually raise your arms
higher and higher.
Exercises No. 1 to 4 with elastic cords
5
:
m CAUTION! DANGER OF INJURY! Do not
extend the elastic cords
5
beyond their maximum
length. The maximum lengths of the elastic cords
5
are listed in the table below. Failure to do so
may cause injury and / or damage to the product.
m CAUTION! RISK OF INJURY! Never wind
the elastic cords
5
around the wrists. Always use
the handles
6
.
m ATTENTION! Hold the handles
6
horizon-
tally when you pull on the elastic cords
5
.
The longer you pull the elastic cords
5
, the greater
the exertion or the energy expended. We recommend
you do 3 sets of 6 to 12 repetitions for every exercise
described. Stretch your muscles after exercising.
11 GB
Getting started
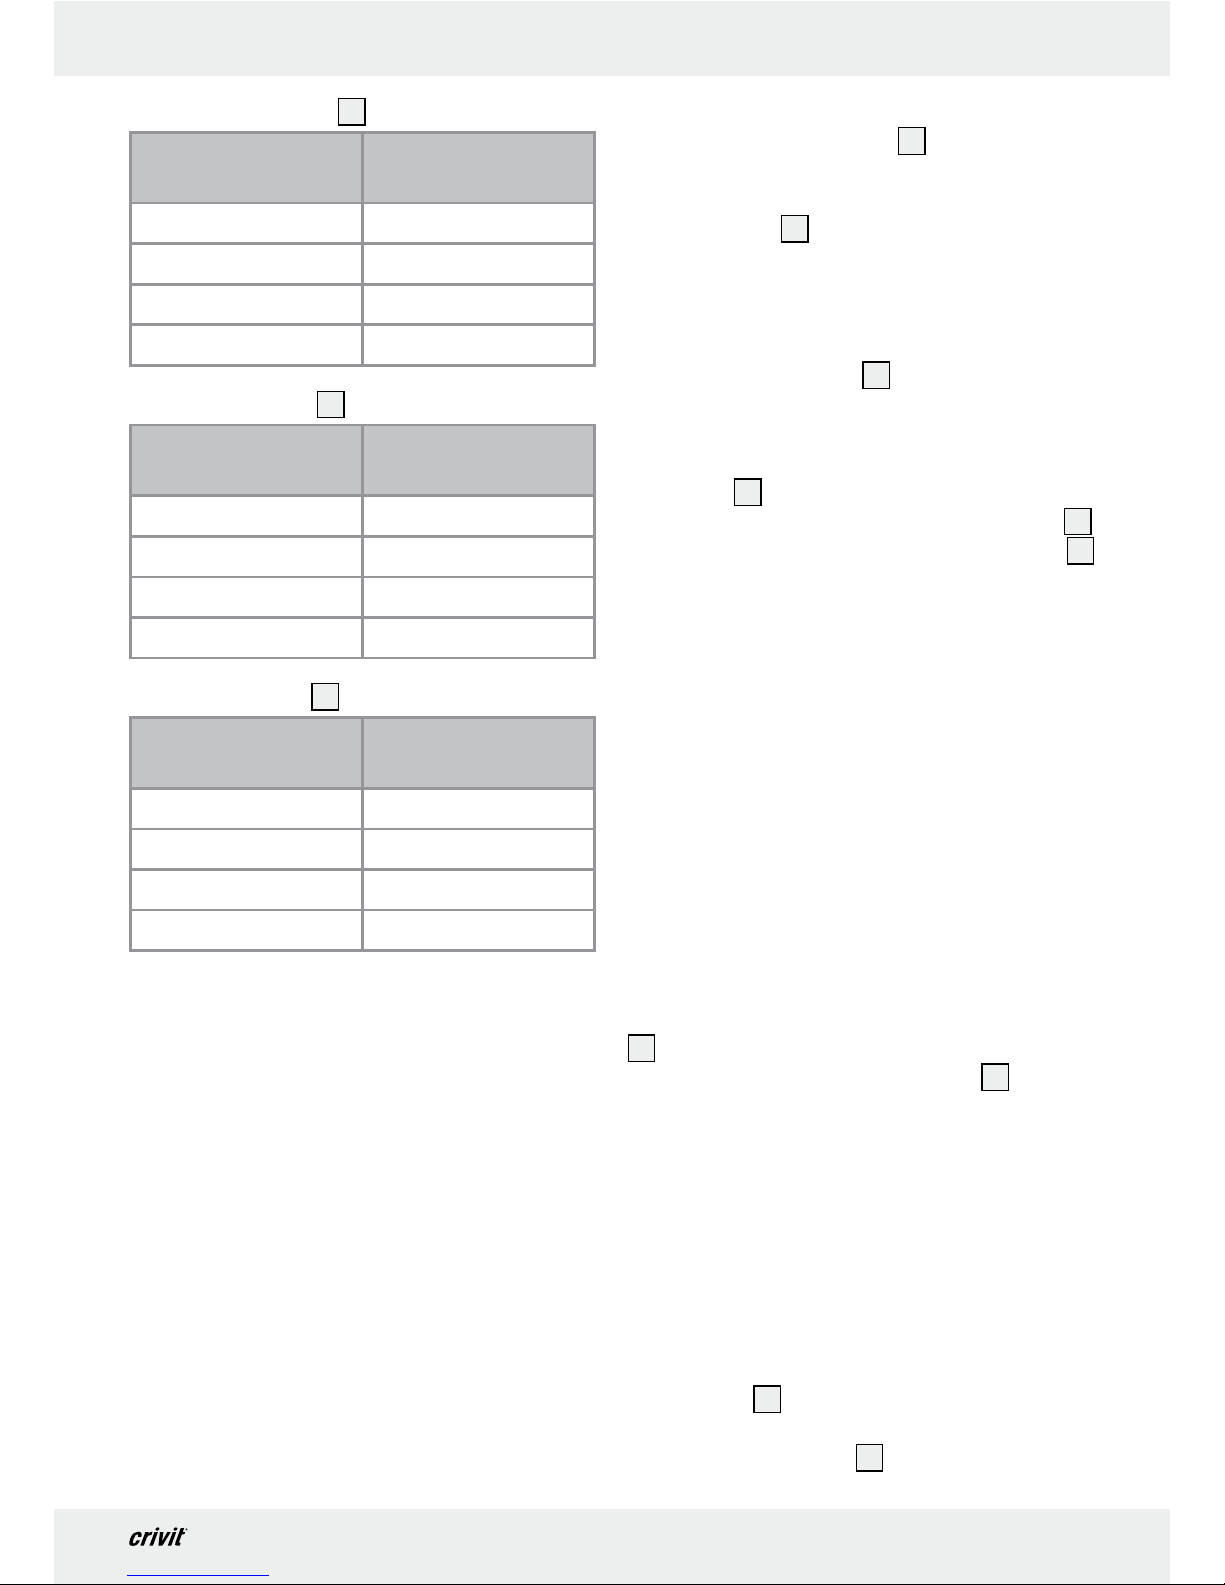
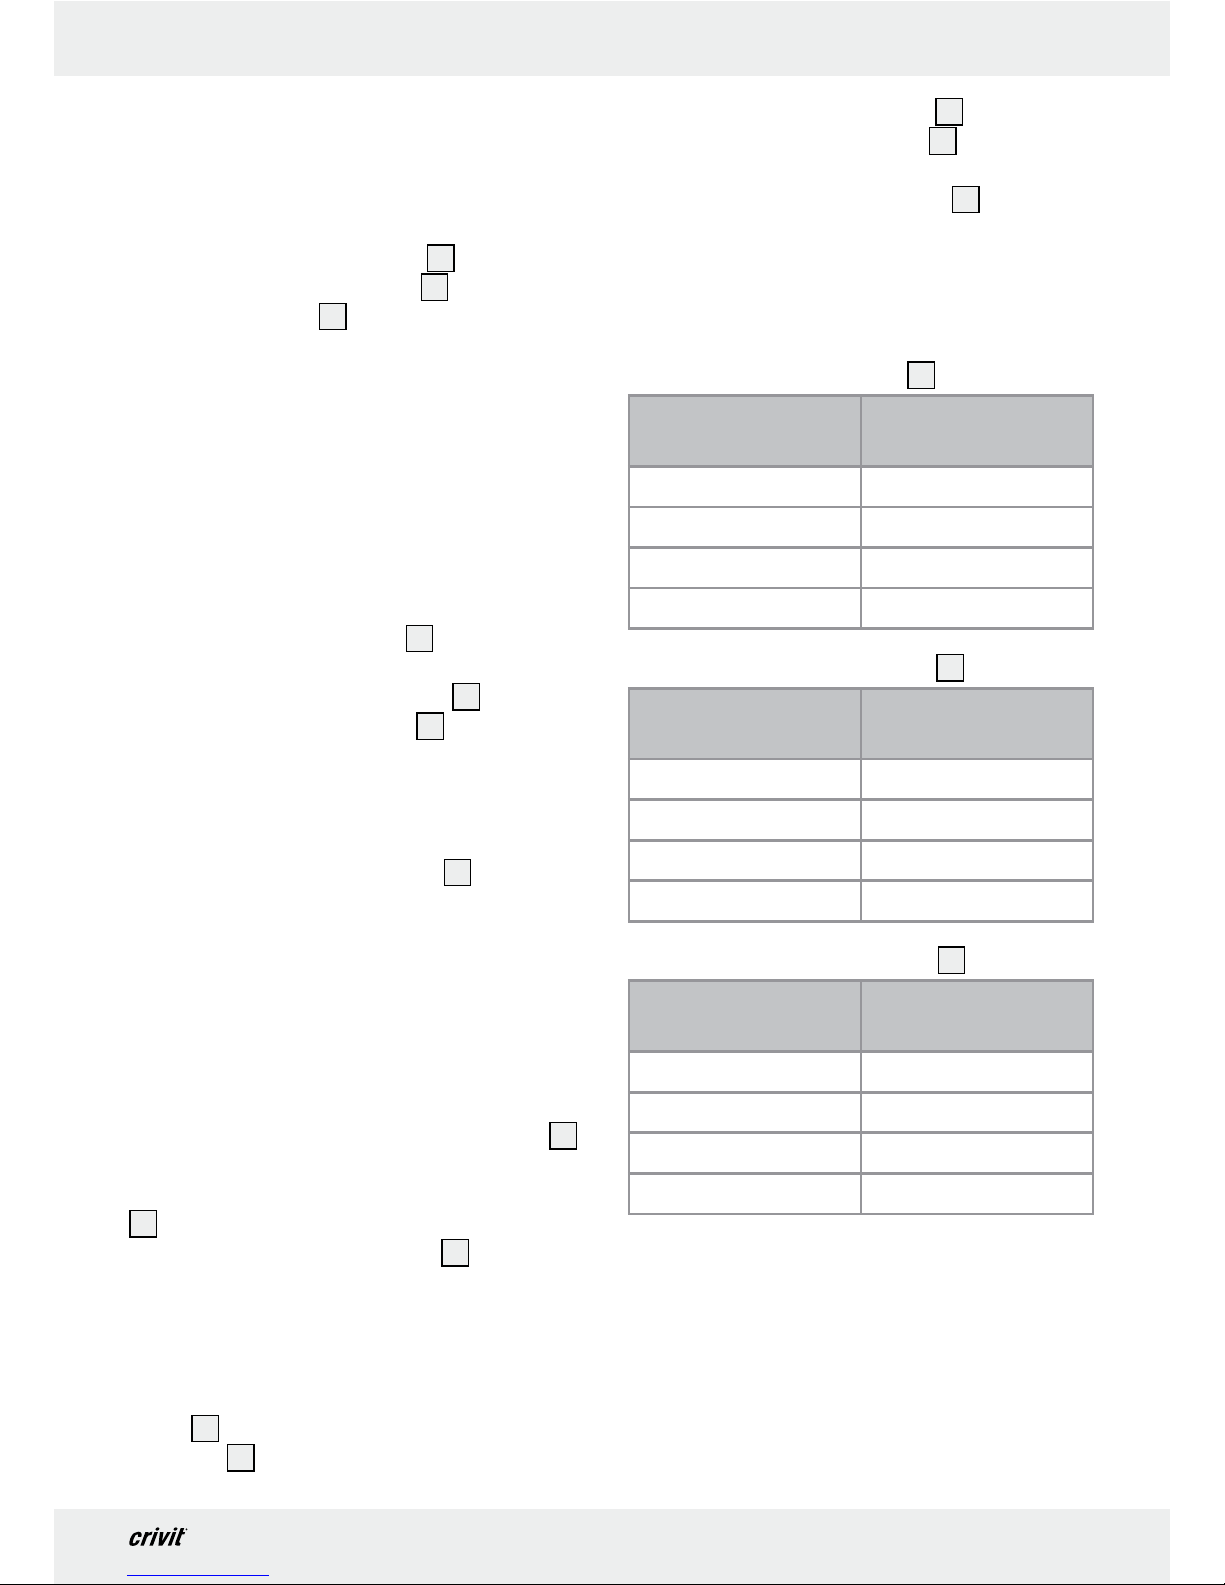
Green elastic cord
5
Length in cm Energy expended
in N (10 N ≈ 1 kg)
120 ca. 17 ± 10 N
140 ca. 24 ± 10 N
160 ca. 43 ± 10 N
185 ca. 80 ± 10 N
Blue elastic cord
5
Length in cm Energy expended
in N (10 N ≈ 1 kg)
120 ca. 30 ± 10 N
140 ca. 41 ± 10 N
160 ca. 50 ± 10 N
185 ca. 65 ± 10 N
Red elastic cord
5
Length in cm Energy expended
in N (10 N ≈ 1 kg)
120 ca. 50 ± 10 N
140 ca. 70 ± 10 N
160 ca. 79 ± 10 N
185 ca. 118 ± 10 N
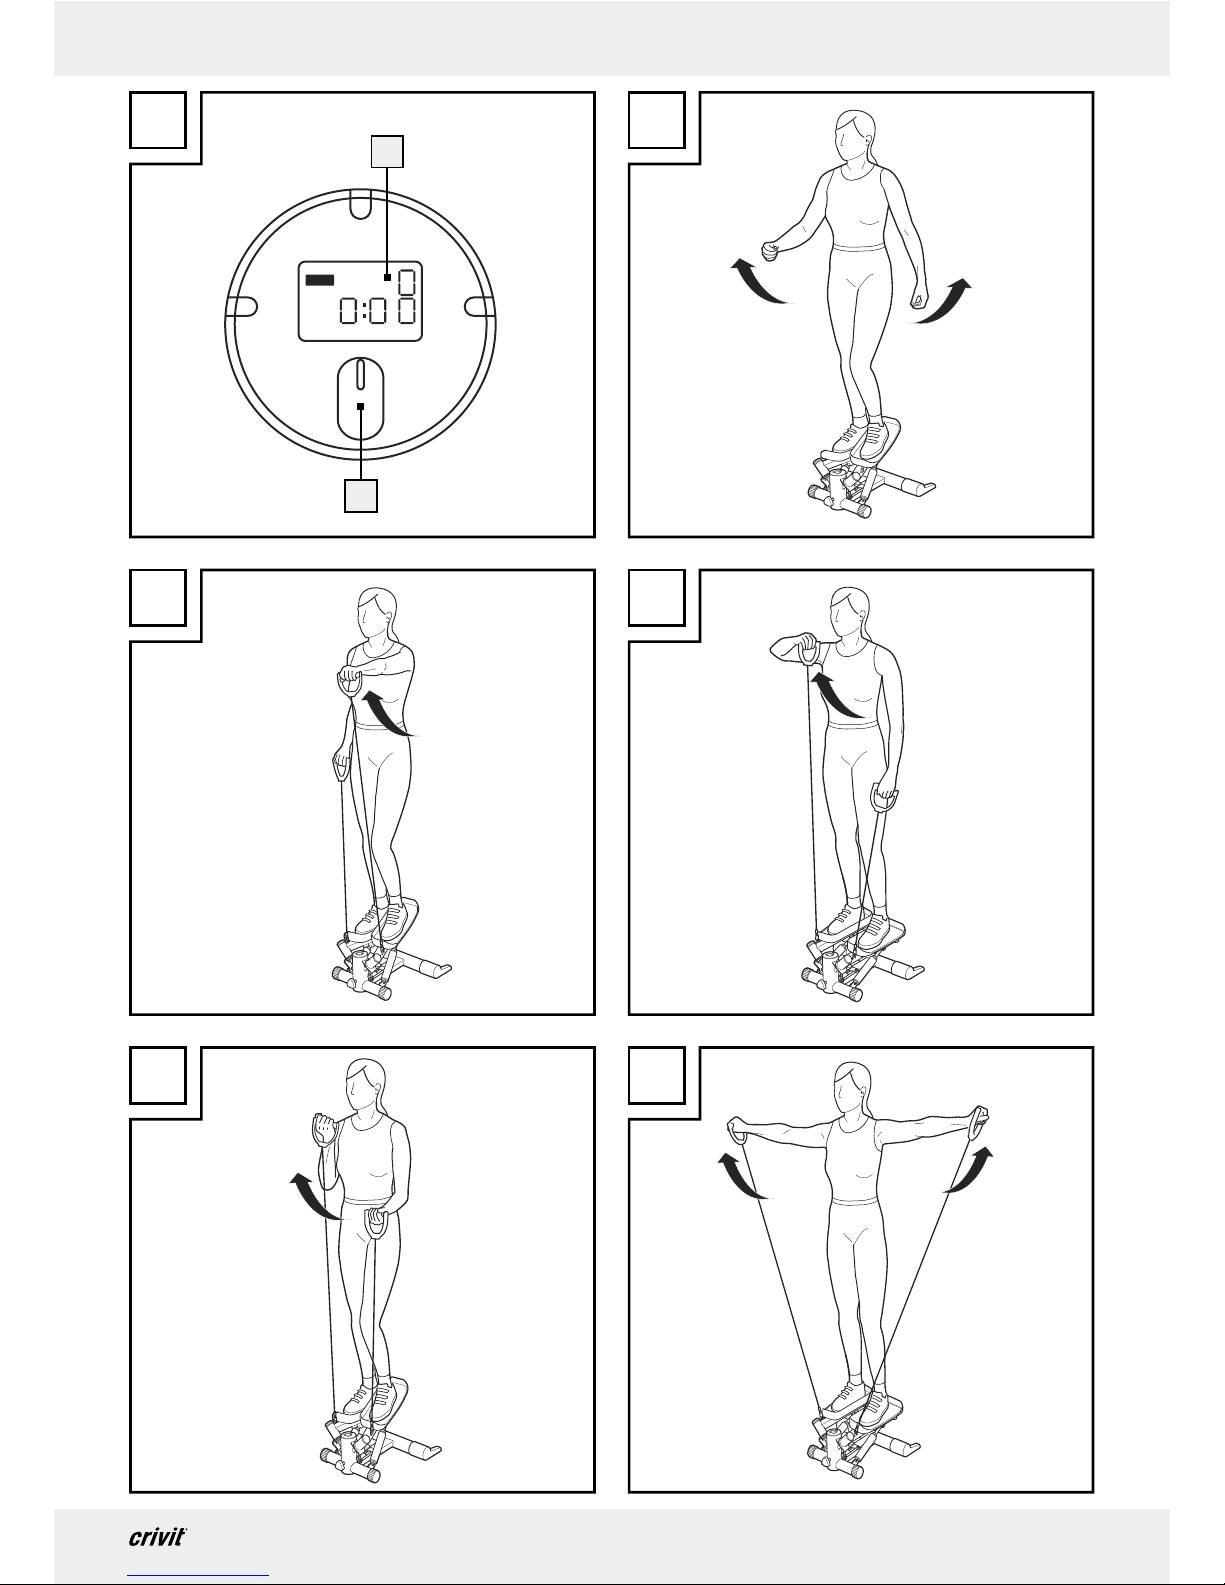
Exercise No. 1 for arms, shoulders, legs
and buttocks, Figure G:
j Press the right pedal down and, with the arm
slightly bent, raise the left arm to roughly shoulder height in front of the body.
j Then lower the left arm, raise the right arm and
press the left pedal down.
j Repeat the two workout steps one after the other.
Exercise No. 2 for shoulders and arms,
Figure H:
j In this exercise, you should not exercise as
though you were climbing stairs but should
keep both pedals at the same height.
j First hold your hands at hip height.
j Pull the right cord handle
6
in the direction of
your chin. The palm of your hand will point
downward. At the same time, lower the left
cord handle
6
.
j Repeat the workout steps one after the other.
Exercise No. 3 for thighs, arms, legs and
buttocks, Figure I:
j Hold the elastic cords
5
as shown – the palms
pointing upwards.
j Press the elbows firmly in against your body.
j Lower the left pedal and pull the left cord
handle
6
upwards.
j Then lower the right pedal and the left handle
6
and at the same time pull the right cord handle
6
upwards.
j Repeat the workout steps one after the other.
Figure No. 4 for the back, shoulders, chest,
legs and buttocks, Figure K:
j Always carry out the running or stair-climbing
movements at a steady speed.
j Raise the arms up to shoulder height while
doing so.
j Then lower the arms.
j Repeat the workout steps one after the other.
Q
Computer functions
You can use the swing stepper without the computer
8
being switched on. The computer, however, will
show useful information on the display
12
regarding your exercise session so far and will tell you how
you can improve your exercise regime.
The swing stepper complies with accuracy class C.
That means that there is no guarantee of accuracy
with the information displayed by the computer.
Q
Switching the machine
on and off
The computer 8 switches itself on automatically as
soon as you start exercising or moving the pedals.
The values in the display
12
become visible. If you
12 GB
Getting started
do not use the device for approx. 4 minutes, the computer
8
will automatically switch itself off.
Q
Choosing the display
While you are exercising, the first line of the
display
12
shows
– “STOP“ as soon as you stop exercising
– the number of steps per minute (estimated
figure)
Q
Choosing the mode
The second line of the display 12 will display various exercise data (modes). Briefly press the MODE
button
13
to change from one mode to another.
1. “TMR“ (lights up): time exercised so far, 0:00
to 99:59
2. “REPS“: Number of steps in the current exercise
session, 0 to 9999
3. “CAL“: the number of calories used
1
), 0 to
9999
4. “TTR“: Number of training steps in total since
the batteries were inserted, 0 to 9999
If you wish to see all exercise data one after the
other, press the MODE button
13
as often as necessary until the “TMR“ flashes in the display. The
display
12
will automatically change from one mode
to the next every 5 seconds.
1) The calculation is based on pre-programmed
standard values that can only serve as a guideline. The calories consumed by using the elastic
cords are not taken into account.
Q
Specifying exercise objectives
You can specify one or several objectives:
– Duration of exercise session (TMR)
– Number of steps (REPS)
– Calorie consumption (CAL)
1. Press the MODE button
13
down until “0:00
(TMR)“ appears in the second line of the display
12
and the first 0 flashes (approx. 4 seconds).
2. In order to specify the duration of an exercise
session, press the MODE button
13
as often as
necessary until the display
12
indicates the
desired duration in minutes.
3. Wait a few seconds until the display
12
shows
the next mode (REPS). Press the MODE button
13
to set the desired number of steps, in increments
of 10.
4. In the next mode (CAL), you can set the desired
calorie consumption, in increments of 10.
5. Start exercising. The computer
8
will count
down the preset values until they reach zero
and this will be indicated in the display
12
.
6. When the set objective has been achieved, the
computer
8
will stop counting for about
10 seconds.
Then the computer
8
will start again at zero.
Q
Resetting the display
The display 12 will only be on zero before your first
exercise session. With every subsequent exercise
session, the computer
8
will continue counting from
where it left off in the last exercise session.
You can reset the display by pressing the MODE
button
13
down until all the symbols can be seen
at the same time. You can reset the total number of
training steps (TTR) by removing the batteries.
Q
Replacing the batteries
j Make sure the display 12 is off before removing
and inserting battery.
j Pull the computer
8
upwards so that it comes
off the casing.
j Remove the used battery and dispose of it in
an environmentally friendly way (see section
called “Disposal“).
j Insert a new 1.5 V
AAA battery into the battery compartment on the lower side of the computer
8
. Ensure correct polarity. Ensure that
the plug
10
is correctly plugged in. Insert the
13 GB
Getting started / Cleaning and care / Disposal
computer 8 back into the casing again. To do
so, press gently on the projection
11
. Make
sure that the cable does not bend or jam
Q
Cleaning and care
j Use a dry fluff-free cloth when you are cleaning
or polishing the product.
j Remove any stubborn dirt using a moist cloth.
j Do not use corrosive or abrasive cleaning
agents as they may damage the product.
Q
Disposal
The packaging is made entirely of
recyclable materials, which you may
dispose of at local recycling facilities.
Contact your local refuse disposal authority for more
details of how to dispose of your worn-out product.
To help protect the environment, please
dispose of the product properly when it
has reached the end of its useful life and
not in the household waste. Information
on collection points and their opening
hours can be obtained from your local
authority.
Faulty or used batteries must be recycled in accordance with Directive 2006 / 66 / EC. Please return
the batteries and / or the device to the available
collection points.
Environmental damage through
incorrect disposal of the batteries!
Batteries may not be disposed of with the usual domestic waste. They may contain toxic heavy metals
and are subject to hazardous waste treatment rules
and regulations. The chemical symbols for heavy
metals are as follows: Cd = cadmium, Hg= mercury,
Pb = lead. That is why you should dispose of used
batteries at a local collection point.
EMC
Product Description:
Side Swing Stepper
Model-no.: Z29550
Version: 06 / 2010

14 PL
Spis zawartości
Wstęp
Zastosowanie zgodne z przeznaczeniem ....................................................................................Strona 15
Opis części .....................................................................................................................................Strona 15
Zakres dostawy ...............................................................................................................................Strona 15
Dane techniczne ............................................................................................................................Strona 15
Wskazówki dot. bezpieczeństwa ..........................................................................Strona 16
Ważne wskazówki dotyczące aspektów zdrowotnych ..............................................................Strona 17
Wskazówki bezpieczeństwa dotyczące baterii ...........................................................................Strona 17
Montaż ..........................................................................................................................................Strona 17
Uruchomienie...........................................................................................................................Strona 18
Funkcje komputera .........................................................................................................................Strona 20
Włączanie i wyłączanie urządzenia ............................................................................................Strona 20
Wybór wskazań ............................................................................................................................Strona 20
Wybór trybu ....................................................................................................................................Strona 20
Zadawanie celów ćwiczeń ...........................................................................................................Strona 21
Zerowanie wskazań ......................................................................................................................Strona 21
Wymiana baterii ............................................................................................................................Strona 21
Czyszczenie i pielęgnacja ............................................................................................Strona 21
Usuwanie ....................................................................................................................................Strona 21
15 PL
Wstęp
Stepper z linkami
Q
Wstęp
Przed zmontowaniem i uruchomieniem
należy zapoznać się z produktem. W tym
celu należy uważnie przeczytać poniższą
instrukcję montażu oraz wskazówki dotyczące bezpieczeństwa i aspektów zdrowotnych. Używać produkt tylko w opisany sposób i dla podanych ćwiczeń
treningowych. Zachować starannie niniejszą instrukcję.
W przypadku odstąpienia produktu osobom trzecim
należy przekazać im również wszystkie dokumenty.
Q
Zastosowanie
zgodne z przeznaczeniem
Swing-Stepper jest przewidziany jako urządzenie
do ćwiczeń do użytku prywatnego. Nie jest ono
dopuszczone do ustawienia i użytku w zakładach
terapeutycznych i w profesjonalnych studiach. Użycie inne niż wyżej opisane lub dokonywanie zmian
produktu nie jest dozwolone i może prowadzić do
jego uszkodzenia. Producent nie ponosi odpowiedzialności za szkody powstałe wskutek użycia produktu niezgodnego z jego przeznaczeniem. Produkt
nie jest przeznaczony do użytku komercyjnego.
Q
Opis części
1
Pedał
2
Rura ramy, tył
3
Podnóżek z tworzywa sztucznego z powierzchnią
oparcia
4
Zaczep (do ekspandera)
5
Ekspander
6
Uchwyt
7
Śruba regulacyjna
8
Komputer
9
Wkręt do blach
10
Wtyczka
11
Występ
12
Wyświetlacz komputera
13
Przycisk rodzaju ćwiczeń
14
Karabinek
Q
Zakres dostawy
Prosimy o sprawdzenie zawartości - bezpośrednio po
rozpakowaniu produktu - pod kątem kompletności i
stanu elementów. Nie należy składać produktu,
jeżeli zawartość opakowania jest niekompletna.
1 Stepper z linkami
1 Komputer
1 Bateria 1,5 V
AAA, (LR 03)
2 Stopy z tworzywa sztucznego z powierzchnią
nośną
2 Wkręty do blach
1 Śruba regulująca
2 Linki elastyczne zielone
2 Linki elastyczne czerwone
2 Linki elastyczne niebieskie
1 Śrubokręt krzyżowy
1 Instrukcja obsługi
Q
Dane techniczne
Zasilanie elektryczne: 1,5 V , Bateria typu
AAA, LR 03
Wymiary: ok. 52 x 24 x 52 cm
(Szer. x Wys. x Gł.)
Klas urządzenia: HC (do użytku w prywat-
nych gospodarstwach
domowych, dokładność
C) / urządzenie nie jest
przeznaczone do ćwiczeń
terapeutycznych
Ciężar: 9,2 kg
Maksymalne
obciążenie: 100 kg
16 PL
Wskazówki dot. bezpieczeństwa
Wskazówki dot.
bezpieczeństwa
PRZED UŻYCIEM NALEŻY PRZECZYTAĆ INSTRUKCJĘ MONTAŻOWĄ! INSTRUKCJĘ MONTAŻOWĄ NALEŻY STARANNIE PRZECHOWAĆ!
J
OSTRZEŻENIE!
NIEBEZPIECZEŃSTWO WYPADKU I
UTRATY ŻYCIA PRZEZ MAŁE
DZIECI! W żadnym wypadku nie pozostawiać
dzieci bez nadzoru w pobliżu opakowania.
Niebezpieczeństwo uduszenia! Produkt przechowywać z dala od dzieci. Produkt ten nie
jest zabawką!
m OSTROŻNIE! Nie pozostawiać dzieci bez
opieki! Produkt nie jest urządzeniem do wspinania się lub zabawy!
OSTRZEŻENIE!
Zagrożenie życia na skutek
uduszenia, wynikiem nieprzestrzegania zaleceń
mogą być obrażenia i / lub szkody materialne.
J Urządzenie nie jest przeznaczone do tego, aby
używały go osoby (łącznie z dziećmi) o ograniczonych zdolnościach fizycznych, sensorycznych lub umysłowych lub bez doświadczenia
i / lub brakiem wiedzy chyba, że będą one
nadzorowane przez osobę odpowiedzialną za
ich bezpieczeństwo i zostaną przez nią poinstruowane, jak należy używać urządzenia.
Należy pilnować dzieci, aby nie bawiły się
urządzeniem.
J Wybrać miejsce ustawienia zapewniające
wystarczającą ilość przestrzeni do montażu i
ćwiczeń. Wybrana powierzchnia winna posiadać wielkość co najmniej 2 x 2 m i posiadać
dobrą wentylację. Podłoże winno być płaskie i
równe. Sprawdzić pewne ustawienie.
J Z cylindrów hydraulicznych może wyciekać olej.
Ustawić urządzenie na płaskiej podkładce o
dobrej przyczepności, aby uniknąć zabrudzenia
podłoża.
m OSTROŻNIE! NIEBEZPIECZEŃSTWO
POWSTANIA OBRAŻEŃ! Upewnić się, czy
części nie są uszkodzone i czy są należycie
zamontowane. W przypadku nieprawidłowego
montażu istnieje niebezpieczeństwo powstania
obrażeń. Uszkodzone części mogą negatywnie
wpływać na bezpieczeństwo i prawidłowe
funkcjonowanie urządzenia.
m OSTROŻNIE! NIEBEZPIECZEŃSTWO
POWSTANIA OBRAŻEŃ! Nie dokonywać
żadnych zmian urządzenia w trakcie ćwiczeń.
OSTROŻNIE! NIEBEZPIECZEŃSTWO
POWSTANIA OPARZEŃ! Podczas ćwiczeń
cylindry hydrauliczne mogą być gorące. W
żadnym wypadku nie dotykać ich – również
po ćwiczeniach.
J
100 kg
OSTROŻNIE! Nie przeciążać
urządzenia. Waga ciała użytkownika
nie może przekraczać 100 kg. W
przeciwnym razie, skutkiem przeciążenia
mogą być obrażenia i / lub szkody materialne.
J Nie należy używać urządzenia boso. Podczas
ćwiczeń zakładać obuwie sportowe o podeszwie
antypoślizgowej oraz wygodne ubranie przepuszczające powietrze.
J Urządzenie nie należy narażać na wysokie
temperatury lub wilgoć. W przeciwnym razie
może nastąpić uszkodzenie produktu.
J Regularnie kontrolować stan wszystkich części
i połączeń śrubowych. W razie potrzeby dokręcić poluzowane śruby.
J Naprawy mogą być wykonywane tylko przez
autoryzowanych specjalistów. Wolno stosować
tylko oryginalne części zamienne.
J Nie używać uszkodzonego urządzenia aż do
jego naprawy.
J W czasie nieużytkowania stepper przechowy-
wać w miejscu niedostępnym dla osób trzecich.
J Regularnie sprawdzać prawidłowe trzymanie
wszystkich połączeń śrubowych. Regularnie
sprawdzać prawidłowe trzymanie elastycznych
cięgien taśmowych
5
i upewnić się, czy z amortyzatorów hydraulicznych nie wycieka olej. Nie
używać swing steppera ani elastycznych cięgien
taśmowych
5
w przypadku stwierdzenia
wszelkich nieregularności lub nieprawidłowości.
17 PL
Wskazówki dot. bezpieczeństwa / Montaż
Ważne wskazówki
dotyczące aspektów
zdrowotnych
m OSTROŻNIE! Przed pierwszym ćwiczeniem
należy poddać się ogólnej ocenie sprawności.
Zanim rozpocznie się ćwiczenia należy zasięgnąć porady lekarskiej. Przedłożyć instrukcję
obsługi tego produktu i poprosić ewentualnie o
przedstawienie indywidualnych zaleceń treningowych.
J Bezwarunkowo zasięgnąć porady lekarskiej, jeśli
istnieją dolegliwości serca, krążenia, równowagi
wzgl. problemy ortopedyczne lub z oddychaniem / astmą. Ponadto bezwarunkowo zasięgnąć
porady lekarskiej w przypadku ciąży lub, gdy
zażywa się lekarstwa na arytmię serca, nadciśnienie tętnicze lub poziom cholesterolu.
J Nie należy ćwiczyć w razie złego samopoczucia
lub pozostałych chorób.
J Nie ćwiczyć bezpośrednio po spożyciu posiłków.
J Natychmiast przerwać ćwiczenia w przypadku
wystąpienia następujących objawów: trudności
w oddychaniu, nieregularne bicie serca, nadzwyczaj krótki oddech, zamroczenie, zawroty
głowy, bóle, nudności. Wznowić ćwiczenia
dopiero po ewentualnym skonsultowaniu się z
lekarzem.
J Nie należy doprowadzać się do całkowitego
wyczerpania. Na początek ćwiczyć bezwarunkowo w odpowiednim zakresie wysiłku i
stopniowo zwiększać obciążenia.
J Planować fazy rozgrzewki i wypoczynku.
Wskazówki bezpieczeństwa dotyczące baterii
OSTRZEŻENIE!
ZAGROŻENIE ŻYCIA!
Baterie nie mogą dostać się do rąk dzieci. Nie
pozostawiać porozrzucanych baterii. Istnieje
niebezpieczeństwo, iż te zostaną połknięte przez
dzieci lub zwierzęta. W przypadku połknięcia
należy natychmiast udać się do lekarza.
J
NIEBEZPIECZEŃSTWO WYBU-
CHU! Nie należy ładować
baterii nie nadających się do łado-
wania, Nie zwierać biegunów baterii i / lub nie
otwierać ich. Skutkiem powyższego może nastąpić przegrzanie, niebezpieczeństwo pożaru lub
rozerwanie. Nie należy nigdy wrzucać baterii
do ognia lub wody. Baterie mogą wybuchnąć.
J Proszę usunąć niezwłocznie zużyte baterie z
urządzenia. Istnieje wzmożone zagrożenie wycieku baterii!
J Baterię należy regularnie kontrolować pod
względem jej szczelności.
J Baterie, które wyciekają lub są uszkodzone w
zetknięciu ze skórą mogą spowodować oparzenia; dlatego w tym wypadku należy bezwarunkowo zakładać odpowiednie rękawice
ochronne!
J W razie dłuższego nieużywania należy wyjąć
baterię z produktu.
J Podczas zakładania należy zwracać uwagę
na właściwą polaryzację! Jest ona oznakowana
w pojemniku na baterie.
J Zużytą baterię należy usunąć z urządzenia.
Bardzo stare lub używane baterie mogą wyciekać. Ciecz chemiczna może wywołać szkody
na produkcie.
J Baterii nie należy usuwać do odpadόw domo-
wych!
J Każdy użytkownik zobowiązany jest prawnie
do usuwania baterii zgodnie z obowiązującymi
przepisami!
J Należy unikać kontaktu ze skόrą, oczami oraz
błonami śluzowymi. Podczas kontaktu z kwasem
wypływającym z baterii należy spłukać narażone
miejsce z dostateczną ilością wody oraz / lub
udać się do lekarza!
J Należy jedynie stosować baterii podanego typu
(zobacz „Dane techniczne“).
Q
Montaż
J Upewnić się, czy produkt jest montowany przez
kompetentna osobę.
Urządzenie Swing-Stepper dostarczane jest w stanie zaawansowanego zmontowania wstępnego.
Pozostałe jeszcze potrzebne czynności montażowe
18 PL
Montaż
opisane są poniżej. Do tego potrzebny jest dostarczony razem z urządzeniem wkrętak krzyżowy.
Rysunek A:
j Włożyć obydwa podnóżki z tworzywa sztucz-
nego
3
do tylnej rury ramy 2 tak, aby powierzchnie oparcia podnóżków z tworzywa
sztucznego
3
skierowane były do tyłu. Wkręcić
wkręty do blach
9
do nawierconych otworów
na stronie spodniej rury ramy
2
.
Rysunek B:
j Wkręcić śrubę regulacyjną
7
do gwintu na
przedniej ramie urządzenia.
Wskazówka: Za pomocą śruby regulacyjnej
7
można ustawiać wysokość wzniosu.
Obracanie w kierunku zgodnym z ruchem
wskazówek zegara
powoduje podnoszenie
pedałów
1
, obrót w kierunku przeciwnym
powoduje opuszczanie pedałów
1
a tym
samym wysokości wzniosu.
Rysunek C:
j Wyciągnąć komputer
8
z obudowy. Włożyć
baterię znajdującą się w zakresie dostawy do
przegródki bateryjnej na spodniej stronie komputera
8
. Zwracać uwagę na prawidłową
biegunowość.
Upewnić się, czy wtyczka
10
jest prawidłowo
włożona. Włożyć komputer
8
z powrotem
do obudowy. Nacisnąć przy tym lekko na występ
11
. Zwracać przy tym uwagę, aby kabel
nie został załamany lub zakleszczony.
Rysunek D:
j Proszę wybrać wymagane linki elastyczne
5
.
W zakresie dostawy załączone są linki o
trzech rόżnych grubościach dla rόżnorodnego
obciążenia. Proszę w tym celu zobaczyć
rόwnież tabelę w rozdziale „Uruchomienie“.
j Proszę następnie montować linki elastyczne
5
. Proszę zahaczyć obydwie linki elastyczne
5
za pomocą karabinka 14 w odpowiednie
oczko
4
. Przed każdym treningiem należy
zwracać uwagę, aby linki elastyczne
5
były
bezpiecznie zamontowane.
Swing-Stepper jest gotowy do użycia.
m UWAGA! Zaczepów
4
nie należy obciążać
w poprzek, ponieważ są one przystosowane wyłącznie do obciążenia naciągowego do góry. W
przeciwnym razie istnieje niebezpieczeństwo obrażeń lub uszkodzenia urządzenia.
Wskazówka: W przypadku, jeśli ekspandery
5
nie są potrzebne do ćwiczeń należy je wypiąć z
zaczepów. W ten sposób unika się niebezpieczeństwa potknięcia.
Następnie sprawdzić, czy nakrętki i śruby są należycie dokręcone.
Q
Uruchomienie
Za pomocą Swing-Steppera można ćwiczyć prawie
wszystkie mięśnie całego ciała. Obok ruchu w górę i
w dół mamy do czynienia dodatkowo ruchami bocznymi. W ten sposób można ćwiczyć w szczególności
biodra, pośladek i brzuch jak również mięśnie wewnętrzne i zewnętrzne ud. Ekspandery
5
służą do
tego, aby podczas ćwiczeń wzmocnić jeszcze
dodatkowo mięśnie ramion.
Uważnie przeczytać wszystkie wskazówki dotyczące
bezpieczeństwa i aspektów zdrowotnych.
Rozgrzewka:
Aby zapobiec niebezpieczeństwu obrażeń przed
rozpoczęciem ćwiczeń sportowych należy przede
wszystkim rozgrzać i rozluźnić mięśnie.
j Przed rozpoczęciem ćwiczeń na urządzeniu
zaplanować 5 do 10 minut rozgrzewki, aby
rozgrzać mięśnie.
j Przykładowo przejść się lub pobiegać w miejscu
i wymachiwać ramionami ruchami okrężnymi.
Ćwiczenia / wchodzenie i schodzenie:
j Nie poddawać się presji wydajnościowej. Na
początku ćwiczyć bezwarunkowo w zakresie,
który nadmiernie nie nadwyręża. Powoli zwiększać obciążenie.
j Jeśli nie jest się wytrenowanym, rozpoczynać
od ćwiczeń przez 3 minuty dziennie. Zwiększyć
19 PL
Montaż
dawkę ćwiczeń w pierwszych 2 tygodniach do
nie więcej niż 10 minut. Następnie można
dalej zwiększać dawkę ćwiczeń.
j Przesunąć pedał całkowicie do dołu, (aby do-
szedł do ramy podstawy), naciskając mocno
stopą na jego powierzchnie
1
. Wejść odpo-
wiednią nogą na ten pedał
1
i ustawić drugą
nogę na pedale
1
znajdującym się w górze.
j Wykonywać ćwiczenia tak jakby się wchodziło
do góry po schodach.
j Utrzymywać możliwie spokojny i równomierny
oddech.
m UWAGA! Podczas ćwiczeń należy zawsze
uwzględniać sygnały własnego organizmu. W
przypadku pojawienia się bólów lub dolegliwości należy natychmiast przerwać ćwiczenia.
j Nie przerywać gwałtownie ćwiczeń. Zwalniać
równomiernie szybkość kroku.
j Aby zejść nacisnąć pedał
1
całkiem do dołu i
zdjąć najpierw drugą nogę z drugiego pedału
skierowanego ukośnie do góry
1
. Następnie
zejść z pierwszego pedału
1
.
Wskazówka: Urządzenie pracuje w sposób
zależny od prędkości i częstotliwości ruchów.
Nakład siły rośnie wraz z prędkością stąpania.
Ćwiczenie bez ekspanderów
5
, dla łydek,
ud i pośladków, Rysunek F:
j Wykonywać z równomierną szybkością ruchy
biegu lub wchodzenia po schodach.
j Poruszać przy tym ramionami całkiem naturalnie
do przodu i do tyłu. W trakcie wykonywania
ćwiczeń podnosić stopniowo ramiona coraz
wyżej.
Ćwiczenia Nr 1 do 4 z ekspanderami
5
:
m OSTROŻNIE! ZAGROŻENIE OBRAŻE-
NIEM! Nie należy naciągać linek elastycznych
5
powyżej ich maksymalnych długości. Maksy-
malne długości linek elastycznych
5
podane są w
następującej tabeli. Nie przestrzegając niniejszego
może dojść do obrażeń oraz / lub uszkodzeń produktu.
m OSTROŻNIE! NIEBEZPIECZEŃSTWO
POWSTANIA OBRAŻEŃ! Nie owijać ekspan-
derów
5
wokół nadgarstków rąk. Używać zawsze
uchwytów
6
.
m UWAGA! Trzymać uchwyty
6
poziomo w
czasie naciągania ekspanderów
5
.
Im bardziej naciąga się ekspandery
5
tym większy
jest wysiłek wzgl. włożona siła. Zalecamy dla każdego opisanego ćwiczenia 3 cykle ćwiczeń z 6 do
12 powtórzeniami. Po wykonanym ćwiczeniu rozciągnąć mięśnie.
Zielona linka elastyczna
5
Długość w cm Potrzebna siła w
N (10 N ≈ 1 kg)
120 ca. 17 ± 10 N
140 ca. 24 ± 10 N
160 ca. 43 ± 10 N
185 ca. 80 ± 10 N
Niebieska linka elastyczna
5
Długość w cm Potrzebna siła w
N (10 N ≈ 1 kg)
120 ca. 30 ± 10 N
140 ca. 41 ± 10 N
160 ca. 50 ± 10 N
185 ca. 65 ± 10 N
Czerwona linka elastyczna
5
Długość w cm Potrzebna siła w
N (10 N ≈ 1 kg)
120 ca. 50 ± 10 N
140 ca. 70 ± 10 N
160 ca. 79 ± 10 N
185 ca. 118 ± 10 N
Ćwiczenie Nr 1, dla rąk, ramion, nóg i
pośladka, Rysunek G:
j Nacisnąć prawy pedał w dół i podnieść lewe
ramię do góry lekko zgięte około na wysokość
barku przed korpus.
20 PL
Montaż
j Opuścić następnie lewe ramię, podnieść prawe
ramię i nacisnąć odpowiednio lewy pedał w dół.
j Powtarzać obydwie czynności na zmianę.
Ćwiczenie Nr 2, dla barków i ramion,
Rysunek H:
j Podczas tego ćwiczenia nie stąpać, lecz utrzy-
mywać pedały na równej wysokości.
j Trzymać najpierw ręce na wysokości bioder.
j Pociągnąć prawy uchwyt
6
w kierunku podbródka. Grzbiet dłoni skierowany jest w dół.
Równocześnie opuścić lewy uchwyt
6
.
j Powtarzać ciąg ćwiczenia na zmianę.
Ćwiczenie Nr 3, dla ud, ramion, nóg i
pośladka, Rysunek I:
j Chwycić ekspandery
5
jak przedstawiono na
rysunku – Powierzchnie dłoni skierowane ku
górze.
j Docisnąć mocno łokieć do korpusu.
j Nacisnąć w dół lewy pedał i pociągnąć lewy
uchwyt
6
do góry.
j Nacisnąć następnie w dół prawy pedał i opuścić
lewy uchwyt
6
i pociągnąć przy tym prawy
uchwyt
6
do góry.
j Powtarzać ciąg ćwiczeń na zmianę.
Ćwiczenie Nr 4, dla pleców, barków,
piersi, nóg i pośladka, Rysunek K:
j Wykonywać z równomierną szybkością ruchy
biegu wzgl. wchodzenia po schodach.
j Podnosić przy tym ramiona do wysokości barków.
j Następnie opuszczać z powrotem ramiona.
j Powtarzać ciąg ćwiczeń na zmianę.
Q
Funkcje komputera
Swing-Stepper można również używać bez włączania
komputera
8
. Jednakże komputer podaje na wy-
świetlaczu
12
, patrz również Rysunek E, pomocne
informacje o przebiegu dotychczasowego ćwiczenia
i informuje, w jaki sposób można poprawić trening.
Swing-Stepper odpowiada klasie dokładności C.
Oznacza to, iż nie ma wymagań odnośnie dokładności wskazań komputera.
Q
Włączanie i wyłączanie
urządzenia
Komputer włącza się automatycznie 8, jak tylko
zaczyna się ćwiczenie wzgl. naciśnie się na pedały.
Wartości wskazań
12
stają się widoczne. Jeśli urządzenie nie jest uruchamiane przez okres ok. 4 minut,
komputer
8
wyłącza się sam automatycznie.
Q
Wybór wskazań
W czasie ćwiczeń wyświetlacz 12 pokazuje w
pierwszym wierszu
– »STOP«, jeśli ćwiczenie zostało przerwane
– liczbę kroków na minutę (liczenie szacunkowe)
Q
Wybór trybu
W drugim wierszu wyświetlacz 12 pokazuje różne
dane ćwiczenia (tryby). Nacisnąć krótko na przycisk
MODE
13
, aby przejść z jednego do drugiego trybu
wyświetlania.
1. »TMR« (świeci się): dotychczasowy czas ćwi-
czenia, 0:00 do 99:59
2. »REPS«: Liczbę kroków aktualnej sesji ćwiczeń,
0 do 9999
3. »CAL«: zużyte kalorie
1
), 0 do 9999
4. »TTR«: Liczba kroków ćwiczeń od momentu
włożenia baterii, 0 do 9999
Jeśli się chce zobaczyć wszystkie dane ćwiczeń po
kolei, należy naciskać przycisk MODE
13
tyle razy,
aż zacznie migać pole »TMR«, wyświetlacz
12
zmienia automatycznie wskazania co 5 sekund od
trybu do trybu.
1) Obliczanie opiera się o wstępnie zaprogramo-
wane wartości standardowe, które mogą służyć
jedynie jako wartości orientacyjne. Zużycie
kalorii na skutek używania pasów elastycznych
nie zostało uwzględnione.
 Loading...