

lidl PLAYTIVE JUNIOR Instructions For Use Manual
1
IAN 303670
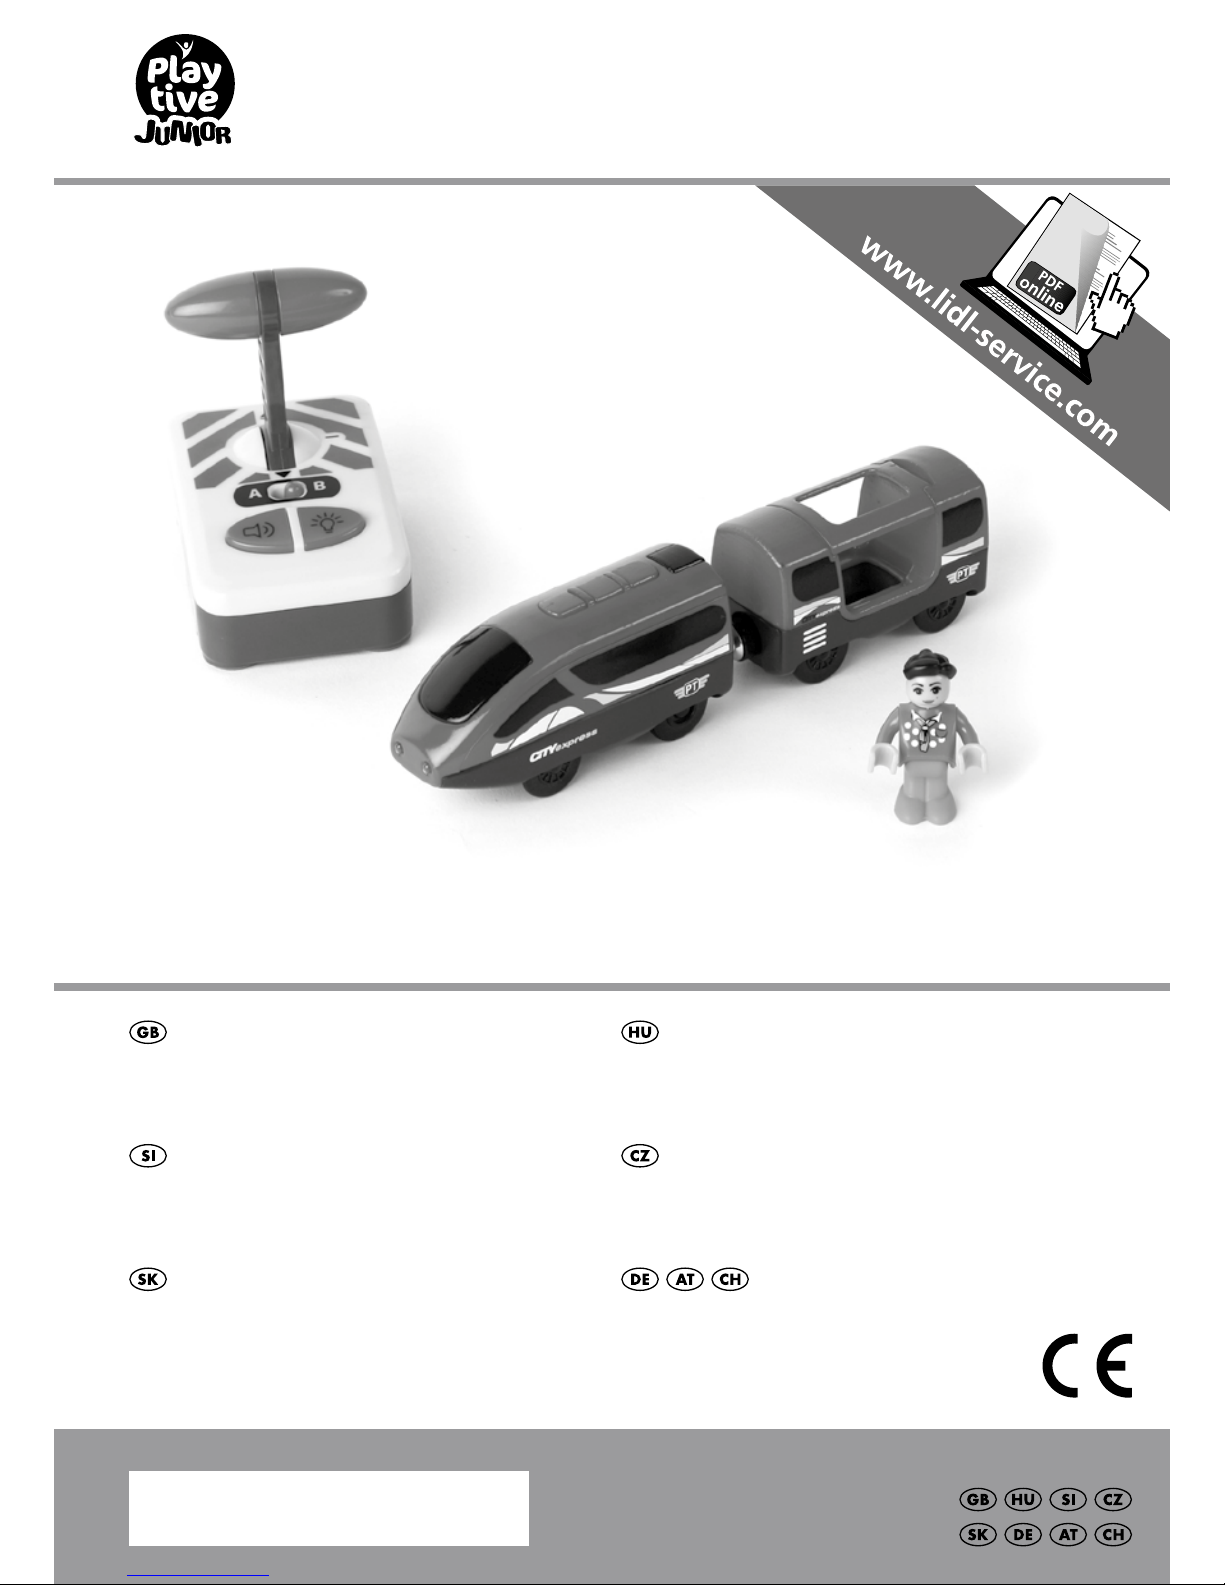
REMOTE CONTROL TRAIN
REMOTE CONTROL TRAIN
Instructions for use
FERNGESTEUERTE EISENBAHN
Gebrauchsanweisung
VLAK NA DÁLKOVÉ OVLÁDÁNÍ
Návod k použití
ŽELEZNICA NA DIAĽKOVÉ
OVLÁDANIE
Návod na obsluhu
TÁVIRÁNYÍTÓS VASÚT
Használati útmutatóval
DALJINSKO VODEN VLAK
Navodilo za uporabo
2
A
1b
1a
1c
5
1
B
5
2
2c
2b
2a
C
1
1g
1f
1e
1d
D
2d
2e
2f
2g
E
1
2
3
4
5
3
1f
2d
1g
2e
2g
2f
F
1g
2e
2g
2f
G
4 GB
Congratulations!
With your purchase you have decided on a
high-quality product. Get to know the product
before you start to use it.
Carefully read the following instructions
for use.
Use the product only as described and only
for the given areas of application. Keep these
instructions safe. When passing the product
on to a third party, always make sure that the
documentation is included.
Scope of delivery (fig. A)
1 x Remote control (1)
1 x Remote-controlled train (2)
1 x Train carriage (3)
1 x Figurine (4)
4 x Batteries (1,5V LR6, AA) (5)
1 x Instructions for use
Technical data
Battery energy supply:
1.5V
LR6, AA
Symbols used
This device meets the basic require-
ments and complies with the other
relevant stipulations of RED 2014/53/EU as
well as the RoHS Directive 2011/65/EU.
Full conformity declarations are available under
http://www.conformity.delta-sport.com/
Date of manufacture (month/year):
07/2018
Intended use
This product is a toy for children 3 to 8 years of
age and is intended for private use.
Safety instructions
• Warning! Not suitable for children under 36
months of age. Danger of suffocation, since
small pieces can be swallowed or inhaled!
• Warning! None of the packaging and
fastening materials are considered part of the
toy and must always be removed for safety
reasons before the product can be given to
children to play with.
• Children can only play with the product under
adult supervision.
• Only use battery type:
1.5 V LR6, AA
Warnings regarding
integrated batteries!
• Remove the batteries if they are dead or if
the product will not be used for an extended
period of time.
• Do not mix different types and makes of battery and do not use new and used batteries together with each other or batteries of different
capacities since they can leak and thus cause
damage.
• Observe polarity (+/-) when installing.
• Replace all batteries together at the same time
and dispose of the old batteries in accordance with regulations.
• Warning! Batteries may not be charged or
reactivated by other means, nor may they be
disassembled, thrown onto a fire or short-circuited.
• Always store batteries out of reach of children.
• Do not use any rechargeable batteries!
• Cleaning and user maintenance may not be
performed by children without supervision.
• When needed, clean the battery and device
terminals before inserting.
• Do not expose the batteries to extreme conditions (e.g. radiators or direct sunlight). Otherwise there is an increased risk of leakage.
• If swallowed, batteries can be life-threatening.
For this reason keep batteries out of the reach
of small children. If a battery has been swallowed, medical help must be sought immediately.
5GB
Danger!
• Handle a damaged or leaking battery with
extreme care and dispose of it immediately as
per regulations. Wear gloves for this.
• If you come into contact with battery acid,
wash the affected area with soap and water.
If battery acid gets into your eye, rinse it out
with water and seek medical treatment immediately!
• The terminals must not be short-circuited.
Replacing the batteries
WARNING! Follow these instructions to
avoid mechanical and electrical damage.
Insert the included batteries in the product
before the first use.
Inserting the batteries in the remote
control (Fig. B)
1. Use a suitable screwdriver to loosen the screw
(1a) on the battery holder (1c) on the underside of the remote control (1).
2. Remove the lid (1b) and carefully place two
batteries (5) into the battery holder (1c). The
batteries must fit fully into the battery holder.
Note: Pay attention to correct plus/minus polarity of the batteries and their installation.
3. Screw the lid (1b) tightly onto the underside.
Inserting the batteries in the locomotive
(Fig. C)
1. Use a suitable screwdriver to loosen the screw
(2a) on the battery holder (2c) on the back of
the locomotive (2).
2. Remove the lid (2b) and carefully place two
batteries (5) into the battery holder (2c). The
batteries must fit fully into the battery holder.
Note: Pay attention to correct plus/minus polarity of the batteries and their installation.
3. Screw the lid (2b) tightly onto the back.
Replacing battery
WARNING! Follow these instructions to
avoid mechanical and electrical damage.
If the batteries stop working, replace them using
the same process as described for inserting
them. Remove the batteries already in the product before inserting the new batteries.
Remote control
To control the locomotive with the remote control, the remote control (1) and the locomotive
(2) must be set to the same channel.
1. Set the control lever (1f) on the remote control
to A or B (Fig. F).
2. Set the control lever (2d) on the locomotive to
the same setting as the remote control, either
A or B (Fig. F).
Note: The locomotive is off when the control
lever is in the OFF position (Fig. E).
Activating the remote control
In order to control the locomotive with the
remote control, the infrared receiver on the
locomotive must be activated.
1. Insert the batteries into the remote control (Fig.
B) and the locomotive (Fig. C).
2. Set the remote control and the locomotive to
the same channel, as described above (Fig.
F).
3. Press any button on the locomotive (2e-2g)
to activate it. Only then will the locomotive
be able to receive the signal from the remote
control (Fig. G).
Note: After five minutes of inactivity, the product will automatically switch off. In order to activate it again, press any button on the locomotive
once again (Fig. G).
Activating light and sound (Fig. D)
1. Press the light button (1d) to activate the light.
2. Press the sound button (1e) to start the sound.
Locomotive (Fig. E)
Activating light and sound
1. Press the front button (2e) to activate the
front light and the sound, and make it move
forward.
6 GB
2. Press the middle button (2f) to stop the sound,
light, and driving.
3. Press the back button (2g) to activate the
back light and the sound and cause it to drive
backward.
Note: The sound will remain active for seven
seconds and the light will remain active as long
as it is driving.
Driving the locomotive
1. Press the lever (1g) forward or backward to
drive the locomotive.
2. Let go of the lever (1g) to stop the locomotive.
Note: If the locomotive stops after a collision,
activate it again using one of the direction
buttons.
Note: If the lever (1g) is held pushed forward
for more than about 1.5 seconds, the locomotive
will continue driving forward automatically. Pull
the lever (1g) back once to stop it again.
If the lever (1g) is held back for more than about
1.5 seconds, the locomotive will automatically
continue driving backwards. Push the lever
forward once to stop it again.
Storage, cleaning
Always store the product in clean and dry condition at room temperature.
Only wipe clean with a dry cleaning cloth.
IMPORTANT! Never clean the product with
aggressive cleaning agents.
Disposal
Dispose of the article and the packaging materials in accordance with current local regulations.
Packaging materials such as foil bags are not
suitable to be given to children. Keep the packaging materials out of the reach of children.
Devices that are marked with the symbol
shown here may not be disposed of with
domestic waste. You are obliged to dispose of these kinds of used electrical and electronic
devices separately. Ask your local authority
about possible methods for regulated disposal.
Remove the batteries from the article before
disposing of it.
Dispose of batteries carefully
Please note: Batteries are hazardous
waste and may not be disposed of with
domestic waste by law. You can hand
over used batteries free of charge at local
collection points or at retail outlets. Special
containers are provided here for this purpose.
Notes on the guarantee and
service handling
The product was produced with great care and
under constant supervision. You receive a threeyear warranty for this product from the date of
purchase. Please retain your receipt.
The warranty applies only to material and
workmanship and does not apply to misuse or
improper handling. Your statutory rights, especially the warranty rights, are not affected by this
warranty.
With regard to complaints, please contact the
following service hotline or contact us by e-mail.
Our service employees will advise as to the
subsequent procedure as quickly as possible.
We will be personally available to discuss the
situation with you.
Any repairs under the warranty, statutory
guarantees or through goodwill do not extend
the warranty period. This also applies to replaced and repaired parts.
Repairs after the warranty are subject to a
charge.
IAN: 303670
Service Great Britain
Tel.: 0871 5000 720 (£ 0.10/Min.)
E-Mail: deltasport@lidl.co.uk
7HU
Gratulálunk!
Vásárlásával egy kiváló minőségű termék mellett
döntött. Az első használatba vételt megelőzően
ismerkedjen meg a termékkel.
Ehhez figyelmesen olvassa el a
következő használati útmutatót.
Csak a leírásnak és csak a megadott felhasználási területeknek megfelelően használja a
terméket. Ezt a útmutatót jól őrizze meg.
Amennyiben a terméket harmadik személynek továbbadja, adja át neki a teljes dokumentációt is.
A csomag tartalma (A ábra)
1 x távirányító (1)
1 x távirányítós vonat (2)
1 x utánfutó (3)
1 x figura (4)
4 x elem (1,5 V LR6, AA) (5)
1 x használati útmutatót
Műszaki adatok
Az elem energiafelhasználása:
1,5 V LR6, AA
Alkalmazott szimbólumok
A készülék az egyezőség tekintetében
megfelel a RED 2014/53/EU alapvető
követelményeinek és más vonatkozó előírásainak, illetve a 2011/65/EU RoHS irányelvnek.
A teljes megfelelőségi nyilatkozat megtalálható
a következő webhelyen: http://www.conformity.
delta-sport.com/
Gyártás dátuma (hónap/év):
07/2018
Rendeltetésszerű használat
3 és 8 év közötti gyermekeknek ajánlott játék
személyes használatra.
Biztonsági utasítások
• Figyelem! A termék 36 hónapnál fiatalabb
gyermekek általi használatra nem alkalmas.
Fulladásveszély áll fenn, mert a termék kisebb
alkatrészeit a gyermekek lenyelhetik vagy
belélegezhetik!
• Figyelem! A csomagolás és a rögzítés nem
része a játéknak és azokat biztonsági okokból
mindig el kell távolítani, mielőtt odaadnánk a
terméket a gyermekeknek játszani.
• Gyermekek csak felnőtt felügyelete mellett
játszhatnak a termékkel.
• Csak megfelelő típusú elemeket használjon:
1,5 V/típus: LR6, AA.
Az elemmel kapcsolatos
figyelmeztetések!
• Távolítsa el az elemeket, ha elhasználódtak,
vagy ha a terméket hosszabb ideig nem használja.
• Ne használjon együtt egymástól eltérő típusú,
márkájú, illetve használt és új elemeket, illetve
eltérő kapacitású elemeket, mivel ezek kifolyhatnak, ezzel károsítva a készüléket.
• Ügyeljen a polaritásra (+/-) a behelyezéskor.
• Mindig egyszerre cserélje ki az elemeket és
gondoskodjon az előírás szerinti ártalmatlanításukról.
• Figyelem! Az elemeket tilos tölteni vagy más
eszközökkel újraaktiválni, tilos őket szétszedni,
tűzbe dobni vagy rövidre zárni.
• Olyan helyen tárolja a készüléket, ahol a
gyermekek nem érhetik el.
• Ne használjon feltölthető elemeket!
• A tisztítást és a felhasználói karbantartást a
gyermekek felügyelet nélkül nem végezhetik.
• Szükség esetén és az elemek behelyezése
előtt tisztítsa ki az elemek és a készülék érintkezéseit.
• Ne tegye ki az elemeket extrém körülményeknek (pl. fűtőtest vagy közvetlen napsugárzás).
Ellenkező esetben nő a kifolyás veszélye.
• Az elemek lenyelése életveszélyes lehet. Ezért
az elemeket tartsa távol a kisgyermekektől.
Egy elem lenyelése esetén azonnal orvosi
segítséget kell kérni.
8 HU
Veszély!
• A károsodott vagy kifolyt elemekkel nagyon
óvatosan bánjon, és haladéktalanul előírásszerűen ártalmatlanítsa őket. Eközben viseljen
kesztyűt.
• Ha akkumulátorsavval kerül érintkezésbe, mossa le vízzel és szappannal az érintett területet.
Amennyiben akkumulátorsav kerül a szemébe,
mossa ki vízzel, és azonnal forduljon orvoshoz!
• A csatlakozó sorkapcsokat nem szabad rövidre zárni.
Elemek behelyezése
FIGYELEM! A mechanikus és elektromos
károk megelőzése érdekében vegye
figyelembe a következő utasításokat.
A termék használata előtt helyezze be a csomagban található elemeket.
Elemek behelyezése a távirányítóba
(B ábra)
1. Egy megfelelő csavarhúzó segítségével oldja
ki a termék alsó részén lévő elemrekeszen (1)
lévő csavarokat (1a).
2. Távolítsa el a fedelet (1b) és helyezze a két
elemet (5) óvatosan az elemrekeszbe (1c). Az
elemeket teljesen be kell illeszteni az elemrekeszbe.
Tudnivaló: ügyeljen a megfelelő polaritásra és
a helyes behelyezésre.
3. Ismét húzza meg a termék alján lévő fedél
(1b) csavarjait.
Elemek behelyezése a vonatba (C ábra)
1. Egy megfelelő csavarhúzó segítségével oldja
ki a vonat (2) hátoldalán lévő elemrekeszen
(2c) lévő csavart (2a).
2. Távolítsa el a fedelet (2b), és helyezze a két
elemet (5) óvatosan az elemrekeszbe (2c). Az
elemeket teljesen be kell illeszteni az elemrekeszbe.
Megjegyzés: ügyeljen a megfelelő polaritásra
és a helyes behelyezésre.
3. Ismét húzza meg a termék hátulján lévő fedél
(2b) csavarjait.
Elemcsere
FIGYELEM! A mechanikus és elektromos
károk megelőzése érdekében vegye
figyelembe a következő utasításokat.
Amennyiben az elemek nem működnek, cserélje
ki őket az elem behelyezése részben leírtak
szerint. Az új elemek behelyezése előtt vegye ki
a termékben lévő elemeket.
Távirányító
Ahhoz, hogy a vonatot a távirányítóval irányítani
tudja, ugyanarra a csatornára kell állítani a
távirányítót (1) és a vonatot (2).
1. A távirányító irányító-csúszkáját (1f) vagy az
A, vagy a B jelzés irányába kell állítani (F
ábra).
2. A vonat irányító-csúszkáját (2d) vagy az A,
vagy a B jelzés irányába kell állítani (F ábra).
Megjegyzés: ha a távirányító irányító-csúszkája az OFF jelzésen áll, akkor a vonat ki van
kapcsolva (E ábra).
A távirányító aktiválása
Ahhoz, hogy a távirányítóval irányítani tudja
a járművet, aktiválni kell a jármű infravörös
vevőkészülékét.
1. Helyezze be az elemeket a távirányítóba (B
ábra) és a vonatba (C ábra).
2. Állítsa a távirányítót és a járművet ugyanarra
a csatornára (F ábra).
3. A vonat aktiválásához nyomja meg a vonat
bármelyik gombját (2e–2g). A vonat csak
ezután képes fogadni a távirányító jeleit (G
ábra).
Megjegyzés: hozzávetőlegesen 5 perc
tétlenség után a termék automatikusan kikapcsol.
Az aktiválásához ismét meg kell nyomni a vonat
bármelyik gombját (G ábra).
A fény- és a hangjelzés aktiválása
(D ábra)
1. A fényjelzés aktiválásához nyomja meg a fény
gombot (1d).
2. A hangjelzés aktiválásához nyomja meg a
hang gombot (1e).
 Loading...