

Page 1

USER MANUAL:
Onsight Connect for Librestream
Devices 1000/2000/2500
Version 6.0
Page 2

Librestream Onsight 1000/2000/2500
User Manual
Doc #: 400135-03
September 2012
Information in this document is subject
to change without notice. Reproduction
in any manner whatsoever without the
written permission of Librestream is
strictly forbidden.
Copyright © 2006 – 2012
Librestream Technologies
Incorporated.
All rights reserved.
Name of Librestream Software
Onsight 1000
Onsight 2000
Onsight 2500
Copyright Notice:
Copyright 2004 – 2012 Libre s tream
Technologies Incorporated. All Rights
Reserved.
Patents Notice:
# 7,221,386, together with addi tional
patents pending in Canada, the United
States and other countries, all of which
are in the name of Librestream
Technologies Inc.
Trademark Notice:
Librestream logo, Onsight, Onsight
Connect, Onsight Expert, Onsight
Mobile, Onsight En te rp ri se , Ons ig h t
License Manager, Onsight TeamLink,
Onsight Account Manager and Onsight
Management Suite are either
registered trademarks or trademarks of
Librestream Technologies Incorporated
in Canada, the United Sta tes and/or
other countries. All other trademarks
are the property of their respective
owners.
United States Patent
Librestream, the
:
Page 3

Librestream Onsight 1000/2000/2500 User Manual
Table of Contents
1
1.1
1.2
1.3
1.3.1
1.4
1.5
1.6
1.6.1
1.6.2
1.6.3
1.6.4
1.6.5
1.6.6
1.7
1.7.1
1.7.2
1.7.3
1.8
1.8.1
1.8.2
1.8.3
1.8.4
1.8.5
1.8.6
1.8.7
1.8.8
1.8.9
1.8.10
2
2.1
2.2
2.2.1
2.2.2
2.3
2.3.1
2.4
2.4.1
2.4.2
2.4.3
2.4.4
Getting Started.............................................................................................1
The Onsight System ......................................................................................1
Onsight Mobile Devices.................................................................................2
About this Manual..........................................................................................2
Accessories and Support...........................................................................2
Models...........................................................................................................2
What’s in the Box...........................................................................................2
Parts of the Onsight Device...........................................................................3
Onsight 1000.............................................................................................3
Onsight 2000/2500....................................................................................4
Control Buttons..........................................................................................5
Navigation Pad Buttons.............................................................................6
Zoom/Manual Focus Control .....................................................................7
Indicators...................................................................................................7
Onsight 2000/2500 Accessories ....................................................................8
I/O Cover...................................................................................................8
Power Sled................................................................................................9
I/O Sled ...................................................................................................10
User Interface Features...............................................................................11
Viewfinder................................................................................................11
Soft Keys.................................................................................................11
Icons........................................................................................................11
Standard Onsight Device Icons...............................................................12
Main Menu...............................................................................................15
Stylus.......................................................................................................15
On-Screen Keyboard...............................................................................16
General Conventions...............................................................................16
Terminology and Definitions....................................................................16
Tips..........................................................................................................16
Onsight Device Basic Operation..............................................................17
Charging the Battery....................................................................................17
Inserting or Replacing the Battery................................................................17
Onsight 1000 Battery Replacement.........................................................18
Onsight 2000/2500 Battery Replacement................................................19
Calibrating the Integrated Touch Panel .......................................................21
Displaying the Calibration Screen Using Navigation Pad Buttons...........21
Turning Power On or Off..............................................................................21
Power On Mode.......................................................................................21
Power Off Mode.......................................................................................21
Standby Mode .........................................................................................22
Resetting the Onsight Device (Soft Reset)..............................................22
i
Page 4

Librestream Onsight 1000/2000/2500 User Manual
2.5
2.5.1
2.5.2
2.6
2.6.1
2.6.2
3
3.1
3.2
3.3
3.4
3.5
4
4.1
4.1.1
4.1.2
4.1.3
4.1.4
4.1.5
5
5.1
5.2
5.3
5.4
5.5
5.6
5.6.1
5.6.2
5.7
5.7.1
5.7.2
5.7.3
5.8
5.8.1
5.8.2
5.8.3
5.9
5.9.1
5.9.2
5.9.3
6
6.1
6.2
Logging In & Out..........................................................................................23
Logging In................................................................................................23
Logging Out.............................................................................................23
Inserting and Removing an SD Memory Card .............................................24
Onsight 1000...........................................................................................24
Onsight 2000/2500..................................................................................25
Answering & Initiating Calls .....................................................................26
Network Access...........................................................................................26
Answering an Incoming Call ........................................................................27
Initiating (Starting) a Call..............................................................................28
Ending a Call ...............................................................................................29
Audio Communication..................................................................................29
Viewfinder Features & Display Modes.....................................................30
Controlling the Viewfinder Mode..................................................................30
Turn Viewfinder Backlight On or Power Save..........................................30
Default Viewfinder Mode .........................................................................31
Session Information.................................................................................31
Streaming Status.....................................................................................32
Viewfinder Main Menu.............................................................................33
Audio/Video (AV) Functions .....................................................................34
Turning the Video Stream On or Off ............................................................34
Setting the Subject Audio Source and Volumes ..........................................34
Using S-Video..............................................................................................36
Turning Illumination On or Off......................................................................37
Adjusting Zoom Levels.................................................................................38
Focusing......................................................................................................38
Automatic Focus......................................................................................38
Manual Focus..........................................................................................38
Telestration (Drawing Lines on the Viewfinder) ...........................................39
Telestration while Streaming Live Video..................................................39
Telestration while Sharing Recorded Video.............................................41
Telestration Colors ..................................................................................43
Capturing and Sharing Images....................................................................46
Capturing Still Images for Local Viewing Only.........................................46
Sharing a Live Image...............................................................................47
Sharing a Saved Image...........................................................................49
Recording and Playing Videos.....................................................................49
Recording a Video...................................................................................50
Playing a Video Recording Locally (not in a Call)....................................50
Sharing a Video Recording......................................................................51
Menus .........................................................................................................53
Stream Setup...............................................................................................53
Checking Status...........................................................................................54
ii
Page 5

Librestream Onsight 1000/2000/2500 User Manual
6.3
6.3.1
6.3.2
6.4
6.4.1
6.4.2
6.4.3
6.4.4
6.5
6.6
7
7.1
7.2
7.3
7.4
7.5
8
9
10
11
12
13
14
15
Viewing Contacts.........................................................................................55
Contacts ..................................................................................................55
History.....................................................................................................56
Managing Files ............................................................................................56
Rename Files and Folders ......................................................................58
Playing Videos.........................................................................................58
Viewing an Image Locally........................................................................58
Sharing an Image with Onsight Connect endpoints.................................59
Configuration ...............................................................................................59
Invite a Guest...............................................................................................61
Maintaining the Onsight Device ...............................................................62
General Recommendations.........................................................................62
Inspection/Maintenance/Cleaning................................................................62
Display/Touch Screen..................................................................................62
Optics...........................................................................................................62
Ergonomic Recommendations.....................................................................62
Onsight 1000 Technical Specifications....................................................63
Onsight 2000R/Onsight 2000Ex Technical Specifications.....................65
Onsight 2500R/Onsight 2500Ex Technical Specifications.....................67
Service Information ...................................................................................69
Regulatory and Safety Information..........................................................70
Librestream Limited Warranty Agreement ..............................................71
End User License Agreement...................................................................72
Librestream Contact Information .............................................................73
Figures
Figure 2 – Onsight 1000...............................................................................................3
Figure 3 – Onsight 2000/2500......................................................................................4
Figure 4 – Control Buttons ...........................................................................................5
Figure 5 – Navigation Pad Buttons...............................................................................6
iii
Page 6

Librestream Onsight 1000/2000/2500 User Manual Getting Started
1 Getting Started
1.1 The Onsight System
The Onsight system reaches beyond traditional video conferencing rooms to con nect field workers in challenging
environments with remote subject matter experts. Using Onsight Connect, subject matter experts can see live
video and images and share feedback with field staff, external suppliers, or customers to assess operations or
resolve issues immediately.
The Onsight Connect solution is comprised of three main components:
1. Onsight Connect service platform including rich collaboration software for the iPhone, iPad, PC and Onsight
mobile devices
2. Librestream’s Onsight mobile devices including rugged and hazardous location certified models
3. Central system management tools including Onsight Account Manager and Onsight Management Suite
Together, these components provide a full operations-driven video collaboration solution that is optimized to
perform in challenging field environments. Using Onsight, a field worker can securely collaborate with multiple
offsite experts through live video, images, voice, and on-screen drawing (“telestration”). Experts and field workers
can resolve issues, fix problems, diagnose, or monitor field situations on the shop floor, in a remote health clinic,
or even at the scene of an emergency.
Onsight Connect can simultaneously connect to multiple Onsight Co nnect
users and multiple Onsight Devices.
1
Page 7

Librestream Onsight 1000/2000/2500 User Manual Getting Started
1.2 Onsight Mobile Devices
Onsight Mobile Devices are used to communicate with Onsight Connect users (or multiple Onsight Connect
users) over a network. The Onsight Device can fully collaborate from a remote site.
Technical experts and remote operators can jointly view, consult, diagnose and resolve issues by sending highresolution video, sound and still images through streaming multimedia from the Onsight Device to one or more
Onsight Connect endpoints.
Multiple Onsight Connect users and Onsight Devices can participate in a conference call. The Onsight Connect
PC user who establishes the connection with the Onsight Device is called the Conferen ce Host.
The Onsight Device operator and Onsight Connect user can:
Converse just as they would on a mobile telephone
Stream audio and video recordings in real time
View and listen to streaming audio/video output in real time
Record and play back video
Draw (telestrate) on the video image
Capture and save snapshot images
Share snapshot images
Draw (telestrate) on the snapshot image
Remotely adjust the controls on the Onsight Device (e.g., zoom, focus, lighting, etc.)
1.3 About this Manual
This manual describes how to use the Onsight Device on a system that has already been set up and configured.
For information on the Onsight Connect for PC application, consult the Onsight Connect for PC User Manual.
1.3.1 Accessories and Support
For info
at http://www.librestream.com/
the Librestream website at http://www.librestream.com/support
rmation on additional accessories or for updated Onsight documentation, consult the Librestre am web site
. For support information, including troubleshooting and release bulletins, consult
.
1.4 Models
The Onsight system includes powerful and easy to use mobile devices that are specifically designed to operate
within different environments. These environments range from light industrial usage in locations such as hospitals
or repair depots to harsh outdoor environments including potentially hazardous locations. For a complete list of
the Onsight mobile devices, please see http://www.librestream.com/products.html.
1.5 What’s in the Box
The Onsight 1000 or 2000/2500 Device includes:
External power adapter
Rechargeable 2400 mAH Li-Ion battery pack
Wrist strap
Stylus (1 for the Onsight 1000)
Stylus screwdriver (2 for the Onsight 2000/2500 – one is a spare)
I/O cover (Onsight 2000/2500 only)
Power sled (Onsight 2000/2500 only)
Lens cover (Onsight 2000/2500 only)
2
Page 8
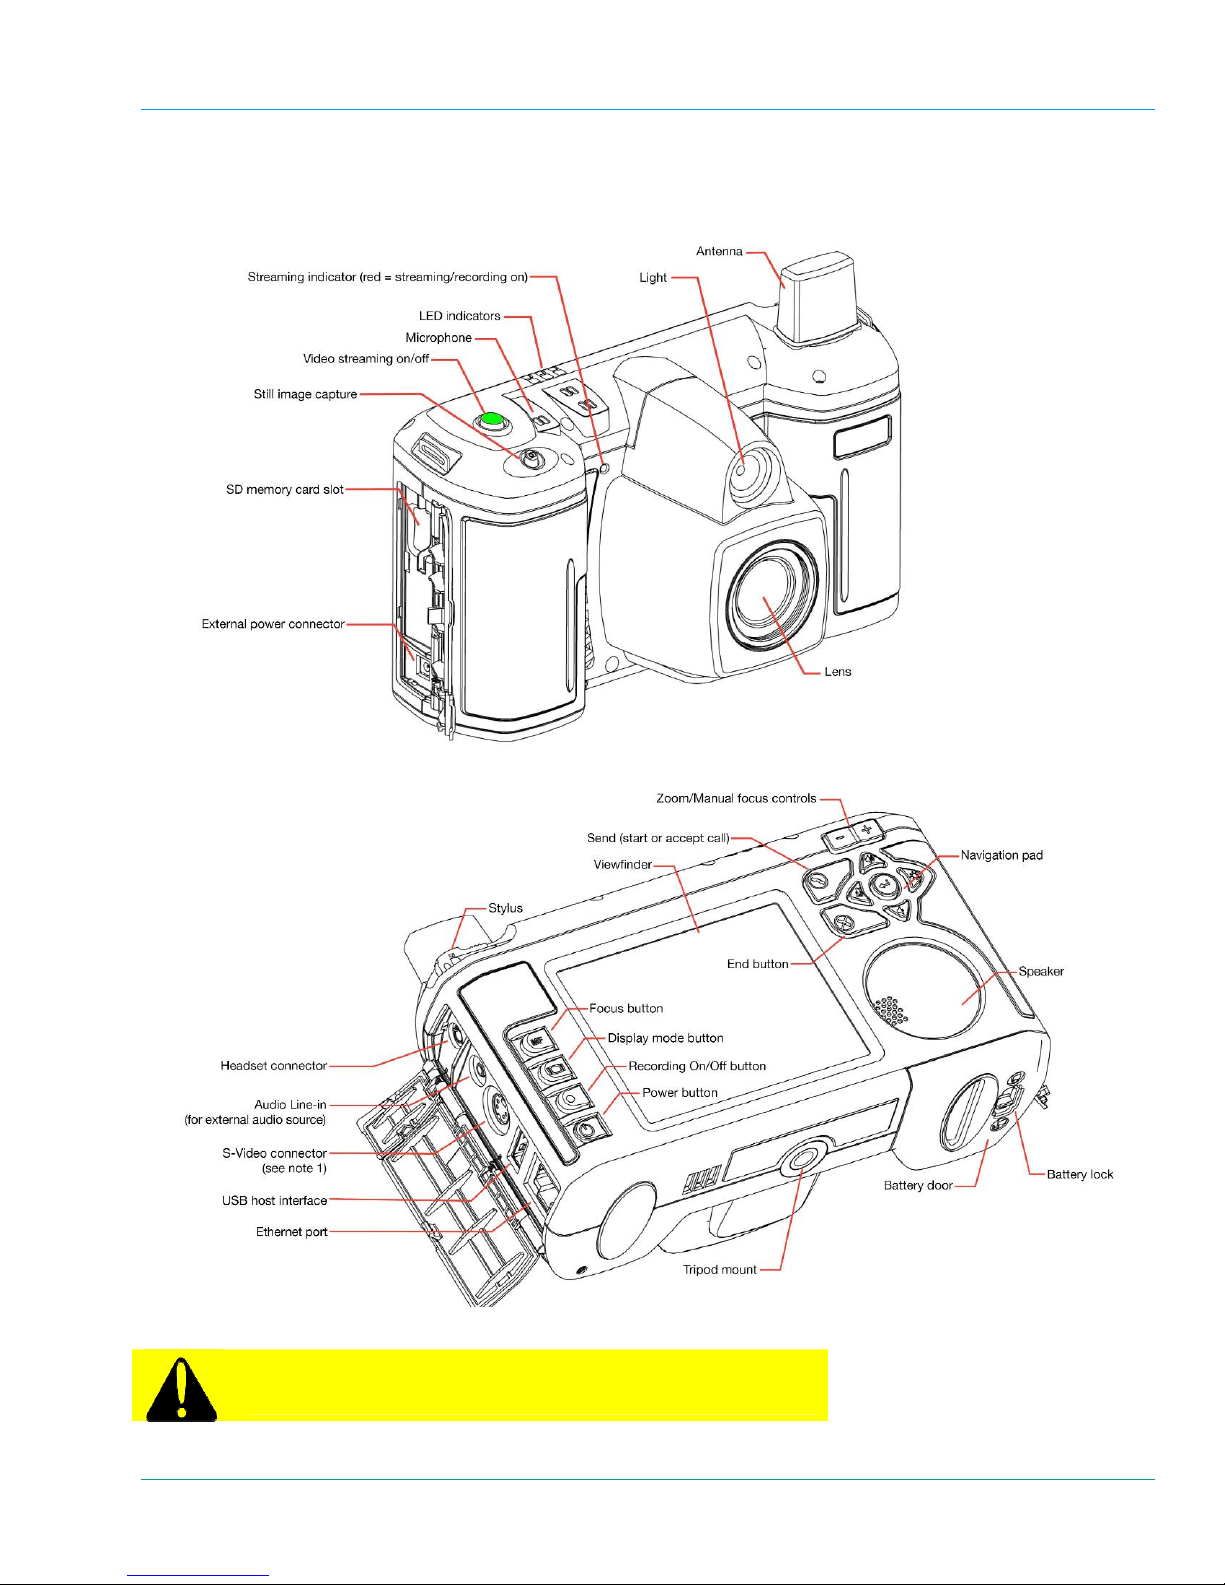
Librestream Onsight 1000/2000/2500 User Manual Getting Started
1.6 Parts of the Onsight Device
1.6.1 Onsight 1000
Note 1: For S-Video Out capability,
ple
ase contact Librestream.
Figure 1 – Onsight 1000
Before operating the Onsight 1000 Device, you must read the
Onsight 1000 Regulatory and Safety Guide.
3
Page 9
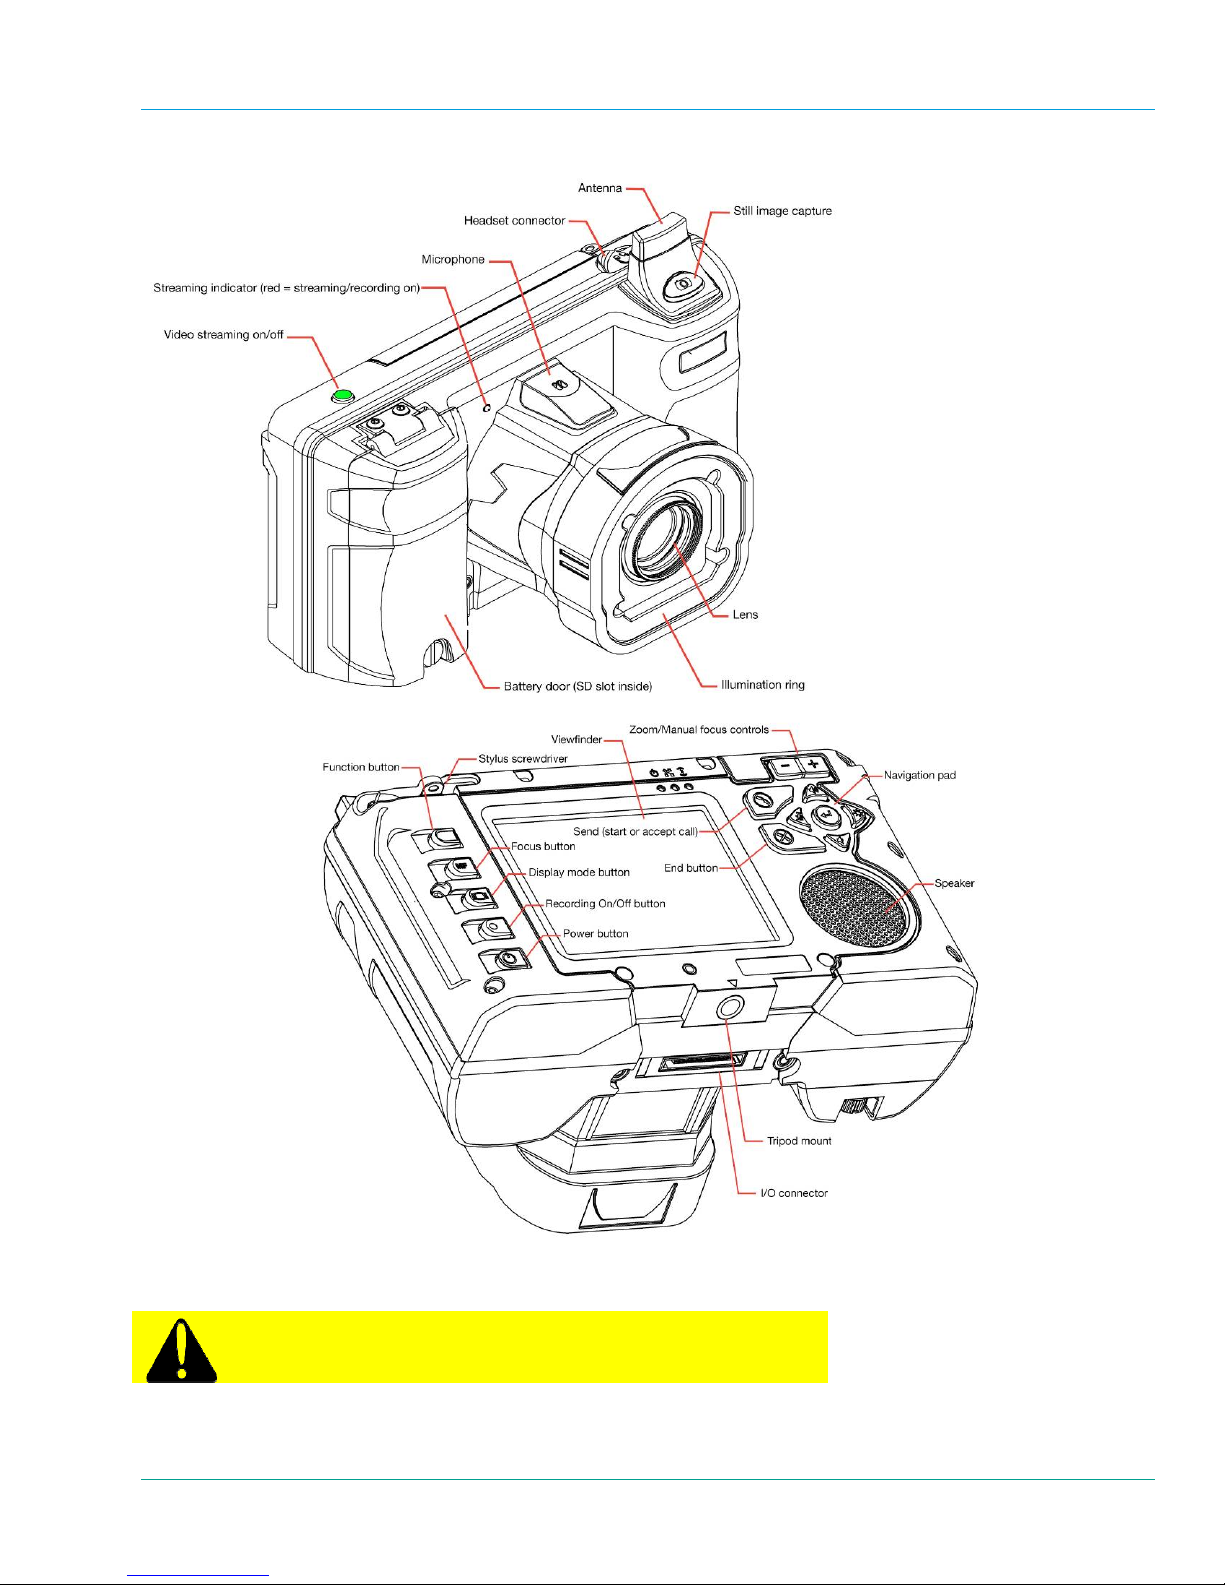
Librestream Onsight 1000/2000/2500 User Manual
1.6.2 Onsight 2000/2500
Figure 2 – Onsight 2000/2500
Before operating the Onsight 2000/2500 Device, you must read
the Onsight 2000/2500 Regulatory and Safety Guide.
See paragraph 1.7 on page 8 for a description of the Onsight 2000/2500 accessories.
4
Page 10
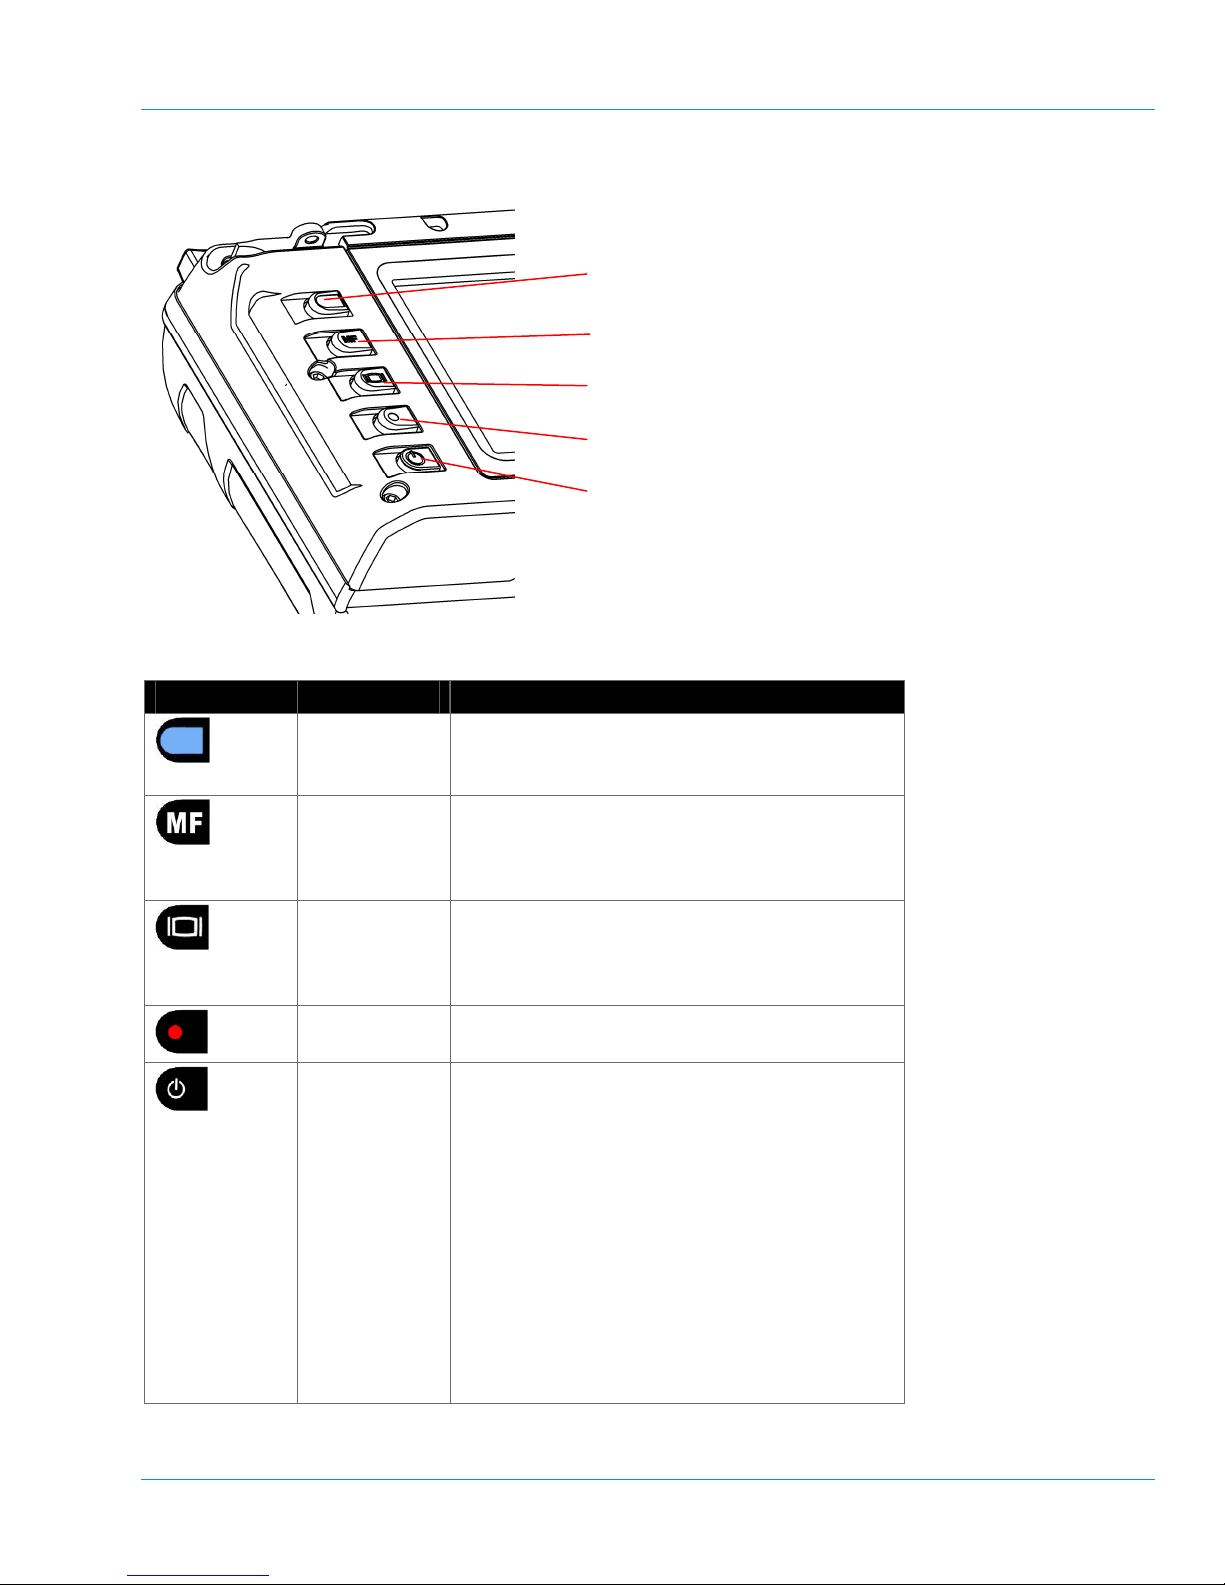
Librestream Onsight 1000/2000/2500 User Manual
r
1.6.3 Control Buttons
Function (Onsight 2000/2500 only)
Manual focus
Display mode
Record
Powe
Figure 3 – Control Buttons
Button Name Function
Function
(Onsight
2000/2500 only)
Manual Focus Use this button to set the focus manually or to resume
Display Mode This button cycles through the Onsight Device’s
Record Press this button to start/stop recording to a local
Power This button controls On/Off/Standby modes. See
Holding this button allows the use of the control
buttons of the Navigation pad while navigating a menu
on the Viewfinder.
automatic focusing. It works in combination with the
Zoom buttons. See paragraph 5.6, Focusing, on
page 38 for more information.
multiple display modes. See section 4, Viewfinder
Features & Display Modes
information.
Secure Digital (SD) memory card.
paragraph 2.4, Turning Power On or Off, on page
21 for more information.
If d
evice status is… Power button function
Off Press and release the button to turn
the power on.
On Press and release the button to go
to Standby mode.
Standby Press and release the button to
enter Power On mode.
On or Standby Press and hold the button for two
seconds to turn the unit off. A
shutdown message appears.
, on page 30 for more
5
Page 11
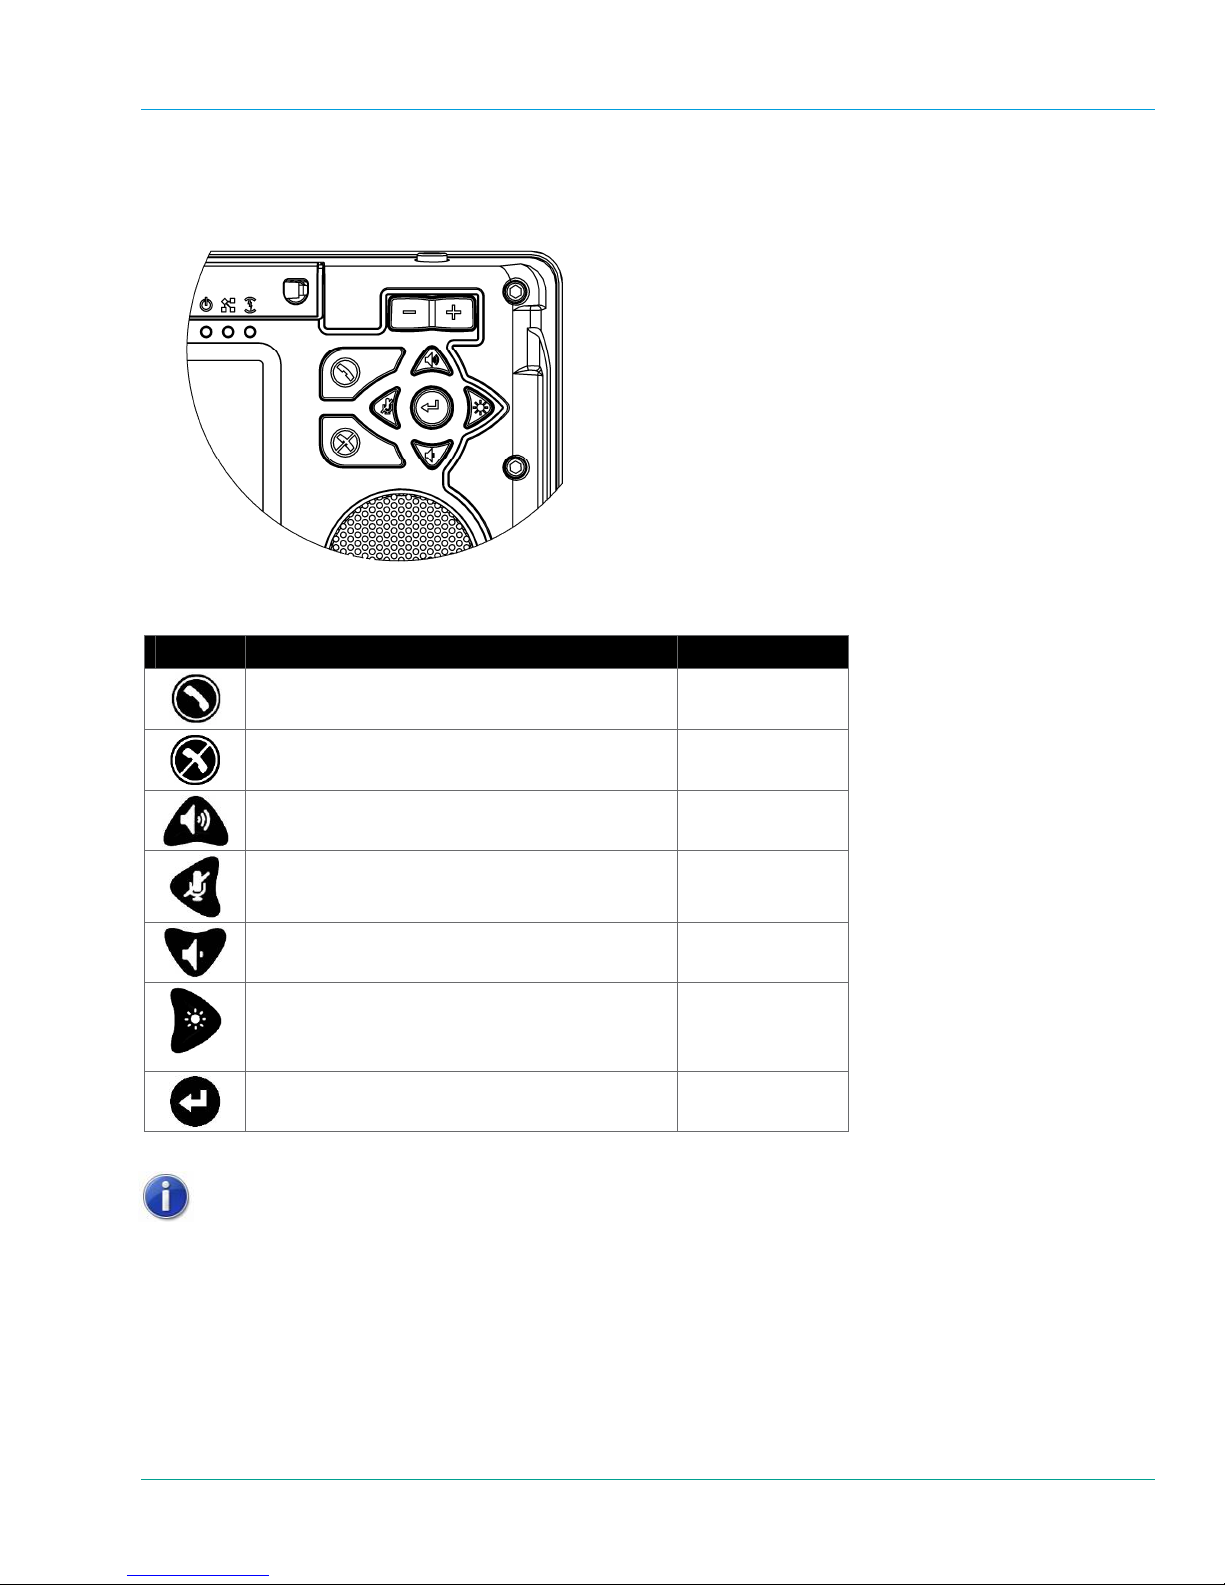
Librestream Onsight 1000/2000/2500 User Manual Getting Started
1.6.4 Navigation Pad Buttons
These context-sensitive buttons control audio volume, microphone mute and the illumination ring. They also
function as command buttons and directional buttons for the menus.
Figure 4 – Navigation Pad Buttons
Button Function Menu Function
Start or accept call (Send) OK or Enter
End a call or reject an incoming call invitation Cancel
Increase volume Up arrow
Microphone mute Left arrow
Decrease volume Down arrow
Front illumination light:
Onsight 1000: normal/off
Onsight 2000/2500: normal/macro/off
Enter/Freeze Accept
Right arrow
Onsight 2000/2500 only – to use the functions of the Navigation pad (e.g.,
Microphone mute) while navigating a menu, press and hold the Function
button, then press the navigation button.
6
Page 12
Librestream Onsight 1000/2000/2500 User Manual Getting Started
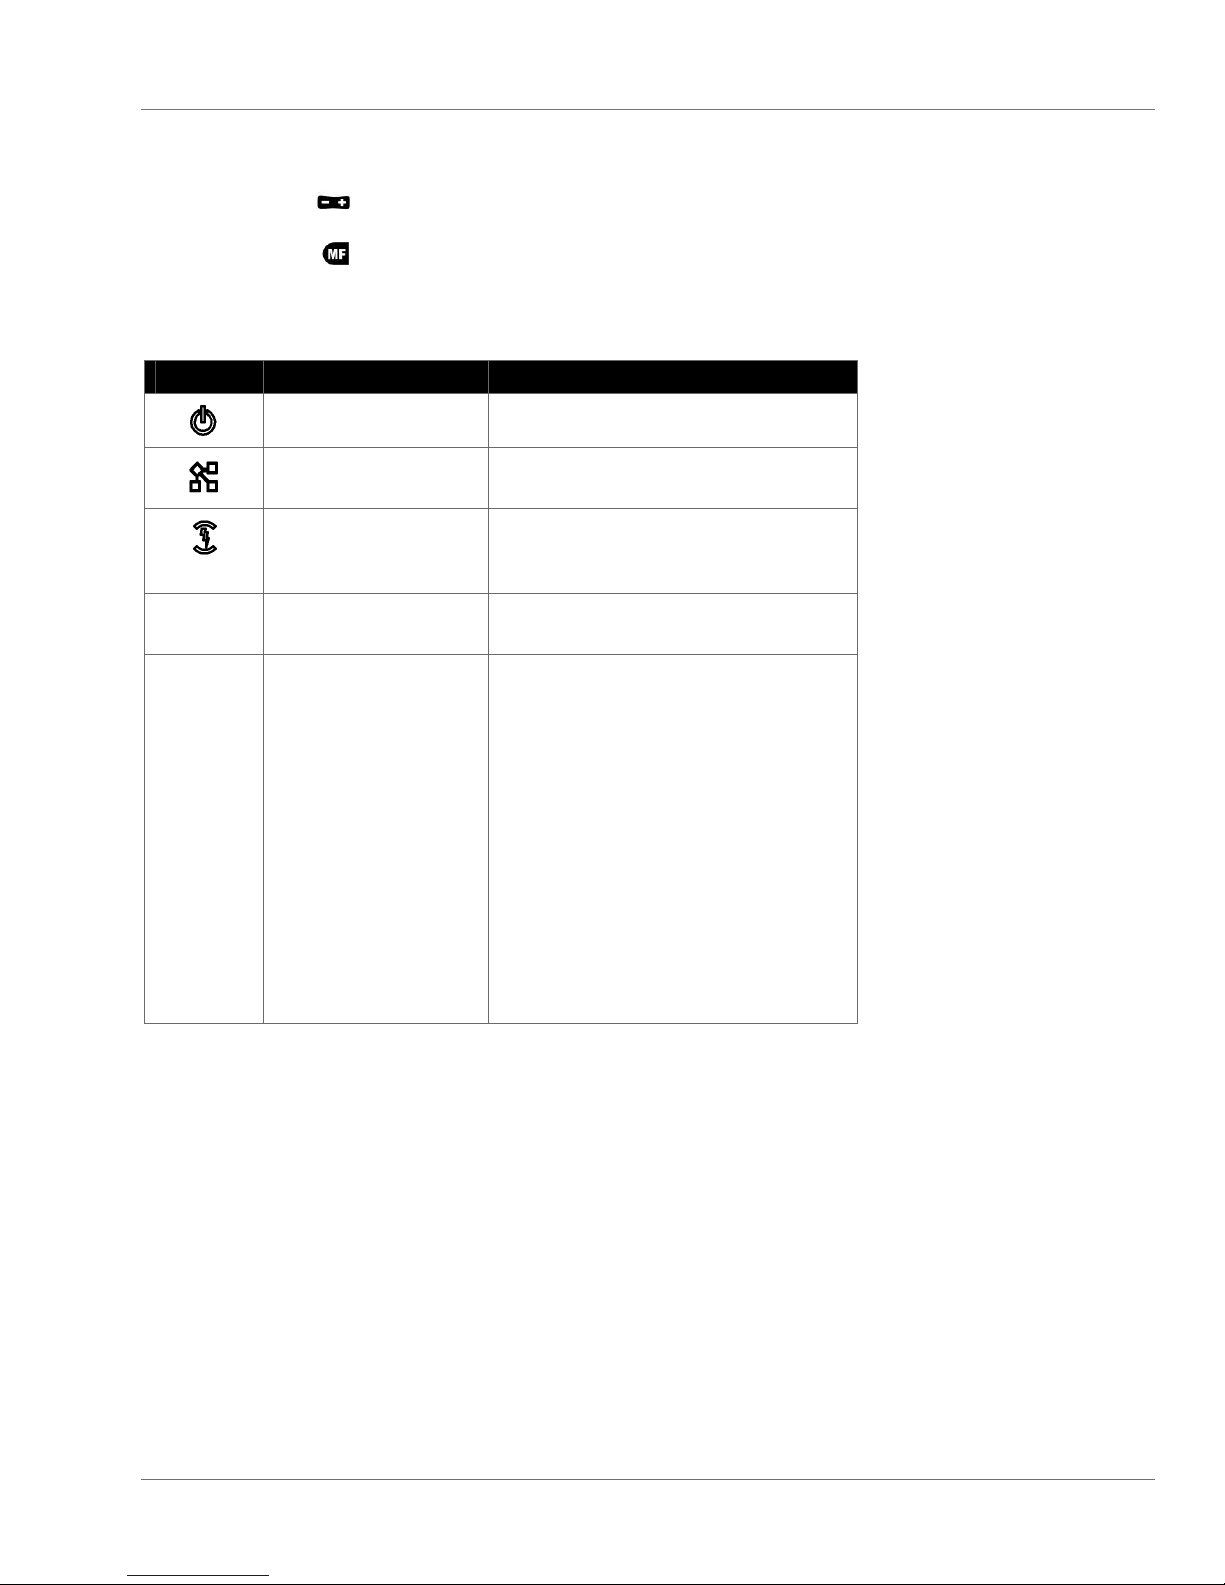
1.6.5 Zoom/Manual Focus Control
The Zoom buttons
Figure 4 on page 6). These allow the operator to set zoom levels
The Manual Focus
are located on the back of the Onsight Device, directly above the Navigation pad (see
on the camera or to set focus manually.
button is located on the back of the Onsight Device on the left side (see Figure 3 on page
5). To set the focus manually, see paragraph 5.6.2, Manual Focus, on page 38.
1.6.6 Indicators
Indicator Name Explanation
Power mode indicator Green = On or Standby
Network indicator Green = Connected to network
Battery/power indicator Orange = Battery is charging
Stream/record Red = streaming/recording on
Ethernet port Establish the Ethernet connection before
Off = Not connected to network
Off = Battery is charged or power is not
connected
Off = streaming/recording off
powering on the Onsight Device. On the
Onsight 1000, the Ethernet port is on the
side. On the Onsight 2000/2500, the
Ethernet port is located on the I/O Sled
accessory.
The Ethernet port includes two LED
indicators.
Yellow On = a wired network link exists
Yellow Flashing = indicates wired network
activity
Yellow Off = no wired network link
Green On = 100 Mbps
Green Off = 10 Mbps
7
Page 13
Librestream Onsight 1000/2000/2500 User Manual Getting Started
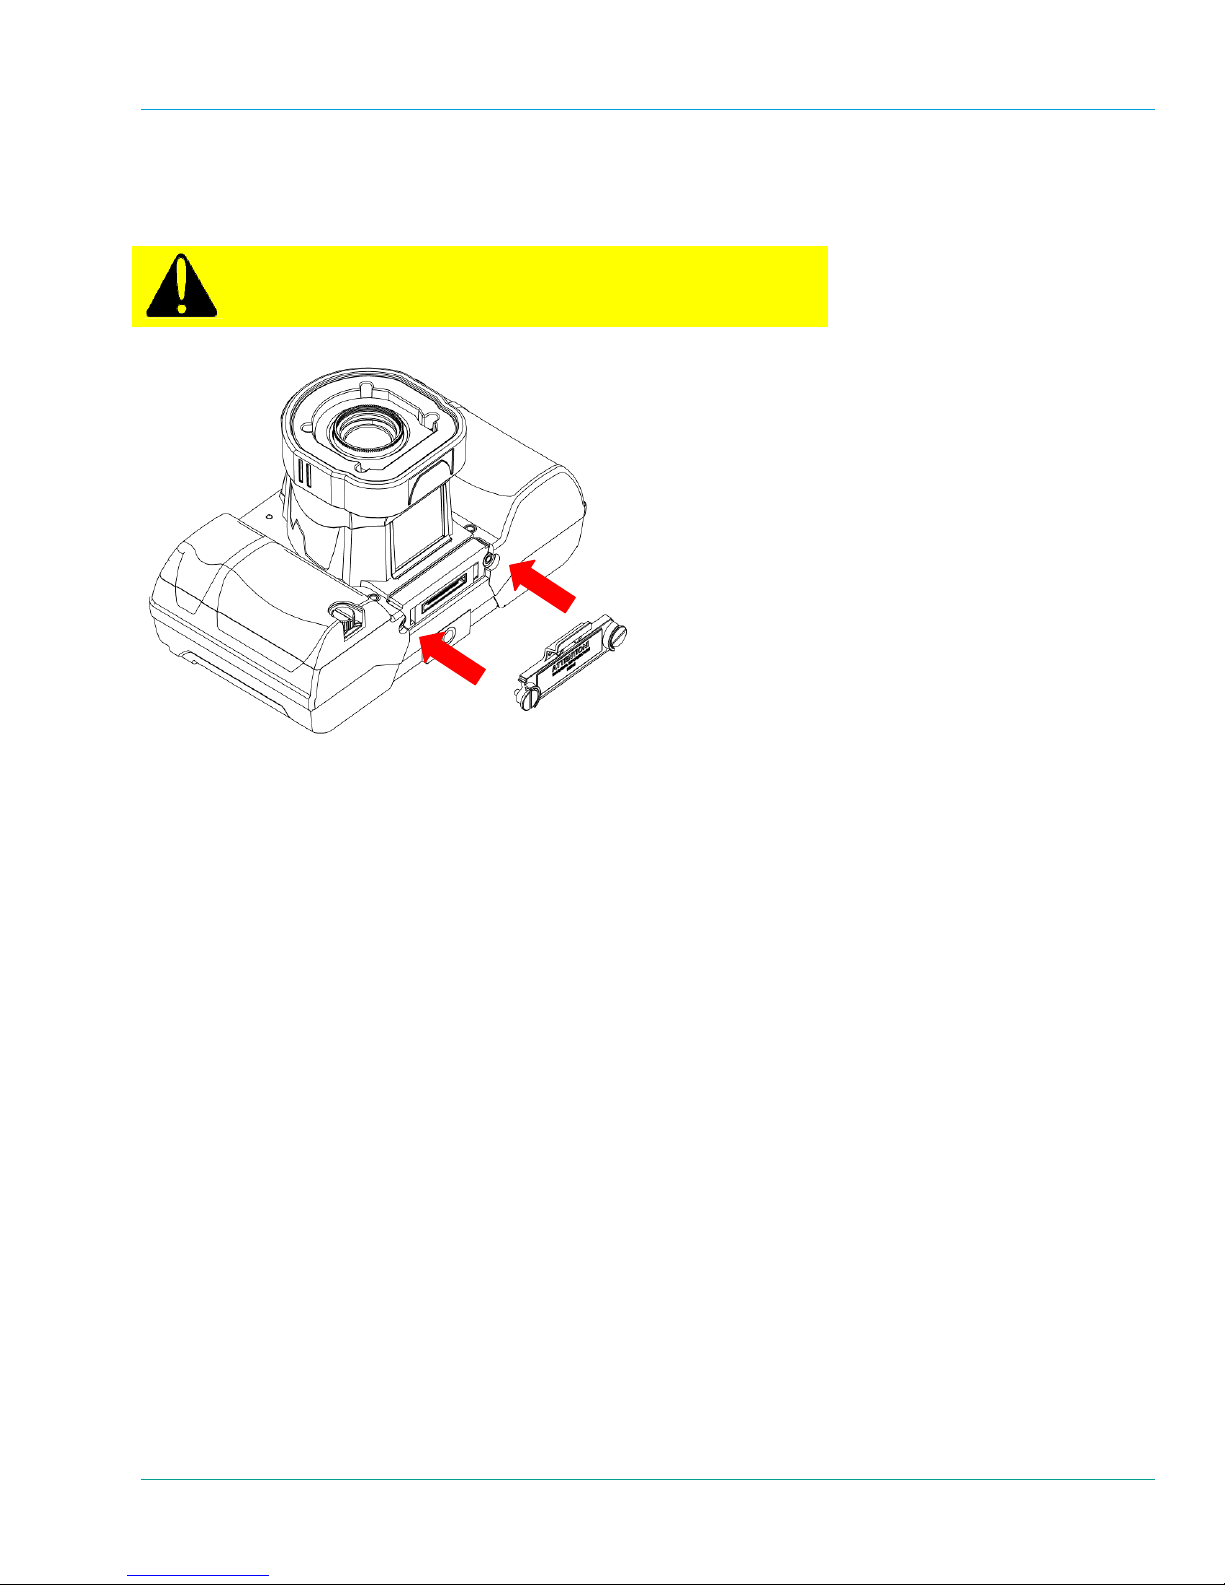
1.7 Onsight 2000/2500 Accessories
The Onsight 2000/2500 comes with an I/O Cover and a Power Sled. The I/O Sled is an optional accessory.
1.7.1 I/O Cover
Before removing the I/O Cover or before using the Onsight
2000Ex/2500Ex Device without the I/O Cover installed, you
must read the Onsight 2000/2500 Regulatory and Safety Guide.
The I/O Cove
r comes attached to the camera and can be removed using the stylus screwdriver. The I/O Cover
seals and protects the I/O Connector so that the I/O Connector is not exposed. Remove the I/O cover when
attaching the Power Sled or I/O Sled.
8
Page 14
Librestream Onsight 1000/2000/2500 User Manual
1.7.2 Power Sled
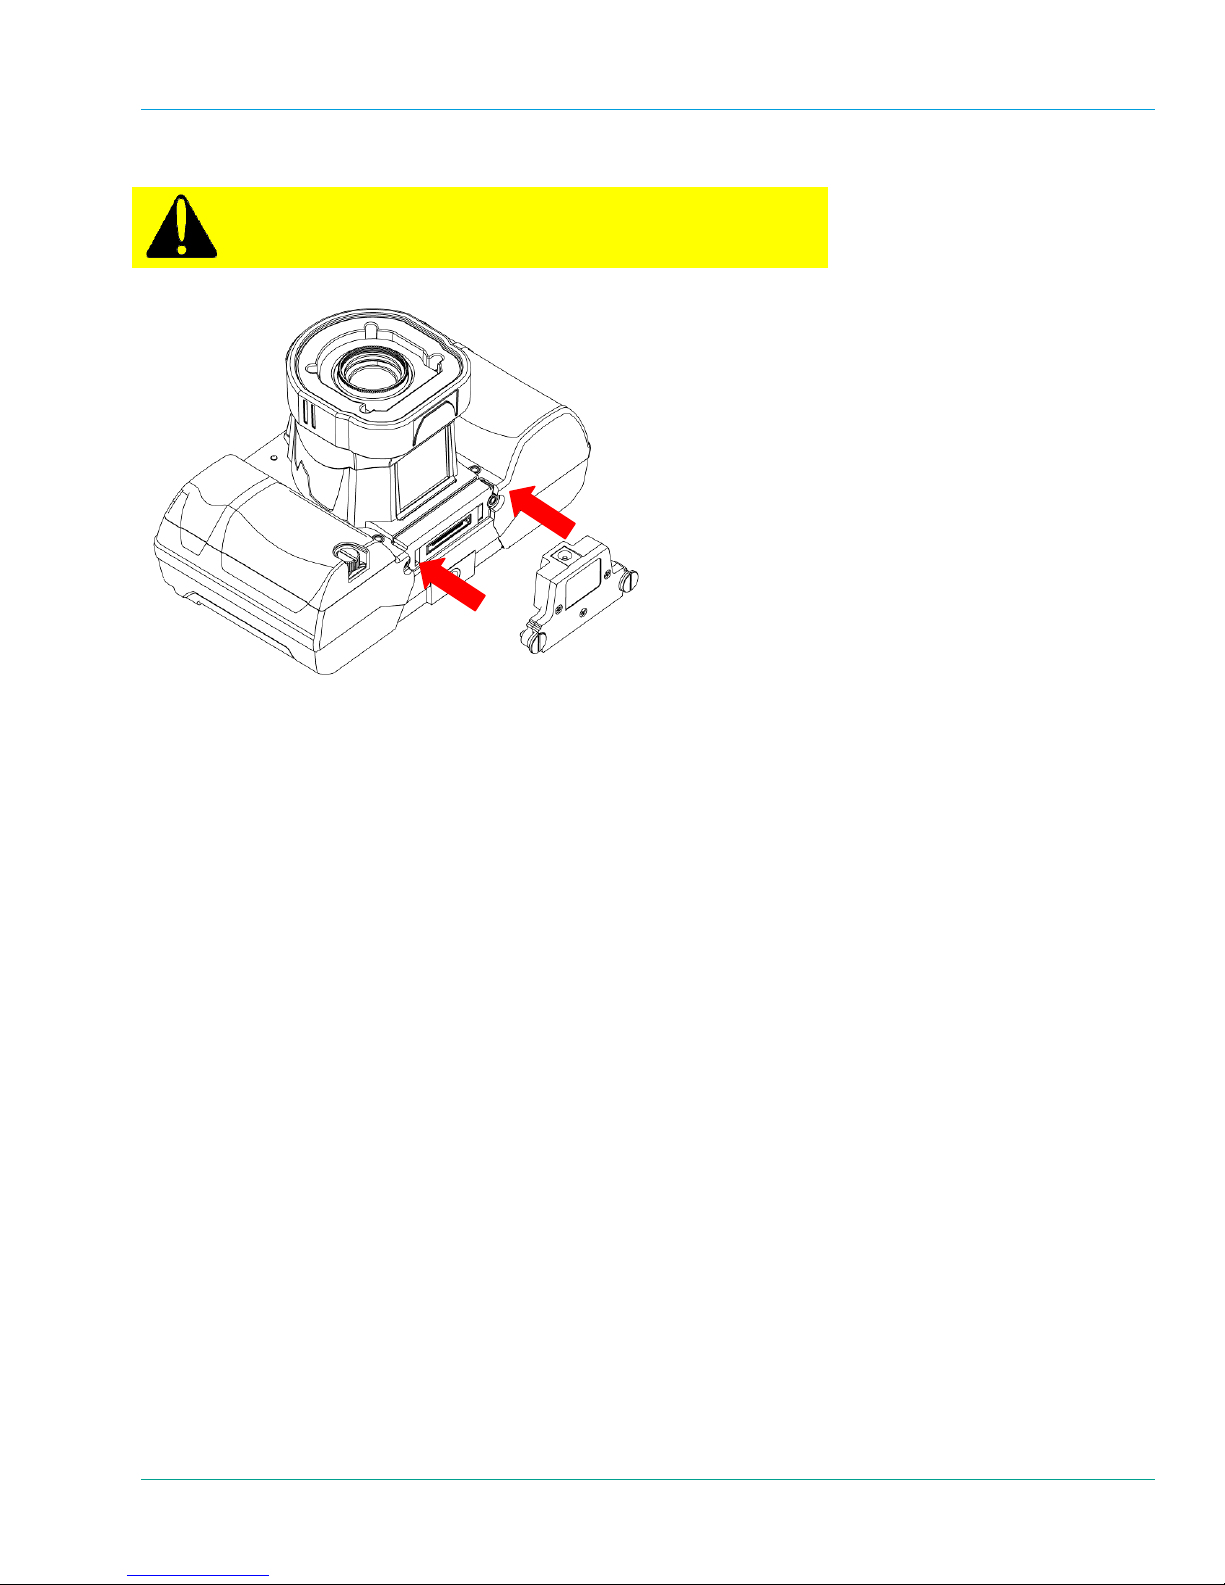
Before using the Power Sled with the Onsight 2000Ex/2500Ex,
you must read the Onsight 2000/2500 Regulatory and Safety
Guide.
Attach the external Po
wer Sled in order to operate the Onsight 2000/2500 from external power and/or to charge
the battery. Remove the I/O Cover, insert the Power Sled into the I/O Connector, and tighten the thumb screws
with the stylus screwdriver.
9
Page 15
Librestream Onsight 1000/2000/2500 User Manual Getting Started
r
A
)
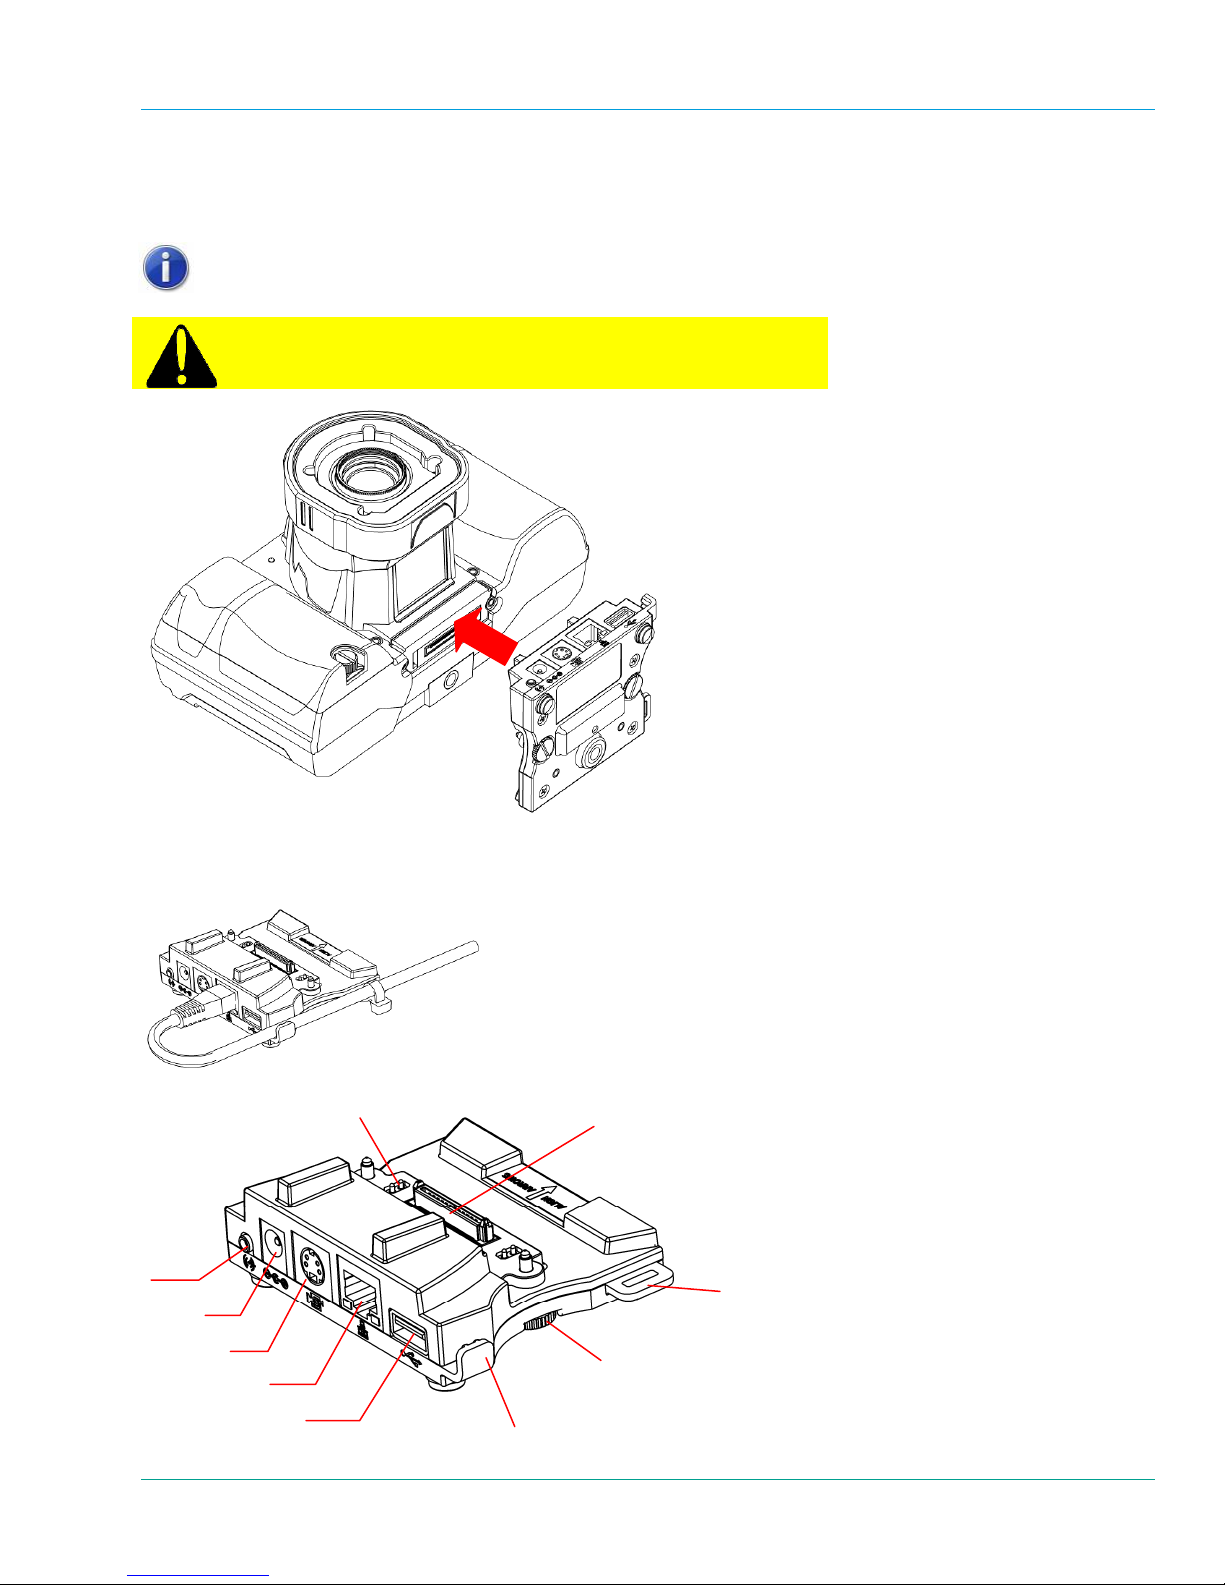
1.7.3 I/O Sled
The I/O Sled is an optional accessory that is required in order to use the Audio-in, S-Video, and Ethernet features
of the Onsight 2000/2500.
Establish the Ethernet connection before powering on the Onsight 2000/2500.
Before using the I/O Sled with the Onsight 2000Ex/2500Ex, you
must read the Onsight 2000/2500 Regulatory and Safety Guide.
udio
Line-in
To attac
h the I/O Sled, insert into the I/O Connector of the Onsight Device. Tighten the thumb screws with the
stylus screwdriver.
The parts of the I/O Sled accessory are as follows:
Power pins (2)
Power
S-Video
Ethernet
USB
Cable slot
I/O Connecto
Thumb screw (2
Tie strap loop (tie strap
not supp
lied)
I/O Sled showing
cable management
10
Page 16
Librestream Onsight 1000/2000/2500 User Manual Getting Started
1.8 User Interface Features
1.8.1 Viewfinder
The display on the back of the Onsight Device functions as a camera viewfinder. By default, it shows what the
lens at the front of the Onsight Device is viewing, but it can also provide status information and menus.
Depending on the display mode, the Viewfinder uses a status bar, icons, and popup windows to provide
information, notifications, and prompts as necessary.
Important: When you are using the Viewfinder screen, always use the stylus provided. Do not use other objects,
as this could damage the Viewfinder screen. Tap the screen lightly. Do not press hard or strike the screen.
For further information on the Viewfinder features and display modes, see section 4, Viewfinder Features &
isplay Modes, on page 30.
D
1.8.2 Soft Keys
Some scre
select these by tapping them with your stylus, or by pressing Navigation pad keys.
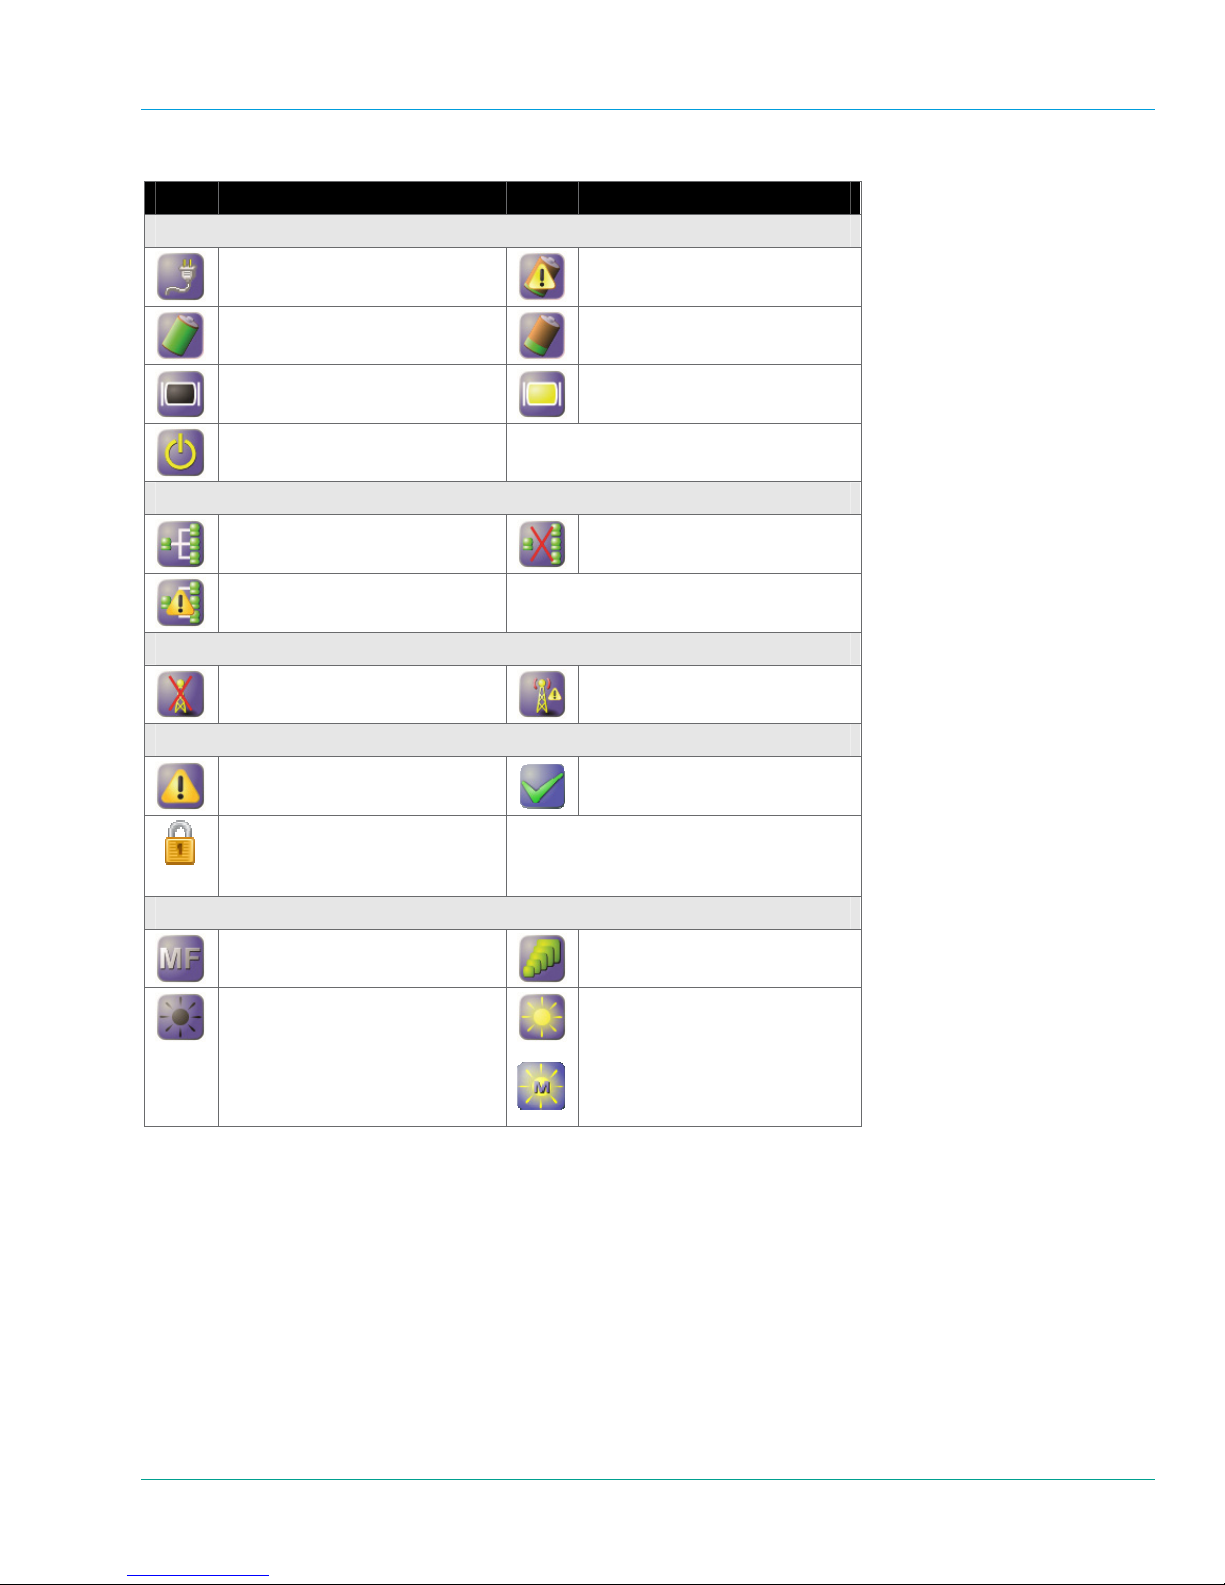
1.8.3 Icons
Some option
touch sensitive – tap the icon with the stylus to view a pop-up message or status screen. Tap the status screen
again to dismiss the message.
Viewfinder icons provide status information and other notifications.
For example, tapping the Power icon
status. Tap the Status screen again or press the Display button
ens contain on-screen keys or buttons, e.g., Accept or Cancel on a configuration screen. You can
All references to “select” refer to pressing the appropriate Navigation pad key
(button) or tapping the screen element/icon with the stylus.
s or operating conditions cause notification icons to appear on the screen. Many of the icons a re
will provide a Status screen showing more detailed power and battery
to dismiss the message.
11
Page 17
Librestream Onsight 1000/2000/2500 User Manual Getting Started
1.8.4 Standard Onsight Device Icons
Icon Description Icon Description
Power
Power Status – connected to
external power
Battery fully charged
Backlight power save
Standby
Network
Network connected
Network error
Communication
Radio link disconnected
General
General alert
Indicates the endpoint has
selected encryption mode as
their security setting.
Camera Functions
Manual focus mode
Illumination is off
Battery level is critically low or
the battery is defective
Battery low
Backlight on
Network disconnected
Low radio signal strength
Process successful (e.g.
software update complete)
Optical Zoom
Illumination is on
Macro Illumination is on
(2000/2500 only)
12
Page 18
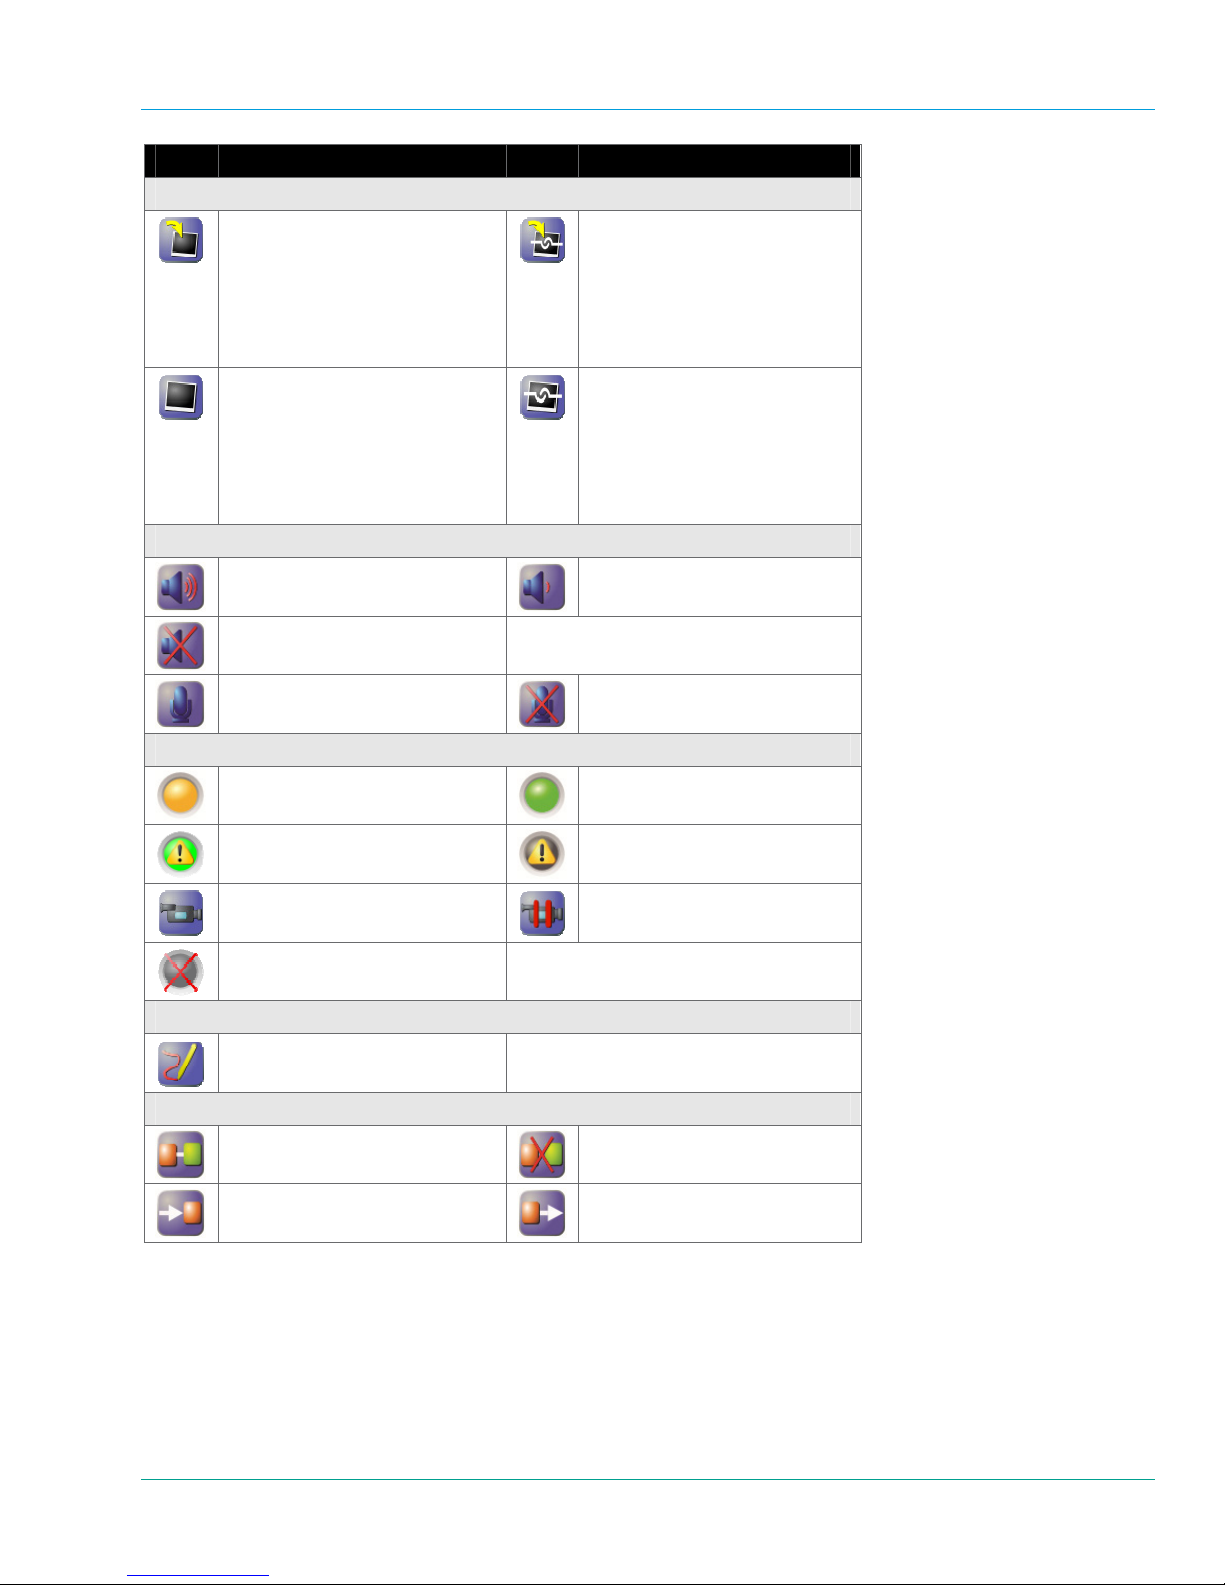
Librestream Onsight 1000/2000/2500 User Manual Getting Started
Icon Description Icon Description
Image Control
Image captured but not displayed
(tap icon to display the last
captured image)
Referred to as the Start Image
Display icon.
Image displayed locally on the
Viewfinder (tap icon or press
Capture button to exit)
Referred to as the Image
Displayed icon.
Audio
Audio volume increased
Audio output muted
Microphone enabled
Video
Stream initializing
Media stream is experiencing
significant packet loss
Live video is not paused
Video streaming is disabled
Telestration
Telestration icon (tap icon to
open the Telestration menu)
Calling
Call connected
Incoming call invitation
Image captured but not shared
while a call is connected (tap
icon to share the last captured
image)
Referred to as the Start Image
Share icon.
Image displayed locally on the
Viewfinder and shared with
Onsight Connect (tap icon or
press Capture button to exit)
Referred to as the Image
Shared icon.
Audio volume decreased
Microphone muted
Media stream active
Media stream error
The live video stream is paused
Call disconnected
Outgoing call request (waiting
for remote side to accept)
13
Page 19
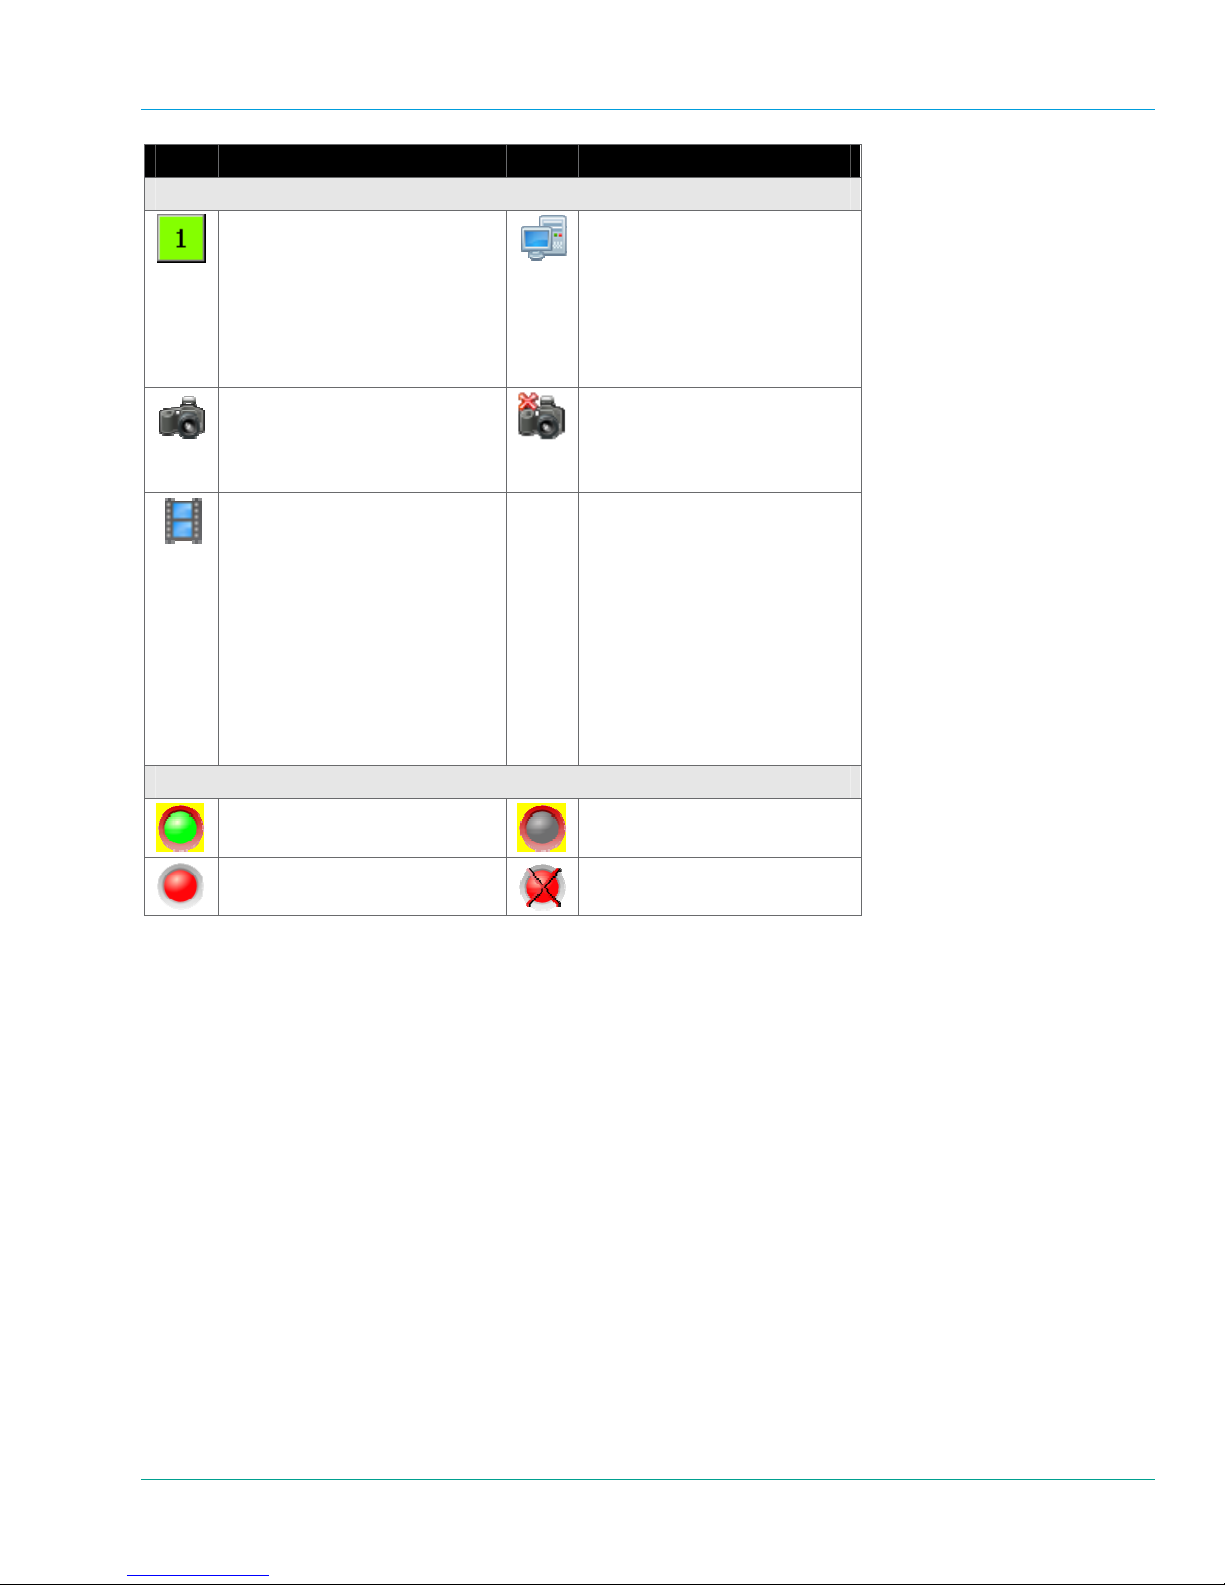
Librestream Onsight 1000/2000/2500 User Manual Getting Started
Icon Description Icon Description
Call Status
Telestration Color – when
clicked, brings up a color palette
to change the telestration color.
Any Onsight endpoint (Onsight
Connect or Device) can change
the telestration color of any other
Onsight endpoint.
Endpoint Type – Onsight
Device that is able to stream or
receive live video, and can share
images and recordings.
Media Stream Source – Onsight
endpoint (Onsight Connect or
Device) can be the Media
Stream Source. By default, the
Media Stream Source is the
active Onsight Device in the
conference. If any Onsight
endpoint wants to play/stream a
recording then that endpoint
becomes the Media Stream
Source.
Recording
Remote endpoint is recording the
call (video is shared)
Record active
Endpoint Type – Onsight
Connect endpoint.
Endpoint Type – Onsight
Device that is not able to stream
or receive live video, but can
share images and recordings.
Remote endpoint is recording
the call (video not active)
Recording disabled (Privacy
mode)
14
Page 20
Librestream Onsight 1000/2000/2500 User Manual Getting Started
1.8.5 Main Menu
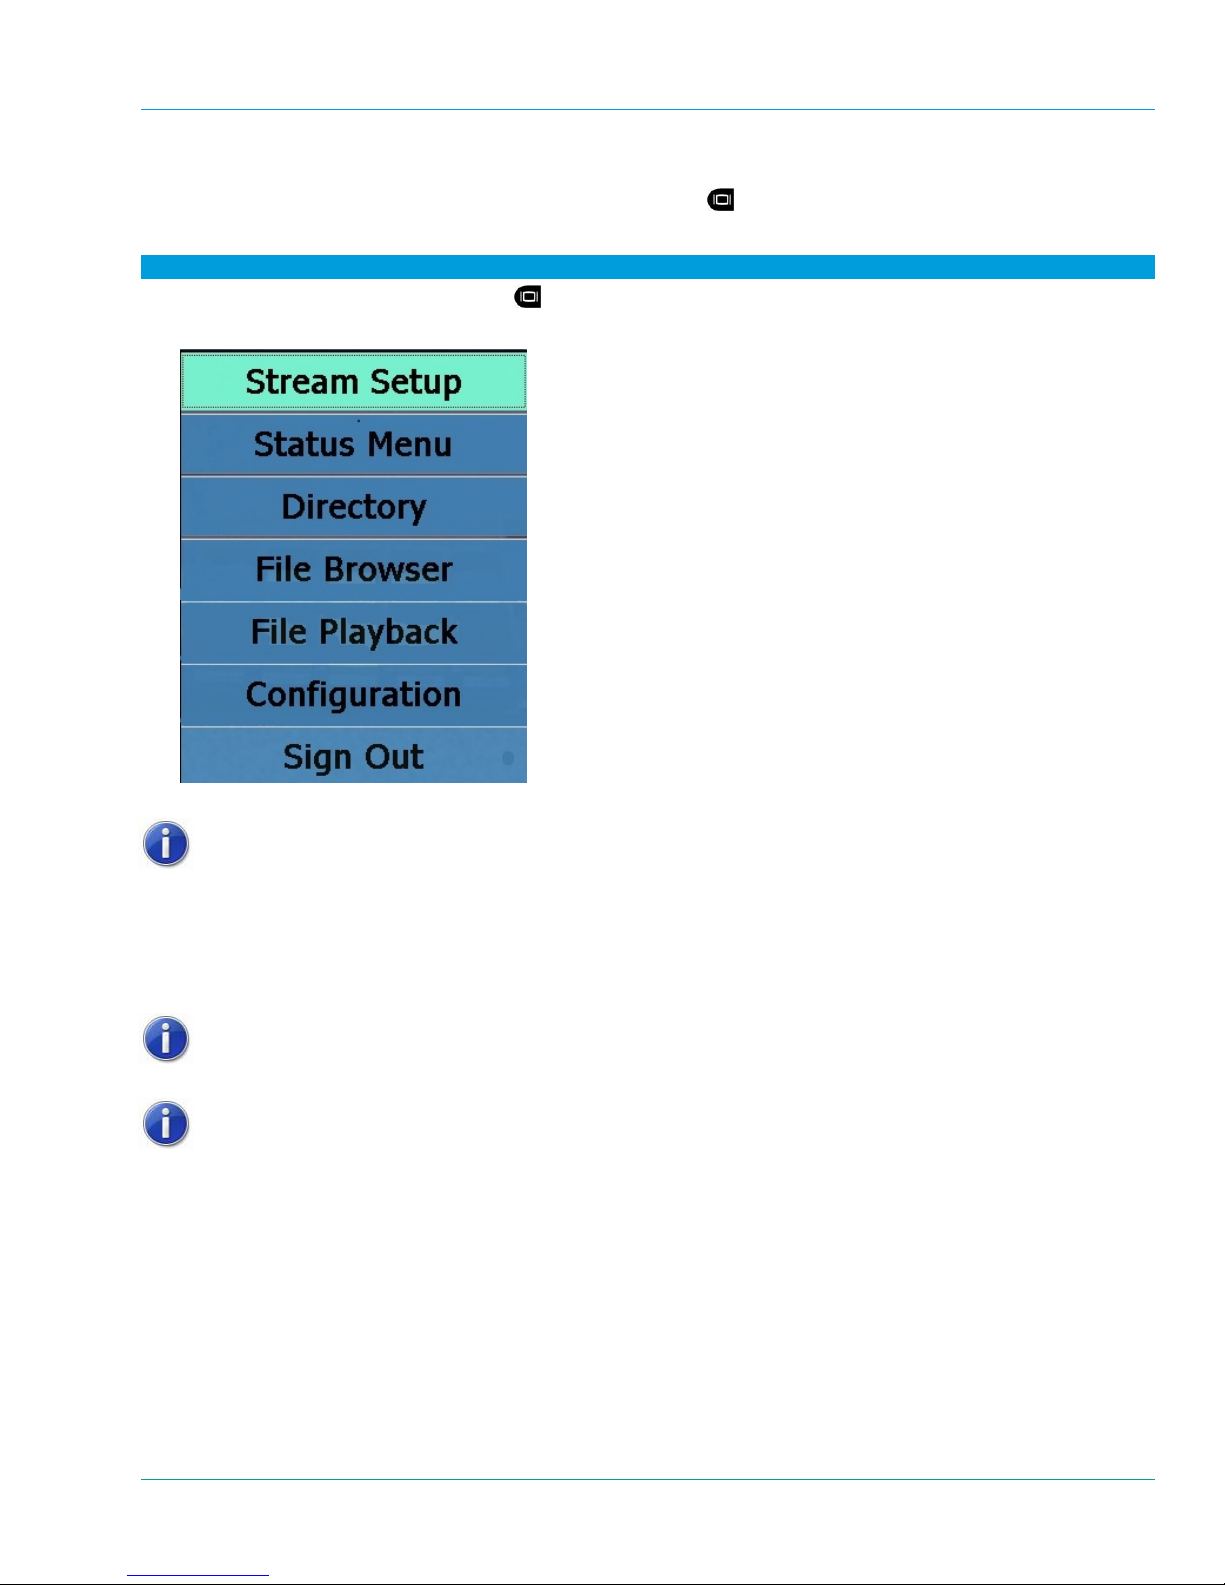
Access to the Main Menu is by using the Display Mode button
. The Main Menu is used for configuration and
other setup options.
To access the Main Menu:
1. Press and release the Display Mode
button three times.
2. The Main Menu appears with these selections.
3. To exit this menu, press and release the Display Mode button.
The Display Mode button cycles through additional display modes. See
section 4, Viewfinder Features & Display Modes, on page 30 for more
inform
ation.
1.8.6 Stylus
The stylu
s is used to select an icon or button, a menu item or keyboard character, or to view a pop-up message or
status screen. Simply tap the item with the stylus tip. For information screens or pop-up messages, tap the item
again to close it.
Tap the screen lightly. Do not press hard or strike the screen. Do not use other
objects, as this could damage the Viewfinder screen
The Onsight 2000/2500 Device’s stylus has a screwdriver tip on one end. Do
not use the screwdriver tip to make any selections on the viewfinder. The
screwdriver tip is used for the I/O Sled, I/O Cover, and Power Sled, or for
opening the battery compartment.
15
Page 21

Librestream Onsight 1000/2000/2500 User Manual
1.8.7 On-Screen Keyboard
The on-screen keyboard appears when you select a text field in the Viewfinder. Tap the keys with the stylus to
enter text. For additional characters, tap the Shift key.
To move the on-screen keyboard to a new location on the screen, touch the stylus to the top edge of the
keyboard image and drag it to a new location.
1.8.8 General Conventions
The “” symbol is used to identify to the user a sequence of steps that need to be performed for a specific
function.
i.e. To set the Standby delay…
Bold is used to identify a screen name, menu name, screen message, or specific icon name called out in an
instruction.
i.e. The message “Video resumed” appears.
The
The
icon identifies to the reader important information to be read.
icon identifies to the reader information that is useful for the function being described.
1.8.9 Terminology and Definitions
Only one Onsight Device can stream live video in a conference call. This Onsight Device is therefore referred
to as the primary Onsight Device. All other Onsight Devices in the conference call are referred to as
secondary Onsight Devices.
“Expert” refers to the user of the Onsight Connect software application.
i.e. Onsight Connect software installed on the expert’s computer.
Onsight Connect or an Onsight Device is designated as an endpoint.
"Video" or “Recording” can be used interchangeably depending on context, and can refer to:
▪ a video recording which may include video, two-way voice, subject audio, images, and telestration
▪ a two-way voice recording only
“Audio” or “Voice” refers to audio from an operator’s voice.
“Subject Audio” refers to the unprocessed sound coming from the subject captured by the Onsight Device.
Temporary color change means that the color that was changed will revert back to its previous (default) color
after a session (call) has ended. A permanent color change is made by saving the new color as defa ult (i.e.
Save As Default).
1.8.10 Tips
A conference call consists of more than two call participants. The host of the conference call is the Onsight
Connect user who establishes the connection with the Onsight De vice.
For video playback, live video streaming must be off.
When making a recording, it is possible to record a voice audio-only call.
You cannot share an image during video playback.
You can share an image during live streaming.
16
Page 22
Librestream Onsight 1000/2000/2500 User Manual Onsight Device Basic Operation
2 Onsight Device Basic Operation
Before operating the Onsight Device, you must read the Onsight
Regulatory and Safety Guide.
Note that the Onsight Device shuts itself off when battery power is low.
If the unit is on, and an operator is using it in an active call, a warning message appears so that the operator
has time to plug the Onsight Device into the external power adapter, or end the call before the Onsight Device
shuts off.
If the unit is in Standby, it simply shuts itself off.
If the unit is off, it cannot be started when the battery is low.
2.1 Charging the Battery
Before charging the battery for the Onsight 2000Ex/2500Ex, you
must read the Onsight 2000/2500 Regulatory and Safety Guide.
New batteries must be charged prior to first use.
To charge the battery:
1. Plug in the external power adaptor and allow the battery to charge until the orange battery indicator
extinguishes (up to eight hours).
2. The internal battery charger will shut itself off to prevent overcharging once the battery is fully charged.
To check current battery levels:
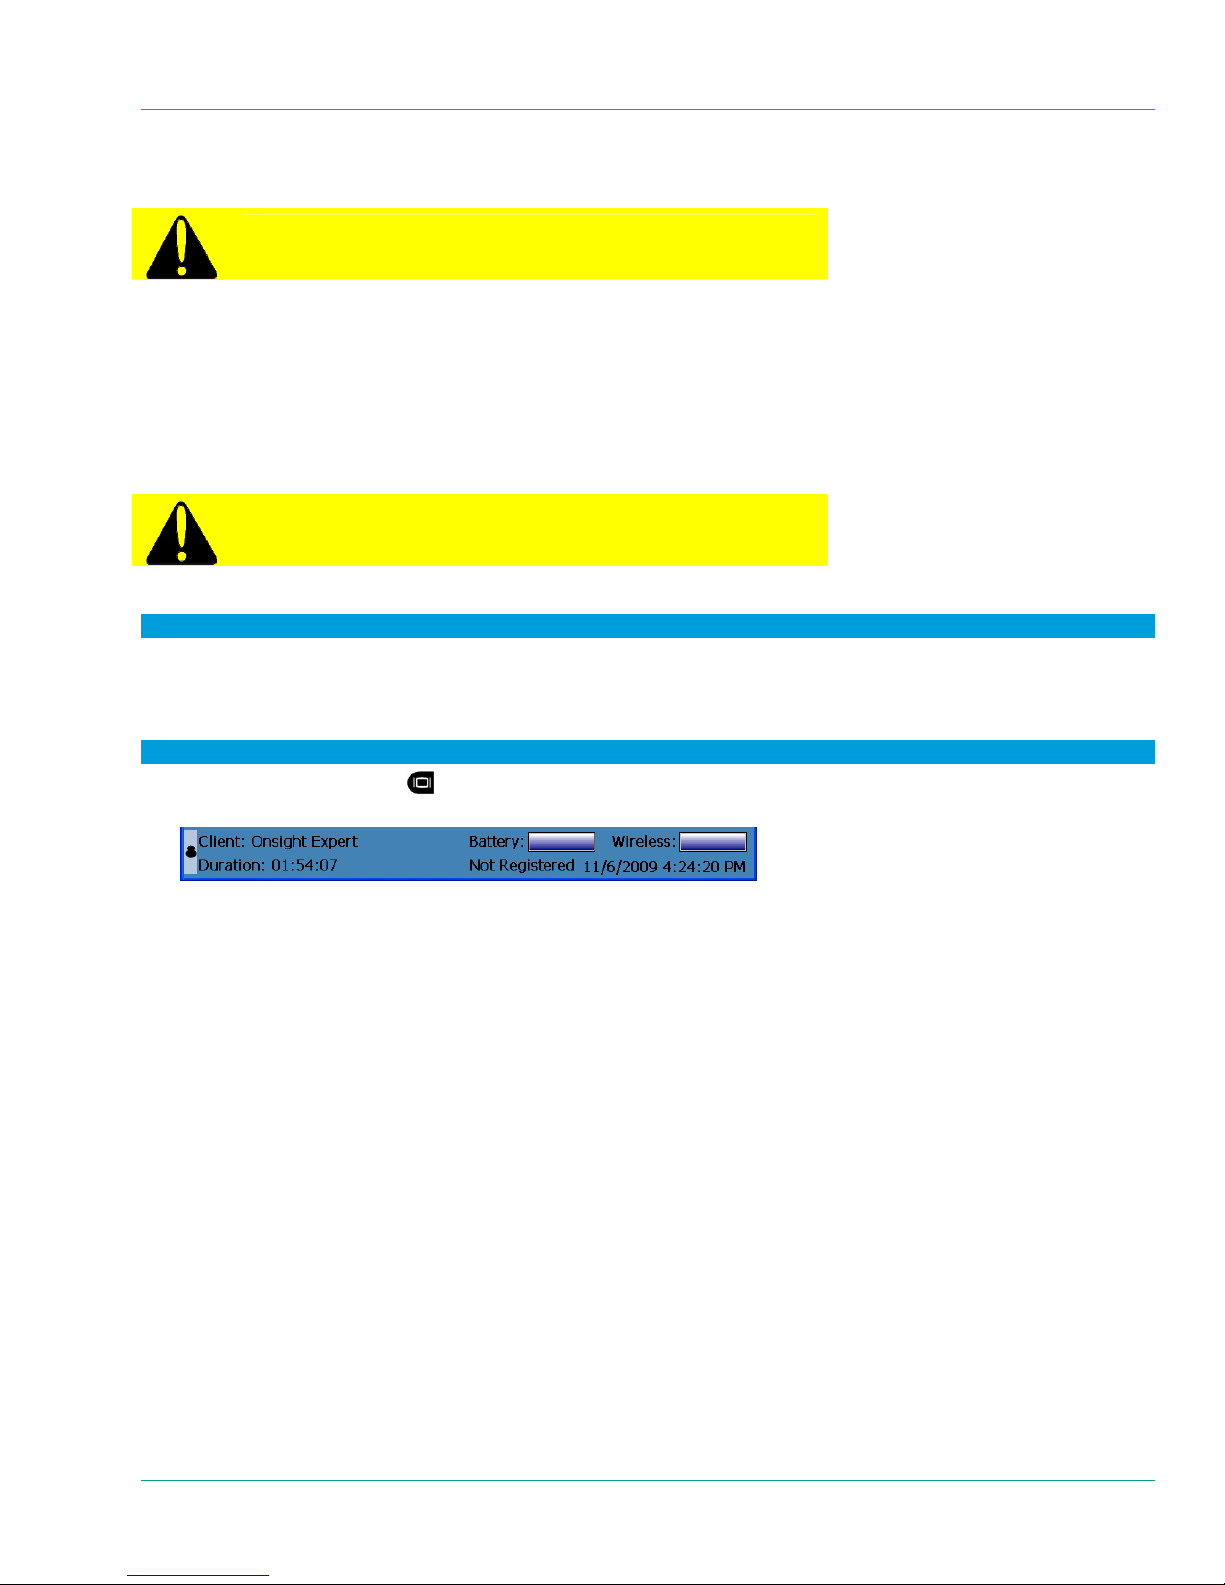
1. Press the Display button
Viewfinder which shows the battery level.
2. See paragraph 4.1.3, Session Information, on page 31 for more information on Viewfinder Features & Display
Modes.
once and check the Session Information Status bar at the bottom of the
2.2 Inserting or Replacing the Battery
Before using this Onsight Device for the first time you must install and charge the battery.
17
Page 23
Librestream Onsight 1000/2000/2500 User Manual Onsight Device Basic Operation
2.2.1 Onsight 1000 Battery Replacement
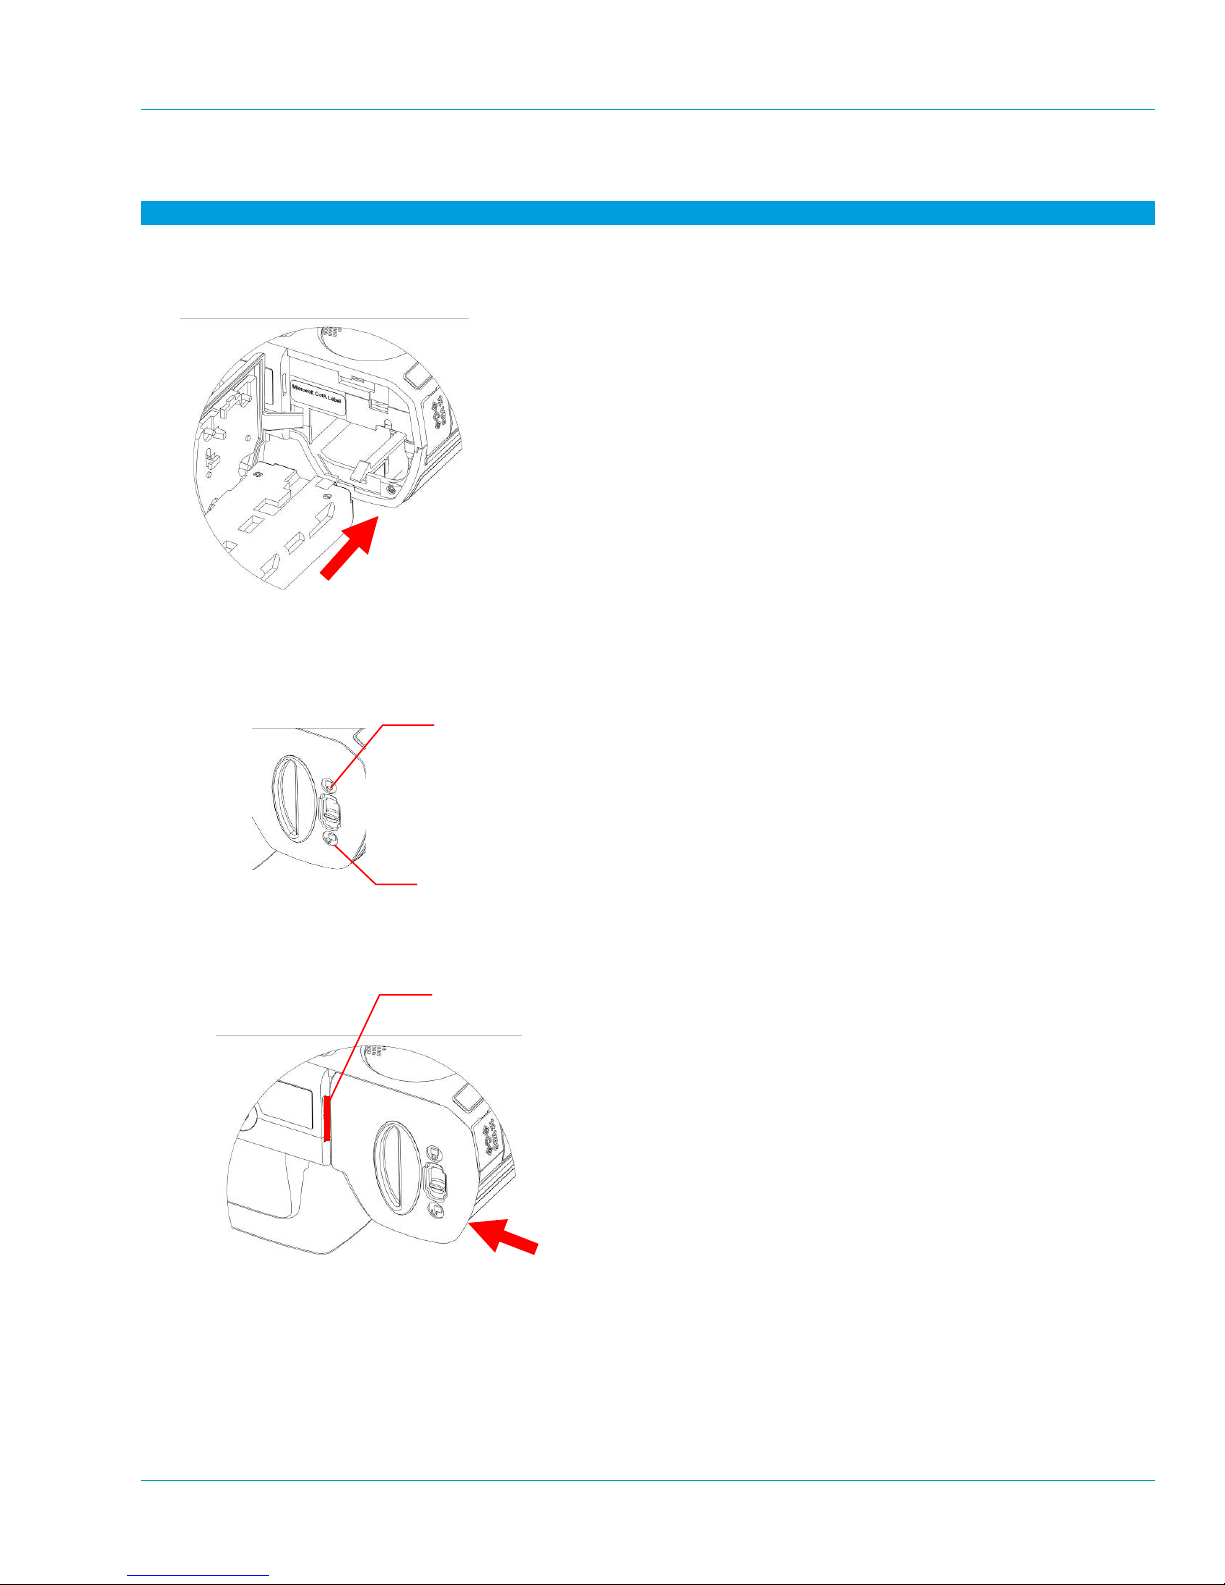
To insert or replace the Onsight 1000 battery:
1. Ensure the device is powered off before proceeding. See paragraph 2.4, Turning Power On or Off, on page
21 for instructions.
Open the battery compartment and insert the battery until it clicks into place and is flush. It only fits one way.
2.
3. Close the battery door as follows:
Ensure the lock switch is in the unlocked position.
Locked
▪
Unlocked
Orient the battery door so it is flat against the battery well, but with approximately a 3mm gap.
Gap
Slide the door toward the center of the unit until it is fully closed.
Slide the lock switch to the locked position.
4. Connect the Onsight 1000 to the external power adapter and charge the battery until the orange LED turns off
(up to 8 hours).
18
Page 24
Librestream Onsight 1000/2000/2500 User Manual
The Onsight Device will not operate on the external adapter alone. You must
have a battery installed.
2.2.2 Onsight 2000/2500 Battery Replacement
Before opening the Onsight 2000Ex/2500Ex battery cover, you
must read the Onsight 2000/2500 Regulatory and Safety Guide.
If an SD memory card needs to be inserted or replaced, it is best to do it at this
time, prior to installing the battery. See paragraph 2.6.2 on page 25 for
ctions on how to remove and replace an SD memory card.
instru
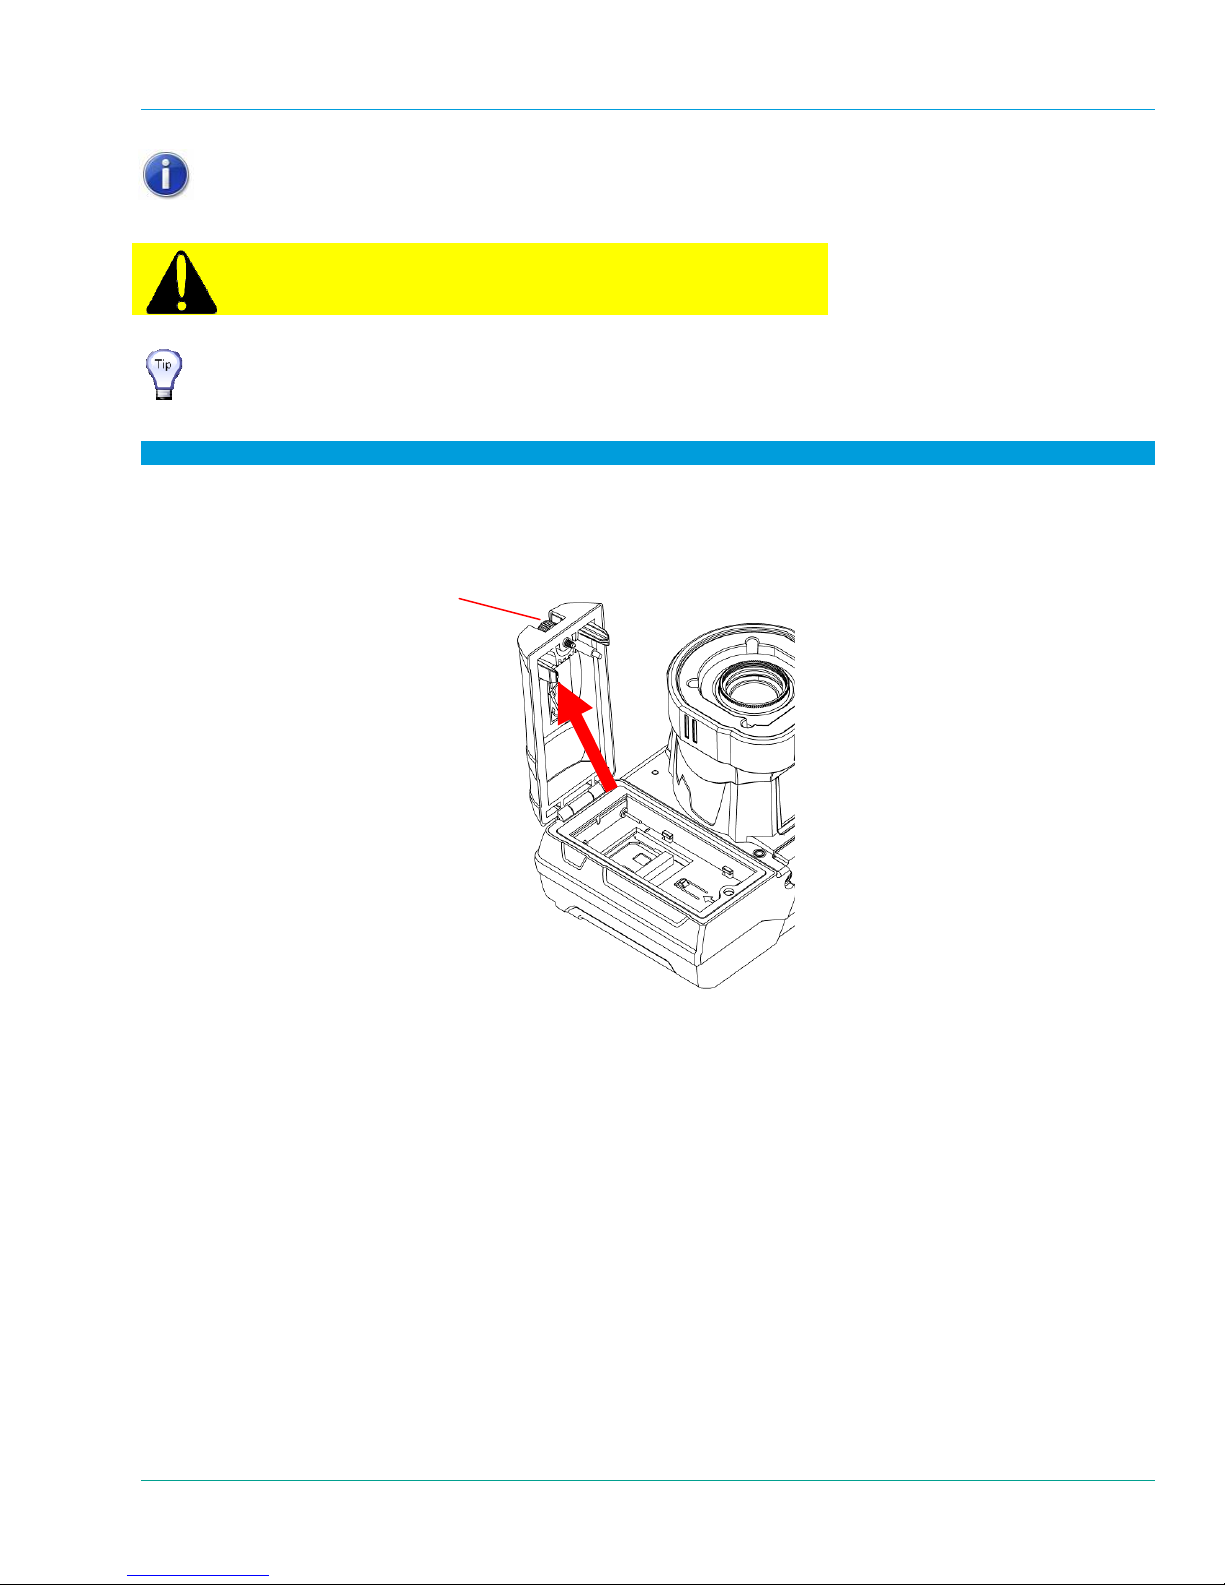
To insert or replace the Onsight 2000/2500 battery:
1. Ensure the Onsight Device is powered off before proceeding. See paragraph 2.4, Turning Power On or Off,
on pag
Open the battery compartment door using the stylus screwdriver.
2.
e 21 for instructions.
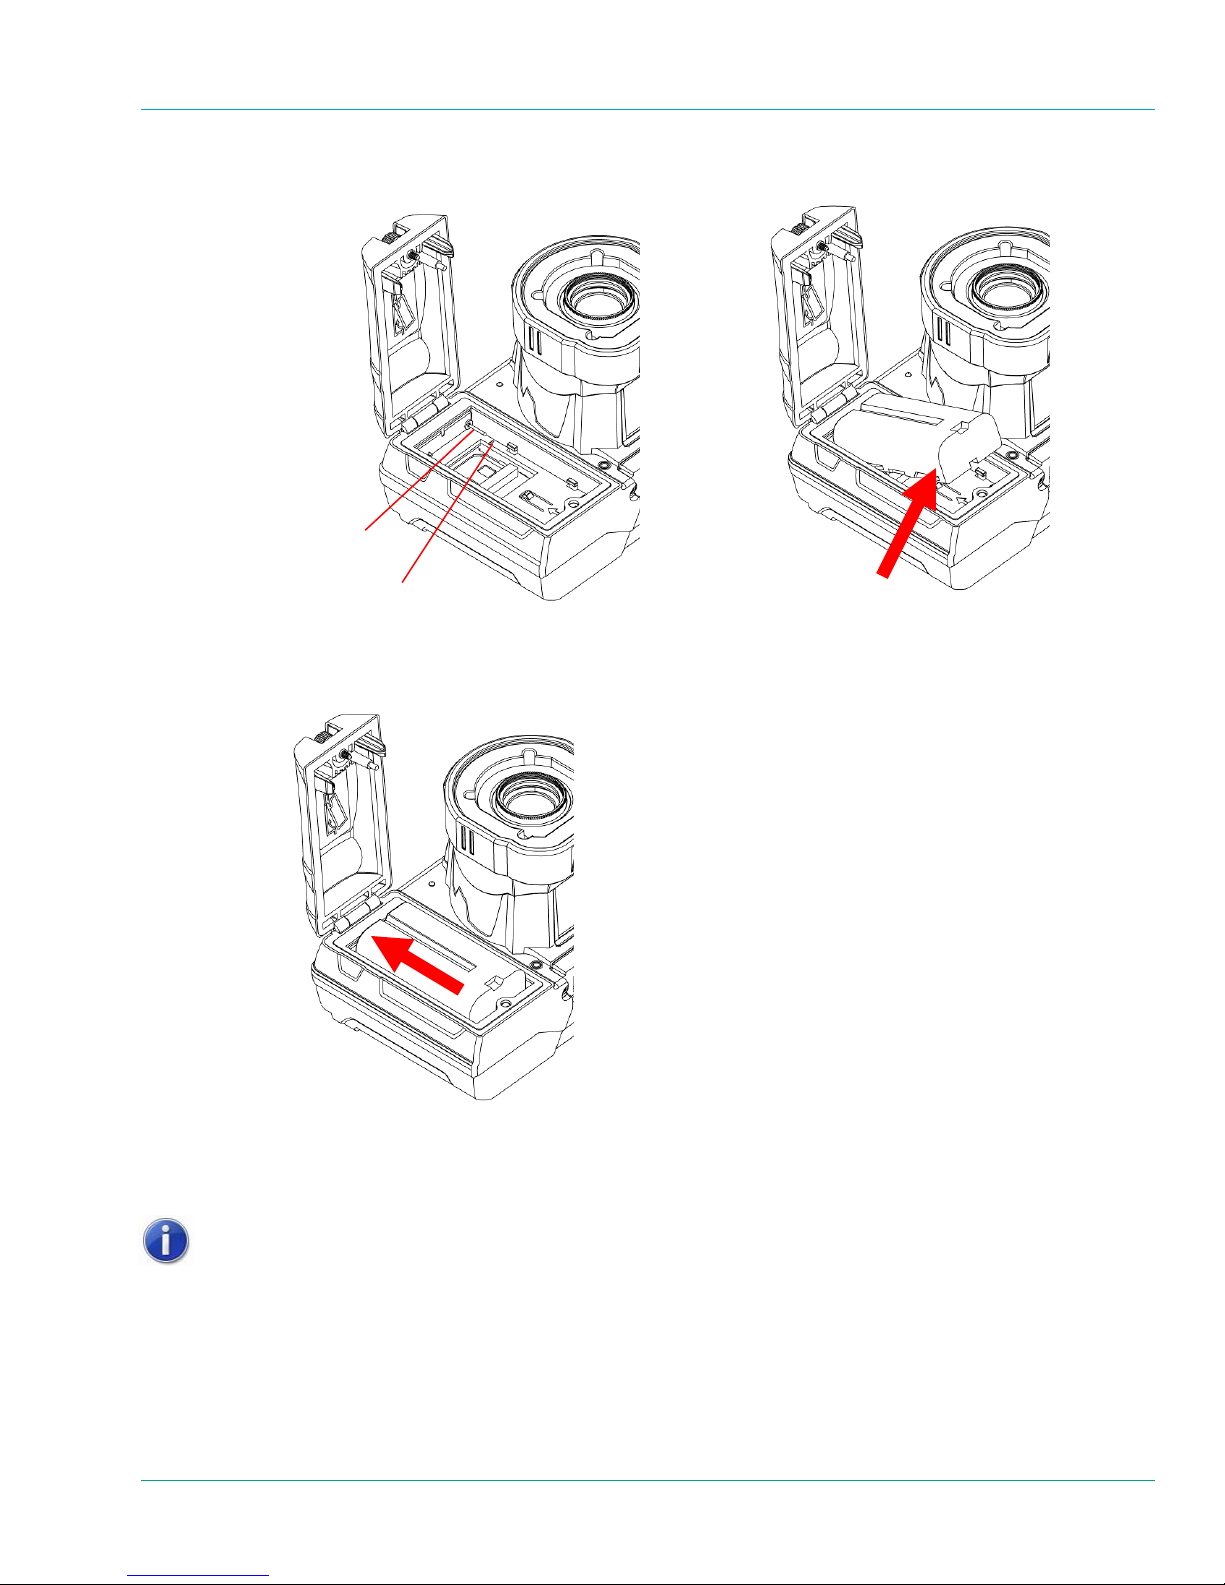
Battery door thumb screw
3. If the battery is being replaced, remove the old battery by sliding the battery back towards the end of the
battery compartment and then lifting out the battery.
19
Page 25
Librestream Onsight 1000/2000/2500 User Manual Onsight Device Basic Operation
A
4. When installing the new battery, align the contact edge of the battery with the small recess lines in the battery
compartment, keeping the opposite end of the battery up.
lignment pins (2)
Recess lines (2)
5. Slide the battery towards the compartment door and push downward to place in the battery well.
6. When the battery is sitting flat on the compartment floor, slide the battery towards the compartment door until
seated.
7. Close the battery compartment and tighten the screw. Note that the door will not close if the battery is not fully
inserted, and the Onsight Device will not start if the door is not properly closed.
8. Attach the Power Sled or I/O Sled and use the external power adapter to charge the battery until the orange
LED turns off (up to 8 hours).
The Onsight Device will not operate on the external adapter alone. You must
have a battery installed.
20
Page 26
Librestream Onsight 1000/2000/2500 User Manual Onsight Device Basic Operation
2.3 Calibrating the Integrated Touch Panel
The Viewfinder display on the back of the Onsight Device includes an integrated touch panel designed for use
with the stylus that has been included with the device. The Viewfinder touch panel allows control of many Onsight
Device features, including menu selection, configuration, text entry (via on-screen keyboard) and on-screen
button selection. In addition, the touch panel can be used to draw over images and video. See paragraph 5.7,
Telestration (Drawing Lines on the Viewfinder), on page 39.
When you are using the Viewfinder screen, always use the stylus provided. Do
not use other objects, as this could damage the Viewfinder screen. Tap the
screen lightly. Do not press hard or strike the screen.
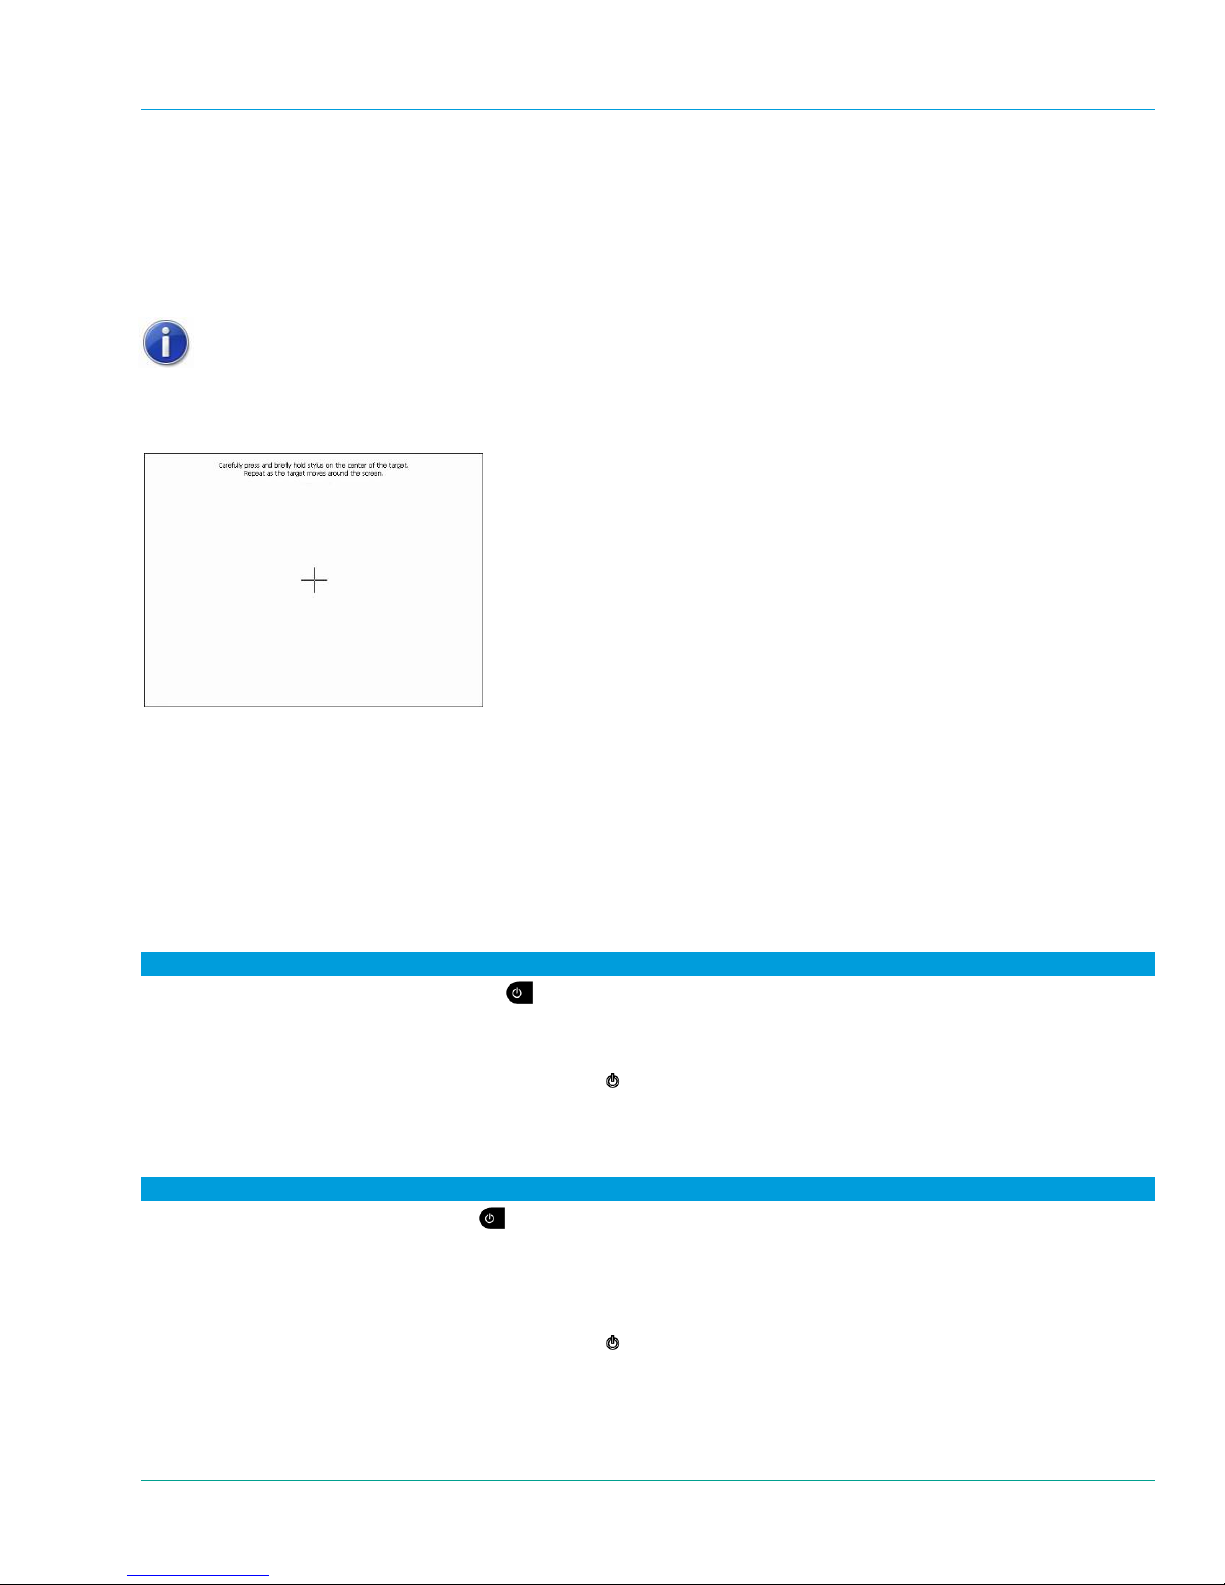
When you first start the Onsight Device, if the touch screen has not been calibrated, a calibration screen is
presented. Follow the on-screen instructions to calibrate your touch panel to permit accurate stylus trackin g.
2.3.1 Displaying the Calibration Screen Using Navigation Pad Buttons
If the touch screen is incorrectly calibrated to the extent that it can’t be used to navigate the menu settings, you
can access the screen calibration function using the keypad: simultaneously press and hold the Up and Down
buttons while not pressing the Enter button. This will display the touch calibration screen.
2.4 Turning Power On or Off
There are three power modes: On, Off and Standby.
2.4.1 Power On Mode
To turn the device on:
1. Press and release the Power button
2. When you first turn the camera on, you may be required to log in, and a touch panel calibration screen may
appear.
3. When the power is on the Power indicator LED
2.4.2 Power Off Mode
Turni
ng off the Onsight Device automatically logs you out.
To turn the device off:
1. Press and hold the Power button
If the device was on, a message is displayed indicating that the device is turning off.
If a call was active, a prompt appears asking for confirmation to terminate the call.
If the device was in Standby, it immediately switches off.
2. When the power is off the Power indicator LED
to turn the Onsight Device on.
is green.
for two seconds.
is off.
21
Page 27

Librestream Onsight 1000/2000/2500 User Manual Onsight Device Basic Operation
2.4.3 Standby Mode
Standby mode provides longer battery life than Power On mode because it shuts down the display and puts the
camera into a low power mode. However, incoming calls will still be received. The Onsight Device also enters
Standby mode automatically after a configurable amount of time.
To enter Standby mode:
1. Turn the Onsight Device on.
2. Press and release the Power button
to enter Standby mode.
3. If a call was active, a prompt is displayed asking for confirmation to terminate the call. A message is displayed
indicating that the Onsight Device is entering Standby.
4. When the Onsight Device is in Standby mode, the Power indicator LED
is green. This is the only visible
indication that the Onsight Device is in Standby mode and is capable of receiving incoming calls.
To come out of Standby:
1. Press the Power button
or answer an incoming call.
2. If the device is configured to require that you log-in when resuming from Standby (this is set in Main Menu >
Configuration > Security > Login), you can answer a call but you must log in again before you can proceed
further, i.e. to use the Onsight Device to stream video, access menus, or perform other functions. You can still
access the Status Menu and its options without logging in though.
To set the Standby delay:
1. From the standard Viewfinder display window, press and release the Display button
three times (or until
the Main Menu appears).
2. Tap the Configuration option with the stylus to display the Configuration screen.
3. Select General and then Power.
4. Set the time in the Standby Timeout field. Enter a time of ‘0’ to disable automatic Standby mode.
5. Click Accept to accept the change and exit the Configuration menu. Click Apply to accept the change but
remain in the Configuration menu. Click Cancel to cancel the change and exit the Configuration menu.
2.4.4 Resetting the Onsight Device (Soft Reset)
If the Onsight
Device becomes non-responsive and you cannot turn it off by pressing the Power button for two
seconds, a soft reset may be required.
To reset the Onsight Device:
1. Press and hold both the Power
and Display buttons until the display clears (approximately 10
seconds).
2. Do not perform a soft reset on the device unless it stops responding to normal operations.
CAUTION:
A hard reset can be generated using the reset switch accessible through the access hole located near the
SD memory slot in the Onsight 1000, or inside the battery compartment in the Onsight 2000/2500.
The hard reset should not be used by non-service personnel because damage to the Onsight Device file
system may result.
22
Page 28
Librestream Onsight 1000/2000/2500 User Manual Onsight Device Basic Operation
2.5 Logging In & Out
There are two Onsight login methods your organization may choose for the Onsight Device. The two methods
are:
Onsight Connect Account Service – the Onsight Device connects to the Onsight Connect hosted service. This
method provides additional features outlined in section 6.
Local Service – the Onsight Device does not use the Onsight hosted service.
The Onsight Device ships with a Local Service license included. The login information is pro v ided below. If your
organization is using the hosted Onsight Connect Account Service, you will likely use the same login met hod you
are using for Onsight PC and Onsight iOS endpoints for a consistent experience .
2.5.1 Logging In
If your Onsig
screen, as shown below. In the Username and Password fields enter the user name and password given to you
by your Onsight system administrator.
For a Local Service log in, the default user name and password are:
Username: admin
Password: admin
This is a built-in user name that is meant to allow an Onsight administrator to initially log in and set up other user
names and passwords. We strongly recommend that the Onsight administrator change the admin passwor d from
the default to improve security.
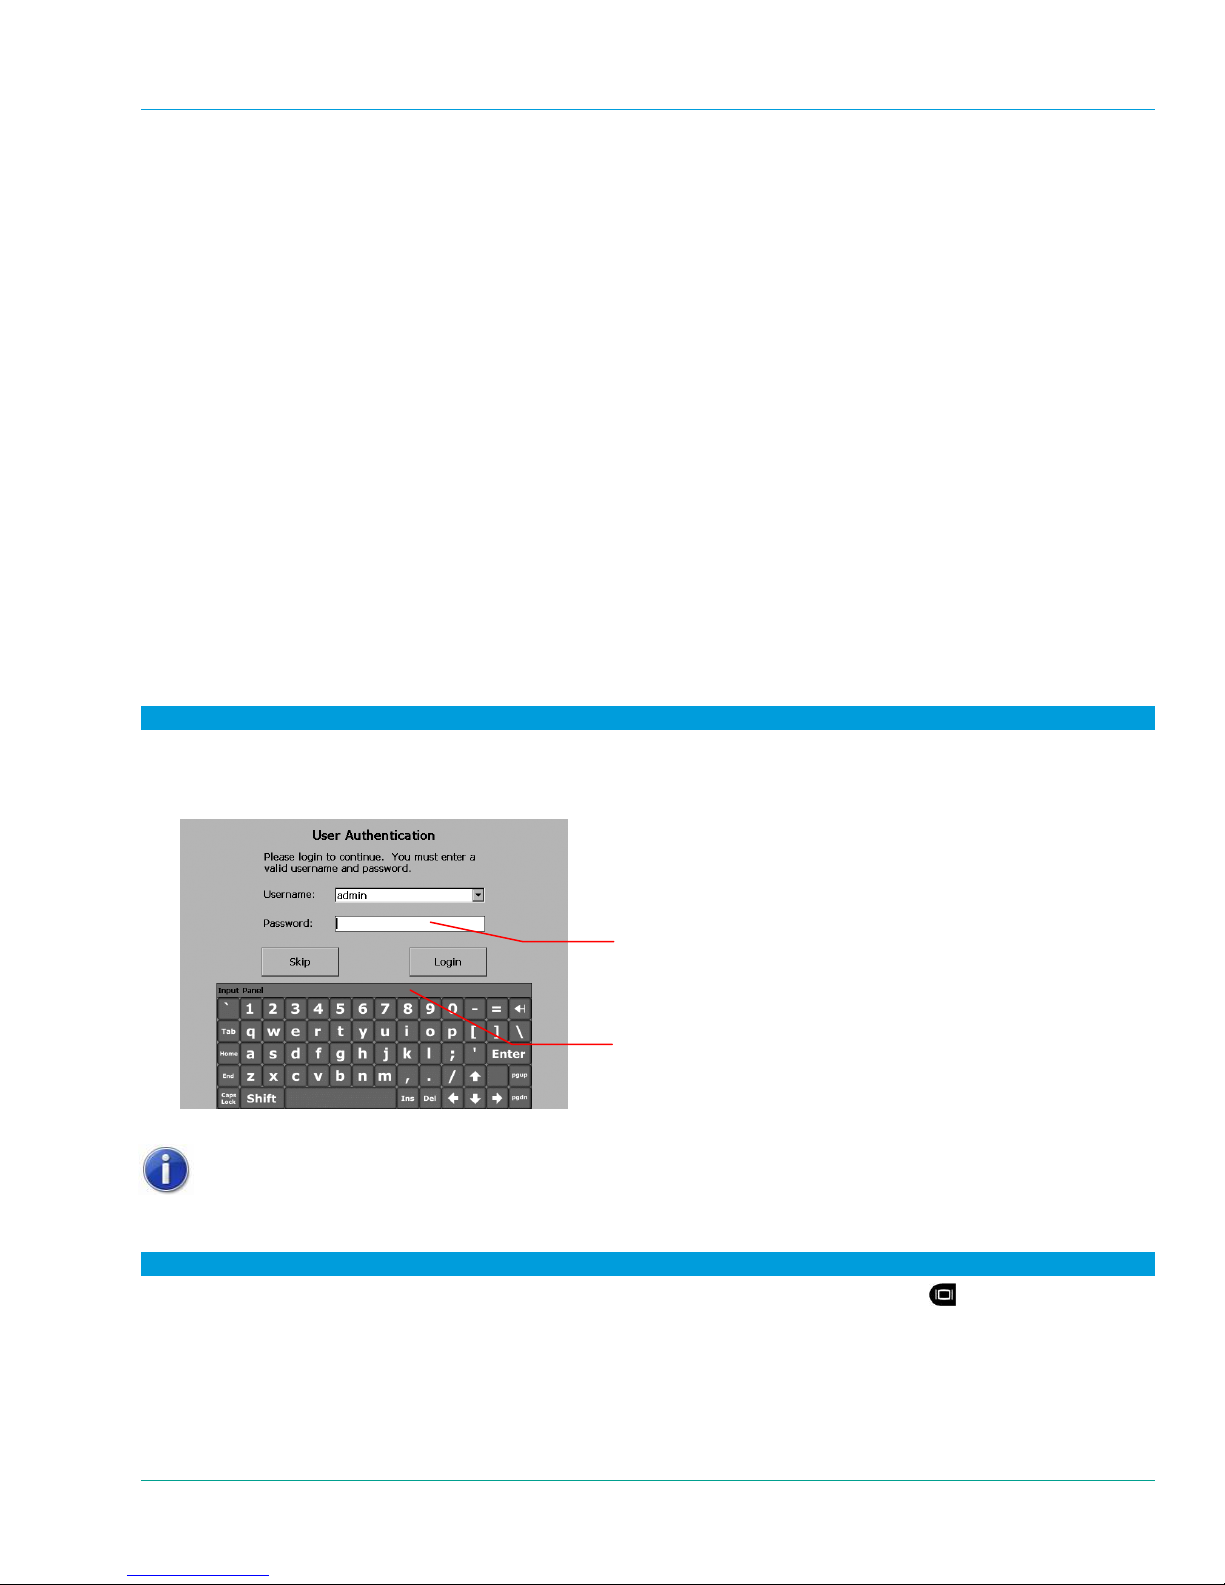
ht Device has been configured to request a login, you will be prompted with a User Authentication
To login to the Onsight Device:
1. Tap the Username field with the stylus and tap characters on the keyboard to enter your user name. (your
Onsight administrator will provide this to you).
2. Tap the Password field with the stylus and tap characters on the keyboard to enter your password.
Keyboard appears when you
select a text field. Tap the keys
with the stylus to enter text.
To move the on-screen keyboard to a
new location on the screen, touch the
stylus to the top edge of the keyboard
and drag it to a new location.
3. Tap
the Login button to finish logging in.
If your Onsight system administrator has enabled anonymous login, a Skip
button is available to bypass the login process.This is a Local Service login.
2.5.2 Logging Out
To log out:
1. From the standard Viewfinder display window, press and release the Display button
three times (or until
the Main Menu appears).
2. Select Sign Out from the Main Menu.
3. If you are still in a call, a message will appear confirming that you need to hang up before you can sign out.
Select Hang Up to end the call and sign out back to the User Authentication login screen.
23
Page 29
Librestream Onsight 1000/2000/2500 User Manual
2.6 Inserting and Removing an SD Memory Card
The Onsight Device features an SD memory card slot to support recording, playback, image capture as well as
configuration and system upgrades.
2.6.1 Onsight 1000
To insert or replace the Onsight 1000 SD memory card:
Do not remove the SD card while recording. This can corrupt the ca rd data.
1. Open the SD memory card slot cover on the side of the device.
SD memory card
2.
If there is already an SD memory card in place, gently push to release it from the slot.
3. Pull the card out. It should slide out easily.
4. Gently push the new card in until it clicks into place.
5. Close the compartment cover.
24
Page 30
Librestream Onsight 1000/2000/2500 User Manual Onsight Device Basic Operation
A
2.6.2 Onsight 2000/2500
Before opening the Onsight 2000Ex/2500Ex battery cover, you
must read the Onsight 2000/2500 Regulatory and Safety Guide.
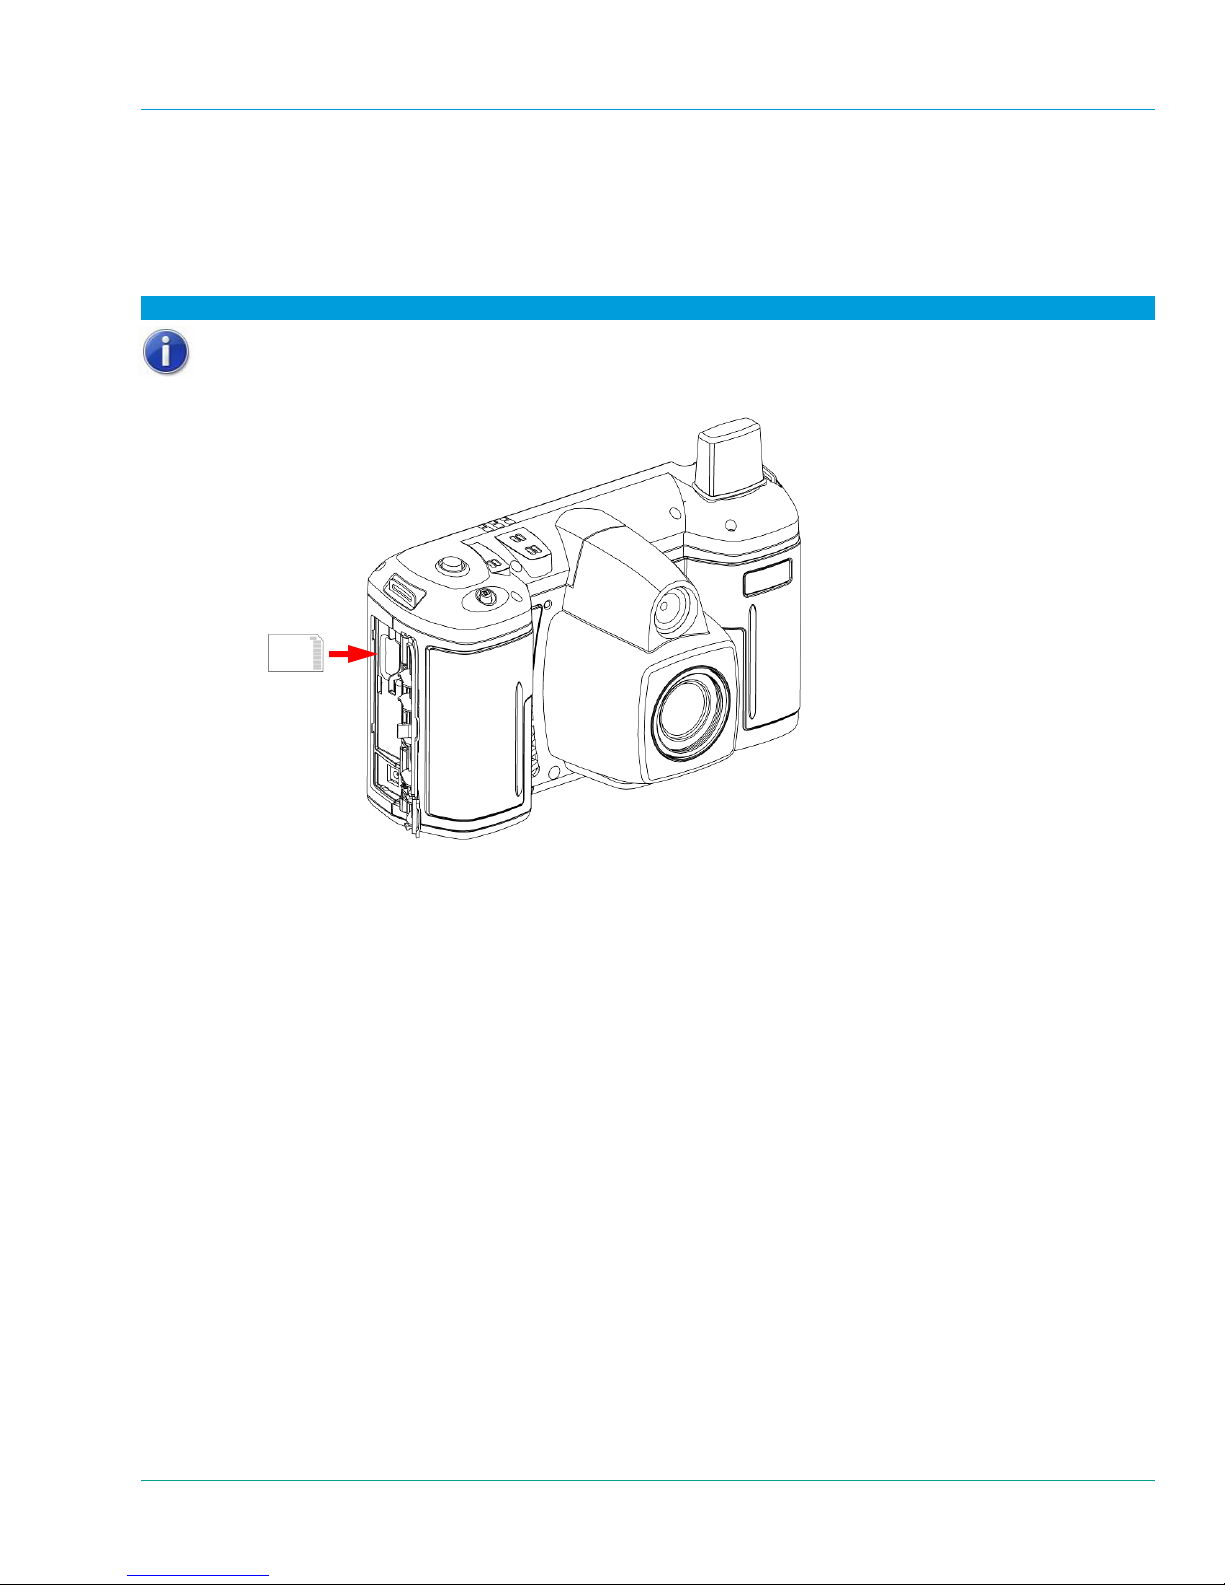
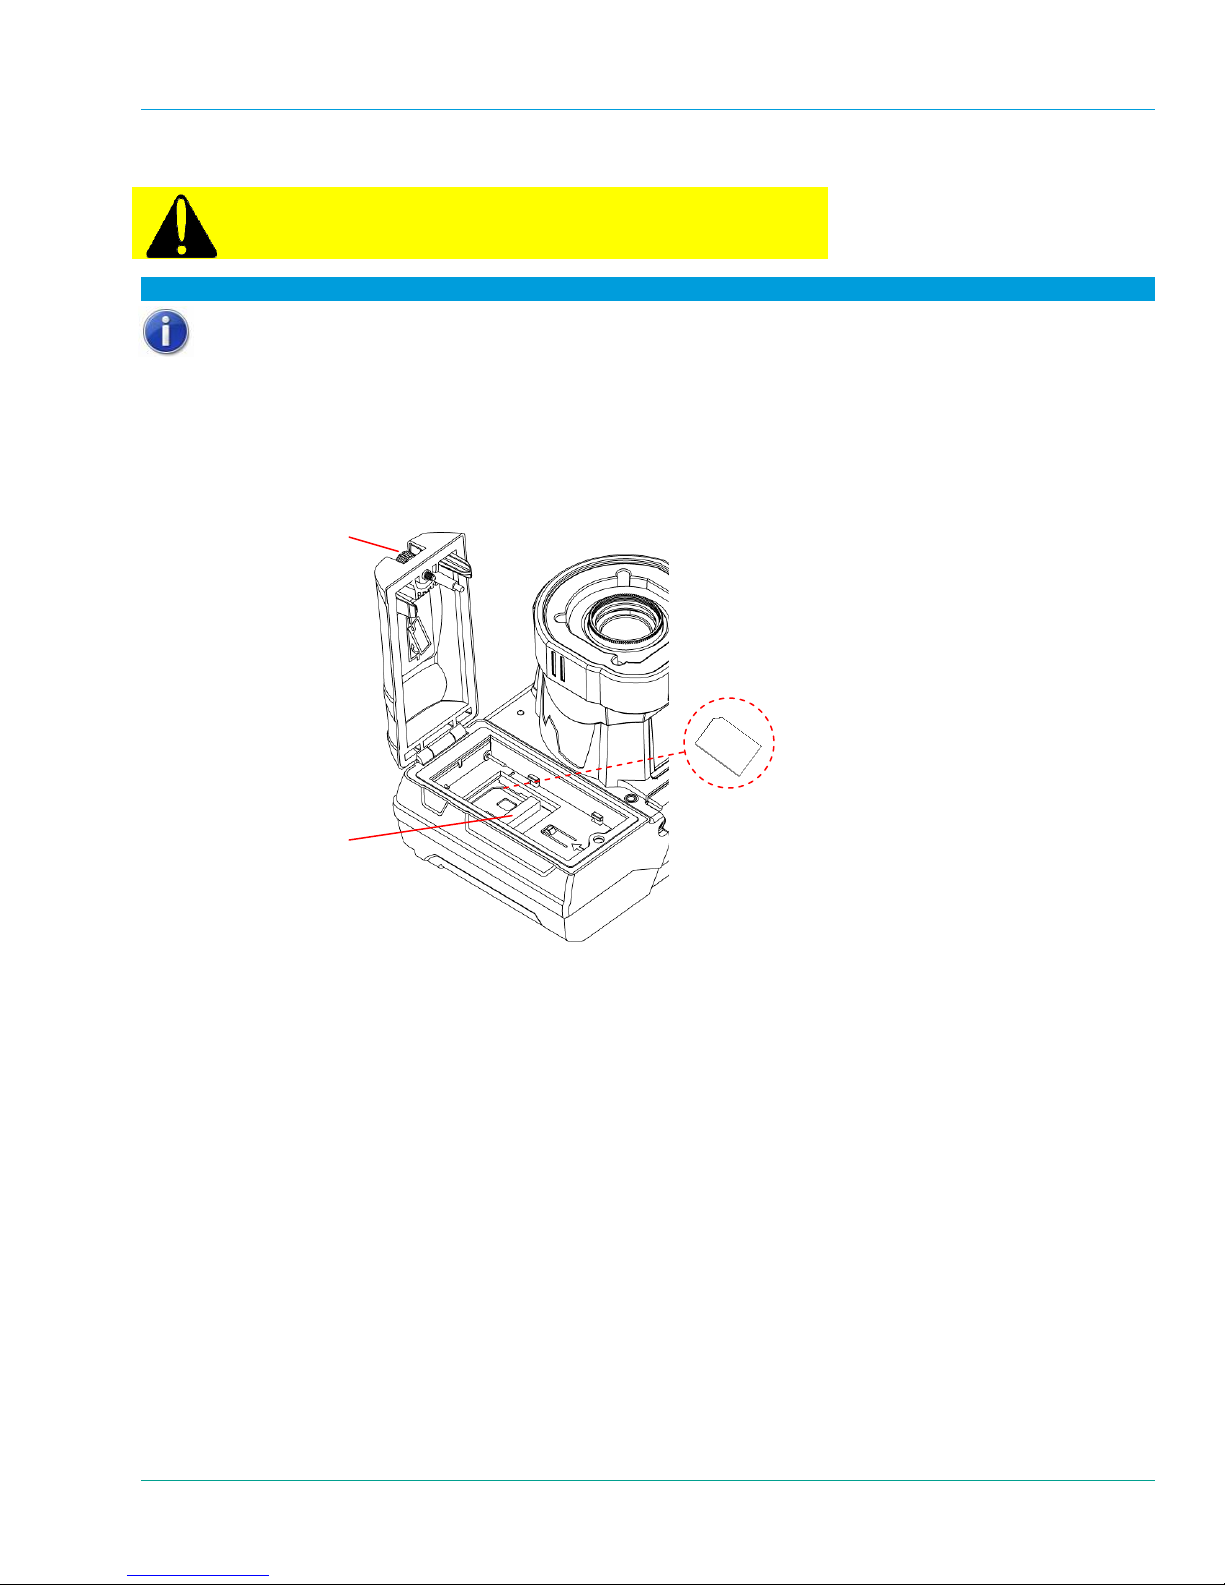
To insert or replace the Onsight 2000/2500 SD memory card:
Do not open the battery door while recording. This can corrupt the memory
card data.
1. Ensure the device is powered off before proceeding. See paragraph 2.4, Turning Power On or Off, on page
21 for instructions.
Open the battery compartment door using the stylus screwdriver, and remove the battery by sliding the
2.
battery back towards the end of the battery compartment and then lifting out the battery.
Battery door
thumb screw
SD memor
ccess door
y card
3. If there is already an SD memory card in place, flip open the access door to release the card from the slot.
4. Pull the card out.
5. Place the new card in the slot (at a slight angle to engage the contacts first) and then gently push the card
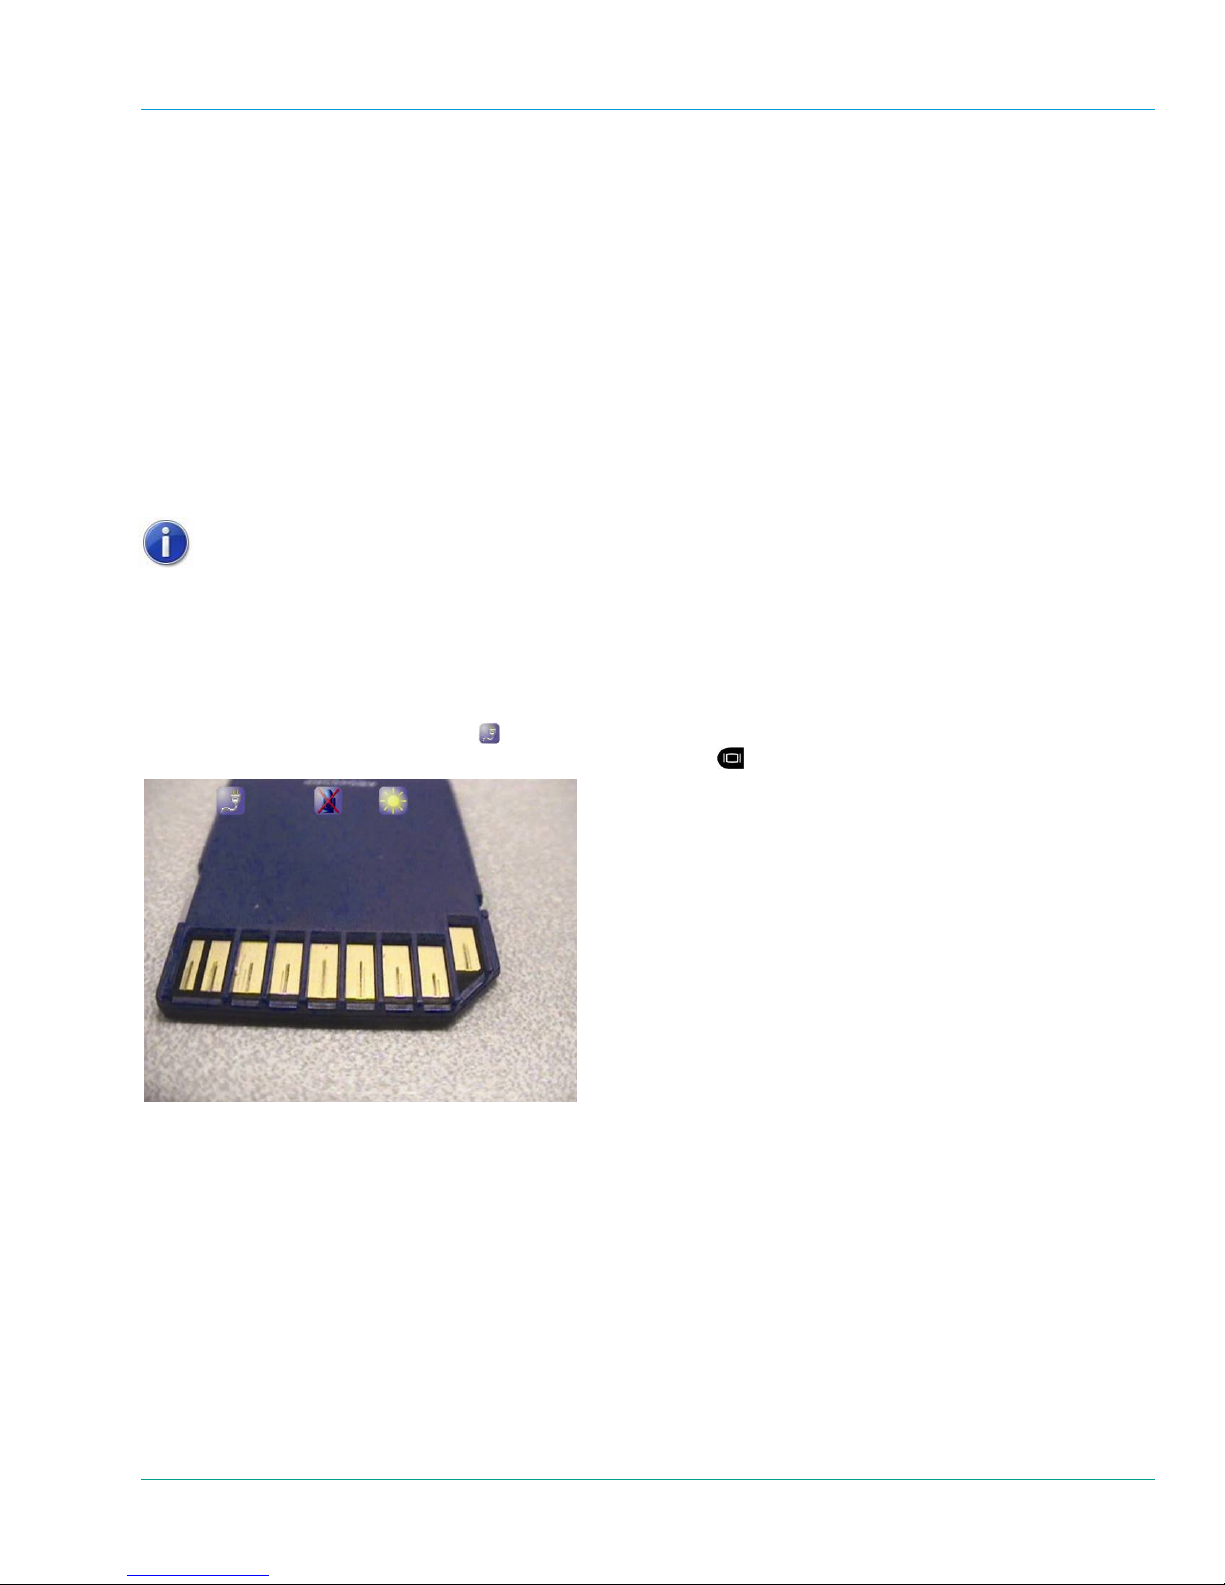
down until it is seated.
6. Close the access door.
7. Re-insert the battery and close the compartment door.
25
Page 31
Librestream Onsight 1000/2000/2500 User Manual Answering & Initiating Calls
3 Answering & Initiating Calls
The Onsight Device operator can either:
call an Onsight Connect user, or
answer an incoming call from an Onsight Connect user.
Use the Send and End buttons on the Navigation pad to start and end calls, similar to the keys on a mobile
phone. Once a call is established, you can collaborate using voice, video, audio, images and annotations.
Note that Onsight Connect can initiate a conference call with other Onsight Connect users so that the Onsight
Device can collaborate with multiple experts.
In order to participate in a call, all participants must have the same encryption
setting. The encryption setting of the person initiating the call must be used by
all other call participants. The Encryption Mode is set in the Main Menu >
Configuration > Security > Encryption screen. See paragraph 6.5,
Configuration, on page 59.
3.1 Network Access
Before you can answer or initiate a call, you must be able to communicate with the network, either through a
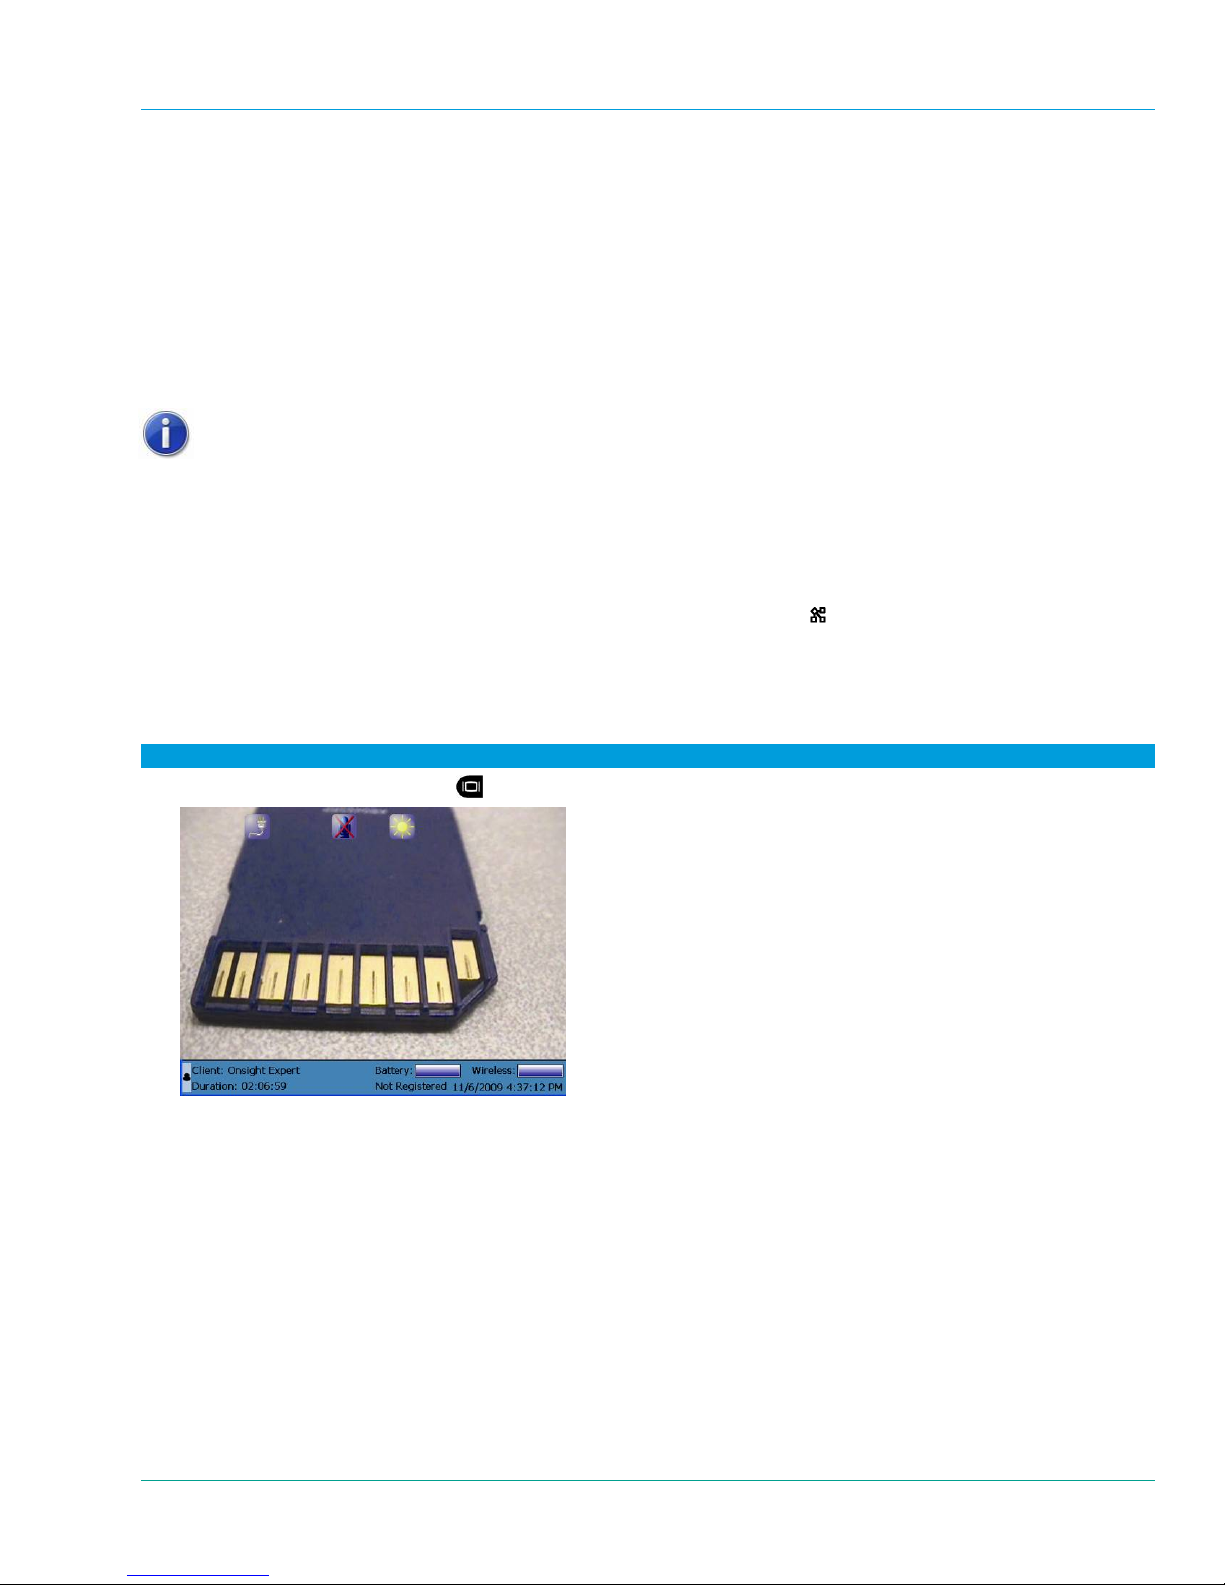
direct wired connection, or wireless connection. The Network link indicator
on the top of the Onsight Device, indicates whether or not a Network link exists.
If a connection is required from a hotspot/guest network that requires browser acce ss, go to the Main Menu >
Configuration > Network > Hotspot Login screen. A successful login will result in the display of the Librestream
welcome page. See paragraph 6.5, Configuration, on page 59.
the middle of the three indicators
,
To check current wireless network conditions:
1. Press the Display button once
and check the Session information at the bottom of the Viewfinder.
2. Another option is to press the Display button three times to display the Main Menu. Tap the Status Menu
option with the stylus, and then select Network Status.
See page 30 for more information on the Viewfinder Features & Display Modes.
26
Page 32
Librestream Onsight 1000/2000/2500 User Manual Answering & Initiating Calls
3.2 Answering an Incoming Call
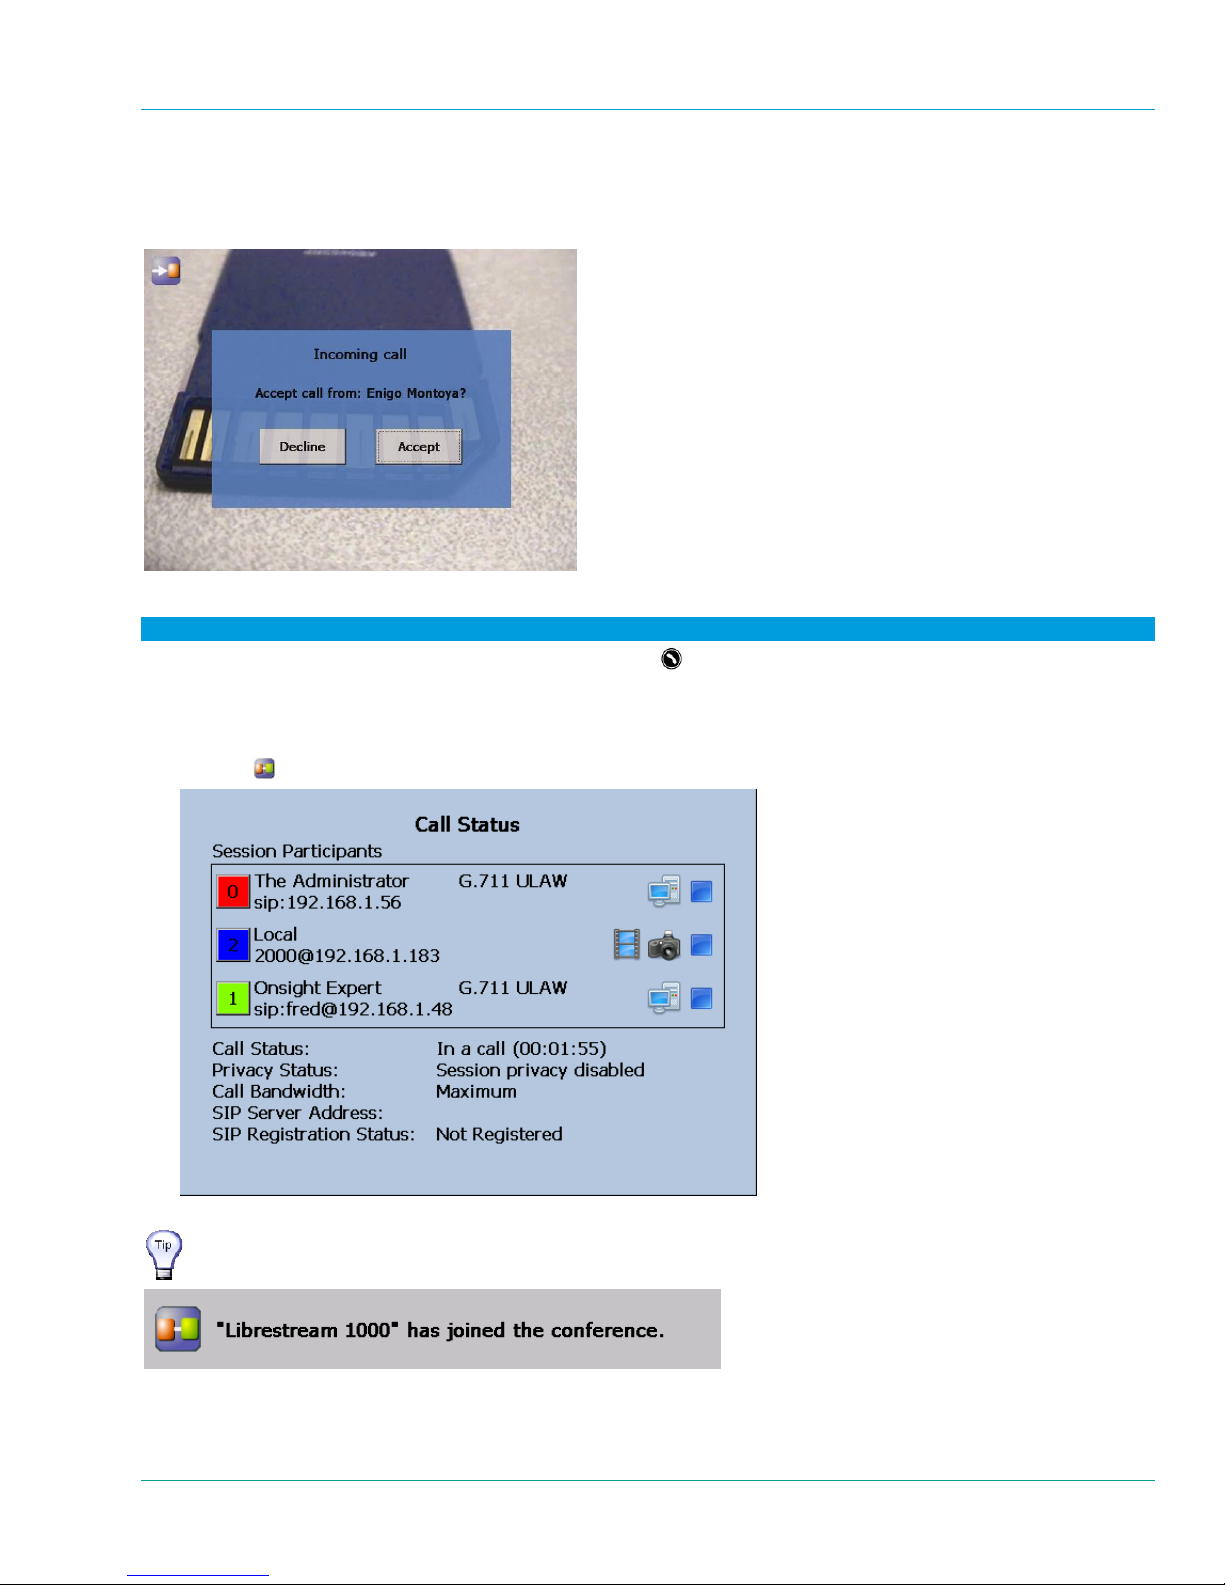
To receive incoming calls, the Onsight Device must be On or in Standby mode. When a call comes in, the Onsight
Device rings like a mobile phone and the Viewfinder displays a dialog box similar to the one shown.
To accept (answer) the call:
1. Tap Accept or press the Onsight Device Send button
2. If there is more than one participant (i.e. Onsight Connect), in the call then the message “Other participants
are in this call. See the call status panel for details.” This means that there is more than one Onsight
Connect connected to the call and you are in a conference call.
3. Tap the
icon to bring up the Call Status screen.
.
4. Tap the Call Status screen to close it.
If a participant enters the conference, the name of the new participant will
appear in a message as in the example below:
27
Page 33
Librestream Onsight 1000/2000/2500 User Manual Answering & Initiating Calls
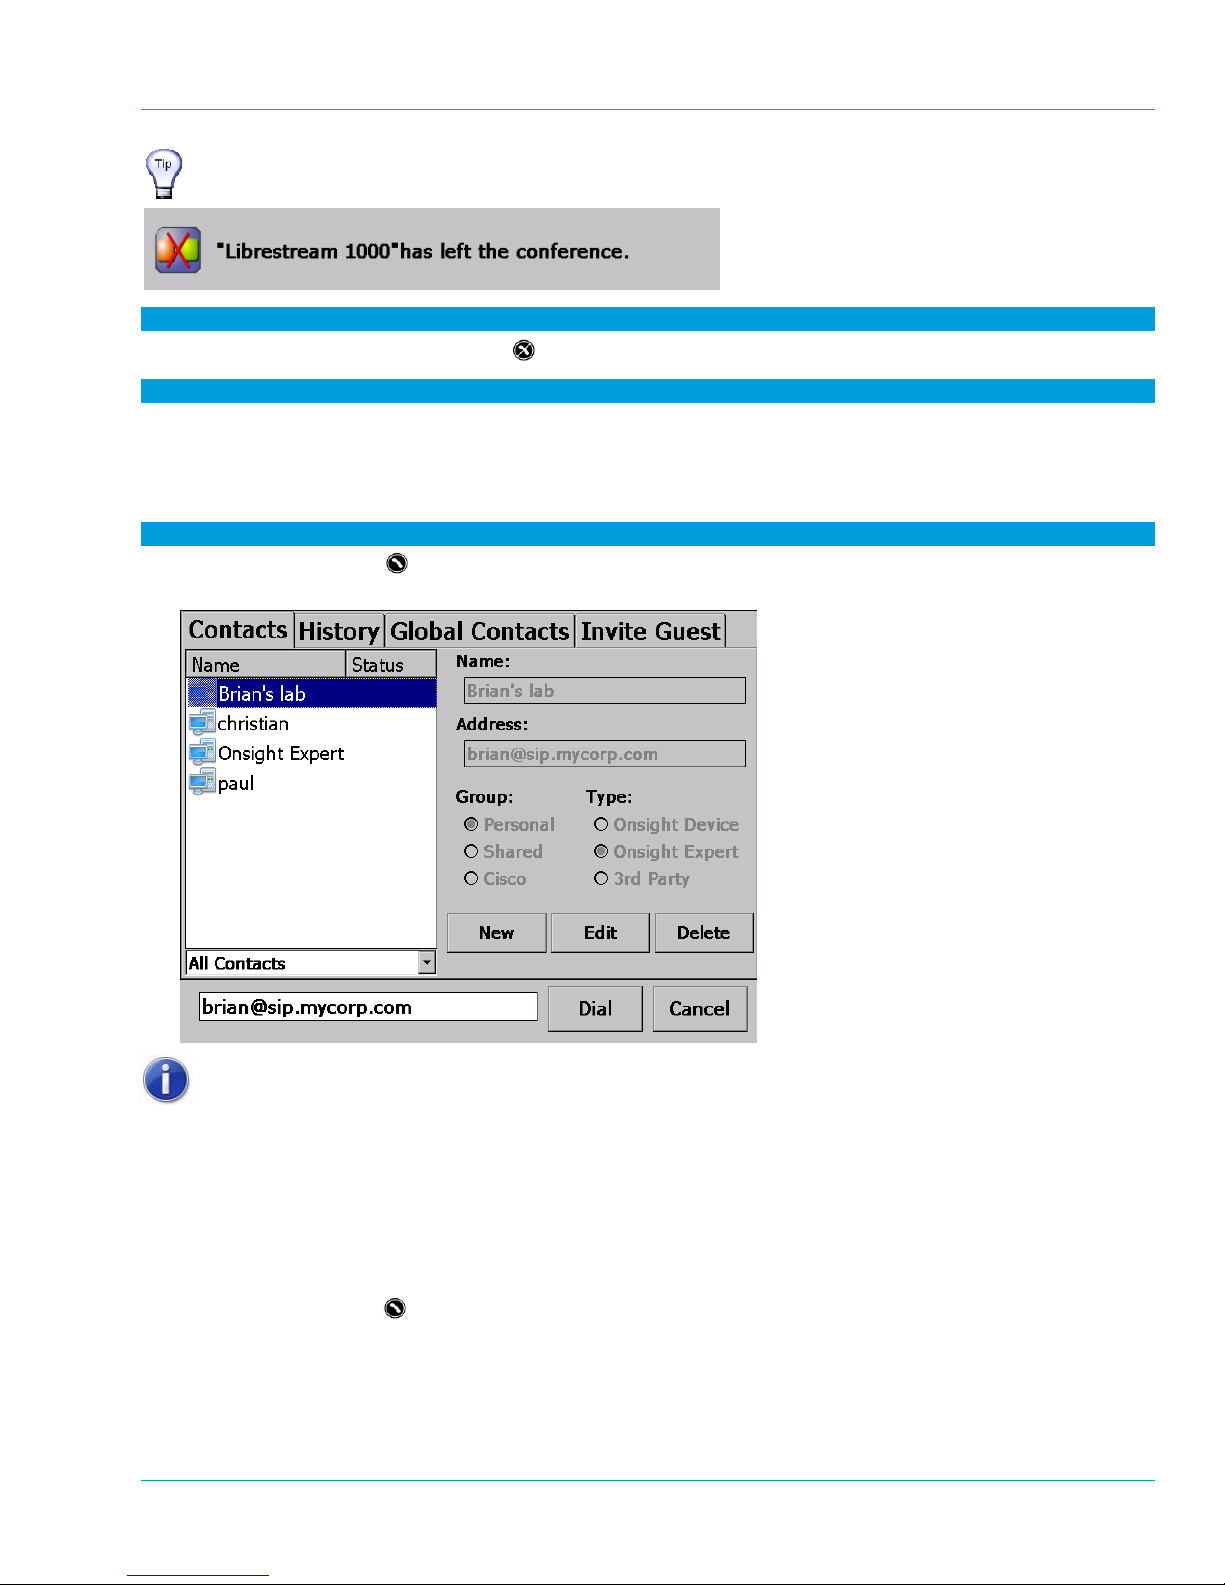
If a participant leaves the conference, the name of the participant leaving will
appear in a message as in the example below:
To refuse the call:
1. Tap Decline or press the End button
.
To enable automatic answering of a call:
1. From Main Menu > Configuration > Call Control > General, select “Enable auto answer”.
2. Any incoming call will now be answered automatically after three rings.
3.3 Initiating (Starting) a Call
To initiate or start a call from an Onsight Device:
1. Press the Send button
Onsight Device has been set up to contact.
to display a Contacts window listing the contacts (personal and global) that this
Note: Global Contacts is not present if you are logged in to Local Service.
Invite Guest is only present if you currently have an active connection to
Onsight Account Service.
2. Use the Navigation pad buttons, or tap the name to highlight the contact that you want to call. When you
select a name, the contact’s destination address appears in the field at the bottom of the window.
If the correct name does not exist, tap the field at the bottom of the window and use the on-screen keyboard
to enter the address of the contact you need to call. Consult your Onsight system administrator for details.
3. When the desired network address is displayed in the Network address field either tap Dial with the stylus or
press the Send button
to initiate the call.
You will hear the outgoing rings or a busy signal on the Onsight Device just as you would on a mobile phone.
When the call is answered, you can start talking, just like a mobile phone. If the call is declined, a message will be
displayed indicating the reason.
28
Page 34
Librestream Onsight 1000/2000/2500 User Manual Answering & Initiating Calls
3.4 Ending a Call
To end a call:
1. Press the End button
.
Onsight Connect can also terminate the call from the Onsight Connect
application.
3.5 Audio Communication
Before using a headset with the Onsight 2000Ex/2500Ex, you
must read the Onsight 2000/2500 Regulatory and Safety Guide.
For conversation, the Onsight Device can operate using its built-in microphone and speaker, o r a headset:
Speaker phone – if a headset is not attached, the Onsight Device operates as a speaker phone using its built-in
omni-directional microphone and speaker.
Headset – if you plug a headset into the headset connector the Onsight Device uses the headset microphone
and speaker. This is useful in noisy environments or where privacy is a concern. In this case, Subje ct Audio
continues to use the built-in microphone or external audio line-in, if selected. When using a closed-ear headset,
the Headset Sidetone feature provides feedback to the user to ensure speaking volume is satisfactory. Main
Menu > Configuration > Audio > General enables the sidetone feature, and Main Menu > Configuration >
Audio > Volumes allows for sidetone volume adjustment.
Onsight 2000/2500 – Audio Line-in is only available on the I/O Sled accessory.
For more information on using the I/O Sled, see paragraph 1.7.3, I/O Sled, on
page 10.
If the operator needs to capture particular sounds as part of the video stream
(e.g., an odd noise being made by a piece of machinery), you can also set a
Subject Audio source, as described in paragraph 5.2, Setting the Subject
Audio Source
and Volumes, on page 34.
29
Page 35
Librestream Onsight 1000/2000/2500 User Manual Viewfinder Features & Display Modes
4 Viewfinder Features & Display Modes
The Viewfinder shows what the Onsight Device is viewing, but it also provides status information and menus.
Depending on the display mode, the Viewfinder uses a status bar, icons, and popup windows to provide
information, notifications, and prompts as necessary.
Note that the status bar information and menus only appear for the Onsight Device operator. This information
does not appear for the Onsight Connect software user who is receiving strea m ed information.
4.1 Controlling the Viewfinder Mode
To control the Viewfinder mode:
1. Starting from the Default mode that appears when the device first turns on, press the Display button
or more times to switch the Viewfinder into a different mode, as described below.
Display button Result
Press and release once Session information displayed.
Press and release second
time
Press and release third time Main Menu displaye d – for configuration and other
Press and release fourth time Display returns to default Viewfinder mode.
Press and hold Toggles the display backlight on or power save.
Stream information displayed.
setup options.
one
4.1.1 Turn Viewfinder Backlight On or Power Save
If you do not require the Viewfinder backlight:
1. Press and hold the Display button
until the backlight dims and enters power-saving mode. Placing the
backlight in power save mode extends run time when operating on battery.
2. Press and hold the Display button again to turn the backlight back on.
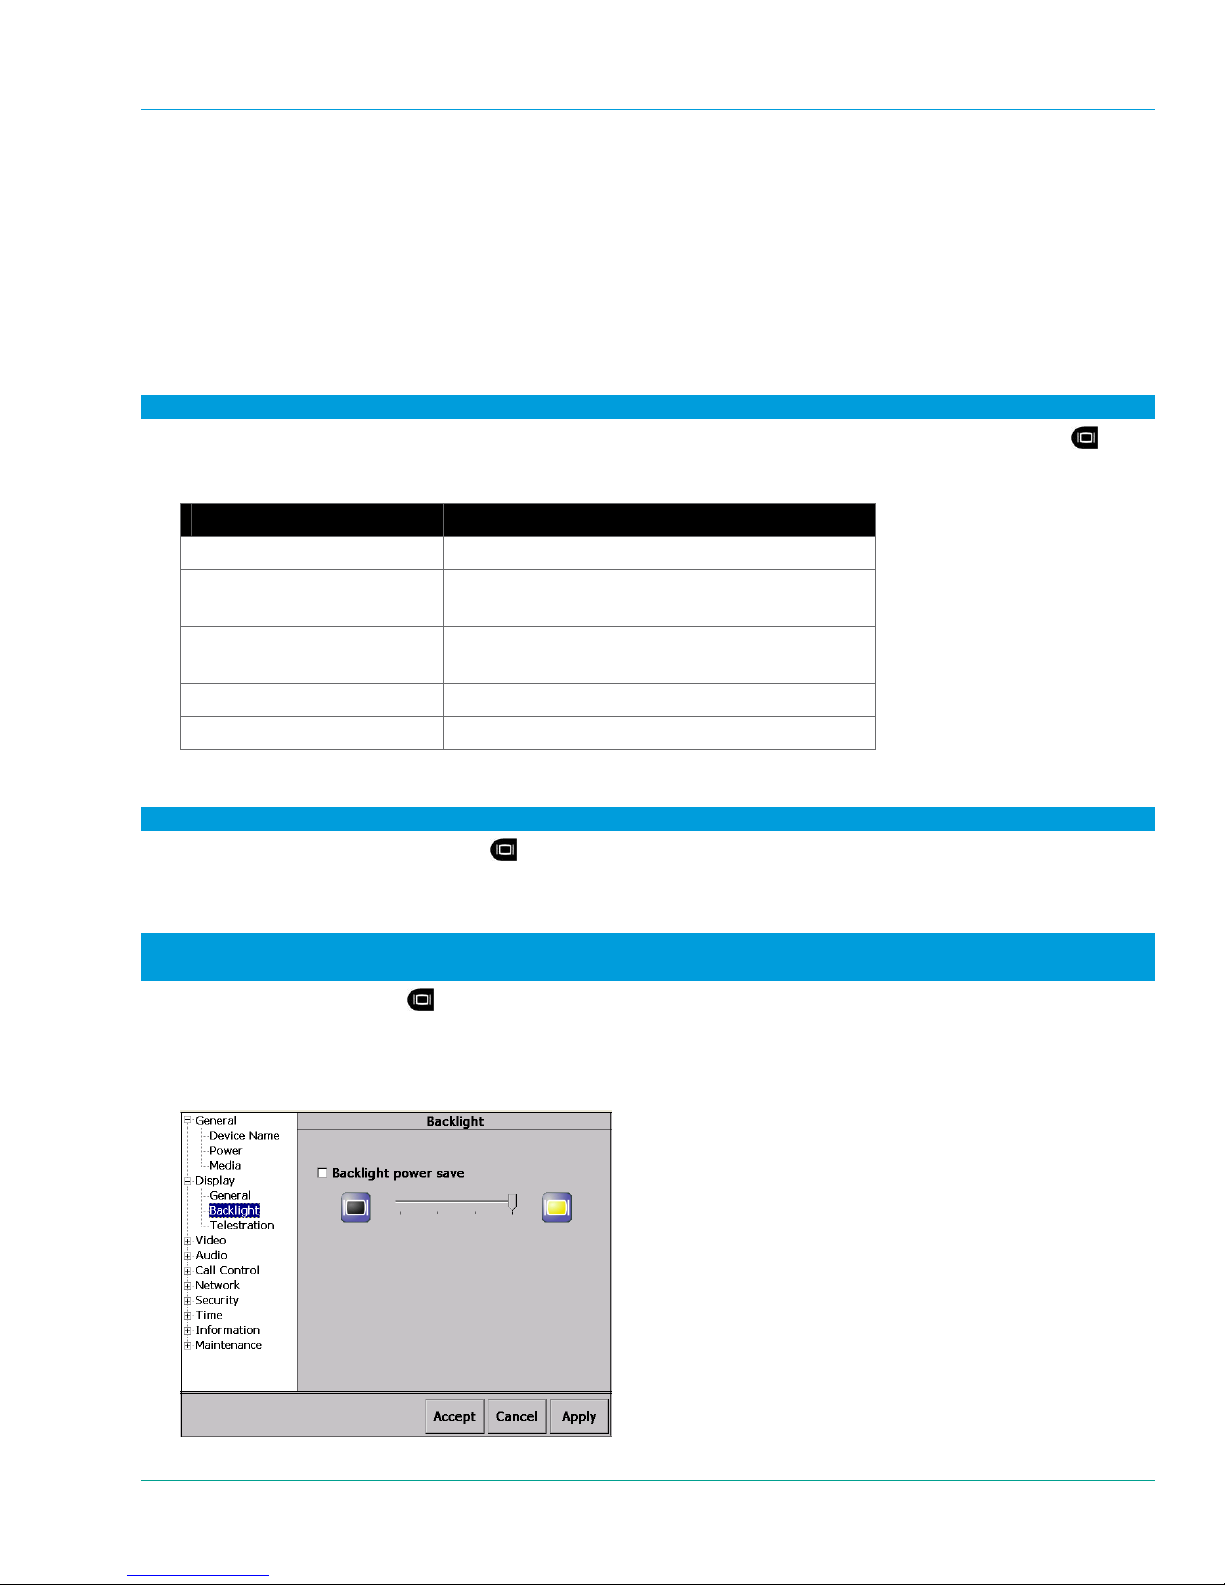
The default backlight level and power save mode can also be set from the Onsight Device configuration
screen:
1. Press the Display button
three times until the Main Menu appears.
2. Select Configuration > Display > Backlight.
3. Select to enable the Backlight power save.
4. If the Backlight power save is not enabled, use the slide bar to adjust the backlight level.
30
Page 36
Librestream Onsight 1000/2000/2500 User Manual Viewfinder Features & Display Modes
4.1.2 Default Viewfinder Mode
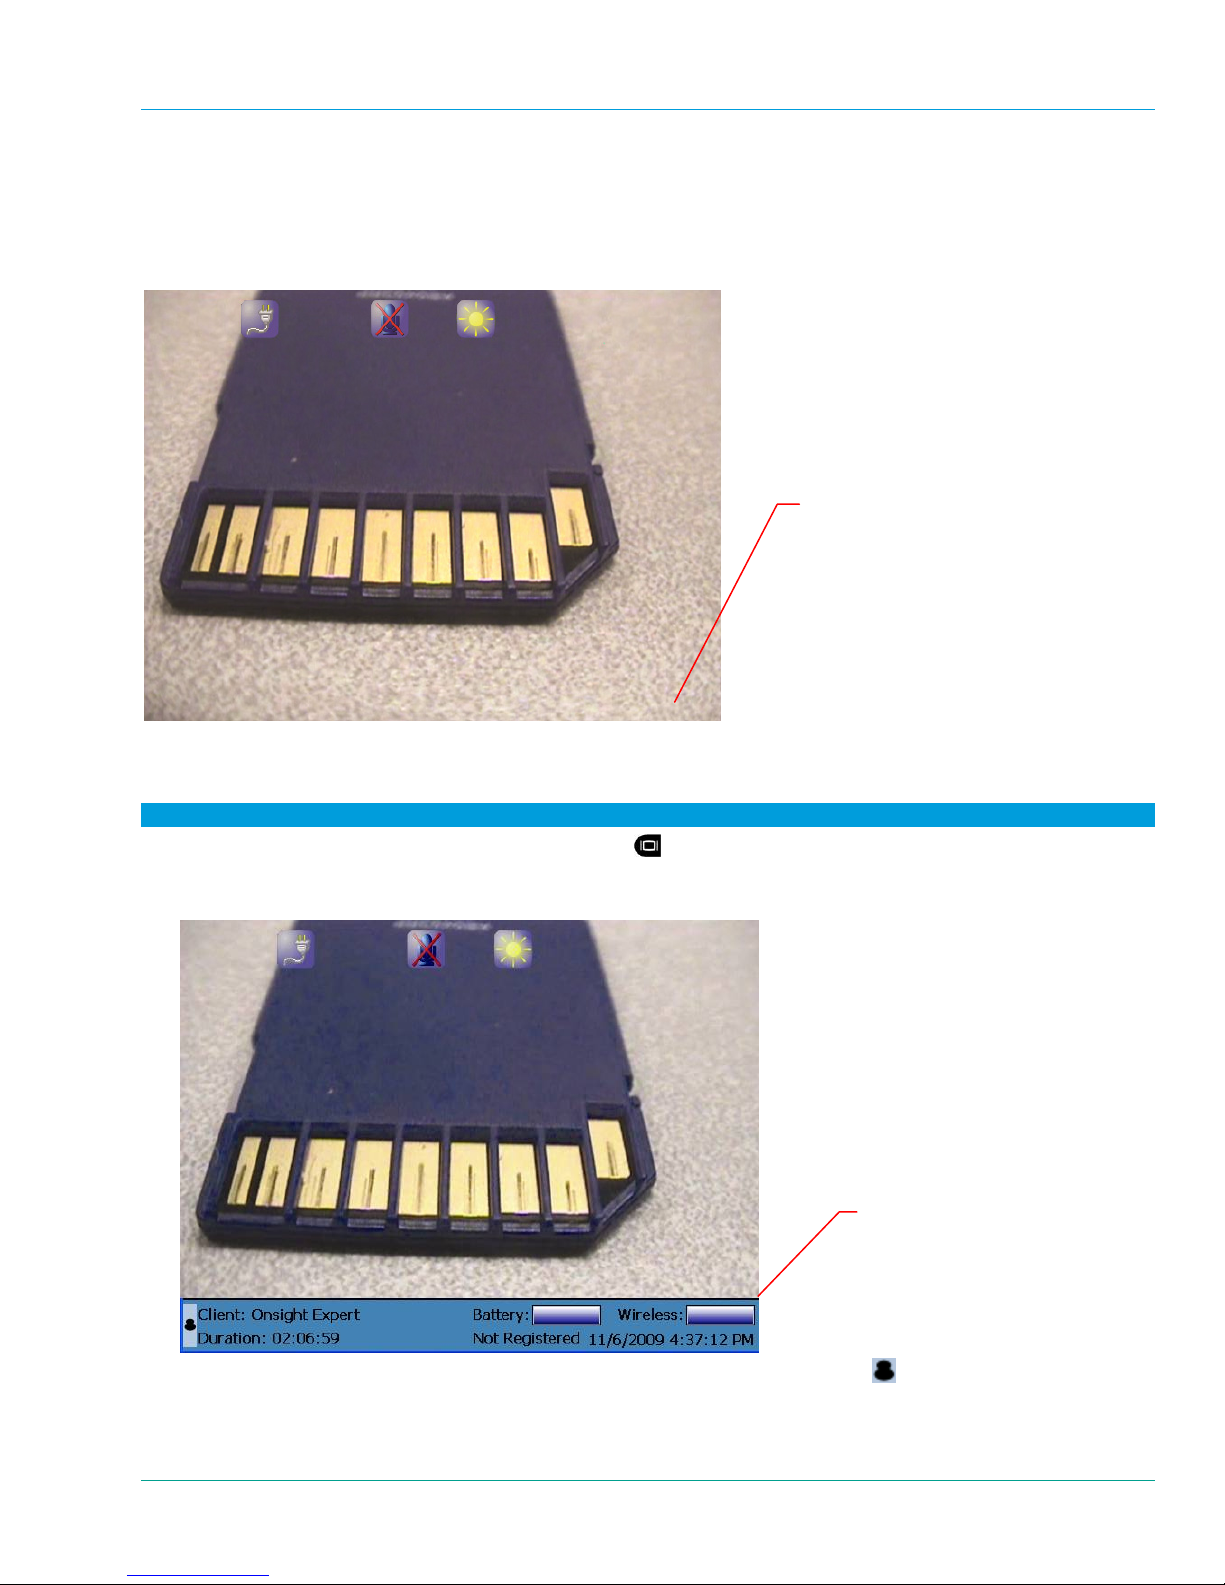
This is the default mode that appears when you first turn the camera on. Viewfinder mode maximizes the visible
video area by providing as little extraneous screen information as possible. The Status bar area is initially blank,
but icons, pop-up notifications, and prompts appear as necessary.
bar area
Status
4.1.3 Session Information
To view the Session Information Status bar:
1. Starting from the default Viewfinder, press Display
once to display session information in the Session
Information Status bar.
2. The Viewfinder shows live camera video and status information as shown below.
Client identifier
Battery
Radio signal strength
Connect time (Duration)
Registration status
Date/Time
level
3. You can hide the Session Information Status bar by tapping on the Pin icon
the status bar.
4. To bring back the Session Information Status bar, tap the bottom of the screen or press Display.
31
in the bottom left corner of
Page 37
Librestream Onsight 1000/2000/2500 User Manual Viewfinder Features & Display Modes
5. If you want to keep the Session Information Status bar visible, tap the Pin icon
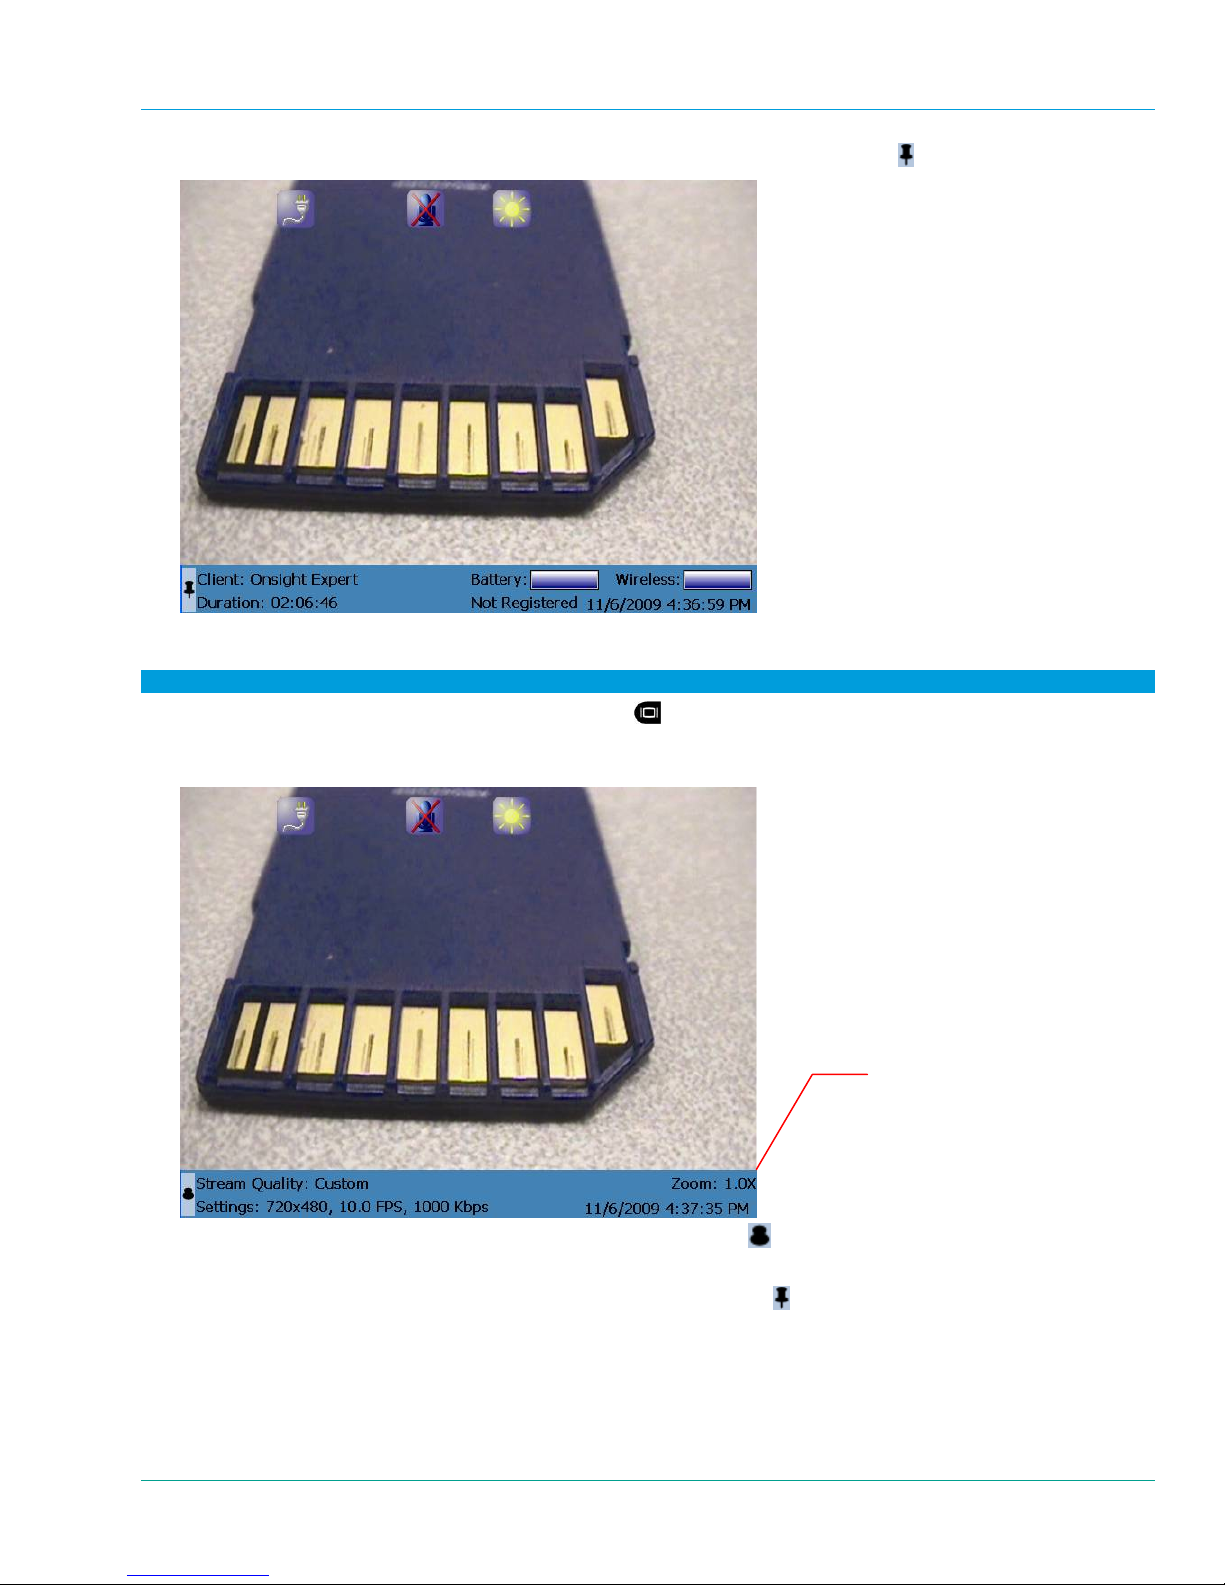
4.1.4 Streaming Status
To view the Stream Status bar:
1. Starting from the default Viewfinder, press Display
twice to display stream information in the Stream
Status bar.
2. The Viewfinder shows live camera video and status information as shown below.
.
3. You can hide the Stream Status bar by tapping on the Pin icon
4. To bring back the Stream Status bar, tap the bottom of the screen or press Display.
5. If you want to keep the Stream Status bar visible, tap the Pin icon
32
Stream quality
Zoom level
Stream video size
FPS (frame rate)
Bit rate
Date/Time
in the bottom left corner of the status bar.
.
Page 38
Librestream Onsight 1000/2000/2500 User Manual Viewfinder Features & Display Modes
4.1.5 Viewfinder Main Menu
To access the Main Menu:
1. Starting from the default Viewfinder, press Display
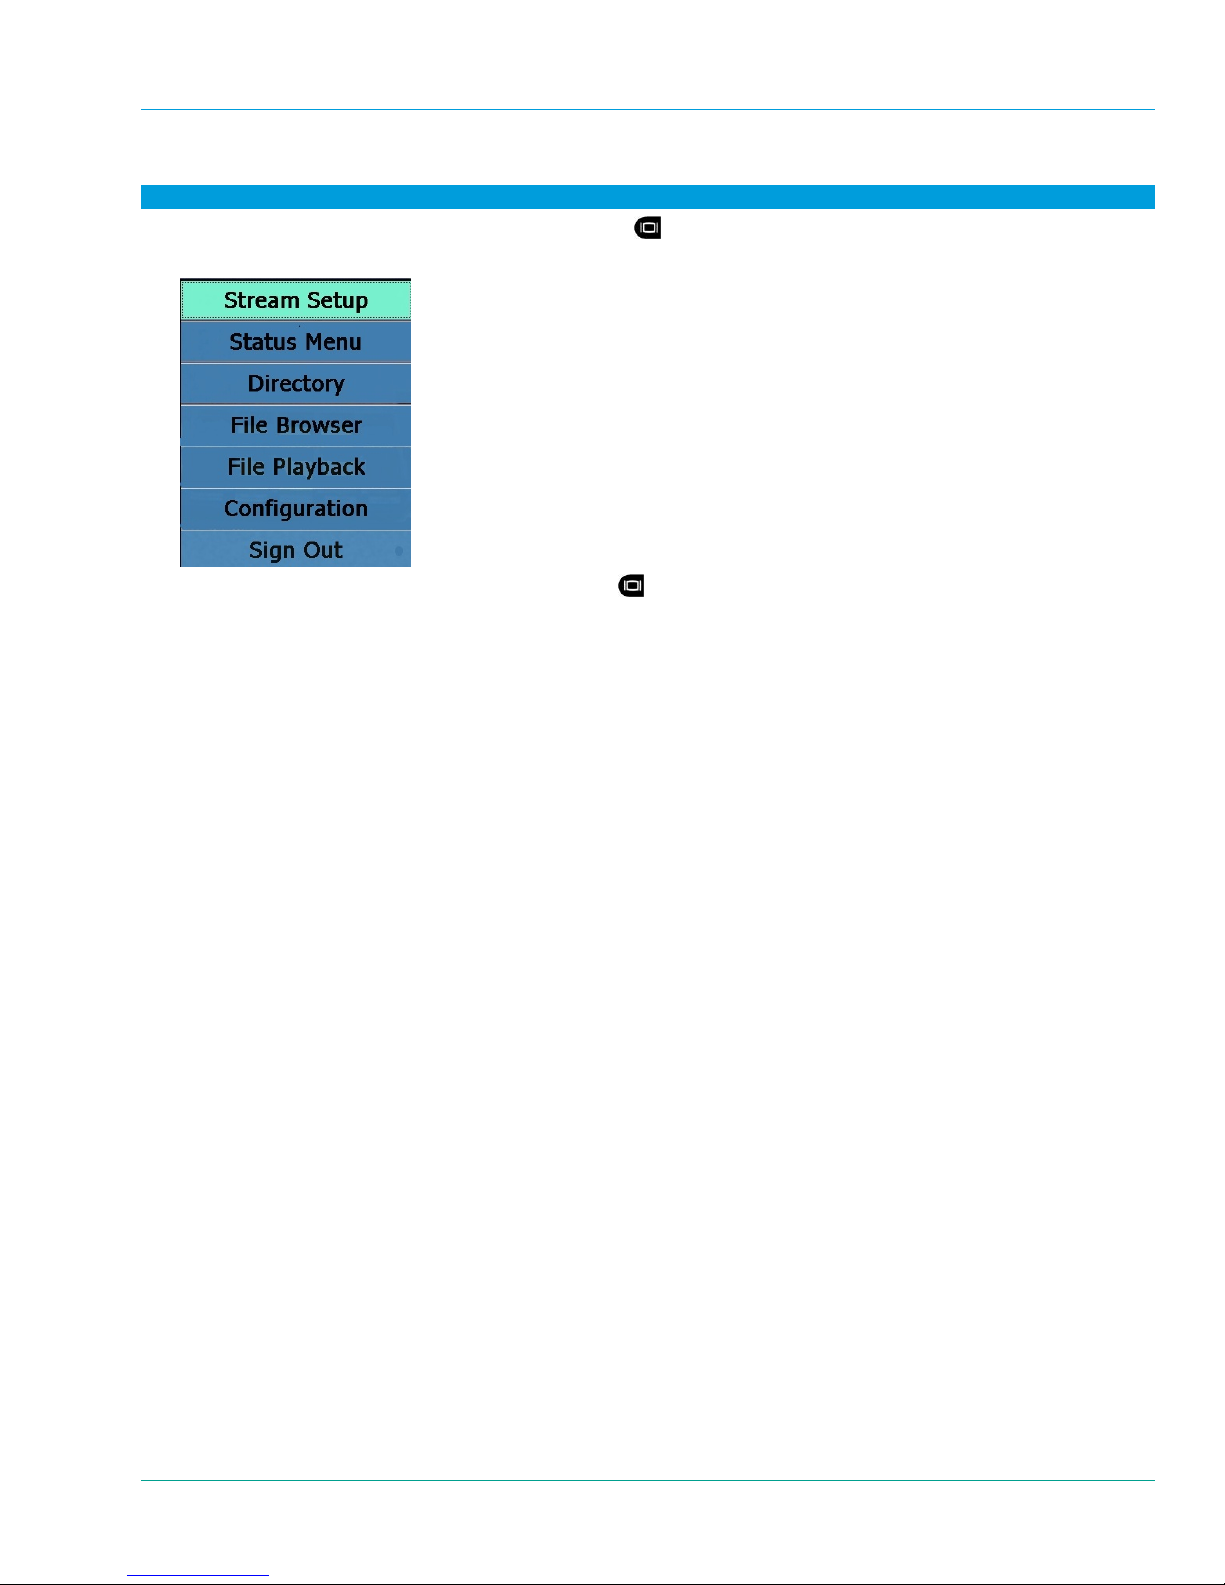
three times.
2. The Main Menu appears with these selections.
3. To exit this menu, press and release the Display button.
For more information on the Main Menu and other menu options, see section 6, Menus, on page 53.
33
Page 39
Librestream Onsight 1000/2000/2500 User Manual Audio/Video (AV) Functions
5 Audio/Video (AV) Functions
Onsight can provide a complete record of a call, including two-way voice, video, subject audio, images an d
telestration. Calls can also be recorded without an active video stream.
Once a call is connected, the Onsight Device can send an AV media stream to Onsight Connect.
In a conference call the AV media stream is seen by all Onsight Connect participants. The secondary Onsight
Devices can participate in image sharing and streaming of recorded audio/video, but unlike the primary Onsight
Device, can not participate in live streaming.
5.1 Turning the Video Stream On or Off
Enabling the video stream sends a subject audio/video media stream from the Onsi ght Device to the Onsight
Connect participants. The stream will continue as long as the call is connected or until the operator or Onsight
Connect selects an option to stop or temporarily freeze the streaming.
To start and stop streaming live video to Onsight Connect:
1. Press the Stream button on the top of the Onsight Device.
2. Press the Stream button again to stop streaming.
This does not disconnect the call; the stream can be started and stopped as
often as desired within the current call.
To temporarily freeze the streaming video, without exiting from the video stream:
1. Press the Enter button
This freezes the video image.
.
2. Press the Enter button again to restart live video.
3. The message “Video resumed” appears.
If the device is sharing an image when the stream is resumed, then the video
stream resumes on the Onsight Connect Call window, but the captured im age
remains in the Onsight Device’s Viewfinder until image sharing is ended by
either briefly pressing the Capture button, or selecting End Still Image
Sharing from the Image Shared icon
.
5.2 Setting the Subject Audio Source and Volumes
The Onsight Device provides two audio channels: one for Subject Audio and one for VoIP operator
communication.
Subject Audio is the unprocessed sound coming from the subject. The sound (Subject Audio) bein g captured and
streamed with the video is captured by the Onsight Device’s built-in microphone or from an external audio source
connected to the Onsight Device’s Audio Line-in port. This allows the Onsight Device to capture and stream audio
that is time-synchronized with the video.
The Audio Line-in port is standard for the Onsight 1000 (see paragraph 1.6.1 on page 3). For the On sight
2000/2
The Stream button also starts and stops streaming of Subject Audio, just as in video streaming described in
paragraph 5.1.
For au
500, Audio Line-in is located on the I/O Sled accessory (see paragraph 1.7.3 on page 10).
For the Onsight 2000/2500 Device, the Audio Line-in port can be configured to
accept either an external microphone or line-level audio input.
dio communication see paragraph 3.5, on page 29.
34
Page 40
Librestream Onsight 1000/2000/2500 User Manual Audio/Video (AV) Functions
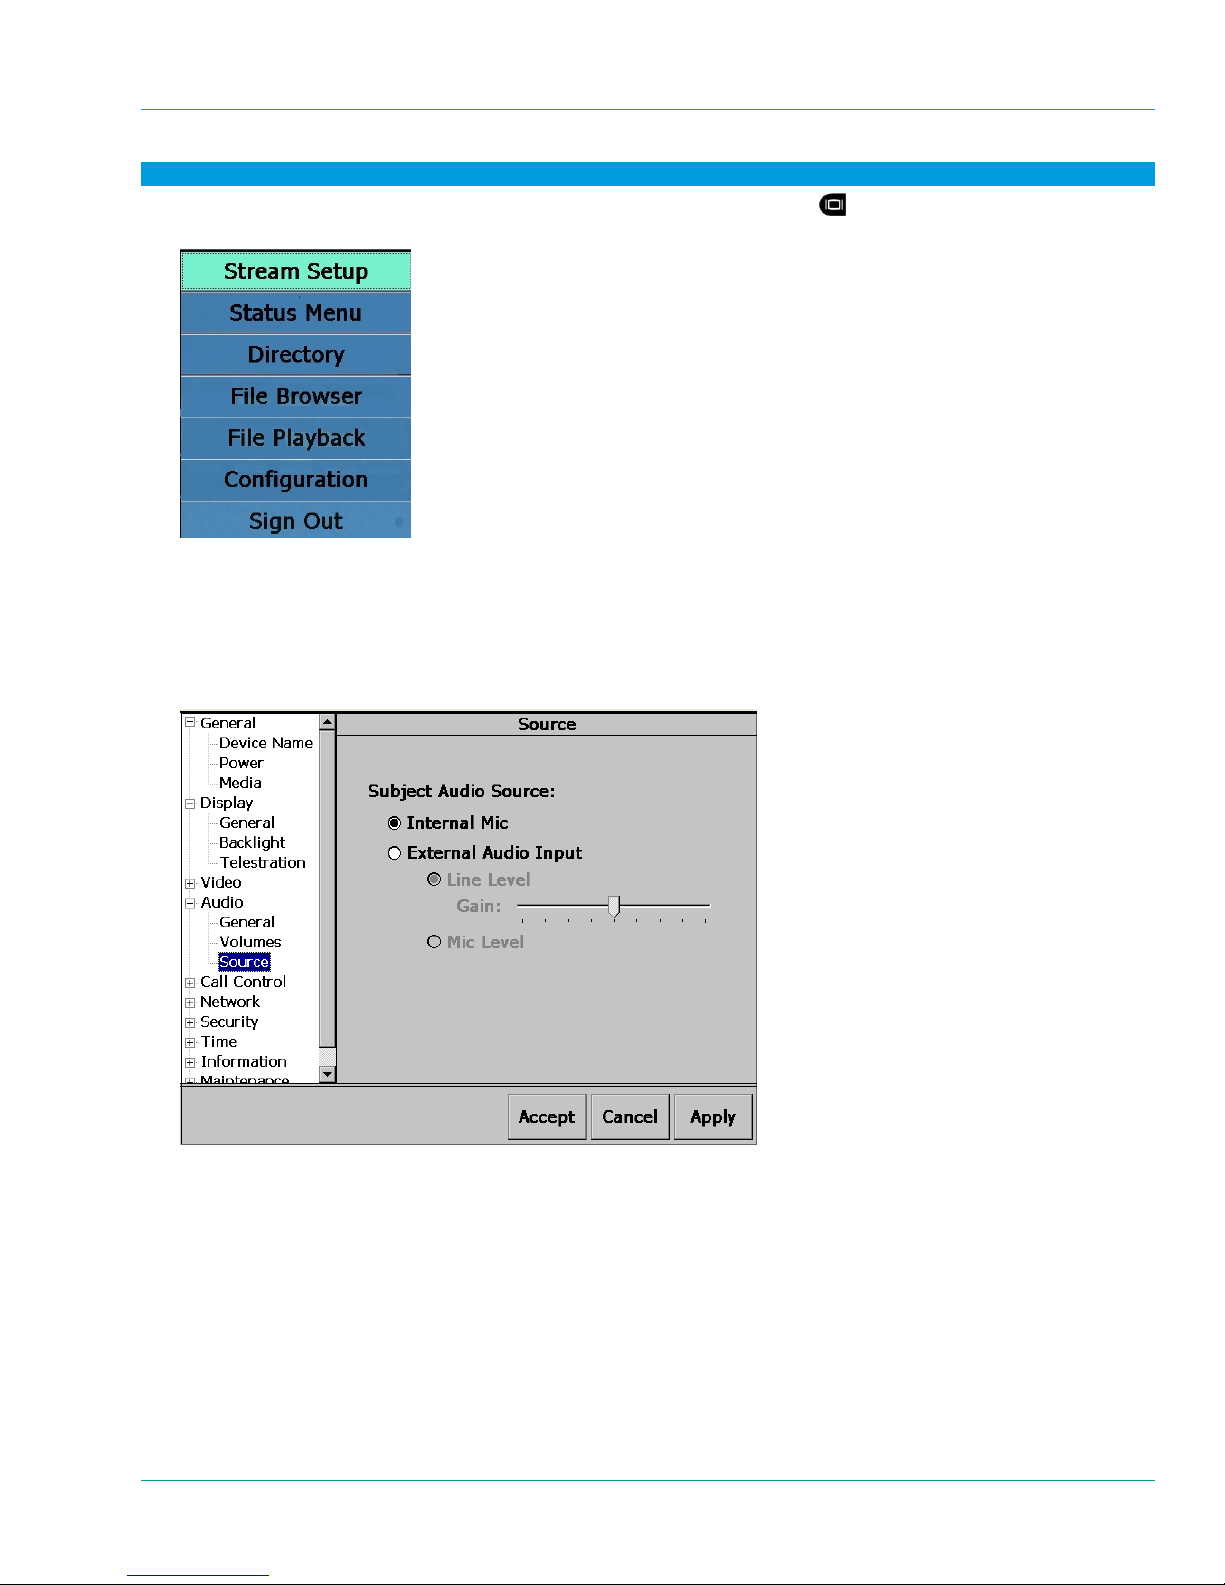
To set which source will act as the Subject Audio source:
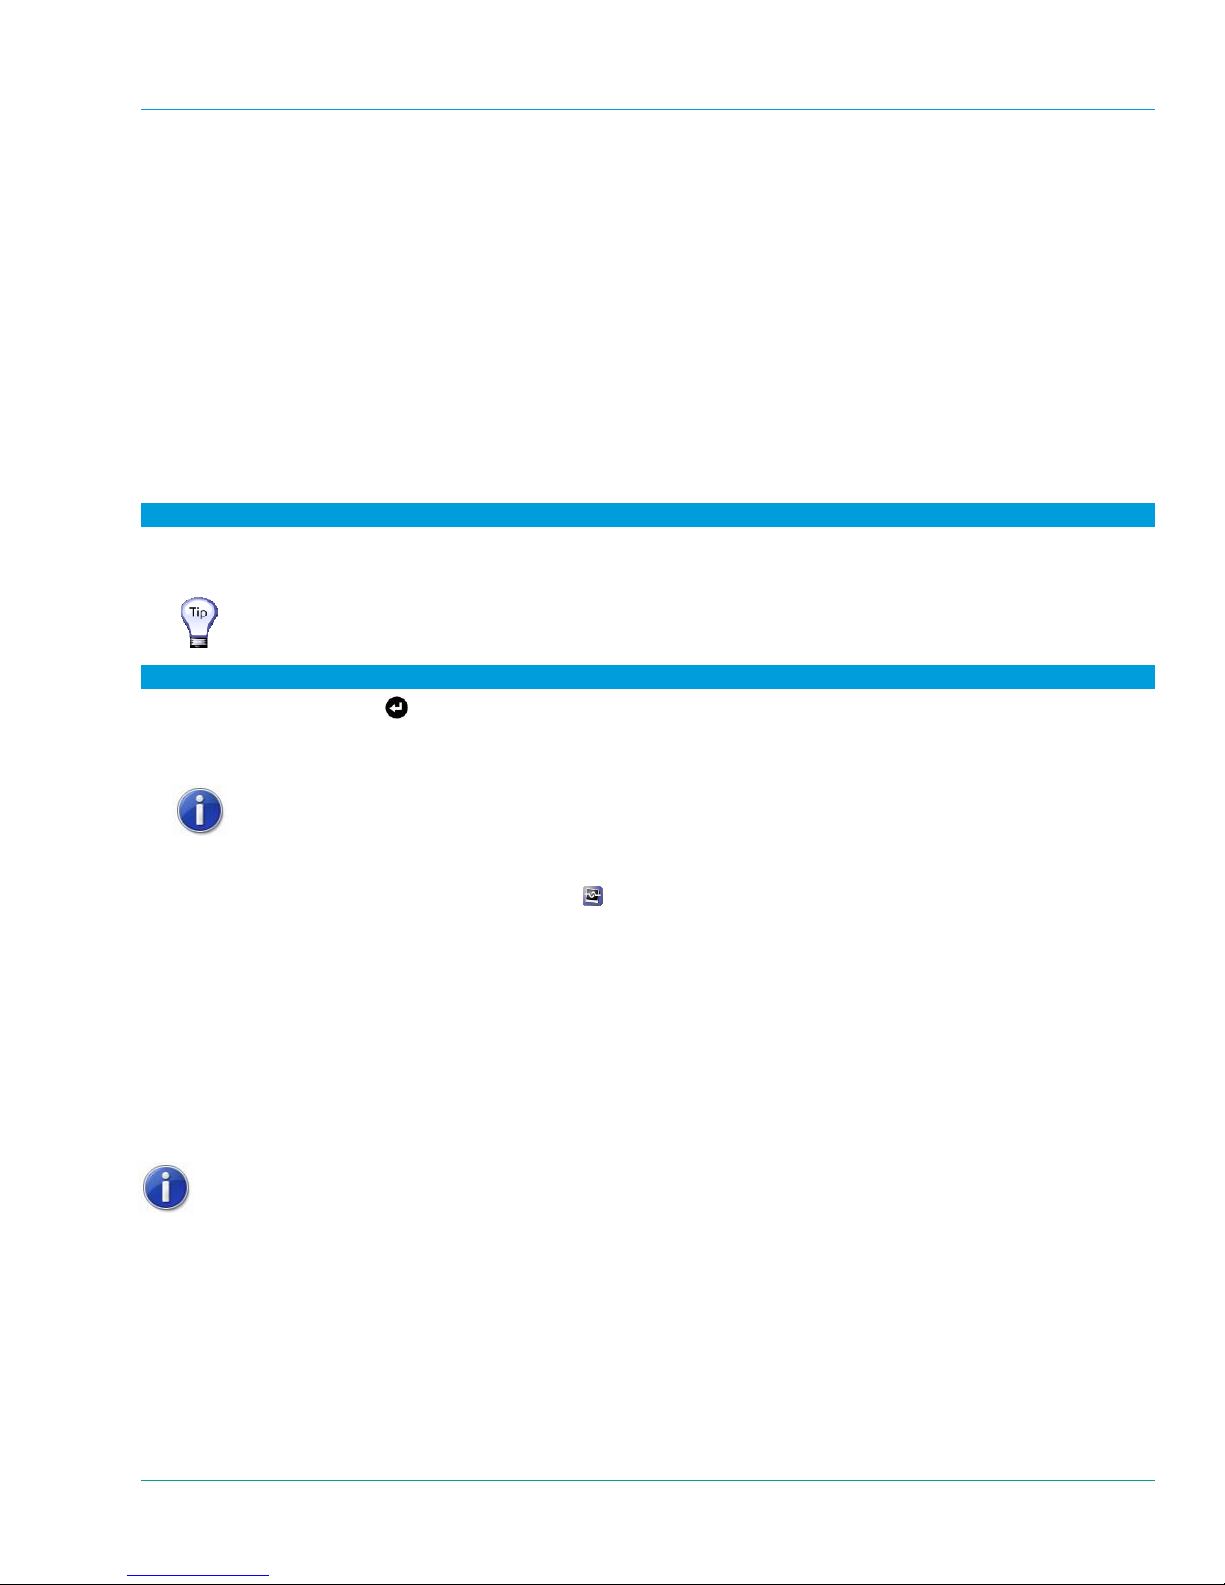
1. From the standard Viewfinder display window, press the Display button
three times (or until the Main
Menu appears).
2. Tap the Configuration option with the stylus to display the Configuration screen.
3. Select Audio and then select Source.
4. This screen allows selection of the Subject Audio Source and Microphone or Line-in level inputs. Select Mic
Level (Onsight 2000/2500 only) when using an external microphone. Use Line Level when using an external
audio source and then adjust the gain for the best Subject Audio volume. Select Internal Mic for the internal
microphone.
35
Page 41
Librestream Onsight 1000/2000/2500 User Manual Audio/Video (AV) Functions
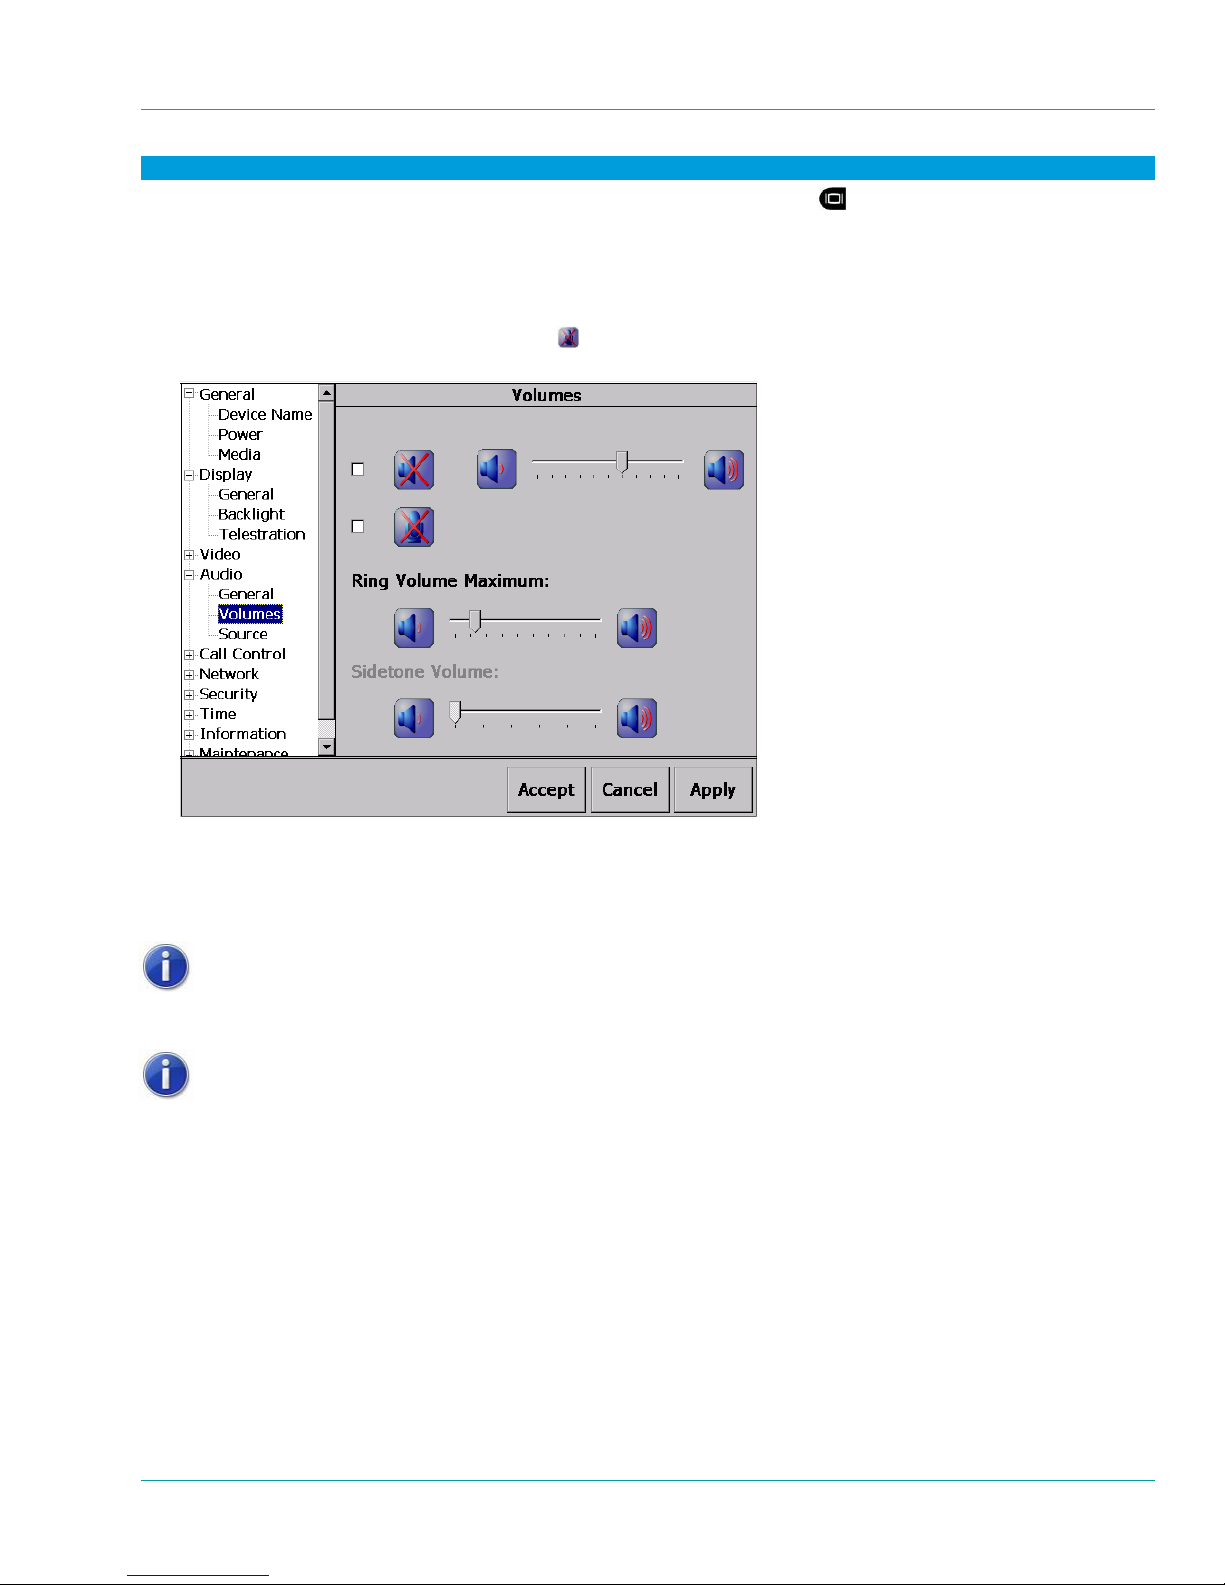
To set audio volume levels:
1. From the standard Viewfinder display window, press the Display button
three times (or until the Main
Menu appears).
2. Tap the Configuration option with the stylus to display the Configuration screen.
3. Select Audio and then select Volumes.
4. This screen allows you to control speaker volume and microphone mute, as well as ring volume and sidetone
volume. Note that if the microphone mute (
) checkbox is selected then both voice and subject audio are
muted.
5.3 Using S-Video
For the Onsight 2000/2500, the S-Video connection can be configured as either an input (to accept video from
another S-Video device) or an output (to provide video to another S-Video device). Most Onsight 1000 models
provide S-Video In only. For Onsight 1000 S-Video Out capability, please contact Librestream.
When using the S-Video input on the Onsight Device make sure to connect
and power up the other video source before switching the Onsight Device’s
Video Source setting to S-Video In.
For the Onsight 2000/2500, S-Video is only available on the I/O Sled
accessory. For more information on using the I/O Sled, see paragraph 1.7.3 on
page 10.
36
Page 42
Librestream Onsight 1000/2000/2500 User Manual Audio/Video (AV) Functions
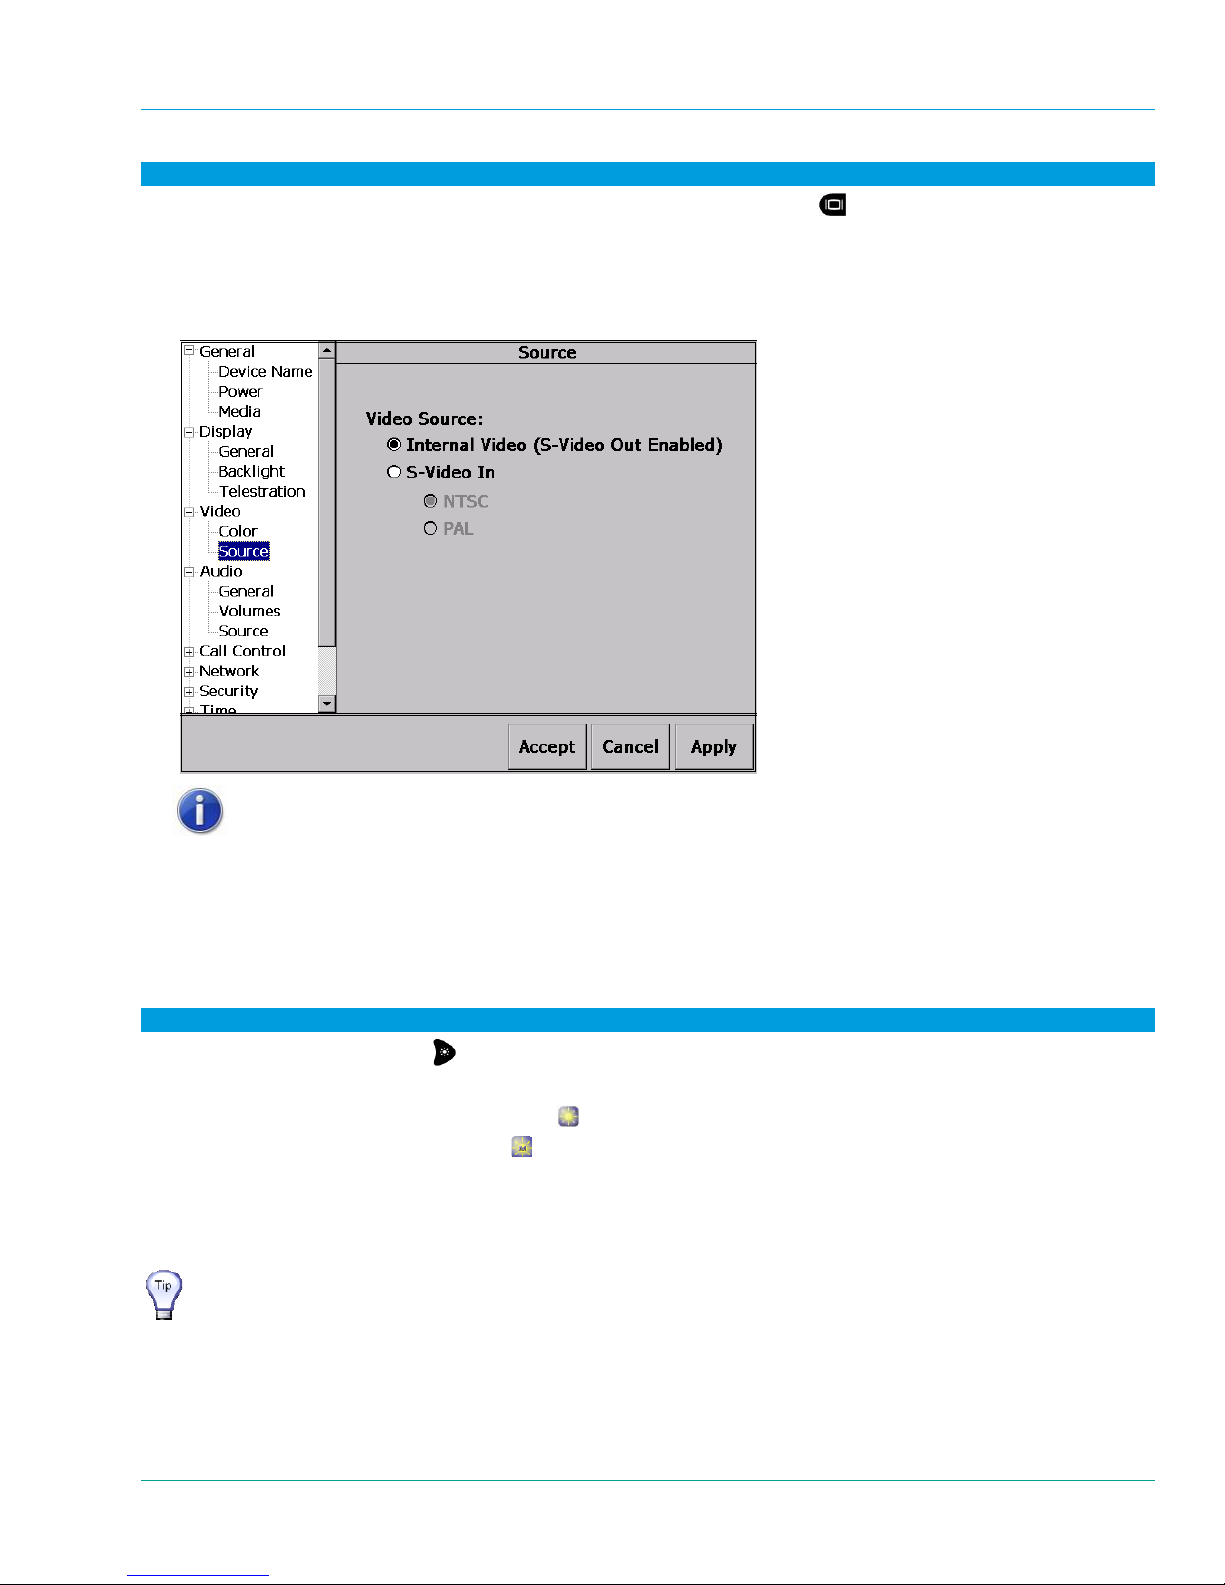
To select the video source:
1. From the standard Viewfinder display window, press the Display button
three times (or until the Main
Menu appears).
2. Tap the Configuration option with the stylus to display the Configuration screen.
3. Select Video and then select Source.
4. This screen allows you to select either Internal Video or S-Video In.
The S-Video type (NTSC or PAL) must be configured to correctly match the
external S-Video device.
5.4 Turning Illumination On or Off
The front illumination light on the Onsight 1000 can either be turned on or off.
The illumination ring on the Onsight 2000/2500 can be used to provide extra lighting in dim lighting situations.
There are two light settings that trigger a different set of lights on the illumination ring.
To adjust illumination levels:
1. Use the Illumination button
2. Toggle the light settings:
Normal – optimized for distant objects(
Macro – optimized for close-ups (
Off – turns the light off
Note that if the Onsight Device is displaying a configuration or directory screen, the Illumination button operates
as a right arrow key. In this case, press and hold the Function button (Onsight 2000/2500 only), then press the
Illumination button to adjust the light setting.
For the Onsight 2000/2500, go to the Main Menu > Status Menu > Camera
Status screen to adjust the level of illumination.
located on the Navigation pad on the back of the Onsight Device.
)
) (Onsight 2000/2500 only)
37
Page 43
Librestream Onsight 1000/2000/2500 User Manual Audio/Video (AV) Functions
5.5 Adjusting Zoom Levels
To adjust zoom levels:
1. Use the Zoom buttons
located above the Navigation pad on the back of the Onsight Device.
To adjust the zoom one step at a time, press and release the Minus (–) button (zoom out) or the Plus (+)
button (zoom in).
To adjust zoom levels at a faster rate, press and hold the Minus (–) or Plus (+) button, and release it
when the zoom level is where you need it.
The minimum focusing distance changes with the zoom level. As you zoom in, the minimum focus distance
moves out. For example, if you are close to an object and zoom in on it, the object will become out of focus if
you zoom in too far. The focus adjusts automatically when zooming unless the Onsight Device is in Manual
Focus mode.
2. If you need to get very close to your subject, set the zoom level to 1x (minimum zoom) and move the Onsight
Device until you reach the desired image size. This will ensure that you achieve the best focus.
5.6 Focusing
5.6.1 Automatic Focus
The Onsight Device normally operates in automatic focus mode and will focus on subjects centered in the
Viewfinder. Focus will continuously update as the distance between the subject and the lens changes or as zoom
is adjusted.
There are situations where manual control is desired to fine tune the focus, particularly for objects not centered in
the Viewfinder. Manual focus control is described in paragraph 5.6.2, Manual Focus, on page 38.
Note that zo
om and focus controls are available regardless of whether the Viewfinder is currently displayed.
5.6.2 Manual Focus
To set the focus manually:
1. Use the Zoom buttons
in combination with the Manual Focus button.
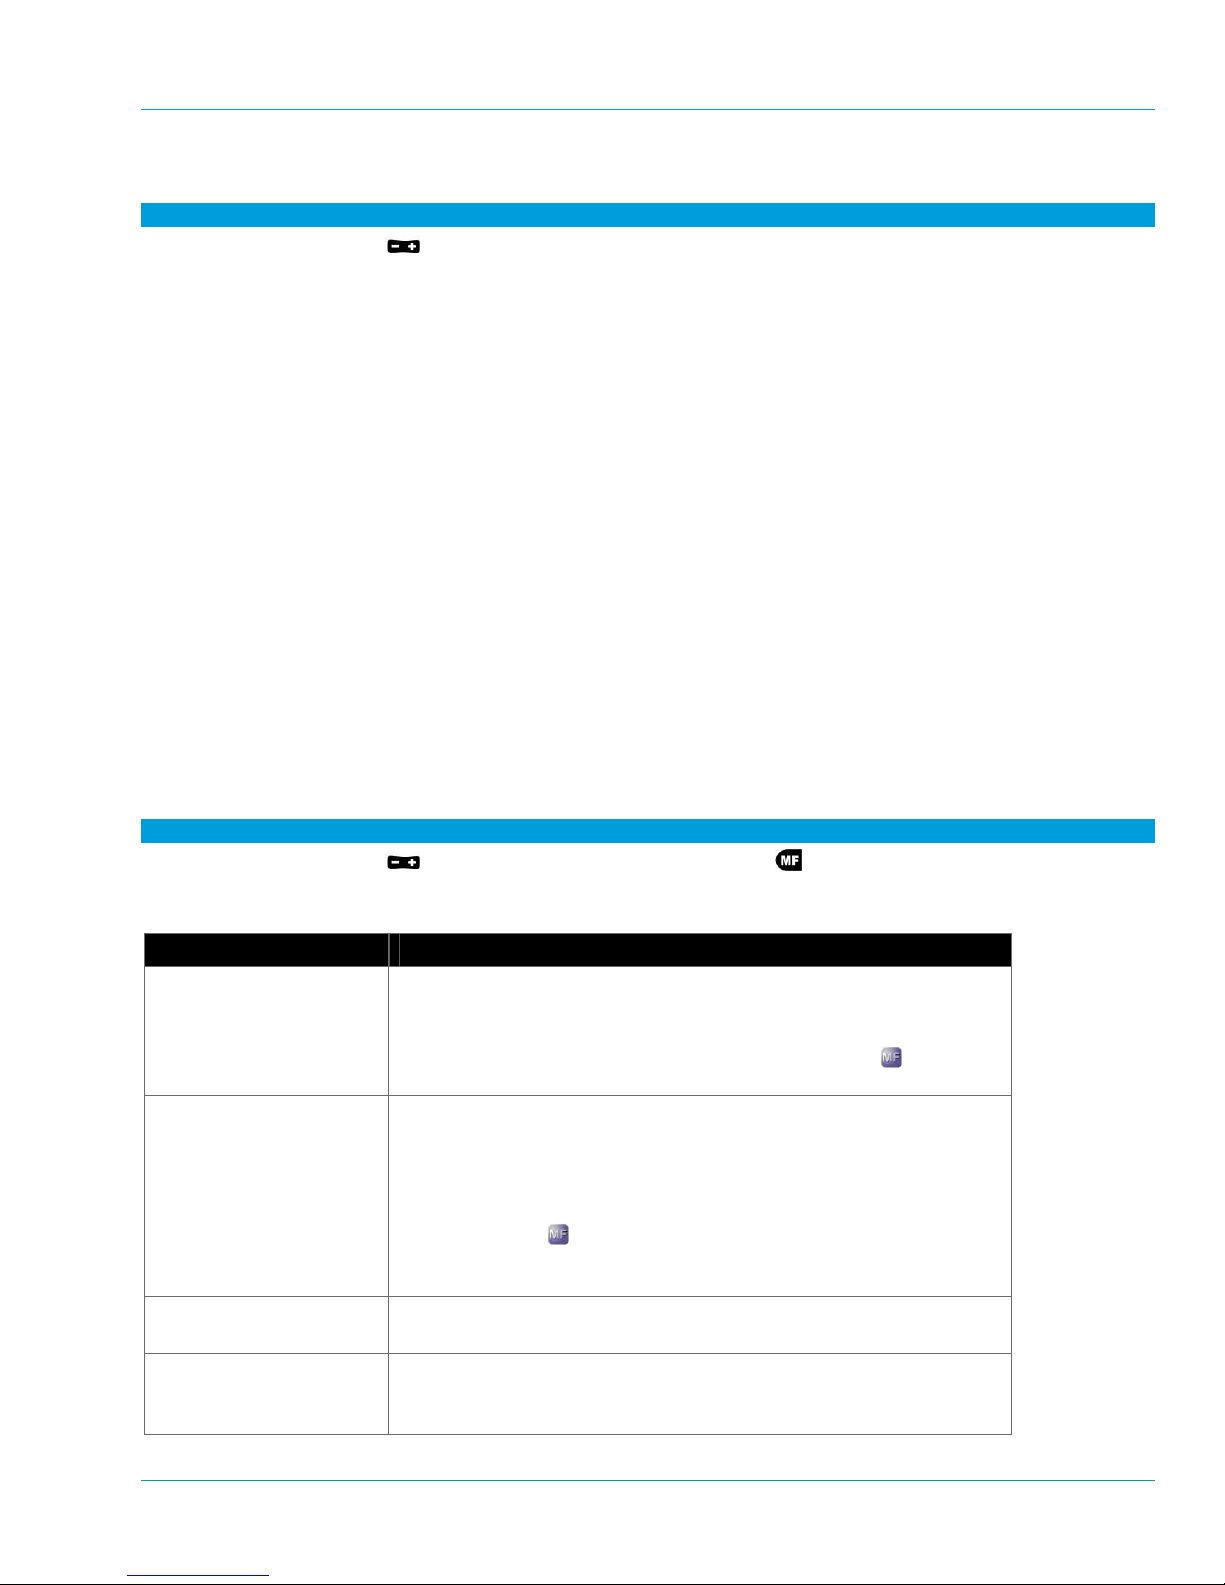
2. Refer to the table below for an explanation of the various manual focus options:
Manual focus options Instruction
Switch to manual focus and
increase or decrease
manual focus by one step.
Switch to manual focus and
increase or decrease
manual focus at a standard
rate.
Switch from manual focus
to automatic focus mode.
Set a temporary focus lock.
While pressing and holding the Manual Focus button, press and release a
Plus (+) or Minus (–) button once. When you release the Manual Focus
button, the Onsight Device remains in manual focus mode, locked at the
focus level you set. Note that the Manual Focus Mode icon now
appears on the screen.
While pressing and holding the Manual Focus button, press and hold a
Plus (+) or Minus (–) button until you reach the setting you want. Then
release the buttons. When you release the Manual Focus button, the
Onsight Device remains in manual focus mode, locked at the focus level
you set. Note that if you are already in manual focus mode (the Manual
Focus Mode icon
to hold down the Manual Focus button while using the Plus (+) or Minus
(–) buttons.
Press and release Manual Focus button without pressing Plus (+) or
Minus (–).
Press and hold Manual Focus button without pressing Plus (+) or Minus
(–). The focus stays locked for as long as you continue to hold the Manual
Focus button. Automatic focus mode resumes when you release it.
will be shown on the screen), then it is not necessary
38
Page 44
Librestream Onsight 1000/2000/2500 User Manual Audio/Video (AV) Functions
5.7 Telestration (Drawing Lines on the Viewfinder)
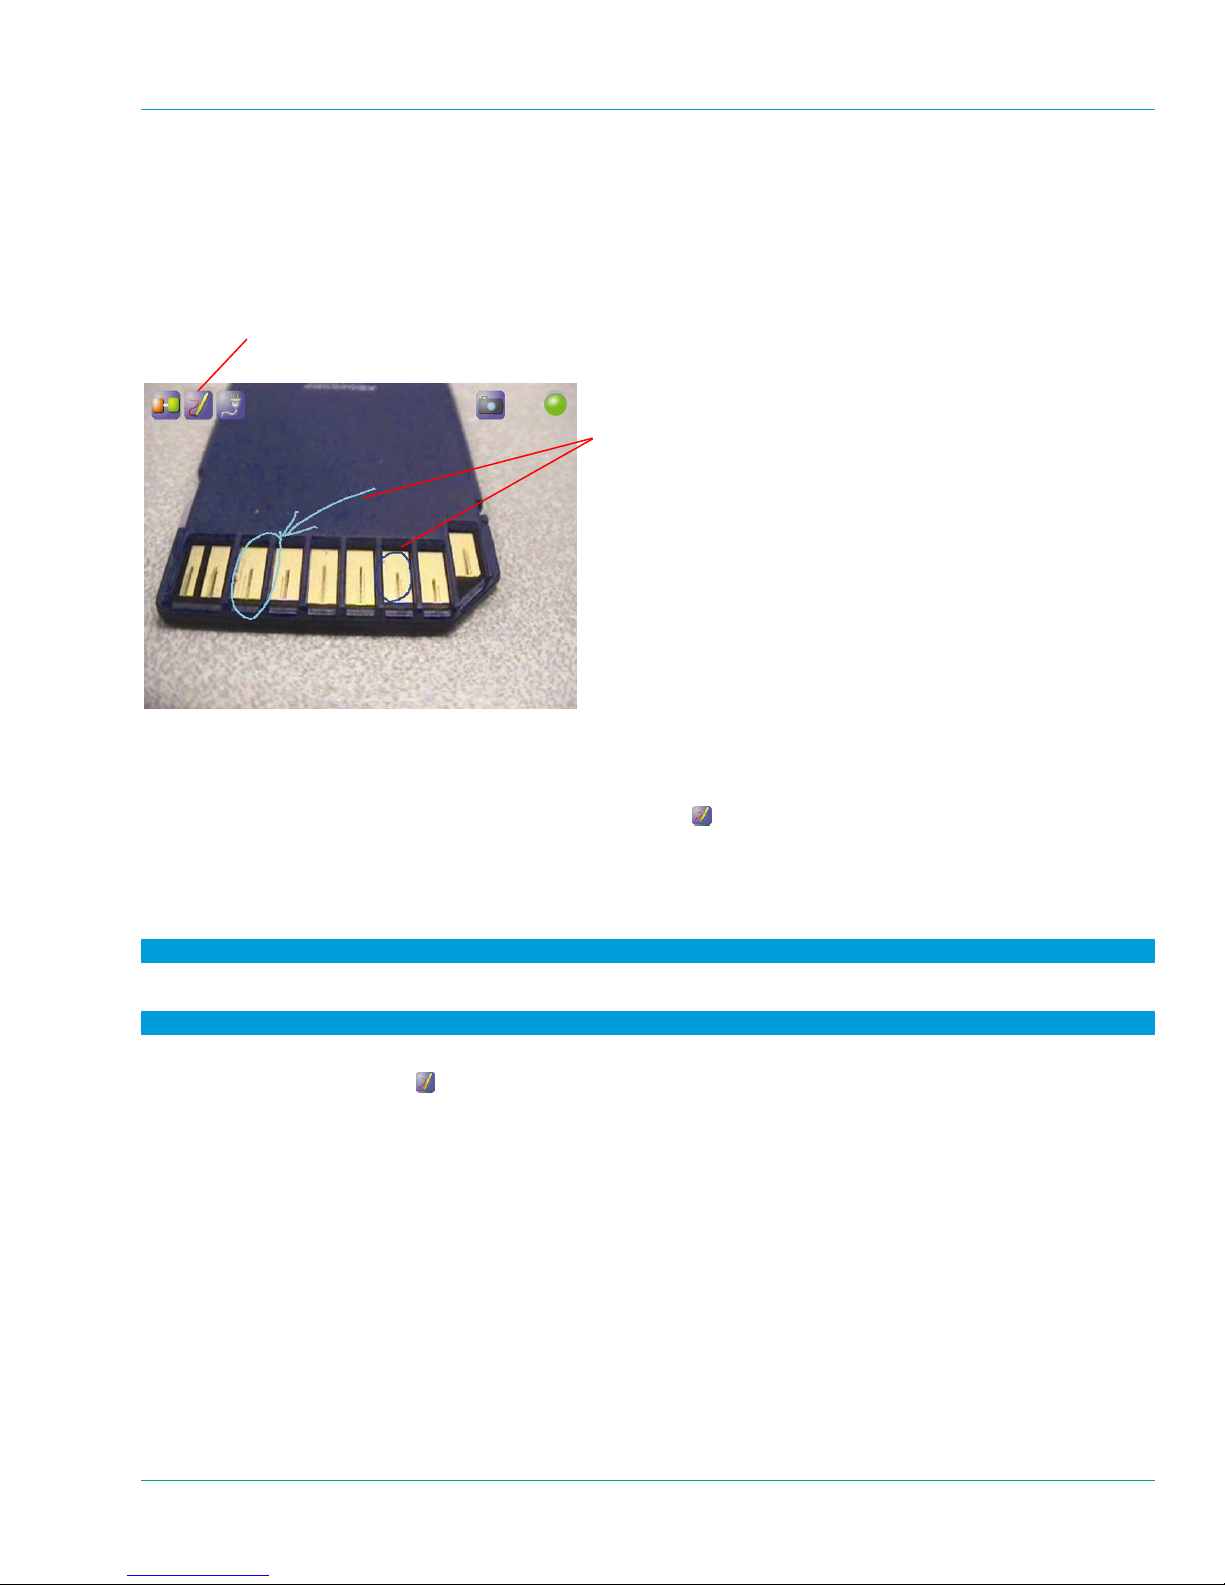
Telestration permits the Onsight Device operator or the Onsight Connect user to draw freehand lines on a still
image, recording, or live media stream using the stylus. Telestration markings appear simultaneously on both the
Onsight Device and the Onsight Connect user’s display. The system is configured so that lines drawn by the
Onsight Device operator and the Onsight Connect users appear in different colors.
Tap the
remove existing telestration lines.
Telestration
icon to show, hide, or
Lines drawn by the operator
appear in a different color
from lines drawn by the
Onsight Expert user.
Telestration is available on the Viewfinder on both streaming media and still images. It is disabled if the
Viewfinder is hidden (e.g. in the configuration or directory screens).
Once telestration lines have been added, a Telestration icon
appears in the Viewfinder.
5.7.1 Telestration while Streaming Live Video
Telest
ration can be made prior to or during streaming. Once streaming begins, any telestration made prior to the
start of streaming will be seen by the Onsight Connect call participants.
To start live streaming:
1. Press the green Share button on the top of the Onsight Device to start streaming video.
To display the Telestration menu:
1. Ensure that there is telestration on the viewfinder.
2. Tap the Telestration icon
.
39
Page 45
Librestream Onsight 1000/2000/2500 User Manual Audio/Video (AV) Functions
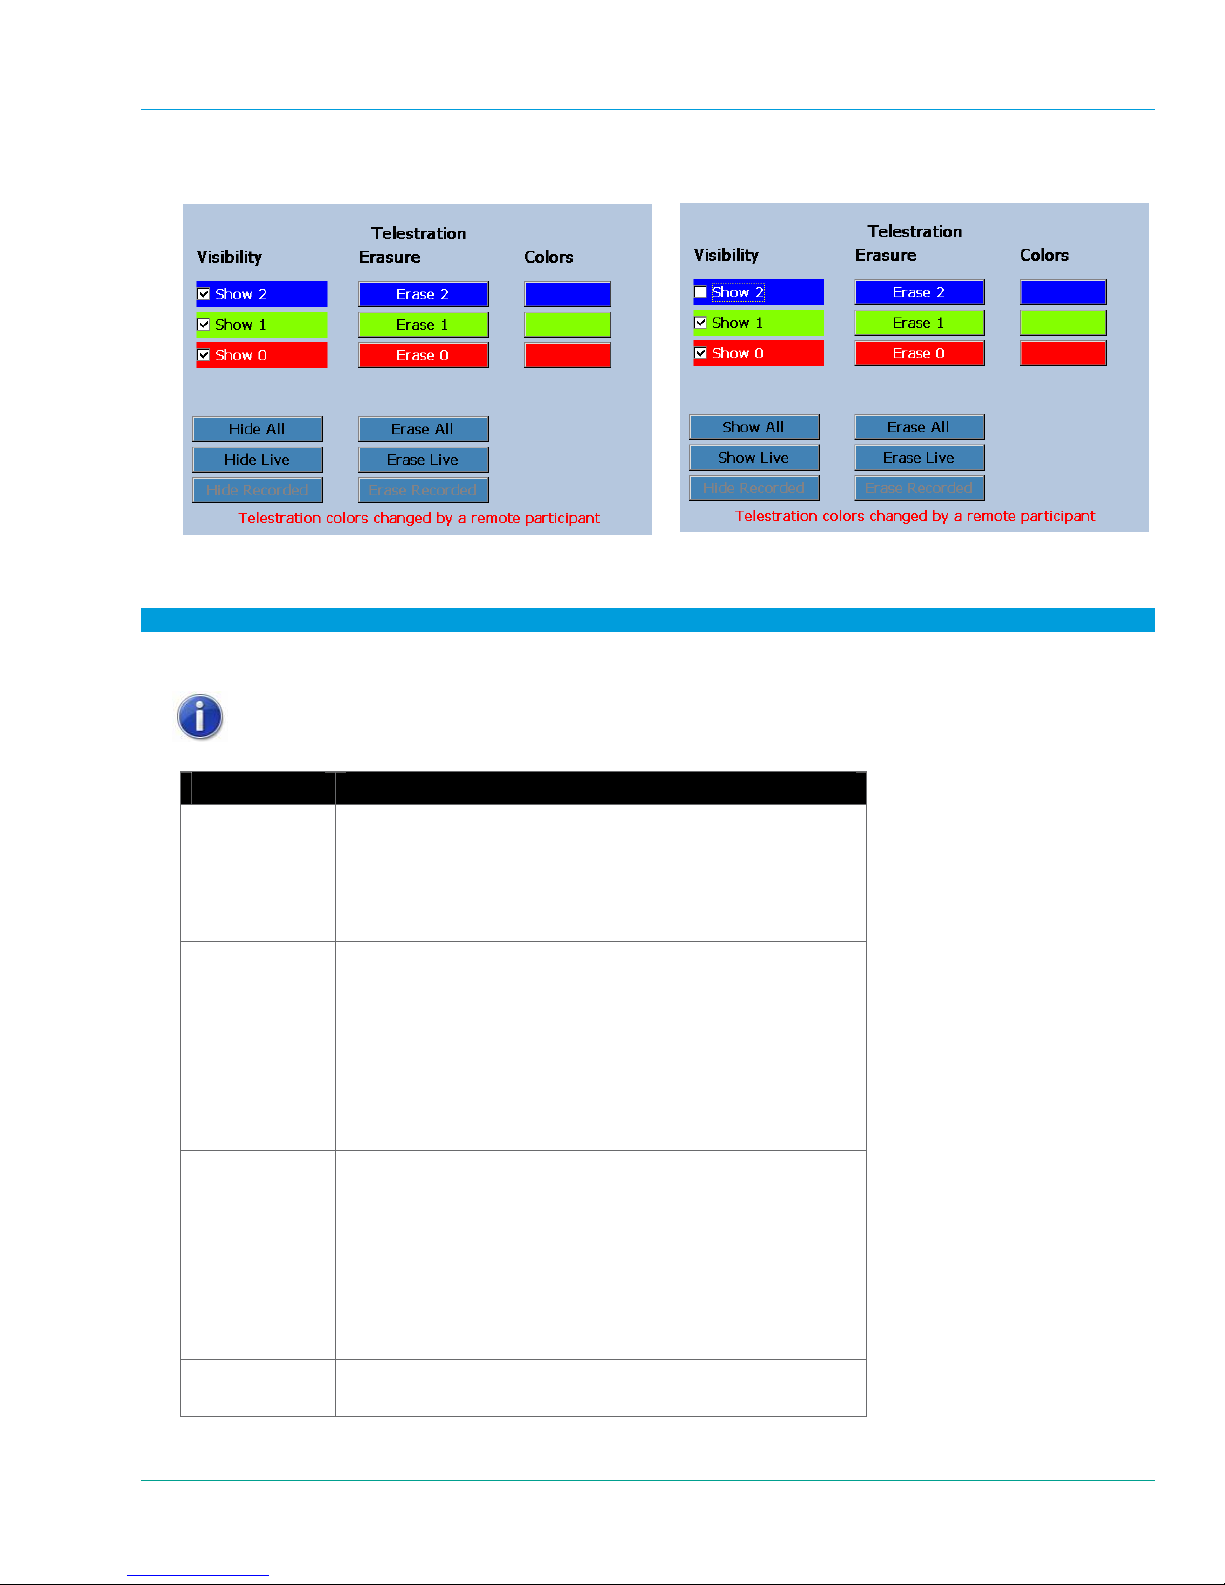
3. Options in the menu allow you to select which telestration lines to show or hide and which lines to erase.
All call participants selected
(note the
Hide All
and
Hide Live
options)
Not all call participants selected
(note the
Show All
and
Show Live
options)
To change telestration visibility preferences:
1. Click on the checkbox next to the user to enable telestration visibility. The initial default state is that all
participants are checked ().
Showing or Hiding telestration is specific to the local device user. The
telestration on Onsight Connect will not be affected.
Visibility Result
Show 2
Show 1
Show 0 Show 0 is an Onsight Connect participant in the conference call
Hide All If Hide All is selected, all telestration is removed from the
Show 2 is the device user in this example.
If the checkbox has been selected (), the live telestration by
the device user will be shown on the Viewfinder.
If the checkbox has not been selected (), the live telestration
by the device user will not be shown on the Viewfinder.
Show 1 is the Onsight Connect conference host in this
example.
If the checkbox has been selected (), the live telestration by
the Onsight Connect conference host will be shown on the
Viewfinder.
If the checkbox has not been selected (), the live telestration
by the Onsight Connect conference host will not be shown on
the Viewfinder.
in this example.
If the checkbox has been selected (), the live telestration by
the Onsight Connect participant will be shown on the
Viewfinder.
If the checkbox has not been selected (), the live telestration
by the Onsight Connect participant will not be shown on the
Viewfinder.
Viewfinder.
40
Page 46
Librestream Onsight 1000/2000/2500 User Manual Audio/Video (AV) Functions
Visibility Result
Hide Live If Hide Live is selected, all live telestration is removed from the
Viewfinder.
Show All If Show All is selected, all telestration is shown on the
Viewfinder.
Show Live If Show Live is selected, all live telestration is shown on the
Viewfinder.
To select erase telestration preferences:
1. Tap the button of the participant in the Erasure column.
Erasing telestration affects all call participants.
Erasure Result
Erase 2
Erase 1
Erase 0 Erase 0 is an Onsight Connect participant in the conference call
Erase All If Erase All is selected, all telestration is erased.
Erase Live If Erase Live is selected, all live telestration is erased.
Erase 2 is the device user in this example.
If Erase 2 is selected, all device user telestration is erased.
Erase 1 is the Onsight Connect conference host in this
example.
If Erase 1 is selected, all Onsight Connect conference host
telestration is erased.
in this example.
If Erase 0 is selected, all telestration of the Onsight Connect
participant is erased.
5.7.2 Telestration while Sharing Recorded Video
To start streaming recorded video:
1. See paragraph 5.9.3, Sharing a Video Recording, on page 51.
To display the Telestration menu:
1. Ensure that there is telestration on the viewfinder.
2. Tap the Telestration icon
.
41
Page 47
Librestream Onsight 1000/2000/2500 User Manual Audio/Video (AV) Functions
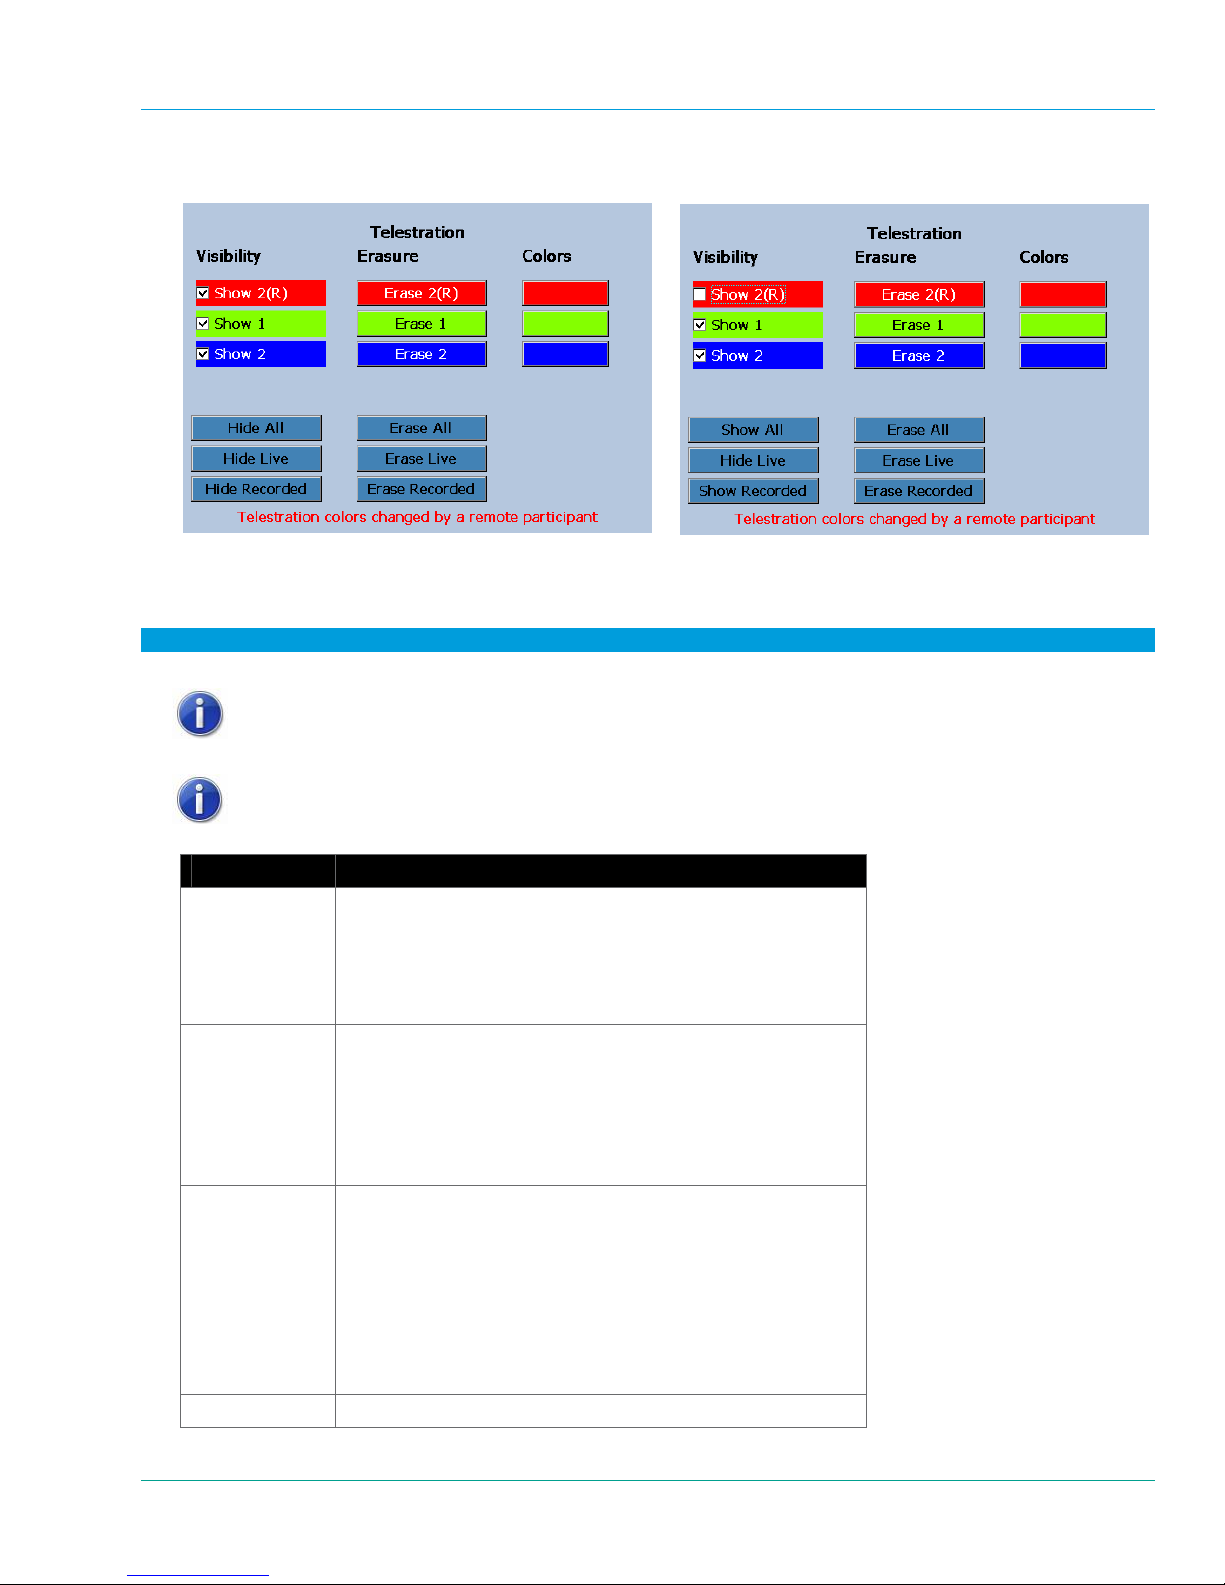
3. Options in the menu allow you to select which telestration lines to show or hide and which lines to erase.
All call participants selected
(note the
Hide All, Hide Live
, and
Hide Recorded
options)
Not all call participants selected
(note the
options)
Show All, Hide Live
To change telestration visibility preferences for a recorded video:
1. Click on the checkbox next to the user to enable telestration visibility.
Showing or Hiding telestration is specific to the local device user. The
telestration on Onsight Connect will not be affected.
Erasing telestration on a recorded video is not permanent.
Visibility Result
Show 2
Show 2(R)
Show 1
Hide All If Hide All is selected, all telestration is removed from the
Show 2 is the device user in this example.
If the checkbox has been selected (), the live telestration by
the device user will be shown on the Viewfinder.
If the checkbox has not been selected (), the live telestration
by the device user will not be shown on the Viewfinder.
Show 2(R) is the device user in this example.
If the checkbox has been selected (), the recorded telestration
by the device user will be shown on the Viewfinder.
If the checkbox has not been selected (), the recorded
telestration by the device user will not be shown on the
Viewfinder.
Show 1 is the Onsight Connect conference host in this
example.
If the checkbox has been selected (), the live telestration by
the Onsight Connect conference host will be shown on the
Viewfinder.
If the checkbox has not been selected (), the live telestration
by the Onsight Connect conference host will not be shown on
the Viewfinder.
, and
Show Recorded
42
Page 48
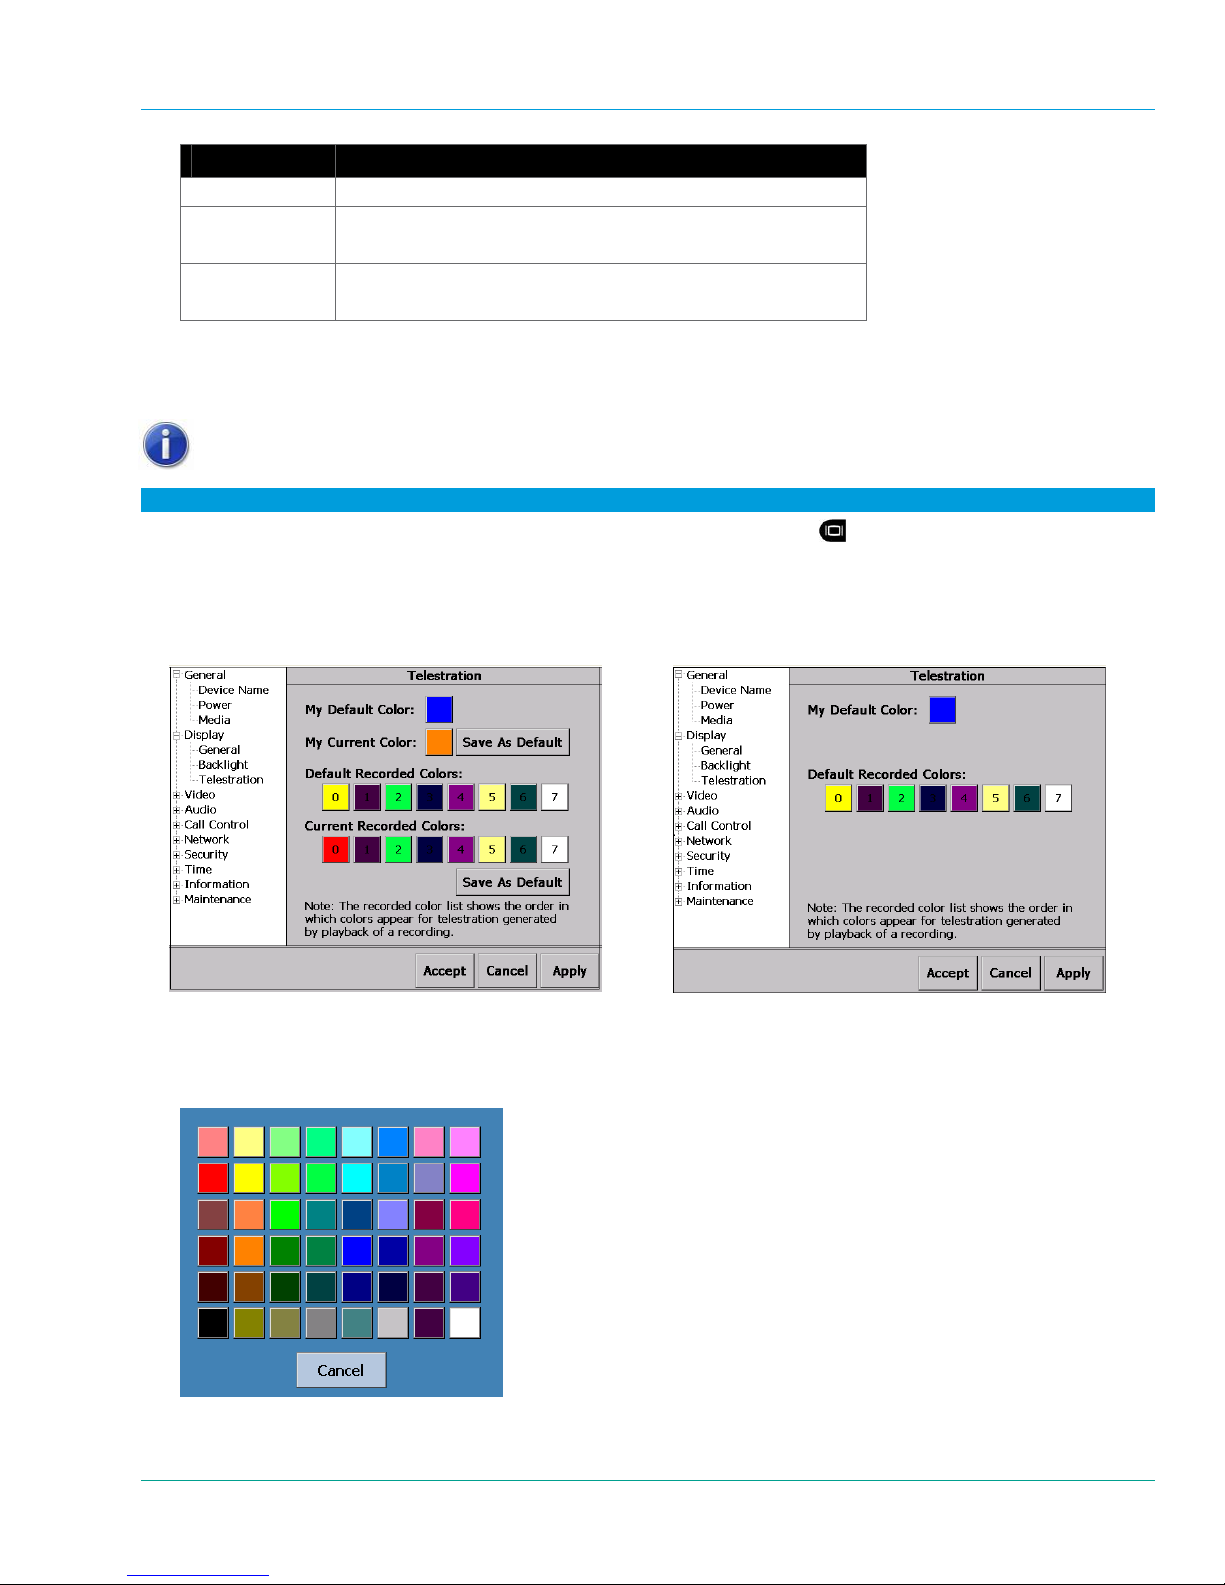
Librestream Onsight 1000/2000/2500 User Manual Audio/Video (AV) Functions
Visibility Result
Viewfinder.
Hide Live If Hide Live is selected, all live telestration is removed from the
Viewfinder.
Hide Recorded If Hide Recorded is selected, all recorded telestration is
removed from the Viewfinder.
5.7.3 Telestration Colors
Telestration colors can be changed by using the Configuration menu, the Telestration icon, or the Call Status
screen. They can be edited for all call participants.
The color changes are also updated to the same colors on all call participants.
To change color preferences using the menus:
1. From the standard Viewfinder display window, press the Display button
three times (or until the Main
Menu appears).
2. Tap Configuration.
3. Tap Display and then Telestration.
4. The Telestration screen appears.
My Current Color
shown if there was a color change made from the default
color.
and
Current Recorded Colors
are
My Current Color
shown
color.
there is a color change made from the default
until
and
Current Recorded Colors
5. Tapping a color will bring up a Colors palette from which a new color can be selected.
43
are
not
Page 49
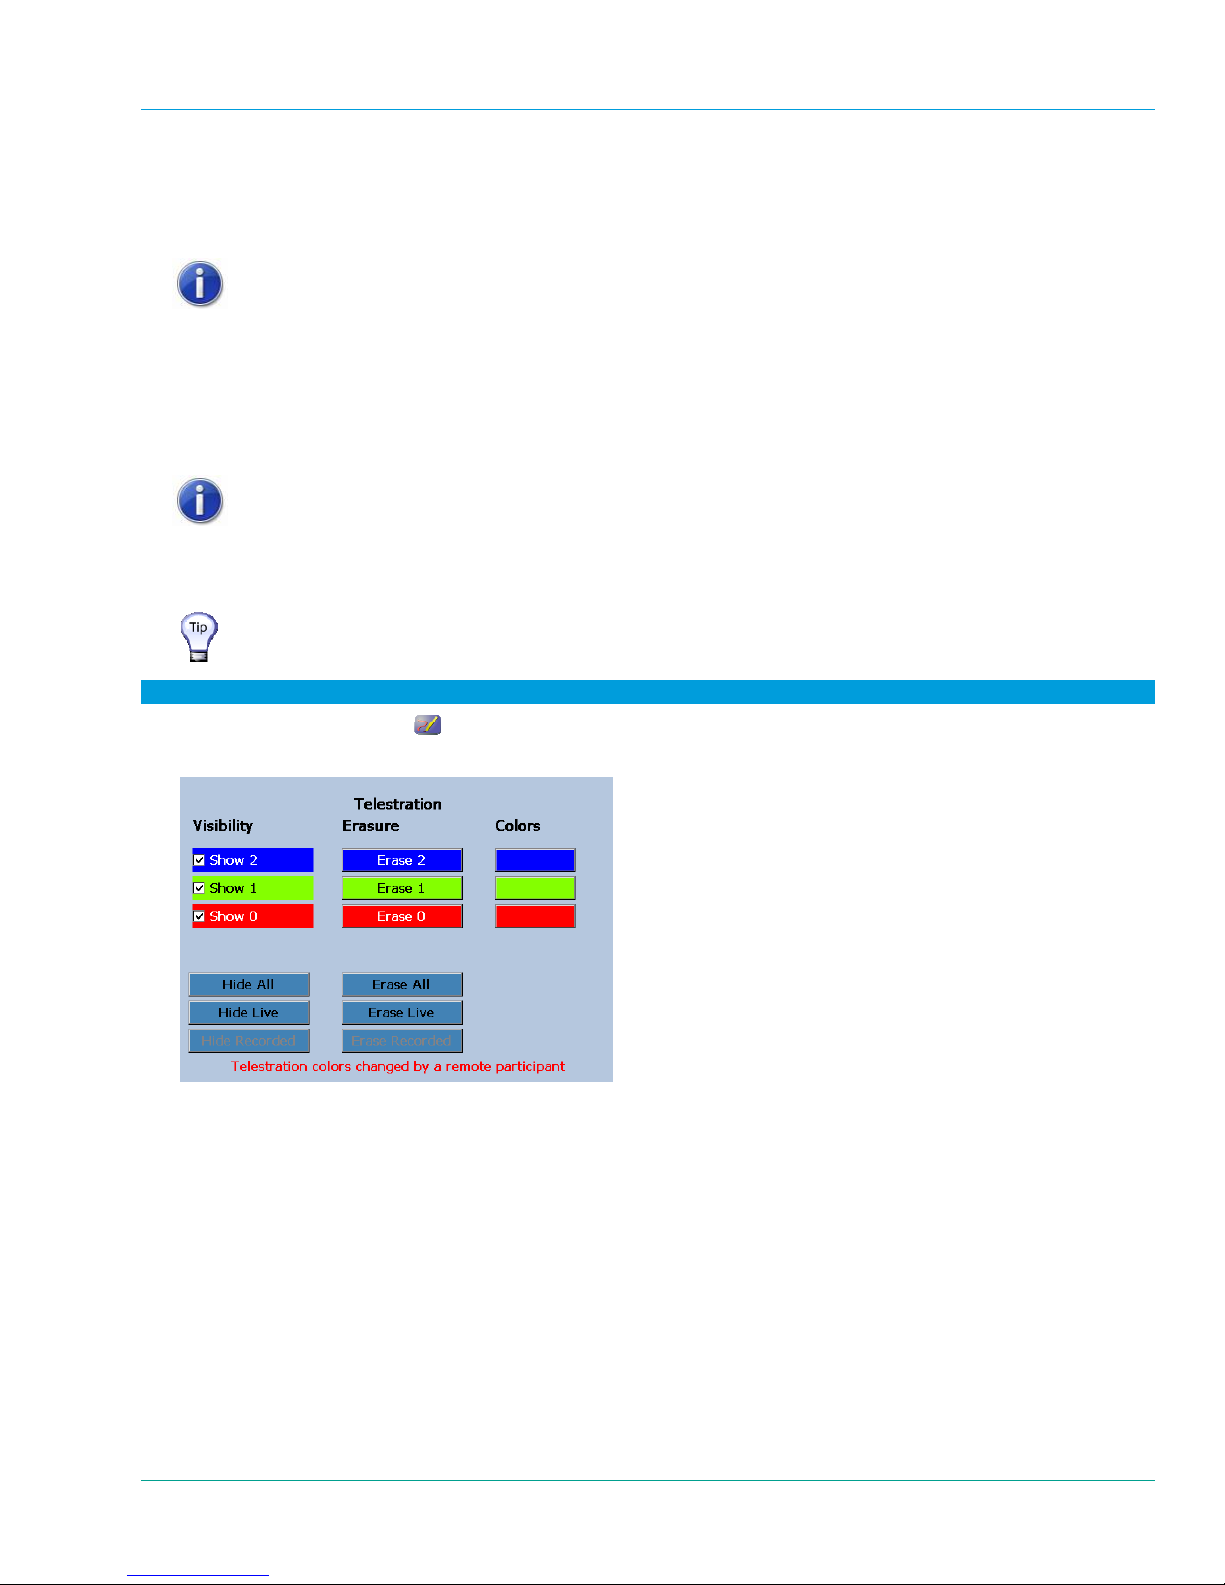
Librestream Onsight 1000/2000/2500 User Manual Audio/Video (AV) Functions
6. Any color change made to My Default Color becomes the new default color. Alternatively, the My Default
Color can be changed to a new default color by selecting Save As Default for My Current Color:
My Default Color becomes the new default color if it is changed.
My Current Color becomes My Default Color if Save As Default is selected.
If an endpoint changes your color (My Current Color), this is only a temporary
color change, and your color will revert back to the default color when the call
is disconnected, unless Save As Default has been selected.
7. Any color change made to Default Recorded Colors becomes the new default color. Alternatively, the
Default Recorded Colors can be changed to a new default recorded color by selecting Save As Default for
Current Recorded Colors:
Default Recorded Colors becomes the new default color if it is changed.
Current Recorded Colors becomes Default Recorded Colors if Save As Default is selected.
If an endpoint changes the current recorded color (Current Recorded
Colors), this is only a temporary color change, and the color will revert back to
the default recorded color (Default Recorded Colors) when the call is
disconnected, unless Save As Default has been selected.
8. Select Accept, Cancel, or Apply.
If you want to accept the change in color, but wish to stay in the Telestration
screen, then Apply should be selected.
To change color preferences using the Telestration icon:
1. Tap the Telestration icon
.
2. The Telestration screen appears.
3. Tap the desired Colors button.
44
Page 50
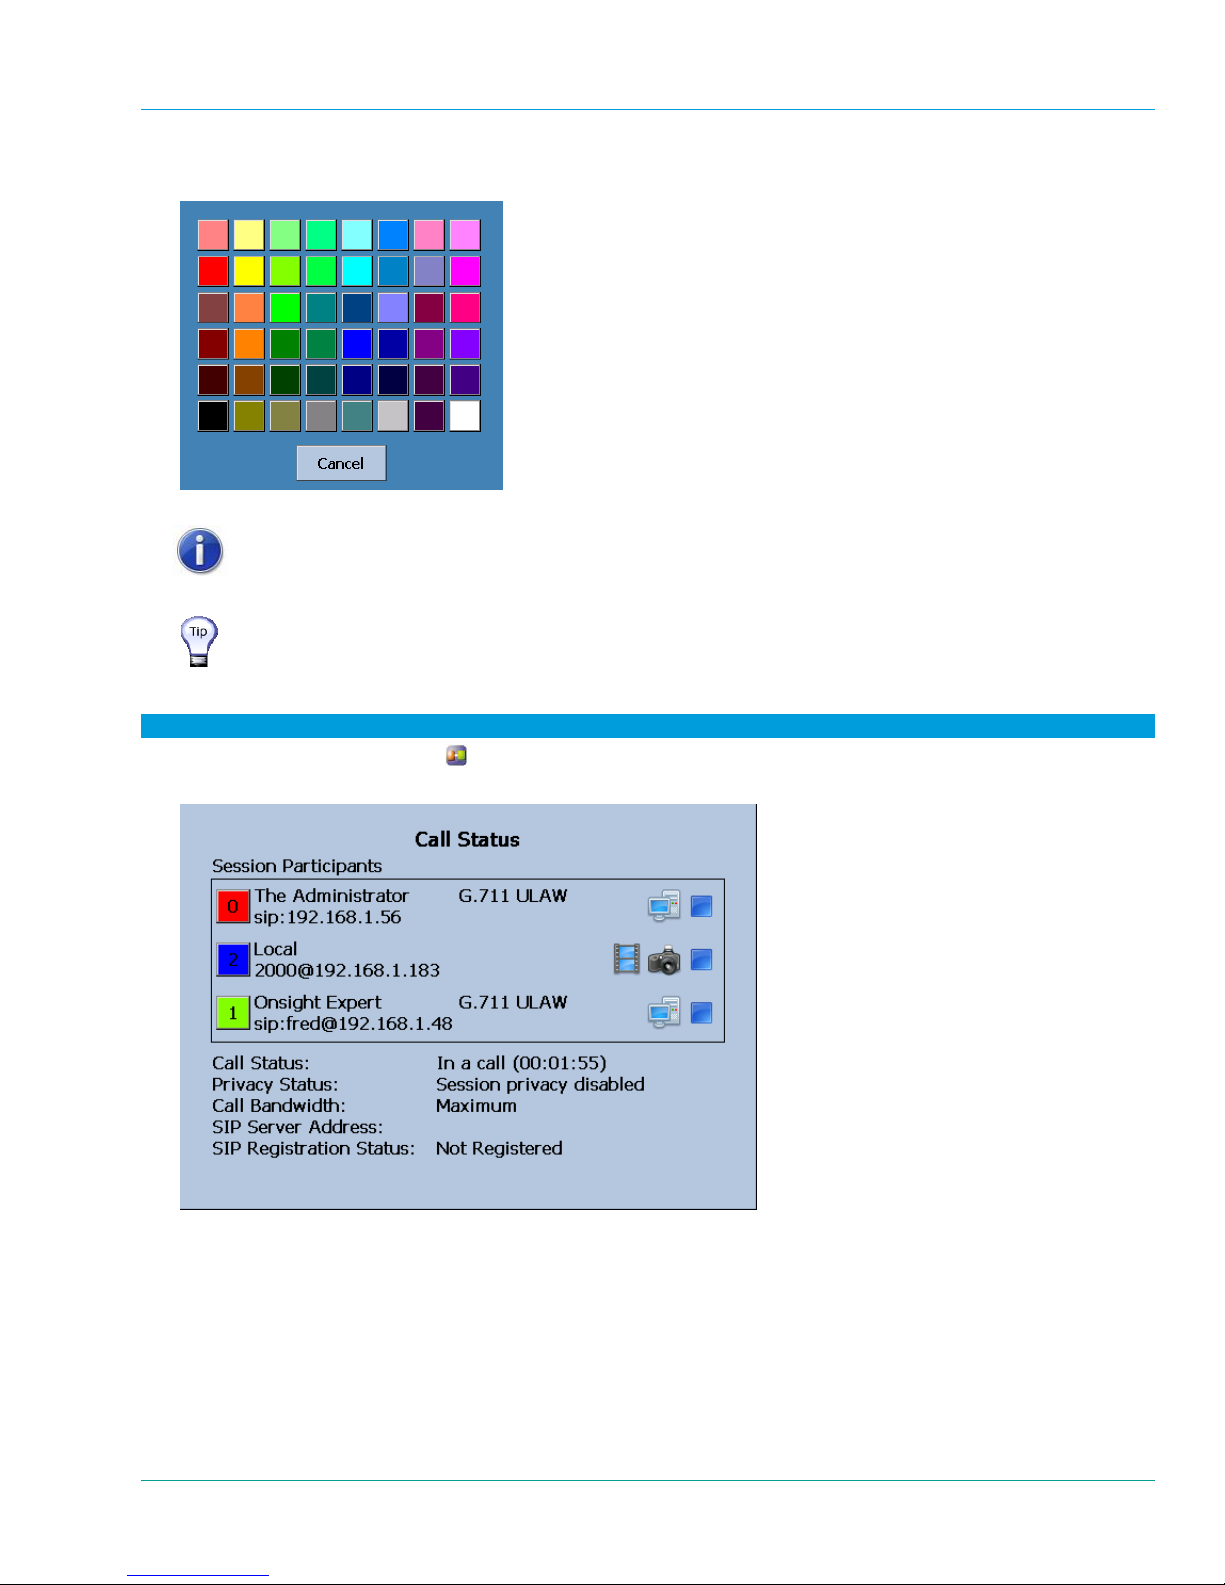
Librestream Onsight 1000/2000/2500 User Manual Audio/Video (AV) Functions
4. Tapping a color will bring up a Colors palette from which a new color can be selected for the selected call
participant.
5. To save the color change, tap the Telestration Colors screen.
When the call is disconnected, the color will revert back to the default color.
To save the color change as a default color, use the Main Menu >
Configuration > Display >Telestration screen.
To change the color preference using the Call Status screen:
1. Tap the Call Connected icon
.
2. The Call Status screen appears with information on all call participants.
45
Page 51
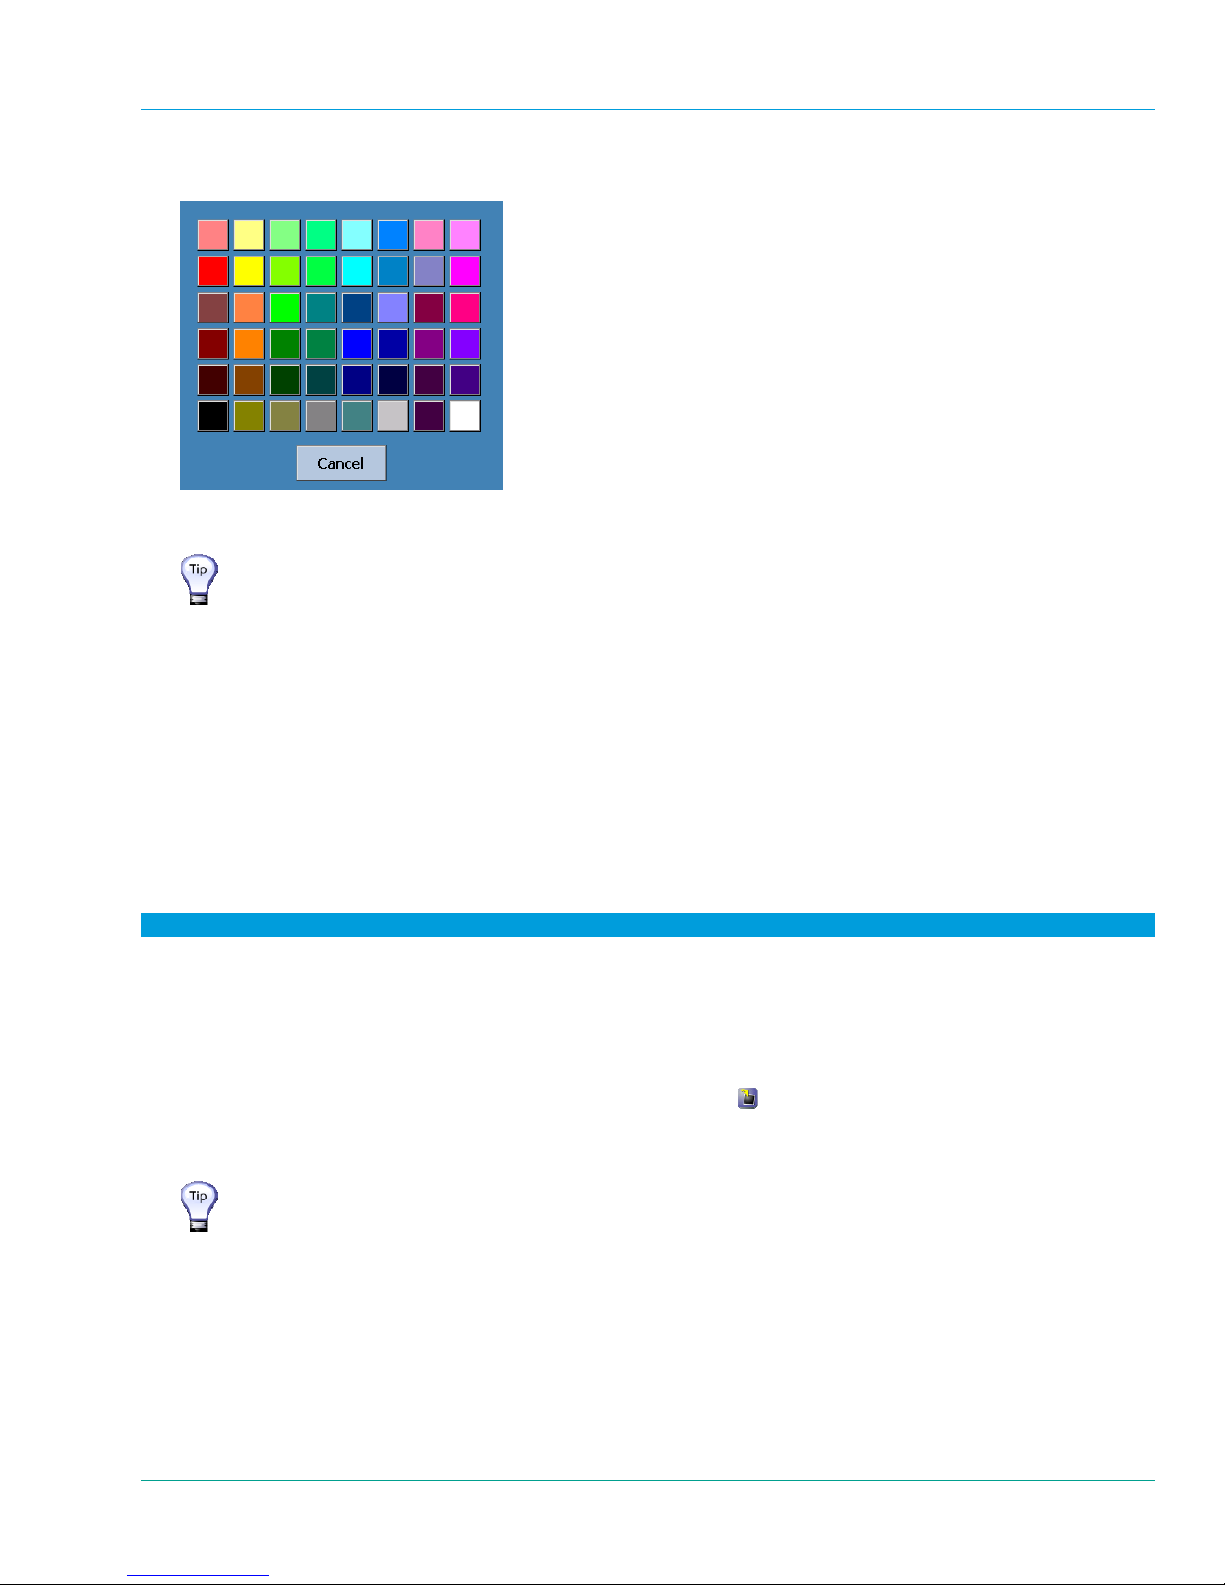
Librestream Onsight 1000/2000/2500 User Manual Audio/Video (AV) Functions
3. Tapping a color will bring up a Colors palette from which a new color can be selected for the selected call
participant.
4. The color change is temporary. The default colors will re-appear when in a new call, or if the Onsight device is
powered on again.
To save your color change as a default color, use the Main Menu >
Configuration > Display >Telestration screen.
5.8 Capturing and Sharing Images
The Onsight Device can capture still images for local viewing; share the captured image live with Onsight Connect
(see paragraph 5.8.2, Sharing a Live Image, on page 47); or share a captured image with Onsight Connect at a
later time (se
oints in a conference call.
endp
Images shared during a session while privacy is enabled are maintained in transient storage and are never written
to permanent storage. While a call is active, images are accessible in the temporary storage area within the
image viewing window. When the call is terminated all temporary images are destroyed.
e paragraph 5.8.3, Sharing a Saved Image, on page 49). Shared images can be seen by all
5.8.1 Capturing Still Images for Local Viewing Only
To capture a still image without sharing:
1. Ensure you are disconnected from Onsight Connect.
2. Press the Capture button on the top of the Onsight Device (the Capture button behaves like the shutter
button on a digital camera).
Note that if there are telestration lines, these are captured as part of the image.
3. The captured image is displayed briefly on the Viewfinder and then cleared.
4. To view the image taken, tap on the Start Image Display icon
.
5. The message “Image display started” appears and the image is displayed on the Viewfinder.
6. The image is saved locally in the session folder on the SD card.
If you want to view the captured image immediately on the Viewfinder, press
and hold the Capture button for a few seconds when taking the picture. The
message “Image display started” will appear and the still image will remain
on the Viewfinder.
46
Page 52
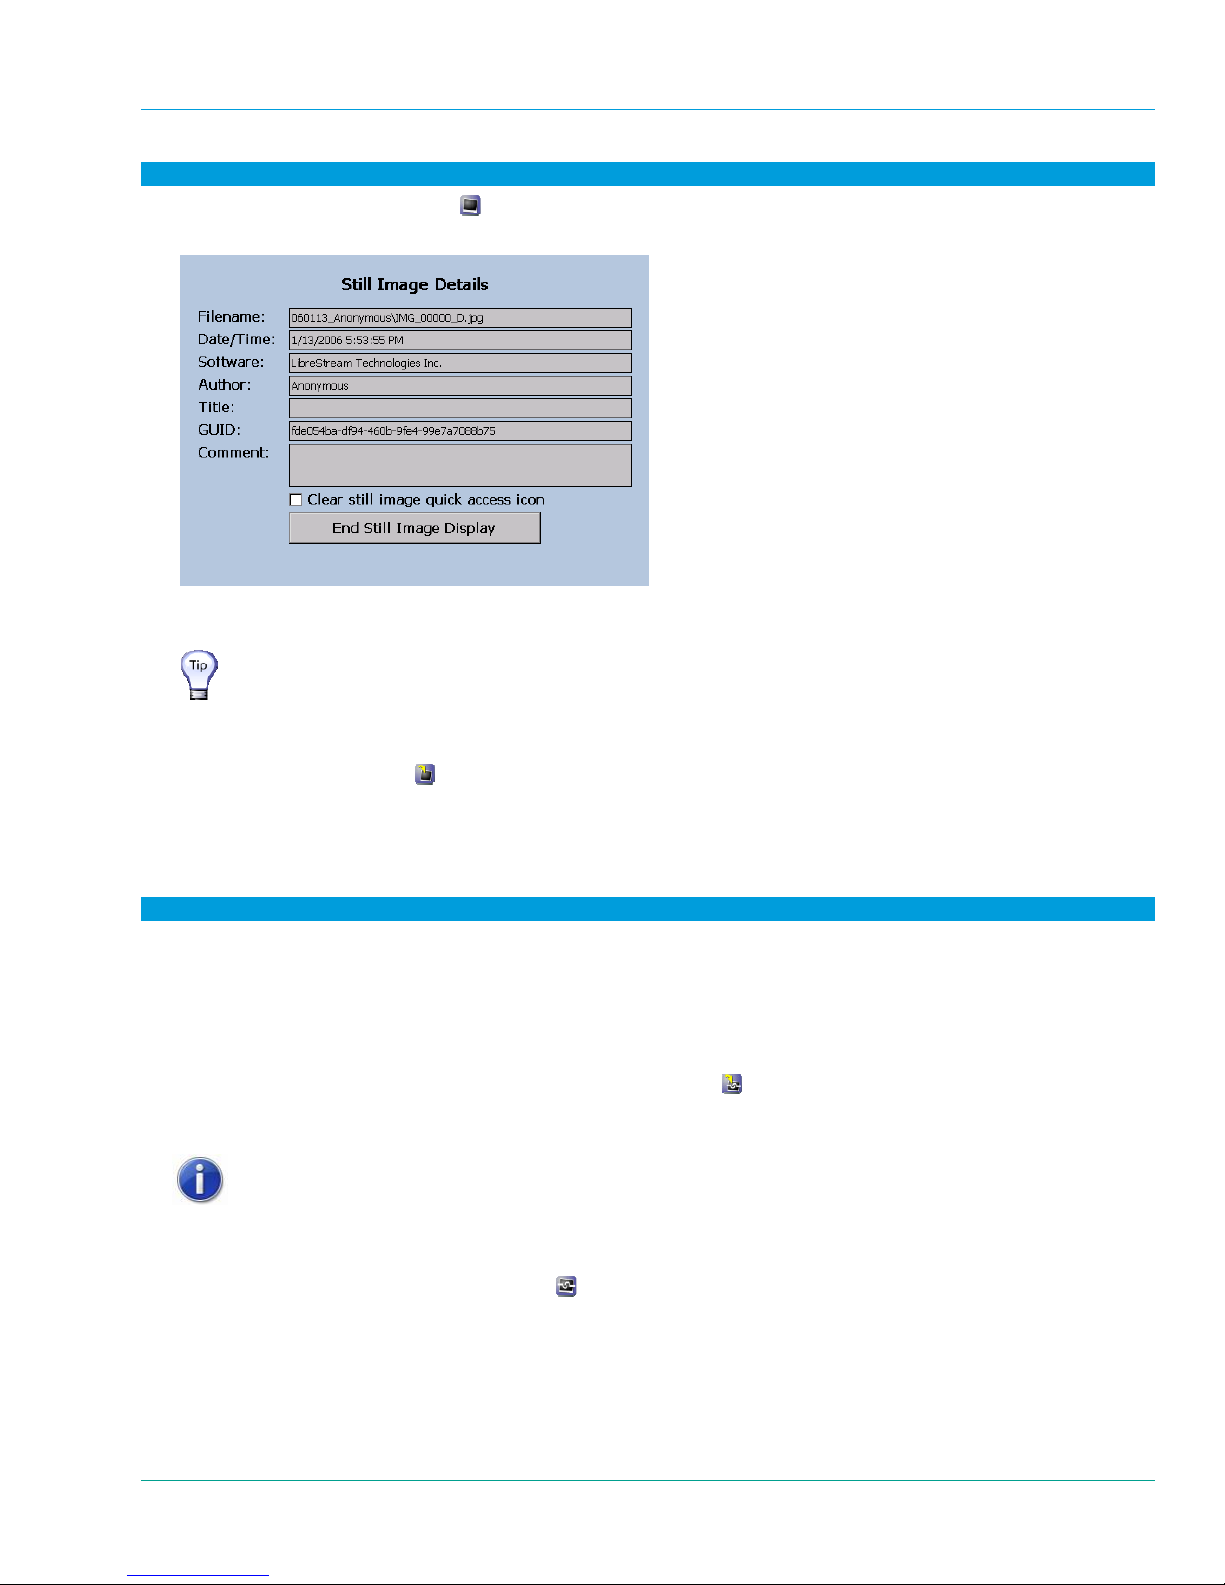
Librestream Onsight 1000/2000/2500 User Manual Audio/Video (AV) Functions
To end still image viewing:
1. Tap the Image Displayed icon
.
2. The Still Image Details screen will appear.
3. Tap End Still Image Display to clear the image from the Viewfinder. At this point you can also clear the
Image Displayed icon by checking off the Clear still image quick access icon checkbox.
Another way to clear the image from the Viewfinder is to briefly press the
Capture button instead of tapping the Image Displayed icon.
4. The message “Image display ended” appears and the image is cleared from the Viewfinder.
5. If the Image Displayed icon was not cleared in step 3 then you can view the image again by tapping the
Start Image Displa
y icon
.
5.8.2 Sharing a Live Image
The On
sight Device and Onsight Connect endpoint can collaborate by sharing images with each other while in a
call, whether video sharing is on or off.
To capture and share an image:
1. Connect to an Onsight Connect endpoint.
2. Press the Capture button on the top of the Onsight Device (the Capture button behaves like the shutter
button on a digital camera).
Note that if there are telestration lines, these are captured as part of the image.
3. The captured image is displayed briefly on the Viewfinder and then cleared. Any telestration will remain.
4. To view the image taken, tap on the Start Image Share icon
.
5. The message “Image sharing started” appears and the image is displayed on the Viewfinder and all
connected Onsight Connect endpoint Image Viewers.
If streaming and the Configuration > General > Media option “While sharing
an image, the video: Stops” is set then when a capture occurs, the streaming
video is turned off in the Viewfinder and the Onsight Connect Call window.
Two messages appear: “Preparing to share the image” and “Stopping the
stream”. Streaming video will return once the Capture button is pressed or
you tap on the Image Shared icon
to end image sharing. For more
information on the video options in the Media menu, see paragraph 6.5,
Configuration, on page 59.
47
Page 53
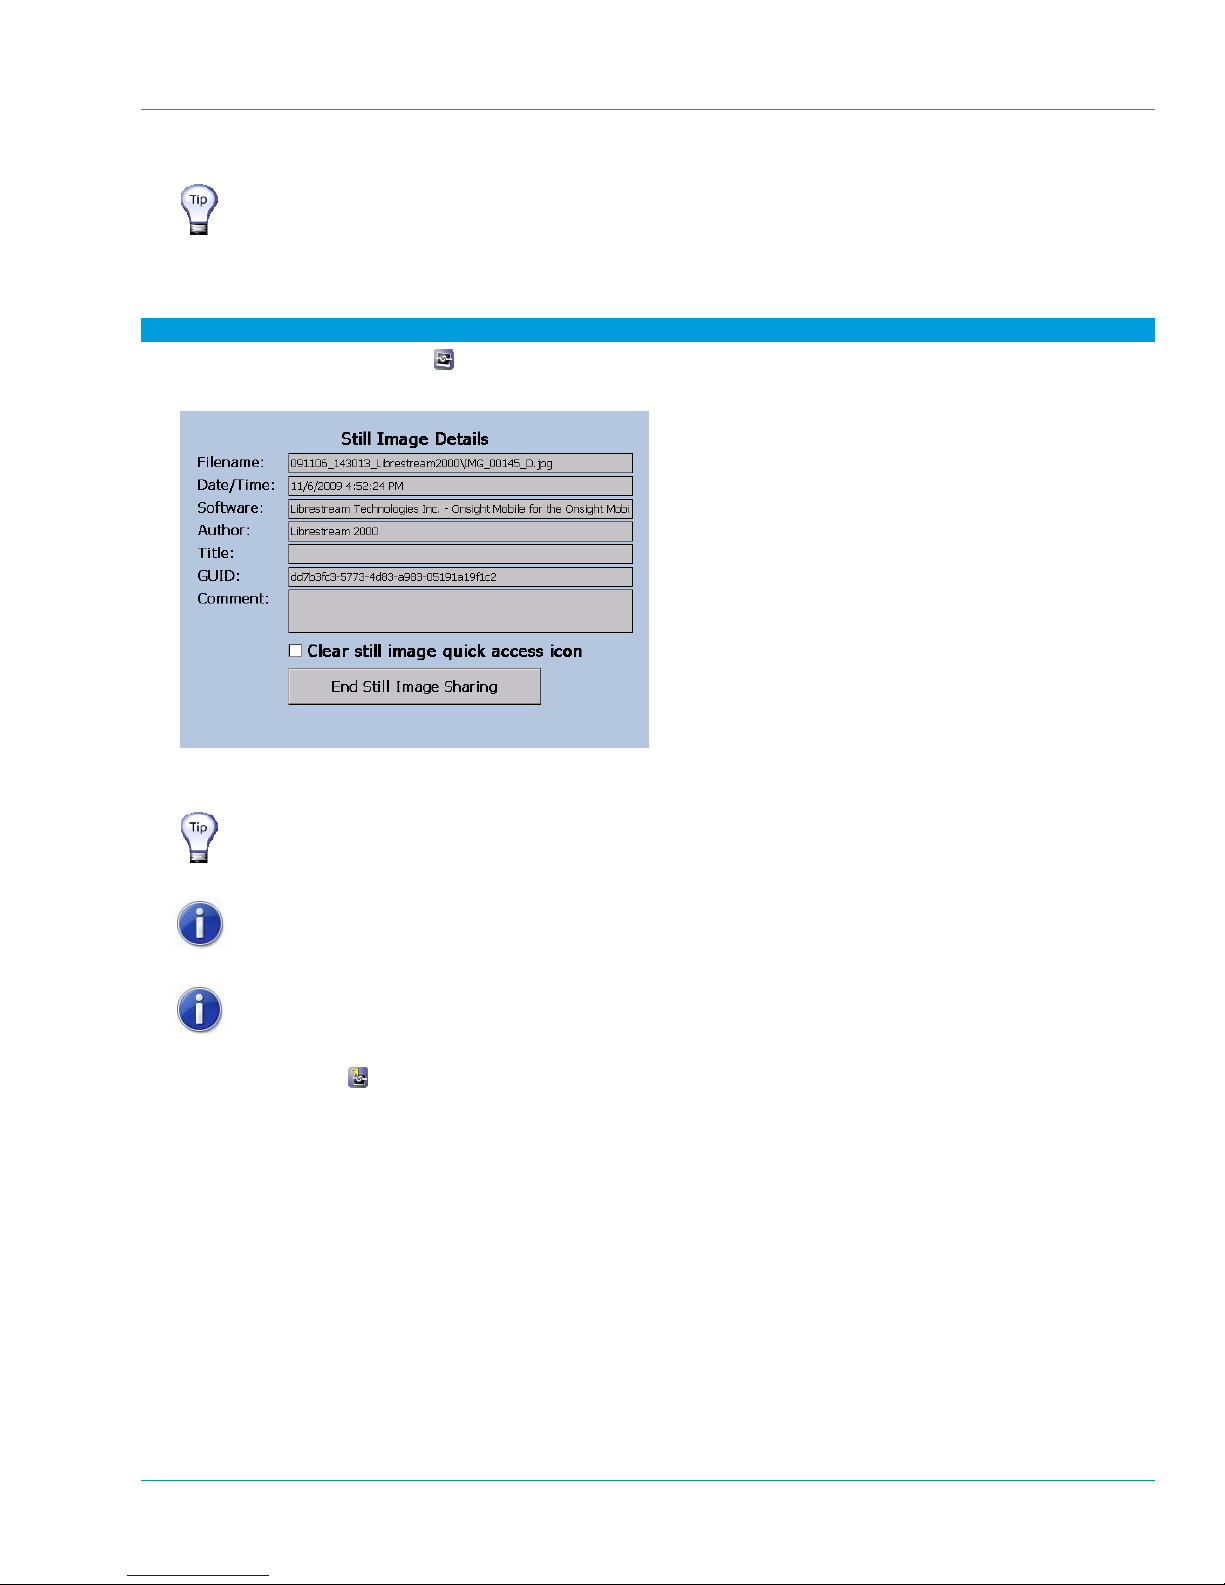
Librestream Onsight 1000/2000/2500 User Manual Audio/Video (AV) Functions
6. The image is saved locally in the session folder on the SD card.
If you want to share the image and view the captured image immediately on
the Viewfinder, press and hold the Capture button for a few seconds when
taking the picture. The message “Image sharing started” will appear and the
shared image will remain on the Viewfinder and on the Onsight Connect
endpoint Image Viewer.
To end sharing:
1. Tap the Image Shared icon
.
2. The Still Image Details screen will appear.
3. Tap End Still Image Sharing to clear the image from the Viewfinder. At this point you can also clear the
Image Shared icon by checking off the Clear still image quick access icon checkbox.
Another way to clear the image from the Viewfinder is to briefly press the
Capture button instead of tapping the Image Shared icon.
4. The message “Image sharing ended” appears.
The image will still remain on the Onsight Connect endpoint’s Image Viewer.
If previously streaming and While sharing an image, the video: Stops was
set, streaming will now continue again.
5. If the Image Shared icon was not cleared in step 3 then you can view the image again by tapping the Start
Image Share
icon
.
48
Page 54
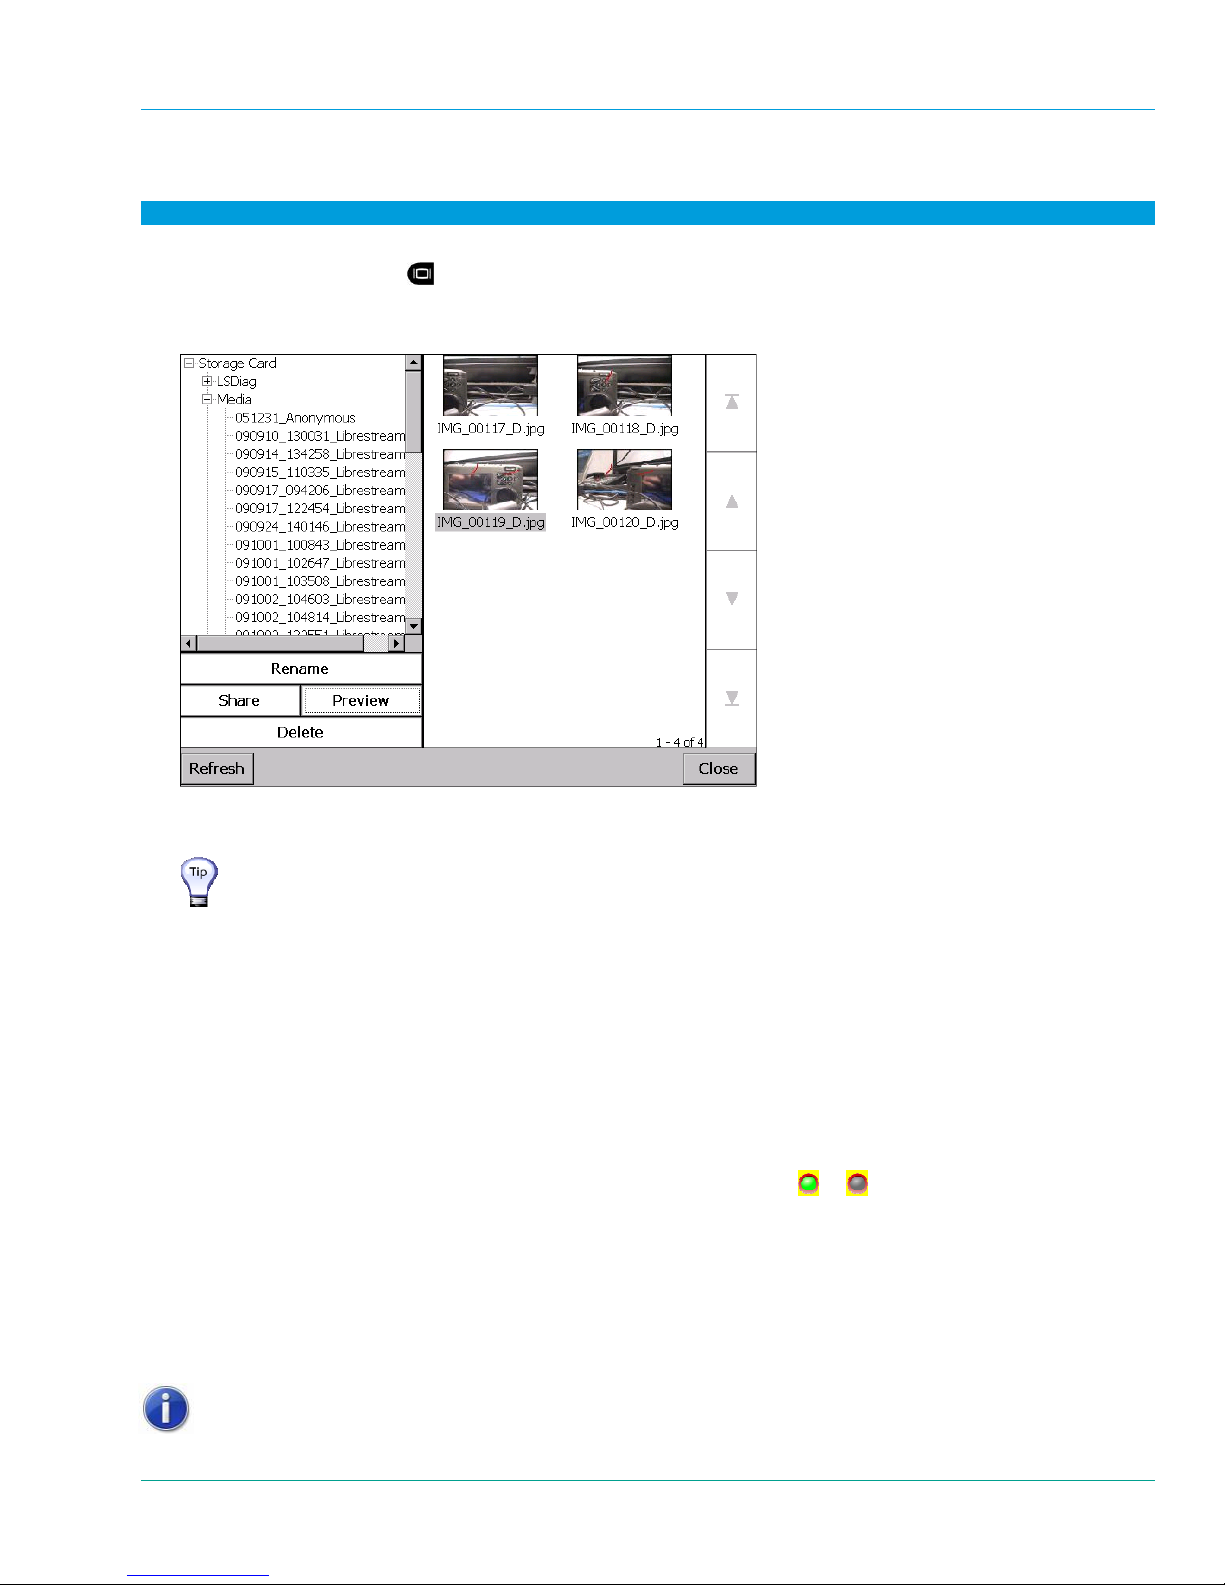
Librestream Onsight 1000/2000/2500 User Manual Audio/Video (AV) Functions
5.8.3 Sharing a Saved Image
To share a saved image:
1. Connect to an Onsight Connect endpoint.
2. Press the Display button repeatedly until the Main Menu appears.
3. Tap File Browser.
4. The File Browser window appears.
5. Tap the folder containing the image that you want to share. Image thumbnails appear in the pane to the right.
6. Select the image you want to share and tap Share in lower left pane.
You can preview the image before sharing it by selecting the image and then
tapping Preview.
7. The message “Image sharing started” will then appear.
8. The Onsight Device sends the image to Onsight Connect endpoint.
9. To end sharing, refer to the instructions on page 48.
5.9 Recording and Playing Videos
The Onsight Device can record video to an SD memory card independent of its call state. That is, it can record
while connected, disconnected, or calling. The only time that it cannot record is while it is playing back a
previously recorded video.
Recording can be disabled for privacy or security reasons. When recording is disabled, video, audio a nd images
can not be stored either internally or to removable media. If recording is disabled by any call participant then
recording is disabled for all participants. If recording is enabled, either the or icon will be displayed.
The Onsight Device is able to record:
video
subject audio
2-way voice
images
telestration
Do not remove the SD card while recording. This can corrupt the ca rd data.
49
Page 55
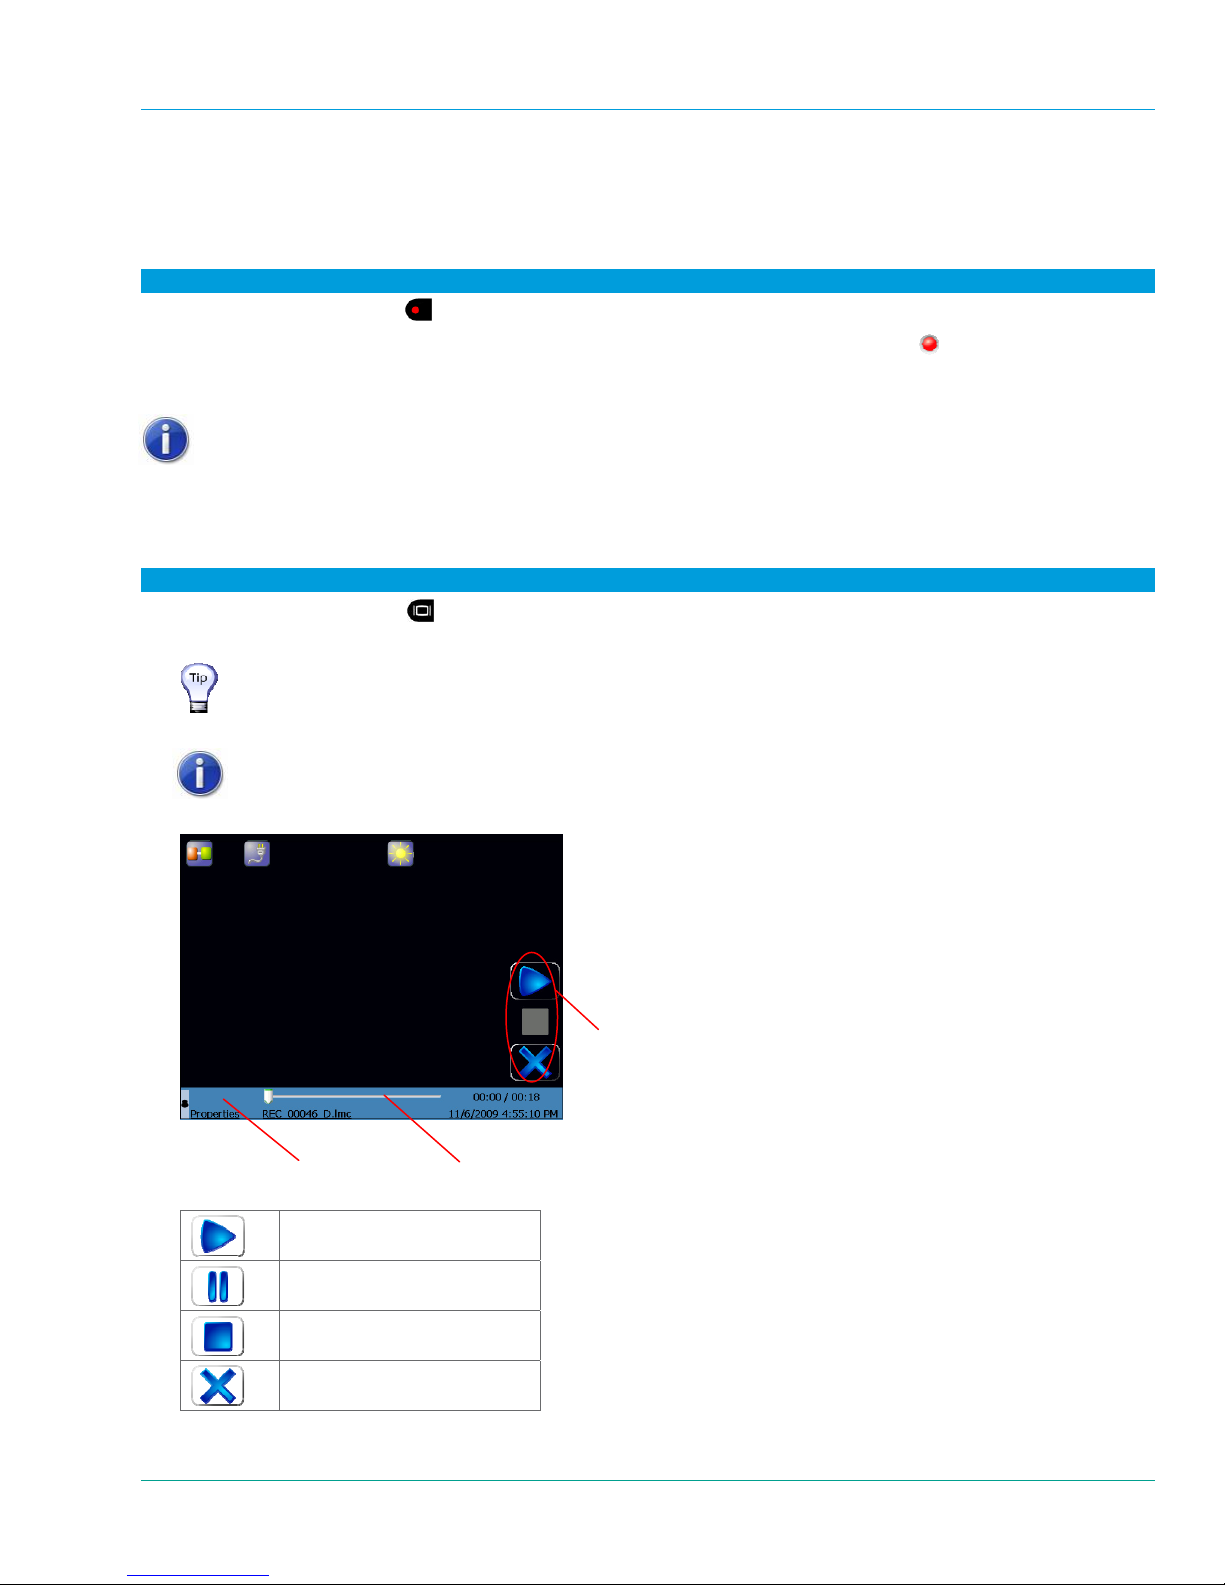
Librestream Onsight 1000/2000/2500 User Manual Audio/Video (AV) Functions
5.9.1 Recording a Video
Video recordings include any telestration lines made during the recording. Telestration lines will appear when you
play or stream a video recording, although they will be in different colors.
When you share an image while recording a session, the image appears in the recording.
To record a video:
1. Press the Record button
2. The message “Please wait – record is starting” appears briefly. The Record icon
on the back of the Onsight Device.
in the top right of the
Viewfinder appears when recording starts.
3. To stop recording, press the Record button again.
The Onsight Device saves the recording in the location on the SD card
specified in Main Menu > Configuration > General > Media. See paragraph
6.5, Configuration, on page 59 for more information. The file name is based on
the date and t
ime of the recording.
5.9.2 Playing a Video Recording Locally (not in a Call)
To play back a video just recorded or to replay a previously recorded video:
1. Press the Display button
on the back of the Onsight Device three times to display the Main Menu.
2. Tap File Playback or tap File Browser to select a recorded video to play.
Use File Playback to play the last video recorded or the last video played,
whichever is more recent.
See paragraph 6.4.2, Playing Videos, on page 58 for information on playing a
vide
o from the File Browser.
3. The Video Playback screen appears.
Status bar
Playback slide bar to
advance the video recording.
Play
Pause playback
Stop playback
Return to Viewfinder
Playback controls
50
Page 56
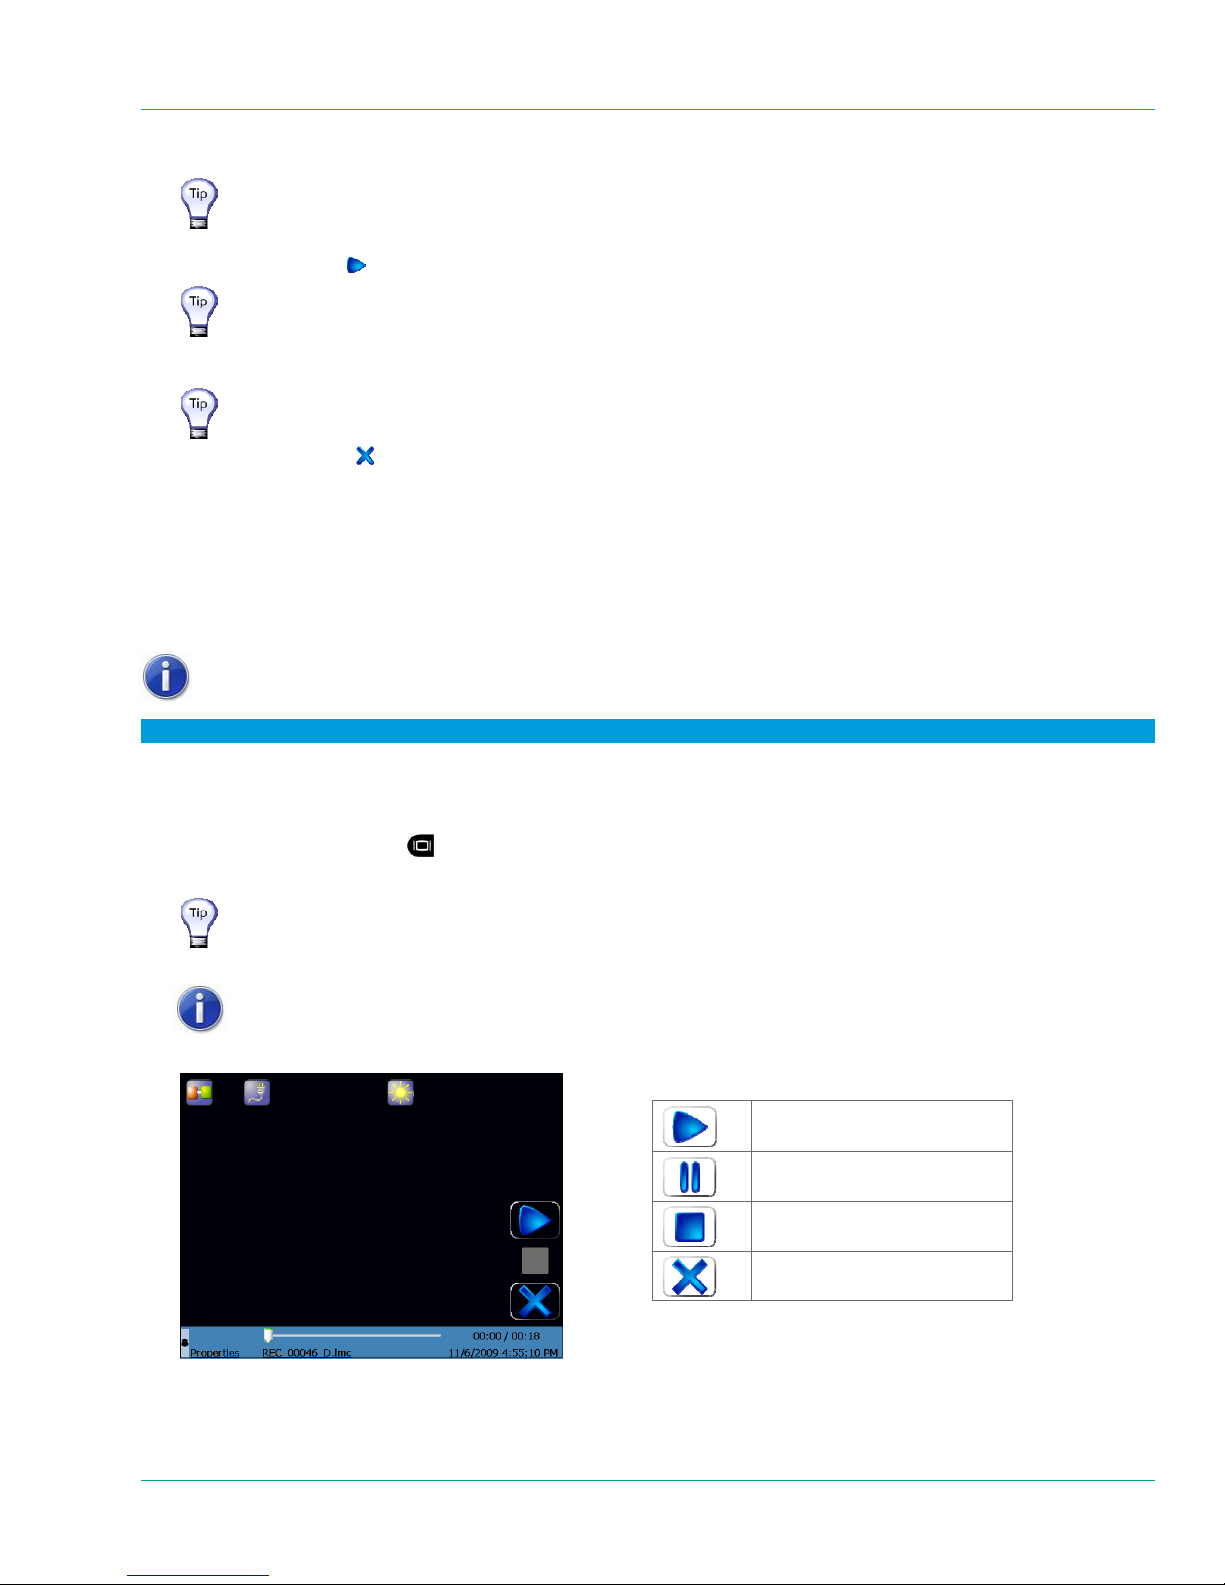
Librestream Onsight 1000/2000/2500 User Manual Audio/Video (AV) Functions
You can hide the status bar located at the bottom of the screen by tapping the
Pin icon located in the left corner. This is useful if telestration appears at the
lower part of the screen as it may get covered up by the status bar.
4. Tap the Play icon
to start the video.
If you don’t want to play the entire video, you can use the playback slide bar to
move to a different point in the recording, during play or while paused. When
you find the desired place, press the Play icon to continue playing the
recorded video.
To switch to the File Browser from the Video Playback screen, tap the file
name just under the track playback slide bar.
5. When finished, tap
to exit back to the Viewfinder.
5.9.3 Sharing a Video Recording
You can
stream previously recorded video to Onsight Connect endpoints.
When streaming video recordings, the Onsight Device adjusts the current stream parameters to match the frame
rate, resolution, bit rate, etc. of the recording.
Onsight Connect endpoints can also stream a previou sly recorded video to the Onsight Device. Playback controls
operate the same as when the Onsight Device is streaming the video.
You cannot stream live video and a recording simultaneousl y.
To share a recorded video:
1. Connect to Onsight Connect endpoint.
2. If the Onsight Device is streaming live video, press the Sharing button on the top of the Onsight Device to
stop streaming.
3. Press the Display button
on the back of the Onsight Device three times to display the Main Menu.
4. Tap File Playback or tap File Browser to select a recorded video to play.
Use File Playback to play the last video recorded or the last video played,
whichever is more recent.
See paragraph 6.4.2, Playing Videos, on page 58 for information on playing a
vide
o from the File Browser.
5. The Video Playback screen appears.
Play
Pause playback
Stop playback
Return to Viewfinder
51
Page 57

Librestream Onsight 1000/2000/2500 User Manual Audio/Video (AV) Functions
6. Press the Play icon or the Sharing button to start playing and streaming the video.
If the video contains a captured image, the Viewfinder will display the captured
image. Onsight Connect endpoint will continue to see the video since the
image will be displayed in the Onsight Connect endpoint’s Image Viewer.
If you don’t want to stream the entire video, you can use the playback slide bar
to move to a different point in the recording, during play or while paused. When
you find the desired place, press the Play icon to continue streaming the
recorded video.
To switch to the File Browser from the Video Playback screen, tap the file
name just under the playback slide bar.
7. When finished, tap
to exit back to the Viewfinder.
52
Page 58
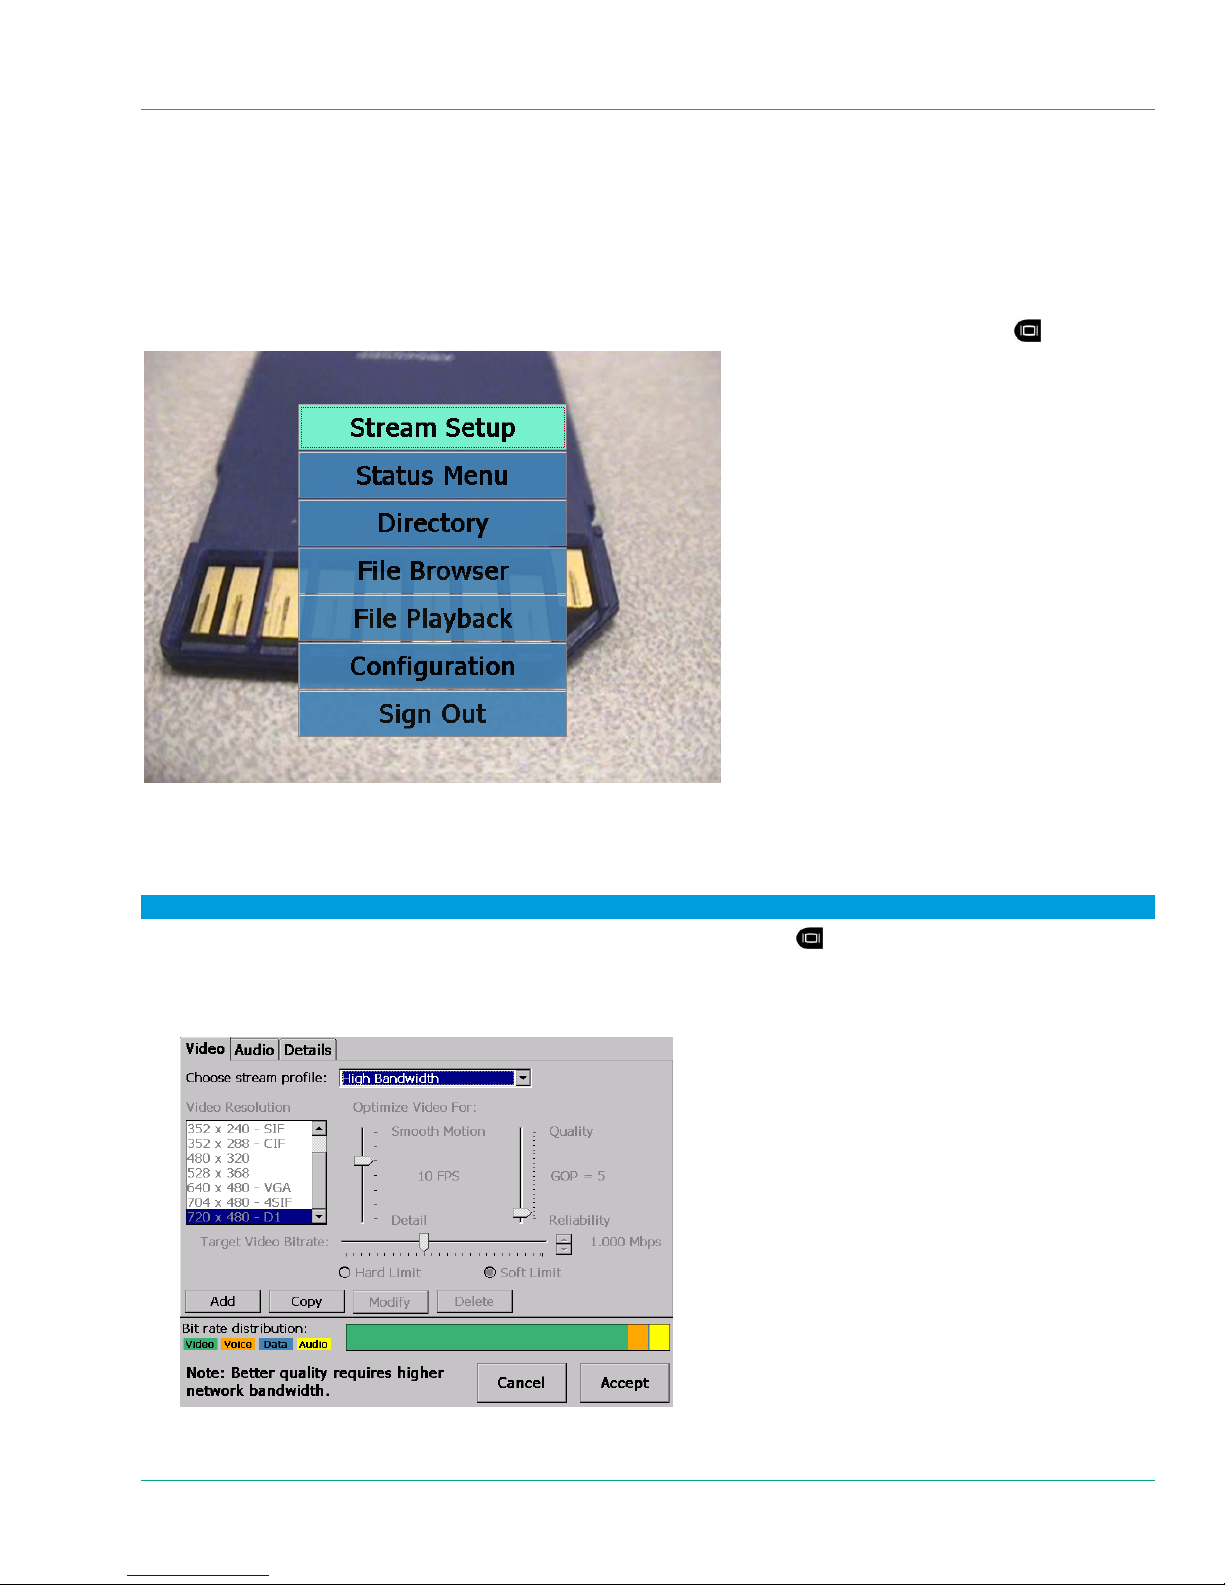
Librestream Onsight 1000/2000/2500 User Manual Menus
6 Menus
The Onsight Device has a menu system that allows operators to check and update system settings, view status,
access the directory or sign out from the Onsight Device.
Note that system configuration and other setup tasks are usually performed by your Onsight system administrator
and are described in the System Administration Manual.
To display the Main Menu, start from the default Viewfinder display, and press the Display button
three times.
You can display the menus at any time, even while sharing media to Onsight Connect endpoints. The person on
the receiving end will not see the menus.
6.1 Stream Setup
To check or change streaming setup options:
1. Starting from the default Viewfinder display, press the Display button
Menu.
2. From the Main Menu, tap Stream Setup and select a built-in configuration from the Choose stream profile
drop-down menu and then select Accept.
three times to display the Main
53
Page 59
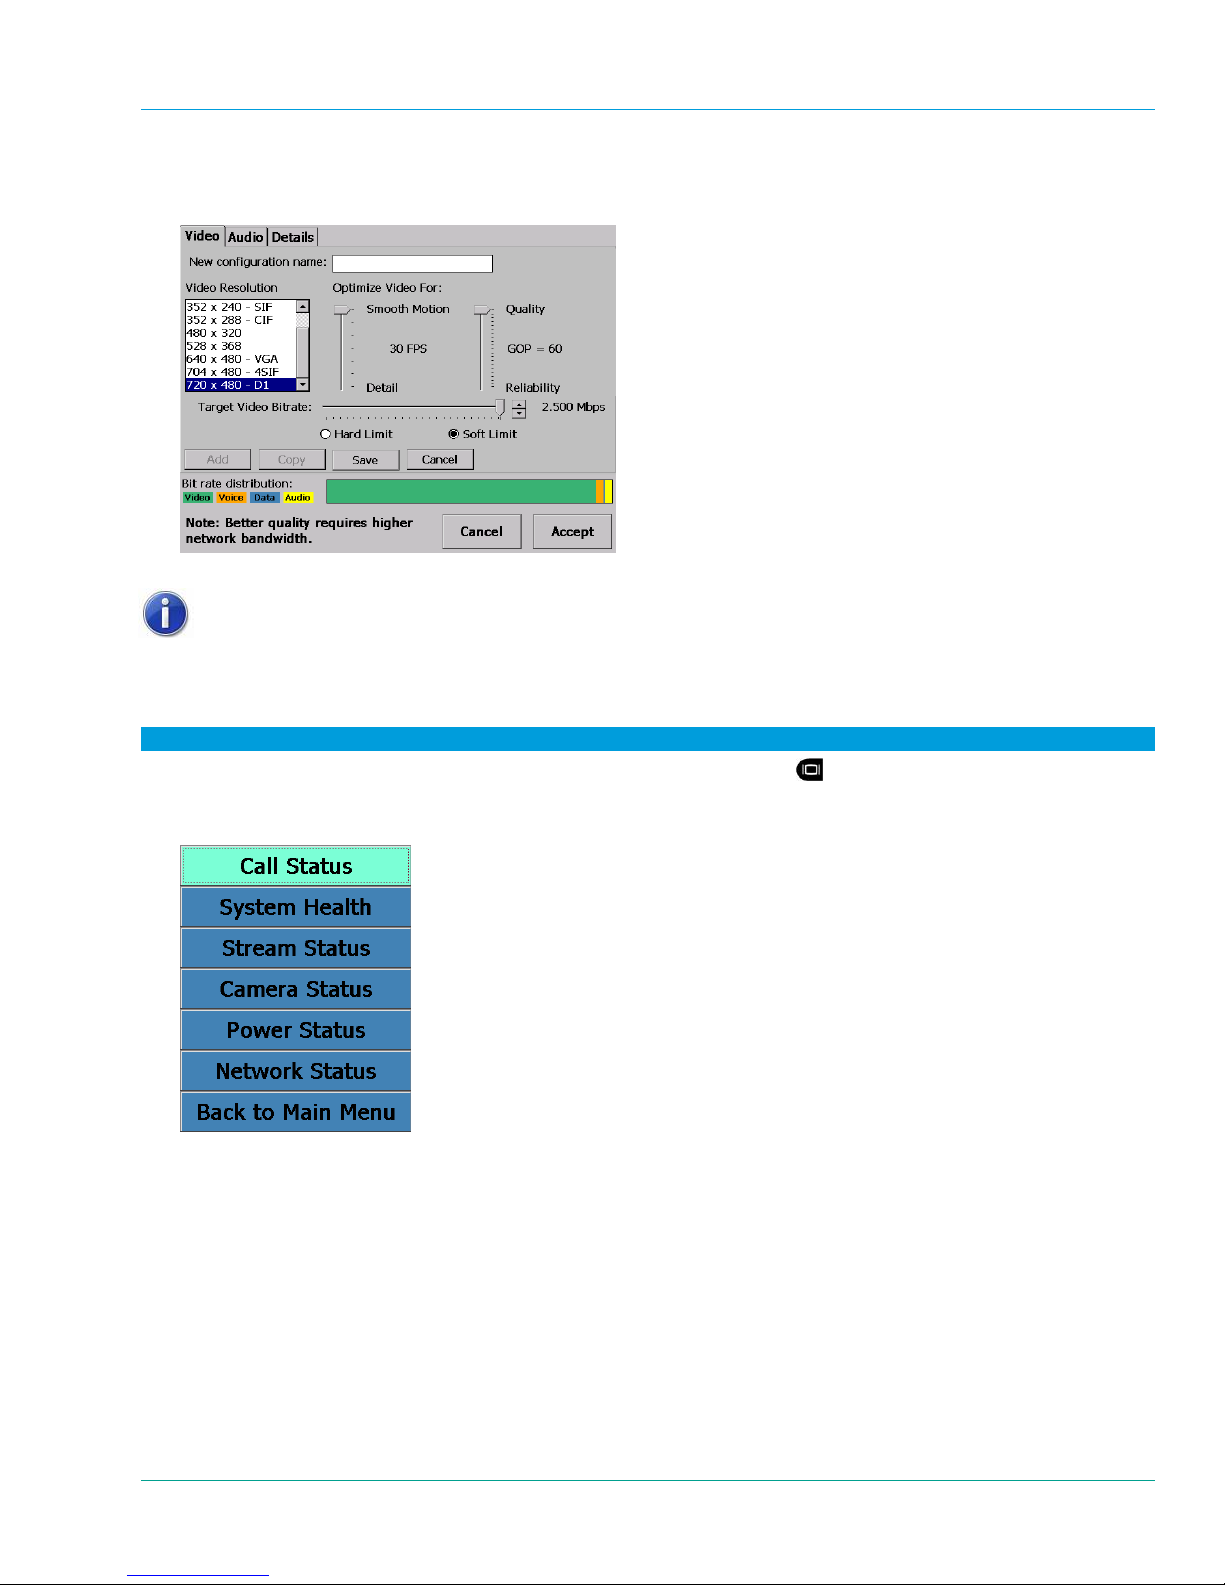
Librestream Onsight 1000/2000/2500 User Manual Menus
3. To set up a custom configuration, tap Add to display the custom stream configuration window. This allows an
operator to configure the stream parameters for circumstances where the predefined settings are not
adequate.
4. Select your configuration options, and then select Accept.
The stream quality can also be selected by Onsight Connect endpoints.
6.2 Checking Status
The Main Menu offers a number of options for checking status, as shown below.
To view status information:
1. Starting from the default Viewfinder display, press the Display button
three times to display the Main
Menu.
2. From the Main Menu, tap the Status Menu option to display a second menu with these status options:
54
Page 60
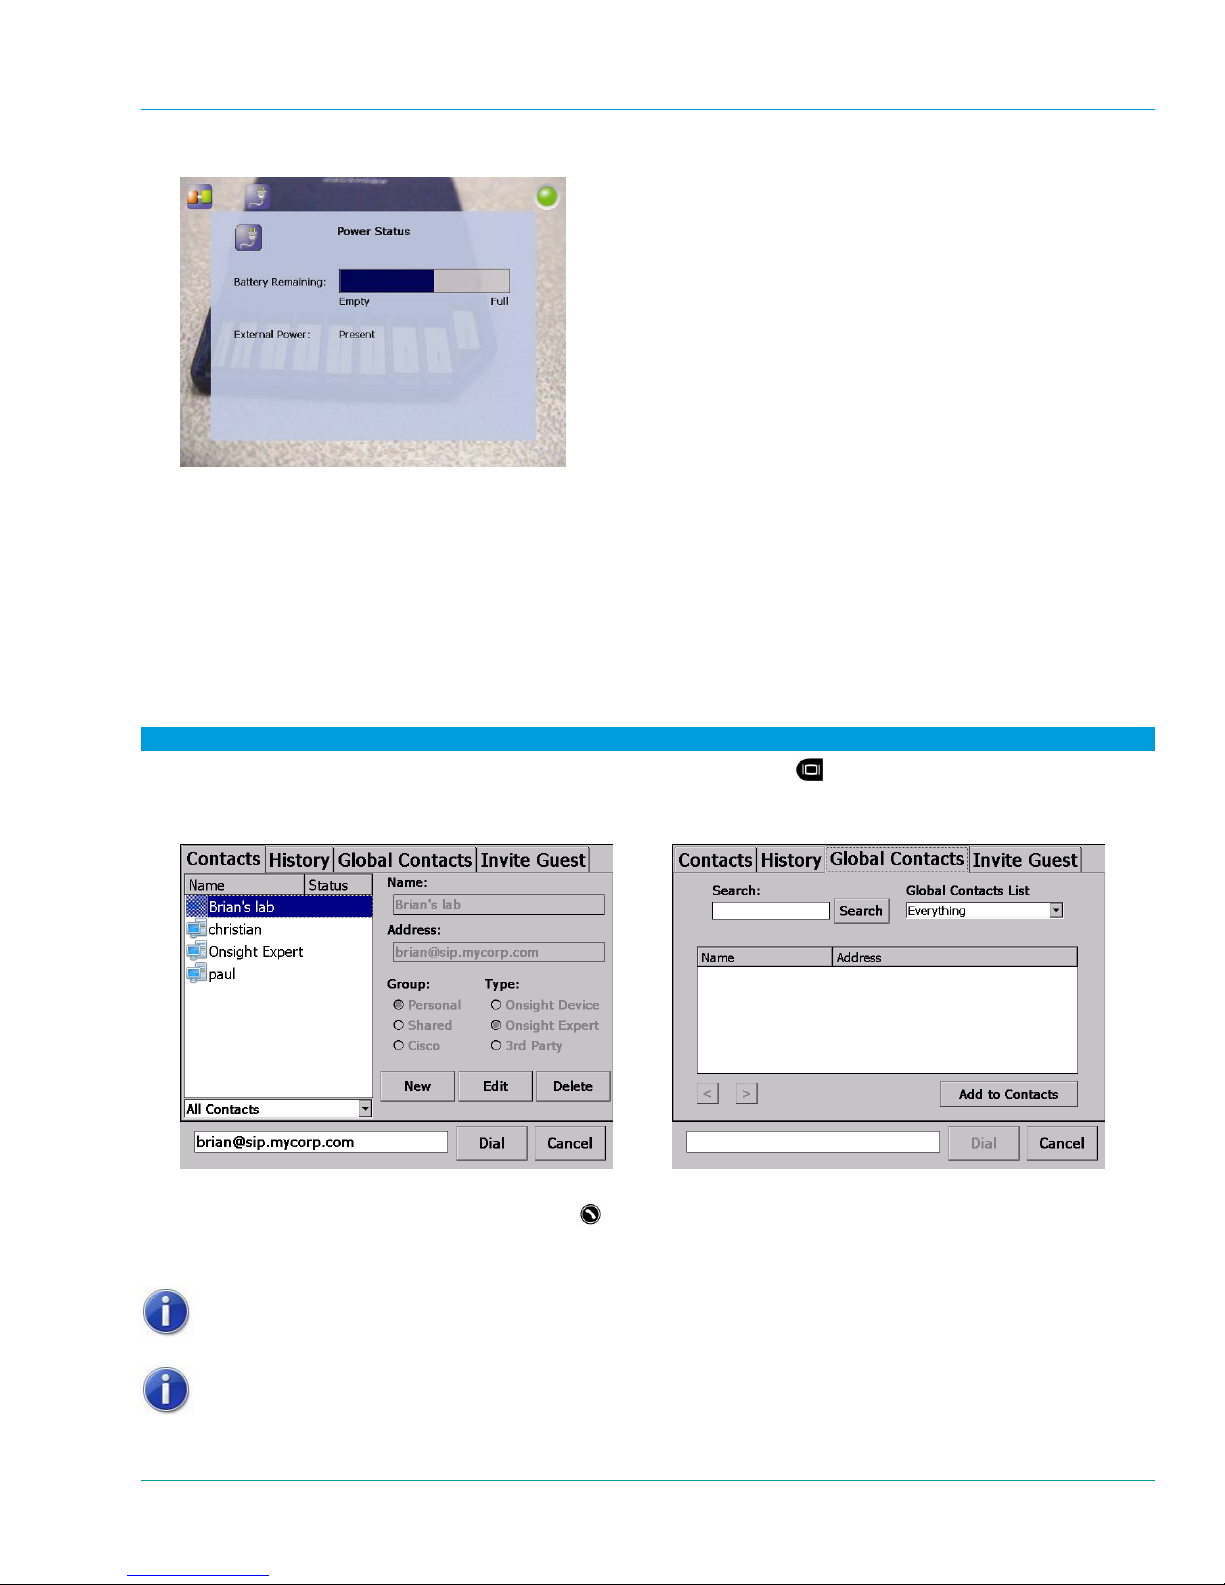
Librestream Onsight 1000/2000/2500 User Manual
3. Tap a status option to view a Status screen for that item. For example, see Power Status below.
4. To dismiss a Status screen and return to the Status menu, tap it with the stylus, or press the Display button.
Contact your Onsight system administrator for more information on any particular status item and what it means.
6.3 Viewing Contacts
6.3.1 Contacts
The Contacts directory contain a list of names and addresses that can be called from the On sight Device. If you
are connected to the Onsight Account Service, you can use the Global Contacts List and Search function in the
Global Contacts tab to display names of contacts to add to the Contacts list. Select one or more names and
then click Add to Contacts to add these names to your Contacts tab.
To display the Contacts directory:
1. Starting from the default Viewfinder display, press the Display button
three times to display the Main
Menu.
2. From the Main Menu, tap Directory and then choose either the Contacts or Global Contacts directory.
3. Select a name and then tap Dial to make the call.
Alternatively, you can press the Send button
to display the Contacts directory, as described in paragraph
3.3, Initiating (Starting) a Call, on page 28.
If you are logged in as a user with Onsight administrator privileges, you may
edit or delete existing contacts or create new ones. Note that these changes
are not forwarded to other devices.
New contacts are created in the Personal Group. Shared contacts are
created in the Shared Group by Onsight system administrators.
55
Page 61
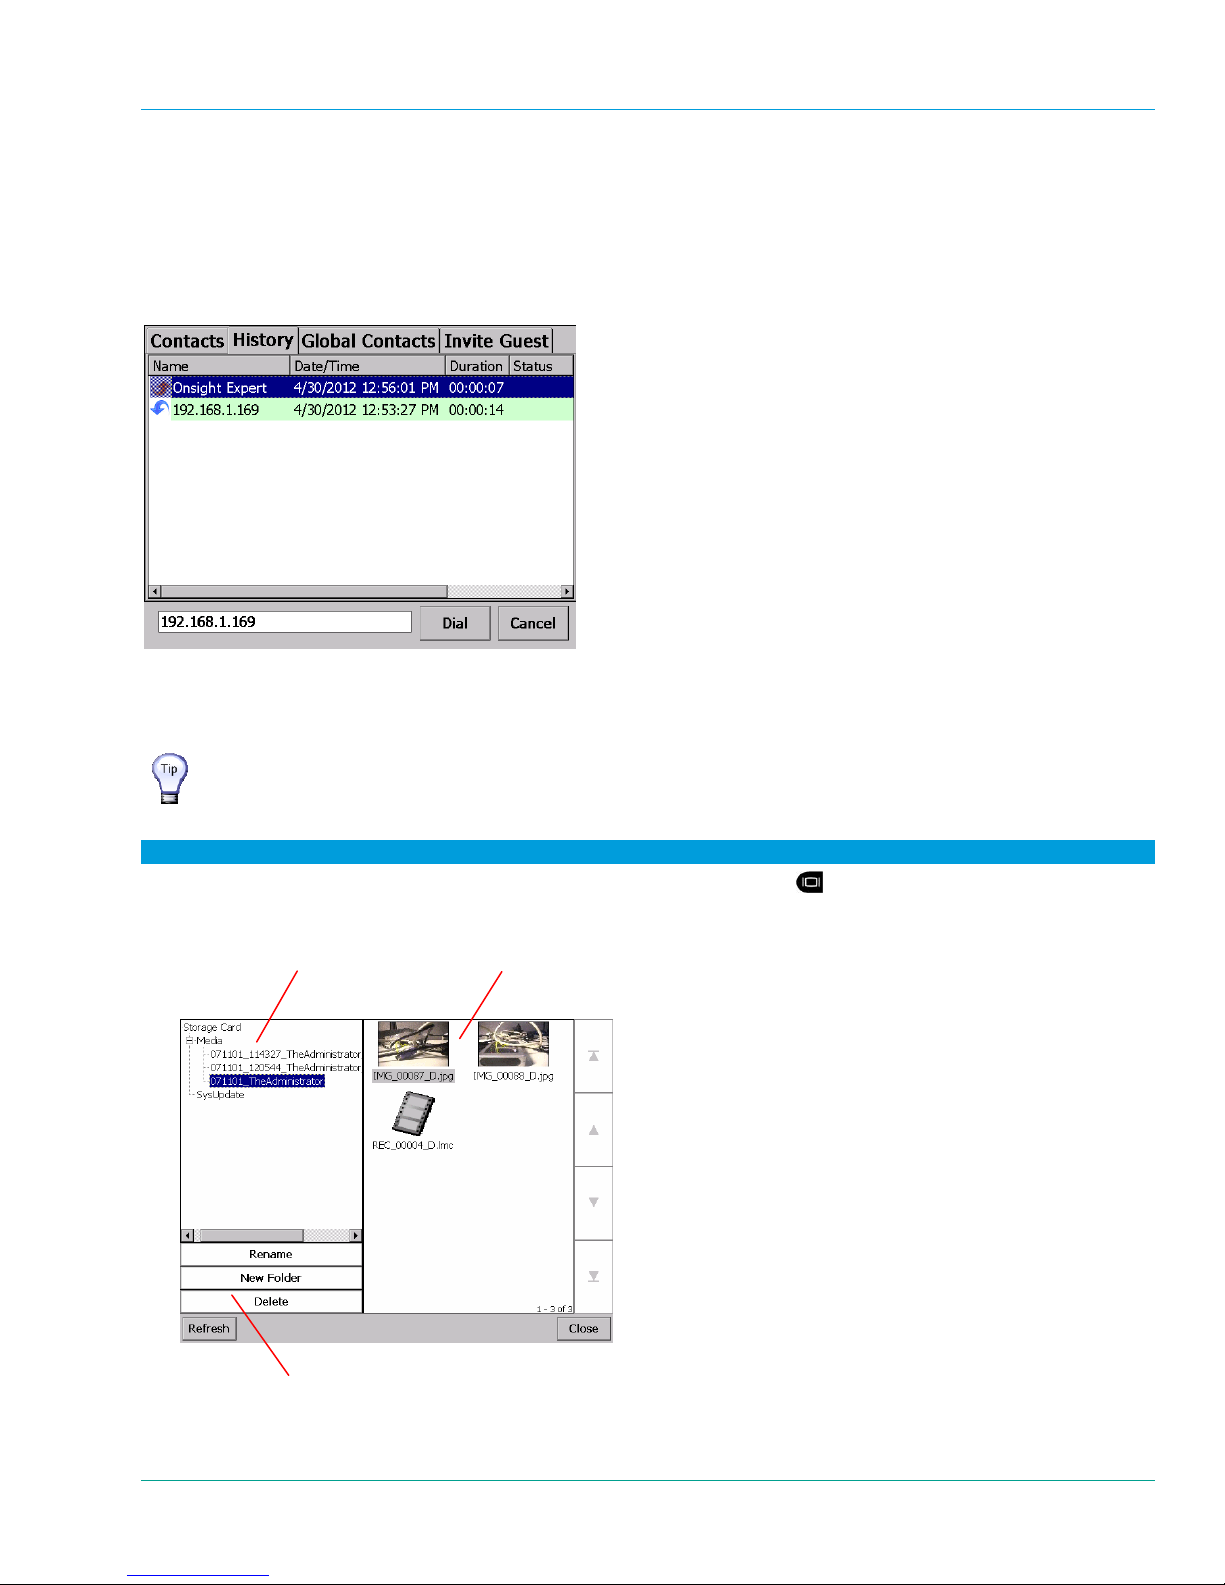
Librestream Onsight 1000/2000/2500 User Manual Menus
6.3.2 History
The History tab provides a convenient way to review and re-establish a previous call as it lists the most recent
calls. The default for the number of calls listed is 20, but this can be changed by the accessing the Main Menu >
Configuration > Call Control > General screen. For further information, see paragraph 6.5, Configuration, on
page 59.
You initiate the call by sel
ecting a name on the list and then tapping Dial.
6.4 Managing Files
The File Browser allows you to organize and play recorded videos, display and share images, and manage
folders and files on the SD memory card.
You can connect the Onsight Device to a PC via the USB cable. This allows
easy file transfer from the device’s SD memory card to the PC. Note that the
device can’t be used to record while it is connected to the PC via USB.
To display the File Browser directory:
1. Starting from the default Viewfinder display, press the Display button
Menu.
2. From the Main Menu, tap File Browser to display the File Browser screen.
Folder pane
File
pane
three times to display the Main
Controls list
56
Page 62

Librestream Onsight 1000/2000/2500 User Manual Menus
The Folder pane displays the folders in which video recordings and image snapshot s are saved. Use the scroll
bar to browse through long lists of folders.
The File pane displays the image snapshots and video recordings saved in the selected folder on the SD card.
Use the scroll arrows on the right to browse through long list of files.
The options in the Controls list allow you to:
Rename folders and files
Create new folders
Delete folders and files
Play video recordings
Preview still images
Share still images
Format the storage card
Session Folders and File Names
When you capture a snapshot or record a video, the Onsight Device creates a session folder on the SD card in
which it saves these files. The name of the folder is based on the date, time, and user names using the
convention:
yymmdd_hhmmss_Onsight device user
where:
yymmdd is the date of the session
hhmmss is the time that the session started (present only if connected to Onsight Connect endpoints)
Onsight device user is the user name that is logged into the Onsight Device
e.g. 090910_132520_Librestream2000
The snapshot and recording file names are based on their medi a type, a serial number, the source, and a version
number. File names use the convention:
media_serial#_source_version#.extension
where:
media is either IMG for a snapshot or REC for a recording
serial# is a sequential number assigned by the source device
source is either A for Onsight Connect endpoints or D for Onsight Device
version# is a sequential number that is added if an image has been modified during sharing
extension is either .jpg for snapshots or .lmc for recordings
e.g. IMG_00003_D.jpg (for a local snapshot) or IMG_00003_A.jpg (for a remote snapshot)
File Pane Icons
Files listed in the File pane are displayed as either image thumbnails or file icons.
Icon Description
Image file. Snapshots usually appear as thumbnails but if the Onsight
Device cannot display a thumbnail, it displays the Image File icon.
Video recording file.
Configuration file (files with an .XML extension)
57
Page 63
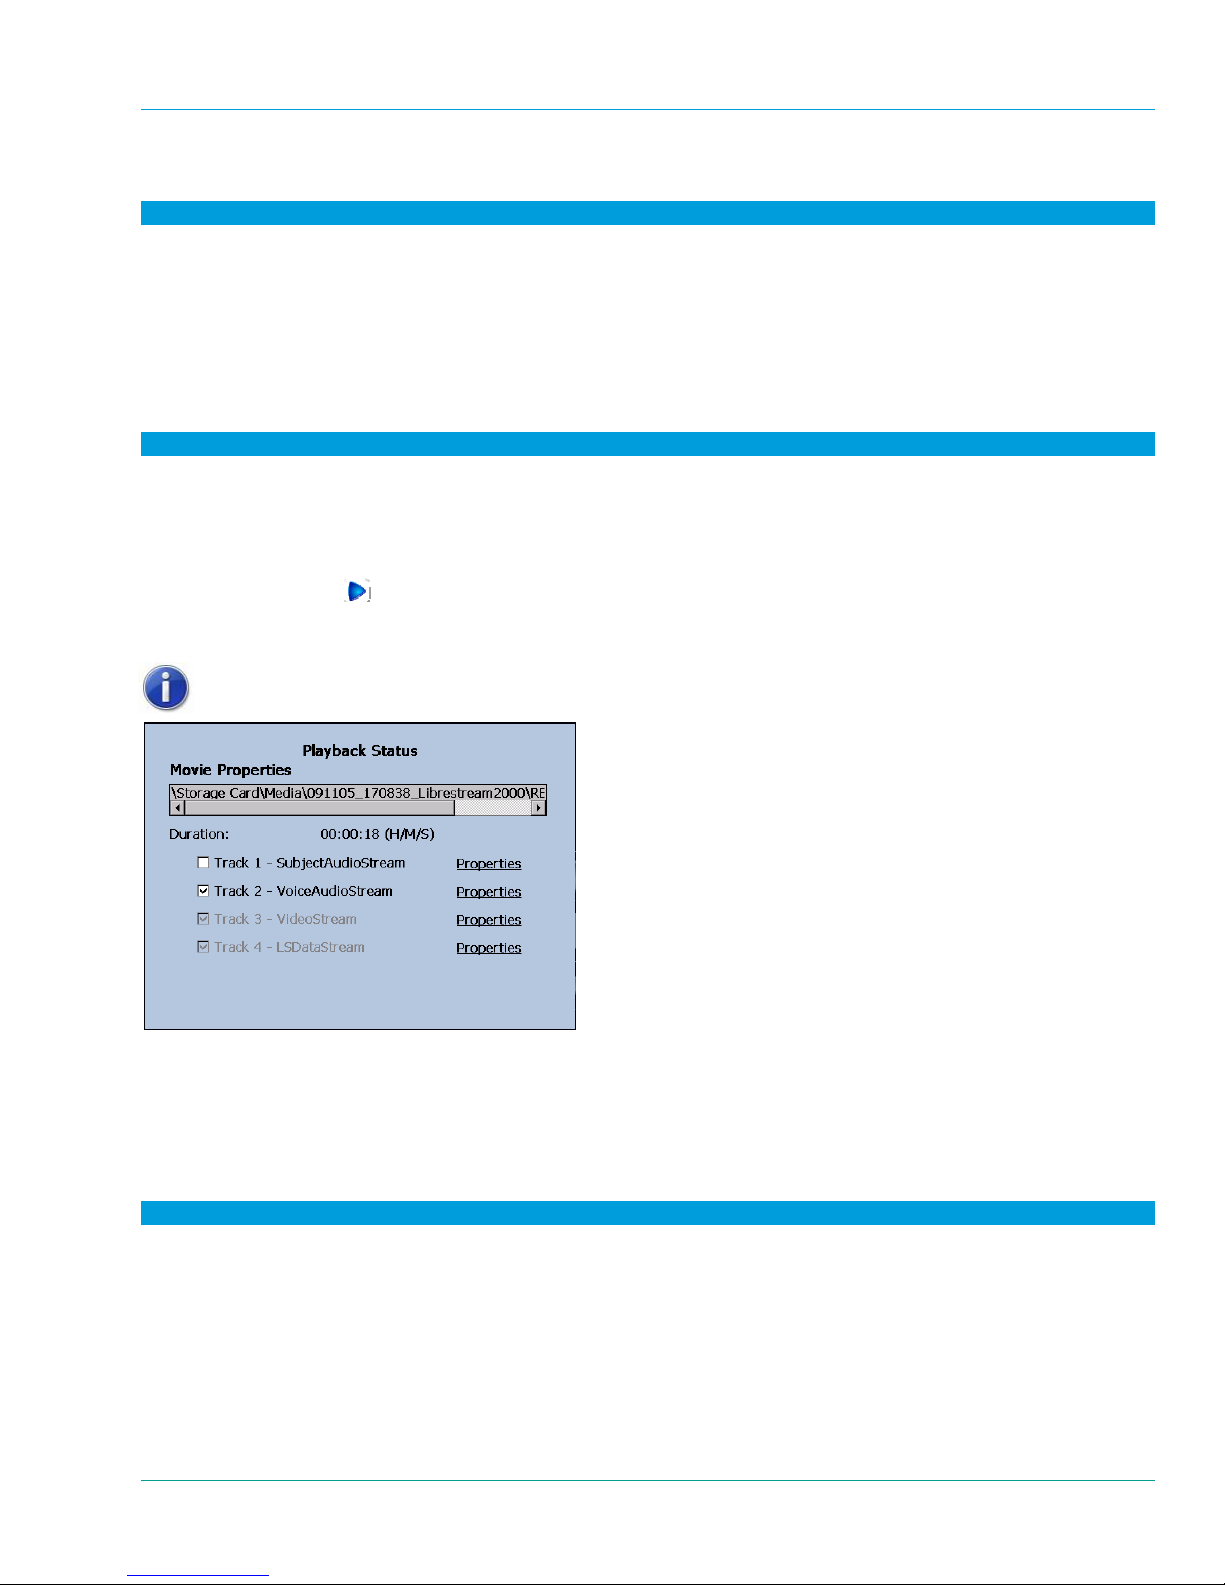
Librestream Onsight 1000/2000/2500 User Manual
6.4.1 Rename Files and Folders
To rename a file or folder:
1. Select the file or folder you want to rename.
2. Tap Rename.
3. The on-screen keyboard appears.
4. Using the stylus, tap the characters on the keyboard to enter a new name.
5. Tap Rename in the Rename File or Rename Folder screen, as applicable.
6.4.2 Playing Videos
To play a video:
1. Using the Folder and File panes, select the video you want to play.
2. Tap Play.
3. The video playback controls appear. See paragraph 5.9, Recording and Playing Videos, on page 49 for
informatio
4. Tap the Play icon
n on using the Video Playback screen.
to start the playback.
When streaming video recordings, the Onsight Device adjusts the current stream parameters to match the frame
rate, resolution, bit rate, etc. of the recording.
By selecting Properties in the File Browser for a selected video, the Playback
Status screen provides information including duration and track properties.
6.4.3 Viewing an Image Locally
If privacy is required in viewing an image, there are two ways to view that image on the Onsight Device without
sharing it with Onsight Connect endpoints.
Disconnect from Onsight Connect endpoints and open or preview the image.
Preview the image if connected to Onsight Connect endpoints.
To display an image locally (the image is not shared with Onsight Connect endpoints):
1. Open the File Browser.
2. Using the Folder and File panes, select the image you want to view.
3. If disconnected from Onsight Connect endpoints, tap Open or Preview. If connected to Onsight Connect
endpoints, tap Preview.
4. The Onsight Device displays the image.
58
Page 64
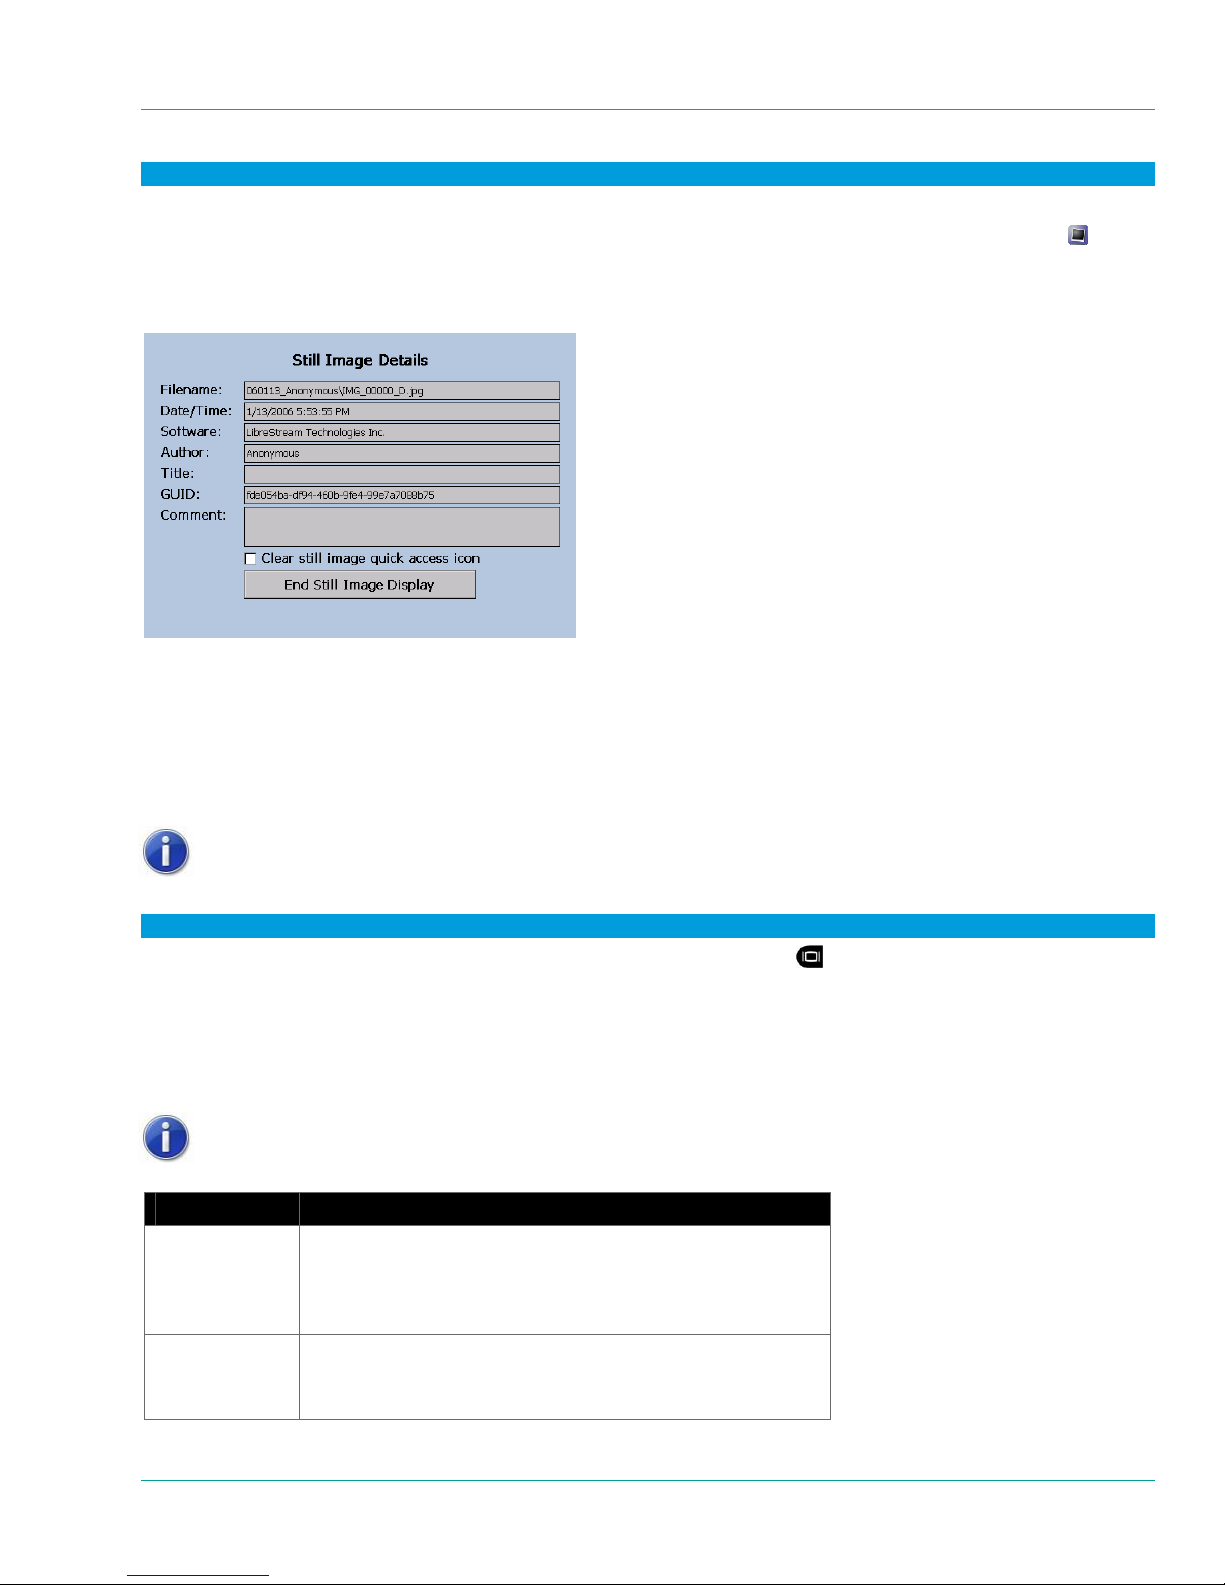
Librestream Onsight 1000/2000/2500 User Manual Menus
To end still image display:
1. If Preview was selected to view the image, tap the image to close the image.
2. If Open was selected to view the image, press the Capture button or tap the Image Displayed icon
.
3. If the Capture button was used to end the still image display then the image is cleared from the Viewfinder,
but if the Image Displayed icon was selected to end the still image display, then the Still Image Details
screen appears.
4. Tap End Still Image Display.
5. The image is cleared from the Viewfinder.
6.4.4 Sharing an Image with Onsight Connect endpoints
See paragrap
h 5.8.3, Sharing a Saved Image, on page 49.
6.5 Configuration
When using the Onsight Account Service, any changes that are made to your
contacts, password, and My SIP settings will be available on any Onsight
Device on which you are connected to the Onsight Account Service.
To check or update Onsight Device configuration options:
1. Starting from the default Viewfinder display, press the Display button
Menu.
2. From the Main Menu, tap the Configuration menu to display the configuration options.
3. From here, follow on-screen instructions to adjust the configuration options as necessary.
The table below is provided as an overview. Please see the System Administration Manual for detailed
information on Onsight Device configuration.
Your Onsight system administrator may have configured company specific
default settings and access rights.
Screen Configuration Options Overview
General
Display
Adjust the standby timeout (amount of time before the Onsight
Device will switch from On to Standby, if it is idle).
Specify the location of saved images and video recordings, and
video options while sharing an image.
Adjust the brightness of the Viewfinder backlight or recalibrate
the touch panel.
Change telestration colors.
three times to display the Main
59
Page 65

Librestream Onsight 1000/2000/2500 User Manual Menus
Screen Configuration Options Overview
Video
Audio
Call Control
Network
Security
Time
Information
Maintenance
Adjust the video settings of the camera and select the video
source (internal camera or external via S-Video connector).
Provides option to display the time and date in video.
Options for controlling volume and mute levels for the speaker.
You can set the maximum ring volume (the volume will ramp up
to this setting regardless of the overall volume setting of the
Onsight Device) and request voice/audio reduced bandwidth
usage.
You can also select the source for Subject Audio – either the
built-in microphone or the Audio line-in connector. The level of
the external audio input can be adjusted using the Gain slide
bar.
The Onsight 2500 provides an option to enable Bluetooth audio.
Configure auto answer and the ability of starting video upon
connection. Maximum call history number can be selected.
SIP, SIP settings, and Bandwidth controls can be adjusted.
Enter SIP server information necessary for registering this
device.
Enter Cisco Presence settings to connect to the Cisco Unified
Presence Server.
Please see the System Administration Manual for detailed
instructions.
This screen allows you to adjust Network settings, including
options to enable or disable the radio and select radio channels,
firewall settings for connection from remote locations, and a
hotspot login. In addition, the Onsight 2500 Bluetooth capability
can be enabled/disabled from the Network screen.
There are options to configure the Onsight Device for remote
management by the Onsight Management Suite.
Please see the System Administration Manual for detailed
instructions.
This screen allows you to set default login options and import
security certificates.
Encryption and Privacy options are selectable.
Follow on-screen instructions to adjust time and date settings.
Onsight Device version and copyright information.
Software updates may be done from this screen (consult the
System Administration Manual).
Change user passwords and import contacts and users. (Note
that password changes are not forwarded to other devices.)
Call history can be cleared.
60
Page 66
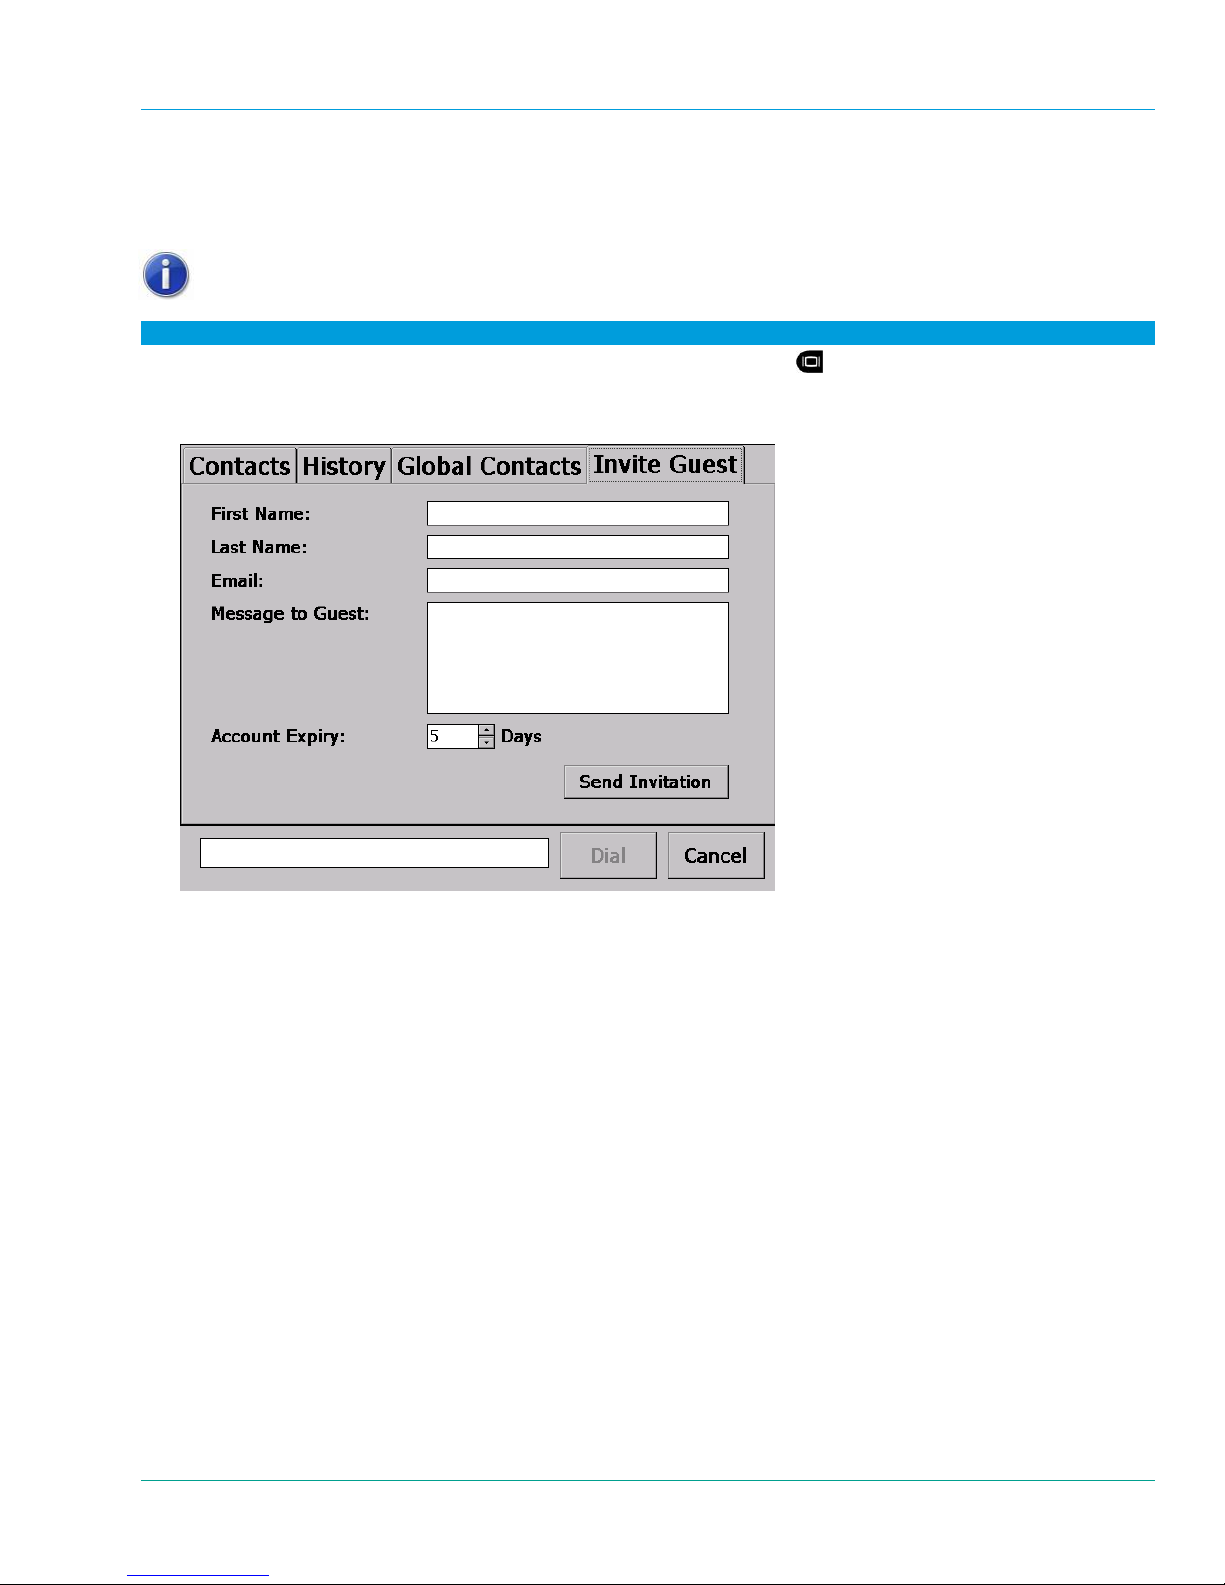
Librestream Onsight 1000/2000/2500 User Manual Menus
6.6 Invite a Guest
You can invite a guest to join an Onsight video session. The guest will receive an email which provides
instructions on how to download and install the Onsight Connect endpoint software.
You must be connected to the Onsight Account Service.
To invite a guest:
1. Starting from the default Viewfinder display, press the Display button
Menu.
2. From the Main Menu, tap Directory and then the Invite Guest tab.
three times to display the Main
3. Enter the required information and a message if desired. Select the number of days the guest can use
Onsight Connect.
4. Click Send Invitation.
5. The guest is automatically added to your Contacts tab.
61
Page 67

Librestream Onsight 1000/2000/2500 User Manual Maintaining the Onsight Device
7 Maintaining the Onsight Device
Follow these guidelines to ensure the Onsight Device remains in good working order:
7.1 General Recommendations
Limit exposure to dust, rain or moisture.
Protect the Onsight Device from temperature extremes (e.g., do not leave it on an automobile dashboard or
on top of a heat source).
Observe the rated operating and storage environmental specifications.
The Onsight Device is a precision instrument and must be protected from drop and vibration. Always use the
provided wrist lanyard or a neck strap to prevent accidental drop.
Operate the Onsight Device in a well ventilated area to prevent overheating. Do not operate the Onsight
Device in a closed environment where it can overheat (e.g. a sealed plastic bag).
Always keep the I/O connector protected using the I/O Cover or an I/O Sled (Onsight 2000/2500).
7.2 Inspection/Maintenance/Cleaning
Inspect the camera and connectors for damage and/or debris/moisture before each use.
Wipe off any debris/moisture with a clean lint-free cloth and a 50/50 mixture of isopropyl alcohol and distilled
water, except for the Display/Touch Screen and interface connectors. Dry off remaining moisture with a fresh
lint-free cloth.
The cleaning requirement for the Display/Touch Screen is in paragraph 7.3 below.
Do not submerse or pour any liquid onto the product.
7.3 Display/Touch Screen
LCD displays deteriorate when exposed to ultraviolet rays. Do not leave the Onsight Device in direct sunlight
or strong ultraviolet rays for extended periods of time.
If you store the Onsight Device above or below the rated storage temperature, it may cause permanent
damage to the display.
Extended contact with water drops or finger grease may cause discoloration or spots.
Protect the screen from scratches. Use the supplied stylus or plastic-tipped pens designed for use on a touch
screen. Never use a sharp object on the touch screen.
Tap the screen lightly. Do not press hard or strike the screen.
Clean the screen with a soft cloth moistened with distilled water. Do not use commercial or household
cleaners as they may damage the screen.
Consider using a replaceable screen protector to help protect against scratches.
7.4 Optics
If you will be using the Onsight Device in a dusty or dirty environment, it is recommended that the lens be
protected with a screw-on lens filter such as a standard 30mm skylight filter.
Clean the lens with optical lens cleaning cloth and cleaning solution. Do not use general purpose tissue.
7.5 Ergonomic Recommendations
Important: Follow the recommendations below to minimize risk of ergonomic injury.
Follow the recommendations of your Health and Safety Officer regarding your company’s safety policies and
procedures.
Whenever possible, reduce or eliminate repetitive motion.
Maintain a natural position while operating the equipment.
62
Page 68

Librestream Onsight 1000/2000/2500 User Manual Onsight 1000 Technical Specifications
8 Onsight 1000
Technical
Specifications
SYSTEM ARCHITECTURE
High performance, multiprocessor
architecture optimized for real-time
multimedia processing and
communications in a handheld
form factor
Microsoft WinCE 5.0
SIP-based session control
Windows-based PC Client allowing
for easy call initiation and camera
control
PHYSICAL CHARACTERISTICS
Size – 174 (6.85”) mm wide x 96.0
(3.78”) mm high x 87.1 (3.43”) mm
deep
Weight – 720 grams (1.59 pounds)
Non slip hand grips
Integrated LED-based illumination
Integrated water resistant doors for
all external connectors
OPTICAL PERFORMANCE
CCD image sensor – capable of
high precision close-up video
10x optical zoom, f=4.2 mm (wide)
to 42 mm (tele), F1.8 to F2.9
10 mm minimum working distance
(wide end)
1000 mm minimum working
distance (tele end)
1.5 lx (50 IRE) minimum
illumination
Automatic/manual white balance
Manual or automatic focus
VIDEO STANDARD
MPEG-4 Simple Profile @ L3
H.263
Up to 2.5 Mbps
User selectable resolutions and
frame rates up to
D1 (720 x 480) at 30 fps
USER INTERFACE & FEATURES
VGA (640 x 480) display/viewfinder
Integrated touch screen
User-friendly graphical user
interface
Dedicated call send and end
buttons – simple end-user
experience much like a mobile
telephone
Still image capture button
Stream button – video stream can
be started and stopped by pushing
one button
Context sensitive cursor pad
buttons (includes volume controls,
microphone mute, and illumination
control)
Media record to SD card
Manual focus button
OSD (On Screen Display) button
for easy access to status and other
information
Integrated contacts directory
End user selectable streaming
parameters
LED indicators for power,
stream/record, power/charging,
and network link
COLLABORATION FEATURES
Form factor and software optimized
to allow real time voice and video
collaboration related to subject
matter being captured by the
Onsight Device
Telestration: allowing both the
Onsight Device operator and PC
operator to draw on top of the
video or frozen image – both
“ends” of the conversation see the
drawing simultaneously
Remote control of major Onsight
Device features – zoom, focus, still
image capture, illumination, and
stream parameters
AUDIO FEATURES
Built-in omni-directional
microphone for VoIP support
Built-in microphone or line-in input
for capture of subject audio time
synchronized with the subject video
Wired headset support ideal for
high noise environments
Speakerphone with acoustic echo
cancellation
Silence suppression of VoIP
communications to minimize
network bandwidth utilization
Dynamic jitter buffer adjusts to
changing network conditions to
balance low latency with a low
voice dropout rate
AUDIO STANDARDS
VoIP: G.711, GSM
Subject Audio: G.711, GSM
SECURITY
User ID and password control
WLAN Network Authentication:
WPA – Enterprise
WPA – PSK
WPA2
WPA2 – PSK
Open
Shared
WLAN Data Encryption:
WEP
TKIP
Disabled
AES
802.1X Authentication
EAP–TLS
PEAP
PEAP-GTC
Media Encryption
AES-128
EXTERNAL INTERFACES
SD/SDHC Memory Card (SD Class
10 or higher)
Minimum write speed: 9.0
MB/sec
Minimum read speed: 10.0
MB/sec
S-Video
S-Video In
S-Video Out (optional)
External power in
Headset
mono 32 ohm speaker
3.5mm audio jack, 3 conductor,
tip mic, ring speaker
10/100 Mb Ethernet
USB Host 2.0, low/full speed
Audio Line-in
1 Vrms input
2.5 mm audio jack, 2
conductor, tip line-in
COMMUNICATIONS
IP calls - SIP
Integrated 802.11 b/g radio
RJ-45 10/100 Ethernet
POWER
Rechargeable 2400 mAH Li-Ion
battery pack
External power
63
Page 69

Librestream Onsight 1000/2000/2500 User Manual Onsight 1000 Technical Specifications
Input: 12 VDC @ 1A
External Power Adapter
Specifications:
Output Voltage: 12 VDC @
1.5A
Rated Input Voltage:
100 – 240 VAC
Input Voltage Range:
90 – 264 VAC
Rated Input Frequency:
50 – 60 Hz
Input Frequency Range:
47 – 63 Hz
OPERATING ENVIRONMENT
Temperature:
Operating: 0° to 40° C
Storage: –20° to 60° C
Operating humidity: 5 – 80%
(non-condensing)
64
Page 70

Librestream Onsight 1000/2000/2500 User Manual Onsight 2000R/On sight 2000Ex Technical Specifications
9 Onsight 2000R/Onsight
2000Ex Technical
Specifications
SYSTEM ARCHITECTURE
High performance, multiprocessor
architecture optimized for real-time
multimedia processing and
communications in a handheld
form factor
Microsoft WinCE 5.0
SIP-based session control
Windows-based PC Client allowing
for easy call initiation and camera
control
PHYSICAL CHARACTERISTICS
Size – 187 (7.36”) mm wide x 127
(5.00”) mm high incl. antenna, 104
(4.09”)mm without antenna x 108
(4.25”) mm deep
Weight – Approx. 900 grams (1.98
pounds) without battery
Non slip hand grips
Integrated LED-based illumination
ring
Integrated water resistant door for
access to Battery and SD Card
Rugged form factor resists shock
and drop
OPTICAL PERFORMANCE
CCD image sensor – capable of
high precision close-up video
10x optical zoom, f=4.2 mm (wide)
to 42 mm (tele), F1.8 to F2.9
10 mm minimum working distance
(wide end)
1000 mm minimum working
distance (tele end)
1.5 lx (50 IRE) minimum
illumination
Automatic/manual white balance
Manual or automatic focus
VIDEO STANDARD
MPEG-4 Simple Profile @ L3
H.263
Up to 2.5 Mbps
User selectable resolutions and
frame rates up to:
D1 (720 x 480) at 30 fps
USER INTERFACE & FEATURES
VGA (640 x 480) display/viewfinder
Integrated touch screen
User-friendly graphical user
interface
Dedicated call send and end
buttons
Simple end-user experience
much like a cellular telephone
Still image capture button
Stream button
Video stream can be started
and stopped by pushing one
button
Context sensitive cursor pad
buttons (includes volume controls,
microphone mute, and illumination
control)
Media record to SD card
Manual focus button
OSD (On Screen Display) button
for easy access to status and other
information
Integrated contacts directory
End user selectable streaming
parameters
LED indicators for power,
stream/record, power/charging,
and network link
COLLABORATION FEATURES
Form factor and software optimized
to allow real time voice and video
collaboration related to subject
matter being captured by the
Onsight Device
Telestration:
Allows both the Onsight Device
operator and Onsight Connect
operator to draw on top of the
video or frozen image
Both “ends” of the conversation
see the drawing simultaneously
Remote control of major Onsight
Device features – zoom, focus, still
image capture, illumination, and
stream parameters
AUDIO FEATURES
Omni-directional microphone for
VoIP support
Microphone or line-in input for
capture of subject audio time
synchronized with the subject video
Headset connector for high noise
environments
Speakerphone with acoustic echo
cancellation
Silence suppression of VoIP
communications to minimize
network bandwidth utilization
Dynamic jitter buffer adjusts to
changing network conditions to
balance low latency with a low
voice dropout rate
AUDIO STANDARDS
VoIP: G.711, GSM 6.10
Subject Audio: G.711, GSM 6.10
SECURITY
User ID and password control
WLAN Network Authentication
modes:
WPA/WPA2 – Enterprise
WPA/WPA2 – PSK
Open
Shared
WLAN Data Encryption modes:
WEP
TKIP
Disabled
AES
802.1X Authentication
EAP-TLS
PEAP
PEAP-GTC
Media Encryption
AES-128
EXTERNAL INTERFACES
SD/SDHC Memory Card (SD Class
10 or higher)
Minimum write speed: 9.0
MB/sec
Minimum read speed: 10.0
MB/sec
Headset
Mono 32 ohm speaker
3.5mm audio jack (3 conductor,
tip microphone, ring speaker)
Removable Input/Output Sled
External power input
RJ-45 10/100 Mbps Ethernet
USB Host 2.0
Audio Line-in
1 Vrms input
2.5 mm audio jack, 2
conductor, tip line-in
S-Video
Configurable for Input or Output
COMMUNICATIONS
IP calls – SIP call control
Integrated 802.11 b/g radio
65
Page 71

Librestream Onsight 1000/2000/2500 User Manual Onsight 2000R/On sight 2000Ex Technical Specifications
10/100 Mbps Ethernet (via
removable Input/Output Sled)
POWER
Rechargeable 2400 mAH Li-Ion
battery pack
External power
Input: 12 VDC @ 1A
External Power Adapter
Specifications:
Output Voltage: 12 VDC @
1.5A
Rated Input Voltage: 100 –
240 VAC
Input Voltage Range: 90 –
264 VAC
Rated Input Frequency: 50
– 60 Hz
Input Frequency Range: 47
– 63 Hz
OPERATING ENVIRONMENT
Temperature:
Operating: -10° to 40° C
Storage: –20° to 60° C
Humidity (non-condensing):
Operating: 5 – 95%
Storage: 5 – 85%
N.B. Long term storage over 3
months is 0°C to 40°C at 60% R.H.
or less
EXPLOSION PROTECTION
Explosion protected versions
available (Onsight 2000Ex).
Consult the Onsight 2000
Regulatory and Safety Guide and
the product label for specific
ratings.
66
Page 72

Librestream Onsight 1000/2000/2500 User Manual Onsight 2500R/On sight 2500Ex Technical Specifications
10 Onsight 2500R/Onsight
2500Ex Technical
Specifications
SYSTEM ARCHITECTURE
High performance, multiprocessor
architecture optimized for real-time
multimedia processing and
communications in a handheld
form factor
Microsoft WinCE 5.0
SIP-based session control
Windows-based PC Client allowing
for easy call initiation and camera
control
PHYSICAL CHARACTERISTICS
Size – 187 (7.36”) mm wide x 127
(5.00”) mm high incl. antenna, 104
(4.09”)mm without antenna x 108
(4.25”) mm deep
Weight – Approx. 900 grams (1.98
pounds) without battery
Non slip hand grips
Integrated LED-based illumination
ring
Integrated water resistant door for
access to Battery and SD Card
Rugged form factor resists shock
and drop
OPTICAL PERFORMANCE
CCD image sensor – capable of
high precision close-up video
10x optical zoom, f=4.2 mm (wide)
to 42 mm (tele), F1.8 to F2.9
10 mm minimum working distance
(wide end)
1000 mm minimum working
distance (tele end)
1.5 lx (50 IRE) minimum
illumination
Automatic/manual white balance
Manual or automatic focus
VIDEO STANDARD
H.264
H.263
Up to 2.5 Mbps
User selectable resolutions and
frame rates up to:
D1 (720 x 480) at 30 fps
USER INTERFACE & FEATURES
VGA (640 x 480) display/viewfinder
Integrated touch screen
User-friendly graphical user
interface
Dedicated call send and end
buttons
Simple end-user experience
much like a cellular telephone
Still image capture button
Stream button
Video stream can be started
and stopped by pushing one
button
Context sensitive cursor pad
buttons (includes volume controls,
microphone mute, and illumination
control)
Media record to SD card
Manual focus button
OSD (On Screen Display) button
for easy access to status and other
information
Integrated contacts directory
End user selectable streaming
parameters
LED indicators for power,
stream/record, power/charging,
and network link
COLLABORATION FEATURES
Form factor and software optimized
to allow real time voice and video
collaboration related to subject
matter being captured by the
Onsight Device
Telestration:
Allows both the Onsight Device
operator and Onsight Connect
operator to draw on top of the
video or frozen image
Both “ends” of the conversation
see the drawing simultaneously
Remote control of major Onsight
Device features – zoom, focus, still
image capture, illumination, and
stream parameters
AUDIO FEATURES
Omni-directional microphone for
VoIP support
Microphone or line-in input for
capture of subject audio time
synchronized with the subject video
Headset connector for high noise
environments
Bluetooth Headset
Speakerphone with acoustic echo
cancellation
Silence suppression of VoIP
communications to minimize
network bandwidth utilization
Dynamic jitter buffer adjusts to
changing network conditions to
balance low latency with a low
voice dropout rate
AUDIO STANDARDS
VoIP: G.711, GSM 6.10
Subject Audio: G.711, GSM 6.10
SECURITY
User ID and password control
WLAN Network Authentication
modes:
WPA/WPA2 – Enterprise
WPA/WPA2 – PSK
Open
Shared
WLAN Data Encryption modes:
WEP
TKIP
Disabled
AES
802.1X Authentication
EAP-TLS
PEAP
PEAP-GTC
Media Encryption
AES-128
EXTERNAL INTERFACES
SD/SDHC Memory Card (SD Class
10 or higher)
Minimum write speed: 9.0
MB/sec
Minimum read speed: 10.0
MB/sec
Headset
Mono 32 ohm speaker
3.5mm audio jack (3 conductor,
tip microphone, ring speaker)
Bluetooth Headset
Removable Input/Output Sled
External power input
RJ-45 10/100 Mbps Ethernet
USB Host 2.0
Audio Line-in
1 Vrms input
2.5 mm audio jack, 2
conductor, tip line-in
S-Video
Configurable for Input or Output
67
Page 73

Librestream Onsight 1000/2000/2500 User Manual Onsight 2500R/On sight 2500Ex Technical Specifications
COMMUNICATIONS
IP calls – SIP call control
Integrated 802.11 a/b/g radio
10/100 Mbps Ethernet (via
removable Input/Output Sled)
POWER
Rechargeable 2400 mAH Li-Ion
battery pack
External power
Input: 12 VDC @ 1A
External Power Adapter
Specifications:
Output Voltage: 12 VDC @
1.5A
Rated Input Voltage: 100 –
240 VAC
Input Voltage Range: 90 –
264 VAC
Rated Input Frequency: 50
– 60 Hz
Input Frequency Range: 47
– 63 Hz
OPERATING ENVIRONMENT
Temperature:
Operating: -10° to 40° C
Storage: –20° to 60° C
Humidity (non-condensing):
Operating: 5 – 95%
Storage: 5 – 85%
N.B. Long term storage over 3
months is 0°C to 40°C at 60% R.H.
or less
EXPLOSION PROTECTION
Explosion protected versions
available (Onsight 2500Ex).
Consult the Onsight 2500
Regulatory and Safety Guide and
the product label for specific
ratings.
68
Page 74

Librestream Onsight 1000/2000/2500 User Manual Service Information
11 Service Information
If you encounter difficulties with the Onsight Device, contact your corporate technical support department. They will determin e
whether the problem exists within the network in frastru ctu re or the Onsi gh t equip men t and w ill con tact Librestrea m Support. See
page 73 for Librestream contact information.
69
Page 75

Librestream Onsight 1000/2000/2500 User Manual Regulatory and Safety Information
12 Regulatory and Safety Information
The Onsight 1000, Onsight 2000 and Onsight 2500 Regulatory and Safety Guides contain detailed safety
information.
Before operating the Onsight 1000, you must read the Onsight
1000 Regulatory and Safety Guide.
Before operating the Onsight 2000/2500, you must read the
Onsight 2000/2500 Regulatory and Safety Guide.
70
Page 76

Librestream Onsight 1000/2000/2500 User Manual Librestream Limited Warranty Agreement
13 Librestream Limited
Warranty Agreement
Hardware
original purchaser (Buyer) that the
hardware Product will be free of defects in
workmanship and materials for a period of
twelve (12) months from the date of
shipment from Librestream or its
designated manufacturer, unless otherwise
provided by Librestream in w ri ting,
provided the Product remains unmodifi ed
and is operated under normal and proper
conditions. The warranty does not extend
to persons other than the Buyer who
purchased the product in unused condition
from Librestream. Warranty provisi ons and
durations on remanufactured products,
and reconditioned or upgraded products,
shall be as provided in the particular
Product documentation in effect at the time
of purchase.
Products may be serviced with parts,
components, or subassemblies that
originate from returned products and that
have been determined to meet applicable
specifications for equivalent new material
and Products.
The sole obligation of Librestream for
defective hardware Products is limited to
repair or replacement (at Librestream's
option) on a "return to se rvi ce depot" basis
with prior Librestream authorization. Buyer
is responsible for shipment to Librestream
and assumes all costs and risks
associated with this transportation; return
shipment to Buyer will be at Librestream's
expense. The Product must be returned
either in its original packaging or in a
similar package affording an equal degree
of protection.
: Librestream warrants to the
Buyer shall be responsible for return
shipment charges for Product returned
where Librestream determines there is no
defect ("No Defect Found"), or for Produ ct
returned that Librestream determines is
not eligible for warranty repair. If after
investigation Librestream determines that
the reported defect was not covered by
warranty, Buyer shall be l iable to pay
Librestream, at Librestream’s sole
discretion, for the cost of investigating the
problem at Librestream’s then prevailing
per incident billable rate. No charge will be
made to Buyer for replacement parts for
warranty repairs. Librestream is not
responsible for any damage to or loss of
data or removable data storage media, or
the restoration or reinstallation of any
software programs or data other than the
software, if any, installed by Libre s tream
during manufacture of the Product.
The above warranty provisions shall not
apply to any Product (i) which has been
repaired, tampered with, altered or
modified, except by Librestream; (ii ) in
which the defects or damage to the
Product result from normal wear and tear,
misuse, negligence, improper storage,
water or other liquids, battery leakage, use
of parts or accessories not approved or
supplied by Librestream, or failu re to
perform operator handling and scheduled
maintenance instructions supplied by
Librestream; (iii) which has been su bjected
to unusual physical or electrical stress,
abuse, or accident, or forces or exposure
beyond normal use within the specified
operational and environmental parameters
set forth in the applicable Product
specification; or (iv) used with any
software, hardware or third par ty
equipment not approved by Librestream,
nor shall the above warranty pro visi ons
apply to any expendable o r consumable
items, such as batteries, supplied with the
Product.
Software
enclosed or embedded in the hardware
Product is warranted in accordance with,
and is otherwise subject to, the provisions
of the Librestream End User License
Agreement that is applicable to that
Librestream software.
EXCEPT FOR THE WARRANTY OF
TITLE AND THE EXPRESS
WARRANTIES STATED ABOVE,
LIBRESTREAM DISCLA IMS AL L OTH ER
WARRANTIES OF ANY NATURE OR
KIND WHATSOVER ON HARDWARE
PRODUCTS FURNISHED HEREUNDER,
INCLUDING ALL IMPLIED WARRANTIES
OR CONDITIONS OF
MERCHANTABILITY AND FITNESS FOR
A PARTICULAR USE. THE REMEDY SET
FORTH IN THIS LIMITED WARRANTY
AGREEMENT IS THE BUYER'S SOLE
AND EXCLUSIVE REMEDY FOR
WARRANTY CLAIMS, AND IS
EXPRESSLY IN LIEU OF ALL OTH ER
REMEDIES THAT MAY BE AVAILABLE
TO BUYER AT LAW OR IN EQUITY.
: Any Librestream software
71
Page 77

Librestream Onsight 1000/2000/2500 User Manual End User License Agreement
14 End User License Agreement
This product’s software is licensed under the terms of an End User License Agreement (EULA), the latest version of which
can be found at:
http://www.librestream.com/products/termsofuse.html
72
Page 78

Librestream Onsight 1000/2000/2500 User Manual Librestream Contact Information
15 Librestream Contact Information
Website
www.librestream.com
Head Office
Librestream Technologies Inc.
895 Waverley St., Suite 110
Winnipeg, Manitoba
Canada, R3T 5P4
General Inquiries
Email [email protected]
Phone +1.204.487.0612
Fax +1.204.487.0914
Support
Email [email protected]
Phone +1.204.487.0612
Fax +1.204.487.0914
73
 Loading...