

Librestream Onsight 1000, Onsight 2000, Onsight 2500 User Manual

USER MANUAL:
Onsight Connect for Librestream
Devices 1000/2000/2500
Version 6.0

Librestream Onsight 1000/2000/2500
User Manual
Doc #: 400135-03
September 2012
Information in this document is subject
to change without notice. Reproduction
in any manner whatsoever without the
written permission of Librestream is
strictly forbidden.
Copyright © 2006 – 2012
Librestream Technologies
Incorporated.
All rights reserved.
Name of Librestream Software
Onsight 1000
Onsight 2000
Onsight 2500
Copyright Notice:
Copyright 2004 – 2012 Libre s tream
Technologies Incorporated. All Rights
Reserved.
Patents Notice:
# 7,221,386, together with addi tional
patents pending in Canada, the United
States and other countries, all of which
are in the name of Librestream
Technologies Inc.
Trademark Notice:
Librestream logo, Onsight, Onsight
Connect, Onsight Expert, Onsight
Mobile, Onsight En te rp ri se , Ons ig h t
License Manager, Onsight TeamLink,
Onsight Account Manager and Onsight
Management Suite are either
registered trademarks or trademarks of
Librestream Technologies Incorporated
in Canada, the United Sta tes and/or
other countries. All other trademarks
are the property of their respective
owners.
United States Patent
Librestream, the
:

Librestream Onsight 1000/2000/2500 User Manual
Table of Contents
1
1.1
1.2
1.3
1.3.1
1.4
1.5
1.6
1.6.1
1.6.2
1.6.3
1.6.4
1.6.5
1.6.6
1.7
1.7.1
1.7.2
1.7.3
1.8
1.8.1
1.8.2
1.8.3
1.8.4
1.8.5
1.8.6
1.8.7
1.8.8
1.8.9
1.8.10
2
2.1
2.2
2.2.1
2.2.2
2.3
2.3.1
2.4
2.4.1
2.4.2
2.4.3
2.4.4
Getting Started.............................................................................................1
The Onsight System ......................................................................................1
Onsight Mobile Devices.................................................................................2
About this Manual..........................................................................................2
Accessories and Support...........................................................................2
Models...........................................................................................................2
What’s in the Box...........................................................................................2
Parts of the Onsight Device...........................................................................3
Onsight 1000.............................................................................................3
Onsight 2000/2500....................................................................................4
Control Buttons..........................................................................................5
Navigation Pad Buttons.............................................................................6
Zoom/Manual Focus Control .....................................................................7
Indicators...................................................................................................7
Onsight 2000/2500 Accessories ....................................................................8
I/O Cover...................................................................................................8
Power Sled................................................................................................9
I/O Sled ...................................................................................................10
User Interface Features...............................................................................11
Viewfinder................................................................................................11
Soft Keys.................................................................................................11
Icons........................................................................................................11
Standard Onsight Device Icons...............................................................12
Main Menu...............................................................................................15
Stylus.......................................................................................................15
On-Screen Keyboard...............................................................................16
General Conventions...............................................................................16
Terminology and Definitions....................................................................16
Tips..........................................................................................................16
Onsight Device Basic Operation..............................................................17
Charging the Battery....................................................................................17
Inserting or Replacing the Battery................................................................17
Onsight 1000 Battery Replacement.........................................................18
Onsight 2000/2500 Battery Replacement................................................19
Calibrating the Integrated Touch Panel .......................................................21
Displaying the Calibration Screen Using Navigation Pad Buttons...........21
Turning Power On or Off..............................................................................21
Power On Mode.......................................................................................21
Power Off Mode.......................................................................................21
Standby Mode .........................................................................................22
Resetting the Onsight Device (Soft Reset)..............................................22
i

Librestream Onsight 1000/2000/2500 User Manual
2.5
2.5.1
2.5.2
2.6
2.6.1
2.6.2
3
3.1
3.2
3.3
3.4
3.5
4
4.1
4.1.1
4.1.2
4.1.3
4.1.4
4.1.5
5
5.1
5.2
5.3
5.4
5.5
5.6
5.6.1
5.6.2
5.7
5.7.1
5.7.2
5.7.3
5.8
5.8.1
5.8.2
5.8.3
5.9
5.9.1
5.9.2
5.9.3
6
6.1
6.2
Logging In & Out..........................................................................................23
Logging In................................................................................................23
Logging Out.............................................................................................23
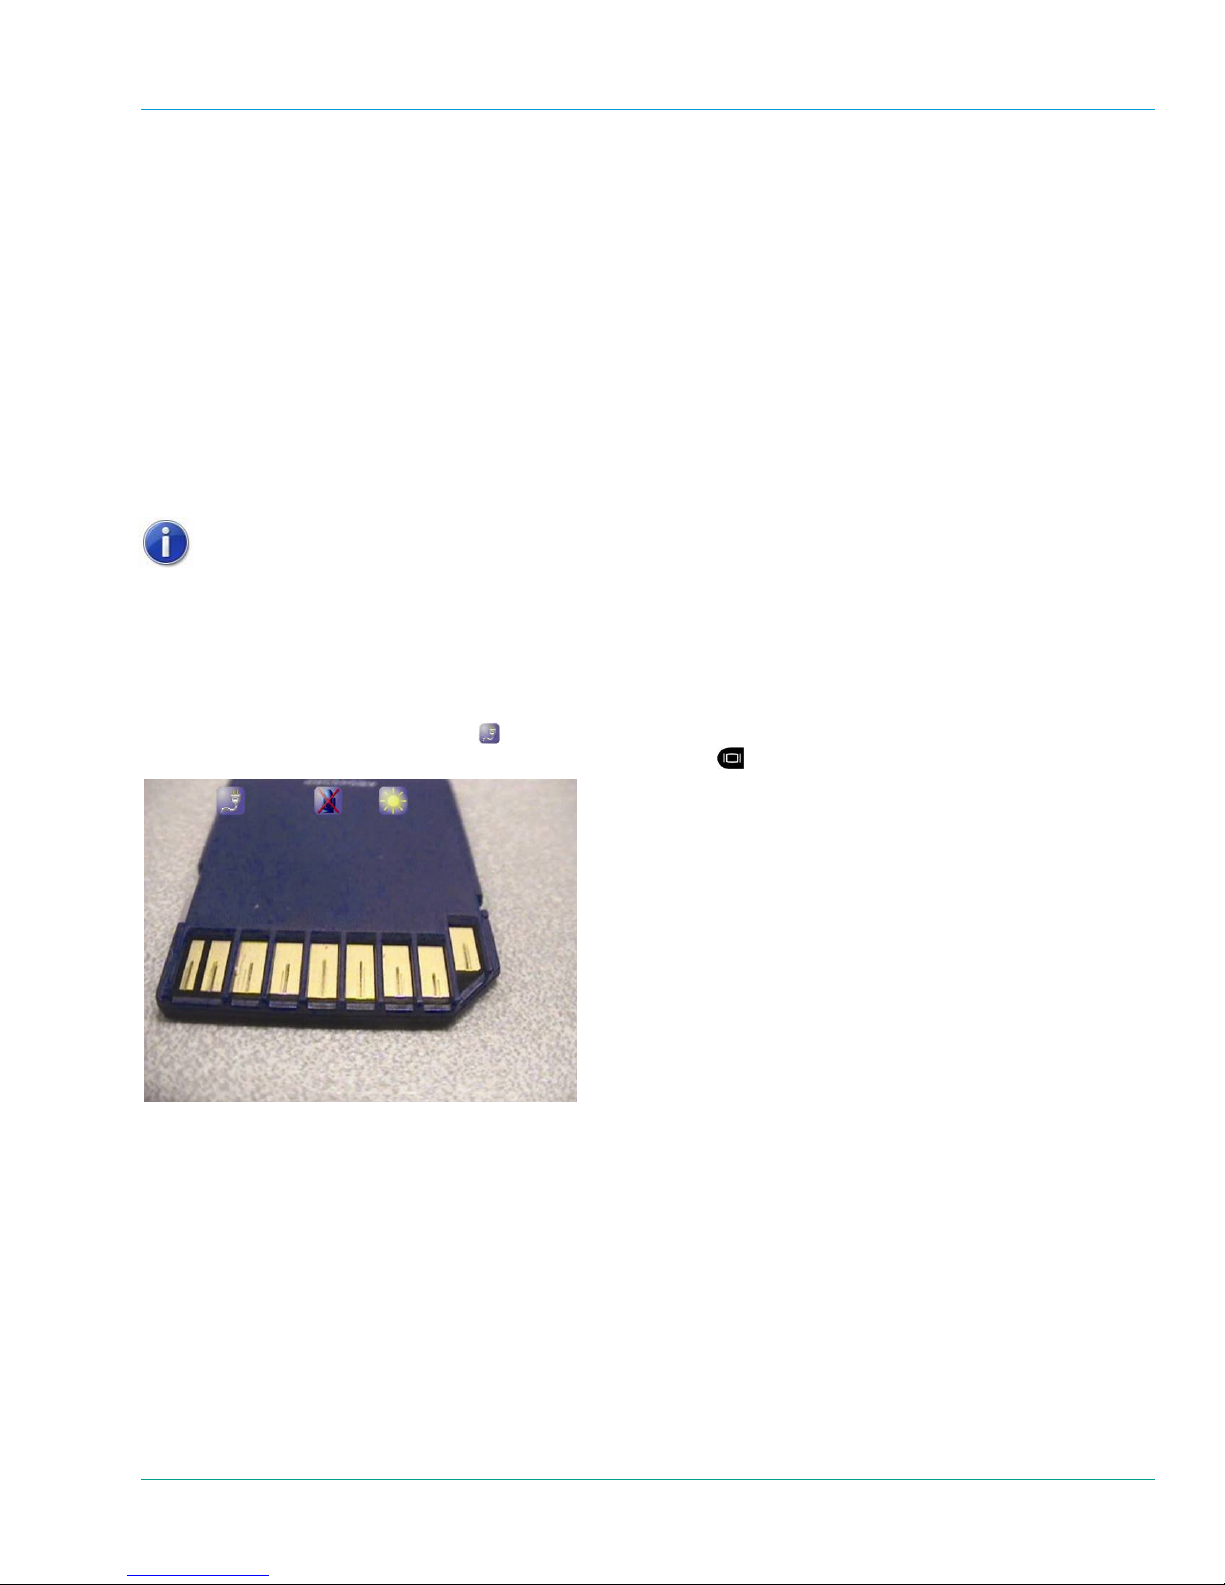
Inserting and Removing an SD Memory Card .............................................24
Onsight 1000...........................................................................................24
Onsight 2000/2500..................................................................................25
Answering & Initiating Calls .....................................................................26
Network Access...........................................................................................26
Answering an Incoming Call ........................................................................27
Initiating (Starting) a Call..............................................................................28
Ending a Call ...............................................................................................29
Audio Communication..................................................................................29
Viewfinder Features & Display Modes.....................................................30
Controlling the Viewfinder Mode..................................................................30
Turn Viewfinder Backlight On or Power Save..........................................30
Default Viewfinder Mode .........................................................................31
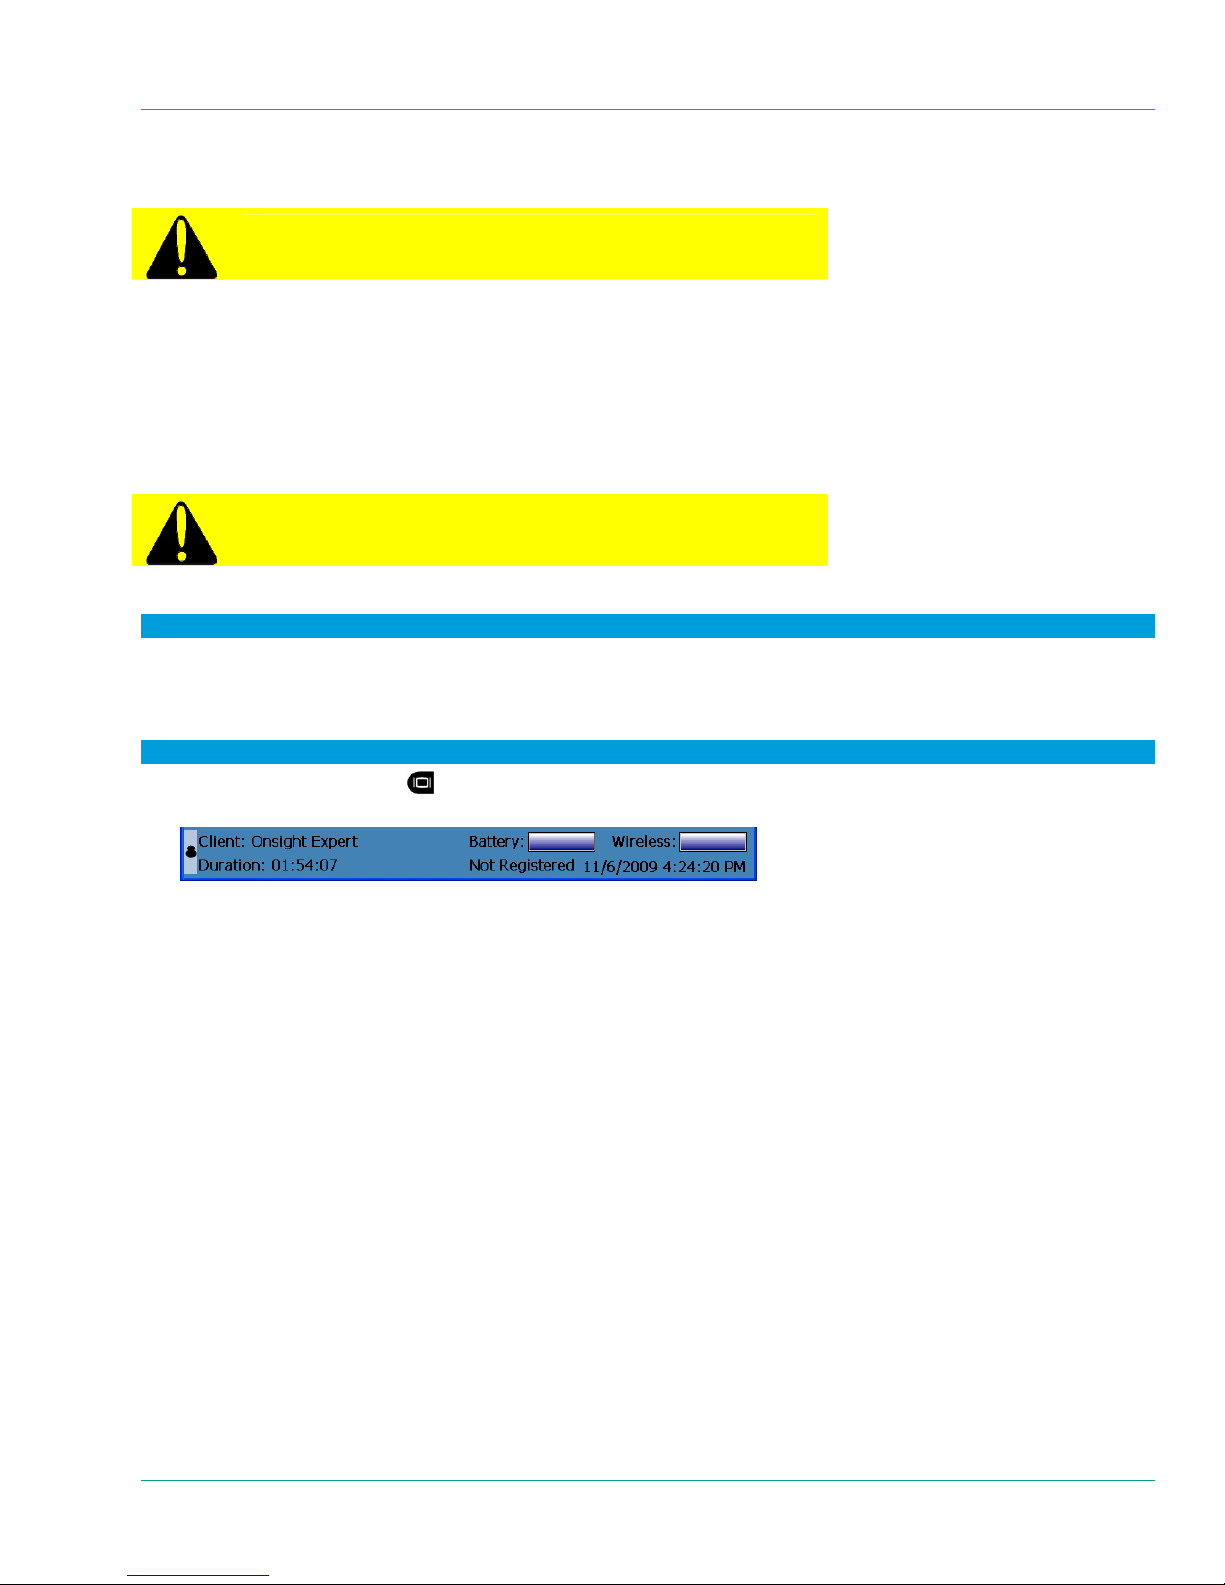
Session Information.................................................................................31
Streaming Status.....................................................................................32
Viewfinder Main Menu.............................................................................33
Audio/Video (AV) Functions .....................................................................34
Turning the Video Stream On or Off ............................................................34
Setting the Subject Audio Source and Volumes ..........................................34
Using S-Video..............................................................................................36
Turning Illumination On or Off......................................................................37
Adjusting Zoom Levels.................................................................................38
Focusing......................................................................................................38
Automatic Focus......................................................................................38
Manual Focus..........................................................................................38
Telestration (Drawing Lines on the Viewfinder) ...........................................39
Telestration while Streaming Live Video..................................................39
Telestration while Sharing Recorded Video.............................................41
Telestration Colors ..................................................................................43
Capturing and Sharing Images....................................................................46
Capturing Still Images for Local Viewing Only.........................................46
Sharing a Live Image...............................................................................47
Sharing a Saved Image...........................................................................49
Recording and Playing Videos.....................................................................49
Recording a Video...................................................................................50
Playing a Video Recording Locally (not in a Call)....................................50
Sharing a Video Recording......................................................................51
Menus .........................................................................................................53
Stream Setup...............................................................................................53
Checking Status...........................................................................................54
ii

Librestream Onsight 1000/2000/2500 User Manual
6.3
6.3.1
6.3.2
6.4
6.4.1
6.4.2
6.4.3
6.4.4
6.5
6.6
7
7.1
7.2
7.3
7.4
7.5
8
9
10
11
12
13
14
15
Viewing Contacts.........................................................................................55
Contacts ..................................................................................................55
History.....................................................................................................56
Managing Files ............................................................................................56
Rename Files and Folders ......................................................................58
Playing Videos.........................................................................................58
Viewing an Image Locally........................................................................58
Sharing an Image with Onsight Connect endpoints.................................59
Configuration ...............................................................................................59
Invite a Guest...............................................................................................61
Maintaining the Onsight Device ...............................................................62
General Recommendations.........................................................................62
Inspection/Maintenance/Cleaning................................................................62
Display/Touch Screen..................................................................................62
Optics...........................................................................................................62
Ergonomic Recommendations.....................................................................62
Onsight 1000 Technical Specifications....................................................63
Onsight 2000R/Onsight 2000Ex Technical Specifications.....................65
Onsight 2500R/Onsight 2500Ex Technical Specifications.....................67
Service Information ...................................................................................69
Regulatory and Safety Information..........................................................70
Librestream Limited Warranty Agreement ..............................................71
End User License Agreement...................................................................72
Librestream Contact Information .............................................................73
Figures
Figure 2 – Onsight 1000...............................................................................................3
Figure 3 – Onsight 2000/2500......................................................................................4
Figure 4 – Control Buttons ...........................................................................................5
Figure 5 – Navigation Pad Buttons...............................................................................6
iii

Librestream Onsight 1000/2000/2500 User Manual Getting Started
1 Getting Started
1.1 The Onsight System
The Onsight system reaches beyond traditional video conferencing rooms to con nect field workers in challenging
environments with remote subject matter experts. Using Onsight Connect, subject matter experts can see live
video and images and share feedback with field staff, external suppliers, or customers to assess operations or
resolve issues immediately.
The Onsight Connect solution is comprised of three main components:
1. Onsight Connect service platform including rich collaboration software for the iPhone, iPad, PC and Onsight
mobile devices
2. Librestream’s Onsight mobile devices including rugged and hazardous location certified models
3. Central system management tools including Onsight Account Manager and Onsight Management Suite
Together, these components provide a full operations-driven video collaboration solution that is optimized to
perform in challenging field environments. Using Onsight, a field worker can securely collaborate with multiple
offsite experts through live video, images, voice, and on-screen drawing (“telestration”). Experts and field workers
can resolve issues, fix problems, diagnose, or monitor field situations on the shop floor, in a remote health clinic,
or even at the scene of an emergency.
Onsight Connect can simultaneously connect to multiple Onsight Co nnect
users and multiple Onsight Devices.
1

Librestream Onsight 1000/2000/2500 User Manual Getting Started
1.2 Onsight Mobile Devices
Onsight Mobile Devices are used to communicate with Onsight Connect users (or multiple Onsight Connect
users) over a network. The Onsight Device can fully collaborate from a remote site.
Technical experts and remote operators can jointly view, consult, diagnose and resolve issues by sending highresolution video, sound and still images through streaming multimedia from the Onsight Device to one or more
Onsight Connect endpoints.
Multiple Onsight Connect users and Onsight Devices can participate in a conference call. The Onsight Connect
PC user who establishes the connection with the Onsight Device is called the Conferen ce Host.
The Onsight Device operator and Onsight Connect user can:
Converse just as they would on a mobile telephone
Stream audio and video recordings in real time
View and listen to streaming audio/video output in real time
Record and play back video
Draw (telestrate) on the video image
Capture and save snapshot images
Share snapshot images
Draw (telestrate) on the snapshot image
Remotely adjust the controls on the Onsight Device (e.g., zoom, focus, lighting, etc.)
1.3 About this Manual
This manual describes how to use the Onsight Device on a system that has already been set up and configured.
For information on the Onsight Connect for PC application, consult the Onsight Connect for PC User Manual.
1.3.1 Accessories and Support
For info
at http://www.librestream.com/
the Librestream website at http://www.librestream.com/support
rmation on additional accessories or for updated Onsight documentation, consult the Librestre am web site
. For support information, including troubleshooting and release bulletins, consult
.
1.4 Models
The Onsight system includes powerful and easy to use mobile devices that are specifically designed to operate
within different environments. These environments range from light industrial usage in locations such as hospitals
or repair depots to harsh outdoor environments including potentially hazardous locations. For a complete list of
the Onsight mobile devices, please see http://www.librestream.com/products.html.
1.5 What’s in the Box
The Onsight 1000 or 2000/2500 Device includes:
External power adapter
Rechargeable 2400 mAH Li-Ion battery pack
Wrist strap
Stylus (1 for the Onsight 1000)
Stylus screwdriver (2 for the Onsight 2000/2500 – one is a spare)
I/O cover (Onsight 2000/2500 only)
Power sled (Onsight 2000/2500 only)
Lens cover (Onsight 2000/2500 only)
2
Librestream Onsight 1000/2000/2500 User Manual Getting Started
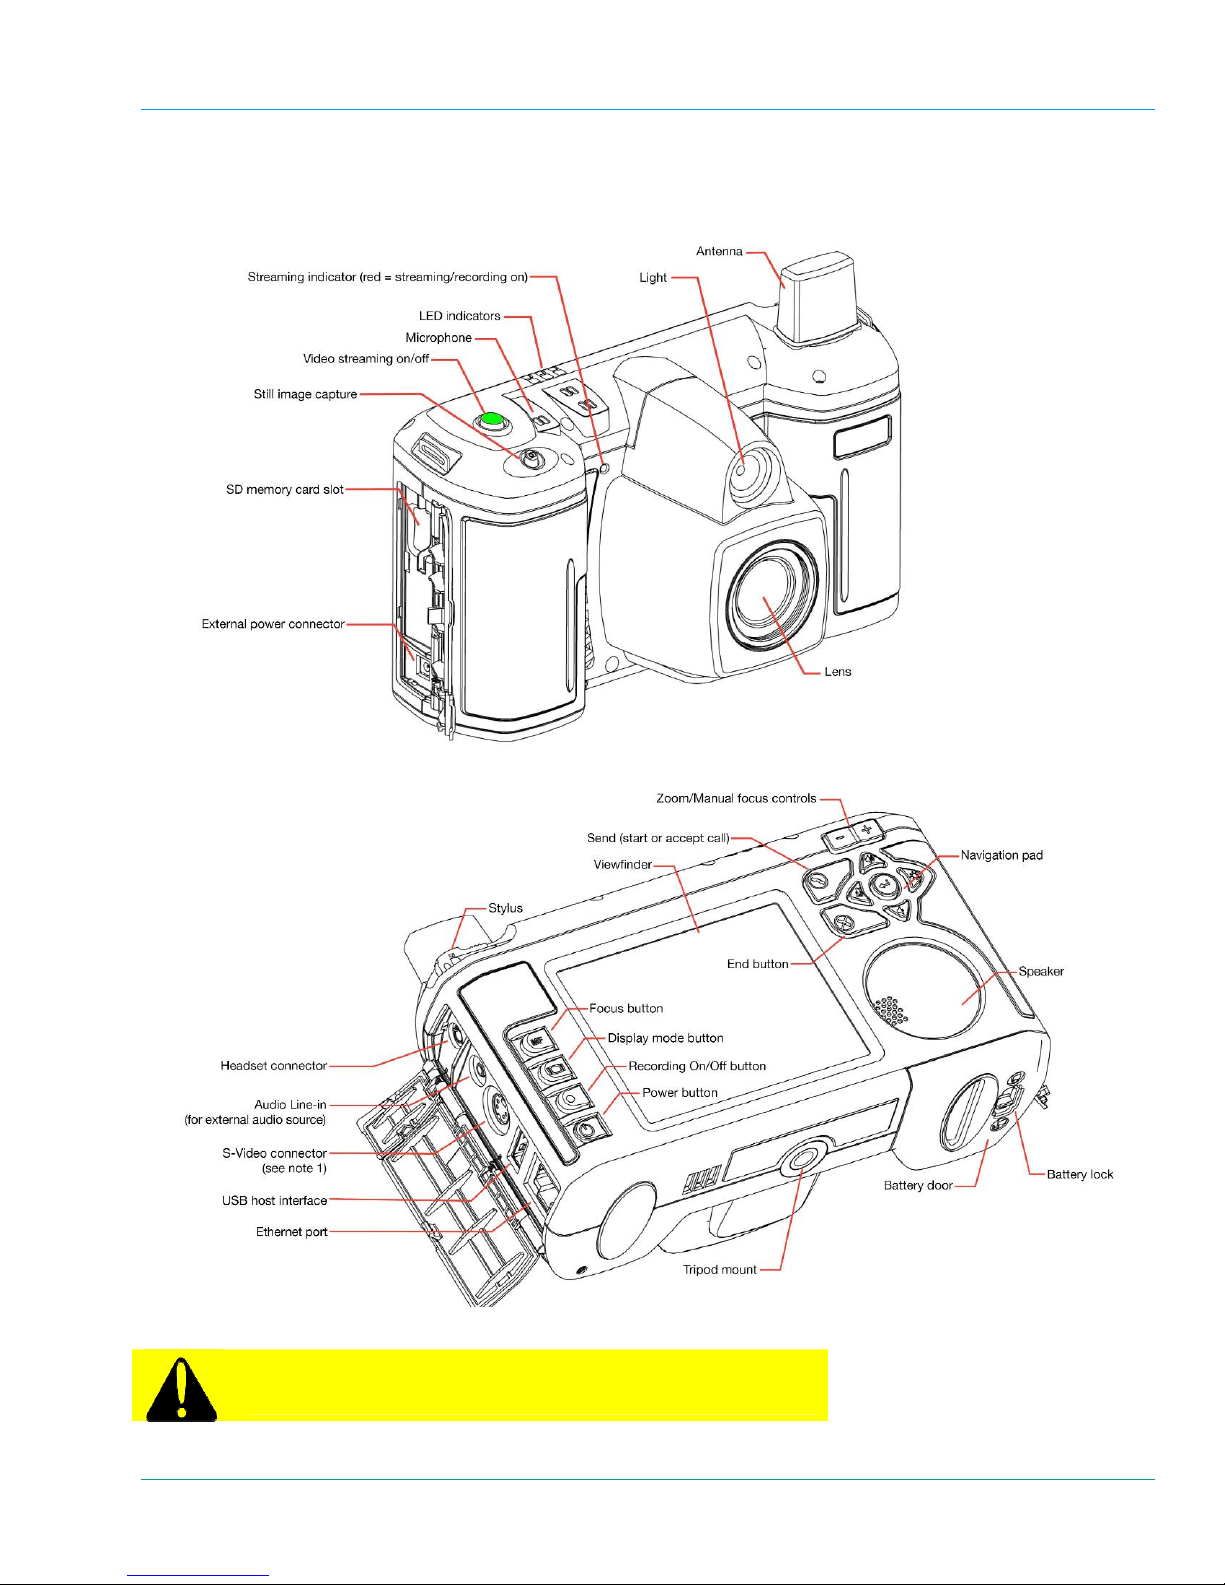
1.6 Parts of the Onsight Device
1.6.1 Onsight 1000
Note 1: For S-Video Out capability,
ple
ase contact Librestream.
Figure 1 – Onsight 1000
Before operating the Onsight 1000 Device, you must read the
Onsight 1000 Regulatory and Safety Guide.
3
Librestream Onsight 1000/2000/2500 User Manual
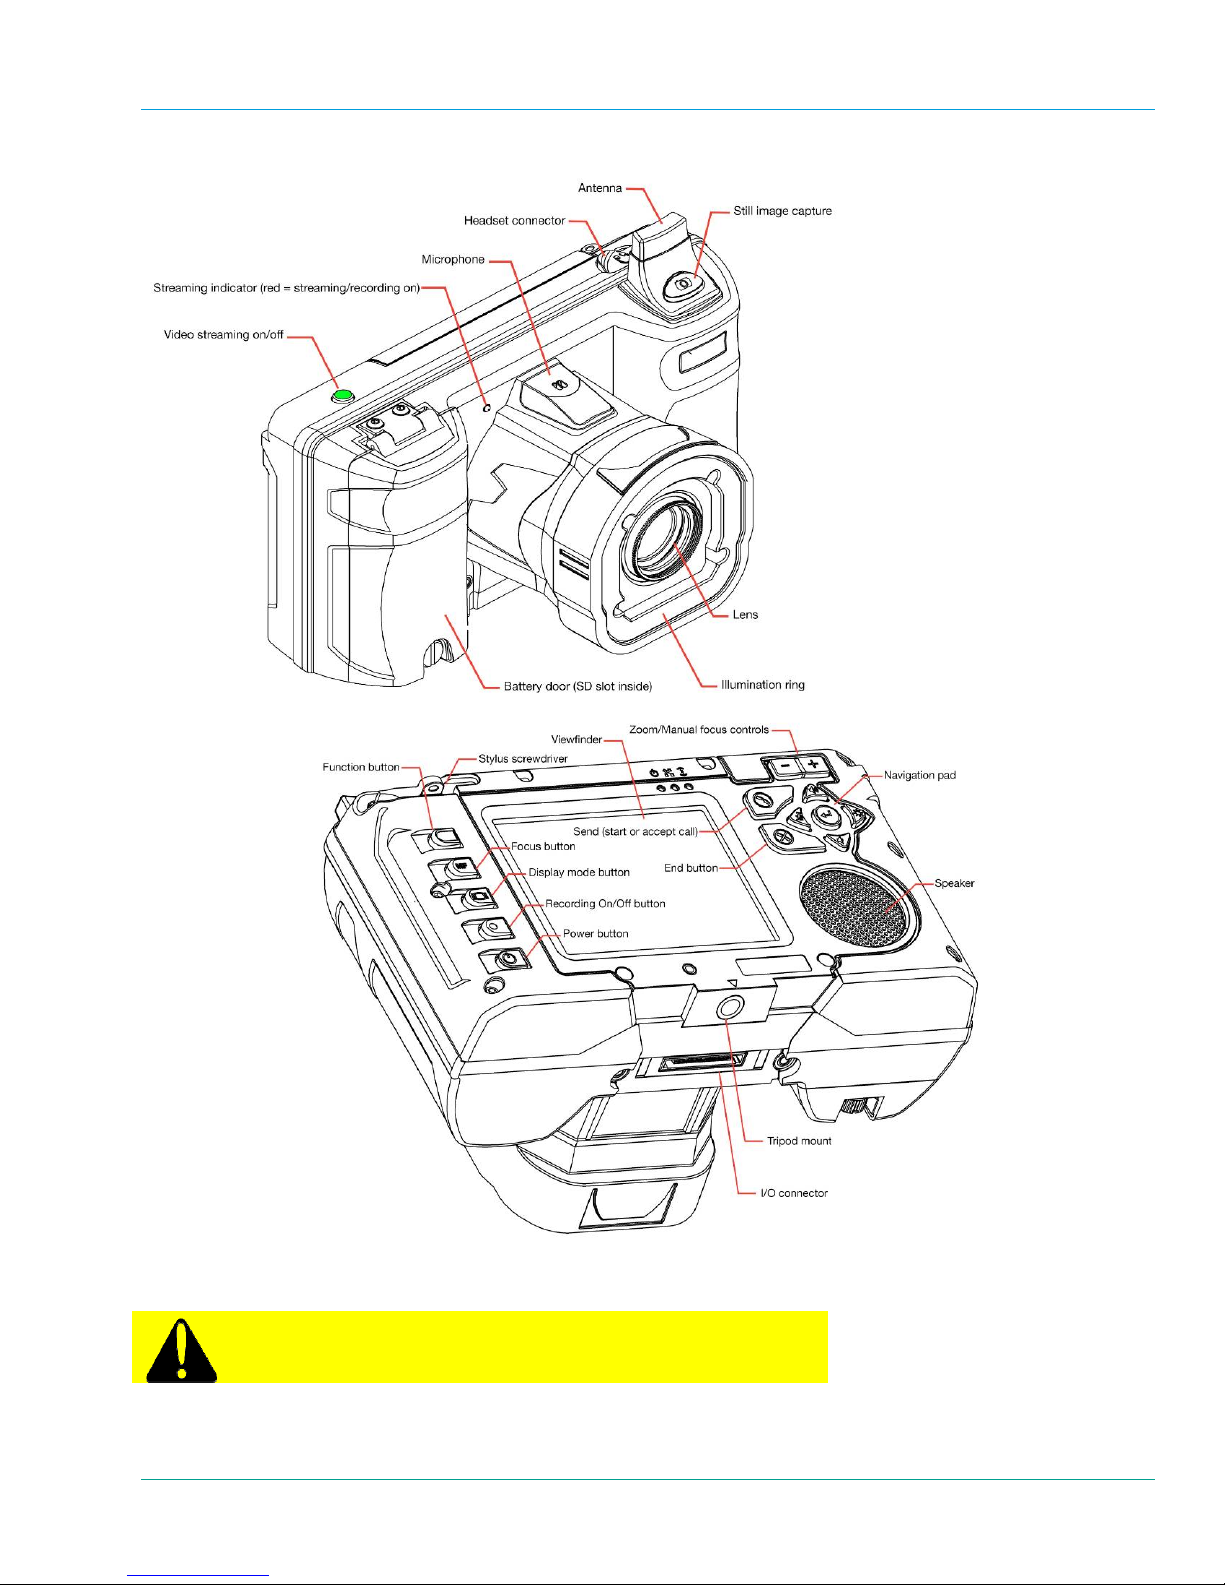
1.6.2 Onsight 2000/2500
Figure 2 – Onsight 2000/2500
Before operating the Onsight 2000/2500 Device, you must read
the Onsight 2000/2500 Regulatory and Safety Guide.
See paragraph 1.7 on page 8 for a description of the Onsight 2000/2500 accessories.
4
Librestream Onsight 1000/2000/2500 User Manual
r
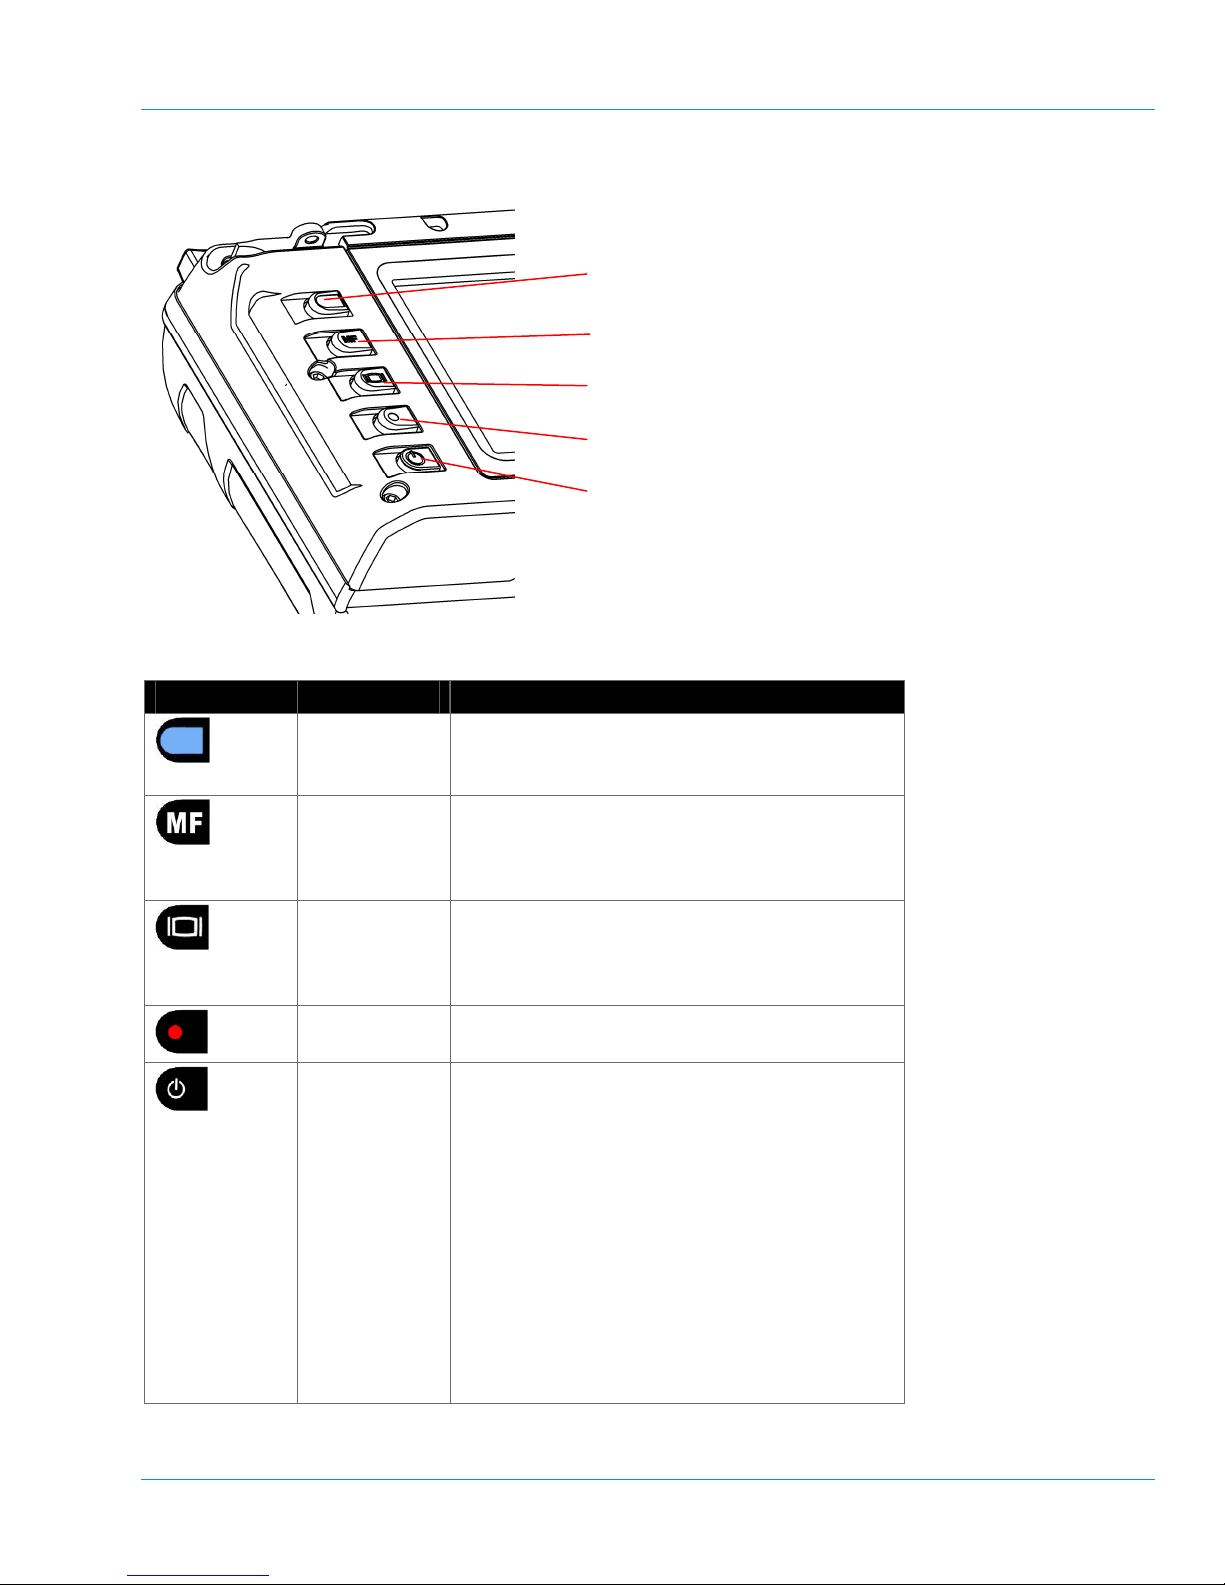
1.6.3 Control Buttons
Function (Onsight 2000/2500 only)
Manual focus
Display mode
Record
Powe
Figure 3 – Control Buttons
Button Name Function
Function
(Onsight
2000/2500 only)
Manual Focus Use this button to set the focus manually or to resume
Display Mode This button cycles through the Onsight Device’s
Record Press this button to start/stop recording to a local
Power This button controls On/Off/Standby modes. See
Holding this button allows the use of the control
buttons of the Navigation pad while navigating a menu
on the Viewfinder.
automatic focusing. It works in combination with the
Zoom buttons. See paragraph 5.6, Focusing, on
page 38 for more information.
multiple display modes. See section 4, Viewfinder
Features & Display Modes
information.
Secure Digital (SD) memory card.
paragraph 2.4, Turning Power On or Off, on page
21 for more information.
If d
evice status is… Power button function
Off Press and release the button to turn
the power on.
On Press and release the button to go
to Standby mode.
Standby Press and release the button to
enter Power On mode.
On or Standby Press and hold the button for two
seconds to turn the unit off. A
shutdown message appears.
, on page 30 for more
5
Librestream Onsight 1000/2000/2500 User Manual Getting Started
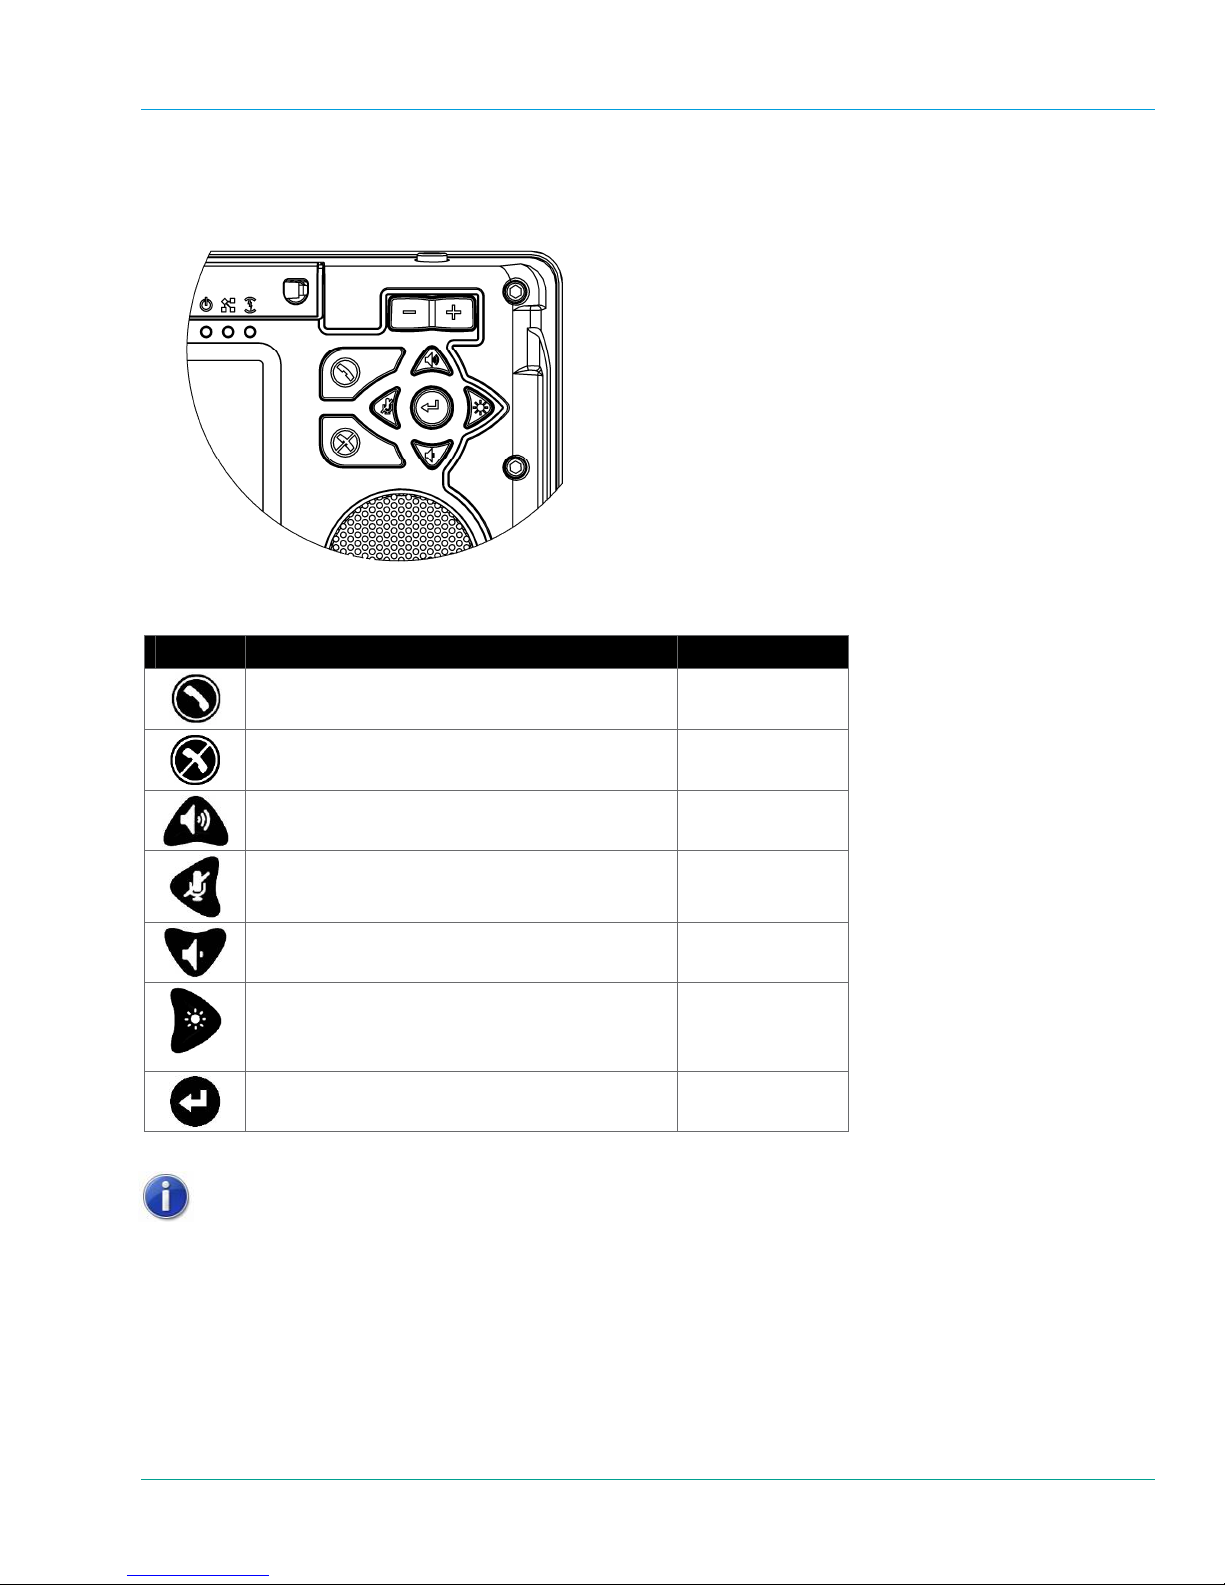
1.6.4 Navigation Pad Buttons
These context-sensitive buttons control audio volume, microphone mute and the illumination ring. They also
function as command buttons and directional buttons for the menus.
Figure 4 – Navigation Pad Buttons
Button Function Menu Function
Start or accept call (Send) OK or Enter
End a call or reject an incoming call invitation Cancel
Increase volume Up arrow
Microphone mute Left arrow
Decrease volume Down arrow
Front illumination light:
Onsight 1000: normal/off
Onsight 2000/2500: normal/macro/off
Enter/Freeze Accept
Right arrow
Onsight 2000/2500 only – to use the functions of the Navigation pad (e.g.,
Microphone mute) while navigating a menu, press and hold the Function
button, then press the navigation button.
6
Librestream Onsight 1000/2000/2500 User Manual Getting Started
1.6.5 Zoom/Manual Focus Control
The Zoom buttons
Figure 4 on page 6). These allow the operator to set zoom levels
The Manual Focus
are located on the back of the Onsight Device, directly above the Navigation pad (see
on the camera or to set focus manually.
button is located on the back of the Onsight Device on the left side (see Figure 3 on page
5). To set the focus manually, see paragraph 5.6.2, Manual Focus, on page 38.
1.6.6 Indicators
Indicator Name Explanation
Power mode indicator Green = On or Standby
Network indicator Green = Connected to network
Battery/power indicator Orange = Battery is charging
Stream/record Red = streaming/recording on
Ethernet port Establish the Ethernet connection before
Off = Not connected to network
Off = Battery is charged or power is not
connected
Off = streaming/recording off
powering on the Onsight Device. On the
Onsight 1000, the Ethernet port is on the
side. On the Onsight 2000/2500, the
Ethernet port is located on the I/O Sled
accessory.
The Ethernet port includes two LED
indicators.
Yellow On = a wired network link exists
Yellow Flashing = indicates wired network
activity
Yellow Off = no wired network link
Green On = 100 Mbps
Green Off = 10 Mbps
7
Librestream Onsight 1000/2000/2500 User Manual Getting Started
1.7 Onsight 2000/2500 Accessories
The Onsight 2000/2500 comes with an I/O Cover and a Power Sled. The I/O Sled is an optional accessory.
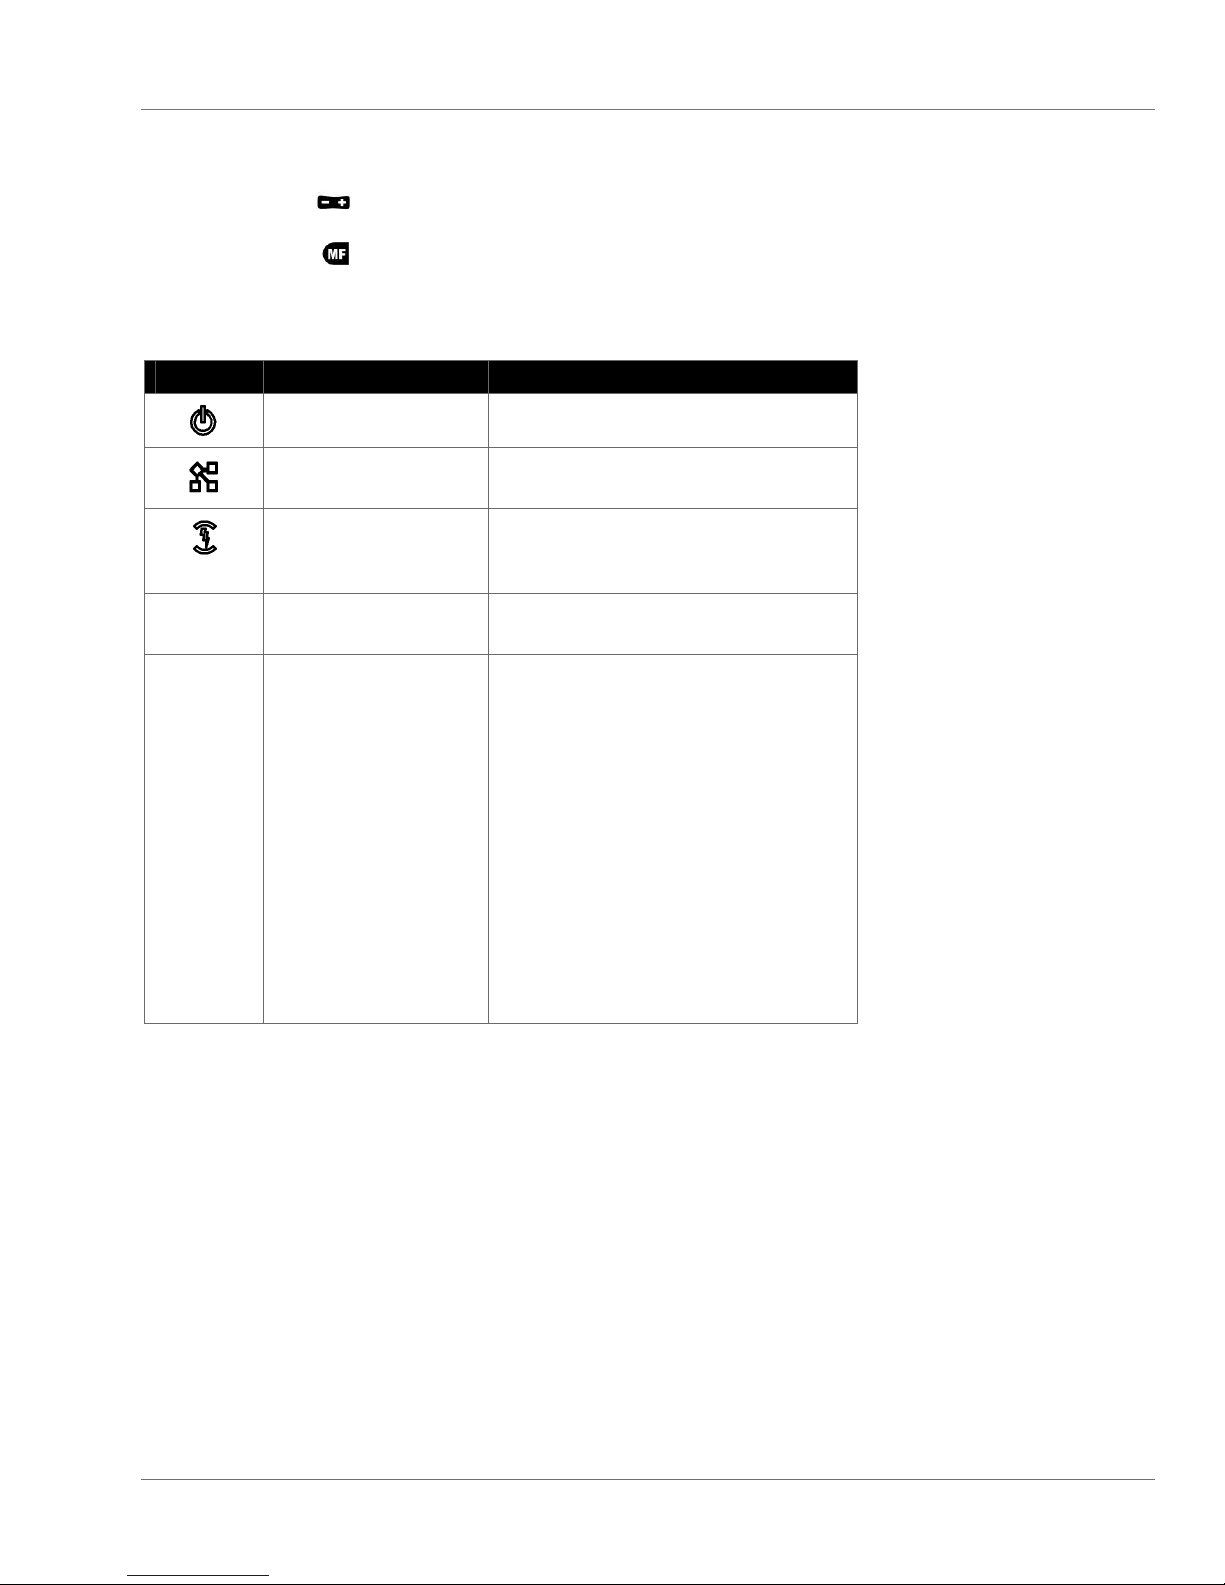
1.7.1 I/O Cover
Before removing the I/O Cover or before using the Onsight
2000Ex/2500Ex Device without the I/O Cover installed, you
must read the Onsight 2000/2500 Regulatory and Safety Guide.
The I/O Cove
r comes attached to the camera and can be removed using the stylus screwdriver. The I/O Cover
seals and protects the I/O Connector so that the I/O Connector is not exposed. Remove the I/O cover when
attaching the Power Sled or I/O Sled.
8
Librestream Onsight 1000/2000/2500 User Manual
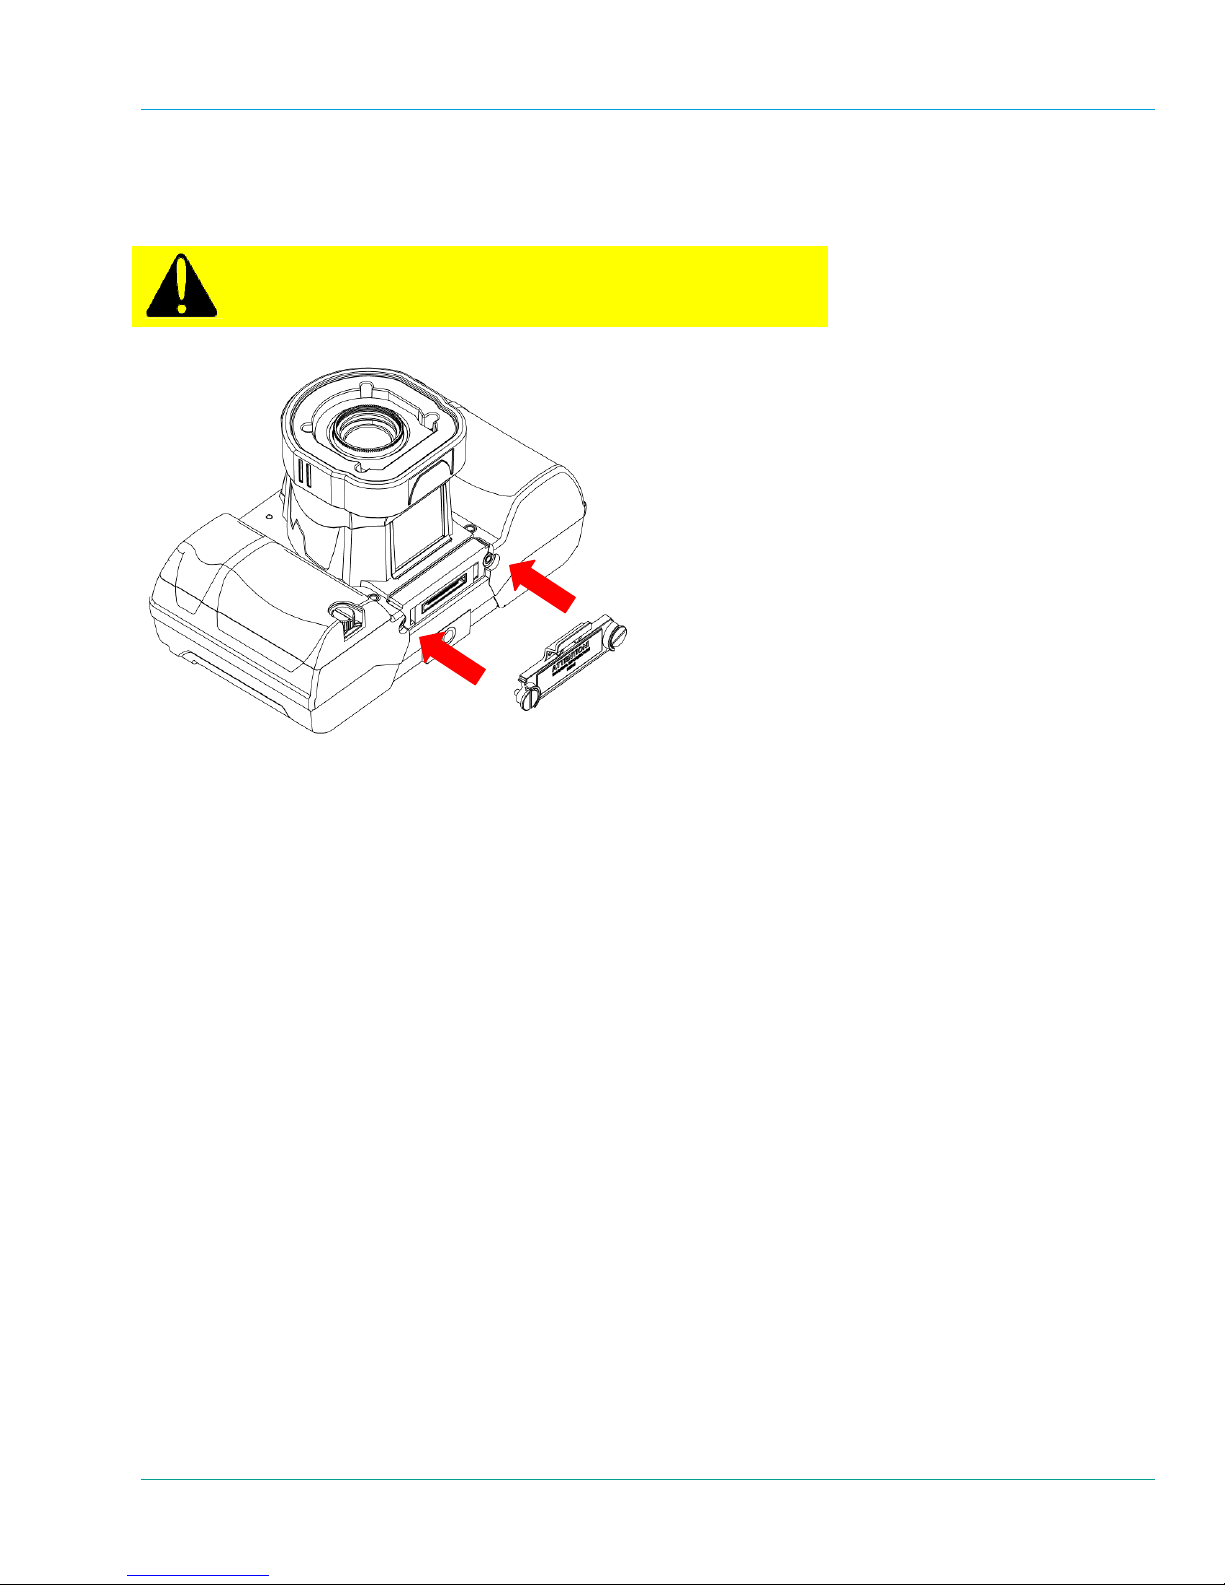
1.7.2 Power Sled
Before using the Power Sled with the Onsight 2000Ex/2500Ex,
you must read the Onsight 2000/2500 Regulatory and Safety
Guide.
Attach the external Po
wer Sled in order to operate the Onsight 2000/2500 from external power and/or to charge
the battery. Remove the I/O Cover, insert the Power Sled into the I/O Connector, and tighten the thumb screws
with the stylus screwdriver.
9
Librestream Onsight 1000/2000/2500 User Manual Getting Started
r
A
)
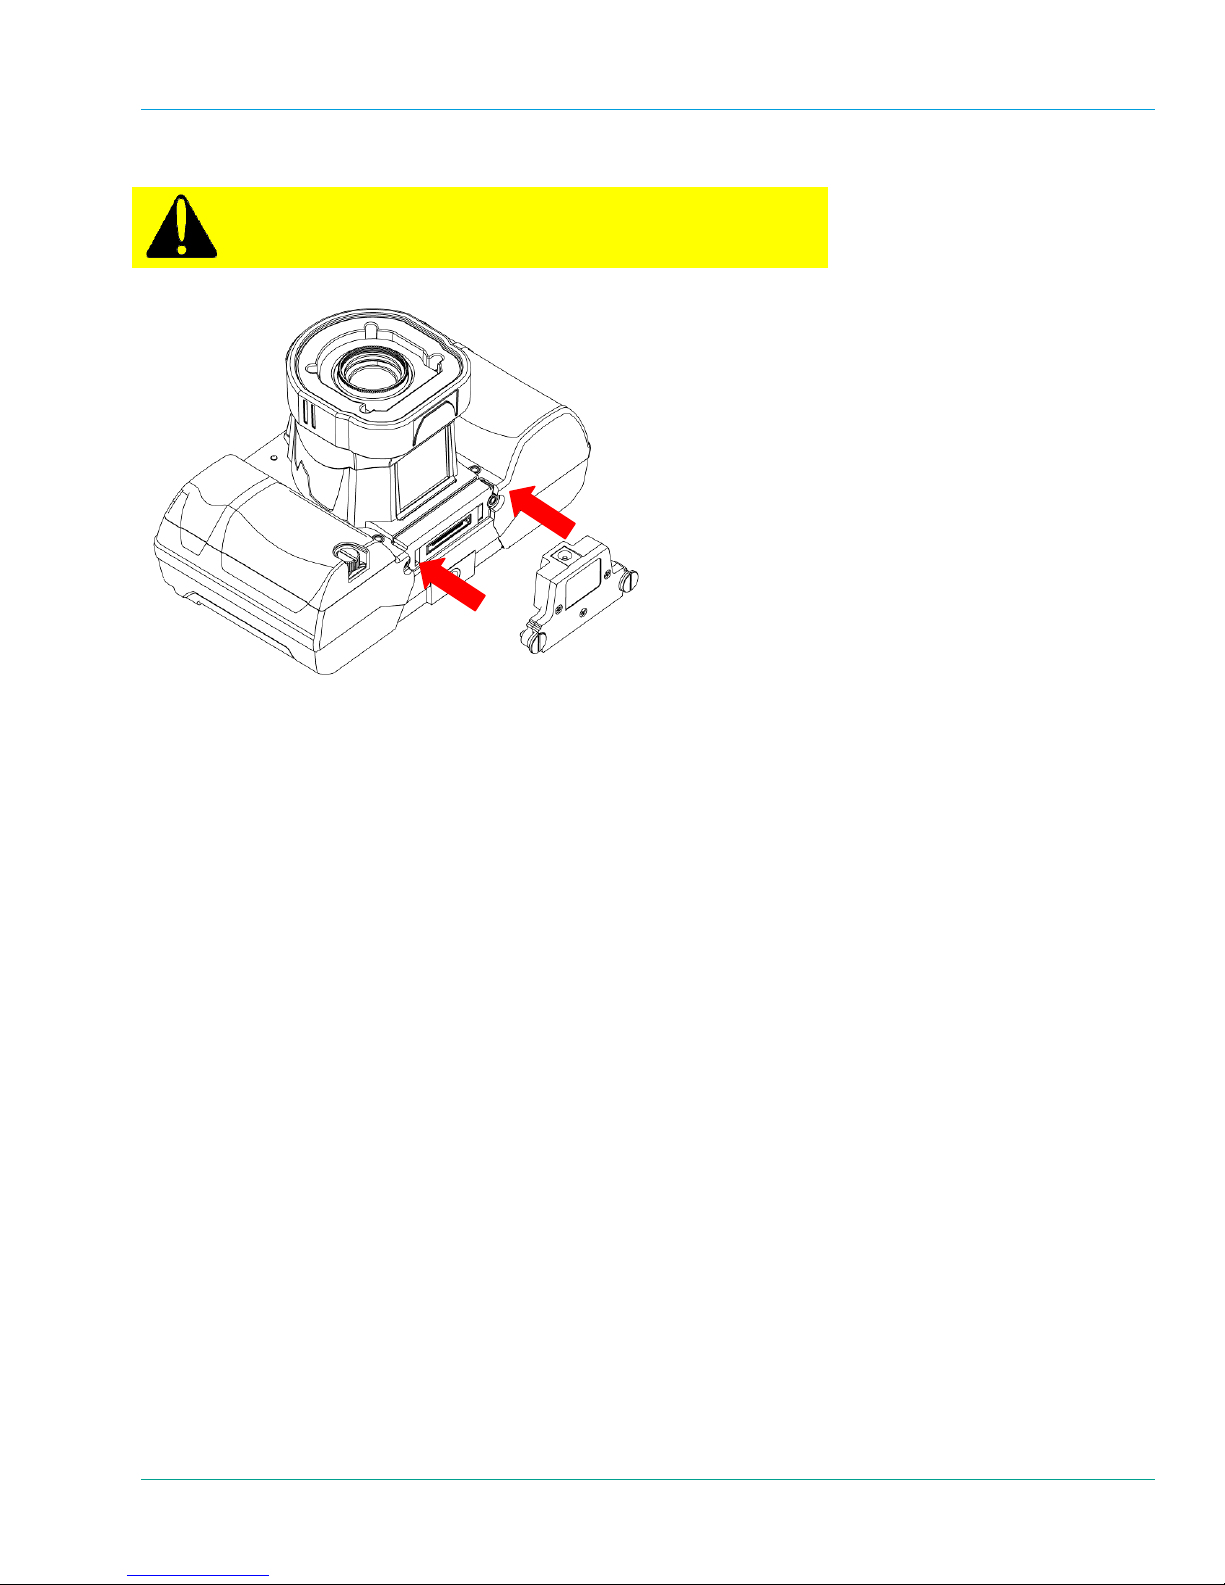
1.7.3 I/O Sled
The I/O Sled is an optional accessory that is required in order to use the Audio-in, S-Video, and Ethernet features
of the Onsight 2000/2500.
Establish the Ethernet connection before powering on the Onsight 2000/2500.
Before using the I/O Sled with the Onsight 2000Ex/2500Ex, you
must read the Onsight 2000/2500 Regulatory and Safety Guide.
udio
Line-in
To attac
h the I/O Sled, insert into the I/O Connector of the Onsight Device. Tighten the thumb screws with the
stylus screwdriver.
The parts of the I/O Sled accessory are as follows:
Power pins (2)
Power
S-Video
Ethernet
USB
Cable slot
I/O Connecto
Thumb screw (2
Tie strap loop (tie strap
not supp
lied)
I/O Sled showing
cable management
10
Librestream Onsight 1000/2000/2500 User Manual Getting Started
1.8 User Interface Features
1.8.1 Viewfinder
The display on the back of the Onsight Device functions as a camera viewfinder. By default, it shows what the
lens at the front of the Onsight Device is viewing, but it can also provide status information and menus.
Depending on the display mode, the Viewfinder uses a status bar, icons, and popup windows to provide
information, notifications, and prompts as necessary.
Important: When you are using the Viewfinder screen, always use the stylus provided. Do not use other objects,
as this could damage the Viewfinder screen. Tap the screen lightly. Do not press hard or strike the screen.
For further information on the Viewfinder features and display modes, see section 4, Viewfinder Features &
isplay Modes, on page 30.
D
1.8.2 Soft Keys
Some scre
select these by tapping them with your stylus, or by pressing Navigation pad keys.
1.8.3 Icons
Some option
touch sensitive – tap the icon with the stylus to view a pop-up message or status screen. Tap the status screen
again to dismiss the message.
Viewfinder icons provide status information and other notifications.
For example, tapping the Power icon
status. Tap the Status screen again or press the Display button
ens contain on-screen keys or buttons, e.g., Accept or Cancel on a configuration screen. You can
All references to “select” refer to pressing the appropriate Navigation pad key
(button) or tapping the screen element/icon with the stylus.
s or operating conditions cause notification icons to appear on the screen. Many of the icons a re
will provide a Status screen showing more detailed power and battery
to dismiss the message.
11
Librestream Onsight 1000/2000/2500 User Manual Getting Started
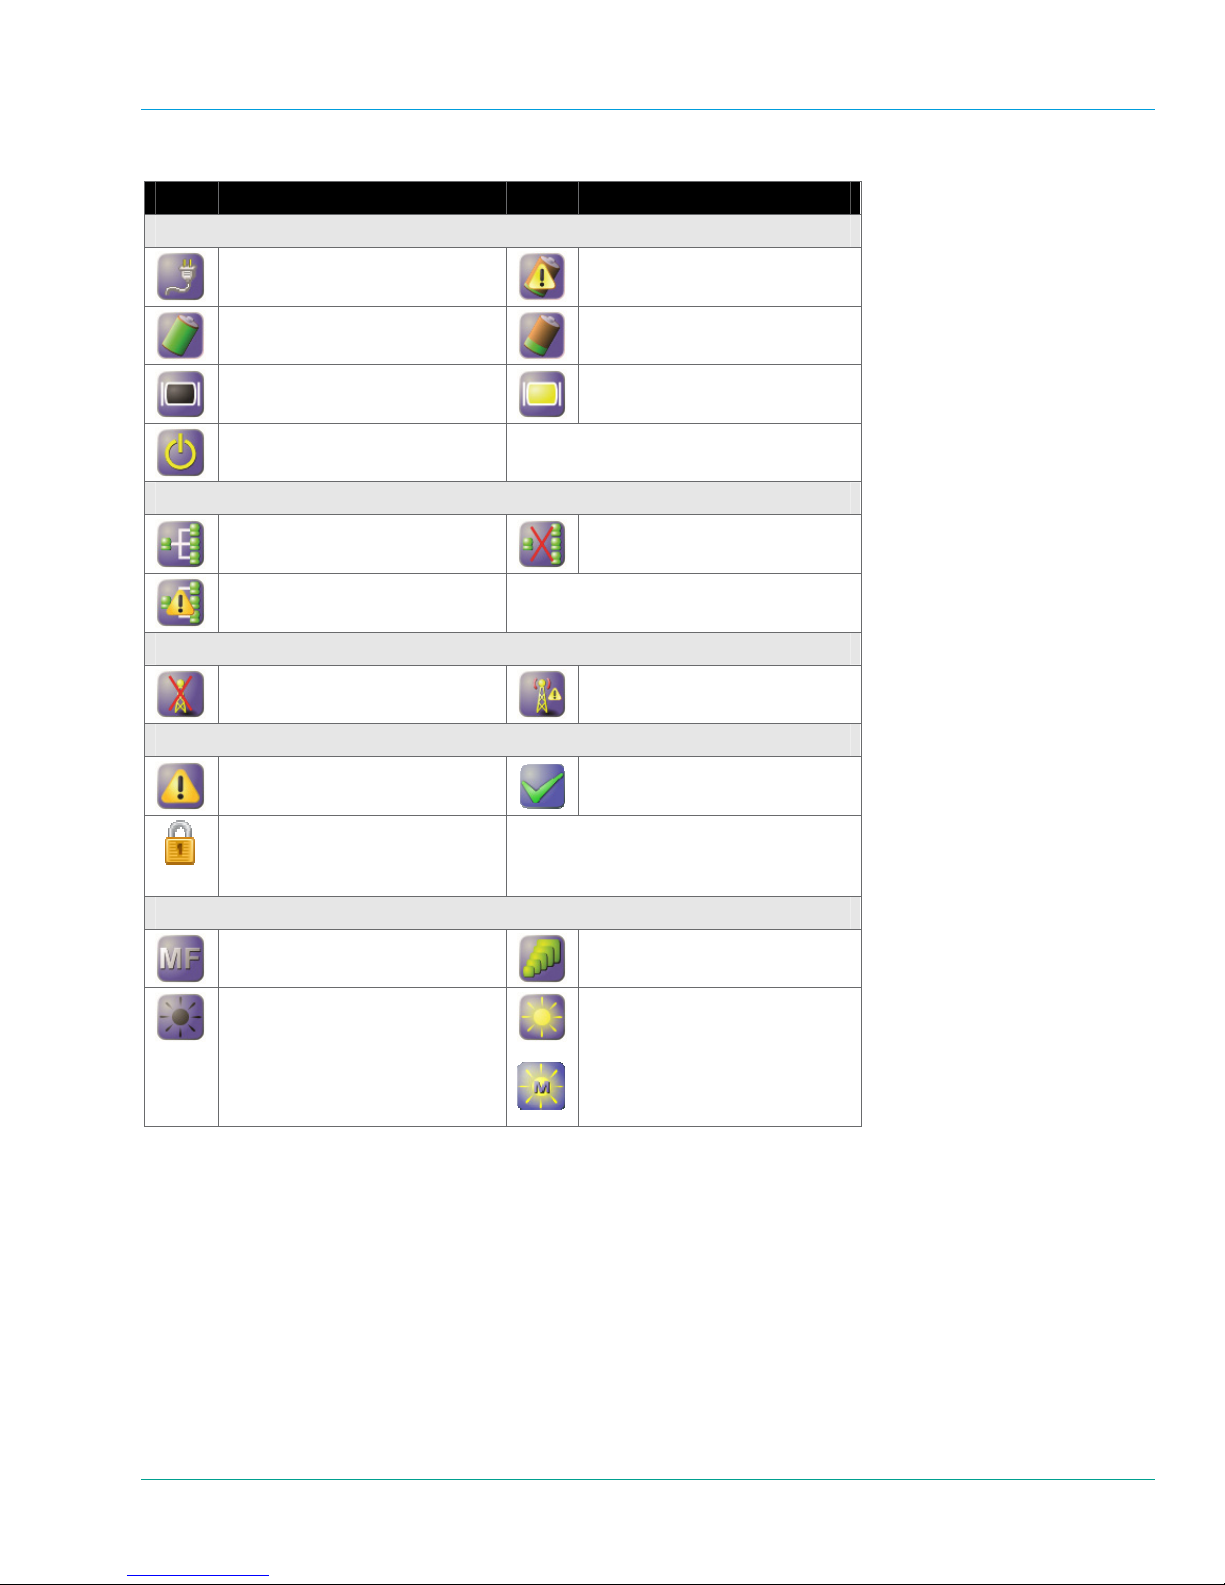
1.8.4 Standard Onsight Device Icons
Icon Description Icon Description
Power
Power Status – connected to
external power
Battery fully charged
Backlight power save
Standby
Network
Network connected
Network error
Communication
Radio link disconnected
General
General alert
Indicates the endpoint has
selected encryption mode as
their security setting.
Camera Functions
Manual focus mode
Illumination is off
Battery level is critically low or
the battery is defective
Battery low
Backlight on
Network disconnected
Low radio signal strength
Process successful (e.g.
software update complete)
Optical Zoom
Illumination is on
Macro Illumination is on
(2000/2500 only)
12
Librestream Onsight 1000/2000/2500 User Manual Getting Started
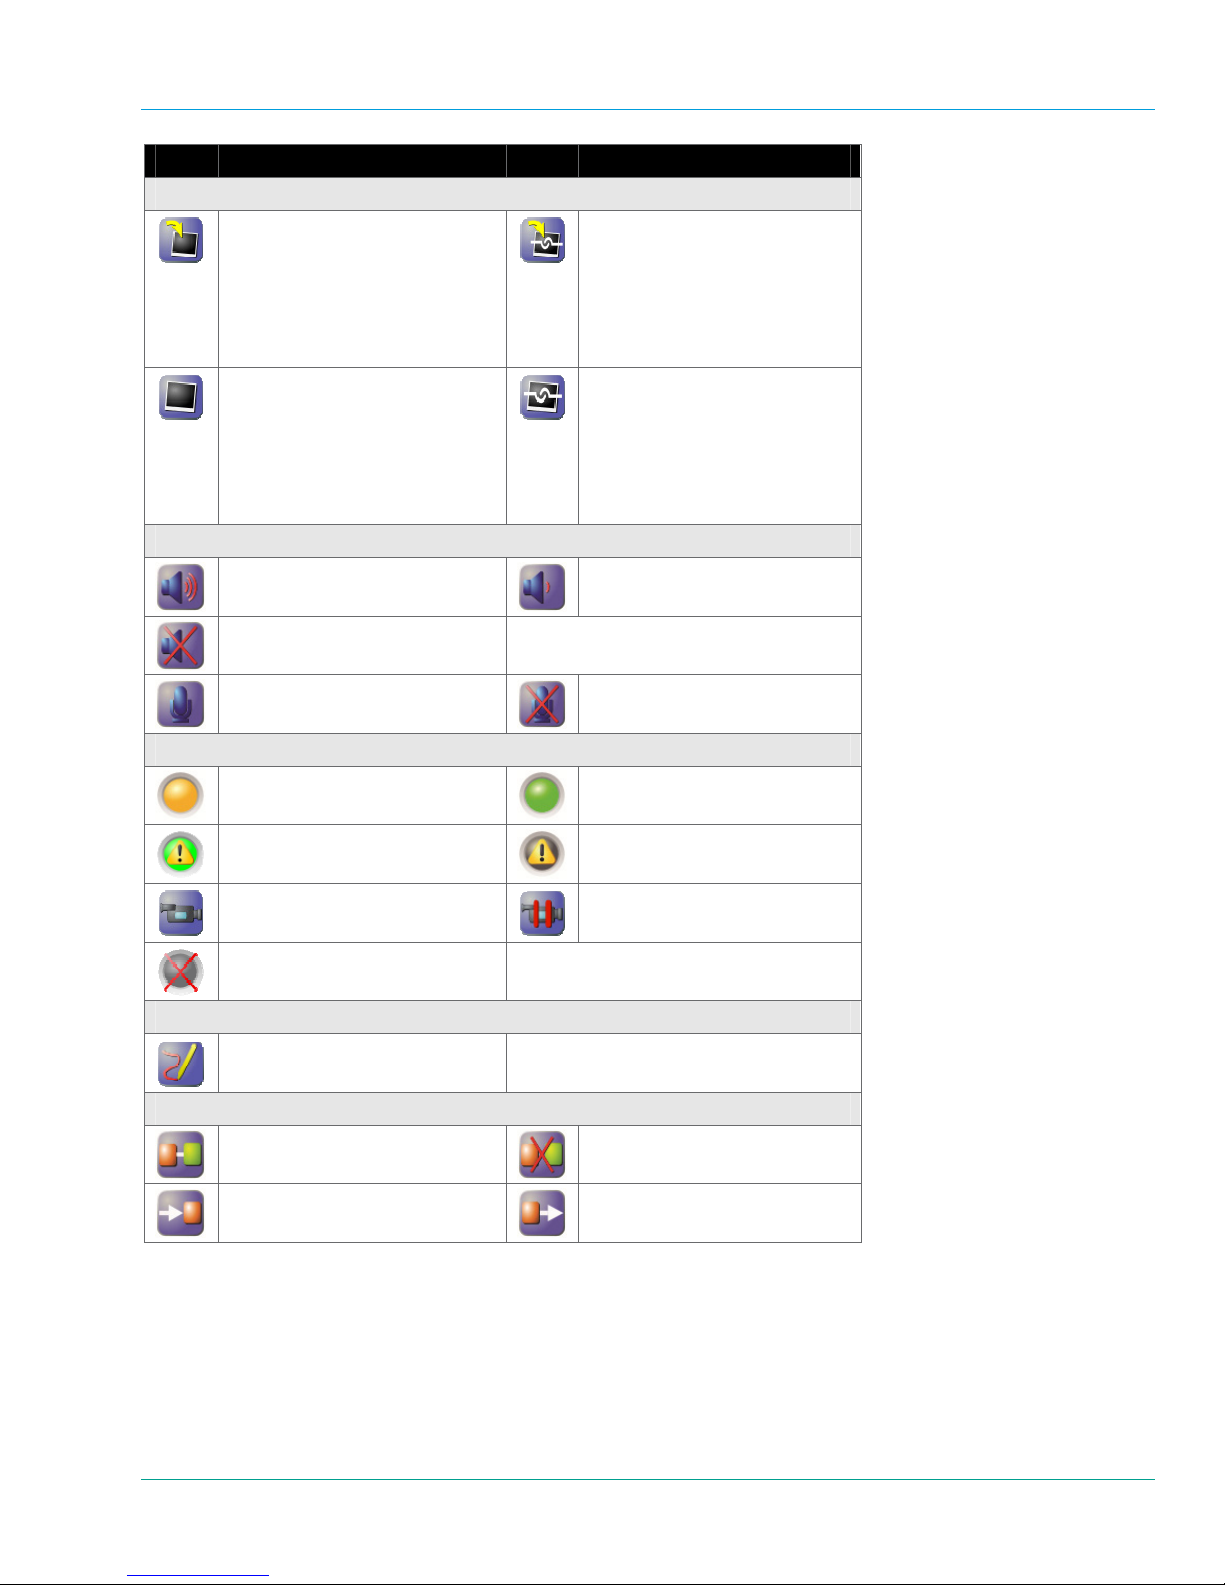
Icon Description Icon Description
Image Control
Image captured but not displayed
(tap icon to display the last
captured image)
Referred to as the Start Image
Display icon.
Image displayed locally on the
Viewfinder (tap icon or press
Capture button to exit)
Referred to as the Image
Displayed icon.
Audio
Audio volume increased
Audio output muted
Microphone enabled
Video
Stream initializing
Media stream is experiencing
significant packet loss
Live video is not paused
Video streaming is disabled
Telestration
Telestration icon (tap icon to
open the Telestration menu)
Calling
Call connected
Incoming call invitation
Image captured but not shared
while a call is connected (tap
icon to share the last captured
image)
Referred to as the Start Image
Share icon.
Image displayed locally on the
Viewfinder and shared with
Onsight Connect (tap icon or
press Capture button to exit)
Referred to as the Image
Shared icon.
Audio volume decreased
Microphone muted
Media stream active
Media stream error
The live video stream is paused
Call disconnected
Outgoing call request (waiting
for remote side to accept)
13
Librestream Onsight 1000/2000/2500 User Manual Getting Started
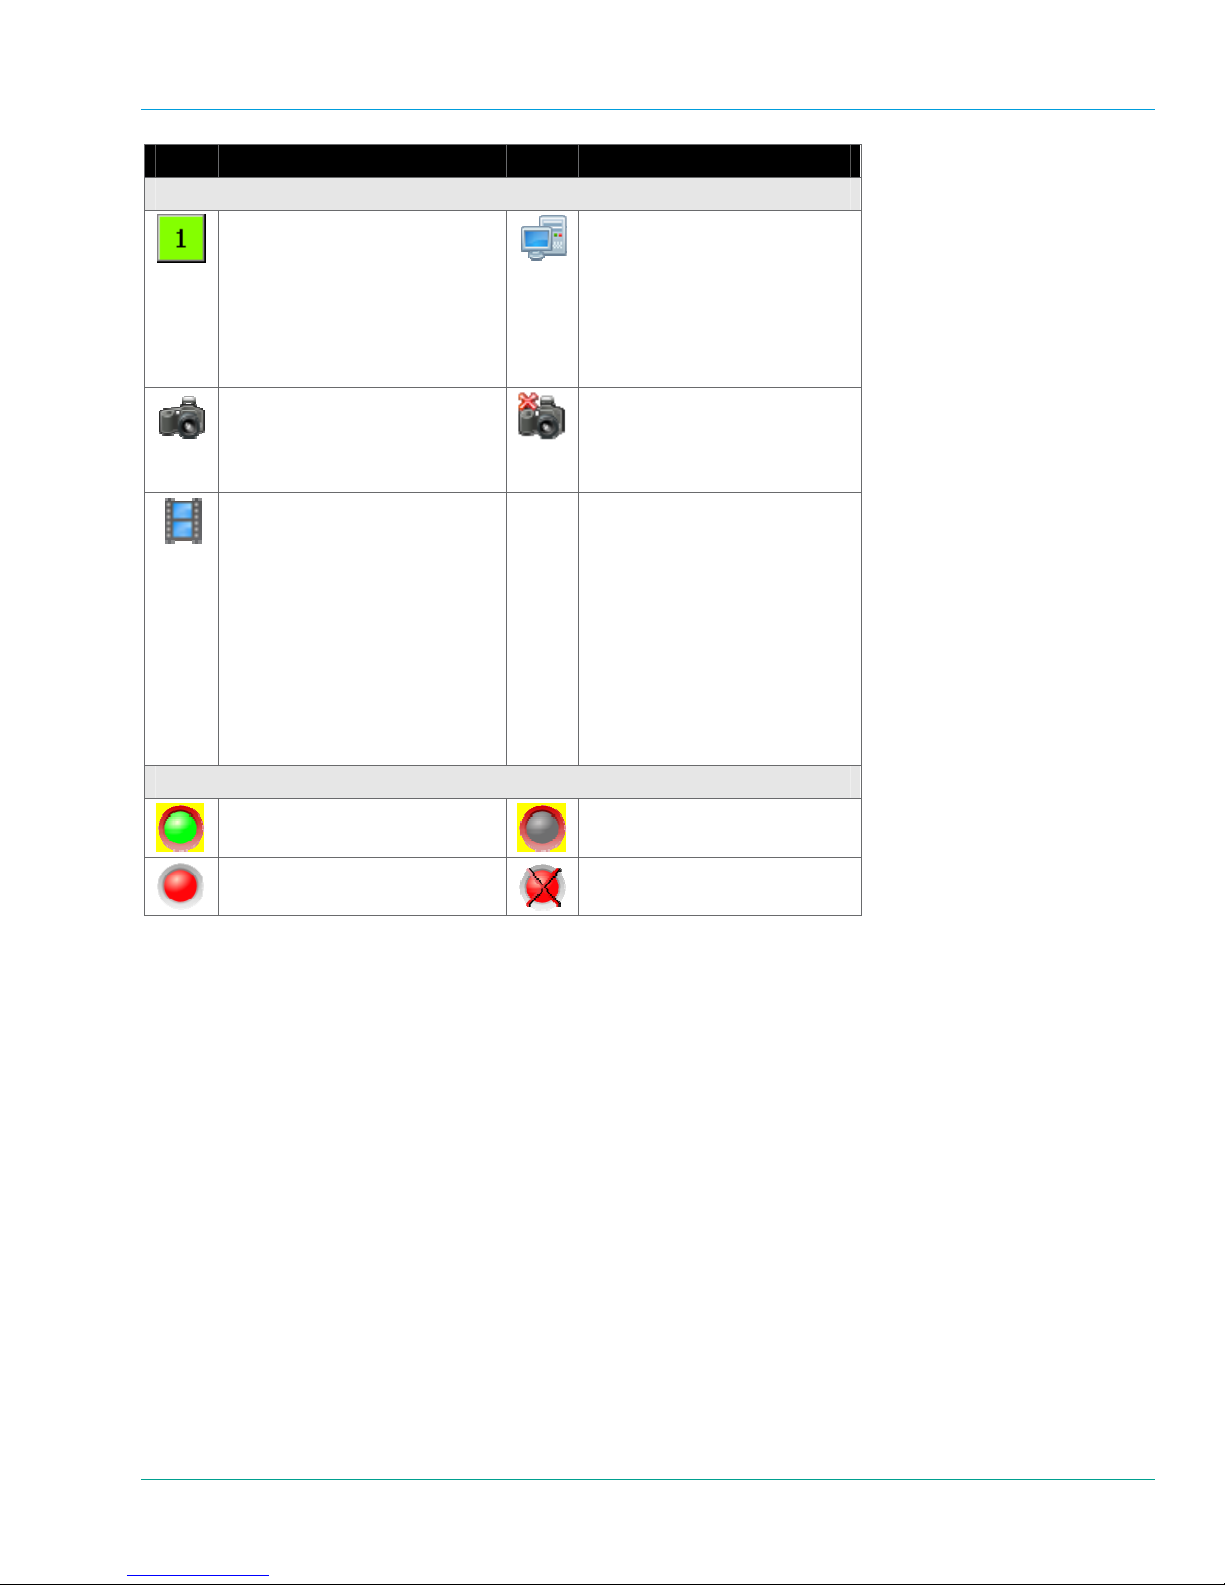
Icon Description Icon Description
Call Status
Telestration Color – when
clicked, brings up a color palette
to change the telestration color.
Any Onsight endpoint (Onsight
Connect or Device) can change
the telestration color of any other
Onsight endpoint.
Endpoint Type – Onsight
Device that is able to stream or
receive live video, and can share
images and recordings.
Media Stream Source – Onsight
endpoint (Onsight Connect or
Device) can be the Media
Stream Source. By default, the
Media Stream Source is the
active Onsight Device in the
conference. If any Onsight
endpoint wants to play/stream a
recording then that endpoint
becomes the Media Stream
Source.
Recording
Remote endpoint is recording the
call (video is shared)
Record active
Endpoint Type – Onsight
Connect endpoint.
Endpoint Type – Onsight
Device that is not able to stream
or receive live video, but can
share images and recordings.
Remote endpoint is recording
the call (video not active)
Recording disabled (Privacy
mode)
14
Librestream Onsight 1000/2000/2500 User Manual Getting Started
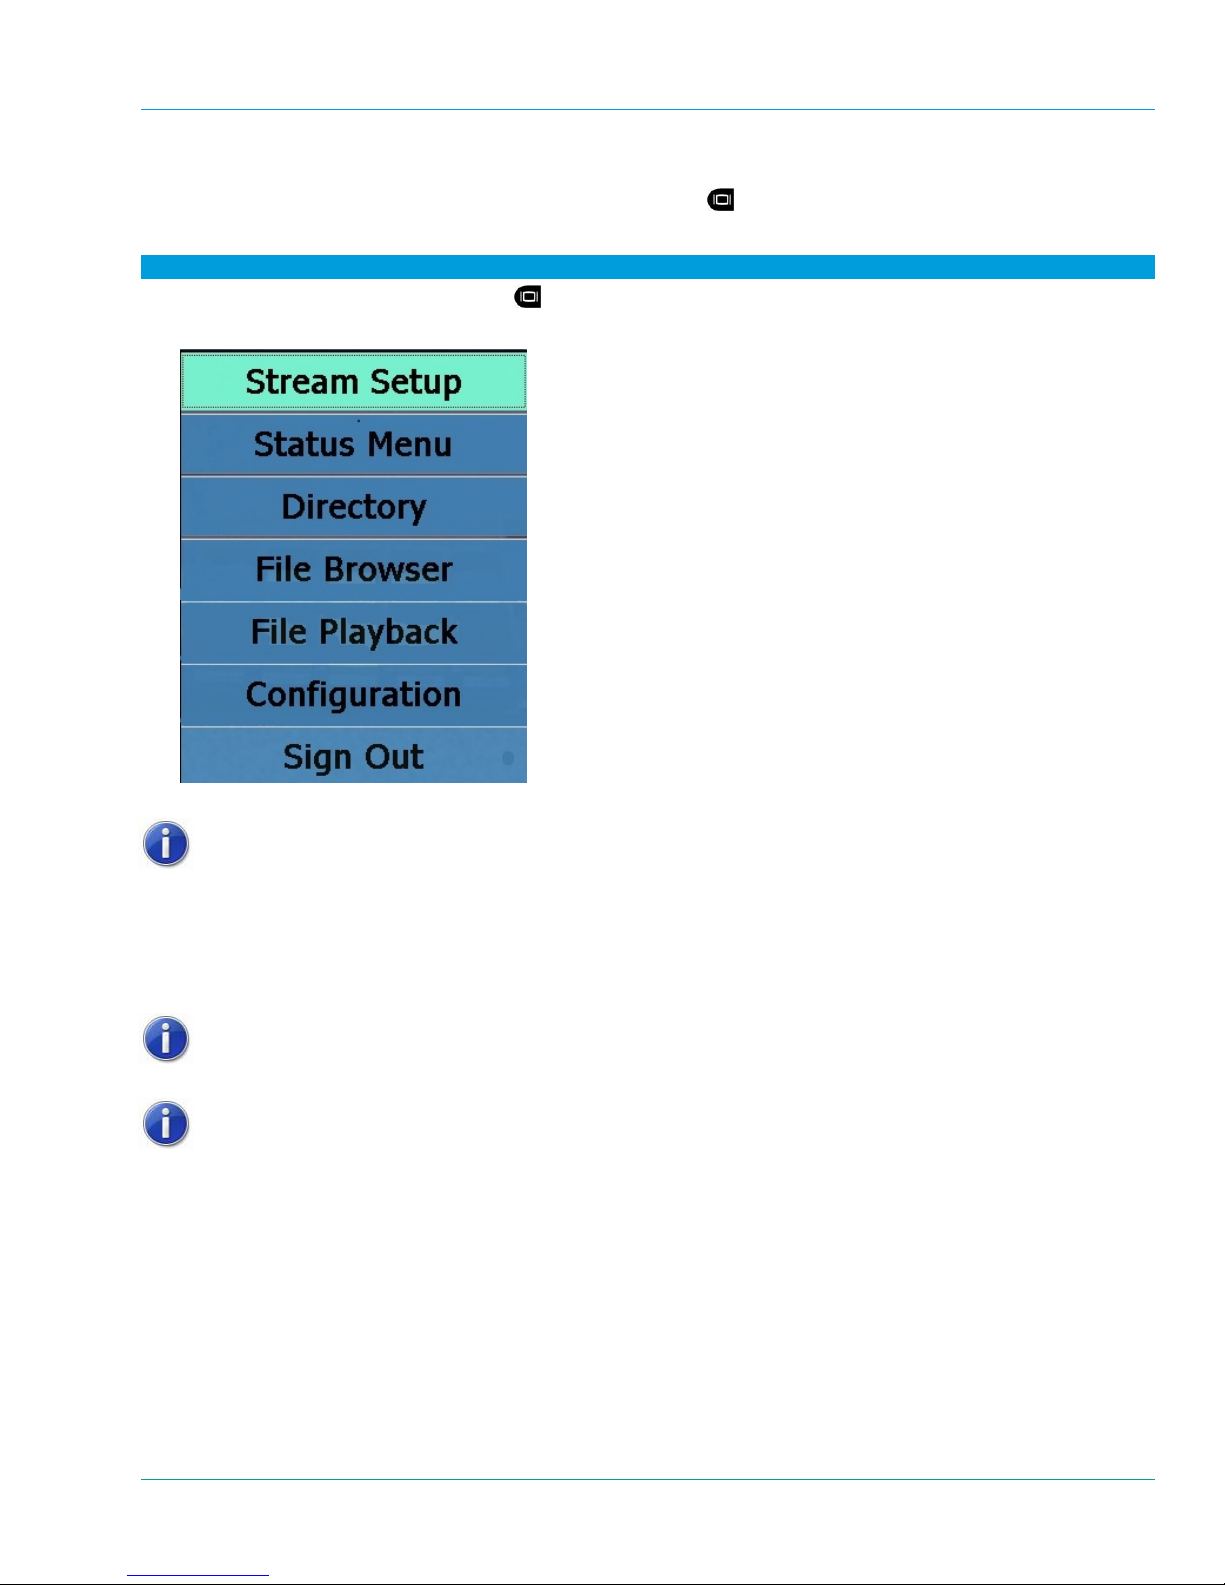
1.8.5 Main Menu
Access to the Main Menu is by using the Display Mode button
. The Main Menu is used for configuration and
other setup options.
To access the Main Menu:
1. Press and release the Display Mode
button three times.
2. The Main Menu appears with these selections.
3. To exit this menu, press and release the Display Mode button.
The Display Mode button cycles through additional display modes. See
section 4, Viewfinder Features & Display Modes, on page 30 for more
inform
ation.
1.8.6 Stylus
The stylu
s is used to select an icon or button, a menu item or keyboard character, or to view a pop-up message or
status screen. Simply tap the item with the stylus tip. For information screens or pop-up messages, tap the item
again to close it.
Tap the screen lightly. Do not press hard or strike the screen. Do not use other
objects, as this could damage the Viewfinder screen
The Onsight 2000/2500 Device’s stylus has a screwdriver tip on one end. Do
not use the screwdriver tip to make any selections on the viewfinder. The
screwdriver tip is used for the I/O Sled, I/O Cover, and Power Sled, or for
opening the battery compartment.
15

Librestream Onsight 1000/2000/2500 User Manual
1.8.7 On-Screen Keyboard
The on-screen keyboard appears when you select a text field in the Viewfinder. Tap the keys with the stylus to
enter text. For additional characters, tap the Shift key.
To move the on-screen keyboard to a new location on the screen, touch the stylus to the top edge of the
keyboard image and drag it to a new location.
1.8.8 General Conventions
The “” symbol is used to identify to the user a sequence of steps that need to be performed for a specific
function.
i.e. To set the Standby delay…
Bold is used to identify a screen name, menu name, screen message, or specific icon name called out in an
instruction.
i.e. The message “Video resumed” appears.
The
The
icon identifies to the reader important information to be read.
icon identifies to the reader information that is useful for the function being described.
1.8.9 Terminology and Definitions
Only one Onsight Device can stream live video in a conference call. This Onsight Device is therefore referred
to as the primary Onsight Device. All other Onsight Devices in the conference call are referred to as
secondary Onsight Devices.
“Expert” refers to the user of the Onsight Connect software application.
i.e. Onsight Connect software installed on the expert’s computer.
Onsight Connect or an Onsight Device is designated as an endpoint.
"Video" or “Recording” can be used interchangeably depending on context, and can refer to:
▪ a video recording which may include video, two-way voice, subject audio, images, and telestration
▪ a two-way voice recording only
“Audio” or “Voice” refers to audio from an operator’s voice.
“Subject Audio” refers to the unprocessed sound coming from the subject captured by the Onsight Device.
Temporary color change means that the color that was changed will revert back to its previous (default) color
after a session (call) has ended. A permanent color change is made by saving the new color as defa ult (i.e.
Save As Default).
1.8.10 Tips
A conference call consists of more than two call participants. The host of the conference call is the Onsight
Connect user who establishes the connection with the Onsight De vice.
For video playback, live video streaming must be off.
When making a recording, it is possible to record a voice audio-only call.
You cannot share an image during video playback.
You can share an image during live streaming.
16
Librestream Onsight 1000/2000/2500 User Manual Onsight Device Basic Operation
2 Onsight Device Basic Operation
Before operating the Onsight Device, you must read the Onsight
Regulatory and Safety Guide.
Note that the Onsight Device shuts itself off when battery power is low.
If the unit is on, and an operator is using it in an active call, a warning message appears so that the operator
has time to plug the Onsight Device into the external power adapter, or end the call before the Onsight Device
shuts off.
If the unit is in Standby, it simply shuts itself off.
If the unit is off, it cannot be started when the battery is low.
2.1 Charging the Battery
Before charging the battery for the Onsight 2000Ex/2500Ex, you
must read the Onsight 2000/2500 Regulatory and Safety Guide.
New batteries must be charged prior to first use.
To charge the battery:
1. Plug in the external power adaptor and allow the battery to charge until the orange battery indicator
extinguishes (up to eight hours).
2. The internal battery charger will shut itself off to prevent overcharging once the battery is fully charged.
To check current battery levels:
1. Press the Display button
Viewfinder which shows the battery level.
2. See paragraph 4.1.3, Session Information, on page 31 for more information on Viewfinder Features & Display
Modes.
once and check the Session Information Status bar at the bottom of the
2.2 Inserting or Replacing the Battery
Before using this Onsight Device for the first time you must install and charge the battery.
17
Librestream Onsight 1000/2000/2500 User Manual Onsight Device Basic Operation
2.2.1 Onsight 1000 Battery Replacement
To insert or replace the Onsight 1000 battery:
1. Ensure the device is powered off before proceeding. See paragraph 2.4, Turning Power On or Off, on page
21 for instructions.
Open the battery compartment and insert the battery until it clicks into place and is flush. It only fits one way.
2.
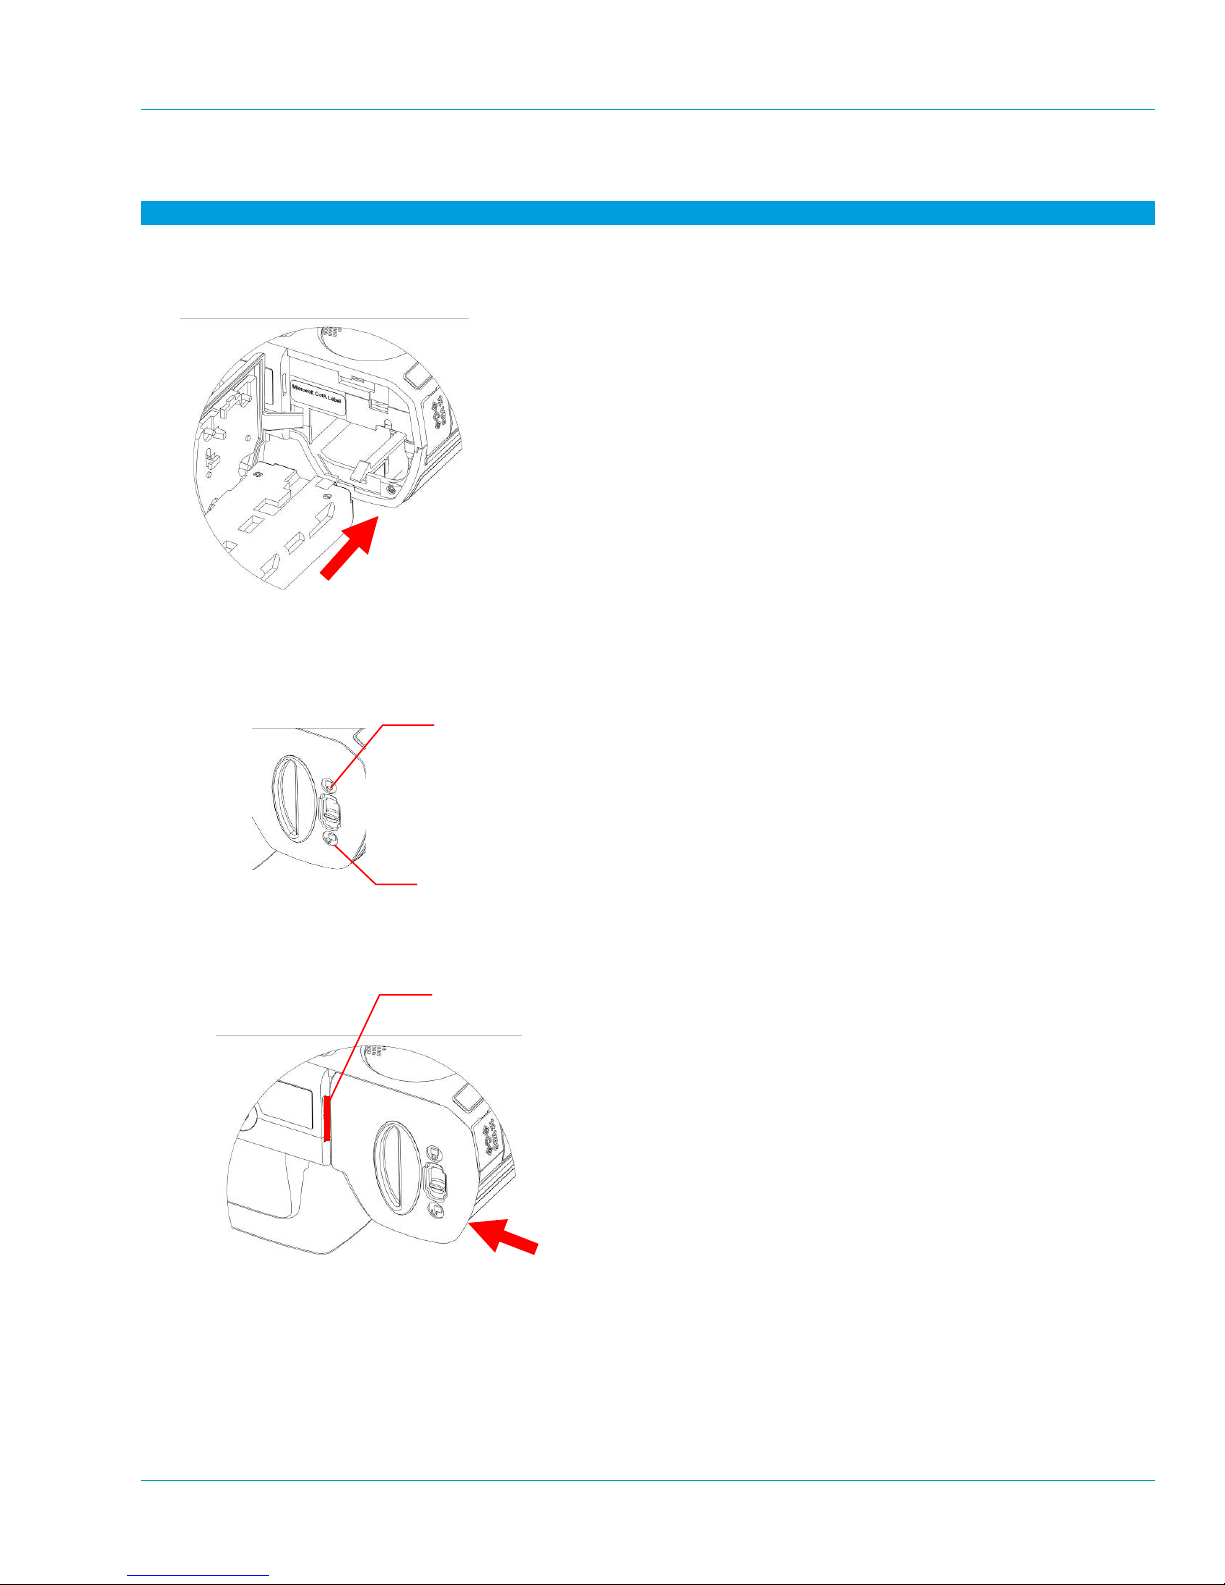
3. Close the battery door as follows:
Ensure the lock switch is in the unlocked position.
Locked
▪
Unlocked
Orient the battery door so it is flat against the battery well, but with approximately a 3mm gap.
Gap
Slide the door toward the center of the unit until it is fully closed.
Slide the lock switch to the locked position.
4. Connect the Onsight 1000 to the external power adapter and charge the battery until the orange LED turns off
(up to 8 hours).
18
Librestream Onsight 1000/2000/2500 User Manual
The Onsight Device will not operate on the external adapter alone. You must
have a battery installed.
2.2.2 Onsight 2000/2500 Battery Replacement
Before opening the Onsight 2000Ex/2500Ex battery cover, you
must read the Onsight 2000/2500 Regulatory and Safety Guide.
If an SD memory card needs to be inserted or replaced, it is best to do it at this
time, prior to installing the battery. See paragraph 2.6.2 on page 25 for
ctions on how to remove and replace an SD memory card.
instru
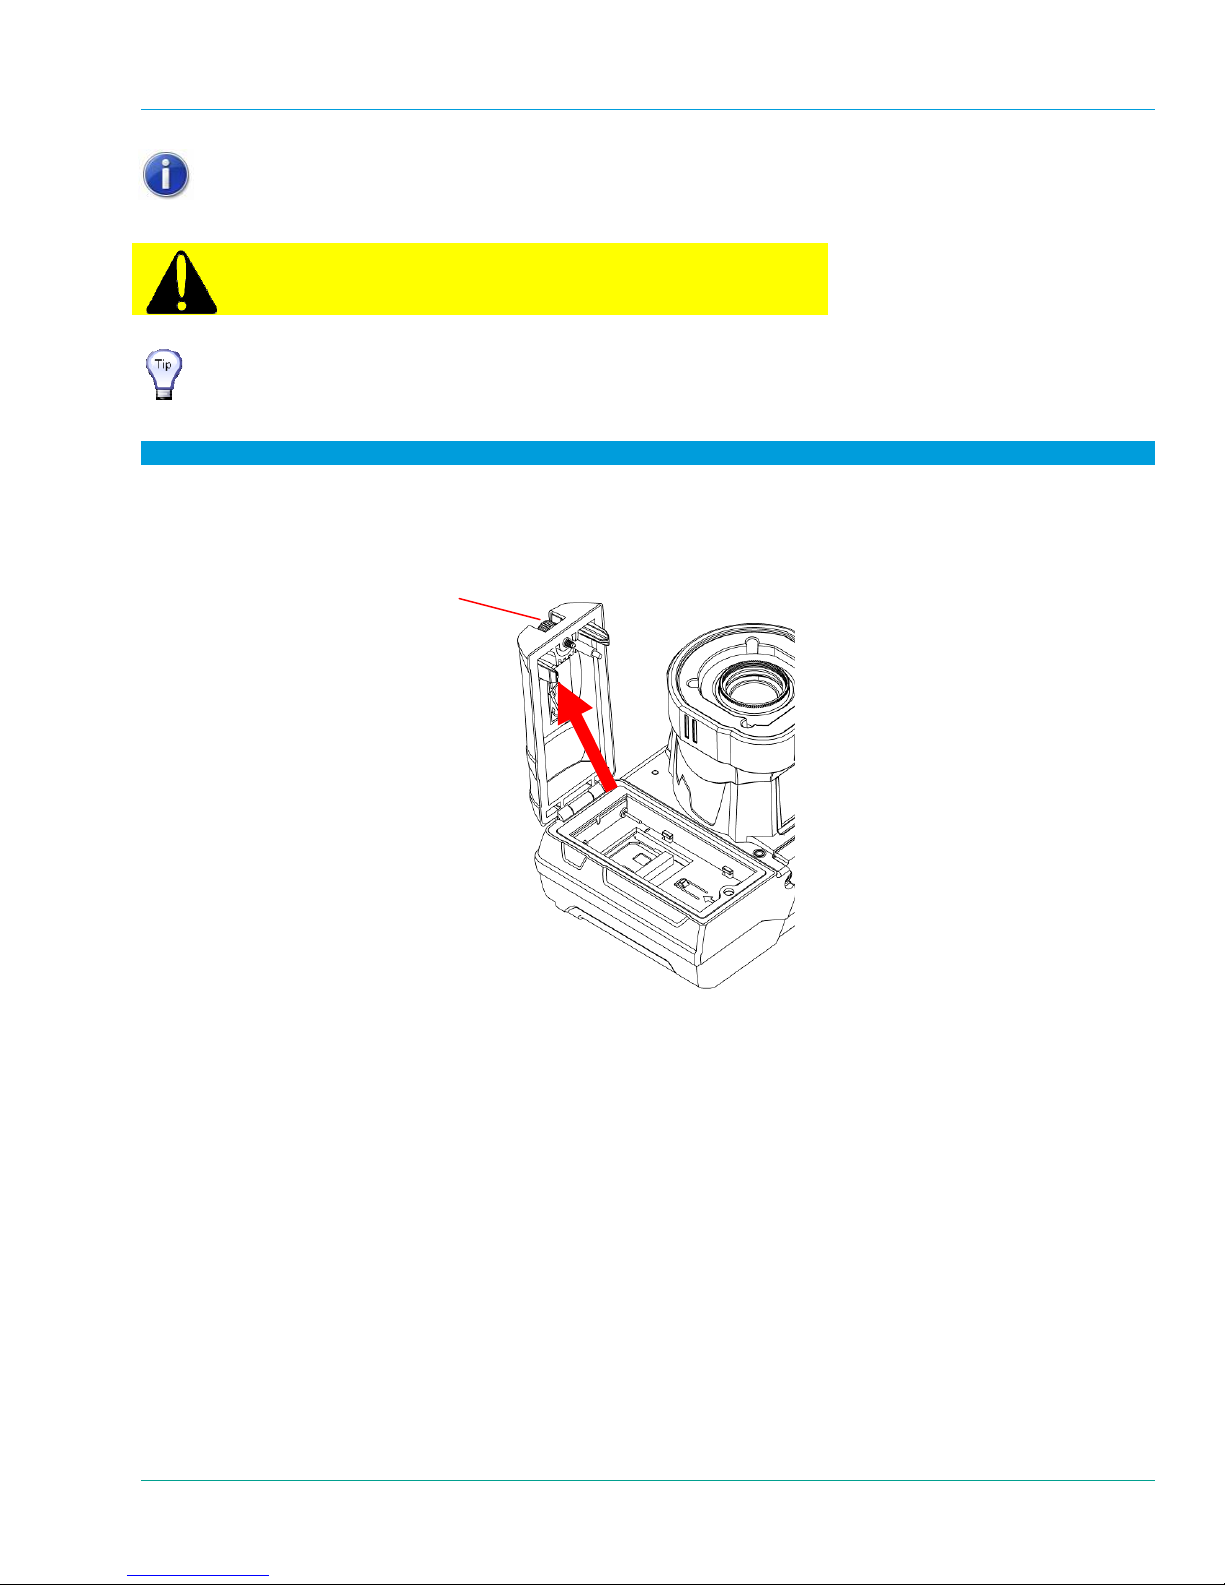
To insert or replace the Onsight 2000/2500 battery:
1. Ensure the Onsight Device is powered off before proceeding. See paragraph 2.4, Turning Power On or Off,
on pag
Open the battery compartment door using the stylus screwdriver.
2.
e 21 for instructions.
Battery door thumb screw
3. If the battery is being replaced, remove the old battery by sliding the battery back towards the end of the
battery compartment and then lifting out the battery.
19
 Loading...