

Liberty Town -Country II User Manual
744
Liberty Town & Country II
User Manual
Thank you for your decision to buy this product.
Please use this product according to the instructions.
Please keep the instructions in a handy place.
.
Town & Country II
48 Volt Lead Acid
1

Introduction
Dear Customer,
Wow! You are excited! You have just received your brand new ebike. We, too, are excited because as designers and developers of our
bikes, we love to make you happy, and we believe your new ebike will give you lots of fun. I know you want to get this bike on the
road immediately, but please STOP!
Why? Well, first of all, you need to charge your batteries fully before using them. So, while your ebike is charging, take the time to
read this manual. We have worked hard to make it as readable as possible. This manual will help prevent injury and teach you how to
care for your new ebike.
It is the owner’s responsibility to carefully read all of the contents of this manual and to comply with all laws pertaining to the
operation of bicycles and/or electric bicycles in your local jurisdiction. If you have any questions, please consult with the laws web
page on www.iloveEbikes.com or consult your local department of motor vehicles for clarification.
These electric bikes are not classified as motor vehicles, however, to drive them on the roads various states have differing laws.
We have worked hard to provide you a quality, well-designed product without defects. That is our responsibility. You, too, have a
part to play. With proper care, maintenance and attention to bicycle safety rules, your ebike will give you years of enjoyment.
Please read the instructions carefully before using your ebike. Do not ride this bicycle until you have read and thoroughly
understand the owner’s manual. It contains information critical to your safety. If you have questions about the operation of this electric
bicycle, consult your authorized dealer. It is extremely important that you follow the safety guidelines contained in this manual in
order to ensure your maximum safety. If you loan your bike to anyone, make sure they also know how to operate it safely.
When using, the load should not be greater than the maximum capacity, and please pay attention to increase the braking distance
during rainy or snowy days.
This ebike can operate in the rain and snow, but it CANNOT be submerged in water. When the rear wheel is submerged in water, it
can cause the motor to short circuit and fail, which is NOT covered by the warranty.
Please don't dismantle and repair the spare parts by yourself, but go to the local dealer.
Please take time to record the following information:
Recording Your Ebike Info
Serial
Number: _______________________________________________________
Model: _______________________________________________________
Color: _______________________________________________________
Date of
Purchase: _______________________________________________________
Dealer’s Name: _______________________________________________________
Dealer’s Ph. #: _______________________________________________________
Dealer’s Email: _______________________________________________________
The serial number is located
under the cover above the
foot rest area as shown in the
picture.
.
2

Table of Contents
...............................................................................................................Introduction 2
......................................................................................................Table of Contents 3
...............................................................................................Assembly Instructions 4
.................................................................................General Operating Instructions 7
....................................................................................................Riding Instructions 8
.......................................................................................................Battery Charging 9
..............................................................................................Important Instructions 10
....................................................................................................Safety Precautions 11
.............................................................................................................Maintenance 12
........................................................................................................Troubleshooting 14
...................................................................................................................Warranty 15
.......................................................................................Federal Electric Bike Law 16
Rear Brake Lever
Turn Signal
Front Wheel
Headlight
Battery Box
Throttle
Side
Kick
Stand
Instrument Panel
Front Brake Lever
Key Switch
Serial Number
Saddle
Optional Rear Trunk
Luggage Rack
Storage Lock
Tail Light
Turn Signal
Mud Guard
Rear Locking Hub
Rear Hub Motor
Double Kick
Stand
.
3
Assembly Instructions
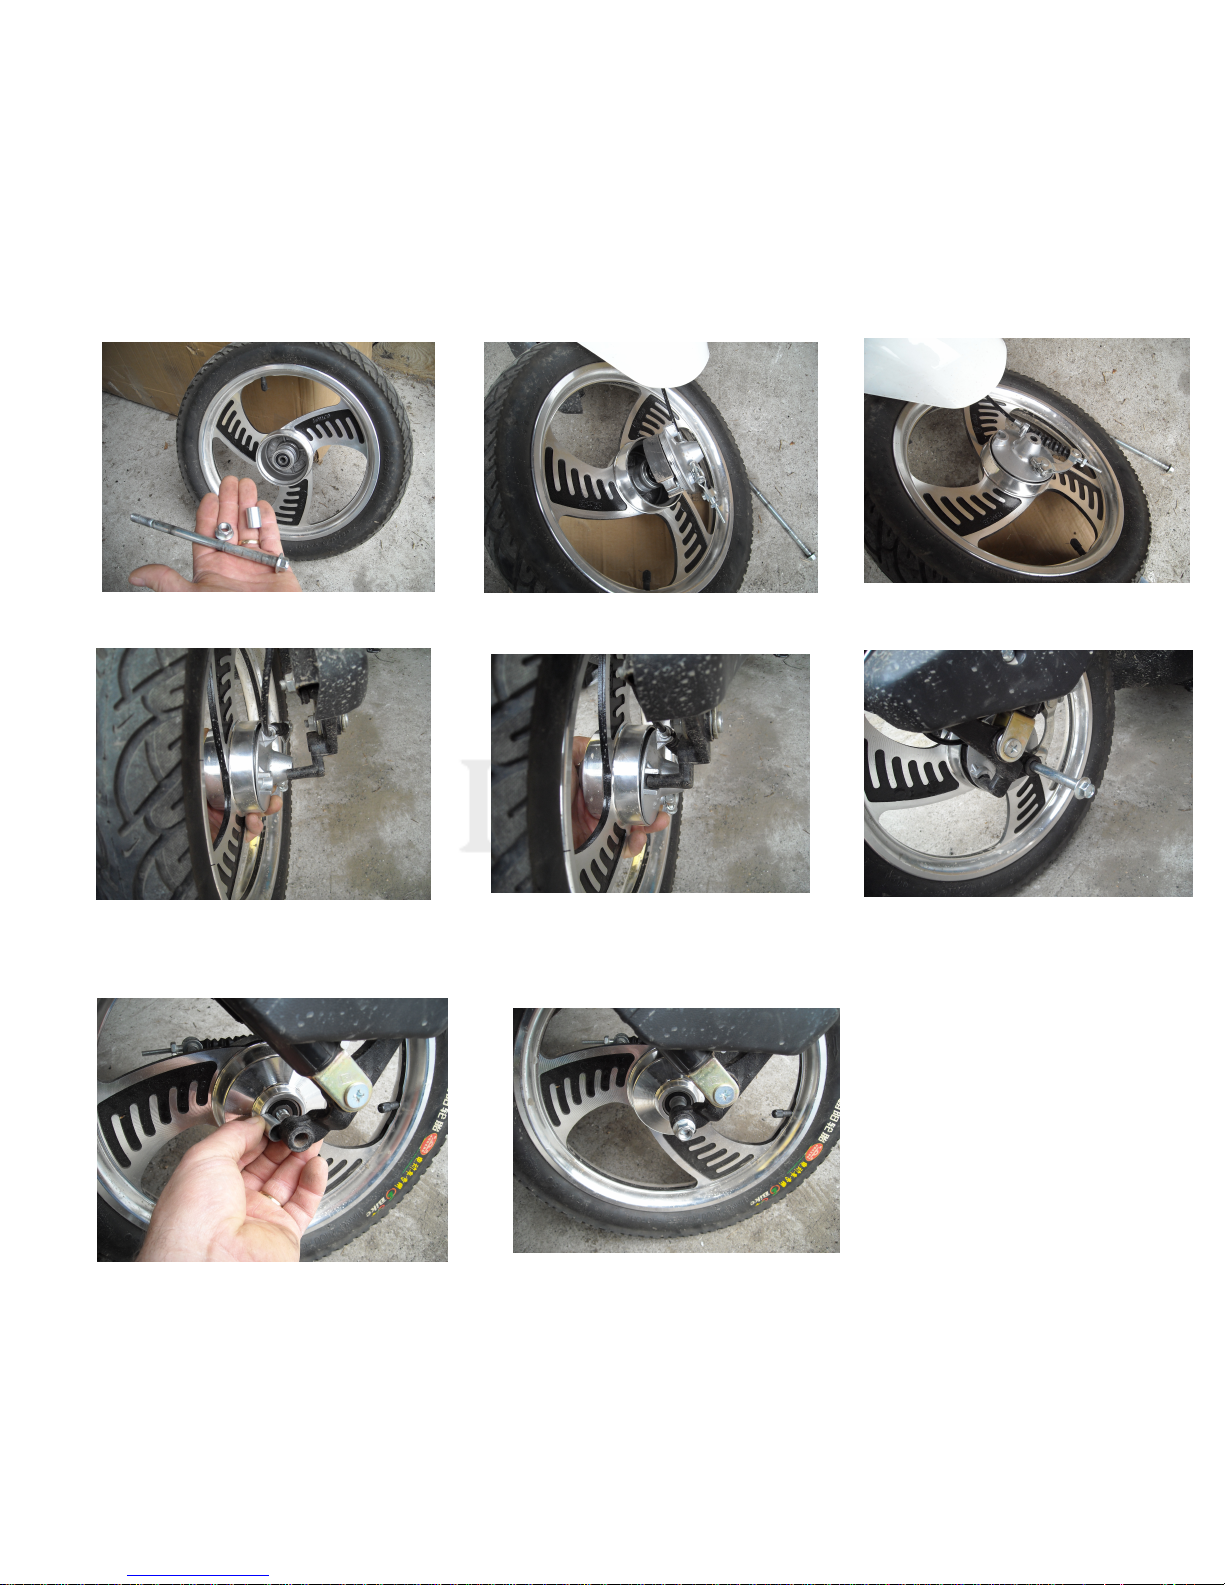
1. INSTALLING THE FRONT WHEEL
1. Showing parts for front wheel. 2. Sliding brake onto the hub. 3. Brake inserted into wheel.
4. Line up notch in brake with black rod. 5. Black rod aligned in aluminum notch. 6. Insert bolt into axle.
7. Place spacer between wheel and frame. 8. Tighten nut (recommended to put thread lock on threads for safety).
2. BRAKE ADJUSTMENT
For most bikes, the front wheel comes disassembled on your Town & Country II and will need to be mounted as in picture.
The rear wheel is assembled, however, the brakes may need adjusting as shown in pictures.
.
4
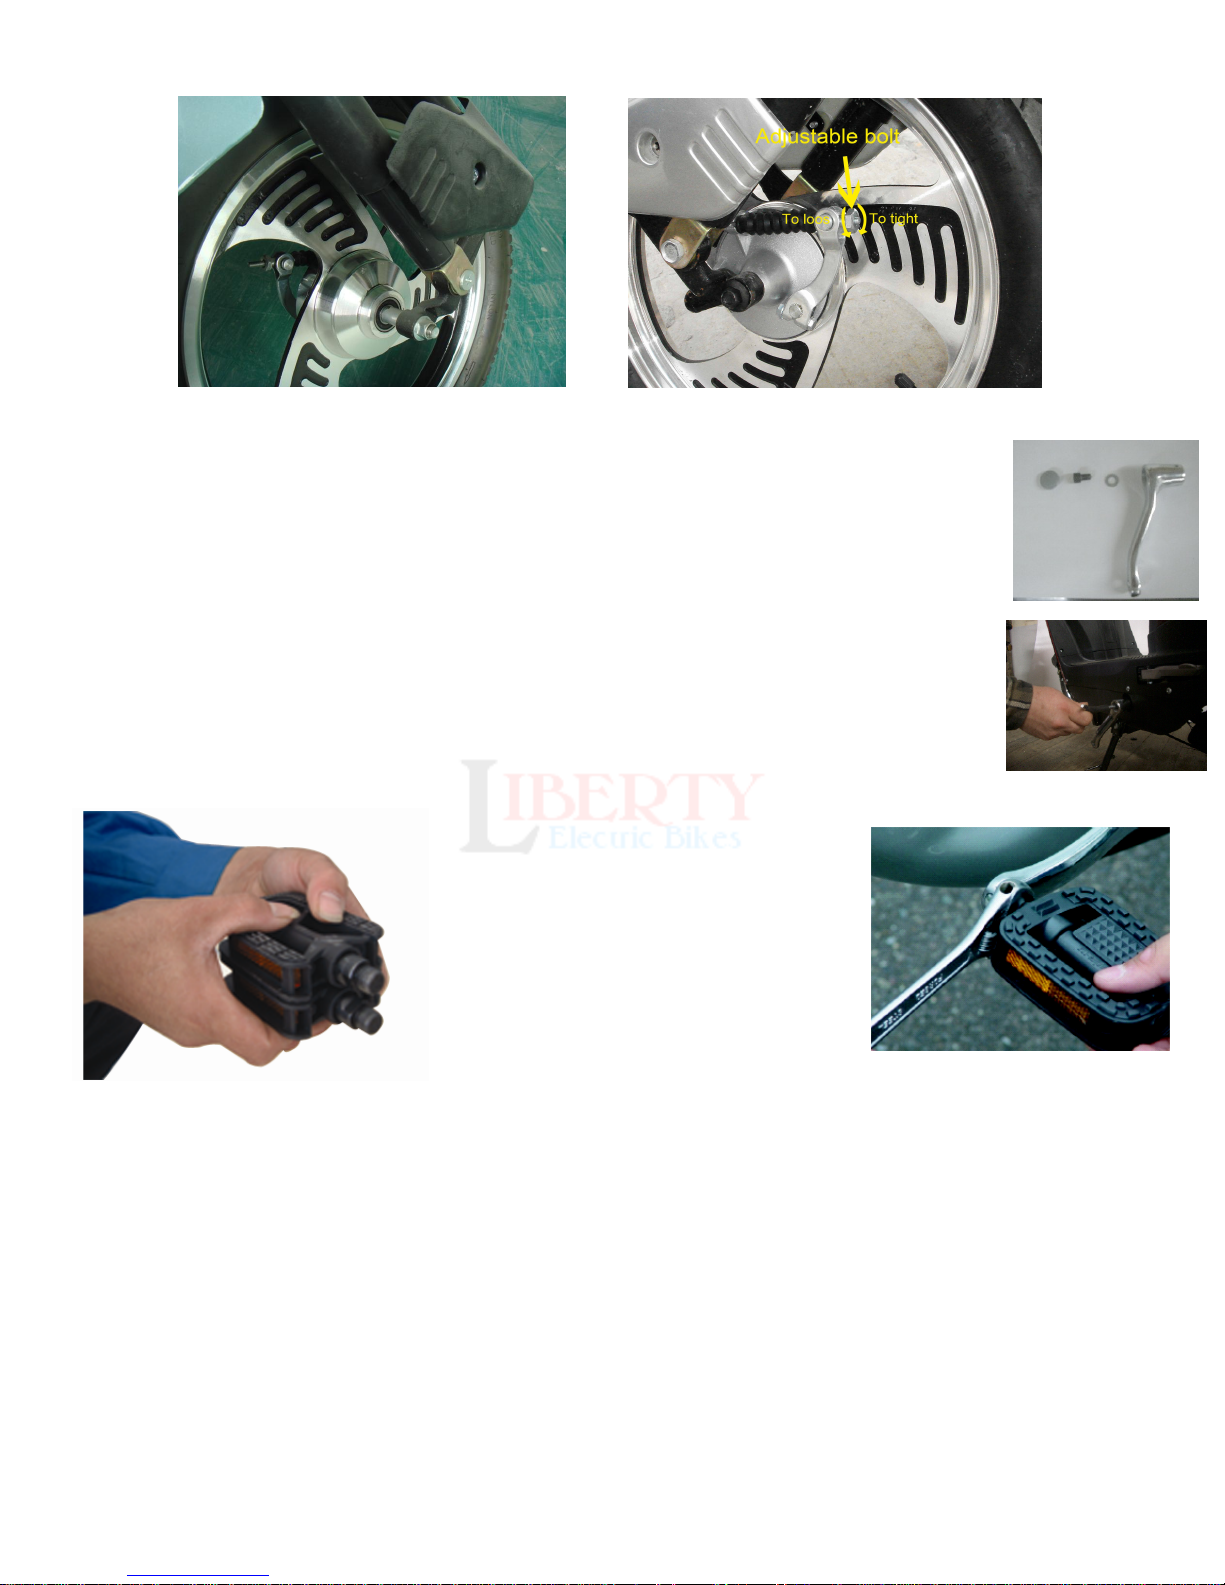
2. INSTALLING THE PEDALS (Optional)
Pedals are included in your purchase. Many do not install pedals on their Town & Country II, but in some
locations, local or state laws require the installation of pedals to meet local laws or restrictions. The pedal
assembly includes two CRANKS (one marked with L and one with R). You must break out one of the
knock-outs located at the pedal location. The square female end of the crank is placed over the square
male end coming from the pedal shaft. Using the pedals require the side kick stand loop to be cut off.
Attaching Cranks
• Assemble materials for each side: Crank, washer, bolt and plastic cap.
• Put washer on bolt and tighten crank to axles shaft.
• Put cap on to cover bolt.
• Attach the L pedal to the L crank, then R pedal to R crank.
• Place the L crank over the square end of the left shaft and use small bolt to secure the crank
to the shaft. Repeat process for R crank.
Crank Parts
•Note the left and right of the pedal.
[L] Left [R] Right are stamped on
the threaded ends of the pedals.
Attention: The threads will be
stripped if you mistake the left
and right pedal, and they won’t
be able to be properly fixed.
(Misapplication is not covered
by warranty.)
•Screw the pedal in until it’s in all the way, and tighten it fully with a 15mm wrench. NOTE: If you install pedals on your
scooter, you must remove the side kickstand as it will interfere with the left pedal. Alternatively, you can cut off with bolt
cutters the loop that sticks out from the side of the kickstand.
3. INSTALLING THE REAR TRUNK (Optional)
If you purchased the optional rear trunk (tool box), it comes with 4 bolts and 4 nuts, 2 metal plates, a box, a key, and a pad
(shown below). In some shipments, it may come installed. If it is not already installed, follow these instructions. The bolts go
up through the rear carrier, then the pad, and into the box. Place metal plates inside box and put nuts on the bolts. Tighten
securely. It is recommended that you use some LOCK-TITE or other thread-locking compound to insure that the bolts do not
loosen from road vibrations.
.
5
 Loading...