

Liberton LMG-205TS, LMG-206 S Customer's Manual

Meat Grinder
Мясорубка
М’ясорубка
Liberton LMG-205TS
Customer Manual
Инструкция пользователя
Інструкція користувача
2
GB
Meat Grinder
Dear Buyer!
We congratulate you on having bought the device under trade name
“Liberton”. We are sure that our devices will become faithful
and reliable assistance in your housekeeping.
Please read thoroughly for important safety and save these instructions.
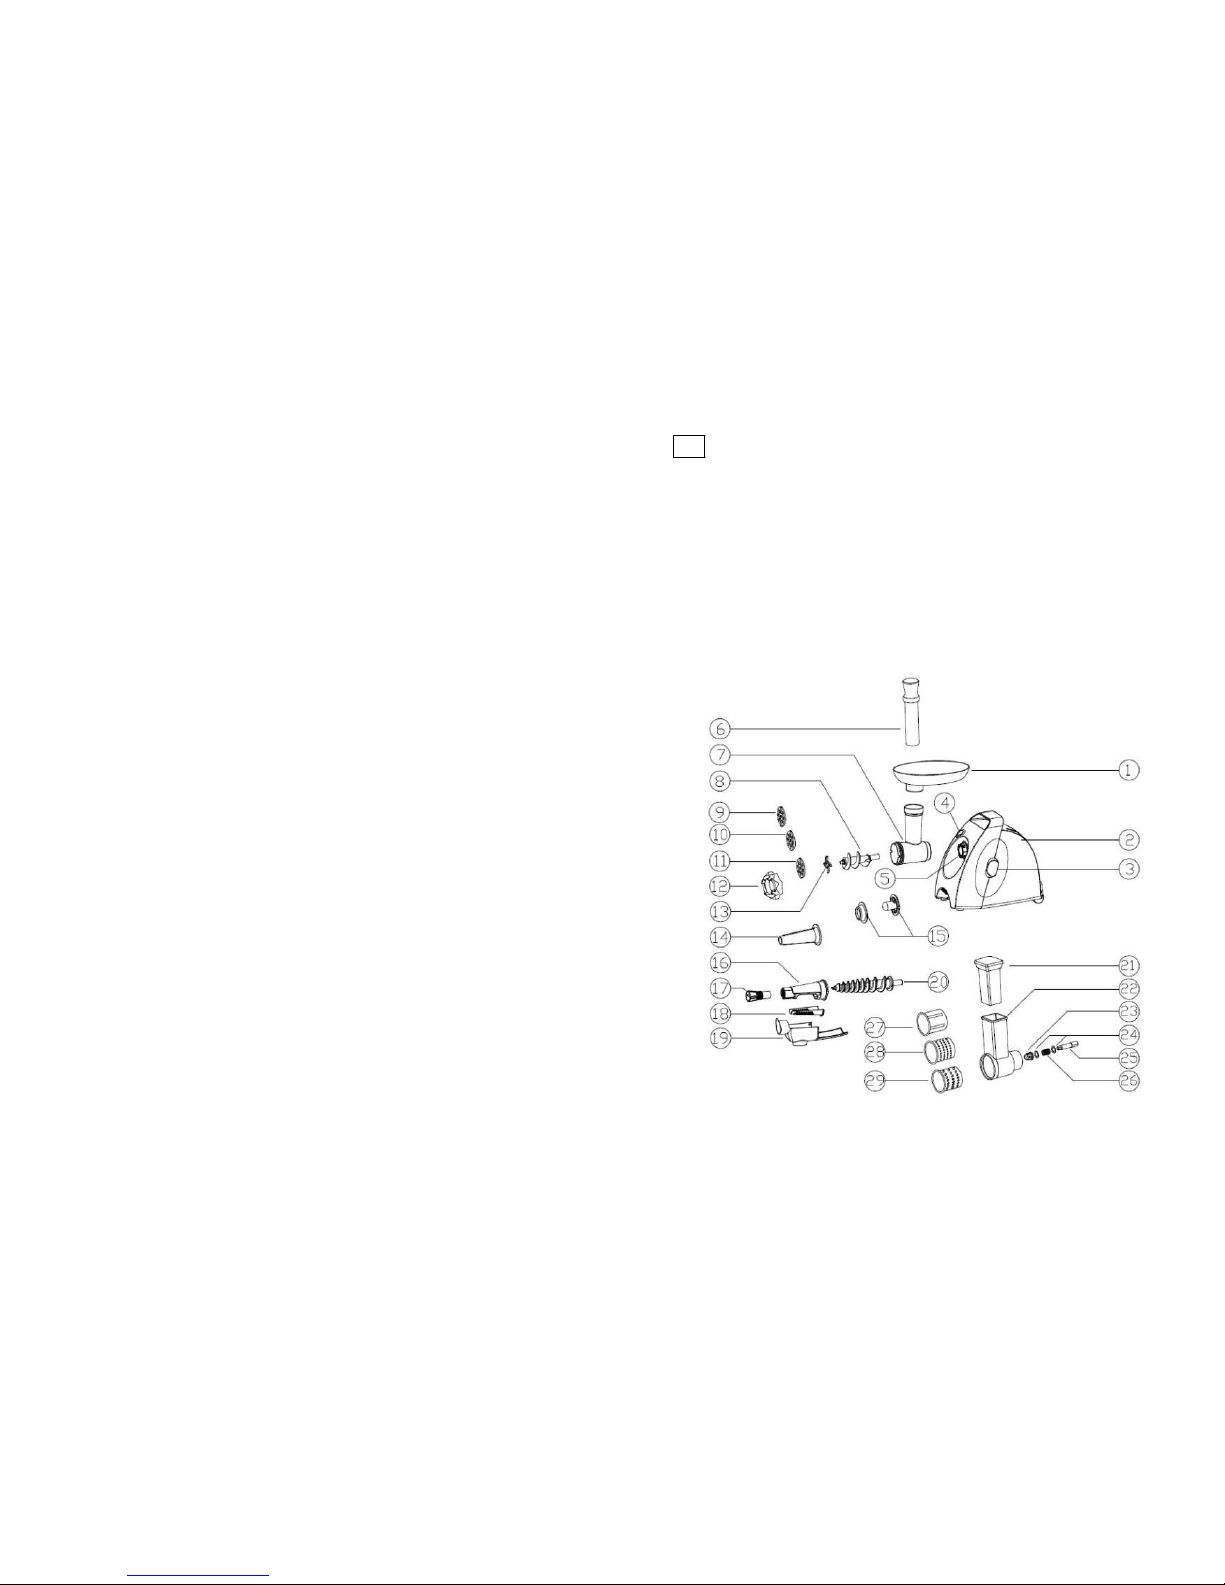
DESCRIPTION
3

1. Hopper plate 16. Tomato attachment bracket
2. Motor housing 17. Adjustable screw
3. ON/OFF/ Reverse switch 18. Sreen
4. Locking knob hole 19. Tomato attachment snake
5. Locking knob 20. Dam-board
6. Food pusher 21. Vegetable pusher
7. Head 22. Vegetable cutting head
8. Feed screw 23. Vegetable cutting of tooth sets
9. Cutting plate (fine) 24. Bushing
10. Cutting plate (medium) 25. Shuan deduction for the sliced
tube
11. Cutting plate (coarse) 26. Spring
12. Fixing ring 27. Strip cutter
13. Cutting blade 28. Shredded cutter
14. Sausage attachment 29. Slice cutter
15. Kebbe attachment
IMPORTANT SAFEGUARDS
Household use only. Do not use for industrial purpose.
Unplug from outlet when assembling and disassembling the unit.
Close supervision is necessary, when any appliance is used near
children.
When carrying the unit, be sure to hold the motor housing with both
hands. Do not carry the unit by holding only the hopper plate or
head.
Do not fix the cutting blade and cutting plate, when using kebbe
attachment.
Never feed food by hand. Always use food pusher.
Do not grind hard food such as bones, nuts, etc.
Do not grind ginger and other materials with hard fiber.
Continuous running of meat grinder should be not more than 10
minutes with the following 10 minutes interval for motor cooling.
Reverse function is prohibited while the appliance is operating (For
example switch “ON” knob to “R” knob or on the contrary), wait at
least one minute until grinder has come to a complete stop.
Otherwise it may cause an abnormal noise, vibration or a transitory
electric spark in the appliance. It could result easily damage to
appliance and make the user frightened.
After use, there would be a little food left in the grinder head. This
is normal. There might be a bit of black metal powder adhering to
the food ground in the end. Please pick them out and throw away,
do not eat them.
To avoid jamming, do not force to operate the unit with excessive
pressure.
When the circuit breaker activates, do not switch on.
Never try to replace the parts and repair the unit by yourself.
FOR THE FIRST TIME
Check that voltage, indicated on the rating label, corresponds the
mains voltage in your home.
Wash all parts (except body) in warm soapy water.
Before plugging in, ensure the “ON/OFF/ Reverse switch is turned
to "OFF" position.
4 5

INSTRUCTION FOR USE
ASSEMBLING
Holding the head,
insert it in the inlet with
one hand, place the
locking knob into the
hole on the side of the
motor housing. Tighten
it clockwise to secure
the head (fig. 1-2).
Place the feed screw
into the head, long end
first, by turning the
feed screw slightly
until it is set into the
motor housing (fig.3).
Place the cutting
blade onto the feed
screw shaft with the
blade facing the front
as illustrated (fig.4). If
it is not fitted properly,
meat will not be
ground.
Place the desired
cutting plate next to the
cutting blade, fitting
protrusions in the slots
(fig.5).
Support or press the
centre of the cutting
plate with one finger,
then screw the fixing
6
ring until tight with
another hand (fig.6).
Do not over tighten.
Place the hopper plate
on the head and fix into
position.
Locate the unit on a
firm place.
The air passage at
the bottom and the side
of the motor housing
should be kept free and
not blocked.
MINCING MEAT
Cut all foods into pieces (sinewless, boneless and fatless meat is
recommended, approximate size: 20 mm x 20 mm x 60 mm), so that
they fit easily into the hopper opening.
Plug in and turn the “R / ON” switch to "ON" position, then turn the
“ON/OFF/Reverse switch to "ON" position.
Feed foods into the hopper plate. Use only the food pusher (fig.7).
After use switch the unit off and unplug it from the power supply.
REVERSE FUNCTION
In case of jamming switch the appliance off by turning the “R / ON”
switch to "R" position and “ON/OFF/ Reverse switch to "R"
position.
Feed screw will be rotating in the opposite direction, and the head
will get empty.
If it doesn't work, switch the unit off and clean it.
7
MAKING KEBBE
RECIPE
STUFFING
Mutton
Olive oil
Onion (cut finely)
Spices
Salt
Flour
Mince mutton once or twice.
100g
1 1/tablespoons
1 1/tablespoons
to your taste
to your taste
1 1/tablespoons
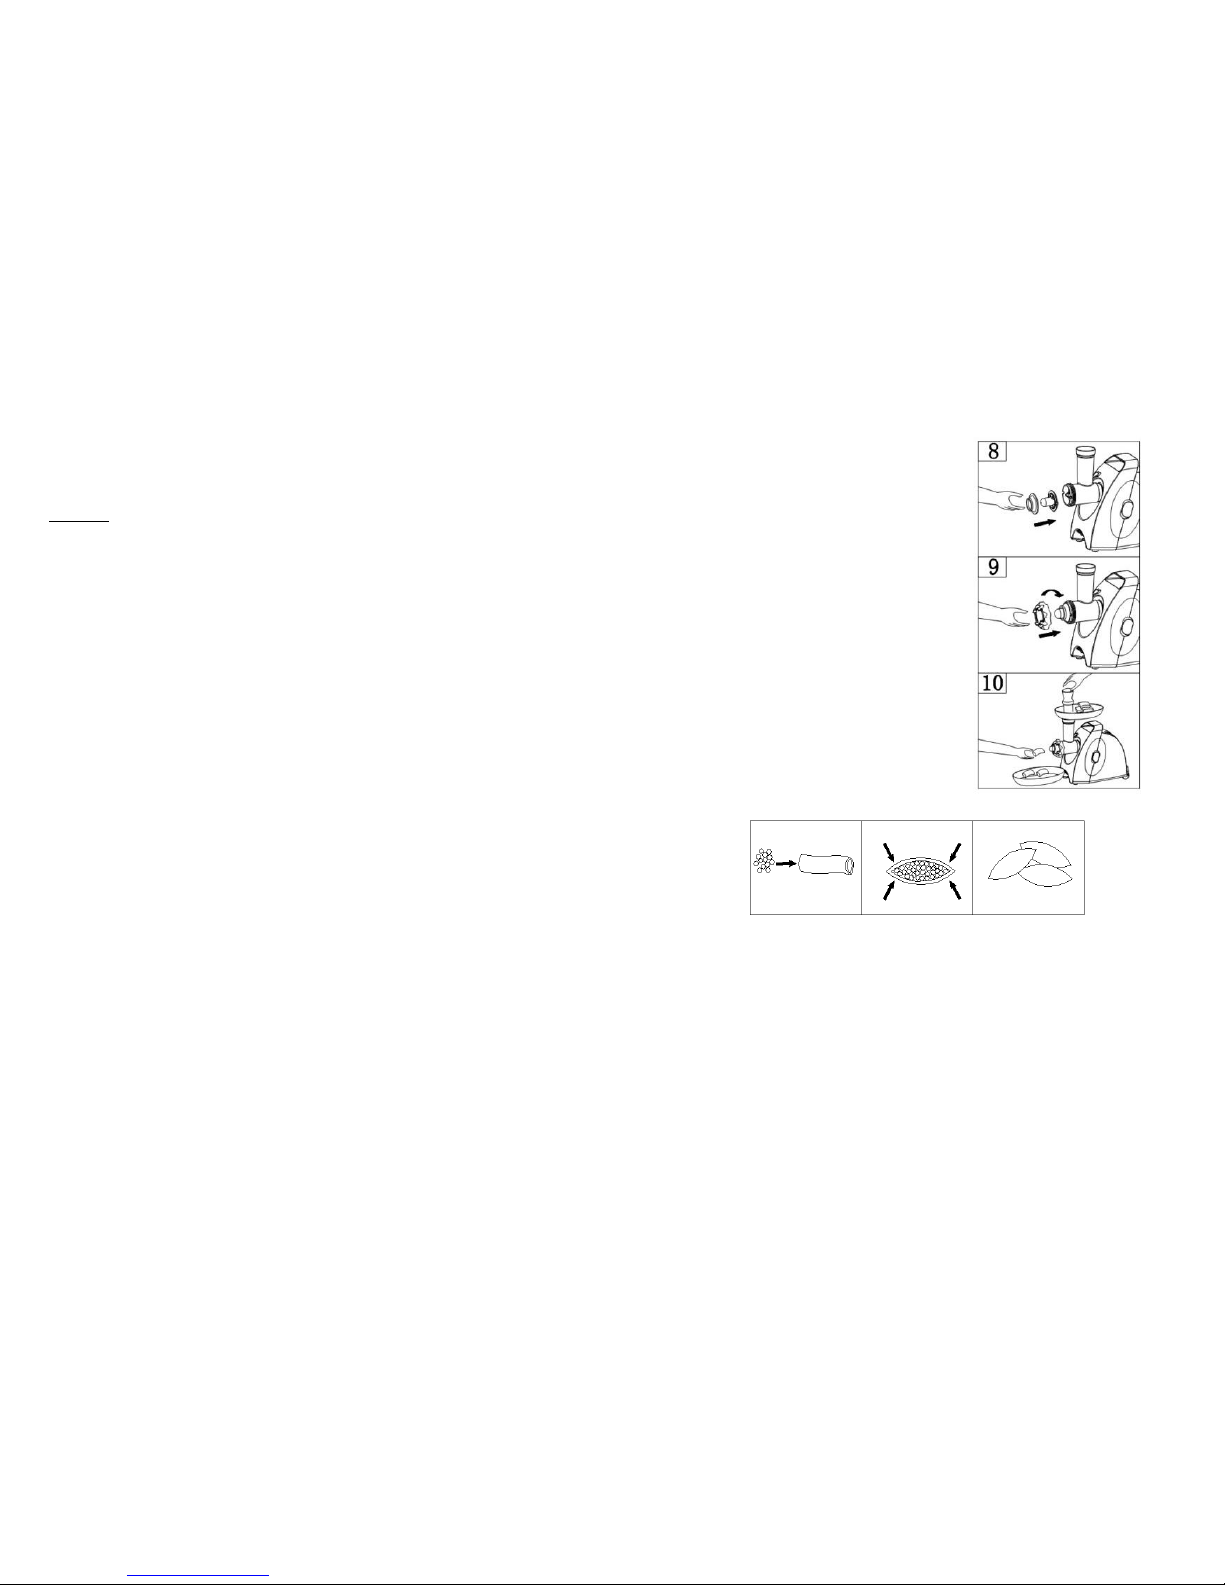
Place kebbe attachments onto the
feed screw shaft together, fitting
protrusions in the slots (fig.8).
Screw fixing ring into place until
tight. Do not over tighten (fig.9).
Make the cylindrical outlet cover
(fig. 10).
Form kebbe as illustrated below
and deep fry.
Fry onion until brown and add minced mutton, all spice, salt and
flour.
OUTLET COVER
Lean meat
Flour
Spices
Nutmeg (cut finely)
Powdered red pepper
450g
150-200g
to your taste
1
to your taste
Mince meat three times and mix
all ingredients together in a bowl.
More meat and less flour for outlet
cover creates better consistency
and taste.
Grind the mixture three times.
Disassemble by reversing the steps
from 5-3 to remove the cutting
plate and cutting blade.
8
CUTTING SLICE/SHRED/STRIP
Press the fasten button, hold the head and insert it into the inlet
(when inserting, please pay attention the head must be slanted as per
arrow indicated on the top, see fig. 8), then move the head
anticlockwise, so that the head being fastened tightly. There will be
locked when you heard a voice of “KA” (fig. 2).
Put the cutting attachments “slice cutter” or “shredded cutter” or
“strip cutter” into the cutting head. Note: must be on place (fig. 9).
9
The switch I/II knob to “I”, the switch ON/O/R knob to “ON”
position, when you cutting. Put the vegetable into vegetable cutting
head, and then push down the vegetable pusher with 5N power (fig.
10).
After use, switch the unit off and unplug it from the power supply.
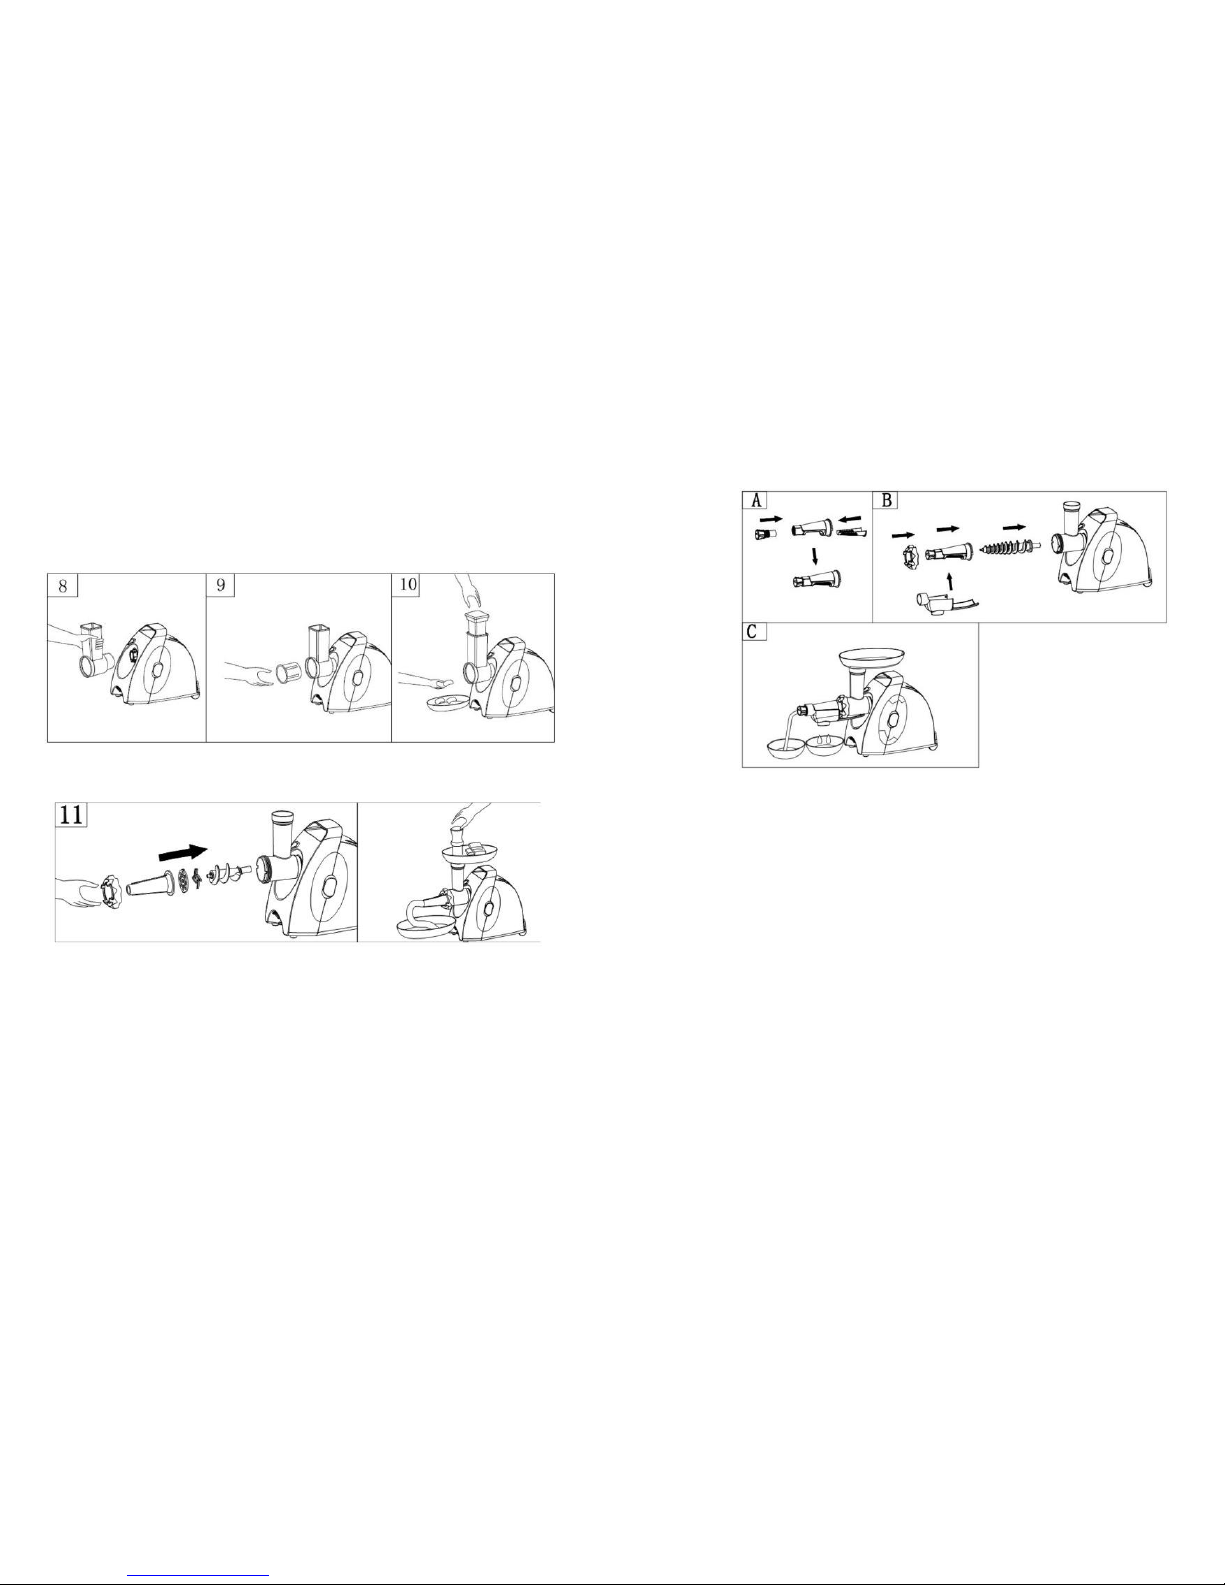
MAKING SAUSAGE
Before starting, please assemble sausage attachment as per
following (fig. 11).
TOMATO JUICER
Revolve the adjusted nail to the front of tomato juicer bracket (fig.
A).
Put the fix ring through the tomato juicer bracket (fig. B).
Pack the attachments like fig. C.
Put the containers under tomato juicer attachment like fig. D to
collect juice and residue. Cut the tomato into fix meat grinder like
head size, then press them gently, it can short the working time.
Adjust the screw can make the juice dense or thin.
Disassembly and clean the tomato juicer as soon as juice completely.
10 11

CLEANING AND MAINTENANCE
DISASSEMBLING
Make sure that the motor has
stopped completely.
Disconnect the plug from the power
outlet.
Disassemble by reversing the steps
from 6-1 pictures.
If the fixing ring is not easily
removed by hands, please use tools
(fig.12).
To remove the cutting plate easily,
place a screwdriver between the
cutting plate and the head as
illustrated and lift it up (fig.13).
CLEANING
Remove meat, etc. Wash each part in warm soapy water.
A bleaching solution containing chlorine will discolor aluminum
surfaces.
Do not immerse the motor housing in water, but only wipe it with a
damp cloth.
Thinners and petrol will crack or change the color of the unit.
Wipe all the cutting parts by vegetable oil wet cloth.
Specification
Rated power 450 W
Locked power 1200 W
Working voltage: 220-230 V
Working frequency: 50 Hz
Rated current 5.5 A
Set
MEAT GRINDER 1
TOMATO JUICER 1
GRATER FOR POTATO PANCAKES 1
STRIP CUTTER 1
SHREDDED CUTTER 1
SLICE CUTTER 1
INSTRUCTION MANUAL 1
WARRANTY BOOK 1
PACKAGE 1
12 13
 Loading...