

Page 1

Liberator Rugged 7
with Chat Software
User’s Guide v2.8.0
Serial numbers LR7-400 and above
Liberator Pty Ltd
265 Gilbert Street, Adelaide SA 5000
Tel: +61 (0)8 8211 7766 Fax: +61 (0)8 8211 7733
info@liberator.net.au www.liberator.net.au
Page 2
LR7 User’s Guide v2.8.0 Page 2
Page 3

LR7 User’s Guide v2.8.0 Page 3
Acknowledgements
Copyright/Trademark Information
NOVA chat and VocabPC are trademarks of Saltillo Corporation.
Microsoft and Windows are either registered trademarks or trademarks of Microsoft Corporation
in the United States and/or other countries.
Android is a trademark of Google Inc.
Android Market is a trademark of Google Inc.
Ivona is Copyright © 2001-2010, IVO Software Sp.z o.o.
Acapela is a trademark of Acapela Group,
PCS Symbols illustrations are copyright of Mayer-Johnson Co.
Symbol Stix is copyright of News2You. "The Library of Character/Logo Symbols contained in this
software is included free of charge, may be used solely for communication purposes and may not
be sold, copied or otherwise exploited for any type of profit."
WordPower and ChatPower are trademarks of Inman Innovations, Inc.
My QuickChat 12 Adult is copyright of Talk To Me Technologies
My QuickChat 12 Child is copyright of Talk To Me Technologies
My QuickChat 8 Adult is copyright of Talk To Me Technologies
My QuickChat 8 Child is copyright of Talk To Me Technologies
My QuickChat 4 Child is copyright of Talk To Me Technologies
Chat Editor USB
Chat Editor, owned by Saltillo Corporation
Microsoft Voices, owned by Microsoft Corporation
Microsoft's agreement states:
INSTALLATION AND USE RIGHTS. You may install and use one copy of the software on each
computer on your premises that you use to exchange data and software with portable
devices powered by a Microsoft operating system.
Saltillo grants permission for the use of Chat Editor on each computer used to exchange data
with the NOVA chat (LR7) device.
Attention! Consult accompanying documents.
Page 4

LR7 User’s Guide v2.8.0 Page 4
Warnings
This device not intended to be an emergency call device or sole communication aid.
When operating this device in a medical environment, do not use with any product that is not
medically approved. Follow all rules for appropriate wireless device use.
Do not use this device close to sources of RF radiation or you may encounter interference. Move
away, if possible, from the source of the interference.
Any mounts used should be fitted by a qualified person. Failure to install the mounting system
according to the manufacturer's instructions may result in an injury to the user. Be certain that the
user’s view is not obstructed by the mounting.
Analysis of positioning by a qualified person is required to prevent repetitive stress injuries to the
user.
Cords and straps are potential strangulation hazards. Please consider this prior to placing these
items with device users.
Small parts could present a choking or other hazard.
Do not use the device if the screen is cracked or broken.
Liberator Pty Ltd assumes no responsibility for any loss or claims by third parties which may arise
through the use of this product.
Liberator Pty Ltd assumes no responsibility for any damage or loss caused by the deletion of
data as a result of malfunction repairs or battery replacement. Be sure to back up all important
data on other media (computer) to protect against its loss.
Implantable Medical Devices
A minimum separation of six (6) inches should be maintained between a handheld wireless
mobile device and an implantable medical device, such as a pacemaker or implantable
cardioverter defibrillator, to avoid potential interference with the device.
Persons who have such devices:
• Should ALWAYS keep the mobile device more than six (6) inches from their implantable medical
device when the mobile device is turned ON;
• Should not carry the mobile device in a breast pocket;
• Should turn the mobile device OFF immediately if there is any reason to suspect that
interference is taking place
• Should read and follow the directions from the manufacturer of your implantable medical
device. If you have any questions about using your wireless mobile device with an implantable
medical device, consult your health care provider.
Page 5

LR7 User’s Guide v2.8.0 Page 5
Contents
Welcome to Liberator Rugged 7 ........................................................................................................... 10
What’s Included ................................................................................................................................... 11
LR7 Device Features ............................................................................................................................. 12
Turning LR7 On & Off ........................................................................................................................... 13
Charging the LR7 .................................................................................................................................. 14
Checking Battery Status ....................................................................................................................... 15
Controlling the Volume ........................................................................................................................ 16
Adjusting the Stand .............................................................................................................................. 17
Remove/Add Handle ............................................................................................................................ 17
Attaching a Strap ................................................................................................................................. 18
Using the Touchscreen ......................................................................................................................... 19
Cleaning your Device .................................................................................................................................... 19
Using a Stylus ................................................................................................................................................ 19
Using the Android Home Screen (non-dedicated devices) ...................................................................... 20
Opening and Closing the Chat Application (non-dedicated devices) ....................................................... 21
Using the Chat application screen ......................................................................................................... 22
Using the Speech Display Bar (SDB) ...................................................................................................... 23
Changing Functional SDB Settings ................................................................................................................ 23
Changing SDB Style Settings ......................................................................................................................... 24
Using the Chat Application Menus ........................................................................................................ 25
Choosing a Vocabulary File ................................................................................................................... 26
Exploring Vocabulary Files .................................................................................................................... 26
Available Vocabulary Files .................................................................................................................... 27
WordPower ................................................................................................................................................... 27
4-Basic ........................................................................................................................................................... 29
Basic Scan...................................................................................................................................................... 29
Communication Journey: Aphasia ................................................................................................................ 30
Essence ......................................................................................................................................................... 31
MultiChat 15 ................................................................................................................................................. 31
myCore .......................................................................................................................................................... 31
myQuickChat................................................................................................................................................. 31
Spelling .......................................................................................................................................................... 32
VocabPC ........................................................................................................................................................ 32
Chat Editor .......................................................................................................................................... 33
Page 6

LR7 User’s Guide v2.8.0 Page 6
Installing Chat Editor..................................................................................................................................... 33
Configuring Chat Editor ................................................................................................................................ 34
Enabling Speech in Chat Editor ..................................................................................................................... 35
Opening Chat Editor ..................................................................................................................................... 35
Using Vocabulary Files with Chat Editor ....................................................................................................... 35
Device and Editor Differences ...................................................................................................................... 36
Using Chat Editor to Create Instructional Materials ..................................................................................... 37
Creating a Customized Vocabulary File ................................................................................................. 39
Turning Edit Mode On .......................................................................................................................... 40
Change Button Label/Message ............................................................................................................. 41
Displaying the Button Text to Edit ................................................................................................................ 41
Editing the Button Text ................................................................................................................................. 41
Adding or Modifying a Button Image .................................................................................................... 42
Finding an Image from the Device Library .................................................................................................... 43
Searching for an Image in the Device Library ............................................................................................... 43
Creating Your Own Image ............................................................................................................................. 44
Using an Existing Image ................................................................................................................................ 45
Transferring Images ............................................................................................................................. 45
Creating and Using a Camera Button .................................................................................................... 46
Setting up the Button Action ........................................................................................................................ 46
Taking a Picture for Your button .................................................................................................................. 46
Deleting Photos ............................................................................................................................................ 47
Hiding Buttons ..................................................................................................................................... 48
Hiding a Single Button .................................................................................................................................. 48
Hiding or Showing Multiple Buttons ............................................................................................................. 49
Saving Hidden Button Settings ..................................................................................................................... 49
Hiding and Showing Button Images .............................................................................................................. 49
Modifying Button Styles ....................................................................................................................... 50
Modifying a Button Style .............................................................................................................................. 50
Modifying Button Colour Saturation ............................................................................................................ 51
Modifying a Page Button Style ..................................................................................................................... 51
Modifying a Vocabulary Button Style ........................................................................................................... 52
Overriding a Button Style ............................................................................................................................. 52
Modifying a Button Arrow Link ..................................................................................................................... 53
Adding or Modifying a Button Action .................................................................................................... 54
Available Button Actions ...................................................................................................................... 55
Page 7

LR7 User’s Guide v2.8.0 Page 7
Using Navigate, Visit, and Jump to Page ............................................................................................... 57
Copying Buttons .................................................................................................................................. 58
Prioritizing Buttons .............................................................................................................................. 59
Rearranging Buttons ..................................................................................................................................... 59
Resizing a Button .......................................................................................................................................... 59
Creating a Page .................................................................................................................................... 60
Creating a New Page ..................................................................................................................................... 60
Creating a Copy of a Page ............................................................................................................................. 60
Creating a Page from a Template ................................................................................................................. 60
Copying a Page from a Different Vocabulary File ......................................................................................... 61
Animating Page Transitions .......................................................................................................................... 61
Adding a Grid to Pages .................................................................................................................................. 61
Creating a Visual Scene ........................................................................................................................ 62
Create a Linking Button ................................................................................................................................ 62
Create a Visual Scene Page ........................................................................................................................... 63
Add a Transparent Button to the Visual Scene Page .................................................................................... 65
Modify a Button’s Actions ............................................................................................................................ 68
Alternative: Create the Scene and then the Linking Button ......................................................................... 69
Create a Visual Scene with Buttons Surrounding the Image ........................................................................ 70
Using Keyboards .................................................................................................................................. 71
Working with Gestures......................................................................................................................... 72
Turning Gestures On or Off .......................................................................................................................... 72
Creating a Gesture for a Page ....................................................................................................................... 72
Creating a Gesture for All Pages ................................................................................................................... 73
Working with Speech ........................................................................................................................... 74
Selecting a Synthesizer and Voice ................................................................................................................ 74
Adding a Pause between Words ................................................................................................................... 74
Adding Words to the Pronunciation Dictionary ........................................................................................... 74
Configuring Speech Modes ........................................................................................................................... 75
Adding Acapela Vocal Smileys .............................................................................................................. 76
Adding a Sound ............................................................................................................................................. 76
Adding an Exclamation ................................................................................................................................. 76
Finding a Vocal Smiley .................................................................................................................................. 76
Example: Add a Smiley Face and Laugh Sound to a Button ......................................................................... 76
Setting Access Options ......................................................................................................................... 78
Activating Buttons on Touch or Release ....................................................................................................... 78
Page 8

LR7 User’s Guide v2.8.0 Page 8
Setting a Time for Button Activation ............................................................................................................ 78
Setting a Time to Prevent Selection of a Button Twice ................................................................................ 79
Setting up a Beep when a Button is Pressed ................................................................................................ 79
Setting up a Visual Indication when a Button is Selected ............................................................................ 79
Changing Device Orientation Settings ................................................................................................... 80
Changing Orientation Settings ...................................................................................................................... 80
Using Orientation Tilt with the SDB .............................................................................................................. 81
Switch Scanning ................................................................................................................................... 82
Setting up Touchscreen Scanning ................................................................................................................. 82
Selecting the Scan Pattern ............................................................................................................................ 83
Configuring Visual Effects for Scanning ........................................................................................................ 84
Using Word Finder ............................................................................................................................... 85
Setting up Word Finder as a Button ............................................................................................................. 85
Setting up Word Finder as a Menu Item ...................................................................................................... 85
Setting the Display Time for Word Finder Results in the SDB ...................................................................... 86
Finding Specific Words.................................................................................................................................. 86
Setting up and Using Word Prediction .................................................................................................. 87
Selecting the Type of Word Prediction ......................................................................................................... 87
Choosing the Default Dictionary ................................................................................................................... 88
Adding Words using the Add Words Screen ................................................................................................. 88
Adding Words by Entering them in the Vocabulary ..................................................................................... 89
Requiring Review of New Prediction Words ................................................................................................ 89
Reviewing New Words for Prediction ........................................................................................................... 90
Excluding Words from Prediction ................................................................................................................. 91
Importing Predictions ................................................................................................................................... 92
Deleting Prediction Words ............................................................................................................................ 93
Using Abbreviation Expansion & Automatic Capitalisation .................................................................... 95
Adding, Modifying, and Deleting Abbreviations ........................................................................................... 95
Enabling Automatic Capitalization ................................................................................................................ 95
Restricting Access ................................................................................................................................ 96
Enabling Menu Lock ...................................................................................................................................... 96
Locking the Device ........................................................................................................................................ 96
Unlocking the Device .................................................................................................................................... 96
Blocking Access to the Operating System and Apps ..................................................................................... 97
Creating a Kiosk Mode Password ................................................................................................................. 97
Enabling Kiosk Mode .................................................................................................................................... 97
Page 9

LR7 User’s Guide v2.8.0 Page 9
Disabling Kiosk Mode .................................................................................................................................... 98
Resetting Your Passwords............................................................................................................................. 98
Creating and Loading Profiles ............................................................................................................... 99
Changing Languages and Voices ......................................................................................................... 100
Changing Display Settings ................................................................................................................... 101
Adjusting Audible & Haptic Feedback ................................................................................................. 101
Setting the Date and Time .................................................................................................................. 102
Analysing Language Development ...................................................................................................... 103
Creating a Privacy Password ....................................................................................................................... 104
Turning Data Logging On or Off .................................................................................................................. 104
Uploading Data for Analysis........................................................................................................................ 105
Configuring Data Uploading........................................................................................................................ 105
Selecting a Person ....................................................................................................................................... 107
Setting up Automatic Data Uploads ........................................................................................................... 108
Initiating an Immediate Data Upload ......................................................................................................... 108
Saving Data to a File to Analyse Manually .................................................................................................. 109
Clearing Usage Data .................................................................................................................................... 110
Changing or Removing Your Privacy Password .......................................................................................... 111
Updating the Chat Application............................................................................................................ 112
Updating the Chat Editor .................................................................................................................... 112
Backing Up and Restoring Vocabulary Files ......................................................................................... 113
Transferring Vocabulary Files ............................................................................................................. 114
Troubleshooting ................................................................................................................................ 116
The device no longer produces speech ...................................................................................................... 116
No Speech and the message is not going to the Speech Display Bar when pressing buttons ................... 116
Can’t Find the Library Menu ....................................................................................................................... 116
Resetting LR7 .............................................................................................................................................. 116
Clearing and Restoring Customizations ............................................................................................... 117
Removing Downloaded Apps and Files ............................................................................................... 117
Care and Maintenance ....................................................................................................................... 118
Warranty ........................................................................................................................................... 118
Appendix A: Advanced Grammar Features .......................................................................................... 119
Page 10
LR7 User’s Guide v2.8.0 Page 10
Welcome to Liberator Rugged 7
The Liberator Rugged 7 with Chat (LR7) combines the advantages of a
fully rugged Android tablet and operating system with the well-known
Chat software from Saltillo to create a powerful communication device.
This manual offers step by step instructions for setting up and using your
LR7 device. Additional information support are available.
Contact Liberator for Training, Operational or Technical Support:
Liberator Pty Ltd
265 Gilbert Street, Adelaide SA 5000
info@liberator.net.au
www.liberator.net.au
Ph (08) 8211 7766
Support articles & webinars can also be found on the Saltillo website:
http://saltillo.com/support
http://saltillo.com/webinars
For Realize language website support:
support@realizelanguage.com
Page 11
LR7 User’s Guide v2.8.0 Page 11
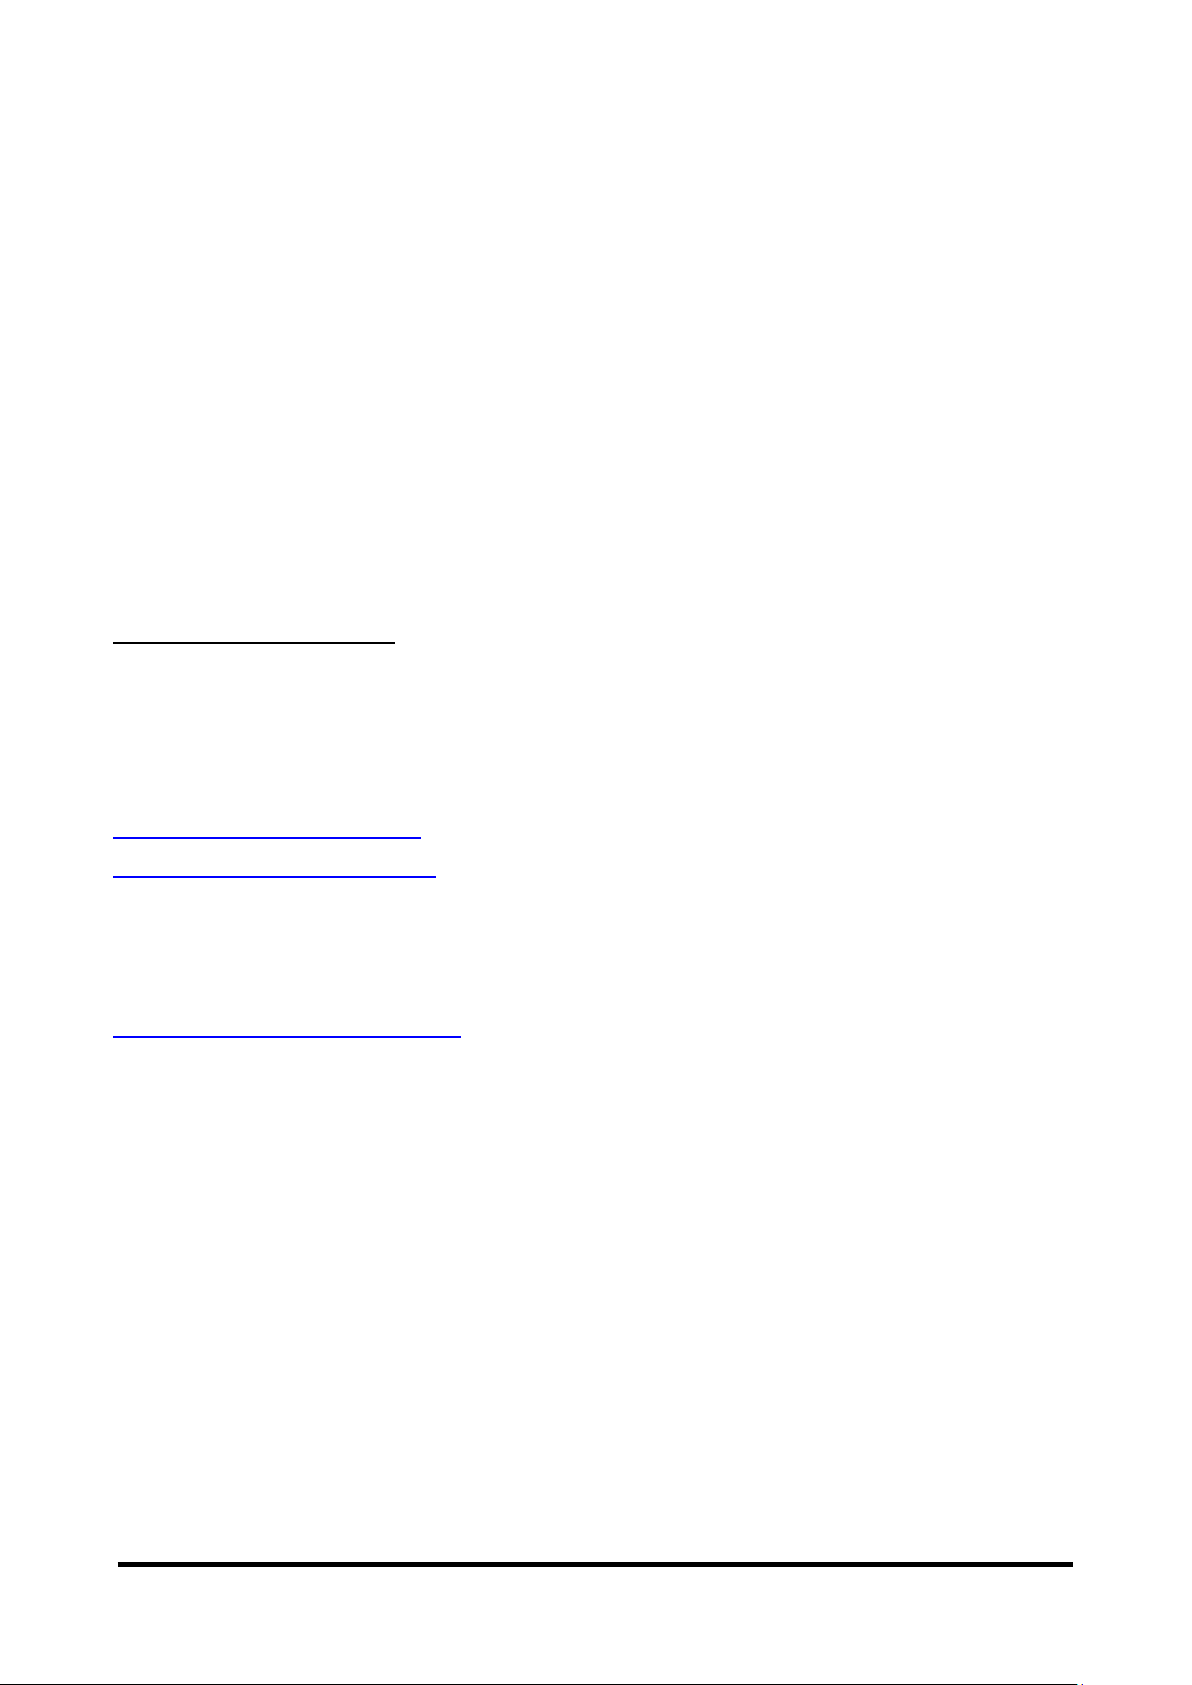
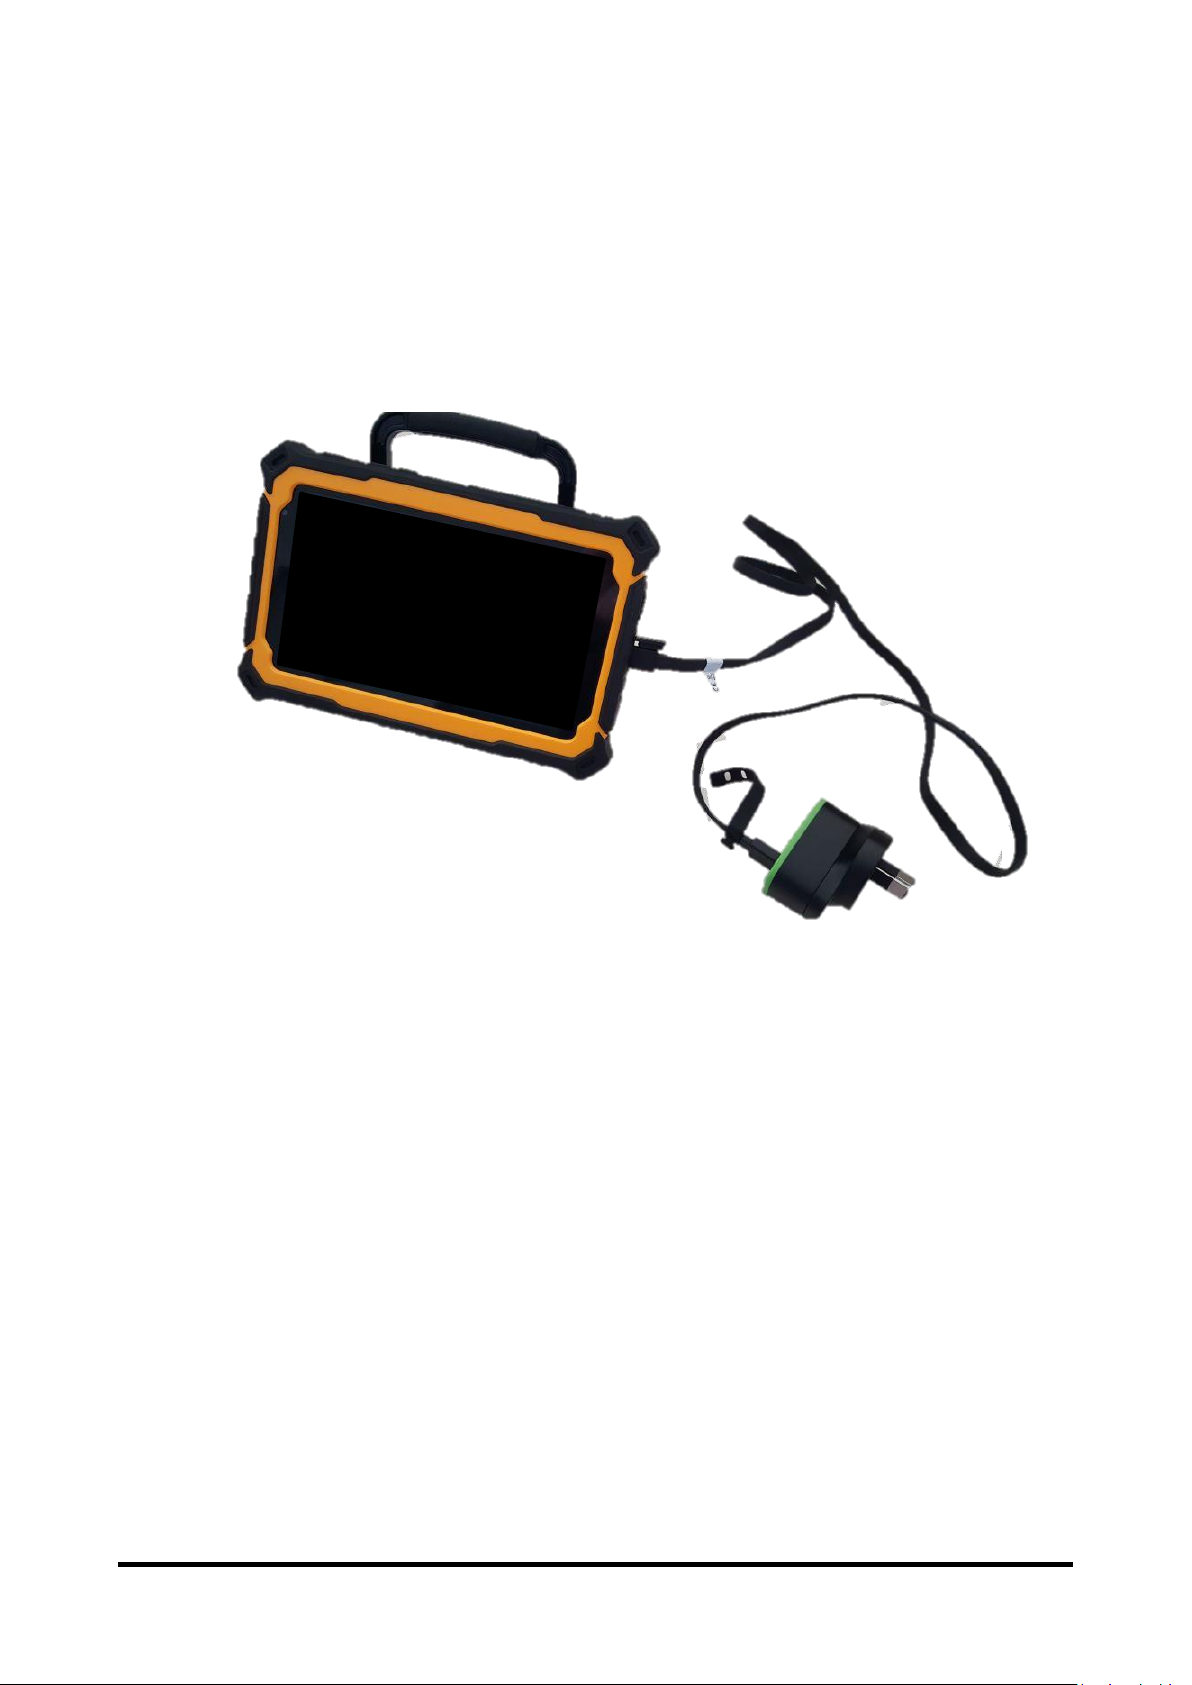
What’s Included
The following were included in your LR7 package.
Chat Editor Install USB Memory Stick
Chat Editor is used for programming from a PC and for backing up custom files.
Carry case
Your LR7 device
Shoulder
strap
Battery
charger
(cable +
adapter)
Page 12
LR7 User’s Guide v2.8.0 Page 12
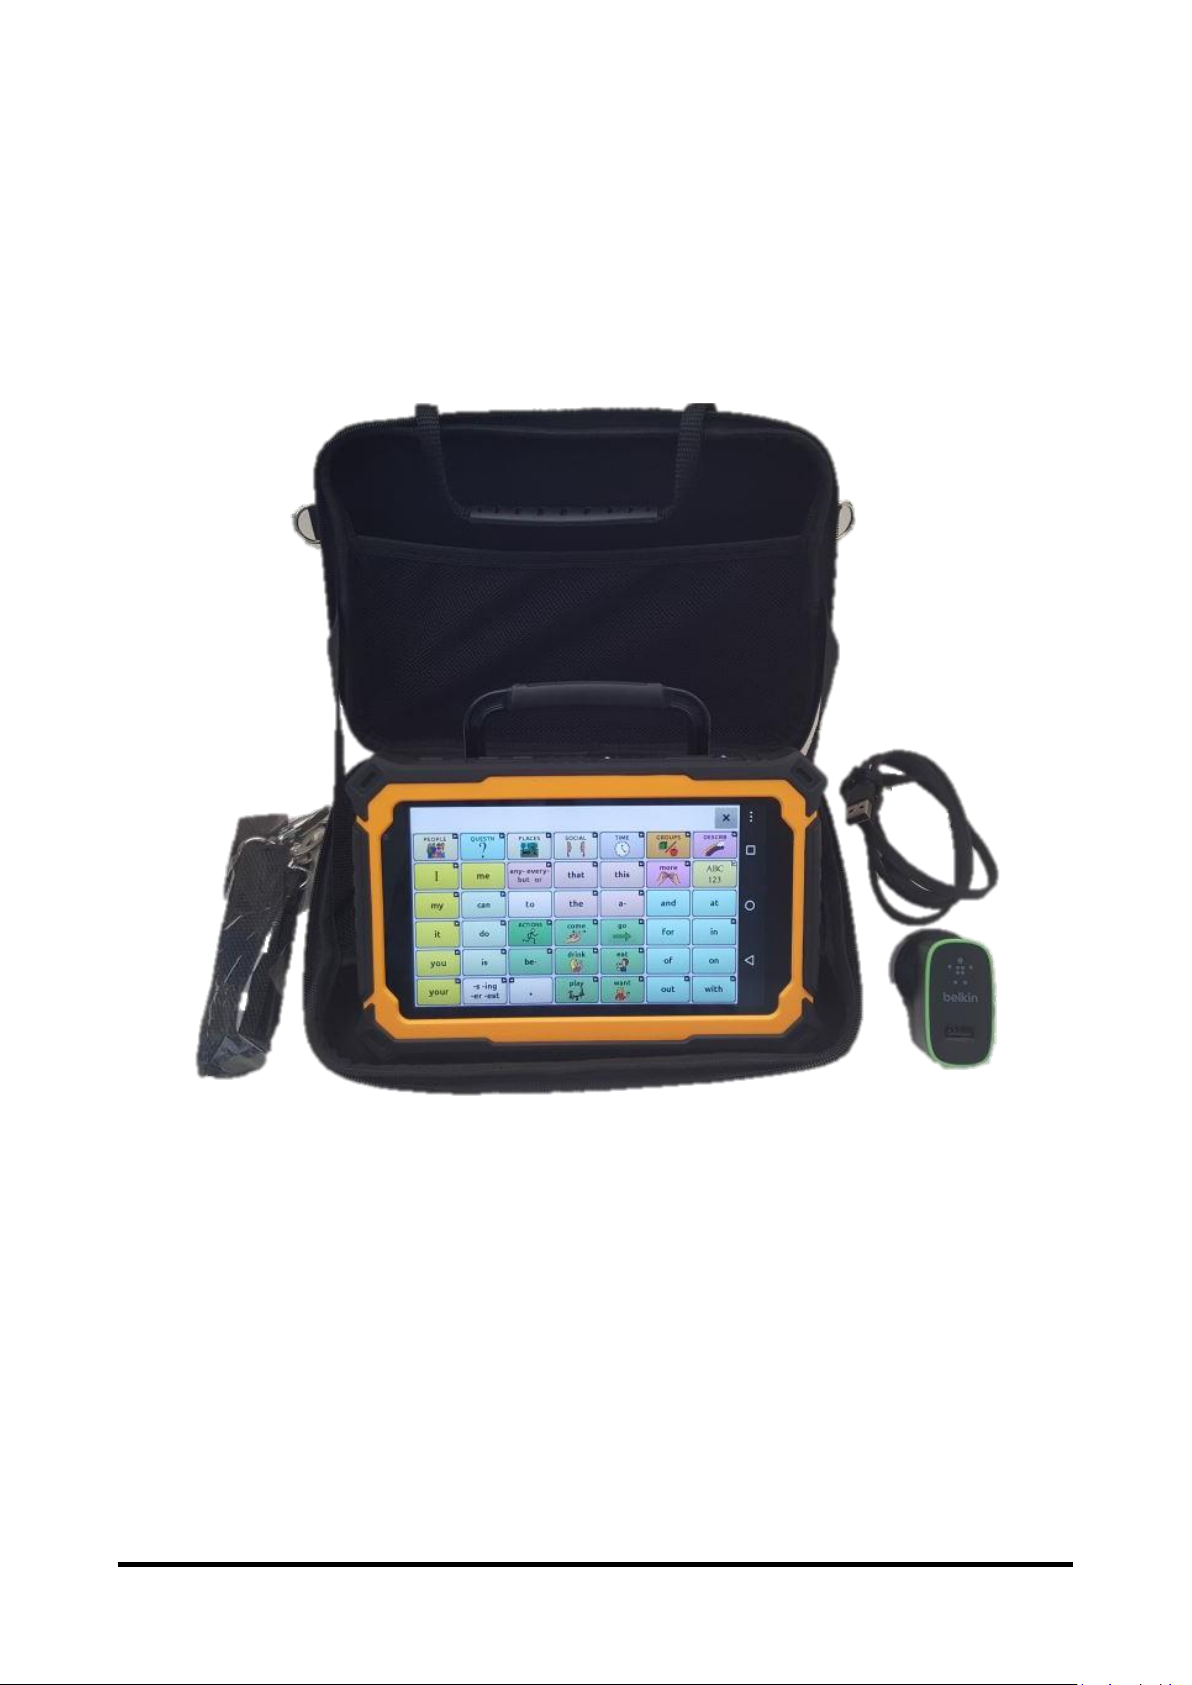
LR7 Device Features
Side buttons:
Menu: Tap to display menus that allow you to select a vocabulary
file, enable or disable augmentative options, set how and when to
speak messages, and configure a wide variety of additional options.
Recent apps (functional in non-dedicated devices): Displays recently
used apps.
Home: Tap to go to the home screen.
Back: Tap to return to the previous screen or menu. Press and hold
to display an option to restart the application.
Volume Controls
Power Button
Reset Button
Front camera
(Rear facing
camera on
reverse)
Headphone
socket
Charge
socket
Sim card slot
Page 13

LR7 User’s Guide v2.8.0 Page 13
Turning LR7 On & Off
Turning your Device On (from complete power down)
Press and hold the Power Switch.
Turning your Device Off (for storage)
Press and hold the Power Switch. Once you feel a vibration, let go.
At the prompt, touch Power off on the screen.
Choose OK to confirm you want the device off.
Power button
Daily Use - Turn just the Screen On & Off
Tapping the Power Switch quickly turns just the screen on and off. This is
the suggested way of use when using the device on a daily basis. We
suggest tapping (not holding) the power switch to turn off the screen. Tap
the power switch to wake up the screen.
The screen is set up to automatically power down after a specified
amount of time of no activity. To change the period of delay between the
last key press or screen touch and the automatic screen timeout:
Choose Menu > Settings > System > Display > Screen Timeout and
choose the appropriate setting.
Page 14
LR7 User’s Guide v2.8.0 Page 14
Charging the LR7
You received a battery charger in the box with your LR7. Plug the charger
into a wall outlet (surge protector recommended).
Open the rubber water /dust protection plug on the right side of the LR7
and plug the micro USB connector into the connector socket.
We suggest charging the LR7 each night. The process should include:
1. Tap the power button to turn off the display
2. Plug in the charger to the LR7
3. Plug the other end of the charger into a wall outlet
Next morning:
1. Unplug the LR7
2. Unplug the charger from the wall outlet (optional)
3. Tap the power button to turn the display on
Page 15

LR7 User’s Guide v2.8.0 Page 15
Checking Battery Status
You can check the battery status of the device and amplifier by navigating
menus or by having a button on a vocabulary page that checks the status.
Checking Battery Status Using Menus
You can check the battery status of the device by navigating menus.
Choose Menu > Settings > System > About Device.
The screen will show the battery charging status and charge level for the
device.
Checking Battery Status Using a Button
Some Saltillo-provided vocabulary files already include buttons for
checking the battery status. For example: WordPower™ offers the option
from the last page of Groups, and MultiChat 15 offers the button on the
Device Tools page from the second page of “Things”.
To create a button that checks the battery status of both the device and
the amplifier, create a button on a vocabulary page that contains the
action “Battery Status”. This must be done in Edit Mode. See Turning Edit
Mode On.
1. Press and hold on the button you want to modify. (Right-click the
button if you are using Chat Editor.)
2. Choose Edit Button to display the Button Properties.
3. Choose the Actions tab.
4. Use the drop-down list to select the Battery status action.
5. Choose OK.
Any time you choose this button, the application will speak the battery
status of the device and the amplifier and display the information in the
Speech Display Bar (SDB).
For additional information on creating a button action, see Adding or
Modifying a Button Action.
Page 16
LR7 User’s Guide v2.8.0 Page 16
Controlling the Volume
Volume controls are located on the top edge of the LR7. Pressing the left
side of the button adjusts the volume in one direction and pressing the
right side does the opposite.
Volume controls can also be added to buttons within the vocabulary
pages. See Adding or Modifying a Button Action.
To prevent possible hearing damage, do not listen to earphones at high
volume levels for long periods.
Page 17

LR7 User’s Guide v2.8.0 Page 17
Adjusting the Stand
An optional stand was provided in your box. The amplifier itself provides
a slight angle for seeing the screen when sitting on a flat surface. If an
additional angle is needed, the stand can be added to the back of the
amplifier.
The stand is intended to be a break-away stand to avoid pinching. It is
secured to the device with a tension fit. Expand the sides of the stand and
put into holes provided on the side of the case.
Remove/Add Handle
The handle was included on your device when shipped.
To remove the handle:
1. Remove the stand, if in place
2. Remove a screw from each side
3. With some tension, extend the sides out around the casing.
The stand and screws from handle could be a potential choking
hazard.
Page 18
LR7 User’s Guide v2.8.0 Page 18
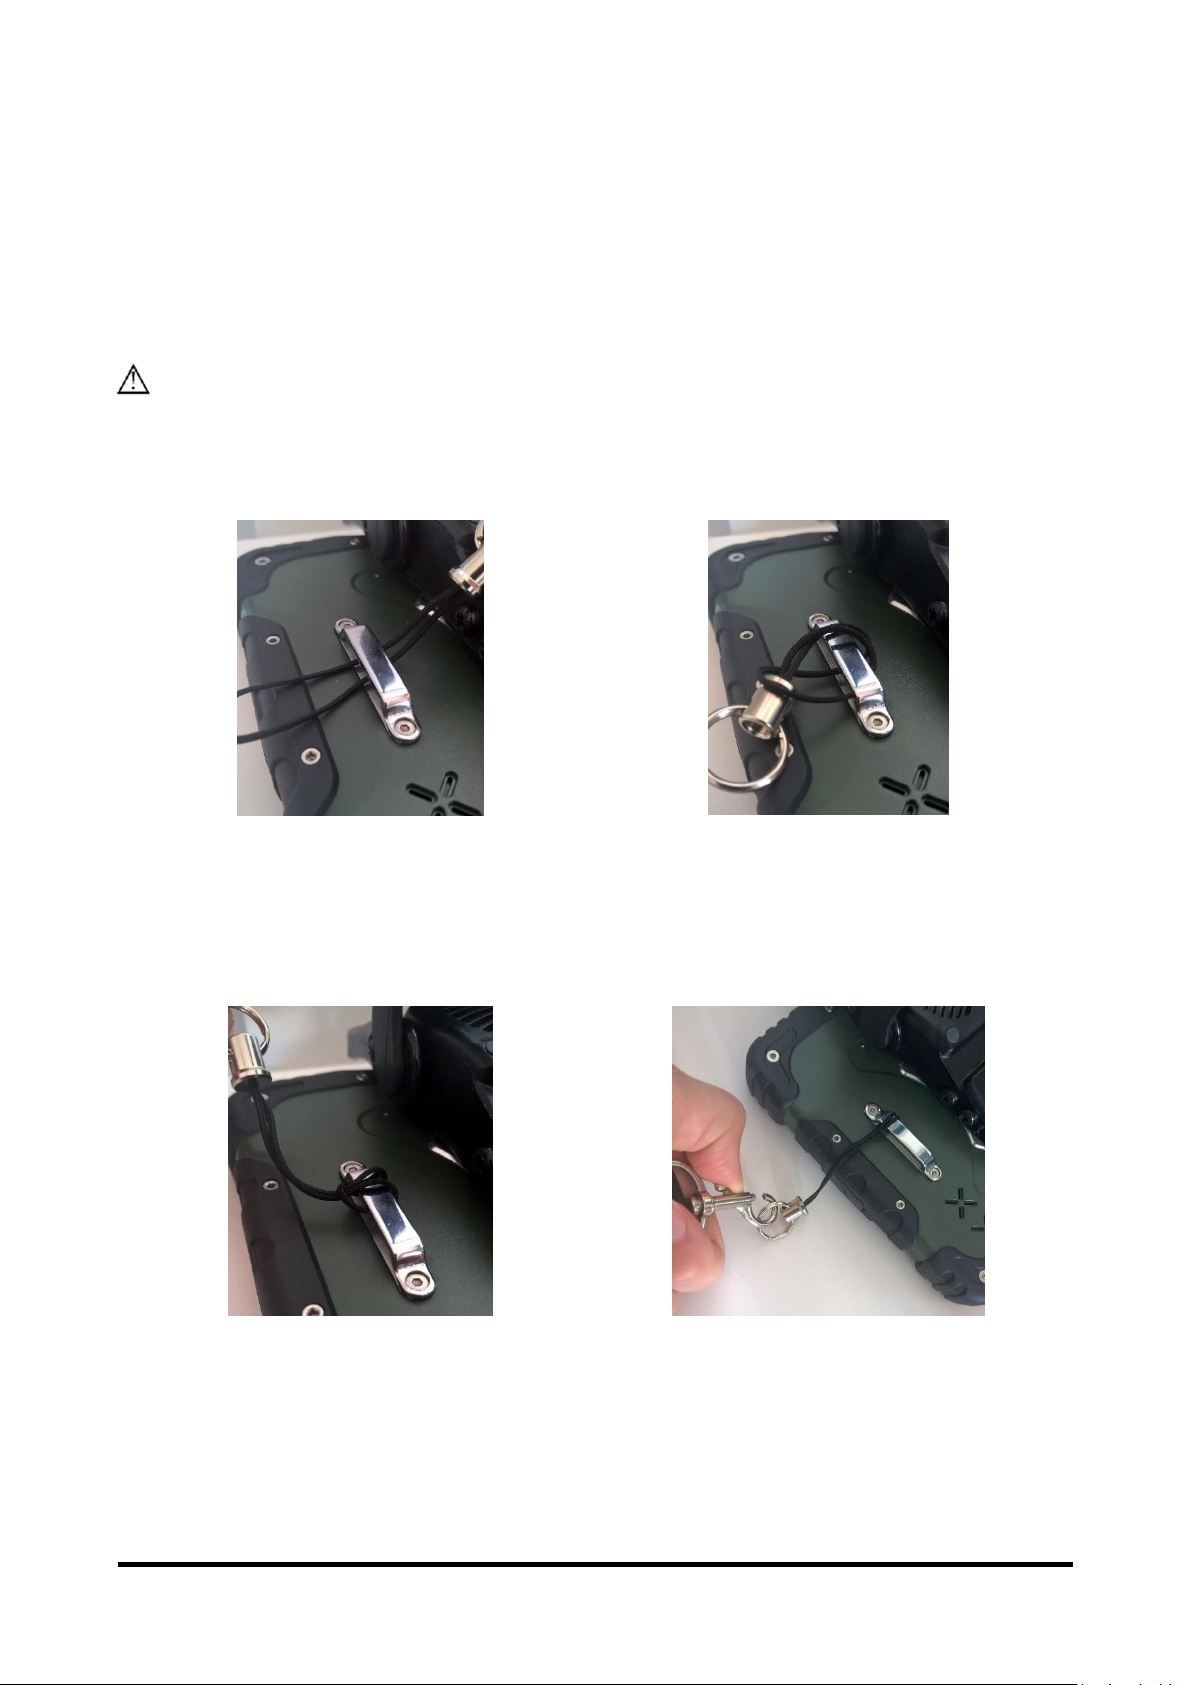
Attaching a Strap
If you want to carry your LR7 with a shoulder strap, attach the two loops
provided with the strap to the silver brackets on the back of your device.
Do not clip the strap directly to the LR7 holders without using the loops,
as this may damage the device.
The loops are a potential choking hazard. Use with caution.
Step 1
Feed the end of the loop
through the hole in the case.
Step 2
Thread the metal ring
through the loop.
Step 3
Pull the metal ring
to tighten the loop.
Step 4
Clip the shoulder strap
to the metal ring.
Step 5: Repeat steps 1-4 for the other loop & end of shoulder strap.
Page 19

LR7 User’s Guide v2.8.0 Page 19
Using the Touchscreen
Your LR7 comes with a capacitive touchscreen. It responds best to a light
touch from the pad of your finger.
Cleaning your Device
If you wish to clean the screen of your device, turn the device off, wipe
with a soft, lint-free cloth slightly dampened with water or diluted
window cleaning fluid. Do not spray or splash liquid directly on the device.
To disinfect the case, moisten a clean cloth in a mixture of one part water
and one part vinegar. Do not use vinegar and water on the display.
Using excessive force or a metallic object when pressing on the
touchscreen may damage the tempered glass surface and void the
warranty.
Using a Stylus
A compatible stylus is available for the LR7. If you prefer to use your own
stylus, be sure it is compatible with a capacitive touchscreen.
Note: The stylus we offer has an opening on the end for attaching to you
or your device. Find a chain, string or lanyard commercially that matches
your personal style.
The stylus is a potential hazard for choking or for poking the eye.
Page 20

LR7 User’s Guide v2.8.0 Page 20
Using the Android Home Screen (non-dedicated devices)
The Android home screen allows you to place shortcuts, widgets, and
other items to customize the device to your needs.
To display the home screen, press Home on the device.
Note: Dedicated (locked) devices do not have access to the home screen.
Unless stated otherwise, instructions in this user’s guide start with the
device unlocked and running the Chat application.
Using the Status Bar
The status bar at the top of the home screen displays icons to show
notifications, battery power, and connection details. Pulling down on the
status bar displays options for viewing notifications and quickly turning on
or off some commonly-used operating system settings.
Adding Shortcuts
The home screen provides shortcuts to applications. You can add
shortcuts as you need them.
To add a shortcut to an app or widget:
1. Press and hold on an empty area of the home screen. A menu
opens.
2. Tap the Apps shortcut. The Apps tab is displayed. If you want to add
a widget, choose the Widgets tab.
3. Press and hold on the item for which you’re creating the shortcut.
The shortcut is placed on the home screen automatically.
To remove a shortcut:
1. Press and hold on the shortcut until Remove appears.
2. Drag the shortcut to Remove.
Shortcuts: We have provided shortcuts to the Chat software and the
camera for your ease.
Page 21
LR7 User’s Guide v2.8.0 Page 21
Opening and Closing the Chat Application (non-dedicated
devices)
To open Chat application from the home screen, choose the NOVA chat
shortcut.
When the Chat application is open, pressing Home along the edge of
the screen will minimize the application and show the Android home
page (if the device is locked, this button will have no action).
To fully close the Chat application, push and hold Back and confirm by
choosing Yes.
Using the Power switch to turn off the LR7 will also close all open
applications on the Android device.
Page 22

LR7 User’s Guide v2.8.0 Page 22
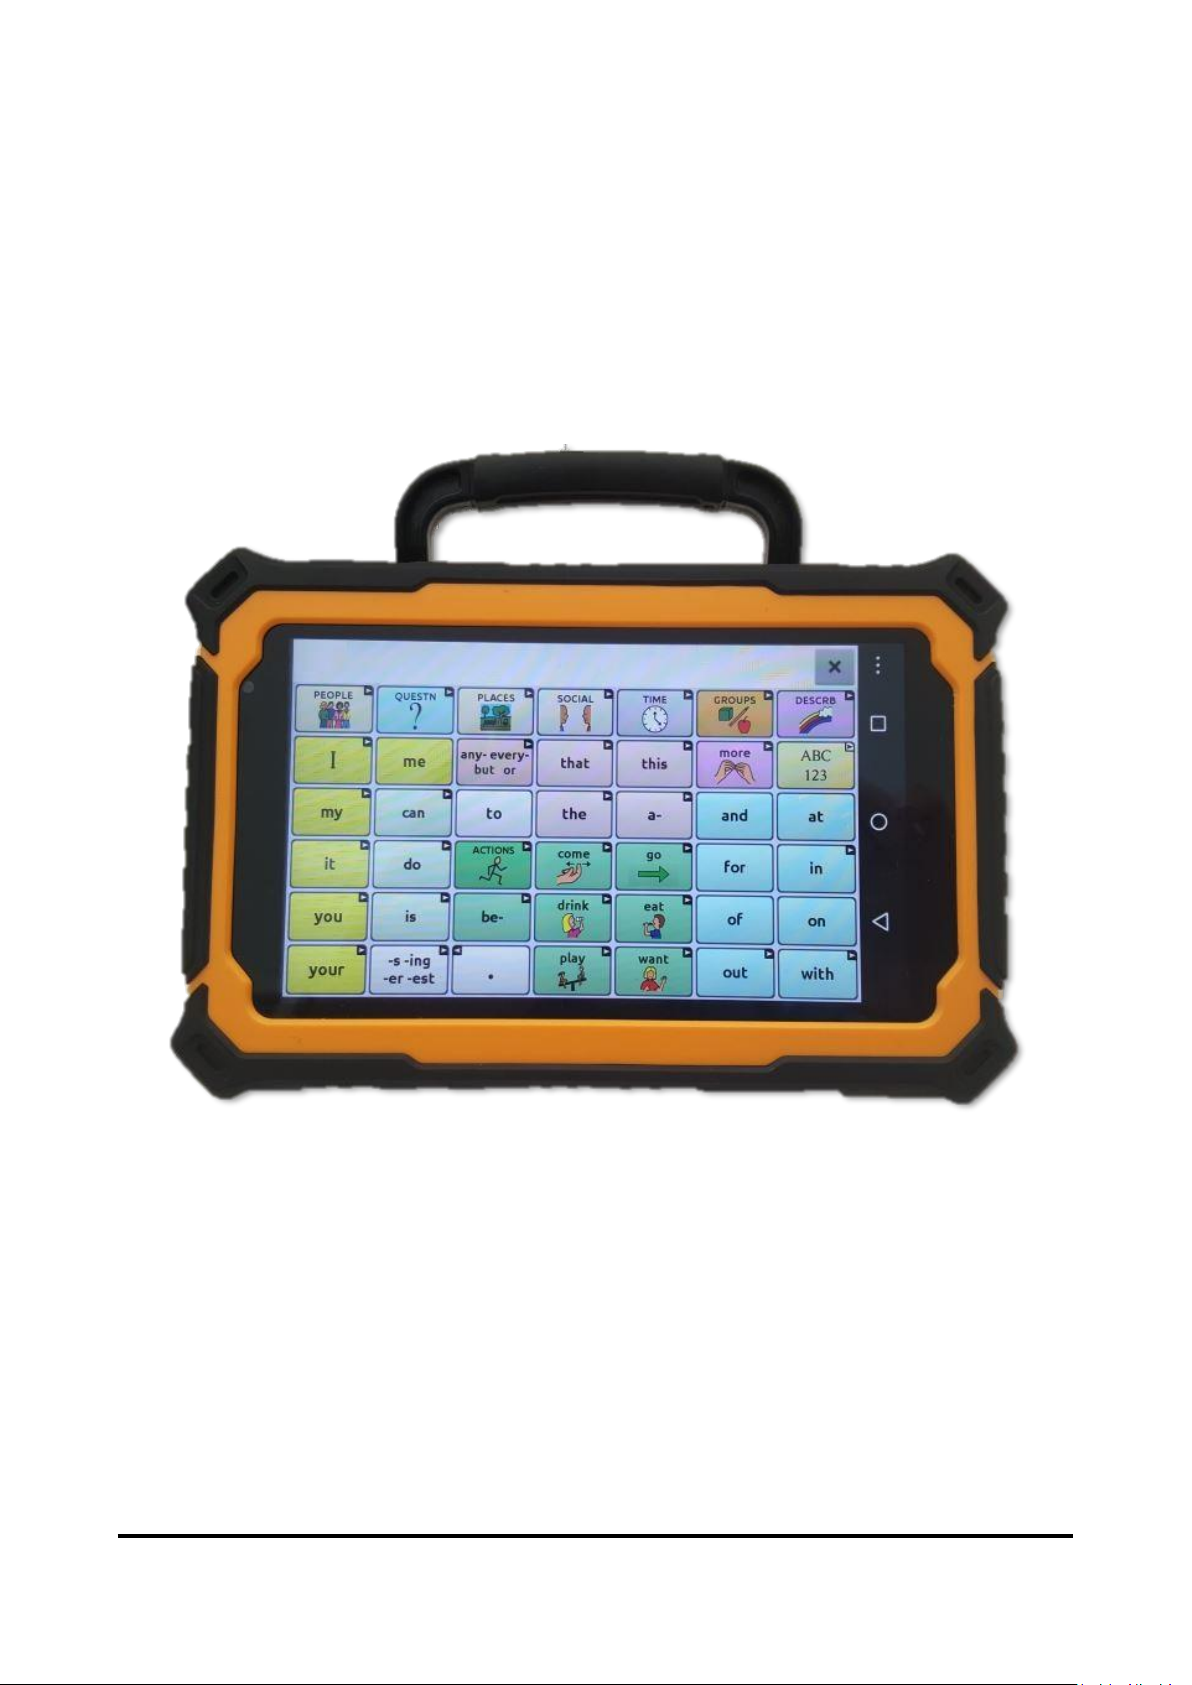
Using the Chat application screen
The main screen of the Chat application displays the first page of the
Vocabulary File that has been selected. This page will look slightly
different depending on which vocabulary file has been loaded.
The Speech Display Bar (SDB) displays text from button presses.
To delete the last word on the SDB, tap X once.
To clear all words, press and hold X.
A small arrow in the upper corner of a button indicates that the button
links to another page. For information on resizing or hiding an arrow, see
Modifying a Button Arrow Link.
Page 23
LR7 User’s Guide v2.8.0 Page 23
Using the Speech Display Bar (SDB)
The Speech Display Bar (SDB) displays text that you enter or generate in
the application. You can change the size of the text and the number of
lines of text that appear in the window.
Tapping on the SDB can speak all text generated.
Tapping the X will delete the last word.
Pressing and holding the X will clear the entire display. Holding the SDB
generates a menu of additional options.
Changing Functional SDB Settings
To access the options for changing Speech Display bar settings, choose
Menu > Settings > Input.
Option
Description
Tap to Speak
This option toggles the option for the SDB to speak when chosen
or not
Tap to Expand
This option toggles the option for the SDB to expand when
chosen or not
Enable Menu
This option toggles the SDB context menu on or off.
Enable Clear
SDB (X)
This option either hides or displays the X on the far right of the
SDB. The X deletes a word when tapped or clears the entire SDB
when held.
Page 24

LR7 User’s Guide v2.8.0 Page 24
Changing SDB Style Settings
To change SDB style settings, choose Menu > Settings > Style. The Style
options allow you to configure the following for the SDB:
• font type, size, and style (Bold or Italic)
• height (number of rows)
• background colour
• text colour
You can also configure the SDB to display icons in addition to text or to
appear at the bottom instead of the top of the screen.
To configure the SDB to display icons in addition to text:
1. Choose Menu > Settings > Style.
2. Tap SDB Icons to insert a checkmark.
To return the SDB to a text-only display, tap SDB Icons to remove the
checkmark.
To configure the SDB to appear at the bottom of the screen:
1. Choose Menu > Settings > Style.
2. Tap On Top to remove the checkmark.
To return the SDB to the top of the screen, tap On Top to insert a
checkmark.
Page 25
LR7 User’s Guide v2.8.0 Page 25
Using the Chat Application Menus
The Menu, Home and Back button icons only illuminate when you tap
them.
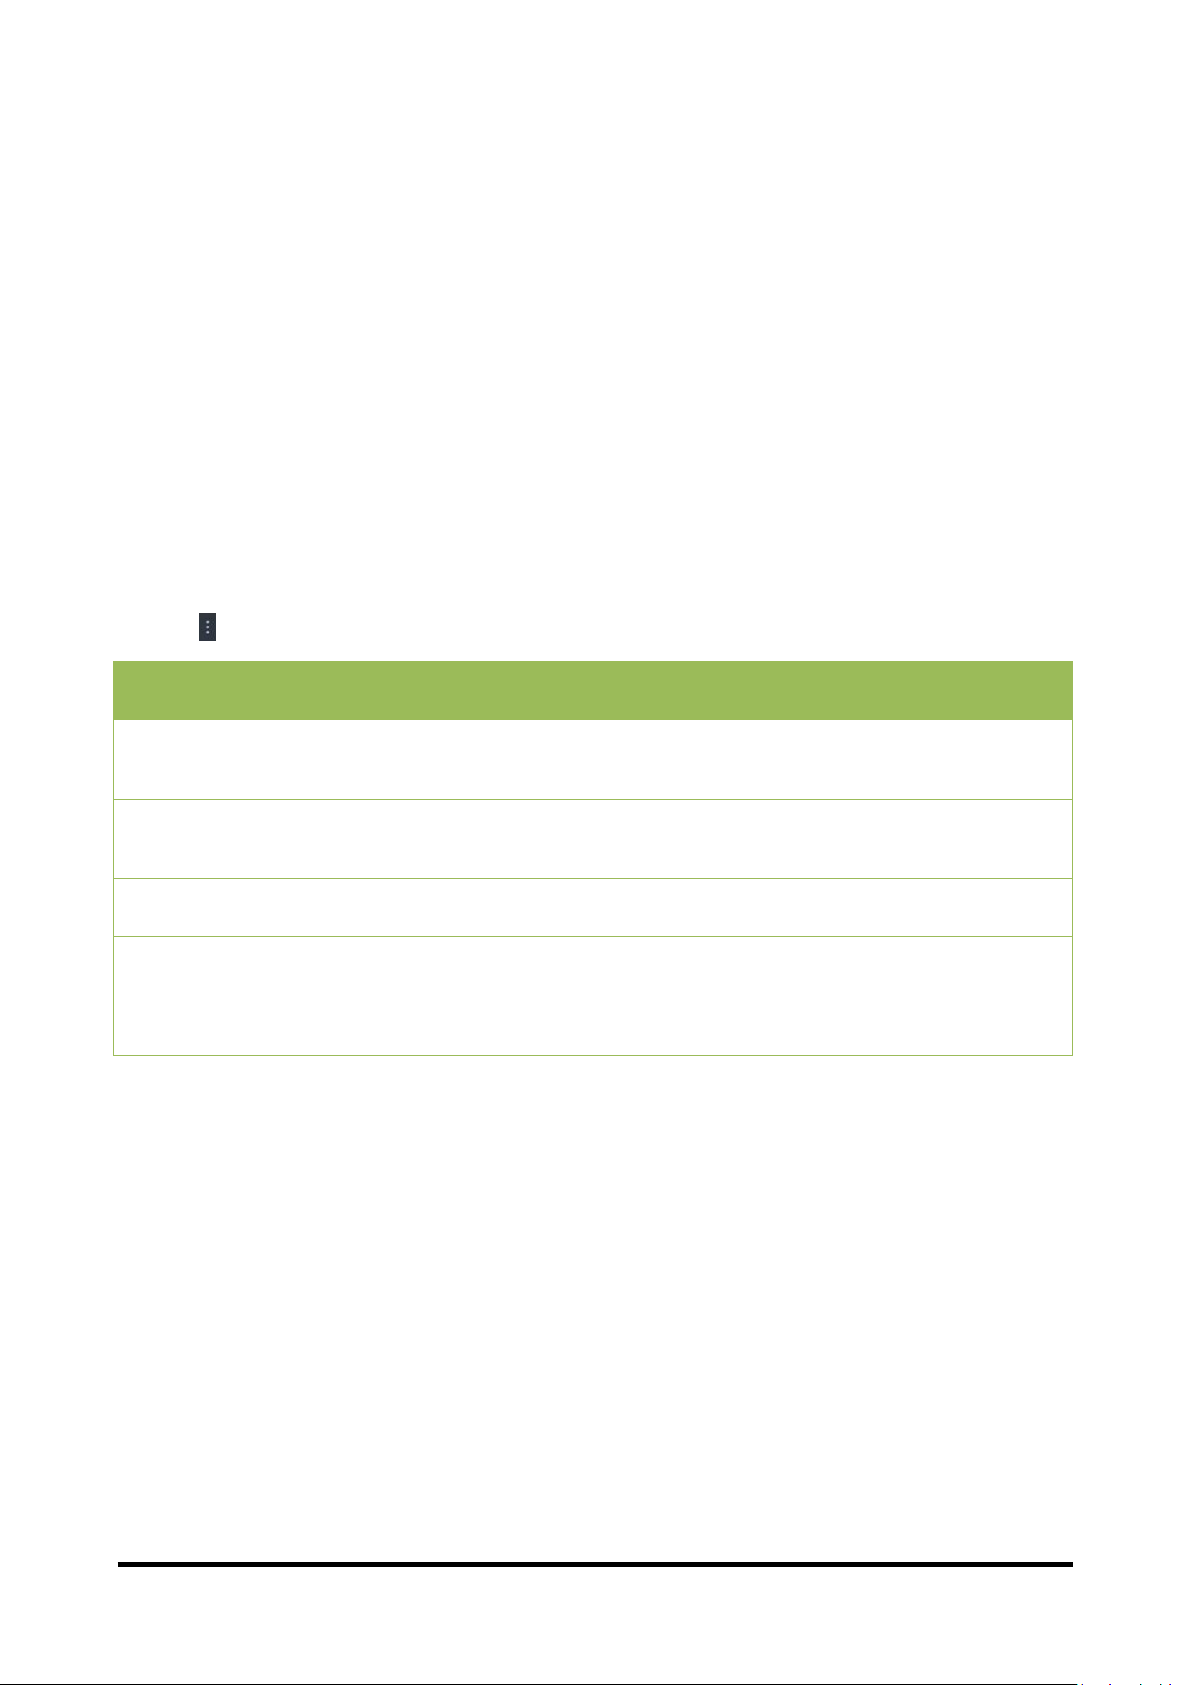
After choosing Menu , groupings of menus appear. These menus vary
depending on other settings in the application.
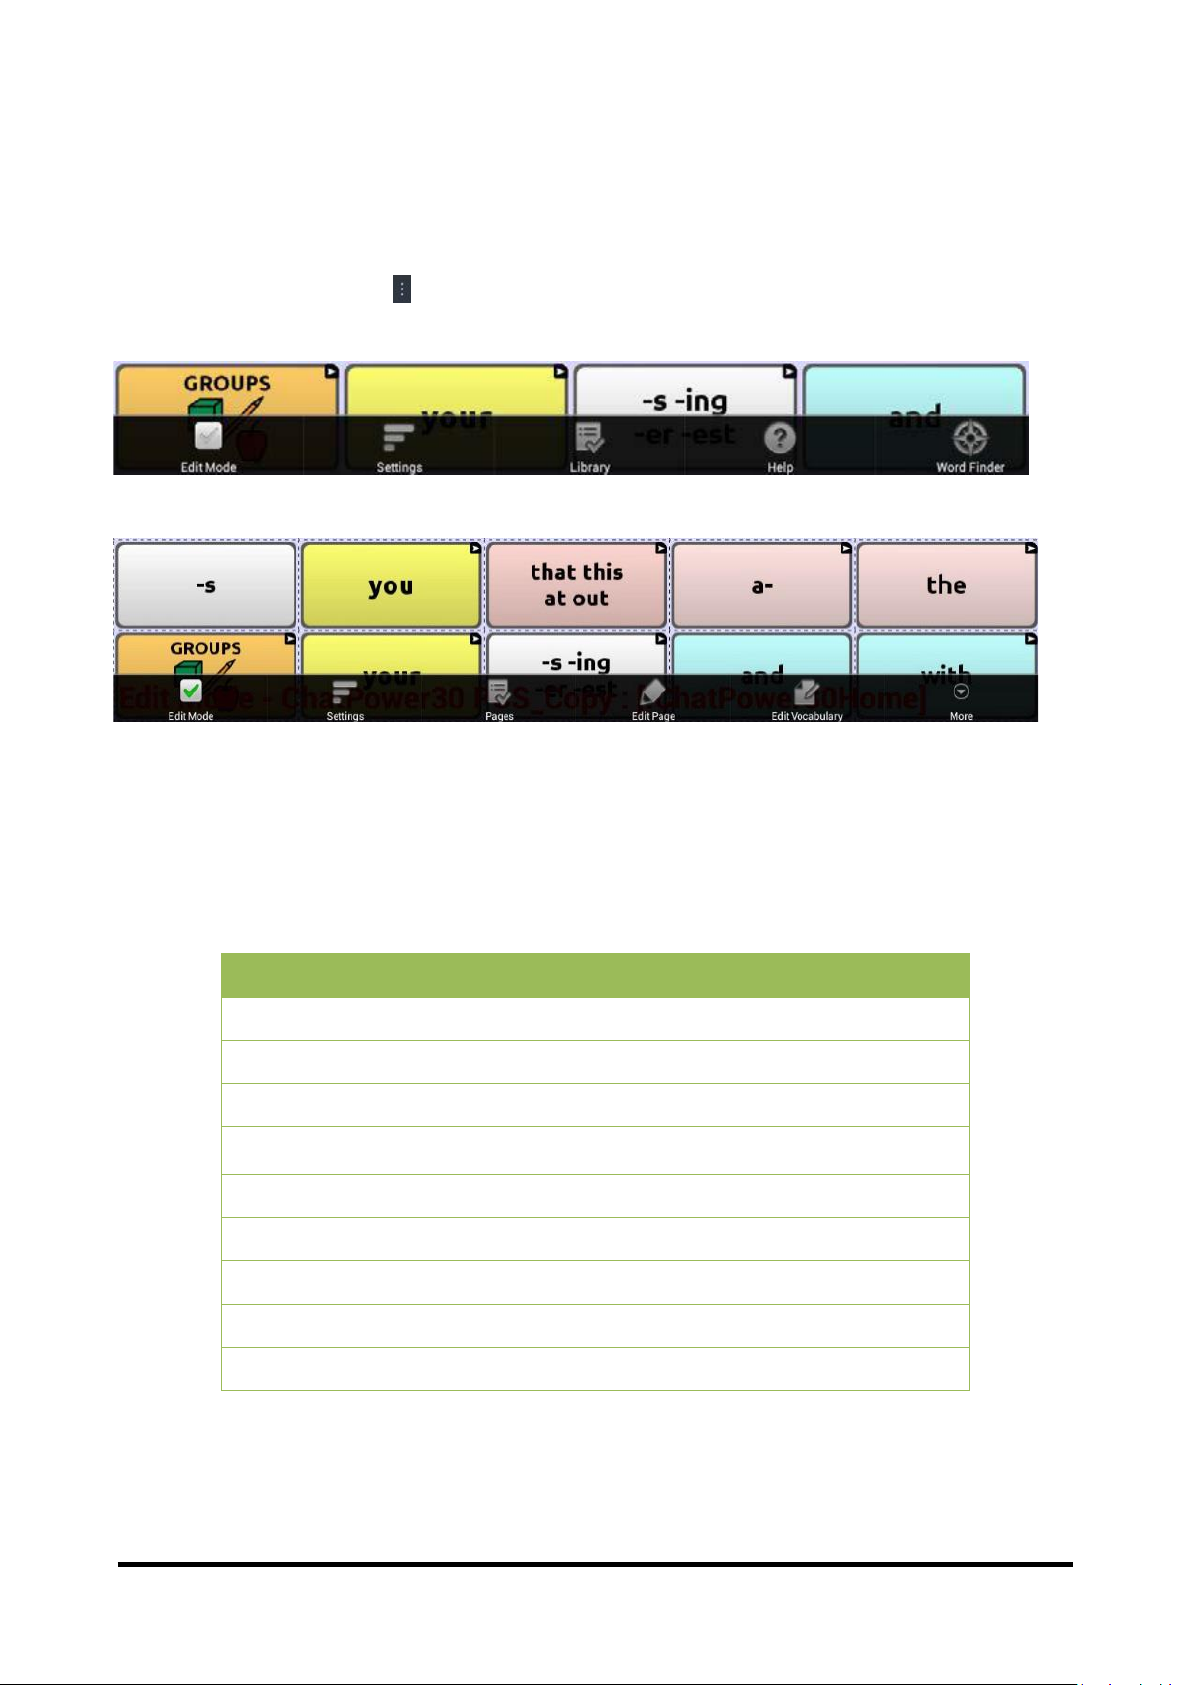
In Edit Mode
In Edit Mode, all the buttons are outlined, indicating that they can be
edited. When the menu disappears, the words “Edit Mode”, followed by
the name of the vocabulary file and the name of the current page, appear
in red across the bottom of the screen.
Note: Chat Editor displays the menus at the top of the screen.
Option
Description
Edit Mode
Turn editing on or off
Settings
Customize device features
Library
View the vocabulary files
Help
View help and other information
Pages
View a list of pages
Edit Page
Edit the current page
Edit Vocabulary
Edit the current vocabulary
More
View additional options
Hide Mode
Turn Hide Mode on or off
Page 26
LR7 User’s Guide v2.8.0 Page 26
Choosing a Vocabulary File
Choosing an appropriate vocabulary file is imperative to the success of
the device user. Liberator suggests that a qualified speech-language
pathologist, teaching staff, parents, and device user are all part of the
decision process of choosing an appropriate vocabulary file. Consider the
features of each vocabulary file (e.g. button size & number, symbols,
screen orientation, available vocabulary, need for customisation, etc.)
when choosing an appropriate option.
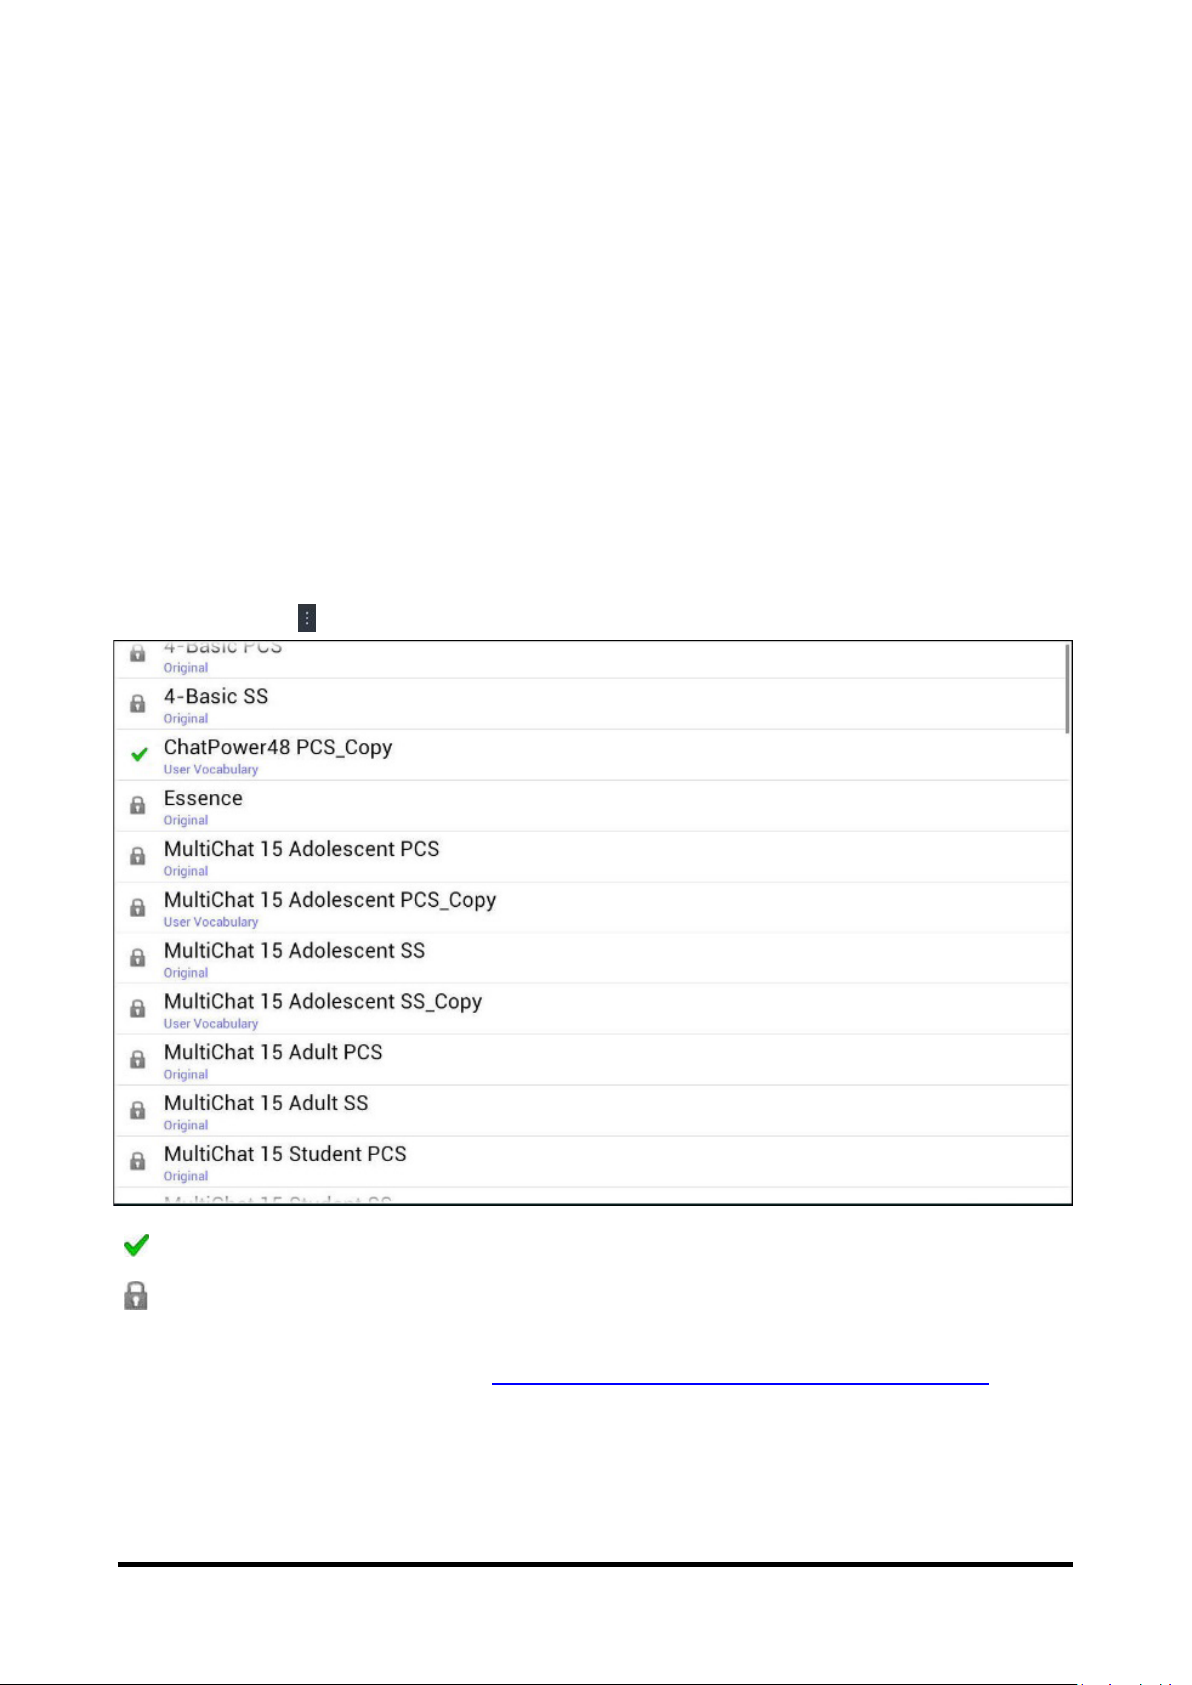
Exploring Vocabulary Files
The application provides a variety of vocabulary files. To view these files,
choose Menu > Library. Available vocabulary files will be listed.
The vocabulary file that is currently open.
An original Saltillo-provided vocabulary file that cannot be modified
or deleted. To customize a vocabulary file, make a copy of it and
customize the copy. See Creating a Customized Vocabulary File for
ways to make a copy.
Page 27

LR7 User’s Guide v2.8.0 Page 27
Available Vocabulary Files
From the list of available vocabulary files, tap on a file name, choose
Open, and explore the file. Take some time to explore each file and see if
one might be appropriate for the device user or get some ideas for
creating your own.
Explore the page and button organization by choosing the buttons.
Buttons with arrows in the corners will move to new pages. As you
explore the page layouts, consider if one of these might work as a starting
point for the intended device user.
WordPower
The WordPowerTM vocabularies are augmentative communication wordbased vocabularies created by Nancy Inman. Notice the listing of
WordPowerTM vocabulary options on your device, each including a
number to indicate the number of cells.
WordPower20 Simply
WordPower20 Simply incorporates carrier phrases with core words for
quick and easy language generation. It can be used as a phrase-based
system or as a word-based system. For example, you could use the carrier
phrases “I want…”, “I like…”, and “I need…” to generate sentences. Or you
could use the individual pronouns “I”, “it”, and “you”, or sentences
starters such as “can” and “do.” When the individual pronouns are
selected, a page of frequently used verbs and helping verbs also becomes
available. You can quickly finish a sentence using a phrase such as “to
eat…”, “to play…”, “to watch…”, etc., or you can select “to” and have a
more expanded set of verbs available.
WordPower25 Touch & Scan
The WordPower25 Touch & Scan vocabulary is designed to be accessible
via direct selection as well as scanning for quick and easy language
generation. It incorporates carrier phrases with core words that move
seamlessly between the main page and related categories. Individuals
who need a sophisticated and efficient language system with a minimum
number of cells per page will benefit from this robust vocabulary.
Page 28

LR7 User’s Guide v2.8.0 Page 28
WordPower42
WordPower42 is a word-based vocabulary that allows for easy and
intuitive communication. WordPower42 is a generative language system
that will be familiar to those using WordPowerTM on other systems, and it
is easy to learn for new users.
WordPower42 Basic
WordPower42 Basic is a simplified version of WordPower42. This wordbased system remains rich in core vocabulary, and it may be appropriate
for beginning users or those who need a more basic vocabulary design. It
is designed to make communication fast and easy.
WordPower48
WordPower48 is very similar to the 42-location, but in the extra column
on the left, you now have a clear display, delete word, period, and plural.
This configuration can be set up for scanning or to be used with a
keyguard.
WordPower60
WordPower60 consists of a large number of high-frequency words
available on the main page, resulting in fast communication with reduced
keystrokes. Word completion and logical next words are used, and the
“grammar” function provides morphological endings to verbs, nouns, and
adjectives. Spelling with word prediction along with the category-based
pages contained in all other versions of the vocabulary are also available.
This vocabulary is configured to work with a keyguard.
WordPower60-Basic
The WordPower60-Basic vocabulary is designed with early language
learners in mind, providing ample picture support and novel structures to
facilitate expressive language development. Core vocabulary is embedded
within category and activity pages, allowing easy generation of language
from the main core page as well as within specific topic-based pages.
Core words remain consistent in terms of placement and access,
providing a natural bridge between core and fringe words. Early literacy is
enhanced by providing pages designed to teach language and core
through children’s books.
Page 29

LR7 User’s Guide v2.8.0 Page 29
WordPower80
WordPower80 is for someone who has good vision, motor skills, and
literacy skills. WordPower80 vocabulary pages consist of core vocabulary,
spelling, and word prediction.
WordPower108
WordPower108 is the newest WordPowerTM vocabulary option. It consists
of a large number of high-frequency words on the main page, resulting in
fast communication and quick access to core words. Word completion
and logical next words are used, and the “grammar” function provides
morphological endings to verbs, nouns, and adjectives.
WordPower108 with Keyboard
WordPower108 with Keyboard is a vocabulary consisting of high
frequency core words, spelling, and word prediction. With the keyboard
on the main page, the communicator moves seamlessly between words
and spelling, thus minimizing keystrokes and the need for navigation.
Some core words are embedded within the category pages in order to
assist in bridging the gap between core and fringe vocabulary.
4-Basic
4-Basic offers just that, a basic vocabulary option with 4 buttons per page.
Basic Scan
Basic Scan is primarily a phrase-based vocabulary for emerging
communicators who access communication through auditory and/or
visual scanning. Basic Scan was developed by Lisa Nobel Martin, MA, CCCSLP specifically for Chat Fusion and NOVA chat. Lisa has years of
experience working with nonverbal paediatric patients at all stages of
communication. Her focus on teaching auditory and visual scanning
techniques to these individuals has proven quite successful.
The Basic Scan file encompasses various communicative functions
(greeting, directing, protesting, commenting, requesting, sharing
information). Page navigation is used to support language formulation. In
addition, some vocabulary is hidden and can be gradually uncovered to
scaffold learning. The Basic Scan file is meant to provide a framework and
example of where to begin with an emerging communicator who is using
auditory and/or visual scanning as a means to access communication.
Page 30

LR7 User’s Guide v2.8.0 Page 30
Basic Scan does not provide access to a comprehensive vocabulary.
Specific items within each category can and should be modified to meet
the unique needs of individuals.
Communication Journey: Aphasia
“Communication Journey: Aphasia” is a vocabulary file containing
features and vocabulary designed to support people with aphasia. It was
developed by Lois Turner (SLP), Anne MacCallum (SLP) and Sarah
Gauthier (SLP Assistant) in consultation with a group of speech-language
pathologists who work exclusively with people with aphasia and brain
injuries. All the participants work at CAYA (Communication Assistance for
Youth and Adults) and the GF Strong Rehabilitation Centre in Vancouver,
BC, Canada. The framework of the file was derived from the Life
Participation Approach to Aphasia from the Aphasia Institute in Toronto,
Canada. The pages were created to facilitate participation in daily
activities and to promote social links.
Aphasia, a disorder caused by damage to the parts of the brain where
language is stored, may affect the ability to comprehend language, to
express oneself, to read, or to spell and write. “Communication Journey:
Aphasia” can easily be adapted for use by people with different types of
aphasia and a range of cognitive levels and degrees of severity.
Symbols, photographs, visual scenes, videos, or words can be used on the
message, topic, and script pages. Included are pages that facilitate
supported communication techniques, self-advocacy, directing care, and
repair of communication breakdowns. Types of information typically
included in communication books—such as pain and emotion scales,
maps, and templates for personal information and life stories—are also
incorporated into the vocabulary file. Specialized features include variable
“rate of speech” and “pause between words”. Grid size and vocabulary
are easily customized to reflect and support the life experiences of the
person with aphasia.
Although this vocabulary file contains starting-point vocabulary
commonly required by adults with aphasia, it must be customized. Each
person has a unique history, and the file must reflect that person’s life,
experiences, and abilities.
Page 31

LR7 User’s Guide v2.8.0 Page 31
Essence
Essence is specifically designed for adults with acquired speech disorders.
The home page of Essence contains a spelling keyboard in addition to
quick links to pages of commonly used phrases for communication with
those you regularly interact with in your family and community. Other
pages contain commonly used vocabulary that may be needed for a visit
to the doctor, using public transportation, going out to eat, etc. Each page
is completely customizable to meet the specific vocabulary needs of each
individual.
MultiChat 15
MultiChat 15 features a 15-button layout and is available in three
versions: one for school-aged individuals with emerging language skills,
one for adolescents, and one for adults. There are multiple forms of
communication available in this program: sentences, phrases, individual
words, recordings for story-telling, and visual scenes. Also included are
interactive play and reading pages, social pages and a News-2-You starter
page for the weekly newspaper’s vocabulary. There are symbols on every
button with the exception of several core words.
myCore
myCore is a combination of core and phrase-based vocabulary geared
toward individuals who have literacy skills.
myQuickChat
myQuickChat is an introductory communication system geared toward
child and adult AAC users with complex communication needs.
myQuickChat is available for both children and adults in 4, 8, and 12
locations, each with an identical 16-location Support Master Home Page.
myQuickChat was created to offer a high frequency, phrase-based
communication system in an easy to use yet engaging format. The
progressive system offers a variety of topics for everyday needs and
conversation and provides AAC users immediate and more successful
communication exchanges within a variety of settings.
Page 32

LR7 User’s Guide v2.8.0 Page 32
Spelling
Spelling is a keyboard page set with four word prediction buttons and a
few pre-stored phrases.
VocabPC
VocabPC was designed by Gail Van Tatenhove, PA, MS, CCC-SLP, for
adults and adolescents with developmental disabilities. Vocabulary in
VocabPC is arranged as carrier phrases, interactive sentences, activity
vocabulary, and naming words. VocabPC uses a 12-location page layout.
Page 33

LR7 User’s Guide v2.8.0 Page 33
Chat Editor
Chat Editor is a supplemental program that runs on a Windows Desktop
or laptop computer. It allows you to customise vocabulary files. Although
customising is also possible on the device itself, the Editor allows the
family and/or professionals a way to customize vocabulary for the device
user when the device is not present.
Note: Having the vocabulary on a second computer is always
recommended as a backup to the device.
Installing Chat Editor
Important! With software release 2.0, we replaced NOVA chat Editor with
Chat Editor. If you have used NOVA chat Editor in the past, it will no
longer work with 2.0 files or newer.
This process installs Chat Editor on your computer and creates desktop
shortcuts to the “Chat Editor’ application and the “Chat Editor Import”
folder.
1. Insert the Chat Editor USB into your computer.
2. You should see a Chat Editor Installer screen (this may take a few
moments). If you do not see the installer screen, need to navigate to
your USB through Windows Explorer and choose setup.exe.
3. The USB Installer screen provides a choice of three applications to
load.
4. Choose Install/Update Chat Editor.
5. If you want the device to be able to use synthetic speech and you have a
compatible sound card (you probably do), choose Microsoft Voices for
SAPI 5.1.
Note: Microsoft Voices provides a voice for Chat Editor to use. If you
already have a desktop application on your computer from a ChatPC,
you will not need to install Microsoft Voices again.
6. Choose Install.
7. Follow the on-screen instructions.
8. When the installation process is complete, remove the USB. The USB is
not needed to run the Editor.
Page 34

LR7 User’s Guide v2.8.0 Page 34
Configuring Chat Editor
The first time you open Chat Editor after installing it, you will be
prompted to set up a configuration.
1. Select Nova Chat/Chat Fusion from the Choose Product window
and click OK.
2. Select your language from the Choose Language window and click
OK.
3. Select one or more symbol sets from the Choose Symbol Sets
window.
Important! This symbol set must match what is on the device you
are supporting.
4. Click OK.
5. Type a descriptive name for the configuration in the Enter Name
window and click OK.
6. Chat Editor will open.
Note: You may need to set up multiple configurations if you support
more than one client. For example: Tommy with only SymbolStix
images and Sarah with both SymbolStix and PCS symbols.
Page 35

LR7 User’s Guide v2.8.0 Page 35
Enabling Speech in Chat Editor
Note: When you install Chat Editor on a computer that had Chat Editor
installed previously, speech will be enabled.
When you install Chat Editor on a computer that did not have Chat Editor
installed previously, the following message will be displayed:
Speech is currently disabled.
Please connect a Nova Chat device to this computer to enable speech.
Choose OK to close the message.
To enable speech in Chat Editor, simply connect a USB cable between
your computer and your device. Test the Editor to verify that speech is
now working and then disconnect the cable. Speech will now be enabled
whenever you use the Editor; you will not need to re-connect the cable.
Opening Chat Editor
To open the Editor for normal use after you have set up a configuration,
choose the Chat Editor shortcut from your computer’s desktop. The
Editor will open on your computer.
Using Vocabulary Files with Chat Editor
The Chat Editor Library contains the same vocabulary files as the device.
See Available Vocabulary Files.
You can explore any of these files by highlighting one and opening it.
Explore the page and button organization by choosing the buttons.
Buttons with arrows in the corners will move to new pages. As you
explore the page layouts, consider if one of these might work as a starting
point for the intended device user.
You cannot modify the “Original” vocabulary files. If one of the files would
be appropriate for the device user, make a copy of it and customize the
copy. See Creating a Customized Vocabulary File.
The device user’s vocabulary file can be created using Chat Editor and
then exported to the device for use.
To explore files using Chat Editor, choose Library. My Resources stores all
custom files. All default Saltillo-supplied files are stored in the folder
specifying the symbol set and language used.
Page 36

LR7 User’s Guide v2.8.0 Page 36
Device and Editor Differences
Note: Chat Editor is not intended to function as a speech generating
device. It is a support tool for modifying the client’s vocabulary so that
the client can continue using the device while modifications are being
made.
Dialog boxes will appear slightly different and a couple of the options are
modified for the computer. The Editor displays menus at the top of the
screen, and device displays them on the bottom.
When you are editing on the device, pressing and holding on the screen
opens context menus. In Chat Editor, right-clicking on the vocabulary
window will open context menus for editing.
Orientation
You can use the device in portrait or landscape orientation. To set Chat
Editor’s screen orientation to match the device, choose Settings > View.
Page 37

LR7 User’s Guide v2.8.0 Page 37
Using Chat Editor to Create Instructional Materials
Capture sequences of buttons from screens in Chat Editor to paste into
instructional materials you create such as Word documents, PowerPoint
presentations, flash cards, etc.
1. In Chat Editor, choose Capture in the top section of the Editor
window. The Button Capture window will open.
2. With Capture Selections selected, start selecting the buttons you
want to appear in your document. Each button you select will be
captured in the Button Capture window.
3. When you finish capturing a sequence of buttons, choose Copy to
Clipboard. The sequence will be cleared from the Button Capture
window.
4. In your document, insert the cursor and select Paste. The sequence
will be pasted into the document.
5. Capture the next sequence.
6. When you finish capturing sequences, select Exit to close the Button
Capture window.
Page 38

LR7 User’s Guide v2.8.0 Page 38
Notes on Capturing Button Sequences
If you need to try several sequences to find the one you want, turn off
Capture Selections. Once you decide what you want to capture, turn
Capture Selections back on.
If you make a mistake, select Clear and start capturing the sequence
again. Keep in mind that Clear removes all captured content from the
Button Capture window.
Page 39

LR7 User’s Guide v2.8.0 Page 39
Creating a Customized Vocabulary File
The Saltillo-provided (original) vocabulary files cannot be modified. This
maintains the original, default vocabularies in case they may be needed
at a later time.
To create your own customized vocabulary file:
1. Determine which original vocabulary file will work as a starting
point.
2. Make a copy of the original file.
3. Customize the copy as needed.
Creating a Copy using the Device in Edit Mode
1. Open the vocabulary file.
2. Choose Menu > Edit Mode.
3. Choose Yes.
4. Type a name for the file.
5. Choose Save.
Creating a Copy from the Device Library
1. Choose Menu > Library.
2. Choose the file to copy.
3. Choose Duplicate.
4. Type a name for the file.
5. Choose Save.
Creating a Copy using Chat Editor
1. Choose Library.
2. Choose the file to duplicate.
3. Choose Duplicate.
4. Type a name for the file.
5. Choose Save.
Page 40

LR7 User’s Guide v2.8.0 Page 40
Turning Edit Mode On
To edit a vocabulary file or any resource linked to it (pages, buttons, etc.),
you must activate Edit Mode. You can edit a vocabulary file on the device
or by using Chat Editor.
Device: Choose Menu > Edit Mode. All the buttons are outlined, and
the words “Edit Mode”, followed by the current vocabulary and page
names, appear in red across the bottom row of keys.
Editor: Choose Edit Mode from the menu bar. All the buttons are
outlined and “Edit Mode” is selected.
Important! Before you start editing a vocabulary file:
Copying a file from one platform to another will overwrite the existing
file. To avoid overwriting others’ changes, coordinate with anyone else
who may edit vocabulary files to make sure that you are working with the
current copy.
Always copy the file with changes to the other platform. This will ensure
that both the device and the Editor are current.
Page 41

LR7 User’s Guide v2.8.0 Page 41
Change Button Label/Message
You can modify the label or message text for any button, or you can
remove the text and fill the button with an image.
Displaying the Button Text to Edit
Choose Menu > Edit Mode. Press and hold on the button (Right Click if
you are using the Editor). A menu will open. Choose Edit Button to display
the button properties.
Editing the Button Text
Tap the Label (what is written on the button) or Message (what will
appear in the SDB) box to display the keyboard. (In Chat Editor, click the
Label or Message Box). Enter your new text. If you tap the Label box,
choose Next to move to the Message Box. Choose Save to apply your
changes to the button.
Using Images with No Text
Don’t enter a label in the Label box. If you decide not to use labels, we
suggest expanding the image to fill the entire button area. To do this:
Choose Menu > Settings > Style > Fill.
For information on adding images to buttons, see Adding or Modifying a
Button Image.
Page 42

LR7 User’s Guide v2.8.0 Page 42
Adding or Modifying a Button Image
Choose Menu > Edit Mode, then press and hold on the button. (Rightclick if you are using the Editor.) A menu will open. Choose Edit Button to
display the Button Properties.
Choose Find (on device) or Search/Browse (in Editor) to look for a
picture that exists in the library.
Choose Import to bring a new picture into the library (in Editor – choose
files from your computer; on device – choose from saved images and
photos).
You can also use the Camera function to take your own image (on
device).
Page 43

LR7 User’s Guide v2.8.0 Page 43
Finding an Image from the Device Library
From the Button Properties, choose Find (device) or Browse (Editor) to
open a list of categories.
Choose a category to open a list of images. Then choose the image you
want. The image will be displayed in the Button Properties. Choose Save.
Searching for an Image in the Device Library
From the Button Properties, choose Find (device) or Search (Editor), and
enter text to search for images with the label name.
Choose the image you want and press Select. The image will be displayed
in the Button Properties. Choose Save. If you don’t find the appropriate
image, enter a new item in the text box, choose Search, and choose a
different image.
Page 44

LR7 User’s Guide v2.8.0 Page 44
Creating Your Own Image
1. Choose Menu > Edit Mode.
2. Press and hold on the button you wish to edit. A menu will open.
3. Choose Edit Button to display the Button Properties.
4. From the Button Properties, choose Camera.
5. You can choose from the front or rear camera, and turn flash on and
off, using the icons at the top of the screen.
Tap the Camera button to take a picture.
Note: The Camera button may look slightly different on your device.
On some devices, a checkmark will be displayed above the Camera
button. Tap the checkmark to open a keyboard.
On other devices, Save and Discard buttons will be displayed. Tap
the Save button to open a keyboard.
6. Enter a name for the image and choose Save.
Camera
button
Page 45

LR7 User’s Guide v2.8.0 Page 45
Using an Existing Image
If you find that the image you need is not available from the device
library, you can use your own digital, scanned, downloaded, or
homemade image and import that image directly into the button.
Note: If you are using the Editor, the image must be on the same
computer. If you are importing directly from the device, the image must
already be stored on the device.
To import an image:
1. From the Button Properties, choose Import.
2. Select the image you want. If you are using the device, choose
Photos and choose the appropriate image. If you are using the
Editor, locate and select the image and then choose Open.
3. Once you have selected the image, choose Save. The image will
appear on the button.
Transferring Images
When you want to copy images from your computer to your device or
from your device to your computer:
1. Attach the device to your computer using the USB cable provided.
2. Give the device a moment to connect to the computer. The device
screen will display “Transfer Mode”, and the computer will display a
window with several options.
3. Click Open device to view files. The computer will view the device
as an external drive.
4. Copy the appropriate images from the computer to your device’s
Pictures folder or from the device to the appropriate folder on the
computer.
5. Unplug the USB cable.
Page 46

LR7 User’s Guide v2.8.0 Page 46
Creating and Using a Camera Button
You can create a button that allows you to take a picture that will be
displayed on the button automatically every time you tap the button. The
picture will also be added to the Gallery app or the Pictures folder in
Gallery. Each time you press the button, a new image from the camera
will replace the existing image on the button. An image will appear on the
button until you press the button again.
Hint: To view the image on a larger scale, increase the size of the button
and remove the button label.
Setting up the Button Action
1. Go to the page with the button location you want.
2. Choose Menu > Edit Mode.
3. Press and hold the button. A menu will open.
4. Choose Edit Button to display the Button Properties.
5. Add a label and message.
6. Scroll down to “Button Actions” and tap Add to open the list of
actions.
7. Scroll down the list and select Take Photo.
8. The Take Photo action will be added to the button’s actions.
9. Choose Save.
Taking a Picture for Your button
1. Tap the new button to activate the camera.
2. Take a picture of the object or person.
3. Save the photo.
• On some devices, a checkmark will be displayed. Tap the
checkmark to open a keyboard.
• On other devices, Save and Discard buttons will be displayed.
Tap the Save button to open a keyboard.
4. Enter a name for the photo and choose Save. “Photo saved to
Button” will appear.
5. The photo will appear as the image on the button.
Note: If the button previously displayed an image, the new image will
replace it. The image will also be available in the Gallery app or the
Pictures folder in Gallery.
Page 47

LR7 User’s Guide v2.8.0 Page 47
Deleting Photos
To delete photos, do either of the following:
• Choose Gallery or the Pictures folder, select the photo, and tap
the Delete icon.
• Power off your device off and power it back on. Then connect
the device to your computer, go The Pictures folder, and
delete the photo using Explorer from the computer.
Page 48

LR7 User’s Guide v2.8.0 Page 48
Hiding Buttons
There may be times when you wish to hide some of the buttons when
using the vocabulary on the device. Hiding a button does not delete the
associated information. The information can be viewed and made visible
again at any time. You can hide a single button or multiple buttons.
Hiding a Single Button
To hide a single button on your device:
1. Choose Menu > Edit Mode.
2. Press and hold the button to hide.
3. Choose Edit Button to display the Button Properties.
4. Uncheck the Visible box.
Note: Unchecking the Visible box makes a button invisible in
standard mode and automatically disables the button action.
5. Choose Save.
To hide a single button using the Editor, right-click, choose the Style tab,
and uncheck the Visible box.
Page 49

LR7 User’s Guide v2.8.0 Page 49
Hiding or Showing Multiple Buttons
Choose Menu > Edit Mode > Hide Mode.
You now have three options:
• Choose buttons one by one to hide or show.
• Choose Hide All to hide all buttons on the current page.
• Choose Show All to show all buttons that had previously been
hidden on the current page.
To exit Hide Mode, choose Menu > Hide Mode.
Saving Hidden Button Settings
If you hide buttons and would like to save those settings for your next
session, choose Menu > Settings > Input > and check Show Hidden
Buttons.
The device or Editor will remember all of the currently hidden buttons.
To start where you left off during your last session, choose Menu >
Settings > Input > and uncheck Show Hidden Buttons.
Hiding and Showing Button Images
To hide or show all button images, turn button images off or on for the
entire vocabulary file.
Choose Menu > Settings > Style > Show Button Images.
Page 50

LR7 User’s Guide v2.8.0 Page 50
Modifying Button Styles
You can modify styles and colour saturation for individual buttons, all
buttons on a page, or all buttons in a vocabulary file. You can also
override button styles set up for pages and vocabulary files for a single
button. Button styles can be modified only while in Edit mode.
Modifying a Button Style
1. Choose Menu > Edit Mode.
2. Press and hold a button. (Right-click if you are using the Editor.) A
list of button options appears.
3. Choose Edit Button to display the Button Properties.
4. Choose the Style tab. The button style properties are displayed.
5. Use the pull-down lists to select the font colour, body colour, border
colour, font, size, shape, and border width for the button.
6. Check Label on Top to define the label position.
7. Check Bold, Italic, or Underlined to modify label text.
8. If you want to create a visual scene in which the location speaks but
the button itself does not appear, choose Transparent.
9. When you finish making changes, choose Save.
Page 51

LR7 User’s Guide v2.8.0 Page 51
Modifying Button Colour Saturation
Saturation (gradient fill) adds the appearance of depth to a button. To
adjust the colour saturation on the device:
Choose Menu > Settings > Style > Enable. Then choose Saturation.
The current saturation setting is displayed. Lower numbers add more
background colour to the buttons.
1. To increase saturation, tap + (the plus sign).
2. To decrease saturation, tap – (the minus sign).
3. Choose OK.
To adjust the colour saturation in the Editor, choose Settings > Style >
Button Style. Under Gradient Fill, verify that Saturation is selected, click
the saturation percentage list box arrow to open a list of percentages,
and select a higher or lower percentage. Then click OK.
Modifying a Page Button Style
The Button Style Override menu offers the ability to modify all buttons on
a page.
1. Display the page you want to modify.
2. Choose Menu > Edit Mode.
3. Press and hold anywhere on the page. (Right-click if you are using
the Editor.) A list of button options appears.
4. Choose Button Style Override. The Button Properties screen opens
to the Button tab.
5. Choose the Page tab.
6. Select the style options you want to modify, modify the setting for
each selected option, and choose Save.
If you are using the Editor, select an option you want to modify,
select the Edit button for that option, modify the setting, and select
Done. Do the same for any other options you want to modify. When
you finish making changes, choose OK.
Page 52

LR7 User’s Guide v2.8.0 Page 52
Modifying a Vocabulary Button Style
The Button Style Override menu offers the ability to modify all buttons in
an entire vocabulary file at one time.
1. Open the vocabulary file you want to modify.
2. Choose Menu > Edit Mode.
3. Press and hold anywhere on the page. (Right-click if you are using
the Editor.) A list of button options appears.
4. Choose Button Style Override. The Button Properties screen opens
to the Button tab.
5. Choose the Vocabulary tab.
6. Select the style options you want to modify, modify the setting for
each selected option, and choose Save.
If you are using the Editor, select an option you want to modify,
select the Edit button for that option, modify the setting, and select
Done. Do the same for any other options you want to modify. When
you finish making changes, choose OK.
Overriding a Button Style
This option is typically used only when the style for an entire page or
entire vocabulary file has been set, but you can make an exception for
one particular button.
1. Choose Menu > Edit Mode.
2. Press and hold on the button you want to modify. (Right-click if you
are using the Editor.) A list of button options appears.
3. Choose Button Style Override. The Button Properties screen opens
to the Button tab.
4. Check the style options you want to change.
5. Choose Save.
Page 53

LR7 User’s Guide v2.8.0 Page 53
Modifying a Button Arrow Link
Linking buttons display a linking arrow in the upper right corner of the
button. The arrow indicates that the button will take you to a different
page. You can resize or hide the linking arrow.
To resize a linking arrow:
1. Choose Menu > Settings > Style.
2. Under “Modifiers”, choose Size. The Select a Size menu opens.
3. Choose Smallest, Small, Normal, Large, or Largest.
If you are using the Editor, select Settings > Style > Button Style. The
Button Style menu window opens. Under Button Modifiers, select the size
you want and select OK.
To hide a linking arrow:
1. Choose Menu > Settings > Style.
2. Under “Modifiers”, choose Size. The Select a Size menu opens.
3. Choose Hide.
If you are using the Editor, select Settings > Style > Button Style. The
Button Style menu window opens. Under Button Modifiers, select No
Show and select OK.
Page 54

LR7 User’s Guide v2.8.0 Page 54
Adding or Modifying a Button Action
A single button can perform a number of different actions. For example:
different speaking options; adding grammatical endings to words; clearing
the display; or backspacing.
To add or modify a button’s action:
1. Choose Menu > Edit Mode.
2. Press and hold the button you want to modify. (Right-click if you are
using the Editor.) A list of button options opens.
3. Choose Edit Button. The Button Properties are displayed.
4. Choose the Actions tab.
5. Tap or click the list arrow to open a list of actions.
6. Choose the action you want.
7. Remove any existing action that is not appropriate.
8. For some actions, you will be prompted for additional steps. For
example, if you choose a linking action such as Navigate or Visit,
you will be asked to choose the page to link the button to.
9. Choose Save. (Click OK if you are using the Editor.)
Note: To perform no action, remove all actions from the button.
Page 55

LR7 User’s Guide v2.8.0 Page 55
Available Button Actions
Button Name
Description
No Action
Performs no action
Add Message to
Display
Inserts text from the button’s message box into the display,
but the words are not spoken
Add Time/Date to
Display
Displays the current date and time in the Speech Display Bar
(SDB)
Apply Grammar
Property
Identifies a word as an adjective, noun or verb. See Appendix
A: Advanced Grammar Features on page 97.
Apply Grammar
State
Applies a grammar rule to a word. See See Appendix A:
Advanced Grammar Features on page 97.
Apply Modifier
A modifier key is a special key on a keyboard that modifies
the normal action of another key. (Caps Lock, Ctrl, Functions,
Num Lock, Shift)
Backspace key
Deletes the last character in the display
Battery Status
Displays the current battery status in the SDB
Cancel Visit
Clears all remaining visits
Character Prediction
Sets the prediction order (1-10) for character prediction
buttons on a keyboard page.
Clear All Modifiers
Releases any Shift, Caps, Ctrl or Num Lock modifiers
Clear Display
Clears the text in the SDB
Clear Grammar State
Clears a grammar rule that has not been applied to a word.
See Appendix A: Advanced Grammar Features on page 97.
Clear Last Word
Deletes the last word in the SDB
Data Logging On/Off
Toggles data logging on and off
Find Word
Finds the path to a word you are looking for. When you tap a
button and then tap Find Word, the path to the word is
displayed in the SDB.
Grammar Action
Changes the existing word to the chosen grammatical form,
add –ed, add –en, add –er, add –est, add –ing, Add –s
Help Signal
Triggers a loud attention-getting sound
Jump to Page
Takes you to a new page for a single hit and then takes you
back and does not remember any unused visits
Load Display
Recalls text that had been saved and adds it to the display
Navigate
Takes you to a new page and leaves you there
Navigate back
Returns to the previously accessed page
Navigate to home
Takes you to the home page
Open Android
Application
Opens a specific Android™ application. (not functional with a
closed/dedicated system)
Page 56

LR7 User’s Guide v2.8.0 Page 56
Button Name
Description
Play audio
Plays audio files. These are recordings of someone speaking
or sounds.
Play Library Audio
Plays audio files from the audio library
Play Library Video
Plays audio files from the video library
Record Audio
Records audio files. These are recordings of someone
speaking or sounds.
Repeat Last Spoken
Repeats the last spoken message
Save Display
Saves the text currently showing on the display for later use.
SDB - Copy Text
Copies all text in the SDB and places a copy in the Clipboard
SDB - Paste Text
Adds text from the Clipboard to the SDB
SDB - Share Text
Copies all text from the SDB to the chosen social network
Select Profile
Changes Settings to match the saved set of settings that was
saved as a profile
Speak
Pronounces the SDB content
Speak Label Only
Speaks the label
Speak Last Sentence
Speaks the sentence
Speak Message Only
Speaks the message, but doesn’t display the text
Speech Message
Types the button message in the SDB and pronounces it
Stop
Stops the speech or audio file currently playing
Stop Library Audio
Stops audio files from the audio library
Stop Scan
Stops a scan
Store Text to Button
Stores text currently in the SDB to the next chosen button
Take Photo
Activates the camera so you can take pictures that will
appear on a button and will also be saved with other images
on the device.
Toggle Mute /
Unmute
If the device is currently speaking a long message, selecting
this button will not stop the speech but will stop the speech
from being spoken aloud. Selecting the button again lets the
text be heard.
Visit
Takes you to a new page for a single hit and then takes you
back and remembers if you did not use up the visit
Visit Exception
If you have one button on a Visit page that you don’t want to
return to the previous page, use a Visit Exception action to
leave it on the page for one additional hit.
Volume Down
Turns down the volume.
Volume Up
Turns up the volume.
Word Prediction
Sets the prediction order (1-10) for word prediction buttons
on a keyboard page.
Page 57

LR7 User’s Guide v2.8.0 Page 57
Using Navigate, Visit, and Jump to Page
Navigate
Navigate takes you to a new page and leaves you there.
Visit
Visit takes you to a new page for a single hit and then takes you back and
remembers if you did not use up the visit.
For example, if you visit the Describer page and then navigate to the
Spelling keyboard from the Describer page, the system will remember the
unused visit and go back after you type a single letter on the keyboard
page.
Jump to Page
Jump to Page takes you to a new page for a single hit and then takes you
back and does not remember any unused visits.
For example, if you jump to the Describer page and then navigate to the
Spelling keyboard from the Describer page, the system will not remember
anything and will leave you on the keyboard page that you navigated to.
Page 58

LR7 User’s Guide v2.8.0 Page 58
Copying Buttons
This device allows you to copy a button, copy and reuse the same button,
copy a button style, and use a button in multiple places. This must be
done in Edit Mode.
Copying and Pasting a Button
Buttons can be copied and pasted to new locations. If you modify a copy
of a button, you will edit only the copy.
1. Press and hold on the button you want to copy.
2. Choose Copy.
3. Press and hold on the location for the new button.
4. Choose Paste.
Copying and Reusing the Same Button
If you modify a button that is used in multiple locations, the button will
also be modified automatically everywhere else it appears. You may want
to use this technique on buttons that contain tools used on each page.
1. Press and hold on the button you want to copy.
2. Choose Copy.
3. Press and hold on the new location.
4. Choose Use Same Button.
Copying and Pasting a Button Style
1. To copy only the appearance (colour, font, etc.) of a button:
1. Press and hold the source button and choose Copy Button Style.
2. Press and hold the target button and choose Paste Button Style.
Using a Button in Multiple Places
1. A button can be used in multiple pages.
1. Choose Menu > Edit Mode.
2. Press and hold on an empty location.
3. Choose Add Button from Library.
4. Choose the page on which the button resides.
5. Choose the button to use.
Page 59

LR7 User’s Guide v2.8.0 Page 59
Prioritizing Buttons
Buttons can be prioritized by their position on the page or by their size.
These processes are done with Edit Mode On.
Rearranging Buttons
You can quickly rearrange the layout of buttons on a page using “dragand-drop swapping”. This procedure allows you to swap the contents of
two buttons. Drag the first button over the top of the second button,
then lift from the screen. The contents of the two buttons will be
immediately swapped.
Resizing a Button
A button can be emphasized by making it larger than the others on a
page.
If increasing the size of the button, the button will expand to the right or
down. The button will draw over the buttons to the right or below it,
rearranging buttons as needed. If the button is already in the far most
column or the bottom row, move the button to the left or up to provide
for additional space.
1. Choose Menu > Edit Mode.
2. Press and hold the button that you want to resize.
3. Choose Change Button Size.
4. Set the number of cells you want the button to fill both vertically
and horizontally.
5. Choose Save.
Page 60

LR7 User’s Guide v2.8.0 Page 60
Creating a Page
Pages are levels of specific vocabulary linked together to create a
vocabulary file specific to the device user. You can create a page by using
any of the following methods.
Creating a New Page
1. Choose Menu > Edit Mode > Pages.
2. Choose Menu > New Page.
3. Give the page a descriptive name.
4. Select the number of rows and columns you need.
5. To change the background colour of the page, choose Set and
choose a colour from the palette.
6. To add a background image to your page, choose Import to use an
image stored on the device or choose Find to search for an image
stored in the library.
7. Centre the image or stretch it to fill the page. (If you stretch the
image, the aspect ratio will not change, so it might not totally fill the
page.)
8. Choose Save. A blank page will be created in your vocabulary file,
ready for you to place buttons.
Creating a Copy of a Page
1. Choose Menu > Edit Mode > Pages.
2. Choose the page to duplicate. (Right-click on the page if you are
using the Editor.)
3. Choose Duplicate.
4. Give the page a new name and choose Save.
Creating a Page from a Template
1. Choose Menu > Pages > Menu > New from template.
2. Choose the appropriate template and choose OK.
3. Give the page an appropriate name and choose Save.
Page 61

LR7 User’s Guide v2.8.0 Page 61
Copying a Page from a Different Vocabulary File
You can copy one or more pages from a different vocabulary file to use in
the current vocabulary file.
1. Choose Menu > Pages > Menu > Import.
2. Choose the vocabulary file that includes the page you want.
3. Check the appropriate page. To import multiple pages, check all the
pages you want.
4. Choose Import.
5. Create a button to link to the new page or pages.
Animating Page Transitions
To add animation when you move from one page to another, choose
Menu > Settings > Style > Animate All to insert a checkmark. To
remove the animation, choose Animate All to remove the checkmark.
Adding a Grid to Pages
To add a wire-frame grid to pages, choose Menu > Settings > Style >
Show Grid to insert a checkmark. To remove the grid, choose Show Grid
to remove the checkmark.
Page 62

LR7 User’s Guide v2.8.0 Page 62
Creating a Visual Scene
You can create visual scenes that include any of the following:
• Hotspots on the image that speak
• Hotspots on the image that produce sounds
• Hotspots on the image that navigate to other vocabulary pages
• Buttons surrounding the image that speak or navigate to other
pages
This section explains how to create a button that will take you to the
visual scene, how to create a background image for the scene, and how to
add hotspots and other buttons. You can create the visual scene on your
device or use Chat Editor to create the scene and transfer it to your
device.
Before you get started: Make sure the image you want to use for the
scene is on your device. You could use an image from the Chat library, use
the device’s camera to take a picture, or copy an image from your
computer to the device. If you plan to use a sound that is not already
available on the device, search the Internet for the appropriate sound in
.wav format, download the file to your computer, and copy it to your
device.
Note: For information on copying files from your computer to the device,
see Transferring Images on page 67.
Create a Linking Button
1. Go to the page that you want to link to your new scene.
2. Choose Menu > Edit Mode.
3. Press and hold the button you want to link to the visual scene and
choose Edit Button. The Button Properties will be displayed
4. To select the image you want for the button, either choose Import
to use an image stored on the device or choose Find to search for an
image stored in the Chat library.
Page 63

LR7 User’s Guide v2.8.0 Page 63
Note: This image could be the same one you plan to use for the visual
scene page. This will make it obvious to the user where the button will
lead. In this example, a simple farm image was imported. The same image
will be used for the background of the visual scene page.
5. Enter a label for the button. In this example, the button is named
My Farm.
6. Now you’re ready to create the visual scene. Leave the Button
Properties displayed and proceed to Create a Visual Scene Page.
Create a Visual Scene Page
1. From the Button Properties, choose the Actions tab and tap the list
arrow to open a list of actions.
2. Choose Navigate. A list of pages will open, allowing you to select the
page to navigate to.
3. Because you haven’t created the new page yet, choose New from
the bottom of the screen.
Page 64

LR7 User’s Guide v2.8.0 Page 64
4. Enter a name for the new page. In this example, the page is named
My Farm.
5. Adjust the number of rows and columns, choosing the maximum
number (19) for each. This will make it easier to create buttons that
fit items in the image.
6. Choose Import or Find and select the background image for your
page.
7. Under Alignment, select Center or Fit. Fit will stretch the image to
fill the page. If you stretch the image, the aspect ratio will not
change, so it might not totally fill the page.
8. Choose Save, choose No Animation and Save, and choose Save
again.
9. Now you’re ready to add your first transparent button to the image.
Proceed to Add a Transparent Button to the Visual Scene Page.
Page 65

LR7 User’s Guide v2.8.0 Page 65
Add a Transparent Button to the Visual Scene Page
In Edit Mode, the page created in Create a Visual Scene Page appears as
follows:
You could create a button that speaks the name of an animal, makes a
sound, and/or navigates to another vocabulary page. This button will act
as a hotspot when touched. For this example, create a button that will
display and speak “cow”, play a “moo” sound, and navigate to a page
about dairy food.
1. Press and hold the button cell located above and to the left of the
cow. A list of button options will appear.
2. Choose Create Button to display the Button Properties.
3. Enter a message in the Message box. In this example, enter cow.
Note: Because you don’t want anything to appear on top of the
image, do not type a label.
4. Choose the Style tab. The button style properties will be displayed.
5. Choose Transparent. This will allow the image to show through the
button. The image preview will display a checkerboard pattern to
indicate transparency.
Page 66

LR7 User’s Guide v2.8.0 Page 66
Note: If you do not want to add a sound or navigation, skip steps 6
and 7 and proceed to step 8.
6. To add a sound for the cow, choose the Actions tab and select Play
Audio. A list of options will be displayed. Select either Import from
file or Choose existing recording.
7. To add navigation (for example, to a page about dairy food), select
Navigation from the list of actions. A list of pages will be displayed.
Select the page you want (in this example, Dairy) and choose OK.
Then choose No Animation and Save.
8. Choose Save. The checkerboard transparent pattern will appear in
the button cell you selected.
9. Press and hold the transparent button, choose Change Button Size,
and adjust the vertical and horizontal cells. For example:
Page 67

LR7 User’s Guide v2.8.0 Page 67
10. Choose Save. The transparent pattern will expand to the size you
specified, showing the area the button will cover.
Note: You may need to change the button size several times to
cover the area you want. Each time, simply press and hold on the
button, choose Change Button Size, and adjust the vertical and
horizontal cells.
11. Create, resize, and save additional transparent buttons for other
areas in the image. For example, you could create a button that
speaks “pig” and makes a pig sound, another button for the sheep,
and a button that speaks “barn”.
12. When you finish, choose Menu > Edit Mode to exit Edit Mode.
13. As you tap each animal, the device will identify the animal and make
the appropriate sound.
Page 68

LR7 User’s Guide v2.8.0 Page 68
Modify a Button’s Actions
In the example above, choosing the cow button would display and speak
“cow”, play a “moo” sound, and display a page about dairy food. If you
decided to modify the button so that it would clear existing text from the
Speech Display Bar (SDB), then display and speak “cow”, play a “moo”
sound, and remain on the same page, you would need to remove the
Navigate action, add the Clear Display action, and change the order of
actions.
To remove the Navigate action:
1. In Edit Mode, choose Edit Button and choose the Actions tab to
display the list of actions set up for the button.
2. Select Navigate (Dairy, No Animation) to open a menu.
3. Choose Remove.
4. Choose Save.
To add an action and change the order of actions:
When you add an action, it appears last in the list of actions set up for the
button. If you added Clear Display to the end of the list, “cow” would be
cleared from the SDB. To clear the SDB first, so that “cow” remained
displayed, you would need to change the order of the actions.
1. In Edit Mode, choose Edit Button and choose the Actions tab.
2. Choose the Actions tab and select Clear Display. Clear Display will
be added to the bottom of the list of actions set up for the button.
3. Select the Clear Display action to open a menu.
4. Choose Move Up. Clear Display will move up one position.
Page 69

LR7 User’s Guide v2.8.0 Page 69
5. Choose Clear Display and Move Up again, so that Clear Display
appears as the first action.
6. Choose Save.
Alternative: Create the Scene and then the Linking Button
If you prefer to create your visual scene first, and then create the linking
button, do the following:
1. Choose Menu > Edit Mode > Pages.
2. Choose Menu > New Page.
3. Enter a name for the page.
4. Choose the maximum number of rows and columns (19 each).
5. Choose Import or Find and add an image to the page.
6. Select Center or Fit. Fit will stretch the image to fill the page or most
of the page.
7. Choose Save.
8. Add buttons to the page. To add buttons that act as hotspots, see
Add a Transparent Button to the Visual Scene Page.
9. When you finish adding buttons and have saved the page, go to the
page that you want to link to your new scene and follow the
procedure under Create a Linking Button.
Page 70

LR7 User’s Guide v2.8.0 Page 70
Create a Visual Scene with Buttons Surrounding the Image
You may prefer to create a visual scene with buttons outside the image
instead of hotspots on the image.
Copy basic function buttons from other pages and paste them onto your
visual scene page. The example above includes the Home, Clear, Delete,
and Go Back buttons. To copy and paste a button:
1. Choose Menu > Edit Mode.
2. Navigate to a page that includes the button you want to copy.
3. Press and hold the button and choose Copy Button.
4. Navigate to your visual scene page.
5. Press and hold the location to which you want to paste the button.
6. Choose Paste Button.
Create additional buttons that will allow the user to tell a story about the
scene. In the example above, buttons speak “Beach”, “Let’s play in the
sand!”, and “Let’s play in the water!”, and another button navigates to a
page of beach accessories.
Page 71

LR7 User’s Guide v2.8.0 Page 71
Using Keyboards
A number of keyboards are available throughout the system. For
example, WordPowerTM files offer ABC and QWERTY options, MultiChat
15 provides a keyboard option for those using a keyguard, and each
default file provides variations of keyboards to choose from.
You can select the specific keyboard you need or link a button to a
keyboard.
Choosing a Different Keyboard
If the keyboard you want is not in the current vocabulary listing, you can
choose a keyboard from the Template options.
If the keyboard you want is not included in your page listing or the
template options, see Copying a Page from a Different Vocabulary File.
Linking a Button to a Keyboard
1. Edit the button to link to the new keyboard.
2. Choose the Actions tab.
3. Press and hold (highlight, if you are using the Editor) the existing
Navigate action and choose Set. Or, if no Navigation action has been
chosen, choose Navigate from the drop-down menu.
4. Choose the new keyboard from the page listing.
5. Choose OK. The button should navigate to the new keyboard.
Page 72

LR7 User’s Guide v2.8.0 Page 72
Working with Gestures
A gesture is a motion that can be made to the screen to trigger a specific
action. An example of a gesture might be a “swipe down” on the screen
that would clear the text from the Speech Display Bar.
A gesture can apply a particular page or it can be applied to all pages in a
vocabulary file.
Important! Once you create a gesture for a page or all pages, the only
way to change the page applicability is to delete the gesture and create a
new gesture. For example: If you wanted to apply a gesture that works on
a specific page to all pages in a vocabulary file, you would need to delete
the existing gesture, and then create a new gesture for all pages.
Turning Gestures On or Off
We understand that gestures might not benefit all of our customers, so
the Settings menu provides an On/Off option.
Important! Timing is not active when gestures are turned on. If the device
user requires a Dwell Time for access, gestures are not recommended.
1. Choose Menu > Settings > Input > Gestures.
2. Either check or uncheck the Gestures option.
Creating a Gesture for a Page
1. To create a gesture for a single page:
1. Open the page on which you want to create the gesture.
2. Choose Menu > Edit Mode > Edit Page.
3. Choose the Gestures tab at the top of the page.
4. Choose Menu > New.
5. Choose the type of gesture from the list box at the top of the
screen. For example: One Finger Swipe Down.
6. Give your gesture a label; for example: “sw clears”.
7. Tap Add an action and choose an action from the drop-down menu.
For example: Clear Display.
8. Choose Save twice.
9. Test the gesture by performing it on the page it was set up on.
Page 73

LR7 User’s Guide v2.8.0 Page 73
Creating a Gesture for All Pages
To create a gesture for all pages in a vocabulary file:
1. Open the vocabulary file.
2. Choose Menu > Edit Mode > Edit Vocabulary > Gestures.
3. Choose the gesture from the list. For example: “One Finger Swipe
Down”.
4. Choose Edit.
5. Give your gesture a label; for example: “sw clears all”.
6. Tap Add an action and choose an action from the drop-down menu.
For example: Clear Display.
7. Choose Save twice.
8. Test the gesture by performing it from any page within the
vocabulary file.
Page 74

LR7 User’s Guide v2.8.0 Page 74
Working with Speech
When you select a speech synthesizer, you can select from a variety of
voices to speak individual characters, words, phrases, or sentences. You
can select exactly what and when you want to speak.
Selecting a Synthesizer and Voice
To access the available voices, choose Menu > Settings > Speech
Output > Voice > Synthesizer. Select a synthesizer from the Synthesizer
menu. Then choose Voice Settings to select a voice. The Acapela and
Ivona synthesizers provide lists of voices from which to choose.
Select a voice and choose the Test button to hear a sample of the voice
you selected. When you are satisfied with the voice, choose Save.
If you are using Chat Editor, you will not have access to the synthesizer
voices. SAPI voices were provided with the installer CD for your computer.
You should be able to select them from the Voice pull-down list.
Note: Chat Editor is not intended to function as a speech generating
device. It is a support tool for modifying the client’s vocabulary so that
the client can continue using the device while modifications are being
made.
Adding a Pause between Words
You can force a specified speech delay between individual words.
Choose Menu > Settings > Speech Output > Voice > Pause Between
Words. The current delay time is displayed.
1. To increase the delay, tap + (the plus sign) or type a higher number.
2. To decrease the delay, tap – (the minus sign) or type a lower
number.
3. Choose Done and then choose OK.
Adding Words to the Pronunciation Dictionary
Each synthesizer speaks words in its own way. You can add pronunciation
exceptions to a dictionary for each synthesizer. The voice synthesizer on
the Editor is not the same as the one on the device, and the two will not
pronounce words in the same way. Pronunciation changes made on the
Editor will not impact the device.
Page 75

LR7 User’s Guide v2.8.0 Page 75
To add a word to the pronunciation dictionary:
1. Choose Menu > Settings > Speech Output > Voice >
Pronunciations.
2. Choose Menu > New.
3. Type the word in the Pronounce box.
4. Tap Next.
5. Type the word’s phonetic spelling in the Pronounce As box.
6. Test the word by choosing Pronounce It.
7. Once the word is pronounced properly, choose Done.
8. Choose Save.
To edit or delete a word from within the dictionary, press and hold on the
entry and choose the appropriate option.
Configuring Speech Modes
You can configure the application to speak after every character, every
word, every sentence, or any combination of these settings.
Choose Menu > Settings > Speech Output. Check one or more options.
Setting
Description
Character
The voice speaks after every character
Word
The voice speaks after every word
Sentence
The voice speaks after every sentence
Auto Clear
Clears the Speech Display Bar automatically after a
sentence or message has been spoken and the next text
is chosen
Speech Off
Toggles all speech off and on
If you prefer to generate messages quietly, uncheck all options and speak
by tapping the Speech Display Bar or by choosing a button provided with
a Speak action.
Page 76

LR7 User’s Guide v2.8.0 Page 76
Adding Acapela Vocal Smileys
Acapela-Group has created the capability of using Voice Sounds and
Exclamations.
Adding a Sound
Sounds are produced by the speaker’s voice for laughing, breathing,
sneezing, coughing, or whatever sounds our voices can produce to mimic
sounds we make in our daily lives. Sounds are always between two pound
signs; for example: #LAUGH02# in capital letters and sometimes followed
by numbers if there are more than one of the same kind. The children’s
voices have more sounds than adult voices.
Adding an Exclamation
Exclamations include a variety of letters and symbols. Type exactly what
you see.
Finding a Vocal Smiley
To find the list of Acapela Vocal Smiley commands:
1. Go to http://www.acapela-
group.com/doc/Vocal%20smileys/excla.html
2. Click the link to the appropriate language.
Important! The language you select must match the language of the
voice you are using.
3. Select the specific Vocal Smiley you want.
Example: Add a Smiley Face and Laugh Sound to a Button
A button can be set up with the command in the message. However, if
you use the “speech message” action, the command appears in the
Speech Display Bar (SDB), which isn't ideal. A better way may be to set up
a button with an emoticon symbol in the message.
For example, you could use a smiley face symbol. Note that you may need
to go to Settings > Keyboards and add the Emoji keyboard so that you
can type emoticon symbols. Once the button is set up with the emoticon
and speech message, go to Pronunciations and add a pronunciation for
the smiley face emoticon. Enter a command such as #LAUGH02# for the
pronunciation.
Page 77

LR7 User’s Guide v2.8.0 Page 77
The Pronunciation Editor can be found in Settings > Speech Output >
Voice > Pronunciations. Choose Menu and New, Add the same Emoticon
used on the button to the Pronounce box and add the command—for
example, #LAUGH02#—to the Pronounce As box.
Now when you touch the button, the emoticon will appear in the Speech
Display Bar and the laugh sound will be heard.
Page 78

LR7 User’s Guide v2.8.0 Page 78
Setting Access Options
Some people who use the LR7 may have trouble reliably selecting
individual buttons or keys due to tremors or lack of fine movement
control. To assist these individuals, we've included several different
methods of "filtering" user input to make selections more reliable.
Activating Buttons on Touch or Release
When you set Activate on Release, you can touch anywhere on the
screen and drag your finger (or stylus) around until you are on the button
you want. Releasing the button will select it.
Activate on Release toggles between activating the screen immediately
upon touch or upon release.
To set buttons to activate on release:
Choose Menu > Settings > Input > Timing > Activate on Release. A
green checkmark shows that the option is selected.
To set buttons to activate when you first touch the screen, tap Activate
on Release. The green checkmark disappears, indicating that the option is
not selected.
Setting a Time for Button Activation
When you set Acceptance Time, a button is not selected until you hold
your finger on it for a certain period of time. You can set the Acceptance
Time using the numeric control in the dialog.
1. Choose Menu > Settings > Input > Timing.
2. Choose Acceptance Time.
3. Choose Enable.
4. Choose Time and set the time value.
Page 79

LR7 User’s Guide v2.8.0 Page 79
Setting a Time to Prevent Selection of a Button Twice
Setting a Release Time helps prevent accidental selection of the same
button twice. After a button selection, another button cannot be selected
until the release time expires.
1. Choose Menu > Settings > Input > Timing.
2. Choose Release Time.
3. Choose Enable.
4. Choose Time and set the time value.
Setting up a Beep when a Button is Pressed
Some people may benefit from an auditory cue when a button is selected.
The Input menu provides an option to toggle beeps on or off when a
button is selected.
1. Choose Menu > Settings > Input.
2. Turn Beep on Button Press on or off.
Setting up a Visual Indication when a Button is Selected
Some people may benefit from a visual indication when a button is
selected. The Input menu provides an option to toggle the visual
indication on or off.
1. Choose Menu > Settings > Input.
2. Turn Draw Button Press on or off.
Note: For additional options, see Adjusting Audible and Haptic Feedback.
Page 80

LR7 User’s Guide v2.8.0 Page 80
Changing Device Orientation Settings
The LR7 allows the screen to rotate automatically when the device is
tilted. This can be quite handy or a nuisance for some. The application
allows you to change orientation settings and use orientation tilt with
Speech Display Bar (SDB).
Changing Orientation Settings
Depending on the button layout, one orientation may be more helpful
than another. For example, WordPower42 seems to work better in a
landscape layout, but WordPower24 works better in a portrait layout.
To Allow Orientation to Change when You Tilt the Device:
Choose Menu > Settings > Input > Tilt > Action. Then choose Auto
Change Orientation.
To Lock the Orientation:
The orientation setting can be locked to keep the screen from
automatically adjusting when tilted.
Choose Menu > Settings > Input > Tilt > Action > No Action > Preferred
Orientation. Then select Portrait or Landscape.
Page 81

LR7 User’s Guide v2.8.0 Page 81
Using Orientation Tilt with the SDB
We know there are times that using the voice output might not be
appropriate but communication is still needed. This might be a library or
church setting. The tilt option offers an Expand option of the Speech
Display Bar to offer the communication partner an expanded version of
the text. This might also be of value in an extremely loud environment.
To set the tilt options, choose Menu > Settings > Input > Tilt > Action.
Option
Description
Expand and
Speak
When the device is tilted, the text in the speech display bar will
fill the screen and be spoken.
Expand Only
When the device is tilted, the text in the speech display bar will
fill the screen and no sound will be made.
Auto Change
Orientation
The screen will shift orientation automatically when the device is
tilted.
No Action
The screen will be locked in the current orientation.
If you select Expand and Speak or Expand Only, you can expand the
Speech Display Bar for easier viewing by tilting the device.
Tilting the device back will redraw the vocabulary page. For information
on using and customizing the Speech Display Bar, see Using the Speech
Display Bar.
Page 82

LR7 User’s Guide v2.8.0 Page 82
Switch Scanning
**Switch Scanning is only available on the LR7 using the screen as a single switch **
Options for customizing a scanning technique are in the Menu >
Settings > Input > Scanning menu.
Setting up Touchscreen Scanning
Using the touchscreen to scan allows the user to tap anywhere on the
screen to initiate a scan of the buttons. In this scenario the device screen
acts as a single switch.
1. Choose Menu > Settings > Input > Scanning > Enable Scanning.
2. Choose Switch Access > Switch Configuration.
3. Choose Touchscreen Only.
4. Configure other settings as appropriate.
Scan Settings
Description
Enable Scanning
Turns Scanning On or Off. You must turn scanning on to
access other settings.
Switch Access
Defines the Selection method (Touchscreen will be the
only option on the LR7) and allows you to turn auto
scanning on or off.
Auditory Prompts
Defines audio feedback during scanning. You can set the
speaker or an earphone as the audio output device, adjust
earphone volume, turn a scanning beep on or off, set a
button prompt, and set the voice pitch and rate.
Patterns
Defines the scanning patterns, whether it scans Speech
Display Bar, or if it Skips Empty Keys.
Scan Timing
Defines the Scanning Speed, the number of rescans and
the Activation Delay.
Page 83

LR7 User’s Guide v2.8.0 Page 83
Selecting the Scan Pattern
To select the scan mode:
1. Choose Menu > Settings > Input > Scanning > Patterns > Mode.
The Mode window will be displayed.
2. Tap the arrow to the right of the currently selected mode. A menu
of mode options will be displayed.
3. Choose Linear, Row/Column, Block, or Flow.
4. Choose OK.
For more information on setting up scanning on your Liberator Rugged or
NOVA chat device, please see
http://saltillo.com/support/category/scanning.
Page 84

LR7 User’s Guide v2.8.0 Page 84
Configuring Visual Effects for Scanning
Visual effects are used with scanning to help the user identify selected
items. To access the visual effects settings, choose Menu > Settings >
Input > Visual Effects.
Effect
Description
Outline
When Outline is turned on, an outline appears around the
active area.
Outline Colour
When Outline is turned on, Outline Colour allows you to set
the colour of the outline.
Outline Width
When Outline is turned on, Outline Width allows you to set
the width of the outline.
Translucent
Overlay
When Translucent Overlay is turned on, a subtle trace of
colour appears over the active area.
Overlay Opacity
When Overlay is turned on, Overlay Opacity allows you to set
how clearly the underlying image shows through the overlay.
To allow less of the underlying image to show through, tap +.
To allow more of the underlying image to show through, tap –
. Then choose OK.
Overlay Colour
When Overlay is turned on, Overlay Colour allows you to set
the colour of the overlay. Tap a colour in the colour selection
window. The selected colour appears in the circle to the right
of Overlay Colour.
Invert Colours
When Invert Colours is turned on, the colours of the active
area are reversed. Dark areas become light, light areas
become dark, and colours are replaced by their opposites—
black and white are reversed, red becomes green, yellow
becomes blue, etc.
Magnify
When Magnify is turned on, the active area is magnified.
Magnify
Multiplier
When Magnify is turned on, Magnify Multiplier allows you to
set the amount by which the active area is magnified. To
increase the amount of magnification, tap +. To decrease the
amount of magnification, tap –. Then choose OK.
Animate Effects
When Animate Effects is turned on, the visual effects visibly
move or grow when an area becomes active. You must turn
on one or more visual effects for Animate Effects to work.
Page 85

LR7 User’s Guide v2.8.0 Page 85
Using Word Finder
Use the Word Finder feature to find the path to specific words. If you
need to know if a word is included, use this feature to find where the
word is stored.
There are two ways to use this feature: Set up a button or set up Word
Finder as a menu item.
Setting up Word Finder as a Button
You can set up a button to initiate a word search.
1. Choose Menu > Edit Mode.
2. Press and hold on the button you want to modify. (Right-click if you
are using the Editor.) A list of button options appears.
3. Choose Edit Button. The Button Properties screen appears.
4. Choose the Actions tab.
5. Tap or click the list arrow to open a list of actions.
6. Choose the action Find Word.
7. Choose Save.
Note: Tap the Find Word button again to stop Word Finder.
Setting up Word Finder as a Menu Item
An alternative to using a button is to set up Word Finder as a menu item.
In Settings there is an option to turn Word Finder on or off.
Choose Menu > Settings > Word Finder > Show Menu Item.
If you choose to turn this feature on, a Word Finder menu item will
appear at the bottom edge of the screen for quick access.
Page 86

LR7 User’s Guide v2.8.0 Page 86
Setting the Display Time for Word Finder Results in the SDB
To set the amount of time each Word Finder result is displayed in the
Speech Display Bar, Choose Menu > Settings > Word Finder > Flip
Interval. The current interval is displayed.
1. To increase the interval, tap + (the plus sign) or type a higher
number.
2. To decrease saturation, tap – (the minus sign) or type a lower
number.
3. Choose Done and then choose OK.
Finding Specific Words
When you want to find where a word is used, either tap the Word Finder
button or choose the Word Finder menu item.
Type the word in the coloured box.
Tap Done. The paths to the word will be displayed.
Page 87

LR7 User’s Guide v2.8.0 Page 87
Setting up and Using Word Prediction
Word prediction helps improve your ability to communicate by
“predicting” a word you intend to speak, thereby reducing the number of
letters you need to enter.
When you enter the first letter on the keyboard, the Chat software
displays a list of words beginning with that letter. As you enter more
letters, the list is updated. When the word you want is displayed, you can
choose it with a single tap to appear in the Speech Display Bar (SDB). The
Chat software then predicts the next word you want to enter.
Two types of word prediction are available—static and learning. Static
word prediction predicts words based on the default word prediction
dictionary. This allows consistent motor planning for an individual.
Learning word prediction predicts words based on words that accumulate
as you continue to select words, allowing the word prediction dictionary
to “learn” them. Words are predicted not only from the dictionary, but
also from new words you add to the dictionary.
Selecting the Type of Word Prediction
You can choose the type of word prediction to use—static or learning—or
you can choose to disable word prediction. Choose Menu > Settings >
Text > Prediction > Type. The Prediction Type window opens.
Type
Description
None
If you choose None, word prediction is disabled.
Static
If you choose Static, the Chat software uses the default word prediction
dictionary you choose and the settings that apply to learning word
prediction are grayed out. See Choosing the Default Dictionary.
Learning
If you choose Learning, the Chat software uses the default word
prediction dictionary, allows you to add words to the dictionary, and
makes the settings that apply to learning word prediction available to you.
Page 88

LR7 User’s Guide v2.8.0 Page 88
Choosing the Default Dictionary
The default is the word prediction dictionary that will be used as the basic
source of words for predicting. For static word prediction, all words will
come from the dictionary. For learning word prediction, words you select
will be added to this dictionary. North American English and British
English dictionaries are available.
Choose Menu > Settings > Text > Prediction > Default Dictionary. The
Dictionary window opens. Choose American English or British English.
Adding Words using the Add Words Screen
Use the Prediction Add Words screen to add words directly to the
learning word prediction dictionary.
This screen accumulates an alphabetical list of all words you added from
all sources—a vocabulary keyboard, the Add Words screen, or an
imported text file. Each word is followed by its “count”, that is, the
number of times it was entered for learning prediction. This list provides
an easy way to review your learning prediction dictionary.
To add a word:
1. Choose Menu > Settings > Text > Prediction > Add Words. The Add
Learned Words screen opens.
2. Enter the word you want to add.
Note: As you enter letters or other characters, the display will be
limited to words that begin with those letters or characters.
3. Choose Add. The word will be added to the list.
4. Repeat steps 2 and 3 for each word you want to add.
Note: To add a large number of words at a time, see Importing
Predictions.
Page 89

LR7 User’s Guide v2.8.0 Page 89
To review your learning prediction dictionary:
Choose Menu > Settings > Text > Prediction > Add Words. The Prediction
Add Words screen opens.
Either scroll through the list or enter letters in the text field to jump to
specific locations in the list.
Adding Words by Entering them in the Vocabulary
In your vocabulary, choose the keyboard button to display the keyboard.
Then enter a word that you want to add to the prediction dictionary,
followed by either a space or a punctuation mark. Repeat for each word
you want to add.
If Review Required is turned off: The words you entered can now be
predicted.
If Review Required is turned on: Proceed to Reviewing New Words for
Prediction.
Note: To add a large number of words at a time, see Importing
Predictions.
Requiring Review of New Prediction Words
You can require that new words entered from the keyboard in a
vocabulary be reviewed before they are added to the word prediction
dictionary.
1. Choose Menu > Settings > Text > Prediction.
2. Choose Review Required to insert a checkmark.
To disable required review of new words, choose Review Required to
remove the checkmark.
Page 90

LR7 User’s Guide v2.8.0 Page 90
Reviewing New Words for Prediction
The Review Words setting opens the screen from which you can review
words before they are added to the word prediction dictionary. Only
words entered from the keyboard in a vocabulary will be reviewed.
Words added from the Add Words Menu or an imported text file will not
be reviewed.
Choose Menu > Settings > Text > Prediction > Review Words. The
Prediction Review Words screen lists new words for review.
Each word is followed by its “count”, that is, the number of times it was
entered for prediction.
Either scroll through the list or enter letters in the text field to jump to
specific locations in the list. To list words in order by frequency of use,
select Order by count.
To add the word to the word prediction dictionary, choose the
checkmark. If you do not want to add the word to the word prediction
dictionary, choose the X icon.
Page 91

LR7 User’s Guide v2.8.0 Page 91
Excluding Words from Prediction
Use the banned words list to prevent specific words from being predicted.
To add a word to the banned words list:
1. Choose Menu > Settings > Text > Prediction > Banned Words.
2. The Prediction Banned Words screen opens.
3. Enter a word you want to add to the list.
Note: As you enter characters, the display will be limited to words that
begin with those characters. This may save you from trying to add a
word that is already on the list.
4. Choose Add. The word will be added to the list, followed by an X
icon.
When the list of words is long, either scroll through the list or enter
letters in the text field to jump to specific locations in the list.
To remove a word from the banned words list:
Choose the X icon for the word you want to remove.
Page 92

LR7 User’s Guide v2.8.0 Page 92
Importing Predictions
You can import words for learning prediction from a text file (.txt). The
text can be in the form of individual words, sentences, or paragraphs.
1. Create a text file by either of these methods:
Copy and
paste
Copy the text you want from your source file and paste it
into any text editor (Microsoft Notepad, for example).
If you copy and paste paragraphs: Separate each sentence
by pressing Enter or Return.
If you copy and paste individual words: Separate each word
by pressing Enter or Return.
Save As
Use Save As from your source file application to save the
document as a text file. Then remove the text you don’t
want to add to learning prediction. For example, if you use
Microsoft Word, select Save As and select Plain Text
(*.txt) from the “Save as type” drop-down menu.
If your text is in paragraphs: Separate each sentence by
pressing Enter or Return.
If your text consists of individual words: Separate each
word by pressing Enter or Return.
2. Connect a USB cable between your device and the computer.
3. Using Explorer from the computer, copy the text file to My Files >
ChatPC > prediction > import.
4. After you copy the file, return to the Chat software and choose
Menu > Settings > Text > Prediction > Import Predictions.
The Prediction Import screen displays the text file you created with
a checkmark to the right.
Page 93

LR7 User’s Guide v2.8.0 Page 93
5. Choose the checkmark. The filename will disappear from the screen,
and the words in the file will be added to the word prediction
dictionary.
6. To quickly confirm that the words were added, choose Menu >
Settings > Text > Prediction > Add Words. The words in the file
should be listed on the Add Words screen.
Deleting Prediction Words
You can delete individual learned words or all learned words from the
word prediction dictionary.
Choose Menu > Settings > Text > Prediction > Delete Learned Words.
Two Delete options are displayed.
• To delete individual learned words, choose Delete Words.
• To delete all learned words, choose Delete All Words.
To delete individual learned words:
Choose Delete Words. The Delete Learned Words screen lists words that
can be deleted.
When the list of words is long, either scroll through the list or enter
letters in the text field to jump to specific locations in the list. To list
words in order by frequency of use, select Order by count.
Page 94

LR7 User’s Guide v2.8.0 Page 94
For any word you want to delete from the word prediction dictionary,
choose the X icon.
To move a word to the list of banned words, choose the icon.
To delete all learned words:
Important! If you make this choice, all words that you added for
prediction will be deleted.
1. Choose Delete All Words. The following message will be displayed.
2. Choose Yes. All words that you added for prediction will be deleted,
and only the default dictionary will be available for word prediction.
Page 95

LR7 User’s Guide v2.8.0 Page 95
Using Abbreviation Expansion & Automatic Capitalisation
Abbreviation Expansion and Automatic Capitalization provide some
additional tools for alternate message formulation.
Adding, Modifying, and Deleting Abbreviations
Abbreviations can be used instead of writing the whole word. Some
abbreviations have been provided in the application. Those abbreviations
cannot be modified or deleted.
To view the existing abbreviation library:
Choose Menu > Settings > Abbreviations.
To add a new abbreviation:
1. Choose Menu > Settings > Abbreviations > Menu > New.
2. Enter the abbreviation to be used.
3. Tap Next.
4. Enter the text to be displayed and spoken.
5. Choose Save.
To use the abbreviation, open the keyboard page and type the
abbreviation, followed by a period. The abbreviation should expand
automatically.
To modify an abbreviation:
1. Press and hold on the entry.
2. Choose Edit and make appropriate changes.
3. Choose Save.
To delete an abbreviation:
1. Press and hold on the entry.
2. Choose Delete.
3. Choose Yes to confirm.
Enabling Automatic Capitalization
To enable automatic capitalization:
1. Choose Menu > Settings > Text.
2. Choose Automatic Capitalization to insert a checkmark.
To disable automatic capitalization, choose Automatic Capitalization to
remove the checkmark.
Page 96

LR7 User’s Guide v2.8.0 Page 96
Restricting Access
When you want to prevent the user from changing application settings,
accessing operating system features, or using apps, you can do any of the
following:
• To prevent the user from accessing application settings, enable
Menu Lock.
• To prevent the user from accessing operating system settings and
apps (if you have a non-dedicated or “unlocked” device), enable
Kiosk Mode.
• To prevent the user from accessing application settings, operating
system settings, and apps, enable both Menu Lock and Kiosk Mode.
Enabling Menu Lock
To block the user’s access to the menu bar, enable Menu Lock.
1. Choose Menu > Settings.
2. Enable Menu Lock. A Password prompt will be displayed with a
keyboard.
3. Enter a password, confirm the password, and choose Save.
Locking the Device
Choose Menu > Lock. The following prompt will be displayed: Enable
Kiosk too?
• To lock the device and enable Kiosk mode, choose Yes.
• To lock the device without enabling Kiosk mode, choose No.
Unlocking the Device
If Kiosk Mode is not enabled:
1. Choose Menu > Unlock. The Password prompt will be displayed
with a keyboard.
2. Enter the Menu Lock password and choose OK.
If Kiosk Mode is also enabled:
1. Choose Menu > Unlock. The Password prompt will be displayed
with a keyboard.
2. Enter the Menu Lock password and choose OK. The following
prompt will be displayed: Disable Kiosk too?
Page 97

LR7 User’s Guide v2.8.0 Page 97
• To unlock the device and disable Kiosk mode, choose Yes. You
will be prompted to enter your Kiosk Mode password. (See
Creating a Kiosk Mode Password.)
• To unlock the device and leave Kiosk mode enabled, choose No.
Blocking Access to the Operating System and Apps
Not everyone will benefit from having access to the operating system and
apps. To make your device a “closed” device that will only allow the end
user to access the application, enable Kiosk Mode.
Important! If the Kiosk Mode option is not available, you have purchased
a dedicated or “locked” device.
Creating a Kiosk Mode Password
If you want to require a password to disable Kiosk Mode, do the following
before you enable Kiosk Mode.
1. Choose Menu > Settings > System > Kiosk Mode.
2. Choose Require Password. A Password prompt will be displayed
with a keyboard.
3. Enter a password, confirm the password, and choose Save.
Enabling Kiosk Mode
To block the user’s access to the operating system and apps, enable Kiosk
Mode.
1. Choose Menu > Settings > System > Kiosk Mode.
2. Enable Kiosk Mode. The following prompt will be displayed: Lock
menu too?
• To enable Kiosk Mode and Menu Lock, choose Yes.
• To enable Kiosk Mode and leave Menu Lock disabled, choose No.
Page 98

LR7 User’s Guide v2.8.0 Page 98
Disabling Kiosk Mode
If Menu Lock is not enabled:
1. Choose Menu > Settings > System > Kiosk Mode.
2. Disable Kiosk Mode.
If Menu Lock is also enabled:
1. Choose Menu. The Unlock menu option will be displayed.
2. Choose Unlock.
3. Enter the Menu Lock password. The following prompt will be
displayed: Disable Kiosk too?
4. To disable Menu Lock and Kiosk Mode, choose Yes.
Note: If you set a Kiosk Mode password, you will be prompted to enter
the password.
Resetting Your Passwords
If you forget your Menu Lock password, enter BOSCO to overwrite the
existing password.
If you set a Kiosk Mode password and you forget it, enter bazinga to
overwrite the existing password.
Page 99

LR7 User’s Guide v2.8.0 Page 99
Creating and Loading Profiles
Profiles provide a snapshot of the current settings of the system to be
saved for easy access at a later time. You can save multiple profiles to be
used when needed. Creating multiple profiles allows you to switch
between groups of settings. A button action is also provided to allow you
to change settings by using a button without navigating the menus.
Creating a Profile
1. Choose Menu > Settings > Profiles > New.
2. Give your profile a name (for example, Morning Settings).
3. Make all of the setting changes that you want associated with this
profile. This includes the vocabulary file, settings, language, etc.
4. Choose Menu > Settings > Profiles > Save.
5. Your new profile has been created with all current settings.
To create a second profile (for example, Afternoon Settings), repeat these
steps, making new settings changes to associate with this new profile.
Loading a Profile
You can load profiles by navigating menus or by choosing a button.
To load a profile using menu options:
Choose Menu > Settings > Profiles > Load.
To load a profile using a button action:
1. Choose Menu > Edit Mode.
2. Press and hold the button. (Right-click if you are using the Editor.)
3. Choose Edit Button.
4. Add a label, message, and icon as needed.
5. Choose the Actions tab, and then choose Add an action to open a
menu.
6. Choose Select Profile.
7. Choose the appropriate profile.
8. Choose Save twice.
If you create multiple profiles and load them using a button action, you
can switch between profiles without navigating the menus.
Page 100

LR7 User’s Guide v2.8.0 Page 100
Deleting a Profile
Choose Menu > Settings > Profiles > Delete. Choose the profile to
delete from the list.
Restoring Default Profile Settings
At any time, you can restore the default settings. Choose Menu >
Settings > Profiles > Load. Then choose Load Default Settings.
Changing Languages and Voices
You can change languages and voices.
1. Choose Menu > Settings > Language.
2. Choose the appropriate language.
3. Changing the language provides alternative voices.
4. For details on changing the voice, see Selecting a Synthesizer and
Voice.
 Loading...