

Page 1

Page 2

-2-
v5.0
Meshlium
X
treme
Index
Document version: v5.0- 04/2015
© Libelium Comunicaciones Distribuidas S.L.
INDEX
1. General and safety information ......................................................................................................... 6
2. Important: read me before using ....................................................................................................... 7
3. Contents of the box ............................................................................................................................. 8
4. Specications ..................................................................................................................................... 10
5. Accessories ........................................................................................................................................ 15
6. How to use Meshlium ........................................................................................................................ 17
6.1. Power supply ..............................................................................................................................................................................17
6.2. External SIM socket .................................................................................................................................................................. 22
6.3. How to install the antennas ..................................................................................................................................................23
6.4. Installation of the IP65 Ethernet cable .............................................................................................................................. 24
6.5. Installing Meshlium .................................................................................................................................................................. 27
6.6. Initialization, Restart and Shutdown .................................................................................................................................. 27
6.7. Setting the time ......................................................................................................................................................................... 28
7. Understanding Meshlium ................................................................................................................. 29
7.1. Concepts ......................................................................................................................................................................................29
7.2. Meshlium Models ......................................................................................................................................................................30
7.3. Storage Options .........................................................................................................................................................................32
7.4. Applications model by model .............................................................................................................................................. 32
8. Meshlium Presets............................................................................................................................... 43
8.1. Presets ........................................................................................................................................................................................... 43
8.2. Validation of Changes in Interfaces .................................................................................................................................... 45
9. Accessing Meshlium - Make it Easy! ................................................................................................. 46
10. Ethernet ............................................................................................................................................ 48
10.1. Conguration ........................................................................................................................................................................... 48
11. Wi AP .............................................................................................................................................. 51
11.1. Conguration ........................................................................................................................................................................... 51
11.2. Clients connected ...................................................................................................................................................................53
Page 3

-3-
v5.0
Meshlium
X
treme
Index
12. Wi Mesh .......................................................................................................................................... 54
12.1. Conguration ........................................................................................................................................................................... 54
12.2. OLSR Options ........................................................................................................................................................................... 55
12.3. The Gateway Node .................................................................................................................................................................57
13. 3G/GPRS ........................................................................................................................................... 58
13.1. Conguration ........................................................................................................................................................................... 58
14. Joined Networks .............................................................................................................................. 60
15. Wireless Sensor Networks ............................................................................................................... 62
15.1. Conguration ........................................................................................................................................................................... 62
15.2. Conguration of the ZigBee interface ............................................................................................................................ 63
15.3. Capturing and storing sensor data ..................................................................................................................................66
15.3.1. Capturing and storing sensor data from XBee / LoRa ................................................................................66
15.3.2. Capturing and storing data from 3G/GPRS, WiFi and Ethernet ...............................................................68
15.3.3. Local Data Base .........................................................................................................................................................69
15.3.4. External Data Base ...................................................................................................................................................70
15.3.5. Show me now! .........................................................................................................................................................74
15.3.6. Advanced Database ................................................................................................................................................75
15.4. Capturer logs ............................................................................................................................................................................ 77
15.5. Sensors ....................................................................................................................................................................................... 78
15.6. OTA via FTP ...............................................................................................................................................................................79
15.7. Sending frames from Meshlium to Waspmote ............................................................................................................ 81
15.8. Key Management on Meshlium ........................................................................................................................................ 82
15.8.1. Link layer key Management (AES-128).............................................................................................................82
15.8.2. Application Layer Key Management (AES-192/256) ...................................................................................83
15.9. AES on Meshlium .................................................................................................................................................................... 84
16. Cloud Connector .............................................................................................................................. 85
16.1. Introduction .............................................................................................................................................................................85
16.2. Geographic Information Systems (GIS) ...........................................................................................................................86
16.2.1. Esri .................................................................................................................................................................................86
16.3. M2M Platform ..........................................................................................................................................................................92
16.3.1. Axeda ...........................................................................................................................................................................92
16.3.2. Thingworx ...................................................................................................................................................................96
16.3.3. Telefónica DCA ..........................................................................................................................................................97
16.3.4. Microsoft Azure Service Bus ................................................................................................................................98
16.3.5. Sentilo ....................................................................................................................................................................... 102
16.4. MQTT Solutions .....................................................................................................................................................................103
16.4.1. Server/Broker Conguration .............................................................................................................................103
16.4.2. MQTT program ......................................................................................................................................................104
16.4.3. Platforms using MQTT .........................................................................................................................................106
Page 4

-4-
v5.0
Meshlium
X
treme
17. Smartphone Detection ................................................................................................................. 107
18. Update! (Version 3.1.4) ................................................................................................................. 110
18.1. Wi Scan ...................................................................................................................................................................................113
18.1.1. Concepts .................................................................................................................................................................. 113
18.1.2. Capturing and Storing Wi Scans ...................................................................................................................114
18.1.3. Local File System ..................................................................................................................................................115
18.1.4. Local Data Base ..................................................................................................................................................... 116
18.1.5. External Data Base ................................................................................................................................................ 117
18.2. Bluetooth Scans ....................................................................................................................................................................120
18.2.1. Concepts .................................................................................................................................................................. 120
18.2.2. Capturing and Storing Bluetooth Scans ....................................................................................................... 121
18.2.3. Local File System ...................................................................................................................................................122
18.2.4. Local Data Base ...................................................................................................................................................... 123
18.2.5. External Data Base ................................................................................................................................................ 124
19. GPS .................................................................................................................................................. 127
19.1. Concepts ..................................................................................................................................................................................127
19.2. Conguring GPS service.....................................................................................................................................................127
19.3. Capturing and Storing GPS Data.....................................................................................................................................128
19.3.1. Local Data Base ...................................................................................................................................................... 128
19.3.2. External Data Base ................................................................................................................................................ 130
19.3.3. Show me now! .......................................................................................................................................................133
20. Networking tools ........................................................................................................................... 134
20.1. Ping ............................................................................................................................................................................................134
20.2. Iperf ...........................................................................................................................................................................................135
20.3. Traceroute................................................................................................................................................................................136
20.4. Netstat ......................................................................................................................................................................................137
20.5. Beep ...........................................................................................................................................................................................137
21. Special options for Wi networks................................................................................................. 138
21.1. Long range links ....................................................................................................................................................................138
21.2. Fresnel calculator ..................................................................................................................................................................138
22. System ............................................................................................................................................ 139
22.1. Hostname ................................................................................................................................................................................139
22.2. Users Manager .......................................................................................................................................................................139
22.3. Setting the time ....................................................................................................................................................................139
22.4. Disk Usage ...............................................................................................................................................................................140
22.5. Internal temperature sensors ...........................................................................................................................................140
23. Data Base Management ................................................................................................................ 141
23.1. MySQL Direct Access ...........................................................................................................................................................141
23.2. PHPMyAdmin .........................................................................................................................................................................142
Index
Page 5

-5-
v5.0
Meshlium
X
treme
24. FTP Management .......................................................................................................................... 143
24.1. Creating user ..........................................................................................................................................................................143
24.2. Setting permission ...............................................................................................................................................................143
24.3. Accessing FTP server ...........................................................................................................................................................144
25. Uploading my own applications to Meshlium ............................................................................ 145
26. Installing new packages and libraries ......................................................................................... 147
27. Upgrading old versions of Meshlium ........................................................................................... 148
27.1. Checking the Libelium Repository .................................................................................................................................149
27.2. Local File ..................................................................................................................................................................................149
27.3. URL .............................................................................................................................................................................................150
28. Rescue System ...............................................................................................................................151
28.1. Steps ..........................................................................................................................................................................................151
28.2. How to Recover the le system .......................................................................................................................................152
29. USB Device Connectivity ............................................................................................................... 153
30. ManagerSystem Changelog ......................................................................................................... 155
31. Documentation Changelog .......................................................................................................... 158
32. Certications .................................................................................................................................. 160
32.1. CE ................................................................................................................................................................................................160
32.2. FCC .............................................................................................................................................................................................162
33. Maintenance .................................................................................................................................. 165
34. Disposal and Recycling ................................................................................................................. 166
Index
Page 6

-6-
v5.0
General and safety information
Meshlium
X
treme
1. General and safety information
• Read carefully the Limited Warranty and Terms and Conditions of Use before using “Meshlium”.
• Read carefully the “General Conditions of Sale and Use of Libelium”. This document can be found at:
http://www.libelium.com/development/meshlium/technical_service
As specied in the Warranty document which you can nd at:
http://www.libelium.com/development/meshlium/documentation, the client has 7 days from the day the order
is received to detect any failure and report that to Libelium. Any other failure reported after these 7 days may not be
considered under warranty.
• Do NOT open the casing. If you do so, you will lose the guarantee.
• Do not remove any of the components.
• Do not allow contact between metallic objects and the electronic part to avoid injury and burns.
• NEVER immerse the equipment in any liquid.
• Keep the equipment in a dry place away from any liquids that could spill.
• Check from the label that comes with the equipment the maximum permitted voltage and amperage range for powering
it and use a power transformer within that range.
• Keep the equipment within the temperature range indicated in the specications section.
• Do not connect or power the equipment using cables that have been damaged.
• Place the equipment in an area to which only maintenance personnel can have access (in a restricted access zone)
• In any case keep children away from the machine.
• If there is a power failure, immediately disconnect from the mains.
• If using the car lighter as a power source, make sure that you follow the voltage and current specications indicated in the
section “How to use Meshlium”.
• If using a battery whether or not in combination with a solar panel as a power source follow the voltage and current
specications indicated in the section “How to use Meshlium”.
• If a software failure occurs, consult the section Libelium web support.
• Do not place the equipment on trees or plants as they could be damaged by its weight.
• Be particularly careful if you are connected through an interface to the software for handling the machine; if the settings of
that interface are incorrectly altered, it could become inaccessible.
Page 7

-7-
v5.0
Important: read me before using
Meshlium
X
treme
2. Important: read me before using
The following list shows just some of the actions that produce the most common failures and warranty-voiding. Complete
documentation about usage can be found at:
http://www.libelium.com/development/meshlium/technical_service
Failure to comply with the recommendations of use will entail the guarantee cancellation.
Software:
• Do not access Meshlium with the shell terminal unless you have advanced Linux skills. Use the Meshlium Manager web
application in order to congure and setup Meshlium. A bad usage of the shell terminal commands may leave Meshlium
without connection or within a unstable mode. All the failures derived from a wrong usage of the shell terminal are not
covered under the warranty.
• In the case you congured Meshlium through the terminal, there is not a method to take Meshlium to the conguration by
default: the only way to get connection again is sending Meshlium back to Libelium and hiring this service. However, if you
only use the Manager System, you can always go to the default conguration by clicking the “Presets” button.
• Do not interrupt the power supply before shutting down Meshlium properly through the “Shutdown” or “Restart” buttons
in the Manager System or through the ’restart-secure’ and ’shutdown-secure’ commands from the terminal. If you do
not do so you may take the system corrupted.
• If you need to modify a le or directory, after executing the command ’remountrw’ and modifying it, execute immediately
the command ’remountro’.
• In the case of developing an application for Meshlium, store the les in ’/mnt/user’ and not in other directory.
• Regarding packages:
- Do not ever use ’apt-get’; if needed, use ’aptitude’.
- Do not ever make an ’upgrade’ of the entire system (not even using ’aptitude’).
- Before installing new packages with ’aptitude’, execute the ’update’ option.
• The SSH password cannot contain special chars (e.g. $, %, =). The SSH password can only be composed of letters and
numbers. Be careful since Meshlium could be damaged with a not appropriate password.
Hardware:
• Do not open the Meshlium enclosure in any case. This will automatically make the warranty void.
• Do not handle the numbered metallic seals in the screws of Meshlium: their integrity is the proof that the Meshlium
enclosure has not been opened. If they have been handled, opened or broken, the warranty is void.
• Do not submerge Meshlium in liquids.
• Do not place Meshlium on places or equipment where the device could be exposed to shocks and/or vibrations.
• Do not expose Meshlium to temperatures below -20º C or above 50º C.
• Meshlium’s microprocessor must not overpass 70 Celsius degrees. The user must ensure that this temperature never
overpass. Especially when using Wi Scan.
• Do not power Meshlium with other power sources than the original provided by Libelium.
For more information: http://www.libelium.com/meshlium
Page 8
-8-
v5.0
Contents of the box
Meshlium
X
treme
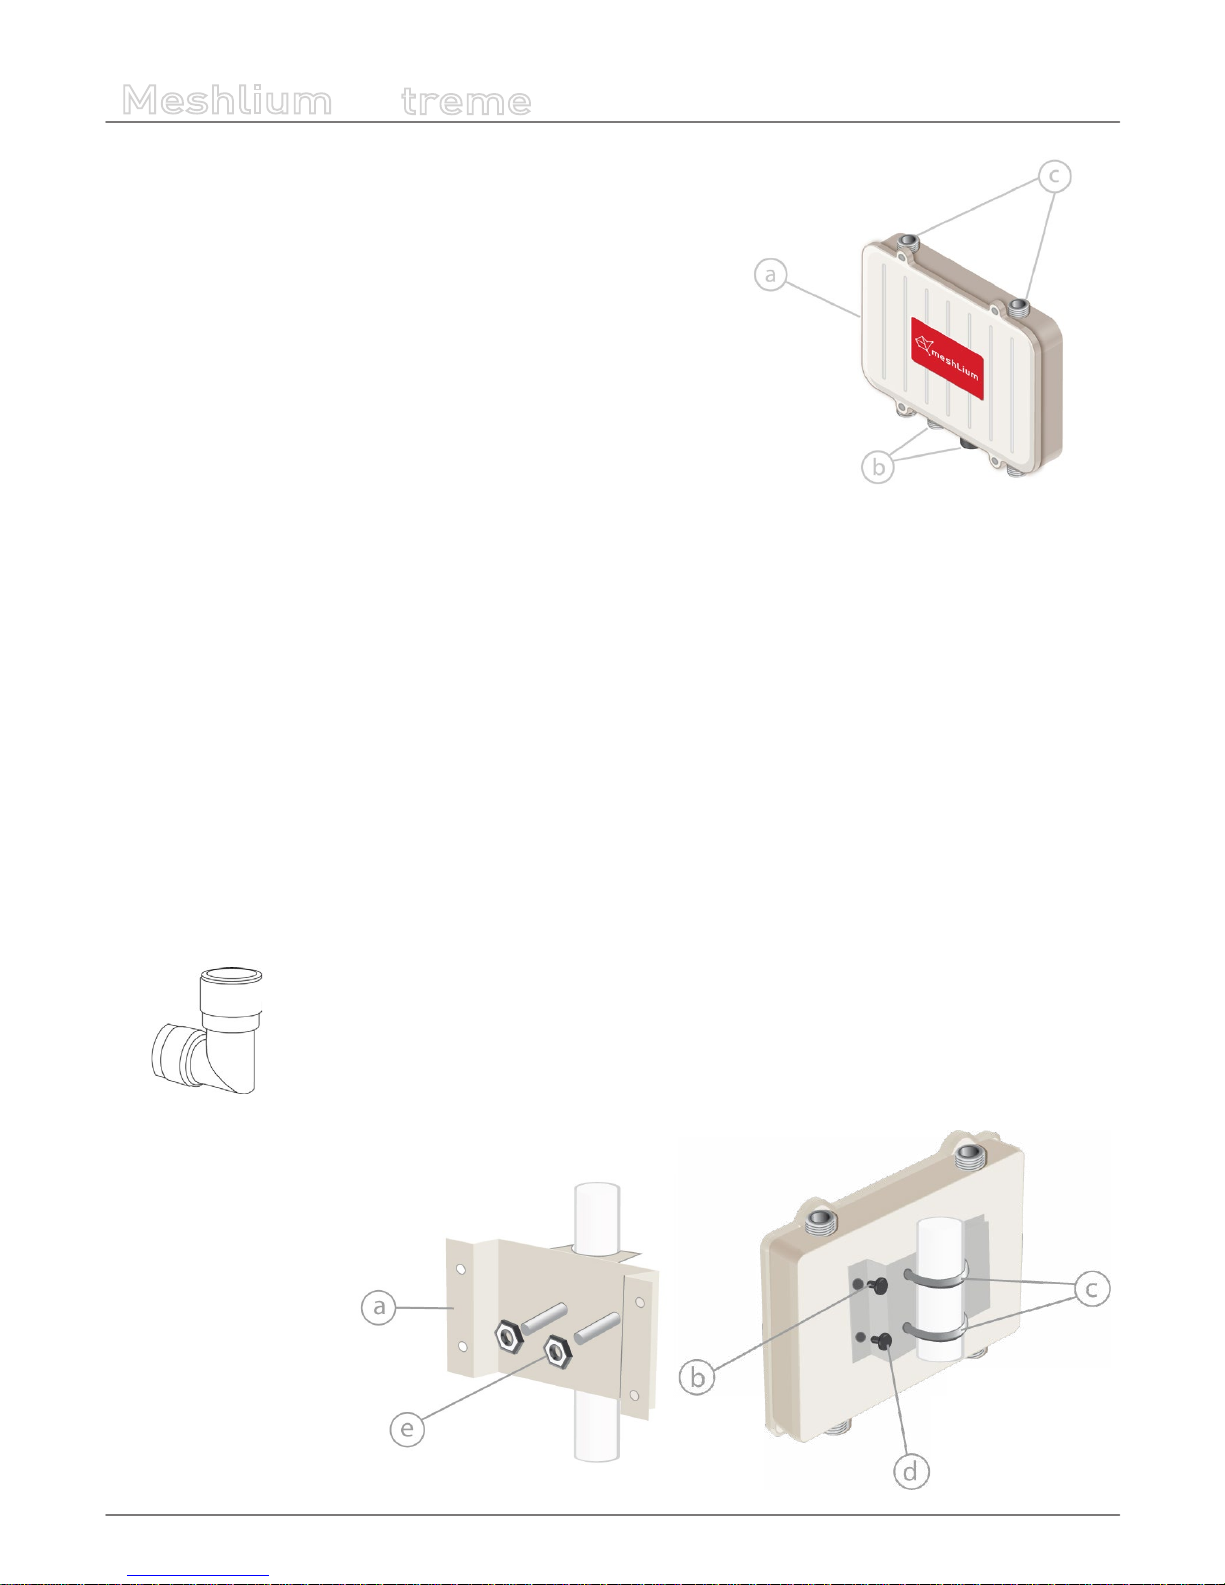
3. Contents of the box
1. Meshlium
a. IP65 casing
b. Ethernet connectors
c. Antenna connectors
2. Antennas
*
a. Dipole 5dBi
(Bluetooth, ZigBee, Wi 2.4GHz low)
b. Dipole 5dBi (868MHz, 900MHz)
c. Omnidirectional 5dBi
Dual (2.4GHz / 5GHz)
d. 3G/GPRS
e. 3G/GPRS
f. GPS
(*) ewwpends on the conguration you choose when you buy
3. Antennas elbow connectors
*
(*) Allow to connect antennas at 90º angle, if needed
4. Fixing
a. Fixing plate
b. 4 washers
c. 2 U-shaped parts
d. 4 screws
e. 4 nuts
Page 9
-9-
v5.0
Contents of the box
Meshlium
X
treme
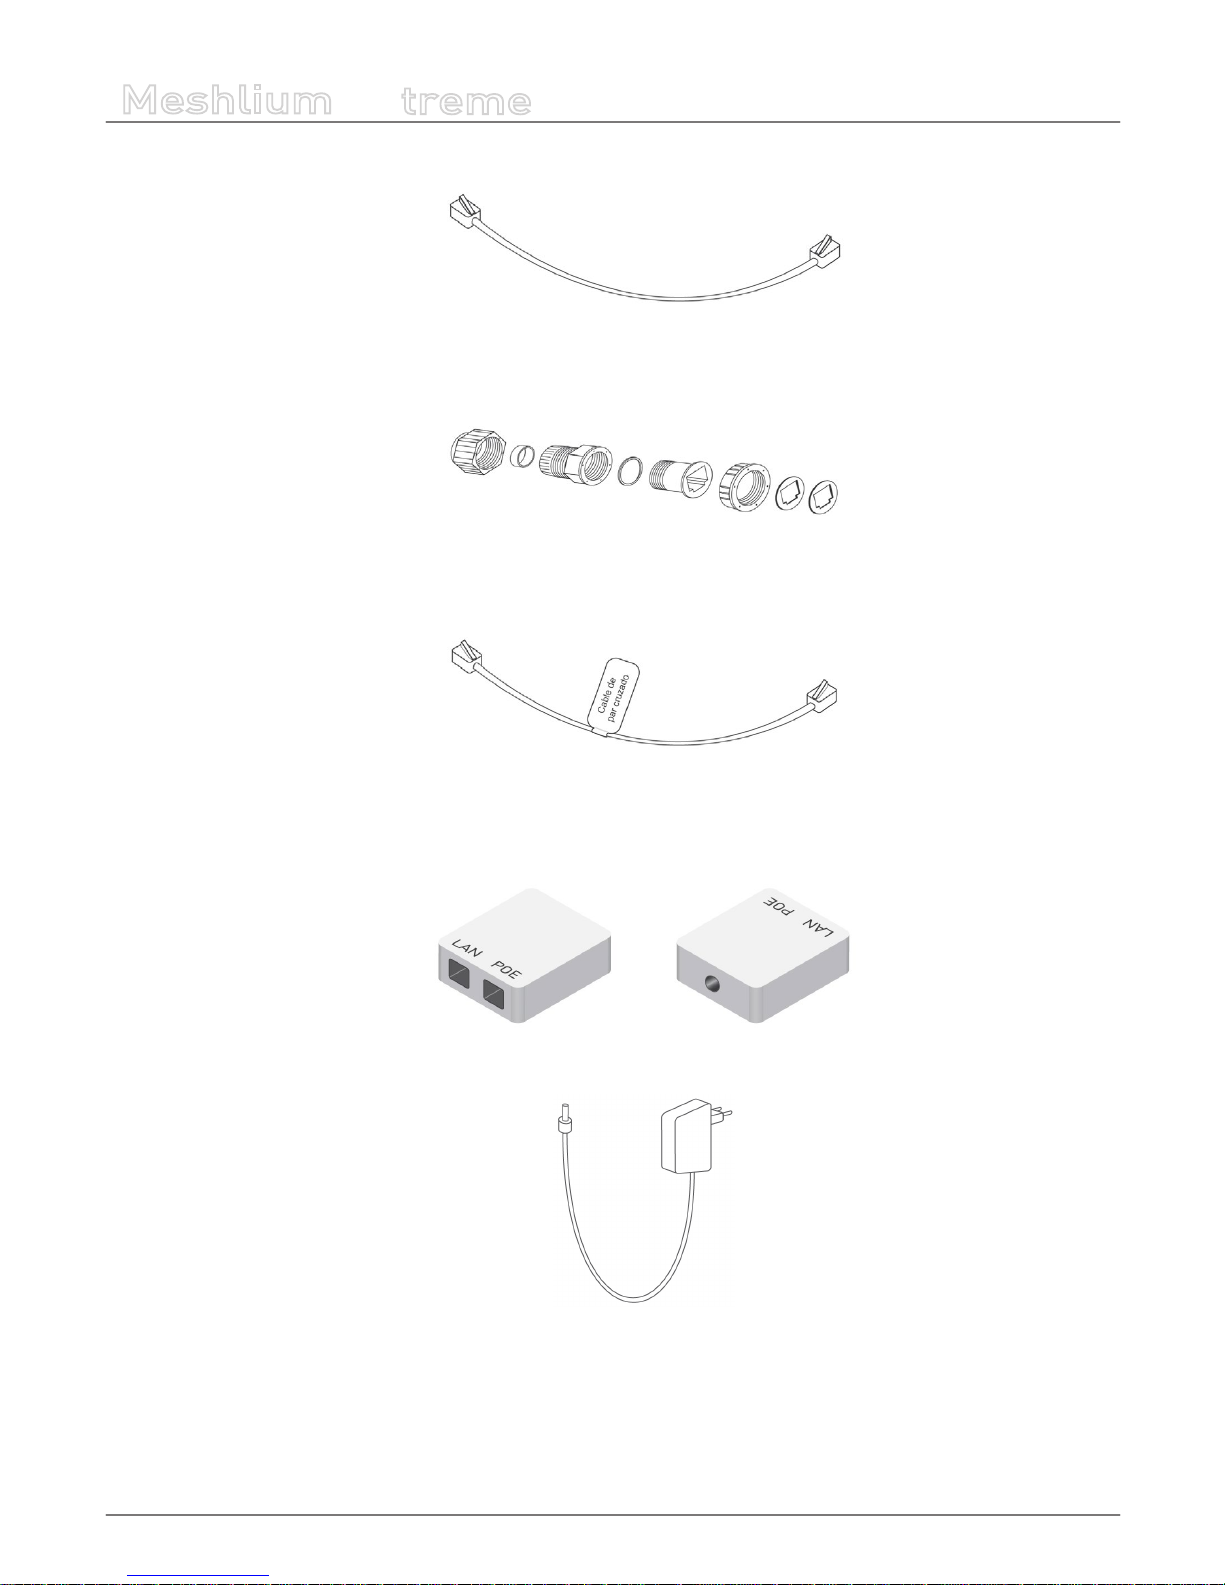
5. Ethernet cable
6. IP65 Ethernet cap
7. Crossover cable
8. POE
9. Charger
Note: you may receive an empty foam protector in the packaging, depending on the Meshlium conguration that you have purchased.
Page 10
-10-
v5.0
Specications
Meshlium
X
treme
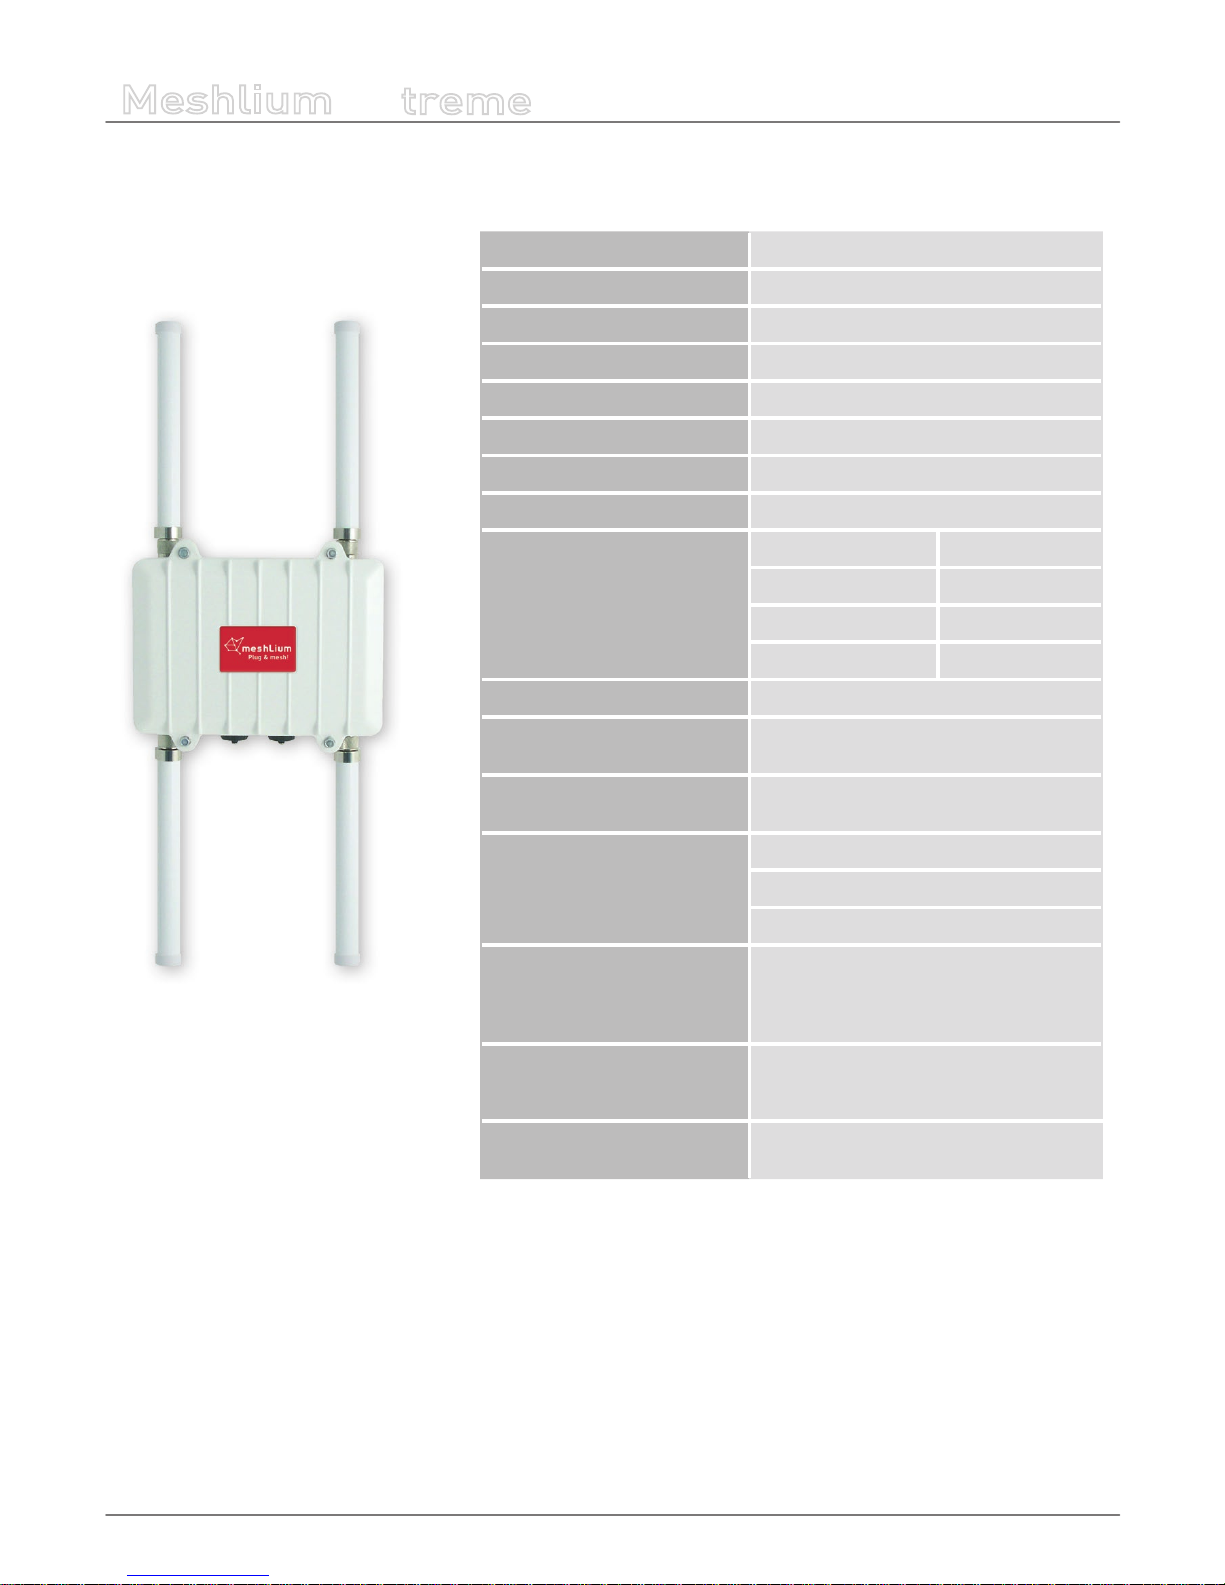
4. Specications
Processor 500MHz (x86)
RAM memory 256MB (DDR)
Disk memory 8GB
Power 5W (18V)
Power Source POE (Power Over Ethernet)
Normal Current Consumption 270mA
High Current Consumption 450mA
Max Supply Current 1’5A
Enclosure
Material Aluminium
Dimensions 210x175x50mm
Weight 1,2Kg
External protection IP65
Temperature Range -20ºC / 50ºC
Response Time to ethernet
ping
60s
Time to have all the services
running
90s
Types of power supply
*
for POE
AC-220V
Battery – solar panel (DC-12V)
Car lighter (DC-12V)
System
Linux, Debian. OLSR Mesh communication
protocol.
Madwi Drivers.
Management software
Meshlium Manager System
(open source)
Security
Authentication WEP, WPA-PSK, HTTPS and
SSH access.
(*) Only with the accessories supplied by Libelium
Page 11
-11-
v5.0
Specications
Meshlium
X
treme
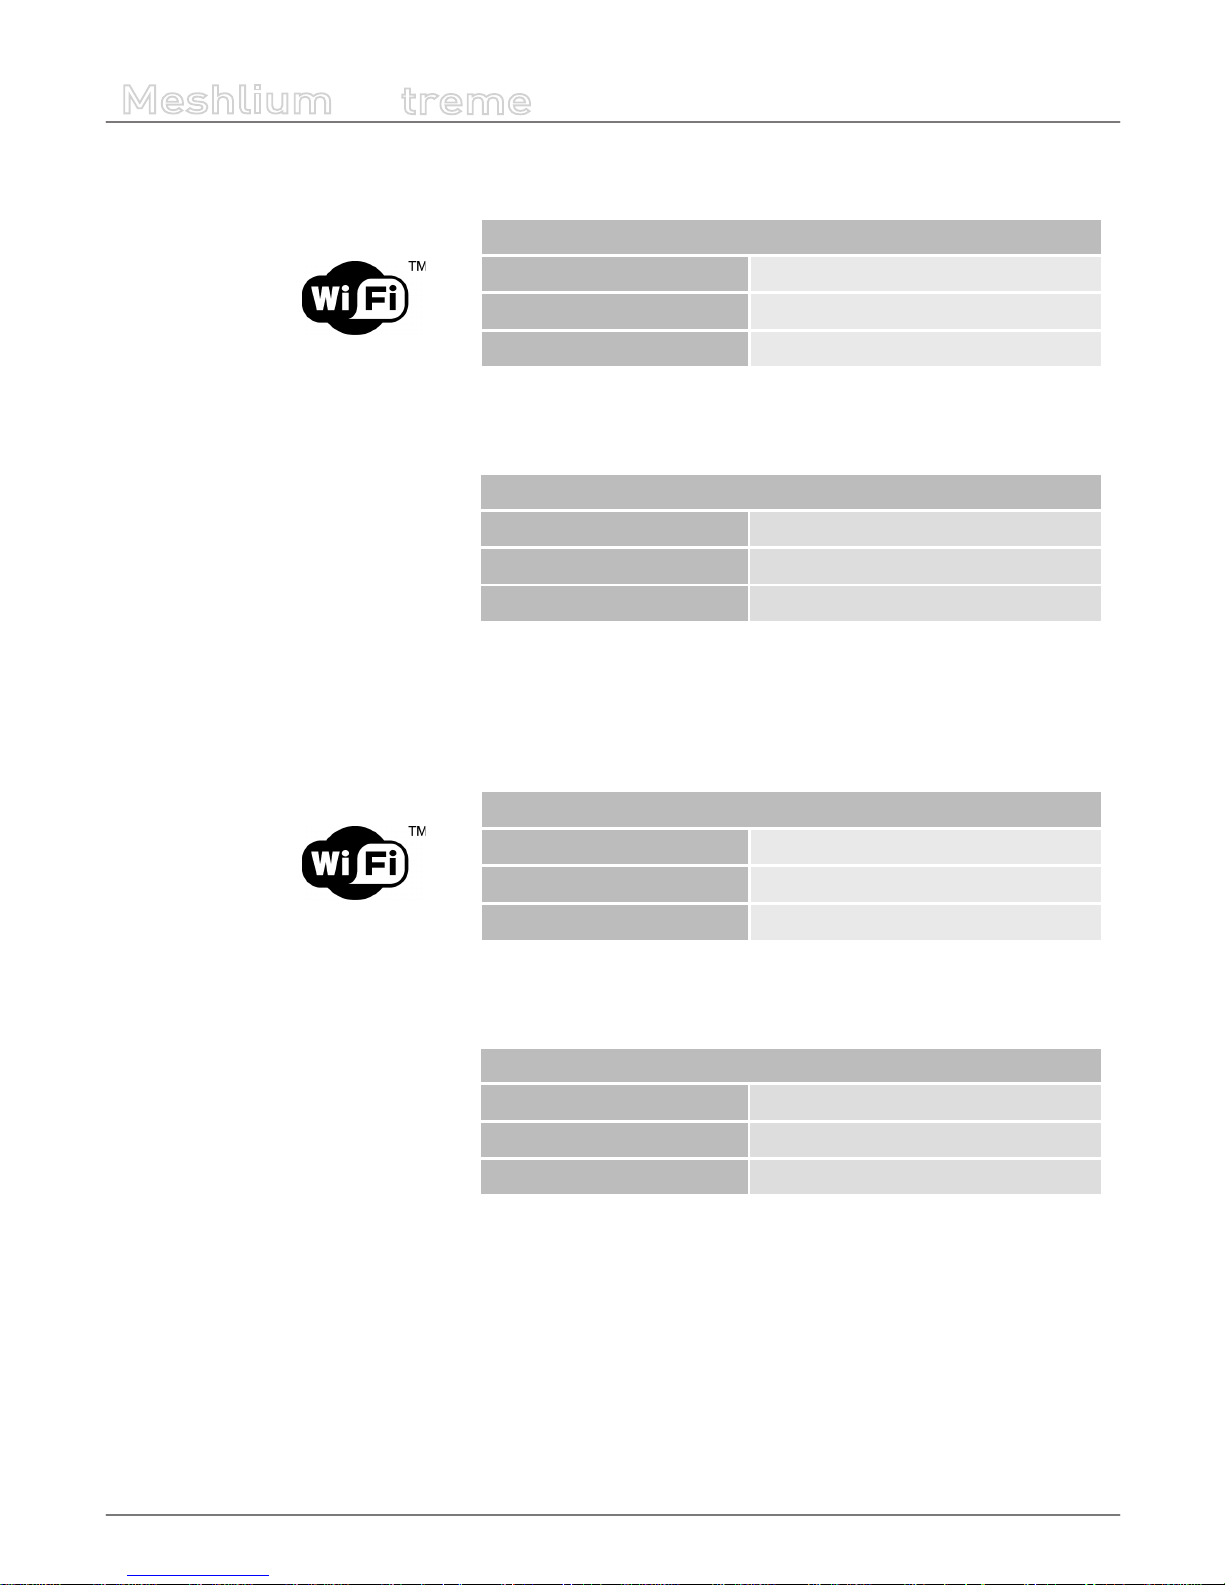
Wi AP - 2.4GHz Radio
WIFI RADIO
Chipset Atheros AR5213A - IEEE 802.11b/g
Tx-Power 100mW - 20 dBm
Distance 500m
*
(*) Depending on antenna and line of sight
ANTENNA
Type Omni-directional
Gain 5dBi
Dimensions 224 x 22 mm
Wi Mesh Dual Band 2.4 GHz / 5GHz Radio
WIFI RADIO
Chipset Atheros AR5213A - IEEE 802.11a/b/g
Tx-Power
20dB - 802.11b/g / 18dB - 802.11a
Distance 2-50km
*
(*) Depending on antenna and line of sight
ANTENNA
Type Omni-directional
Gain 5dBi - 2.4GHz / 8dBi - 5GHz
Dimensions 224 x 22 mm
Page 12
-12-
v5.0
Specications
Meshlium
X
treme
RF Module Radio (Xbee or LoRa)
Model XBee - PRO - 802.15.4
Frequency 2.4GHz
Tx-Power 100mW
Rx Sensitivity -100dBm
Antenna 5dBi Dipole
Distance 7km
*
Model XBee - PRO - ZigBee
Frequency 2,4GHz
Tx-Power
50mW
Rx Sensitivity -102dBm
Antenna
5dBi Dipole
Distance
7km
*
Model XBee - PRO - 868
Frequency
868MHz
Tx-Power 315mW
Rx Sensitivity -112dBm
Antenna
5dBi Dipole
Distance 12km
*
Model XBee - PRO - 900
Frequency 900MHz
Tx-Power 50mW
Rx Sensitivity -100dBm
Antenna 5dBi Dipole
Distance 10km
*
Model Semtech SX1272
Frequency 868 and 915 MHz
Tx-Power 14 dBm
Rx Sensitivity -137 dBm
Antenna 4.5 dBi dipole
Distance 21+ km
*
(*) Depending on antenna and line of sight
Page 13
-13-
v5.0
Specications
Meshlium
X
treme
RF Module Radio (Xbee or LoRa) (continuation)
Model XBee - PRO - Digimesh
Frequency 2.4GHz
Tx-Power 100mW
Rx Sensitivity -100dBm
Antenna 5dBi Dipole
Distance 7km
*
(*) Depending on antenna and line of sight
Wi Scanner
Chipset Atheros AR5213A - IEEE 802.11b/g
Distance 50-200m
*
Antenna 5dBi Dipole
(*) Depending on antenna and line of sight
Bluetooth Scanner
Protocol Bluetooth 2.1 + EDR. Class 2
Tx-Power 3dBm
Antenna 5dBi
Power 3dBm
Distance 20-30m
*
(*) Depending on antenna and line of sight
Page 14
-14-
v5.0
Specications
Meshlium
X
treme
3G/GPRS Module
Protocols 3G * , WCDMA, HSPA, UMTS, GPRS, GSM
Tri Band
900MHz/1900MHz/2100MHZ or
850MHz/1900MHz/2100MHZ
Output power
UMTS 850/900/1900/2100: 0.25W
GSM850/GSM900: 2W
DCS1800/PCS1900: 1W
Rx Rate 7.2Mb/s
Tx Rate 5.5Mb/s
Antenna 3dBi
SIM card Access via the External SIM socket
(*) Note for US users: We tested the 3G shield with the AT&T network which supports natively the GSM and 3G protocols. With other
carriers may also work although we haven’t tried and thus we can not ensure it. For this reason we recommend to use AT&T SIM
cards.
GPS Module
Modes
Assisted GPS (A-GPS),
Standalone mode (NMEA frames)
Server
Server enabled to perform even indoor
location ins A-GPS and S-GPS modes
Antenna 26dBi (+-4.5dBi) - 3m cable. Magnetic
Page 15
-15-
v5.0
Accessories
Meshlium
X
treme
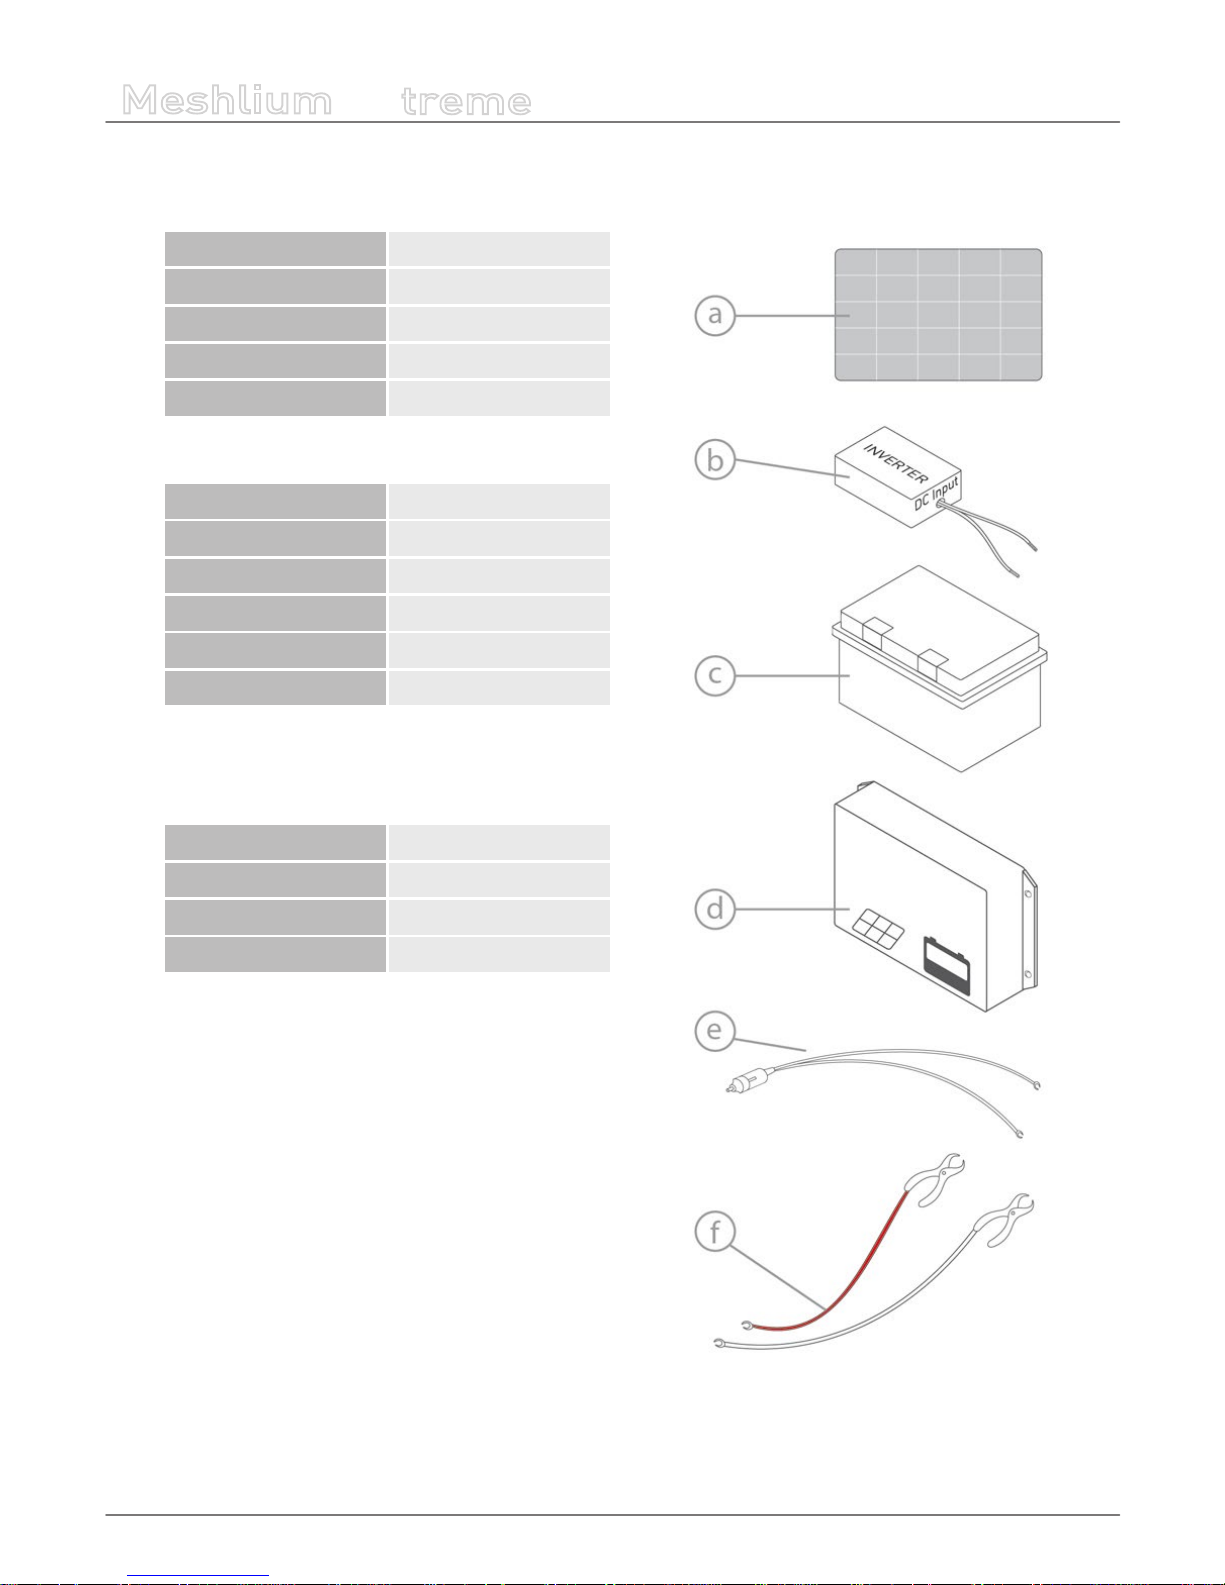
5. Accessories
Meshlium accessories are not included in the box.
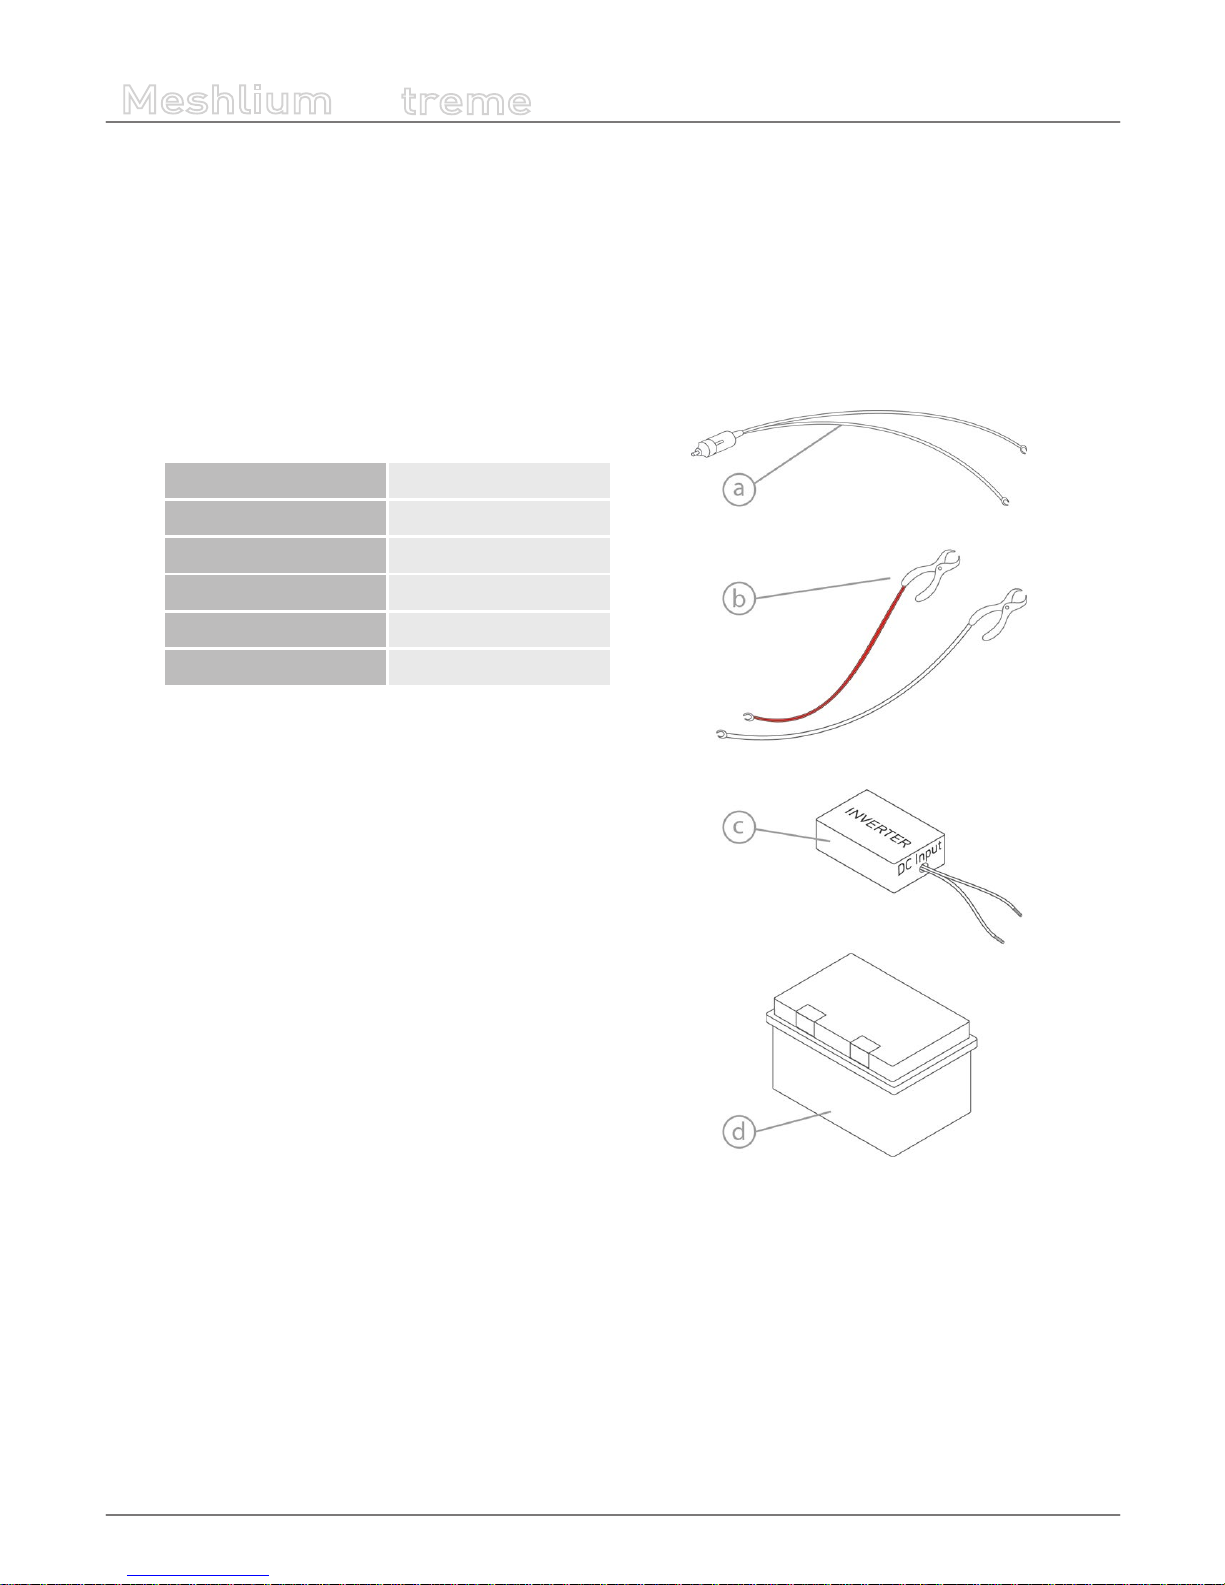
1. 220AC Adapter - car lighter/battery (12V – 300W)
a. Car lighter adapter (on demand)
b. Battery clamps
*
c. 12 VDC - 220 VAC converter
Average power 300 W
Maximum power 600 W
Input voltage 12 VDC
Output voltage 220 VAC
Dimensions 205x165x67 mm
Weight 1 Kg
d. 12 VDC Battery
*
(*) Libelium does not supply these components;
you can purchase it from battery sales points
Page 16
-16-
v5.0
Accessories
Meshlium
X
treme
2. Solar connection kit (12V – 20W):
a. Solar panel
Power 20 W
Maximum voltage 17 V
Maximum current 1.15 A
Dimensions 480x430x30 mm
Weight 2.50 Kg
b. 12 VDC - 220 VAC converter
Average power 300 W
Maximum power 600 W
Input voltage 12 VDC
Output voltage 220 VAC
Dimensions 205x165x67 mm
Weight 1 Kg
c. 12 VDC Battery
*
d. Charge regulator
Charge voltage range 11.10V - 21.20V
Maximum input current 5A
Dimensions 130x70x25 mm
Weight 200 g
e. Car lighter adapter (on demand)
f. Battery clamps
*
(*) Libelium does not supply these components;
you can purchase it from battery sales points
Page 17
-17-
v5.0
How to use Meshlium
Meshlium
X
treme
6. How to use Meshlium
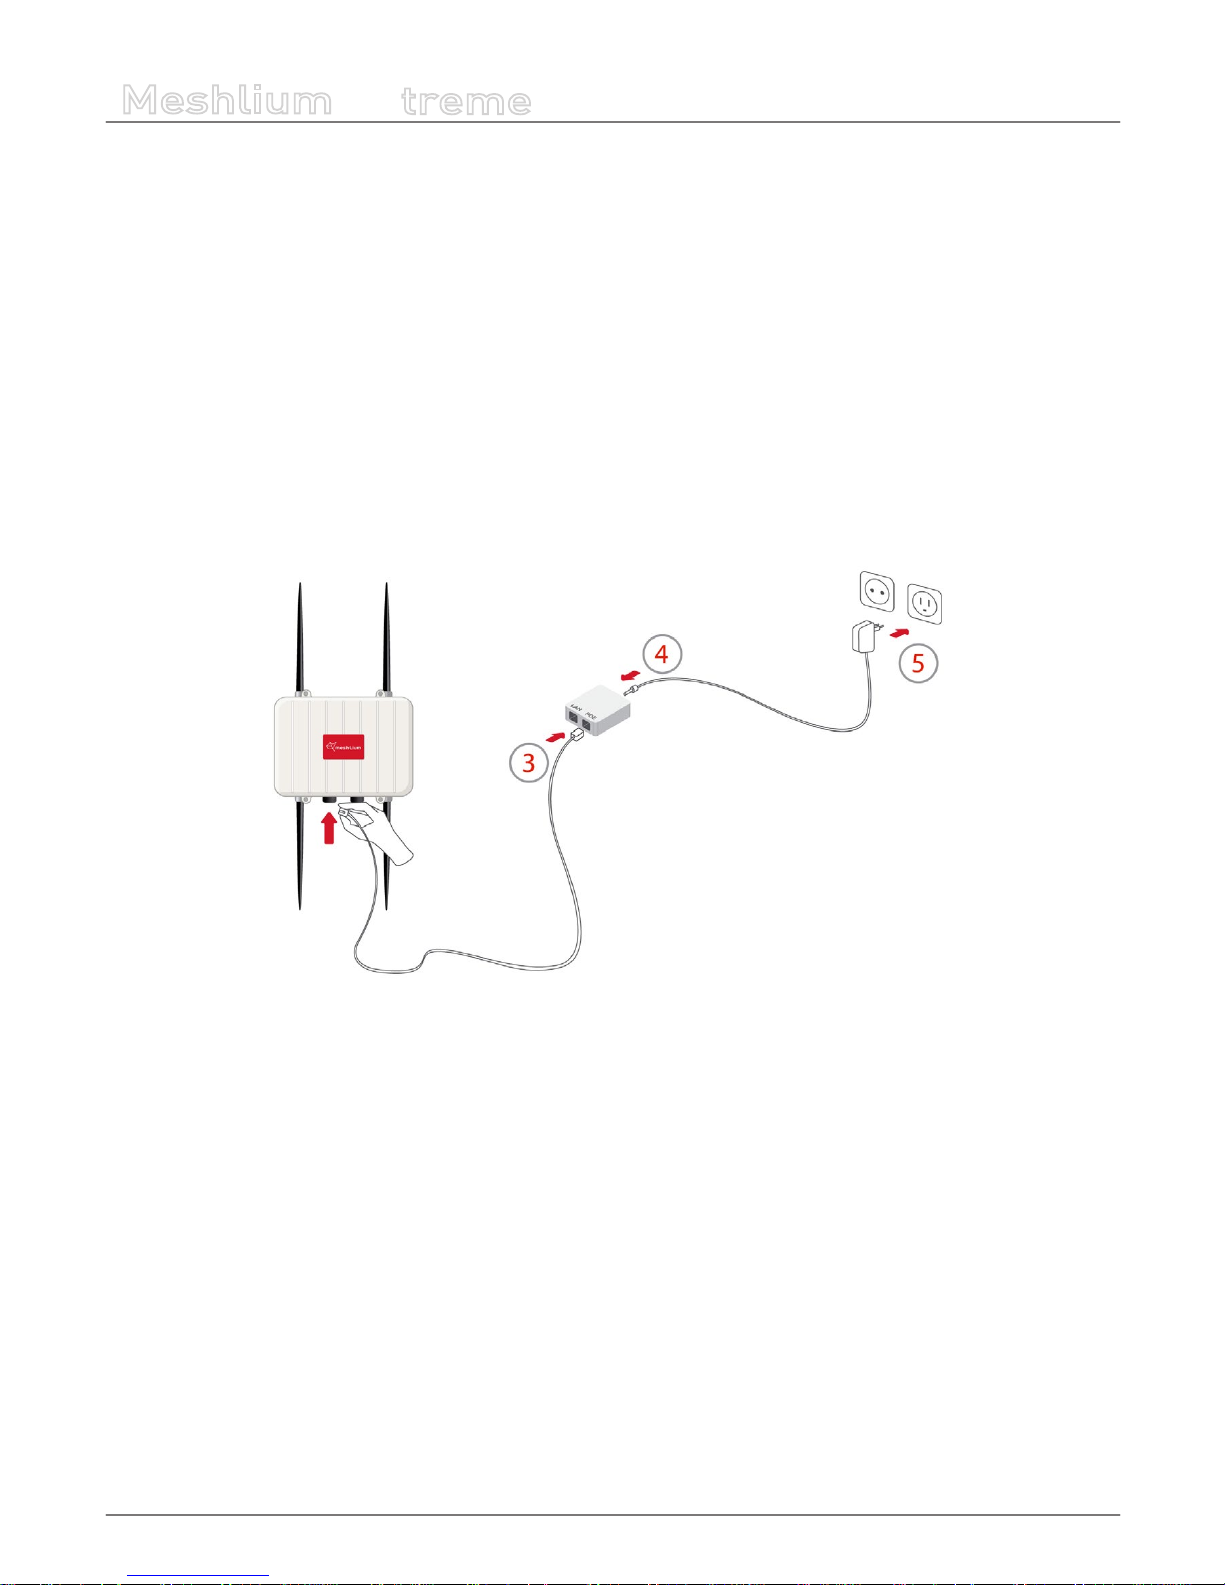
6.1. Power supply
How to connect Meshlium to 220V:
1. Take the Meshlium casing and unscrew the Ethernet connector cap shown in the drawing.
2. Join the end that has the IP65 protection of the IP65 Ethernet cable to said connector and screw the cap on to x it.
3. Connect the other end of the cable to the POE input marked “POE”. As explained in the section “Before using Meshlium”
make sure that the POE is indoors.
4. Take the supplied POE power adapter and plug it into the corresponding POE connector.
5. Plug the other end of the adapter into the 220V socket and your Meshlium is now ready to operate.
In addition to this option, you can power Meshlium through a solar panel and battery or through a car lighter socket. The
accessories for these options are NOT included in the box, and the necessary components must be purchased from Libelium.
Except for the battery it is not recommended to use third party components since they have not been tested by Libelium and
could cause failures in the device.
At Libelium we oer an equipment for operating at 12V. It is very important to bear in mind that not all batteries supply the
same voltage. You must use a 12V battery .
Note: Take special care to ensure that the battery you connect has the same power rating as the kit that you have purchased.
Page 18
-18-
v5.0
How to use Meshlium
Meshlium
X
treme
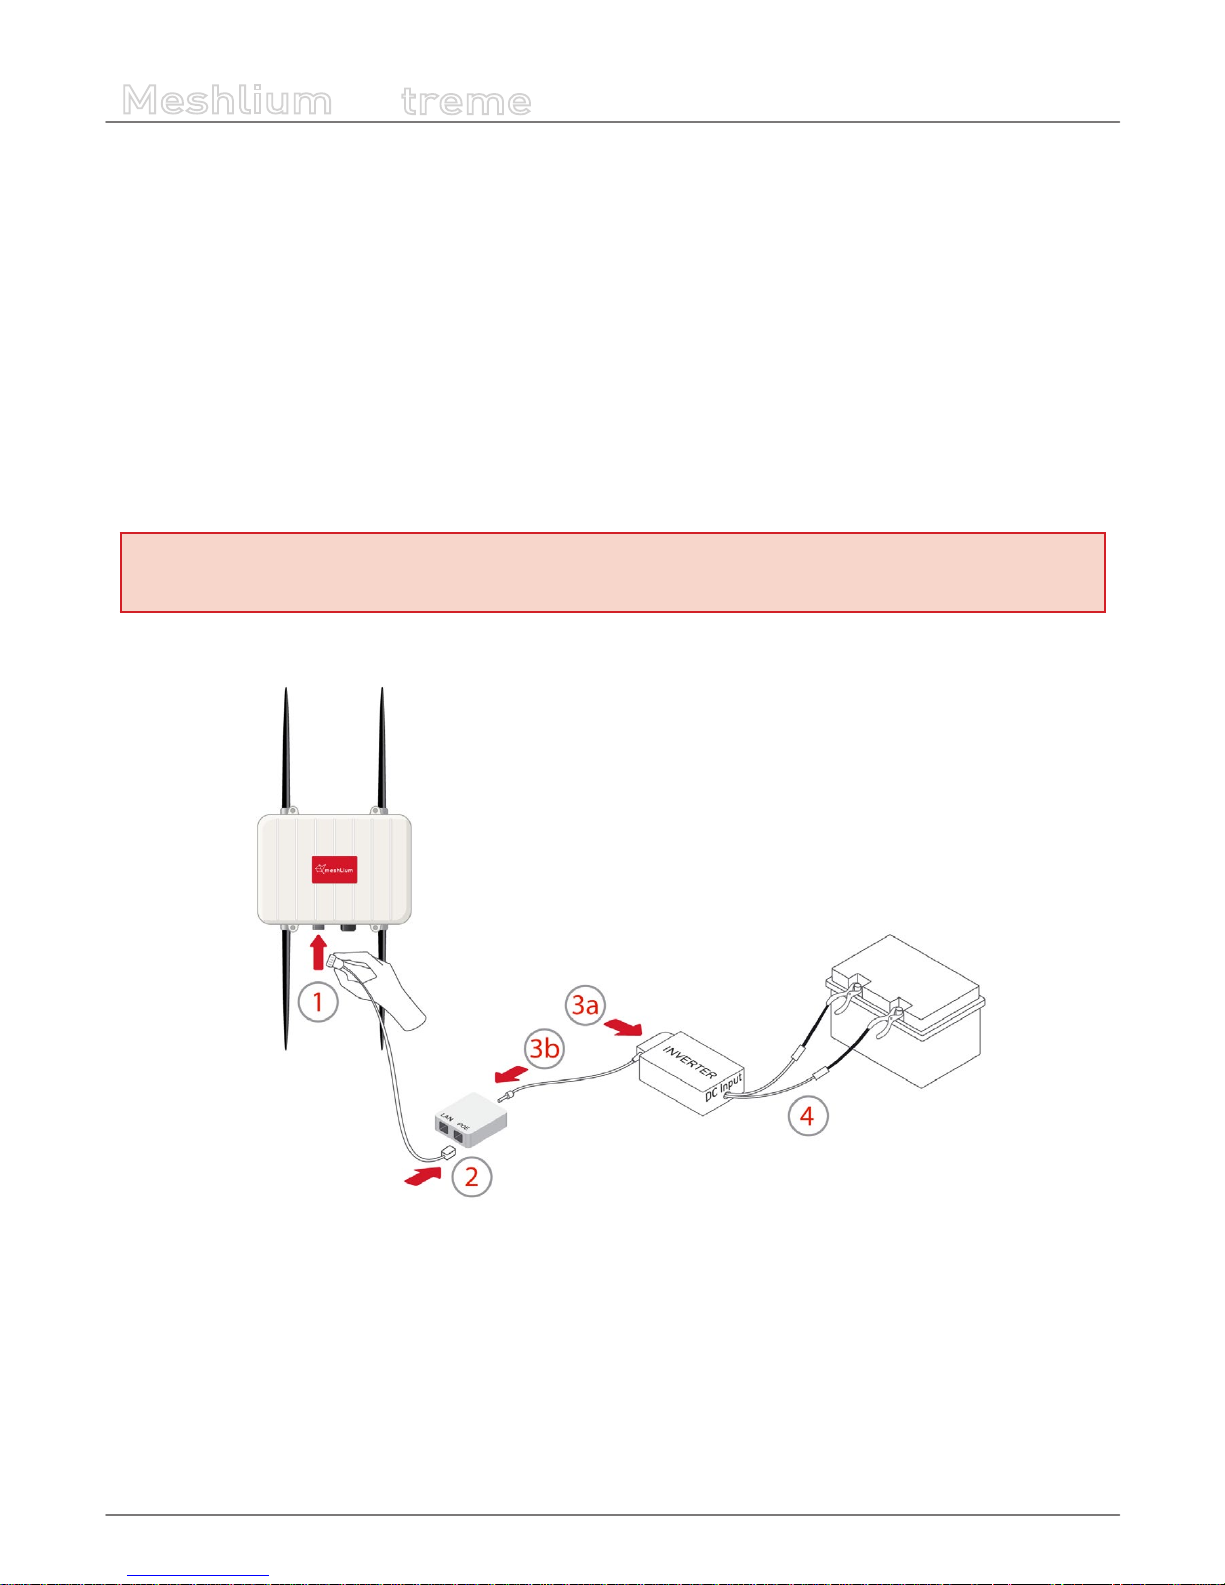
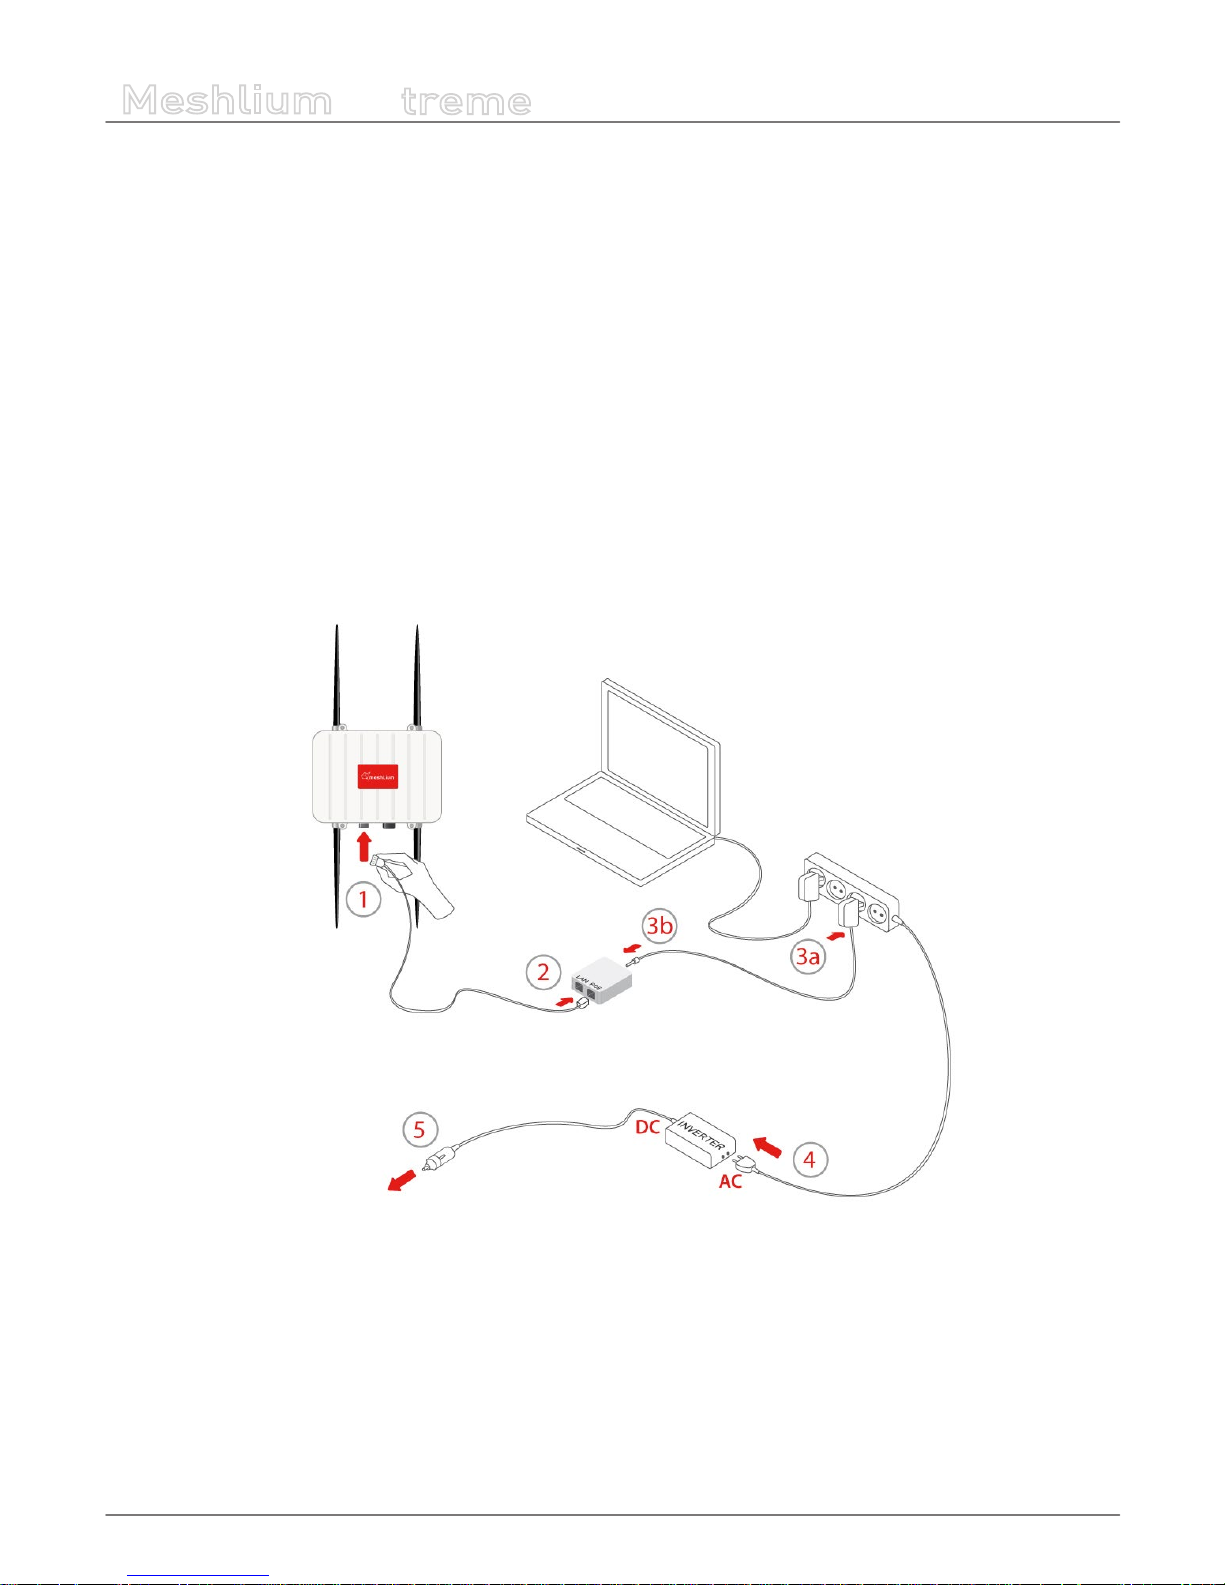
How to connect Meshlium for powering through the battery:
Additional required components: 12V battery, with exposed terminals for placing the clamps.
1. Connect the end with the IP65 protection of the Ethernet cable to the Meshlium connector that does not have the cap.
2. Connect the end of the Ethernet cable to the POE input marked “POE”. As explained in the section “Before using Meshlium”
make sure that the POE is indoors.
3a. Plug the POE charger into the Inverter output (AC output).
3b. Connect the POE charger cable into the POE.
4. Connect the ends of the cables which come from the Inverter to the battery. To do so, it is advised to use battery clamps.
In this case the cables of the Inverter must be spliced to the cables of the clamps, and they are the clamps the part that is
connected to the terminals of the 12 VDC battery.
Important: Check polarity at all times before making the connections. It is advised to avoid the possibility of contact with the
positive and negative polo at any time. There is lethal shock hazard and the devices can also be damaged.
Page 19
-19-
v5.0
How to use Meshlium
Meshlium
X
treme
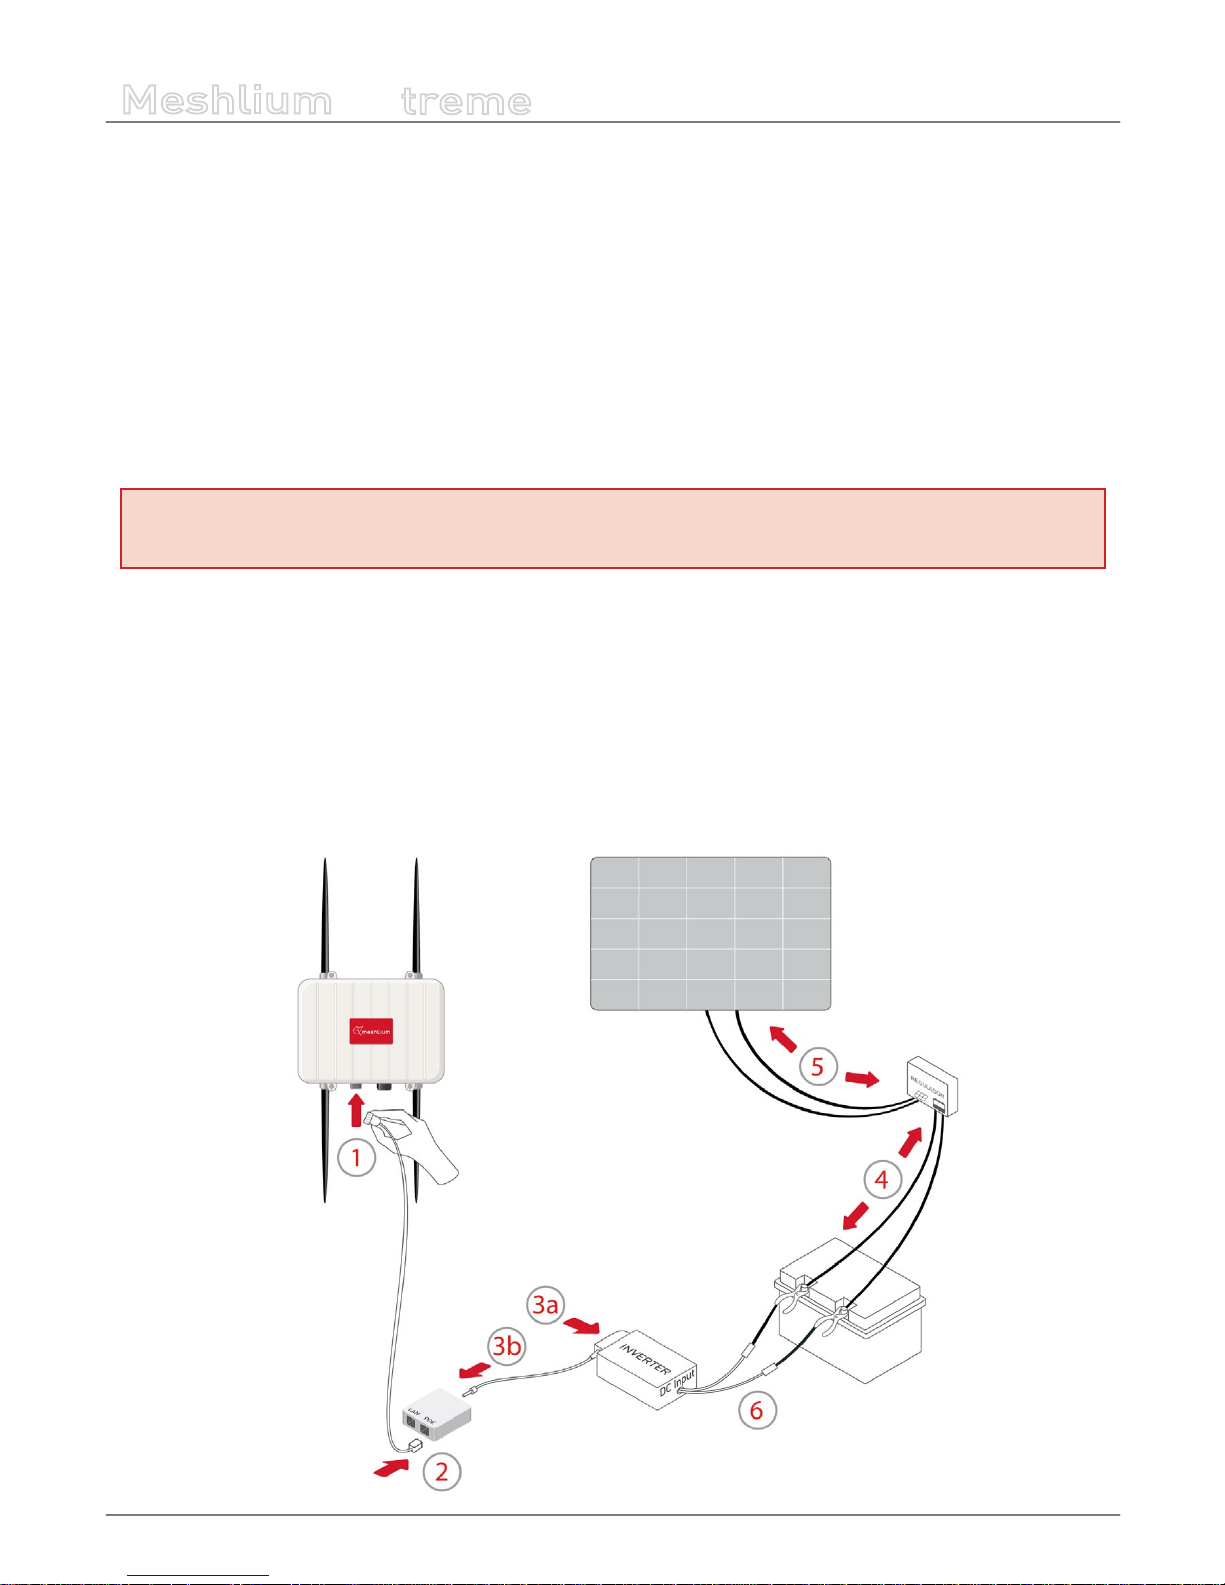
How to connect Meshlium for solar panel and battery powering:
Additional required components: solar panel / 12V-220V and 12V battery, with exposed terminals for placing the clamps.
Important: Check polarity to make sure that the positive (+) and negative (-) poles are connected to the right socket.
1. Connect the end with the IP65 protection of the Ethernet cable to the Meshlium connector that does not have the cap.
2. Connect the end of the Ethernet cable to the POE input marked “POE”. As explained in the section “Before using Meshlium”
make sure that the POE is indoors.
3a. Plug the POE charger into the Inverter output (AC output).
3b. Connect the POE charger cable into the POE.
Important: Check polarity at all times before making the connections. It is advised to avoid the possibility of contact with the
positive and negative polo at any time. There is lethal shock hazard and the devices can also be damaged.
4. Connect a cable to each battery terminal and screw the other end into the socket of the Charge Regulator marked as
“battery”. Take polarity (+) / (-) into consideration.
5. Connect the solar panel cables into the socket of the Charge Regulator marked as “solar”. Take polarity (+) / (-) into
consideration.
6. Connect the ends of the cables which come from the Inverter to the battery. To do so, it is advised to use battery clamps.
In this case the cables of the Inverter must be spliced to the cables of the clamps, and they are the clamps the part that is
connected to the terminals of the 12 VDC battery.
Page 20
-20-
v5.0
How to use Meshlium
Meshlium
X
treme
How to connect Meshlium for powering through a car lighter:
In this case, you must purchase the required components from Libelium. We do not advise using third party components as they
have not been tested by Libelium and could cause failures in the device or the car.
Important: Bear in mind that not all car lighters supply the same voltage. The Inverter oered by Libelium works at 12 V DC input
voltage. Although it must be checked in each case, cars normally have 12 V as output of the lighter.
1. Connect the end with the IP65 protection of the IP65 Ethernet cable to the Meshlium connector without the cap.
2. Connect the other end of the cable to the POE input marked “POE”. As explained in the section “Before using Meshlium”
make sure that the POE is indoors.
3a. Plug the POE charger into the Inverter output (AC output). You can also connect it to a multi-socket adapter, as the image
shows.
3b. Connect the POE charger cable into the POE.
4. In the case of using a multi-socket adapter, connect the end of its cable to the Inverter.
5. Plug the end of the cable which comes out from the Inverter to the lighter socket of a car.
Page 21
-21-
v5.0
How to use Meshlium
Meshlium
X
treme
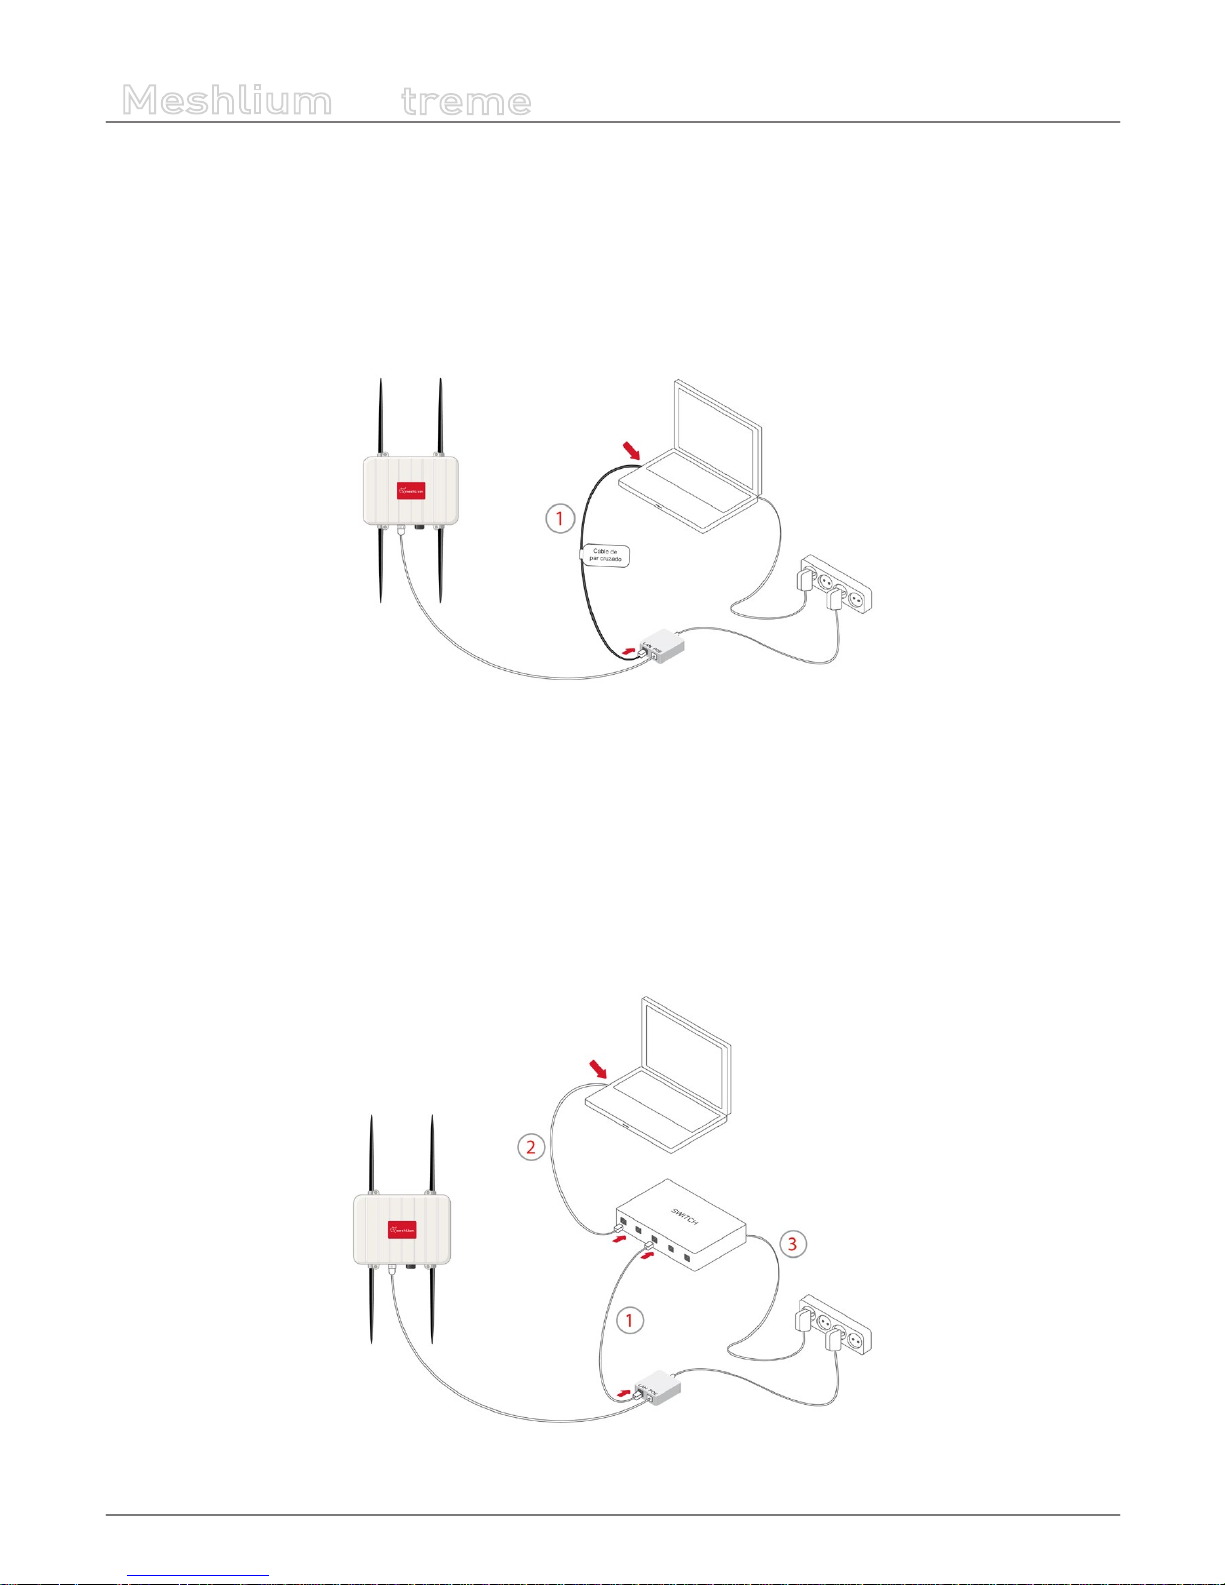
How to connect Meshlium in order to get access by the Ethernet interface:
1. Connect the network crossover cable (it has an identifying label) included in the box to the POE input marked “LAN” and to the
network socket of your PC as shown in the drawing. The procedure is the same for any of the selected power supply options.
(*) See the “Accessing Meshlium” section in order to see how to get access wirelessly.
You can also carry out this connection through a switch (not supplied with Meshlium):
1. Connect the Ethernet cable (not the crossover) to the POE input marked “LAN” and to one of the switch inputs.
2. Connect another Ethernet cable to another one of the switch inputs and the opposite end to the network socket of your PC.
3. Plug the switch into the network.
(*) See the “Accessing Meshlium” section in order to see how to get access wirelessly.
Page 22

-22-
v5.0
How to use Meshlium
Meshlium
X
treme
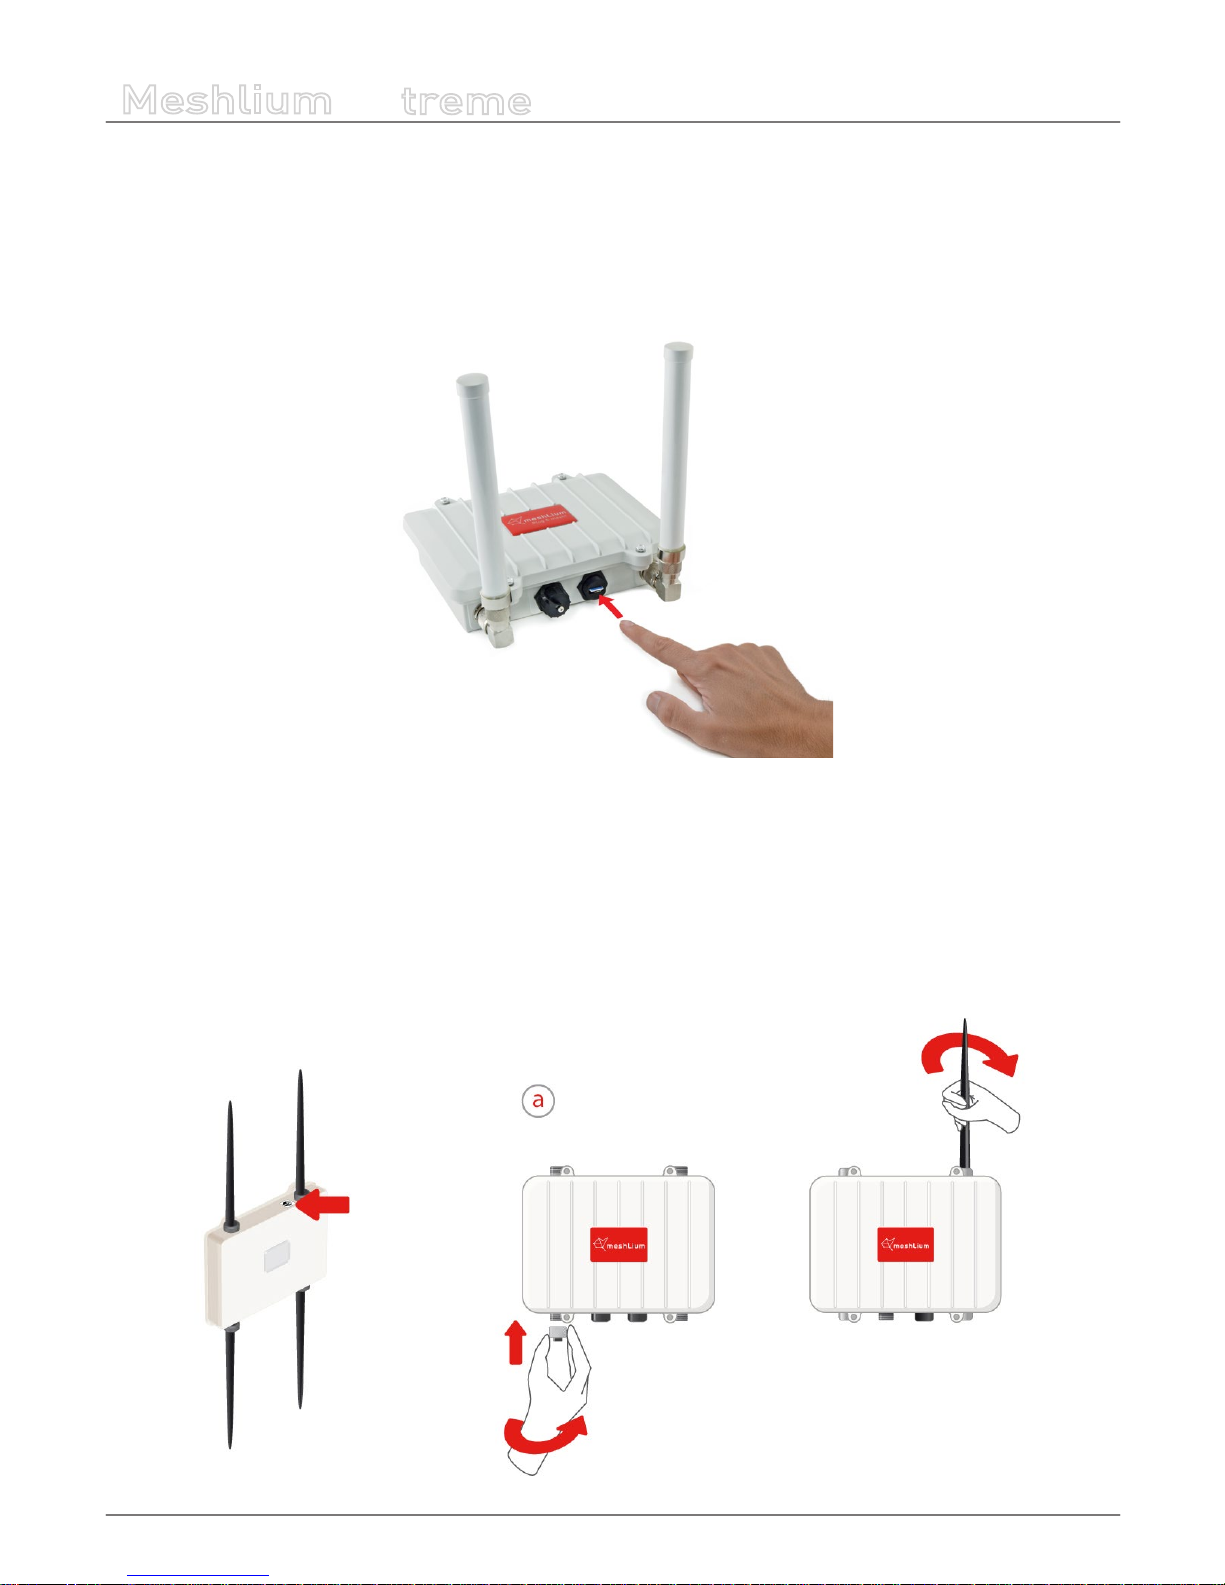
6.2. External SIM socket
The External SIM socket replaces the USB socket in two devices:
• Meshlium devices with 3G/GPRS module
• Waspmote Plug & Sense! devices with GPRS, GPRS+GPS or 3G+GPS module
The External SIM socket is composed of 2 connectors:
• micro-SIM card
• micro-USB (type B)
Figure : External SIM socket in a Meshlium with 3G/GPRS module
The micro-SIM card connector allows the user to connect the SIM card he likes from the outside. It is no longer necessary
to send a SIM card to Libelium for proper installation. You can ask your telecommunication provider for a microSIM card. Alternatively you can take a normal SIM card and transform it into a micro-SIM card with a SIM card cutter.
Besides, the micro-SIM card connector has a push-pull mechanism, so it is really easy to remove the card with the aid of one nail.
Figure : Push-pull mechanism in the External SIM socket
Page 23
-23-
v5.0
How to use Meshlium
Meshlium
X
treme
It is highly important to turn o Meshlium device in a secure way before inserting a micro-SIM card, or removing an existing
SIM-card. The user can damage the device if this operation is done “on-the-y”.
Make sure you closed the External SIM socket with its protection cap before outdoors deployment.
The operation with the micro-USB socket is just the same than with the normal USB socket (please read the Rescue System
section). Just remember to use a micro-USB cable.
Take into account that the External SIM socket has a limited resistance so please be gentle and do not push too hard.
Figure : Inserting a SIM card with care in the External SIM socket
6.3. How to install the antennas
Check the labels next to the antennas to know which is the one that needs to be connected (refer to page 7 to know which
technology corresponds to each antenna). If the antenna is of the GPS, 3G/GPRS, Wi or Dipole 5dBi (868MHz, 900MHz) type,
the corresponding adapter will have to be installed as indicated in gure “a“. All the antennas are screwed into place. To install
the Meshlium antennas place them in the corresponding connectors as shown in the drawing.
Page 24
-24-
v5.0
How to use Meshlium
Meshlium
X
treme
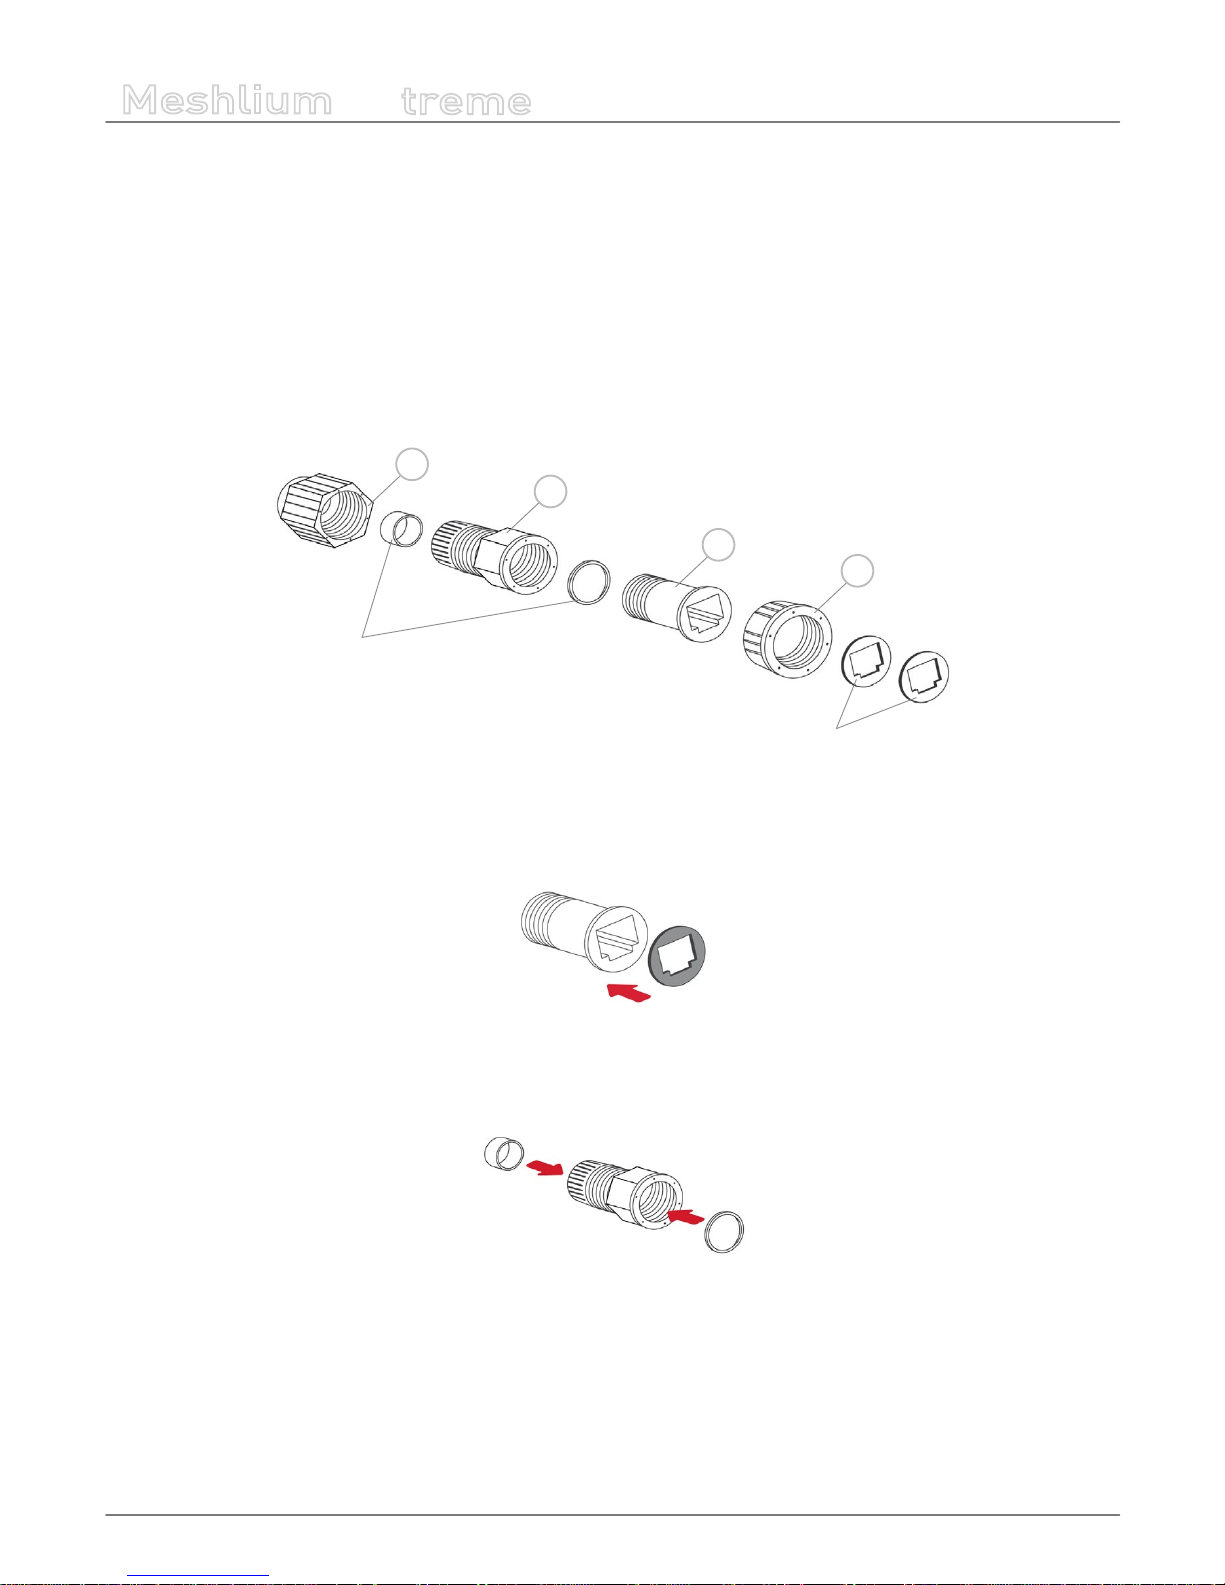
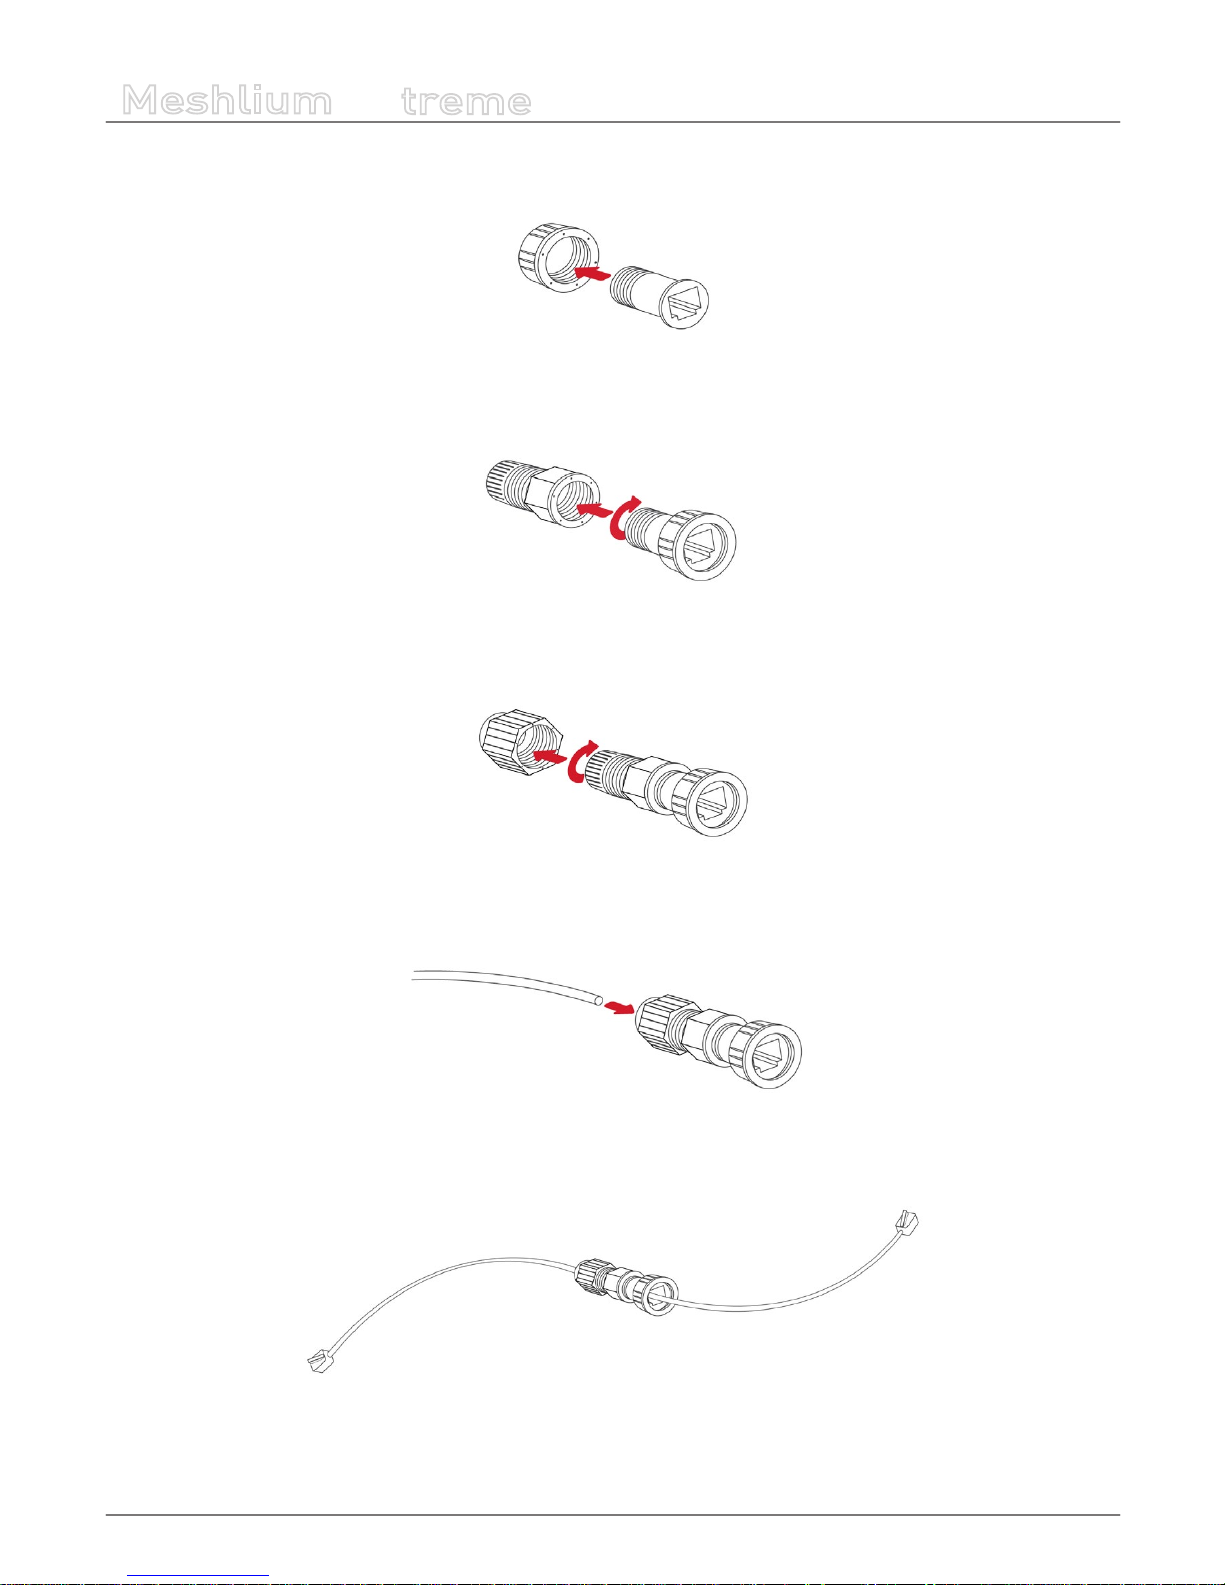
6.4. Installation of the IP65 Ethernet cable
Fitting of the IP65 cap:
In order to t the IP65 cap you will need a connector-free RJ45 cable. This cable is NOT included in the Meshlium box.
Important: Make sure that you buy a suciently long cable to connect Meshlium from its position to the POE situated indoors.
1. Take from the Meshlium box the bag containing the parts for xing the IP cap. Check that you have all the parts that appear
in the picture.
c
b
d
Joints
Adhesive joints
a
2 . Stick one of the supplied adhesive joints to part C.
3. Slot the joints into part B as shown in the drawing.
Page 25
-25-
v5.0
How to use Meshlium
Meshlium
X
treme
4. Insert part C into part D.
5. Screw both sets of parts in the direction shown in the diagram.
6. Screw part D to the end.
7. Pass the cable through the tted cap.
8. Crimp the RJ45 connectors at the ends of the cable (the crimping tool is not supplied with Meshlium).
Your IP65 Ethernet cable is now ready for use.
Page 26

-26-
v5.0
How to use Meshlium
Meshlium
X
treme
How to connect the IP65 Ethernet cable to Meshlium:
1. Take the adhesive joint that has not been used for tting the cap and stick it to the Meshlium bare Ethernet connector.
2. Connect the end of the Ethernet cable to the Meshlium Ethernet socket.
3. Screw part C onto the Meshlium connector. Your Meshlium is now ready for using outdoors.
Page 27
-27-
v5.0
How to use Meshlium
Meshlium
X
treme
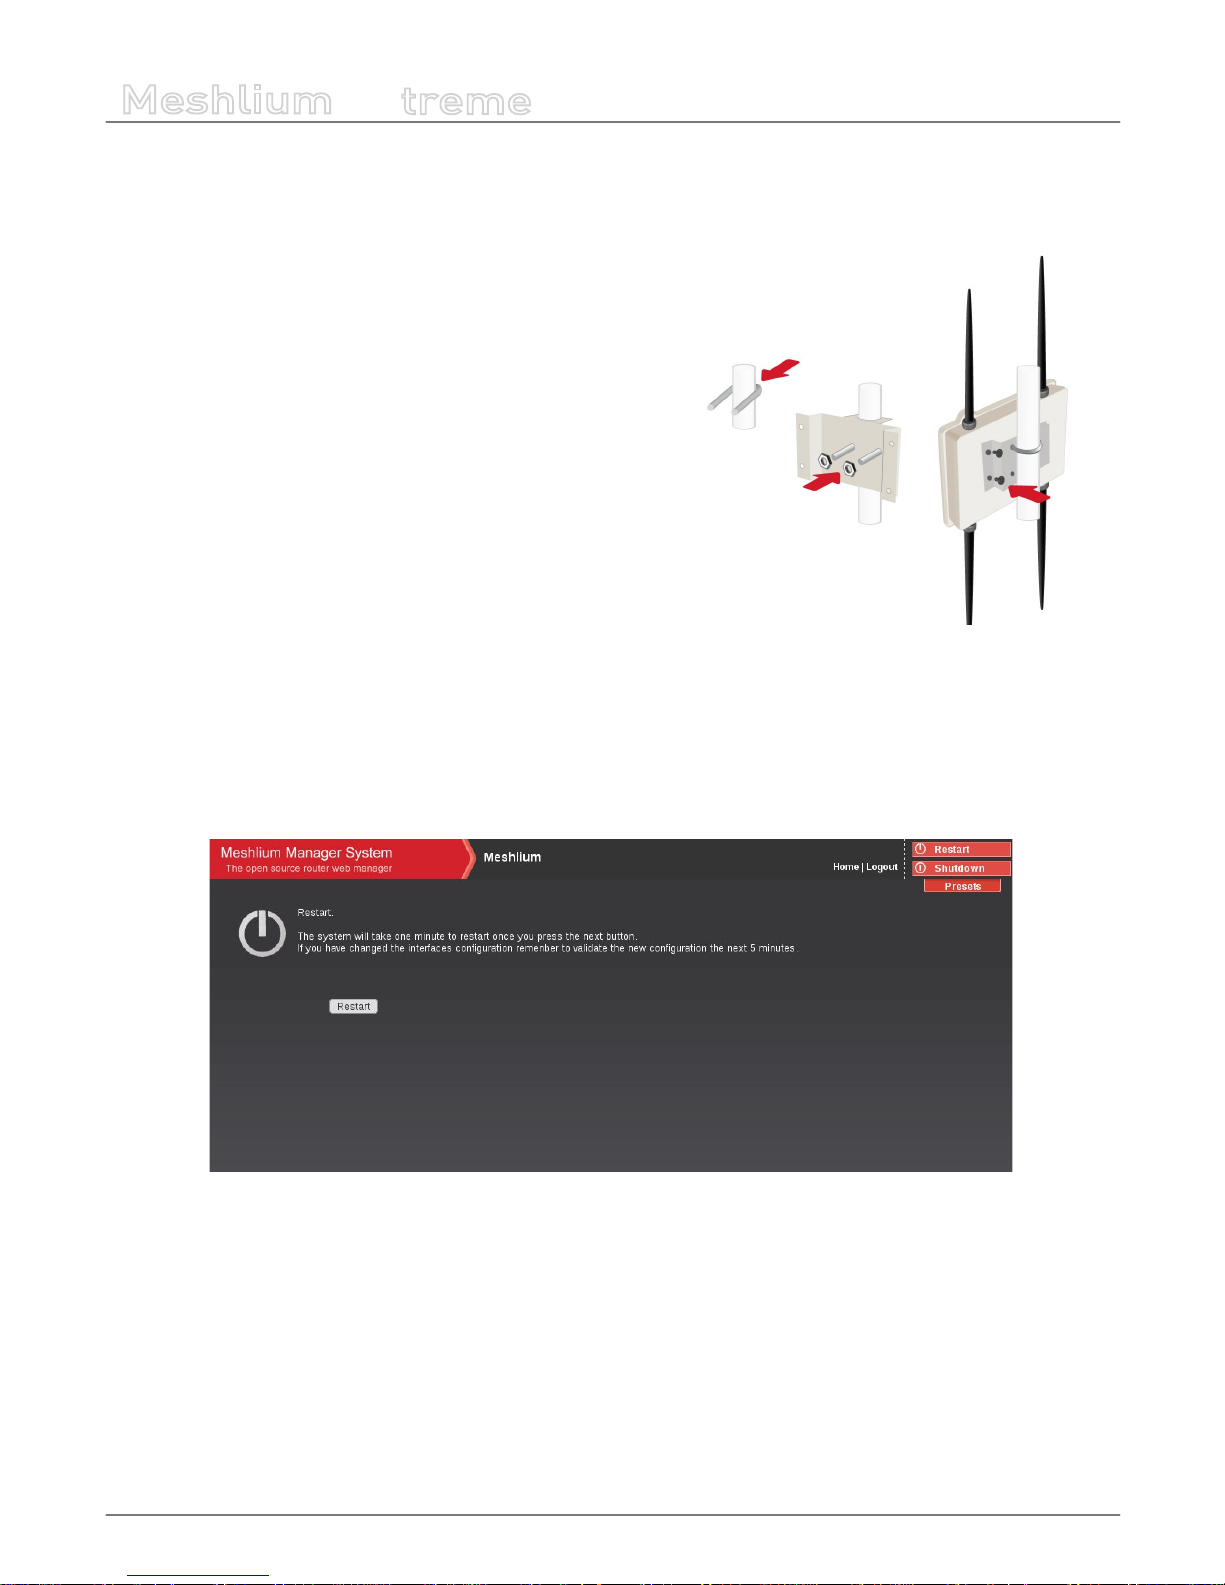
6.5. Installing Meshlium
Meshlium has been designed to operate in a vertical position. You will nd the required xtures for this in the box. The image
shows the steps to follow to secure Meshlium to a vertical post.
1. Place the U-shaped piece tted against the post.
2. Slot the xing plate into the U-shaped piece leaving the post
between the two parts. Secure both parts by turning the nuts
included in the U-piece. Repeat these steps with the second
U-piece.
3. Place Meshlium so that the casing holes coincide with the xing
plate and x Meshlium to the post by turning the screws into these
holes.
As specied in the section “General and Safety Information” the device
must be installed by trained personnel only in an area of restricted
access.
6.6. Initialization, Restart and Shutdown
In order to allow Meshlium to close correctly all the daemons and applications it is important to use the buttons “Restart” and
“Shutdown” placed in the upper right corner in the Manager System. This way you will keep maximum the performance and
lifetime of the system.
If you are connected to Meshlium through a SSH connection you must use the following scripts:
/bin/restart-secure
/bin/shutdown-secure
They can be executed from the terminal directly:
$ restart-secure
$ shutdown-secure
Page 28

-28-
v5.0
How to use Meshlium
Meshlium
X
treme
Beep! System
Meshlium includes an internal speaker which will emit “beep!” sounds when initializing, rebooting and shutting down in order
to inform about the state of the process.
Initialization beeps:
• 1 short beep when Meshlium is powered
• 1 long beep when Meshlium starts launching the operate system
• 2 long beeps when Meshlium has nished starting and it is ready to be used
Reboot beeps:
• long beep when the reboot order is executed.
• Initialization beeps when Meshlium starts again.
• Do not remove the power cable during this process is carried out.
Shutting down beeps:
• This process could take up to one minute.
• 2 long beeps when Meshlium is about to shutdown. A few seconds after the beeps, Meshlium can be unplugged.
• Do not remove the power cable until this process is totally completed.
Note: The “beep!” sound is not really loud so you will have to take attention and be close to the Meshlium box in order to hear them
clearly.
Note 2: If Meshlium is unplugged before the acoustic signal of shutdown, internal memory could be damaged. Be sure to wait for
several minutes if you are not sure the beeps sounded.
Note 3: The duration of the reboot or shut-down processes may vary. Make sure you heard the corresponing beeps and be patient.
Note 4: If the user does not follow these instructions, the risk is very high. Meshlium will become unresponsive and unaccessible. This
problem is out of the warranty scope, because it is produced by bad use. The only possible solution will be a repair process in Libelium’s
facilities, paid by the user.
6.7. Setting the time
In order to get all the data stored in the Meshlium Local Data Base with the right timestamp you must adjust the System time.
To do so go to the “Setting the Time” section inside the “System” chapter in the current manual.
Page 29

-29-
v5.0
Understanding Meshlium
Meshlium
X
treme
7. Understanding Meshlium
7.1. Concepts
Meshlium is a Linux router which can contain 6 dierent radio interfaces: Wi 2.4GHz, Wi 5GHz, 3G/GPRS, Bluetooth and RF
communications. RF communications may be implemented by one XBee module or one LoRa module. As well as this Meshlium
can also integrate a GPS module for mobile and vehicular applications and be solar and battery powered. These features along
with an aluminium IP65 enclosure allows Meshlium to be placed anywhere outdoor.
Meshlium can work as:
• an RF (XBee/LoRa) to Ethernet router for Waspmote nodes
*
• an RF (XBee/LoRa) to 3G/GPRS router for Waspmote nodes
*
• a Wi Access Point
• a Wi Mesh node (dual band 2.4GHz-5GHz)
• a Wi to 3G/GPRS router
• a Bluetooth scanner and analyzer
• a GPS-3G/GPRS real-time tracker
• a Smartphone scanner (detects iPhone and Android devices)
(* ) More info about Waspmote at: http://www.libelium.com/waspmote
All the networking options can be controlled from two dierent sources:
1. Manager System: a web interface which comes with Meshlium. It allows you to control all the interfaces and system
options in a secure, easy and quick way.
2. SSH console: for expert users direct access to the shell console is enabled.
Meshlium is also a complete Linux station which oers dierent services, programming environments and storage systems:
Services activated:
• HTTP / HTTPS
• SSH
Examples of programming environments to be installed:
• C (by default)
• C++
• Java
• PHP (by default)
• Python
• Perl
• Ruby
Regarding the information storage Meshlium counts with two dierent data base systems.
• MySQL (by default)
• Postgre
Page 30
-30-
v5.0
Understanding Meshlium
Meshlium
X
treme
All the information coming from all the interfaces (RF module [XBee/LoRa], Bluetooth, 3G/GPRS, Wi and from the GPS module)
can be stored in the Local File System and/or the Local Data Base as explained in the “Storage Options” section or even exported
to an external Data Base connected to the Internet.
Also, when Meshlium is the central node in a Wireless Sensor Network, it can perform the OTA feature (over the air programming).
That is to say, Meshlium can send to some (or all) Waspmotes in the network a new program via wireless. This feature is
available for Meshliums with all XBee radios (802.15.4, DigiMesh, 868 MHz and 900 MHz) with the exception of Meshliums with
ZigBee radio. Also, OTA can be performed with Waspmotes with GPRS, 3G or WiFi. For more information, please read the OTA
Programming Guide.
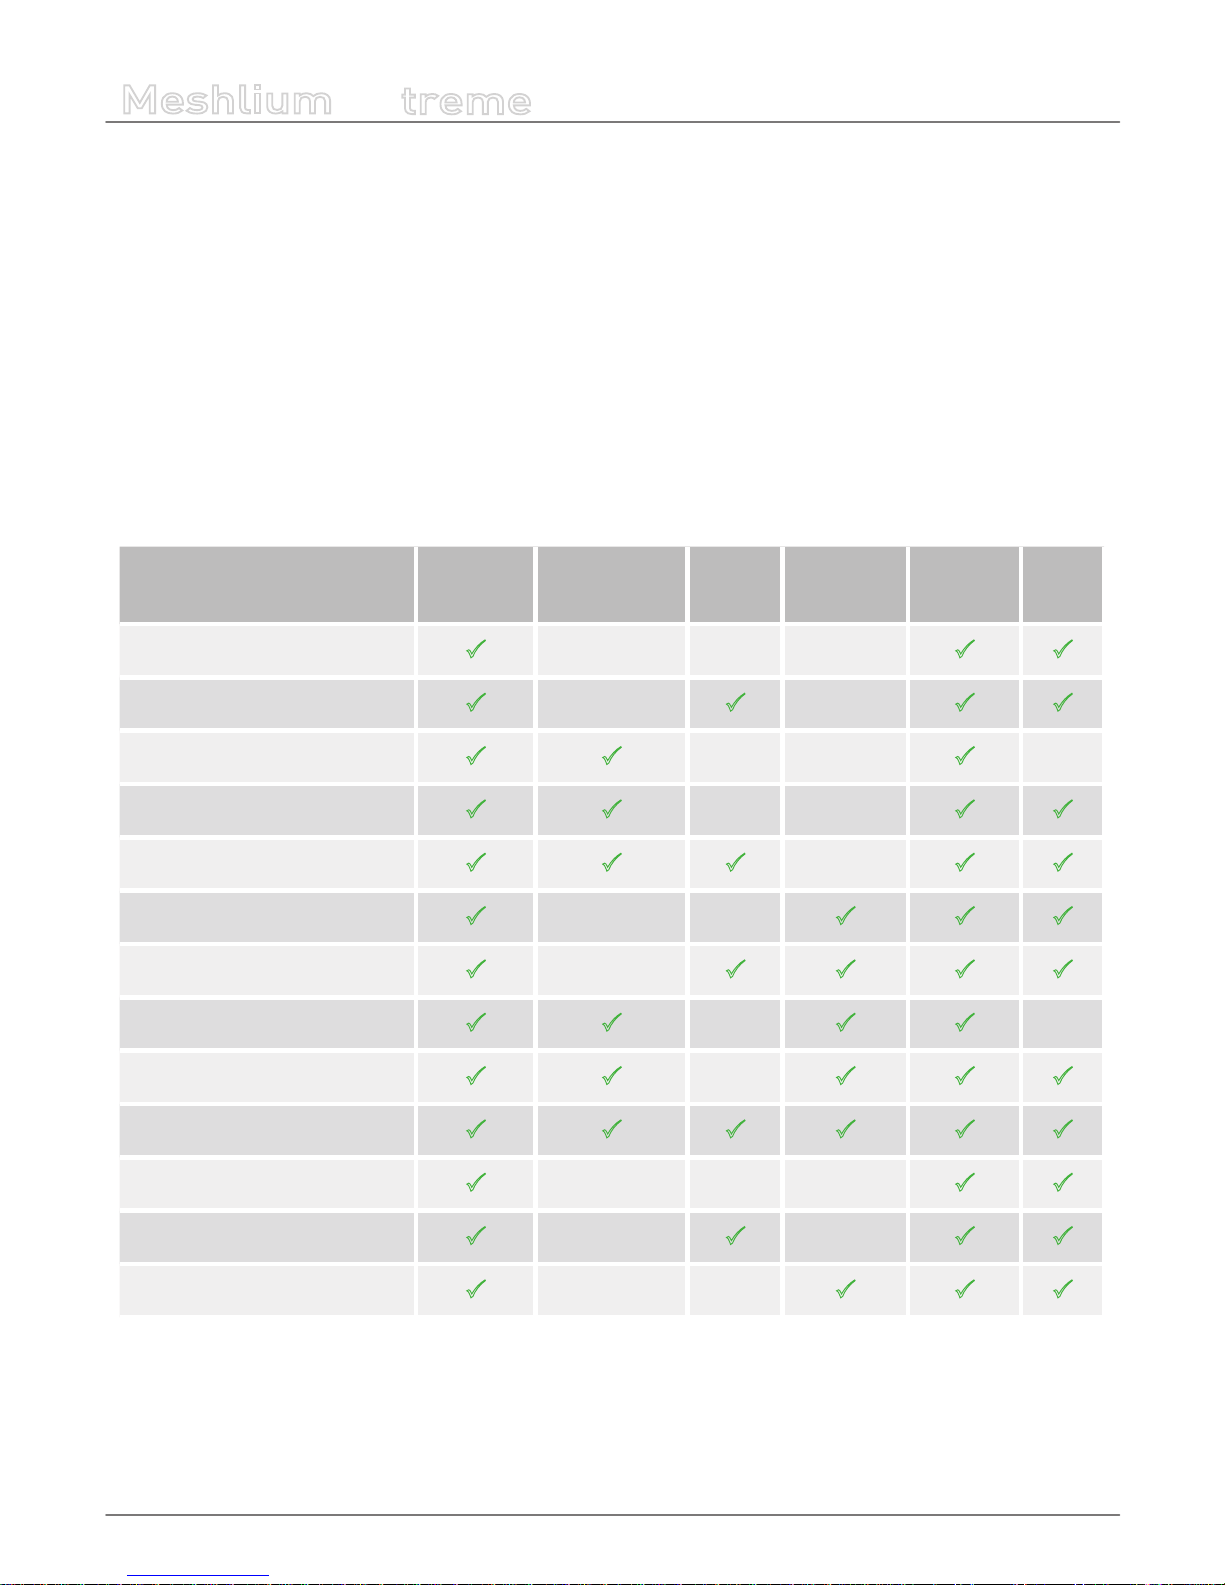
7.2. Meshlium Models
There are dierent Meshlium models (“Presets”) depending on the radios integrated and on the fact if they act as a Gateway
(GW) node or not.
Models
Wi AP
(2.4GHz)
Wi Mesh
(2.4GHz /5GHz)
3G/GPRS
RF Module
(XBee/LoRa)
Ethernet GW
Meshlium AP
P P P
Meshlium 3G/GPRS-AP
P P P P
Meshlium Mesh-AP
P P P
Meshlium Mesh-AP-GW
P P P P
Meshlium Mesh-3G/GPRS-AP
P P P P P
Meshlium RF-AP
P P P P
Meshlium RF-3G/GPRS-AP
P P P P P
Meshlium RF-Mesh-AP
P P P P
Meshlium RF-Mesh-AP-GW
P P P P P
Meshlium RF-Mesh-3G/GPRS-AP
P P P P P P
Meshlium Scanner AP
P P P
Meshlium Scanner 3G-/GPRS-AP
P P P P
Meshlium Scanner RF-AP
P P P P
All the congurations will act as GW nodes except the nodes congured to act as simple mesh nodes (Mesh-AP and XBeeMesh-AP) which need one GW node in the mesh network which shares its Internet connection. However, all the nodes can be
changed to act as GW nodes with just one click through the Presets section. LoRa models do not have Mesh capabilities.
All the Meshlium models come with Ethernet (IPv4 and IPv6) interfaces.
Page 31

-31-
v5.0
Understanding Meshlium
Meshlium
X
treme
On some of them two extra modules can be installed: Bluetooth and GPS.
Models
Wi
Scans
Bluetooth Scans GPS
Meshlium AP
Meshlium 3G/GPRS-AP
Optional
Meshlium Mesh-AP
Meshlium Mesh-AP-GW
Meshlium Mesh-3G/GPRS-AP
Optional
Meshlium RF-AP
Meshlium RF-3G/GPRS-AP
Optional
Meshlium RF-Mesh-AP
Meshlium RF-Mesh-AP-GW
Meshlium RF-Mesh-3G/GPRS-AP
Meshlium Scanner AP
P P
Meshlium Scanner 3G/GPRS-AP
P P
Meshlium Scanner RF-AP
P P
For more information about each radio interface and module see its specic section in the current manual.
Page 32

-32-
v5.0
Understanding Meshlium
Meshlium
X
treme
7.3. Storage Options
The size of the Meshlium hard disk is 8 GB . The Operating System and the Manager System take ~2.5GB. This means the space
which can be used to store the data captured and to be used by the applications loaded by the user is:
• 8GB - 2.5GB = 5.5GB
This space is assigned to the user partition: “/mnt/user”
There are three folders where the captured data is stored when the “Store to a File or Data Base” option is activated:
• /mnt/user/zigbee_data
• /mnt/user/bluetooth_data
• /mnt/user/gps_data
The Local Data Base les can be found in: “/mnt/user/mysql/MeshliumDB”
7.4. Applications model by model
Meshlium AP
Clients can connect to Meshlium via Wi with laptops and smart phones and get access to the Internet. In order to give Internet
access Meshlium uses the Ethernet connection. Just connect it to your hub or switch and it will get automatically an IP from
your network using DHCP. Waspmotes with GPRS, GPRS+GPS, 3G+GPS or WiFi can send sensor data through the access point or
through the Internet via HTTP protocol.
Page 33

-33-
v5.0
Understanding Meshlium
Meshlium
X
treme
Meshlium 3G/GPRS AP
Clients can connect to Meshlium via Wi with laptops and smart phones and get access to the Internet. In order to give Internet
access Meshlium uses the 3G/GPRS connection. Waspmotes with GPRS, GPRS+GPS, 3G or WiFi can send sensor data through the
access point or through the Internet via HTTP protocol.
Page 34

-34-
v5.0
Understanding Meshlium
Meshlium
X
treme
Meshlium Mesh AP - Meshlium Mesh AP GW
Meshlium can work as a Mesh node. This means we can interconnect several Meshliums in order to share a common resource as
the Internet connection. This way, the clients connected to a certain node can access to the Internet connection of a third node
which is some hops far away the actual connecting point. Waspmotes with GPRS, GPRS+GPS, 3G or WiFi can send sensor data
through the access point or through the Internet via HTTP protocol. In a mesh network there are two kinds of nodes:
• Meshlium Mesh AP allows clients to connect via Wi and creates links with other nodes using a second Wi radio which
operates in the 5GHz band.
• Meshlium Mesh AP GW (gateway) is the node which shares its Internet connection with the rest of the network. It takes
the Internet connection from the Ethernet interface. There is only one GW in the mesh network.
Page 35

-35-
v5.0
Understanding Meshlium
Meshlium
X
treme
Meshlium Mesh AP - Meshlium Mesh 3G/GPRS AP:
Meshlium can work as a Mesh node. This means we can interconnect several Meshliums in order to share a common resource as
an Internet connection. This way, the clients connected to a certain node can access to the Internet connection of a third node
which is some hops far away the actual connecting point. Waspmotes with GPRS, GPRS+GPS, 3G or WiFi can send sensor data
through the access point or through the Internet via HTTP protocol. In a mesh network there are two kinds of nodes:
• Meshlium Mesh AP allows clients to connect via Wi and creates links with other nodes using a second Wi radio which
operates in the 5GHz band.
• Meshlium Mesh 3G/GPRS AP (3G/GPRS gateway) is the node which shares its Internet connection with the rest of the
network. It takes the Internet connection from the 3G/GPRS interface. There is only one GW in the mesh network.
Page 36

-36-
v5.0
Understanding Meshlium
Meshlium
X
treme
Meshlium RF AP
Meshlium can take the sensor data which comes from a Wireless Sensor Network (WSN) made with Waspmote sensor devices
*
and send it to the Internet using the Ethernet interface. Waspmotes with GPRS, GPRS+GPS, 3G or WiFi can send sensor info
through the access point or through the Internet via HTTP protocol. Users can also connect directly to Meshlium using the Wi
interface to control it and access to the sensor data.
(*) http://www.libelium.com/waspmote
Page 37

-37-
v5.0
Understanding Meshlium
Meshlium
X
treme
Meshlium ZigBee 3G/GPRS AP
Meshlium can take the sensor data which comes from a Wireless Sensor Network (WSN) made with Waspmote sensor devices
*
and send it to the Internet using the 3G/GPRS interface. Waspmotes with GPRS, GPRS+GPS, 3G or WiFi can send sensor info
through the access point or through the Internet via HTTP protocol. Users can also connect directly to Meshlium using the Wi
interface to control it and access to the sensor data.
(*) http://www.libelium.com/waspmote
Page 38

-38-
v5.0
Understanding Meshlium
Meshlium
X
treme
Meshlium XBee Mesh AP - Meshlium XBee Mesh AP GW:
Meshlium can work as a XBee Mesh node. This means we can interconnect several nodes in order to share a common resource
as an Internet connection. This way, the sensor nodes connected to a node via XBee can send the information to the Internet
link set on a third node which is some hops far away the actual point. In this hybrid XBee - Wi mesh network there are two
kinds of nodes:
• Meshlium XBee Mesh AP allows the sensor devices to connect via XBee, WiFi or Internet (Ethernet) and creates links with
other nodes using a Wi radio which operates in the 5GHz band. Users can also connect directly to Meshlium using the
2.4GHz Wi interface to control it and access to the sensor data.
• Meshlium XBee Mesh AP GW (gateway) is the node which shares its Internet connection with the rest of the network. It
takes the Internet connection from the Ethernet interface. There is only one GW in the mesh network.
Page 39

-39-
v5.0
Understanding Meshlium
Meshlium
X
treme
Meshlium XBee Mesh AP - Meshlium XBee Mesh 3G/GPRS AP
Meshlium can work as a ZigBee Mesh node. This means we can interconnect several nodes in order to share a common resource
as an Internet connection. This way, the sensor nodes connected to a node via XBee can send the information to the Internet
link set on a third node which is some hops far away the actual point. In this hybrid XBee - Wi mesh network there are two
kinds of nodes:
• Meshlium XBee Mesh AP allows the sensor devices to connect via XBee, WiFi or Internet (Ethernet) and creates links with
other nodes using a Wi radio which operates in the 5GHz band. Users can also connect directly to Meshlium using the
2.4GHz Wi interface to control it and access to the sensor data.
• Meshlium XBee Mesh 3G/GPRS AP (3G/GPRS gateway) is the node which shares its Internet connection with the rest of
the network. It takes the Internet connection from the 3G/GPRS interface. There is only one GW in the mesh network.
Page 40

-40-
v5.0
Understanding Meshlium
Meshlium
X
treme
Meshlium Scanner AP
It allows to detect Smartphones (iPhone, Android) and in general any device which works with Wi or Bluetooth interfaces.
The collected data can be send to the Internet by using the Ethernet. Clients can also connect to Meshlium via Wi with laptops
and smart phones and get access to the Internet (as a common Access Point). Waspmotes with GPRS, GPRS+GPS, 3G or WiFi can
send sensor info through the access point or through the Internet via HTTP protocol.
Page 41

-41-
v5.0
Understanding Meshlium
Meshlium
X
treme
Meshlium Scanner 3G/GPRS-AP
It allows to detect Smartphones (iPhone, Android) and in general any device which works with Wi or Bluetooth interfaces.
The collected data can be send to the Internet by using the Ethernet, and 3G/GPRS connectivity. Clients can also connect to
Meshlium via Wi with laptops and smart phones and get access to the Internet (as a common Access Point). Waspmotes with
GPRS, GPRS+GPS, 3G or WiFi can send sensor info through the access point or through the Internet via HTTP protocol.
Page 42

-42-
v5.0
Understanding Meshlium
Meshlium
X
treme
Meshlium Scanner RF-AP
It allows to detect Smartphones (iPhone, Android) and in general any device which works with Wi or Bluetooth interfaces. It
can also capture the sensor data which comes from the Wireless Sensor Network (WSN) made with Waspmote sensor devices.
The collected data can be send to the Internet by using the Ethernet and Wi connectivity. Clients can also connect to Meshlium
via Wi with laptops and smart phones and get access to the Internet (as a common Access Point).
Page 43

-43-
v5.0
Meshlium Presets
Meshlium
X
treme
8. Meshlium Presets
8.1. Presets
The Presets section allows us to set a certain node type as presented in the Meshlium Models section. This means you can
change quickly from one setting to another just pressing one button.
The dierent Meshlium congurations you can set depends on the hardware and if they have a GW roll or not.
All the congurations can act as GW nodes except the nodes congured to act a simple mesh nodes (Mesh-AP and XBee-MeshAP) which need one GW node in the mesh to get the information out to the Internet. Anyway all the nodes can be changed to
act as GW nodes in the Preset section.
Once we know the Preset you want to use just press the “Set Preset” button and restart the machine with the “Restart” button
(upper right side). The system will start now with the factory default options for this Preset. Go to the “Accessing Meshlium”
chapter in order to see how to connect to Meshlium.
If we have selected a 3G/GPRS Preset the Manager System will take you to the 3G/GPRS Interface conguration screen so that
you can congure the parameters which will be used in order to connect to the carrier each time Meshlium starts.
Before restarting Meshlium you can access to the Interface sections in order to change essential parameters such as the Ethernet
IP (if we want to use the static mode and not DHCP).
Page 44

-44-
v5.0
Meshlium Presets
Meshlium
X
treme
On the one hand if we try to access to an Interface such as RF module (XBee / LoRa) or 3G/GPRS or to a module which is not
physically installed, we get the message “The XXX module is not installed”.
On the other hand if we try to access to an Interface which is physically installed but it is not internally activated in the current
preset the next message will be shown: “Please go to presets and select the right one”.
Page 45

-45-
v5.0
Meshlium Presets
Meshlium
X
treme
8.2. Validation of Changes in Interfaces
After changing a parameter in any Interface (Ethernet, Wi AP, Wi Mesh, 3G/GPRS) and once Meshlium is restarted you have to
validate the changes done in the next 5 minutes.
This is a security mechanism in order to make sure that the user is still able to communicate with Meshlium after changes are
performed.
If the changes are not validated, Meshlium will set the factory defaults and the user will be able to connect again as described
in the “Accessing Meshlium” chapter. If the connection fails just keep Meshlium ON for ve minutes and try to access as pointed
in the “Accessing Meshlium” chapter.
If your settings were successful, you will get into the Validation Screen where you have three dierent options:
• Validate current conguration
• Return to the last validated conguration
• Back to factory presets
Choose the option desired to save the changes permanently.
If you can not access to the Manager System due to a bad Interface conguration just keep Meshlium 5 minutes running and
then restart. The system will start with the factory default settings so you will be able to access as specied in the “Accessing
Meshlium” chapter.
Page 46

-46-
v5.0
Accessing Meshlium - Make it Easy!
Meshlium
X
treme
9. Accessing Meshlium - Make it Easy!
Meshlium comes with all the radios ready to be used. Just “plug & mesh!”. All the Meshlium nodes come with the Wi AP ready
so that users can connect using their Wi devices. Connect the Ethernet cable to your network hub, restart Meshlium and it will
automatically get an IP from your network using DHCP *.
(*) For the Meshlium Mesh AP and for the Meshlium XBee Mesh AP the Internet connection depends on the GW of the network.
Then access Meshlium through the Wi connection. First of all, search the available access points and connect to “Meshlium”.
No password is needed as the network is public (you can change it later in the Wi AP Interface options). When you select it,
Meshlium will give an IP from the range 10.10.10.10 - 10.10.10.250.
Now you can open your browser and access to the Meshlium Manager System:
• URL: http://10.10.10.1/ManagerSystem
• user: root
• password: libelium
Page 47

-47-
v5.0
Accessing Meshlium - Make it Easy!
Meshlium
X
treme
If your network does not oer DHCP service Meshlium starts with a default IP (192.168.1.100). In this case you can connect
Meshlium through the Wi connection (which is always available) or with the crossover cable provided with Meshlium.
If you want to access to the Manager System using the crossover ethernet cable go to:
• URL: http://192.168.1.100/ManagerSystem
• user: root
• password: libelium
Page 48

-48-
v5.0
Ethernet
Meshlium
X
treme
10. Ethernet
10.1. Conguration
By default Meshlium comes with the Ethernet interface activated to get dynamically the IP using the DHCP service. If the case a
static conguration is required the next parameters can be congured:
Page 49

-49-
v5.0
Ethernet
Meshlium
X
treme
You can also use IPv6 (Internet Protocol version 6) by setting the check box “Use IPv6”. IPv6 is a version of the Internet Protocol
(IP) intended to succeed IPv4. The next parameters can be congured:
In many cases, IPv6 addresses are composed of two logical parts: a prex of 64-bit (2001::) and a 64 bit part that is generated
automatically from the MAC address of the interface.
The button “Generate IPv6 address” performs this task.
After saving the new options and once you have restarted Meshlium you have to validate the new conguration before the
next 5 minutes, if not, the factory default conguration will be restored to avoid leaving Meshlium without connectivity. More
info see the “Default Interfaces” section.
To check IPv6 conguration, after save and restart Meshlium, go to Tools -> Ping. Select Ethernet (IPv6), by default
ipv6.google.com appears as destination host.
Page 50

-50-
v5.0
Ethernet
Meshlium
X
treme
If your ISP doesn’t support external IPv6 addresses yet, you can change it to a local address.
Then press “Do Test”. If something like next image appears, you have IPv6 correctly congured.
Page 51

-51-
v5.0
Wi AP
Meshlium
X
treme
11. Wi AP
By default Meshlium comes with a 2.4GHz Wi interface ready to work as an Access Point (AP). It also comes with the
DHCP Service activated so when users connect through the Wi connection will get automatically an IP from the range
10.10.10.10 - 10.10.10.250.
11.1. Conguration
There are three sections in the conguration screen: Network, Radio, Security.
Network:
Here you can change the common Network options and the DHCP IP range which is oered to the clients. Remember that if you
change the IP of the AP you should also change the DHCP options in order to make all them work in the same network.
Page 52

-52-
v5.0
Wi AP
Meshlium
X
treme
Radio:
These are specic Wi parameters. You can change the public name of the AP which is oered to the clients -ESSID-, by default
is set “Meshlium”. You can also make it invisible so that only users who know it can connect.
You can also change the radio channel which is being used for the transmissions, according to the next diagram:
The Protocols that can be used are 802.11b for long links and 802.11g for high bandwidth links. Transmission Power, Rate and
Fragmentation can also be controlled for experts users. Do not change them if you don’t know exactly what you are doing.
Page 53

-53-
v5.0
Wi AP
Meshlium
X
treme
Security:
You can activate encryption in the communication using the WEP and WPA protocols.
WEP is enabled in the 5 and 13 characters congurations while WPA-PSK can be used with a password from 8 to 63 characters.
We recommend use WPA in order to get the a major security in the network.
After saving the new options and once you have restarted Meshlium you have to validate the new conguration before the next
5 minutes, if not, the factory default conguration will be restored to avoid leaving Meshlium without connectivity. More info
see the “Default Interfaces” section.
11.2. Clients connected
In this section you can see the MAC address of clients along with the IP assigned by the AP. It is a quick way to know how many
clients are connected and who they are.
Page 54

-54-
v5.0
Wi Mesh
Meshlium
X
treme
12. Wi Mesh
The Wi Mesh Interface enables dual band networks as it can be congured to work in the 2.4GHz or in the 5GHz in order to
avoid interferences with common Wi networks. The mesh protocol used is Optimized Link State Routing (OLSR), an open
source protocol which allows us to control if a certain node has to work as a xed node or as a mobile one.
The antennas used are also dual band so you can change the frequency dynamically without changing the antennas attached
to this radio.
12.1. Conguration
By default, when you buy Meshlium with the Wi Mesh radio included it comes already congured to create the mesh network.
This means that when you buy several Meshlium, one comes precongured with the “Mesh Gateway” preset and the rest with
the normal “Mesh” preset.
Just connect the router labeled as GW to your Ethernet connection and it will share the Internet access to the rest of the
neighbour nodes.
In order to distinguish between them they come with dierent ESSID’s for the Wi AP Interface. The GW has “Meshlium AP1” and
the rest come with the form “Meshlium AP2”, “Meshlium AP3”, etc.
If you want to do it manually:
To set a Mesh network you need several nodes with a Meshlium Mesh AP or Meshlium XBee Mesh AP preset and one with a
Meshlium Mesh AP GW or Meshlium Mesh AP 3G/GPRS preset *.
* More info about the dierent roles in the “Presets” section.
Page 55

-55-
v5.0
Wi Mesh
Meshlium
X
treme
Once you have chosen the preset you only need to give a valid IP in order to get this node communicating with the rest of the
neighbours of the mesh network. The IP can be changed in the main section. Just set one IP which is not being used by any node
and the current node will be able to join automatically to the mesh network. Just “plug & mesh!”
By default all the nodes with a Mesh preset come with the same ESSID and CELL ID. It is important all the nodes have this two
elds with the same data. On the one hand the ESSID will allow the nodes to share a common ID in order to be detected as the
same mesh network. On the other hand the CELL ID lets the nodes to act with a unique virtual MAC address, what facilitates the
connections between the nodes in the network.
In the frequency eld you can choose the band in which you want the mesh network to be created: 2.4GHz or 5GHz. As the
antennas included for the Wi Mesh radio are dual you don’t need to change anything in the hardware conguration.
After saving the new options and once you have restarted Meshlium you have to validate the new conguration before the next
5 minutes, if not, the factory default conguration will be restored to avoid leaving Meshlium without connectivity. More info
see the “Default Interfaces” section.
12.2. OLSR Options
In this section you can set if the current node is the GW of the mesh network. If you check the “Share Internet Connection”
box it will oer its Internet connection to the rest of the brothers in the network. Remember that only one node in the mesh
network can be working as GW.
The rest of the parameters allow us to change the time intervals used by the mesh daemon in order to send topology information
to the neighbours.
The “Hello Interval” and “Validity Time” set how often this node will be broadcasting information about its presence to the rest
of the nodes “hello!”.
The “TC Interval” and “Validity Time” set how often this node will be broadcasting information about its connections and
topology to the rest of the nodes.
The “Hna Interval” and “Validity Time” set how often this node will be broadcasting that is sharing its Internet connection. This
parameter is only used by the GW node.
Page 56

-56-
v5.0
Wi Mesh
Meshlium
X
treme
In order to make this process easier we have created two dierent roles: xed node and mobile node which can be set just
pressing each button.
In the “OLSR Summary” section you can see direct information of the mesh daemon which is running inside Meshlium.
The Links/Topology section shows the direct brothers and the two hop neighbours along with the “next hop” node which will
be accessed in order to reach these nodes.
The “Routes” shows what networks can be accessed regarding the information passed by the rest of the nodes. In the image
below we can see as the node 10.10.11.1 is oering access to the Internet (0.0.0.0/0). This means this node (10.10.11.1) is acting
as GW of the Mesh network.
Page 57

-57-
v5.0
Wi Mesh
Meshlium
X
treme
12.3. The Gateway Node
In a mesh network there is a node which shares its Internet connection to the rest of the neighbours. It is called the Gateway (GW).
There is only one GW in the mesh network and it has to be specied in the OLSR conguration (as pointed before) checking the
“Share Internet Connection” option. You can also choose the Mesh Gateway Preset and change the Wi Mesh IP to one not used
in the network.
The Internet connection can be shared from the Ethernet cable or from the 3G/GPRS link. For this reason there are two kinds of Mesh
GW:
• Meshlium Mesh AP GW -> from Ethernet
• Meshlium Mesh 3G/GPRS AP -> from 3G/GPRS
For more information about how to change the roll of a Mesh node into a Mesh Gateway node go to the “Presets section”.
Page 58

-58-
v5.0
3G/GPRS
Meshlium
X
treme
13. 3G/GPRS
13.1. Conguration
Here you can set the parameters of the mobile operator you have chosen. There is a list with some initial congurations
depending on the country and the operator *. However, this list may not be updated with the last valid conguration of your
mobile provider. Ask your mobile company for the information required to connect (APN, Username, Password) and add the PIN
code of the SIM card used (leave empty if there is no PIN). We recommend to disable the PIN in the SIM card as this will make
easier the test and validation process and will avoid to block the SIM card.
* You can nd more information about the 3G/GPRS settings listed by country at: http://www.unlocks.co.uk/GPRS_settings.php
After setting the 3G/GPRS parameters and before save them you can test your connection through the “Connect now” button.
It will try to connect to your carrier and get a valid IP. Once the connection has been made the default gateway of the machine
is changed so all the clients connected through Wi will reach the Internet via 3G/GPRS.
Important: once you get a valid 3G/GPRS IP through the “Connect now” button, you will not be able to access Meshlium via Ethernet
unless you are connected through the same Local Area Network. For this reason we recommend to make all the tests using the WiFi
connection.
Page 59

-59-
v5.0
3G/GPRS
Meshlium
X
treme
Once validated your settings press the Disconnect button and save your conguration. If you want the 3G/GPRS to be the
Default Gateway of Meshlium each time it starts just activate the service in the “Set as Default Gateway” check box before
saving. Setting this each time Meshlium restarts will connect to the Internet using the 3G/GPRS radio.
Note for US users: We tested the 3G shield with the AT&T network which supports nativelly the GSM and 3G protocolos. With other
carriers may also work although we haven’t tried and thus we can not ensure it. For this reason we recommend to use AT&T SIM cards.
Page 60

-60-
v5.0
Joined Networks
Meshlium
X
treme
14. Joined Networks
This is an information section where you will nd how the networks have been joined in order to give access from one to other
interface. Possible networks joined are:
Wireless AP -> Ethernet
This bridge allows the clients connected to the Wi AP access to the Internet through the Meshlium Ethernet connetion.
Wireless AP -> 3G/GPRS
This bridge allows the clients connected to the Wi AP access to the Internet through the Meshlium 3G/GPRS connetion.
Wireless AP -> Wireless Mesh
This bridge allows the clients connected to the Wi AP access to other nodes of the Wi Mesh network. It also let access to the
Internet if it is shared for the Gateway node in the Mesh network.
Wireless Mesh -> Ethernet
This bridge allows a Gateway node in a Wi Mesh Network to share its Internet connection which comes from Ethernet with the
rest of the nodes in the Mesh Network and the clients connected to their Wi AP interface.
Page 61

-61-
v5.0
Joined Networks
Meshlium
X
treme
Wireless Mesh -> 3G/GPRS
This bridge allows a Gateway node in a Wi Mesh Network to share its Internet connection established via 3G/GPRS with the rest
of the nodes in the Mesh Network and the clients connected to their Wi AP interface.
The real union of the networks is made automatically when setting the node type in the Presets section.
Page 62

-62-
v5.0
Wireless Sensor Networks
Meshlium
X
treme
15. Wireless Sensor Networks
15.1. Conguration
One of the applications of Meshlium is to act as a Gateway of the Waspmote
Sensor Networks. Waspmote is a sensor device specially oriented to developers. It
works with dierent protocols (ZigBee, XBee, LoRa,Bluetooth, WiFi, 3G/GPRS) and
frequencies (2.4GHz, 868MHz, 900MHz) being capable of getting links up to 22km.
It counts with a hibernate mode of 0.7uA which allows to save battery when it is
not transmitting. More than 50 sensors already available and a complete open
source IDE (API libraries + compiler) made really easy to start working with the
platform.
More info at: http://www.libelium.com/waspmote
Page 63

-63-
v5.0
Wireless Sensor Networks
Meshlium
X
treme
15.2. Conguration of the ZigBee interface
There are 5 dierent XBee models can can be congured:
Page 64

-64-
v5.0
Wireless Sensor Networks
Meshlium
X
treme
Depending the kind of XBee model the parameters to be congured may vary.
Complete list:
• Network ID: Also known as PAN ID (Personal Arena Network ID)
• Channel: frequency channel used
• Network Address: 16b address (hex eld) - MY
• Node ID: maximum 20 characters (by default “Meshlium”)
• Power level: [0..4] (by default 4)
• Encrypted mode: true/false (by default false)
• Encryption Key: 16 characters maximum
• MAC: 64b hardware address. It is a read only value divided in two parts:
- MAC-high: 32b (hex eld)
- MAC-low: 32b (hex eld)
These parameters must be also congured in the Waspmote sensor nodes. Access to all the information related to Waspmote at:
http://www.libelium.com/waspmote
To discover the MAC address of the XBee module just press the “Load MAC” button.
The “Check status” option allows to see if the RF module is working properly and if the conguration stored on it matches the
values set in the Manager System.
Both process (“Load MAC” and “Check status”) require the sensorParser daemon to be stopped. This means no frames
will be received while executing this actions. Be patient this can take up to 1 minute to nish.
Page 65

-65-
v5.0
Wireless Sensor Networks
Meshlium
X
treme
Note: When you buy a Waspmote Developer kit with Meshlium and with the XBee ZB as ZigBee radio both the Waspmote GW and
Meshlium come congured as Coordinator of the network. Take into account that only one of them can be working at the same time.
Note: If the encryption check fails but the rest of parameters are OK, it means the ZigBee radio has an old version of the rmware but
it is working perfectly.
In the model with LoRa Semtech Sx1272 module, the parameters to setup are:
• Frequency Band: Options are 868 MHz and 900 MHz bands.
• Channel: Frequency channel used.
• LoRa Address: Address for the Meshlium LoRa module. Waspmotes will have to send information to this address.
• Bandwidth: Choose between 125 kHz, 250 kHz and 500 kHz.
• Coding rate: Possible values are 4/5, 4/6, 4/7 and 4/8.
• Spreading Factor: Values from 6 to 12.
Page 66

-66-
v5.0
Wireless Sensor Networks
Meshlium
X
treme
These parameters must be also congured in the Waspmote sensor nodes. Access to all the information related to Waspmote at:
http://www.libelium.com/waspmote
The “Check status” option allows to see if the RF module is working properly and if the conguration stored on it matches the
values set in the Manager System.
“Check status” require the sensorParser daemon to be stopped. This means no frames will be received while executing
this actions. Be patient this can take up to 1 minute to nish.
15.3. Capturing and storing sensor data
15.3.1. Capturing and storing sensor data from XBee / LoRa
When you buy a kit containing Meshlium and Waspmote, they already come congured to send frames to the Gateway. Later,
once the user has developed the code for transmitting to Gateway, he can switch to Meshlium.
Meshlium will receive the sensor data sent by Waspmote using the RF radio and it will store the frames in the Local Data Base.
That can be done in an automatic way thanks to the Sensor Parser.
The Sensor Parser is a software system which is able to do the following tasks in an easy and transparent way:
• receive frames from XBee / LoRa (with the Data Frame format)
• receive frames from 3G/GPRS, WiFi and Ethernet via HTTP protocol (Manager System version 3.1.4 and above)
• parse these frames
• store the data in local Database
• synchronize the local Database with an external Database
Besides, the user can add his own sensors.
The initial frames sent by Waspmote contain the next sequence:
~\0x00I\0x90\0x00}3\0xa2\0x00@z\0xcb\0x92\0xd8\0xd3\0x02<=>\0x80\0x03#35689722##7#ACC:80;10
;987#IN_TEMP:22.50#BAT:93#\0xb4
Page 67

-67-
v5.0
Wireless Sensor Networks
Meshlium
X
treme
Initially there are some hexadecimal characters, which belong to the API frame, followed by the message. In the above example
the message is:
<=>\0x80\0x03#35689722##7#ACC:80;10;987#IN_TEMP:22.50#BAT:93#
They are formed by the accelerometer values, RTC internal temperature value, and battery level. The MAC address is added and
other helpful information.
In order to add your own sensor frames properly go to the section “Capturing and storing your own ZigBee frames”. All frames
captured will be able to stored on Local Database, however the frame has not been dened is stored in the database. See the
picture below in order to see dierent frames types and how they are saved in the database.
If you change any of the parameters in Waspmote or Meshlium you will have to do it in both platforms so that they still can
communicate.
We can perform two dierent storage options with the frames captured:
• Local Data Base
• External Data Base
Page 68

-68-
v5.0
Wireless Sensor Networks
Meshlium
X
treme
You can also send the information received to the Internet using the Ethernet, Wi and 3G/GPRS interfaces.
15.3.2. Capturing and storing data from 3G/GPRS, WiFi and Ethernet
From version 3.1.4, Meshlium accepts POST and GET requests in any of its interfaces so Waspmotes are capable of sending
frames, through GPRS, 3G or WiFi modules, via HTTP requests. Meshlium, through HTTP requests is capable of:
• receive frames from 3G/GPRS, WiFi or Ethernet via HTTP (version 3.1.4 or older)
• parse these frames
• store the data in local Database
• synchronize the local Database with an external Database
Frames received by this method are stored the same way that ZigBee frames, and are identically processed at synchronization
stage. You can view received frames in the same way that radio frames.
Like the case of ZigBee, the user can add his own sensors.
Page 69

-69-
v5.0
Wireless Sensor Networks
Meshlium
X
treme
15.3.3. Local Data Base
Meshlium has a MySQL data base up and running which is used to store locally the information captured. In the “Local Data
Base” tab you can see the connection parameters.
• Database: MeshliumDB
• Table: sensorParser
• IP: localhost
• Port: 3306
• User: root
• Password: libelium2007
Steps:
At any time you can see the last “x” records stored. Just set how many insertions you want to see and press the “Show data”
button.
Page 70

-70-
v5.0
Wireless Sensor Networks
Meshlium
X
treme
15.3.4. External Data Base
Meshlium can also store the information captured in an External Data Base.
Steps:
1. Pressing the “Show sql script” you will get the code needed to create the data base along with the table and the right privileges.
2. Insert this code in your MySQL management application.
3. Fill the Connection Data elds with the information about where the data base is located (IP, Port) and with the authentication
options (Database, Table, User, Password).
This data are stored in /mnt/lib/cfg/sensorExternalDB le.
4. Now press the “Check Connection” button to see if the conguration is correct.
Page 71

-71-
v5.0
Wireless Sensor Networks
Meshlium
X
treme
5. Set the check box “Store frames in external database”, you can dened the interval how often to synchronize the local database
with external database and press the “Save” button.
From this time Meshlium will automatically perform Scans and will store the results in the External Data Base each . This process
will also continue after restarting Meshlium.
Page 72

-72-
v5.0
Wireless Sensor Networks
Meshlium
X
treme
You can also choose to sync when you want. Just press the “Synchronize Now” button.
Page 73

-73-
v5.0
Wireless Sensor Networks
Meshlium
X
treme
At any time you can see the last “x” records stored. Just set how many insertions you want to see and press the “Show data”
button.
Page 74

-74-
v5.0
Wireless Sensor Networks
Meshlium
X
treme
15.3.5. Show me now!
In the “Show me now!” tab you can see in real time the Scans captured.
You can specify if you want the information to be updated periodically with the dened interval just checking the “Use the
Dened Interval” button.
Page 75

-75-
v5.0
Wireless Sensor Networks
Meshlium
X
treme
15.3.6. Advanced Database
In the “Advanced” tab you can see information about the state in which they are databases.
It displays information about the Local and External database, showing the following information:
• Local and External Database names
• Local and External Database sizes
• Local and External Tables
• Total Local and External Entries
• Synchronized Local Frames
• Unsynchronized Local Frames
From this tab, you can delete all the information contained in the Local database or Remove synchronized data. Before
performing these actions, a conrmation message will be displayed.
Note: Before running these options, it is recommended to have a backup or having synchronized your local database with external
database.
Page 76

-76-
v5.0
Wireless Sensor Networks
Meshlium
X
treme
In addition can display a log of the date of the last synchronization between the local database and external database was
successful.
Page 77

-77-
v5.0
Wireless Sensor Networks
Meshlium
X
treme
15.4. Capturer logs
Inside “Sensor Networks” exist the section Logs, in this section you can see the last frames received on Meshlium.
First show the “sensor log”, in this logs shows the frames are stored after being processed.
ASCII-35690399-N1-253-198-,STR:XBee frame,BAT:93,IN_TEMP:31.50
Secondly shown “Frame Log”, in this logs shows the frames stored as the arrive to Meshlium.
<=>?#35690399#N1#198#STR:XBee frame#BAT:93#IN_TEMP:31.50#
Page 78

-78-
v5.0
Wireless Sensor Networks
Meshlium
X
treme
15.5. Sensors
In section “Sensor List”, the user can add new sensors or delete sensors.
By default, Meshlium recognize all Libelium ocial sensors frames. All sensor frames that Meshlium can capture and store must
be specied in an XML le.
The le with ocial sensors of Libelium is located in /mnt/lib/cfg/parser/sensors.xml
The button “update sensors” update the Libelium ocial sensor. User sensors remaining unchanged.
Users can add and remove sensors in an easy and simple from the ManagerSystem.
To add a new sensor the user must complete the elds:
• ASCII ID: sensor id for ASCII frame.
• Fields: This eld species the number of sensor elds sent in the frame. This helps to calculate the frame length.
• Type: type of elds
- uint8_t
- int
- oat
- string
- ulong
- array(ulong)
Once all elds are lled in, click on the button “Add sensor”
Page 79

-79-
v5.0
Wireless Sensor Networks
Meshlium
X
treme
The new user sensors will be added to the new XML le, the le with user sensors is located in /mnt/lib/cfg/parser/user_
sensors.xml
Note: In “Waspmote data frame guide” document is located more extensive information about how to build the frame.
To delete sensor the user must press the garbage can that appears to the left of the description of the sensor. To complete the
action should accept a conrmation message.
15.6. OTA via FTP
From version 3.0.7, Meshlium can also be used like FTP server to prepare the binary les to be downloaded by Waspmote.
For more info about Over the Air Programming go to:
http://www.libelium.com/development/waspmote/documentation/over-the-air-programming-guide-otap/
This feature allows reprogramming Waspmote using an FTP server and FTP client which is Waspmote itself.
There are two basic steps involved in OTA procedure:
• Step 1: Waspmote requests a special text le which gives information about the program to update: program name,
version, size, etc.
• Step 2: If the information given is correct, Waspmote queries the FTP server for a new program binary le and it updates its
ash memory in order to run the new program.
Figure : OTA via FTP protocol
Besides, a default user is congured in Meshlium FTP Server with the following settings:
user: ota
password: libelium
Page 80

-80-
v5.0
Wireless Sensor Networks
Meshlium
X
treme
This user directly connects to the following path in Meshlium’s system directory where the application creates all the binary
and UPGRADE.TXT les:
/mnt/user/ota
Inside “Sensor Network” there is the section OTA - FTP. Users can prepare the binary les to be downloaded by Waspmote. So,
you can generate UPGRADE.TXT text le necessary to do OTA with 3G/GPRS/WiFi via FTP.
Figure : OTA-FTP Meshlium plug-in
Firstly, there are three possibilities to be chosen:
• Select NO_FILE to inform Waspmote that no OTA is necessary
• Select a new le generated by Waspmote-IDE so as to update the Waspmote’s program.
• Select a existing binary if the user needs to update to an older program. The les are stored in the following path: /mnt/
user/ota
Secondly, the program version is always set by the user before generating the new UPGRADE.TXT le. There is a specic input
to indicate the program version. It must be dened as a 1-unsigned-byte number (range: from 0 to 255).
Finally, there is a button to generate the new UPGRADE.TXT le.
Once these steps have been completed, the binary le and the proper UPGRADE.TXT le are ready for the Waspmote devices
deployed which try to perform OTA via FTP transmission. This le is shown in the last window of the application representing
the actual binary prepared for OTA.
Page 81

-81-
v5.0
Wireless Sensor Networks
Meshlium
X
treme
15.7. Sending frames from Meshlium to Waspmote
Meshlium can also send frames to the Waspmote nodes. In order to use this feature you have to stop the “capturing and storing”
daemon which is running in the system.
To do so access by SSH to Meshlium and stop the default ZigBee daemon::
$ sensorParserD.sh stop
Now you can execute the ZigBeeSend command. There are several ways to send information to a node:
• Using its 802.15.4 MAC address (64b)
• Using its Network address (MY) (16b)
• Performing a broadcast transmission
Sending to Waspmote using its MAC address (64b):
$ ./ZigBeeSend -mac 0013a2004069165d “Hello Waspmote!”
Sending to Waspmote using its Net address (MY - 16b):
$ ./ZigBeeSend -net 1234 “hello Waspmote!”
Send to all the Waspmote devices at the same time - Broadcast mode:
$ ./ZigBeeSend -b “hello everybody!”
The source code “ZigbeeSend.c” in the path /var/ManagerSystem/plugins/b_SensorData/b0_capturer/bin/
You can download these les and change them in order to get new features and sending options.
Compilation:
The compilation can be done in the same Meshlium. Just copy these les in a folder accessing by SSH and execute:
$ gcc -o ZigBeeSend ZigBeeSend.c -lpthread
Important: If you want to create a “ZigBee sending” daemon that is executed each time Meshlium starts you have to deactivate the
“ZigBee Capturer” daemon (/etc/init.d/ZigbeeScanD.sh) as the ZigBee radio has to be used by one process at a time.
You will nd support in the Libelium Forum at: http://www.libelium.com/forum
Page 82

-82-
v5.0
Wireless Sensor Networks
Meshlium
X
treme
15.8. Key Management on Meshlium
15.8.1. Link layer key Management (AES-128)
This feature is provided by XBee and ZigBee modules, and it’s not available in LoRa module.
Encryption is this layer provided through the AES 128b algorithm. Specically through the type AES-CTR. In this case the Frame
Counter eld has a unique ID and encrypts all the information contained in the Payload eld which is the place in the link layer
frame where the data to be sent is stored. The way in which the libraries have been developed for module programming means
that encryption activation is as simple as running the initialization function and giving it a key to use in the encryption.
{
xbee.encryptionMode(1);
xbee.setLinkKey(key);
}
In Manager System, on Sensor Network section, users can encrypt messages on link layer.
Depending the kind of module model the parameters to be congured may vary.
Complete list:
Network ID: Also known as PAN ID (Personal Arena Network ID)
Channel: frequency channel used
Network Address: 16b address (hex eld) - MY
Node ID: maximum 20 characters (by default “Meshlium”)
Power level: [0..4] (by default 4)
Encrypted mode: true/false (by default false)
Encryption Key: Must be 16 characters
MAC: 64b hardware address. It is a read only value divided in two parts:
MAC-high: 32b (hex eld)
MAC-low: 32b (hex eld)
The parameter to providing AES-128 to link layer are: encrypted mode and encrypted key.
Page 83

-83-
v5.0
Wireless Sensor Networks
Meshlium
X
treme
15.8.2. Application Layer Key Management (AES-192/256)
Meshlium is capable to properly receive encrypted data from Waspmote. The coding process is made in the application layer, so
it’s Waspmote and Meshlium processor and not XBee/ZigBee module who encrypts and decrypts the messages.
The user have to set a key for the encryption in Waspmote and Meshlium.
In Manager System, inside section Tools, go to encryption section:
Page 84

-84-
v5.0
Wireless Sensor Networks
Meshlium
X
treme
For each Waspmote can send frames to Meshlium, Waspmotes keys can be added to a encryption Key le. In this interface the
user must specify the node ID and the Waspmote AES secret key (128, 192 or 256 bits).
After dening the above elds to press the button “Add Waspmote”. A new entry is generated in the left list.
To delete Waspmote of list, select the Waspmote and press “Delete Waspmote”. The encrypted Waspmote frames received
can not be decrypted anymore.
The AES secret key is necessary to recognize the frames sent each Waspmote to Meshlium.
When a frame arrives at Meshlium sensorParser will consult the encryptionKey le for the AES secret key, and use the AES
algorithm to decrypt the message.
15.9. AES on Meshlium
Once the user has properly set the AES keys associated to every waspmote, receiving AES encrypted frames in Meshlium is a
straightforward process.
As an encrypted frame arrives to Meshlium, sensorParser program takes the appropriate key for the waspmote ID. The frame is
decoded with the key and the information is extracted to the sensor database.
Bear in mind that to use this feature, the frame have to be created with the Waspmote libraries for AES frames. You can see
futher information about this in the Waspmote guides.
http://www.libelium.com/waspmote
Page 85

-85-
v5.0
Cloud Connector
Meshlium
X
treme
16. Cloud Connector
16.1. Introduction
The aim of this Guide is to introduce the user to the Meshlium Cloud Connector section. This section helps you to connect your
Meshlium and Waspmote sensor data to a third party Cloud Platform, and therefore, write applications to run in the cloud to
manipulate your data from the Internet or automatically.
Figure : Cloud connector diagram
Interfacing Meshlium with 3rd party Clouds should be the last step the user develops in any project. The user should think if
the use of Clouds is needed, and in positive case, that will be the last step in the project. Before trying Clouds, make sure all the
Waspmotes are sending frames to Meshlium, and Meshlium is receiving and inserting them on the local database properly.
This manual is only intended for Meshlium Xtreme versions higher or equal to v3.1.0 If you don’t have that version, see chapter
“Upgrading old versions of Meshlium” on this guide.
What is a cloud platform?
The coming shift to cloud computing is a major change in our industry. One of the most important parts of that shift is the advent
of cloud platforms. This kind of platforms lets developers write applications that run in the cloud, or use services provided form
the cloud, or both.
Meshlium Cloud Connector
We have provided three dierent plugins in this rst version of cloud connector. The plugins are: GIS, that allows you to control
your WSN from any ArcGIS Software; M2M Platform that helps you to connect your data with Axeda and Thingworx Platforms;
and MQTT Solutions that sends Meshlium Sensor Parser data through MQTT protocol.
Page 86

-86-
v5.0
Cloud Connector
Meshlium
X
treme
16.2. Geographic Information Systems (GIS)
With “GIS” plugin, Waspmote sensor data can be directly integrated into your existing maps and ArcGIS applications.
Figure : GIS plugin
This plugin is located in:
Manager System > Cloud Connector > GIS.
16.2.1. Esri
ArcGIS is a complete spatial information platform provided by Esri, that allows to create, analyze, store and spread data, models,
maps and 3D globes. It can be accessed via desktop application, browser or handsets. ArcGIS is targeted at GIS professionals,
location analysts and developers that want to create their own applications based in geographical data.
More information: http://www.esri.com/products
16.2.1.1. Rest Service Info
In REST Service Info is presented the information needed to operate with any ArcGIS software.
Figure : REST Service Info section
• Meshlium IP: needed to add the Meshlium Feature Server to ArcGIS. This IP address must be static.
• A link to REST Services Directory: a view of the REST API in HTML format. Here the user can browse the contents of an
Meshlium-ArcGIS Server and obtain information such as service metadata and supported operations that can be useful in
developing applications.
• A link to ArcGIS.com: view Meshlium, Waspmote and sensors data directly on the free ArcGIS Online map viewer.
With ArcGIS Online map viewer, you can easily explore, visualize, and share GIS information. Use it to directly access basemaps
and other content.
Page 87

-87-
v5.0
Cloud Connector
Meshlium
X
treme
To view Meshlium, Waspmote and sensors data from any ArcGIS software, open your ArcGIS software, click on “Add Layer from
Web” and enter:
[MeshliumIP]/meshlium/rest/services/Libelium/FeatureServer
Note: [MeshliumIP] must be a static IP address, hired by the user. It cannot be 192.168.x.x.
Figure : ArcGIS software, add Layer
Once the Layer is added you will see the information parsed and stored in the Meshlium database on the ArcGIS software.
See chapter “Capturing and storing sensor data“ for more information.
Figure : ArcGIS.com viewer with Meshlium Layer
Page 88

-88-
v5.0
Cloud Connector
Meshlium
X
treme
16.2.1.2. Meshlium info
In Meshlium Info, by pressing button “Show”, the user can set and modify the name and description of Meshlium.
Figure : Meshlium Info
16.2.1.3. Waspmote List
In Waspmote List the user can manage the Waspmote units which are sending information to Meshlium.
Figure : Waspmote List
To Add a new Waspmote, click “ADD NEW Waspmote” Button. Then ll up this information:
• Name: The Waspmote name. Must match with the Waspmote identier of the frame. See chapter “Capturing and storing
sensor data“ for more information.
• Description: A description of that Waspmote unit.
• Sensor Count: Number of sensors information. Must match with the number of elds of the frame. See chapter “Capturing
and storing sensor data“ for more information.
And click “Add”.
Page 89

-89-
v5.0
Cloud Connector
Meshlium
X
treme
To Modify a Wasmpote, click on the “Show” button of the desired Waspmote.
Figure : Modify Waspmote
Then the user can modify the name, description, and sensor count information. To Save the properties, click “Save” Button.
To Delete this Waspmote, click “Delete” button.
16.2.1.4. Devices Location
In Devices Location, there is a visor where the user can see Meshlium and Waspmote located on a map.
Figure : Devices Location
To change the location of the devices, center the map on the desired location, select the device, and click “Set Position” button.
Page 90

-90-
v5.0
Cloud Connector
Meshlium
X
treme
16.2.1.5. Security
The second tab of the plugin contains the security information.
Figure : Security layer
By default is disabled, click on the button to enable it.
16.2.1.5.1. Users List
In Users List the user can manage the Users that can request tokens to make connections with ArcGIS in a secure way.
Figure : Security users list
Page 91

-91-
v5.0
Cloud Connector
Meshlium
X
treme
To Add a new user, click “Add New” Button.
Then ll up the information user and password, and click “Add”.
To Modify or Delete an user, click on the “Show” button of the desired User.
Figure : Modify security users
Then the user can change the password or delete the user. For both issues, the user has to enter the old password.
16.2.1.5.2. Token Request
To request a Torrent, enter the User and Password an click “Send Request”.
Figure : Security token request
Then, in the “Received Token” box you will see the token and expiration time.
Page 92

-92-
v5.0
Cloud Connector
Meshlium
X
treme
16.3. M2M Platform
With “M2M Platform” plugin, Waspmote sensor data can be directly integrated into M2M Platforms.
This plugin is located in:
Manager System > Cloud Connector > Machine Cloud.
Figure : Thingworx plugin
16.3.1. Axeda
Axeda provides and advanced cloud-based service and software for managing connected products and implementing
innovative M2M applications. We take the cost and complexity out of connecting and remotely servicing the products of the
world’s leading companies. Our customers use our M2M cloud service to optimize their business processes with data from their
connected products and trigger alerts.
More information: http://www.axeda.com
16.3.1.1. Conguration
Inside the “Axeda” plugin you have information about the Device, and the Development properties needed to develop a Project.
Figure : Axeda conguration
You should have the following virtual components before proceeding:
• Axeda Gateway Agent (for Windows), v6.5
• Axeda Builder, v6.5
• Axeda Deployment Utility, v6.5
Note: If you need more information about these components, go to http://www.axeda.com/resources
Page 93

-93-
v5.0
Cloud Connector
Meshlium
X
treme
16.3.1.2. Checking Connection
The Agent will be able transmit data to the Platform. In the default project provided with Meshlium, data is forwarded to
https://connect.axeda.com, an instance of the Platform hosted specically for connection testing.
1. Make sure you have the Gateway Agent Running. If not, click on “Start”
Figure : Gateway Agent Status
2. Copy Device and Serial ID information.
3. Click on ‘Open Axeda Connection Test’
4. From the drop-down, select ‘Libelium Meshlium’, and then type the serial number of the connected device.
5. Click ‘Check Connection’
Upon clicking ‘Check Connection’, a page will appear indicating the device has successfully connected to the Platform.
Figure : Axeda Ready
Page 94

-94-
v5.0
Cloud Connector
Meshlium
X
treme
16.3.1.3. Using the Axeda Gateway Agent
The Gateway Agent requires a secondary utility program to be running in order to push conguration information from your
Builder installation to the Meshlium unit running the Axeda Agent for Meshlium. This utility program is called ERemoteServer.
Note: Axeda recommends that the ERemoteServer only be started when necessary; that is, when changes to the Agent’s
core conguration need to be pushed from Builder.
16.3.1.3.1. Loading the Sample Project
The Axeda Agent for Meshlium comes with a sample project that demonstrates the functionality of the Axeda Agent while also
trying to simulate a real-world use case for the Gateway Agent. This project is located under the directory, builder_projects, in
the Release Archive and is called ‘SampleProject’.
To load the sample into Builder, follow these steps:
1. Open Axeda Builder. A window named ‘Project’ appears, prompting you to start a new project or load an existing one.
2. Click the ‘Existing’ tab and click ‘Select…’ in the displayed File Browser window. Navigate to the Release Archive location on
your local workstation and nd the directory named ‘builder_projects’.
3. Open the ‘SampleProject’ directory.
4. Select the SampleProject.gwsp le and click ‘Open’.
Figure : Axeda Builder
Page 95

-95-
v5.0
Cloud Connector
Meshlium
X
treme
16.3.1.3.2. Updating the Sample Project and Persisting Changes to the Agent
If you make changes to the sample project and want to push those changes to the Axeda Agent for Meshlium, then you need
to do the following:
1. Start the ERemoteServer server pressing the ‘Start’ button of Eremote Server.
Figure : ERemote Server
2. Stop the Gateway Agent program pressing the ‘Stop’ button of Gateway Agent Status.
Figure : Gateway Agent Stopped
3. Save the Builder Project. From the Axeda Builder menu, select File > Save all…
4. Download the project to the Gateway Agent. To do this, from Axeda Builder select ‘Active Device’ then click ‘Download’.
Figure : Remote Viewer
Page 96

-96-
v5.0
Cloud Connector
Meshlium
X
treme
5. Restart the Axeda Gateway Agent by pressing the “Start” button of Gateway Agent Status.
Figure : Gateway Agent Running
16.3.2. Thingworx
ThingWorx is the rst software platform designed to build and run the applications of the connected world. ThingWorx
reduces the time, cost, and risk required to build innovative Machine-to-Machine (M2M) and Internet of Things applications
by providing a complete application design, runtime, and intelligence environment. The ThingWorx platform includes exible
device connectivity options, rapid application development tools, scalable storage, and supports various deployment models.
More information: http://www.thingworx.com
16.3.2.1. Conguration
Inside the “Thingorx” plugin you have information about the Edge Microserver Home, needed to upload your projects to your
Meshlium.
Figure : Thingworx conguration
ThingWorx includes the following features:
• ThingWorx Composer™ - an end-to-end application-modeling environment designed to help you easily build the unique
applications of today’s connected world. Composer makes it easy to model the Things, Business Logic, Visualization, Data
Storage, Collaboration, and Security required for a connected application.
• Codeless Mashup Builder – a “drag and drop” Mashup Builder empowers developers and business users to rapidly create
rich, interactive applications, real-time dashboards, collaborative workspaces, and mobile interfaces without the need for
coding.
• Execution and Storage Engine - ThingWorx’s event-driven execution engine and 3-Dimensional storage allows companies
to make business sense of the massive amounts of data from their people, systems, and connected “Things” – making the
data useful and actionable. It also features a data collection engine that provides unied, semantic storage for time-series,
structured, and social data at rates 10X faster than traditional RDBs.
• Search-based Intelligence - ThingWorx SQUEAL™ (Search, Query, and Analysis) brings Search to the world of connected
devices and distributed data. With SQUEAL’s interactive search capabilities, users can correlate data that delivers answers
to key business questions.
Note: If you need more information about these components, go to http://www.thingworx.com/platform/
Page 97

-97-
v5.0
Cloud Connector
Meshlium
X
treme
16.3.2.2. Using The Edge MicorServer (EMS)
ThingWorx has the ability to connect very quickly and easily to the physical world and structured data systems. ThingWorx
supports a variety of communication protocols and system interfaces. Many are implemented directly on the ThingWorx
Platform. However, for edge devices or data stores that need to connect to the platform using the Internet or through rewalls on
an Intranet, ThingWorx provides an Edge MicroServer (EMS) solution that can be deployed where the data is, and allows secure,
ecient communication back to the ThingWorx Platform. This section will concentrate on the EMS and the corresponding Edge
Thing software components.
To launch the Edge MicroServer (EMS) press Start button, and to stop it, press Stop button.
Figure : Thingworx Edge MicroServer status
16.3.3. Telefónica DCA
Telefónica provides an M2M cloud to collect and analyze data. This platform is based in assets and models and you can optimize
your business processes implementing rules and notications, and subscribing to data from dierent hosts.
16.3.3.1. Conguration
A new option is shown in M2M Platform menu, in the Cloud Connector main option. If you expand it, you can see this form with
5 elds in it:
• URL: Address of the API service of Telefonica. This address should be provided without the “http://”, usually int.dca.tid.es
• PORT: The port in which the API listens to connections if you choose MQTT protocol, 1883.
• API KEY: The security key to send data to Telefonica.
• SERVICE: The service to send data to Telefonica.
• PROTOCOL: You can choose the protocol, if you want to use HTTP UltraLight 2.0 or MQTT in the comunication to synchronize
the data.
All this data are provided by Telefonica service administrators.
Page 98

-98-
v5.0
Cloud Connector
Meshlium
X
treme
16.3.3.2. Controlling synchronization
The synchronization will be done in packs of 100 data at a time, so the system is not overloaded. You can start and stop the
synchronization of the data to the Telefonica service. In the interface, you can see an indicator of whether the Telefonica service
is running or not. If you click on “Start”, the synchronization will begin.
You can stop at any moment clicking on “Stop” button.
16.3.4. Microsoft Azure Service Bus
Azure is a cloud computing platform by Microsoft. It oers services of computing, virtual machines, databases, storage,
messaging and many others.
Discover Microsoft Azure here:
http://azure.microsoft.com/en-gb/overview/what-is-azure/
Azure Service Bus is a message system that allows to exchange information between dierent systems, inside and outside Azure
platform, independent of the architecture, operating system or complexity level.
All the information about Service Bus can be found here:
http://azure.microsoft.com/en-us/documentation/services/service-bus/
In particular, Meshlium implements the use of queues, a FIFO system where one or more senders can push messages to the
queue and an application or service can receive this data.
More information about queues:
http://azure.microsoft.com/en-us/documentation/articles/service-bus-dotnet-how-to-use-queues/
16.3.4.1. Setup in Azure - Creating NameSpace
A service namespace is a scoping container for a set of Service Bus messaging entities. The boundary formed by service
namespace is expressed in the form of URI subdomains, to distinguish between dierent domains of control in the naming
system. The URL for a namespace will have the form:
namespace.servicebus.windows.net
In order to use Service Bus with Meshlium, we are using the Java API distributed by Microsoft. This API is still not compatible with
the latest authentication method used in Azure (SAS). You need to use ACS authentication. If you create the namespace in the
web administration panel, only SAS authentication method is available, so you have to create your namespace with a command
line tool to enable ACS authentication.
Page 99

-99-
v5.0
Cloud Connector
Meshlium
X
treme
In order to do this process you have rst to install the Client Line Interface tool. Updated instrcutions and les can be found here:
http://azure.microsoft.com/en-us/documentation/articles/xplat-cli/
Once installed the CLI tool, you hace to download your account. Do this with the commands: (Linux commands used in this
guide, check documentation for this process in other platforms.)
azure account download
This will return a url. Put this url in your browser and login in your Azure account. Then you will be able to download the
credential le.
Then you hace to import the le with the command:
azure account import <path_to_le>
You will be then enabled to manage your Azure settings from the CLI.
In order to create the namespace for Service Bus, use the command:
azure sb namespace create <your_namespace>
Select your region from the list and the namespace will be created.
You can then access the web manager and your namespace will be there. Go to Connection Information at the bottom of the
page.
Page 100

-100-
v5.0
Cloud Connector
Meshlium
X
treme
There you will be able to see the credentials and to access to the ACS Management Portal.
These credentials have to be set in Meshlium Manager System in order to use Azure Service Bus synchronization.
16.3.4.2. SETUP in Meshlium
Meshlium can send sensor data to an Azure queue located in a specic namespace. This process needs a basic conguration in
Manager System. You need to setup the namespace and the credentials of your Azure account.
With the parameters obtained in the previous section “Setup in Azure - Creating NameSpace” we can ll the form in the plugin
of Meshlium Manager System located in:
ManagerSystem → Cloud Connectors → M2M platforms → Azure Service Bus
 Loading...