

Page 1
NB-IoT / Cat-M Module
Networking Guide
Page 2

-2-
v7.0
Index
Document version: v7.0 - 02/2019
© Libelium Comunicaciones Distribuidas S.L.
INDEX
1. Introduction ..........................................................................................................................4
1.1. NB-IoT vs Cat-M ................................................................................................................................. 5
2. Hardware ...............................................................................................................................6
2.1. Specications ..................................................................................................................................... 6
2.2. How to connect the module ............................................................................................................ 8
2.3. Antennas ............................................................................................................................................ 9
3. Software ............................................................................................................................... 10
3.1. Waspmote library ............................................................................................................................ 10
3.1.1. Waspmote NB-IoT / Cat-M library .....................................................................................10
3.1.2. Class constructor .................................................................................................................10
3.1.3. API functions ........................................................................................................................10
3.2. Switching on .................................................................................................................................... 11
3.3. Switching o .................................................................................................................................... 11
3.4. SIM card............................................................................................................................................ 12
3.4.1. Entering PIN .........................................................................................................................12
3.4.2. Getting module information ..............................................................................................12
3.5. Setting operator parameters ......................................................................................................... 14
3.6. Checking network connection status ........................................................................................... 15
3.7. Basic network connection to NB-IoT ............................................................................................ 16
3.8. Basic network connection to Cat-M .............................................................................................. 16
3.9. Basic network connection to EGPRS ............................................................................................. 16
3.10. HTTP client ..................................................................................................................................... 17
3.10.1. HTTP connections .............................................................................................................17
3.10.2. HTTP request methods .....................................................................................................19
3.10.3. Sending Waspmote frames to Meshlium via HTTP .......................................................20
3.10.4. Sending Waspmote frames to Meshlium via HTTPS .....................................................22
3.11. Making TCP/UDP connections ..................................................................................................... 23
3.11.1. Socket identiers ..............................................................................................................23
3.11.2. Socket status structure .....................................................................................................23
3.11.3. Creating a TCP/UDP client socket ....................................................................................24
3.11.4. Sending data ......................................................................................................................26
3.11.5. Receiving data ...................................................................................................................27
3.11.6. Closing a socket .................................................................................................................28
3.11.7. SSL sockets .........................................................................................................................28
3.12. GNSS – Getting position ............................................................................................................... 31
3.13. Sleep mode .................................................................................................................................... 32
3.14. eDRX setup .................................................................................................................................... 33
Page 3

-3-
v7.0
3.15. Scanning network operators ....................................................................................................... 33
3.16. Sending AT commands................................................................................................................. 33
4. Consumption ....................................................................................................................... 34
4.1. Consumption table ......................................................................................................................... 34
5. Code examples and extended information .....................................................................35
6. API changelog ...................................................................................................................... 36
7. Certications ....................................................................................................................... 37
Index
Page 4

-4-
v7.0
Introduction
1. Introduction
Due to the popularity of Low Power Wide Area Networks (LPWAN) such as LoRaWAN or Sigfox in the IoT industry,
the traditional cellular networks like 4G has been ousted as the best choice, specially when low cost, low power
consumption and long range are key characteristics. As a response to this market demand, the 3GPP association
published 2 cellular narrow band IoT standards in the release 13: NB-IoT (“narrow band for the Internet of Things”)
and Cat-M (“category machine”). They are also known as LTE Cat-NB1 and LTE Cat-M1. Libelium has integrated the
BG96 chipset by Quectel to meet this requirement.
This module has been included in the Waspmote ecosystem as an OEM development kit, where the NB-IoT and
the Cat-M connectivities can be easily tested in pilot projects or proof of concepts applications.
The NB-IoT / Cat-M module also includes EGPRS connectivity, allowing to transmit information even if there is no
coverage for NB-IoT or Cat-M and also maintaining ultra-low power consumption. Besides, the most common
Internet protocols like HTTP(S), FTP(S), SSL, TCP or UDP are supported.
Moreover, the module integrates a GNSS engine supporting GPS, BeiDou, Galileo, GLONASS and QZSS systems,
making it suitable for tracking applications where low cost and accurate positioning is needed.
Designed to be plugged on the socket1 of Waspmote, the module can meet almost all requirements for IoT
applications like smart cities, remote monitoring, smart logistics, real-time tracking, etc. Additionally, the NB-IoT /
Cat-M module has a unique global version, allowing the usage all over the world with no fragmentation.
Like other radio modules, Libelium provides a dedicated library for Waspmote and some example codes, which
speed up the testing for the NB-IoT or the Cat-M connectivity with just a few high-level functions, and without
dealing with large amounts of AT commands. Thus, the development of pilot projects and proof of concepts
becomes easy.
Note: It is important to remark that the NB-IoT or Cat-M connectivities require a dedicated SIM card (not included by
default). With a standard SIM card, only the EGPRS connectivity can be tested. Besides, the network coverage is only
present in certain zones and strongly depends on the selected mobile network operator. It is recommended to check
operators coverage in the location where the module will be used.
Page 5

-5-
v7.0
Introduction
1.1. NB-IoT vs Cat-M
Despite both connectivities are available on the NB-IoT / Cat-M module, there are a few dierences to be mentioned.
While Cat-M allows one of the highest bandwidth of the LPWAN technologies, NB-IoT is focused only for low data
rate applications, being a great choice for single sensor applications. Also, Cat-M can support voice applications,
while NB-IoT does not.
An advantage of Cat-M is that is compatible with the existing LTE network and that avoids operators to spend money
building new antennas because just a software update is needed. On the other hand, NB-IoT is not compatible
with the LTE network and it would require higher costs for operators to deploy a NB-IoT network. Despite of this
fact, there are a lot of operators that are actively researching and making eorts to commercialize NB-IoT.
On the other hand, NB-IoT has a great advantage against Cat-M on indoor coverage due to its bigger sensitivity,
reaching very good levels even inside basements and large buildings.
Recently, the 3GPP association has published the release 14, where the standards LTE Cat NB2 and LTE Cat M2 has
been dened. However, the market will have to wait till they are available for commercialize.
Important:
• All documents and any examples they contain are provided as-is and are subject to change without notice.
Except to the extent prohibited by law, Libelium makes no express or implied representation or warranty of
any kind with regard to the documents, and specically disclaims the implied warranties and conditions of
merchantability and tness for a particular purpose.
• The information on Libelium’s websites has been included in good faith for general informational purposes
only. It should not be relied upon for any specic purpose and no representation or warranty is given as to its
accuracy or completeness.
Page 6

-6-
v7.0
Hardware
2. Hardware
2.1. Specications
The NB-IoT / Cat-M module is based on the Quectel’s BG96 chipset. The module is managed by UART and it must
be connected to socket 1 (direct connection, without Waspmote Expansion Board).
Model: BG96 (Quectel)
Frequency bands:
• Cat NB1 / Cat M1: LTE FDD: B1/B2/B3/B4/B5/B8/B12/B13/B18/ B19/B20/B25**/B26*/B28
• LTE TDD: B39 (for Cat-M1 only)
• EGPRS: 850/900/1800/1900 MHz
Data:
• Cat-NB1: Max. 32 kbps (DL), Max. 70 kbps (UL)
• Cat-M1: Max. 375 kbps (DL), Max. 375 kbps (UL)
• EDGE: Max. 296 kbps (DL), Max. 236.8 kbps (UL)
• GPRS: Max. 107 kbps (DL), Max. 85.6 kbps (UL)
SMS:
• Point-to-point MO and MT
• SMS Cell Broadcast
• Text and PDU Mode
GNNS:
Embedded GNSS as optional. Supports GPS, GLONASS, BeiDou/Compass, Galileo and QZSS.
Antenna connectors:
• U.FL for main antenna (cellular)
• U.FL for GNSS antenna
External antenna: 5 dBi
Sensitivity:
• -113 dBm @Cat NB1, CE Level 0
• -107 dBm @Cat M1, 1.4 MHz Bandwidth, CE Mode A
SIM size: Nano-SIM (4FF standard) (not included)
Protocols:
PPP/TCP/UDP/SSL/TLS/FTP(S)/HTTP(S)/NITZ/ PING/MQTT
Actions:
• Sending/receiving SMS
• TCP/IP and UDP/IP clients
• HTTP and HTTPS service (fully secured comms)
Page 7
-7-
v7.0
Hardware
Certications:
• GCF/Vodafone (Global)
• CE/Deutsche Telekom (Europe)
• FCC/PTCRB/AT&T/Verizon/T-Mobile*/Sprint* (North America)
• RCM/Telstra (Australia)
• IC/Telus/Bell* (Canada)
• Telefónica (Spain)
• JATE/TELEC/KDDI/SoftBank/DOCOMO* (Japan)
• KC/SKT/LGU+* (Korea)
• IFETEL (Mexico)
• IMDA (Singapore)
• NCC (Taiwan)
• CCC (China)
* Under Development
**LTE B25 will be supported on BG96 with R1.2 hardware version.
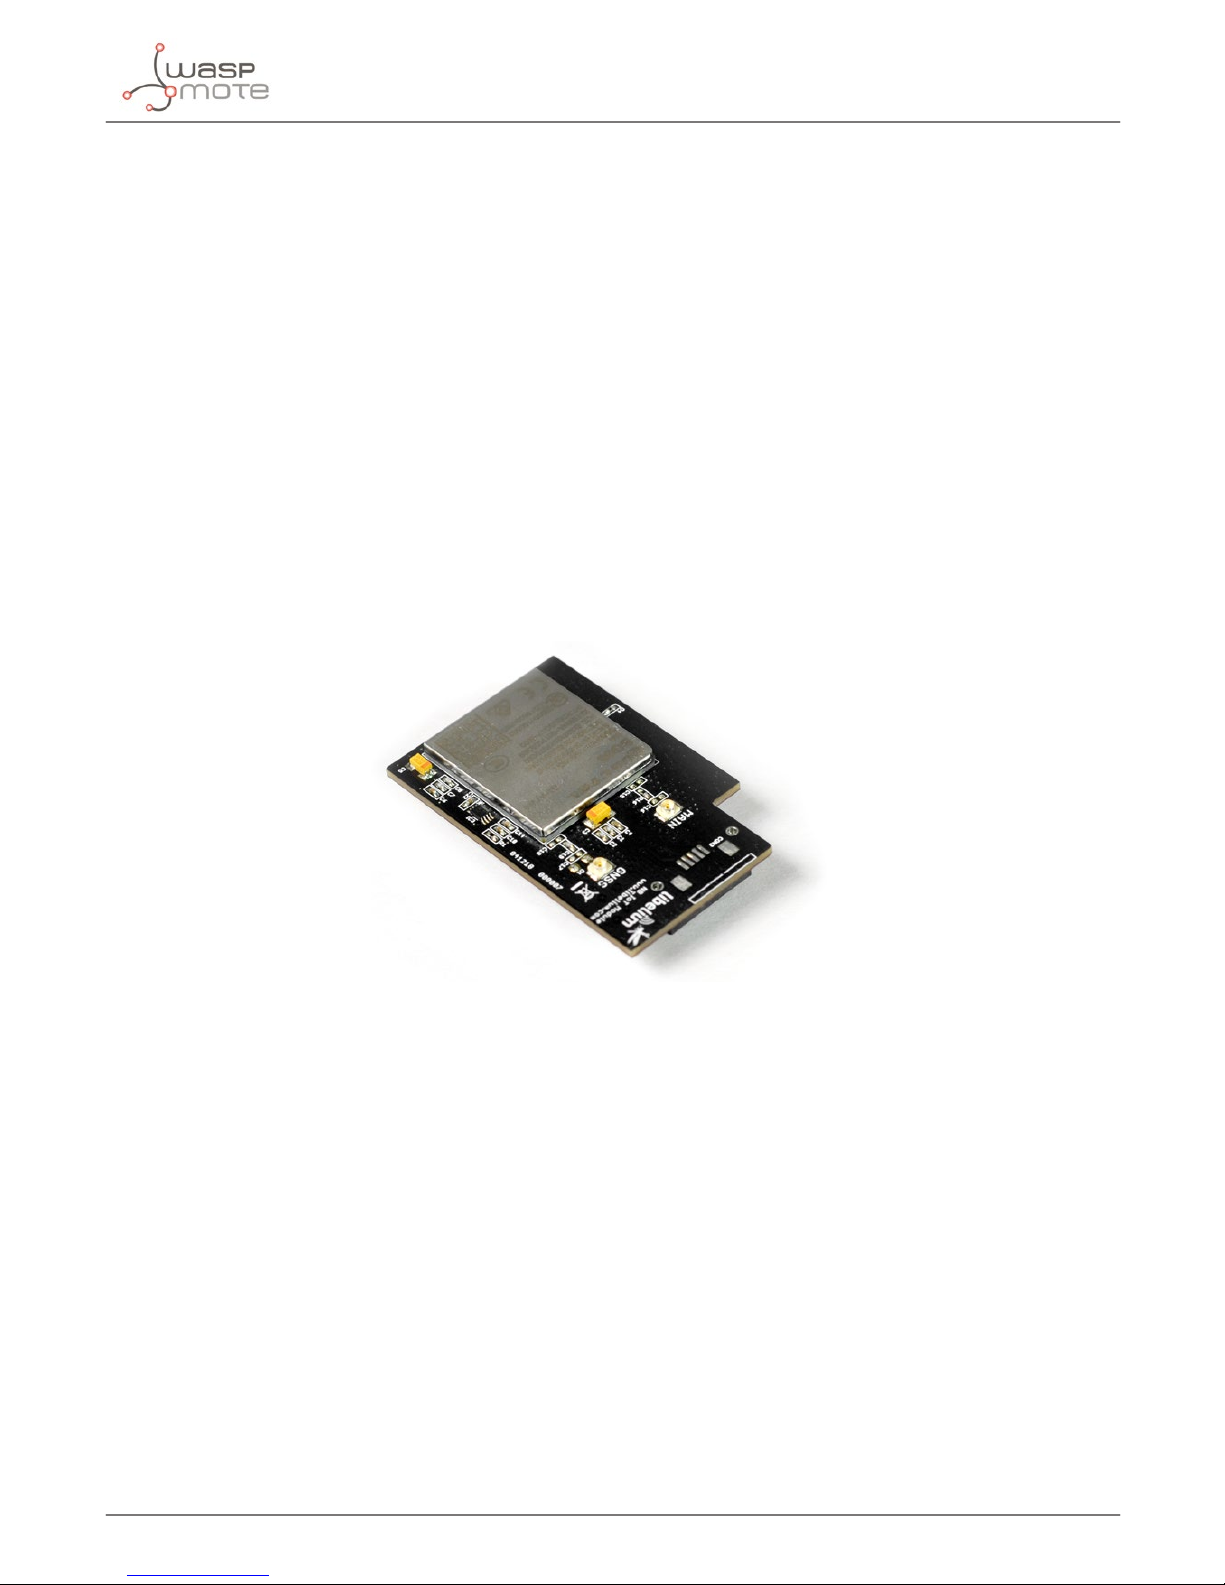
Figure: NB-IoT / Cat-M module
Page 8
-8-
v7.0
Hardware
2.2. How to connect the module
This module must be connected directly to the SOCKET1 on the Waspmote board. This radio does not need the
Expansion Radio Board.
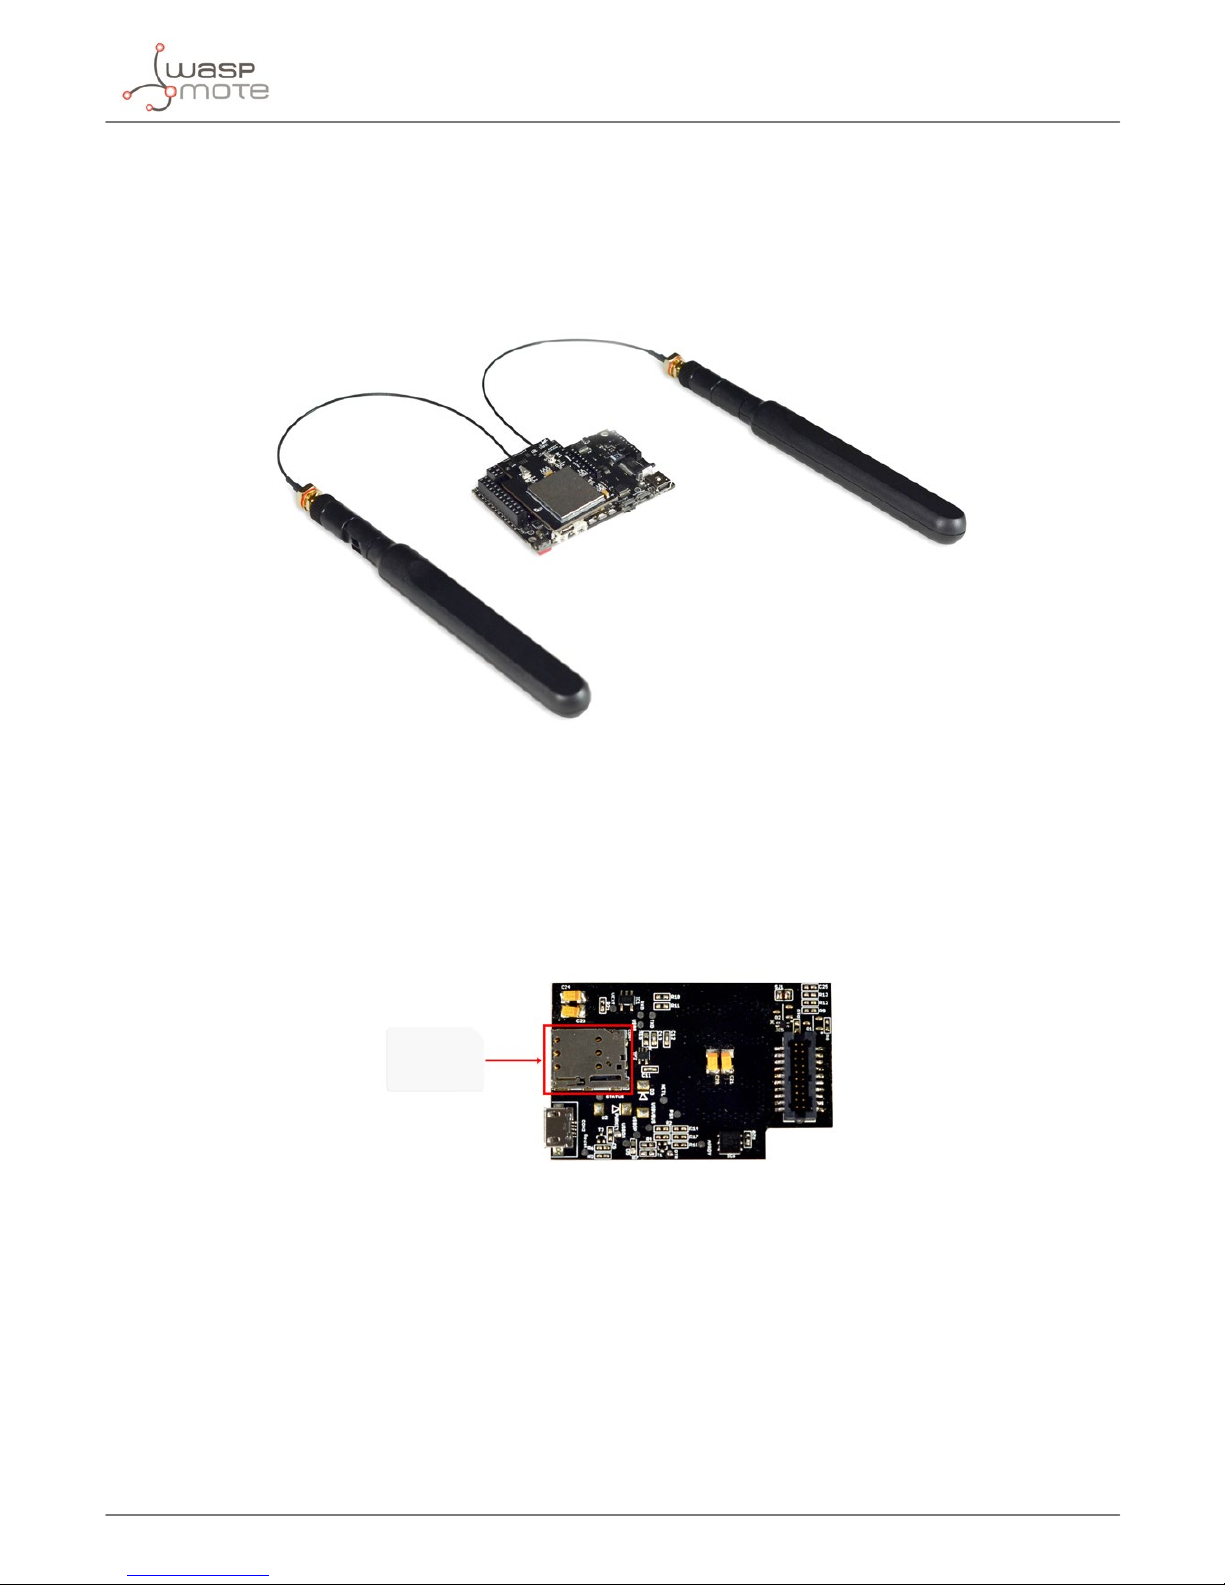
Figure: Module connected to Waspmote in SOCKET1
The SIM card size used in the NB-IoT / Cat-M module is nano-SIM. The next picture shows how the nano-SIM card
must be plugged in the module.
Figure: SIM card installation in OEM version
Page 9
-9-
v7.0
Hardware
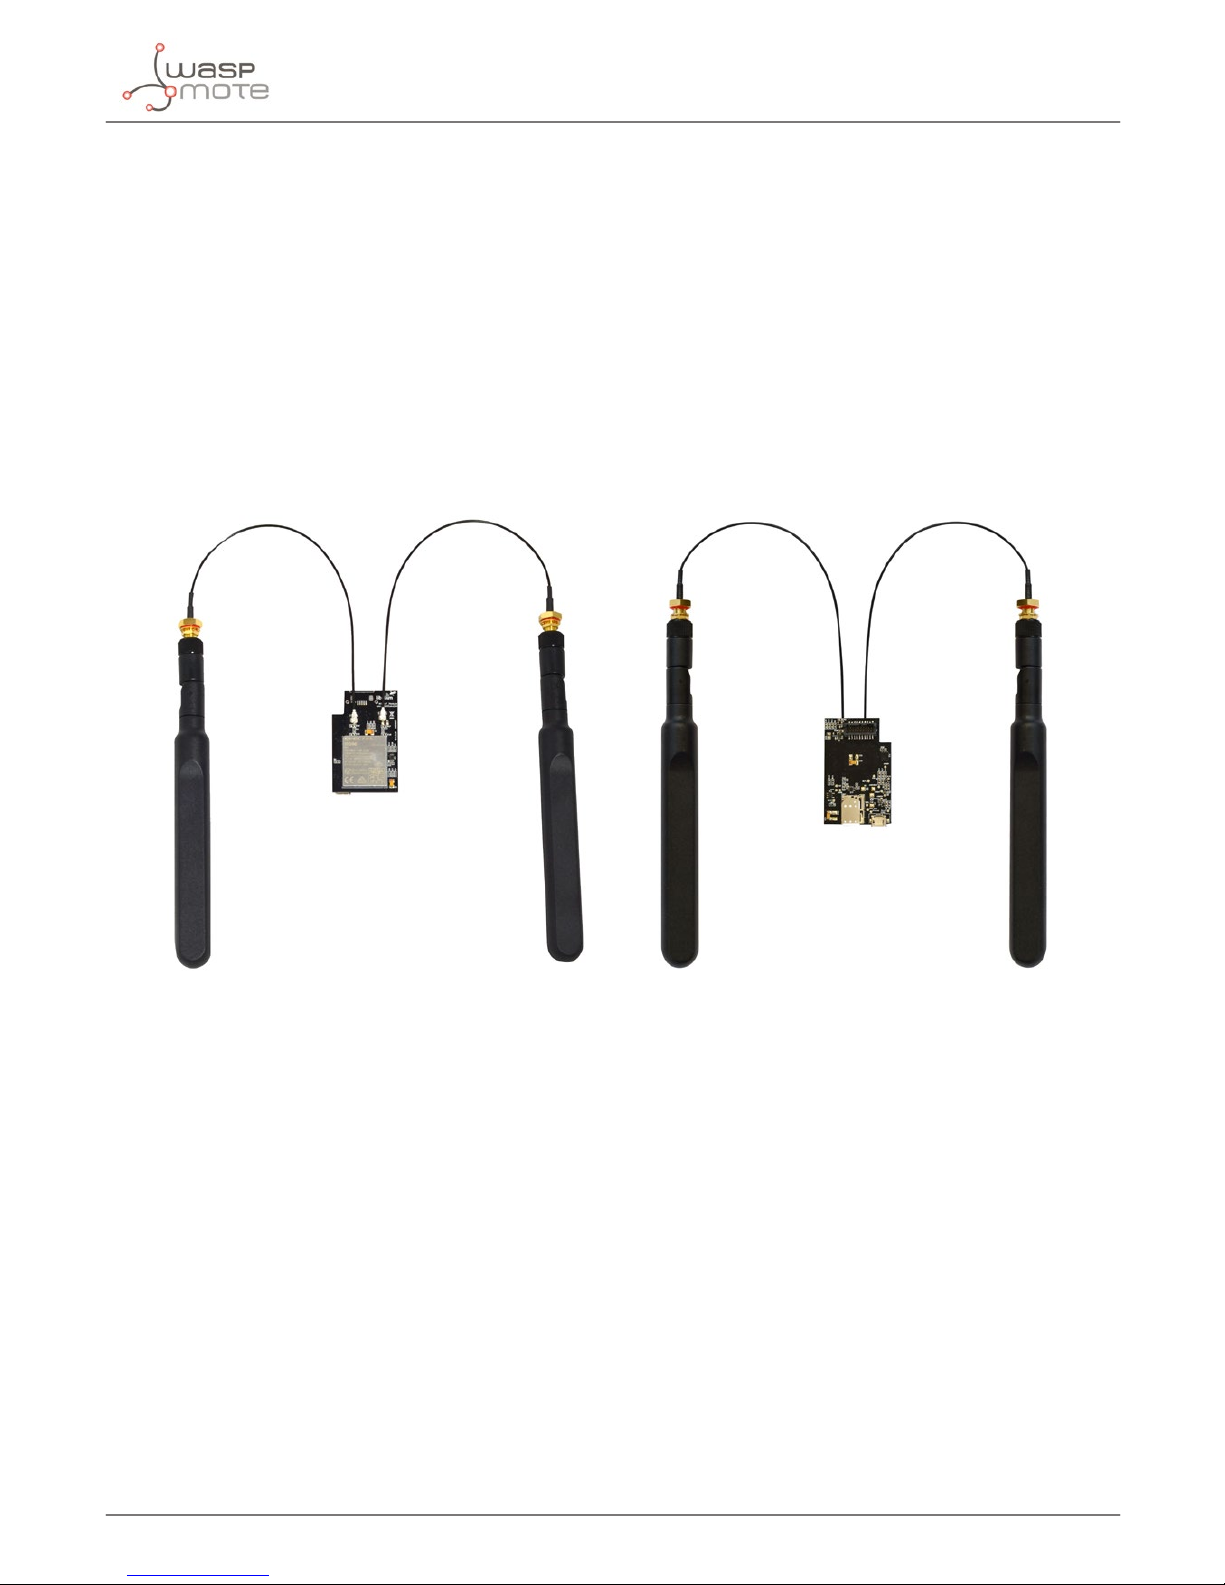
2.3. Antennas
The NB-IoT / Cat-M module comes with one cellular antenna for improving the signal reception. Besides, a GNSS
antenna is also included for the GNSS receiver.
Both antennas are the same model and can be used in any of the 2 antenna connectors. The module’s silkscreen
identies the connectors. The operating bands of the dipole antenna go from 698 to 960 MHz and from 1710 to
2690 MHz. The maximum gain of the antenna is observed at 2.6 GHz: 3.4 dBi.
To get the maximum performance, it is recommended to place the antennas like that:
• The main cellular antenna should be in vertical position, pointing to the sky, in order to radiate better to the
cellular base stations around.
• The GPS antenna should be in horizontal position, because the GPS satellite signal will come from above.
Figure: NB-IoT / Cat-M module antennas
Page 10

-10-
v7.0
Software
3. Software
3.1. Waspmote library
3.1.1. Waspmote NB-IoT / Cat-M library
The les related to the NB-IoT / Cat-M module library are:
• /BG96/WaspBG96.h
• /BG96/WaspBG96.cpp
It is mandatory to include the NB-IoT / Cat-M library when using this module. So the following line must be added
at the beginning of the code:
#include <WaspBG96.h>
3.1.2. Class constructor
To start using the Waspmote NB-IoT / Cat-M library, an object from the WaspBG96 class must be created. This
object, called BG96, is already created by default inside the Waspmote NB-IoT / Cat-M library. It will be used along
this guide to show how Waspmote works.
When using the class constructor, all variables are initialized to their default values.
3.1.3. API functions
Through this guide there are lots of examples, showing the use of functions. In these examples, API functions are
called to execute the commands, storing in their related variables the parameter value in each case. The functions
are called using the predened object BG96.
All public functions return dierent possible values:
• 0: OK
• Otherwise: ERROR. See corresponding function error code
Page 11

-11-
v7.0
Software
3.2. Switching on
The ON() function switches on the NB-IoT / Cat-M module and it opens the MCU’s UART bus for communicating
with the module. After this step, the module will be able to receive commands to manage it.
Example of use:
{
BG96.ON();
}
3.3. Switching o
The OFF() function allows the user to switch o the NB-IoT / Cat-M module and close the UART. This function
must be called in order to save battery when the module is not going to be used.
Example of use:
{
BG96.OFF();
}
Page 12

-12-
v7.0
Software
3.4. SIM card
3.4.1. Entering PIN
The enterPIN() function allows the user to enter the PIN (Personal Identication Number) of the SIM (Subscriber
Identication Module) card. If the SIM card has no PIN (or the PIN was disabled on the SIM card), it is not necessary
to use this function.
Example for entering the PIN:
{
BG96.enterPIN(“1234”);
}
Besides, there is another function prototype in order to set a new one. It is mandatory to specify the current PIN
number and the new one.
Example for setting a new PIN:
{
BG96.enterPIN(“1234”, ”1111”);
}
Example of entering the PIN number:
www.libelium.com/development/waspmote/examples/nb-iot-01-enter-pin-code
3.4.2. Getting module information
The getInfo() function can get more than one information eld to the module. This function needs one input
to indicate the type of information requested. The resulting information is stored in _buffer, and _length is the
number of bytes in the buer. The information possibilities are:
• WaspBG96::INFO_HW: To request the hardware revision
• WaspBG96::INFO_MANUFACTURER_ID: To request the manufacturer identier
• WaspBG96::INFO_MODEL_ID: To request the model identier
• WaspBG96::INFO_REV_ID: To request the rmware revision
• WaspBG96::INFO_IMEI: To request the IMEI (International Mobile Station Equipment Identity), which is the
unique identier of the module, similar to a MAC address
• WaspBG96::INFO_IMSI: To request the IMSI
• WaspBG96::INFO_ICCID: To request the ICCID
Examples of use:
{
// get IMEI number
BG96.getInfo(WaspBG96::INFO_HW);
// get IMSI number
BG96.getInfo(WaspBG96::INFO_IMSI);
// get ICCID number
BG96.getInfo(WaspBG96::INFO_ICCID);
}
Page 13

-13-
v7.0
Software
Related variables:
BG96._buffer → Buer which stores the information requested
BG96._length → Number of bytes in buer
Example of getting module info:
www.libelium.com/development/waspmote/examples/nb-iot-02-get-module-info
Page 14

-14-
v7.0
Software
3.5. Setting operator parameters
When the NB-IoT / Cat-M module uses data services like TCP/UDP connections, HTTP services, SMTP or FTP
transfers, it is mandatory to congure the parameters provided by the user’s Mobile Network Operator (MNO):
APN, login and password. The owner of a SIM should be notied with these parameters by the MNO.
The set_APN() function allows the user to save these parameters into Waspmote memory. Later, when data
connection functions are called, Waspmote will congure these parameters into the NB-IoT / Cat-M module.
Example of use:
{
BG96.set_APN(“apn”, ”login”, ”password”);
}
The show_APN() function allows the user to display the current settings stored in Waspmote’s memory which are
used by the libraries when data connections are performed.
Example of use:
{
BG96.show_APN();
}
Related variables:
BG96._apn → Stores the APN name
BG96._apn_login → Stores the APN login
BG96._apn_password → Stores the APN password
Page 15

-15-
v7.0
Software
3.6. Checking network connection status
There are 2 functions to check the network connection status: checkConnection() and checkDataConnection().
The checkConnection() function checks the module’s network connection status and returns whether the module:
• is connected to a network
• is not connected to a network
• is searching for a new operator to register to
• registration was denied
This function will wait for the module to be connected to a network for the specied time in second units.
Example of use:
{
BG96.checkConnection(60);
}
Possible error codes for this function:
1: not registered, the Mobile Equipment (ME) is not currently searching for a new operator to register to
2: not registered, but ME is currently searching for a new operator to register to
3: registration denied
4: unknown
The checkDataConnection() function checks the module’s network connection status, connects the module to
data service and returns whether the module:
• is connected to data service
• is not connected to a network
• is searching for a new operator to register to
• registration was denied
This function will wait for the module to be connected to a network for the specied time in second units.
Example of use:
{
BG96.checkDataConnection(60);
}
Possible error codes for this function:
1: not registered, ME is not currently searching for a new operator to register to
2: not registered, but ME is currently searching for a new operator to register to
3: registration denied
4: unknown
6: not registered, ME is not currently searching for a new operator to register to
8: not registered, but ME is currently searching for a new operator to register to
9: registration denied
Page 16

-16-
v7.0
Software
10: unknown
12: if error setting APN
13: if error setting login
14: if error setting password
15: if error activating GPRS connection
Example of getting network information:
www.libelium.com/development/waspmote/examples/nb-iot-03-get-network-info
3.7. Basic network connection to NB-IoT
To demonstrate a basic connection through the NB-IoT network, the 1st step is to congure the connection using
the function nbiotConnection().The APN, the desired band and the network operator should be provided as
arguments. Each band has been dened as a constant in the header le.
Then, use the contextActivation() function to connect the network.
Example of basic NB-IoT connection:
www.libelium.com/development/waspmote/examples/nb-iot-04a-basic-connection-nb-iot
3.8. Basic network connection to Cat-M
In the same way as for NB-IoT connection, to demonstrate a basic connection through the Cat-M network, the 1st
step is to congure the connection with lteM1Connection() function and then connect with contextActivation().
Example of basic Cat-M connection:
www.libelium.com/development/waspmote/examples/nb-iot-04b-basic-connection-cat-m
3.9. Basic network connection to EGPRS
Moreover, the EGPRS link can be also tested with GPRSConnection() function.
Example of basic EGPRS connection:
www.libelium.com/development/waspmote/examples/nb-iot-04c-basic-connection-egprs
Page 17

-17-
v7.0
Software
3.10. HTTP client
3.10.1. HTTP connections
HTTP is a great protocol because it is a standard, simple and light way to send information to web servers.
Libelium has created a little web service in order to allow 4G, 3G, GPRS, GPRS+GPS, NB-IoT / Cat-M or WiFi modules
to test the HTTP mode. This web service is a little code, written in PHP, which is continuously listening to the
HTTP port (port number 80) of our test server “pruebas.libelium.com”. This is a kind of RESTful service. These
communication modules can send HTTP instances to our web service.
HTTP instances should have the following structures so that our web service can understand.
GET method
In GET method the data are sent to the server append to the main URL with the ‘?’ character. The base sentence
to perform GET method is shown below:
pruebas.libelium.com/getpost_frame_parser.php?<variable1=value1>&<variable2=value2>&<...>&
view=html
Where:
• getpost_frame_parser.php?: It is the main URL, where the web service is running.
• <variable1=value1>: It is a couple with the variable name and value which we want the web service to parse.
• view=html: It is an optional argument. It shows a “pretty” response (HTML formatted).
All arguments must be separated by “&”. The variable name and value must be separated by “=”.
Some examples:
pruebas.libelium.com/getpost_frame_parser.php?var1=3.1415
pruebas.libelium.com/getpost_frame_parser.php?var1=3.1415&view=html
pruebas.libelium.com/getpost_frame_parser.php?var1=3.1415&var2=123456&var3=hello&view=html
POST method
Unlike GET method, with POST method the data are sent to the server into an extra data eld. The URL only
includes the site name and the PHP direction:
pruebas.libelium.com/getpost_frame_parser.php
The data eld is very similar as the used in GET method:
<variable1=value1>&<variable2=value2>&<...>&view=html
Where:
<variable1=value1>: It is a couple with the variable name and value which we want the web service to
parse.
All arguments must be separated by “&”. The variable name and value must be separated by “=”.
Some examples of data eld:
pruebas.libelium.com/getpost_frame_parser.php?variable1=3.141592
pruebas.libelium.com/getpost_frame_parser.php?var1=3.1415&var2=123456&var3=hello
Page 18

-18-
v7.0
Software
Server response
If the web service receives one instance with the appropriate format, some actions will happen:
• The web service grabs the string and parses it. So the PHP code creates couples with the variables name and
value.
• The web service responses to the sender device (to the sender IP) with an HTML-formatted reply.
Figure: Operating with the web service from a PC browser
Remember this PHP code is really simple and is oered with the only purpose of testing, without any warranty.
The source code is available here:
downloads.libelium.com/waspmote-html-get-post-php-parser-tester.zip
The user may nd it interesting to copy this code and make it run on his own server (physical or virtual). If the user
wants to go further, he can complete the code. For example, once the couples are parsed, the user can modify the
PHP to save data into a txt le, or insert couples into a database, or include a timestamp...
Page 19

-19-
v7.0
Software
3.10.2. HTTP request methods
The http() function congures HTTP parameters, performs the request selected by the user and handles the data
returned from the server.
This function needs several parameters to work properly depending on the method used. The 1st parameter
required by the function is the request method. User can choose among 5 methods: GET, HEAD, DELETE, POST
and PUT:
WaspBG96::HTTP_GET
WaspBG96::HTTP_HEAD
WaspBG96::HTTP_DELETE
WaspBG96::HTTP_POST
WaspBG96::HTTP_PUT
After choosing the method, the function needs the host URL, port and resource of the HTTP server requested. The
data eld is only necessary when POST or PUT methods are performed.
Example of use (GET, HEAD and DELETE methods):
{
char host[] = “test.libelium.com”;
uint16_t port = 80;
char resource[] = “/test-get-post.php?varA=1&varB=2&varC=3&varD=4”;
BG96.http(WaspBG96::HTTP_GET, host, port, resource);
}
Example of use (POST and PUT methods):
{
char host[] = “test.libelium.com”;
uint16_t port = 80;
char resource[] = “/test-get-post.php”;
char data[] = “varA=1&varB=2&varC=3&varD=4&varE=5”;
BG96.http(WaspBG96::HTTP_POST, host, port, resource, data);
}
Once the request has been sent, the function waits for data from the server and stores it in _buffer. It also stores
the HTTP status code from the server in _httpCode.
Related variables:
BG96._httpCode → Stores the HTTP code from the server
BG96._buffer → Stores data received from server
BG96._length → Stores data length
Example of HTTP GET:
www.libelium.com/development/waspmote/examples/nb-iot-06-http-get
Example of HTTP POST:
www.libelium.com/development/waspmote/examples/nb-iot-07-http-post
Page 20

-20-
v7.0
Software
3.10.3. Sending Waspmote frames to Meshlium via HTTP
Since Meshlium Manager System v4.0.9, HTTPS method is the default method for sending data. HTTPS is the
recommended technology because it provides many cyber security services. Therefore, the HTTPS service is
always enabled on Meshlium.
However, Meshlium Manager System v4.1.0 and greater versions allow the user to enable the HTTP service
in order to be able to receive HTTP non-secure requests. The user must go to: Manager System → System →
Security→ HTTP Service:
Figure: Enable HTTP service in Meshlium Manager System
The sendFrameToMeshlium() function has been developed to send Waspmote frames from Waspmote to Meshlium
via non-secure HTTP request. Meshlium will parse (chop) the frame and will store it in its internal MySQL database.
This function requires the following parameters:
• Meshlium’s IP address
• Meshlium’s remote port
• Data to send: frame.buffer will be used from the generated frame
• Data length: frame.length will be used from the generated frame
Page 21

-21-
v7.0
Software
Figure: Send frames to Meshlium via NB-IoT
After calling the function, the response from Meshlium will be stored in _buffer. Besides, it will store the HTTP
status code from server in _httpCode. Please refer to the Data Frame Guide in order to know more about how to
create sensor frames with Waspmote libraries.
Example of use:
{
char host[] = “pruebas.libelium.com”;
uint16_t port = 80;
// after frame has been created
BG96.sendFrameToMeshlium(host, port, frame.buffer, frame.length);
}
Related variables:
BG96._http → Code Stores the HTTP code from the server
BG96._buffer → Stores data received from server
BG96._length → Stores data length
frame.buffer → Stores data frame that will be sent to Meshlium
frame.length → Stores data frame length
Page 22

-22-
v7.0
Software
3.10.4. Sending Waspmote frames to Meshlium via HTTPS
Since Meshlium Manager System v4.0.9, HTTPS is the default method for sending data.
For HTTPS, the user must keep in mind that the Meshlium’s certicate has to be installed in the Waspmote or
Plug & Sense! radio prior to opening secure connections. The next picture shows how the user can download the
Meshlium’s certicate from Manager System → System → Users Manager → Download Certicate:
Figure: Meshlium certicate export process
The downloaded certicate must be installed following the steps explained in the “SSL sockets” section and the
proper library function. Also, the example linked at the end of this section shows how to perform the installation.
Example of sending frames to Meshlium via HTTPS:
www.libelium.com/development/waspmote/examples/nb-iot-08b-sending-frames-to-meshlium-via-https
Page 23

-23-
v7.0
Software
3.11. Making TCP/UDP connections
3.11.1. Socket identiers
The NB-IoT / Cat-M module permits to have up to 6 simultaneous TCP/UDP connections. For that purpose, the
library denes the following socket identiers to be used when handling the multi-socket connections:
WaspBG96::CONNECTION_1
WaspBG96::CONNECTION_2
WaspBG96::CONNECTION_3
WaspBG96::CONNECTION_4
WaspBG96::CONNECTION_5
WaspBG96::CONNECTION_6
The NB-IoT / Cat-M library denes dierent structures in order to store the information related to all socket
identiers. After opening sockets or sending/receiving data, the structures are updated. So this is useful in order
to manage the most important settings of the connection.
3.11.2. Socket status structure
The SocketStatus_t structure stores the status for all sockets. For each one of the connections, the status
structure includes:
• Socket identier
• Current socket status. The API denes several constants to describe it:
WaspBG96::STATUS_CLOSED
WaspBG96::STATUS_ACTIVE
WaspBG96::STATUS_SUSPENDED
WaspBG96::STATUS_SUSPENDED_DATA
WaspBG96::STATUS_LISTENING
WaspBG96::STATUS_INCOMING
WaspBG96::STATUS_OPENING
• Local IP address
• Local port
• Remote IP address
• Remote port
As it is possible to have up to 6 simultaneous connections, the global variable is dened as follows:
SocketStatus_t socketStatus[6];
The denition of the structure is:
struct SocketStatus_t
{
uint8_t id;
uint8_t state;
char localIp[16];
uint16_t localPort;
char remoteIp[16];
uint16_t remotePort;
};
The getSocketStatus() function allows the user to update the socket status structure from the NB-IoT / Cat-M
module. It is mandatory to indicate the identier of the socket to be updated. It is possible to update all socket
status by calling the getAllSocketStatus() function which is faster than iterating through all dierent identiers.
Page 24

-24-
v7.0
Software
Example of use:
{
uint8_t socketId = WaspBG96::CONNECTION_1;
BG96.getSocketStatus(socketId);
}
Related variables:
BG96.socketInfo[socketId].id → Socket identier
BG96.socketInfo[socketId].state → Socket status
BG96.socketInfo[socketId].localIp → Local IP address
BG96.socketInfo[socketId].localPort → Local port
BG96.socketInfo[socketId].remoteIp → Remote IP address
BG96.socketInfo[socketId].remotePort → Remote port
3.11.3. Creating a TCP/UDP client socket
The openSocketClient() function congures and opens a socket. This function expects several input parameters:
• Socket ID: The 1st parameter indicates the identier to be associated to the new TCP/UDP connection. This
identier is needed in order to send or receive data through the corresponding socket after creating it.
• Protocol: This parameter indicates whether use TCP or UDP protocol for the new socket. The possibilities are:
WaspBG96::TCP
WaspBG96::UDP
• Host: Address of the remote host, string type. This parameter can be either:
- Any valid IP address in the format: “xxx.xxx.xxx.xxx”
- Any host name to be solved with a DNS query
- Any valid IPv6 address in the format: xxxx:xxxx:xxxx:xxxx:xxxx:xxxx:xxxx:xxxx or xxx.xxx.xxx.xxx.xxx.xxx.
xxx.xxx.xxx.xxx.xxx.xxx.xxx.xxx.xxx.xxx
• Remote port: Remote host port to contact from 1 to 65535.
• Local port: Parameter is valid for UDP connections only and has
no eect (if used) for TCP connections. UDP connections local port from 1 to 65535.
Example of creating a TCP client connection:
{
uint8_t socketId = WaspBG96::CONNECTION_1;
char host[] = “xxx.xxx.xxx.xxx”;
uint16_t remote_port = 15010;
BG96.openSocketClient(socketId, WaspBG96::TCP, host, remote_port);
}
Example of creating a UDP client connection:
{
uint8_t socketId = WaspBG96::CONNECTION_2;
char host[] = “xxx.xxx.xxx.xxx”;
uint16_t remote_port = 15010;
uint16_t local_port = 4000;
BG96.openSocketClient(socketId, WaspBG96::UDP, host, remote_port, local_port);
}
Page 25

-25-
v7.0
Software
Possible error codes for this function:
1: not registered, ME is not currently searching for a new operator to register to
2: not registered, but ME is currently searching for a new operator to register to
3: registration denied
4: unknown
6: not registered, ME is not currently searching for a new operator to register to
8: not registered, but ME is currently searching for a new operator to register to
9: registration denied
10: unknown
12: if error setting APN
13: if error setting login
14: if error setting password
15: if error activating GPRS connection
16: if error getting socket status
17: Socket with an active data transfer connection
18: Socket suspended
19: Socket suspended with pending data
20: Socket listening
21: Socket with an incoming connection. Waiting for the user accept or shutdown command.
22: Socket in opening process. The socket is not closed but still not in Active or Suspended.
23: if error in Socket Conguration
24: if error in Socket Conguration Extended 3
25: if error sending the open command
26: if timeout opening the socket
Page 26

-26-
v7.0
Software
3.11.4. Sending data
The send() function allows the user to send TCP/UDP packets once the socket is active. The function needs 2
dierent inputs parameters:
• Socket ID: the socket identier used for opening the connection.
• Data: This is the stream of data to send to the TCP/UDP socket. This stream of data can be dened as a simple
string message. On the other hand, the data can be dened as an array of bytes, specifying a 3rd input for the
length of the array of bytes to send.
Example for sending a string message:
{
BG96.send(WaspBG96::CONNECTION_1, “This_is_the_data_payload”);
}
Example for sending an array of bytes:
{
uint8_t data[] = {0x31, 0x32, 0x33, 0x34, 0x35}
BG96.send(WaspBG96::CONNECTION_1, data, 6);
}
Possible error codes for this function:
1: if error checking socket status
2: if incorrect socket status
3: if error sending data
4: if error waiting conrmation from module
5: if error getting socket status
6: if timeout getting socket status
All examples related to TCP/UDP sockets (both client and server) show how to send data:
http://www.libelium.com/development/waspmote/examples/nb-iot-11-tcp-client
http://www.libelium.com/development/waspmote/examples/nb-iot-13-udp-client
Page 27

-27-
v7.0
Software
3.11.5. Receiving data
The receive() function allows the user to receive TCP/UDP packets once the socket is active. The function needs
dierent inputs:
• Socket ID: the socket identier used for opening the connection.
• Timeout (optional input):
- If no timeout input is specied, the receive function is a non-blocking function which answers if data has
been received.
- If the timeout is inserted as new input, the function will block until a new packet is received or time is up in
the case no packet is received. This timeout must be specied in milliseconds units.
Example for instant reception:
{
BG96.receive(WaspBG96::CONNECTION_1);
}
Example for blocking reception (i.e. 30 seconds):
{
BG96.receive(WaspBG96::CONNECTION_1, 30000);
}
Related variables:
BG96._buffer → Pointer to the buer where received data is stored
BG96._length → Length of the data received
Possible error codes for this function:
1: if no data received
2: if error getting socket info
3: if timeout waiting for data
4: if error receiving data from module
5: if error parsing length of data
6: if error reading incoming bytes
Page 28

-28-
v7.0
Software
3.11.6. Closing a socket
The closeSocketClient() function allows the user to close a TCP/UDP client previously open. The function needs
an input parameter for the socket identier.
The closeSocketServer() function allows the user to close a TCP/UDP server previously open. The function needs
2 inputs:
• Socket ID: the socket identier used for opening the connection.
• Protocol: This parameter indicates the protocol used by the socket:
WaspBG96::TCP
WaspBG96::UDP
3.11.7. SSL sockets
The NB-IoT / Cat-M module includes a stack for establishing SSL sockets. For this feature, the user must keep
in mind that it is necessary to install the proper security data in the module. For handling the SSL socket new
functions are dened for opening the socket, sending data, receiving data and closing the socket.
Currently, for SSL sockets only one single connection is permitted. So, regarding the socket identiers the only
available option is: WaspBG96::CONNECTION_1.
The manageSSL() function allows the user to store, delete and read security data (Certicate, CA certicate, private
key) into the non volatile memory of the module. The function expects several inputs:
• Socket ID: the socket identier used for opening the connection.
• Action: the action to perform:
- WaspBG96::SSL_ACTION_DELETE: Delete data from memory
- WaspBG96::SSL_ACTION_STORE: Store data into memory
- WaspBG96::SSL_ACTION_READ: Read data from memory
• Data type:
- WaspBG96::SSL_TYPE_CERT: Certicate
- WaspBG96::SSL_TYPE_CA_CERT: CA certicate
- WaspBG96::SSL_TYPE_RSA: RSA Private key
• Data (optional): this input is needed when the user selects to store a new security data into module’s memory.
Possible error codes for this function:
1 if error setting security data
2 if error waiting module conrmation
3 if error getting security data
4 if error deleting security data
5 if invalid action input
The openSocketSSL() function allows the user to open a remote connection via socket secured through SSL.
Several inputs are needed for calling this function:
• Socket ID: The socket identier used for opening the connection
• Host: Remote SSL server address
• Remote port: Remote TCP port to contact from 1 to 65535.
Page 29

-29-
v7.0
Software
Possible error codes for this function:
1: not registered, ME is not currently searching for a new operator to register to
2: not registered, but ME is currently searching for a new operator to register to
3: registration denied
4: unknown
6: not registered, ME is not currently searching for a new operator to register to
8: not registered, but ME is currently searching for a new operator to register to
9: registration denied
10: unknown
12: if error setting APN
13: if error setting login
14: if error setting password
15: if error activating GPRS connection
16: if error getting SSL Socket Status
17: if socket disabled
19: if socket already open
20: if error opening the socket
21: if no response from module
The sendSSL() function allows the user to send data through a secure socket. Several inputs are needed for
calling this function:
• Socket ID: the socket identier used for opening the connection.
• Data: Data to send.
Possible error codes for this function:
1: if error checking socket status
2: if incorrect socket status
3: if error sending data
4: if no response from module
5: if error getting socket status
6: if timeout waiting for correct socket status
The receiveSSL() function allows the user to receive data through a secure socket. Several inputs are needed for
calling this function:
• Socket ID: the socket identier used for opening the connection.
• Timeout (optional input):
Page 30

-30-
v7.0
Software
- If no timeout input is specied, the receive function is a non-blocking function which answers if data has
been received.
- If the timeout is inserted as new input, the function will block until a new packet is received or time is up
in the case no packet is received. This timeout must be specied in milliseconds units.
Possible error codes for this function:
1: if no answer from module
2: if SSL socket disconnected
3: if error code from module
4: if no response from module
5: if error parsing length of received data
6: if error getting received data
7: if error waiting module conrmation
The closeSocketSSL() function allows the user to close a secure socket. The function needs an input parameter
for the socket identier.
Example for SSL socket:
www.libelium.com/development/waspmote/examples/nb_iot-15-ssl-sockets
Page 31

-31-
v7.0
Software
3.12. GNSS – Getting position
The gpsStart() function allows the user to power on the GNSS engine. By default, the module selects the best
GNSS network to acquire the position in a transparent process. However, the user is able to select the desired
GNSS network if needed.
The waitForSignal() function waits until GNSS signal is received for valid data. The input parameter denes
the timeout to wait for signal in millisecond units. If the function returns a correct answer means that the GNSS
attributes have been updated:
• Latitude
• Latitude indicator: North or South
• Longitude
• Longitude indicator: East or West
• Time
• Date
• Number of satellites
• HDOP: Horizontal Dilution of precision. If this value is less than 1 indicates the highest possible condence
level to be used for applications.
The convert2Degrees() function performs the conversion from the latitude and latitude variables given by the
module to degrees so it is more legible and intuitive. The input parameters must be the latitude/longitude and the
corresponding indicator. The returning value is the converted value in degrees units.
The gpsStop() function powers down the GNSS engine of the module. It is possible to switch from a SUPL session
to the autonomous GNSS mode. Firstly, the GNSS feature must be stopped, and then restart with the autonomous
mode.
Example of GPS modes:
http://www.libelium.com/development/waspmote/examples/nb-iot-16-GNSS
Page 32

-32-
v7.0
Software
3.13. Sleep mode
In order to save battery, the user can simply switch the module o with the OFF() function, but she must take
into account that it will take about 20 seconds until the next on process is completed (the module and the network
must redo the hand-shake process). So switching o could not be really ecient, because the power consumption
during that 20 seconds is not trivial. To maximize the battery saving, the module oers sleep functions in which
the module is not totally switched o, but it remains in a low-power state, sending paging frames to the network
from time to time to keep the link active. Getting the module ready to work from a sleep state is much faster than
from o state.
Thus, depending on the application, the user may nd interesting not to switch the radio o, but to put it to sleep:
nodes with frequent communications (<5 minutes) will probably prefer sleep mode over o mode. The user
should test both modes and decide the best choice.
By default, the module sleep mode can be enabled by the nbiotSleepMode() function.
However, the NB-IoT / Cat-M module allows several conguration modes to minimize the power consumption. For
example, the module can be congured in Power Saving Mode (PSM) using the function nbiotSettingPSM(), and
the conguration can be check with nbiotGetPSMValues().
A more detailed description of sleep modes will be added in this section.
Example of how to use the sleep mode:
http://www.libelium.com/development/waspmote/examples/nb-iot-25-sleep-mode
Page 33

-33-
v7.0
Software
3.14. eDRX setup
The enhanced Extended Discontinuous Reception (eDRX) can be congured using the function nbiotSettingeDRX().
For the proper conguration of the eDRX feature, rst of all ensure that your operator has implemented this
feature in its network (as of February 2019, many operators do not oer some advanced features yet).
Example of how to use the eDRX feature:
http://www.libelium.com/development/waspmote/examples/nb-iot-24-edrx
3.15. Scanning network operators
In order to see the coverage of NB-IoT or Cat-M in a certain location, use the function scanOperator().
The list of the detected operators is stored in _buffer, and _length is the number of bytes in the buer.
Related variables:
BG96._buffer → Buer which stores the information requested
BG96._length → Number of bytes in buer
Example of how to scan network operators:
http://www.libelium.com/development/waspmote/examples/nb-iot-23-scan-operators
3.16. Sending AT commands
The NB-IoT / Cat-M library allows to send custom AT commands directly to the module using the sendATcommand()
function.
The AT command to be sent, the expected answer and an estimated timeout can be also provided as arguments
to make the communication more robust.
Example of sending AT commands to the module:
http://www.libelium.com/development/waspmote/examples/nb-iot-22-manual-AT-command
Page 34

-34-
v7.0
Consumption
4. Consumption
4.1. Consumption table
The NB-IoT / Cat-M module is directly powered by the battery. The next table shows the Waspmote’s peak current
consumption in dierent states of the NB-IoT / Cat-M module.
State Mean power consumption
On TBD
Idle state (DRX = 1.28 s) 16 mA
PSM mode (only NB-IoT / Cat-M module) 25 uA
Cat-M data transfer (B20) 215 mA
NB-IoT data transfer (B20) 190 mA
Non-rechargeable batteries are not advised for the NB-IoT / Cat-M module, because the high peaks of current
consumption could make the voltage of these batteries to go below the threshold, so Waspmote would reset. The
rechargeable battery will not suer this eect as long as its level is above 20%.
The complete consumption table can be found in the manufacturer website.
Page 35

-35-
v7.0
Code examples and extended information
5. Code examples and extended information
In the Waspmote Development section you can nd complete examples:
www.libelium.com/development/waspmote/examples
Page 36

-36-
v7.0
API changelog
6. API changelog
Keep track of the software changes on this link:
www.libelium.com/development/waspmote/documentation/changelog/#nb_iot
Page 37

-37-
v7.0
Certications
7. Certications
Libelium oers 2 types of sensor platforms, Waspmote OEM and Plug & Sense!:
• Waspmote OEM is intended to be used for research purposes or as part of a major product so it needs nal
certication on the client side. More info at: http://www.libelium.com/products/waspmote/
• Plug & Sense! is the line ready to be used out of the box. It includes market certications. See below the
specic list of regulations passed. More info at: http://www.libelium.com/products/plug-sense/
Besides, Meshlium, our multiprotocol router for the IoT, is also certied with the certications below. Get more
info at: www.libelium.com/products/meshlium
List of certications for Plug & Sense! and Meshlium:
• CE (Europe)
• FCC (US)
• IC (Canada)
• ANATEL (Brazil)
• RCM (Australia)
• PTCRB (cellular certication for the US)
• AT&T (cellular certication for the US)
Figure: Certications of the Plug & Sense! product line
You can nd all the certication documents at:
http://www.libelium.com/legal
 Loading...