

LG OUTDOOR LGSGM45BL Operating Manual
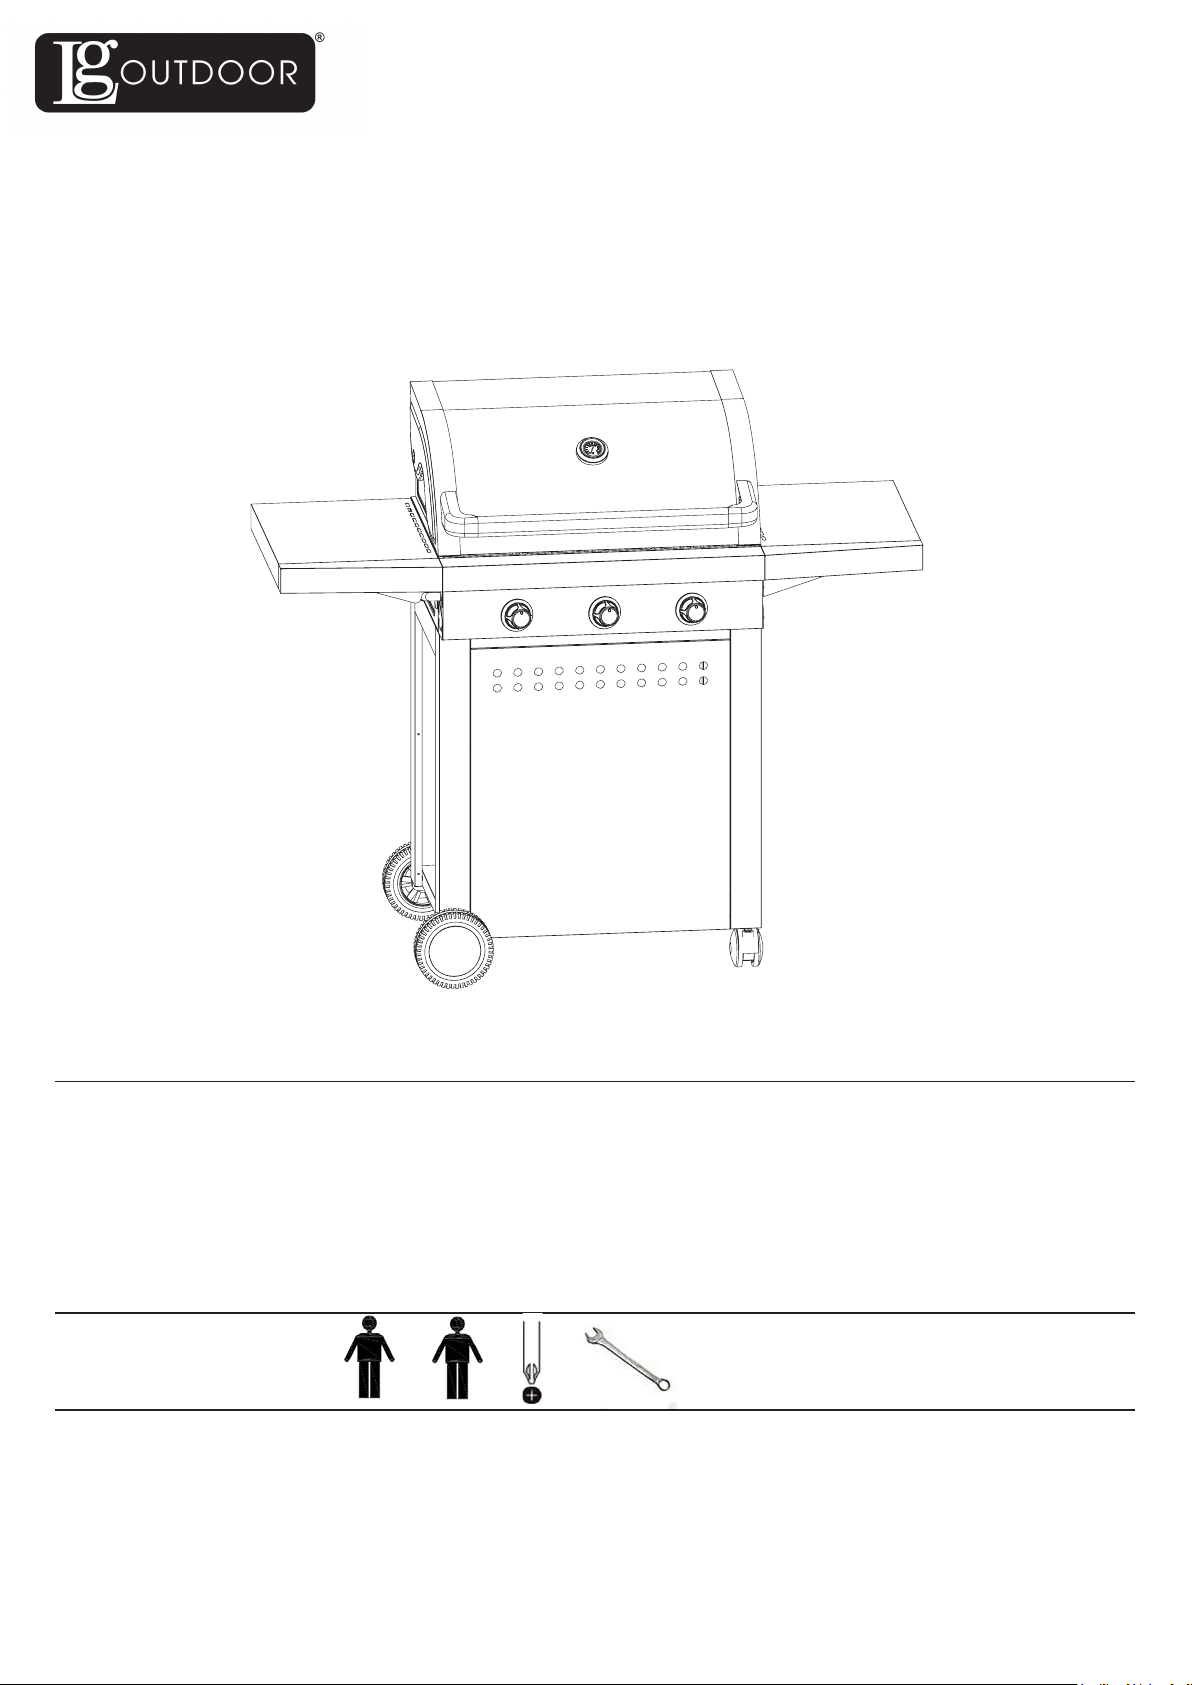
3 Burner Roaster
LGCL30SSBL
WARNING! FOR YOUR SAFETY, FOR OUTDOOR USE ONLY
Please read these instructions carefully and ensure that your barbecue is properly installed, assembled,
maintained and serviced in accordance with these instructions.
Failure to follow these instructions may result in serious injury and/or damage to property.
If you have any questions concerning the assembly or operation of this barbecue, please contact your local
John Lewis store.
Necessary Tools
Please check the pack contents before attempting to assemble this product. A full checklist of components is
given in this leaet. If any components are missing, please contact the retailer from whom you bought this
product.
This product takes approximately 40 MINUTES to assemble with 2 PEOPLE
The ttings pack contains SMALL ITEMS which should be KEPT AWAY FROM YOUNG CHILDREN .
Read this leaet in full before commencing assembly
1

LGCL30SSBL
Contents
Warning Information
Location of your BBQ
Connecting to the gas cylinder
The hose and regulator assembly
Testing for leaks
Gas cylinder safety
What is Butane/Propane
Are all gas bottle gases the same
How is it different from natural gas
Lighting your BBQ
Using your BBQ
Maintenance of your BBQ
Troubleshooting
Exploded Diagram
Parts list
Fittings list
Assembly instructions
Leak Test
Page 3
Page 3
Page 3
Page 3-4
Page 4
Page 4
Page 4
Page 4
Page 4
Page 4
Page 5
Page 5-6
Page 7
Page 8
Page 9
Page 10
Page 11-25
Page 26
Page 2
LGCL30SSBL
WARNING INFORMATION
- Read this Operating Manual before use
- Ensure there is adequate clearance away from flammable materials
- This bbq is only to be used outdoors
- Do not allow children to operate the bbq
- Accessible parts may be very hot, keep children away
- Any modification of this bbq may be dangerous
- Do not move this bbq during use
- When you have finished cooking, turn off the gas cylinder before you turn off
the BBQ controlls - this means any gas in the pipeline will be used up
- Parts sealed by the manufacturer or their agent must not be
manipulated by the user
- BBQ specifications can be found on the data label attached on the
side panel of the bbq frame
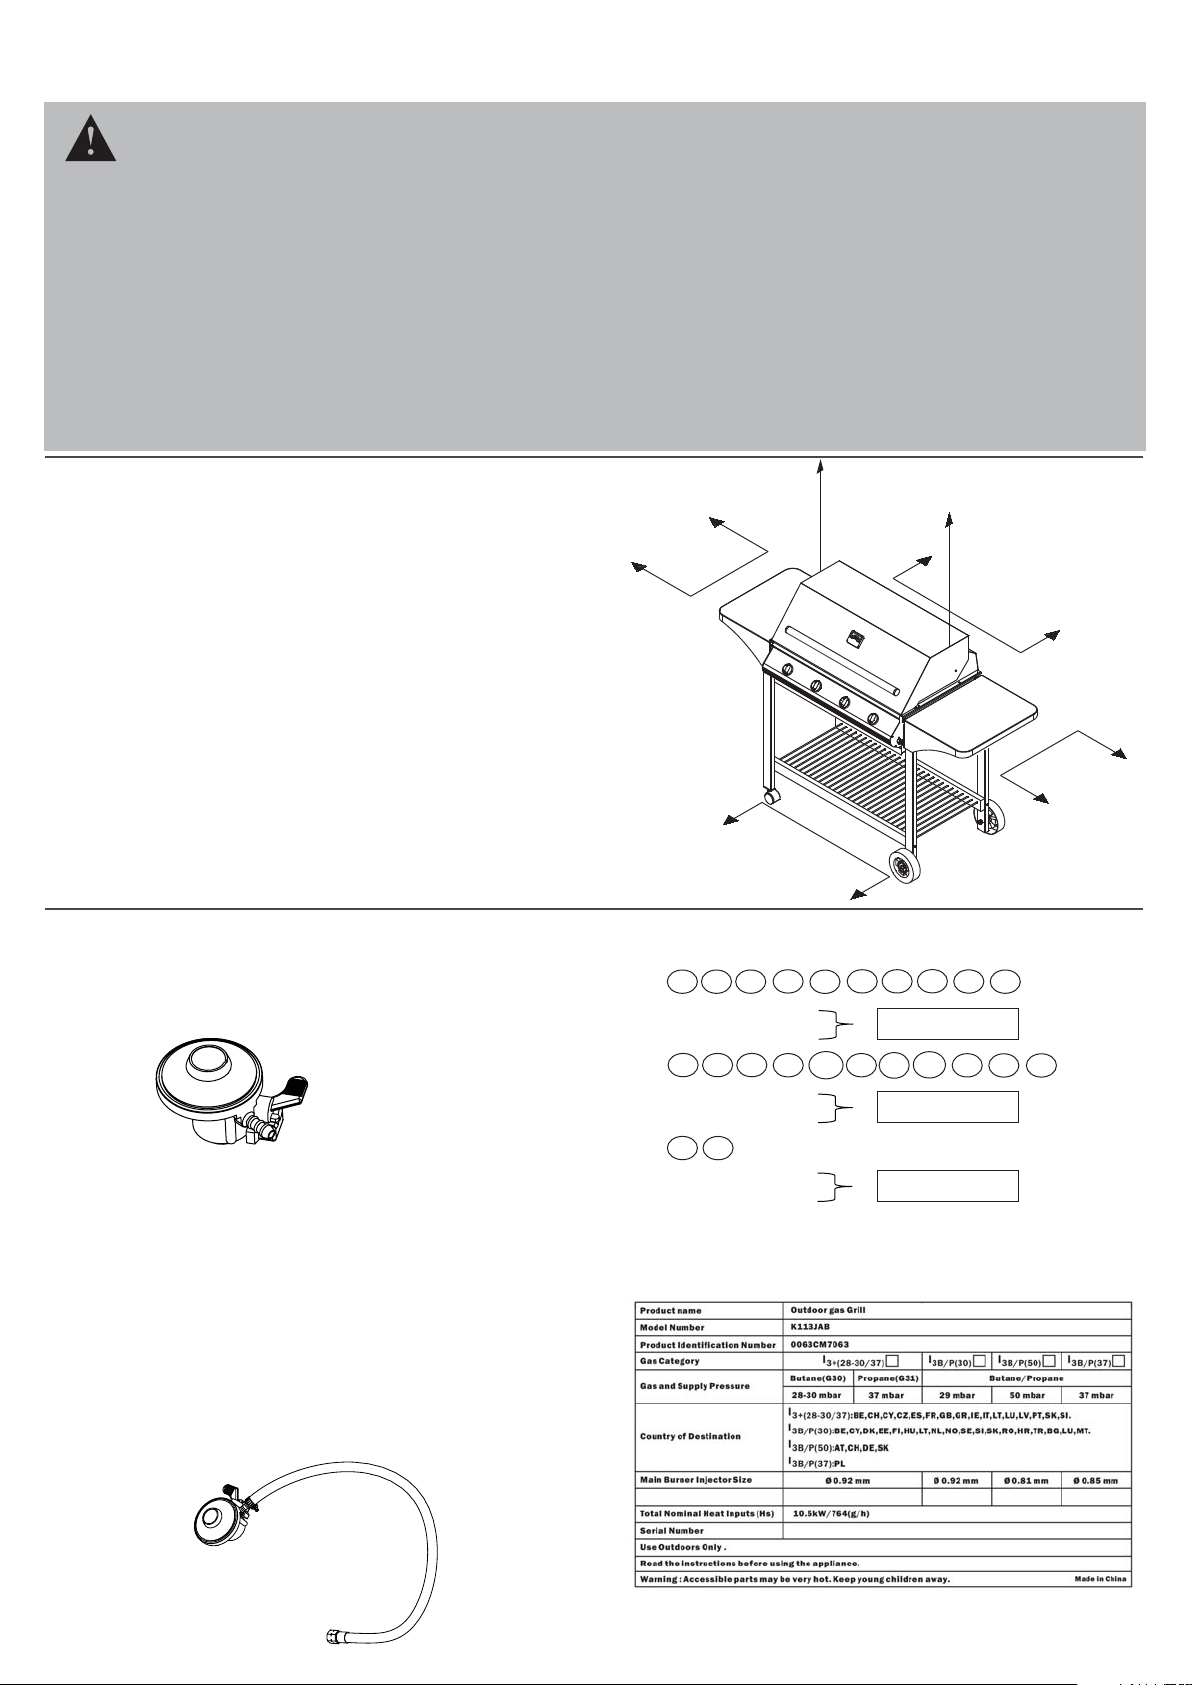
LOCATION OF YOUR BBQ
IMPORTANT - BBQS MUST BE INSTALLED IN ACCORDANCE WITH
THE MANUFACTURER’S INSTALLATION INSTRUCTIONS, LOCAL
GAS FITTING REGULATIONS AND MUNICIPAL BUILDING CODES.
Think carefully when deciding on a location where you are to use your
bbq. The bbq must not be installed under or on any combustible
material and must be a level surface.
Minimum clearance from any combustible materials on ALL sides is
430mm (18”). Minimum clearance from any combustible material from
the TOP of the bbq is 1000mm (39”). (Fig. 1)
- Do not store or use petrol or other flammable vapours and liquids
near the bbq
- Do not store empty or full spare gas cylinders under or near the bbq
- Keep the gas hose and any electrical cord away from hot surfaces
- Avoid unnecessary twisting of the gas hose
- Visually inspect hose prior to each use for cuts, cracks, excessive
wear or other damage
- The hose must be replaced if damaged and when National Conditions
require it
- Never light the bbq with the hood or lid closed
- Never lean over the cooking surface whilst lighting the bbq
- Use bbq tools with heat proof handles or good quality insulated oven
mitts when operating bbq
- Never alter or modify the regulator or gas supply assembly
1000mm Minimum
430mm
Minimum
430mm
Minimum
- Not to be used in garages, porches, breezeways, sheds, or other
enclosed areas
- Not to be used on recreational vehicles
- Do not obstruct flow of combustion and vetilation air around the bbq
CONNECTING THE GAS CYLINDER
There are two different types of gas that can be used on your gas bbq
depending on where you live, that being either butane or propane gas.
Both are supplied in gas cylinders. The connection between the gas
cylinder and the bbq is made with a regulator. (Fig. 2)
(Fig. 2)
It is important that you use the correct regulator for the particular type
of gas you purchase. See your local gas dealer for information on
purchasing the correct regulator. Never operate this bbq without a gas
regulator.
THE HOSE AND REGULATOR ASSEMBLY (Fig. 3)
- Must be suitable for liquefied petroleum gas (LPG)
- Must withstand the above pressures
- Must not exceed 1000mm (39”) in length
- The bbq is supplied with a 1/4” BSP LHT adaptor and screw on hose
that is suitable for direct connection of a suitable regulator
- Before connecting inspect the hose, its fittings and rubber seals. If
there is any sign of cracking, splitting or wear, have the hose
replaced
- While in use, keep the hose unobstructed and free of kinks and
twisting
430mm
Minimum
(Fig. 1)
The following gas supply pressures are a guide only:
DK FI
For
Butane - 30 millibars
Propane - 30 millibars
GB IE
For
Butane - 28 millibars
Propane - 37 millibars
AT
DE
For
Butane - 50 millibars
Propane - 50 millibars
NL SE
NO
FR GR IT ES LU PT
BE
HR
SI
IS
EE
1 3 B/P (30)
1 3 + (28 - 30/37)
1 3 B/P (50)
FOR AUSTRALIA
Propane - 2.75 kPa
Universal LPG - 2.75 kPa
LV
CH CZ
430mm
Minimum
NOTE: Hose and Regulator
picture for reference only.
(Fig. 3)
Page 3
LGCL30SSBL
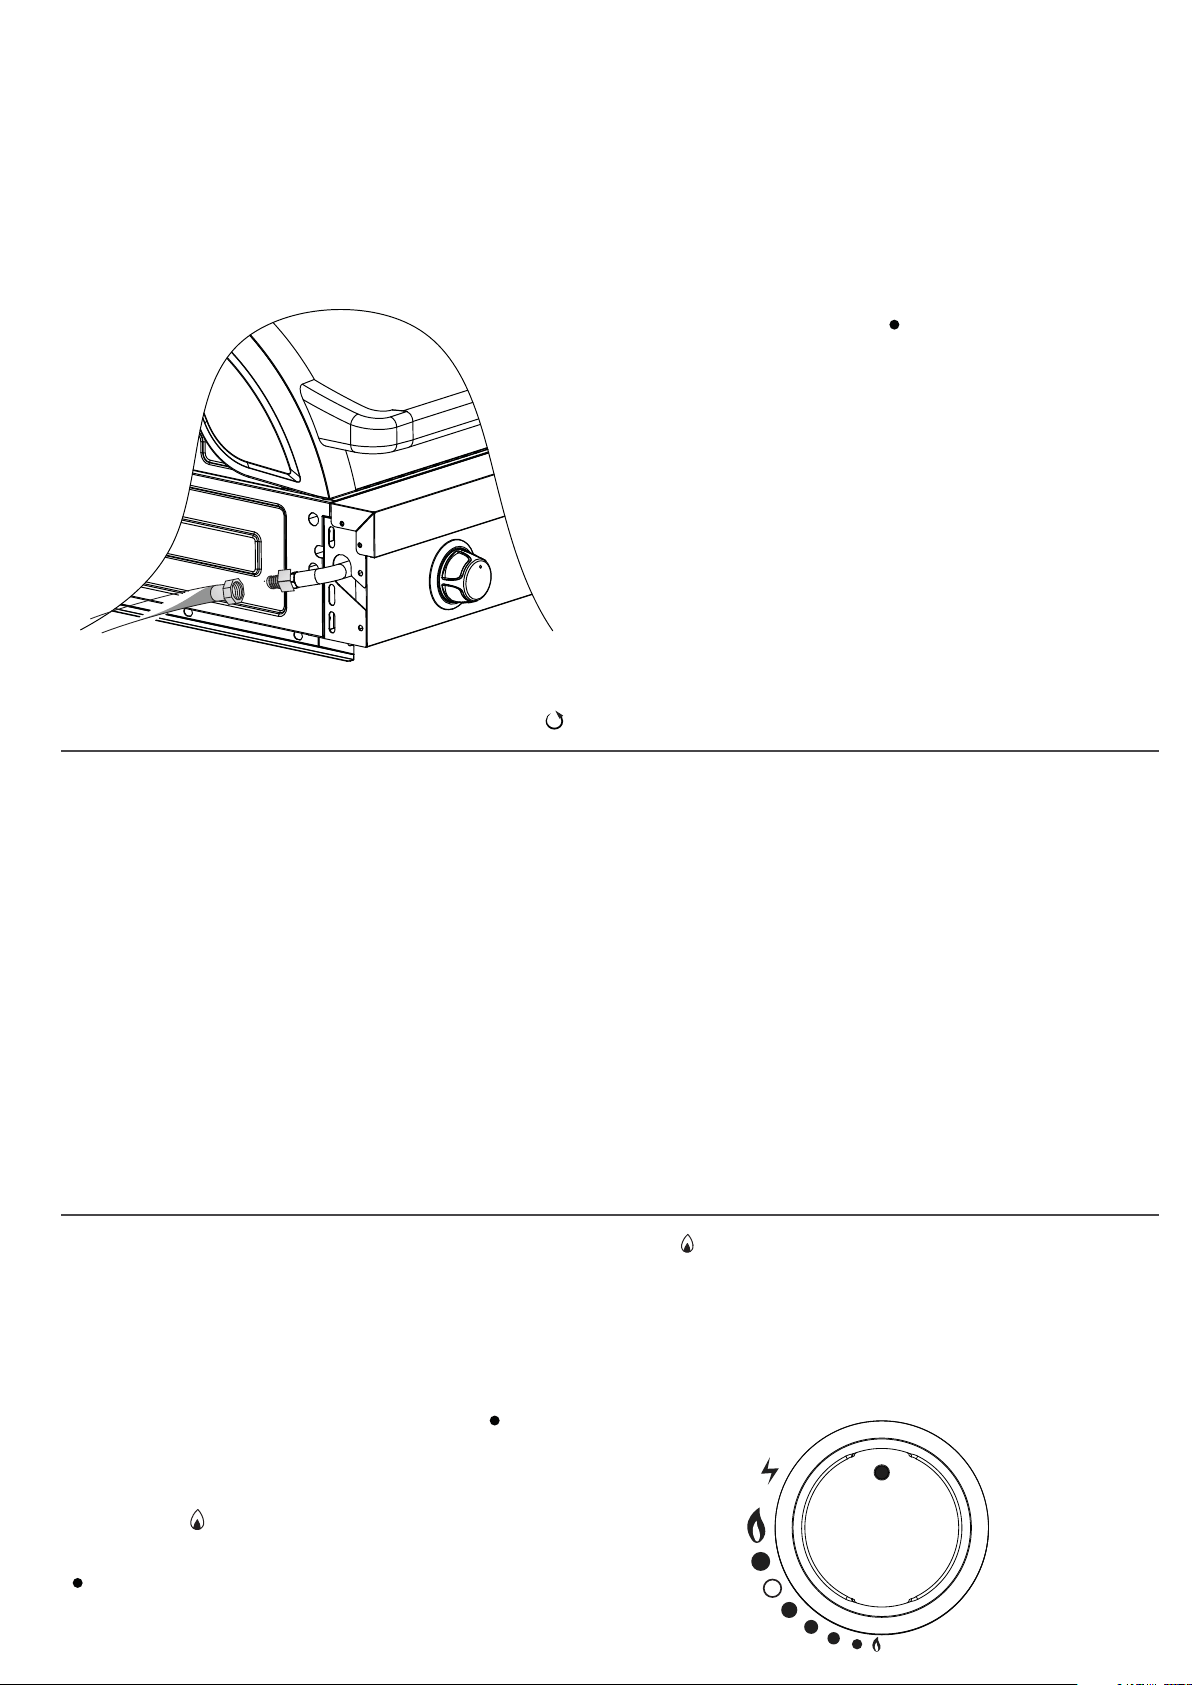
SECURING THE HOSE AND REGULATOR ASSEMBLY
Type A) Screw on hose connection (Fig. 4)
- The bbq’s manifold connection is 1/4” Male Thread BSP
- The connection between the hose and regulator and the bbq should
always be tightened with a spanner. ‘Finger tight’ only is not sufficient.
N.B. IMMEDIATLY PERFORM GAS LEAK CHECK AS SHOWN OPPOSITE TO
ENSURE SAFE CONNECTION.
(Fig. 4)
TESTING FOR LEAKS - DO THIS BEFORE USING YOUR BBQ
NOTE - DO NOT test for gas leaks with an open flame. If
you smell gas, turn off at the source.
Before first use and periodically during the season, or whenever a
gas cylinder is changed, you must check for gas leaks.
Do so by:
- Turn on the gas cylinder
- Turn all gas valves on the bbq to the off position
- Brush a soap solution of one part liquid detergent and one part water
to all gas connections
- The presence of bubbles indicates a leak. Tighten or repair as
necessary
- Under no circumstances should a naked flame be used to check for
leaks
- If a gas odour is present and no leaks can be found, do not use the
bbq. Turn the gas off at the source, disconnect the hose and
immediately contact your bbq dealer or place of purchase for
assistance
N.B. LEFT HAND THREAD CONNECTION OF HOSE TO ADAPTOR
GAS CYLINDER SAFETY
- Always change over a gas cylinder away from any possible source
of ignition in a well ventilated area
- Do not smoke whilst handling gas cylinders
- Never store gas cylinder indoors
- Store away from direct heat in a well ventilated area
- The gas cylinder is position on a flat surface
- Always keep the gas cylinder in an upright position
- Close cylinder valve when bbq is not in use and, if available, use a
sealing plug to prevent possible leaks
- Do not subject gas cylinder to excessive heat
- Do not tamper with any fitting attached to any gas cylinder. Have it
taken to the manufacturer or an authorized testing station
- When the cylinder runs out of gas, have it refilled or swapped at an
authorized testing station. They will fill the cylinder to no more than
80% of its capacity. This allows the gas to expand with temperatures
- Have the cylinder inspected EVERY 10 YEARS at an authorized
testing station. The date of every inspection is imprinted onto the
cylinder itself
LIGHTING YOUR BBQ
JET FLAME IGNITION SYSTEM
Upon turning any burner control knob you will hear an audible
“click”. This is known as a Jet Flame Ignition System.
WHAT IS PROPANE / BUTANE?
It is a fuel gas compressed until it turns to liquid, then stored in a bottle or
cylinder under pressure for easy transport.
ARE ALL GAS BOTTLE GASES THE SAME?
No. The LPG that cars use is known as auto LPG. It is different to
propane/butane, which is used in household gas appliances. This guide
only deals with propane/butane.
HOW IS IT DIFFERENT FROM NATURAL GAS?
Propane and butane are similar to natural gas. They are colorless,
non-poisonous and do not pollute when burnt. There is one important
difference, propane and butane are heavier than air, if they escape they
don’t float away. The gas collects and forms gas pools at ground level
or at the bottom of your appliance.
- The lo position is obtained by turning the knob fully anti-clockwise
- Adjusting the control knob to your heat requirements allows you to
control the flame
- If ignition cannot be achieved see section: If bbq fails to operate
properly
Jet Flame Ignition to ALL burners
- Before starting - ALL burner control knobs must be in the off
position
- Flat lids and roasting hoods must be OPEN before lighting
- Turn on the gas cylinder
- Push in and turn Any Knob in an anti-clockwise
direction to the hi position or until a click is heard. This will trigger
a spark to light the burner.
- If burner does not light immediately, turn the gas control knob to the
off position and wait five minutes for any accumulated gas to clear
out of the bbq before repeating procedure.
Page 4
IMPORTANT - It is important that all control valves, and the gas
cylinder are turned off after use.
OFF
HI
(Fig. 6)
LOW
LGCL30SSBL
FIRST TIME USE OF BBQ
- Before using the bbq for the rst time, it should be rst wiped with a
mild soap and water solution to remove any dust
-Make sure your BBQ is on a solid level surface
- Dry cooking surface and apply a light coating of cooking oil
- Light the barbecue and leave burning for 30 minutes on the low
position, with hood up. This is to burn o any residual oils or foreign
matter on the grills.
FAT COLLECTION
Using the drip tray
The drip tray should be lled with a layer of either an approved ‘fat catch’
material or sand to soak up dripping fats and oils during cooking. Flat drip
trays can also be lined with foil before adding fat catch material.
PREHEATING
Light the burners as previously directed, turn to low and allow the bbq
to preheat for 2-5 minutes. Adjust control to Grillstream position marked
or optimum cooking temperature, the hood must be closed while doing this.
EXCEEDING 250 Degrees CAN DAMAGE THE BBQ AND VOID YOUR WARRANTY
PREPARE THE COOKING SURFACE
It is preferable to apply a light coat of cooking oil using a long handled
brush to the cooking surface prior to lighting each time. The oil will keep
the food from sticking to the cooking surface. Also see CAST IRON COOKING
SURFACES in the maintenance section below for ongoing maintenance
instructions.
Note: The heat distribution plates disperses the heat from the burners.
This results in a uniform heat zone beneath the cooking grill.
Exceeding 250 C can damage the bbq and void your warranty.
MAINTENANCE OF YOUR BBQ
PROTECTION
Keep your bbq beneath a weather cover and out of the rain. Proper
care and maintenance will keep your bbq in top operating condition
and prolong its life.
CLEANING THE COOKING SURFACES
Allow your bbq to continue burning for 5 minutes after cooking has
ceased, which will burn o excess fats and juices etc. that may block
the ame ports of the burners. To keep your bbq ready for the next time,
turn the burners to o then take a long handled brush and brush the
cooking surface to remove excess oils and food scraps. Be careful as
surfaces are hot. Protect your hands by using an oven mitt to hold the
brush.
Allow to cool before washing in a warm soapy solution. Ensure that
any dried fat/food deposits are cleaned o both the grills after EVERY
cooking session. Rinse o with clean water and dry before returning
to bbq.
CAST IRON COOKING SURFACES (on specic models)
Cast Iron requires curing/seasoning after each use if possible or on a regular
basis. After cleaning as above, lightly coat the grills and griddle top and
bottom with cooking oil, either with a brush or aerosol spray. Replace all the
cooking surfaces back into the barbecue, light the burners and turn them to
low for at least 15 minutes. Your cooking surfaces are now seasoned.
Note: Curing/seasoning cast iron will help to slow corrosion.
CLEANING THE FLAME TAMERS
Periodically wash in a warm soapy solution. Use a wire brush to remove
stubborn burnt on cooking residue if necessary. Dry thoroughly before
re-installing to the bbq body.
CLEANING THE BBQ BODY
The body of the bbq should be cleaned regularly dependant on the use
and type of food cooked. Use warm soapy solution.
CLEANING THE DRIP TRAY
- IMPORTANT - the drip tray should be cleaned on a regular basis.
If this is ignored, a build up of fats and greases may cause a re in the bbq
- More frequent cleaning may be necessary as usage demands
- FAT FIRES ARE NOT COVERED BY WARRANTY
CLEANING THE BURNERS
Occasionally after long cooking sessions, excess fats, juices and
marinades can clog the burners. If so, remove the burners (see
removing burners section) for cleaning.
- Clean by washing in a warm, soapy solution
- Ensure that all burner ports are free from obstruction
- Rinse in water, dry and return to bbq
- Light immediately to prevent rust and corrosion
- Brush lightly with cooking oil if bbq is not used for an extended period
Page 5
FIRST USE AFTER LONG PERIODS
At the start of each bbq season or before using after a long period
of time:
- Read this operation manual again thoroughly
- Check all gas valve orices, burner tubes and connections for
obstructions
- Check that all burners are in their correct positions
- Check to see if the gas cylinder is full
- Check for gas leaks using a soapy water solution
- Set burner controls to o and connect gas supply
- Ensure all grills are clean before use
LGCL30SSBL
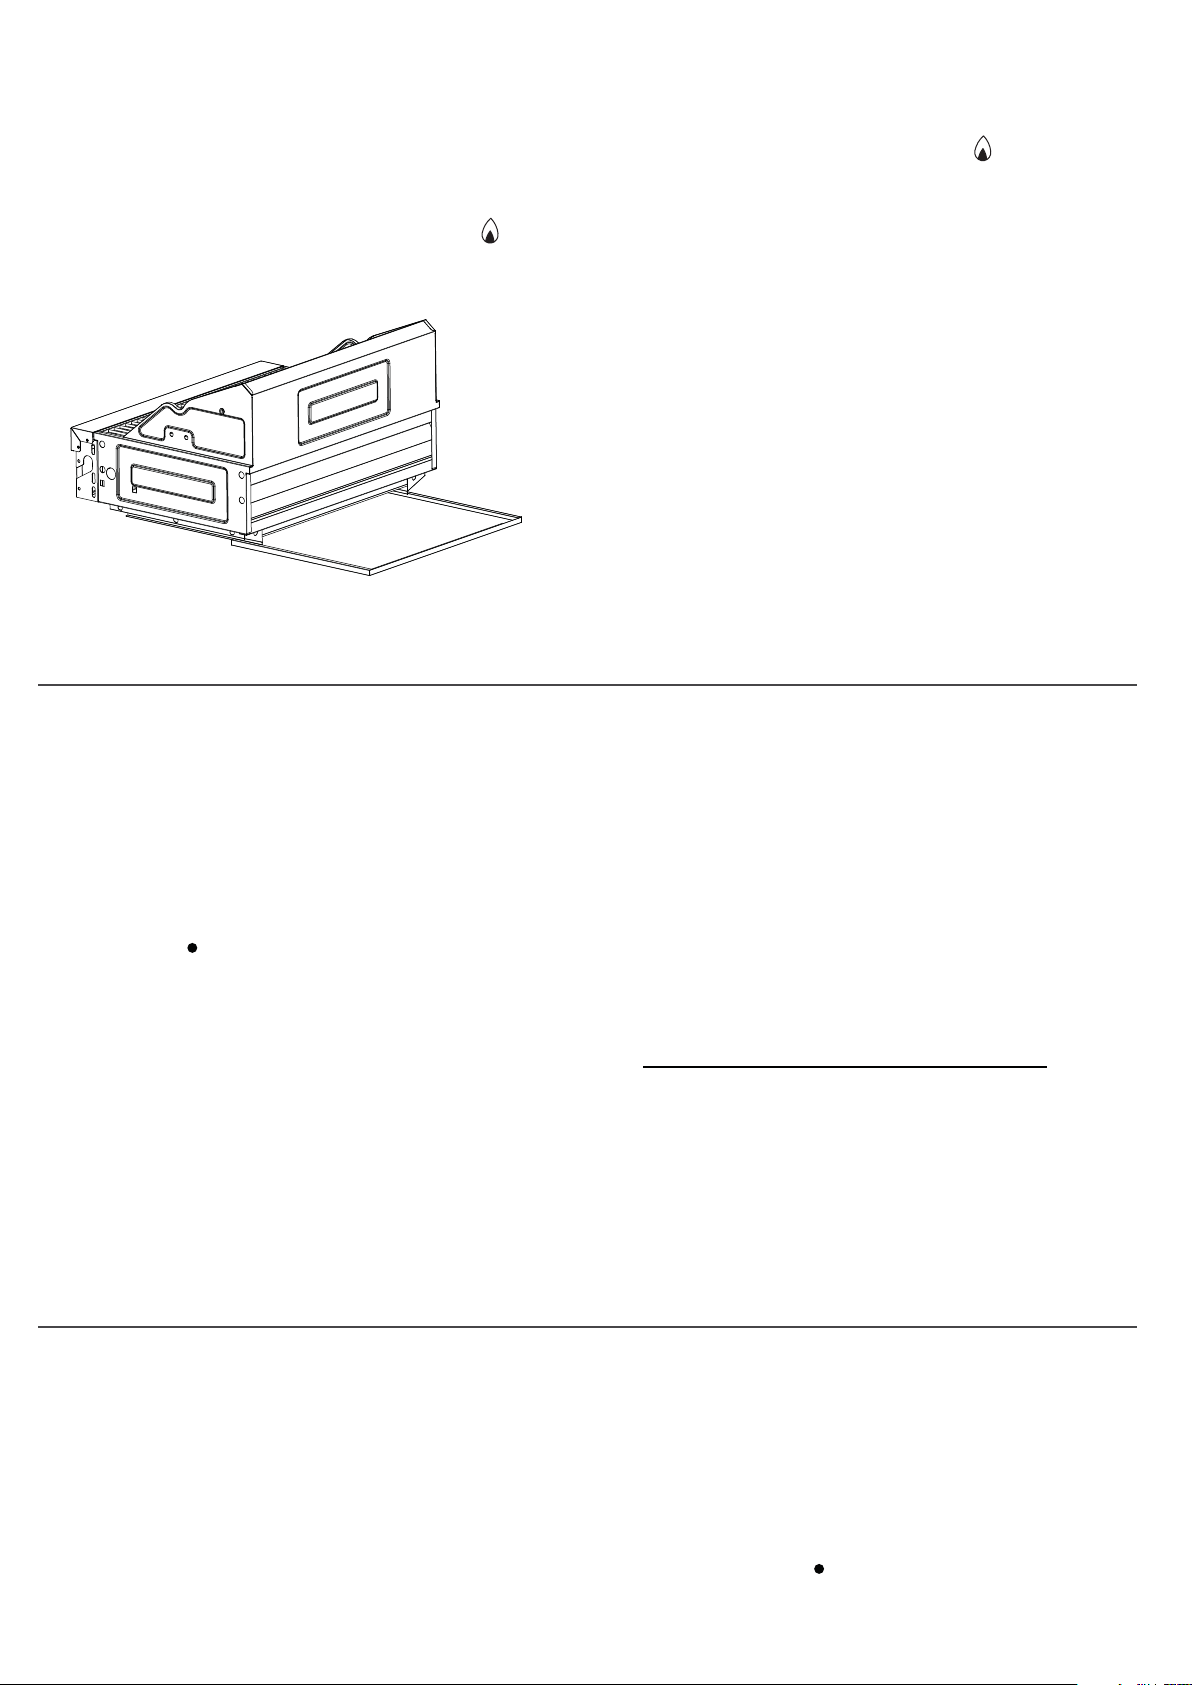
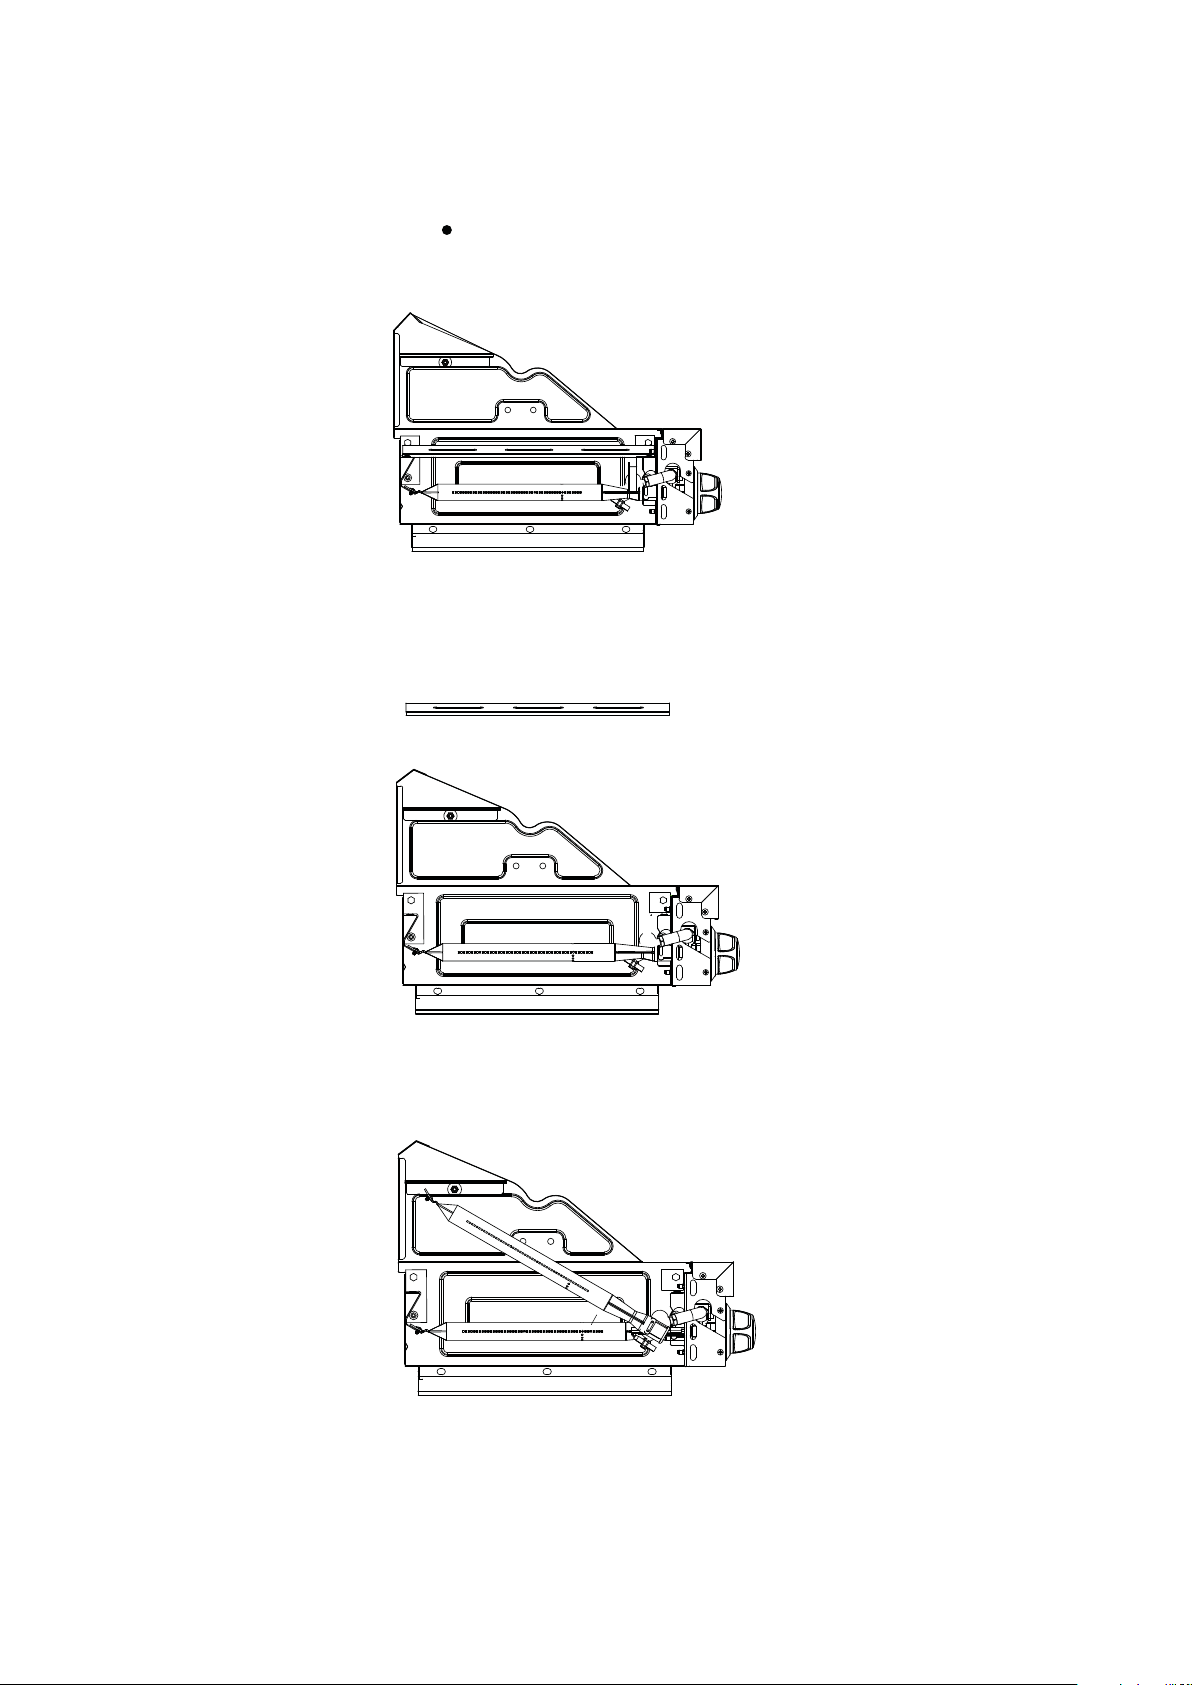
REMOVING BURNERS - Necessary care to be undertaken
- Make sure the bbq has been switched off and has completely cooled
down
- Ensure all gas control knobs are set to the off position and the gas
cylinder has been turned off
- Lift the grills off the bbq as shown in (Fig.14)
- Lift the flame diffuser from position as shown in (Fig.15)
(Fig. 14)
(Fig. 15)
- Remove the screws or clips located at the back of the burners.
- Lift and swing out the burner from position as shown in (Fig.16)
(Fig. 16)
- Clean burners as described
- Reverse the previous procedure to re-install the burners, flame
diffuser and grills
Page 6

LGCL30SSBL
TROUBLESHOOTING
IF BBQ FAILS TO OPERATE PROPERLY
- Stop, turn off gas at its source and turn all burner controls to off
- Do not smoke
- Check gas supply connections
- Repeat lighting procedure after waiting for five minutes for
accumulated gases to disperse
If bbq still fails to operate properly TURN OFF GAS AT SOURCE,
TURN BURNER CONTROLS TO OFF, wait for bbq to cool and check
the following:
a) Misalignment of burner tubes over orifices
CORRECTION: Reposition burner tube to properly sit over orifice
b) Obstruction in gas line
CORRECTION: Remove hose from bbq. Open gas supply for one
second to clear any obstruction from hose. Close off gas supply at
source and re-connect hose to bbq
c) Blocked orifice
CORRECTION: Remove burners as described above. Inspect gas
valve orifice, clear any obstruction with a fine wire. Re-install
burners over orifices and test again
IF THERE IS A FIRE
If there is a fire at the appliance
- If there is a fire at the appliance, turn the gas off at the cylinder.
- Smother the flames with a wet cloth
If there is a fire at the cylinder or you cannot get to the valve to
turn it off
- call the fire brigade
- direct a garden hose to the middle of the cylinder to keep it cool,
however do not extingish the flame. If the gas is burning it wont
build up and explode
- Evacuate the area
IF THERE IS A LEAK
- Turn the gas cylinder off
- Ventilate the area to disperse any accumulated gas
- Check all connections
- If the leak persists, keep cylinder upright and take to an open area
- Keep skin away from any gas or liquid escaping from the cylinder
- Keep the cylinder at least 20 metres away from any sparks or ignition
sources including electrical equipment, camera flash, engines or
motors
- Disperse gas by providing maximum ventilation and spraying with a
fine water spray
A note on fire prevention:
Most fires in outdoor bbqs are caused by a build up of greases and fat,
or gas connections which have not been secured properly. Remember
to follow the manufacturer’s instructions on proper cleaning and
connection procedures.
INSECTS
Spiders and insects can occasionally spin webs or make nests in the
burner tubes.
These can obstruct gas flow which could result in a fire. This is known
as “Flashback” and can cause serious damage to the bbq and create
an unsafe operating environment.
Frequent inspection and cleaning of the burner tubes is recommended.
Care and Safety Advice
TAKE CARE Grills are heavy
- Clean grills after each use for continued optimum performance.
- Roasting dishes can be placed on top of the grills.
- For safety and optimum performance ensure that your barbecue is on
a level, solid surface.
- Empty the fat responsibly after each use.
-
Page 7
LGCL30SSBL
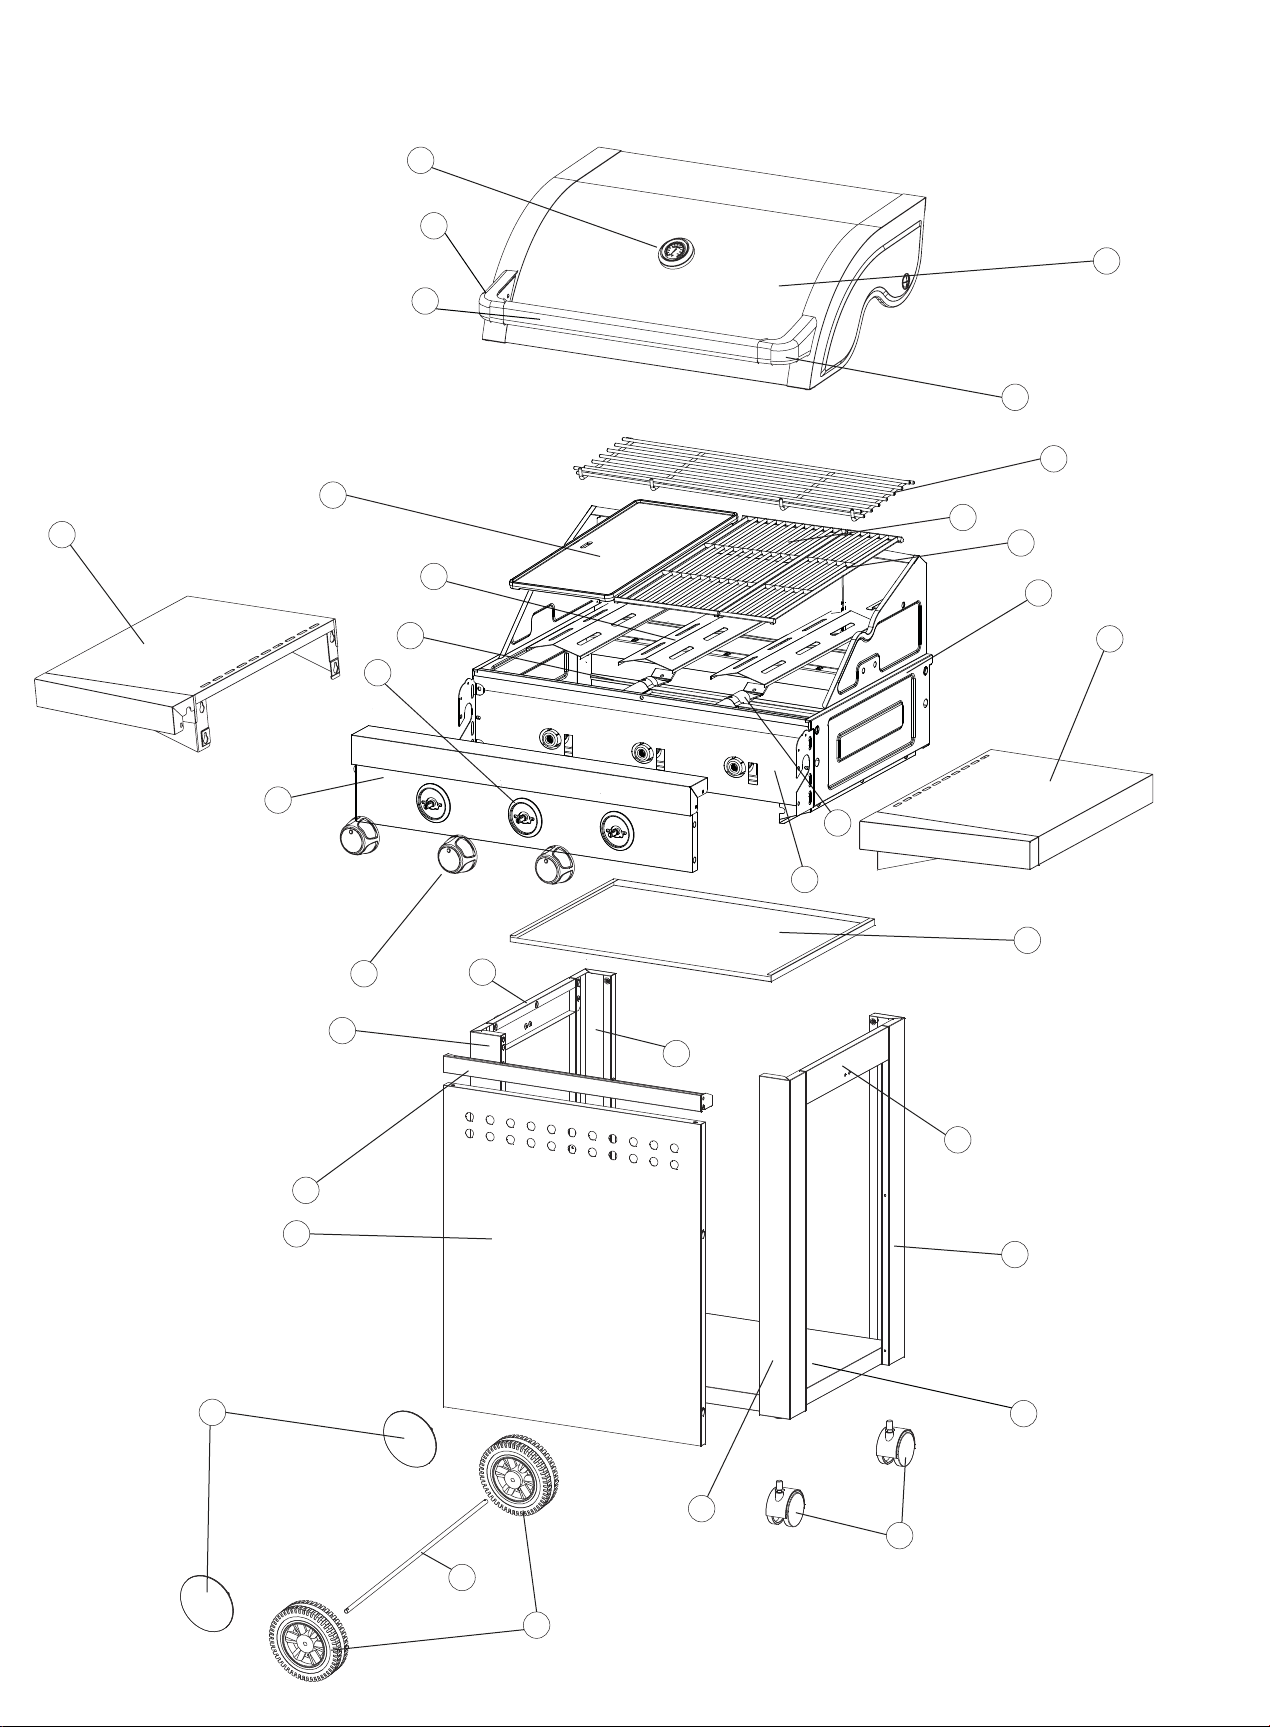
4
1
3b
2
3a
3c
6
29
31
30
7
14
11
16
22
12
13
8
9
10
28
17
23
18
5
26
15
21
19
20
24
27
25
Page 8

g
g
g
g
g
y
y
pp
pp
g
y
g
g
g
g
g
g
p
y
LGCL30SSBL
Part Number
2 Hood 1 SP-010-CL35SS-HOOD
3a Hood Handle Bar 1 SP-011-CL3-HHB
3b Hood Handle Left Casin
3c Hood Handle Ri
5 Ri
6 Warmin
8 Cross Fire Assembl
10 Inner Control Panel 1 SP-100-CL3-ICP
15 Trolle
16 Front Su
17 Left Su
18 Ri
19 Trolle
20 Ri
21 Ri
22 Left Front Le
23 Left Back Le
26 Hub Ca
28 Fat Tra
29
30
31
Part Name Quantity Supplier Code
1 SP-011-CL-HHLC
ht Casin
Front Panel 1 SP-100-CL30BL-FP
ort Bar 1 SP-100-CL3-FXB
ort Bar 1 SP-100-CL-LBAR
ht Support Bar 1 SP-100-CL-RBAR
Base Shelf 1 SP-100-CL3-BS
ht Front Le
ht Back Le
126mm Cast Iron Grill
235mm Cast Iron Grill
1 SP-011-CL-HHRC
SSL-LC-001-PS1flehs ediS tfeL4
SSR-LC-001-PS1flehS ediS th
1 SP-060-CL3-XF
30-FSPLC-020-PS1lenaP lortnoC11
SP-030-AGSUN-KNOB3sbonK21
1 SP-100-CL-RFL
1 SP-100-CL-RBL
1 SP-100-CL-LFL
1 SP-100-CL-LBL
1 SP-070-JLCL3-FT
1
1
SP-050-JL-126CGRL
SP-050-JL-235CGRL
PMET-NUSGA-110-PS1retemomrehT1
RW-3LC-310-PS1kcaR
MTLFLC-NUSGA-050-PS3sremaT emalF7
NRUBLC-NUSGA-050-PS3srenruB ebuT9
ZEB-NUSGA-030-PS3slezeB31
EMARF-3LC-010-PS1emarF QBB41
TSAC-LC-180-PS2retsaC42
LHW-LC-180-PS2leehW52
PACH-LC-180-PS2s
ELXA-LC-180-PS1elxA72
LDG532-SGN-050-PS 1 elddirG /etalP mm532
NOTE: LEFT AND RIGHT SIDE OF BBQ ARE DESIGNATED WHILST VIEWING BBQ
FROM THE FRONT
Page 9
 Loading...