

LG-Ericsson LDP-7224D User Manual
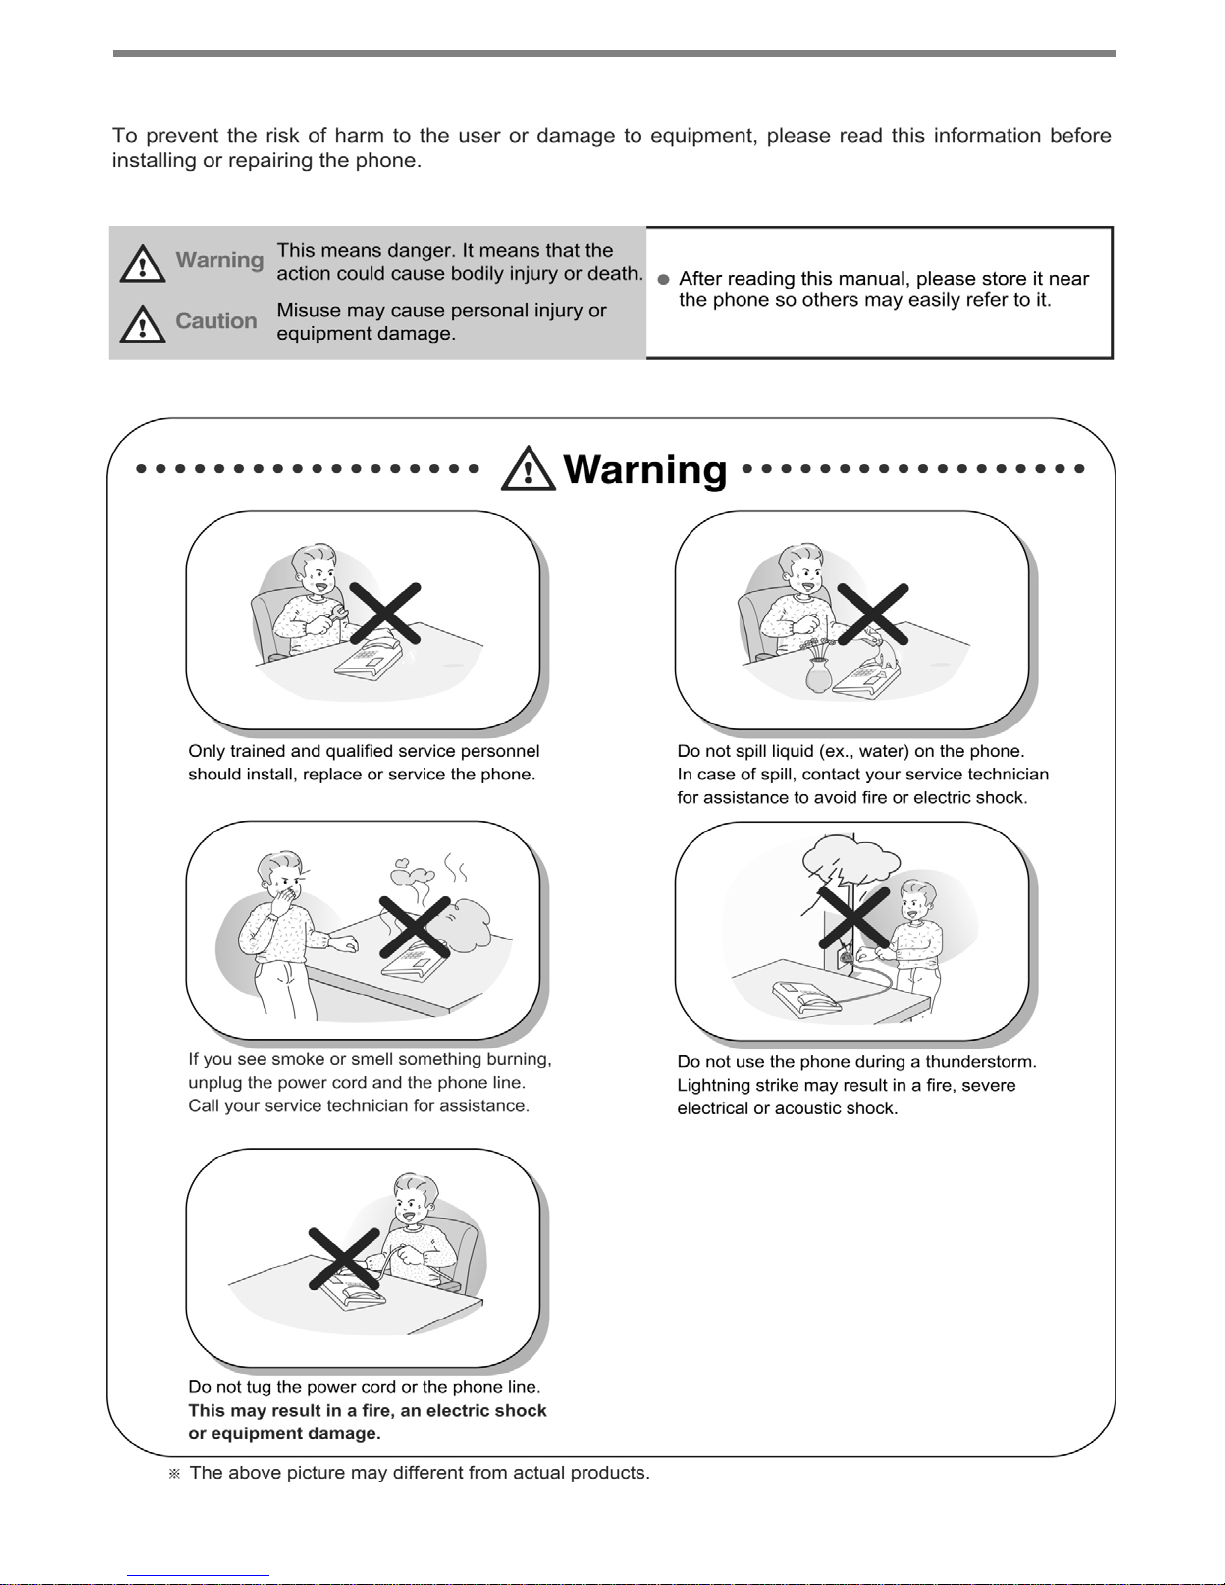
Important Safety Information
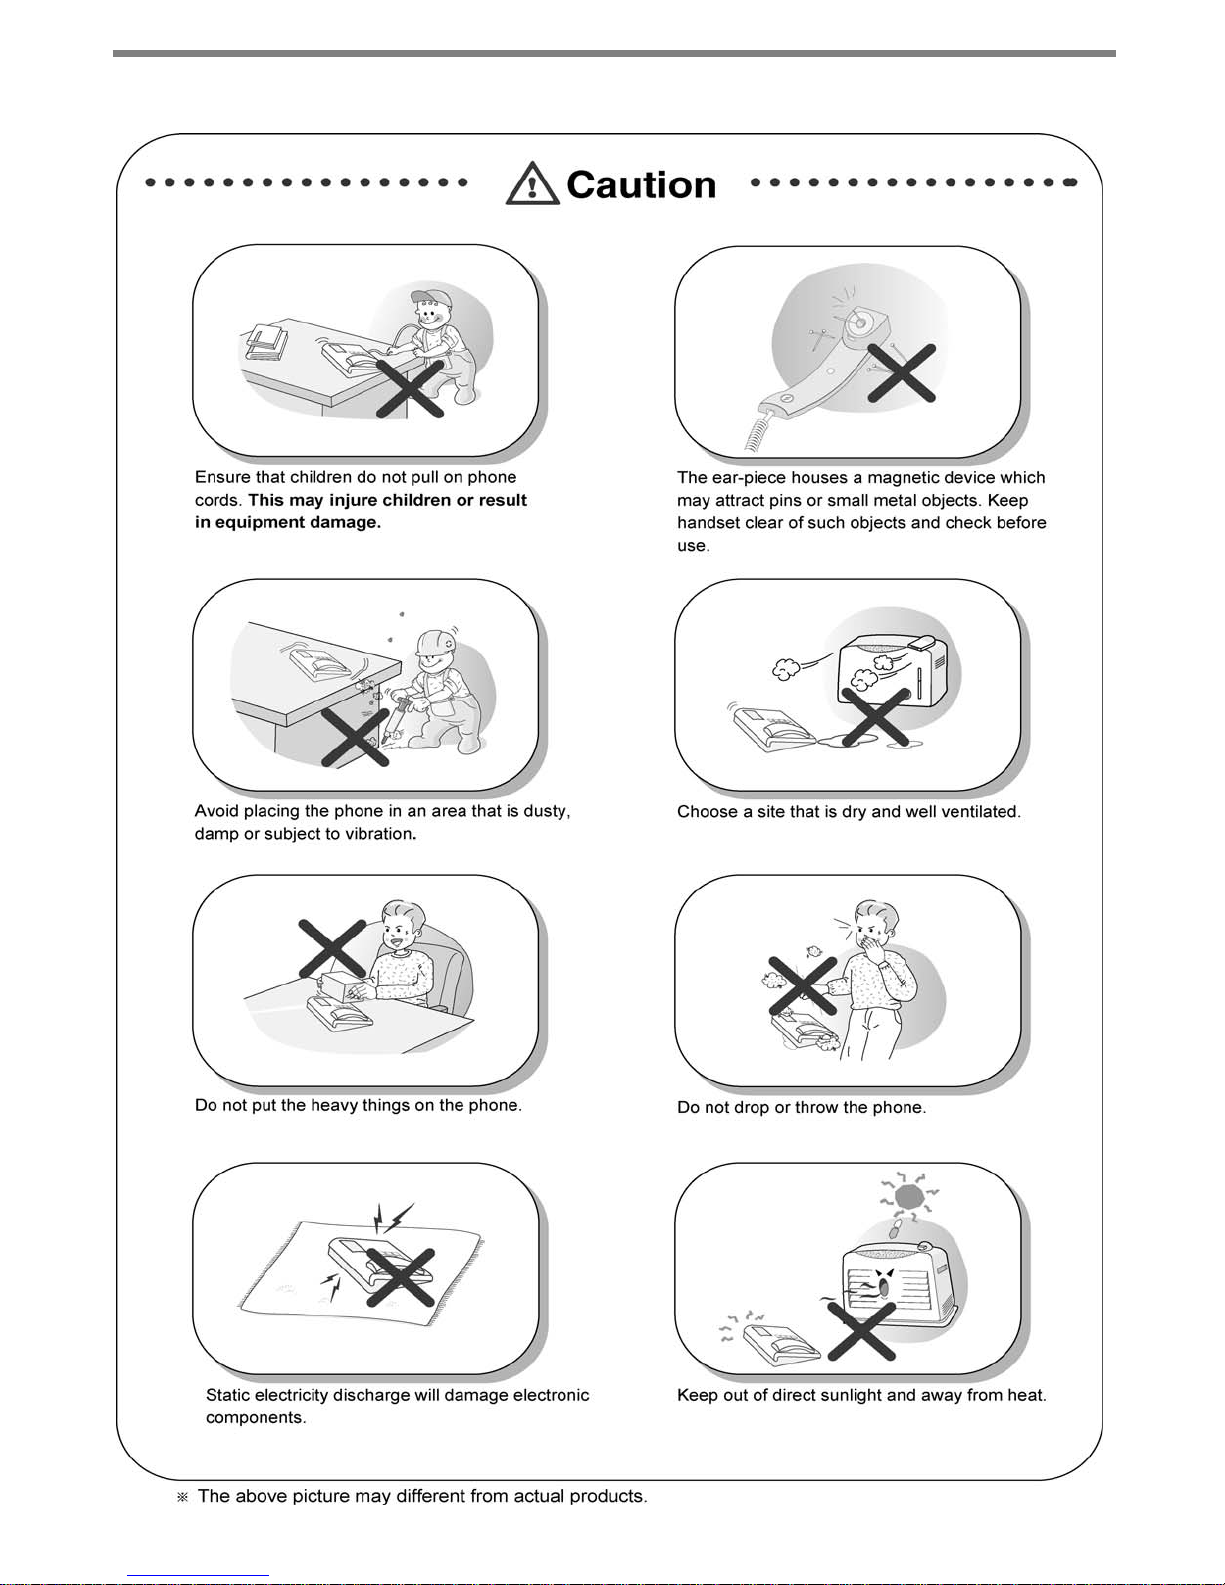
Important Safety Information
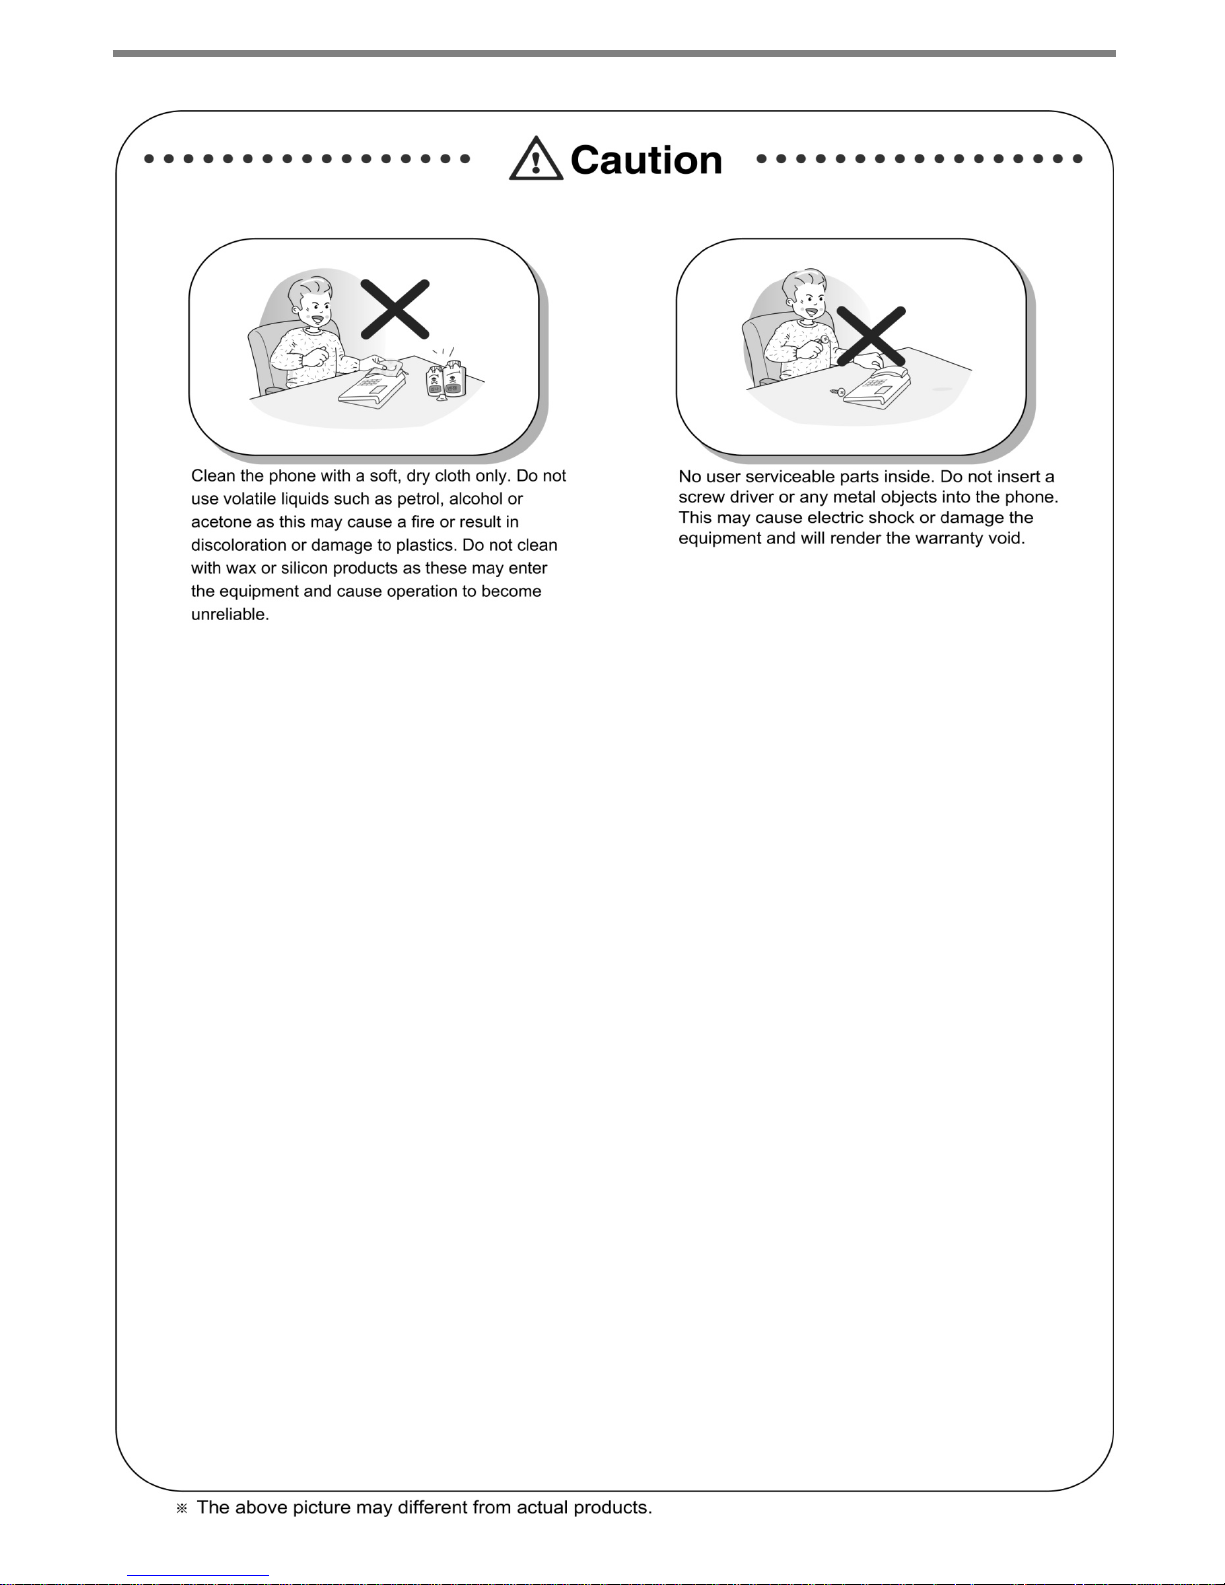
Important Safety Information

Getting Started
1. LDP-7224D
2. Input /Output Diagram
3. Cable Connection
Placing or Answering a Call
1. Placing a Call
2. Answering a Call
3 Soft Buttons & Navigation Button
1. 3 Soft Buttons
2. Navigation Button
Basic Function
1. Idle
1.1 Pickup
1.2 Conference
1.3 Redial
2. Off Hook
3. Intercom Dialing
4. Intercom Ring Back
5. Intercom Busy
6. Intercom Do Not Disturb
7. Intercom Dialing Error
8. Intercom Receiving
9. Intercom Talk
10. CO Dialing
10.1 Manual Dialing
10.2 Speed Dialing
11. CO Line Busy
12. CO Talk
13.Two-way Recording
14.Checking Voice Mail
15.Paging
16.Call Forward
16.1 Follow-me Forward
16.2 Unconditional, Busy, No Answer, Busy/No Answer Forward
16.3 Unconditional, No Answer Off-net Forward w/Speed Bin
16.4 Unconditional, No Answer Off-net Forward w/Telephone Number
17.Flexible Button Programming
18.Call Park
19. Name Display
20. Barge-In Monitor
21.Voice Mail
Table of Contents
ⅰ
1
1
2
4
5
5
5
6
6
6
7
7
7
8
9
9
9
10
10
10
10
10
11
11
11
11
11
12
12
12
13
13
13
13
13
13
14
15
15
15
16

22. Call Back
23. Camp On
24. Voice Over
Call Log
1. Received Call
2. Dialed Call
3. Lost Call
3.1 Answer
3.2 Del Cur (Delete Current)
3.3 Del All (Delete All)
3.4 Save
3.5 Name/Tel
Menu
1. Basic Program
1.1 Station Name Program
1.2 Ring Program
1.2.1 Select Ring
1.2.2 Select CO Ring
1.3 Mode (H/T/P) Program
1.4 Password Program
1.4.1 Password Registration
1.4.2 Password Change
1.5 Language Program
1.6 Enblock Mode Program
2. Advanced Program
2.1 Wake-up Program
2.1.1 Setting
2.1.2 Canceling
2.2 Pre-selected MSG Program
2.2.1 Setting
2.2.2 Canceling/ Changing
2.3 Station COS Program
2.3.1 COS Down Mode
2.3.2 Restoring COS Mode
2.3.3 Walking COS Mode
2.4 SPK/Headset Program
2.5 EAR MIC Program
3. Speed Program
4. Conference Room PGM
4.1 Create Conference Room
Table of Contents
ⅱ
17
17
17
18
18
19
19
20
20
20
21
21
22
23
23
24
25
25
26
27
27
28
29
29
30
30
30
31
32
32
33
34
34
35
35
36
36
37
38
38

4.2 Delete Conference Room
5 Hot Desk Program
5.1 Hot Desk Login
5.2 Hot Desk Logout
Phone Book
1. Dial By ICM Name
2. Dial By STA SPD name
3. Dial By SYS SPD Name
Attendant Function
1. Set or Change the Date/Time
2. Change Date Format
3. Attendant intrusion
4. DND Mode Override
5. Setting Day/Night/Weekend Mode
6. System Speed Numbers
7. Temporary COS (Class of Service)
Character Entry Chart
Glossary of Terms
Table of Contents
ⅲ
39
39
40
40
41
41
42
42
43
43
43
43
44
44
45
45
46
47
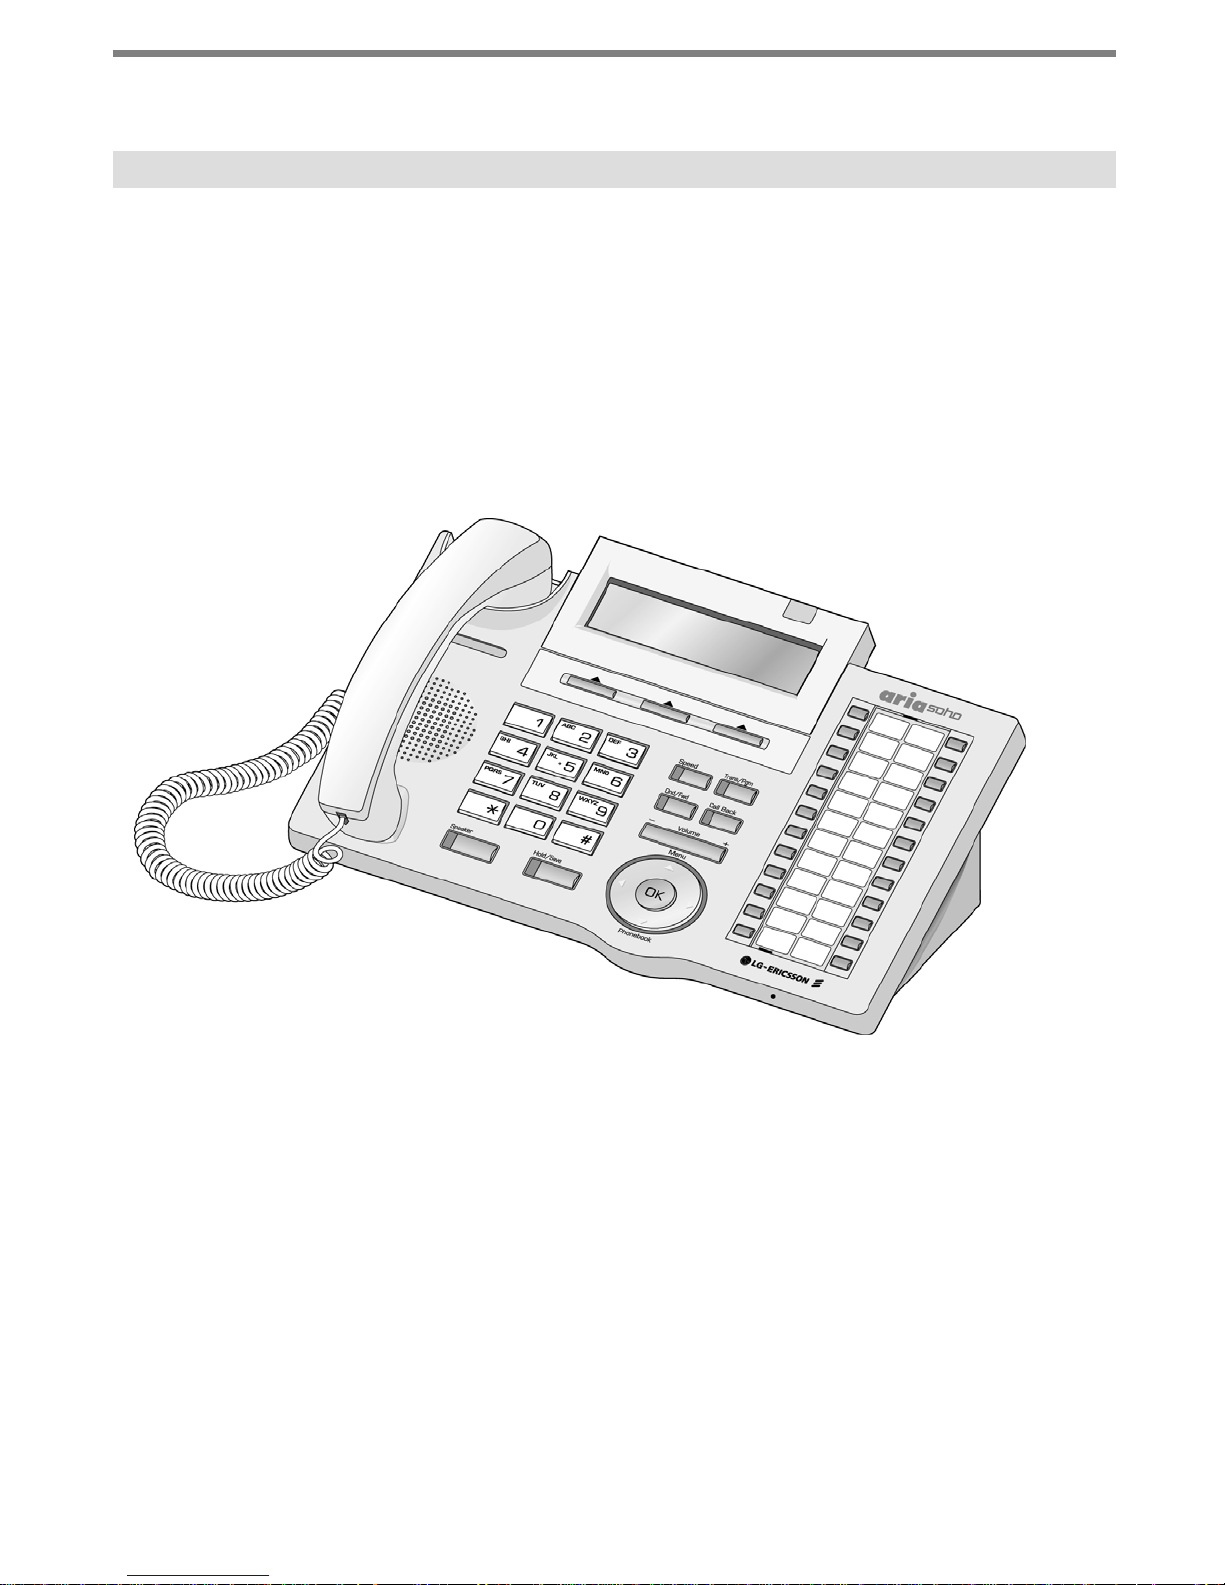
1. LDP-7224D
LDP-7224D is an advanced, user-friendly digital keyset, offering the convenience of 3 soft
buttons and a navigation key.
• Features
- Trendy and stylish LDP Family product design
- Multi-line LCD (3 x 24)
- 24 Flexible buttons with dual-color LEDs
- Call Log feature
- Wall mountable (bracket not included - optional)
Getting Started
1
2. Input /Output Diagram
Getting Started
2
3
4
5
6
7
8
9
2
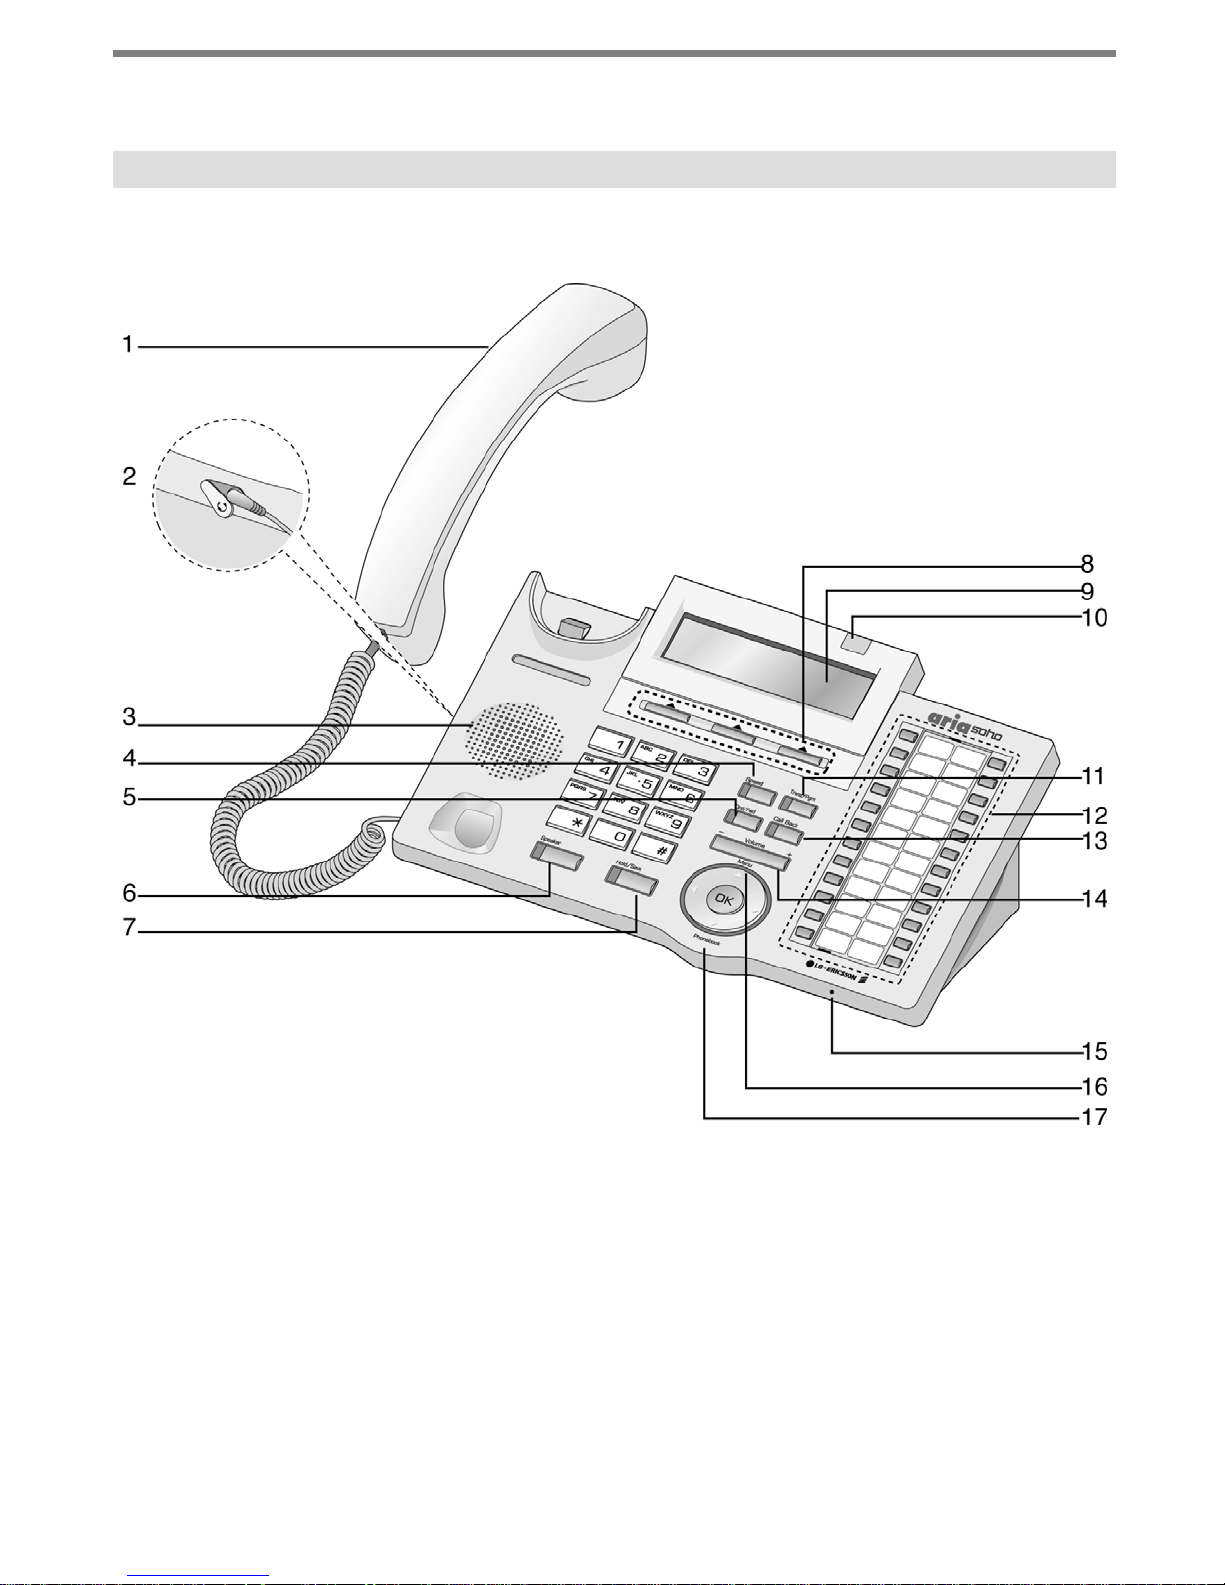
The diagram (shown) depicts the input/output items and buttons of the LDP-7224D, and is
described on the following page.

Used for handset calls.
Used to connect an optional headset to the phone.
Tone and voice output.
Used to access speed dialing, speed programming, saved number
redial, and last number redial.
The DND (Do Not Disturb) feature blocks all incoming calls; when DND
is active, the red LED is illuminated.
Used to activate speakerphone (red LED will illuminate), also used to
initiate call forward (transfer call to another station o r voicemail, the red
LED will flash).
Used to put a call on hold or save information when programming.
Used in conjunction with fixed and flexible features, and function
changes related to call progress (indicated on the LCD display).
Displays information about telephone status, dial ing dir ector ies and test
message information.
Illuminates when the phone is ringing.
Used to initiate a call transfer (TRANS) or to enter programming mode
(PGM).
Some flexible buttons are pre-programmed in the system for line
appearances, loop functions etc. The remaining flexible buttons can be
user-programmed.
A station can initiate a call back request to a busy station. Once that
station becomes idle, the initiating station is signaled.
Adjusts the audio levels for ringing, handset and speakerphone.
Microphone is used for hands-free speakerphone function.
Used to move to the desired option (Dial, MSG, Prog ram), and to select
the next screen when indicated by an arrow on the LCD display.
Used to access speed dialing, save number redial, and last number
redial, and to access flexible button programming.
Handset
Earphone Jack
Speaker
Speed Button
DND/Fwd Button
Speaker Button
Hold/Save Button
3 Soft Buttons
LCD Display
Visual Ringing LED
TRANS/PGM Button
Flexible Button
Call Back Button
Volume Button
Hands-free
Microphone
Menu Button
Phonebook Button
Getting Started
3
1
2
3
4
5
6
7
8
9
10
11
12
13
14
15
16
17
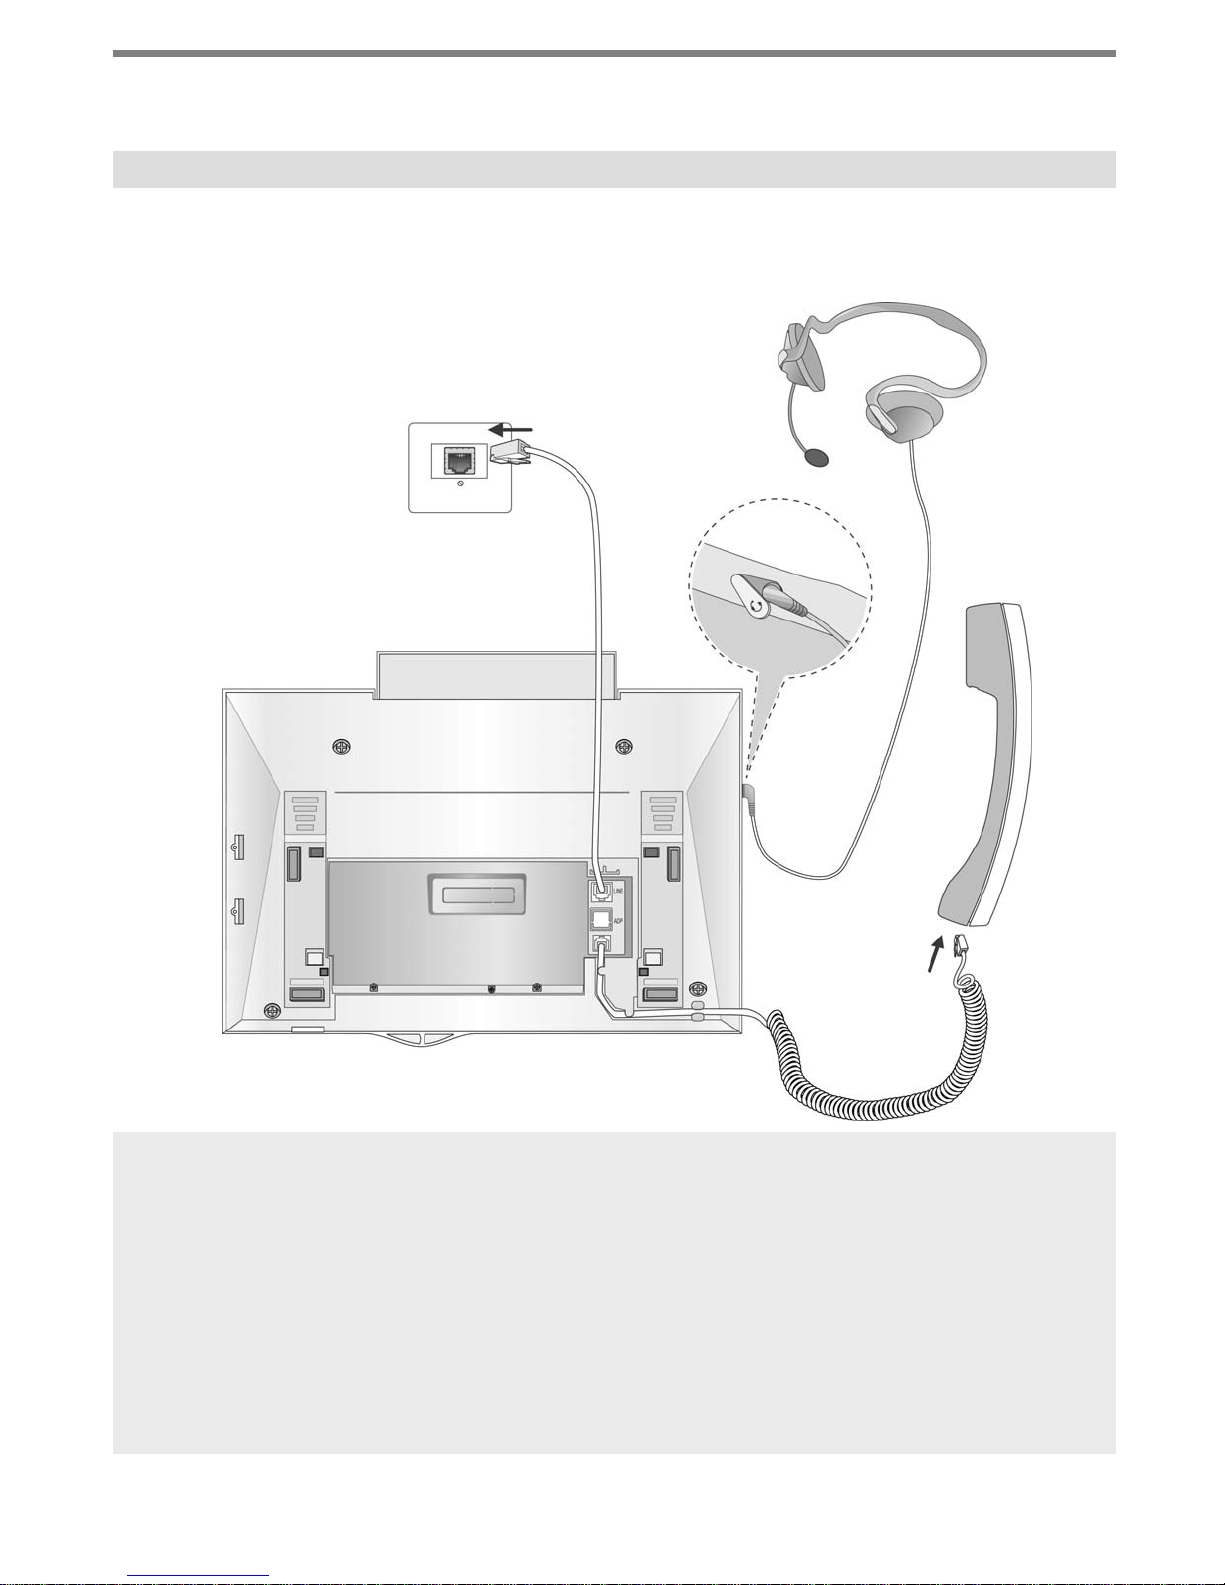
3. Cable Connection
A - Connect the telephone cord (spiral cord) to the handset and the other end to the
handset jack at the bottom of the telephone.
B - Connect the line cable to the port at the bottom of telephone and the other end to the
wall socket.
C - Connect the Headphone to the headphone jack on the left side of the telephone
(when viewed from the front).
Getting Started
A
B
C
4
The diagram (shown) depicts cable connections for the LDP-7224D; connection points are
described below.
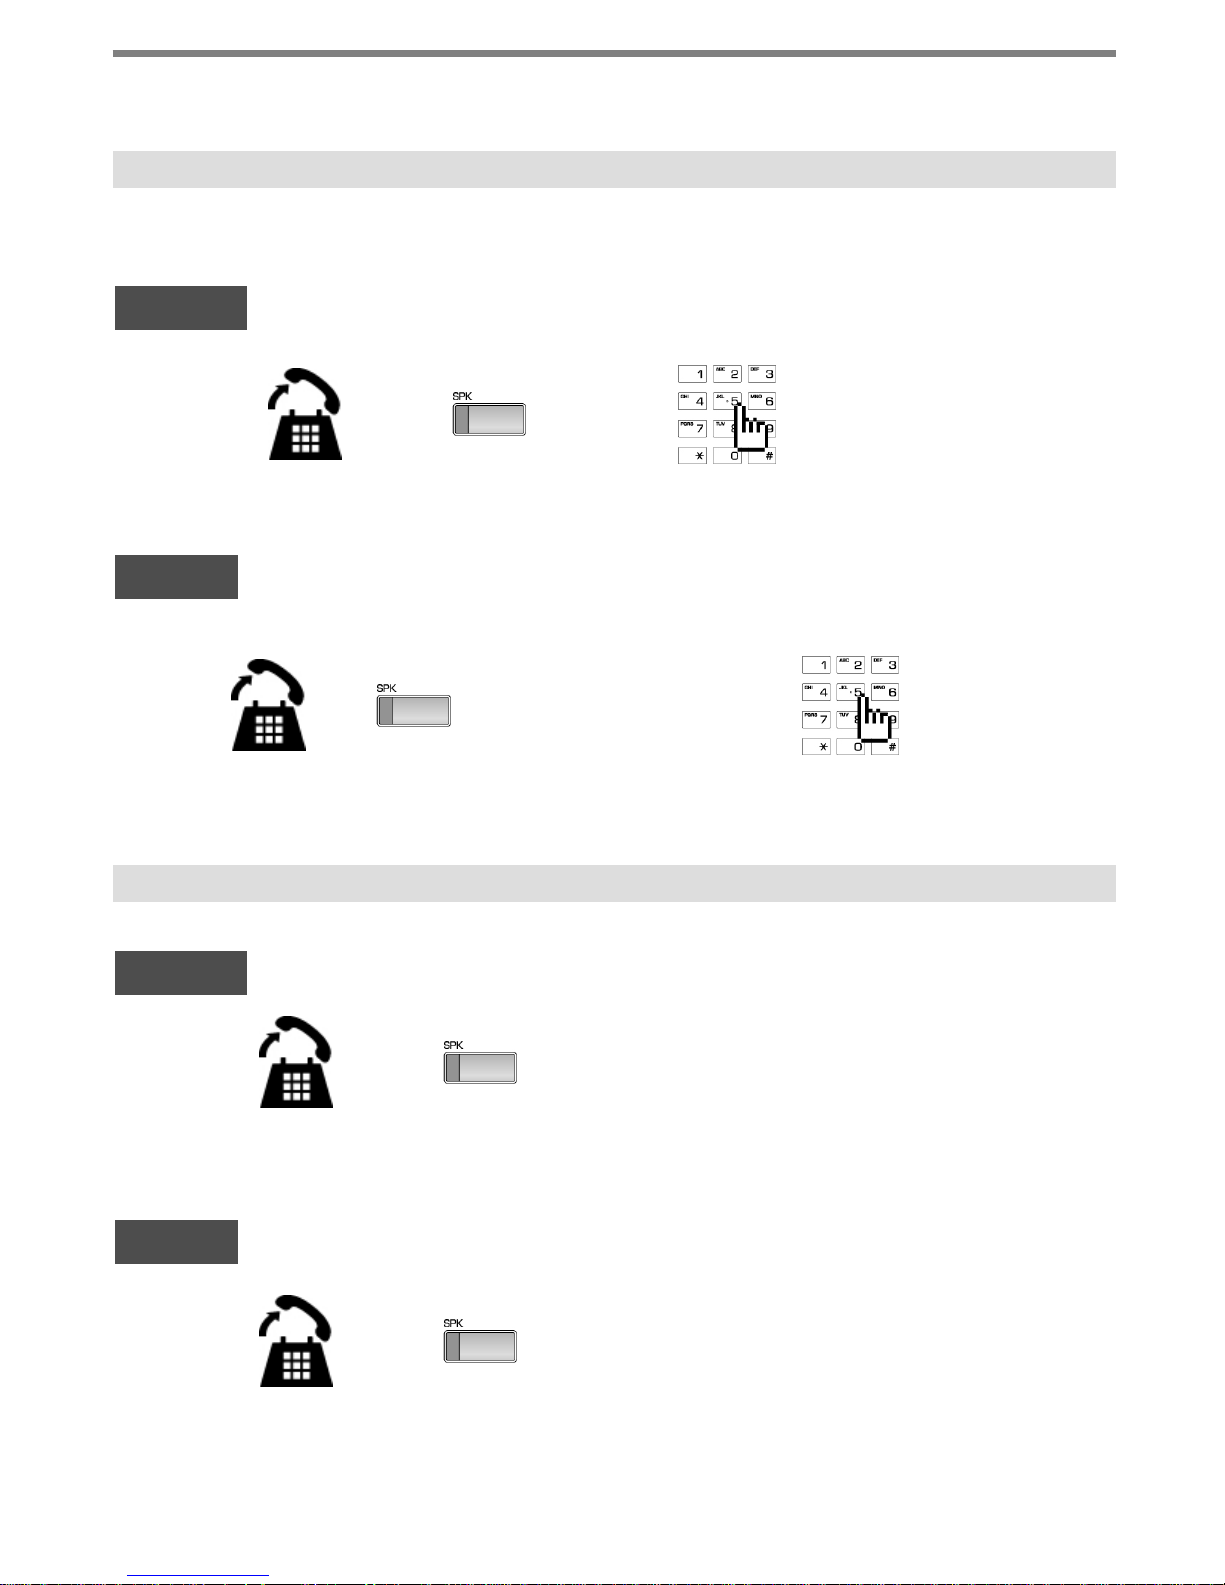
1. Placing a Call
Lift handset
▶
Enter the extension number
Dial 9 or select
CO line flexible
button.
talk
▶
2. Answering a Call
or
Lift handset
or
▶
talk
CO Line
ICM Line
Lift handset
▶
Enter the desired phone number
talk
▶
or
▶
CO Line
ICM Line
Lift handset
or
▶
talk
Press flashing
CO line button or
loop key.
▶
Placing or Answering a Call
The CO access code (ex., 9) can be changed by Admin Programming 107 depending on t
he user’s needs.
5
Press [Speaker]
Press [Speaker]
Press [Speaker]
Press [Speaker]
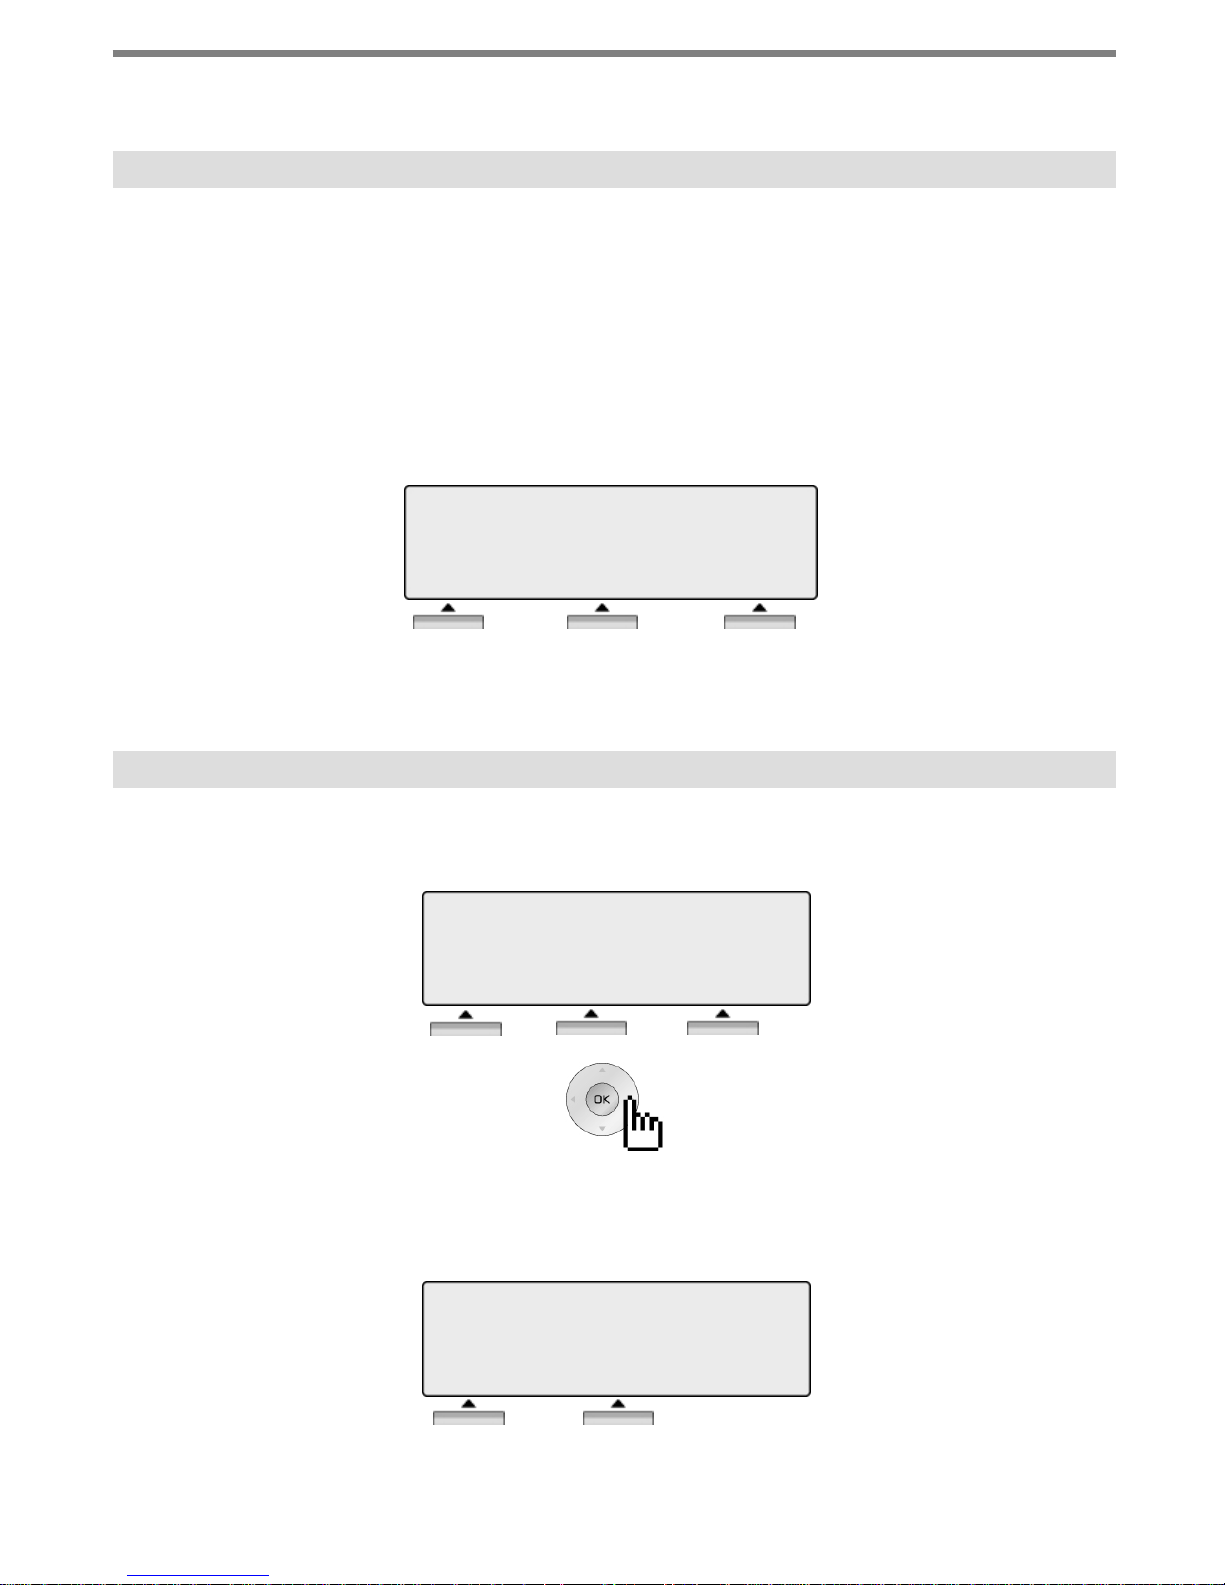
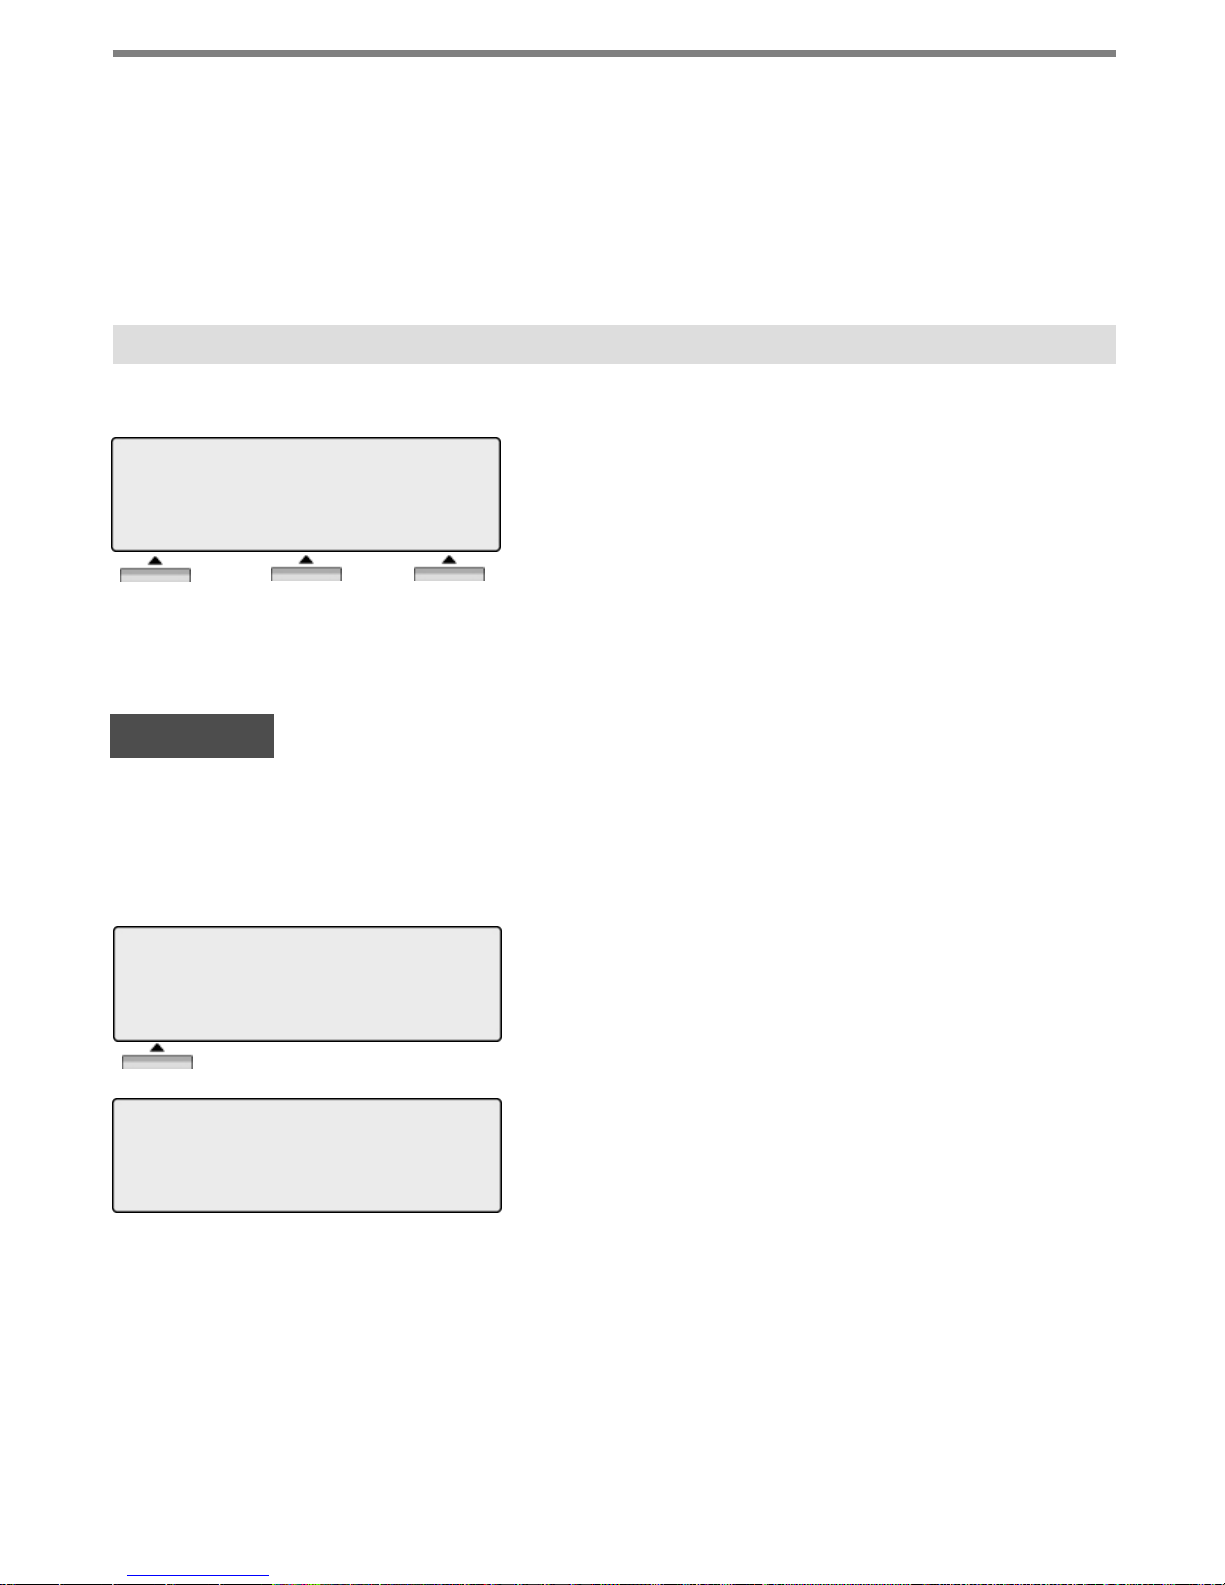
The 3 Soft Buttons are located on the bottom of the LCD display. The function of each
button changes based on call status and progress. The current available functions are
displayed on the LCD screen, directly above each button. For example, if the user calls a
busy extension, the busy tone will be heard and the busy status is displayed. The LCD
screen will display the busy message along with the different options available (shown in
image): MSG, Camp-On and Flash. Activate feature by pressing the corresponding button.
1. 3 Soft Buttons
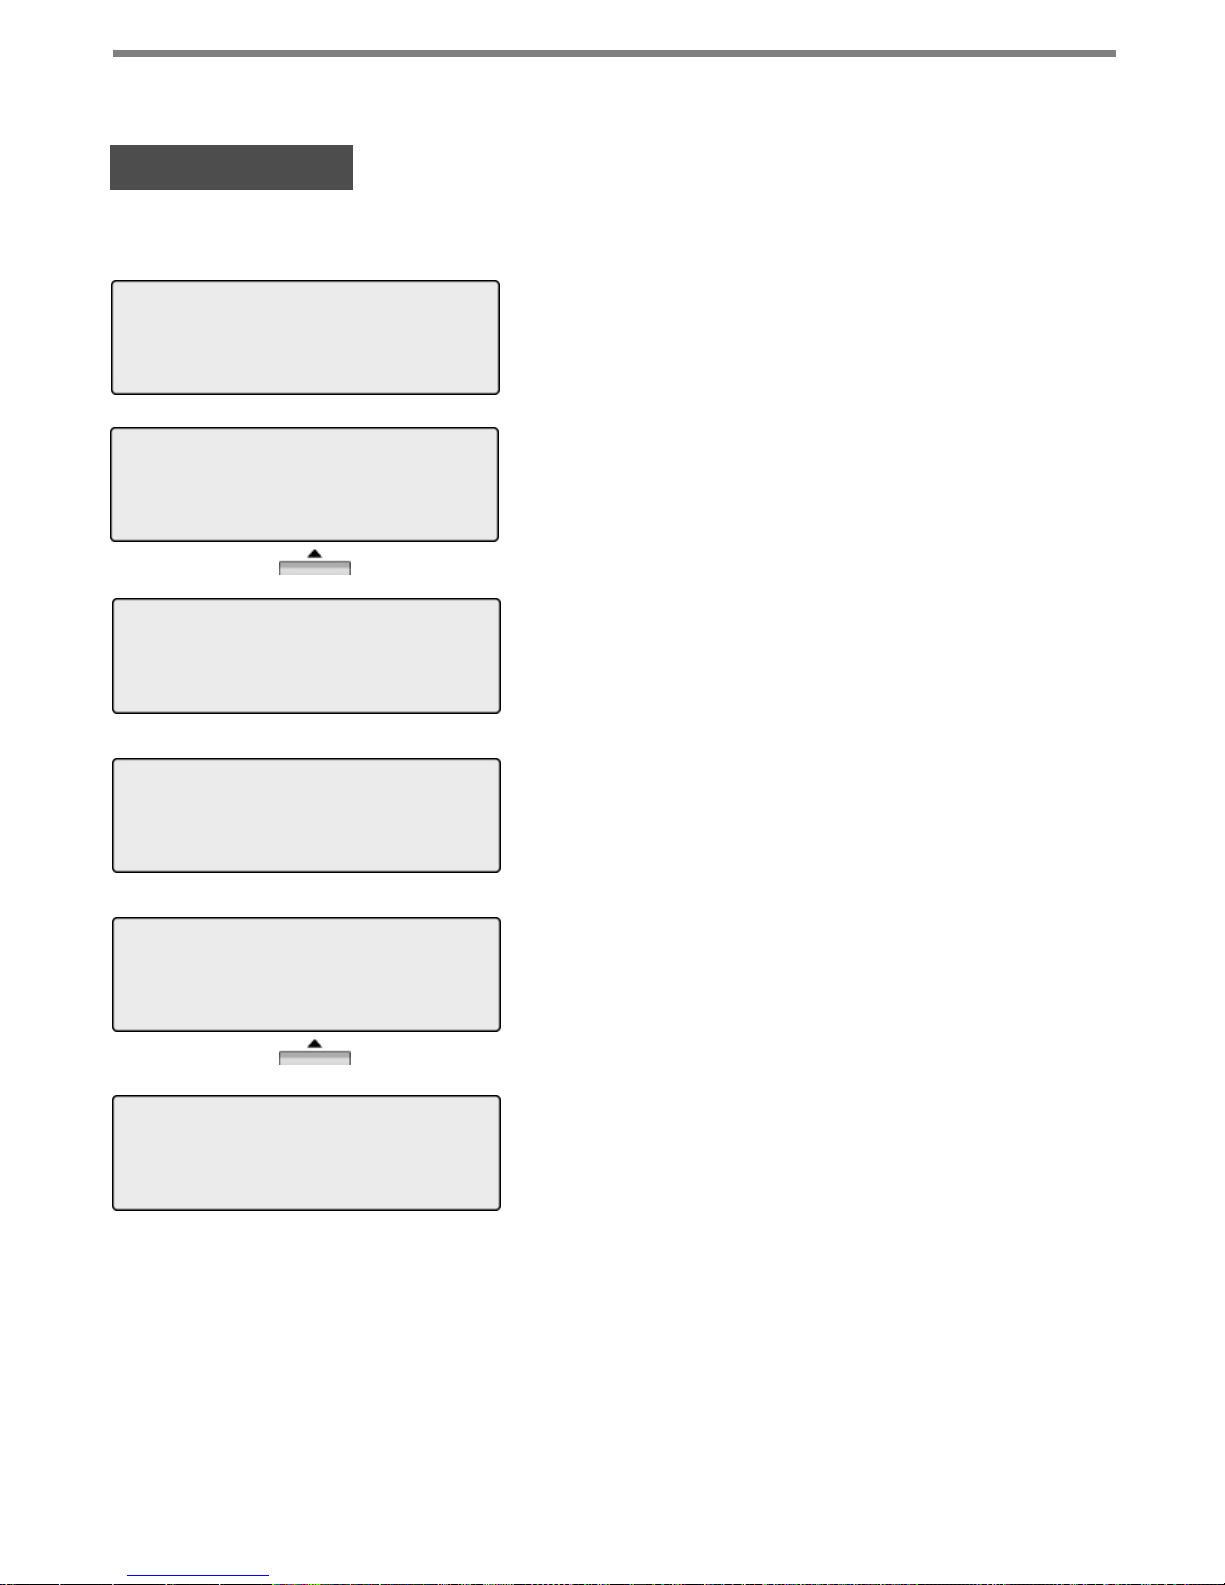
2. Navigation Button
In some instances, more than 3 current functions are available to the user. This is indicated
by the appearance of a left () or right () arrow in the LCD screen (shown).
BUSY : STA 100
[CALLBK] CAMP(*) STEP
MSG CAMP-ON FLASH →
STATION 100 (T)
FEB 01 04 05:34 pm
FWD CONF REDIAL →
STATION 100 (T)
FEB 01 04 05:34 pm
← ICM FLASH
3 Soft Buttons & Navigation Button
6
By pressing the navigation key (shown above), in the direction corresponding to the arrow,
the additional functions will be displayed.
Displayed functions can be selected by pressing one of the 3 soft buttons. For instance, if
you want to select Call Pickup (as shown below), press the first button on the left. If there
are more than three functions available at any point, an arrow will be displayed on the LCD
display. Use the navigation key to move the to next or previous screen to show additional
functions.
3 Soft Buttons are located below the LCD display.
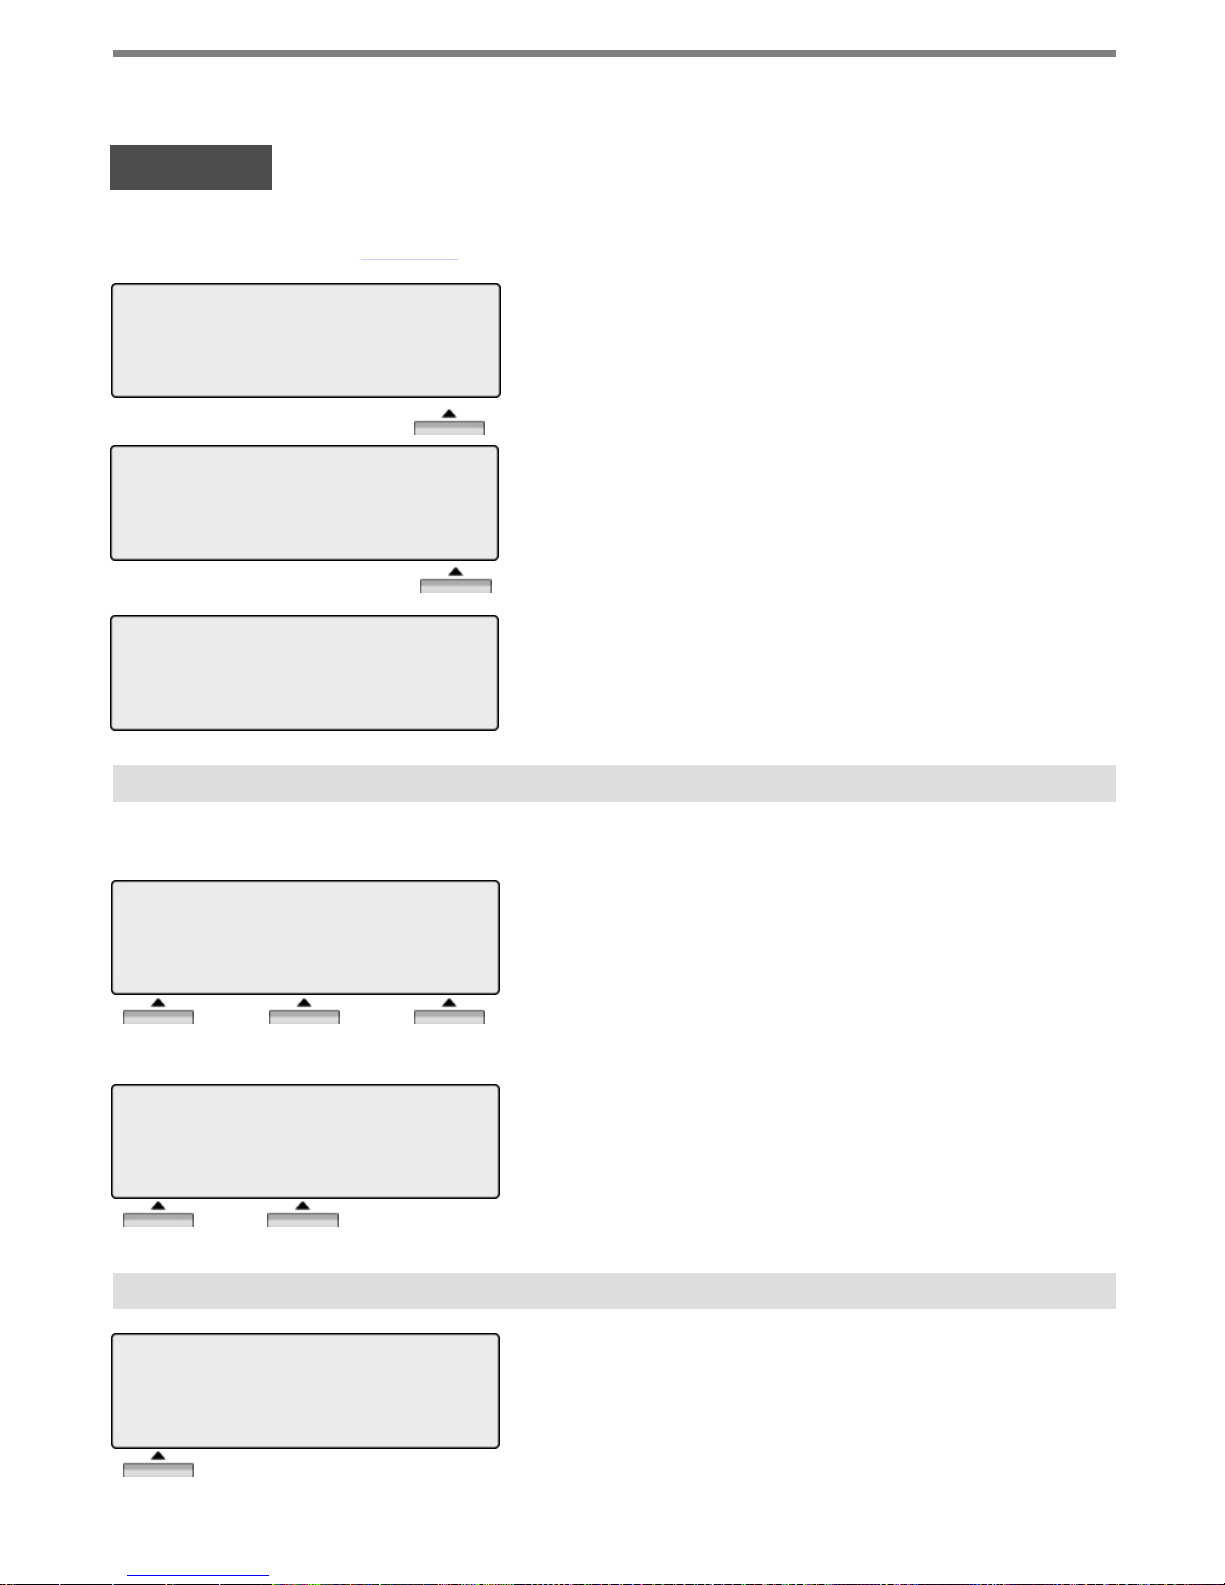
1. Idle
PICKUP: press to answer a call ringing within the same pickup
group.
CONF: press to initiate & activate a conference.
REDIAL: press to redial the last number called.
CALL TO STA 104
FROM 100 05:37pm
TRANS CONF MUTE→
A station can pickup a call ringing to an unattended station within the same pickup group
using the pickup procedure (refer to the System Programming manual).
Press the [PICKUP] button.
Initiate conversation with calling party.
STATION 100 (T)
FEB 01 04 05:34 pm
PICKUP CONF REDIAL
STATION 100 (T)
FEB 01 04 05:34 pm
PICKUP CONF REDIAL
Basic Function
7
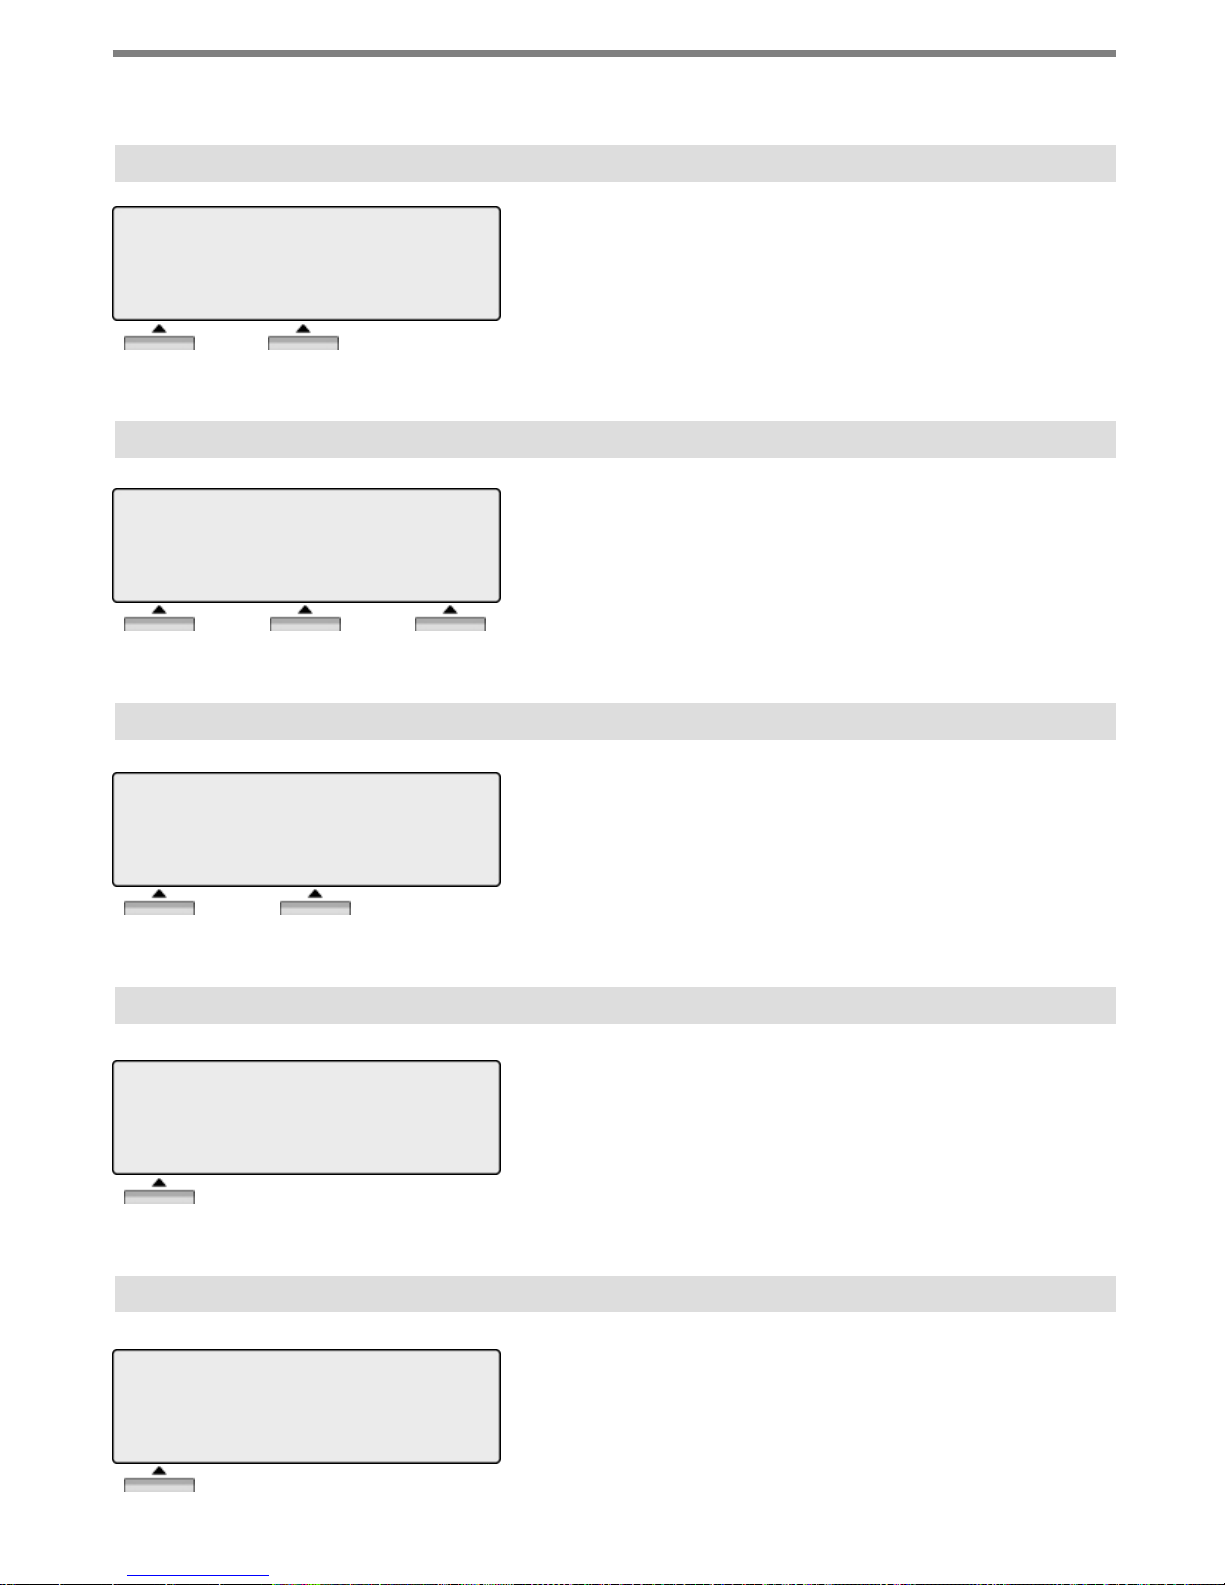
1.1 PICKUP
CALL TO STA 100
FEB 01 04 05:34 pm
MSG FLASH
CALL TO STA 100
FEB 01 04 05:34 pm
TRANS CONF MUTE
Dial the desired station number (ex.,100),
Station 100 answers the call.
Press [CONF] button.
CONFERENCE
FEB 01 04 05:34 pm
FWD CONF REDIAL →
Dial the phone number of the next desired station (ex.,104).
CALL TO STA 104
FEB 01 04 05:34pm
MSG FLASH
Station 104 answers the call.
CALL TO STA 104
FEB 01 04 05:34 pm
TRANS CONF MUTE
Press the [CONF] button (add more parties as
needed) then press again.
CONFERENCE
FEB 01 04 05:34 pm
CONF MUTE
3-party conference is established.
Basic Function
You can establish a Conference with up to 15 parties. The other parties in the
Conference may be internal or external.
8
1.2 CONFERENCE
Press the [REDIAL] button.
>123456789
FEB 01 04 05:34 pm
BACK DELETE OK
Press [OK] button to call.
123456789
LINE 008 00:00:10
TRANS CONF MUTE →
Initiate a conversation with the called party.
STATION 100 (T)
FEB 01 04 05:34 pm
PICKUP CONF REDIAL
2. Off Hook
STATION 100 (T)
FEB 01 04 05:34 pm
FWD CONF REDIAL→
FWD: Press to forward calls to another station, voicemail etc.
CONF: Press to initiate a conference call.
REDIAL: Press to call last number dialed.
STATION 100 (T)
FEB 01 04 05:34 pm
← ICM FLASH
ICM: While on a call, press to answer ICM call (current call will
be placed on Hold).
FLASH : Press to terminate an ICM call and make another call,
press [FLASH] to access a dial tone.
Basic Function
The last number dialed on an external call is automatically saved in the Last Number
Redial (LNR) buffer or Call Log buffer.
9
When off-hook (receiving ICM dial tone) the Soft buttons can be used for the following:
1.3 REDIAL
3. Intercom Dialing
STATION 100 (T)
FEB 01 04 05:34 pm
PICKUP CONF REDIAL
Dial Station number or press programmed flexible button for
station number.
4. Intercom Ring Back
CALL TO STA 100
FEB 01 04 05:34 pm
MSG FLASH
MSG: Press to leave a your station number or message at the
called station when making a call that is unanswered.
FLASH: Press to disconnect and access a line to make a new
call.
5. Intercom Busy
BUSY : STA 100
[CALLBK] CAMP ( * ) STEP
MSG CAMP-ON FLASH→
MSG: Press to leave a callback or voice message.
CAMP-ON: Press to send a call waiting tone at the busy station.
FLASH: Press to disconnect the line and access a line to make a
new call.
7. Intercom Dialing Error
INVALID
FEB 01 04 05:34 pm
FLASH
FLASH: Press to re-access the dial tone.
6. Intercom Do Not Disturb
DO NOT DISTURB STA 100
CALLBK FLASH
CALLBK: Press leave a call back request or message at the
called station when making a call to a station in DND mode.
FLASH: Press to disconnect the line and access a line to make a
new call.
8. Intercom Receiving
CALL FROM STA 104
FEB 01 04 05:34 pm
DND
DND: Press to block all incoming calls (Do Not Disturb).
Basic Function
10
 Loading...