

Page 1
Digita
l
!
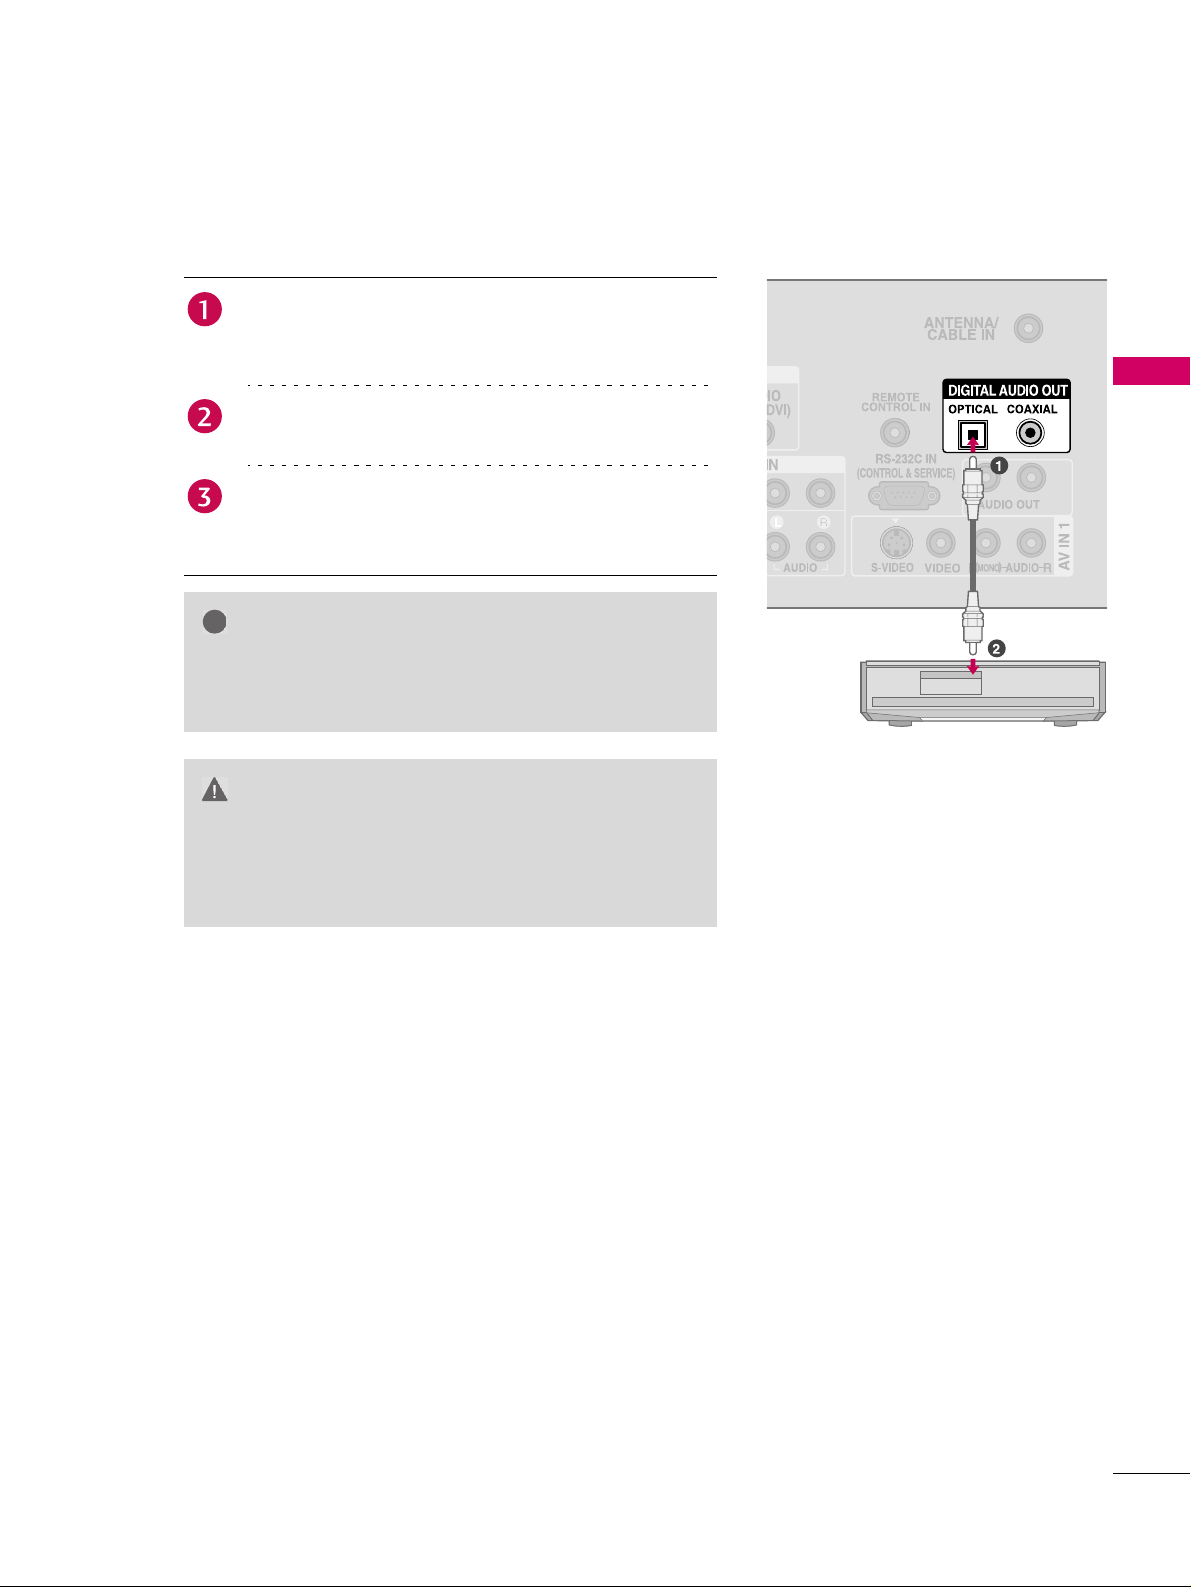
1. How to connect
Connect one end of the optical or coaxial cable to the
TV’s OPTICAL or COAXIAL port of DIGITAL AUDIO
OUT.
Connect the other end of the optical cable to the
digital audio input on the audio equipment.
Set the “TV Speaker option - Off” in the AUDIO menu.
(
Xp.53). See the external audio equipment instruction
manual for operation.
EXTERNAL EQUIPMENT SETUP
NOTE
X When connecting with external audio equipments, such
as amplifiers or speakers, you can turn the TV speakers
off in the menu. (
CAUTION
X Do not look into the optical output port. Looking at the
laser beam may damage your vision.
X Block the SPDIF out (optical) about the contents with
ACP (Audio Copy Protection) function.
Xp.53)
29
Page 2
WATCHING TV / CHANNEL CONTROL
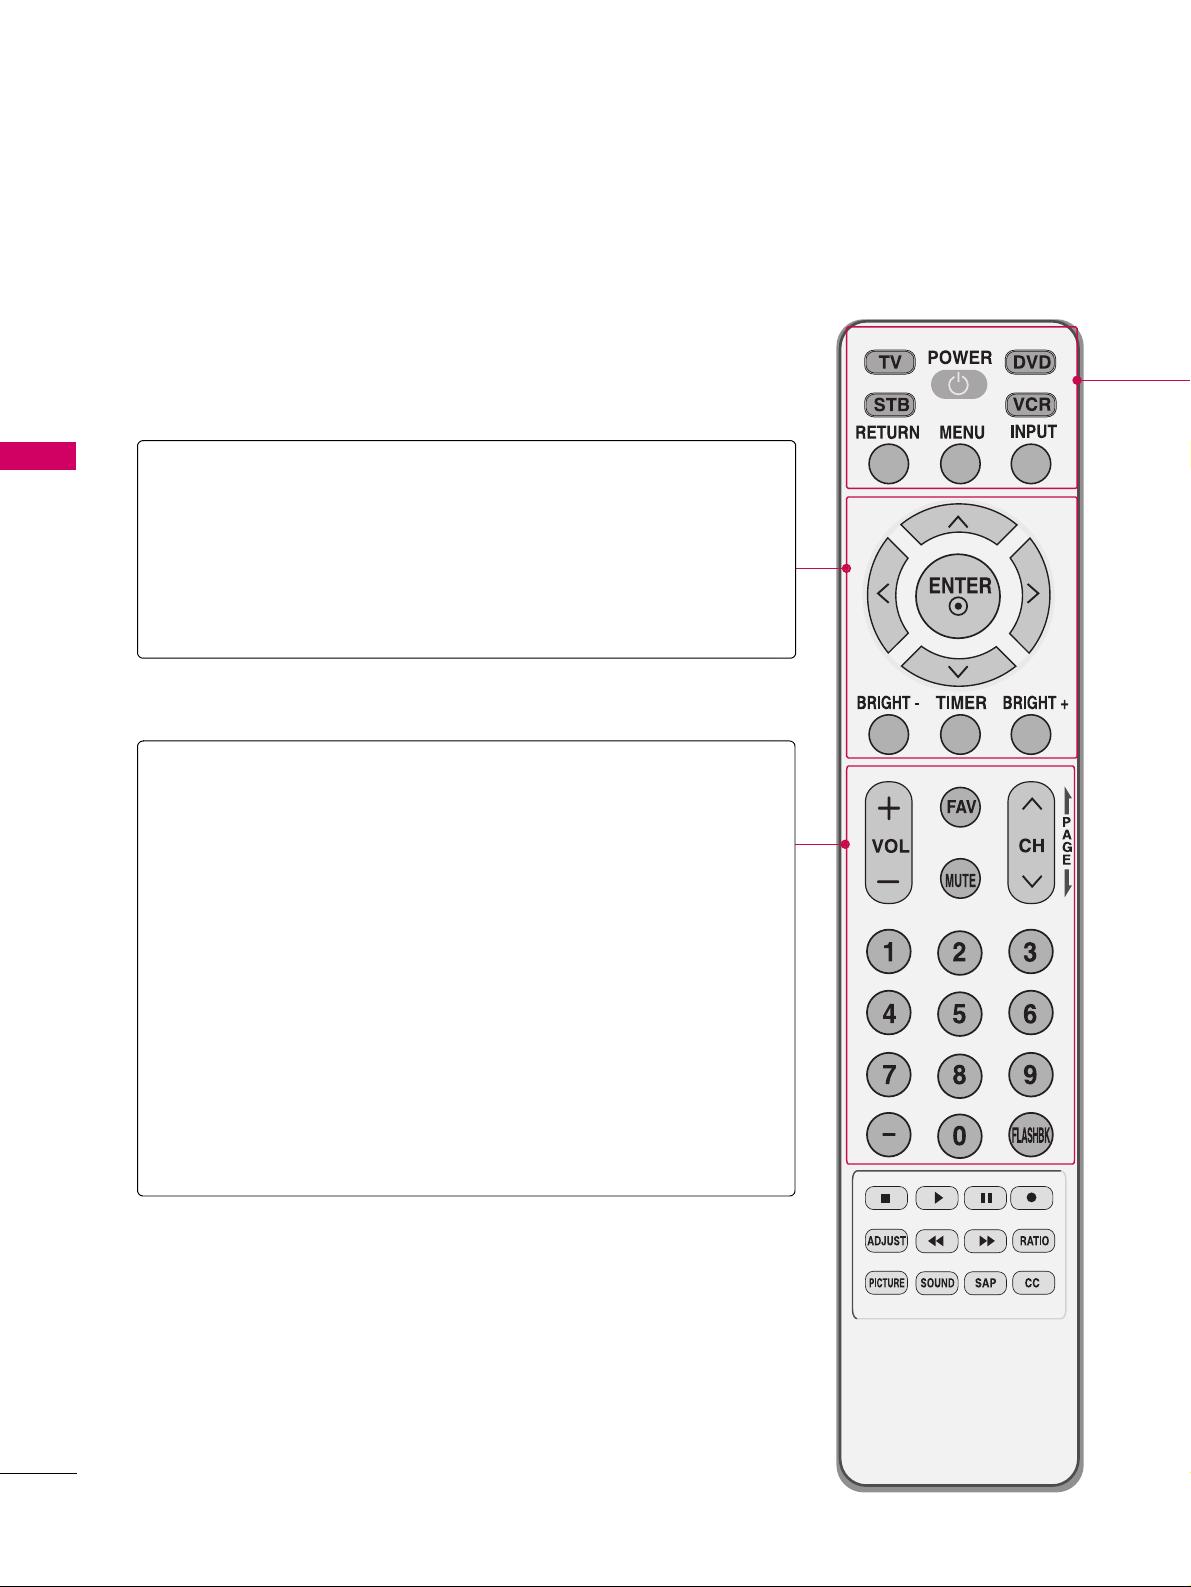
REMOTE CONTROL FUNCTIONS
When using the remote control, aim it at the remote control sensor on the TV.
WATCHING TV / CHANNEL CONTROL
THUMBSTICK
(Up/Down/Left
Right/ENTER)
BRIGHT -/+ Adjust the brightness on screen.
TIMER Select the amount of time before your TV turns off
VOLUME UP
/DOWN
MUTE Switch the sound on or off. Xp.32
CHANNEL
UP/DOWN
UP/DOWN
Navigate the on-screen menus and adjust the system
settings to your preference.
automatically.
Increase/decrease the sound level.
FAV Scroll through the programmed Favorite channels.
Select available channels.
PAG E
Move from one full set of screen information to the next
one.
Xp.64
Xp.36
30
NUMBER button
BACK Tune to the last channel viewed.
-
(DASH) Used to enter a program number for multiple program
channels such as 2-1, 2-2, etc.
Page 3
POWER Turns your TV or any other programmed equipment on or off, depending on the mode.
MODE Select the remote operating mode: TV, DVD, VCR, AUDIO, or STB.
*If the mode of another product is selected, a button on the remote control which is not used for the
selected product can control the TV.
RETURN Allows the user to move return one step in an interactive application or other user interaction function.
MENU Displays the main menu.
INPUT External input modes rotate in regular sequence: Antenna, Cable, AV 1-2, Component 1-2, RGB-PC,
HDMI1, HDMI2, HDMI3 (AV 1-2, Component 1-2, RGB-PC, HDMI1, HDMI2, HDMI3 input sources
are linked automatically, only if these are connected).
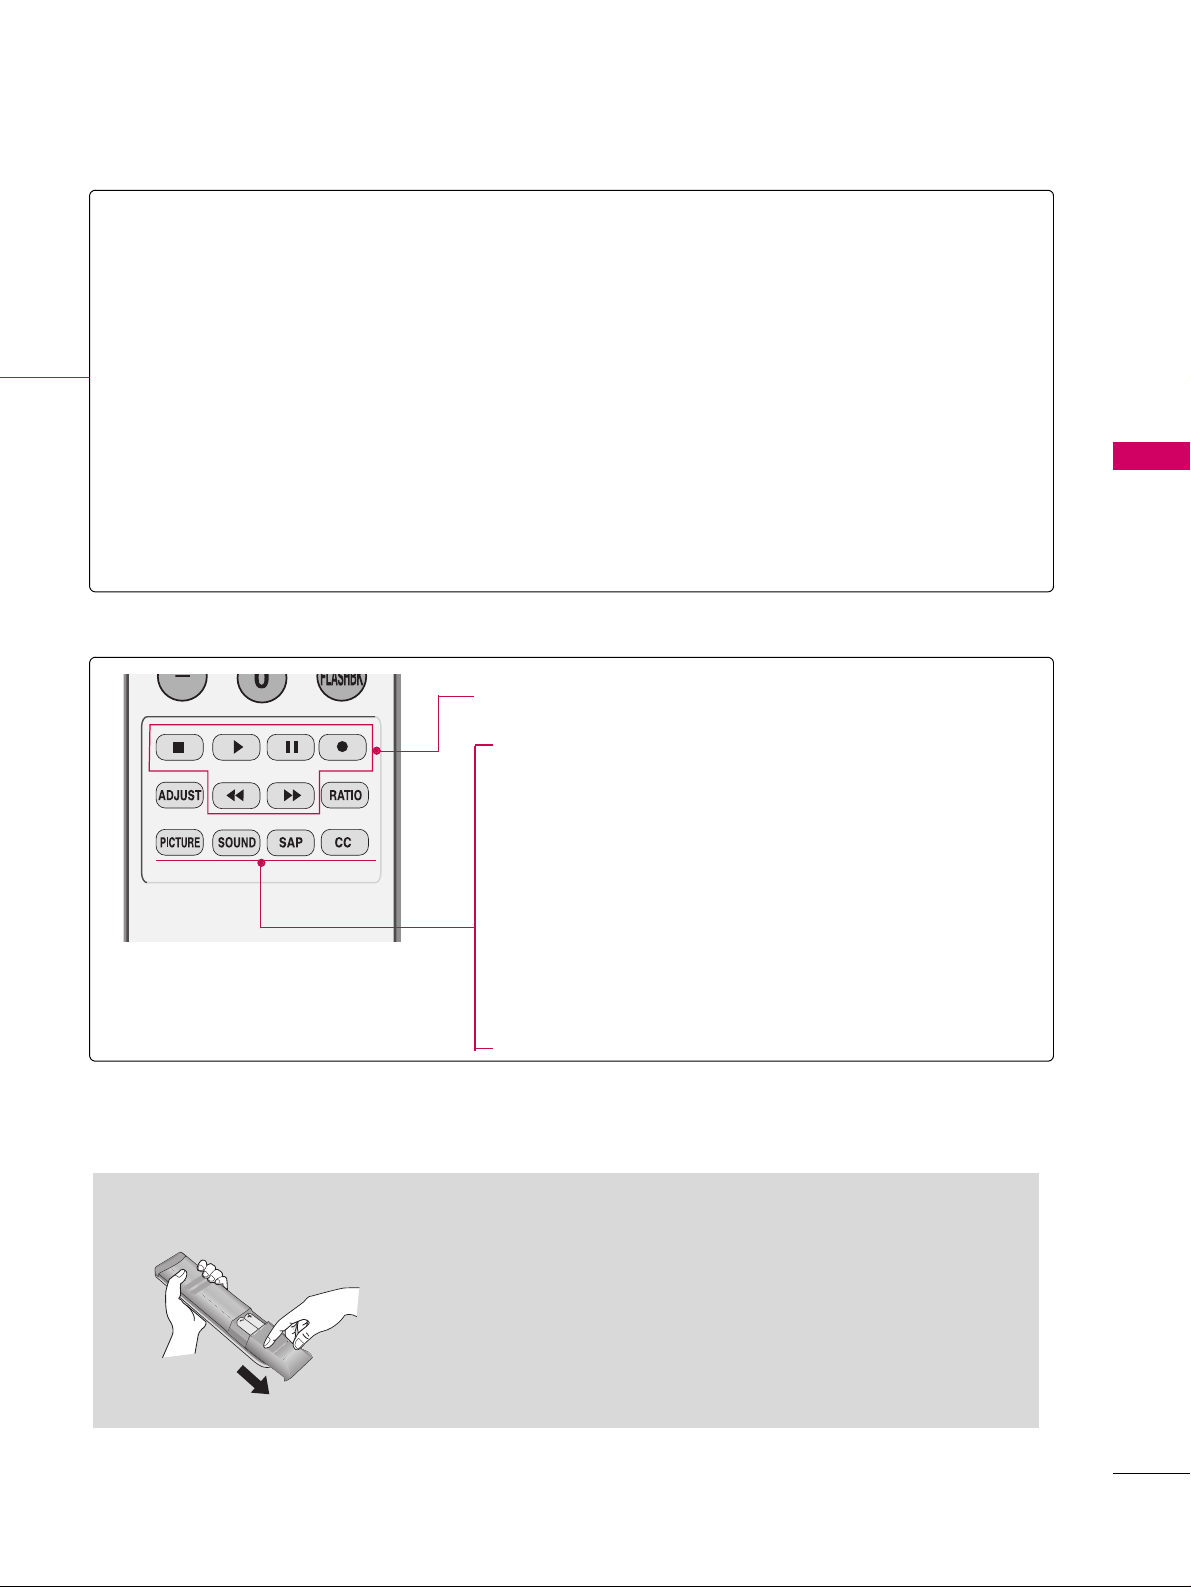
VCR/DVD
Control video cassette recorders or DVD players.
Control
buttons
ADJUST Adjustment for screen Resolution, Position, Size, and
Phase.
Xp.26-27
RATIO Change the aspect ratio.
Xp.40
PICTURE Adjust the factory preset picture depend on the viewing
environment.
Xp.41
SOUND Select the appropriate type of sound for type of
program.
Xp.50
SAP Select MTS sound: Mono, Stereo, and SAP analog
mode. Change the audio language DTV mode.
CC Select the Caption On/Off.
Xp.57
Xp.54
WATCHING TV / CHANNEL CONTROL
Installing Batteries
Open the battery compartment cover on the back side and install the
batteries matching correct polarity (+with +, -with -).
Install two 1.5V AAA batteries. Don’t mix old or used batteries with
new ones.
Close cover.
31
Page 4
WATCHING TV / CHANNEL CONTROL
!
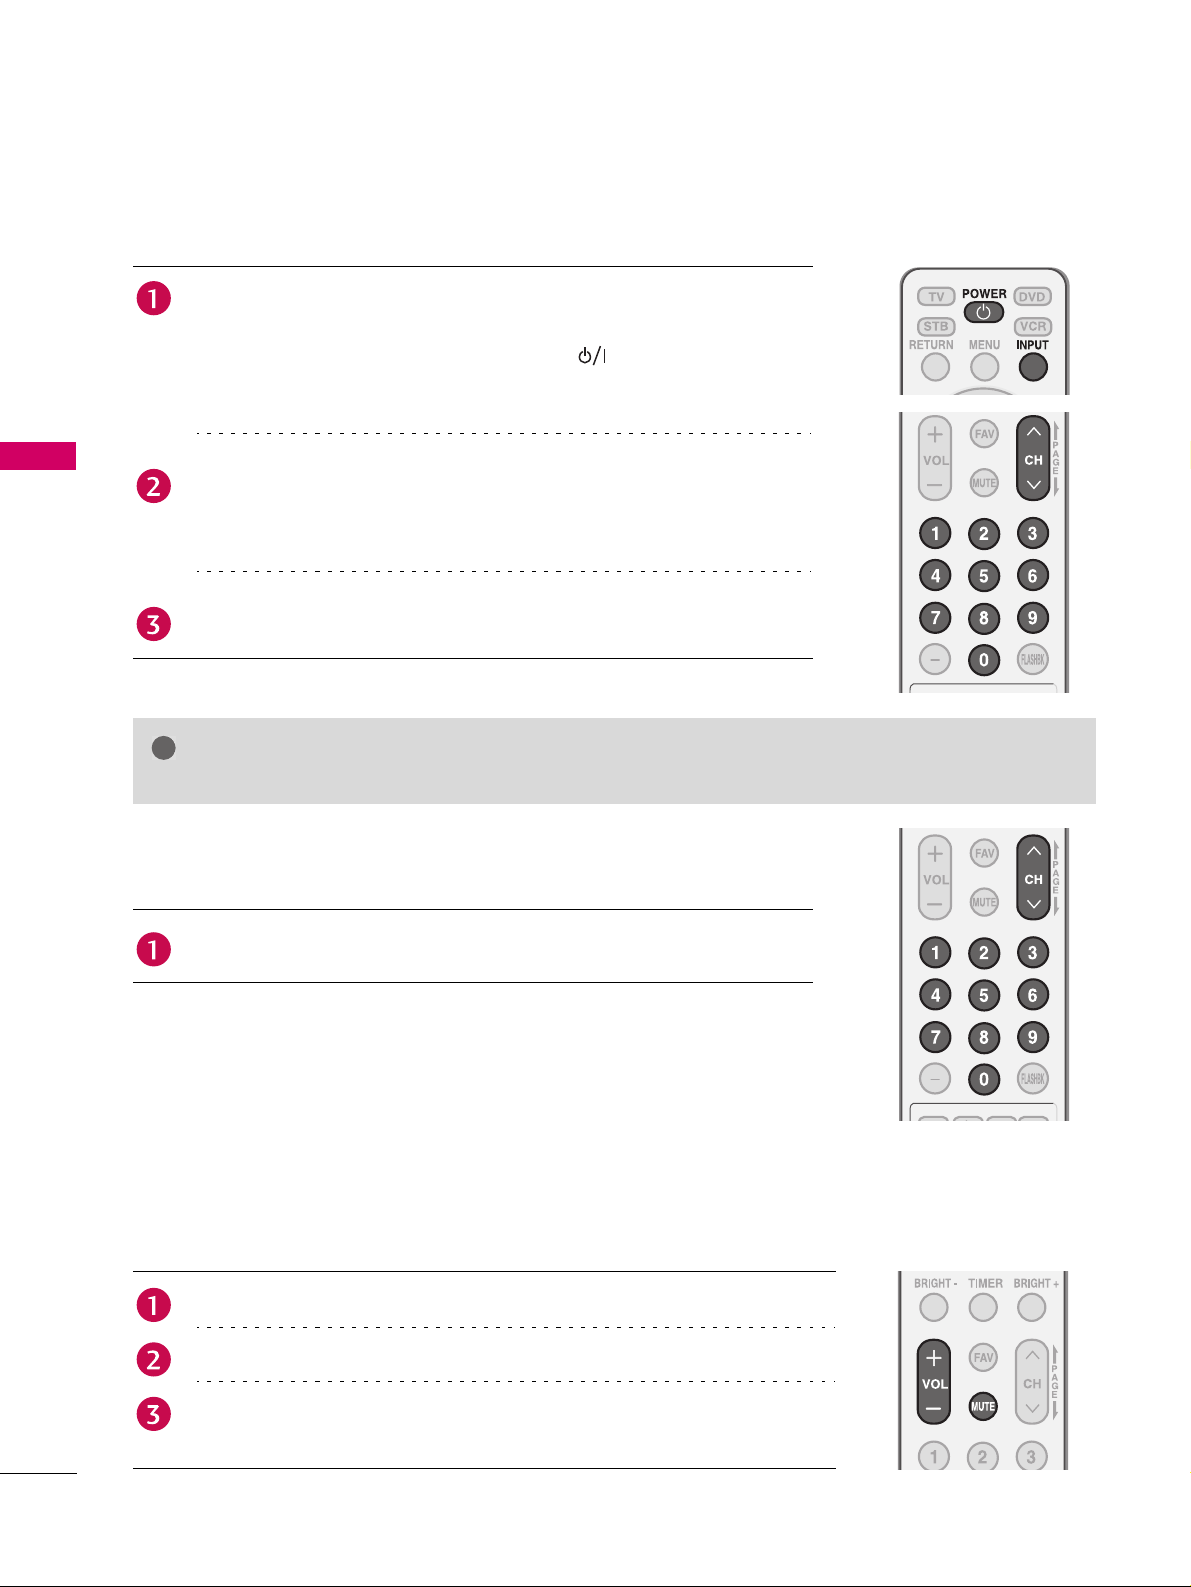
TURNIN G O N T V
First, connect power cord correctly.
At this moment, the TV switches to standby mode.
In standby mode to turn TV on, press the , INPUT, CH (S or T)
button on the TV or press the POWER, INPUT, CH (1 or 2),
Number (0~9) button on the remote control.
Select the viewing source by using the INPUT button on the remote
WATCHING TV / CHANNEL CONTROL
control.
This TV is programmed to remember which power state it was last set
to, even if the power cord is out.
When finished using the TV, press the POWER button on the remote
control. The TV reverts to standby mode.
NOTE
X If you intend to be away on vacation, disconnect the power plug from the wall power outlet.
CHANNEL SELECTION
Press the CH (1 or 2) or NUMBER buttons to select a channel number.
VOLUME ADJUSTMENT
Adjust the volume to suit your personal preference.
Press the VOL (+ or -) button to adjust the volume.
If you want to switch the sound off, press the MUTE button.
You can cancel the Mute function by pressing the MUTE or VOL (+ or -)
button.
32
Page 5
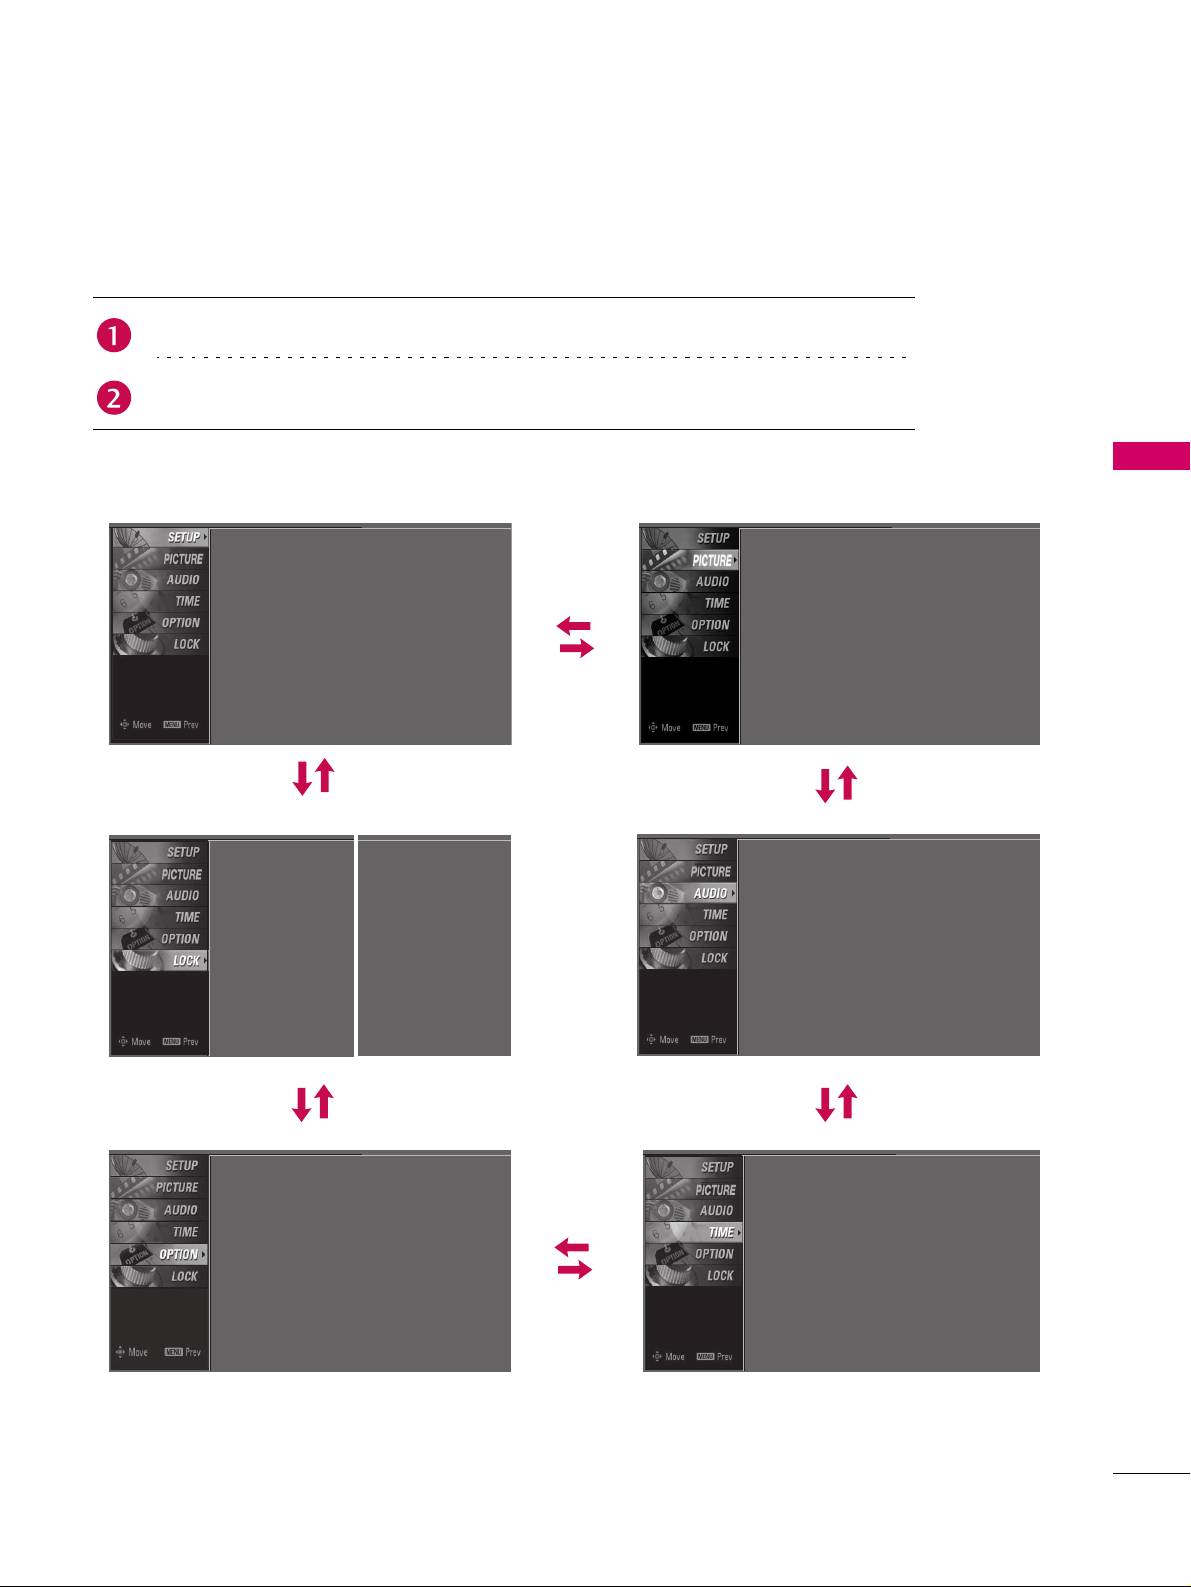
ON-SCREEN MENUS SELECTION
Your TV's OSD (On Screen Display) may differ slightly from what is shown in this manual.
Press the MENU button and then use 1 or 2 button to select each menu.
Press the 4 button and then use 1 2 3 4 button to display the available menus.
SETUP PICTURE
Auto Tuning
Manual Tuning
Channel Edit
LOCK AUDIO
For USA For Cana da
Lock S yste m : Off
Set Password
Block Channel
Movie Rating
TV Rating-Children
TV Rating-General
Downloadable Rating
Input Block
Lock System : Off
Set Password
Block Channel
TV Rating-English
TV Rating-French
Downloadable Rating
Input Block
Picture Mode
Color Temperature
DB
Advanced
Aspect Ratio
Picture Reset
Screen
Sound Mode
Auto Volume
Balance
TV Speaker
WATCHING TV / CHANNEL CONTROL
: User1
: Cool
: 16:9
: Standard
: On
: 0
: On
OPTION TIME
Language
Input Label
Key Lock
Caption
Set ID
: English
: Off
: Off
: 1
Clock
Off Time
On Time
Sleep Time
Auto Sleep
: Oct 19, 2006, 03:44 AM
: Off
: Off
: Off
: Off
33
Page 6
WATCHING TV / CHANNEL CONTROL
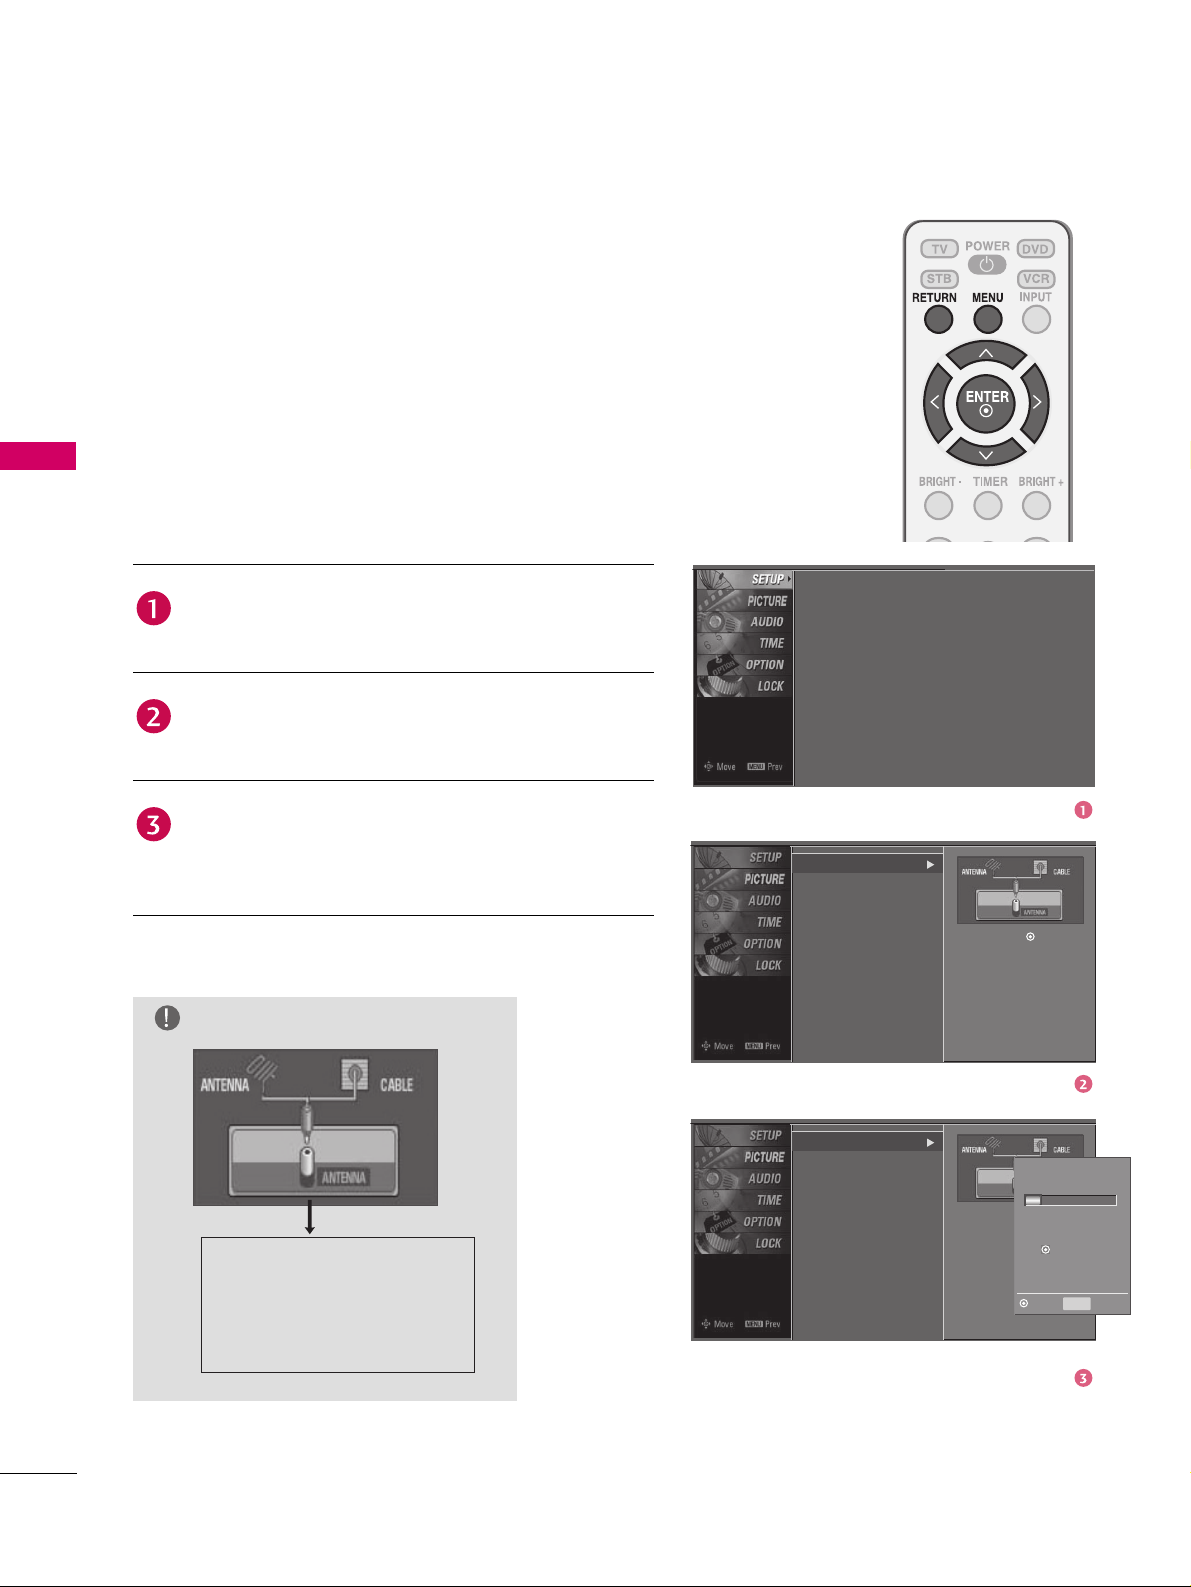
CHANNEL SETUP
Auto Scan (Auto Tuning)
Automatically finds all channels available through antenna
or cable inputs, and stores them in memory on the channel
list.
Run Auto Tuning again after any Antenna/Cable connection
changes.
A password is required to gain access to Auto Tuning menu if
WATCHING TV / CHANNEL CONTROL
the Lock System is turned on.
Press the MENU button and then use 1 or 2 button
to select the SETUP menu.
Press the 4 button and then use 1 or 2 button to
select Auto Tuning.
Press the ENTER button to begin the channel search.
Allow Auto Tuning to complete the channel search
cycle for ANTENNA and CABLE.
NOTE
DTV (Digital DTV antenna)
TV (Analog TV antenna)
CADTV (Digital CADTV cable)
CATV (Analog CATV cable)
Auto Tuning
Manual Tuning
Channel Edit
Auto Tuning
Manual Tuning
Channel Edit
Auto Tuning
Manual Tuning
Channel Edit
Selection (X or ) leads you
to the Auto Tuning screen.
Processing Auto Tuning. .
Selection (X or ) leads you
to the Auto Tuning screen.
DTV Ch.23
Found Channel(s): 16
Press to stop the current
scan and start ANALOG
ANTENNA channel scan.
MENU
Next Prev
34
Page 7

Add/Delete Channel (Manual Tuning)
A password is required to gain access to Manual Tuning
menu if the Lock System is turned on.
If selecting DTV or CADTV input signal, you can view the
on-screen signal strength monitor to see the quality of the
signal being received.
WATCHING TV / CHANNEL CONTROL
Press the MENU button and then use 1 or 2 button
to select the SETUP menu.
Press the 4 button and then use 1 or 2 button to
select Manual Tuning.
Press the 4 button and then use 1 or 2 button to
select TV, DTV, CATV, and CADTV.
Press the 4 button and then use 1 or 2 button to
select channel you want to add or delete.
Press the ENTER button to add or delete the channel.
Press RETURN button to return to TV viewing or
press MENU button to return to the previous menu.
Auto Tuning
Manual Tuning
Channel Edit
Auto Tuning
Manual Tuning
Channel Edit
Auto Tuning
Manual Tuning
Channel Edit
Select channel type and
RF-channel number.
DTV 2
Select channel type and
RF-channel number.
DTV 12
DTV 12-0
Bad Normal Good
Press to delete the channel.
35
Page 8

WATCHING TV / CHANNEL CONTROL
Channel Editing
From the default channel list created from the Auto Tuning
channel search, you can create two different types of channel
lists in memory: “custom list” and “favorite channel list”.
A custom list can be created by toggling each channel on or
off with ENTER button. The channels in the Custom List are
displayed in black and the channels deleted from the Custom
List are displayed in gray. Once a channel is highlighted you
WATCHING TV / CHANNEL CONTROL
can add or delete the channel by referring to the small
window at the top-left corner of the screen.
You can create your own Favorite List. Use the FAV button on
the remote control when a channel is highlighted and then
add or delete the channel to/from your Favorite List.
Press the MENU button and then use 1 or 2 button
to select the SETUP menu.
Press the 4 button and then use 1 or 2 button to
select Channel Edit.
Press the 4 button. You will now see a screen filled
with channel numbers and a preview picture. To move
to the next or previous page, press the CH (1 or 2)
button.
Use 1 2 3 4 button to select a channel and then use
the ENTER button to add or delete it.
Press FAV button to add the channel to the Favorite
List. The surfing icon will appear in front of that
channel number.
Auto Tuning
Manual Tuning
Channel Edit
Auto Tuning
Manual Tuning
Channel Edit
Selection (X or ) leads you
to the Auto Tuning screen.
36
Press RETURN button to return to TV viewing or
press MENU button to return to the previous menu.
Page 9

INPUT LIST
Press the INPUT button to display external device that is
connected to the unit, on screen.
Press the ENTER button to change the input to the active
external device. Use the 1 or 2 button to select the input
source.
If all external input sources are connected:
Antenna Cable AV 1 AV 2 Component 1
Input List
Antenna
Cable
AV 1
AV 2
Component 1
AV 2
WATCHING TV / CHANNEL CONTROL
If no external input sources are connected:
Antenna Cable
If there is any external input source connected:
(ex: When connected only to AV 2)
Antenna Cable AV 2
Antenna: Select it to watch over-the-air broadcasts.
Cable: Select it to watch cable and digital cable.
AV 1-2: Select them to watch a VCR or other external equipment.
Component 1-2: Select them to watch DVD or a Digital set-top box.
RGB-PC: Select it to view PC input.
HDMI1-3: Select them to watch high definition devices.
Component 2RGB-PCHDMI1HDMI2HDMI3
37
Page 10

WATCHING TV / CHANNEL CONTROL
INPUT LABEL
You can set a label for each input source when it's not in
use.
WATCHING TV / CHANNEL CONTROL
Press the MENU button and then use 1 or 2 button
to select the OPTION menu.
Press the 4 button and then use 1 or 2 button to
select Input Label.
Press the 4 button and then use 1 or 2 button to
select the source: AV 1, AV 2, Component 1,
Component 2, RGB-PC, HDMI1, HDMI2 or HDMI3.
Press the 3 or 4 button to select the label.
Press RETURN button to return to TV viewing or
press MENU button to return to the previous menu.
Language
Input Label
Key Lock
Caption
Set ID
Language
Input Label
Key Lock
Caption
Set ID
: English
: Off
: Off
: 1
AV 1
AV 2
Component 1
Component 2
RGB-PC
HDMI1
HDMI2
HDMI3 Cable Box
Cable Box
VCR
DVD
Set Top Box
VCR
Game
Satellite
38
Page 11

KEY LOCK
The TV can be set up so that it can only be used with the
remote control.
This feature can be used to prevent unauthorized viewing by
locking out the front panel controls.
This TV is programmed to remember which option it was
last set to even if you turn the TV off.
WATCHING TV / CHANNEL CONTROL
Press the MENU button and then use 1 or 2 button
to select the OPTION menu.
Press the 4 button and then use 1 or 2 button to
select Key Lock.
Press the 4 button and then use 1 or 2 button to
select On or Off.
Press RETURN button to return to TV viewing or
press MENU button to return to the previous menu.
Language
Input Label
Key Lock
Caption
Set ID
Language
Input Label
Key Lock
Caption
Set ID
: English
: Off
: Off
: 1
Off
On
39
Page 12

PICTURE CONTROL
!
PICTURE SIZE (ASPECT RATIO) CONTROL
This feature lets you choose the way an analog picture with a 4:3 aspect ratio is
displayed on your TV.
RGB-PC input source use 4:3 or 16:9 aspect ratio.
NOTE
X If a fixed image is displayed on the screen for a long time, the image could
become imprinted on the screen and remain visible.
This phenomenon is common to all manufacturers and is not covered by
warranty. Although, after watching video that did not fill the screen, any
afterimage from the black bars will normally dissipate after a few minutes.
Press the RATIO button repeatedly to select the desired picture format.
You can also adjust Aspect Ratio in the PICTURE menu.
PICTURE CONTROL
Set by program
Selects the proper picture proportion to match
the source’s image.
(4:3 4:3) (16:9 16:9)
Set by program
Set by program
4:3
Choose 4:3 when you want to view a picture with
an original 4:3 aspect ratio.
4:3
16 : 9
Adjust the picture horizontally, in a linear
pro-portion to fill the entire screen.
16 : 9
Set By Program
Zoom 1
Zoom 2
Choose Zoom 2 when you want the picture to be
altered, both vertically extended and cropped.
The picture taking a halfway trade off between
alteration and screen coverage.
Zoom 2
Just Scan
Following selection will lead you to view the
picture of best quality without loss of original
picture in high resolution image.
Notes:If there are noise in original picture, you
can see the noise at the edge.
Just Scan operates only in DTV/CADTV
(720p/1080i/1080p), HDMI-DTV,
DVI-DTV input source.
Zoom 1
Choose Zoom 1 when you want to view the picture
without any alteration. However, the top and bottom
portions of the picture will be cropped.
Just Scan
40
Page 13

PRESET PICTURE SETTINGS
Picture Mode - Preset
There are factory presets for picture settings available in the
user menus. You can use a preset, change each setting
manually, or use the Intelligent Sensor.
Dynamic, Standard, Mild Settings are preset for the
optimum picture quality at the factory and are not
adjustable.
In the User1 and User2 modes only, user can directly adjust
the contrast, brightness, color, sharpness, tint, backlight.
Press the PICTURE button repeatedly to select the
picture appearance setup option as below :
Dynamic, Standard, Mild, User1 (your own settings),
and User2 (your own settings).
Press the RETURN button to save and return to TV
viewing.
PICTURE CONTROL
You can also use the PICTURE menu to adjust Picture Mode.
Picture Mode
Color Temperature
DB
Advanced
Aspect Ratio
Picture Reset
Screen
: User1
: Cool
: 16:9
Picture Mode
Color Temperature
DB
Advanced
Aspect Ratio
Picture Reset
Screen
Dynamic
Standard
Mild
User1
User2
41
Page 14

PICTURE CONTROL
Color Tone - Preset
Choose one of three automatic color adjustments. Set to
Warm to enhance hotter colors such as red, or set to Cool to
see less intense colors with more blue.
When selecting Picture Mode options (Dynamic, Standard
and Mild), Color Temperature is automatically changed.
When selecting Picture Mode options (User1 and User2),
you can choose the Color Temperature.
PICTURE CONTROL
Press the MENU button and then use 1 or 2 button
to select the PICTURE menu.
Press the 4 button and then use 1 or 2 button to
select Color Temperature.
Press the 4 button and then use 1 or 2 button to
select either Cool, Medium, Wa rm or User.
Press RETURN button to return to TV viewing or
press MENU button to return to the previous menu.
Picture Mode
Color Temperature
DB
Advanced
Aspect Ratio
Picture Reset
Screen
Picture Mode
Color Temperature
DB
Advanced
Aspect Ratio
Picture Reset
Screen
: User1
: Cool
: 16:9
Cool
Medium
Warm
User
42
Page 15

MANUAL PICTURE ADJUSTMENT
Picture Mode - User Mode
Adjust the picture appearance to suit your preference and
viewing situations.
Press the MENU button and then use 1 or 2 button
to select the PICTURE menu.
Press the 4 button and then use 1 or 2 button to
select Picture Mode.
Press the 4 button and then use 1 or 2 button to
select User1 or User2.
Press the 4 button and then use 1 or 2 button to
select the desired picture option (Contrast,
Brightness, Color, Sharpness, Ti n t , or Back Light).
Back Light
To control the brightness of the screen, adjust the
brightness of LCD panel.
Press the 4 button and then use 3 or 4 button to
make appropriate adjustments.
Press RETURN button to return to TV viewing or
press MENU button to return to the previous menu.
Picture Mode
Color Temperature
DB
Advanced
Aspect Ratio
Picture Reset
Screen
Picture Mode
Color Temperature
DB
Advanced
Aspect Ratio
Picture Reset
Screen
User1
Contrast
Brightness
Color
Sharpness
Tint
Back Light
85
50
50
50
100
: User1
: Cool
: 16:9
Dynamic
Standard
Mild
User1
User2
Selection (X or ) leads you
to the detailed setting screen.
0
PICTURE CONTROL
Press
MENU
to confirm.
Contrast 85
43
Page 16

PICTURE CONTROL
Color Tone - User Mode
You can also adjust the detailed settings (Red, Green, Blue)
by selecting the Color Temperature-User menu.
When selecting Picture Mode options (User1 and User2),
you can choose the Color Temperature.
PICTURE CONTROL
Press the MENU button and then use 1 or 2 button
to select the PICTURE menu.
Press the 4 button and then use 1 or 2 button to
select Color Temperature.
Press the 4 button and then use 1 or 2 button to
select User.
Press the 4 button and then use 1 or 2 button to
select Red, Green, or Blue.
Press the 4 button and then use 3 or 4 button to
make appropriate adjustments.
The adjustment range of Red, Green, or Blue is
-20~ +20.
Press RETURN button to return to TV viewing or
press MENU button to return to the previous menu.
Picture Mode
Color Temperature
DB
Advanced
Aspect Ratio
Picture Reset
Screen
Picture Mode
Color Temperature
DB
Advanced
Aspect Ratio
Picture Reset
Screen
User
Red
Green
Blue
: User1
: Cool
: 16:9
Cool
Medium
Warm
User
Selection (X or ) leads you
to the detailed setting screen.
0
0
0
44
Press
MENU
to confirm.
Red 0
Page 17

DB - PICTURE IMPROVEMENT TECHNOLOGY
DB is Zenith’s unique picture improving technology to
display a real HD source through an advanced digital signal
processing algorithm.
When selecting Picture Mode options (Dynamic, Standard,
and Mild), DB is automatically changed to Auto.
When selecting Picture Mode options (User1 and User2),
you can choose the Auto / Manual.
When selecting the Manual, you can adjust the DB Contrast,
DB Color and DB Noise.
It’s not available to use this function in RGB-PC input
source.
Press the MENU button and then use 1 or 2 button
to select the PICTURE menu.
Press the 4 button and then use 1 or 2 button to
select DB.
Press the 4 button and then use 3 or 4 button to
select either Auto or Manual.
Selecting the Manual
1. Press the 4 button and then use the 1 or 2
button to select DB Contrast, DB Color or DB
Noise.
DB Contrast: Optimizing the contrast
automatically according to the brightness of
the reflection.
DB Color: Adjusting the colors of the
reflection automatically to reproduce as closely
as possible to the natural colors.
DB Noise: Removing the noise up to the point
where it does not damage the original picture.
2. Use the 3 or 4 button to select On or Off.
Picture Mode
Color Temperature
DB
Advanced
Aspect Ratio
Picture Reset
Screen
Picture Mode
Color Temperature
DB
Advanced
Aspect Ratio
Picture Reset
Screen
: User1
: Cool
: 16:9
Manual
DB Contrast
DB Color
DB Noise
PICTURE CONTROL
On
On
On
Press RETURN button to return to TV viewing or
press MENU button to return to the previous menu.
45
Page 18

PICTURE CONTROL
ADVANCED - CINEMA 3:2 PULLDOWN MODE
Set up the TV for the best picture appearance for viewing
movies.
When you operate Cinema 3:2 Mode (3:2 Pull-Down Mode
or Cinema Correction Mode), the TV will adjust 24 fps
video from movies to 30 fps video for display.
This feature operates only in TV (Analog TV/CATV, Digital
DTV/CADTV), AV1, AV2, Component 480i/1080i, and
HDMI 1080i mode.
PICTURE CONTROL
Press the MENU button and then use 1 or 2 button
to select the PICTURE menu.
Press the 4 button and then use 1 or 2 button to
select Advanced.
Picture Mode
Color Temperature
DB
Advanced
Aspect Ratio
Picture Reset
Screen
: User1
: Cool
: 16:9
Press the 4 button and then use 1 or 2 button to
select Cinema 3:2 Mode.
Use 3 or 4 button to select On or Off.
Press RETURN button to return to TV viewing or
press MENU button to return to the previous menu.
Picture Mode
Color Temperature
DB
Advanced
Aspect Ratio
Picture Reset
Screen
Cinema 3:2 Mode
Black Level
Off
Low
46
 Loading...