

Page 1

Communication
5. Tap a voicemail entry to listen to it. Then you can tap Call back, Save,
Erase, or Speaker. To forward or reply to a message, tap the Menu Key
(in the Front Touch Keys bar), then tap Forward or Reply.
6. If you decide to reply with a voicemail or forward it, record a message.
The buttons at the bottom of the screen allow you to record, stop,
re-record, or cancel the message.
Gmail
When you open the Gmail application, the most recent conversations are
displayed at the top of your Inbox list. All of your conversations are
displayed in your Inbox unless you delete, archive, or filter them.
To open the Gmail application
From the Home screen, tap the Apps Key > Gmail .
Your Gmail Inbox
The current Google Account is displayed at the top of the Inbox. If you have
more than one account, you can switch accounts to view the messages in
each Inbox. Simply tap the Accounts & labels icon
select another account or label to display.
Conversations with new messages are displayed with bold subject lines. To
read a message in a conversation, tap its subject line text.
indicates that you were copied on this message.
indicates that this message was sent directly to you.
Tap the letter icon (or contact photo) next to a Gmail message, then you
can tap the Archive icon
Menu icon
Report spam, and Report phishing).
NOTE You can also tap the Favorite icon next to a Gmail message to designate it as a
(Delete, Change labels, Add star, Mark as important, Mute,
favorite message.
, Read/Unread icon , Move to icon , or the
at the top left corner to
99
Page 2
100
Communication
Gmail Inbox icons
Use the following icons (at the bottom of the screen) while viewing your
Gmail Inbox:
New Gmail Tap to begin a new Gmail message.
Search Tap to search within your Gmail messages.
Accounts and labels Tap to change to another account or label.
NOTE Drag the screen downwards to refresh and check for new email.
Message search
Tap the Search icon at the top of the screen, enter the text you are
looking for, then tap the Search icon
on the on-screen keyboard.
Adding another Google Account
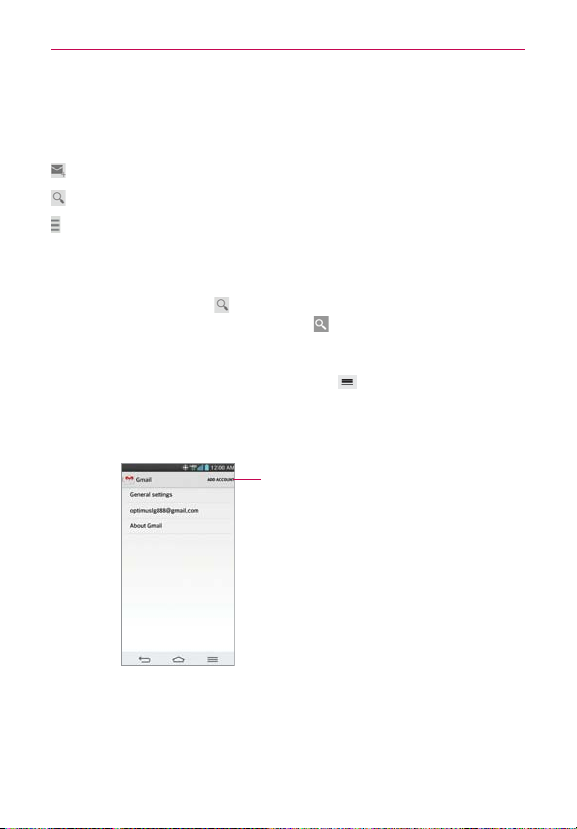
1. From your Gmail Inbox, tap the Menu Key (in the Front Touch Keys
bar) > Settings.
2. Tap ADD ACCOUNT at the top right corner of the screen.
3. Tap Existing or New, then enter the necessary information.
Tap here to add an account.
To switch accounts
Gmail displays conversations and messages from one Google Account at a
time. If you set up more than one Google Account on your device, you can
easily switch between them.
Page 3
Communication
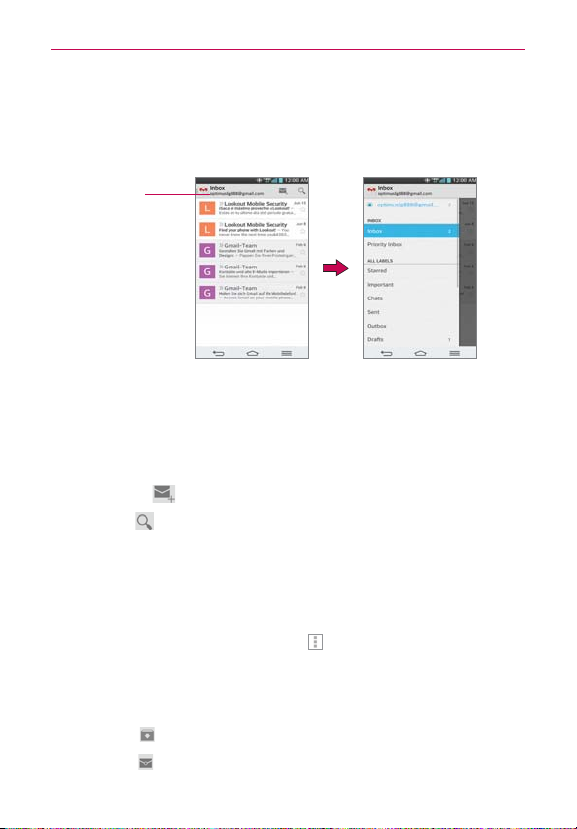
From your Gmail Inbox, tap the Accounts on the Inbox header, then
tap the account that contains the email you want to read.
NOTE The number to the right of the selected Google Account indicates the number of unread
messages you have in that account.
Accounts
Tap here to open a
list of account
choices and
account labels.
Gmail Inbox
Navigating in the Gmail application
While viewing your Inbox, swipe the screen up and down to scroll through
the list of messages. The following icons are available at the top right of the
Gmail Inbox:
Compose
Search
In addition, while viewing your Inbox you can:
Swipe a Gmail message off the screen to the left or right to quickly
and easily archive the message. Tap Undo to restore it to your Inbox.
Tap the letter icon (or contact photo) to the left of one or more
messages, then tap the Menu icon
them.
While viewing a message, swipe the screen left and right to scroll through
all of your messages and use the following icons:
Archive
Unread
: Tap to start a new Gmail message.
: Tap to search within the Gmail application.
and select Delete to delete it/
: Tap to send the message to your archive folder.
: Tap to return the message to an unread state.
101
Page 4
102
Communication
Move to : Tap to move the email to another label.
If you are viewing a message or another label, tap the Back Key
Front Touch Keys bar) until you return to your Inbox.
Reading Your Messages
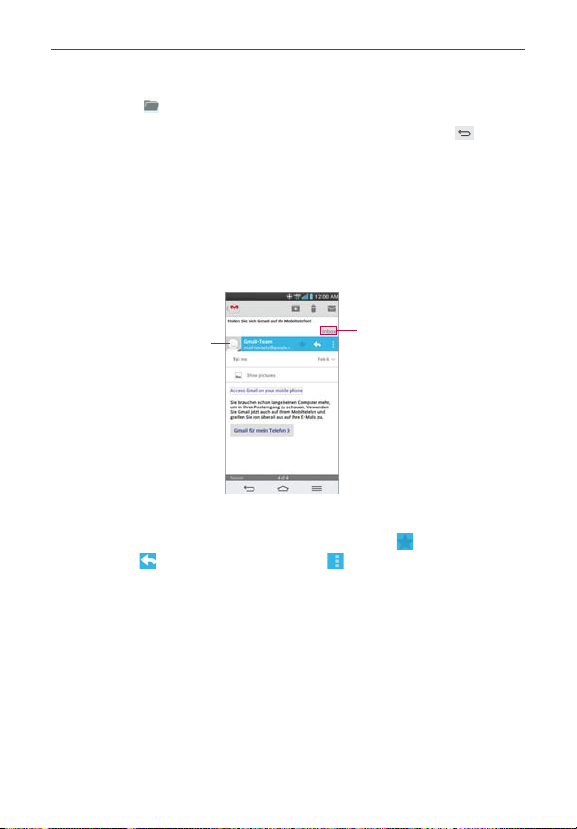
Tap a conversation that contains the message you want to read.
The conversation opens to the first new (unread) message, or to the
first starred message, if you’ve previously starred a message in the
conversation.
Tap to set labels
Tap the Contact's
picture to open
Quick Contact.
While viewing a message, tap the message action icons on the
message header to access options which include
favorite,
to reply to the sender, and to access Reply all to reply
to all addresses and Forward to forward the message to someone
else.
for the message to
help organize your
messages.
to mark it as a
(in the
To reread a message
When you open a conversation, messages that you’ve already read are
minimized into a tab that indicates the number of hidden messages.
1. From your Gmail Inbox, tap the conversation you want to view.
2. Tap the contact name to open that message.
Page 5
Communication
While reading a message you can tap the Unread icon to return a read
message to the unread state. For example, to remind yourself to read it
again later.
Composing and Sending a Message
You can compose and send a message to people or groups with Gmail
addresses or other email addresses.
To compose and send a message
1.
From the Home screen, tap the Apps Key
icon
at the top right corner of the screen.
NOTE If you set up more than one Google Account on your device and want to send the
message from a different Google Account, tap the current Google Account, then tap the
account you want to use.
2. Enter a recipient’s address.
As you enter text, matching addresses are offered from your Contacts
list. You can tap a suggested address or continue entering text to enter a
new one.
3. Tap the Menu Key
(in the Front Touch Keys bar), then tap Add Cc/
Bcc to copy (normal or blind copy) recipients, if necessary.
4. Enter a subject for the message in the Subject field.
5. Enter your email text in the Compose email field.
6. Tap the Menu Key
(in the Front Touch Keys bar), then tap Attach
picture or Attach video if you want to add an attachment to your Gmail
message.
7. Tap the Send icon
at the top right corner of the screen to send your
message.
NOTE If you aren't ready to send the message, tap the Menu Key (in the Front Touch
Keys bar), then tap Save draft.
> Gmail > Compose
103
Page 6
104
Communication
Replying to or Forwarding a Message
Continue an email conversation by replying to a message or by forwarding
it without changing the Subject text. Change the Subject text to start a new
conversation.
NOTE The conversation text and previous messages are also included in your reply (or
forwarded) message.
To reply to or forward a message
1. Open the message you want to reply to or forward.
2. On the message header, tap the Reply icon
then tap Reply all or Forward.
Add others to an ongoing conversation by replying to all and then
adding the new person’s address(es) to the reply.
3. Tap the Send icon
at the top right corner of the screen to send your
Gmail message.
NOTE You can change the message action after you've started the message. Simply tap in
the message header next to the current message action and tap the one you want. For
example, if you chose Reply but decide you want to Reply all instead.
Google Account settings
1. From the Home screen, tap the Apps Key > Gmail > Menu Key
(in the Front Touch Keys bar).
2. Tap Settings.
3. Tap General settings to change the following settings for all accounts.
Archive & delete actions: Choose if you want to display only the archive
option, only the delete option, or both options.
Swipe to archive: Select to archive a conversation when you swipe it.
Sender image: Allows the senders image to be displayed beside the name
in the conversation list.
Reply all: Mark the checkbox to make Reply all the default message action.
or tap the Menu icon ,
Page 7

Communication
Auto-fit messages: Mark the checkbox to shrink the messages to fit the
screen and allow zooming.
Auto-advance: Sets which conversation list is viewed after archive or
deletion.
Message actions: Sets when to show message actions.
Confirm before deleting: Mark the checkbox to ask to confirm before
deleting a message.
Confirm before archiving: Mark the checkbox to ask to confirm before
archiving a message.
Confirm before sending: Mark the checkbox to ask to confirm before
sending a message.
OR
Tap an account to change the following settings for that specific account.
Inbox type: Select the default inbox.
Notifications: Mark the checkbox to display notifications for new
messages.
Inbox sound & vibrate: Set the notification settings.
Signature:
email.
Sync Gmail: Mark the checkbox to automatically sync your account.
Days of mail to sync: Choose how many days of email you want to sync.
Manage labels: Allows you to set the sync and notification settings for
your labels.
Download attachments: Mark the checkbox to automatically download
attachments to recent messages via Wi-Fi.
Set the signature you want to include with every outgoing
105
Page 8
106
Communication
Hangouts
The Hangouts application lets you have real-time text conversations with
your friends.
To Open the Hangouts application
From the Home screen, tap the Apps Key > Hangouts .
To sign out of Hangouts
From your chatting list, tap the Menu Key > Settings > Sign out.
Chatting with Friends
1. From the Home screen, tap the Apps Key > Hangouts .
2. Tap
to view your contacts list. It includes all of the Google Accounts
you've added.
Tap the name of the person in your contacts list. If your friend is not
yet on Hangouts, you can invite your friend via SMS.
OR
Tap the text field to enter a name, email, or number.
and then enter your message.
3. Tap Message
4. Tap Send
Hangouts chatting list
Touch and hold the friend in the chat screen. You can set below options.
.
Tap to turn the notifications off.
Tap to archive the conversation.
Tap to delete the conversation.
Page 9

Communication
Blocking your Friends
To block a friend from exchanging messages with you, tap the friend
in the chatting list. Tap the Menu Key
tap the block option.
To remove a friend from the blocked list, tap the Menu Key
the chatting list. Then tap Settings > Blocked people > Unblock next
to the person’s name.
> People & options. Then
from
Hangouts Settings
From the chatting list, tap the Menu Key to choose from Hangout
request, Snooze notifications, Archived Hangouts, Settings, Send
feedback, and Help.
While chatting, tap the Menu Key
options, New group Hangout, Turn history off, Archive, Delete,
Send feedback, and Help.
to choose from People &
107
Page 10
108
Entertainment
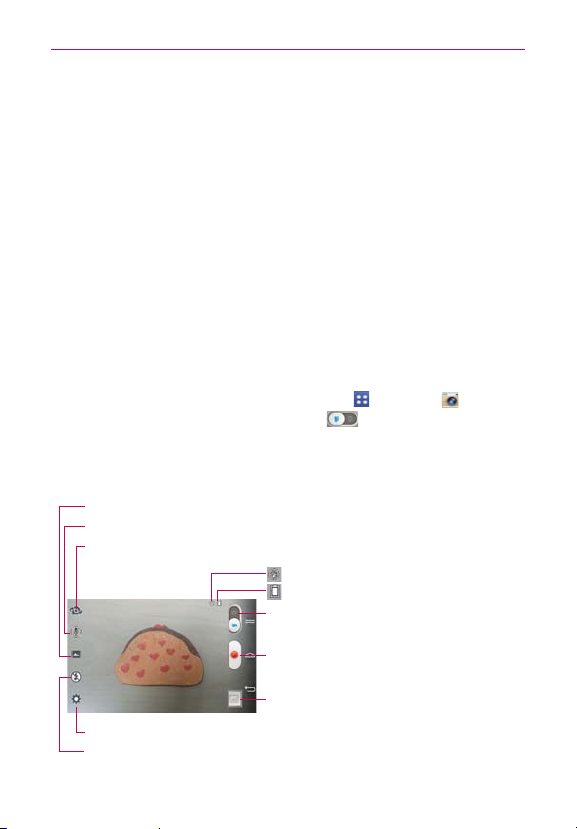
Camera
The Camera application not only allows you to take high quality pictures
and share them, but also includes many specialized features eliminating the
need for any other camera.
To open the Camera application
From the Home screen, tap the Apps Key > Camera .
OR
Tap the Camera icon
TIP If you’ve set your phone to use the Swipe unlock method, from the locked screen,
simply press the Power/Lock Key
upward to open the Camera application.
icon
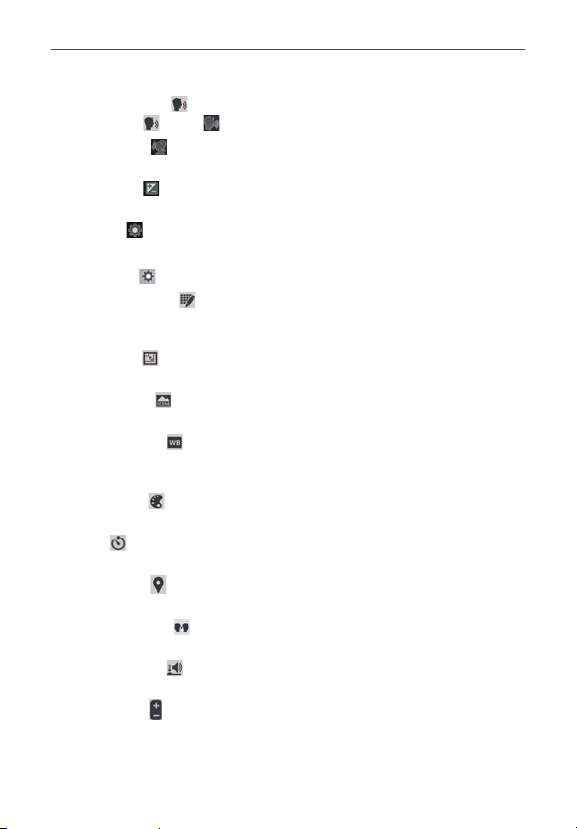
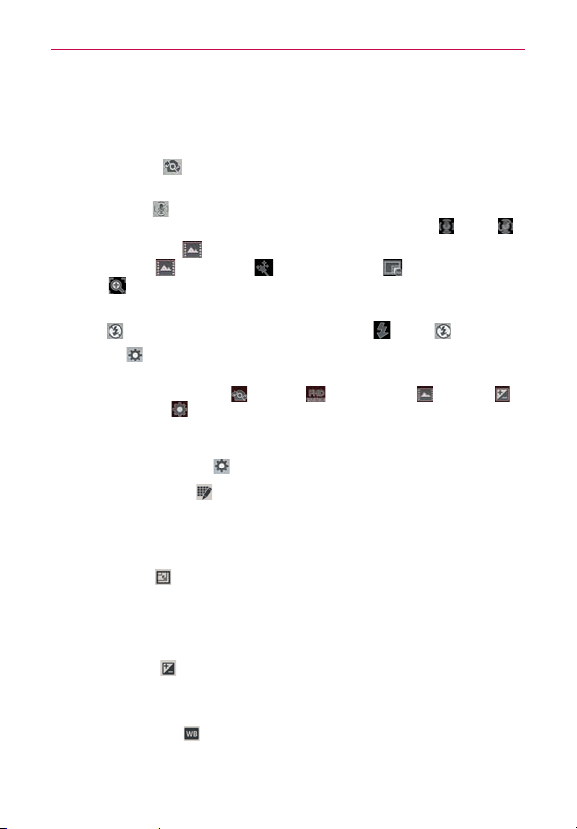
Getting to know the viewfinder
Shot mode
–
Panorama, VR panorama, Burst shot, Beauty shot, Dual camera, or Time catch shot.
Intelligent auto –
for aperture, shutter speed, etc. to take the best possible photo.
Swap camera – Tap to swap between the rear camera lens and the front camera lens.
Defines how the shot will be taken. Choose from Normal, Shot & Clear, HDR,
Identifies
Indicates the number of pictures that can be taken and stored based on the current image size.
from the Home screen.
, on the back of the phone, then drag the Camera
the scene's characteristics and automatically adjusts the settings
indicates the flash setting: On, Off, or
Auto.
indicates the current battery charge.
Mode Switch – Tap (or slide) to toggle between
Camera mode and Video mode.
Capture Button – Tap to take a photo.
Gallery – Tap to access your saved Gallery photos
from within Camera mode.
Settings – Tap to open the Camera settings menu.
Scene mode – Adjusts for better image capture in different environments. Choose from Normal,
Portrait, Landscape, Sports, Sunset, or Night.
Page 11

Entertainment
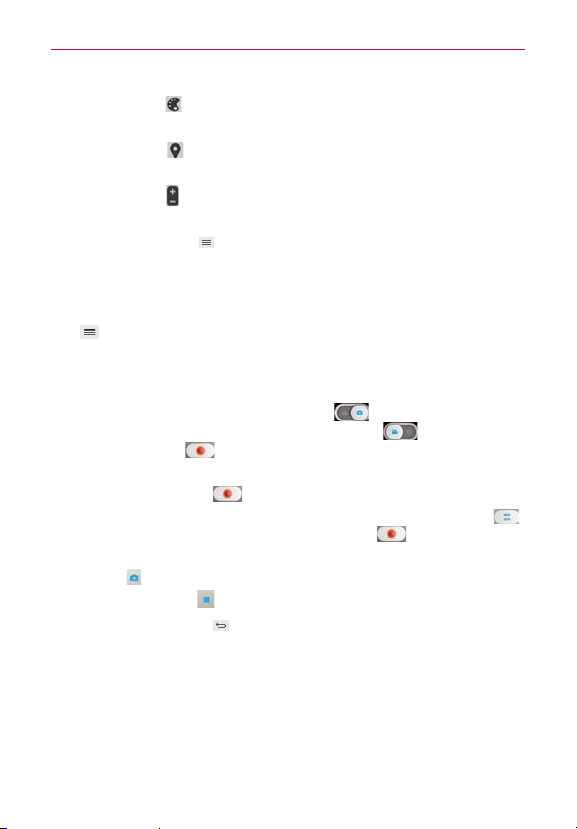
Rear camera lens options
When using the rear camera lens, the quick menus on the left side of the
screen are:
s Swap camera
camera lens.
s Intelligent Auto
settings for the shot. Choose On or Off .
s Shot mode
Normal, Shot & Clear, HDR, Panorama, VR panorama, Burst shot,
Beauty shot, Dual camera, and Time catch shot.
NOTE When you change these modes, information is displayed to help you to use the feature.
s Scene mode - Adjusts for better image capture in specific
environments. Choose from Normal, Portrait, Landscape, Sports,
Sunset, and Night.
s Settings
The following options are available to optimize your shot when you tap the
Settings icon
s Edit quick menu
left side of the viewfinder) for quick access to your favorite options. Tap
the option icon (on the left) to change, then tap the option you want.
s Cheese shutter
Choose On or Off.
s Flash
displayed on the viewfinder.
s Brightness
lens. Slide the brightness indicator along the bar toward “-” for a lower
brightness image or toward “+” for a higher brightness image.
s Focus
sAuto: Sets the camera to focus automatically on the object you tap on
the screen before you tap the Capture button
sManual: Sets the camera to focus manually by sliding the distance
indicator along the bar, before you tap the Capture button
- Swaps between the rear camera lens and front
- Sets the camera to automatically choose the best
- Defines how the shot will be taken. Choose from
- Opens the camera settings menu.
on the viewfinder screen for the rear camera lens:
: Allows you to edit the quick menus (icons on the
: Activates the camera shutter by voice command.
: Sets the flash to Off, On, or Auto. The flash icon will be
: Defines and controls of the amount of light entering the
: Defines the focus of the shot.
.
.
109
Page 12
110
Entertainment
sFace tracking: Sets the camera to automatically detect and focus on
human faces. When set, tapping the screen does not activate the
focus box.
s Image size
: Defines the resolution for the photo. Choose from 13M
(4160x3120), W10M (4160x2340), 8M (3264x2448), and 1M (1280x960).
NOTE The default resolution is W10M (4160x2340).
s ISO : Defines and controls the camera’s sensitivity to light. Choose
from Auto, 800, 400, 200, and 100.
s White balance : Defines the ambient lighting to improve the color
qualities of the photo under different lighting conditions. Choose from
Auto, Incandescent, Sunny, Fluorescent, and Cloudy.
s Color effect : Applies artistic effects to pictures. Choose from None,
Mono, Sepia, and Negative.
s Timer
: Sets a timer to delay taking the picture. Choose from Off, 3
sec, 5 sec, and 10 sec.
s Geotagging
: Sets the camera to save the location information for the
pictures you take. Choose Off or On.
s Shutter sound
: Sets the shutter sound. Choose from Tone 1, Tone
2, Tone 3, Tone 4, and Off.
s Volume key
- Sets how to use the Volume Key. Choose from Record
or Zoom.
NOTE Tap the Menu Key (in the Front Touch Keys bar) to select Edit quick menu, Reset,
and Camera help guide options.
Reverting to the Default settings
To reset to the default settings, from the Camera application, tap the Menu
Key
(in the Front Touch Keys bar), tap Reset, then Yes .
Front camera lens options
When using the front camera lens, the quick menus on the left side of the
screen are:
s Swap camera
camera lens.
- Swaps between the rear camera lens and front
Page 13
Entertainment
s Cheese shutter - Sets the shutter to activate by voice command.
Choose On
s Beauty shot
Use the slider bar to increase or decrease this effect.
s Brightness
lens. Use the slider bar to increase or decrease image brightness.
s Settings
The following options are available to optimize your shot when you tap the
Settings icon
s Edit quick menu
left side of the viewfinder) for quick access to your favorite options. Tap
the option icon (on the left) to change, then tap the option you want.
s Image size
W2M(1920x1080), 2M(1600x1200), or 1M(1280x960).
s Scene mode
environments. Choose Normal or Night.
s White balance
qualities of the photo under different lighting conditions. Choose from
Auto, Incandescent, Sunny, Fluorescent, and Cloudy.
s Color effect
Mono, Sepia, and Negative.
s Timer
sec, and 10 sec.
s Geotagging
picture. Choose Off or On.
s Save as flipped
it was taken (landscape or portrait). Choose Off or On.
s Shutter sound
Tone 1, Tone 2, Tone 3, Tone 4, and Off.
s Volume key
or Zoom.
or Off .
- Sets an effect to make skin look brighter and smoother.
- Defines and controls the amount of light entering the
- Opens the camera settings menu.
on the viewfinder screen for the front camera lens:
: Allows you to edit the quick menus (icons on the
: Defines the resolution for the photo. Choose
: Adjusts for better image capture in different
: Defines the ambient lighting to improve the color
: Applies artistic effects to pictures. Choose from None,
: Sets a delay timer for the camera. Choose from Off, 3 sec, 5
: Sets the camera to add location information to the
: Sets the camera to save the image in the orientation
: Sets the shutter sound for the camera. Choose from
: Set how to use the Volume Key. Choose from Capture
111
Page 14
112
Entertainment
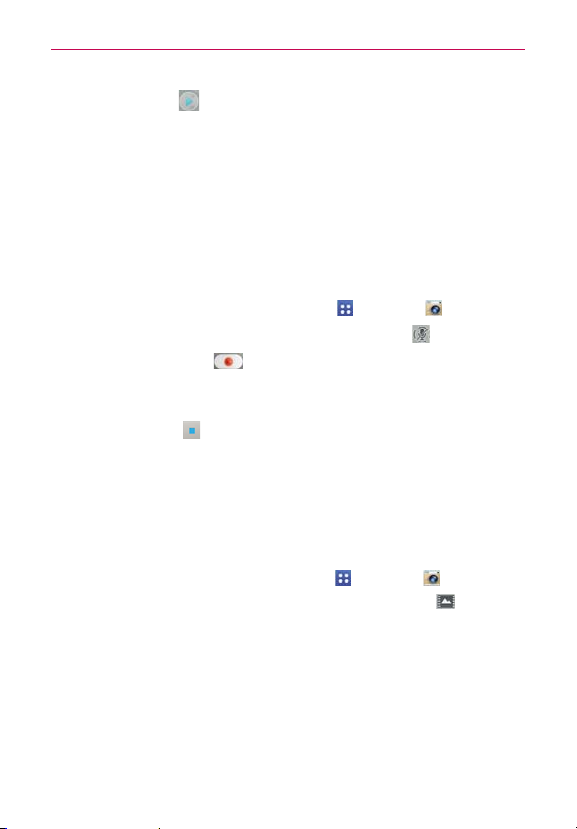
Taking a quick photo
1. Open the Camera application and point the lens toward the subject you
want to photograph.
2. Touch the subject on the screen and a focus box will appear in the
viewfinder. When the focus box turns green, the camera has focused on
your subject.
3. Tap the Capture button
NOTE You can zoom up to 8 time while taking a picture.
to take the picture.
Using the Shot & Clear mode
This feature allows the camera to identify objects you may not want in your
photo. After taking the photo, tap an outlined object* to remove it, then
save the photo.
1. From the Home screen, tap the Apps Key
2. Tap the Shot Mode icon
3. Tap the Capture button
> Shot & Clear.
to take a picture.
> Camera .
4. Tap any of the outlined objects to remove them from the photo, then tap
the Save icon
* When taking a picture, moving objects are shown as dashed lines.
s Take a picture after fixing the camera in one place.
NOTES
s If the color of a subject is similar to the background, only a part may be detected or it
s If a moving subject is too small or too large, it may be difficult to erase.
s If the subject is moving insignificantly, it may not be detected.
s If there are too many moving subjects, only some of them may be detected.
may be difficult to erase.
.
Using the Dual camera mode
Allows you to take a picture with the front and rear cameras at the same
time, combined into one picture.
1. From the Home screen, tap the Apps Key
2. Tap the Shot Mode icon
> Dual camera.
> Camera .
Page 15
Entertainment
3. A small viewfinder box appears on the main viewfinder screen. Set up
your shot.
Drag the small viewfinder to move it where you want it in the shot.
Touch and hold the small viewfinder to resize it, if necessary.
Tap the small viewfinder to swap the lens between the main
viewfinder and the small viewfinder.
4. Tap the Capture button
to take the combined picture.
Using the Time catch shot mode
Sets the camera to capture missing moments by taking five sequential
pictures before the Capture button
1. From the Home screen, tap the Apps Key
2. Tap the Shot Mode icon
3. Tap the Capture button
4. To view the moments just before the picture was taken, tap the image
thumbnail at the bottom of the Camera screen.
5. Select the pictures that you want to keep, then tap the Save icon
the top of the screen.
is tapped.
> Camera .
> Time catch shot.
to take a picture.
at
Viewing your saved photos
You can access your saved photos from Camera mode. Just tap the image
thumbnail at the bottom of the Camera screen, then flick left or right to
scroll through your photos.
While viewing a photo, tap the screen to access the following options:
Tap to share the photo using SmartShare.
Tap to return to camera mode to take a new photo (or record a video).
Tap to select which application to use to share the photo.
Tap to delete the photo.
113
Page 16

114
Entertainment
While viewing a photo, tap the Menu Key (in the Front Touch Keys bar)
to access the following additional options.
Set image as: Tap to set the photo as the icon identifying a contact or
set it as your Home screen wallpaper or Lock screen wallpaper.
Move: Tap to move the picture to another album or folder.
Copy: Tap to copy the picture to another album you select.
Copy to Clip Tray: Tap to copy the picture to Clip Tray.
Rename: Tap to open the keyboard to rename the photo for easy
identification.
Rotate left: Tap to rotate the photo counter-clockwise.
Rotate right: Tap to rotate the photo clockwise.
Crop: Tap to open a cropping box tool that allows you to manually
crop the photo. Use your finger to move or resize the cropping box to
encompass only the part of the photo you want to see, then tap OK.
Edit: Tap to edit the photo with special effects.
Slideshow: Tap to see your photos played in a slideshow.
Add location: Tap to set a location tag where the photo was taken.
Print: Tap to print the photo. Choose to automatically find a printer on
your network, or manually enter one to use.
Details: Tap to display information about the photo (e.g., file type, file
size, etc.).
TIP You can use the pinch-to-zoom gesture to easily zoom in and out of the displayed
picture.
Gallery views
Open the Camera application, then tap the image thumbnail at the bottom
of the screen.
Your photos are displayed in full size. Swipe or flick your finger left or
right to scroll through your photos (or videos).
For quicker, direct access, you can tap the screen to display smaller
film-like images of your photos across the bottom of the screen.
Page 17
Entertainment
Swipe or flick horizontally to quickly scroll through them, then tap the
one you want to view.
The pinch-to-zoom gesture allows you to easily zoom in and out of the
displayed picture. Spread your fingers to zoom in and pinch your
fingers to zoom out.
Continue the pinch in gesture on an image to display your photos in
reduced size which allows you to swipe an image up, off the screen
to quickly delete it.
Video Camera
The Camera application allows you to change to video camera mode to
record videos.
To open the Video Camera
From the Home screen, tap the Apps Key > Camera , then tap
(or slide down) the Mode Switch icon
Video camera mode.
Getting to know the viewfinder
Recording mode – Choose from Normal, Live effect, Dual recording, or Tracking zoom.
Audio zoom – Tap to turn the Audio zoom On or Off.
Swap camera – Tap to swap between the rear camera lens and
the front camera lens.
Indicates if the flash setting is on.
Indicates the current battery power.
Mode Switch – Tap (or slide) to switch between
Camera mode and Video mode.
Record Button – Tap to start video recording.
to toggle from Camera to
115
Gallery – Tap to access your saved videos (and photos)
from video camera mode.
Settings – Tap to open the Video camera settings menu.
Flash – Tap to set the flash mode.
Page 18
116
Entertainment
Rear video camera lens options
When using the rear camera lens, the quick menus on the left side of the
screen are:
s Swap camera
camera lens.
s Audio zoom
sound sensitivity and decrease the noise. Choose from On or Off .
s Recording mode
from Normal , Live effect , Dual recording , and Tracking
zoom .
NOTE When you change these modes, information is displayed to help you use the feature.
s Flash - Activates the flash mode. Choose On or Off .
s Settings
NOTE When using the front lens to record video, the quick menus on the left side of the
screen are Swap camera
and Settings
video.
The following options are available to optimize your video recording when
you tap the Settings icon
Edit quick menu
the left side of the viewfinder) for quick access to your favorite
options. Tap the option icon (on the left) to change, then tap the
option (from the displayed choices) you want.
Video size
from Full HD 60fps (1920x1080), Full HD 30fps (1920x1080), HD
(1280x720), MMS (320x240), and MMS (176x144).
NOTE The default resolution is Full HD 30fps(1920x1080).
Brightness : Defines and controls of the amount of light entering
the lens. Slide the brightness indicator along the bar toward “-” for a
lower brightness image or toward “+” for a higher brightness image.
White balance
qualities of the video under different lighting conditions. Choose from
Auto, Incandescent, Sunny, Florescent, and Cloudy.
- Swaps between the rear camera lens and front
- Allows you to zoom in on an area to increase the
- Defines how the video will be recorded. Choose
- Opens the video camera settings menu.
, Video size , Recording mode , Brightness ,
. There is no flash setting when using the front camera lens to record
on the viewfinder screen:
: Allows you to edit the quick menus (icons on
: Sets the resolution (video size) for the video. Choose
: Defines the ambient lighting to improve the color
Page 19
Entertainment
Color effect : Applies artistic effects to videos. Choose from None,
Mono, Sepia, and Negative.
Geotagging
: Sets the camcorder to add location information to
the video. This is ideal for geotagging purposes. Choose Off or On.
Volume key
: Set how to use the Volume Key. Choose from
Capture or Zoom.
NOTE Tap the Menu Key (in the Front Touch Keys bar) to select Edit quick menu, Reset,
and Video help guide options.
Reverting to the Default settings
To reset to the default settings, from Video camera mode, tap the Menu
Key
(in the Front Touch Keys bar), tap Reset, then Yes .
Recording a quick video
1. Open the Camera application.
2. Tap (or slide down) the Mode switch icon
mode. The camera Mode switch icon changes to
to toggle it to Video
and the Capture
button changes to .
3. Point the lens toward the subject of the video.
4. Tap the Record button once to start recording.
5. The video length timer begins counting. You can tap the Pause icon
to pause the recording, then tap the Record icon to resume the
same recording file.
NOTE Tap to take pictures while recording video.
6. Tap the Stop button to stop recording.
NOTE Tapping the Back Key (in the Front Touch Keys bar) will also stop the recording.
Watching your saved videos
From the Camera application in Video mode
1. In the viewfinder, tap the video thumbnail at the bottom of the screen.
2. The last video you recorded appears on the screen.
NOTE You can also scroll and select other videos to watch. Your Gallery videos (and photos) are
displayed in film-like images at the bottom of the screen for you to select.
117
Page 20
118
Entertainment
3. Tap the Play icon in the middle of the still image of the video to play
it automatically.
From your Gallery
1. Open the Gallery application, then tap the album you want.
2. Tap the video you want to watch to play it automatically.
Using the Audio Zoom
Focuses the audio recording on a particular area of your choosing; this will
increase microphone sensitivity and reduce background noise.
1. From the Home screen, tap the Apps Key
2. Change to video mode, then tap the Audio zoom icon
3. Tap the Record button
to start recording.
> Camera .
and select On.
4. Pinch to zoom in a certain area to increase sound sensitivity and
decrease noise.
5. Tap the Stop icon
NOTES ţDo not cover the side microphones while using this feature.
ţYou must record in landscape orientation to use this function.
to stop recording.
Using the Dual recording mode
Allows you to record videos with the front and rear cameras at the
same time, combined into one recording.
1. From the Home screen, tap the Apps Key
2. Change to video mode, then tap the Recording mode icon
recording.
3. A small viewfinder box appears on the main viewfinder screen. Set up
your shot.
Drag the small viewfinder to move it where you want it in the shot.
Touch and hold the small viewfinder to resize it, if necessary.
Tap the small viewfinder to swap the lens between the main
viewfinder and the small viewfinder.
> Camera .
> Dual
Page 21
Entertainment
4. Tap the Record button to start dual recording.
5. Tap the Stop button
to stop dual recording.
Using the Tracking zoom mode
Allows you to define an area of the recording to focus on and enlarge. You
can set the area before recording, then move it as necessary during the
recording.
1. From the Home screen, tap the Apps Key
2. Change to video mode, then tap the Recording mode icon
Tracking zoom.
3. Tap the Record button
4. Drag the focus box while recording a video. The small screen shows the
defined focus in large view. To move it, touch and hold it, then drag it to
the desired location.
5. Tap the Stop button
to start recording.
to stop recording.
Viewing your videos list
You can access your videos from Video camera mode. Just tap the video
thumbnail at the bottom of the Camera screen, then flick left or right to
scroll through your videos (and photos). Tap the Play icon
of the image to play the video recording.
Video Options
Open the Camera application in video mode, then tap the video thumbnail
at the bottom of the screen. Tap the still image of the video (but not on
the Play icon
already on).
a new photo).
) to access the following options:
Tap to share the video using SmartShare (turn on Wi-Fi if it’s not
Tap to return to video camera mode to record a new video (or take
Tap to select which application to use to share the video.
> Camera .
>
in the middle
119
Page 22

120
Entertainment
Tap to delete the video.
Tap the Menu Key
Trim, Rename, or Details.
(in the Front Touch Keys bar) to select Move, Copy,
Gallery views
Open the Camera application in video mode, then tap the video thumbnail
at the bottom of the screen.
Your video images are displayed in full size. Swipe or flick your finger
left or right to scroll through your videos (or photos).
For quicker, direct access, you can tap the screen to display smaller
film-like images of your videos across the bottom of the screen.
Swipe or flick horizontally to quickly scroll through them, then tap the
one you want to view.
The pinch-to-zoom gesture allows you to easily zoom in and out of the
displayed video image. Spread your fingers to zoom in and pinch your
fingers to zoom out.
Continue the pinch in gesture on the video image to display your
videos in reduced size which allows you to swipe a video image up,
off the screen to quickly delete it or swipe down to share it.
Gallery
Open the Gallery application to view albums of your pictures and videos.
To open the Gallery application
From the Home screen, tap the Apps Key > Gallery . You can
also access it by tapping Gallery
from the Home screen.
Viewing your albums
The Gallery application presents the pictures and videos saved in
your phone, including those you’ve taken with the Camera application
and those you downloaded from the web or other locations.
Tap an album to open it and view its contents.
Page 23
Entertainment
Tap a picture or video in an album to view it.
Return to the main Gallery screen at any time by tapping
left of the screen.
Tap the Menu Key
Album, Delete, Hide/Show album, View all files, Help, and
Settings.
Tap the location drop-down menu
files. Choose Gallery, Picasa, or Nearby devices.
Tap the Camera icon
Tap the Display icon
Albums, By locations, or By dates.
(in the Front Touch Keys bar) to access New
to access the location of your
to return to the Camera application.
to select your Gallery view. Choose from
at the top
To share an album
You can share the entire contents of one or more albums or individual
images or videos from an album.
1. From the Home screen, tap the Apps Key
2. Touch and hold the desired album, tap Share, select the application to
use to share your images, then complete the sending method as
necessary.
> Gallery .
Working with photos
Use the Gallery application to view pictures that you’ve taken with the
Camera application, downloaded, or that are stored in Picasa web albums.
To view and browse photos
1. From the Home screen, tap the Apps Key > Gallery .
2. Open an album and tap a picture.
121
Page 24
122
Entertainment
3. Tap the Menu Key (in the Front Touch Keys bar) to access Set
image as, Move, Copy, Copy to Clip Tray, Rename, Rotate left,
Rotate right, Crop, Edit, Slideshow, Add/Remove location, Print, or
Details.
Camera Mode Icon
Tap here to go to
camera mode.
Gallery Icon
Tap here to return
to your Gallery.
SmartShare Icon
Tap here to share
the photo using
SmartShare.
Share Icon
Tap here to share the photo using the
method you select.
Delete Icon
Tap here to delete the photo.
Swipe horizontally to scroll
through the photos in the current
album.
Swipe here to quickly scroll through
the images in the album, then tap
the one you want to view.
To edit pictures
When viewing a photo, tap the Menu Key (in the Front Touch Keys bar),
then tap Edit.
Undo Icon
Tap here to go back to
the previous step.
Exit Editing Icon
Tap here to save your
changes and return to
your Gallery.
Redo Icon
Tap here to redo the step.
Save Icon
Tap here to save the edits as a
new photo.
Editing Screen
Editing Tools Icon
Tap here to access the editing tools.
Page 25
Entertainment
The following edits can be used on the photo:
Exposure
- Choose from Auto-fix, Fill Light, Highlights, and
Shadows.
Artistic Effect
- Choose from Cross-process, Posterize, Lomo,
Documentary, Vignette, Film Grain, and Fisheye.
Color
- Choose from Doodle, Warmth, Saturation, B&W, Sepia,
Negative, Tint, and Duo-tone.
Adjustment
- Choose from Crop, Red Eye, Face Glow, Straighten,
Rotate, Flip, and Sharpen.
Tap the Exit editing icon
and exit. You can also tap the Back Key
in the upper left corner of the screen to save
(in the Front Touch Keys bar) to
exit and save your changes as a copy in your Gallery.
Working with Videos
Use the Gallery application to play videos that you’ve taken with the
Camera application and to share them with friends.
To play videos
1. From the Home screen, tap the Apps Key > Gallery .
2. Open an album and tap a video.
The video plays in the orientation you recorded it in.
123
Tap to select the area of the screen from where you want to hear focused audio.
Tap an object or drag the icon to the target position you want to track.
Page 26
124
Entertainment
Tap to play the video in a QSlide window.
Tap to share your video via the SmartShare function.
Tap to lock the video screen. Then tap the lock icon to unlock the video screen.
Tap to capture an image viewed during playing a video.
Tap to pause video playback.
Tap to resume video playback.
Tap to fast-forward 10 seconds.
Tap to rewind 10 seconds.
Tap to adjust the video volume.
Tap to change the aspect ratio (best fit, full screen, or original size) of the video screen.
Video Options
From your Gallery, tap the Menu Key (in the Front Touch Keys bar)
to access Move, Copy, or Slideshow.
NOTE Rotate left, Rotate right, and Print are not valid for video files.
While a video is playing, tap the Menu Key (in the Front Touch
Keys bar) to access Subtitle, Play speed, Share, Trim, Delete,
Settings, Details, and Help.
To share a video
1. Open an album to view its contents, then tap the Share icon at the
top of the Gallery screen.
2. Checkmark the video(s) you want to share, tap Share at the bottom of
the screen, select how to share the file(s), then complete as necessary.
To delete a video
1. Open an album to view its contents, then tap the Delete icon at the
top of the Gallery screen.
Page 27
Entertainment
2. Checkmark the video(s) you want to delete, tap Delete at the bottom of
the screen, then tap Yes to confirm.
NOTE You can also pinch in on your video list, then swipe a video up, off the screen to quickly
delete it.
QSlide while playing videos
You can play videos in a QSlide window allowing you to use other
applications while the video is playing.
1. Open the Gallery application and begin playing the video.
2. Tap the QSlide icon
feature to play the video in a QSlide window.
3. To close the QSlide window, tap the
title bar.
at the top of the screen to activate the QSlide
in the upper-right corner of its
Video Player
The Videos application plays a wide variety of videos. Supported file
formats are dependent on the software version of the phone.
To open the Videos application
From the Home screen, tap the Apps Key > Videos .
Using the Videos application
Tap the View type icon to access a drop-down list to set how to
display your video files. Choose from List, Grid, and Folder.
Tap the Sort by icon
your video files. Choose from Title, Date, Size, and Type.
Tap the Share icon
to access a drop-down list to set how to sort
to select video file(s) to share.
125
Playing Videos
1. Open the Videos application.
2. Tap the video you want to play.
Page 28
126
Entertainment
Hold the phone in the orientation the video was recorded in for
correct playback sizing.
Tap the screen to display the playback controls. The following button
icons allow you to control the video playback.
Tap to pause playback.
Tap to play the video file.
Touch and hold to fast-forward playback in 3 second increments. Tap once to fast-forward
in 10 second increments.
Touch and hold to rewind playback in 3 second increments. Tap once to rewind in 10
second increments.
Tap to display a sliding scale to adjust the volume of the video.
Video playback icons
In addition to the video playback controls, while viewing a video, use the
icons at the top of the screen to access Audio focus
Qslide
, SmartShare , and Screen lock/unlock . Tap the View icon
, Zoom track ,
at the bottom of the screen to cycle through the available screen views
(original size, best fit, and full screen. Tap
to display the available videos
and tap one to play it.).
Videos options
From the Home screen, tap the Apps Key > Videos > the
Menu Key
play next, Delete, and DivX
Tap Videos
to connect to a device to view your video(s).
to access the following Videos Options menu. Auto
®
VOD.
at the top of the screen, then tap Nearby devices
Video Editor
The Video Editor application allows you to create and edit video files using
the videos (and photos) stored on the phone.
NOTE The Video Editor application supports only photos or videos which were recorded using
this device.
Page 29

Entertainment
Opening the Video Editor application
From the Home screen, tap the Apps Key > Video Editor .
Project list screen
Project List Area
Tap a project to edit it.
Project Title
Tap here to edit the title.
Project Options
Tap an icon to apply it to your project.
Project Options
New : Tap to create a new project.
Share
: Tap to share the video project with other applications, such
as YouTube.
Export
: Tap to export the finished project to play in other
applications.
Delete
Help
: Tap to delete the video project.
: Tap to view the help information on using this feature.
Project edit screen
List Icon
Tap to view the Project
list screen.
Play Icon
Tap to play the current
clip.
Undo Icon
Tap to remove the last
the selected clip.
Add Icon
Tap to add additional
video clips.
Viewer area
Style Icon
Tap to choose to video style.
Text Icon
Tap to add text to your video.
Split Icon
Tap to split the video clip.
Timeline area
127
List : Tap to exit the Project edit screen and access the project list
screen. The current project is saved automatically.
Play
: Tap to play the video.
Page 30
128
Entertainment
Undo : Tap to remove the last action.
Redo
Style
Text
Split
Add
: Tap to redo the previously removed action.
: Tap to select the video style to quickly and easily make a
high-quality video.
: Tap to add text to a video or image clip.
: Tap to split the selected video clip into two portions.
: Tap to add additional video, images, or audio clips.
Using the Video editor
Zoom in or out of the timeline
Use the pinch-to-zoom gesture to change the timeline view. Pinch out to
zoom in or pinch in to zoom out within the timeline.
Move or delete a clip
Touch and hold a clip, then drag it to a new location (or to the trashcan icon
to delete it).
Trim a clip
Tap a clip to display the trim bars. Drag the trim bars to shorten or lengthen
the clip.
Play Store
Play Store allows you to browse and search for free and paid applications.
To open the Play Store application
From the Home screen, tap the Apps Key > Play Store or tap
the Play Store icon
on the Home screen.
To get help with Play Store
Play Store Help web pages are available from all Play Store screens.
Tap the Menu Key
(in the Front Touch Keys bar), then tap Help.
Page 31

Entertainment
The Chrome application opens to the Play Store Help page, with links
to many help topics.
To open a screen with details about an application
At any time while browsing in Play Store, tap an application to open
its details screen.
The Application details screens include a description, ratings,
comments, and related information about the application. From this
screen, you can download, install, uninstall, rate the application, and
more.
Downloading and Installing Applications
When you find an application you want, you can install it on your phone.
To download and install an application
NOTE Before you can download a paid application, you must set up a billing arrangement.
Price/Install button
Indicates the cost or
install for free apps.
129
1. From the Home screen, tap the Apps Key > Play Store .
2. Tap a category from the homepage or tap
to search for an application.
3. Tap INSTALL or the Price button to download an application.
4. If you agree with the application's access requirements, tap ACCEPT.
5. The application will be downloaded and installed.
Page 32

130
Entertainment
Play Store menu options
Tap the Menu Key (in the Front Touch Keys bar) to access My apps,
My wishlist, Redeem, Accounts, Settings, and Help.
Your Wishlist
While viewing an app (or music, games, etc.), tap the Wishlist icon at
the top of the screen to add it to your wishlist for future reference.
Music
Transferring Music Files to Your Phone
The Music application plays audio files that are stored in your phone’s
memory. Copy audio files from your computer onto your phone before you
open the Music application.
NOTE The LG USB driver needs to be installed on your PC before connecting your phone to
transfer music.
To copy music files into your phone
1. Connect the phone to your computer with a USB Cable. If the default
connection mode is not set to Media sync (MTP), open the Notifications
panel and tap USB connected > Media sync (MTP). Your computer will
prompt you with different actions to take. Choose to open the folder to
view files.
2. Use the computer to copy music and other audio files into the folder that
you created on the phone.
3. To disconnect your phone, open the Notifications panel and tap USB
connected > Charge phone. Then disconnect the USB Cable from the
phone.
Your Music Library
The Music Library displays your music organized in music category tabs
that include Songs, Albums, Artists, Genres, Playlists, Folders, and
Nearby devices.
Page 33

Entertainment
The Music tabs are listed at the top of the screen. Flick sideways on
the tab bar to scroll and select one.
Swipe sideways on the screen to scroll sequentially through each of
the Music tabs.
Your Songs and Artist items are listed in alphabetical order within the
tab. An alphabetical search directory is displayed along the right side
131
Page 34

132
Entertainment
3. Tap the song you want to play.
Audio Effects Icon
Volume Icon
Tap here the adjust the
Music Player volume.
NOTE While viewing a list of tracks in an album, tap the Menu Key
Keys bar), then tap Shuffle all to play all of the songs in the album in a shuffled order.
Playback Screen
Tap here to apply audio
effects to the song.
Tap here to restart, pause,
play, or skip.
(in the Front Touch
To return to the Playback screen
From a Music playlist screen, tap the currently playing song at the
bottom of the screen.
From a Music playlist screen, tap
at the top left corner of the
screen.
From any other application, open the Notifications panel and tap the
ongoing music notification.
To control playback
The Playback screen contains several icons that you can tap to control the
playback of songs, albums, and playlists:
Tap to pause playback.
Tap to resume playback.
Tap to skip to the next track in the album, playlist, or shuffle. Touch and hold to fast
forward.
Tap to restart the current track or skip to the previous track in the album, playlist, or
shuffle. Touch and hold to rewind.
Page 35

Entertainment
Tap to display the Volume slider bar, then adjust the playback volume on the slider bar.
Tap to set audio effects.
Tap to find the files with YouTube.
Tap to open the current playlist.
Tap to add the song to your favorites.
Tap to play the current playlist in shuffle mode (tracks are played in random order).
Tap to toggle through the repeat modes to repeat all songs, repeat current song, or
repeat off.
Tap to share your music via the SmartShare funtion.
To control playback volume
In addition to the techniques for setting media volume in the Sounds
settings, you can control the volume of music in the Music application.
Press the phone’s up/down Volume Keys on the back of the phone.
A panel opens to show the current media volume.
Tap the Volume icon
to display a volume slider bar to set the
playback volume.
To stop music playback and exit the Music Player
Touch and hold the Home Key , tap Task Manager at the bottom of the
screen, then tap Stop next to the Music application.
To use a song as a ringtone
You can use a song as your phone ringtone, in place of one of the ringtones
that come with the phone.
Touch and hold a song in the Music Library list. In the Context menu
that opens, tap Set music as, then tap Ringtone or Contact
ringtone.
OR
On the Playback screen, tap the Menu Key
Keys bar), tap Set music as, then tap Ringtone or Contact ringtone.
(in the Front Touch
133
Page 36

134
Entertainment
Working with Playlists
You can create playlists to organize your music files into sets of songs,
which you can play in the order you set or in a shuffle.
To create a playlist
1. From the Music Library, select the Playlists tab.
2. Tap the Menu Key
playlist.
3. Enter a name for the playlist and tap OK.
4. Select the songs you want to add to a playlist, then tap Add. The new
playlist is added to the Playlist tab.
To add a song to a playlist
1. From the Music Library, touch and hold the song you want to add to a
playlist.
2. In the context menu that opens, tap Add to playlist, then tap the name
of the playlist you want to add it to.
To remove a song from a playlist
1. Open a playlist.
2. Touch and hold the song you want to remove, then tap Remove from
playlist in the Context menu that appears.
To delete a playlist
1. Open the Playlists library.
2. Touch and hold the playlist, then tap Delete in the Context menu that
appears.
3. Tap Ye s to confirm.
(in the Front Touch Keys bar), then tap New
To rename a playlist
1. Open the Playlists library.
Page 37

Entertainment
2. Touch and hold the playlist, then tap Rename in the Context menu that
appears.
3. Enter a name, then tap OK.
To delete multiple songs
Open the Music Library screen, tap the Songs tab, tap the Menu Key
(in the Front Touch Keys bar), then tap Delete. Checkmark each of
the songs you want to delete, tap Delete at the bottom of the screen,
then tap Ye s to confirm.
NOTE Tap the Menu Key (in the Front Touch Keys bar) from another Music tab to delete
one or more of the items in that selected tab.
YouTube™
Opening YouTube and Watching Videos
You can browse, search for, view, upload, and rank YouTube videos on your
phone with the YouTube application.
To open the YouTube application
From the Home screen, tap the Apps Key > YouTube .
Tap a video to watch it or tap the Menu Key
bar) for other YouTube options (Settings, Feedback, Help, and Sign in/
out).
To search for videos
1. At the top of the main YouTube screen, tap the Search icon .
2. Enter the text to search for or tap the Microphone icon
voice.
3. Tap a suggestion below the search box or tap the Search Key on the
keyboard.
4. Scroll through the search results and tap a video to watch it.
(in the Front Touch Keys
to search by
135
Page 38

136
Tools
VuTalk
VuTalk is another way to chat with your friends in realtime using your
Contacts list. The VuTalk feature allows you to exchange more interactive
and creative notes with your contacts including sharing a photo, a map, and
more.
NOTES s VuTalk requires both parties to have VuTalk enabled devices to use this feature.
To register VuTalk before use
VuTalk requires both parties to be registered in VuTalk to use this feature.
1. From the Home screen, tap the Contacts Key
2. Tap the VuTalk registration icon
NOTE You can also register with the VuTalk service while you are in a call.
s During a voice call, you can use VuTalk only when connected to the 4G data network
or a Wi-Fi connection.
s The VuTalk screen will lock if it doesn't detect any input from both phones.
s VuTalk requires a data connection. Data charges will apply to both phones.
(in the Quick Keys bar).
to the left of the search box.
VuTalk
Registration Icon
Tap to register.
VuTalk
Registration Icon
Tap to register.
3. Tap the checkmark boxes to agree to VuTalk terms and conditions and
VuTalk privacy policy at the bottom of the screen, then tap the Accept
button to confirm.
Page 39

Tools
Communicate Visually with VuTalk
1. From the Home screen, tap the Contacts Key (in the Quick Keys bar).
2. Tap the VuTalk contacts icon
the VuTalk feature.
3. Tap a contact to start a VuTalk connection.
4. In the contact's details screen, tap the VuTalk icon .
After the other party accepts your VuTalk request, you can start your
VuTalk with him/her.
5. Use the VuTalk screen to chat and visually communicate with your friend.
Tap
Tap the Pen icon
to attach a photo, take a new photo, insert a map view, or add
a sticker.
attached.
to display only the contacts who use
and Eraser icon to write on the images you
137
Page 40

138
Tools
6. When you finish your VuTalk, tap the Exit VuTalk icon or the Back
Key
(in the Front Touch Keys bar) to exit the VuTalk feature. VuTalk
screens you create are stored in the Notebook app.
NOTE If you tap the Home Key (in the Front Touch Keys bar) to go back to the Home
screen, the VuTalk feature continues still running.
VuTalk Settings
1. From the Home screen, tap the Contacts Key (in the Quick Keys bar).
2. Tap the Menu Key
settings.
3. Tap the VuTalk switch
4. Set the following options as your preferences.
Notification sound: Tap to set the notification sound when you
receive a VuTalk notification.
Vibrate: Tap to set when the device will vibrate for a VuTalk
notification.
Show request popup: Checkmark this option to display a pop-up
when a VuTalk request is received.
Contact sync: Checkmark this option to sync your VuTalk contacts.
(in the Front Touch Keys bar), then tap VuTalk
to turn it off or on.
Page 41

Tools
QuickMemo
The QuickMemo feature allows you to create memos and capture screen
shots. You can use QuickMemo to easily and efficiently create memos
during a call, with a saved picture or on the current phone screen.
To create a QuickMemo
Drag the Status Bar downward, then tap the QuickMemo icon in
the Quick settings bar.
139
1. Drag the Status Bar
downward then tap the
QuickMemo icon
NOTE Please use a fingertip while using the QuickMemo feature. Do not use your fingernail (or
any other rigid object).
2. Tap an option at the
top of the screen (e.g.,
pen type and color) to
.
create your memo.
3. When your memo is
complete, tap Save
to save it to your
Gallery or Notebook.
Using QuickMemo options
The QuickMemo options bar at the top of the screen allows you to easily
create memos. Tap the options bar tab
option icons, and tap it again to hide them.
Overlay - Tap to keep the memo on top and continue using other
phone features.
NOTE Tap the Front Touch Keys icon in the bottom left corner of the screen to enable or
disable the Front Touch Keys while using the QuickMemo feature.
to access the QuickMemo
Page 42

140
Tools
Sticky note - Tap to toggle between the current background screen
or a blank page.
Undo - Tap to undo the most recent action.
Redo - Tap to redo the most recently deleted action.
Pen - Tap to select the pen type and color. Tap the memo background
to close the pen selection.
Erase - Tap to use the eraser to erase any part of the memo that you
created.
Share - Tap to share the memo with others via any of the available
applications.
Save - Tap to save the memo you’ve created to your Gallery or
Notebook.
To Exit the QuickMemo feature
Tap the Back Key (in the Front Touch Keys bar) to exit the QuickMemo
feature.
Viewing saved QuickMemos
QuickMemos are saved in the Gallery application or Notebook application.
From the Home screen, tap the Apps Key
the QuickMemo album.
From the Home screen, tap the Apps Key
the QuickMemo notebook.
> Gallery , then tap
> Notebook , then tap
Page 43

Tools
QSlide
The QSlide function enables an overlay window on your phone’s display for
easy multitasking. QSlide windows can be opened from the QSlide apps
bar on the Notifications panel, or directly from the applications that suport
the QSlide function.
QSlide icons on the Notifications panel
QSlide icons are displayed in a bar on the Notifications panel below the
Quick settings bar. These icons provide a quick, convenient way to multitask on the same screen (similar to picture-in-picture on a TV). QSlide
displays a small application window on the screen that can be moved,
resized, or made transparent.
OR
Tap to exit the QSlide function and return to full window.
Slide to adjust transparency.
Tap to exit the QSlide function.
141
NOTE The QSlide function can support up to two windows at the same time.
To open a QSlide window
1. Open the Notifications panel and tap the desired app from the QSlide
apps bar.
OR
While using an application that supports QSlide, tap the QSlide icon
.
Page 44

142
Tools
Using QSlide
The QSlide function opens the associated application in a window in the
foreground, allowing you to access other applications in the background. It
is displayed continuously on the screen until you close it.
Drag the QSlide title bar to move it to another position on the screen.
Drag the bottom right corner of the QSlide window to resize it.
Move the circle on the slider bar to the left to make it transparent.
This will allow you to interact with items underneath the transparent
QSlide window. Move the slider back to the right to use the QSlide
window again.
Tap the QSlide icon
in the top left corner of the title bar to open the
application in full screen view. To go back to QSlide view, tap the
QSlide icon
NOTE You can also tap the application in the QSlide window to automatically display the
application in full screen view.
at the top of the screen.
Tap at the upper-right corner of the title bar to close the QSlide
window.
Customizing the QSlide bar icons
You can set the order of the icons displayed in the QSlide bar, as well as
which icons are displayed.
1. Open the Notifications panel and swipe to the left to the end of the
QSlide apps section, then tap the Edit icon
Drag one of the icon handles
at the right side of the screen to
move its icon to another position in the QSlide icon bar.
Checkmark the icons you want to display and remove the checkmark
for the ones you want to remove.
2. Tap the Back Key
(in the Front Touch Keys bar) to return to the
Notifications panel.
.
Page 45

Tools
QuickTranslator
The QuickTranslator function allows you to get language translations,
anytime and anywhere. Simply aim your device’s camera at the foreign
sentence you want to understand and it will provide you with a translation.
You can also request verbal translations. Buy additional dictionaries for
offline translation from the Google Play Store.
Switch to Voice mode. Tap the language
button and then speak.
Translation of a written word.
Translation of a written sentence.
Translation of a written block of text.
Sets the home and destination language.
Turns on the flash for dark conditions.
1. From the Home screen, tap the Apps Key > QuickTranslator .
, Word, Line, or Block.
2. Tap
3. Tap the Setting icon
destination (to) languages.
4. Hold the phone toward the subject you want to translate for a few
seconds.
5. If necessary, tap the screen to focus on the subject.
NOTES s Only one dictionary is provided free of charge. Additional dictionaries must be
purchased. Please select the dictionary you would like to install as your complimentary
dictionary.
s There may be a difference in the rate of recognization depending on the size, font,
color, brightness and angle of the letters that need to be translated.
to select the desired home (from) and
143
Page 46

144
Tools
QuickRemote
QuickRemote turns your phone into a Universal Remote for your home TV,
set-top box, audio system, DVD/Blu-ray players, and projector.
NOTE QuickRemote may not be available for some devices.
To open the QuickRemote application and set up your QuickRemote
1. From the Home screen, tap the Apps Key > QuickRemote . Select
a room at the top left corner, then tap the Add icon
corner to add a a remote.
NOTE You can also perform the initial set up of your QuickRemote from the Notifications panel.
Swipe the Status bar downward, tap the QuickRemote icon
bar), then tap ADD REMOTE in the dialog box. After initial set up, to set up additional
devices from the Notifications panel, tap
QuickRemote screen.
, then tap in the top right corner of the
2. Select the type and brand of the device, then follow the on-screen
instructions to configure the device(s).
in the top right
(in the Quick Settings
Using QuickRemote
1. Swipe the Status Bar downward, then tap the QuickRemote icon (in
the Quick Settings bar) to open a QuickRemote bar with all of the
remotes you set up.
2. Select the remote you want by tapping the remote name at the top of
the QuickRemote bar.
Page 47

Tools
3. Tap the buttons on the displayed remote.
NOTE ţTap to view the QuickRemote in full-screen.
ţWhen adding remote control of TV, QuickRemote could use the INPUT button to
configure appropriate remote control. When configuring the INPUT button, input source
of TV could be changed. To reset input source of your TV, tap the INPUT button on
QuickRemote several times(depending on number of devices connected on TV).
QuickRemote options
You can edit your QuickRemote bar by tapping the Edit icon in the top
right corner of the QuickRemote bar. Drag a remote handle
to move it to
another position on the bar.
To access the QuickRemote Options menu, tap the Menu Key
(in the
Front Touch Keys bar) to select Magic Remote settings, Edit remote
name, Learn remote, Move remote, Delete remote, Edit room, Edit
tabs, Settings, and Help.
Customizable remote
You can create your own personalized universal remote and choose where
to place all of the buttons.
1. From the Home screen tap the Apps Key
2. Tap
> Customizable remote.
3. Enter the Remote name and touch OK.
4. Place the buttons you want on the remote at the desired location and
tap Next.
> QuickRemote .
145
5. Tap the button to be learned.
Page 48

146
Tools
6. Point the original remote 4 inches away from the IR sensor on top of the
phone.
7. Press and hold the button on the original remote for 2 seconds.
Using Magic Remote feature
Magic Remote controls TV using a Touchpad and Smart Text(keyboard).
Magic Remote is compatible only with LG Smart TVs released in 2012 and
after.
1. Select the remote you want, and then tap the Menu Key
Remote setting.
2. Tap the Supported models button and check whether your TV supports
this feature.
3. Connect your phone and LG Smart TV to the same Wi-Fi network.
4. Select the device and enter the certificate number in your phone.
Touchpad: Move the TV pointer with the touchpad.
Smart Text: Provide keypad when typing text.
Calendar
Viewing Your Calendar and Events
The Calendar application allows you to track your schedule of events (that
you created or that you’ve been invited to), organized by day, week, month,
year, agenda, or Life Square.
When you first set up your phone, you configured it to use an existing
Google Account or you created a new account. The first time you open the
Calendar application on your phone, it displays any existing calendar events
from your Google Account on the web.
> Magic
To open the Calendar application
From the Home screen, tap the Apps Key > Calendar .
Page 49

Tools
Events from each account you’ve added to your phone and configured
to synchronize calendars is displayed in your Calendar.
Events from each calendar account are displayed in a different color.
To change your calendar view
No matter where you are in the Calendar application, you can easily switch
calendar views. Simply tap the date in the upper left corner of the screen to
display a drop-down menu of calendar views. Tap Day, Week, Month,
Year, Agenda, or Life Square.
Calendar title bar icons
Tap the QSlide icon to open the Month calendar view in a QSlide
window.
Tap the Current date icon
to immediately jump back to the current
date in the calendar you are viewing.
Tap the Add icon
to add a new event to any of your accounts.
Using Dual view
You can display two calendar views at the same time. From Day, Week,
and Agenda calendar view, drag the calendar handle
(at the top of the
screen) downward to display the Month calendar view above your existing
calendar view. Drag it back up to close it.
NOTE When you select the Month calendar view from the drop-down menu (at the top left of
the screen), it automatically displays the Dual view calendar. Tap one of the calendar tabs
(Day, Week, or Agenda) to change the bottom calendar view.
QSlide for the Calendar application
You can view your month calendar in a QSlide window allowing you to
easily check dates, obligations, etc. while using other applications at the
same time.
1. Open the Calendar application.
2. Tap the QSlide icon
Calendar in a QSlide window.
at the top of the screen to display the month
147
Page 50

148
Tools
Swipe up and down to scroll through the months.
Tap a date to view the events for that day in your Day calendar.
Drag the bottom right corner of the window to resize it.
Drag the title bar to move the window within the screen.
To move the window to the background, move the transparency slider
To return to the Calendar application, tap the QSlide icon
To close the QSlide window, tap the
to the left (move it back to the right to bring it back to the front).
left corner of the QSlide title bar.
in the top right corner of the
title bar.
Adding an event to your calendar
1. From the Home screen, tap the Apps Key > Calendar .
2. Tap the date in the upper left corner of the screen, then tap the calendar
view that you want to use.
3. Tap the date of the event, then tap the Add icon
corner of the screen. From Day or Week calendar view, you can simply
touch and hold the date to create a new calendar event.
4. Tap the necessary fields to enter the event details.
Event name identifies the event.
Location identifies where the event takes place.
From Date/Time sets when the event starts.
To Date/Time sets when the event ends.
All day sets it as an all-day event.
Time zone sets which time zone to use for the event.
Guests sets who is invited to the event.
Description sets additional detailed information or notes about the
event.
in the top right
in the top
Page 51

Tools
Repeat sets if the event will repeat.
Reminders sets the reminder notification for the event.
Show me as sets your Google status during the event.
Privacy sets the event as Calendar default, private, or public.
5. Tap Save to save the event in the calendar.
Viewing Event Details
You can view more information about an event in a number of ways,
depending on the current calendar view.
To view information about an event
In Day, Week, or Agenda view, tap an event to view its details.
In Month view, tap a day to display the event(s) at the bottom of the
screen in Day, Week, or Agenda calendar view. Then tap an event to
view its details.
Calendar Icon
Tap here to go back
to Calendar view.
Delete Icon
Tap here to delete the event.
Edit Icon
Tap here to edit the event.
149
Tap the Reminders fields to change the reminder settings, tap Add
reminder
to add another reminder, or tap the Remove reminder icon
to remove the reminder.
If you have permission to change the event, you can tap the Edit icon
the top of the screen) to edit the event or tap the Delete icon
(at the top
right corner of the screen) to delete the event.
(at
Page 52

150
Tools
To share an event, tap the Menu Key (in the Front Touch Keys bar),
then tap Share in the Options menu. Choose the method for sharing and
complete as necessary.
Calendar Options menu
Tap the Menu Key (in the Front Touch Keys bar) to access the Options
menu.
From the Calendar application, the Options menu includes: Go to
date, Search, Sync now, Calendars to display, Delete, and
Settings.
From the Event details screen, the Options menu includes: Share and
Add to Tasks.
Calculator
The Calculator application allows you to perform mathematical
calculations.
To open and use the Calculator
From the Home screen, tap the Apps Key > Calculator .
QSlide Icon
Tap here to display
the Calculator in a
QSlide window.
Basic calculator Scientific calculator
Tap the calculator keys to enter numbers and arithmetic operators on
the calculator’s display.
Page 53

Tools
Tap the Delete Key to delete the last number or operator you
entered.
Tap the Clear Key
Tap anywhere within the calculator’s display to place the cursor within
the calculation.
Touch and hold the calculator’s display to open a Context menu where
you can copy what you’ve entered to use it in other tools that you
access.
To open the Scientific calculator, tap the Menu Key
Touch Keys bar), then tap Scientific calculator. To return to the Basic
calculator, tap the Menu Key
tap Basic calculator.
Tap the Menu Key
history. You can tap an entry to calculate it again or edit it.
Tap the QSlide icon
Calculator in a QSlide window.
to clear the calculator’s display.
(in the Front
(in the Front Touch Keys bar), then
> Calculation history to view your calculator
at the top left corner of the screen to use the
Using the Calculator in QSlide
The QSlide function displays the calculator panel in a moveable window in
the foreground while allowing you to access other phone features in the
background.
Touch and hold the Calculator QSlide title bar to move it to another
position on the screen.
Drag the bottom right corner of the window to resize it.
Tap the QSlide icon
Calculator Application.
Drag the circle on the transparency bar to the left to make the QSlide
calculator window transparent allowing you to access the screen
functions underneath it. Drag it back to the right to use the QSlide
window again.
Tap
in the upper right corner of the title bar to close the Calculator
QSlide window.
in the upper left corner to return to the
151
Page 54

152
Tools
Alarm/Clock
You use the Alarm/Clock application to access the Alarms, Timer, World
clock, and Stopwatch functions. Access these functions by tapping the tabs
across the top of the screen, or swiping horizontally across the screen.
To open the Alarm/Clock application
From the Home screen, tap the Apps Key > Alarm/Clock .
Setting and Activating Alarms
The Alarms tab allows you to set varying alarm clocks. You can set an
alarm by modifying an existing alarm or by adding a new one. After you've
created one or more alarms, you can easily activate or deactivate an alarm
by tapping its Alarm icon
1. From the Home screen, tap the Apps Key
2. Tap the Alarms tab
3. Tap the New alarm icon
alarm or tap a current alarm icon
activate an existing alarm (when the icon is blue, the alarm is set).
To set an alarm
1. Open the Alarm/Clock application, then access the Alarms tab .
2. Tap New alarm icon
an alarm, or tap an existing alarm to modify and set it.
to toggle it on (blue) or off (grey).
> Alarm/Clock .
at the top of the screen, if necessary.
(at the bottom of the screen) to add a new
(on the right side of the screen) to
in the lower left corner of the screen to create
Existing Alarm
Tap here to modify
this alarm's settings.
Delete Icon
Tap here to delete an
alarm.
New Alarm Icon
Tap here to create a
new alarm.
Set Alarm ScreenAlarms Screen
Page 55

Tools
3. Scroll the time wheel to set the alarm time (Hour and Minute) and the
time of day (AM or PM).
4. Tap the day(s) when you want the alarm to sound in the Repeat field. If
you don’t tap the Repeat setting, the alarm sounds only the one day you
set it.
5. Tap Snooze duration to open a dialog box to set the amount of time to
wait before sounding the alarm again if it is not dismissed. You can set
the alarm to ring repeatedly from 5 minutes up to 1 hour.
6. Tap Vibration to checkmark the setting and have the phone vibrate, in
addition to playing the alarm sound.
7. Tap Alarm sound to set the sound notification. Tap Alarm tone or
Music, select the sound for the alarm, then tap OK. The ringtone plays
briefly when you select it.
8. Slide the button on the Alarm volume slider to the right to increase the
alarm volume and to the left to decrease it. The alarm sound plays to
help you determine the volume you want.
9. Tap Auto app starter to set the application you want to automatically
open when you stop the alarm, then tap OK.
10. Tap Puzzle lock to checkmark the setting, which requires you to wake
up enough to solve a simple puzzle to dismiss the alarm.
11. Tap Memo to enter information about the alarm. For example, to
identify when to use it (e.g., class day).
12. When you’re finished, tap
Save at the bottom of the screen.
Alarm Settings
To access the Alarm settings, from the Alarms tab, tap the Menu Key
(in the Front Touch Keys bar), then tap Settings. The Alarm settings include
Alarm in silent mode, Volume button behavior, and Puzzle lock.
153
When the alarm sounds
Tap Dismiss or, if set, use the gesture feature of simply flipping the
device over to stop the alarm.
Page 56

154
Tools
Tap Snooze to stop the alarm for the snooze duration you set.
NOTE If Puzzle lock is set to On, using the gesture feature of flipping the device over will
snooze the alarm instead of turning it off.
Setting the Timer
The Timer tab can be used to alert you with an audible signal when a set
amount of time has passed.
1. Open the Alarm/Clock application, then select the Timer tab
2. Set the time on the digital timer. Tap the Hour, Minute and/or Second
field(s) and enter the numbers as necessary.
NOTE If you don't need to change the Timer settings, you can tap the green Start button on
the time keypad to start the timer immediately.
3. Tap the Settings icon to set Vibration, Alert sound, and Alert
volume for the timer.
the green Start button at the bottom of the screen
4. Tap
to begin the time
countdown.
5. Once the alarm sounds, tap
the red Stop button
to stop the timer.
Setting the World Clock
The World clock tab allows you to set up a list of cities to easily check
current times in other time zones with a quick glance.
1. Open the Alarm/Clock application, then select the World clock tab
2. Tap the New City icon
the available cities, then tap the one you want.
(at the bottom of the screen), search through
.
.
Managing the World Clock Cities
Tap the New City icon (at the bottom left corner of the screen) to
select another city for your list.
Tap the Delete icon
select one or more cities to delete from your list.
Tap the Menu Key
cities in your World Clock list.
(at the bottom right corner of the screen) to
(in the Front Touch Keys bar) to delete all of the
Page 57

Tools
Touch and hold an entry in the list to open a Context menu to select
Set daylight saving or Delete.
Using the Stopwatch
The Stopwatch tab allows you to use your phone as a Stopwatch.
1. Open the Alarm/Clock application, then select the Stopwatch tab
2. Tap the green Start button at the bottom of the screen
to start timing and
tap the red Stop button to stop the time.
You can use the Lap function by tapping the Lap button to record
multiple milestone times within the same timing session.
3. Tap the Reset button to reset the Stopwatch or
button
to continue monitoring time.
tap the green Resume
Maps
The Maps application allows you to find places and get directions.
To open the Maps application
From the Home screen, tap the Apps Key > Maps .
Maps Menu
Tap here to access Map, Local,
Navigation, Offers, My Places,
Join Latitude, and Location
history.
155
.
Directions Icon
Tap here to get directions to a
destination.
Search Icon
Tap here to open the keyboard to
enter your search.
Local Icon
Tap here to find types of places
near your location.
Layers Icon
Tap here to select the type of
map you want to view.
Page 58

156
Tools
Maps navigation
Tap the Maps menu at the top of the screen to access Map, Local,
Navigation, Offers, My Places, Join Latitude, and Location history.
Drag across the screen to move across a displayed map.
Pinch-to-zoom to zoom in or out of the map view.
Maps icons
Tap to open the keyboard to enter your search request.
Red markers indicate search matches.
Tap a marker to open a balloon that contains a label.
Tap a balloon to open additional location information.
Tap to get directions to a destination.
Use the starting point pop-up to insert My current location,
Contacts, Point on map, or My Places.
Get directions by Car
White circle markers indicate a direction change.
Tap the right arrow icon
and tap the left arrow icon
instructions.
Tap DIRECTIONS LIST at the bottom of the screen to view the
directions in text format (instead of map view).
Tap the Menu Key
Tap to find types of places near your location.
Tap to select the type of map you want to view.
Select your map layer. Choose from Traffic, Satellite, Terrain, Transit
lines, Latitude, My Maps, Bicycling, Wikipedia, and your search
history.
Tap to display your current location on the map.
, Transit , Cycling , or Walking .
to step through the directions on the map,
to step backward through the direction
> Reverse to reverse the directions.
Page 59

Tools
Weather
The Weather application provides weather forecasts and other city
information. Place a Weather widget on your Home screen for a summary
of your local weather and access the Weather application for more detailed
information.
NOTE The Weather widget on your Home screen allows you to quickly view information for
each city in your City list. Flick up or down within the widget to cycle through each city in
your list.
To open and view the Weather application
From the Home screen, tap the Apps Key > Weather .
Swipe right or left to scroll through the weather information for each
of the cities in your list.
Tap the Refresh icon
current weather.
Tap the City list icon
To add a city or update your current location
Open the Weather application, then tap the Add icon in the upper right
corner of the screen.
Enter a location in the Search city box, the tap the city you want to
add.
Tap Current location to update your current location.
Managing your City list
From the Weather application, tap the Menu Key > Settings > Edit city
list.
Tap the Add icon
another city.
Tap the Delete icon
your list.
at the bottom of the screen to update the
at the top of the screen to view your City list.
in the upper right corner of the screen to add
at the top of the screen to delete a city from
157
Page 60

158
Tools
Touch and drag the handle icon (on the right side of the screen) to
move a city to a new position in your city list. This affects the order
viewed when you swipe across the Weather application.
Changing Weather settings
From the Weather application, tap the Menu Key > Settings.
List Settings: Edit city list.
Data & Synchronization: Update data and Update interval.
General Settings: Temperature unit and Wind speed unit.
Voice Mate
You can ask Voice Mate to perform phone functions using your voice, such
as calling a contact, setting alarms, or searching the web. When you access
Voice Mate for the first time, it displays help information to assist you in
learning how to use this function.
To open the Voice Mate application
From the Home screen, tap the Apps Key > Voice Mate .
Using the Voice Mate application
1. Open the Voice Mate application.
2. Tap the Speak icon
what you want it to do for you.
If you say “Call Rachel”, Voice Mate will call your contact Rachel.
NOTE Access the Voice Mate settings to checkmark Skip confirmation so that found exact
name (or number) match requests will be executed without confirming it first.
Voice Mate Icons
The following Voice Mate icons are displayed at the bottom of the screen:
Tap to display the Voice Mate QSlide window on the Home screen.
Tap to say a voice command to execute.
(at the bottom of the screen) to turn it on. Say
Page 61

Tools
Tap to type a command to execute.
Voice Mate Options menu
Tap the Menu Key (in the Front Touch Keys bar) to access the Options
menu to select Settings or Help.
Voice Mate settings
The Voice Mate settings include Skip confirmation, Voice feedback, User
name, Save events to, Voice activation, Button vibration, Voice launch
command, Voice launch when charging, Voice launch on Lock screen,
Skip Lock screen, Facebook (log in), and Twitter (log in).
NOTES s When the language setting for Voice Mate is not the same as the default language
s When entering text, you can only use letters or numbers.
s Voice Mate recognizes your speech better when you speak slowly.
s You can view examples of various commands by swiping the Voice Mate main
setting on your phone, some commands such as launching apps may not work.
screen to the left.
Voice Recorder
The Voice Recorder application records audible files for you to use in a
variety of ways. Use them to simply remind you about something you don’t
want to forget (like a grocery list) or record sound effects that you can
attach to a message.
Record a Voice Memo
1. From the Home screen, tap the Apps Key > Voice Recorder .
2. Tap the Record button
3. Speak into the microphone.
4. When you’re finished, tap the Stop button
The recording is automatically saved to your recordings list.
to start recording.
.
159
Page 62

160
Tools
Recording Mode Icon
Tap here to change the
recording mode.
Record Button
Tap here to start recording
a voice memo.
Tap here to listen to this
voice memo.
Play Button
Tap here to play (or
pause) your recording.
Volume Icon
Tap here to control the
volume.
Voice Record screen
Recorded Voice
Memo screen
List Button
Tap here to view a list of
your recordings.
New Recording Icon
Tap here to record a new
voice recording.
Trim Icon
Tap here to trim the
recording.
Bookmark Icon
Tap here to bookmark a
spot within your voice
recording.
Recording Bar
Displays the recording
playback.
Play a Voice Memo
1. From the Home screen, tap the Apps Key > Voice Recorder .
2. Tap the List button
3. Tap the voice memo you want to play.
4. Use the following options while listening to a voice memo.
Tap the Pause button
Tap the Stop button
screen.
Tap the Volume icon
.
to pause the recording.
to end the playback and return to the List
to increase or decrease the volume.
Page 63

Tools
Move the slider on the recording bar to listen to a specific part of the
voice memo.
Tap the Trim icon
of the recording.
to trim away segments at the beginning or end
Managing your Voice memos
From the Voice Recorder list screen:
Tap the Share icon
memo using the available choices.
Tap the Delete icon
memo(s) you want to delete.
Touch and hold a voice memo to open a context memo to select
Share, Delete, Rename, or Details.
(at the top of the screen) to share the voice
(at the top of the screen) to select the voice
POLARIS Office 5
POLARIS Office 5 is a professional mobile office solution that lets users
conveniently view various types of office documents, including Word, Excel
and PowerPoint files, anywhere or anytime, using their mobile devices.
Create a New Document
1. From the Home screen, tap the Apps Key > POLARIS Office 5 .
2. Register your email address on the Registration page.
NOTE You can tap Skip to ignore the registration information.
3. Tap the New icon (at the top of the screen) to start a new document.
4. Tap a document type from the drop-down list, then choose a template.
5. Enter contents in the document using the tools at the top of the screen
and the on-screen keyboard.
6. When you're done working on the document, tap the File icon
top left corner of the screen), then tap Save (or Save as to enter a new
document name) to save.
(in the
161
Page 64

162
Tools
7. Enter the document name and and verify the folder to save it in, then tap
the Save icon in the top right corner of the screen.
8. Tap the Back Key
(in the Front Touch Keys bar) to exit.
View and edit a document on your device
1. From the Home screen, tap the Apps Key > POLARIS Office 5 .
2. Tap an office document tab (Word
or text file ) at the top of the screen to search for documents on your
phone. You can also slide the screen to the right to select Recently
viewed, Favorites, or Broadcast files.
3. Tap the document that you want to view or edit.
NOTE You can also open an attachment in an email by tapping the attachment in the message.
4. The document opens for you to view. To edit it, tap the Menu icon (in
the top right corner of the screen), then tap Change edit mode.
5. When you’re finished editing, tap the File icon
of the screen), then tap Save. Tap the Back Key (in the Front Touch
Keys bar) to exit.
, Excel , PowerPoint , PDF ,
(in the top left corner
File Manager
Use the File Manager application to manage your applications and
documents stored in your phone.
To open the File Manager application
From the Home screen, tap the Apps Key > File Manager .
File Manager Options
File Manager makes it easy to view and manage your files. Simply tap a file
type (All files, Music files, Image files, Video files, or Document files),
then tap on the necessary folders to find your files.
Open the File Manager application, tap All files, then tap the Internal
storage folder to access to the following File Manager options (at the
bottom of the screen):
Page 65

Tools
: Allows you to create a new folder.
: Allows you to move files and folders to another folder.
: Allows you to copy files and folders to another folder.
: Allows you to delete files and folders.
Tap the Menu Key
options.
Sort by: Allows you to sort files and folders by Name, Size, Date, or
Type.
View by: Allows you to display your files as a List or in a Grid.
Share: Allows you to select files and folders to share with others.
Zip: Allows you to select files and folders to compress into a .zip file.
Show/Hide hidden files: Allows you to show hidden files or hide
them.
Exit: Exits the application.
(in the Front Touch Key bar) to access the following
Searching in File Manager
Tap the Search icon (in the top right corner of the File Manager screen)
to search for your files or information.
Using QSlide
While viewing All Files, tap the QSlide icon to open File Manager in a
QSlide window.
163
Page 66

164
Tools
Tasks
The Tasks application can be synchronized with your MS Exchange
account. You can create a task, revise it, and delete it using your phone, or
from MS Outlook or MS Office Outlook Web Access.
To synchronize MS Exchange
1. From the Home screen, tap the Apps Key > Settings > Add
account (under the Accounts section).
2. Tap Microsoft Exchange, then sign-in using your Email address and
Password.
3. Checkmark the Sync task checkbox.
To add Tasks
1. From the Home screen, tap the Apps Key > Tasks .
2. Tap the Add new task icon
3. Enter the Subject, Due date, Description, Repeat, and Reminder.
4. Tap Save.
Tasks options
While viewing your Tasks screen, tap the Menu Key (in the Front Touch
Keys bar) to access the following:
Sync now Tap to sync your Microsoft Exchange account tasks.
Sort by Tap to select Due date, Priority, or Creation order.
Delete Tap to select tasks to delete.
View completed tasks Tap to view your list of completed tasks.
Lists to display Tap to select which lists to display.
Settings Tap to change your Tasks settings including Notifications,
Notification sound, Vibrate, Pop-up notification, and Accounts.
(in the top right corner of the screen).
Page 67

Settings
Settings
The Settings application contains most of the tools for customizing and
configuring your phone. All of the settings in the Settings application are
described in this section. For settings specific to the Chrome application,
see the Chrome section and for settings specific to the Google account,
see the Gmail section.
To open the Settings application
From the Home screen, tap the Apps Key > Settings .
OR
From the Home screen, tap the Menu Key
Keys bar) > Settings.
To switch to tab view
The settings are grouped into categories.
List view displays each category (5) in blue capital letters followed by
its related settings. Scroll up and down through the screen.
Tab view displays each category (4) in tabs (at the top of the screen)
that include its related settings. Swipe to the left or right to switch
between tabs or tap a tab to select it.
1. From the Home screen, tap the Menu Key
bar) > Settings.
2. Tap the Menu Key
view (or Switch to list view).
3. Tap OK to confirm.
NOTE Instructions to perform tasks in this guide are based on the default list view.
(in the Front Touch Keys bar) > Switch to tab
(in the Front Touch
(in the Front Touch Keys
165
WIRELESS & NETWORKS
The Wireless and Networks category allows you to configure and manage
your device’s wireless radio communications.
Page 68

166
Settings
Airplane mode
Tap the Airplane mode switch to toggle between On and Off. On
disables all wireless connections.
Wi-Fi
Tap the Wi-Fi switch to toggle between On and Off. Tap Wi-Fi to
access the following Wi-Fi settings:
Notify Me: Checkmark to be notified when a Wi-Fi network is in range
when you launch an application.
WI-FI NETWORKS
The list of all of the Wi-Fi networks that are within access range. Tap one
to access it.
NOTE Tap SEARCH at the bottom of the screen to scan for available Wi-Fi networks. Tap ADD
NETWORK at the bottom of the screen to add a new network.
Tap the Menu Key (in the Front Touch Keys bar) in the Wi-Fi menu to
access the following options.
WPS Push Button: Information to connect to a secured Wi-Fi network
with a WPS button.
WPS Pin Entry: Information to connect to a secured Wi-Fi network with
a WPS PIN.
Wi-Fi Direct: Allows direct connection with Wi-Fi devices without any
access point.
Advanced Wi-Fi: Accesses the following advanced Wi-Fi settings.
Keep Wi-Fi on during sleep: Sets the Wi-Fi status during sleep.
Choose from Always, Only when plugged in, and Keep Wi-Fi off.
Wi-Fi signal weak: Checkmark to disconnect Wi-Fi automatically
when the Wi-Fi signal is weak.
Internet unavailable: Checkmark to disconnect Wi-Fi automatically
when the Internet is unavailable.
Wi-Fi optimization: Checkmark to minimize battery usage when Wi-Fi
is on.
Page 69

Settings
Manage networks: Opens a screen to specify the order in which the
available networks will be detected.
MAC address: Displays the MAC address.
IP address: Displays the IP address.
Bluetooth
Tap the Bluetooth switch to toggle between On and Off. Turn it on and
tap Bluetooth to access the following settings:
VS985 4G LTE: Checkmark to allow other Bluetooth devices to see your
phone for pairing and connection.
AVAILABLE DEVICES
The list of all of the available in-range Bluetooth devices.
Tap the Menu Key
(in the Front Touch Keys bar) in the Bluetooth
menu to access the following options.
Edit phone name: Changes your phone name for easy identification
when pairing and connecting. Enter your new phone name, then tap
Save.
Visibility timeout: Sets the amount of time other Bluetooth devices can
see your phone for pairing and connection.
Show received files: Displays a list of your Bluetooth received files.
Help: Displays information about Bluetooth features.
NOTE Tap SEARCH FOR DEVICES at the bottom of the screen to search for in-range Bluetooth
devices.
Mobile data
This menu allows you to manage your mobile data usage. Tap the Mobile
data switch
the following settings:
Limit mobile data usage: Checkmark to limit your mobile data. Your
mobile data connection will be disabled when you reach the limit you
set. Set your data usage limit by dragging the red line on the graph
provided.
to toggle between On and Off. Tap Mobile data to access
167
Page 70

168
Settings
Alert me about data usage: Checkmark to allow your phone to alert you
when your mobile data usage reaches the warning amount you have set.
Set your warning amount by dragging the yellow line on the graph
provided.
Data usage cycle: Displays your current data usage cycle. Tap the
drop-down menu icon
Data usage graph: Displays your data usage on a graph.
Data usage applications: Applications are displayed with their data
usage on a bar graph. Tap one to see more detailed information.
To access advanced options, tap the Menu Key
Keys bar).
Data roaming: Checkmark to allow you to use data connections when
you are roaming.
Restrict background data: Checkmark to disable sync in the background
while using a mobile network.
Auto-sync data: Checkmark to set the device to sync contact, calendar,
email, bookmark, and social network image data automatically.
Show Wi-Fi usage: Checkmark to view your data usage via Wi-Fi.
Mobile hotspots: Displays a list to select and use another device's
mobile network as a mobile hotspot for mobile data usage. Turn on Wi-Fi
and search for mobile hotspots, if necessary.
to change the cycle date.
(in the Front Touch
Call
This menu allows you to manage various call settings.
Voicemail: Sets up your standard voicemail details, including the
following:
Service: Changes your voicemail service. The default is My carrier.
Setup: Changes your voicemail access (e.g., the number that dials your
voicemail service).
Notification sound: Sets the sound for notifications.
Page 71

Settings
Vibrate: Sets the vibrate mode for new voicemail notifications. Choose
from Always, While in vibrate only mode, and Never.
OUTGOING CALL
Auto retry: Sets the amount of time to wait before automatically
redialing a call that failed to connect. Choose from Off, 10 seconds, 30
seconds, or 60 seconds.
Assisted dialing: Configures the Assisted dialing options when you are
traveling outside of your home country.
INCOMING CALL
Incoming call pop-up: Checkmark to display incoming call pop-up when
an application is in use. Use the pop-up to Answer, Ignore, or Ignore
with message.
Ignore with message: Checkmark to enable the Quick text message
feature. It allows you to use the Ignore with message option to ignore
an incoming call and respond to the caller with a specified text message
instead. Tap the Settings icon
the New icon to create a new quick message, tap a message to edit
it, or tap the Delete icon to delete a message.
Privacy keeper: Sets whether the phone displays the caller's
information when you receive a call. Choose from Hide all info., Show
number only, or Disable.
OUTGOING CALL
Show dialpad: Sets which types of calls will automatically display the
dialpad. Choose from Voicemail / Toll-Free, All calls, or Customized
number.
TTY mode: Sets the TTY mode to communicate with other TTY devices.
Hearing aids: Checkmark to turn on hearing aid compatibility.
Voice enhancement: Checkmark to enhance voice clarity in noisy
environments, allowing you to hear more clearly.
to manage your Quick messages. Tap
169
Page 72

170
Settings
END CALL
Power button ends call: Checkmark to allow you to end voice calls by
pressing the Power/Lock Key
(on the back of the phone) instead of
returning to the Call screen to end the call.
OTHERS
DTMF tones: Sets the length of the DTMF tones. Choose Normal, or
Long.
CDMA CALL SETTINGS
Call forwarding: Enables or disables call forwarding.
Voice privacy: Checkmark to enable enhanced privacy mode.
Auto answer: Sets the time before a connected hands-free device
automatically answers an incoming call. Choose from Disable, 1 second,
3 seconds, and 5 seconds.
GSM CALL SETTINGS
Connection vibration: Checkmark to vibrate when the other party
answers the call.
Call forwarding: Tap to set call forwarding options.
Call barring: Tap to lock incoming and/or outgoing international calls.
Call duration: Tap to check the call duration.
Additional settings: Tap to set additional settings.
Share & connect
NOTE From the Share & connection settings, tap the Menu Key (in the Front Touch Keys
bar), then tap Use DLNA feature to access SmartShare.
DATA/MEDIA SHARE
NFC: Tap the NFC switch
receive when the phone touches another data-compatible device
(typically within 20 mm). NFC (Near Field Communication) establishes
radio communication between smartphones and similar devices. NFC
will be turned off automatically when airplane mode activated. Tap NFC
to access the following settings:
to toggle it On or Off. On allows data
Page 73

Settings
Show NFC Security alerts: Checkmark to show NFC security alerts
you for permission when a phone tries to send you information.
Only every 30 days: Checkmark to show NFC security alerts only
every 30 days.
Read/Peer to Peer: Checkmark to display confirmation when receiving
a contact or URL via NFC.
Connection handover: Checkmark to display confirmation when
pairing devices via NFC.
NFC sound in call: Checkmark to play the NFC sound even during an
incoming call.
Direct/Android Beam: Tap the Direct/Android Beam switch
toggle it On or Off. On allows you to beam application content or files to
other mobile devices by holding them close together. Tap the menu
name to view help information.
SmartShare Beam: Allows you to receive multimedia content via
SmartShare Beam from another LG phone.
SCREEN SHARE
Miracast: Tap the Miracast switch
you to wirelessly mirror your phone screen and sound onto a Miracast
dongle or TV. Tap HELP to view help information.
STORAGE SHARE
Wireless storage: Allows you to share files with your phone and
computer. Tap the Wireless storage switch in the top right corner of the
screen to toggle it On, connect to a network, then select the devices to
allow connection. Tap the Menu Key
information.
to toggle it On or Off. On allows
and select Help to view help
to
171
Tethering & networks
This menu allows you to manage other network and wireless settings.
TETHERING
Tethering allows you to connect other devices to your phone's internet
connection. Select connection your method.
Page 74

172
Settings
Mobile Broadband Connect: Tap the Mobile Broadband Connect
switch
to toggle it On or Off. On allows you to share the phone's
mobile data connection using a USB connection. This setting is greyed
out if not connected via USB.
Mobile Hotspot: Allows you to use your device as a Mobile Hotspot for
other devices to use your mobile network connection.
Mobile Hotspot: Checkmark to set your device as a mobile hotspot
so other devices can use your mobile data connection.
Configure: Sets the SSID and key for your mobile hotspot.
Manage device: Sets the device(s) allowed to use your hotspot
connection.
Help: Displays hotspot help information.
Connected devices are listed at the bottom of the screen.
NOTE From the Mobile Hotspot setting, tap the Menu Key (in the Front Touch Keys bar),
then tap Advanced to access additional settings including Manage applications, DHCP
server, DHCP server settings, and Power Management.
Bluetooth tethering: Tap the Bluetooth tethering switch to toggle
it On or Off. On shares the phone's internet connection with other
Bluetooth devices.
Help: Displays information regarding mobile broadband connection,
mobile hotspot, and Bluetooth tethering.
NETWORK
Mobile networks: Sets up options for data roaming, networks, and
APNs (Access Point Names).
Mobile data: Checkmark to enable data access over the mobile
network.
Global data roaming access: Sets up your data services while
roaming.
Global data roaming: Checkmark to allow connection to data
services while roaming.
Page 75

Settings
Allow access: Sets when to allow global data roaming access.
Choose For all trips or Only for this trip.
System select: Sets your network mode and CDMA roaming mode.
Network mode: Sets the network mode. Choose from Global,
LTE/CDMA, and GSM/UMTS.
GSM/UMTS settings: Sets the network submode and network
operators.
Network type and strength: Displays the current network type and
the signal strength.
Access point names: Sets up APN for data service. Select an APN in
the list or tap the Menu Key
(in the Front Touch Keys bar), then
tap New APN to create a new one.
Roaming state: Displays your current roaming state.
VPN: Sets up and manages Virtual Private Networks (VPNs).
Basic VPN: Sets your phone to use the built-in Android VPN client
supporting basic features.
LG VPN: Sets your phone to use an advanced LG VPN client
supporting full IP Security features and interoperability. You can add an
LG VPN network or select from your list of VPN connections.
NOTE Tap the Menu Key (in the Front Touch Keys bar) to access Settings, Import
certificates, Delete all, and About.
DEVICE
The Device category allows you to configure and manage the general
device functions such as sound and display options.
173
Sound
This menu allows you to manage your device’s sound settings.
SOUND PROFILE
Silent mode: Sets the Silent mode to Off, Vibrate, or On.
Page 76

174
Settings
Volumes: Sets individual volume levels for phone Ringtone, Notifications
sound, Touch feedback & system, and Music, video, games, and other
media. Move the slider button on each volume bar to set the volume.
Vibrate strength: Allows you to set the vibrate strength for calls,
notifications, and touch feedback.
Quiet mode: Sets up your Quiet mode. Tap the Turn Quiet mode on
now switch
activate automatically and designate exceptions to your Quiet mode.
Schedule settings: Tap the switch to toggle it On or Off. You can also
set the days and times to automatically turn Quiet mode on.
Allowed calls
Block incoming calls: Checkmark to block all incoming calls.
Repeat call: Checkmark to allow a call that is repeated within 3
minutes.
Allowed contacts: Designate which Contacts calls will be allowed.
Auto reply to silenced calls: Set how to you want to automatically
reply to silenced calls.
Help: Displays help information.
RINGTONES & VIBRATIONS
Phone ringtone: Sets the ringtone for calls. You can also add a ringtone
by tapping the New icon
Smart ringtone: Checkmark to increase phone ringtone volume
automatically in noisy environments.
Incoming call vibration: Sets the incoming call vibration Options.
Choose from Long Lasting, Rapid, Short repeated, Standard, and
Ticktock.
Gentle vibration: Checkmark to gradually increasing vibration up to
current strength set.
Ringtone with vibration: Checkmark to set the phone to vibrate in
addition to the ringtone when you receive calls.
to toggle it On or Off. You can schedule Quiet mode to
at the top right corner of the screen.
Page 77

Settings
SYSTEM
Voice notifications: Tap the Voice notifications switch
On or Off. On allows your device to incoming call and message events
automatically.
Notification sound: Allows you to set the sound for notifications. You
can also add a sound by tapping the New icon
of the screen.
Touch feedback & system: Allows you to set the feedback (tones and/
or vibration) while using your device.
Dial pad touch tones: Checkmark to play tones when tapped.
Touch sounds: Checkmark to play a tone when the screen is tapped.
Screen lock sound: Checkmark to play a tone when the screen is
locked/unlocked.
Sound when roaming: Checkmark to play a tone when you are
roaming.
Emergency tone: Sets how to play emergency tones. Choose from
Off, Alert, and Vibrate.
Vibrate on touch: Checkmark to vibrate when keys are tapped.
at the top right corner
to toggle it
Display
This menu allows you to manage your phone’s display settings.
SCREEN
Brightness: Adjusts the brightness of the screen. For best battery
performance, use the dimmest comfortable brightness.
Screen timeout: Sets the amount of time before the screen times out.
Screen-off effect: Sets the screen-off effect. Choose from Simple,
Black hole, and Retro TV.
Auto-rotate screen: Checkmark to set the phone to automatically rotate
the screen based on the phone orientation (portrait or landscape).
175
Page 78

176
Settings
Daydream: Tap the Daydream switch to toggle it On or Off. On
allows the set screensaver to be displayed when the phone is sleeping
while docked and/or charging. Choose from Clock, Colors, Photo
Frame, and Photo Table.
FONT
Font type: Sets the type of font used for the phone and menus.
Font size: Sets the size of the font displayed in the phone and menus.
SMART ON
Smart screen: Checkmark to keep the screen from timing-out when the
device detects your eyes looking at the screen.
Smart video: Checkmark to pause the video when it doesn't detect your
eyes looking at the screen.
ADVANCED SETTINGS
Front touch buttons: Sets the Front Touch Keys displayed at the bottom
of all of the screens. Set which ones are displayed, their position on the
bar, and what they look like. Select the keys and order, the theme, and
the background.
Notification light: Tap the switch
activate the LED light for the notifications you select, in the color you set
for each one.
Aspect ratio correction: Allows you to change the aspect ratio of a
downloaded application to fix screen distortion.
to toggle it On or Off. On will
Home screen
This menu allows you to manage your Home screen settings.
SCREEN
Theme: Sets the screen theme for your device. Choose Basic or
Marshmallow.
Wallpaper: Sets the wallpaper to use on your Home screen. Select it
from Gallery, Live Wallpapers, Multi-photo, or Wallpaper gallery.
Page 79

Settings
Screen swipe effect: Sets the effect when you swipe to change
screens. Choose from Basic, Breeze, Accordion, Panorama, Carousel,
Layer, and Domino.
Allow Home screen looping: Checkmark to allow continuous Home
screen scrolling (loop back to first screen after last screen).
Allow apps list looping: Checkmark to allow continuous Application
screen scrolling (loop back to first screen after last screen).
Portrait view only: Checkmark to always display the Home screen in
portrait view.
TIPS
Help: Displays information regarding the Home screen items and
functions.
Lock screen
This menu allows you to manage your Lock screen settings.
SCREEN SECURITY
Select screen lock: Sets how to secure your phone from unintentional
and/or unauthorized use. Choose from None, Swipe, Face Unlock,
Pattern, PIN, and Password.
Screen swipe effect: Sets the screen swipe effect options. Choose
from Ripple, Dewdrop, White light, Particle, and Crystal.
NOTE This setting name may be Pattern effect if the Screen lock is set to Pattern.
Weather animation: Checkmark to show weather animation for current
location or primary city set in Weather based on auto data updates.
Wallpaper: Sets your Lock screen wallpaper. Select it from Gallery or
Wallpaper gallery.
Shortcuts: Allows you to change the shortcuts on the Swipe Lock
screen.
Owner info: Checkmark to set the device owner’s name to be displayed
on the Lock screen. Tap the Settings icon
displayed as the Owner info.
to enter the text to be
177
Page 80

178
Settings
LOCK TIME
Security lock timer: Sets the amount of time before the screen
automatically locks after the screen has timed-out.
Power button instantly locks: Checkmark to instantly lock the screen
when the Power/Lock Key is pressed. This setting overrides the
Security lock timer setting.
The Security lock settings depend on the Lock type. The following
settings may also be displayed.
Hidden pattern: Checkmark to display the unlock dot patter when (and
where) you tap the Lock screen.
Make pattern visible: Checkmark to make your pattern visible while
drawing it.
Random PIN: Sets the keypad to random numbers so that someone
watching cannot detect your PIN from your hand movements.
Improve face matching: Sets a more precise detection for face
matching.
Liveness check: Checkmark to require you to blink during face matching
detection (to guard against using a photo of you).
Gestures
This menu allows you to manage various gesture settings.
KnockON: Checkmark to enable KnockON to turn the screen on and off.
Quickly double-tap center screen to turn it on. Double-tap the Status Bar,
an empty area on the Home screen, or the Lock screen to turn the
screen off. For the best results, do not move the phone while using the
KnockON feature.
Slide Aside: Checkmark to use three-finger swipe to save running apps
to the left or bring them back to the display.
Answer Me: Checkmark to enable you to bring the phone to your ear to
automatically answer the incoming call.
Silence incoming calls: Checkmark to enable you to flip the phone to
silence incoming calls.
Page 81

Settings
Fade out ringtone: Checkmark to enable you to pick up the phone from
the flat surface to fade out the incoming call ringtone.
Snooze or stop alarm: Checkmark to enable you to simply flip the
device to snooze or stop the alarm.
Pause video: Checkmark to enable you to simply flip the device to
pause the currently playing video.
Move Home screen items: Checkmark to enable you to move an icon
to another screen by tilting the phone. Tap and hold the icon and tilt the
phone left or right, then let go on the screen where you want the icon.
Help: Opens a help guide on how to use the Gestures features of your
device.
SENSOR
Motion sensor calibration: Allows you to improve the accuracy of the
tilt and speed of the sensor.
One-handed operation
Dial keypad: Checkmark to enable you move the dial keypad to the right
or left side of the device. Simply tap the arrow to move it to one side or
the other.
LG keyboard: Checkmark to enable you move the keyboard to the right
or left side of the device. Simply tap the arrow to move it to one side or
the other.
Gesture control: Checkmark to enable you to swipe the keyboard left or
right to adjust the position of LG keyboard.
Lock screen: Checkmark to enable you move the PIN Lock screen
keypad to the right or left side of the device. Simply tap the arrow to
move it to one side or the other.
Help: Displays information regarding one-handed operation.
179
Storage
Use the Storage menu to monitor the used and available space in your
phone.
Page 82

180
Settings
INTERNAL STORAGE
Total space: Displays the total amount of space in the phone’s memory.
It’s listed in Gigabytes and also on a colored bar graph with a colorcoordinated list of the applications as well as the amount of space they
use. Remaining memory space is grey-colored.
Battery
BATTERY INFORMATION
The Battery charge information is displayed on a battery graphic along
with the percentage of the remaining charge and its status.
Touch the Battery charge icon to display the Battery use screen to see
battery usage level and battery use details. It displays which components
and applications are using the most battery power. Tap one of the entries
to see more detailed information.
Battery percentage: Checkmark to display the battery level percentage
on the Status Bar next to the battery icon.
BATTERY SAVER
Tap the Battery saver switch
saver to access the following settings:
Turn Battery saver on: Sets the battery charge percent level that will
automatically turn on Battery saver. Choose from Immediately, 10%
battery, 20% battery, 30% battery, and 50% battery.
BATTERY SAVING ITEMS
Auto-sync: Checkmark to turn off Auto-sync when Battery saver is
activated.
Wi-Fi: Checkmark to turn Wi-Fi off when data is not being used while
Battery saver is activated.
Bluetooth: Checkmark to turn Bluetooth off when not connected
while Battery saver is activated.
Vibrate on touch: Checkmark to turn off touch feedback when
Battery saver is activated.
Brightness: Checkmark to set the screen brightness when Battery
saver is activated. Tap the Settings icon
to toggle it On or Off. Tap Battery
to change the setting.
Page 83

Settings
Screen timeout: Checkmark to set the screen timeout when Battery
saver is activated. Tap the Settings icon to change the setting.
Notification light: Checkmark to turn off the LED light for
notifications when Battery saver is activated.
Battery saver tips: Displays tips for using the Battery saver function.
Application manager
Use the Application manager menu to view details about the applications
installed on your phone, manage their data, and force them to stop.
Swipe left and right to select one of the three tabs across the top of the screen
to view detailed information for DOWNLOADED, RUNNING, and ALL
applications. Tap an entry to view more information, tap Stop (or Force stop),
then OK to stop it from running.
PERSONAL
The Personal category allows you to configure and manage your personal
information.
Guest mode
Use Guest mode when you let someone else use your phone. They will only
be able to use applications that you’ve selected. You enter Guest mode by
drawing a specified guest pattern on the Lock screen that is different from
your normal lock pattern.
Allow Guest mode: Checkmark to let people who borrow your phone
use only the applications you choose.
Set pattern: Tap to create unlock screen pattern for Guest mode.
Set apps: Tap to select the applications to be viewed in Guest mode.
Help: Displays information regarding Guest mode.
181
Location access
Use the Location access menu to set your preferences for using and
sharing your location when you search for information and use locationbased applications, such as Maps.
Page 84

182
Settings
Access to my location: Tap the Access to my location switch to
toggle it On or Off. On allows applications that have asked your
permission use your location information.
LOCATION SOURCES
GPS & Verizon location services: Checkmark to enable your phone’s
standalone global positioning system (GPS) satellite receiver to pinpoint
your location to within an accuracy as close as several meters (“street
level”). Actual GPS accuracy depends on a clear view of the sky and
other factors.
Wi-Fi & mobile network location: Checkmark to use information from
Wi-Fi and mobile networks to determine your approximate location that
is used while searching in Google Maps and other applications. When
you checkmark this option, you’re asked whether you consent to sharing
your location anonymously with Google’s location service.
Security
Use the Security menu to configure how to help secure your phone and its
data.
ENCRYPTION
Encrypt phone: Allows you to encrypt the phone to keep it secure. After
encryption, a PIN or password needs to be entered each time you power
the phone on.
SIM CARD LOCK
Set up SIM card lock: Allows you to set if you want to require a PIN to
be able to access the SIM card. And, if set, allows you to change the
PIN.
PASSWORDS
Password typing visible: Checkmark to briefly show each character of
the password as you type so that you can see what you enter.
PHONE ADMINISTRATION
Phone administrators: Displays the list of administrators, allowing you
to deactivate device administrators.
Page 85

Settings
Unknown sources: Checkmark to allow installation of non-Play Store
applications.
Verify apps: Checkmark to disallow or warn before installation of
applications that may cause harm.
CREDENTIAL STORAGE
Trusted credentials: Allows applications to access your phone’s
encrypted store of secure certificates, related passwords and other
credentials. The screen has a System tab and a User tab. Credential
storage is used to establish some kinds of VPN and Wi-Fi connections.
This setting is dimmed if you have not set a password to secure your
credential storage.
Install from storage: Allows you to install a secure certificate from the
storage.
Clear credentials: Deletes all secure certificates and related credentials
and erases the secure storage’s own password. You are prompted to
confirm you want to clear this data.
Language & input
Use the Language & input menu to select the language for the text on your
phone and for configuring the on-screen keyboard. You can also manage
your language dictionary for personal words that you’ve added.
Language: Sets the language to use on your device.
Personal dictionary: Displays a list of the personal words that you’ve
added that are not in the standard dictionaries.
KEYBOARD & INPUT METHODS
Default: Sets the default on-screen keyboard to use when entering text.
Google voice typing: Checkmark to select Google voice typing to enter
data. Tap the Settings icon
Choose input languages: Sets the languages supported with Google
voice typing.
Block offensive words: Checkmark to hide recognized offensive text.
Download offline speech recognition: Enables voice input while
offline.
to change the Google voice settings.
183
Page 86

184
Settings
LG Keyboard: Checkmark to select the LG Keyboard to enter data. Tap
the Settings icon to change the following settings:
Input language and type: Sets the keyboard language and characters.
Word suggestion: Checkmark to set Auto correction, Suggest next
word, Advanced word selection, and Clear history. Tap the Settings
to access these settings.
icon
Auto capitalization: Checkmark to automatically capitalize the first
letter of each sentence.
Auto punctuation: Checkmark to insert a period when the space key
is double-tapped.
Voice input: Checkmark to display the Voice typing key on the
keyboard.
Path input: Checkmark to enter a word by drawing a path through all
of the letters.
Handwriting: Checkmark to set the handwriting style. Tap the
Settings icon
Gesture guide.
Keyboard gesture: Sets the gestures to use including Hide Keyboard,
Split Keyboard, and One-handed operation.
Additional settings: Sets additional settings including Keyboard
theme, Extend keyboard, Vibrate on keypress, Sound on keypress,
Preview on keypress.
Help: Tap the Help for more information.
SPEECH
Voice Search: Sets voice search options.
Language: Sets the Google search by voice language.
Speech output: Sets when to use speech output. Choose from
Always, Informative only, or Hands-free only. To turn on speech
output only when you’ve got a headset attached to your phone, select
Hands-free only.
Block offensive words: Checkmark to hide offensive voice results.
to set the pen type (thickness), color, delay time, and
Page 87

Settings
Hotword detection: Checkmark to allow you to say “Google” when
viewing the Google Now screen rather than touching the Microphone
icon to initiate a voice search or action.
Download offline speech recognition: Sets one or more additional
languages for speech recognition when you don’t have a network
connection.
Personalized recognition: Checkmark to improve speech recognition
accuracy using the recordings you perform using this device.
Google Account dashboard: Manage your collected data using your
Google Account.
Bluetooth headset: Checkmark to record audio through a connected
Bluetooth headset.
Text-to-speech output: Sets the preferred speech engine and speech
rate (very slow to very fast). Also plays a short demonstration of speech
synthesis.
MOUSE/TRACKPAD
Pointer speed: Sets the pointer speed on a slide bar.
Backup & reset
This menu allows you to back up and/or erase your data.
BACKUP & RESTORE
Backup my data: Checkmark to backup application data, Wi-Fi
passwords, and other settings to Google servers.
Backup account: Sets the account to backup.
Automatic restore: Checkmark to allow the device to automatically
restore backed up settings and data when an application is reinstalled on
the device.
PERSONAL DATA
Factory data reset: Allows you to erase all of the data on the phone.
Read the warning, then tap Reset phone at the bottom of the screen
and Erase everything to confirm.
185
Page 88

186
Settings
ACCOUNTS
Backup Assistant Plus: Accesses Last backup status, Daily backup
schedule, and About. Tap the Back up now button at the bottom of the
screen to manually back up your device.
Email: Accesses your Email accounts and Email settings. You can also
manage your email account(s) by adding or removing accounts.
Google: Manages your Google Account(s).
ACCOUNTS: Displays your Google Account(s).
PRIVACY
Maps & Latitude: Displays your location information and allows you to
manage your location settings.
Search: Displays your sign-in account information and allows you to
manage your search settings.
Location settings: Displays settings for how applications can access
and use your location.
Google+: Displays your Google+ settings.
Ads: Sets whether to personalize Google ads in apps on your device.
Add account: Allows you to add accounts.
SYSTEM
The System category allows you to manage various system settings.
Date & time
This menu allows you to manage your date and time formats.
Automatic date & time: Checkmark to use the network-provided date
and time.
Automatic time zone: Checkmark to use the network-provided time
zone.
Set date: Tap to manually set the date to use for your device. This
setting is greyed-out when the Automatic date & time setting is
checkmarked.
Page 89

Settings
Set time: Tap to manually set the time to use for your device. This
setting is greyed-out when the Automatic date & time setting is
checkmarked.
Select time zone: Tap to select select a time zone other than the one
provided by the network. This setting is greyed-out when the Automatic
time zone setting is checkmarked.
Use 24-hour format: Checkmark to display the time using the 24-hour
time format (for example, 13:00 instead of 1:00 pm).
Select date format: Sets the format for displaying dates.
Accessibility
Improves accessibility for users who have impaired vision, hearing, or
reduced dexterity.
SERVICES
TalkBack: Allows you to set up the TalkBack function which assists
people with impaired vision by providing verbal feedback. Tap the
TalkBack switch
or Off. Tap SETTINGS at the bottom of the screen to adjust the TalkBack
settings.
When TalkBack is turned on, the touchscreen settings require the user
to first tap an item they wish to select, and then double tap the item
again in order to access this feature.
NOTE Passwords can be heard as they are entered when headsets are connected to the phone
unless settings are changed to read passwords aloud without a headset.
VISION
Install web scripts: Allows you to enable (or disable) installation of web
scripts.
Large text: Checkmark to increase the size of the text.
Invert color: Sets the color contrast for better screen viewing. Tap the
Invert color switch at the top right corner of the screen to turn it on.
Then, tap the screen and drag across the screen in any direction until
you see the color contrast you want to use.
at the top right corner of the screen to toggle it On
187
Page 90

188
Settings
Magnification gestures: Tap the Magnification gestures switch to
toggle it On or Off. On allows you to zoom in and out by triple-tapping
the screen.
Shades: Checkmark to set the screen to a darker contrast (a darker
shade).
NOTE BrailleBack is an application that connects the phone to Braille devices. It is available on
the Google Play Store.
HEARING
Mono audio: Checkmark to route the sound through both the right and
left channel when a headset is connected. To manually set the audio
route, move the slider on the mono audio slide bar.
PHYSICAL AND MOTOR
Touch & hold delay: Sets the touch and hold delay. Choose from Short,
Medium, or Long.
Universal touch: Tap the Universal touch switch
to toggle it On or
off. On allows you to replace the hardware keys with a Universal touch
board
.Tap the Universal touch icon to be able to tap its Power
button, Home button, Volume down button, Volume up button, and
Pinch button. Draw a "C" ("call") on the board to automatically display the
Dial tab. Draw an "M" on the board to automatically display the
Messaging application. Draw a "W" ("web") on the board to automatically
launch the Chrome application.
SYSTEM
Auto-rotate screen: Checkmark to allow the device to rotate the screen
depending on the device orientation (portrait or landscape).
Speak passwords: Checkmark so that you can say your log in
passwords (instead of typing your passwords).
Power button ends call: Checkmark so that you can end voice calls by
pressing the Power/Lock Key
. When enabled, pressing the Power/
Lock Key during a call does not lock the screen.
Easy access: Sets quick, easy access to selected features when you
triple-tap the Home Key
. Choose Off, Show all, TalkBack, Invert
color, Universal touch, or Accessibility settings.
Page 91

Settings
Text-to-speech output: Sets the text-to-speech preferred engine and
speech rate setting. Also plays a short demonstration of speech
synthesis. Text-to-speech output provides an audible readout of text, for
example, the contents of text messages, and the Caller ID for incoming
calls.
PC connection
This menu allows you to manage the default USB connection type and
other connection functions.
USB CONNECTION
Select USB connection method: Sets the default mode when
connecting your phone to a PC using a USB Cable. Choose from Charge
phone, Media sync (MTP), Internet connection, and Camera (PTP).
Ask upon connecting: Checkmark to confirm the USB connection type
when you connect to a PC.
Help: Displays connection settings information.
Accessory
QuickWindow case: Tap to activate the QuickWindow case to use
functions available on the small view window.
Car Home: Checkmark to automatically set the phone to the Car Home
mode when it’s mounted in the car cradle.
USB storage: Sets the app panel display. Checkmark App panel to
automatically display the application panel when connected via an OTG
(On-the-Go) USB cable. Tap Edit app panel to change the displayed
applications.
Earphone: Sets the app panel display. Checkmark App panel to
automatically display the application panel when an earphone is
connected. Tap Edit app panel to change the displayed applications.
Dock: Sets the app panel display. Checkmark App panel to automatically
display the application panel when the device is inserted in a dock. Tap
Edit app panel to change the displayed applications.
189
Page 92

190
Settings
About phone
This menu allows you to manage your software updates and view various
information relating to your device.
Phone name: Tap to edit your phone name.
Software update: Allows you to check for Android system software
updates and other current information.
Network: Allows you to view your Network, Network type and strength,
Service state, Roaming state, Mobile network state, IP address, and IMS
registration status.
Status: Allows you to view your phone number, PRL Version, ERI version,
IMEI, IMEISV, ICCID, Rooting status and Last factory data reset.
Battery: Allows you to view Battery status, Battery level, and Battery use.
Hardware information: Allows you to view Model number, Up time,
Lifetime calls, Warranty Date Code, Hardware version, Wi-Fi MAC address
and Bluetooth address.
Software information: Allows you to view Android version, Baseband
version, Kernel version, Build number, and Software version.
Legal information: Allows you to view open source licenses and Google
legal information.
Patent information: Displays LG patent information.
Regulatory and Safety: Allows you to view the regulatory and safety
information.
Page 93

Safety
WARNING: This product contains chemicals known to the State of
California to cause cancer and birth defects or reproductive harm. Wash
hands after handling.
HAC
This phone has been tested and rated for use with hearing aids for some of
the wireless technologies that it uses. However, there may be some newer
wireless technologies used in this phone that have not been tested yet for
use with hearing aids. It is important to try the different features of this
phone thoroughly and in different locations, using your hearing aid or
cochlear implant, to determine if you hear any interfering noise. Consult
your service provider or the manufacturer of this phone for information on
hearing aid compatibility. If you have questions about return or exchange
policies, consult your service provider or phone retailer.
FCC Part 15 Class B Compliance
This device and its accessories comply with part 15 of FCC rules. Operation
is subject to the following two conditions: (1) This device and its
accessories may not cause harmful interference, and (2) this device and its
accessories must accept any interference received, including interference
that causes undesired operation.
Any changes or modifications not expressly approved in this user guide
could void your warranty for this equipment. Use only the supplied antenna.
Use of unauthorized antennas (or modifications to the antenna) could impair
call quality, damage the phone, void your warranty and/or violate FCC
regulations.
Don’t use the phone with a damaged antenna. A damaged antenna could
cause a minor skin burn. Contact your local dealer for a replacement
antenna.
FCC RF Exposure Information
WARNING! Read this information before operating the phone.
In August 1996, the Federal Communications Commission (FCC) of the
United States, with its action in Report and Order FCC 96-326, adopted an
updated safety standard for human exposure to Radio Frequency (RF)
191
Page 94

192
Safety
electromagnetic energy emitted by FCC regulated transmitters. Those
guidelines are consistent with the safety standard previously set by both
U.S. and international standards bodies. The design of this phone complies
with the FCC guidelines and these international standards.
Bodily Contact During Operation
This device was tested for typical use with the back of the phone kept 0.39
inches (1.0 cm) from the body. To comply with FCC RF exposure
requirements, a minimum separation distance of 0.39 inches (1.0 cm) must
be maintained between the user’s body and the back of the phone,
including the antenna, whether extended or retracted. Third-party belt-clips,
holsters, and similar accessories containing metallic components should
not be used. Avoid the use of accessories that cannot maintain 0.39 inches
(1.0 cm) distance between the user’s body and the back of the phone and
have not been tested for compliance with FCC RF exposure limits.
Vehicle-Mounted External Antenna
(Optional, if available.)
To satisfy FCC RF exposure requirements, keep 8 inches (20 cm) between
the user / bystander and vehicle-mounted external antenna. For more
information about RF exposure, visit the FCC website at www.fcc.gov.
FCC Notice and Cautions
This device and its accessories comply with part 15 of FCC rules. Operation
is subject to the following two conditions: (1) This device and its
accessories may not cause harmful interference, and (2) this device and its
accessories must accept any interference received, including interference
that causes undesired operation.
Any changes or modifications not expressly approved in this user guide
could void your warranty for this equipment. Use only the supplied antenna.
Use of unauthorized antennas (or modifications to the antenna) could impair
call quality, damage the phone, void your warranty and/or violate FCC
regulations.
Don’t use the phone with a damaged antenna. A damaged antenna could
cause a minor skin burn. Contact your local dealer for a replacement
antenna.
Page 95

Safety
Part 15.19 statement
This device complies with part15 of FCC rules. Operation is subject to the
following two conditions:
(1) This device may not cause harmful interference.
(2) This device must accept any interference received, including
interference that may cause undesired operation.
Part 15.21 statement
Changes or modifications that are not expressly approved by the
manufacturer could void the user’s authority to operate the equipment.
Part 15.105 statement
This equipment has been tested and found to comply with the limits for a
class B digital device, pursuant to Part 15 of the FCC rules. These limits are
designed to provide reasonable protection against harmful interference in a
residential installation. This equipment generates, uses, and can radiate
radio frequency energy and, if not installed and used in accordance with the
instructions, may cause harmful interference to radio communications.
However, there is no guarantee that interference will not occur in a
particular installation. If you experience interference with reception (e.g.,
television), determine if this equipment is causing the harmful interference
by turning the equipment off and then back on to see if the interference is
affected. If necessary, try correcting the interference by one or more of the
following measures:
- Reorient or relocate the receiving antenna.
- Increase the separation between the equipment and receiver.
- Connect the equipment into an outlet on a circuit different from that to
which the receiver is connected.
- Consult the dealer or an experienced radio/TV technician for help.
The phone by LG operates on Verizon’s 4G network, based on Long Term
Evolution (LTE) technology and Mobile Broadband 4G networks in the
United States*.
193
Page 96

194
Safety
Now you can connect easily at high speeds to the Internet, your corporate
Intranet, and your email while you’re away from the office.
* Service not available everywhere. Visit website (verizonwireless.com/4G) for a
* Information subject to change.
complete list of available areas.
Wi-Fi Caution
This device is capable of operating in 802.11a/n mode. For 802.11a/n
devices operating in the frequency range of 5.15 - 5.25 GHz, they are
restricted for indoor operations to reduce any potential harmful interference
for Mobiles Satellite Services (MSS) in the US.
Wi-Fi Access Points that are capable of allowing your device to operate in
802.11a/n mode(5.15 - 5.25 GHz band) are optimized for indoor use only.
If your Wi-Fi network is capable of operating in this mode, please restrict
your Wi-Fi use indoors as to not violate federal regulations to protect
Mobile Satellite Services.
Consumer Information About Radio Frequency
Emissions
Your wireless phone, which contains a radio transmitter and receiver,
emits radio frequency energy during use. The following consumer
information addresses commonly asked questions about the health
effects of wireless phones.
Are wireless phones safe?
Scientific research on the subject of wireless phones and radio frequency
(“RF”) energy has been conducted worldwide for many years, and
continues. In the United States, the Food and Drug Administration (“FDA”)
and the Federal Communications Commission (“FCC”) set policies and
procedures for wireless phones. The FDA issued a website publication on
health issues related to cell phone usage where it states, “The scientific
community at large … believes that the weight of scientific evidence does
not show an association between exposure to radiofrequency (RF) from cell
phones and adverse health outcomes. Still the scientific community does
Page 97

Safety
recommend conducting additional research to address gaps in knowledge.
That research is being conducted around the world and FDA continues to
monitor developments in this field. You can access the joint FDA/FCC
website at http://www.fda.gov (under “c”in the subject index, select Cell
Phones > Research). You can also contact the FDA toll-free at (888)
463-6332 or (888) INFO-FDA. In June 2000, the FDA entered into a
cooperative research and development agreement through which additional
scientific research is being conducted. The FCC issued its own website
publication stating that “there is no scientific evidence that proves that
wireless phone usage can lead to cancer or a variety of other problems,
including headaches, dizziness or memory loss.” This publication is
available at http://www.fcc.gov/cgb/ cellular.html or through the FCC at
(888) 225-5322 or (888) CALL-FCC.
What does “SAR” mean?
In 1996, the FCC, working with the FDA, the U.S. Environmental Protection
Agency, and other agencies, established RF exposure safety guidelines for
wireless phones in the United States. Before a wireless phone model is
available for sale to the public, it must be tested by the manufacturer and
certified to the FCC that it does not exceed limits established by the FCC.
One of these limits is expressed as a Specific Absorption Rate, or “SAR.”
SAR is a measure of the rate of absorption of RF energy in the body. Tests
for SAR are conducted with the phone transmitting at its highest power
level in all tested frequency bands. Since 1996, the FCC has required that
the SAR of handheld wireless phones not exceed 1.6 watts per kilogram,
averaged over one gram of tissue.
Although the SAR is determined at the highest power level, the actual SAR
value of a wireless phone while operating can be less than the reported
SAR value. This is because the SAR value may vary from call to call,
depending on factors such as proximity to a cell site, the proximity of the
phone to the body while in use, and the use of hands-free devices. For
more information about SARs, see the FCC’s OET Bulletins 56 and 65 at
http://www.fcc.gov/Bureaus/Engineering_Technology/Documents/bulletins
or visit the Cellular Telecommunications Industry Association website at
http://www.ctia.org/consumer_info/index.cfm/AID/10371. You may also
wish to contact the manufacturer of your phone.
195
Page 98

196
Safety
Can I minimize my RF exposure?
If you are concerned about RF, there are several simple steps you can take
to minimize your RF exposure. You can, of course, reduce your talk time.
You can place more distance between your body and the source of the RF,
as the exposure level drops off dramatically with distance. The FDA/FCC
website states that “hands-free kits can be used with wireless phones for
convenience and comfort. These systems reduce the absorption of RF
energy in the head because the phone, which is the source of the RF
emissions, will not be placed against the head. On the other hand, if the
phone is mounted against the waist or other part of the body during use,
then that part of the body will absorb more RF energy. Wireless phones
marketed in the U.S. are required to meet safety requirements regardless
of whether they are used against the head or against the body. Either
configuration should result in compliance with the safety limit.” Also, if you
use your wireless phone while in a car, you can use a phone with an
antenna on the outside of the vehicle. You should also read and follow your
wireless phone manufacturer’s instructions for the safe operation of your
phone.
Do wireless phones pose any special risks to children?
The FDA/FCC website states that “the scientific evidence does not show a
danger to users of wireless communication devices, including children.”
The FDA/FCC website further states that “some groups sponsored by
other national governments have advised that children be discouraged from
using wireless phones at all”. For example, the Stewart Report from the
United Kingdom [“UK”] made such a recommendation in December 2000.
In this report a group of independent experts noted that no evidence exists
that using a cell phone causes brain tumors or other ill effects. [The UK’s]
recommendation to limit cell phone use by children was strictly
precautionary; it was not based on scientific evidence that any health
hazard exists. A copy of the UK’s leaflet is available at http://www.dh.gov.uk
(search “mobile”), or you can write to: NRPB, Chilton, Didcot, Oxon OX11
ORQ, United Kingdom. Copies of the UK’s annual reports on mobile phones
and RF are available online at www.iegmp.org.uk and http://www.hpa.org.
uk/radiation/ (search “mobile”). Parents who wish to reduce their children’s
RF exposure may choose to restrict their children’s wireless phone use.
Page 99

Safety
Where can I get further information about RF emissions?
For further information, see the following additional resources (websites
current as of April 2005):
U.S. Food and Drug Administration
FDA Consumer magazine November-December 2000
Telephone: (888) INFO-FDA
http://www.fda.gov (Under “c” in the subject index, select Cell Phones >
Research.)
U.S. Federal Communications Commission
445 12th Street, S.W. Washington, D.C. 20554
Telephone: (888) 225-5322
http://www.fcc.gov/oet/rfsafety
Independent Expert Group on Mobile Phones
http://www.iegmp.org.uk
Royal Society of Canada Expert Panels on Potential Health Risks of
Radio Frequency Fields from Wireless Telecommunication Devices
283 Sparks Street Ottawa, Ontario K1R 7X9 Canada
Telephone: (613) 991-6990
http://www.rsc.ca/index.php?page=Expert_Panels_RF&Lang_id=120
World Health Organization
Avenue Appia 20 1211 Geneva 27 Switzerland
Telephone: 011 41 22 791 21 11
http://www.who.int/mediacentre/factsheets/fs193/en/
International Commission on Non-Ionizing Radiation Protection
c/o Bundesamt fur Strahlenschutz Ingolstaedter Landstr. 1 85764
Oberschleissheim Germany
197
Page 100

198
Safety
Telephone: 011 49 1888 333 2156
http://www.icnirp.de
American National Standards Institute
1819 L Street, N.W., 6th Floor Washington, D.C. 20036 Telephone: (202)
293-8020
http://www.ansi.org
National Council on Radiation Protection and Measurements
7910 Woodmont Avenue, Suite 800 Bethesda, MD 20814-3095
Telephone: (301) 657-2652
http://www.ncrponline.org
Engineering in Medicine and Biology Society, Committee on Man and
Radiation (COMAR) of the Institute of Electrical and Electronics
Engineers
http://ewh.ieee.org/soc/embs/comar/
Consumer Information on SAR
(Specific Absorption Rate)
This model phone meets the government's requirements for exposure to
radio waves. Your wireless phone is a radio transmitter and receiver. It is
designed and manufactured not to exceed the emission limits for exposure
to Radio Frequency (RF) energy set by the Federal Communications
Commission of the U.S. Government. These limits are part of
comprehensive guidelines and establish permitted levels of RF energy for
the general population. The guidelines are based on standards that were
developed by independent scientific organizations through periodic and
thorough evaluation of scientific studies. The standards include a
substantial safety margin designed to assure the safety of all persons,
regardless of age and health.
The exposure standard for wireless mobile phones employs a unit of
measurement known as the Specific Absorption Rate, or SAR. The SAR
 Loading...