LG Electronics USA V410 Users Manual

Tools

QPair

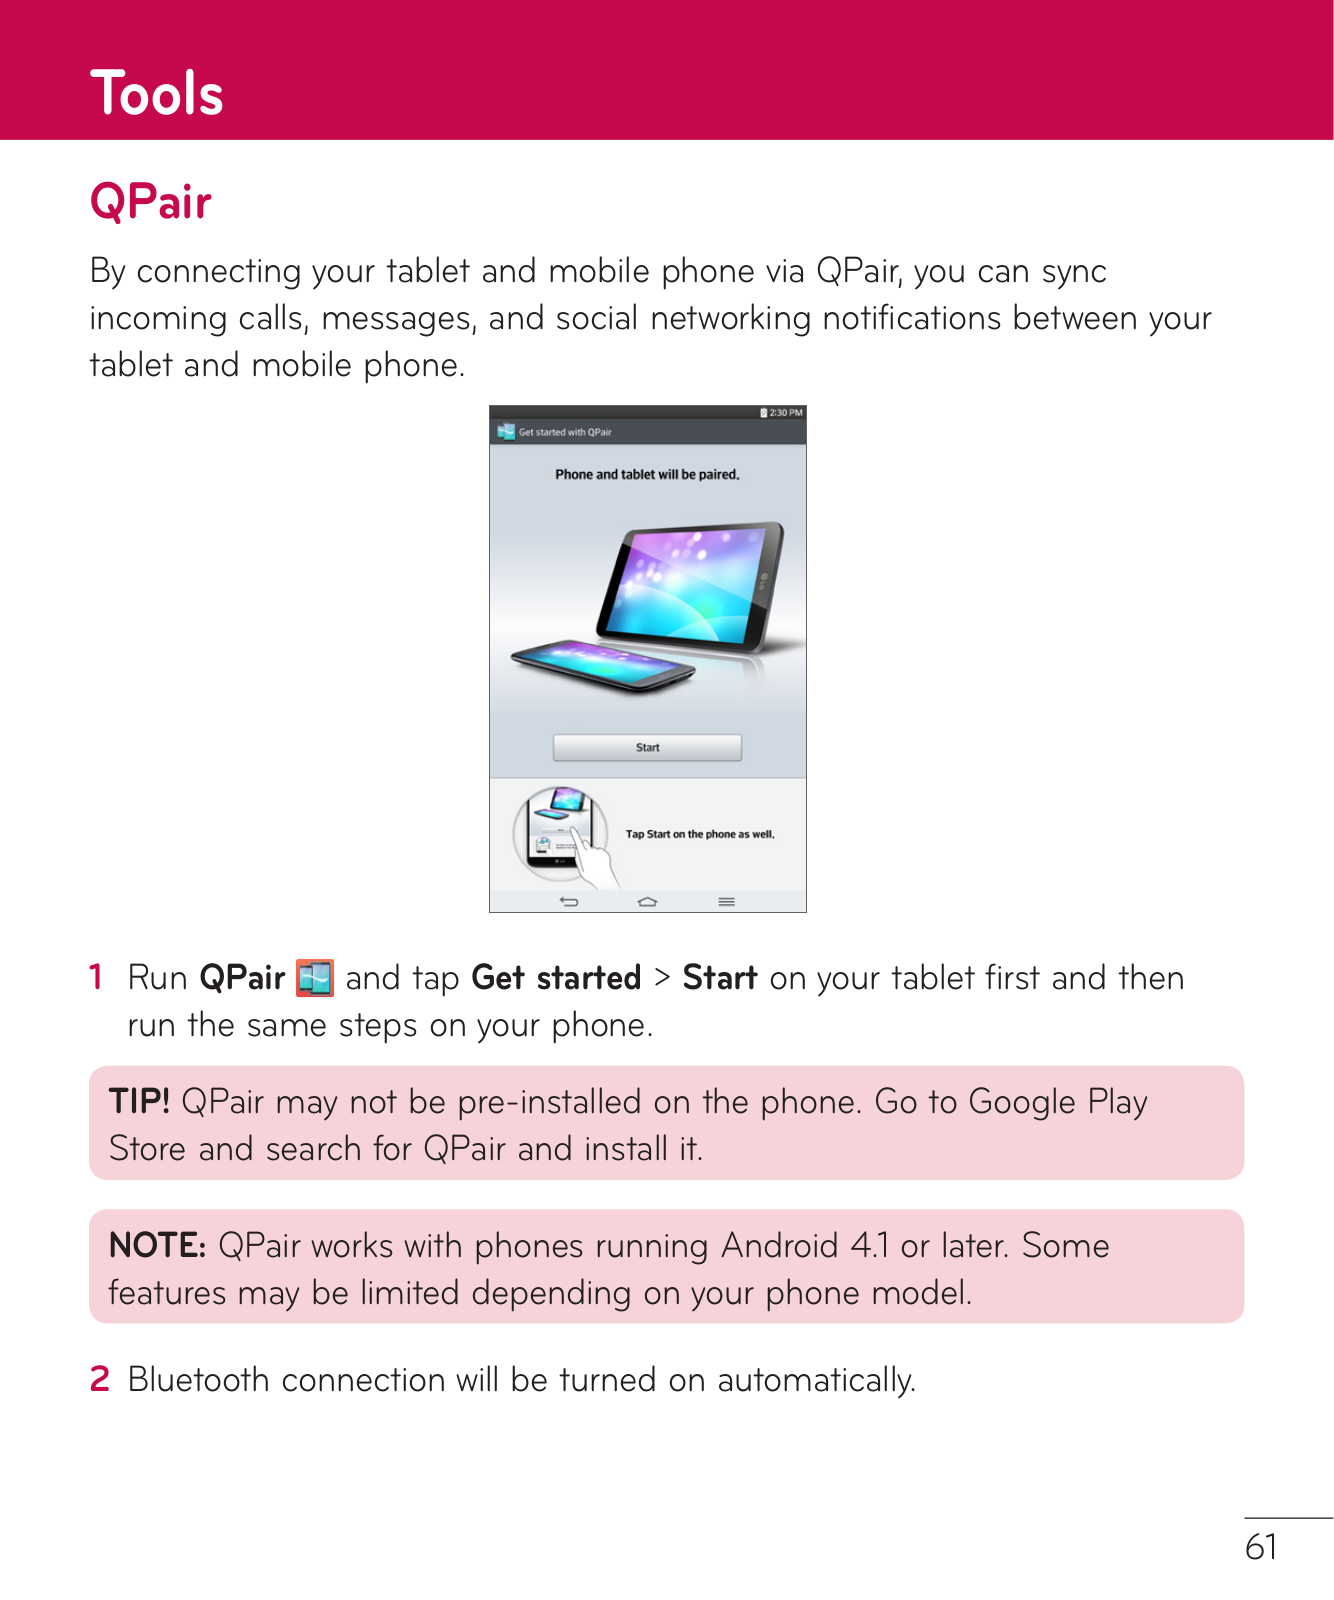
By connecting your tablet and mobile phone via QPair, you can sync incoming calls, messages, and social networking notifications between your tablet and mobile phone.

1Run QPair and tap Get started > Start on your tablet first and then run the same steps on your phone.

TIP! QPair may not be pre-installed on the phone. Go to Google Play Store and search for QPair and install it.

NOTE: QPair works with phones running Android 4.1 or later. Some features may be limited depending on your phone model.

2 Bluetooth connection will be turned on automatically.

61

QPair features

Call notifications – Sends the tablet a notification when the phone receives a call. The notification displays the caller's number and allows you to decline the call.

Message notifications – Sends the tablet a notification when the phone receives a message.

Social network notifications – Displays a social networking notification on your tablet's Status Bar when it arrives on your phone.

NOTE: To enable this feature, turn the QPair social network notifications option on your phone (Settings > Accessibility > QPair social network notifications). This option allows you to be notified of social networking notifications on your tablet.

QuickMemo transfer – Saves your current QuickMemo in the tablet's Gallery, and then syncs the tablet's Gallery with the Gallery on your phone.

Recent app sticker – When the paired device's screen is unlocked, a sticker will display the last app used on the other device if the app is installed both on the tablet and the phone.

QSlide

The QSlide function enables an overlay window on your tablet’s display for easy multi-tasking. QSlide windows can be opened from the QSlide apps bar on the Notifications panel, or directly from the applications that support the QSlide function.

62

LG Electronics USA V410 Users Manual

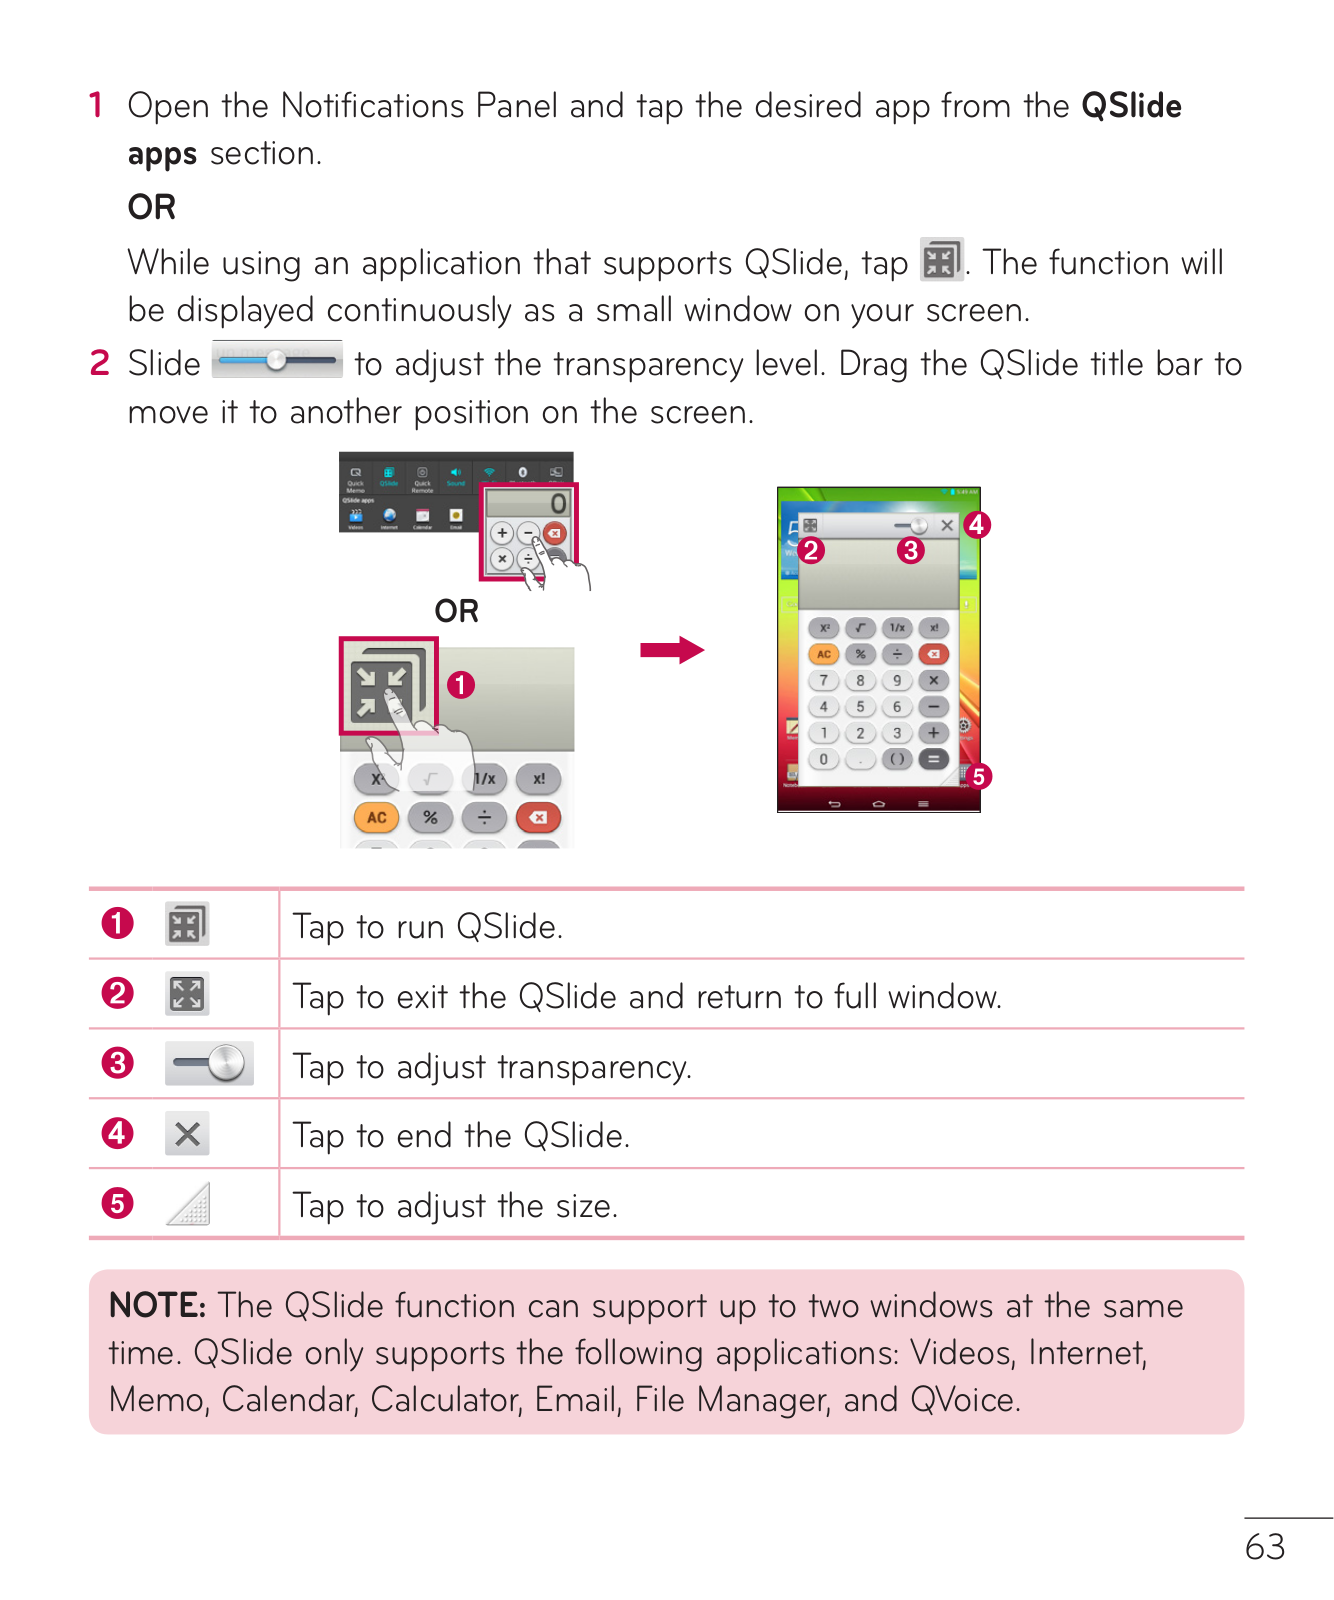
1Open the Notifications Panel and tap the desired app from the QSlide apps section.

OR

While using an application that supports QSlide, tap . The function will be displayed continuously as a small window on your screen.

2 Slide to adjust the transparency level. Drag the QSlide title bar to move it to another position on the screen.

OR

Tap to run QSlide.

Tap to exit the QSlide and return to full window.

Tap to adjust transparency.

Tap to end the QSlide.

Tap to adjust the size.

NOTE: The QSlide function can support up to two windows at the same time. QSlide only supports the following applications: Videos, Internet, Memo, Calendar, Calculator, Email, File Manager, and QVoice.

63

QuickMemo

The QuickMemo feature allows you to create memos and capture screen shots. Capture screens, draw on them, and share them with family and friends with QuickMemo.

Creating a QuickMemo

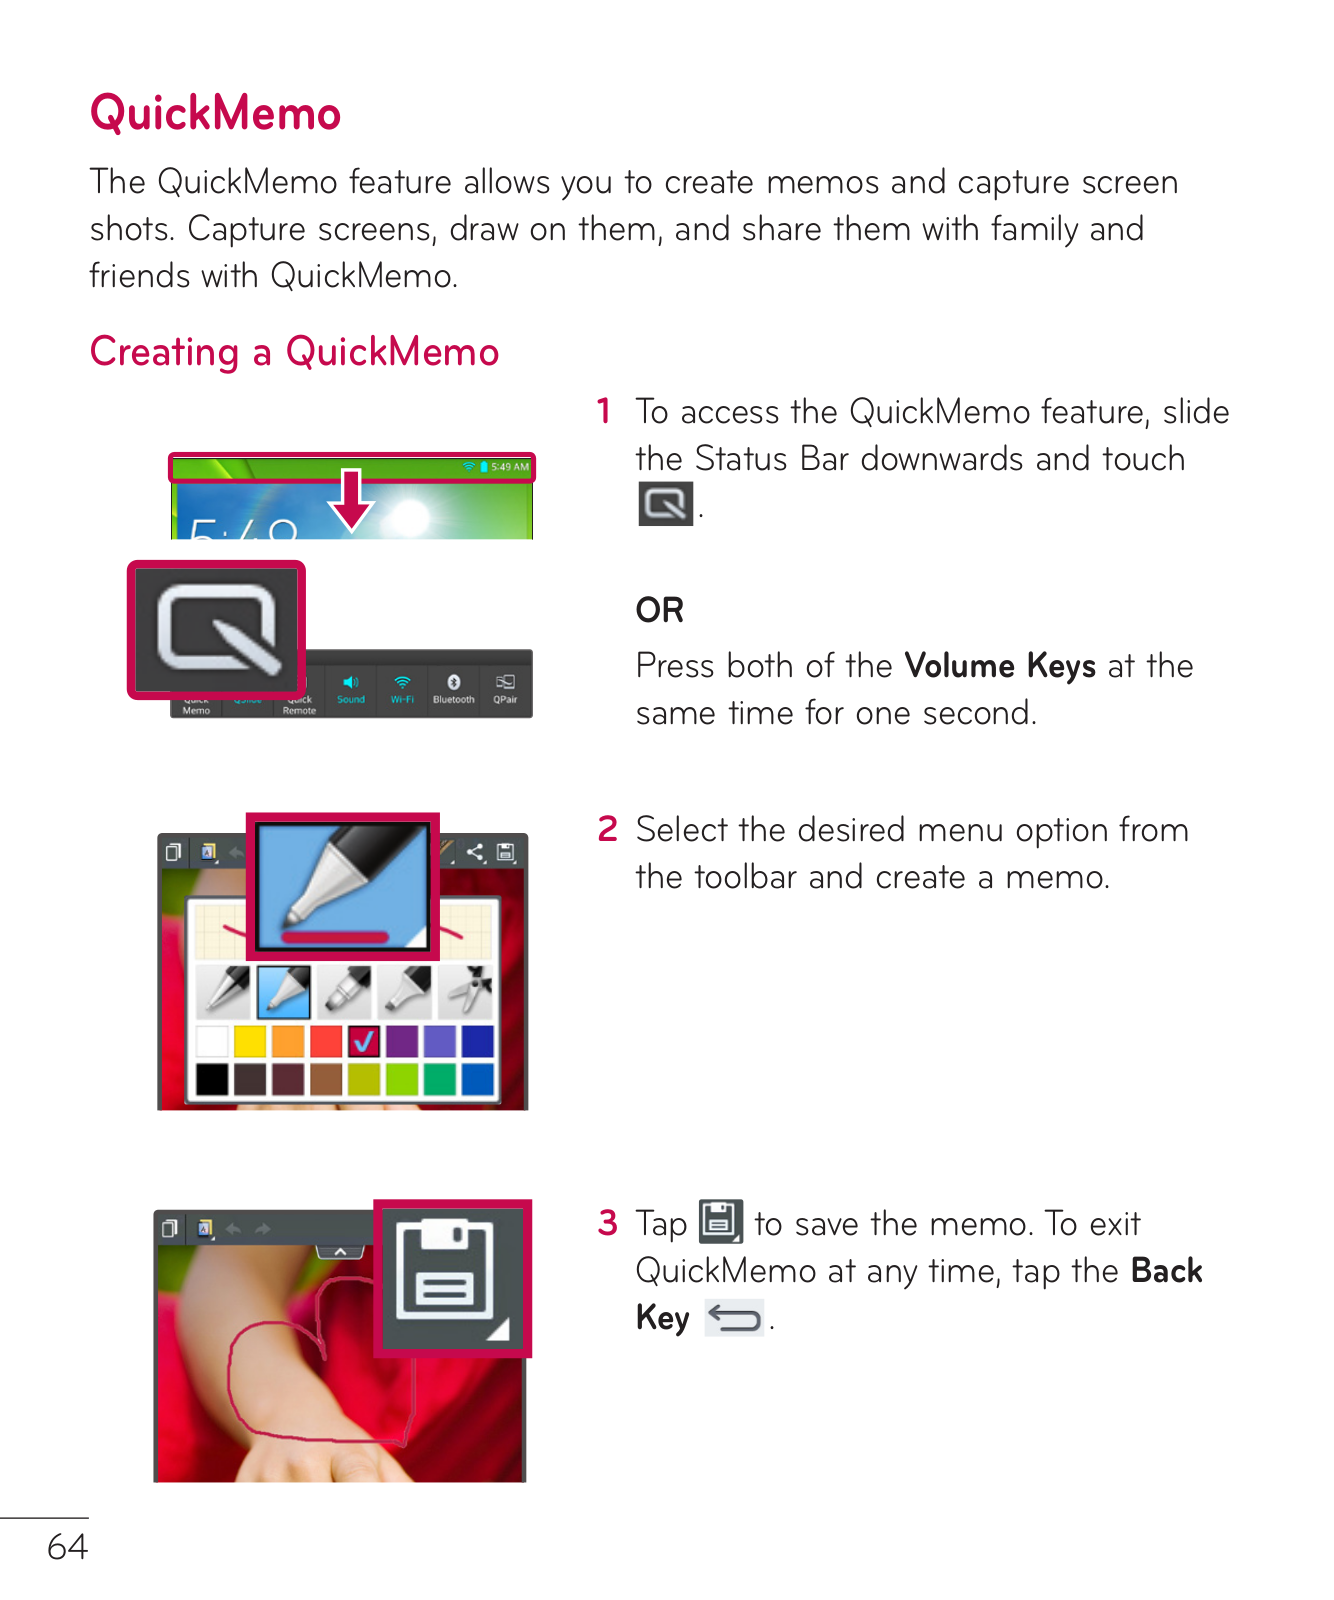
1To access the QuickMemo feature, slide the Status Bar downwards and touch .

OR

Press both of the Volume Keys at the same time for one second.

2 Select the desired menu option from the toolbar and create a memo.

3 Tapto save the memo. To exit QuickMemo at any time, tap the Back Key .

64

NOTE:

Please use a fingertip while using the QuickMemo. Do not use your fingernail.

Using the QuickMemo options

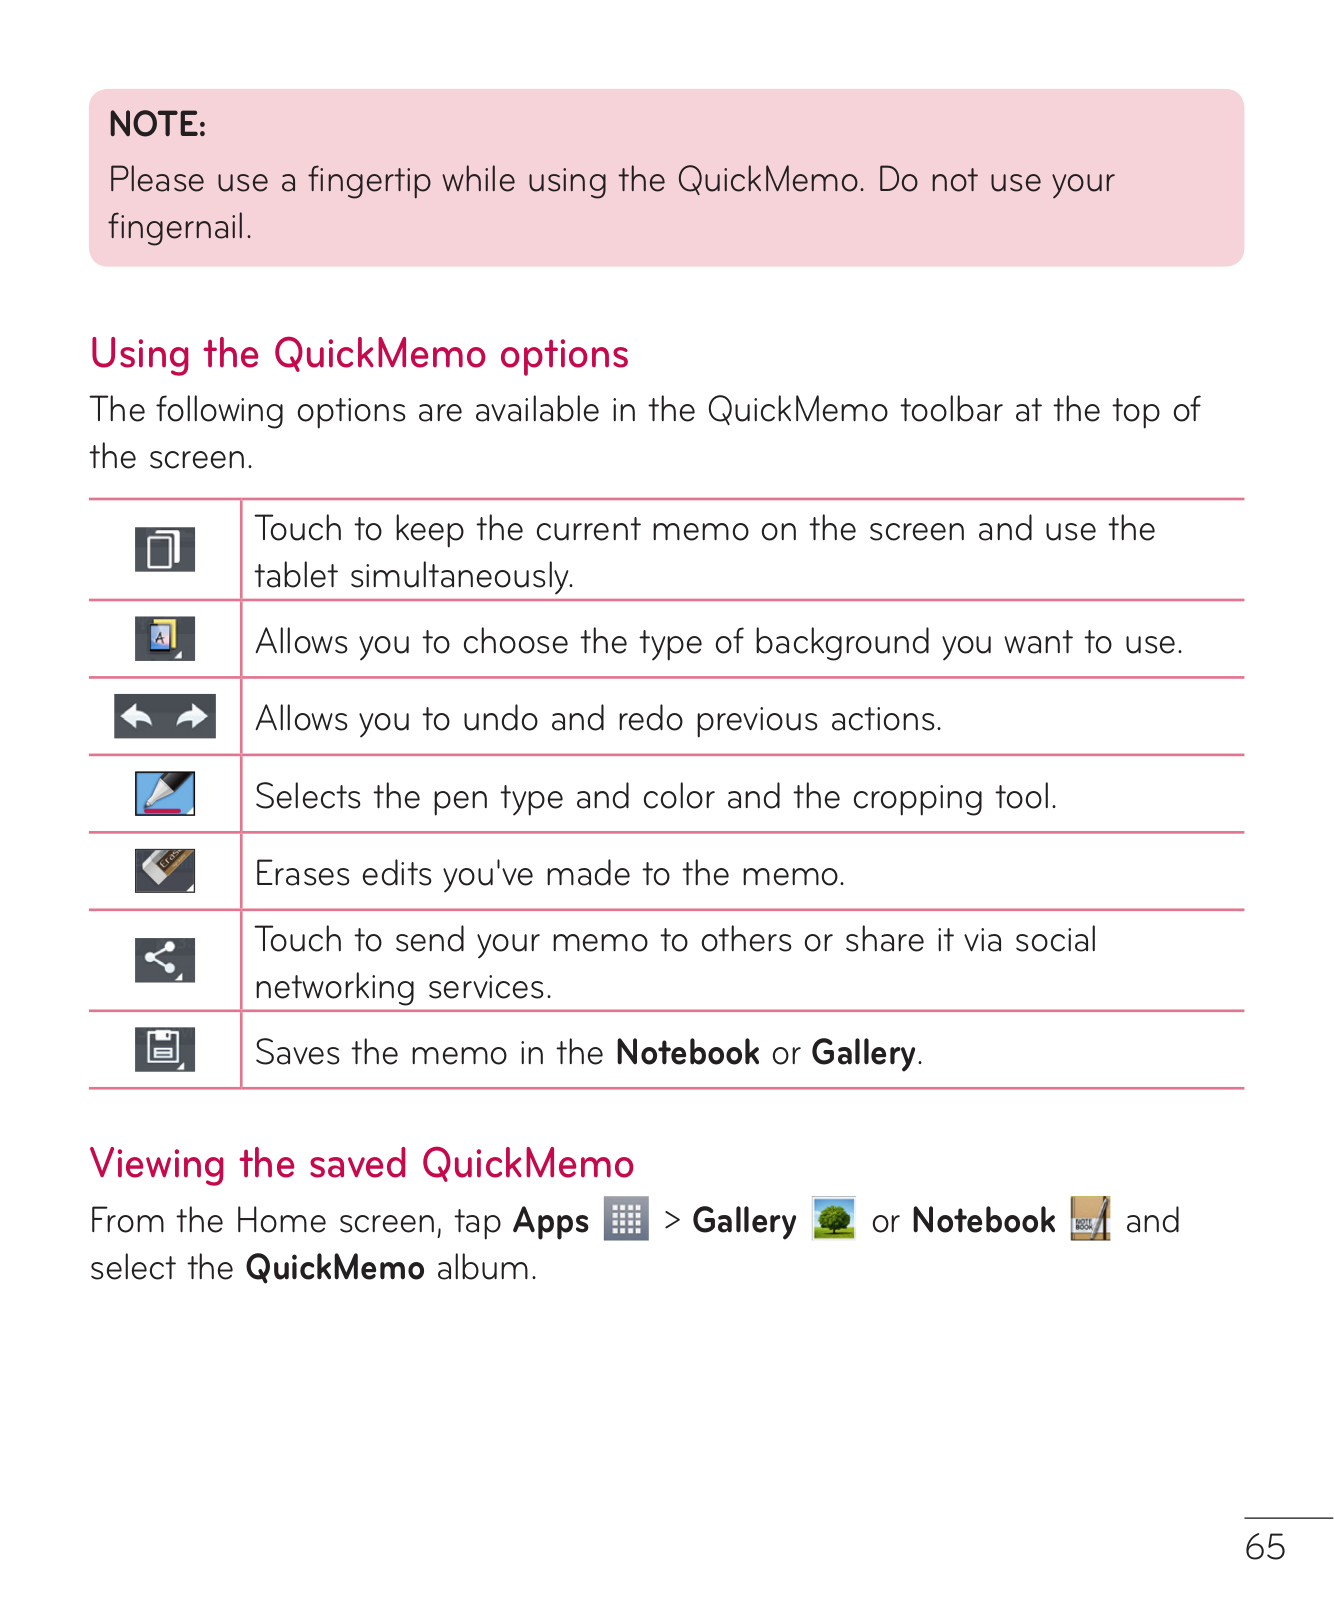
The following options are available in the QuickMemo toolbar at the top of the screen.

Touch to keep the current memo on the screen and use the tablet simultaneously.

Allows you to choose the type of background you want to use.

Allows you to undo and redo previous actions.

Selects the pen type and color and the cropping tool.

Erases edits you've made to the memo.

Touch to send your memo to others or share it via social networking services.

Saves the memo in the Notebook or Gallery.

Viewing the saved QuickMemo

From the Home screen, tap Apps > Gallery or Notebook and select the QuickMemo album.

65

QuickRemote

QuickRemote turns your tablet into a Universal Remote for your home TV or cable box.

NOTE: QuickRemote may not be available for some devices and areas.

To open the QuickRemote application and set up your QuickRemote(s)

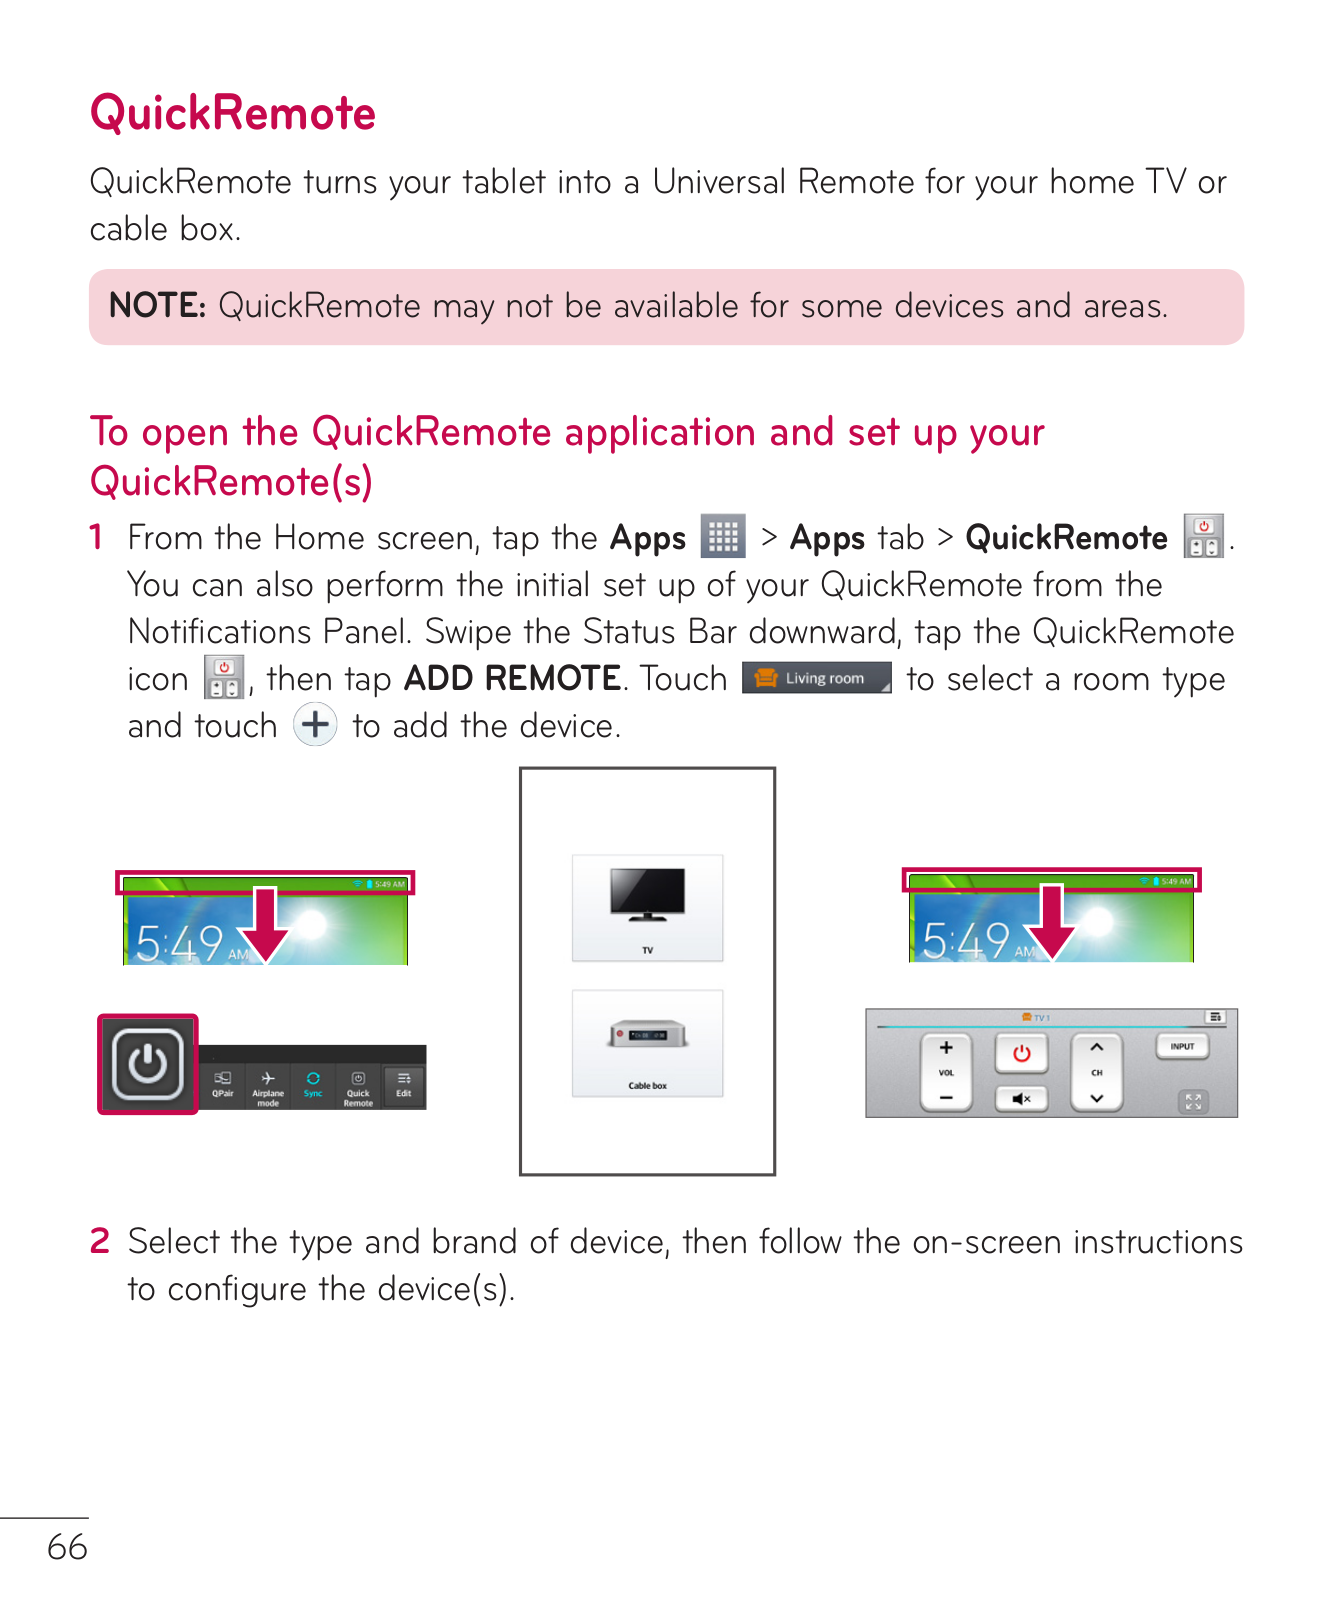
1From the Home screen, tap the Apps > Apps tab > QuickRemote . You can also perform the initial set up of your QuickRemote from the Notifications Panel. Swipe the Status Bar downward, tap the QuickRemote

icon , then tap ADD REMOTE. Touch to select a room type and touch to add the device.

2Select the type and brand of device, then follow the on-screen instructions to configure the device(s).

66

NOTE: The QuickRemote operates the same way as an ordinary infrared (IR) remote control in your region or country. Be careful not to cover the infrared sensor at the top of the tablet when you use the QuickRemote function. This function may not be supported depending on the model, the manufacturer or service company.

Using QuickRemote

1Open QuickRemote and choose the room where you configured the remote.

2Select the remote you want by tapping its type/name on the QuickRemote bar along the left side of the screen.

3Tap the buttons on the displayed remote.

NOTE: When adding the TV remote control, QuickRemote can use the INPUT button to configure appropriate remote control. When configuring the INPUT button, the TV input source can be changed. To reset the TV input source, tap the INPUT button on QuickRemote several times (depending on the number of devices connected to the TV).

QuickRemote options

To access the QuickRemote options menu, tap the Menu Key to select the desired option.

NOTE: While playing music in the background, pressing any QuickRemote button will mute the sound for a second.

67

QuickTranslator

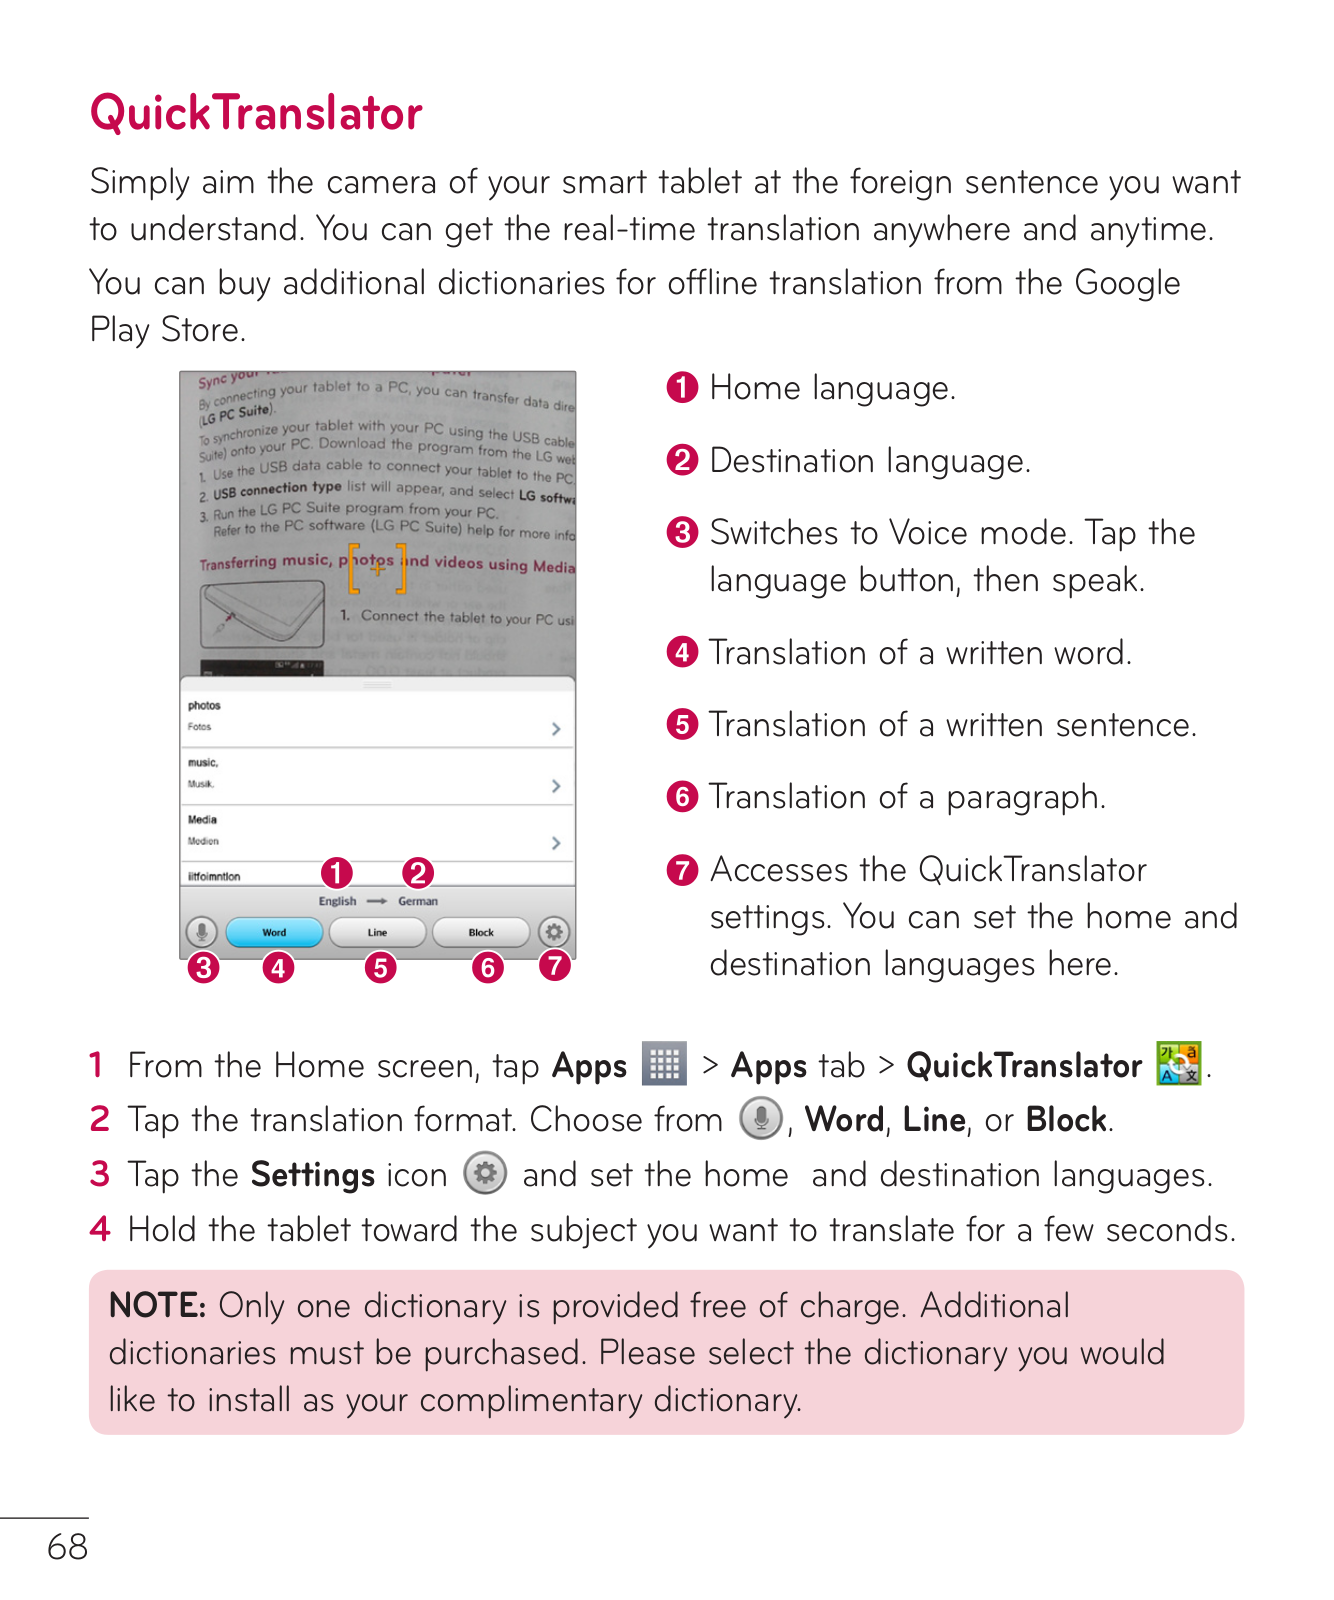
Simply aim the camera of your smart tablet at the foreign sentence you want to understand. You can get the real-time translation anywhere and anytime.

You can buy additional dictionaries for offline translation from the Google Play Store.

Home language.

Destination language.

Switches to Voice mode. Tap the language button, then speak.

Translation of a written word.

Translation of a written sentence.

Translation of a paragraph.

Accesses the QuickTranslator settings. You can set the home and destination languages here.

1From the Home screen, tap Apps > Apps tab > QuickTranslator .

2Tap the translation format. Choose from , Word, Line, or Block.

3Tap the Settings icon and set the home and destination languages.

4Hold the tablet toward the subject you want to translate for a few seconds.

NOTE: Only one dictionary is provided free of charge. Additional dictionaries must be purchased. Please select the dictionary you would like to install as your complimentary dictionary.

68

NOTE: There may be a difference in the rate of recognization depending on the size, font, color, brightness and angle of the letters that need to be translated.

Voice Mate

Voice Mate allows you hands-free interaction with your devices. You can ask Voice Mate to perform tablet functions using your voice, such as setting alarms, or searching the web. When you access Voice Mate for the first time, it displays help information to assist you in learning how to use this function.

To open the Voice Mate application

• From the Home screen, tap the Apps > Voice Mate .

Using the Voice Mate application

1Open the Voice Mate application.

2Tap the Speak icon to turn it on. Say what you want it to do for you.

If you say “Wake me up at 6 AM", Voice Mate will set the alarm for that time.

NOTE: Use Voice Mate in a quiet environment so it can accurately recognize your commands.

69

Voice Mate Icons

The following Voice Mate icons are displayed at the bottom of the screen:

Tap to display the Voice Mate QSlide window on the Home screen.

Tap to say a voice command to execute.

Tap to type a command to execute.

Voice Mate Options menu

Tap the Menu Key to access Settings and Help.

NOTE:

When the language setting for Voice Mate is not the same as the default language setting on your tablet, some commands, such as launching apps, may not work.

When entering text, you can only use letters or numbers.

Voice Mate recognizes your speech better when you speak slowly.

You can view examples of various commands by swiping the Voice Mate main screen to the left.

Alarm

Setting your alarm

1From the Home screen, tap Apps > Apps tab > Alarm/Clock >

.

2Set the desired alarm time.

3Set Repeat, Snooze duration, Vibration, Alarm sound, Alarm volume, Auto app starter, Puzzle lock and Memo.

4Touch Save.

70

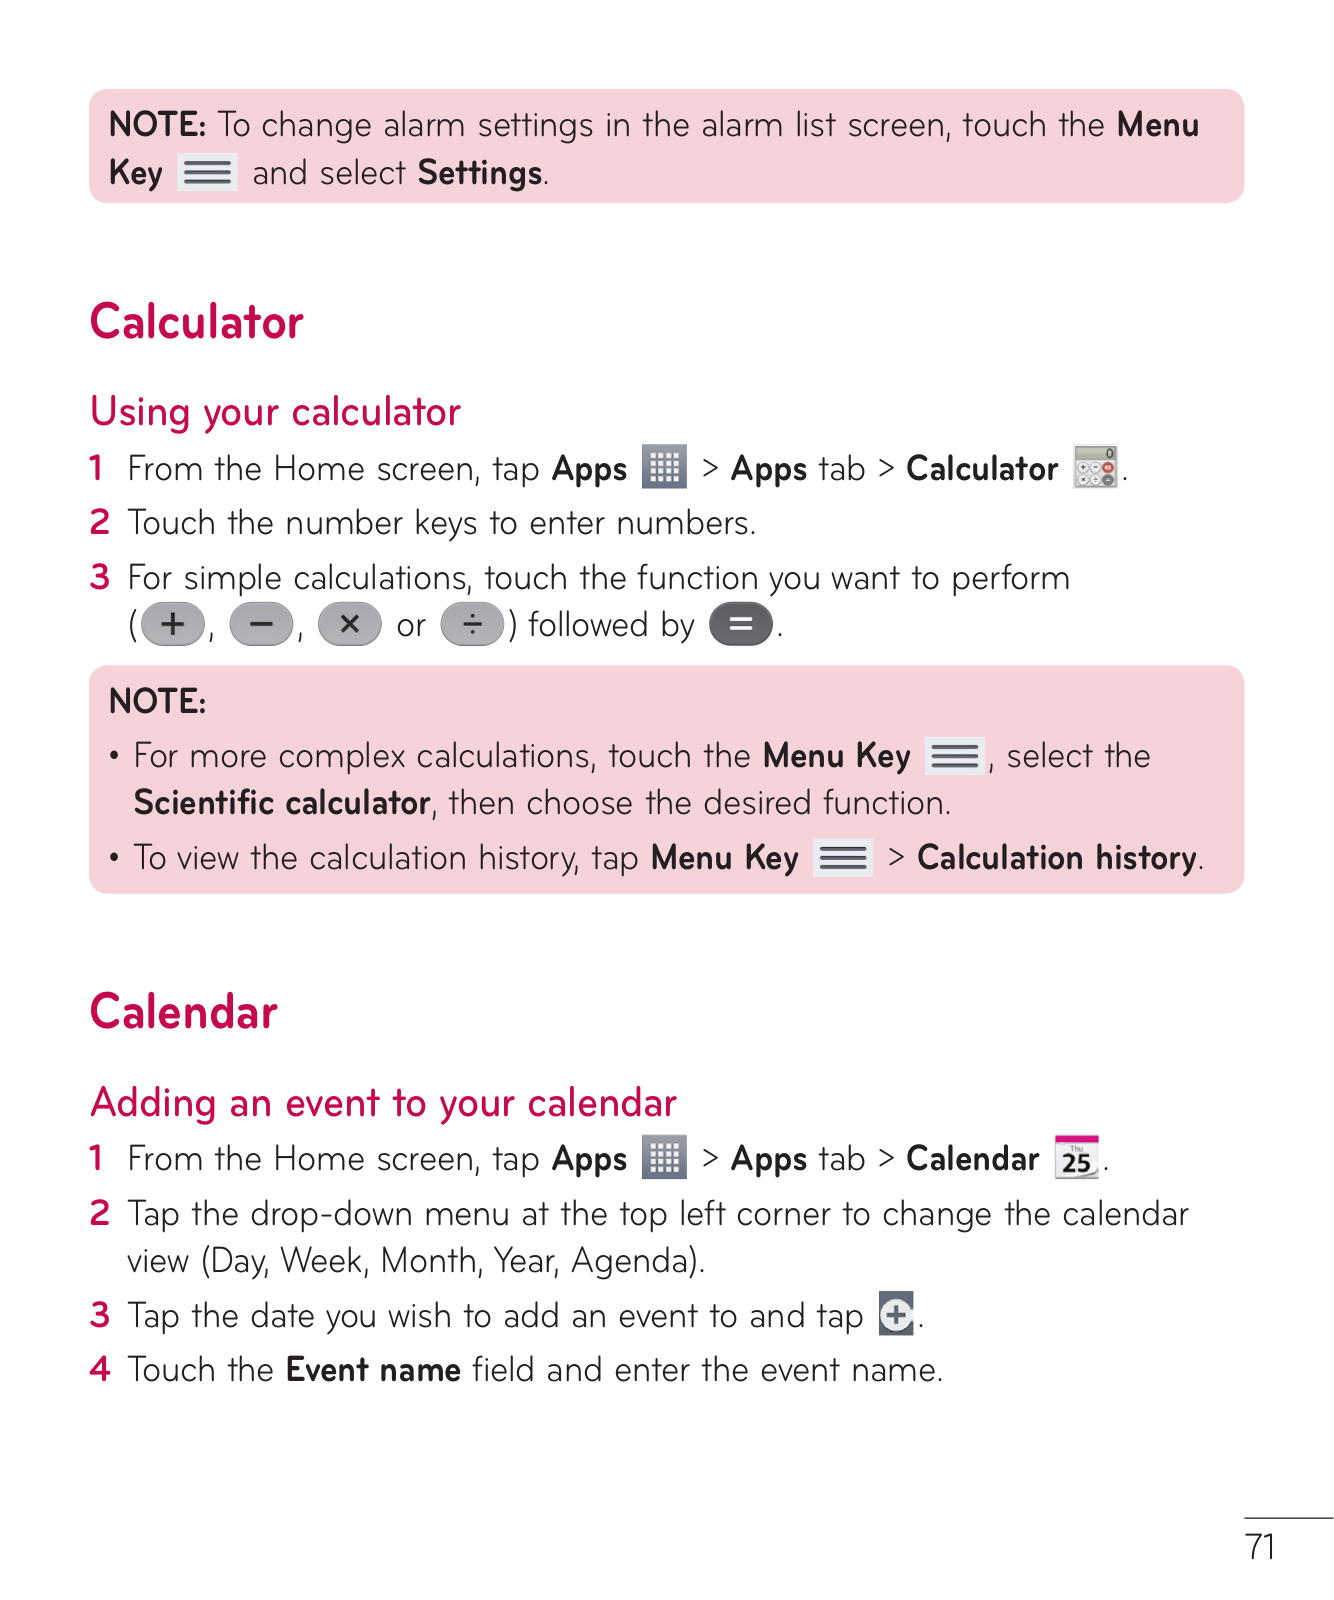
NOTE: To change alarm settings in the alarm list screen, touch the Menu Key and select Settings.

Calculator

Using your calculator

1 From the Home screen, tap Apps

> Apps tab > Calculator

.

2Touch the number keys to enter numbers.

3For simple calculations, touch the function you want to perform

(

,

,

or

) followed by

.

NOTE:

For more complex calculations, touch the Menu Key , select the Scientific calculator, then choose the desired function.

To view the calculation history, tap Menu Key > Calculation history.

Calendar

Adding an event to your calendar

1From the Home screen, tap Apps > Apps tab > Calendar .

2Tap the drop-down menu at the top left corner to change the calendar view (Day, Week, Month, Year, Agenda).

3Tap the date you wish to add an event to and tap .

4Touch the Event name field and enter the event name.

71

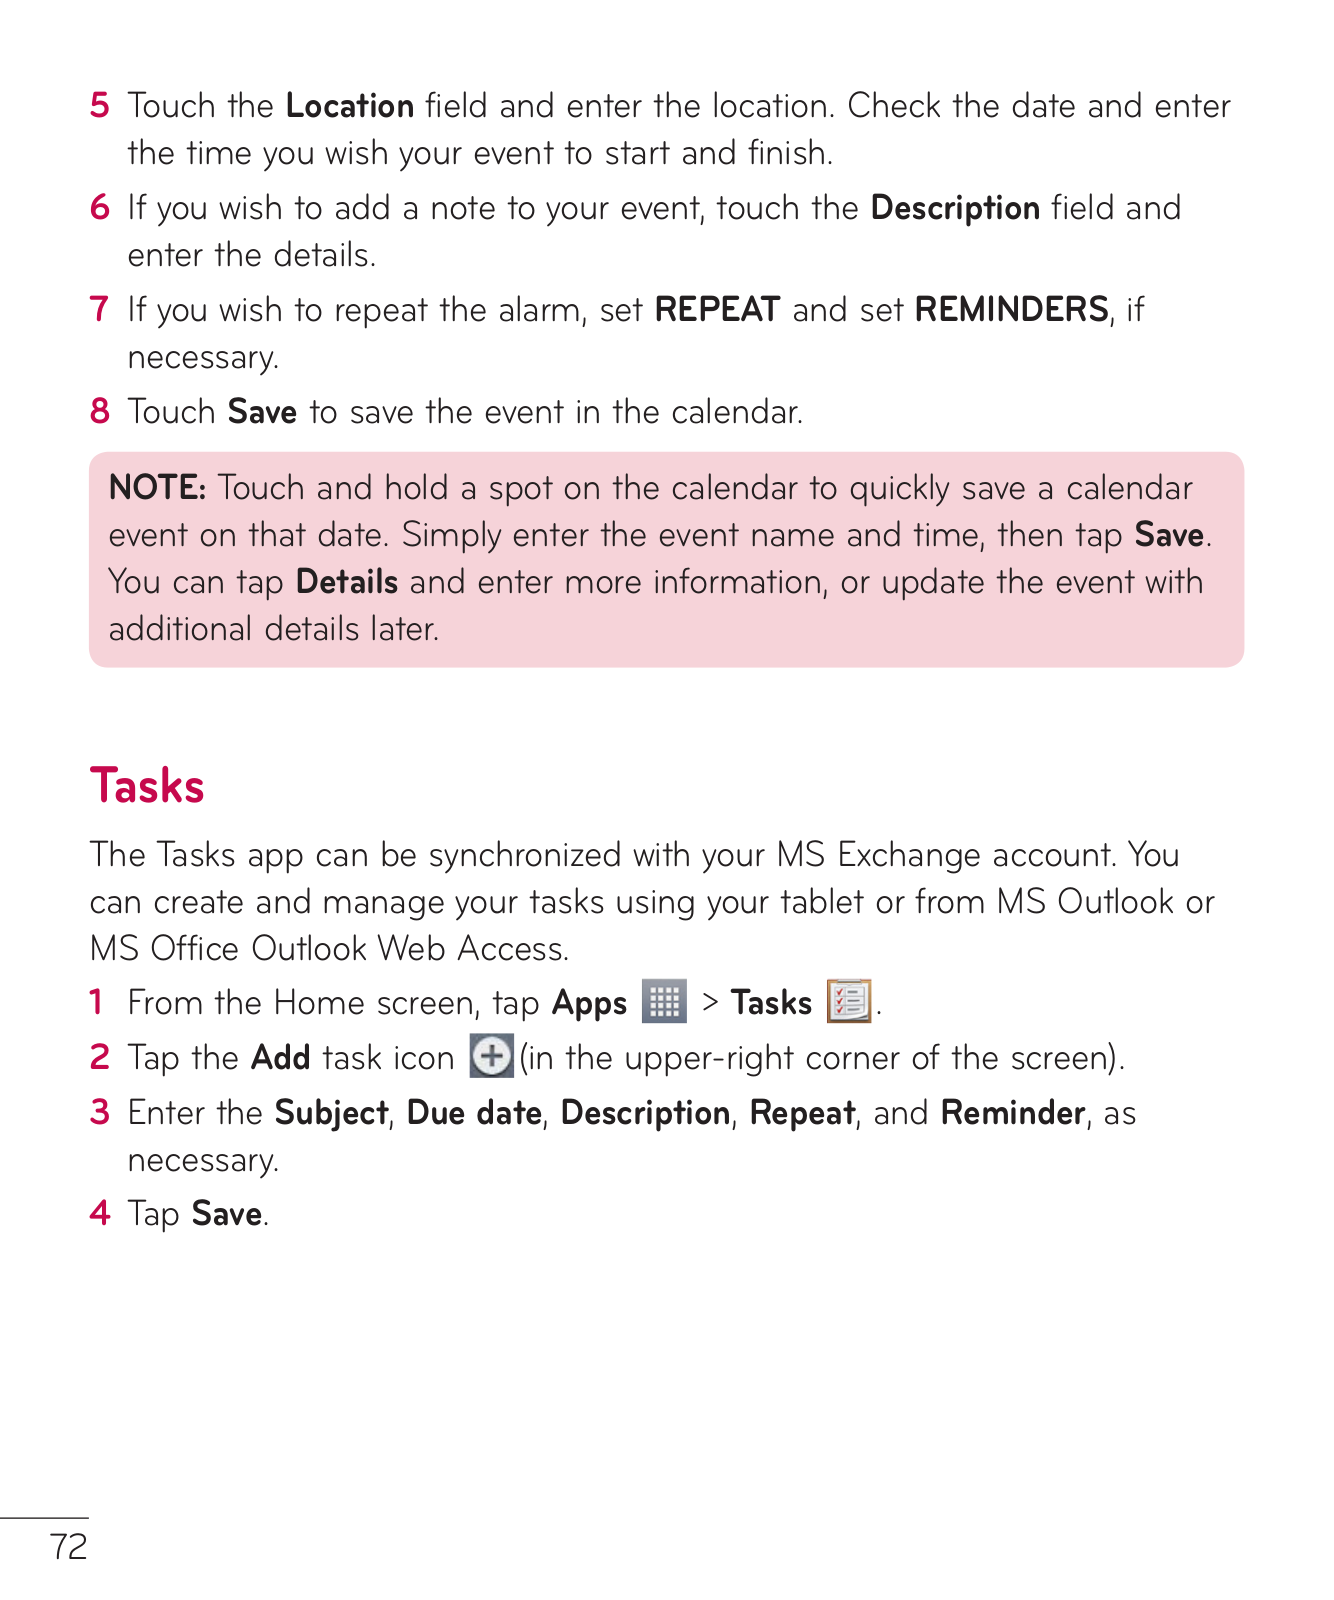
5Touch the Location field and enter the location. Check the date and enter the time you wish your event to start and finish.

6If you wish to add a note to your event, touch the Description field and enter the details.

7If you wish to repeat the alarm, set REPEAT and set REMINDERS, if necessary.

8Touch Save to save the event in the calendar.

NOTE: Touch and hold a spot on the calendar to quickly save a calendar event on that date. Simply enter the event name and time, then tap Save. You can tap Details and enter more information, or update the event with additional details later.

Tasks

The Tasks app can be synchronized with your MS Exchange account. You can create and manage your tasks using your tablet or from MS Outlook or MS Office Outlook Web Access.

1From the Home screen, tap Apps > Tasks .

2Tap the Add task icon (in the upper-right corner of the screen).

3Enter the Subject, Due date, Description, Repeat, and Reminder, as necessary.

4Tap Save.

72

File Manager

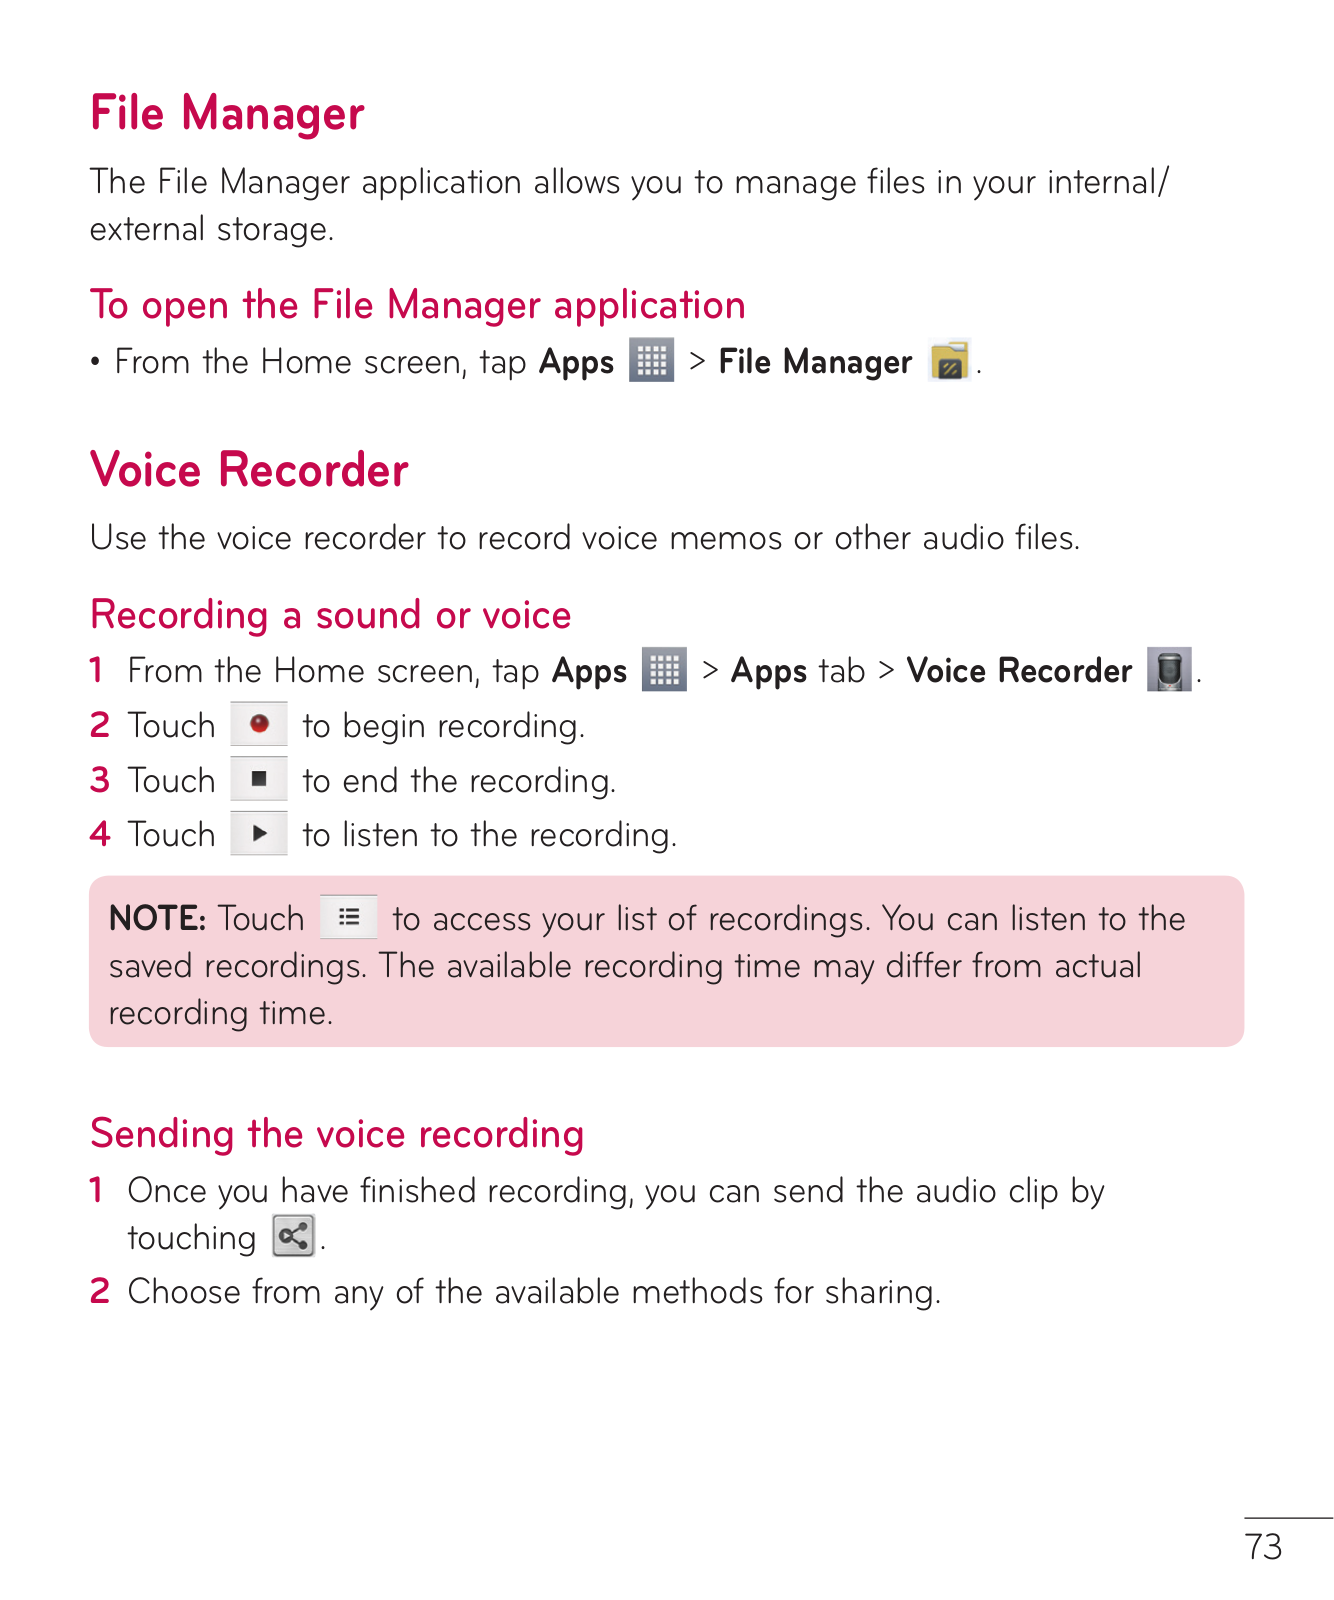
The File Manager application allows you to manage files in your internal/ external storage.

To open the File Manager application

• From the Home screen, tap Apps > File Manager .

Voice Recorder

Use the voice recorder to record voice memos or other audio files.

Recording a sound or voice

1

From the Home screen, tap Apps

> Apps tab > Voice Recorder

.

2

Touch

to begin recording.


3

Touch

to end the recording.


4

Touch

to listen to the recording.


NOTE: Touch

to access your list of recordings. You can listen to the


saved recordings. The available recording time may differ from actual


recording time.


Sending the voice recording

1Once you have finished recording, you can send the audio clip by touching .

2Choose from any of the available methods for sharing.

73

Task Manager

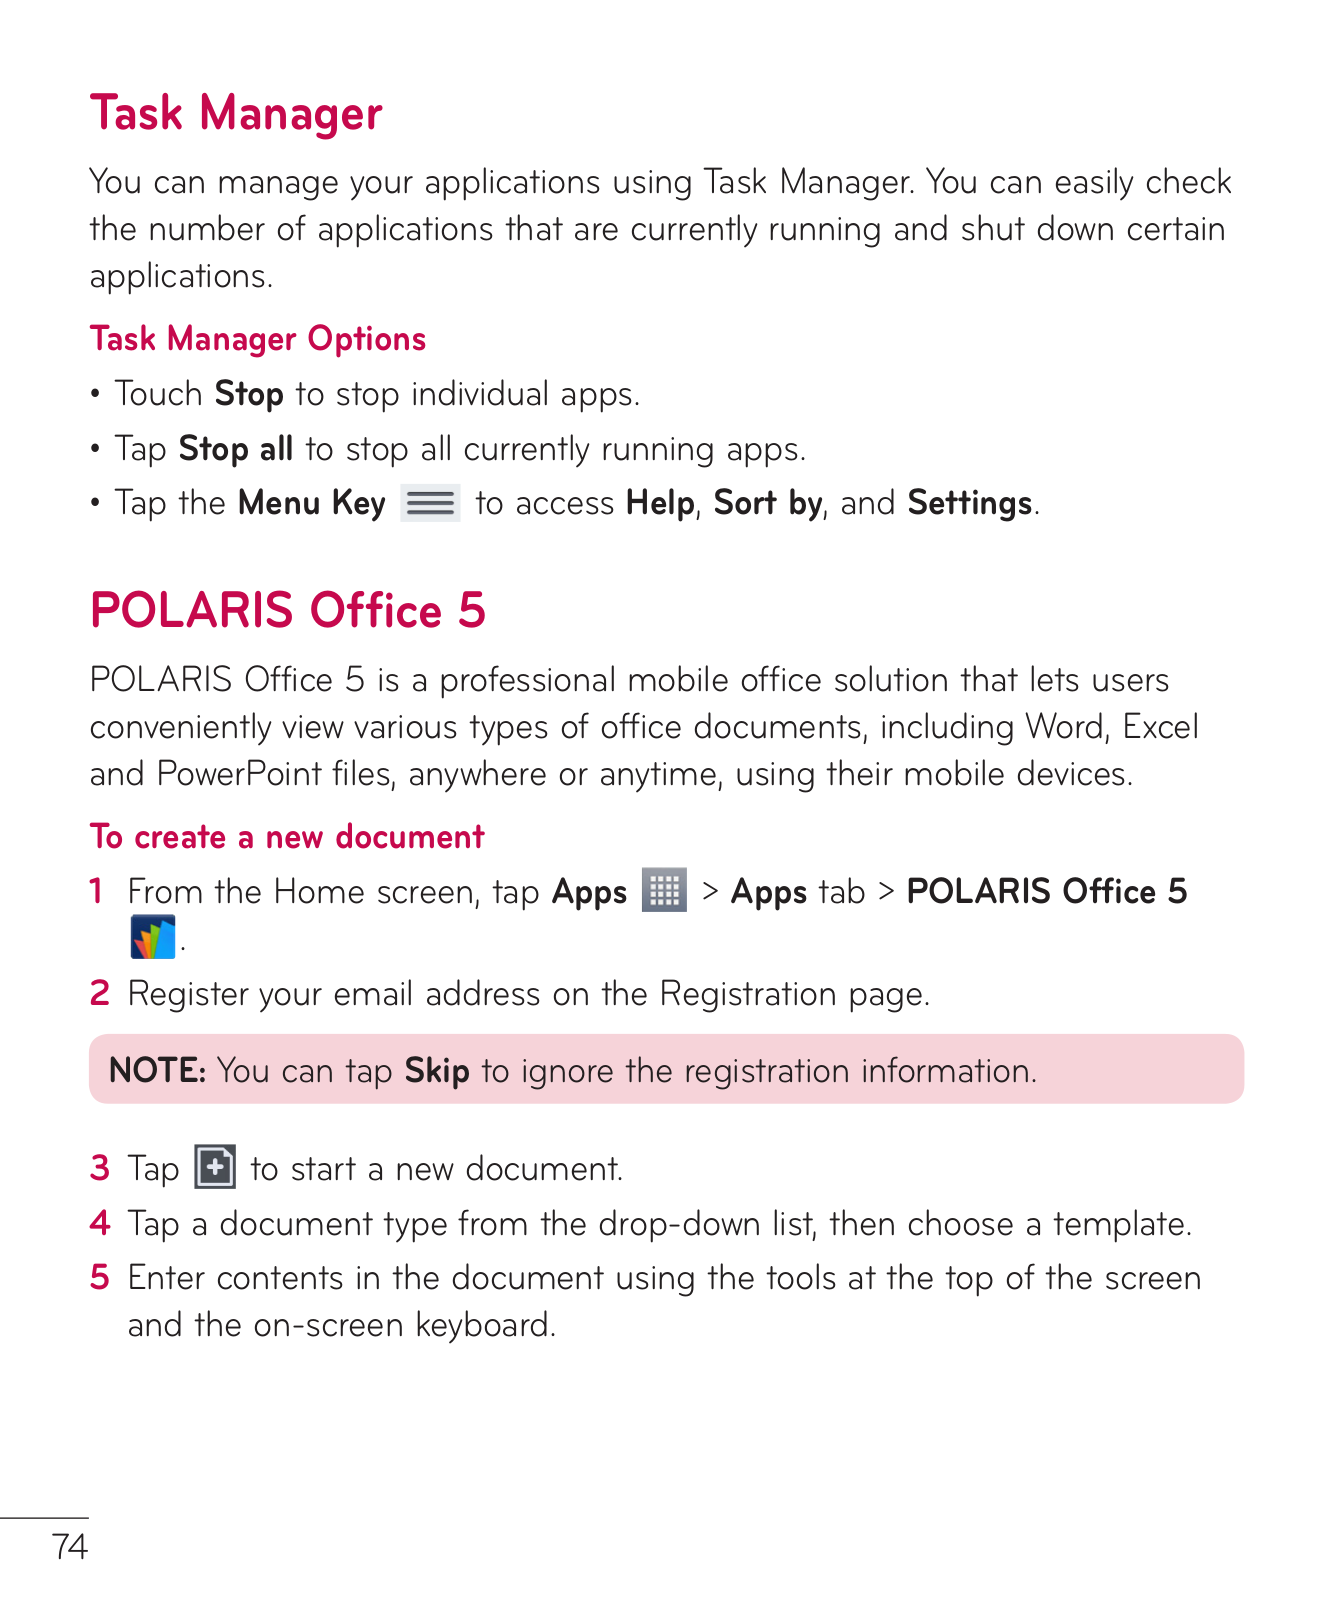
You can manage your applications using Task Manager. You can easily check the number of applications that are currently running and shut down certain applications.

Task Manager Options

Touch Stop to stop individual apps.

Tap Stop all to stop all currently running apps.

Tap the Menu Key to access Help, Sort by, and Settings.

POLARIS Office 5

POLARIS Office 5 is a professional mobile office solution that lets users conveniently view various types of office documents, including Word, Excel and PowerPoint files, anywhere or anytime, using their mobile devices.

To create a new document

1From the Home screen, tap Apps > Apps tab > POLARIS Office 5

.

2Register your email address on the Registration page.

NOTE: You can tap Skip to ignore the registration information.

3Tap to start a new document.

4Tap a document type from the drop-down list, then choose a template.

5Enter contents in the document using the tools at the top of the screen and the on-screen keyboard.

74

6When you're done working on the document, tap (in the top left corner of the screen), then tap Save (or Save as to enter a new document name) to save.

7Enter the document name and touch Save.

To view and edit a document on your device

You can now easily view and edit a wide variety of file types, including Microsoft Office documents and Adobe PDF, right on their mobile devices.

1Open POLARIS Office 5 and search for a document.

2Touch the document that you want to view or edit.

When viewing documents using POLARIS Office 5, the objects and layout remain the same as in the original documents.

3To edit the document, tap.

Google+

Use the Google+ app to stay connected with people via Google’s social network service.

From the Home screen, tap Apps > Apps tab > Google+ .

NOTE: This application may not be available depending on the region or service provider.

75

Voice Search

The Voice Search app allows you to search webpages using your voice instead of typing.

1From the Home screen, tap Apps > Apps tab > Voice Search .

2Say a keyword or phrase when Speak now appears on the screen. Select one of the suggested keywords that appear.

NOTE: This application may not be available depending on the region or service provider.

Downloads

Use the Downloads app to see what files have been downloaded. From the Home screen, tap Apps > Apps tab > Downloads .

Box

The Box app makes you easy to access and edit your files, share content and stay connected with your files from anywhere on any device.

To open the Box application

• From the Home screen, tap Apps > Apps tab > Box .

76

The Web

Internet

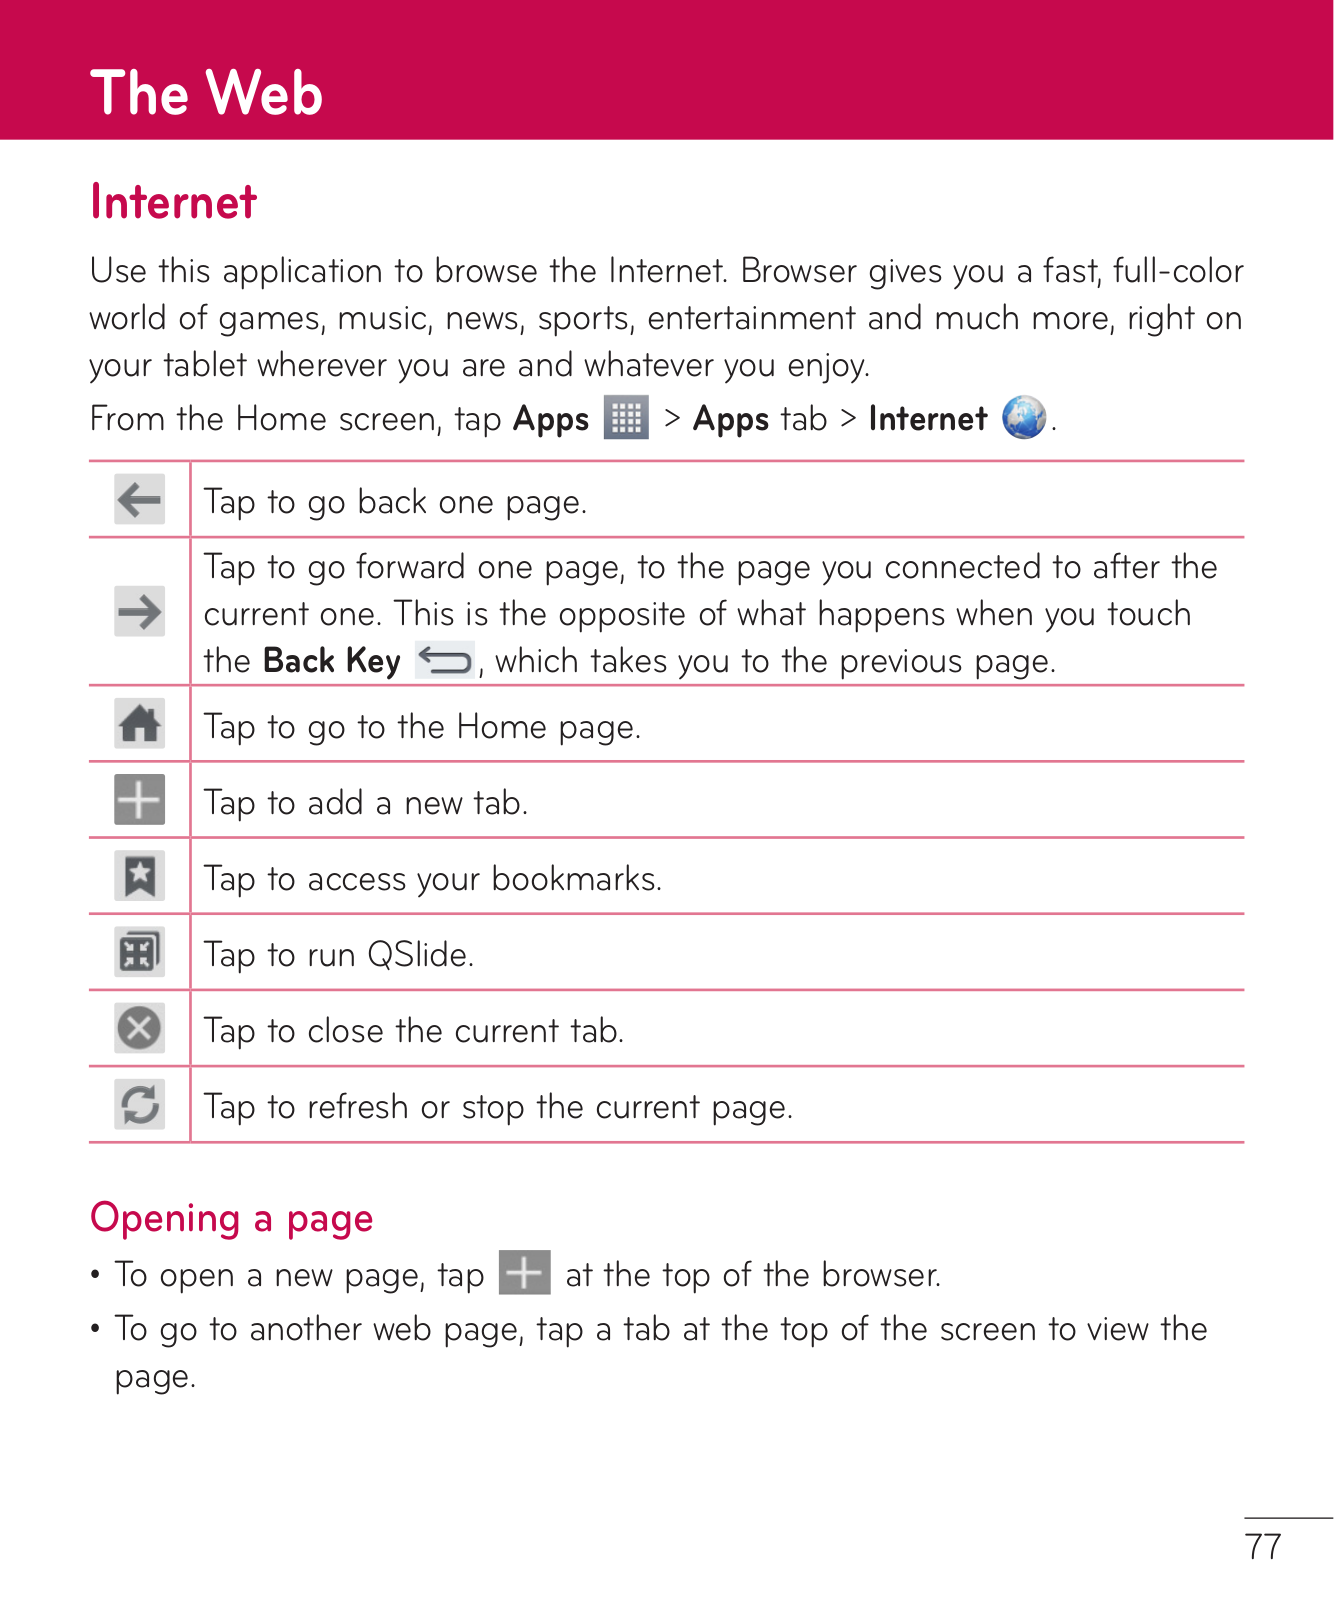
Use this application to browse the Internet. Browser gives you a fast, full-color world of games, music, news, sports, entertainment and much more, right on your tablet wherever you are and whatever you enjoy.

From the Home screen, tap Apps > Apps tab > Internet .

Tap to go back one page.

Tap to go forward one page, to the page you connected to after the current one. This is the opposite of what happens when you touch the Back Key , which takes you to the previous page.

Tap to go to the Home page.

Tap to add a new tab.

Tap to access your bookmarks.

Tap to run QSlide.

Tap to close the current tab.

Tap to refresh or stop the current page.

Opening a page

To open a new page, tap at the top of the browser.

To go to another web page, tap a tab at the top of the screen to view the page.

77

Searching the web by voice

Tap the web address field, tap , speak a keyword, and then select one of the suggested keywords that appear.

NOTE: This feature may not be available depending on the region or service provider.

Bookmarks

To open a bookmarked web page, tap

on the browser toolbar and select

one.


History

Tap on the browser toolbar and select the History tab to open a web page from the list of recently-visited web pages. To clear the history, tap the

Menu Key > Clear all history.

Using QSlide

Use this feature to access the Internet without closing the current application.

While viewing content on the browser, tap

. You can then browse other

information on your tablet. To view the browser in full screen, tap

.

Chrome


Use Chrome to search for information and browse web pages.


From the Home screen, tap Apps

> Apps tab > Chrome

.

NOTE: This application may not be available, depending on your region and service provider.

78

Viewing web pages

Tap the address field (at the top of the screen), enter a web address or search criteria, and tap on the keyboard.

Opening a page

To go to a new page, tap at the top of the browser.

To go to another web page, tap the a tab at the top of the screen to select the page.

Searching the web by voice

Tap the address field, tap , speak a keyword and select one of the suggested keywords that appear.

NOTE: This feature may not be available depending on the region or service provider.

Syncing with other devices

Sync open tabs and bookmarks to use with Chrome on another device when you are logged in with the same Google account.

To view open tabs on other devices, tap the Menu Key > Other devices. You must be signed in to the same Google account on all devices. Select a web page to open.

Adding and viewing bookmarks

To add bookmarks, tap in the URL bar.

To open a bookmarked web page, tap the Menu Key > Bookmarks and select the desired page.

79

Chrome Options menu

Tap the Menu Key to access the following options.

New tab – Tap to open a new web page tab.

New incognito tab – Tap to open a new incognito tab.

Bookmarks – Displays your bookmarked web pages.

Other devices – Displays your open web pages on other devices.

History – Displays your browsing data (web pages you've visited).

Share... – Allows you to share the web page.

Print... – Tap to print the web page. Choose to automatically find a printer on your network, or manually enter one to use.

Find in page – Allows you to search for text on the current web page.

Request desktop site – Checkmark to access the desktop site when you view web pages on your tablet.

Settings – Allows you to change the settings specific to the Chrome app.

Help – Displays information about using the Chrome app on your tablet.

80

Settings

Access the Settings menu

1From the Home screen, tap Apps > Apps tab > Settings .

OR

From the Home screen, tap the Menu Key > System settings.

2Select a setting category and set the desired option.

WIRELESS NETWORKS

Wi-Fi

Wi-Fi – Turns on Wi-Fi to connect to available Wi-Fi networks.

A list of all available Wi-Fi networks will be displayed. Tap one to connect to it.

NOTE: Tap Search to scan for available Wi-Fi networks.

Tap the Menu Key in the Wi-Fi menu to access the following options.

WPS Push Button – Allows you to connect to a secured Wi-Fi network with a WPS button.

WPS Pin Entry – Allows you to connect to a secured Wi-Fi network with a WPS PIN.

Add network – Allows you to manually enter a new Wi-Fi network.

81

Wi-Fi Direct – Allows direct connection with Wi-Fi devices without any access point.

Advanced Wi-Fi – Accesses the advanced Wi-Fi settings.

Interactive tutorial – Displays some useful tutorials for the Wi-Fi function.

TIP! How to obtain the MAC address

To set up a connection in some wireless networks with MAC filters, you may need to enter the MAC address of your tablet in the router.

You can find the MAC address in the following user interface: From the Home screen, tap Apps > Settings > Wi-Fi > Menu Key > Advanced Wi-Fi > MAC address.

Bluetooth

Turn the Bluetooth wireless feature on or off to use Bluetooth. Turning Bluetooth on allows you to pair and connect to other Bluetooth devices.

Tap the Menu Key in the Bluetooth menu to access the following options.

Edit tablet name – Changes your tablet name for easy identification when pairing and connecting. Enter your new tablet name, then tap Save.

Visibility timeout – Sets the amount of time other Bluetooth devices can see your tablet for pairing and connection. Choose from 2 minutes, 5 minutes,

1 hour, and Never time out.

Show received files – Displays a list of your Bluetooth received files. Interactive tutorial – Displays some useful tutorials about Bluetooth features.

82

Data usage

Displays the data usage during the chosen periods of time. Tap an app from the list to view the app's data usage.

More...

Allows you to share folders with other devices via wireless connection.

Airplane mode – Allows you to set Airplane mode. Activating Airplane mode disables all wireless connections.

Wireless storage – You can manage files on your tablet in the computer or copy files to the tablet from the computer without a USB connection. Make sure that the tablet and computer are connected to the same network.

Then, enter the web addresses shown on your tablet into the address bar of the browser on your computer.

Miracast – Allows you to wirelessly mirror your tablet screen and sound onto a Miracast dongle or TV.

SmartShare Beam – Allows you to receive multimedia content via SmartShare Beam from LG phones or tablets.

Media server – Allows to share media contents with nearby devices via DLNA.

VPN – Displays the list of Virtual Private Networks (VPNs) that you've previously configured. Allows you to add different types of VPNs.

NOTE: You must set a lock screen PIN or password before you can use credential storage.

83

Loading...
+ 53 hidden pages