

Page 1
OPERATION
ENGLISH
33
Baking Tips
•Baking time and temperature will vary depending
on the characteristics, size, and shape of the
baking pan used.
•Check for food doneness at the minimum recipe
time.
•Use metal bakeware (with or without a nonstick
finish), heatproof glass-ceramic, ceramic or other
bakeware recommended for oven use.
•Dark metal pans or nonstick coatings will cook food
faster with more browning. Insulated bakeware will
slightly lengthen the cooking time for most foods.
NOTE
The oven bottom has a porcelain-enamel finish.
To make cleaning easier, protect the oven bottom
from excessive spillovers by placing a cookie
sheet on the rack below the rack you are cooking
on. This is particularly important when baking a
fruit pie or other foods with a high acid content.
Hot fruit fillings or other foods that are highly
acidic may cause pitting and damage to the
porcelain-enamel surface and should be wiped up
immediately.
Tips for Convection Baking
•Use Convection Bake for faster and more even
multiple-rack cooking of pastries, cookies, muffins,
biscuits, and breads of all kinds.
•Bake cookies and biscuits on pans with no sides
or very low sides to allow heated air to circulate
around the food. Food baked on pans with a dark
finish will cook faster.
•If cooking on single rack, place the rack in the
position suggested in the charts on the following
pages. If cooking on multiple racks, place the oven
racks in positions 3 and 5 (for two racks).
•Multiple oven rack cooking may slightly increase
cook times for some foods.
•Cakes, cookies and muffins have better results
when using multiple racks.
The Convection Roast feature is designed to give
optimum roasting performance. Convection Roast
combines cooking with the convection fan to roast
meats and poultry. The heated air circulates around
the food from all sides, sealing in juices and flavors.
Foods are crispy brown on the outside while staying
moist on the inside. Convection roasting is especially
good for large tender cuts of meat, uncovered.
Convection Mode
The convection system uses a fan to circulate
the heat evenly within the oven. Improved heat
distribution allows for even cooking and excellent
results while cooking with single or multiple racks.
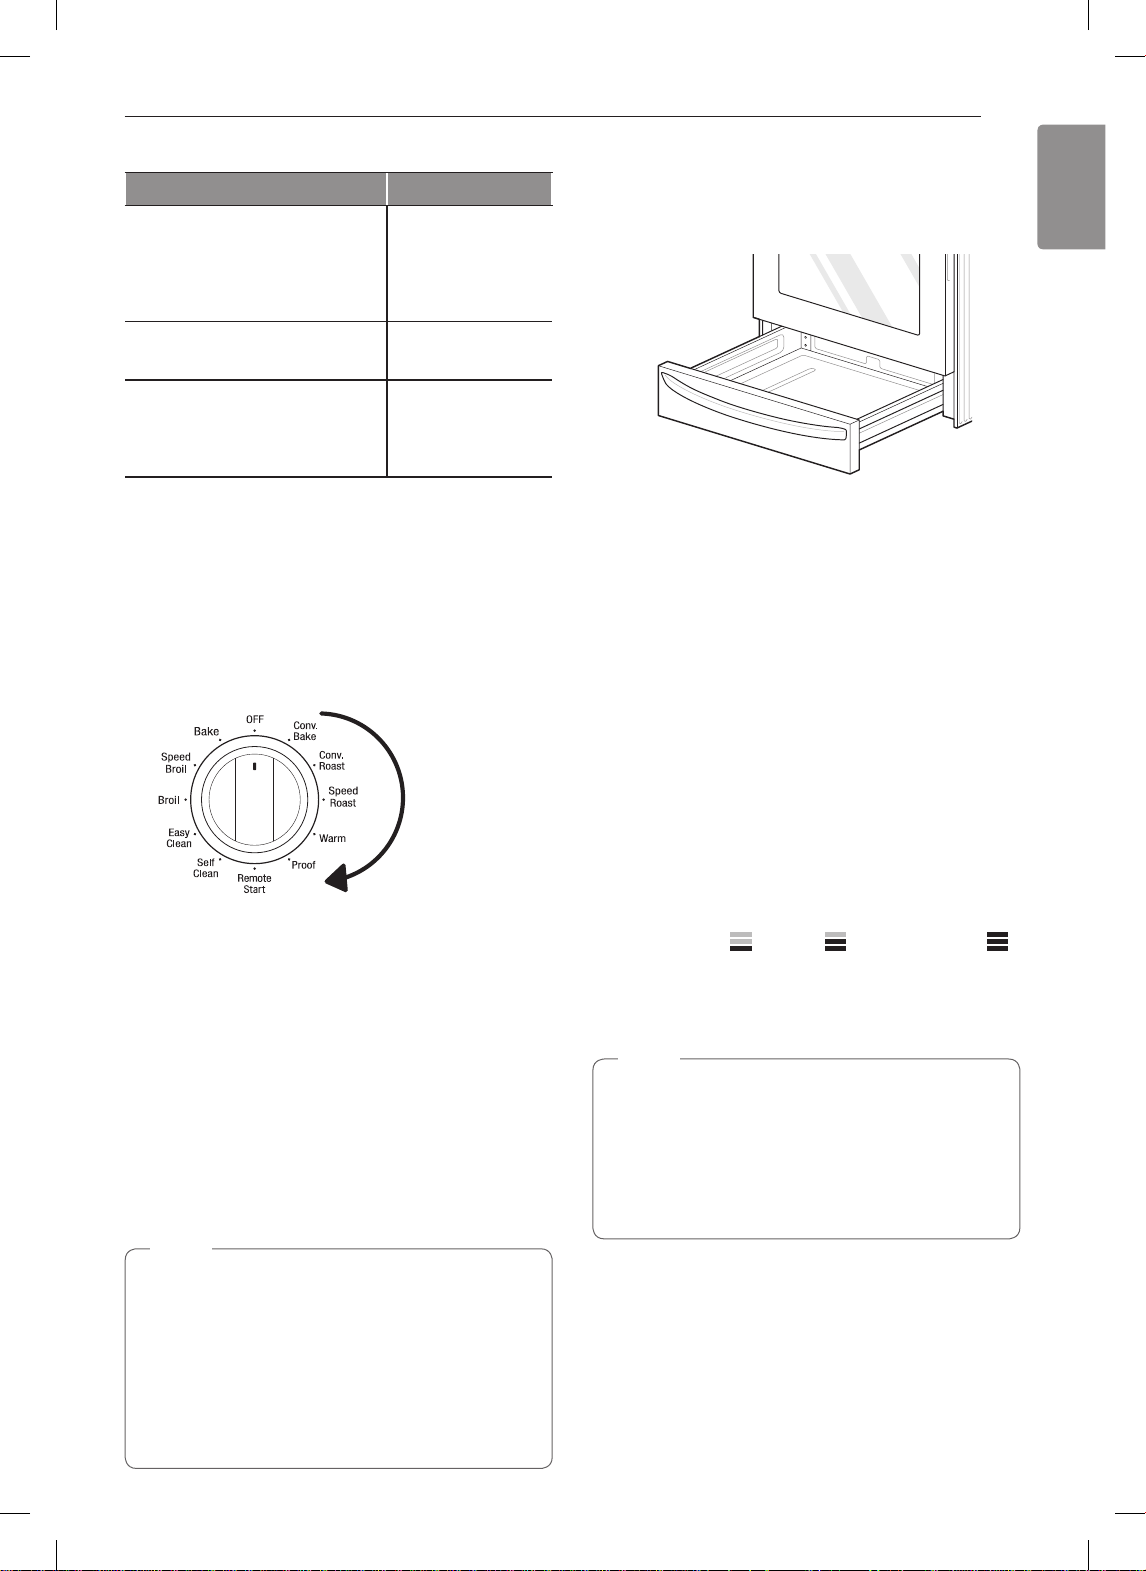
Setting the Convection Function (example, 375 °F)
Turn the oven mode knob to select the
1
Conv. Bake or Conv. Roast.
Set the oven temperature: for example, press
2
plus(+) until 375 °F appears in the display.
Press Start. The display shows Conv. Bake or
3
Conv. Roast and the oven temperature starting
at 100 °F.
As the oven preheats, the display shows increasing
temperatures in 5-degree increments. Once the oven
reaches the set adjusted temperature, a tone sounds
and the oven light flashes on and off. The display
shows the auto converted oven temperature, 350 °F
and the fan icon.
When cooking has finished or to cancel, turn the
4
oven mode knob to the Off position.
NOTE
The oven fan runs while convection baking. The
fan stops when the door is open. In some cases,
the fan may shut off during a convection bake
cycle.
Tips for Convection Roasting
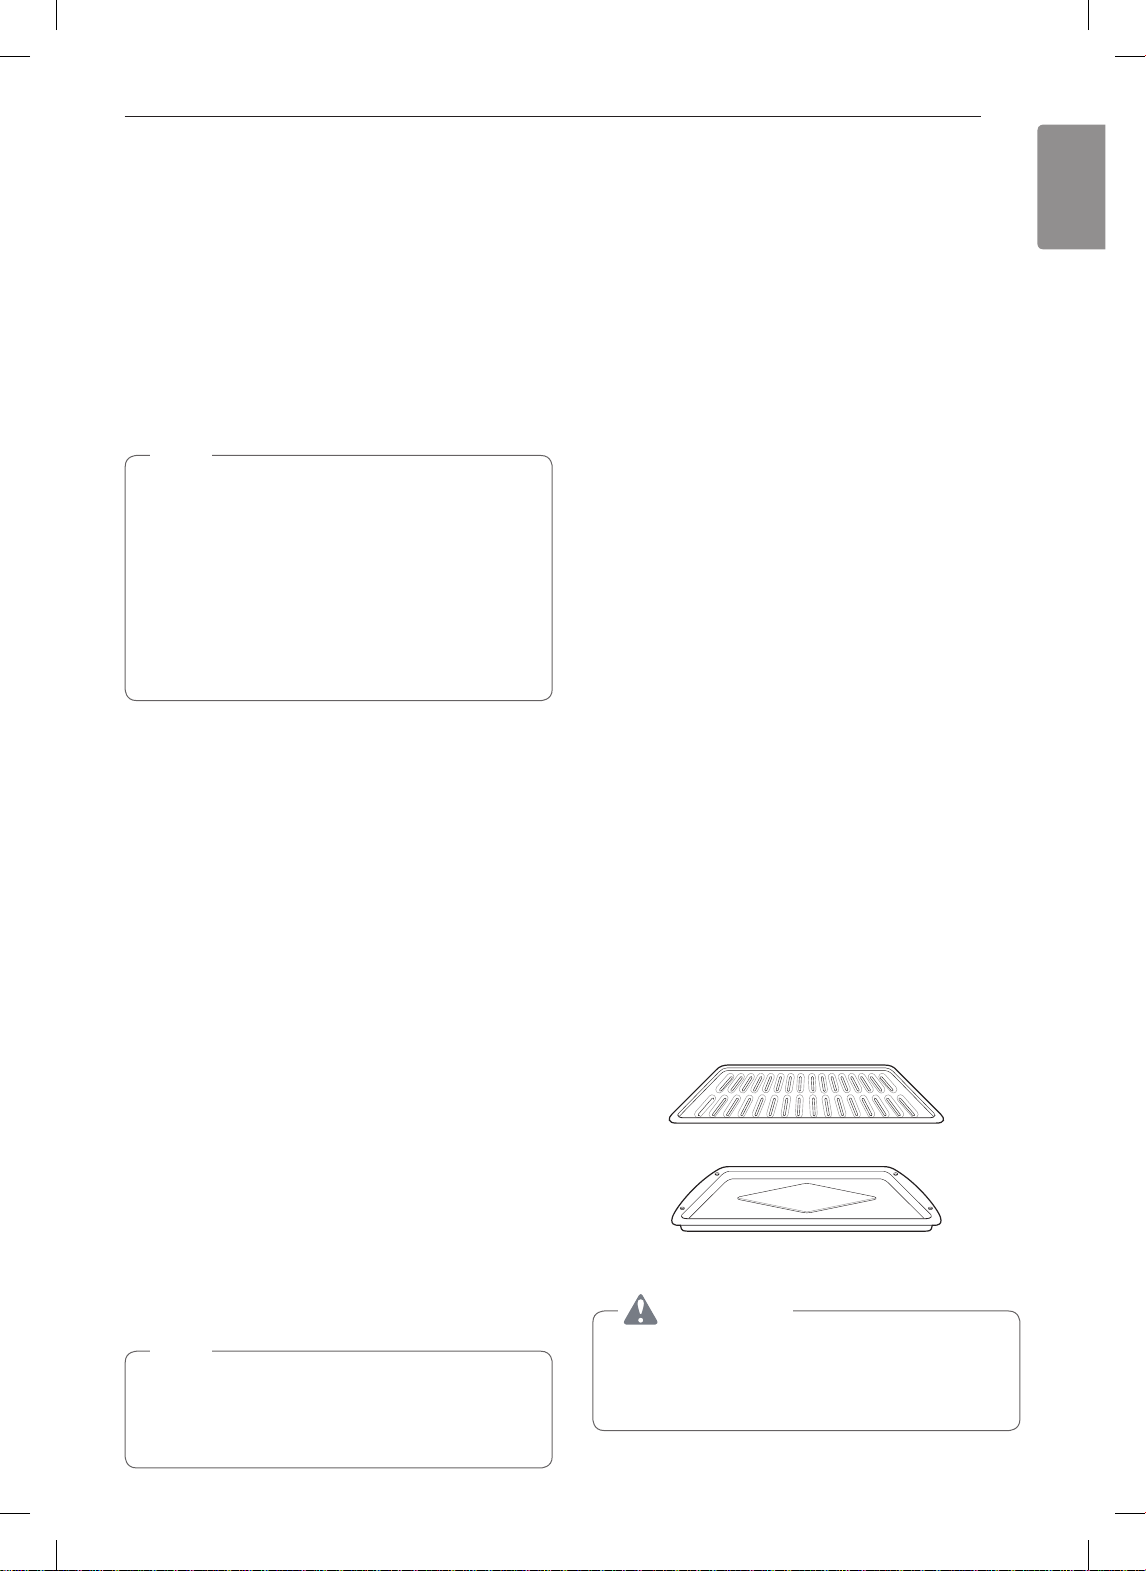
Use a broiler pan and grid when preparing meats for
roasting. The broiler pan catches grease spills and
the grid helps prevent grease splatters.
Place the oven rack in the position suggested in
1
the charts on the following pages.
Place the grid in the broiler pan.
2
Place the broiler pan on the oven rack.
3
Grid (sold separately)
Broiler pan (sold separately)
CAUTION
•Do not use a broiler pan without a grid.
•Do not cover the grid with aluminum foil.
•Position food (fat side up) on the grid.
Page 2
34
OPERATION
Recommended Baking and Roasting
Guide
Baking results will be better if baking pans are
centered in the oven as much as possible. If cooking
on multiple racks, place the oven racks in the
positions shown.
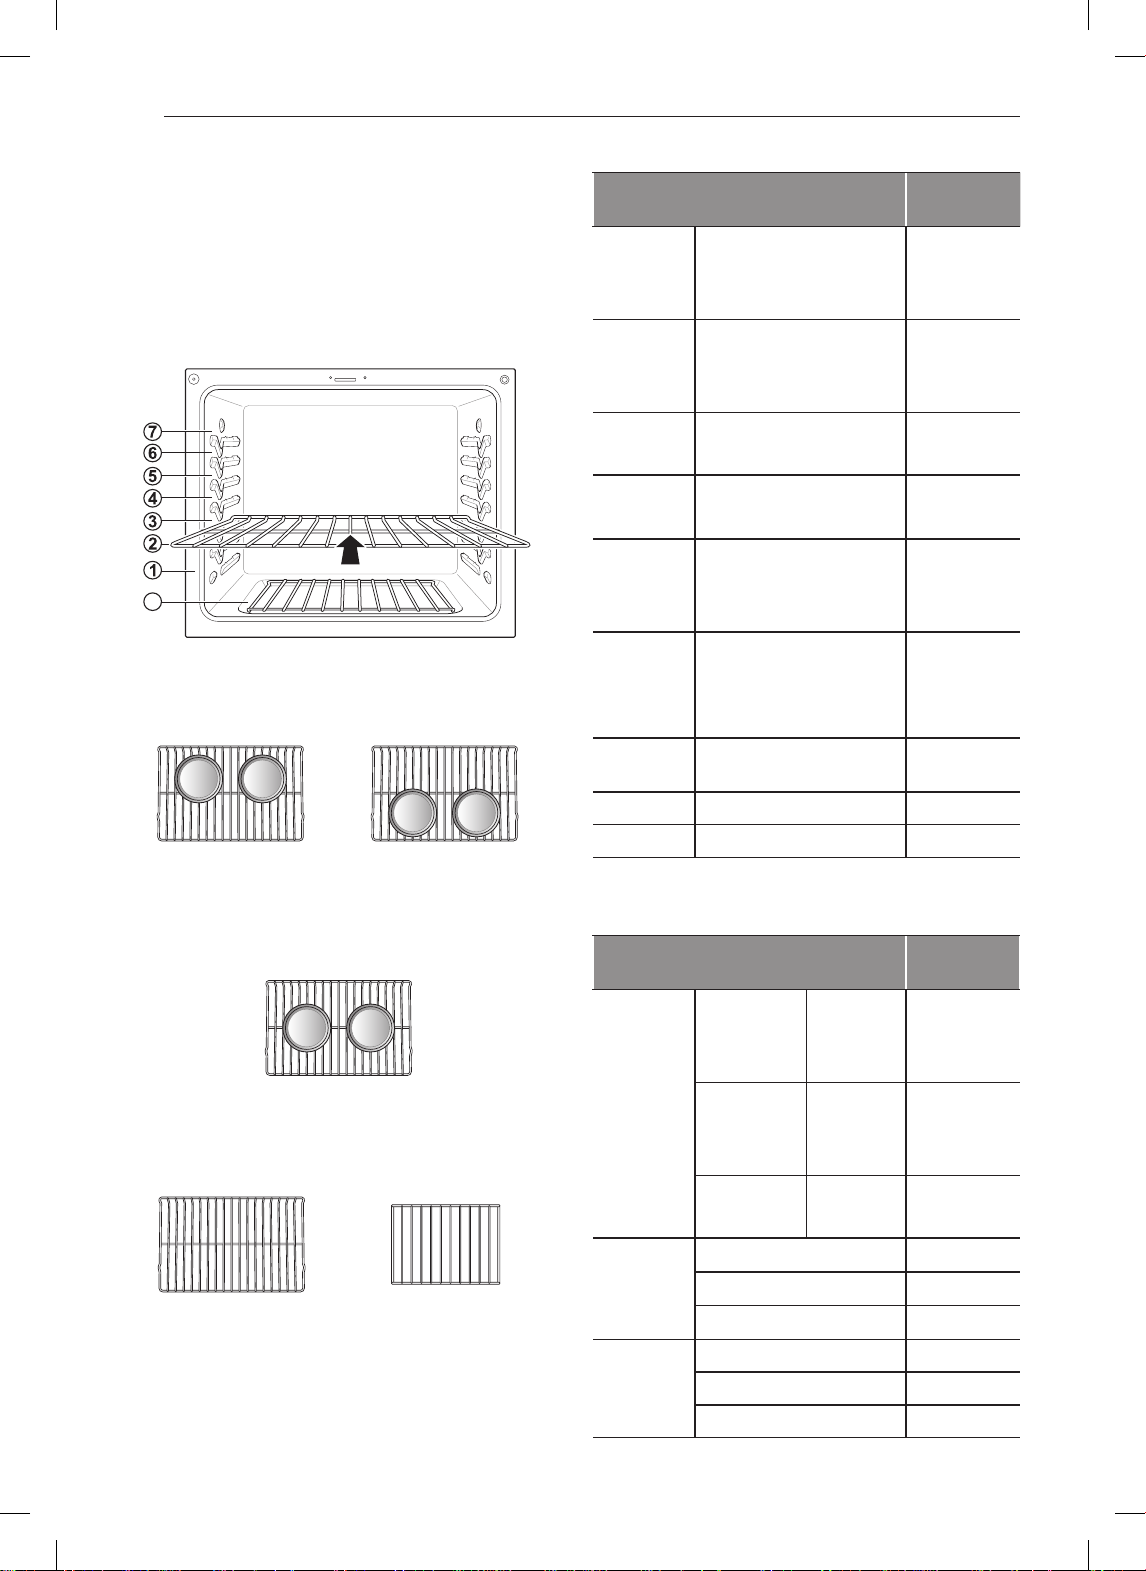
Rack and Pan Placement
B
Multiple rack baking
Rack
(Position 3)
Rack
(Position 5)
Baking rack guide
Food
position
•Layer cakes
Cakes
•Bundt cakes
•Angel food cake
•Sugar cookies
Cookies
•Chocolate chips
•Brownies
Pizza
Pastry
Crust
•Fresh
•Frozen
•From scratch
•Refrigerator
•Biscuit, canned
Breads
•Biscuit, from scratch
•Muffins
•Fruit crisps and
Desserts
cobblers, from scratch
•Pies, from scratch,
2-crust fruit
Custards
•Cheesecake,
crème brulée
Soufflés •Sweet or savory 2
Casserole •Frozen lasagna 5
Roasting rack guide
Rack
4
3
3
4
4
4
5
5
4
4
5
5
5
4
4
2
Single rack baking
Rack
Multiple rack roasting
Rack
(Position 4)
Bottom Rack
(Position B)
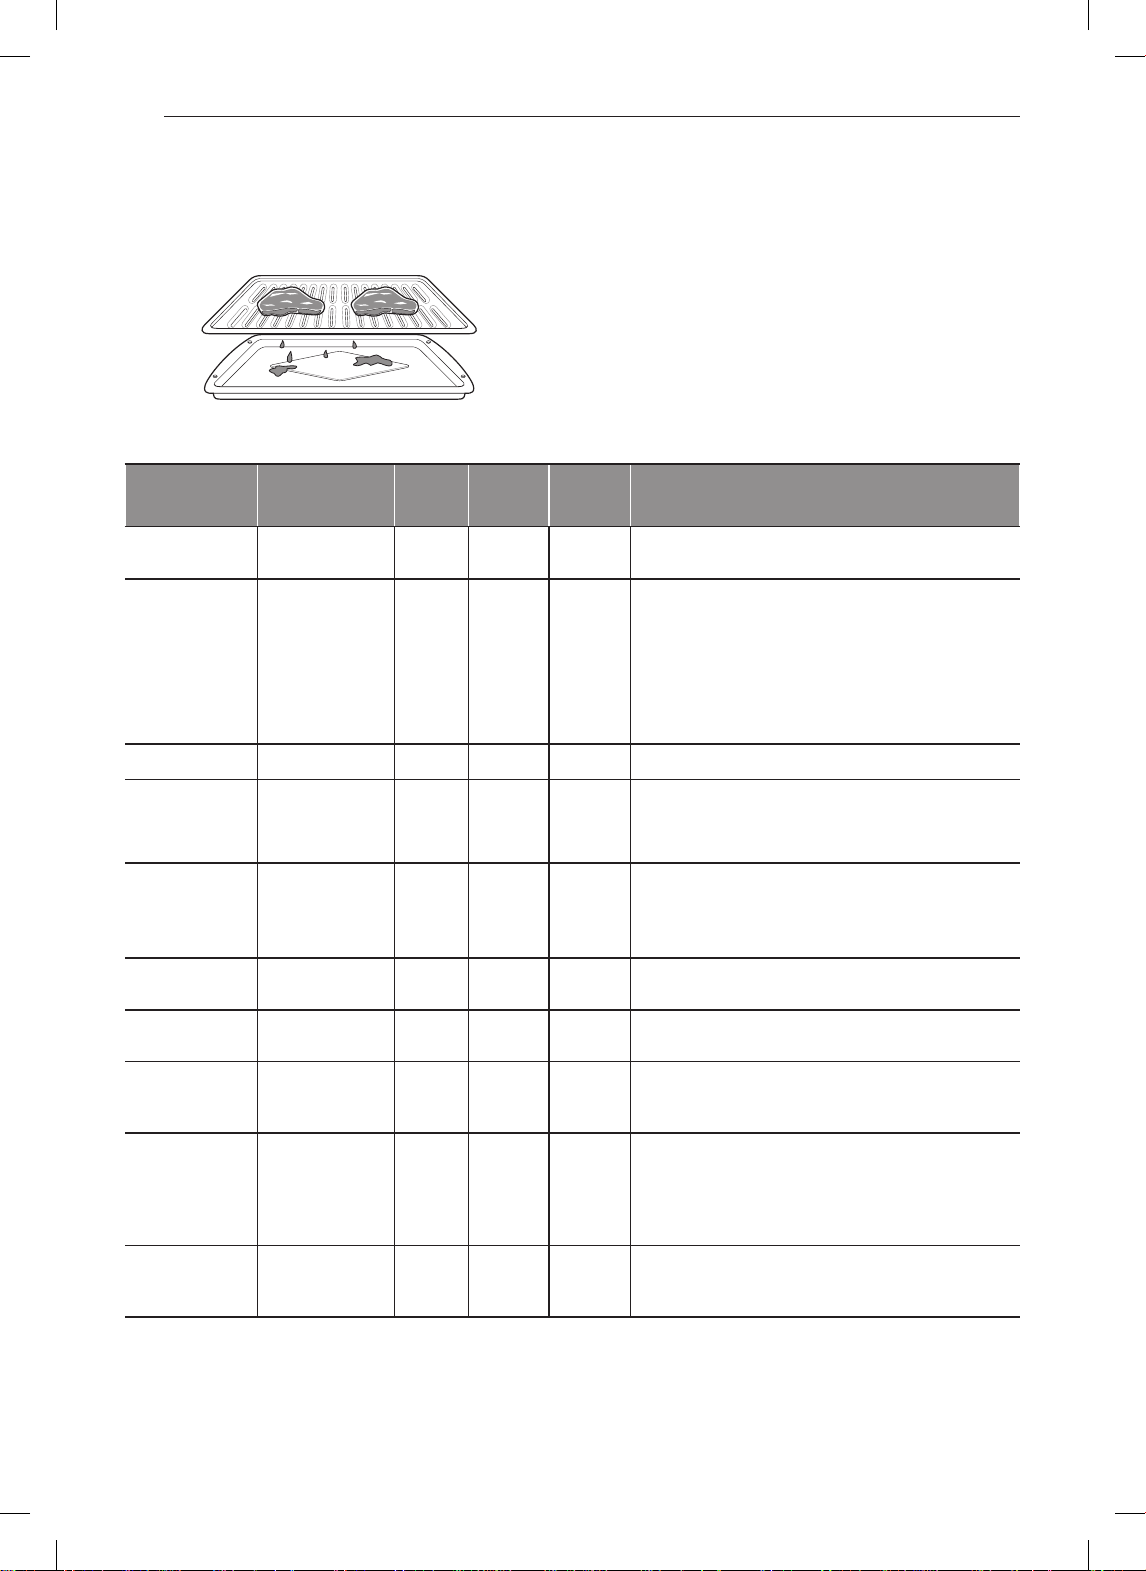
•Multiple roasting helps to make more than 2
roasted foods at same time.
•If roasting on multiple racks, place more than 2
broiler pans and 2 grids on the racks.
Beef
Pork
Poultry
Food
Rib
Boneless
rib, top
sirloin
Beef
tenderloin
Rare
Medium
Well done
Rare
Medium
Well done
Rare
Medium
Rack
position
2
2
2
2
2
2
2
2
Rib 2
Bone-in, sirloin 2
Ham, cooked 2
Whole chicken 2
Chicken pieces 2
Turkey 2 or B
Page 3

OPERATION
ENGLISH
35
Broil
The Broil function uses intense heat from the upper
heating element to cook food. Broiling works best for
tender cuts of meat, fish, and thinly cut vegetables.
Some models may feature a hybrid broiler consisting
of an inner broiler that utilizes a carbon heating
element which provides instantaneous heat, and
a traditional outer broiling element. During normal
broiler operation, it is normal for either element to
cycle off intermittently.
CAUTION
•Do not use a broiler pan without a grid. Oil can
cause a grease fire.
•Do not cover the grid and broiler pan with
aluminum foil. Doing so will cause a fire.
•Always use a broiler pan and grid for excess fat
and grease drainage. This will help to reduce
splatter, smoke, and flare-ups.
NOTE
•This range is designed for closed-door broiling.
Close the door to set the Broil function. If the
door is open, the Broil function cannot be set
and door appears on the display. Close the
door and reset the Broil function. Opening the
door turns off the broil burner during broiling.
If the door is opened during broiling, the broil
burner turns off after five seconds. The broiler
turns back on automatically once the door is
closed.
Speed Broil
The Speed Broil setting is designed to reduce the
amount of time it takes to broil foods. By utilizing
the infrared broil element, which provides heat
instantaneously, there is no need for preheating.
Setting the oven to Broil / Speed Broil
Smoking
Due to the intense heat associated with broiling, it
is normal to experience smoke during the cooking
process. This smoke is a natural byproduct of
searing and should not cause you to worry. If you are
experiencing more smoke than you are comfortable
with, use the following tips to reduce the amount of
smoke in your oven.
Always use a broiler pan. Do not use saute pans
1
or regular baking sheets for safety reasons.
The broiler pan should always be thoroughly
2
cleaned and at room temperature at the
beginning of cooking.
Always run your cooktop ventilation system or
3
vent hood during broiling.
Keep the interior of your oven as clean as
4
possible. Leftover debris from prior meals can
burn or catch fire.
Avoid fatty marinades and sugary glazes. Both
5
of these will increase the amount of smoke you
experience. If you would like to use a glaze,
apply it at the very end of cooking.
If you are experiencing significant smoke with
6
any food item, consider:
•Lowering the broiler to the Lo setting.
•Lowering the rack position to cook the food
further away from the broiler.
•Using the Hi broil setting to achieve the level of
searing you desire, and then either switching
to the Lo broil setting, or switching to the Bake
function.
As a rule, fattier cuts of meat and fish will
7
produce more smoke than leaner items.
Adhere to the recommended broil settings and
8
cooking guidelines in the chart on the following
page whenever possible.
Turn the oven mode knob to select Broil or
1
Speed Broil.
Press plus(+) or minus(-) to select Hi or Lo.
2
Press Start. The oven begins to heat.
3
Let the oven preheat for approximately five
4
minutes before cooking the food if using broil.
Turn the oven mode knob to the Off position to
5
cancel at any time or when cooking is complete.
Page 4
36
OPERATION
Recommended Broiling Guide
The size, weight, thickness, starting temperature, and your preference of doneness will affect broiling times.
This guide is based on meats at refrigerator temperature. For best results when broiling, use a pan designed for
broiling.
Food
Ground Beef
Well done
Beef Steaks
Rare
Medium
Well done
Rare
Medium
Well done
Quantity and/or
Thickness
1 lb. (4 patties)
1
/2 to 3/
thick
"
4
thick
1
"
1
/2 lbs.
1 to 1
1
1
/
thick
"
2
1
/2 lbs.
2 to 2
Rack
Position
First Side
(minutes)
7 3-6 2-4
7
7
7
5
5
5
3-5
4-6
5-7
7-9
9-11
11-13
Second
Side
(minutes)
2-4
2-4
3-5
4-6
6-8
8-10
Toast 7 0.5-1 0.5
Chicken 1 whole cut up
1
2 to 2
lengthwise
/2 lbs., split
2 Breasts
Lobster Tails 2–4
10 to 12 oz. each
Fish Fillets
Ham Slices
(precooked)
Pork Chops
Well done
1
/4 to 1/
2
1
/
thick
"
2
1
/
thick)
1 (
"
2
2 (1" thick)
thick
"
5
5
5 9-12 Do not
6 2-4 2-4 Handle and turn very carefully. Brush with lemon butter
5 2-4 2-4 Increase time 5 to 10 minutes per side for 1
6
5
8-10
8-10
3-6
5-8
4-6
5-7
turn over
4-7
5-8
about 1 lb.
Comments
Space evenly. For 1-4patties, use Speed Broil. For more
than 4 patties, use Broil.
Steaks less than 1" thick cook through before browning.
Pan frying is recommended. Slash fat.
Broil skin-side-down first.
Cut through back of shell. Spread open. Brush with
melted butter before broiling and after half of broiling
time.
before and during cooking, if desired.
home-cured ham.
1
/2" thick or
Lamb Chops
Medium
Well done
Medium
Well done
Salmon Steaks
thick) about
2 (1
"
10 to 12 oz.
1
/
2 (1
about 1 lb.
2 (1
"
4 (1" thick)
thick)
"
2
thick)
6
6
6
6
5
5
3-5
5-7
7-9
9-11
8-10
9-11
2-5
4-7
7-9
7-9
3-5
Grease pan. Brush steaks with melted butter.
4-6
about 1 lb.
•This guide is only for reference. Adjust cook time according to your preference.
•For best performance, center food on rack when using Speed Broil/Broil.
Page 5

OPERATION
ENGLISH
37
Tips for Broiling
Beef
•Steaks and chops should always be allowed to rest
for five minutes before being cut into and eaten.
This allows the heat to distribute evenly through the
food and creates a more tender and juicy result.
•Pieces of meat that are thicker than two inches
should be removed from the refrigerator 30 minutes
prior to cooking. This will help them cook more
quickly and evenly, and will produce less smoke
when broiling. Cooking times will likely be shorter
than the times indicated in the Broiling Chart.
•For bone-in steaks or chops that have been
frenched (all meat removed from around the bone),
wrap the exposed sections of bone in foil to reduce
burning.
Seafood
•When broiling skin-on fish, always use the Lo broil
setting and always broil the skin side last.
•Seafood is best consumed immediately after
cooking. Allowing seafood to rest after cooking can
cause the food to dry out.
•It is a good idea to rub a thin coating of oil on the
surface of the broiling pan before cooking to reduce
sticking, especially with fish and seafood. You can
also use a light coating of non-stick pan spray.
Warm
This function will maintain an oven temperature of
170 °F. The Warm function will keep cooked food
warm for serving up to three hours after cooking has
finished. The Warm function may be used without any
other cooking operations.
Setting the Warm Function
Turn the oven mode knob to select Warm.
1
Press Start.
2
Turn the oven mode knob to the Off position
3
when warming is finished.
NOTE
•The Warm function is intended to keep food
warm. Do not use it to cool food down.
•It is normal for the fan to operate during the
Warm function.
Proof
This feature maintains a warm oven for rising yeast
leavened products before baking.
Vegetables
•Toss your vegetables lightly in oil before cooking to
improve browning.
Setting the Proof Function
Use rack position 2 or 3 for proofing.
1
Turn the oven mode knob to select Proof.
2
Press Start.
3
Turn the oven mode knob to the Off position
4
when proofing is finished.
NOTE
•To avoid lowering the oven temperature and
lengthening proofing time, do not open the oven
door unnecessarily. Check bread products early
to avoid over proofing.
•Do not use the proofing mode for warming
food or keeping food hot. The proofing oven
temperature is not hot enough to keep foods
at safe temperatures. Use the Warm feature
to keep food warm. Proofing does not operate
when the oven is above 125 °F. Hot shows in
the display.
•It is normal for the fan to operate during the
Proof function.
Page 6
38
OPERATION
Speed Roast
The Speed Roast feature is designed to quickly roast
poultry. The combination of intense heat from the
upper heating element and heated air from the back
heating element result in crispier food and help to
save cooking time. Speed roasting is especially good
for medium sized poultry.
NOTE
•The recommended cook time is 60-65 minutes
for a whole chicken weighing 3.3 lb.
•Adjust the cook time according to the weight of
the poultry.
•Place the oven rack in position 2.
•Speed Roast is designed to reduce the cooking
time. There is no need for preheating.
•This function is optimized for poultry, so
the temperature of Speed Roast cannot be
changed.
•It is normal for the fan to operate during the
Speed Roast function.
Setting the Speed Roast Function
Put food in the oven.
1
Turn the oven mode knob to select
2
Speed Roast. The display shows Roast Speed.
Setting the Probe Temperature
Select cook mode. Turn the oven mode knob to
1
select Conv. Roast.
Set the oven temperature: press plus(+) or
2
minus(-) until 375
Press Probe.
3
Set the probe temperature: press plus(+) or
4
minus(-) until 160
Press Start.
5
The default probe temperature is 150 °F (65 °C), but
can be changed to any temperature between
80 °F (27 °C) and 210 °F (100 °C). The display
shows the changing probe temperature. When the
set probe temperature is reached, the oven shuts off
automatically.
Changing the Probe temperature while cooking
Press Probe.
1
Set the probe temperature.
2
Press Start.
3
°F appears in the display
°F appears in the display
.
.
Press Start.
3
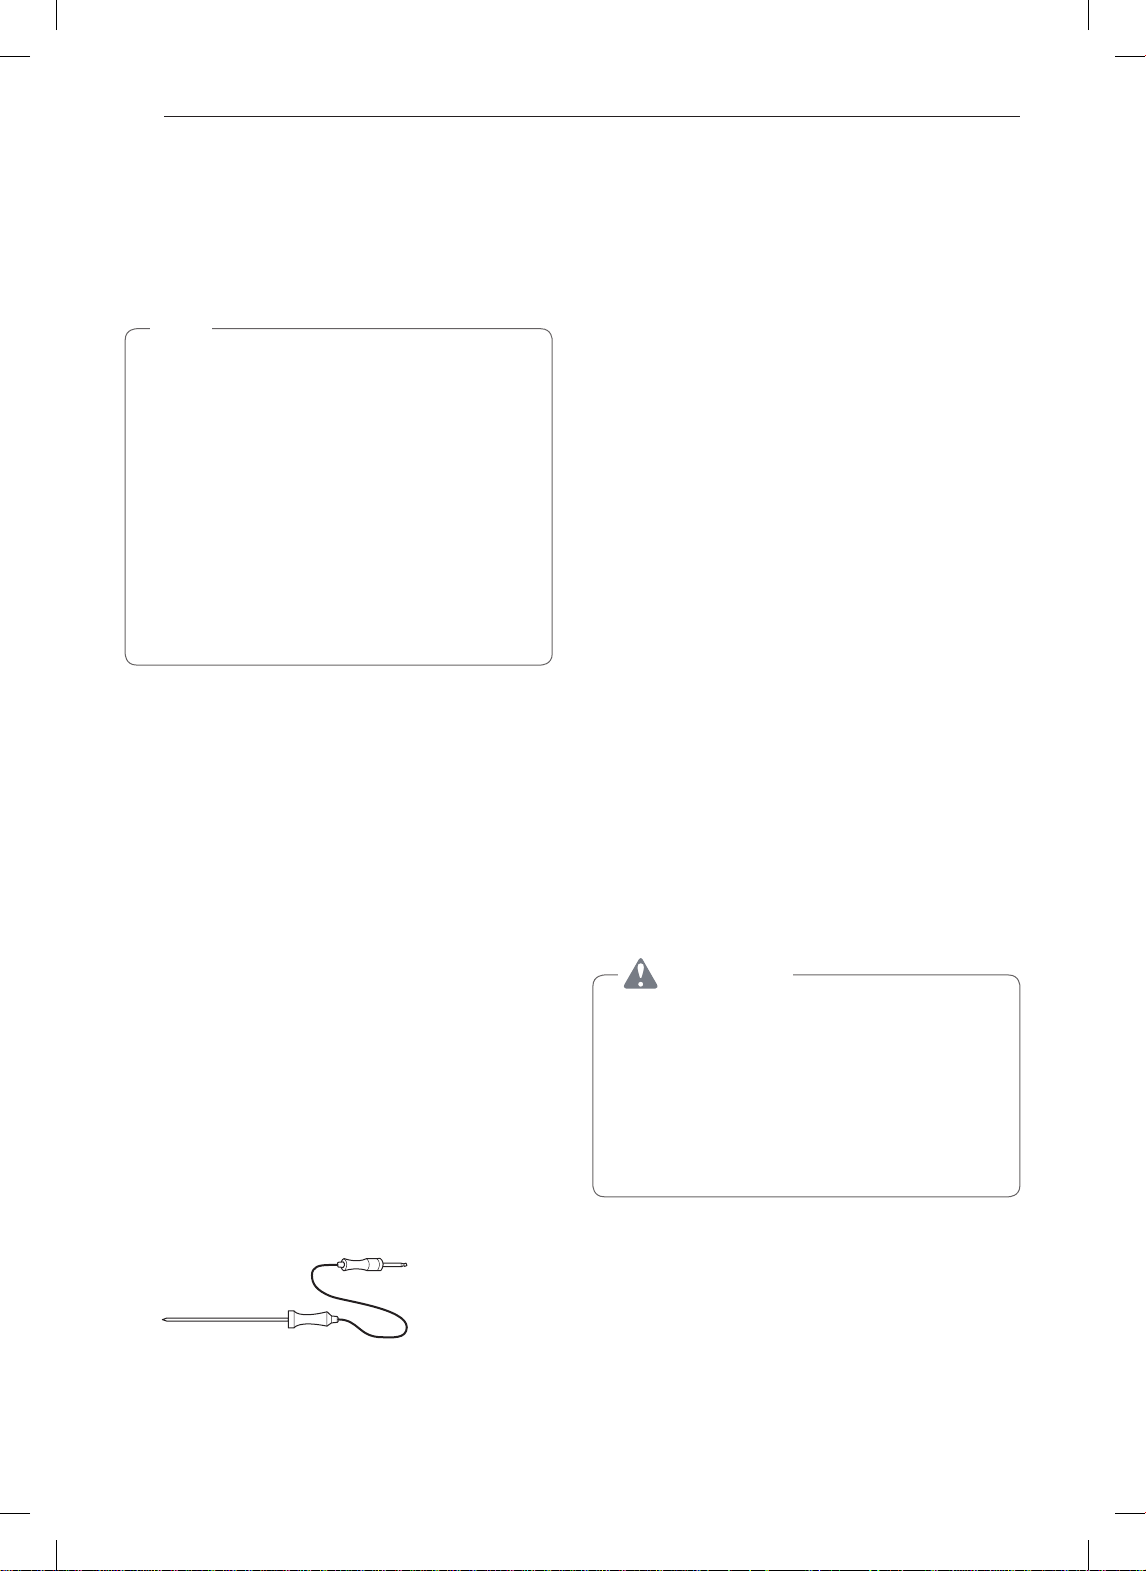
Meat Probe
The meat probe accurately measures the internal
temperature of meat, poultry and casseroles. It should
not be used during broiling, self clean, warming or
proofing. Always unplug and remove the meat probe
from the oven when removing food. Before using,
insert the probe into the center of the thickest part of
the meat or into the inner thigh or breast of poultry,
away from fat or bones. Place food in the oven and
connect the meat probe to the jack. Keep the probe
as far away from heat sources as possible.
Setting the Meat Probe Function (example for
Roast 375 °F with Probe temp. 160 °F)
Insert the meat probe into the meat.
1
Connect the meat probe to the jack.
2
The meat probe icon flashes in the display if the
3
meat probe is properly connected.
IMPORTANT NOTE
Turn the oven mode knob to the Off position to
cancel the Meat Probe function at any time. To avoid
breaking the probe, make sure food is completely
defrosted before inserting.
CAUTION
•Always use an oven mitt to remove the
temperature probe. Do not touch the broil
element. Failure to obey this caution can result
in severe personal injury.
•To avoid damage to the meat probe, Do
not use tongs to pull on the probe when
removing it.
•Do not store the meat probe in the oven.
Page 7
OPERATION
ENGLISH
39
Recommended Probe Temperature Chart
Doneness Probe Temp.
Beef, Lamb and Veal
Rare
Medium Rare
Medium
Well Done
Pork
Well Done 170 °F (77 °C)
Poultry
Breast, Well Done
Thigh, Well Done
Stuffing, Well Done
130 °F (54 °C)
140 °F (60 °C)
150 °F (66 °C)
160 °F (71 °C)
170 °F (77 °C)
180 °F (82 °C)
165 °F (74 °C)
Remote Start
If the appliance is registered on a home Wi-Fi
network, this function starts or stops the pre-heating
function of the appliance. Follow the instructions on
page 38 to register the appliance on the network.
Set the oven mode knob to the Remote Start position
to use the function.
Operating the Warming
Drawer
The Warming Drawer keeps hot cooked foods at
serving temperature.
All food placed in the Warming Drawer should be
covered with an oven-safe lid or aluminum foil to
maintain quality. Do not place foil on bottom or
sides of drawer. Do not use plastic wrap to cover
food. Plastic may melt onto the drawer and be very
difficult to clean. Use only utensils and cookware
recommended for oven use in the Warming Drawer.
Setting Remote Start
Open the oven door to make sure the oven is
1
empty and ready for pre-heating. Do not place
food in the oven. Close the oven door.
Within 30 seconds of closing the door, turn the
2
oven mode knob to select Remote Start.
When ON appears in the display, the Remote
3
Start function is ready to use.
Follow the directions in the smart phone app to
4
set Remote Start times.
NOTE
Remote Start is disconnected in the following
situations:
•Remote Start is never set up in the smart phone
app.
•The Remote Start status is “ready.”
•Remote Start experiences a problem during
operation.
Setting the Warming Drawer Control
Press Warming Drawer Set/Off. The indicator
1
light will flash. (If no further buttons are pressed
within 25 seconds, the display will clear.)
Use the plus(+) or minus(-) button to set the
2
power level:
for High.
When the food is ready, or to cancel, press
3
Warming Drawer Set/Off.
NOTE
•The Warming Drawer shuts off automatically
after three hours.
•Do not heat cold food in the Warming Drawer.
•Do not use pans or utensils with rough finishes
in the Warming Drawer. Doing so can leave
scratches on the inner drawer surfaces.
for Low, for Medium, and
Page 8
40
OPERATION
Warming Drawer food/power level
recommendations
Setting Food Item
•Vegetables
•Rice
Low
140°F (60°C)
Medium
160°F (71°C)
High
180°F (82°C)
* Do not warm heat-sensitive foods for longer than 20
minutes.
Do not put thin cuts of meat in the warming drawer as they
will dry out.
Different types of food may be placed in the warming
drawer at the same time. For best results, do not
leave food in the warming drawer for more than one
hour. Do not leave smaller quantities or heat-sensitive
food, such as eggs, in the warming drawer more than
30 minutes. The maximum operating time is three
hours.
•Pasta
•Breakfast pastries (coffee cake,
muffins)
•Dinner rolls
•Plates of food
•Heat-sensitive foods* (pancakes,
pizza, eggs)
•Meat* (if warming for 1-2 hours)
•Smaller casseroles
•Bacon or sausage
•Warming empty ovenproof plates
or serving dishes
•Meat* (if warming for less than an
hour)
•Large casseroles
CAUTION
•Do not use the warming drawer for storage
of racks, broiler pans, insert pans, plates,
or utensils. The warming drawer contains a
heating element which may damage any items
not specifically designed to be used with it
and should only be used to store cookware
specifically supplied by LG with your range.
•Do not put food or foil directly on the surface
or base of the warming drawer. This may result
in damage to your drawer and may spoil your
food.
•Do not place plastic wrap in the warming
drawer or use it to cover food being heated
in the warming drawer. Plastic may melt onto
the drawer or surrounding areas and is very
difficult to remove. Use only aluminum foil or
cookware that is capable of withstanding baking
temperature to heat or cover your food.
•Do not use the warming drawer to heat water
or any other liquids. Spilled liquids may cause
an electrical short or result in severe personal
injury, electric shock or death.
•Never place plastics, paper, canned foods or
other combustible material into the warming
drawer. These items pose a severe risk of fire,
damage and injury.
•In the unlikely event that an item falls behind
the warming drawer, always turn the power off
and wait for the warming drawer to cool before
retrieving the item. Never attempt to retrieve
any items that fall behind the warming drawer
without first turning the power off and ensuring
the warming drawer cavity has cooled off.
Failure to do so may result in severe personal
injury, electric shock or death.
•Do not touch the surface of the warming drawer
while it is in operation. Use oven mitts or hot
pads when inserting or removing food to avoid
burns or other injury.
•Do not leave food in the warming drawer for
longer than one hour. Eating food which has
been heated for too long at low temperatures
can lead to food-borne illnesses.
Page 9

SMART FEATURES
ENGLISH
41
SMART FUNCTIONS
Application Installation
Search for the LG Smart Oven application from
the Google Play Store on a smart phone. Follow
instructions to download and install the application.
Product Registration
Run the LG Smart Oven application on a smart
1
phone.
Create an account and sign in.
2
Select Register.
3
Select Oven.
4
Follow the instructions on the smart phone to
5
register the appliance and connect it to a Wi-Fi
network.
•To verify the Wi-Fi connection, check the Wi-Fi
icon
NOTE
•LG Electronics is not responsible for any
network connection problems or any faults,
malfunctions, or errors caused by network
connection.
•The machine supports 2.4 GHz Wi-Fi networks
only.
•If the appliance is having trouble connecting
to the Wi-Fi network, it may be too far from
the router. Purchase a Wi-Fi repeater (range
extender) to improve the Wi-Fi signal strength.
•The Wi-Fi connection may not connect or may
be interrupted because of the home network
environment.
•The network connection may not work properly
depending on the internet service provider.
•The surrounding wireless environment can
make the wireless network service run slowly.
•This information is current at the time of
publication. The application is subject to change
for appliance improvement purposes without
notice to users.
•Depending on your wifi connection, you may
Experience delays with app.
on the control panel is lit.
Using the Wi-Fi Function
Communicate with the appliance from a smart phone
using the convenient smart features.
Using the Application
Select the appliance in the application and
1
connect it to a Wi-Fi network.
Select the menu on the upper right side to
2
access settings and features.
Cleaning
This function helps you to check the energy efficiency,
Usage and guide of
Smart Diagnosis™
This function provides useful information for
diagnosing and solving issues with the appliance
based on the pattern of use.
Settings
Allows you to set various options on the oven and in
the Application.
Monitoring
This function helps you recognize the current status,
remaining time, cook settings and end time on the
screen.
Push Alerts
Turn on the Push Alerts to receive appliance status
notifications.
The notifications are triggered even if the LG Smart
Oven application is off.
Timer
You can set the timer from the application.
IMPORTANT : Features could be added or deleted
when the LG Smart Oven application is updated.
Data saved on the LG Smart Oven application could
be deleted when the application is updated or your
smart phone is changed.
EasyClean®.
Page 10

42
SMART FEATURES
Open Source Software Notice
Information
To obtain the source code under GPL, LGPL, MPL,
and other open source licenses, that is contained in
this product, please visit http://opensource.lge.com.
In addition to the source code, all referred license
terms, warranty disclaimers and copyright notices are
available for download.
LG Electronics will also provide open source code
to you on CD-ROM for a charge covering the cost
of performing such distribution (such as the cost of
media, shipping, and handling) upon email request
to opensource@lge.com. This offer is valid for three
(3) years from the date on which you purchased the
product.
Wireless LAN Module (LCW-003) Specifications
Frequency Range 2412~2462 MHz
IEEE 802.1 1 b : 17.56 dBm
Output Power (max.)
IEEE 802.1 1 g : 25.53 dBm
IEEE 802.1 1 n : 25.29 dBm
FCC Notice
The following notice covers the transmitter module
contained in this product.
This equipment has been tested and found to comply
with the limits for a Class B digital device, pursuant
to Part 15 of the FCC Rules and also Part 18 of the
FCC Rules. These limits are designed to provide
reasonable protection against harmful interference in
a residential installation. This equipment generates,
uses, and can radiate radio frequency energy and,
if not installed and used in accordance with the
instructions, may cause harmful interference to radio
communications. However, there is no guarantee that
interference will not occur in a particular installation.
If this equipment does cause harmful interference to
radio or television reception, which can be determined
by turning the equipment off and on, the user is
encouraged to try to correct the interference by one
or more of the following measures:
•Reorient or relocate the receiving antenna.
•Increase the separation between the equipment
and the receiver.
•Connect the equipment to an outlet on a circuit
different from that to which the receiver is
connected.
•Consult the dealer or an experienced radio/TV
technician for help.
This device complies with Part 15, Part 18 of the
FCC Rules. Operation is subject to the following two
conditions:
1) this device may not cause harmful interference
and
2) this device must accept any interference received,
including interference that may cause undesired
operation of the device.
Any changes or modifications in construction of this
device which are not expressly approved by the party
responsible for compliance could void the user’s
authority to operate the equipment.
FCC RF Radiation Exposure
Statement
This equipment complies with FCC radiation exposure
limits set forth for an uncontrolled environment. This
transmitter must not be co-located or operating in
conjunction with any other antenna or transmitter.
This equipment should be installed and operated with
minimum distance 20 cm (7.8 inches) between the
antenna and your body . Users must follow the specific
operating instructions for satisfying RF exposure
compliance.
Page 11
MAINTENANCE
ENGLISH
43
MAINTENANCE
Cleaning the Glass-Ceramic
Cooktop
CAUTION
•Do not use scrub pads or abrasive cleaning
pads. They may damage your cooktop surface.
•For your safety, wear an oven mitt or pot
holder while using a scraper on the hot cooking
surface.
•Read and follow all instructions and warnings
on the cleaning cream label.
Use ceramic cooktop cleaner on the glass cooktop.
Other creams may not be as effective or may scratch,
damage or stain the cooktop surface.
To maintain and protect the surface of the glass
cooktop, follow these steps:
Before using the cooktop for the first time, clean
1
it with a ceramic cooktop cleaner. This helps
protect the top and makes cleanup easier.
Use ceramic cooktop cleaner daily to help keep
2
the cooktop looking new.
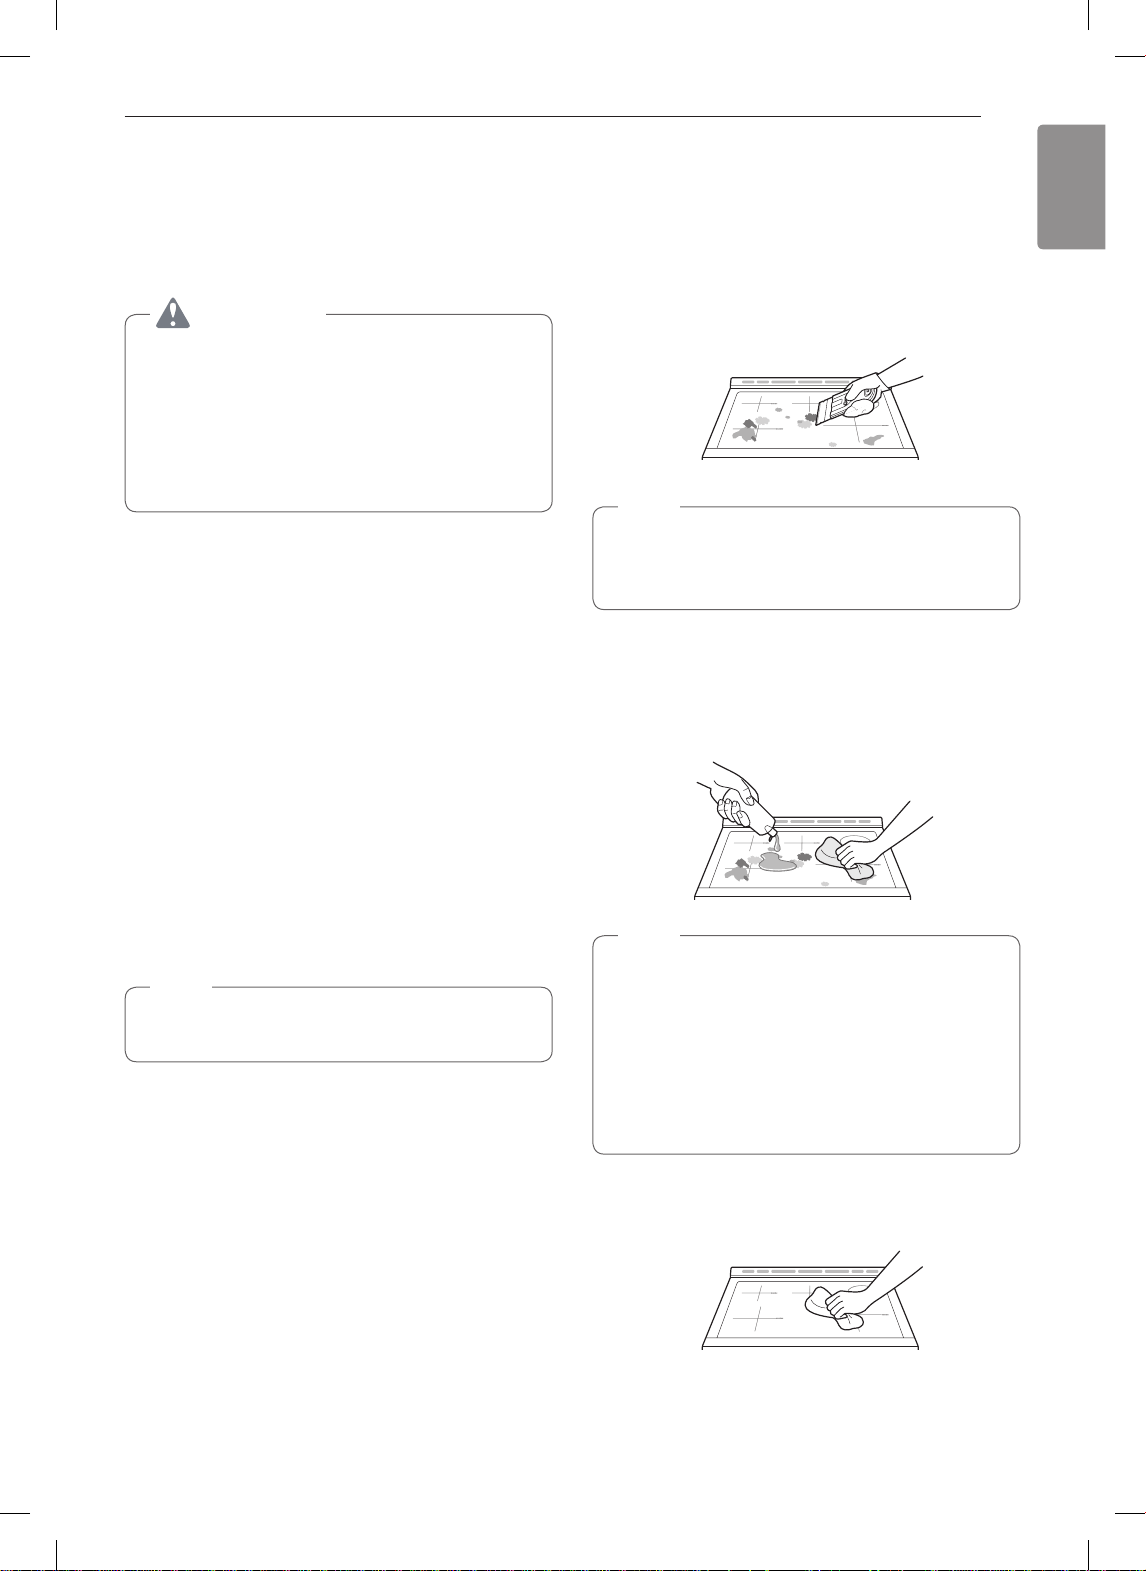
Burned-On Residue
While the cooktop is still hot, remove any burnt
1
on deposits or spilled food from the
glass-ceramic cooking surface with a suitable
metal razor scraper. (Similar to scraping paint
off of a windowpane, it will not damage the
decorated cooking surface.) Hold the scraper at
an approximate 30° angle to the cooktop.
NOTE
•Do not use a dull or nicked blade.
•To prevent burns, wear an oven mitt or pot
holder while using the metal scraper.
When the cooking surface has cooled down,
2
apply a few dabs (about the size of a dime) of an
approved cleaner in each burner area and work
the cleaning cream over the cooktop surface
with a damp paper towel.
Shake the cleaning cream well. Apply a few
3
drops of cleaner directly to the cooktop.
Use a paper towel to clean the entire cooktop
4
surface.
Rinse with clear water and use a dry cloth or
5
paper towel to remove all cleaning residue.
NOTE
Do not heat the cooktop until it has been cleaned
thoroughly.
IMPORTANT
If any sugar or food containing sugar (preserves,
ketchup, tomato sauce, jellies, fudge, candy, syrups,
chocolate) spills, or plastic or foil melts on the
cooktop, remove the molten material IMMEDIATELY
with a metal razor scraper (it will not damage the
decorated cooking surface) while the cooking surface
is still hot to avoid the risk of damage to the
glass-ceramic surface. For your safety, please use an
oven mitt or pot holder while scraping the hot cooking
surface.
NOTE
Approved cleaners
•Weiman Cooktop Cleaning Cream
(www.weiman.com)
•Cerama Bryte (www.ceramabryte.com)
•Golden Ventures Cerama Bryte
•Easy-Off 3 in 1 Glass Top Cleaner Spray
(www.easyoff.us)
Rinse with clean water and wipe the cooktop
3
surface with a clean, dry paper towel.
Page 12
44
MAINTENANCE
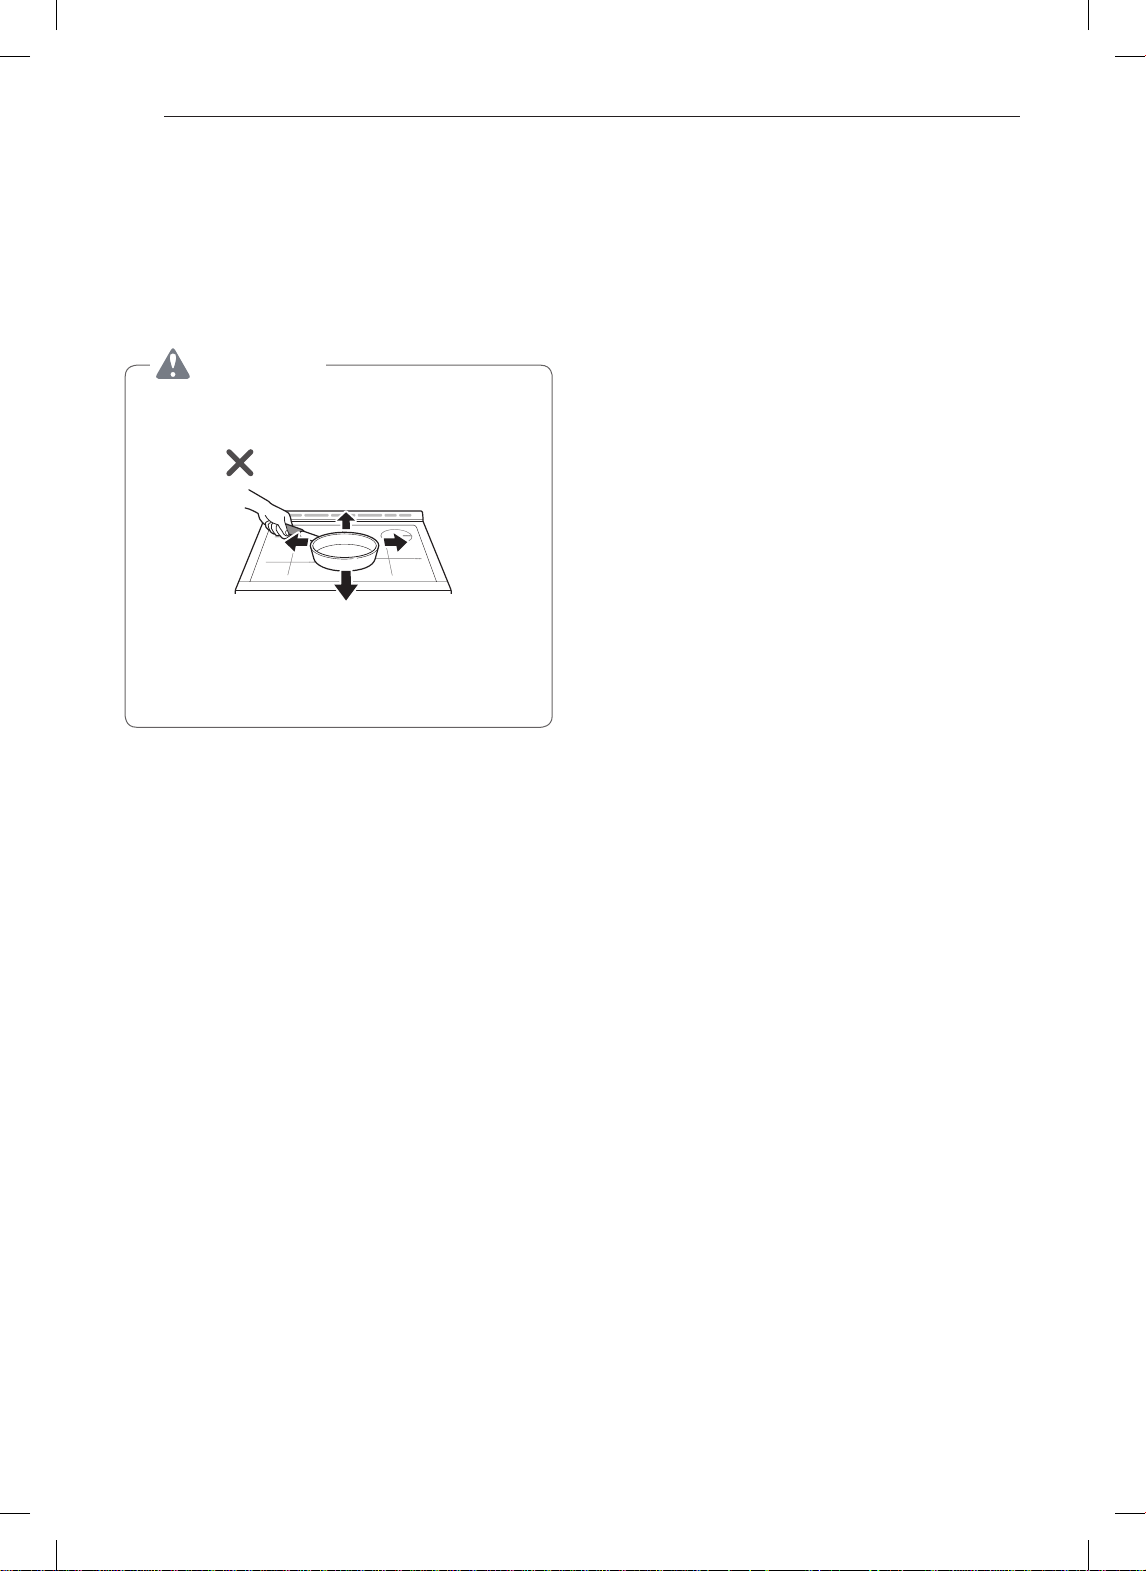
Metal Marks and Scratches
Be careful not to slide pots and pans across the
1
cooktop. Doing so will leave metal markings on
the cooktop surface.
To help remove these marks, use a ceramic
2
cooktop cleaner with a cleaning pad for ceramic
cooktops.
CAUTION
Cookware with rough or uneven bottoms can
mark or scratch the cooktop surface.
•Do not slide metal or glass across the cooktop
surface.
•Do not use cookware with any dirt build-up on
the bottom.
EasyClean
LG’s EasyClean® enamel technology provides two
cleaning options for the inside of the range. The
EasyClean® feature takes advantage of LG’s new
enamel to help lift soils without harsh chemicals, and
it runs using ONLY WATER for just 10 minutes in low
temperatures to help loosen LIGHT soils before
hand-cleaning.
While EasyClean
and LIGHT soils, the Self Clean feature can be
used to remove HEAVY, built up soils. The intensity
and high heat of the Self Clean cycle may result in
smoke which will require the opening up of windows
to provide ventilation. Compared to the more intense
Self Clean process, your LG oven gives you the
option of cleaning with LESS HEAT, LESS TIME, and
virtually NO SMOKE OR FUMES.
When needed, the range still provides the self clean
option for longer, more thorough oven cleaning for
heavier, built up soils.
Benefits of EasyClean
•Helps loosen light soils before hand-cleaning
•EasyClean
•Makes for a better self-clean experience
- Delays the need for a self-clean cycle
- Minimizes smoke and odors
- Can allow shorter self-clean time
®
®
is quick and effective for small
®
®
only uses water; no chemical cleaners
Page 13
MAINTENANCE
ENGLISH
45
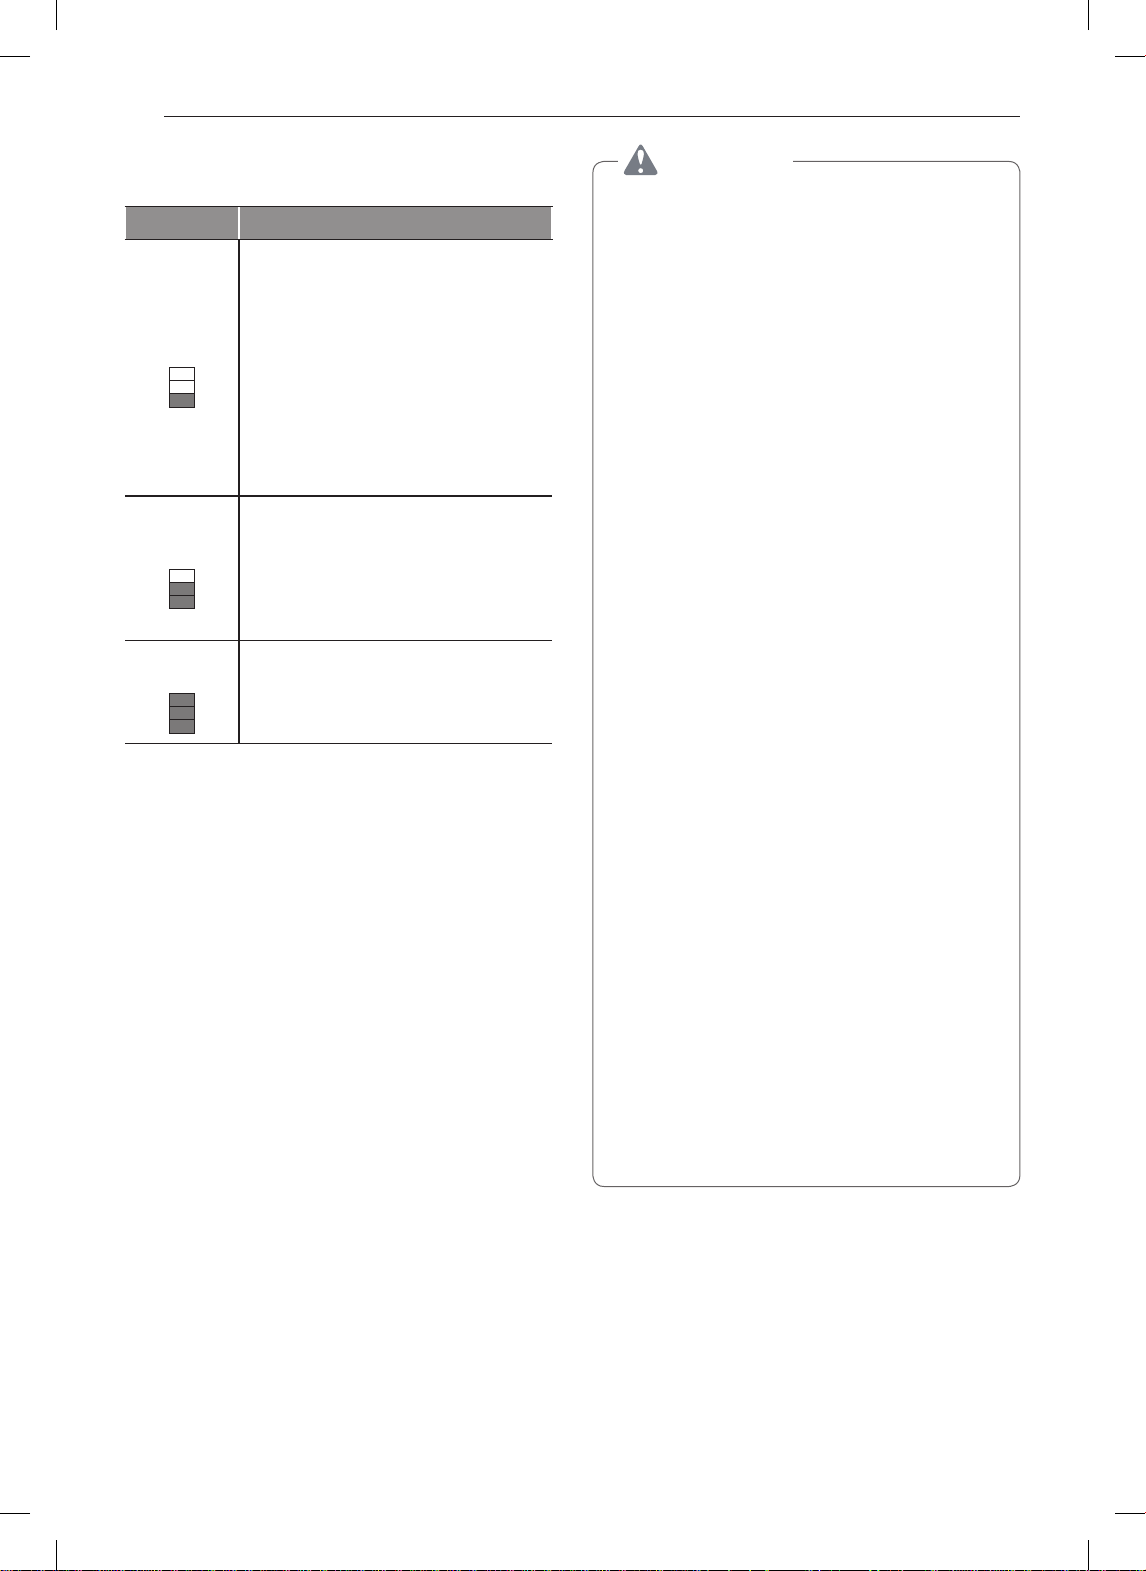
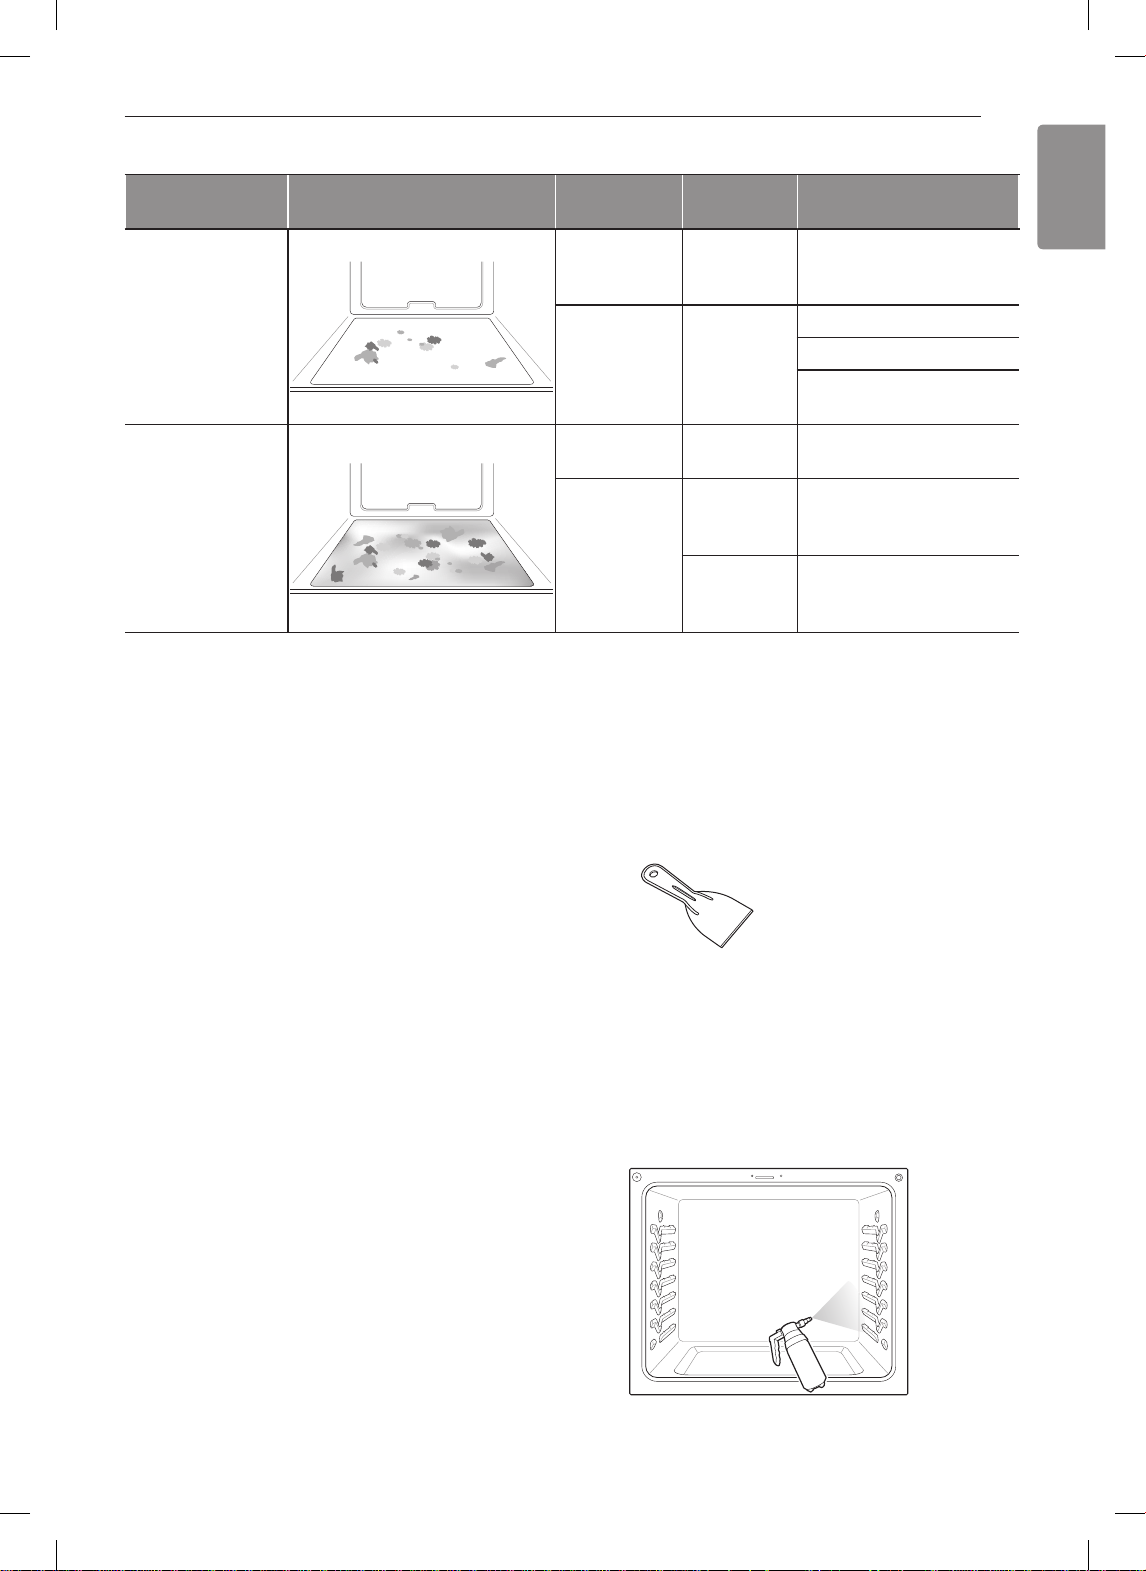
When to Use EasyClean
Suggested
Cleaning Method
EasyClean
Self Clean*
* The Self Clean cycle can be used for soil that has been built up over time.
®
Example of Oven Soiling Soil Pattern
Cleaning Tips
•Allow the oven to cool to room temperature before
using the EasyClean® cycle. If your oven cavity is
above 150 °F (65 °C), Hot will appear in the display,
and the EasyClean
the oven cavity cools down.
•A plastic spatula can be used as a scraper to
scrape off any chunks or debris before and during
oven cleaning.
•Using the rough side of a non-scratch scouring pad
may help to take off burnt-on stains better than a
soft sponge or towel.
•Certain non-scratch scrubbing sponges, such as
those made of melamine foam, available at your
local stores, can also help improve cleaning.
•The range should be level to ensure that the bottom
surface of the oven cavity is entirely covered by
water at the beginning of the EasyClean
•For best results, use distilled or filtered water. Tap
water may leave mineral deposits on the oven
bottom.
•Soil baked on through several cooking cycles will
be more difficult to remove with the EasyClean
cycle.
•Do not open the oven door during the EasyClean
cycle. Water will not get hot enough if the door is
opened during the cycle.
•For hard to reach areas such as the back surface
of the oven, it is better to use the Self Clean cycle.
®
cycle will not be activated until
®
Types of
Small drops or
spots
Light splatter Fat/grease
Medium to
heavy splatter
Drops or spots
ingredients
Fat/grease
Filling or
sugar based
Cream or
EasyClean® Instruction Guide
Remove oven racks and accessories from the
1
oven.
Scrape off and remove any burnt-on debris with
2
a plastic scraper.
Fill a spray bottle with 1¼ cups (10 oz or 300 ml)
3
of water and use the spray bottle to thoroughly
spray the inside surfaces of the oven.
Use at least ¼ cup (2 oz or 60 ml) of the water
4
®
cycle.
®
®
to completely saturate the soil on both the walls
and in the corners of the oven.
Soils
Cheese
or other
soils
tomato
sauce
Common Food Items
That Can Soil Your Oven
Pizza
Steaks, broiled
Fish, broiled
Meat roasted at low
temperatures
Meat roasted at high
temperatures
Pies
Casseroles
Suggested plastic scrapers:
•Hard plastic spatula
•Plastic pan scraper
•Plastic paint scraper
•Old credit card
Page 14

46
MAINTENANCE
Spray or pour the remaining 1 cup (8 oz or 250
5
ml) of water onto the bottom center of the oven
cavity. The indentation on the oven bottom
should be fully covered to submerge all soils.
Add water if necessary.
NOTE
Use the "mist" setting on the spray bottle for
better coverage. The entire 1¼ cup (10 oz or 300
ml) of water should be used for each oven cavity
cleaned. Do not spray water directly on the door.
Doing so will result in water dripping to the floor.
Close the oven door.
6
Turn the oven mode knob to select EasyClean®.
Press Start.
CAUTION
•Some surfaces may be hot after the
EasyClean
cleaning to prevent burns.
•During the EasyClean
becomes hot enough to cause burns. Wait
until the cycle is over before wiping the inside
surface of the oven. Failure to do so may result
in burns.
•Avoid leaning or resting on the oven door glass
while cleaning the oven cavity.
A tone will sound at the end of the 10 minute
7
cycle. Turn the oven mode knob to the Off
position to clear the display and end the tone.
®
cycle. Wear rubber gloves while
®
cycle, the oven
Once the oven cavity is cleaned, wipe any
10
excess water with a clean dry towel. Replace
racks and any other accessories.
If some light soils remain, repeat the above
11
steps, making sure to thoroughly soak the
soiled areas. If stubborn soils remain after
multiple EasyClean® cycles, run the Self
Clean cycle. Be sure that the oven cavity is
empty of oven racks and other accessories,
and that the oven cavity surface is dry before
running the Self Clean cycle. Consult the Self
Clean section of your owner’s manual for
further details.
NOTE
•If you forget to saturate the inside of the oven
with water before starting EasyClean
the Oven mode knob to the Off position to end
the cycle. Wait for the range to cool to room
temperature and then spray or pour water into
the oven and start another EasyClean® cycle.
•The cavity gasket may be wet when the
EasyClean
not clean the gasket.
•If mineral deposits remain on the oven bottom
after cleaning, use a cloth or sponge soaked in
vinegar to remove them.
•It is normal for the fan to operate during the
EasyClean
®
cycle finishes. This is normal. Do
®
cycle.
®
, turn
After the cleaning cycle and during hand-
8
cleaning, enough water should remain on the
oven bottom to completely submerge all soils.
Add water if necessary. Place a towel on the
floor in front of the oven to capture any water
that may spill out during hand-cleaning.
Clean the oven cavity immediately after the
9
EasyClean® cycle by scrubbing with a wet,
non-scratch scouring sponge or pad. (The
scouring side will not scratch the finish.) Some
water may spill into the bottom vents while
cleaning, but it will be captured
in a pan under the oven cavity
and will not hurt the burner.
NOTE
Do not use any steel scouring pads, abrasive
pads or cleaners as these materials can
permanently damage the oven surface.
Page 15

MAINTENANCE
ENGLISH
47
Self Clean
The Self Clean cycle uses extremely hot temperatures
to clean the oven cavity. While running the Self Clean
cycle, you may notice smoking or an odor. This is
normal; especially if the oven is heavily soiled.
During Self Clean, the kitchen should be well
ventilated to minimize the odors from cleaning.
Before Starting Self Clean
•Remove the oven racks, broiler pan, broiler grid, all
cookware, aluminum foil or any other material from
the oven.
•The kitchen should be well ventilated to minimize
the odors from cleaning.
•Wipe any heavy spillovers on the bottom of the
oven.
•Make sure that the oven light bulb cover is in place
and the oven light is off.
•The oven light cannot be turned on during a Self
Clean cycle. The oven light cannot be turned on
until the oven temperature has cooled below
500 ˚F (260 ˚C) after a Self Clean cycle is complete.
CAUTION
•Do not leave small children unattended near
the appliance. During the Self Clean cycle, the
outside of the range can become very hot to
the touch.
•If you have pet birds, move them to another
well-ventilated room. The health of some birds
is extremely sensitive to the fumes given off
during the Self Clean cycle of any range.
•Do not line the oven walls, racks, bottom or any
other part of the range with aluminum foil or
any other material. Doing so will destroy heat
distribution, produce poor baking results and
cause permanent damage to the oven interior
(aluminum foil will melt to the interior surface of
the oven).
•Do not force the door open. This can damage
the automatic door locking system. Use care
when opening the oven door after the Self
Clean cycle. Stand to the side of the oven when
opening the door to allow hot air or steam to
escape. The oven may still be VERY HOT.
During the Self Clean cycle, the cooktop elements
and warming drawer cannot be used.
NOTE
•Remove oven racks and accessories before
starting the Self Clean cycle.
•If oven racks are left in the oven cavity during
the Self Clean cycle, they will discolor and
become difficult to slide in and out.
•Clean the frame of the oven and door with hot
soapy water. Rinse well.
•Do not clean the gasket. The fiberglass material
of the oven door gasket cannot withstand
abrasion. It is essential for the gasket to remain
intact. If you notice it becoming worn or frayed,
replace it.
•Wipe up any heavy spillovers on the oven
bottom.
•Make sure that the oven light bulb cover is in
place and the oven light is off.
•It is normal for the fan to operate during the Self
Clean cycle.
•The Burner On indicator light turns on when
the knob is turned even if the cooktop element
does not operate.
Setting Self Clean
The Self Clean function has cycle times of 3, 4, or 5
hours.
Self Clean Soil Guide
Soil Level Cycle Setting
Lightly Soiled Oven Cavity 3-Hour Self Clean
Moderately Soiled Oven Cavity 4-Hour Self Clean
Heavily Soiled Oven Cavity 5-Hour Self Clean
Remove all racks and accessories from the
1
oven.
Turn the oven mode knob to select Self Clean.
2
The oven defaults to the recommended
four-hour self clean for a moderately soiled oven.
Press plus(+) or minus(-) to select a self clean
time from 3 to 5 hours.
Press Start.
3
Once the self-clean cycle is set, the oven door
4
locks automatically and the lock icon displays.
You will not be able to open the oven door
until the oven has cooled. The lock releases
automatically when the oven has cooled.
Page 16

48
MAINTENANCE
CAUTION
Do not force the oven door open when the lock
icon is displayed. The oven door remains locked
until the oven temperature has cooled. Forcing
the door open will damage the door.
Setting Self Clean with a Delayed
Start
Remove all racks and accessories from the
1
oven.
Turn the oven mode knob to select Self Clean.
2
The oven defaults to the recommended
four-hour self clean for a moderately soiled oven.
Press plus(+) or minus(-) to select a self clean
time from 3 to 5 hours.
Press Start Time.
3
Press plus(+) or minus(-) to enter the time of
4
day you would like the Self Clean to start.
Press Start.
5
NOTE
It may become necessary to cancel or interrupt a
Self Clean cycle due to excessive smoke or fire in
the oven. To cancel the Self Clean function, turn
the oven mode knob to the Off position.
During Self Clean
•The Self Clean cycle uses extremely hot
temperatures to clean the oven cavity. While
running the Self Clean cycle, you may notice
smoking or an odor. This is normal, especially if the
oven is heavily soiled.
•As the oven heats, you may hear sounds of metal
parts expanding and contracting. This is normal
and will not damage the oven.
•Do not force the oven door open when the lock
is displayed. The oven door remains locked until
the oven temperature has cooled. Forcing the door
open will damage the door.
After the Self Clean Cycle
•The oven door remains locked until the oven
temperature has cooled.
•You may notice some white ash in the oven. Wipe it
off with a damp cloth or a soap-filled steel wool pad
after the oven cools. If the oven is not clean after
one self-clean cycle, repeat the cycle.
•If oven racks were left in the oven and do not slide
smoothly after a self-clean cycle, wipe racks and
rack supports with a small amount of vegetable oil
to make them glide more easily.
•Fine lines may appear in the porcelain because it
went through heating and cooling. This is normal
and will not affect performance.
NOTE
•The Self Clean cycle cannot be started if the
Lockout feature is active.
•Once the Self Clean cycle is set, the oven door
locks automatically. You will not be able to open
the oven door until the oven is cooled. The lock
releases automatically.
•Once the door has been locked, the lock
indicator light stops flashing and remains on.
Allow about 15 seconds for the oven door lock
to activate.
•If the clock is set for a 12-hour display (default)
the Delayed Self Clean can never be set to
start more than 12 hours in advance.
•After the oven is turned off, the convection
fan keeps operating until the oven has cooled
down.
Page 17

MAINTENANCE
ENGLISH
49
Changing the Oven Light
The oven light is a standard 40-watt appliance bulb. It
turns on when the oven door is open. When the oven
door is closed, press Light to turn it on or off.
Unplug the range or disconnect power.
1
Turn the glass bulb cover in the back of the oven
2
counterclockwise to remove.
Turn the bulb counterclockwise to remove it from
3
the socket.
Insert the new bulb and turn it clockwise.
4
Insert the glass bulb cover and turn it clockwise.
5
Plug in the range or reconnect the power.
6
Cleaning the Exterior
Painted and Decorative Trim
For general cleaning, use a cloth with hot soapy
water. For more difficult soils and built-up grease,
apply a liquid detergent directly onto the soil. Leave it
on for 30 to 60 minutes. Rinse with a damp cloth and
dry. Do not use abrasive cleaners.
Stainless Steel Surfaces
To avoid scratches, do not use steel wool pads.
Place a small amount of stainless steel
1
appliance cleaner or polish on a damp cloth or
paper towel.
Clean a small area, rubbing with the grain of the
2
stainless steel if applicable.
Dry and buff with a clean, dry paper towel or soft
3
cloth.
Repeat as necessary.
4
WARNING
•Make sure that the oven and bulb are cool.
•Disconnect the electrical power to the range at
the main fuse or circuit breaker panel. Failure
to do so can result in severe personal injury,
death, or electrical shock.
Oven Door
•Use soapy water to thoroughly clean the oven door.
Rinse well. Do not immerse the door in water.
•You may use a glass cleaner on the outside glass
of the oven door. Do not spray water or glass
cleaner on the door vents.
•Do not use oven cleaners, cleaning powders, or
harsh abrasive cleaning materials on the outside of
the oven door.
•Do not clean the oven door gasket. The oven door
gasket is made of a woven material that is essential
for a good seal. Care should be taken not to rub,
damage, or remove this gasket.
CAUTION
Do not use harsh cleaners or harsh abrasive
cleaning materials on the outside of the oven
door. Doing so can cause damage.
Don’t hand
clean oven
door gasket
Do hand
clean door
Page 18
50
MAINTENANCE
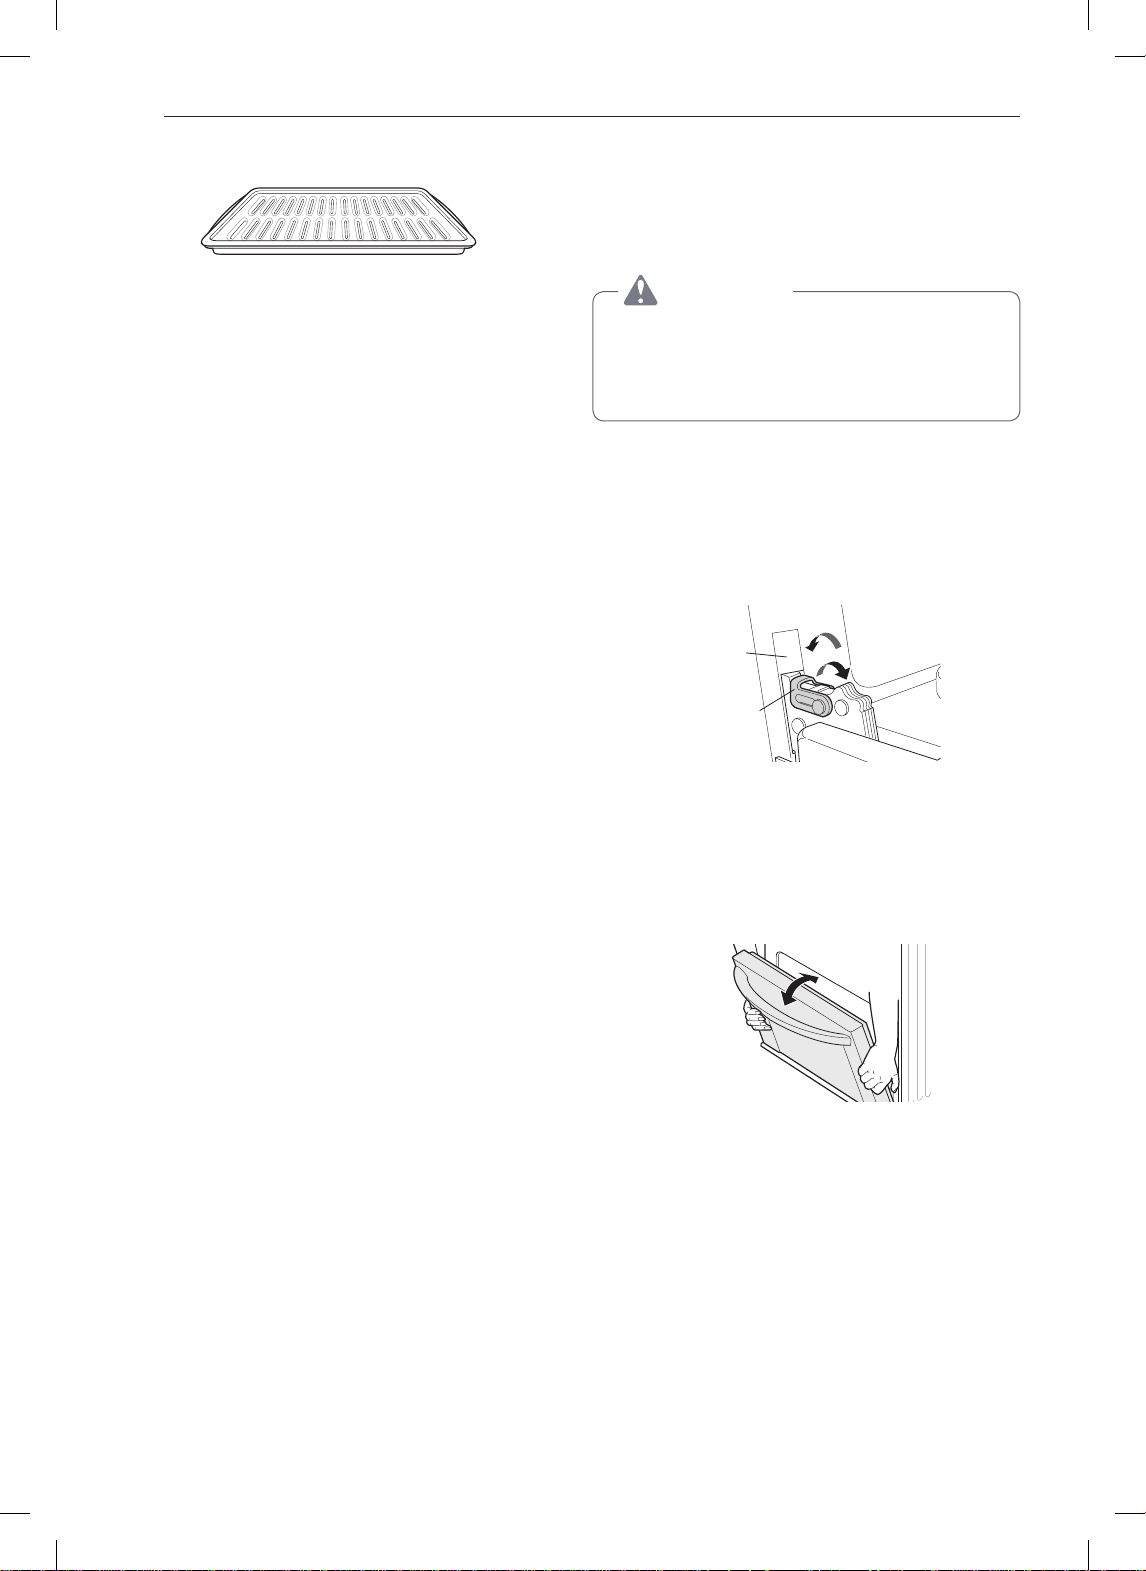
Broiler Pan and Grid
•Do not store a soiled broiler pan or grid anywhere
in the range.
•Do not clean the broiler pan or grid in a
self-cleaning mode.
•Remove the grid from the pan. Carefully pour out
the grease from the pan into a proper container.
•Wash and rinse the broiler pan and grid in hot water
with a soap-filled or plastic scouring pad.
•If food has burned on, sprinkle the grid with cleaner
while hot and cover with wet paper towels or a
dishcloth. Soaking the pan will remove burned-on
foods.
•Both the broiler pan and grid may be cleaned with a
commercial oven cleaner or in the dishwasher.
Removing and Replacing
the Lift-Off Oven Doors and
Drawer
CAUTION
•Be careful when removing and lifting the
door.
•Do not lift the door by the handle. The door
is very heavy.
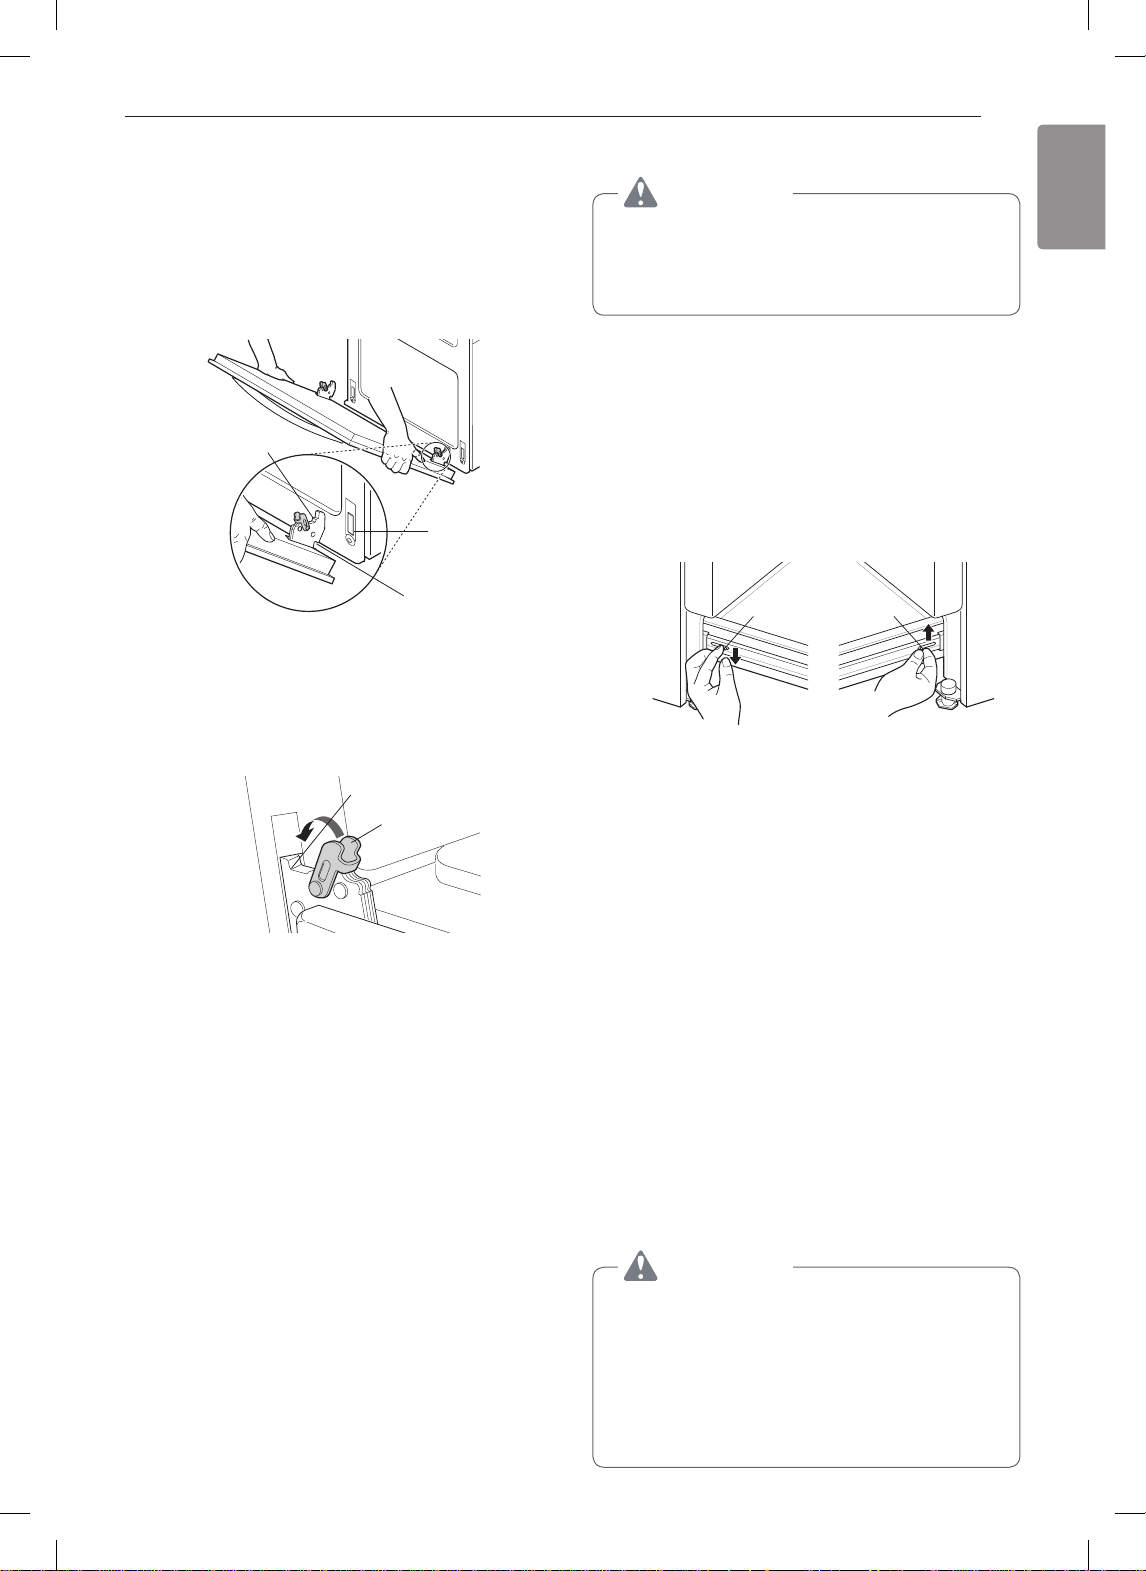
Removing the Door
Fully open the door.
1
Unlock the hinge locks, rotating them as far
2
toward the open door frame as they will go.
Lock
Slot
Hinge
lock
Unlock
Firmly grasp both sides of the door at the top.
3
Close the door to the removal position
4
(approximately five degrees) which is halfway
between the broil stop position and fully closed.
If the position is correct, the hinge arms will
move freely.
about 5°
Lift door up and out until the hinge arms are
5
clear of the slots.
Page 19
MAINTENANCE
ENGLISH
51
Replacing the Door
Firmly grasp both sides of the door at the top.
1
With the door at the same angle as the removal
2
position, seat the indentation of the hinge arms
into the bottom edge of the hinge slots. The
notch in the hinge arms must be fully seated into
the bottom edge of the slots.
Hinge arm
Bottom
edge of slot
Indentation
Open the door fully. If the door will not open fully,
3
the indentation is not seated correctly in the
bottom edge of the slots.
Removing the Drawer
CAUTION
Disconnect the electrical power to the range at
the main fuse or circuit breaker panel. Failure to
do so can result in severe personal injury, death,
or electrical shock.
Most cleaning can be done with the drawer in place;
however, the drawer may be removed if further
cleaning is needed. Use warm water to thoroughly
clean.
Fully open the drawer.
1
Locate the glide lever on each side of the
2
drawer. Push down on the left glide lever and
pull up on the right glide lever.
Lever Lever
Lock the hinge locks, rotating them back toward
4
the slots in the oven frame until they lock.
Hinge arm
Hinge lock
Close the oven door.
5
Push down with nger Pull up with nger
Pull the drawer away from the range.
3
Replacing the Drawer
Pull the bearing glides to the front of the chassis
1
glide.
Align the glide on each side of the drawer with
2
the glide slots on the range.
Push the drawer into the range until levers click
3
(approximately 2 inch).
Pull the drawer open again to seat bearing glides
4
into position.
Door Care Instructions
Most oven doors contain glass that can break.
CAUTION
•Do not close the oven door until all the oven
racks are fully in place.
•Do not hit the glass with pots, pans, or any
other object.
•Scratching, hitting, jarring, or stressing the
glass may weaken its structure causing an
increased risk of breakage at a later time.
Page 20

52
TROUBLESHOOTING
TROUBLESHOOTING
FAQs
What types of cookware are recommended for
use with the cooktop?
•Look for cookware that is marked "induction
ready" or "induction capable" or that is specifically
designed for induction cooking.
•The cookware must have a magnetic metallic base.
See the Induction Cookware Types section.
•The pans must have a flat bottom and straight
sides.
•Only use heavy-gauge pans.
•The pan size must match the amount of food to be
prepared and the size of the surface element.
•Use tight fitting lids.
•Only use flat-bottom woks.
Why do the heating elements appear to be turning
ON and OFF during use of the cooktop or oven?
Depending on your cooktop element setting or the
temperature selected in your oven it is NORMAL for
the cooking elements to cycle on and off.
My new oven doesn’t cook like my old one. Is
there something wrong with the temperature
settings?
No, your oven has been factory tested and calibrated.
For the first few uses, follow your recipe times and
temperatures carefully. If you still think your new
oven is too hot or too cold, you can adjust the oven
temperature yourself to meet your specific cooking
needs. Refer to the Oven Temperature Adjustment
section in this manual for easy instructions on how to
adjust your thermostat.
Is it normal to hear a clicking noise coming from
the back of my oven when I am using it?
Your new range is designed to maintain a tighter
control over your oven’s temperature. You may hear
your oven’s heating elements click on and off more
frequently on your new oven. This is NORMAL.
Why is the colon in the clock flashing?
This means that the product has just been plugged
in, or that it has experienced a power interruption. To
clear the flashing colon in the clock, press any key or
reset the clock if needed.
During convection cooking the fan stops when I
open the door. Is that normal?
Yes, this is normal. When the door is opened, the
convection fan will stop until the door is closed.
Can I use aluminum foil to catch drippings in my
oven cavity?
Never use aluminum foil to line the bottom or sides of
the oven or the warming drawer. The foil will melt and
stick to the bottom surface of the oven and will not be
removable. Use a sheet pan placed on a lower oven
rack to catch drippings instead. (If foil has already
melted onto the bottom of the oven, it will not interfere
with the oven's performance.)
Can I use aluminum foil on the racks?
Do not cover racks with aluminum foil. Covering
entire racks with foil restricts air flow, leading to poor
cooking results. Use a sheet pan lined with foil under
fruit pies or other acidic or sugary foods to prevent
spillovers from damaging the oven finish.
CAUTION
Foil may be used to wrap food in the oven or
warming drawer, but do not allow the foil to come
into contact with the exposed heating/broiling
elements in the oven. The foil could melt or ignite,
causing smoke, fire, or injury.
Can I leave my racks in the oven when running a
Self Clean cycle?
No. Although it will not damage the racks, it will
discolor them and may make them hard to slide in
and out during use. Remove all items from the oven
before starting a Self Clean cycle.
What should I do if my racks are sticky and have
become hard to slide in and out?
Over time, the racks may become hard to slide in
and out. Apply a small amount of olive oil to the ends
of the racks. This will work as a lubricant for easier
gliding.
What should I do for hard to remove stains on my
cooktop?
The cooktop should be cleaned after every use to
prevent permanent staining. When cooking foods with
high sugar content, such as tomato sauce, clean the
stain off with a scraper while the cooktop is still warm.
Use an oven mitt when scraping to prevent burns.
Refer to the MAINTENANCE section of this owner's
manual for further instruction.
Page 21

TROUBLESHOOTING
ENGLISH
53
Why aren't the function buttons working?
Make sure that the range is not in Lockout mode. The
will show in the display if Lockout is activated.
lock
To deactivate Lockout, pressing Probe or Clock for
three seconds. The unlock melody sounds and Loc
appears in the display until the controls are unlocked.
My range is still dirty after running the
®
EasyClean
The EasyClean
cycle. What else should I do?
®
cycle only helps to loosen light soils
in your oven range to assist in hand-cleaning of your
oven. It does not automatically remove all soils after
the cycle. Some scrubbing of your oven range is
required after running the EasyClean
®
cycle.
I tried scrubbing my oven after running
®
EasyClean
, but some soils still remain. What can
I do?
®
The EasyClean
feature works best when the soils
are fully soaked and submerged in water before
running the cycle and during hand-cleaning. If soils
are not sufficiently soaked in water, it can negatively
affect the cleaning performance. Repeat the
EasyClean® process using sufficient water.
Sugar-based and certain greasy soils are especially
hard to clean. If some stubborn soils remain, use the
Self Clean feature to thoroughly clean your oven.
Soils on my oven walls are not coming off. How
can I get my walls clean?
Soils on the side and rear walls of your oven range
may be more difficult to fully soak with water. Try
®
repeating the EasyClean
process with more than
the ¼ cup (2 oz or 60 ml) spray recommended.
®
Will EasyClean
get all of the soils and stains out
completely?
It depends on the soil type. Sugar-based and certain
grease stains are especially hard to clean. Also, if
stains are not sufficiently soaked in water, this can
negatively affect cleaning performance. If stubborn
or built-up stains remain, use the Self Clean feature.
Refer to the Self Clean section of your owner's
manual.
Is it safe for my convection fan, broil burner or
®
heater element to get wet during EasyClean
Yes. The convection fan, broiler burner or heater
?
element may get a little wet during cleaning. However,
direct spray onto the broil burner and heater elements
is not necessary because these are self-cleaning
during regular use.
Do I need to use all 1¼ cups (10 oz or 300 ml) of
®
water for EasyClean
?
Yes. It is highly recommended that 1 cup (8 oz or
250 ml) of water be sprayed or poured on the bottom
and an additional ¼ cup (2 oz or 60 ml) of water
be sprayed on walls and other soiled areas to fully
saturate the soils for better cleaning performance.
I see smoke coming out of my oven range’s
®
cooktop vents during EasyClean
. Is this normal?
This is normal. This is not smoke. It is actually water
vapor (steam) from the water in the oven cavity. As
®
the oven heats briefly during EasyClean
, the water
in the cavity evaporates and escapes through the
oven vents.
®
How often should I use EasyClean
®
EasyClean
can be performed as often as you wish.
?
EasyClean® works best when your oven is LIGHTLY
soiled from such things as LIGHT grease splatter
and small drops of cheese. Please refer to the
EasyClean® section in your owner's manual for more
information.
®
What is required for EasyClean
?
A spray bottle filled with 1¼ cups (10 oz or 300 ml) of
water, a plastic scraper, a non-scratch scrubbing pad
and a towel. You should not use abrasive scrubbers
such as heavy-duty scouring pads or steel wool.
Except for a towel, all of the materials you need are
included in a special cleaning kit with your new range.
Are there any tricks to getting some of the
stubborn soils out?
Scraping the soils with a plastic scraper before
and during hand-cleaning is recommended. Fully
saturating soils with water is also recommended.
However, certain types of soils are harder to clean
than others. For these stubborn soils, the Self Clean
cycle is recommended. Consult the Self Clean section
of your owner's manual for details.
Page 22
54
TROUBLESHOOTING
Before Calling for Service
Before you call for service, review this list. It may save you time and expense. The list includes common
occurrences that are not the result of defective workmanship or materials in this appliance.
Symptoms Possible Causes / Solutions
•Poor installation. Place oven rack in center of oven. Place a level on the oven
rack. Adjust leveling legs at base of range until the oven rack is level.
Range is not level.
Cannot move
appliance easily.
Appliance must be
accessible for service.
Oven control beeps
and displays any F
code error.
•Be sure floor is level and strong and stable enough to adequately support range.
•If floor is sagging or sloping, contact a carpenter to correct the situation.
•Kitchen cabinet alignment may make range appear unlevel. Be sure cabinets are
square and have sufficient room for range clearance.
•Cabinets not square or are built in too tightly. Contact builder or installer to make
appliance accessible.
•Carpet interferes with range. Provide sufficient space so range can be lifted over
carpet.
•Anti-tip device engaged.
•Electronic control has detected a fault
condition. Turn the Oven mode knob
to the Off position to clear the display
and stop beeping. Reprogram oven.
If fault recurs, record fault number.
Turn the Oven mode knob to the Off
position and call for service.
CODE CAUSE
F-3 Key short error
F-9 Oven not heating
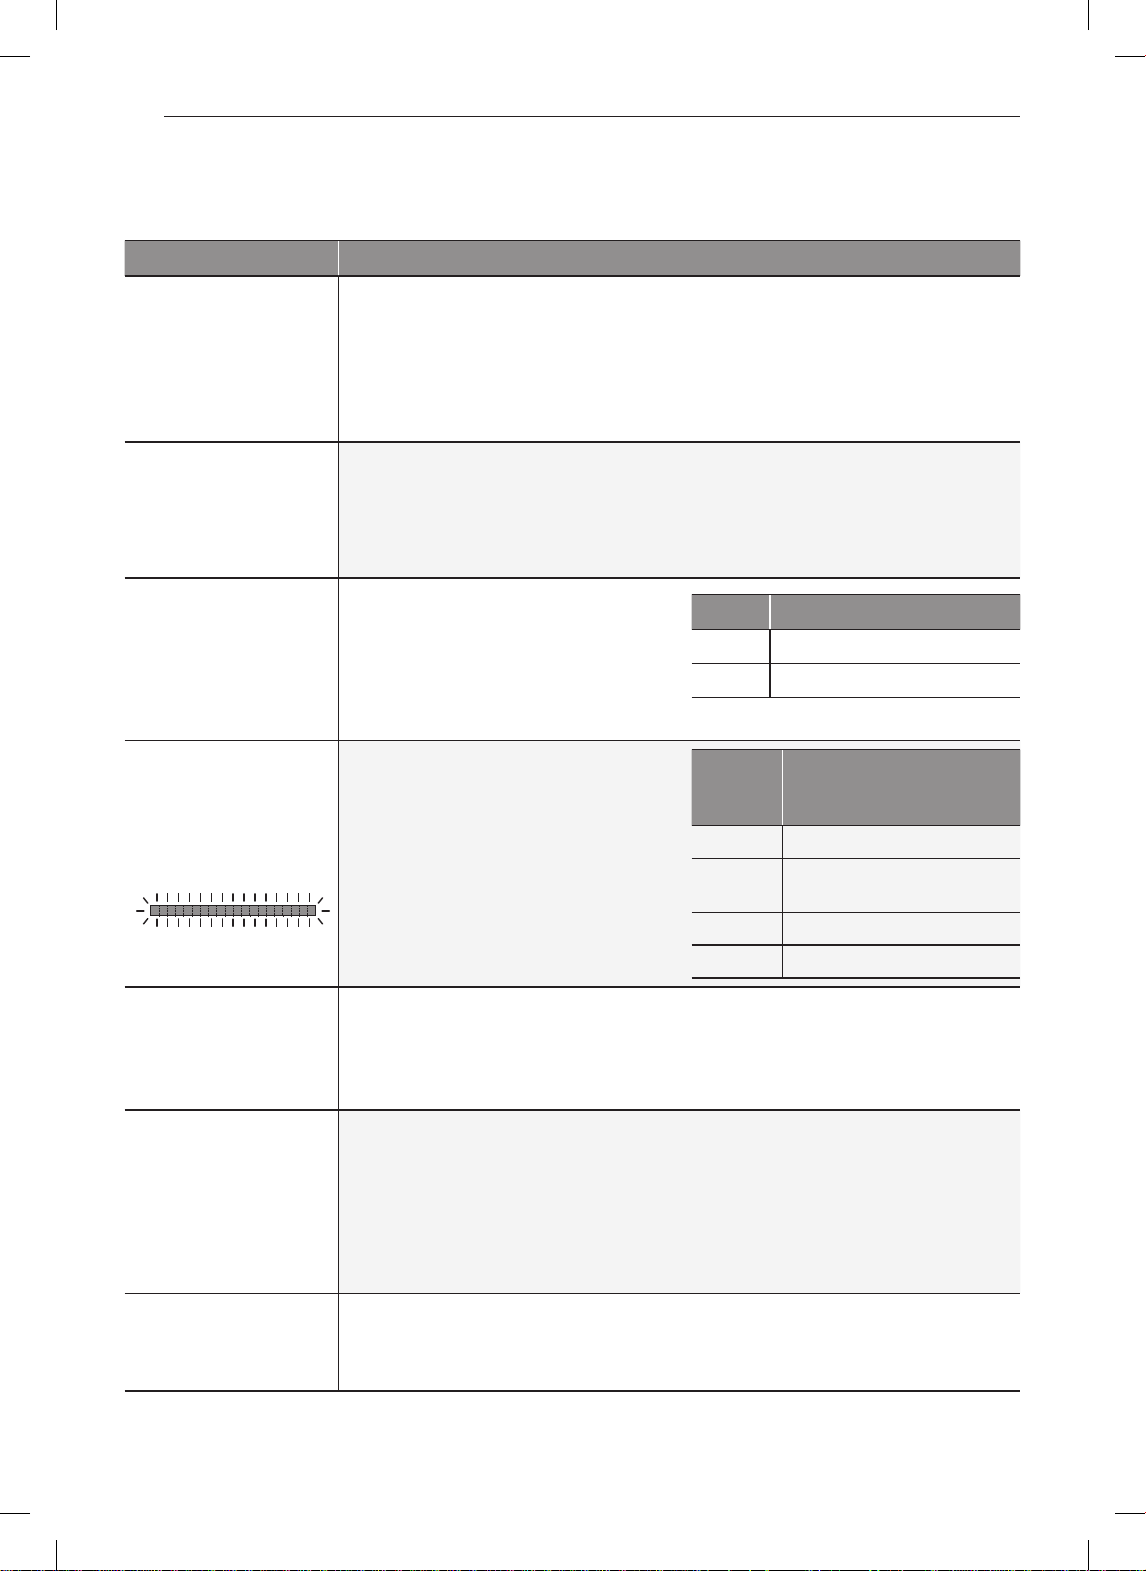
Surface element
control beeps and
entire LED bar
flashes.
Surface units will not
maintain a rolling boil
or cooking is not fast
enough
Surface units do not
work properly
Surface unit stops
glowing when
changed to a lower
setting
Number
of
Flashes
•Electric control has detected a fault
condition. Turn the control knob to the
Off position to clear the display and
stop the beeping. Call for service.
•Improper cookware being used.
- Use pans which are flat and match the diameter of the surface unit selected.
•In some areas, the power(voltage) may be low.
- Cover pan with a lid until desired heat is obtained.
•A fuse in your home may be blown or the circuit breaker tripped.
- Replace the fuse or reset the circuit breaker.
•Cooktop controls improperly set.
- Check to see the correct control is set for the surface unit you are using.
•Cookware is the wrong size or is not induction capable.
- See Induction Cookware section for more information.
•This is normal. The unit is still on and hot.
1 Top Thermistor Open/Short
2
3 Communication error
4 Box fan not working
Heatsink Thermistor Open/
Short
CAUSE
Page 23

ENGLISH
Symptoms Possible Causes / Solutions
•Food spillovers not cleaned before next use.
Areas of discoloration
on the cooktop
Frequent cycling on
and off of surface
units
Oven will not work
Steam is exhausted
through the oven
vent.
Appliance does not
operate.
Oven light does not
work.
Oven smokes
excessively during
broiling.
Food does not bake
or roast properly
- See Cleaning the Glass-Ceramic Cooktop section.
•Hot surface on a model with a light-colored cooktop.
- This is normal. The surface may appear discolored when it is hot. This is
temporary and will disappear as the glass cools.
•This is normal.
- The element will cycle on and off to maintain the heat setting.
•Plug on range is not completely inserted in the electrical outlet.
- Make sure electrical plug is plugged into a live, properly grounded outlet.
•A fuse in your home may be blown or the circuit breaker tripped.
- Replace the fuse or reset the circuit breaker.
•Oven controls improperly set.
- See the Using the Oven section.
•Oven too hot.
- Allow the oven to cool to below locking temperature.
•Cooking foods with high moisture produces steam. This is normal.
•Make sure cord is plugged correctly into outlet. Check circuit breakers.
•Service wiring is not complete. Contact your electrician for assistance.
•Power outage. Check house lights to be sure. Call your local electric company
for service.
•Replace or tighten bulb. See Changing the Oven Light section in this Owner’s
Manual.
•Control not set properly. Follow instructions under Setting Oven Controls.
•Meat too close to the element. Reposition the rack to provide proper clearance
between the meat and the element. Preheat broil element for searing.
•Meat not properly prepared. Remove excess fat from meat. Cut remaining fatty
edges to prevent curling.
•Insert on broiler pan wrong side up and grease not draining. Always place grid
on the broiler pan with ribs up and slots down to allow grease to drip into pan.
•Grease has built up on oven surfaces. Regular cleaning is necessary when
broiling frequently.
- Old grease or food spatters cause excessive smoking.
•Oven controls improperly set.
- See the Using the Oven section.
•Rack position is incorrect or the rack is not level.
- See the Using the Oven section.
•Incorrect cookware or cookware of improper size being used.
- See the Using the Oven section.
•Oven sensor needs to be adjusted.
- See Oven Temperature Adjustment in the Features section.
TROUBLESHOOTING
55
Page 24

56
TROUBLESHOOTING
Symptoms Possible Causes / Solutions
Food does not broil
properly
Oven temperature too
hot or too cold
Scratches or
abrasions on cooktop
surface
Metal marks
Brown streaks or
specks
Areas of discoloration
on cooktop
Oven will not Self
Clean
“Crackling” or
“popping” sound
Fan noise
•Oven controls improperly set.
- Make sure you turn the oven mode knob to select the Broil mode.
•Improper rack position being used.
- See the Broiling Guide.
•Cookware not suited for broiling.
- Use broiling pan and grid.
•Aluminum foil used on the broiling pan and grid has not been fitted properly and
slit as recommended.
- See the Using the Oven section.
•In some areas the power voltage may be low.
- Preheat the broil element for 5-7 minutes.
- See the Broiling Guide.
•Oven sensor needs to be adjusted.
- See Oven Temperature Adjustment in the Features section.
•Coarse particles such as salt or sand between cooktop and utensils can cause
scratches. Be sure the cooktop surface and bottoms of utensils are clean before
using. Small scratches do not affect cooking and will become less visible with
time.
•Cleaning materials not recommended for glass-ceramic cooktop have been
used. See Cleaning the Glass-Ceramic Cooktop in the MAINTENANCE section.
•Cookware with rough bottom has been used. Use smooth, flat-bottomed
cookware.
•Scraping of metal utensils on cooktop surface. Do not slide metal utensils
on cooktop surface. Use a glass-ceramic cooktop cleaning creme to remove
the marks. See Cleaning the Glass-Ceramic Cooktop in the MAINTENANCE
section.
•Boilovers are cooked onto surface. Use a blade scraper to remove soil. See
Cleaning the Glass-Ceramic Cooktop in the MAINTENANCE section.
•Mineral deposits from water and food. Remove using a glass-ceramic cooktop
cleaning creme. Use cookware with clean, dry bottoms.
•The oven temperature is too high to set a Self Clean operation.
- Allow the range to cool and reset the controls.
•Oven controls improperly set.
- See the Self Clean section.
•A Self Clean cycle cannot be started if the oven lockout feature is active.
•This is the sound of the metal heating and cooling during both the cooking and
Self Clean functions.
- This is normal.
•A convection fan may automatically turn on and off.
- This is normal.
Convection Fan stops
•Convection fan stops during a convection bake cycle.
- This is normal and is done to allow for more even heating during the cycle.
This is not a failure of the range and should be considered normal operation.
Page 25

ENGLISH
Symptoms Possible Causes / Solutions
Displayed colon in the
clock is flashing
Excessive smoking
during a Self Clean
cycle
Oven door does not
open after a Self
Clean cycle
The oven does not
clean after a Self
Clean cycle
CLEAN and door flash
in the display
LOCKED is on in the
display when you
want to cook
Burning or oily odor
emitting from the vent
Oven racks are
difficult to slide
Moisture collects on
oven window or steam
comes from oven vent
Wifi network does not
connect properly.
•This is normal. This means that the product has just been plugged in, or that it
has experienced a power interruption. Press Cook Time for three seconds and
reset the clock, or press any key to stop the flashing.
•Excessive soil.
- Turn the oven mode knob to the Off position. Open the windows to rid the
room of smoke. Wait until the Self Clean mode is cancelled. Wipe up the
excess soil and reset the clean.
•Oven is too hot.
- Allow the oven to cool below locking temperature.
•Allow about one hour for the oven to cool after the completion of a Self Clean
cycle. The door can be opened when the lock
•The control and door may be locked.
•Oven controls not properly set.
- See the Self Clean section.
•Oven was heavily soiled.
- Clean up heavy spillovers before starting the clean cycle. Heavily soiled ovens
may need to Self Clean again or for a longer period of time.
•The Self Clean cycle has been selected, but the door is not closed.
- Close the oven door.
•The oven door is locked because the temperature inside the oven has not
dropped below the locking temperature.
- Turn the oven mode knob to the Off position. Allow the oven to cool.
•This is normal in a new oven and will disappear in time.
- To speed the process, set a Self Clean cycle for a minimum of 3 hours. See
the Self Clean section.
•The shiny, silver-colored racks were cleaned in a Self Clean cycle.
- Apply a small amount of vegetable oil to a paper towel and wipe the edges of
the oven racks with the paper towel.
•This is normal when cooking foods high in moisture.
•Excessive moisture was used when cleaning the window.
•If the appliance is having trouble connecting to the Wi-Fi network, it may be too
far from the router. Purchase a Wi-Fi repeater (range extender) to improve the
Wi-Fi signal strength.
•The Wi-Fi connection may not connect or may be interrupted because of the
home network environment.
•The network connection may not work properly depending on the internet service
provider.
•The surrounding wireless environment can make the wireless network service
run slowly.
TROUBLESHOOTING
is no longer displayed.
57
Page 26
58
SMART DIAGNOSIS™
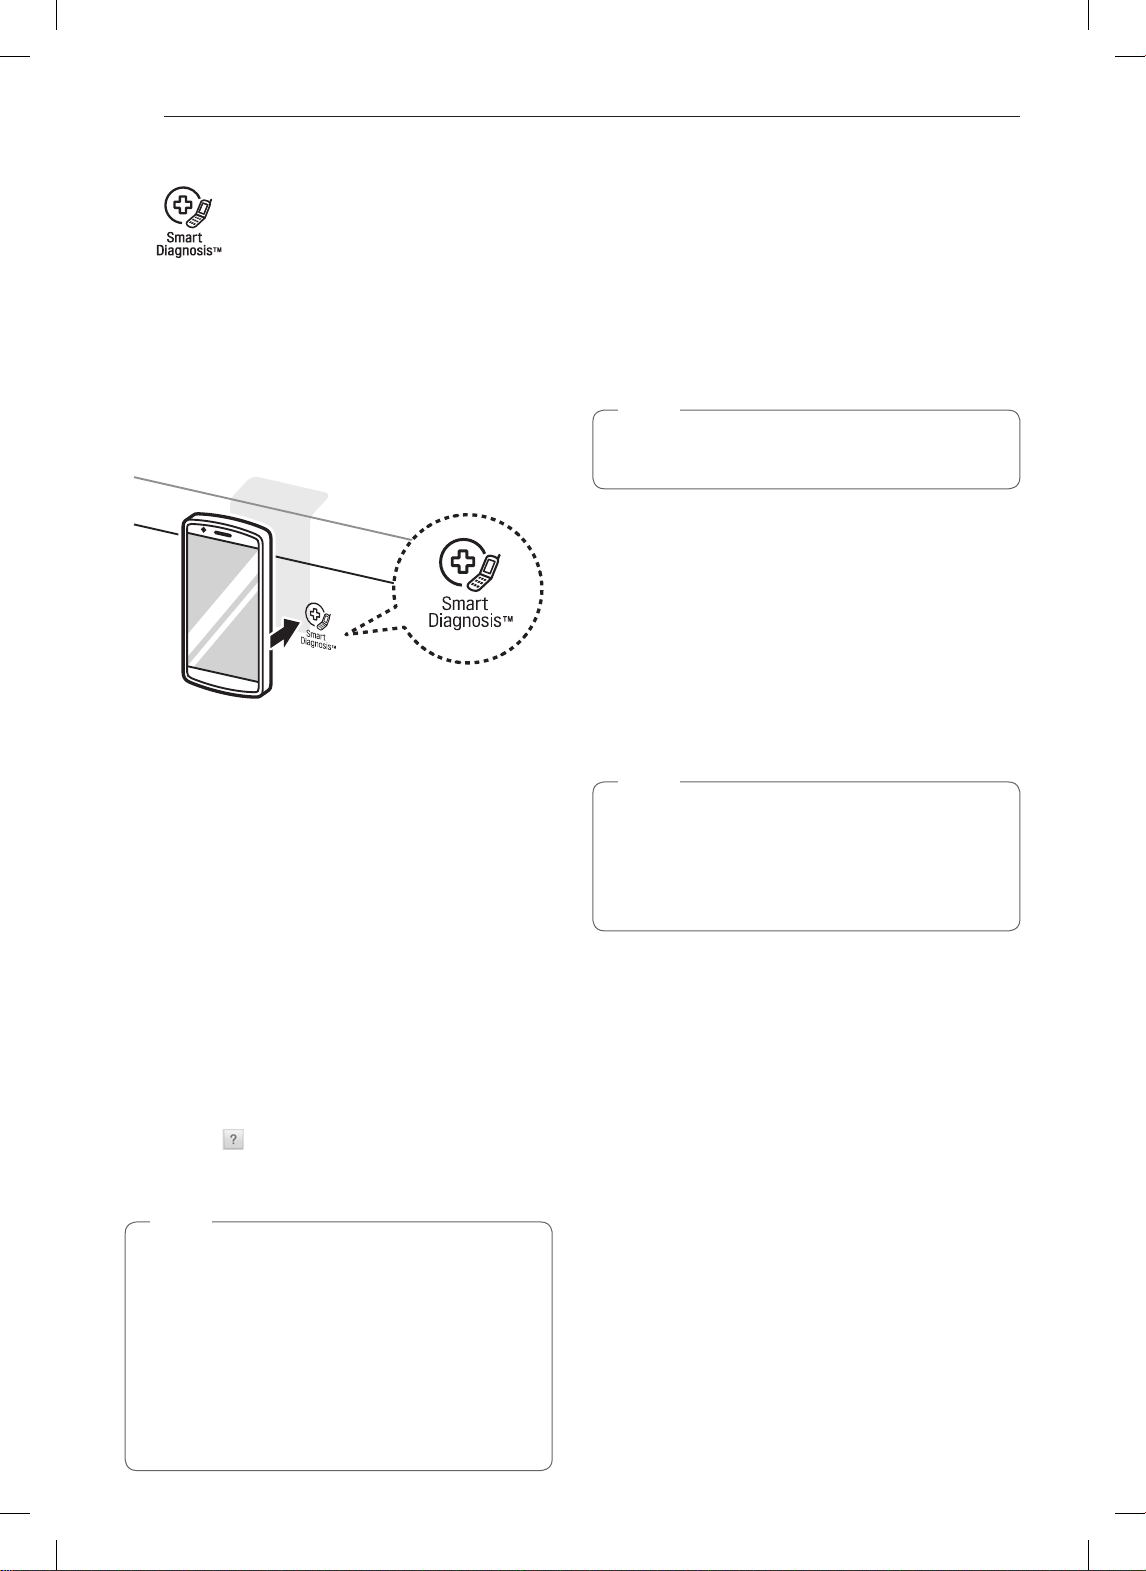
SMART DIAGNOSIS™
Should you experience any problems with your range,
it has the capability of transmitting data to your smart
phone using the LG Smart Oven application or via
your telephone to the LG call center.
Smart Diagnosis™ cannot be activated unless your
range is turned on by pressing the Start button. If
your range is unable to turn on, then troubleshooting
must be done without using Smart Diagnosis™.
Smart Diagnosis™ Through the Call
Center
Call the LG call center at: (LG U.S.) 1-800-243-
1
0000 (LG Canada) 1-888-542-2623.
When instructed to do so by the call center
2
agent, hold the mouthpiece of your phone over
the Smart Diagnosis™ logo on the machine.
Hold the phone no more than one inch from (but
not touching) the machine.
NOTE
Do not touch any other buttons or icons on the
display screen.
Press and hold the Start button for three
3
seconds.
Keep the phone in place until the tone
4
transmission has finished. This takes about 6
seconds and the display will count down the
time.
Once the countdown is over and the tones have
5
stopped, resume your conversation with the call
center agent, who will then be able to assist you
in using the information transmitted for analysis.
Using Smart Diagnosis™
Smart Diagnosis™ Using Your Smart
Phone
Download the LG Smart Oven application on
1
your smart phone.
Open the LG Smart Oven application on your
2
smart phone. Press Smart Diagnosis™ button to
advance to the next screen.
Follow directions of the application. Using ‘Tag
3
On’ is recommended but, if it does not work well,
the application will show how to use Audible
Diagnosis.
Press [ ] in the LG Smart Oven application for
4
a more detailed guide on how to use the Tag On
function.
NOTE
•Call quality differences by region may affect the
function.
•Use the home telephone for better
communication performance, resulting in better
service.
•Bad call quality may result in poor data
transmission from your phone to the machine,
which could cause Smart Diagnosis™ to
malfunction.
NOTE
•For best results, do not move the phone while
the tones are being transmitted.
•If the call center agent is not able to get an
accurate recording of the data, you may be
asked to try again.
Page 27

WARRANTY
ENGLISH
WARRANTY (USA)
Should your LG Electric Range fail due to a defect in materials or workmanship under normal home use, during
the warranty period set forth below, LG will at its option repair or replace the product. This limited warranty is
valid only to the original retail purchaser of the product and applies only when purchased and used within the
United States including U.S. Territories. Proof of original retail purchase is required to obtain warranty service
under this limited warranty.
Warranty Period Scope of Warranty HOW SERVICE IS HANDLED
59
One (1) year from date of
original retail purchase
•Replacement products and parts are warranted for the remaining portion of the original warranty period or
ninety (90) days, whichever is greater.
•Replacement products and parts may be new or remanufactured.
THIS WARRANTY IS IN LIEU OF ANY OTHER WARRANTY, EXPRESS OR IMPLIED, INCLUDING WITHOUT
LIMITATION, ANY WARRANTY OF MERCHANTABILITY OR FITNESS FOR A PARTICULAR PURPOSE. TO
THE EXTENT ANY IMPLIED WARRANTY IS REQUIRED BY LAW, IT IS LIMITED IN DURATION TO THE
EXPRESS WARRANTY PERIOD ABOVE. NEITHER THE MANUFACTURER NOR ITS U.S. DISTRIBUTOR
SHALL BE LIABLE FOR ANY INCIDENTAL, CONSEQUENTIAL, INDIRECT, SPECIAL, OR PUNITIVE
DAMAGES OF ANY NATURE, INCLUDING WITHOUT LIMITATION, LOST REVENUES OR PROFITS, OR
ANY OTHER DAMAGE WHETHER BASED IN CONTRACT, TORT, OR OTHERWISE.
Some states do not allow the exclusion or limitation of incidental or consequential damages or limitations on how
long an implied warranty lasts, so the above exclusion or limitation may not apply to you. This warranty gives you
specific legal rights and you may also have other rights that vary from state to state.
THIS LIMITED WARRANTY DOES NOT COVER:
•Service trips to deliver, pick up, or install or repair the product; instruction to the customer on operation of
the product; repair or replacement of fuses or correction of wiring or plumbing, or correction of unauthorized
repairs/installation.
•Failure of the product to perform during power failures and interruptions or inadequate electrical service.
•Damage caused by leaky or broken water pipes, frozen water pipes, restricted drain lines, inadequate or
interrupted water supply or inadequate supply of air.
•Damage resulting from operating the Product in a corrosive atmosphere or contrary to the instructions outlined
in the Product’s owner’s manual.
•Damage to the Product caused by accidents, pests and vermin, lightning, wind, fire, floods, or acts of God.
•Damage or failure caused by unauthorized modification or alteration, or if it is used for other than the intended
purpose, or any water leakage where the unit was not properly installed.
•Damage or failure caused by incorrect electrical current, voltage, or plumbing codes, commercial or industrial
use, or use of accessories, components, or consumable cleaning products that are not approved by LG.
•Damage caused by transportation and handling, including scratches, dents, chips, and/or other damage to the
finish of your product, unless such damage results from defects in materials or workmanship and is reported
within one (1) week of delivery.
•Damage or missing items to any display, open box, discounted, or refurbished Product.
•Products with original serial numbers that have been removed, altered, or cannot be readily determined. Model
and Serial numbers, along with original retail sales receipt, are required for warranty validation.
•Increases in utility costs and additional utility expenses.
•Repairs when your Product is used in other than normal and usual household use (e.g. commercial use, in
offices and recreational facilities) or contrary to the instructions outlined in the Product’s owner’s manual.
•Costs associated with removal of your Product from your home for repairs.
Parts and Labor
LG will provide parts and labor to repair or replace
defective parts.
Page 28

60
WARRANTY
•The removal and reinstallation of the Product if it is installed in an inaccessible location or is not installed in
accordance with published installation instructions, including LG’s owner’s and installation manuals.
•Damage resulting from misuse, abuse, improper installation, repair, or maintenance. Improper repair includes
use of parts not approved or specified by LG.
The cost of repair or replacement under these excluded circumstances shall be borne by the consumer.
OBTAIN WARRANTY SERVICE AND ADDITIONAL INFORMATION
If you do not have access to the internet and you need assistance using your product or you would like to
schedule service, you may contact LG Electronics at the number below.
For assistance or service, call 1-800-243-0000.
If you need further assistance, you can write to LG with any questions or concerns at the address below:
LG Electronics, 201 James Record Road, Huntsville, Alabama 35813
For additional product information, visit our website at http://www.lg.com
Page 29

ENGLISH
MEMO
MEMO
61
Page 30

62
MEMO
MEMO
Page 31

Español
MANUAL DEL PROPIETARIO
COCINA
ELÉCTRICA
Lea detenidamente el manual del propietario antes de poner el aparto en
funcionamiento y consérvelo a mano en todo momento para su referencia.
LSE4617**
MFL68881508_00
www.lg.com
Page 32

2 ÍNDICE
ÍNDICE
INSTRUCCIONES IMPORTANTES
3
DE SEGURIDAD
DESCRIPCIÓN GENERAL DEL
10
PRODUCTO
10 Piezas
10 Accesorios
INSTALACIÓN
11
1 1 Descripción general de la instalación
11 Especificaciones del producto
12 Antes de instalar la cocina
13 Instalación de la cocina
15 Conexión de la electricidad
19 Colocación del dispositivo antivuelco
19 Relleno trasero opcional
19 Prueba de funcionamiento
FUNCIONAMIENTO
20
20 Descripción general del panel de control
21 Posición de la perilla
22 Cambio de las configuraciones del horno
22 Clock (Reloj)
22 Lockout (Bloqueo)
22 Configuraciones mínimas y máximas
predeterminadas
23 Timer On/Off (Temporizador encendido/apagado)
23 Conectar
23 Settings (Ajustes)
-Configuración del modo de hora
-Configuración del modo de conversión
automática a convección
-Ajuste de temperatura del horno
-Encendido/apagado de la luz de alarma de
precalentamiento
-Ajuste del volumen del indicador sonoro
-Selección de grados Fahrenheit o Celsius
-Turning the Cooktop Beeper On/Off
24 Start Time [Hora de inicio] (Delayed T imed Cook
[Cocción temporizada retardada])
25 Cook Time [Tiempo de cocción] (Timed Cook)
[Cocción temporizada])
25 Oven Light (Luz del horno)
26 Using the Cooktop
26 Cooking Areas
26 Benefits of Induction Surface Cooking
26 Induction Cookware
27 Cookware Placement
27 Moving Cookware on the Cooktop
27 Pan Sensing
28 Minimum and Maximum Pan Size
28 Hot Cookware and Residual Heat
28 Home Canning
29 Setting Surface Controls
29 Hot Surface Indicator
29 Using the Cooking Elements
30 The Recommended Surface Cooking Setting
30 Pan Preheat Recommendations
30 Noises during Cooktop Operation
31 Power Management
31 Warming Zone
32 Uso del horno
32 Antes de usar el horno
32 Ventilación del horno
32 Uso de los estantes del horno
32 Bake (Hornear)
33 Modo de convección
34 Guía de recomendaciones para hornear y rostizar
35 Broil (Asar)
36 Guía de recomendaciones para asar
37 Warm (Calentar)
37 Proof (Leudar)
38 Speed Roast (Rostizado rápido)
38 Sonda para carne
39 Remote Start (Inicio remoto)
39 Funcionamiento del cajón de calentamiento
FUNCIONES INTELIGENTES
41
41 Instalación de la aplicación
41 Registro del producto
41 Uso de la función Wi-Fi
42 A viso de la FCC
42 Declaración sobre exposición a la radiación de RF de
la FCC
MANTENIMIENTO
43
43 Limpieza de la placa de cocción de vitrocerámica
44 EasyClean
47 Self Clean (Autolimpieza)
49 Cambio de la luz del horno
49 Limpieza del exterior
50 Remoción y reemplazo de la puertas removible del
horno y el cajón
51 Instrucciones para el cuidado de la puerta
SOLUCIÓN DE PROBLEMAS
52
52 PREGUNTAS FRECUENTES
54 Antes de llamar al servicio técnico
SMART DIAGNOSIS™
58
58 Uso de Smart Diagnosis™
GARANTÍA
59
®
Page 33

3INSTRUCCIONES IMPORTANTES DE SEGURIDAD
Español
INSTRUCCIONES IMPORTANTES DE
SEGURIDAD
Lea y siga todas las instrucciones cuando utilice la cocina para evitar riesgos de incendios, descargas
eléctricas, lesiones personales o daños. Esta guía no incluye todas las situaciones posibles que
podrían ocurrir. Siempre comuníquese con su agente de servicio técnico o con el fabricante cuando
haya problemas que no comprenda.
Descargue este manual del propietario en: http://www.lg.com
Este es el símbolo de alerta de seguridad. Este símbolo le advierte sobre posibles riesgos
que pueden ocasionar daños materiales, lesiones personales graves o la muerte.
El símbolo de alerta de seguridad siempre estará acompañado de las palabras
"ADVER
ADVERTENCIA
PRECAUCIÓN
TENCIA" o "PRECAUCIÓN". Estos términos significan lo siguiente:
Indica una situación peligrosa que, de no evitarse, podría
-
causar lesiones graves o la muerte.
Indica una situación peligrosa que, de no evitarse, podría
-
causar lesiones menores o moderadas.
DISPOSITIVO DE SEGURIDAD ANTIVUELCO
ADVERTENCIA
•PARA REDUCIR EL RIESGO DE VUELCO, EL ELECTRODOMÉSTICO DEBE ESTAR
ASEGURADO CON UN DISPOSITIVO ANTIVUELCO INSTALADO DE MANERA
ADECUADA. PARA VERIFICAR QUE EL DISPOSITIVO ANTIVUELCO ESTÉ INSTALADO
CORRECTAMENTE, RETIRE EL CUERPO DEL CAJÓN Y VERIFIQUE QUE EL DISPOSITIVO
ANTIVUELCO ESTÉ BIEN SUJETO O TOME EL BORDE SUPERIOR TRASERO DE LA
PROTECCIÓN POSTERIOR DE LA COCINA E INTENTE INCLINARLA HACIA ADELANTE
CON CUIDADO. Consulte las instrucciones en la sección de instalación.
•Es posible que un niño o un adulto inclinen la cocina y el vuelco consecuente les produzca la
muerte.
•Verifique que el dispositivo antivuelco se haya instalado correctamente y
esté fijo al piso o a la pared y enganchado a la pata de nivelación de la
cocina.
•No ponga en funcionamiento la cocina sin el dispositivo antivuelco
colocado y enganchado.
•Nunca retire las patas del horno. La cocina no estará asegurada al soporte
antivuelco si se retiran las patas del horno.
•No se pare ni se siente sobre la puerta del horno. La cocina podría
inclinarse y usted podría sufrir lesiones con líquidos calientes derramados,
alimentos calientes o la cocina misma.
•No coloque objetos grandes y pesados, como pavos enteros, sobre la
puerta del horno abierta. La cocina podría inclinarse hacia adelante y
ocasionar lesiones.
•Vuelva a conectar el dispositivo antivuelco después de mover la cocina hacia delante para tareas de
limpieza, reparaciones o cualquier otro motivo.
•El incumplimiento de estas instrucciones, puede tener como consecuencia la muerte o quemaduras
graves en niños o adultos.
Soporte
antivuelco
Pata de
nivelación
Page 34

4 INSTRUCCIONES IMPORTANTES DE SEGURIDAD
PRECAUCIONES DE SEGURIDAD
ADVERTENCIA
Este producto contiene quimicos conocidos por el Estado de California de causar cáncer y defectos
de nacimiento u otros daños reproductivos. Lávese las manos después de manipular.
•NO TOQUE LAS HORNALLAS NI LAS SUPERFICIES INTERIORES DEL HORNO. Las hornallas
podrían estar calientes incluso cuando presenten un color oscuro. Las superficies interiores del
horno se calientan lo suficiente como para causar quemaduras. Durante y después del uso, no
toque ni permita que la vestimenta u otro material inflamable entren en contacto con las hornallas o
las superficies interiores del horno, hasta que hayan tenido tiempo suficiente para enfriarse. Otras
superficies, como los orificios de venteo del horno y las superficies cercanas a estos orificios, las
puertas del horno y las ventanas de las puertas del horno también se calientan y podrían causar
quemaduras si no se han enfriado.
•Abra la puerta del horno con cuidado. El aire caliente y el vapor que salen del horno pueden
causar quemaduras en las manos, el rostro y los ojos. Permita que el aire caliente o el vapor salgan
del horno antes de sacar o colocar nuevamente la comida en el horno.
•No repare ni reemplace ninguna parte del electrodoméstico, excepto en caso de que haya
recomendaciones específicas en el manual. Un técnico calificado debe estar a cargo de todas las
demás tareas de mantenimiento.
•No utilice limpiadores ásperos, abrasivos ni espátulas de metal para limpiar el vidrio de la puerta del
horno, ya que podrían rayar la superficie. Los arañazos podrían hacer que el vidrio se quiebre.
ADVERTENCIA
Si el vidrio de la puerta, la vitrocerámica de la placa de cocción, la superficie o la resistencia del
horno están dañados, deje de usar el horno y solicite servicio técnico.
•No ponga en funcionamiento el horno sin la malla calentadora de carbón.
•No utilice plástico para cubrir los alimentos. Utilice únicamente papel de aluminio o tapas seguras
para horno.
•No permita que nadie se suba, se pare o se cuelgue de la puerta, del cajón de almacenamiento
ni de la placa de cocción. Podrían causar daños a la cocina e incluso volcarla, lo que generaría
lesiones personales graves.
•No recubra las paredes del horno, los estantes, el fondo ni ninguna otra parte del horno con
papel de aluminio ni ningún otro material. Hacer esto interrumpe la distribución de calor, produce
resultados de horneado deficientes y causa daños permanentes al interior del horno (el papel de
aluminio se fundiría en la superficie interior del horno).
•Nunca intente secar a una mascota en el horno.
•Nunca utilice su electrodoméstico para calefaccionar el ambiente.
•Utilice siempre agarraderas o guantes para horno cuando retire alimentos del horno o de las hornallas.
La batería de cocina estará caliente. Utilice solo agarraderas secas. Las agarraderas húmedas
o mojadas sobre superficies calientes podrían producir quemaduras por vapor. No permita que la
agarradera toque las hornallas calientes. No utilice una toalla u otra tela gruesa para retirar alimentos.
•No caliente recipientes cerrados de alimentos. La presión podría causar una explosión que
podría generar lesiones.
•Before using Wi-Fi functions, open the oven door and make sure the oven is ready for pre-heating.
•If the supply cord is damaged, it must be replaced by the manufacturer, its service agent or similarly
qualified persons in order to avoid a hazard.
•If the range is placed on a base, measures must be taken to prevent the appliance from slipping off
of the base.
•To avoid the product overheating, do not install a decorative panel on the front of the appliance.
Page 35

5INSTRUCCIONES IMPORTANTES DE SEGURIDAD
Español
•Para eliminar el riesgo de quemaduras o incendios por pasar por encima de la superficie de
las unidades calientes, debe evitarse la colocación de gabinetes de almacenamiento sobre las
unidades. Si se instalará un gabinete de almacenamiento, el riesgo puede reducirse mediante la
instalación de una campana que se proyecte, de forma horizontal, un mínimo de 5 pulgadas más
allá de la parte inferior de los gabinetes.
MATERIALES INFLAMABLES
ADVERTENCIA
Remove all packing materials from the appliance before operating. Keep plastic, clothes, paper,
and other flammable materials away from parts of the appliance that may become hot.
•No almacene ni utilice material inflamable en el horno ni cerca de la placa de cocción. Los
materiales inflamables incluyen papel, plástico, agarraderas, telas, recubrimientos para paredes,
cortinas y gasolina u otros vapores inflamables y líquidos como grasa o aceite de cocina. Estos
materiales pueden prenderse fuego cuando el horno y la placa de cocción están en uso.
•Use vestimenta adecuada. No use prendas holgadas o que cuelguen, ya que podría prenderse
fuego en contacto con superficies calientes y causar quemaduras graves.
•No utilice el horno para secar ropa. Solo use el horno para el propósito para el que fue diseñado.
•Si posee gabinetes de almacenamiento directamente sobre la superficie de cocción, guarde en
estos los objetos que use con poca frecuencia y que puedan almacenarse de manera segura en un
lugar expuesto al calor. Las altas temperaturas pueden ser peligrosas para objetos volátiles como
líquidos inflamables, limpiadores o aerosoles.
SEGURIDAD ELÉCTRICA
•Desconecte siempre la energía del electrodoméstico antes de que se efectúen tareas de
mantenimiento.
•No utilice papel de aluminio ni ningún otro material para revestir la base del horno.
La instalación inadecuada de estos revestimientos podría causar riesgo de descarga eléctrica o
incendio.
•No permita que el papel de aluminio ni la sonda de temperatura entren en contacto con las
hornallas.
•Asegúrese de que su cocina esté instalada correctamente y con la conexión a tierra adecuada, a
cargo de un instalador o técnico de mantenimiento calificado.
ADVERTENCIA
Antes de reemplazar la bombilla del horno, desconecte la energía eléctrica del horno desde el
fusible principal o el panel disyuntor. El no hacerlo podría causar lesiones graves, descargas
eléctricas o la muerte.
FREIDORA
•Tenga extremo cuidado al trasladar o desechar grasa caliente.
•Siempre caliente la grasa lentamente y vigile mientras aumenta la temperatura.
•Si va a freír una combinación de aceites y grasas, mézclelos antes de calentarlos.
•Si es posible, utilice un termómetro para frituras para evitar que la grasa se caliente por encima del
punto de humeo.
•Utilice la menor cantidad posible de grasa para rehogar o freír de manera efectiva. Llenar la sartén
con demasiada grasa podría causar derrames al agregar los alimentos.
Page 36
6 INSTRUCCIONES IMPORTANTES DE SEGURIDAD
SEGURIDAD DE LOS NIÑOS
•No toque la superficie caliente entre la parte inferior de la puerta del horno y la parte superior del
cajón, en el frente del horno, mientras está en funcionamiento. La superficie se calienta y puede
causar quemaduras y otras lesiones.
•No deje a los niños sin supervisión cerca del horno.
ADVERTENCIA
No deje solos a los niños o sin supervisión cerca del electrodoméstico cuando está en
funcionamiento o aún caliente. Nunca debe permitir que los niños se sienten o paren en ninguna
parte del electrodoméstico, ya que podrían sufrir lesiones o quemaduras.
PRECAUCIÓN
No guarde objetos de interés para los niños en los gabinetes que están arriba de la cocina o sobre
la protección trasera; si los niños subieran a la cocina para alcanzar algo que buscan, podrían
sufrir lesiones graves.
•Nunca permita que un niño se cuelgue de la puerta del horno.
•No permita que los niños se metan dentro del horno.
•Deje que los utensilios calientes se enfríen en un lugar seguro, fuera del alcance de los niños.
•No debe permitir que los niños jueguen con los controles ni con ninguna otra parte del
electrodoméstico.
ADVERTENCIA
•The appliance and its accessible parts become hot during use. Do not touch heating elements
inside the oven. Young children must be continuously supervised if allowed near the appliance.
•This appliance is not intended for use by persons (including children) with reduced physical,
sensory or mental capabilities, or lack of experience and knowledge, unless they have been given
supervision or instruction concerning use of the appliance by a person responsible for their safety.
Do not allow children to play with the appliance. Any cleaning and user maintenance performed by
children must be supervised.
SUPERFICIES DE COCCIÓN DE VITROCERÁMICA
•Las hornallas superficiales podrían estar calientes incluso cuando presenten un color oscuro. Las
áreas cercanas a las hornallas superficiales podrían calentarse lo suficiente como para causar
quemaduras. Durante y después de su uso, NO TOQUE LAS HORNALLAS SUPERFICIALES
NI LAS ÁREAS CERCANAS ni permita que la vestimenta u otro material inflamable entren en
contacto con las hornallas o las superficies cercanas hasta que hayan tenido tiempo suficiente para
enfriarse. Esto incluye la placa de cocción y el área sobre la puerta del horno.
•No cocine sobre una placa de cocción rota. Si la placa de cocción se rompe, los líquidos de
limpieza y los derrames podrían penetrar a través de la placa rota y provocar un riesgo de descarga
eléctrica. Switch off the appliance to avoid the possibility of electric shock and contact a qualified
technician immediately.
•No utilice la superficie de vidrio de la placa de cocción como tabla para cortar.
•No coloque ni almacene objetos que puedan derretirse o prenderse fuego sobre la placa de cocción
de vidrio, incluso cuando no esté en uso.
•Elija el tamaño correcto del quemador. Para ollas y sartenes más pequeñas, utilice las hornallas
más pequeñas. Para ollas y sartenes más grandes, utilice las hornallas más grandes. Seleccione
las sartenes con fondo plano del tamaño suficiente para cubrir las hornallas. Si utiliza sartenes
demasiado pequeñas, una parte de la hornalla quedará expuesta al contacto directo y podría
quemar la ropa.
Page 37

7INSTRUCCIONES IMPORTANTES DE SEGURIDAD
Español
•Batería de cocina vidriada. Solo determinados tipos de vidrio, cerámica vidriada, cerámica,
recipientes de cocción de barro y otros utensilios de cocina vidriados son aptos para uso en las
hornallas de la cocina sin quebrarse, debido al cambio abrupto de temperatura.
•Nunca cocine directamente sobre el vidrio. Utilice siempre batería de cocina.
•Siempre apague las hornallas antes de retirar la batería de cocina. Do not rely on the pan sensor.
ADVERTENCIA
Do not leave fats or oils to heat unattended on the cooktop. Spillovers can result in a fire.
•The cooktop is not intended to be operated by means of an external timer or separate remotecontrol system.
•Gire las manijas de los recipientes hacia dentro, para que no se extiendan hacia las hornallas
adyacentes. Esto reduce el riesgo de quemaduras, el riesgo de incendio con materiales inflamables
y derrames debido a contacto involuntario con la batería de cocina.
•Limpie de inmediato los derrames en el área de cocción para prevenir una tarea de limpieza más
complicada posteriormente.
•Algunos limpiadores pueden generar vapores peligrosos si se aplican sobre una superficie caliente.
•Do not place metallic objects such as knives, forks, spoons, and lids on the cooktop surface,
because they can get hot.
•Coloque siempre la sartén en el centro de la hornalla sobre la que está cocinando. Nunca deje las
hornallas sin supervisión en configuraciones de altas temperaturas. El contacto adecuado
de la batería de cocina con el quemador también mejorará la eficiencia. Las ebulliciones causan
derrames humeantes y grasosos que podrían prenderse fuego.
•Limpie la placa de cocción con precaución. No utilice esponjas ni paños para limpiar derrames
sobre un área de cocción caliente. Utilice una espátula de metal adecuada para la tarea. Si utiliza
una esponja o paño húmedos para limpiar derrames sobre un área de cocción caliente, esto podría
causar quemaduras por vapor. Algunos limpiadores pueden generar vapores nocivos si se aplican
sobre una superficie caliente.
•No encienda las hornallas antes de colocar la batería de cocina.
•No guarde elementos pesados arriba la superficie de la placa de cocción que pudieran caer y dañarla.
•No coloque papel de aluminio ni artículos plásticos, como salero y pimentero, soportes para cucharas
o envoltorios plásticos, ni ningún otro material sobre la cocina cuando esté en funcionamiento.
•No utilice esponjas de lana de acero, esponjas para fregar ni esponjas abrasivas de limpieza. Estas
pueden rayar la superficie.
SUGERENCIAS PARA AHORRAR ENERGÍA
•Cocinar en varios estantes ahorra tiempo y energía. Siempre que sea posible, cocine alimentos que
requieran la misma temperatura de cocción en un único horno.
•Para un desempeño óptimo y ahorro de energía, siga las pautas de la página 30 para colocar
correctamente los estantes y las bandejas.
•Utilice piezas de la batería de cocina proporcionadas para la cantidad de alimentos que va a cocinar
y así ahorrar energía al calentarlos. Calentar un litro de agua requiere más energía en una olla de
tres litros, que en una de un litro.
•Utilice piezas de la batería de cocina con fondos planos para lograr el mejor contacto posible con la
superficie de la placa de cocción al cocinar en la placa de cocción de vitrocerámica.
•Haga coincidir el tamaño del quemador o la hornalla de la placa de cocción con el tamaño del
recipiente en uso. Utilizar una hornalla grande para una sartén pequeña desperdicia energía
térmica, y la superficie expuesta de la hornalla es un riesgo de quemadura o incendio.
•Reduzca el uso de energía al limpiar la suciedad ligera del horno con la función EasyClean
lugar del autolimpiante.
•Evite abrir la puerta del horno más de lo necesario durante el uso. Esto ayuda a que el horno
mantenga la temperatura, evita la pérdida innecesaria de calor y ahorra el consumo de energía.
®
, en
Page 38

8 INSTRUCCIONES IMPORTANTES DE SEGURIDAD
SEGURIDAD DURANTE EL USO
PRECAUCIÓN
Supervise all cooking processes. Continuously supervise quick cooking processes.
•During use the appliance becomes hot. Care should be taken to avoid touching heating elements
inside the oven.
•No toque los estantes del horno mientras están calientes.
•No bloquee la abertura de ventilación.
•Acomode los estantes del horno solo cuando el horno esté frío.
•Si se debe mover un estante mientras el horno está caliente, evite que la agarradera toque el
quemador del horno.
•Utilice con precaución las funciones Cocción temporizada o Cocción temporizada retardada. Utilice
el reloj temporizador automático al cocinar carnes curadas o congeladas y la mayoría de las frutas
y los vegetales. Los alimentos que pueden echarse a perder fácilmente como la leche, huevos,
pescado, carne o aves se deben enfriar primero en el refrigerador. Incluso cuando se hayan
enfriado, no deben permanecer en el horno durante más de 1 hora antes de iniciar la cocción y
se los debe retirar rápidamente una vez que la cocción haya terminado. Ingerir alimentos en mal
estado puede producir intoxicaciones alimentarias.
•Las partes accesibles podrían calentarse cuando se utiliza la parrilla.
•No coloque alimentos ni batería de cocina en el fondo de la cavidad del horno. Hacerlo podría
causar daños permanentes al acabado de la base del horno.
•Only use the temperature probe recommended for this oven.
•No utilice agua para apagar incendios provocados por grasa. Si se produce un incendio en
el horno, mantenga la puerta del horno cerrada y apague el horno. Si el fuego continúa, arroje
bicarbonato de sodio sobre el fuego o utilice un extinguidor. No arroje agua ni harina sobre el
fuego. La harina podría ser explosiva y el agua podría hacer que un incendio causado por grasa se
propague y genere lesiones personales.
•Tire del estante del horno hasta llegar a la posición de bloqueo al cargar y descargar alimentos del
horno. Esto ayuda a prevenir quemaduras causadas al tocar superficies calientes de la puerta y las
paredes del horno.
•No utilice el horno si el quemador desarrolla un punto de brillo durante el uso o si muestra otros
signos de daño. Un punto de brillo indica que el quemador podría fallar y representar un peligro
potencial de quemadura, incendio o descarga eléctrica. Apague el horno de inmediato y solicite que
un técnico calificado reemplace el quemador.
•Al usar bolsas para hornear o asar en el horno, siga las instrucciones del fabricante.
SEGURIDAD AL LIMPIAR
PRECAUCIÓN
Remove food, cookware, racks, and accessories from the oven before operating the selfcleaning function. Remove any items placed in the bottom drawer.
•Avoid touching the door, window, or oven vent area during a cleaning cycle, and keep children away
from the appliance. These surfaces may get hotter than usual.
•Do not use a steam cleaner to clean the oven.
•Abra una ventana y encienda un ventilador o campana extractora antes de realizar la autolimpieza.
•Si el horno está muy sucio con aceite, realice la autolimpieza antes de volver a utilizarlo. El aceite
podría causar un incendio.
•Limpie la suciedad difícil de la base del horno antes de usar la función autolimpieza.
Page 39

9INSTRUCCIONES IMPORTANTES DE SEGURIDAD
Español
•No utilice limpiadores para hornos. No debe utilizarse ningún limpiador de hornos comercial ni
ningún tipo de revestimiento de protección dentro o alrededor de ninguna parte del horno.
•Nunca deje aves domésticas en la cocina. La salud de las aves es sumamente sensible a los gases
liberados durante un ciclo de autolimpieza del horno. Los gases podrían ser nocivos o fatales para
las aves. Traslade las aves a un ambiente bien ventilado.
•Limpie con el ciclo de autolimpieza solo las partes indicadas en este manual. Antes de realizar
la autolimpieza del horno, retire la asadera, todos los estantes del horno, la sonda para carne y
cualquier otro utensilio o alimento del horno.
•Instrucción importante. El horno muestra el código de error F y se escuchan tres tonos largos durante
el proceso de autolimpieza si está funcionando mal. Desconecte la energía eléctrica del horno desde
el fusible principal o el panel disyuntor y solicite reparación a cargo de un técnico calificado.
•Es normal que la placa de cocción de la cocina se caliente durante el ciclo de autolimpieza. Por lo
tanto, debe evitar tocar la placa de cocción, durante un ciclo de autolimpieza.
•Nunca derrame agua fría sobre el horno caliente para limpiarlo. Hacerlo podría provocar el mal
funcionamiento del horno.
•Asegúrese de que las luces del horno estén frías antes de limpiar.
•No limpie las juntas de la puerta del horno. Las juntas de la puerta del horno son esenciales para
lograr un buen sellado. No debe frotar, dañar ni mover la junta.
•Si se produce un incendio durante la limpieza automática, apague el horno y espere que se
apague el incendio. No fuerce la puerta del horno para abrirla. La introducción de aire fresco a
las temperaturas de autolimpieza podría ocasionar una explosión con llamas desde el horno. El
incumplimiento de esta instrucción podría tener como consecuencia quemaduras graves.
MODO CORRECTO DE COCINAR CARNES Y AVES
•Para evitar enfermedades transmitidas por los alimentos, cocine bien las carnes rojas y aves. La USDA
ha indicado las siguientes como las temperaturas internas mínimas de seguridad para el consumo:
•Carne molida de vaca: 160 °F
•Aves: 165 °F
•Carne de vaca, ternera, cerdo o cordero: 145 °F
•Pescado/mariscos: 145 °F
Page 40

10 DESCRIPCIÓN GENERAL DEL PRODUCTO
DESCRIPCIÓN GENERAL DEL PRODUCTO
Piezas
Placa de
cocción
Controlador
de la placa
de cocción
Puerta del
horno
Cajón de
almacenamiento
Accesorios
Accesorios incluidos
Vitrocerámica
Perilla de modo
del horno
Junta
Model and serial
number plate
Estante pesado (2 c/u) Estante deslizante (1 c/u) Sonda para carne (1 c/u) Bottom rack
(1 c/u)
Esponja
Limpiador
Limpiador para placa
de cocción (1 c/u)
Esponja limpiadora para placa
limpiadora
de cocción (1 c/u)
Botella rociadora
(1 c/u)
Esponja limpiadora
que no raya (1 c/u)
Accesorios opcionales
Rejilla Asadera
NOTA
•Comuníquese con el Servicio de atención al cliente de LG al 1-800-243-0000 (1-888-542-2623 en Canadá) si faltara algún
accesorio.
•Para su seguridad y para extender la vida útil del producto, solo debe utilizar componentes autorizados.
•El fabricante no es responsable del mal funcionamiento del producto ni de accidentes causados por el uso de componentes
o piezas no autorizados y comprados por separado.
•Las imágenes de esta guía podrían ser diferentes a los componentes y accesorios reales, que están sujetos a cambios a
discreción del fabricante, sin previo aviso, con fines de mejorar el producto.
Page 41
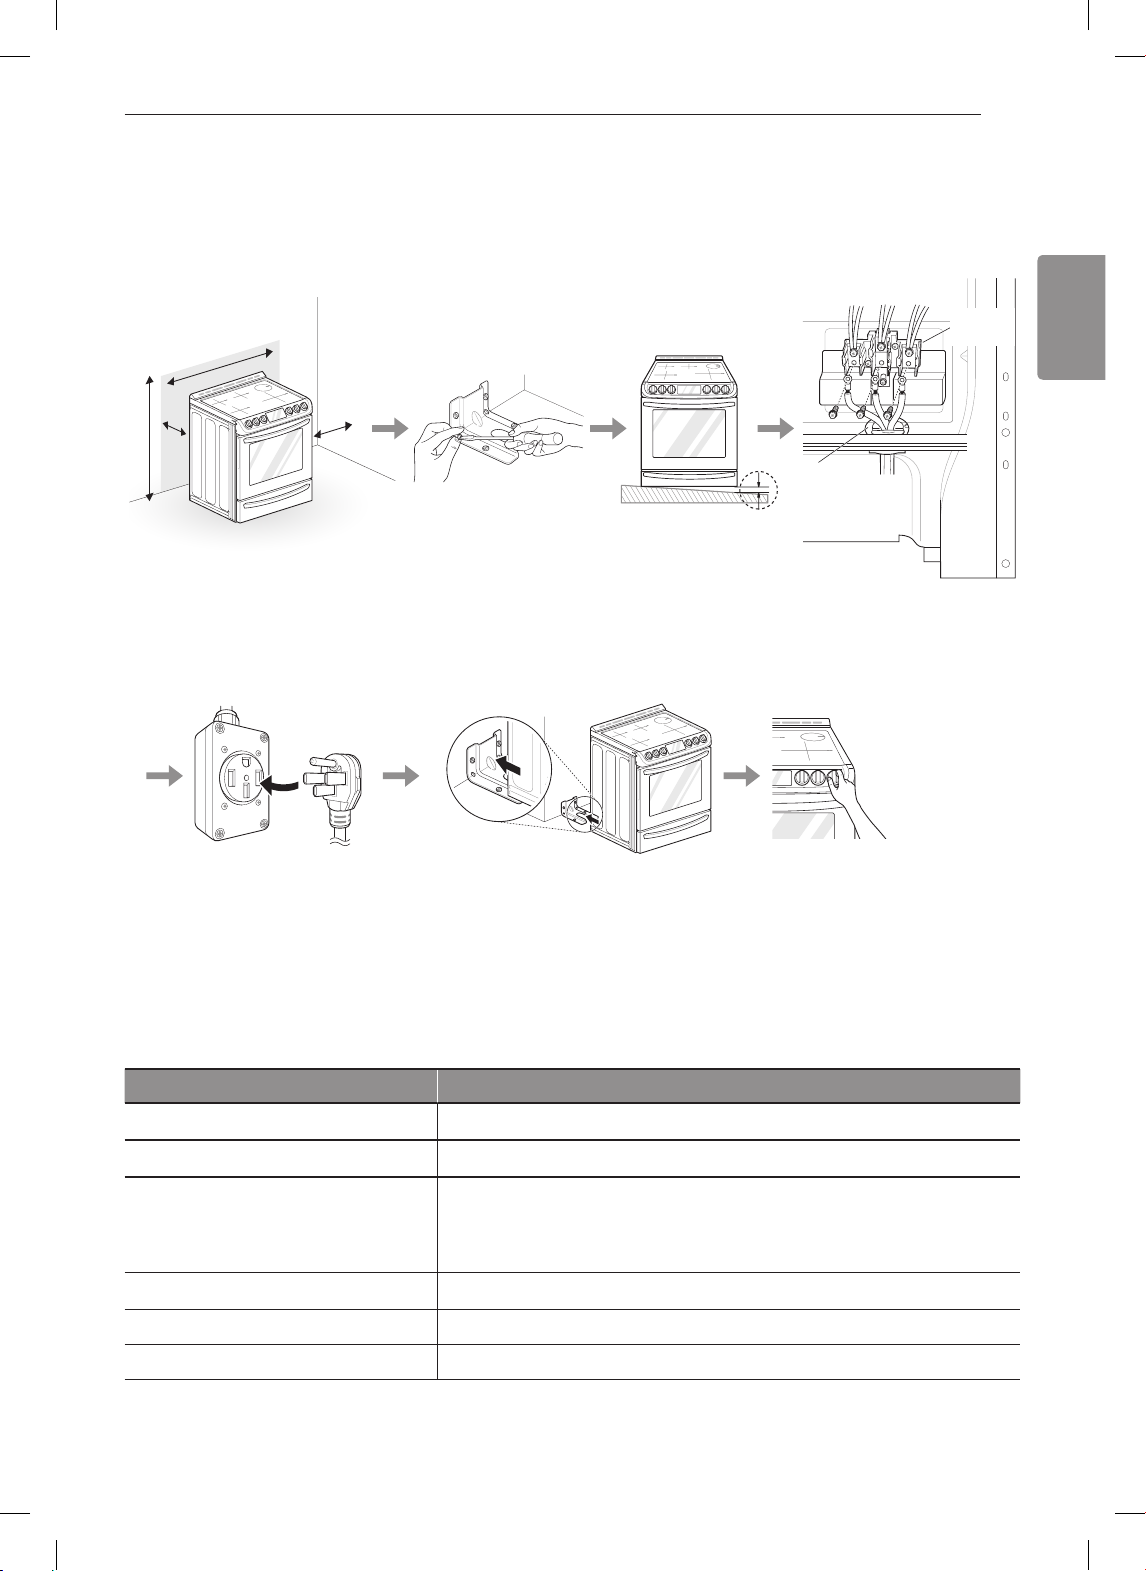
11INSTALACIÓN
Español
INSTALACIÓN
Descripción general de la instalación
Lea las siguientes instrucciones de instalación en primer lugar, después de comprar este producto o transportarlo a otra ubicación.
Verique y elija la ubicación
adecuada
240 V
Negro Blanco Rojo
Placa de
conexión del
conducto
Instale el dispositivo antivuelco Nivele la cocina Conecte la cocina
eléctrica
Bloque de
bornes
Enchufe el cable de alimentación Conecte el dispositivo antivuelco Prueba de
funcionamiento
Especificaciones del producto
La apariencia y las especificaciones detalladas en este manual podrían variar debido a mejoras constantes en el producto.
Modelos de cocinas con horno LSE4617
Descripción Cocina con horno eléctrica empotrable
Requisitos eléctricos 12,7 kW 120/240 VAC o 10,5 kW 120/208 VAC
7
"
29
/
(Ancho) x 37 7/
8
Dimensiones exteriores
cerrada)
75,7 cm (Ancho) x 96 cm (Alto) x 67,3 cm (Profundidad) (Profundidad con la
puerta cerrada)
Altura hasta la superficie de cocción 36
"
(91,4 cm)
Peso neto 198 lb (90,0 kg)
Capacidad total Capacidad total: 6,3) cu. ft.
"
(Alto) x 26 1/
8
"
(Profundidad) (Profundidad con la puerta
2
 Loading...