

Page 1
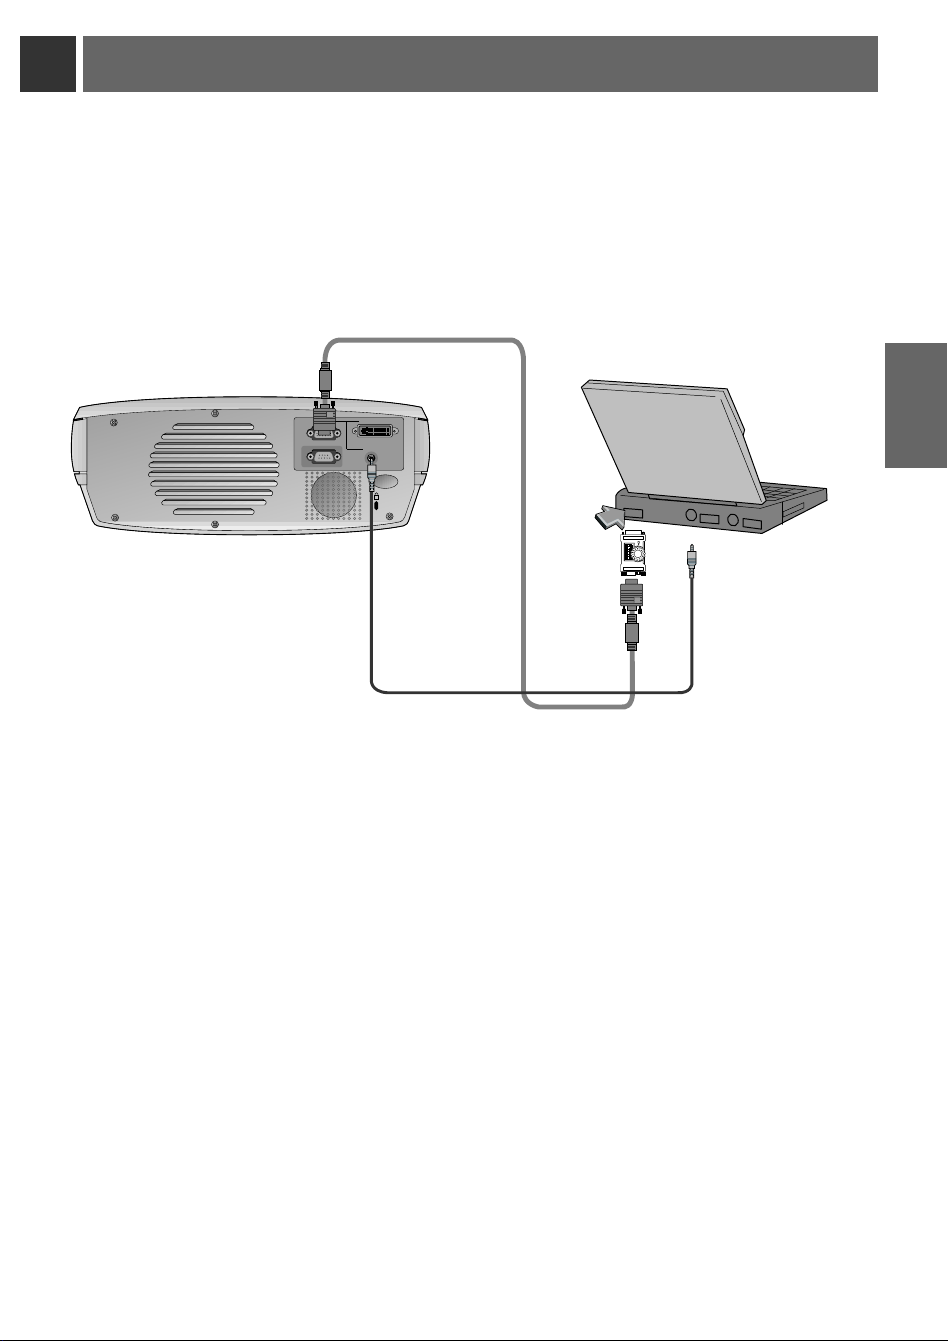
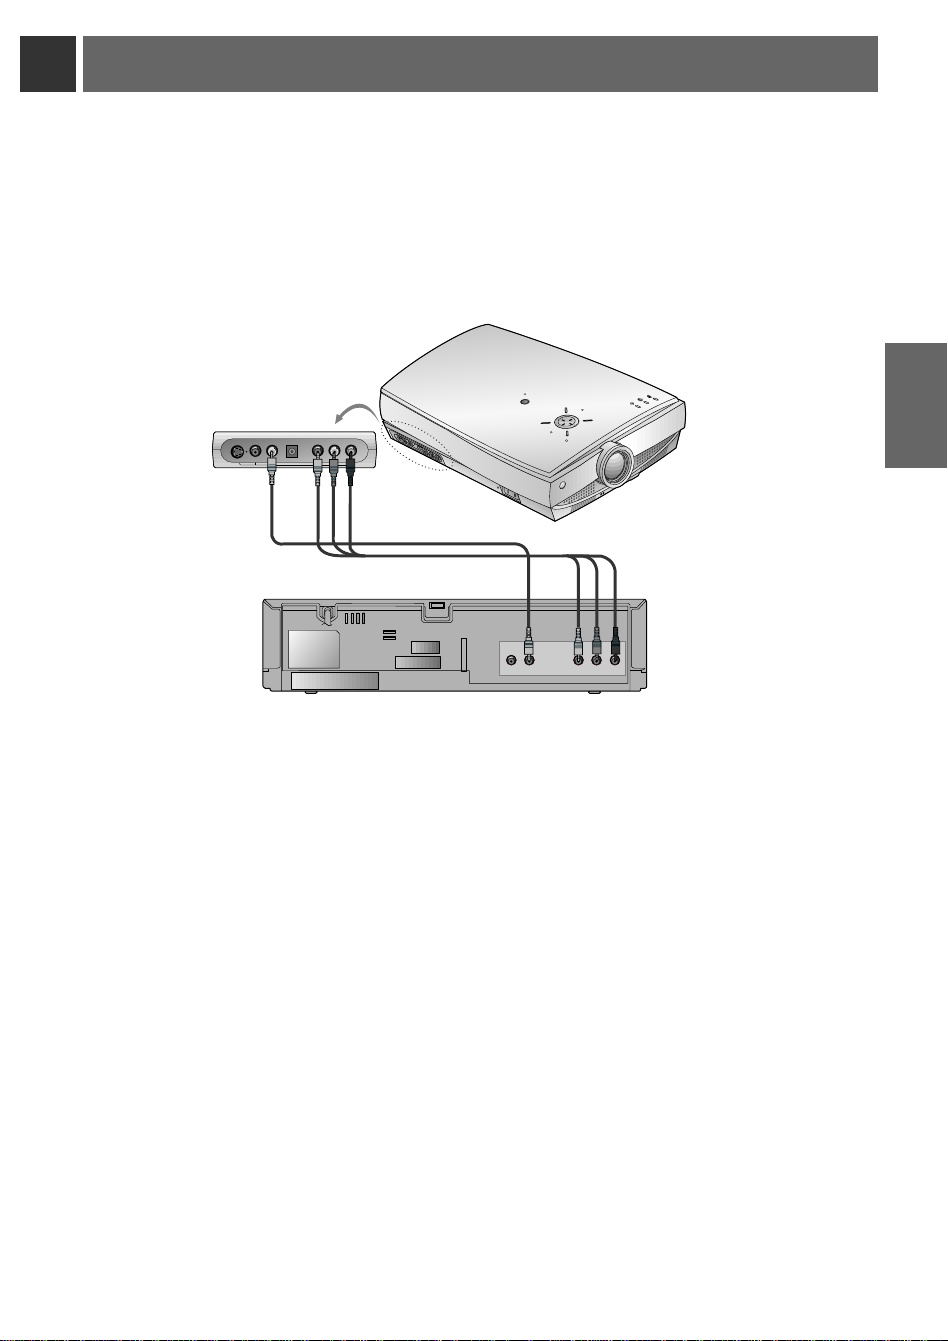
Connecting to a Macintosh PowerBook
K
A-RGB1
RS-232C
Audio
A-RGB2/D-RGB
1 2 3 4 5 6 7 8 9
ON
a
b
CONNECTION
c
d
< How to connect >
a. Connect computer cable to A-RGB1 of the projector.
b. Set the adjusting number and letter of the Macintosh desktop adaptor in accordance with the resolution
you want to use and connect the adaptor to the Macintosh. (Refer to page 29 ~ 30)
c. Connect the computer cable to the Macintosh desktop adaptor.
d. Connect the audio cable of PC (LINE OUT sound port) to Audio of the projector.
31
Page 2
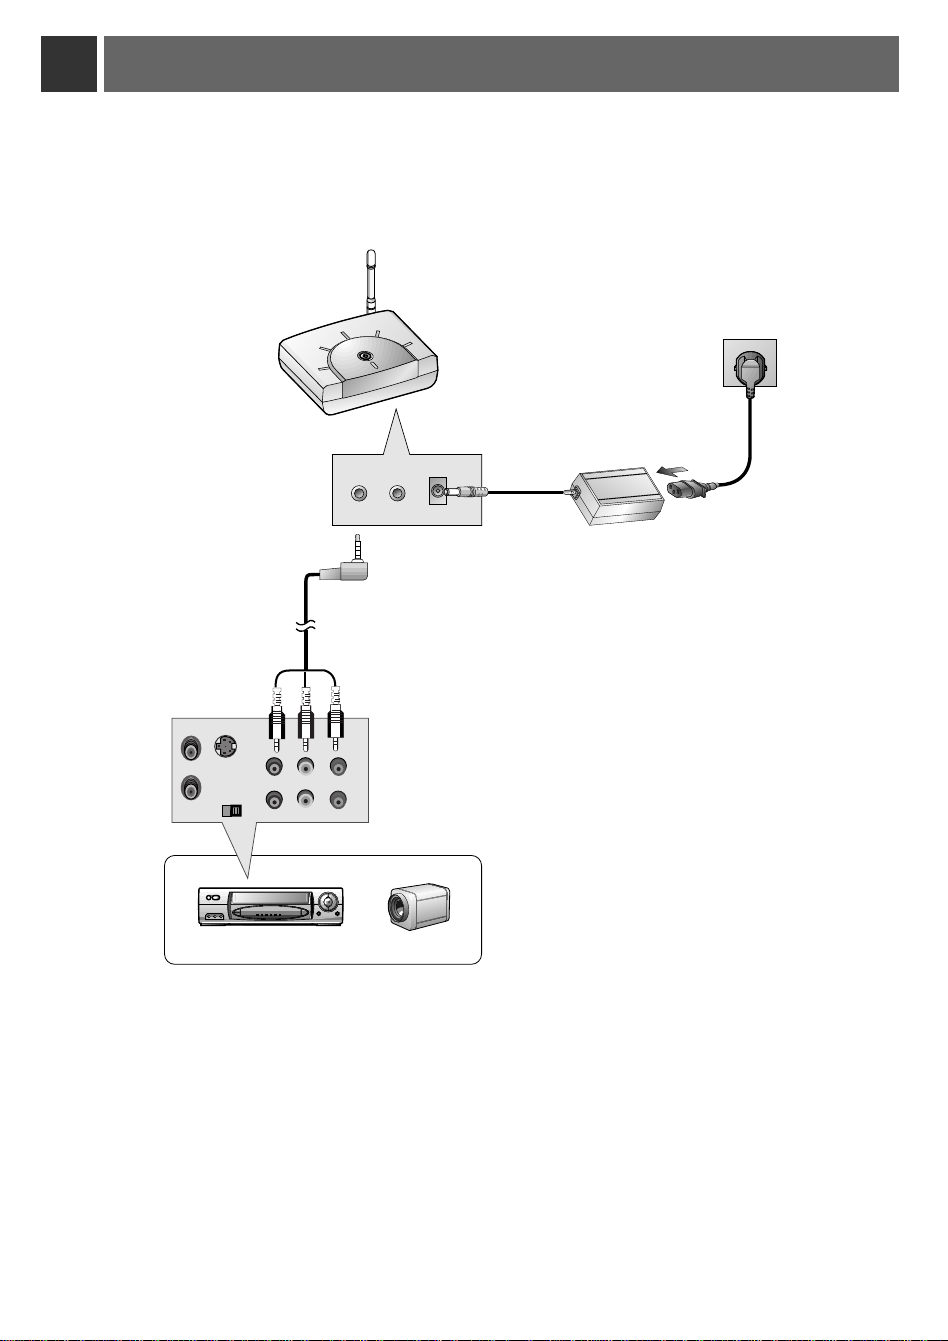
Connecting to a wireless transmitter (option)
S VIDEO
(R) AUDIO (L) VIDEO
OUT
IN
AV INPUT
AV OUTPUT
12V DC INPUT
CH1 CH2 CH3
CH S/W
CH4CH1 CH2 CH3
CH S/W
CH4
AV INPUT
• When connecting the wireless transmitter with external equipments, match the colors of
connecting ports (Video - yellow, Audio(L) - white, Audio(R) -red).
• If you have a mono VCR, connect the audio cable from the VCR to the AV input of the wireless
AV transmitter.
• See the wireless transmitter-receiver operating guide for installation and connection etc.
a
d
<Transmitter rear>
c
b
<VCR rear>
VCR
CAMCORDER
< How to connect >
a. Turn the power button of a transmitter on, and adjust desired channel with channel button and
place the wireless AV transmitter toward the wireless receiver.
b. Connect the output ports of the VCR to the AV OUTPUT port of the wireless AV transmitter.
c. Connect the adaptor to the DC input of the wireless AV transmitter .
d. Connect the power plug to the wall outlet socket after connecting the power cord to the adaptor.
32
Page 3
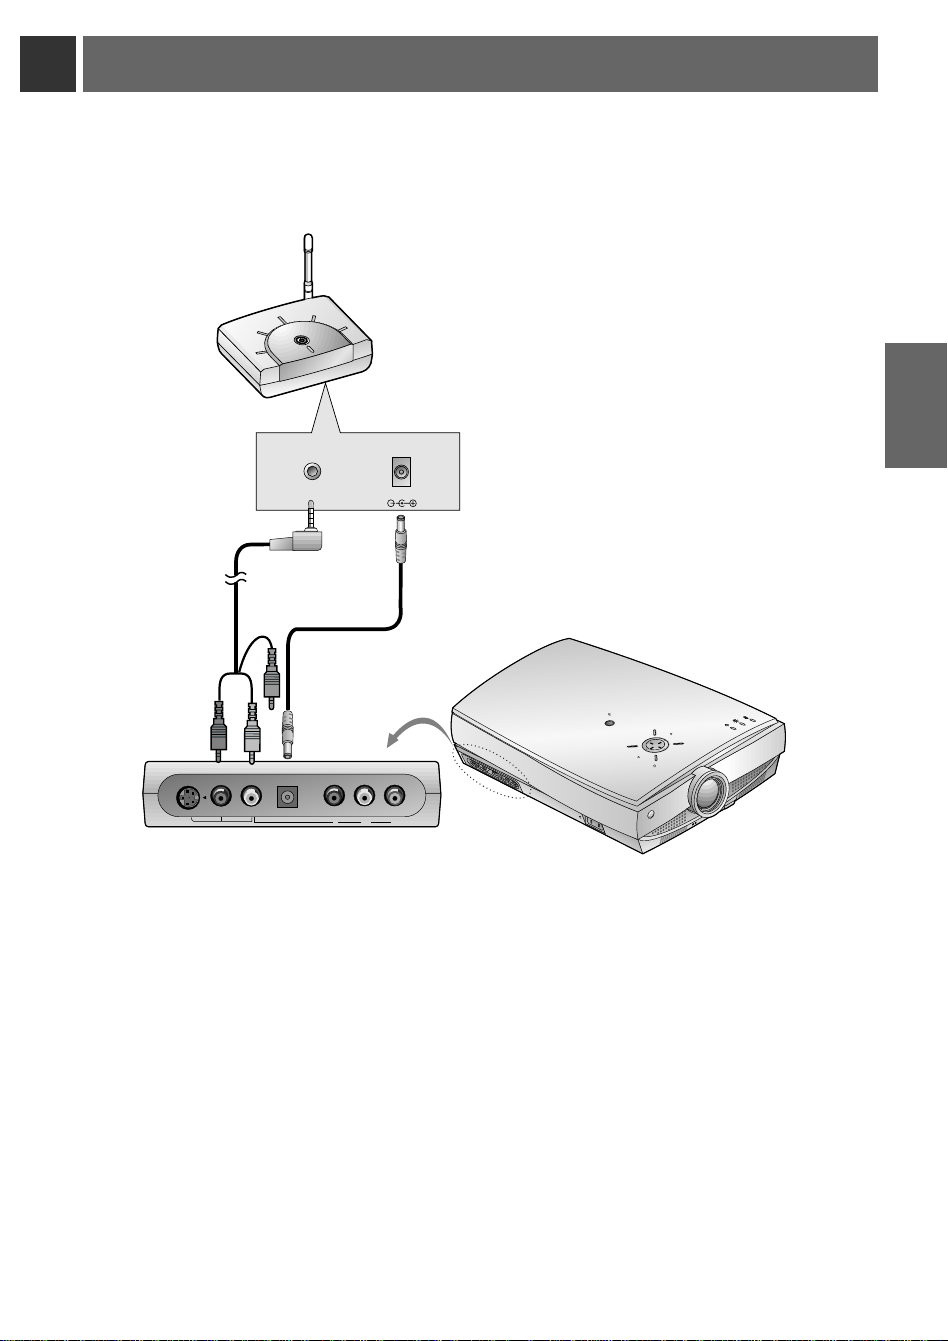
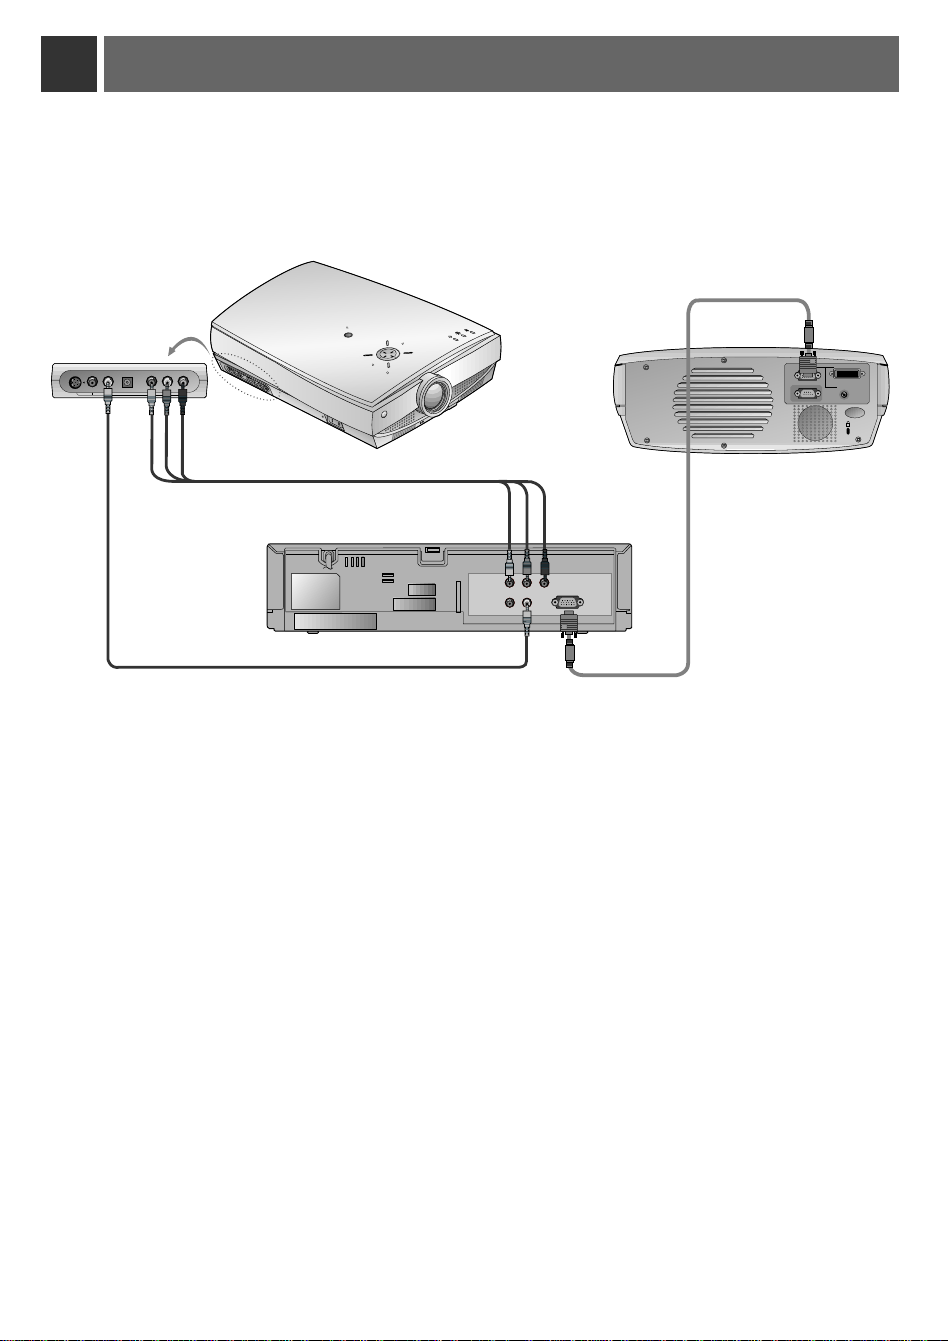
Connecting to a wireless receiver (option)
12V DC INPUT
CH1 CH2 CH3
CH S/W
CH4CH1 CH2 CH3
CH S/W
CH4
AV INPUT
Y PBP
R
Video
S-Video
Audio
DC 12V OUT
Component (DVD/DTV)
R
AC IN
INPUT SELECT
PATTERN
POWER
MENU
VOL
VOL
OK
/
• When connecting the wireless receiver with external equipments, match the colors of connecting
ports (Video - yellow, Audio(L) - white).
a
<Receiver rear>
c
b
<Side panel of the Projector>
< How to connect >
a. Turn the power button of a receiver on, and adjust channel number same to the channel num-
ber of a transmitter with the channel button. Place the wireless AV receiver toward the wireless
transmitter.
CONNECTION
b. Connect the AV input ports of the projector to the AV INPUT port of the receiver.
c. Connect the DC output of the projector to DC input of the wireless receiver with DC cable.
33
Page 4
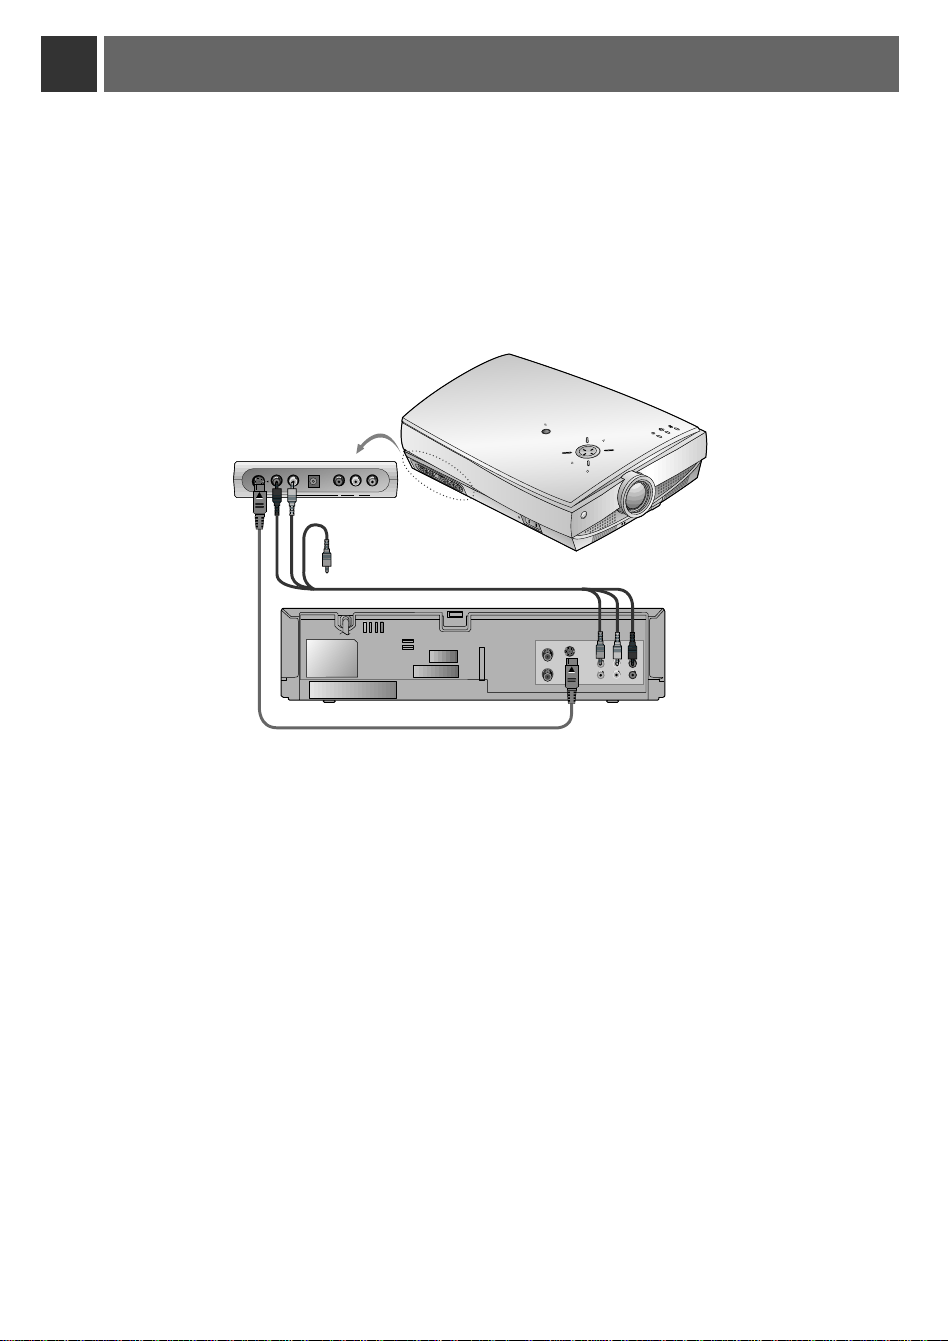
Connecting to a Video Source
R
INPUT
SELECT
PATTERN
POWER
MENU
AC IN
Y PBP
R
Video
S-Video
Audio
DC 12V OUT
Component (DVD/DTV)
S VIDEO
(R) AUDIO (L) VIDEO
OUT
IN
VOL
VOL
OK
/
* You can connect a VTR, a camcorder, a LDP or any other compatible video image source to the projector.
a
b
< How to connect 1 >
a. Connect the AV input ports of the projector to the output ports of the A/V source with A/V cables. If you
connect the Audio(R) of external equipment with projector, you can’t hear the sound. The video cable is
yellow and the left audio is white and right audio is red.
< How to connect 2 >
b. Connect S-Video input port of the projector to S-Video output port of A/V source with S-Video cable.
Connect the Audio input ports of the projector to the output ports of the A/V source with Audio cable.
* You can get better picture quality when connecting S-Video source to the projector.
34
Page 5
Connecting to a DVD
PR
PB
Y
(R) AUDIO (L)
R
INPUT
SELECT
PATTERN
POWER
MENU
AC IN
Y PBP
R
Video
S-Video
Audio
DC 12V OUT
Component (DVD/DTV)
VOL
VOL
OK
/
* The outputs(Y, PB, PR) of the DVD might be labeled as Y, Pb, Pr / Y, B-Y, R-Y / Y, Cb, Cr according to the equip-
ments.
b
a
CONNECTION
<DVD rear>
< How to connect >
a. Connect the Component (DVD/DTV) ports (Y, PB, PR) of the projector to the Video output ports (Y, PB,
PR) of the DVD.
b. Connect the Audio port of the projector to the Audio output port (L) of the DVD.
c. Use a DVD with Component 480i(576i)/480p mode.
35
Page 6
Connecting to a D-TV Set-Top Box
(R) AUDIO (L)
DTV OUTPUT
PR
PB
Y
K
A-RGB1
RS-232C
Audio
A-RGB2/D-RGB
R
INPUT
SELECT
PATTERN
POWER
MENU
AC IN
Y PBP
R
Video
S-Video
Audio
DC 12V OUT
Component (DVD/DTV)
VOL
VOL
OK
/
* To receive D-TV programmes, it is necessary to purchase a D-TV receiver (Set-Top Box) and
connect it to the projector.
* Please refer to the owner's manual of the D-TV Set-Top Box for the connection between
LCD projector and D-TV Set-Top Box.
* Use a D-TV receiver with DTV 720p/1080i mode.
c
(Component)
<D-TV Set-Top Box rear>
(RGB)
(Component)
< How to connect-In case of connecting RGB>
a. Connect computer cable to A-RGB1 of the projector.
* If the Set-Top Box has DVI output, use DVI cable.
b. Use a DTV receiver with DTV 720p/1080i mode.
< How to connect-In case of connecting Component>
a. Connect the Component (DVD/DTV) ports (Y, PB, PR) of the projector to the Video output ports (Y, PB,
b. Connect the Audio port of the projector to the Audio output port (L) of the D-TV Set-Top Box.
c. Use a DTV receiver with DTV 480p/720p/1080i mode.
PR) of the D-TV Set-Top Box.
36
Page 7

Function checking
*
If there is no input signal, Menu will not display on screen.
*
This operating guide explains operation of A-RGB1 mode mainly.
Press the MENU button to show a menu on screen.
1
Press the D, E button to select a menu.
2
● Each press will cycle through the different menus as shown below.
Contrast 50
Brightness 50
Color R 50
Color G 50
Color B 50
Reset
Menu exit move OK Menu exit move OK
Twin Picture
Color Temp. R 0
Color Temp. G 0
Color Temp. B 0
Off
Language
ARC
Flip Horizontal
Flip Vertical
Auto Tracking
Clock 25
Phase 25
Horizontal 0
Vertical 0
Menu exit move OK
V Keystone 0
H Keystone 0
Zoom
Blank Image
Set ID
Lamp Time
English
16:9
Blue
1
0 Hr
BASIC
FUNCTIONS
Menu exit move OKMenu exit move OK
Press the OK (A) button and then press the D , E or VOLUME (F, G) buttons to select a feature you
want to use.
3
● To finish the menu display, press the MENU button.
* In V ideo and S-Video mode and Component(480i(576i)), D-RGB mode menu is not displayed.
* Only A-RGB1, A-RGB2, Component(480p, 720p, 1080i) mode displays [Horizontal], [Vertical] in menu
* The sub menus of menu in Video and S-Video mode and Component mode are dif ferent from those in the RGB
mode. (Refer to page 52).
* [Color R], [Color G], [Color B] : Use only for the A-RGB1 and the A-RGB2 modes. [Color R], [Color G], [Color B]
items are used to adjust the R/G/B color levels when the RGB analog input signal has improper R/G/B signal levels.
37
Page 8
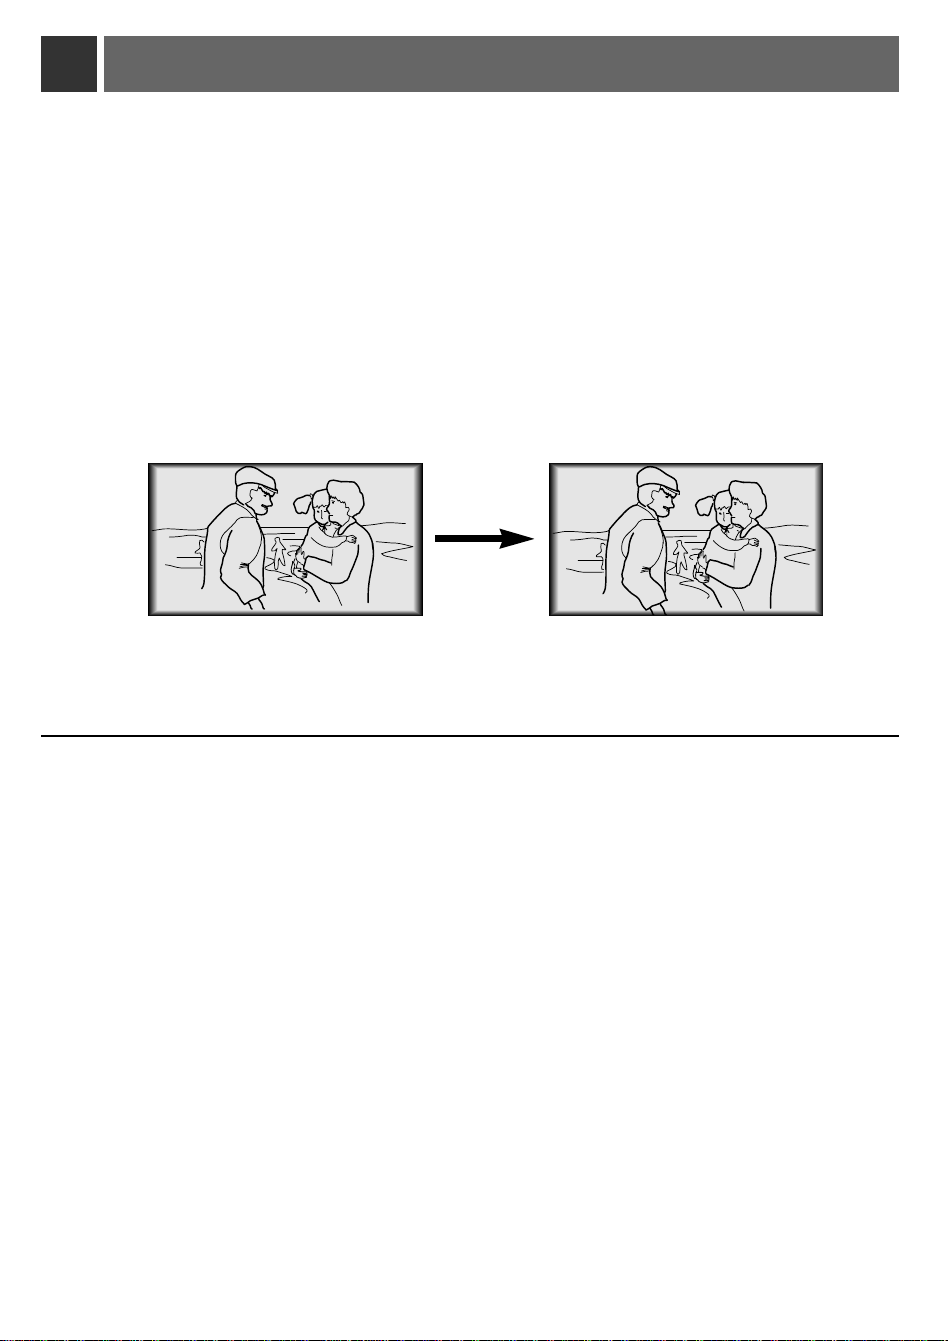
Using Still function
Press the STILL button.
1
* You can freeze the input image.
<Moving Image>
To finish this function, press the any button again.
2
* The STILL function would release automatically after about 10 minutes.
<Still Image>
38
Page 9

Selecting language
Press the MENU button and then use D / E button to select the menu.
1
Language
ARC
Flip Horizontal
Flip Vertical
Menu exit move OK
English
16:9
Press the OK (A) button and then use D / E button to select [Language] item.
2
3
Press the
●
●
To finish menu display, press the MENU button.
VOLUME (F, G) button to select the language you want to use.
On-Screen-Display(OSD) is marked in the selected language from this point.
SPECIAL
FUNCTIONS
Language
ARC
Flip Horizontal
Flip Vertical
Menu prev. move select
English
16:9
39
Page 10
Checking lamp time
Press the MENU button and then use D / E button to select the menu.
1
V Keystone 0
H Keystone 0
Zoom
Blank Image
Set ID
Lamp Time
Menu exit move OK
●
You can see the used lamp time.
●
When projector lamp is reaching the end of its life(over 1500 hours), the lamp indicator will be turned
red and the projector will display “Replace the Lamp” on screen.
●
The OSD, “Replace the Lamp” is displayed 10 seconds from the first power on.
●
The lamp warning LED illuminates red continuously in case of excessing of lamp time.
Blue
0 Hr
1
40
Page 11

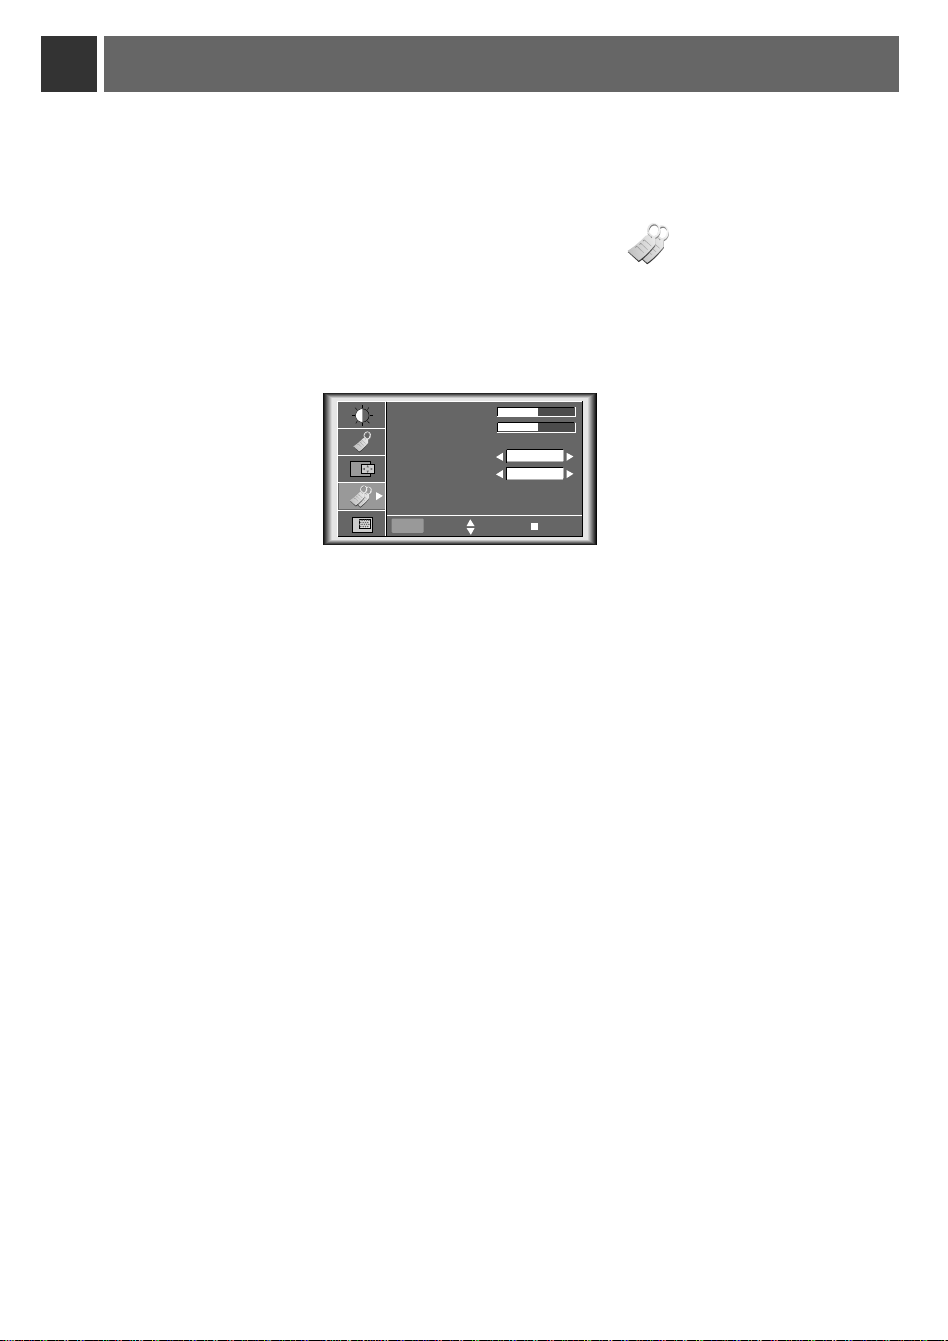
Manual Color Temperature Control
* You can adjust red, green, or blue to any color temperature you prefer.
Press the
MENU button and then use D / E button to select the menu.
1
Twin Picture
Color Temp. R 0
Color Temp. G 0
Color Temp. B 0
Menu exit move OK
Press the OK (A) button and then use D / E button to select a color.
2
Twin Picture
Color Temp. R 0
Color Temp. G 0
Color Temp. B 0
Off
SPECIAL
FUNCTIONS
Off
3
Menu prev. move adjust
Use the
●
●
VOLUME (F, G) button to make appropriate adjustments.
The adjustment range of [Color Temp. R], [Color Temp. G] and [Color Temp. B] is -50 ~ +50.
To exit the menu display, press the MENU button.
41
Page 12
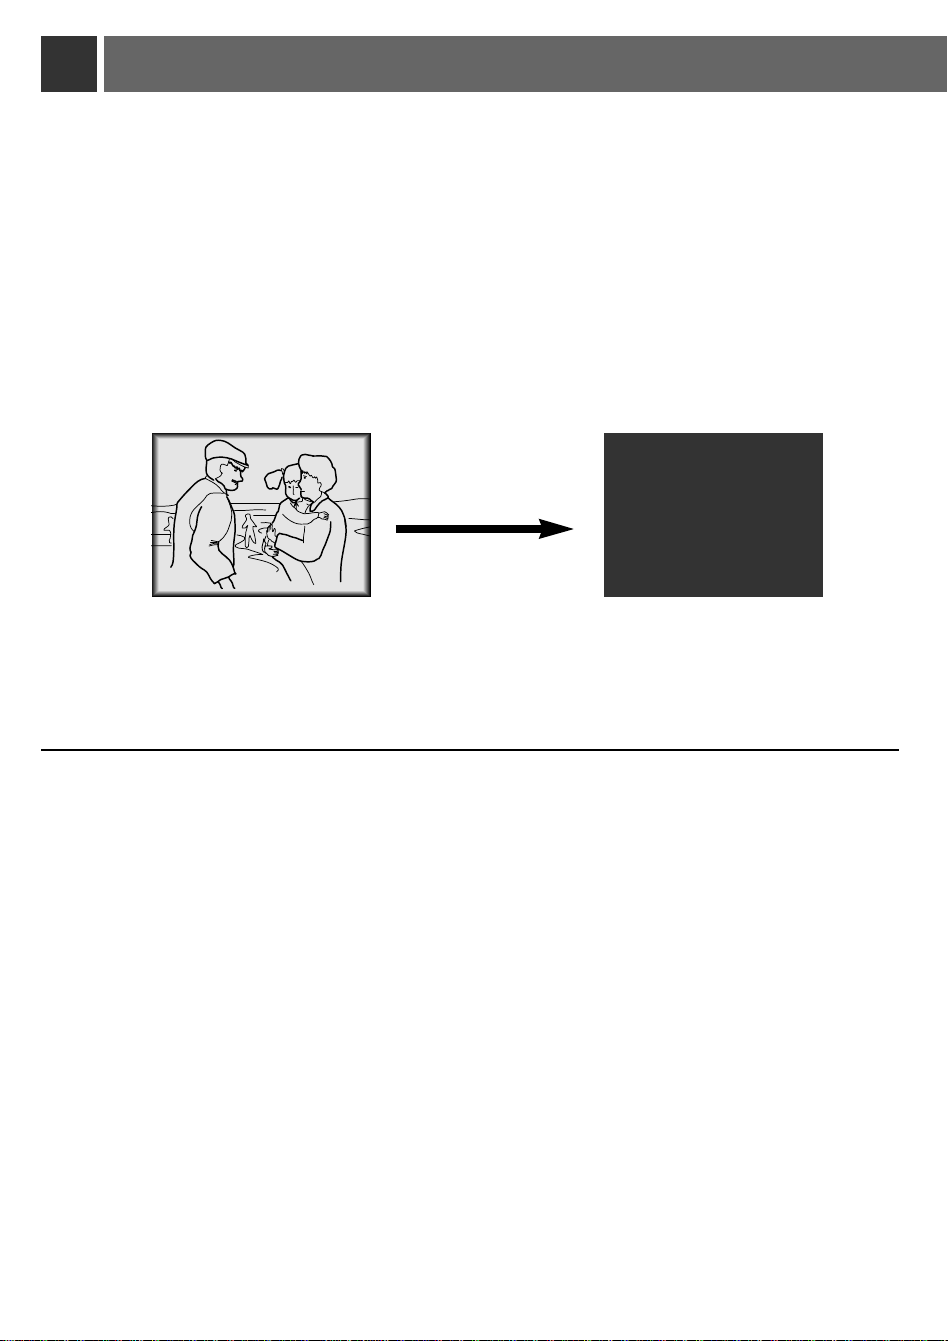
Using Blank function
* This function may be effective if you need to get attention of the audience during presentations, meetings
or briefings.
Press the BLANK button.
1
*
The screen turns off to a background color and sound also turns off.
* You can choose the background color. Refer to page 43.
Press any buttons to cancel the blank function.
2
*
On exiting the blank status sound also is restored.
42
Page 13

Selecting Blank Image color
Selecting Blank Image color
Press the MENU button and then use D / E button to select the menu.
1
V Keystone 0
H Keystone 0
Zoom
Blank Image
Set ID
Lamp Time
Menu exit move OK
Blue
0 Hr
1
Press the OK (A) button and then use D / E button to select [Blank Image] item.
2
SPECIAL
FUNCTIONS
Press the VOLUME (F, G) button to select the color you want to use.
3
●
Background color will be changed to the selected Blank function color from this point.
●
To exit menu display, press the MENU button.
V Keystone 0
H Keystone 0
Zoom
Blank Image
Set ID
Lamp Time
Menu prev. move select
Blue
1
0 Hr
43
Page 14

Using Flip Horizontal / Vertical function
Flip Horizontal Function
Flip Horizontal Function
* This function reverses the left and the right side of the projected image. Use this function when projecting from behind
onto a transparent screen being viewed from the opposite side.
Press the MENU button and then use D / E button to select the menu.
1
Language
ARC
Flip Horizontal
Flip Vertical
Menu exit move OK
English
16:9
Press the OK (A) button and then use D / E button to select [Flip Horizontal] item.
2
English
16:9
Press OK to Flip
Press the
Language
ARC
Flip Horizontal
Flip Vertical
Menu prev move OK
OK(
) button to see reversed image.
A
3
●
Each time you press the button, the image will be reversed.
●
To finish menu display, press the MENU button.
44
Page 15

Flip V
Flip V
* This function reverses the upper and the lower side of the projected image.
* When you hang the projector upside down from the ceiling for using, you need to reverse all the sides(left, right,
upper, lower) of the image.
ertical Function
ertical Function
Press the MENU button and then use D / E button to select the menu.
1
Language
ARC
Flip Horizontal
Flip Vertical
Menu exit move OK
English
16:9
Press the OK (A) button and then use D / E button to select [Flip Horizontal] item.
2
English
16:9
Press OK to Flip
Press the
OK(
) button to see reversed image.
A
Language
ARC
Flip Horizontal
Flip Vertical
Menu prev move OK
3
●
Each time you press the button, the image will be reversed.
●
To finish menu display, press the MENU button.
SPECIAL
FUNCTIONS
45
Page 16

TITLE
PICTURE
TWIN
Twin Picture function
How to use twin picture
Press the TWIN PICTURE button to select desired with picture.
Twin Picture1
Twin Picture 1
● You can use this function by using the MENU button.
Twin Picture 2 Twin Picture : Off
Twin Picture : Off
Twin Picture 2
Input select of the sub picture
Press the SUB INPUT button to select the input source of sub picture.
SUB INPUT
select OK
F A-RGB1 G
46
Page 17

Changing the picture of main and sub picture
Press the SWAP button in twin picture mode.
SWAP
A-RGB2
Video
Using Still function in twin picture mode.
STILL
Press the STILL button in twin picture mode.
Video
A-RGB2
SPECIAL
FUNCTIONS
Main Still
Sub Still
exit select
● You can cancel this function directly by selecting [Off] in menu.
●
The STILL function is cancelled when changing the input signal.
[Main Still] is cancelled when changing the input signal with
Off
Off
INPUT SELECT
button and [Sub Still] is cancelled when changing the input signal with
SUB INPUT button. That is, [Main/Sub Still] work separately.
●
The STILL function would release automatically after about 10 minutes.
47
Page 18

Adjusting screen display
*If the image size does not fit the screen in accordance with the input source, set the position of the image
by selecting Horizontal / Vertical position.(For A-RGB1, A-RGB2, Component 480p/720p/1080i)
Press the MENU button and then use D / E button to select the menu.
1
Auto Tracking
Clock 25
Phase 25
Horizontal 0
Vertical 0
Menu exit move OK
Press the OK (A) button and then use D / E button to select [Horizontal] or [Vertical] item.
2
Auto Tracking
Clock 25
Phase 25
Horizontal 0
Vertical 0
Menu prev. move adjust
VOLUME (F, G) button to adjust the screen condition as you want.
[Horizontal], [Vertical] are adjusted from -50 to +50.
To exit the menu display, press the MENU button.
3
Press the
●
●
48
Page 19

Using Keystone function
*Keystone function adjusts the upper and lower width of the projected image to prevent the
image from being a trapezoid shape. Use this function when the screen or the projector is
slanted and cannot make an ideal projection angle.
*Only use the Keystone function when you can’t get the best angle of projection, because it
may cause a blazing fire of the screen.
Press the KEYSTONE button.
1
V Keystone 0
H Keystone 0
exit adjust
Press the
D / E button to select [V Keystone] or [H Keystone] item.
2
Press the VOLUME (F, G) button to adjust the screen condition as you want.
3
●
[Keystone]
●
Adjustment range of H/V Keystone may not work until -50 ~ +50 because they are interlocked.
●
To exit the menu display, press the OK (A)
● You can also use this function by using the MENU button.
are adjusted from -50 to +50.
button.
ING
POSITION-
49
Page 20

Using Zoom function
R
* This function works only in RGB mode.
Press the ZOOM - or ZOOM + button.
1
0/20
ZOOM+
ZOOM-
Press the ZOOM - or ZOOM + button to adjust the zoom level.
2
15/20 20/20
ZOOM+
ZOOM-
Move to the position you want to see the enlarged screen by moving press the VOLUME (F, G) ,
D, E button.
3
Press the OK (A) or ARC button to finish the zoom function.
ZOOM-
ZOOM+
4
* This function doesn’t work in Video, S-Video, Component mode.
* You can use this function by using the MENU button.
* In the zoom mode, you can adjust horizontal / vertical position with the
VOLUME (F, G) , D, E
button during displaying zoom OSD.
50
Page 21

Using ARC function
R
* With HD input (720p,1080i) mode, you can select 16:9 picture format only.
Press the ARC button.
1
Each press of the button changes the display as below.
< A-RGB1/A-RGB2/D-RGB mode >
16:9
F
16:9
G
16:9
F
G
ARC
< Video/S-Video/Component(480i(576i), 480p) mode >
ARC
ARC
ARC
4 : 3
4:3
F
G
4:3
F
G
22% Magnification
16:9
Zoom4
F
ARC
22% Magnification
G
4 : 3
ARC
Zoom1
F
Zoom1
17% Magnification
G
Zoom4
22% Magnification
ARC
Zoom3
F
Zoom3
Zoom2
F
G
ARC
G
17% Magnification
17% Magnification
Zoom2
* Zoom1
Choose when you want to evenly stretch the normal picture vertically (about 17% for original picture format). Some of top and bottom portions
of the picture will be deleted. But black bars appear at top and bottom of screen for some input source.
* Zoom2
Choose when you want to evenly stretch the normal picture vertically and horizontally (about 17% for original picture format) and to remove
the screen distortion of Zoom1.
* Zoom3
Choose when you want to evenly stretch the normal picture vertically (about 22% for original picture format).
* Zoom4
Choose when you want to evenly stretch the normal picture vertically and horizontally (about 22% for original picture format) and to remove
the screen distortion of Zoom3.
* You can also use this function by using the MENU button.
ING
POSITION-
51
Page 22

Adjusting Video
Press the MENU button and move the D / E button up or down to select each menu.
1
< RGB mode >
Contrast 50
Brightness 50
Color R 50
Color G 50
Color B 50
Reset
Menu exit move OK
Press the OK (A) button.
2
< RGB mode >
Contrast 50
Brightness 50
Color R 50
Color G 50
Color B 50
Reset
Menu Prev. move adjust
< Video, S-Video, Component mode >
APC
Contrast 50
Brightness 50
Color 50
Sharpness 50
Tint 0
Menu exit move OK
User
< Video, S-Video, Component mode >
APC
Contrast 50
Brightness 50
Color 50
Sharpness 50
Tint 0
Menu Prev. move select
User
< Twin picture mode >
Contrast 50
Brightness 50
Reset
Menu exit move OK
< Twin picture mode >
Contrast 50
Brightness 50
Reset
Menu Prev. move adjust
Press the D / E button up or down to select a video item you want to adjust.
3
Press the VOLUME (F, G) button to adjust the selected video item as you want.
4
●
You can only adjust [Contrast] and [Brightness] of menu in Twin picture mode. In Twin picture mode,
adjustment for [Contrast] and [Brightness] doesn’t effect other input sources. Adjustments apply to main and
sub picture simultaneously.
●
Each adjustment of menu options don’t effect other input source. As required, re-adjust menu options
for the following input source : Video/S-Video/Component(480i(576i)), Component(480p, 720p, 1080i)
●
To restore the original image condition after changing it, press OK (A) button after selecting [Reset] item.
●
In the broadcasting system NTSC, the picture item Tint is displayed and adjusted.
●
To finish menu display, press the MENU button.
52
Page 23

APC (Auto Picture Control)
R
APC (Auto Picture Control)
* Use APC to set the projector for the best picture appearance.
* This function doesn’t work in RGB mode.
Press the APC button.
1
User
F
APC
G
Each press of the APC button changes the screen as shown below.
2
User Clear Soft
* You can also use this function by using the MENU button.
(Video/S-Video/Component mode)
VIDEO
53
Page 24

Using Tracking function
R
Auto T
Auto T
* Auto Tracking Function
This function assures you of getting the best video quality by automatically adjusting the difference of horizontal size and
synchronization of the image.
Auto Tracking function works in Analog RGB(A-RGB1, A-RGB2) input only.
Press the AUTO TRACKING button.
racking Function
racking Function
1
Auto Tracking
* Image positioning and synchronization are automatically adjusted.
Adjust [Clock] or [Phase] in menu after operation of [Auto Tracking] if you want to get bet-
2
ter picture quality in accordance with diverse Analog RGB(A-RGB1, A-RGB2) input modes.
In certain circumstances, you can’t get the best picture quality only with auto-correction.
(Refer to page 55.)
* You can also use this function by using the MENU button.(Only in Analog RGB
mode)
* For best results, perform this function while displaying a still image.
54
Page 25

Clock / Phase Function
Clock / Phase Function
* Clock Function
This function adjusts the horizontal width of the projected image to get the image to fit on the screen size.
* Phase Function
This function is for the detailed adjustment of the clock function.
* It’s available to adjust [Clock], [Phase] in Analog RGB mode only.
Press the MENU button and then use D / E button to select the menu.
1
Auto Tracking
Clock 25
Phase 25
Horizontal 0
Vertical 0
Menu exit move OK
Press the OK (A) button and then use D / E button to select [Clock] or [Phase] item.
2
Auto Tracking
Clock 25
Phase 25
Horizontal 0
Vertical 0
Menu prev. move adjust
VOLUME (F, G) button to adjust the screen condition.
To exit the menu display, press the MENU button.
3
Press the
●
TRACKING
55
Page 26

External control device setup
*
Connect the RS-232C input jack to an external control device (such as a computer or an A/V control system)
and control the Projector’s functions externally.
* When you connect a control(RS-232C) cable to this projector, use a control cable with a ferrite core attached.
If you do not do this, this projector will not conform to mandatory CISPR22(EN55022) standards.
SET ID
• Use this function to specify projector ID number.
Press the MENU button and then use D / E button to select the menu.
1
V Keystone 0
H Keystone 0
Zoom
Blank Image
Set ID
Lamp Time
Menu exit move OK
Blue
0 Hr
1
Press the OK (A) button and then use D / E button to select [Set ID] item.
2
Press the VOLUME (F, G) button to adjust Set ID to choose the desired projector ID number.
3
●
The adjustment range of Set ID is 1~99.
●
If projector have specified ID number, the choosed projector operates only.
●
To exit the menu display, press the MENU button.
V Keystone 0
H Keystone 0
56
Zoom
Blank Image
Set ID
Lamp Time
Menu prev. move select
Blue
1
0 Hr
Page 27

How to connect external control equipment
K
A-RGB1
RS-232C
Audio
A-RGB2/D-RGB
• Connect the serial port of the PC to the RS-232C jack on the projector back panel.
• RS-232C cable is not supplied with the projector.
• Use the RS232C cable to control the projector externally (Refer to Fig.1).
<Fig.1, RS-232 Interface Cable>
RXD
2
TXD
3
5
GND
DTR
4
DSR
6
RTS
7
CTS
8
Male
(-)
* 1, 9 Pin No Connection
3
2
5
4
6
7
8
Female
(-)
TXD
RXD
GND
DTR
DSR
RTS
CTS
Communication Parameter Setup
• Baud Rate : 19200 bps(UART)
• Data Length : 8 bit
• Parity : none
• Stop bit : 1 bit
• Flow Control : none
• Communication code : ASCII code
RS-232C
57
Page 28

External control device setup
Command Reference List
01. Power k 0 0 00~63 00, 01
02. Input Select k 0 1 00~63 00~05
03. Aspect Ratio k 0 2 00~63 00~05
04. Screen Mute k 0 3 00~63 00, 01
05. Sub Input Select k 0 4 00~63 00~05
06. Contrast k 3 0 00~63 00~64
07. Brightness k 3 1 00~63 00~64
08. Color k 3 2 00~63 00~64
09. Tint k 3 3 00~63 00~64
10. Sharpness k 3 4 00~63 00~64
11. Color R k 3 6 00~63 00~64
12. Color G k 3 7 00~63 00~64
13. Color B k 3 8 00~63 00~64
14. Color Temp. R k 3 9
15. Color Temp. G k 3 a
16. Color Temp. B k 3 b
17.
Twin Picture Mode Select k 4 1 00~63 00, 01, 02
18. Volume Mute k 5 4 00~63 00, 01
19. Volume Control k 5 0 00~63 00~64
20. OSD Lock mode k 9 0 00~63 00, 01
21.
Remote Control Lock mode
Command1 Command2-1 Command2-2 SET ID Data(Hexa) Data(Hexa)
00~63 00~64
00~63 00~64
00~63 00~64
k 9 1 00~63 00, 01
❑ Communication Protocol
ransmission
1. T
[Command1][Command2-1][Command2-2][ ][Set ID][ ][Data][Cr]
[Command 1] : To classify factory adjustment mode or user adjustment mode.(ASCII code, 1 Character)
*
[Command 2-1] : Group classification code to control set.(ASCII code, 1 Character)
*
[Command 2-2] : To control projector set.
*
[Set ID] : You can adjust the set ID to choose desired projector ID number in specialmenu. See previous page.
*
[DATA] : To transmit command data. Transmit 2 character when organized ASCII code.
*
[Cr] : Carriage Return
*
[ ] : ASCII code character correspond to “Space Bar” which is in order to classify command set ID and Data.
*
➜ Shortening Key Group :0, Video Group : 3, Twin Picture Group : 4, Audio Group:5, Others : 9
Adjustment range is 1 ~ 99. When selecting Set ID ‘0’, every connected projector set is controlled.
* Transmit ‘FF’ data to read status of command.
ASCII code ‘0x0D’
[Command2-1][Command2-2][ ][Set ID][ ][OK][Data][X]
* The Projector transmits ACK (acknowledgement) based on this format when receiving normal data. At this time, if the data is
data read mode, it indicates present status data. If the data is data write mode, it returns the data of the PC computer.
2. Error Acknowledge
[Command2-1][Command2-2][ ][Set ID][ ][NG][Data][X]
* The Projector transmits ACK (acknowledgement) based on this format when receiving abnormal data from non-viable
functions or communication errors.
Data : [01] : illegal code(This command is not supported.)
[02] : not support function(This function doesn’t work.)
[03] : wait more time(Try again a few minute later.)
58
Page 29

01. Power (Command2-1:0, Command2-2:0)
➜ To control Power On/Off of the Projector.
Transmission
[k] [0] [0] [Set ID] [ ] [Data] [Cr]
Data 00 : Power Off
01 : Power On
Ack
[0] [0] [ ] [Set ID] [ ] [OK] [Data] [X]
Data 00 : Power Off
01 : Power On
➜ To show Power On/Off status.
Transmission
[k] [0] [0] [ ] [Set ID] [ ] [FF] [Cr]
Ack
[0] [0] [ ] [Set ID] [ ] [OK] [Data] [X]
Data 00 : Power Off
01 : Power On
* In like manner, if other functions transmit
‘FF’ data based on this format,
Acknowledgement data feed back presents
status about each function.
03. Aspect Ratio (Command2-1:0, Command2-2:2)
➜ To adjust the screen format.
Transmission
[k] [0] [2] [ ] [Set ID] [ ] [Data] [Cr]
Data 00 : Wide Screen(16:9) 01 : Normal Screen( 4:3)
02 : Zoom 1 03 : Zoom 2
04 : Zoom 3 05 : Zoom 4
Ack
[0] [2] [ ] [Set ID] [ ] [OK] [Data] [X]
Data 00 : Wide Screen(16:9) 01 : Normal Screen( 4:3)
02 : Zoom 1 03 : Zoom 2
04 : Zoom 3 05 : Zoom 4
* Using the PC input, you select either 16:9 or 4:3 screen
aspect ratio.
* Screen size function doesn’t work with HD signal.
* Zoom1~Zoom4 mode works only with Video/S-Video/
Component(480i(576i), 480p) input.
04. Screen Mute (Command2-1:0, Command2-2:3)
➜ To select screen mute on/off.
Transmission
[k] [0] [3] [ ] [Set ID] [ ] [Data] [Cr]
Data 01 : Screen Mute On (Picture Off)
00 : Screen Mute Off (Picture On)
02. Input Select (Command2-1:0, Command2-2:1)
➜ To select input source for the Set.
Transmission
[k] [0] [1] [ ] [Set ID] [ ] [Data] [Cr]
Data 00 : A-RGB1 01 : A-RGB2 02 : D-RGB
03 : Video 04 : S-Video 05 : Component
Ack
[0] [1] [ ] [Set ID] [ ] [OK] [Data] [X]
Data 00 : A-RGB1 01 : A-RGB2 02 : D-RGB
03 : Video 04 : S-Video 05 : Component
Ack
[0] [3] [ ] [Set ID] [ ] [OK] [Data] [X]
Data 01 : Screen Mute On (Picture Off)
00 : Screen Mute Off (Picture On)
05. Sub Input Select
(Command2-1:0, Command2-2:4)
➜ To select input source for sub picture.
Transmission
[k] [0] [4] [ ] [Set ID] [ ] [Data] [Cr]
Data 00 : A-RGB1 01 : A-RGB2 02 : D-RGB
03 : Video 04 : S-Video 05 : Component
Ack
[0] [4] [ ] [Set ID] [ ] [OK] [Data] [X]
Data 00 : A-RGB1 01 : A-RGB2 02 : D-RGB
03 : Video 04 : S-Video 05 : Component
RS-232C
59
Page 30

External control device setup
06. Contrast (Command2-1:3, Command2-2:0)
➜ To adjust screen contrast.
Transmission
[k] [3] [0] [ ] [Set ID] [ ] [Data] [Cr]
Data Min : 00 ~ Max : 64
Refer to ‘Real data mapping 1’.
*
* Always marks data value with Hexadecimal.
That is, marks with two-place Hexadecimal
while writing and read data is also marked with
Hexadecimal value.
Ack
[3] [0] [ ] [Set ID] [ ] [OK] [Data] [X]
Data Min : 00 ~ Max : 64
07. Brightness (Command2-1:3, Command2-2:1)
➜ To adjust screen brightness.
Transmission
[k] [3] [1] [ ] [Set ID] [ ] [Data] [Cr]
Data Min : 00 ~ Max : 64
Refer to ‘Real data mapping 1’.
*
* Always marks data value with Hexadecimal.
That is, marks with two-place Hexadecimal
while writing and read data is also marked with
Hexadecimal value.
Ack
[3] [1] [ ] [Set ID] [ ] [OK] [Data] [X]
Data Min : 00 ~ Max : 64
9. Tint (Command2-1:3, Command2-2:3)
➜ To adjust the screen tint.
Transmission
[k] [3] [3] [ ] [Set ID] [ ] [Data] [Cr]
Data Red : 00 ~ Green : 64
Refer to ‘Real data mapping2’.
*
* Always marks data value with Hexadecimal.
That is, marks with two-place Hexadecimal
while writing and read data is also marked with
Hexadecimal value.
Ack
[3] [3] [ ] [Set ID] [ ] [OK] [Data] [X]
Data Red : 00 ~ Green : 64
Real data mapping 1
*
0 : Step 0
A : Step 10
F : Step 15
10 : Step 16
64 : Step 100
* This is a Hexadecimal number data.
Real data mapping 2
*
0 : Step -50
32 : Step 0
64 : Step 50
08. Color (Command2-1:3, Command2-2:2)
➜ To adjust the screen color.
Transmission
[k] [3] [2] [ ] [Set ID] [ ] [Data] [Cr]
Data Min : 00 ~ Max : 64
Refer to ‘Real data mapping 1’.
*
* Always marks data value with Hexadecimal.
That is, marks with two-place Hexadecimal
while writing and read data is also marked with
Hexadecimal value.
Ack
[3] [2] [ ] [Set ID] [ ] [OK] [Data] [X]
Data Min : 00 ~ Max : 64
60
10. Sharpness (Command2-1:3, Command2-2:4)
➜ To adjust the screen sharpness.
Transmission
[k] [3] [4] [ ] [Set ID] [ ] [Data] [Cr]
Data Min : 00 ~ Max : 64
Refer to ‘Real data mapping 1’.
*
* Always marks data value with Hexadecimal.
That is, marks with two-place Hexadecimal
while writing and read data is also marked with
Hexadecimal value.
Ack
[3] [4] [ ] [Set ID] [ ] [OK] [Data] [X]
Data Min : 00 ~ Max : 64
Page 31

11. Color R Adjustment
(Command2-1:3, Command2-2:6)
➜ To adjust red in color temperature.
Transmission
[k] [3] [6] [ ] [Set ID] [ ] [Data] [Cr]
Data Min : 00 ~ Max : 64
Refer to ‘Real data mapping 1’.
*
* Always marks data value with Hexadecimal.
That is, marks with two-place Hexadecimal
while writing and read data is also marked with
Hexadecimal value.
Ack
[3] [6] [ ] [Set ID] [ ] [OK] [Data] [X]
Data Min : 00 ~ Max : 64
14. Color Temp. R
(Command2-1:3, Command2-2:9)
➜ Adjust the color temperature R of LCD part.
Transmission
[k] [3] [9] [ ] [Set ID] [ ] [Data] [Cr]
Data Min : 00 ~ Max : 64
Refer to ‘Real data mapping 1’.
*
* Always marks data value with Hexadecimal.
That is, marks with two-place Hexadecimal
while writing and read data is also marked with
Hexadecimal value.
Ack
[3] [9] [ ] [Set ID] [ ] [OK] [Data] [X]
Data Min : 00 ~ Max : 64
12. Color G Adjustment
(Command2-1:3, Command2-2:7)
➜ To adjust green in color temperature.
Transmission
[k] [3] [7] [ ] [Set ID] [ ] [Data] [Cr]
Data Min : 00 ~ Max : 64
Refer to ‘Real data mapping 1’.
*
* Always marks data value with Hexadecimal.
That is, marks with two-place Hexadecimal
while writing and read data is also marked with
Hexadecimal value.
Ack
[3] [7] [ ] [Set ID] [ ] [OK] [Data] [X]
Data Min : 00 ~ Max : 64
13. Color B Adjustment
(Command2-1:3, Command2-2:8)
➜ To adjust blue in color temperature.
Transmission
[k] [3] [8] [ ] [Set ID] [ ] [Data] [Cr]
Data Min : 00 ~ Max : 64
Refer to ‘Real data mapping 1’.
*
* Always marks data value with Hexadecimal.
That is, marks with two-place Hexadecimal
while writing and read data is also marked with
Hexadecimal value.
Ack
[3] [8] [ ] [Set ID] [ ] [OK] [Data] [X]
Data Min : 00 ~ Max : 64
15. Color Temp. G
(Command2-1:3, Command2-2:a)
➜ Adjust the color temperature G of LCD part.
Transmission
[k] [3] [a] [ ] [Set ID] [ ] [Data] [Cr]
Data Min : 00 ~ Max : 64
Refer to ‘Real data mapping 1’.
*
* Always marks data value with Hexadecimal.
That is, marks with two-place Hexadecimal
while writing and read data is also marked with
Hexadecimal value.
Ack
[3] [a] [ ] [Set ID] [ ] [OK] [Data] [X]
Data Min : 00 ~ Max : 64
16. Color Temp. B
(Command2-1:3, Command2-2:b)
➜ Adjust the color temperature B of LCD part.
Transmission
[k] [3] [b] [ ] [Set ID] [ ] [Data] [Cr]
Data Min : 00 ~ Max : 64
Refer to ‘Real data mapping 1’.
*
* Always marks data value with Hexadecimal.
That is, marks with two-place Hexadecimal
while writing and read data is also marked with
Hexadecimal value.
Ack
[3] [b] [ ] [Set ID] [ ] [OK] [Data] [X]
Data Min : 00 ~ Max : 64
RS-232C
61
Page 32

External control device setup
17. Twin Picture Mode Select
(Command2-1:4, Command2-2:1)
➜ To control the twin picture.
Transmission
[k] [4] [1] [ ] [Set ID] [ ] [Data] [Cr]
Data 00 : FULL 01 : TWIN 1 02 : TWIN 2
Ack
[4] [1] [ ] [Set ID] [ ] [OK] [Data] [X]
Data 00 : FULL 01 : TWIN 1 02 : TWIN 2
18. Volume Mute (Command2-1:5, Command2-2:4)
➜ To control volume mute on/off.
Transmission
[k] [5] [4] [ ] [Set ID] [ ] [Data] [Cr]
Data 00 : Volume Mute On (Volume Off)
01 : Volume Mute Off (Volume On)
Ack
[5] [4] [ ] [Set ID] [ ] [OK] [Data] [X]
Data 00 : Volume Mute On (Volume Off)
01 : Volume Mute Off (Volume On)
19. Volume Control (Command2-1:5, Command2-2:0)
➜ To adjust volume.
Transmission
[k] [5] [0] [ ] [Set ID] [ ] [Data] [Cr]
Data Min : 00 ~ Max : 64
Refer to ‘Real data mapping 1’.
*
* Always marks data value with Hexadecimal.
That is, marks with two-place Hexadecimal
while writing and read data is also marked with
Hexadecimal value.
Ack
[5] [0] [ ] [Set ID] [ ] [OK] [Data] [X]
Data Min : 00 ~ Max : 64
20. OSD Lock mode
(Command2-1:9, Command2-2:0)
➜ This function operates Local Keypad and
Remote control Lock so that only Power button
on Local Keypad works with “OSD Lock On”.
Transmission
[k] [9] [0] [ ] [Set ID] [ ] [Data] [Cr]
Data 00 : OSD Lock Mode Off
01 : OSD Lock Mode On
Ack
[9] [0] [ ] [Set ID] [ ] [OK] [Data] [X]
Data 00 : OSD Lock Mode Off
01 : OSD Lock Mode On
21. Remote Control Lock mode
(Command2-1:9, Command2-2:1)
➜ To lock the front panel controls on the
projector and remote control.
Transmission
[k] [9] [1] [ ] [Set ID] [ ] [Data] [Cr]
Data 00 : Remote Control Lock Off
01 : Remote Control Lock On
Ack
[9] [1] [ ] [Set ID] [ ] [OK] [Data] [X]
Data 00 : Remote Control Lock Off
01 : Remote Control Lock On
* If you’re not use the remote control, set this mode.
62
Page 33

Supported Monitor Display
Sources Format Vertical Freq.(Hz) Horiz ontal Freq. (kHz)
VGAEGA 640X350 70.090Hz 31.468kHz
640X350 85.080Hz 37.861kHz
PC98 / VGA text 640X400 70.090Hz 31.468kHz
640X400 85.080Hz 37.861kHz
720X400 70.082Hz 31.469kHz
720X400 85.039Hz 37.927kHz
VGA 640X480 59.940Hz 31.469kHz
640X480 66.667Hz 35.00kHz
640X480 72.800Hz 37.861kHz
640X480 75.00Hz 37.500kHz
640X480 85.008Hz 43.269kHz
SVGA 800X600 56.250Hz 35.156kHz
800X600 60.317Hz 37.879kHz
800X600 72.188Hz 48.077kHz
800X600 75.00Hz 46.875kHz
800X600 85.061Hz 53.674kHz
XGA 1024X768 60.004Hz 48.363kHz
1024X768 70.069Hz 56.476kHz
1024X768 75.029Hz 60.023kHz
SXGA 1152X864 60.053Hz 54.348kHz
1280X960 60.00Hz 60.00kHz
1280X1024 60.020Hz 63.981kHz
MAC 16
¥
832X624 74.550Hz 49.725kHz
19
¥
1024X768 60.004Hz 48.363kHz
1024X768 75.029Hz 60.241kHz
* The projector displays the best image quality at a resolution of 1280x720 pixels.
To display other resolution images, the projector compresses or expands it to 1280x720.
The following table lists the display formats supported by the projector.
* If the projector does not support the input signal, “Out of Range” message appears on the screen.
* The projector supports DDC1/2B type as Plug & Play function.(Auto recognition of PC monitor)
* The Synchronization input form for horizontal and vertical frequencies are Separate, Composite and SOG.
* According to PC, the optimum vertical frequency may not be displayed up to the optimum frequency of set in
‘Registration information(Display registration information)’.(ex, The optimum vertical frequency may be displayed
up to 75Hz or under in the resolution of 640X480 or 800X600.)
TION
INFORMA-
63
Page 34

Maintenance
* The projector needs little maintenance. You should keep the lens clean because any dirt or stains may appear
on the screen. You will also need to clean the air filter attached at the bottom of the projector periodically
because a clogged air filter prevents proper ventilation that is necessary to cool the projector and prevents it
from overheating. If any parts need to be replaced, contact your dealer. When cleaning any part of the projector, always turn the power off and unplug the projector first.
Cleaning the lens
Cleaning the lens
Clean the lens whenever you notice dirt or dust on the surface of it. Wipe the lens surface gently with an air
spray or a soft, dry lint-free cloth.
To remove dirt or stains on the lens, moisten a soft cloth with water and a neutral detergent and wipe the lens
surface gently.
Cleaning the Projector Case
Cleaning the Projector Case
To clean the projector case, first unplug the power cable. To remove dirt or dust, wipe the casing with a soft,
dry, lint-free cloth. To remove stubborn dirt or stains, moisten a soft cloth with water and a neutral detergent
and then wipe the casing.
Do not use alcohol, benzene, thinners or other chemical detergents as these can cause the casing to be
warped.
Cleaning the
Cleaning the
The air filter, which is located at the bottom of the projector, should be cleaned after every 100 hours’ use.
If it is not cleaned periodically, it can become clogged with dust and prevent the projector from being ventilated properly. This may cause overheating and damage of the projector.
To clean the air filter :
1. Switch the projector off and unplug the power cable from the wall socket.
2. Stand the projector on it’s side so that the handle can be at the top, and you can easily access the
air filter.
3. Push the opening tip of the air filter cover and remove the cover.
4. The air filter is inside the cover. To clean the filter, use a small vacuum cleaner designed for computers or other office equipment. If not, you may use a dry, lint-free cloth. If it is difficult to remove
dirt or the filter is torn, contact your dealer or the service center to replace it.
5. Close the filter cover after cleaning.
6. Plug the power cable back into the wall socket.
Air Filter
Air Filter
64
Page 35

Memo
65
Page 36

Memo
66
Page 37

Specifications
MODEL
LCD panel size
resolution
screen size
remote control distance
speaker system
horizontal / vertical ratio
zoom ratio
Video compatibility
Power
height
breadth
length
weight
RL-JA20
0.87 inches
1280(Horizontal) x 720(Vertical)pixel
1.01~5.08m(40~200 inches)
12m
3W
16:9(horizontal:vertical)
1:1.3
NTSC/PAL/SECAM/NTSC4.43/PAL-M/PAL-N
AC 100 - 240V~50/60Hz
158mm(including front foot)
344mm
448.6mm(including lens)
4.2kg
Operating Condition
temperature
In operation : 32~95°F(0°C~35°C)
In storage and transit : -4~140°F(-20°C~60°C)
humidity
In operation : 0~ 80% relative humidity by dry hygrometer
Not in operation : 0 ~ 90% relative humidity by dry hygrometer
Projection Lamp
lamp model
AJ-LA60
power consumption
210W
67
Page 38

P/NO : 3828VA0360B a (373-026H)
 Loading...