

LG Electronics USA LNM1980NCAE User Manual

Using the route menu
Using the route menu
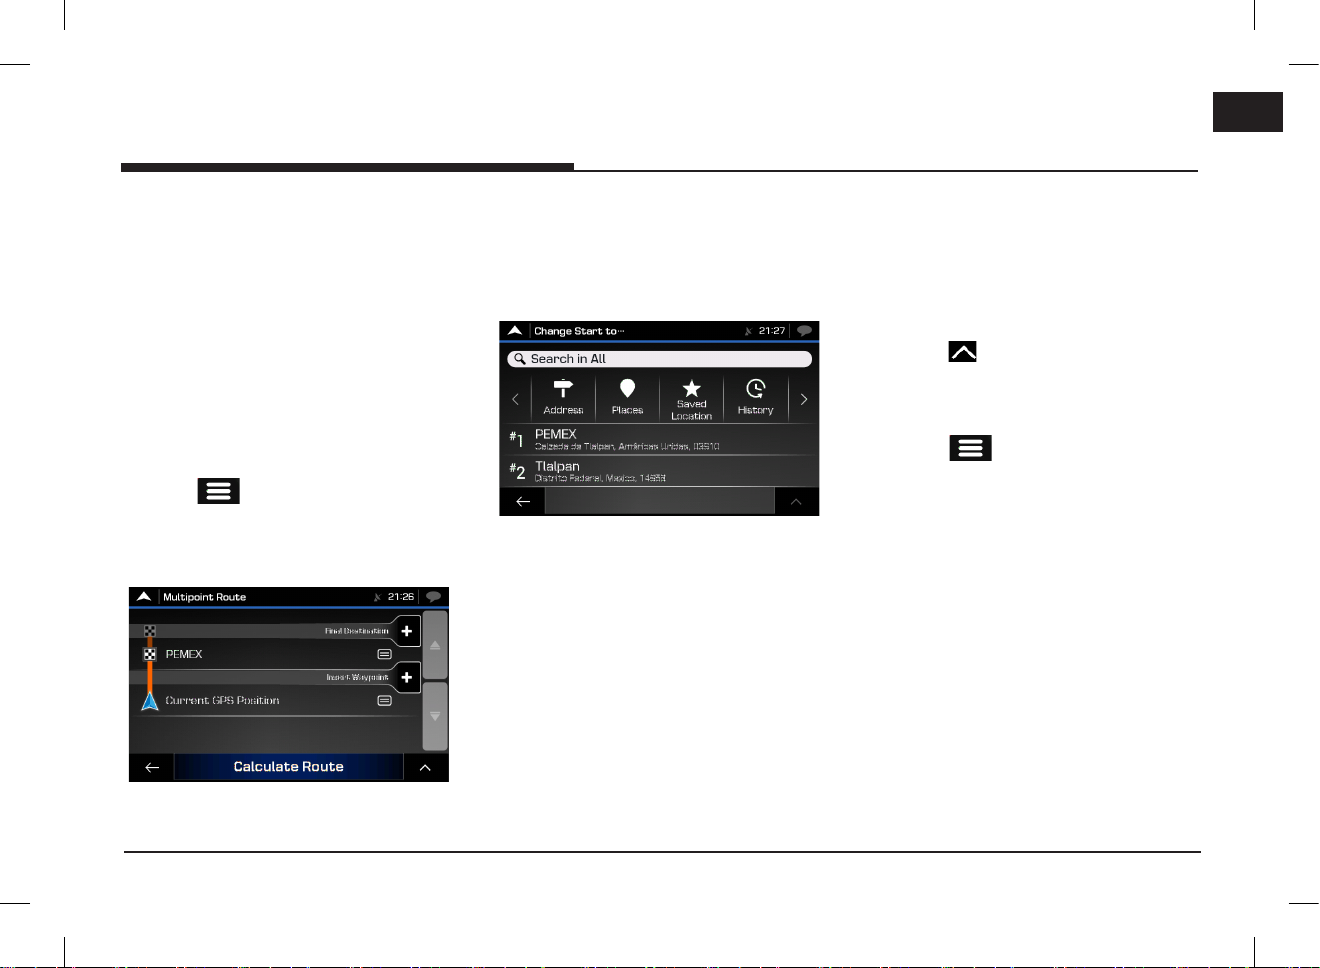
Planning a multipoint route
To build your route destination-by-destination,
perform the following steps:
1. Press [ ] on the navigation view to
access the navigation menu.
2. Press [Multipoint Route].
There is only one line in the list of route
points, the starting point of the route, which
is normally the current GPS position.
3. Press [Destination +] to select the
destination. The "New Route to..." screen
appears, where you can select the
destination of the route the same way as
described in the previous sections.
4. When the selected location appears on the
map, press [Select as Destination] and the
list returns. If needed, you can add further
intermediate destinations.
5.
To add more route points, press [Insert
Waypoint +] or Press [Final Destination +]
to change the final destination. The "Add to
Route..." menu appears again, where you can
select the new route point the same way as
you have set the destination before.
Note
Press [ ] to optimise the whole route or the
order of waypoints. You can also delete all the
destinations.
6. When you have added all the route points,
press [Calculate Route] > [Start Navigation].
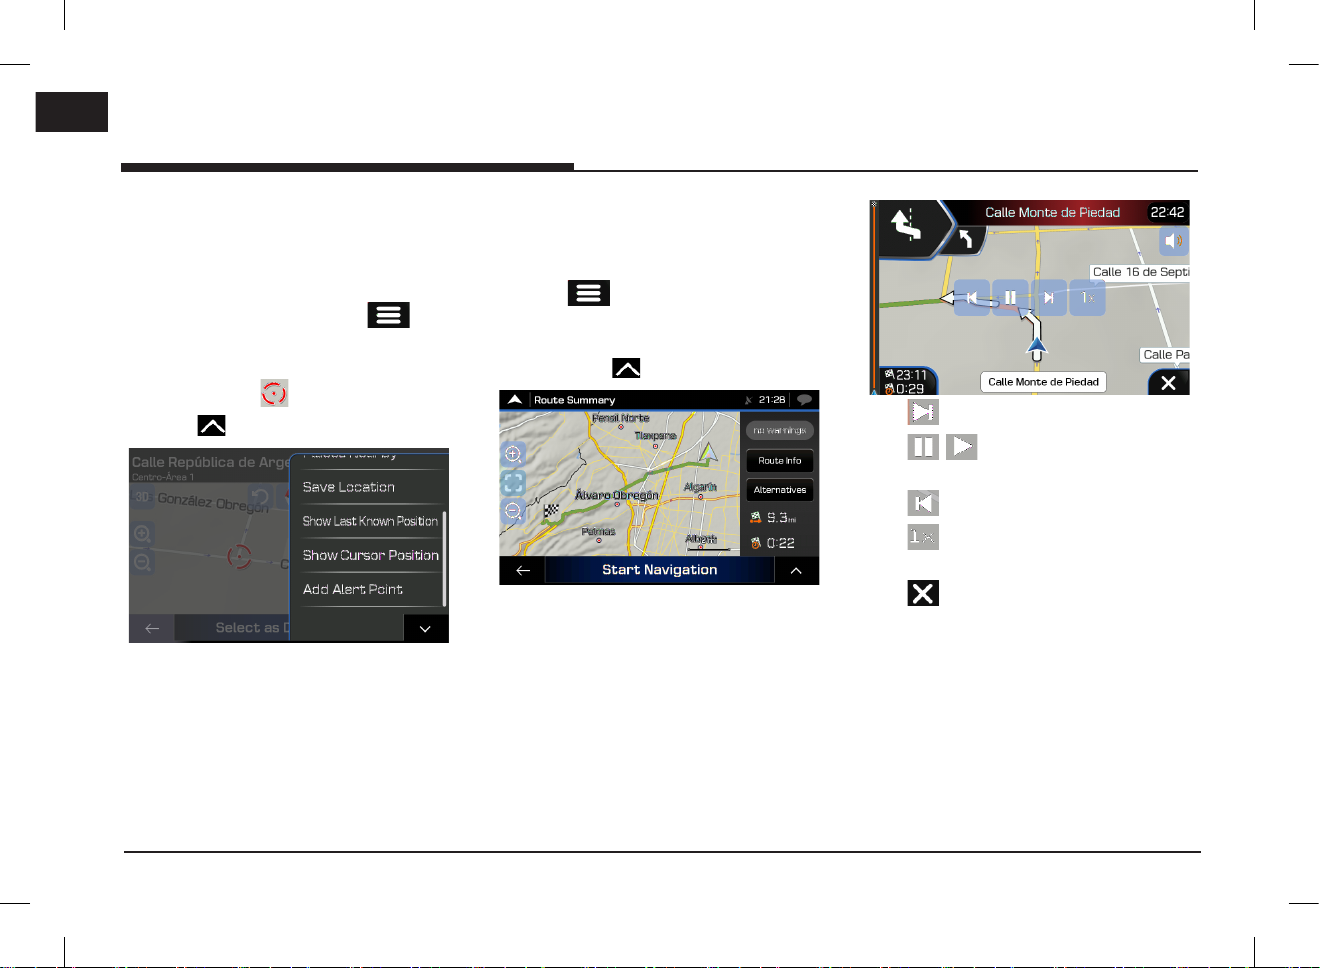
Checking route information and
alternatives
To get a map overview of the planned route and
check different parameters of the planned route,
perform the following steps:
1. Press [ ] on the navigation view to
access the navigation menu.
2. In the navigation menu, Press [Route
Summary].
36
PIO_AE PE HEV ENG MFLXXXXXXXX.indd 36 2019-02-01 8:53:00
Using the route menu
Editing the route
When navigation has already started, there are
several ways to modify the planned route. You
have the following options:
Setting a new starting point
For normal navigation, all routes are calculated
from the current position. You can pause
navigation to check future routes, simulate them
or see their length in time and distance. Then
you can set the starting point of the route to a
location other than the current GPS position.
1. Press [ ] on the navigation view to
access the navigation menu.
2. In the navigation menu, press [Multipoint
Route].
3. Press [Current GPS Position] > [Set Starting
Point] and confirm your action at the
warning message.
4. Select the starting point of the route the
same way you select a destination.
5. You can see the new starting point on the
map. Press [Set Starting Point] and the
multipoint route screen appears where you
can continue adding a destination to your
route.
6. Press [Calculate Route] to continue.
Adding an additional destination
To add a new intermediate destination to the
planned route, perform one of the following
actions:
•Press the map anywhere to browse it.
After selecting the location on the map,
press [ ] > [Select as Waypoint] to
add the selected location to your route
as an intermediate destination. The other
destinations of the route remain intact.
•Press [ ] on the navigation view and
press [Multipoint Route].
Add a destination to your route as
described on page 37.
37
PIO_AE PE HEV ENG MFLXXXXXXXX.indd 37 2019-02-01 8:53:00
Using the route menu
Modifying the list of destinations
To edit your route, perform the following steps:
1. Press [ ] on the navigation view to
access the navigation menu.
2. In the navigation menu, press [Multipoint
Route].
•Press [ ] to delete all the destinations,
or optimise the waypoints or the route.
•Press the name of the intermediate
destination to move it up or down in the
list, to save the location or to delete it from
the list.
•If you have a route with at least one
intermediate destination, you can delete
the waypoint from the list right from the
main menu. Press [Delete Waypoint], then
confirm the deletion.
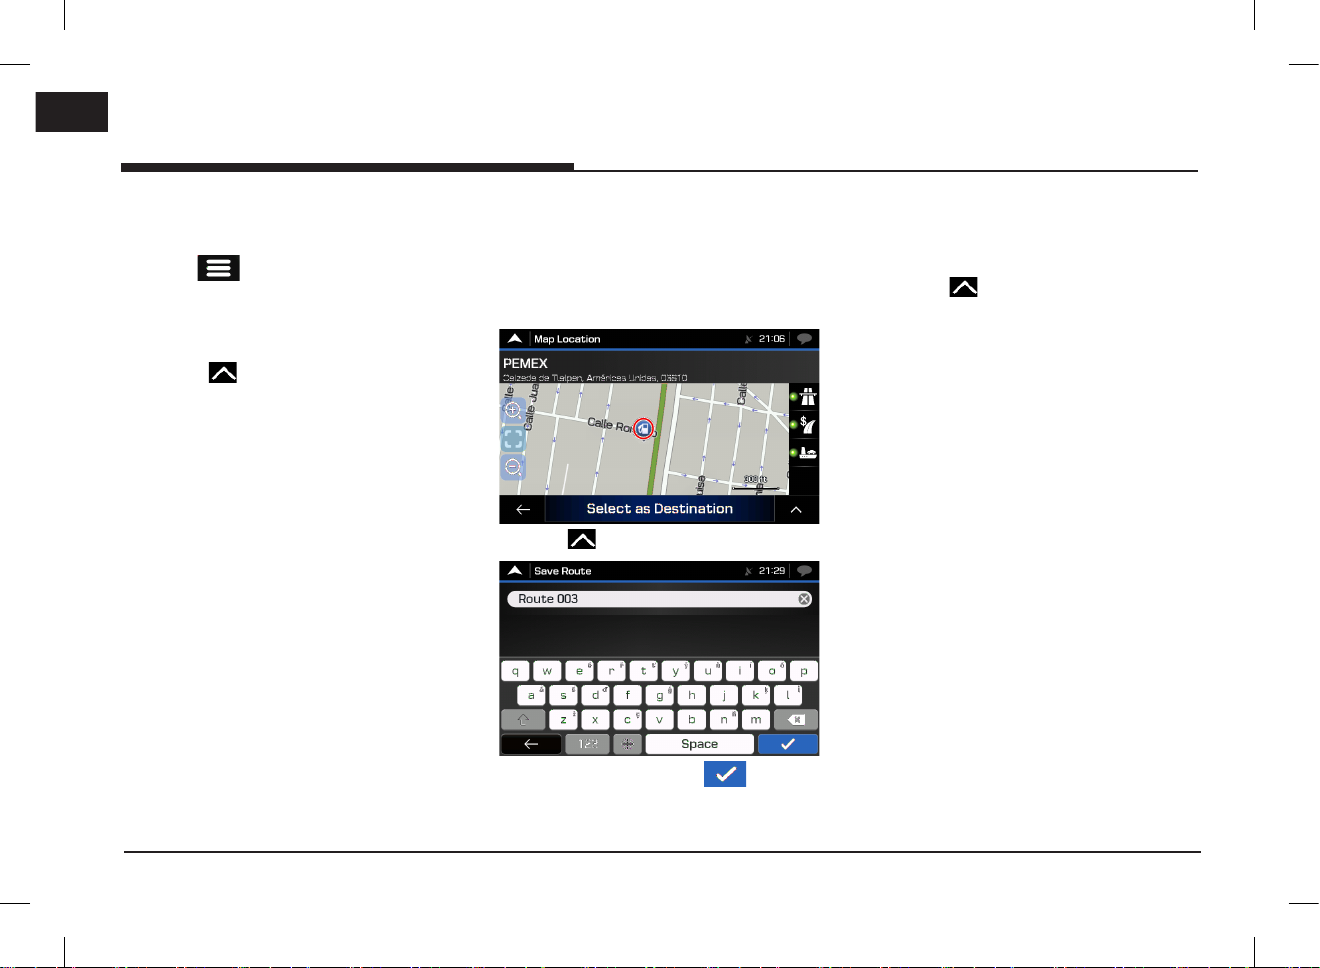
Saving the planned route
To save the planned route, perform the following
steps:
1. Select a destination as described earlier and
press [Select as Destination].
2. Press [ ] > [Save Route].
3. Type in a name and press [ ].
The route is saved and it is available in [New
Route] > [Saved Routes].
Deleting the planned route
You have the following two options to delete the
navigated route:
•Press [ ] to delete all the destinations,
or optimise the waypoints or the route.
•In the navigation menu, press [Delete
Route] or [Delete Waypoint]. If there are
no waypoints, the planned route is deleted
after a confirmation. If you have waypoints,
you can choose to delete the whole route
or only the next waypoint.
38
PIO_AE PE HEV ENG MFLXXXXXXXX.indd 38 2019-02-01 8:53:00

Using the route menu
Selecting a route alternative when
planning the route
To select from different route alternatives or
change the route planning method after you
have selected a new destination, perform the
following steps:
1. Select a destination as explained earlier and
go to the route confirmation screen.
2. Press [Alternatives].
3. You can see the basic details of route
alternatives. Press any of them to see it on
the map.
4. To view more suggestions, press [More
Results] and scroll down for other alternative
routes with different route planning methods.
5. Select one of the route alternatives and
press [Select] to return to the previous
screen. Press [Start Navigation] to start your
journey. The orange line now shows the new
planned route.
Selecting a route alternative for an
existing route
To recalculate the planned route with a different
route planning method and to compare different
route alternatives, perform the following steps:
1. Press [ ] on the navigation view to
access the navigation menu.
2. You can access the list of route alternatives
from the navigation menu in one of the
following ways:
•Press [Detours & Alternatives] >
[Alternative Routes].
•Press [Route Summary] > [Alternatives].
3. You can see the basic details of a few route
alternatives. Press any of them to see it on
the map.
39
PIO_AE PE HEV ENG MFLXXXXXXXX.indd 39 2019-02-01 8:53:00

Using the route menu
If there are suitable alternatives calculated
with the route planning method that is
selected in Route preferences (page 44), they
are shown on top of the list. Routes with
other route planning methods are shown at
the bottom of the list.
4. Select one of the route alternatives and
press [Select] to return to the previous
screen. Press [Start Navigation] to start your
journey. The orange line now shows the new
planned route.
Pausing guidance
When you are driving a planned route but you
do not need guidance for a certain part of the
route, you can suspend it and continue when it is
needed again.
In the navigation menu, press [ ] to suspend
guidance or press [ ] to resume guidance.
40
PIO_AE PE HEV ENG MFLXXXXXXXX.indd 40 2019-02-01 8:53:00

Setting for navigation
Setting for navigation
Saving a location
To add any location to the saved locations (the
list of frequently used destinations), perform the
following steps:
1. Select a destination as described before. It
can be an address, a place, any location on
the map, a previously used destination from
history, and so on.
2. When the map appears with the selected
location in the middle, press [ ].
3. Press [Save Location]. Using the keyboard,
you can change the name offered for the
Saved Location.
4. Press [ ] to save the location.
To add your home and work address to the
saved locations, perform the following steps:
1. On the navigation view, press [ ] >
[New Route] > [Saved Location].
2. Press [Home] or [Work].
Press [Yes] to confirm your selection.
Editing a saved location
To edit a location that you have already added as
a Saved Location, perform the following steps:
1. On the navigation view, press [ ] >
[New Route] > [Saved Location].
The list of Saved locations is displayed.
2. Press [ ] > [Edit].
3. Press the location you want to edit, press
[Rename] and enter the name of the location
on the keyboard.
4. Press [ ] > [Done].
41
PIO_AE PE HEV ENG MFLXXXXXXXX.indd 41 2019-02-01 8:53:01
Setting for navigation
Adding an alert point
You can save any map location as an alert point,
for example a speed camera or a school zone.
Before using alert point, you have to set the
[Alert Point Warnings] by pressing [ ] >
[Settings] > [Warnings] > [Alert Points].
1. On the navigation view, select the alert point.
The red cursor [ ] appears there.
2. Press [ ].
3. Scroll down the list and press [Add Alert
Point].
4. Select the type of the alert point, the
direction from which you expect the alert,
and (if applicable) the speed limit for this
alert point.
5. Press [Save] to save the location as a new
alert point.
Running a simulation
To run a simulated navigation that demonstrates
the planned route, perform the following steps:
1. Press [ ] on the navigation view to
access the navigation menu.
2. In the navigation menu, press [Route
Summary] > [ ].
3. Press [Simulation]. The simulation starts
from the starting point of the route and
leads you through the whole planned route
using a realistic speed.
•[ ]: Moves to the next section.
•[ / ]: Pauses or plays the driving
simulation.
•[ ]: Moves to the previous section.
•[ ]: Sets the speed of driving simulation
as [1x]/[4x]/[8x]/[16x].
•[ ]: Ends the driving simulation.
42
PIO_AE PE HEV ENG MFLXXXXXXXX.indd 42 2019-02-01 8:53:01

Setting for navigation
Off-road navigation
This navigation calculates routes using the road
network of the maps provided with the product.
Switching to off-road navigation
1. On the navigation view, press [ ] >
[Settings] > [Route Preferences].
2. Press [Navigation Mode] > [Off-road].
Selecting the destination in offroad mode
Selecting a destination (waypoint or final
destination) is the same as described in the
previous sections. The only difference is that
route points are linked to form a route with
straight lines regardless of the road network and
traffic regulations.
Useful information menu
The Useful Information menu provides various
additional functions. It can be found in the
navigation menu.
•[Where Am I]: Shows information on the
current position (latitude, longitude, nearest
town, next crossing street, and so on) or
the last known position if GPS reception is
not available.
•[Help Nearby]: Offers assistance near your
current position. (Refer to the page 34)
•[GPS Information]: Shows the GPS
Information screen with satellite position
and signal strength information.
•[Dealer Info]: Shows a list of nearby
dealership and service locations.
43
PIO_AE PE HEV ENG MFLXXXXXXXX.indd 43 2019-02-01 8:53:01

Setting for navigation
Settings menu
You can configure the navigation settings and
modify the behaviour of the navigation by
pressing [ ] > [Settings].
•[Route Preferences]: Select the road
types used in route planning method, the
navigation mode and road types for the
route.
•[Sound]: Adjust the different sound
volumes. [Master], [Voice], [Alerts],
[Ding], [Voice Guidance], [Early Indication
of Maneuvers] and [Verbosity Level].
•[Warnings]: Enable and set up warnings
for speed limit, alert points (such as speed
cameras) and road signs.
•[Navigation View]: Fine-tune the
appearance of the navigation view or
adjust how the software helps you navigate
with different kinds of route-related
information on the navigation view.
•[Regional]: Change the voice guidance
language, the measurement units, the date,
and formats, and customise the application
for your local language.
•[Display]: Enable or disable menu
animations.
44
PIO_AE PE HEV ENG MFLXXXXXXXX.indd 44 2019-02-01 8:53:01

Android Auto/Apple CarPlay - option
Android Auto/Apple CarPlay - option
※ Android Auto and Apple CarPlay aren't
available in some countries.
What is Android Auto/Apple
CarPlay?
Securely access your mobile phone while driving.
Various functions of your mobile phone are
displayed on and operable from the screen of
the multimedia device (e.g. navigation, making a
call, listening to music etc.)
When connected, an Android Auto/Apple CarPlay
icon appears on the screen. Available functions
and operations may differ depending on the
company model.
For more information, visit the Google or Apple
website.
- Google: http://support.google.com/
androidauto/
- Apple: http://www.apple.com/ios/carplay/
Cautions
•Android Auto is a registered trademark of Google Inc.
•Apple CarPlay is a registered trademark of
Apple Inc.
•Android Auto and Apple CarPlay are unavailable
if the phone OS is not the latest version or
if the phone cannot be recognized due to a
shutdown caused by a failure or defect in the
device itself.
•Your phone may not be recognised if its battery
is low. Charge your phone then try again.
•If your phone is shut down due to a defect
in the device itself, reset your phone and try
again.
•If the USB cable of the Android Auto/Apple
CarPlay device is repeatedly disconnected
and reconnected in a short period of time, the
phone may malfunction. This can also cause a
device failure.
•The device recognition time may differ
depending on the device type and firmware/OS
version.
•Using the USB cable that came with the phone
is recommended. (Using a non-genuine product
may cause noise or malfunction.)
•Normal operations cannot be guaranteed if the
phone is arbitrarily manipulated while Android
Auto/Apple CarPlay is active.
•Apple CarPlay cannot be run while making a
call via Bluetooth.
•Android Auto or Apple CarPlay may not operate
normally due to mobile phone issues.
•Carrier charges may apply when using Android
Auto or Apple CarPlay.
※ Some features may not operate normally
according to the version of iOS and Android.
45
•The following problems may occur due to
phone-related issues:
[Android Auto]
- Intermittent black screens appear when
entering Android Auto.
- Differentiation of phones that support
Android Auto and those which do not, may
not be possible.
- Black screens appear in some areas of the
screen due to app errors.
[Apple CarPlay]
- Intermittent black screens appear when
entering Apple CarPlay.
- Black screens appear in some areas of the
screen due to app errors when navigating
between screens in Apple CarPlay.
- The audio volume control may not operate
depending on the status of connected phone.
Apple CarPlay can control the volume on the
head unit regardless of phone volume. Even if
the phone volume is set to 0, the sound can be
outputted by controlling the volume of head unit.
- The sound output of a call may be cut upon
disconnecting Apple CarPlay during a call via
Apple CarPlay.
※ If services do not work properly due to
problems similar to the specified above,
check your phone, and if necessary,
reconnect your phone after restarting.
PIO_AE PE HEV ENG MFLXXXXXXXX.indd 45 2019-02-01 8:53:01

Android Auto/Apple CarPlay - option
Using Android Auto or Apple
CarPlay
1. Make sure only genuine USB cables are used
that were provided by the mobile phone´s
manufacturer.
2. Enter Android Auto /Apple CarPlay from
the home screen or from the submenu [All
menus].
3. Now the features such as navigation, music
and phone are ready to be used.
NOTICE
•Before connecting your mobile phone, check
whether Android Auto or Apple CarPlay is
activated in the [Phone projection] menu.
•After connecting the mobile phone, the phone
has to be unlocked and the disclaimers on the
phone have to be accepted in order to launch
Android Auto or Apple CarPlay.
•The screens and features displayed on the
multimedia system correspond to the screens
and features provided by Google or Apple. They
are subject to changes according to the policy
of the respective company.
NOTICE-Android Auto
•Bluetooth media features will be disabled when
Android Auto is activated. After removing the
USB cable, these features will be available
again.
•If Android Auto is not activated even after a
successful connection, follow these steps:
- Check whether an error occurred on the
phone.
- Check whether Android Auto has been closed
on the phone.
- Check whether Android Auto is activated in
the [Phone projection] menu.
•If Android Auto does not work normally even
after a reconnection has been made, visit the
Google website http://support.google.com/
androidauto/
NOTICE-Apple CarPlay
•Bluetooth phone/media features will be
disabled when Apple CarPlay is activated. After
removing the USB cable, these features will be
available again.
•If Apple CarPlay is not activated even after a
successful connection, follow these steps:
- Check whether Apple CarPlay is disabled in
the iPhone´s application settings.
- Check whether Apple CarPlay is activated in
the [Phone projection] menu.
•If Apple CarPlay does not work normally even
after a reconnection has been made, visit
the Apple website http://www.apple.com/ios/
carplay/
46
PIO_AE PE HEV ENG MFLXXXXXXXX.indd 46 2019-02-01 8:53:01
 Loading...