

LG Electronics USA L190N Users Manual
Test Report No.: GETEC-E3-05-070
FCC Class B Class II Permissive Change
APPENDIX H
: USER’S MANUAL
EUT Type: 19” LCD Monitor
FCC ID: BEJL190N

IBM ThinkVisionTM Monitor L190
L190
User's Guide |
|
English |

First Edition (December/2004)
Note: For important information, refer to the Monitor Safety and Warranty manual that comes with this monitor.
ii

|
Contents |
Safety (Read first)....................................................................................................... |
2 |
Setting up the monitor ............................................................................................... |
5 |
Product description .............................................................................................. |
5 |
Handling instructions............................................................................................ |
5 |
Kensington security slot ....................................................................................... |
6 |
Workplace preparation ......................................................................................... |
7 |
Adjusting the monitor position.............................................................................. |
7 |
Working practices................................................................................................. |
8 |
Caring for your monitor ........................................................................................ |
8 |
Connecting your monitor...................................................................................... |
9 |
Turning on your monitor ..................................................................................... |
10 |
Device driver installation ......................................................................................... |
11 |
Windows 95/98................................................................................................... |
11 |
Windows 2000/Me.......................................................................................................... |
12 |
Windows XP ................................................................................................................... |
13 |
Automatic Image setup ............................................................................................ |
14 |
Image setup ....................................................................................................... |
14 |
Image setup for DOS ......................................................................................... |
15 |
Image setup for Windows 95, Windows 98, Windows 2000, Windows NT, |
|
Windows Me, or Windows XP .................................................................................. |
16 |
Manual Image setup ................................................................................................. |
17 |
Adjusting your LCD monitor ................................................................................... |
18 |
User controls...................................................................................................... |
18 |
On-screen display (OSD) controls ..................................................................... |
19 |
Further information .................................................................................................. |
22 |
Display modes ................................................................................................... |
22 |
Power management........................................................................................... |
23 |
Product disposal ................................................................................................ |
23 |
Troubleshooting ....................................................................................................... |
24 |
Help and service information ............................................................................. |
26 |
Specifications ........................................................................................................... |
27 |
Service information .................................................................................................. |
28 |
Notices and trademarks........................................................................................... |
29 |
ENGLISH
1

2

Always observe the following precautions to reduce the risk of injury and property damage.
Do not attempt to service a product yourself unless instructed to do so by the IBM Support Center. Use only an IBM authorized service provider who is approved to repair your particular product.
Note: Some parts can be upgraded or replaced by the customer. These parts are referred to as Customer Replaceable Units, or CRUs. IBM expressly identifies CRUs as such, and provides documentation with instructions when it is appropriate for customers to replace those parts. You must closely follow all instructions when performing such replacements. Always make sure that the power is turned off and that the product is unplugged from any power source before you attempt the replacement. If you have any questions or concerns, contact the IBM Support Center.
Use only the power cords and power adapters supplied by the product manufacturer.
Never wrap a power cord around the power adapter or other object. Doing so can stress the cord in ways that can cause the cord to fray, crack or crimp. This can present a safety hazard.
Always route power cords so that they will not be walked on, tripped over, or pinched by objects.
Protect the cord and power adapters from liquids. For instance, do not leave your cord or power adapter near sinks, tubs, toilets, or on floors that are cleaned with liquid cleansers. Liquids can cause a short circuit, particularly if the cord or power adapter has been stressed by misuse. Liquids can also cause gradual corrosion of the power cord terminals and/or the connector terminals on the adapter which can eventually result in overheating.
Always connect power cords and signal cables in the correct order and ensure that all power cord connectors are securely and completely plugged into receptacles.
Do not use any power adapter that shows corrosion at the ac input pins and/or shows signs of overheating (such as deformed plastic) at the ac input or anywhere on the power adapter.
Do not use any power cords where the electrical contacts on either end show signs of corrosion or overheating or where the power cord appears to have been damaged in any way.
Ensure that extension cords, surge protectors, uninterruptible power supplies, and power strips that you use are rated to handle the electrical requirements of the product. Never overload these devices. If power strips are used, the load should not exceed the power strip input rating. Consult an electrician for more information if you have questions about power loads, power requirements, and input ratings.
If a receptacle (power outlet) that you intend to use with your computer equipment appears to be damaged or corroded, do not use the outlet until it is replaced by a qualified electrician.
Do not bend or modify the plug. If the plug is damaged, contact the manufacturer to obtain a replacement.
Some products are equipped with a three-pronged plug. This plug fits only into a grounded electrical outlet. This is a safety feature. Do not defeat this safety feature by trying to insert it into a non-grounded outlet. If you cannot insert the plug into the outlet, contact an electrician for an approved outlet adapter or to replace the outlet with one that enables this safety feature. Never overload an electrical outlet. The overall system load should not exceed 80 percent of the branch circuit rating. Consult an electrician for more information if you have questions about power loads and branch circuit ratings.
ENGLISH
3
Be sure that the power outlet you are using is properly wired, easily accessible, and located close to the equipment. Do not fully extend power cords in a way that will stress the cords.
Connect and disconnect the equipment from the electrical outlet carefully.
All IBM personal computers contain a non-rechargeable coin cell battery to provide power to the system clock. In addition many mobile products such as ThinkPad notebook PCs utilize a rechargeable battery pack to provide system power when in portable mode. Batteries supplied by IBM for use with your product have been tested for compatibility and should only be replaced with IBM approved parts.
Never attempt to open or service any battery. Do not crush, puncture, or incinerate batteries or short circuit the metal contacts. Do not expose the battery to water or other liquids. Only recharge the battery pack strictly according to instructions included in the product documentation.
Battery abuse or mishandling can cause the battery to overheat, which can cause gasses or flame to "vent" from the battery pack or coin cell. If your battery is damaged, or if you notice any discharge from your battery or the buildup of foreign materials on the battery leads, stop using the battery and obtain a replacement from the battery manufacturer.
Batteries can degrade when they are left unused for long periods of time. For some rechargeable batteries (particularly Lithium Ion batteries), leaving a battery unused in a discharged state could increase the risk of a battery short circuit, which could shorten the life of the battery and can also pose a safety hazard.
Do not let rechargeable Lithium-Ion batteries completely discharge or store these batteries in a discharged state.
Computers generate heat when turned on and when batteries are charging. Notebook PCs can generate a significant amount of heat due to their compact size. Always follow these basic precautions:
•Do not leave the base of your computer in contact with your lap or any part of your body for an extended period when the computer is functioning or when the battery is charging. Your computer produces some heat during normal operation. Extended contact with the body could cause discomfort or, potentially, a skin burn.
•Do not operate your computer or charge the battery near flammable materials or in explosive environments.
•Ventilation slots, fans and/or heat sinks are provided with the product for safety, comfort, and reliable operation. These features might inadvertently become blocked by placing the product on a bed, sofa, carpet, or other flexible surface. Never block, cover or disable these features.
CD and DVD drives spin discs at a high speed. If a CD or DVD is cracked or otherwise physically damaged, it is possible for the disc to break apart or even shatter when the CD drive is in use. To protect against possible injury due to this situation, and to reduce the risk of damage to your machine, do the following:
•Always store discs in their original packaging
•Always store discs out of direct sunlight and away from direct heat sources
•Remove discs from the computer when not in use
•Do not bend or flex discs, or force them into the computer or their packaging
•Check discs for cracks before each use. Do not use cracked or damaged discs
4

Setting up the monitor
Product description
The IBM ThinkVision Monitor, L190, is a TFT LCD Color Monitor.
It requires a computer with a suitable on-board sub-system or Video
Adapter card that can support SXGA 1280 x 1024, XGA 1024 x 768,
SVGA 800 x 600, or VGA 640 x 480 at 60Hz.
In addition to your monitor, your option package includes the following:
•User's Guide and Installation Files CD
•Monitor Safety and Warranty Information Manual
•IBM ThinkVision Monitor L190 Setup Guide
•Power Cord
•L190 ThinkVision Monitor
•Analog Interface Cable - Attached to Monitor
ENGLISH
Handling instructions
Do not support the monitor within 1. Lift the monitor by placing your hands where indicated by the arrow in |
||
the screen area. The Liquid |
the figure below. |
|
Crystal Display is glass and can |
||
|
||
be damaged by rough handling or |
|
|
excessive pressure. |
|
|
2.Before using your monitor for the first time, remove the clear protective film from the front of the screen.
5
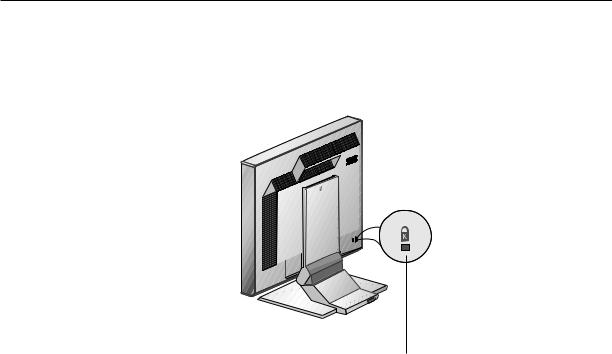
Kensington security slot
This slot can be used to connect to a locking cable. Locking cables can be purchased separately at most computer stores.
Kensington security slot
6

ENGLISH
Workplace preparation
i This section gives advice on what you should
consider before you set up your monitor.
Height
Position the monitor so that the top of the screen is slightly below your eye level when you sit at your workstation.
Orientation
1.Choose a position that gives the least reflection from lights and windows, usually at a right angle to any windows.
2.Position the monitor directly in front of you so that you do not have to twist your body to use it.
3.Tilt the monitor to a comfortable viewing angle.
Adjusting the monitor position
i With the IBM Flat Panel
Monitor, you can adjust its position in various ways for maximum comfort.
Viewing angle
You can tilt the screen forward and backward as shown below in Figure A.
Figure A
7
Working practices
i This section gives advice on how you can work
comfortably and reduce fatigue.
Rest
Take regular breaks. Vary your posture, stand up and stretch occasionally as prolonged use of computer workstations can be tiring.
Back
Sit back in your chair and use the backrest.
Hands
Adjust the seat height so that your forearms are approximately horizontal and your wrists are straight when using the keyboard. Your upper arms should be relaxed with your elbows near your body.
Use a light touch on the keyboard, keeping your hands and fingers relaxed.
Allow a space in front of the keyboard to rest your wrists when not typing.
Consider using a wristpad.
Eyesight
Working with monitors, in common with any prolonged close work, can be visually demanding. Look away from the screen periodically and have your eyesight checked regularly.
Screen settings
Set the screen brightness and contrast to a comfortable level. You may have to adjust these settings as the lighting changes during the day. Many application programs let you select color combinations which can help you to view in comfort. See the User controls section on page 18 for more information.
Caring for your monitor
Be sure to disconnect the power cord from your monitor before you perform any maintenance on the monitor. Clean your monitor as follows:
• Gently wipe the covers and the screen with a soft cloth, do not use solvents or abrasives.
• Never drop water or other liquid into your monitor.
• Remove finger marks and grease with a damp cloth and mild detergent.
• Never use flammable cleaning materials to clean your IBM monitor or any other electrical apparatus.
• Do not rub, touch, or tap the surface of the screen with sharp or abrasives items such as a ballpoint pen or screwdriver. This type of contact may result in a scratched piture tube.
|
• |
Do not use any type of cleaner containing an anti-static solution or similar |
|
|
additive as this may scratch the screen's coating. |
|
• |
Never apply detergent or other liquid directly to the screen. Dampen the |
8 |
|
cloth and then wipe. |
|
|
ENGLISH
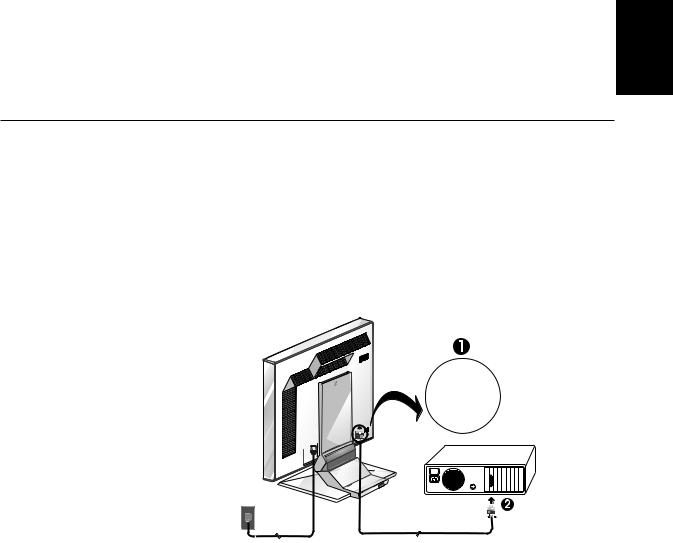
Connecting your monitor
Be sure to read the Safety Information located in the
Monitor Safety and Warranty
Information Manual before carrying out this procedure.
1.Turn off your computer and all attached devices. Next, unplug all power cords to your computer and all attached devices.
2.Connect the signal cable.
•The analog signal cable is already connected to your monitor (See  in Figure A).
•When connecting the analog signal cable, connect the free end of the attached signal cable to the 15-pin monitor port on the computer and tighten the screws. 
Figure A
3.Connect the power cord to the monitor and then plug the power cord into a properly grounded outlet. Next, reconnect the power cords to your computer and all attached devices.
9

Turning on your monitor
1.Turn on your computer.
2.Turn on your monitor by pushing and releasing the power switch marked " " at the front of the bezel.
• To turn off your monitor, push and release the power switch again.
3.To update or install device drivers, follow the instructions in the Device driver installation section on page 11.
4.If you are using the analog connector, run Image setup by following the instructions in the Automatic Image setup section on page 14.
10
 Loading...