


Getting to know your phone
Slide the SIM card into the SIM card slot.
2
Make sure the gold contact area on the
card is facing downwards.
38
Insert the battery into place by aligning
3
the gold contacts on the phone and the
battery (1) and pressing it down until it
clicks into place (2).

Align the battery cover over the battery
4
compartment (1) and press it down until it
clicks into place (2).
Charging your phone
The charger connector is at the bottom of
the phone. Insert the charger and plug it into
an electrical outlet.
39
Getting to know your phone
NOTE: The battery must be fully charged
initially to improve battery lifetime.
NOTE: Do not open the battery cover
while your phone is charging.
Using the memory card
Your phone supports the use of microSDTM
or microSDHC
32 GB capacity. These memory cards are
specifically designed for mobile phones
40
TM
memory cards of up to
and other ultra-small devices, and are ideal
for storing media-rich files such as music,
programs, videos, and photographs for use
with your phone.
To insert a memory card:
Insert the memory card into the slot.
Make sure the gold contact area is facing
downwards.
To safely remove the memory card:
Touch > Apps tab > Settings >
Storage and then DEVICE > Unmount SD
card > OK.

NOTE:
Use only compatible memory cards
•
with your phone. Using incompatible
memory cards may damage the card
and data stored on the card, as well
as the phone.
As the device uses FAT32, the
•
maximum size for any given file is
4 GB.
41
Getting to know your phone
WARNING
Do not insert or remove the memory
card when the phone is on. Doing so
may damage the memory card as well
as your phone, and the data stored on
the memory card may become corrupt.
To format the memory card:
Your memory card may already be
formatted. If it isn't, you must format it
before you can use it.
42
NOTE: All files on your memory card are
deleted when it is formatted.
Touch to open the application list.
1
Scroll and touch Settings > Storage
2
from the DEVICE tab.
Touch Unmount SD card and touch OK
3
to confirm.
Touch Erase SD card > Erase SD card
4
> Erase everything, and then confirm
your choice.

If you have set a pattern lock, input
5
the pattern lock then select Erase
everything.
NOTE: If there is content on your memory
card, the folder structure may be different
after formatting, as all the files will have
been deleted.
Locking and unlocking the
screen
If you do not use the phone for a while, the
screen is turned off and locked automatically.
This helps to prevent accidental touches and
saves battery power.
When you are not using the LG-E610v, press
the Power/Lock key
phone.
to lock your
43

Getting to know your phone
If there are any programs running when you
set lock screen, they may be still running in
Lock mode. It is recommended that you exit
all programs before entering Lock mode to
avoid unnecessary charges (e.g. phone calls,
web access and data communications).
To wake up your phone, press the Power/
Lock key
appear. Touch and slide the lock screen in
any direction to unlock your home screen.
The last screen you viewed will open.
44
. The lock screen will
TIP! To wake up your phone, you can
alternatively use the home key while the
screen is turned off.
Secure your lock screen
You can lock the touch screen by activating
the screen lock feature. Your phone will
require the unlock code each time you turn
on the phone or unlock the touch screen.
LG is not responsible for any loss of
•
security codes or private information or
other damage caused by illegal software.

Set a swipe unlock
On the Home screen, touch to open
1
the application list and select Settings
> Lock screen > Select screen lock
> Swipe.
Swipe the screen to unlock the screen.
2
Set an unlock pattern
1
On the Home screen, touch to open
the application list and select Settings
> Lock screen > Select screen lock
> Pattern.
See the on-screen instructions and
2
example patterns and select Next.
Draw a pattern by dragging your finger to
3
connect at least 4 dots.
Select Continue.
4
Draw a pattern again to confirm.
5
Select Confirm.
6
Set an unlock PIN code
1
On the Home screen, touch to open
the application list and select Settings
> Lock screen > Select screen lock
> PIN.
2
Enter a new PIN (numeric) and select
Continue.
3
Enter the PIN again and select OK.
45

Getting to know your phone
Set an unlock password
On the Home screen, touch to open
1
the application list and select Settings >
Lock screen > Select screen lock >
Password.
Enter a new password (alphanumeric)
2
and select Continue.
Enter the password again and select OK.
3
46
NOTE:
Precautions to take when using
pattern lock.
It is very important to remember the
unlock pattern you set. You will not be
able to access your phone if you use an
incorrect pattern five times. You have five
chances to enter your unlock pattern,
PIN or password. If you have used all 5
opportunities, you can try again after 30
seconds.

When you cannot recall your unlock
pattern:
If you logged in to your Google account on
the phone but failed to enter the correct
pattern 5 times, tap the Forgot pattern
button (or, if you preset the backup PIN, you
can use the backup PIN code to unlock the
pattern). > page 44). You are then required
to log in with your Google account to unlock
your phone.
If you have not created a Google account
on the phone or you forgot it, you have to
perform a hard reset.
If you have forgotten your PIN or
password: If you have forgotten your PIN or
password, you need to perform a hard reset.
47
Your Home screen
Touch screen tips
Here are some tips on how to navigate
around your phone.
Touch – To choose a menu/option or open
an application, touch it.
Touch and hold – To open an options menu
or grab an object you want to move, touch
and hold it.
Drag – To scroll through a list or move
slowly, drag across the touch screen.
48
Flick – To scroll through a list or move
quickly, flick across the touch screen (drag
quickly and release).
NOTE:
• To select an item, touch the centre of
the icon.
• Do not press too hard; the touch
screen is sensitive enough to pick up a
light, firm touch.
• Use the tip of your finger to touch the
option you want. Be careful not to
touch any other keys.
Home screen
Simply swipe your finger to the left or right
to view the panels. You can customise each
panel with apps, downloads, widgets and
wallpapers.
NOTE: Some screen images may vary
depending on your phone provider.
On your Home screen, you can view quick
keys at the bottom of the screen. Quick
keys provide easy, one-touch access to the
functions you use the most.
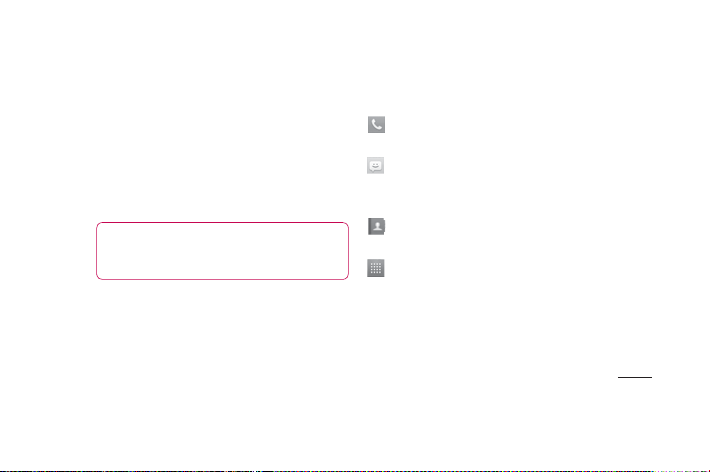
Touch the Phone icon to bring up the
touch screen dialpad to make a call.
Touch the Messaging icon to access
the messaging menu. This is where you can
create a new message.
Touch the Contacts icon to open your
contacts.
Touch the Apps icon at the bottom
of the screen. You can then view all
your installed applications. To open any
application, simply touch the icon in the
applications list.
49

Your Home screen
Customising the Home screen
You can customise your Home screen
by adding apps, downloads, widgets or
wallpapers. For more convenience when
using your phone, add your favourite widgets
to the Home screen.
Home screen >
1
or
Touch and hold the empty part of the
Home screen go to the Edit mode screen.
The multiple panels of the Home screen
2
and items in Apps, Downloads, Widgets
or Wallpapers will be displayed on the
50
.
Edit mode screen.
3
Scroll left or right to the panel that
contains the item, and then tap and hold
an item you want to move and drag the
item to the desired location or panel.
To remove an item from the Home
screen:
Home screen > touch and hold the icon
•
you want to remove > drag it to
.

TIP! To add an application icon to the
Home screen from the Applications
menu, touch and hold the application you
want to add.
Add or remove panels to the
Home screen
You can add or remove panels of the Home
screen to organise widgets according to your
preferences and needs.
Place two fingers on the screen and
1
pinch to switch to Edit mode. Then you
can add, remove or change the order of
the panels.
Returning to recently-used
applications
Touch and hold the Home key. The
1
screen displays a pop-up with icons of
applications you used recently.
Touch an icon to open the application.
2
Or touch the Back key to return to your
current application.
51
Your Home screen
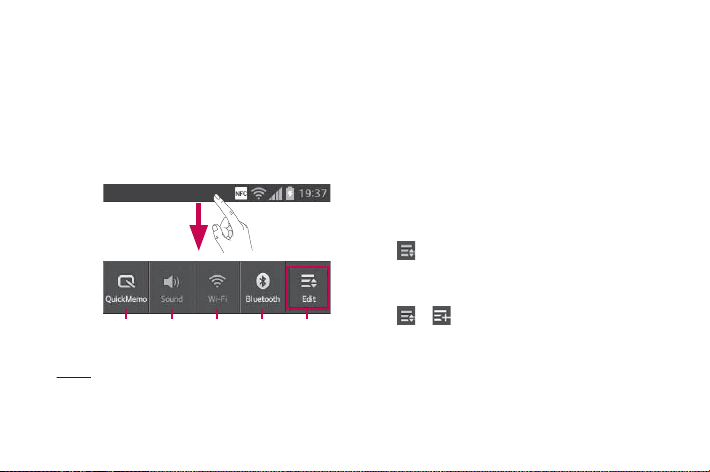
Notification drawer
The notification drawer runs across the top
of your screen.
QuickMemo
Vibrate/
Silent
52
To customise the notification
panel
You can customise the notification panel to
match your preferences.
To rearrange items on the notification
panel
Touch . Then, you can check and
rearrange items on the notification panel.
To view further notification settings
EditBluetoothWi-FiSound/
Touch > .
You can add and remove the items on the
notification panel like Sound profile, Wi-Fi,
Bluetooth, Airplane mode, and so on.
Touch and slide the notification drawer down
with your finger.
Touch
> to manage the Notifications.
Here you can check and manage Sound,
Wi-Fi, Bluetooth, Airplane mode, Accounts &
sync, Auto-rotate screen, Brightness, Data
enabled, GPS, NFC, Portable Wi-Fi Hotspot,
and so on.
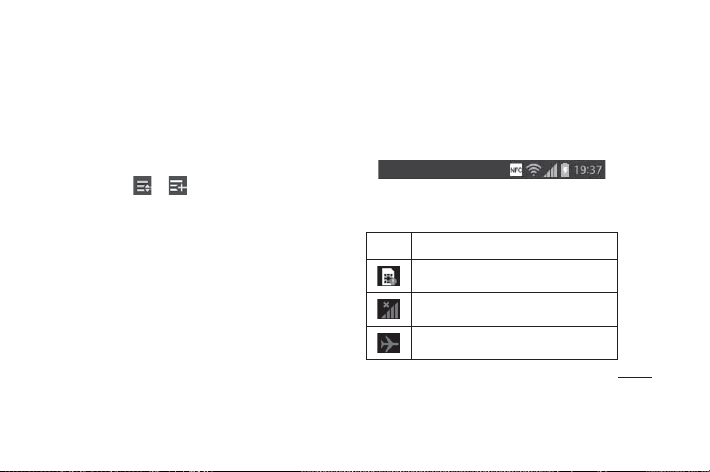
Viewing the status bar
The status bar uses different icons to display
phone information such as signal strength,
new messages, battery life, and active
Bluetooth and data connections.
Below is a table explaining the meaning of
icons you're likely to see in the status bar.
Icon Description
No SIM card
No signal
Flight mode
53
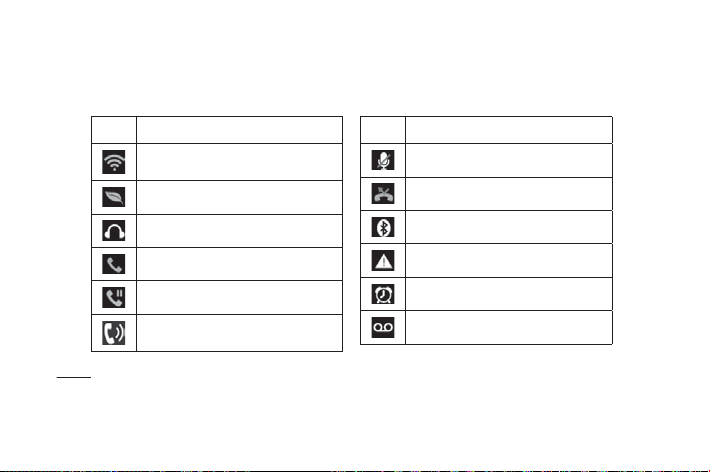
Your Home screen
Icon Description
Connected to a Wi-Fi network
Power saver is on
Wired headset
Call in progress
Call on hold
Speakerphone
54
Icon Description
Phone microphone is muted
Missed call
Bluetooth is on
System warning
Alarm is set
New voicemail
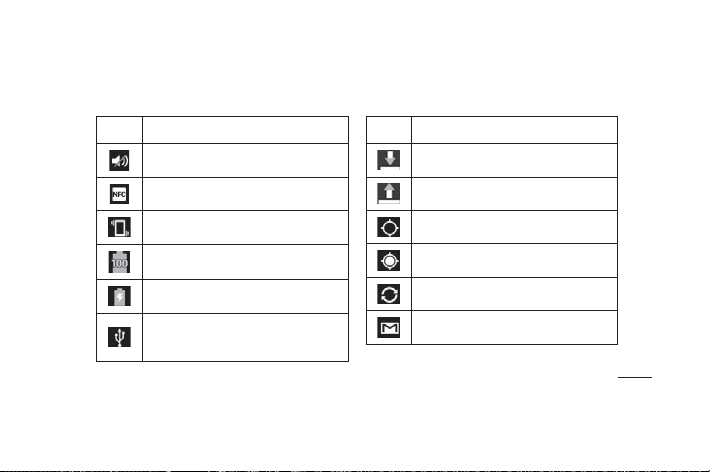
Icon Description
Ringer is silenced
NFC is on
Vibrate mode
Battery fully charged
Battery is charging
Phone is connected to PC via
USB cable
Icon Description
Downloading data
Uploading data
GPS is acquiring
Receiving location data from GPS
Data is syncing
New Gmail
55
Your Home screen
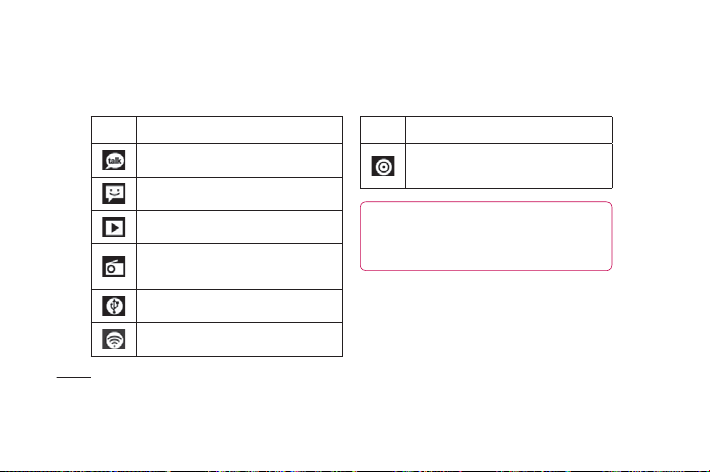
Icon Description
New Google Talk message
New message
Song is playing
FM radio turned on in the
background
USB tethering is active
Portable Wi-Fi hotspot is active
56
Icon Description
Both USB tethering and portable
hotspot are active
NOTE: Icons shown on the display may
vary depending on your region or service
provider.
Onscreen keyboard
You can enter text using the onscreen
keyboard. The on-screen keyboard appears
automatically on the screen when you

need to enter text. To manually display the
keyboard, simply touch a text field where
you want to enter text.
Using the keypad & entering text
Tap once to capitalise the next letter
you type. Double-tap or touch and hold for
all caps.
Tap to switch to the numbers and
symbols keyboard. You can also touch and
hold this tab to view the Settings menu.
Tap to enter a space.
Tap to create a new line in the message
field.
Tap to delete the previous character.
Entering accented letters
When you select French or Spanish as the
text entry language, you can enter special
French or Spanish characters (e.g. ‘á’).
For example, to input ‘á’, touch and hold
the ‘a’ key until the zoom-in key grows
bigger and displays characters from different
languages. Then select the special character
you want.
57

Google account set up
When you first turn on your phone, you have
the opportunity to activate the network, to
sign into your Google Account and to decide
how you want to use some Google services.
To set up your Google account:
Sign into a Google Account from the
•
prompted set up screen.
OR
Touch
•
If you have a Google account, touch
Existing, enter your email address and
58
> Apps tab > select a Google
application (such as Gmail) > select New
to create a new account.
password, then touch Sign in.
Once you have set up your Google account
on your phone, your phone automatically
synchronises with your Google account on
the web.
Your phone is synchronised with your
contacts, Gmail messages, Calendar
events and other information from these
applications and services on the web. (This
depends on your synchronisation settings.)
After signing in, you can use Gmail™ and
take advantage of Google services on your
phone.
Connecting to Networks and Devices
Wi-Fi
With Wi-Fi, you can use high-speed Internet
access within the coverage of the wireless
access point (AP). Enjoy wireless Internet
using Wi-Fi, without extra charges.
Connecting to Wi-Fi networks
To use Wi-Fi on your phone, you need to
access a wireless access point or ‘hotspot’.
Some access points are open and you can
simply connect to them. Others are hidden
or use security features; you must configure
your phone to be able to connect to them.
Turn off Wi-Fi when you're not using it to
extend the life of your battery.
Turning Wi-Fi on and connecting to a
Wi-Fi network
1
2
NOTE: If you are out of the Wi-Fi zone or
have set Wi-Fi to OFF, additional charges
may be applied by your mobile operator
for mobile data use.
Touch > Apps tab > Settings > Wi-
Fi from the WIRELESS & NETWORKS tab.
Set Wi-Fi to ON to turn it on and start
59

Connecting to Networks and Devices
scanning for available Wi-Fi networks.
3
Tap the Wi-Fi menu again to see a list of
active and in-range Wi-Fi networks.
Secured networks are indicated by a
•
lock icon.
Touch a network to connect to it.
4
If the network is open, you are asked
•
to confirm that you want to connect to
that network by touching Connect.
If the network is secured, you are
•
prompted to enter a password or
other credentials. (Ask your network
administrator for details)
60
The status bar displays icons that indicate
5
Wi-Fi status.
Bluetooth
You can use Bluetooth to send data by
running a corresponding application, not
from the Bluetooth menu as on most other
mobile phones.
NOTE:
LG is not responsible for the loss,
•
interception or misuse of data sent
or received via the Bluetooth wireless
feature.
Always ensure that you share and
•
receive data with devices that are
trusted and properly secured. If there
are obstacles between the devices,
the operating distance may be
reduced.
Some devices, especially those
•
that are not tested or approved by
Bluetooth SIG, may be incompatible
with your device.
Turning on Bluetooth and pairing up your
phone with a Bluetooth device
You must pair up your device with another
device before you connect to it.
1
> Apps tab > Settings > Set
Touch
Bluetooth to ON from the WIRELESS &
NETWORKS tab.
Tap the Bluetooth menu again. Your
2
phone will scan for and display the IDs
of all available Bluetooth devices that are
in range. If the device you want to pair
with isn't on the list, make sure the target
device is set to be discoverable, then tap
61
Connecting to Networks and Devices
Search for devices again.
3
Choose the device you want to pair up
with from the list.
Once the paring is successful, your device
will connect to the device.
NOTE: Some devices, especially
headsets or hands-free car kits, may
have a fixed Bluetooth PIN, such as
0000. If the other device has a PIN, you
must enter it.
62
Send data using the Bluetooth wireless
feature
Select a file or item, such as a contact,
1
calendar event, memo, or media file, from
an appropriate application or Downloads.
Select an option for sending data via
2
Bluetooth.
NOTE: The method for selecting an
option may vary by data type.
3
Search for and pair with a Bluetoothenabled device.
Receive data using the Bluetooth
wireless feature
Touch > Apps tab > Settings > Set
1
Bluetooth to ON
checkbox next to your device.
NOTE: To select the length of time that
your device will be visible, touch
> Make phone visible.
Select Pair to confirm that you are willing
2
to receive data from the device.
and then tick the
Sharing your phone's data
connection
USB tethering and portable Wi-Fi hotspot are
great features when there are no wireless
connections available. You can share your
phone's mobile data connection with a
single computer via a USB cable (USB
tethering). You can also share your phone's
data connection with more than one device
at a time by turning your phone into a
portable Wi-Fi hotspot.
When your phone is sharing its data
connection, an icon appears in the status
63

Connecting to Networks and Devices
bar and as an ongoing notification in the
notifications drawer.
For the latest information about tethering
and portable hotspots, including supported
operating systems and other details, visit
http://www.android.com/tether.
To change Portable Wi-Fi hotspot
settings:
Touch > Apps tab > Settings >
•
More from the WIRELESS & NETWORKS
tab > Portable Wi-Fi hotspot > Choose
options that you want to adjust.
64
TIP! If your computer is running Windows
7 or a recent distribution of some
flavours of Linux (such as Ubuntu),
you don't usually need to prepare your
computer for tethering. But if you're
running an earlier version of Windows or
another operating system, you may need
to prepare your computer to establish
a network connection via USB. For the
most current information about which
operating systems support USB tethering
and how to configure them, visit http://
www.android.com/tether.

To rename or secure your portable
hotspot
You can change the name of your phone's
Wi-Fi network name (SSID) and secure its
Wi-Fi network.
On the Home screen, touch
1
> Apps
tab > Settings.
Touch More from the WIRELESS &
2
NETWORKS tab and select Portable WiFi hotspot.
Ensure Portable Wi-Fi hotspot is ticked.
3
Touch Configure Wi-Fi hotspot.
4
•
The Configure Wi-Fi hotspot dialogue
box will open.
You can change the network SSID
•
(name) that other computers see when
scanning for Wi-Fi networks.
You can also touch the Security menu
•
to configure the network with Wi-Fi
Protected Access 2 (WPA2) security
using a pre-shared key (PSK).
65

Connecting to Networks and Devices
If you touch the WPA2 PSK security
•
option, a password field is added to
the Configure Wi-Fi hotspot dialogue
box. If you enter a password, you will
need to enter that password when you
connect to the phone's hotspot with a
computer or other device. You can set
Open in the Security menu to remove
security from your Wi-Fi network.
Touch Save.
5
66
ATTENTION!
If you set the security option as Open,
you cannot prevent unauthorised usage
of online services by other people and
additional charges can be incurred.
To avoid unauthorised usage, you are
advised to keep the security option active.

Using the Wi-Fi Cast
You can share your music, pictures and
video content with users who use Android
Phones connected via the same Wi-Fi & WiFi Directed network.
Check your Wi-Fi & Wi-Fi Directed network
in advance and make sure the users are
connected to the same network.
Touch
1
2
> Apps tab > Settings >
More from the WIRELESS & NETWORKS
tab > Wi-Fi Direct
Touch the Wi-Fi direct checkbox to turn
it on.
Select a device to connect from the
3
scanned device list.
Touch Connect.
4
Enabling Wi-Fi Direct to share
through SmartShare
Wi-Fi Direct automatically scans nearby WiFi Direct devices and the searched devices
are listed as they are found so you can
select a specific device to share multimedia
data with through Smart Share.
67

Connecting to Networks and Devices
NOTE: Wi-Fi Direct cannot be enabled
while using other Wi-Fi functions.
Touch > Apps tab > Settings >
1
More from the WIRELESS & NETWORKS
tab > Wi-Fi Direct.
Select a device to connect from the
2
scanned device list.
CREATE GROUP – Touch to activate group
owner mode, which enables the legacy Wi-Fi
devices to connect by scanning your phone.
In this case you must enter the password
68
that is set in Password.
NOTE: When your phone becomes a
group owner it will consume more battery
power than when it is a client. The Wi-Fi
Direct connection does not provide an
Internet service. Additional costs may
be incurred when connecting and using
online services. Check data charges with
your network provider.

Using SmartShare
Using your phone, you can allow media
content files on the network to be shared
with other players.
Touch
1
2
and then select SmartShare
.
Your device should be connected to a
•
Wi-Fi network. If not, a new window
appears for Wi-Fi connection.
From: Set a library to view a content list.
If there is a previously connected
•
device, the device's content list of is
displayed.
To: Set a player to play the content files.
3
•
You can only play the files on the
supported devices, such as DLNAenabled TVs and PCs.
Touch
•
to search for available
devices again.
Select a content file you want to play
4
from the content list.
Touch and hold a content file to play it
•
or to view its details.
Touch the menu button to play, upload/
•
download, set it or view Help.
Upload/download content files to/from the
5
69

Connecting to Networks and Devices
content list.
•
You can upload the content files saved
on your phone to other devices.
You can download the content files
•
saved in an external library to your
phone.
Download/upload progress can be
•
viewed on the notification bar.
The uploaded or downloaded content
•
files are saved in the SmartShare
folder.
70
Enable DMS in the Settings menu.
6
•
Discoverable: Detects your phone
among other DLNA-enabled devices.
Device name: Sets the name and icon
•
displayed on other devices.
Always accept request: Automatically
•
accepts requests from other devices to
share content files.
Receive files: Allows other devices to
•
upload files to your phone.
MY SHARE CONTENTS: Allows you
•
to set the media file type you want to
share.

NOTE:
DMS (Digital Media Server) allows
•
you to share content files on your
phone with other devices connected
to the same network. With the DMC
(Digital Media Controller) function you
can view and control (playback/stop)
content files on other digital devices.
You can also play content files saved
on other devices on your phone using
the DMP (Digital Media Player).
You can only play content files in the
•
formats supported by the DMR. It may
not be possible to play some content
files, depending on the DMR.
The upload or download function may
•
not be supported, depending on the
DMS.
PC connections with a PC data
cable
Learn to connect your device to a PC with
a PC data cable in USB connection modes.
71

Connecting to Networks and Devices
By connecting the device to a PC you can
transfer data to and from your device directly
and use the PC software (LG PC Suite).
Sync your phone with your computer
To synchronise your phone with your PC
using the USB cable, you need to install
the PC software (LG PC Suite) on your PC.
Download the program from the LG website
(www.lg.com).
Use the USB data cable to connect your
1
phone to the PC. The USB connection
type list will appear; select LG software.
Run the LG PC Suite program on your PC.
2
72
Refer to the PC software (LG PC Suite)
help for more information.
NOTE: The LG integrated USB driver is
required to connect an LG device to a
PC. It is installed automatically when you
install the LG PC Suite software.
Transferring music, photos and videos
using USB mass storage mode
Connect the LG-E610v to a PC using a
1
USB cable.

If you haven't installed LG Android
2
Platform Driver on your PC, you need to
change the settings manually. Choose
System settings > Connectivity > USB
Connection type, then select Media
sync (MTP).
You can view the mass storage content
3
on your PC and transfer the files.
NOTE: If you installed LG Android
Platform Driver, you will immediately see
a pop-up saying Turn on USB storage.
Synchronise with Windows Media Player
Ensure that Windows Media Player is
installed on your PC.
1
Use the USB cable to connect the phone
to a PC on which Windows Media Player
is installed.
Select the Media sync (MTP) option.
2
When connected, a popup window will
appear on the PC.
Open Windows Media Player to
3
synchronise music files.
Edit or enter your device’s name in the
4
popup window (if necessary).
73

Connecting to Networks and Devices
Select and drag the music files you want
5
to the sync list.
Start synchronisation.
6
The following requirements must be
•
satisfied to synchronise with Windows
Media Player.
74
Items Requirement
Microsoft Windows XP SP2,
OS
Vista or higher
Window
If the Windows Media Player version is
•
lower than 10, install version 10 or higher.
Windows Media Player 10
Media
or higher
Player
version

Calls
Making a call
Touch to open the keypad.
1
Enter the number using the keypad. To
2
delete a digit, touch the
3
Touch
To end a call, touch the End icon
4
TIP! To enter ‘+’ to make international
calls, touch and hold
to make a call.
Calling your contacts
1
Touch to open your contacts.
.
.
Scroll through the contact list or enter the
2
first few letters of the contact you want to
call by touching Search contacts.
In the list, touch the contact you want
3
to call.
.
Answering and rejecting a call
When you receive a call in Lock state, hold
and slide the
call.
Hold and slide the
incoming call.
to answer the incoming
to decline an
75

Calls
Hold and slide the Quick msg icon at the
bottom if you want to send a quick message.
TIP! Quick msg
You can send a message quickly using
this function. This is useful if you need to
reply the message during a meeting.
Adjusting call volume
To adjust the in-call volume during a call,
use the volume up and down keys on the
left-hand side of the phone.
76
Making a second call
During your first call, touch Menu >
1
Add call and dial the number. You can
also see a list of recently dialled numbers
by touching
contacts by touching
number you want to call.
Touch
2
Both calls are displayed on the call
3
screen. Your initial call is locked and put
on hold.
Touch the displayed number to toggle
4
between calls. Or touch
, or you can search your
and select the
to make the call.
Merge call

to make a conference call.
To end active calls, touch End or press
5
the Home Key and slide the notification
bar down and select the End call icon
.
View a complete list of all dialled, received
and missed voice calls.
TIP! Touch any call log entry to view the
date, time and duration of the call.
NOTE: You are charged for each call you
make.
Viewing your call logs
On the Home screen, touch and choose
the Call logs tab
.
TIP! Touch the Menu key, and then touch
Delete all to delete all the recorded
items.
Call settings
You can configure phone call settings such
77

Calls
as call forwarding and other special features
offered by your carrier.
On the Home screen, touch
1
Touch the Menu key.
2
Tap Call settings and choose the options
3
that you want to adjust.
Fixed dialling numbers – To turn on and
compile a list of numbers that can be called
from your phone. You'll need your PIN2,
which is available from your operator. Only
numbers on the fixed dial list can be called
from your phone.
Voicemail service – Allows you to select
78
.
your carrier’s voicemail service.
Voicemail settings – If you are using your
carrier’s voicemail service, this option allows
you to enter the phone number to use for
listening to and managing your voicemail.
Save unknown numbers – Add unknown
numbers to contacts after a call.
Call reject – Allows you to set the call reject
function. Choose from Disabled, Reject
calls on list or Reject all calls.
Quick messages – When you want to reject
a call, you can send a quick message using
this function. This is useful if you need to

reject a call during a meeting.
Call forwarding – Choose whether to divert
all calls when the line is busy, when there is
no answer or when you have no signal.
Call barring – Select when you would like
calls to be barred. Enter the call barring
password. Please check with your network
operator about this service.
Call duration – View the duration of calls,
including all calls, dialled calls, received calls
and last call.
Call costs – View the charges applied
to your calls. (This service is network
dependent; some operators do not support
this function.)
Additional settings – This lets you change
the following settings:
Caller ID: Choose whether to display your
number on an outgoing call.
Call waiting: If call waiting is activated,
the handset will notify you of an
incoming call while you are on the phone
(depending on your network provider).
79

Contacts
Add contacts to your phone and synchronise
them with the contacts in your Google
account or other accounts that support
contact syncing.
Searching for a contact
In the Home screen
Touch to open your contacts.
1
Touch Search contacts and enter the
2
contact name using the keyboard.
80
Adding a new contact
Touch to open your contacts.
1
Select
2
3
4
5
.
Select a memory location. If you have
more than one account, select an account
to which you want to add the contact,
such as Phone or Google.
Touch a contact information category and
enter your contact's details.
Touch Save to add the contact to
memory.

You can also create a contact from the
dialling screen.
Touch > to open the dial screen.
1
Enter a phone number.
2
Select Add to Contacts > Create new
3
contact.
Select a memory location. If you have
4
more than one account, select an account
to which you want to add the contact,
such as Phone or Google.
Enter the contact information.
5
Touch a contact information category and
6
enter your contact's details.
7
Touch Save to add the contact to
memory.
Favourite contacts
You can classify frequently called contacts
as favourites.
Adding a contact to your favourites
1
Touch to open your contacts.
2
Touch a contact to view their details.
3
Touch the star to the right of the contact's
name. The star turns yellow.
81

Contacts
Removing a contact from your favourites
list
Touch to open your contacts.
1
Touch the Favourites tab, and choose a
2
contact to view its details.
Touch the yellow star to the right of the
3
contact's name. The star will turn grey
and the contact will be removed from
favourites.
Import or export contacts
To import/export contact files (in vcf format)
between a storage memory (internal storage/
82
memory card) or SIM or USIM card and your
device.
Touch
1
2
3
4
to open your contacts.
Touch the Menu key > Import/Export.
Select a desired import/export option. If
you have more than one account, select
an account to which you want to add the
contact.
Select contact files to import/export and
select Import to confirm.

Moving contacts from your old
device to your new device
Export your contacts as a CSV file from
your old phone to your PC, using a PC
sync programme.
First install LG PC Suite on the PC.
1
Run the programme, and connect your
Android mobile phone to the PC using a
USB cable.
From the top of the screen, select Device
2
> Import personal information >
Import contacts.
A pop-up to open a contacts file will
3
appear.
Select a contacts file and click Open.
4
A pop-up to import a new contact from
5
the PC to the contacts in the device will
appear.
If the contacts in the device and new
6
contacts from the PC are different, select
a contact you want to import from the PC.
Click the [OK] button to import a new
7
contact from the PC to the device.
83

Messaging
Your LG-E610v combines SMS and MMS
into one intuitive, easy-to-use menu.
Sending a message
Touch on the home screen, and touch
1
to open a blank message.
Enter a contact name or contact number
2
in the To field. As you enter the contact
name, matching contacts will appear. You
can touch a suggested recipient. You can
add multiple contacts.
84
NOTE: You will be charged for a text
message for every person you send the
message to.
Touch the Enter message field and start
3
to compose your message.
Touch the Menu key to open the Options
4
menu. Choose from Add subject,
Discard, Attach, Insert smiley or All
messages.
Touch Send to send your message.
5

The message screen opens, with your
6
message after Recipient Name/Number.
Responses will appear on the screen. As
you view and send additional messages,
a message thread will be created.
WARNING: The 160-character
limit may vary from country to country
depending on the language and how the
SMS is coded.
WARNING: If an image, video or
audio file is added to an SMS message,
it is automatically converted into an
MMS message and you are charged
accordingly.
Threaded box
Messages (SMS, MMS) exchanged
with another party can be displayed
in chronological order so that you can
conveniently see an overview of your
conversation.
85

Messaging
Using emoticons
Liven up your messages using emoticons.
When writing a new message, touch the
Menu key, then choose Insert smiley.
Changing your message settings
Your LG-E610v message settings are
predefined, so you can send messages
immediately. You can change the settings
based on your preferences.
Touch
on the home screen, and touch
the Menu key, then tap Settings.
86

Email
You can use the Email application to read
emails from services other than Google Mail.
The email application supports the following
account types: POP3, IMAP and Exchange.
Your service provider or system administrator
can provide the account settings you need.
Managing an email account
The first time you open the Email
application, a setup wizard opens to help you
to set up an email account.
To add another email account:
Touch > Apps tab > Email > in the
•
account screen, touch
> ADD ACCOUNT
After the initial setup, Email displays the
contents of your inbox. If you have added
more than one account, you can switch
among accounts.
To change the settings of an email
account:
•
Touch > Apps tab > Email > in the
account screen, touch
> Settings
> Settings
87

Email
To delete an email account:
Touch > Apps tab > Email > in the
•
account screen, touch
> touch an account you want to delete >
Remove account
Email account screen
You can touch an account to view its Inbox.
The account from which you send email by
default is indicated with a tick.
– Touch the folder icon to open the
account folders.
88
> Settings
Only the most recent emails in your account
are downloaded to your phone.
Working with account folders
Each account has an Inbox, Outbox, Sent
and Drafts folder. Depending on the features
supported by your account's service provider,
you may have additional folders.
Composing and sending email
To compose and send a message
While in the Email application, touch
1
the
.

Enter an address for the message's
2
intended recipient. As you enter text,
matching addresses are offered from your
Contacts. Separate multiple addresses
with semicolons.
Add Cc/Bcc and add attachment files if
3
required.
Enter the text of the message.
4
Touch the
5
If you aren't connected to a network, for
example, if you're working in airplane
mode, the messages that you send
are stored in your Outbox folder until
.
you're connected to a network again. If
it contains any pending messages, the
Outbox will be displayed on the Accounts
screen.
TIP! When a new email arrives in the
inbox, you will receive a notification
by sound or vibration. Tap the email
notification to stop notifications.
89

Camera
Getting to know the viewfinder
NOTE: The memory capacity may
differ depending on the shooting
scene or shooting conditions.
90
Zoom – Zoom in or zoom out. Alternatively, you can use the
side volume keys.
Brightness – This defines and controls the amount of sunlight
entering the image.
Shot mode – Choose from Normal, Panorama or
Continuous shot.
Flash – Allows you to turn on the flash when taking a photo
in a dark place.
Settings – Touch this icon to open the Settings menu.
Video mode – Touch this icon to switch to video mode.
Capture – Takes a photo.
Gallery – Touch to view the last photo you captured. This
enables you to access your gallery and view saved photos
within camera mode.

Taking a quick photo
Open the Camera application.
1
Hold the phone, point the lens towards
2
the subject you want to photograph.
Touch the screen and a focus box will
3
appear in the centre of the viewfinder
screen.
When the focus box turns green, the
4
camera has focused on your subject.
Touch the Capture icon
5
picture.
to take the
Using the advanced settings
In the viewfinder, touch to open all
advanced options.
- Restore all camera default settings.
•
•
- Touch whenever you want to know
how this function operates. This
provides you with a quick guide.
- Focuses on the specific spot.
•
91

Camera
- Select the image resolution. If you
•
choose high resolution, the file size will
increase, which means you will be able to
store fewer photos in the memory.
•
- Finds the colour and light settings
appropriate for the current environment.
Choose from Auto, Portrait, Landscape,
and Sunset.
- The ISO rating determines the
•
sensitivity of the camera's light sensor.
The higher the ISO, the more sensitive
the camera is. This is useful in darker
conditions when you cannot use the flash.
92
- Improves colour qualities in different
•
lighting conditions.
•
- Choose a colour tone to use for your
new view.
•
- Takes pictures a few seconds after
clicking the shutter. This option is ideal if
you want to be in the picture.
- Activate to use your phone's location-
•
based services. Take pictures wherever
you are and tag them with the location.
If you upload tagged pictures to a blog
that supports geotagging, you can see the
pictures displayed on a map.

NOTE: This function is only available
when GPS is active.
- Select one of the four shutter sounds.
•
•
- Allows you to review images after
taking pictures.
•
- Select storage to save images.
TIP! When you exit camera mode, some
settings return to their defaults, such as
white balance, timer and scene mode.
Check these before you take your next
photo.
TIP! The Settings menu is superimposed
over the viewfinder so, when you change
elements of the image colour or quality,
you see a preview of the image change
behind the Settings menu.
93

Camera
After taking photos, select the image
viewer icon to view the photos you have
taken.
To view more photos, scroll left or right.
•
To zoom in or out, place two fingers on the
•
screen and spread them apart (move your
fingers closer together to zoom out) or
double-tap the screen.
To send a photo to others, touch Share
•
via
> desired item like Bluetooth,
Email, Memo, Picasa and so on.
•
To delete a photo, touch Delete
94
View a photo
Learn to view photos saved in your phone's
storage.
On the Home screen, open the application
1
list and select Gallery.
Select a photo to view.
2
While viewing a photo, use the following
options:
To view more photos, scroll left or right.
•
To zoom in or out, tap the screen with two
•
.
fingers and spread them apart (move your
fingers closer together to zoom out).

To send a photo to others, touch Share
•
via
> desired item like Bluetooth,
Email, Memo, Picasa and so on.
TIP! If you have an SNS account and set
it up on your phone, you can share your
photo with the SNS community.
•
To delete a photo, touch Delete .
Touch the Menu key to open all
advanced options.
Set image as – Touch to use the image as
a Contact photo, Lockscreen Wallpaper
or Wallpaper.
Move – Touch to move the image to a
different place.
Rename – Touch to edit the name of the
selected picture.
Rotate left/Rotate right – Rotate left or
right.
Crop – crop your photo. Move your finger
across the screen to select an area.
95

Camera
Edit – View and edit the picture.
- Select the image resolution. If you
choose high resolution, the file size will
increase, which means you will be able to
store fewer photos in the memory.
- Improves colour qualities in different
lighting conditions.
- Applies artistic effects to the pictures.
- Applies the additional options for
pictures.
Slideshow – Auto review automatically
shows you the picture you just recorded.
96
Details – Show the picture information.
NOTE: Some file formats are not
supported, depending on the device
software.
NOTE: If the file size exceeds the
available memory, an error can occur
when you open files.

Video camera
Getting to know the viewfinder
Zoom – Zoom in or zoom out. Alternatively, you can use the
side volume keys.
Brightness – This defines and controls the amount of sunlight
entering the video.
Video size – Touch to set the size (in pixels) of the video you
are recording.
Flash – Allows you to turn on the flash when recording a video
in dark conditions.
Settings – Touch this icon to open the settings menu.
Camera mode – Touch this icon to switch to camera mode.
NOTE: The zoom function is not
available while recording a video.
Record – Starts recording.
Gallery – Touch to view the last video you recorded. This
enables you to access your gallery and view your saved videos
from within video mode.
97

Video camera
Shooting a quick video
Slide the Camera mode button down and
1
the icon changes to
The video camera viewfinder appears on
2
the screen.
Holding the phone, point the lens towards
3
the subject you want to capture in your
video.
Press the Record
4
recording.
A red light appears at the top corner of
5
the viewfinder with a timer showing the
length of the video.
98
.
button once to start
Touch on the screen to stop
6
recording.
Using the advanced settings
Using the viewfinder, touch to open all
the advanced options.
- Restore all video camera default
settings.
- Improves colour qualities in different
lighting conditions.
- Apply a special effect, such as sepia or
mono tones.

- Activate to use your phone's
location-based services. Records
videos wherever you are and tag
them with the location. If you upload
tagged videos to a blog that supports
geotagging, you can see the videos
displayed on a map.
- Choose Off to record a video without
sound.
- Auto review automatically shows you
the video you just recorded.
- Select storage to save videos.
After recording videos, select the image
viewer icon to view the recorded videos.
To view more videos, scroll left or right.
•
To send a video to others, select Share
•
via
, a desired item like Bluetooth,
Messaging, YouTube and so on.
To play a video, select Play
•
•
To delete a video, select Delete
.
.
Play a video
Learn to use the video player to play various
kinds of videos.
99

Video camera
On the Home screen, open the application
1
list and select Gallery.
Select a video (with the
2
3
Rotate the device to landscape view.
4
Control playback with the virtual keys.
NOTE:
Some file formats are not supported,
•
depending on the device software.
•
If the file size exceeds the available
memory, an error can occur when you
open files.
100
icon) to play.
Touch the Menu key to open all
advanced options.
Screen ratio – Tap to select desired screen
ratio.
Brightness – Check for adjusting brightness
level for comfortable video viewing.
Smart Share – Tap to share this video file
through Smart Share.
Details – Tap to see a detailed information,
such as the name, date, time, size and type.

Adjusting the volume when
viewing a video
To adjust the volume of a video while it is
playing, use the volume keys on the lefthand side of the phone.
101

Multimedia
You can store multimedia files on a memory
card for easy access to all your image and
video files.
Gallery
Learn to view photos and play videos saved
in your device’s memory and memory card.
Touch
1
Supported file formats (type format)
•
102
> Apps tab > Gallery. Open
a list of catalogue bars that store all your
multimedia files.
Image: bmp, gif, jpg, png
•
Video: 3gp, mp4, avi, wmv, flv, mkv
•
(Codec: MPEG4, H.263, Sorenson
H.263, H.264, VC-1, DivX/XviD)
Avoid locking the device’s screen while
•
playing a DivX Video-On-Demand. Each
time you lock the screen while playing a
DivX Video-On-Demand, your available
rental counts will be decremented by one.
Some file formats are not supported,
•
depending on the device software.
If the file size exceeds the available
•
memory, an error can occur when you
open files.

QuickMemo
Use QuickMemo to practically and efficiently create memos during a call, with a saved
picture or on the current phone screen.
Enter the QuickMemo screen by
1
pressing both the Volume Up and
Volume Down Keys for one second
on the screen you want to capture.
Or touch and
slide the Status
Bar downwards
and touch
2
Select the desired
menu option from
Pen type, Colour,
Eraser, and create a
.
memo.
Touch in the Edit
3
menu and select
to save the memo
with the current
screen.
103

Multimedia
NOTE: Please use a fingertip while using the QuickMemo function. Do not use your
fingernail.
Using the QuickMemo options
While using the QuickMemo function, you can easily use the QuickMenu options.
- Select whether you want to use the background screen or not.
- Select the pen type and the colour.
- Erase the memo that you created.
- Set the location where you want to save the memo.
- Save the memo with the current screen.
- Send or share the current QuickMemo to/with others.
Viewing the saved QuickMemo
Touch Gallery and select the QuickMemo album.
104

Music player
Your phone has a built-in music player that
lets you play all your favourite tracks. The
music player supports the following file
formats: mp3, m4a, mp4, 3gp, 3ga, asf/
wma, ogg, aac, flac, wav.
Add music files to your phone
Start by transferring files to your phone or
memory card:
Transferring music, photos and videos
•
using USB mass storage mode =>
page 70
Download from the wireless web =>
•
page 115
Sync your phone with your computer =>
•
page 70
Receive via Bluetooth => page 58
•
Copy to your memory card.
•
Play music
After transferring music files to your phone
or memory card.
Touch
1
2
> Apps tab > Music Player.
Select a music category.
105

Multimedia
Select a music file. Refer to the following
3
icons for playback control.
Touch to pause playback.
Touch to resume playback.
Touch to skip to the next track in the
album, playlist or shuffle.
Touch to go back to the beginning of
the song. Touch twice to return to the
previous song.
Touch to manage the music volume.
Touch to set repeat mode.
106
Touch to play the current playlist in
shuffle mode.
Touch to see the current playlist.
Touch to see lyrics. This option is on only
if the song includes the lyrics.
To change the volume while listening to
music, press the up and down volume keys
on the left-hand side of the phone.
Create a playlist
Touch > Apps tab > Music Player.
1
Select Playlists.
2
Press
3
> New playlist.

Enter a title for your new playlist and
4
select OK.
Select Add music.
5
Select the files you want to include and
6
select Add.
TIP! During playback, you can add files
to a playlist by pressing
to playlist.
> Add
Add songs to the favourite playlist
You can add your favourite song quickly as
a favourite playlist. During playback, press
> Add to favourites to add the
current song to the quick list.
Customise music player settings
Touch > Apps tab > Music Player.
1
Press
2
3
Adjust the settings to customise your
music player:
> Settings.
107

Multimedia
NOTE:
Some file formats are not supported,
•
depending on the device software.
If the file size exceeds the available
•
memory, an error can occur when you
open files.
108
NOTE: Music file copyrights may be
protected by international treaties and
national copyright laws.
Therefore, it may be necessary to obtain
permission or a licence to reproduce or
copy music.
In some countries, national laws prohibit
private copying of copyrighted material.
Before downloading or copying the file,
check the national laws of the relevant
country concerning the use of such
material.

FM Radio
Your LG-E610v has a built-in FM radio so
you can tune in to your favourite stations
and listen on the go.
NOTE: You need to use your headphones
to listen to the radio. Insert it into the
headphone jack.
Searching for stations
You can tune in to radio stations by searching
for them manually or automatically. They are
then saved to specific channel numbers, so
you don't have to find them again.
You can store up to 48 channels on your
phone.
Tuning in automatically
On the Home screen, touch > Apps
1
tab > FM Radio.
Touch
2
During auto scanning, touch Stop if you
3
want to stop scanning. Only scanned
channels are saved before you stop
scanning.
, then select Scan.
109

Multimedia
NOTE: You can also manually tune in to a
station using the on-screen wheel.
TIP! To improve radio reception, extend
the headset cord as this also functions as
the radio antenna.
If you connect a headset not specifically
made for radio reception, radio reception
may be poor.
110
LG Tag+
LG Tag+ allows easy saving and loading to
NFC tag, which can be customised to suit
certain environments. You will receive an
LG Tag+ sticker as an accessory with your
phone. Finally, by simply tapping the battery
cover over an NFC tag, your phone will
detect these NFC tags and perform some
customisable action, such as Navigation
mode in your car, silent mode when you’re in
a meeting and more.

Press on the Home screen > Apps
1
tab > LG Tag+.
Select the desired mode (Car mode/
2
Office mode/Sleep mode/User mode).
After selecting the item to be set, touch
3
Write on tag.
Touch the battery cover of your phone
4
to the tag.
TIP!
With the NFC (Near Field
Communication) data transfer technology,
you can use the functions set for each
mode by simply touching the battery
cover to a tag.
111

LG SmartWorld
LG SmartWorld offers an assortment of
exciting content – games, applications,
wallpaper and ringtones – giving LG phone
users the chance to enjoy richer ‘Mobile Life’
experiences.
How to get to LG SmartWorld
from your phone
Touch > Apps tab > LG SmartWorld.
1
Tap Sign in and enter ID/PW for
2
LG SmartWorld. If you have not yet
signed up, tap Register and get an LG
SmartWorld membership.
112
Download the content you want.
3
NOTE: What if there is no
1 Using a mobile web browser, access
LG SmartWorld (www.lgworld.com)
and select your country.
2 Download LG SmartWorld App.
3 Execute and install the downloaded
file.
4 Access LG SmartWorld by tapping the
LG SmartWorld application.
icon?

How to use LG SmartWorld
Participate in monthly LG SmartWorld
•
promotions.
Try the easy ‘Menu’ buttons to find what
•
you're looking for fast.
Categories – Find content by category
(e.g. Education, Entertainment, Games,
etc.).
Search – Search content.
Apps for you – Recommended content
based on your previous choices.
My Apps – List of downloaded/to-be-
updated content.
Settings – Set profile and display.
Sign in – Set your ID and password.
Try other useful functions as well. (Content
•
Detail screen)
NOTE: LG SmartWorld may not be
available from all carriers or in all
countries.
113

Utilities
Setting your alarm
Touch > Apps tab > Alarm/Clock
1
>
.
After you set the time, the LG-E610v lets
2
you know how much time is left before
the alarm will sound.
Set Repeat, Snooze duration, Vibration,
3
Alarm sound, Puzzle lock and Memo.
Touch Save.
Using your calculator
1
Touch > Apps tab > Calculator
2
Touch the number keys to enter numbers.
114
For simple calculations, touch the
3
function you want (+, –, x or ÷) followed
by =.
For more complex calculations, touch
4
, select the Advanced panel, then
choose sin, cos, tan, log and so on.
Adding an event to your
calendar
1
Touch > Apps tab > Calendar
2
Tap the month displayed at left top
corner; here you can find the different
calendar views (Day, Week, Month,
Agenda).

Tap the date for the event you want to
3
add.
Tap
4
to add the event.
Touch Event name, then enter the event
5
name.
Touch Location and enter the location.
6
Check the date and enter the time you
want your event to start and finish.
If you want to add a note to your event,
7
touch Description and enter the details.
If you want to repeat the alarm, set
8
REPEAT, and set REMINDERS if
necessary.
Touch Save to save the event in the
9
calendar.
Polaris Office
Polaris Office is a professional mobile office
solution that lets users conveniently view
various types of office documents, including
Word, Excel and PowerPoint files, anywhere,
anytime, using their mobile devices.
Touch
> Apps tab > Polaris Office
115

Utilities
Managing files
Polaris Office provides mobile users with
convenient file management features,
including copying, moving and pasting, and
deleting files and folders right on the device.
Viewing files
Mobile users can now easily view a wide
variety of file types, including Microsoft
Office and Adobe PDF documents, right
on their mobile devices. When viewing
documents using Polaris Office, the objects
and layout remain the same as in the
original documents.
116

The web
Internet
Internet gives you a fast, full-colour world of
games, music, news, sport, entertainment
and much more, right on your mobile phone.
Wherever you are and whatever you enjoy.
NOTE: Additional charges apply when
connecting to these services and
downloading content. Check data charges
with your network provider.
Using the web toolbar
Touch to go back a page.
Touch to go forward a page, to the page
you connected to after the current one.
This is the opposite of what happens
when you press the Back key, which
goes to the previous page.
Touch and hold, up and down to zoom in
or out of browser.
Touch to add a new window.
Touch to open a list of saved bookmarks.
117

The web
Using options
Press to view options.
Refresh – Update the current web page.
Save to bookmarks – Add the current web
page as a bookmark.
Go to Homepage – Allows you to go to the
homepage.
Share page – Allows you to share the web
page with others.
Find on page – Allows you to find letters or
words on the current web page.
118
Request desktop site – Allows you to view
the web page on the desktop.
Save for offline reading – Allows you to
save current web page and read it on offline
later.
Brightness – Allows you to adjust the
brightness of the screen.
Settings – Displays Internet settings.
Exit – Allows you to exit from the browser.

Settings
Access the Settings menu
On the Home screen, touch > Apps
1
tab > Settings.
or
On the Home screen, touch
System settings.
Select a setting category and select an
2
option.
WIRELESS & NETWORKS
Here you can manage Wi-Fi and Bluetooth.
You can also set up mobile networks and
switch to airplane mode.
>
< Wi-Fi >
Wi-Fi – Turns on Wi-Fi to connect to
available Wi-Fi networks.
Wi-Fi settings – Allows you to set up and
manage wireless access points. Set network
notification or add a Wi-Fi network. The
advanced Wi-Fi settings screen is accessed
from the Wi-Fi settings screen. Press the
and touch Advanced.
119

Settings
TIP! How to obtain the MAC address
To set up a connection in some wireless
networks with MAC filters, you may
need to enter the MAC address of your
LG-E610v into the router.
You can find the MAC address in the
following user interface: Touch Apps
tab > Settings > Wi-Fi >
Advanced > MAC address..
120
>
< Bluetooth >
Turns the Bluetooth wireless feature on or
off. Refer to the Bluetooth information for
more details => page 58
< Data usage >
Displays data usage and allows you to
customise the settings for your data limit.
Mobile data: Set to use data connections
•
on any mobile network.
Set mobile data limit: Set a limit for the
•
mobile data usage.
Data usage cycle: Customise the settings
•
for the limit cycle.

< Call >
You can configure phone call settings such
as call forwarding and other special features
offered by your carrier.
Fixed dialling numbers - Select Fixed
•
Dialling Numbers to turn on this feature
and compile a list of numbers that can
be called from your phone. You'll need
your PIN2, which is available from your
operator. Only numbers on the fixed dial
list can be called from your phone.
VOICE MAIL
•
Voicemail service - Allows you to select
your carrier's voicemail service. You can
obtain this number from your service
provider.
Voicemail settings - If you are using
•
your carrier's voicemail service, this option
allows you to enter the phone number to
use for listening to and managing your
voicemail.
END CALL SETTINGS
Save unknown numbers - Add unknown
•
numbers to contacts after a call.
121

Settings
OTHER CALL SETTINGS
•
Call reject - Allows you to set the call
reject function. Choose from Disabled,
Reject calls on list or Reject all calls.
Quick messages - When you want
•
to reject a call, you can send a quick
message using this function. This is
useful if you need to reject a call during
a meeting.
Call forwarding - Choose whether to
•
divert all calls when the line is busy, when
there is no answer or when you have no
signal.
122
Call barring - Select when you would like
•
calls to be barred. Enter the call barring
password. Please check with your network
operator about this service.
Call duration - View the duration of calls
•
including all calls, dialled calls, received
calls and last call.
Call costs - View the charges applied
•
to your calls. (This service is network
dependent; some operators do not support
this function.)
Additional settings - This lets you change
•
the following settings:

•
Caller ID - Choose whether to display
your number on an outgoing call.
•
Call waiting - If call waiting is
activated the handset will notify you
of an incoming call while you are on
the phone (depending on your network
provider).
< More ... >
Airplane mode - After switching to
•
airplane mode, all wireless connections
are disabled.
Wi-Fi Direct - Activate the Wi-Fi Direct
•
feature to connect two devices via a WLAN
without requiring an access point. Refer
to the Wi-Fi information for more details
=> page 65
Portable Wi-Fi hotspot - Activate the
•
Portable WLAN hotspot feature to share
your device’s mobile network connection
with PCs or other devices through the
WLAN feature.
Configure Wi-Fi hotspot: Configure
•
network settings for your WLAN
hotspot.
Timeout: Set the time for the portable
•
hotspot timeout.
Help: View information about using the
•
tethering features.
123

Settings
NFC - Your phone is an NFC-enabled
•
mobile phone. NFC (Near Field
Communication) is a wireless connectivity
technology that enables two-way
communication between electronic
devices. It operates over a distance of
a few centimetres. You can share your
content with an NFC tag or another device
by simply touching it with your device. If
you touch an NFC tag with your device, it
will display the tag content on your device.
124
NOTE: Be careful not to scratch or
damage the inside of the battery cover,
as this is the NFC antenna.
To switch NFC on or off: From the
•
Home screen, touch and slide the
notification drawer down with your
finger, then select the NFC icon to turn
it on.
NOTE: The NFC application can be used
even when Airplane mode is activated.

Android Beam - You can beam a web
•
page, video or other content from your
screen to another device by bringing the
devices together (typically back to back).
NOTE: Make sure both devices
are unlocked, support Near Field
Communication (NFC), and have both
NFC and Android Beam™ turned on.
VPN settings - Displays the list of Virtual
•
Private Networks (VPNs) that you've
previously configured. Allows you to add
different types of VPN.
NOTE: You must set a lock screen PIN or
password before you can use credential
storage.
Mobile networks - Set options for data
•
roaming, network mode & operators,
access point names (APNs) and so on.
Data enabled: Set to enable data
•
access over a mobile network.
Data roaming: Set the device to
•
connect to another network when you
are roaming or your home network is
not available.
125

Settings
Network mode: Select a network type.
•
•
Access point names: Set up access
point names (APNs).
Use only 2G networks: Select a
•
network type.
Network operators: Search for
•
available networks and select a network
for roaming.
DEVICE
< Sound >
•
Sound profile - You can choose from
Sound, Vibrate only or Silent.
126
Volumes - You can manage the volume
•
of music, video, games, other media,
and ringtones & notifications. See ‘Touch
feedback & system’.
RINGTONE & NOTIFICATIONS
Phone ringtone - Allows you to set your
•
default incoming call ringtone.
Notification sound - Allows you to set
•
your default notification sound.
Ringtone with vibration - Vibration
•
feedback for calls and notifications.
Quiet time - Set times to turn off all
•
sounds except alarm and media.

TOUCH FEEDBACK & SYSTEM
•
Dial pad touch tones - Allows you to set
the phone to play tones when using the
dialpad to dial numbers.
Touch sounds - Allows you to set your
•
phone to play a sound when you touch
buttons, icons and other onscreen items
that react to your touch.
Screen lock sound - Allows you to set
•
your phone to play a sound when locking
and unlocking the screen.
< Display >
Brightness - Adjust the screen brightness.
•
Auto-rotate screen - Set to switch
•
orientation automatically when you rotate
the phone.
Screen timeout - Set the time for screen
•
timeout.
Font size - Change the display size.
•
Front key light - Set the front key LED
•
time.
127

Settings
< Home screen >
Home screen - Select a background image
for the Home screen. You can set the
Animation, Screen effect or Wallpaper.
< Lock screen >
Set how to unlock the screen.
Select screen lock - Set an unlock
•
pattern to secure your phone. This opens
a set of screens that guide you through
drawing a screen unlock pattern.
None: Disable the screen lock.
•
Swipe: Set to use the screen lock
•
128
without a PIN, password, pattern, or
face detection.
Pattern: Set an unlock pattern to
•
unlock the screen.
PIN: Set a PIN (numeric) to unlock the
•
screen.
Password: Set to display your own
•
message for the locked screen.
< Storage >
View memory information for your device
and memory card. You can also format the
USB storage and the memory card.

WARNING
Formatting a memory card will
permanently delete all data from the
memory card.
INTERNAL STORAGE - View the internal
•
storage usage.
•
SD CARD - Check total available SD card
space. Touch Unmount SD card for safe
removal. Erase SD card if you want to
delete all data from the SD card.
< Power Saver >
Here you can manage the battery and check
the power saving items. You can also check
the battery usage.
Turn Power saver on: Activate power
•
saving mode to limit some system
resource usage.
Power saver tips: Learn how to reduce
•
battery consumption by using the power
saving items.
POWER SAVING ITEMS
Set to activate power saving mode according
to your custom settings.
129

Settings
BATTERY INFORMATION
View the amount of power consumed by
your device.
< Apps >
You can view and manage the applications.
PERSONAL
< Accounts & sync >
Permits applications to synchronise data
in the background, whether or not you are
actively working in them. Deselecting this
setting can save battery power and reduces
(but does not eliminate) data usage.
130
< Location services >
Change the settings for GPS functionality.
•
Google's location service - If you select
Google's location service, your phone
determines your approximate location
using Wi-Fi and mobile networks. When
you select this option, you're asked
whether you consent to allowing Google
to use your location when providing these
services.
GPS satellites - If you select GPS
•
satellites, your phone determines your
location with street level accuracy.

Location & Google search - Set the
•
device to use your current location for
Google search and other Google services.
< Security >
Change the settings for securing your device
and the SIM or USIM card.
SIM CARD LOCK
Set up SIM card lock - Set up SIM card
•
lock or change the SIM PIN.
Lock SIM card: Activate or deactivate
•
the PIN lock feature to require the PIN
before using the device.
Change SIM PIN: Change the PIN used
•
to access SIM or USIM data.
PASSWORDS
Make passwords visible - Show
•
password as you type.
DEVICE ADMINISTRATION
Device administrators - View device
•
administrators configured on your device.
You can activate device administrators to
apply new policies to your device.
Unknown sources - View device
•
administrators configured on your device.
You can activate device administrators to
apply new policies to your device.
131

Settings
CREDENTIAL STORAGE
•
Trusted credentials - Select certificates
and credentials to ensure secure use of
various applications
Install from storage - Install encrypted
•
certificates that are stored in the USB
storage device.
Clear credentials - Erase the credential
•
contents from the device and reset the
password.
< Language & input >
Use the language & input settings to
select the language for the text on your
132
phone and for configuring the onscreen
keyboard, including words you've added to
its dictionary.
< Backup & reset >
Change the settings for managing your
settings and data.
BACKUP & RESTORE
Change the settings for managing your
settings and data.
Back up my data - Set to back up your
•
settings and application data to the Google
server.

Backup account - Add and view your
•
Google account to back up your data.
Automatic restore - Set to restore your
•
settings and application data when the
applications are reinstalled on your device.
PERSONAL DATA
Factory data reset - Reset your settings
•
to the factory default values and delete all
your data. If you reset the phone in this
way, you are prompted to re-enter the
same information that you did when you
first started Android.
NOTE: If you select factory data reset,
it will erase all of your personal data
from your phone’s system memory,
including information about your Google
account, any other accounts, your
system/application data and settings as
well as any downloaded applications and
DRM licences. Resetting the phone does
not erase any system software updates
you have downloaded or any files on your
microSD card or internal memory, such
as music or photos.
133

Settings
So, if you want to erase all the data in
the internal memory while resetting the
phone, select the ‘Erase internal memory’
checkbox.
SYSTEM
< Date & time >
Use Date & time settings to set how dates
are displayed. You can also use these
settings to set your own time and time zone
rather than obtaining the current time from
the mobile network.
134
Automatic date & time: Automatically
•
update the time when you set a time zone.
Automatic time zone: Automatically
•
update the time when you move across
time zones.
Set date: Set the current date manually.
•
Set time: Set the current time manually.
•
Select time zone: Set your home time
•
zone.
Use 24-hour format: Set to the time to
•
be displayed in 24-hour format.
Select date format: Select a date format.
•

< Accessibility >
Use the Accessibility settings to configure
accessibility plug-ins you have installed on
your phone.
NOTE: Requires additional plug-ins.
SYSTEM
Large text: Set the text size to large.
•
Power button ends call: Set the device to
•
end a call when you press the Power/Lock
key.
Auto-rotate screen: Set whether or not to
•
rotate the content automatically when the
device is rotated.
•
Touch & hold delay: Set the recognition
time for tapping and holding the screen.
Install web scripts: Set applications
•
to install web scripts to make their web
content more accessible.
< Connectivity >
USB CONNECTION
•
USB connection type - You can set the
desired mode (Charge only, Media sync
(MTP), USB tethering or LG software).
Ask on connection - Ask to confirm USB
•
connection mode when connecting to a
135

Settings
computer.
•
Help - View information about using the
USB connection type.
LG SOFTWARE
PC Suite Wi-Fi connection - Tick this
•
checkbox to use LG PC Suite with Wi-Fi
connection. Please note that the Wi-Fi
network should be connected for LG
PC Suite via Wi-Fi connection from the
WIRELESS & NETWORKS tab.
<Developer options>
Change the settings for application
development.
136
USB debugging: Select to connect your
•
device to a PC using a USB cable. This is
for application development.
Development device ID: View your
•
device’s development ID.
Stay awake: Screen will never sleep while
•
charging.
Allow mock locations: Allow mock
•
locations and service information to be
sent to a Location Manager service for
testing. This is for application development.
Desktop backup password: Set a
•
password to secure your backup data.

USER INTERFACE
•
Strict mode enabled: Set the device
to flash the screen when applications
perform long operations.
Pointer location: Set to show the
•
coordinates and traces of the pointer when
you touch the screen.
Show touches: Set to show the pointer
•
when you touch the screen.
Show screen updates: Set to flash areas
•
of the screen when they are updated.
Show CPU usage: Set to list all active
•
processes.
Force GPU rendering: Set to use 2D
•
hardware acceleration to improve graphic
performance.
Window animation scale: Select a speed
•
for opening and closing pop-up windows.
Transition animation scale: Select a
•
speed for switching between screens.
APPS
Don't keep activities: Set to end a
•
running application when you launch a
new application.
Background process limit: Set to limit
•
the number of processes that can run in
137
 Loading...