LG Electronics USA DT-KG Users Manual

6-4 Replacing the CPU
The shape and replacement method of the CPU fan may be different depending on the model.
Remove 4 screws and then disassemble the computer case as the arrow indic ates.
Align the groove to the right position, pins can easily be broken.
Clamps on both sides of the CPU fasten the fan tightly to the CPU socket. raise the handle , release the clamps, and then spread them outward .
After releasing the clamps, lift and remove the CPU.
70 System Expansion

Raise the handle on the CPU socket to unlock the CPU.
Lift the CPU straight up. Be careful not to damage the pins at the bottom of the CPU.
Align the identifying marks at the corners of the new CPU and socket, and carefully install the CPU in the socket. Lower the handle to lock the CPU in place.
Always wear gloves to avoid injuries.
System Expansion 71

 Replacing CPU
Clamps on both sides of the CPU fasten the fan tightly to the CPU socket. raise the handle , release the clamps, and then spread them outward .
After releasing the clamps, lift and remove the CPU fan from the socket.
Raise the handle on the CPU socket to unlock the CPU.
72 System Expansion

Lift the CPU straight up. Be careful not to damage the pins at the bottom of the CPU.
Align the identifying marks at the corners of the new CPU and socket, and carefully install the CPU in the socket. Lower the handle to lock the CPU in place.
Lower the handle as shown picture and lock the clamps as shown picture .
In a specific system, clamps are not fully open.
Raise the CPU fan from the fully opened space.
To assemble it, install from the opposite side.
System Expansion 73

6-5. Increasing the memory
If you run out of memory while using the computer, you may want to increase the amount of memory in your computer.
About memory
Your computer uses DDR(Double Data Rate) SDRAM DIMM(Dual In-Line Memory Module) with 184 pins. Your computer supports Unbuffered DDR SDRAM DIMM of 128MB up to 1024MB in size in each socket, and 2048MB total.
Note
Windows 95, 98SE, ME supports memory up to 512MB total. Increasing the memory beyond 512MB in these systems may cause errors while using the computer.
Always wear gloves to avoid injury when disassembling the computer
Static electricity can damage memory modules be sure to minimize the static electricity when replacing memory.
Make sure to replace the memory of the same type as the installed memory. DIMM is different from SIMM in that it is configured for 64 bit operation; therefore,
your computer can operate with only one DIMM installed.
Note
Use a 2.5V DDR SDRAM DIMM.(The shape of the memory may be different depending on the model) DDR SDRAM enhances the rate of data transmission of the SDRAM and looks different from SDRAM.
DDR
74 System Expansion

Your computer supports PC2700/3200 DDR memory.
Use Unbuffered DDR SDRAM DIMM only to increase the memory.
Dual channel mode operates when each identical memory is installed in the same color of DIMM slot.
FSB Frequency |
Supported memory type |
|
|
|
|
533/800MHz |
PC2700/3200-DDR SDRAM 333/400MHz |
|
|
|
Purchasing a memory
Check the type of memory installed in your computer and refer to the memory configuration chart before purchasing a memory.
Specification: PC2700/3200(184 pin DDR SDRAM DIMM) Speed: 333MHz(166MHz X 2), 400MHz(200MHz X 2) Size: 256MB, 512MB
Memory configuration chart
Total memory |
DIMM 1 |
DIMM 2 |
|
DIMM 3 |
DIMM 4 |
DUAL/SINGLE |
256MB |
|
|
256 |
|
SINGLE |
|
|
256MB |
|
|
256MB |
|
DUAL |
|
|
|
|
|
|
|
512MB |
|
256MB |
|
|
256MB |
DUAL |
|
|
|
|
|
|
|
|
|
512 (1/4) |
|
SINGLE |
||
|
256MB |
256MB |
|
256MB |
256MB |
DUAL |
1024MB |
|
|
|
|
|
|
512MB |
|
|
512MB |
|
DUAL |
|
|
|
|
|
|
|
|
|
|
512MB |
|
|
512MB |
DUAL |
2048MB |
512MB |
512MB |
|
512MB |
512MB |
DUAL |
|
|
|
|
|
|
|
Note
Dual channel improves the efficiency of the system.
Each identical memory should be used for dual channel setting.
Dual channel setting is recommended.
System Expansion 75

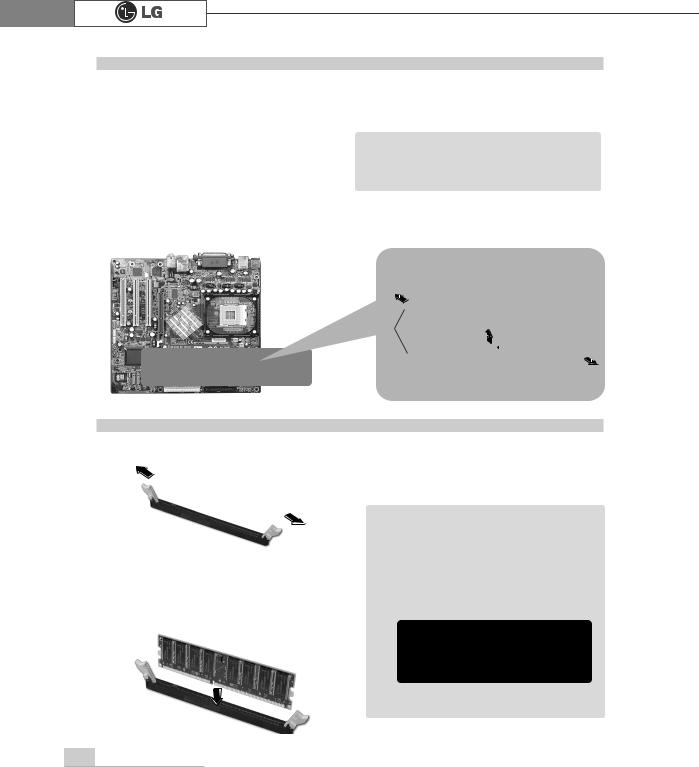
Replacing the memory
The main board configuration, memory socket, and the shape of memory may be different depending on the model.
Note
Remove the screws on the rear of the computer, and open the com puter case.
Before opening the case, turn off the computer and peripheral devices, and remove the power cords.
Pull the latch on each side of a memory socket to release the memory.
Latch
Installing a memory
Pull the latch on each side of a memory socket.
Align the notch at the bottom of the memory with a protrusion in the middle of the socket, and then insert the memory straight down.
Note
For dual channel system, each mem ory should be installed in independent slot(1&3 slot or 2&4 slot) when using DDR Memory
It is recognized as a single channel if there is a difference between dual channel 1 and 3, 2 and 4.
Firmly push the latch to lock the memory.
76 System Expansion
 Loading...