

Page 1
E-mail
You can use the E-mail application to read emails from services like Gmail. The E-mail
application supports the following account types: POP3, IMAP and Exchange.
Your service provider or system administrator can provide you with the account settings
you need.
Managing an email account
The first time you open the E-mail application, a set-up wizard opens to help you to set
up an email account.
After the initial set-up, E-mail displays the contents of your inbox.
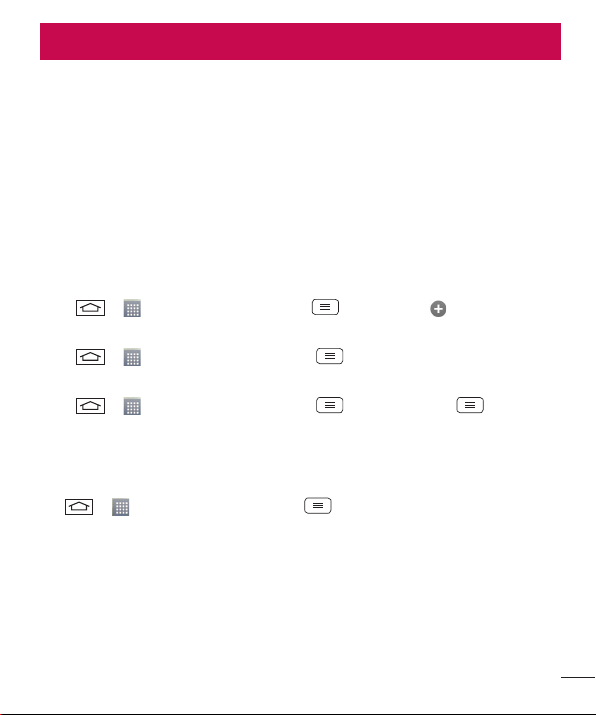
To add another email account:
• Tap > > Apps tab > E-mail >tap > Settings > Add account.
To change an email account's settings:
• Tap > > Apps tab > E-mail > tap > Settings > General settings.
To delete an email account:
• Tap > > Apps tab > E-mail > tap > Settings > tap > Remove
account > Select the account to delete > Remove > select Yes.
Working with account folders
Tap > > Apps tab > E-mail > tap and select Folders.
Each account has an Inbox, Outbox, Sent and Drafts folder. Depending on the features
supported by your account's service provider, you may have additional folders.
53
Page 2
E-mail
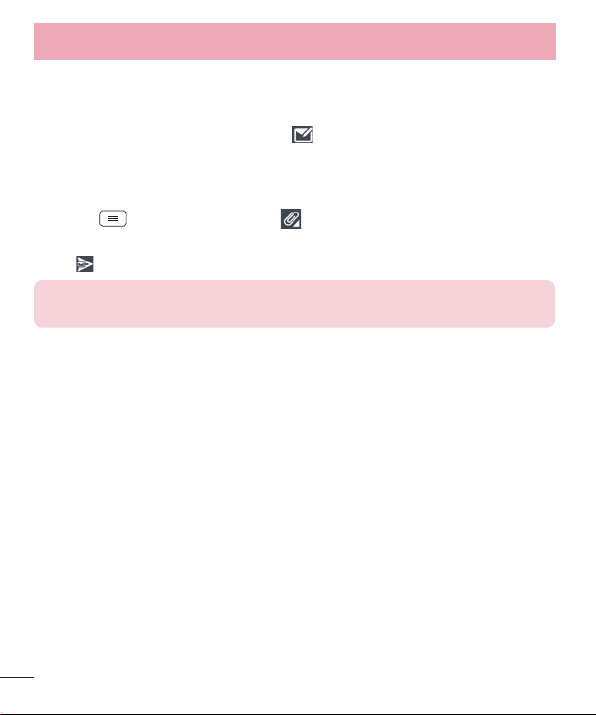
Composing and sending email
To compose and send a message
1 While in the E-mail application, tap the .
2 Enter an address for the message's intended recipient. As you enter text, matching
addresses will be proposed from your Contacts. Separate multiple addresses using
semicolons.
3 Tap the to add a Cc/Bcc and tap to attach files, if required.
4 Enter the text of the message.
5 Tap .
TIP! When a new email arrives in your Inbox, you will be notified by a sound
or vibration.
54
Page 3
Camera
With the OIS (Optical Image Stabilizer) camera on the phone, you can take a clearer
picture by removing physical shaking. The Multi Point AF (Autofocus) feature enables
you to get a clearer and natural picture even if the objects are not in the center.
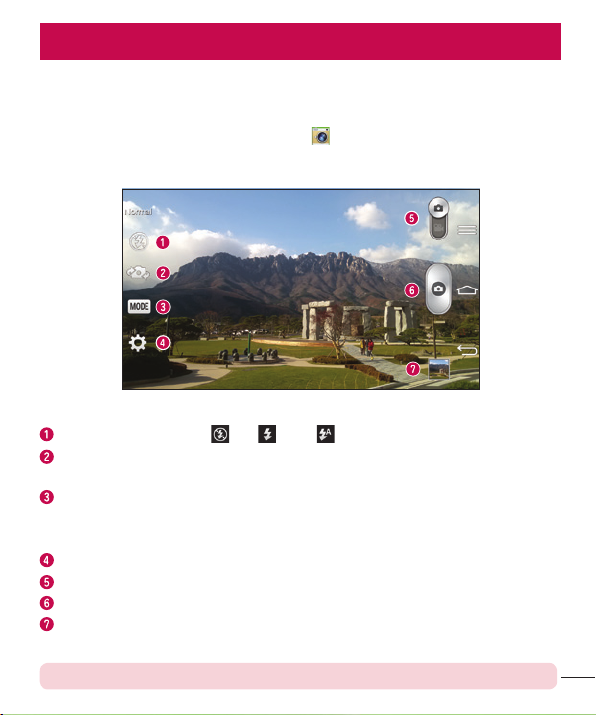
To open the Camera application, tap Camera on the Home screen.
Getting to know the viewfinder
Flash – Choose from Off , On , Auto .
Swap camera – Switch between the rear–facing camera lens and the front–facing
camera lens.
Shot mode – Choose from Normal, Shot & Clear, Dynamic tone (HDR),
Panorama, VR panorama, Burst shot, Beauty shot, Dual camera, Time catch
shot, Intelligent auto, Sports or Night.
Settings – Tap this icon to open the settings menu.
Video mode – Tap and slide down this icon to switch to video mode.
Capture button
Gallery – Tap to view the last photo you captured. This enables you to access your
gallery and view saved photos while in camera mode.
NOTE: Please ensure the camera lens is clean before taking pictures.
55
Page 4
Camera
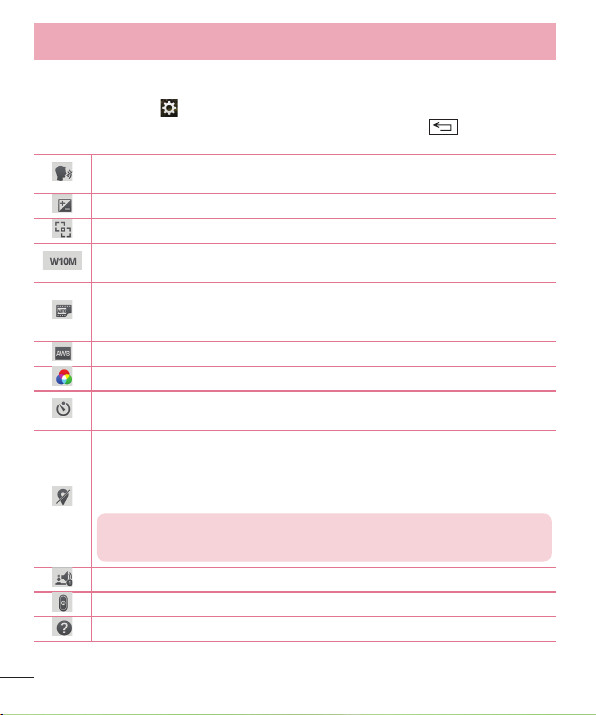
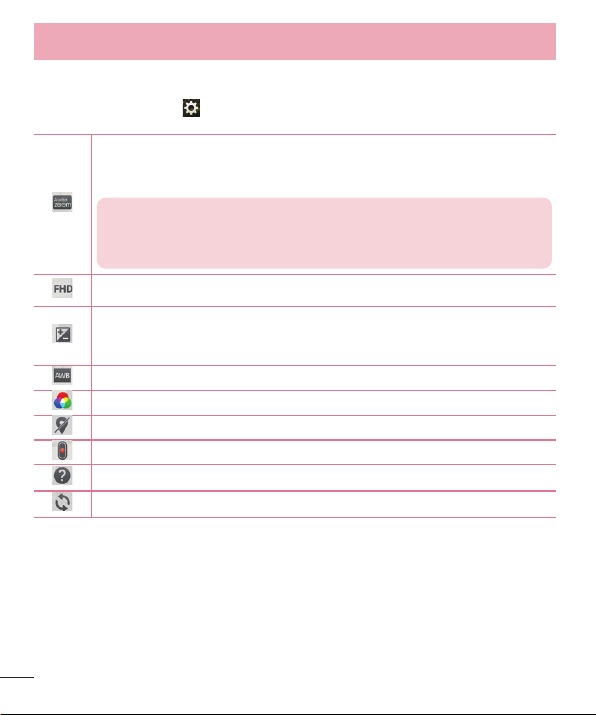
Using the advanced settings
In the viewfinder, tap to open the advanced options. You can change the camera
settings by scrolling through the list. After selecting the option, tap .
To take a photo, say one of the following words: Cheese, Smile, Whisky,
Kimchi or LG.
Defines and controls the amount of sunlight entering the photo.
Tap to select the focus mode.
Selects photo resolution. If you choose high resolution, file size will increase,
which means you will be able to store fewer photos in the memory.
The ISO rating determines the sensitivity of the camera's light sensor. The
higher the ISO, the more sensitive the camera. This is useful in darker
conditions when you cannot use the flash.
Improves color quality in various lighting conditions.
Applies artistic effects to your pictures.
Sets a delay after the capture button is pressed. This is ideal if you want to
be in the photo.
Activate this to use your phone's location-based services. Take pictures
wherever you are and tag them with the location. If you upload tagged
pictures to a blog that supports Geotagging, you can see the pictures
displayed on a map.
NOTE: This function is only available when the GPS function is
active.
Selects a shutter sound.
Set the Volume Key whether to use for the capture or zoom.
Opens the help guide to know how a function operates.
56
Page 5
Restores all camera default settings.
TIP!
• When you exit the camera, some settings return to their defaults, such as
white balance, color effect, timer and shot mode. Check these before you
take your next photo.
• The setting menu is superimposed over the viewfinder, so when you change
photo color or quality elements, you will see a preview of the changed
image behind the Settings menu.
Taking a quick photo
1 Open the Camera application and point the lens toward the subject your want to
photograph.
2 Focus boxes will appear in the center of the viewfinder screen. You can also tap
anywhere on the screen to focus on that spot.
3 When the focus box turns green, the camera has focused on your subject.
4 Tap to capture the photo.
Using Shot & Clear mode
This feature allows the camera to identify objects you may not want in your photo. After
taking the photo, tap an outlined object* to remove it, then save the photo.
1 Open the Camera application.
2 Tap > Shot & Clear.
3 Tap to take a picture.
57
Page 6
Camera
4 Tap any of the outlined objects to remove them from the photo, then tap .
* When taking a picture, moving objects are shown as dashed lines.
NOTES
• Take a picture after fixing the camera in one place.
• If the color of a subject is similar to the background, only a part may be
detected or it may be difficult to erase.
• If a moving subject is too small or too large, it may be difficult to erase.
• If the subject is moving insignificantly, it may not be detected.
Using Dual camera mode
Allows you to take a picture with the front and rear cameras at the same time,
combined into one picture.
1 Open the Camera application.
2 Tap > Dual camera.
3 A small viewfinder box appears on the main viewfinder screen. Set up your shot.
• Drag the small viewfinder to move it where you want it in the shot.
• Touch and hold the small viewfinder to resize it, if necessary.
• Tap the small viewfinder to swap the lens between the main viewfinder and the small
viewfinder.
4 Tap to take the combined picture.
Using Time catch shot mode
Sets the camera to capture missing moments by taking five sequential pictures before
is tapped.
1 Open the Camera application.
2 Tap > Time catch shot.
3 Tap to take a picture.
58
Page 7
4 To view the moments just before the picture was taken, tap the image thumbnail at
the bottom of the Camera screen.
5 Select the pictures that you want to keep, then tap at the top of the screen.
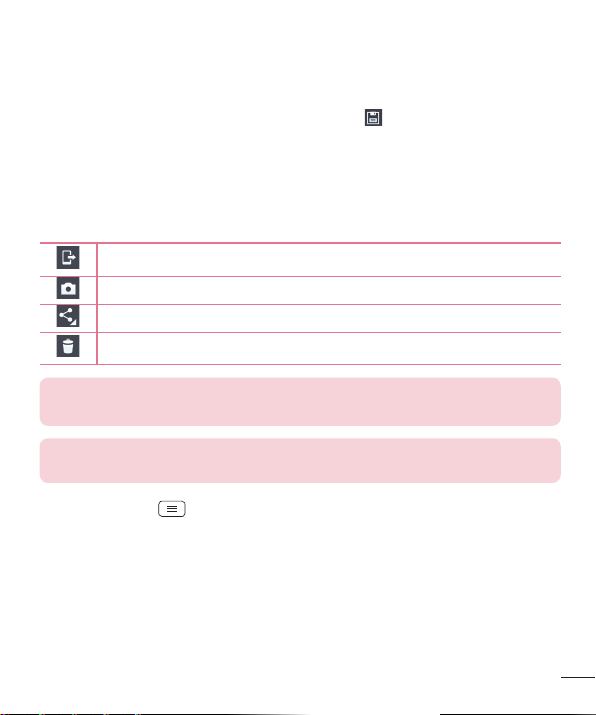
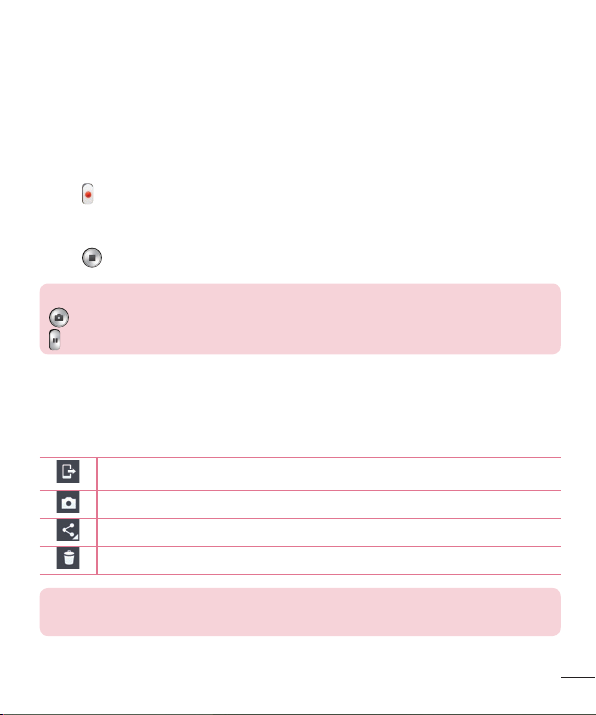
Once you've taken a photo
Tap the image thumbnail at the bottom of the Camera screen to view the last photo you
took.
Tap to share your photo using the SmartShare function.
Tap to take another photo immediately.
Tap to send your photo to others or share it via social network services.
Tap to delete the photo.
TIP! If you have an SNS account and set it up on your phone, you can share
your photo with your SNS community.
NOTE: Additional charges may apply when MMS messages are downloaded
while roaming.
Tap the Menu key to open all advanced options.
Set image as – Tap to use the photo as a Contact photo, Home screen wallpaper,
Lock screen wallpaper or Wallpaer.
Move – Tap to move the photo to another place.
Copy – Tap to copy the selected photo and save it to another album.
Copy to Clip Tray – Tap to copy the photo and store in the Clip Tray.
Rename – Tap to edit the name of the selected photo.
Rotate left/right – To rotate left or right.
59
Page 8

Camera
Crop – Crop your photo. Move your finger across the screen to select the area to be
cropped.
Edit – View and edit the photo.
Slideshow – Automatically shows you the images in the current folder one after the
other.
Add location – To add the location information.
Details – Find out more information about the file.
From your Gallery
Tap Gallery and select Camera.
• To view more photos, scroll left or right.
• To zoom in or out, double-tap the screen or place two fingers and spread them apart
(move your fingers closer together to zoom out).
60
Page 9
Video camera
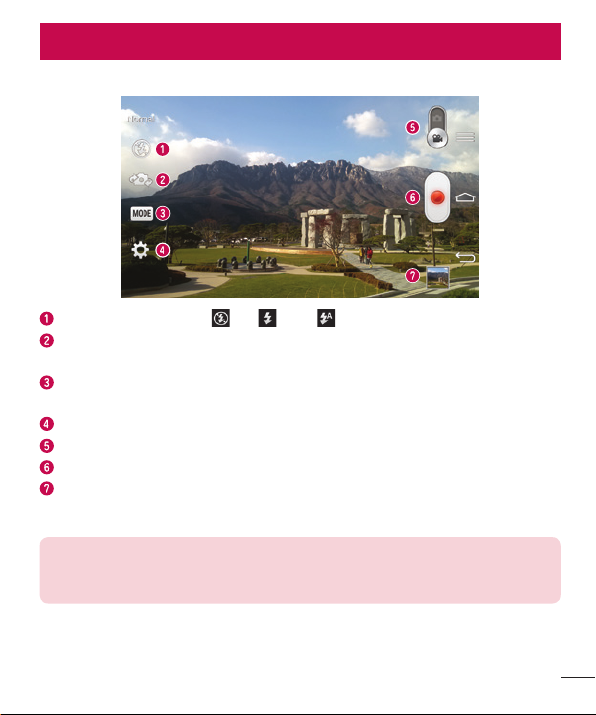
Getting to know the viewfinder
Flash – Choose from Off , On , Auto .
Swap camera – Switch between the rear–facing camera lens and the front-facing
camera lens.
Recording mode – Choose from Normal, Live effect, Dual recording, or Tracking
zoom.
Settings – Tap this icon to open the settings menu.
Camera mode – Tap and slide up this icon to switch to camera mode.
Start recording
Gallery – Tap to view the last video you recorded. This enables you to access your
gallery and view your saved videos while in video mode.
TIP!
When recording a video, place two fingers on the screen and pinch to use the
Zoom function.
61
Page 10
Video camera
Using the advanced settings
Using the viewfinder, tap to open all the advanced options.
Tap to turn on Audio zoom feature. You can record only the sound you want
clearly and loudly. After turning this on, focus the subject you want to zoom,
on inside the blue circle. To zoom in on sounds as well as sight, pinch in.
NOTES
• Only available in landscape view.
• Do not cover the microphones on both sides.
Tap to set the size (in pixels) of the video you are recording.
Defines and controls of the amount of sunlight entering the lens. Slide the
brightness indicator along the bar towards “-” for a lower brightness video or
towards “+” for a higher brightness video.
Improves color quality in various lighting conditions.
Choose a colour tone to use for your new view.
Activate this to use your phone's location-based services.
Set the Volume Key whether to use for the record or zoom.
Opens the help guide to know how a function operates.
Restores all camera default settings.
62
Page 11
Recording a quick video
1 Open the Camera application and slide the Video mode button.
2 The video camera viewfinder appears on the screen.
3 Holding the phone, point the lens towards the subject you wish to capture in your
video.
4 Tap once to start recording.
5 A red light will appear at the top left corner of the viewfinder with a timer showing
the length of the video.
6 Tap on the screen to stop recording.
TIP!
– Tap to capture image during recording a video.
– Tap to pause during recording a video.
After recording a video
In the viewfinder, tap the video thumbnail at the bottom of the screen to veiw the last
video you took.
Tap to share your video using the SmartShare function.
Tap to record another video immediately.
Tap to send your video to others or share it via social network services.
Tap to delete the video.
NOTE: Additional charges may apply when MMS messages are downloaded
while roaming.
63
Page 12
Video camera
From your Gallery
Tap Gallery and select Camera. Tap on video play icon to play the video.
Adjusting the volume when viewing a video
To adjust the volume of a video while it is playing, use the volume keys on the back
side of the phone.
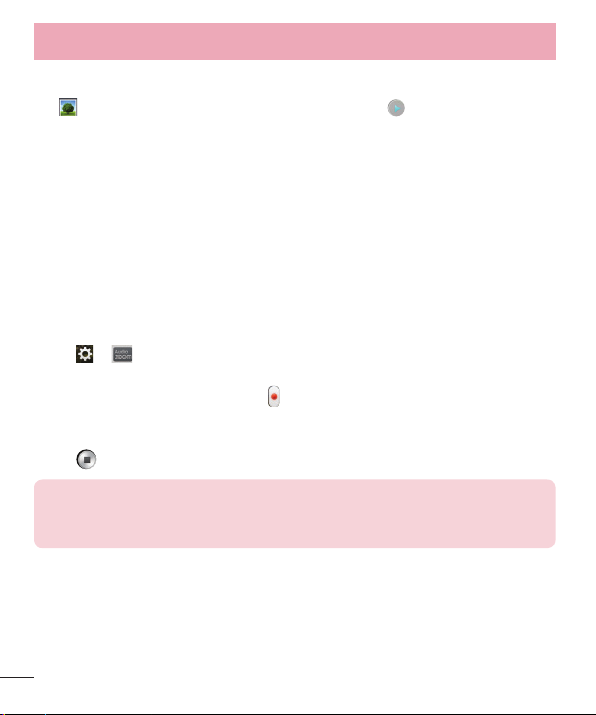
Using Audio Zoom
Focuses the audio recording on a particular area of your choosing; this will increase
microphone sensitivity and reduce background noise.
1 Open the Camera application and change to video mode
2 Tap > Audio zoom and select On.
3 Tap an empty space on viewfinder to close the Setting pop-up window.
4 Hold the phone horizontally and tap to start recording.
5 Focus the subject you want to zoom in on inside the blue circle. Then, pinch to
zoom in to increase sound sensitivity and decrease noise.
6 Tap to stop recording.
NOTES
• Do not cover the side microphones while using this feature.
• You must record in landscape orientation to use this function.
64
Page 13
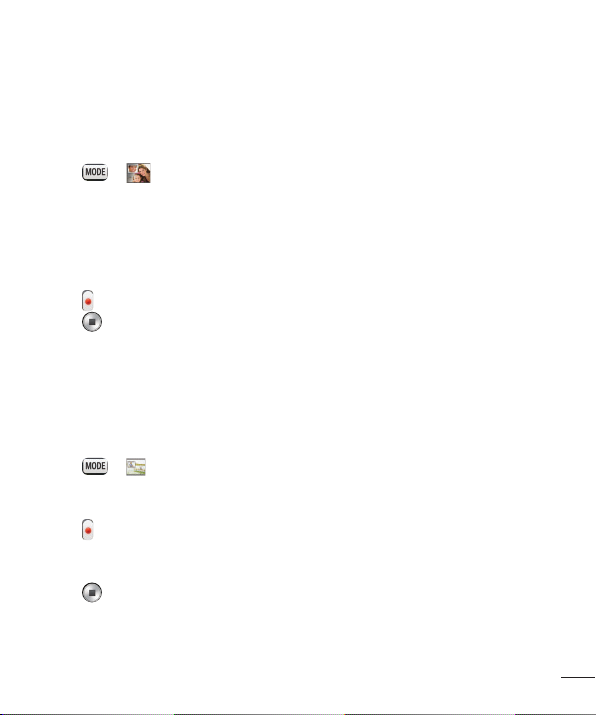
Using Dual recording mode
Allows you to record videos with the front and rear cameras at the same time,
combined into one recording.
1 Open the Camera application and change to video mode
2 Tap > Dual recording.
3 A small viewfinder box appears on the main viewfinder screen. Set up your shot.
• Drag the small viewfinder to move it where you want it in the shot.
• Touch and hold the small viewfinder to resize it, if necessary.
• Tap the small viewfinder to swap the lens between the main viewfinder and the small
viewfinder.
4 Tap to start dual recording.
5 Tap to stop dual recording.
Using Tracking zoom mode
Allows you to define an area of the recording to focus on and enlarge. You can set the
area before recording, then move it as necessary during the recording.
1 Open the Camera application and change to video mode
2 Tap > Tracking zoom.
3 Drag the magnifying glass to the area to enlarge. The small screen shows the
defined focus in large view.
4 Tap to start recording.
• While recording, you can move the small screen. Touch and drag it to the desired
location.
5 Tap to stop recording.
65
Page 14
Function
QuickMemo
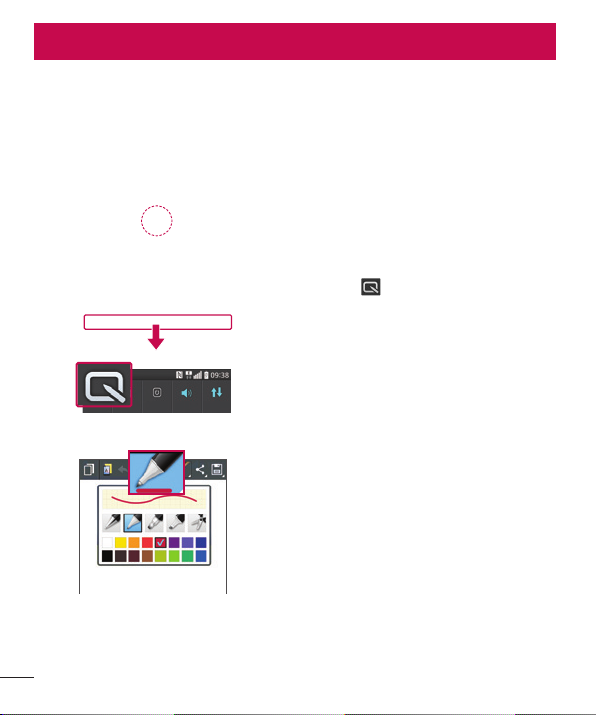
The QuickMemo allows you to create memos and capture screen shots.Capture
screens, draw on them and share them with family and friends with QuickMemo.
1 (While screen is switched off) Press
and hold the Volume Up key.
OR
OR
Touch and slide the status bar downward
and tap
2 Select the desired menu option from
Pen type, Colour, Eraser and create
a memo.
.
66
Page 15
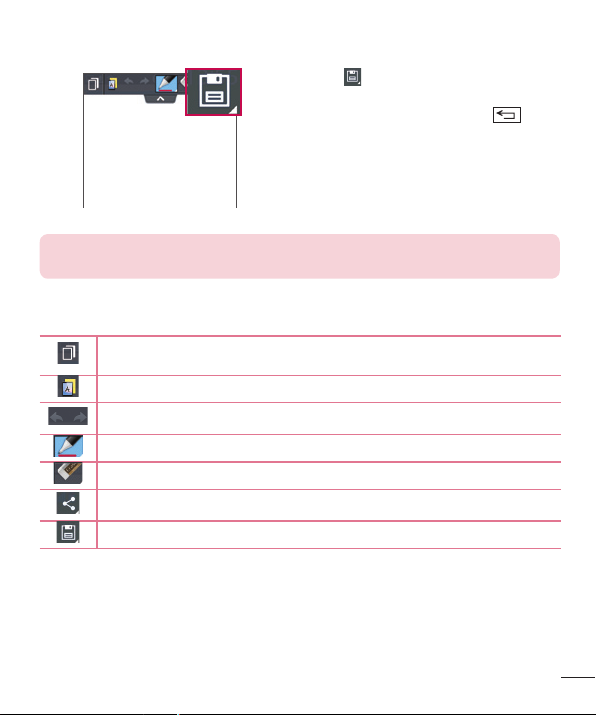
3 Tap in the Edit menu to save the
memo with the current screen. To exit
QuickMemo at any time, tap .
NOTE: Please use a fingertip while using the QuickMemo. Do not use your
fingernail.
Using the QuickMemo options
You can easily use the QuickMenu options when using the QuickMemo.
Tap to keep the current QuickMemo as a text overlay on the screen and
continue to use the phone.
Selects whether to use the background screen or not.
Undo or Redo.
Selects the pen type and the colour.
Erases the memo that you created.
Tap to share the memo with others via any of the available applications.
Saves the memo with the current screen in the Gallery or Notebook.
Viewing the saved QuickMemo
Tap Notebook/Gallery and select the QuickMemo album.
QuickTranslator
Simply aim the camera of your smart phone at the foreign sentence you want to
67
Page 16
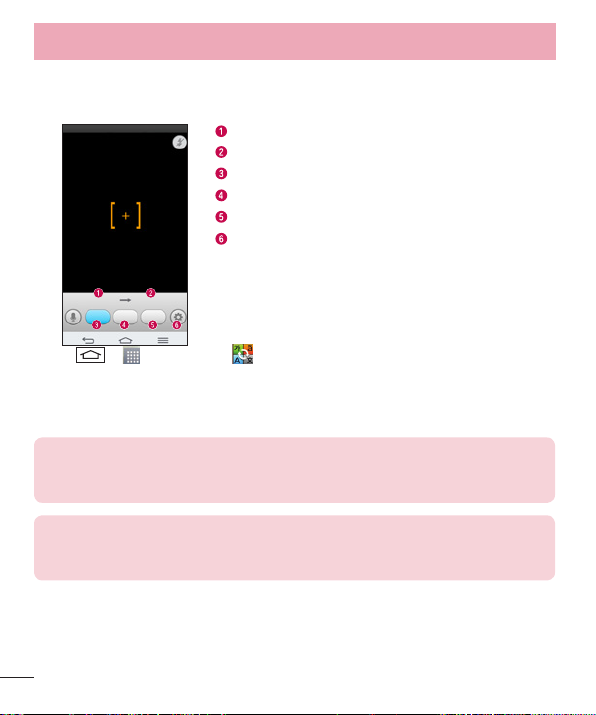
Function
understand. You can get the real-time translation anywhere and anytime.
You can buy additional dictionaries for offline translation from the Google Play Store.
Home language.
Destination language.
Translation of word.
Translation of sentence.
Translation of block.
Settings.
1 Tap > > Apps tab > QuickTranslator.
2 Tap Word, Line or Block.
3 Tap and select the desired language.
4 Hold the phone toward the subject you want to translate for a few seconds.
NOTE: Only one dictionary is provided free of charge. Additional dictionaries
must be purchased. Please select from the list below the dictionary you would
like to install as your complimentary dictionary.
NOTE: There may be a difference in the rate of recognization depending
on the size, font, color, brightness and angle of the letters that need to be
translated.
QSlide
From any screen, bring up a notepad, calendar, and more as a window inside your
68
Page 17
screen.
Tap to exit the QSlide and return to
full window.
Tap to adjust transparency.
OR
Tap to end the QSlide.
Tap to adjust the size.
1 Touch and slide the status bar downwards > tap QSlide apps or while using
applications that support QSlide, tap . The function will be continuously displayed
as a small window on your screen.
2 You can make a call, browse the Web, or choose other phone options. You can also
use and tap the screen under the small windows when the transparency bar is not
full .
NOTE: The QSlide can support up to two windows at the same time.
69
Page 18
Function
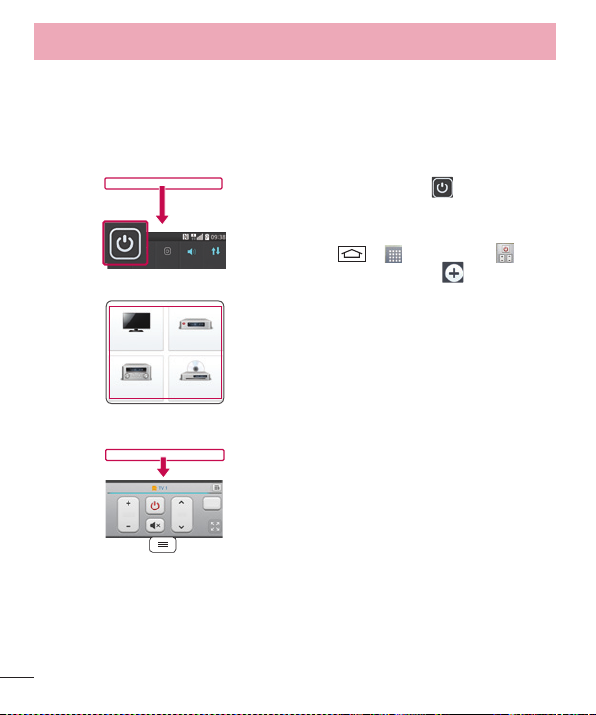
QuickRemote
QuickRemote turns your phone into a Universal Remote for your home TV, Set top box,
audio system, DVD/Blu-ray players, air conditioner and projector.
1 Touch and slide the status bar
downwards and tap > ADD
REMOTE.
OR
Tap > > Apps tab >
QuickRemote > tap .
2 Select the type and brand of device,
then follow the on-screen instructions
to configure the device(s).
3 Touch and slide the status bar
downwards and use QuickRemote
functions.
Tap the Menu key to select Magic Remote setting, Edit remote name, Learn
remote, Move remote, Delete remote, Edit room, Settings and Help.
70
Page 19
NOTE: The QuickRemote operates the same way as an ordinary remote
control infrared (IR) signals. Be careful not to cover the infrared sensor at
the top of the phone when you use the QuickRemote function. This function
may not be supported depending on the model, the manufacturer or service
company.
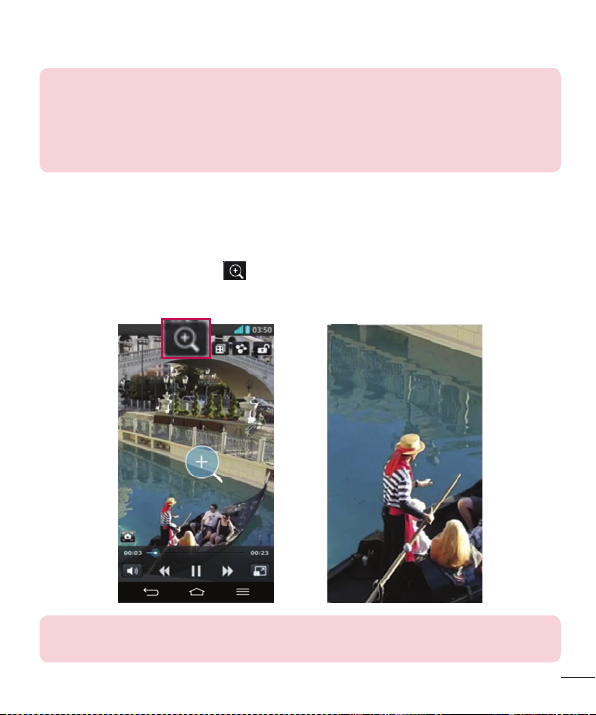
Zoom to Track
When you play a video, you can enlarge an object while tracking it.
1 When you play a video, tap .
2 Touch the magnifying glass and drag it to the object to track.
NOTE: Zoom to Track may not be available if the object moves too fast or off
from the screen.
71
Page 20
Function
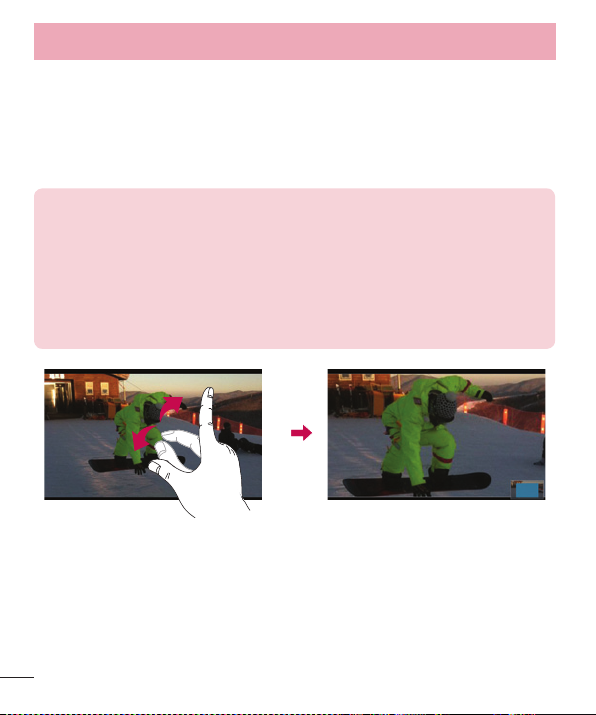
Live Zooming
Live Zooming allows you to zoom in or zoom out on a portion of a video that is being
played to make the desired section appear larger or smaller.
When viewing a video, use your index finger and thumb in a pinching or spreading
motion to zoom in or out.
NOTE:
• While a video is playing, slide left side on the screen up or down to adjust
the screen brightness.
• While a video is playing, slide right side of the screen up or down to adjust
the screen volume.
• While playing a video, slide the screen left or right to rewind or fast-forward.
• Do not press too hard; the touch screen is sensitive enough to pick up a
light, but firm tap.
72
Page 21

VuTalk
With the VuTalk feature, you can make an interactive and more creative notes with the
other party. Visual communication is possible while sharing a photo, a map or camera
preview.
NOTE:
• Only available with a phone that supports this feature as well.
• You can also use the VuTalk feature during a call.
• The screen will lock if there is no input.
• Requires data connection. Data charge will apply to both phones.
Register VuTalk Before Use
1 Tap > Contacts > .
You can also register VuTalk service while you are in a call.
2 Read the LG apps terms and conditions and privacy policy. If you agree, tap the
check boxes, then tap Accept.
VuTalk Settings
1 Tap > Contacts > > VuTalk settings .
2 Set the following options as your preferences.
• Notification sound: Select the desired notification sound.
• Vibrate: Select the desired vibrate type.
• Show request: Checkmark this option to display a pop-up when a VuTalk request is
received.
• Contact sync: Checkmark this option to sync contacts.
73
Page 22
Function
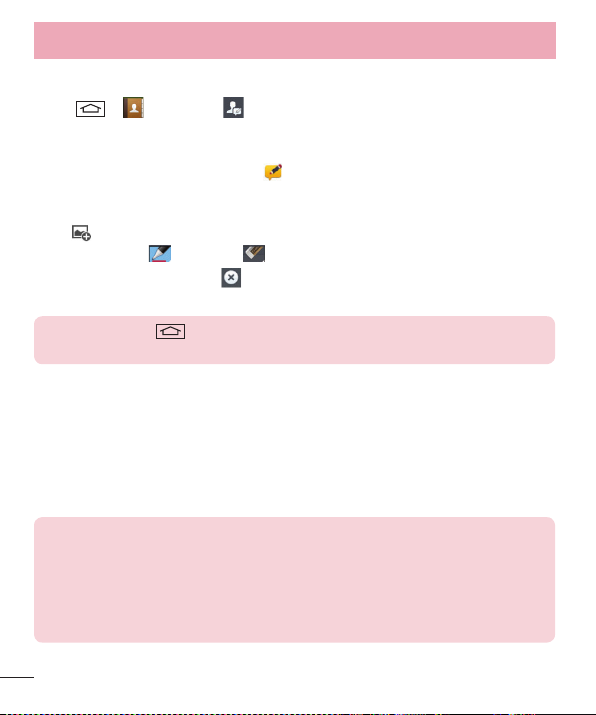
Communicate Visually with VuTalk
1 Tap > Contacts > .
Only the contacts who use the VuTalk feature will be displayed.
2 Tap a contact to start VuTalk with.
3 In the contact's details screen, tap . After the other party accepts your VuTalk
request, you can start VuTalk with him/her.
4 Use the VuTalk screen to chat and visually communicate with your friend.
• Tap to attach a photo, take a new photo, map view, or a sticker.
• Tap the Pen icon and Eraser icon to write on the images you attached.
5 When you finish VuTalk, tap or to exit the VuTalk feature.
The created VuTalk screen is stored in the Notebook app.
NOTE: If you tap and go back to the Home screen, the VuTalk feature
still runs in the background.
Voice Mate
Voice Mate allows you hands-free interaction with your devices. You can ask Voice Mate
to perform phone functions using your voice, such as calling a contact, setting alarms
or searching the web. When you access this feature for the first time, it displays help
information to assist you in learning how to use this function.
NOTE:
• You can use Voice Mate after agreeing the End User License Agreement
and Privacy policy.
• You can view examples of various commands by swiping the Voice Mate
main screen to the left.
• You can also launch Voice Mate using the Quick Access feature.
74
Page 23
Use Voice Mate
1 Tap > > Voice Mate.
2 Tap to turn it on. Say what you want it to do for you.
TIP! Use Voice Mate in a quiet environment so it can accurately recognize
your commands.
Voice Mate Settings
1 Tap > > Voice Mate.
2 Tap > Settings to configure the environment settings.
LG SmartWorld
LG SmartWorld offers an assortment of exciting content - games, applications,
wallpaper and ringtones - giving LG phone users the chance to enjoy richer "Mobile
Life" experiences.
How to Get to LG SmartWorld from Your Phone
1 Tap > > Apps tab > tap the icon to access LG SmartWorld.
2 Tap Sign in and enter ID/PW for LG SmartWorld. If you have not signed up yet, tap
Register to receive your LG SmartWorld membership.
3 Download the content you want.
NOTE: What if there is no icon?
1 Using a mobile Web browser, access LG SmartWorld (www.lgworld.com)
and select your country.
2 Download the LG SmartWorld App.
3 Run and install the downloaded file.
4 Access LG SmartWorld by tapping the
icon.
75
Page 24

Function
How to use LG SmartWorld
• Participate in monthly LG SmartWorld promotions.
Search content.
Find content by category (e.g. Games, Education, Entertainment etc).
• Try the easy "Menu" buttons to find what you’re looking for fast.
Settings – Set Profile and Display.
Sign in – Set your ID and Password.
• Try other useful functions as well. (Content Detail screen)
NOTE: LG SmartWorld may not be available from all carriers or in all
countries.
On-Screen Phone
On-Screen Phone allows you to view your mobile phone screen from a PC via a USB
or Wi-Fi connection. You can also control your mobile phone from your PC, using the
mouse or keyboard.
On-Screen Phone icons
Connects your mobile phone to your PC, or disconnects it.
Changes the On-Screen Phone preferences.
Exits the On-Screen Phone programme.
Maximises the On-Screen Phone window.
Minimize the On-Screen Phone window.
On-Screen Phone features
76
Page 25

• Real-time transfer and control: displays and controls your mobile phone screen when
connected to your PC.
• Mouse control: allows you to control your mobile phone by using the mouse to click
and drag on your PC screen.
• Text input with keyboard: allows you to compose a text message or note using your
computer keyboard.
• File transfer (mobile phone to PC): sends files from your mobile phone (e.g. photos,
videos, music and POLARIS Viewer 5 files) to your PC. Simply right-click on the file
which you want to send to PC and click on "Save to PC".
• File transfer (PC to mobile phone): sends files from your PC to your mobile phone.
Just select the files you wish to transfer and drag and drop them into the On-Screen
Phone window. The files sent are stored in internal SD card.
• Real-time event notifications: prompts a pop-up to inform you of any incoming calls or
text/multimedia messages.
How to install On-Screen Phone on your PC
1 Visit LG Home (www.lg.com) and select a country of your choice.
2 Go to Support > Mobile Phone Support > Select the Model (LG-D802) > Click
OSP ( On-Screen Phone ) to download. You can install the On-Screen Phone on
your PC.
77
Page 26

Multimedia
Gallery
Open the Gallery application to view albums of your pictures and videos.
1 Tap > > Apps tab > Gallery.
You can manage and share all your image and video files with Gallery.
NOTE:
• Some file formats are not supported, depending on the software installed
on the device.
• Some files may not play properly, depending on how they are encoded.
Viewing pictures
Launching Gallery displays your available folders. When another application, such as
Email, saves a picture, the download folder is automatically created to contain the
picture. Likewise, capturing a screenshot automatically creates the Screenshots folder.
Select a folder to open it.
Pictures are displayed by creation date in a folder. Select a picture to view it full screen.
Scroll left or right to view the next or previous image.
Zooming in and out
Use one of the following methods to zoom in on an image:
• Double-tap anywhere to zoom in.
• Spread two fingers apart on any place to zoom in. Pinch to zoom out, or double-tap
to return.
78
Page 27

Playing videos
Video files show the icon in the preview. Select a video to watch it and tap . The
Videos application will launch.
Editing photos
When viewing an photo, tap the Menu key > Edit.
Deleting photos/videos
Use one of the following methods:
• In a folder, tap and select photos/videos by ticking, and then tap on Delete.
• When viewing a photo/Video, tap .
Setting as wallpaper
When viewing a photo, tap the Menu key > Set image as to set the image as
wallpaper or assign to a contact.
NOTE:
• Some file formats are not supported, depending on the device software.
• If the file size exceeds the available memory, an error can occur when you
open files.
Videos
Your phone has a built-in video player that lets you play all of your favorite videos. To
access the video player, tap > > Apps tab > Videos.
79
Page 28

Multimedia
Playing a video
1 Tap > > Apps tab > Videos.
2 Select the video you want to play.
Tap the desired direction for audio zoom.
Tap to use Zoom to Track feature.
Tap to enter into Qslide mode.
Tap to share your video via the SmartShare function.
Tap to lock a video screen.
Tap to view the video list.
Tap to capture the screen shot.
Tap to pause video playback.
Tap to resume video playback.
Tap to go 10 seconds forward.
Tap to go 10 seconds backward.
Tap to manage the video volume.
Tap to change the ratio of the video screen.
To change the volume while watching a video, press the up and down volume keys on
the rear side of the phone.
Touch and hold a video in the list. The Share, Delete, Trim and Details options will be
displayed.
80
Page 29

Video Editor
You can edit the photos or videos stored on the phone.
X Tap > > Apps tab > Video Editor.
NOTE: Video Editing function is supported only for photos or videos which
recorded with this phone.
< Project list screen >
Project List Area
Tap a project to edit it.
Project Title
Tap here to edit the title.
Buttons Area
Create a new project.
Share the video project with other applications, such as YouTube.
Export the finished project to play in other applications.
Delete the video project.
View the help information.
81
Page 30

Multimedia
< Project edit screen >
Viewer area
Timeline area
Tap to view the Project list screen.
Tap to play the current clip.
Tap to remove the last the selected clip.
Tap to add additional video, images, or audio clips.
Tap to choose to video style.
Tap to add text in video clip.
Tap to split video clip.
Music
Your phone has a built-in music player that lets you play all your favorite tracks. To
access the music player, tap > > Apps tab > Music.
Add music files to your phone
Start by transferring music files to your phone:
• Transfer music using Media sync (MTP).
• Download from the wireless Web.
• Synchronize your phone to a computer.
82
Page 31

• Receive files via Bluetooth.
Transfer music using Media sync (MTP)
1 Connect the phone to your PC using the USB cable.
2 Select the Media sync (MTP) option. Your phone will appear as another hard drive
on your computer. Click on the drive to view it. Copy the files from your PC to the
drive folder.
3 When you’re finished transferring files, swipe down on the Status Bar and tap USB
connected > Charge phone. You may now safely unplug your device.
Playing a song
1 Tap > > Apps tab > Music.
2 Tap Songs.
3 Select the song you want to play.
Tap to pause playback.
Tap to resume playback.
Tap to skip to the next track in the album, playlist, or shuffle. Touch and hold
to fast forward.
Tap to restart the current track or skip to the previous track in the album,
playlist, or shuffle. Touch and hold to rewind.
Tap to display the Volume slider bar, then adjust the playback volume on the
slider bar.
Tap to set audio effects.
Tap to find the files with YouTube.
Tap to open the current playlist.
Tap to add the song to your favourites.
83
Page 32

Multimedia
Tap to play the current playlist in shuffle mode (tracks are played in random
order).
Tap to toggle through the repeat modes to repeat all songs, repeat current
song, or repeat off.
Tap to share your music via the SmartShare funtion.
To change the volume while listening to music, press the up and down volume keys on
the back side of the phone.
Touch and hold any song in the list. The Play, Add to playlist, Share, Set as ringtone,
Delete, Details and Search options will be displayed.
NOTE:
• Some file formats are not supported, depending on the device software.
• If the file size exceeds the available memory, an error can occur when you
open files.
NOTE: Music file copyrights may be protected by international treaties and
national copyright laws.
Therefore, it may be necessary to obtain permission or a licence to reproduce
or copy music.
In some countries, national laws prohibit private copying of copyrighted
material. Before downloading or copying the file, check the national laws of
the relevant country concerning the use of such material.
84
Page 33

Utilities
Slide Aside (Quick task-switching with THREE fingers)
You can quickly switch to another task using three fingers.
1 Place three fingers on the screen which you are currently working on and slide the
screen to the left. The current screen is saved and you can do another task.
• You can save up 3 (three) apps in the left side of the screen.
2 To reopen the saved screen and continue to use the app, place three fingers on a
screen and slide it to the right.
NOTE: Please be careful not to place another fingers or palm on the screen.
Guest Mode
To protect your privacy or limit some applications to your children, you can use the
Guest mode.
When you lend your phone to others, you can limit the applications to be displayed.
In advance, set the Guest mode and customize the options.
NOTE: To use the Guest mode, the pattern lock should be set in advance.
1 Tap > > Apps tab > Settings > General tab > Guest mode.
2 Tap Use Guest mode to place a checkmark.
Setting your alarm
1 Tap > > Apps tab > Alarm/Clock > .
2 After you set the alarm, your phone lets you know how much time is left before the
alarm will go off.
3 Set Repeat, Snooze duration, Vibration, Alarm sound, Alarm volume, Auto app
starter, Puzzle lock and Memo. Tap Save.
85
Page 34

Utilities
NOTE: To change alarm settings in the alarm list screen, tap the Menu key
and select Settings.
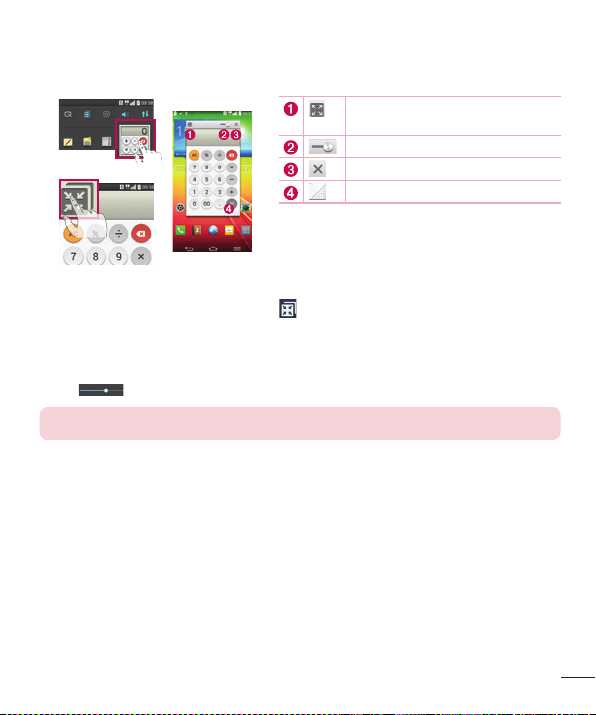
Using your calculator
1 Tap > > Apps tab > Calculator.
2 Tap the number keys to enter numbers.
3 For simple calculations, tap the function you want to perform (+, –, x or ÷) followed
by =.
4 For more complex calculations, slide the left then choose sin, cos, tan, log etc.
5 To check the history, tap the icon .
Adding an event to your calendar
1 Tap > > Apps tab > Calendar.
2 On the screen, you can find the different view types for the Calendar (Day, Week,
Month, Year, Agenda, Life Square).
3 Tap on the date for which you wish to add an event and tap .
4 Tap Event name and enter the event name.
5 Tap Location and enter the location. Check the date and enter the time you wish
your event to start and finish.
6 If you wish to add a note to your event, tap Link note to select the saved notebook
image. (Only available on the Phone calendar)
7 If you wish to repeat the alarm, set REPEAT and set REMINDERS, if necessary.
8 Tap Save to save the event in the calendar.
86
Page 35

Voice Recorder
Use the voice recorder to record voice memos or other audio files.
Recording a sound or voice
1 Tap > > Voice Recorder.
2 Tap to begin recording.
3 Tap to end the recording.
4 Tap to listen to the recording.
NOTE: Tap to access your album. You can listen to the saved recording.
The available recording time may differ from actual recording time.
Sending the voice recording
1 Once you have finished recording, you can send the audio clip by tapping .
2 Choose from Bluetooth, Drive, E-mail, Gmail, Memo, Messaging or SmartShare
Beam. When you select Bluetooth, Drive, E-mail, Gmail, Memo, Messaging or
SmartShare Beam the voice recording is added to the message. You may then
write and send the message as you usually would.
Task Manager
You can manage your applications using Task Manager. You can easily check the
number of applications that are currently running and shut down certain applications.
87
Page 36

Utilities
Tasks
This task can be synchronized with MS Exchange account. You can create task, revise it
and delete it in MS outlook or MS Office Outlook Web Access.
To Synchronize MS Exchange
1 From the Home Screen, Tap > > Apps tab > Settings.
2 Tap General tab > Accounts & sync > Add account.
3 Tap Microsoft Exchange to create Email address and Password.
4 Make sure if you checkmark Sync task.
NOTE: MS Exchange may not be supported depending on email server.
POLARIS Viewer 5
POLARIS Viewer 5 is a professional mobile office solution that lets users conveniently
view various types of office documents, including Word, Excel and PowerPoint files,
anywhere or anytime, using their mobile devices.
Tap > > Apps tab > POLARIS Viewer 5.
Viewing files
Mobile users can now easily view a wide variety of file types, including Microsoft Office
documents and Adobe PDF, right on their mobile devices. When viewing documents
using POLARIS Viewer 5, the objects and layout remain the same as in the original
documents.
88
Page 37

Google+
Use this application to stay connected with people via Google’s social network service.
• Tap > > Apps tab > Google+.
NOTE: This application may not be available depending on the region or
service provider.
Voice Search
Use this application to search webpages using voice.
1 Tap > > Apps tab > Voice Search.
2 Say a keyword or phrase when Speak now appears on the screen. Select one of
the suggested keywords that appear.
NOTE: This application may not be available depending on the region or
service provider.
Downloads
Use this application to see what files have been downloaded through the applications.
• Tap > > Apps tab > Downloads.
NOTE: This application may not be available depending on the region or
service provider.
89
Page 38

The Web
Internet
Use this application to browse the Internet. Browser gives you a fast, full-color world of
games, music, news, sports, entertainment and much more, right on your mobile phone
wherever you are and whatever you enjoy.
NOTE: Additional charges apply when connecting to these services and
downloading content. Check data charges with your network provider.
1 Tap > > Apps tab > Internet.
Using the Web toolbar
Tap slide it upwards with your finger to open.
Tap to go back one page.
Tap to go forward one page, to the page you connected to after the current
one. This is the opposite of what happens when you tap , which takes
you to the previous page.
Tap to go to the Home page.
Tap to add a new window.
Tap to access bookmarks.
Viewing webpages
Tap the address field, enter the web address and tap Go.
90
Page 39

Opening a page
To go to new page, tap .
To go to another webpage, tap , scroll up or down, and tap the page to select it.
Searching the web by voice
Tap the address field, tap , speak a keyword, and then select one of the suggested
keywords that appear.
NOTE: This feature may not be available depending on the region or service
provider.
Bookmarks
To bookmark the current webpage, tap > Add to bookmarks > OK.
To open a bookmarked webpage, tap and select one.
History
Tap > History to open a webpage from the list of recently-visited webpages. To
clear the history, tap Menu key Clear all history.
Using Popup Browser
Use this feature to access the Internet without closing the current application.
While viewing content, such as contacts or notes that include web addresses, select a
web address and then tap Popup Browser to open the pop-up browser. Touch and drag
the browser to move it to another location.
To view the browser in full screen, tap .
To close the browser, tap .
91
Page 40

The Web
Chrome
Use Chrome to search for information and browse webpages.
1 Tap > > Apps tab > Chrome.
NOTE: This application may not be available, depending on your region and
service provider.
Viewing webpages
Tap the Address field, and then enter a web address or search criteria.
Opening a page
To go to a new page, tab New tab.
To go to another webpage, tap , scroll up or down and tap the page to select it.
Syncing with other devices
Sync open tabs and bookmarks to use with Chrome on another device when you are
logged in with the same Google account.
To view open tabs on other devices, tap Menu key Other devices.
Select a webpage to open.
To add bookmarks, tap .
92
Page 41

Settings
This section provides an overview of items you can change using your phone's System
settings menus.
To access the Settings menu:
Tap > > System settings.
- or Tap > > Apps tab > Settings.
Networks
< Wi-Fi >
Wi-Fi – Turns on Wi-Fi to connect to available Wi-Fi networks.
TIP! How to obtain the MAC address
To set up a connection in some wireless networks with MAC filters, you may
need to enter the MAC address of your phone in the router.
You can find the MAC address in the following user interface: tap
Apps tab > Settings > Networks tab > Wi-Fi > > Advanced Wi-Fi
> MAC address.
< Bluetooth >
Turn the Bluetooth wireless feature on or off to use Bluetooth.
< Mobile data >
Displays the data usage and set mobile data usage limit.
< Call >
Configure phone call settings such as call forwarding and other special features offered
by your carrier.
Voicemail – Allows you to select your carrier’s voicemail service.
Fixed dialing numbers – Turn on and compile a list of numbers that can be called
from your phone. You’ll need your PIN2, which is available from your operator. Only
numbers within the fixed dial list can be called from your phone.
> >
93
Page 42

Settings
Incoming call pop-up – Display incoming call popup when using camera and videos.
Call reject – Allows you to set the call reject function. Choose from Call reject mode
or Reject calls from.
Decline with message – When you want to reject a call, you can send a quick
message using this function. This is useful if you need to reject a call during a meeting.
Privacy keeper – Hides the caller name and number for an incoming call.
Call forwarding – Choose whether to divert all calls when the line is busy, when there
is no answer or when you have no signal.
Auto answer – Set the time before a connected hands-free device automatically
answers an incoming call. Choose from Disable, 1 second, 3 seconds, and 5 seconds.
Connection vibration – Vibrates your phone when the other party answers the call.
Voice enhancement – Enhances voice quality in noisy environments so you can hear
more clearly.
Save unknown numbers – Add unknown numbers to contacts after a call.
Power button ends call – Allows you to select your end call.
Call barring – Lock incoming, outgoing or international calls.
Call duration – View the duration of calls including Last call, Outgoing calls, Incoming
calls and All calls.
Additional call settings – Allows you to change the following settings:
Caller ID: Choose whether to display your number in an outgoing call.
Call waiting: If call waiting is activated, the handset will notify you of an incoming call
while you are on a call (depending on your network provider).
< Share & connect >
NFC – Your phone is an NFC-enabled mobile phone. NFC (Near Field Communication)
is a wireless connectivity technology that enables two-way communication between
electronic devices. It operates over a distance of a few centimeters. You can share your
content with an NFC tag or another NFC support device by simply tapping it with your
device. If you tap an NFC tag with your device, it will display the tag content on your
device.
94
Page 43

To switch NFC on or off: From the Home screen, touch and slide the notification
panel down with your finger, then select the NFC icon to turn it on.
NOTE: When airplane mode is activated, the NFC application can be used.
Using NFC: To use NFC, make sure your device is switched on, and activate NFC if
disabled.
Android Beam – When this feature is turned on, you can beam app content to another
NFC-capable device by holding the devices close together.
Just bring the device together(typically back to back) and then tap your screen. The app
determines what gets beamed.
SmartShare Beam – Enable to receive files from LG phones.
Miracast – Mirror phone screen and sound onto Miracast dongle or TV Wirelessly.
Wireless storage – You can manage files on your phone in the computer or copy files
to the phone from the computer without a USB connection. After switching on Wireless
storage, make sure that the phone and computer are connected to the same network.
Then, enter the web addresses shown on your phone in the address bar of the browser
on your computer.
< Tethering & networks >
Wi-Fi hotspot – You can also use your phone to provide a mobile broadband
connection. Create a hotspot and share your connection. Please "Sharing your
phone's data connection" for more information.
Bluetooth tethering – Allows you to set your phone whether you are sharing the
Internet connection or not.
Help – Tap to view help information on the Wi-Fi hotspot and Bluetooth tethering
functions.
Airplane mode – After switching to Airplane mode, all wireless connections are
disabled.
95
Page 44

Settings
NOTE: You must set a lock screen PIN or password before you can use
credential storage.
Mobile networks – Set options for data roaming, network mode & operators, access
point names (APNs) etc.
Default SMS app – Allows you to set the default SMS app.
VPN – Displays the list of Virtual Private Networks (VPNs) that you've previously
configured. Allows you to add different types of VPNs.
Sound
Sound profile – Choose the Sound, either Vibrate only or Silent.
Volumes – Adjust the phone's volume settings to suit your needs and your
environment.
Vibrate strength – Allows you to set the vibrate strength for calls, notifications, and
touch feedback.
Quiet mode – Set up your Quiet mode. Tap the Turn quiet mode on now switch
to toggle it On or Off. You can schedule Quiet mode to activate automatically and
designate exceptions to your Quiet mode.
Set quiet time: Tap the switch to toggle it On or Off. You can also set the days and
times to automatically turn Quiet mode on.
Incoming call settings
Block incoming calls: Checkmark to block all incoming calls.
Allow repeated calls: Checkmark to allow a call that is repeated within 3 minutes.
Allowed contact lists: Designate which Contacts calls will be allowed.
Auto reply to blocked calls: Set how to you want to automatically reply to
silenced calls.
Phone ringtone – Set the ringtone for calls. You can also add a ringtone by tapping
at the top right corner of the screen.
96
Page 45

Smart ringtone – Checkmark to increase phone ringtone volume automatically in noisy
environments.
Incoming call vibration – Sets the incoming call vibration Options.
Gentle vibration – Checkmark to gradually increasing vibration up to current strength
set.
Ringtone with vibration – Checkmark to set the phone to vibrate in addition to the
ringtone when you receive calls.
Voice notifications – Tap the Voice notifications switch to toggle it On or Off. On
allows your device to incoming call and message events automatically.
Notification sound – Allows you to set the sound for notifications. You can also add a
sound by tapping at the top right corner of the screen.
Touch feedback & system – Allows you to set the feedback (tones and/or vibration)
while using your device.
Display
< Home screen >
Set the Theme, Wallpaper, Screen swipe effect, Allow Home screen looping, or
Portrait view only.
Home backup & restore – You can backup and restore app/widget layouts and
themes.
Do you know? – Select whether to include an additional Home screen for Do you
know, which is a video guide for the new features of G2.
Help – Tap to view help information on Home screen.
< Lock screen >
Select screen lock – Set a screen lock type to secure your phone. Opens a set of
screens that guide you through drawing a screen unlock pattern. Set None, Swipe,
Face Unlock, Pattern, PIN or Password.
97
Page 46

Settings
If you have enabled a Pattern lock type when you turn on your phone or wake up the
screen, you will be asked to draw your unlock pattern to unlock the screen.
Screen swipe effect – Sets the screen swipe effect options. Choose
from Ripple, Dewdrop, White hole, Particle, and Crystal.
NOTE: This setting name may be Pattern effect if the Screen lock is set to
Pattern.
Weather animation – Checkmark to show weather animation for current
location or primary city set in Weather based on auto data updates.
Wallpaper – Sets your Lock screen wallpaper. Select it from Gallery or
Wallpaper gallery.
Shortcuts – Allows you to change the shortcuts on the Swipe Lock screen.
Owner info – Checkmark to set the device owner’s name to be displayed on the Lock
screen. Tap to enter the text to be displayed as the Owner info.
Lock timer – Sets the amount of time before the screen automatically locks after the
screen has timed-out.
Power button instantly locks – Checkmark to instantly lock the screen when the
Power/Lock Key is pressed. This setting overrides the Security lock timer setting.
< Front touch buttons >
Set the Front Touch Keys displayed at the bottom of all of the screens. Set which ones
are displayed, their position on the bar, and what they look like. Select the keys and
order, the theme, and the background.
< SCREEN >
Brightness – Adjusts the brightness of the screen. For best battery
performance, use the dimmest comfortable brightness.
Screen timeout – Sets the amount of time before the screen times out.
Screen-off effect – Sets the screen-off effect. Choose from Fade out, Black hole, and
Retro TV.
98
Page 47

Auto-rotate screen – Checkmark to set the phone to automatically rotate the screen
based on the phone orientation (portrait or landscape).
Daydream – Tap the Daydream switch to toggle it On or Off. On allows the set
screensaver to be displayed when the phone is sleeping while docked and/or charging.
Choose from Clock, Colors, Photo Frame, and Photo Table.
< FONT >
Font type – Sets the type of font used for the phone and menus.
Font size – Sets the size of the font displayed in the phone and menus.
< SMART ON >
Smart screen – Checkmark to keep the screen from timing-out when the device
detects your eyes looking at the screen.
Smart video – Checkmark to pause the video when it doesn't detect your eyes looking
at the screen.
< ADVANCED SETTINGS >
Notification LED – Tap the switch to toggle it On or Off. On will activate the LED light
for the notifications you select, in the color you set for each one.
General
< Gestures >
Screen on/off – Checkmark to enable KnockON to turn the screen on and off. Quickly
double-tap center screen to turn it on. Double-tap the Status Bar, an empty area on
the Home screen, or the Lock screen to turn the screen off. For the best results, do not
move the phone while using the KnockON feature.
Answer an incoming call – Checkmark to enable you to bring the phone to your ear
to automatically answer the incoming call.
Fade out ringtone – Checkmark to enable you to pick up the phone from the flat
surface to fade out the incoming call ringtone.
99
Page 48

Settings
Silence incoming calls – Checkmark to enable you to flip the phone to silence
incoming calls.
Snooze or turn off alarm – Checkmark to enable you to simply flip the device to
snooze or stop the alarm.
Pause video – Checkmark to enable you to simply flip the device to pause the
currently playing video.
Help – Opens a help guide on how to use the Gestures features of your device.
Motion sensor calibration – Allows you to improve the accuracy of the tilt and speed
of the sensor.
< One-handed operation >
Dial keypad – Checkmark to enable you move the dial keypad to the right or left side
of the device. Simply tap the arrow to move it to one side or the other.
LG keyboard – Checkmark to enable you move the keyboard to the right or left side of
the device. Simply tap the arrow to move it to one side or the other.
Lock screen – Checkmark to enable you move the PIN Lock screen keypad to the right
or left side of the device. Simply tap the arrow to move it to one side or the other.
Help – Displays information regarding one-handed operation.
< Storage >
INTERNAL STORAGE – View the internal storage usage.
< Battery >
BATTERY INFORMATION
The Battery charge information is displayed on a battery graphic along with the
percentage of the remaining charge and its status.
Touch the Battery charge icon to display the Battery use screen to see battery usage
level and battery use details. It displays which components and applications are using
the most battery power. Tap one of the entries to see more detailed information.
Battery percentage on status bar – Checkmark to display the battery level
percentage on the Status Bar next to the battery icon.
100
Page 49

BATTERY SAVER
Tap the Battery saver switch to toggle it On or Off. Tap Battery saver to access the
following settings:
Turn Battery saver on – Sets the battery charge percent level that will automatically
turn on Battery saver. Choose from Immediately, 10% battery, 20% battery, 30%
battery, and 50% battery.
BATTERY SAVING ITEMS
Auto-sync – Checkmark to turn off Auto-sync when Battery saver is activated.
Wi-Fi – Checkmark to turn Wi-Fi off when data is not being used while Battery saver is
activated.
Bluetooth – Checkmark to turn Bluetooth off when not connected while Battery saver
is activated.
Vibrate on touch – Checkmark to turn off touch feedback when Battery saver is
activated.
Brightness – Checkmark to set the screen brightness when Battery saver is activated.
Tap to change the setting.
Screen timeout – Checkmark to set the screen timeout when Battery saver is
activated. Tap the Settings icon to change the setting.
Notification LED – Checkmark to turn off the LED light for notifications when Battery
saver is activated.
< Apps >
View and manage your applications.
< Slide Aside >
Tap the Slide Aside switch to toggle it on to use Slide Aside feature. (Please see Slide
Aside.)
101
Page 50

Settings
< Accounts & sync >
Permits applications to synchronize data in the background, whether or not you are
actively working in them. Deselecting this setting can save battery power and lower (but
not eliminate) data usage.
< Cloud >
Add a cloud account to quickly and easily use cloud service on LG apps.
< Guest mode >
To protect your privacy or limit some applications to your children, you can use the
Guest mode.
When you lend your phone to others, you can limit the applications to be displayed.
In advance, set the Guest mode and customize the options.
< Location >
Turn on location service, your phone determines your approximate location using GPS,
Wi-Fi and mobile networks.
Mode – Set the location mode from High accuracy, Battery saving and Device
sensors only.
Google Location Reporting – Select whether to turn on or off Google Location
Reporting options. For further information, tap > Help.
< Security >
Encrypt phone – Allows you to encrypt data on the phone for security. You will be
required to enter a PIN or password to decrypt your phone each time you power it on.
Set up SIM card lock – Set up Micro-USIM card lock or change the Micro-USIM card
PIN.
Password typing visible – Show the last character of the hidden password as you
type.
Phone administrators – View or deactivate phone administrators.
Unknown source – Default setting to install non-Play store applications.
Verify apps – Disallow or warn before installation of apps that may cause harm.
102
Page 51

Storage type – Software only
Trusted credentials – Display trusted CA certificates.
Install from storage – Choose to install encrypted certificates.
Clear credentials – Remove all certificates.
< Language & input >
Use the Language & input settings to select the language for the text on your phone
and to configure the on-screen keyboard, including words you've added to its dictionary.
< Backup & reset >
Change the settings for managing your settings and data.
Backup my data – Set to backup your settings and application data to the Google
server.
Backup account – Set to backup your account.
Automatic restore – Set to restore your settings and application data when the
applications are reinstalled on your device.
LG Backup service – Backs up all information on the device and restores it in the
event of data loss or replacement.
Factory data reset – Reset your settings to the factory default values and delete all
your data. If you reset the phone this way, you are prompted to re-enter the same
information as when you first started Android.
< Date & time >
Use Date & time settings to set how dates will be displayed. You can also use these
settings to set your own time and time zone rather than obtaining the current time from
the mobile network.
< Accessibility >
Use the Accessibility settings to configure accessibility plug-ins you have installed on
your phone.
NOTE: Requires additional plug-ins to become selectable.
103
Page 52

Settings
< PC connection >
Select USB connection method – Set the desired mode: Charge phone, Media sync
(MTP), Tethering, LG software or Send images (PTP).
Ask upon connecting – Ask in USB connection mode when connecting to a computer.
Help – Help for USB connection.
PC Suite – Check this to use LG PC Suite with your Wi-Fi connection.
Please note that Wi-Fi network should be connected to LG PC Suite via a Wi-Fi
connection.
Help – Help for LG software.
< Accessory >
QuickWindow case – Activate to make features, such as music, weather, and clock,
available in small view when using the QuickWindow case.
USB storage – Sets the Plug & Pop feature for USB storage. Checkmark the App
panel option to automatically display the app panel when connecting an OTG (On-the-
Go) USB cable. Tap Edit app panel to change the applications you want to make
available.
Earphone – Sets the Plug & Pop feature for earphones. Checkmark the App panel
option to automatically display the app panel when connecting an earphone. Tap Edit
app panel to change the applications you want to make available.
< About phone >
View legal information and check your phone status and software version.
< Regulatory and Safety Information >
To view regulatory and safety information, tap Settings > General tab > About
phone > Regulatory and Safety.
104
Page 53

PC software (LG PC Suite)
"LG PC Suite" PC software is a program that helps you connect your device to a PC via
a USB cable and Wi-Fi. Once connected, you can use the functions of your device from
your PC.
With your "LG PC Suite" PC Software, You Can...
• Manage and play your media contents (music, movie, picture) on your PC.
• Send multimedia contents to your device.
• Synchronizes data (schedules, contacts, bookmarks) in your device and PC.
• Backup the applications in your device.
• Update the softwares in your device.
• Backup and restore the device data.
• Play multimedia contents of your PC from your device.
• Backup and create and edit the memos in your device
NOTE: You can use the Help menu from the application to find out how to
use your "LG PC Suite" PC software.
Installing "LG PC Suite" PC Software
"LG PC Suite" PC software can be downloaded from the webpage of LG.
1 Go to www.lg.com and select a country of your choice.
2 Go to Support > MOBILE SUPPORT > LG Mobile Phones > Select the Model
or
Go to Support > Mobile > Select the Model.
3 Click PC SYNC from MANUALS & DOWNLOAD and click DOWNLOAD to download
"LG PC Suite" PC software.
105
Page 54

PC software (LG PC Suite)
System Requirements for "LG PC Suite" PC software
• OS: Windows XP (Service pack 3) 32bit, Windows Vista, Windows 7, Windows 8
• CPU: 1 GHz or higher processors
• Memory: 512 MB or higher RAMs
• Graphic card: 1024 x 768 resolution, 32 bit color or higher
• HDD: 500 MB or more free hard disk space (More free hard disk space may be
needed depending on the volume of data stored.)
• Required software: LG integrated drivers, Windows Media Player 10 or later
NOTE: LG Integrated USB Driver
LG integrated USB driver is required to connect an LG device and PC and
installed automatically when you install "LG PC Suite" PC software application.
Synchronizing your Device to a PC
Data from your device and PC can be synchronized easily with "LG PC Suite"
PC software for your convenience. Contacts, schedules and bookmarks can be
synchronized.
The procedure is as follows:
1 Connect your device to PC. (Use a USB cable or Wi-Fi connection.)
2 The Select USB connection method will appear, then select LG software.
3 After connection, run the program and select the device section from the category
on the left side of the screen.
4 Click Personal information to select.
5 Select the checkbox of contents to synchronize and click the Sync button.
NOTE: To synchronize your phone with your PC, you need to install LG PC
Suite onto your PC. Please refer to previous pages to install LG PC Suite.
106
Page 55

Moving contacts from your Old Device to your New Device
1 Export your contacts as a CSV file from your old device to your PC using a PC sync
program.
2 Install "LG PC Suite" on the PC first. Run the program and connect your Android
mobile phone to the PC using a USB cable.
3 On the top menu, select Device > Import to device > Import contacts.
4 A popup window to select the file type and a file to import will appear.
5 On the popup, click the Select a file and Windows Explorer will appear.
6 Select the contacts file to import in Windows Explorer and click the Open.
7 Click OK.
8 A Field mapping popup to link the contacts in your device and new contacts data
will appear.
9 If there is a conflict between the data in your PC contacts and device contacts,
make the necessary selections or modifications in LG PC Suite.
10 Click OK.
107
Page 56

Phone software update
Phone software update
LG Mobile phone software update from the Internet
For more information about using this function, please visit http://www.lg.com/common/
index.jsp select your country and language.
This feature allows you to conveniently update the firmware on your phone to a newer
version from the Internet without needing to visit a service center. This feature will only
be available if and when LG makes a newer firmware version available for your device.
Because the mobile phone firmware update requires the user's full attention for the
duration of the update process, please make sure you check all instructions and notes
that appear at each step before proceeding. Please note that removing the USB data
cable during the upgrade may seriously damage your mobile phone.
NOTE: LG reserves the right to make firmware updates available only for
selected models at its own discretion and does not guarantee the availability
of the newer version of the firmware for all handset models.
LG Mobile Phone software update via Over-the-Air (OTA)
This feature allows you to conveniently update your phone's software to a newer
version via OTA, without connecting using a USB data cable. This feature will only be
available if and when LG makes a newer firmware version available for your device.
You should first check the software version on your mobile phone: Settings > General
tab > About phone > Update Center > Software Update > Check now for update.
108
Page 57

NOTE: Your personal data from internal phone storage—including
information about your Google account and any other accounts, your system/
application data and settings, any downloaded applications and your DRM
licence—might be lost in the process of updating your phone's software.
Therefore, LG recommends that you backup your personal data before
updating your phone's software. LG does not take responsibility for any loss
of personal data.
NOTE: This feature depends on your network service provider, region and
country.
109
Page 58

About this user guide
About this user guide
• Before using your device, please carefully read this manual. This will ensure that you
use your phone safely and correctly.
• Some of the images and screenshots provided in this guide may appear differently on
your phone.
• Your content may differ from the final product, or from software supplied by service
providers or carriers, This content may be subject to change without prior notice. For
the latest version of this manual, please visit the LG website at www.lg.com.
• Your phone's applications and their functions may vary by country, region, or
hardware specifications. LG cannot be held liable for any performance issues resulting
from the use of applications developed by providers other than LG.
• LG cannot be held liable for performance or incompatibility issues resulting from
edited registry settings being edited or operating system software being modified. Any
attempt to customize your operating system may cause the device or its applications
to not work as they should.
• Software, audio, wallpaper, images, and other media supplied with your device are
licensed for limited use. If you extract and use these materials for commercial or
other purposes is, you may be infringing copyright laws. As a user, you are fully are
entirely responsible for the illegal use of media.
• Additional charges may be applied for data services, such as messaging, uploading
and downloading, auto-syncing, or using location services. To avoid additional
charges, select a data plan to is suitable for your needs. Contact your service provider
to obtain additional details.
Trademarks
• LG and the LG logo are registered trademarks of LG Electronics.
• All other trademarks and copyrights are the property of their respective owners.
110
Page 59

DivX HD
ABOUT DIVX VIDEO: DivX® is a digital video format created by DivX, LLC, a subsidiary
of Rovi Corporation. This is an official DivX Certified® device that has passed rigorous
testing to verify that it plays DivX video. Visit divx.com for more information and software
tools to convert your files into DivX videos.
ABOUT DIVX VIDEO-ON-DEMAND: This DivX Certified® device must be registered
in order to play purchased DivX Video-on-Demand (VOD) movies. To obtain your
registration code, locate the DivX VOD section in your device setup menu. Go to vod.
divx.com for more information on how to complete your registration.
DivX Certified® to play DivX® video up to HD 720p, including premium content.
DivX®, DivX Certified® and associated logos are trademarks of Rovi Corporation
or its subsidiaries and are used under license.
Dolby Digital Plus
Manufactured under license from Dolby Laboratories. Dolby, Dolby Digital Plus,
and the double-D symbol are trademarks of Dolby Laboratories.
Notice: Open Source Software
To obtain the corresponding source code under GPL, LGPL, MPL and other
open source licences, please visit http://opensource.lge.com/
All referred licence terms, disclaimers and notices are available for download
with the source code.
111
Page 60

Accessories
These accessories are available for use with the your phone. (Items described below
may be optional.)
Travel adaptor Stereo headset
Quick Start Guide Data cable
NOTE:
• Always use genuine LG accessories.
• Failure to do this may void your warranty.
• Accessories may vary in different regions.
112
Page 61

Troubleshooting
This chapter lists some problems you might encounter when using your phone. Some
problems require you to call your service provider, but most are easy to fix yourself.
Message Possible causes Possible corrective measures
There is no
Micro-USIM
card error
Micro-USIM card
in the phone
or it is inserted
incorrectly.
Make sure that the Micro-USIM card is
correctly inserted.
No network
connection/
Dropped
network
Codes do
not match
Signal is weak or
you are outside the
carrier network.
Operator applied
new services.
To change a
security code,
you will need
to confirm the
new code by
re-entering it.
The two codes
you have entered
do not match.
Move toward a window or into
an open area. Check the network
operator coverage map.
Check whether the Micro-USIM card
is more than 6~12 months old. If so,
change your Micro-USIM card at your
network provider's nearest branch.
Contact your service provider.
If you forget the code, contact your
service provider.
113
Page 62

Troubleshooting
Message Possible causes Possible corrective measures
114
No
applications
can be set
Calls not
available
Phone
cannot be
switched on
Not supported by
service provider
or registration
required.
Dialling error New network not authorized.
New Micro-USIM
card inserted.
Pre-paid charge
limit reached.
On/Off key
pressed too briefly.
Battery is not
charged.
Contact your service provider.
Check for new restrictions.
Contact service provider or reset limit
with PIN2.
Press the On/Off key for at least two
seconds.
Charge battery. Check the charging
indicator on the display.
Page 63

Message Possible causes Possible corrective measures
Charging
error
Number not
allowed
Impossible
to receive /
send SMS
& photos
Files do not
open
Battery is not
charged.
Outside
temperature is too
hot or cold.
Contact problem
No voltage Plug the charger into a different socket.
Charger defective Replace the charger.
Wrong charger Use only original LG accessories.
The Fixed dialling
number function
is on.
Memory full
Unsupported file
format
Charge battery.
Make sure phone is charging at a
normal temperature.
Check the charger and its connection
to the phone.
Check the Settings menu and turn the
function off.
Delete some messages from your
phone.
Check the supported file formats.
115
Page 64

Troubleshooting
Message Possible causes Possible corrective measures
The screen
does not
turn on
when I
receive a
call.
No sound Vibration mode
Hangs up
or freezes
Proximity sensor
problem
Intermittent
software problem
116
If you use a protection tape or case,
make sure it has not covered the area
around the proximity sensor. Make
sure that the area around the proximity
sensor is clean.
Check the settings status in the sound
menu to make sure you are not in
vibration or silent mode.
Try to perform a software update via
the website.
Page 65

FAQ
Category
Sub-
Category
BT
Bluetooth
Devices
BT
Bluetooth
Headset
Data
Contacts
Backup
Data
Synchronization
Data
Synchronization
Google™
Service
Gmail Log-In
Question Answer
You can connect a Bluetooth audio
What are the functions
available via Bluetooth
If my Bluetooth
headset is connected,
can I listen to my
music through
my 3.5 mm wired
headphones?
How can I backup
Contacts?
Is it possible to set up
one-way sync with
Gmail?
Is it possible to
synchronize all email
folders?
Do I have to log into
Gmail whenever I want
to access Gmail?
device such as a Stereo/Mono headset
or Car Kit. Also, when the FTP server
is connected to a compatible device,
you can share content stored on the
storage media.
When a Bluetooth headset is
connected, all system sounds are
played over the headset. As a result,
you will not be able to listen to music
through your wired headphones.
The Contacts data can be
synchronized between your phone and
Gmail™.
Only two-way synchronization is
available.
The Inbox is automatically
synchronized. You can view other
folders by tapping the Menu Key
and select Folders to choose a folder.
Once you have logged into Gmail, no
need to log into Gmail again.
117
Page 66

FAQ
Category
Sub-
Category
Google™
Service
Google
Account
Phone
Function
Email
Phone
Function
Ringtone
Phone
Function
Message
Time
Phone
Function
Navigation
Phone
Function
Synchronisation
Question Answer
Is it possible to filter
emails?
What happens when
I execute another
application while
writing an email?
Is there a file size
limitation for when I
want to use MP3 file
as ring tone?
My phone does not
display the time of
receipt for messages
older than 24 hrs. How
can I change this?
Is it possible to install
another navigation
application on my
phone?
Is it possible to
synchronize my
contacts from all my
email accounts?
No, email filtering is not supported via
the phone.
Your email will automatically be saved
as a draft.
There is no file size limitation.
You will only be able to see the times
for messages received the same day.
Any application that is available at Play
Store™ and is compatible with the
hardware can be installed and used.
Only Gmail and MS Exchange server
(company email server) contacts can
be synchronized.
118
Page 67

Category
Sub-
Category
Phone
Function
Wait and
Pause
Phone
Function
Security
Question Answer
If you transferred a contact with the W
& P functions saved into the number,
you will not be able to use those
features. You will need to re-save each
Is it possible to save a
contact with Wait and
Pause in the numbers?
What are the phone’s
security functions?
number.
How to save with Wait and Pause:
1. From the Home screen, tap the
Phone icon .
2. Dial the number, then tap the Menu
Key .
3. Tap Add 2-sec pause or Add wait.
You are able to set the phone to
require that an Unlock Pattern be
entered before the phone can be
accessed or used.
119
Page 68

FAQ
Category
Sub-
Category
Phone
Function
Unlock
Pattern
Question Answer
1. From the Home screen, tap the
Menu Key .
2. Tap System settings > Display tab
> Lock screen.
3. Tap Select screen lock > Pattern.
The first time you do this, a short
tutorial about creating an Unlock
Pattern will appear.
4. Set up by drawing your pattern
once, and once again for
How do I create the
Unlock Pattern?
confirmation.
Precautions to take when using the
pattern lock.
It is very important to remember the
unlock pattern you set. You will not
be able to access your phone if you
use an incorrect pattern five times.
You have five chances to enter your
unlock pattern, PIN or password. If you
have used all 5 opportunities, you can
try again after 30 seconds. (Or, if you
preset the backup PIN, you can use
the backup PIN code to unlock the
pattern.)
120
Page 69

Category
Sub-
Category
Phone
Function
Unlock
Pattern
Phone
Function
Memory
Phone
Function
Language
Support
Question Answer
If you have forgotten your pattern:
If you logged into your Google account
on the phone but failed to enter the
correct pattern 5 times, tap the forgot
What should I do if
I forget the unlock
pattern and I didn’t
create my Google
account on the
phone?
Will I know when my
memory is full?
Is it possible to change
my phone's language?
pattern button. You are then required
to log in with your Google account
to unlock your phone. If you have
not created a Google account on the
phone or you have forgotten it, you will
have to perform a hard reset.
Caution: If you perform a factory reset,
all user applications and user data
will be deleted. Please remember to
backup any important data before
performing a factory reset.
Yes, you will receive a notification.
The phone has multilingual capabilities.
To change the language:
1. From the Home screen, tap the
Menu Key and tap System
settings.
2. Tap General tab > Language &
input > Language.
3. Tap the desired language.
121
Page 70

FAQ
Category
Sub-
Category
Phone
Function
VPN
Phone
Function
Screen time
out
Phone
Function
Wi-Fi &
mobile
network
Phone
Function
Home
screen
Question Answer
VPN access configuration is different
How do I set up a
VPN?
My screen turns off
after only 15 seconds.
How can I change the
amount of time for the
backlight to turn off?
When Wi-Fi and
mobile network are
both available, which
service will my phone
use?
Is it possible to remove
an application from the
Home screen?
for each company. To configure VPN
access from your phone, you must
obtain the details from your company’s
network administrator.
1. From the Home screen, tap the
Menu Key .
2. Tap System settings > Display tab.
3. Tap Screen timeout.
4. Tap the preferred screen backlight
timeout time.
When using data, your phone may
default to the Wi-Fi connection (if
Wi-Fi connectivity on your phone is
set to On). However, there will be no
notification when your phone switches
from one to the other.
To know which data connection is
being used, view the mobile network or
Wi-Fi icon at the top of your screen.
Yes. Just touch and hold the icon until
the dustbin icon appears at the top
and center of the screen. Then, without
lifting your finger, drag the icon to the
trash can.
122
Page 71

Category
Sub-
Category
Phone
Function
Application
Phone
Function
Charger
Phone
Function
Alarm
Phone
Function
Alarm
Phone
Function
Alarm
Question Answer
1. From the Home screen, tap the
I downloaded an
application and it
causes a lot of errors.
How do I remove it?
Is it possible to charge
my phone using a USB
data cable without
installing the necessary
USB driver?
Can I use music files
for my alarm?
Will my alarm be
audible or will it go off
if the phone is turned
off?
If my ringer volume is
set to Off or Vibrate,
will I hear my alarm?
Menu Key .
2. Tap System settings > General tab
> Apps > DOWNLOADED.
3. Tap the application, then tap
Uninstall.
Yes, the phone will be charged by the
USB cable regardless of whether the
necessary drivers are installed or not.
Yes. After saving a music file as a
ringtone, you can use it as your alarm.
1. Touch and hold a song in a library
list. In the menu that opens, tap Set
as ringtone > Phone ringtone or
Contact ringtone.
2. In the alarm clock setting screen,
select the song as a ringtone.
No, this is not supported.
Your alarm is programmed to be
audible even in these scenarios.
123
Page 72

FAQ
Category
Sub-
Category
Recovery
Solution
Hard Reset
(Factory
Reset)
Question Answer
How can I perform a
factory reset if I can’t
access the phone’s
setting menu?
If your phone does not restore to its
original condition, use a hard reset
(factory reset) to initialize it.
124
Page 73

Wi-Fi (WLAN)
This equipment may be operated in all European
countries.
The 5150 - 5350 MHz band is restricted to indoor
use only.
Page 74

General Inquiries
<LG Customer Information Centre>
0844-847-5847 or +44-844-847-5847
* Make sure the number is correct before making a call.
 Loading...