

Page 1

Bluetooth
To connect using the phone settings
Your phone’s Bluetooth feature may be set to
off by default. To use the Bluetooth feature,
Bluetooth must be turned on in your phone.
Refer to your phone’s user guide.
1. Enable the phone’s Bluetooth component.
This might be in a menu called Settings,
Bluetooth, Connections, or Hands-free.
2. Initiate a search for Bluetooth devices.
These settings might be located in a menu
called Bluetooth, Connections, or Handsfree.
3. Select the your device from the list of
phone.
4. Input the PIN code (0000) in your phone.
When it is successfully connected, the
mark is displayed in the "Handsfree available devices" screen.
Setting the Bluetooth
You must select to connect successfully
your unit and bluetooth phone.
1. Touch in the “Handsfree -
available devices” screen. And then touch
.
Disconnecting/Deleting/Connect
-ing again the bluetooth phone
1. Touch the connected phone. And then
touch .
Touch . Your phone is disconnected
and the mark disappears.
2. Touch the disconnected phone again to
connect again or delete your phone.
When you touch , the disconnected phone is connected again to the unit.
The mark appears again.
2. Check the PIN code. Change the PIN
code using the number buttons if you
want to change the PIN code. And then
touch .
3. If the visibility option has set as .
Other Bluetooth devices can’t find your
device.
When you touch , the disconnected
phone is deleted.
36
Page 2
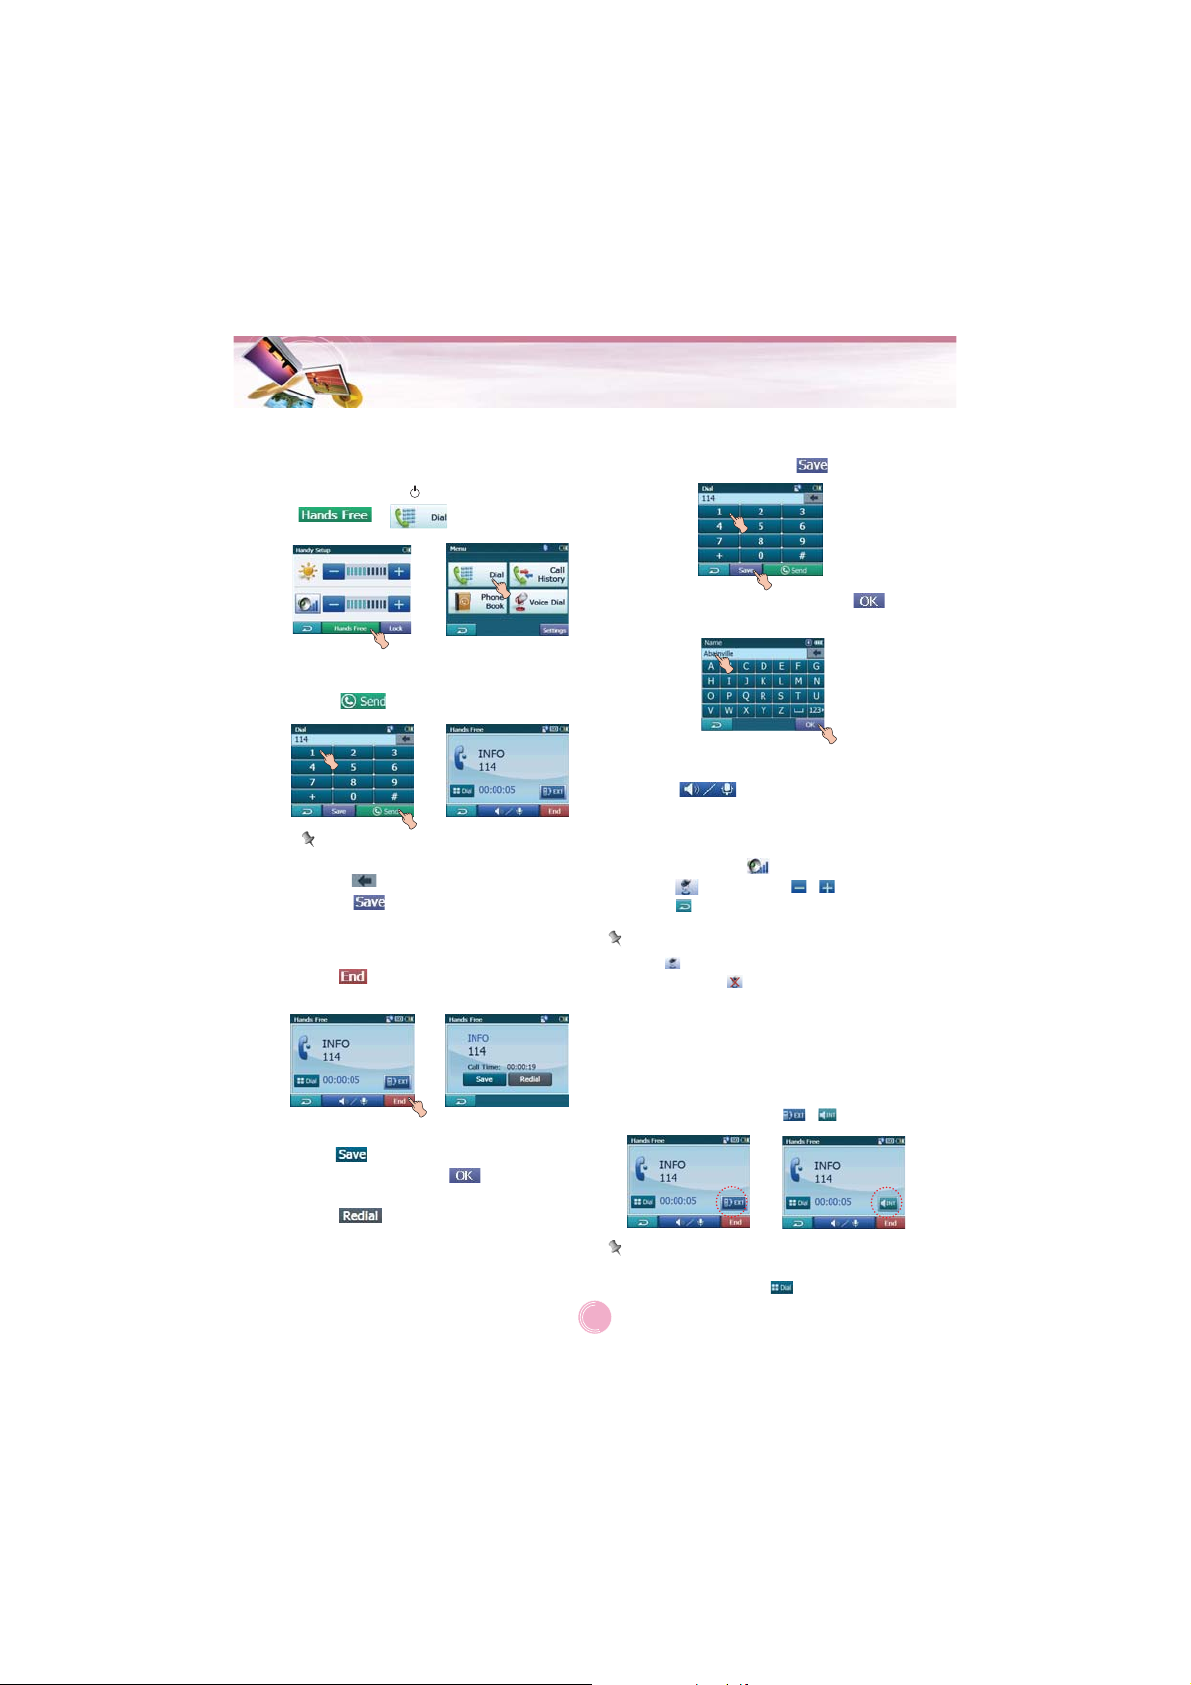
Bluetooth
Making a call with phone number
Connect your unit and bluetooth phone before
you make a call.
1. Press POWER ( ) briefly. And then touch
> .
2. Input the phone number you want to call,
by touching the number buttons. And then
touch
Note
• If you make a mistake while dialling,
touch to erase one digit at a time.
• Touch if you want to store the
phone number. It is stored in the phone
book.
3. Touch to finish the telephone
conversations.
.
Storing the phone number
1. Input the phone number in the “Dial”
screen. And then touch
2. Input the name. And then touch .
It is stored in the phone book.
.
Adjusting the Volume/Microphone level
1. Touch
The “Volume & Microphone” screen
appears.
2. Set the volume ( ) and microphone
level ( ) by touching / and then
touch .
during a call.
Note
• Touch to cut the microphone sound .To
cancel it, touch again.
• If there is not any touch for about 5 sec-
onds, the screen moves to the previous
screen.
If you want to store the phone number,
touch , then input the name using key
board. And then touch and it is stored
in the phone book.
Touch if you want to make a call
again.
If there is not any touch for about 10 seconds, the screen moves to the “MENU”
screen.
Switching the sound path during a call
You can hear sound through the speaker of
unit or phone by touching / .
Note
If you want to send the DTMF (Dual Tone
Multi-Frequency), touch
.
37
Page 3
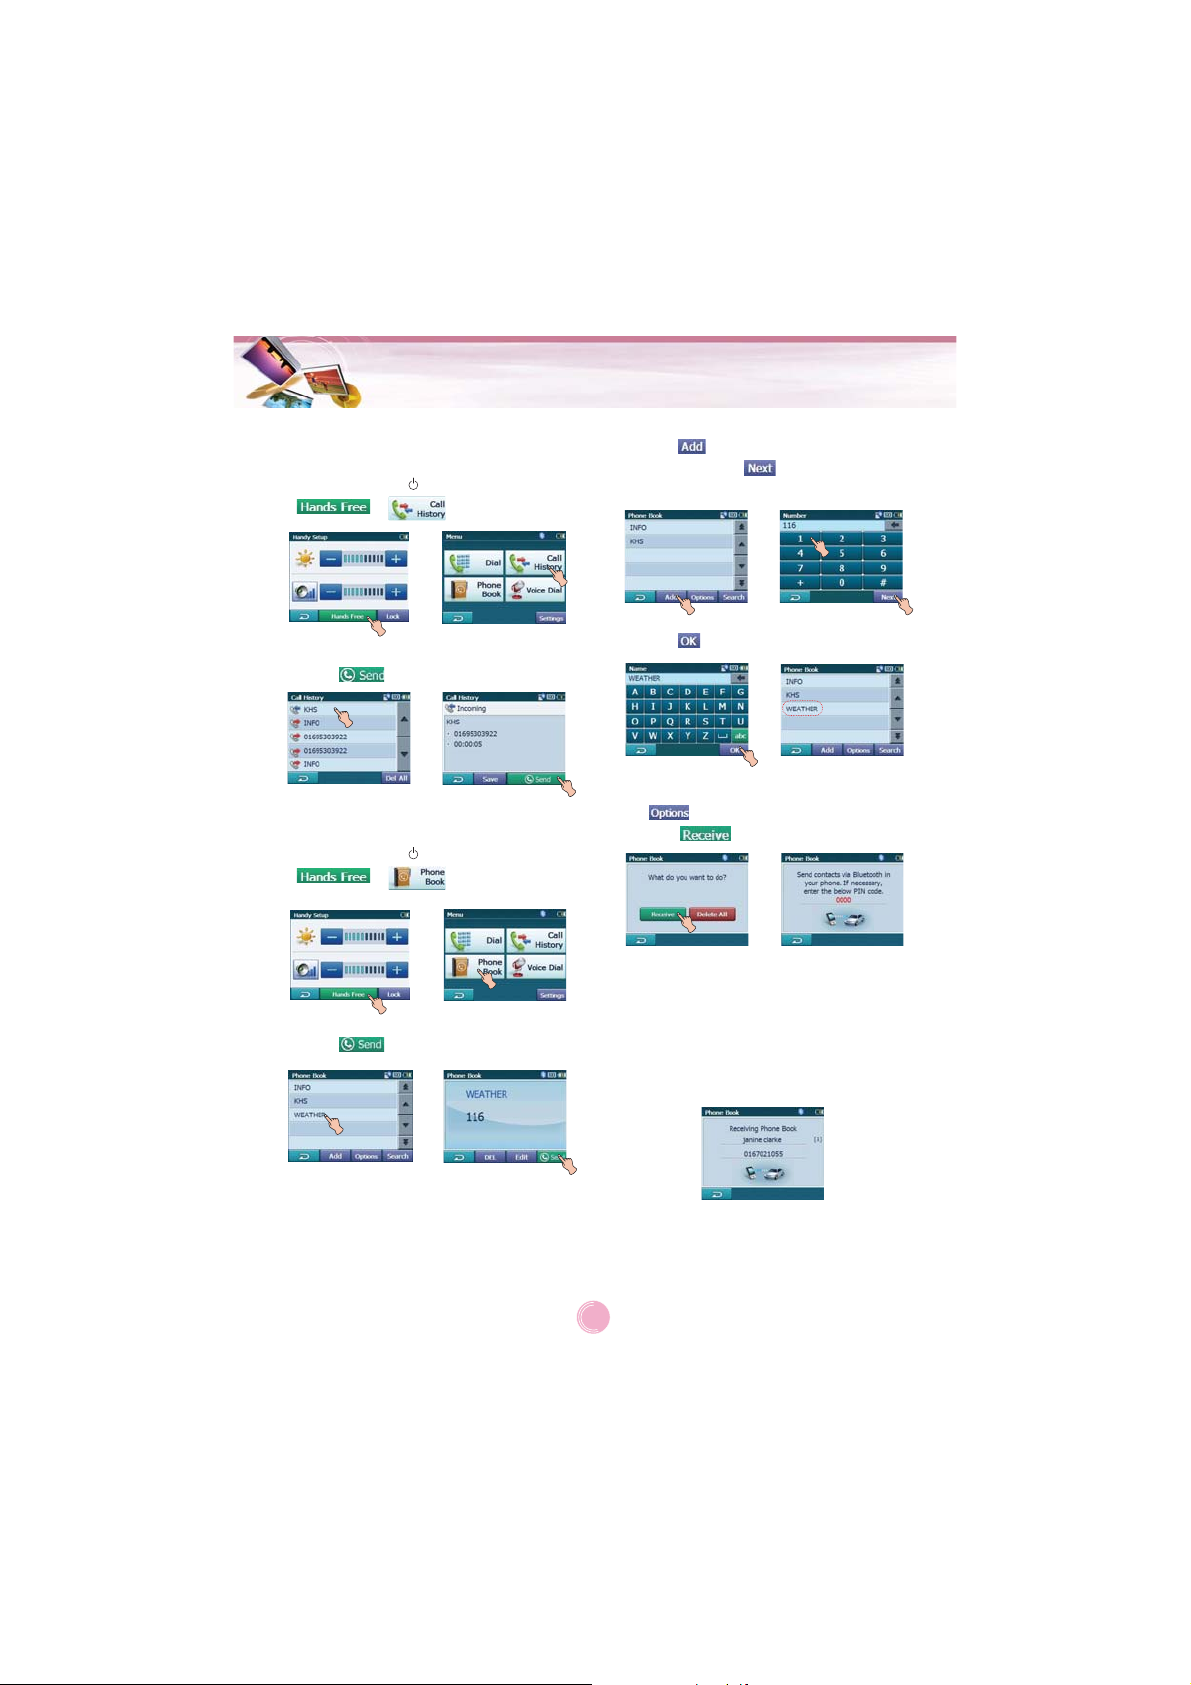
Bluetooth
Call History
Your unit keeps a record of your recently
received and dialling calls.
1. Press POWER ( ) briefly. And then touch
> .
2. Touch the list you want to call. And then
touch .
Using your phone book
1. Press POWER ( ) briefly. And then touch
> .
2. Touch the list you want to call. And then
touch .
Adding the phone number
1. Touch in the “Phone Book” screen.
And then Touch after inputting the
number buttons.
2. Touch after changing the name.
Receiving all list in your phone
Touch in the “Phone Book” screen. And
then touch
- Your device will receive the contact(s) via
Bluetooth in your phone. If your phone is
not connected, it needs to enter the PIN
code in the phone.
- With receiving phone book from your
phone, and the data will be stored in the
resident memory of your device.
.
38
Page 4
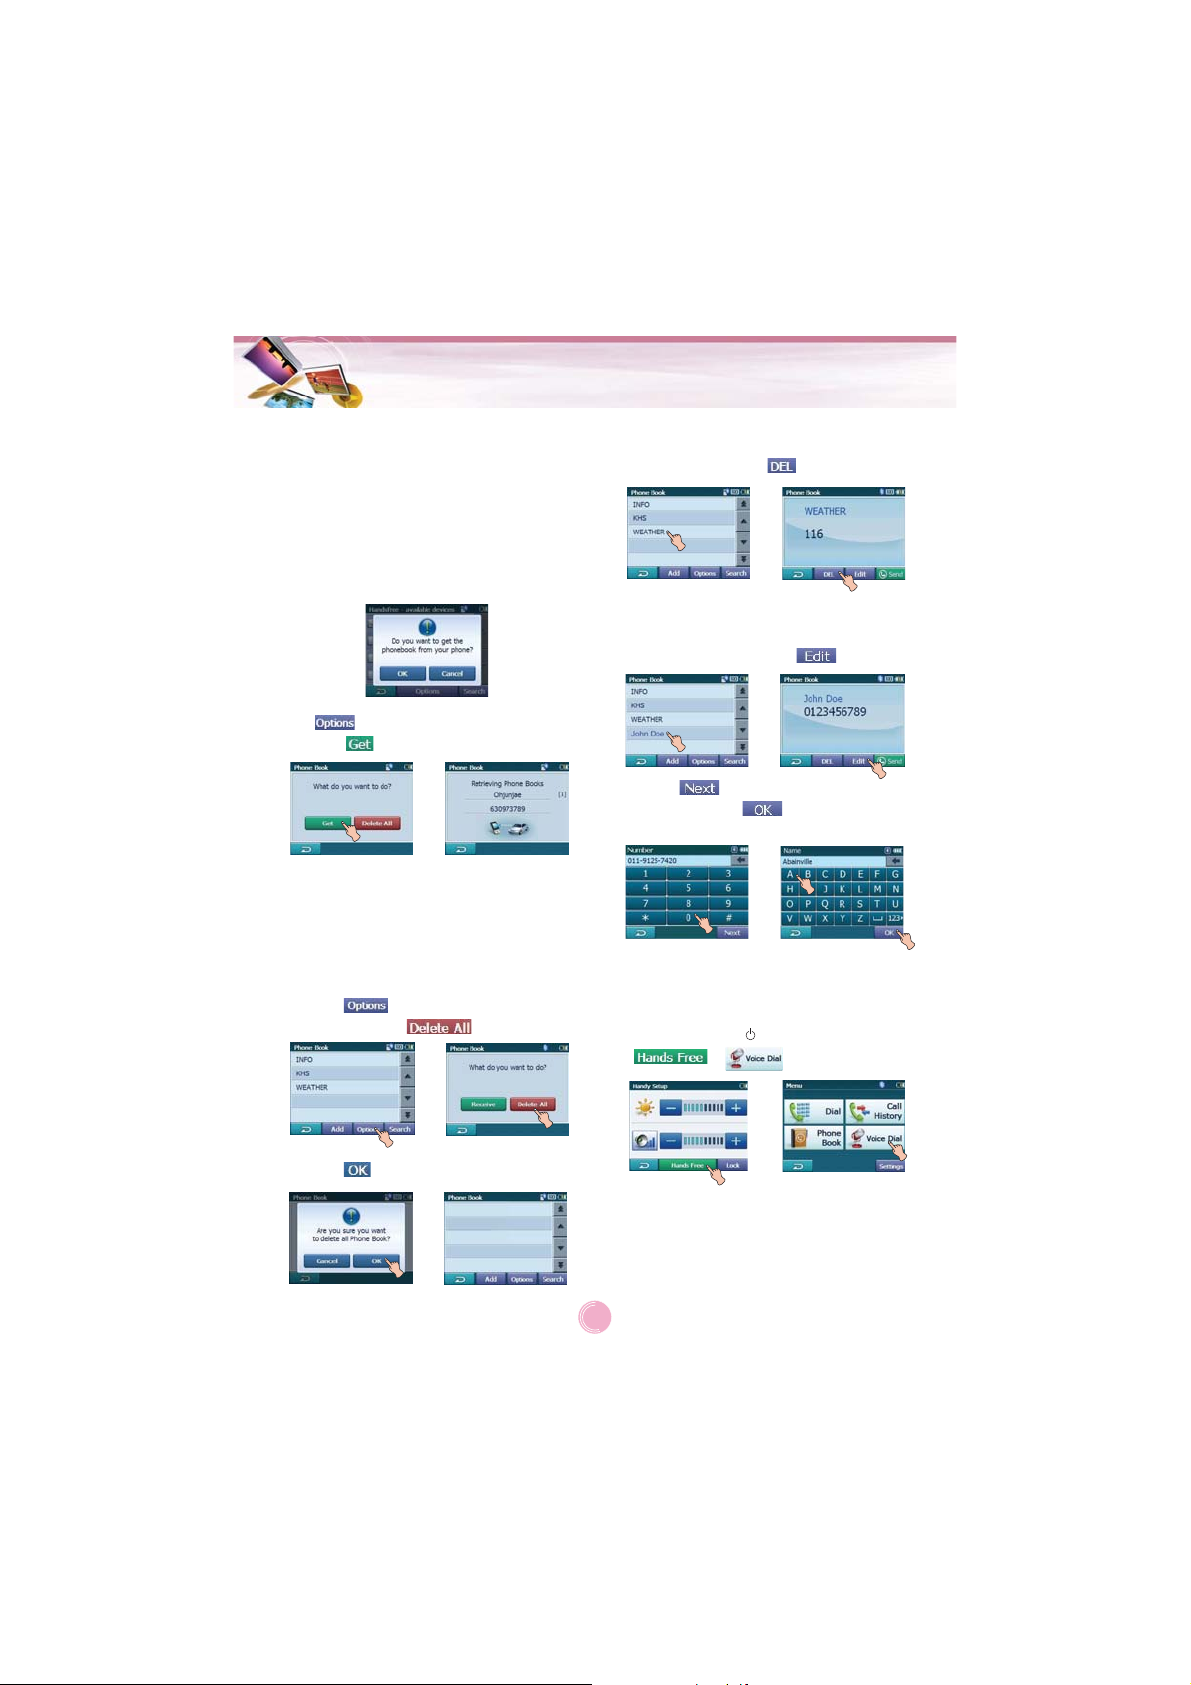
Bluetooth
Getting all list from you phone
If your phone supports the synchronization of
phone book, you can get all list from the
phone.
* If the phone hasn't been registered to avail-
able list on your device, you will meet the
below pop-up, "Do you want to get the
phonebook from your phone?", after connecting your phone with the your device.
Touch in the “Phone Book” screen. And
then touch
The synchronisation with your phone book will
begin automatically, the data will be stored in
the resident memory of your device. (It will
takes a few minutes according to the number
of phone book in your phone.)
.
Deleting all list in the phone book
1. Touch in the “Phone Book” screen.
And then touch
.
Deleting the phone number
Touch the list to delete in the “Phone Book”
screen. And then touch
.
Editing the phone number
1. Touch the list to edit in the “Phone Book”
screen. And then touch
2. Touch after changing the number.
And then touch after changing the
name.
.
Using voice Dial
You can make a call by speaking the contact’s
name.
1. Press POWER ( ) briefly. And then touch
> .
2. Touch .
39
Page 5
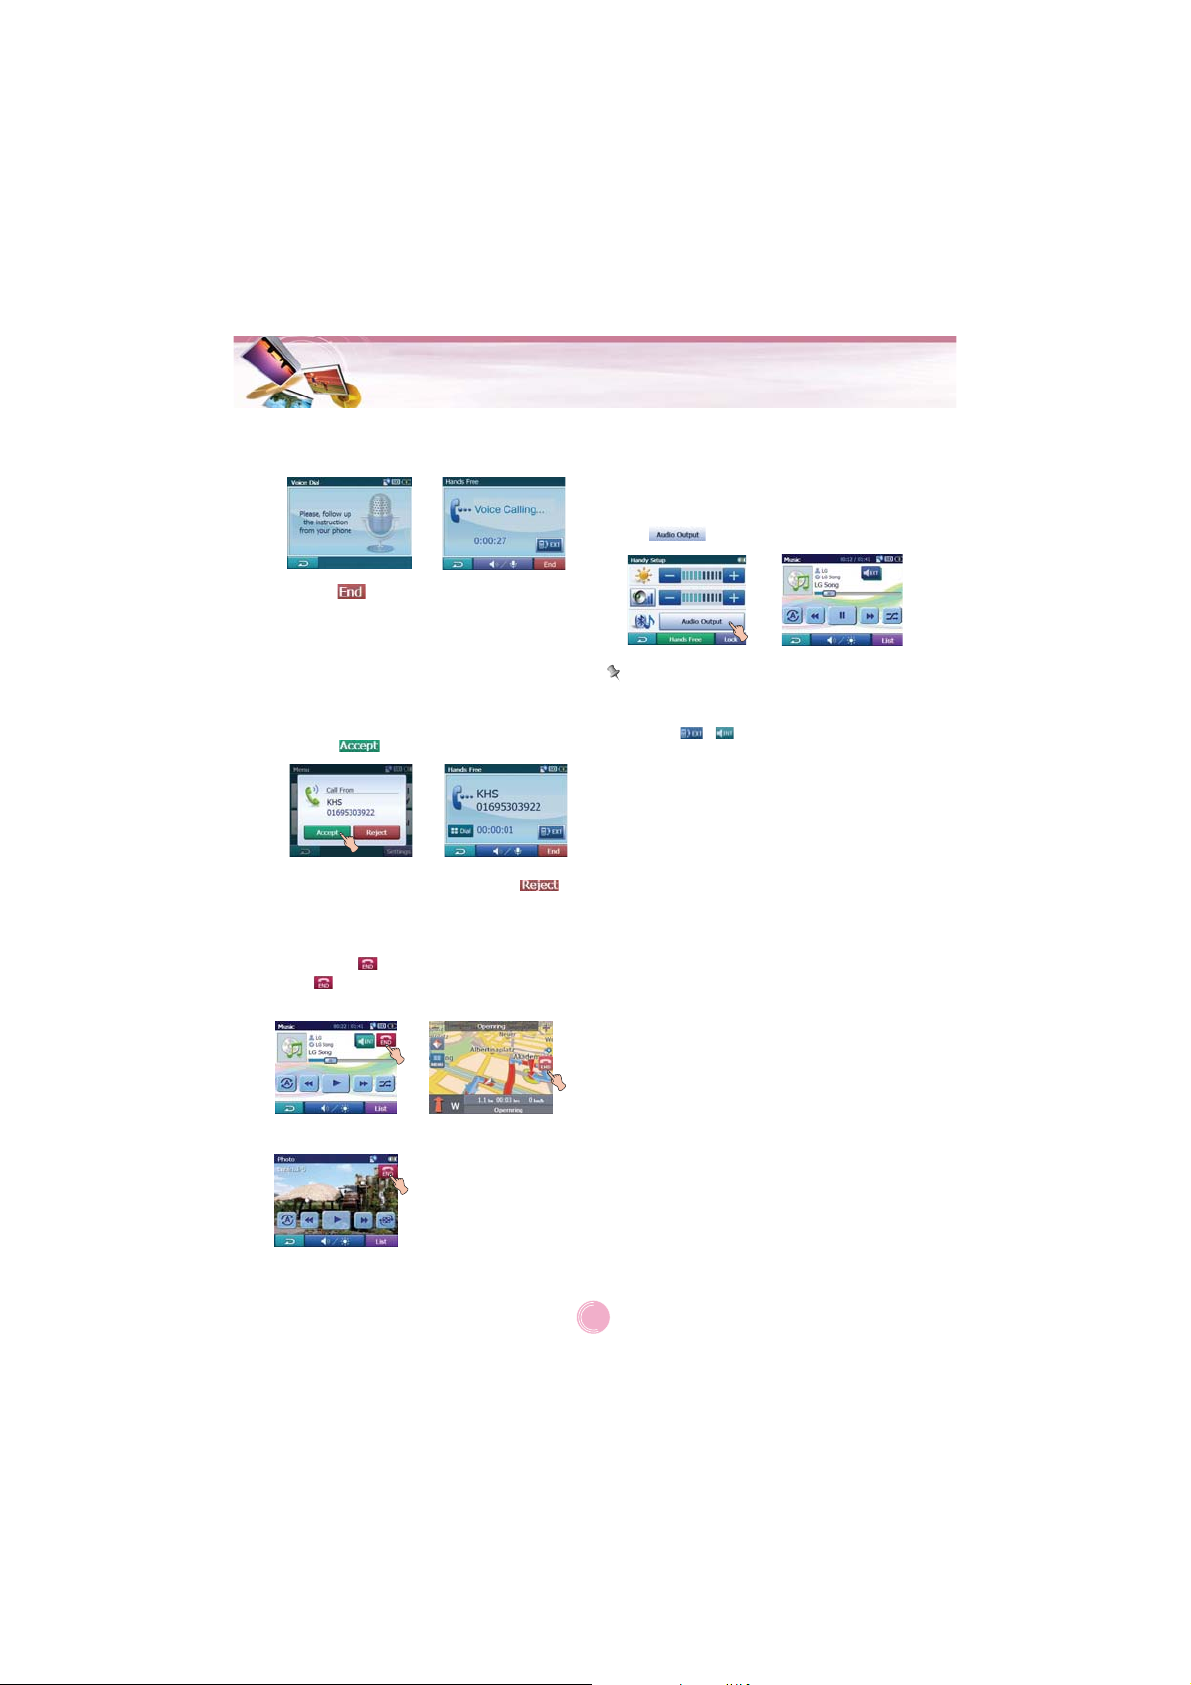
Bluetooth
2. Speak the contact name from your phone.
And then follow up the instruction from
your phone.
3. Touch to finish the telephone
conversations.
Incoming calls
1. If there is an incoming call, your phone
rings and the “Call from” pop-up screen is
displayed on the screen.
2. Touch to answer the call.
If you want to reject a call, touch .
Ending calls
When you are calling on the map, music, or
photo mode, appears in the screen.
Touch to finish the telephone conversations.
Listening to music files
You can control and hear the music (especially, mp3) files saved on your device via the
your stereo headset with Bluetooth wireless
technology.
Touch in the “Handy Setup” screen.
Notes
• You can hear the sound through the speaker of unit or Bluetooth stereo headsets by
touching / .
• The sound quality depends on Radio
Frequency (RF) conditions and the sampling rate of audio.
• Sampling rate of MP3 file that can hear the
music using Bluetooth stereo headset
-
16 KHz , 32 KHz , 44.1 KHz , and 48 KHz
- The sound quality may be poor on the
sampling rate of 16 KHz , 32 KHz.
Photo mode
Map modeMusic mode
40
Page 6

Installation
Installing the Navigator “PC
Portal”
Installation the Microsoft .Net Framework 2.0
for computer can be done by following the
instructions.
1. Insert the Navigator CD into the PC's CDROM drive. The “PC Portal” Installation
wizard prompts you to select the language
used for the installation process. When you
have selected a language, click “OK”.
2. Read the Welcome message and click
“Next”.
3. From the Select Directory screen, either
accept the recommended default directory
or browse to a different directory to install
the “PC Portal”.
Click “Next”.
4. If you want to change the directory location
before installing, click “Back”. When you
are ready to install the “PC Portal”, click
“Next”.
The installation status box displays the
progress of the installation process.
5. When the installation is complete, click the
“Finish” button.
6. After finishing installing PC Portal, install
the “Maps installer’ program. This procedures is simillar to PC Portal install.
7. When the installation is complete, click the
“Finish”button, The Select Language box
appears.
9. Select from up to two connected devices.
(N10)
Note
Please pay close attention to all the programs
before installing the CD to your personal
computer.
Please pay close attention especially for antivirus programs like spyware.
Recommended PC System
Requirements
Please review the following system requirements before installing “PC Portal”:
• CPU: AMD/Intel® Processor 300 MHz or
faster
• Operating System: Windows® 2000/XP/Vista
• Memory: 128 MB RAM (minimum)
• Hard drive free space: 500 MB (minimum)
• CD-ROM: 4x drive or higher
• ActiveSync Version 3.8 to 4.2 supported
under Windows 2000 and XP
• USB Version 1.1 or 2.0 connection (compati-
ble 2.0)
• Microsoft .Net Framework 2.0
8. From the Select Language dialog box, you
can select the display language for the “PC
Portal”. Select the Launch “PC Portal”
checkbox for “PC Portal” to immediately
start and click “OK”. Alternatively, you can
start the “PC Portal” from the Microsoft®
Windows® Programs menu.
41
Page 7

Installation/Using software
Starting the “PC Portal” Wizard
The first time you start the “PC Portal”, the
“PC Portal” Wizard automatically starts, letting
you install navigator software, supported languages and voice prompts, and maps.
For a complete description of the “PC Portal”,
see Using the “PC Portal” on the page 42-43.
1. Click the Microsoft® Windows® Start button.
2. Click the Programs > LGE > “PC Portal”.
The “LGE PC Portal for N10” appears.
3. If this is your first time using “PC Portal”,
the “PC Portal” wizard automatically starts
and displays the Welcome screen.
4. Make sure that your device is connected by
USB cable to a port on your PC. You will
see Connected on the “PC Portal” screen.
5. Click the buttons to move to
the previous or next screen.
6. Select software components to install to
your device.
Note
• If you want to start the wizard, click
from the “PC Portal” Main screen.
• If you want to stop the wizard, click
.
The “PC Portal” Main screen is displayed.
• If after selecting component, software, and
voice options, you want to return to the original selections, click .
Using the “PC Portal”
Click “Install Software” and select from the following components to install to your device:
• LGE: GPS navigation software
• Tutorial: Tutorial guide
To install navigator components:
1. From the Install Software screen, select
from the list of components, as described
above.
2. Click the Install button.
3. Navigator “PC Portal” installs the selected
components to the device’s main memory.
Click “Manage Maps” to install or remove a
map.
For more information, see “Installing Maps” on
the page 44.
Click the “User Manual” button to see a user
manual.
Click the “Select Language” button to show a
list of languages that you can choose from to
display the “PC Portal”.
Click the “About” button to check software
version.
42
Page 8

Using software
Click “Import Speed Camera Alerts” to update
the Speed Cam. You can visit the Speed Cam
Update site.
Click the “Backup/Restore” button to backup
the following Navigator items:
• Favorites: All locations that are displayed in
Navigator’s Favorites screens.
• Trips: All locations that appear in Navigator’s
Multistops screens.
• LGE Settings: Setting configurations, such
as map views (2D/3D and Day/Night),
prompts, units of measurement, and map
and route setting preferences.
When you select Backup, “PC Portal” makes
a copy and stores the information to your
computer.
To backup Navigator data to your PC:
1. From the Backup/Restore screen, select
Backup.
2. Select the items that you want to make a
copy of and save to your computer.
3. Click the “Backup” button.
4. “PC Portal” saves the selected items to
your computer.
Click the Backup/Restore button to restore
Favorites, Multistops, and My Navigator data
to a navigation device. When you select
Restore, “”PC Portal” recovers the information
stored on your computer.
To restore stored Navigator data to a navigation device:
1. From the Backup/Restore screen, select
Restore.
2. Select the items that you want to restore.
3. Click the “Restore” button.
4. “PC Portal” restores the selected items.
Click to import favorite locations from your PC
to the selected My Favorites group on your
device.
For more information, see “Importing Favorite
Locations” on page 44.
Click Install Languages to install a language
to your device.
To install languages:
1. From the Install Languages screen, select
the languages to be installed to the device.
2. Click the Install button.
3. Navigator PC Portal installs the selected
languages to the device’s main memory.
4. You can display the Navigator interface in
the language of your choice by tapping the
Language Settings button on the Setup
menu and selecting the language in
Navigator.
43
Page 9

Using software
Installing Maps
1. From the Desktop Maps pane, select a
map.
2. From the “Target” context box, select the
main memory.
3. When you select a Target option (Storage
Card, Main Memory) the “PC Portal” displays the following information:
• Required: The amount of free space necessary to install the map on the selected
Target option.
• Available: The amount of free space available for the selected Target option.
Note: If the free space required is equal or
greater than the free space available, “PC
Portal” will not install the selected map.
4. Select a map to add or remove.
5. Click the “Add/Remove” button.
6. The selected map is installed and displayed
in the Device Maps panel.
Removing Maps
You can remove a map by selecting a map in
the Device Maps pane and clicking the
“Add/Remove” button.
Importing Favorite Locations
Import Favorites lets you import content created externally as a new Favorites category.
You can download a category of favorite destinations from your PC to your device.
Destination data must be contained in a
comma-separated values (.csv) file. You can
import favorites to your device by following
the procedure as displayed on the Import
Favorites screen.
The .csv file contains the following fields:
Fav. Name Notes Longitude Latitude
Fav.place 1 Comm. 1 39.21370 38.78903
Altitude City Street Address
8033 Munich Adaloweg 173
• The longitude, latitude, and altitude are
numerical values. All other fields
contain string values.
• Even if the .csv file does not contain longitude, latitude, and altitude values, the separating commas must still be included.
• The .csv file contains the values in a table
as a series of ASCII text lines, organized so
that each column value is separated by a
comma from the next column's value and
each row starts a new line.
44
Page 10

Using software
General Warning Messages
The following warning messages can appear
when you’re working with navigator “PC
Portal”.
Lost connection transfer
If at any point during the installation or data
transfer, the connection to the device is lost,
the following message is displayed:
"Connection to the device has been lost.
Please check your connection."
Uninstalling Navigator Console
When a version of navigator programme (versions prior to the “PC Portal”) is located on
your computer, the following message is displayed:
"A previous version of “PC Portal” was found.
Do you wish to uninstall?"
It is recommended to uninstall the previous
progam before installing “PC Portal”.
Uninstalling “PC Portal”
When an earlier version of navigator “PC
Portal” is located on your computer, the following message is displayed:
"A previous version of “PC Portal” was found.
Do you wish to uninstall? "
It is recommended to uninstall a previous version of “PC Portal” before installing the current version.
Previous maps
If maps from a previous version are located
on your computer, the following message is
displayed:
"Existing maps data found. Do you want to
keep it?"
Clicking “Yes” lets you install maps from previous versions.
Remove maps
The following message appears when you
have selected an installed map and clicked
the Actions
button:
"Selected maps shall be removed from your
device. Are you sure you wish to continue?"
Data Transfer
If you close the PC Portal while install navigator software, a map, importing or exporting a
Favorite location, or backing up data. the following message appears. : “if you will close
the PC Portal now, the [process] shall not be
completed. Are you sure you wish to close?”.
Backup Data
If stored data is located on your computer, the
following message appears:
"Navigator Backup data found. Do you want to
keep it?" It is recommended to keep backup
data.
Updates to “PC Portal”
If there are updates in navigator, you are
prompted to download them in the following
message:
"There are updates to “PC Portal”, do you
wish to download and install them?"
45
Page 11

Troubleshooting
Navigation program and map data
protection
• If you want to operate this product properly,
navigation program and map data provided by
LGE should be in LGE folder on your navigation device.
• Don't erase or modify any contents in the LGE
folder using USB mass storage connection.
(All contents are important to operate
navigation. Deleting this data may cause navigation to lead to malfunction.)
Audio streaming
To enjoy high quality music using Bluetooth
stereo headsets, we recommend over 16-bit
audio with sampling rates of 48 KHz and 44.1
KHz. (The sound quality depends on sampling
rates of audio and your headset.)
Picture format
JPG: Image file size should be less than 1600
MP (megapixels).
Cannot identify the current location. (GPS
not receiving)
GPS cannot be used indoors and must be connected to the power with ACC to a vehicle in a
location where the sky can be seen well.
When initially connecting the GPS, it usually
takes about 10 minutes to operate normally, but
the connection speed can differ depending on
the weather condition, and surrounding obstacles.
If the GPS connection is unstable for a long period of time, try the following.
• Check if the power is connected to the product.
• Check if the back of the GPS product is in a
location where the sky can be seen well.
• If there are high buildings or if you are under a
tree, move to a location where there aren’t any
obstacles.
• Check the GPS receiving condition from the
GPS menu.
Cannot hear the voice guide.
You can hear the voice guide when you select
“Guidance” in “Setup”.
But during actual driving, the voice guide is provided.
If the volume is too low, adjust the volume on
the right unit.
Cannot see the map.
This is when you cannot see the map even
when you have executed the navigation
menu.
This happens when the data within the
memory is damaged. Delete all the data
within the memory and reinstall the data.
If the problem persists after the installation,
contact the Customer Service Center.
Map data and dangerous area information
are not updated.
You must periodically update the map data.
Refer to the homepage for details on how to
update the data.
The path guide can be different from the
actual path. (Path guide error)
• When the road is closely parallel.
• When the splitting road angle is very small.
• When there is an adjacent road when
turning.
• When driving on a road that is narrowing
fast.
• When driving through the mountain or where
the road is too curvy.
• When the starting, passing and arriving
locations are too close within 10 km.
• When you have set the starting, passing or
arriving location more than 1 km away from
the road.
• When driving through the tunnel.
• When driving through high buildings.
46
Page 12

Troubleshooting
GPS
GPS
GPS
GPS
There is a difference between the driving
road and the road on the map in the product.
Even though GPS is usually very accurate, it
has an error range.
When GPS receiver is installed, there can be an
error of about 5 to 15m. But for newly constructed roads, the problem could be from the data
update to the map.
What is GPS?
The Global Positioning System (GPS) is a
satellite-based navigation system made up of
a network of 24 satellites placed into orbit by
the U.S.
Department of Defence. GPS was originally
intended for military applications, but in the
1980s, the government made the system
available for civilian use.
GPS works in any weather conditions, anywhere in the world, 24 hours a day.
There are no subscription fees or setup
charges to use GPS.
Map matching
The GPS used by this Mobile Navigation
System is susceptible to certain errors. Their
calculations may on occasion place you in a
location on the map where no road exists. In
this situation, the processing system
understands that vehicles travel only on
roads, and is able to correct your
position by adjusting it to a near road. This is
called map matching.
With map matching.
With no map matching.
Basic operation tips
1.After charging or connecting to a power
source, turn the unit on.
2.Make sure you are stopped (not moving) in
a location with a clear view of the sky.
3.You will see your current location within a
few minutes and then you can start navigating.
4.If the correct location is not found within 6
minutes, restart the unit using the ON/OFF
button on the side of the unit.
47
Page 13

Bluetooth phone compatibility list
• If even a phone as described in this list meets requirements of Bluetooth Hand-free Profile
1.5 and Object Push Profile 1.1, it can operate. However, it is noted that we cannot assure
for operation by function.
• As difference in functional operation by model is mainly resulted from feature of a hand-free
phone, consult manufacturer of a phone if you have any question.
• There may be restrictions on using Bluetooth technology depending on some locations or
wireless environment. Due to the variety of Bluetooth phones and their firmware version, your
device may respond differently when performing over Bluetooth.
YES
YES
YES
YES
YES
YES
YES
YES
YES
YES
YES
YES
YES
YES
YES
YES
YES
YES
YES
YES
YES
YES
YES
YES
YES
YES
YES
YES
YES
YES
YES
YES
YES
YES
YES
YES
YES
YES
YES
Display
Caller ID
YES
YES
YES
YES
YES
YES
YES
NO
YES
YES
YES
YES
YES
YES
YES
YES
YES
NO
YES
YES
YES
YES
YES
YES
YES
YES
YES
YES
YES
YES
YES
YES
YES
YES
YES
YES
NO
YES
YES
Voice
Dial
YES
YES
NO
NO
NO
YES
NO
NO
NO
NO
NO
NO
NO
NO
NO
NO
NO
NO
NO
NO
YES
YES
YES
YES
YES
NO
YES
NO
YES
YES
YES
YES
YES
YES
YES
YES
YES
YES
YES
Phone Book
Sync
NO
NO
NO
YES
NO
NO
NO
YES
NO
NO
NO
NO
NO
NO
NO
NO
YES
NO
NO
NO
NO
YES
YES
YES
YES
NO
NO
NO
YES
YES
YES
YES
YES
YES
YES
NO
NO
YES
NO
Object Push
(vCard)
NO
NO
YES
YES
YES
YES
YES
NO
YES
YES
YES
YES
YES
YES
NO
YES
NO
YES
YES
NO
YES
YES
YES
YES
YES
YES
YES
YES
YES
NO
YES
YES
YES
YES
YES
YES
YES
YES
YES
Manufacturer
BLACK BERRY
BLACK BERRY
HP
HP
LG
LG
LG
LG
LG
LG
LG
LG
LG
LG
LG
LG
LG
LG
LG
LG
MOTOROLA
MOTOROLA
MOTOROLA
MOTOROLA
MOTOROLA
MOTOROLA
MOTOROLA
MOTOROLA
MOTOROLA
MOTOROLA
MOTOROLA
MOTOROLA
MOTOROLA
MOTOROLA
MOTOROLA
NOKIA
NOKIA
NOKIA
NOKIA
Model
8100
8800
H6315
HW6915
CU500
CU575
KE500
KE850
KE970
KG245
KG290
KG800
KU380
KU580
KU970
M4410
ME970
MG280
MG320
U890
A1000
E1000
E550
KRZR K1
RAZR V3i
RIZR Z80
ROKR E2
ROKR E6
SLVR L7
U6
V195
V360
V525
V600
V600
3230
3650
5300
5500
Year
2007
2007
2005
2007
2007
2007
2007
2007
2007
2006
2007
2006
2007
2007
2007
2006
2007
2007
2007
2006
2004
2005
2004
2006
2006
2007
2006
2007
2006
2006
2006
2006
2004
2006
2004
2005
2004
2006
2006
Hansfree
Calling
48
Page 14

Bluetooth phone compatibility list
Manufacturer
NOKIA
NOKIA
NOKIA
NOKIA
NOKIA
NOKIA
NOKIA
NOKIA
NOKIA
NOKIA
NOKIA
NOKIA
NOKIA
NOKIA
NOKIA
NOKIA
NOKIA
NOKIA
NOKIA
NOKIA
NOKIA
NOKIA
NOKIA
NOKIA
NOKIA
NOKIA
NOKIA
NOKIA
NOKIA
NOKIA
PALM
SAMSUNG
SAMSUNG
SAMSUNG
SAMSUNG
SAMSUNG
SAMSUNG
SAMSUNG
SHARP
SIEMENS
SIEMENS
SIEMENS
SONY
SONY
SONY
SONY
SONY
SONY
SONY
Model
6103
6131
6230
6280
6600
6670
6670
6680
7370
7380
7610
8600
9500
6230i
6820a
8910i
E50
E60
E61
E62
E70
N70
N73
N77
N80
N91
N91
N92
N95
N-GAGE
TREO750V
A707
D600
D820
D900
i600
T509
Z540V
GX15
S65
SK65
SX1
K700i
K750i
S700i
T610
V800
W710i
Z600
Year
2006
2006
2004
2006
2004
2006
2005
2005
2006
2006
2004
2007
2004
2005
2004
2004
2006
2006
2006
2006
2006
2006
2006
2007
2006
2007
2007
2006
2007
2004
2007
2007
2006
2006
2007
2007
2006
2006
2004
2004
2004
2004
2005
2006
2005
2004
2005
2006
2004
Hansfree
Calling
YES
YES
YES
YES
YES
YES
YES
YES
YES
YES
YES
YES
YES
YES
YES
YES
YES
YES
YES
YES
YES
YES
YES
YES
YES
YES
YES
YES
YES
YES
YES
YES
YES
YES
YES
YES
YES
YES
YES
YES
YES
YES
YES
YES
YES
YES
YES
YES
YES
Display
Caller ID
YES
YES
YES
YES
YES
YES
YES
YES
YES
YES
YES
YES
YES
YES
YES
YES
YES
YES
YES
YES
YES
YES
YES
YES
YES
YES
YES
YES
YES
YES
YES
YES
YES
YES
YES
YES
YES
YES
NO
YES
YES
YES
YES
YES
YES
YES
YES
YES
YES
49
Voice
Dial
YES
YES
YES
YES
YES
YES
YES
YES
YES
YES
YES
YES
NO
YES
YES
NO
YES
YES
YES
YES
YES
YES
YES
YES
YES
YES
YES
YES
YES
YES
NO
NO
NO
NO
NO
YES
NO
NO
NO
NO
NO
YES
YES
YES
YES
YES
YES
YES
YES
Phone Book
Sync
YES
YES
NO
YES
NO
NO
NO
NO
YES
YES
NO
YES
NO
YES
NO
YES
NO
NO
NO
NO
NO
NO
NO
NO
NO
NO
NO
NO
NO
NO
NO
NO
NO
NO
YES
NO
NO
NO
NO
YES
YES
NO
YES
YES
YES
YES
YES
YES
YES
Object Push
(vCard)
YES
YES
YES
YES
YES
YES
YES
YES
YES
YES
YES
YES
NO
YES
YES
YES
YES
YES
YES
YES
YES
YES
YES
YES
YES
YES
YES
YES
YES
YES
YES
NO
YES
YES
YES
NO
YES
NO
YES
YES
YES
YES
YES
YES
YES
YES
YES
YES
YES
Page 15

Specifications
ITEM SPECIFICATION
OS
CPU
MEMORY
DISPLAY 3.5 inch TFT LCD
AUDIO Mono, Internal Speaker
GPS SiRF star III,
NAVI EU (It depends on models.)
MAP Navteq
POWER DC 5V/1A Vehicle Power
TEMPERATURE Operating : -10 °C to 60 °C
Built-in BATTERY DC 3.7 V (Li-Ion), 1100mAh
Win CE 5.0
ARM9 400 MHz
512MB/1GB/2GB (It depends
on models.)
Resolution 320 X 240
LED type Backlight
Touch Screen
Internal Antenna
(TMC : FM Traffic Receiver)
Storing : -30 °C to 80 °C
- MP3:
5 hours [Brightness: Minimum, Volume: 5 (Center)]
- Navigation:
4.5 hours [Brightness: 5 (Center) , Volume: 5 (Center)]
- Photo:
5 hours [Brightness: 5 (Center) , Volume: 5 (Center)]
Built-in Memory
Analog resisitive type
Typical 1.0W (1EA)
Voice Guidance
Cigar-jack Input
(12-24V)
REMARK
INTERFACE Mini-USB Port
External GPS Jack
Multimedia Image
Audio
USB 2.0
JPG
MP3
50
Page 16

Bluetooth
“The Bluetooth word mark and logos are owned by the Bluetooth SIG, Inc. and any use of such
marks by LG Electronics is under license. Other trademarks and trade names are those of their
respective owners.”
P/N: AFN32793967-1
 Loading...