

Page 1

PICTURE CONTROL
71
PICTURE IMPROVEMENT TECHNOLOGY
You can calibrate the screen for each Picture Mode or set the video value according to the special video screen.
You can set the video seeing differently for each input.
To reset to the factory default screen after making adjustments to each video mode, execute the “Reset” func-
tion for each Picture Mode.
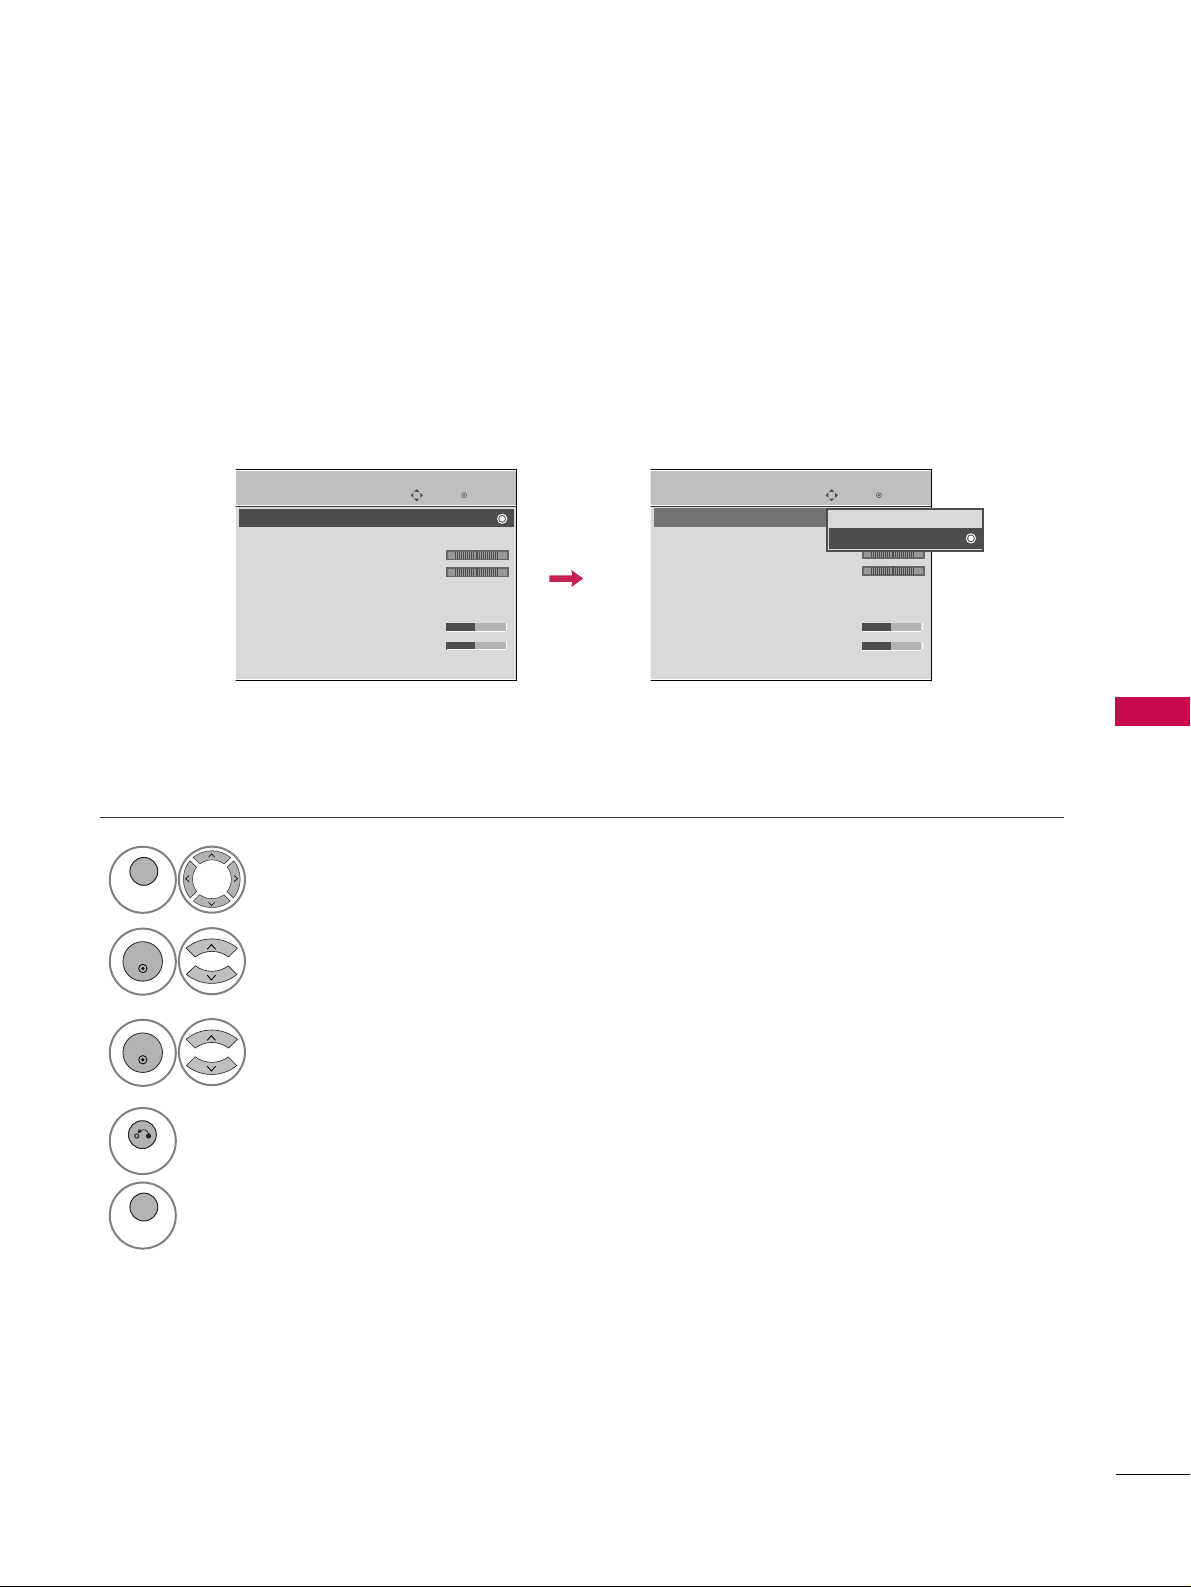
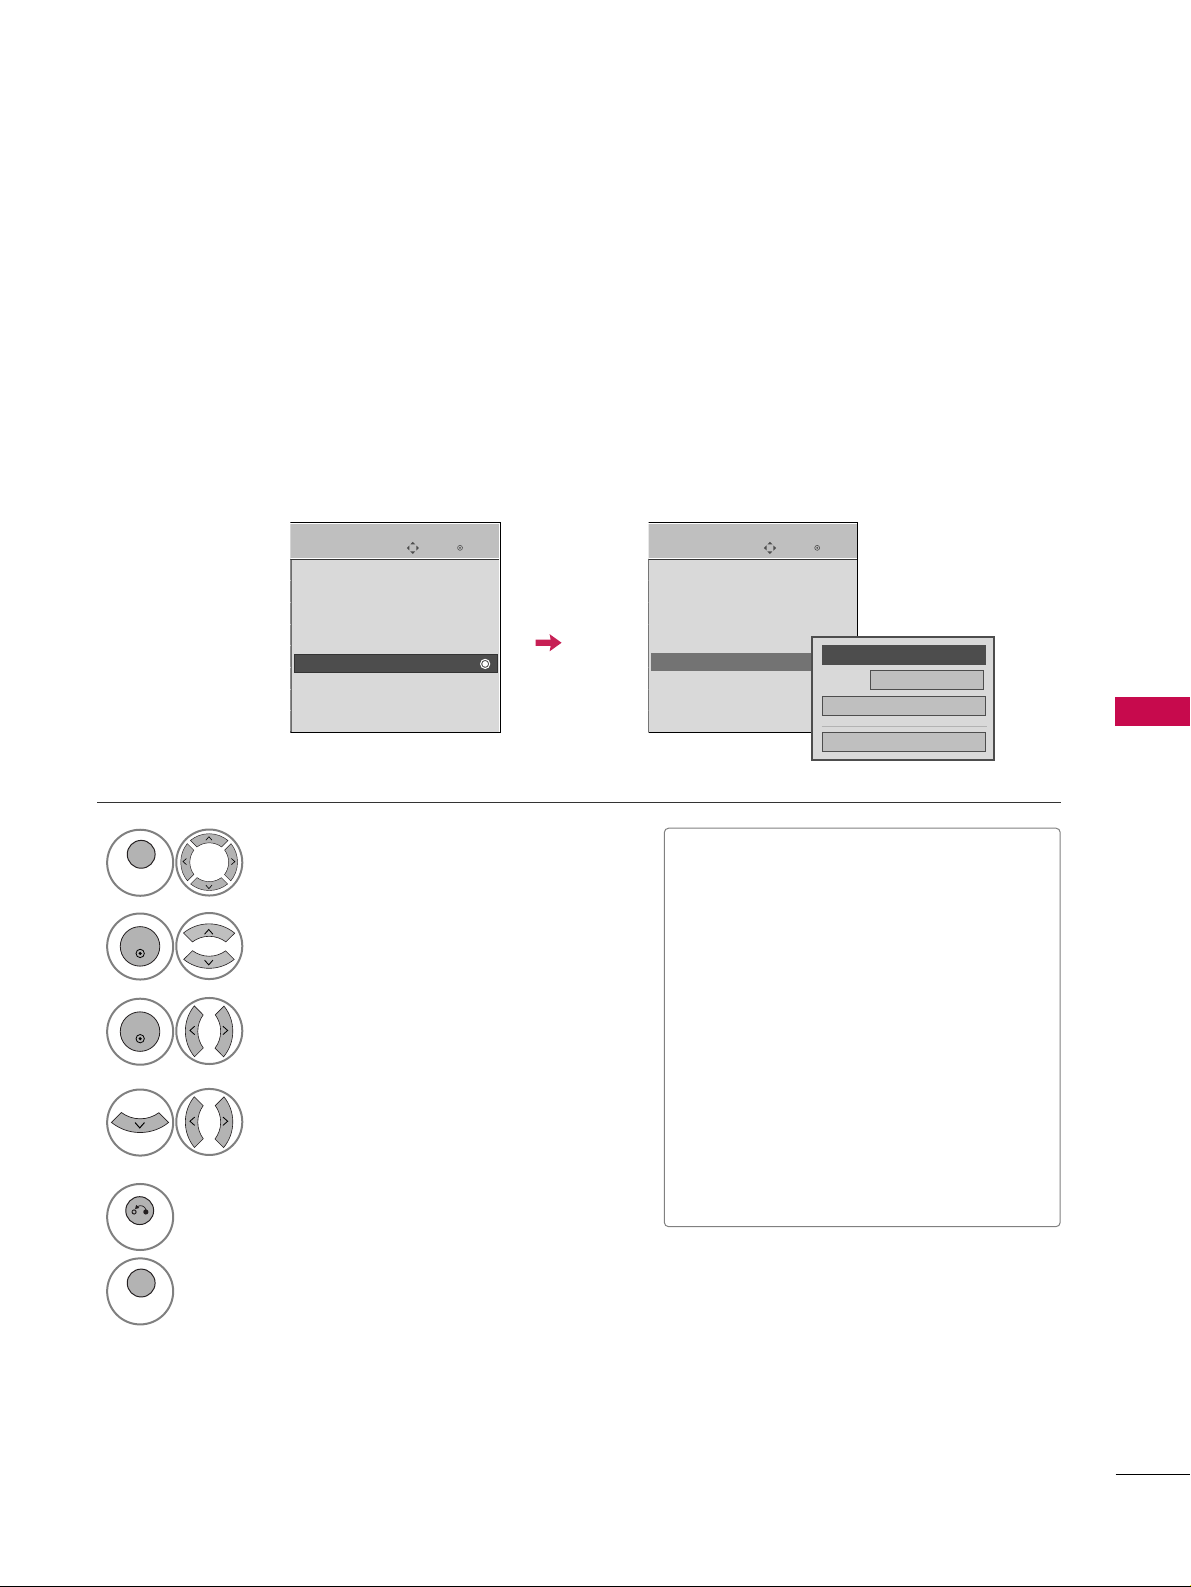
Select
PPIICCTT UURREE
.
Select
AA ddvvaanncceedd CCoonnttrrooll
.
Select your desired options.
1
MENU
3
2
ENTER
ENTER
5
RETURN
Return to the previous menu.
MENU
Return to TV viewing.
Make appropriate adjustments.
4
Enter
Move
PICTURE
Enter
Move
PICTURE
E
Aspect Ratio : 16:9
Energy Saving : Intelligent Sensor
Picture Mode : Standard
• Contrast 90
• Brightness 50
• Sharpness 60
• Color 60
• Tint 0
• Advanced Control
RG
E
Aspect Ratio : 16:9
Energy Saving : Intelligent Sensor
Picture Mode : Standard
• Contrast 90
• Brightness 50
• Sharpness 60
• Color 60
• Tint 0
• Advanced Control
RG
RG
Color Temperature
Dynamic Contrast
Dynamic Color
Off
Noise Reduction
Off
Gamma
Medium
Black Level
Low
Film Mode
Off
Close
FF
Medium
GG
Off
Color Gamut
Wide
Edge Enhancer
On
Page 2

PICTURE CONTROL
72
PICTURE CONTROL
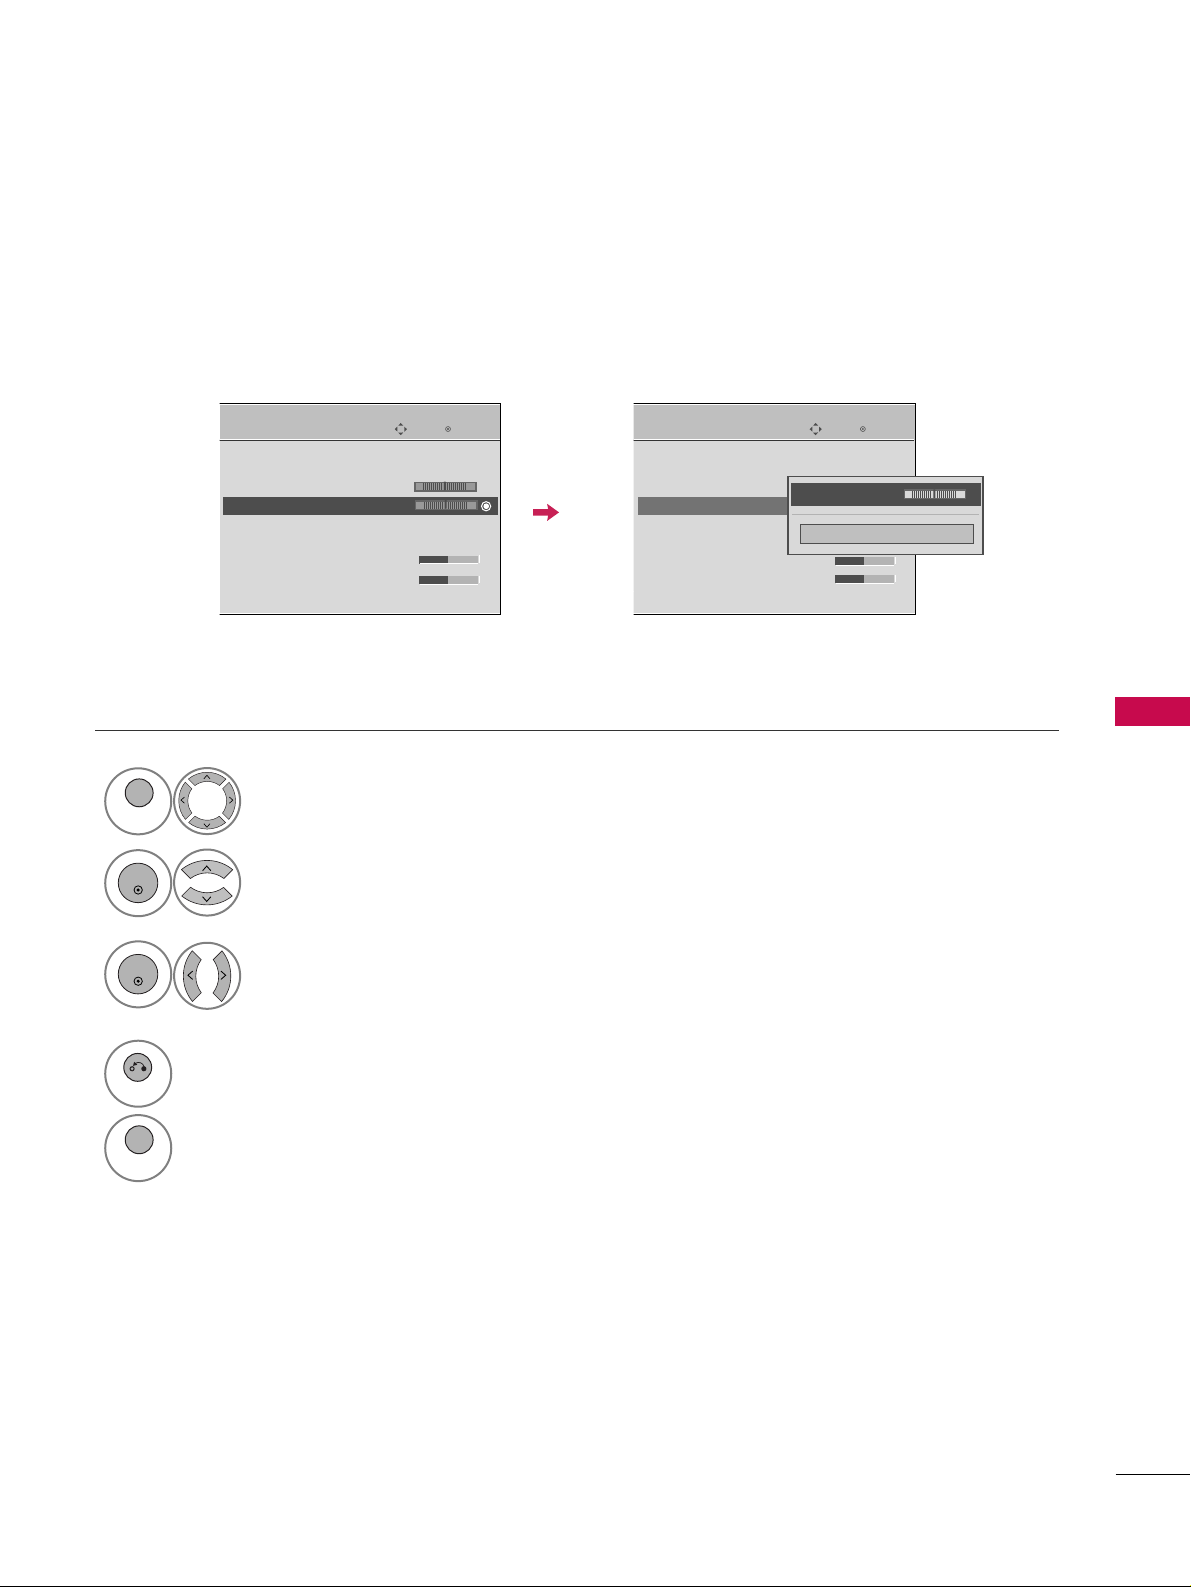
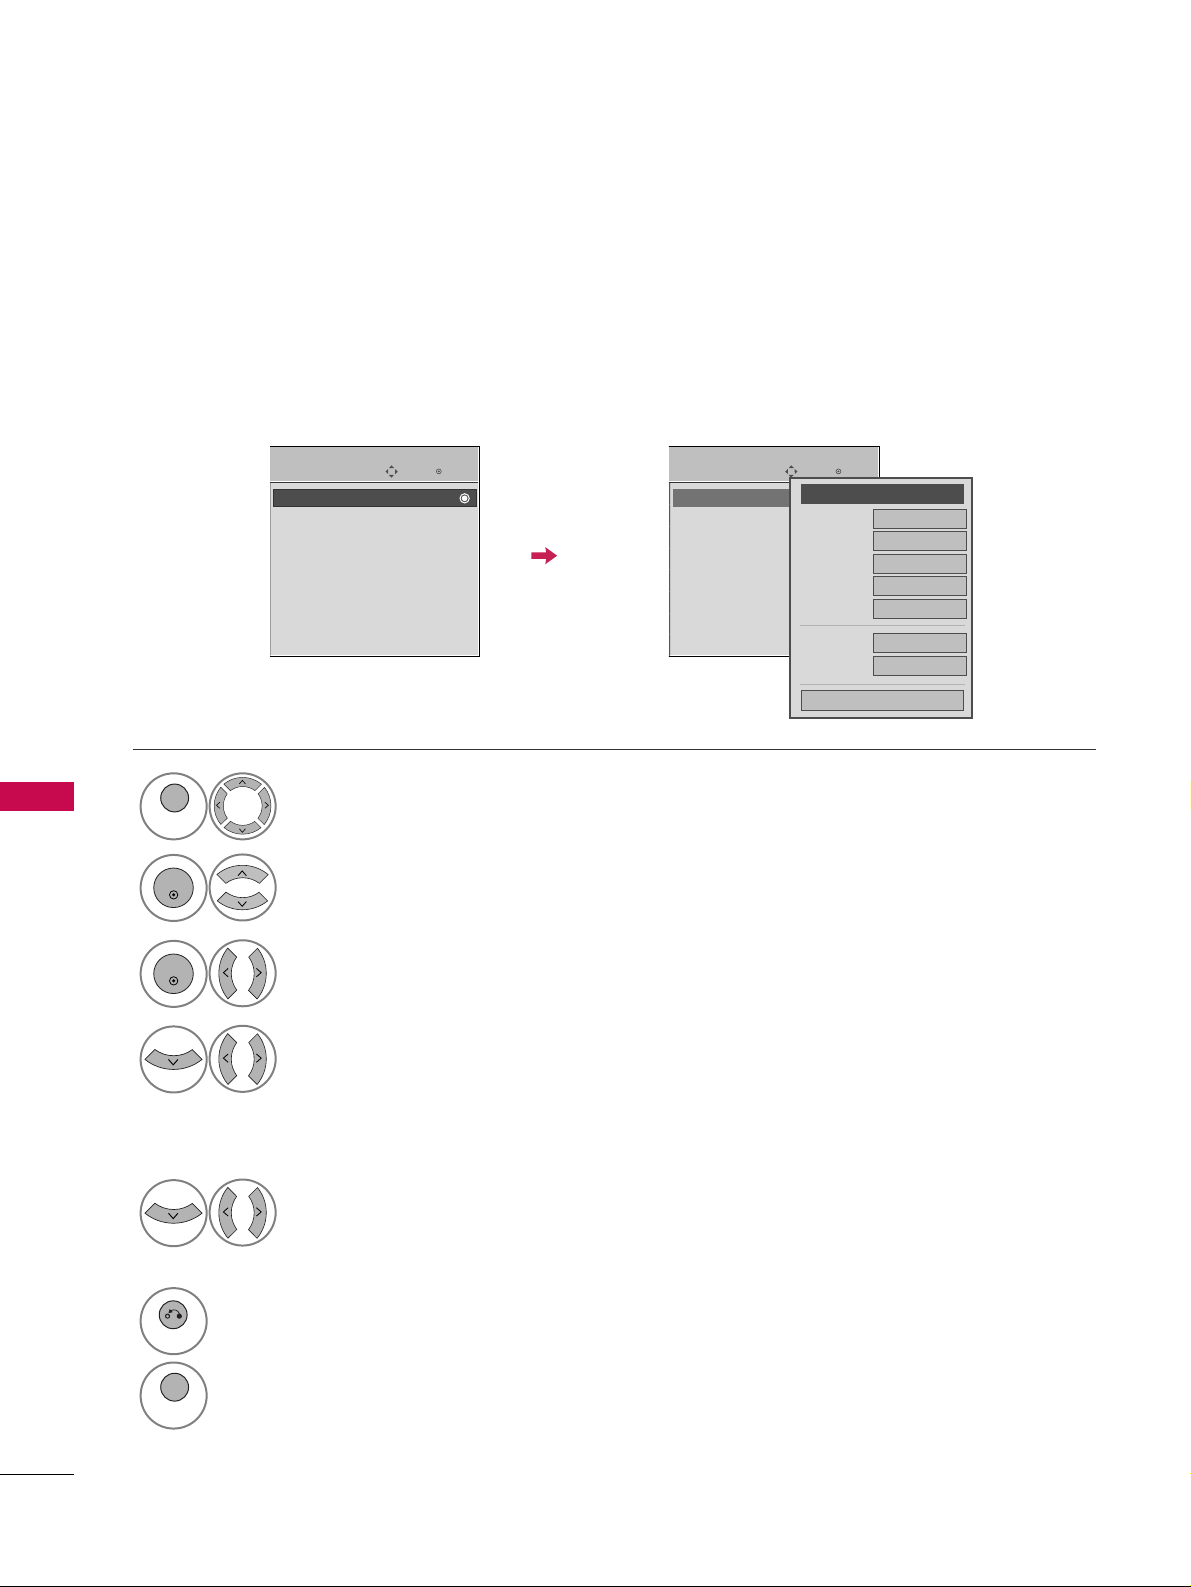
Select your desired menu option.
Select
PPIICCTT UURREE
.
Select
PPiiccttuurree MMooddee
.
Select
EExxppeerrtt CC oonnttrr ooll
.
Select
EExxppeerrtt11
, or
EExxppeerrtt22
.
1
MENU
3
2
ENTER
ENTER
4
ENTER
5
ENTER
Make appropriate adjustments.
6
EXPERT PICTURE CONTROL
By segmenting categories,
EExxppee rrtt11
and
EExxppee rrtt22
provide more categories which users can set as
they see fit, offering the optimal picture quality for users.
This may also be used be a professional to help optimize the TV performance in the environment the TV is in.
7
RETURN
Return to the previous menu.
MENU
Return to TV viewing.
Enter
Move
PICTURE
E
Aspect Ratio : 16:9
Energy Saving : Intelligent Sensor
Picture Mode : Expert1
• Contrast 80
• Brightness 50
• H Sharpness 50
• V Sharpness 50
• Color 50
• Tint 0
RG
Enter
Move
PICTURE
Energy Saving : Intelligent Sensor
Picture Mode : Expert2
• Contrast 50
• Brightness 50
• H Sharpness50
• V Sharpness50
• Color 50
• Tint 0
• Expert Control
RG
Vivid
Standard
Cinema
Sport
Game
Expert1
Expert2
FF
Off
GG
Dynamic Contrast
Noise Reduction
Off
Gamma
Medium
Black Level
Low
Off
Film Mode
Color Standard
HD
Close
E
E
E
Color Gamut
Standard
Edge Enhancer
Off
Page 3

PICTURE CONTROL
73
Color Temperature
■
Set to warm to enhance hotter colors such as red, or set to cool to make picture bluish.
■
Adjusts the contrast to keep it at the best level according to the brightness of the
screen. The picture is improved by making bright parts brighter and dark parts darker.
■
Adjusts screen colors so that they look livelier, richer and clearer. This feature enhances
hue, saturation and luminance so that red, blue, green and white look more vivid.
■
Reduces screen noise without compromising video quality.
Low : Make dark and middle gray level area of the picture brighter.
Medium: Express original picture levels.
High: Make dark and middle gray level area of the picture darker.
■
You can adjust brightness of dark area and middle gray level area of the picture.
Low: The reflection of the screen gets darker.
High: The reflection of the screen gets brighter.
Auto: Realizing the black level of the screen and set it to High or Low automatically.
■
Set black level of the screen to proper level.
■
This function enables to select 'Low' or 'High' in the following mode: AV (NTSC-M),
HDMI or Component. Otherwise, 'Black level' is set to 'Auto'.
■
Makes video clips recorded in film look more natural by eliminating judder effect.
■
DVD and Blu-ray movies are filmed at 24 frames per second.
Dynamic Contrast
Dynamic Color
Noise Reduction
Gamma
Black Level
Film Mode
Standard: Displays standard color area.
Wide: Mode to use and set the rich color area of the display.
■
Maximize the utilization of color to increase color quality.
■
In Advanced Control mode, this feature is enabled in “
CCoolloorr TTeemmppeerraattuurree -- WWaarrmm
”.
■
Show clearer and distinctive yet natural corners of the video.
■
Convert the color of a different video to HD color.
■
This is the function to adjust the overall color of the screen to the feeling you want.
a. Method : 2 Points
- Pattern: Inner, Outer
- Red/Green/Blue Contrast, Red/Green/Blue Brightness:
The adjustment range is -50 - +50.
b. Method : 20 Point IRE
- Pattern: Inner, Outer
- IRE (Institute of Radio Engineers) is the unit to display the size of the video signal and can be
set among 5, 10, 15 - 95, 100. You can adjust Red, Green or Blue according to each setting.
- Red/Green/Blue: The adjustment range is -50 - +50.
■
As the tool used by the experts to make adjustments by using the test patterns,
this does not affect other colors but can be used to selectively adjust the 6 color
areas (Red/Green/Blue/Cyan/Mgt/Yellow).
Color difference may not be distinctive even when you make the adjustments for
the general video.
Adjusts Red/Green/Blue/Yellow/Cyan, Magenta.
- Red/Green/Blue/Yellow/Cyan, Magenta Color: The adjustment range is -30 -
+30.
- Red/Green/Blue/Yellow/Cyan, Magenta Tint: The adjustment range is -30 - +30.
- This feature is disable in RGB-PC and HDMI (PC) mode.
Color Standard
White Balance
Color Management
System
Edge Enhancer
Color Gamut
Page 4

PICTURE CONTROL
74
PICTURE CONTROL
PICTURE RESET
Settings of the selected picture modes return to the default factory settings.
Select
PPIICCTT UURREE
.
Select
RReesseett
.
Initialize the adjusted value.
1
MENU
3
2
ENTER
ENTER
4
MENU
Return to TV viewing.
Enter
Move
PICTURE
E
RG
Picture Mode : Standard
• Contrast 90
• Brightness 50
• Sharpness 60
• Color 60
• Tint 0
• Advanced Control
• Reset
Screen (RGB-PC)
Enter
Move
PICTURE
E
RG
Picture Mode : Standard
• Contrast 90
• Brightness 50
• Sharpness 60
• Color 60
• Tint 0
• Advanced Control
• Reset
Screen (RGB-PC)
Resetting video configuration...
ii
THX MEDIA DIRECTOR
- Only 50/60PS70, 50/60PS80 models
Enter
Move
OPTION
Enter
Move
OPTION
Menu Language(Language):
English
Audio Language : English
Input Label
THX Media Director : Off
SIMPLINK : On
Key Lock : Off
Caption : Off
Demo Mode : Off
Menu Language(Language):
English
Audio Language : English
Input Label
THX Media Director : On
SIMPLINK : On
Key Lock : Off
Caption : Off
Demo Mode : Off
EE
EE
Select
OOPPTTII OONN
.
Select
TT HHXX MMeeddiiaa DDiirreeccttoorr
.
1
MENU
2
ENTER
Select
OO nnorOO ffff
.
3
ENTER
4
RETURN
Return to the previous menu.
MENU
Return to TV viewing.
Picture and sound setting by metadata from the device with enabled THX Media director function. Metadata
includes aspect ratio, picture mode and sound mode etc.
Off
On
Page 5

PICTURE CONTROL
75
IMAGE STICKING MINIMIZATION (ISM) METHOD
A frozen still picture displayed on the screen for prolonged periods can result in a ghost image. You can use
Orbiter to help prevent image sticking. The other two functions are for removing a ghost image.
GG
An excessive ghosted image may be impossible to
clear entirely with White Wash. To return to normal viewing, press the any button.
NOTE
!
■
NNoorr mmaall
: If image sticking is never a
problem, ISM is not necessary - set to
Normal.
■
OO rr bbii tt ee rr
: Orbiter may help prevent
ghost images. However, it is best not to
allow any fixed image to remain on the
screen. To avoid a ghost image on the
screen, the image will move every 2 minutes.
■
CCoolloorr WWaasshh
: The color block with the
screen moved a little and the white pattern are alternately displayed. It is difficult to see the after image on all colors.
Once it has been corrected it will not be
visible in any color.
■
WWhh iittee WWaasshh
: White Wash removes
ghost images from the screen. Use sparingly. Watch the TV normally for a while
before using this feature to see if the
ghost image disappears on its own.
Select
OOPPTTII OONN
.
Select
IISSMM MMeetthhoodd
.
1
MENU
2
ENTER
Select
NNoorrmmaall,, OOrrbbiitt eerr,,
CCoolloorr WWaasshh
or
WWhhiittee WWaasshh..
3
ENTER
4
RETURN
Return to the previous menu.
MENU
Return to TV viewing.
Enter
Move
OPTION
Menu Language(Language): English
Audio Language : English
Input Label
SIMPLINK : On
Key Lock : Off
Caption : Off
Demo Mode : Off
ISM Method : Normal
Set ID : 1
Enter
Move
OPTION
Menu Language(Language): English
Audio Language : English
Input Label
SIMPLINK : On
Key Lock : Off
Caption : Off
Demo Mode : Off
ISM Method : Normal
Set ID : 1
Normal
Orbiter
Color Wash
White Wash
E
E
Page 6

PICTURE CONTROL
76
PICTURE CONTROL
DEMO MODE
Displays a slide show to explain the various features of this TV.
This feature is disabled in “
IInniittiiaa ll SSeettttiinngg--HHoommee UUssee
”.
Enter
Move
OPTION
Menu Language(Language): English
Audio Language : English
Input Label
SIMPLINK : On
Key Lock : Off
Caption : Off
Demo Mode : Off
ISM Method : Normal
Set ID : 1
Enter
Move
OPTION
Menu Language(Language): English
Audio Language : English
Input Label
SIMPLINK : On
Key Lock : Off
Caption : Off
Demo Mode : Off
ISM Method : Normal
Set ID : 1
E
E
Off
On
Select
OOPPTTII OONN
.
1
MENU
Select
DDeemmoo MMooddee
.
2
ENTER
Select
OO nn
.
3
ENTER
Return to TV viewing.
After a while,
DDeemmoo MMooddee
starts.
If you want to stop the demo, press any button.
(except VOL or MUTE)
4
MENU
Show the various features of the TV.
5
6
Show the difference XD Engine features.
Page 7
SOUND & LANGUAGE CONTROL
77
SOUND & LANGUAGE CONTROL
AUTO VOLUME LEVELER (AUTO VOLUME)
Auto Volume makes sure that the volume level remains consistent whether you are watching a commercial or a
regular TV program.
Because each broadcasting station has its own signal conditions, volume adjustment may be needed every
time the channel is changed. This feature allows users to enjoy stable volume levels by making automatic
adjustments for each program.
Select
AA UUDDIIOO
.
Select
AA uuttoo VVoolluummee
.
Select
OO nn
or
OO ffff
.
1
MENU
3
2
ENTER
ENTER
4
RETURN
Return to the previous menu.
MENU
Return to TV viewing.
Enter
Move
AUDIO
Auto Volume : On
Clear Voice II : On
• Level 0
Balance 0
Sound Mode : Standard
•
SRS TruSurround XT:
Off
• Treble 50
• Bass 50
• Reset
Enter
Move
AUDIO
Auto Volume : Off
Clear Voice II : On
• Level 0
Balance 0
Sound Mode : Standard
•
SRS TruSurround XT:
Off
• Treble 50
• Bass 50
• Reset
LR
LR
E E
-+
-+
Off
On
Page 8

SOUND & LANGUAGE CONTROL
78
SOUND & LANGUAGE CONTROL
CLEAR VOICE II
By differentiating the human sound range from others, it improves the sound quality of voices.
■
If you select “
CCllee aarr VVooiiccee IIII--OOnn
”,
SSRRSS TTrruuSSuurrrroouunndd XXTT
feature will not
work.
Select
AA UUDDIIOO
.
Select
CClleeaarr VV ooii ccee IIII
.
Select
OO nn
or
OO ffff
.
1
MENU
3
2
ENTER
ENTER
Enter
Move
AUDIO
Auto Volume : Off
Clear Voice II : On
• Level 0
Balance 0
Sound Mode : Standard
•
SRS TruSurround XT:
Off
• Treble 50
• Bass 50
• Reset
Enter
Move
AUDIO
Auto Volume : Off
Clear Voice II : On
• Level 0
Balance 0
Sound Mode : Standard
•
SRS TruSurround XT:
Off
• Treble 50
• Bass 50
• Reset
LR
LR
E E
Adjustment for Clear Voice II Level
With selecting On
Select
LLeevveell
.
4
Make appropriate adjustments.
5
ENTER
6
RETURN
Return to the previous menu.
MENU
Return to TV viewing.
Close
EE
EE
Level 0
-
+
-+
LR
Off
On
ENTER
Page 9

SOUND & LANGUAGE CONTROL
79
PRESET SOUND SETTINGS (SOUND MODE)
Sound Mode lets you enjoy the best sound without any special adjustment as the TV sets the appropriate
sound options based on the program content.
SSttaannddaarrdd, MMuussiicc, CC iinneemm aa, SSppoorrtt
, and
GGaammee
are preset for optimum sound quality at the factory and are
not adjustable.
Standard Music
Game Sport
Cinema
1
Q. MENU
Select
SSoouunn dd MM ooddee
.
2
Select
SSttaannddaarrdd, MMuussii cc
,
CCiinneemm aa, SSppoorrtt
, or
GGaammee
.
3
Q. MENU
Return to TV viewing.
Q.Menu
Close
FF
16:9
GG
Vivid
Off
English
Off
Add
Eject
Aspect Ratio
Picture Mode
Sound Mode
Caption
Multi Audio
Sleep Timer
Del/Add/Fav
Eject USB
CH
FF
Standard
GG
16:9
■
You can also adjust
SSoouunn dd MM ooddee
in
the
AA UUDDIIOO
menu.
■
SSttaannddaarrdd
: Offers standard-quality
sound.
■
MMuussii cc
: Optimizes sound for listening
to music.
■
CCiinneemm aa
: Optimizes sound for watching
movies.
■
SSppoorrtt
: Optimizes sound for watching sports
events.
■
GGaammee
: Optimizes sound for playing
games.
Page 10

SOUND & LANGUAGE CONTROL
80
SOUND & LANGUAGE CONTROL
SOUND SETTING ADJUSTMENT - USER MODE
SRS TRUSURROUND XT
Select this option to sound realistic.
Adjust the sound to suit your taste and room situations.
Select
AA UUDDIIOO
.
Select
SSoouunn dd MM ooddee
.
Select
TT rr eebbllee
or
BBaassss
.
1
MENU
4
2
ENTER
Select
SSttaannddaarrdd, MMuussii cc
,
CCiinneemm aa, SSppoorrtt
, or
GGaammee
.
3
ENTER
ENTER
Make appropriate adjustments.
5
ENTER
Select
AA UUDDIIOO
.
Select
SSRRSS TTrruuSSuurrrroouunndd XXTT
.
Select
OO nn
or
OO ffff
.
1
MENU
3
2
ENTER
ENTER
■
If you select “
CCllee aarr VV ooii ccee IIII--OOnn
”,
SSRRSS
TT rruuSSuu rrrroouunndd XXTT
feature will not work.
■
SSRRSS TTrruuSSuurrrroouunndd XXTT
: TruSurround XT is a
patented SRS technology that solves the problem of playing 5.1 multichannel content over
two speakers.
6
RETURN
Return to the previous menu.
MENU
Return to TV viewing.
4
RETURN
Return to the previous menu.
MENU
Return to TV viewing.
Enter
Move
AUDIO
Auto Volume : Off
Clear Voice II : On
• Level 0
Balance 0
Sound Mode : Standard
•
SRS TruSurround XT:
Off
• Treble 50
• Bass 50
• Reset
Enter
Move
AUDIO
Auto Volume : Off
Clear Voice II : On
• Level 0
Balance 0
Sound Mode : Standard
•
SRS TruSurround XT:
Off
• Treble 50
• Bass 50
• Reset
LR
LR
Close
EE
EE
Treble 50
Bass 50
SRS TruSurround XT
Off
E E
-+
-+
Page 11
SOUND & LANGUAGE CONTROL
81
BALANCE
Select
AA UUDDIIOO
.
Select
BBaallaann ccee
.
Make appropriate adjustments.
1
MENU
3
2
ENTER
ENTER
Adjust the left/right sound of speaker to suit your taste and room situations.
4
RETURN
Return to the previous menu.
MENU
Return to TV viewing.
Enter
Move
AUDIO
Auto Volume : Off
Clear Voice II : On
• Level 0
Balance 0
Sound Mode : Standard
•
SRS TruSurround XT:
Off
• Treble 50
• Bass 50
• Reset
Enter
Move
AUDIO
Auto Volume : Off
Clear Voice II : On
• Level 0
Balance 0
Sound Mode : Standard
•
SRS TruSurround XT:
Off
• Treble 50
• Bass 50
• Reset
LR
LR
E E
Close
EE
EE
Balance 0
LR
-+
Page 12

SOUND & LANGUAGE CONTROL
82
SOUND & LANGUAGE CONTROL
TV SPEAKERS ON/OFF SETUP
Turn the TV speakers off if using external audio equipment.
If you wish to use an external Hi-Fi system or a SRS system, turn off the TV’s internal speakers.
Select
AA UUDDIIOO
.
Select
TT VV SSppeeaakkeerr
.
Select
OO nn
or
OO ffff
.
1
MENU
3
2
ENTER
ENTER
4
RETURN
Return to the previous menu.
MENU
Return to TV viewing.
Enter
Move
AUDIO
Clear Voice II : On
• Level 0
Balance 0
Sound Mode : Standard
•
SRS TruSurround XT:
Off
• Treble 50
• Bass 50
• Reset
TV Speaker : On
Enter
Move
AUDIO
Clear Voice II : On
• Level 0
Balance 0
Sound Mode : Standard
•
SRS TruSurround XT:
Off
• Treble 50
• Bass 50
• Reset
TV Speaker : On
LR
LR
EE
Off
On
-+
-+
Page 13

SOUND & LANGUAGE CONTROL
83
AUDIO RESET
Settings of the selected Sound Mode return to the default factory settings.
Select
AA UUDDIIOO
.
Select
RReesseett
.
1
MENU
2
ENTER
Initialize the adjusted value.
3
ENTER
4
MENU
Return to TV viewing.
Enter
Move
AUDIO
Auto Volume : Off
Clear Voice II : On
• Level 0
Balance 0
Sound Mode : Standard
•
SRS TruSurround XT:
Off
• Treble 50
• Bass 50
• Reset
Enter
Move
AUDIO
Auto Volume : Off
Clear Voice II : On
• Level 0
Balance 0
Sound Mode : Standard
•
SRS TruSurround XT:
Off
• Treble 50
• Bass 50
• Reset
LR
LR
E E
Resetting audio configuration...
ii
-+
-+
Page 14
SOUND & LANGUAGE CONTROL
84
SOUND & LANGUAGE CONTROL
STEREO/SAP BROADCAST SETUP
For Analog only: This TV can receive MTS stereo programs and any SAP (Secondary Audio Program) that accompanies the stereo program if the station transmits an additional sound signal. Mono sound is automatically used
if the broadcast is only in Mono.
Select
SSAAPP
.
Select
MMoonnoo, SStteerreeoo
, or
SSAAPP
.
Return to TV viewing.
1
Q. MENU
3
2
Q. MENU
Select
MMuullttii AAuuddiioo
.
Select other languages.
Return to TV viewing.
1
Q. MENU
3
2
Q. MENU
Analog TV Digital TV
FF
English
GG
Q.Menu
Close
FF
16:9
GG
Vivid
Off
Off
Add
Eject
Aspect Ratio
Picture Mode
Sound Mode
Caption
Multi Audio
Sleep Timer
Del/Add/Fav
Eject USB
CH
16:9
Standard
FF
English
GG
Page 15
SOUND & LANGUAGE CONTROL
85
AUDIO LANGUAGE
Other languages may be available if a digital signal is provided by the broadcasting station.
This feature operates only in DTV/CADTV mode.
Select
OOPPTTII OONN
.
Select
AA uuddiioo LLaa nngg uuaaggee
.
Select your desired language.
1
MENU
3
2
ENTER
ENTER
4
RETURN
Return to the previous menu.
MENU
Return to TV viewing.
Enter
Move
OPTION
Menu Language(Language): English
Audio Language : English
Input Label
SIMPLINK : On
Key Lock : Off
Caption : Off
Demo Mode : Off
ISM Method : Normal
Set ID : 1
Enter
Move
OPTION
Menu Language(Language): English
Audio Language : English
Input Label
SIMPLINK : On
Key Lock : Off
Caption : Off
Demo Mode : Off
ISM Method : Normal
Set ID : 1
E E
English
Spanish
French
Page 16

SOUND & LANGUAGE CONTROL
86
SOUND & LANGUAGE CONTROL
ON-SCREEN MENUS LANGUAGE SELECTION
The menus can be shown on the screen in the selected language.
Select
OOPPTTII OONN
.
Select
MMeennuu LLaann gguu aaggee(( LLaanngguuaaggee))
.
Select your desired language.
From this point on, the on-screen menus will
be shown in the selected language.
1
MENU
3
2
ENTER
ENTER
4
RETURN
Return to the previous menu.
MENU
Return to TV viewing.
Enter
Move
OPTION
Menu Language(Language): English
Audio Language : English
Input Label
SIMPLINK : On
Key Lock : Off
Caption : Off
Demo Mode : Off
ISM Method : Normal
Set ID : 1
Enter
Move
OPTION
Menu Language(Language): English
Audio Language : English
Input Label
SIMPLINK : On
Key Lock : Off
Caption : Off
Demo Mode : Off
ISM Method : Normal
Set ID : 1
E E
English
Español
Français
Page 17
SOUND & LANGUAGE CONTROL
87
CAPTION MODE
Captions are provided to help people with hearing loss watch TV. Select a caption mode for displaying captioning information if provided on a program. Analog caption displays information at any position on the screen
and is usually the program's dialog. Caption/Text, if provided by the broadcaster, would be available for both
digital and analog channels on the Antenna/Cable. This TV is programmed to memorize the caption/text mode
which was last set when you turned the power off. This function is only available when
CC aappttiioonn
Mode is set
OO nn
.
Select
OOPPTTII OONN
.
Select
CCaa ppttiioonn
.
Select
OO nn
.
1
MENU
3
2
ENTER
ENTER
Select
CCCC11-44
or
TT eexxtt11-44
.
4
Analog Broadcasting System Captions
■
When selecting
OO ffff
, Sub-menus for
Analog, DTV, and Digital Option
become disabled.
■
CCAA PP TTIIOONN
The term for the words that scroll
across the bottom of the TV screen;
usually the audio portion of the program provided for the hearing impaired.
■
TT EEXXTT
The term for the words that appear in a
large black frame and almost cover the
entire screen; usually messages provided by the broadcaster.
5
RETURN
Return to the previous menu.
MENU
Return to TV viewing.
Enter
Move
OPTION
Menu Language(Language): English
Audio Language : English
Input Label
SIMPLINK : On
Key Lock : Off
Caption : Off
Demo Mode : Off
ISM Method : Normal
Set ID : 1
Enter
Move
OPTION
Menu Language(Language): English
Audio Language : English
Input Label
SIMPLINK : On
Key Lock : Off
Caption : Off
Demo Mode : Off
ISM Method : Normal
Set ID : 1
Mode
CC1
Close
Digital Option
FF
On
GG
E E
Page 18

SOUND & LANGUAGE CONTROL
88
SOUND & LANGUAGE CONTROL
Digital Broadcasting System Captions
Choose the language you want the DTV/CADTV Captions to appear in.
Other Languages can be chosen for digital sources only if they are included on the program.
This function in only available when Caption Mode is set On.
Select
OOPPTTII OONN
.
Select
CCaa ppttiioonn
.
Select
OO nn
.
1
MENU
3
2
ENTER
ENTER
Select
CCCC11-44, TT eexxtt11-44
, or
SSeerrvviiccee11- 66
.
4
5
RETURN
Return to the previous menu.
MENU
Return to TV viewing.
Enter
Move
OPTION
Menu Language(Language): English
Audio Language : English
Input Label
SIMPLINK : On
Key Lock : Off
Caption : Off
Demo Mode : Off
ISM Method : Normal
Set ID : 1
Enter
Move
OPTION
Menu Language(Language): English
Audio Language : English
Input Label
SIMPLINK : On
Key Lock : Off
Caption : Off
Demo Mode : Off
ISM Method : Normal
Set ID : 1
Mode
Service 1
Close
Digital Option
FF
On
GG
E E
Page 19

SOUND & LANGUAGE CONTROL
89
Caption Option
Customize the DTV/CADTV captions that appear on your screen.
This function in only available when Caption Mode is turned On.
Select
OOPPTTII OONN
.
Select
CCaa ppttiioonn
Select
OO nn
.
1
MENU
3
2
ENTER
ENTER
Select
CCuussttoomm
.
5
ENTER
Customize the
SSttyyllee, FF oonntt
, etc., to your
preference. A preview icon is provided at
the bottom of the screen, use it to see the
caption language.
6
Select
DDii ggiittaall OOppttiioonn
.
4
■
SSiizz ee
: Set the word size.
■
FF oonntt
: Select a typeface for the text.
■
TT eexxtt CCoolloorr
: Choose a color for the
text.
■
TT eexxtt OOppaacciittyy
: Specify the opacity
for the text color.
■
BBgg ((BBaacckkggrroouunndd)) CCoolloorr
: Select a
background color.
■
BBgg ((BBaacckkggrroouunn dd)) OOppaacciittyy
: Select
the opacity for the background color.
7
RETURN
Return to the previous menu.
MENU
Return to TV viewing.
Enter
Move
OPTION
Menu Language(Language): English
Audio Language : English
Input Label
SIMPLINK : On
Key Lock : Off
Caption : Off
Demo Mode : Off
ISM Method : Normal
Set ID : 1
Enter
Move
OPTION
Menu Language(Language): English
Audio Language : English
Input Label
SIMPLINK : On
Key Lock : Off
Caption : Off
Demo Mode : Off
ISM Method : Normal
Set ID : 1
Size
A Standard
Font
Font 1
Text Color
White
Text Opacity
Solid
Bg Color
Black
Bg Opacity
Solid
Close
FF
Custom
GG
E E
Mode
Service1
Close
Digital Option
FF
On
GG
Page 20
TIME SETTING
90
CLOCK SETTING
TIME SETTING
Auto Clock Setup
The time is set automatically from a digital channel signal.
The digital channel signal includes information for the current time provided by the broadcasting station.
Set the clock manually if the current time is set incorrectly by the auto clock function.
Select
TT II MMEE
.
Select
CClloocckk
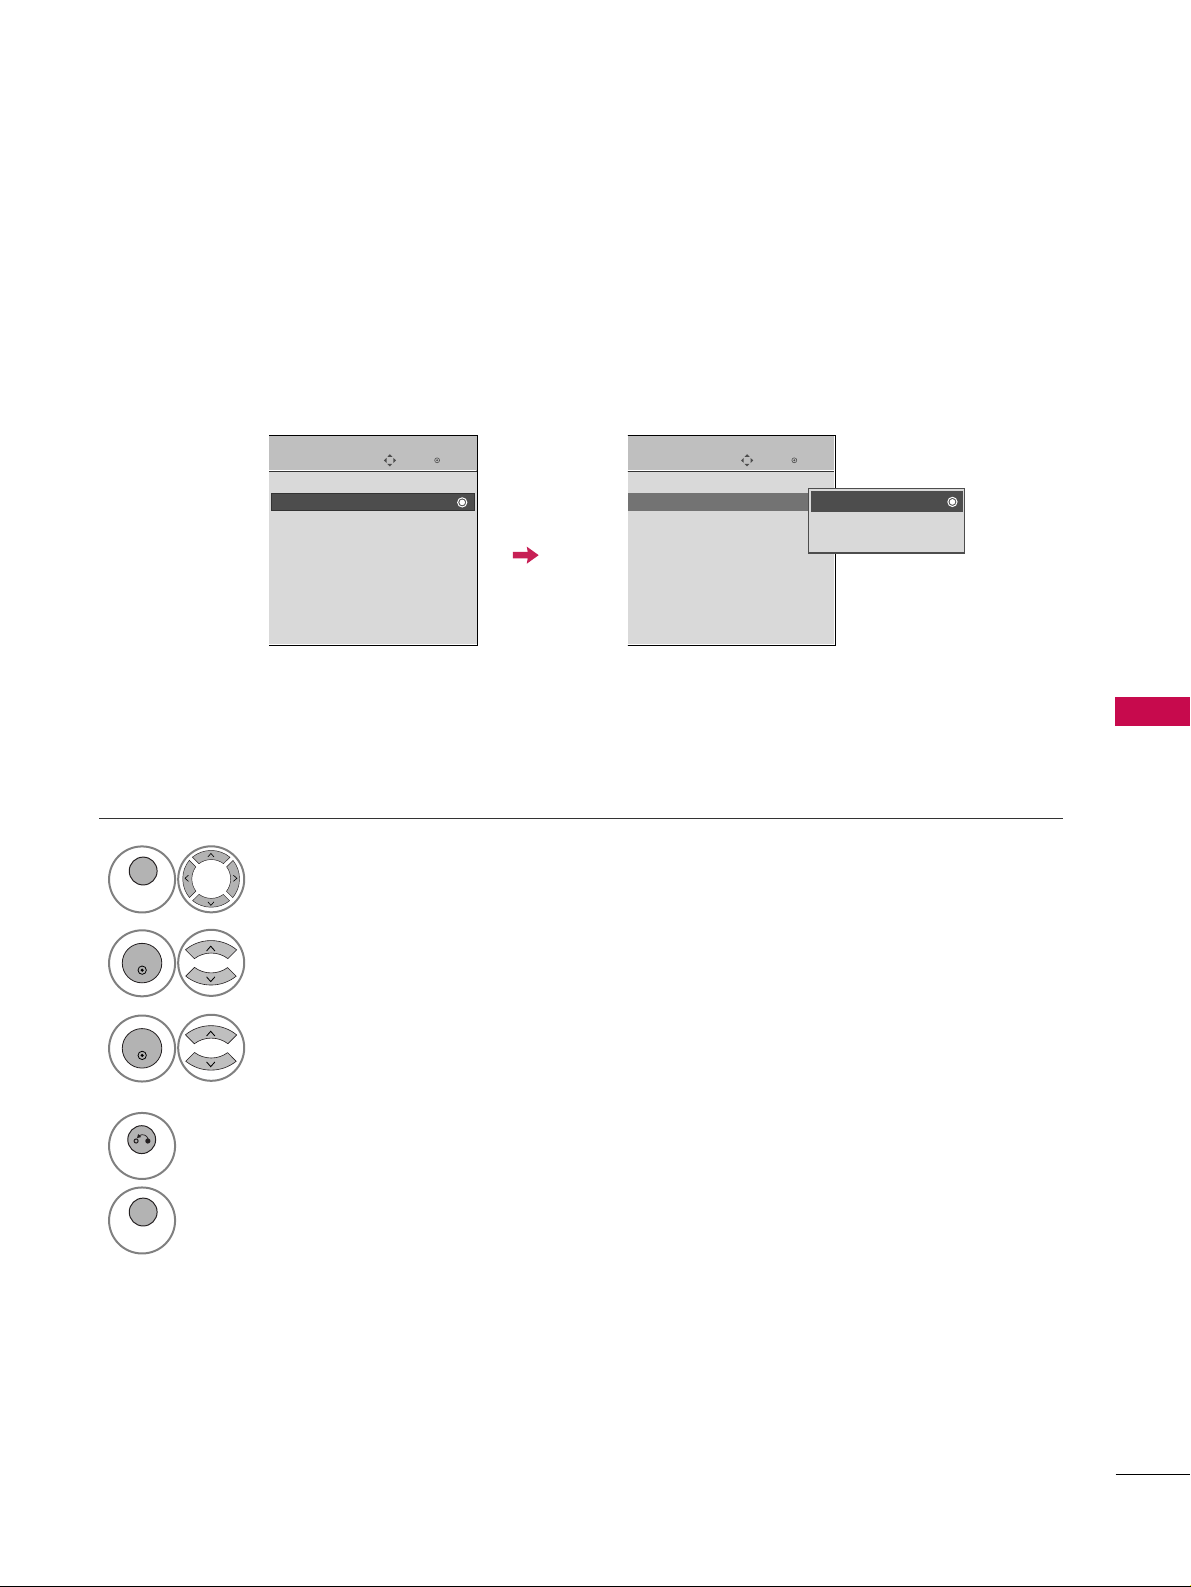
.
Select
AA uutt oo
.
1
MENU
3
2
ENTER
ENTER
Select your viewing area time zone.
• U.S.A:
EEaassttee rrnn, CCee nnttrraall, MMoouu nnttaaii nn
,
PPaacciiffiicc, AA llaasskkaa
, or
HHaawwaaiiii
.
• Canada:
EEaass tteerrnn, CCeenn ttrraa ll, MMoouunnttaaiinn
,
PPaacciiffiicc, NNeeww FF..l
laanndd
, or
AA ttllaannttiicc
.
4
Select
AA uuttoo, OO nn
, or
OO ffff
(depending on
whether or not your viewing area observes
Daylight Saving time).
5
6
RETURN
Return to the previous menu.
MENU
Return to TV viewing.
Enter
Move
TIME
Clock
Off Time : Off
On Time : Off
Sleep Timer : Off
Enter
Move
TIME
Clock
Off Time : Off
On Time : Off
Sleep Timer : Off
Year
Month
2
Date
21
Hour
2 AM
2008
Minute
10
Time Zone
Eastern
Daylight
Saving
Auto
Close
FF
Auto
GG
Page 21

TIME SETTING
91
Manual Clock Setup
If the current time setting is wrong, set the clock manually.
Select
TT II MMEE
.
Select
CClloocckk
.
Select
MMaa nnuuaall
.
1
MENU
3
2
ENTER
ENTER
Select the Year, Month, Date, Hour, or Minutes
option.
4
Set the Year, Month, Date, Hour, or Minutes
option.
5
6
RETURN
Return to the previous menu.
MENU
Return to TV viewing.
Enter
Move
TIME
Clock
Off Time : Off
On Time : Off
Sleep Timer : Off
Enter
Move
TIME
Clock
Off Time : Off
On Time : Off
Sleep Timer : Off
Year
Month
2
Date
21
Hour
2 AM
2008
Minute
10
Time Zone
Eastern
Daylight
Saving
Auto
Close
FF
Manual
GG
GG
If you unplug the TV once or turn the
main power off, the clock function
reset.
Page 22

TIME SETTING
92
TIME SETTING
AUTO ON/OFF TIME SETTING
This function operates only if the current time has been set.
The
OOffff TTiimmee
function overrides the
OOnn TTiimmee
function if they are both set to the same time.
The TV must be in standby mode for the
OOnn TTiimmee
to work.
If you do not press any button within 2 hours after the TV turns on with the
OOnn TTiimmee
function, the TV will
automatically revert to standby mode.
■
To cancel
OOnn//OOffff TTiimmee
function, select
OO ffff
.
■
Only for On Time function
Select
IInnppuutt
.
Select the desired input source.
Select
TT II MMEE
.
Select
OOffff ttiimmee
or
OOnn ttiimmee
.
Select
RReeppeeaatt
.
1
MENU
3
2
ENTER
ENTER
Select
OO ffff, OO nn ccee, DDaaiill yy, MMoonn..~FF rr ii..
,
MMoonn..~SSaa tt.., WWeeeekkeenndd
, or
SSuunnddaa yy
.
4
Select and set
HHoouurr
or
MMiinnuuttee
.
5
1
ENTER
3
4
2
When Selecting
TT VV
:
set the channel at turn-on.
Adjust to sound level at
turn-on.
6
RETURN
Return to the previous menu.
MENU
Return to TV viewing.
Enter
Move
TIME
Clock
Off Time : Off
On Time : Off
Sleep Timer : Off
Enter
Move
TIME
Clock
Off Time : Off
On Time : Off
Sleep Timer : Off
Repeat
FF
Once
GG
Hour
6 AM
Minute
30
Input
TV
Channel
TV 2-0
Volume
30
Close
May /27 / 2009 /10:10 AM
Page 23

TIME SETTING
93
SLEEP TIMER SETTING
The Sleep Time turns the TV off at the preset time.
Note that this setting is cleared when the TV is turned off.
■
You can also adjust
SSllee eepp TT iimmeerr
in
the
TT II MMEE
menu.
Q.Menu
Close
FF
16:9
GG
Vivid
Off
English
Off
Add
Eject
Aspect Ratio
Picture Mode
Sound Mode
Caption
Multi Audio
Sleep Timer
Del/Add/Fav
Eject USB
CH
16:9
FF
Off
GG
Standard
Select
SSllee eepp TT iimmeerr
.
1
Q. MENU
2
Select
OO ffff, 11 00, 22 00, 33 00, 66 00, 99 00
,
112200, 118800
, or
224400
minutes.
3
Q. MENU
Return to TV viewing.
Page 24

PARENTAL CONTROL / RATING
94
PARENTAL CONTROL / RATINGS
Parental Control can be used to block specific channels, ratings and other viewing sources.
The Parental Control Function (V-Chip) is used to block program viewing based on the ratings sent by the broadcasting station. The default setting is to allow all programs to be viewed. Viewing can be blocked by choosing the
type of the program and the categories. It is also possible to block all program viewing for a time period. To use
this function, the following must be done :
1. Set ratings and categories to be blocked.
2. Specify a password
3. Enable the lock
V-Chip rating and categories
Rating guidelines are provided by broadcasting stations. Most television programs and television movies can be
blocked by TV Rating and/or Individual Categories. Movies that have been shown at the theaters or direct-tovideo movies use the Movie Rating System (MPAA)only.
Ratings for Television programs including made-for-TV movies :
■
TV-G(General audience
)
■
TV-PG(Parental guidance suggested
)
■
TV-14(Parents strongly cautioned
)
■
TV-MA (Mature audience only
)
■
TV-Y(All children
)
■
TV-Y7(Children 7 years older
)
Set up blocking schemes to block specific channels, ratings, and external viewing sources.
A password is required to gain access to this menu.
Setting up Your Password
For USA For Canada
Close
Enter Password
* * * *
Select
LLOOCCKK
.
1
MENU
ENTER
Input the password.
2
1
456
7809
23
■
Enter the password as requested.
■
The TV is set up with the initial password
“0-0-0-0”.
SET PASSWORD & LOCK SYSTEM
Enter
Move
LOCK
Lock System : Off
Set Password
Block Channel
Movie Rating
TV Rating-Children
TV Rating-General
Downloadable Rating
Input Block
Enter
Move
LOCK
Lock System : Off
Set Password
Block Channel
TV Rating-English
TV Rating-French
Downloadable Rating
Input Block
Page 25

PARENTAL CONTROL / RATING
95
Enables or disables the blocking scheme you set up previously.
Lock System
Select
LLoocckk SSyysstteemm
.
Select
OO nn
or
OO ffff
.
4
3
ENTER
■
When you select
OO nn
, the Lock System
is enable.
Select
LLOOCCKK
.
1
MENU
ENTER
Input the password.
2
1
456
7809
23
5
RETURN
Return to the previous menu.
MENU
Return to TV viewing.
Enter
Move
LOCK
Lock System : Off
Set Password
Block Channel
Movie Rating
TV Rating-Children
TV Rating-General
Downloadable Rating
Input Block
Enter
Move
LOCK
Lock System : On
Set Password
Block Channel
Movie Rating
TV Rating-Children
TV Rating-General
Downloadable Rating
Input Block
Off
On
Page 26

PARENTAL CONTROL / RATING
96
PARENTAL CONTROL / RATINGS
Change the password by inputting a new password twice.
Set Password
Select
SSeett ppaasssswwoorrdd
.
Choose any 4 digits for your new password.
As soon as the 4 digits are entered, re-enter
the same 4 digits on the
CCoonnffiirrmm
.
4
3
ENTER
1
456
7809
23
Select
LLOOCCKK
.
1
MENU
ENTER
Input the password.
2
1
456
7809
23
5
RETURN
Return to the previous menu.
MENU
Return to TV viewing.
Enter
Move
LOCK
Lock System : Off
Set Password
Block Channel
Movie Rating
TV Rating-Children
TV Rating-General
Downloadable Rating
Input Block
Enter
Move
LOCK
Lock System : Off
Set Password
Block Channel
Movie Rating
TV Rating-Children
TV Rating-General
Downloadable Rating
Input Block
Close
New
* * * *
Confirm
* * * *
Page 27

PARENTAL CONTROL / RATING
97
CHANNEL BLOCKING
Select
BBlloocckk CChhaannnneell
.
Select a channel to block or unblock.
4
3
ENTER
Block or unblock a channel.
5
Blocks any channels that you do not want to watch or that you do not want your children to watch.
Select
LLOOCCKK
.
1
MENU
ENTER
Input the password.
2
1
456
7809
23
6
RETURN
Return to the previous menu.
MENU
Return to TV viewing.
Enter
Move
LOCK
Lock System : Off
Set Password
Block Channel
Movie Rating
TV Rating-Children
TV Rating-General
Downloadable Rating
Input Block
Ch.Change
Move Page
CH
Move
Previous
Block/Unblock
Page 28

PARENTAL CONTROL / RATING
98
PARENTAL CONTROL / RATINGS
MOVIE & TV RATING
Movie Rating (MPAA)
-
For USA only
Blocks movies according to the movie ratings limits specified, so children cannot view certain movies. You can
set the ratings limit by blocking out all the movies with the ratings above a specified level. Keep in mind that
the movie ratings limit only applies to movies shown on TV, not TV programs, such as soap operas.
Select
MMoovviiee RRaattiinngg
.
Select GG,
PPGG, PPGG--1133, RR, NNCC--1177
,
XX
, or
BBlloocckkiinngg OOffff
.
4
3
ENTER
■
G (General audience)
■
PG (Parental guidance suggested)
■
PG-13 (Parents strongly cautioned)
■
R (Restricted)
■
NC-17 (No one 17 and under admitted)
■
X (Adult only)
■
Blocking Off (Permits all programs)
GG
If you set PG-13: G and PG movies will
be available, PG-13, R, NC-17 and X will
be blocked.
Select
LLOOCCKK
.
1
MENU
ENTER
Input the password.
2
1
456
7809
23
5
RETURN
Return to the previous menu.
MENU
Return to TV viewing.
Enter
Move
LOCK
Lock System : Off
Set Password
Block Channel
Movie Rating
TV Rating-Children
TV Rating-General
Downloadable Rating
Input Block
Enter
Move
LOCK
Lock System : Off
Set Password
Block Channel
Movie Rating
TV Rating-Children
TV Rating-General
Downloadable Rating
Input Block
G
PG
PG-13
R
NC-17
X
Blocking Off
Blocking off : Permits all
programs
Page 29

PARENTAL CONTROL / RATING
99
Select
TT VV RRaattiinngg--CChhiillddrreenn
.
Select
AA ggee
or
FFaannttaassyy VViioolleennccee
.
4
3
ENTER
Select block options.
5
ENTER
■
Age (applies to TV-Y, TV-Y7)
■
Fantasy Violence (applies to TV-Y7)
TV Rating Children
-
For USA only
Prevents children from watching certain children's TV programs, according to the ratings limit set. The children
rating does not apply to other TV programs. Unless you block certain TV programs intended for mature audiences in the TV Rating - sub menu, your children can view those programs.
Select
LLOOCCKK
.
1
MENU
ENTER
Input the password.
2
1
456
7809
23
6
RETURN
Return to the previous menu.
MENU
Return to TV viewing.
Enter
Move
LOCK
Lock System : Off
Set Password
Block Channel
Movie Rating
TV Rating-Children
TV Rating-General
Downloadable Rating
Input Block
Enter
Move
LOCK
Lock System : Off
Set Password
Block Channel
Movie Rating
TV Rating-Children
TV Rating-General
Downloadable Rating
Input Block
Close
Age
Fantasy Violence
Page 30

PARENTAL CONTROL / RATING
100
PARENTAL CONTROL / RATINGS
TV Rating General
-
For USA only
Based on the ratings, blocks certain TV programs that you and your family do not want to view.
Select
TT VV RRaattiinngg--GGee nneerraall
.
Select
AA ggee, DDiiaa lloogguuee, LLaanngguu aaggee
,
SSee xx
or
VViioolleennccee
.
4
3
ENTER
Select block options.
5
ENTER
■
Age (applies to TV-G,TV-PG,TV-14,TVMA).
■
Dialogue-sexual dialogue (applies to
TV-PG,TV-14).
■
Language-adult language (applies to
TV-PG, TV-14, TV-MA).
■
Sex-sexual situations (applies to TV-PG,
TV-14, TV-MA).
■
Violence (applies to TV-PG, TV-14, TVMA).
Select
LLOOCCKK
.
1
MENU
ENTER
Input the password.
2
1
456
7809
23
6
RETURN
Return to the previous menu.
MENU
Return to TV viewing.
Enter
Move
LOCK
Lock System : Off
Set Password
Block Channel
Movie Rating
TV Rating-Children
TV Rating-General
Downloadable Rating
Input Block
Enter
Move
LOCK
Lock System : Off
Set Password
Block Channel
Movie Rating
TV Rating-Children
TV Rating-General
Downloadable Rating
Input Block
Close
Age
Dialogue
Language
Sex
Violence
Page 31

PARENTAL CONTROL / RATING
101
TV Rating English
-
For CANADA only
Selecting English rating system.
Select
TT VV RRaattiinngg--EEnngglliisshh
.
Select EE, CC,
CC88++, GG, PPGG, 1144 ++
,
1188 ++
, or
BBlloocckkiinngg OOffff
.
4
3
ENTER
■
E (Exempt)
■
C (Children)
■
C8+ (Children eight years and older)
■
G (General programming, suitable for
all audiences)
■
PG (Parental Guidance)
■
14+ (Viewers 14 years and older)
■
18+ (Adult programming)
■
Blocking Off (Permits all programs)
Select
LLOOCCKK
.
1
MENU
ENTER
Input the password.
2
1
456
7809
23
5
RETURN
Return to the previous menu.
MENU
Return to TV viewing.
Enter
Move
LOCK
Lock System : Off
Set Password
Block Channel
TV Rating-English
TV Rating-French
Downloadable Rating
Input Block
Enter
Move
LOCK
Lock System : Off
Set Password
Block Channel
TV Rating-English
TV Rating-French
Downloadable Rating
Input Block
Blocking off : Permits all
programs
E
C
C8+
G
PG
14+
18+
Blocking Off
Page 32

PARENTAL CONTROL / RATING
102
PARENTAL CONTROL / RATINGS
TV Rating French
-
For CANADA only
Selecting Canadian French rating system.
Select
TT VV RRaattiinngg--FFrreenncchh
.
Select EE, GG,
88aannss++, 1133 aannss++
,
1166 aannss++, 1188 aannss++
, or
BBlloocckkiinngg ooffff
.
4
3
ENTER
■
E (Exempt)
■
G (General)
■
8ans+ (General-Not convenient for little children)
■
13ans+ (Not convenient for children of
13 years and younger)
■
16ans+ (Not convenient for children of
16 years and younger)
■
18ans+ (This programs is only for
adults)
■
Blocking off (Permits all programs)
Select
LLOOCCKK
.
1
MENU
ENTER
Input the password.
2
1
456
7809
23
5
RETURN
Return to the previous menu.
MENU
Return to TV viewing.
Enter
Move
LOCK
Lock System : Off
Set Password
Block Channel
TV Rating-English
TV Rating-French
Downloadable Rating
Input Block
Enter
Move
LOCK
Lock System : Off
Set Password
Block Channel
TV Rating-English
TV Rating-French
Downloadable Rating
Input Block
Blocking off : Permits all
programs
E
G
8ans+
13ans+
16ans+
18ans+
Blocking Off
Page 33

PARENTAL CONTROL / RATING
103
DOWNLOADABLE RATING
■
Based on rating table, your TV's OSD
(On Screen Display) may differ slightly
from what is shown in this manual.
This function is available only for digital channels.
This function operates only when TV has received Region5 Rating data.
Select
DDoowwnnllooaaddaabbllee RRaattiinngg
.
Select desired
DDoowwnnllooaaddaabbllee
RRaattiinngg
option.
4
3
ENTER
Select desired option and block it.
5
ENTER
Select
LLOOCCKK
.
1
MENU
ENTER
Input the password.
2
1
456
7809
23
6
RETURN
Return to the previous menu.
MENU
Return to TV viewing.
Enter
Move
LOCK
Lock System : Off
Set Password
Block Channel
Movie Rating
TV Rating-Children
TV Rating-General
Downloadable Rating
Input Block
Enter
Move
LOCK
Lock System : Off
Set Password
Block Channel
Movie Rating
TV Rating-Children
TV Rating-General
Downloadable Rating
Input Block
Humor
Sport
Cruelty
Language
Sadness
Genre
Age
Close
E
E
Page 34

PARENTAL CONTROL / RATING
104
PARENTAL CONTROL / RATINGS
EXTERNAL INPUT BLOCKING
Enables you to block an input.
Select
IInnppuutt BBlloocckk
.
Select input source.
4
3
Select
OO nn
or
OO ffff
.
5
ENTER
Select
LLOOCCKK
.
1
MENU
ENTER
Input the password.
2
1
456
7809
23
6
RETURN
Return to the previous menu.
MENU
Return to TV viewing.
Enter
Move
LOCK
Lock System : Off
Set Password
Block Channel
Movie Rating
TV Rating-Children
TV Rating-General
Downloadable Rating
Input Block
Enter
Move
LOCK
Lock System : Off
Set Password
Block Channel
Movie Rating
TV Rating-Children
TV Rating-General
Downloadable Rating
Input Block
AV1
FF
Off
GG
AV2
Off
Component1
Off
HDMI1
Off
RGB-PC
Off
Component2
Off
HDMI2
Off
HDMI3
Off
Close
Only 42/50PQ60,
50/60PS60,
50/60PS60C,
50/60PS70,
50/60PS80
HDMI4
Off
Page 35

PARENTAL CONTROL / RATING
105
KEY LOCK
The TV can be set up so that it can only be used with the remote control.
This feature can be used to prevent unauthorized viewing by locking out the front panel controls.
This TV is programmed to remember which option it was last set to even if you turn the TV off.
Select
OOPPTTII OONN
.
Select
KKeeyy LLoocckk
.
1
MENU
2
ENTER
Select
OO nn
or
OO ffff
.
3
ENTER
■
In
KKeeyy LLoocckk‘OO nn
’, if the TV is turned
off, press the INPUT, CH
DD , EE
button
on the TV or POWER, INPUT, CH ,
or NUMBER buttons on the remote control.
■
With the
KKeeyy LLoocckk OOnn
, the display
‘
KKeeyy LLoocckk
’ appears on the screen if
any button(Except (power) button)
on the front panel is pressed while viewing the TV.
4
RETURN
Return to the previous menu.
MENU
Return to TV viewing.
Enter
Move
OPTION
Menu Language(Language): English
Audio Language : English
Input Label
SIMPLINK : On
Key Lock : Off
Caption : Off
Demo Mode : Off
ISM Method : Normal
Set ID : 1
Enter
Move
OPTION
Menu Language(Language): English
Audio Language : English
Input Label
SIMPLINK : On
Key Lock : Off
Caption : Off
Demo Mode : Off
ISM Method : Normal
Set ID : 1
Off
On
!
E
E
Page 36

APPENDIX
106
APPENDIX
TROUBLESHOOTING
TThhee ooppeerraattiioonn ddooeess nnoott wwoorrkk nnoorrmmaallllyy..
TThhee vviiddeeoo ffuunnccttiioonn ddooeess nnoott wwoorrkk..
No picture &No sound
No or poor color
or poor picture
Poor reception on
some channels
Lines or streaks
in pictures
No picture
when connecting HDMI
Horizontal/vertical bars
or picture shaking
Picture appears slowly
after switching on
The remote control
doesn’t work
Power is suddenly
turned off
■
Check to see if there is any object between the product and the remote control
causing obstruction. Ensure you are pointing the remote control directly at the TV.
■
Ensure that the batteries are installed with correct polarity (+ to +, - to -).
■
Ensure that the correct remote operating mode is set: TV, VCR etc.
■
Install new batteries.
■
Is the sleep timer set?
■
Check the power control settings. Power interrupted.
■
TV will be automatically turned off, in case of no signal for 15 minutes.
■
Check whether the product is turned on.
■
Try another channel. The problem may be with the broadcast.
■
Is the power cord inserted into wall power outlet?
■
Check your antenna direction and/or location.
■
Test the wall power outlet, plug another product’s power cord into the outlet
where the product’s power cord was plugged in.
■
This is normal, the image is muted during the product startup process. Please
contact your service center, if the picture has not appeared after five minutes.
■
Adjust Color in menu option.
■
Keep a sufficient distance between the product and the VCR.
■
Try another channel. The problem may be with the broadcast.
■
Are the video cables installed properly?
■
Activate any function to restore the brightness of the picture.
■
Check for local interference such as an electrical appliance or power tool.
■
Station or cable product experiencing problems, tune to another station.
■
Station signal is weak, reorient antenna to receive weaker station.
■
Check for sources of possible interference.
■
Check antenna (Change the direction of the antenna).
■
Check HDMI cable over version 1.3.
The HDMI cables don’t support HDMI version 1.3, it cause flickers or no screen
display. In this case use the latest cables that support HDMI version 1.3.
*This feature is not available for all models.
Page 37

APPENDIX
107
TThheerree iiss aa pprroobblleemm iinn PPCC mmooddee.. ((OOnnllyy PPCC mmooddee aapppplliieedd))
■
Adjust resolution, horizontal frequency, or vertical frequency.
■
Check the input source.
■
Work the Auto configure or adjust clock, phase, or H/V position. (Option)
■
Check the signal cable.
■
Reinstall the PC video card.
The signal is out of range
Screen color is unstable
or single color
Vertical bar or stripe on
background &
Horizontal Noise &
Incorrect position
Picture OK & No sound
Unusual sound from
inside the product
No sound
when connecting
HDMI/USB
No output from one
of the speakers
TThhee aauuddiioo ffuunnccttiioonn ddooeess nnoott wwoorrkk..
■
Press the VOL or VOLUME button.
■
Sound muted? Press MUTE button.
■
Try another channel. The problem may be with the broadcast.
■
Are the audio cables installed properly?
■
Adjust Balance in menu option.
■
A change in ambient humidity or temperature may result in an unusual noise
when the product is turned on or off and does not indicate a fault with the
product.
■
Check HDMI cable over version 1.3.
■
Check USB cable over version 2.0.
■
Use normal MP3 file.
*This feature is not available for all models.
Page 38

APPENDIX
108
APPENDIX
MAINTENANCE
Early malfunctions can be prevented. Careful and regular cleaning can extend the amount of time you can
enjoy your new TV.
Caution: Be sure to turn the power off and unplug the power cord before you begin any cleaning.
Cleaning the Screen
Here’s a great way to keep the dust off your screen for a while. Wet a soft cloth in a mixture of lukewarm
water and a little fabric softener or dish washing detergent. Wring the cloth until it’s almost dry, and then
use it to wipe the screen.
Make sure the excess water is off the screen, and then let it air-dry before you turn on your TV.
Cleaning the Cabinet
■
To remove dirt or dust, wipe the cabinet with a soft, dry, lint-free cloth.
■
Please be sure not to use a wet cloth.
Extended Absence
GG
If you expect to leave your TV dormant for a long time (such as a vacation), it’s a good idea to unplug
the power cord to protect against possible damage from lightning or power surges.
CAUTION
2
1
Page 39

APPENDIX
109
■
The specifications shown above may be changed without prior notice for quality improvement.
AC100-240V ~ 50/60Hz
NTSC-M, ATSC, 64 & 256 QAM
VHF 2-13, UHF 14-69, CATV 1-135, DTV 2-69, CADTV 1-135
75 ohm
32 ~ 104°F (0 ~ 40°C)
Less than 80%
-4 ~ 140°F (-20 ~ 60°C)
Less than 85%
Dimensions
(Width x Height
x Depth)
Weight
Power requirement
Television System
Program Coverage
External Antenna Impedance
Environment
condition
With stand
Without stand
With stand
Without stand
Operating Temperature
Operating Humidity
Storage Temperature
Storage Humidity
MODELS
40.5 x 28.3 x 12.1 inches
1031.2 x 720.9 x 308.0 mm
40.5 x 25.8 x 3.1 inches
1031.2 x 656.7 x 80.8 mm
54.6 lbs / 24.8 kg
50.0 lbs / 22.7 kg
47.9 x 32.2 x 13.8 inches
1216.7 x 818.1 x 353.0 mm
47.9 x 29.8 x 3.2 inches
1216.7 x 759.0 x 83.0 mm
74.2 lbs / 33.7 kg
68.7 lbs / 31.2 kg
Dimensions
(Width x Height
x Depth)
Weight
With stand
Without stand
With stand
Without stand
48.3 x 32.4 x 13.8 inches
1228.8 x 824.6 x 353.0 mm
48.3 x 30.3 x 3.1 inches
1228.8 x 772.0 x 78.9 mm
77.1 lbs / 35.0 kg
71.6 lbs / 32.5 kg
MODELS
50PS30
(50PS30-UB)
Dimensions
(Width x Height
x Depth)
Weight
With stand
Without stand
With stand
Without stand
47.9 x 32.2 x 13.8 inches
1216.7 x 818.1 x 353.0 mm
47.9 x 29.8 x 3.2 inches
1216.7 x 759.0 x 83.0 mm
78.0 lbs / 35.4 kg
72.3 lbs / 32.8 kg
50PS60, 50PS60C
(50PS60-UA, 50PS60C-UA)
60PS60, 60PS60C
(60PS60-UA, 60PS60C-UA)
48.3 x 32.4 x 13.8 inches
1228.8 x 824.6 x 353.0 mm
48.3 x 30.3 x 3.1 inches
1228.8 x 772.0 x 78.9 mm
80.0 lbs / 36.3 kg
74.5 lbs / 33.8 kg
57.6 x 38.6 x 15.5 inches
1465.4 x 982.6 x 395.5mm
57.6 x 35.5 x 3.2 inches
1465.4 x 903.2 x 82.1 mm
113.0 lbs / 51.3 kg
100.3 lbs / 45.5 kg
MODEL
42PQ20
(42PQ20-UA)
40.5 x 28.3 x 12.1 inches
1031.2 x 720.9 x 308.0 mm
40.5 x 25.8 x 3.1 inches
1031.2 x 656.7 x 80.8 mm
54.6 lbs / 24.8 kg
50.0 lbs / 22.7 kg
50PQ20
(50PQ20-UA)
47.9 x 32.2 x 13.8 inches
1216.7 x 818.1 x 353.0 mm
47.9 x 29.8 x 3.2 inches
1216.7 x 759.0 x 83.0 mm
74.2 lbs / 33.7 kg
68.7 lbs / 31.2 kg
Dimensions
(Width x Height
x Depth)
Weight
With stand
Without stand
With stand
Without stand
MODELS
42PQ30, 42PQ31, 42PQ30C
(42PQ30-UA, 42PQ30-UD,
42PQ31-UD,
42PQ30C-UA
)
50PQ30, 50PQ31, 50PQ30C
(50PQ30-UA, 50PQ30-UD, 50PQ31-
UD, 50PQ30C-UA)
PRODUCT SPECIFICATIONS
42PQ60
(42PQ60-UA)
40.9 x 28.5 x 12.1 inches
1040.8 x 725.8 x 308.0 mm
40.9 x 26.3 x 3.0 inches
1040.8 x 669.2 x 76.8 mm
55.7 lbs / 25.3 kg
51.3 lbs / 23.3 kg
50PQ60
(50PQ60-UA)
50PS70
(50PS70-UG)
48.4 x 32.9x 12.2inches
1228.0 x 835.8 x 309 mm
48.4 x 30.9 x 3.1 inches
1228.0x 784.5 x 78.9 mm
84.0 lbs
/
38.1 kg
75.2 lbs
/
34.1kg
60PS70
(60PS70-UG)
57.7 x 38.9 x 14.6 inches
1465.4x 986.4 x 371 mm
57.7 x 36.7 x 3.2 inches
1465.4 x 932.2 x 82.1 mm
114.2 lbs
/
51.8kg
99.2 lbs
/
45.0kg
50PS80
(50PS80-UG)
48.4 x 32.9x 12.2inches
1228.0 x 835.8 x 309 mm
48.4 x 31.3 x 3.1 inches
1228.0x 795.1 x 78.9 mm
84.4 lbs
/
38.3 kg
75.6 lbs
/
34.3kg
60PS80
(60PS80-UG)
57.7 x 38.9 x 14.6 inches
1465.4x 986.4 x 371 mm
57.7 x 36.5 x 3.2 inches
1465.4 x 926.7 x 82.1 mm
116.4 lbs
/
52.8kg
101.4 lbs
/
46.0kg
Page 40

APPENDIX
110
APPENDIX
PROGRAMMING THE REMOTE CONTROL
(This feature is not available for all models.)
The provided universal remote control can be programmed to operate most remote-controllable devices.
Note that the remote may not control all models of other brands.
Programming a code into a remote mode
Testing your remote control.
To find out whether your remote control can operate other components without programming, turn on a
component such as a STB and press the corresponding mode button (such as a
SSTTBB
) on the remote con-
trol, while pointing at the component. Test the
PPOOWWEERR
and
CCHH
buttons to see if the component
responds correctly. If the component does not operate correctly, the remote control requires programming
to operate the device.
Turn on the component to be programmed, then press the corresponding mode button (such as
SSTTBB
) on
the remote control. The remote control button of the desired device is illuminated.
Press the
MMEENNUU
and
MMUUTTEE
buttons simultaneously, and the remote control is ready to be programmed with
the code.
Enter a code number using the number buttons on the remote control. Programming code numbers for the
corresponding component can be found on the following pages. If the code is correct, the device will turn
off.
Press the
MMEENNUU
button to store the code.
Test the remote control functions to see if the component responds correctly. If not, repeat from step 2.
2
3
4
5
6
1
Page 41

APPENDIX
111
Remote Control Code
Brand Codes Brand Codes Brand Codes
AIWA 034
AKAI 016 043 046 124
12 5 146
AMPRO 072
ANAM 031 033 103
AUDIO DYNAMICS
012 0 23 0 39 0 43
BROKSONIC 035 037 129
CANON 028 031 033
CAPEHART 108
CRAIG 003 040 135
CURTIS MATHES 031 033 041
DAEWOO 005 007 010 064
065 108 110 111
112 116 117 119
DAYTRON 108
DBX 012 023 039 043
DYNATECH 034 053
ELECTROHOME 059
EMERSON 006 017 025 027
029 031 034 035
036 037 046 101
12 9 131 138 15 3
FISHER 003 008 009 010
FUNAI 034
GE 031 033 063 072
10 7 10 9 14 4 14 7
GO VIDEO 132 136
HARMAN KARDON 012 045
HITACHI 004 018 026 034
043 063 137 150
INSTANTREPLAY 031 033
JCL 031 033
JCPENNY 012 013 015 033
040 066 101
JENSEN 043
JVC 012 031 033 043
048 050 055 060
13 0 15 0 15 2
KEN WOOD 014 034 039 043
047 048
LG (GOLDSTAR) 001 012 013 020
101 10 6 114 12 3
LLOYD 034
LXI 003 009 013 014
017 0 34 101 10 6
MAGIN 040
MAGNAVOX 031 033 034 041
067 068
MARANTZ 012 031 033 067
069
MARTA 101
MATSUI 027 030
MEI 031 033
MEMOREX 003 010 014 031
033 034 053 072
101 10 2 13 4 13 9
MGA 0 45 046 059
MINOLTA 013 020
MITSUBISHI 013 020 045 046
049 051 059 061
151
MTC 034 040
MULTITECH 024 034
NEC 012 023 039 043
048
NORDMENDE 043
OPTONICA 053 054
PANASONIC 066 070 074 083
13 3 14 0 14 5
PENTAX 013 020 031 033
063
PHILCO 031 034 067
PHILIPS 031 033 034 054
067 071 101
PILOT 101
PIONEER 013 021 048
PORTLAND 108
PULSAR 072
QUARTZ 011 014
QUASAR 033 066 075 145
RCA 013 020 033 034
040 041 062 063
107 109 140 144
14 5 14 7
REALISTIC 003 008 010 014
031 033 034 040
053 054 101
RICO 058
RUNCO 148
SALORA 014
SAMSUNG 032 040 102 104
10 5 10 7 10 9 112
113 115 12 0 12 2
12 5
SANSUI 022 043 048 135
SANYO 003 007 010 014
10 2 13 4
SCOTT 017 037 112 129
131
SEARS 003 008 009 010
013 014 017 0 20
031 042 073 081
101
SHARP 031 054 149
SHINTOM 024
SONY 003 009 031 052
056 057 058 076
077 078 149
SOUNDESIGN 034
STS 013
SYLVANIA 031 033 034 059
067
SYMPHONIC 034
TANDY 010 034
TATUNG 039 043
TEA C 034 039 043
TECHNICS 031 033 070
TEKNIKA 019 031 033 034
101
THOMAS 034
TMK 006
TOSHIBA 008 013 042 047
059 082 112 131
TOTEVISION 040 101
UNITECH 040
VECTOR RESEARCH
012
VICTOR 048
VIDEO CONCEPTS
012 0 34 0 46
VIDEOSONIC 040
WARDS 003 013 017 024
031 033 034 040
053 054 131
YAM AH A 012 034 039 0 43
ZENITH 034 048 056
058 072 0 80 101
VCR
Page 42

APPENDIX
112
APPENDIX
Brand Codes Brand Codes Brand Codes
ALPHASTAR DSR 123
AMPLICA 050
BIRDVIEW 051 126 129
CHANNEL MASTER
013 014 015 018
036 055
CHAPARRAL 008 009 012 077
CITOH 054
CURTIS MATHES 050 145
DRAKE 005 006 007 010
011 0 52 112 116
141
DX ANTENNA 024 046 056 076
ECHOSTAR 038 040 057 058
093 094 095 096
097 098 099 100
12 2
ELECTRO HOME 089
EUROPLUS 114
FUJITSU 017 021 022 027
13 3 13 4
GENERAL INSTRUMENT
003 004 016 029
031 059 101
HITACHI 139 140
HOUSTON TRACKER
033 037 039 051
057 104
HUGHES 068
JANIEL 060 147
JERROLD 061
KATHREIN 108
LEGEND 057
LG 001
LUTRON 132
LUXOR 062 144
MACOM 010 059 063 064
065
MEMOREX 057
NEXTWAVE 028 124 125
NORSAT 069 070
PACE SKY SATELLITE
14 3
PANASONIC 060 142
PANSAT 121
PERSONAL CABLE 117
PHILIPS 071
PICO 105
PRESIDENT 019 102
PRIMESTAR 030 110 111
PROSAT 072
RCA 066 106
REALISTIC 043 074
SAMSUNG 123
SATELLITE SERVICE CO
028 035 047 057
085
SCIENTIFIC ATLANTA
032 138
SONY 103
STARCAST 041
SUPER GUIDE 020 124 125
TEECOM 023 026 075 087
088 090 107 130
13 7
TOSHIBA 002 127
UNIDEN 016 025 042 043
044 045 048 049
078 079 0 80 086
101 135 136
VIEWSTAR 115
WINEGARD 128 146
ZENITH 081 082 083 084
091 120
HDSTB
DVD
Brand Codes Brand Codes Brand Codes
APEX DIGITAL 022
DENON 020 014
GE 005 006
HARMAN KARDON 027
JVC 012
LG 001 010 016 025
MAGNAVOX 013
MARANTZ 024
MITSUBISHI 002
NAD 023
ONKYO 008 017
PANASONIC 003 009
PHILIPS 013
PIONEER 004 026
PROCEED 021
PROSCAN 005 006
RCA 005 006
SAMSUNG 011 015
SONY 007
THOMPSON 005 006
TOSHIBA 019 008
YAMAHA 009 018
ZENITH 010 016 025
Page 43

APPENDIX
113
■
Configuration of frame
1st frame
Repeat frame
■
Lead code
■
Repeat code
■
BBiitt ddeessccrriippttiioonn
■
FFrraammee iinntteerrvvaall:: TTff
The waveform is transmitted as long as a key is depressed.
C0 C1 C2 C3 C4 C5 C6 C7 C0 C1 C2 C3 C4 C5 C6 C7 D0 D1 D2 D3 D4 D5 D6 D7 D0 D1 D2 D3 D4 D5 D6 D7
Lead code Low custom code High custom code Data code Data code
Repeat code
Tf
4.5 ms
9 ms
2.25 ms
9 ms
0.55 ms
0.56 ms
1.12 ms
0.56 ms
2.24 ms
Tf Tf
Tf=108ms @455KHz
Bit ”0” Bit ”1”
1. How to Connect
■
Connect your wired remote control to the Remote Control port on the TV.
2. Remote Control IR Codes
■
Output waveform
Single pulse, modulated with 37.917KHz signal at 455KHz
T1
Tc
Carrier frequency
FCAR = 1/TC = fOSC/12
Duty ratio = T1/TC = 1/3
IR CODES
Page 44

APPENDIX
114
APPENDIX
Code
Function Note
(Hexa)
Code
Function Note
(Hexa)
D6 TV Discrete IR Code
(TV Input Selection)
C4 POWER ON Discrete IR Code
(Only Power On)
C5 POWER OFF Discrete IR Code
(Only Power Off)
5A AV1 Discrete IR Code
(AV1 Input Selection)
D0 AV2 Discrete IR Code
(AV2 Input Selection)
BF COMPONENT1 Discrete IR Code
(Component1 Input Selection)
D4 COMPONENT2 Discrete IR Code
(Component2 Input Selection)
D5 RGB-PC Discrete IR Code
(RGB-PC Input Selection)
CE HDMI1 Discrete IR Code
(HDMI1 Input Selection)
CC HDMI2 Discrete IR Code
(HDMI2 Input Selection)
E9 HDMI3 Discrete IR Code
(HDMI3 Input Selection)
DA HDMI4 Discrete IR Code
(HDMI4 Input Selection)
76 Ratio 4:3 Discrete IR Code
(Only 4:3 Mode)
77 Ratio 16:9 Discrete IR Code
(Only 16:9 Mode)
AF Ratio Zoom Discrete IR Code
(Only Zoom1 Mode)
Only 42/50PQ60, 50/60PS60,
50/60PS60C, 50/60PS70, 50/60PS80
08 POWER
Remote control Button (Power On/Off)
45 Q.MENU Remote control Button
43 MENU Remote control Button
0B INPUT Remote control Button
10-19 Number Key 0-9 Remote control Button
4C - Dash(List) Remote control Button
1A FLASHBK Remote control Button
09 MUTE Remote control Button
02 VOL + Remote control Button
03 VOL - Remote control Button
00 CH Remote control Button
01 CH Remote control Button
1E FAV Remote control Button
40 Remote control Button
41 Remote control Button
07 Remote control Button
06 Remote control Button
44 ENTER Remote control Button
28 RETURN Remote control Button
7E SIMPLINK Remote control Button
30 AV MODE Remote control Button
79 RATIO Remote control Button
65 FREEZE Remote control Button
95 ENERGY Remote control Button
AA Info Remote control Button
72 Red Remote control Button
71 Green(Stop
A
) Remote control Button
63 Yellow(Play
G
) Remote control Button
61 Blue(Pause
ll ll
) Remote control Button
8E FF
GG
Remote control Button
8F Rew
FF
Remote control Button
Page 45

APPENDIX
115
EXTERNAL CONTROL THROUGH RS-232C
RS-232C Setup
The RS-232C port allows you connect the RS-232C input jack to an external control device (such as a computer
or an A/V control system) to control the TV’s functions externally.
■
Note: RS-232C on this unit is intended to be used with third party RS-232C control hardware and software.
The instructions below are provided to help with programming software or to test functionality using telenet
software.
1
2
L
R
RGB IN (PC)
REMOTE
CONTROL IN
AUDIO
VIDEO
S-VIDEO
/MONO
AV IN 1
HDMI/DVI IN
2
1
ANTENNA/
CABLE IN
RS-232C IN
(CONTROL & SERVICE)
Type of Connector; D-Sub 9-Pin Male
No. Pin Name
1 No connection
2 RXD (Receive data
)
3 TXD (Transmit data
)
4 DTR (DTE side ready
)
5 GND
6 DSR (DCE side ready
)
7 RTS (Ready to send
)
8 CTS (Clear to send
)
9 No Connection
1
6
5
9
PC
Communication Parameters
■
Baud rate : 9600 bps (UART
)
■
Data length : 8 bits
■
Parity : None
■
Stop bit : 1 bit
■
Communication code : ASCII code
■
Use a crossed (reverse) cable.
Page 46

www.lgusa.com / www.lg.ca / www.lgcommercial.com
Ce produit est conforme ENERGY STAR dans le
réglage défaut “d’usine (mode Maison)”, et ceci correspond au réglage qui permet les économies d’énergie.
Modifier les réglages d'usine par défaut ou activer
d’autres fonctionnalités augmente la consommation
d'énergie qui pourrait alors dépasser les limites de la
qualification Energy Star.
www.lgusa.com / www.lg.ca
Veuillez lire ce manuel attentivement avant d’utiliser
votre appareil et conservez-le pour consultation
ultérieure.
Notez les numéros de modèle et de série de l’appareil
qui figurent sur l’étiquette au dos du moniteur. Et
inscrivez-les sur le dessus ou au verso de ce manuel.
TÉLÉ PLASMA
GUIDE DE L’UTILISATEUR
42PQ20
50PQ20
42PQ30
50PQ30
42PQ31
50PQ31
42PQ60
50PQ60
50PS30
50PS60
60PS60
42PQ30C
50PQ30C
50PS60C
60PS60C
50PS70
60PS70
50PS80
60PS80
Modèle :
Publication périodique :
1-888-542-2623 CANADA
1-800-243-0000
1-888-865-3026
LG Centre d’information client
États-Unis, service consommateur
États-Unis, service commercial
Page 47

A
AVERTISSEMENT/ATTENTION
AVERTISSEMENT/ATTENTION
POUR ÉVITER TOUT RISQUE DE CHOC
ÉLECTRIQUE OU D’INCENDIE, NE PAS EXPOSER
CE PRODUIT À LA PLUIE OU À L’HUMIDITÉ.
AVIS DE LA FCC
Appareil numérique de classe B
Cet appareil a été testé et est conforme aux exigences
pour appareil numérique de classe B, partie 15 des
règlements de la FCC. Ces limites sont conçues pour
assurer une protection raisonnable contre les
interférences nocives dans une installation résidentielle.
Cet équipement génère, utilise et peut radier de
l’énergie de radiofréquence et s’il n’est pas installé et
utilisé conformément aux instructions, peut causer
des interférences nuisibles aux communications
radio. Toutefois, il n’y a aucune garantie que des
interférences ne surviendront pas. Si cet appareil
cause des inter-férences à la réception radio et télé,
ce qui peut être déterminé en mettant l’appareil hors
circuit, puis en circuit, l’utilisateur peut essayer de
corriger cette interférence d’une des façons suivantes:
- Réorienter l’antenne réceptrice.
- Éloigner l’appareil du récepteur.
- Brancher l’appareil sur un circuit différent de celui
du récepteur.
- Consulter le marchand ou un technicien qualifié en
radio et téléviseur.
Ce dispositif est conforme à la partie 15 des réglementations de la FCC.
L’opération est assujettie aux deux conditions suivantes: (1)
Ce dispositif ne doit pas causer d’interférences (nocives) et
(2) ce dispositif doit accepter toute interference reçue
risquant causer une operation indésirable de l’appareil.
Tout changement ou modification non expressément
approuvé par la partie responsable concernant la
conformité peut annuler la possibilité de l’utilisateur
à utiliser cet appareil.
ATTENTION
Ne pas tenter de modifier cet appareil de quelle que
façon que ce soit sans une autorisation écrite de LG
Electronics.
Toute modification non autorisée peut annuler la
possibilité de l’utilisateur à utiliser cet appareil.
L’éclair avec flèche dans un triangle
équilatéral est destiné à aviser l’utilisa-
teur de la présence de ten-sion dangereuse non isolée dans le boîtier de l’appareil
pouvant être suffisamment forte pour causer un
risque de choc électrique.
Le point d’exclamation dans un triangle
équilatéral est destiné à aviser l’utilisateur
de la présence d’in-structions de
fonctionnement et d’entretien.
POUR RÉDUIRE LE RISQUE DE CHOC
ÉLECTRIQUE, NE PAS ENLEVER LE COUVERCLE
(OUDOS). AUCUNE PIÈCE NE PEUT ÊTRE
RÉPARÉE PAR L’UTILISATEUR. RÉFÉRER TOUT
SER-VICE À UN TECHNICIEN QUALIFIÉ.
AVERTISSEMENT/ATTENTION
POUR ÉVITER TOUT RISQUE DE CHOC
ÉLECTRIQUE OU D’INCENDIE, NE PAS EXPOSER
CE PRO-DUIT À LA PLUIE OU À L’HUMIDITÉ.
NOTE À L’INSTALLATEUR DE LA
CÂBLODISTRIBUTION
Ceci est un rappel à l’installateur de la câblodistribution
de tenir compte de l’article 820-40 du National Electric
Code (É.-U.). On y trouve les lignes directrices portant
sur une mise à la terre conforme. On y stipule, entre
autres, que le conducteur de terre du câble doit être
raccordé au système de mise à la terre de l’immeuble,
aussi près que possible du point d’entrée du câble.
Page 48

1
CONSIGNES DE SÉCURITÉ
INSTRUCTIONS DE SÉCURITÉ IMPORTANTES
Lire ces instructions.
Conserver ces instructions.
Observer les avertissements.
Observer les instructions.
Ne pas utiliser cet appareil près de l’eau.
Nettoyer seulement avec un chiffon sec.
Ne pas obstruer les ouvertures de ventilation.
Installer conformément aux instructions du
fabricant.
Ne pas installer à proximité de sources de chaleur
comme radiateurs, registres de chauffage,
cuisinières ou tout autre appareil (incluant
amplificateurs) produisant de la chaleur.
Ne pas outrepasser le dispositif de sécurité de la
fiche polarisée ou mise à la terre. Une fiche
polarisée est dotée de deux lames dont une plus
large que l’autre. Une fiche mise à la terre est
dotée de deux lames et d’une broche mise à la
terre. La lame large ou la broche sont destinées à
la sécurité. Si la fiche ne peut être branchée sur la
prise, demander à un électricien qualifié de
remplacer la prise usitée.
Protéger le cordon d’alimentation afin qu’il ne
soit pas écrasé ni pincé, surtout à la prise et au
point où il sort de l’appareil.
Utiliser seulement les accessoires spécifiés par
le fabricant.
Utiliser seulement avec chariot, support, fixation
ou table spécifiés par le fabricant ou vendus
avec l’appareil. Au moment d’utiliser avec un
chariot, faire attention pour le déplacer afin
qu’il ne bascule pas avec l’appareil.
Débranchez cet appareil pendant les orages ou
durant les longues périodes d’inutilisation.
Référer tout service à un technicien qualifié. Un
service est requis lorsque l’appareil a été
endommagé comme le cordon d’alimentation
ou la fiche, du liquide a été renversé ou des
objets sont tombés dans l’appareil, s’il a été
exposé à la pluie ou à l’humidité, s’il ne fonctionne
pas normalement ou a été échappé.
1
2
3
4
5
7
8
6
9
10
Page 49

2
INSTRUCTIONS DE SÉCURITÉ
Ne jamais toucher cet appareil ou l’antenne
lors d’un orage ou d’une tempête.
Si vous fixez votre téléviseur au mur, veillez à ne
pas le suspendre par le cordon d’alimentation
et le câble situés à l’arrière du moniteur.
Faites attention à ce qu’aucun objet ne choque
sur l’appareil, et ne laissez pas tomber d’éléments solides sur l'écran.
ATTENTION concernant le cordon d’alimentation:
Il est recommandé que la plupart des appareils
soient branchés sur un circuit dédié qui est une
prise simple qui alimente seulement cet appareil
et qu’il n’y a pas d’autres prises additionnelles
ou circuits terminaux. Vérifier les données
techniques dans le guide du propriétaire.
Ne pas brancher un trop grand nombre d’appareils à la même prise c.a. puisque cela pourrait causer un incendie ou un choc électrique.
Ne pas surcharger les prises murales. Une sur
charge, des prises endommagées ou lâches,
des rallonges, des cordons effrités ou dont
l’isolation est endommagée, peuvent être
dangereux. Si ces conditions existent, il peut
en résulter un risque de choc électrique ou
d’incendie. Vérifier périodiquement le cordon
de l’appareil et s’il semble endommagé et
détérioré, le débrancher et ne pas utiliser
l’appareil tant que le cordon n’est pas remplacé
par un modèle de rechange semblable par un
technicien qualifié.
Protéger le cordon de tout abus physique ou
mécanique. Il ne doit pas être tordu, pincé,
situé près de la porte et il ne faut pas marcher
dessus. Porter une attention particulière aux
fiches, prises murales et au point de sortie de
l’appareil.
Ne pas déplacer le téléviseur lorsque le cordon
d’alimentation est branché. Ne pas utiliser le
téléviseur si le cordon est endommagé ou
desserré. Assurez-vous de tirer sur la prise du
cordon lorsque vous voulez le débrancher; ne
tirez pas sur le cordon pour débrancher le
téléviseur.
AVERTISSEMENT - Pour réduire le risque d’incendie ou de choc électrique, n’exposez pas ce
produit à la pluie, à l’humidité ou à d’autres liquides. Ne touchez pas le téléviseur si vous avez les
mains mouillées. Ne pas installer ce produit près
de produits inflammables comme de l’essence ou
des chandelles ou exposer le téléviseur à une
source directe de climatisation.
Ne pas exposer le téléviseur à des gouttes ou à
des éclaboussures d’eau et ne pas déposer
d’objets remplis de liquide comme des vases,
des tasses, etc. sur le téléviseur ou les placer
au-dessus de celui-ci (par exemple sur une
étagère, au-dessus de l’appareil).
MMIISSEE ÀÀ LLAA TTEE RRRREE
S’assurer de brancher la mise à la terre pour
empêcher les chocs électriques possible (par
ex., un téléviseur avec une prise à trois fils c.a. mis
à la masse doit être branché à une prise c.a. trois
fils, mise à la masse). Si les méthodes de mise à
la terre ne sont pas possibles, demander à un
électricien d’installer un coupe-circuit séparé.
Ne pas mettre l’appareil à la terre sur les fils de
téléphone, paratonnerre ou tuyau à gaz.
DD ÉÉCC OO NNNN EEXX II OO NN DD EE LL'' AA PPPPAARREEII LL DDUU
RRÉÉSSEE AAUU ÉÉLLEECCTTRRIIQQUUEE
Vous devez débrancher l'appareil de la prise
principale. La prise doit demeurer disponible et
fonctionnelle.
Tant que cette unité est reliée à la prise murale,
elle est toujours alimentée en courant alternatif
même si vous éteignez le bouton d’alimentation.
(Excepté 42/50PQ30C, 50/60PS60C)
12
11
14
13
16
17
18
19
Aliment
ation
Disjoncteur
court-circuité
15
Page 50

3
AA NNTT EENNNNEE
MMiissee àà llaa tteerrrree ddee ll’’aanntteennnnee eexxttéérriieeuurree
Si une antenne extérieure a été installée, veuillez
suivre les directives indiquées ci-dessous. Un
système avec antenne extérieure ne devrait pas
se trouver près de lignes aériennes d’électricité
ou de tout autre circuit de transport d’électricité
ou d’alimentation électrique ni près de tout
endroit où il peut entrer en contact avec de
telles lignes de transport ou circuits électriques
puisque cela pourrait entraîner le décès de la
personne qui y touche ou que celle-ci pourrait
subir des blessures graves.
Assurez-vous que le système d’antenne soit mis
à la masse pour ainsi offrir une certaine protection contre la tension et l’accumulation de statique.
L’article 810 du National Electrical Code (NEC)
des États-Unis donne de l’information à l’égard
de la mise à la masse appropriée du mât et de la
structure de soutien, de la mise à la masse du fil
de connexion à une unité de décharge de l’antenne, de la taille des conducteurs de mise à la
masse, de l’emplacement de l’unité de décharge
de l’antenne, de la connexion à des électrodes de
mise à la masse et des exigences que doit
respecter l’électrode de mise à la masse.
LLaa mmiissee àà llaa mmaassssee ddee ll’’aanntteennnnee ddeevvrraaiitt
êêttrree c
coonnffoorrmmee aauu NNaattiioonnaall EElleeccttrriiccaall
CCooddee,, AANNSSII//NNFFPPAA 7700 ddeess ÉÉttaattss--UUnniiss..
NNeettttooyyaaggee
Lorsque vous nettoyez le téléviseur, assurez-vous
de l’avoir d’abord débranché. Utilisez un chiffon
doux pour éviter d’égratigner le téléviseur. Ne pas
vaporiser d’eau ou d’autres liquides directement
sur le téléviseur puisque cela pourrait causer un
choc électrique. Ne pas nettoyer le téléviseur avec
des produits chimiques comme de l’alcool, du
diluant ou du benzène.
DDééppllaacceemmeenntt
Assurez-vous que le téléviseur a été éteint, qu’il
a été débranché et que tous les câbles et cordons ont été retirés. Deux personnes ou plus
pourront être requises pour transporter les plus
gros téléviseurs. Ne pas vous appuyer contre le
panneau avant du téléviseur ou causer de la tension sur ce panneau.
VVeennttiillaat
tiioonn
Installez votre téléviseur dans un endroit offrant
une ventilation appropriée. Ne pas l’installer
dans un endroit confiné comme une bibliothèque. Ne pas recouvrir l’appareil de tissu ou
d’autres matériaux comme du plastique, lorsqu’il
est branché. Ne pas l’installer dans un endroit
excessivement poussiéreux.
Si vous sentez une odeur de fumée ou que
d’autres odeurs se dégagent du téléviseur ou
qu’il produit des sons étranges, débranchez le
cordon d’alimentation et communiquez avec un
centre de service autorisé.
N’appuyez pas avec force sur le panneau avec
une main ou un objet pointu comme un clou,
un crayon ou un stylo et évitez les égratignures.
Garder l’appareil éloigné de la lumière directe
du soleil.
20
23
24
25
26
21
22
NEC - Code national d’électricité
Décharge d’antenne
Système d’électrode
Équipement électrique
Pince de mise à la terre
Fil d entrée d antenne
(section 810-20 du NEC)
Conducteur mis à la terre
(section 810-21 du NEC)
Pince de mise à la terre
de mise à la terre (article 250,
section H du NEC)
Page 51

4
TABLE DES MATIÈRES
AVERTISSEMENT/ATTENTION
. . . . . . . . . . . . . A
CONSIGNES DE SÉCURITÉ
. . . . . . . . . . . . . . . . . . . . . 1
CARACTÉRISTIQUES DU TÉLÉVISEUR
. . . . 6
PRÉPARATION
Accessoires
. . . . . . . . . . . . . . . . . . . . . . . . . . . . . . . . . . . . . . . . . . . . . . . . . . . . . . 7
Information relative au panneau avant . . . . . . . . . . . . . . . . 8
Information relative au panneau arrière . . . . . . . . . . . . . 10
Instructions du support
. . . . . . . . . . . . . . . . . . . . . . . . . . . . . . . . . . . 11
Pince du Compartiment à fils
. . . . . . . . . . . . . . . . . . . . . . . . . . . 12
Installation sur un Bureau
. . . . . . . . . . . . . . . . . . . . . . . . . . . . . . . . . 13
Système de fixation vesa (Association des standards
vidéo)
. . . . . . . . . . . . . . . . . . . . . . . . . . . . . . . . . . . . . . . . . . . . . . . . . . . . . . . . . . . . . 13
Installer le téléviseur au mur de façon sécuritaire
pour l’empêcher de tomber lorsqu’il est installé sur
un pied
. . . . . . . . . . . . . . . . . . . . . . . . . . . . . . . . . . . . . . . . . . . . . . . . . . . . . . . . . . . 14
Stand de pivot
. . . . . . . . . . . . . . . . . . . . . . . . . . . . . . . . . . . . . . . . . . . . . . . . 14
Connexion antenne ou câble . . . . . . . . . . . . . . . . . . . . . . . . . . . . 15
CONFIGURATION DE LA SOURCE AUXILIAIRE
Installation de Récepteur HD
. . . . . . . . . . . . . . . . . . . . . . . . . .
16
Réglage DVD
. . . . . . . . . . . . . . . . . . . . . . . . . . . . . . . . . . . . . . . . . . . . . . . . . . . 19
Réglage magnétoscope
. . . . . . . . . . . . . . . . . . . . . . . . . . . . . . . . . . .
21
Réglage source A/V externe
. . . . . . . . . . . . . . . . . . . . . . . . . . . . . 23
Connexion de sortie audio
. . . . . . . . . . . . . . . . . . . . . . . . . . . . . . . 23
Connexion USB
. . . . . . . . . . . . . . . . . . . . . . . . . . . . . . . . . . . . . . . . . . . . . . . 24
Réglage PC
. . . . . . . . . . . . . . . . . . . . . . . . . . . . . . . . . . . . . . . . . . . . . . . . . . . . . 25
VISIONNEMENT DE LA TÉLÉVISION /
COMMANDE DES CHAÎNES
Fonctions de la télécommande
. . . . . . . . . . . . . . . . . . . . . . . . . 30
Mise en circuit du téléviseur
. . . . . . . . . . . . . . . . . . . . . . . . . . . . . 34
Sélection de chaîne
. . . . . . . . . . . . . . . . . . . . . . . . . . . . . . . . . . . . . . . . . 34
Réglage du volume
. . . . . . . . . . . . . . . . . . . . . . . . . . . . . . . . . . . . . . . . . . 34
Réglage initial
. . . . . . . . . . . . . . . . . . . . . . . . . . . . . . . . . . . . . . . . . . . . . . . . . 35
Sélection des menus affichés à l’écran
. . . . . . . . . . . . . . 37
Menu éclair (Quick Menu)
. . . . . . . . . . . . . . . . . . . . . . . . . . . . . . . . . . . 38
Repérage de canaux
- Recherche automatique des chaînes
(Syntonisation automatique)
. . . . . . . . . . . . . . . . . . . . . 39
- Ajout/Effacement des chaînes
(Syntonisation manuelle)
. . . . . . . . . . . . . . . . . . . . . . . . . . . 40
- Édition des chaînes
. . . . . . . . . . . . . . . . . . . . . . . . . . . . . . . . . . . 41
Liste des Canaux
. . . . . . . . . . . . . . . . . . . . . . . . . . . . . . . . . . . . . . . . . . . . . 42
Mémoire des Canaux préférés
. . . . . . . . . . . . . . . . . . . . . . . . . . 43
Liste des Favoris . . . . . . . . . . . . . . . . . . . . . . . . . . . . . . . . . . . . . . . . . . . . . . 43
Brève Info. . . . . . . . . . . . . . . . . . . . . . . . . . . . . . . . . . . . . . . . . . . . . . . . . . . . . . .44
Liste d’entrées
. . . . . . . . . . . . . . . . . . . . . . . . . . . . . . . . . . . . . . . . . . . . . . . . . 45
Indentité source . . . . . . . . . . . . . . . . . . . . . . . . . . . . . . . . . . . . . . . . . . . . . . 46
Mode AV
. . . . . . . . . . . . . . . . . . . . . . . . . . . . . . . . . . . . . . . . . . . . . . . . . . . . . . . . 47
SIMPLINK . . . . . . . . . . . . . . . . . . . . . . . . . . . . . . . . . . . . . . . . . . . . . . . . . . . . . . . 48
USB
Modes d’entrée . . . . . . . . . . . . . . . . . . . . . . . . . . . . . . . . . . . . . . . . . . . . . . . 50
Liste Photo
. . . . . . . . . . . . . . . . . . . . . . . . . . . . . . . . . . . . . . . . . . . . . . . . . . . . . . 51
Liste Musique
. . . . . . . . . . . . . . . . . . . . . . . . . . . . . . . . . . . . . . . . . . . . . . . . . . 55
COMMANDE DE L’IMAGE
Commande de la taille de l’image (Allongement)
. . . . . . 58
Assistant Image
. . . . . . . . . . . . . . . . . . . . . . . . . . . . . . . . . . . . . . . . . . . . . . . 60
Économie d’énergie
. . . . . . . . . . . . . . . . . . . . . . . . . . . . . . . . . . . . 62
Configuration préréglée des Images(Mode image)
. 63
Réglage Manuel de l’image - Mode personnel
. . 64
Technologie D’amélioration de l’image
. . . . . . . . . . . . . . 65
Commande Experte d’image
. . . . . . . . . . . . . . . . . . . . . . . . . . . . 66
Réinitialisation de l’image
. . . . . . . . . . . . . . . . . . . . . . . . . . . . . . . 68
Méthode ISM (minimisation d’incrustation d’image)
. 69
Mode Démo
. . . . . . . . . . . . . . . . . . . . . . . . . . . . . . . . . . . . . . . . . . . . . . . . . . .
70
Page 52

5
COMMANDE DU SON ET DE LA LANGUE
Contrôle Automatique du Volume
(Réglage vol.auto.)
. . . . . . . . . . . . . . . . . . . . . . . . . . . . . . . . . . . . . . . . . . 71
Voix claires II
. . . . . . . . . . . . . . . . . . . . . . . . . . . . . . . . . . . . . . . . . . . . . . . . . . .
72
Configuration préréglée du son (Mode audio)
. . 73
Réglages du son - Mode personnel
. . . . . . . . . . . . . . . . . . . 74
Équilibre
. . . . . . . . . . . . . . . . . . . . . . . . . . . . . . . . . . . . . . . . . . . . . . . . . . . . . . . . .
75
Réglage marche-arrêt des haut-parleurs
du téléviseur
. . . . . . . . . . . . . . . . . . . . . . . . . . . . . . . . . . . . . . . . . . . . . . . . . . . 76
Réinitialisation du mode audio
. . . . . . . . . . . . . . . . . . . . . . . . 77
Réglage diffusions stéréo/SAP
. . . . . . . . . . . . . . . . . . . . . . . . . . 78
Langage audio
. . . . . . . . . . . . . . . . . . . . . . . . . . . . . . . . . . . . . . . . . . . . . . . . 79
Sélection de langue pour les menus à l’écran
. . . . 80
Sous-titres
-
Sous-titres à système de diffusion analogique
. . 81
-
Sous-titres à système de diffusion numérique
. . 82
- Option sous-titres
. . . . . . . . . . . . . . . . . . . . . . . . . . . . . . . . . . . 83
REGLAGE DE L’HEURE
Réglage de la pendule
- Réglage autoamtique
. . . . . . . . . . . . . . . . . . . . . . . . . . . . . . . 84
- Réglage manuel
. . . . . . . . . . . . . . . . . . . . . . . . . . . . . . . . . . . . . . . 85
Réglage de la minuterie
- Marche/arrêt automatique . . . . . . . . . . . . . . . . . . . . . . . . . . . 86
- Arrêt différé
. . . . . . . . . . . . . . . . . . . . . . . . . . . . . . . . . . . . . . . . . . . . . . . . . . 87
COMMANDE PARENTALE / CLASSEMENT
Système de Réglage de mot de passe et
Verrouillagae
. . . . . . . . . . . . . . . . . . . . . . . . . . . . . . . . . . . . . . . . . . . . . . . . . . . 88
Blocage des chaînes . . . . . . . . . . . . . . . . . . . . . . . . . . . . . . . . . . . . . . . . 91
Classement des films et des émissions télévisées
. . 92
Téléchargeable
. . . . . . . . . . . . . . . . . . . . . . . . . . . . . . . . . . . . . . . . . . . . . . . . 97
Blocage de l’entrée externe
. . . . . . . . . . . . . . . . . . . . . . . . . . . . . . 98
Touches verrouillées
. . . . . . . . . . . . . . . . . . . . . . . . . . . . . . . . . . . . . . . . 99
ANNEXE
Liste de vérification de dépannage
. . . . . . . . . . . . . . . . . 10 0
Entretien
. . . . . . . . . . . . . . . . . . . . . . . . . . . . . . . . . . . . . . . . . . . . . . . . . . . . . . .
10 2
Spécifications de l’appareil . . . . . . . . . . . . . . . . . . . . . . . . . . . . . 10 3
Réglage de la télécommande
. . . . . . . . . . . . . . . . . . . . . . .10 4
Codes IR
. . . . . . . . . . . . . . . . . . . . . . . . . . . . . . . . . . . . . . . . . . . . . . . . . . . . .107
Commande externe par le biais du RS-232C
. . . .10 9
Page 53

6
CARACTÉRISTIQUES DU TÉLÉVISEUR
■
Quand une image fixe (par exemple logos, menus d'écran, affichage de jeu vidéo, et d'ordinateur) est
affichée pendant une période prolongée sur le téléviseur, elle peut rester imprimée de manière permanente
sur l'écran. Ce phénomène est connu sous le nom de « brûlure d'image » ou « brûlure ». La brûlure d'image
n'est pas couverte par la garantie du fabricant.
■
Afin d'empêcher la brûlure d'image, éviter d’afficher une image fixe sur votre écran de télévision pendant
une période prolongée (2 heures ou plus pour l'affichage à cristaux liquides, 1 heures ou plus pour le
plasma).
■
La brûlure d'image peut également se produire
si vous utilisez le format 4:3 pendant une
période prolongée.
INFORMATION IMPORTANTE POUR ÉVITER LE
PHÉNOMÈNE DE « BRÛLURE D'IMAGE » SUR VOTRE ÉCRAN
DE TÉLÉVISEUR.
est une marque déposée de SRS Labs, Inc.
La technologie TruSurround XT est comprise dans la
licence de SRS Labs, Inc.
Fabriqué sous la licence de Dolby Laboratories.
‘Dolby’ et le symbole du double D sont des marques
déposées de Dolby Laboratories.
Télévision Haute Définition. Système de diffusion et
de lecture d’émissions de télévision numérique à
grande résolution, comprenant environ 1 millions de
pixels, le format d’écran 16/9 et l’audio numérique
AC3. Avec une télévision non numérique, les formats
HDTV comprennent les résolutions 1080i et 720p.
Le mode THX Cinema est recommandé pour les
films. Conçu pour un usage dans une salle sombre.
(Cette fonction n'est pas disponible pour tous les
modèles.)
Ce téléviseur offre les réglages précis exigés pour la
certification professionnelle par l’Imaging Science
Foundation. Les modes « nuit » et « jour » d'ISF en
résultant, sont donc accessibles et permettent aux utilisateurs de profiter pleinement de leur télévision haute
définition LG.
CALIBREZ COMME UN PRO :
Des calibrations sophistiquées et détaillées peuvent
être réalisées avec le mode ISFccc.
Un technicien qualifié est requis pour effectuer une
calibration détaillée.
Veuillez vous adresser à votre détaillant local pour
trouver un technicien qualifié ISF.
HDMITM, le logo HDMI et High-Definition Multimedia
Interface sot des marques deposes de HDMI Licensing.
■
Cette fonction n'est pas disponible pour tous les modèles.
Page 54

PRÉPARATION
7
PRÉPARATION
ACCESSOIRES
S’assurer que les accessoires suivants sont compris avec l’appareil. S’il manque des accessoires, communiquer
avec le marchand où l’appareil a été acheté.
Il se peut que les accessoires inclus ne correspondent pas aux illustrations ci-dessous.
Couvercle de protection
(Voir page11)
1.5V 1.5V
Manuel de
l’Utilisateur
Cordon
d’alimentation
Télécommande,
Piles
INPUT
FAV
MUTE
RATIO
SO
U
N
D
POWER
Q. MENU MENU
AV MODE
RETURN
ENTER
VOL
CH
123
456
78
0
9
FLASHBK
P
A
G
E
SLEEP
PICTURE
Manuel sur CD
Écrous pour l’assemblage
de la base (Voir page11)
x 4
Serre-fils
EEnn ooppttiioonn
* N’essuyez les taches apparaissant sur
la surface extérieure qu’à l’aide d’un
chiffon à lustrer.
* N'essuyez pas énergiquement la sur-
face pour enlever la saleté.
Autrement, cela risquerait de rayer
ou de décolorer la surface de l’appareil.
Chiffon à lustrer
(Non inclus avec tous les modèles)
D-sub câble 15 broches
Lors de l’utilisation d’une connexion
PC VGA (câble D-sub à 15 broches),
l'utilisateur doit utiliser des câbles de
passage de signaux blindés à noyaux
de ferrite pour conserver la conformité
du produit aux normes de la standard.
x 2
F
A
V
MARK
Q.MENU
MENU
LIST
123
456
78
0
9
FLASHBK
MUTE
VOL
CH
P
A
G
E
RETURN
INFO
ENTER
INPUT
POW
ER
AV MODE
E
N
E
R
G
Y
S
A
V
IN
G
F
R
E
E
Z
E
R
A
T
IO
ou
Pince du compartiment à fils
(Voir page
12 )
(Sauf
60PS60, 60PS60C)
(Seulement 60PS60, 60PS60C)
Utilisation de tore de ferrite
(Cette fonction n'est pas disponible pour tous les modèles.)
Le tore de ferrite peut être utilisé pour réduire l’onde électromagnétique
lors du raccordement au cordon d’alimentation.
Plus le tore de ferrite sera près de la fiche d’alimentation électrique, mieux
ce sera.
Installez la fiche d’alimentation très près.
Page 55

PRÉPARATION
8
PRÉPARATION
INFORMATION RELATIVE AU PANNEAU AVANT
■
Cette illustration peut ne pas correspondre à votre téléviseur.
Touche
INPUT
Touche
ALIMENTATION
Touche
MENU
Touche
ENTER
Touche
VOLUME
Touche
CHANNEL
42/50PQ20
Voyant alimentation/attente
S’allume en rouge lorsque l’appareil est en Veille.
S’illumine en bleu lorsque le téléviseur est mis en marche.
Capteur intelligent
Règle l’image en fonction des
conditions environnantes.
Capteur de télécommande
GG
Quand le téléviseur ne peut pas être allumé avec la télécommande, appuyez sur le bouton de (alimentation) du téléviseur. (La télécommande ne fonctionne pas quand la (alimentation) principale du téléviseur est coupée).
ATTENTION (Excepté
42/50PQ30C, 50/60PS60C)
INPUT
MENU
ENTER
VOL
CH
Page 56

9
Touche
INPUT
Touche
MENU
Touche
ENTER
Touche
VOLUME
Touche
CHANNEL
Voyant alimentation/attente
S’allume en rouge lorsque l’appareil
est en Veille.
S’illumine en bleu lorsque le
téléviseur est mis en marche.
42/50PQ30, 42/50PQ31, 42/50PQ30C, 42/50PS30
Capteur de télécommande
Capteur intelligent
Règle l’image en fonction
des conditions environnantes.
Touche
ALIMENTATION
Voyant alimentation/attente
S’allume en rouge lorsque l’appareil est en Veille.
La lumière blanche illumine et s'éteint lentement
quand la TV est branchée.
42/50PQ60, 50/60PS60, 50/60PS60C
Touche
CHANNEL
Touche
VOLUME
Touche ENTER
Touche MENU
Touche INPUT
Touche
ALIMENTATION
Capteur de télécommande
Capteur intelligent
Règle l’image en fonction des
conditions environnantes.
PRÉPARATION
INPUT
MENU
ENTER
VOL
CH
CH
CH
VOL
VOL
ENTER
MENU
INPUT
Page 57

PRÉPARATION
10
PRÉPARATION
INFORMATION RELATIVE AU PANNEAU ARRIÈRE
■
Cette illustration peut ne pas correspondre à votre téléviseur.
AV IN 2
L/ MONO
R
AUDIO
VIDEO
USB IN
HDMI /
DVI IN 3
R
7
1
9
10
AV IN 2
L/ MONO
R
AUDIO
VIDEO
USB IN
HDMI/DVI IN 3
HDMI/DVI IN 4
7
1
9
Only 42/50PQ60,
50/60PS60,
50/60PS60C
R
ANTENNA/
CABLE IN
HDMI/DVI IN
2
1
RGB IN (PC)
RS-232C IN
(CONTROL & SERVICE)
OPTICAL
DIGITAL
AUDIO OUT
AUDIO IN
(RGB/DVI)
COMPONENT IN
1
2
VIDEO
AUDIO
L
R
AUDIO
AV IN 1
VIDEO
S-VIDEO
REMOTE
CONTROL IN
/MONO
1
2
HDMI/DVI IN, HDMI IN
Connexion numérique.
Prend en charge les signaux vidéo et audion-
umériques de haute définition. Ne prend pas en
charge le mode 480i.
Prend en charge le signal DVI à l’aide d’un adaptateur
ou d’un câble HDMI vers DVI (non inclus)
OPTICAL DIGITAL AUDIO OUT
Prise de sortie audionumérique pour l'amplificateur
ou système cinéma maison.
Remarque: en mode attente, ces prises sont désactivées.
RS-232C IN (CONTROL & SERVICE) PORT
Utilisé sur appareils offerts par des tiers.
AUDIO IN (RGB/DVI)
Prise pour écouteurs de 1/8" pour l’entrée du signal
audio analogique du PC.
RGB IN (PC)
Connexion analogique pour PC. Nécessite un câble
D-sub à 15 broches (câble VGA).
REMOTE CONTROL IN PORT
Prise pour télécommande à fil.
COMPONENT IN
Connexion analogique. Prend en charge les signaux
haute définition.
Nécessite un câble rouge, un câble vert et un câble
bleu pour le signal vidéo, et un câble rouge et un
câble blanc pour le signal audio.
AV (Audio/Video) IN
Connexion analogique composite. Prend en charge
uniquement le signal vidéo de définition standard
(480i).
S-VIDEO
Procure une meilleure qualité que le signal standard.
Prend en charge uniquement le signal vidéo de définition standard (480i).
ANTENNA/CABLE IN
Brancher les signaux d’antenne sur l’appareil.
Reliez les signaux du câble à cette prise.
USB IN
Permet de regarder des photos, d’écouter des fichiers
MP3.
Prise de cordon d'alimentation
Cet appareil fonctionne sur c.a.
Avertissement : Ne jamais faire fonctionner sur une
alimentation c.c.
1
2
3
4
5
9
10
8
6
7
3
4
5
6
7
8
Page 58

PRÉPARATION
11
INSTRUCTIONS DU SUPPORT
■
Cette illustration peut ne pas correspondre à votre téléviseur.
Placez soigneusement l'écran du téléviseur, face
vers le bas, sur un coussin afin de ne pas
endommager l'appareil.
Assemblez le téléviseur tel qu’illustré.
1
2
Fixez bien les quatre boulons dans les trous
situés au dos de l’appareil.
3
Placez soigneusement l'écran du téléviseur, face
vers le bas, sur un coussin afin de ne pas
endommager l'appareil.
1
Desserrez les boulons du téléviseur.
2
Démontez le support du téléviseur.
3
Une fois la base retirée, fixez le
CCOOUUVVEERRCCLLEE DDEE
PPRROOTTEECCTTIIOONN
sur la cavité servant à accueillir la
base.
Insérez le
CCOOUUVVEERRCCLLEE DDEE PPRROOTTEECCTTIIOONN
dans le
téléviseur jusqu’à ce que vous entendiez un clic.
COUVERCLE DE PROTECTION
GG
Lors de l’assemblage du support de plateau, vérifiez que le boulon est bien serré à fond (S’il n’est
pas serré à fond, le produit peut pencher vers l’avant après son installation). Ne pas trop serrer.
REMARQUE
!
INSTALLATION
(Sauf
60PS60, 60PS60C)
DÉMONTAGE
GG
En assemblant le pied, veillez à repérer et monter l’avant et l’arrière du pied correctement.
AVANT
Page 59

PRÉPARATION
12
PRÉPARATION
Après avoir relié les câbles selon les besoins,
installez le SUPPORT de CÂBLE comme indiqué
et regroupez les câbles.
Pour relier un appareil supplémentaire, reportezvous à la section CONFIGURATION DE LA
SOURCE AUXILIAIRE.
1
Installez le PINCE DU COMPARTIMENT
À FILS comme montré.
2
PINCE DU COMPARTIMENT
À FILS
GG
Tenir le PINCE DU COMPARTIMENT À FILS avec
les deux mains et tirez-le vers vous.
SUPPORT de
CÂBLE
Comment retirer le PINCE DU COMPARTIMENT À FILS
(Seulement 60PS60, 60PS60C)
(Seulement 60PS60, 60PS60C)
PINCE DU COMPARTIMENT À FILS
■
Cette illustration peut ne pas correspondre à votre téléviseur.
Page 60

PRÉPARATION
13
SYSTÈME DE FIXATION VESA
(ASSOCIATION DES STANDARDS VIDÉO)
Installez votre fixation murale sur un mur solide perpendiculaire au plancher. Lorsque vous devez fixer à d’autres
matériaux de construction, veuillez contacter le détaillant le plus proche de chez vous.
Si le téléviseur est installé au plafond ou sur un mur incliné, il peut chuter et causer des blessures corporelles graves.
Nous vous préconisons l’utilisation d’un support de montage mural de la marque LG pour monter le téléviseur sur un mur.
recommande que l’installation murale soit effectuée par un installateur professionnel qualifié.
LG recommande que l’installation murale soit effectuée par un installateur professionnel qualifié.
GG
N’installez pas votre ensemble de fixation murale pendant que votre téléviseur est allumé. Il pourrait en résulter des blessures corporelles causées par une décharge électrique.
ATTENTION
GG
La longueur des vis dépend de la fixation murale utilisée. Pour un complément d’information, reportezvous aux instructions qui accompagnent la fixation.
GG
Les dimensions standard des ensembles de fixation
murale sont présentées dans le tableau.
GG
Avec l’achat de notre ensemble de fixation murale,
un manuel d’installation détaillé et toutes les pièces
requises pour l’assemblage sont fournis.
GG
N’utilisez pas des vis plus longues que la dimension
standard, puisqu’elles peuvent endommager l’intérieur
du téléviseur.
GG
Pour les fixations murales qui ne sont pas conformes
aux spécifications de la norme VESA concernant les
vis, la longueur des vis peut différer dépendant de
leurs caractéristiques techniques.
GG
N’utilisez pas des vis qui ne sont pas conformes aux
spécifications de la norme VESA concernant les vis.
Ne serrez pas les vis trop à fond, ce qui peut endommager le téléviseur ou causer la chute du téléviseur
et des blessures corporelles. LG n’est pas responsable dans le cas de ce type d’accident.
GG
LG n’est pas responsable des dommages au téléviseur
ou des blessures corporelles lorsqu'une fixation
murale non conforme à la norme VESA ou qu’une fixation non spécifiée est utilisée ou que l'utilisateur néglige de suivre les instructions d’installation du
téléviseur.
REMARQUE
!
INSTALLATION SUR UN BUREAU
Pour assurer une ventilation adéquate, laisser un espacement de 10 centimètres (4 pouces) des quatre côtés à
partir du mur.
■
Cette illustration peut ne pas correspondre à votre téléviseur.
4 pouces
4 pouces (10 centimètres )
4 pouces
4 pouces
GG
Assurez une bonne ventilation en respectant ces recommandations.
GG
Ne pas installer l’appareil près ou audessus d’une source de chaleur.
ATTENTION
Modèle
VESA (A *B)
Vis standard Quantité
Support mural
(vendu séparément)
42PQ20, 42PQ30,
42PQ31, 42PQ30C,
42PQ60,
50PQ20, 50PQ30,
50PQ31, 50PQ30C,
50PQ60, 50PS30,
50PS60, 50PS60C
60PS60, 60PS60C
400* 400 M6 4
600* 400 M8 4
AW-50PG60MS
AW-60PG60MS
AA
BB
Page 61

PRÉPARATION
14
PRÉPARATION
INSTALLER LE TÉLÉVISEUR AU MUR DE FAÇON SÉCURITAIRE POUR
L’EMPÊCHER DE TOMBER LORSQU’IL EST INSTALLÉ SUR UN PIED
Nous vous conseillons d’installer votre téléviseur à proximité immédiate d’un mur afin que ce dernier retienne
l’appareil en cas de basculement vers l’arrière.
De plus, nous vous conseillons également d’attacher le téléviseur au mur afin qu’il ne bascule pas vers l’avant,
ce qui pourrait causer des blessures et endommager l’appareil.
Attention : Assurez-vous que les enfants ne montent pas ni s’accrochent au téléviseur.
■
Insérez les boulons à œil (ou les supports et boulons de la TV) pour attacher le produit au mur comme le montre
l’image.
*Insérez les boulons à œil et serrez-les à fond dans les orifices supérieurs.
Fixez les supports au mur avec les boulons (vendu séparément). Faites correspondre la hauteur des supports
montés au mur avec les orifices du produit.
Vérifiez que les boulons à œil et supports soient bien complètement serrés.
■
Utilisez une ficelle solide (vendu séparément) pour attacher l’appareil.
Il est plus sûr d’attacher la corde de façon à ce qu’elle soit horizontale
entre le mur et l’appareil.
■
Vous devriez vous procurer les pièces requises pour éviter que le téléviseur ne bascule sur sa base.
■
Cette illustration peut ne pas correspondre à votre téléviseur.
GG
Servez-vous d’une plateforme ou d'une armoire suffisamment grande pour
accueillir le téléviseur, et suffisamment solide pour en supporter le poids.
GG
Pour utiliser le téléviseur en toute sécurité, veillez à ce que la hauteur du
support mural et celle du téléviseur correspondent.
REMARQUE
!
STAND DE PIVOT
■
Cette fonction n'est pas disponible pour tous les modèles.
Après avoir installé le téléviseur, le régler manuellement vers la gauche ou la droite de 20° selon la position de
visionnement désirée.
Page 62

PRÉPARATION
15
CONNEXION ANTENNE OU CÂBLE
1. Antenne (analogique ou numérique)
Douille d’antenne murale ou antenne extérieure sans connexion à
un convertisseur. Pour une qualité d’image maximale, régler la
direction de l’antenne au besoin.
2. Câble
Douille
antenne
murale
Antenne
extérieure
(VHF, UHF)
Prise
murale de
télédistribution
Appartement à logements
(branché sur une douille antenne murale)
Fil coaxial RF 75 ohms
Fil coaxial RF 75 ohms
Appartement à logements
(branché sur une prise murale pour antenne
extérieure)
Attention de ne pas tordre le fil de cuivre
lorsque vous branchez l’antenne.
Fil bronze
■
Dans une z one où le signal est faible, pour améliorer la qualité, acheter et installer un amplificateur de signal.
■
Si l’antenne doit être séparée pour deux téléviseurs, installer un séparateur de signal 2 façons pour les connexions.
■
Si l’antenne n’est pas installée adéquatement, communiquer avec le marchand pour de l’aide.
ANTENNA/
CABLE IN
R
ANTENNA/
CABLE IN
R
R
■
Pour éviter d’endommager le téléviseur, ne branchez pas le cordon d‘alimentation avant de procéder au branchement
de tous les appareils.
Page 63

CONFIGURATION DE LA SOURCE AUXILIAIRE
16
CONFIGURATION DE LA SOURCE AUXILIAIRE
INSTALLATION DE RÉCEPTEUR HD
Cet appareil peut recevoir les signaux câble/hors antenne numérique sans boîte numérique extérieure. Toutefois il faut
recevoir les signaux numériques depuis une boîte ou autre appareil externe numérique, voir l’illustration ci-dessous.
Connexion des composantes
1. Comment brancher
Reliez les sorties vidéo (Y, PB, PR
)
du boîtier de la télévi-
sion numérique aux prises d’entrée
CCOOMMPPOONNEENNTT IINN
VVIIDDEEOO 11
de l’appareil. Respectez les couleurs des pris-
es (Y = vert, P
B = bleu et PR = rouge).
Reliez la sortie audio du boîtier de la télévision
numérique aux prises d’entrée
CCOOMM PP OONNEE NNTT II NN
AA UUDDIIOO 11
de l’appareil.
2
1
2. Comment utiliser
■
Mettre la boîte numérique en circuit
(voir le guide du propriétaire).
■
Sélectionnez la source d’entrée
CCoommppoossaannttee11
sur le
téléviseur à l’aide de la touche
IINNPPUUTT
de la télécommande.
■
Si la composante est branchée à l’entrée
CCOOMMPPOONNEENNTT
IINN 22
, sélectionnez la source d’entrée
CCoommppoossaannttee22
sur
le téléviseur.
■
Pour éviter que l'équipement ne subisse des dommages, ne branchez aucun cordon d'alimentation avant que
tous les composants aient été raccordés.
■
Cette illustration peut ne pas correspondre à votre téléviseur.
AN
CA
RGB IN (PC)
AUDIO
VIDEO
S-VIDEO
REMOTE
CONTROL IN
/MONO
COMPONENT IN
1
2
VIDEO
AUDIO
L
R
AV IN 1
Y L RPB PR
1
2
Y, CB/PB, CR/PR
Résolutions prises en charge
Fréquence Fréquence
Horizontale (KHz)Verticale(Hz
)
15.73 59.94
15.73 60.00
31.47 59.94
31.50 60.00
44.96 59.94
45.00 60.00
33.72 59.94
33.75 60.00
27.00 24.00
33.75 30.00
67.43 59.94
67.50 60.00
Résolution
720x480i
720x480p
1280x720p
1920x1080i
1920x1080p
Signal
480i
480p
720p
10 8 0 i
10 8 0 p
Composante
Oui
Oui
Oui
Oui
Oui
HDMI
Non
Oui
Oui
Oui
Oui
Page 64

CONFIGURATION DE LA SOURCE AUXILIAIRE
17
Connexion HDMI
Reliez le boîtier de la télévision numérique à la prise
HHDD MMII//DDVVII IINN 11, 22, 33 ou44
(Seulement 42/50PQ60,
50/60PS60, 50/60PS60C) de l’appareil.
Un branchement audio séparé n’est pas nécessaire.
L'interface HDMI prend en charge l'audio et le vidéo.
1. Comment brancher
2. Comment l’utiliser
■
Allumez le boîtier de la télévision numérique
(Consultez le
manuel de l’utilisateur de votre boîtier numérique).
■
Sélectionnez la source d’entrée
HHDDMMII11, 22, 33
ou
44
(Seulement 42/50PQ60, 50/60PS60, 50/60PS60C) sur
le téléviseur à l’aide de la touche
IINNPPUUTT
de la télécom-
mande.
2
1
HDMI-DTV
Fréquence Fréquence
Horizontale (KHz)Verticale (Hz
)
31.469 59.94
31.50 60.00
44.96 59.94
45.00 60.00
33.72 59.94
33.75 60.00
27.00 24.00
33.75 30.00
67.43 59.94
67.50 60.00
Résolution
720x480p
1280x720p
1920x1080i
1920x1080p
HDMI/DVI IN
2
1
HDMI-DTV OUTPUT
RGB(PC)
RS-232C IN
(CONTROL & SERVICE)
OPTICAL
DIGITAL
AUDIO OUT
AUDIO
(RGB/DVI)
R
CO
1
GG
Vérifiez la compatibilité du câble HDMI avec la version 1.3.
Les câbles HDMI ne prennent pas en charge
l’HDMI version 1.3, ils causent des scintillements
ou aucun affichage. Dans ce cas, utilisez des câbles
plus récents qui prennent en charge HDMI version
1.3.
REMARQUE
!
Page 65

CONFIGURATION DE LA SOURCE AUXILIAIRE
18
CONFIGURATION DE LA SOURCE AUXILIAIRE
Connexion DVI vers HDMI
HDMI/DVI IN
2
1
RGB IN (PC)
RS-232C IN
(CONTROL & SERVICE)
OPTICAL
DIGITAL
AUDIO OUT
REMOTE
CONTROL IN
AV IN 1
AUDIO IN
(RGB/DVI)
LR
DVI-DTV OUTPUT
1
2
GG
Cette connexion requiert un câble DVI vers HDMI ou un
adaptateur. Comme la connexion DVI ne prend pas en
charge le signal audio, une connexion audio autonome
est requise.
REMARQUE
!
Reliez la sortie DVI du boîtier de la télévision numérique
à la prise
HHDDMMII//DDVVII IINN 11, 22, 33 ou44
(Seulement
42/50PQ60, 50/60PS60, 50/60PS60C) de l’appareil.
Reliez la sortie audio du boîtier de la télévision
numérique à la prise
AA UUDDIIOO IINN ((RRGGBB//DDVVII))
de
l’appareil.
1. Comment brancher
2. Comment l’utiliser
■
Allumez le boîtier de la télévision numérique. (Consultez le
manuel de l’utilisateur de votre boîtier numérique.)
■
Sélectionnez la source d’entrée
HHDDMMII11, 22, 33
ou
44
(Seulement 42/50PQ60, 50/60PS60, 50/60PS60C) sur
le téléviseur à l’aide de la touche
IINNPPUUTT
de la télécom-
mande.
2
1
Page 66

CONFIGURATION DE LA SOURCE AUXILIAIRE
19
RÉGLAGE DVD
Connexion des composantes
Ports Entrée Composante
Pour une meilleure qualité d’image, connectez votre lecteur DVD aux ports d’entrée composante comme
montré ci-dessous.
Ports Composante de la TV
YPBP
R
Ports de sortie vidéo du lecteur
DVD
Y
Y
Y
Y
PB
B-Y
Cb
Pb
PR
R-Y
Cr
Pr
Reliez les sorties vidéo (Y, PB
, PR
)
du DVD aux prises
CCOOMMPPOONNEENNTT IINN VVIIDDEEOO11
de l’appareil.
Respectez les couleurs. (Y = vert, P
B = bleu et PR = rouge
)
.
Reliez les sorties audio du DVD aux prises
CCOOMMPPOONNEENNTT
IINN AAUUDDII OO11
de l’appareil.
1. Comment brancher
2. Comment l’utiliser
■
Allumez votre lecteur et insérez un DVD.
■
Sélectionnez la source d’entrée
CCoommppoonn eenntt11
sur le
téléviseur à l’aide de la touche
IINNPPUUTT
de la télécommande.
■
Si la composante est branchée à l’entrée
CCOOMMPPOONNEENNTT
IINN 22
sélectionnez la source d’entrée
CCoommppoossaannttee22
sur le
téléviseur.
■
Reportez-vous au manuel d’utilisation du lecteur DVD.
2
1
RGB(PC)
AUDIO
VIDEO
S-VIDEO
REMOTE
CONTROL IN
/MONO
COMPONENT IN
1
2
VIDEO
AUDIO
L
R
AV IN 1
Y L RPB PR
1 2
Page 67

CONFIGURATION DE LA SOURCE AUXILIAIRE
20
CONFIGURATION DE LA SOURCE AUXILIAIRE
Connexion S-Video
Connexion HDMI
Reliez la sortie HDMI due DVD aux prises
HHDDMMII//DDVVII
IINN 11, 22, 33 ou44
(Seulement 42/50PQ60,
50/60PS60, 50/60PS60C) de l’appareil.
Un branchement audio séparé n’est pas nécessaire.
L'interface HDMI prend en charge l'audio et le vidéo.
1. Comment brancher
2. Comment l’utiliser
■
Sélectionnez la source d’entrée
HHDDMMII11, 22, 33
ou
44
(Seulement 42/50PQ60, 50/60PS60, 50/60PS60C) sur
le téléviseur à l’aide de la touche
IINNPPUUTT
de la télécom-
mande.
■
Reportez-vous au manuel d’utilisation du lecteur DVD.
2
1
1
2
VIDEO
AUDIO
L
R
REMOTE
AN
CA
COMPONENT IN
L R
S-VIDEO
AUDIO
AUDIO
AV IN 1
S-VIDEO
/MONO
VIDEO
1
2
HDMI/DVI IN
2
1
(CONTROL & SERVICE)
HDMI-DVD OUTPUT
1
Reliez la sortie S-VIDEO du DVD à la prise d’entrée
SS --VVII DDEEOO
de l’appareil.
Reliez les sorties audio du DVD aux prises d’entrée
AA UUDDIIOO
de l’appareil.
1. Comment brancher
2. How to use
■
Allumez votre lecteur et insérez un DVD.
■
Sélectionnez la source d’entrée
VViiddééoo11
sur le téléviseur à
l’aide de la touche
IINNPPUUTT
de la télécommande.
■
Reportez-vous au manuel d’utilisation du lecteur DVD.
2
1
Page 68

CONFIGURATION DE LA SOURCE AUXILIAIRE
21
RÉGLAGE MAGNÉTOSCOPE
Branchement de l'antenne
ANTENNA/
CABLE IN
L R
S-VIDEO VIDEO
OUTPUT
SWITCH
ANT IN
ANT OUT
Prise Murale
Antenne
1
2
Reliez la sortie antenne RF du magnétoscope à la prise
AA NNTTEENN NNAA //CCAABBLLEE IINN
de l’appareil.
Branchez le câble de l’antenne à la prise
antenne RF du magnétoscope.
1. Comment brancher
2. Comment l’utiliser
■
Réglez l’interrupteur de sortie du magnétoscope
sur 3 ou 4 puis réglez la télévision sur le même
canal.
■
Insérez une cassette vidéo dans le magnétoscope
et appuyez sur la touche PLAY.
(Reportez-vous au manuel de l’utilisateur du magnétoscope).
2
1
Page 69

CONFIGURATION DE LA SOURCE AUXILIAIRE
22
CONFIGURATION DE LA SOURCE AUXILIAIRE
Connexion composite (RCA)
Reliez les prises
AA UUDDIIOO/VVIIDDEEOO
du téléviseur et du
magnétoscope. Respectez les couleurs (Vidéo = jaune,
Audio Gauche = blanc et Audio Droit = rouge)
1. Comment brancher
2. Comment l’utiliser
■
Insérez une cassette vidéo dans le magnétoscope et appuyez
sur la touche PLAY. (Reportez-vous au manuel de l’utilisateur
du magnétoscope).
■
Sélectionnez la source d’entrée
VViiddééoo11
sur le téléviseur à
l’aide de la touche
IINNPPUUTT
de la télécommande.
■
Si la composante est branchée à l’entrée
AAVV IINN 22
, sélec-
tionnez la source d’entrée
VViiddééoo22
sur le téléviseur.
1
2. Comment l’utiliser
■
Insérez une cassette vidéo dans le magnétoscope et
appuyez sur la touche PLAY. (Reportez-vous au manuel de
l’utilisateur du magnétoscope).
■
Sélectionnez la source d’entrée
VViiddééoo11
sur le téléviseur à
l’aide de la touche
IINNPPUUTT
de la télécommande.
GG
Si votre magnétoscope n’est pas stéréo, reliez le
câble audio entre le magnétoscope et la prise
AA UUDD IIOO LL// MM OONNOO
de l’appareil.
REMARQUE
!
1
2
VIDEO
AUDIO
L
R
RGB IN (PC)
REMOTE
CONTROL IN
ANTE
CAB
S-VIDEO
COMPONENT IN
AUDIO
AV IN 1
VIDEO
/MONO
L R
S-VIDEO VIDEO
OUTPUT
SWITCH
ANT IN
ANT OUT
1
Connexion S-Video
Reliez la sortie S-VIDEO du magnétoscope à la
prise d’entrée
SS --VVIIDDEEOO
de l’appareil.
Reliez les sorties audio du magnétoscope aux prises
d’entrée
AA UUDDIIOO
de l’appareil.
1. Comment brancher
2
1
1
2
VIDEO
AUDIO
L
R
RGB IN (PC)
REMOTE
CONTROL IN
ANTENN
CABLE
COMPONENT IN
AUDIO
AV IN 1
S-VIDEO
/MONO
VIDEO
L R
S-VIDEO VIDEO
OUTPUT
SWITCH
ANT IN
ANT OUT
1
2
GG
Ne pas brancher aux deux prises
Vidéo et S-Vidéo en même
temps. Si vous branchez à la fois
les câbles Vidéo et S-vidéo, seul
le système S-Vidéo fonctionnera.
ATTENTION
GG
Le mode S-Video offre un signal de qualité supérieure
au mode composite. Utilisez-le s’il est offert.
REMARQUE
!
Page 70

CONFIGURATION DE LA SOURCE AUXILIAIRE
23
RÉGLAGE SOURCE A/V EXTERNE
CONNEXION DE SORTIE AUDIO
L R
VIDEO
AV IN 2
L/ MONO
R
AUDIO
VIDEO
USB IN
HDMI IN 3
Caméscope numérique
Console de jeux vidéo
Reliez les prises
AAUUDDIIOO/VVIIDDEEOO
du
téléviseur et de l’appareil externe.
Respectez les couleurs
(
Vidéo = jaune, Audio Gauche = blanc, et
Audio Droit = rouge
)
1. Comment brancher
2. Comment l’utiliser
■
Sélectionnez la source d’entrée
VViiddééoo22
sur le
téléviseur à l’aide de la touche
IINNPPUUTT
de la
télécommande.
■
Si la composante est branchée à l’entrée
AAVV IINN 11
sélectionnez la source d’entrée
VViiddééoo11
sur le
téléviseur.
■
Faites fonctionner l’appareil externe.
1
1
RGB(PC)
RS-232C IN
(CONTROL & SERVICE)
OPTICAL
DIGITAL
AUDIO OUT
AUDIO
(RGB/DVI)
C
HDMI/DVI IN
2
1
1
2
GG
Lorsque vous branchez équipements audios externes comme des
amplificateurs ou des haut-parleurs, vous pouvez désactiver les
haut-parleurs du téléviseur à partir du menu. (
GG
pp..7766
)
REMARQUE
!
GG
Ne pas regarder à l’intérieur du port de sortie optique. Regarder un rayon laser peut endommager vos yeux.
GG
La fonction ACP (Audio Copy Protection) peut bloquer la sortie audio numérique.
ATTENTION
Branchez l’une des extrémités du câble optique au port
OOPPTTIICCAALL
de la
DDIIGGIITTAALL AAUUDDIIOO OOUUTT
du téléviseur..
Branchez l’autre extrémité dans l’entrée audio numérique
(optique) de l’équipement audio.
Réglez «Option Haut-parleurs internes – Arrêt» dans le
menu AUDIO. (
GG
pp..
7766
). Consultez le manuel d’utilisation de
l’équipement audio externe.
1. Comment brancher
2
3
1
Relier le son du téléviseur vers de l’équipement audio externe par le biais de la prise optique.
 Loading...