

LG Electronics USA 60LA7400UA User Manual
16 ASSEMBLING AND PREPARING
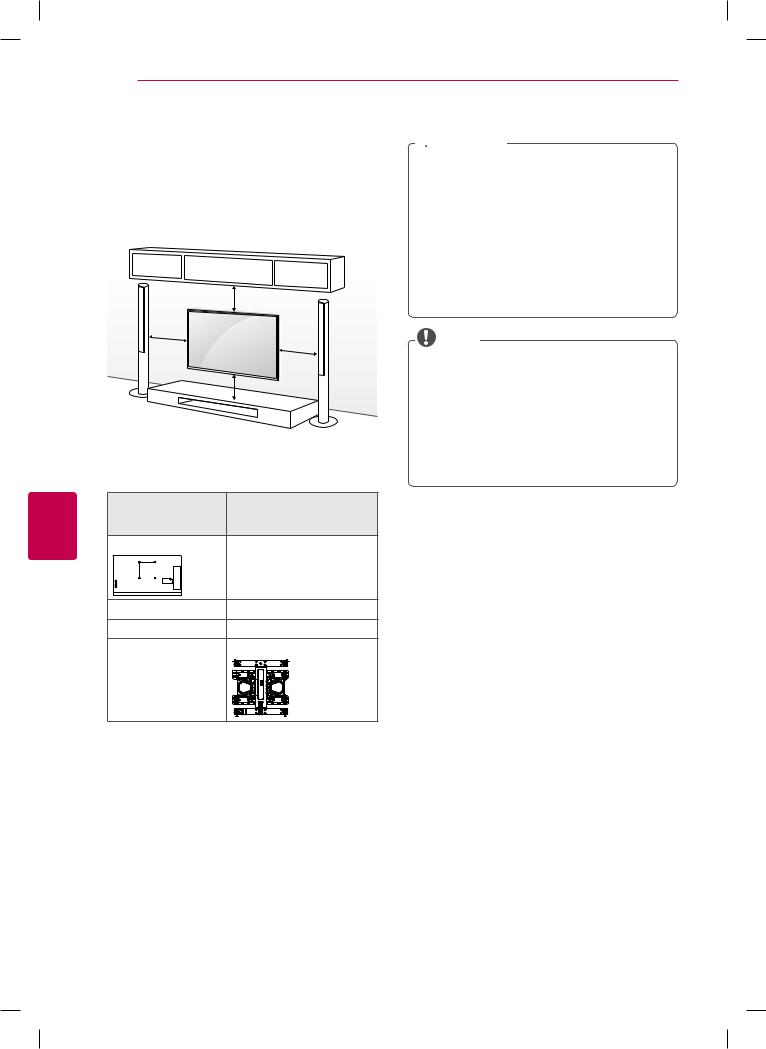
Adjusting the angle of the TV to suit view
Swivel 10 degrees to the left or right and adjust the angle of the TV to suit your view.
Swivel 8 degrees to the left or right and adjust the angle of the TV to suit your view.
ENGLISH
 CAUTION
yyInstall the product on a flat surface for easy swivel. Make sure to use the TV cabinet or stand that can properly support the TV.
yyAfter installing the TV, the angle of the screen can be adjusted to the left or right.
yyWhen adjusting the angle, make sure there are no objects near the TV and the TV has enough distance from the wall. A space of at least 5 cm on the front and 10 cm on the back should be available. Otherwise, the product could fall due to
balance problems, which may cause personal injury or damage to the product.

|
ASSEMBLING AND PREPARING 17 |
|
Gather |
|
wit |
|
the |
Securing the TV to a wall (optional) |
Tidying cables |
(Depending on model) |
1 Gather and bind the cables with the cable holder on |
|
|
|
the back of the TV. |
2
#

 Cable Tie
2 Gather |
cable |
bolts on the back of the TV.
- If there are bolts inserted at the eye-bolts position, remove the bolts first.
2Mount the wall brackets with the bolts to the wall. Match the location of the wall bracket and the eyebolts on the rear of the TV.
3Connect the eye-bolts and wall brackets tightly with a sturdy rope.
Make sure to keep the rope horizontal with the flat surface.
CAUTION
sure that children do not climb on or hang on TV.
NOTE
platform or cabinet that is strong and large enough to support the TV securely.
yyBrackets, bolts and ropes are optional. You can obtain additional accessories from your local dealer.
Cable Management Clip
CAUTION
not move the TV by holding the cable holder, the cable holders may break, and injuries and
damage to the TV may occur.
ENGLISH
18 ASSEMBLING AND PREPARING
Mounting on a wall
An optional wall mount can be used with your LG TV. Consult with your local dealer for a wall mount that supports the VESA standard used by your TV model (listed below).
We recommend that you use an LG brand wall mount when mounting the TV to a wall.
10 cm
10 cm 10 cm
10 cm
Make sure to use screws and wall mounts that meet the VESA standard. Standard dimensions for the wall mount kits are described in the following table.
ENGLISH |
Model |
47/50/55LA6900 |
|
47/50/55LA6950 |
|
|
|
|
|
|
47/55/60LA7400 |
|
VESA (A x B) |
400 x 400 |
|
A |
|
|
B |
|
|
Standard screw |
M6 |
|
Number of screws |
4 |
|
Wall mount bracket |
LSW430B |
|
(optional) |
|
 CAUTION
yyDisconnect the power before moving or installing the TV. Otherwise electric shock may occur.
yyIf you install the TV on a ceiling or slanted wall, it may fall and result in severe injury.
Use an authorized LG wall mount and contact the local dealer or qualified personnel.
yyDo not over tighten the screws as this may cause damage to the TV and void your warranty.
yyUse the screws and wall mounts that meet the VESA standard. Any damages or injuries by misuse or using an improper accessory are not covered by the warranty.
NOTE
yyUse the screws that are listed in the VESA standard screw specifications.
yyThe wall mount kit includes an installation manual and necessary parts.
yyThe wall mount bracket is optional. You can obtain additional accessories from your local dealer.
yyThe length of screws may differ depending on the wall mount. Make sure to use the proper length. yyFor more information, refer to the manual supplied
with the wall mount.

MAKING CONNECTIONS 19
MAKING CONNECTIONS
You can connect various external devices to the TV. Supported external devices are: HD receivers, DVD players, VCRs, audio systems, USB storage devices, PC, gaming devices, and other external devices. For more information on external device’s connection, refer to the manual provided with each device.
 NOTE
NOTE
yyIf you record a TV program on a DVD recorder or VCR, make sure to connect the TV signal input cable to the TV through a DVD recorder or VCR. For more information of recording, refer to the manual provided with the connected device.
yyThe external device connection may differ from the model.
yyConnect external devices to the TV regardless of the order of the TV port.
yyIf you connect a gaming device to the TV, use the cable supplied with the gaming device. yyRefer to the external equipment’s manual for operating instructions.
Connecting to an antenna or cable
Connect an antenna, cable, or cable box to watch TV while referring to the following. The illustrations may differ from the actual items and a RF cable is optional.
VHF Antenna


 UHF Antenna
|
|
|
|
|
|
Antenna |
or |
|
|
|
|
|
|
|
|
|
|
|
|
|
|
|
|
|
|
|
|
||
ANTENNA |
CABLE |
|
|
Wall Jack |
||||||||||
IN |
|
IN |
|
|
|
|||||||||
|
|
|
|
|
|
|
|
|
|
|
|
|
|
|
|
|
|
|
|
|
|
|
|
|
|
|
|
|
|
|
|
|
|
|
|
|
|
|
|
|
|
|
|
|
|
|
|
|
|
|
|
|
|
|
|
|
|
|
|
|
|
|
|
Coaxial (75Ω) |
|
|
|
|
|
Coaxial (75Ω) |
||||
|
|
|
|
|
|
Terminal |
|
|
|
|
|
|
|
|
ENGLISH
 CAUTION
yyMake sure not to bend the copper wire of the RF cable.
Copper wire
yyComplete all connections between devices, and then connect the power cord to the power outlet to prevent damage to your TV.
NOTE
yyTo improve the picture quality in a poor signal area, please purchase a signal amplifier and install it properly.
yyUse a signal splitter to use more than 2 TVs.
yyIf the antenna is not installed properly, contact your dealer for assistance.
yyDTV Audio Supported Codec: MPEG, Dolby Digital, DTS

20 MAKING CONNECTIONS
Connecting to a HD receiver, DVD Player or VCR
Connect a HD receiver, DVD Player, or VCR to the TV and select an appropriate input mode.
HDMI Connection
HDMI is the best way to connect a device.
Transmits digital video and audio signals from an external device to the TV. Connect the external device and the TV with the HDMI cable as shown in the following illustration.
 NOTE
NOTE
yyUse the latest High Speed HDMI™ Cable that supports CEC (Customer Electronics Control) function. yyHigh Speed HDMI™ Cables are tested to carry an HD signal up to 1080p and higher.
yyHDMI Audio Supported Format: Dolby Digital, PCM (Up to 192 KHz, 32k/44.1k/48k/88k/96k/176k/192k) -> DTS.
Choose any HDMI input port to connect.
It does not matter which port you use.
ENGLISH
3 (MHL)
(*Not Provided)
/DVI IN2
DVD / Blu-Ray / HD Cable Box / HD STB
1(ARC)
ARC (Audio Return Channel)
yyWhen connected with a high-speed HDMI cable, digital audio can be sent to a compactible device without an additional optical audio cable.
yyARC is only supported on the HDMI input 1 (ARC) port. An external audio device that
supports ARC should be connected to HDMI 1 if you wish to use ARC.
 Loading...