

Page 1

MAKING CONNECTIONS
COMPO
P
R
O
/
Y
L/MONO
AUDIO
22
Composite Connection
Transmits analog video and audio signals from an external device to the TV. Connect the external device and the TV with
the composite cable as shown in the following illustration.
NOTE
Check to ensure the cables are matched with the corresponding color connection.
PC-AUDIO IN
PC-AUDIO IN
ENGLISH
VIDE
VIDEO
/ Y
YELLOW
L/MONO
NENT IN / AV IN
(*Not Provided)
YELLOW
VIDEO
( )
MONO
AUDIO R
WHITE
WHITE
AUDIOL R
RED
RED
VCR / DVD / Blu-Ray / HD Cable Box
Page 2

MAKING CONNECTIONS
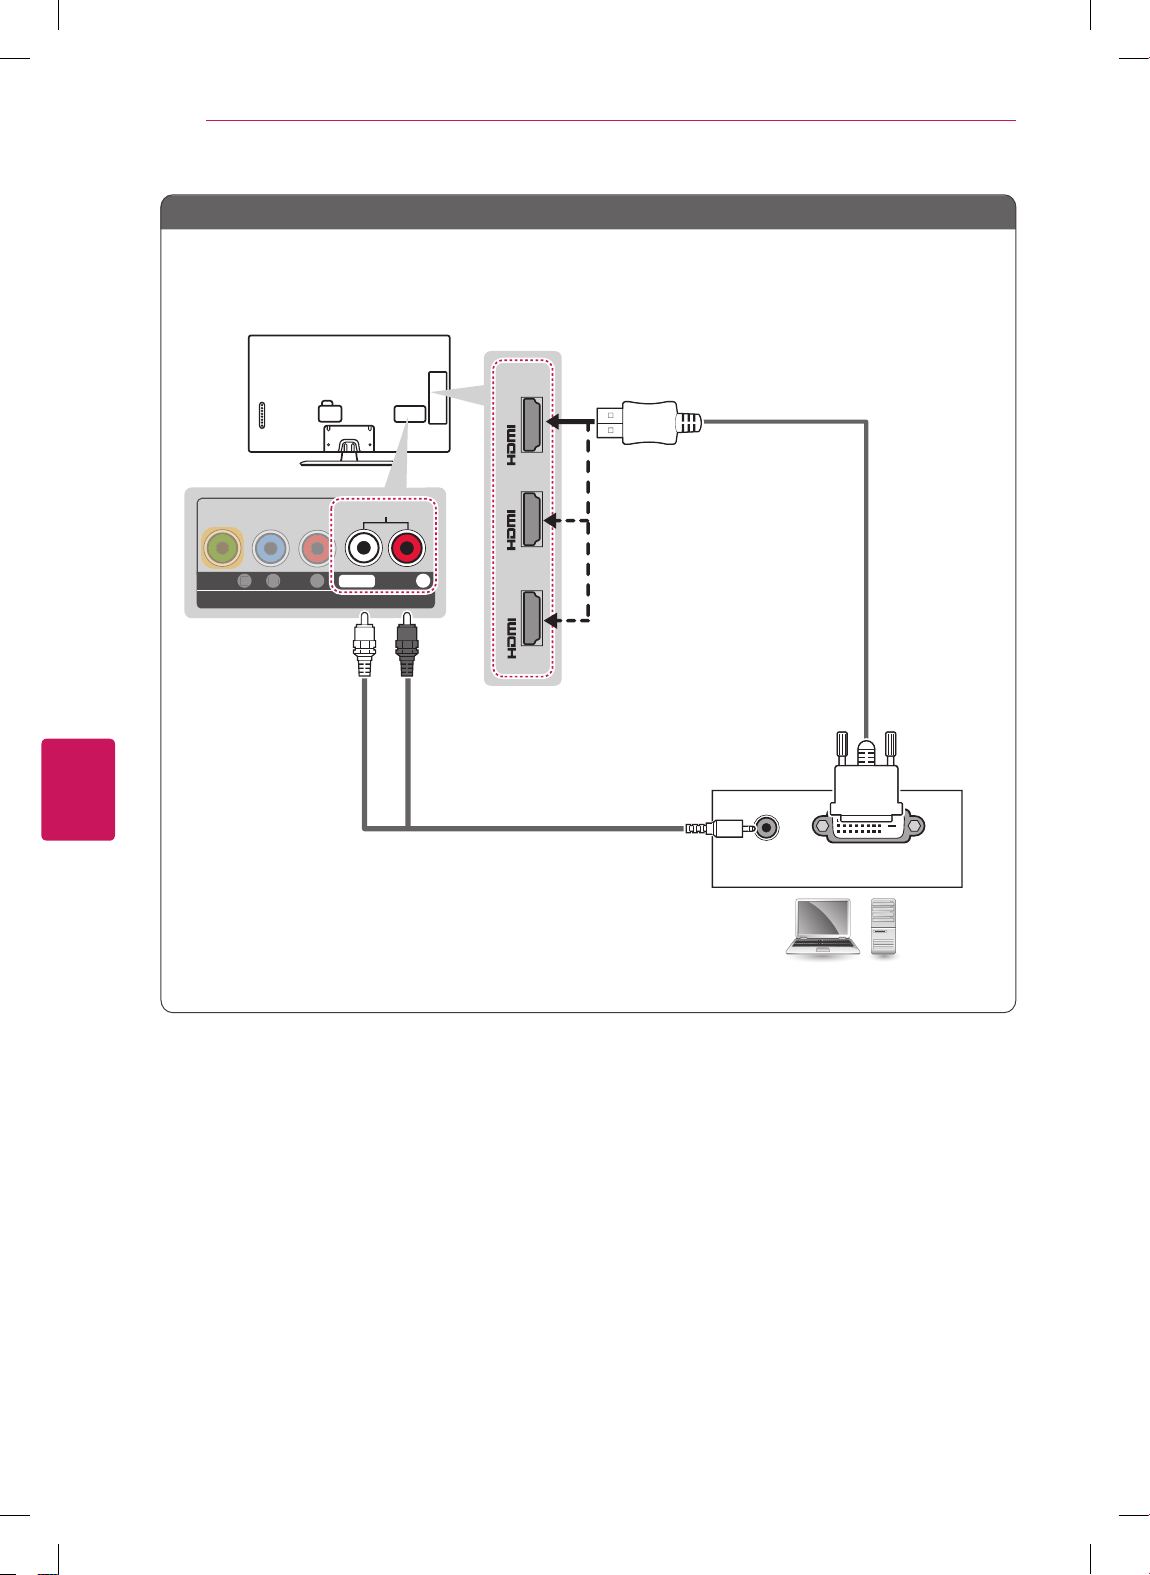
Connecting to a PC
NOTE
It is recommended to use an HDMI connection for the best image quality.
Depending on the graphics card, DOS mode video may not work if a HDMI to DVI Cable is in use.
In PC mode, there may be noise associated with the resolution, vertical pattern, contrast or brightness. If noise
is present, change the PC output to another resolution, change the refresh rate to another rate or adjust the
brightness and contrast on the PICTURE menu until the picture is clear.
The synchronization input form for Horizontal and Vertical frequencies is separate.
Depending on the graphics card, some resolution settings may not allow the image to be positioned on the screen
properly.
If you are using DVI out from a PC, you have to connect analog audio separately. Refer to the instructions on the
next page.
When using the HDMI/DVI cable, Single link is only supported.
HDMI Connection DVI or HDMI Connection
Choose method A or B to make connection.
Method A: HDMI Connection
23
Choose any HDMI input port to connect.
It does not matter which port you use.
(MHL)
3
IN
2
IN
(ARC)
1
IN
ENGLISH
HDMI
(*Not Provided)
PC
Page 3
MAKING CONNECTIONS
HDMI
IN
1
(ARC)
IN
3
(MHL)
IN
2
IN
1
(ARC)
IN
3
(MHL)
IN
2
AUDIO OUT
DVI OUT
PC-AUDIO IN
COMPONENT IN / AV IN
P
B
VIDE
O
/
Y
L/MONO
AUDIO R
24
Method B: DVI to HDMI Connection
Choose any HDMI input port to connect.
It does not matter which port you use.
WHITE
RED
(*Not Provided)
ENGLISH
(*Not Provided)
PC
Page 4
MAKING CONNECTIONS
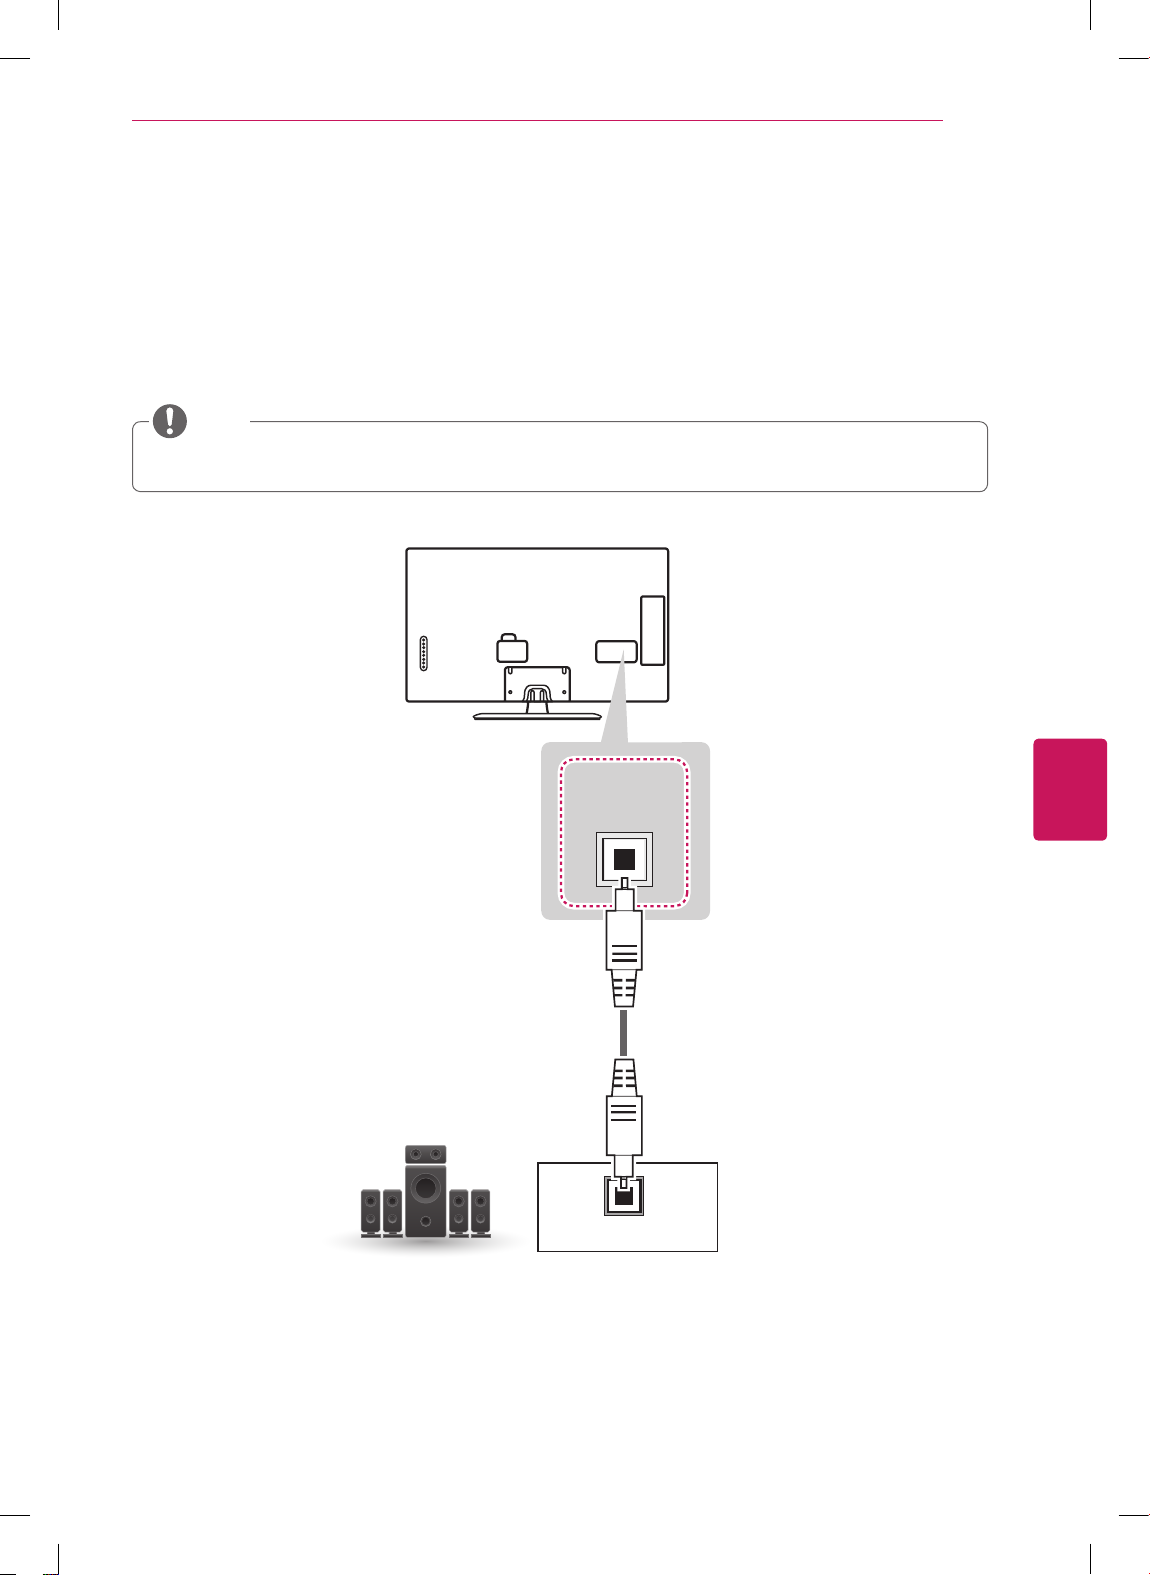
Connecting to an Audio System
You may use an optional external audio system instead of the built-in speaker.
Digital Optical Audio Connection
Transmits a digital audio signal from the TV to an external device. Connect the external device and the TV with the
optical audio cable as shown in the following illustration.
NOTE
Do not look into the optical output port. Looking at the laser beam may damage your vision.
Audio with ACP (Audio Copy Protection) function may block digital audio output.
25
Digital Audio System
ENGLISH
OPTICAL
DIGITAL
AUDIO OUT
(*Not Provided)
OPTICAL AUDIO IN
Page 5
MAKING CONNECTIONS
26
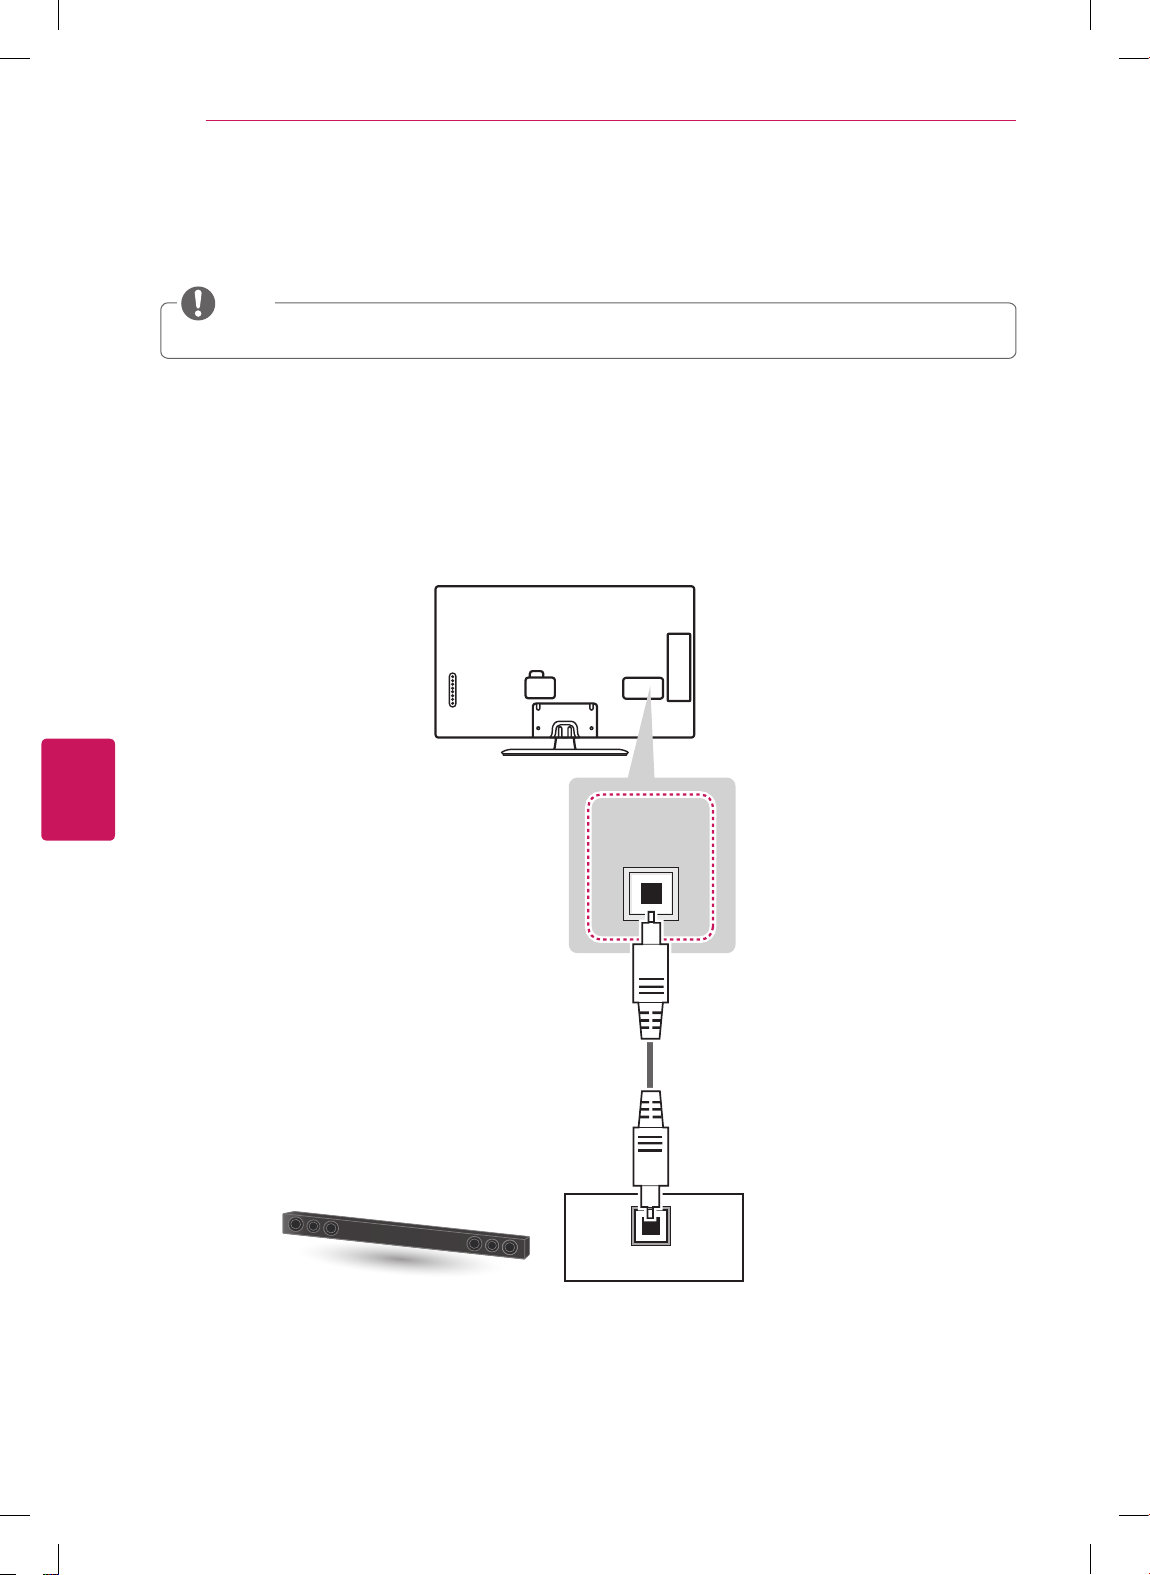
Connecting to a Sound Bar
You may use a Sound Bar instead of the built-in speaker.
NOTE
If you use a Sound Bar instead of the built-in speaker, set the TV speaker to off in the user menu.
Digital Optical Audio Connection
Transmits a digital audio signal from the TV to a Sound Bar. Connect the Sound Bar and the TV with an optical audio
cable as shown in the following illustration.
For LN5790 series
ENGLISH
Sound Bar
OPTICAL
DIGITAL
AUDIO OUT
OPTICAL AUDIO IN
Page 6
MAKING CONNECTIONS
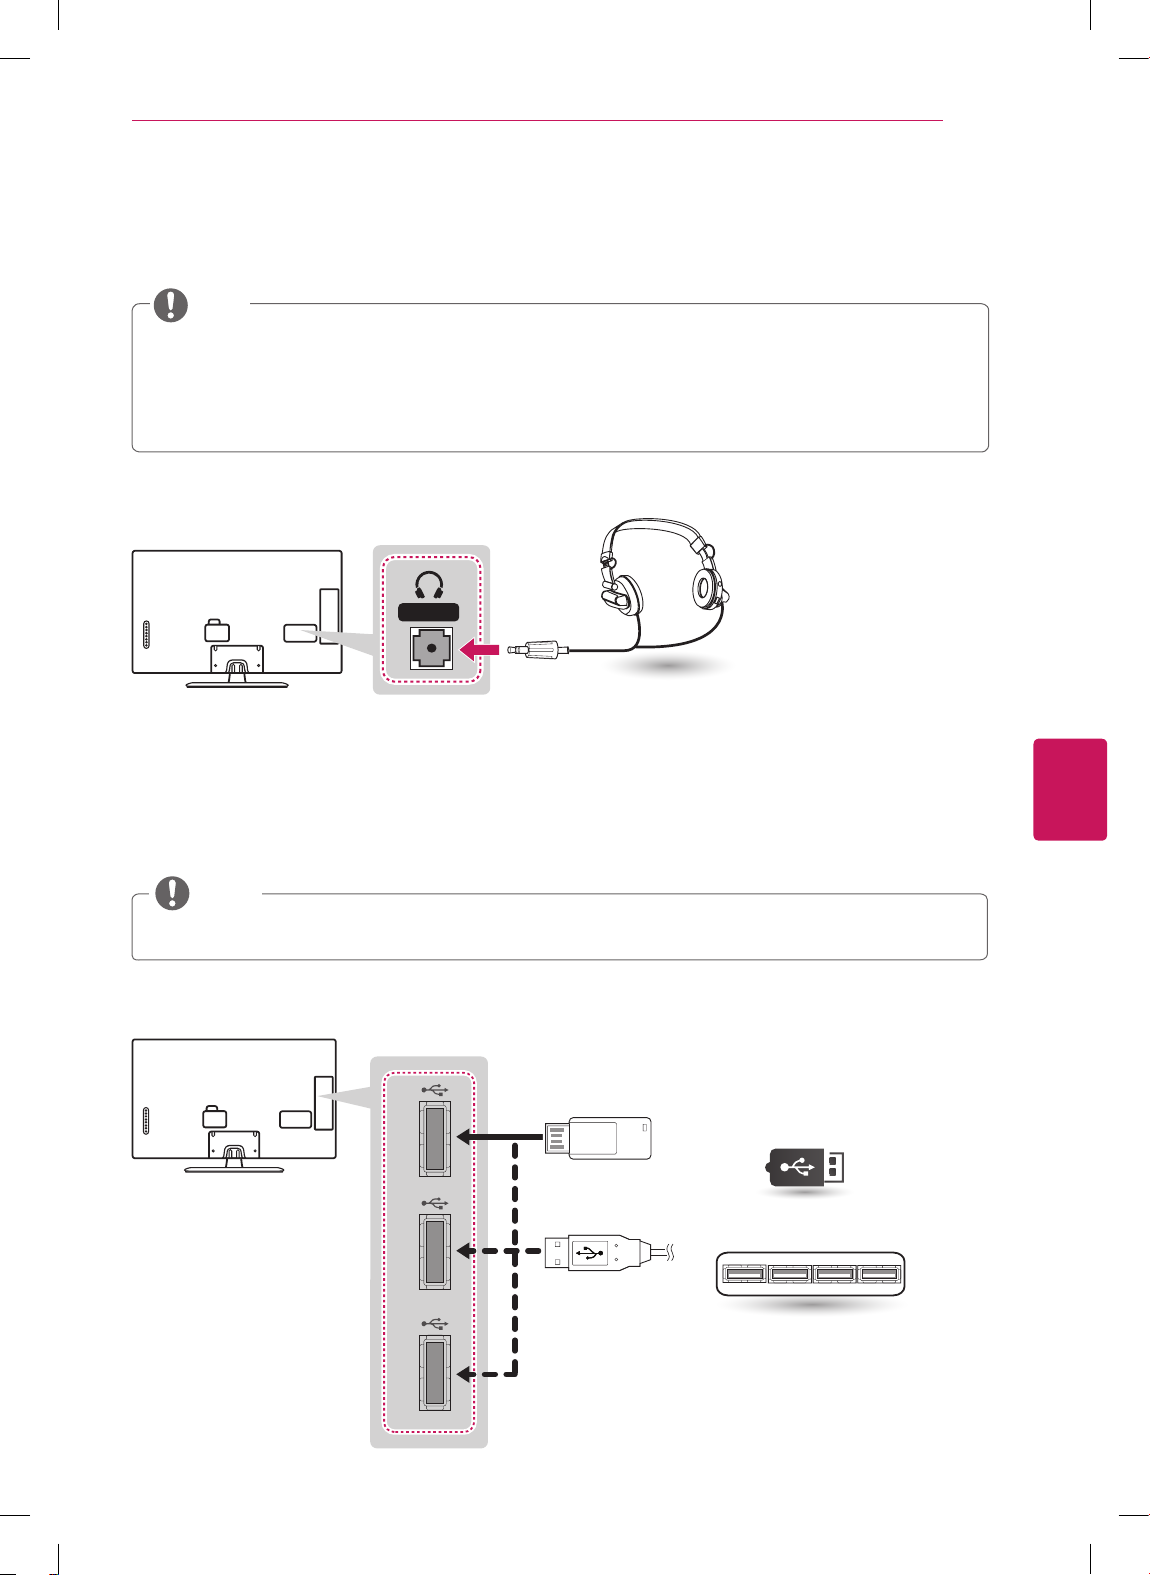
Connecting Headphones
You listen to the sound using headphones.
NOTE
AUDIO menu options are disabled when headphones are connected.
When changing AV MODE with headphones connected, the change is applied to video but not to audio.
Optical Digital Audio Out is not available when headphones are connected.
Headphone impedance: 16
Max audio output: 10 mW to 15 mW
Headphone jack size: 0.35 cm (0.13 inches)
Ω
Headphone
H/P OUT
(*Not Provided)
27
Connecting a USB Drive
Connect a USB storage device such as a USB flash thumbdrive, external hard drive, or a USB memory card reader to the
TV and access the Smart Share menu to use various multimedia files.
NOTE
Some USB Hubs may not work. If a USB device connected using a USB Hub is not detected, connect it to the
USB port on the TV directly.
Choose any USB input port to connect.
It does not matter which port you use.
(*Not Provided)
USB IN 3
USB
USB IN 2
ENGLISH
USB Hub
USB IN 1
Page 7
28
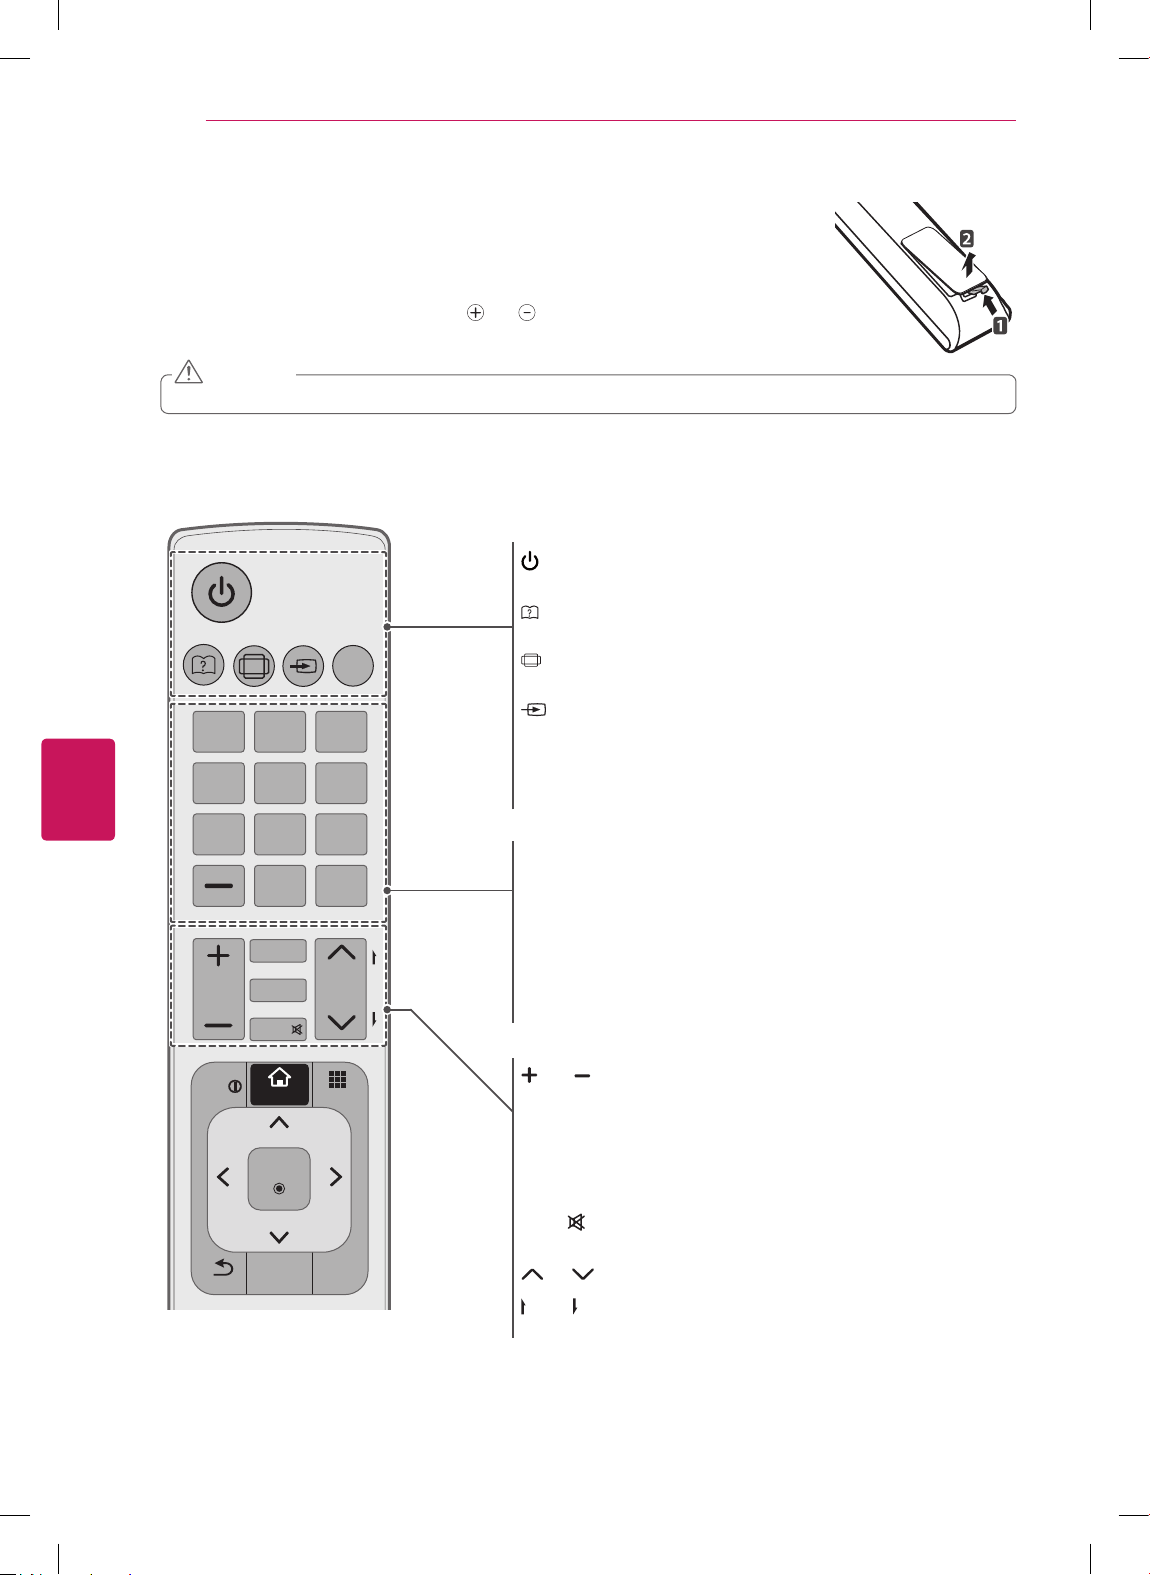
REMOTE CONTROL
The descriptions in this manual are based on the buttons on the remote control. Please read this
manual carefully and use the TV correctly. To install batteries, open the battery cover,
replace batteries (1.5 V AAA) matching the and ends to the label inside the compartment,
and close the battery cover. To remove the batteries, perform the installation actions in reverse.
This remote uses infrared light. When in use, it should be pointed in the direction of the TV’s remote sensor.
For LN5700, LN570B, LN5790 series
ENGLISH
REMOTE CONTROL
CAUTION
Do not mix old and new batteries, as this may damage the remote control.
(POWER)
Turns the TV on or off.
ser Guide)
(U
RATIO
INPUT
1 2 3
4 5 6
TV
Sees user-guide.
RATIO
Resizes an image.
INPUT
Rotates through inputs.
Also switches the TV on from standby.
TV
Returns to the last TV channel.
7 8
LIST
VOL
INFO
BACK
0
FAV
SETTINGS
MUTE
Q.MENU
SMART
MY APPS
OK
AV MODE
9
FLASHBK
P
A
G
CH
E
EXIT
Number button
Enters numbers.
LIST
Accesses the saved channel list.
- (Dash
)
Inserts a dash between numbers such as 2-1 and 2-2.
FLASHBK
Tunes to the last channel viewed.
VOL
Adjusts the volume level.
FAV
Accesses your favorite channel list.
SETTINGS
Accesses the main menu.
MUTE
Mutes all sounds.
CH
Scrolls through the saved channels.
PAGE
Moves to the previous or next screen.
Page 8

1 2 3
4 5 6
7 8
0
9
MY APPS
TV
SMART
CH
VOL
P
A
G
E
RATIO
INPUT
FAV
MUTE
LIST
FLASHBK
EXIT
BACK
OK
Q.MENU
INFO
AV MODE
SETTINGS
REMOTE CONTROL
INFO
Shows information on the current program.
SMART
Accesses the Smart Home menu.
MY APPS
Shows the list of Apps.
Q.MENU
Accesses the quick menu.
Navigation buttons
Scrolls through menus or options.
ꔉ
OK
Selects menus or options and confirms your input.
ꕣ
BACK
Returns to the previous level.
AV MODE
Selects an AV mode.
EXIT
Clears all on-screen displays and returns to TV viewing.
(up/down/left/right)
29
ENGLISH
Color buttons
These access special functions in some menus.
( : Red, : Green, : Yellow, : Blue)
Control buttons ( , , , , )
Controls the SIMPLINK compatible devices (USB,SIMPLINK).
Accesses the AV devices connected to the TV;
Opens the SIMPLINK menu.
Page 9

MAGIC REMOTE CONTROL FUNCTIONS
30
MAGIC REMOTE CONTROL FUNCTIONS
When the message “Magic remote control battery is low. Change the battery.” is displayed,
replace the battery. To install batteries, open the battery cover, replace batteries (1.5 V AA)
matching and ends to the label inside the compartment, and close the battery cover. Be
sure to point the remote control at the remote control sensor on the TV. To remove the batteries,
perform the installation actions in reverse.
CAUTION
Do not mix old and new batteries, as this may damage the remote control.
This remote uses infrared light. When in use, it should be pointed in the direction of the TV’s remote sensor.
For LN5750 series
ENGLISH
Wheel (OK)
Selects menus or options and confirms
Scrolls through the saved channels.
If you press the navigation button while
moving the pointer on the screen, the
pointer disappears, and the Magic remote
control works as a regular remote control.
To display the pointer again, shake the
Magic remote control from side to side.
Returns to the previous screen.
-This is a beta version and only available in
selected functions for supported models.
-Network connection is required to use the
voice recognition function.
1. Press the Voice recognition button.
2. Speak slowly and precisely.
When a voice is recognized, the processing
message appears on the screen.
• Use the magic remote control no further
than 10 cm from your face.
your input.
BACK
Voice recognition
Sees user-guide.
Pointer (RF transmitter)
BACK SMART
/Q.MENU
VOL
CH
(POWER)
Turns the TV on or off.
Navigation buttons
Scrolls through menus or options.
SMART
Accesses the Smart Home menu.
Q.MENU
/
Accesses the Universal Control.
Accesses the quick menu.
VOL
Adjusts the volume level.
CH
Scrolls through the saved
channels.
(MUTE)
Mutes all sounds.
(up/down/left/right)
Page 10

MAGIC REMOTE CONTROL FUNCTIONS
31
Registering Magic Remote Control
The Magic Remote Control operates by pairing with your
TV.
How to register the Magic Remote Control
To register automatically, turn the TV on and
(Wheel)
press the
is completed, the completion message
appears on the screen.
If registration fails, turn the TV off and back
on, then press the
complete registration.
Wheel (OK)
. When registration
Wheel (OK)
to
How to Re-register the Magic Remote Control
BACK
SMART
1 Press and hold the
SMART
to reset, then register it by following “How
to register the Magic remote control”
above.
2 To re-register the Magic remote control,
press and hold the
seconds toward the TV.
buttons together for 5 seconds
BACK
BACK
and
button for 5
How to use Magic Remote Control
1 You can move the pointer by moving the
remote up and down or left and right.
»
If the pointer does not work properly,
wait 10 seconds and then try again.
2 If the pointer disappears, move the remote
control slightly to left or right. It will then
automatically appear on the screen.
»
If the pointer has not been used for a
certain period of time, it will disappear.
132
i
If you press
control, the screen above opens.
1
It shows information about the current program
and screen.
Pressing this button will display number
2
keypad which you can select channel number.
You can select My Apps Menu.
3
Wheel (OK)
on the Magic remote
Precautions to Take when Using
the Magic Remote Control
Use the Magic remote control within the maximum
communication distance (10 m, 32.8ft). Using the remote
control beyond this distance, or with an object obstructing it,
may cause a communication failure.
A communication failure may occur due to nearby devices.
Electrical devices such as a microwave oven or wireless
LAN product may cause interference, as these use the same
bandwidth (2.4 GHz) as the Magic remote control.
The Magic remote control may be damaged or may
malfunction if it is dropped or receives a heavy impact.
Take care not to bump into nearby furniture or other people
when using the Magic remote control.
Manufacturer and installer cannot provide service related to
human safety as the applicable wireless device has possibility
of electric wave interference.
It is recommended that an Access Point (AP) be located more
than 1 m (3.28 ft) away from the TV. If the AP is installed
closer than 1 m (3.28 ft), the Magic remote control may not
perform as expected due to frequency interference.
ENGLISH
Page 11

WATCHING TV
32
WATCHING TV
Turning the TV on for the first time
When you turn the TV on for the first time, the Initial
setting screen appears. Select a language and customize
the basic settings.
1
2
3
ENGLISH
Connect the power cord to a power outlet.
In Standby mode, press the power button on the
remote control to turn the TV on.
The Initial setting screen appears if you turn the TV
on for the first time.
NOTE
You can also access
Follow the on-screen instructions to customize your
TV settings according to your preferences.
in the main menu.
OPTION
Language Selection*
Initial Setting
Selects a language to
display.
Enviroment Selection
Select
home environment.
Time Zone Setting
Auto Energy Saving mode
Setting
Selects the time zone and
daylight saving.
(Depending on country)
Select Auto Energy Saving
mode.
by accessing
* for the
Home
NOTE
Select
puts the TV in demo mode.
If you select
settings will switch back to the default settings
of
Store
The Standby light feature is disabled in Store
Demo mode.
When the basic settings are complete,
4
press the OK button.
* when prompted.
Home
Store
* in 5 minutes.
* mode
Store
*, the any customized
NOTE
If you do not complete the Initial setting, it will
appear whenever the TV turns on.
Disconnect the power cord from the power
outlet when you do not use the TV for a long
period of time.
To turn the TV off, press the power button on the
5
remote control.
Network Connection
Select TV Watching Type
Auto Tuning
Setting is complete.
Experience Magic
Remote Control
Sets your network to
enable network-related
features on the TV.
Set the TV and set-top box
for each watching type.
Scans and saves available
channels automatically.
Confirms the setting
options.
Simple guide of Magic
Remote Control
(Depending on model)
Page 12

USING THE USER GUIDE
33
USING THE USER GUIDE
User Guide allows you to easily access detailed TV
information.
Press
1
SMART
button to access the Smart Home
menu.
Select
2
User Guide
and press the OK button.
User Guide
User Guide
1
OPTION > To set language
SMART Settings OPTION Language
Selects Menu Language and Audio Language displayed on the screen.
Menu
Selects a screen menu language.
Language
[In Digital Mode Only]
Audio
When watching a digital broadcast containing several audio
Language
languages, you can select the language you want.
[In Digital mode Only]
Use the Subtitle function when two or more subtitle
Subtitle
languages are broadcast.
Language
✎ If subtitle data in a selected language is not broadcast,
the default language subtitle will be displayed.
Shows the description of the selected menu. You
1
can use / to move between pages.
Moves to the selected menu directly from the
2
User Guide.
1
2
Try Now
Close
ENGLISH
To use input device
To set time options
2 3
To set TV lock options
To set language
To set caption
To set other options
Index
4 5
(Depending on country)
CHANNEL Setting
PICTURE, SOUND Setting
OPTION
LG SMART Function
Advanced Function
Information
Shows the video you were watching.
1
Guide categories.
2
List of topics in the current category.
3
You can use
/ button to move between
pages.
An index of key words present in the User Guide.
4
Provides the detailed information on the functions
of LG Smart TV when the Internet is connected.
5
(It may not be available depending on the country/
language.)
Online User Guide
Page 13

SPECIFICATIONS
34
SPECIFICATIONS
Product specifications may be changed without prior notice due to upgrade of product functions.
ENGLISH
Power requirement
Television System
Program Coverage
External Antenna Impedance
Operating Temperature 0 - 40 °C
Environment
condition
Operating Humidity Less than 80 %
Storage Temperature -20 - 60 °C
Storage Humidity Less than 85 %
MODELS
With stand
Dimensions (Width x
Height x Depth)
Without stand
Weight
With stand
Without stand
Current Value / Power consumption
MODELS
With stand
Dimensions (Width x
Height x Depth)
Without stand
Weight
With stand
Without stand
Current Value / Power consumption
AC 100 - 240 V ~ 50 / 60 Hz
ATSC / NTSC-M, 64 & 256 QAM
VHF 2-13, UHF 14-69, CATV 1-135, DTV 2-69, CADTV 1-135
75
Ω
32LN5700
(32LN5700-UH)
32LN570B
(32LN570B-UH)
738 x 497 x 207 (mm) 894 x 587 x 236 (mm)
29.0 x 19.5 x 8.1 (inch) 35.1 x 23.1 x 9.2 (inch)
738 x 449 x 79 (mm) 894 x 537 x 79 (mm)
29.0 x 17.6 x 3.1 (inch) 35.1 x 21.1 x 3.1 (inch)
7.0 kg (15.4 lbs) 9.7 kg (21.3 lbs)
6.4 kg (14.1 lbs) 8.6 kg (18.9 lbs)
1.3 A / 80 W 1.5 A / 100 W
42LN5700
(42LN5700-UH)
968 x 629 x 236 (mm) 1,080 x 694 x 264 (mm)
38.1 x 24.7 x 9.2 (inch) 42.5 x 27.3 x 10.3 (inch)
968 x 579 x 79 (mm) 1,080 x 642 x 80.5 (mm)
38.1 x 22.7 x 3.1 (inch) 42.5 x 25.2 x 3.1 (inch)
10.7 kg (23.5 lbs) 14.5 kg (31.9 lbs)
9.6 kg (21.1 lbs) 13.1 kg (28.8 lbs)
1.1 A / 110 W 1.3 A / 130 W
39LN5700
(39LN5700-UH)
47LN5700
(47LN5700-UH)
47LN5790
(47LN5790-UI)
MODELS
With stand
Dimensions (Width x
Height x Depth)
Without stand
Weight
With stand
Without stand
Current Value / Power consumption
55LN5700
50LN5700
(50LN5700-UH)
1,136 x 727 x 264 (mm) 1,250 x 790 x 297 (mm)
44.7 x 28.6 x 10.3 (inch) 49.2 x 31.1 x 11.6 (inch)
1,136 x 673 x 82.1 (mm) 1,250 x 737 x 79.1 (mm)
44.7 x 26.4 x 3.2 (inch) 49.2 x 29.0 x 3.1 (inch)
15.6 kg (34.3 lbs) 21.2 kg (46.7 lbs)
14.2 kg (31.3 lbs) 19.1 kg (42.1 lbs)
1.4 A / 140 W 1.6 A / 160 W
(55LN5700-UH)
55LN5790
(55LN5790-UI)
Page 14

SPECIFICATIONS
35
MODELS
With stand
Dimensions (Width x
Height x Depth)
Without stand
Weight
With stand
Without stand
Current Value / Power consumption
MODELS
With stand
Dimensions (Width x
Height x Depth)
Without stand
Weight
With stand
Without stand
Current Value / Power consumption
MODELS
With stand
Dimensions (Width x
Height x Depth)
Without stand
Weight
With stand
Without stand
Current Value / Power consumption
60LN5700
(60LN5700-UA)
1,359 x 852 x 297 (mm)
53.5 x 33.5 x 11.6 (inch)
1,359 x 799 x 67.2 (mm)
53.5 x 31.4 x 2.6 (inch)
26.3 Kg (57.9 lbs)
24.2 Kg (53.3 lbs)
2.0 A / 200 W
32LN5750
(32LN5750-UH)
738 x 497 x 207 (mm) 894 x 587 x 236 (mm)
29.0 x 19.5 x 8.1 (inch) 35.1 x 23.1 x 9.2 (inch)
738 x 449 x 79 (mm)
29.0 x 17.6 x 3.1 (inch) 35.1 x 21.1 x 3.1 (inch)
7.0 kg (15.4 lbs) 9.7 kg (21.3 lbs)
6.4 kg (14.1 lbs) 8.6 kg (18.9 lbs)
1.3 A / 80 W 1.5 A / 100 W
42LN5750
(42LN5750-UH)
968 x 629 x 236 (mm) 1,080 x 694 x 264 (mm)
38.1 x 24.7 x 9.2 (inch) 42.5 x 27.3 x 10.3 (inch)
968 x 579 x 79 (mm) 1,080 x 642 x 80.5 (mm)
38.1 x 22.7 x 3.1 (inch) 42.5 x 25.2 x 3.1 (inch)
10.7 kg (23.5 lbs) 14.5 kg (31.9 lbs)
9.6 kg (21.1 lbs) 13.1 kg (28.8 lbs)
1.1 A / 110 W 1.3 A / 130 W
39LN5750
(39LN5750-UH)
894 x 537 x 79 (mm)
47LN5750
(47LN5750-UH)
ENGLISH
MODELS
With stand
Dimensions (Width x
Height x Depth)
Without stand
Weight
With stand
Without stand
Current Value / Power consumption
MODELS
With stand
Dimensions (Width x
Height x Depth)
Without stand
Weight
With stand
Without stand
Current Value / Power consumption
50LN5750
(50LN5750-UH)
1,136 x 727 x 264 (mm) 1,250 x 790 x 297 (mm)
44.7 x 28.6 x 10.3 (inch) 49.2 x 31.1 x 11.6 (inch)
1,136 x 673 x 82.1 (mm) 1,250 x 737 x 79.1 (mm)
44.7 x 26.4 x 3.2 (inch) 49.2 x 29.0 x 3.1 (inch)
15.6 kg (34.3 lbs) 21.2 kg (46.7 lbs)
14.2 kg (31.3 lbs) 19.1 kg (42.1 lbs)
1.4 A / 140 W 1.6 A / 160 W
60LN5750
(60LN5750-UA)
1,359 x 852 x 297 (mm)
53.5 x 33.5 x 11.6 (inch)
1,359 x 799 x 67.2 (mm)
53.5 x 31.4 x 2.6 (inch)
26.3 Kg (57.9 lbs)
24.2 Kg (53.3 lbs)
2.0 A / 200 W
55LN5750
(55LN5750-UH)
Page 15

SPECIFICATIONS
36
ENGLISH
HDMI (DTV) supported mode
Resolution
720x480
1280x720
1920x1080
Horizontal Frequency
(kHz)
31.469
31.50
44.96
45.00
33.72
33.75
26.97
27.000
33.716
33.75
67.43
67.500
Component supported mode
Resolution
720x480i
720x480p
1280x720p
1920x1080i
1920x1080p
Horizontal
Frequency (kHz)
15.73 59.94
15.73 60.00
31.47 59.94
31.50 60
44.96 59.94
45.00 60.00
33.72 59.94
33.75 60.00
26.97 23.976
27.00
33.71 29.97
33.75 30.00
67.432 59.94
67.500 60.00
Vertical Frequency
(Hz)
59.94
60.00
59.94
60.00
59.94
60.00
23.97
24.000
29.976
30.00
59.94
60
Vertical Frequency
(Hz)
24.00
Component port connecting information
Component ports on the
TV
Video output ports
on DVD player
Y PB PR
Y PB PR
Y B-Y R-Y
Y Cb Cr
Y Pb Pr
HDMI (PC) supported mode
Resolution
640x480 31.469 59.94
800x600 37.879 60.31
1024x768 48.363 60.00
1152x864 54.348 60.053
1360x768 47.712 60.015
1280x1024 63.981 60.020
1920x1080 67.5
Horizontal
Frequency (kHz)
Vertical Frequency
60.00
(Hz)
Page 16

Wireless LAN module (WN8122E1) specification
SPECIFICATIONS / EXTERNAL CONTROL DEVICE SETUP
37
Standard
Frequency Range
Output Power (Max.)
Because band channel used by the country could
be different, the user can not change or adjust the
operating frequency and this product is set for the
regional frequency table.
Contains FCC ID: BEJWN8122E1
Contains IC: 2703H-WN8122E1
IEEE802.11a/b/g/n
2400 to 2483.5 MHz
5150 to 5250 MHz
5725 to 5850 MHz
802.11a: 16.5 dBm
802.11b: 16 dBm
802.11g: 15.5 dBm
802.11n - 2.4GHz: 15.5 dBm
802.11n - 5GHz: 16.5 dBm
Bluetooth module (BM-LDS401) specification
(For LN5750 series)
Standard
Frequency Range
Output Power (Max.)
Bluetooth Version 3.0
2400 ~ 2483.5 MHz
10 dBm or lower
ENGLISH
Contains FCC ID: BEJLDS401
Contains IC: 2703H-LDS401
EXTERNAL CONTROL DEVICE SETUP
To obtain the external control device setup information, please visit ‘www.lg.com’.
Page 17

38
MAINTENANCE
Cleaning Your TV
Clean your TV regularly to keep it at peak performance and to extend the product lifespan.
Screen, frame, cabinet and stand
To remove dust or light dirt, wipe the surface with a dry, clean, and soft cloth.
To remove major dirt, wipe the surface with a soft cloth dampened in clean water or a diluted mild detergent. Then wipe
immediately with a dry cloth.
ENGLISH
MAINTENANCE / TROUBLESHOOTING
CAUTION
Before Cleaning, turn the power off and disconnect the power cord and all other cables.
When the TV is left unattended or unused for a long time, disconnect the power cord from the wall outlet to
prevent possible damage from lightning or power surges.
CAUTION
Do not push, rub, or hit the surface with your fingernail or a sharp object, as this may result in scratches on the
screen and image distortions.
Do not use any chemicals, such as waxes, benzene, alcohol, thinners, insecticides, air fresheners, lubricants, as
these may damage the screen’s finish and cause discoloration.
Do not spray liquid onto the surface. If water enters the TV, it may result in fire, electric shock, or malfunction.
Power cord
Remove the accumulated dust or dirt on the power cord regularly.
TROUBLESHOOTING
Problem Solution
Check the remote control sensor on the product and try again.
Cannot control the TV with the
remote control.
No image display and no sound is
produced.
The TV turns off suddenly.
Check if there is any obstacle between the product and the remote control.
Check if the batteries are still working and properly installed ( to , to ).
Check if the product is turned on.
Check if the power cord is connected to a wall outlet.
Check if there is a problem in the wall outlet by connecting other products.
Check the power control settings. The power supply may be interrupted.
Check if the Auto sleep feature is activated in the Time settings.
If there is no signal while the TV is on, the TV will turn off automatically after 15 minutes of
inactivity.
Page 18

CHILD SAFETY:
It Makes A Difference How and Where
You Use Your Flat Panel Display
Congratulations on your purchase! As you enjoy your new product,
please keep these safety tips in mind:
THE ISSUE
• The home theater entertainment experience is a growing trend and
larger flat panel displays are popular purchases. However, flat panel
displays are not always supported on the proper stands or installed
according to the manufacturer’s recommendations.
• Flat panel displays that are inappropriately situated on dressers,
bookcases, shelves, desks, speakers, chests or carts may fall over
and cause injury.
THIS MANUFACURER CARES!
• The consumer electronics industry is committed to making home
entertainment enjoyable and safe.
TUNE INTO SAFETY
• One size does NOT fit all. Follow the manufacturer’s
recommendations for the safe installation and use of your flat panel
display.
• Carefully read and understand all enclosed instructions for proper
use of this product.
• Don’t allow children to climb on or play with furniture and television
sets.
• Don’t allow place flat panel displays on furniture that can easily be
used as steps, such as a chest of drawers.
• Remember that children can become excited while watching a
program, especially on a “larger than life” flat panel display.
Care should be taken to place or install the display where it cannot
be pushed, pulled over, or knocked down.
• Care should be taken to route all cords and cables connected to the
flat panel display so that they cannot be pulled or grabbed by curious
children.
WALL MOUNTING: IF YOU DECIDE TO WALL
MOUNT YOUR FLAT PANEL DISPLAY, ALWAYS:
• Use a mount that has been recommended by the display
manufacturer and/or listed by an independent laboratory
(such as UL, CSA, ETL).
• Follow all instructions supplied by the display and wall mount
manufacturers.
• If you have any doubts about your ability to safely install your flat
panel display, contact your retailer about professional installation.
• Make sure that the wall where you are mounting the display is
appropriate. Some wall mounts are not designed to be mounted to
walls with steel studs or old cinder block construction.
If you are unsure, contact a professional installer.
• A minimum of two people are required for installation.
Flat panel displays can be heavy.
Page 19

ederal Communications Commission(FCC) Statement) Federal Communications Commission(FCC) Statement
for compliance could void the user s authority to operate the equipment
for compliance could void the user s authority to operate the equipment
interf
interf
particular installation
particular installation
which the receiver is connectedwhich the receiver is connected
Y
ou are cautioned that changes or modifications not expressly approved by You are cautioned that changes or modifications not expressly approved by
the part responsiblethe part responsible
’
’
This equipment has been tested and found to comply with the limits for a This equipment has been tested and found to comply with the limits for a
Class B digital device, pursuant to part 15 of the FCC rules.Class B digital device, pursuant to part 15 of the FCC rules.
These limits are designed to provide reasonable protection against harmful These limits are designed to provide reasonable protection against harmful
erence in a residential installation.
erence in a residential installation.
This equipment generates, uses and can radiate radio frequency energy This equipment generates, uses and can radiate radio frequency energy
and, if not installed and used in accordance with the instructions, may and, if not installed and used in accordance with the instructions, may
cause harmful interference to radio communications.cause harmful interference to radio communications.
However, there is no guarantee that interference will not occur in a However, there is no guarantee that interference will not occur in a
.
.
.
.
If this equipment does cause harmful interference to radio or television If this equipment does cause harmful interference to radio or television
reception, which can be determined by turning the equipment off and on, reception, which can be determined by turning the equipment off and on,
the user is encouraged to try to correct the the user is encouraged to try to correct the
interference by one or more of the following measures:interference by one or more of the following measures:
--. Reorient or relocate the receiving antenna.. Reorient or relocate the receiving antenna.
--. Increase the separation between the equipment and receiver.. Increase the separation between the equipment and receiver.
--. Connect the equipment into an outlet on a circuit different from that to . Connect the equipment into an outlet on a circuit different from that to
--. Consult the dealer or an experienced radio/TV technician for help.. Consult the dealer or an experienced radio/TV technician for help.
Page 20

This device complies with Part 15 of the FCC Rules.This device complies with Part 15 of the FCC Rules.
Ind
lyInd
ly
Operation is subject to the following two conditions:Operation is subject to the following two conditions:
1) this device may not cause harmful interference, and1) this device may not cause harmful interference, and
2) this device must accept any interference received, including interference 2) this device must accept any interference received, including interference
that may cause undesired operation of the device.that may cause undesired operation of the device.
oor use on
oor use on
FCC Caution: Any changes or modifications not expressly approved by the FCC Caution: Any changes or modifications not expressly approved by the
party responsible for compliance could void the user's authority to operate party responsible for compliance could void the user's authority to operate
this equipment.this equipment.
Page 21

The model and serial number of the TV is located
on the back and one side of the TV.
Record it below should you ever need service.
MODEL
SERIAL
LG Customer Information Center
For inquires or comments, visit www.lg.com or call;
1-800-243-0000
1-888-865-3026
1-888-542-2623
USA, Consumer User
USA, Commercial User
CANADA
Register your product Online!
www.lg.com
This product qualifies for ENERGY STAR in the
“factory default (Home Use)” setting.
Changing the factory default settings or enabling
other features may increase power consumption
that could exceed the limits necessary to quality for
ENERGY STAR.
 Loading...