

Page 1

ASSEMBLING AND PREPARING
10 cm
10 cm
10 cm
15
Attaching the Cover
Firmly attach the velcro tape as shown in the figure.
1
Velcro
Please assemble the AV cover, as shown in the figure.
2
AV Cover
Mounting on a table
Lift and tilt the TV into its upright position on a table.
1
- Leave a 10 cm (4 inch) (minimum) space from the wall for
proper ventilation.
10 cm
(4
in
ch
es)
10 cm
10 cm
10 cm
ENGLISH
Connect the power cord to a wall outlet.
2
CAUTION
Do not place the TV near or on sources of heat, as this
y
may result in fire or other damage.
Page 2
16
ASSEMBLING AND PREPARING
(Depending on model)
1
ENGLISH
2
3
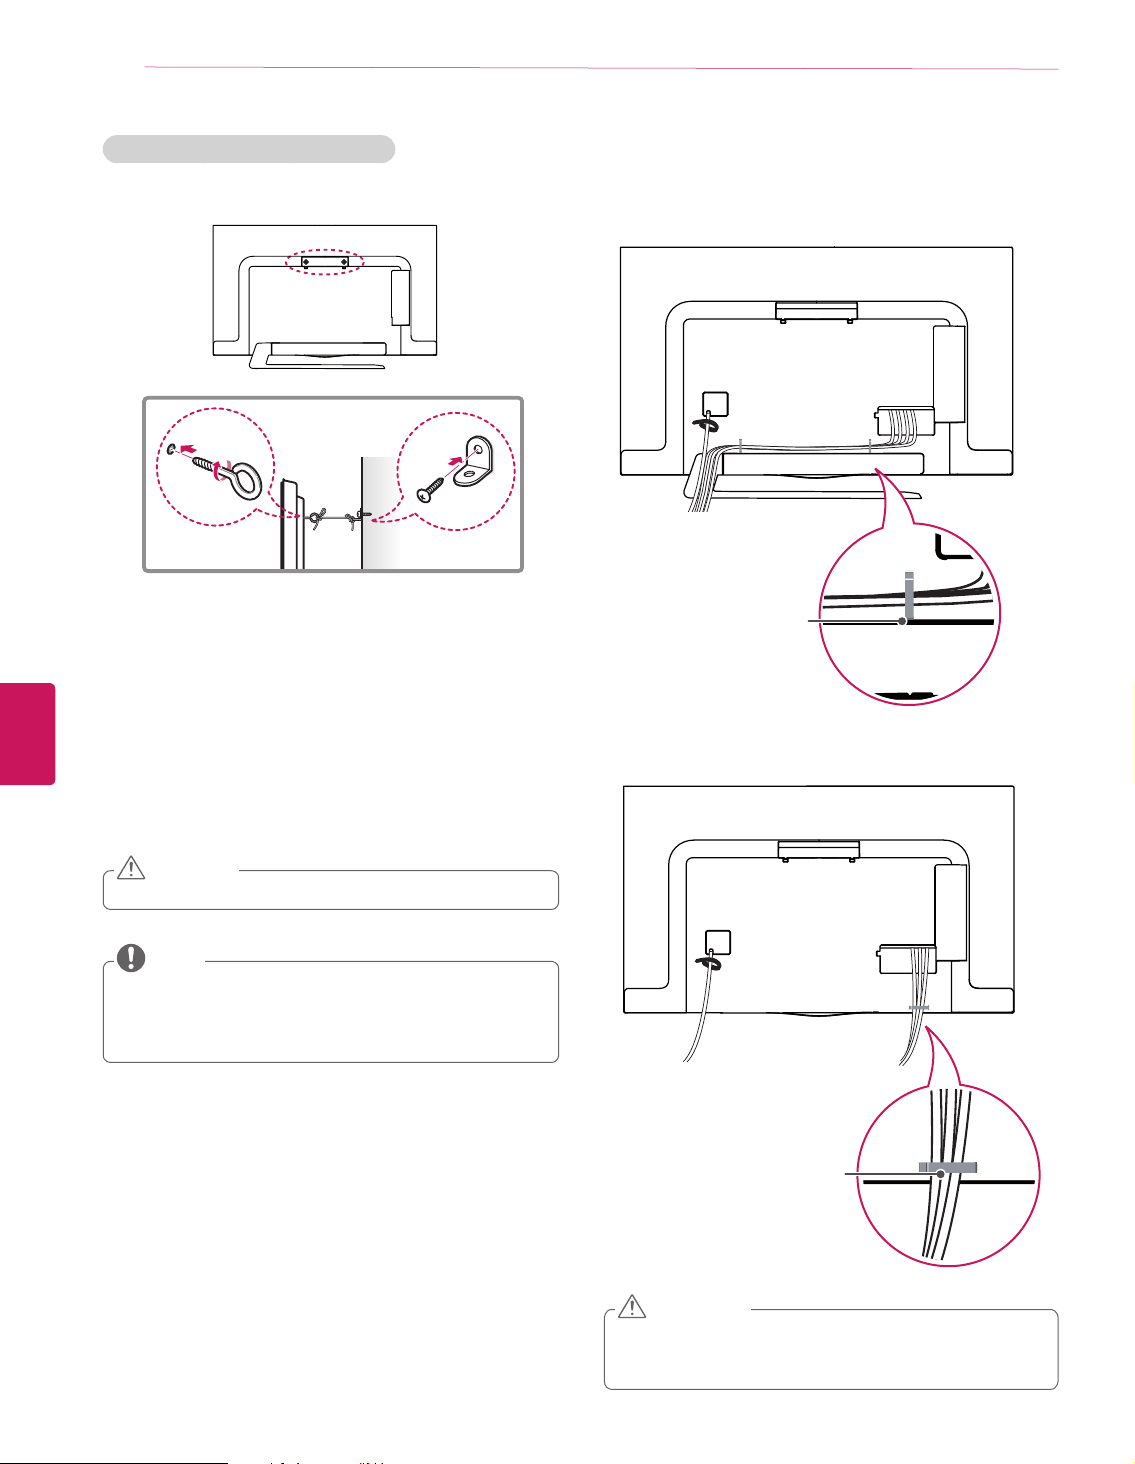
Securing the TV to a wall (optional)
Insert and tighten the eye-bolts, or TV brackets and bolts on
the back of the TV.
- If there are bolts inserted at the eye-bolts position, remove
the bolts first.
Mount the wall brackets with the bolts to the wall.
Match the location of the wall bracket and the eye-bolts on
the rear of the TV.
Connect the eye-bolts and wall brackets tightly with a sturdy
rope.
Make sure to keep the rope horizontal with the flat surface.
Tidying cables
Gather and bind the cables with the Cable Holder.
1
Cable Holder
Gather and bind the cables with the Cable Holder
2
CAUTION
Make sure that children do not climb on or hang on the TV.
y
NOTE
Use a platform or cabinet that is strong and large enough
y
to support the TV securely.
Brackets, bolts and ropes are optional. You can obtain
y
additional accessories from your local dealer.
Cable Holder
CAUTION
Do not move the TV by holding the cable holder, as the
y
cable holders may break, and injuries and damage to the
TV may occur.
Page 3

Using Video Call Camera
ASSEMBLING AND PREPARING
17
Front
Microphones
Activity Indicator
Lens
Stand
Product Handling
Do not let the camera get wet. Liquid getting into the
y
camera could cause a short circuit.
Wipe the camera gently with a dry cloth to remove any
y
dust or dirt. If the product is very dirty, spray a mild
detergent on the cloth first.
Do not clean with thinner, alcohol, benzene or any other
y
volatile agent. These may damage the product’s surface
or affect its operation.
Do not disassemble, repair or alter the product. Incorrect
y
disassembly may cause a fire, electric shock, or injury.
Do not shake the camera.
y
Do not pull on the cable.
y
Rear
USB Cable
Stand-Arm
Stand-Bottom
Stand-Cable holder
Installation Instructions
Make sure you have enough space for connections when
y
installing the product.
Do not install in a dusty, dirty or moist area.
y
Do not install in direct sunlight or near a heat source.
y
Magnetic objects, such as speakers, may interfere with
y
the camera’s operation.
Install the product in a place with moderate temperature
y
and humidity. The recommended temperature range is 0
°C (32 °F) to 40 °C (104 °F).
Strong electromagnetic waves from other devices could
y
interfere with the camera’s operation.
Remove all the protective plastic bags (Vinyl) before use.
y
ENGLISH
The product and company names contained in this manual
may or may not be registered trademarks or copyrights, and
are only used for identification or explanatory purposes. All
trademarks reserved.
No emergency calls with Skype
Skype is not a telephony replacement service, and cannot be
used for emergency service dialing.
Page 4

18
ASSEMBLING AND PREPARING
Preparing Video Call Camera
1
ENGLISH
2
Unfold the stand and put it on the top center of the TV set.
Video Call Camera
Bend the stand of the video call camera.
TV
Video Call Camera
Insert the video call camera’s cable into the cable holder.
4
Please open the USB Camera Cover for video call camera’s
cable connection.The camera shall be connected to the
CAM terminal as shown in the figure.
Stand-Cable
holder
TV
Firmly attach the TV stand to the back of the TV set using
3
the velcro tape.
Velcro tape
Page 5

NOTE
For the best quality video and audio outputs, install the
y
camera on the top-center of your TV.
Set up with the television switched off.
y
When using external speakers, allow sufficient space
y
between the microphones and the speakers.
The TV must be connected to a network for Skype to
y
work.
NOTE
For best results when using a external speakers on your
y
TV, only use the front right/left (stereo) speakers when
using Skype.
When making a video call with Skype using a PC, the
y
Skype software version for Windows should be 4.2 or
newer. (Visit the Skype homepage (www.skype.com) for
operating systems other than Windows, e.g. OS X, Linux,
etc.)
Video calls can not be made to a Mac that runs Skype 2.8
y
or lower.
Content can be changed or deleted depending on Content
y
Provider.
Please visit the content providers web site for specific
y
information on their services.
The software update screen will automatically appear
y
when an update is available.
For some models, you cannot use input devices such
y
as a keyboard and mouse while using Skype (premium
content).
ASSEMBLING AND PREPARING
19
ENGLISH
Page 6

20
MAKING CONNECTIONS
MAKING CONNECTIONS
You can connect various external devices to the TV. Supported external devices are: HD receivers, DVD players, VCRs, audio systems,
USB storage devices, PC, gaming devices, and other external devices. For more information on external device’s connection, refer to
the manual provided with each device.
NOTE
If you record a TV program on a DVD recorder or VCR, make sure to connect the TV signal input cable to the TV through a DVD
y
recorder or VCR. For more information of recording, refer to the manual provided with the connected device.
The external device connections shown may differ slightly from illustrations in this manual.
y
Connect external devices to the TV regardless of the order of the TV port.
y
If you connect a gaming device to the TV, use the cable supplied with the gaming device.
y
Refer to the external equipment’s manual for operating instructions.
y
Connecting to an antenna or cable
Connect an antenna, cable, or cable box to watch TV while referring to the following. The illustrations may differ from the actual items
and a RF cable is optional.
ENGLISH
CAUTION
Make sure not to bend the copper wire of the RF
y
cable.
Copper wire
Complete all connections between devices, and
y
then connect the power cord to the power outlet
to prevent damage to your TV.
(*Not Provided)
Coaxial (75Ω)
VHF Antenna
UHF Antenna
Antenna
Terminal
NOTE
Use a signal splitter to use more than 2 TVs.
y
Visit http://lgknowledgebase.com for more information
y
about the antenna and cable connection. Search for
antenna.
DTV Audio Supported Codec: MPEG, Dolby Digital.
y
Page 7

MAKING CONNECTIONS
Connecting to a HD receiver, DVD Player or VCR
Connect a HD receiver, DVD Player, or VCR to the TV and select an appropriate input mode.
HDMI Connection
HDMI is the best way to connect a device.
Transmits digital video and audio signals from an external device to the TV. Connect the external device and the TV with the HDMI
cable as shown in the following illustration.
NOTE
Use the latest High Speed HDMI™ Cable that supports CEC (Customer Electronics Control) function.
y
High Speed HDMI™ Cables are tested to carry an HD signal up to 1080p and higher.
y
HDMI Audio Supported Format: PCM (Up to 192 kHz, 32 kHz / 44.1 kHz / 48 kHz / 88 kHz / 96 kHz / 176 kHz / 192 kHz)
y
Choose any HDMI input port to connect.
It does not matter which port you use.
21
HDMI
(*Not Provided)
DVD / Blu-Ray / HD Cable Box / HD STB
ARC (Audio Return Channel)
When connected with a high-speed HDMI
y
cable, digital audio can be sent to a compactible
device without an additional optical audio cable.
ARC is only supported on the HDMI input
y
1 (ARC) port. An external audio device that
supports ARC should be connected to HDMI 1
if you wish to use ARC.
ENGLISH
Page 8

22
MAKING CONNECTIONS
DVI to HDMI Connection
Transmits the digital video signal from an external device to the TV. Connect the external device and the TV with the DVI-HDMI cable
as shown in the following illustration. To transmit an audio signal, connect an audio cable.
NOTE
When using the HDMI/DVI cable, Single link is only supported.
y
Choose any HDMI input port to connect.
It does not matter which port you use.
(*Not Provided)
ENGLISH
YELLOW
DVI OUT
(*Not Provided)
AUDIO OUT
DVD / Blu-Ray / HD Cable Box
 Loading...