

LG Electronics USA 60PK750UA, 50PK750UA User Manual
AD-hoc Mode
AP , (direct)2 PC
Network Setting
|
Direct Input |
|
|
|
|
|
Network Setting |
|
|
|
|
|
|
|
|
|
|
|
|
|
Network1 |
|
|
|
|
|
Ad-hoc network to connect to |
||
|
|
|
|
||||||
|
|
|
|
|
|
Server Information |
|||
|
Network2 |
|
|
Access Point |
|
|
|
|
|
|
|
|
Search |
|
|
|
|
|
|
|
Ad-hoc |
|
|
|
|
Network ID (SSID) : adhoc 12 |
|||
|
|
|
|
|
|
||||
|
|
|
|
|
|
|
|
|
|
|
Network4 |
|
|
|
|
|
Security Key : 1230983738 |
||
|
|
|
|
|
|
|
|
|
|
|
|
|
|
|
|
|
Create a new server |
||
|
|
|
|
|
|
|
|
||
|
|
PIN |
|
|
|
|
|||
|
|
|
|
|
|
||||
|
|
|
Enter |
|
Cancel |
||||
|
|
|
|
|
|
|
|
|
|
Ad-hoc |
PBC |
|
|
|
|
||||
YELLOW |
Enter the ad-hoc mode. |
If a network may not operate, cre- |
|
ate a new server, using the |
|||
|
|
||
|
|
YELLOW button. |
|
|
ENTER Select ENTER. |
|
setup equipment external
59

watchingWATCHING TVtv/ CHANNEL/ channelCONTROLcontrol
REMOTE CONTROL FUNCTIONS
When using the remote control, aim it at the remote control sensor on the TV.
control channel / TV watching
POWER Turns the TV on from standby or off to standby.
ENERGY SAVING Adjusts the Energy Saving setting. ►p.138
AV MODE Toggles through preset Video and Audio modes.
►p.64
INPUT Rotates through inputs.
Also switches the TV on from standby. ►p.62
TV Returns to the last TV channel.
NUMBER button
— (DASH) Used to enter a program number for multiple program channels such as 2-1, 2-2, etc.
LIST Displays the channel table. ►p.
FLASHBK Tunes to the last channel viewed.
MENU Displays the main menu or clears all on-screen displays and return to TV viewing.
Netcast Select the desired NETCAST menu source. (Yahoo! TV Widgets, Netflix, Vudu, YouTube, My Media etc.)
Q.MENU
THUMBSTICK (Up/Down/Left Right/ENTER)
BACK
WIDGETS
Opens the list of Quick Menu options. ►p.
Navigates the on-screen menus and adjusts the system settings to your preference.
Allows the user to move return one step in an interactive application or other user interaction function.
WIDGETS for showing or hiding the Yahoo! Dock and accessing the Yahoo! TV Widgets user experience. ►p.70-77
EXIT Clears all on-screen displays and return to TV viewing.
ENERGY AV MODE INPUT
TV
SAVING
12ABC 3DEF
4GHI 5JKL 6MNO
7PQRS 8TUV 9WXYZ
LIST |
0 |
FLASHBK |
|
MARK |
|
|
|
|
|
|
|
|
FAV |
|
|
VOL |
CHAR/NUM |
CH |
P |
RATIO |
EG |
||
|
|
|
A |
|
DELETE |
|
|
MUTE
MENU  Q.MENU
ENTER
BACK WIDGETS EXIT 

FREEZE
INFO 
60
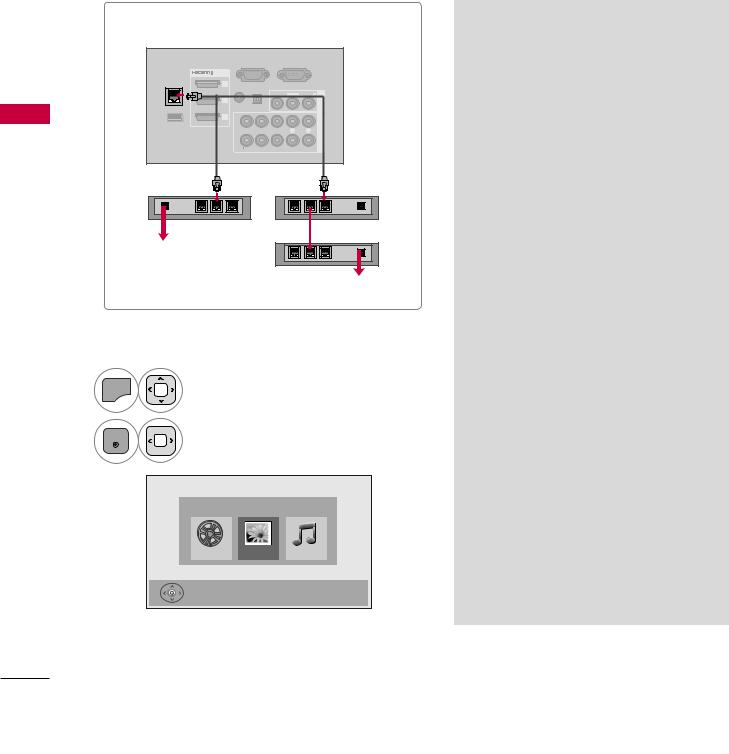
MY Media
Viewing Files on the Network
You can view the photos or listen to music files from folders shared on the network.
1
2
Set a share folder (CIFS: Common Internet File System) on the PC (Refer to P.?).
Connect the LAN port of the Modem or Router to the LAN port on the TV.
|
i.e) LCD TV |
|
|
|
|
|
|
|
|
RGB IN (PC) |
|
RS-232C IN |
|
||
|
|
(CONTROL&SERVICE) |
|
||||
|
LAN |
/DVI IN |
|
|
|
|
|
|
3 |
|
|
|
|
1 |
|
|
|
(RGB/DVI) |
OPTICAL |
|
|
|
IN |
|
|
DIGITAL |
VIDEO L(MONO) |
AUDIO |
|||
|
|
|
|
R |
|||
|
|
2 |
|
|
|
|
AV |
|
|
|
|
|
|
|
|
|
|
AUDIO IN |
AUDIO OUT |
|
|
|
|
My |
|
1 |
|
|
|
|
INCOMPONENT |
WIRELESS |
2 |
|
|
|
|
||
|
|
|
|
|
|
||
|
CONTROL |
Y |
PB |
PR |
L |
R |
|
|
|
1 |
|
|
|
|
|
Media |
|
|
VIDEO |
|
AUDIO |
|
|
Broadband |
|
|
|
|
|
Router |
|
|
modem |
|
|
|
|
|
|
Broadband modem
Broadband Service
Broadband Service
MENU |
Select My Media. |
|
ENTER |
Select Movie List, Photo List |
|
or Music List. |
||
|
||
|
MY MEDIA |
|
|
Movie List Photo List Music List |
|
|
Press ENTER ( ) to see photos from the USB. DivXOption Exit |
►Connect the PC and TV using a sharing device so that you can see the PC’s shared files on the TV.
►How to set a share folder may differ depending on the Windows version.
►The speed may be slow or it may cause an error if you try to access a folder from two TVs at the same time.
►Because files could be deleted from a shared PC, set the user access level to Read Only.
►Do not share any important personal documents as it may be accessed by a different PC.
►If you rename or disable a shared folder on the PC after mounting, you cannot mount it again.
►If the status of the network or a share folder on the PC is changed, search is run again when entering the highest folder in the menu.
►A maximum of 20 of shared folders on 4 computers are supported.
►When using file sharing from a computer, it is recommended you use a wired port of the hub.
►When using the wireless port of the hub to share the file on the PC, some functions can be limited.
►Because the TV does not support the wireless function using the USB dongle, My Media function only supports the wired environment.
92

DLNA
About DLNA
This TV is a DLNA Certified digital media product that can display and play movie, photo and music content from your DLNA Certified network device and DLNA server.
The Digital Living Network Alliance (DLNA) is a cross-industry organization of consumer electronics, computing industry and mobile device companies.
Digital Living provides consumers with easy sharing of digital media through a wired or wireless network in the home.
The DLNA certification logo makes it easy to find products that comply with the DLNA Interoperability Guidelines. This unit complies with DLNA Interoperability Guidelines v1.5. When a PC running DLNA server software or other DLNA compatible device is connected to this player, some setting changes of software or other devices may be required. Please refer to the operating instructions for the software or device for more information.
! NOTE
►The supplied Nero MediaHome 4 Essentials CD-ROM is a customized software edition only for sharing files and folders to this player.
►The supplied Nero MediaHome 4 Essentials software does not support following functions: Transcoding, Remote UI, TV control, Internet services and Apple iTunes
►This manual explains operations with the English version of Nero MediaHome 4 Essentials as examples. Follow the explanation referring to the actual operations of your language version.
Media My
93

MY Media
Installing Nero MediaHome 4 Essentials
Nero MediaHome 4 Essentials is a software for sharing movie, music and photo files stored on your computer to this TV.
|
|
Requirement PC system before you install Nero MediaHome 4 Essentials |
||
|
|
Windows® XP (Service Pack 2 or higher), Windows Vista® (no Service Pack required), Windows® XP |
||
|
|
|
Media Center Edition 2005 (Service Pack 2 or higher), Windows Server® 2003 |
|
|
|
Windows Vista® 64-bit edition (application runs in 32-bit mode) |
||
|
|
Hard drive space: 200 MB hard drive space for a typical installation of Nero MediaHome stand- |
||
|
|
|
alone |
|
|
|
1.2 GHz Intel® Pentium® III or AMD Sempron™ 2200+ processors |
||
|
|
Memory: 256 MB RAM |
||
|
|
Graphics card with at least 32 MB video memory, minimum resolution of 800 x 600 pixels, and |
||
|
|
|||
My |
|
16-bit color settings |
||
Windows® Internet Explorer® 6.0 or higher |
||||
Media |
|
DirectX® 9.0c revision 30 (August 2006) or higher |
||
|
Network environment: 100 Mb Ethernet, WLAN (IEEE 802.11b/g/n) |
|||
|
|
|||
|
|
|
|
|
|
|
1 |
Start up your computer, and insert the Nero MediaHome 4 Essentials CD-ROM into your compu- |
|
|
|
|
ter’s CD-ROM drive. |
|
|
|
|
An installation wizard will walk you through the quick and uncomplicated installation process. |
|
|
|
2 |
Close all Microsoft Windows programs and exit any anti-virus software that may be running. |
|
|
|
3 |
Insert the Nero MediaHome 4 Essentials CD-ROM into your computer’s CD-ROM drive. |
|
|
|
4 |
Click Nero MediaHome 4 Essentials. The installation is prepared and the installation wizard appears. |
|
|
|
5 |
Click the Next button to display the serial number input screen. |
|
|
|
|
Click Next to go to the next step. |
|
|
|
6 |
If you accept all conditions, click I accept the License Conditions check box and click Next. |
|
|
|
|
Installation is not possible without this agreement. |
|
|
|
7 |
Click Typical and click Next. The installation process is started. |
|
|
|
8 |
If you want to take part in the anonymous collection of data, select the check box and click the |
|
|
|
|
Next button. |
|
|
|
9 |
Click the Exit button to complete the installation. |
|
94
 Loading...