

Page 1

EXTERNAL EQUIPMENT SETUP
41
Resolution
720x400
1360x768
640x350
640x480
800x600
1024x768
1280x1024
1600x1200
1920x1080
1280x768
Horizontal Vertical
Frequency(KHz)Frequency(Hz
)
31.468 70.09
31.469 70.08
31.469 59.94
37.500 75.00
37.861 72.80
35.156 56.25
37.879 60.31
46.875 75.00
48.077 72.18
48.363 60.00
56.476 70.06
60.023 75.02
47.776 59.87
60.289 74.893
63.981 60.02
79.976 75.025
47.712 60.015
75.00 60.00
66.587 59.934
For 42/50PG25, 50/60PG60, 50/60PG70
* Only RGB-PC mode
Page 2
EXTERNAL EQUIPMENT SETUP
42
EXTERNAL EQUIPMENT SETUP
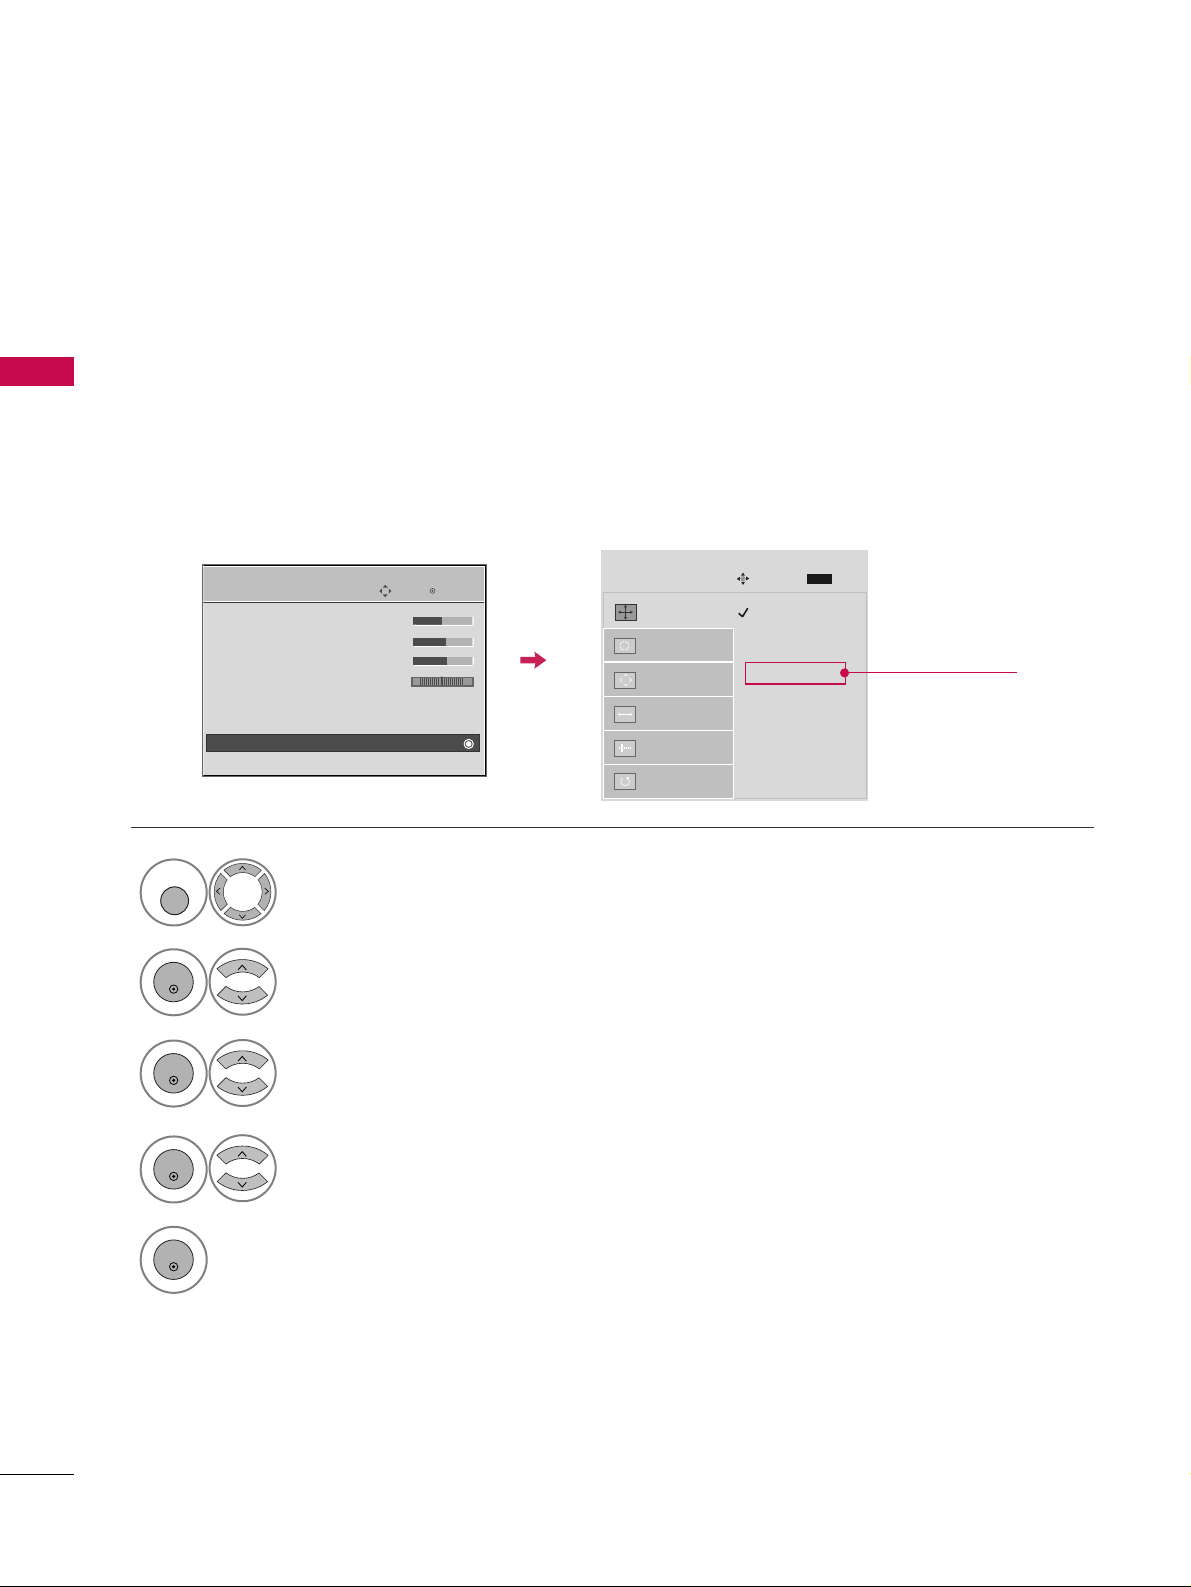
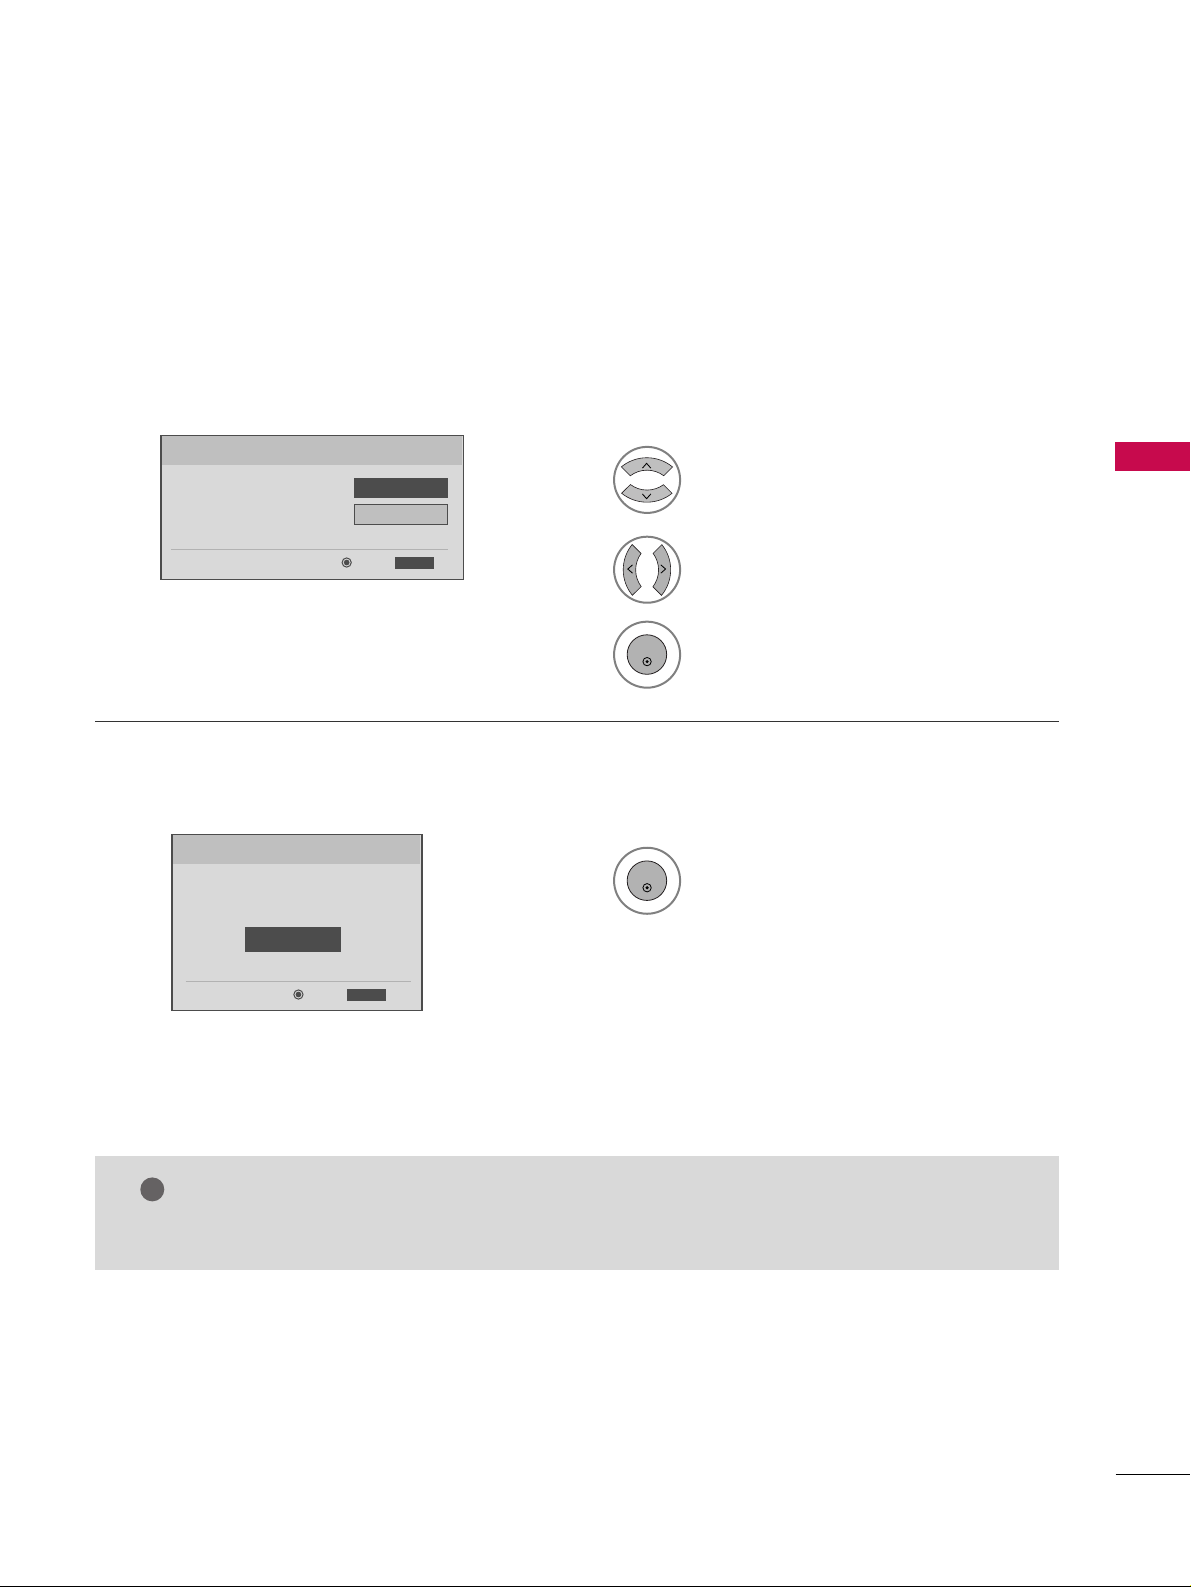
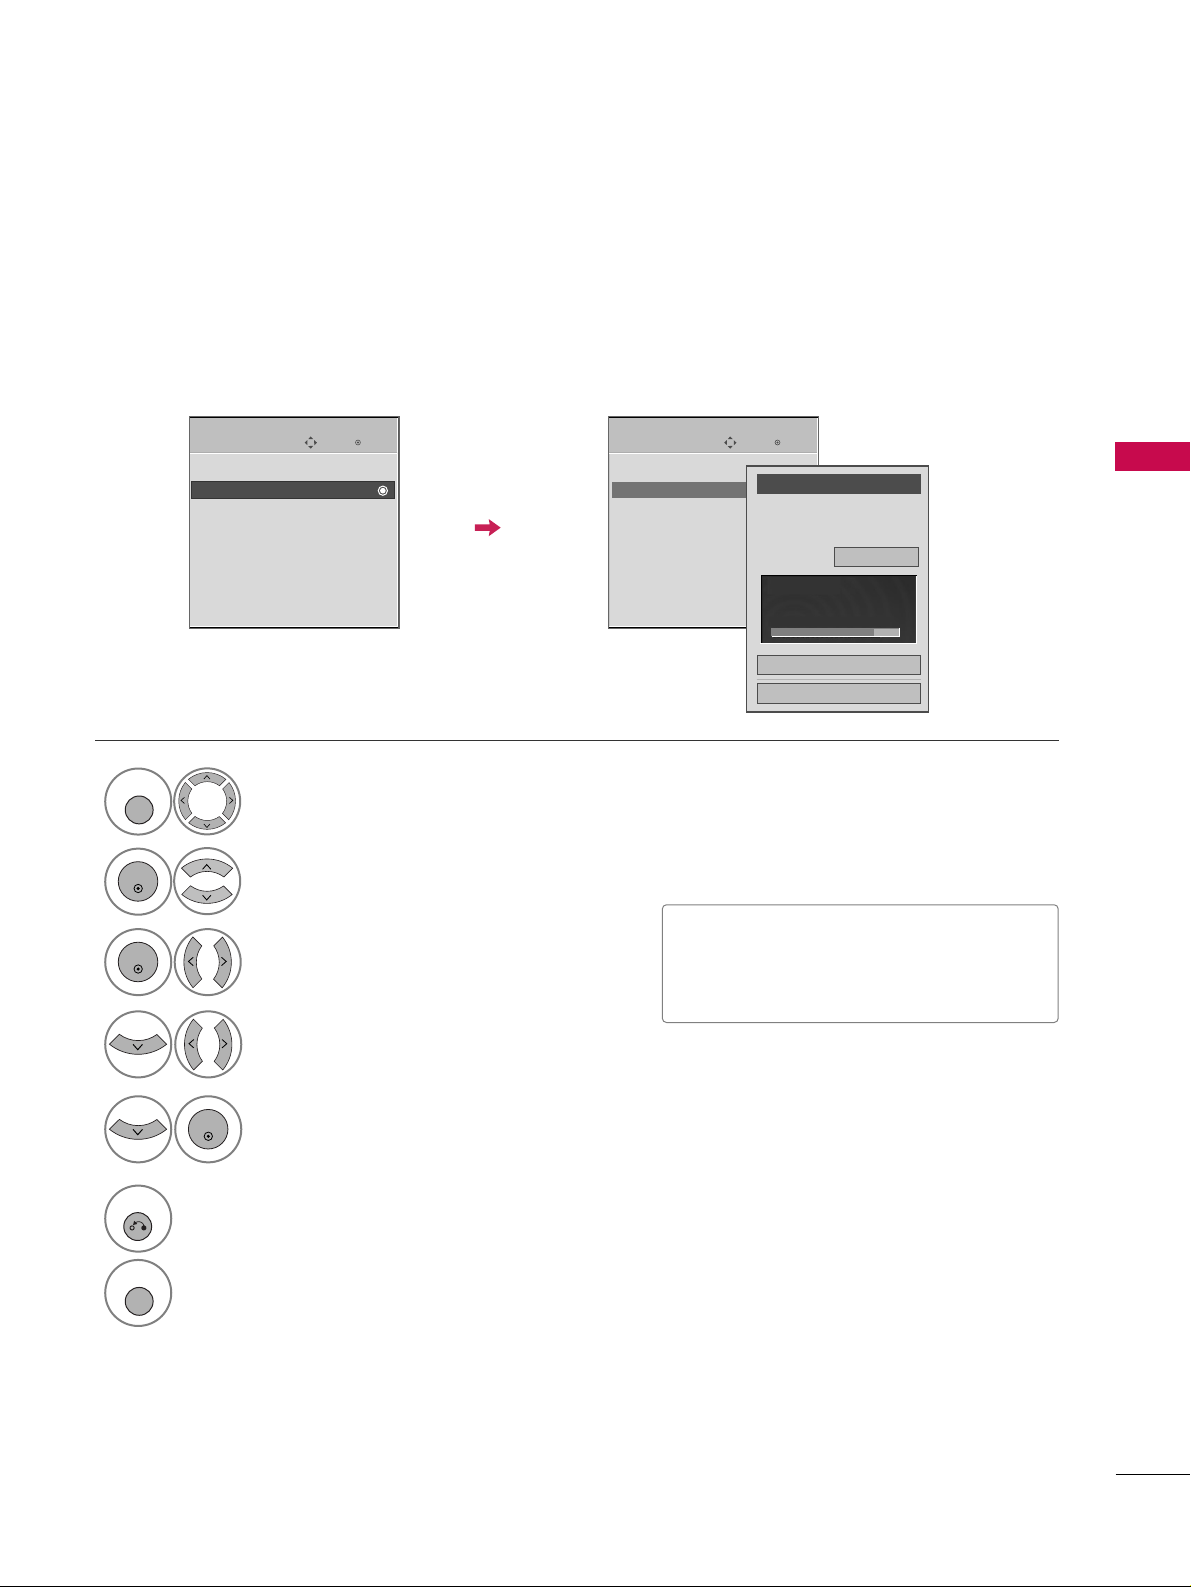
Screen Setup for PC mode
Selecting Resolution
You can choose the resolution in RGB-PC mode.
The
PPoossiittiioonn, PPhhaassee
, and
SSiizzee
can also be adjusted.
Select
PPIICCTT UURREE
.
Select
SSccrreeeenn ((RRGGBB --PP CC))
.
Select
RR eess oolluutt iioonn
.
Select the desired resolution.
1024 x 768
1280 x 768
1360 x 768
1366 x 768
Auto config.
Resolution
G
Position
Size
Phase
Reset
SCREEN
Move
Prev.
MENU
1
MENU
3
4
2
ENTER
ENTER
ENTER
5
ENTER
Enter
Move
PICTURE
E
• Brightness 50
• Sharpness 60
• Color 60
• Tint 0
• Advanced Control
• Reset
Screen (RGB-PC)
TruMotion Demo
RG
Only for
32/37/42LG30
Page 3
EXTERNAL EQUIPMENT SETUP
43
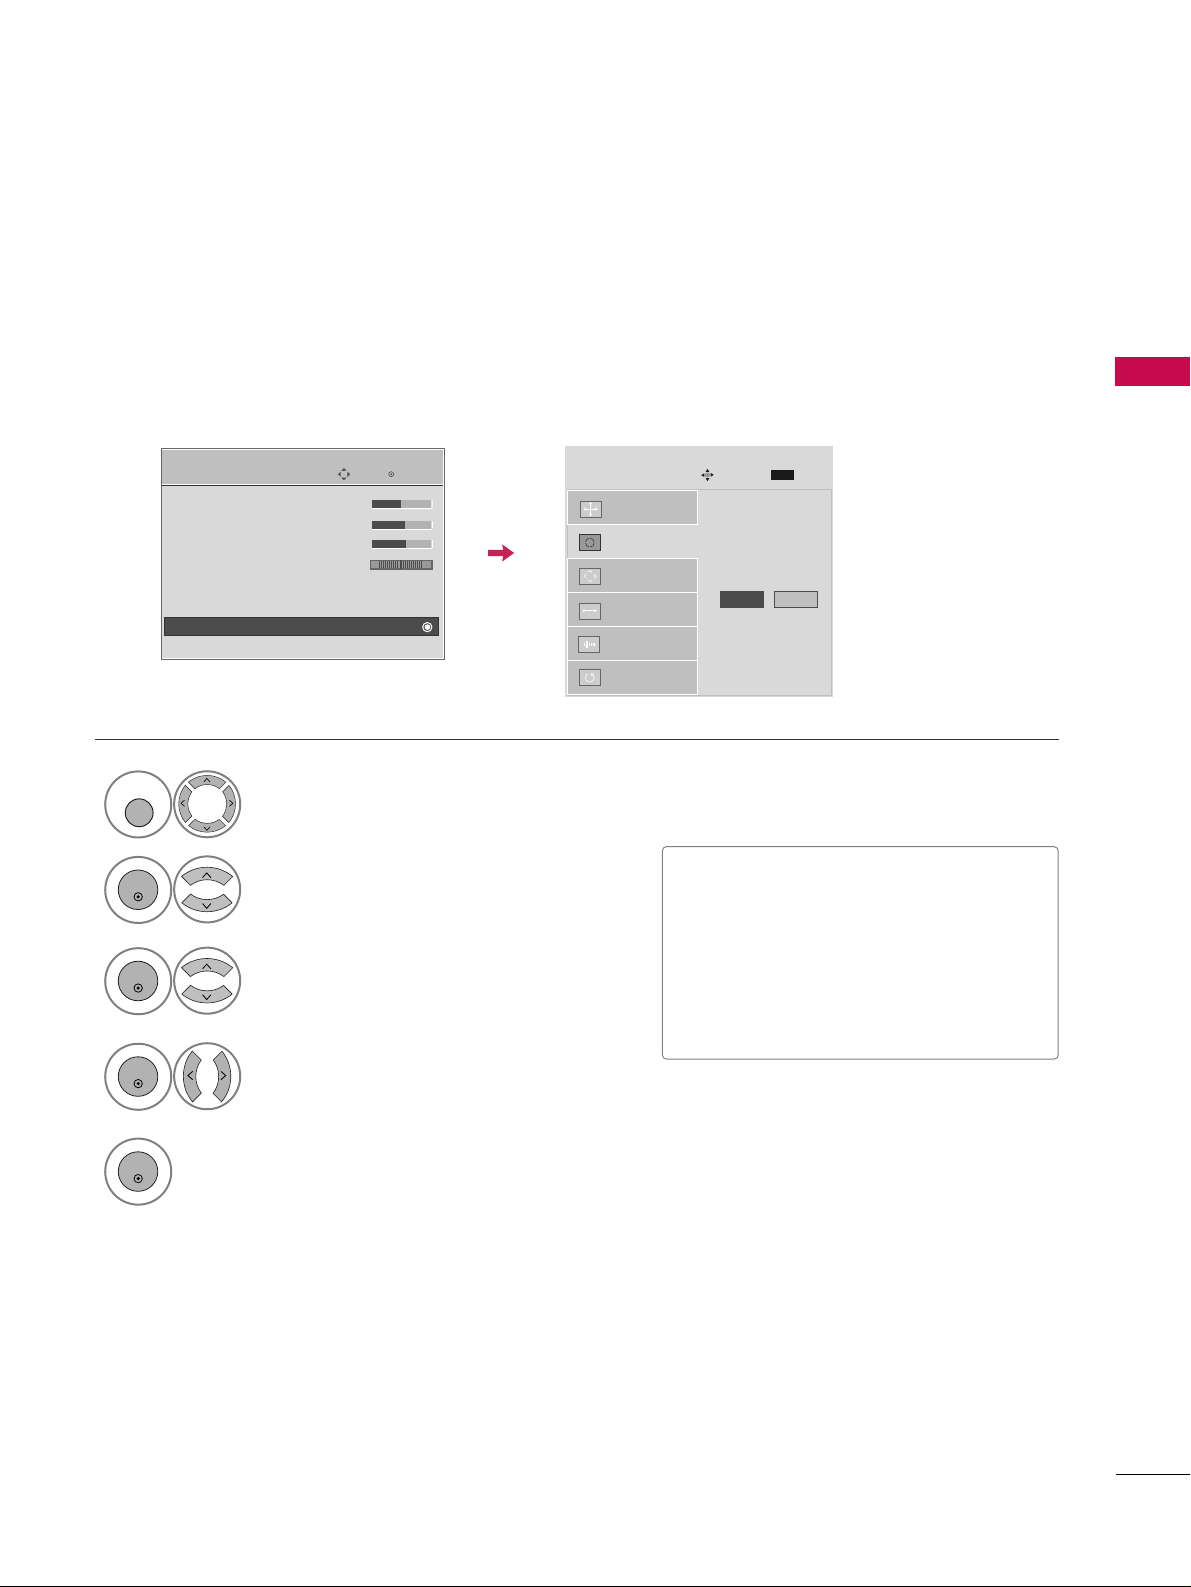
Auto Configure
Automatically adjusts picture position and minimizes image instability. After adjustment, if the image is still
not correct, try using the manual settings or a different resolution or refresh rate on the PC.
Select
SSccrreeeenn ((RRGGBB --PP CC))
.
Select
AA uu ttoo ccoonn ffii gg..
.
Auto config.
G
Resolution
Position
Size
Phase
Reset
SCREEN
Move
Prev.
MENU
To Set
3
2
ENTER
ENTER
Select
YY ee ss
.
4
ENTER
Start Auto Configuration.
5
ENTER
Select
PPIICCTT UURREE
.
1
MENU
• If the position of the image is still not
correct, try Auto adjustment again.
• If picture needs to be adjusted again
after Auto adjustment in RGB-PC, you
can adjust the
PPoo ss ii ttii oo nn, SS ii zz ee
or
PPhh aassee
.
Enter
Move
PICTURE
E
• Brightness 50
• Sharpness 60
• Color 60
• Tint 0
• Advanced Control
• Reset
Screen (RGB-PC)
TruMotion Demo
RG
Yes No
Page 4
EXTERNAL EQUIPMENT SETUP
44
EXTERNAL EQUIPMENT SETUP
Adjustment for screen Position, Size, and Phase
If the picture is not clear after auto adjustment and especially if characters are still trembling, adjust the picture
phase manually.
This feature operates only in RGB-PC mode.
Select
PPoossiitt iioonn, SSii zzee
, or
PPhh aassee
.
Make appropriate adjustments.
Auto config.
Resolution
Position
G
Size
Phase
Reset
GF
D
E
SCREEN
Move
Prev.
MENU
3
ENTER
4
ENTER
■
PPoossiitt iioonn
: This function is to adjust picture to left/right and up/down as you
prefer.
■
SSii zzee
: This function is to minimize any
vertical bars or stripes visible on the
screen background. And the horizontal
screen size will also change.
■
PPhh aa ssee
: This function allows you to
remove any horizontal noise and clear or
sharpen the image of characters.
Select
PPIICCTT UURREE
.
Select
SSccrreeeenn ((RRGGBB --PP CC))
.
1
MENU
2
ENTER
5
ENTER
Enter
Move
PICTURE
E
• Brightness 50
• Sharpness 60
• Color 60
• Tint 0
• Advanced Control
• Reset
Screen (RGB-PC)
TruMotion Demo
RG
Page 5
EXTERNAL EQUIPMENT SETUP
45
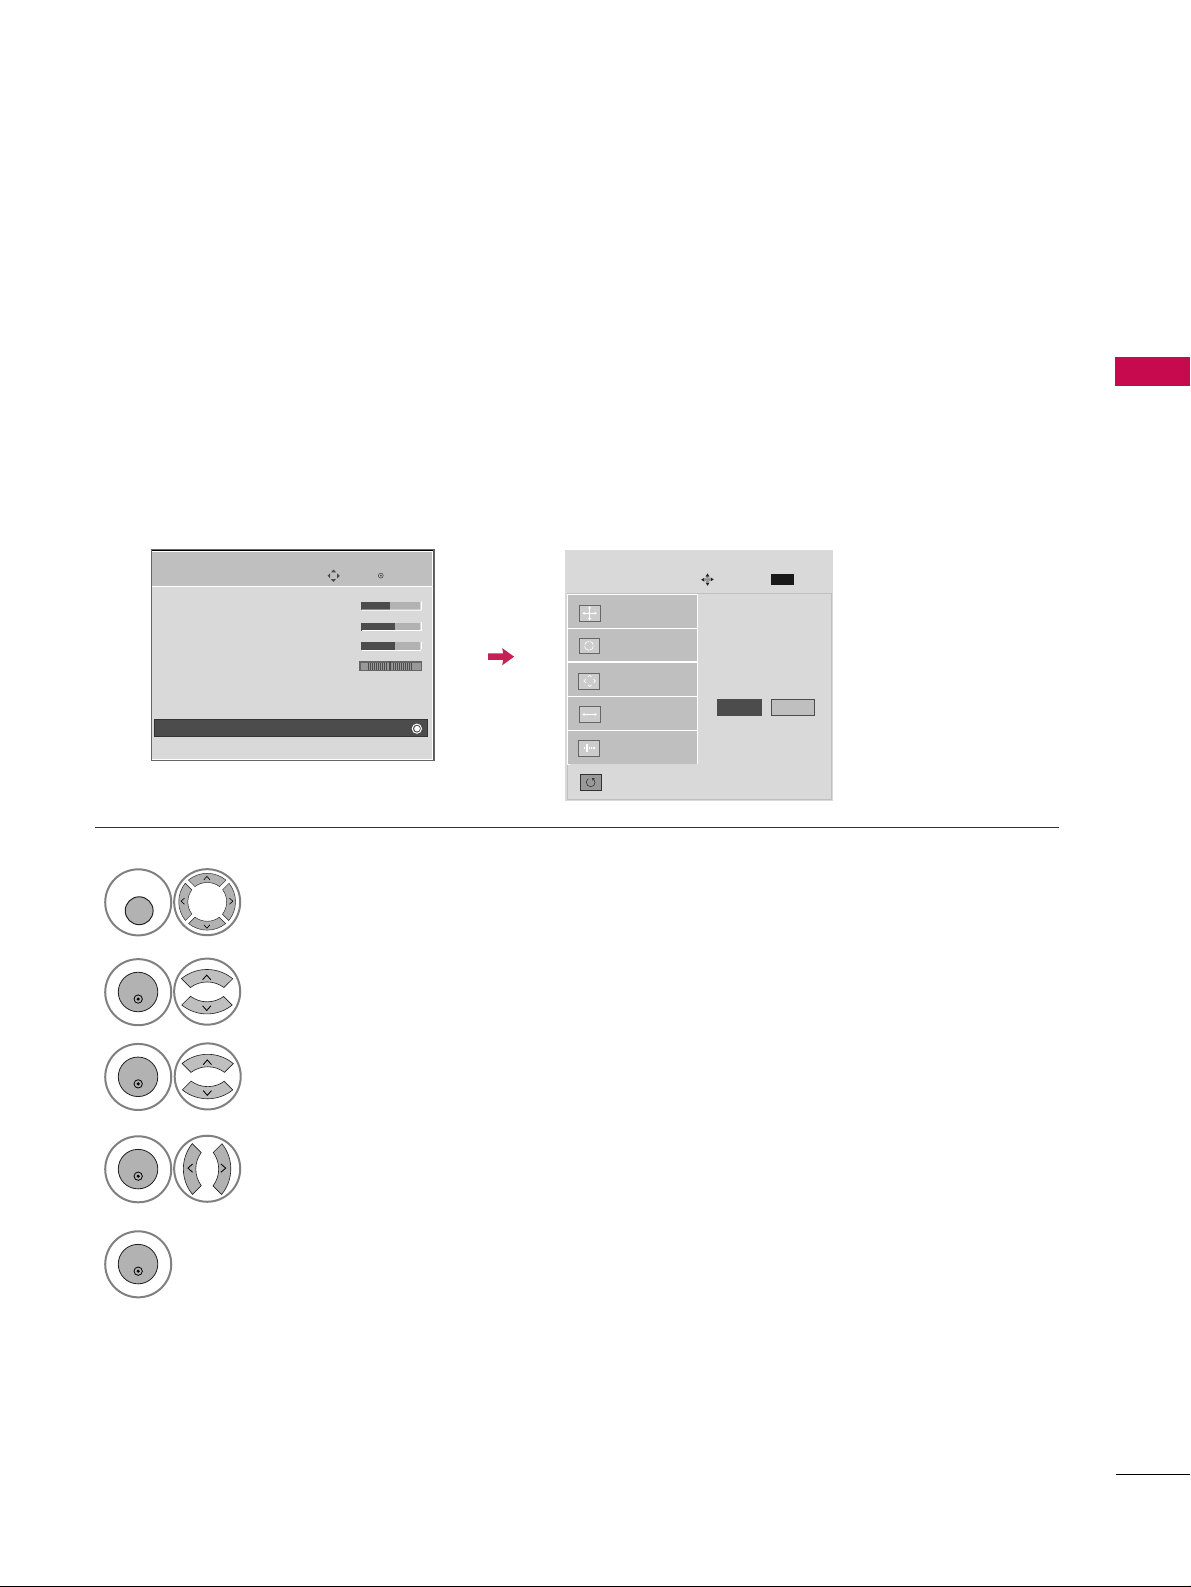
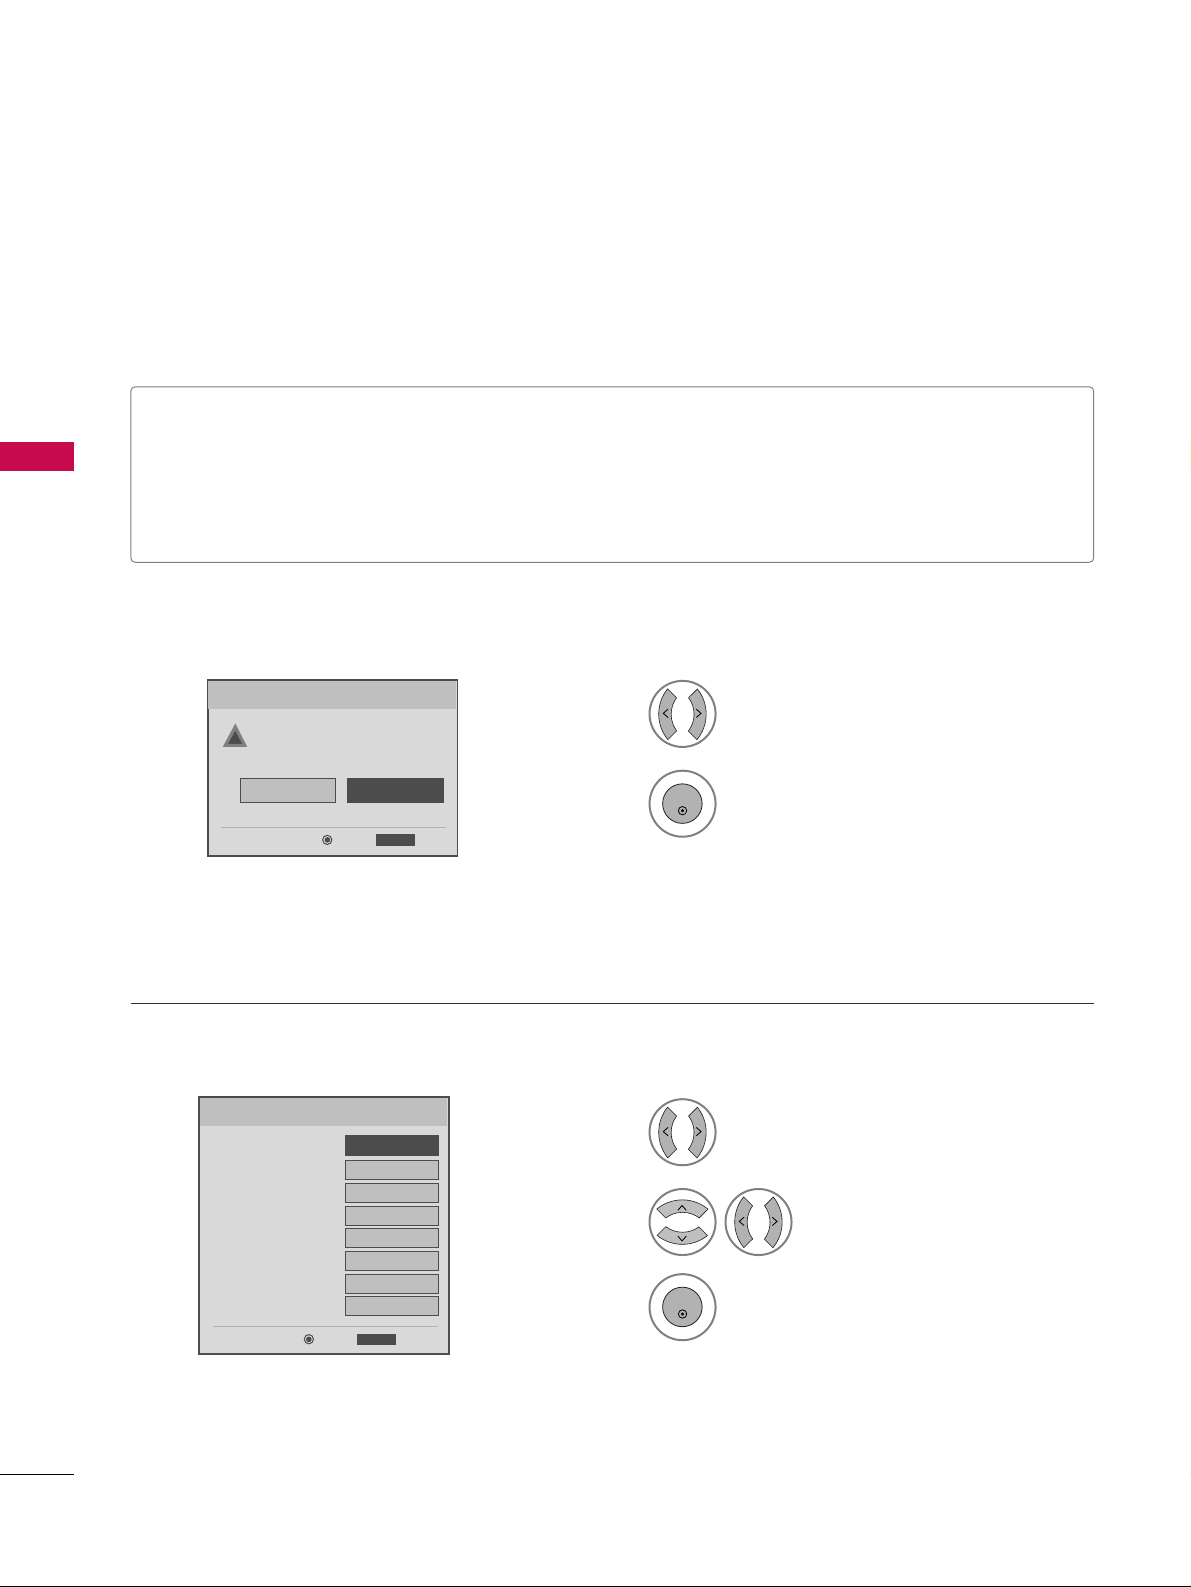
Screen Reset (Reset to original factory values)
Returns
PPooss ii ttiioonn, SSiizzee
, and
PPhhaa ssee
to the default factory settings.
This feature operates only in RGB-PC mode.
Auto config.
Position
Resolution
Size
Phase
Reset
G
SCREEN
Move
Prev.
MENU
To Set
Select
RR eesseett
.
3
ENTER
Select
PPIICCTT UURREE
.
Select
SSccrreeee nn ((RRGGBB --PPCC))
.
1
MENU
2
ENTER
Select
YY ee ss
.
4
ENTER
5
ENTER
Enter
Move
PICTURE
E
• Brightness 50
• Sharpness 60
• Color 60
• Tint 0
• Advanced Control
• Reset
Screen (RGB-PC)
TruMotion Demo
RG
Yes No
Page 6

EXTERNAL EQUIPMENT SETUP
46
USB CONNECTION
(Except 32/37/42LG30)
EXTERNAL EQUIPMENT SETUP
AV IN 2
L/ MONO
R
AUDIO
VIDEO
HDMI IN 3 USB IN
Connect the USB device to the
UUSS BB II NN
jack on the side
of TV.
1. How to connect
1
2. How to use
■
After connecting the
UU SS BB II NN
jack, you use the USB func-
tion. (
GG
pp ..6644
)
1
or
i.e)
Page 7
EXTERNAL EQUIPMENT SETUP
47
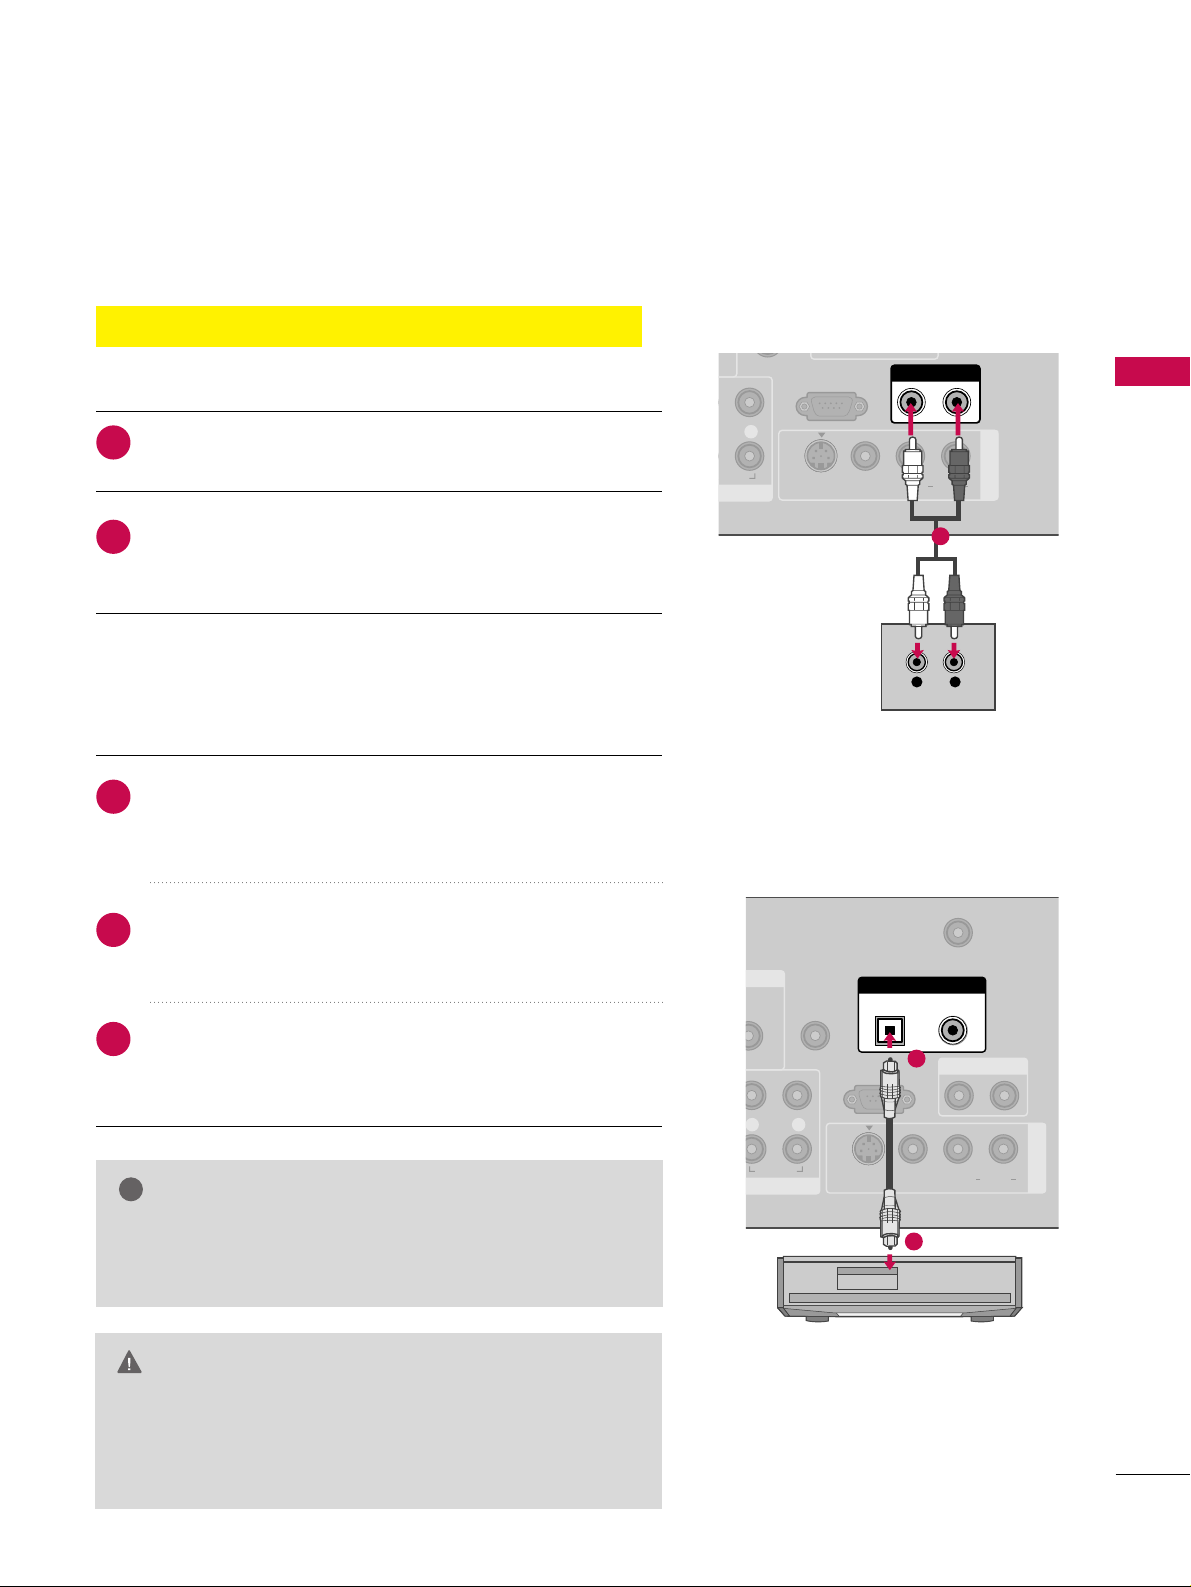
AUDIO OUT CONNECTION
Send the TV’s audio to external audio equipment via the Audio Output port.
RS-232C IN
(CONTROL & SERVICE)
R
AUDIO OUT
AV IN 1
VIDEO L R
(MONO)
AUDIO
S-VIDEO
L R
AUDIO
1
REMOTE
CONTROL IN
ANTENNA/
CABLE IN
RS-232C IN
(CONTROL & SERVICE)
L R
AUDIO
OPTICAL COAXIAL
DIGITAL AUDIO OUT
AUDIO OUT
AV IN 1
VIDEO L R
(MONO)
AUDIO
S-VIDEO
1
2
GG
When connecting with external audio equipments, such as
amplifiers or speakers, you can turn the TV speakers off in
the menu. (
GG
pp..99 33
)
NOTE
!
G
Do not look into the optical output port. Looking at the
laser beam may damage your vision.
GG
Block the SPDIF out (optical/coaxial) about the contents
with ACP(Audio Copy Protection) function.
CAUTION
Connect one end of the optical or coaxial cable to the
TV’s
OOPP TTII CC AALL
or
CCOOAAXXIIAALL
(Except 32/37/42LG30)
port of
DDIIGGIITTAALL AAUUDDIIOO OOUUTT
.
Connect the other end of the optical or coaxial cable to
the digital audio input on the audio equipment.
Set the “TV Speaker option - Off” in the AUDIO menu. (
GG
pp ..9933
). See the external audio equipment instruction manu-
al for operation.
1. How to connect
2
3
1
Connect audio outputs to the TV’s
AAUUDDIIOO OOUUTT
jacks.
Set the “TV Speaker option - Off” in the AUDIO menu.
(
GG
pp ..9933
). See the external audio equipment instruction
manual for operation.
1. How to connect
2
1
Analog
(Except 32/37/42/47/52LG60, 42LGX)
Digital
Page 8
WATCHING TV / CHANNEL CONTROL
48
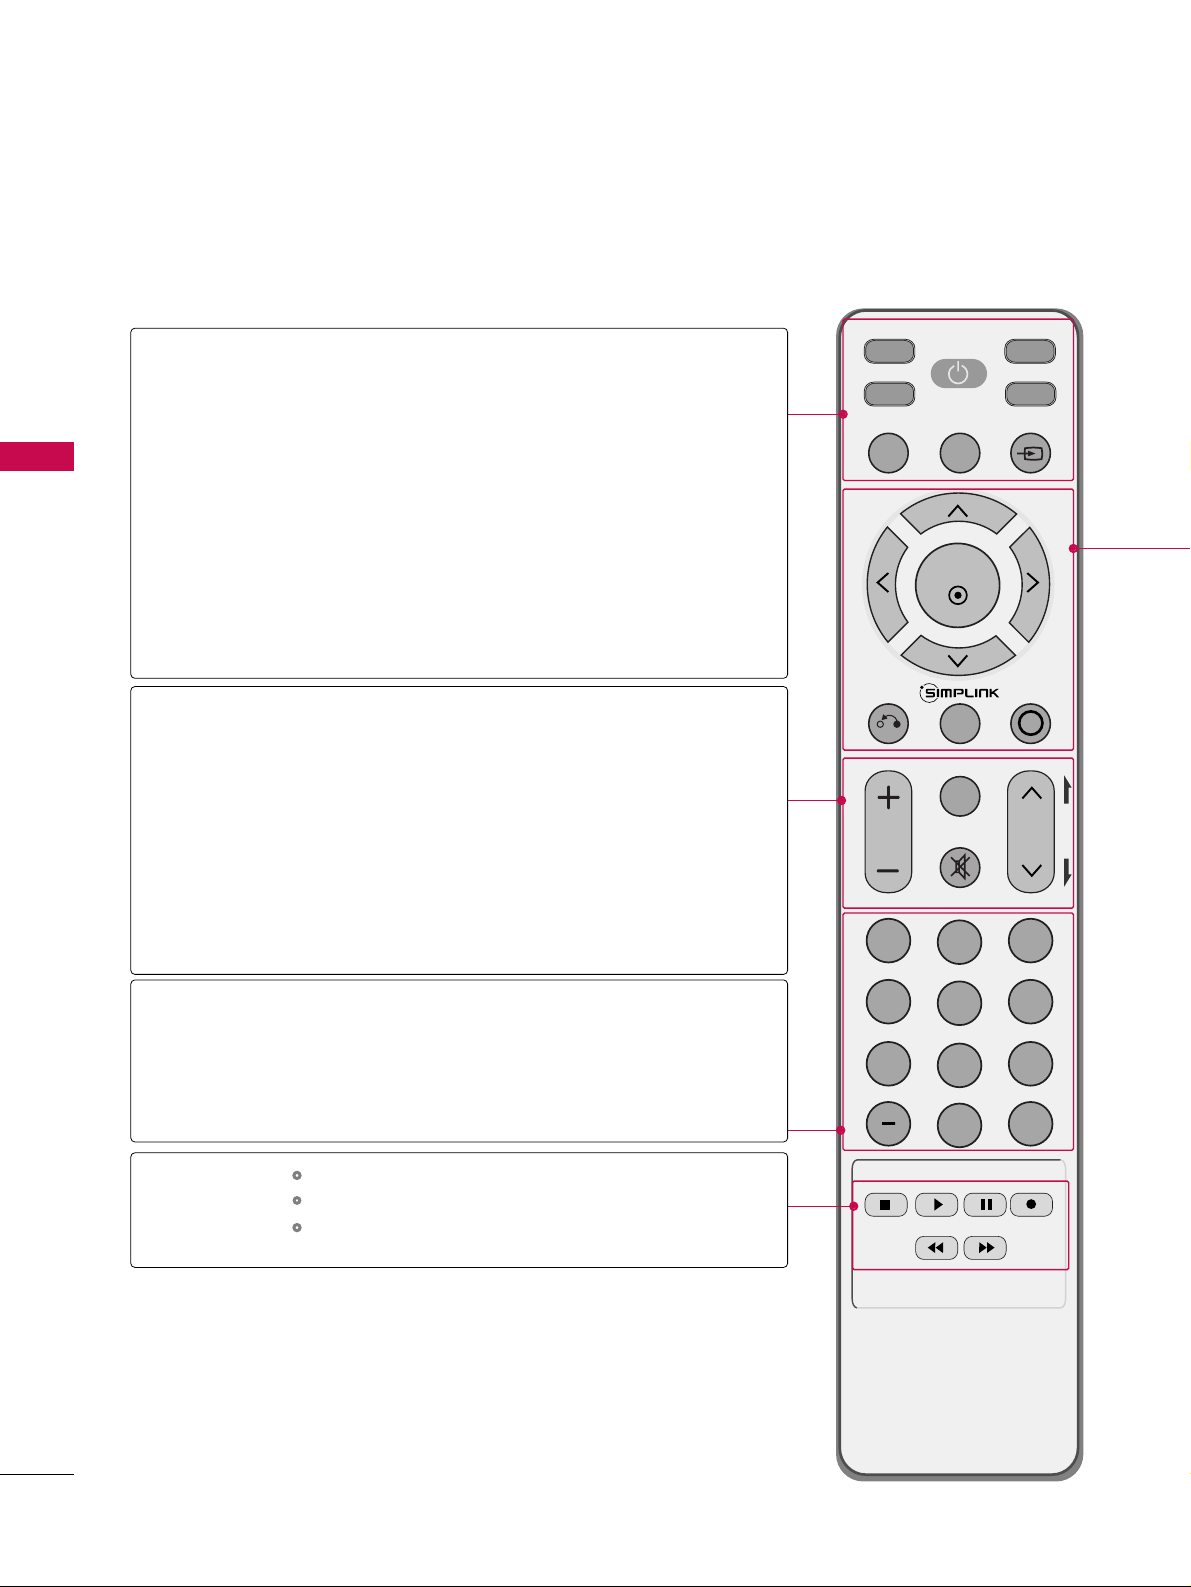
REMOTE CONTROL FUNCTIONS
WATCHING TV / CHANNEL CONTROL
When using the remote control, aim it at the remote control sensor on the TV.
INPUT
FAV
MUTE
TV
STB
POWER
Q. MENU MENU
AV MODERETURN
ENTER
VOL
CH
123
456
7809
FLASHBK
P
A
G
E
DVD
VCR
TV/STB/DVD/VCR
POWER
Q.MENU
MENU
INPUT
VOLUME UP
/DOWN
FAV
MUTE
CHANNEL
UP/DOWN
PAGE
UP/DOWN
— (DASH)
FLASHBK
Select the remote operating mode: TV, STB, DVD, or VCR.
Turns your TV or any other programmed equipment on or
off, depending on the mode.
Select the desired quick menu source.
GG
pp..5511
Displays the main menu.
Clear all on-screen displays and return to TV viewing from
any menu.
External input modes rotate in regular sequence.
Increase/decrease the sound level.
Scroll through the programmed Favorite channels.
GG
pp..5511
Switch the sound on or off.
GG
pp..5500
Select available channels.
Move from one full set of screen information to the next one.
Used to enter a program number for multiple
program channels such as 2-1, 2-2, etc.
Tune to the last channel viewed.
Control video cassette recorders or DVD players.
Control USB menu (PHOTO LIST and MUSIC LIST.)
Control the SIMPLINK compatible devices.
NUMBER button
VCR/DVD, USB,
SIMPLINK
Control buttons
Page 9

WATCHING TV / CHANNEL CONTROL
49
Installing Batteries
■
Open the battery compartment cover on the back side and install
the batteries matching correct polarity (+with +,-with -).
■
Install two 1.5V AAA batteries. Don’t mix old or used batteries with
new ones.
■
Close cover.
THUMBSTICK
(Up/Down/Left
Right/ENTER)
RETURN
SIMPLINK
AV MODE
Navigate the on-screen menus and adjust the system settings to your preference.
Allows the user to move return one step in an interactive application or other user interaction
function.
See a list of AV devices connected to TV.
When you toggle this button, the SIMPLINK menu appears at the screen.
GG
pp..6622--6633
It helps you select and set images and sounds.
GG
pp..6611
Page 10

WATCHING TV / CHANNEL CONTROL
50
TURNING ON THE TV
WATCHING TV / CHANNEL CONTROL
NOTE
!
GG
If you intend to be away on vacation, disconnect the power plug from the wall power outlet.
First, connect power cord correctly.
At this moment, the TV switches to standby mode.
■
In standby mode to turn TV on, press the ,
IINNPPUUTT,CCHH ((
DDEE
or
))
button on the TV or press the
PPOOWWEERR, IINNPPUUTT, CCHH((
or )),
NNuummbbeerr
((00~99))
button on the remote control.
Select the viewing source by using the
IINNPPUUTT
button on the remote control.
■
This TV is programmed to remember which power state it was last set to,
even if the power cord is out.
When finished using the TV, press the
PPOOWWEERR
button on the remote control.
The TV reverts to standby mode.
1
2
3
Press the
CCHH ((
or ))or
NNUUMMBBEERR
buttons to select a channel number.
1
VOLUME ADJUSTMENT
CHANNEL SELECTION
Press the
VVOOLL ((++
or
--))
button to adjust the volume.
If you want to switch the sound off, press the
MMUUTTEE
button.
You can cancel the Mute function by pressing the
MMUUTTEE
or
VVOOLL ((++
or
--))
button.
Adjust the volume to suit your personal preference.
1
2
3
Page 11
WATCHING TV / CHANNEL CONTROL
51
QUICK MENU
Display each menu.
Make appropriate adjustments.
■
AA ssppee cctt RR aa ttii oo
: Selects your desired picture format.
■
PPoowweerr SSaa vvii nn gg
(Plasma TV Only): Adjusts screen
brightness to reduce the power consumption of the
TV.
■
BB aa cckklliigg hhtt
(LCD TV Only): Adjust the brightness
of LCD panel to control the brightness of the screen.
■
CClleeaarr VVooiiccee
: By differentiating the human sound
range from others, it helps make human voices
sound better.
■
PPii cc ttuu rree MMooddee
: Selects the factory preset picture
depend on the viewing environment.
■
SSoouunndd MM ooddee
: Selects the factory preset sound for
type of program.
■
CCaa pp ttii oonn
: Select on or off.
■
MM uullttii AAuu ddii oo
: Changes the audio language (Digital
signal).
SSAA PP
: Selects MTS sound (Analog signal).
■
SSll eeeepp TTiimmeerr
: Select the amount of time before
your TV turns off automatically.
■
DDeell//AAdddd//FFaavv
: Select channel you want to add/delete
or add the channel to the Favorite List.
■
UU SS BB EEjj ee cc tt
: Select “USB Eject” in order to eject
USB device.
Your TV's OSD (On Screen Display) may differ slightly from what is shown in this manual.
Q.Menu (Quick Menu) is a menu of features which users might use frequently.
1
Q. MENU
2
LCD TV
Q.Menu
3
FF
16:9
GG
Vivid
Off
Standard
Off
English
Off
Add
Eject
Aspect Ratio
Backlight
Clear Voice
Picture Mode
Sound Mode
Caption
Multi Audio
Sleep Timer
Del/Add/Fav
USB Eject
CH
Plasma TV
Q.Menu
Close Close
3
FF
16:9
GG
Vivid
Off
Standard
Off
English
Off
Add
Eject
Aspect Ratio
Power Saving
Clear Voice
Picture Mode
Sound Mode
Caption
Multi Audio
Sleep Timer
Del/Add/Fav
USB Eject
CH
3
Q. MENU
Return to TV viewing.
Except 32/37/42LG30
Page 12
WATCHING TV / CHANNEL CONTROL
52
INITIAL SETTING
WATCHING TV / CHANNEL CONTROL
This Function guides the user to easily set the essential items for viewing the TV for the first time when purchasing the TV. If will be displayed on the screen when turning the TV on for the first time. It can also be activated from the user menus.
Select
HH oo mm ee
Mode.
1
2
ENTER
Select
AA uutt oo
or
MM aa nn uuaall
.
Select desired time option.
1
3
ENTER
2
Year
Current Time Setting
2007
Month
11
Date
15
Hour
5 PM
Minute
52
Time Zone
Eastern
Daylight Saving
Off
FF
Auto
GG
ExitEnter
RETURN
Step2. Time Setting
Selecting the environment.
Choose the setting mode you want.
In Store
Home
ExitEnter
RETURN
Step1. Mode Setting
Step1. Mode setting
Step2. Time setting
■
Default selection is “
HH oo mm ee
”. We recommend setting the TV to “
HH oo mm ee
” mode for the best picture in your
home environment.
■
“
IInn-- ss ttoorr ee
” Mode is only intended for use in retail environments. Customers can adjust the “
PPii ccttuu rree
menu -
PPii cc ttuu rree mm ooddee
” manually while inspecting the TV, but the TV will automatically return to preset in-store
mode after 5 minutes.
!
Page 13
WATCHING TV / CHANNEL CONTROL
53
Select
OOSSDD LLaanngg uuaaggee SS eett ttii nn gg
or
AAuu dd iioo LLaanngg uuaaggee SSeett ttiinn gg
.
Start
AA uu ttoo TT uunnii nngg
.
Select your desired language.
1
3
ENTER
1
ENTER
2
Auto Tuning can change channel map.
Do you want to start Auto Tuning?
Enter
Exit
Enter
RETURN
Step4. Auto Tuning
ExitEnter
RETURN
Step3. Option Setting
1. OSD Language Setting
FF
English
GG
2. Audio Language Setting
French
Step3. Option setting
Step4. Auto Tuning
■
You can also adjust
IInnii ttii aa ll SS eett ttii nngg
in the
OO PPTTIIOONN
menu
.
NOTE
!
Page 14
WATCHING TV / CHANNEL CONTROL
54
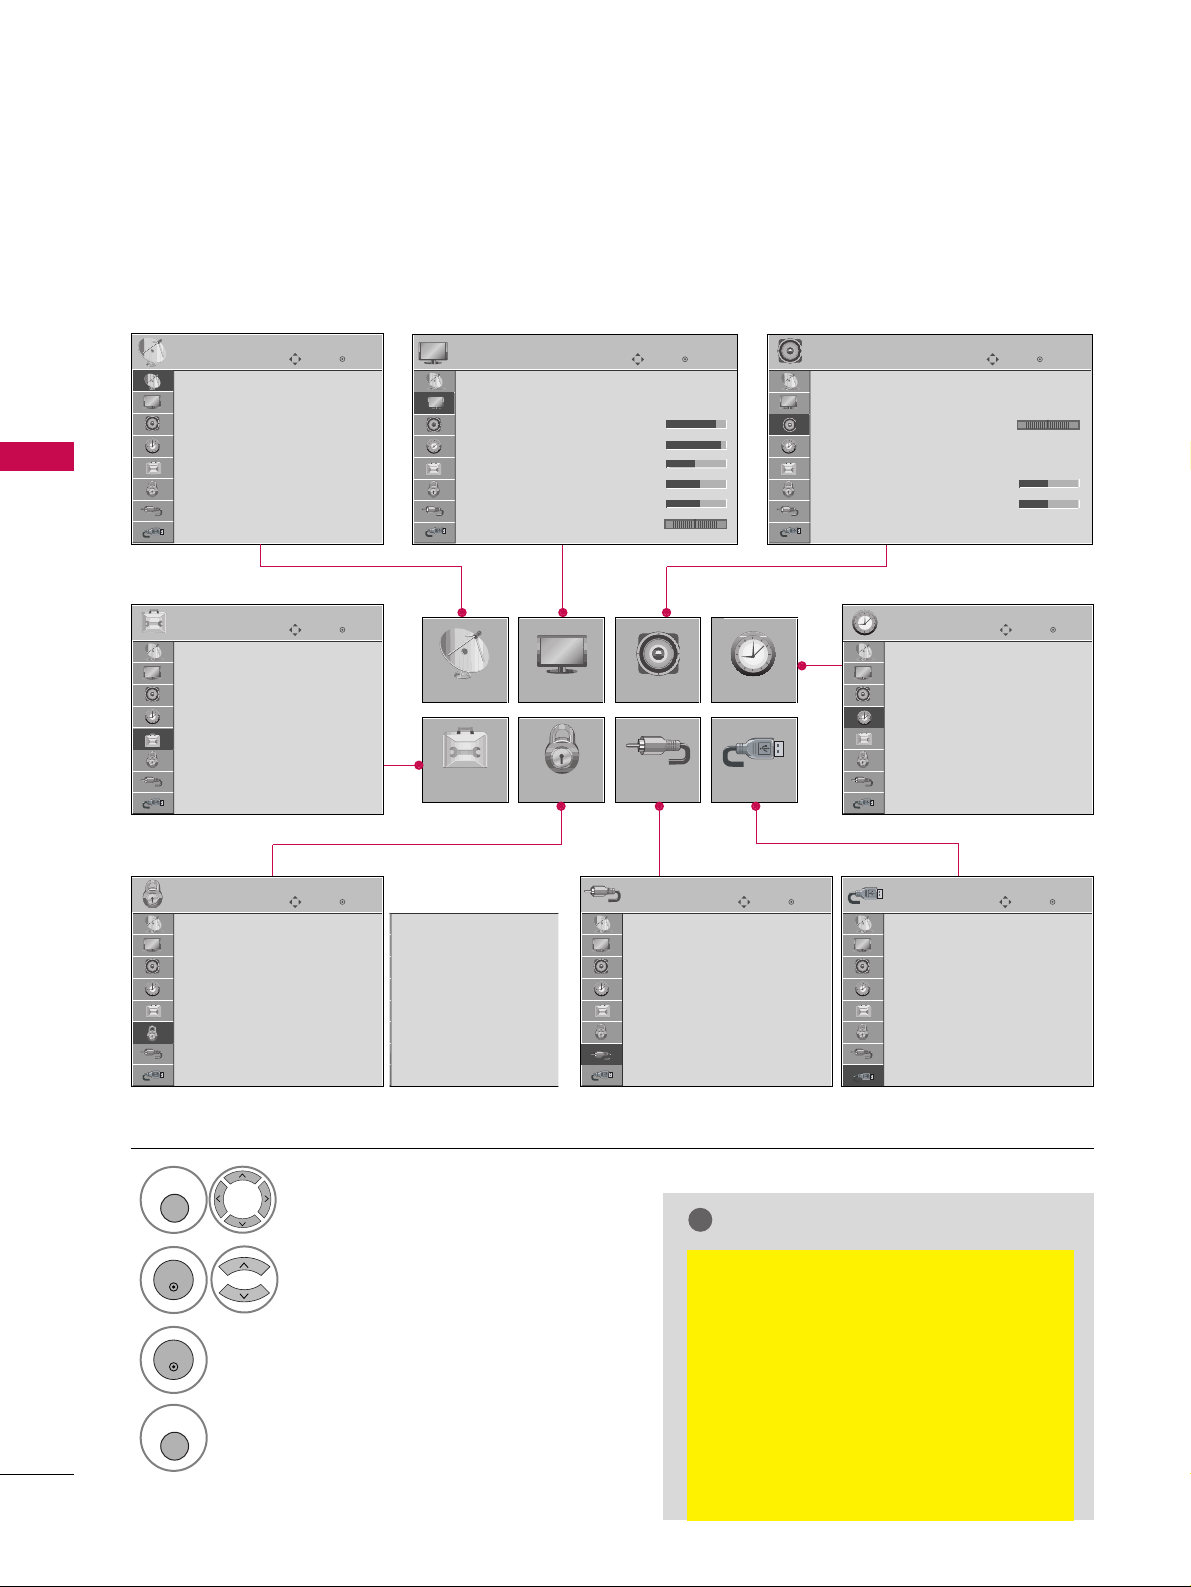
ON-SCREEN MENUS SELECTION
WATCHING TV / CHANNEL CONTROL
Your TV's OSD (On Screen Display) may differ slightly from that shown in this manual.
NOTE
!
GG
IISSMM MM eett hhoodd, PPoowwee rr SS aa vvii nngg
: Only
PPll aa ssmmaa TTVV
.
GG
BB aa cckkll iigghh tt,, PPooww eerr II nn dd iiccaatt oorr,,
TT rruu MMoottiioonn DD eemmoo
: Only
LLCCDD TT VV
.
(But,
TT rr uuMMoo ttiioonn DD ee mm oo
: Only for
3322//3377//4422//4477//5522LLGG6600,, 3322//4422//4477//5522LLGG7700,,
4422LLGGXX,, 4477LLGG9900
)
GG
SSeett IIDD
: Except
3322//3377//4422//4477//5522LLGG6600,, 4422LLGGXX
.
GG
LLooccaall DDiimm mm iinngg, LLooccaall DDiimm mm iinngg
DD ee mm oo
: Only
4477LL GG9900
Display each menu.
Select a menu item.
Enter to the pop up menu.
1
MENU
3
2
ENTER
ENTER
Return to TV viewing.
4
MENU
Enter
Move
Auto Tuning
Manual Tuning
Channel Edit
CHANNEL
CHANNEL
OPTION
PICTURE
LOCK
AUDIO
INPUT
TIME
USB
Enter
Move
Aspect Ratio : 16:9
Picture Mode : Standard
• Backlight 80
• Contrast 90
• Brightness 50
• Sharpness 60
• Color 60
• Tint 0
PICTURE
E
Enter
Move
Auto Volume : Off
Clear Voice : On
Balance 0
Sound Mode : Standard
•
SRS TruSurround XT:
Off
• Treble 50
• Bass 50
• Reset
AUDIO
E
LR
Enter
Move
Clock :
Feb/21/2008 2:10 AM
Off Time : Off
On Time : Off
Sleep Timer : Off
Auto Sleep : Off
TIME
Enter
Move
PHOTO LIST
MUSIC LIST
USB
Enter
Move
Antenna
Cable
AV1
AV2
Component1
Component2
RGB-PC
HDMI1
INPUT
E
Enter
Move
Lock System : Off
Set Password
Block Channel
Movie Rating
TV Rating-Children
TV Rating-General
Downloadable Rating
Input Block
LOCK
Lock System : Off
Set Password
Block Channel
TV Rating-English
TV Rating-French
Downloadable Rating
Input Block
Enter
Move
Language : English
Input Label
SIMPLINK : On
Key Lock : Off
Caption : Off
ISM Method : Normal
Power Saving : Level 0
Set ID : 1
OPTION
For USA For Canada
E
All models (Except 32/37/42LG30)
RG
Page 15
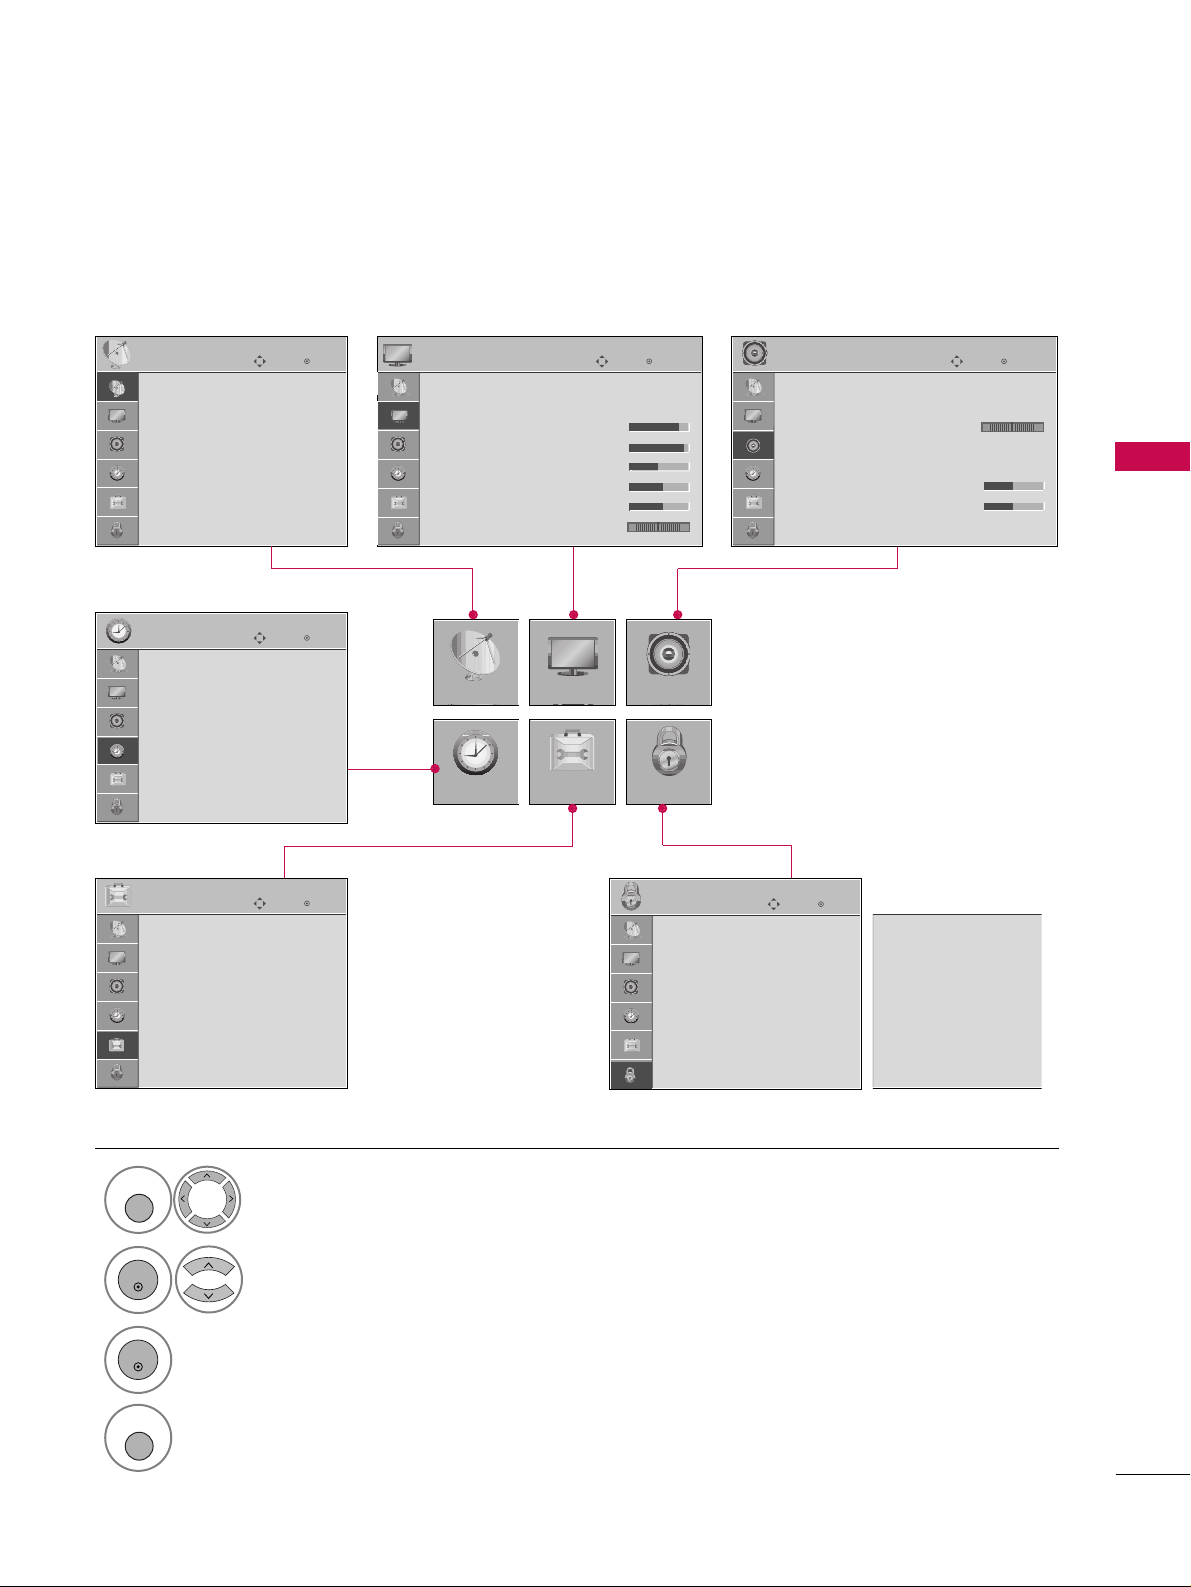
WATCHING TV / CHANNEL CONTROL
55
Only for 32/37/42LG30
Display each menu.
Select a menu item.
Enter to the pop up menu.
1
MENU
3
2
ENTER
ENTER
Return to TV viewing.
4
MENU
Enter
Move
Auto Tuning
Manual Tuning
Channel Edit
CHANNEL
CHANNEL
TIME
PICTURE
OPTION
AUDIO
LOCK
Enter
Move
Aspect Ratio : 16:9
Picture Mode : Standard
• Backlight 80
• Contrast 90
• Brightness 50
• Sharpness 60
• Color 60
• Tint 0
PICTURE
E
Enter
Move
Auto Volume : Off
Clear Voice : On
Balance 0
Sound Mode : Standard
•
SRS TruSurround XT:
Off
• Treble 50
• Bass 50
• Reset
AUDIO
E
LR
Enter
Move
Clock :
Feb/21/2008 2:10 AM
Off Time : Off
On Time : Off
Sleep Timer : Off
Auto Sleep : Off
TIME
Enter
Move
Lock System : Off
Set Password
Block Channel
Movie Rating
TV Rating-Children
TV Rating-General
Downloadable Rating
Input Block
LOCK
Enter
Move
Language : English
Input Label
SIMPLINK : On
Key Lock : Off
Caption : Off
Set ID : 1
Power Indicator
Initial Setting : Home
OPTION
Lock System : Off
Set Password
Block Channel
TV Rating-English
TV Rating-French
Downloadable Rating
Input Block
For USA For Canada
RG
Page 16
WATCHING TV / CHANNEL CONTROL
56
CHANNEL SETUP
WATCHING TV / CHANNEL CONTROL
Auto Scan (Auto Tuning)
Automatically finds all channels available through antenna or cable inputs, and stores them in memory on the
channel list.
Run Auto Tuning again after any Antenna/Cable connection changes.
Select
CCHHAANNNNEE LL
.
Select
AA uu ttoo TT uunnii nngg
.
Select
YY ee ss
.
Run
AA uu ttoo ttuu nnii nn gg
.
Enter
Move
CHANNEL
Enter
Move
CHANNEL
1
MENU
3
2
ENTER
ENTER
4
ENTER
Auto Tuning
Manual Tuning
Channel Edit
Auto Tuning
Manual Tuning
Channel Edit
Press ‘Yes’ button to begin
auto tuning.
Yes
No
■
A password is required to gain access to
Auto Tuning menu if the Lock System is
turned on.
5
RETURN
Return to the previous menu.
MENU
Return to TV viewing.
Page 17
WATCHING TV / CHANNEL CONTROL
57
Select
CCHHAANNNNEE LL
.
1
MENU
2
ENTER
If selecting DTV or CADTV input signal, you can view the on-screen signal strength monitor to see the quality
of the signal being received.
Add/Delete Channel (Manual Tuning)
Enter
Move
CHANNEL
Enter
Move
CHANNEL
Channel
Select channel type and
RF-channel number.
FF
DTV
GG
2
Close
Delete
Auto Tuning
Manual Tuning
Channel Edit
DTV 2-1
Bad Normal Good
Select
MM aa nnuuaall TT uunnii nngg
.
Select
DD TTVV, TT VV, CCAA DDTT VV
, or
CCAA TTVV
.
Select channel you want to add
or delete.
3
ENTER
4
Select
AA dd dd
or
DD eellee ttee
.
5
ENTER
Auto Tuning
Manual Tuning
Channel Edit
■
A password is required to gain access to
Manual Tuning menu if the Lock System
is turned on.
6
RETURN
Return to the previous menu.
MENU
Return to TV viewing.
Page 18
WATCHING TV / CHANNEL CONTROL
58
CHANNEL SETUP
WATCHING TV / CHANNEL CONTROL
Select a channel.
Select channel you want to add or
delete.
3
ENTER
4
ENTER
A custom list can be created by toggling each channel on or off with ENTER button. The channels in the Custom
List are displayed in black and the channels deleted from the Custom List are displayed in gray.
Once a channel is highlighted you can add or delete the channel by referring to the small window at the topright corner of the screen.
Channel Editing
Enter
Move
CHANNEL
Auto Tuning
Manual Tuning
Channel Edit
Select
CCHHAANNNNEE LL
.
1
MENU
2
ENTER
Select
CChhaa nnnneell EEddii tt
.
RETURN
Return to TV viewing.
Return to the previous menu.
5
MENU
Add/Delete
Move Page
CH
Move
Previous
MENU
Exit
RETURN
Page 19
WATCHING TV / CHANNEL CONTROL
59
INPUT LIST
Only these input signals which are connected to a TV can be activated and selected.
Select the desired input source.
■
You can also select the desired input source in the
IINNPPUUTT
menu
(Except 32/37/42LG30).
1
INPUT
Antenna Cable AV1 AV2 Component1
HDMI3 HDMI2 HDMI1 RGB-PC
Component2
Antenna Cable AV1 AV2 Component1
ENTER
■
AA nn ttee nnnnaa
: Select it to watch over-the-air broadcasts.
■
CCaa bb llee
: Select it to watch cable and digital cable.
■
AA VV
: Select them to watch a VCR or other external equipment.
■
CCoomm ppoonneenn tt
: Select them to watch DVD or a Digital set-top box.
■
RR GGBB--PPCC
: Select it to view PC input.
■
HH DDMMII
: Select them to watch high definition devices.
Antenna Cable AV1 AV 2 Component1
Input Label
Q.MENU
Exit
RETURN
Select a desired input source (except
AAnntteennnnaa
or
CCaabbll ee
). Then, you can select
your desired Input Label with using Q. MENU
button.
GG
pp..6600
Disconnected inputs are inactive (grayed out)
ie)
32/37/42LG30, 37/42/47/52LG50
Antenna
Cable AV1 AV2 Component1
HDMI4 HDMI3 HDMI2 HDMI1 RGB-PC
Component2
Plasma TV, 32/42/47/52LG70, 47LG90
Antenna
Cable AV Component1
HDMI4 HDMI3 HDMI2 HDMI1 RGB-PC
Component2
32/37/42/47/52LG60, 42 LGX
Page 20
WATCHING TV / CHANNEL CONTROL
60
INPUT LABEL
WATCHING TV / CHANNEL CONTROL
You can set a label for each input source when it's not in use.
Enter
Move
OPTION
Language : English
Input Label
SIMPLINK : On
Key Lock : Off
Caption : Off
ISM Method : Normal
Power Saving : Level 0
Set ID : 1
EE
Select
OOPP TTII OONN
.
Select
IInnppuutt LLaabbeell
.
Select the label.
1
MENU
2
ENTER
Select the source.
3
ENTER
4
5
RETURN
Return to the previous menu.
MENU
Return to TV viewing.
With using OPTION menu
Select the source.
Select the label.
1
INPUT
2
Q. MENU
3
RETURN
Return to the previous menu.
MENU
Return to TV viewing.
With using INPUT button
■
When new external device is connected, this popup menu is displayed automatically.
If selecting
YY ee ss
, you can select input source that you want to appreciate.
■
But, when selecting “
SSIIMM PPLLIINN KK- OO nn
”, popup menu for HDMI input will not be displayed.
No
Ye s
!
New external device is connected.
Do you want to enjoy this?
!
Select input source that you want to appreciate.
AV1
AV2
Component1
AV1
FF GG
AV2
Component1
HDMI1
RGB-PC
Component2
HDMI2
HDMI3
Close
AV1
FF GG
AV2
Component1
HDMI1
RGB-PC
Component2
HDMI2
HDMI3
HDMI4
Close
FF GG
AV
Component1
HDMI1
RGB-PC
Component2
HDMI2
HDMI3
HDMI4
Close
Plasma TV, 32/42/47/52LG70,
47LG90
32/37/42/47/52LG60,
42 LGX
32/37/42LG30,
37/42/47/52LG50
Page 21
WATCHING TV / CHANNEL CONTROL
61
AV MODE
You can select the optimal images and sounds.
1
AV MODE
2
Off Cinema
Game Sport
Off Cinema
Game Sport
Press the
AA VV MMOO DDEE
button repeatedly to select the desired source.
ENTER
■
If you select “
CCiinn eemmaa // CCiinneemm aa
”
in AV mode,
CCiinn eemmaa
will be selected
both for “PICTURE menu - Picture
Mode” and “AUDIO menu - Sound
Mode” respectively.
■
If you select “
OO ff ff
” in AV mode, the
“
PPii cc ttuu rree MM ooddee
” and “
SSoouunndd MM oo ddee
”
return to previous selected value.
All models (Except 50/60PG60, 50/60PG70)
Only for 50/60PG60, 50/60PG70
Page 22

WATCHING TV / CHANNEL CONTROL
62
WATCHING TV / CHANNEL CONTROL
This function operates only with devices with the logo.
The TV might not function properly when using it with other products with HDMI-CEC function.
This allows you to control and play other AV devices connected with HDMI cable without additional cables and
settings.
To start using SIMPLINK, turn it on in the user menus.
Enter
Move
OPTION
Select
OOPP TTII OONN
.
Select
SSIIMMPPLLIINN KK
.
Select
OO nn orOO ff ff
.
Enter
Move
OPTION
E
1
MENU
3
2
ENTER
ENTER
Language : English
Input Label
SIMPLINK : On
Key Lock : Off
Caption : Off
ISM Method : Normal
Power Saving : Level 0
Set ID : 1
Language : English
Input Label
SIMPLINK : On
Key Lock : Off
Caption : Off
ISM Method : Normal
Power Saving : Level 0
Set ID : 1
Off
On
NOTE
!
GG
Connect the HDMI/DVI IN or HDMI IN terminal of the TV to the rear terminal (HDMI terminal) of the
SIMPLINK device with the HDMI cable.
GG
When you switch the Input source with the INPUT button on the remote control, the SIMPLINK device
will stop.
GG
When you select a device with home theater functionality, the sound output automatically switches to
the home theater speakers.
GG
If a connected SIMPLINK home theater system doesn't play the audio from the TV, connect the DIGITAL
AUDIO OUT terminal on the back of the TV to the DIGITAL AUDIO IN terminal on the back of the SIMPLINK device with an OPTICAL cable.
E
4
RETURN
Return to the previous menu.
MENU
Return to TV viewing.
Page 23
WATCHING TV / CHANNEL CONTROL
63
■
DDiirr eecctt PP llaayy::
After connecting AV devices to the TV, you can directly control the devices and play media with-
out additional settings.
■
SSee llee cc tt AAVV ddee vviicc ee::
Enables you to select one of the AV devices connected to TV.
■
DDii sscc ppllaayybbaacckk ::
Control connected AV devices by pressing the ,
ENTER, G, A,
ll ll
, FFand GGbuttons.
■
PPoowweerr ooffff aallll ddeevviicceess::
When you power off the TV, all connected devices are turned off.
■
SSwwiitt cchh aauu ddii oo-- oouu tt::
Offers an easy way to switch audio-out.
■
SSyynn cc PPooww eerr oonn::
When you play the connected AV device, TV will automatically turn on.
(A device, which is connected to the TV through a HDMI cable but does not support SIMPLINK, does not provide
this function)
Note: To operate SIMPLINK, an HDMI cable over Version 1.2 with *CEC function should be used. (*CEC: Consumer
Electronics Control).
SIMPLINK Menu
TT VV vv iiee ww iinngg
: Switch to the previous TV
channel regardless of the current mode.
DDIISSCC ppll aayybbaa cc kk
: Select and play discs.
When multiple discs are available, the titles
of discs are conveniently displayed at the
bottom of the screen.
VV CCRR pp llaayy bbaacckk
: Control the connected
VCR.
HHDDDD RReeccoorr dd iinnggss ppll aa yybbaa cc kk
: Control
recordings stored in HDD.
AAuu ddiioo OOuu tt ttoo HH oommee TThhee aa tteerr ssppee aa kk--
ee rr//AAuuddiioo OOuutt ttoo TTVV
: Select Home
Theater speaker or TV speaker for Audio
Out.
SIMPLINK Functions
1
2
3
4
5
GG
When no device is connected
(displayed in gray)
GG
Selected Device
GG
When a device is connected
(displayed in bright color)
1
2
3
4
5
Display
SSIIMMPPLLIINN KK
menu.
Select the desired device.
Control connected AV devices.
1
TV
3
2
ENTER
ENTER
Page 24
USB
USB
ENTRY MODES
64
When you connect a USB device, this screen is displayed automatically.
In USB device, you can not add a new folder or delete the existing folder.
Precautions when using the USB device
GG
Only a USB storage device is recognizable.
GG
If the USB storage device is connected through a
USB hub, the device is not recognizable.
GG
A USB storage device using an automatic recognition program may not be recognized.
GG
A USB storage device which uses its own driver
may not be recognized.
GG
In case of a card reader, up to four memory cards
are concurrently recognizable.
GG
The recognition speed of a USB storage device
may depend on each device.
GG
Please do not turn off the TV or unplug the USB
device when the connected USB storage device is
working. When such device is suddenly separated
or unplugged, the stored files or the USB storage
device may be damaged.
GG
Please do not connect the USB storage device
which was artificially maneuvered on the PC. The
device may cause the product to malfunction or
fail to be played. Never forget to use only a USB
storage device which has normal music files or
image files.
GG
Please use only a USB storage device which was
formatted as a FAT or NTFS file system provided
with the Windows operating system. In case of a
storage device formatted as a different utility program which is not supported by Windows, it may
not be recognized.
GG
Please connect power to a USB storage device
which requires an external power supply. If not,
the device may not be recognized.
GG
Please connect a USB storage device with cable is
offered by USB maker. If connected with cable is
not offered by USB maker or an excessively long
cable, the device may not be recognized.
GG
Some USB storage devices may not be supported
or operated smoothly.
GG
File alignment method of USB storage device is
similar to Window XP and filename can recognize
up to 100 English characters.
GG
Please backup important files because data on
USB device may be damaged. Data management is
consumer's responsibility and as a result, the manufacturer does not cover data damage.
When removing the USB device
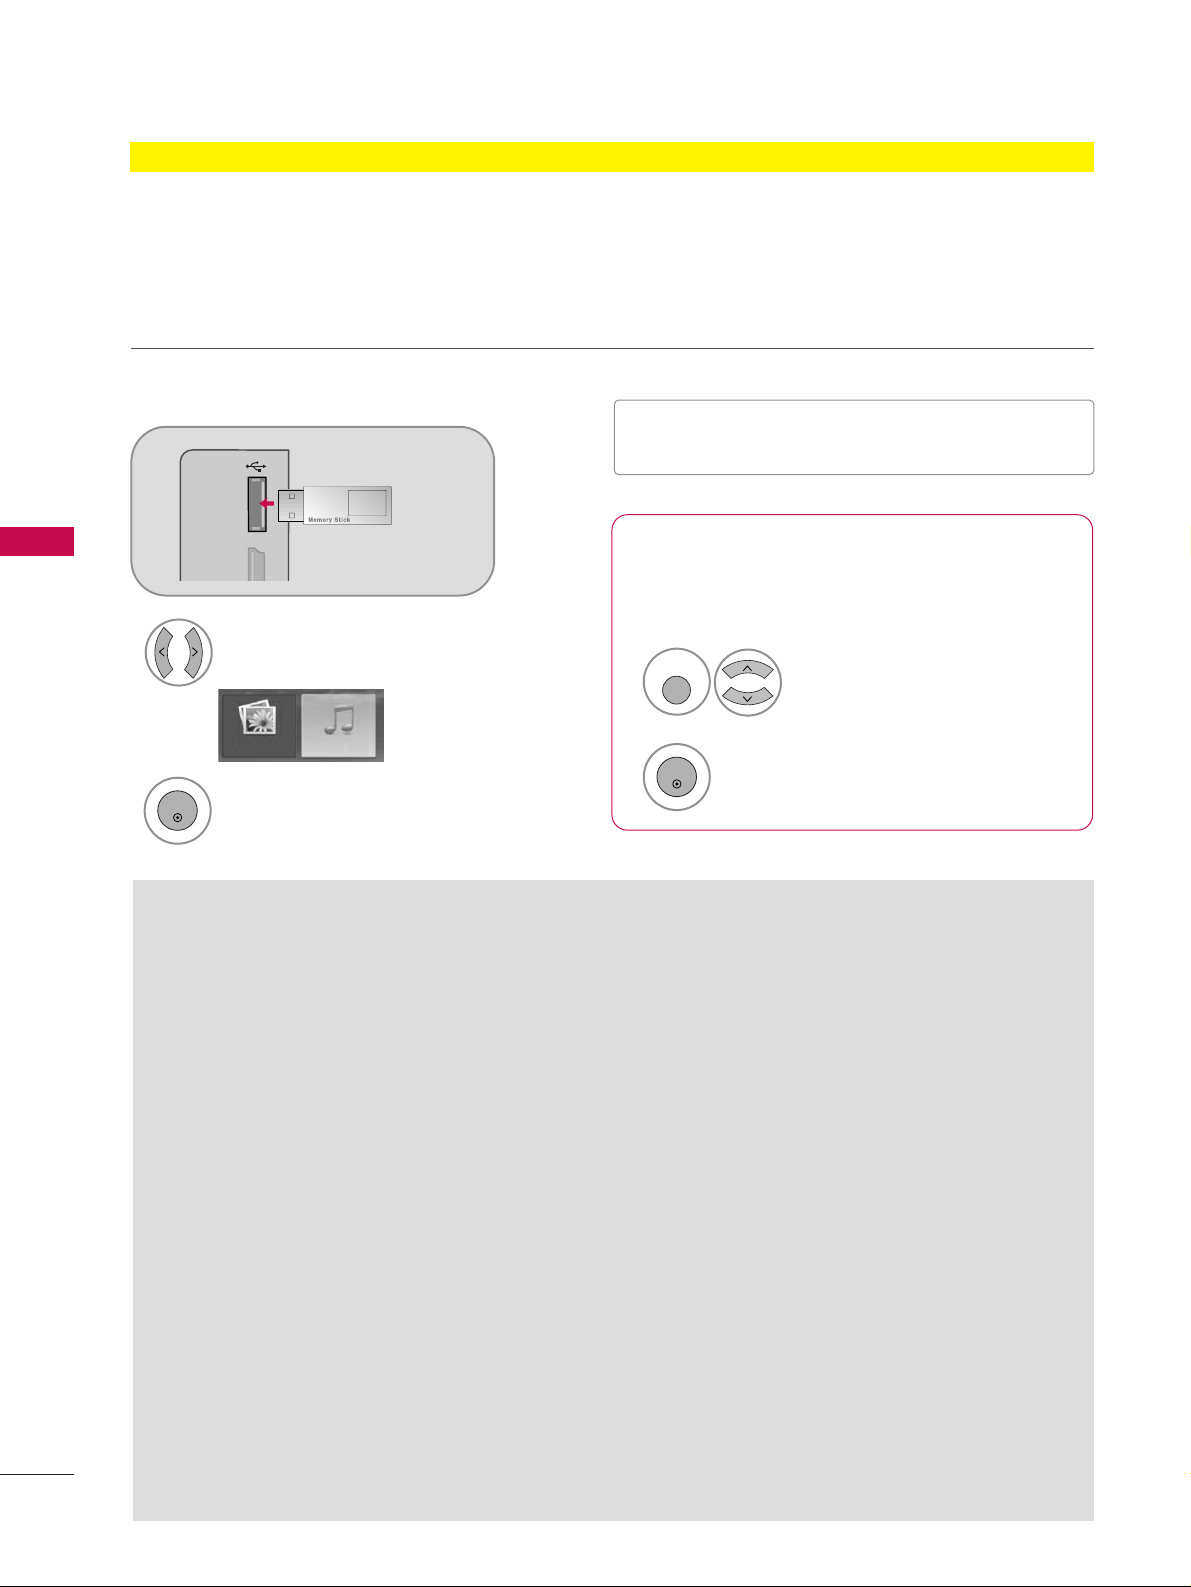
Connect the USB device to the
UU SS BB II NN
jacks on the side of TV.
3
Select
PPHH OOTT OO LL II SS TT orMM UUSS II CC LLIISS TT
1
PHOTO LIST MUSIC LIST
Select
UU SS BB EEjj eecc tt
.
Select the
UU SS BB EEjj eecc tt
menu before removing the
USB device.
2
ENTER
1
Q. MENU
2
ENTER
* Except 32/37/45LG30
■
It doesn’t support USB HDD
■
This TV supports JPG and MP3.
Page 25
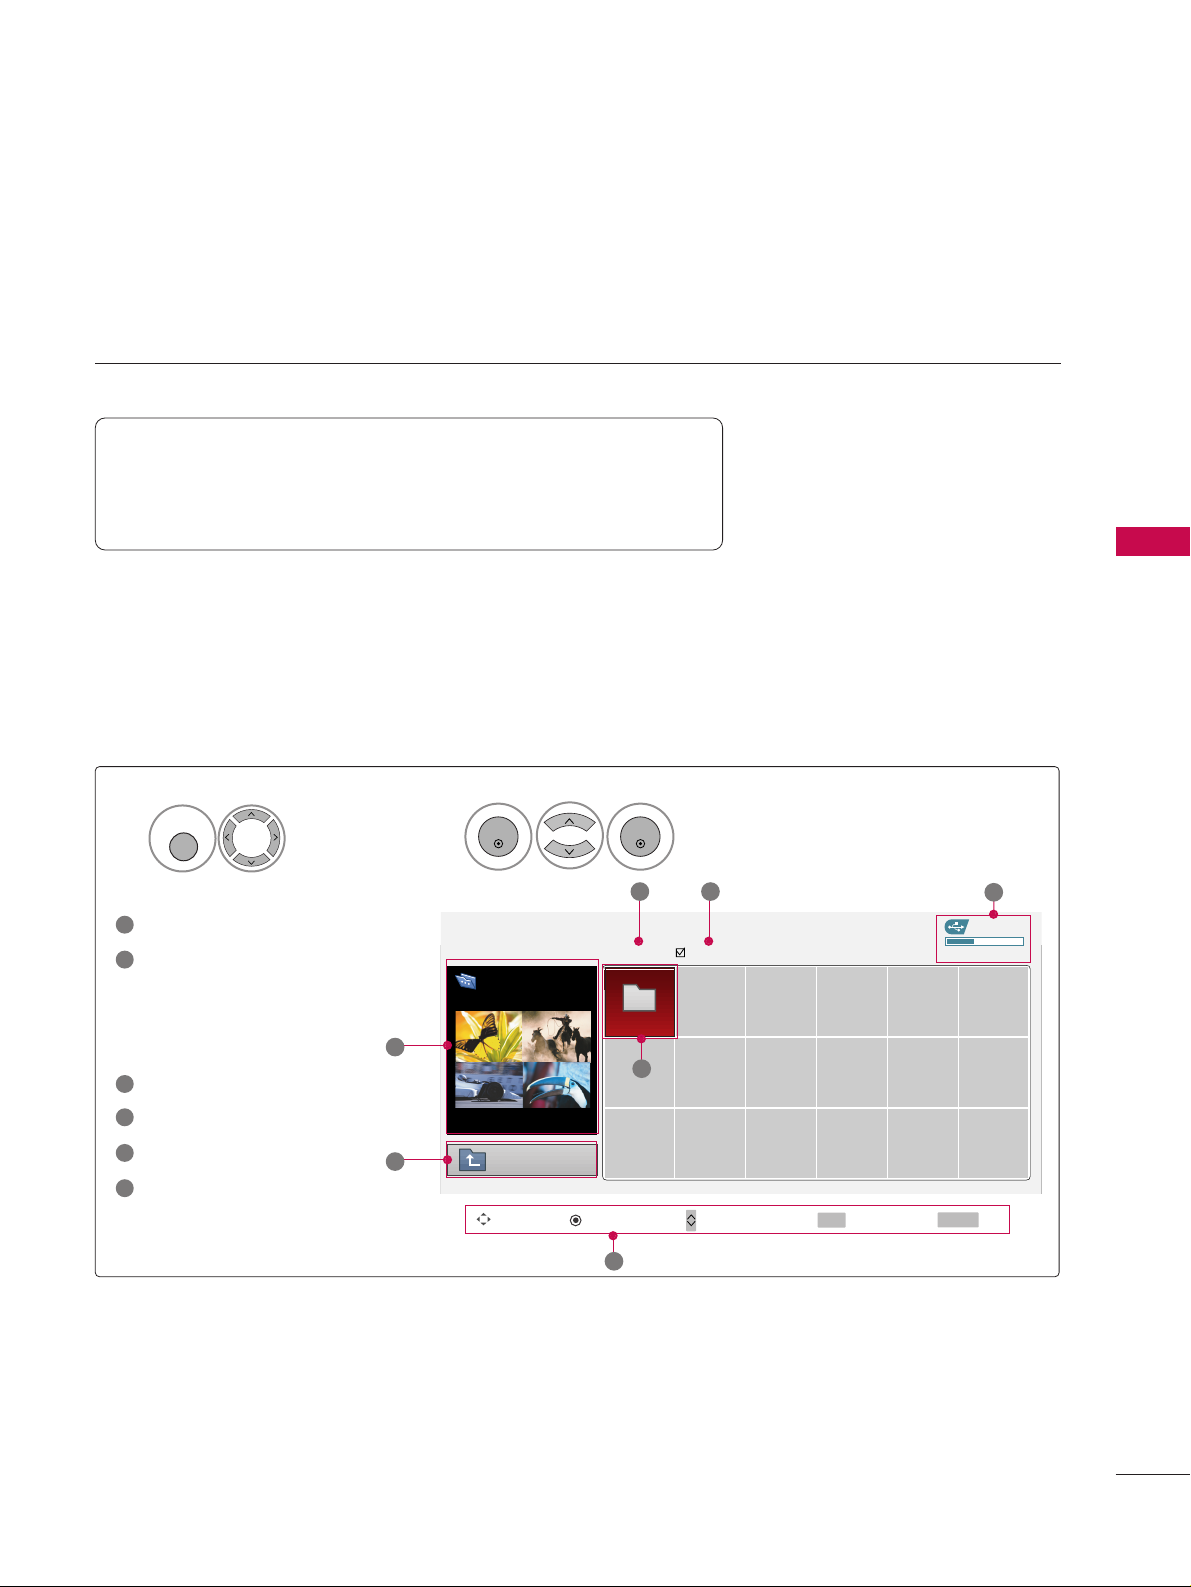
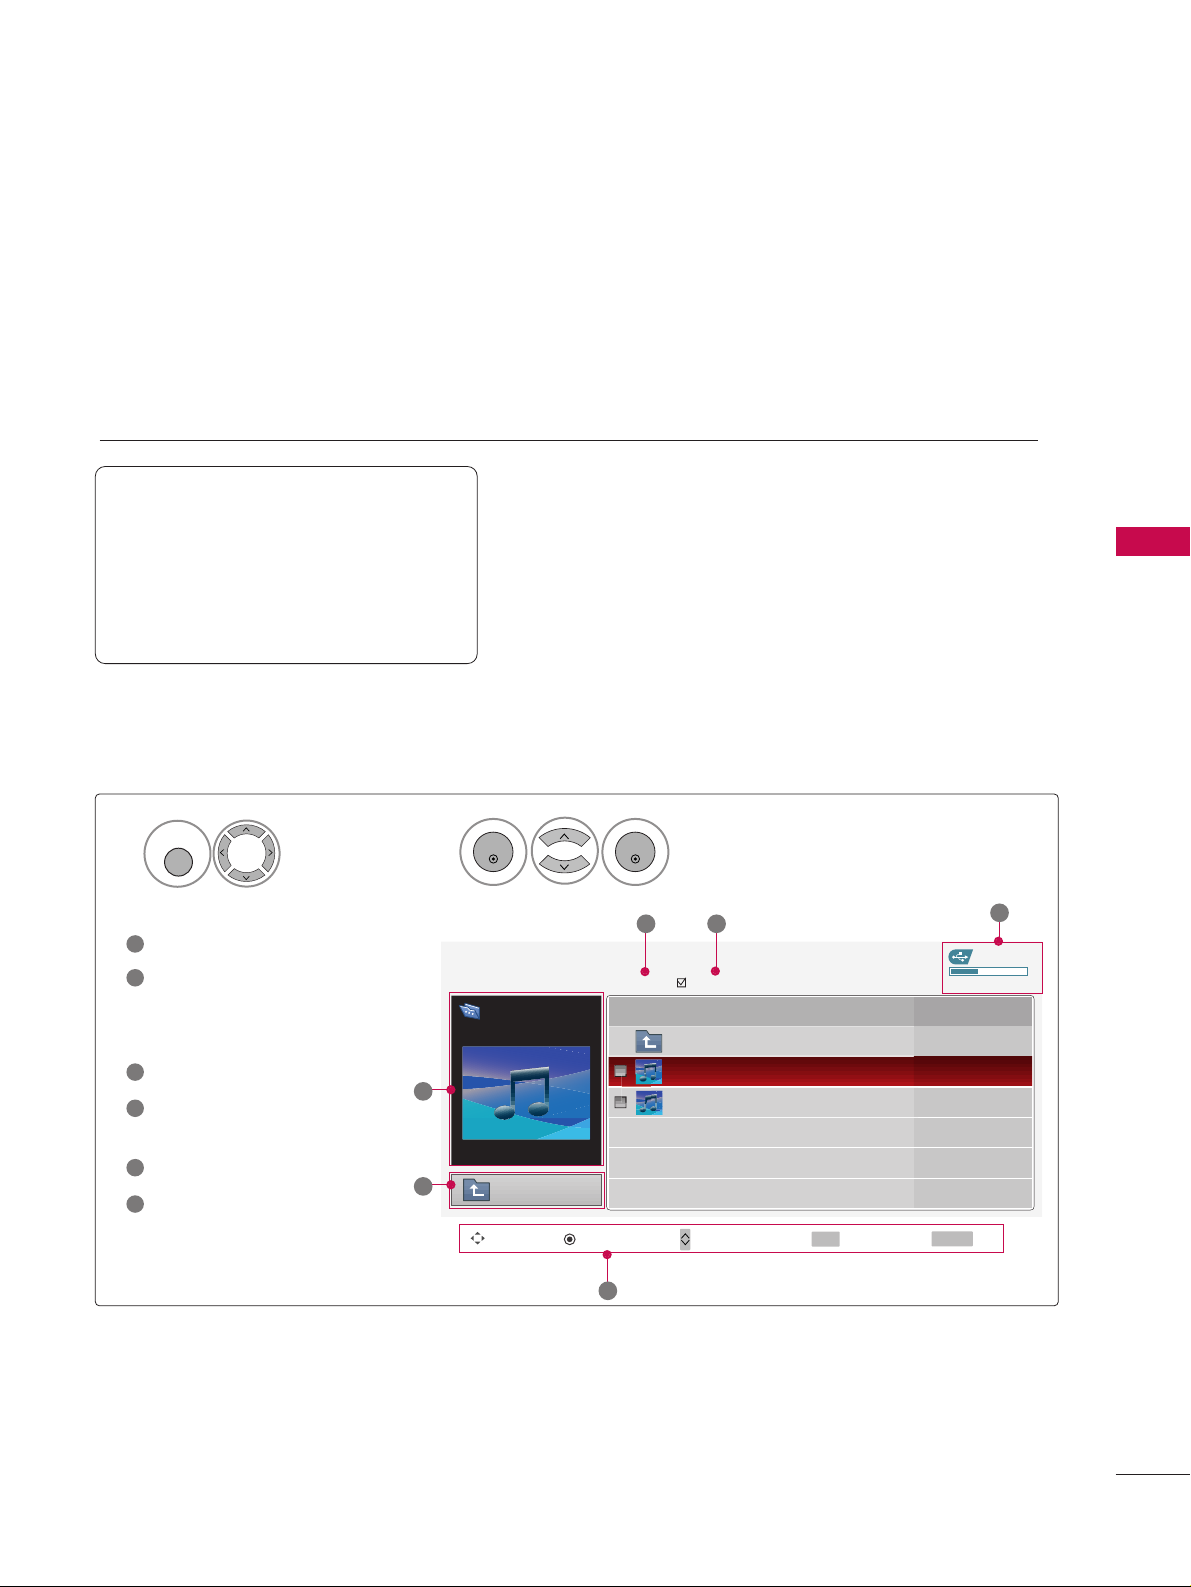
PHOTO LIST
USB
65
You can view .JPG files from USB storage devices.
The On Screen Display on your model may be slightly different.
Screen Components
Moves to upper level file
Preview: Display the
thumbnail/folder name of
the photo in the selected
folder
Current page/Total pages
Total number of marked photos
Usable USB memory
Corresponding buttons on
the remote control
Supported photo file: *.JPG
■
You can play JPG files only.
■
Only baseline scan is supported among JPG.
USB Device
Page 1/1
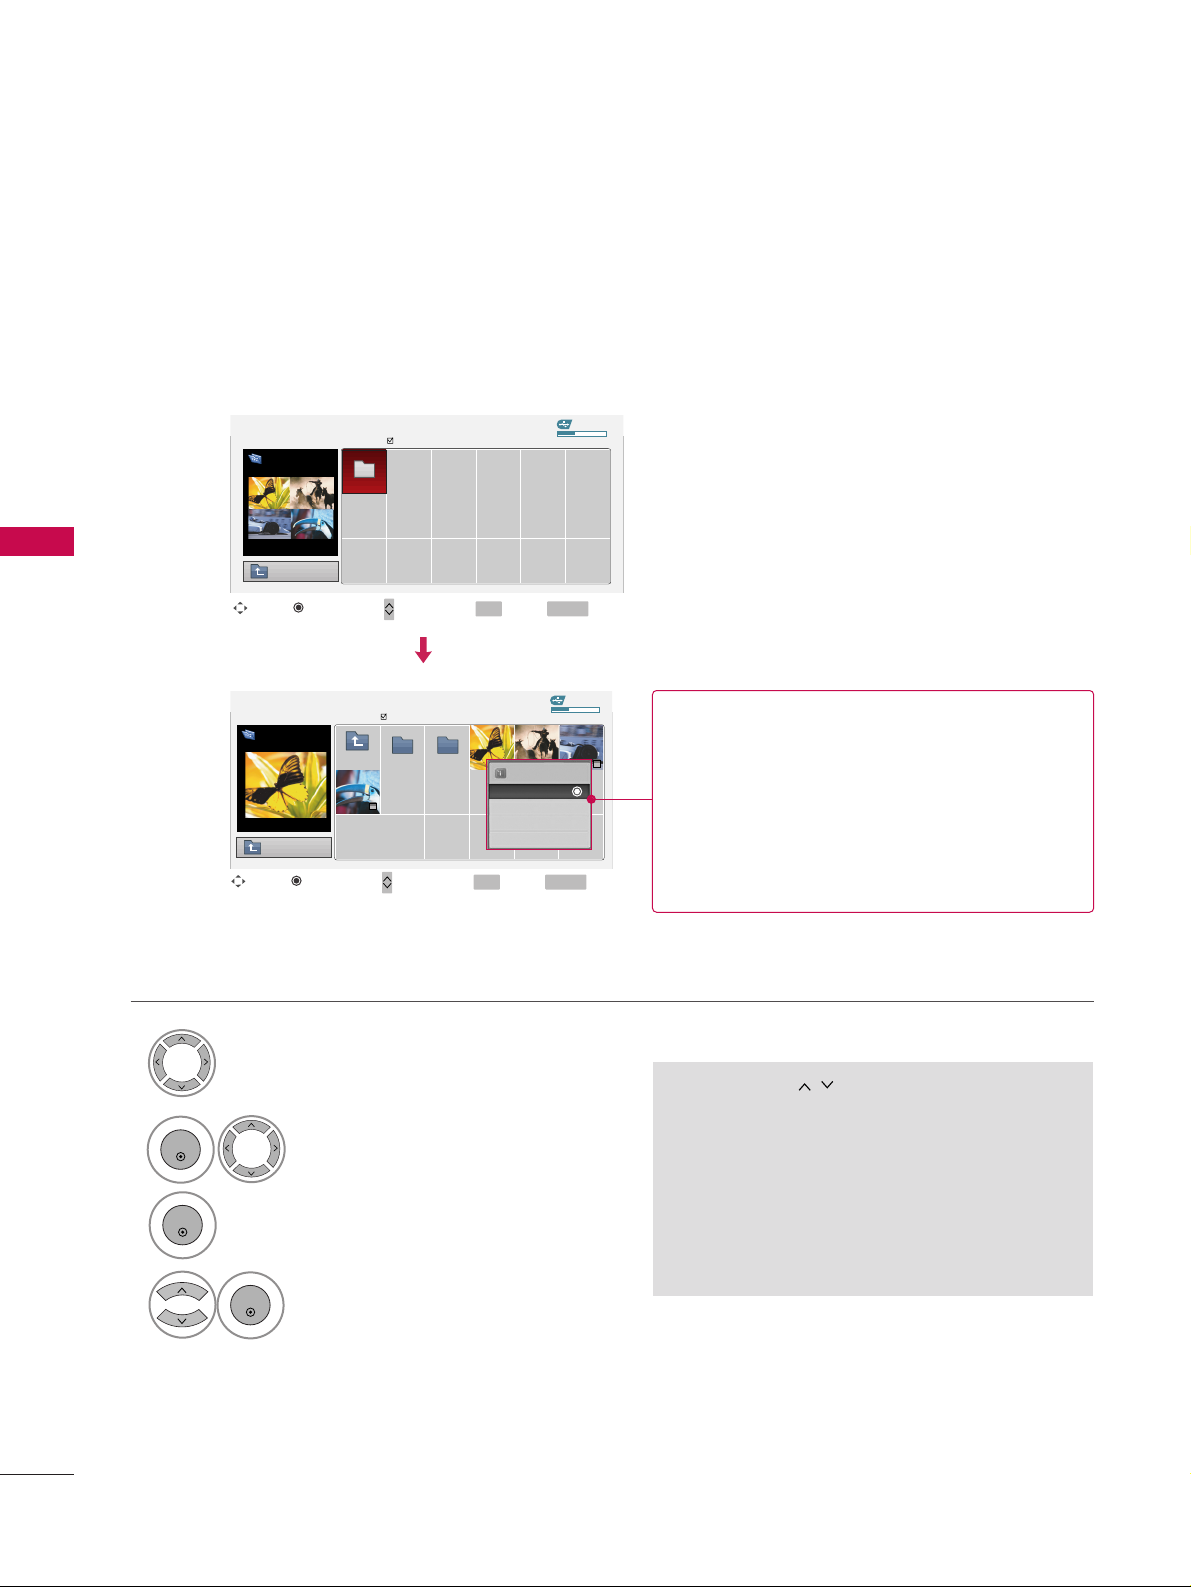
No Marked
PHOTO LIST
Upper
Free Space 150MB
Navigate PopUp Menu Move Page Mark Exit
2Folders, 4Files
3 4
5
1
1
2
Select
UU SSBB
.
Select
PPHH OOTT OO LLIISSTT
.
2
TOP FOLDER
Drive1
1
MENU
ENTER
ENTER
1
2
3
4
5
6
Drive1
CH
FAV
RETURN
6
Page 26
USB
66
USB
Photo Selection and Popup Menu
USB Device
Page 1/1
No Marked
PHOTO LIST
Upper
Free Space 150MB
2Folders, 4Files
USB Device
Page 1/1
No Marked
PHOTO LIST
Upper
Free Space 150MB
1366x768 125KB
Select the target folder or drive.
Select the desired photos.
2
Show the Popup menu.
3
1
■
Use the
CCHH
button to navigation in the
photo page.
■
Use the
FFAAVV
button to mark or unmark a
photo. When one or more photos are marked,
you can view individual photos or a slide show
of the marked photos. If no photos are marked,
you can view all photos individually or all photos in the folder in a slide show.
TOP FOLDER
Drive1
4
Select the desired Popup menu.
ENTER
ENTER
ENTER
Navigate Move Page Mark Exit
CH
FAV
RETURN
PopUp Menu
Navigate Move Page Mark Exit
CH
FAV
RETURN
PopUp Menu
Drive1
Drive1
Butterfly
Upper Photo X.Box
1366x768
125KB
View
Mark All
Delete
Cancel
When you select a file (not folder), this PopUp
menu is displayed.
GG
VViieeww
: Display the selected item.
GG
MMaarrkk AAllll
: Mark all photos on the screen.
GG
UU nn mm aa rr kk AAllll
: Deselect all marked photos.
GG
DD eellee ttee
: Delete the selected photo item.
GG
CCaa nncceell
: Close the pop-up menu.
Page 27

USB
67
Full Screen Menu
You can change the Photo List view so that it fills the screen. More operations are available in full
screen mode.
■
Use the
CCHH
button to navigation in the
photo page.
The aspect ratio of a photo may change the size of
the photo displayed on the screen in full size.
1/17
Sideshow BGM Delete Option Hide
Select the target folder or drive.
Select the desired photos.
Show the Popup menu.
5
Select
VV iieeww
.
The selected photo is displayed in
full size.
2
3
1
4
ENTER
ENTER
ENTER
USB Device
Page 1/1
No Marked
PHOTO LIST
Upper
Free Space 150MB
2Folders, 4Files
USB Device
Page 1/1
No Marked
PHOTO LIST
Upper
Free Space 150MB
1366x768 125KB
TOP FOLDER
Drive1
Navigate Move Page Mark Exit
CH
FAV
RETURN
PopUp Menu
Navigate Move Page Mark Exit
CH
FAV
RETURN
PopUp Menu
Drive1
Drive1
Butterfly
Upper Photo X.Box
1366x768
125KB
View
Mark All
Delete
Cancel
Page 28

USB
68
USB
1/17
Sideshow BGM Delet e Option Hide
Select the
SSiiddeesshhooww, BBGGMM
,
((RRoottaattee))
,
DDeell ee ttee,OOppttiioonn
, or
HHiiddee..
Press
FF GG
to set the time interval between slides.
Slide Speed
Fast
Cancel
...
Music Folder
ENTER
■
Use button to select the previous or
next photo.
■
Use button to select and control
the menu on the full-sized screen.
ENTER
6
GG
SSii ddeesshhooww
: Selected photos are displayed during the
slide show. If no photo is selected, all photos in the current folder are displayed during slide show.
■
Set the time interval of the slide show in
OOpptt iioonn
.
■
A slide show continues for a maximum of 4 hours.
After 4 hours, the slide show will end and go to TV
mode or external input mode.
GG
BB GG MM
: Listen to music while viewing photos in full size.
■
Set the BGM device and album in
OOpptt iioonn
.
GG
((RRoo ttaatt ee))
: Rotate photos.
■
Rotates the photo 90°, 18 0 °, 270°, 360° clockwise.
GG
DD eellee ttee
: Delete photos.
GG
OOpptt iioonn
: Set values for
SSll iiddee SS ppeeee dd
and
MM uussii cc
FFooll ddeerr
.
■
Use button and
EENN TTEE RR
button to set values.
Then go to and press
EENN TTEE RR
to save the set-
tings.
■
You cannot change
MM uussiicc FFooll dd eerr
while BGM is
playing.
GG
HH iiddee
: Hide the menu on the full-sized screen.
■
To see the menu again on the full-sized screen, press
EENN TTEERR
button to display.
NOTE
!
GG
This TV will not be able to decode
most JPEG images saved using the
Progressive option.
Page 29
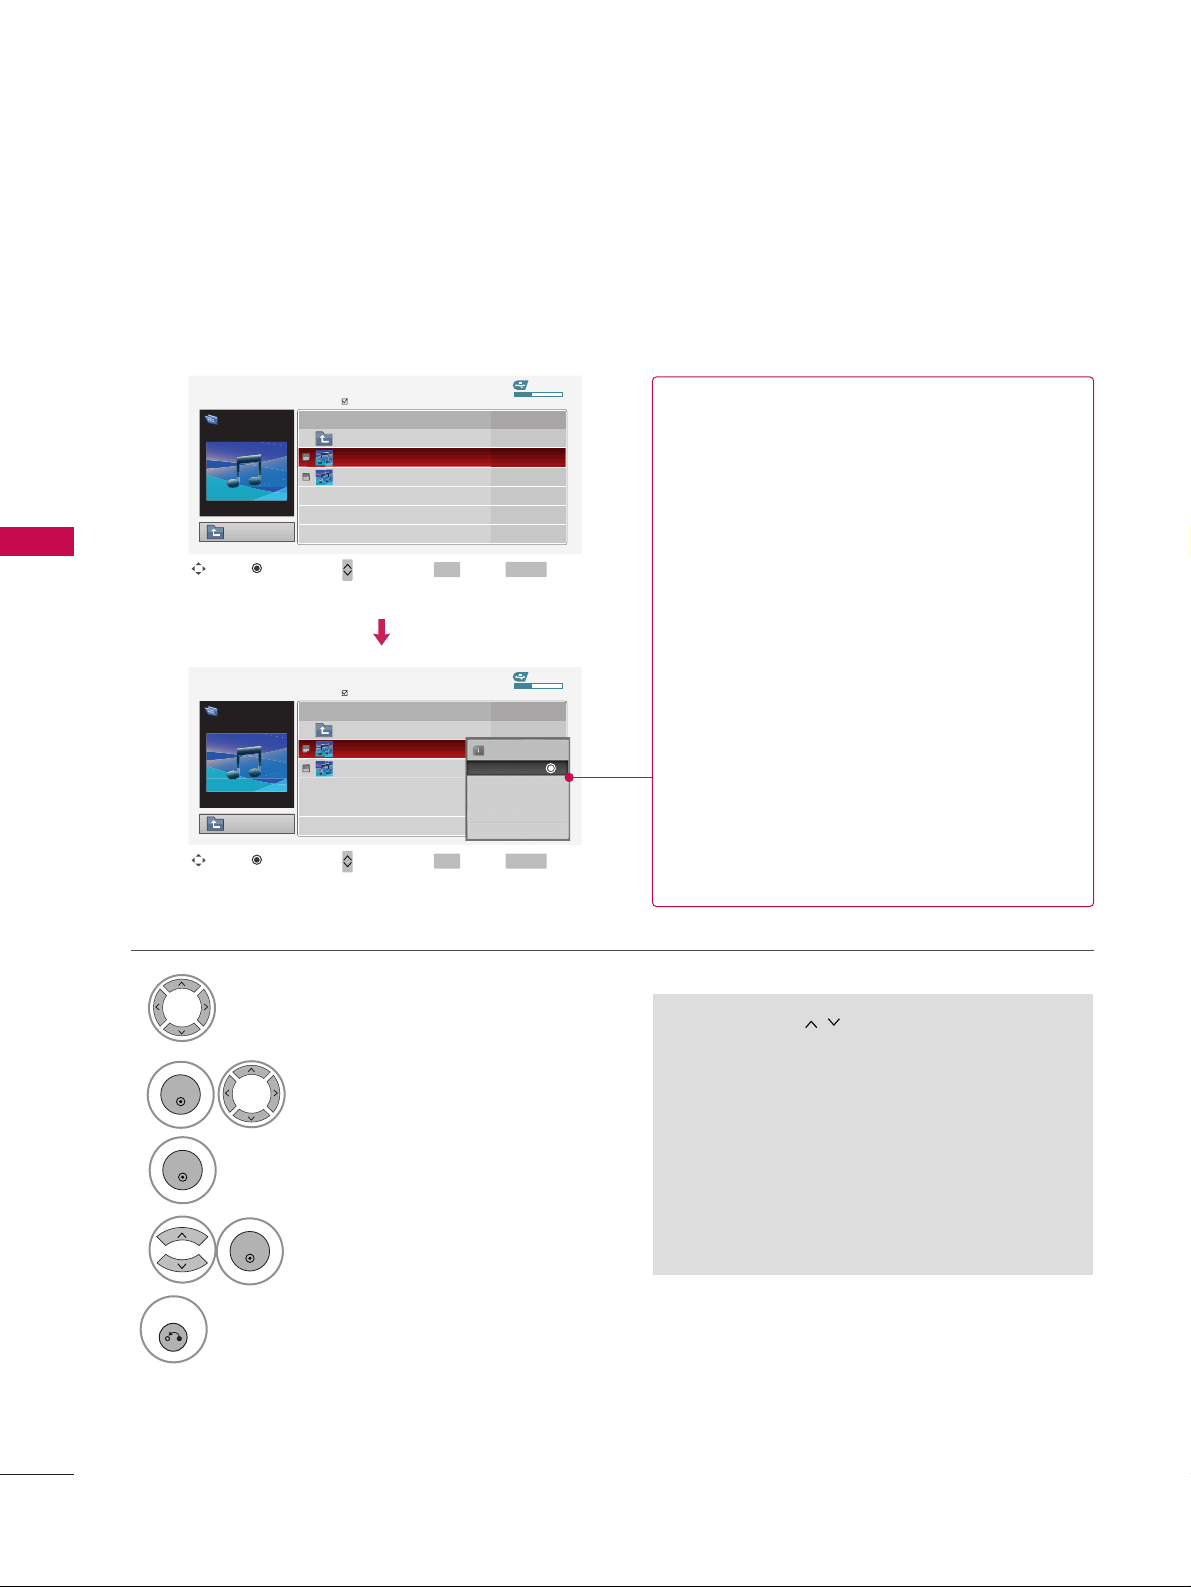
MUSIC LIST
USB
69
You can use the Music List menu to play MP3 files form a USB storage device.
This TV cannot play back copy-protected files.
The On Screen Display on your model may be slightly different.
Screen Components
Supported music file: *.MP3
Bit rate range 40Kbps ~ 320Kbps
• Sampling rate (Sampling Frequency)
MPEG1 : 32000, 44100, 48000Hz
MPEG2 : 16000, 24000, 22050Hz
MPEG2.5 : 16 ~ 48KHz
Moves to upper level file
Preview: If any album jacket
for the file exists, this jacket is displayed.
Current page/Total pages
Total number of marked
musics
Usable USB memory
Corresponding buttons on
the remote control
1
3
4
5
6
2
Select
UU SSBB
.
Select
MM UUSSIICC LLIISSTT
.
1
2
MENU
ENTER
ENTER
USB Device
MUSIC LIST
Upper
Free Space 150MB
3945 KB, 128 Kbps
Title Play Time
Upper
Good Bye
Arirang 04:12
05:30
3 4
5
1
2
Navigate PopUp Menu Move Page Mark Exit
CH
FAV
RETURN
6
Page 1/1
No Marked
Drive1
Arirang
Page 30
USB
USB
70
Music Selection and Popup Menu
■
Use the
CCHH
button to navigation in
the music page.
■
Use
FFAA VV
button to mark or unmark a music
file. If no music is marked, all the music in the
folder will be played in sequence. When one or
more music files are marked, the marked music
files will be played in sequence. If you want to
listen to only one song repeatedly, just mark
that one file and play.
Up to 6 music titles are listed per page.
Select the target folder or drive.
Select the desired musics.
Show the Popup menu.
Select the desired Popup menu.
2
3
1
4
ENTER
ENTER
ENTER
5
RETURN
Return to TV viewing
USB Device
Page 1/1
No Marked
MUSIC LIST
Upper
Free Space 150MB
3945 KB, 128 Kbps
Drive1
Arirang
Navigate Move Page Mark Exit
CH
FAV
RETURN
PopUp Menu
Play TimeTitle
Upper
Good Bye
Arirang
USB Device
Page 1/1
No Marked
MUSIC LIST
Upper
Free Space 150MB
3945 KB, 128 Kbps
Drive1
Arirang
Navigate Move Page Mark Exit
CH
FAV
RETURN
PopUp Menu
Play TimeTitle
Upper
Good Bye
Arirang
05:30
04:12
3945 KB
128 Kbps
Play
Play with Photo
Mark All
Delete
Cancel
GG
PPll aa yy
(During stop): Play the selected music.
Once a song finishes playing, the next selected
one will be played. When there are no selected
musics to play, the next one in the current folder will be played. If you go to a different folder
and press the
EENN TTEE RR
button, the current
music in playback will stop.
GG
PPll aa yy MMaarr kkee dd
: Play the selected musics. Once
a music finishes playing, the next selected one
will be played automatically.
GG
SSttoopp PPll aa yy
(During playback): Stop the play-
ing musics.
GG
PPll aa yy wwii tthh PP hhoottoo
: Start playing the selected
musics and then move to the Photo List.
GG
MM aa rr kk AAllll
: Mark all musics in the folder.
GG
UU nn mm aa rr kk AAllll
: Deselect all marked music.
GG
DD eellee ttee
: Delete the selected music.
GG
CCaa nncceell
: Close the pop-up menu.
Page 31

USB
71
■
The play information box (as shown below) will automatically
move across the screen when there is no user input to prevent a fixed image remaining on the screen for a extended
period of time.
NOTE
!
GG
When music is playing, is displayed in front of the music play time.
GG
A damaged or corrupted music file that does not play displays 00:00 as the play time.
GG
Music files with copy-protection will not play.
GG
Press
EENN TTEE RR
, AA, or
RR EETT UURRNN
button to stop the screen saver.
GG
This TV can not play music files less than 16 Kbytes.
Page 32

PICTURE CONTROL
72
PICTURE SIZE (ASPECT RATIO) CONTROL
PICTURE CONTROL
This feature lets you choose the way an analog picture with a 4:3 aspect ratio is displayed on your TV.
■
RGB-PC input source use 4:3 or 16:9 aspect ratio.
NOTE
!
GG
If a fixed image is displayed on the screen for a long time, the image could become imprinted on the
screen and remain visible.
This phenomenon is common to all manufacturers and is not covered by warranty. Although, after watching video that did not fill the screen, any after-image from the black bars will normally dissipate after a few
minutes.
■
You can also adjust
AA ssppee cctt RR aa ttii oo
in
the
QQ -- MM ee nnuu
.
Enter
Move
PICTURE
E
Enter
Move
PICTURE
E
RG
Aspect Ratio : 16:9
Picture Mode : Standard
• Backlight 80
• Contrast 90
• Brightness 50
• Sharpness 60
• Color 60
• Tint 0
Aspect Ratio : 16:9
Picture Mode : Standard
• Backlight 80
• Contrast 90
• Brightness 50
• Sharpness 60
• Color 60
• Tint 0
RG
Set By Program
4:3
16:9
Zoom1
Zoom2
Just Scan
Select
PPIICCTT UURREE
.
Select
AA ssppee cctt RR aa ttii oo
.
Select the desired picture format.
1
MENU
3
2
ENTER
ENTER
4
RETURN
Return to the previous menu.
MENU
Return to TV viewing.
Page 33

PICTURE CONTROL
73
Set by program
Selects the proper picture proportion to match
the source’s image.
4:3
Choose 4:3 when you want to view a picture
with an original 4:3 aspect ratio.
16:9
Adjust the picture horizontally, in a linear proportion to fill the entire screen.
Zoom 1
Choose Zoom 1 when you want to view the picture without any alteration. However, the top and
bottom portions of the picture will be cropped.
Zoom 2
Choose Zoom 2 when you want the picture to be
altered, both vertically extended and cropped.
The picture taking a halfway trade off between
alteration and screen coverage.
Just Scan
Normally the edges of video signals are cropped
1-2%. Just Scan turns off this cropping and
shows the complete video.
Notes: If there is noise on the edges of the original
signal, it will be visible when Just Scan is activated.
JJuusstt SSccaann
operates only in
DTV/CADTV/Component/HDMI-DTV/DVI-DTV
(720p/1080i/1080p) input source.
(4:3 4:3)
(16:9 16:9)
Page 34

PICTURE CONTROL
74
PRESET PICTURE SETTINGS
PICTURE CONTROL
Picture Mode - Preset
There are factory presets for picture settings available in the user menus. You can use a preset, change each
setting manually, or use the Intelligent Sensor.
Enter
Move
PICTURE
E
Select
PPIICCTT UURREE
.
Select
PPii cc ttuu rree MMooddee
.
Select
IInntteelllliiggeenntt SSeennssoorr
(Except
32/37/42LG30, Plasma TV),
VV iivviidd
,
SSttaannddaarrdd, CCiinneemm aa// CCiinnee mm aa
(Only for 50/60PG60, 50/60PG70) ,
SSppoo rr tt
, or
GGaammee
.
■
When selecting
IInntteellll iiggeenntt SS eennssoorr
(Except 32/37/42LG30, Plasma TV),
the most suitable picture is automatically
adjusted according to the surrounding
conditions.
■
VV ii vviidd, SStt aa nnddaa rr dd, CCii nneemmaa //
CCiinneemm aa, SSppoo rr tt
, and
GGaammee
Settings are
preset for the optimum picture quality at
the factory and are not adjustable.
■
You can also adjust
PPii cc ttuu rree MMooddee
in
the
QQ .. MMeenn uu
.
■
Cinema (Only for 50/60PG60,
50/60PG70): This is cinema quality
mode to provide you the experience of
watching a movie at home. The user will
be able enjoy the best level of satisfactory screen quality in any movie without
any separate adjustments. Cinema
expresses the optimal screen quality
when it is darkest.
■
When selecting
CCii nnee mm aa
, Aspect
ratio changes to Just scan.
■
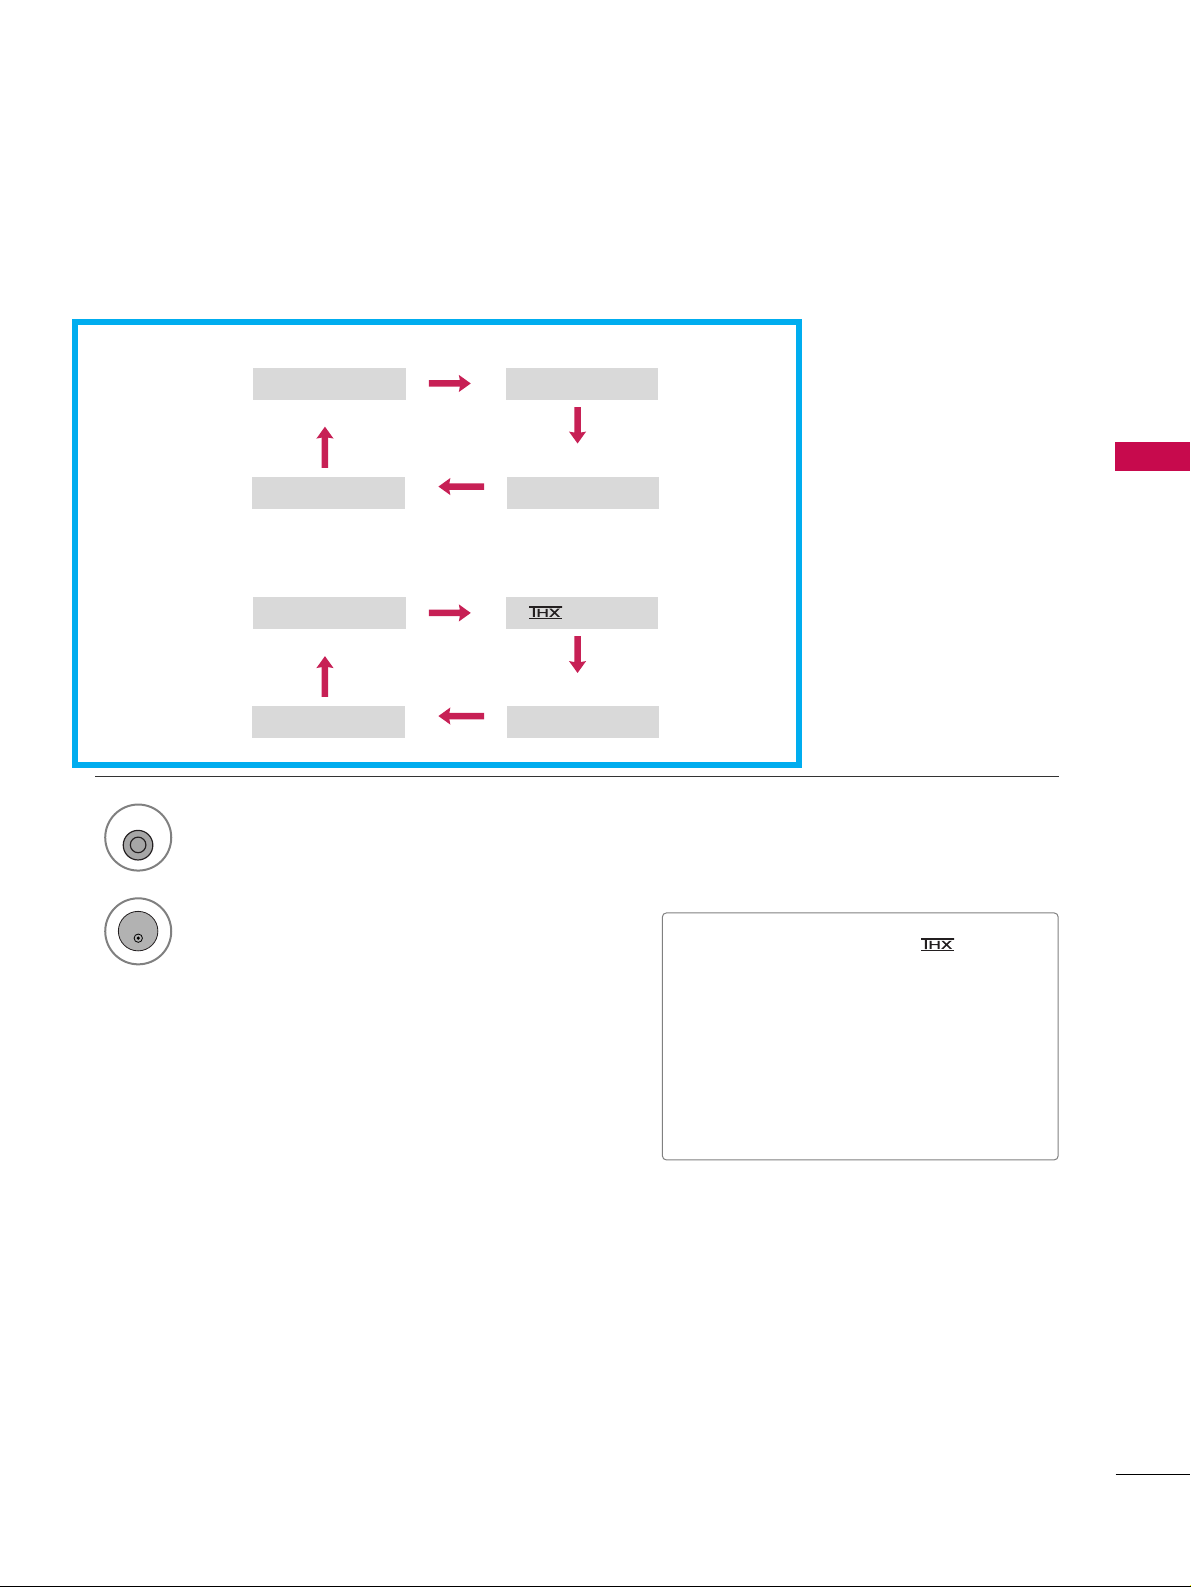
(Thomlinson Holman’s Experiment) is the
audio and video certification standard of THX
established by George Lucas, who directed the
movie Star Wars, and Thomlinson.
This is the product to be certified in THX display
area and guarantees screen quality that exceeds the
display standard specification in both hardware and
software.
1
MENU
3
2
ENTER
ENTER
Aspect Ratio : 16:9
Picture Mode : Standard
• Backlight 80
• Contrast 90
• Brightness 50
• Sharpness 60
• Color 60
• Tint 0
RG
Intelligent Sensor
Vivid
Standard
Cinema
Sport
Game
Expert1
Expert2
Vivid
Standard
Cinema
Sport
Game
Expert1
Expert2
Vivid
Standard
Cinema
Sport
Game
Expert1
Expert2
4
RETURN
Return to the previous menu.
MENU
Return to TV viewing.
32/37/42LG30,
42/50PG25
50/60PG60,
50/60PG70
37/42/47/52LG50,
32/37/42/47/52LG60,
32/42/47/52LG70,
42LGX, 47LG90
Page 35

PICTURE CONTROL
75
Color Tone - Preset
Choose one of three automatic color adjustments. Set to warm to enhance hotter colors such as red, or set to
cool to see less intense colors with more blue.
Enter
Move
PICTURE
E
Select
PPIICCTT UURREE
.
Select
CCoo lloorr TT eemmppee rraatt uurree
.
1
MENU
3
ENTER
Select
CCooooll, MM eeddii uumm
, or
WWaarrmm
.
4
• Brightness 50
• Sharpness 60
• Color 60
• Tint 0
• Advanced Control
• Reset
Screen (RGB-PC)
TruMotion Demo
Select
AA ddvv aa nn ccee dd CC oonn ttrr oo ll
.
2
ENTER
5
RETURN
Return to the previous menu.
MENU
Return to TV viewing.
RG
Enter
Move
PICTURE
E
• Brightness 50
• Sharpness 60
• Color 60
• Tint 0
• Advanced Control
• Reset
Screen (RGB-PC)
TruMotion Demo
RG
Color Temperature
FF
Medium
GG
Fresh Contrast
Off
Fresh Color
Off
Noise Reduction
Off
Gamma
Medium
Black Level
Low
Eye Care
Off
Real Cinema
Off
TruMotion
High
Close
Page 36

PICTURE CONTROL
76
MANUAL PICTURE ADJUSTMENT
PICTURE CONTROL
Picture Mode - User Mode
Adjust the picture appearance to suit your preference and viewing situations.
LCD TV only: This feature is disable in “
PPiiccttuu rr ee MMoodd ee--IInntteellllii ggeenntt SSeennssoo rr
”.
50/60PG60, 50/60PG70 only: This feature is disabled in “
PPiicctt uu rree MMooddee-- CCiinnee mm aa
”.
Enter
Move
PICTURE
Select
PPIICCTT UURREE
.
Make appropriate adjustments.
Select
BB aa cckklliigg hhtt
(Only LCD TV),
CCoonntt rraasstt
,
BB rr iigghh ttnneessss, SShhaarrppnnee ssss, CCoolloorr
, or
TT iinn tt
.
1
MENU
Select
PPii cc ttuu rree MMooddee
.
2
ENTER
Select
VV iivviidd,SSttaannddaarrdd, CCiinneemm aa, SSppoo rr tt
, or
GGaammee
.
3
ENTER
4
ENTER
5
ENTER
E
Aspect Ratio : 16:9
Picture Mode : Standard
• Backlight 80
• Contrast 90
• Brightness 50
• Sharpness 60
• Color 60
• Tint 0
RG
• Backlight 80
EE
EE
EE
EE
Enter
6
RETURN
Return to the previous menu.
MENU
Return to TV viewing.
Page 37

PICTURE CONTROL
77
Select your desired menu option.
Select
PPIICCTT UURREE
.
Select
PPii cc ttuu rree MMooddee
.
Select
EExxppeerrtt CCoo nntt rrooll
.
Select
EExxppee rr tt11
or
EExxppee rr tt22
.
1
MENU
3
2
ENTER
ENTER
4
ENTER
5
ENTER
Make appropriate adjustments.
6
Picture Mode - Expert Control
By segmenting categories,
EExx ppee rrtt11
and
EExx ppee rrtt22
provide more categories which users can set as they see
fit, offering the optimal picture quality for users.
Enter
Move
PICTURE
E
Aspect Ratio : 16:9
Picture Mode : Standard
• Backlight 80
• Contrast 90
• Brightness 50
• Sharpness 60
• Color 60
• Tint 0
RG
Sport
Game
Expert1
Expert2
7
RETURN
Return to the previous menu.
MENU
Return to TV viewing.
Enter
Move
PICTURE
E
• Brightness 50
• Sharpness 60
• Color 60
• Tint 0
• Expert Control
• Reset
Screen (RGB-PC)
TruMotion Demo
RG
FF
Off
GG
Fresh Contrast
Noise Reduction
Off
Gamma
Medium
Black Level
Off
Off
Real Cinema
Color Standard
SD
White Balance
Normal
• Method
2 Points
• Red Contrast
50
• Green Contrast
50
• Blue Contrast
50
E
Page 38

PICTURE CONTROL
78
PICTURE IMPROVEMENT TECHNOLOGY
PICTURE CONTROL
Fresh Contrast: Optimizes the contrast automatically according to the brightness of the reflection.
Fresh Color: Adjusts the color of the reflection automatically to reproduce as close as possible natural colors.
Noise Reduction: Removes interference up to the point where it does not damage the original picture.
Gamma: High gamma values display whitish images and low gamma values display high contrast images.
Color Gamut (Only for 47LG90): Select the range of colors that can be expressed.
Select
PPIICCTT UURREE
.
Select
AA ddvv aa nn ccee dd CC oonn ttrr oo ll
.
Select
FFrr eesshh CCoonntt rraasstt, FFrr ee sshh CCooll oorr, NNooii ss ee
RR ee dduu cctt iioonn, GG aa mm mm aa
, or
CCoolloorr GGaammuu tt
.
1
MENU
3
2
ENTER
ENTER
5
RETURN
Return to the previous menu.
MENU
Return to TV viewing.
Select your desired options.
4
Enter
Move
PICTURE
E
• Brightness 50
• Sharpness 60
• Color 60
• Tint 0
• Advanced Control
• Reset
Screen (RGB-PC)
TruMotion Demo
RG
Enter
Move
PICTURE
E
• Brightness 50
• Sharpness 60
• Color 60
• Tint 0
• Advanced Control
• Reset
Screen (RGB-PC)
TruMotion Demo
RG
Color Temperature
Medium
Fresh Contrast
FF
Off
GG
Fresh Color
Off
Noise Reduction
Off
Gamma
Medium
Black Level
Low
Eye Care
Off
Real Cinema
Off
TruMotion
High
Close
Page 39

PICTURE CONTROL
79
ADVANCED CONTROL - BLACK (DARKNESS) LEVEL
Adjusting the contrast and the brightness of the screen using the black level of the screen.
This feature is disabled in DTV and RGB-PC mode.
Select
PPIICCTT UURREE
.
Select
AA ddvv aa nn ccee dd CC oonn ttrr oo ll
.
Select
BB llaacc kk LLee vvee ll
.
1
MENU
3
2
ENTER
ENTER
Select
LL oo ww
or
HH iigg hh
.
4
■
LL oo ww
: The reflection of the screen gets
darker.
■
HH iigg hh
: The reflection of the screen gets
brighter.
■
AA uutt oo
: Realizing the black level of the
screen and set it to High or Low automatically.
5
RETURN
Return to the previous menu.
MENU
Return to TV viewing.
Enter
Move
PICTURE
E
• Brightness 50
• Sharpness 60
• Color 60
• Tint 0
• Advanced Control
• Reset
Screen (RGB-PC)
TruMotion Demo
RG
Enter
Move
PICTURE
E
• Brightness 50
• Sharpness 60
• Color 60
• Tint 0
• Advanced Control
• Reset
Screen (RGB-PC)
TruMotion Demo
RG
Color Temperature
Medium
Fresh Contrast
Off
Fresh Color
Off
Noise Reduction
Auto
Gamma
Medium
Black Level
FF
Low
GG
Eye Care
Off
Real Cinema
Off
TruMotion
High
Close
Page 40

PICTURE CONTROL
80
ADVANCED CONTROL - EYE CARE
-
LCD TV Only
PICTURE CONTROL
Dims extremely bright pictures.
This feature is disabled in “
PPiicctt uu rree MMoodd ee-- VViivv ii dd, CC iinnee mmaa
”.
Select
PPIICCTT UURREE
.
Select
AA ddvv aa nn ccee dd CC oonn ttrr oo ll
.
Select
EEyy ee CC aa rr ee
.
1
MENU
3
2
ENTER
ENTER
Select
OO nn
or
OO ff ff
.
4
5
RETURN
Return to the previous menu.
MENU
Return to TV viewing.
Enter
Move
PICTURE
E
• Brightness 50
• Sharpness 60
• Color 60
• Tint 0
• Advanced Control
• Reset
Screen (RGB-PC)
TruMotion Demo
RG
Enter
Move
PICTURE
E
• Brightness 50
• Sharpness 60
• Color 60
• Tint 0
• Advanced Control
• Reset
Screen (RGB-PC)
TruMotion Demo
RG
Color Temperature
Medium
Fresh Contrast
Off
Fresh Color
Off
Noise Reduction
Off
Gamma
Medium
Black Level
Low
Eye Care
FF
Off
GG
Real Cinema
Auto
TruMotion
High
Close
Page 41

PICTURE CONTROL
81
ADVANCED CONTROL - REAL CINEMA / FILM MODE
Set up the TV for the best picture appearance for viewing movies.
When you operate Real Cinema/Film Mode (3:2 Pull-Down Mode or Cinema Correction Mode), the TV will
adjust 24 fps video from movies to 30 fps video for display.
■
Plasma TV, 32/37/42LG30
This feature operates only in TV (Analog TV/CATV, Digital DTV/CADTV), AV1, AV2, Component 480i/1080i,
and HDMI 1080i mode.
■
37/42/47/52LG50
This feature operates only in TV (Analog TV/CATV, Digital DTV/CADTV), AV1, AV2, Component 480i/1080i,
and HDMI 1080i mode.
This TV ouputs 48Hz in DTV, Component, and HDMI 1080p (24Hz).
■
32/37/42/47/52LG60, 32/42/47/52LG70, 42LGX, 47LG90
This function works with all inputs except PC mode.
Select
PPIICCTT UURREE
.
Select
AA ddvv aa nn ccee dd CC oonn ttrr oo ll
.
Select
RR ee aa ll CCii nnee mm aa
or
FFii llmm
MM ooddee
.
1
MENU
3
2
ENTER
ENTER
Select
OO nn
or
OO ff ff
.
4
5
RETURN
Return to the previous menu.
MENU
Return to TV viewing.
Enter
Move
PICTURE
E
• Brightness 50
• Sharpness 60
• Color 60
• Tint 0
• Advanced Control
• Reset
Screen (RGB-PC)
TruMotion Demo
RG
Enter
Move
PICTURE
E
• Brightness 50
• Sharpness 60
• Color 60
• Tint 0
• Advanced Control
• Reset
Screen (RGB-PC)
TruMotion Demo
RG
Color Temperature
Medium
Fresh Contrast
Off
Fresh Color
Off
Noise Reduction
Off
Gamma
Medium
Black Level
Low
Film Mode
FF
Off
GG
Close
Color Temperature
Medium
Fresh Contrast
Off
Fresh Color
Off
Noise Reduction
Off
Gamma
Medium
Black Level
Low
Eye Care
Off
Real Cinema
FF
Off
GG
TruMotion
High
Close
For Plasma TV
For LCD TV
Real Cinema
On
On
TruMotion
Off
On
Screen
5:5 Pull-Down
3:2 Pull-Down
Page 42

PICTURE CONTROL
82
ADVANCED CONTROL - TRUMOTION
-
Only 37/42/47/52LG60, 42/47/52LG70, 42LGX, 47LG90
TRUMOTION DEMO
-
Only 37/42/47/52LG60, 42/47/52LG70, 42LGX, 47LG90
PICTURE CONTROL
■
HH iigg hh
: Provides smoother picture movement.
■
LL oo ww
: Provides smooth picture movement. Use
this setting for standard use.
■
OO ff ff
: Use this setting when “High”and “Low” set-
ting result in noise.
■
If you enable "TruMotion", noise may appear on
the screen. If this occurs, set "TruMotion" to "Off".
Enter
Move
PICTURE
E
• Brightness 50
• Sharpness 60
• Color 60
• Tint 0
• Advanced Control
• Reset
Screen (RGB-PC)
TruMotion Demo
RG
Enter
Move
PICTURE
E
• Brightness 50
• Sharpness 60
• Color 60
• Tint 0
• Advanced Control
• Reset
Screen (RGB-PC)
TruMotion Demo
RG
Color Temperature
Medium
Fresh Contrast
Off
Fresh Color
Off
Noise Reduction
Off
Gamma
Medium
Black Level
Low
Eye Care
Off
Real Cinema
Off
TruMotion
FF
High
GG
Close
Select
PPIICCTT UURREE
.
Select
AA ddvv aa nn ccee dd CC oonn ttrr oo ll
.
Select
TT rruu MMoott iioonn
.
1
MENU
3
2
ENTER
ENTER
Select
OO ff ff, LL oo ww
, or
HH iigg hh
.
4
5
RETURN
Return to the previous menu.
MENU
Return to TV viewing.
TruMotion On
TruMotion Off
LG’s Advanced TruMotion 120Hz technology provides images whi
Use this feature to see the difference TruMotion makes.
TruMotion works with all inputs except PC mode.
Enter
Move
PICTURE
E
• Brightness 50
• Sharpness 60
• Color 60
• Tint 0
• Advanced Control
• Reset
Screen (RGB-PC)
TruMotion Demo
RG
Select
PPIICCTT UURREE
.
Select
TT rruu MMoottiioonn DD eemmoo
.
1
MENU
2
ENTER
3
4
ENTER
Begin
TT rruu MMoottiioonn DD eemmoo
.
MENU
Stop
TT rruu MMoottiioonn DD eemmoo
.
Exit
RETURN
TruMotion provides even better quality for movies than 3:2 Pull-Down conversions.
TruMotion means the panel supports faster frame rates that normal panels which makes for smoother motion
in video. TruMotion LCD models support 120Hz instead of 60Hz. This means twice the information on the
screen in the same amount of time and easier film conversions (120 is equally divisible by 24, so no interpretations or double frames are needed).
TruMotion works with all inputs except PC mode.
Page 43

PICTURE CONTROL
83
LOCAL DIMMING
-
Only 47LG90
After analyzing the signla of the input video by areas of the screen, it adjusts the brightness to improve the
contrast ratio.
Enter
Move
PICTURE
E
• Color 60
• Tint 0
• Advanced Control
• Reset
Local Dimming : On
Screen (RGB-PC)
TruMotion Demo
Local Dimming Demo
RG
Enter
Move
PICTURE
E
• Color 60
• Tint 0
• Advanced Control
• Reset
Local Dimming : On
Screen (RGB-PC)
TruMotion Demo
Local Dimming Demo
RG
Off
On
Select
PPIICCTT UURREE
.
Select
LLooccaall DDiimm mm iinngg
.
1
MENU
2
ENTER
Select
OO nn
or
OO ff ff
.
3
ENTER
4
RETURN
Return to the previous menu.
MENU
Return to TV viewing.
LOCAL DIMMING DEMO
-
Only 47LG90
Use this feature to see the difference Local Dimming makes.
Select
PPIICCTT UURREE
.
Select
LLooccaall DDiimm mm iinngg DDee mm oo
.
1
MENU
2
ENTER
3
4
ENTER
Begin
LLooccaall DDiimm mm iinngg DDee mm oo
.
MENU
Stop
LLooccaall DDiimm mm iinngg DDee mm oo
.
Enter
Move
PICTURE
E
• Color 60
• Tint 0
• Advanced Control
• Reset
Local Dimming : On
Screen (RGB-PC)
TruMotion Demo
Local Dimming Demo
RG
Local Dimming Demo
Exit
RETURN
Page 44

PICTURE CONTROL
84
PICTURE RESET
PICTURE CONTROL
Settings of the selected picture modes return to the default factory settings.
Select
PPIICCTT UURREE
.
Select
RR eesseett
.
Initialize the adjusted value.
1
MENU
3
2
ENTER
ENTER
4
MENU
Return to TV viewing.
Enter
Move
PICTURE
E
• Brightness 50
• Sharpness 60
• Color 60
• Tint 0
• Advanced Control
• Reset
Screen (RGB-PC)
TruMotion Demo
RG
Enter
Move
PICTURE
E
• Brightness 50
• Sharpness 60
• Color 60
• Tint 0
• Advanced Control
• Reset
Screen (RGB-PC)
TruMotion Demo
RG
Resetting video configuration...
ii
Page 45

PICTURE CONTROL
85
POWER INDICATOR
-
LCD TV Only
Select
OOPP TTII OONN
.
Select
PPoowweerr II nnddiiccaattoorr
.
1
MENU
2
ENTER
Select
SSrr aa rr ttuu pp SS oo uu nn dd,SSttaa nn dd bb yy
LLiigghh tt,PPoowwee rr LLii gghhtt orDDeemmoo MMooddee
.
3
ENTER
Select your desired options.
4
5
RETURN
Return to the previous menu.
MENU
Return to TV viewing.
■
SSttaarrtt uupp SSoouunn dd
: You can turn off the
starting sound of the TV or set the volume.
■
SSttaann ddbbyy LLii gghhtt
: You can set the
brightness of the LED on the front side
of the TV during power standby.
■
PPoowwee rr LLii gghhtt
: You can set the the LED
on the front side of the TV to be turned
on or off while watching the TV.
■
DDeemmoo MMooddee
: You can set the LED on
the front side of the TV to flash.
Enter
Move
OPTION
Language : English
Input Label
SIMPLINK : On
Key Lock : Off
Caption : Off
Set ID : 1
Power Indicator
Initial Setting : Home
Enter
Move
OPTION
Language : English
Input Label
SIMPLINK : On
Key Lock : Off
Caption : Off
Set ID : 1
Power Indicator
Initial Setting : Home
Standby Light
On
Demo Mode
Off
Srartup Sound
Off
Close
FF
Low
GG
Power Light
Only for
32/37/42/47/52LG60,
42 LGX
Page 46

PICTURE CONTROL
86
IMAGE STICKING MINIMIZATION (ISM) METHOD
-
Plasma TV Only
PICTURE CONTROL
A frozen still picture from a PC/video game displayed on the screen for prolonged periods can result in a ghost
image. You can use Orbiter to help prevent image sticking. The other two functions are for removing a ghost
image.
GG
An excessive ghosted image may be impossible to
clear entirely with White Wash. To return to normal viewing, press the any button.
NOTE
!
Enter
Move
OPTION
Language : English
Input Label
SIMPLINK : On
Key Lock : Off
Caption : Off
ISM Method : Normal
Power Saving : Level 0
Set ID : 1
Normal
Orbiter
Inversion
White Wash
EE
■
NNoorr mm aa ll
: If image sticking is never a
problem, ISM is not necessary - set to
Normal.
■
OO rr bbii tt ee rr
: Orbiter may help prevent
ghost images. However, it is best not to
allow any fixed image to remain on the
screen. To avoid a ghost image on the
screen, the image will move every 2 minutes.
■
IInnvv eerrssii oonn
: Inversion will automatically
invert the plasma display panel color
every 30 minutes.
■
WWhh iitt ee WWaa ss hh
: White Wash removes
ghost images from the screen. Use sparingly. Watch the TV normally for a while
before using this feature to see if the
ghost image disappears on its own.
Select
OOPP TTII OONN
.
Select
IISSMM MM eett hhoodd
.
1
MENU
2
ENTER
Select
NNoorr mm aa ll,, OOrr bb iitteerr,,
IInnvv eerrssii oonn
or
WWhhii ttee WW aa sshh ..
3
ENTER
4
RETURN
Return to the previous menu.
MENU
Return to TV viewing.
Enter
Move
OPTION
Language : English
Input Label
SIMPLINK : On
Key Lock : Off
Caption : Off
ISM Method : Normal
Power Saving : Level 0
Set ID : 1
EE
Page 47

PICTURE CONTROL
87
POWER SAVING PICTURE MODE
-
Plasma TV Only
It reduces the plasma display’s power consumption.
Enter
Move
OPTION
Enter
Move
OPTION
Language : English
Input Label
SIMPLINK : On
Key Lock : Off
Caption : Off
ISM Method : Normal
Power Saving : Level 0
Set ID : 1
Language : English
Input Label
SIMPLINK : On
Key Lock : Off
Caption : Off
ISM Method : Normal
Power Saving : Level 0
Set ID : 1
Level 0
Level 1
Level 2
Level 3
Level 4
■
Level 0 is the brightest.
■
Level 0 > Level 1 > Level 2 > Level 3 >
Level 4
■
You can also adjust
PPoowwee rr SSaavv iinngg
in
the
QQ .. MMeenn uu
.
EE
EE
Select
OOPP TTII OONN
.
Select
PPoowwee rr SS aa vvii nngg
.
1
MENU
2
ENTER
Select
LLeevv eell 00, LLeevv eell 11
,
LLeevv eell 22, LLeevv eell 33
, or
LLeevv eell 44
.
3
ENTER
4
RETURN
Return to the previous menu.
MENU
Return to TV viewing.
Page 48

SOUND & LANGUAGE CONTROL
88
SOUND & LANGUAGE CONTROL
AUTO VOLUME LEVELER (AUTO VOLUME)
Auto Volume makes sure that the volume level remains consistent whether you are watching a commercial or a
regular TV program.
Select
AA UUDD II OO
.
Select
AA uu ttoo VV oo lluummee
.
Select
OO nn
or
OO ff ff
.
Enter
Move
AUDIO
E
LR
Enter
Move
AUDIO
E
LR
1
MENU
3
2
ENTER
ENTER
Auto Volume : Off
Clear Voice : On
Balance 0
Sound Mode : Standard
•
SRS TruSurround XT:
Off
• Treble 50
• Bass 50
• Reset
Auto Volume : On
Clear Voice : On
Balance 0
Sound Mode : Standard
•
SRS TruSurround XT:
Off
• Treble 50
• Bass 50
• Reset
Off
On
4
RETURN
Return to the previous menu.
MENU
Return to TV viewing.
Page 49

SOUND & LANGUAGE CONTROL
89
PRESET SOUND SETTINGS (SOUND MODE)
Sound Mode lets you enjoy the best sound without any special adjustment as the TV sets the appropriate
sound options based on the program content.
SSttaa nn ddaarrdd, MM uuss iicc, CC iinnee mmaa, SSppoorr tt
, and
GG aamm ee
are preset for optimum sound quality at the factory and are
not adjustable.
Select
AA UUDD II OO
.
Select
SSoouunndd MMooddee
.
Select
SStt aa nn dd aa rrdd, MM uussii cc
,
CCiinn ee mm aa, SSppoorr tt
, or
GG aa mm ee
.
1
MENU
3
2
ENTER
ENTER
Enter
Move
AUDIO
E
LR
Enter
Move
AUDIO
E
LR
Auto Volume : Off
Clear Voice : On
Balance 0
Sound Mode : Standard
•
SRS TruSurround XT:
Off
• Treble 50
• Bass 50
• Reset
Auto Volume : Off
Clear Voice : On
Balance 0
Sound Mode : Standard
•
SRS TruSurround XT:
Off
• Treble 50
• Bass 50
• Reset
Standard
Music
Cinema
Sport
Game
■
You can also adjust
SSoouunndd MMooddee
in
the
QQ .. MMeenn uu
.
4
RETURN
Return to the previous menu.
MENU
Return to TV viewing.
Page 50

SOUND & LANGUAGE CONTROL
90
SOUND & LANGUAGE CONTROL
SOUND SETTING ADJUSTMENT - USER MODE
SRS TRUSURROUND XT
Adjust the sound to suit your taste and room situations.
Select
AA UUDD II OO
.
Select
SSoouunndd MMooddee
.
Select
TT rr eebbll ee
or
BB aa ss ss
.
1
MENU
4
2
ENTER
Select
SStt aa nn dd aa rrdd, MM uussii cc
,
CCiinn ee mm aa, SSppoorr tt
, or
GG aa mm ee
.
3
ENTER
ENTER
Enter
Move
AUDIO
LR
E
Auto Volume : Off
Clear Voice : On
Balance 0
Sound Mode : Standard
•
SRS TruSurround XT:
Off
• Treble 50
• Bass 50
• Reset
Enter
Move
AUDIO
LR
E
Auto Volume : Off
Clear Voice : On
Balance 0
Sound Mode : Standard
•
SRS TruSurround XT:
Off
• Treble 50
• Bass 50
• Reset
Select
AA UUDD II OO
.
Select
SSRR SS TT rruu SS uurrrr oouu nndd XXTT
Select
OO nn
or
OO ff ff
.
1
MENU
3
2
ENTER
ENTER
■
SSRR SS TTrr uu SS uurr rroouunndd XXTT
: Takes advantage of
any multi-channel format without needing to
add extra speakers or equipment. Dialog clarity,
bass enrichment, and the addition of stereo
audio enhancement produces an immersive
sound experience from standard stereo material.
6
RETURN
Return to the previous menu.
MENU
Return to TV viewing.
4
RETURN
Return to the previous menu.
MENU
Return to TV viewing.
Close
EE
EE
Treble 50
Bass 50
SRS TruSurround XT
Off
Make appropriate adjustments.
5
ENTER
Page 51

SOUND & LANGUAGE CONTROL
91
CLEAR VOICE
By differentiating the human sound range from others, it improves the sound quality of voices.
■
If you select “
CCllee aa rr VVooiiccee --OO nn
”,
SSRRSS
TT rr uuSS uurrrroouu nndd XXTT
feature will not
work.
■
You can also adjust
CClleeaarr VVooiicc ee
in the
QQ -- MM ee nnuu
.
Enter
Move
AUDIO
E
LR
Enter
Move
AUDIO
E
LR
Auto Volume : Off
Clear Voice : On
Balance 0
Sound Mode : Standard
•
SRS TruSurround XT:
Off
• Treble 50
• Bass 50
• Reset
Auto Volume : Off
Clear Voice : On
Balance 0
Sound Mode : Standard
•
SRS TruSurround XT:
Off
• Treble 50
• Bass 50
• Reset
Off
On
Select
AA UUDD II OO
.
Select
CClleeaarr VV oo iiccee
.
Select
OO nn
or
OO ff ff
.
1
MENU
3
2
ENTER
ENTER
4
RETURN
Return to the previous menu.
MENU
Return to TV viewing.
Page 52

SOUND & LANGUAGE CONTROL
92
BALANCE
SOUND & LANGUAGE CONTROL
Select
AA UUDD II OO
.
Select
BB aa llaanncc ee
.
Make appropriate adjustments.
1
MENU
3
2
ENTER
ENTER
Adjust the left/right sound of speaker to suit your taste and room situations.
Enter
Move
AUDIO
Enter
Move
AUDIO
LR
E
Auto Volume : Off
Clear Voice : On
Balance 0
Sound Mode : Standard
•
SRS TruSurround XT:
Off
• Treble 50
• Bass 50
• Reset
LR
E
Auto Volume : Off
Clear Voice : On
Balance 0
Sound Mode : Standard
•
SRS TruSurround XT:
Off
• Treble 50
• Bass 50
• Reset
Close
EE
EE
Balance 0
LR
4
RETURN
Return to the previous menu.
MENU
Return to TV viewing.
Page 53

SOUND & LANGUAGE CONTROL
93
TV SPEAKERS ON/OFF SETUP
Turn the TV speakers off if using external audio equipment.
Enter
Move
AUDIO
E
Clear Voice : On
Balance 0
Sound Mode : Standard
•
SRS TruSurround XT:
Off
• Treble 50
• Bass 50
• Reset
TV Speaker : On
Select
AA UUDD II OO
.
Select
TT VV SSppee aa kkee rr
.
Select
OO nn
or
OO ff ff
.
1
MENU
3
2
ENTER
ENTER
4
RETURN
Return to the previous menu.
MENU
Return to TV viewing.
LR
Enter
Move
AUDIO
E
Clear Voice : On
Balance 0
Sound Mode : Standard
•
SRS TruSurround XT:
Off
• Treble 50
• Bass 50
• Reset
TV Speaker : On
LR
Off
On
Page 54

SOUND & LANGUAGE CONTROL
94
AUDIO RESET
SOUND & LANGUAGE CONTROL
Settings of the selected Sound Mode return to the default factory settings.
Select
AA UUDD II OO
.
Select
RR eesseett
.
1
MENU
2
ENTER
Initialize the adjusted value.
3
ENTER
Enter
Move
AUDIO
E
LR
Auto Volume : Off
Clear Voice : On
Balance 0
Sound Mode : Standard
•
SRS TruSurround XT:
Off
• Treble 50
• Bass 50
• Reset
Resetting audio configuration...
ii
4
MENU
Return to TV viewing.
Enter
Move
AUDIO
LR
E
Auto Volume : Off
Clear Voice : On
Balance 0
Sound Mode : Standard
•
SRS TruSurround XT:
Off
• Treble 50
• Bass 50
• Reset
Page 55

SOUND & LANGUAGE CONTROL
95
STEREO/SAP BROADCAST SETUP
For Analog only: This TV can receive MTS stereo programs and any SAP (Secondary Audio Program) that accompanies the stereo program if the station transmits an additional sound signal. Mono sound is automatically used
if the broadcast is only in Mono.
Q.Menu
Close
3
16:9
Vivid
Off
Standard
Off
FF
English
GG
Off
Add
Eject
Aspect Ratio
Backlight
Clear Voice
Picture Mode
Sound Mode
Caption
Multi Audio
Sleep Timer
Del/Add/Fav
USB Eject
CH
Select
SSAA PP
.
Select
MM oonnoo, SStt eerreeoo
, or
SSAAPP
.
Return to TV viewing.
1
Q. MENU
3
2
Q. MENU
Select
MM uull ttii AA uuddiioo
.
Select other languages.
Return to TV viewing.
1
Q. MENU
3
2
Q. MENU
Analog TV Digital TV
Q.Menu
Close
3
16:9
Vivid
Off
Standard
Off
FF
English
GG
Off
Add
Eject
Aspect Ratio
Power Saving
Clear Voice
Picture Mode
Sound Mode
Caption
Multi Audio
Sleep Timer
Del/Add/Fav
USB Eject
CH
LCD TVPlasma TV
Page 56

SOUND & LANGUAGE CONTROL
96
AUDIO LANGUAGE
SOUND & LANGUAGE CONTROL
Other languages may be available if a digital signal is provided by the broadcasting station.
This feature operates only in DTV/CADTV mode.
Select
OOPP TTII OONN
.
Select
LLaann gguuaagg ee
.
Select
AA uuddii oo
.
1
MENU
3
2
ENTER
ENTER
Select your desired language:
EEnn gglliiss hh, SSppaa nnii sshh
, or
FFrr ee nn cchh
4
Enter
Move
OPTION
Language : English
Input Label
SIMPLINK : On
Key Lock : Off
Caption : Off
ISM Method : Normal
Power Saving : Level 0
Set ID : 1
Menu
English
Audio
FF
English
GG
Close
Enter
Move
OPTION
E
E
Language : English
Input Label
SIMPLINK : On
Key Lock : Off
Caption : Off
ISM Method : Normal
Power Saving : Level 0
Set ID : 1
5
RETURN
Return to the previous menu.
MENU
Return to TV viewing.
Page 57

SOUND & LANGUAGE CONTROL
97
ON-SCREEN MENUS LANGUAGE SELECTION
The menus can be shown on the screen in the selected language.
Select
OOPP TTII OONN
.
Select
LLaann gguuaagg ee
.
Select
MM ee nn uu
.
1
MENU
3
2
ENTER
ENTER
Select your desired language.
From this point on, the on-screen menus
will be shown in the selected language.
4
Enter
Move
OPTION
Language : English
Input Label
SIMPLINK : On
Key Lock : Off
Caption : Off
ISM Method : Normal
Power Saving : Level 0
Set ID : 1
Enter
Move
OPTION
E
E
Language : English
Input Label
SIMPLINK : On
Key Lock : Off
Caption : Off
ISM Method : Normal
Power Saving : Level 0
Set ID : 1
Menu
FF
English
GG
Audio
English
Close
5
RETURN
Return to the previous menu.
MENU
Return to TV viewing.
Page 58

SOUND & LANGUAGE CONTROL
98
CAPTION MODE
SOUND & LANGUAGE CONTROL
Caption must be provided to help people with hearing loss watch TV. Select a caption mode for displaying captioning information if provided on a program. Analog caption displays information at any position on the screen
and is usually the program's dialog. Caption/Text, if provided by the broadcaster, would be available for both
digital and analog channels on the Antenna/Cable. This TV is programmed to memorize the caption/text mode
which was last set when you turned the power off. This function is only available when
CC aa pptt ii oonn
Mode is set
OO nn
.
Select
OOPP TTII OONN
.
Select
CCaa pp ttii oonn
.
Select
OO nn
.
1
MENU
3
2
ENTER
ENTER
Select
CCCC11-44
or
TT eexxtt 11-44
.
4
Enter
Move
OPTION
Enter
Move
OPTION
Language : English
Input Label
SIMPLINK : On
Key Lock : Off
Caption : Off
ISM Method : Normal
Power Saving : Level 0
Set ID : 1
Language : English
Input Label
SIMPLINK : On
Key Lock : Off
Caption : CC1
ISM Method : Normal
Power Saving : Level 0
Set ID : 1
Mode
CC1
Close
Digital Option
FF
On
GG
Analog Broadcasting System Captions
■
When selecting
OO ff ff
, Sub-menus for
Analog, DTV, and Digital Option
become disabled.
■
CCAAPP TTII OONN
The term for the words that scroll
across the bottom of the TV screen;
usually the audio portion of the program provided for the hearing impaired.
■
TT EEXX TT
The term for the words that appear in a
large black frame and almost cover the
entire screen; usually messages provided by the broadcaster.
E E
5
RETURN
Return to the previous menu.
MENU
Return to TV viewing.
Page 59

SOUND & LANGUAGE CONTROL
99
Digital Broadcasting System Captions
Choose the language you want the DTV/CADTV Captions to appear in.
Other Languages can be chosen for digital sources only if they are included on the program.
This function in only available when Caption Mode is set On.
Select
OOPP TTII OONN
.
Select
CCaa pp ttii oonn
.
Select
OO nn
.
1
MENU
3
2
ENTER
ENTER
Select
CCCC11-44, TT eexxtt 11-44
, or
SSee rr vvii cc ee11- 66
.
4
Enter
Move
OPTION
Enter
Move
OPTION
Language : English
Input Label
SIMPLINK : On
Key Lock : Off
Caption : Off
ISM Method : Normal
Power Saving : Level 0
Set ID : 1
Language : English
Input Label
SIMPLINK : On
Key Lock : Off
Caption : CC1
ISM Method : Normal
Power Saving : Level 0
Set ID : 1
E E
Mode
CC1
Close
Digital Option
FF
On
GG
5
RETURN
Return to the previous menu.
MENU
Return to TV viewing.
Page 60

SOUND & LANGUAGE CONTROL
100
SOUND & LANGUAGE CONTROL
Caption Option
Customize the DTV/CADTV captions that appear on your screen.
This function in only available when Caption Mode is set On.
Enter
Move
OPTION
Enter
Move
OPTION
Language : English
Input Label
SIMPLINK : On
Key Lock : Off
Caption : Off
ISM Method : Normal
Power Saving : Level 0
Set ID : 1
Language : English
Input Label
SIMPLINK : On
Key Lock : Off
Caption : CC1
ISM Method : Normal
Power Saving : Level 0
Set ID : 1
Mode
Service1
Close
Digital Option
FF
On
GG
Select
OOPP TTII OONN
.
Select
CCaa pp ttii oonn
Select
OO nn
.
1
MENU
3
2
ENTER
ENTER
Select
CCuusstt oomm
.
5
ENTER
Customize the
SStt yyllee, FFoonntt
, etc., to your
preference. A preview icon is provided at
the bottom of the screen, use it to see the
caption language.
6
Select
DDiiggii ttaall OOppttiioonn
.
4
Size
A Standard
Font
Font 1
Text Color
White
Text Opacity
Solid
Edge Type
None
Edge Color
Black
Bg Color
Black
Bg Opacity
Solid
Close
FF
Custom
GG
■
SSii zz ee
: Set the word size.
■
FFoonntt
: Select a typeface for the text.
■
TT eexxtt CC oo lloorr
: Choose a color for the
text.
■
TT eexxtt OOppaa ccii ttyy
: Specify the opacity
for the text color.
■
BB gg (( BBaacckk gg rr oouu nn dd )) CCoo lloorr
: Select a
background color.
■
BB gg (( BBaacckk gg rr oouu nn dd )) OOppaa ccii ttyy
: Select
the opacity for the background color.
■
EEddgg ee TTyy ppee
: Select an edge type.
■
EEddgg ee CC ooll oo rr
: Select a color for the
edges.
EE
7
RETURN
Return to the previous menu.
MENU
Return to TV viewing.
Page 61

TIME SETTING
101
CLOCK SETTING
TIME SETTING
Auto Clock Setup
The time is set automatically from a digital channel signal.
The digital channel signal includes information for the current time provided by the broadcasting station.
Set the clock manually if the current time is set incorrectly by the auto clock function.
Enter
Move
TIME
Enter
Move
TIME
Clock :
Feb/21/2008 2:10 AM
Off Time : Off
On Time : Off
Sleep Timer : Off
Auto Sleep : Off
Clock :
Feb/21/2008 2:10 AM
Off Time : Off
On Time : Off
Sleep Timer : Off
Auto Sleep : Off
Year
Month
2
Date
21
Hour
2 AM
2008
Minute
10
Time Zone
Eastern
Daylight
Saving
Auto
Close
FF
Auto
GG
Select
TT II MM EE
.
Select
CClloocc kk
.
Select
AA uutt oo
.
1
MENU
3
2
ENTER
ENTER
Select your viewing area time zone.
• U.S.A:
EE aa ss tt ee rr nn, CCee nn ttrr aa ll, MM oouu nnttaa ii nn
,
PPaaccii ffiicc, AA llaass kkaa
, or
HH aa ww aa iiii
.
• Canada:
EEaasstt ee rr nn, CCee nn ttrraall, MM oo uunntt aa iinn
,
PPaaccii ffiicc, NNee ww FF.. llaanndd
, or
AA ttllaann ttii cc
.
4
Select
AA uutt oo, OO ffff
, or
OO nn
(depending on
whether or not your viewing area observes
Daylight Saving time).
5
6
RETURN
Return to the previous menu.
MENU
Return to TV viewing.
Page 62

TIME SETTING
102
TIME SETTING
Manual Clock Setup
If the current time setting is wrong, set the clock manually.
Enter
Move
TIME
Enter
Move
TIME
Clock :
Feb/21/2008 2:10 AM
Off Time : Off
On Time : Off
Sleep Timer : Off
Auto Sleep : Off
Clock :
Feb/21/2008 2:10 AM
Off Time : Off
On Time : Off
Sleep Timer : Off
Auto Sleep : Off
Year
Month
2
Date
21
Hour
2 AM
2008
Minute
10
Time Zone
Eastern
Daylight
Saving
Auto
Close
FF
Manual
GG
Select
TT II MM EE
.
Select
CClloocc kk
.
Select
MM aa nn uuaall
.
1
MENU
3
2
ENTER
ENTER
Select the Year, Month, Date, Hour, or Minutes
option.
4
Set the Year, Month, Date, Hour, or Minutes
option.
5
6
RETURN
Return to the previous menu.
MENU
Return to TV viewing.
Page 63

TIME SETTING
103
AUTO ON/OFF TIME SETTING
This function operates only if the current time has been set.
The
OOffff TT ii mmee
function overrides the
OOnn TTiimmee
function if they are both set to the same time.
The TV must be in standby mode for the
OOnn TTiimmee
to work.
If you do not press any button within 2 hours after the TV turns on with the
OOnn TT iimmee
function, the TV will
automatically revert to standby mode.
■
To cancel
OOnn // OOff ff TTiimmee
function, select
OO ff ff
.
■
Only for On Time function
Select
IInnppuu tt
.
Select
TTVV, AAVV//AAVV11--22, CCoommppoonneenntt11--22
,
RRGGBB--PPCC
, or
HHDDMMII11--44
.
Enter
Move
TIME
Enter
Move
TIME
Clock :
Feb/21/2008 2:10 AM
Off Time : Off
On Time : Off
Sleep Timer : Off
Auto Sleep : Off
Clock :
Feb/21/2008 2:10 AM
Off Time : Off
On Time : 6:30 AM (Once)
Sleep Timer : Off
Auto Sleep : Off
Repeat
FF
Once
GG
Hour
6 AM
Minute
30
Input
TV
Channel
TV 2-0
Volume
30
Close
Select
TT II MM EE
.
Select
OOff ff ttii mm ee
or
OOnn ttiimm ee
.
Select
RR eeppeeaatt
.
1
MENU
3
2
ENTER
ENTER
Select
OO ff ff, OOnn cc ee, EEvv ee rryy ddaa yy, MM oonn~FFrrii
,
MM oonn~SSaa tt, WWee ee kkee nndd
, or
SSuunn dd aa yy
.
4
Select and set
HH oouu rr
or
MM iinn uuttee
.
5
1
ENTER
3
4
2
When Selecting
TT VV
:
set the channel at turn-on.
Adjust to sound level at
turn-on.
6
RETURN
Return to the previous menu.
MENU
Return to TV viewing.
Page 64

TIME SETTING
104
TIME SETTING
SLEEP TIMER SETTING
The Sleep Timer turns the TV off at the preset time.
Note that this setting is cleared when the TV is turned off.
■
You can also adjust
SSll eeeepp TT iimmee rr
in
the
QQ -- MM ee nnuu
.
Enter
Move
TIME
Enter
Move
TIME
Clock :
Feb/21/2008 2:10 AM
Off Time : Off
On Time : Off
Sleep Timer : Off
Auto Sleep : Off
Clock :
Feb/21/2008 2:10 AM
Off Time : Off
On Time : Off
Sleep Timer : Off
Auto Sleep : Off
Select
TT II MM EE
.
Select
SSll eeeepp TT iimmee rr
.
Select
OO ffff, 11 00, 22 00, 33 00, 66 00, 99 00
,
1122 00, 1188 00
, or
2244 00
minutes.
1
MENU
3
2
ENTER
ENTER
Close
FF
Off
GG
4
RETURN
Return to the previous menu.
MENU
Return to TV viewing.
Page 65

TIME SETTING
105
AUTO SHUT-OFF SETTING
TV will be automatically turned off, in case of no signal for 10 minutes.
Enter
Move
TIME
Enter
Move
TIME
Clock :
Feb/21/2008 2:10 AM
Off Time : Off
On Time : Off
Sleep Timer : Off
Auto Sleep : Off
Clock :
Feb/21/2008 2:10 AM
Off Time : Off
On Time : Off
Sleep Timer : Off
Auto Sleep : On
Select
TT II MM EE
.
Select
AA uu ttoo SSll eeeepp
.
Select
OO nn
or
OO ff ff
.
1
MENU
3
2
ENTER
ENTER
Off
On
TV will be automatically turned off,
in case of No Signal for 10 minutes.
4
RETURN
Return to the previous menu.
MENU
Return to TV viewing.
Page 66

PARENTAL CONTROL / RATING
106
PARENTAL CONTROL / RATINGS
Parental Control can be used to block specific channels, ratings and other viewing sources.
The Parental Control Function (V-Chip) is used to block program viewing based on the ratings sent by the broadcasting station. The default setting is to allow all programs to be viewed. Viewing can be blocked by choosing the
type of the program and the categories. It is also possible to block all program viewing for a time period. To use
this function, the following must be done :
1. Set ratings and categories to be blocked.
2. Specify a password
3. Enable the lock
V-Chip rating and categories
Rating guidelines are provided by broadcasting stations. Most television programs and television movies can be
blocked by TV Rating and/or Individual Categories. Movies that have been shown at the theaters or direct-tovideo movies use the Movie Rating System (MPAA)only.
Ratings for Television programs including made-for-TV movies :
■
TV-G(General audience
)
■
TV-PG(Parental guidance suggested
)
■
TV-14(Parents strongly cautioned
)
■
TV-MA (Mature audience only
)
■
TV-Y(All children
)
■
TV-Y7(Children 7 years older
)
Set up blocking schemes to block specific channels, ratings, and external viewing sources.
A password is required to gain access to this menu.
Setting up Your Password
For USA
Enter
Move
LOCK
Lock System : Off
Set Password
Block Channel
Movie Rating
TV Rating-Children
TV Rating-General
Downloadable Rating
Input Block
For Canada
Enter
Move
LOCK
Lock System : Off
Set Password
Block Channel
TV Rating-English
TV Rating-French
Downloadable Rating
Input Block
Close
Enter Password
* * * *
Select
LLOO CC KK
.
1
MENU
ENTER
Input the password.
2
1
456
7809
23
■
Enter the password as requested.
■
The TV is set up with the initial password “0-0-0-0”.
SET PASSWORD & LOCK SYSTEM
Page 67

PARENTAL CONTROL / RATING
107
Enables or disables the blocking scheme you set up previously.
Lock System
Enter
Move
LOCK
Lock System : Off
Set Password
Block Channel
Movie Rating
TV Rating-Children
TV Rating-General
Downloadable Rating
Input Block
Select
LLoocckk SSyysstt eemm
.
Select
OO nn
or
OO ff ff
.
4
3
ENTER
Enter
Move
LOCK
Lock System : On
Set Password
Block Channel
Movie Rating
TV Rating-Children
TV Rating-General
Downloadable Rating
Input Block
Off
On
■
When you select
OO nn
, the Lock System
is enable.
Select
LLOO CC KK
.
1
MENU
ENTER
Input the password.
2
1
456
7809
23
5
RETURN
Return to the previous menu.
MENU
Return to TV viewing.
Page 68

PARENTAL CONTROL / RATING
108
PARENTAL CONTROL / RATINGS
Change the password by inputting a new password twice.
Set Password
Enter
Move
LOCK
Lock System : Off
Set Password
Block Channel
Movie Rating
TV Rating-Children
TV Rating-General
Downloadable Rating
Input Block
Select
SSee tt ppaass sswwoorrdd
.
Choose any 4 digits for your new password.
As soon as the 4 digits are entered, re-enter
the same 4 digits on the
CCoonnff iirr mm
.
4
3
ENTER
1
456
7809
23
Enter
Move
LOCK
Lock System : Off
Set Password
Block Channel
Movie Rating
TV Rating-Children
TV Rating-General
Downloadable Rating
Input Block
Close
New
* * * *
Confirm
* * * *
Select
LLOO CC KK
.
1
MENU
ENTER
Input the password.
2
1
456
7809
23
5
RETURN
Return to the previous menu.
MENU
Return to TV viewing.
Page 69

PARENTAL CONTROL / RATING
109
CHANNEL BLOCKING
Enter
Move
LOCK
Lock System : Off
Set Password
Block Channel
Movie Rating
TV Rating-Children
TV Rating-General
Downloadable Rating
Input Block
Select
BB lloocckk CChh aann nn eell
.
Select a channel to block or unblock.
4
3
ENTER
Block or unblock a channel.
5
ENTER
Blocks any channels that you do not want to watch or that you do not want your children to watch.
Select
LLOO CC KK
.
1
MENU
ENTER
Input the password.
2
1
456
7809
23
6
MENU
Return to the previous menu.
RETURN
Return to TV viewing.
Block/Unblock
Move Page
CH
Move
Previous
MENU
Exit
RETURN
Page 70

PARENTAL CONTROL / RATING
110
MOVIE & TV RATING
PARENTAL CONTROL / RATINGS
Movie Rating (MPAA)
-
For USA only
Blocks movies according to the movie ratings limits specified, so children cannot view certain movies. You can
set the ratings limit by blocking out all the movies with the ratings above a specified level. Keep in mind that
the movie ratings limit only applies to movies shown on TV, not TV programs, such as soap operas.
Enter
Move
LOCK
Lock System : Off
Set Password
Block Channel
Movie Rating
TV Rating-Children
TV Rating-General
Downloadable Rating
Input Block
Select
MM oovv iiee RR aa ttii nn gg
.
Select GG,
PP GG, PPGG --1133, RR, NNCC-- 11 77
,
XX
, or
BB lloocckkiinngg OOffff
.
4
3
ENTER
Enter
Move
LOCK
Lock System : Off
Set Password
Block Channel
Movie Rating
TV Rating-Children
TV Rating-General
Downloadable Rating
Input Block
Blocking off : Permits all programs
G
PG
PG-13
R
NC-17
X
Blocking Off
■
G (General audience)
■
PG (Parental guidance suggested)
■
PG-13 (Parents strongly cautioned)
■
R (Restricted)
■
NC-17 (No one 17 and under admitted)
■
X (Adult only)
■
Blocking Off (Permits all programs)
GG
If you set PG-13: G and PG movies will
be available, PG-13, R, NC-17 and X will
be blocked.
Select
LLOO CC KK
.
1
MENU
ENTER
Input the password.
2
1
456
7809
23
5
RETURN
Return to the previous menu.
MENU
Return to TV viewing.
Page 71

PARENTAL CONTROL / RATING
111
Enter
Move
LOCK
Lock System : Off
Set Password
Block Channel
Movie Rating
TV Rating-Children
TV Rating-General
Downloadable Rating
Input Block
Select
TT VV RR aa ttiinngg --CChhiillddrr eenn
.
Select
AA ggee
or
FFaa nnttaassyy VViiooll eenncc ee
.
4
3
ENTER
Select block options.
5
ENTER
Enter
Move
LOCK
Lock System : Off
Set Password
Block Channel
Movie Rating
TV Rating-Children
TV Rating-General
Downloadable Rating
Input Block
■
Age (applies to TV-Y, TV-Y7)
■
Fantasy Violence (applies to TV-Y7)
TV Rating Children
-
For USA only
Prevents children from watching certain children's TV programs, according to the ratings limit set. The children
rating does not apply to other TV programs. Unless you block certain TV programs intended for mature audiences in the TV Rating - sub menu, your children can view those programs.
Close
Age
Fantasy Violence
Select
LLOO CC KK
.
1
MENU
ENTER
Input the password.
2
1
456
7809
23
6
RETURN
Return to the previous menu.
MENU
Return to TV viewing.
Page 72

PARENTAL CONTROL / RATING
112
PARENTAL CONTROL / RATINGS
TV Rating General
-
For USA only
Based on the ratings, blocks certain TV programs that you and your family do not want to view.
Enter
Move
LOCK
Lock System : Off
Set Password
Block Channel
Movie Rating
TV Rating-Children
TV Rating-General
Downloadable Rating
Input Block
Select
TT VV RR aa ttiinn gg --GG eenneerr aa ll
.
Select
AA ggee, DD iiaall oo gguuee, LLaann gguu aa ggee
,
SSeexx
or
VV iioolleenncc ee
.
4
3
ENTER
Select block options.
5
ENTER
Enter
Move
LOCK
Lock System : Off
Set Password
Block Channel
Movie Rating
TV Rating-Children
TV Rating-General
Downloadable Rating
Input Block
■
Age (applies to TV-G,TV-PG,TV-14,TVMA).
■
Dialogue-sexual dialogue (applies to
TV-PG,TV-14).
■
Language-adult language (applies to
TV-PG, TV-14, TV-MA).
■
Sex-sexual situations (applies to TV-PG,
TV-14, TV-MA).
■
Violence (applies to TV-PG, TV-14, TVMA).
Close
Age
Dialogue
Language
Sex
Violence
Select
LLOO CC KK
.
1
MENU
ENTER
Input the password.
2
1
456
7809
23
6
RETURN
Return to the previous menu.
MENU
Return to TV viewing.
Page 73

PARENTAL CONTROL / RATING
113
TV Rating English
-
For CANADA only
Selecting canadian english language rating system.
Enter
Move
LOCK
Lock System : Off
Set Password
Block Channel
TV Rating-English
TV Rating-French
Downloadable Rating
Input Block
Select
TT VV RR aa ttiinn gg --EEnn gglliiss hh
.
Select EE, CC,
CC88++, GG, PP GG, 1144++
,
1188++
, or
BB lloocckkiinngg OOffff
.
4
3
ENTER
Enter
Move
LOCK
Lock System : Off
Set Password
Block Channel
TV Rating-English
TV Rating-French
Downloadable Rating
Input Block
Blocking off : Permits all programs
E
C
C8+
G
PG
14+
18+
Blocking Off
■
E (Exempt)
■
C (Children)
■
C8+ (Children eight years and older)
■
G (General programming, suitable for
all audiences)
■
PG (Parental Guidance)
■
14+ (Viewers 14 years and older)
■
18+ (Adult programming)
■
Blocking Off (Permits all programs)
Select
LLOO CC KK
.
1
MENU
ENTER
Input the password.
2
1
456
7809
23
5
RETURN
Return to the previous menu.
MENU
Return to TV viewing.
Page 74

PARENTAL CONTROL / RATING
114
PARENTAL CONTROL / RATINGS
TV Rating French
-
For CANADA only
Selecting canadian french language rating system.
Enter
Move
LOCK
Lock System : Off
Set Password
Block Channel
TV Rating-English
TV Rating-French
Downloadable Rating
Input Block
Select
TT VV RR aa ttiinn gg--FFrree nn cchh
.
Select EE, GG,
88aannss++, 1133aann ss++
,
1166aann ss++, 1188aann ss++
, or
BB lloocckkii nngg ooffff
.
4
3
ENTER
Enter
Move
LOCK
Lock System : Off
Set Password
Block Channel
TV Rating-English
TV Rating-French
Downloadable Rating
Input Block
Blocking off : Permits all programs
E
G
8ans+
13ans+
16ans+
18ans+
Blocking Off
■
E (Exempt)
■
G (General)
■
8ans+ (General-Not convenient for little children)
■
13ans+ (Not convenient for children of
13 years and younger)
■
16ans+ (Not convenient for children of
16 years and younger)
■
18ans+ (This programs is only for
adults)
■
Blocking off (Permits all programs)
Select
LLOO CC KK
.
1
MENU
ENTER
Input the password.
2
1
456
7809
23
5
RETURN
Return to the previous menu.
MENU
Return to TV viewing.
Page 75

PARENTAL CONTROL / RATING
115
DOWNLOADABLE RATING
This function may become available in the future and will be available only for digital channels.
This function operates only when TV has received Region5 Rating data.
Enter
Move
LOCK
Lock System : Off
Set Password
Block Channel
Movie Rating
TV Rating-Children
TV Rating-General
Downloadable Rating
Input Block
Enter
Move
LOCK
Lock System : Off
Set Password
Block Channel
Movie Rating
TV Rating-Children
TV Rating-General
Downloadable Rating
Input Block
Humor
Sport
Cruelty
Language
Sadness
Genre
Age
Close
E
E
Select
DDoowwnnll ooaaddaa bbllee RRaattiinngg
.
Select desired
DDoowwnnll ooaaddaabbllee
RR aa ttii nngg
option.
4
3
ENTER
Select desired option and block it.
5
ENTER
Select
LLOO CC KK
.
1
MENU
ENTER
Input the password.
2
1
456
7809
23
6
RETURN
Return to the previous menu.
MENU
Return to TV viewing.
■
Based on rating table, your TV's OSD
(On Screen Display) may differ slightly
from what is shown in this manual.
Page 76

PARENTAL CONTROL / RATING
116
PARENTAL CONTROL / RATINGS
EXTERNAL INPUT BLOCKING
Enables you to block an input.
Select
IInnppuutt BB lloocc kk
.
Select input source.
4
3
Select
OO nn
or
OO ffff
.
5
ENTER
Enter
Move
LOCK
Lock System : Off
Set Password
Block Channel
Movie Rating
TV Rating-Children
TV Rating-General
Downloadable Rating
Input Block
Select
LLOO CC KK
.
1
MENU
ENTER
Input the password.
2
1
456
7809
23
6
RETURN
Return to the previous menu.
MENU
Return to TV viewing.
AV1
FF
Off
GG
AV2
Off
Component1
Off
HDMI1
Off
RGB-PC
Off
Component2
Off
HDMI2
Off
HDMI3
Off
Close
AV1
FF
Off
GG
AV2
Off
Component1
Off
HDMI1
Off
RGB-PC
Off
Component2
Off
HDMI2
Off
HDMI3
Off
HDMI4
Off
Close
FF
Off
GG
AV
Component1
Off
HDMI1
Off
RGB-PC
Off
Component2
Off
HDMI2
Off
HDMI3
Off
HDMI4
Off
Close
Plasma TV, 32/42/47/52LG70,
47LG90
32/37/42/47/52LG60,
42 LGX
32/37/42LG30,
37/42/47/52LG50
Page 77

PARENTAL CONTROL / RATING
117
KEY LOCK
The TV can be set up so that it can only be used with the remote control.
This feature can be used to prevent unauthorized viewing by locking out the front panel controls.
This TV is programmed to remember which option it was last set to even if you turn the TV off.
Select
OOPP TTII OONN
.
Select
KKeeyy LLoocckk
.
Enter
Move
OPTION
Enter
Move
OPTION
1
MENU
2
ENTER
Language : English
Input Label
SIMPLINK : On
Key Lock : Off
Caption : Off
ISM Method : Normal
Power Saving : Level 0
Set ID : 1
Language : English
Input Label
SIMPLINK : On
Key Lock : On
Caption : Off
ISM Method : Normal
Power Saving : Level 0
Set ID : 1
Off
On
Select
OO nn
or
OO ff ff
.
3
ENTER
■
In
KKeeyy LLoocc kk‘OO nn
’, if the TV is turned
off, press the
rr
/ I, INPUT, CH
((
DDEE
or
))
button on the TV or POWER,
INPUT, CH or NUMBER buttons
on the remote control.
■
With the
KKeeyy LLoocckk OOnn
, the display
‘
KKeeyy LLoocc kk
’ appears on the screen
if any button on the front panel is
pressed while viewing the TV.
4
RETURN
Return to the previous menu.
MENU
Return to TV viewing.
E E
!
Page 78

APPENDIX
118
APPENDIX
TROUBLESHOOTING
TThhee ooppeerraattiioonn ddooeess nnoott wwoorrkk nnoorrmmaallllyy..
TThhee vviiddeeoo ffuunnccttiioonn ddooeess nnoott wwoorrkk..
No picture &No sound
No or poor color
or poor picture
Poor reception on
some channels
Lines or streaks
in pictures
No picture
when connecting HDMI
Horizontal/vertical bars
or picture shaking
Picture appears slowly
after switching on
The remote control
doesn’t work
Power is suddenly
turned off
■
Check to see if there is any object between the product and the remote control
causing obstruction. Ensure you are pointing the remote control directly at the TV.
■
Ensure that the batteries are installed with correct polarity (+ to +, - to -).
■
Ensure that the correct remote operating mode is set: TV, VCR etc.
■
Install new batteries.
■
Is the sleep timer set?
■
Check the power control settings. Power interrupted.
■
Check whether the product is turned on.
■
Try another channel. The problem may be with the broadcast.
■
Is the power cord inserted into wall power outlet?
■
Check your antenna direction and/or location.
■
Test the wall power outlet, plug another product’s power cord into the outlet
where the product’s power cord was plugged in.
■
This is normal, the image is muted during the product startup process. Please
contact your service center, if the picture has not appeared after five minutes.
■
Adjust Color in menu option.
■
Keep a sufficient distance between the product and the VCR.
■
Try another channel. The problem may be with the broadcast.
■
Are the video cables installed properly?
■
Activate any function to restore the brightness of the picture.
■
Check for local interference such as an electrical appliance or power tool.
■
Station or cable product experiencing problems, tune to another station.
■
Station signal is weak, reorient antenna to receive weaker station.
■
Check for sources of possible interference.
■
Check antenna (Change the direction of the antenna).
■
Check HDMI cable over version 1.3.
The HDMI cables don’t support HDMI version 1.3, it cause flickers or no screen
display. In this case use the latest cables that support HDMI version 1.3.
Page 79

APPENDIX
119
TThheerree iiss aa pprroobblleemm iinn PPCC mmooddee.. ((OOnnllyy PPCC mmooddee aapppplliieedd))
■
Adjust resolution, horizontal frequency, or vertical frequency.
■
Check the input source.
■
Work the Auto configure or adjust clock, phase, or H/V position. (Option)
■
Check the signal cable.
■
Reinstall the PC video card.
The signal is out of range
Screen color is unstable
or single color
Vertical bar or stripe on
background &
Horizontal Noise &
Incorrect position
Picture OK & No sound
Unusual sound from
inside the product
No sound
when connecting
HDMI/USB
No output from one
of the speakers
TThhee aauuddiioo ffuunnccttiioonn ddooeess nnoott wwoorrkk..
■
Press the VOL or VOLUME button.
■
Sound muted? Press MUTE button.
■
Try another channel. The problem may be with the broadcast.
■
Are the audio cables installed properly?
■
Adjust Balance in menu option.
■
A change in ambient humidity or temperature may result in an unusual noise
when the product is turned on or off and does not indicate a fault with the
product.
■
Check HDMI cable over version 1.3.
■
Check USB cable over version 2.0.
■
Use normal MP3 file.
Page 80

APPENDIX
120
APPENDIX
MAINTENANCE
Early malfunctions can be prevented. Careful and regular cleaning can extend the amount of time you can
enjoy your new TV.
Caution: Be sure to turn the power off and unplug the power cord before you begin any cleaning.
Cleaning the Screen
Here’s a great way to keep the dust off your screen for a while. Wet a soft cloth in a mixture of lukewarm
water and a little fabric softener or dish washing detergent. Wring the cloth until it’s almost dry, and then
use it to wipe the screen.
Make sure the excess water is off the screen, and then let it air-dry before you turn on your TV.
Cleaning the Cabinet
■
To remove dirt or dust, wipe the cabinet with a soft, dry, lint-free cloth.
■
Please be sure not to use a wet cloth.
Extended Absence
GG
If you expect to leave your TV dormant for a long time (such as a vacation), it’s a good idea to unplug
the power cord to protect against possible damage from lightning or power surges.
CAUTION
2
1
Page 81

APPENDIX
121
PRODUCT SPECIFICATIONS
■
The specifications shown above may be changed without prior notice for quality improvement.
MODELS
AC100-240V ~ 50/60Hz
NTSC-M, ATSC, 64 & 256 QAM
VHF 2-13, UHF 14-69, CATV 1-135, DTV 2-69, CADTV 1-135
75 ohm
32 ~ 104°F (0 ~ 40°C)
Less than 80%
-4 ~ 140°F (-20 ~ 60°C)
Less than 85%
Dimensions
(Width x Height
x Depth)
Weight
Power requirement
Television System
Program Coverage
External Antenna Impedance
Environment
condition
With stand
Without stand
With stand
Without stand
Operating Temperature
Operating Humidity
Storage Temperature
Storage Humidity
32LG30
(32LG30-UA)
(32LG30-UD)
37LG30
(37LG30-UA)
(37LG30-UD)
42LG30
(42LG30-UA)
(42LG30-UD)
MODELS
37LG50
(37LG50-UA)
(37LG50-UG)
42LG50
(42LG50-UA)
(42LG50-UG)
31.5 x 23.7 x 8.9 inches
801.8 x 604.2 x 227.3 mm
31.5 x 21.4 x 3.1 inches
801.8 x 544.1 x 79.0 mm
29.5 pounds / 13.4 kg
26.2 pounds / 11.9 kg
36.2 x 26.8 x 11.5 inches
919.6 x 682.3 x 293.8 mm
36.2 x 24.0 x 3.5 inches
919.6 x 610.3 x 89.0 mm
41.4 pounds / 18.8 kg
35.7 pounds / 16.2 kg
40.6 x 29.2 x 11.5 inches
1032.8 x 742.3 x 293.8 mm
40.6 x 26.3 x 3.6 inches
1032.8 x 670.1 x 92.0 mm
52.0 pounds / 23.6 kg
46.2 pounds / 21.0 kg
Dimensions
(Width x Height
x Depth)
Weight
With stand
Without stand
With stand
Without stand
36.8 x 26.9 x 11.5 inches
936.4 x 685.4 x 293.4 mm
36.8 x 24.1 x 3.4 inches
936.4 x 612.8 x 88.0 mm
40.3 pounds / 18.3 kg
34.3 pounds / 15.6 kg
40.7 x 28.9 x 11.5 inches
1034.0 x 735.0 x 294.0 mm
40.7 x 26.1 x 3.5 inches
1034.0 x 663.0 x 91.0 mm
54.0 pounds / 24.5 kg
48.5 pounds / 22.0 kg
MODELS
47 LG5 0
(47LG50-UA)
(47LG50-UG)
52LG50
(52LG50-UA)
(52LG50-UG)
Dimensions
(Width x Height
x Depth)
Weight
With stand
Without stand
With stand
Without stand
45.5 x 32.0 x 13.5 inches
1156.2 x 813.1 x 342.9 mm
45.5 x 29.1 x 4.0 inches
1156.2 x 739.2 x 103.0 mm
64.3 pounds / 29.2 kg
54.2 pounds / 24.6 kg
50.8 x 35.1 x 13.5 inches
1291.7 x 892.2 x 342.9 mm
50.8 x 32.1 x 4.5 inches
1291.7 x 817.0 x 115.3 mm
87.0 pounds / 39.5 kg
76.9 pounds / 34.9 kg
Page 82

APPENDIX
122
APPENDIX
■
The specifications shown above may be changed without prior notice for quality improvement.
MODELS
AC100-240V ~ 50/60Hz
NTSC-M, ATSC, 64 & 256 QAM
VHF 2-13, UHF 14-69, CATV 1-135, DTV 2-69, CADTV 1-135
75 ohm
32 ~ 104°F (0 ~ 40°C)
Less than 80%
-4 ~ 140°F (-20 ~ 60°C)
Less than 85%
Dimensions
(Width x Height
x Depth)
Weight
Power requirement
Television System
Program Coverage
External Antenna Impedance
Environment
condition
With stand
Without stand
With stand
Without stand
Operating Temperature
Operating Humidity
Storage Temperature
Storage Humidity
32LG60
(32LG60-UA)
37LG60
(37LG60-UA)
42LG60
(42LG60-UA)
MODELS
42LGX
(42LG61-UA)
52LG60
(52LG60-UA)
31.7 x 24.6 x 13.1 inches
805.6 x 626.0 x 333.0mm
31.7 x 23.1 x 3.7 inches
805.6 x 587.4 x 96.2 mm
31.7 pounds / 14.4 kg
26.8 pounds / 12.2 kg
36.5 x 27.8 x 14.7 inches
929.0 x 706.9 x 374.7 mm
36.5 x26.1 x 3.8 inches
929.0 x 665.0 x 98.7 mm
46.7 pounds / 21.2 kg
39.9 pounds / 18.1 kg
40.8 x 31.3 x 14.9 inches
10 3 7.8 x 796.4 x 379.5 mm
40.8 x 29.4 x 3.1 inches
10 3 7.8 x 747.0 x 80.8 mm
53.1 pounds / 24.1 kg
44.9 pounds / 20.4 kg
Dimensions
(Width x Height
x Depth)
Weight
With stand
Without stand
With stand
Without stand
40.8 x 31.4 x 14.8 inches
103 7.8 x 798.0 x 378.0 mm
40.8 x 29.3 x 1.7 inches
103 7.8 x 746.2 x 45.0 mm
46.9 pounds / 21.3 kg
39.6 pounds / 18.0 kg
47 LG6 0
(47LG60-UA)
45.3 x 34.1 x 17.1 inches
1152.8 x 868.6 x 434.5 mm
45.3 x 32.3 x 3.1 inches
1152.8 x 820.8 x 79.0 mm
71.8 pounds / 32.6 kg
59.3 pounds / 26.9 kg
50.3 x 37.1 x 16.9 inches
1280.1 x 944.7 x 430.0 mm
50.3 x 35.2 x 3.5 inches
1280.1 x 896.0 x 89.0 mm
99.2 pounds / 45.0 kg
83.9 pounds / 38.1 kg
MODELS
32LG70
(32LG70-UA)
42LG70
(42LG70-UA)
Dimensions
(Width x Height
x Depth)
Weight
With stand
Without stand
With stand
Without stand
31.3 x 23.5 x 8.9 inches
797.0 x 597.0 x 227.3 mm
31.3 x 21.9 x 3.9 inches
797.0 x 558.6 x 100.5 mm
28.4 pounds / 12.9 kg
25.1 pounds / 11.4 kg
40.4 x 28.8 x 11.5 inches
1026.2 x 734.0 x 293.4 mm
40.4 x 27.0 x 4.4 inches
1026.2 x 687.9 x 111.8 mm
49.3 pounds / 22.4 kg
43.4 pounds / 19.7 kg
MODELS
47 LG7 0
(47LG70-UA)
52LG70
(52LG70-UA)
47LG 90
(47LG90-UA)
Dimensions
(Width x Height
x Depth)
Weight
With stand
Without stand
With stand
Without stand
44.8 x 32.2 x 13.5 inches
1140.4 x 820.1 x 342.9 mm
44.8 x 30.1 x 5.0 inches
1140.4 x 764.8 x 129.0 mm
66.3 pounds / 30.1 kg
55.9 pounds / 25.4 kg
50.5 x 35.3 x 13.5 inches
1284.4 x 898.6 x 342.9 mm
50.5 x 33.2 x 5.0 inches
1284.4 x 844.6 x 129.5 mm
87.9 pounds / 39.9 kg
77.6 pounds / 35.2 kg
44.8 x 32.2 x 13.5 inches
1140.4 x 820.1 x 342.9 mm
44.8 x 30.1 x 5.0 inches
1140.4 x 764.8 x 129.0 mm
66.5 pounds / 30.2 kg
56.2 pounds / 25.5 kg
Page 83

APPENDIX
123
■
The specifications shown above may be changed without prior notice for quality improvement.
MODELS
AC100-240V ~ 50/60Hz
NTSC-M, ATSC, 64 & 256 QAM
VHF 2-13, UHF 14-69, CATV 1-135, DTV 2-69, CADTV 1-135
75 ohm
32 ~ 104°F (0 ~ 40°C)
Less than 80%
-4 ~ 140°F (-20 ~ 60°C)
Less than 85%
Dimensions
(Width x Height
x Depth)
Weight
Power requirement
Television System
Program Coverage
External Antenna Impedance
Environment
condition
With stand
Without stand
With stand
Without stand
Operating Temperature
Operating Humidity
Storage Temperature
Storage Humidity
42PG25
(42PG60-UA)
50PG25
(50PG60-UA)
41.1 x 28.9 x 12.1 inches
1044.4 x 735.4 x 308.0 mm
41.1 x 26.7 x 3.1 inches
1044.4 x 680.6 x 79.6 mm
61.7 pounds / 28.0 kg
55.1 pounds / 25.0 kg
48.6 x 33.4 x 14.3 inches
1235.6 x 849.3 x 364.1 mm
48.6 x 31.2 x 3.1 inches
1235.6 x 792.8 x 79.6 mm
96.3 pounds / 43.7 kg
87.5 pounds / 39.7 kg
MODELS
50PG60 (50PG60F-UA)
50PG70 (50PG70F-UB)
60PG60 (60PG60F-UA)
60PG70 (60PG70F-UB)
Dimensions
(Width x Height
x Depth)
Weight
With stand
Without stand
With stand
Without stand
48.6 x 33.4 x 14.3 inches
1235.6 x 849.3 x 364.1 mm
48.6 x 31.2 x 3.1 inches
1235.6 x 792.8 x 79.6 mm
100.7 pounds / 45.7 kg
91.9 pounds / 41.7 kg
57.3 x 38.8 x 16.3 inches
1455.0 x 985.0 x 414.0 mm
57.3 x 36.4 x 3.3 inches
1455.0 x 924.8 x 84.1 mm
137.5 pounds / 62.4 kg
121.0 pounds / 54.9 kg
Page 84

APPENDIX
124
PROGRAMMING THE REMOTE CONTROL
APPENDIX
The provided universal remote control can be programmed to operate most remote-controllable devices.
Note that the remote may not control all models of other brands.
Programming a code into a remote mode
Testing your remote control.
To find out whether your remote control can operate other components without programming, turn on a
component such as a STB and press the corresponding mode button (such as a
SSTTBB
) on the remote con-
trol, while pointing at the component. Test the
PPOO WW EERR
and
CCHH
buttons to see if the component
responds correctly. If the component does not operate correctly, the remote control requires programming
to operate the device.
Turn on the component to be programmed, then press the corresponding mode button (such as
SSTTBB
) on
the remote control. The remote control button of the desired device is illuminated.
Press the
MM EENN UU
and
MM UUTTEE
buttons simultaneously, and the remote control is ready to be programmed with
the code.
Enter a code number using the number buttons on the remote control. Programming code numbers for the
corresponding component can be found on the following pages. If the code is correct, the device will turn
off.
Press the
MM EENN UU
button to store the code.
Test the remote control functions to see if the component responds correctly. If not, repeat from step 2.
2
3
4
5
6
1
Page 85

APPENDIX
125
Remote Control Code
Brand Codes Brand Codes Brand Codes
AIWA 034
AKAI 016 043 046 124
12 5 14 6
AMPRO 072
ANAM 031 033 103
AUDIO DYNAMICS
012 0 23 039 04 3
BROKSONIC 035 037 129
CANON 028 031 033
CAPEHART 108
CRAIG 003 040 135
CURTIS MATHES 031 033 041
DAEWOO 005 007 010 064
065 108 110 111
112 116 117 11 9
DAYTRON 108
DBX 012 023 039 043
DYNATECH 034 053
ELECTROHOME 059
EMERSON 006 017 025 027
029 031 034 035
036 037 046 101
12 9 131 13 8 15 3
FISHER 003 008 009 010
FUNAI 034
GE 031 033 063 072
10 7 10 9 14 4 147
GO VIDEO 132 136
HARMAN KARDON 012 045
HITACHI 004 018 026 034
043 063 137 150
INSTANTREPLAY 031 033
JCL 031 033
JCPENNY 012 013 015 033
040 066 101
JENSEN 043
JVC 012 031 033 043
048 050 055 060
13 0 15 0 15 2
KENWOOD 014 034 039 043
047 048
LG (GOLDSTAR) 001 012 013 020
101 10 6 114 123
LLOYD 034
LXI 003 009 013 014
017 0 34 101 10 6
MAGIN 040
MAGNAVOX 031 033 034 041
067 068
MARANTZ 012 031 033 067
069
MARTA 101
MATSUI 027 030
MEI 031 033
MEMOREX 003 010 014 031
033 034 053 072
101 10 2 134 13 9
MGA 045 046 059
MINOLTA 013 020
MITSUBISHI 013 020 045 046
049 051 059 061
151
MTC 034 040
MULTITECH 024 034
NEC 012 023 039 043
048
NORDMENDE 043
OPTONICA 053 054
PANASONIC 066 070 074 083
13 3 14 0 14 5
PENTAX 013 020 031 033
063
PHILCO 031 034 067
PHILIPS 031 033 034 054
067 071 101
PILOT 101
PIONEER 013 021 048
PORTLAND 108
PULSAR 072
QUARTZ 011 014
QUASAR 033 066 075 145
RCA 013 020 033 034
040 041 062 063
107 109 140 144
14 5 14 7
REALISTIC 003 008 010 014
031 033 034 040
053 054 101
RICO 058
RUNCO 148
SALORA 014
SAMSUNG 032 040 102 104
10 5 10 7 10 9 112
113 115 12 0 12 2
12 5
SANSUI 022 043 048 135
SANYO 003 007 010 014
10 2 13 4
SCOTT 017 037 112 129
131
SEARS 003 008 009 010
013 014 017 02 0
031 0 42 073 081
101
SHARP 031 054 149
SHINTOM 024
SONY 003 009 031 052
056 057 058 076
077 078 149
SOUNDESIGN 034
STS 013
SY LVA NIA 031 033 034 059
067
SYMPHONIC 034
TANDY 010 034
TATUNG 039 043
TEA C 034 039 043
TECHNICS 031 033 070
TEKNIKA 019 031 033 034
101
THOMAS 034
TMK 006
TOSHIBA 008 013 042 047
059 082 112 131
TOTEVISION 040 101
UNITECH 040
VECTOR RESEARCH
012
VICTOR 048
VIDEO CONCEPTS
012 0 34 04 6
VIDEOSONIC 040
WARDS 003 013 017 024
031 033 034 040
053 054 131
YAMAHA 012 034 039 043
ZENITH 034 048 056
058 072 080 101
VCR
Page 86

APPENDIX
126
APPENDIX
Brand Codes Brand Codes Brand Codes
ALPHASTAR DSR 123
AMPLICA 050
BIRDVIEW 051 126 129
CHANNEL MASTER
013 014 015 018
036 055
CHAPARRAL 008 009 012 077
CITOH 054
CURTIS MATHES 050 145
DRAKE 005 006 007 010
011 05 2 112 116
141
DX ANTENNA 024 046 056 076
ECHOSTAR 038 040 057 058
093 094 095 096
097 098 099 100
12 2
ELECTRO HOME 089
EUROPLUS 114
FUJITSU 017 021 022 027
13 3 13 4
GENERAL INSTRUMENT
003 004 016 029
031 059 101
HITACHI 139 140
HOUSTON TRACKER
033 037 039 051
057 104
HUGHES 068
JANIEL 060 147
JERROLD 061
KATHREIN 108
LEGEND 057
LG 001
LUTRON 132
LUXOR 062 144
MACOM 010 059 063 064
065
MEMOREX 057
NEXTWAVE 028 124 125
NORSAT 069 070
PACE SKY SATELLITE
14 3
PANASONIC 060 142
PANSAT 121
PERSONAL CABLE 117
PHILIPS 071
PICO 105
PRESIDENT 019 102
PRIMESTAR 030 110 111
PROSAT 072
RCA 066 106
REALISTIC 043 074
SAMSUNG 123
SATELLITE SERVICE CO
028 035 047 057
085
SCIENTIFIC ATLANTA
032 138
SONY 103
STARCAST 041
SUPER GUIDE 020 124 125
TEECOM 023 026 075 087
088 090 107 130
13 7
TOSHIBA 002 127
UNIDEN 016 025 042 043
044 045 048 049
078 079 080 086
101 135 136
VIEWSTAR 115
WINEGARD 128 146
ZENITH 081 082 083 084
091 120
HDSTB
DVD
Brand Codes Brand Codes Brand Codes
APEX DIGITAL 022
DENON 020 014
GE 005 006
HARMAN KARDON 027
JVC 012
LG 001 010 016 025
MAGNAVOX 013
MARANTZ 024
MITSUBISHI 002
NAD 023
ONKYO 008 017
PANASONIC 003 009
PHILIPS 013
PIONEER 004 026
PROCEED 021
PROSCAN 005 006
RCA 005 006
SAMSUNG 011 015
SONY 007
THOMPSON 005 006
TOSHIBA 019 008
YAMAHA 009 018
ZENITH 010 016 025
Page 87

APPENDIX
127
IR CODES
■
Configuration of frame
1st frame
Repeat frame
■
Lead code
■
Repeat code
■
BB iitt ddeessccrriipptt iioonn
■
FFrr aammee iinntteerr vvaall:: TTff
The waveform is transmitted as long as a key is depressed.
C0 C1 C2 C3 C4 C5 C6 C7 C0 C1 C2 C3 C4 C5 C6 C7 D0 D1 D2 D3 D4 D5 D6 D7 D0 D1 D2 D3 D4 D5 D6 D7
Lead code Low custom code High custom code Data code Data code
Repeat code
Tf
4.5 ms
9 ms
2.25 ms
9 ms
0.55 ms
0.56 ms
1.12 ms
0.56 ms
2.24 ms
Tf Tf
Tf=108ms @455KHz
Bit ”0” Bit ”1”
1. How to Connect
■
Connect your wired remote control to the Remote Control port on the TV.
2. Remote Control IR Codes
■
Output waveform
Single pulse, modulated with 37.917KHz signal at 455KHz
T1
Tc
Carrier frequency
FCAR = 1/TC = fOSC/12
Duty ratio = T1/TC = 1/3
Page 88

APPENDIX
128
APPENDIX
Code
Function Note
(Hexa)
Code
Function Note
(Hexa)
08 POWER
Remote control Button (Power On/Off)
45 Q.MENU Remote control Button
43 MENU Remote control Button
0B INPUT Remote control Button
10-19 Number Key 0-9 Remote control Button
4C - (Dash) Remote control Button
1A FLASHBK Remote control Button
09 MUTE Remote control Button
02 VOL + Remote control Button
03 VOL - Remote control Button
00 CH Remote control Button
01 CH Remote control Button
1E FAV Remote control Button
40 Remote control Button
41 Remote control Button
07 Remote control Button
06 Remote control Button
44 ENTER Remote control Button
5B RETURN Remote control Button
7E SIMPLINK Remote control Button
30 AV MODE Remote control Button
B0 PLAY Remote control Button
BA PAUSE Remote control Button
B1 STOP Remote control Button
BD REC Remote control Button
8F REW Remote control Button
8E FF Remote control Button
D6 TV Discrete IR Code
(TV Input Selection)
C4 POWER ON Discrete IR Code
(Only Power On)
C5 POWER OFF Discrete IR Code
(Only Power Off)
5A AV or AV1 Discrete IR Code
(AV or AV1 Input Selection)
D0 AV2 Discrete IR Code
(AV2 Input Selection)
BF COMPONENT1 Discrete IR Code
(Component1 Input Selection)
D4 COMPONENT2 Discrete IR Code
(Component2 Input Selection)
D5 RGB-PC Discrete IR Code
(RGB-PC Input Selection)
CE HDMI1 Discrete IR Code
(HDMI1 Input Selection)
CC HDMI2 Discrete IR Code
(HDMI2 Input Selection)
E9 HDMI3 Discrete IR Code
(HDMI3 Input Selection)
DA HDMI4 Discrete IR Code
(HDMI4 Input Selection)
76 Ratio 4:3 Discrete IR Code
(Only 4:3 Mode)
77 Ratio 16:9 Discrete IR Code
(Only 16:9 Mode)
AF Ratio Zoom Discrete IR Code
(Only Zoom1 Mode)
* Use this feature depending on your model.
Page 89

APPENDIX
129
EXTERNAL CONTROL THROUGH RS-232C
-
Except 32/37/42/47/52LG60, 42LGX
RS-232C Setup
The RS-232C port allows you connect the RS-232C input jack to an external control device (such as a computer
or an A/V control system) to control the TV’s functions externally.
■
Note: RS-232C on this unit is intended to be used with third party RS-232C control hardware and software.
The instructions below are provided to help with programming software or to test functionality using telenet
software.
REMOTE
CABLE IN
RS-232C IN
(CONTROL & SERVICE)
R
OPTICAL COAXIAL
DIGITAL AUDIO OUT
AUDIO OUT
AV IN 1
VIDEO L R
(MONO)
AUDIO
S-VIDEO
Type of Connector; D-Sub 9-Pin Male
No. Pin Name
1 No connection
2 RXD (Receive data
)
3 TXD (Transmit data
)
4 DTR (DTE side ready
)
5 GND
6 DSR (DCE side ready
)
7 RTS (Ready to send
)
8 CTS (Clear to send
)
9 No Connection
1
6
5
9
PC
i.e)
Communication Parameters
■
Baud rate : 9600 bps (UART
)
■
Data length : 8 bits
■
Parity : None
■
Stop bit : 1 bit
■
Communication code : ASCII code
■
Use a crossed (reverse) cable.
NOTE
!
GG
This product has command echo back in the
RS-232C Command.
Page 90

APPENDIX
130
RS-232C Configurations
APPENDIX
Use this function to specify a TV ID number.
Refer to ‘Real Data Mapping1’.
GG
pp..113333
.
Either cable below can be used.
Set ID
PC TV
RXD 2 3 TXD
TXD 3 2 RXD
GND 5 5 GND
DTR 4 6 DSR
DSR 6 4 DTR
RTS 7 8 CTS
CTS 8 7 RTS
D-Sub 9 D-Sub 9
PC TV
RXD 2 3 TXD
TXD 3 2 RXD
GND 5 5 GND
DTR 4 6 DTR
DSR 6 4 DSR
RTS 7 7 RTS
CTS 8 8 CTS
D-Sub 9 D-Sub 9
7-Wire Configuration
(
Serial female-female NULL modem cable
)
3-Wire Configurations
(
Not standard
)
Enter
Move
OPTION
Enter
Move
OPTION
Language : English
Input Label
SIMPLINK : On
Key Lock : Off
Caption : Off
ISM Method
Power Saving : Level 0
Set ID : 1
Language : English
Input Label
SIMPLINK : On
Key Lock : Off
Caption : Off
ISM Method
Power Saving : Level 0
Set ID : 1
EEEE
Select
OOPP TTII OONN
.
Select
SSeett IIDD
.
Choose the desired TV ID number.
The adjustment range of Set ID is
1~99.
1
MENU
3
2
ENTER
ENTER
FF
1
GG
Close
4
RETURN
Return to the previous menu.
MENU
Return to TV viewing.
Page 91

APPENDIX
131
Command Reference List
CCOO MMMMAA NNDD11 CCOOMMMMAA NNDD22
21. Channel Tuning
DATA
(Hexadecimal)
CCOO MMMMAA NNDD11 CCOOMMMMAA NNDD22
DATA
(Hexadecimal)
CCOOMM MMAANNDD11 CCOOMMMM AANNDD22
DATA00
(Hexadecimal)
DATA01
(Hexadecimal)
DATA02
(Hexadecimal)
DATA03
(Hexadecimal)
DATA04
(Hexadecimal)
DATA05
(Hexadecimal)
physical major major low minor high minor low attribute
program high program low
ma
01. Power k a 00 ~ 01
02. Input Select x b (
GG
p.132)
03. Aspect Ratio k c (
GG
p.132)
04. Screen Mute k d 00 ~ 01
05. Volume Mute k e 00 ~ 01
06. Volume Control k f 00 ~ 64
07. Contrast k g 00 ~ 64
08. Brightness k h 00 ~ 64
09. Color k i 00 ~ 64
10. Tint k j 00 ~ 64
11. Sharpness k k 00 ~ 64
12. OSD Select k l 00 ~ 01
13. Remote Control
Lock Mode
Transmission / Receiving Protocol
TTrr aannss mm iiss ssiioo nn
[Command 1] : First command to control the set.
(j, k, m or x)
[Command 2] : Second command to control the set.
[Set ID] : You can adjust the set ID to choose desired TV ID
number in Setup menu. Adjustment range is 1
~ 99.
When selecting Set ID ‘0’, every connected the TV is
controlled. Set ID is indicated as decimal (1
~ 99
)
on
menu and as Hexa decimal (0x0~ 0x63)on transmission
/receiving protocol.
[DATA] : To transmit the command data.
Transmit the ‘FF’ data to read status of command.
[Cr] : Carriage Return
ASCII code ‘0x0D’
[ ] : ASCII code ‘space (0x20)’
* In this model, TV will not send the status during the standby mode.
OO KK AA cc kk nn oowwll eedd ggeemmee nn tt
The TV transmits ACK (acknowledgement) based on this format when receiving normal data. At this time, if the data is
data read mode, it indicates present status data. If the data is
data write mode, it returns the data of the PC computer.
* In this model, TV will not send the status during the standby mode.
* Data Format
[Command 2] : Use as command.
[Set ID] : Use the small character, if set ID is 10, it will send the ‘0’, ‘a’.
[DATA] : Use the small character, if data is 0 x ab, it will send the ‘a’, ‘b’.
[OK] : Use the large character.
EErr rr oo rr AAcckknnoowwll eedd ggeemmee nn tt
The TV transmits ACK (acknowledgement) based on this format when receiving abnormal data from non-viable functions
or communication errors.
Data1: Illegal Code
Data2: Not supported function
Data3: Wait more time
* In this model, TV will not send the status during the standby mode.
* Data Format
[Command 2] : Use as command.
[Set ID] : Use the small character, if set ID is 10, it will send the ‘0’, ‘a’.
[DATA] : Use the small character, if data is 0 x ab, it will send the ‘a’, ‘b’.
[NG] : Use the large character
[[CC oommmmaa nn dd11]] [[CCoo mm mmaanndd 22]][[ ]] [[SSee tt II DD]][[ ]][[ DDaa tt aa]][[ CCrr]]
[[CC oommmmaa nn dd22]] [[ ]][[SS eett IIDD ]][[ ]][[ OOKK]] [[DD aattaa]] [[xx ]]
[[CC oommmmaa nn dd22]] [[ ]][[SS eett IIDD ]][[ ]][[ NN GG]] [[DD aattaa ]] [[xx]]
14. Treble k r 00 ~ 64
15. Bass k s 00 ~ 64
16. Balance k t 00 ~ 64
17.
Color Temperature
k u 00 ~ 02
18. ISM Method j p (
GG
p.134)
19. Power Saving j q 00 ~ 01
20. Auto Configuration j u (
GG
p.134)
22. Channel Add/Del m b 00 ~ 01
23 . Ke y m c (
GG
p.135)
24. Backlight m g 00 ~ 64
00 ~ 01
k m
Only Plasma TV Model
Only LCD TV Model
Page 92

APPENDIX
132
APPENDIX
0011.. PP oo wwee rr ((CCoo mmmmaanndd :: kk aa ))
To control Power On/Off of the TV.
Transmission [k][a][ ][Set ID][ ][Data][Cr]
Data 00: Power Off Data 01: Power On
Acknowledgement [a][ ][Set ID][ ][OK/NG][Data][x]
* In a like manner, if other functions transmit ‘FF’ data
based on this format, Acknowledgement data feedback
presents status about each function.
* Note: In this model, TV will send the Acknowledge
after power on processing completion.
There might be a time delay between command and
acknowledge.
0022.. II nn pp uu tt SSee ll eecctt ((CCoo mm mm aanndd:: xx bb))
To select input source for TV.
Transmission [x][b][ ][Set ID][ ][Data][Cr]
Data 00: DTV (Antenna) Data 01: DTV (Cable)
Data 10: Analog (Antenna) Data 11: Analog (Cable)
Data 20: AV1 Data 21: AV2
Data 40: Component 1 Data 41: Component 2
Data 60: RGB-PC Data 90: HDMI1
Data 91: HDMI2 Data 92: HDMI3
Data 93: HDMI4
Acknowledgement [b][ ][Set ID][ ][OK/NG][Data][x]
* Use the feature depending on your model.
0033.. AAss pp eecctt RRaa tt iioo (( CCoo mm mmaanndd:: kk cc))
To adjust the screen format.
Transmission [k][c][ ][Set ID][ ][Data][Cr]
Data 01: 4:3 05: Zoom 2
02: 16:9 06: Set by program
04: Zoom 1 09: Just scan
Reserved
Acknowledgement [c][ ][Set ID][ ][OK/NG][Data][x]
0044.. SS cc rree eenn MMuuttee ((CCoommmmaanndd :: kk dd ))
To select screen mute on/off.
Transmission [k][d][ ][Set ID][ ][Data][Cr]
Data 00: Screen mute off (Picture on)
Data 01: Screen mute on (Picture off)
Acknowledgement [d][ ][Set ID][ ][OK/NG][Data][x]
0055.. VV oolluummee MM uu tt ee (( CCoo mm mmaanndd:: kk ee ))
To control volume mute on/off.
You can also adjust mute using the MUTE button on
remote control.
Transmission [k][e][ ][Set ID][ ][Data][Cr]
Data 00: Volume mute on (Volume off)
Data 01: Volume mute off (Volume on)
Acknowledgement [e][ ][Set ID][ ][OK/NG][Data][x]
0066.. VV oolluummee CCoo nnttrroo ll ((CCoommmmaa nndd :: kk ff ))
To adjust volume.
You can also adjust volume with the volume buttons on
remote control.
Transmission [k][f][ ][Set ID][ ][Data][Cr]
Data Min: 00 ~ Max: 64 (*transmit by Hexadecimal code)
*Refer to ‘Real data mapping’. See page 133.
Acknowledgement [f][ ][Set ID][ ][OK/NG][Data][x]
0077.. CCoo nn tt rraa sstt (( CCoo mm mmaanndd:: kk gg))
To adjust screen contrast.
You can also adjust contrast in the PICTURE menu.
Transmission [k][g][ ][Set ID][ ][Data][Cr]
Data Min: 00 ~ Max: 64 (*transmit by Hexadecimal code)
*Refer to ‘Real data mapping’. See page 133.
Acknowledgement [g][ ][Set ID][ ][OK/NG][Data][x]
0088.. BB rrii gghhttnnee ssss ((CC oo mmmmaanndd :: kk hh))
To adjust screen brightness.
You can also adjust brightness in the PICTURE menu.
Transmission [k][h][ ][Set ID][ ][Data][Cr]
Data Min: 00 ~ Max: 64 (*transmit by Hexadecimal code)
*Refer to ‘Real data mapping’. See page 133.
Acknowledgement [h][ ][Set ID][ ][OK/NG][Data][x]
Page 93

APPENDIX
133
0099.. CCoo lloorr (( CCoo mm mm aann dd:: kk ii))
To adjust screen color.
You can also adjust color in the PICTURE menu.
Transmission [k][i][ ][Set ID][ ][Data][Cr]
Data Min: 00 ~ Max: 64 (*transmit by Hexadecimal code)
*Refer to ‘Real data mapping’ as shown below.
Acknowledgement [i][ ][Set ID][ ][OK/NG][Data][x]
1100.. TT iinntt (( CCoo mm mm aann dd:: kk jj))
To adjust screen tint.
You can also adjust tint in the PICTURE menu.
Transmission [k][j][ ][Set ID][ ][Data][Cr]
Data Red: 00 ~ Green: 64 (*transmit by Hexadecimal code)
*Refer to ‘Real data mapping’ as shown below.
Acknowledgement [ j ][ ][Set ID][ ][OK/NG][Data][x]
1111.. SShhaarrppnnee ssss ((CCoommmmaanndd :: kk kk))
To adjust screen sharpness.
You can also adjust sharpness in the PICTURE menu.
Transmission [k][k][ ][Set ID][ ][Data][Cr]
Data Min: 00 ~ Max: 64 (*transmit by Hexadecimal code)
*Refer to ‘Real data mapping’ as shown below.
Acknowledgement [k][ ][Set ID][ ][OK/NG][Data][x]
1122.. OOSSDD SS eellee cc tt ((CC oo mmmmaanndd :: kk ll ))
To select OSD (On Screen Display) on/off.
Transmission [k][l][ ][Set ID][ ][Data][Cr]
Data 00: OSD off Data 01: OSD on
Acknowledgement [l][ ][Set ID][ ][OK/NG][Data][x]
1133.. RRee mmoottee CCoo nn tt rroo ll LLoocckk MM ooddee ((CCoommmmaanndd :: kk mm ))
To lock the remote control and the front panel controls
on the set.
Transmission [k][m][ ][Set ID][ ][Data][Cr]
Data 00: Lock off Data 01: Lock on
Acknowledgement [m][ ][Set ID][ ][OK/NG][Data][x]
If you’re not using the remote control and front panel
controls on the TV, use this mode. When main power is
on/off, remote control lock is released.
1144.. TT rr eebbll ee (( CCoo mm mm aanndd:: kk rr ))
To adjust treble.
You can also adjust treble in the AUDIO menu.
Transmission [k][r][ ][Set ID][ ][Data][Cr]
Data Min: 00 ~ Max: 64 (*transmit by Hexadecimal code)
*Refer to ‘Real data mapping’ as shown.
Acknowledgement [r][ ][Set ID][ ][OK/NG][Data][x]
1155.. BB aass ss (( CCoo mmmmaanndd:: kk ss ))
To adjust bass.
You can also adjust bass in the AUDIO menu.
Transmission [k][s][ ][Set ID][ ][Data][Cr]
Data Min: 00 ~ Max: 64 (*transmit by Hexadecimal code)
*Refer to ‘Real data mapping’ as shown below.
Acknowledgement [s][ ][Set ID][ ][OK/NG][Data][x]
1166.. BB aallaa nncc ee (( CCoo mm mmaanndd:: kk tt))
To adjust balance.
You can also adjust balance in the AUDIO menu.
Transmission [k][t][ ][Set ID][ ][Data][Cr]
Data Min: 00 ~ Max: 64 (*transmit by Hexadecimal code)
*Refer to ‘Real data mapping’ as shown below.
Acknowledgement [t][ ][Set ID][ ][OK/NG][Data][x]
1177.. CCoo lloorr TTee mm ppee rraa tt uurree ((CCoo mmmmaanndd :: kk uu))
To adjust color temperature.
You can also adjust color temperature in the PICTURE menu.
Transmission [k][u][ ][Set ID][ ][Data][Cr]
Data 00: Medium 01: Cool 02: Warm
Acknowledgement [u][ ][Set ID][ ][OK/NG][Data][x]
*Real data mapping
0 : Step 0
A : Step 10 (SET ID 10)
F : Step 15 (SET ID 15)
10 : Step 16 (SET ID 16)
63 : Step 99 (SET ID 99)
64 : Step 100
Page 94

APPENDIX
134
APPENDIX
1188.. II SS MM MM eetthhoodd ((CCoommmmaanndd :: jj pp ))
(Only Plasma TV model)
To avoid having a fixed image remain on screen.
Transmission [ j ][p][ ][Set ID][ ][Data][Cr]
Data 01: Inversion 02: Orbiter
04: White Wash 08: Normal
Acknowledgement [p][ ][Set ID][ ][OK/NG][Data][x]
1199.. PPoowweerr ss aavv iinngg ((CCoommmmaanndd :: jj qq ))
(Only Plasma TV model)
To control the power saving function on/off.
Transmission [ j ][q][ ][Set ID][ ][Data][Cr]
Data 00: Power saving off (Power Saving Level 0)
01: Power saving on (Power Saving Level 4)
Acknowledgement [q][ ][Set ID][ ][OK/NG][Data][x]
2200.. AAuu tt oo CCoonnffii gguurr aattiioo nn ((CCoommmmaa nndd :: jj uu ))
To adjust picture position and minimize image shaking
automatically. Auto configuration only works in RGB-PC
mode.
Transmission [ j ][u][ ][Set ID][ ][Data][Cr]
Data 1: To set
Acknowledgement [u][ ][Set ID][ ][OK/NG][Data][x]
2211.. CChhaa nn nnee ll TTuunniinngg ((CCoommmmaa nndd :: mm aa))
To tune channel to following physical/major/minor number.
Transmission [m][a][ ][Set ID][ ][Data00][ ][Data01]
[ ][Data02][ ][Data03][ ][Data04][ ][Data05][Cr]
Digital channels have a Physical, Major, and Minor channel
number. The Physical number is the actual digital channel
number, the Major is the number that the channel should
be mapped to, and the Minor is the sub-channel. Since
the ATSC tuner automatically maps the channel to the
Major number, the Physical number is not required when
sending a command.
Data 00: Physical Channel Number
NTSC air: 02~45, NTSC cable: 01, 0E~7D
ATSC air: 01~45, ATSC cable: 01~87
Data 01 & 02: Major Channel Number
Data 01: High byte Data 02: Low byte
Two bytes are available for the Major and Minor, normally only the second byte is used.
Data 03 & 04: Minor Channel Number
Not needed for NTSC.
Page 95

APPENDIX
135
Data05:
The table above lists the binary code which must be
converted to Hexadecimal before sending. For example:
The binary code to tune the sub source to an NTSC
cable channel is “1000 0001”, which translates to “81”
in Hex.
* 7th bit : For which source do you want to change the
channel.
* 6th bit: Use a two part or one part channel. Most cases
just use 0 since it’s ignored when using NTSC.
* 5th bit: Use 0 with NTSC since it can only use the phys-
ical channel number. Normally use 1 for ATSC since most
times it doesn’t matter what the physical number is.
* 4th bit: Set to 0.
* 3-0 bits: Choose signal type.
* Tune Command Examples:
1. Tune to the analog (NTSC) cable channel 35.
Data 00 = Physical of 35 = 23
Data 01 & 02 = No Major = 00 00
Data 03 & 04 = No Minor = 00 00
Data 05 = 0000 0001 in binary = 01
Total = ma 00 23 00 00 00 00 01
2. Tune to the digital (ATSC) local channel 30-3.
Data 00 = Don’t know Physical = 00
Data 01 & 02 = Major is 30 = 00 1E
Data 03 & 04 = Minor is 3 = 00 03
Data 05 = 0010 0010 in binary = 22
Total = ma 00 00 00 1E 00 03 22
Acknowledgement[a][ ][Set ID][ ][OK][Data00][Data01]
[Data02][Data03][Data04][x][a][ ][Set ID]
[ ][NG][Data00][x]
2222.. CChhaa nn nnee ll AAdd dd //DD eell ((CCoo mmmmaanndd :: mm bb))
To add and delete the channels
Transmission [m][b][ ][Set ID][ ][Data][Cr]
Data 00: Channel Delete Data 01: Channel Add
Acknowledgement [b][ ][Set ID][ ][OK/NG][Data][x]
2233.. KKee yy (( CCoo mm mm aanndd:: mm cc))
To send IR remote key code.
Transmission [m][c][ ][Set ID][ ][Data][Cr]
Data Key code: Refer to page 128.
Acknowledgement [c][ ][Set ID][ ][OK/NG][Data][x]
2244.. BB aacckkllii gghhtt (( CCoo mm mmaanndd:: mm gg))
(Only LCD TV model)
To adjust screen backlight.
Transmission [m][g][ ][Set ID][ ][Data][Cr]
Data Min:00 ~ Max:64 (*transmit by Hexadecimal code)
*Refer to ‘Real data mapping 1’. See page 133.
Acknowledgement [g][ ][Set ID][ ][OK/NG][Data][x]
Step
NTSC Air
NTSC Cable
ATSC Air
ATSC Cable_std
ATSC Cable_hrc
ATSC Cable_irc
ATSC cable_auto
Reserved
...
Reserved
1
0
0
1
1
0
0
1
1
x
1
2
0
0
0
0
1
1
1
1
x
1
3
0
0
0
0
0
0
0
0
x
1
4
x
x
x
x
x
x
x
x
x
x
Reserved
5
01Use
No Use
Using Physical
Channel
6
01Tw o
One
Two/One
Part Channel
7
01Main
Sub
Main/Sub
Picture
0
0
1
0
1
0
1
0
1
x
1
Page 96

APPENDIX
136
OPEN SOURCE LICENSE
-
This feature is not available for all models.
APPENDIX
Copyright (C) 1989, 1991 Free Software Foundation, Inc., 51
Franklin Street, Fifth Floor, Boston, MA 02110-1301 USA
Everyone is permitted to copy and distribute verbatim copies of
this license document, but changing it is not allowed.
Preamble
The licenses for most software are designed to take away your
freedom to share and change it. By contrast, the GNU General
Public License is intended to guarantee your freedom to share
and change free software - to make sure the software is free for
all its users. This General Public License applies to most of the
Free Software Foundation's software and to any other program
whose authors commit to using it. (Some other free software
foundation software is covered by the GNU Lesser General Public
License instead.) You can apply it to your programs, too.
When we speak of free software, we are referring to freedom, not
price. Our General Public Licenses are designed to make sure that
you have the freedom to distribute copies of free software (and
charge for this service if you wish), that you receive source code
or can get it if you want it, that you can change the software or
use pieces of it in new free programs; and that you know you can
do these things.
To protect your rights, we need to make restrictions that forbid
anyone to deny you these rights or to ask you to surrender the
rights. These restrictions translate to certain responsibilities for
you if you distribute copies of the software, or if you modify it.
For example, if you distribute copies of such a program, whether
gratis or for a fee, you must give the recipients all the rights that
you have. You must make sure that they, too, receive or can get
the source code. And you must show them these terms so they
know their rights.
We protect your rights with two steps: (1) copyright the software, and (2) offer you this license which gives you legal permission to copy, distribute and/or modify the software.
Also, for each author's protection and ours, we want to make certain that everyone understands that there is no warranty for this
free software. If the software is modified by someone else and
passed on, we want its recipients to know that what they have is
not the original, so that any problems introduced by others will
not reflect on the original authors' reputations.
Finally, any free program is threatened constantly by software
patents. We wish to avoid the danger that redistributors of a free
program will individually obtain patent licenses, in effect making
the program proprietary. To prevent this, we have made it clear
that any patent must be licensed for everyone's free use or not
licensed at all.
The precise terms and conditions for copying, distribution and
modification follow.
GNU GENERAL PUBLIC LICENSE
TERMS AND CONDITIONS FOR COPYING, DISTRIBUTION
AND MODIFICATION
0. This license applies to any program or other work which contains a notice placed by the copyright holder saying it may be
distributed under the terms of this General Public License. The
"Program", below, refers to any such program or work, and a
"work based on the Program" means either the Program or any
derivative work under copyright law: that is to say, a work containing the Program or a portion of it, either verbatim or with
modifications and/or translated into another language.
(Hereinafter, translation is included without limitation in the
term "modification".) Each licensee is addressed as "you".
Activities other than copying, distribution and modification
are not covered by this license; they are outside its scope.
The act of running the Program is not restricted, and the output from the program is covered only if its contents constitute
a work based on the program (independent of having been
made by running the program). Whether that is true depends
on what the program does.
1. You may copy and distribute verbatim copies of the program's
source code as you receive it, in any medium, provided that
you conspicuously and appropriately publish on each copy an
appropriate copyright notice and disclaimer of warranty; keep
intact all the notices that refer to this license and to the
absence of any warranty; and give any other recipients of the
program a copy of this license along with the Program.
You may charge a fee for the physical act of transferring a
copy, and you may at your option offer warranty protection in
exchange for a fee.
2. You may modify your copy or copies of the program or any
portion of it, thus forming a work based on the Program, and
copy and distribute such modifications or work under the
terms of section 1 above, provided that you also meet all of
these conditions:
a) You must cause the modified files to carry prominent
notices stating that you changed the files and the date of
any change.
GNU GENERAL PUBLIC LICENSE
Version 2, June 1991
Page 97

APPENDIX
137
b) You must cause any work that you distribute or publish,
that in whole or in part contains or is derived from the
Program or any part there of, to be licensed as a whole at
no charge to all third parties under the terms of this
license.
c) If the modified program normally reads commands interac-
tively when run, you must cause it, when started running
for such interactive use in the most ordinary way, to print
or display an announcement including an appropriate
copyright notice and a notice that there is no warranty (or
else, saying that you provide a warranty) and that users
may redistribute the program under these conditions, and
telling the user how to view a copy of this license.
(Exception: if the Program itself is interactive but does not
normally print such an announcement, your work based on
the Program is not required to print an announcement.)
These requirements apply to the modified work as a whole. If
identifiable sections of that work are not derived from the
Program, and can be reasonably considered independent and
separate works in themselves, then this license, and its terms,
do not apply to those sections when you distribute them as
separate works. But when you distribute the same sections as
part of a whole which is a work based on the Program, the distribution of the whole must be on the terms of this license,
whose permissions for other licensees extend to the entire
whole, and thus to each and every part regardless of who
wrote it.
Thus, it is not the intent of this section to claim rights or contest your rights to work written entirely by you; rather, the
intent is to exercise the right to control the distribution of
derivative or collective works based on the program.
In addition, mere aggregation of another work not based on
the program with the Program (or with a work based on the
program) on a volume of a storage or distribution medium
does not bring the other work under the scope of this license.
3. You may copy and distribute the program (or a work based on
it, under section 2) in object code or executable form under
the terms of sections 1 and 2 above provided that you also
do one of the following:
a) Accompany it with the complete corresponding machine-
readable source code, which must be distributed under the
terms of sections 1 and 2 above on a medium customarily
used for software interchange; or,
b) Accompany it with a written offer, valid for at least three
years, to give any third party, for a charge no more than
your cost of physically performing source distribution, a
complete machine-readable copy of the corresponding
source code, to be distributed under the terms of sections
1 and 2 above on a medium customarily used for software
interchange; or,
c) Accompany it with the information you received as to the
offer to distribute corresponding source code. (This alternative is allowed only for noncommercial distribution and
only if you received the program in object code or executable form with such an offer, in accord with Subsection
b above.)
The source code for a work means the preferred form of the
work for making modifications to it. For an executable work,
complete source code means all the source code for all modules it contains, plus any associated interface definition files,
plus the scripts used to control compilation and installation
of the executable. However, as a special exception, the source
code distributed need not include anything that is normally
distributed (in either source or binary form) with the major
components (compiler, kernel, and so on) of the operating
system on which the executable runs, unless that component
itself accompanies the executable.
If distribution of executable or object code is made by offering access to copy from a designated place, then offering
equivalent access to copy the source code from the same
place counts as distribution of the source code, even though
third parties are not compelled to copy the source along with
the object code.
4. You may not copy, modify, sublicense, or distribute the Program
except as expressly provided under this license. Any attempt
otherwise to copy, modify, sublicense or distribute the
Program is void, and will automatically terminate your rights
under this license. However, parties who have received copies,
or rights, from you under this license will not have their licenses terminated so long as such parties remain in full compliance.
5. You are not required to accept this license, since you have not
signed it. However, nothing else grants you permission to
modify or distribute the Program or its derivative works.
These actions are prohibited by law if you do not accept this
license. Therefore, by modifying or distributing the program
(or any work based on the program), you indicate your acceptance of this license to do so, and all its terms and conditions
for copying, distributing or modifying the program or works
based on it.
6. Each time you redistribute the program (or any work based on
the Program), the recipient automatically receives a license
from the original licensor to copy, distribute or modify the
Program subject to these terms and conditions. You may not
impose any further restrictions on the recipients' exercise of
the rights granted herein. You are not responsible for enforcing compliance by third parties to this license.
Page 98

APPENDIX
138
APPENDIX
7. If, as a consequence of a court judgment or allegation of
patent infringement or for any other reason (not limited to
patent issues), conditions are imposed on you (whether by
court order, agreement or otherwise) that contradict the conditions of this license, they do not excuse you from the conditions of this license. If you cannot distribute so as to satisfy simultaneously your obligations under this license and any
other pertinent obligations, then as a consequence you may
not distribute the program at all. For example, if a patent
license would not permit royalty-free redistribution of the
program by all those who receive copies directly or indirectly
through you, then the only way you could satisfy both it and
this license would be to refrain entirely from distribution of
the program.
If any portion of this section is held invalid or unenforceable
under any particular circumstance, the balance of the section
is intended to apply and the section as a whole is intended to
apply in other circumstances.
It is not the purpose of this section to induce you to infringe
any patents or other property right claims or to contest validity of any such claims; this section has the sole purpose of
protecting the integrity of the free software distribution system, which is implemented by public license practices. Many
people have made generous contributions to the wide range
of software distributed through that system in reliance on
consistent application of that system; it is up to the
author/donor to decide if he or she is willing to distribute
software through any other system and a licensee cannot
impose that choice.
This section is intended to make thoroughly clear what is
believed to be a consequence of the rest of this license.
8. If the distribution and/or use of the program is restricted in
certain countries either by patents or by copyrighted interfaces, the original copyright holder who places the program
under this license may add an explicit geographical distribution
limitation excluding those countries, so that distribution is
permitted only in or among countries not thus excluded. In
such case, this license incorporates the limitation as if written
in the body of this license.
9. The Free Software Foundation may publish revised and/or
new versions of the General Public License from time to time.
Such new versions will be similar in spirit to the present version, but may differ in detail to address new problems or concerns.
Each version is given a distinguishing version number. If the
program specifies a version number of this license which
applies to it and "any later version", you have the option of
following the terms and conditions either of that version or of
any later version published by the Free Software Foundation.
If the program does not specify a version number of this
license, you may choose any version ever published by the
Free Software Foundation.
10.If you wish to incorporate parts of the program into other free
programs whose distribution conditions are different, write to
the author to ask for permission. For software which is copyrighted by the Free Software Foundation, write to the Free
Software Foundation; we sometimes make exceptions for this.
Our decision will be guided by the two goals of preserving the
free status of all derivatives of our free software and of promoting the sharing and reuse of software generally.
NO WARRANTY
11. BECAUSE THE PROGRAM IS LICENSED FREE OF CHARGE,
THERE IS NO WARRANTY FOR THE PROGRAM, TO THE
EXTENT PERMITTED BY APPLICABLE LAW. EXCEPT WHEN
OTHERWISE STATED IN WRITING THE COPYRIGHT HOLDERS AND/OR OTHER PARTIES PROVIDE THE PROGRAM "AS
IS" WITHOUT WARRANTY OF ANY KIND, EITHER
EXPRESSED OR IMPLIED, INCLUDING, BUT NOT LIMITED
TO, THE IMPLIED WARRANTIES OF MERCHANTABILITY
AND FITNESS FOR A PARTICULAR PURPOSE. THE ENTIRE
RISK AS TO THE QUALITY AND PERFORMANCE OF THE
PROGRAM IS WITH YOU. SHOULD THE PROGRAM PROVE
DEFECTIVE, YOU ASSUME THE COST OF ALL NECESSARY
SERVICING, REPAIR OR CORRECTION.
12.IN NO EVENT UNLESS REQUIRED BY APPLICABLE LAW OR
AGREED TO IN WRITING WILL ANY COPYRIGHT HOLDER,
OR ANY OTHER PARTY WHO MAY MODIFY AND/OR
REDISTRIBUTE THE PROGRAM AS PERMITTED ABOVE, BE
LIABLE TO YOU FOR DAMAGES, INCLUDING ANY GENERAL,
SPECIAL, INCIDENTAL OR CONSEQUENTIAL DAMAGES
ARISING OUT OF THE USE OR INABILITY TO USE THE PROGRAM (INCLUDING BUT NOT LIMITED TO LOSS OF DATA
OR DATA BEING RENDERED INACCURATE OR LOSSES SUSTAINED BY YOU OR THIRD PARTIES OR A FAILURE OF THE
PROGRAM TO OPERATE WITH ANY OTHER PROGRAMS),
EVEN IF SUCH HOLDER OR OTHER PARTY HAS BEEN
ADVISED OF THE POSSIBILITY OF SUCH DAMAGES.
Page 99

APPENDIX
139
END OF TERMS AND CONDITIONS
How to apply these terms to your new programs
If you develop a new program, and you want it to be of the greatest possible use to the public, the best way to achieve this is to
make it free software which everyone can redistribute and change
under these terms.
To do so, attach the following notices to the program. It is safest
to attach them to the start of each source file to most effectively convey the exclusion of warranty; and each file should have at
least the "copyright" line and a pointer to where the full notice is
found.
one line to give the program's name and a brief idea of what it
does.
Copyright (C) <year> <name of author>
This program is free software; you can redistribute it and/or
modify it under the terms of the GNU General Public License as
published by the Free Software Foundation; either version 2 of
the license, or (at your option) any later version.
This program is distributed in the hope that it will be useful, but
WITHOUT ANY WARRANTY; without even the implied warranty
of MERCHANTABILITY or FITNESS FOR A PARTICULAR PURPOSE. See the GNU General Public License for more details.
You should have received a copy of the GNU General Public
License along with this program; if not, write to the Free Software
Foundation, Inc., 51 Franklin Street, Fifth Floor, Boston, MA
02110-1301 USA.
Also add information on how to contact you by electronic and
paper mail.
If the program is interactive, make it output a short notice like
this when it starts in an interactive mode:
Gnomovision version 69, Copyright (C) year name of author
Gnomovision comes with ABSOLUTELY NO WARRANTY; for
details type ‘show w’. This is free software, and you are welcome
to redistribute it under certain conditions; type ‘show c’ for
details.
The hypothetical commands ‘show w’ and ‘show c’ should show
the appropriate parts of the General Public License. Of course,
the commands you use may be called something other than
‘show w’ and ‘show c’; they could even be mouse-clicks or menu
items-whatever suits your program.
You should also get your employer (if you work as a programmer)
or your school, if any, to sign a “copyright disclaimer” for the program, if necessary. Here is a sample; alter the names:
Yoyodyne, Inc., hereby disclaims all copyright interest in the program ‘Gnomovision’ (which makes passes at compilers) written by
James Hacker.
signature of Ty Coon, 1 April 1989
Ty Coon, President of Vice
This General Public License does not permit incorporating your
program into proprietary programs. If your program is a subroutine library, you may consider it more useful to permit linking proprietary applications with the library. If this is what you want to
do, use the GNU Lesser General Public License instead of this
license.
Page 100

APPENDIX
140
APPENDIX
Copyright (C) 1991, 1999 Free Software Foundation, Inc. 51
Franklin Street, Fifth Floor, Boston, MA 02110-1301 USA
Everyone is permitted to copy and distribute verbatim copies of
this license document, but changing it is not allowed.
[This is the first released version of the Lesser GPL. It also
counts as the successor of the GNU Library Public License, version 2, hence the version number 2.1.]
Preamble
The licenses for most software are designed to take away your
freedom to share and change it. By contrast, the GNU General
Public Licenses are intended to guarantee your freedom to share
and change free software - to make sure the software is free for
all its users.
This license, the Lesser General Public License, applies to some
specially designated software packages - typically libraries - of
the Free Software Foundation and other authors who decide to
use it. You can use it too, but we suggest you first think carefully about whether this license or the ordinary General Public
License is the better strategy to use in any particular case, based
on the explanations below.
When we speak of free software, we are referring to freedom of
use, not price. Our General Public Licenses are designed to make
sure that you have the freedom to distribute copies of free software (and charge for this service if you wish); that you receive
source code or can get it if you want it; that you can change the
software and use pieces of it in new free programs; and that you
are informed that you can do these things.
To protect your rights, we need to make restrictions that forbid
distributors to deny you these rights or to ask you to surrender
these rights. These restrictions translate to certain responsibilities
for you if you distribute copies of the library or if you modify it.
For example, if you distribute copies of the library, whether gratis
or for a fee, you must give the recipients all the rights that we
gave you. You must make sure that they, too, receive or can get
the source code. If you link other code with the library, you must
provide complete object files to the recipients, so that they can
relink them with the library after making changes to the library
and recompiling it. And you must show them these terms so they
know their rights.
We protect your rights with a two-step method: (1) we copyright
the library, and (2) we offer you this license, which gives you legal
permission to copy, distribute and/or modify the library.
To protect each distributor, we want to make it very clear that
there is no warranty for the free library. Also, if the library is modified by someone else and passed on, the recipients should know
that what they have is not the original version, so that the original author's reputation will not be affected by problems that
might be introduced by others.
Finally, software patents pose a constant threat to the existence
of any free program. We wish to make sure that a company cannot effectively restrict the users of a free program by obtaining a
restrictive license from a patent holder. Therefore, we insist that
any patent license obtained for a version of the library must be
consistent with the full freedom of use specified in this license.
Most GNU software, including some libraries, is covered by the
ordinary GNU General Public License. This license, the GNU
Lesser General Public License, applies to certain designated
libraries, and is quite different from the ordinary General Public
License. We use this license for certain libraries in order to permit linking those libraries into non-free programs.
When a program is linked with a library, whether statically or
using a shared library, the combination of the two is legally
speaking a combined work, a derivative of the original library. The
ordinary General Public License therefore permits such linking
only if the entire combination fits its criteria of freedom. The
Lesser General Public License permits more lax criteria for linking
other code with the library.
We call this license the "Lesser" General Public License because
it does Less to protect the user's freedom than the ordinary
General Public License. It also provides other free software developers Less of an advantage over competing non-free programs.
These disadvantages are the reason we use the ordinary General
Public License for many libraries. However, the Lesser license provides advantages in certain special circumstances.
For example, on rare occasions, there may be a special need to
encourage the widest possible use of a certain library, so that it
becomes a de-facto standard. To achieve this, non-free programs
must be allowed to use the library. A more frequent case is that
a free library does the same job as widely used non-free libraries.
In this case, there is little to gain by limiting the free library to free
software only, so we use the Lesser General Public License.
In other cases, permission to use a particular library in non-free
programs enables a greater number of people to use a large body
of free software. For example, permission to use the GNU C
Library in non-free programs enables many more people to use
the whole GNU operating system, as well as its variant, the
GNU/Linux operating system.
GNU LESSER GENERAL PUBLIC LICENSE
Version 2.1, February 1999
 Loading...