

LG Electronics USA 26LG30UD User Manual
WATCHING TV / CHANNEL CONTROL
51
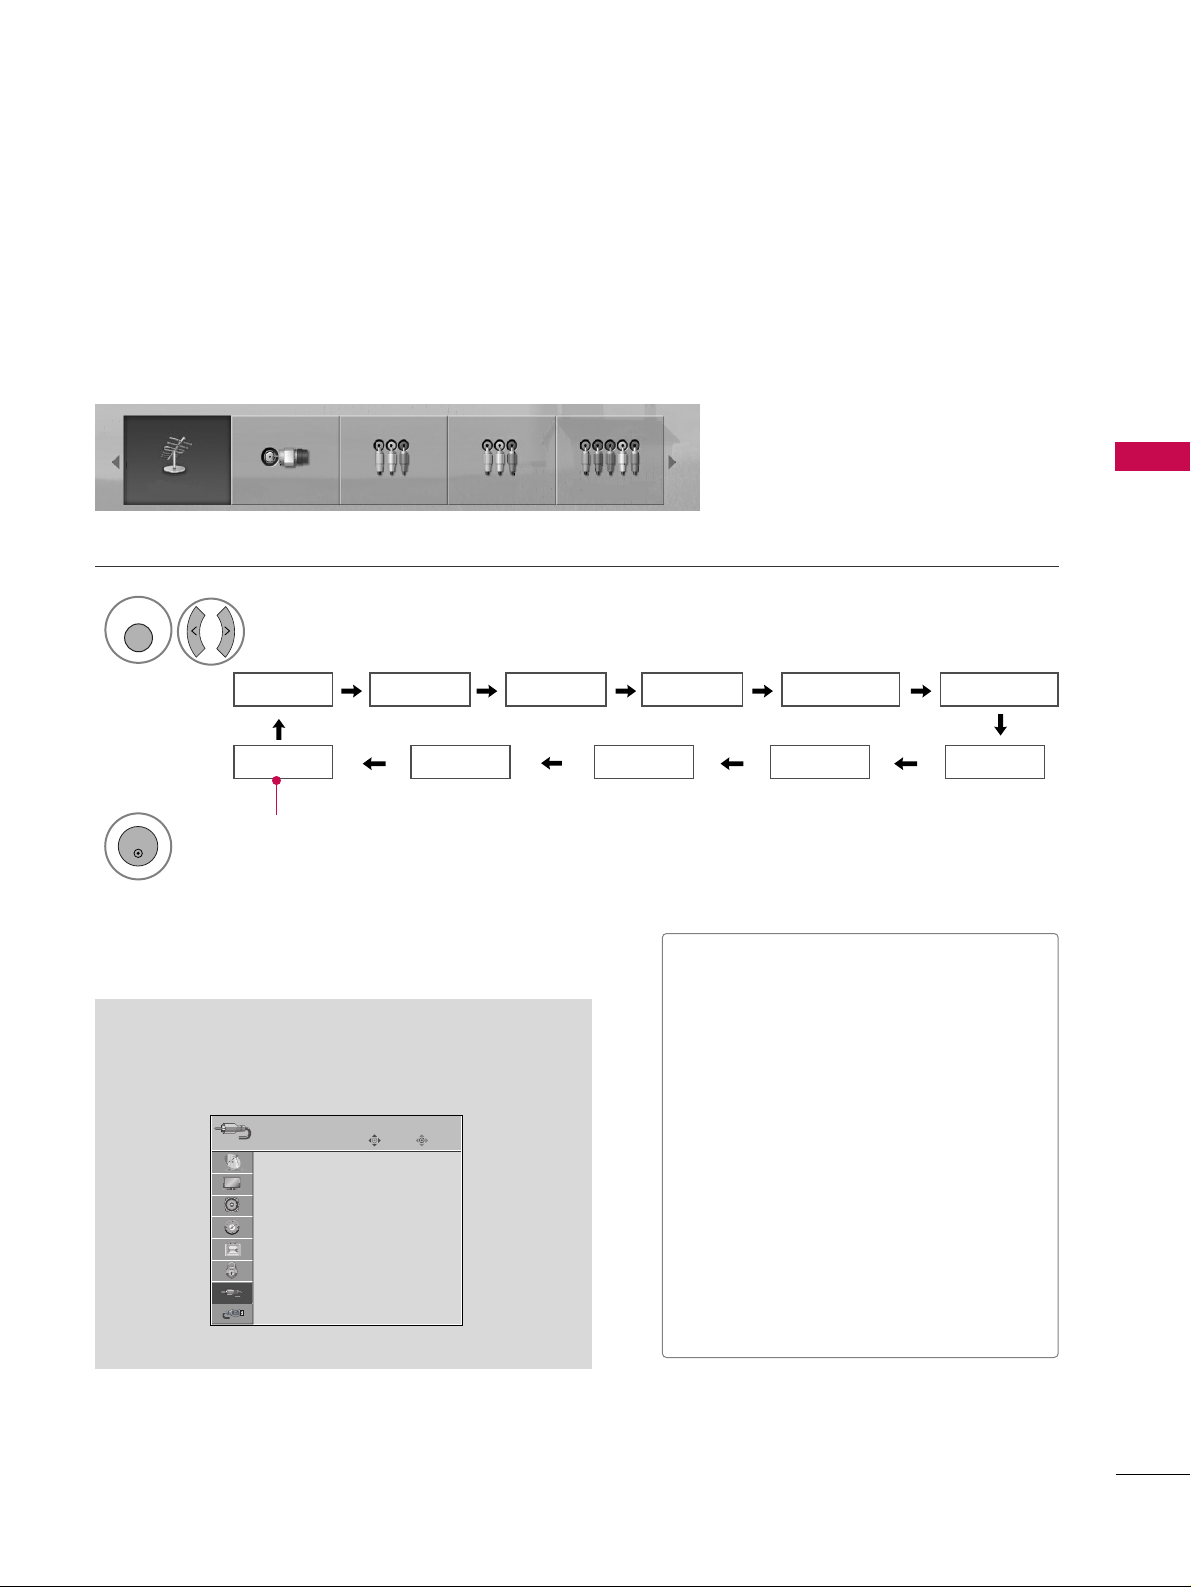
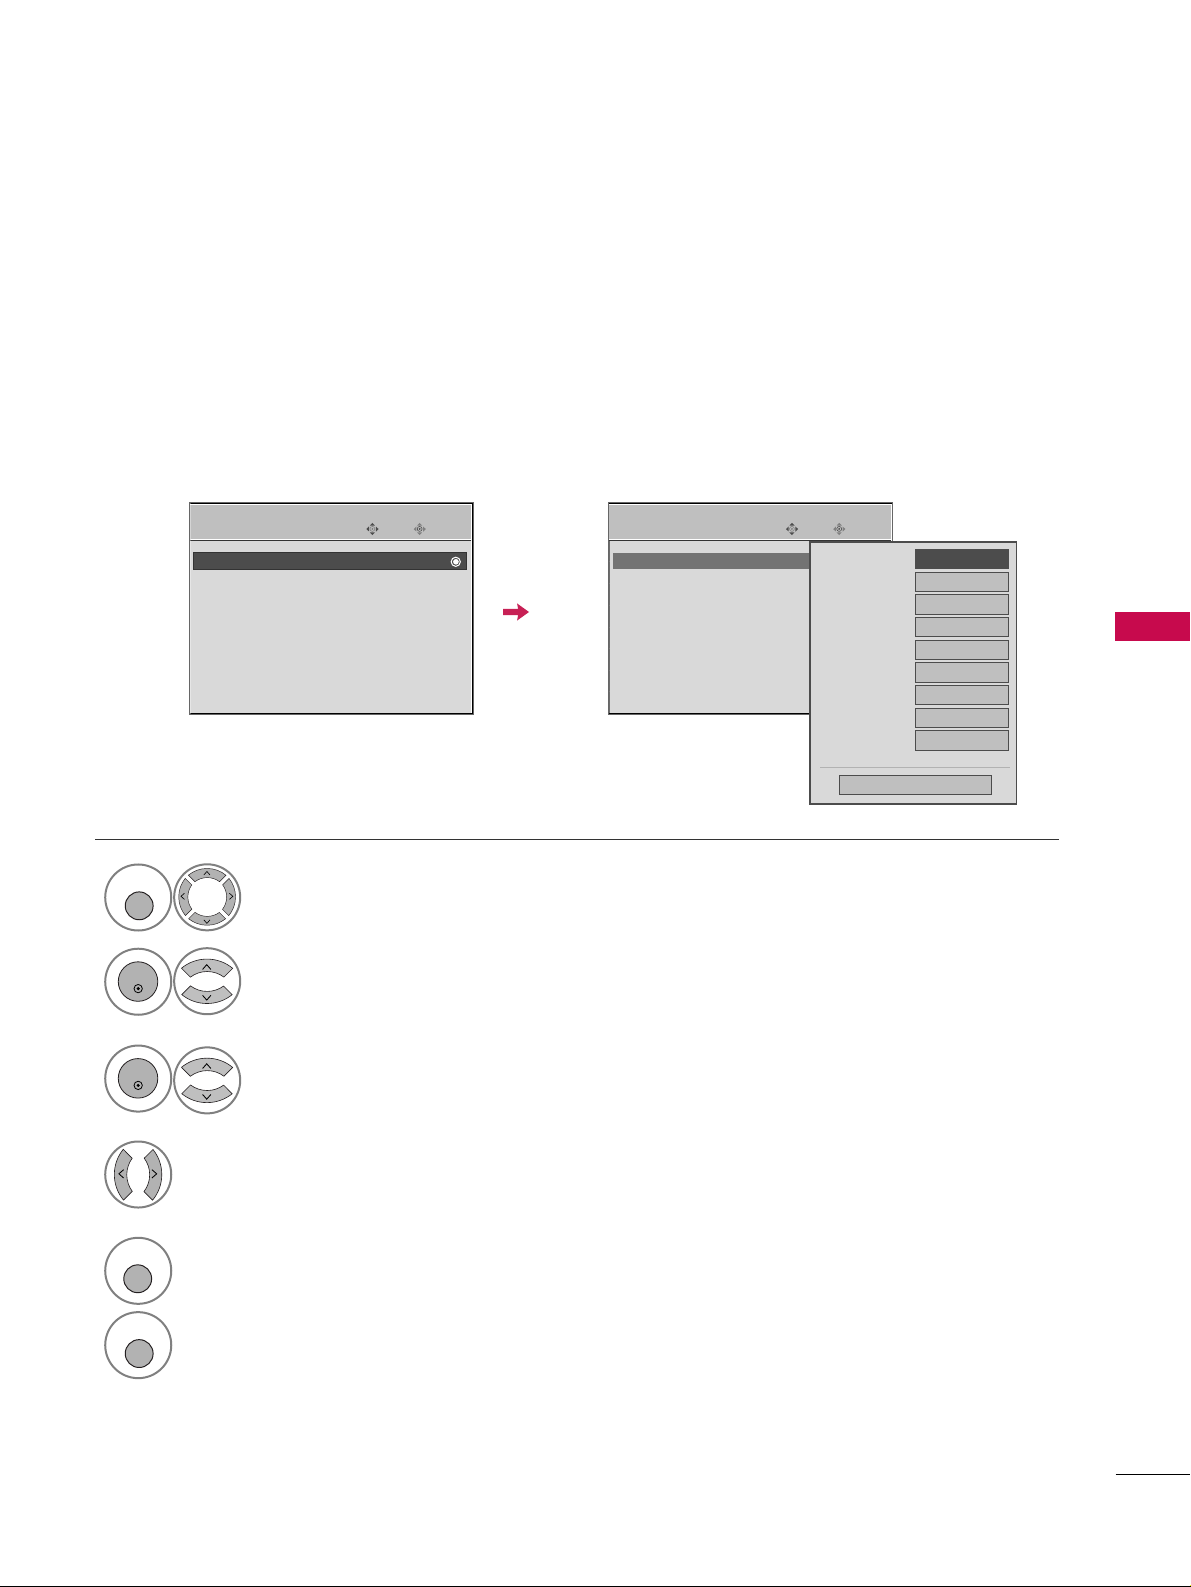
INPUT LIST
Only these input signals which are connected to a TV can be activated and selected.
Select the desired input source.
1
INPUT
■
You can also select the desired input source in the
IINNPPUUTT
menu (Only 32/37/42/47/52LG50/60/70,
50/60PG60F).
Input List
Antenna Cable AV1 AV2 Component1
HDMI4 HDMI3 HDMI2 HDMI1 RGB-PC
Component2
Antenna Cable AV1 AV2 Component1
Selected input source is linked.
2
ENTER
■
AAnntteenn nn aa
: Select it when watching the
DTV/TV.
■
CC aabbllee
: Select it when watching the
CADTV/CATV.
■
AAVV 11--22
: Select it when watching the
VCR or external equipment.
■
CCoommppoonneenntt 11--22
: Select it when using
the DVD or the Digital set-top box
depend on connector.
■
RR GG BB --PPCC
: Select it when using PC
depend on connector.
■
HHDDMMII11--44
: Select it when using DVD,
PC or Digital set-top box depend on connector.
Enter
Move
Antenna
Cable
AV1
AV2
Component1
Component2
RGB-PC
HDMI1
INPUT
E
Except 26/32/37/42/47/52LG30/50, 42/50PG10/20

WATCHING TV / CHANNEL CONTROL
52
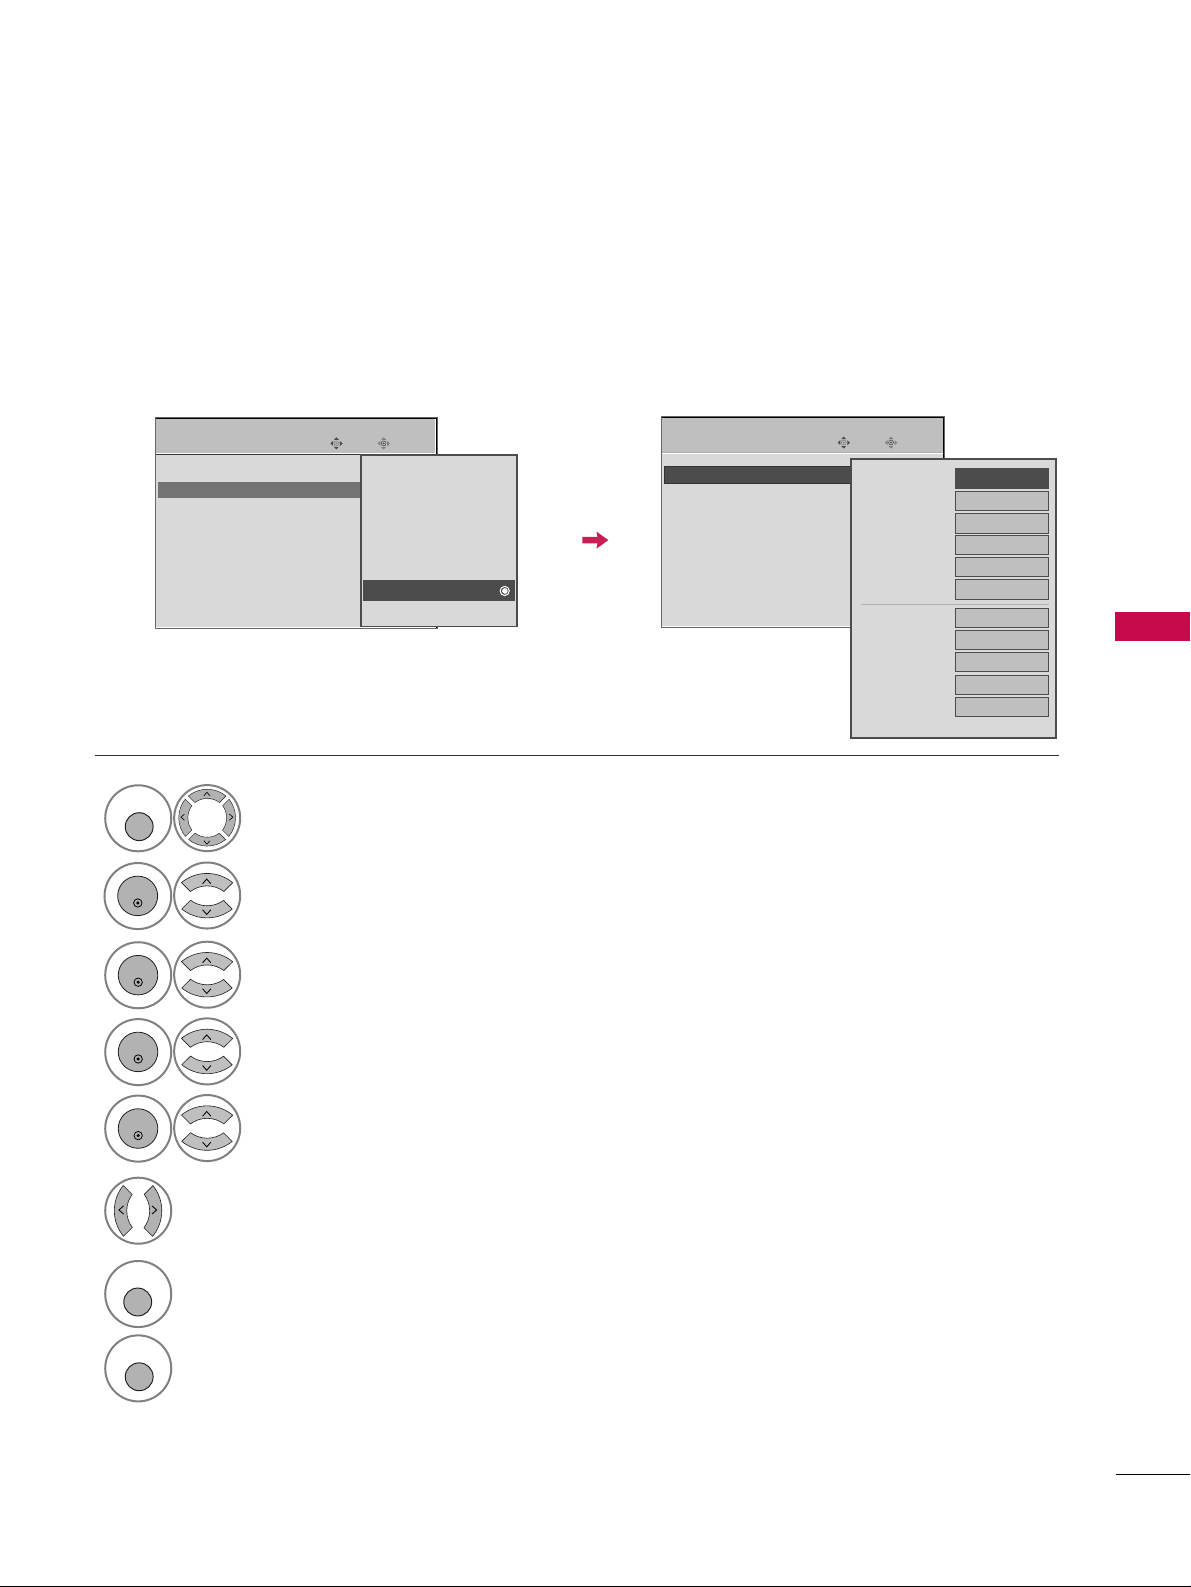
INPUT LABEL
WATCHING TV / CHANNEL CONTROL
Sets a label to each input source which is not in use.
Select
OOPPTTII OONN
.
Select
IInnpp uu tt LLaa bbee ll
.
Select the source.
Enter
Move
OPTION
Enter
Move
OPTION
1
MENU
3
2
ENTER
ENTER
Language : English
Input Label
SIMPLINK : On
Key Lock : Off
Caption : Off
ISM Method
Power Saving : Level 0
Set ID : 1
Language : English
Input Label
SIMPLINK : On
Key Lock : Off
Caption : Off
ISM Method
Power Saving : Level 0
Set ID : 1
AV1
AV2
Component1
Component2
RGB-PC
HDMI1
HDMI2
HDMI3
HDMI4
FF GG
Close
Select the label.
4
ENTER
EEEE
5
RETURN
Return to the previous menu.
MENU
Return to TV viewing
Only for
32/37/42/47/52LG60/70,
50/60PG60F

WATCHING TV / CHANNEL CONTROL
53
AV MODE
You can select the optimal images and sounds when connecting AV devices to external input.
1
AV MODE
2
Off Cinema
Game Sport
Press the
AAVV MMOODD EE
button repeatedly to select the desired source.
ENTER
3
RETURN
Return to the previous menu.
MENU
Return to TV viewing
■
If you select Cinema Mode in AV mode,
Cinema mode will be selected both for
Picture and Sound Mode in PICTURE and
AUDIO menu respectively.
■
If you select “Off ” in AV mode, the picture
and image which you initially set will be
selected.

WATCHING TV / CHANNEL CONTROL
54
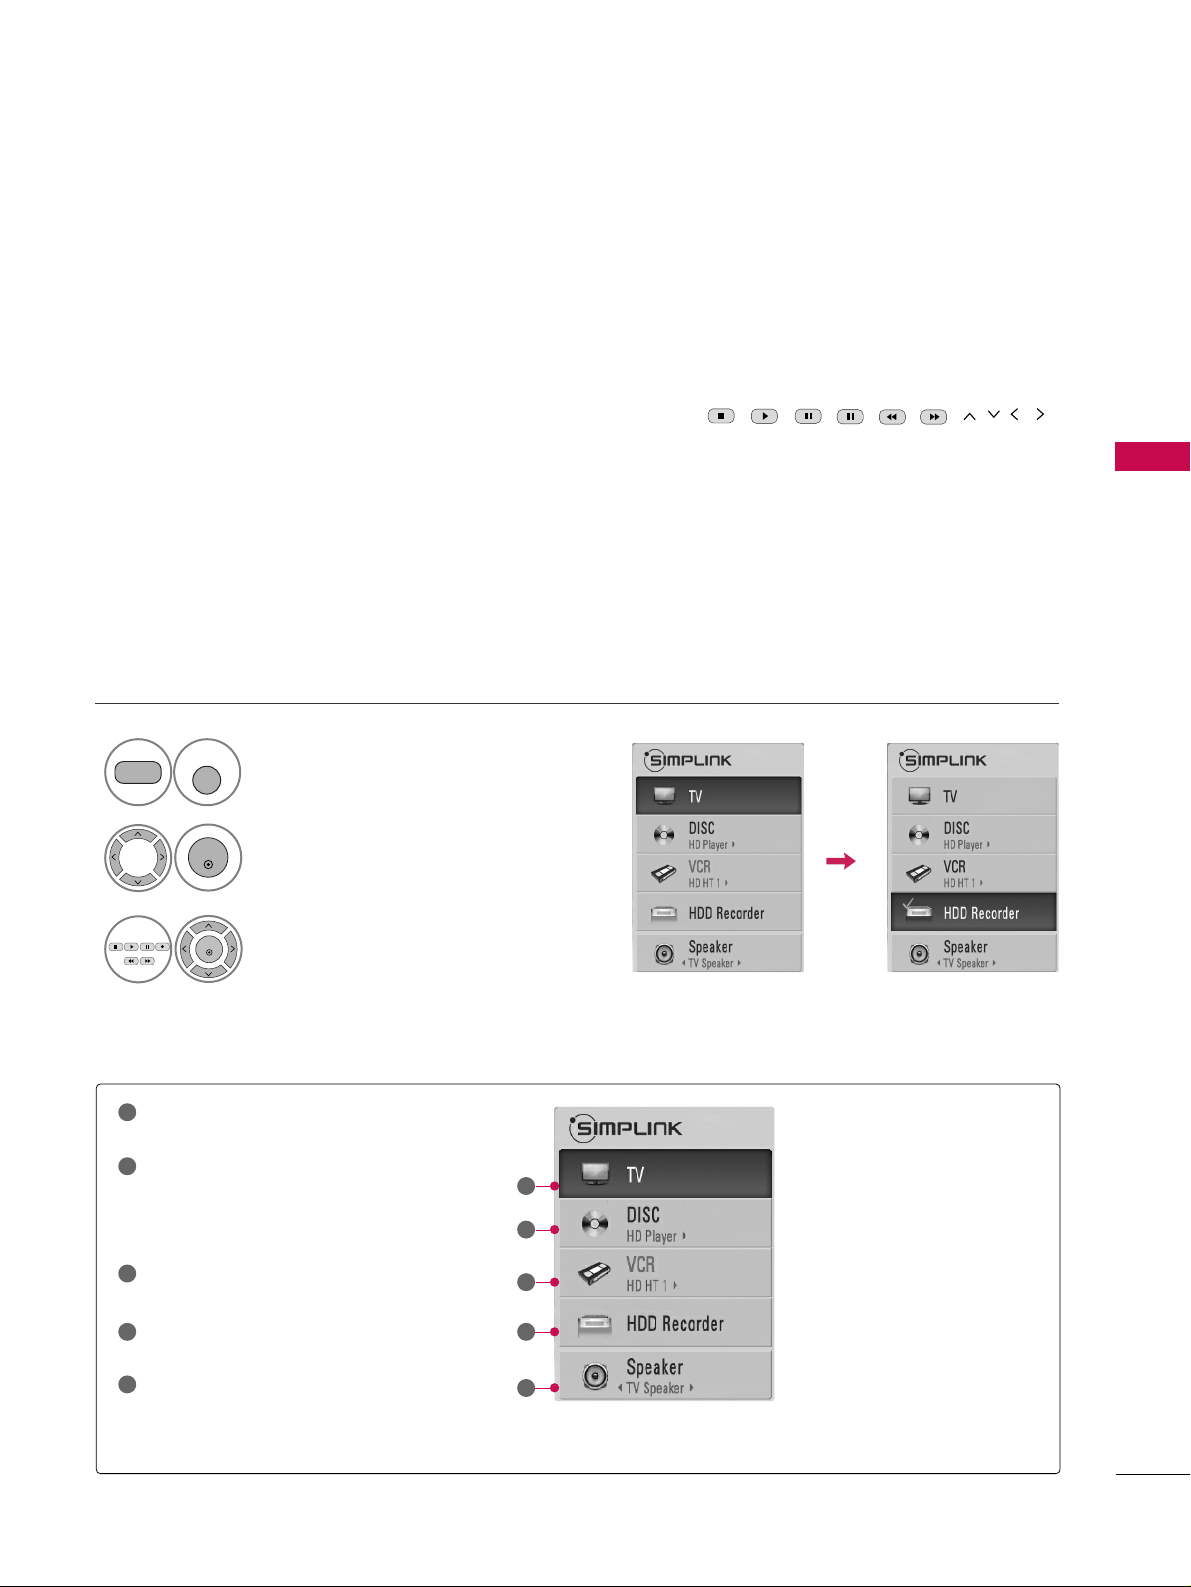
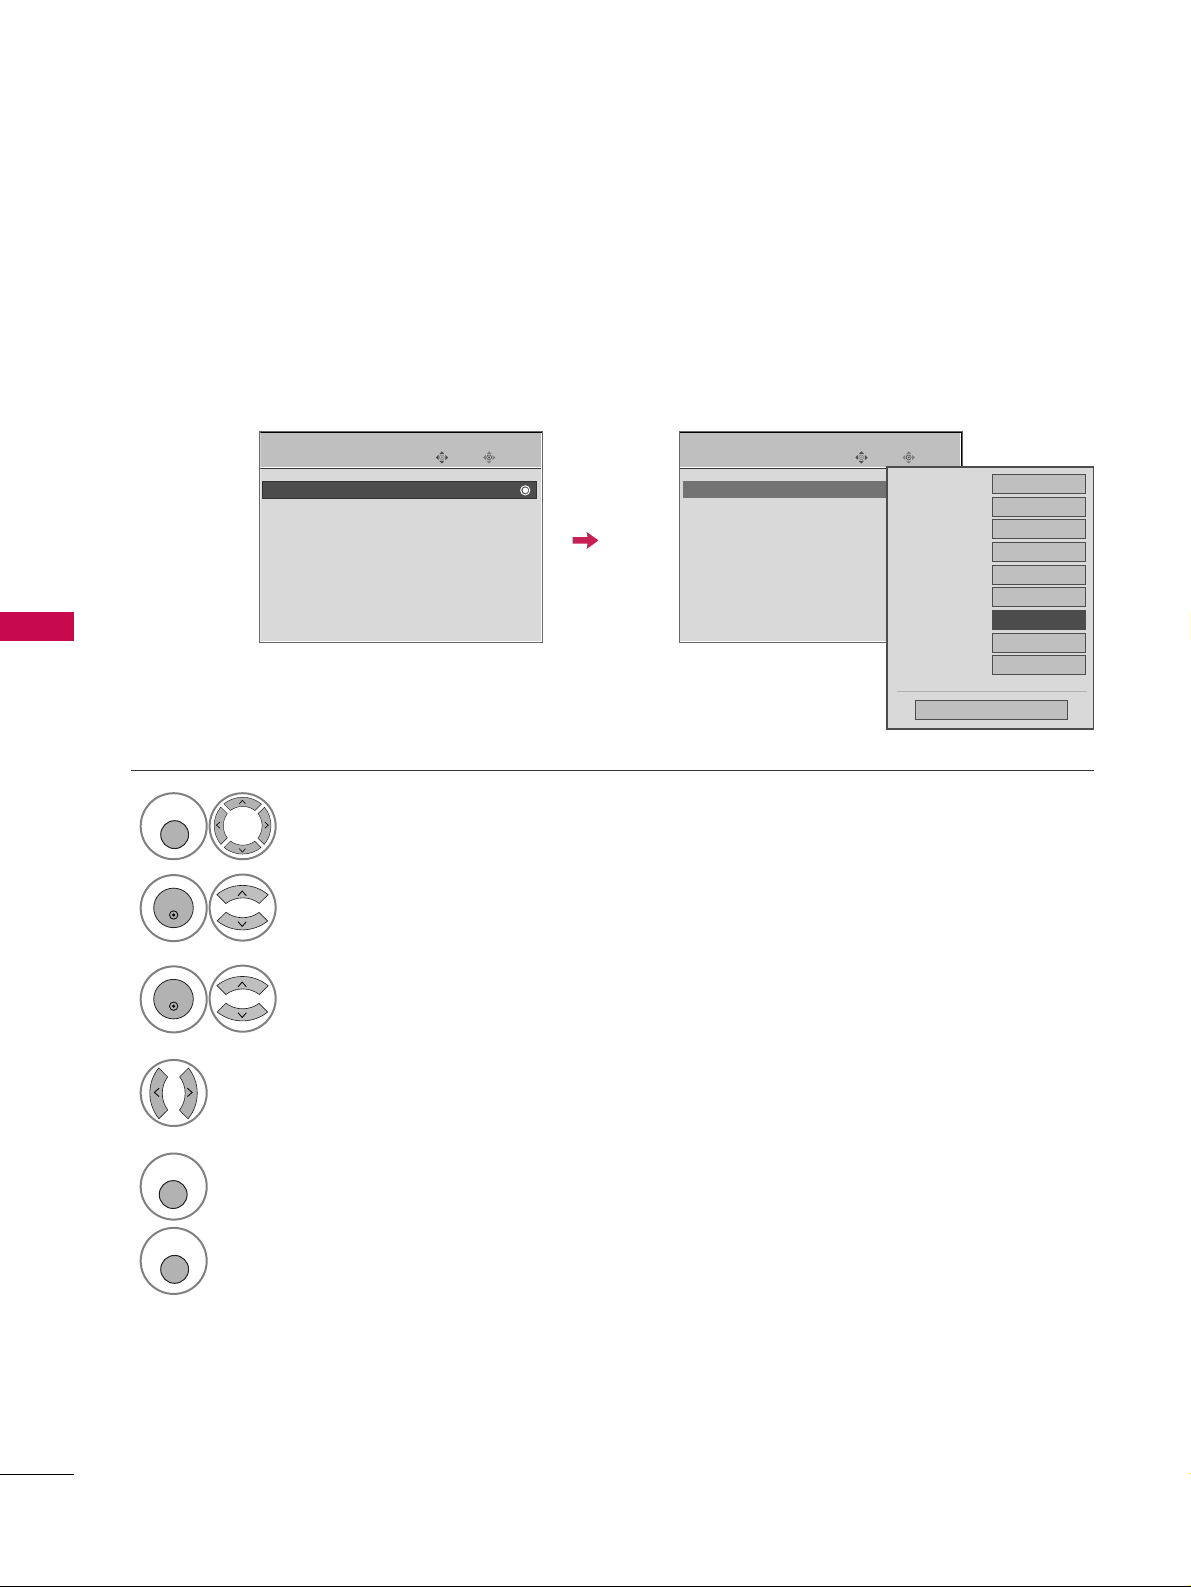
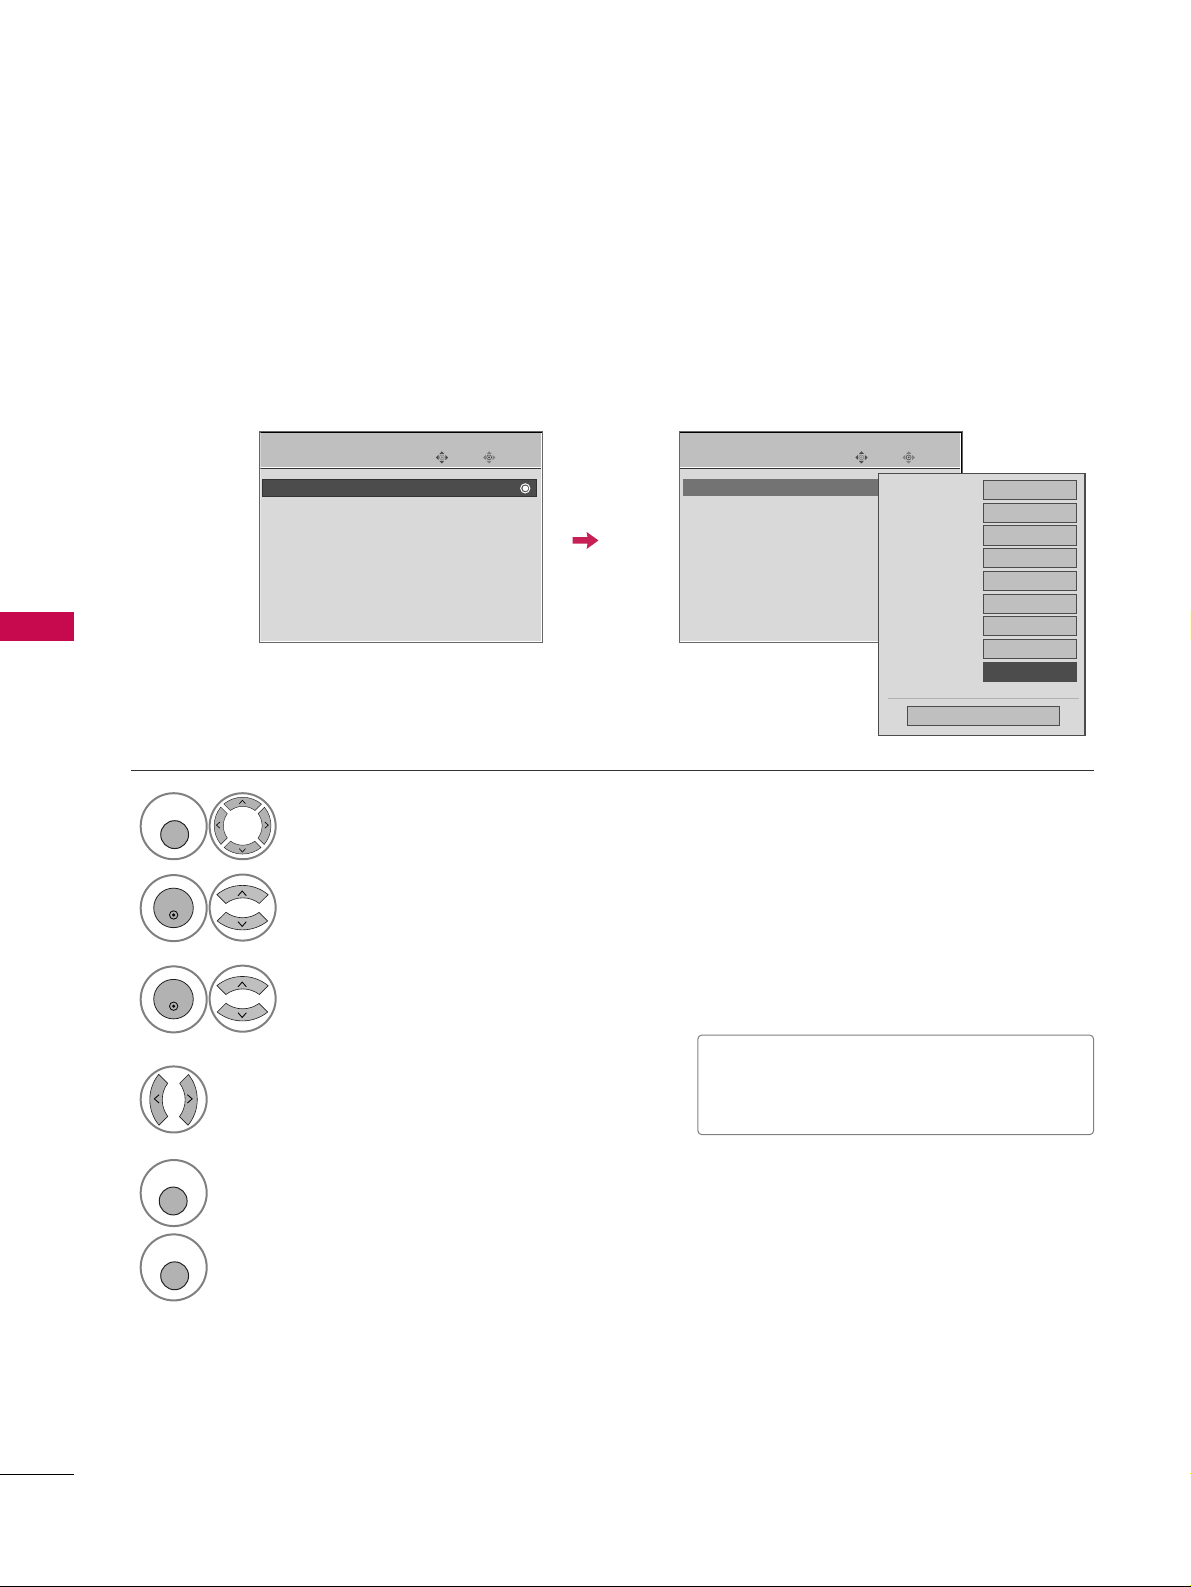
WATCHING TV / CHANNEL CONTROL
This function operates only with devices with the logo. Please check the logo.
This allows you to control and play other AV devices connected to the display through HDMI cable without
additional cables and settings.
If you require the SIMPLINK menu, select “
OO nn
”.
SIMPLINK function is not supported by HDMI IN 4 input source.
Enter
Move
OPTION
Select
OOPPTTII OONN
.
Select
SSIIMMPP LLII NN KK
.
Select
OOnn orOOffff
.
Enter
Move
OPTION
E
1
MENU
3
2
ENTER
ENTER
Language : English
Input Label
SIMPLINK : On
Key Lock : Off
Caption : Off
ISM Method
Power Saving : Level 0
Set ID : 1
Language : English
Input Label
SIMPLINK : On
Key Lock : Off
Caption : Off
ISM Method
Power Saving : Level 0
Set ID : 1
Off
On
NOTE
!
GG
Connect the HDMI/DVI IN or HDMI IN terminal of the TV to the rear terminal (HDMI terminal) of the SIMPLINK device with the HDMI cable.
GG
After connecting the HDMI terminal for the home theater with the SIMPLINK function using the above
method, connect the DIGITAL AUDIO OUT terminal on the back of the TV to the DIGITAL AUDIO IN terminal on the back of the SIMPLINK device with the OPTICAL cable.
GG
When you switch the Input source with the INPUT button on the remote control, you can stop the operation of device controlled by SIMPLINK.
GG
When you select or operate the media device with home theater function, the speaker automatically switches to home theater speaker (HT speaker).
GG
When you execute ‘PHOTO LIST, MUSIC LIST’ function during DVD playback included in home theater supported the SimpLink stops and the applicable function is executed after switching the input to TV.
E
4
RETURN
Return to the previous menu.
MENU
Return to TV viewing
WATCHING TV / CHANNEL CONTROL
55
■
DDiirr eecc tt PPllaayy::
After connecting AV devices to the TV, you can directly control the devices and play media with-
out additional settings.
■
SSeelleecc tt AAVV ddeevviiccee::
Enables you to select one of the AV devices connected to TV and play it.
■
DDiiss cc ppllaayy bbaacc kk ::
Control connected AV devices by pressing the
,
,,,,, ,
ENTER
buttons and buttons for play, stop, pause, fast reverse, fast forward, chapter skip.
■
PPoowweerr ooffff aallll ddeevviicceess::
When you power off the TV, all connected devices are turned off.
■
SSwwiittcc hh aauuddiioo--oouutt ::
Offers an easy way to switch audio-out.
(A device, which is connected to the TV through a HDMI cable but does not support SimpLink, does not provide
this function)
Note: To operate SIMPLINK, the HDMI cable over 1.2 Version with *CEC function should be used. (*CEC: Consumer
Electronics Control).
SimpLink Menu
TTVV vvii eeww iinngg
: Switch to the previous TV
channel regardless of the current mode.
DDIISSCC ppllaayybbaacckk
: Select and play discs.
When multiple discs are available, the titles
of discs are conveniently displayed at the
bottom of the screen.
VVCC RR ppll aayybbaa cckk
: Control the connected
VCR.
HHDDDD RReeccoo rr ddii nn gg ss ppllaayybbaacckk
: Control
recordings stored in HDD.
AAuudd iioo OOuutt tt oo HHTT ss ppee aakkeerr//AAuuddiioo
OOuutt ttoo TTVV
: Select HT speaker or TV
speaker for Audio Out.
SimpLink Functions
1
2
3
4
5
GG
Selected Device
GG
When no device is connected
(displayed in gray)
GG
When a device is connected
(displayed in bright color)
1
2
3
4
5
Display
SSIIMMPP LL II NN KK
menu.
Select the desired device.
Control connected AV devices.
1
TV
SIMPLINK
3
2
ENTER
ENTER

ENTRY MODES
MEDIA HOST
56
USB
When you connect a USB device, this screen is displayed, automatically.
In USB device, you can not add a new folder or delete the existing folder.
Precautions when using the USB device
GG
Only a USB storage device is recognizable.
GG
If the USB storage device is connected through a
USB hub, the device is not recognizable.
GG
A USB storage device using an automatic recognition program may not be recognized.
GG
A USB storage device which uses its own driver
may not be recognized.
GG
In case of a card reader, up to four memory cards
are concurrently recognizable.
GG
The recognition speed of a USB storage device
may depend on each device.
GG
Please do not turn off the TV or unplug the USB
device when the connected USB storage device is
working. When such device is suddenly separated
or unplugged, the stored files or the USB storage
device may be damaged.
GG
Please do not connect the USB storage device
which was artificially maneuvered on the PC. The
device may cause the product to malfunction or
fail to be played. Never forget to use only a USB
storage device which has normal music files or
image files.
GG
Please use only a USB storage device which was
formatted as a FAT32 file system provided with the
Windows operating system. In case of a storage
device formatted as a different utility program
which is not supported by Windows, it may not be
recognized.
GG
Please connect power to a USB storage device
which requires an external power supply. If not,
the device may not be recognized.
GG
Please connect a USB storage device with cable is
offered by USB maker. If connected with cable is
not offered by USB maker or an excessively long
cable, the device may not be recognized.
GG
Some USB storage devices may not be supported
or operated smoothly.
GG
If the name of a folder or file is too long, it will not
be displayed or recognized.
GG
Please backup the important file because a data of
USB device may be damaged. Data management is
consumer's responsibility and in consequence the
manufactures does not cover the product bearing
data damage.
When removing the USB device
Connect the USB device to the
UUSSBB IINN
jacks on the side of TV.
3
Select
PPHHOOTTOO LLIISSTT orMMUUSSIICC LL II SS TT
1
USB
SERVUCE ONLY
PHOTO LIST MUSIC LIST
Select
UUSSBB EEjj eecctt
.
Select the USB EJECT menu before removing the
USB device.
2
ENTER
1
Q. MENU
2
ENTER
■
This feature is only for 32/37/42/47/52LG50/60/70, 50/60PG60F.

PHOTO LIST
MEDIA HOST
57
It’s available to playback the photo file(*.jpg) in the USB device.
The On Screen Display may be different from your set. Images are an example to assist with the TV operation.
Screen Components
Moves to upper level file
Current page/Total pages
Total number of marked
thumbnail photos
Usable USB memory
Corresponding buttons on
the remote control
PHOTO (*.JPEG) supporting file
Baseline: width<=4800, height is no limit
• You can play JPEG files only.
• Only baseline scan is supported among JPEG.
• Non-supported files are displayed in the form of icon.
USB Device
Page 2/3
No Marked
PHOTO LIST
Up Folder
Free Space 150MB
Navigate PopUp Menu Move Page Mark Exit
1366x768, 125KB
2 3 4
1
Select
UUSS BB
.
Select
PPhhoo ttoo LLiisstt
.
2
Drive1
1
MENU
ENTER
ENTER
1
2
3
4
5
KY104 KY105 KY106
CH
FAV
RETURN
5
MEDIA HOST
58
USB
Photo Selection and PopUp Menu
USB Device
Page 2/3
No Marked
PHOTO LIST
Up Folder
Free Space 150MB
1366x768, 125KB
USB Device
Page 2/3
No Marked
PHOTO LIST
Up Folder
Free Space 150MB
1366x768, 125KB
1366x768, 125KB
View
Mark All
Delete
Cancel
GG
VViieeww
: Display the selected item.
GG
MMaarrkk AAllll
: Mark all photos on the screen.
GG
UUnnmmaarr kk AAllll
: Deselect all marked photos.
GG
DDee llee tt ee
: Delete the selected photo item.
GG
CC aannccee ll
: Close the pop-up menu.
Select the target folder or drive.
Select the desired photos.
2
Show the PopUp menu.
3
1
•
Use the
CC HH
button to navigation in the
thumbnail photo page.
• Use the
FFAAVV
button to mark or unmark a photo.
When one or more photos are marked, you can
view individual photos or a slide show of the
marked photos. If no photos are marked, you
can view all photos individually or all photos in
the folder in a slide show.
Drive1
Drive1
4
Select the desired PopUp menu.
ENTER
ENTER
ENTER
5
Return to TV viewing
RETURN
Return to the previous menu.
MENU
Navigate Move Page Mark Exit
CH
FAV
RETURN
PopUp Menu
Navigate Move Page Mark Exit
CH
FAV
RETURN
PopUp Menu
KY104 KY105 KY106
KY104 KY105 KY106

MEDIA HOST
59
Set up the menu in Full-Sized Screen
You can change the settings to display photos stored on a USB device, on a full-sized screen.
Detailed operations are available on full-sized photo view screen.
•
Use the
CC HH
button to navigation in the
thumbnail photo page.
USB Device
Page 2/3
No Marked
PHOTO LIST
Up Folder
Free Space 150MB
1366x768, 125KB
KR101
KR102
JMJ001
JMJ002
JMJ003
JMJ004
KR103
KR104
KR105
JMJ005
JMJ006
JMJ007
JMJ008
Up Folder
1366x768, 125KB
View
Mark All
Delete
Cancel
The aspect ratio of a photo may change the size of
the photo displayed on the screen in full size.
1/17
Slideshow BGM Delete Option Hide
USB Device
Page 2/3
No Marked
PHOTO LIST
Up Folder
Free Space 150MB
1366x768, 125KB
KR101
KR102
JMJ001
JMJ002
JMJ003
JMJ004
KR103
KR104
KR105
JMJ005
JMJ006
JMJ007
JMJ008
Up Folder
Drive1
Drive1
Select the target folder or drive.
Select the desired photos.
show the PopUp menu.
5
Select
VViiee ww
The selected photo is displayed in
full size.
2
3
1
4
ENTER
ENTER
ENTER
Navigate Move Page Mark Exit
CH
FAV
RETURN
PopUp Menu
Navigate Move Page Mark Exit
CH
FAV
RETURN
PopUp Menu

MEDIA HOST
60
USB
The aspect ratio of a photo may change
the size of the photo displayed on the
screen in full size.
1/17
Slideshow BGM Del ete Option Hide
Select the
SSlliiddeesshhooww, BBGGMM
,
((RRoottaattee))
,
DDeellee ttee,OOppttiioonn
, or
HHiiddee..
Press
FF GG
to set the time interval between slides.
Slide Speed
Fast
Cancel
Music
Music Folder
ENTER
• Use button to select the previous
or next photo.
• Use button to select and control
the menu on the full-sized screen.
ENTER
6
GG
SSlliidd eesshhooww
: When no picture is selected, all photos in
the current folder are displayed during slide show.
When selected, the selected photos are displayed during slide show.
■
Set the time interval of the slide show in
OOppttiioonn
.
GG
BBGG MM
: Listen to music while viewing photos in full size.
■
Set the BGM device and album in
OOppttiioonn
.
GG
(( RRoo ttaattee))
: Rotate photos.
■
Rotates the photo 90°, 18 0 °, 270 °, 360° clockwise.
■
A slide show continues for a maximum of 4 hours.
After 4 hours, the slide show will end and go to TV
mode or external input mode.
GG
DDee llee tt ee
: Delete photos.
GG
OOppttiioonn
: Set values for
SSlliidd ee SSpp eeee dd
and
MMuussiicc
FF oolldd eerr
.
■
Use button and
EENNTTEE RR
button to set values.
Then go to and press
EENNTTEE RR
to save the set-
tings.
■
You cannot change
MMuu ssiicc FF ooll ddee rr
while BGM is
playing.
GG
HHii ddee
: Hide the menu on the full-sized screen.
■
To see the menu again on the full-sized screen, press
EENNTTEE RR
button to display.
NOTE
!
GG
If it is Progressive JPEG format,
some photos may be not decorded.

MUSIC LIST
MEDIA HOST
61
Purchased music files(*.MP3) may contain copyright restrictions. Playback of these files may not be supported by this model.
Music file on your USB device can be played by this unit.
The On Screen Display may be different from your set. Images are an example to assist with the TV opera-
tion.
Screen Components
MUSIC(*.MP3) supporting file
Bitrate range 8Kbps ~ 320Kbps
•Sampling rate
MPEG1 : 32000, 44100, 48000Hz
MPEG2 : 16000, 24000, 22050Hz
MPEG2.5 : 8000, 11025, 12000Hz
USB Device
Page 2/3
No Marked
MUSIC LIST
Up Folder
Free Space 150MB
1:340, 120KB
Title Play Time
Up Folder
2 3 4
1
Moves to upper level file
Current page/Total pages
Total number of marked
musics
Usable USB memory
Corresponding buttons on
the remote control
1
3
4
5
2
Select
UUSS BB
.
Select
MMuu ssiicc LL iiss tt
.
1
2
Music
MENU
ENTER
ENTER
Navigate PopUp Menu Move Page Mark Exit
CH
FAV
RETURN
5

MEDIA HOST
62
Music Selection and PopUp Menu
USB Device
Page 2/3
No Marked
MUSIC LIST
Up Folder
Free Space 150MB
1:340, 120KB
Up Folder
4395KB
1Kbps
Play
Play with Photo
Mark All
Delete
Cancel
GG
PPll aayy
(During stop) : Play the selected musics.
Once a music finishes playing, the next selected
one will be played. When there are no selected
musics to play, the next one in the current folder will be played. If you go to a different folder
and press the
EENNTTEE RR
button, the current
music in playback will stop.
GG
PPllaayy MM aarrkkee dd
: Play the selected musics. Once
a music finishes playing, the next selected one
will be played automatically.
GG
SStt oopp PP llaa yy
(During playback) : Stop the play-
ing musics.
GG
PPllaayy ww iitthh PP hh oottoo
: Start playing the selected
musics and then move to the Photo List.
GG
MMaarrkk AAll ll
: Mark all musics in the folder.
GG
UUnnmmaarr kk AAllll
: Deselect all marked musics.
GG
DDee llee tt ee
: Delete the selected musics.
GG
CC aannccee ll
: Close the pop-up menu.
•
Use the
CC HH
button to navigation in the
thumbnail photo page.
•
Use
FF AAVV
button to mark or unmark a music.
When one or more music files are marked, the
marked musics will be played in sequence. For
example, if you want to listen to only one music
repeatedly, just mark the music only and play it.
If no music is marked, all the music in the folder
will be played in sequence.
As shown, up to 6 music titles are listed per page.
USB Device
Page 2/3
No Marked
MUSIC LIST
Up Folder
Free Space 150MB
1:340, 120KB
Up Folder
Music
Music
Select the target folder or drive.
Select the desired musics.
show the PopUp menu.
Select the desired PopUp menu.
2
3
1
4
ENTER
ENTER
ENTER
5
RETURN
Return to TV viewing
MENU
Return to the previous menu.
Navigate Move Page Mark Exit
CH
FAV
RETURN
PopUp Menu
Navigate Move Page Mark Exit
CH
FAV
RETURN
PopUp Menu
Title Play Time
Title Play Time

MEDIA HOST
63
■
If you don't press any button for a while during the playing,
the play information box (as shown in the below) will float as
a screen saver.
■
The ‘Screen Saver’?
Screen saver is to prevent screen pixel damage due to an fixed
image remaining on the screen for a extended period of time.
NOTE
!
GG
When music is playing, is displayed in Back of the music title.
GG
A damaged or corrupted music does not play but displays 00:00 in playtime.
GG
A music downloaded from a paid service with copyright protection does not start but displays inappropriate information in playtime.
GG
If you press
EENNTTEE RR
, AAbuttons, screen saver is stopped.
GG
The
PPLLAAYY ((GG)), PPaauu ssee((IIII))
,
AA
buttons on the remote control are also available in this mode.
GG
It’s not available to play MP3 file under 16Kbyte.

PICTURE CONTROL
64
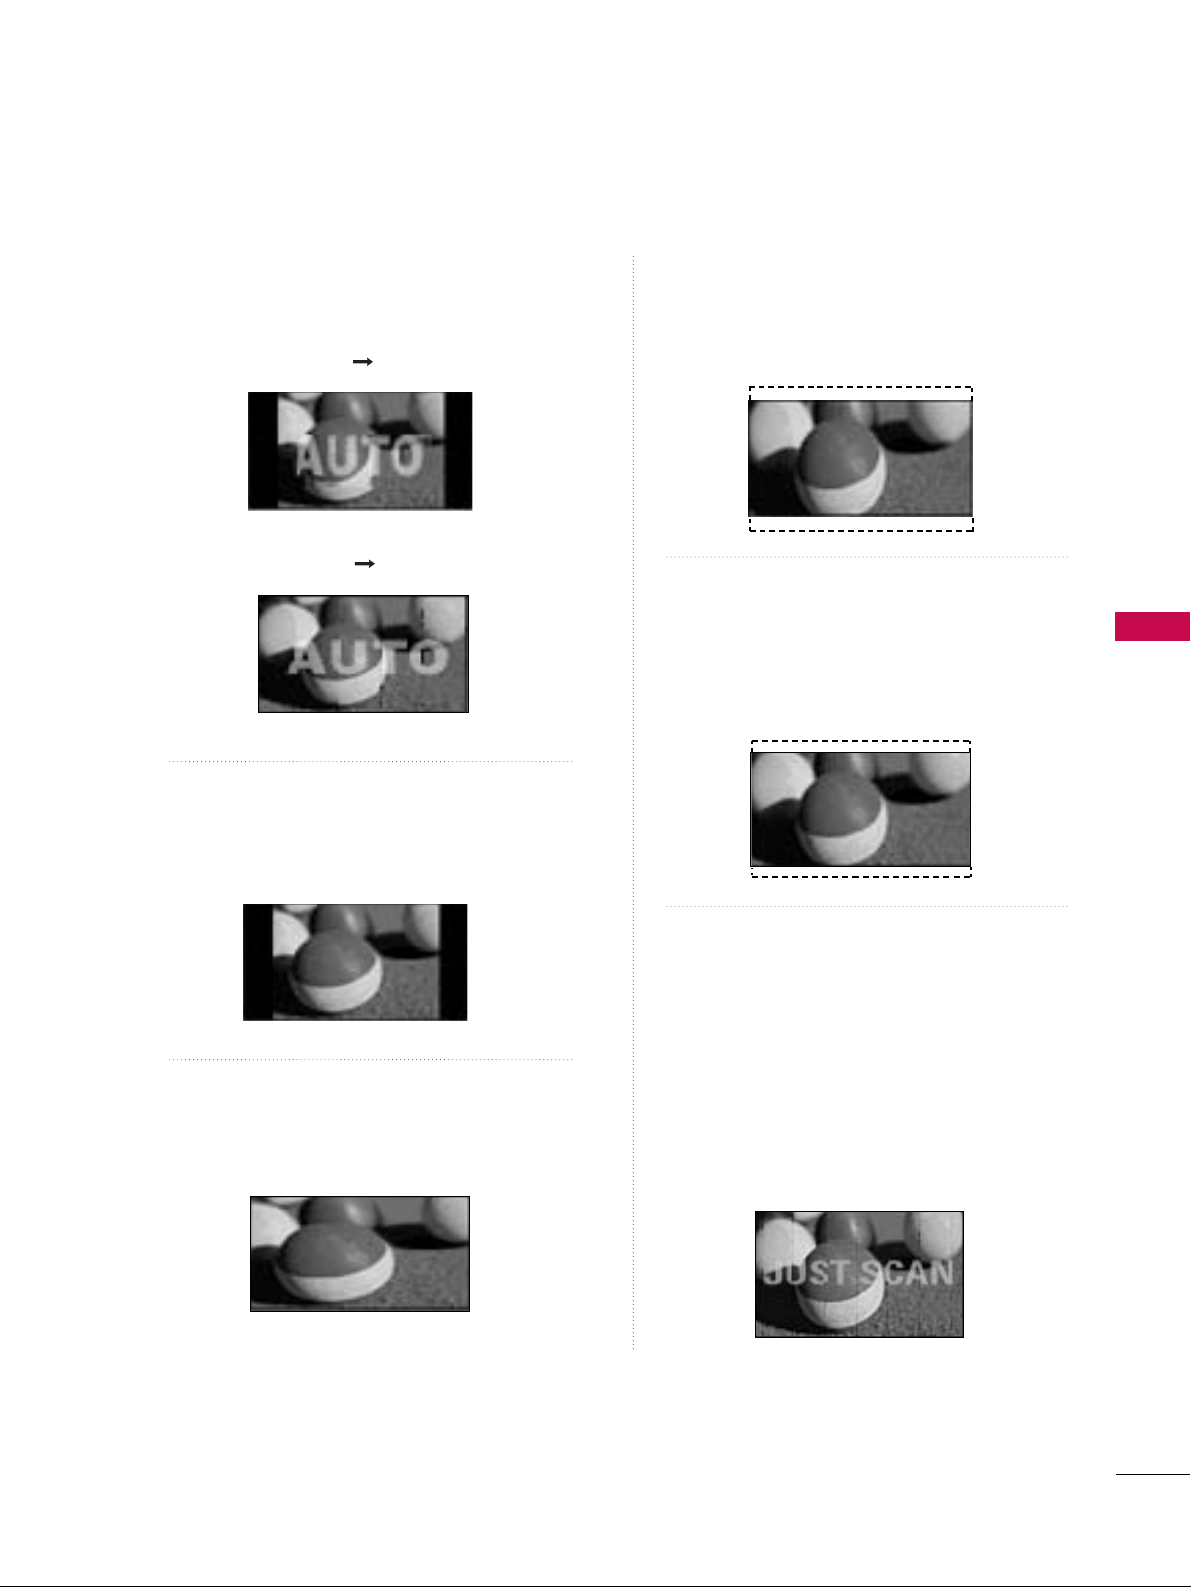
PICTURE SIZE (ASPECT RATIO) CONTROL
PICTURE CONTROL
This feature lets you choose the way an analog picture with a 4:3 aspect ratio is displayed on your TV. When
you receive an analog picture with a 4:3 aspect ratio on your 16:9 TV, you need to specify how the picture is
to be displayed.
■
RGB-PC input source use 4:3 or 16:9 aspect ratio.
NOTE
!
GG
If a fixed image is displayed on the screen for a long time, the image may become imprinted on the
screen and remain visible.
This phenomenon is common to all manufactures and in consequence the manufactures warranty does not
cover the product bearing this phenomenon.
■
You can also adjust
AAssppeecctt RRaa tt iioo
in
the
QQ -- MMee nnuu
.
Enter
Move
PICTURE
E
Enter
Move
PICTURE
E
RG
Aspect Ratio : 16:9
Picture Mode : Standard
• Backlight 80
• Contrast 90
• Brightness 50
• Sharpness 60
• Color 60
• Tint 0
Aspect Ratio : 16:9
Picture Mode : Standard
• Backlight 80
• Contrast 90
• Brightness 50
• Sharpness 60
• Color 60
• Tint 0
RG
Set By Program
4:3
16:9
Zoom1
Zoom2
Just Scan
Select
PPIICC TTUURREE
.
Select
AAssppeecctt RRaa tt iioo
.
Select the desired picture format.
1
MENU
3
2
ENTER
ENTER
4
RETURN
Return to the previous menu.
MENU
Return to TV viewing
PICTURE CONTROL
65
Set by program
Selects the proper picture proportion to match
the source’s image.
4:3
Choose 4:3 when you want to view a picture
with an original 4:3 aspect ratio.
16:9
Adjust the picture horizontally, in a linear proportion to fill the entire screen.
Zoom 1
Choose Zoom 1 when you want to view the picture without any alteration. However, the top and
bottom portions of the picture will be cropped.
Zoom 2
Choose Zoom 2 when you want the picture to be
altered, both vertically extended and cropped.
The picture taking a halfway trade off between
alteration and screen coverage.
Just Scan
Following selection will lead to you view the picture of best quality without loss of original picture in high resolution image.
Notes: If there are noise in original picture, you
can see the noise at the edge.
JJuusstt SS cc aann
operates only in DTV/CADTV
(720p/1080i/1080p), HDMI-DTV, DVIDTV input source.
(4:3 4:3)
(16:9 16:9)

PICTURE CONTROL
66
PRESET PICTURE SETTINGS
PICTURE CONTROL
Picture Mode - Preset
Picture Mode adjusts the TV for the best picture appearance. Select the preset value in the Picture Mode menu
based on the program category.
Enter
Move
PICTURE
E
Select
PPIICC TTUURREE
.
Select
PPiiccttuurree MMoodd ee
.
Select
IInnttee lllliiggeenntt EEyyee
(Only
26/32/37/42/47/52LG50/60/70),
VVii vviidd,SSttaannddaarrdd, CCiinneemmaa, SSppoorrtt ss
, or
GGaa mmee
.
■
IInnttee lllliiggeenntt EEyyee, DDyynnaammiicc, SSttaannddaarrdd
,
MMiilldd
Settings are preset for the optimum
picture quality at the factory and are
not adjustable.
■
When selecting
IInntt eelllliiggee nn tt EEyyee
(Only
26/32/37/42/47/52LG50/60/70),
the most suitable picture is automatically
adjusted according to the surrounding
conditions.
■
You can also adjust
PPiiccttuurree MMoodd ee
in
the
QQ .. MM eenn uu
.
Enter
Move
PICTURE
E
1
MENU
3
2
ENTER
ENTER
Aspect Ratio : 16:9
Picture Mode : Standard
• Backlight 80
• Contrast 90
• Brightness 50
• Sharpness 60
• Color 60
• Tint 0
Aspect Ratio : 16:9
Picture Mode : Standard
• Backlight 80
• Contrast 90
• Brightness 50
• Sharpness 60
• Color 60
• Tint 0
RG
Intelligent Eye
Vivid
Standard
Cinema
Sports
Game
Expert1
Expert2
RG
4
MENU
Return to TV viewing
PICTURE CONTROL
67
Color Tone - Preset
Choose one of three automatic color adjustments. Set to warm to enhance hotter colors such as red, or set to
cool to see less intense colors with more blue.
To initialize values (reset to default settings), select the Cool option.
When selecting Picture Mode options (Dynamic, Standard and Mild),
CCooll oorr TTee mmppeerraattuurree
is automatically
change.
Enter
Move
PICTURE
Enter
Move
PICTURE
EE
Select
PPIICC TTUURREE
.
Select
CCooll oorr TTee mmppeerraattuurree
.
1
MENU
3
ENTER
Select
CC ooooll, MMeeddiiuu mm
, or
WW aarr mm
.
4
• Advanced Control
• Picture Reset
Screen
TruMotion Demo
• Advanced Control
• Picture Reset
Screen
TruMotion Demo
Select
AAdd vv aanncceedd CCoonntt rrooll
.
2
ENTER
Color Temperature
FF
Medium
GG
Fresh Contrast
Off
Fresh Color
Off
Noise Reduction
Auto
Gamma
Medium
Black Level
Low
Eye Care
Off
Film Mode
Off
TruMotion
High
Close
5
RETURN
Return to the previous menu.
MENU
Return to TV viewing

PICTURE CONTROL
68
MANUAL PICTURE ADJUSTMENT
PICTURE CONTROL
Picture Mode - User Mode
Adjust the picture appearance to suit your preference and viewing situations.
This feature is disable in “
PPiiccttuurree MMooddee--IInntt eellllii gg eenn tt EEyyee
”.
Enter
Move
PICTURE
Select
PPIICC TTUURREE
.
Make appropriate adjustments.
Select
BBaacc kk llii gg hh tt
(Only LCD TV),
CC oonnttrraasstt
,
BBrriigghhttnnee ssss, SShhaa rr ppnnee ssss, CC oolloo rr
, or
TTii nn tt
.
1
MENU
Select
PPiiccttuurree MMoodd ee
.
2
ENTER
Select
VVii vviidd,SSttaannddaarrdd, CCiinneemmaa, SSppoorrtt ss
, or
GGaa mmee
.
3
ENTER
4
ENTER
5
ENTER
E
Aspect Ratio : 16:9
Picture Mode : Standard
• Backlight 80
• Contrast 90
• Brightness 50
• Sharpness 60
• Color 60
• Tint 0
RG
• Backlight 80
EE
EE
EE
EE
Enter
6
RETURN
Return to the previous menu.
MENU
Return to TV viewing
PICTURE CONTROL
69
Select your desired menu option.
Select
PPIICC TTUURREE
.
Select
PPiiccttuurree MMoodd ee
.
Select
EExxppeerrtt CC oonnttrroo ll
.
Select
EExxppee rr tt 11
or
EExxppee rr tt 22
.
1
MENU
3
2
ENTER
ENTER
4
ENTER
5
ENTER
Make appropriate adjustments.
6
Picture Mode - Expert Control
By segmenting categories,
EExxpp ee rr tt11
and
EExxpp ee rr tt22
provide more categories which users can set as they see
fit, offering the optimal picture quality for users.
Enter
Move
PICTURE
E
Aspect Ratio : 16:9
Picture Mode : Standard
• Backlight 80
• Contrast 90
• Brightness 50
• Sharpness 60
• Color 60
• Tint 0
RG
Intelligent Eye
Vivid
Standard
Cinema
Sports
Game
Expert1
Expert2
Enter
Move
PICTURE
E
• Expert Control
• Picture Reset
Screen
TruMotion Demo
FF
Off
GG
Fresh Contrast
Black Level
Low
Noise Reduction
Off
Film Mode
Off
SD
Color Standard
Gamma
Medium
White Balance
2 Point
• Red Gain
128
• Green Gain
128
• Blue Gain
128
• Red Offset
64
E
7
RETURN
Return to the previous menu.
MENU
Return to TV viewing

PICTURE CONTROL
70
PICTURE IMPROVEMENT TECHNOLOGY
PICTURE CONTROL
Fresh Contrast: Optimizes the contrast automatically according to the brightness of the reflection.
Fresh Color: Adjusts the color of the reflection automatically to reproduce as close as possible natural colors.
Noise Reduction: Removes interference up to the point where it does not damage the original picture.
Gamma: High gamma values display whitish images and low gamma values display high contrast images.
Select
PPIICC TTUURREE
.
Select
AAdd vv aanncceedd CCoonntt rrooll
.
Select
FF rr eesshh CCoonnttrraa sstt, FF rr eesshh CC ooll oorr
,
NNooiissee RR eedd uucc ttiioo nn
, or
GGaa mmmmaa
.
1
MENU
3
2
ENTER
ENTER
Enter
Move
PICTURE
Enter
Move
PICTURE
EE
• Advanced Control
• Picture Reset
Screen
TruMotion Demo
• Advanced Control
• Picture Reset
Screen
TruMotion Demo
Color Temperature
Medium
Fresh Contrast
FF
Off
GG
Fresh Color
Off
Noise Reduction
Auto
Gamma
Medium
Black Level
Low
Eye Care
Off
Film Mode
Off
TruMotion
High
Close
5
RETURN
Return to the previous menu.
MENU
Return to TV viewing
Select your desired options.
4

PICTURE CONTROL
71
ADVANCED - BLACK (DARKNESS) LEVEL
Adjusting the contrast and the brightness of the screen using the black level of the screen.
This feature operates only in AV1-2, HDMI1-3 (or 4) mode.
Select
PPIICC TTUURREE
.
Select
AAdd vv aanncceedd CCoonntt rrooll
.
Select
BBll aacckk LLeevveell
.
1
MENU
3
2
ENTER
ENTER
Select
LLoo ww
or
HHii gghh
.
4
■
LLoo ww
: The r:flection of the screen gets
darker.
■
HHii gghh
: The reflection of the screen gets
brighter.
■
AAuuttoo
: Realizing the black level of the
screen and set it to High or Low automatically.
Enter
Move
PICTURE
Enter
Move
PICTURE
EE
• Advanced Control
• Picture Reset
Screen
TruMotion Demo
• Advanced Control
• Picture Reset
Screen
TruMotion Demo
Color Temperature
Medium
Fresh Contrast
Off
Fresh Color
Off
Noise Reduction
Auto
Gamma
Medium
Black Level
FF
Low
GG
Eye Care
Off
Film Mode
Off
TruMotion
High
Close
5
RETURN
Return to the previous menu.
MENU
Return to TV viewing
PICTURE CONTROL
72
ADVANCED - EYE CARE
-
Only LCD TV
PICTURE CONTROL
It helps you adjust brightness when the screen is too bright to prevent dazzling.
Select
PPIICC TTUURREE
.
Select
AAdd vv aanncceedd CCoonntt rrooll
.
Select
EEyyee CCaa rree
.
1
MENU
3
2
ENTER
ENTER
Enter
Move
PICTURE
Enter
Move
PICTURE
EE
• Advanced Control
• Picture Reset
Screen
TruMotion Demo
• Advanced Control
• Picture Reset
Screen
TruMotion Demo
Color Temperature
Medium
Fresh Contrast
Off
Fresh Color
Off
Noise Reduction
Auto
Gamma
Medium
Black Level
Low
Eye Care
FF
Off
GG
Film Mode
Auto
TruMotion
High
Close
Select
OO nn
or
OOffff
.
4
5
RETURN
Return to the previous menu.
MENU
Return to TV viewing

PICTURE CONTROL
73
ADVANCED - FILM MODE
Set up the TV for the best picture appearance for viewing movies.
When you operate Film Mode (3:2 Pull-Down Mode or Cinema Correction Mode), the TV will adjust 24 fps
video from movies to 30 fps video for display.
This feature operates only in TV (Analog TV/CATV, Digital DTV/CADTV), AV1, AV2, Component 480i/1080i,
and HDMI 1080i mode.
Select
PPIICC TTUURREE
.
Select
AAdd vv aanncceedd CCoonntt rrooll
.
Select
FF iill mm MMoo ddee
.
1
MENU
3
2
ENTER
ENTER
Enter
Move
PICTURE
Enter
Move
PICTURE
EE
• Advanced Control
• Picture Reset
Screen
TruMotion Demo
• Advanced Control
• Picture Reset
Screen
TruMotion Demo
Color Temperature
Medium
Fresh Contrast
Off
Fresh Color
Off
Noise Reduction
Auto
Gamma
Medium
Black Level
Low
Eye Care
Off
Film Mode
FF
Off
GG
TruMotion
High
Close
Select
OO nn
or
OOffff
.
4
5
RETURN
Return to the previous menu.
MENU
Return to TV viewing
PICTURE CONTROL
74
ADVANCED - TRUMOTION
-
Only 32/37/42/47/52LG60/70
PICTURE CONTROL
It is used for the best picture quality without any motion blur or judder when you enter a quick image or Film
Source.
This feature is disable in RGB-PC,HDMI (PC) mode.
Select
PPIICC TTUURREE
.
Select
AAdd vv aanncceedd CCoonntt rrooll
.
Select
TTrruuMMoo tt iioonn
.
1
MENU
3
2
ENTER
ENTER
Enter
Move
PICTURE
Enter
Move
PICTURE
EE
• Advanced Control
• Picture Reset
Screen
TruMotion Demo
• Advanced Control
• Picture Reset
Screen
TruMotion Demo
■
LLoo ww
: Set amount of film judder to low.
■
HHii gghh
: Set amount of film judder to high.
Select
OOffff, LLoo ww
, or
HHii gghh
.
4
5
RETURN
Return to the previous menu.
MENU
Return to TV viewing
Color Temperature
Medium
Fresh Contrast
Off
Fresh Color
Off
Noise Reduction
Auto
Gamma
Medium
Black Level
Low
Eye Care
Off
Film Mode
Auto
TruMotion
FF
High
GG
Close
 Loading...