

Page 1

Z525i USER GUIDE
Please read this manual carefully before operating your set.
Retain it for future reference.
Page 2

▶
Do not damage the power cord by bending,
twisting, pulling, or heating. Do not use the plug if it
is loose as it may cause a fire or electric shock.
▶
Do not place any heavy items on the power cord.
Do not allow the power cord to be crimped as it
may cause fire or electric shock.
▶
Do not handle the phone with wet hands while it is
being charged. It may cause an electric shock or
seriously damage your phone.
▶
Do not disassemble the phone.
▶
Do not place or answer calls while charging the
phone as it may short-circuit the phone and/or
cause electric shock or fire.
▶
Only use the batteries, antennas, and chargers
provided and approved by LG. The warranty will
not be applied to products provided by other
suppliers.
▶
Only authorized personnel should service the
phone and its accessories. Faulty installation or
service may result in accidents and consequently
invalidate the warranty.
▶
Do not hold or let the antenna come in contact
with your body during a call.
▶
An emergency call can be made only within a service
area. For an emergency call, make sure that you are
within a service area and that the phone is turned
on.
Important Safety Precautions
3
Read these simple guidelines. Breaking the rules may
be dangerous or illegal. Further detalied information is
given in this user guide.
CCAAUU TT IIOONN
Violation of the instructions may cause serious injury
or death.
▶
Never use an unapproved battery since this could
damage the phone and/or battery and could cause
the battery to explode.
▶
Never place your phone in a microwave oven as it
will cause the battery to explode.
Do not dispose of your battery by fire or with
hazardous or flammable materials.
▶
Make sure that no sharp-edged items such as
animal’s teeth, nails, come into contact with the
battery. There is a risk of this causing a fire. Store
the battery in a place out of reach of children.
▶
Be careful that children do not swallow any parts
such as rubber plugs (earphone, connection parts
of the phone, etc.). This could cause asphyxiation
or suffocation.
▶
Unplug the power cord and charger during lightning
storms to avoid electric shock or fire.
▶
When riding in a car, do not leave your phone or set
up the hands-free kit near to the air bag. If wireless
equipment is improperly installed and the air bag is
activated, you may be seriously injured.
▶
Do not use a hand-held phone while driving.
▶
Do not use the phone in areas where its use is
prohibited. (For example: aircraft).
▶
Do not expose the battery charger or adapter to
direct sunlight or use it in places with high humidity,
such as a bathroom.
▶
Never store your phone in temperatures less
than - 20 Celsius or greater than
+
50 Celsius.
▶
Do not use harsh chemicals(such as alcohol,
benzene, thinners, etc.) or detergents to clean your
phone. There is a risk of this causing a fire.
▶
Do not drop, strike, or shake your phone severely.
Such actions may harm the internal circuit boards
of the phone.
▶
Do not use your phone in high explosive areas as
the phone may generate sparks.
Important Safety Precautions
Important Safety Precautions
2
Page 3

Contents
Contents
4
Before You Start 5
Guidelines for Safe and Efficient Use 6
Phone Overview 9
Phone Components 9
Menus Overview 10
Using the Battery and Charger 11
Onscreen Icons 11
Installing and Removing the Battery 12
Charging the Battery 12
Battery Charge Level 12
Caring for the Battery 13
Basic Phone Operation 14
Entering and Editing Information 18
Entering Information Using T9 Text Input 18
Key Mapping For Arabic Entry 20
Using Phone Menus 21
1 Names 21
2 Messages 24
3 Call History 28
4 Organizer 30
5 Sounds 32
6 Display 34
7 Settings 36
8 Fun&Util 41
9 Favorites 43
Accessories 44
SPEC 45
Before You Start
5
Before You Start
Congratulations on your purchase of the Z525i
cellular phone that has been designed to operate with
the latest digital mobile communication technology,
Code Division Multiple Access (CDMA). The CDMA
system has greatly enhanced voice clarity and can
provide various types of advanced features. This is an
advanced and compact phone which has diverse
features as follows :
▶
Large, easy-to-read, 5 lines display + 1 line icon +
1 line menu, backlight LCD with status icons.
▶
Paging, Messaging, Voice mail, and Caller ID.
22-key keypad(10 number keys / 2 function keys /
2 Soft keys / 1 clear key / 4 way navigation key /
1 Call key / 1 End key / 1 OK key).
▶
Long battery stand-by and talk time.
▶
Choice of 22 ring sounds.
▶
Menu-driven interface with prompt for easy
operation and configuration.
▶
Voice privacy inherent with CDMA encoding.
(Not available in Zapp network)
▶
Any key answer, auto redialing, one touch and
speed dialing with 99 memory locations.
▶
Optional accessories with greater convenience and
enhanced functionality.
▶
You can hear the recipient’s voice louder with
Speaker Mode On during a call.
▶
Rhythmic Backlighting.
Check Accessories
Your mobile phone comes with a AC Adaptor,
Handstrap and a rechargeable battery. Please verify
that these accessories are included.
Page 4

76
Please read these simple guidelines. Not following
these guidelines may be dangerous or illegal.
Further detailed information is given in this manual.
Product care and maintenance
WARNING! Only use batteries, chargers and
accessories approved for use with this particular
phone model. The use of any other types may
invalidate any approval or warranty applying to the
phone, and may be dangerous.
▶
Do not disassemble this unit. Take it to a qualified
service technician when repair work is required.
▶
Keep away from electrical appliances such as a TV,
radio or personal computer.
▶
The unit should be kept away from heat sources
such as radiators or cookers.
▶
Do not drop.
▶
Do not subject this unit to mechanical vibration or
shock.
▶
The coating of the phone may be damaged if
covered with wrap or vinyl wrapper.
▶
Use dry cloth to clean the exterior of the unit.
(Do not use solvent such as benzene, thinner or
alcohol.)
▶
Do not subject this unit to excessive smoke or dust.
▶
Do not keep the phone next to credit cards or
transport tickets; it can affect the information on
the magnetic strips.
▶
Do not tap the screen with a sharp object as it may
damage the phone.
▶
Do not expose the phone to liquid or moisture.
▶
Use the accessories like an earphone cautiously.
Electronics devices
All mobile phones may get interference, which could
affect performance.
▶
Do not use your mobile phone near medical
equipment without requesting permission. Avoid
placing the phone over pacemakers (i.e. in your
breast pocket.)
▶
Some hearing aids might be disturbed by mobile phones.
▶
Minor interference may affect TVs, radios, PCs, etc.
Guidelines for Safe and Efficient Use
Guidelines for Safe and Efficient Use
Guidelines for Safe and Efficient Use
Guidelines for Safe and Efficient Use
6
Road safety
Check the laws and regulations on the use of mobile
phones in the areas when you drive.
▶
Do not use a hand-held phone while driving.
▶
Give full attention to driving.
▶
Use a hands-free kit, if available.
▶
Pull off the road and park before making or
answering a call if driving conditions so require.
▶
RF energy may affect some electronic systems in
your motor vehicle such as car stereo or safety
equipment.
▶
When your vehicle is equipped with an air bag, do
not obstruct with installed or portable wireless
equipment. It can cause serious injury due to
improper performance.
Blasting area
Do not use the phone where blasting is in progress.
Observe restrictions, and follow any regulations or
rules.
Potentially explosive atmospheres
▶
Do not use the phone at a refueling point. Don’t
use near fuel or chemicals.
▶
Do not transport or store flammable gas, liquid, or
explosives in the compartment of your vehicle,
which contains your mobile phone and accessories.
In aircraft
Wireless devices can cause interference in aircraft.
▶
Turn off your mobile phone before boarding any
aircraft.
▶
Do not use it on the ground without crew
permission.
Children
Keep the phone in a safe place out of small children’s
reach. It includes small parts which if detached may
cause a choking hazard.
Page 5
Emergency calls
Emergency calls may not be available under all cellular
networks. Therefore, you should never depend solely
on the phone for emergency calls.
Check with your local service provider.
Battery information and care
▶
You do not need to completely discharge the
battery before recharging. Unlike other battery
systems, there is no memory effect that could
compromise the battery’s performance.
▶
Use only LG batteries and chargers. LG chargers are
designed to maximize the battery life.
▶
Do not disassemble or short-circuit the battery
pack.
▶
Keep the metal contacts of the battery pack clean.
▶
Replace the battery when it no longer provides
acceptable performance. The battery pack may be
recharged hundreds of times until it needs
replacing.
▶
Recharge the battery if it has not been used for a
long time to maximize usability.
▶
Do not expose the battery charger to direct
sunlight or use it in high humidity, such as the
bathroom.
▶
Do not leave the battery in hot or cold places, this
may deteriorate the battery performance.
98
Before You Start
Phone Overview
Guidelines for Safe and Efficient Use
Guidelines for Safe and Efficient Use
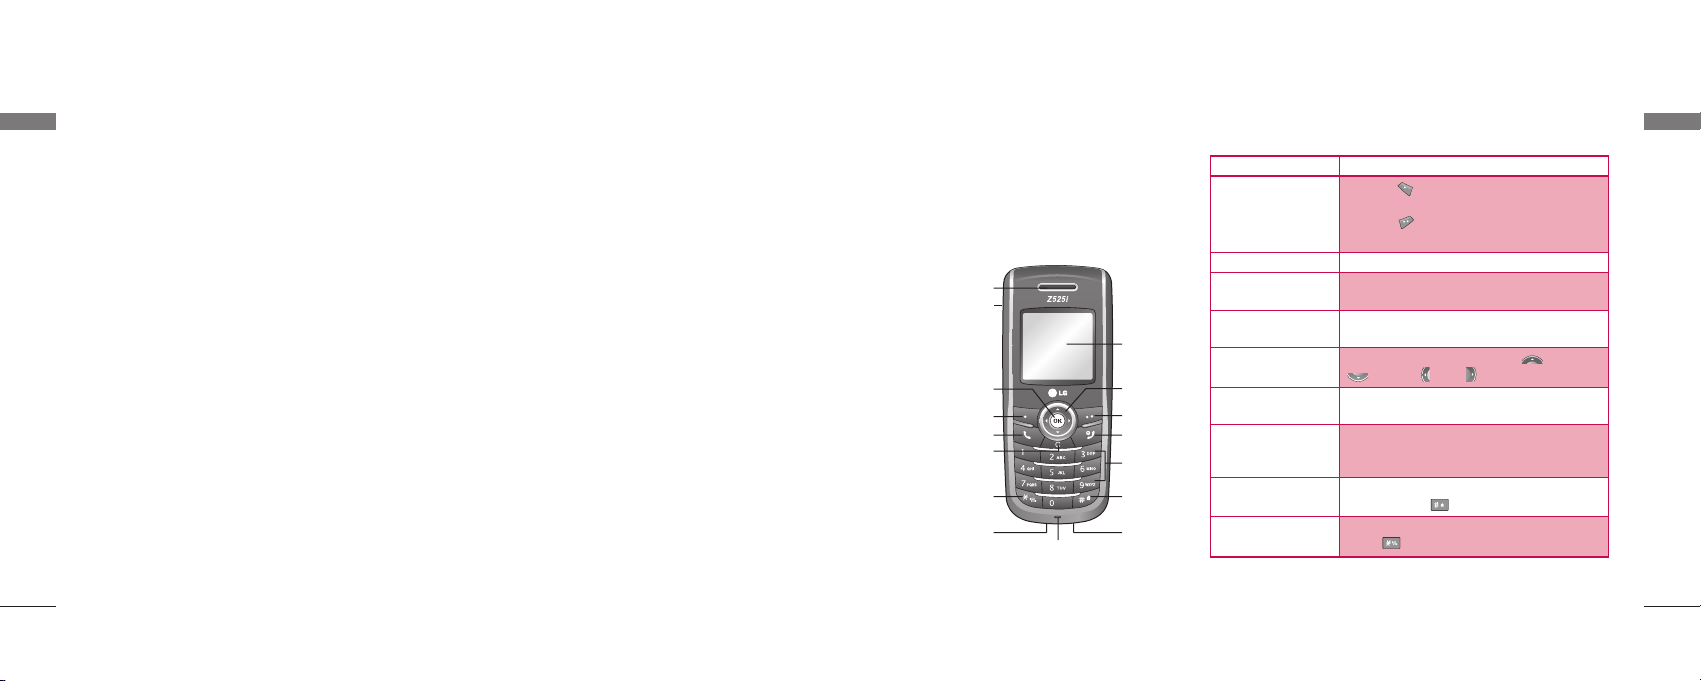
Phone Components
The following shows key components of
your mobile phone.
Soft Key 1
Used to Display the Menu.
Soft Key 2
Use to select an action within a menu.
Allows user to place or answer calls.
Used to turn power on/off and to end a call.
Using this, you can return to the Idle screen.
These keys enable you to enter numbers and characters and
choose menu items.
This Navigation key allows quick access to Messages,
My menu, Modes, Scheduler.
Accepts the highlighted choice when navigating through a
menu. During a call, activate speaker mode on/off.
Press to delete a single space or character. Press and hold to
delete entire words. Press this key once in any menu to go back
to the previous menu.
In standby mode, set the Key Guard to be enabled by pressing
and holding the key about 2 seconds.
In standby mode, set the vibrate mode by pressing and holding
the key about 2 seconds.
①
Soft Keys
(the names of the
functions of these keys
appear at the bottom of
the screen)
②
CALL Key
③
END/PWR Key
④
Alphanumeric Keypad
⑤
Navigation Key
⑥
OK/Speaker On/Off Key
⑦
Clear Key
⑧
Keypad Lock
⑨
Vibrate Mode Key
Earpiece
⑥
①
②
⑦
Vibrate Mode Key
Data Port
LCD Screen
⑤
①
③
Alphanumeric
Keypad
⑧
Charger Port
Microphone
LCD Screen Displays messages & indicator icons.
Headset Jack
Page 6

1110
Using the Battery and Charger
Using the Battery and Charger
Menus Overview
Menus Overview
Onscreen Icons
The phone screen displays several onscreen icons which appear when the phone is powered on.
IIccoo nnss DDee ssccrriippttiioonnss
Displays the strength of the signal received by the phone and current signal
strength is indicated by the number of bars displayed on the screen.
No service
The phone is not receiving a system signal.
In use/A call is in progress.
* No icon indicates the phone is in standby mode.
Roaming indicator
In Alarm mode.
In Vibration mode.
Indicates battery charge level.
Names
1. Add New
2. Search
3. Group Settings
4. Group Member
5. Speed Dials
6. Call Reject List
7. Capacity
8. Delete Names
Messages
1. Create Message
2. Inbox
3. Outbox
4. Archive
5. Drafts
6. Template
7. Delete Msg
8. Msg Settings
Call History
1. Dialed Calls
2. Received Calls
3. Missed Calls
4. In Call Memo
5. All Calls
6. Call Timer
7. Delete History
Organizer
1. Reminder
2. Alarm
3. Scheduler
4. To Do
5. Anniversary
6. Memo
Sounds
1. Ring Tones
2. Message Tones
3. Alerts
4. Volume
5. System Tones
Display
1. Screens
2. Clock
3. Banner
4. Menu Color
5. Language
6. Dialing Font
7. Backlight
8. Contrast
Settings
1. Call
2. Security
3. Phone
Fun&Util
1. ZappMe
2. Game
3. Calculator
4. Stop Watch
5. World Time
Favorites
1. My Stuff
Page 7

Installing and Removing the Battery
Charge the battery fully before the initial use of the
phone. The phone comes with a rechargeable battery.
Keep the battery charged while not in use in order to
maximize talk and standby time when using the phone.
▶
To install, insert the battery into the opening on
the back of the phone, and insert the bottom of
battery into groove at the bottom of the handset.
Gently press down the cover until the latch snaps
into place.
▶
To remove, push the back cover down. Push the tab
with one hand and lift the top of the battery to
separate.
Charging the Battery
To use the charger provided with your phone:
Warning! Use only the charger provided with the
phone. Using any charger other than the ones
approved by LG may damage your phone or battery.
1. Plug the round end of the adapter into the phone’s
charger jack and the other end into an electrical
outlet.
2. The charge time varies depending upon the battery
level. The maximum charge time for a fully
discharged battery is 3.5 hours.
Battery Charge Level
The battery charge level is shown at the top right of
the LCD screen.
When the battery charge level becomes low, the low
battery sensor will alert you in three ways: sounding
an audible tone, blinking the battery icon outline, and
displaying Low battery. Recharge soon. If the battery
12 13
Using the Battery and Charger
Using the Battery and Charger
charge level becomes exceedingly low, the phone will
automatically switch off and any function in progress
will not be saved.
Caring for the Battery
1) If you use an unauthorized battery, it may cause
damage to or explosion of the battery. Therefore,
please refrain from using unauthorized ones.
2) You do not need to wait until the battery
completely runs down to recharge the battery.
3) Use only LG batteries and chargers specific to
your model of phone. LG’s chargers are designed
to maximize battery life.
4) Do not disassemble or short-circuit the battery.
5) Keep the battery’s metal contacts clean.
6) Replace the battery when it no longer provides
acceptable performance. The battery can be
recharged several hundred times before it needs
replacing.
7) Recharge the battery if it has not been used for a
long time to maximize battery life.
8) Do not expose the battery charger to direct
sunlight or use it in areas of high humidity, such as
the bathroom.
9) Do not leave the battery in hot or cold places as it
may deteriorate battery performance.
10) Long backlight settings, searching for service,
data connectivity, and synchronization all may
affect battery life, talk, and standby times.
Using the Battery and Charger
Using the Battery and Charger
Page 8
1514
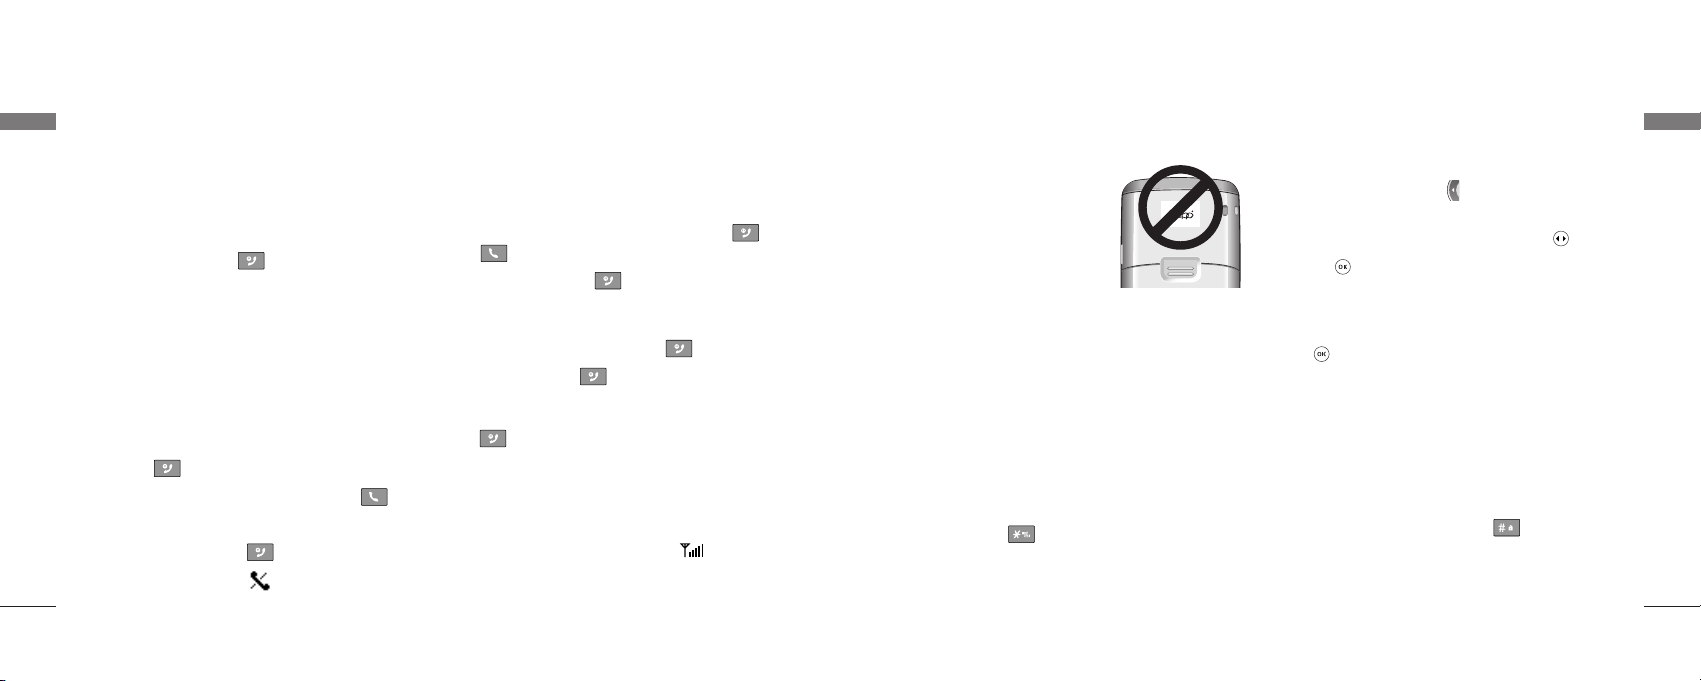
About the antenna
Your phone has a built-in
antenna. As with any other radio
transmitting device, do not
touch the antenna unnecessarily
when the phone is switched on.
Contact with the antenna affects
call quality and may cause the
phone to operate at a higher
power level than needed. Not touching the antenna
during a call optimizes the antenna performance and
the talk-time of your phone. Normal position: Hold
the phone as you would any other telephone.
Quick Adjust
Adjusting Vibrate Mode
Use Vibrate Mode in a public place.
1) In standby mode, activate Vibrate Mode quickly by
pressing the . (for 2 seconds) instead of
using the Menu function.
▶
When Vibrate Mode is set, Key tone does not
sound.
Note To cancel Vibrate Mode, press for 2 seconds.
Select Profiles
1) In standby mode, press .
2) Select one of four Profiles Silent Mode, Vibrate
Mode, User Mode and Power Mode with .
3) Press .
Adjusting Speaker Mode On
During a call, to activate or cancel Speaker quickly,
press .
Adjusting Keypad Lock Function
Used to lock the keypad and prevent accidental
pressing of the keys. There are two ways to enable the
Keypad Lock Function - with one key and by using the
Menu.
1) In standby mode, set the Key Guard to be enabled
by pressing and holding the key about 2
seconds.
Note To cancel the Keypad Lock Mode, Press Soft
Key 1, then press the star (*) key.
Introduction
Basic Phone Operation
Basic Phone Operation
Introduction
Turning the Phone On and Off
Turning the Phone On
1) Install a charged battery pack or connect the
phone to an external power source such as the car
kit or AC Adaptor.
2) Hold down the Key for 2 seconds until the
LCD screen flashes.
Note As any other communication device, avoid any
unnecessary contact with the antenna while
your phone is turned on.
Making a Call
Every time you make a call, follow these steps:
1) Make sure that the phone is turned on. If not, hold
down for 2 seconds.
2) Type the phone number and then press .
▶
If the phone is locked, type the lock code
3) To end the call press .
Note In no service area, appears from the
screen. When trying voice call in no service area,
“Out of Service area”is displayed. It means you
are in no service area.
Receiving Calls
1) When the phone rings or vibrate (if the Vibrate
Mode is enabled), press any key (except ) or
depending on the Call settings.
▶
When you press once, when a call is
received, the phone stops ringing or vibrating
depending on the mode it is in.
2) To end an answered call press .
On pressing the key for the first time, when
the call is received, the phone stops ringing or
vibrating depending on the mode it is in. Pressing
key after that will disconnect the call.
Signal Strength
If you’re inside a building, being near a window may
give you better reception. You can see the strength of
your signal by the signal indicator ( ) on your
phone’s display screen.
Page 9

17
Call Waiting
Your cellular service may offer a call waiting function.
While a call is in progress, you may hear two beeps
indicating another incoming call. When call waiting is
enabled, you may put the active call on hold while you
answer the other incoming call. Check with your
service provider for information about this function.
1) Press to receive a waiting call.
2) Press again to switch between calls.
Mute
The mute function prevents the other party from
hearing your voice, but allows you to hear the other
party.
1) Press Soft Key 1 Menu and during a call.
2) To cancel Mute, press Soft Key 1 Menu and
again.
Redialing Calls
1) Press twice to redial the last number in
Recent Calls.
▶
You can also dial any of the last 120 (Missed +
Received + Dialed) numbers stored in the Recent
Calls. (See the Call History List on page 28~30)
Speed Dialing
Speed dialing is a convenient feature, which allows you
to make phone calls quickly and easily. Your phone
recalls the phone number from your personal
directory, displays it briefly and then dials it. Memory
locations 1 through 9 should be used for onetouch
dialing for your most frequently used phone numbers.
1) Enter memory location number 1 to 9.
2) Press .
Dialing Speed Dials from 10 to 99
Press the first digit and then press and hold the key of
the last digit.
OR
Enter the first and second digits and press .
16
Basic Operations
Basic Operations
Caller ID
Caller ID lets you know who is calling by displaying the
number of the person calling when your phone rings. If
the caller’s name and number are already stored in
your phone book, the corresponding name appears
with the number. You should check with your service
provider to ensure they offer this feature.
Basic Phone Operation
Basic Phone Operation
Page 10

1918
Soft Key 2 until Number Mode is displayed.
Symbol/Imoticon(^.^) Mode
Insert special characters, punctuation, or smileys.
You may use any of the special characters. When the
cursor is located where you want the special
character, switch to Symbol/Smileys mode. If you
want to add a smiley, switch to the smileys mode.
Press the Navigation Key to cycle through the
desired characters : To select Character, Press the
assigned number key.
Initial Cap (T9En/Abc)
Only the first letter is capitalized.
Caps Lock (T9EN/ABC)
All subsequent letters are capitalized.
Lowercase (T9en/abc)
All subsequent letters are lowercase.
Examples Using T9 Text Input
Typing In T9 Mode
When you want to use T9 Mode, check that T9En is
shown at the right bottom of the display. To write the
desired word, press each key once for one letter.
For example, to write “Call the office”, follow these
steps:
1. Press the Soft Key 2 to change T9En mode.
Press the Soft Key 2 repeatedly to change T9En
mode.
2. Press: .
3. Press: to complete the word and add a
space.
4. Press:
.
5. Display: Call the office.
As you can see, the word changes after each key
press. Therefore you don’t need to pay much
attention to what happens on the display before you
have keyed in the whole word.
Entering and Editing Information
Entering and Editing Information
Entering Information Using T9
Te xt Input
Entering Information Using T9 Text Input You can
edit the Banner, Scheduler, long Message and Phone
Book using T9 Text Input. T9 Text is an easy way to
write. In this input method, you only need to press a
key once for each letter.
Key Functions
Soft Key 2 : Press to select mode.
- You can select the modes using Soft Key 2: T9En,
Abc, 123, T9Rom, Rom
- Shift Key : Used to change the letter case.
~
(Type Text): In T9 mode, press one key
per letter to enter text.
~
(Type Numbers): In 123 (Numbers)
mode, press once to enter numbers.
(Next): In T9 mode, press to display other
matching words.
(Punctuation): In T9 mode, press to insert
punctuation in a word and complete a
sentence.
(Space): Press to complete a word or insert a
space.
Note In number mode, inserting a space is not
available.
(Clear): Press to delete a single space or
character. Press and hold to delete entire
words.
Input mode
T9 Text Input provides five modes for entering text,
numbers, special characters, and punctuation.
T9En/T9Rom (T9) Mode
Type text using one keystroke per letter. The default
is T9 mode.
Abc/Rom (Multi-tap) Mode
Type text by selecting the desired character with
keypad pressed some times.
123(Number) Mode
Type numbers using one keystroke per number.
To change to Number Mode in a text entry field, press
Entering and Editing Information
Entering and Editing Information
Page 11

21
Using Phone Menus
Using Phone Menus
20
Using the NEXT Key
After you have finished typing a word, if the word
displayed is not the word you want, press to
display additional choices.
For example, follow these steps :
1. Press: .
2. Display: Good.
3. Press: .
4. Display: Home, Gone, Hood......
Examples Using Abc (Multi-tap) Text input
Typing In Abc (Multi-tap) Mode
For example, to type “LG”, follow these steps:
1. Press: Soft Key 2 to change letter case to Abc
mode.
2. Press: to change to ABC Caps Lock mode.
3. Press: .
4. Display: LG.
Key Mapping For Romanian Entry
The Keys are mapped as follows:
Entering and Editing Information
Entering and Editing Information
General Guidelines to Menu Access and
Settings
1. Press Soft Key 1 Menu. Nine menu items will appear
on the display screen.
2. Press to go through the list of menu features.
3. Press the corresponding number to the menu item
that you want to select. Then the sub-menu list will
appear on the screen.
4. Press the appropriate key to select the sub-menu
you want to access.
5. Select preferred settings, using the . Press
to go one step backward while accessing
menu or selecting settings.
6. Press to save the settings or to cancel
without saving.
1 Names
Personal Phone Book Memory
The phone has 500 personal phone book memory
where you can store up to 4 phone numbers with 32
digit capacity for each phone number.
1.1 Add New
You can save phone numbers, mobile numbers and so
on, up to 500 entries.
1. Press Soft Key 1 .
2. Select .
3. Select .
▶
How to save in the Phone
4. Select Phone. (Phone is set as default.)
5. If Phone is selected as a place to be saved in, go
down one step using .
6. Enter the name of person to save.
7. Using , select an item to enter. icon sets
security for each Name, Group, Mobile No.,
Home No., Office No., E-mail, Ringtones,
Message Tones, PmdFileName,
ImageFileName, Memo, Birthday, Etc No., Fax
No., and Secret .
8. After entering of information is finished, press
to save.
Add New
Names
Menu
Page 12

2322
1.2 Search
To find phone numbers you have stored in the Names.
1. Press Soft Key 1 .
2. Select .
3. Press and Soft Key 1 .
4. The display prompts you to enter the entry name
on the display screen. You can select Send Msg,
Assign Dial(Change Dial), By Name, By Number,
By Group or Delete by using .
5. Press Soft Key 2 SMS to send a message.
▶
Enter the contents, and select Save/Priority
using , then press .
Note At any entry, you may move to another entry
by pressing the . If you press Edit or
Soft Key 1 (6 Delete) you can save or
erase or edit.
1.3 Group Settings
This is a function for changing Group Name and
setting Ring tones by Group.
1. Press Soft Key 1 .
2. Select .
3. Select .
4. Select your desired Group using .
Press Soft Key 1 :
Initialize / Initialize All.
5. Press to edit.
Group Name : Edit the group name.
Group Bell : Set the group ring tone.
Message Tones : Set the group message tone.
1.4 Group Member
1. Press Soft Key 1 .
2. Select .
3. Select .
4. Select your desired Group using .
5. Press to view.
Group Member
Names
Menu
Options
Group Settings
Names
Menu
Option
OptionSearch
Names
Menu
Using Phone Menus
Using Phone Menus
Using Phone Menus
Using Phone Menus
1.5 Speed Dials
Speed Dial allows you to make a call faster by just
pressing a corresponding number.
1. Press Soft Key 1 .
2. Select .
3. Select .
4. To register, press Add to find information
you want, then press .
Note Speed Dials may be set up to 99.
1.6 Call Reject List
Assign the number and group which you want to
reject and cancel the reject list.
1. Press Soft Key 1 .
2. Press .
3. Press .
4. Enter the four-digit Lock code. (Default value is
“0000”)
5. Select Assign Number or Assign Group by using
, then press .
1.7 Capacity
Capacity indicates quantity of phone book presently
saved in the card and the phone. It is indicated as
used quantity/available quantity.
1. Press Soft Key 1 .
2. Press .
3. Press .
1.8 Delete Names
To erase all the entries stored in the Names.
1. Press Soft Key 1 .
2. Press .
3. Press .
4. Press to select the name, then press Soft
Key 2 .
5. Select , then press .
Yes
Delete
Delete Names
Names
Menu
Capacity
Names
Menu
Call Reject List
Names
Menu
Speed Dials
Names
Menu
Page 13

2524
2 Messages
Text messages, become available as soon as the
power is on. You can access the above types of
messages using the message Key .
In addition, you can make a call to the call back
number by pressing during a message check.
The phone can store up to 50 messages with 160
characters per message.
Users may read and edit messages, saved in the
Outbox during transmission and send them.
However you should check whether your service
provider provides the above features.
Character limits: The Z525i supports up to 160
characters per message sending and receiving. Limits
to available byte per message may exist; please check
with your service provider for system capabilities.
The information that is stored in the message is
determined by phone mode and service capability.
You can check types of messages by pressing the
message Key .
2.1 Create Message
1. Press Soft Key 1 , or .
2. Select .
4. Enter message.
5. Use to select Save/Priority for saving
message.
6. Select type of message by using , then press
.
▶
Normal / Urgent / Emergency
7. Enter destination number or find saved number
in the phone book.
▶
Allows you to be certain the message has gone
through. When the message has gone through, a
confirming message is displayed on the display
screen.
Create Message
Menu
Using Phone Menus
Using Phone Menus
Using Phone Menus
Using Phone Menus
2.2 Inbox
Received Text messages and Page messages may be
searched and the contents may be viewed. Received
messages are sorted in an order of urgent messages,
unread messages and read messages. Up to 50
message can be stored.
To view the list of the received messages.
1. Press Soft Key 1 , or .
2. Select .
▶
Messages are saved in order of Unread/Read. For
example, if a New message is read it goes into
Read messages. You can initiate a call to any
number (greater than 2 digits) in the received
message by pressing from message view
screen.
: Unread SMS : Read SMS
3. After selecting the desired message with ;
press .
4. After viewing the message press Soft Key 1
.
▶
Reply Replies to the SMS with your new text.
▶
Forward Forwards a received message to others
destination address(es).
▶
Delete Deletes the selected message from the
Inbox.
▶
To Archive Save messages in Inbox move to
Archive folder.
▶
Delete All Deletes the all message from the
Inbox.
2.3 Outbox
Up to 30 sent messages can be stored in the Outbox.
View lists and contents of sent messages and verify
whether the transmission was successful or not.
1. Press Soft Key 1 , or .
2. Select .
3. After selecting the desired message with ;
press .
Outbox
Menu
Options
Inbox
Menu
Page 14

2726
4. After viewing the message press Soft Key 1
.
▶
Forward You can modify the message you’ve
got. Then follow the process for Write
(see page 24).
▶
Delete Delete a selected message in the Outbox.
▶
Delete All Deletes the all message from the
Outbox.
2.4 Archive
Archive stores what is preferred to save among
messages received. Up to 20 message can be stored.
To view the list of the received messages.
1. Press Soft Key 1 , or .
2. Select Archive.
▶
Messages are saved in order of Unread/Read like
the Inbox.
3. After selecting the desired message with ;
press .
4. After viewing the message press Soft Key 1
.
▶
Reply Replies to the SMS with the original
message attached.
▶
Forward Forwards a received message to others
destination address(es).
▶
Delete Deletes the selected message from the
Archive.
▶
Delete All Deletes the all message from the
Archive.
2.5 Drafts
The text message is saved in Drafts. A total of upto 5
messages can be saved in Drafts. When you failed to
send message, you can save to draft by selecting save
button.
1. Press Soft Key 1 , or .
2. Select .
3. Then follow the process for Create Message.
Drafts
Menu
Options
Menu
Options
Using Phone Menus
Using Phone Menus
Using Phone Menus
Using Phone Menus
2.6 Template
There are 10 predefined phrases included in the
Templates.
1. Press Soft Key 1 , or .
2. Select .
3. Select the message to view with .
▶
Press : To check the contents entered.
▶
Press Soft Key 1 : To edit the contents
entered.
▶
Press Soft Key 2 : To forward the contents
selected.
2.7 Delete Msg
Text messages and page messages are deleted when
you select from the Message
Menu screen.
1. Press Soft Key 1 , or .
2. Select .
3. Select the item of choice with then press
.
▶
Delete Inbox / Delete Outbox / Delete Archive
4. Select with , then press .
2.8 Msg Settings
Allows you to configure six settings for messages.
1. Press Soft Key 1 , or .
2. Select .
3. Use to highlight one of the settings and
prees to select it.
▶
Priority - (Normal / Urgent / Emergency)
▶
Save Sent Msg - (Yes / No)
▶
Text Color - (16 colors)
▶
Writing Paper - (Winter / City / Sea / White
Paper)
▶
Message Display - (Only Arrived / All Contents)
▶
Acknowledge - (Yes / No)
Msg Settings
Menu
Yes/No
Delete Msg
Menu
Delete Msg
Fwd
Edit
Template
Menu
Page 15

2928
3 Call History
The Call History Menu is a list of the last phone
numbers or Contact entries for calls you placed,
accepted, or missed. It is continually updated as new
numbers are added to the beginning of the list and
the oldest entries are removed from the bottom of the
list.
Note You can view Call History in two ways.
▶
The key in idle mode, upto 120 most
recent calls including Dialed, Received,
Missed and In Call Memo are displayed.
▶
From the Call History menu, select Dialed,
Received, Missed, In Call Memo or All Calls
and press .
Making a Call from Call History
1. From the Call History menu, select Dialed,
Received, Missed, In Call Memo or All Calls and
press .
2. Place a call by selecting the desired entry and press
to connect.
3.1 Dialed Calls
Allows you to view list of all Dialed Calls.
1. Press Soft Key 1 , , .
2. Use to highlight an entry, then
▶
Press to view the entry.
▶
Press to place a call to the number.
▶
Press Soft Key 1 to select: Call / Send
Msg / Save Number / Call Reject / Delete /
Delete All
3.2 Received Calls
Allows you to view list of all Received Calls.
1. Press Soft Key 1 , , .
2. Use to highlight an entry, then
▶
Press to view the entry.
▶
Press to place a call to the number.
▶
Press Soft Key 1 to select: Call / Send
Msg / Save Number / Call Reject / Delete /
Delete All
Option
Menu
Option
Menu
Using Phone Menus
Using Phone Menus
Using Phone Menus
Using Phone Menus
3.3 Missed Calls
Allows you to view list of all Missed Calls.
1. Press Soft Key 1 , , .
2. Use to highlight an entry, then
▶
Press to view the entry.
▶
Press to place a call to the number.
▶
Press Soft Key 1 to select: Call / Send
Msg / Save Number / Call Reject / Delete /
Delete All
3.4 In Call Memo
Save the phone numbers taken while talking and can
view the list of numbers present in In Call Memo.
1. Press Soft Key 1 , , .
2. Use to highlight an entry, then
▶
Press to view the entry.
▶
Press to place a call to the number.
▶
Press Soft Key 1 to select: Call / Send
Msg / Save Number / Call Reject / Delete /
Delete All
3.5 All Calls
Allows you to view list of all Calls.
1. Press Soft Key 1 , , .
2. Use to highlight an entry, then
▶
Press to view the entry.
▶
Press to place a call to the number.
▶
Press Soft Key 1 to select: Call / Send
Msg / Save Number / Call Reject / Delete /
Delete All
3.6 Call Timer
You may erase all history from three options (1. Erase
Missed 2. Erase Received 3. Erase Dialled)
1. Press Soft Key 1 , , .
2. Use to highlight a call list.
▶
All Calls / Dialed Calls / Received Calls /
Sent Msgs
3. Press Soft Key 1 to delete.
4. Select with , then press .
Yes/No
Delete
Menu
Option
Menu
Option
Menu
Option
Menu
Page 16

3130
3.7 Delete History
1. Press Soft Key 1 , , .
2. Select the item which it will erase with .
▶
Delete Dialed / Delete Received / Delete
Missed / Delete In-Call / Delete All
3. Press .
4. Select using and then press .
4 Organizer
4.1 Reminder
Allows you to set one alarm. The current time is
displayed at the top of the screen when you select an
alarm to set. At the Reminder time, Alarm! will be
displayed on the LCD screen and the alarm will sound.
1. Press Soft Key 1 , , .
2. You can change the alarm mode using .
▶
AlarmOff / +10min / +30min / +1hour /
Set time / Daily
3. Use to set alarm time, and select ringer.
▶
Press to select AM/PM, and enter the
number for Hour/Minute.
▶
Use to select one of the available alarm ring
types.
▶
Using Type( Soft Key 1), select various ring type.
4. Set the alarm mode for alarm and press Save.
4.2 Alarm
Allows you to set five alarms. The current time is
displayed at the top of the screen when you select an
alarm to set. At the alarm time, “Morning Call” will be
displayed on the LCD screen and the alarm will sound.
1. Press Soft Key 1 , , .
2. Select Alarm1, Alarm2, Alarm3, Alarm4, Alarm5.
3. You can change the alarm mode using .
▶
AlarmOff / Once / Mon~Fri / Mon~Sat / Daily
4. Use to set alarm time, and select ringer.
▶
Press to select AM/PM, and enter the
number for Hour/Minute.
Menu
Menu
Yes
Menu
Using Phone Menus
Using Phone Menus
Using Phone Menus
Using Phone Menus
▶
Use to select one of the available alarm ring
types.
▶
Using Type( Soft Key 1), select various ring
type.
5. Set the alarm mode for alarm and press
Save.
Note Alarm is disabled when the mobile is switched
off. Any alarms that have passed the set limits
will automatically expire.
How to Set Snooze
Snooze defaults when it is set to morning call.
When no key is input when alarm sounds, snooze
function is set automatically one minute later, and the
alarm sound again five minutes after the set alarm
time. Snooze alarm repeats 9 times. To deactivate
snooze alarm, press when morning call rings.
4.3 Scheduler
Scheduler Functions
Scheduler keeps your agenda convenient and easy to
access. Simply store your appointments and your
phone alerts you with a reminder of your appointment.
Note If transmitting message or during a call or using
internet applications, at the preset time, it does
not ring. After exiting, it will ring the reminder.
Note Handset time is taken from Network time
settings.
How to use buttons
Moves cursor to the left.
Moves cursor to the right.
Moves to the previous week.
Moves to the next week.
Moves to the previous year.
Moves to the next year.
Moves to the previous month.
Moves to the next month.
or Moves to today.
1. Press Soft Key 1 , , .
2. Select the date using your keypad, then press
.
3. Press Soft key 1 to select.
Option
Menu
Page 17

3332
▶
View Schedule / View To Do / View Anniv. /
Search / Go to Date / Delete All
4. In scheduler view mode, press Soft key 2 Add to
add schedule.
5. Edit the contents and press to select From /
To / Alarm / Rept /
Options / Stop Repeat.
6. Press .
4.4 To Do
1. Press Soft Key 1 , , .
2. Press the Soft Key 2
.
3. Edit the contents and press to select Prior /
Done / Due.
4. Press Save.
4.5 Anniversary
1. Press Soft Key 1 , , .
2. Press Soft Key 1 to select:
▶
View Anniv. / View Schedule / View To Do /
Search / Go to Date / Delete All
3. Press .
4.6 Memo
1. Press Soft Key 1 , , .
▶
Press the Soft Key 1 .
Delete / Search / Writing Paper / Delete All
▶
Press the Soft Key 2 .
Enter a Memo and press .
5 Sounds
Options to customize the phone’s sounds.
5.1 Ring Tones
1. Press Soft Key 1 , , .
2. Select the item of choice with , then press
.
▶
Press Soft Key 1 to select: Incoming
Bell / Power On Bell / Power Off Bell /
Option
Menu
Add
Option
Menu
Option
Menu
Add
Menu
Using Phone Menus
Using Phone Menus
Using Phone Menus
Using Phone Menus
Reminder Bell / Alarm Bell
3. Use to select the melody of choice, then
press .
5.2 Message Tones
1. Press Soft Key 1 , , .
2. Use , to select the Message Tone, then
press .
▶
Sound 1 ~Sound 5
5.3 Alerts
Allows you to set alert settings.
1. Press Soft Key 1 , , .
2. Select the item of choice with , then press
.
▶
Call+Msg Alerts / Msg Alerts Cycle
3. Select the item of choice with , then press
.
5.4 Volume
Allows you to set various volume settings.
1. Press Soft Key 1 , , .
2. Select the item of choice with , then press
.
▶
Ring Tone / Key Tone / Voice In Call /
Keylock Sound / Menu Sound / Power On/
Off / Game
3. Adjust the volume with , then press .
5.5 System Tones
Allows you to set any of the 3 alert options to Enable
or Disable.
1. Press Soft Key 1 , , .
2. Select the item of choice with , then press
.
▶
Call Connect / No Service / Auto Voice
Volume / 1 Min Alert
3. Select Enable / Disable by using , then press
.
Menu
Menu
Menu
Menu
Page 18

3534
6 Display
Lets you personalise your phone’s display by selecting
different graphics.
6.1 Screens
Allows you to choose the kind of background to be
displayed on the phone.
1. Press Soft Key 1 , , .
2. Select the item of choice with , then press
.
▶
Press Soft Key 1 to select : Idle
Screen / Incoming Call / Power On /
Power Off
6.2 Clock
Allows you to select a clock on your mobile phone
display.
1. Press Soft Key 1 , , .
2. Select the item of choice with , then press
.
▶
Theme & Clock / Theme Only / Analog Clock
/ Digital Clock
6.3 Banner
Allows you to enter a string of up to 12 characters
displayed on the LCD screen.
1. Press Soft Key 1 , , .
2. Enter a Banner name and then press .
3. Press to select your desired option(s), then
select Align / Font / Text / Box for the letters
you entered by using .
4. Press .
6.4 Menu Color
Allows you to choose the color of the background
screen.
1. Press Soft Key 1 , , .
2. Select the item of choice with , then press
.
Menu
Menu
Menu
Option
Menu
Using Phone Menus
Using Phone Menus
Using Phone Menus
Using Phone Menus
6.5 Language
Allows you to set the bilingual feature according to
your preference. Choose between English and
Romanian, Hungarian.
1. Press Soft Key 1 , , .
2. Set English / Romanian / Hungarian with
then press .
6.6 Dialing Font
Dialing Font is a function that sets the size, color and
font of number displayed on screen when entering
phone number.
1. Press Soft Key 1 , , .
2. Select the item of choice with , then press .
▶
Dial Size / Dial Color/ Dial Font
6.7 Backlight
Display and buttons are lighted for a designated
length of time, allowing you to use your mobile phone
in the dark with convenience.
1. Press Soft Key 1 , , .
2. Select the item of your choice by using .
▶
Normal / Manual
3. Select the item of your choice by using ,
then select Light / LCD / Keypad for the letters
you entered by using .
4. Press .
6.8 Contrast
Using left/right navigation key, select the contrast
setting using the scale of lightest to darkest.
1. Press Soft Key 1 , , .
2. Adjust the contrast with .
3. Then press to save the contrast setting.
Menu
Menu
Menu
Menu
Page 19

3736
7 Settings
7.1 Call
The Call settings menu allows you to designate how
the phone handles both incoming and outgoing calls.
7.1.1 Call Divert
Call Divert lets you forward all your incoming calls to
another number or Voice Mail connection.
1. Press Soft key , , , .
2. Select the item of choice with , then press
.
▶
All Voice Calls / If Busy / If Not Answered /
Busy/Not Ans.
After selecting Enable, press 1 To Num and
enter number to be diverted.
3. Select Enable / Disable by using , then press
.
7.1.2 Call Waiting
Request the network to notify you when you receive a
new call during a call. (network service)
1. Press Soft key , , , .
2. Select Enable / Disable by using , then
press .
7.1.3 Voice Privacy
Use Enhanced when you make a security call.
(Function not available in Zapp network)
1. Press Soft key , , , .
2. Select
SSttaa nndd aa rr dd /EEnnhhaanncceedd
by using ,
then press .
7.2 Security
Prevents unauthorized use of your phone.
Note The lock code/password on your phone is
0000 by default.
Menu
Menu
Menu
Using Phone Menus
Using Phone Menus
Using Phone Menus
Using Phone Menus
7.2.1 Calling Lock
Limits outgoing calls, and you have the following three
options.
1. Press Soft key 1 , , .
2. Enter the four-digit Lock Code.
3. Press .
4. Select All Calls/Int’I. Calls/Disable by using ,
then press .
7.2.2 ZappMe Lock
Limits using ZappMe services.
1. Press Soft key 1 , , .
2. Enter the four-digit Lock Code.
3. Press .
4. Select Enable/Disable by using , then press
.
7.2.3 Phonebook Lock
Allows you to protect your phonebook list against
unauthorized use.
1. Press Soft key 1 , , .
2. Enter the four-digit Lock Code.
3. Press .
4. Select Enable/Disable by using , then press
.
7.2.4 Message Lock
Allows you to protect your messages against
unauthorized use.
1. Press Soft key 1 , , .
2. Enter the four-digit Lock Code.
3. Press .
4. Select Enable/Disable by using , then press
.
Message Lock
Menu
Phonebook Lock
Menu
ZappMe Lock
Menu
Calling Lock
Menu
Page 20

3938
7.2.5 Call Log Lock
Allows you to protect your call log against
unauthorized use.
1. Press Soft key 1 , , .
2. Enter the four-digit Lock Code.
3. Press .
4. Select Enable/Disable by using , then press
.
7.2.6 Phone Lock
Keeps your phone from unauthorized use. Once the
phone is locked, it is in restricted mode, until the lock
code is entered. This will allow you to receive phone
calls and still make emergency calls. If you need to
modify the lock code, you may modify it using the new
lock code within the security set menu.
1. Press Soft key 1 , , .
2. Enter the four-digit Lock Code.
3. Press .
4. Select Enable/Disable by using , then press
.
7.2.7 Emergency No
You can call emergency numbers, even the phone is
locked or restricted.
To enter 1 fixed numbers and 2 available numbers:
1. Press Soft key 1 , , .
2. Enter the four-digit Lock Code.
3. Press .
4. Press Soft Key 1 .
5. Enter an Emergency number.
6. Press .
Edit
Emergency No
Menu
Phone Lock
Menu
Call Log Lock
Menu
Using Phone Menus
Using Phone Menus
Using Phone Menus
Using Phone Menus
7.2.8 New Lock Code
New Lock Code allows you to enter a new four-digit
lock code number.
1. Press Soft key 1 , , .
2. Enter the four-digit Lock Code.
3. Press .
4. Enter the New Lock Code(four-digit), then press
.
5. For confirmation, it will ask you to enter the New
Lock Code again, then press .
7.2.9 Lock Code Hint
Allows you to inform you of lock code hint.
1. Press Soft key 1 , , .
2. Enter the four-digit Lock Code.
3. Press .
5. Enter the Lock Code Hint, then press .
7.3 Phone
The Phone menu provides you with specific
information pertaining to your phone model.
7.3.1 Auto Key Lock
1. Press Soft key 1 , , , .
2. Select Disable / Enable by using , then
press to save.
When selecting Enable, set the time for waiting
time to be keyguarded.
7.3.2 Any Key Answer
1. Press Soft key 1 , , , .
2. Select Disable / Enable by using , then
press .
Menu
Menu
Lock Code Hint
Menu
New Lock Code
Menu
Page 21

7.3.3 Entry Mode
1. Press Soft key 1 , , , .
2. Select T9Rom / Rom / T9En / Abc by using
, then press .
7.3.4 Memory Mgt.
Allows you to initialize the memory of phonebook,
message, ringtone and image.
1. Press Soft key 1 , , , .
2. Select Memory Info/Initialize by using , then
press .
7.3.4.1 Memory Info.
1. Press Soft key 1 , , , , .
2. You can check the memory contents using the
up/down key
7.3.4.2 Initialize
1. Press Soft key 1 , , , , .
2. Enter the four-digit Lock Code, then press .
3. Select Reset phonebook / Reset message /
Reset ringtone / Reset image / Reset All by
using , then press Soft Key 1 .
4. Press .
And then memory is initialized and reset.
7.3.5 Line Speed
Allows you to set the port speed. Set the port speed
based on your carrier’s network. Contact your carrier
to determine the maximum available speed.
1. Press Soft key 1 , , , .
2. Select the item of your choice by using ,
then press .
▶
USB / Serial / Modem/Fax
Menu
Select
Menu
Menu
Menu
Menu
Using Phone Menus
Using Phone Menus
41
Using Phone Menus
Using Phone Menus
40
7.3.6 Modem/Fax In
Sets the phone mode to receive the data from the
other party.
1. Press Soft key 1 , , , .
2. Select the item of your choice by using ,
then press .
▶
Disable / Modem In / Fax In
7.3.7 My Phone Number
Allows you to save and view your phone number and
contact information.
1. Press Soft key 1 , , , .
▶
My Number / Contact Address / E-Mail
7.3.8 Version Info
The Phone Info menu provides you with specific
information pertaining to your phone model.
1. Press Soft key 1 , , , .
▶
VER / Date / Time
8 Fun&Util
8.1 ZappMe
ZappMe services enables you experience various
applications.
1. Press Soft key 1 , , .
▶
Zapp Me / Settings / Help
8.2 Game
8.2.1 Sudoku
▶
Press key : , , , .
▶
Key map
- Input digits:
~
- Cursor move: right, left, up, down
- Confirm: OK
- Delete: soft1
- Pause: Soft2, CLR
Menu
Menu
Menu
Menu
Menu
Page 22

8.5 World Time
Is useful if you need to make a call to another country,
and you are not sure about the time difference.
1. Press Soft key 1 , , .
2. Select the city you desire by using .
3. Press .
Note Use Right soft key 2 to activate DST. (DST -
Daylight Saving Time - plus or minus 1 hour
depending on season)
9 Favorites
9.1 My Stuff
Show you the list of download graphics and melody.
you can see graphics and play melodys.
1. Press soft key 1 , , .
2. Select the GRAPHIC or MELODY.
3. Press .
Menu
Menu
Using Phone Menus
Using Phone Menus
43
8.2.2 Halloween Fever
▶
Press key : , , , .
▶
Key map
- Cursor move: right( ), left( ), up( ),
down( ).
- Select: OK( )
- Retry: ‘
*
’
- Undo: ‘
#
’
- Pause: CLR
- Back: Soft2
8.3 Calculator
Calculate simple mathematical computations.
(Can get result upto second decimal place.)
1. Press Soft key 1 , , .
2. Select (multiplication) using keys.
3. Press , in order.
4. Press .
You will see the result of the calculation.
Note Calculations can be made with up to 30
characters at one time (e.g., 73+10-30 would
be 8 characters).
8.4 Stop Watch
Stopwatch is available.
1. Press Soft key 1 , , .
2. Press Soft Key 1 to start, and press Soft
Key 1 to stop.
▶
You can use the Lap function using Soft Key 2
Lap. Max. 10 lap time is available. And lap time
can be recorded.
3. Press Soft Key 2 to reset.
Reset
Stop
Start
Menu
Menu
Menu
Using Phone Menus
Using Phone Menus
42
Page 23

SPEC
SPEC
45
Accessories
Accessories
44
There are a variety of accessories available for your mobile phone. You can select these options according to your
personal communication requirements. Consult your local dealer for availability.
AC Adapter
This adaptor supports AC
100~240 Volts, 50~60Hz
outlets.
Battery
Standard batteries is available.
Headset
The headset connects to
your phone allowing
hands-free operation.
It includes earpiece and
microphone.
USB Cable
Connect your phone to your
PC’s USB port.
IITTEEMM SS ppee ccii ffiicc aattiioonn
RF Freq. Range TX: 453 ~457.5MHz(CDMA)
RX: 463 ~467.5MHz(CDMA)
Preferred set Channel Number 160, 210, 260
Frequency Bandwidth 1.25 MHz
Maximum RF Output Power 23 ~27 dBm
Minimum RF Output Power - 50 dBm/1.23 below
Rx Sensitivity - 104dBm below (at FER=0.5%)
SAR max: 0.383 W/kg (messured for the entire body, also for head and members)
SAR max value accepted in Romania by MCTI rules : 2 W/kg
Page 24

 Loading...