

LG WT-R1071THP User Manual

Washing Machine
OWNER'S MANUAL
MODELS :
Please read this manual carefully before operating your washing
machine.
Retain it for future reference.
Record model name and serial number of the washing machine.
Quote this information to your dealer if you require service.
WT-R1071TH(P)
P/No.: 3828EA3006F
roduct Features
START
WASHING
AUTO
POWER
OFF
SENSING
Laundry Sensor
Water Level Sensor
SETTING
Optimum
Washing
Condition
P
T
The Turbo Drum DD washing machine does not operate with the lid open.
If the lid is opened during wash, rinse and spin cycles, the machine will stop
automatically.
Fuzzy Logic Control
●
A built-in load sensor automatically detects and measures the laundry load and a
microprocessor optimizes washing conditions such as ideal water consumption
and washing time.
●
Advanced technology is built into the Electronic Control System which ensures
the best washing result.
ontents
C
Read this manual
Inside you will find many helpful hints on how to use and maintain your washer
properly. Just a little preventive care on your part can save you a great deal of time and
money over the life of your washer. You will find many answers to common problems
in the Troubleshooting section. If you review our chart of Troubleshooting Tips first, you
may not need to call for service at all.
Introduction
Before Starting to Wash
Important Safety Information
Identification of Parts
Preparation Before Washing
Use of Water, Detergent, Bleach
4
5
6
7
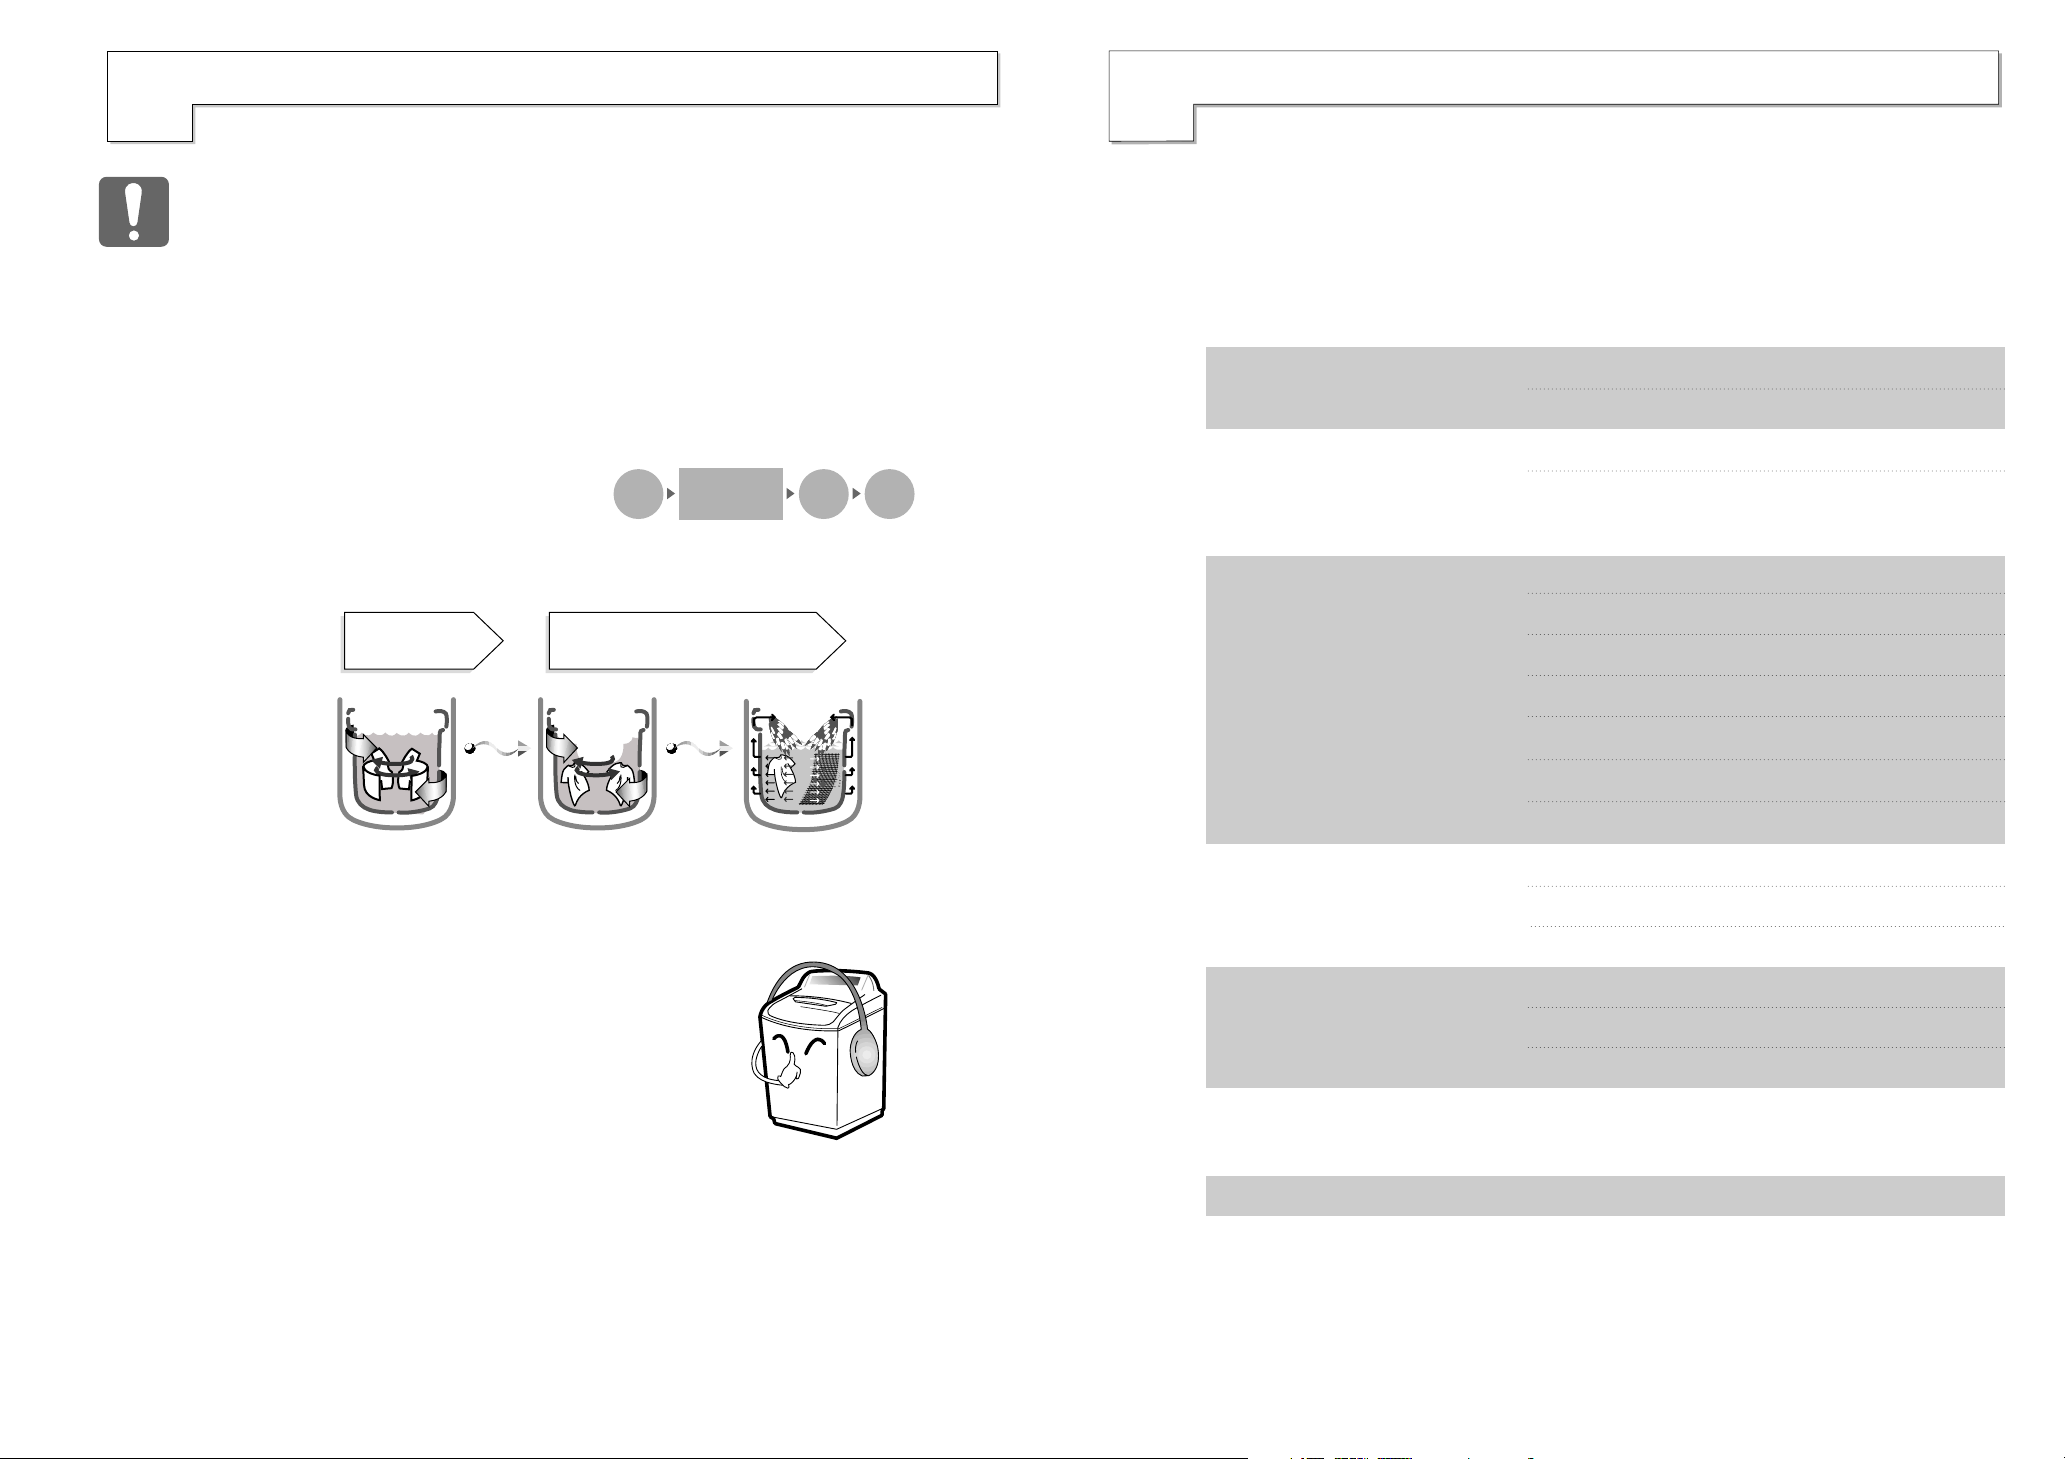
Turbo Drum DD washing
Drum Rotate
Drum rotates at
high speed
Penetration wash from
centrifugal wash
Stains are removed by
penetrating water
from centrifugal force
Water pours down
and circulates
Low Noise Direct Drive System
●
The advanced Blushless DC motor rotates the Tub
directly without belt and clutch, thereby reducing
the noise of the washer.
●
The washing machine adjusts to optimum speed
according to the type of clothing in the load.
Washing Programs
Additional Function
Options
Installation
Care and Maintenance
and Softener
Function of each Button
Delicate Wash
Wool Wash
Normal wash
Speedy Wash
Jean Wash
Soak Wash
Option Washing Method
Delay Start Wash
Other useful Functions
Placing and Leveling
Connecting Water Supply Hose
Connecting Drain Hose
Grounding Method
Cleaning
8
10
12
12
12
12
12
12
14
15
16
17
18
20
21
22
Fully Stainless Steel Washing Tub
●
Indentations on the stainless steel washing tub combined with the movement
of the water whirls gently rub the laundry and improving washing efficiency.
Troubleshooting
Specification
Troubleshooting
Specification
24
27
4
5
mportant safety information
READ ALL INSTRUCTIONS BEFORE USE
W ARNING!
title
Important Safety Information
WATER HEATER SAFETY
Under certain conditions hydrogen gas may be produced in a water heater that has not been used for two
weeks or more. Hydrogen gas can be explosive under these circumstances.
If the hot water has not been used for two weeks or more, prevent the possibility of damage or injury by turning on
all hot water faucets and allowing them to run for several minutes. Do this before using any electrical appliance
which is connected to the hot water system. This simple procedure will allow any built-up hydrogen gas to escape.
Since the gas is flammable, do not smoke or use an open flame or appliance during this process.
PROPER INSTALLATION
■ Install or store where it will not be exposed to
temperatures below freezing or exposed to the weather.
■
Properly ground washer to conform with all governing
codes and ordinances.
YOUR LAUNDRY AREA
■ Keep the area underneath and around your appliances free
of combustible materials such as lint, paper, rags,
chemicals, etc.
WHEN USING THE WASHER
For your safety, the information in this manual must be followed to minimize the risk of fire
or explosion, electric shock, or to prevent property damage, personal injury, or loss of life.
■
The base opening must not be obstructed by carpeting when
the washing machine is installed on a carpeted floor.
■
The appliance must be positioned so that the plug is
accessible.
■ Close supervision is necessary if this appliance is used by
or near children. Do not allow children to play on, with, or
inside this or any other appliance.
■ Keep the washing machine away from fire or heat source.
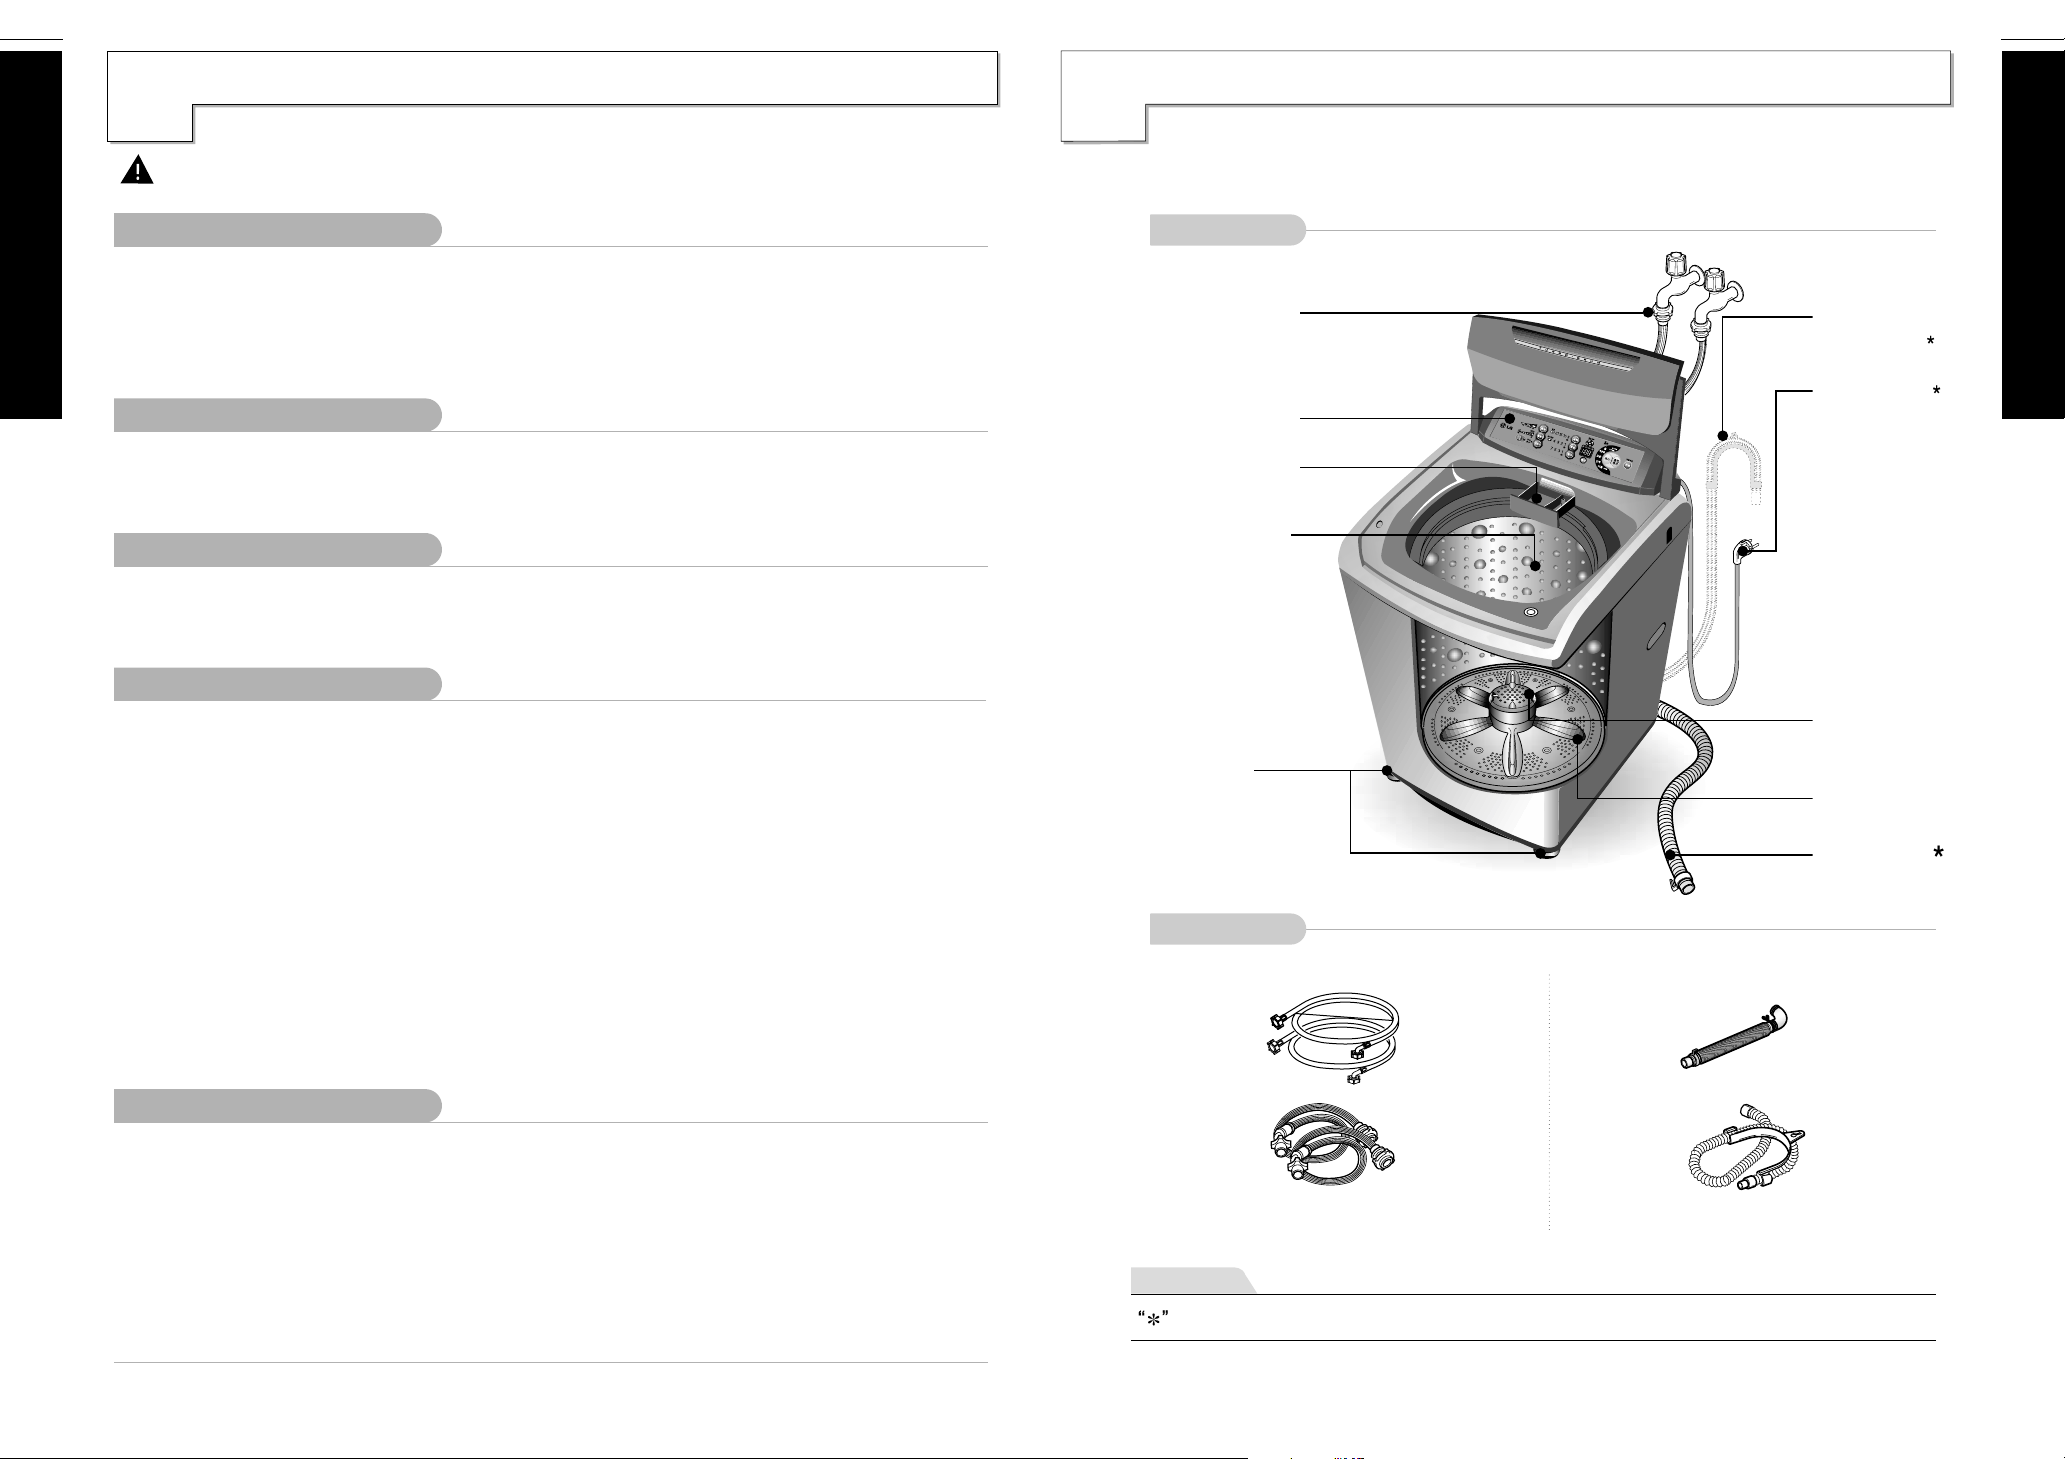
dentification of Parts
II
Body
• Water supply hose
• Feature Control panel
• Powder detergent
Power bleach box/
Softener box
• Fully Stainless Steel
Inner tub
• Drain hose
pump model
• Power cord
- Do not touch the
power cord with
wet hands
- If the power cord
or fuse is damaged.
it must be replaced
by the manufacturer
or its service agents
or similaly qualified
people in order to
avoid a risk of fire
or electric shock.
for
Introduction
■ Use this appliance only for its intended purpose as
described in this Owner's Manual.
■ Never reach into washer while it is moving. Wait until the
machine has completely stopped before opening the lid.
■ Do not mix chlorine bleach with ammonia or acids such as
vinegar and/or rust remover. Mixing different chemicals can
produce a toxic gas which may cause death.
■ Do not wash or dry articles that have been cleaned in,
washed in, soaked in, or spotted with combustible or
explosive substances (such as wax, oil, paint, gasoline,
degreasers, dry-cleaning solvents, kerosene, etc.) which
may ignite or explode. Do not add these substances to the
wash water. Do not use or place these substances around
your washer or dryer during operation.
■ The laundry process can reduce the flame retardancy of
■ To minimize the possibility of electric shock, unplug this
■ Never attempt to operate this appliance if it is damaged,
■ Young children should be supervised to ensure that they
WHEN NOT IN USE
■
Turn off water faucets to relieve pressure on hoses and
valves and to minimize leakage if a break or rupture
should occur. Check the condition of the fill hoses; they
may need replacement after 5 years.
■
Before discarding a washer, or removing it from
service, remove the washer lid to prevent children from
hiding inside.
■
■
Read and follow this Safety Information carefully.
fabrics. To avoid such a result, carefully follow the
garment manufacturer's wash and care instructions.
appliance from the power supply or disconnect the washer
at the household distribution panel by removing the fuse or
switching off the circuit breaker before attempting any
maintenance or cleaning.
NOTE: Pressing Power button to turn off does NOT
disconnect the appliance from the power supply.
malfunctioning, partially disassembled, or has missing or
broken parts,
do not play with the appliance.
Do not attempt to repair or replace any part of this
appliance unless specifically recommended in this
Owner's Manual, or in published user-repair instructions
that you understand and have the skills to carry out.
Do not tamper with controls.
• Adjustable leg
Accessories
Note
Part can be different according to the model.
Water supply hoses
or or
1 Each for cold and
hot water
• Turbo Clean Filter
• Washing Wing
(unique with Inner Tub)
• Magic hose
Drain hose
or
SAVE THESE INSTRUCTIONS
6
WIRE
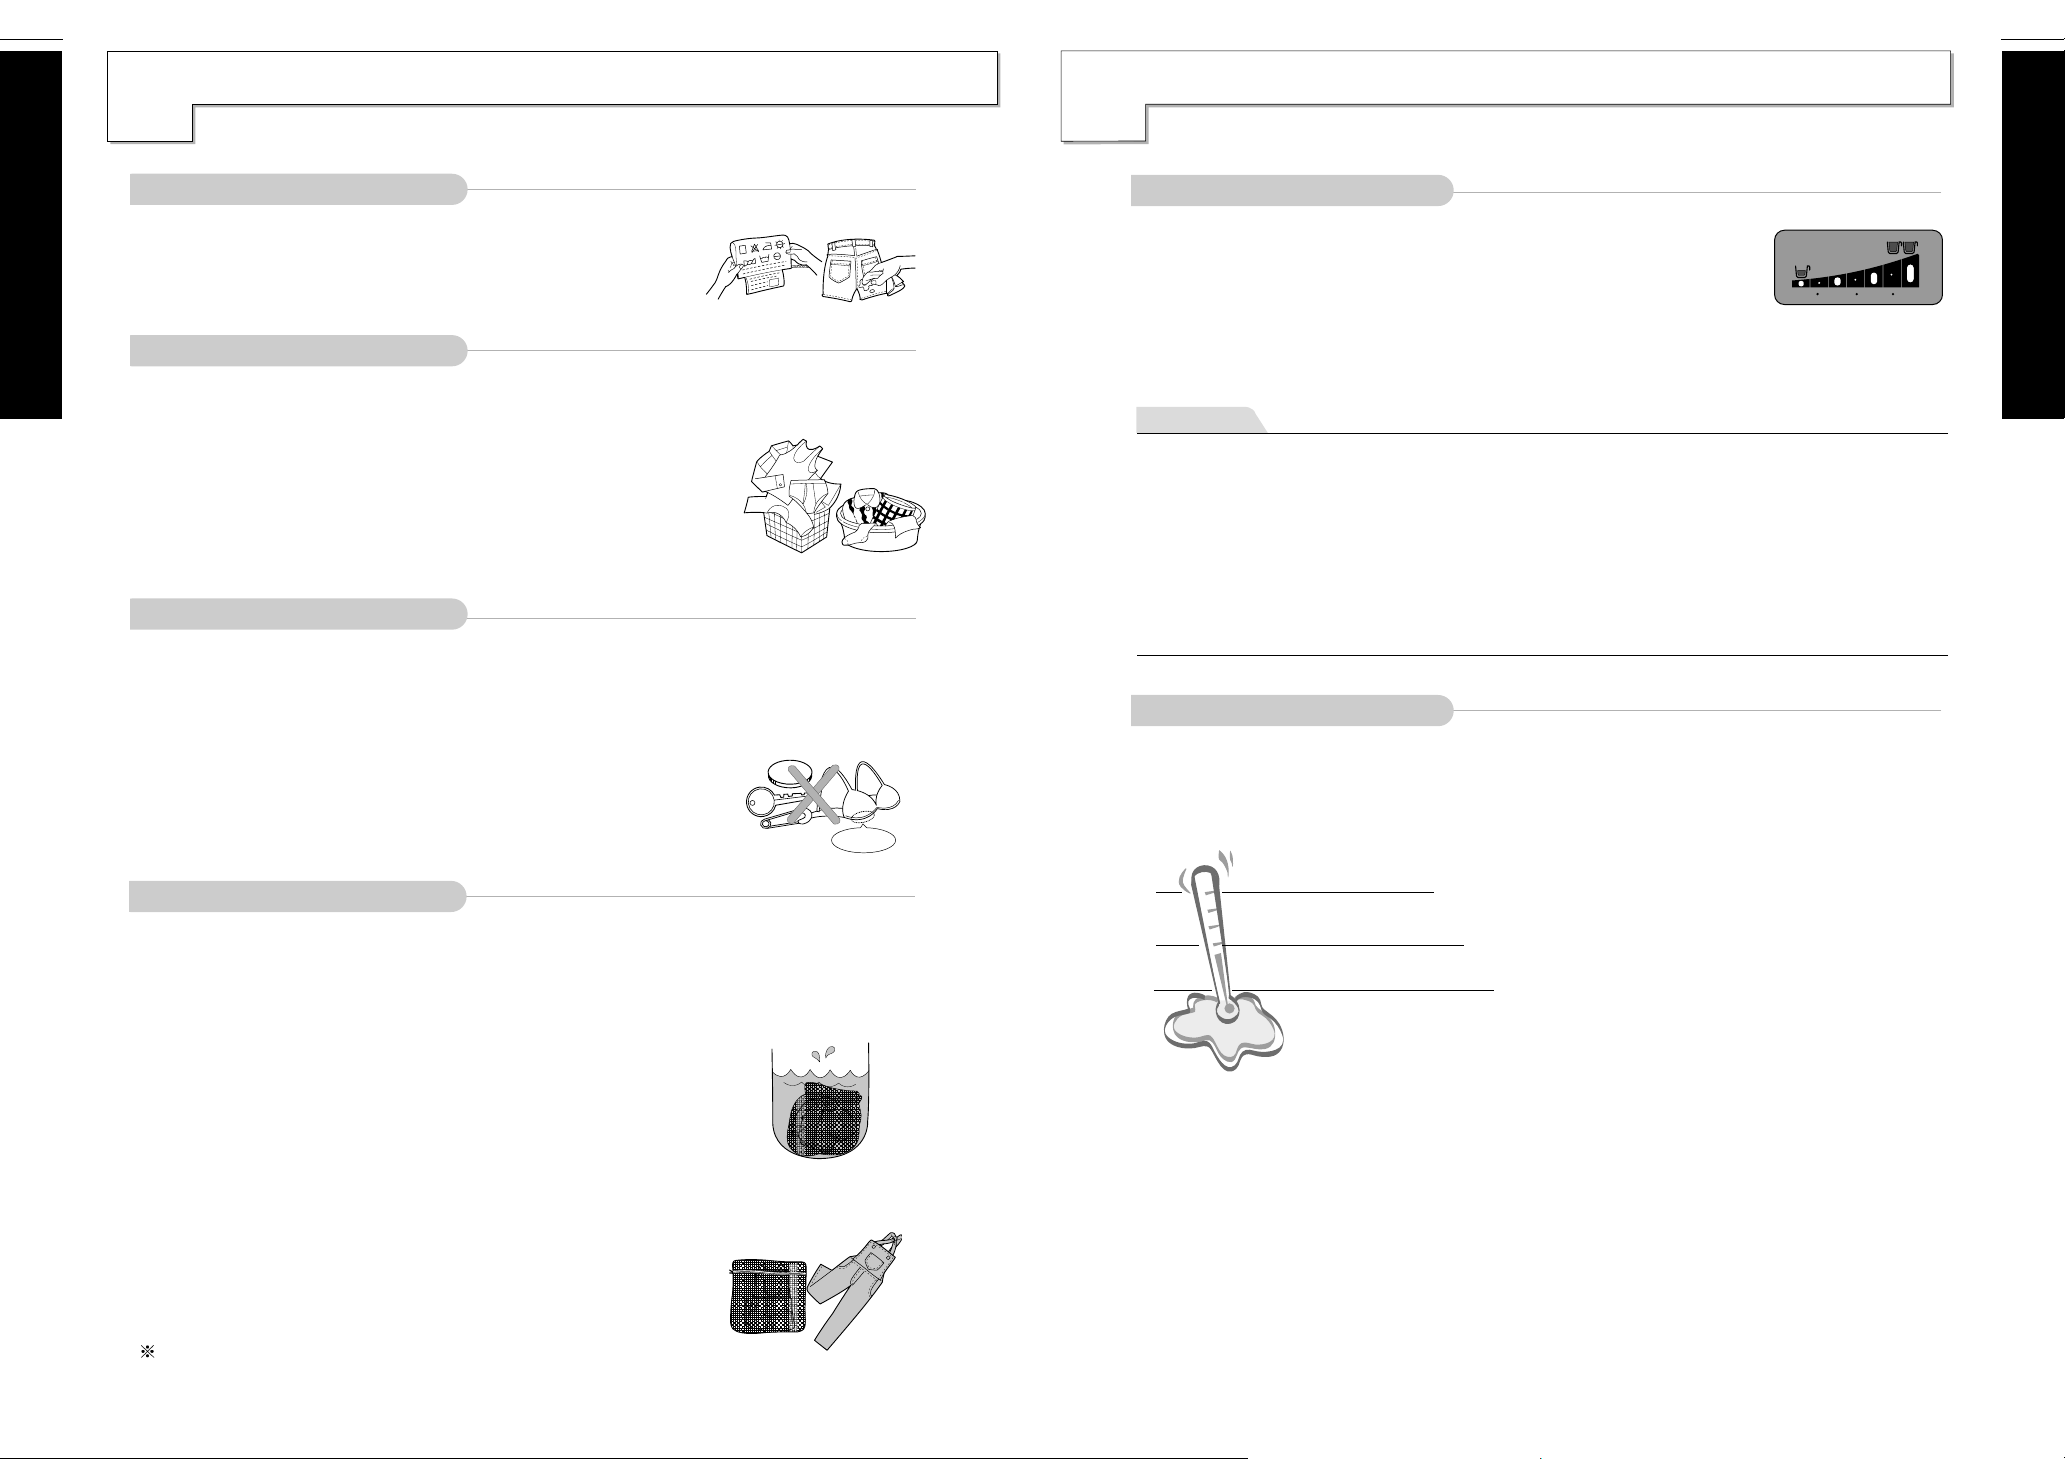
S M L XL
HOT 50~60˚C(120~140˚F)
WARM 30~40˚C(85~105˚F)
COLD ❋ 18~24˚C(65~75˚F)
7
Before Starting to Wash
reparation Before Washing
P
CARE LABELS.
* Look for a care label on your clothes. This will tell you about the fabric content
of your garment and how it should be washed.
Sort clothes into loads that can be washed with the same wash cycle, water
temperature and spin speed.
SORTING
To get the best results, different fabrics need to be washed in different ways.
• SOIL (Heavy, Normal, Light)
• COLOR (Whites, Lights, Darks) Separate white fabrics from colored fabrics.
• LINT (Lint producers, Collectors) Separate lint producers and lint collectors.
Lint Producers Terry cloth, Chenille, Towel, diaper
Lint Collectors Synthetics, Corduroy, Permanent Press, Socks
CHECK BEFORE LOADING
• Check all pockets to make sure that they are empty. Things such as nails, hairclips, matches,
pens, coins and keys can damage both your washer and your clothes.
• Fasten zippers, hook and strings to make sure that these items don't snag on other clothes.
• Mend any torn garments or loose buttons. Tears or holes may become larger during washing.
• Remove any loose brassiere wires as they can damage your washer and clothes.
• Pretreat any dirt and stains.
• Make sure the clothes are washable in water.
• Check the washing instructions on your clothes.
Separate clothes according to the type and amount of soil
ater Level Temperature
W
WATER LEVEL
• This machine detects the quantity of laundry automatically, then sets the water level
and proper amount of detergent.
• When you select a wash program, the water level and amount of detergent
(to be used) will be shown on the control panel.
• When the water level is automatically detected, it may differ depending on the quantity of
laundry even though the same water level is indicated on the control panel.
Note
• When a Wash, Wash/Rinse or Rinse only option is selected, after the wash is completed the water will
not be drained off.
• If you wish to drain the water, press the SPIN button and wait until the water in the tub has drained
completely. Then press the START/PAUSE button .
• If you do not specify the water level, then Medium will be automatically selected.
• If Rinse only is selected, the process will start from Water Supply.
• The washing machine may occasionally add water while pulsator is rotating. This is to maintain the water
level due to the release of air trapped in the garments.
WATER TEMPERATURE
• You can change the water temperature by pressing the WATER TEMP button. (Option depending on model).
The temperature of the water impacts the effectiveness of all laundry additives and therefore, the cleaning
results. We recommend temperatures of:
Introduction
LOADING
Do not wash fabrics containing flammable materials (waxes, cleaning fluids, etc.).
Load Size
The water level should just cover the clothes. Adjust the load size accordingly. Loosely load clothes no higher than the
top row of holes in the washer tub. To add items after washer has started, press Start button and submerge additional
items. Close the lid and press Start button again to restart.
Light and Large-sized clothing
Clothes including downs and woollens are light weight, large and
float easily.So use a nylon net and wash them in a small amount of
water.
If the laundry floats during the wash cycle, it may become damaged.
Use dissolved detergent to prevent the detergent from clumping.
Long laundry items
Use nylon nets for long, delicate items.
For laundry with long strings or long length, a net will prevent tangling during
washing.
Fasten any zippers or hooks on items before washing.
Nylon net is not supplied by LG.
White items, diapers, underclothing and heavily soiled, colorfast items.
Most items.
Only very bright colors with light soil.
❋ When washing in cold water additional steps may be needed:
• Adjust detergent amount and pre-dissolve detergent in warm water
• Pretreat spots and stains
• Soak heavily soiled items
• Use appropriate bleach
• Temperature below 18˚C (65˚F) will not activate laundry additives and may cause lint, residue, poor
cleaning, etc. In addition, detergent manufacturers and care labels define cold water as 26~29˚C(80~85˚F).
• If the temperature of the water in the tub is too cold for your hands, the detergent will not activate
and clean effectively.

8
9
Before Starting to Wash
se of Detergent
U
CHOOSING THE RIGHT DETERGENT
• We recommend the use of domestic detergent, (powder, liquid or concentrated). Soap flakes
or granulated soap powders should not be used in your washing machine. When washing woolens
remember to use a detergent suitable for washing woolens.
AMOUNT OF DETERGENT
Follow the detergent package directions. Using too little detergent is a common cause of laundry
problems. Use more detergent if you have hard water, large loads, greasy or oily soils or lower water
temperature.
The correct amount of detergent will vary depending on the amount of soil in your clothes (Jeans and
work clothes may need more detergent, while bath towels usually need less).
For liquid and concentrated detergents, follow the recommendations of the detergent manufacturer.
Note
To check you are using the correct amount of detergent, lift the lid of your machine about half-way
through the wash. There should be a thin layer of foam over the surface of the water. Lots of foam may
look good, but it does not contribute to cleaning your clothes. No foam means not enough detergent has
been used; soil and lint can settle back on the clothes or the washing machine.
se of Detergent
U
Using Softener
AVAILABLE FABRIC SOFTENER TYPE
Do not use concentrated fabric softener. This may cause some problems in automatic dispensing.
For more details refer to the softener products instructions for use.
DEPOSITING FABRIC SOFTENER
• Don't use softener with detergent. Use softener in last rinse water
• When using dispenser, dilute softener(30ml) with
fresh water(30ml)
• When filling dispenser, do not splash or overfill.
It may stain clothes.
• Never pour fabric softener directly on clothes. It may stain them
• If spotting occurs, wet and hand rub dishwashing liquid (or mild
bar soap) and rewash.
Note
Fabric Softener will be dispensed automatically during the final rinse.
If the softener is over filled,
it can overflow
Before Starting to Wash
Attention
If excessive detergent is used, the rinse will not be as clean and efficient. Also, it could cause environmental
pollution, so use it accordingly.
ADDING THE DETERGENT
• Some detergents MUST be fully dissolved before adding to your machine to get the best wash
results. Check the instructions on the detergent packet.
If you use powder detergent it is essential that the required amount be fully dissolved in very hot
water before being added to warm or hot water for the actual wash.
Pre-dissolving detergent in warm water when washing in cold water can improve its performance.
• Open the DETERGENT Box and deposit the
appropriate amount of detergent .
Where you
deposit the
detergent
Powder Detergent / Powder Bleach dispenser.
Using Bleach
Check fabric care labels for special instructions.
AVAILABLE BLEACH TYPE
Use oxygenated bleach.
Do not use liquid bleach.
For more details refer to the products instruction for use.
DEPOSITING BLEACH
• Separate the laundry to be bleached.
• Measure powdered bleach carefully, following instructions on the box.
• Before starting the washer, pour measured amount of bleach directly into bleach dispenser.
Attention
■ Never pour undiluted liquid bleach directly onto clothes or into the wash basket.
This may affect colors or damage clothing.
■ Do not mix chlorine bleach with ammonia or acids such as vinegar and/or rust remover. Mixing can
produce a toxic gas which may cause death.
■ Do not pour liquid bleach into bleach dispenser.
 Loading...