

LG WT4801CW Owners Manual

OWNER’S MANUAL
WASHING MACHINE
WT4801CW
Before beginning installation, read these instructions carefully. This will simplify
installation and ensure that the washer is installed correctly and safely.
Leave these instructions near the washer after installation for future reference.
P/NO : MFL67221322
www.lg.com
ENGLISH
ESPAÑOL

2
PRODUCT FEATURES
PRODUCT FEATURES
INVERTER DIRECT-DRIVE MOTOR
The inverter motor, which is directly connected to the tub, minimizes energy loss and produces little noise and vibration.
SMARTDIAGNOSIS™
Should you experience any technical difficulty with your washing machine, it has the capability of transmitting data by phone to
the Customer Information Center. The call center agent records the data transmitted from your machine and uses it to analyze
the issue, providing a fast and effective diagnosis (Refer to page 33).
TUB CLEAN
Regular cleaning of the tub on a monthly basis using TUB CLEAN will keep the tub clean and fresh.
CHILD LOCK
Use this option to disable the controls during a wash cycle. This option can prevent children from changing cycles or operating
the machine.
SMARTRINSE™ WITH JET SPRAY
This washer is designed to save rinse water by using the SMARTRINSE™ with jet spray in COTTON/NORMAL and HEAVY
DUTY cycles.
NOTE: Select FABRIC SOFTENER option or EXTRA RINSE option, if you use fabric softener in COTTON/NORMAL and HEAVY
DUTY cycles.
FULL STAINLESS STEEL DRUM
The Full stainless steel drum offers extreme durability.

3
IMPORTANT SAFETY INSTRUCTIONS
ENGLISH
IMPORTANT SAFETY INSTRUCTIONS
READ ALL INSTRUCTIONS BEFORE USE
WARNING
For your safety, the information in this manual must be followed to minimize the risk of fire or explosion, electric shock, or to
prevent property damage, injury to persons, or death.
Your Safety and the safety of others are very important.
We have provided many important safety messages in this manual and on your appliance. Always read and obey all safety
messages.
This is the safety alert symbol.
This symbol alerts you to potential hazards that can kill or hurt you and others.
All safety messages will follow the safety alert symbol and either the word DANGER, WARNING or CAUTION.
These words mean:
DANGER
You will be killed or seriously injured if you don’t immediately follow instructions.
WARNING
You can be killed or seriously injured if you don’t follow instructions.
CAUTION
You may be slightly injured or cause damage to the product if you do not follow instructions.
All safety messages will tell you what the potential hazard is, tell you how to reduce the chance of injury, and tell you what can
happen if the instructions are not followed.

4
IMPORTANT SAFETY INSTRUCTIONS
IMPORTANT SAFETY INSTRUCTIONS
READ ALL INSTRUCTIONS BEFORE USE
WARNING
For your safety, the information in this manual must be followed to minimize the risk of fire or explosion, electric shock, or to
prevent property damage, injury to persons, or death.
BASIC SAFETY PRECAUTIONS
WARNING
To reduce the risk of fire, electric shock, or injury to persons when using this appliance, follow basic precautions, including the
following.
GROUNDING INSTRUCTIONS
This appliance must be grounded. In the event of malfunction or breakdown, grounding will reduce the risk of electric shock by
providing a path of least resistance for electric current. This appliance is equipped with a cord having an equipment-grounding
conductor and grounding plug. The plug must be plugged into an appropriate outlet that is properly installed and grounded in
accordance with all local codes and ordinances.
WARNING
Improper connection of the equipment-grounding conductor can result in risk of electric shock. Check with a qualified electrician
or servicer if you are in doubt as to whether the appliance is properly grounded. Do not modify the plug provided with the
appliance. If it does not fit the outlet, have a proper outlet installed by a qualified electrician. Failure to follow these warnings can
cause serious injury, fire, electric shock, or death.
•
Before use, the washer must be properly installed as
described in this manual.
•
Do not wash articles that have been previously cleaned in,
washed in, soaked in, or spotted with gasoline, dry cleaning
solvents, or other flammable or explosive substances,
as
they give off vapors that could ignite or explode.
•
Do not add gasoline, dry cleaning solvents, or other
flammable or explosive substances to the wash water.
These substances give off vapors that could ignite or
explode.
• Under certain conditions, hydrogen gas may be produced
in a hot water system that has not been used for 2 weeks
or more. HYDROGEN GAS IS EXPLOSIVE.
If the hot water
system has not been used for such a period, before using
the washer, turn on all hot water faucets and let the water
flow from each for several minutes.
This will release any
accumulated hydrogen gas. As the gas is flammable,
do not
smoke or use an open flame during this time.
•
Do not allow children to play on or in the washer. Close
supervision of children is necessary when the washer is
used near children.
•
Before the washer is removed from service or discarded,
remove the door to prevent children from climbing inside.
•
Do not install or store the washer where it will be exposed
to the weather or freezing temperatures.
•
Do not tamper with controls.
•
Do not repair or replace any part of the washer or attempt
any servicing other than as described in this manual.
We
strongly recommend that any service be performed by a
qualified technician.
•
See Installation Instructions for grounding requirements.
•
ALWAYS follow the fabric care instructions supplied by the
garment manufacturer.
•
Do not place items exposed to cooking oil in your washer.
Items contaminated with cooking oils may contribute to a
chemical reaction that could cause a load to catch fire.
•
Use fabric softeners or products to eliminate static only as
recommended by the manufacturer.
• This washer is not designed for maritime use or for mobile
installations such as in RVs, aircraft, etc.
•
Turn off the water faucets and unplug the washer if the
machine is to be left for an extended period of time, such as
during vacations.
•
Do not use to dry articles containing foam rubber or
similarly textured rubber-like materials.
• Packaging material can be dangerous for children. There is a
risk of suffocation!
Keep all packaging from children.
•
Always check the inside of the washer for foreign objects
before loading laundry. Keep the door closed when not in
use.
•
Do not reach into the appliance if the tub or agitator is
moving.

5
IMPORTANT SAFETY INSTRUCTIONS
ENGLISH
IMPORTANT SAFETY INSTRUCTIONS
READ ALL INSTRUCTIONS BEFORE USE
WARNING
For your safety, the information in this manual must be followed to minimize the risk of fire or explosion, electric shock, or to
prevent property damage, injury to persons, or death.
SAFETY INSTRUCTIONS FOR INSTALLATION
WARNING
To reduce the risk of fire, electric shock, or injury to persons when using this appliance, follow basic precautions, including the
following.
•
Refer to INSTALLATION INSTRUCTIONS for detailed
grounding procedures.
Installation instructions are packed
with the washer for installer’s reference. If the washer is
moved to a new location, have it checked and reinstalled by a
qualified service technician. Failure to follow this warning can
cause serious injury, fire, electric shock, or death.
•
Do not, under any circumstances, cut or remove the third
(ground) prong from the power cord.
Failure to follow this
warning can cause serious injury, fire, electric shock, or
death.
•
For personal safety, this appliance must be properly
grounded.
Failure to follow this warning can cause serious
injury, fire, electric shock, or death.
•
The power cord of this appliance is equipped with a 3-prong
(grounding) plug which mates with a standard 3-prong
(grounding) wall outlet
to minimize the possibility of electric
shock from this appliance.
•
This washer must be plugged into a 120 VAC, 60 Hz
grounded outlet.
Failure to follow this warning can cause
serious injury, fire, electric shock, or death.
•
Have the wall outlet and circuit checked by a qualified
electrician to make sure the outlet is properly grounded.
Failure to follow this warning can cause serious injury, fire,
electric shock, or death.
•
Where a standard 2-prong wall outlet is encountered, it
is your personal responsibility and obligation to have it
replaced with a properly grounded 3-prong wall outlet.
Failure to follow this warning can cause serious injury, fire,
electric shock, or death.
•
Do not install on carpet. Install washer on a solid floor.
Failure to follow this warning can cause serious leak damage.
•
Do not remove ground prong. Do not use an adapter or
extension cord. Plug into a grounded 3-prong outlet.
Failure
to follow these warnings can cause serious injury, fire,
electric shock, or death.
•
The washer should always be plugged into its own individual
electrical outlet which has a voltage rating that matches the
rating plate.
This provides the best performance and also
prevents overloading house wiring circuits which could cause
a fire hazard from overheated wires.
•
Never unplug your washer by pulling on the power cord.
Always grip plug firmly and pull straight out from the outlet.
Failure to follow this warning can cause serious injury, fire,
electric shock, or death.
•
Repair or immediately replace all power cords that have
become frayed or otherwise damaged. Do not use a cord
that shows cracks or abrasion damage along its length or at
either end.
Failure to follow this warning can cause serious
injury, fire, electric shock, or death.
•
When installing or moving the washer, be careful not to
pinch, crush, or damage the power cord.
Failure to follow
this warning can cause serious injury, fire, electric shock, or
death.
•
The washer must be installed and electrically grounded by
a qualified service person in accordance with local codes
to
prevent shock hazard and assure stability during operation.
•
The washer is heavy. Two or more people may be needed
to install and move the appliance.
Failure to do so can result
in back or other injury.
•
Store and install the washer where it will not be exposed
to temperatures below freezing or exposed to outdoor
weather conditions.
Failure to follow this warning can cause
serious leak damage.
•
Do not install the washer in humid spaces to reduce the risk
of electric shock
. Failure to follow this warning can cause
serious injury, fire, electric shock, or death.
•
To reduce the risk of injury to persons, adhere to all industry
recommended safety procedures including the use of long
sleeved gloves and safety glasses.
Failure to follow all of
the safety warnings in this manual could result in property
damage, injury to persons or death.

6
IMPORTANT SAFETY INSTRUCTIONS
IMPORTANT SAFETY INSTRUCTIONS
READ ALL INSTRUCTIONS BEFORE USE
WARNING
For your safety, the information in this manual must be followed to minimize the risk of fire or explosion, electric shock, or to
prevent property damage, injury to persons, or death.
SAFETY INSTRUCTIONS FOR USE, CARE, CLEANING, AND DISPOSAL
WARNING
To reduce the risk of fire, electric shock, or injury to persons when using this appliance, follow basic precautions, including the
following.
SAVE THESE INSTRUCTIONS
•
Unplug the washer before cleaning
to avoid the risk of
electric shock.
•
Never use harsh chemicals, abrasive cleaners, or solvents
to clean the washer.
They will damage the finish.
•
Do not put oily or greasy rags or clothing on top of the
washer.
These substances give off vapors that could ignite
the materials.
•
Do not wash items that are soiled with vegetable or cooking
oil.
These items may contain some oil after laundering. Due
to the remaining oil, the fabric may smoke or catch fire by
itself.
•
Disconnect this appliance from the power supply before
attempting any user maintenance. Turning the controls to
the OFF position does not disconnect this appliance from
the power supply.
Failure to follow this warning can cause
serious injury, fire, electric shock, or death.
•
Do not combine laundry products for use in one load unless
specified on the label.
•
Do not mix chlorine bleach with ammonia or acids such
as vinegar. Follow package directions when using laundry
products.
Incorrect usage can produce poisonous gas,
resulting in serious injury or death.
•
Do not reach into the washer while parts are moving.
Before loading, unloading, or adding items, press the START/
PAUSE button and allow the drum to coast to a complete
stop before reaching inside.
Failure to follow this warning
can cause serious injury, fire, electric shock, or death.
•
Do not allow children to play on or in the washer. Close
supervision of children is necessary when the washer
is used near children. As children grow, teach them the
proper, safe use of all appliances.
Failure to comply with
these warnings could result in serious injury to persons or
death.
•
Destroy the carton, plastic bag, and other packing materials
after the washer is unpacked. Children might use them for
play. Cartons covered with rugs, bedspreads, or plastic
sheets can become airtight chambers.
Failure to comply
with these warnings could result in serious injury to persons
or death.
•
Keep laundry products out of children’s reach. To prevent
injury to persons, observe all warnings on product labels.
Failure to comply with these warnings could result in serious
injury to persons or death.
•
Remove the door to the washing compartment to avoid the
danger of children or small animals getting trapped inside
before your washer is removed from service or discarded.
Failure to do so can result in serious injury to persons or
death.
•
Keep hands and foreign objects clear of the lid and latch area
when closing the lid. Failure to keep hands clear can result
in personal injury.

7
TABLE OF CONTENTS
ENGLISH
TABLE OF CONTENTS
2 PRODUCT FEATURES
3 IMPORTANT SAFETY INSTRUCTIONS
4 BASIC SAFETY PRECAUTIONS
4 GROUNDING INSTRUCTIONS
5 SAFETY INSTRUCTIONS FOR INSTALLATION
6 SAFETY INSTRUCTIONS FOR USE, CARE,
CLEANING, AND DISPOSAL
8
INTRODUCING YOUR WASHING MACHINE
8 Parts and Accessories
9 Control panel features
11 INSTALLATION INSTRUCTIONS
11 Installation Overview
12 Checking and choosing the proper location
13 Unpacking the washer
14 Connecting the water lines
15 Connecting the drain line
16 Leveling the washing machine
17 Plugging in the power cord and grounding
17 Test run
18 PREPARATION
18 Sorting wash loads
18 - Precautions for fabric care before wash cycle
18 - Fabric care labels
18 - Sorting laundry
19 Using detergent/fabric softener
19 - Recommended detergent
19 - Loading the dispenser
21 USING YOUR WASHING MACHINE
21 Basic operation
22 Cycle guide
23 Main cycle
23 - Normal items, COTTON/NORMAL
23 - Heavy soiled items,
HEAVY DUTY
23 - Blankets or bulky items,
BULKY/BEDDING
23 - Wrinkle free items,
PERM.PRESS/CASUAL
23 - Sheer items, DELICATES
23 - Quick wash,
SPEED WASH
23 - Rinse, drain and spin only, RINSE+SPIN
23 Cycle setting buttons
23 Setting options before cycle
23 - Setting the water temperature, WASH TEMP.
24 - Setting soil level of laundry, SOIL LEVEL
24 - Setting spin speed, SPIN SPEED
24 - Tuning on/off melody and button tones, SIGNAL
ON/OFF
24 -
Setting add garments of laundry, ADD GARMENTS
24 - Presetting the start time, DELAY WASH
25 -
Setting fabric softener of laundry, FABRIC SOFTENER
25 - Adding time during wash cycle, SOAK
25 - Adding extra rinse cycle, EXTRA RINSE
25 - Setting customized wash cycle, CUSTOM
PROGRAM
25 Setting options during cycle
25 - Button lock feature, CHILD LOCK
26 MAINTENANCE
26 Care
26 - Cleaning the water inlet filters
26 - Care in cold climates
27 Cleaning
27 - Clean the drum, TUB CLEAN
27 - Cleaning the detergent box
28 TROUBLESHOOTING
28 Checking error messages
30 Normal sounds you may hear
30 Before calling for service
33 SPECIFICATIONS
33 USING SMARTDIAGNOSIS™
34 WARRANTY
8
INTRODUCING YOUR WASHING MACHINE
NOTE
Contact LG Customer Service at 1-800-243-0000 (1-888-542-2623 in Canada) if any accessories are missing or to purchase
y
accessories.
Always purchase good quality hoses. Leaking caused by poor quality hoses or by improper installation is not covered by the
y
manufacturer’s warranty.
The images in this guide may be different from the actual components and accessories, and are subject to change by the
y
manufacturer without prior notice for product improvement purposes.
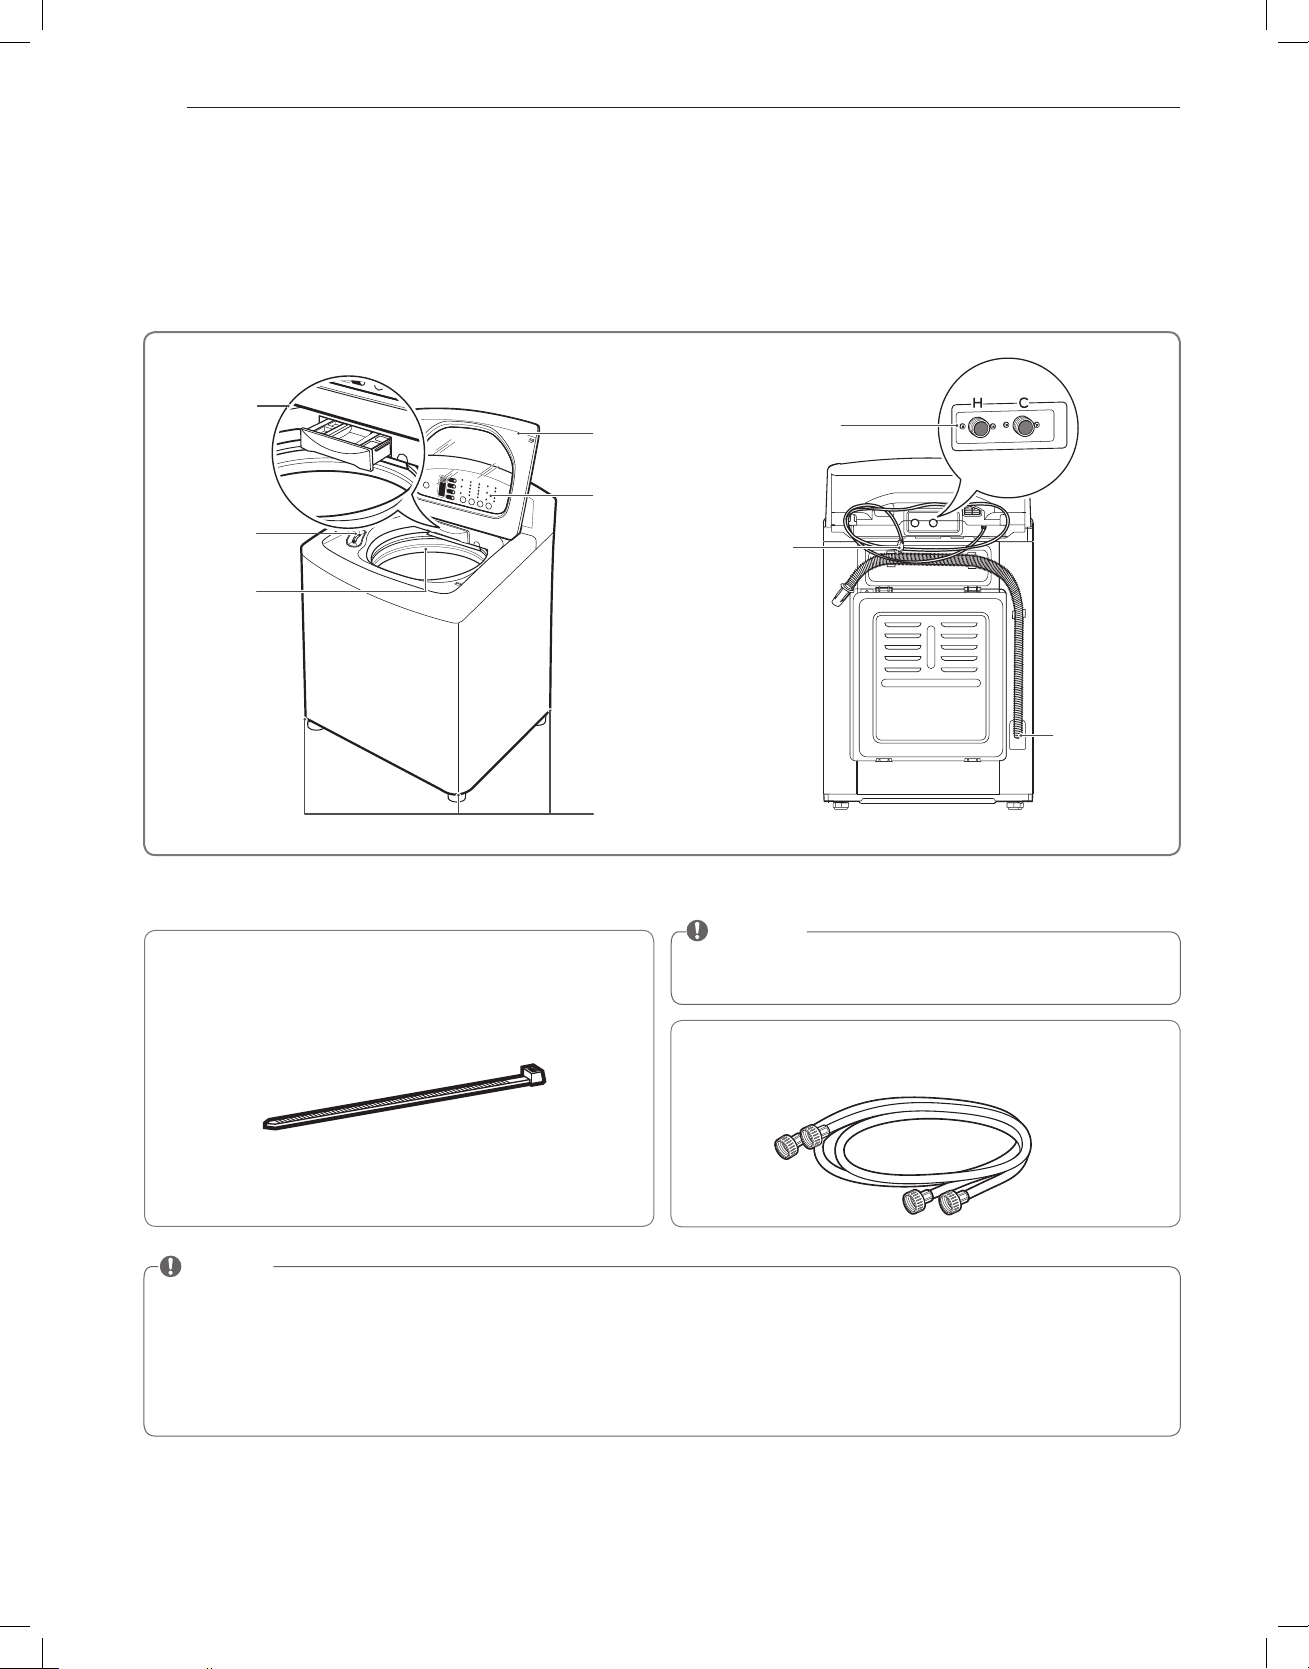
INTRODUCING YOUR WASHING MACHINE
Parts and Accessories
Parts
Accessories
Dispenser box
(See page 19)
Lid
Control panel
(See page 9)
Bleach
box
Tub
Leveling feet
Identify
HOT and COLD
Power
cord
Drain hose
NOTE
Accessories shown below are not included in this
y
model, but are required for the proper operation.
or
or
Not supplied with washer
Included Accessories
Hot and Cold Water Hoses
y
Tie Strap (for securing drain hose)
y
9
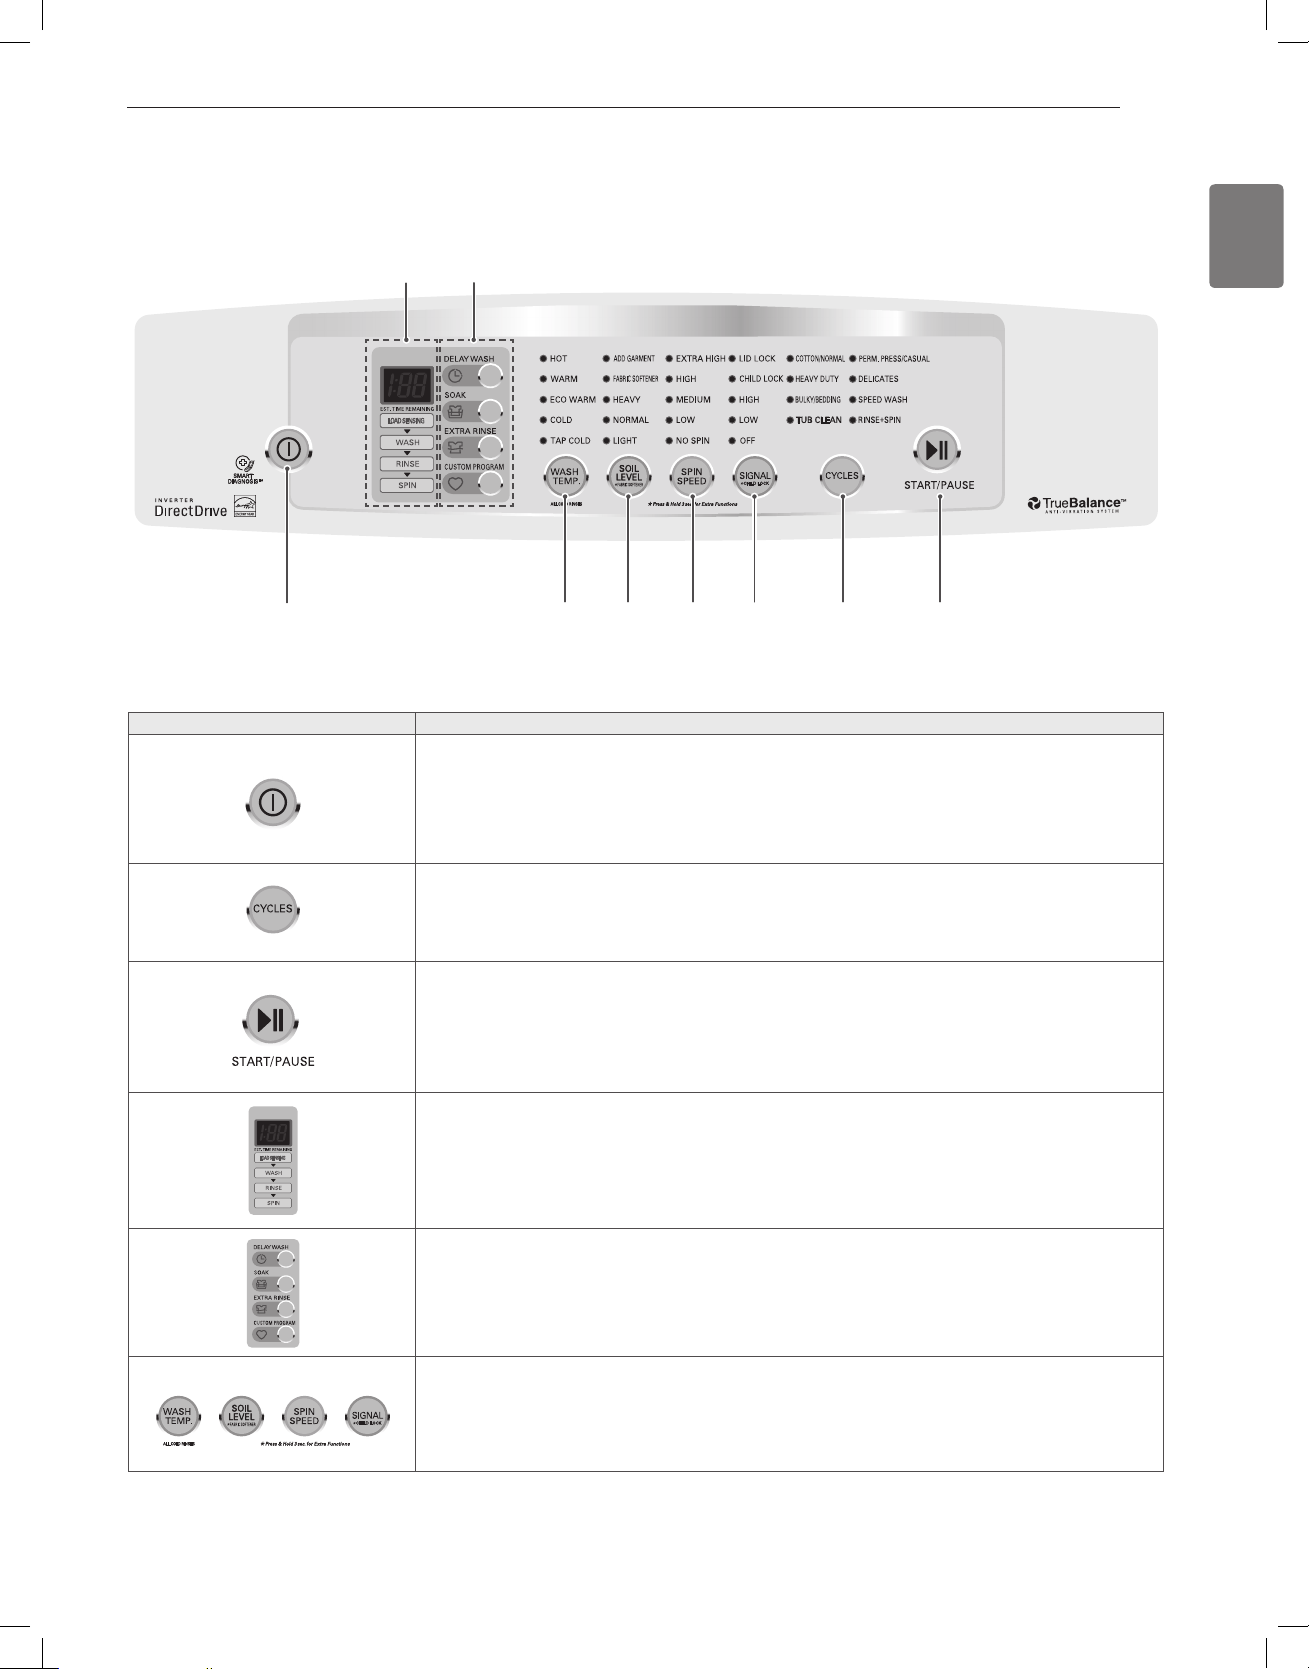
INTRODUCING YOUR WASHING MACHINE
ENGLISH
Button Description
POWER ON/OFF BUTTON
y
- Press to turn the washer ON. Press again to turn the washer OFF.
NOTE:
If the washer remains idle for 4 minutes after turning the washer off, the water in the tub will
drain.
NOTE:
An alarm will sound 1 minute prior to draining, and ‘dr’ will appear on the display. You may
restart the washer at this time. However, once the washer initiates draining, all functions will
be suspended, and ‘dr’ will be displayed until draining is complete.
CYCLE SELECTOR BUTTON
y
- Press the Cycle Selector Button until the desired cycle is selected. Once the desired cycle has been
selected, the standard presets will be shown in the display. These settings can be adjusted using
the cycle setting buttons before starting the cycle.
START/PAUSE BUTTON
y
- Press this button to START the selected cycle.
If the washer is running, use this button to PAUSE the cycle without losing the current settings.
NOTE:
If you do not press the START/PAUSE button within 4 minutes of selecting a cycle, the
washer automatically turns off.
NOTE:
If the washer remains idle for 8 minutes after pausing the cycle, the water in the tub will
drain.
LED DISPLAY
y
- The display shows the settings, estimated time remaining, and status messages for your washer.
The display will remain on through the cycle.
OPTION BUTTONS
y
- The option buttons allow you to select additional cycle options and will light when selected.
CYCLE MODIFIER BUTTONS
y
- Use these buttons to select the desired cycle options for the selected cycle. Press the button for
that setting until the indicator light for the desired value is lit.
Certain buttons also allow you to activate special functions by pressing and holding the button for 3
seconds. For detailed information about the individual options, please see the following pages.
Control panel features
Operation
LED
Display
Option
Selection
Button
Soil
Level
Selection
Button
Wash
Temp.
Selection
Button
Spin
Speed
Selection
Button
Signal
Selection
Button
Cycles
Selection
Button
Start/
Pause
Button
Power
Button

10
INTRODUCING YOUR WASHING MACHINE
Display
Button Description
ESTIMATED TIME REMAINING
y
- When the START/PAUSE button is pressed, the washer automatically detects the wash load
(weight) and optimizes the washing time based on the selected cycle and options. The display will
then indicate the estimated time remaining for the selected wash cycle.
CYCLE STATUS INDICATOR
y
- This portion of the display shows which stage of the wash cycle is currently underway
(LOAD SENSING, WASH, RINSE, or SPIN).
Estimated time remaining/
error message display
(See page 28)
Cycle
Status
Indicator
11
INSTALLATION INSTRUCTIONS
ENGLISH
INSTALLATION INSTRUCTIONS
Installation Overview
WARNING
Washer is heavy! Two or more people are required when moving and unpacking the washer.
y
Failure to do so can result in
back or other injury.
Store and install the washer where it will not be exposed to temperatures below freezing or exposed to outdoor weather
y
conditions.
Failure to follow this warning can cause serious injury, fire, electric shock, or death.
Properly ground washer to conform with all governing codes and ordinances.
y
Failure to follow this warning can cause
serious injury, fire, electric shock, or death.
To reduce the risk of electric shock, do not install the washer in humid spaces.
y
Failure to follow this warning can cause
serious injury, fire, electric shock, or death.
The base opening must not be obstructed by carpeting when the washer is installed on a carpeted floor.
y
Do not remove ground prong. Do not use an adapter or extension cord. Plug into a grounded 3-prong outlet.
y
Failure to
follow this warning can cause serious injury, fire, electric shock, or death.
Checking and choosing the
proper location
Unpacking the washer Connecting the water line
Connecting the drain line Leveling the washing
machine
Plugging in the power cord
and grounding
Test run
12
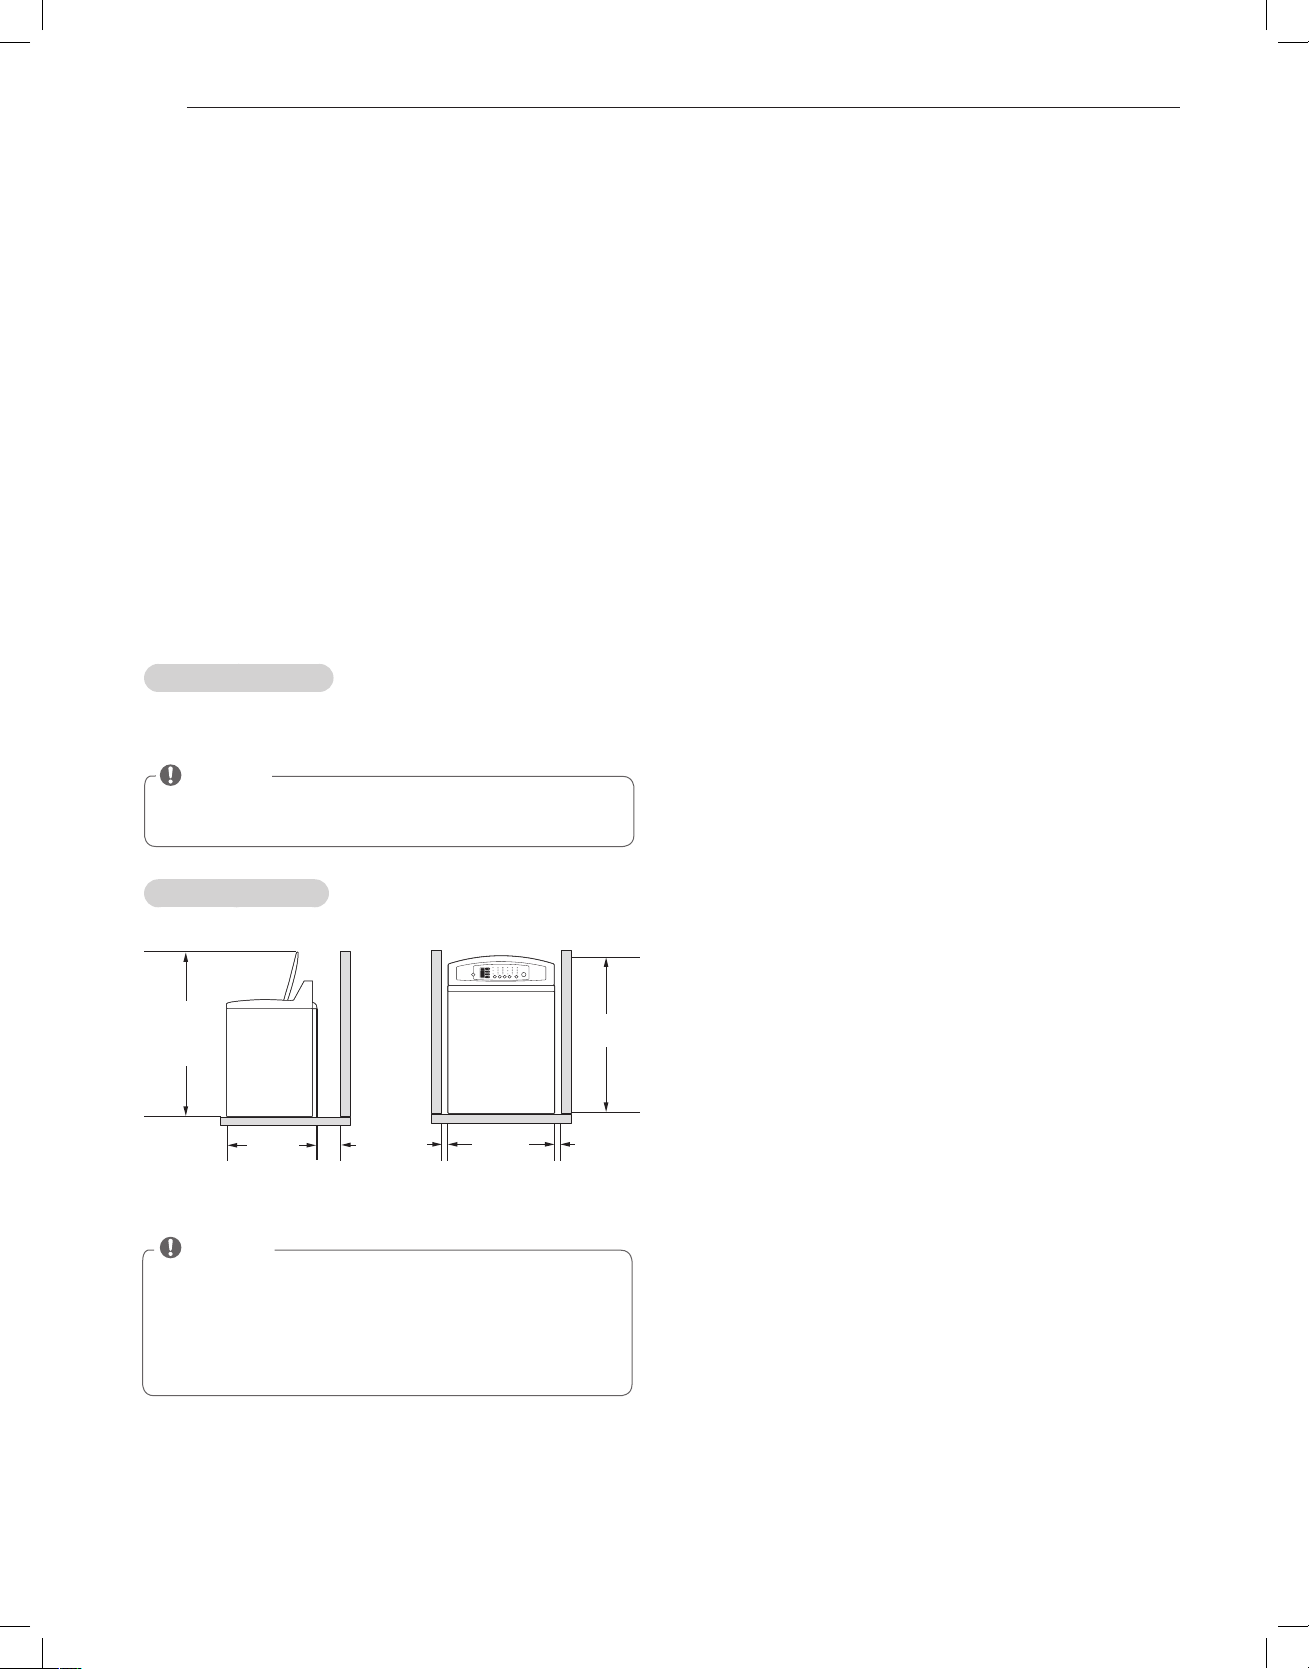
INSTALLATION INSTRUCTIONS
Checking and choosing the proper
location
Install the washing machine on a solid floor that is strong and
rigid enough to support the weight of the washing machine,
even when fully loaded, without flexing or bouncing. If the
floor has too much flex, you may need to reinforce it to make
it more rigid. If the floor is not solid, it may cause severe
vibration and noise.
1
Clean the floor before installation.
- Make sure to select solid and smooth ground.
2
Two or more people are needed for moving and
unpacking the washing machine.
3
Allow for sufficient space between the walls and the
washing machine for installation.
Space requirements
You must allow sufficient space for water lines, the drain
line, and airflow.
NOTE
Be sure to allow for wall, door, or floor moldings that
y
may increase the required clearances.
Installing on a floor
28 1/4″
(71.6 cm)
4″
(10 cm)
52
3
/4″
(133.7 cm)
(with lid
open)
27″
(68.6 cm)
1″
(2.5 cm)
1″
(2.5 cm)
43
7
/8″
(1 1 1 .4 cm)
NOTE
Before installing the washer, make sure the floor is
y
clean, dry and free of dust, dirt, water and oils so the
washer feet cannot slide easily. Leveling feet that can
move or slide on the floor can contribute to excess
vibration and noise due to poor contact with the floor.
13
INSTALLATION INSTRUCTIONS
ENGLISH
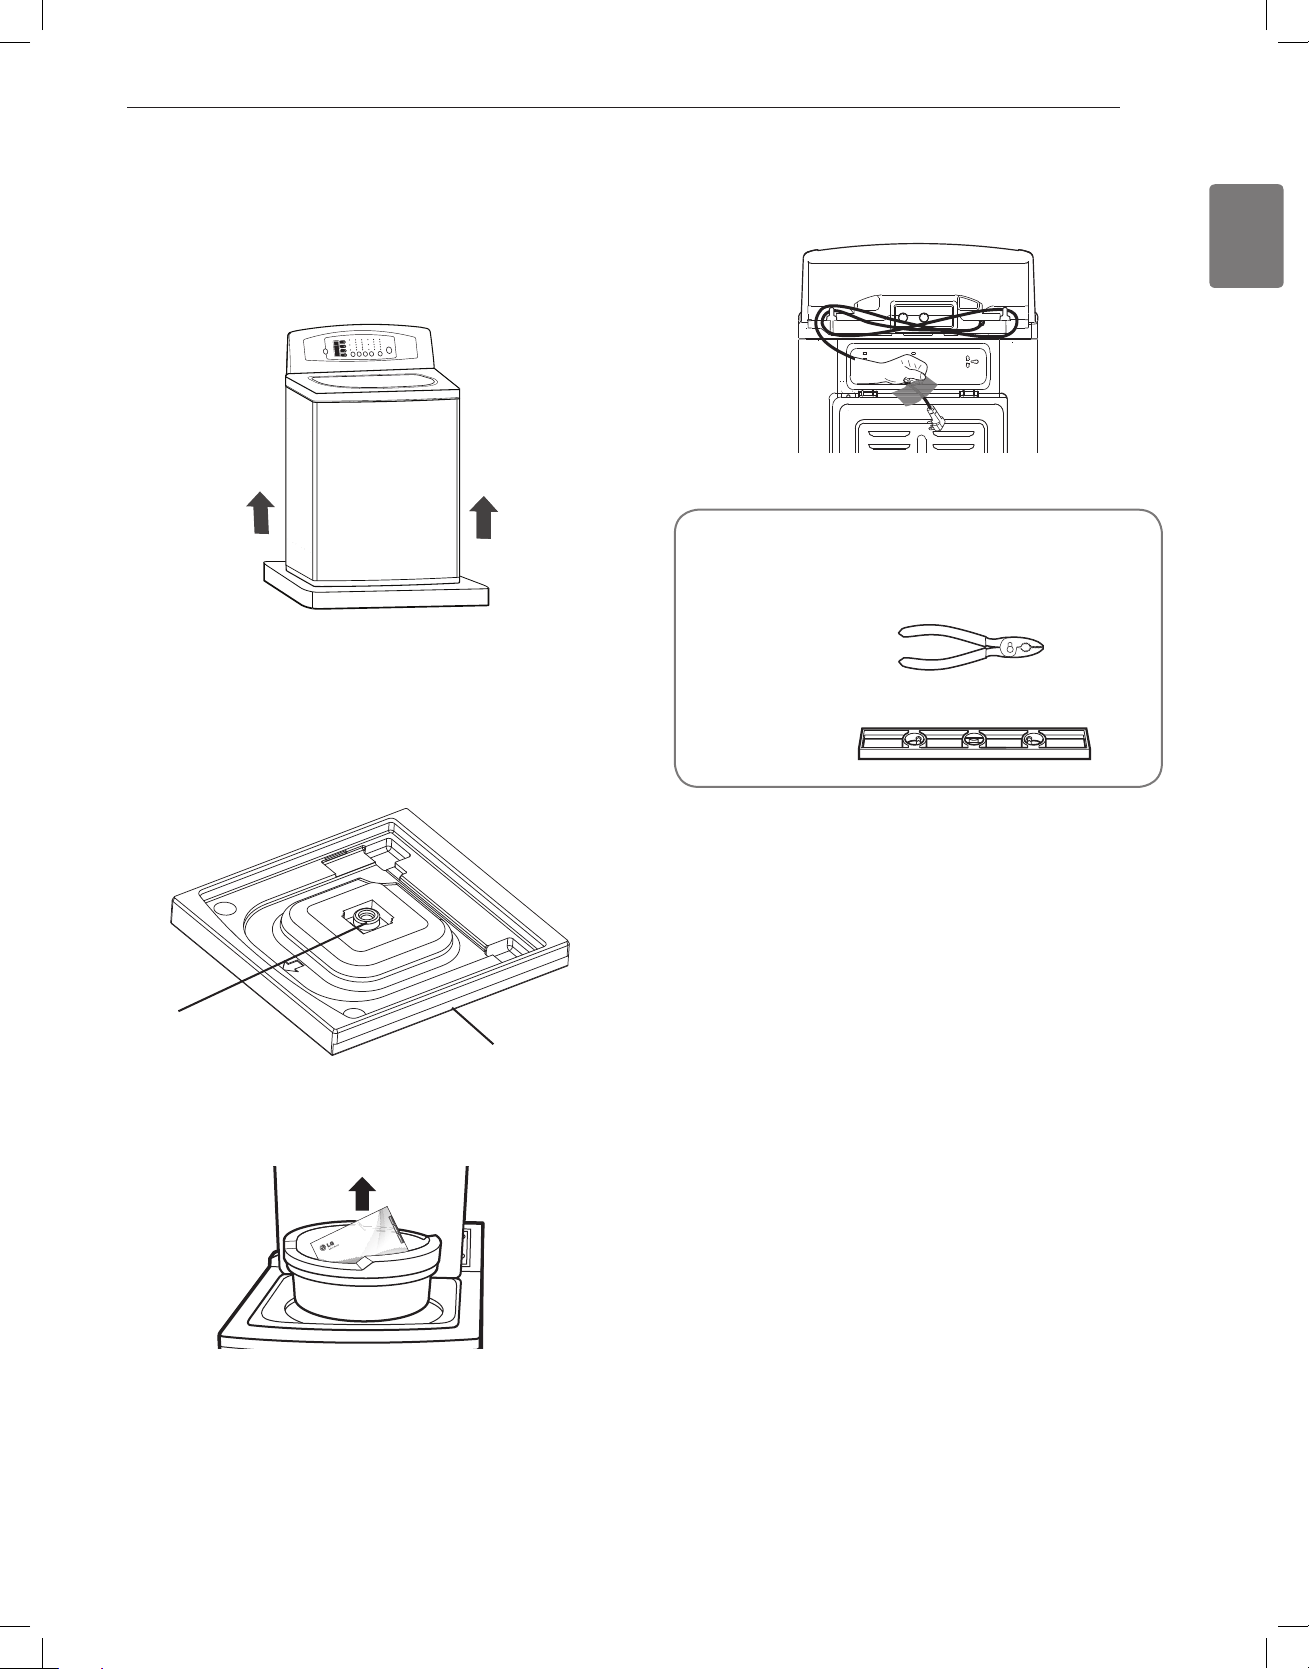
Unpacking the washer
1
After the washer is in the home, remove the carton and
Styrofoam® shipping base from the washer.
When removing the washer from the carton base, be sure
to remove the tub support in the middle of the carton base.
If you must lay the washer down to remove the base
packaging materials, always protect the side of the washer
and lay it carefully on its side. Do NOT lay the washer on its
front or back.
Carton Base
Tub support
2
Remove the packing block containing the owner’s
manual, parts and laundry product samples.
3
Unfasten the power cord from the back of the
washer.
TOOLS YOU WILL NEED
• Adjustable Pliers
• Carpenter’s Level
14
INSTALLATION INSTRUCTIONS
Connecting the water lines
1
Check the rubber seals on both sides of the hose.
- Insert a rubber seal into the threaded fittings on each
hose to prevent leaking.
Rubber seal
Water hose
(To water inlet on the
washing machine)
Rubber seal
Water hose
(To tap)
WARNING
Do not reuse old hoses.
y
Only use new hoses when
you install the washing machine. Old hoses could leak
or burst causing flooding and property damage.
2
Connect the water supply hoses to the HOT and COLD
water faucets tightly by hand and then tighten another
2/3 turn with pliers.
- Connect the blue hose to a cold water faucet and the
red hose to a hot water faucet.
WARNING
Do not overtighten.
y
Damage to the coupling can result.
3
After connecting inlet hose to water faucets, turn on the
water faucets to flush out foreign substances (dirt, sand
or sawdust) in the water lines. Let water drain into a
bucket, and check the water temperature.
4
Connect the hoses to the water inlets tightly by hand and
then tighten another 2/3 turn with pliers.
- Connect the blue hose to the cold water inlet and the
red hose to the hot water inlet.
Cold water inlet
Hot water inlet
WARNING
Do not overtighten the hoses.
y
Overtightening can
damage the valves resulting in leaking and property
damage.
5
Check for leaks by turning on the faucets.
- If water leaks, check steps 1 to 4 again.
NOTE
Periodically check the hoses for cracks, leaks and wear,
y
and replace the hoses every 5 years.
When moving or installing the machine do not stretch,
y
crush of kink the hoses.
Water supply pressure must be between 14.5 PSI and
y
116 PSI (100~800 kPa). If the water supply pressure is
more than 116 PSI, a pressure reducing valve must be
installed.
To provide optimum washing performance the hot
y
water temperature should be set at 120-135°F (48-57°C)
and the cold at 60°F (15°C).
15
INSTALLATION INSTRUCTIONS
ENGLISH
Connecting the drain line
Secure the drain hose in place to prevent moving and leaking.
NOTE
The drain hose should be properly secured. Failure to
y
properly secure the drain hose can result in flooding
and malfunction.
Total height of the house end should not exceed 96
y
inches (244.8 cm) from the bottom of the washer.
The drain must be installed in accordance with any
y
applicable local codes and regulations.
Make sure that the water lines are not stretched,
y
pinched, crushed, or kinked.
Using a standpipe
1
Insert the end of the drain hose into the standpipe.
Drain Hose
2
Use a tie strap to secure the drain hose in place.
Cable Tie
39″
(99 cm)
39″
(99 cm)
Cable Tie
Using a laundry tub
1
Clip the end of the hose into the elbow bracket.
-
Connect the elbow bracket within 4 inches (10 cm) from the
end of the drain hose. If the drain hose is extended more than
4 inches (10 cm) beyond the end of the elbow bracket, mold,
or microorganisms could spread to the inside of the washer.
No more than
4 inches (10 cm)
2
Hang the end of the drain hose over the side of the laundry tub.
Drain Hose
3
Use a tie strap to secure the drain hose in place.
16
INSTALLATION INSTRUCTIONS
Leveling the washer machine
The washer spins at very high speeds, up to 1,000 RPM.
NOTE
Adjust the leveling feet only as far as necessary to
y
level the washer. Extending the leveling feet more than
necessary can cause the washer to vibrate.
All four leveling feet must rest solidly on the floor. Rock
y
the washer gently from corner to corner to make sure
that the washer does not rock.
Before installing the washer, make sure the floor is
y
clean, dry and free of dust, dirt, water and oils so the
washer feet cannot slide easily. Leveling feet that can
move or side on the floor can contribute to excess
vibration and noise due to poor contact with the floor.
1
Position the washer in the final location,
taking special care to not pinch, strain, or crush the water
and drain lines. Place a level across the top of the washer.
2
Adjust the 2 front leveling feet. Turn clockwise to raise
the washer or counterclockwise to lower it.
Raise Lower
3
To make sure that the washer is properly level, open
the lid and look from above to see if it is same as shown
below. If you have a level, check your washer with the
level.
• To check if the washer is level side to side, close the lid
and place a level at the back of the lid.
• To check if the washer is level front to back, place a level at
the side of the washer on the edge where the cabinet side
meets the top cover.
Raise
front to back
side to side
Lower
If the washer is not level, adjust the front leveling feet. Turn
clockwise to raise, counterclockwise to lower.
4
Check the washing machine’s level again.
- Push or rock the top edges of the washing machine
gently to make sure that the washing machine does not
rock.
- If the washing machine rocks, repeat steps 1 to 3.
WARNING
Using the washing machine without leveling, it may
y
result in malfunction caused by the production of
excess vibration and noise.
Use the leveling feet only when you level the washing
y
machine.
If you raise the leveling feet unnecessarily, it
may cause abnormal vibration of the washing machine.
17
INSTALLATION INSTRUCTIONS
ENGLISH
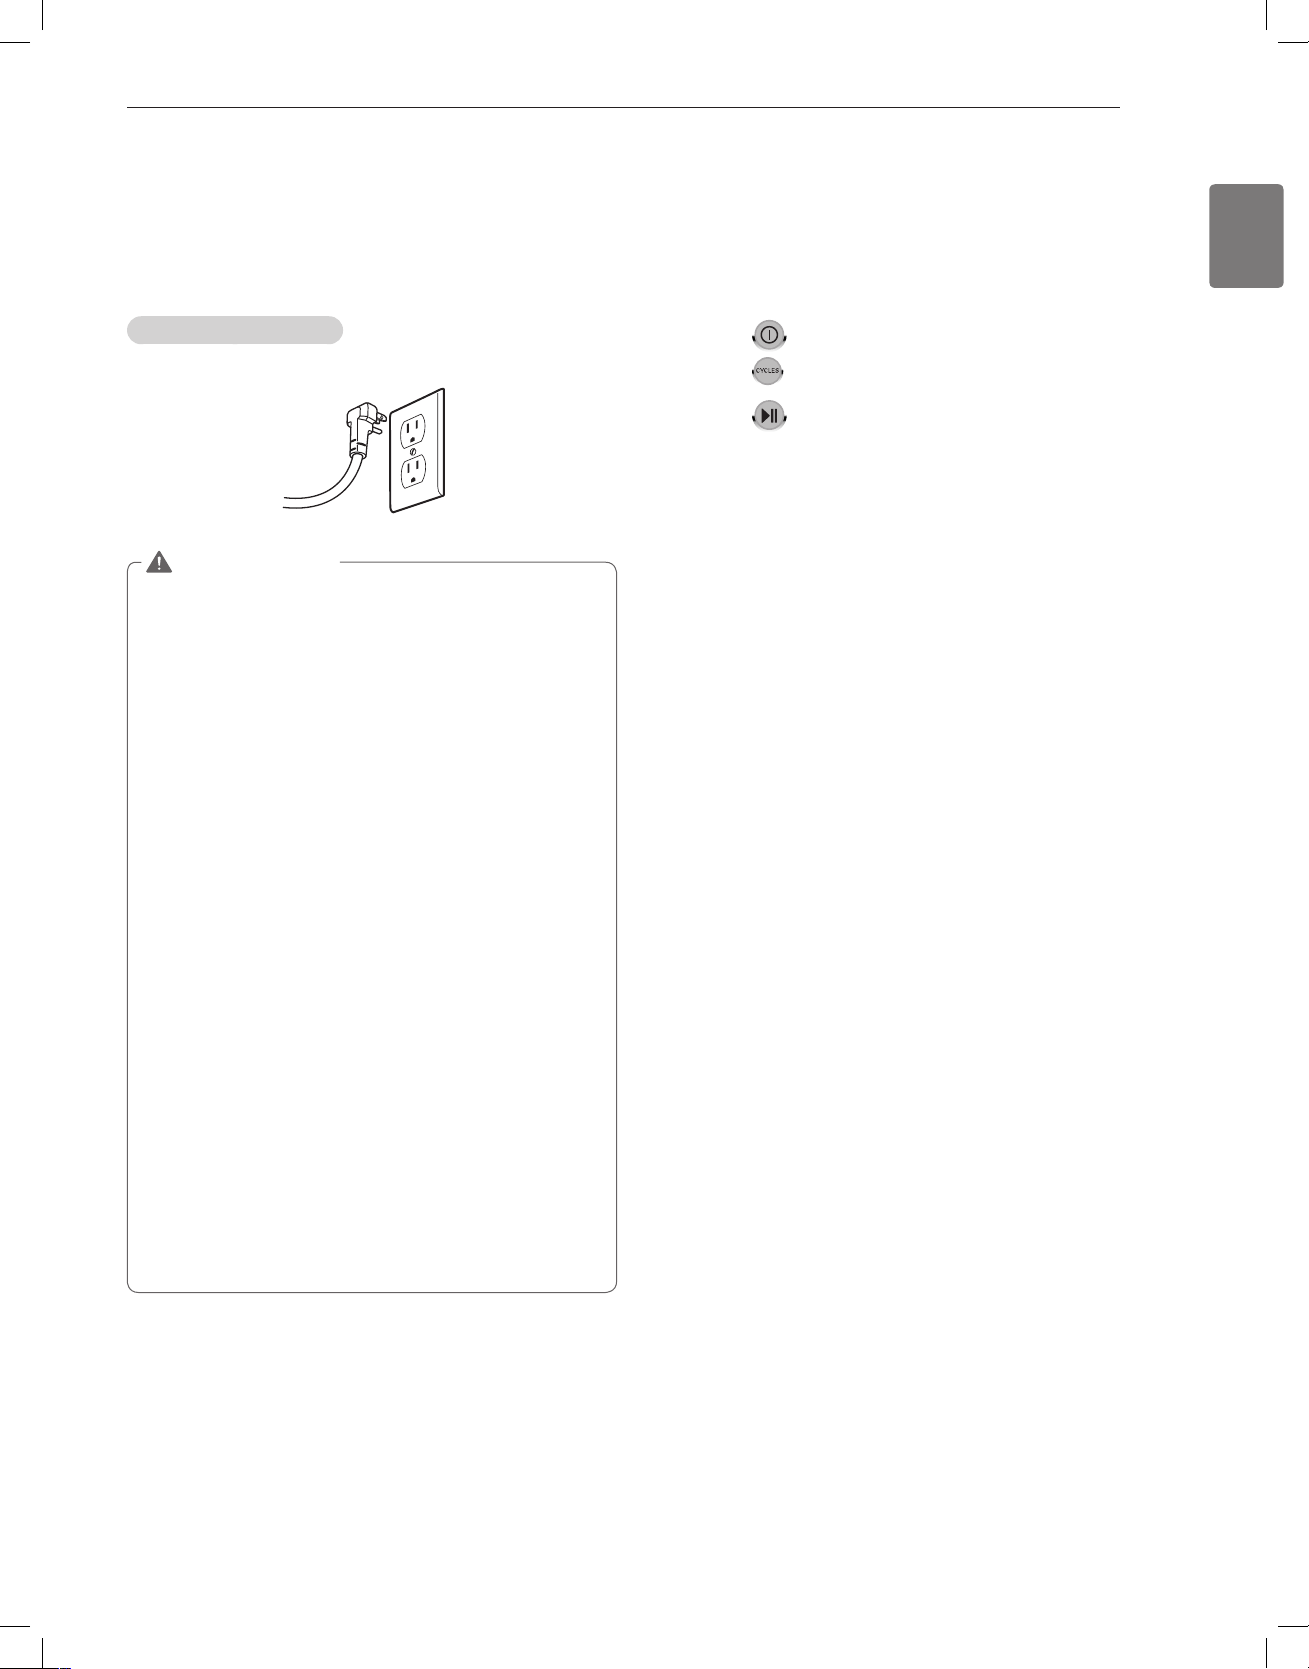
Plugging in the power cord and
grounding
Make sure to ground the washing machine to prevent a short
circuit or an electric shock when plugging in.
Using a 3-prong outlet
Plug in the electrical outlet without additional grounding.
WARNING
The power outlet must be within 60 inches (1.5 m) of either
y
side of the washer.
The appliance and outlet must be positioned so that the plug
y
is easily accessible.
Do not overload the outlet with more than one appliance.
y
The outlet must be grounded in accordance with current
y
wiring codes and regulations.
Time-delay fuse or circuit breaker is recommended.
y
It is the personal responsibility and obligation of the product
y
owner to have a proper outlet installed by a qualified
electrician.
Do not use a worn or damaged power cord or power plug.
y
Replace or repair it immediately.
Failure to do so may result
in death, fire, electric shock, or malfunction.
Do not modify the power cord and take care not to damage
y
it when installing or moving the washing machine.
Failure to
do so may result in death, fire, electric shock, or malfunction.
Make sure that the washing machine is grounded.
y
Connect this washing machine to a grounded outlet
y
conforming to the rating prior to use.
Failure to do so may
result in fire, electric shock, or malfunction.
Do not use adaptors or extension cords.
y
The washing
machine should always be plugged into its own individual
electrical outlet which has a voltage rating that matches the
rating plate. Failure to do so may result in fire, electric shock
or disorder.
Do not damage or cut off the ground prong of the power
y
cord.
Doing so may cause death, fire, electric shock, or
product malfunction.
Test run
Check if the washing machine is properly installed and run a
test cycle.
1
Load the washing machine with 6 pounds of laundry.
2
Press
3
Press to RINSE + SPIN.
4
Press .
- The wash cycle starts.
5
Check if water is supplied, that the washing machine
does not rock or vibrates excessively, and that it drains
well during the spin cycle.
- If water leaks during water supply, see page 14,
Connecting the water lines
to connect them properly.
- If the washing machine rocks and vibrates excessively,
see page 16,
Leveling the washing machine
to level it
again.
- If the drain does not work, see page 15,
Connecting the
drain line
to install it properly.

PREPARATION
18
PREPARATION
Sorting wash loads
Precautions for fabric care before wash cycle
Read and observe the following to prevent shrinkage or damage to clothes.
CAUTION
y Do not wash or spin any item labeled or known to be water-
proof or water-resistant, even if the product care label on
the item permits machine washing. Failure to follow these
instructions could result in bodily injury, severe damage to
your laundry, your washer and/or property damage as a result
of abnormal vibration of the washer.
- Examples of water-proof or water-resistant items include
certain mattress pads, mattress covers, rain gear, camping
gear, skiing apparel , outdoor gear and similar items.
uCheck all pockets to make sure that they are empty.
-Items such as clips, matches, pens, coins, and keys can damage
both your washer and your clothes.
u Close zippers, hooks, and drawstrings to prevent these items
from snagging or tangling on other clothes.
uPretreat heavily stained areas before washing.
- Doing so will produce clean, stain-free results.
uCombine large and small items in a load. Load large items first.
uLarge items should not be more than half of the total washload.
uThe washer can be fully loaded, but the drum should not be
tightly packed with items.
uDo not wash single items, except for bulky items such as
blankets. Make sure to wash laundry in similar types of loads.
- Washing a single small item may result in the tub becoming
unbalanced, vibrating and making a noise.
uDo not wash waterproof clothes.
- This may cause abnormal vibration, or may cause the load
to bounce, which could damage the tub.
Fabric care labels
Most articles of clothing feature fabric care labels that include
instructions for proper care.
Category Label Directions
Hand Wash
Machine Wash, Normal Cycle
Use Permanent Press/Wrinkle
Resistant washing machine
setting (which has a cool down or
cold spray before the reduced
spin)
Washing
Water Temperature
Bleach symbols
Use Gentle/Delicate washing
machine setting (slow agitation
and/ or reduced wash time).
Do Not Wash
Do Not Wring
Hot
Warm
Cold/Cool
Any Bleach (When Needed)
Only Non-Chlorine Bleach (When
Needed)
Do Not Bleach
uBrush heavy soil, dust, or hair off fabrics before washing.
- Laundry may not wash clean if there is dirt or sand on the
fabrics, or they may damage due to particles rubbing against
sheer fabrics.
uWash blankets individually.
- Washing more than one blanket together may produce unclean
results due to tangling or an unbalanced load.
uAlways separate fabrics according to their colors and wash them
separately to prevent colors from running.
- Fabrics may damage or become stained due to fabric dyes
running, or due to foreign objects transferring from one
fabric to another.
Sorting laundry
It is recommended that you sort laundry into similar loads
that are washable in the same cycle.
Refer to the following chart for sorting clothes
Colors
Soil
Fabric
Lint
Whites / Lights / Darks
Heavy / Normal / Light
Delicates / Easy Care / Sturdy Cottons
Lint Producers / Lint Collectors
PREPARATION
19
Using detergent/fabric softener
Recommended detergent
Make sure to use HE (High-Efficiency) detergent for Top
loading washing machines. HE detergents dissolve more
efficiently and produce fewer suds to ensure efficient
washing and rinsing. Use the correct amount of detergent as
indicated on the label of the detergent packaging.
Designed specially to use only
HE (High-Efficiency) detergent
NOTE
yOnly use HE detergents, since using a regular
detergent may produce excessive suds.
yHE detergents produce fewer suds, dissolve more
efficiently to improve washing and rinsing performance,
and help to keep the interior of your washer clean.
y Use less detergent for soft water.
yWipe up any spills immediately, as liquids could
damage the finish and the control panel of the washing
machine.
yUsing too much detergent can cause a build-up in
the tub resulting in unsatisfactory performance and
machine malfunction.
yIf you use a detergent that does not dissolve easily or a
detergent with high viscosity, it will leave a residue on
the tub, which may not rinse properly.
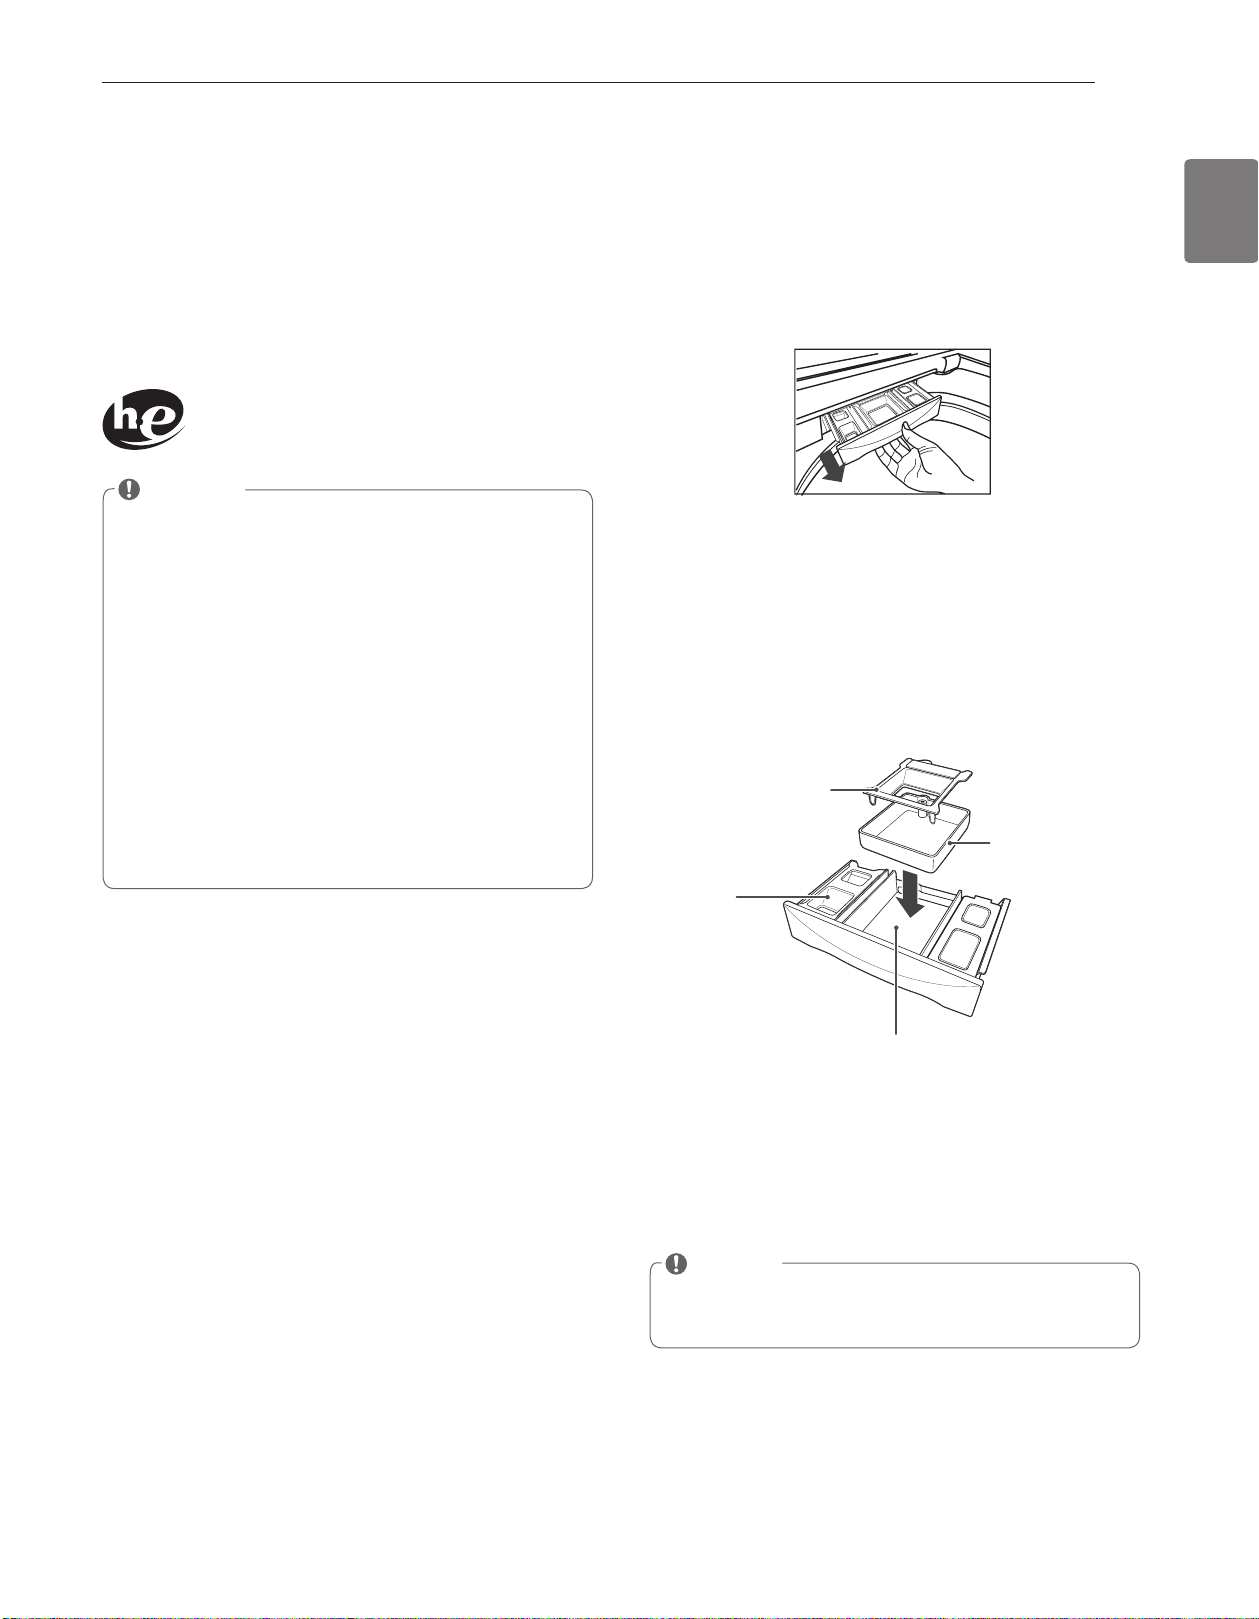
Loading the dispenser
The detergent dispenser drawer of the washing machine has
a dispenser compartment for each detergent type. Add the
appropriate detergents into its respective compartments.
Pull out the detergent dispenser drawer.
1
Add the appropriate detergent to its allocated
2
compartment.
- If you use a liquid detergent, check if the liquid
detergent cup is in place.
- If you use a powdered detergent, remove the liquid
detergent cup and put the powder in the main wash
detergent compartment.
Main Wash
Liquid Detergent
Compartment
Insert
Liquid Fabric
Softener
Compartment
ENGLISH
Main Wash
Powder Detergent
Compartment
Close the detergent dispenser drawer slowly.
3
- Slamming the detergent dispenser drawer may result in
the detergent overflowing into another compartment or
pouring into the tub earlier than programmed.
NOTE
yIt is normal for a small amount of water to remain in
the dispenser compartments at the end of the cycle.
PREPARATION
20
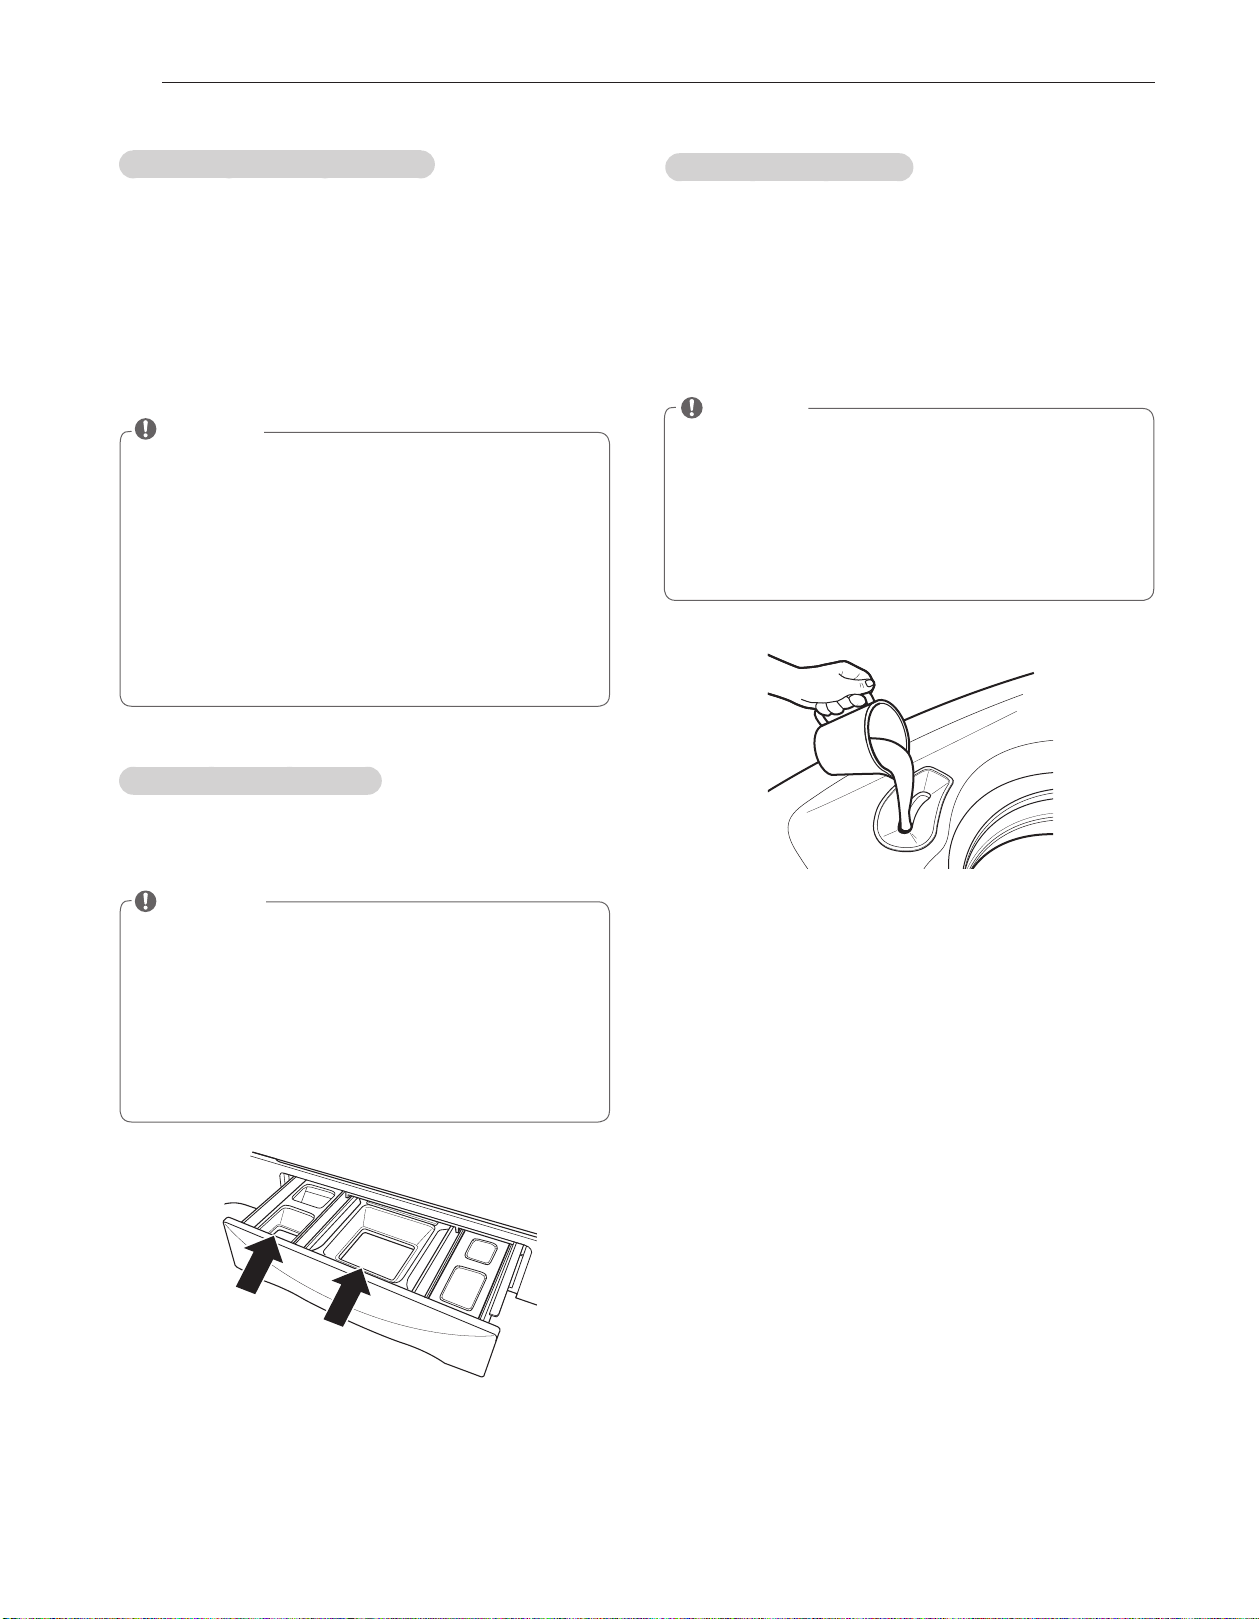
Main Wash Detergent Compartment
This compartment holds laundry detergent for the main wash
cycle, which is added to the load at the beginning of the
cycle. Always use HE (High-Efficiency) detergent with your
washing machine.
Never exceed the manufacturer’s recommendations when
adding detergent. Using too much detergent can result
in detergent buildup in clothing and the washer. Either
powdered or liquid detergent may be used.
NOTE
yLiquid or powdered color-safe bleach may be added
to the main wash compartment with detergent of the
same type.
yWhen using liquid detergent, make sure the liquid
detergent cup and insert are in place. Do not exceed
the maximum fill line.
yWhen using powdered detergent, remove the insert
and liquid detergent cup from the compartment.
Powdered detergent will not dispense with the liquid
detergent cup and insert in place.
Liquid Bleach Compartment
This compartment holds liquid chlorine bleach, which will be
dispensed automatically at the proper time during the wash
cycle. Avoid overfilling or splashing when adding bleach
to the dispenser. The maximum capacity of the bleach
dispenser is one cup of bleach per wash cycle. Overfilling
could result in premature dispensing of bleach, which will
result in fabric damage.
NOTE
yDo not add powdered or liquid color-safe bleach to this
compartment.
yAlways follow the manufacturer’s recommendations
when adding bleach. Do not exceed the maximum fill
line. Using too much bleach can damage fabrics.
yNever pour undiluted liquid chlorine bleach directly onto
the load or into the drum. Fabric damage can occur.
Fabric Softener Compartment
This compartment holds liquid fabric softener, which will be
automatically dispensed during the final rinse cycle.
NOTE
yAlways follow the manufacturer’s recommendations
when adding fabric softener. Do not exceed the
maximum fill line. Using too much fabric softener may
result in stained clothes.
yDilute concentrated fabric softeners with warm water.
Do not exceed the maximum fill line.
yNever pour fabric softener directly onto the load or into
the drum.
Fabric
Softener
Main Wash
Detergent

USING YOUR WASHING MACHINE
21
USING YOUR WASHING MACHINE
Basic operation
1
2
3
SORT LAUNDRY AND LOAD WASHER.
TURN ON THE WASHER.
Press the POWER button to turn on the washer.
SELECT CYCLE.
Press the cycle selector button to the desired cycle. The display will show the preset WASH
TEMP. SOIL LEVEL, SPIN SPEED for that cycle.
ENGLISH
4
5
6
WARNING
yTo reduce the risk of fire, electric shock, or injury to persons,
operating this appliance.
ADD DETERGENT BLEACH AND SOFTENER.
If you are using fabric softener with the COTTON/NORMAL or HEAVY DUTY cycles, select the
FABRIC SOFTENER option. Refer to pages 19-20 for details.
Press .
- The washing machine will start.
When the melody plays if the sound is turned on, the wash cycle is finished.
- When the washing cycle is finished, the door will unlock. Open the door and remove the laundry
immediately.
read the IMPORTANT SAFETY INSTRUCTIONS before

22
USING YOUR WASHING MACHINE
Cycle guide
The cycle guide below shows the options and recommended fabric types for each cycle.
=Default setting
NOTE: To protect your garments, not every Wash Temp., Spin Speed, Soil Level, or Option is available with every cycle.
Cycle Fabric Type Wash Temp. Soil Level Spin Speed
Delay
Wash
Soak
Extra
Rinse
Fabric
Softener
Cotton/Normal
Cotton, linen, towels,
shirts, sheets, jeans,
mixed loads
Warm Normal High
Hot ★Heavy
Extra High
Eco Warm Light Medium
Cold ★Low
Tap Cold No Spin
★
"Low" Spin Speed selection available only with "Heavy" Soil Level selection.
Heavy Duty
Heavy soiled cotton
fabrics
Warm
Heavy
High
Hot Normal
Extra High
Eco Warm Light Medium
Cold Low
Tap Cold No Spin
Bulky/Bedding
Large items such
as blankets and
comforters
Warm Normal Medium
Hot
Heavy Extra High
Eco Warm Light High
Cold Low
Tap Cold No Spin
* Use the Bulky/Bedding cycle for items such as pillows, comforters and other articles which have difficultly absorbing water.
ONLY WASH SMALL LOADS to make sure there is plenty of room for the load to move during washing. Keep like items
together; do not mix large bulky items with smaller clothing items. Failure to follow these instructions may result in damage to
the clothing or to the washer.
Tub Clean
Refer to page 27.
High
Perm.Press/Casual
Dress shirts/pants,
wrinkle-free clothing,
poly/cotton blend
clothing, tablecloths
Warm Normal High
Eco Warm
Heavy
Medium
Cold Light No Spin
Tap Cold
Delicates Dress shirts/blouses
nylons, sheer or lacy
garments (less than
8 lbs).
Cold Light Low
Warm
Heavy
Medium
Eco Warm Normal No Spin
Tap Cold
Speed Wash
Lightly soiled and
small loads
Warm Light High
Eco Warm
Heavy Extra High
Cold Normal Medium
Tap Cold Low
No Spin
Rinse+Spin Tap Cold
High
Extra High
Medium
Low
No Spin
 Loading...