

Page 1

P/No.: 3828EY3068M
WASHING MACHINE
OWNER'S MANUAL
website : http://www.lg.ca
e-mail : http://www.LGEservice.com/techsup.html
MODEL : WT1485CW
Page 2

ontents
C
Important Safety Information
Read this manual
Identification of Parts
Before Starting to Wash
Operating Instructions
Additional Function
Options
Installation Instructions
User Maintenance Instructions
Specifications
Fabric Care Labels
Troubleshooting
Warranty
3
4
How to Remove Stains 5
Preparation Before Washing 6
Water Level and Temperature 7
Use of Detergent 8
Use of Softener and Bleach 9
Function of Each Button 10
FUZZY Wash 12
DELICATE Wash 12
QUICK Wash 12
JEAN Wash 12
WOOL Wash 12
SILENT Wash 12
SPEEDY SOAK Wash 13
FAVORITE Wash 14
TUB CLEAN 15
DELAY START (RESERVATION) Wash
16
Option 17
Washing Option 18
Other Useful Functions 19
Placing and Leveling 20
Connecting Hoses 21
Washer Connections for Portable Model 22
Grounding Instructions 23
User Maintenance Instructions 24
Troubleshooting 26
Warranty 29
Specifications 30
Fabric Care Labels 31
Inside you will find many helpful hints on how to use and maintain your washer
properly. Just a little preventive care on your part can save you a great deal of time and
money over the life of your washer. You will find many answers to common problems
in the Troubleshooting section. If you review our pages of Troubleshooting first, you
may not need to call for service at all.
Page 3
Important Safety Inf ormation
3
I
mportant Safety Information
For your safety, the information in this manual must be followed
to minimize the risk of fire or explosion, electric shock, or to
prevent property damage, personal injury, or loss of life.
READ ALL INSTRUCTIONS BEFORE USE.
W ARNING!
• Read all instructions before using the washer.
• Do not wash articles that have been previously
cleaned in, washed in, soaked in, or spotted
with gasoline, dry cleaning solvents, or other
flammable or explosive substances, as they
give off vapors that could ignite or explode.
• Do not add gasoline, dry cleaning solvents, or
other flammable or explosive substances to the
wash water. These substances give off vapors
that could ignite or explode.
• Under certain conditions, hydrogen gas may
be produced in a hot water system that has not
been used for 2 weeks or more. HYDROGEN
GAS IS EXPLOSIVE! If the hot water system
has not been used for such a period, before
using the washing machine, turn on all hot
water faucets, and let the water flow from each
for several minutes. This will release any
accumulated hydrogen gas. As the gas is
flammable, do not smoke or use an open flame
during this time.
• Do not allow children to play on or in the
washer. Close supervision of children is
necessary when the washer is used near
children.
• Before the washer is removed from service or
discarded, remove the lid to prevent children
from hiding inside.
• Do not reach into the washer if the basket or
agitator is moving.
• Do not install or store the washer where it will
be exposed to the weather.
• Do not tamper with controls.
• Do not repair or replace any part of the washer
or attempt any servicing unless specifically
recommended in the user-maintenance
instructions or published user-repair
instructions that you understand and have
the skills to carry out.
• See Installation Instructions for grounding
requirements.
GROUNDING INSTRUCTIONS
This appliance must be grounded. In the event of malfunction or breakdown, grounding will reduce the
risk of electric shock by providing a path of least resistance for electric current. This appliance is equipped
with a cord having an equipment-grounding conductor and grounding plug. The plug must be plugged into
an appropriate outlet that is properly installed and grounded in accordance with all local codes and
ordinances.
Do not use an adapter or otherwise defeat the grounding plug.
If you don’t have the proper outlet, consult an electrician.
IMPORT ANT SAFETY INSTRUCTIONS
WARNING:
T o reduce the risk of fire, electric shock, or injury to persons when using the washer,
follow basic precautions, including the following:
SA VE THESE INSTRUCTIONS
WARNING:
Improper connection of the equipment-grounding conductor can result in risk of
electric shock. Check with a qualified electrician or serviceman if you are in doubt as to whether
the appliance is properly grounded. Do not modify the plug provided with the appliance - if it does
not fit the outlet, have a proper outlet installed by a qualified electrician.
Page 4
dentification of Parts
I
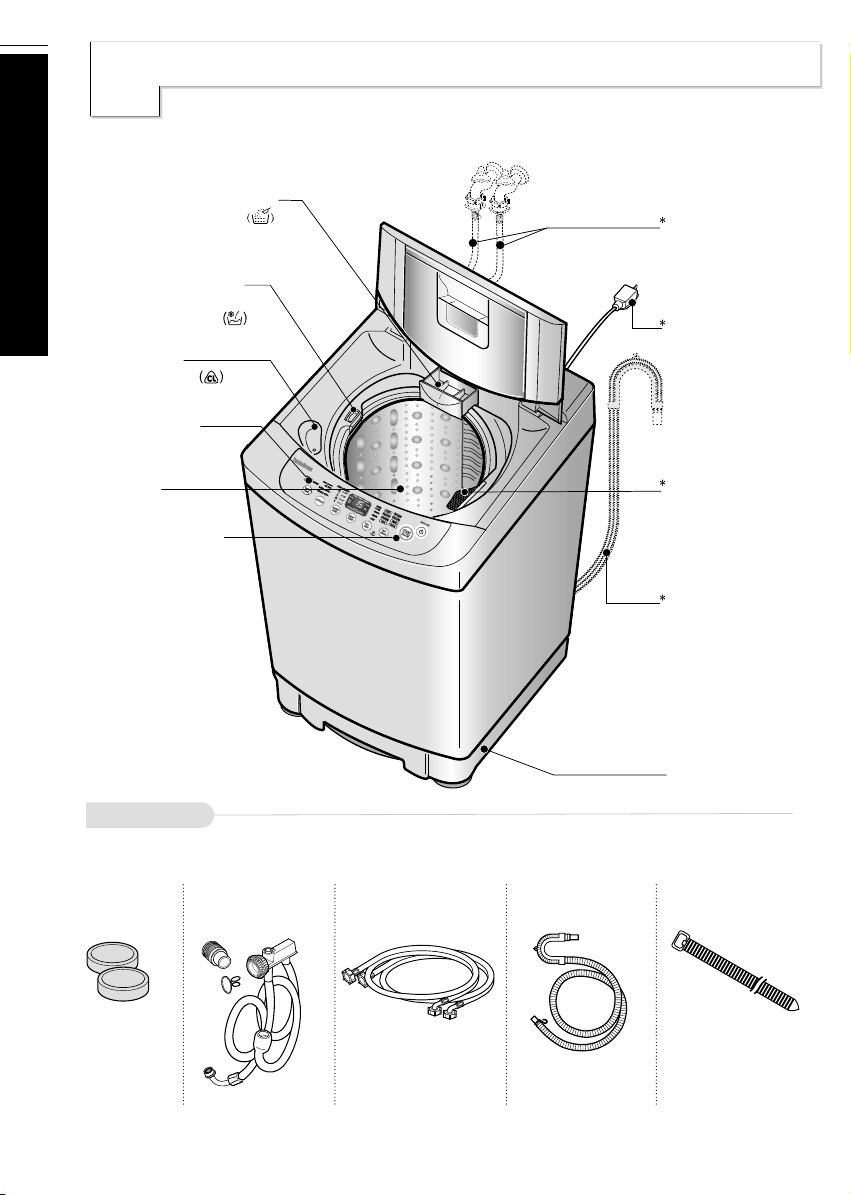
Accessories
Identification of Parts
4
POWDER
DETERGENT BOX
*
SOFTENER INLET
Softner will automatically
flow into the tub.
BLEACH
DISPENSER
FUNCTION
SELECTOR
TUB
START/PAUSE
BUTTON
Use to start or
stop the washing
machine
temporarily.
WATER SUPPLY
HOSE
Make sure the
water does not
leak.
POWER PLUG
If the supply cord is
damaged, it must be
replaced by the
manufacturer or its
service agents or
similarly qualified
person in order to
avoid a hazard.
LINT FILTER
Clean regularly to
stop linting on the
clothes load.
DRAIN HOSE
Check if the drain
hose is hung up
before operating the
washing machine.
Leg Stopper
(Option)
2 Pieces
Complete hose
(Option)
Inlet hose Drain hose Tie strap
1 Each for cold and
hot water
BASE
to secure drain hose
to standpipe, inlet
hose or laundry tub
Page 5

Before Star ting t o Wash
5
H
ow to Remove Stains
How to Remove Stains
Pretreating dirt and stains
Brush a little washing detergent dissolved in water onto stains, collars, and cuffs to help shift dirt.
The secret of stain treatment is immediate action.
When an accident happens, plunge the stained area into cold water and sponge it down.
This prevents the stain from setting. Wash as soon as possible afterwards.
• Treat stains AS SOON AS POSSIBLE. The longer they are left, the harder it is to remove them.
• Always consider the type of fabric you are treating to make sure you do not use a water temperature
that is too hot or a treatment that will alter the color of the fabric.
It pays to pre-wash products and solvents on an inconspicuous part of the garment first.
• Place the garment being treated on an absorbent cloth, such as an old towel.
Work from the reverse side of the stain, as this can force the stain off the fabric instead of through it.
• Use cold or warm water on unknown stains as hot water can set some stains.
• Some stains are not easily seen when the fabric is wet. Air dry the stained garment to be sure the stain
has been removed, as heat from a dryer may set the stain.
• Take care with stain removal treatments as they are often flammable and highly poisonous.
Do not use them in your washer as they may damage the paint or plastic components.
• Some pretreatment sprays or liquids can damage control panel of your washer.
Diaper Sanitizers
• Diaper sanitizers are very corrosive to metal surfaces. DO NOT soak diapers in sanitizers in your
washer or tip the contents of the diaper bucket into your machine.
Rinse and wring diapers out thoroughly before placing them in your machine.
Diapers
• Scrape off any excess baby cream, such as Vaseline , from the diapers before washing and
handwash to prevent the cream being transferred to other items in the wash.
R
Page 6
Before Star ting t o Wash
6
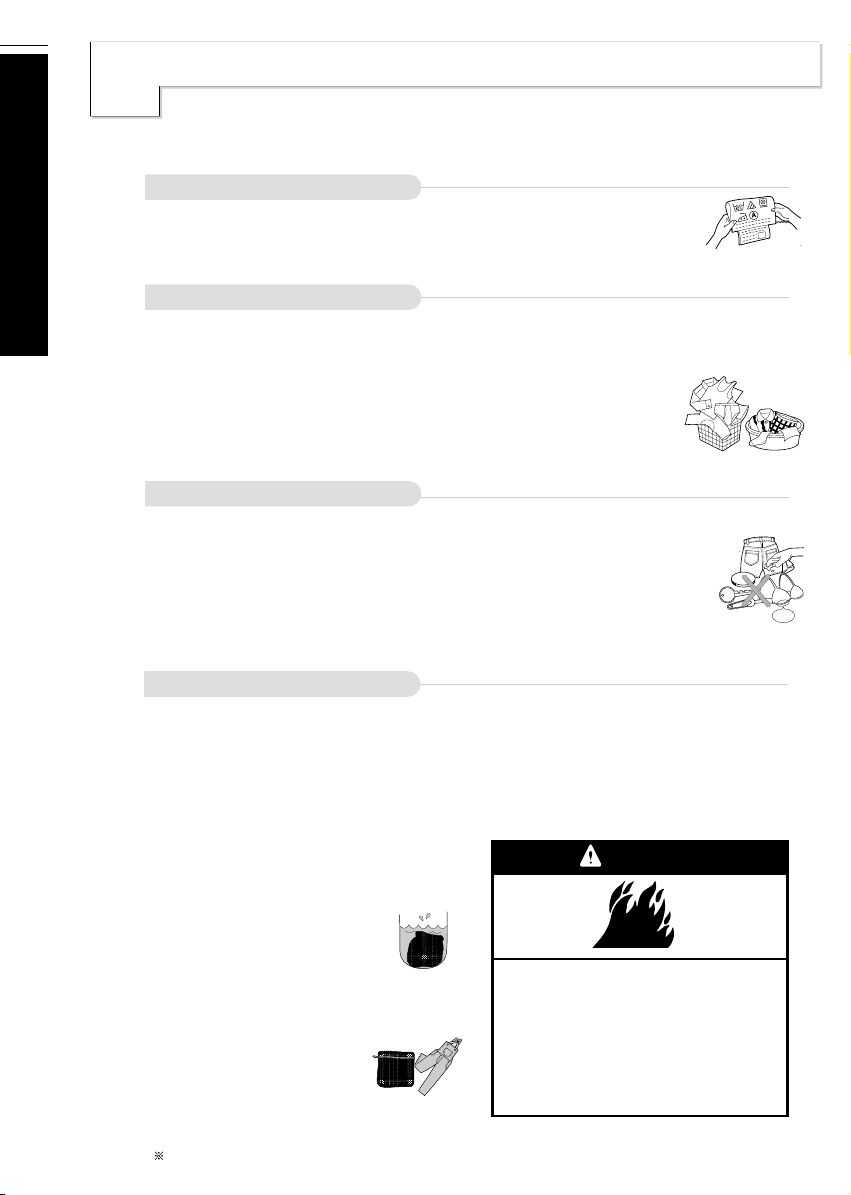
Clothes like downs and woolens are lightweight,
large, and float easily. You can use a nylon laundry
washing bag specifically designed for washing light
items...
If the laundry floats during the
wash cycle, it may become damaged.
Use dissolved detergent to prevent the
detergent from clumping.
repar ation Befor e Washing
P
• Check all pockets are empty. Things such as nails, hairclips, matches, pens, coins, and keys
can damage both your washer and your clothes.
• Mend any torn garments or loose buttons. Tears or holes may become larger during washing.
• Remove belts, underwires, etc. to prevent damage to the machine or your clothes.
• Pretreat any dirt and stains.
• Make sure the clothes are washable in water.
• Check the washing instructions on care label. (Refer to page 30.)
To get the best results, different fabrics is needed to be washed in different ways.
• SOIL (Heavy, Normal, Light) Separate clothes according to the type and amount of soil.
• COLOR (Whites, Lights, Darks) Separate white fabrics from colored fabrics.
• LINT (Lint Producers, Collectors) Separate lint producers and lint collectors.
• Lint Producers Terry cloth, Chenile, Towels, Nappies, Diapers
• Lint Collectors Synthetics, Corduroy, Permanent Press, Socks
Sorting
Check before Loading
Look for a care label on your clothes. This will tell you about the fabric content of your garment
and how it should be washed. (Refer to page 30.)
Sort clothes into loads that can be washed with the same wash cycle, water temperature, and spin speed.
Care Labels
Use nylon nets for long, delicate items.
For laundry with long strings
or long length , a net will prevent
tangling during washing.
Fasten zippers, hook, and strings to make sure
that these items don't snag on other clothes.
Nylon net is not supplied by LG.
•
Light and Large-sized Clothing
•
Long laundry items
•
Load Size
The water level should be greater than the amount of laundry. Load laundry loosely no higher than the top row of
holes in the washer tub. To add items after washer has started, press the START/PAUSE button and submerge
additional items. Close the lid and press the START/PAUSE button again to restart.
Loading
Fire Hazard
Never place items in the washer that are
dampened with gasoline or other flammable fluids.
No washer can remove oil completely.
Do not dry anything that has ever had any type of
oil on it (including cooking oils).
Doing so can result in death, explosion, or fire.
WARNING
WIRE
Page 7
Before Star ting t o Wash
7
W
ater Level and Temperature
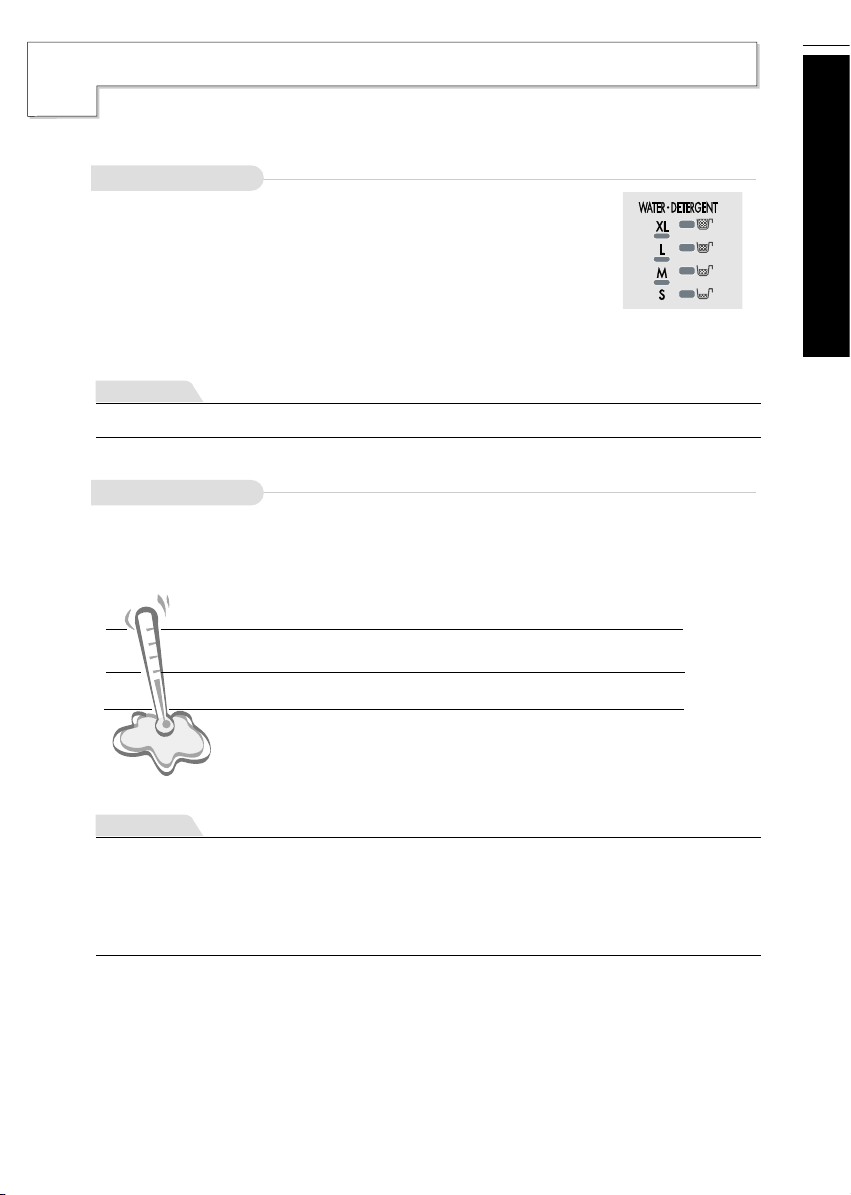
Water Temperature
• You can change the water temperature by pressing the WATER TEMP. button.
The temperature of the water impacts the effectiveness of all laundry additives and, therefore, which
results in wash performance. We recommend the water temperature as follows :
• Temperature below 65˚F (18˚C) will not activate laundry additives and may cause lint, residue, poor
cleaning, etc. In addition, detergent manufactures and care labels define cold water as 80~85˚F
(26.5~29.5˚C).
If the temperature of the water in the tub is cold to your hands, the detergent will not be activated
and clean effectively.
• This machine detects the quantity of laundry automatically,
then sets the water level and proper amount of detergent.
• When you select a wash program, the water level and
amount of detergent (to be used) will be shown on the
control panel.
• When the water level is automatically detected, it may
differ depending on the quantity of laundry even though
the same water level is indicated on the control panel.
Water Level
(refer to p10)
• If you do not specify the water level ‘L(Large)’ will be automatically selected.
Note
Note
* When washing in cold water, additional steps may be needed:
- Adjust detergent amount and pre-dissolve detergent in warm water
- Pretreat spots and stains
- Soak heavily soiled items
- Use appropriate bleach
HOT 120 - 140˚F : White items, diapers, underclothes, and heavily soiled, colorfast items.
(49 - 60˚C)
WARM 85 - 105˚F : Most items
(29.5 - 40.5˚C)
COLD 65- 75˚F: Lightly soiled items
(18-24˚C)
Page 8

Before Star ting t o Wash
8
se of Deter gent
U
Amount of Detergent
• Follow the directions on the detergent package.
• Using too little detergent is a common cause of performance problems.
• Use more detergent if you have hard water, large loads, greasy or oily soils, or lower water temperature.
• The correct amount of detergent will vary depending on the amount of soil in your clothes.
(Jeans and work clothes may need more detergent while bath towels need less.)
• For liquid and concentrated detergent, follow the recommendations of the detergent manufacturer.
To see if you are using the correct amount of detergent, lift the lid of your washer about half-way during
the wash. There should be a thin layer of foam over the surface of the water. Lots of foam seems to be
good, but it does not contribute to washability. No foam means not enough detergent has been used; soil
and lint can settle back on the clothes or the washing machine.
• We recommend powdered detergent for the detergent box.
• Soap or granulated soap powders should not be used in your washing machine to prevent build-up.
• When washing woolens, remember to use a detergent suitable for washing woolens.
If excessive detergent is used, the rinse will not be as clean and efficient.
Also, it could cause environmental pollution, so measure and add detergent accordingly.
Attention
Choosing the Right Detergent
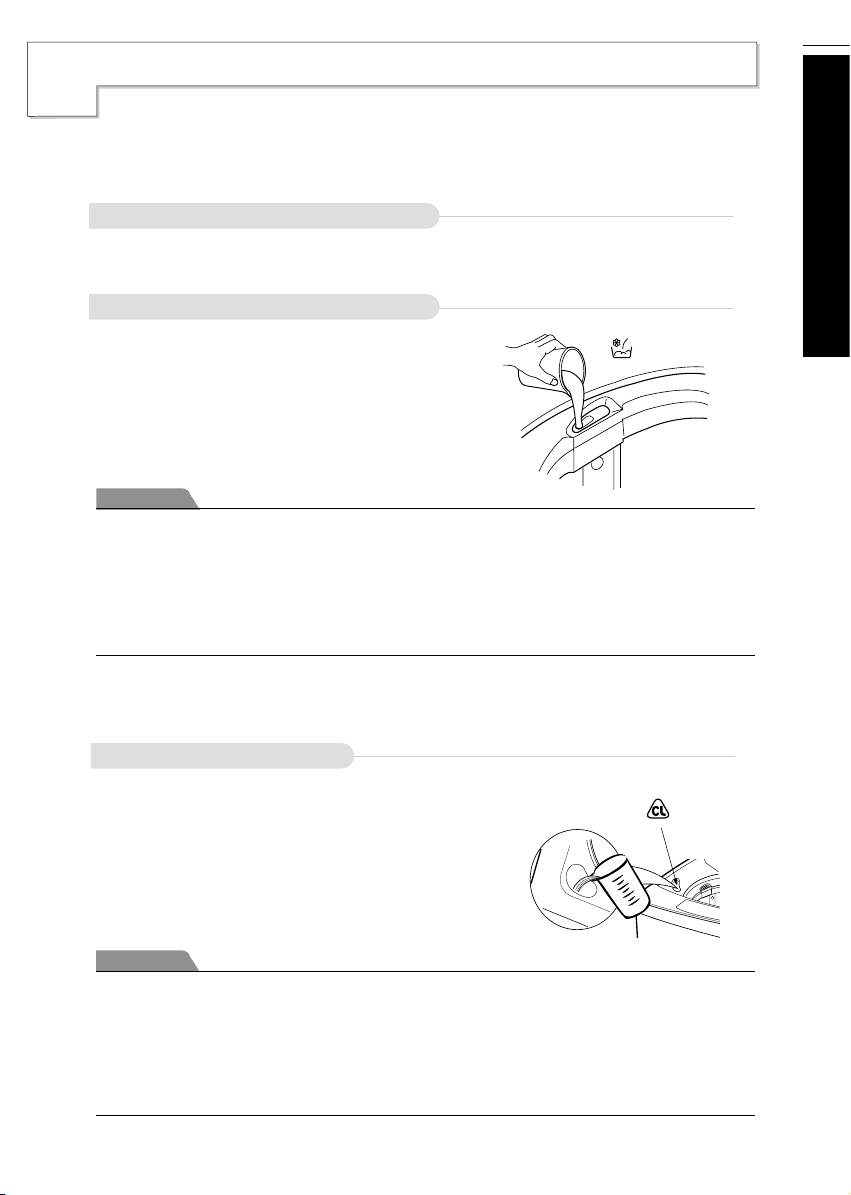
• Pull out the detergent box and deposit the
appropriate amount of detergent .
Adding the Detergent
• Some detergents MUST be fully dissolved before adding to your machine to get the best wash results.
Check the instructions on the detergent package.
• If you add powdered detergent to the wash tub directly, it is essential that the required amount be fully
dissolved in hot water before being added to warm or hot water for the actual wash.
Pre-dissolving detergent in warm water when washing in cold water can improve its performance.
Note
Dónde
deposita el
detergente
Dispensador de detergente en polvo.
Where you
deposit the
Detergent
Powder Detergent Box
( )
Page 9
Before Star ting t o Wash
9
U
se of Soft ener and Bleach
Available Fabric Softener Type
• Do not use concentrated fabric softener. This may cause some problems in automatic dispensing.
• For more details, refer to the softener product instructions for use.
Depositing Fabric Softener
• Don't use softener with detergent. Softener is dispensed into the last rinse water.
• When using concentrated softener, dilute 1 oz. (30ml) of softener with 1 oz. (30ml) of fresh water.
• When filling dispenser, do not splash or overfill. It may stain clothes.
• Never pour fabric softener directly on clothes. It may stain them.
• Never pour fabric softener directly on clothes. It may stain clothes.
• If spotting occurs, wet and rub with dishwashing liquid (or mild bar soap) and rewash.
• Add 60ml (2 oz.) of fabric softener in the dispenser when
starting the washer.
It will be dispensed into the final rinse at the proper time.
See the attention, below, for using concentrated fabric
softener in the dispenser.
Depositing Bleach
• Separate the laundry to be bleached.
• Measure liquid bleach carefully by the instructions on the bottle.
• Before starting the wash, pour measured amount of bleach directly
into the bleach dispenser.
• Avoid splashing or overfilling. If you prefer to use
powdered bleach, add it into the detergent box with your detergent.
• The bleach inlet dilutes liquid bleach before it reaches into your
laundry.
Using Bleach
Using Softener
Check fabric care labels for special instructions.
Attention
Attention
• Never pour undiluted liquid bleach directly onto the clothes or into the wash tub.
This may damage the laundry.
• Do not mix chlorine bleach with ammonia or acids such as vinegar and/or rust remover.
Mixing can produce a toxic gas which may cause death.
• Do not pour powdered bleach into the bleach inlet.
Powdered bleach should be dissolved with water to be deposited into the bleach inlet.
• For more details, refer to the product instructions for use.
Bleach inlet
( )
( )
Page 10

Operating Instructions
10
T
unction of Each But ton
F
● The FUZZY program is used for average
day-to-day washing.
● Press the POWER button to turn power on.
● Load clothes.
● Press the START/PAUSE button.
● The water level lights will scroll up and down while
the washer is determining the optimum water level
for your load.
● Add detergent, bleach, and softener as desired
into the appropriate dispenser.
● Close the lid.
Fully automatic control
* For optimizing the washing algorithm, the displaying time may be changed during washing-increased by
8minutes at maximum and decreased by 4 minutes at maximum.
* If the Detergent quantity is put more than the standard, for increasing the rinsing performance, it automatically
adds rinsing, and the remaining time may be increased.
* The standard detected by the sensor changing the algorithm is set by the normal standard. It may not be same to
the washing habit of a specific user. So, it does not matter that the user uses it according to her/his washing habit.
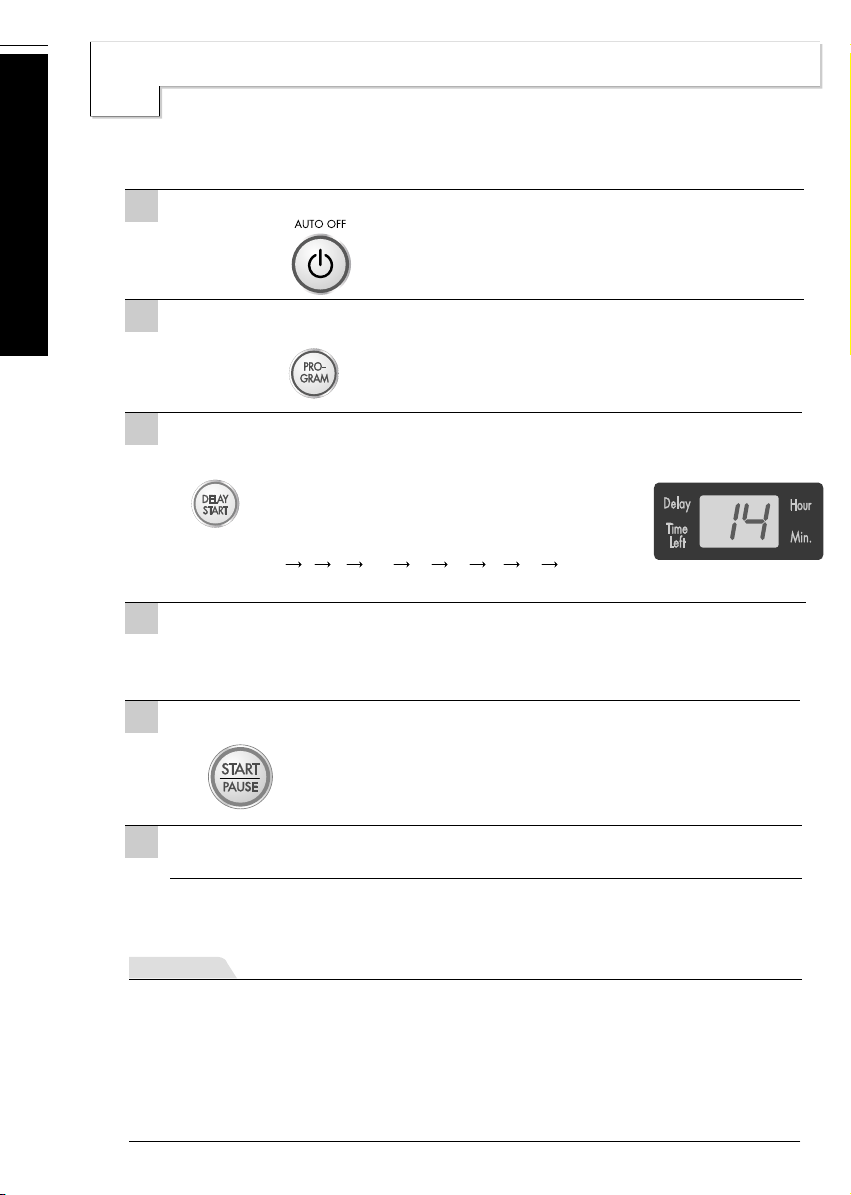
DELAY START (RESERVATION) BUTTON
• Use to set a delayed finishing time.
• The time increases when the button
is pushed.
• The following settings are indicated
as the button is pushed 3
4 5
...11 12 14 16 ...46
48 3 HOUR.
• To cancel delay time, turn the power
switch off.
(refer to page 16)
• Use to adjust the WATER LEVEL as required. The
appropriate amount of Detergent is shown next to the
WATER LEVEL in the WATER-DETERGENT diagram
• WATER LEVEL is automatically selected for FUZZY
program.
The following settings are indicated as the button is pushed
LARGE LARGE . EX-LARGE
EX-LARGE SMALL SMALL • MEDIUM
MEDIUM MEDIUM • LARGE LARGE
WASHING CONDITION INDICATOR
• It only operates in FUZZY Program.
• During being detected by the sensor, the LED flashes green, orange
and red in turn. And, after detecting, the LED lights a specific color according to the detecting
condition as follows:
If the current washing condition (Detergent quantity, Water Temperature, water quality, etc.) is
determined as better than the standard one, it optimizes the algorithm to save the energy by
decreasing washing time/strength, and the LED automatically turns to red.
If the current washing condition is determined as worse than the standard one, it optimizes the
algorithm by increasing washing time/strength, and the LED automatically turns to orange.
If the current washing condition is determined as equal to the standard one, the algorithm has
no change and the LED turns to green.
• Use to select Water Temperature.
Pressing the button allows you to select
WARM (HOT&COLD) HOT
COLD WARM (HOT&COLD)
respectively.
WATER TEMPERATURE BUTTON
OPTION BUTTON
WATER LEVEL BUTTON
(INDICATION OF DETERGENT AMOUNT)
• According to kinds of
laundry, Air Dry, soiled
extent or washing habit you
can select suitable OPTION
manually.
• By pressing the button
OPTION is changed.
(refer to page 17)
Note
Page 11
Operating Instructions
11
Other programs are selected as follows:
● Press the POWER button to turn power on.
● Load clothes.
● Add detergent, bleach, and softener as desired in the appropriate dispensers.
● Select water temperature, water level, program, and wash options as described below.
● Close the lid and press the START/PAUSE button.
Manual control
* The sensor for a Detergent quantity is designed to detect based on a synthetic Detergent powder. If you put a
liquid one or a natural one or too much bleaching agent, the detecting ability of the sensor may be decreased.
* Because the detecting ability of the sensor may be decreased by using it for a long time, periodically use
TUB CLEAN course to clean the tub. (refer to page 15)
* Even if the water level or the water temperature are changed by the user in FUZZY Program,
the sensor will still work. The sensor algorithm may differ according to models.
* The control panel may differ according to different models.
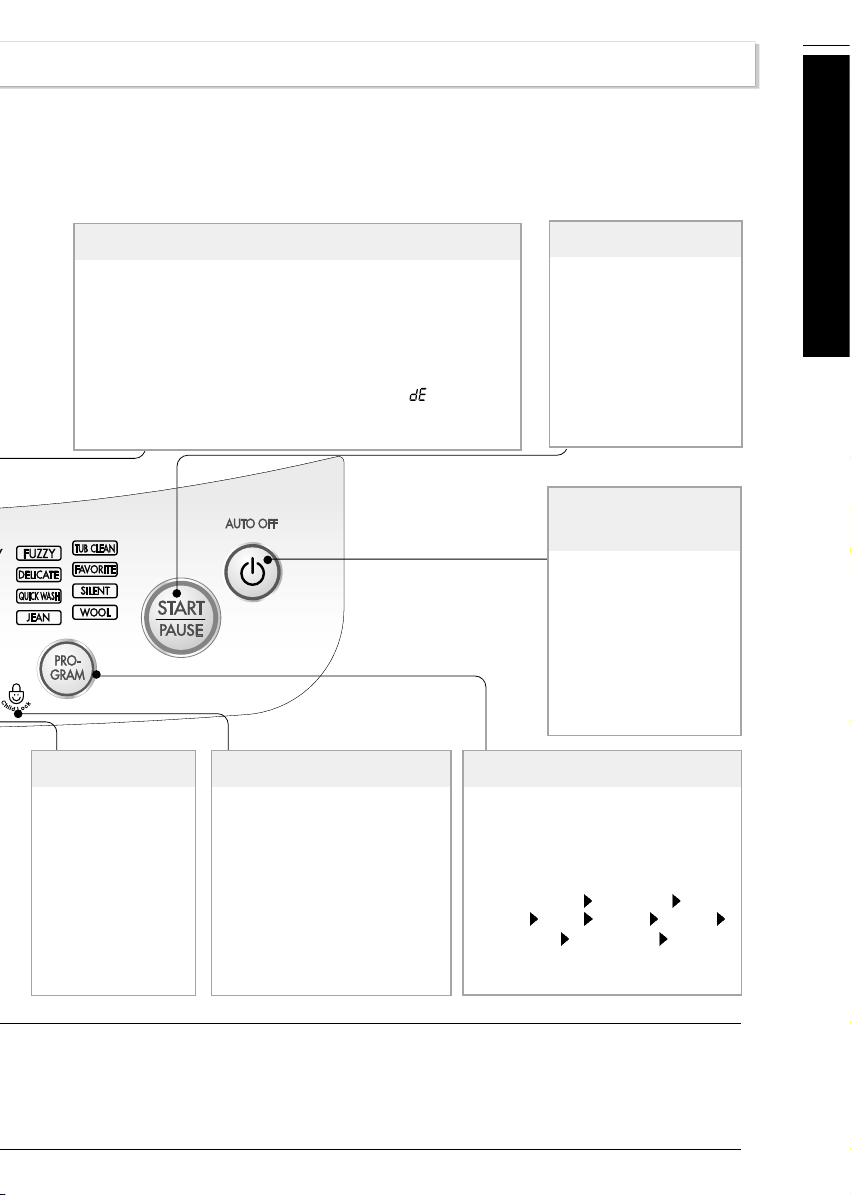
TIME LEFT, DELAY START (RESERVATION), ALARM INDICATION
• Time left - During operation, the remaining time is indicated.
• DELAY START INDICATION (RESERVATION) - When
DELAY START (RESERVATION) program is selected, it
indicates the finishing time. (RES.=DELAY)
• Alarm indication -When an error occurs, an error message
appears to indicate the abnormality. For example, indicates
that the lid is open.
CHILD LOCK FUNCTION
• Use to lock or unlock the control
buttons to prevent settings from
being changed by a child.
To lock, push the PROCESS and
PROGRAM buttons
simultaneously and to unlock
push them one more time during
the washing process.
(refer to page 19)
START/ PAUSE BUTTON
• Use to start or pause the
washing process.
• Repeats start and pause by
pushing the button.
PROCESS BUTTON
• Use to select SPEEDY
SOAK Wash, Rinse
and Spin functions as
desired.
AUTO OFF
(POWER) BUTTON
• Use to turn the power on or
off.
• Push again and power goes
on or off
• The power goes off
automatically about 10
seconds after the wash is
finished.
PROGRAM BUTTON
• Use for selecting wash program.
• This button allows you to select 4 different
programs for different kinds of laundry and
dirtiness.
• program selections light up in sequence as
follows:
FUZZY DELICATE QUICK
WASH JEAN WOOL SILENT
FAVORITE TUB CLEAN
FUZZY
etc. Select the desired program by pressing
the button.
Page 12

Operating Instructions
12
ashing Progr ams
W
Press the POWER button to turn the power on.
1
Press the PROGRAM button to select the washing program.
2
Thick and heavy clothes or those which are excessively dirty like jeans or working
uniforms can be washed.
Delicate clothes (lingerie, woolens, etc.) which may be easily damaged can be washed.
• Before washing your woolens, check the care label for the washing instructions. (Machine washable
woolens have been specifically modified to prevent felting when they are machine washed. Most
handknitted garments are not made of machine washable wool so we recommend that you wash them
with hand.)
• When washing woolens, use a mild detergent recommended for washing wool.
• Hand washed woolens may be spun in the washing machine to reduce the time to dry.
• To dry woolens lay down them flat on a towel and pat into shape. Dry woolens out of direct sunlight.
(The heat and tumble action of a dryer may cause shrinkage or felting of woolen garments.)
Some underlaid woolens and sheepskin products machine may cause pump blockages during washing.
• Ensure that the whole article is suitable for machine washing and not just the backing material.
JEAN Wash
WOOL Wash
Quick Wash can be selected to wash lightly soiled clothes for a short time.
QUICK Wash
Use this program to wash quietly at night.
SILENT Wash
Delicate clothes (lingerie etc.) which may be easily damaged can be washed.
DELICATE Wash
Use this program for normal clothes except woolens and lingerie.
FUZZY Wash
• When you press the START/PAUSE button the light will blink.
Add the laundry and press the START/PAUSE button.
• The appropriate quantity of detergent is marked next to the water
level of WATER-DETERGENT.
(Optional step) If desired, add measured bleach or fabric softener
to the each dispenser. (Refer to page 9.)
Add the detergent.
• When the lid is open the machine will not operate and
an alarm signal will remind you to close the lid.
• Water will be supplied for up to 2 minutes after the start of the wash
to supplement the water which the laundry has absorbed.
Close the lid.
4
3
5
Attention
Page 13
Operating Instructions
13
S
PEEDY SOAK Wash
Use this mode to wash normal clothes or thick and heavy clothes which are excessively dirty.
SPEEDY SOAK mode can be used with FUZZY or JEAN program.
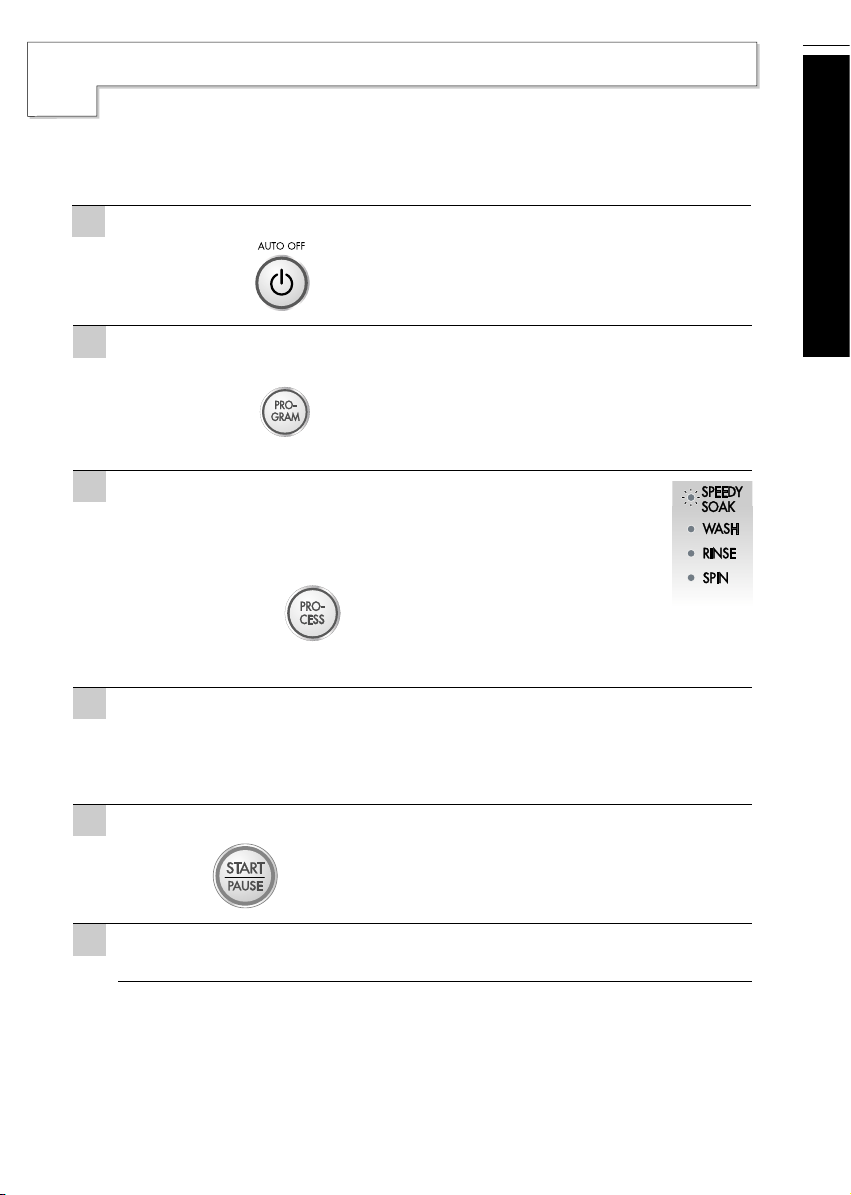
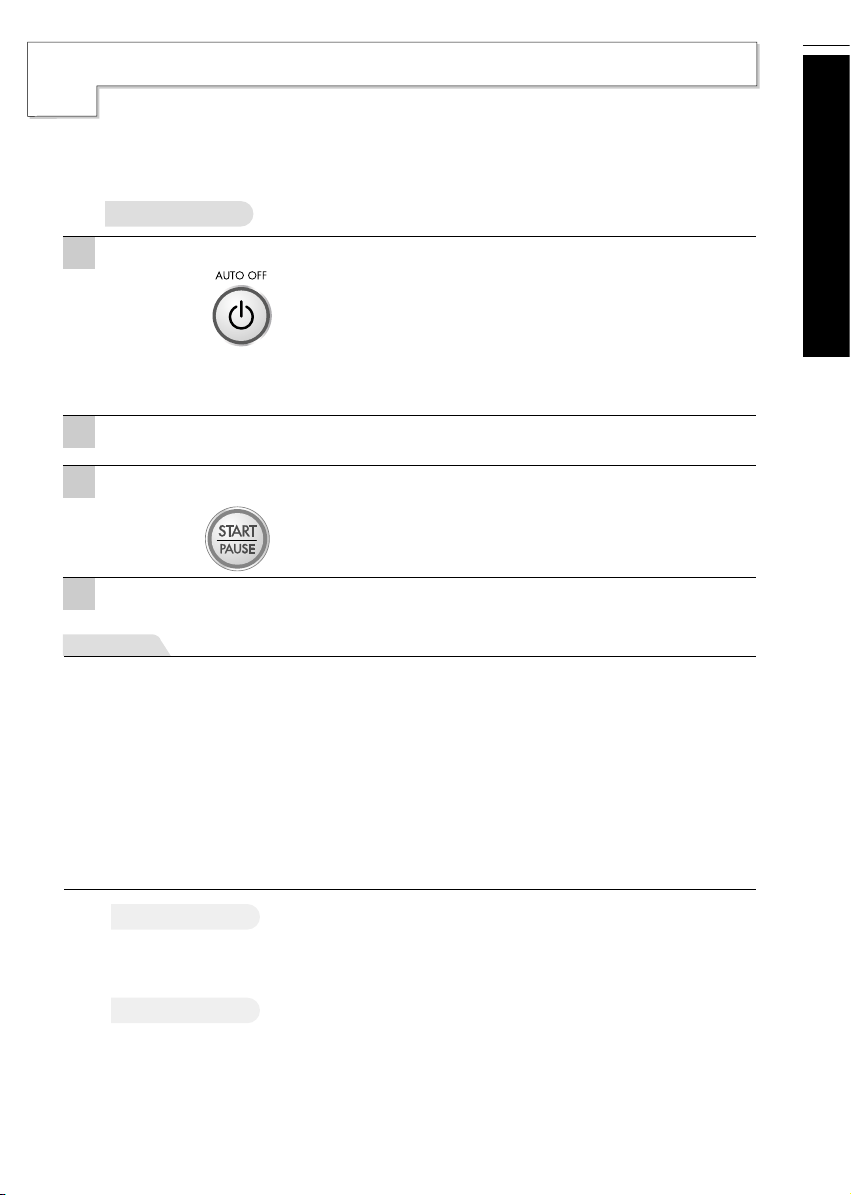
1
Press the AUTO OFF (POWER) button to turn power on.
Press the PROGRAM button to select the washing program.
SPEEDY SOAK will not work in WOOL and TUB
CLEAN, DELICATE, QUICK WASH Program.
2
3
Add the Detergent.
• The appropriate quantity of Detergent marked next to
the WATER LEVEL of WATER-DETERGENT.
• The WATER LEVEL and the amount of Detergent to
be used will be shown and water will be supplied.
• Water will be supplied for 2 minutes after the start of the
wash to supplement the absorbed water by the laundry.
4
Add the laundry and press the START/PAUSE button.
5
Close the lid.
• When the wash program ends, the buzzer will ring for
10seconds before the Power goes off automatically.
Finish
6
Keep pressing the PROCESS button until the SPEEDY SOAK
light is on and then Wash, Rinse, Spin lights are on
simultaneously.
Until the washing process is completed, the SPEEDY SOAK
light is on.
Page 14

Operating Instructions
14
AVORITE Wash
F
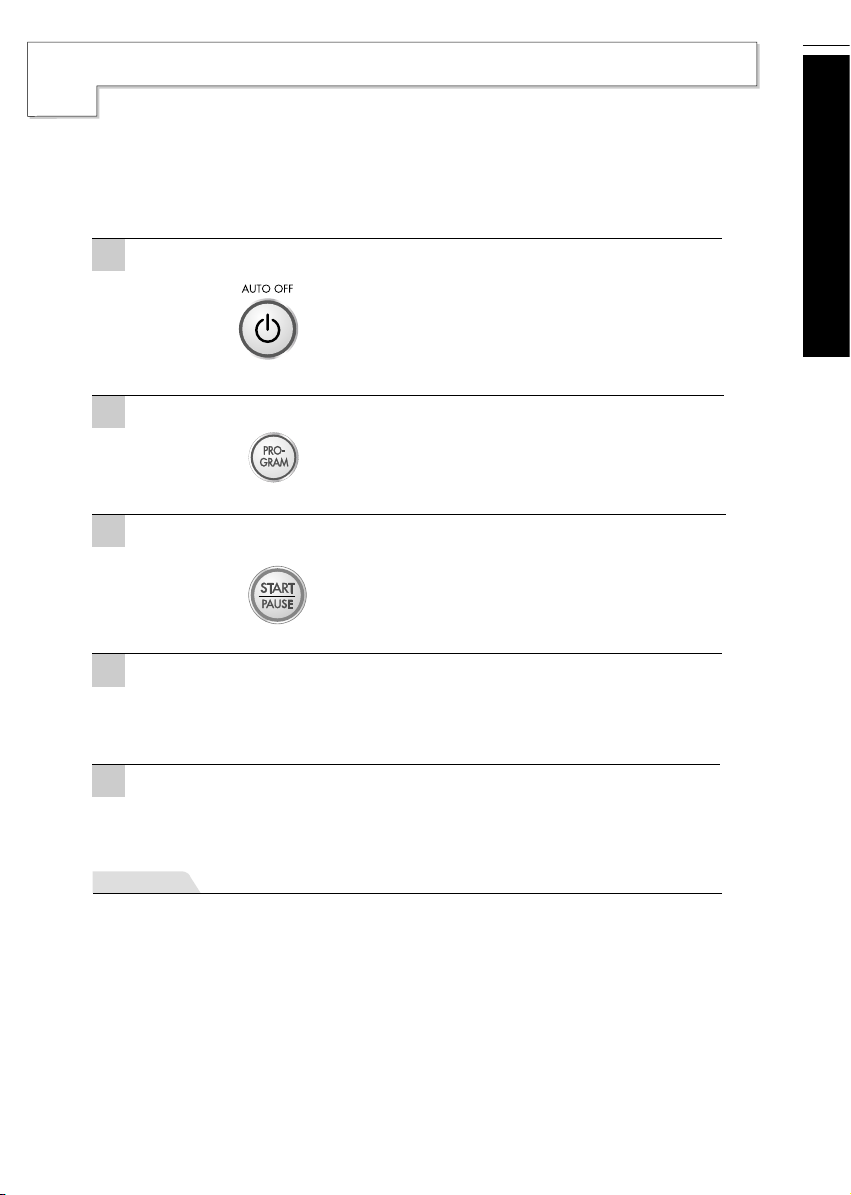
Pressing the FAVORITE button allows you to store your FAVORITE wash conditions in
the normal cycle memory and then recall it for use at a later time.
Press the AUTO OFF (POWER) button to turn power on.
Select the FAVORITE program.
Select your FAVORITE wash conditions.
Press the START/PAUSE button to store & start your FAVORITE wash cycle.
Power turns off automatically after wash.
1
3
4
2
Note
To recall your FAVORITE cycle.
1. Press POWER on.
2. Select the FAVORITE cycle by pressing the PROGRAM.
3. Press the START/PAUSE button. Then the wash cycle starts.
• Press the WATER TEMP. button to select wash Water Temperature.
• Press the WATER LEVEL button to select
WATER LEVEL.
• Press the OPTION to select OPTION.(Extra Rinse, Gentle Spin)
• Press the PROCESS button to select PROCESS(WASH, RINSE,
SPIN) respectively you want to store.
Page 15
Operating Instructions
15
T
UB CLEAN
3
If scrud is allowed to build-up in the machine it can result in stains on your clothes or unpleasant smell
in your washer.
Scrud is the way build-up that can occur within any washer when the fabric softener comes into
contact with Detergent, and according to particular degree of dirtiness or quality of water to be use, in
these case, use this program to clean inner tub and outer tub.
• Do not use Detergent box.
• Do not place any laundry inside tub.
• Ex-Large WATER LEVEL is set automatically.
• Left time is displayed.
Press the POWER button to turn power on.
Press the PROGRAM button to select the TUB CLEAN program.
After 10 minutes of water supplement. Add the oxygenated bleach
(about 300mL).
Press the START/PAUSE button.
• When the lid is open the machine will not operate, and an
alarm signal will remind you to close the lid.
Close the lid.
Note
• Before using this program remove lint inside lint filter.
• When using this program, do not place any laundry inside tub.
• This program takes about 3 hours to be completed.
• After using this program, remove dirt inside filter.
• After finishing this program, open the lid of wash to remove irritant odor.
• Do not pour bleach into the tub directly. It might cause damage the tub.
• Do not leave diluted oxygenated bleach inside tub for long time.
It rusts the tub must drain the remained diluted oxygenated water out.
• Use this program once for every month.
• Do not use this program repeatedly.
1
2
5
4
Page 16
Additional Function Options
16
ELAY START (RESER VATION) Wash
D
DELAY START(RESERVATION) Wash is used to delay the finishing time of the
operation. The hours to be delayed can be set by the user accordingly.
The time on the display is the finishing time, not the start time.
Press the POWER button to turn power on.
Press the PROGRAM button to select the washing program.
Add the Detergent.
Add the laundry and press the START/PAUSE button.
Press the DELAY START (RESERVATION) button to set the time when
the delayed washing is to be completed.
Close the lid.
Select the program for laundry on the Control panel.
This program will not work in WOOL and DELICATE,
TUB CLEAN Program.
• How to set the delay time.
Example : It’s 7 a.m. now. If you’d like your wash to finish at
9 p.m. set the time as in the figure below.
When you push the button the reservation time changes
[3
4 5 ...12 14 16 ... 48 3] repeatedly.
• The appropriate quantity of Detergent marked next to the
WATER LEVEL of WATER·DETERGENT.
• When the lid is open the machine will not operate, and an
alarm signal will remind you to close the lid
• When you press the START/PAUSE button the light will
blink.
• Water will be supplied for 2 minutes after the start of the wash
to supplement the water the laundry has absorbed.
Finish
• The washing will be finished according to the delayed time.
1
2
3
4
5
6
• If the lid is open, the machine will not work, and an alarm signal will alarm to remind you to close the lid.
• To select washing program, spinning time, WATER LEVEL or HOT/COLD manually, press the DELAY
START (RESERVATION) button and select the desired option. Then press the START/PAUSE button.
• When the laundry cannot be taken out immediately after the wash program ends, it is better to omit the
spinning program . (The laundry will be wrinkled if left for a long time after spinning.)
Note
(RES.=DELAY)
Page 17
Additional Function Options
17
O
ption
Press the POWER button to turn power on.
Press the Option button untill above AIR DRY light is on.
• Turn Power on.
This cause is used to air dry of your laundry and tub dry
ARY DRY
2
1
Press the START/PAUSE button.
Gives additional one deep rinse
eg.) If you want EXTRA RINSE, you must add fabric softener manually
when indication beep rings in the final rinse. This maximize the fabric
softener function.
EXTRA RINSE
■ Select "Air Dry" 30min ➔ Tub Dry
-Use this mode to keep inner tub from getting moldy caused by remaining moisture.
- Do not place any laundry inside tub.
- Use this mode once a week.
Caution) For better performance, put drain hose down to the floor so that water inside will be
completely drained out.
■ Select"Air Dry" above 1 hour
- Use this mode to reduce the drying time by minimizing remaining moisture on the laundry.
- In general, this is very effective on synthetic items(100% polyester).
- Do place laundry which is evenly distributed(Under 2kg).
- For normal clothes : Select 1 hour
- For synthetic items(100% polyester): Select 2 hours or 3 hours(on some models)
Note
3
Closed the lid.
4
Gives GENTLE SPIN instead of normal spin.
GENTLE SPIN
One or more OPTIONS (Extra Rinse, Gentle spin) can be selected for FUZZY and JEAN
washing program. Wash program is changed as follows according to selected OPTIONS.
“AIR DRY” can be selected, after turning on the power and “AIR DRY” times can be changed
by pressing the “OPTION” button.
Page 18

Additional Function Options
18
ashing Option
W
When you only need the Wash, Wash/Rinse or Rinse cycles, these can be set
manually
Press the AUTO OFF (POWER) button to turn power on.
Add the laundry into the washing tub.
Press the START/PAUSE button.
Press the WATER LEVEL button, to control the WATER LEVEL
according to the amount of laundry. If you do not choose anything, it is
set the Large WATER LEVEL automatically. (reper to p10)
Add the Detergent and close the lid.
• Press the PROCESS button until above Option Washing
light is on. (reper to p11)
• When you want to only drain, wait until the water in the
washing tub drains completely and then, turn off the power.
1
2
3
4
5
6
• When a Wash, Wash/Rinse or Rinse only option is selected, the water will not be drained off after
the wash is completed.
• If you do not specify the WATER LEVEL, then Medium will be automatically selected.
• If only Rinse is selected, the process will start from Water Supply.
Note
Wash , Wash+Rinse , Rinse , Rinse+Spin , Spin only options
Page 19
Additional Function Options
19
O
ther Useful Functions
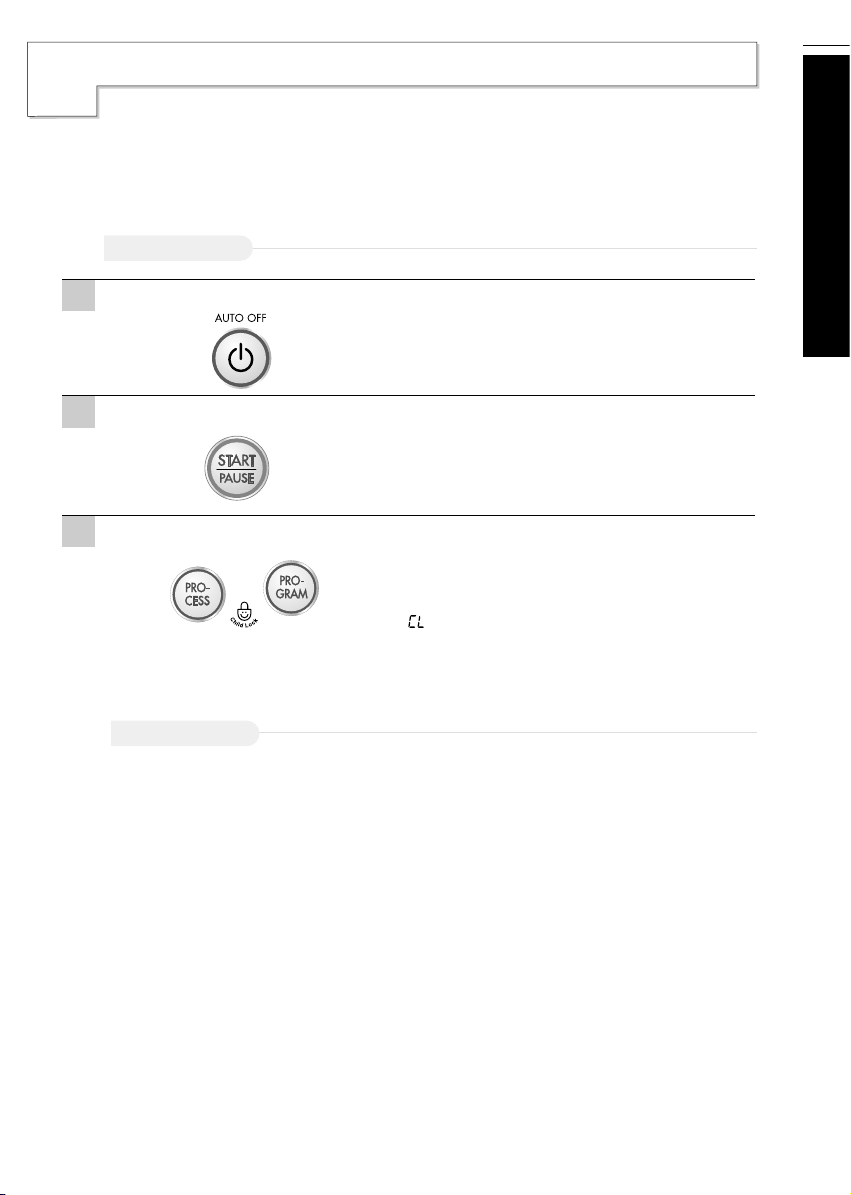
Press the POWER button.
Child Lock Function
• Turn Power on.
• After all washing conditions are set according to the
manual.
• During the wash program, all the buttons are locked until
washing is completed or until the child- lock function is
deactivated manually.
• “ ” and the remaining time will be displayed alternately
in child-lock mode.
How to Lock
1
Press the START/PAUSE button to start washing.
If you want to unlock during wash, press both the PROCESS and the PROGRAM
button simultaneously again.
How to Unlock
2
Press both the PROCESS button and the PROGRAM button simultaneously.
3
If you want to lock all the keys to prevent settings from being changed by a child, you can use the child
lock option.
Mute Option
If you want to use the washing machine without alarm signal sounds, press both the WATER LEVEL
and PROCESS buttons simultaneously.
To make buzzer work, press both the WATER LEVEL and PROCESS buttons simultaneously one
more time.
Page 20
Installation Instructions
20
lacing and Leveling
P
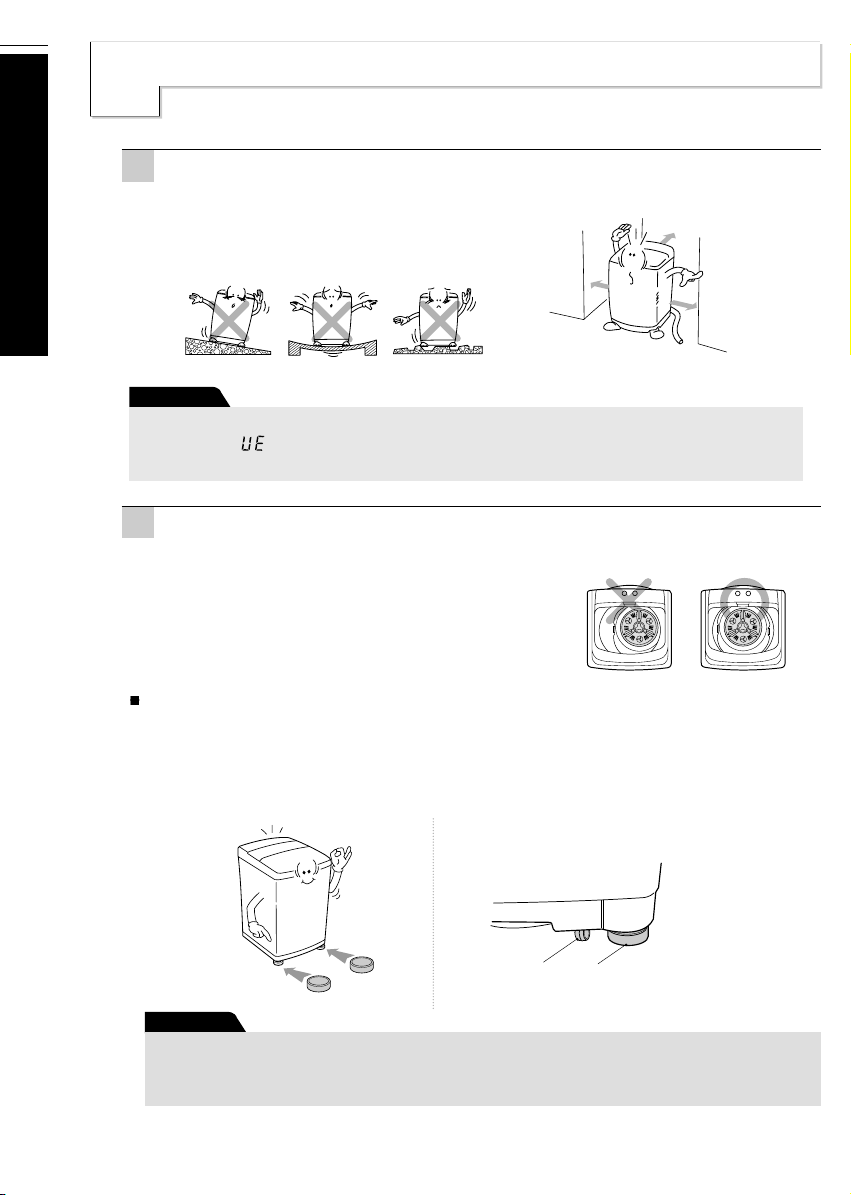
Check that the machine is level and securely installed not to move.
Open the lid and look from above to see if it is
same as shown beside.
2
Please ensure that transit restraint has been removed before operating your machine.
more than 4”
more
than
1”
more than 1”
Place the machine on a flat and firm surface which allows proper clearance.
Concreate flooring is best. Washer should not be installed
on rugs or exposed to the weather.
We suggest a minimum clearance of 1” from right and left
sides and 4” from rear wall.
1
Caution
If the washer is installed on a uneven,weak or tilted floor causing excessive vibration,
spin failure or “ ” error can happen to it.
It must be placed on a firm and level floor to prevent spin failure.
Top view of the machine
Washer with Casters
An insecure installation may cause walking during spin cycles because the washer has casters for
convenience to move.
To protect it from walking, place the leg stoppers, which are provided as a accessory, under the
two front legs of washer as shown in the figure.
Caster
Leg Stopper
Caution
If the power is supplied from a cord extension set or generator, the cord extension set or
electrical portable outlet device should be positioned so that it is not exposed to splashing or
ingress of moisture.
Page 21

Installation Instructions
21
C
onnecting Hoses
Connect the water supply hose to the tap.
Push the water supply hose up so that the sealing
washer within the hose can adhere completely to
the tap.
Tighten it by turning to the right.
Connect water supply hose to the machine.
Verify there is a sealing washer
inside the connector.
Check water leakage.
Connect the water supply hose to inlet valve of
the washing machine, and then lock it by turning
the hose connecting part.
After connecting the hose, open the tap
to check for any water leakage.
Water Supply Hose
Water Supply Hose
Sealing Washer
Water
Tap
1
2
3
Fit the end of the drain hose to the outlet of the
drain pump of washer and tighten the clamp.
Drain Hose
• To prevent siphoning, the drain hose should not be extended more than 2” from the end of the hose guide.
• The discharge height should be approximately 36 ~ 47” from the floor.
Note
Put the other end of the drain hose
over the standpipe or wash tub.
To prevent accidental dislodging
secure the drain hose to the standpipe,
inlet hose or laundry tub with the tie
strap provided in the parts package.
1
2
Inlet
Valve
Drain Hose
Hose
Guide
36~47”
within 2”
Tie Strap
Hose Connector
Sealing Washer
Page 22

Installation Instructions
22
asher Connections for Portable Model
W
Use the Complete hose provided with the washer for a one-faucet connection.
Make sure the temperature selector is set at cold
One-Faucet Connections
Remove the complete hose from
inside the washer
Tighten the water filter to the faucet.
Attach the water supply hose to the cold water
valve inlet (BLUE color).
Make sure the washer is inside the complete hose
before tightening.
Tighten the hose, ensuring the threads are aligned
properly for tightest fit. Inspect for kinks or
binding of the hose.
1
2
3
Connect to valve inlet
4
5
Tighten water filter
Attach the faucet connector to the faucet adapter
by pulling down on the locking collar while
lifting up on the connector until it snaps into
place. Make sure the water filter provided is in
place.
Connect to water supply
Attach the drain hose to the rear of the washer.
Install the clamp on the drain hose and tighten
to prevent leakage of water.
Connect drain hose
[ Complete Hose ]
Drain hose
Water
Supply Hose
Clamp
Faucet Connector
Water Filter
Faucet
Water Filter
Locking
Collar
Faucet Connector
Page 23

Installation Instructions
23
G
rounding Instructions
Grounding Instructions With Ground Insert Space T erminal
If the AC current outlet has no ground terminal,
separate grounding is required.
Note that AC power outlet configurations
may differ from country to country.
If your outlet has no ground terminal or does not
match your plug on the washer,
consult a qualified electrician.
DO NOT change or modify the plug or the outlet.
Outlet with ground terminal
(may vary)
• To prevent a explosion, do not connect ground to a gas pipe.
• Do not connect ground to telephone wires or lightning rods.
This may be dangerous during electrical storms.
• Connecting ground to plastics has no effect.
Caution
Electrical Shock Hazard
Plug into a grounded 3 prong outlet.
Do not remove ground prong.
Do not use an adapter.
Do not use an extension cord.
Failure to follow these instructions can result in death, fire, or electrical shock.
WARNING
Caution
CAUTION concerning the Power Cord
Most appliances recommend they be placed upon a dedicated circuit; that is, a single outlet circuit
which powers only that appliance and has no additional outlets or branch circuits. Check the
specification page of this owner's manual to be certain. Do not overload wall outlets. Overloaded wall
outlets, loose or damaged wall outlets, extension cords, frayed power cords, or damaged or cracked
wire insulation are dangerous. Any of these conditions could result in electric shock or fire.
Periodically examine the cord of your appliance, and if its appearance indicates damage or
deterioration, unplug it, discontinue use of the appliance, and have the cord replaced with an exact
replacement part by an authorized servicer. Protect the power cord from physical or mechanical abuse,
such as being twisted, kinked, pinched, closed in a door, or walked upon. Pay particular attention to
plugs, wall outlets, and the point where the cord exits the appliance.
Page 24

User Maintenance Instructions
24
ser Maintenance Instructions
U
• Turn off taps to prevent the chance from flooding.
• Always unplug the power cord when not in use.
When you have finished washing
Inner-Tub Leave the lid open after washing to allow moisture to evaporate.
If you want to clean the inner-tub, use a clean soft cloth dampened with liquid detergent,
then rinse. Do not use harsh or gritty cleaners.
Inlet Hoses Hoses should be replaced every 5 years.
Exterior Immediately wipe off any spills. Wipe with damp cloth.
Try not to hit surface with sharp objects.
Long Vacations Be sure water supply is shut off at faucets.
Drain all water from hoses if weather will be below freezing.
These might damage your washing machine
• Concentrated bleaches and diaper sanitizer will cause damages to the paintwork and components of your washer.
• Hydrocarbon solvents, such as gasoline, paint thinners, lacquer thinners, etc. can dissolve plastic and blister
paint. Be careful when washing garments stained with these solvents as they are flammable. DO NOT put them
in washer or dryer.
• Some pretreatment sprays or liquids can damage your washer's control panel.
• Use of dyes in your washer may cause staining of the plastic components. The dye will not damage the machine
but we suggest you thoroughly clean your washer afterwards. We do not recommend the use of dye strippers in
your washer.
• Do not use your washer lid as a work surface.
• Clean your machine regularly.
• Cold water washing results in build-up.
We recommend warm or hot wash at regular intervals for example, approximately every 5th wash.
• Fabric softener of thinner consistency is less likely to leave the residue on the dispenser and contribute
to build-up.
Scum is the name given to the waxy build-up that can occur inside any washer when the fabric softener
comes into contact with detergent.
This build-up is not due to a fault of the washer. If scum has accumulated in the machine,
it can result in stains on your clothes or an unpleasant smell in your washer.
If you use fabric softener or do regular cold water washing, it is important that you occasionally clean
the inside of your machine as following;
1. Fill your machine with hot water. Add chlorine bleach or equivalent for cleaner.
Measure the amount of cleaner carefully according to instructions on the bottle.
2. Select wash cycle and operate. Repeat it 2 or 3 times.
3. Stop the machine and open the lid. Leave it to soak overnight.
4. After soaking, drain and run through a regular cycle.
We do not recommend that you wash clothes during this procedure.
Note
If you wish to use fabric softener, we recommend
How to clean the inside of your washing machine
Page 25

User Maintenance Instructions
25
U
ser Maintenance Instructions
Check it if water leaks after reassembling. (The gasket is in the cap.)
T o Clean the Pump Casing
Caution
T o Clean the Filter in the Inlet Valve
Close the tap before turning off the
power. Select both hot/cold and then
press the START/PAUSE button to
remove water remaining in the inlet
hose completely.
In case the water supply is impure, check substances such as stones or sand in the filter. If the filter is clogged
with dirt, water cannot flow into the washer. Clean the filter regulary. (The figure of power cord and water tap
may vary by country.)
After disconnecting the inlet
hose, remove the filter from
the inlet valve by hand or
with tools. Then remove dirt
with a brush, or etc.
Turn off the power and
disconnect the power
cord.
Replace the filter into the water
inlet after cleaning it.
1 2
3 4
Before cleaning the filter, water remaining in the water supply hose should be emptied
Caution
T o Clean the Lint Filter
Turn the net inside out to
remove dirt and rinse it
with water.
Pull out the lint filter from
the tub in the direction
shown below.
Replace the filter to
the original location.
Push the lip of the filter
until a pop sound is heard.
1 2 3
Note
• If the lint filter is worn out or damaged, contact an LG Service Center for new one.
• The amount of collected lint depends on the load size and type.
Clean the lint filters as necessary.
Cap
Filter
Guide rib
Filter
Place a towel on the
floor under the drain
pump cap. Excess
water may flow out.
Remove any foreign
objects and fluff inside
pump casing and from the
filter.
Replace the cap. Insert the filter along
the guide ribs inside the pump casing.
Filter must face the guide ribs inside
pump casing and securely turn the cap
clockwise.
1 2 3 4
Turn the cap
counterclockwise and
pull it out.
Page 26

Troubleshooting
26
roubleshooting
T
Look for your problem below, then check the things we suggest. More often than not, this
will give you the answer to your problem, and you’ll be able to carry on without having to
telephone your service center.
WASH PROBLEM
Possible CausesProblem
What To Do
• Separate lint producers from lint collectors.
• Wash small loads for a shorter time than larger loads.
• Some lint is normal. Using the dryer should remove
any lint not removed by the washer.
Detergent on
clothes
Lint or residue
on clothes
Incorrect sorting
Wash time too long
Natural by product
when washing
certain items
Detergent does
not dissolve
Incorrect use of
fabric softener
Dye transfer
Not enough
detergent used
A build-up caused
by the interaction
of fabric softener
and detergent.
Pins, snaps, hooks,
sharp buttons, belt
buckles, zippers,
and sharp objects
left in pockets
Chemical Damage
a. Chlorine Bleach
b. Battery Acid
c. Hydrogen Peroxide
d. Skin & Hair Care
Products
Non-chemical Damage
a. Age & Normal Use
b. Poor Construction
c. Overloading
d. Mice & Insects
e. Sunlight
• Use warmer water for wash.
• Try pre-dissolving the detergent in warm water.
• Try a liquid detergent.
Black spots on
clothes
• When filling dispenser, do not splash or overfill.
• Never pour fabric softener directly on clothes.
• Separate whites or lightly colored items from
dark colors.
• Wash and dry non-colorfast clothes separately.
• Insufficient detergent for the amount of soil on the
clothes can remain black marks on clothes.
• Cleaning the inside of your washing machine.
(Refer to page 9.)
• Fasten snaps, hooks, buttons, and zippers.
• Remove any loose support wires.
• Remove objects in pockets.
• Turn knits (which snag easily) inside out.
• Dilute bleach and use the dispenser.
(Refer to page 9.)
• Pay attention to loads stained with acids or skin
and hair care products - these can remove color
and cause holes or tears in fabrics.
• Check construction carefully when purchasing.
• Mend any damage before laundering.
Fabric damage
(snags, holes,
tears, rips or
excessive wear)
Page 27

Troubleshooting
27
T
roubleshooting
WASH PROBLEM
Possible CausesProblem
What To Do
• Use warmer water temperature.
• Select the wash temperature according to soil type.
For example, blood and mud are better in cold water,
while oily soils are better in warmer water.
• Brush a little detergent dissolved in water or liquid
detergent or suitable prewash product onto stains,
collars, and cuffs to help shift dirt.
• Wash stains as soon as possible.
The longer they are left the harder to be removed.
• Select load size to match clothes load.
• White clothes are better washed separately.
Separate light and heavily soiled items, as clothes
restained from dirty washed water.
• Various size of load mixture is recommanded
(e.g. full loads of sheets may not wash that well.)
• Detergent for load size or amount of soil is not
enough. Hard water requires more detergent
than soft water.
The laundry
isn’t clean
Water temperature
is too cold.
Water temperature
is not correct.
Stain is not
pretreated.
Washer is
overloaded.
Incorrect sorting
Insufficient
detergent
Result of normal
wear on polycotton
blends and fuzzy
fabrics
• While this is not caused by the washer, you
can slow the pilling process by washing
garments inside out.
Pilling
Not enough
detergent
Water is not hot
enough.
Washer is
overloaded.
Dye transfer
Use more detergent (especially with larger loads).
Make sure water heater is delivering water at
120˚F.
Select load size to match clothes load.
Sort clothes by color. If fabric label states wash
separately, unstable dyes may be indicated.
Grayed or
yellowed
clothes
Gulping sound
after drain and
before spin.
Load is unbalanced
Washer is not level
Floor not strong
enough to support
washer
This is normal.
Redistribute load
Level washer (Refer to page 20.)
Relocate washer (Refer to page 20.)
Washer makes
Noise
Page 28

Troubleshooting
28
roubleshooting
T
Symptom Error Message
Check up
Is the water tap shut off?
Is the water supply cut off ?
Is the tap or water supply hose frozen ?
Is the water pressure low or is the filter of the inlet
valve clogged with impurities?
Is the Cold hose connected to Hot inlet valve?
Are the hot and cold supply hoses comected to the
proper inlets?
Drainage Failure
Water Supply
Failure
Is the drain hose positioned correctly?
Is the drain hose bent or placed too high?
Is the internal part of the hose or drain pump
clogged with impurities?
Check if electric power has gone off.
Spin Failure
.
.
.
.
.
.
.
.
.
.
.
.
.
.
Is the laundry evenly balanced?
Is the washing machine placed on a flat surface?
Is the lid closed?
Door(Lid) Open
Internal sensing
failure
Power failure
Overflow failure
Ask for help at the Service Center.
Call (888)542-2623[LG-CANADA]
Page 29

Warranty
29
W
arranty
Page 30

Specifications
30
pecifications
S
Model WT1485CW
Type Fully automatic washer
Tub capacity 2.6 cu.ft.
Electrical ratings 120 V, 60 Hz
Standard amount of water
Approx. 19
3
/4gal. (75 L)
(EX-LARGE water level)
Standard amount of water used
Approx. 39
5
/8gal. (150 L)
(EX-LARGE water level)
Washing system Drum rotating system
Water tap pressure 4~115 PSI (30-800 kPa)
Outer dimension 231/4(W) X 237/8(D) X 361/2(H) in.
590 (W) X 606 (D) X 928 (H) mm
Weight 90
2
/5lbs. (41kg)
Inlet water pressure
max.115 PSI (800 kPa)
min. 4 PSI (30 kPa)
Electricity supply 120 V
60 Hz sinusoidal
23
7
/
8
”
23
1
/
4
”
MInimum height of taps
to clear the top of machine
45
1
/
4
”
Standpipe
36~47”
44
5
/
8
”
Allowing for
adjustable feet
Page 31

Fabr ic Care Labels
31
F
abric Care Labels
Below are fabric care label symbols that affect the clothing you will be laundering.
WASH LABELS
DRY LABELS
BLEACH LABELS
Machine
wash
cycle
Water
temperature
T umble
dry
Heat
setting
Special
instructions
Bleach
symbols
IRON LABELS
DRYCLEAN
Iron-dry
or steam
DrycleanNormal cycle
Professional
dryclean
Hand
wash
Normal
Permanent Press/
wrinkle resistant
Gentle/
delicate
Hot
(50˚C/120˚F)
Warm
(40˚C/105˚F)
Cold/cool
(30˚C/85˚F)
Do not
wash
Do not
tumble dry
NormalDry
High Medium Low No heat/air
Line dry/
hang to dry
Any bleach
(when needed)
Only non-chlorine bleach
(when needed)
Do not bleach
No SteamDo not ironIron
Dryclean
Reduce
moisture
Short cycle No Steam
finishing
Low heat
Any solvent Any solvent except
trichloroethylene
Petroleum
Solvent only
Do not
dryclean
High Medium Low
Drip dry Dry flat In the shade
Permanent Press/
wrinkle resistant
Gentle/
delicate
Do not dry
(used with
do not wash)
Do not
wring
Page 32

Memo
32
emo
M
Page 33

Mémo
32
émo
M
Page 34

Étiquettes d’entr etien
31
É
tiquett es d’entretien
Vous trouverez ci-dessous les symboles des étiquettes d’entretien qui concernent les vêtements que vous
laverez.
ÉTIQUETTES POUR LE LA VAGE
ÉTIQUETTES POUR LE SÉCHAGE
ÉTIQUETTES POUR LE JA VELLISANT
Programme
de lavage
Température
de l’eau
Séchage par
culbutage
Réglage de
la chaleur
Directives
spéciales
Symboles du
javellisant
ÉTIQUETTES POUR LE REP ASSAGE
NETTOYAGE À SEC
Repassage à
sec ou à vapeur
Nettoyer à
sec
Ne pas
nettoyer à sec
Laver à
la main
Normal
Tissus infroissables /
résistants aux plis
Doux/
délicat
Chaude
(50˚C/120˚F)
Tiède
(40˚C/105˚F)
Froide/fraîche
(30˚C/85˚F)
Ne pas
laver
Ne pas faire sécher
par culbutage
NormalSécher
Haute Moyenne Basse Sans chaleur/air
Sécher sur corde/suspendre
pour sécher
Tout javellisant
(au besoin)
Javellisant sans chlore
seulement (au besoin)
Ne pas javelliser
Sans vapeur
Ne pas repasser
Repasser
Nettoyer à sec
Réduire
l’humidité
Cycle court Finition sans
vapeur
Chaleur
basse
Tout solvant
Tout solvant, sauf
le trichloroéthylène
Solvant pétrolier
seulement
Ne pas
nettoyer à sec
Haute Moyenne Basse
Laisser égoutter
Sécher à plat Sécher à l’ombre
Tissus infrossables /
résistants aux plis
Doux/
délicat
Ne pas faire sécher
(en combinaison avec
« ne pas laver »)
Ne pas
essorer
Page 35

Fiche technique
30
iche technique
F
Modèle WT1485CW
Type Laveuse entièrement automatique
Capacité de la cuve 2.6 pi
3
Caractéristiques électriques 120 V, 60 Hz
Quantité d’eau standard
Environ 75 L (19
3
/4gal.)
(niveau d’eau très élevé)
Quantité d’eau standard utilisée
Environ 150 L (39
5
/8gal.)
(niveau d’eau très élevé)
Système de lavage Système rotatif à tambour
Pression de l’eau d’arrivée De 4 à 115 lb/po
2
(de 30 à 800 kPa)
Dimension extérieure 231/4(L) X 23
7
/8(P) X 36
1
/2po(H)
590 (L) X 606 (P) X 928 mm (H)
Poids 41kg (90
2
/5lbs.)
Pression de l’eau d’arrivée
115 lb/po
2
max. (800 kPa)
4 lb/po
2
min. (30 kPa)
Alimentation électrique de 120 V
60 Hz sinusoïdal
61 cm (23
7
/
8
po)
59 cm (23
1
/
4
po)
Hauteur minimale des robinets
pour dégager le haut de l’appareil
115 cm (45
1
/
4
po)
Conduite verticale
91 à 119 cm (36 à 47 po)
113 cm (44
5
/
8
po)
Espace prévu pour
les pieds réglables
Page 36

Garantie
29
G
arantie
Visitez notre site Web à www.LG.ca LG Electronics Canada, Inc.
GARANTIE LIMITÉE
S’il s’avère que, dans des conditions normales d'utilisation, le produit présente un défaut de matériau ou de fabrication
pendant la période de garantie indiquée ci-dessous, laquelle est en vigueur à compter de la date d’achat, LG Electronics,
à son choix, réparera ou remplacera le produit sans frais.
La garantie s’applique uniquement au premier acheteur du produit, pendant la période de la garantie, pourvu que ce soit
au Canada.
Période de garantie des laveuses/sécheuses LG
Composants Pièces Main-d’œuvre
Toutes les pièces 1 an 1 an (service à domicile)
Moteur, contrôleur 3 ans 1 an (service à domicile)
Cuve/tambour 5 ans 1 an (service à domicile)
Aucune autre garantie ne s’applique à ce produit. LA DURÉE DE TOUTE GARANTIE IMPLICITE, INCLUANT LA
GARANTIE IMPLICITE DE QUALITÉ MARCHANDE, SE LIMITE À LA DURÉE DE LA GARANTIE EXPRESSE
CI-INCLUSE. LG ELECTRONICS NE SERA PAS TENUE RESPONSABLE DE LA PERTE D’UTILISATION DU
PRODUIT, DES INCONVÉNIENTS, D’UNE PERTE OU DE TOUT AUTRE DOMMAGE DIRECT OU CONSÉCUTIF
DÉCOULANT DE L’UTILISATION OU DE L’INCAPACITÉ D’UTILISER CE PRODUIT, OU DE TOUTE
VIOLATION DE TOUTE GARANTIE EXPRESSE OU IMPLICITE, INCLUANT LA GARANTIE IMPLICITE DE
QUALITÉ MARCHANDE OU DE CONVENANCE À UN USAGE PARTICULIER, APPLICABLE À CE PRODUIT.
Certaines provinces ou certains territoires ne permettent pas l’exclusion ou la limitation des dommages indirects ou
consécutifs ou les limitations de la durée d’une garantie implicite. Ces limitations et exclusions peuvent donc ne pas
s'appliquer à vous. La présente garantie vous (le premier acheteur) confère des droits légaux précis, et vous avez peut-être
d’autres droits qui varient d’une province à l’autre ou d'un territoire à l’autre.
LA GARANTIE CI-DESSUS NE S’APPLIQUE PAS À CE QUI SUIT :
1. Les déplacements à votre domicile pour livrer, ramasser ou installer un produit, vous montrer comment installer un produit,
remplacer des fusibles, brancher des câbles, effectuer des travaux de plomberie ou encore corriger des réparations non autorisées.
2. Les dommages aux produits causés par un accident, des insectes nuisibles, un incendie, une inondation ou une catastrophe naturelle.
3. Les réparations requises lorsque le produit LG est utilisé par un ménage autre qu'unifamilial ou dans des conditions contraires aux
directives comprises dans le guide d’utilisation.
4. Les dommages découlant d’un accident, d’une modification, d’une mauvaise utilisation, d’un abus, ou d'une installation ou d’un
entretien inadéquats.
5. Les produits dont les numéros de série ont été modifiés ou enlevés.
Si le produit est installé à l’extérieur du rayon d'action d’un centre de réparation, les frais de transport liés à la réparation du produit ou
au remplacement d’une pièce défectueuse seront la responsabilité du propriétaire.
ASSISTANCE À LA CLIENTÈLE
Pour obtenir une couverture de garantie : Conservez votre facture pour prouver la date d’achat.
Vous devez fournir une copie de votre reçu lorsqu’une réparation est
effectuée au titre de la garantie.
Cette garantie est invalide si le numéro de série appliqué en usine a été
modifié ou retiré du produit.
Pour obtenir de l’aide concernant le produit Composez le 1 888 LG-CANADA (542-2623).
ou le service à la clientèle : Choisissez l’option appropriée et ayez à votre disposition les numéros
de modèle et de série du produit, ainsi que votre code postal.
Pour obtenir l’adresse du centre de Accédez à notre site Web à www.LG.ca (option « Service »)
réparation agréé le plus près : ou composez le 1 888 LG-CANADA (542-2623).
Choisissez l’option appropriée et ayez à votre disposition les numéros
de modèle et de série du produit, ainsi que votre code postal.
Page 37

Dépannage
28
épannage
D
Symptôme Message d’erreur
Vérification
• Le robinet est-il fermé?
• L'alimentation en eau est-elle coupée?
• Le robinet ou le tuyau d’alimentation en eau sont-ils
gelés?
• La pression d’eau est-elle faible? Le filtre de la
soupape d’entrée d’eau est-il engorgé de saleté?
• Le tuyau pour l’eau froide est-il branché sur la soupape
d’entrée de l’eau chaude?
• Les tuyaux d’alimentation en eau chaude et en eau
froide sont-ils branchés sur les bonnes soupapes
d'entrée?
Interruption du
drainage
Interruption de
l’alimentation en
eau
• Le tuyau de vidange est-il bien placé?
• Le tuyau de vidange est-il plié ou placé trop haut?
• Y a-t-il de la saleté dans la partie interne du tuyau ou
la pompe de vidange?
• Vérifiez s’il y a une panne de courant.
Interruption de
l’essorage
• La lessive est-elle bien équilibrée?
• La laveuse est-elle placée sur une surface plane?
• Le couvercle est-il fermé?
Couvercle ouvert
Défaillance du
capteur interne
Panne de courant
Débordement
• Demandez de l’aide au centre de réparation.
Composez le 888 542-2623 [LG-CANADA]
Page 38

Dépannage
27
D
épannage
PROBLÈME DE LAVAGE
Causes possiblesProblème
Solution
• Utilisez une température de l'eau plus chaude.
• Sélectionnez la température de l’eau selon le type de saleté. Par
exemple, le sang et la boue sont plus faciles à laver dans l’eau
froide, tandis que les taches huileuses sont plus faciles à laver
dans l'eau chaude.
• Versez une petite quantité de détergent dissous dans de l’eau, du
détergent liquide ou un produit de prétraitement approprié sur les
taches, les cols et les manchettes, et brossez pour aider à déplacer
la saleté.
• Lavez les taches le plus rapidement possible.
Plus vous attendez avant de les traiter, plus elles sont difficiles à
éliminer.
• Sélectionnez la grosseur de la brassée en fonction de la quantité
de vêtements.
• Il est préférable de laver les articles blancs séparément.
Séparez les articles légèrement sales des articles très sales,
puisqu'une eau de lavage sale peut tacher les vêtements.
• Il est recommandé de laver différents articles dans une brassée.
(P. ex., une pleine brassée de draps ne se lavera pas très bien.)
• Le détergent n’est pas suffisant pour la grosseur de la brassée ou
le degré de saleté. L’eau dure nécessite plus de détergent que
l’eau douce.
La lessive n’est
pas propre
La température de
l’eau est trop froide.
La température de
l’eau est incorrecte.
Les taches ne sont pas
prétraitées.
La laveuse est
surchargée.
Tri incorrect
Quantité insuffisante
de détergent
Résultat d’une usure
normale pour les mélanges
de polyester et coton et les
tissus pelucheux
• Bien que cela ne soit pas causé par la laveuse,
vous pouvez ralentir le processus de boulochage
en retournant les vêtements à l’envers avant de les
laver.
Boulochage
Quantité insuffisante
de détergent
Eau pas assez chaude
Surcharge
Transfert de couleur
Utilisez plus de détergent (particulièrement pour les grosses
brassées).
Assurez-vous que la température de l’eau de votre chauffe-
eau se situe à 49 ˚C (120 ˚F).
Sélectionnez la grosseur de la brassée en fonction de la
quantité de vêtements.
Triez les vêtements selon les couleurs. Si l’étiquette
d’entretien précise de laver l'article séparément, il est
possible que celui-ci ne soit pas grand teint.
Vêtements
grisâtres ou
jaunis
Bruits de déglutition
après le drainage et
avant l’essorage.
La brassée n'est pas
bien équilibrée.
La laveuse n’est pas
de niveau.
Le plancher n’est pas
assez solide pour
supporter la laveuse.
Cela est normal.
Redistribuez la brassée.
Mettez la laveuse de niveau.
(Reportez-vous à la page 20.)
Placez la laveuse dans un autre endroit.
(Reportez-vous à la page 20.)
La laveuse fait
du bruit
Page 39

Dépannage
26
épannage
D
Recherchez le problème qui vous préoccupe parmi ceux ci-dessous, puis vérifiez la solution
proposée. La plupart du temps, vous trouverez la solution à votre problème, et vous n’aurez
pas besoin d'appeler un centre de réparation.
PROBLÈME DE LAVAGE
Causes possiblesProblème
Solution
• Séparez les tissus qui produisent de la charpie de
ceux qui la recueillent.
• Réglez un lavage plus court pour les petites brassées.
• Il est normal qu’il y ait un peu de charpie. La charpie
qui reste devrait être recueillie pendant le séchage
dans la sécheuse.
Détergent sur
les vêtements
Charpie ou
résidus sur les
vêtements
Tri incorrect
Temps de lavage
trop long
Sous-produit naturel
lorsqu’on lave
certains articles
Détergent non
dissous
Utilisation inadéquate
de l’assouplissant
Transfert de couleur
Utilisation insuffisante
de détergent
Accumulation causée par
l’interaction entre
l’assouplissant et le détergent
Épingles, boutons-pression,
crochets, boutons pointus,
boucles de ceinture,
fermetures à glissière et
objets pointus laissés dans
les poches
Dommage chimique
a. Javellisant au chlore
b. Acide sulfurique
c. Peroxyde d'hydrogène
d. Produits pour le soin de
la peau et des cheveux
Dommage non chimique
a. Âge et utilisation
normale
b. Mauvaise confection
c. Surcharge
d. Souris et insectes
e. Lumière du soleil
• Utilisez de l’eau plus chaude.
• Essayez de dissoudre le détergent dans de l’eau chaude au préalable.
• Essayez un détergent liquide.
Taches noires
sur les
vêtements
• Lorsque vous remplissez le distributeur, évitez les
éclaboussures et les débordements.
• Ne versez jamais d’assouplissant directement sur les
vêtements.
• Séparez les articles blancs ou de couleur pâle des articles
de couleur foncée.
• Lavez et faites sécher séparément les vêtements qui ne sont
pas grand teint.
• Une quantité insuffisante de détergent par rapport au degré
de saleté des vêtements peut laisser des marques noires sur
les vêtements.
• Nettoyez l’intérieur de la laveuse.
(Reportez-vous à la page 9.)
• Attachez les boutons-pression, les crochets et les
boutons, et remontez les fermetures à glissière.
• Enlevez les armatures lâches.
• Retirez les objets dans les poches.
• Tournez à l’envers les tricots (dont les fils se tirent
facilement).
• Diluez le javellisant et utilisez le distributeur.
(Reportez-vous à la page 9.)
• Faites attention aux articles tachés avec de l’acide
et aux produits pour le soin de la peau ou des
cheveux – ceux-ci peuvent décolorer, trouer ou
déchirer les tissus.
• Vérifiez soigneusement la confection au moment
de l’achat.
• Faites les réparations nécessaires avant de laver
les articles.
Détérioration
des tissus
(fils tirés, trous,
déchirures ou
usure excessive)
Page 40

Directives d ’entr etien
25
D
irectiv es d’entretien à l’intention de l’utilisateur
Vérifiez s’il y a des fuites d'eau après le remontage. (Le joint d’étanchéité se trouve dans le capuchon.)
Pour nettoyer le corps de pompe
Mise en garde
Pour nettoyer le filtre dans la soupape d’entrée d'eau
Fermez le robinet avant de mettre la
laveuse hors tension. Sélectionnez l’eau
chaude et l’eau froide, puis appuyez sur la
touche START/PAUSE (mise en
marche/pause) pour enlever complètement
l’eau qui reste dans le tuyau d’alimentation.
Si l’alimentation en eau est impure, vérifiez les substances comme les roches ou le sable dans le filtre. Si le filtre
est engorgé de saleté, l’eau ne peut s’écouler dans la laveuse. Nettoyez le filtre régulièrement. (La figure du
cordon d’alimentation et du robinet peut varier d’un pays à l’autre.)
Après avoir débranché le tuyau
d’alimentation, retirez le filtre
de la soupape d’entrée d’eau
manuellement ou à l'aide
d’outils. Enlevez ensuite la
saleté à l’aide d’une brosse, etc.
Mettez la laveuse hors
tension et débranchez le
cordon d’alimentation.
Après avoir nettoyé le filtre,
replacez-le dans la soupape
d’entrée d’eau.
1 2
3 4
Avant de nettoyer le filtre, il faut vider l’eau qui reste dans le tuyau d'alimentation en eau.
Mise en garde
Pour nettoyer le filtre à charpie
Tournez le filet à l’envers
pour enlever la saleté, et
rincez-le avec de l’eau.
Retirez le filtre à charpie de
la cuve, dans le sens indiqué
ci-dessous.
Remettez le filtre à sa
place. Poussez le bord du
filtre jusqu’à ce que vous
entendiez un claquement.
1 2 3
Remarque
• Si le filtre à charpie est usé ou endommagé, communiquez avec un centre de réparation LG pour en obtenir un neuf.
• La quantité de charpie amassée est fonction de la grosseur et du type de la brassée.
Nettoyez le filtre à charpie aussi souvent que nécessaire.
Capuchon
Filtre
Nervure de guidage
Filtre
Placez une serviette sur le
plancher, sous le capuchon
de la pompe de drainage.
L'eau qui reste dans la
pompe peut s'écouler.
Retirez les corps
étrangers et les résidus à
l’intérieur du corps de
pompe et sur le filtre.
Remettez le capuchon en place. Insérez le
filtre le long des nervures de guidage à
l’intérieur du corps de pompe. Le filtre doit
faire face aux nervures de guidage à l’intérieur
du corps de pompe. Tournez le capuchon dans
le sens des aiguilles d’une montre.
1 2 3 4
Tournez le
capuchon dans le
sens contraire des
aiguilles d’une
montre et retirez-le.
Page 41

Directives d ’entr etien
24
irectiv es d’entretien à l’intention de l’utilisateur
D
• Fermez les robinets pour éviter le risque d’une inondation.
• Débranchez toujours le cordon d’alimentation lorsque vous n’utilisez pas l’appareil.
Lorsque vous avez terminé un lavage :
Cuve intérieure Après un lavage, laissez le couvercle ouvert pour permettre à l’humidité de s’évaporer.
Si vous voulez nettoyer la cuve intérieure, utilisez un linge propre et doux humecté de
détergent liquide, puis rincez. N’utilisez pas de nettoyants forts ou rugueux.
Tuyaux
d’alimentation Les tuyaux devraient être remplacés tous les cinq ans.
Extérieur Essuyez immédiatement les liquides renversés. Essuyez à l’aide d’un chiffon humide.
Essayez de ne pas frapper la surface avec des objets tranchants
Longues Assurez-vous de fermer l’alimentation en eau au niveau des robinets.
vacances Videz toute l’eau dans les tuyaux si la température est inférieure au point de congélation.
Les produits suivants peuvent endommager la laveuse.
• Les javellisants concentrés et les désinfectants pour couches endommageront le travail de peinture et les
éléments de la laveuse.
• Les solvants pour hydrocarbures, comme l’essence, les diluants pour peintures, les diluants à peinture-laque,
etc., peuvent dissoudre le plastique et faire cloquer la peinture. Faites attention lorsque vous lavez des
vêtements teints à l’aide de ces solvants, car ceux-ci sont inflammables. NE les mettez PAS dans la laveuse ou
la sécheuse.
• Certains produits de prétraitement par pulvérisation ou liquides peuvent endommager le panneau de
commande de la laveuse.
• L’utilisation de colorants dans la laveuse peut tacher les éléments en plastique. Le colorant n’endommagera
pas la laveuse, mais nous vous suggérons de bien nettoyer la laveuse par la suite. Nous ne recommandons pas
l’utilisation de produits décapants dans la laveuse.
• N’utilisez pas le couvercle de la laveuse comme surface de travail.
• Nettoyez la laveuse régulièrement.
• Les lavages à l'eau froide causent des accumulations.
Nous recommandons de laver à l’eau tiède ou à l'eau chaude à des intervalles réguliers, par exemple, environ tous les
cinquièmes lavages.
• Les assouplissants plus liquides laissent moins de résidus sur le distributeur et ont moins tendance à s’accumuler.
L’écume est l’accumulation cireuse qui peut se produire à l’intérieur de n’importe quelle laveuse lorsque
l'assouplissant entre en contact avec le détergent.
Cette accumulation n’est pas causée par une défaillance de la laveuse. Si de l’écume s'accumule dans la
laveuse, cela peut tacher les vêtements ou causer des odeurs désagréables dans la laveuse.
Si vous utilisez de l’assouplissant ou que vous lavez régulièrement à l’eau froide, il est important de
nettoyer occasionnellement l’intérieur de la laveuse, comme suit :
1. Remplissez la laveuse d’eau chaude. Ajoutez du javellisant au chlore ou un produit équivalent
comme produit nettoyant. Mesurez la quantité de nettoyant conformément aux directives inscrites sur
le contenant.
2. Sélectionnez le cycle de lavage et faites fonctionner la laveuse. Répétez à deux ou trois reprises.
3. Arrêtez la laveuse et ouvrez le couvercle. Laissez tremper pendant toute la nuit.
4. Après le trempage, videz la laveuse et effectuez un lavage régulier.
Nous ne vous recommandons pas de laver des vêtements pendant cette procédure.
Remarque
Si vous souhaitez utiliser un assouplissant, voici ce que nous vous recommandons :
Façon de nettoyer l’intérieur de la laveuse
Page 42

Directives d'installation
23
D
irectiv es de mise à la terre
Directives de mise à la terre avec borne de mise à la terre
Si la prise de courant alternatif n’est pas dotée d’une borne de
mise à la terre, une mise à la terre distincte est requise.
Veuillez prendre note que les configurations des prises de courant
alternatif peuvent différer d’un pays à l’autre.
Si la prise de courant dont vous disposez n’est pas dotée d’une
borne de mise à la terre ou si elle ne correspond pas à la fiche de
la laveuse, consultez un électricien qualifié.
NE modifiez PAS la fiche ou la prise de courant.
Prise de courant avec borne de
mise à la terre (peut varier)
• Pour éviter une explosion, ne branchez pas la prise de terre sur un tuyau de gaz.
• Ne branchez pas une prise de terre à des fils téléphoniques ou des paratonnerres.
Cela peut être dangereux pendant un orage électrique.
• Brancher la prise de terre sur du plastique n’a aucun effet.
Mise en garde
A VERTISSEMENT
Mise en garde
MISE EN GARDE concernant le cordon d’alimentation
Pour la plupart des appareils électroménagers, il est recommandé de les brancher sur un circuit spécialisé. Cela
veut dire qu’un circuit comportant une prise de courant simple alimente uniquement cet appareil et qu’il n’a ni
d’autres prises de courant ni d’autres circuits secondaires. Vérifiez la page des spécifications dans le présent guide
d’utilisation pour en être sûr. Évitez de surcharger les prises murales. Les prises murales surchargées, desserrées ou
endommagées, les rallonges, les cordons d’alimentation effilochés et l’isolation des câbles endommagée ou fêlée
sont dangereux. Toutes ces conditions risquent de provoquer un choc électrique ou un incendie.
Examinez périodiquement le cordon de votre appareil, et si son aspect indique qu'il est endommagé ou détérioré,
débranchez-le, arrêtez momentanément l'utilisation de l'appareil, et demandez à un technicien agréé de remplacer
le cordon par une pièce de rechange appropriée. Protégez le cordon d’alimentation de tout emploi abusif, évitant
par exemple qu’il soit tordu, entortillé ou pincé, que l’on ferme une porte ou que l’on marche sur le cordon. Faites
très attention aux fiches, aux prises murales et au point où le cordon sort de l’appareil.
Risque de choc électrique
Branchez dans une prise triphasée mise à la terre.
N’enlevez pas la broche de mise à la terre.
N’utilisez pas un adaptateur.
N’utilisez pas une rallonge électrique.
Le non-respect de ces directives peut causer la mort, un incendie ou un choc
électrique.
Page 43

Directives d'installation
22
accords de la laveuse (modè e portatif)
R
Utilisez le tuyau complet fourni avec la laveuse pour effectuer le raccordement à un robinet.
Assurez-vous que le sélecteur de température est réglé à froid.
Raccordements à un robinet
Retirez le tuyau complet de
l'intérieur de la laveuse
Serrez le filtre à eau sur le robinet
Branchez le tuyau d'alimentation en eau sur la
soupape d'entrée d'eau froide (couleur BLEUE).
Assurez-vous que la rondelle est à l'intérieur du
tuyau complet avant de serrer.
Serrez le tuyau en vous assurant que les filetages
sont alignés correctement pour un bon serrage.
Vérifiez si le tuyau est entortillé et assurez-vous
qu'il est bien droit.
1
2
3
Branchez sur la soupape d'entrée
d'eau
4
5
Serrez le filtre à eau
Branchez le raccord de robinet sur l'adaptateur de
robinet en tirant la bague de verrouillage vers le
bas tout en soulevant le raccord jusqu'à ce qu'il
s'enclenche en place. Assurez-vous que le filtre
fourni est en place.
Raccordez l'alimentation en eau
Raccordez le tuyau de vidange à l'arrière de la
laveuse.
Installez le collier de serrage sur le tuyau de
vidange et serrez pour éviter toute fuite d'eau.
Raccordez le tuyau de vidange
[ Complete Hose ]
Drain hose
Water
Supply Hose
Clamp
Faucet Connector
Water Filter
Faucet
Water Filter
Locking
Collar
Faucet Connector
Raccord de robinet
Collier de
serrage
Filtre à eau
Tuyau de vidange
[Tuyau complet]
Tuyau
d'alimentation
en eau
Filtre à eau
Robinet
Bague de
verrouillage
Raccord de robinet
Page 44

Directives d’installation
21
T
uyaux de raccordement
Branchez le tuyau d’alimentation en eau sur le robinet.
Poussez le tuyau d’alimentation en eau vers le haut de
sorte que la rondelle d’étanchéité à l’intérieur du
tuyau adhère complètement au robinet.
Serrez le tuyau en le tournant vers la droite.
Branchez le tuyau d'alimentation en eau sur la laveuse.
Vérifiez s’il y a une rondelle d’étanchéité à l’intérieur
du tuyau.
Branchez le tuyau d’alimentation en eau sur la soupape
d’entrée d’eau de la laveuse, puis verrouillez-le en
tournant le raccord de tuyau.
Vérifiez s’il y a des fuites d'eau.
Après avoir branché le tuyau, ouvrez le robinet pour vérifier
s’il y a des fuites d'eau.
Tuyau d’alimentation en eau
Tuyau d’alimentation
en eau
Rondelle
d’étanchéité
Robinet
1
2
3
Insérez l’extrémité du tuyau de vidange dans la sortie de
la pompe de vidange de la laveuse et serrez le collier de
serrage.
Tuyau de vidange
• Pour éviter le siphonnement, le tuyau de vidange ne doit pas dépasser le guide-tuyau de plus de 5 cm (2 po).
• La hauteur de refoulement doit se situer entre 91 et 119 cm (36 et 47 po) du plancher.
Remarque
Insérez l’autre extrémité du tuyau de
vidange dans la conduite verticale ou le
bac à laver.
Pour éviter que le tuyau de vidange ne se
détache accidentellement, fixez-le à la
conduite verticale, au tuyau d’arrivée d'eau
ou au bac à laver à l’aide de l'attache
fournie dans l'emballage des pièces.
1
2
Soupape
d’entrée
d’eau
Tuyau de
vidange
Guide-
tuyau
91 à 119 cm
(36 à 47 po)
à l’intérieur de 5 cm (2 po)
Attache
Raccord de tuyau
Rondelle
d’étanchéité
Page 45

Directives d’installation
20
nstallation et mise à niveau
I
Contrôlez que la machine soit nivelée.
Ouvrez le couvercle et regardez à l’intérieur pour voir si la
situation est la même que celle montrêe sur la figure.
2
Veuillez vous assurer d’enlever les boulons de transport avant d’utiliser la laveuse.
plus de 4 po
plus
de 1
po
plus de 1 po
Placez la laveuse dans un endroit où le dégagement sera approprié et où la surface est
plane et dure.
L’idéal est un plancher en béton. Il ne faut pas installer la
laveuse sur du tapis ou dans un endroit où elle est exposée aux
intempéries.
Nous recommandons un dégagement minimal de 1 po de
chacun des côtés et de 4 po à l’arrière.
1
Mise en garde
Si la laveuse est installée sur un plancher inégal, peu solide ou incliné qui cause des vibrations excessives,
cela peut entraîner une défaillance du cycle d’essorage ou le message d’erreur .
Il faut placer la laveuse sur un plancher solide et de niveau pour éviter une défaillance du cycle d’essorage.
Vue de dessus de la laveuse
Laveuse avec roulettes.
La laveuse étant dotée de roulettes pour faciliter son déplacement, elle pourrait se déplacer durant les
cycles d'essorage en raison d'une installation inadéquate.
Pour éviter cela, placez les butoirs pour pied, qui sont fournis comme accessoires, sous les deux pieds
avant de la laveuse, tel qu'il est illustré.
Caster
Leg Stopper
Mise en garde
Si l’alimentation est fournie à partir d’une rallonge électrique ou d'une génératrice, la rallonge
électrique ou le dispositif de fixation pour fiche et prise de courant doit être placé de façon à ce qu’il
ne soit pas exposé aux éclaboussures ou à une entrée d’humidité.
Roulette Butoir pour pied
Page 46

Options supplémentaires
19
A
utres f onctions utiles
Appuyez sur la touche AUTO OFF (mise sous tension/hors tension).
Child Lock (verrouillage de sécurité)
• Mettez la laveuse sous tension.
• Une fois que vous avez réglé toutes les fonctions
de lavage conformément au guide d’utilisation.
• Pendant le programme de lavage, toutes les touches sont
bloquées jusqu’à la fin du programme ou jusqu’à ce que
vous désactiviez manuellement la fonction de verrouillage
de sécurité.
• En mode de verrouillage de sécurité, les lettres
et le
temps restant sont affichés en alternance.
Pour verrouiller les commandes
1
Appuyez sur la touche START/PAUSE (mise en marche/pause) pour commencer
un lavage.
Si vous voulez déverrouiller les commandes pendant un lavage, appuyez de nouveau et
simultanément sur les touches PROCESS (processus) et PROGRAM (programme).
Pour déverrouiller les commandes
2
Appuyez simultanément sur les touches PROCESS (processus) et PROGRAM
(programme).
3
Si vous souhaitez verrouiller toutes les touches pour éviter qu’un enfant ne change les réglages, vous
pouvez utiliser l’option de verrouillage de sécurité.
Option sourdine
Si vous voulez utiliser la laveuse sans entendre les signaux sonores, appuyez simultanément sur les
touches WATER LEVEL (niveau d’eau) et PROCESS (processus).
Pour activer les signaux sonores, appuyez de nouveau et simultanément sur les touches WATER
LEVEL (niveau d’eau) et PROCESS (processus).
Page 47

Options supplémentaires
18
ption de lavage
O
Lorsque vous n’avez besoin que d’un cycle de lavage, de lavage/rinçage ou de rinçage,
vous pouvez le régler manuellement.
Appuyez sur la touche AUTO OFF (mise sous tension/hors tension) pour
mettre la laveuse sous tension.
Ajoutez la lessive dans la cuve de lavage.
Appuyez sur la touche START/PAUSE (mise en marche/pause).
Appuyez sur la touche WATER LEVEL (niveau d'eau) pour contrôler le niveau
d'eau selon la quantité de lessive. Si vous ne choisissez rien, le niveau d’eau
sera réglé automatiquement à élevé. (reportez-vous à la page 10)
Ajoutez le détergent et fermez le couvercle.
• Appuyez sur la touche PROCESS (processus) jusqu’à ce que le voyant de
l’option de lavage ci-dessus soit allumé. (reportez-vous à la page 11)
• Si vous voulez uniquement drainer la laveuse, attendez que l’eau dans la
cuve soit complètement vidée et, ensuite, mettez la laveuse hors tension.
1
2
3
4
5
6
• Lorsque vous choisissez uniquement l’option Wash (lavage), Wash/Rinse (lavage/rinçage) ou Rinse
(rinçage), la laveuse ne se drainera pas une fois que le lavage est terminé.
• Si vous ne précisez pas le niveau d'eau, le niveau d’eau moyen sera automatiquement sélectionné.
• Si vous sélectionnez l'option de rinçage seulement, le processus commencera par le remplissage d’eau.
Remarque
Options Wash (lavage) , Wash+Rinse (lavage+rinçage) , Rinse (rinçage) ,
Rinse+Spin (rinçage+essorage) , Spin (essorage) seulement
Page 48

Options supplémentaires
17
O
ption
Appuyez sur la touche AUTO OFF (mise sous tension/hors tension) pour
mettre la laveuse sous tension.
Appuyez sur la touche OPTION jusqu’à ce que le voyant AIR DRY
(séchage à l’air) s’allume.
• Mettez la laveuse sous tension.
On utilise cette option pour un séchage à l’air de la lessive et de la cuve.
AIR DRY (SÉCHAGE À L’AIR)
2
1
Appuyez sur la touche START/PAUSE (mise en marche/pause).
Cette option permet d’obtenir un rinçage supplémentaire en profondeur.
P. ex., si vous voulez un rinçage supplémentaire, vous devez ajouter de l’assouplissant manuellement
lorsqu'un signal sonore se fait en entendre au cours du rinçage final. Cela maximise la fonction de
l’assouplissant.
EXTRA RINSE (rinçage supplémentaire)
■ Sélectionnez Air Dry (séchage à l'air) 30 min Tub Dry (séchage de la cuve)
- Utilisez cette option pour éviter que de la moisissure ne se forme à l’intérieur de la cuve en raison de
l’humidité restante.
- N'ajoutez pas de lessive à l’intérieur de la cuve.
- Utilisez cette option une fois par semaine.
Mise en garde : Pour obtenir de meilleurs résultats, déposez le tuyau de vidange sur le plancher de sorte que l’eau à
l’intérieur se vide complètement.
■ Sélectionnez Air Dry (séchage à l'air) au delà d'une heure
- Utilisez cette option pour réduire le temps de séchage en minimisant l’humidité restante dans la lessive.
- En général, cela est très efficace sur les articles en tissu synthétique (entièrement en polyester).
- Distribuez la lessive uniformément dans la laveuse (moins de 2 kg).
- Pour les vêtements ordinaires, sélectionnez une heure.
- Pour les articles en tissu synthétique (entièrement en polyester), sélectionnez deux ou trois heures (option
offerte sur certains modèles)
Remarque
3
Fermez le couvercle.
4
Permet d’obtenir un essorage en douceur au lieu d’un essorage normal.
GENTLE SPIN (essorage en douceur)
Vous pouvez sélectionner une ou plusieurs OPTIONS – Extra Rinse (rinçage supplémentaire), Gentle Spin (essorage
en douceur) – pour les programmes de lavage FUZZY (lavage flou) et JEAN (jeans). Le programme de lavage est
modifié en fonction des options sélectionnées. Après avoir mis la laveuse sous tension, vous pouvez sélectionner
l’option “AIR DRY” (séchage à l'air) et modifiez la durée du séchage à l'air en appuyant sur la touche OPTION.
Page 49

Options supplémentaires
16
ELAY START (mise en mar che différée)
D
On utilise la fonction DELAY START (mise en marche différée) pour retarder l’heure
de la fin du lavage. Vous pouvez régler l’heure de mise en marche différée en fonction
de vos besoins. L’heure affichée est l’heure de la fin du lavage, et non pas l'heure de
mise en marche.
Appuyez sur la touche AUTO OFF (mise sous tension/hors tension) pour
mettre la laveuse sous tension.
Appuyez sur la touche PROGRAM (programme) pour sélectionner le
programme de lavage.
Ajoutez le détergent.
Ajoutez la lessive et appuyez sur la touche START/PAUSE (mise en
marche/pause).
Appuyez sur la touche DELAY START (mise en marche différée) pour
régler l’heure à laquelle le lavage différé devra être terminé.
Fermez le couvercle.
Choisissez le programme sur le panneau de commande.
Cette fonction ne fonctionne pas avec les programmes WOOL (lainages)
et DELICATE (délicat), TUB CLEAN (nettoyage de la cuve).
• Façon de régler l’heure différée.
Exemple : Il est maintenant 7 h. Si vous voulez que le lavage
soit terminé à 21 h, réglez l’heure de la manière indiquée ci-
dessous.
Lorsque vous appuyez sur la touche, l'heure différée change
[3 4 5 ... 12 14 16 ... 48 3] à répétition.
• La quantité appropriée de détergent est indiquée à côté de
l’indication du niveau d’eau sur le diagramme WATER-
DETERGENT (eau/détergent).
• Lorsque le couvercle est ouvert, la machine ne fonctionnera pas, et
un signal d’avertissement vous rappellera de fermer le couvercle.
• Lorsque vous appuyez sur la touche START/PAUSE (mise
en marche/pause), le voyant clignote.
• La laveuse se remplira d’eau pendant deux minutes après le
début du lavage pour compenser l’eau absorbée par la lessive.
Fin
• Le lavage se terminera à l’heure différée sélectionnée.
1
2
3
4
5
6
• Si le couvercle est ouvert, la machine ne fonctionnera pas, et un signal d’avertissement vous rappellera de fermer le
couvercle.
• Pour sélectionner manuellement le programme de lavage, le temps d’essorage, le niveau d’eau ou la température de l’eau
HOT/COLD (chaude/froide), appuyez sur la touche DELAY START (mise en marche différée) et sélectionnez l’option
désirée. Appuyez ensuite sur la touche START/PAUSE (mise en marche/pause).
• Si vous ne pouvez pas sortir la lessive de la laveuse immédiatement à la fin d’un lavage, il est préférable d’omettre le
programme d’essorage. (Les articles seront froissés si vous les laissez longtemps dans la laveuse après le cycle d’essorage).
Remarque
RES.=MISE EN MARCHE DIFFÉRÉE
Page 50

Mode d’emploi
15
T
UB CLEAN (nettoyage de la cuve)
3
Si de l’écume s'accumule dans la laveuse, cela peut tacher les vêtements ou causer des
odeurs désagréables dans la laveuse.
Le degré de saleté de la lessive, la qualité de l’eau utilisée et l’assouplissant qui entre en
contact avec le détergent peuvent causer une accumulation d’écume. Dans ces cas, utilisez
ce programme pour nettoyer l’intérieur et l’extérieur de la cuve.
• N’utilisez pas le compartiment à détergent.
• N’ajoutez aucune lessive à l'intérieur de la cuve.
• Le niveau d’eau très élevé est réglé automatiquement.
• Le temps restant s’affiche.
Appuyez sur la touche AUTO OFF (mise sous tension/hors tension) pour
mettre la laveuse sous tension.
Appuyez sur la touche PROGRAM (programme) pour sélectionner le
programme TUB CLEAN (nettoyage de la cuve).
Lorsque cela fait 10 minutes que la laveuse se remplit d’eau, ajoutez le
javellisant oxygéné (environ 300 ml).
Appuyez sur la touche START/PAUSE (mise en marche/pause).
• Lorsque le couvercle est ouvert, la machine ne
fonctionnera pas, et un signal d’avertissement vous
rappellera de fermer le couvercle.
Fermez le couvercle.
Remarque
• Avant d’utiliser ce programme, enlevez la charpie à l’intérieur du filtre à charpie.
• Lorsque vous utilisez ce programme, n’ajoutez aucune lessive à l’intérieur de la cuve.
• Ce programme dure environ trois heures.
• Une fois le programme terminé, enlevez la saleté à l’intérieur du filtre et ouvrez le couvercle pour
éliminer toute odeur irritante.
• Ne versez pas de javellisant directement dans la cuve, car cela pourrait l’endommager.
• Ne laissez pas de javellisant oxygéné dilué à l’intérieur de la cuve pendant une longue période, car
cela peut faire rouiller la cuve. L’eau javellisée diluée doit être complètement drainée.
• Utilisez ce programme une fois par mois.
• N’utilisez pas ce programme à répétition.
1
2
5
4
Page 51

Mode d’emploi
14
AVORITE (lavage préféré)
F
En appuyant sur la touche FAVORITE (préféré), vous pouvez sauvegarder vos conditions
de lavage préférées dans la mémoire du programme normal, puis les rappeler plus tard.
Appuyez sur la touche AUTO OFF (mise sous tension/hors tension) pour
mettre la laveuse sous tension.
Choisissez le programme FAVORITE (préféré).
Sélectionnez vos conditions de lavage préférées.
Appuyez sur la touche START/PAUSE (mise en marche/pause) pour sauvegarder et
lancer votre programme de lavage préféré.
La laveuse se met automatique hors tension après le lavage.
1
3
4
2
Remarque
Pour rappeler votre programme de lavage préféré :
1. Appuyez sur la touche AUTO OFF (mise sous tension/hors tension).
2. Sélectionnez votre programme préféré en appuyant sur la touche PROGRAM (programme).
3. Appuyez sur la touche START/PAUSE (mise en marche/pause) pour lancer le programme de
lavage.
• Appuyez sur la touche WATER TEMP. pour sélectionner la température
de l’eau.
• Appuyez sur la touche WATER LEVEL pour sélectionner le niveau d’eau.
• Appuyez sur la touche OPTION pour sélectionner une option. [Extra Rinse
(rinçage supplémentaire), Gentle Spin (essorage en douceur)].
• Appuyez sur la touche PROCESS (processus) pour sélectionner le
processus [WASH (lavage), RINSE (rinçage), SPIN (essorage)] que vous
souhaitez sauvegarder.
Page 52

Mode d’emploi
13
S
PEEDY SOAK (trempag e rapide)
Utilisez ce mode pour laver les vêtements ordinaires ou épais qui sont excessivement sales.
Vous pouvez utiliser le mode SPEEDY SOAK (trempage rapide) avec le programme
FUZZY (lavage flou) ou le programme JEAN (jeans).
1
Appuyez sur la touche AUTO OFF (mise sous tension/hors tension) pour
mettre la laveuse sous tension.
Appuyez sur la touche PROGRAM (programme) pour sélectionner le
programme de lavage.
Le mode SPEEDY SOAK (trempage rapide) ne fonctionnera
pas avec les programmes WOOL (lainages) et TUB CLEAN
(nettoyage de la cuve), DELICATE (délicat), QUICK WASH
(lavage rapide).
2
3
Ajoutez le détergent.
• La quantité appropriée de détergent est indiquée à côté de
l’indication du niveau d’eau sur le diagramme WATER-
DETERGENT (eau/détergent).
• Le niveau d’eau et la quantité de détergent à utiliser
seront indiqués, et la laveuse se remplira d’eau.
• La laveuse se remplira d’eau pendant deux minutes après le
début du lavage pour compenser l’eau absorbée par la
lessive.
4
Ajoutez la lessive et appuyez sur la touche START/PAUSE (mise en marche/pause)
5
Fermez le couvercle.
• Lorsque le programme de lavage prend fin, un signal sonore
se fait entendre pendant 10 secondes avant que la laveuse ne
soit automatiquement mise hors tension.
Fin
6
Continuez d’appuyer sur la touche PROCESS (processus) jusqu’à
ce que le voyant SPEEDY SOAK (trempage rapide) s'allume, puis
jusqu’à ce que les voyants Wash (lavage), Rinse (rinçage) et Spin
(essorage) s’allument simultanément.
Le voyant SPEEDY SOAK (trempage rapide) demeure allumé
jusqu’à ce que le processus de lavage soit terminé.
Page 53

Mode d’emploi
12
rogr ammes de lav age
P
Appuyez sur la touche AUTO OFF (mise sous tension/
hors tension) pour mettre la laveuse sous tension.
1
Appuyez sur la touche PROGRAM (programme) pour sélectionner
le programme de lavage.
2
Utilisez ce programme pour laver les vêtements épais et lourds ou les vêtements qui sont
excessivement sales comme les vêtements de travail ou les jeans.
Utilisez ce programme pour laver les vêtements délicats (lingerie, lainages, etc.) qui peuvent être
facilement endommagés.
• Avant de laver des lainages, vérifiez le mode d’entretien sur l’étiquette d’entretien. (Les lainages lavables à la
machine ont été spécialement modifiés pour prévenir le feutrage lorsqu’on les lave à la machine. Comme la plupart
des articles tricotés à la main ne sont pas faits en laine lavable à la machine, il est recommandé de les laver à la main.)
• Lorsque vous lavez des lainages, utilisez un détergent doux recommandé pour le lavage des lainages.
• Les lainages lavés à la main peuvent être essorés dans la laveuse pour réduire le temps de séchage.
• Pour faire sécher les lainages, déposez-les à plat sur une serviette et redonnez-leur leur forme. Faites sécher les
lainages à l'abri de la lumière directe du soleil.
(La chaleur et le culbutage d’une sécheuse peuvent causer le rétrécissement ou le feutrage des lainages.)
Certains articles en lainage et en peau de mouton peuvent bloquer la pompe pendant le lavage.
• Assurez-vous que l’article au complet, et non pas seulement le matériau de renfort, peut être lavé à la machine.
JEAN (lavage de jeans)
WOOL (lavage de lainages)
Vous pouvez choisir le lavage rapide pour laver les vêtements légèrement sales pendant une brève période.
QUICK WASH (lavage rapide)
Utilisez ce programme pour faire un lavage en silence le soir.
SILENT (lavage silencieux)
Utilisez ce programme pour laver la lingerie fine qui peut facilement être endommagée.
DELICATE (lavage délicat)
Utilisez ce programme pour laver les vêtements ordinaires, sauf les lainages et la lingerie.
FUZZY (lavage flou)
• Lorsque vous appuyez sur la touche START/PAUSE (mise en
marche/pause), le voyant clignote.
Ajoutez la lessive et appuyez sur la touche ST ART/P AUSE(mise en marche/pause).
• La quantité requise de détergent est indiquée à côté du niveau d'eau sous
l’inscription WATER-DETERGENT (eau/détergent).
(Étape facultative) Si vous le souhaitez, vous pouvez ajouter du javellisant et de
l’assouplissant mesurés dans chaque distributeur. (Reportez-vous à la page 9.)
Ajoutez le détergent.
• Lorsque le couvercle est ouvert, la machine ne fonctionnera pas, et un
signal d’avertissement vous rappellera de fermer le couvercle.
• La laveuse se remplira d’eau pendant deux minutes après le début du
lavage pour compenser l’eau absorbée par la lessive.
Fermez le couvercle.
4
3
5
Attention
Page 54

Mode d’emploi
11
Les autres programmes sont sélectionnés de la façon suivante :
● Appuyez sur la touche AUTO OFF (mise sous tension/hors tension) pour mettre la laveuse sous tension.
● Ajoutez les vêtements.
● Ajoutez le détergent, le javellisant et l’assouplissant dans les distributeurs appropriés.
● Choisissez la température de l’eau, le niveau d’eau, le programme et les options de lavage, tel qu’il est décrit ci-dessous.
● Fermez le couvercle et appuyez sur la touche START/PAUSE (mise en marche/pause).
Commande manuelle
* Le capteur de la quantité de détergent est conçu pour détecter en fonction d'une poudre de détergent synthétique. Si
vous utilisez du détergent liquide ou naturel ou trop de javellisant, cela diminuera la capacité de détection du capteur.
* Puisque la capacité de détection du capteur peut être diminuée si vous l'utilisez pendant une longue période, utilisez
périodiquement le programme TUB CLEAN (nettoyage de la cuve) pour nettoyer la cuve. (reportez-vous à la page 15)
* Même si vous modifiez le niveau d’eau ou la température de l’eau pendant un programme FUZZY (lavage flou), le
capteur fonctionnera toujours. L’algorithme du capteur peut varier selon les modèles.
* Le panneau de commande peut varier selon les différents modèles.
TEMPS RESTANT, MISE EN MARCHE DIFFÉRÉE, INDICATEUR D’ERREUR
• Temps restant – Le temps restant s’affiche pendant un lavage.
• INDICATEUR DE MISE EN MARCHE DIFFÉRÉE –
Lorsque vous choisissez la fonction DELAY START (mise en
marche différée), l’indicateur affiche l’heure de la fin du lavage.
(RES.=MISE EN MARCHE DIFFÉRÉE)
• Indicateur d’erreur – Lorsqu’une erreur se produit, un message
d’erreur apparaît pour indiquer l’anomalie. Par exemple,
l’indicateur peut indiquer que le couvercle est ouvert.
FONCTION CHILD LOCK
(VERROUILLAGE DE SÉCURITÉ)
• Utilisez cette fonction pour verrouiller ou
déverrouiller les touches de commande et
éviter que des enfants ne modifient les
réglages.
Pour verrouiller les commandes, appuyez
simultanément sur les touches PROCESS
(processus) et PROGRAM (programme).
Pour déverrouiller les commandes, appuyez de
nouveau sur ces touches pendant le processus
de lavage. (reportez-vous à la page 19)
TOUCHE START/PAUSE
(MISE EN MARCHE/PAUSE)
• Utilisez cette touche pour
mettre en marche ou arrêter
temporairement la laveuse.
• Appuyez de nouveau sur la
touche pour remettre la
laveuse en marche ou
l’arrêter temporairement.
TOUCHE PROCESS
(PROCESSUS)
• Utilisez cette touche
pour choisir les
fonctions SPEEDY
SOAK (trempage
rapide), Rinse
(rinçage) ou Spin
(essorage).
TOUCHE AUTO OFF
(MISE SOUS
TENSION/HORS TENSION)
• Utilisez cette touche pour
mettre la laveuse sous tension
ou hors tension.
• Appuyez de nouveau sur la
touche pour remettre la laveuse
sous tension ou hors tension.
• La laveuse se mettra
automatiquement hors tension
environ 10 secondes après la
fin d’un lavage.
TOUCHE PROGRAM
(PROGRAMME)
• Utilisez cette touche pour sélectionner un programme de lavage.
• Cette touche vous permet de sélectionner quatre programmes
différents pour différents types de lessive et degrés de saleté.
• Les sélections de programme s’allument dans l’ordre suivant :
FUZZY (lavage flou) DELICATE (articles délicats)
QUICK WASH (lavage rapide) JEAN (jeans) WOOL
(lainage) SILENT (lavage silencieux) FAVORITE
(lavage préféré) TUB CLEAN (nettoyage de la cuve)
FUZZY (lavage flou), etc. Sélectionnez le programme souhaité
en appuyant sur la touche.
Page 55

Mode d’emploi
10
T
onction de chaque touche
F
Commande entièrement automatique
* Pour optimiser l’algorithme de lavage, le temps affiché pendant le lavage peut être modifié – augmenté de huit minutes
au maximum et diminué de quatre minutes au maximum.
* Si la quantité de détergent est supérieure à la quantité standard, du temps de rinçage est automatiquement ajouté pour
améliorer la performance de rinçage, et le temps restant peut être augmenté.
* Les conditions standard détectées par le capteur qui modifie l’algorithme sont réglées en fonction des conditions
standard normales. Cela peut différer des habitudes de lavage d’un utilisateur en particulier. Cela n’a donc aucune
importance que l’utilisateur l’utilise en fonction de ses habitudes de lavage.
TOUCHE DELAY START
(MISE EN MARCHE DIFFÉRÉE)
• Cette fonction permet de régler une heure
différée de la fin d’un programme de lavage.
• Le temps augmente lorsque vous appuyez sur
la touche.
• Les réglages suivants s’affichent lorsque vous
appuyez sur la touche 3 4 5 ...11
12 14 16 ...46 48 3 HOUR
(heures).
• Pour annuler l’heure différée, appuyez sur la
touche AUTO OFF (mise sous tension/hors
tension).
(reportez-vous à la page 16)
• Utilisez cette touche pour régler le NIVEAU D’EAU selon les
besoins. La quantité appropriée de détergent est indiquée à côté de
l’indication du niveau d’eau sur le diagramme WATER-
DETERGENT (eau/détergent).
• Le NIVEAU D’EAU est automatiquement sélectionné pour le
programme FUZZY (lavage flou).
Les réglages suivants s'affichent lorsque vous appuyez sur la touche
LARGE (élevé)
LARGE (élevé) . EX-LARGE (très élevé)
EX-LARGE (très élevé) SMALL (peu élevé) SMALL
(peu élevé) • MEDIUM (moyen)
MEDIUM (moyen)
MEDIUM (moyen) • LARGE (élevé) LARGE (élevé)
INDICATEUR DES CONDITIONS DE LAVAGE
• L’indicateur fonctionne pendant le programme FUZZY (lavage flou) seulement.
• Les conditions étant détectées par un capteur, le voyant DEL passe du vert, à l’orange et au rouge à tour de
rôle. Par la suite, le voyant DEL indique une couleur précise d'après les conditions détectées, comme ce qui
suit :
S’il est déterminé que les conditions de lavage (quantité de détergent, température de l’eau, qualité de l'eau,
etc.) sont supérieures aux conditions standard, l’algorithme est optimisé pour ménager de l’énergie en
diminuant le temps/la puissance de lavage, et le voyant DEL devient automatiquement rouge.
S’il est déterminé que les conditions de lavage sont inférieures aux conditions standard, l'algorithme est
optimisé en augmentant le temps/la puissance de lavage, et le voyant DEL devient automatiquement orange.
S’il est déterminé que les conditions de lavage sont égales aux conditions standard, l’algorithme ne change
pas, et le voyant DEL devient vert.
• On l’utilise pour choisir la température
de l’eau. En appuyant sur la touche,
vous pouvez choisir WARM (tiède)
(HOT&COLD) (chaude et froide)
HOT (chaude) COLD (froide)
WARM (tiède) (HOT&COLD)
(chaude et froide) respectivement.
TOUCHE W ATER TEMP .
(TEMPÉRA TURE DE L’EAU)
TOUCHE OPTION
TOUCHE WATER LEVEL (NIVEAU D’EAU)
(INDICATION DE LA QUANTITÉ DE DÉTERGENT)
• Vous pouvez choisir
manuellement l’OPTION
appropriée, selon le type de
lessive, le séchage à l’air, le
degré de saleté ou les
habitudes de lavage.
• En appuyant sur la touche,
l’OPTION est changée.
(reportez-vous à la page 17)
On utilise le programme Fuzzy (lavage flou) pour les lavages
quotidiens.
Appuyez sur la touche AUTO OFF (mise sous tension/hors
tension) pour mettre la laveuse sous tension.
Ajoutez les vêtements.
Appuyez sur la touche START/PAUSE (mise en marche/pause).
Les voyants du niveau d’eau clignoteront vers le haut et vers le bas
pendant que la laveuse détermine le niveau d’eau optimal pour la
brassée.
Ajoutez le détergent, le javellisant et l’assouplissant dans les
distributeurs appropriés.
Fermez le couvercle.
Remarque
Page 56

Avant de commencer un lav ag e
9
U
tilisation d'un assouplissant et d’un javellisant
Type d'assouplissant disponible
• N’utilisez pas d’assouplissant concentré. Cela peut causer des problèmes liés à la distribution automatique.
• Pour de plus amples détails, consultez le mode d’emploi de l’assouplissant.
Ajout de l’assouplissant
• N’utilisez pas d’assouplissant avec le détergent. L’assouplissant est distribué au moment du rinçage final.
• Si vous utilisez un assouplissant concentré, diluez-en 30 ml (1 oz) dans 30 ml (1 oz) d’eau fraîche.
• Lorsque vous remplissez le distributeur, évitez les éclaboussures et les débordements, car cela pourrait
tacher les vêtements.
• Ne versez jamais d’assouplissant directement sur les vêtements. Cela pourrait les tacher.
• Si des vêtements sont tachés, mouillez-les et frottez-les avec du détergent à vaisselle (ou un pain de savon
doux), puis lavez-les de nouveau.
• Versez 60 ml (2 oz) d’assouplissant dans le distributeur
lorsque vous mettez la laveuse en marche.
L’assouplissant sera distribué au moment approprié pendant
le rinçage final. Voyez la rubrique « Attention » ci-dessous
concernant l'utilisation d'un assouplissant concentré dans le
distributeur.
Ajout du javellisant
• Séparez les articles qui doivent être javellisés.
• Mesurez le javellisant liquide en suivant soigneusement les directives
indiquées sur la bouteille.
• Avant de commencer le lavage, versez la quantité mesurée de
javellisant directement dans le distributeur de javellisant.
• Évitez les éclaboussures et les débordements. Si vous préférez utiliser
du javellisant en poudre, ajoutez-le dans le compartiment à détergent
avec le détergent.
• L’orifice d’entrée du javellisant dilue le javellisant liquide avant que
celui-ci n'atteigne la lessive.
Utilisation d'un javellisant
Utilisation d’un assouplissant
Lisez les étiquettes d’entretien pour vérifier s’il y a des directives spéciales.
Attention
Attention
• Ne versez jamais de javellisant liquide non dilué directement sur les vêtements ou dans la cuve de lavage.
Cela peut endommager la lessive.
• Ne mélangez pas de javellisant au chlore avec de l’ammoniaque ou des acides, comme du vinaigre ou un
décapant pour la rouille.
Ce mélange peut générer un gaz toxique qui peut être fatal.
• Ne versez pas de javellisant en poudre dans l’orifice d’entrée du javellisant.
Le javellisant en poudre doit être dissous dans de l’eau et verser dans l’orifice d’entrée du javellisant.
• Pour de plus amples détails, consultez le mode d’emploi du produit.
Orifice d’entrée du javellisant
( )
( )
Page 57

Avant de commencer un lav ag e
8
tilisation de déter gent
U
Quantité de détergent
• Suivez les directives sur la boîte de détergent.
• L’utilisation d’une trop petite quantité de détergent est souvent à l’origine des problèmes de performance.
• Utilisez plus de détergent si l’eau est dure, si une brassée est plus importante, si les vêtements sont
graisseux ou huileux, ou encore si la température de l’eau est moins élevée.
• La quantité de détergent varie selon le degré de saleté des vêtements. (Il faudra sans doute plus de
détergent pour des jeans et des vêtements de travail, tandis qu’il en faudra moins pour des serviettes de
bain.)
• Pour les détergents liquides ou concentrés, suivez les recommandations du fabricant de détergent.
• Nous recommandons du détergent en poudre pour le compartiment à détergent.
• Afin de prévenir les accumulations, vous ne devez pas utiliser de poudre de savon dans la laveuse.
• Lorsque vous lavez des lainages, n'oubliez pas d'utiliser un détergent approprié.
Si vous utilisez une quantité excessive de détergent, le rinçage ne sera pas aussi efficace.
De plus, cela pourrait polluer l’environnement. Il est donc important de bien mesurer le détergent
Attention
Choix du bon détergent
Ajout du détergent
• Pour assurer de meilleurs résultats de lavage, certains détergents DOIVENT être complètement
dissous avant de les ajouter dans la laveuse.
Vérifiez les directives indiquées sur la boîte de détergent.
• Si vous ajoutez du détergent en poudre directement dans la cuve de lavage, il est essentiel que la
quantité de détergent requise soit complètement dissoute dans l'eau chaude avant de l’ajouter à l’eau
tiède ou chaude dans la laveuse.
Lorsque vous lavez à l’eau froide, vous pouvez améliorer la performance du détergent en le faisant
dissoudre dans de l’eau tiède.
• Retirez le compartiment à détergent et
versez-y la quantité appropriée de détergent.
Remarque
Pour vérifier si vous utilisez la bonne quantité de détergent, soulevez le couvercle de la laveuse vers le
milieu du cycle de lavage. Il devrait y avoir une mince couche de mousse sur la surface de l’eau. Une
grande quantité de mousse peut sembler une bonne chose, mais cela n’améliore pas la lavabilité. S’il n’y a
aucune mousse, c’est que vous n’avez pas utilisé assez de détergent; la saleté et la charpie peuvent se
redéposer sur les vêtements ou la laveuse.
detergente
Endroit où
verser le
détergent
Compartiment à détergent en poudre
( )
deposita el
Dónde
Dispensador de detergente en polvo.
Page 58

Avant de commencer un lav ag e
7
N
iveau d'eau et température de l’eau
Température de l’eau
• Vous pouvez modifier la température de l’eau en appuyant sur la touche WATER TEMP. (température de
l’eau) (reportez-vous à la page 10).
La température de l’eau influe sur l’efficacité de tous les additifs de lessive et, par conséquent, sur la
performance de lavage. Nous recommandons les températures suivantes :
• Cette laveuse détecte automatiquement la quantité de lessive, puis règle le niveau
d’eau et la quantité de détergent.
• Lorsque vous choisissez un programme de lavage, le niveau d’eau et la quantité de
détergent (à utiliser) s’afficheront sur le panneau de commande.
• Lorsque le niveau d’eau est détecté automatiquement, il peut différer selon la
quantité de lessive, même si le niveau d'eau indiqué sur le panneau de commande
est le même.
Niveau d’eau
• Si vous ne précisez pas le niveau d'eau, le niveau L (élevé) sera automatiquement sélectionné.
Remarque
Remarque
* Lorsque vous lavez à l’eau froide, d'autres étapes peuvent être nécessaires :
- Ajuster la quantité de détergent et faire dissoudre le détergent dans de l’eau
tiède au préalable.
- Prétraiter les souillures et les taches.
- Faire tremper les articles très sales.
- Utiliser du javellisant approprié.
• Une température inférieure à 18 °C (65 °F ) n’activera pas les additifs de lessive, ce qui peut entraîner une
accumulation de charpie ou de résidus, un nettoyage inadéquat, etc. De plus, selon les fabricants de détergent
et les étiquettes d’entretien, une eau froide se situe entre 26,5 à 29,5 °C (80 et 85 °F).
Si la température de l’eau dans la cuve est froide au toucher, le détergent ne sera pas activé et ne
nettoiera pas efficacement.
Page 59

Avant de commencer un lav ag e
6
Les articles comme les duvets et les lainages sont légers et larges, et ils
flottent facilement. Vous pouvez utiliser un sac à lessive en nylon
spécialement conçu pour laver les articles légers...
Si les articles flottent pendant le cycle de
lavage, cela peut les endommager.
Utilisez du détergent dissous afin d’éviter
la formation d'amas de détergent.
réparation avant un lavage
P
• Vérifiez si toutes les poches sont vides. Les objets comme les clous, les pinces à cheveux, les
allumettes, les stylos, les sous et les clés peuvent endommager la laveuse et les vêtements.
• Raccommodez les vêtements déchirés ou les boutons décousus. Les déchirures ou les trous peuvent
s’agrandir pendant le lavage.
• Enlevez les ceintures, les armatures, etc. pour éviter d’endommager la laveuse ou les vêtements.
• Prétraitez la saleté et les taches.
• Assurez-vous que les vêtements sont lavables à l’eau.
• Vérifiez le mode d’entretien de lavage sur l’étiquette d’entretien. (Reportez-vous à la page 30.)
Pour obtenir les meilleurs résultats possible, il faut laver les différents tissus de différentes façons.
• NIVEAU DE SALETÉ (haut, normal, bas)
Triez les vêtements en fonction du type et du degré de saleté.
• COULEUR (blancs, couleurs pâles, couleurs foncées)
Séparez les tissus blancs des tissus de couleur.
• CHARPIE
(tissus produisant de la charpie ou amassant la charpie)
Séparez les tissus qui produisent de la charpie de ceux qui l’amassent.
• Tissus produisant de la charpie Tissu éponge, chenille, serviettes, couches
• Tissus amassant la charpie Tissus synthétiques, velours côtelé, tissus infroissables, chaussettes
Tri
Vérification avant de remplir la laveuse
Recherchez l’étiquette d’entretien sur les vêtements. Celle-ci vous informe au sujet des tissus et
de la façon dont il faut les laver. (Reportez-vous à la page 30.)
Triez les vêtements en fonction du cycle, de la température de l’eau et de la vitesse d’essorage
recommandés.
Étiquettes d’entretien
Utilisez des filets en nylon pour les articles longs et fragiles. Pour
les articles longs ou dotés de longs cordons, utilisez un filet
pour éviter qu’ils ne s’emmêlent pendant le lavage.
Fermez les fermetures à glissière et attachez les
crochets et les cordons pour vous assurer que ces
articles n'accrochent pas d’autres vêtements.
*LG ne fournit pas le filet en nylon.
• Articles légers et de grande taille
• Articles longs
• Taille des brassées
Le niveau d’eau devrait être supérieur à la quantité de lessive. Ajoutez les vêtements dans la cuve de la laveuse sans
les entasser et sans dépasser la rangée supérieure d'orifices. Pour ajouter des articles après avoir mis la laveuse en
marche, appuyez sur la touche START/PAUSE (mise en marche/pause) et submergez les articles additionnels.
Fermez le couvercle et appuyez de nouveau sur la touche START/PAUSE (mise en marche/pause) pour remettre
la laveuse en marche.
Chargement
A VERTISSEMENT
ARMATURE
Risque d’incendie
Ne placez jamais d’articles imbibés d’essence ou
d’autres fluides inflammables dans la laveuse.
Aucune laveuse ne peut éliminer complètement
les taches d’huile.
Ne faites pas sécher des articles sur lesquels de
l’huile a été renversée (tous les types, incluant les
huiles de cuisson).
Cela pourrait entraîner la mort, une explosion ou
un incendie.
Page 60

Avant de commencer un lav ag e
5
M
anière d’éliminer les tac hes
Manière d’éliminer les taches
Prétraitement de la saleté et des taches
Versez une petite quantité de détergent dissous dans de l'eau sur les taches, les cols et les manchettes et
brossez pour aider à déplacer la saleté. Pour traiter les taches, le secret consiste à agir immédiatement.
Lorsqu’un accident se produit, immergez la partie tachée dans l’eau froide, puis épongez-la.
Cela empêche la tache de s’incruster. Lavez l'article le plus rapidement possible par la suite.
• Traitez les taches LE PLUS RAPIDEMENT POSSIBLE. Plus vous attendez avant de les traiter, plus
elles sont difficiles à éliminer.
• Tenez toujours compte du type de tissu que vous traitez afin de ne pas utiliser une eau trop chaude ou
un traitement qui modifiera la couleur du tissu.
Cela vaut la peine de prélaver d’abord les produits et les solvants sur la partie la moins en évidence
du vêtement.
• Placez le vêtement traité sur un linge absorbant, comme une vieille serviette. Travaillez à partir de
l’envers du vêtement, car cela peut éliminer la tache au lieu de la faire pénétrer dans le tissu.
• Utilisez de l’eau froide ou de l’eau tiède sur les taches dont vous ne connaissez pas l’origine puisque
l’eau chaude peut fixer certaines taches.
• Certaines taches sont difficiles à voir lorsque le tissu est mouillé. Faites sécher à l'air le vêtement
taché pour vous assurer que la tache a été éliminée, car la chaleur d’une sécheuse peut fixer la tache.
• Faites attention lorsque vous utilisez des produits pour éliminer les taches, car ceux-ci sont souvent
inflammables et très toxiques.
Ne les utilisez pas dans la laveuse, car ils peuvent endommager la peinture ou les composants en
plastique.
• Certains produits de prétraitement en aérosol ou liquides peuvent endommager le panneau de
commande de votre laveuse.
Désinfectants pour couches
• Les désinfectants pour couches sont très corrosifs pour les surfaces en métal. NE faites PAS
tremper les couches dans du désinfectant dans la laveuse et ne renversez pas le contenu du seau à
couches dans la laveuse.
Rincez et essorez complètement les couches avant de les mettre dans la laveuse.
Couches
• Avant de laver des couches dans la laveuse, enlevez tout excédent de crème pour bébés, comme de
la vaseline, et lavez-les à la main afin d’éviter que la crème ne se retrouve sur d’autres articles dans
la laveuse.
Page 61

dentification des pièces
I
Accessoires
Identification des pièces
4
Page 62

Renseignements importants sur la sécurité
3
R
enseignements importants sur la sécurité
Pour votre sécurité, vous devez respecter les renseignements
inclus dans le présent guide afin de réduire les risques d’incendie,
d’explosion ou de choc électrique, ou de prévenir les dommages
matériels, les blessures corporelles et la mort.
VEUILLEZ LIRE TOUTES LES CONSIGNES AVANT D’UTILISER L'APPAREIL.
A VERTISSEMENT!
• Lisez toutes les consignes avant d’utiliser la laveuse.
• Ne lavez pas d'articles qui ont déjà été en contact de
quelque façon que ce soit avec de l’essence, des
solvants pour nettoyage à sec ou d’autres substances
inflammables ou explosives, car ces produits libèrent
des vapeurs qui peuvent s’enflammer ou exploser.
• N’ajoutez pas d’essence, de solvants pour nettoyage
à sec ou d’autres substances inflammables ou
explosives à l’eau de lavage. Ces substances libèrent
des vapeurs qui peuvent s’enflammer ou exploser.
• Dans certaines conditions, du gaz hydrogène peut
être généré dans les canalisations d’eau chaude qui
ne sont pas utilisées pendant deux semaines ou plus.
LE GAZ HYDROGÈNE PEUT EXPLOSER! Si
vous n'avez pas utilisé le réseau d’alimentation en
eau chaude pendant une longue période, ouvrez tous
les robinets d’eau chaude et laissez l’eau couler
pendant plusieurs minutes avant d’utiliser la laveuse.
Cela libèrera le gaz hydrogène accumulé. Puisque le
gaz est inflammable, ne fumez pas et n’utilisez pas
de flamme nue pendant ce processus.
• Ne laissez pas les enfants jouer sur la laveuse ou à
l'intérieur de celle-ci. V ous devez surveiller les
enfants de près lorsque vous utilisez la laveuse en
leur présence.
• Lorsque la laveuse doit être apportée aux fins de
réparation ou d'élimination, enlevez le couvercle
pour éviter que des enfants se cachent à l'intérieur.
• N’essayez pas de prendre un article dans la laveuse
lorsque le panier de lavage tourne ou que l'agitateur
fonctionne.
• N’installez ou n’entreposez pas la laveuse dans un
endroit où elle sera exposée aux intempéries.
• Ne modifiez pas les commandes.
• Ne réparez ou ne remplacez pas toute pièce de la
laveuse ou ne tentez pas de la réparer à moins que
cela ne soit expressément recommandé dans le
présent guide d’utilisation ou dans des consignes de
réparation déjà publiées et que vous soyez qualifié
pour le faire.
• Consultez les directives d’installation pour connaître
les exigences en matière de mise à la terre.
DIRECTIVES DE MISE À LA TERRE
L’appareil doit être mis à la terre. En cas de mauvais fonctionnement ou de panne, la mise à la terre réduira
le risque de choc électrique en fournissant une voie de moindre résistance au courant électrique. L’appareil
est muni d’un cordon d’alimentation ayant un conducteur de mise à la terre et d’une fiche de mise à la
terre. La fiche doit être branchée sur une prise de courant appropriée qui est installée et mise à la terre
conformément à tous les règlements et codes locaux.
N’utilisez pas un adaptateur ou n’endommagez pas la fiche de mise à la terre.
Si vous ne disposez pas d’une prise de courant appropriée, consultez un électricien.
CONSIGNES DE SÉCURITÉ IMPORT ANTES
A VERTISSEMENT
: Pour réduire les risques d’incendie, de choc électrique ou de blessures
corporelles lorsque vous utilisez la laveuse, veuillez respecter les mesures de sécurité de base, dont
les suivantes :
CONSERVEZ CES CONSIGNES
A VERTISSEMENT:
Une mauvaise connexion du conducteur de mise à la terre peut provoquer
un risque de choc électrique. En cas de doute quant à la mise à la terre adéquate de l’appareil,
informez-vous auprès d’un électricien ou d’un réparateur qualifié. Ne modifiez pas la fiche fournie avec
l’appareil. Si vous ne pouvez pas l’insérer dans la prise de courant, demandez à un électricien qualifié
d’installer une prise adéquate.
Page 63

able des matières
T
Renseignements importants sur la sécurité
Veuillez lire le présent guide
Identification des pièces
Avant de commencer un lavage
Mode d’emploi
Options supplémentaires
Directives d’installation
Directives d'entretien
Fiche technique
Étiquettes d’entretien des tissus
Dépannage
Garantie
3
4
Manière d’éliminer les taches 5
Préparation avant un lavage 6
Niveau d’eau et température de l’eau 7
Utilisation de détergent 8
Utilisation d’un assouplissant et d’un javellisant
9
Fonction de chaque touche 10
FUZZY (lavage flou) 12
DELICATE (lavage délicat) 12
QUICK WASH (lavage rapide) 12
JEAN (lavage de jeans) 12
WOOL (lavage de lainages) 12
SILENT (lavage silencieux) 12
SPEEDY SOAK (trempage rapide) 13
FAVORITE (lavage préféré) 14
TUB CLEAN (nettoyage de la cuve) 15
DELAY START (mise en marche différée)
16
Option 17
Option de lavage 18
Autres fonctions utiles 19
Installation et mise à niveau 20
Tuyaux de raccordement 21
Raccords de la laveuse (modèle portatif) 22
Directives concernant la mise à la terre
23
Directives d’entretien à l’intention de l’utilisateur
24
Dépannage 26
Garantie 29
Fiche technique 30
Étiquettes d’entretien 31
Vous trouverez à l’intérieur de nombreux conseils utiles sur la manière de bien utiliser et entretenir votre
laveuse. Quelques mesures préventives suffiront pour vous faire gagner beaucoup de temps et
économiser de l’argent pendant toute la durée utile de votre laveuse. Vous trouverez de nombreuses
solutions à des problèmes courants dans la section Dépannage. Si vous examinez d’abord les pages dans
cette section, vous n’aurez peut-être pas besoin d’appeler pour demander les services d’un réparateur.
Page 64

LAVEUSE
GUIDE D’UTILISATION
Site Web : http://www.lg.ca
Courriel : http://www.LGEservice.com/techsup.html
MODÈLE : WT1485CW
Nous vous remercions d’avoir acheté une laveuse entièrement
automatique LG.
Veuillez lire attentivement le présent guide d’utilisation. Il contient
des directives concernant l'installation, l’utilisation et l’entretien de
votre appareil, en toute sécurité.
Conservez le guide pour consultation future.
Inscrivez ci-dessus le numéro de série de votre laveuse.
P/No. : 3828EY3068M
 Loading...