

LG WP-1100R User Manual
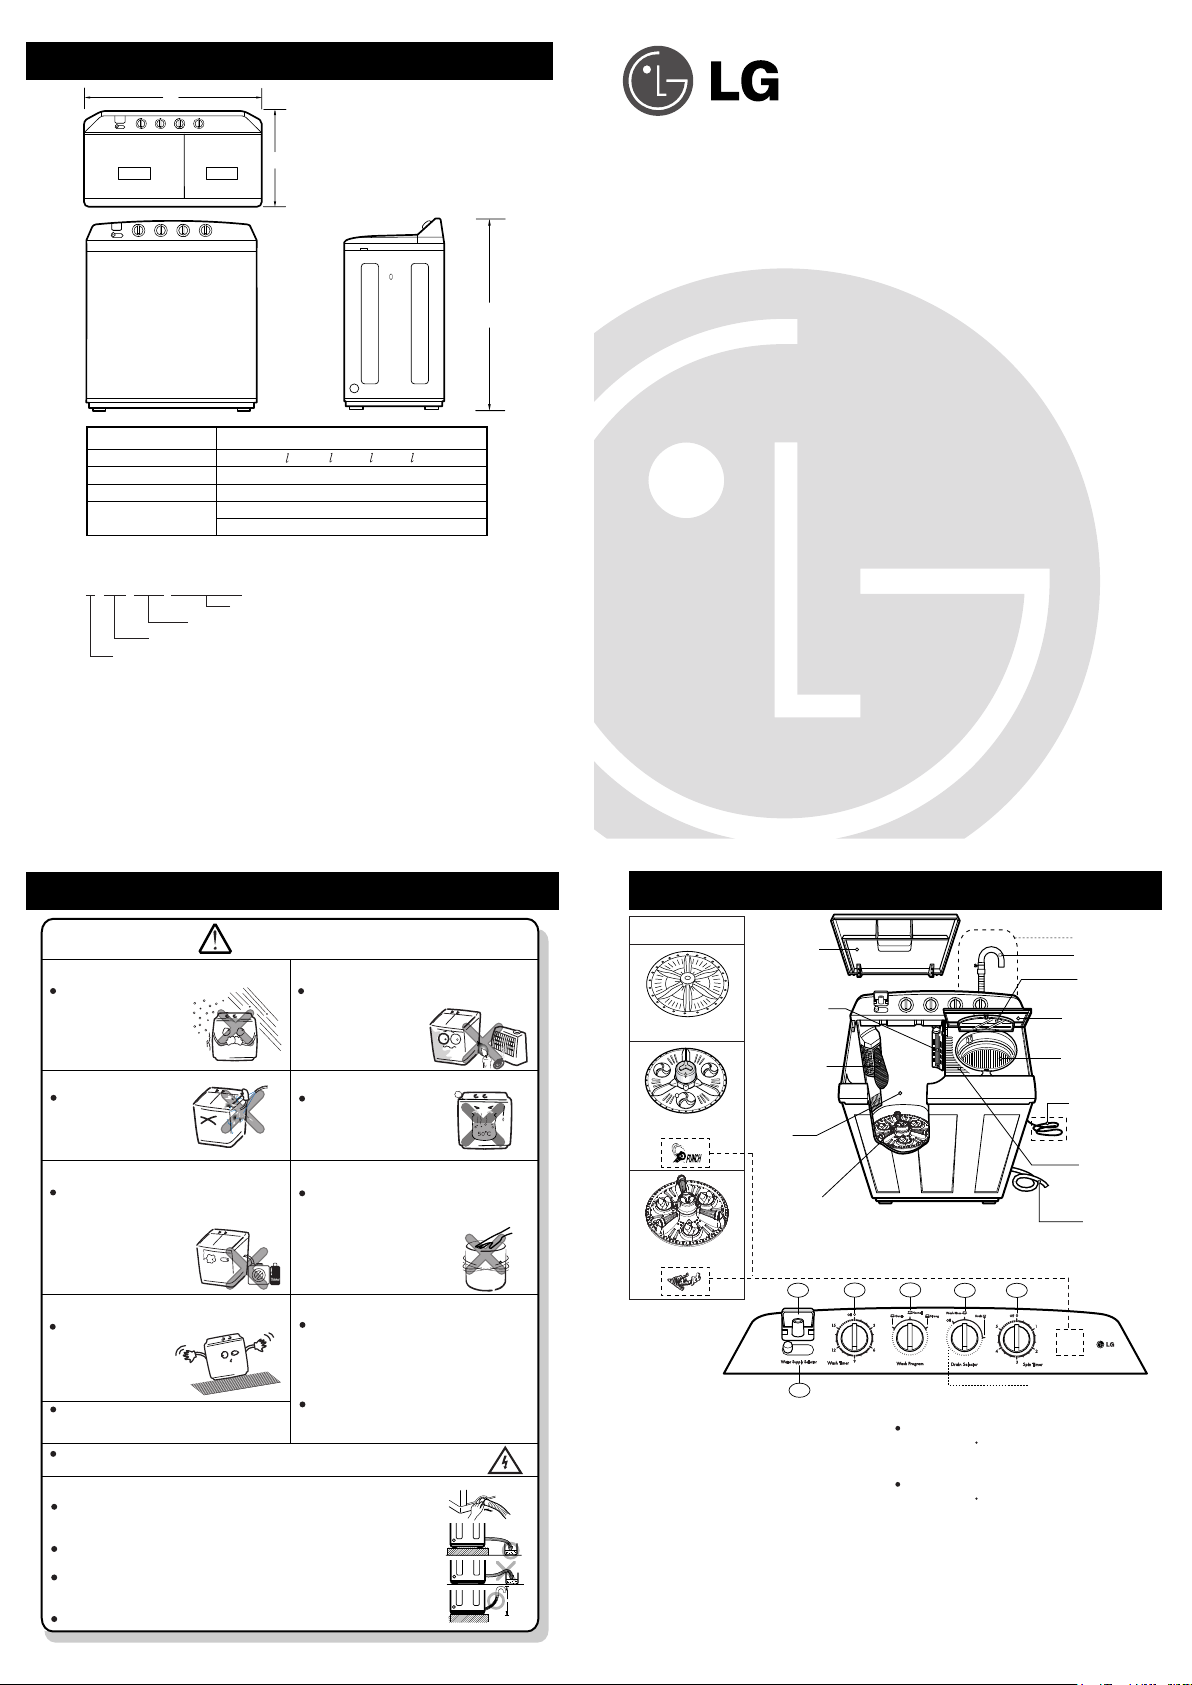
SPECIFICATION
W
WASH
WATER SELECTOR
D
H
Power source ON SPECIFICATION LABEL
Water Level
Water Pressure Less than 100kPa (1kgf/cm2)
Dimension
Weight
How to read the manufactured month and year from the label stuck on the
back of the product.
EX) 4 0 1 T W 0 0 0 0 1
Product code
Month
Year (The last digit to year)
Main service part list : Refer to below listed part name when you need
service call.
Part name Remark
- WASH MOTOR
- SPIN MOTOR
- CYCLE TIMER ASSEMBLY
- CAPACITOR
- GEAR CASE ASSEMBLY
H : 67 , M : 58 , L : 50 , S : 43
850 530 1017 mm. (W D H)
X X X X
For Non-Pump Model 40.5 kg
For Pump Model 41.1 kg
Serial No.
105 W (Output)
105 W (Output)
PLASTIC- S.D. BASKET
8
P/No. : 3828EY3049A
Washing Machine
OWNER'S MANUAL
MODEL : WP-1080N(P)
WP-1100(N,Q,R)(P)
WP-1130N(P)
Please read the operating instructions carefully
and thoroughly before installing and operating
your washing machine.
This washing machine is designed and manufactured
for household use only.
Specification
(N,Q,R) : Pulsator Type
(P) : Pump Model Only
CAUTION
CAUTION
Installation Area
Avoid area exposed to snow,
rain, or where humidity
is high. It may cause
electric shock.
Switch Area
Avoid watering on the
switch area.
It may cause
electric shock
or fire.
Volatile Material
Do not use volatile material such as
Benzene, Gasoline, bug killer.
Do not leave strong alkaline substance
such as bleach inside
the tub. Damage on
plastic surface and
rubber parts may occur.
Installation
Install the washing machine on
a horizontal support.
Otherwise,
it may cause
vibration and noise.
e
B
u
s
re
to
d
c
is
o
n
n
e
t
c
h
t
e
p
o
e
fr
o
m
th
e
e
le
tr
c
i
o
c
a
c
re
a
d
n
Be sure to earth the washer to prevent electric shock. To reduce
the risk of electric shock, do not install the washer in humid spaces.
Connecting the drain hose
Push the clamp toward the body of the washing machine as shown in
the figure.
For Non-Pump Model
Be sure to reroute the hose so that it is not kinked; kinks or sharp
bending in the hose will prevent proper drainage.
Make sure water is draineded smoothly by placing a base under the
machine or by applying other appropriate mean.
For Pump Model
L <= 1 m.
u
m
a
t
in
e
a
n
w
e
tl
t
b
e
re
fo
n
s
e
c
.
Heat
Avoid electric heater, candle light,
cigarette light, bug smoker,
etc. near the machine.
It may ignite or
deform
plastic part.
Hot water
Avoid using hot water
over 50°C. It may
deform plastic parts
or cause malfunction.
In Operation
Do not insert the hand inside the spin
dryer basket while the machine is in
operation (Do not let children climb on
the machine or climb into
the tub. Injury may occur.)
Power Cord
If the power supply cord is damaged, it
must only be replaced by the
manufacture or its service agent or a
similarly qualified person in order to
avoid a hazard.
Electric Outlet
r
t
a
Avoid connecting several electric
o
c
rd
devices to single outlet. It may cause
rt
in
g
fire.
2 3
FEATURES
Pulsator Table
Use for WP-****N(P)
Use for WP-****Q(P)
Use for WP-****R(P)
1. Water Supply Inlet
Connect here with the inlet hose from the
water faucet to feed water to the tub.
2. Water Selector
Select "WASH" to supply water for
washing and rinsing and "SPIN" for spin
shower rinse.
3. Wash Timer
Select the desired time for washing or
rinsing.
4. Wash Program
L
Set the program to "GENTLE","NORMAL",
"STRONG" according to kind and
WASHING
COVER
OVERFLOW
FILTER
ROTATION
FILTER-C
TUB
PULSATOR
(See detail in Pulsator Table)
1
WASH
2
4
3
6
5
5. Drain Selector
For Non-Pump Model
Select "WASH RINSE" for washing and
rinsing and "DRAIN" to drain the water out
of the tub.
For Pump Model
Select "WASH RINSE" for washing and
rinsing and "DRAIN" to drain the water out
of Cabinet, and "OFF" to turn off the drain pump.
6. Spin Timer
Select the desired time for spinning. The
maximum limit is 5 min. Don’t rotate the knob
more than prescribed limit.
quantity of the laundry.
*For Pump Model Only*
DRAIN HOSE
SAFETY
COVER-2
SPIN DRYER
COVER
SPIN DRYER
BASKET
EARTH WIRE
(For models
with two pro ng plug)
SAFETY
COVER-1
POWER
CORD
*For Pump Model Only*
INSTALLATION
Earth
wire
●
Installation area
Set on flat and firm floor.
●
●
Incorrect installation may course
severe noise and break down.
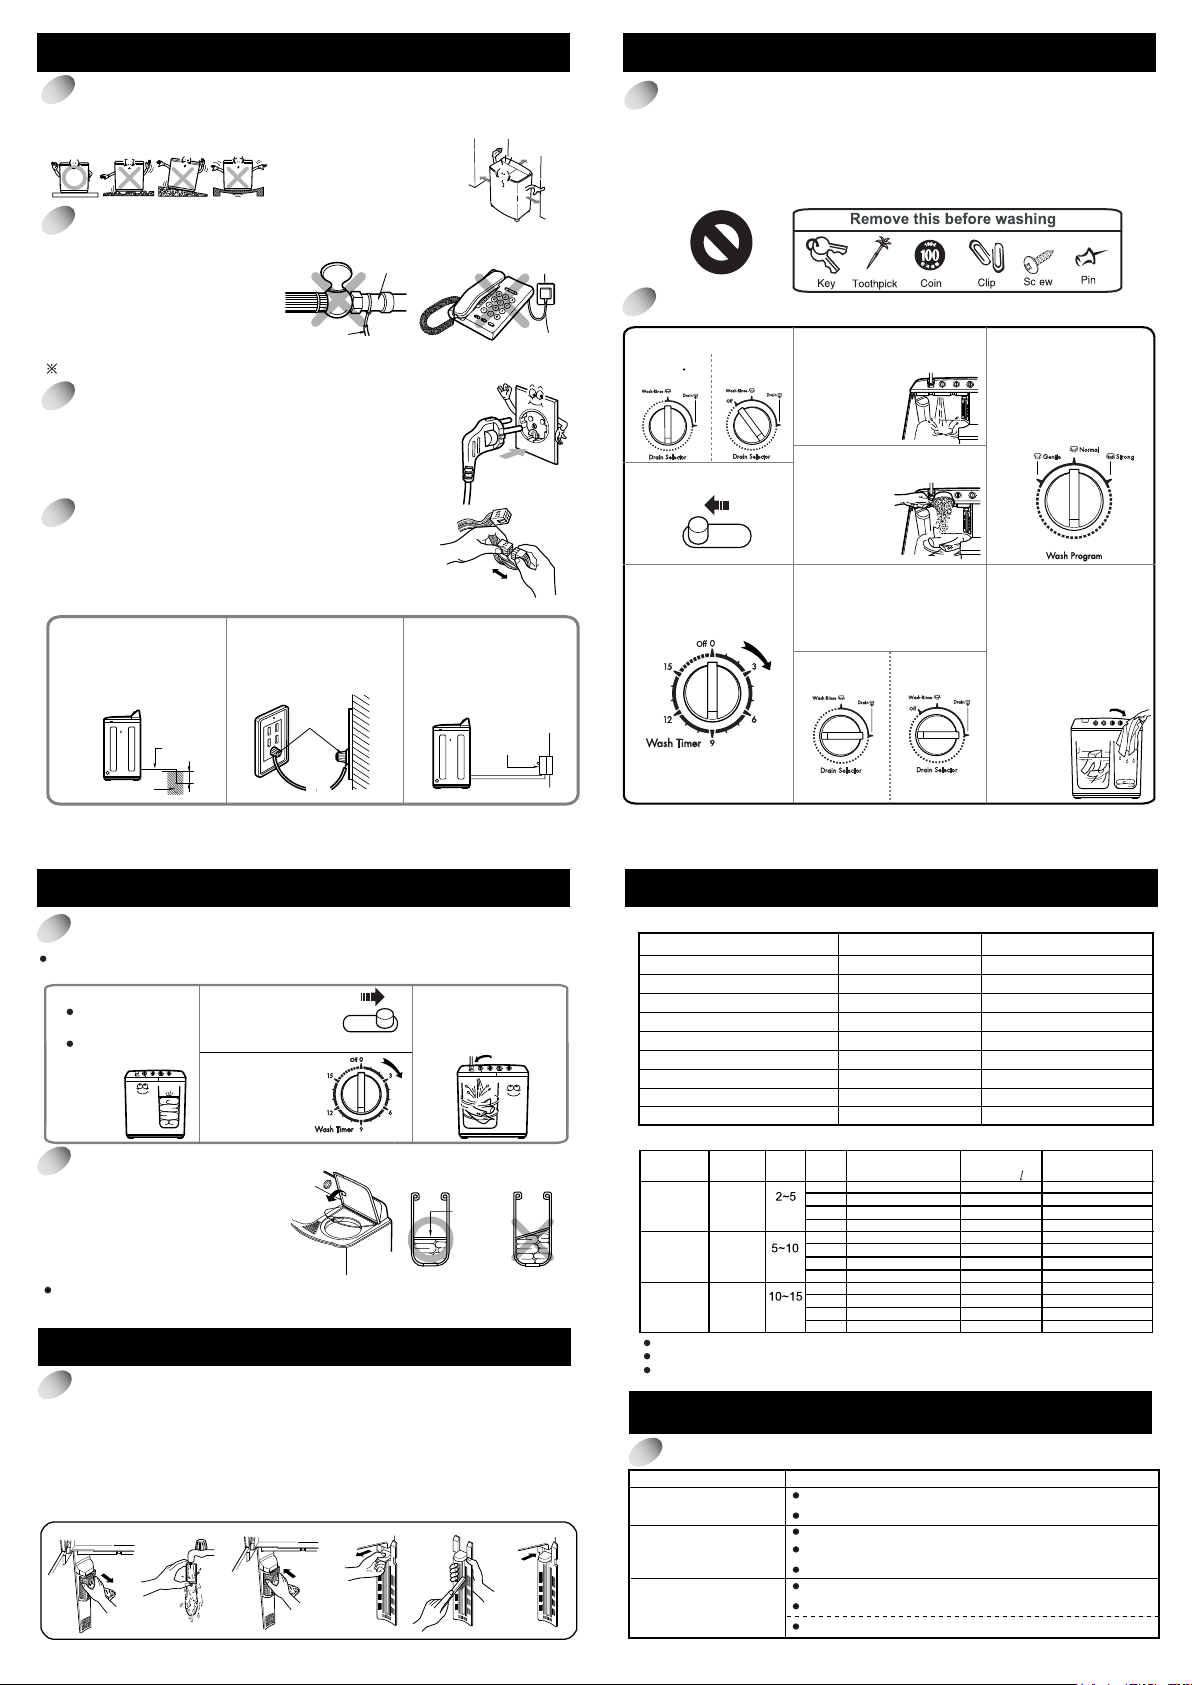
Connecting the earth wire
●
Install the earth wire to prevent short-circuit due to leaking current and electric shock.
●
It is attached at the back of the washer.
Connect it to the metal water pipe.
If the water pipe is made of plastic,
it does not have the earth effect.
●
Do not connect the earth wire to the
gas pipe, lightning arrester. telephone
connecter, etc.
Warning-the appliance with two-pronged plug must be grounded.
Connecting the power plug
●
Insert the power plug into the outlet.
●
Before connecting the power plug, check if the voltage
setting of the washer matches the out let voltage.
●
If AC outlet with ground terminal is used, grounding is not
needed. If not, never forget earthing (Refer earthing method above).
●
The appliance must be positioned so that the plug is accessible.
Voltage Change (only for dual voltage)
This washer is assembled for 220V, but can be changed from
220V to 110V(or 127V).
Check your electrical source and follow the diagram below
to convert voltage.
Other earthing method
●
After connecting the earth
wire to the earth copper
plate, bury it at least 75cm
deep under the wet
ground.
Earth
wire
Earth copper plate
●
75cm
Connect to the
earthing-only outlet.
Maintain more than 10 cm between
the side of drain hose and the wall.
A carpet must not obstruct the
●
ventilation openings.
Gas pipe
Earth
wire
● When installing it in an
area where earthing is
not possible, purchase a
short-circuit breaker
connect it to the outlet.
Short-circuit breaker
INSTALLATION & HOW TO WASH
Before washing
1.Check the washing instruction labels on the clothing to be washed.
2.Remove all objects from the pockets of the clothing.Objects left in the pockets may
damage clothing or the washing machine (could cause the drain hose to clog).
3.After separating oiled or dyed clothing, wash.
4.For your convenience hang up the wash cover on the right or left side of the
washingmachine tub when not in use.
How to wash
Set the drain selector
1
For Non-Pump Model
Set as "WASH RINSE"
position.
Set the water selector
2
to "WASH"
Set the desired wash
6
time.
For Pump Model
Set as "OFF"
position.
WASH
Water Selector
Open the water tap and
3
fill water in the wash tub
about halfway
to the desired
water level.
Put the appropriate amount
4
of detergent and the laundry
into the wash
tub. And add
water to the
desired water
level which
you want.
When washing is finished,
7
locate the drain selector to
"DRAIN" position and drain
the water out.
For Non-Pump Model
For Pump Model
r
Select the wash
5
program to "GENTLE",
"NORMAL" or
"STRONG" according
to the kinds and
quantity of the laundry.
(Refer to Tabel 2)
Spinning in the spin
8
dryer basket.
Move the laundry into
the spin dryer basket.
Put the laundry down
lightly.
Place the safety cover
horizontally on the
laundry.
Set the desired
spin time
with the
spin timer.
4 5
HOW TO RINSE & HOW TO SPIN
Inter spin rinse
Interim spin rinse prior to regular rinsing helps removing sudsy water from the
laundry and improve rinsing efficiency. Also is helpful to water saving.
After washing.
1
Move the laundry into
the spin dryer basket.
Place the safety cover
horizontally on the
laundry.
Set the water
2
selector to "SPIN".
Set the desired
3
spin flow
appropriately.
SPIN
Water Selector
After interim spin
4
rinse, move the
laundry into the
wash tub for rinsing.
Note for spinning
Put the laundry evenly into the spin
1.
dryer basket.
2. Put the laundry down lightly.
Place the safety cover horizontally
3.
over the laundry.
4. Close the spin dryer cover.
If the spin dryer basket is off-balance and vibrates excessively, stop the
spinning, rearrange the clothes evenly, and then resume spinning.
Safety cover
CARE
Overflow filter & Rotation filter-C
1
.
T
a
e
k
t
o
u
h
e
t
r
o
ta
ti
n
o
e
lt
fi
C
r-
b
y
p
u
lli
n
g
n
i
e
t
h
d
i
re
c
n
o
ti
h
s
w
o
n
2
.
T
u
t
rn
h
e
e
t
n
o
v
r
a
e
d
n
r
in
e
s
water.
3
.
A
ft
e
r
a
le
c
n
in
g
,
re
p
4
.
u
P
th
ll
e
o
5
.
s
U
e
a
b
rush
t
h
e
v
o
erfl
6
.
s
In
e
rt
e
th
1
la
r
ve
w
flo
ilt
f
e
or y
o
u
r
o
w
te
fil
r.
v
o
er f
w
lo
f
2
in
c
t
h
e
e
r
ta
o
o
ti
n
t
f
il
r-
e
.
r
f
o
rwar
d
f
ro
a
h
n
d
r
to
m
e
ilt
e
r
b
k
a
c
n
t
i
3
m
o
o
t
ve al
t
h
h
e
e
l
was
C
w
s
a
t
h
u
b
i
n
t
h
t
o
f
h
e
e
h
n
ts
li
w
h
ic
u
t
b
.
4
6
.
d
ir
e
c
o
ti
n
f
o
h
e
t
r
a
ro
h
h
s
s
a
a
d
5
w
h
e
re
o
d
t
6
REFERENCE
TABLE 1. WEIGHT GUIDE FOR CLOTHES
Type of clothing Type of fabric Weight per piece
Under shirt Cotton 150g(53oz)
Handkerchief Cotton 50g(1.8oz)
Bath towel Cotton 300g(10.6oz)
Shirt Mixed fabric 200g(7.1oz)
Socks (1 pair) Mixed fabric 50g(1.8oz)
Pajama (shirt and pants) Cotton 500g(17.6oz)
Winter undershirt Cotton 600g(21.2oz)
Workclothes Mixed fabric 800g(28.2oz)
Blouse Mixed fabric 200g(7.1oz)
TABLE 2. GUIDE FOR WASHING
Type of
fabric
Synthetics,
Silk, Woolen,
Knits
Cotton,
Linen
Very soiled
cotton and
linen
Amount of laundry is based on dry laundry.
Detergent amount is based on a general synthetic detergent.
If washing and spinning mest be operated together, starting washing and spinning
operation shall be done at the same time to cope with EMC requirement.
TROUBLESHOOTING GUIDE
.
Before Requesting Service
Motor does not operate, Is the power cord firmly plugged in?
Spin dryer basket does Is there any clothing dropped between the basket and tub?
not operate.
No draining
For Non-Pump Model
For Pump Model
Wash
Wash
Selector
GENTLE
NORMAL
STRONG
Problem Checking point
Water
time
min
min
min
Is the timer turned to a suitable point except "OFF" ?
Is the spin dryer cover closed?
Is the laundry gathered to one side of the spin dryer basket?
Is there lint stuck in the plunger valve?
Is the end of the drain hose guide located at an exceed height?
Is the drain pump operated?
level
S
L
M
H
S
L
M
H
S
L
M
H
Amount of
laundry (Kg)
0.5 ~ 4.5 40 ~ 45
4.5 ~ 5.5
5.5 ~ 6.5
6.5 ~
0.5 ~ 4.5
4.5 ~ 5.5
5.5 ~ 6.5
6.5 ~
0.5 ~ 4.5
4.5 ~ 5.5
5.5 ~ 6.5
6.5 ~
Amount of
water ( )
43
50
58
67
43
50
58
67
43
50
58
67
7
Amount of
detergent (g)
48 ~ 52
56 ~ 60
65 ~ 70
40 ~ 45
48 ~ 52
56 ~ 60
65 ~ 70
40 ~ 45
48 ~ 52
56 ~ 60
65 ~ 70
 Loading...