

LG WM3431HW/01, WM3431HW/00, WM3431HS Owner’s Manual
'_' 1-800-243-0000
24 HOURSADAY,7 DAYSAWEEKFORLGCUSTOMERSERVICE
paraelServicioLG(Atenci6nal Cliente)24horasaldia,7diasa lasemana
WM3431H*
WM3434H*
as ing Machine
OWNER'S NANUAL
Please read this manual carefully. Itprovides
instructions on safeinstallation, use, and maintenance.
Retain itfor future reference.
Recordthe modeland serialnumbersofyour machine
andreportthisinformationto yourdealer ifyour machine
requiresservice.
les instructions
Futilisationet I'entretien.
rie de I'appareih
serviceest
(High Efficiency) detergent
(hante efficacite)
wice.com
p.html
_ DelayWashPress& Hold3 _c
?o set child lock
©
[]
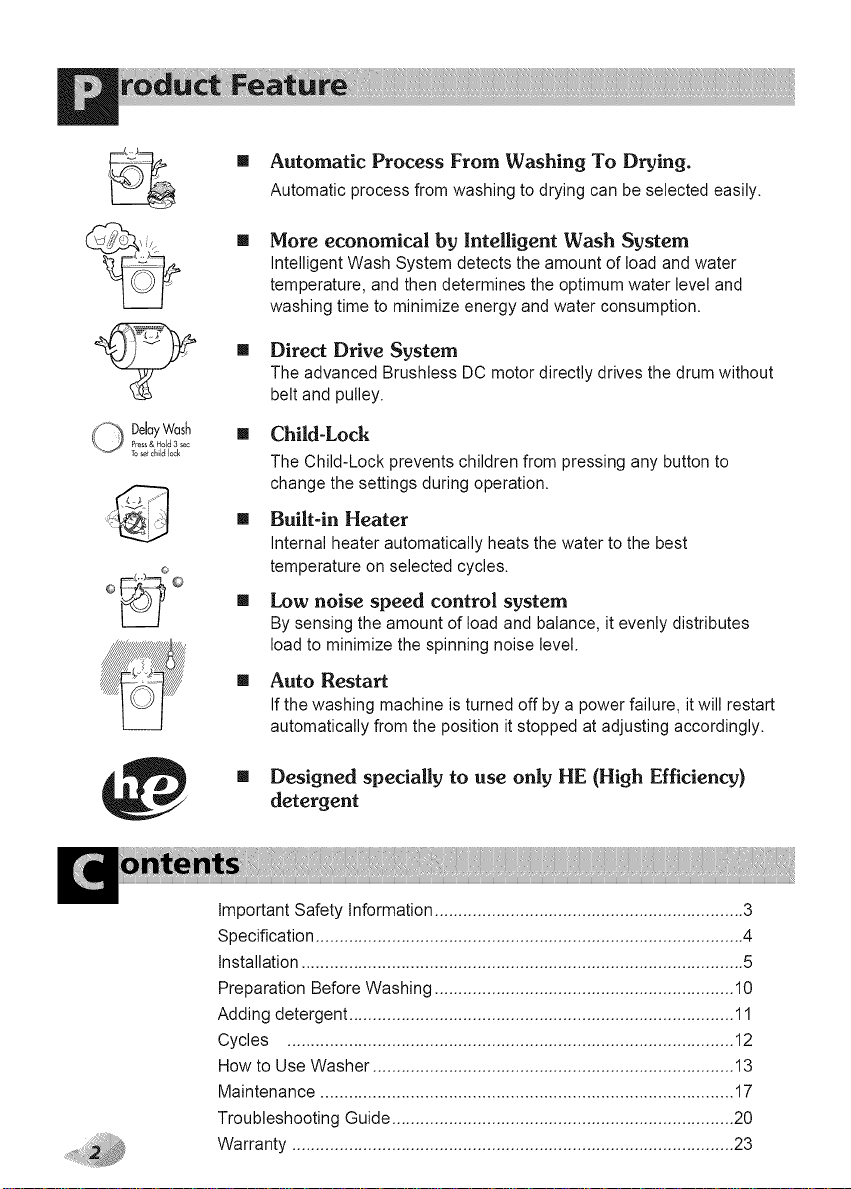
Automatic Process From Washing To Drying.
Automaticprocessfromwashing to drying can beselectedeasily.
[]
More economical by Intelligent Wash System
IntelligentWashSystemdetectstheamountof loadand water
temperature,andthendeterminestheoptimumwaterlevel and
washingtimeto minimizeenergyandwater consumption.
[]
Direct Drive System
The advanced Brushless DC motor directly drives the drum without
belt and pulley.
[]
Child-Lock
The Child-Lock prevents children from pressing any button to
change the settings during operation.
[]
Built-in Heater
Internal heater automatically heats the water to the best
temperature on selected cycles.
[]
Low noise speed control system
By sensing the amount of load and balance, it evenly distributes
load to minimize the spinning noise level.
[]
Auto Restart
If the washing machine is turned off by a power failure, it will restart
automatically from the position itstopped at adjusting accordingly.
[]
Designed specially to use only HE (High Efficiency)
detergent
Important Safety Information ................................................................. 3
Specification .......................................................................................... 4
Installation ............................................................................................. 5
Preparation Before Washing ............................................................... 10
Adding detergent ................................................................................. 11
Cycles .............................................................................................. 12
How to Use Washer ............................................................................ 13
Maintenance ....................................................................................... 17
Troubleshooting Guide ........................................................................ 20
Warranty ............................................................................................. 23
READ ALL INSTRUCTIONS BEFORE USE
Foryoursafety,the informationinthismanualmustbefollowedto minimizetheriskoffire
orexplosion,electricshock,ortopreventpropertydamage,personalinjury,or lossof life.
IMPORTANT SAFETY INSTRUCTIONS
_kWARNING • To reduce the risk of fire, electric shock, or injury to persons when using the
washer, follow basic precautions, including the following:
• Read all instructionsbefore using the washer.
• Do not wash articles that have been previously
cleaned in, washed in, soaked in, or spotted with
gasoline, dry cleaning solvents, or other
flammable or explosive substances, as they give
off vapors that could ignite or explode.
• Do not add gasoline, dry cleaning solvents, or
other flammable or explosive substances to the
wash water. These substances give off vapors
that could ignite or explode.
• Under certain conditions, hydrogen gas may be
produced in a hot water system that has not been
used for 2weeks or more. HYDROGEN GAS IS
EXPLOSIVE. If the hot water system has not
been used for such a period, before using the
washing machine, turn on all hot water faucets
and let the water flow from each for several
minutes. This will release any accumulated
hydrogen gas. As the gas isflammable, do not
smoke or usean open flame during this time.
• Do not allow children to play on or in the washer.
Close supervision of children is necessary when
the washer isused near children.
• Before the washer is removed from service or
discarded, remove the door to prevent children
from hiding inside.
• Do not install or store the washer where itwill
be exposed to the weather.
• Do not tamper with controls.
• Do not repair or replace any part of the washer
or attempt any servicing unless specifically
recommended in the user-maintenance
instructions or published user-repair instructions
that you understand and have the skills to carry
out.
• See Installation Instructions for grounding
requirements.
• Do not use heat to dry articles containing foam
rubber or similarly textured rubber-like materials.
• Interior of washer and condensing duct should be
cleaned periodically by qualified service
personnel.
• ALWAYS follow the fabric care instructions
supplied bythe garment manufacturer.
• Do not place items exposed to cooking oil in your
dryer, items contaminated with cooking oils may
contribute to a chemical reaction that could cause
a load to catch fire.
• Do not use fabric softeners or products to
eliminate static unless recommended by the
manufacturer of the fabric softener or product.
SAVE THESE INSTRUCTIONS
GROUNDINGINSTRUCTIONS
This appliance must be grounded. In the event of malfunction or breakdown, grounding will reduce the risk
of electric shock by providing a path of least resistance for electric current. This appliance is equipped with a
cord having an equipment-grounding conductor and grounding plug. The plug must be plugged into an
appropriate outlet that is properly installed and grounded in accordance with all local codes and ordinances.
• Do not use an adapter or extension cord.
• Do not remove ground prong.
• If you don't have the proper outlet, consult an electrician.
_WARNING •Improper connection of the equipment-grounding conductor can result in risk of electric
shock. Check with a qualified electrician or serviceman if you are in doubt as to whether the appliance is
properly grounded. Do not modify the plug provided with the appliance - if it does not fit the outlet, have a
proper outlet installed by a qualified electrician.
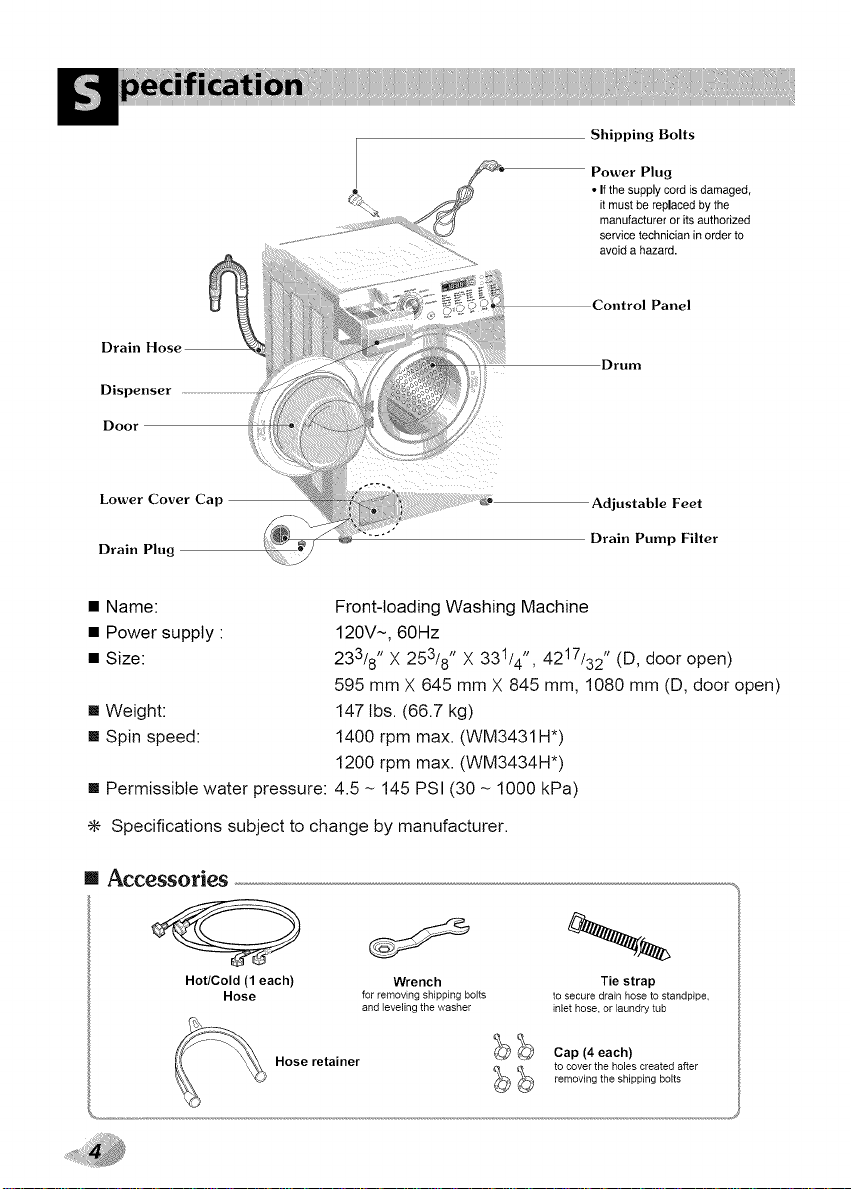
Shipping Bolts
Power Plug
• If the supply cord is damaged,
it must be replaced by the
manufacturer or its authorized
service technician in order to
avoid a hazard.
Control Panel
Drain
Dispenser
Door
Lower Cover Cap Adjustable Feet
Drain Plug
Drum
Drain Pump Filter
[] Name: Front-loading Washing Machine
[] Power supply : 120V~, 60Hz
[] Size: 233/8" X 253/8" X 331/4", 4217/32" (D, door open)
595 mm X 645 mm X 845 mm, 1080 mm (D, door open)
[] Weight: 147 lbs. (66.7 kg)
[] Spin speed: 1400 rpm max. (WM3431H*)
1200 rpm max. (WM3434H*)
[] Permissible water pressure: 4.5 ~ 145 PSI (30 - 1000 kPa)
÷ Specifications subject to change by manufacturer.
[] Accessories
Hot/Cold (1 each)
Hose
Hose retainer
Wrench Tie strap
for removing shipping bolts to secure drain hose to standpipe,
and leveling the washer inlet hose, or laundry tub
_ Cap (4 each)
_...._ to cover the holes created after
removing the shipping bolts
Install or store unit where it will not be exposed to temperatures below freezing or
exposed to outside weather conditions.
Properly ground washer to confbrm with all governing codes and ordinances.
To reduce the risk of electric shock, do not install the washer in humid spaces.
The base opening must not be obstructed by carpeting when the washing machine is installed on a
carpeted floor.
In areas where there are areas which may be subject to infestation by cockroaches or other vermin, pay
particular attention to keeping the appliance and its surroundings in clean condition at all times.
Damage caused by cockroaches or other vermin will not be covered by the appliance warranty.
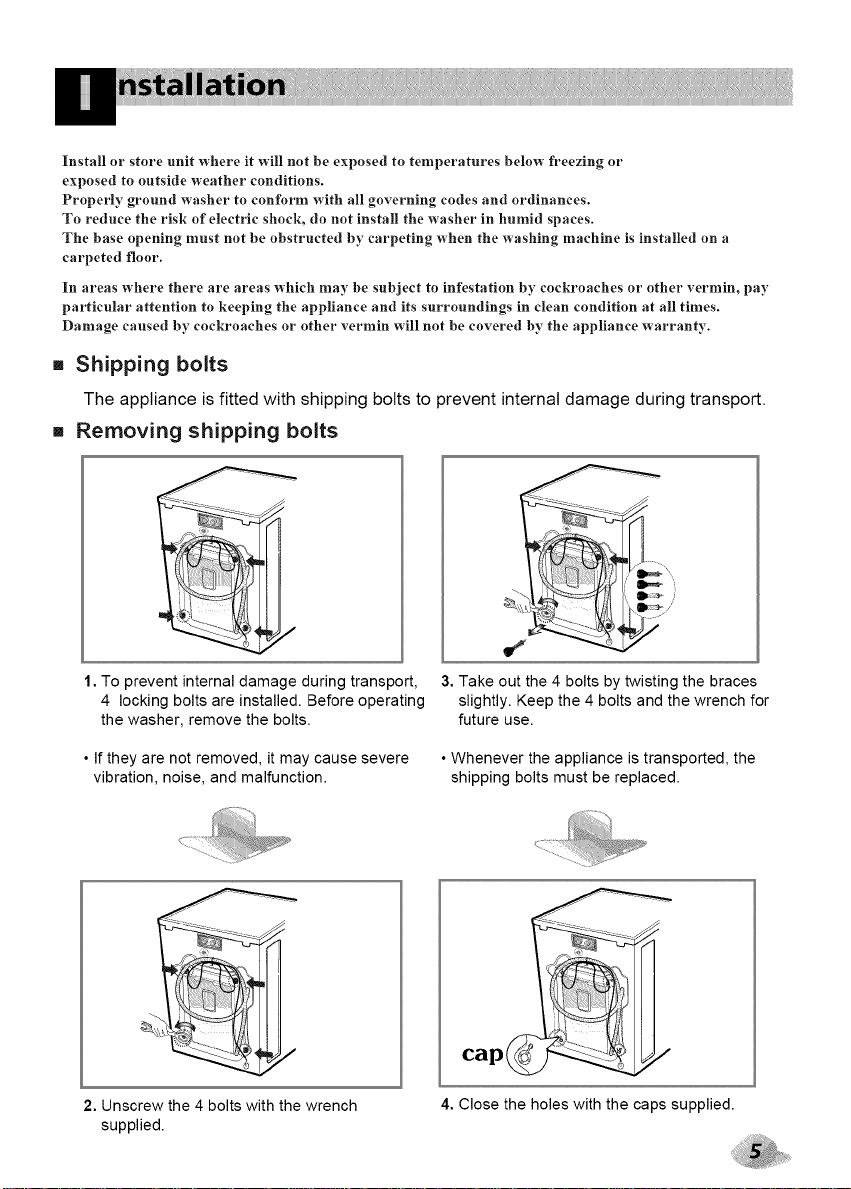
[] Shipping bolts
The appliance is fitted with shipping bolts to prevent internal damage during transport.
[] Removing shipping bolts
1. To prevent internal damage during transport,
4 locking bolts are installed. Before operating
the washer, remove the bolts.
3. Take out the 4 bolts by twisting the braces
slightly. Keep the 4 bolts and the wrench for
future use.
• If they are not removed, it may cause severe • Whenever the appliance is transported, the
vibration, noise, and malfunction, shipping bolts must be replaced.
cap_
2. Unscrew the 4 bolts with the wrench
supplied.
4. Close the holes with the caps supplied.
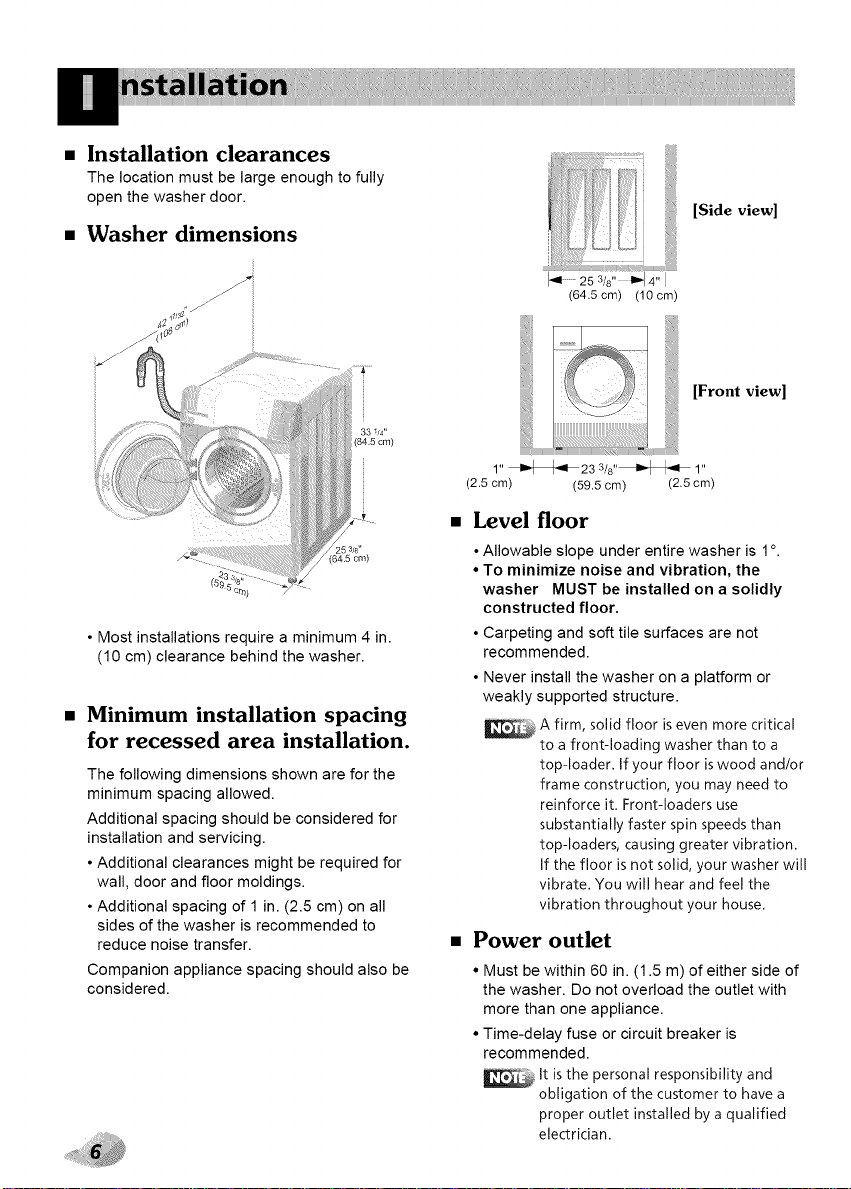
• Installation clearances
The location must be large enough to fully
open the washer door.
• Washer dimensions
(84.5 cm)
53/8'
(645 cm)
• Most installations require a minimum 4 in.
(10 cm) clearance behind the washer.
• Minimum installation spacing
for recessed area installation.
The following dimensions shown are for the
minimum spacing allowed.
Additional spacing should be considered for
installation and servicing.
• Additional clearances might be required for
wall, door and floor moldings.
• Additional spacing of 1 in. (2.5 cm) on all
sides of the washer is recommended to
reduce noise transfer.
Companion appliance spacing should also be
considered.
[Side view]
(64.5 cm) (10 cm)
[Front view]
1" _23 3/8"_ 1"
(2.5 cm) (59.5 cm) (2.5 cm)
• Level floor
• Allowable slope under entire washer is 1°.
• To minimize noise and vibration, the
washer MUST be installed on a solidly
constructed floor.
• Carpeting and soft tile surfaces are not
recommended.
• Never install the washer on a platform or
weakly supported structure.
A firm, solid floor iseven more critical
to a front-loading washer than to a
top-loader. If your floor iswood and/or
frame construction, you may need to
reinforce it. Front-loaders use
substantially faster spin speeds than
top-loaders, causing greater vibration.
If the floor is not solid, your washer will
vibrate. You will hear and feel the
vibration throughout your house.
• Power outlet
• Must be within 60 in. (1.5 m) of either side of
the washer. Do not overload the outlet with
more than one appliance.
• Time-delay fuse or circuit breaker is
recommended.
It isthe personal responsibility and
obligation of the customer to have a
proper outlet installed by a qualified
electrician.
• Electrical connection
Do not use an extension cord or double adapter.
If the supply cord is damaged, it must be replaced by a qualified person in order to avoid a hazard.
If the machine will not be used for an extended time, unplug it and shut off the water supply.
Connect the machine to a grounded outlet in accordance with current wiring regulations.
The appliance must be positioned so that the plug is easily accessible.
Repairs to the washing machine must only be carried out by qualified personnel. Repairs carried out by
inexperienced persons may cause injury or serious malfunctioning. Contact your local service center.
• Do not install your washing machine in rooms where temperatures below freezing may occur. Frozen
hoses may burst under pressure. The reliability of the electronic control unit may be impaired at
temperatures below freezing point.
• If the appliance is delivered in the winter months and temperatures are below freezing : Store the
washing machine at room temperature for a few hours before putting it into operation.
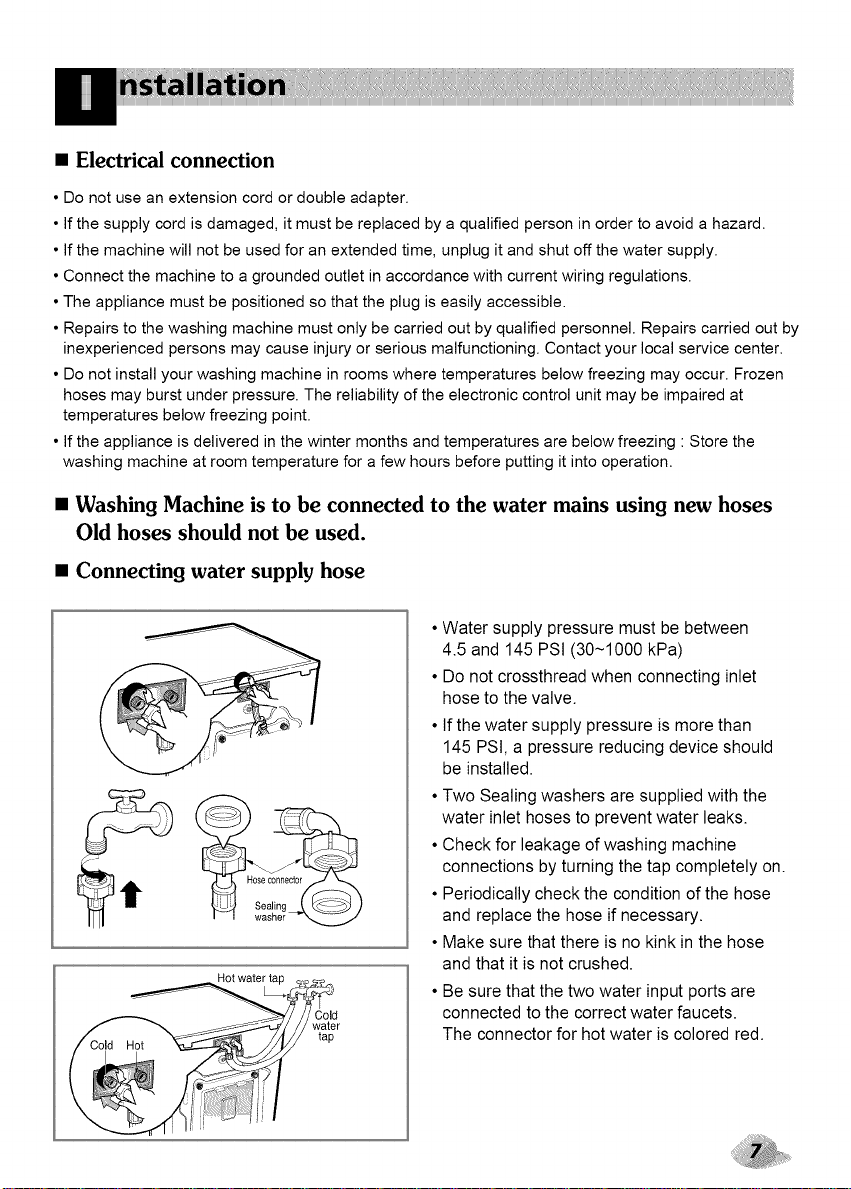
• Washing Machine is to be connected to the water mains using new hoses
Old hoses should not be used.
• Connecting water supply hose
• Water supply pressure must be between
4.5 and 145 PSt (30~1000 kPa)
• Do not crossthread when connecting inlet
hose to the valve.
• If the water supply pressure is more than
145 PSt, a pressure reducing device should
be installed.
• Two Sealing washers are supplied with the
water inlet hoses to prevent water leaks.
• Check for leakage of washing machine
connections by turning the tap completely on.
• Periodically check the condition of the hose
and replace the hose if necessary.
• Make sure that there is no kink in the hose
and that it is not crushed.
• Be sure that the two water input ports are
Cold
water
tap
connected to the correct water faucets.
The connector for hot water iscolored red.
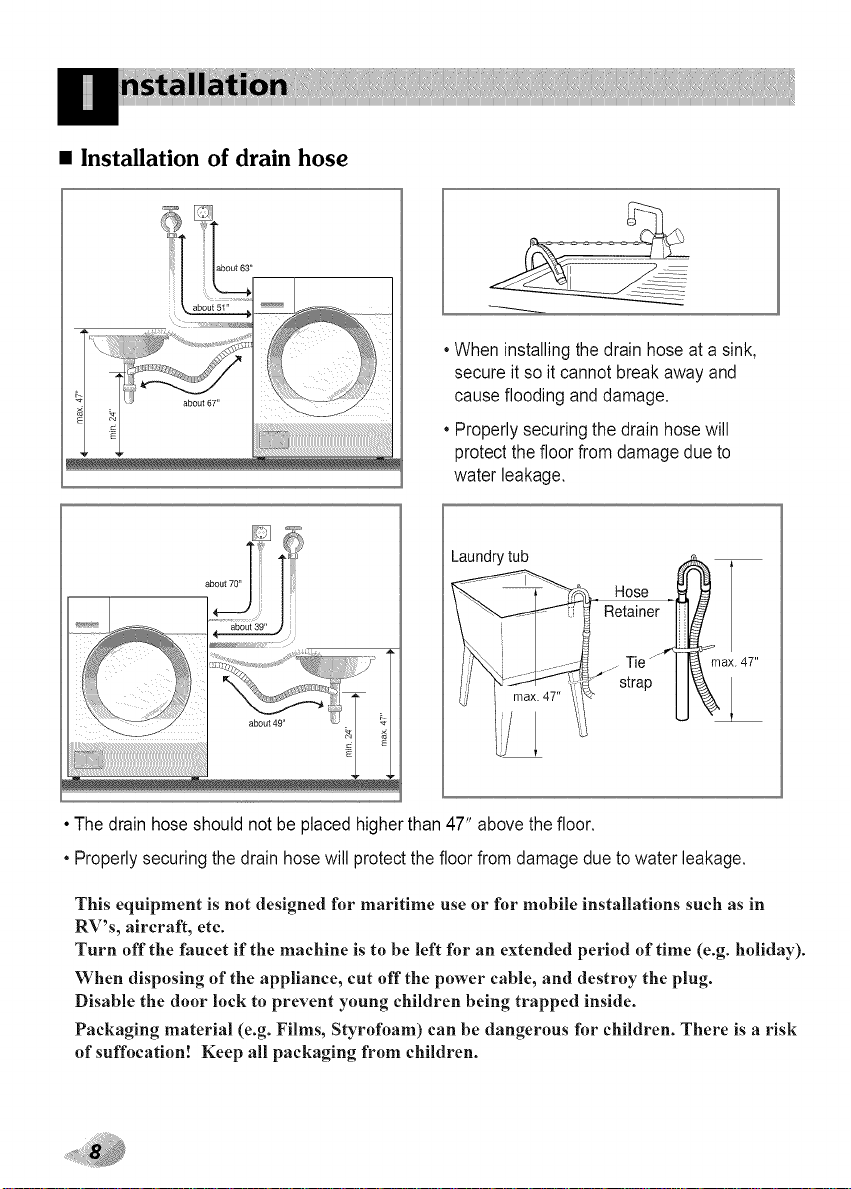
• Installation of drain hose
1
7111'
.<rT_J -r]'EL[
_1 _ _ about 67'
• When installing the drain hose at a sink,
secure it so it cannot break away and
cause flooding and damage.
• Properly securing the drain hose win
protect the floor from damage due to
water leakage.
Laundry tub
Retainer
Hose _m
" ax. 47"
_ ..............................._!iii/iii!;i_!¸
about 49 =
ii?i iiiiiiiii
• The drain hose should not be placed higher than 47" above the floor.
• Properly securing the drain hose will protect the floor from damage due to water leakage.
This equipment is not designed for maritime use or for mobile installations such as in
RV's, aircraft, etc.
Turn off the faucet if the machine is to be left for an extended period of time (e.g. holiday).
When disposing of the appliance, cut off the prover cable, and destroy the plug.
Disable the door lock to prevent young children being trapped inside.
Packaging material (e.g. Films, Styrofoam) can be dangerous for children. There is a risk
of suffocatio!! Keep all packaging from children.
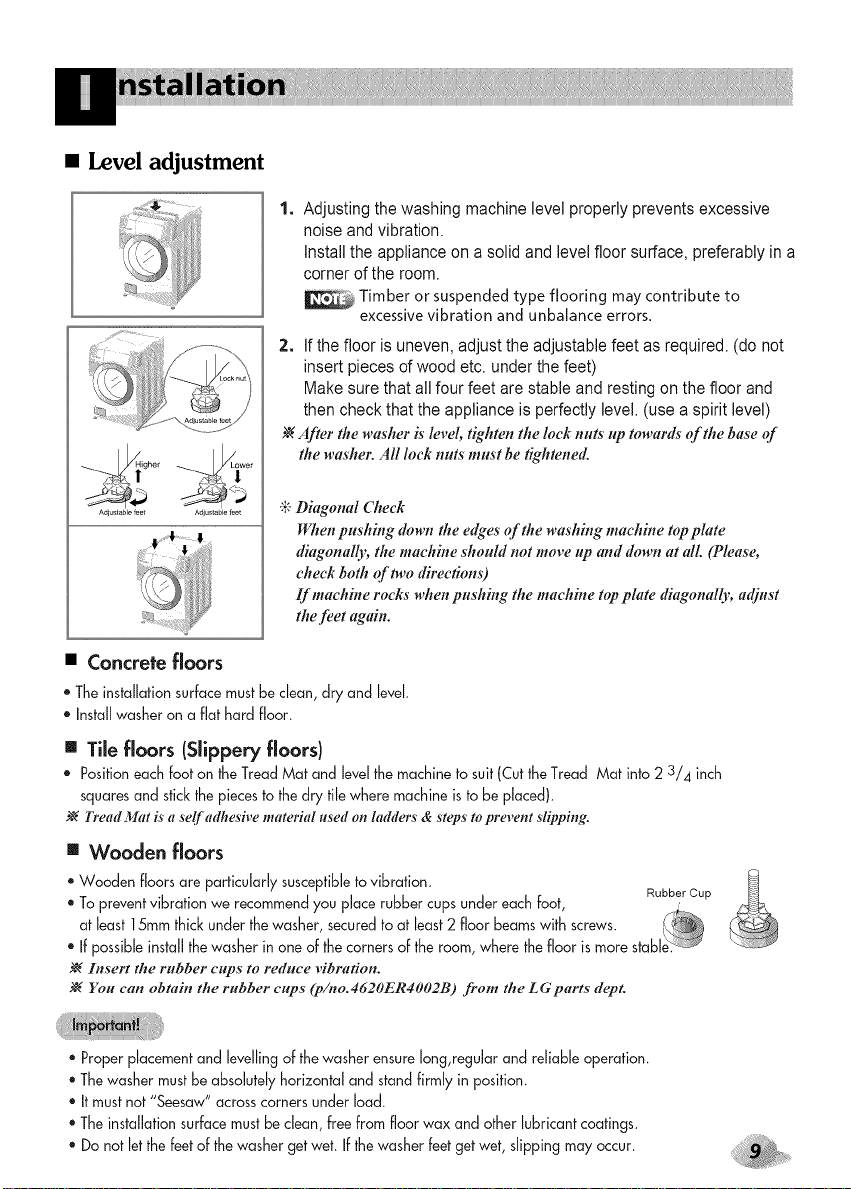
• Level adjustment
1. Adjusting the washing machine level properly prevents excessive
noise andvibration.
Installthe appliance on a solid and level floor surface, preferably ina
corner of the room.
Timber or suspendedtype flooring maycontribute to
excessivevibration and unbalance errors.
2. If the floor is uneven,adjust the adjustable feet as required. (do not
insert pieces of wood etc. under the feet)
Makesure that all four feet are stable and resting on the floor and
then check that the appliance is perfectly level. (use a spirit level)
After tile washer # level, tighten tile lock nuts up towards of the base of
the washer. All lock nuts must be tightened.
"4"Diagonal Check
When pushing down the edges of the washing machine top plate
diagonall); the machiue shouM not move up and down at all. (Please,
check both of two direction#
If machine rocks when pushing the machine top plate diagonally, adjust
the feet again.
[] Concrete floors
* The installation surface mustbe clean, dry and level,
" Install washer on a flat hard floor.
[] Tile floors (Slippery floors)
• Position each foot on the Tread Mat and [eve[the machine to suit (Cut the Tread Mat into 2 3/4 inch
squaresand stick the piecesto thedry tile where machine is to be placed).
?g Tread_lJat is"a self adhesive material used on htdders & steps toprevent slipping.
[] Wooden floors
• Wooden floors are particularly susceptible to vibration,
• To prevent vibration we recommend you place rubber cups under each foot, Rubber.c;--,_Cup
least 15mm thick under the washer, secured to at least2 floor beams with screws.at
• If possible install the washer in one of the corners of the room, where the floor is more stab[
?g Insert the rubber cups to reduce vibration.
?g You can obtain the rubber cups (p/no.4620ER4002B) from the LGparts dept.
• Proper placement and levelling of the washer ensure long,regular and reliable operation.
• Thewasher mustbe absolutely horizontal and stand firmly in position.
• It must not "Seesaw" across corners under load.
• The installation surface must be clean, free from floor wax and other lubricant coatings.
• Do not let the feetof thewasher get wet. If thewasher feet get wet, slipping may occur.
_WARNING - To reduce the risk of fire, electric shock, or injury to persons, read the
IMPORTANT SAFETY INSTRUCTIONS before operating this appliance.
• Before the first washing
SelecttheNormalcycle,addabout1/2 therecommendedamountof detergentinthedispenser,andallow
theunittowashwithoutclothing.Thiswillremoveany residuefromthedrumthatmayremainafter
manufacturing.
1. Fabric Care Labels
Look for a care label on your clothes. This will tell you about the fabric content of your
garment and how it should be washed.
2. Sorting
To get the best results, sort clothes into loads that can be washed with the same wash cycle.
Different fabrics need to bewashed indifferent ways.
Always sort dark colors from pale colors and whites. Wash separately as dye and linttransfer
can occur causing discoloration of white clothing. Ifpossible, do not wash heavilysoiled
items with lightly soiled ones.
Soil (Heavy, Normal, Light)
Color (White, Lights, Darks)
Lint (Lint Producers, Collectors)
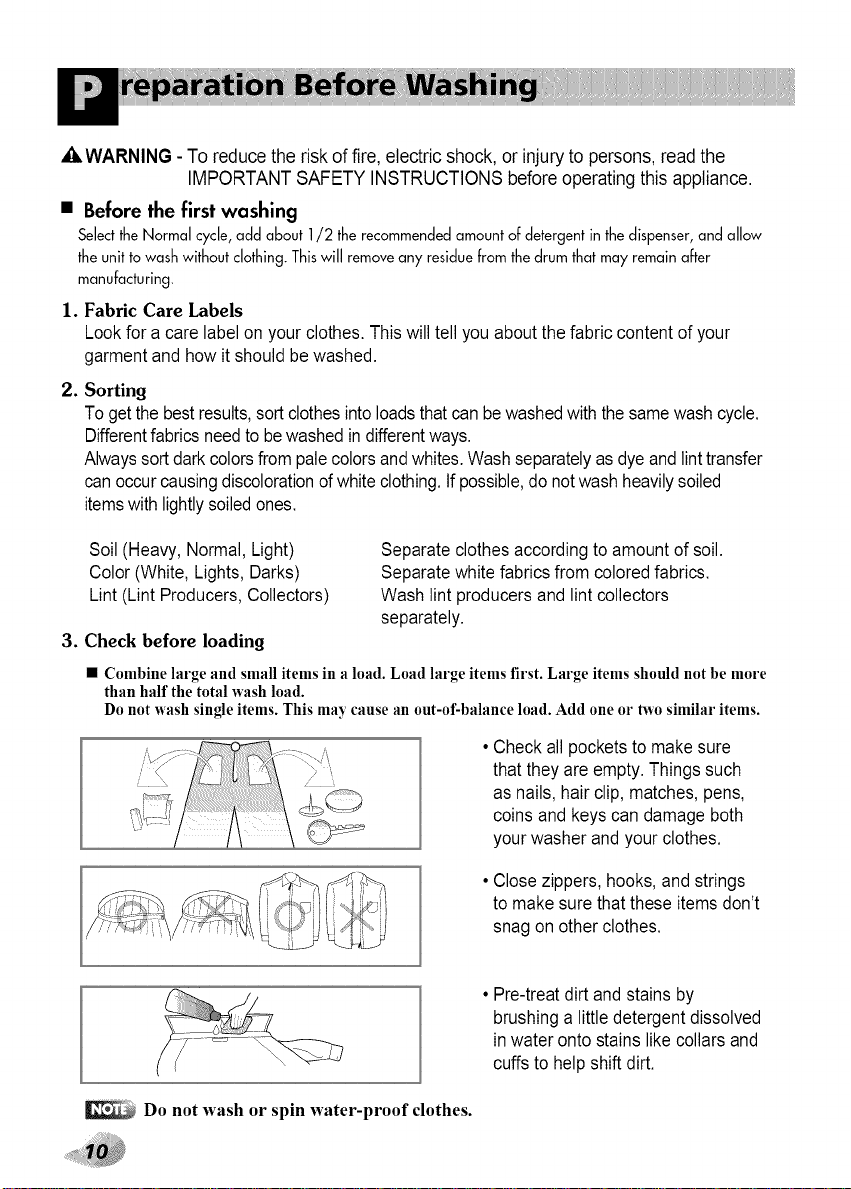
3. Check before loading
• Combine large and small items in a load. Load large items first. Large items should not be more
than half the total wash load.
Do not wash single items. This may cause an out-of-balance load. Add one or two similar items.
.... ' i/ _izi
_S u._bzJ
(
Do not wash or spin water-proof clothes.
Separate clothes according to amount of soil.
Separate white fabrics from colored fabrics.
Wash lint producers and lint collectors
separately.
Check all pockets to make sure
that they are empty. Things such
as nails, hair dip, matches, pens,
coins and keys can damage both
your washer and your clothes.
Close zippers, hooks, and strings
to make sure that these items don't
snag on other clothes.
• Pre-treat dirt and stains by
brushing a little detergent dissolved
in water onto stains like collars and
cuffs to help shift dirt.
• Adding detergent and fabric softener
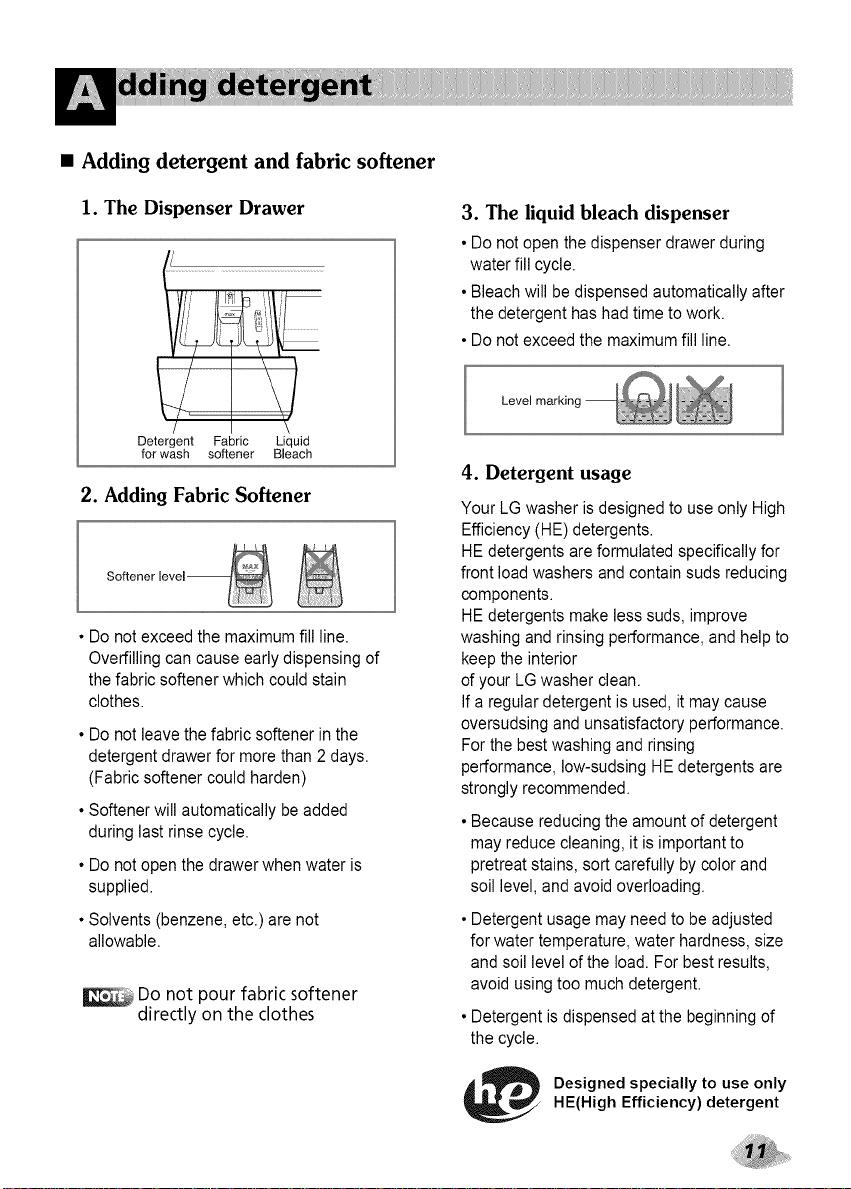
1. The Dispenser Drawer
/ I__
Detergent Fabric Liquid
for wash softener Bleach
2. Adding Fabric Softener
• Do notexceed the maximum fill line.
Overfilling can cause early dispensing of
the fabric softener which could stain
clothes.
• Do notleave the fabric softener inthe
detergent drawer for more than 2 days.
(Fabric softener could harden)
• Softener willautomatically be added
during last rinsecycle.
• Do notopen the drawer when water is
supplied.
• Solvents (benzene,etc.) are not
allowable.
:Do not pour fabric softener
directly on the clothes
3. The liquid bleach dispenser
• Do notopen the dispenser drawer during
water fill cycle.
• Bleach will be dispensed automatically after
the detergent has had time to work.
• Do notexceed the maximum fill line.
Level marking --
4. Detergent usage
Your LG washer is designed to use only High
Efficiency (HE) detergents.
HE detergents are formulated specifically for
front load washers and contain suds reducing
components.
HE detergents make less suds, improve
washing and rinsing performance, and help to
keep the interior
d your LG washer clean.
If a regular detergent is used, it may cause
oversudsing and unsatisfactory performance.
For the bestwashing and rinsing
performance, low-sudsing HE detergents are
strongly recommended.
• Because reducing the amount of detergent
may reduce cleaning, it is importantto
pretreat stains, sortcarefully by colorand
soil level, and avoid overloading.
• Detergent usage may need to be adjusted
for water temperature, water hardness, size
and soil level of the load. For best results,
avoid usingtoo much detergent.
• Detergent is dispensed at the beginning of
the cycle.
Designed specially to use only
HE(High Efficiency) detergent
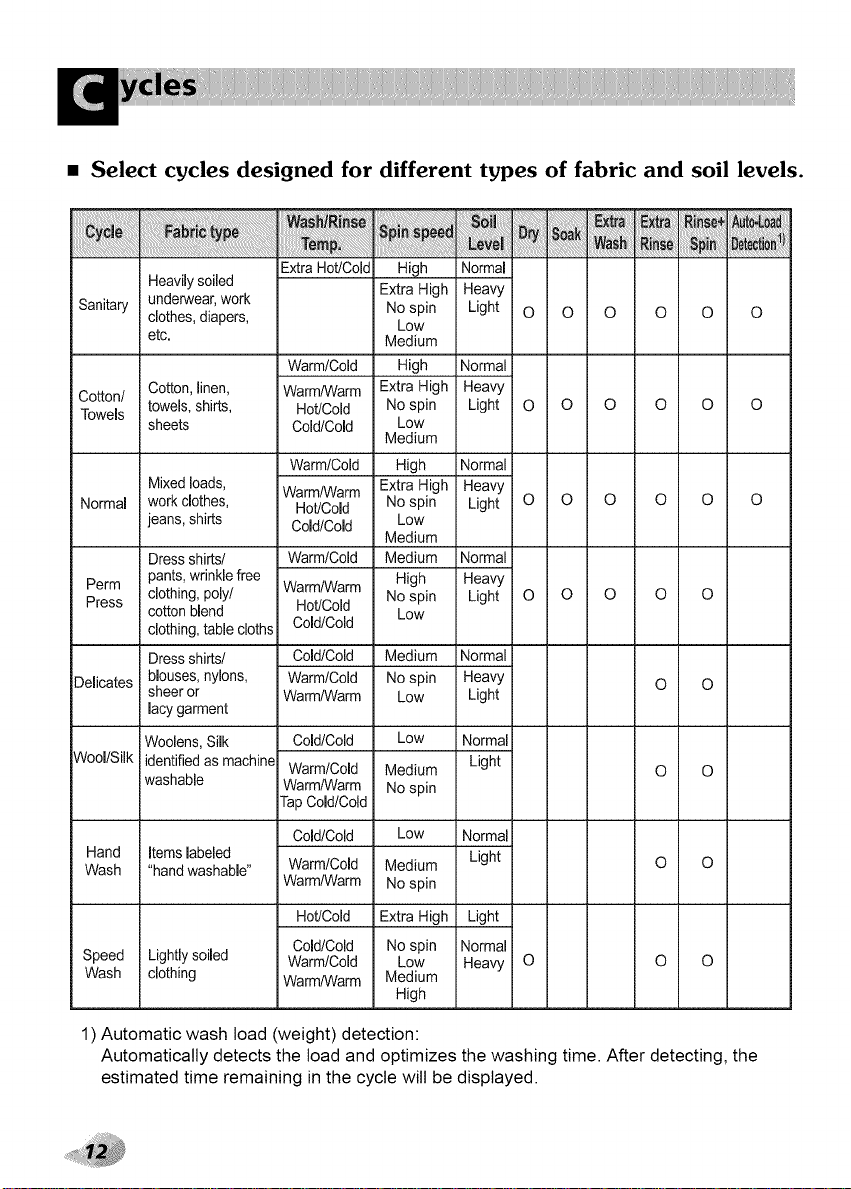
• Select cycles designed for different types of fabric and soil levels.
Extra Hot/Cold High Normal
Sanitary underwear,work
Cotton/ Cotton, linen, Warm/Warm Extra High Heavy
Towels towels, shirts, Hot/Cold No spin Light O Q O O O O
Normal work clothes, Hot/Cold No spin Light O O Q O O O
Perm pants,wrinkle free High Heavy
Press clothing, poly/ Warm/Warm
Delicates blouses, nylons, Warm/Cold
Wool/Silk identified as machin_ Warm/Cold Medium Light
Hand Items labeled Light
Wash "handwashable" Warm/Cold Medium
Speed Lightly soiled Warm/Cold Low Heavy
Wash clothing Warm/Warm Medium
Heavilysoiled Extra High Heavy
clothes,diapers, No spin Light O O O O O O
etc. Medium
Warm/Cold High Normal
sheets Cold/Cold Low
Warm/Cold High Normal
Mixedloads, Warm/warm Extra High Heavy
jeans, shirts Cold/Cold Low
Dress shirts/ Warm/Cold Medium Normal
cotton blend Hot/Cold No spin Light O O O O O
clothing,tablecloths Cold/Cold
Dress shirts/ Cold/Cold
sheer or Warm/Warm
lacy garment
Woolens, Silk Cold/Cold Low Normal
washable Warm/Warm No spin
TapCold/Cold
Cold/Cold Low Normal
WarmlWarm No spin
Hot/Cold Extra High Light
Cold!Cold No spin Normal
Low
Medium
Medium
Low
Medium Normal
No spin Heavy
Low Light
High
O O
O O
O O
O O
1) Automatic wash toad (weight) detection:
Automatically detects the toad and optimizes the washing time. After detecting, the
estimated time remaining in the cycle will be displayed.
o Soak
0 Extr_Wash © H_/Ccld 0 High
0 Rinse+Spln 0 Warm/Warm 0 Medium
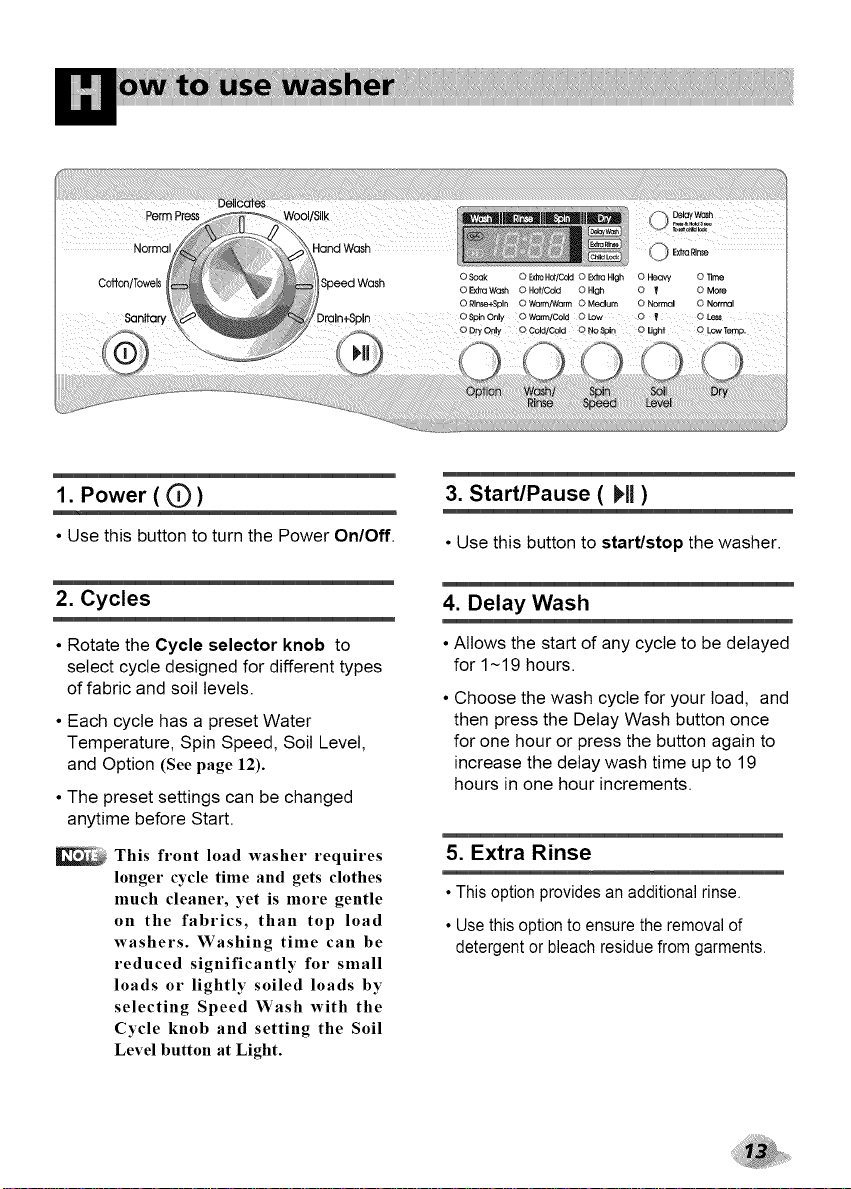
1. Power ((_)
• Use this button to turn the Power On/Off.
2. Cycles
• Rotate the Cycle selector knob to
select cycle designed for different types
of fabric and soil levels.
• Each cycle has a preset Water
Temperature, Spin Speed, Soil Level,
and Option (See page 12).
• The preset settings can be changed
anytime before Start.
This front load washer requires
longer cycle time and gets clothes
much cleaner, yet is more gentle
on the fabrics, than top load
washers. Washing time can be
reduced significantly for small
loads or lightly soiled loads by
selecting Speed Wash with the
Cycle knob and setting the Soil
Level button at Light.
3. Start/Pause ( Hi )
• Use this button to start/stop the washer.
4. Delay Wash
• Allows the start of any cycle to be delayed
for 1~19 hours.
• Choose the wash cycle for your toad, and
then press the Delay Wash button once
for one hour or press the button again to
increase the delay wash time up to 19
hours in one hour increments.
5. Extra Rinse
• This option provides an additional rinse.
• Use this option to ensure the removal of
detergent or bleach residue from garments.

6. Wash/Rinse Temperature
7 Spin speed
• Select a water temperature based on
the type of load you are washing.
• Follow the fabric care label and chart
below for best results.
Warm Mostloads
• Warm rinses leave the loads dryer than
cold rinses. Warm rinses increase
wrinkling.
• In cold climates, a warm rinse makes the
load more comfortable to handle.
• Cold rinses save energy.
• The Cold rinse temperatures depend on
the cold water at your faucet.
• To change the spin speed, press the
Spin Speed button repeatedly to cycle
through available options.
8 Soil Level
• To change the soil level, press the
Soil Level button repeatedly until the
desired setting is on.
 Loading...