

LG WM3370HWA/01, WM3370HWA/00, WM3370HVA/00, WM3370HRA/00 Owner’s Manual

Life's Good
OWNER'S MANUAL
SHING MACHINE
Please read ths owneCs manual thoroughiy before operat ng and keep if handy
for reference at ai tree%
WM3370H_A
MFL68639703
vet 080514.00
2 PRODUCT FEATURES
PRODUCT FEATU R ES
The inverter direct drive motor, which is directly attached to the drum, is capable of producing mui
tiple distinct different motions for optimal washing performance with very little noise and vibration,
The motor assembly a_so contains fewer moving parts, thus resulting in fewer repairs.
Should you experience any technical difficulty with your washing machine, it has the capability of
transmitting data by phone to the Customer Information Center, The ceil center agent records the
data transmitted from your machine and uses it to analyze the issue, providing a fast and effective
diagnosis (Refer to page 45).
Cleaning of the tub on a reguiar monthly basis using Tub Ciean can help keep the tub clean and
fresh.
Safely and conveniently secure the door s{ightiy ajar with the magnetic door ptunger. This wilt pro_
mote air circulation and allow the interior of the machine to dry. To use this feature, after the load has
been removed, do not close the door completely.
When the magnetic door plunger comes into contact with, the metal washer cabinet, it witi secure the
door slightly open allowing the interior of the washer to dr,/
The large capacity stainless steeI drum offers extreme durability and is tilted to improve efficiency
and allow easier access for large items,
Use this option to disable the controls during a wash cycle, This option can prevent children from
changing cycles or operating the machine.
The four-compartment dispenser drawer makes it easy to separate the p_e.-wash detergent, main
iaundP¢ detergent, liquid bleach, and fabric softener into different eompa_ments.
LG's unique, high temperature steam cycles help to remove tough stains,
The Tag On feature works on most NFC equipped smart phones by communicating with your Tag
On equipped LG appliance. Using the LG Smart Laundry application, the Tag On feature allows you
to diagnose your appliance, download new cycles, and see the status of your appliance by simply
touching the smart phone to the Tag On logo of the appliance.
TABLE OF CONTENTS
TABL£ OF CONTBNTS 3
2 PRODUCT FEATURES
4 IMPORTANT SAFETY INSTRUCTIONS
8 INTRODUCING YOUR WASHING MACHINE
8 Parts ancJ Accesr_or es
9 Centre{ panel lieature
11 INSTALLATION INSTRUCTIONS
11
Preview nslat_atioe o_de
12
Checking arid crees ng the proper Joc_#ion
13
Unpacking and tamer ng shippng bolt
14
Contract ng the water lnes
15
Connectif_g the @ain ne
16
_veting the washing machine
17
Piugging n the pewor cord and g_ound ng
1'7
-lest run
18 PREPARATION
18 Sorting wash oads
18 _ Precaut one lbr abdc care before _ash cycle
19 -- Fabric care abes
19 Sort ng !aundry
20 Uing de_erger t/fabric seftener
20 - Reeorernended deJe_gent
20 - [ oading the dispenser
22 USING YOUR WASHING MACHINE
22 Basic operation
23 Cycle guide
24 Wash cycles
24 _ Reduce a s'_dry allergens, AHergiene TM
24 _ Reduce aur dry bacfeda Sanffary
24 - BJankets or bury terns, Bulky/Large
24 _ Normal items Coffon/Normal
24 _ _¢drnkle free tern Perm.Press
24 - Shee_ terns, Delieefes
24 - Quick was_ Speed Wash
25 Cycle rood f er buttens
25 Set¢ing options befere the o/de
25 - Setting the water temperature Wash Temp
25 _ Setting the sp_ speed Spin Speed
25 - Se_ting so evai of _aundry, SaiJ Level
26 _ Ad_us¢ing the melody and buiton tones, Signal
26 _ Prewashing Pre Wash
26 _ Rinse dran arid spn only Rinse+Spin
26 Addng an exlra rnse cycle Extra Rinse
26 - F:%;_sefl ng the start time, Delay Wash
26 o E[ffcien Jycleaning Steam
27 _ Addin _ extra water te IRe wash and rnse cycles
Wafer Pl_s
27 - Savng e#ergy, Cold Wash _
27 Serf ng options durng ff_e cycle
27 ._ Button ock feature, Ch#d Lock
28 Saving a custom zed wash cyCkzs PGM Save
28 - Selecting your cus omi ed cycle Custom PGM
28 . Tumb ng delhes to prevertwrinkes Fresh Care
29 B@e_e using the 'Tag On function
29 _ lo use the "Tag On fund_on
2g - The Tag On gude
30 h_g On
36 MAINTENANCE
36 Cae
36 • Care after wash
36 Care ir cold ctmes
37 C caning
37 - C_ean r g the drurn_ Tub CJean
38 o Clean ng the detergent dispenser drawe_
3g CIear_ ng the water nlet fi_lers
40 o C_ean ng the d_an pur_p flier
41 C_ean ng the door sam
42 TROUBLESHOOTING
42 Checking error rnessages
43 Before calling for service
44 SPECIFICATIONS
45 USING SMART DIAGNOSIS _
46 V,/ARRANTY
4 IMPORTANT SAFETY NSTRUCTSONS
IMPORTANT SAFETY INSTRUCTIONS
READ ALL INSTRUCTIONS BEFORE USE
A WARNING
}:or your safety, the information in this manual must be fogowed to minimize the risk of fire, explosion, or electric
shock, or to prevent property damage, inja w to persons, or death,
Your safety and the safety of others are very important,
We have provided marly impo_ant safety messages in this manual and on your" appliance Always read and abe
ail screw message&
This is the safety alert symbol.
This symbol alerts you to potential hazards that can kiB or hurt you and others.
All safety messages wilt follow the _fe4y alert symbol and either the word DANGER, WARNING or CAUTION.
These words mean:
A DANGER
You will be kiited or seriously iniured ff yoa don't immediately fo_ow instructions
AWARNING
You can be killed or se_rioasly injured if you don't fol|ow instructio#s.
CAUTION
You may be slightly injured or cause damage to tbe product if you do not follow i_struction&
All safety messages will teil you what the poteatlal hazard is, tell you how to reduce the chance of injury, and tell
you what can happen if the instruclions are not fomlowed
eASeSSAFETy_R
A WARNING
To reduce the risk of fire, eiectde shock, or in}ury to persons when using this appliance, follow basic: precautions,
including the following
, Usethis appliance o_ly for its intended purpose as described
in this Owner's Manual
- Before _se,the washer must _ propedy installed as
described in ths manual
, Donot wash articles that have beer] previously cleaned in,
,washedi_, soaked in, or spotted with gasoline, dry cleaning
so,vents, or other flammable or explosive substances, as
they give off vapors that could igrgte or explode,
• Do not add gasoline, dry c!eaniag solvents, or other
flammable or expiosive substasces to the wash water. These
substances give off vapors that could ignite or e×plode_
• Under certain conditions, hydrogee gas may be produced in
a hot water system that hasnot been used for 2weeks or
more, HYDROGEN GAS IS EXPLOSPTE,ff the hot water
system has net been used for such a period, before using the
washer, turn on aI{ hot water faacets and _etthe water flow
from each for severa_minutes, This _-_illre}easeany
accumulated hydrogen gas. As the gas is flammable, do not
smoke or use an open flame durie gflris time,
• Donot allow children to p_ayon or in the "washer,Close
supervision of children is necessary when the washer is used
nee[ children,
, Before the washer is removed from service or discarded,
remove the lid to prevent children from climbing inside.
• Do not instalt or store the washer' where it will be exposed to
the weather or freezing temperatures,
• Do net tamper with controls,
• Keep the area andemeath and around your appliances flee
of combustibie matsriais (lint, paper, rags, etc.), gasoline,
chemicals and other flammable vapors and liquids,
*Do no_ _epair or replace any part of the washer or attempt
any servicing other than as described in this maeaaL We
strongly recommend that coy service be performed bya
qualified technician
*See Insta_letion instructions for grounding requiremeets_
, ALWAYS fo_low the fabric care instructions supplied bythe
garment manufacturer:
*Do not place items exposed to cooking og in your washer
Items contaminated with cook;n9 oiis may cent#buts to a
chemical reaction that could cause a load to catch fire
, Use fabric s_ofteeersor products to eliminate static on,ly as
recommended by the manufacturer.
*This washer is not designed for maritime use or for mobile
installations sash as in RVs, aircraft, etc,
*Turn off the water faucets and unph_g the washer if the
machine is to be [eft for an extended period of time, such as
during vacations
*Packaging material see be dangerous for children. There is a
risk of suff_ation! Keep all packaging from childree,
-Always check the inside of the washer for foreige objects
before ioading laundry, Keepthe lid closed when nat in use,
, Do net reach into the appliance if the tub or agitator is
mov rig,
*WARNING :This product contains chemicals known to the
State of California to causecancer and bidh ddeets or other
reproductive harm. Wa_ hasdaafterhandling.
!MP©R_I_NT SA_'ETY N%[RUCT!QNS 5
IMPORTANT SAFETY INSTRUCTIONS
READ ALL INSTRUCTIONS BEFORE USE
_WARNING
For your safety, the information in this manual must be foltowed to minimize the risk of fire, explosion, or
ele_ric shock, or to prevent property damage, injury to persons, or death,
This appliance must be grounded In the event of malfunction or breakdown, grounding wifl reduce the
risk of ele_de shock by providing a path of least resistance for etectric current. This appliance is equipped
with, a cord having an equipmentogrounding conductor and grounding plug. The ping must be plugged
into an appropriate outlet that is propedy installed and grounded in accordance with afl local codes and
ordinances.
WARNING
Improper connection of the equipmenbgrounding conductor can result in risk of ete_ric shock. Check with
a qualified electrician or servicer if you are in doubt as to whether the appliance is pro_rly grounded. Do
not modify the plug provided with the appliance, if it does not fit the outlet, have a proper outlet installed
by a qualified ele_rician. Failure to follow these warnings can cause serious injury, fire, electric shock, or
death.
6 IMPORTANT SAFETY NSTRUCTaONS
IMPORTANT SAFETY INSTRUCTIONS
READ ALL INSTRUCTIONS BEFORE USE
A WARNING
For your safety, the information in this manual must be to[towed to minimize the risk of fire, explosion, or electric
shock, or to prevent prope_y damage, injury to persons_ or death.
SAFETY INSTRUCTIONS FOR INSTA;LLATtON
A WARNING
To reduce the risk of fire, electric shock, or iniury to persons when using this appliance, follow basic precautions,
in¢iuding the following,
- Refer to iNSTALLATiON INSTRUCTIONS for detaiied
grounding procedures. Installation instructions are
packed with the washer for inslaHer's reference if the
washer is moved to a new location, have it checked
aod reinstailed by a qualified service technician
Failure to follow this warning can cause serious iniury;
fro, elecWie shock, or death,
. Do not, under any circumstances, cut or remove the
third (ground) prong from the power cot& Failure to
fellow this warning can cause serious iniury, fire,
electric shock, or death.
- For persona[ safety, this applia_ce must be propedy
grounded Failure to fo[!ow this warning can cause
serious injuH, fire, electric shock_ or death.
- The power cord of this appliance is equipped with a
3@rong (grounding) plug which mates with a standard
3 prong (grounding) wail eerier to minimize the
possibili w d electric shock from this appliance.
• This washer must be plugged into a 120 V,-,60Hz
grounded eager, Failure to follow this warning can
cause serious injury, fire, electric shock, or death
, Have the wall outlet and circuit checked by a qua}flied
electrician to make sure the oudet is properly
grounded. Fa#ure to follow this warning can cause
serious iojury, fire, electric shock, or death.
. Where a _andard 2,,prong wall outlet is encountered,
it is your personal responsibility and obligation to
have it replaced with a properly grounded 3 prong
wa_l outlet Failure to follow this warning can cause
serious iniu_, fire, ebctric shock, or death.
- Do not install on carpet. Install washer on a solid floor,
Failu_e to follow this warning can cause serious leak
damage,
• Do not remove ground prong. Do not use an adapter
or extension cord. Plug into a grounded 3_prong
outlet. Faiiure to follow these warnings can cause
sedous injury, fire, electric shock, or death,
, The washer shoutd aiways be plugged into its own
individual elecldcal outlet which has a voltage rating
that matches the rating plate, This provktes the best
performance and also prevents overloading house
w#ing circuits which could cause a fire hazard from
overheated wires.
• Never unplug your washer by puiHog on the power
cord. Always grip plug firmly arid pull straight out
from the oatlet. Failare to follow this warning can
cause serious injury, fire, electric shock, or death,
• Repair or immediately replace all power cords that
have become frayed or otherwise damaged, Do not
use a cord that shows cracks or abrasion damage
along its length or at either end. Faiture to fotiow this
warning can cause serious iniury, fire, electric shock,
or death,
•When installing or moving the washer, be careful not
to pinch, crush, or damage the power cord Failure to
follow this warning can cause serious injury, fire,
elecldc shock_ or death
• The washer must be installed and electrically
grounded by a qualified service person in accordance
wRh _oca_codes to prevent shock hazard and assure
stability dudng operation.
• The washer is heavy, Two or more people may be
needed to install and move the appliance, Faiture to
do so can, resutt in back or other injury.
• Store and install the washer where it will not be
exposed to temperatures below freezing or exposed to
outdoor weather conditions. Failure to follow this
warning can cause serious leak damage.
• To reduce the risk of electric shock, do not install the
washer in humid spaces Failure to fofiow this warning
can cause serious injury, fire, electric shock, or death,
•To reduce the risk of injury to persons, adhere to air
indust H recommended safety procedures including
the use of long sleeved gloves and safety glasses.
Failure to follow all of the safety warnings in this
maoua[ could result in prope_y damage, injurl to
persoos or death_
!MP©R_I_NT SAFETY NS_RUCT!QNS
IMPORTANT SAFETY INSTRUCTIONS
READ ALL INSTRUCTIONS BEFORE USE
AWARNING
For your safety_ the information in this manual must be fo_owed to minimize the risk of fire, explosion, or
ele_dc shock, or to prevent property damage injury to persoes, or death
RUCTDN CLEANfftG, AND DISPOSAL
A WARNING
To reduce the risk of fine, eiectdc shock, or injury to persons when using this appliance, follow basic
precautions_ including the following.
•Unpfug the washer before cleaning to avoid the
risk of eiectdc shocL
• Never use harsh chemicals, abrasive cleaners, or
solvents to clean the washer. They will damage the
finish,
• Do not put oily or greasy rags or clothing on, top of
the washer. These substances give off vapors that
could ignite the materials.
• Do not wash items that are soiled wkh vegetable
or cooking oil. These items may contain some oil
a_er lauedering. Due to the remaining oil, the
fabric may smoke or catch fire by itself.
• Disconnect this appliance from the power supply
before attempting any user maintenance, Turning
the controls to the OFF position does not
disconnect this appliance from the power supply
Failure to follow this warning can cause serious
injury, fire, electric shock, or death,
• Do not combine iaundw products for use in one
load unless specified on the label.
- Do not mix chlorine bleach with ammonia or acids
such as vinegar. Follow package directions when
using laundry products, Incorrect usage can
produce poisonous gas, resulting in serious injury
or death.
• Do not reach into the washer while parts are
moving. Before loading, unloading, or adding
items, press the START/PAUSE button and allow
the drum to coast to a complete stop before
reaching inside. Failure to follow this warning can
cause serious injury, fire, electric shock, or death
. Do not allow children to play on or in the washer.
Close supervision of children is necessary when
the washer is used near children. As children grow,
teach them the propec safe use of all apptiances.
Failure to comply with these warnings could result
in serious injury to persons or death.
. Destroy the carton, plastic bag, and other packing
materials after the washer is unpacked. Children
might use them for play. Cartons covered with
rugs, bedspreads, or plastic sheets can become
airtight chambers, Failure to comply with these
warnings could result in serious iniury to persons
or death,
* Keep laundry products out of children's reach. To
prevent injuH to persons, observe air warnings on
product labels. Failure to comply with these
warnings could resuk in serious injury to persons
or death.
. Before your washer is removed from service or
discarded, remove the door to the washing
compartment to avoid the danger of children or
small animals getting trapped inside. Failure to do
so can result in serious injury to persons or death.
. Make sure the dispenser drawer is closed at all
times when not being filled with laundry produ_s.
Fa lure to keep the drawer dosed can result in
personal injury or flooding.
SAVE THESE INSTRUCTIONS
8 INTRODUCING YOUR WASHING MACHINE
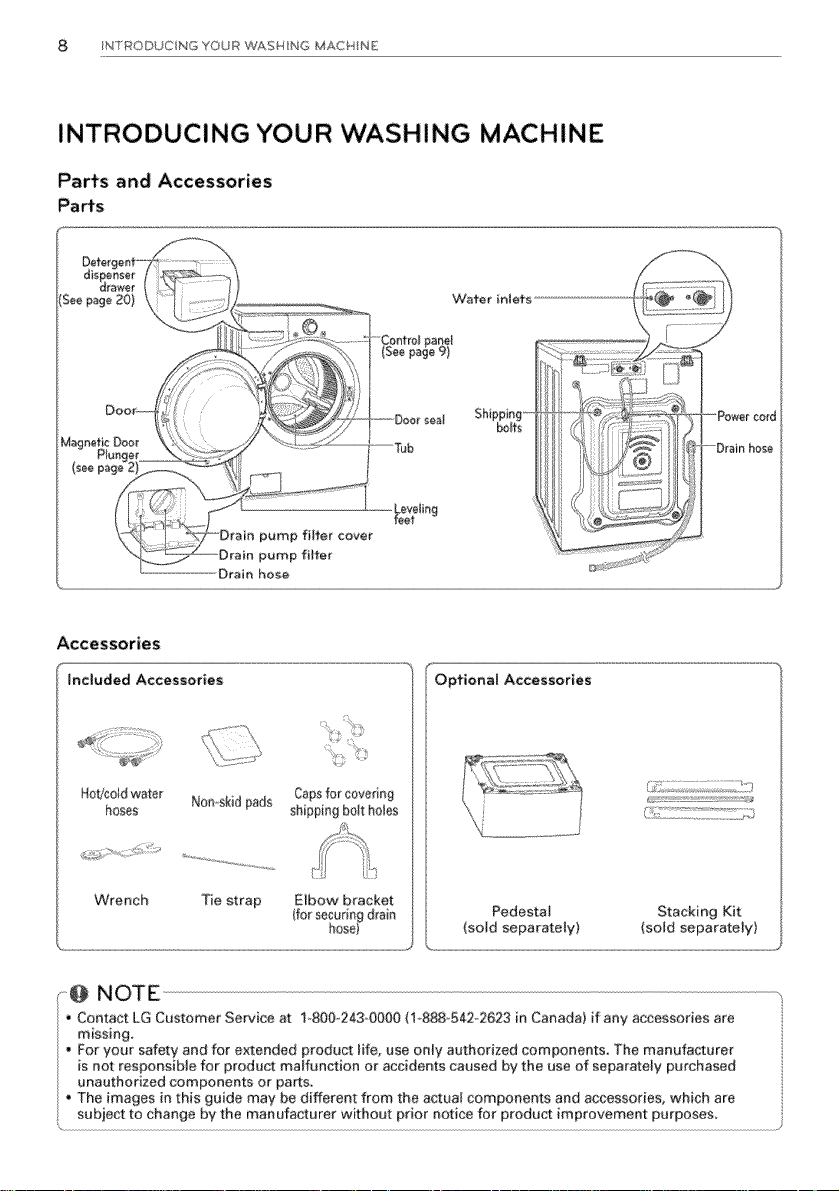
INTRODUCING YOUR WASHING MACHINE
Parrs and Accessories
Parts
Wafer inJets
holt_
Accessories
included Accessories
Hot/cOWhosesWaterNon-skidpads shipping boltholes
Wrench
Tie strap Elbow bracket
Capsfor covering
¢--
':Optlonai Accessories
Pedestal Stacking Kit
{sold separately} (sold separately)
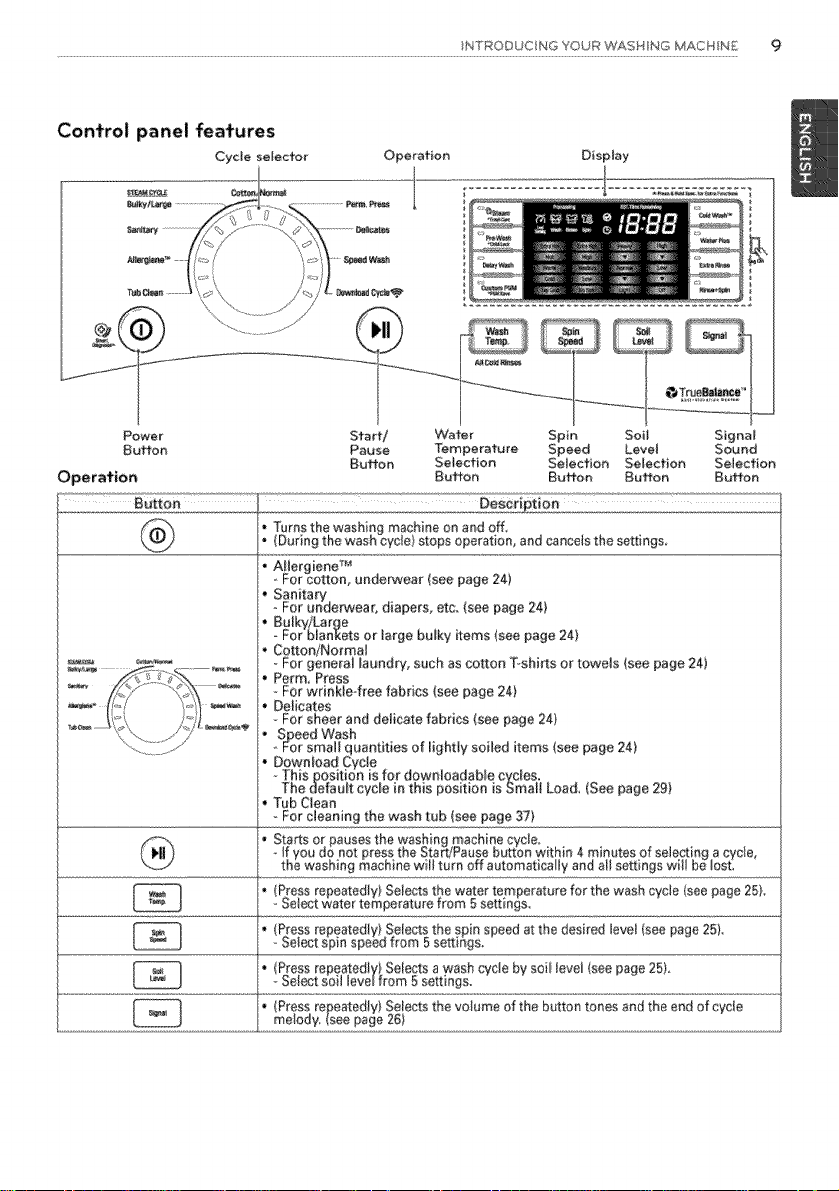
Control panel features
Cycle selector Display
NTr4_ODUCING"fOUR /_AS4 NG MACH! ,_E 9
Operation
Power
Buffon
BUtton
Start/ rearer Spin Soil S_9na_
Pause Temperature Speed Level Sound
Buffon Selection Selection Selection Selection
? De_:rip_ioa
• A!tergieneTM
bor cotton, underwear (seepage 24)
Cotton/Normal
For general laundry, such as cotton Toshirts or towels (see page 24)
Porto. Press
,.For wrinkteofree fabrics (see page 24)
Delicates
- For sheer and delicate fabrics (see page 24}
Speed Wash
,- For small quantities of lightly soiled items (see page 24)
Downioad Cycle .....
- Thisposition is for _owmoaaable cycles,
The default cycle in this position is Small Load, (See page 29]
Tub Clean
- For cleaning the wash tub {see page 37)
(Px_eserepeatedly Selects the water temperature for the wash cycle (see page 25).
_elect water temperature from 5 settings.
(Press repeatedly} Selects the spin speed at the desired level (see page 25)
Select Spin speed from 5 se_i_gs
(_ess repeatediy)Selects a wash cycle by soii level (see page 25).
bele¢_ soiNleve_from 5 settings,
, (Press repeatedly) Selects the volume of the button tones and the end of cycle
melody {see page 26)
Button Buffon Button Buffon
10 INTRODUCING YOJR WASFHNG MA('[ HINE
Opera€ion (continued)
(Press before wash cycle} Pre-wash heavily soiled laundry (Seepage 26L
(Pressand hold during wash cycle} Activates orcancels Child Lockfeature,
(Seepage 27L
(Press bdore wash cycle} To add water during wash and rinse cycle
(See page 271.
{Press before wash cycle)Add an extra rinse to the selected cycle, {see page 26,}
Use this option to rinse detergent from the load {See page 26}
Set the start time of the wash cycle. (See page 26},
(Press before starting, wash cycle/Use this option to add steam for extra
cleaning power (See page 26)
(Press and hold before starting wash cycle} Tumbles clothes after cycle
• Use this option to heip reduce energy consumption (See page, 27}.
• (Press and hold} Saves the cL_rrent cycle and settings for use at a later time.
• (Press once) Restores the previously saved seltings. {See page 27_28}
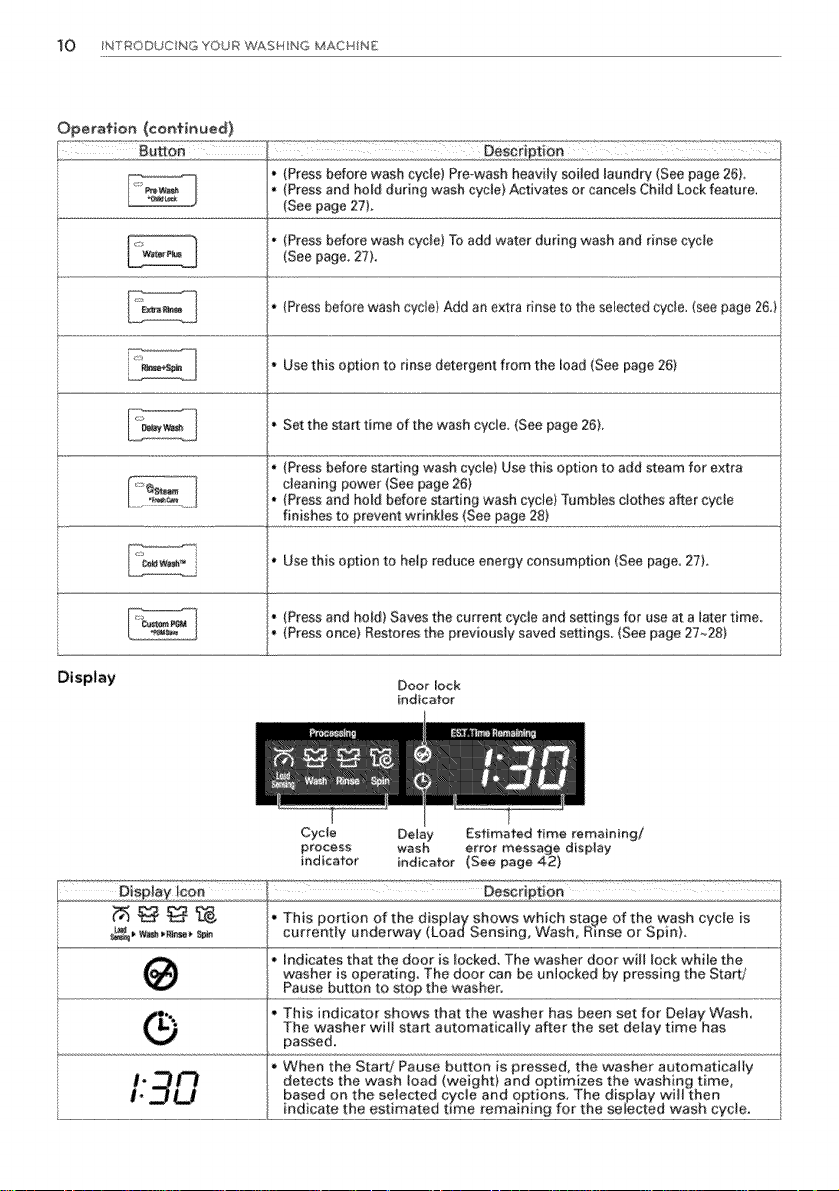
Display Door lock
Cycle Delay [sfimafed lime remaining/
process wash error message display
indieafer i,ndica,for (See page 42)
* This portion of the display shows which stage of the wash cycle is
currentty underway (LoadSensing, Wash, Rinse or Spin},
* Indicates that the door is locked, The washer door will lock while the
washer is operating, The door can be unlocked by pressing the Start:/
Pause button to _op the washer,
passed,
When the Start/Pause button is pressed, the washer automatically
detects the wash toad (weight) and optimizes the washing time,
.............................................................................................................................................
based on the selected cycle and options, The display will then
................!r,_!s_tt _h s_t!mate _!m _eme!n!,, tq th es!t ct_ w__ qyc!e_...............................
indicator
Deser!ption '__"_°":_'="T'_":T '

+
INSTALLATION INSTRUCTIONS
Preview installation order
NSTALLA[ION NSTRUCT!ONS _1
Checking and choosing
the proper location
Connecting the drain _ne
Unpacking and removing
shipping bolts
Leve/ng the washing Plugging !n the power
machine cord and grounding
Conned_ng the water ine
Tea_run
Failure to do so can result in back or other injur%
• Store and install the washer where it veil not be exposed to temperatures below freezing or
exposed to outdoor weather conditions Faiture to fottow this warning can cause serious injury,
fire, electric shock, or death_
• Properly ground the washer to conform with ali governing codes and ordinances, Fature to follow
this warning can cause serious injury; firs, electric shock, or death.
• To redu_-e the risk of electric shock, do not instal the washer in humid spaces, Failure to folow
this warning can cause serious injury; fire, electric shock, or death,
• The base opening must not be obstructed by carpeting when the washer is insta/ed on a carpeted
floor,
• Do not remove the ground prong, Do not use an adapter or extension cord, Plug into a grounded
3 prong outlet, Failure to follow this warning can cause serious injur% fire_ electric shock, or
death,
.... !
_2 INSTALLATION NSTRL CTIONS
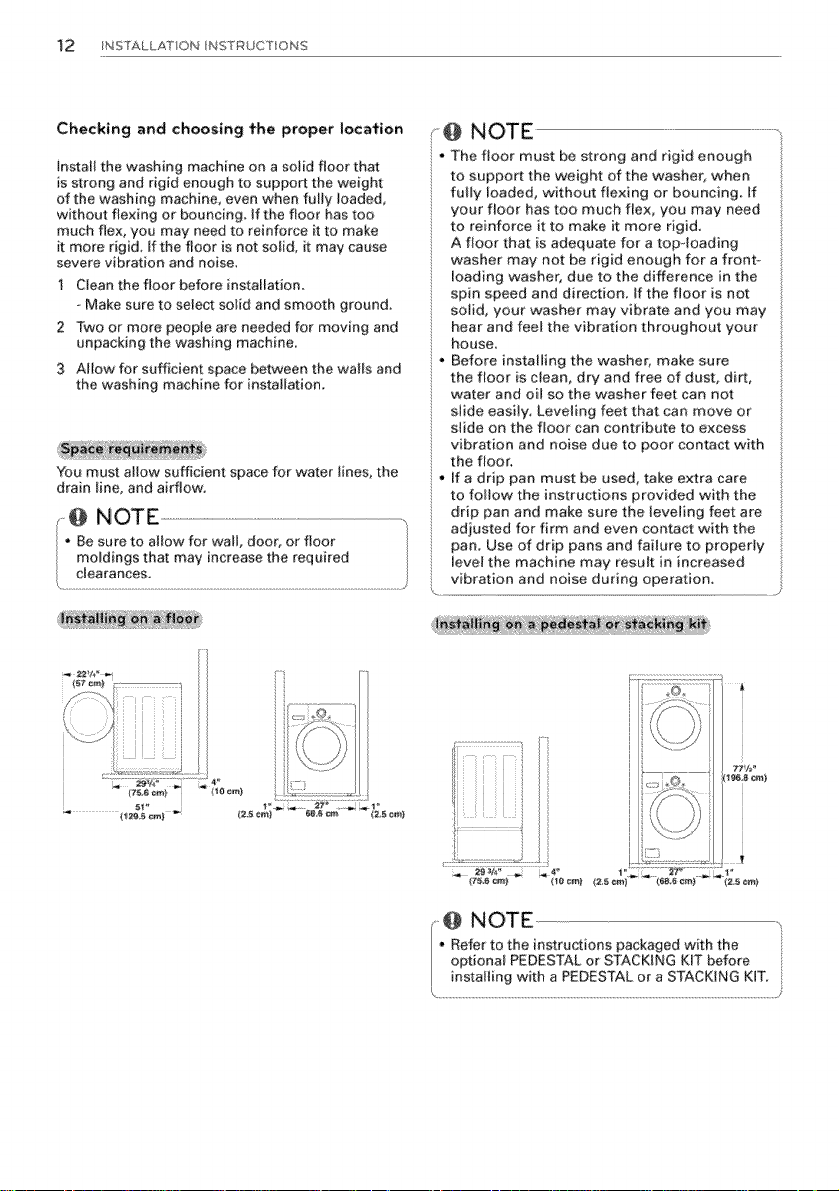
Checking and choosing the proper location
Install the washing machine on a solid floor that
is strong and rigid enough to suppo_ the weight
of the washing machine, even when fu/y loaded,
without flexing or bouncing, If the floor has too
much flew you may need to reinforce it to make
it more rigid, ffthe floor is not solid, it may cause
severe vibration and noise.
1 Clean the floor before installation.
- Make sure to select sold and smooth ground.
2 Two or more people are needed for moving and
unpacking the washing machine_
3 Allow for sufficient space between the walls and
the washing machine for installation.
You must aIIow sufficient space for water fnes, the
drain line, and airflow.
@ NOTE
• The floor must be strong and rigid enough
to support the weight of the washer) when
fully loaded, without flexing or bouncing, If
your floor has too much flex, you may need
to reinforce it to make it more rigid.
A floor that is adequate for a top-loading
washer may not be rigid enough for a front°
loading washer, due to the difference in the
spin speed and direction, if the floor is not
solid, your washer may vibrate and you may
hear and feel the vibration throughout your
house,
• Before installing the washer, make sure
the floor is clean, dry and free of dust, dirt,
water and oil so the washer feet can not
siide easil% Leveling feet that can move or
slide on the floor can contribute to excess
vibration and noise due to poor contact with
the floor.
• If a drip pan must be used, take extra care
to folow the instructions provided with the
drip pan and make sure the leveling feet are
adjusted for firm and even contact with the
pan_ Use of drip pans and failure to properly
level the machine may result in increased
vibration and noise during operation.
......... .......
77V= =
NSTALLAT ON NSTRUCT ONS _3
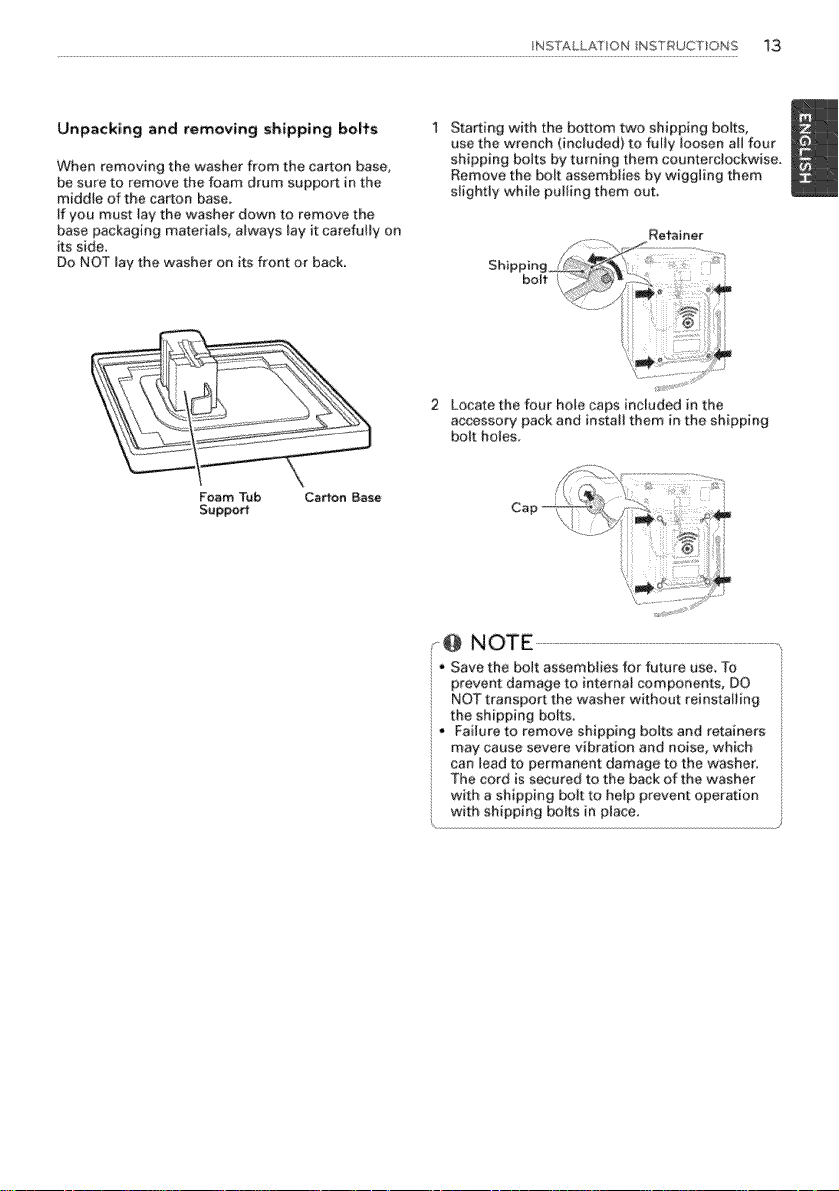
Unpacking and removing shipping bolts 1
When removing the washer from the carton base,
be sure to remove the foam drum support in the
middle of the carton base,
ff you must tay the washer down to remove the
base packaging materials, always lay it carefully on
its side.
Do NOT lay the washer on its #oct or beck.
Foam Tub Carton Base
Support
Ste_ing with the bottom two shipping bolts,
use the wrench (included) to fully loosen eli four
shipping bolts by turning them counterclockwise.
Remove the bolt assemblies by wiggMing them
slightly while pulling them out
Retainer
2 Locate the four hole caps included in the
accessory pack and install them Jn the shipph_g
bolt holes.
/i_,_
................................
7 {i
i )
r@ NOTE
• Save the bolt assemblies for future u_ To
prevent damage to internal components, DO
NOT transport the washer without reinstaiiing
the shipping bolts.
• Failure to remove shipping bolts and retainers
may cause severe vibration end noise, which
can lead to permanent damage to the washer.
The cord is secured to the back of the washer
with a shipping bolt to help prevent operation
with shipping bolts in place.
i
14 INS'TALLAT_ON NSTRL CTION$
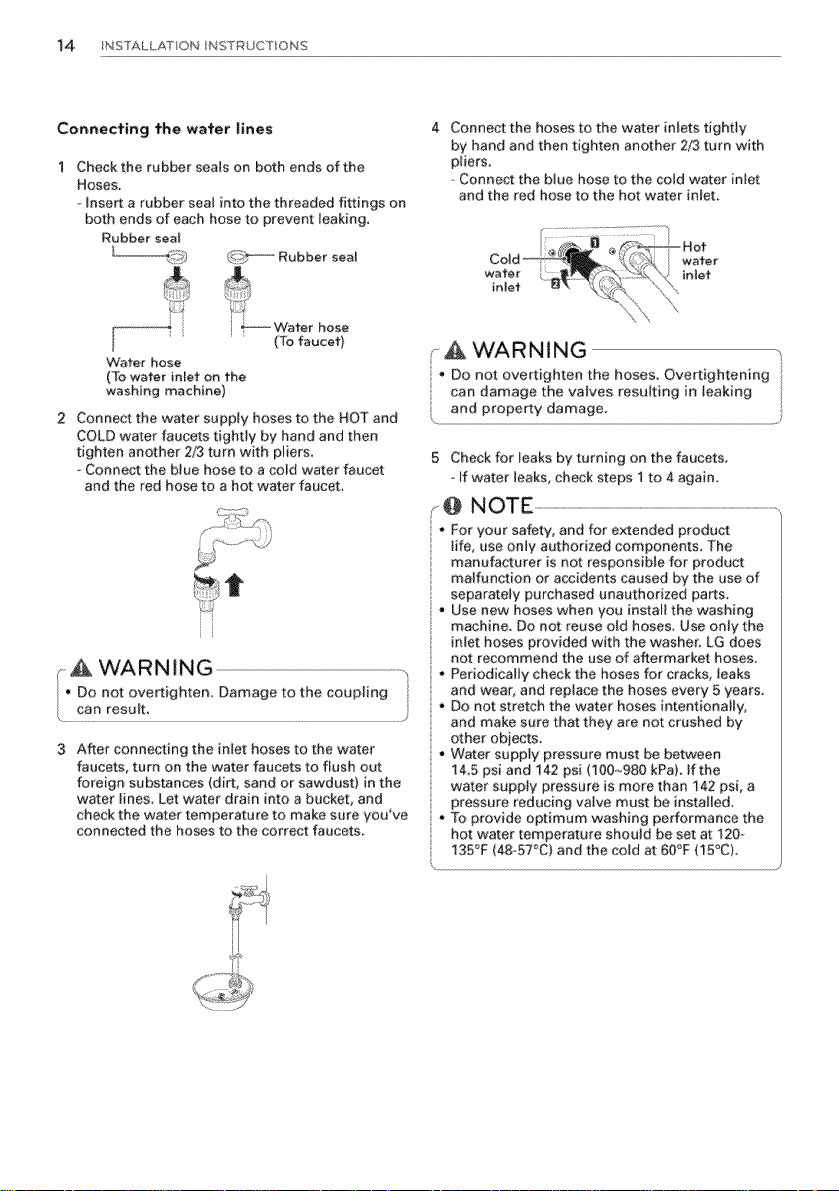
Connecting the water lines
4 Connect the hoses to the water inlets tightfy
by hand and then tighten another 2/3 turn with
Check the rubber seamson both ends of the
Hoses,
.-insert a rubber seal into the threaded fittings on,
pliers°
-,Connect the blue hose to the cold water inlet
and the red hose to the hot water inlet,
both ends of each hose to prevent leaking.
Rubber seat
'_ _ Water hose
Water hose
(To water inlet on the
washing machine}
(% faucet}
Connect the water supply hoses to the HOT and
COLD water faucets tightly by hand and then
tighten another 2/3 turn with pliers,
Connect the blue hose to a cold water faucet
and the red hose to a hot water fauceL
5 Check for Ieaks by turning on the faucets
If water leaks, check steps 1 to 4 again.
:ri__. ,_@ NOTE .......................................................................................................................................................................................................................................................
/" • For your safety, and for extended product
_t malfunction or accidents caused by the use of
i_ :_" machine. Do not reuse oid hoses_ Use only the
(_ WAR N JN G not recommend the use of aftermarket hoses,
Do not overtighten. Damage to the coupling and wear, and replace the hoses every 5 years.
can result, ...., Do not stretch the water hoses intentionally,
After connecting the inlet hoses to the water
faucets, turn on the water faucets to flush out
foreign sub_Aances {dirt, sand or sawdust} in the
water lines, Let water drain into a bucket_ and
check the water temperature to ma!,-e sure you've
connected the hoses to the correct faucets,
life, use only authorized components. The
manufacturer is not responsible for product
separately purchased unauthorized parts.
Use new hoses when you instalt the washing
inlet hoses provided with the washer, LG does
.... • Periodically check the hoses for cracks, leaks
and make sure that they are not crushed by
other objects.
* Water sapp{y pressure must be between
14_5 psi and 142 psi (100._980 kPaL if the
water supply pressure is more than 142 psi, a
pressure reducing valve must be installed
o To provide optimum washing performance the
hot water temperature shouid be set at 120 -
135°F (48_57_C) and the cold at 60_F (15_'CL
Connecting the drain line
Secure the drain hose in place to prevent it from
moving and leaking.
_@ NOTE
• The drain hose should be propedy secure&
Failure to properly secure the drain hose can
result in flooding and malfunction.
• The end of the drain hose should not be lower
than 29 inches (73.66 era} or higher than 96
inches (244.8 cm) from the bottom of the
washer.
• The drain must be installed in accordance with
any applicable local codes and regulations.
• Make sure that the water lines are not
stretched, pinched, crushed, or kinked.
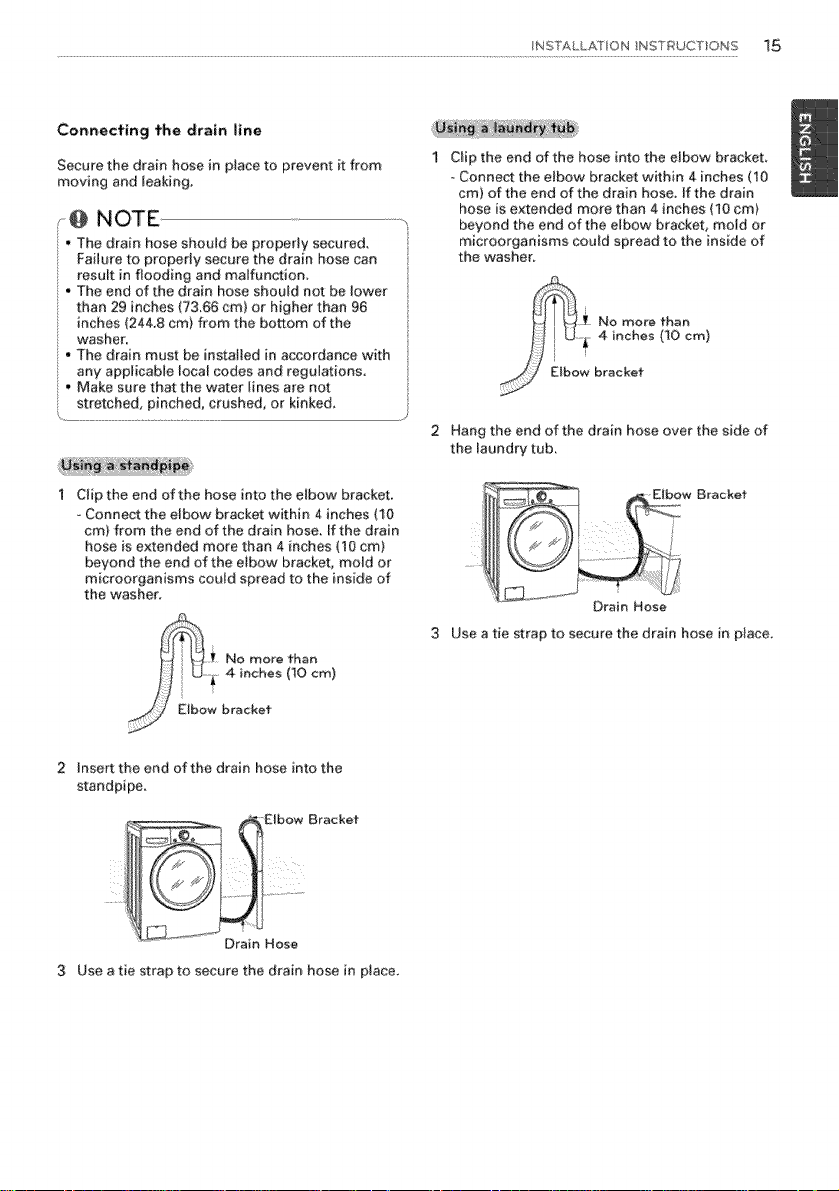
Ciip the end of the hose into the elbow bracket.
Connect the elbow bracket within 4 inches (10
cm} from the end of the drain hose. if the drain
hose is extended mere than 4 inches (10 cm)
beyond the end of the elbow bracket, mold or
microorganisms could spread to the inside of
the washer.
No more than
NSTALLA"f ON !NSTRUCT OHS _5
CHp the end of the hose into the elbow bracket
_.Connecl the elbow bracket within 4 inches (10
cm) of the end of the drain hose. If the drain
hose is extended more than 4 inches (10 cm}
beyond the end of the elbow bracket, mold or
microorganisms could spread to the inside of
the washer.
-_ No more than
....._ 4 inches (10 cm}
w bracket
2 Hang the end of the drain hose over the side of
the laundry t[_b.
_W Bracket
Drain Hose
3 Use a tie strap t:o secure the drain hose in place.
i 4 inches (10 cm)
w bracket
insert the end of the drain hose into the
standpipe.
Bracket
3 Use a tie strap to secure the drain hose in p_ace.
16 INSTALLATION NSTRL CTION$
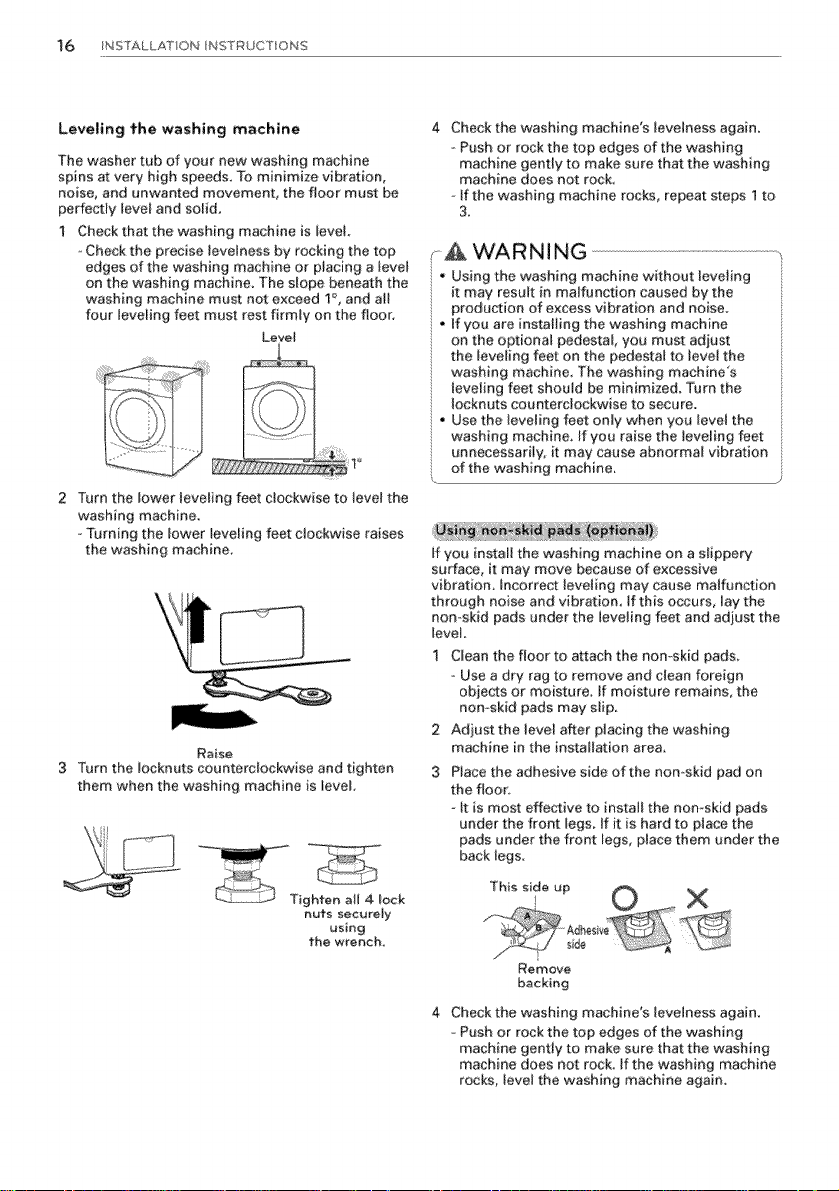
Leveling the washing machine
The washer tub of your new washing machine
spins at very high speeds_ To minimize vibration,
noise, and unwanted movement, the floor must be
perfectly leveI and solid.
1 Check that the washing machine is level
-Check the precise levelness by rocking the top
edges of the washing machine or placing a level
on the washing machine. The slope beneath the
washing machine must not exceed 1_, and aII
four leveling fee, t must rest firmly on the floor.
Level
2 Turn the lower leveling feet clockwise to levet the
washing machine
Turning the lower leveling feet clockwise raises
the washing machine.
3 Turn the Iocknuts counterclockwise and tighten
them when the washing machine is level,
Raise
4 Cheek the washing machine's levelness again,
_-Pash or rock the top edges of the washing
machine gently to make sure that the washing
machine does not reel
- if the washing machine rocks, repeat steps 1 to
3.
A WARNING
" Using the washing machine without leveling
it may result in maffunction caused by the
production of excess vibration and noise.
• tf you are installing the washing machine
on the optional pedestal, you must adi_st
the leveling feet on the pedestal to level the
washing machine. The washing machines
leveling feet should be minimized, Turn the
iocknuts counterclockwise to secure.
, Use the leveling feet only when you level the
washing machine. If you raise the leveling feet
ueeecessadiy, it may cause abnormal vibration
of the washing machine,
if you install the washing machine on a slippery
surface_ it may move because of excessive
vibration, Incorre_ leveling may cause malfunction
through noise and vibration, tf this occurs, lay the
nomskid pads under the leveling feet and adiust the
level,
1 Clean the floor to attach the non-skid pads.
Use a dry rag to remove and clean foreign
objects or moisture, if moisture remains, the
non-skid pads may slip.
2
Adiust the level a_er placing the washing
machine in the installation area.
3
Place the adhesive side of the non_,skid pad on
the floor;
tt is most effective to instatl the nomskid pads
under the front legs if it is hard to place the
pads under the front legs, place them under fhe
back Kegs,
nuts securely
using
fhe wrench.
This side up 0
......... X
A_i"
Remove
backing
4 Check the washing machine's levelness again,
= Push or rock the top edges of the washing
machine gently to make sure that the washing
machine does not rock. If the washing macMne
rocks, level the washing machine again.
+
NSTALLA[ION NSTRLJCT!ONS 17
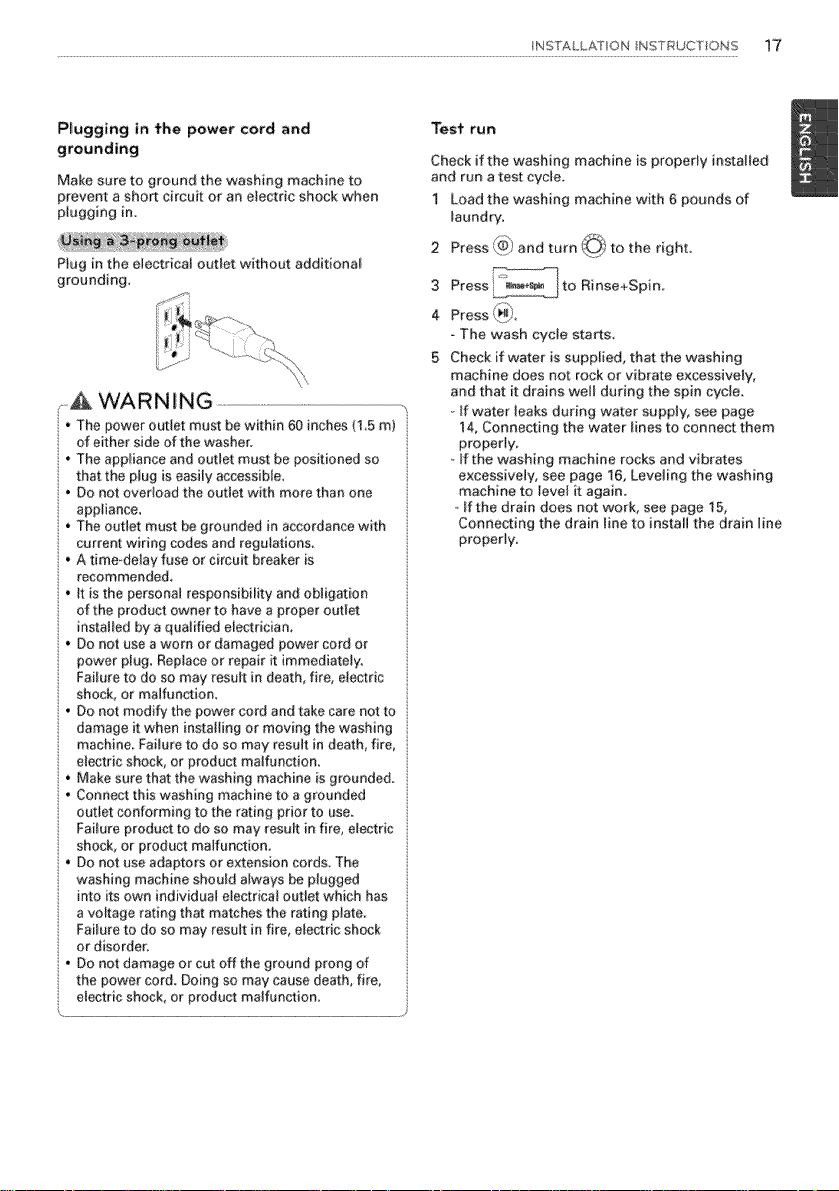
Plugging in the power cord and
grounding
Make sure to ground the washing machine to
prevent a sho_ circuit or an efectric shock when
plugging in.
Piug in the ele_rical outlet without additiona_
grounding,
- _ WAR N IN G
• The power outlet must be within 60 inches (1.5 m)
d either side of the washer.
• The appfance and outlet must be positioned so
that the plug is easily accessible,
, Do not ovedoad the outiet with mote than one
appliance,
• The outlet must be grounded in accordance with
current wiring codes and regulations
• A time-delay fuse or circul breaker is
recommended,
• it is the personal responsibility and obligation
of the product owner to have a proper outlet
installed by a qualified electrician,
• Do not use a worn or damaged power cord or
power plug, Replace or repair it immediately.
Fature to do so may result in death, fire, electric
shock, or malfunction,
, Do not modify the power cord and take care not to
damage it when instating or moving the washing
machine. Failure to do so may result in death, fire,
electric shock, or product maffunction.
• Make sure that the washing machine is grounded.
• Connect this washing machine to a grounded
outlet conforming to the rating prior to use,
Faifure product to do so may result in fire, electric
shock, or product malfunction.
• Do not use adaptors or extension cords, The
washing machine should always be plugged
into its own individual electrical outlet which has
a voltage rating that matches the rating plate.
Fa/ure to do so may result in fire, electric shock
or disorder.
• Do not damage or cut off the ground prong of
the power cord. Doing so may cause death, fire,
electric shock, or product malfunction.
Teet run
Check if the washing machine is properly iosta/ed
and run a test cycle,
1 Load the washing machine with 6 pounds of
laundry.
2 Press _i ) and turn/,@ to the right.
3 Press =j_+____ to Rinse+Spin.
4 vress ,),
- The wash cycle starts.
5 Check if water is supplied, that the washing
machine does not rock or vibrate excessively,
and that it drains well during the spin cycle.
- tf water leaks during water suppb/, see page
14, Connecting the water/nes to connect them
properly,
- tf the washing machine rocks and vibrates
excessively, see page 16, Leveling the washing
machine to level it again.
- If the drain does not work, see page 15,
Connecling the drain line to inetal the drain line
propedy,
18 PRU_A A_TON
PREPARATION
Sorfing wash loads
Precautions for fabric care before fhe wash cycle
Read and observe the follevving to prevent shrinkage or damage to clethes
Check atl pockets to make sure that they are
empty
,- kems such as ciips, matches, pens, coins, and
keys can damage beth your washer and your
clothes
4_ Ciose zippers, hooks, and drawstrings to
prevent these items from snagging or tang_ing
on other clothes.
Pretreat heavily stained areas before washing.
- Doing so will produce clean, stMmfree results
4i, Combine large and small items in a load. Load
large items first.
Large items should not be more than half of
the totai wash load
4, The washer can be fuliy loaded, but the drum
shouid not be tightly packed with items,
_The door of the washer should close easily.
Do not wash singJe items, except for bulky
items such as blankets Make sure to wash
Iaundry in similar types of loads.
- Washing a single small item may result in the
tub becoming unbalanced, vibrating and
making a noise,
Do not wash waterproof clothes,
This may cause abnormal vibration, or may
cause the load to bounce, :which could
damage the tub,
Check if there are any foreign objects in the
door seal and take extra care that clothes do
not get caught there,
--Foreign objects in the door seat may stain
clothes, and water may leak if clothes get
caught in the door seal
Wash underwear or small, light items in a
laundry net.
-Smatl, light items may get caught in the door
seal, and a brassiere hook may damage other
items or the tub.
Brush heavy soil, dust, or hair off fabrics before
washing,
Laundry may not wash clean if there is dirt or
sand on the fabrics, or items may be
damaged due to panicles rubbing against
sheer fabrics
Wash blankets individually
Washing more than one blanket together may
produce unsatisfactory results due to tangling
or an unbalanced toad,
Always separate fabrics according to their
colors and wash them separately to prevent
colors from running.
o Fabrics may be damaged or become stained
due to fabric dyes running, or due to foreign
objects transferring from one fabric to
another.
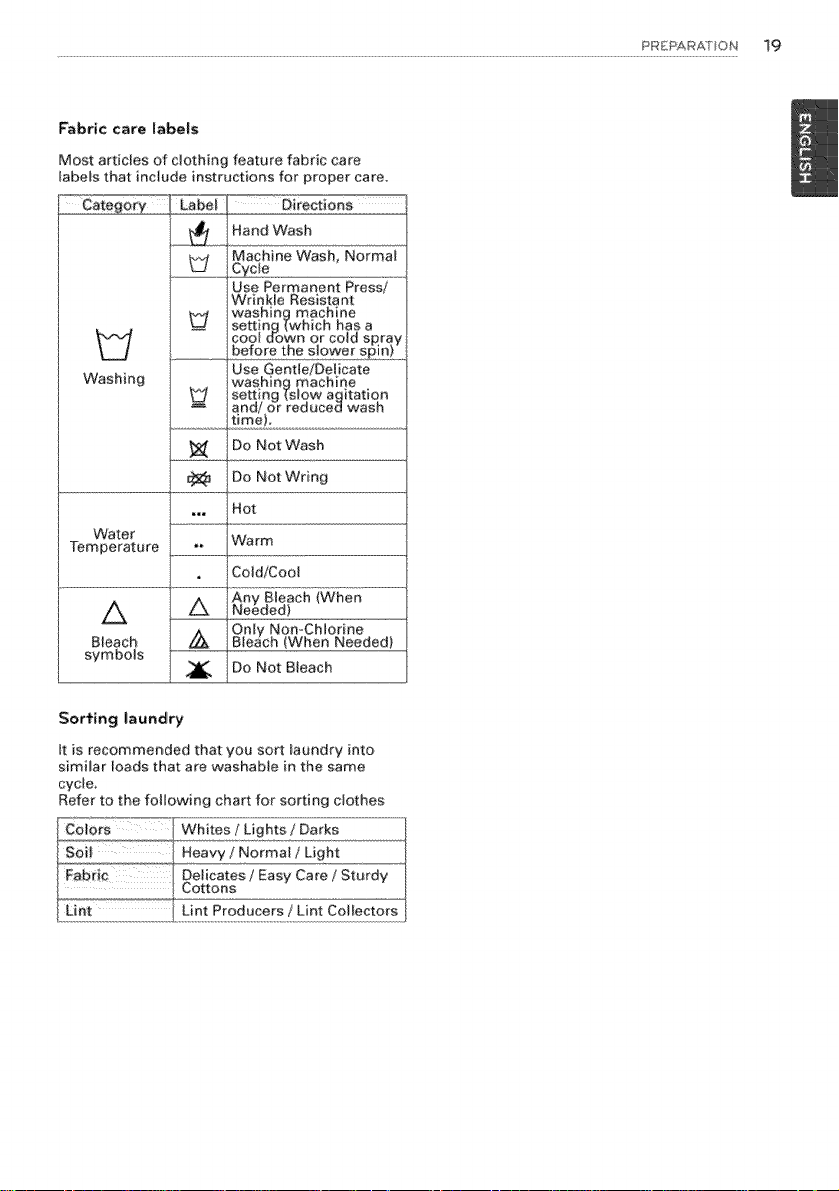
Fabric care labels
Most articles of clothing feature fabric care
tabels that include instructions for proper care.
Hand Wash
Machine Wash, Normal
.Cycte
Use Permanent Press/
Wrinkle Resistant
washing machine
setting [which has a
W
Washing
Water
Temperature
A
Bleach
symbols
cool down or cold sRray
petoro, et#e s!o_(ver s:!2_n_......
Use Gentle/Delicate
washing machine
U
setting [slow a_itatiqn
and/or reduced wash
time),
Do Not Wash
Do Not Wring
Hot
Warm
Cold/Cool
Any Bleach (When
A
Neeeed)
A
Do Not Bleach
PREPARA"rON 19
Sorting laundry
It is recommended that you sort fauedw into
similar loads that are washable in the same
cycle,
Refer to the following chart for sorting clothes
20 PR{{PARATION
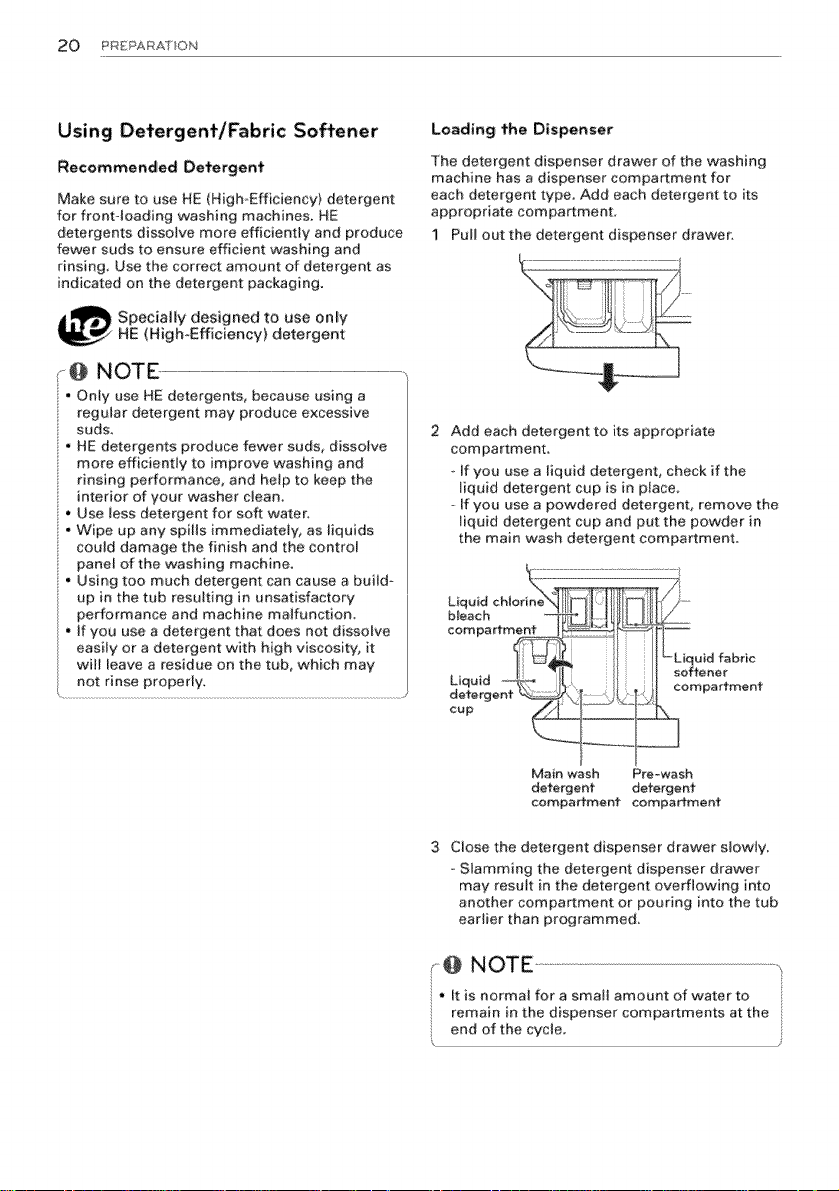
Using Detergent/Fabric Softener
Recommended Detergent
Make sure to use HE (High-Efficiency} detergent
for frontqoading washing machines. HE
detergents dissofve more efficiently and produce
fewer suds to ensure efficient washing and
rinsing, Use the correct amount of detergent as
indicated on the detergent packaging.
Loading the Dispenser
The detergent dispenser drawer of the washing
machine has a dispenser compartment for
each detergent type. Add each detergent to its
appropriate compartment
! Pull out the detergent dispenser drawer:
Specially designed to use only
(High-Efficiency) detergent
,-@ NOTE .............................................................................................................................................................................................................................................................
* Only use HE detergents, because using a
regular detergent may produce excessive
suds
" HE detergents produce fewer suds dissolve
more efficiently to improve washing and
' rinsing performanee, and hetp to keep the
interior of your washer clean.
, Use less detergent for soft water,
, Wipe up any spills immediateb/, as liquids
could damage the finish and the control
panel of the washing machine,
, Using too much detergent can cause a build_
2 Add each detergent to its appropriate
compartment,
• If you use a liquid detergent, check if the
liquid detergent cup is in place
- If you use a powdered detergent, remove the
iiquid detergent cup and put the powder h_
the main wash detergent compartment,
Liq
bleach
Main wash Pre-wash
detergent detergent
compaRmenf eompaRment
3 Close the detergent dispenser drawer slowly.
Slamming the detergent dispenser drawer
may result in the detergent overflowing into
another compartment or pouring into the tub
earlier than programmed,
_@ NOTE
It is normal for a small amount of water te
remain in the dispenser compartments at the
end of the cycie,
J
US_N( YOURWASHNG MACH ,_g 21
Add liquid or powdered detergent to this
compartment when using the Pre_Wash option.
Always use HE (High Efficiency) detergent with
your washing machine,
_@ NOTE
• When using the pre-wash option, if liquid
detergent is to be used for the main wash,
remember to use the liquid detergent cup
accessory in the main wash dispenser, to
prevent the main wash liquid detergent
from being dispensed with the pre-wash
detergent.
, The amount d detergent added for the Pre,-
Wash option is _ the amount recommended
for the main wash cycle. For example, if the
main wash cycle requires one measure of
detergent, add $/2 measure for the Pre_Wash
option.
This compa_rnent holds laundry detergent for the
main wash, cycle, which is added to the load at
the beginning of the cycie, Always use HE (High
Efficiency} detergent ,with your washing machine,
Never exceed the manufactureCs
recommendations when adding detergent, Using
too much detergent can result in detergent
buildup on clothing and the waahec Either
powdered or Hquid detergent may be used.
This compartment holds liquid chlorine bleach,
which witl be dispensed automatically at the
proper time during the wash cycle,
_@ NOTE
, Do not add powdered or liquid coloPsafe
bleach to this compartment,
• Always follow the manufacturer's
recommendations when adding bteach. Do
not exceed the maximum fill line, Using too
much bleach can damage fabrics,
• Never pour undiluted liquid chlorine bleach
directly onto the load or into the drum_
Fabrics may be damaged.
This compartment holds liquid fabric softener,
which will be automatically dispensed during the
final rinse cycle,
@ NOTE
• Always follow the manufacturer's
recommendations when adding fabric
so_ener, Do not exceed the maximum fill
line, Using too much fabric so_ener may
result in stained clothes,
• Dilute concentrated fabric softeners with
warm water Do not exceed the maximum fill
line,
• Never pour fabric softener directly onto the
load or into the drum.
@ NOTE .........................................................................................................................................................................................................................................................
,,Liquid or powdered cotor-_safe bleach may be
added to the main wash compartment with
detergent of the same type,
• When using liquid detergent, make sure the
liquid detergent cup and insert are in place,
Do not exceed the maximum fill line,
• When using powdered detergent, remove
the insert and liquid detergent cup from the
compartment, Powdered detergent will not
dispense with the liquid detergent cup and
insert in ptace.
22 USNG YOUR WASHNG MACHINE
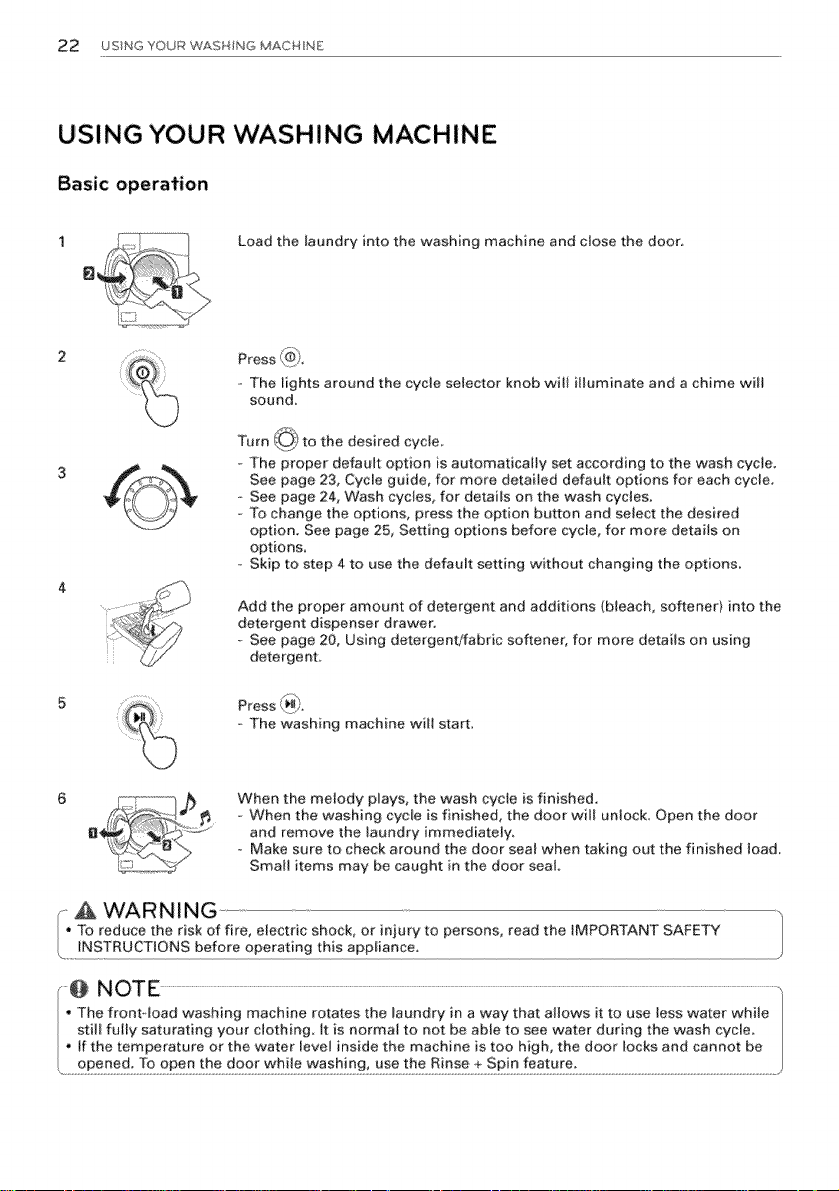
USING YOUR WASHING MACHINE
Basic operafion
Load the laundry into the washing machine and close the door,
Press C_,
= The lights around the cycle selector knob will illuminate and a chime wilt
sound,
Turn (:,(j:Lto the desired cycle.
The proper defauk option is automatically set according to the wash cycle.
See page 23, Cycle guide, for more detailed default options for each cycle,
,- See page 24, Wash cyctes_ for details on the wash cycles.
To change the options, press the option button and select the desired
option, See page 25, Setting options before cycle, for more details on
options,
.- Skip to step 4 to use the defauit setting without changing the options.
Add the proper amount of detergent and additions (bleach, softener) into the
detergent dispenser drawer,
- See page 20, Using detergent/fabric softener, for more details on using
detergent,
The washing machine wilt start,
When the metody plays, the wash cycle is finished,
When the washing cycle is finished, the door will unlock, Open the door
and remove the _aundry immediateb/,
o Make sure to check around the door seat when taking out the finished load,
Small items may be caught in the door seal.
_,A WARNING .....................
TO reduce the risk of fire, electric shock, or injury to persons, read the iMPORTANT SAFETY
INSTRUCTIONS before operating this appliance.
US!HG"fOUR A_AS4 NG MACH! ,_E 23
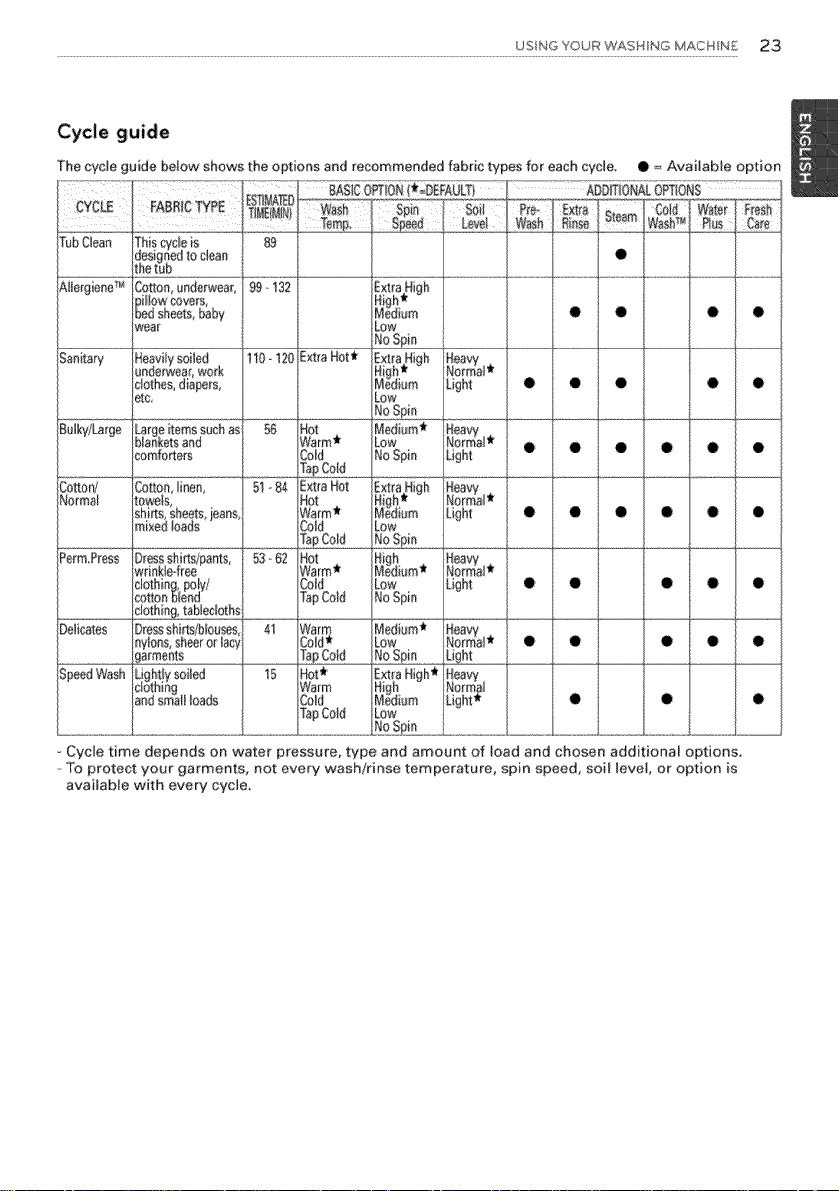
Cycle guide
The cycle guide below shows the options and recommended fabric types for each cycle. • = Available option
F_iCTYFEEST_MA_D "T
Thiscycleis 89
designed to clean
the t_b
" Co_toe underwear, %-i-_-'-3'2- .......
........:oLLLC::_:_Loooo .............
pillOW®vers,
bedsheeCs,baby
wear
aeaerwear,work High _orma_ _
clothes, dia_rs, Me,}am /Ught
eta, /Low
Large ffems sash as 56
blarlkets and
comforters
Norton! towels,
_P _'Dressshires/pan,s, 53_62
_i;_Ze_°-SiesW_gi°_,bloase_°°°°-°_..........._......................
Cycle time depends on water p_essure, Wpe and amount of toad and chosen additional o )tions.
To pro_eet your garments, not every wash/rinse temperature, spin speed, soil level, or option is
avaiiabie with ever,/cycle,
CottOn linen, 51•84
shifts sheets,jeans
m ×ed ands CoN IL_ i "
wrinkie4ree
dmhie_, £o!d
cottonNeed
clothing, taNecloth_
nylons,sheeror lac
arments
L!ght!ysoiied i--_
c:lotmr_g
andsmall ioads
24 USNG YOUR WASHNG MACHINE
Wash cycles
You can wash laundry items more thoroughly by
sebcting the wash cycle that best suits the type
of items to be washed Turn _i:) to the desired
cycie_ When you select a wash'_'_'_cycle,the light
for the corresponding wash cycle witt turn on,
See page 22, Basic operation, for mere details on
operating methods,
Reduce laundry allergens, AHergiene _j_
This cycte is a powerfut_ high temperature cycle
designed specifically to reduce certain albrgens,
@ NOTE
, Selecting the Altergiene TM cycle
automatically incorporates steam into the
wash cycle.
* The Aliergiene TM cycle can significantly
reduce allergens in bedding and clothing,
, The Altergiene TM cycle helps reduce dust
mite populations and helps reduce allergens.
, Due to the higher energy and temperatures
used, the Atlergiene TM cycle is not
recommended for wool, silk, leather, or any
other deticate or temperature sensitive items,
Reduce laundry bacteria, Sa__ tary
NSF International (formerly the National
Sanitation Foundation), certifies that the Sanitary
cycle reduces 99.9% of bacteria on laundr% and
none of the bacteria will carry over onto the next
laundry load,
Wrinkle free items, Perm Press
This cycle is for washing items such as wrinkle
free clothes or tablecloths to minimize wrinkles.
Sheer items, De/icates
This cycle is for washing lingede or sheer and
lacy cbthes which can easily be damaged.
Quick wash, Speed Was#'_
Use the Speed Wash cycle to quickly wash lightly
soiled clothing and small loads. For high wash
and rinse efficiency, it is recommended to wash
smal_ _oads of 23 lightly soiled garments.
,-@ NOTE
Use very Httle detergent in this cycle For
additional rinsing, you can add an extra rinse
by using the option button.
Blankets or bulky items, Bu/ky!La_*{_e
This cycfe is for washing blankets o_bulky items.
Normal items, Carton/Norms/
Use this cycle to wash ail normal items, except
deiica[e fabrics such as woot or sill
US!NG"fOUR /_AS;H NG MAC:4 NE 25
Cycle modifier buttons
Each cycle has preset settings that are selected
automatically, You may also customize the
settings using the cycle modifier buttons, Press
the button for that option to view and select other
settings.
The washer automatically adjusts the water level
for the type and size of wash load for best results
and maximum efficiency, it may seem there is no
water inside the drum in some cycles, but this is
normal,
@ NOTE:
* To protect your garments, not every wash/
rinse temperature, spin speed, soil level, or
option is avaitabie with ever,/cycle, See the
Setting options before the cycle
You san select and add the desired optional
functions before you start the wash cycle,
Setting the water temperature_
Wash Temp,,
The optimum water temperature is set
automatically for each cycle To change the
water temperature setting for a cycle, follow
the instructions below: Remember to set the
appropriate temperature, as specified in the
fabric care tabels on your clothing,
1 Press (0;f/and turn _} to the desired cycle.
2 Press repeatedly to select the desired
water temperature:
When you press the button, an indlcator light
for the corresponding selection will turn on in
the display,
You can now modify other cycte settings and
add options (see page 25-28), or proceed to
step 4 to begin the cycle_
Press k_;,
-@ NOTE
• Cold rinses use less energy,
• Your washer features a heating demeet to
boost the hot water temperature for Extra
Hot settings, This provides improved wash
performance at normal water heater settings.
• Select the water temperature suitable for
the type of load you are washing, FoItow the
fabric care label for best results_
Se#i;ng spin speed_ Spin S_;eed
Higher spin speeds extract more water from
clothes, reducing drying time and saving energy,
Some fabrics, such as delicates, require a slower
spin speed, To protect your clothing, not nil
spin speeds are available for alt cycles The
optimum spin speeds for each cycle have been
set automatically, To change the spin speed for a
cycle, follow the instructions below,
1 Press <:_ and turn ';':'
2 Press _ repeatedly to select the desired
spin speed.
When you press the button, an indicator light
for the corresponding selection will turn on in
the display_
3 Yeu can now modify other cycle se_ings and
add options (see page 25-28), or proceed to step
4 to begin the cycle
4 Press (_
_0_ to the desired° cycle.
@ NOTE ,
The Spin Speed button also activates the
Drain & Spin cycle to drain the tub and spin
clothes; for example, if you want to remove
clothes before the cycle has ended, To use
Drain & Spin, press the Power button, then
press the Spin Speed button repeatedly to
select a spin speed. Press the StardPause
button, to begin,
Seffing soil level of laundry_ Soil Level
You can wash your laundry more thoroughly
by setting the proper soil level on the washing
machine. The soil level for each cycle has been
set automatically, To change the soil level for a
cycle, follow the instructions below.
1 Press :_, and turn _%
2 Press repeatedly to select a soil level,
- When you press the button, an indicator Hght
fer the corresponding selection wifl turn on in
the display,
You can now modify other cycle settings and
add options {see page 25-28), or proceed to
step 4 to begin the cycle.
4 Press k.,;,
/i__ to the desired cycle.
@ NOTE
• Ligh:tJy soiled loads may take tess time and
heavily soiled loads may add time to the
i. cycle,
..... /

26 USNG YOUR WASH NG MACHINE
Adjusting the melody and buffon tones,
The washing machine plays a melody when the
wash cycle is finished. The buttons make a sound
each time a button is pressed. The melody and
button tones can be changed or they can be
turned off if desired.
I Presa_:
2
Turn {_ to the desired cycle.
3
Press , Adjust the melody and button
tones as desired.
4
You can now modify other cycle settings and
add options (see page 25-28), or proceed to
step 4 to begin the cycle.
Press ./.
Prewashing, Pre Was_
Preowash for 16 minutes when clothes are cow
ered in dirt or dusL This feature is suitable for
heavily soiled items.
1 Press (_) and turn (6_ to seiect the desired
cycle,
2 ress L_._J.
-;':%i "_ light 'will turn on.
You can now modify other cycle settings and
add options (see page 25..28}, or proceed to
step 4 to begin the cycle.
4 Press _,_'i
Rinse_ drain and spin only_ Ri_s_+Sp r_
Use this cycle to rinse detergent from the load.
1 Press o} and turn _} to select the desired
cycle.
2
3
You can now modify other cycle settings and
add options (see page 25-28}, or proceed to
step 4 to begin the cycle.
4 Pufse _:;_:J.
Adding extra rinse cycle, Extra Ri_;e
*You can add an extra rinse cycte to the default
rinse cycle.
1 Pressi® and turn desffed
cycle
2 Press ,
- _._ ;;light will turn on.
3 You can now modify other cycle settings and
add options (see page 25-28), or proceed to
step 4 to begin the cycle.
4 Press _,
Presetting the start time, ©e_ay Wash
You can set the desired start time
1 Press _ and turn _ to the desired cycle.
2 "You can now modify other cycle settings and
add options (see page 25-28).
3 Press i repeatedly to select the desired
start time.
_ light will turn on.
- The set start time appears on the display
panel.
--Each press d the button increases the delay
time by one hoar, up to 19 hours.
4 Press _..
_ tO setect the
High temperature_ Sfeam
Adding the Steam option to these cycles helps to
enhance washing performance.
By using hot steam fabrics get the cleaning ben-
efits of a super hot wash.
1 Press {_i_ and turn _ to select the desired
cycle
2 Press The washer wilt automatically
adjust the cycle settings.
3 Set any other desired options.
4 Press (_
_A WAR N ING
• Do not touch the door during steam cycles.
The door surface can become very hot. Allow
the door fock to release before opening the
door.
Do not attempt to override the door Iock
mechanism or reach into the washer during
a steam cycte. Steam can cause severe
burns.

Adding Extra .Water to the Wash and Rinse
Cycles_ Wat_er _':_/ua
You can rinse the load more thoroughly by
adding extra water to the wash and rinse cycles.
1 Press and turn (_: to
2 Press
4 Press ;_,
_® .,.)_ the desired cycle
--The indicator light will turn on,
Go to step 4 to accept the default settings
without changing the options Press the cycle
modifier buttons to change the cycle settings
if desired, Press the option buttons to add
options if desired,
US!N( "fOUR WASH NG MACI_INE 27
Setting options during the cycle
You can add desired options during the wash
cycle.
Bu#on lock feature, Chad Lock
You can lock the washing machine to prevent
children or others from changing the cycle
settings by pressing the buttons during the cycte,
Press and hold ["_ for three seconds during
the wash cycle.
- When the Child Lock is enabled, a _'L message
and the remaining wash time are displayed,
in turn, on the display panel of the washing
machine,
(When the Child Lock is activated,)
Press and hotd for three seconds during
the wash cycle.
L
Saving energy, Co_d Was_ _
Adding the Cold Wash TM option reduces
energy usage and provides the same washing
performance as a warm water wash,
By using six different washing motions {'Tumbling,
Roiling, Stepping, Scrubbing, Swing, Filtration),
fabrics get the cleaning benefits, without the
energy usage,
1 Press (_, and turn C_! to select the desired
cycle°
2 Press; _-, The washer will automatically
3 Set any other desired options,
:11 ......................i
adjust the cycle settings,
4 Press(_;.
@ NOTE
• When you select the Cold Wash _ option,
wash time will be increased up to ten
minutes,
• For high wash efficiency, use this option
with, less than 8 pounds {3,6 kg} of laundry
(approximately 8 thick towels),
_-@ NOTE
* Child Lock remains active aRer the cycle
ends, To cancel Child Lock, turn the washer
on and then press and hold the PreWash
button, for three seconds.
28 USNG YOUR WASH NG MACHINE
Saving customized wash cycler PGM S_sw_
YOu can save a cycle with all the settings and
options you use most frequently.
I Press _6)and turn {0._ to select the desired
cycle.
2 Modify the cycle settings and add other
options tsee pages 2528), if desired,
3 Press the StadjPause button to start the cycle.
4 Press and hold _:_ for three seconds during
the ,wash cycle,
,_The cycle with your preferred settings and
options is saved
Selecting your customized cycle,
Custom PGM
You can recall the customized wash cycle you
had previously saved
1 Press {_} after then press
2 Press (_}
Tumbling clothes to prevent wrinkles, F'resh
Use this function when you are not able to
take out your clothes as soon as the wash
cycle ends,
1 cycle.Press,,, and turn _ to select the desired
Press and hold for three seconds
during the was_ cycie_o
- The light wilt turn on,
3 You can now modify other cycle settings and
add options (see page 25 28), or proceed to
step 4 to begin the cycle.
4 Press (i_
@ NOTE
• This function provides periodic tumbling for
up to about 19 hours to prevent wrinkles.
If you press the START/PAUSE or ON/OFF
button, you can unload your laundry at am/"
time.
US!HG"fOUR /rASH NG MACI_INZ. 29
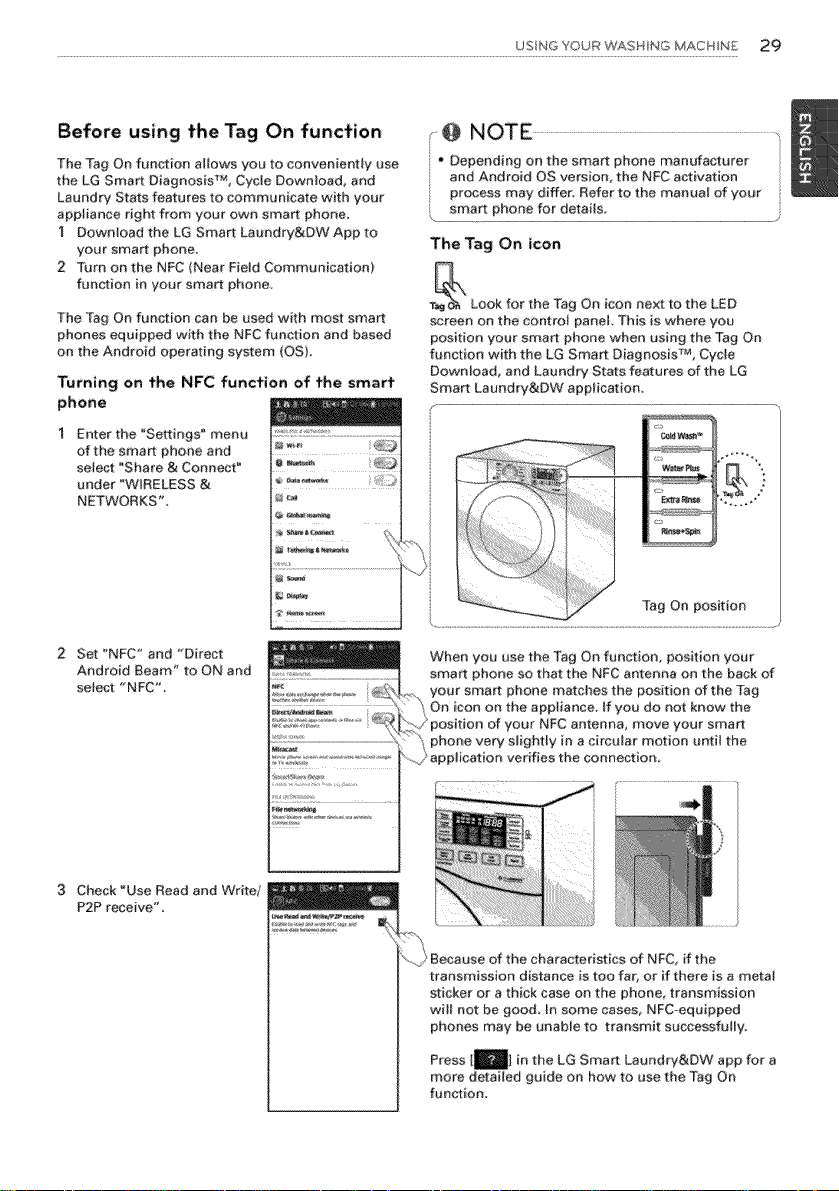
Before using the Tag On function
The Tag On fuoction allows you to conveniently use
the LG Smart Diagnosist% Cycle Download, and
Laundry Stats features to communicate with your
appliance right from your own smart phone
1 Download the LG Smart Laondry&DW App to
your sma_ phone,
2 Turn on the NFC (Near Field Communication)
function in your smart phone
The Tag On function can be used with most smart
phones equipped with the NFC function and based
on the Android operating system (ca).
Turning on the NFC function of the smart
phone
Enter the "S_tings" menu
of the smart phone and
select _Share & Connect"
under "WIRELESS&
NETWORKS"
N_
L
2 Set "NFC" and "Direct
Android Beam" to ON and
set_t "NFC".
4@ NOTE ........................................................................................................................................................................
, Depending on the smart phone manufacturer
and Android OS version the NFC activation
process may differ. Refer to the manual of your
smart phone for deta#s
The Tag On icon
When you use the Tag On function, position your
smart phone so that the NFC antenna on the back of
your smart phone matches the position of the Tag
On con on the appliance, tf you do not: know the
! phone very slightly in a circular motion until the
of your NFC antenna, move your smart
application verifies the connection,
3 Check"Use Read and Write[
P2P receive",
_y
".._ Because of the characteristics of NFC, if the
transmission distance is too far, or if there is a metal
sticker or a thick case on the phone transmission
will not be good, In some cases, NFCoequipped
phones may be unable to transmit successfi_lly.
Press [_] in the LG Smart Laundry&DW app for a
more detailed guide on how to use the Tag On
function,
 Loading...