

Page 1
USER’S GUIDE &
INSTA L L ATION INSTRU C T I O N S
P/No. MFL31245113
Before beginning installation, read these
instructions carefully. This wll simplify installation
and ensure that the washer is installed correctly
and safely. Leave these instructions near the
washer after installation for future reference.
WM2455H*
TROMM
WAS H I NG M ACHI N E
Antes de comenzar la instalación, lea atentamente estas
instrucciones. Esto simplificará la instalación y asegurará
que la lavadora está instalada en forma correcta y segura.
Conserve estas instrucciones cerca de la lavadora luego
de la instalación para futuras consultas.
Mo d e l/ M o de l o
Designed specially to use only
HE (High-Efficiency) detergent
Diseñada específicamente para
usar con el detergente tipo HE
(Alta eficiencia)
GUÍA DEL USUA R I O E
INSTRU C C I O N E S D E I N S TAL ACIÓN
To contact LG Electronics, 24 hours a day,
7 days a week:
1-800-243-0000
Or visit us on the Web at: us.lge.com
Número telefónico de LG Electronics, las 24
horas del día, 7 días a la semana:
1-800-243-0000
O visítenos en la Web en: us.lge.com
LAVAD O R A T ROM M
TM
TM
MFL31245113_ENG.indd 1 2007.10.4 2:31:12 PM
Page 2
I M P O RTA N T S A F E T Y I N S T R U C T I O N S
Congratulations on your purchase
and welcome to the LG family.
Your new LG washing machine
combines the most advanced
washing technology with simple
operation and high efficiency.
By following the operating and care
instructions in this manual, your
washer will provide you with many
years of reliable service.
THANK YOU!
I N T RO D U C T I O N
wWARNING For your safety, the information in this manual must be
followed to minimize the risk of fire or explosion, electric shock, or to prevent
property damage, personal injury, or loss of life.
Your Safety and the safety of others is very important.
We have provided many important safety messages in this manual and on your appliance. Always read
and obey all safety messages.
This is the safety alert symbol.
This symbol alerts you to potential hazards that can kill or hurt you and others.
All safety messages will follow the safety alert symbol and either the word DANGER or WARNING.
These words mean:
wDANGER: You can be killed or seriously injured if you don’t immediately follow instructions.
wWARNING: You can be killed or seriously injured if you don’t follow instructions.
All safety messages will tell you what the potential hazard is, tell you how the reduce the chance of
injury, and tell you what can happen if the instructions are not followed.
INSTALLATION INSTRUCTIONS
Choose the Proper Location .................................. 9
Clearances ............................................................. 9
Flooring ................................................................ 10
Installations With Optional Pedestal Base
or Stacking Unit .................................................... 10
Unpacking and Removing Shipping Bolts ........... 11
Connecting the Water Lines ................................. 12
Connecting the Drain Line .................................... 13
Leveling the Washer ............................................. 14
HOW TO USE
Sorting Wash Loads ............................................. 15
Selecting Detergent .............................................. 16
About the Dispenser ............................................. 16
Loading the Dispenser ......................................... 17
Control Panel Features and Cycle Guide ....... 18, 19
The Time and Status Display ............................... 20
Operating the Washer .......................................... 21
Cycle Setting Buttons .......................................... 22
Custom Program .................................................. 23
Cycle Option Buttons .......................................... 24
Special Functions ................................................. 25
PARTS AND FEATURES
Special Features ..................................................... 7
Key Parts and Components ................................... 8
TROUBLESHOOTING
Normal Sounds You May Hear ............................. 30
Before Calling for Service ............................... 31–32
CARE AND CLEANING
Regular Cleaning .................................................. 26
Cleaning the Washer ............................................ 27
Maintenance ................................................... 28, 29
WARRANTY
Product Registration Information ......................... 39
SPECIFICATIONS/OPTIONAL ACCESSORIES
IMPORTANT SAFETY INSTRUCTIONS
Basic Safety Precautions .................................. 3–6
Key Dimensions and Specifications ..................... 33
Optional Accessories ........................................... 33
Pedestal Installation ....................................... 34, 35
Stacking Kit Installation .................................. 36, 37
2
3
READ ALL INSTRUCTIONS BEFORE USE
MFL31245113_ENG.indd 2-3 2007.10.4 2:31:14 PM
Page 3
• Before use, the washer must be properly installed as
described in this manual.
• Do not wash articles that have been previously
cleaned in, washed in, soaked in, or spotted with
gasoline, dry cleaning solvents, or other flammable
or explosive substances, as they give off vapors that
could ignite or explode.
• Do not add gasoline, dry cleaning solvents, or other
flammable or explosive substances to the wash
water. These substances give off vapors that could
ignite or explode.
• Under certain conditions, hydrogen gas may be
produced in a hot water system that has not been
used for 2 weeks or more. HYDROGEN GAS IS
EXPLOSIVE. If the hot water system has not been
used for such a period, before using the washer,
turn on all hot water faucets and let the water flow
from each for several minutes. This will release any
accumulated hydrogen gas. As the gas is flammable,
do not smoke or use an open flame during this time.
• Do not allow children to play on or in the washer.
Close supervision of children is necessary when the
washer is used near children.
• Before the washer is removed from service or
discarded, remove the door to prevent children from
climbing inside.
• Do not install or store the washer where it will be
exposed to the weather or freezing temperatures.
• Do not tamper with controls.
• Do not repair or replace any part of the washer or
attempt any servicing other than as described in this
manual. We strongly recommend that any service be
performed by a qualified individual.
• See Installation Instructions for grounding
requirements.
• ALWAYS follow the fabric care instructions
supplied by the garment manufacturer.
• Do not place items exposed to cooking oil in your
washer. Items contaminated with cooking oils may
contribute to a chemical reaction that could cause a
load to catch fire.
• Use fabric softeners or products to eliminate static
only as recommended by the manufacturer.
• This washer is not designed for maritime use or for
mobile installations such as in RVs, aircraft, etc.
• Turn off the water taps and unplug the washer if the
machine is to be left for an extended period of time,
such as during vacations.
• Packaging material can be dangerous for children.
There is a risk of suffocation! Keep all packaging
from children.
• Always check the inside of the washer for foreign
objects before loading laundry. Keep the door closed
when not in use.
wWARNING: To reduce the risk of fire, electric shock, or injury to persons when using this
appliance, follow basic precautions, including the following.
BASIC SAFETY PRECAUTIONS
wWARNING For your safety, the information in this manual must be
followed to minimize the risk of fire or explosion, electric shock, or to prevent
property damage, personal injury, or loss of life.
READ ALL INSTRUCTIONS BEFORE USE
• Refer to INSTALLATION INSTRUCTIONS for
detailed grounding procedures. Installation
instructions are packed in the washer for installer's
reference. If the washer is moved to a new location,
have it checked and reinstalled by a qualified service
person. Failure to follow this warning can cause
serious injury,fire, electrical shock or death.
• Do not, under any circumstances cut of remove
the third (ground) prong from the power cord.
Failure to follow this warning can cause serious
injury, fire, electrical shock or death.
• For personal safety, this appliance must be
properly grounded. Failure to follow this warning
can cause serious injury, fire, electrical shock
or death.
• The power cord of this appliance is equipped
with a 3-prong (grounding) plug which mates
with a standard 3-prong (grounding) wall outlet to
minimize the possibillty of electric shock hazard from
this appliance.
• This washer must be plugged into a 120VAC, 60Hz
grounded outlet. Failure to follow this warning can
cause serious injury, fire, electrical shock or death.
• Have the wall outlet and circuit checked by a
qualified electrician to make sure the outlet is
properly grounded. Failure to follow this warning
can cause serious injury, fire, electrical shock
or death.
• Where a standard 2-prong wall outlet is
encountered, it is your personal responsibility
and obligation to have it replaced with a property
grounded 3-prong wall outlet. Failure to follow
this warning can cause serious injury, fire, electrical
shock or death.
• Do not install on carpet. Install washer on a solid
floor. Failure to follow this warning can cause serious
leak damage.
• Do not remove ground prong. Do not use an
adapter or extension cord. Plug into a grounded
3-prong outlet. Failure to follow these warnings can
cause serious injury, fire, electrical shock or death.
• The washer should always be plugged into its
own individual electrical outlet which has a
voltage rating that matches the rating plate. This
provides the best performance and also prevents
overloading house wiring circuits which could cause
a fire hazard from overheated wires.
• Never unplug your washer by pulling on the
power cord. Always grip plug firmly and pull straight
out from the outlet. Failure to follow this warning can
cause serious injury, fire, electrical shock or death.
• Repair or replace immediately all power cords
that have become frayed or otherwise damaged.
Do not use a cord that shows cracks or abrasion
damage along its length or at either end. Failure
to follow this warning can cause serious injury, fire,
electrical shock or death.
• When installing or moving the washer, be careful
not to pinch, crush, or damage the power cord.
Failure to follow this warning can cause serious
injury, fire, electrical shock or death.
• The washer must be installed and electrically
grounded by a qualified service person in
accordance with local codes to prevent shock
hazard and assure stability during operation.
• Washer is heavy. Two or more people may be
need to install and move the appliance. Failure to
do so can result in back or other injury
• Store and install the washer where it will not
be exposed to temperatures below freezing or
exposed to outdoor weather conditions. Failure to
follow this warning can cause serious leak damage.
• Do not install the washer in humid spaces to
reduce the risk of electric shock. Failure to follow
this warning can cause serious injury, fire, electrical
shock or death.
wWARNING: To reduce the risk of fire, electric shock, or injury to persons when using this
appliance, follow basic precautions, including the following.
SAFETY INSTRUCTIONS FOR INSTALLATION
wWARNING For your safety, the information in this manual must be
followed to minimize the risk of fire or explosion, electric shock, or to prevent
property damage, personal injury, or loss of life.
READ ALL INSTRUCTIONS BEFORE USE
I M P O RTA N T S A F E T Y I N S T R U C T I O N SI M P O RTA N T S A F E T Y I N S T R U C T I O N S
GROUNDING INSTRUCTIONS
This appliance must be grounded. In the event of malfunction or breakdown, grounding will reduce the risk of
electric shock by providing a path of least resistance for electric current. This appliance is equipped with a cord
having an equipment-grounding conductor and grounding plug. The plug must be plugged into an appropriate
outlet that is properly installed and grounded in accordance with all local codes and ordinances.
risk of electric shock. Check with a qualified electrician or serviceman if you are in doubt as to whether the
appliance is properly grounded. Do not modify the plug provided with the appliance
- if it does not fit the outlet, have a proper outlet installed by a qualified electrician.
Failure to follow these warnings can cause serious injury, fi re, electrical shock or death.
w
WARNING:
Improper connection of the equipment-grounding conductor can result in
4
5
MFL31245113_ENG.indd 4-5 2007.10.4 2:31:15 PM
Page 4
I M P O RTA N T S A F E T Y I N S T R U C T I O N S
SAFETY INSTRUCTIONS FOR USE, CARE AND CLEANING, AND DISPOSAL
•
Unplug the washer before cleaning to avoid the
risk of electric shock.
•
Never use harsh chemicals, abrasive cleaners,
or solvents to clean the washer. They will
damage the finish.
•
Do not put oily or greasy rags or clothing on
top of the washer. These substances give off
vapors that could ignite the materials.
•
Do not wash items that are soiled with
vegetable or cooking oil. These items may
contain some oil after laundering. Due to the
remaining oil, the fabric may smoke or catch
fire by itself.
•
Disconnect this appliance from the
power supply before attempting any user
maintenance. Turning the controls to the OFF
position does not disconnect this appliance
from the power supply. Failure to follow this
warning can cause serious injury, fire, electrical
shock or death.
•
Do not combine laundry products for use in 1
load unless specified on the label.
•
Do not mix chlorine bleach with ammonia
or acids such as vinegar. Follow package
directions when using laundry products.
Incorrect usage can produce poisonous gasresulting in serious injury or death.
•
Do not reach into the washer while parts are
moving. Before loading, unloading or adding
items, push in the cycle selector knob and
allow the drum to coast to a complete stop
before reaching inside. Failure to follow this
warning can cause serious injury, fire, electrical
shock or death.
•
Do not allow children to play on or in the
washer. Close supervision of children is
necessary when the washer is used near
children. As children grow, teach them the
proper, safe use of all appliances.Failure to
comply with these warnings could result in
serious personal injuries.
•
Destroy the carton, plastic bag and other
packing materials after the washer is
unpacked. Children might use them for play.
Cartons covered with rugs, bedspreads, or
plastic sheets can become airtight chambers.
Failure to comply with these warnings could result
in serious personal injuries or death.
•
Keep laundry products out of children's reach.
To prevent personal injury, observe all warnings
on product labels. Failure to comply with these
warnings could result in serious personal injuries.
•
Remove the door to the washing compartment
to avoid the danger of children or small animals
getting trapped inside before your washer is
removed from service or discarded. Failure to do
so can result in serious personal injury or death.
PA RT S A N D F E AT U R E S
3
2
1
4
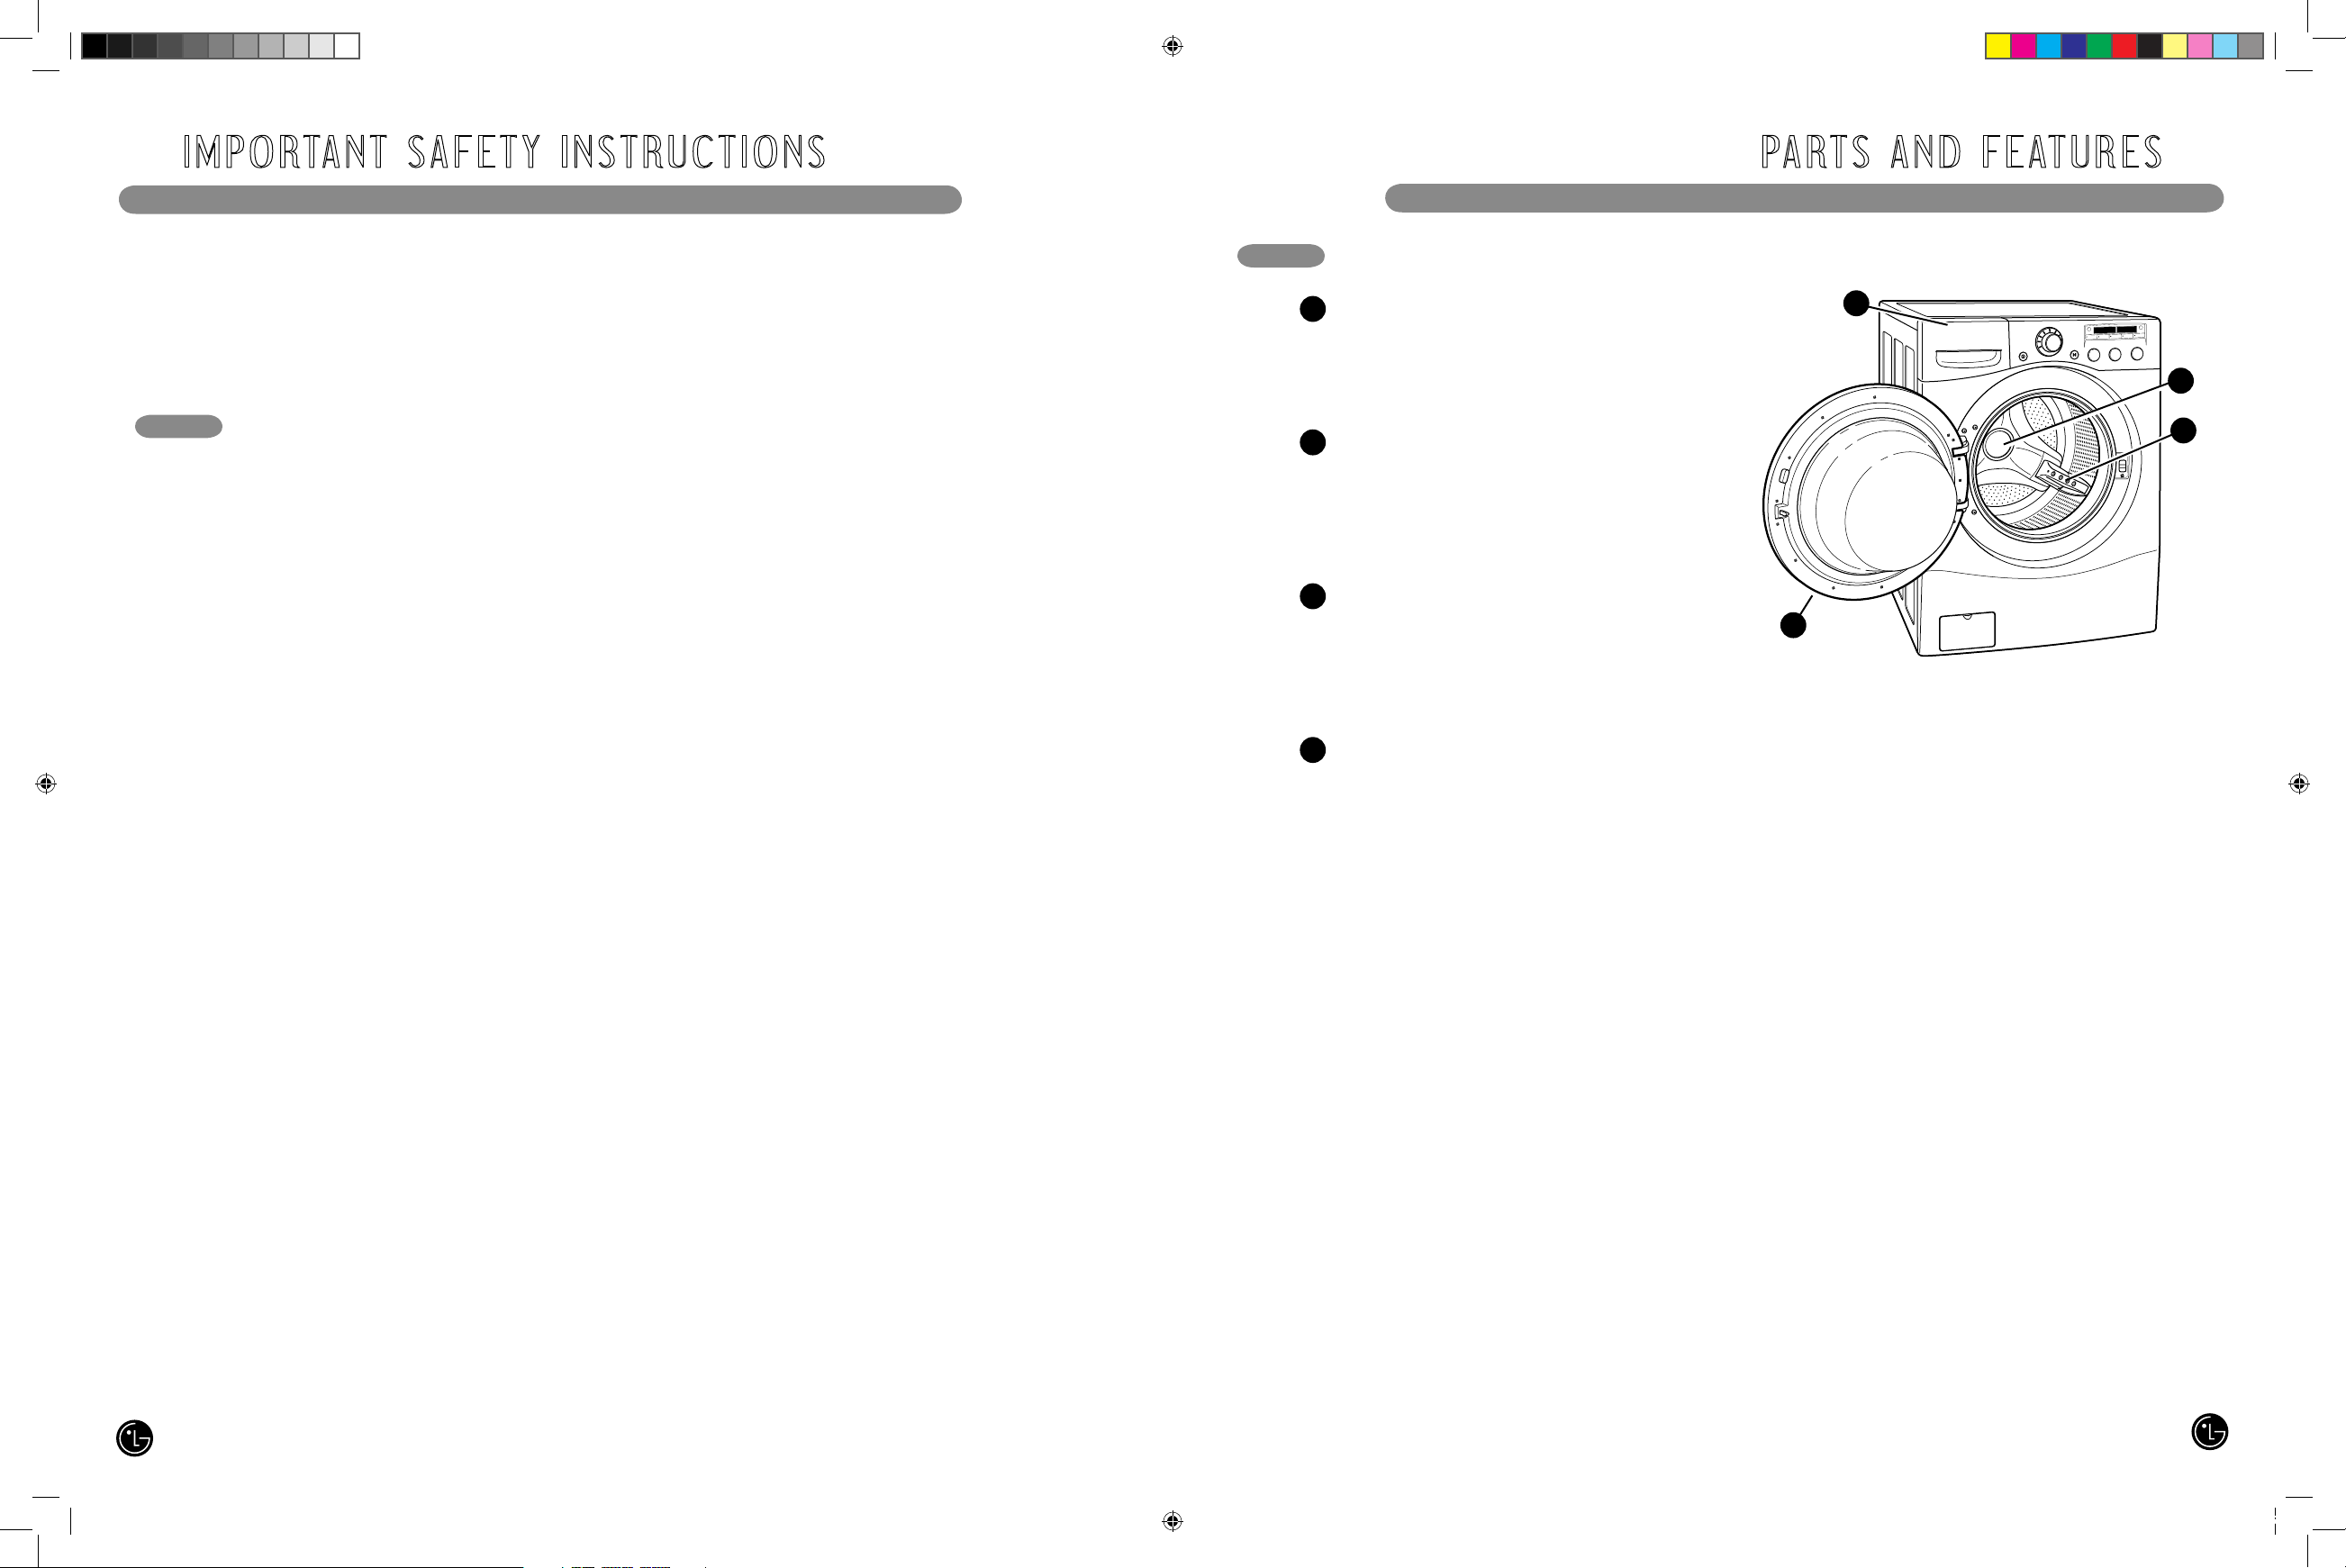
SPECIAL FEATURES
2
1
4
3
DETERGENT DISPENSER DRAWER
This four-compartment drawer provides separate
dispensers for prewash and main wash detergent,
liquid bleach, and liquid fabric softener.
EASY-ACCESS LOCKING DOOR
Extra-large door locks during operation and
features a delay to prevent the door from being
opened until the washer interior has cooled and
the water level has lowered.
ROLLERJETS
The RollerJet system enhances wash
performance while reducing fabric wear.
Integrated jets spray clothes to further improve
washing efficiency.
DIRECT-DRIVE MOTOR
Direct-drive motor eliminates the belt and pulleys
found on most washers to provide improved
performance and reliability while increasing
energy efficiency.
wWARNING: To reduce the risk of fire, electric shock, or injury to persons when using this
appliance, follow basic precautions, including the following.
6
7
SAVE THESE INSTRUCTIONS
READ ALL INSTRUCTIONS BEFORE USE
wWARNING For your safety, the information in this manual must be
followed to minimize the risk of fire or explosion, electric shock, or to prevent
property damage, personal injury, or loss of life.
MFL31245113_ENG.indd 6-7 2007.10.4 2:31:16 PM
Page 5
PA RT S A N D F E AT U R E S I N S TA L L AT I O N
CHOOSE THE PROPER LOCATION
CLEARANCES
Allow at least 24 in. (61.2 cm) in front of the
washer to open the door.
293/4"
(75.6 cm)
4"
(10 cm)
51"
(129.5 cm)
211/4"
(54 cm)
To ensure sufficient clearance for water lines and
airflow, allow minimum clearances of at least
1 in. (2.5 cm) at the sides and 4 in. (10 cm)
behind the unit. Be sure to allow for wall, door,
or floor moldings that may increase the required
clearances.
• Do not remove ground prong. Do not use
an adapter or extension cord. Plug into a
grounded 3-prong outlet. Failure to follow this
warning can cause serious injury, fire, electrical
shock, or death.
Power Outlet
• The power outlet must be within 60 in. (1.5 m) of
either side of the washer.
• The appliance and outlet must be positioned so
that the plug is easily accessible.
• Do not overload the outlet with more than one
appliance.
• The outlet must be grounded in accordance with
current wiring codes and regulations.
• Time-delay fuse or circuit breaker is
recommended.
NOTE: It is the personal responsibility and
obligation of the product owner to have a
proper outlet installed by a qualified electrician.
27"
(68.6 cm)1"(2.5 cm)
1"
(2.5 cm)
2
1
3
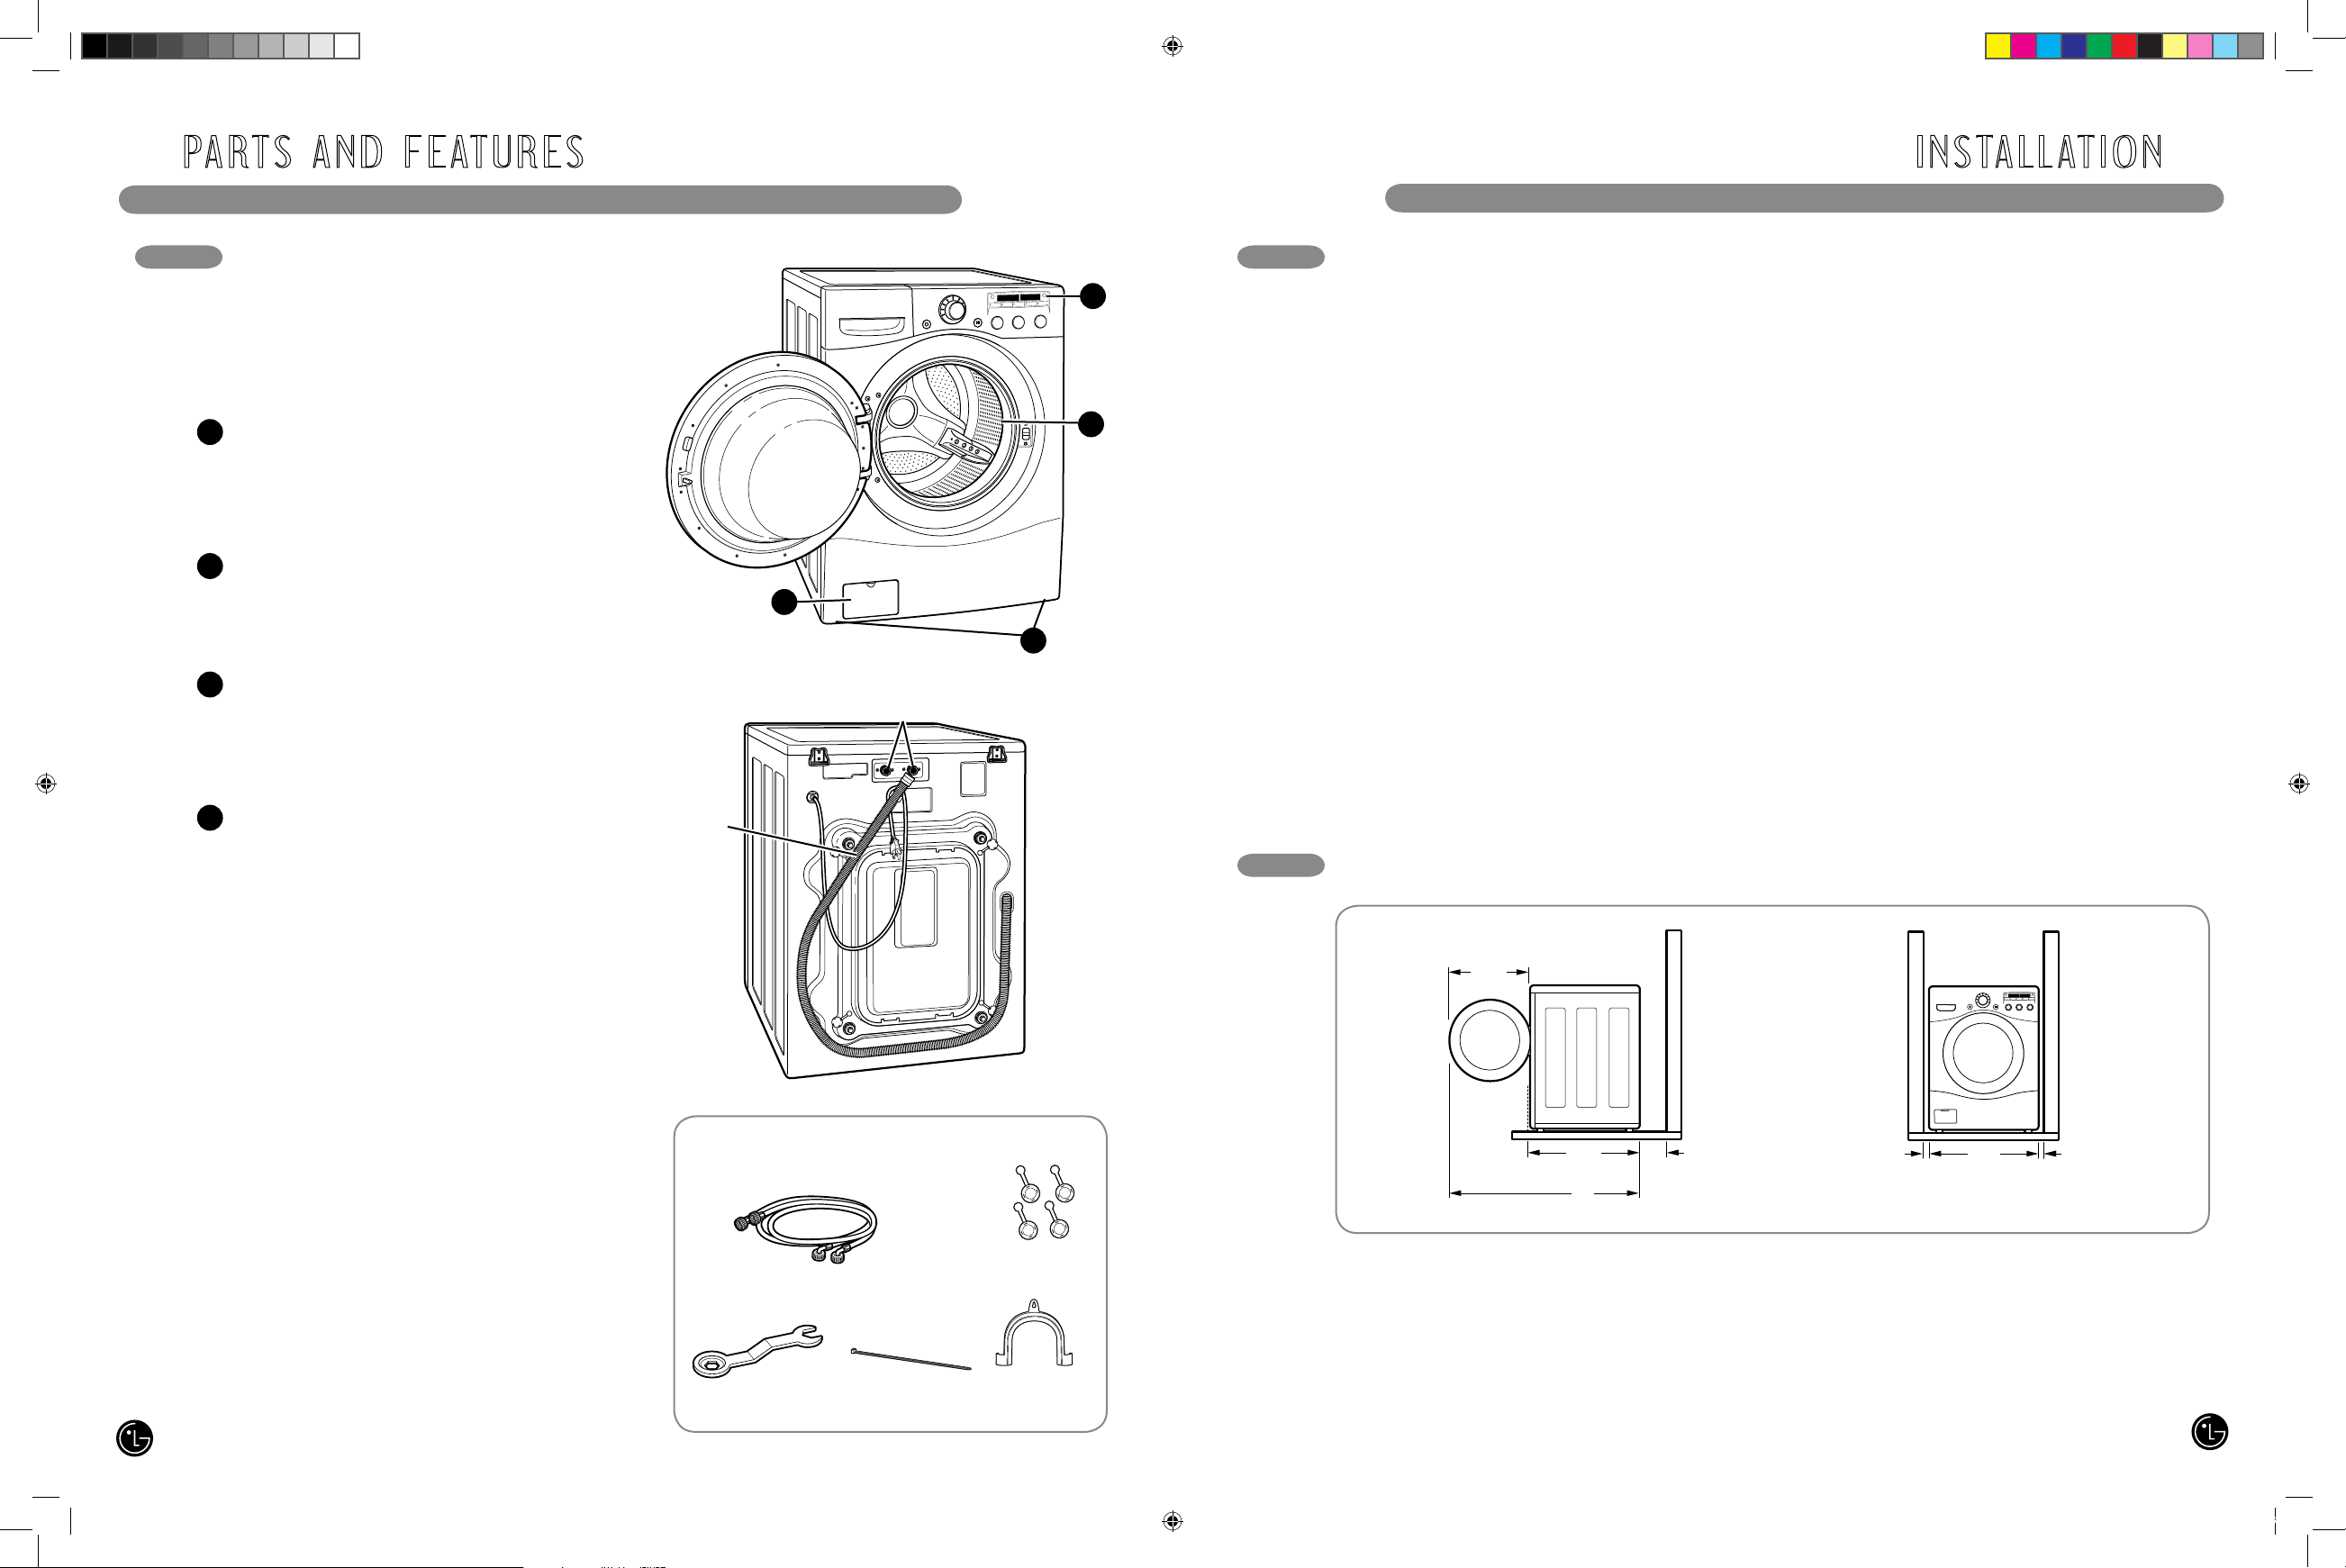
Included Accessories
Hot and Cold
Water Hoses
Wrench
(for removing
shipping bolts and
adjusting leveling feet)
Tie Strap
(for securing
drain hose)
1
4
Hot and Cold
Water Inlets
Drain
Hose
Rear of Washer
4
KEY PARTS AND COMPONENTS
Elbow Bracket
(for securing
drain hose)
In addition to the special features and
components outlined in the Special Features
section, there are several other important
components that are referenced in this manual.
LARGE-CAPACITY STAINLESS STEEL DRUM
The large capacity stainless steel drum offers
extreme durability and is tilted to improve
efficiency and allow easier access for large items.
DISPLAY WITH LOAD SIZE INDICATOR
The load size is set automatically based on the
weight and size of each load for optimal washing
and fabric care.
LEVELING FEET
Four leveling feet (two in the front and two in
the back) adjust to improve washer stability on
uneven floors.
DRAIN ACCESS PANEL
Provides access to the drain line and drain
pump filter.
wWARNING
• Washer is heavy! Two or more people
are required when moving and unpacking
the washer. Failure to do so can result in back
or other injury.
• Store and install the washer where it will not
be exposed to temperatures below freezing
or exposed to outdoor weather conditions.
Failure to follow this warning can cause serious
injury, fire, electrical shock, or death.
• Properly ground washer to conform with all
governing codes and ordinances. Failure to
follow this warning can cause serious injury, fire,
electrical shock, or death.
• To reduce the risk of electric shock, do not
install the washer in humid spaces. Failure to
follow this warning can cause serious injury, fire,
electrical shock, or death.
• The base opening must not be obstructed by
carpeting when the washer is installed on a
carpeted floor.
3
Caps (4)
(for covering
shipping bolt holes)
2
8
9
MFL31245113_ENG.indd 8-9 2007.10.4 2:31:23 PM
Page 6
I N S TA L L AT I O N
FLOORING
I N S TA L L AT I O N
When removing the washer from the carton
base, be sure to remove the foam tub support in
the middle of the carton base.
If you must lay the washer down to remove the
base packaging materials, always lay it carefully
on its side. Do NOT lay the washer on its front
or back.
IMPORTANT: To prevent internal damage
during transport, the washer is equipped with
4 shipping bolts and plastic retainers. These
bolts and retainers MUST be removed before
operating the washer.
• Failure to remove shipping bolts and retainers
may cause severe vibration and noise, which can
lead to permanent damage to the washer. The
cord is secured to the back of the washer with
a shipping bolt to help prevent operation with
shipping bolts in place.
Remove the retainers by turning them slightly
while pulling. Rotate and press the hole caps
into the shipping bolt holes.
Starting with the bottom 2 shipping bolts,
use the included wrench to remove the
4 shipping bolts by turning them
counterclockwise.
1
Shipping
Bolts
2
NOTE: Save the bolts and retainers for
future use. To prevent damage to internal
components, the shipping bolts and
retainers must be installed when
transporting the washer.
NOTE: Please note that the floor must be strong
and rigid enough to support the weight of the
washer when fully loaded, without flexing or
bouncing. If your floor has too much flex in it,
you may need to reinforce it to make it more
rigid. A floor that is adequate for a top-loading
washer may not be rigid enough for a frontloading washer, due to the difference in the spin
speed and direction. If the floor is not solid, your
washer may vibrate and you may hear and feel
the vibration throughout your house.
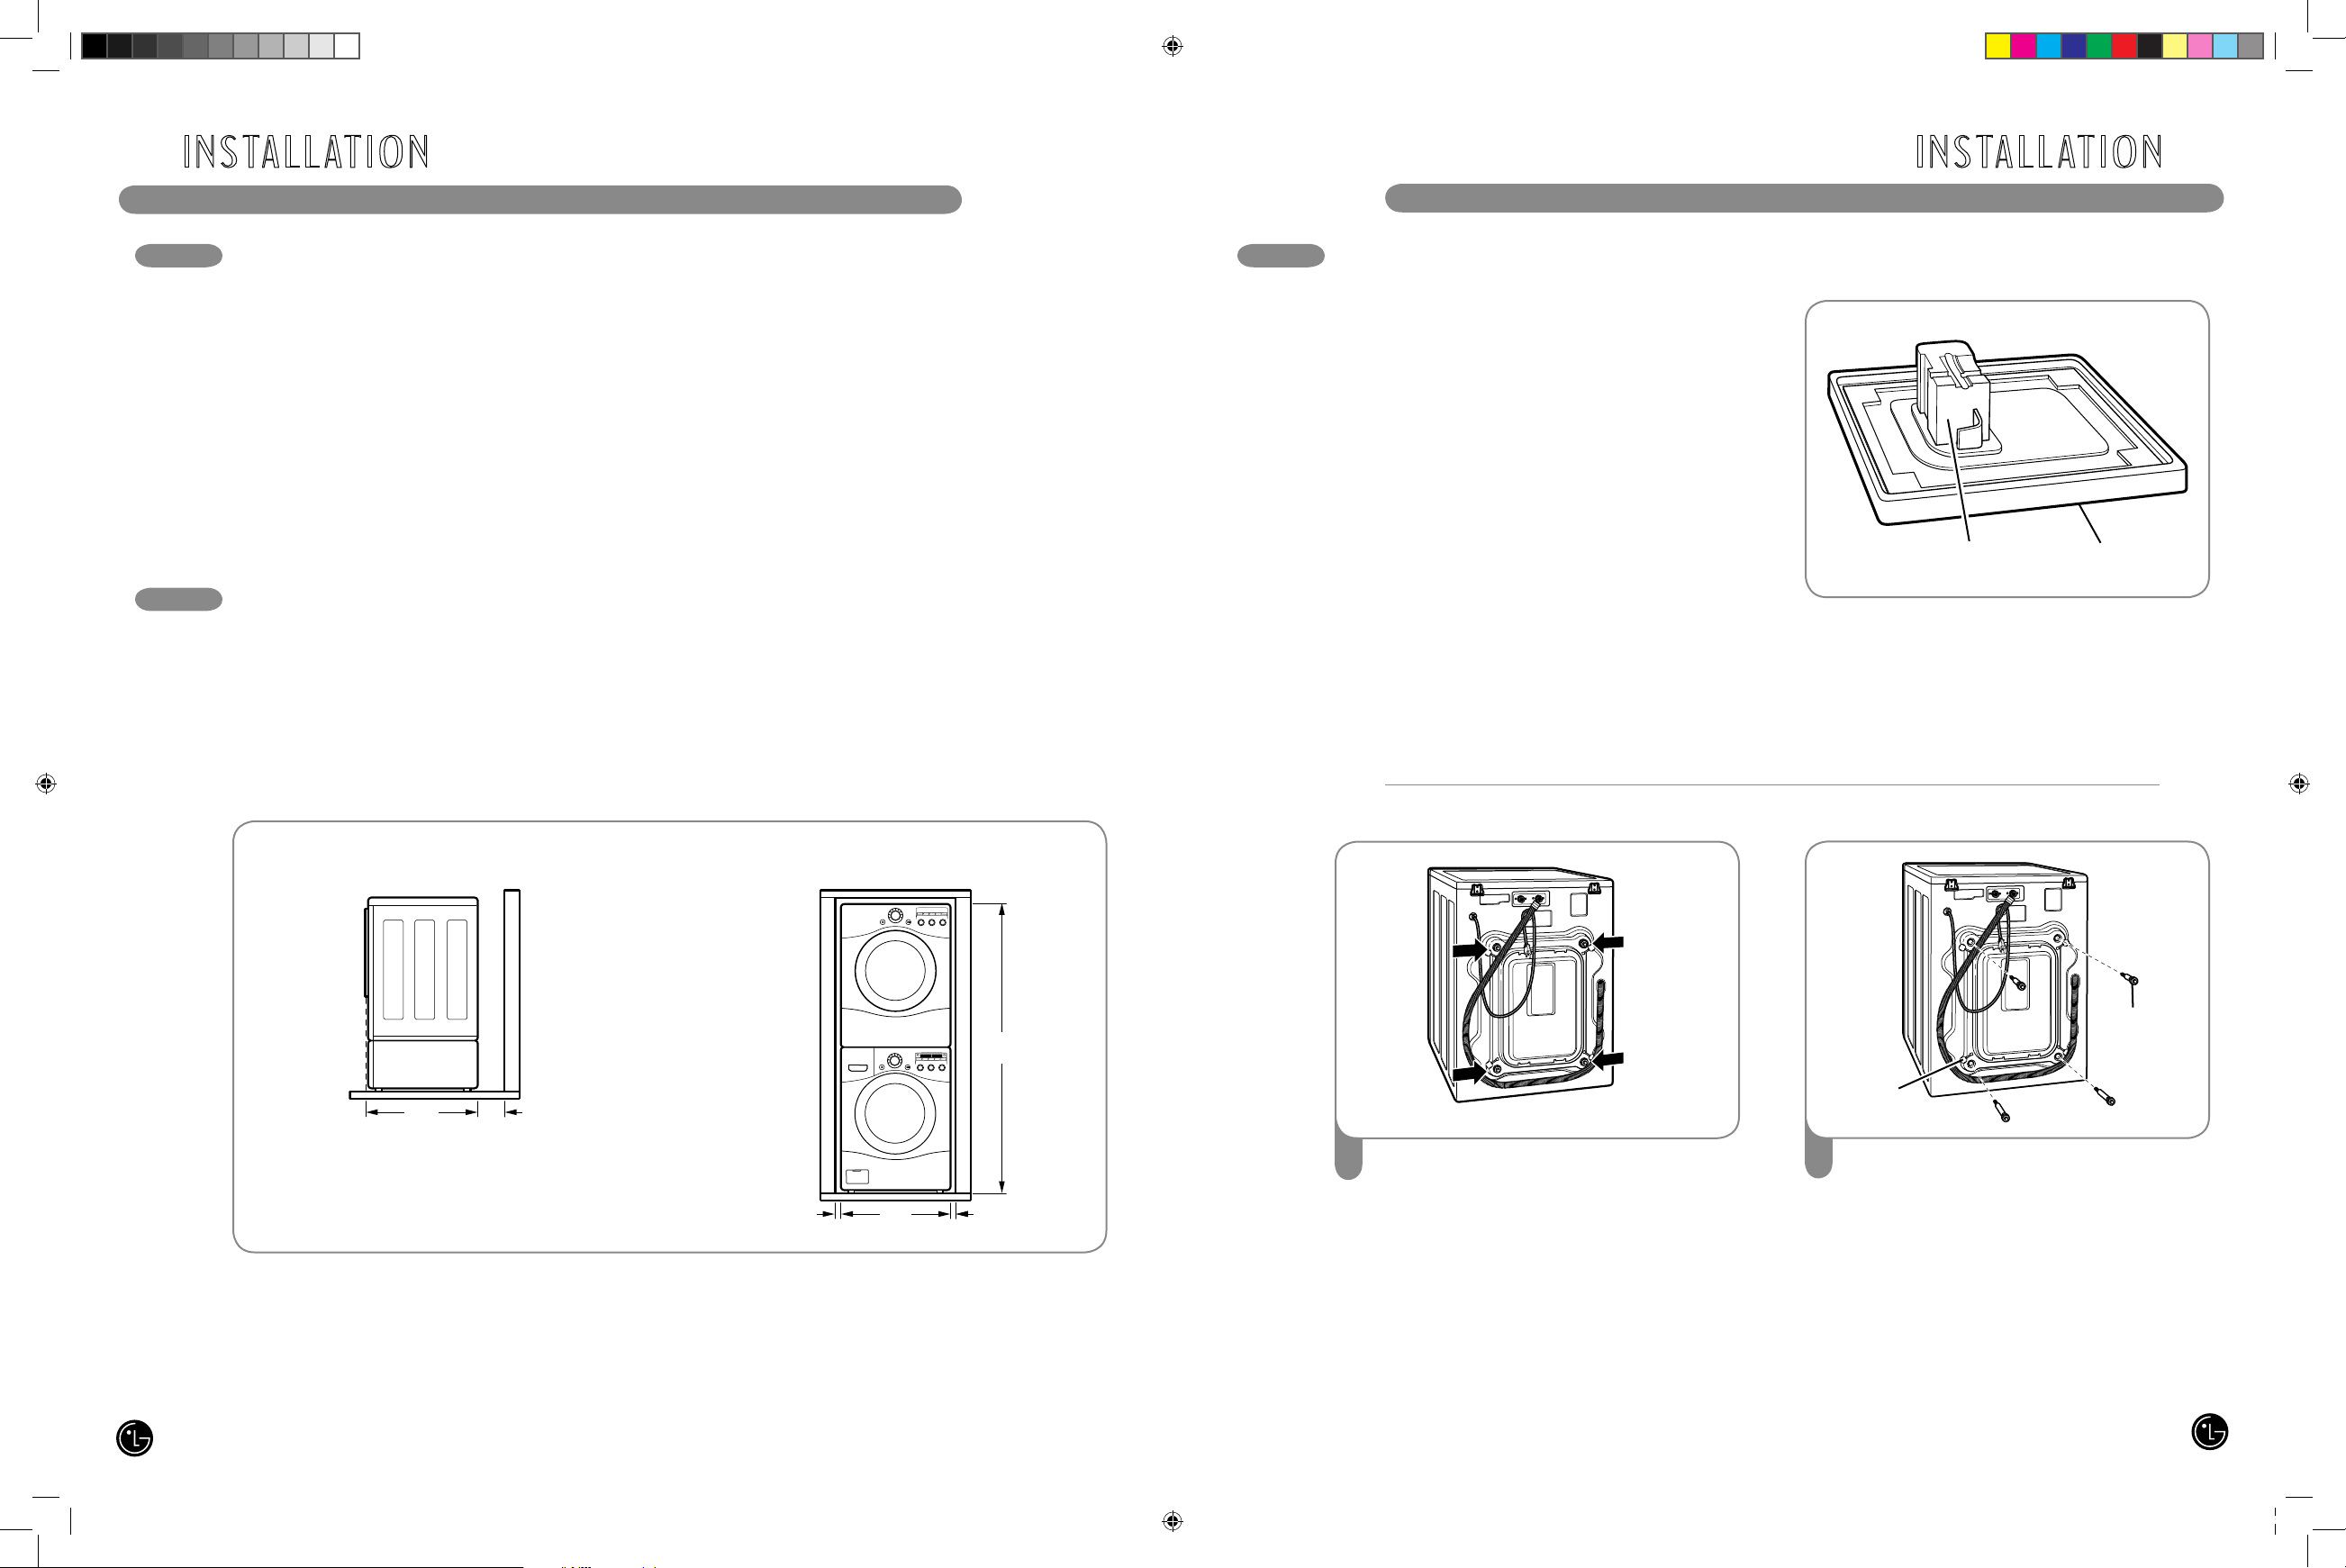
INSTALLATIONS WITH OPTIONAL
PEDESTAL BASE OR STACKING KIT
IMPORTANT: If you are installing your washer
using an optional pedestal base or stacking
kit, please refer to Optional Accessories in this
manual or to the instructions for your pedestal
or stacking kit before proceeding with the
installation.
Retainer
Hole Cap
30"
(76.1 cm)
4"
(10 cm)
27"
(68.6 cm)1"(2.54 cm)
1"
(2.54 cm)
771/2"
(190.5 cm)
Required Dimensions for Installation
With Pedestal
Required Dimensions for Installation
With Stacking Kit
Carton Base
Foam Tub
Support
• To minimize noise and vibration, the washer
MUST be installed on a solidly constructed floor.
See the NOTE at right.
• Allowable slope under the entire washer is
1° maximum.
• Carpeting and soft tile surfaces are not
recommended.
• Never install the washer on a platform or weakly
supported structure. Use only an approved
accessory pedestal as described below.
UNPACKING AND REMOVING SHIPPING BOLTS
10
11
MFL31245113_ENG.indd 10-11 2007.10.4 2:31:28 PM
Page 7
I N S TA L L AT I O N I N S TA L L AT I O N
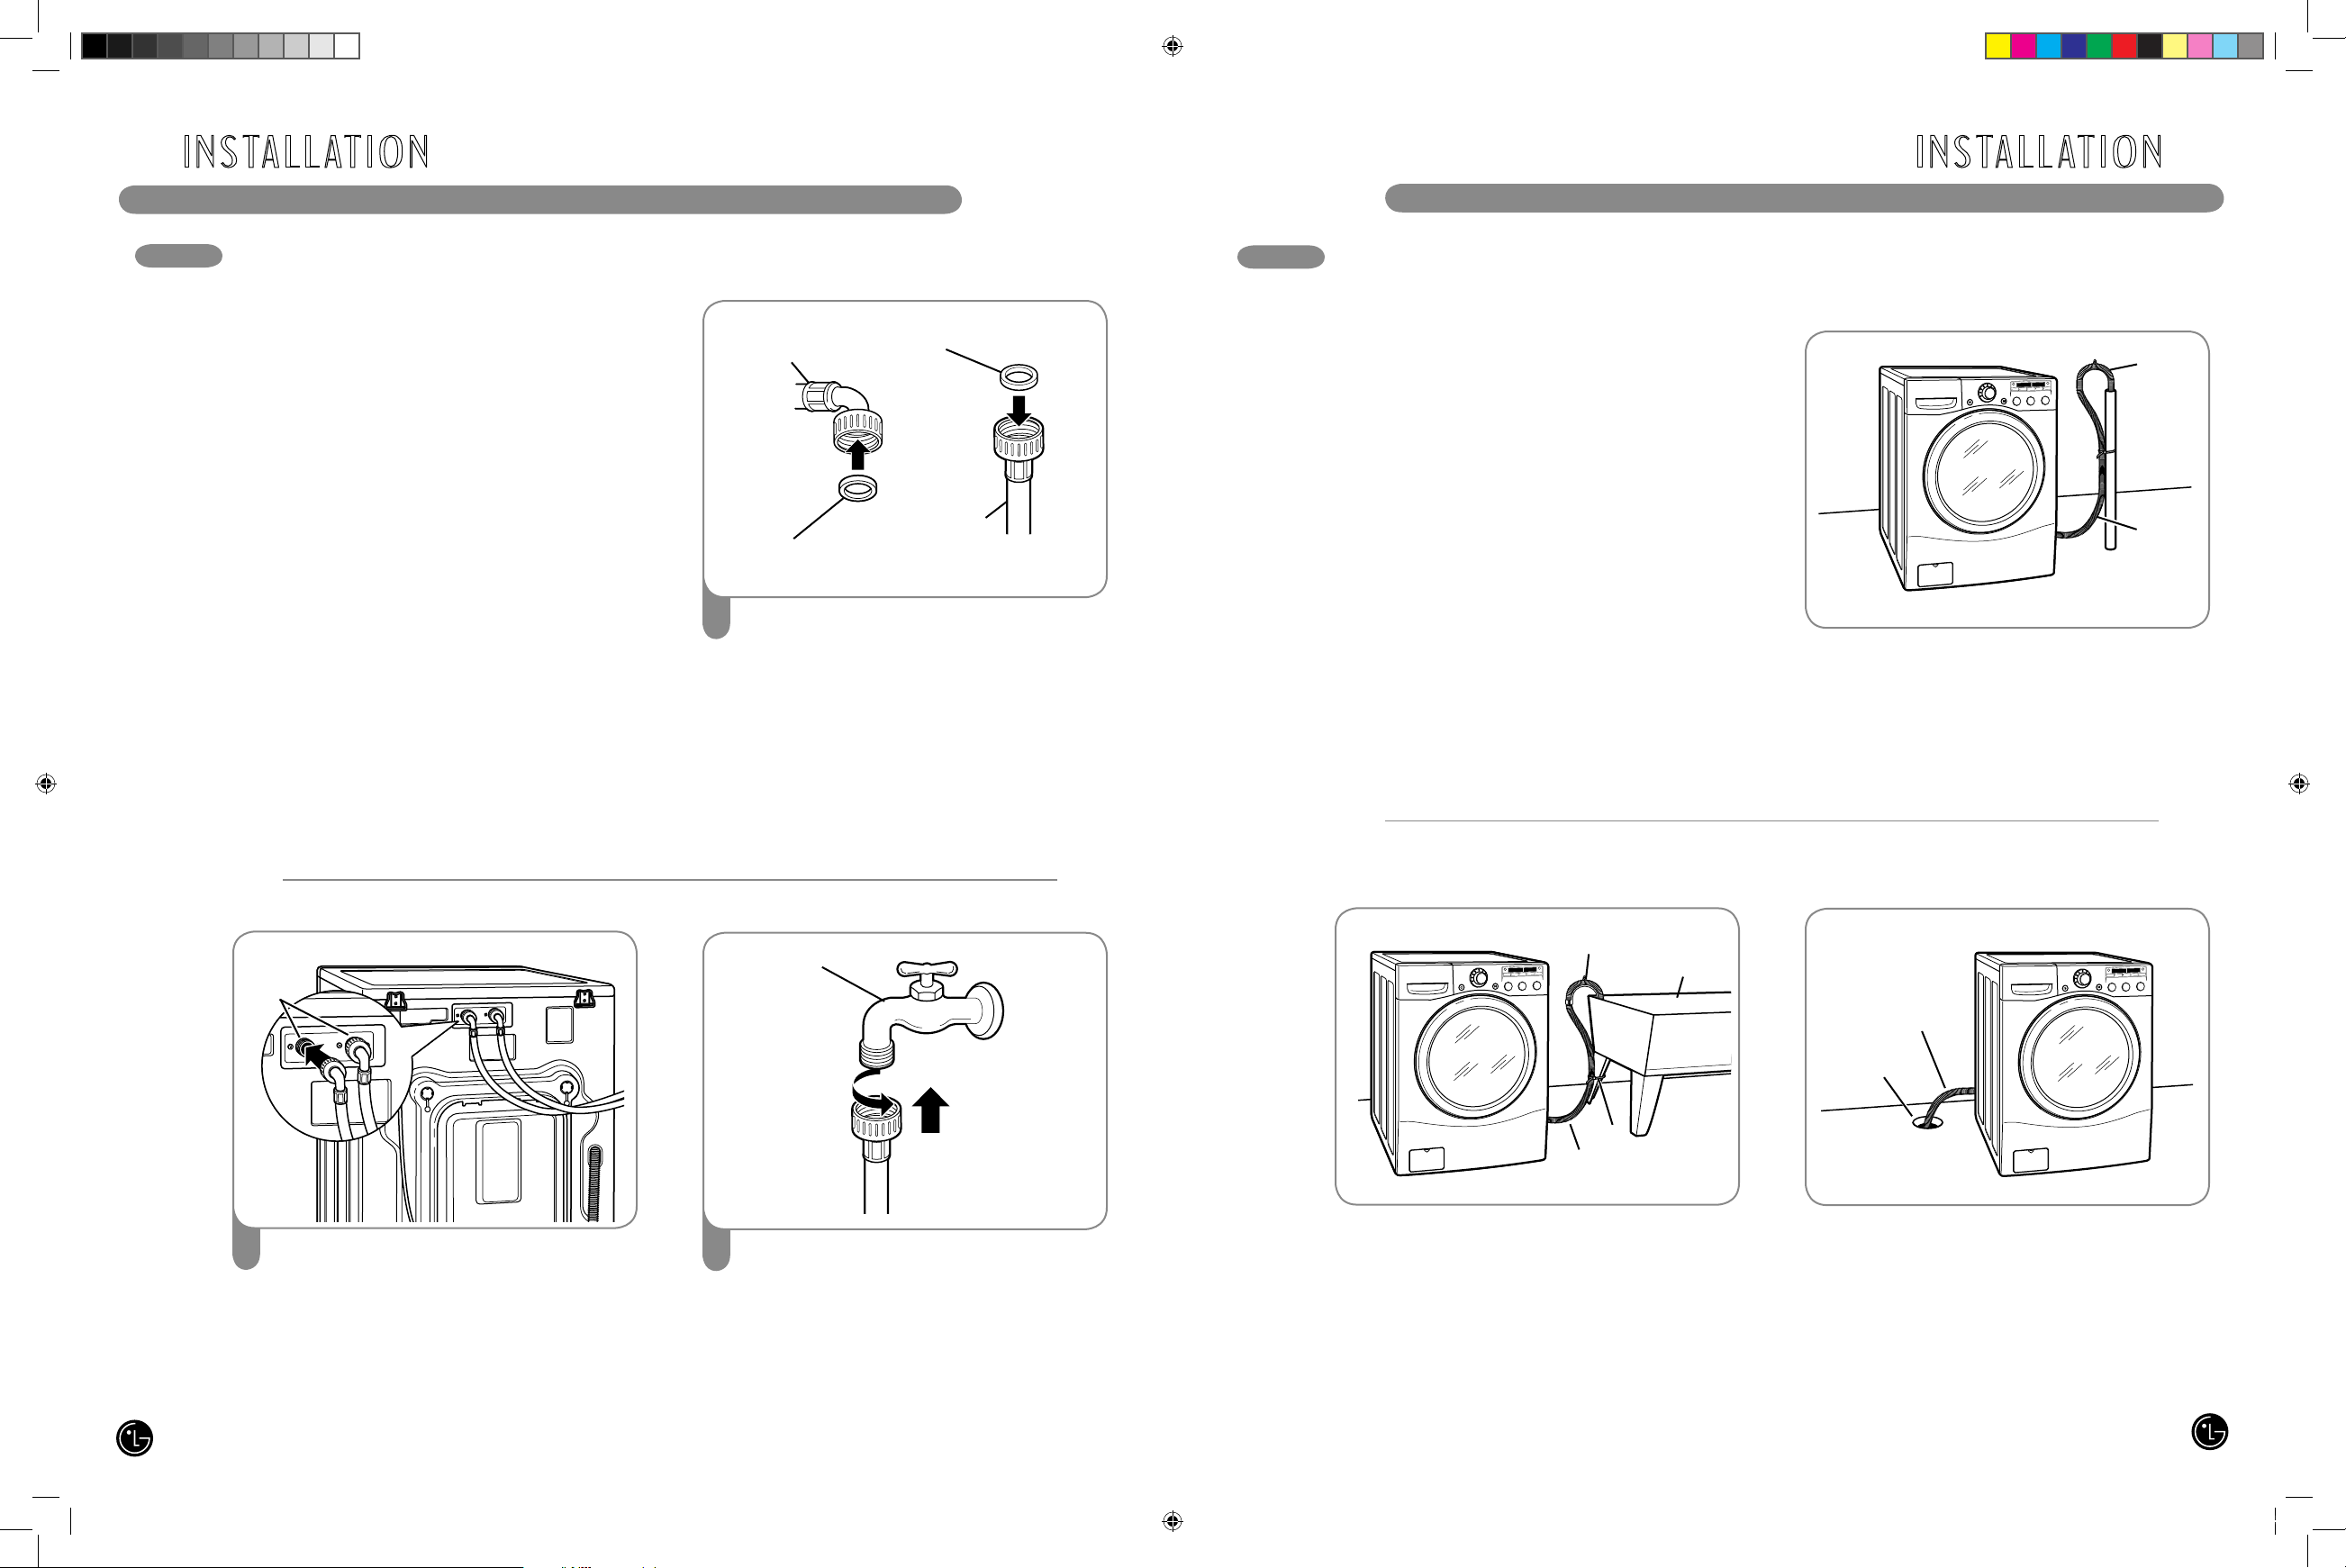
CONNECTING THE WATER LINES CONNECTING THE DRAIN LINE
Insert the end of the drain hose into the floor
drain. Secure the hose in place to prevent it
from moving.
Drain Hose
Floor Drain
Option 3: Floor Drain
Stand
Pipe
Tie Strap
Clip the end of the hose into the elbow bracket.
Insert the end of the drain hose into a standpipe.
Use tie strap to secure the drain hose in place.
NOTE: Total height of the hose end should not
exceed 96 in. (244.8 cm) from the bottom of the
washer.
Option 1: Standpipe
Elbow
Bracket
Drain
Hose
Clip the end of the hose into the elbow bracket.
Hang the end of the drain hose over the side of
the laundry tub. Use tie strap to secure the drain
hose in place.
NOTE: Total height of the hose end should not
exceed 96 in. (244.8 cm) from the bottom of the
washer.
Laundry
Tub
Option 2: Laundry Tub
Elbow
Bracket
Tie
Strap
Drain
Hose
Insert a rubber seal into the threaded
fittings on each hose.
1
Rubber Seal
Water Hose
(to tap)
Rubber Seal
Water Hose
(to water inlet
on washer)
3
Attach the hot water line to the hot water
tap. Attach the cold water line to the cold
water tap.
Tighten the fittings securely. Open the water
taps fully to check for leaks.
Water Tap
NOTE: Do not cross-thread the hose fittings.
Attach the hot water line to the red hot water
inlet on the back of the washer. Attach the
cold water line to the blue cold water inlet on
the back of the washer. Tighten the fittings
securely.
2
Water
Inlets
• IMPORTANT: Use new hoses when installing
the washer. Do NOT reuse old hoses.
•
IMPORTANT: Us e ONLY the in l e t hoses
provided by LG with this laundry product.
Aftermarket hoses are not guaranteed to fit or
function correctly. Other hoses may not tighten
correctly and could cause leaks. Subsequent
damage to product or property will not be
covered under the terms of LG's warranty.
• Water supply pressure must be between
14.5 PSI and 116 PSI (100~800 kPa). If the
water supply pressure is more than 116 PSI, a
pressure reducing valve must be installed.
• Periodically check the hose for cracks, leaks,
and wear, and replace the hose if necessary.
• Make sure that the water lines are not stretched,
pinched, crushed, or kinked.
• The washer should never be installed or stored
in a location subject to freezing temperatures.
Damage to the water lines and internal
mechanisms of the washer can result. If the
washer was exposed to freezing temperatures
prior to installation, allow it to stand at room
temperature for several hours before use.
• The drain hose should always be properly
secured. Failure to properly secure the drain
hose can result in flooding and property
damage.
• Do not install the end of the drain hose higher
than 96 in. (244.8 cm) above the bottom of the
washer.
• The drain must be installed in accordance with
any applicable local codes and regulations.
• Make sure that the water lines are not stretched,
pinched, crushed, or kinked.
12
13
MFL31245113_ENG.indd 12-13 2007.10.4 2:31:34 PM
Page 8
3
I N S TA L L AT I O N
SORTING WASH LOADS
H O W TO U S E
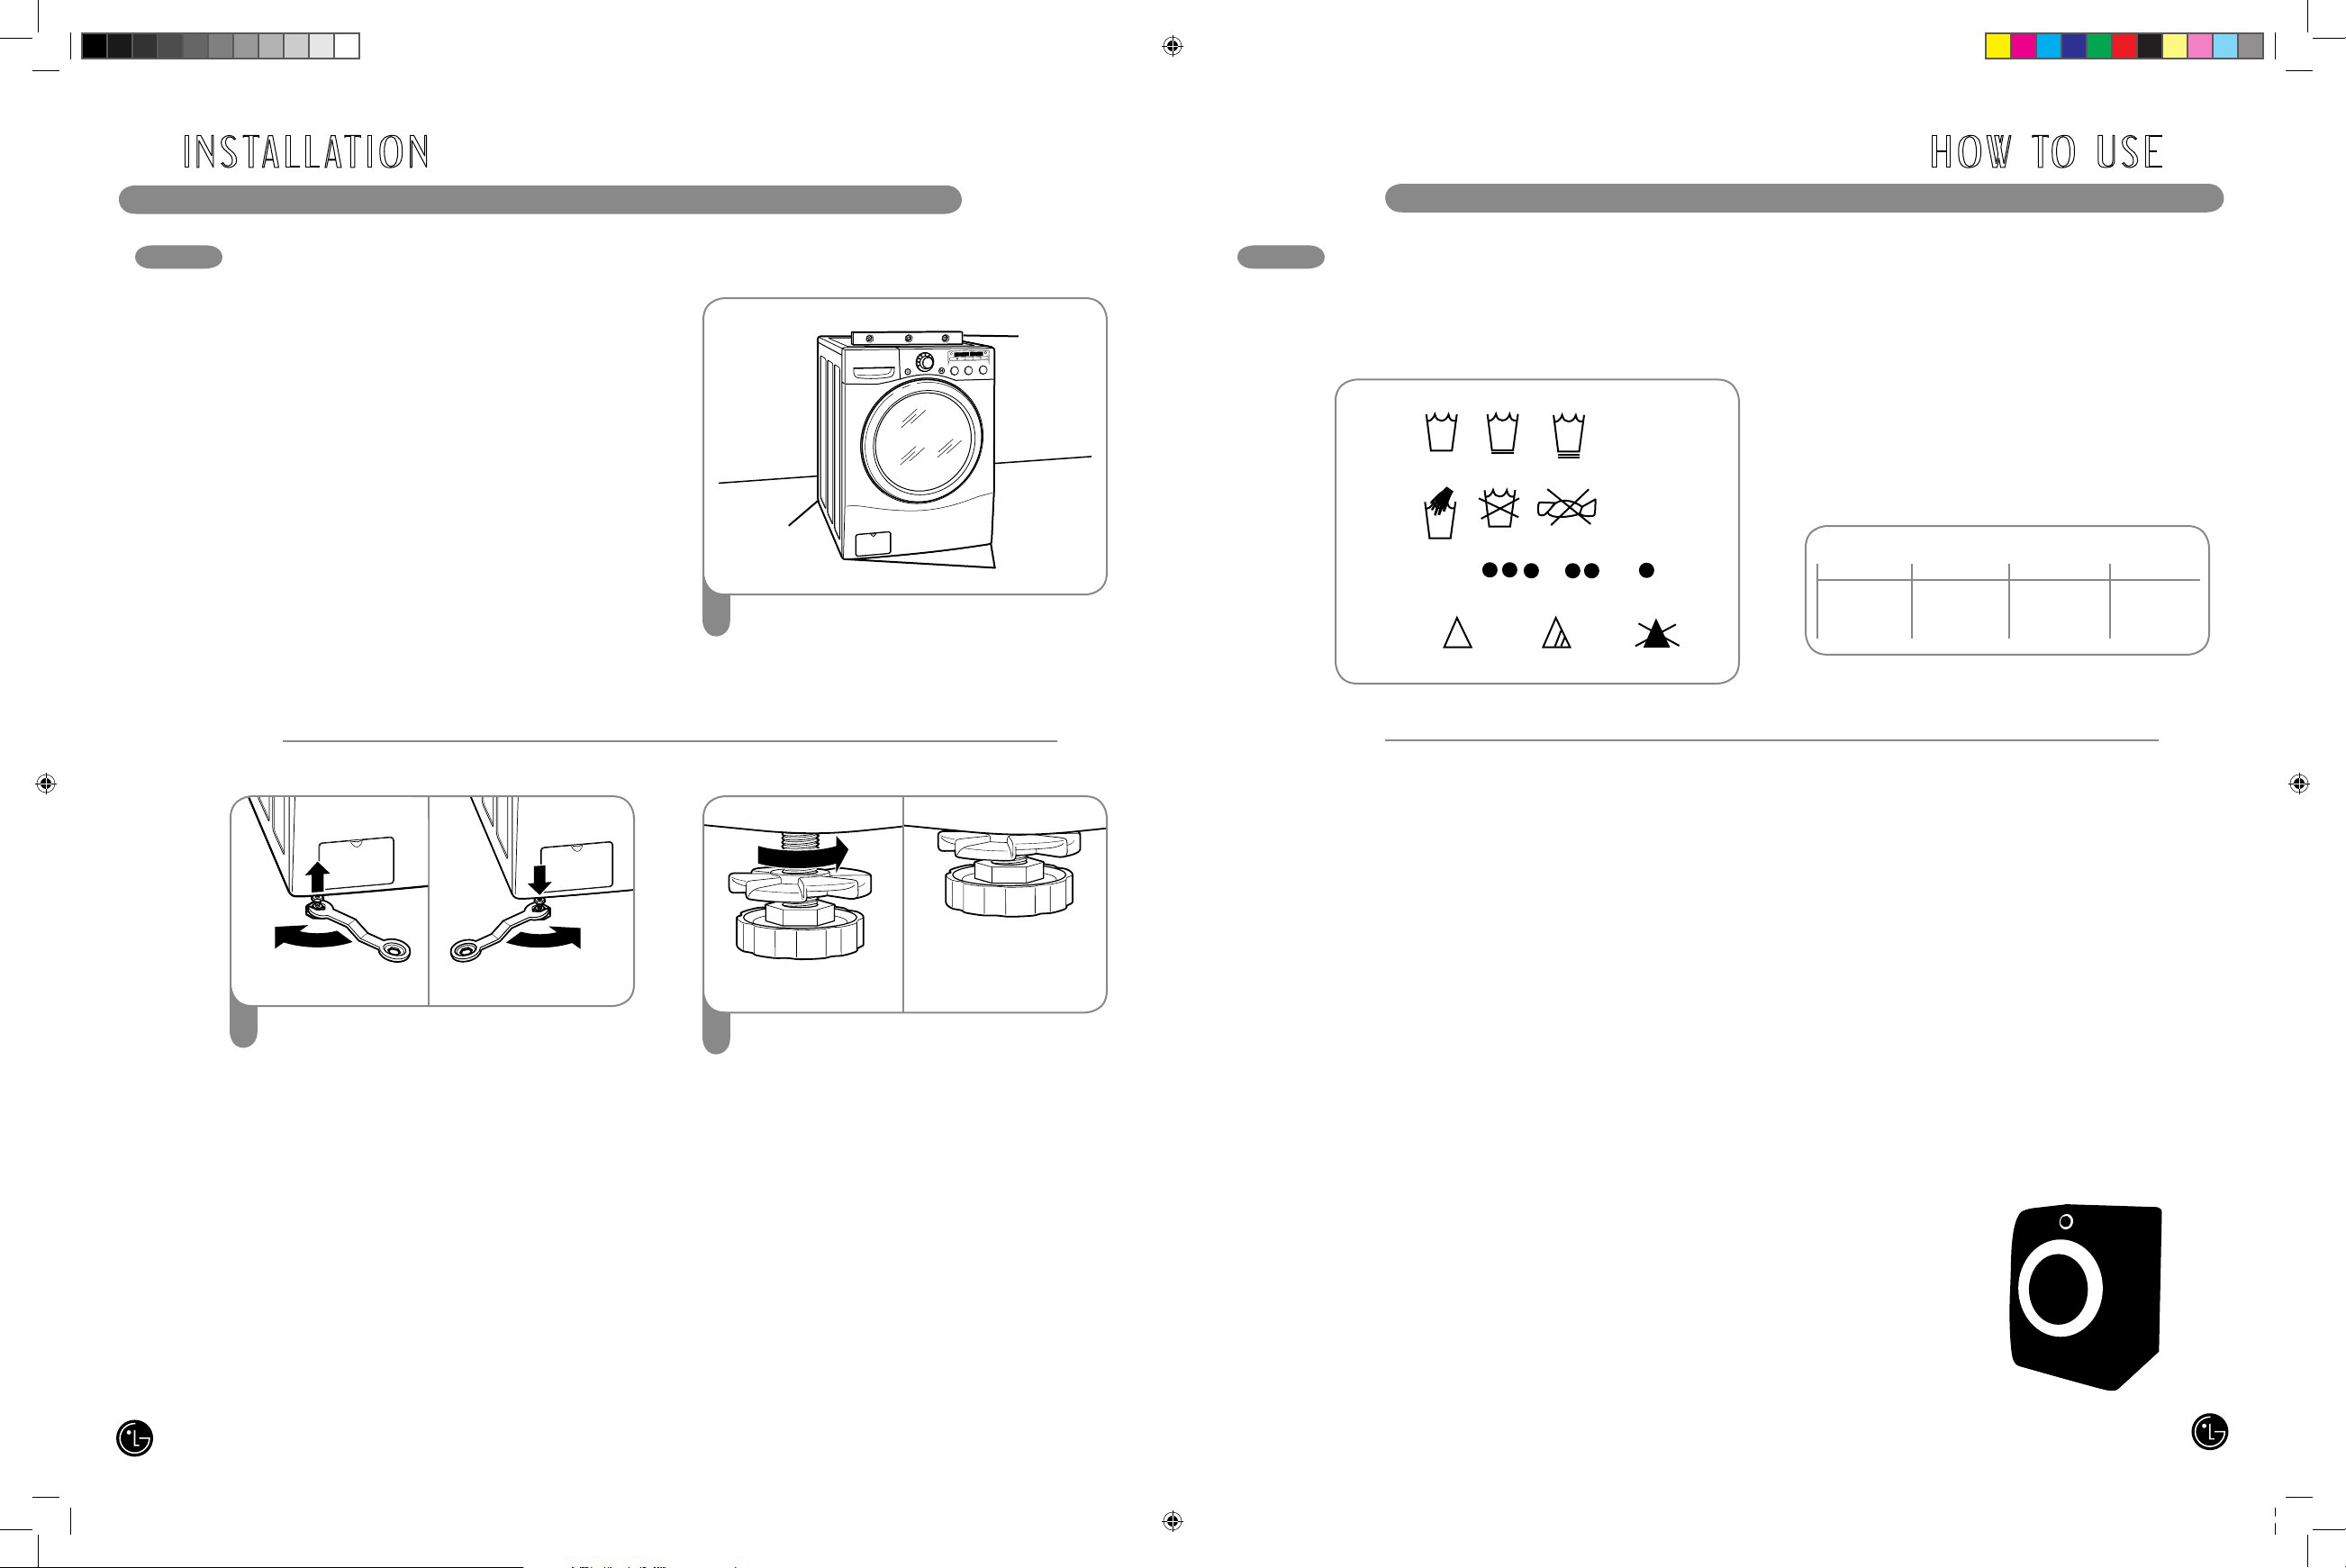
LEVELING THE WASHER
Loosen the locknuts on all 4 leveling feet
until you can turn the feet with the included
wrench. Turn clockwise to raise the washer
or counterclockwise to lower it.
2
Once the washer is level from side to side
and front to back, tighten all locknuts
securely.
Make sure that all 4 leveling feet are in firm
contact with the floor.
NOTE: To make sure that the washer is
properly level, run the washer with a test
load: place approximately 6 pounds of
laundry in the machine. Then, press POWER,
press RINSE+SPIN, and then press the
START/PAUSE button. See the following
sections for additional information on cycle
selection and operation.
Verify that the washer does not rock or
vibrate excessively during the spin cycle.
If the washer vibrates or shakes, adjust
the leveling feet until the washer is stable
and retest.
Fabric Care Labels
Most articles of clothing feature fabric care labels
that include instructions for proper care.
Grouping Similar Items
For best results, sort clothes into loads that can
be washed with the same wash cycle.
Different fabrics have different care requirements.
Always wash dark colors separately from light
colors and whites to prevent discoloration. If
possible, do not wash heavily soiled items with
lightly soiled ones. The chart below shows
recommended groupings.
Bleach
symbols
Any bleach
(when needed)
Only non-chlorine bleach
(when needed)
Do not bleach
Machine
wash
cycle
Normal
Permanent press/
wrinkle resistant
Gentle/
delicate
Hand wash
Do not wash Do not wring
Water
temperature
Hot
(50°C/120°F)
Warm
(40°C/105°F)
Cold/cool
(30°C/85°F)
Fabric Care Labels
Sort Laundry...
by Colors by Soil by Fabric by Lint
Whites Heavy Delicates Lint Producer
Lights Normal Easy Care Lint Collector
Darks Light Sturdy
Loading the Washer
• Check all pockets to make sure that they
are empty. Items such as clips, matches,
pens, coins, and keys can damage both your
washer and your clothes.
• Close zippers, hooks, and drawstrings to
prevent these items from snagging or tangling
on other clothes.
• Pretreat heavily stained areas for best results.
• Combine large and small items in a load. Load
large items first.
• Large items should not be more than half of the
total washload.
• The washer can be fully loaded, but the drum
should not be tightly packed with items. The
door of the washer should close easily.
• To prevent an out-of-balance load, do not wash
single items. Add one or two similar items to
the load. Large, bulky items, such as a blanket,
comforter, or bedspread should be washed
individually.
• Do not wash or spin waterproof clothes.
• When unloading the washer, check under the
door seal for small items.
Position the washer in the final location,
taking special care to not pinch, strain, or
crush the water and drain lines. Place a level
across the top of the washer.
1
Level
Leveling
Feet
Leveling
Feet
The drum of your new washer spins at very high
speeds, up to 1,200 RPM. To minimize vibration,
noise, and unwanted movement, the floor must
be a perfectly level, solid surface.
NOTE: Adjust the leveling feet only as far as
necessary to level the washer. Extending the
leveling feet more than necessary can cause
the washer to vibrate.
• All four leveling feet must rest solidly on the
floor. Rock the washer gently from corner to
corner to make sure that the washer does
not rock.
If you are installing the washer on the optional
pedestal, you must use the leveling feet on
the pedestal to level the washer. The washer’s
leveling feet should be fully retracted and locked
into position with the locknuts.
Raise
Lower
Tighten all 4
locknuts securely
14
15
MFL31245113_ENG.indd 14-15 2007.10.4 2:31:39 PM
Page 9
H O W TO U S E
SELECTING DETERGENT
ABOUT THE DISPENSER
The automatic dispenser consists of four
compartments which hold:
• Liquid chlorine bleach.
• Liquid fabric softener.
• Liquid or powdered detergent for prewash.
• Liquid or powdered detergent and color-safe
bleach for main wash.
All laundry products can be added at once in
their respective dispenser compartments. They
will be dispensed at the appropriate time for the
most effective cleaning.
After adding the laundry products to the
dispenser, close the dispenser drawer.
To add detergent, bleach, and fabric softener to
the automatic dispenser:
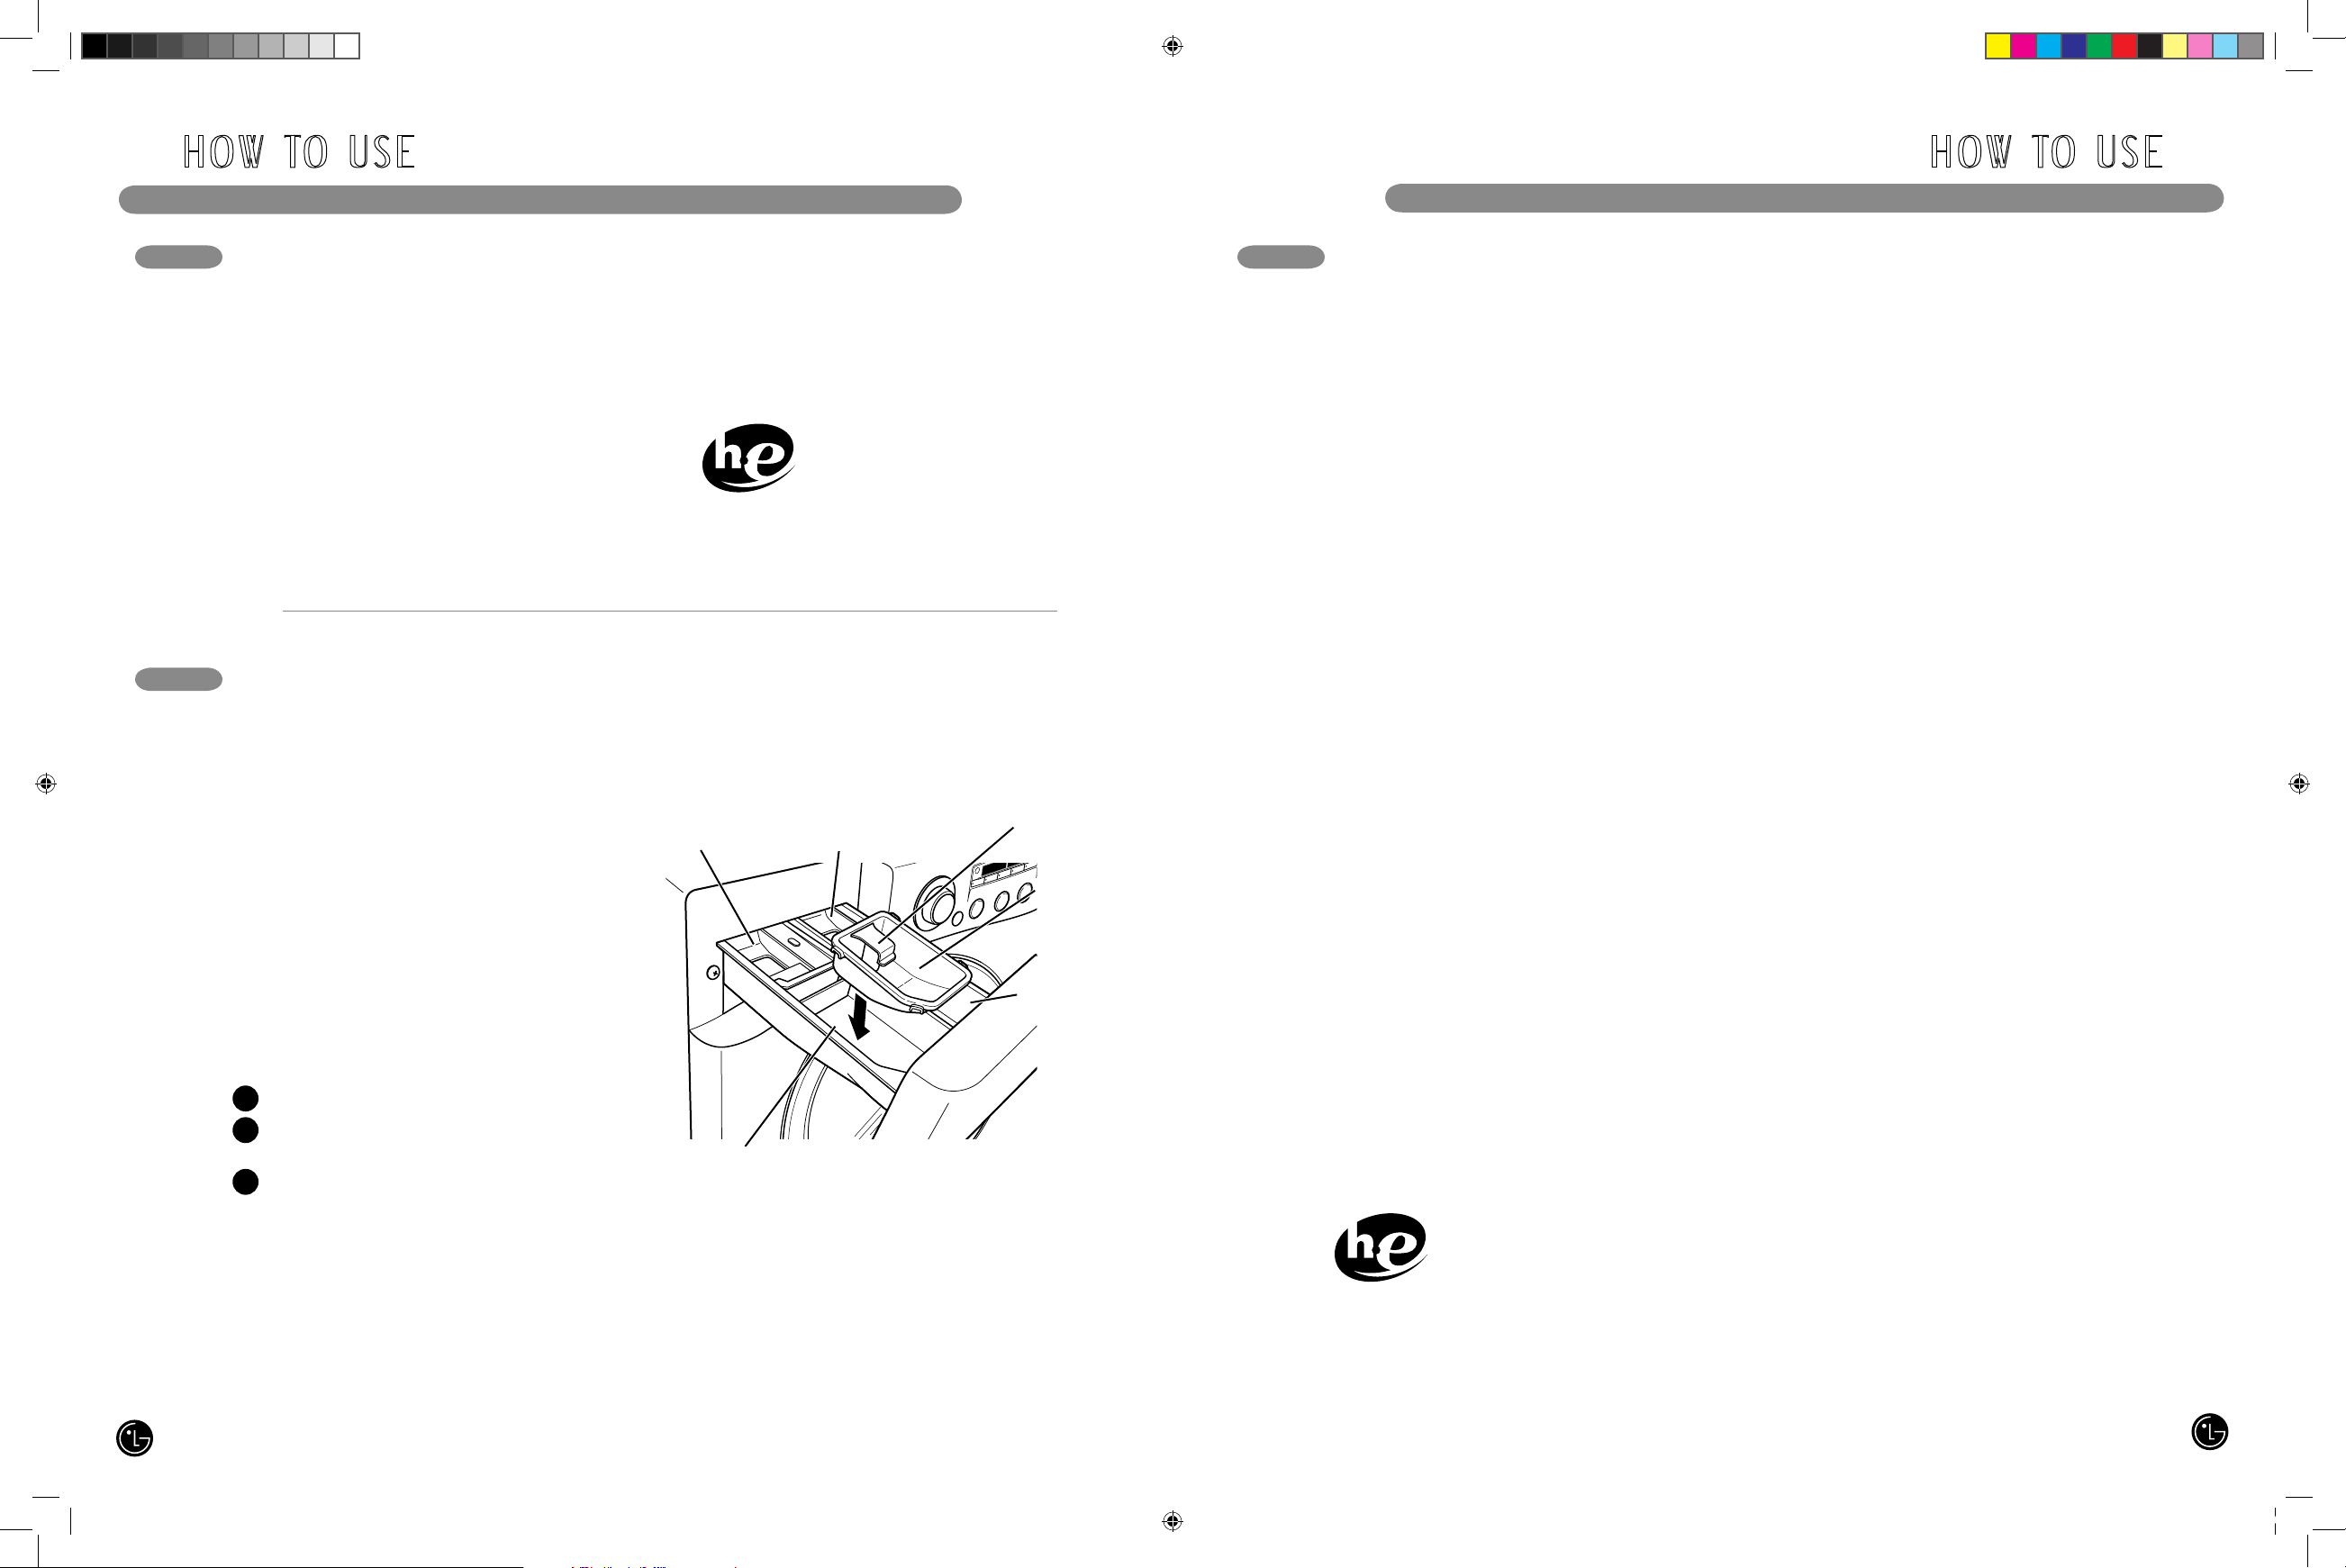
Open the dispenser drawer.
Load the laundry products into the
appropriate compartments.
Slowly close the dispenser drawer to
avoid early dispensing of the laundry
products.
NOTE: It is normal for a small amount of water to
remain in the dispenser compartments at the end
of the cycle.
1
2
3
Liquid Chlorine
Bleach
Compartment
Liquid Fabric
Softener
Compartment
Prewash
Detergent
Compartment
Main Wash Detergent
Compartment
Liquid
Detergent
Cup
Insert
LOADING THE DISPENSER
H O W TO U S E
Prewash Detergent Compartment
Add liquid or powered detergent to this
compartment to automatically dispense when
using the Prewash option. Always use HE (HighEfficiency) detergent with your washing machine.
• The amount of detergent added for the Prewash
option is 1/2 the amount recommended for the
main wash cycle. For example, if the main wash
cycle requires one cup of detergent, add 1/2
cup for the Prewash option.
NOTE: If liquid detergent is to be used for the
main wash when using the pre-wash option, the
liquid detergent cup accessory must be used
in main wash dispenser to prevent the main
wash liquid detergent from being dispensed
immediately.
Main Wash Detergent Compartment
This compartment holds laundry detergent
for the main wash cycle, which is added to
the load at the beginning of the cycle. Always
use HE (High-Efficiency) detergent with your
washing machine.
Always follow the manufacturer’s
recommendations when adding detergent.
Using too much detergent can result in
detergent buildup in clothing and the washer.
Either powdered or liquid detergent may be used.
• When using liquid detergent, make sure the
liquid detergent cup and insert are in place.
Do not exceed the maximum fill line.
• When using powdered detergent, remove
the insert and liquid detergent cup from the
compartment. Powdered detergent will not
dispense with the liquid detergent cup and
insert in place.
NOTE: Liquid or powdered color-safe bleach
may be added to the main wash compartment
with detergent of the same type.
Liquid Bleach Compartment
This compartment holds liquid chlorine bleach,
which will be dispensed automatically at the
proper time during the wash cycle.
• Do not add powdered or liquid color-safe bleach
to this compartment.
• Always follow the manufacturer’s
recommendations when adding bleach. Do not
exceed the maximum fill line. Using too much
bleach can damage fabrics.
• Never pour undiluted liquid chlorine bleach
directly onto the load or into the drum. Fabric
damage can occur.
Fabric Softener Compartment
This compartment holds liquid fabric softener,
which will be automatically dispensed during the
final rinse cycle.
• Always follow the manufacturer’s
recommendations when adding fabric softener.
Do not exceed the maximum fill line. Using
too much fabric softener may result in stained
clothes.
• Dilute concentrated fabric softeners with warm
water. Do not exceed the maximum fill line.
• Never pour fabric softener directly onto the load
or into the drum.
IMPORTANT: Do not place or store laundry
products, such as detergent, bleach, or liquid
fabric softener, on top of your washer or dryer.
Wipe up any spills immediately. These products
can damage the finish and controls.
Designed specially to use only
HE (High-Efficiency) detergent
Designed specially to use only
HE (High-Efficiency) detergent
IMPORTANT: Your washing machine is
designed for use with only High-Efficiency
(HE) detergents. HE detergents are formulated
specifically for front-load washers and contain
suds-reducing agents. Always look for the HE
symbol when purchasing detergent.
HE detergents produce fewer suds, dissolve
more efficiently to improve washing and rinsing
performance, and help to keep the interior of your
washer clean.
Using a regular detergent may cause oversudsing
and unsatisfactory performance.
16
17
MFL31245113_ENG.indd 16-17 2007.10.4 2:31:40 PM
Page 10
H O W TO U S E H O W TO U S E
CYCLE GUIDE—WM2455H*
CONTROL PANEL FEATURES—WM2455H*
2
Cycle
Heavily soiled
underwear, work
clothes, diapers, etc.
Extra Hot/Cold
Normal
Heavy
Light
Normal
Heavy
Heavy
Light
Normal
Heavy
Light
Normal
Heavy
Light
Normal
Light
Warm/Cold
Warm/Warm
Hot/Cold
Cold/Cold
Warm/Cold
Warm/Warm
Hot/Cold
Cold/Cold
Extra Hot/Cold
Hot/Cold
Cold/Cold
Warm/Cold
Warm/Warm
Dress shirts/pants,
wrinkle-free clothing,
poly/cotton blend
clothing, tablecloths
Large items such as
blankets and comforters
Lightly soiled baby wear
Dress shirts/blouses
nylons, sheer or lacy
garments
Sanitary
Perm. Press
Bulky/
Large
Baby Wear
Delicates
Fabric Type
Wash/Rinse
Temp.
Spin Speed Soil Level
Pre-
Wash
Rinse +
Spin
Water
Plus
Stain
Cycle
Extra
Rinse
Normal
Normal
Light
Cold/Cold
Warm/Cold
Warm/Warm
Normal
Heavy
Light
Warm/Cold
Warm/Warm
Hot/Cold
Cold/Cold
Cotton, linen, towels
shirts, sheets, jeans
mixed loads
COTTON/
NORMAL
High (==)
Extra High (==)
No Spin (•)
Low (---)
Medium (—)
No Spin (•)
Low (---)
Medium (—)
Medium (—)
High (==)
No Spin (•)
Low (---)
High (==)
No Spin (•)
Low (---)
Medium (—)
Extra High (==)
Cold/Cold
Warm/Cold
Warm/Warm
High (==)
No Spin (•)
Low (---)
Medium (—)
Extra High (==)
No Spin (•)
Low (---)
Medium (—)
Hand Wash/
Wool
Items labeled
“hand washable”
No Spin (•)
Low (---)
Medium (—)
Speed
Wash
Lightly soiled clothing
and small loads
High (==)
No Spin (•)
Low (---)
Medium (—)
Light
Hot/Cold
Extra High (==)
Drain, Spin Only
Drain+
Spin
High (==)
Extra High (==)
No Spin (•)
Low (---)
Medium (—)
The cycle guide below shows the options and recommended fabric types for each cycle.
NOTE: To protect your garments, not every wash/rinse temperature, spin speed, soil level,
or option is available with every cycle.
1
3
6
5
7
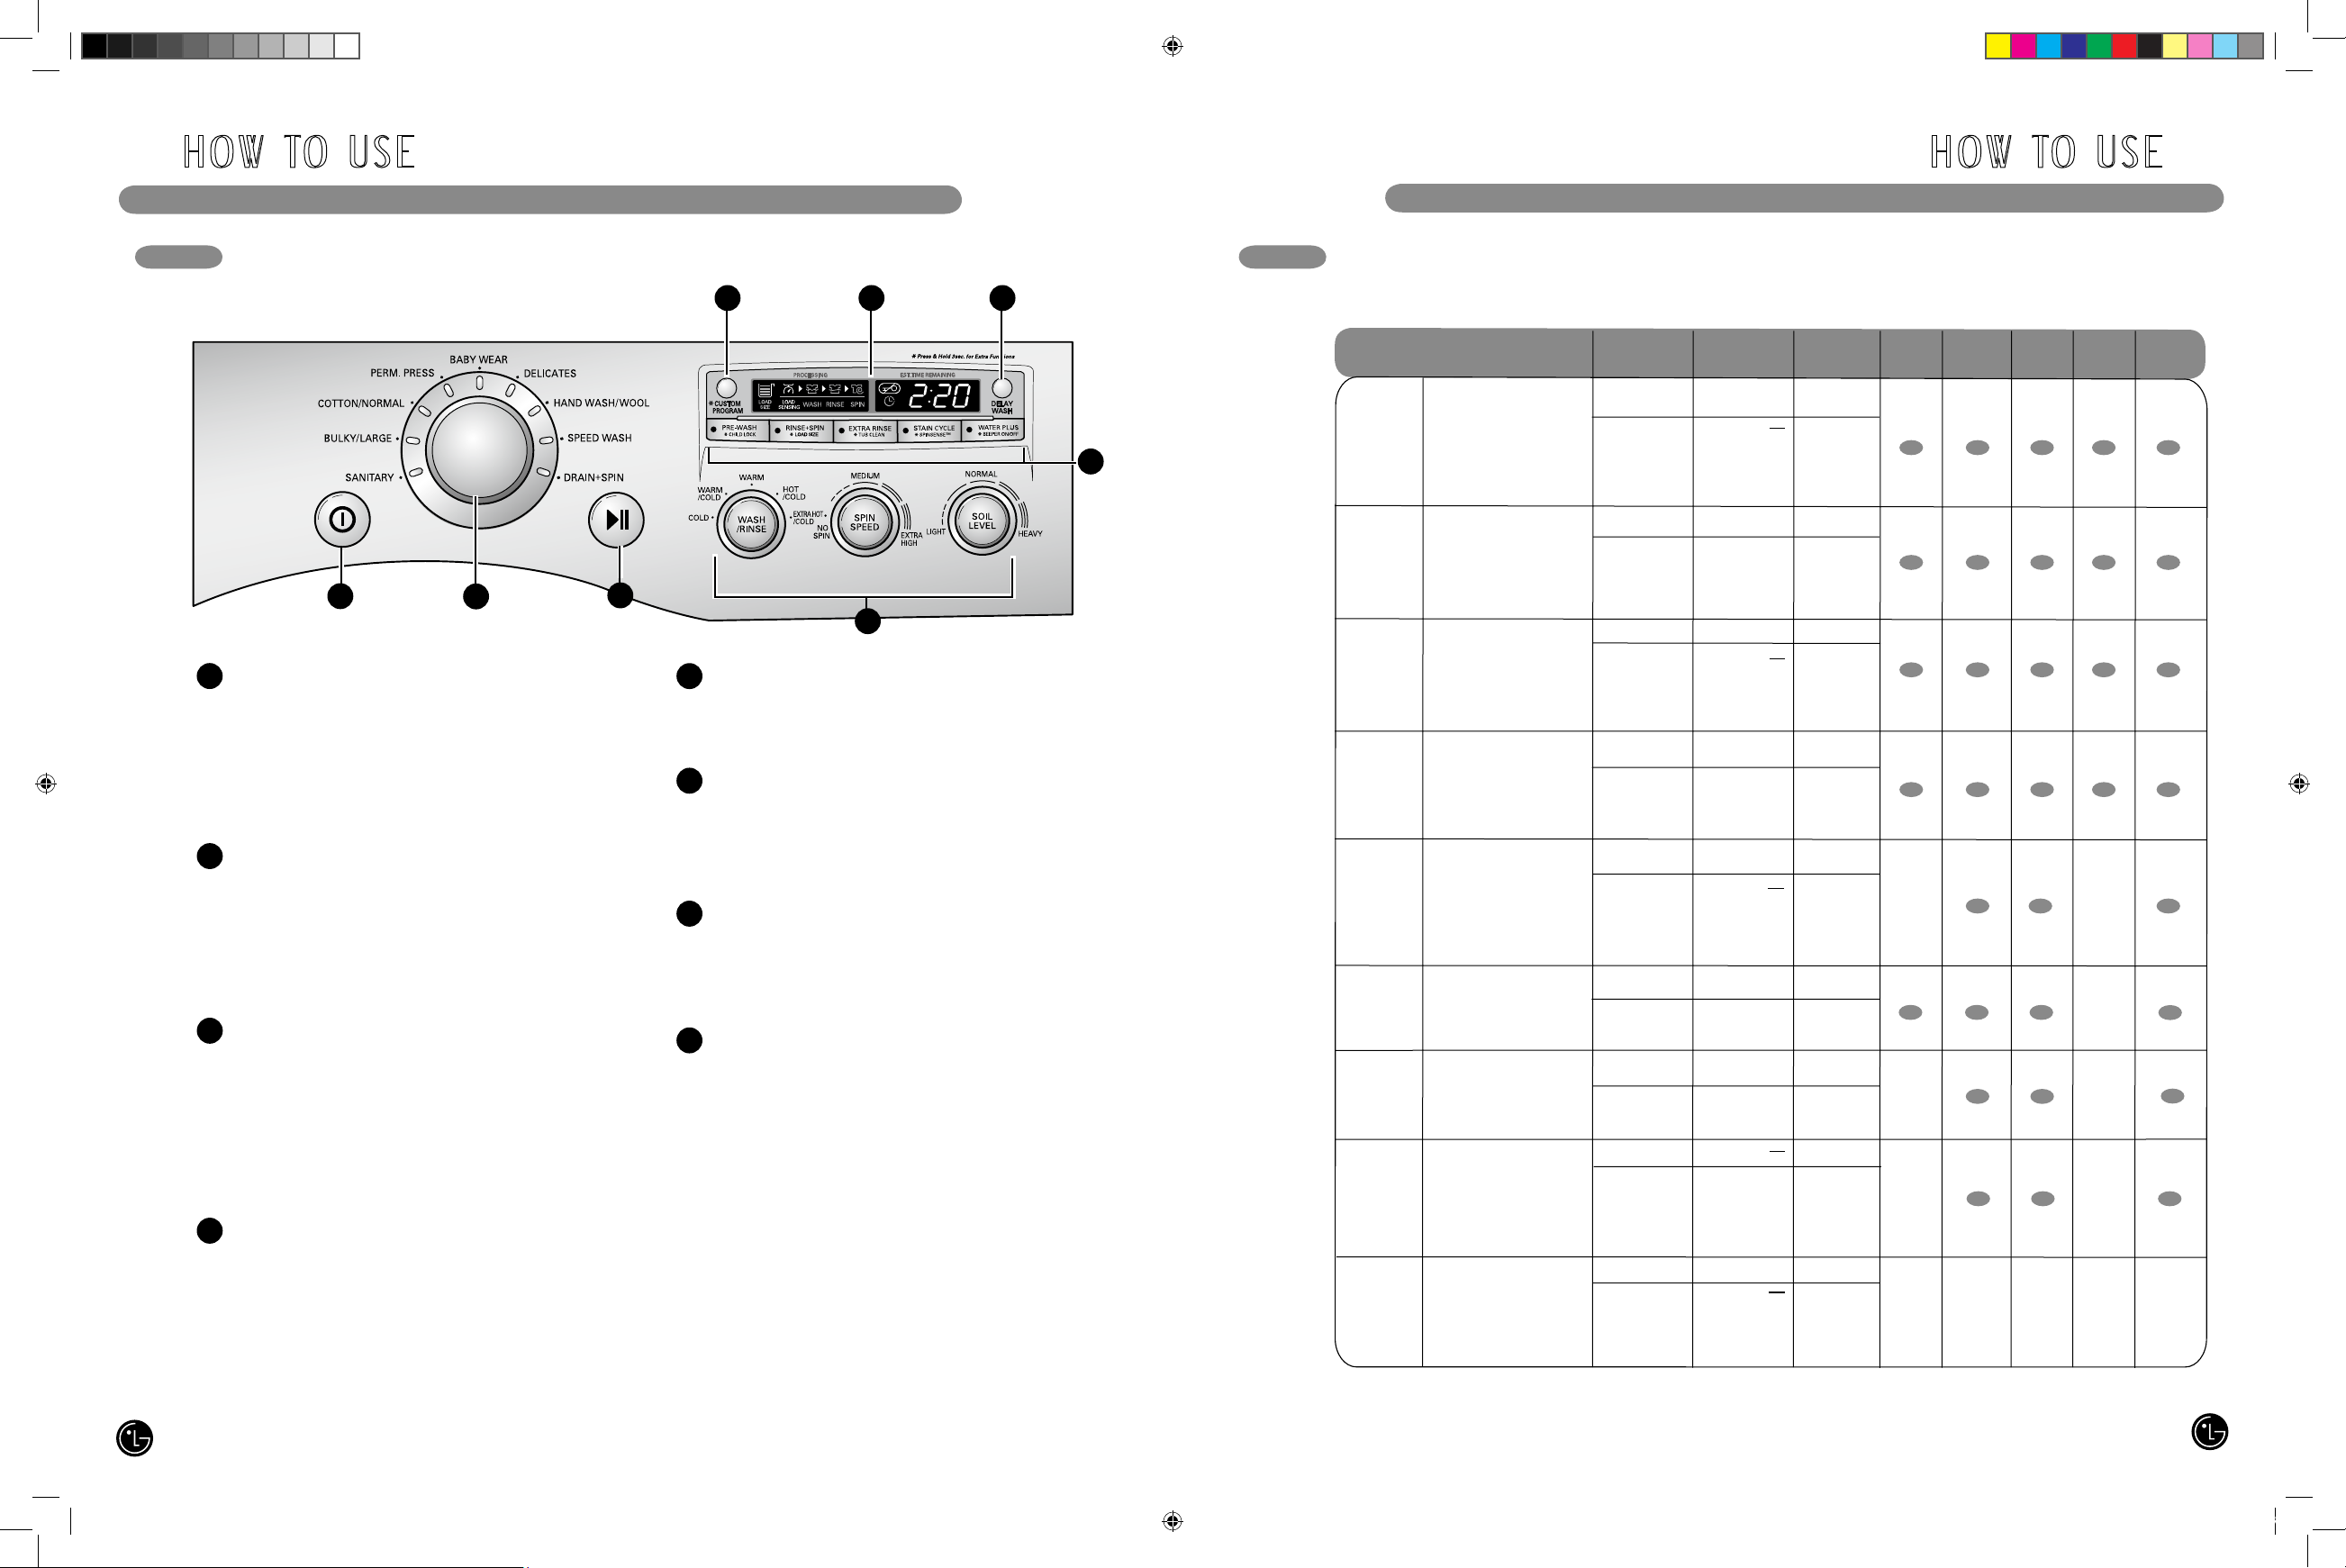
POWER ON/OFF BUTTON
Press to turn the washer ON. Press again to turn
the washer OFF.
NOTE: Pressing the ON/OFF button during a
cycle will cancel that cycle and any load settings
will be lost.
CYCLE SELECTOR KNOB
Turn this knob to select the desired cycle. Once
the desired cycle has been selected, the standard
presets will be shown in the display. These
settings can be adjusted using the cycle settings
buttons anytime before starting the cycle.
START/PAUSE BUTTON
Press this button to START the selected cycle.
If the washer is running, use this button to PAUSE
the cycle without losing the current settings.
NOTE: If you do not press the START/PAUSE
button within 4 minutes of selecting a cycle, the
washer automatically turns off.
CUSTOM PROGRAM BUTTON
Press the CUSTOM PROGRAM button to save
and recall a customized wash cycle for future use.
You can save the Cycle, Wash/Rinse
Temperature, Spin Speed, and Soil Level
settings, as well as other cycle options.
1
2
CYCLE SETTINGS BUTTONS
Use these buttons to adjust the desired cycle
options for the selected cycle.
DELAY BUTTON
Press this button to delay the start of the wash
cycle. Each press of the button increases the
delay time by one hour, up to 19 hours.
TIME AND STATUS
The display shows the settings, estimated
time remaining, options, and status messages
for your washer.
OPTION BUTTONS
The option buttons allow you to select
additional cycle options and will light when
selected. Certain buttons also allow you to
activate special functions by pressing and
holding the button for 3 seconds.
For detailed information about the individual
options, please see the following pages.
5
6
3
4
7
8
4
8
18
19
MFL31245113_ENG.indd 18-19 2007.10.4 2:31:43 PM
Page 11
H O W TO U S EH O W TO U S E
THE TIME AND STATUS DISPLAY
ESTIMATED TIME REMAINING
When the START/PAUSE button is pressed, the
washer automatically detects the wash load
(weight) and optimizes the washing time, based
on the selected cycle and options. The display
will then indicate the estimated time remaining
for the selected wash cycle.
NOTE: The cycle time displayed may appear
much longer than that of a top-loading washer.
The displayed time is for the complete cycle,
rather than just the agitation portion of the cycle,
as is typically shown on a top-loading washer.
CYCLE COMPLETION INDICATOR
This portion of the display shows which stage
of the wash cycle is currently underway (LOAD
SENSING, WASH, RINSE or SPIN).
AUTOMATIC LOAD SIZE SENSING
At the beginning of the cycle, the washer tumbles
the load and detects the weight of the clothes.
The display will indicate the approximate load
size in the LOAD SIZE display. This allows you
to adjust the amount of detergent and other
additives for best results and improved efficiency.
1
2
DOOR LOCK INDICATOR
Indicates that the door is locked. The washer
door will lock while the washer is operating. The
door can be unlocked by pressing the START/
PAUSE button to stop the washer.
NOTE: If the temperature in the washer is too
high, the door cannot be unlocked until the
washer has cooled. If the water level is too high,
select the DRAIN & SPIN cycle to drain excess
water. Do not try to force open the door.
DELAY WASH INDICATOR
This indicator shows that the washer has been
set for DELAY WASH. The washer will start
automatically after the set delay time
has passed.
5
3
4
OPERATING THE WASHER
Press the ON/OFF button to turn on the
washer. The lights around the cycle
selector knob will illuminate.
Turn the cycle selector knob to the desired
cycle. The display will show the
preset Rinse/Wash Temperature,
Spin Speed, Soil Level, and
Option settings for that cycle.
If you would like to change the settings
for that cycle, press the appropriate cycle
settings button(s) until the indicator light for
the desired setting is lit.
NOTE: To protect your garments, not every
wash/rinse temperature, spin speed, soil
level, or option is available with every cycle.
1
2
3
Select any additional cycle options, such
as CUSTOM PROGRAM, DELAY WASH,
EXTRA RINSE, or STAIN CYCLE, by pressing
the button for that option.
NOTE: To protect your garments, not every
wash/rinse temperature, spin speed, soil
level, or option is available with every cycle.
4
Press the START/PAUSE button to begin
the cycle. The door will latch,
the display will change, and
the washer will calculate the
estimated time remaining. Once
the washer has calculated the estimated
total cycle time, the washer will start.
To pause the cycle at any time, press
START/PAUSE.
NOTE: The cycle time displayed may
appear much longer than that of a toploading washer. The displayed time is for the
complete cycle, rather than just the agitation
portion of the cycle, as is typically shown on
a top-loading washer.
NOTE: If the temperature in the washer is
too high, the door cannot be unlocked until
the washer has cooled. If the water level is
too high, select the DRAIN & SPIN cycle to
drain excess water. Do not try to force the
door open.
Washing time can be reduced significantly
for small or lightly soiled loads by selecting
the Speed Wash cycle and setting the Soil
Level button to Light.
5
Once you have loaded the washer and added
laundry products (detergent, bleach, and/or
fabric softener):
When the load is finished, the beeper (if set)
will sound and the door will unlock.
Remove damp clothes from the washer
immediately. Check under the door seal
for small items.
6
The time and status display shows the cycle progress and estimated time remaining, cycle
options, and other status messages for your washer.
13 2 4
5
20
21
MFL31245113_ENG.indd 20-21 2007.10.4 2:31:47 PM
Page 12
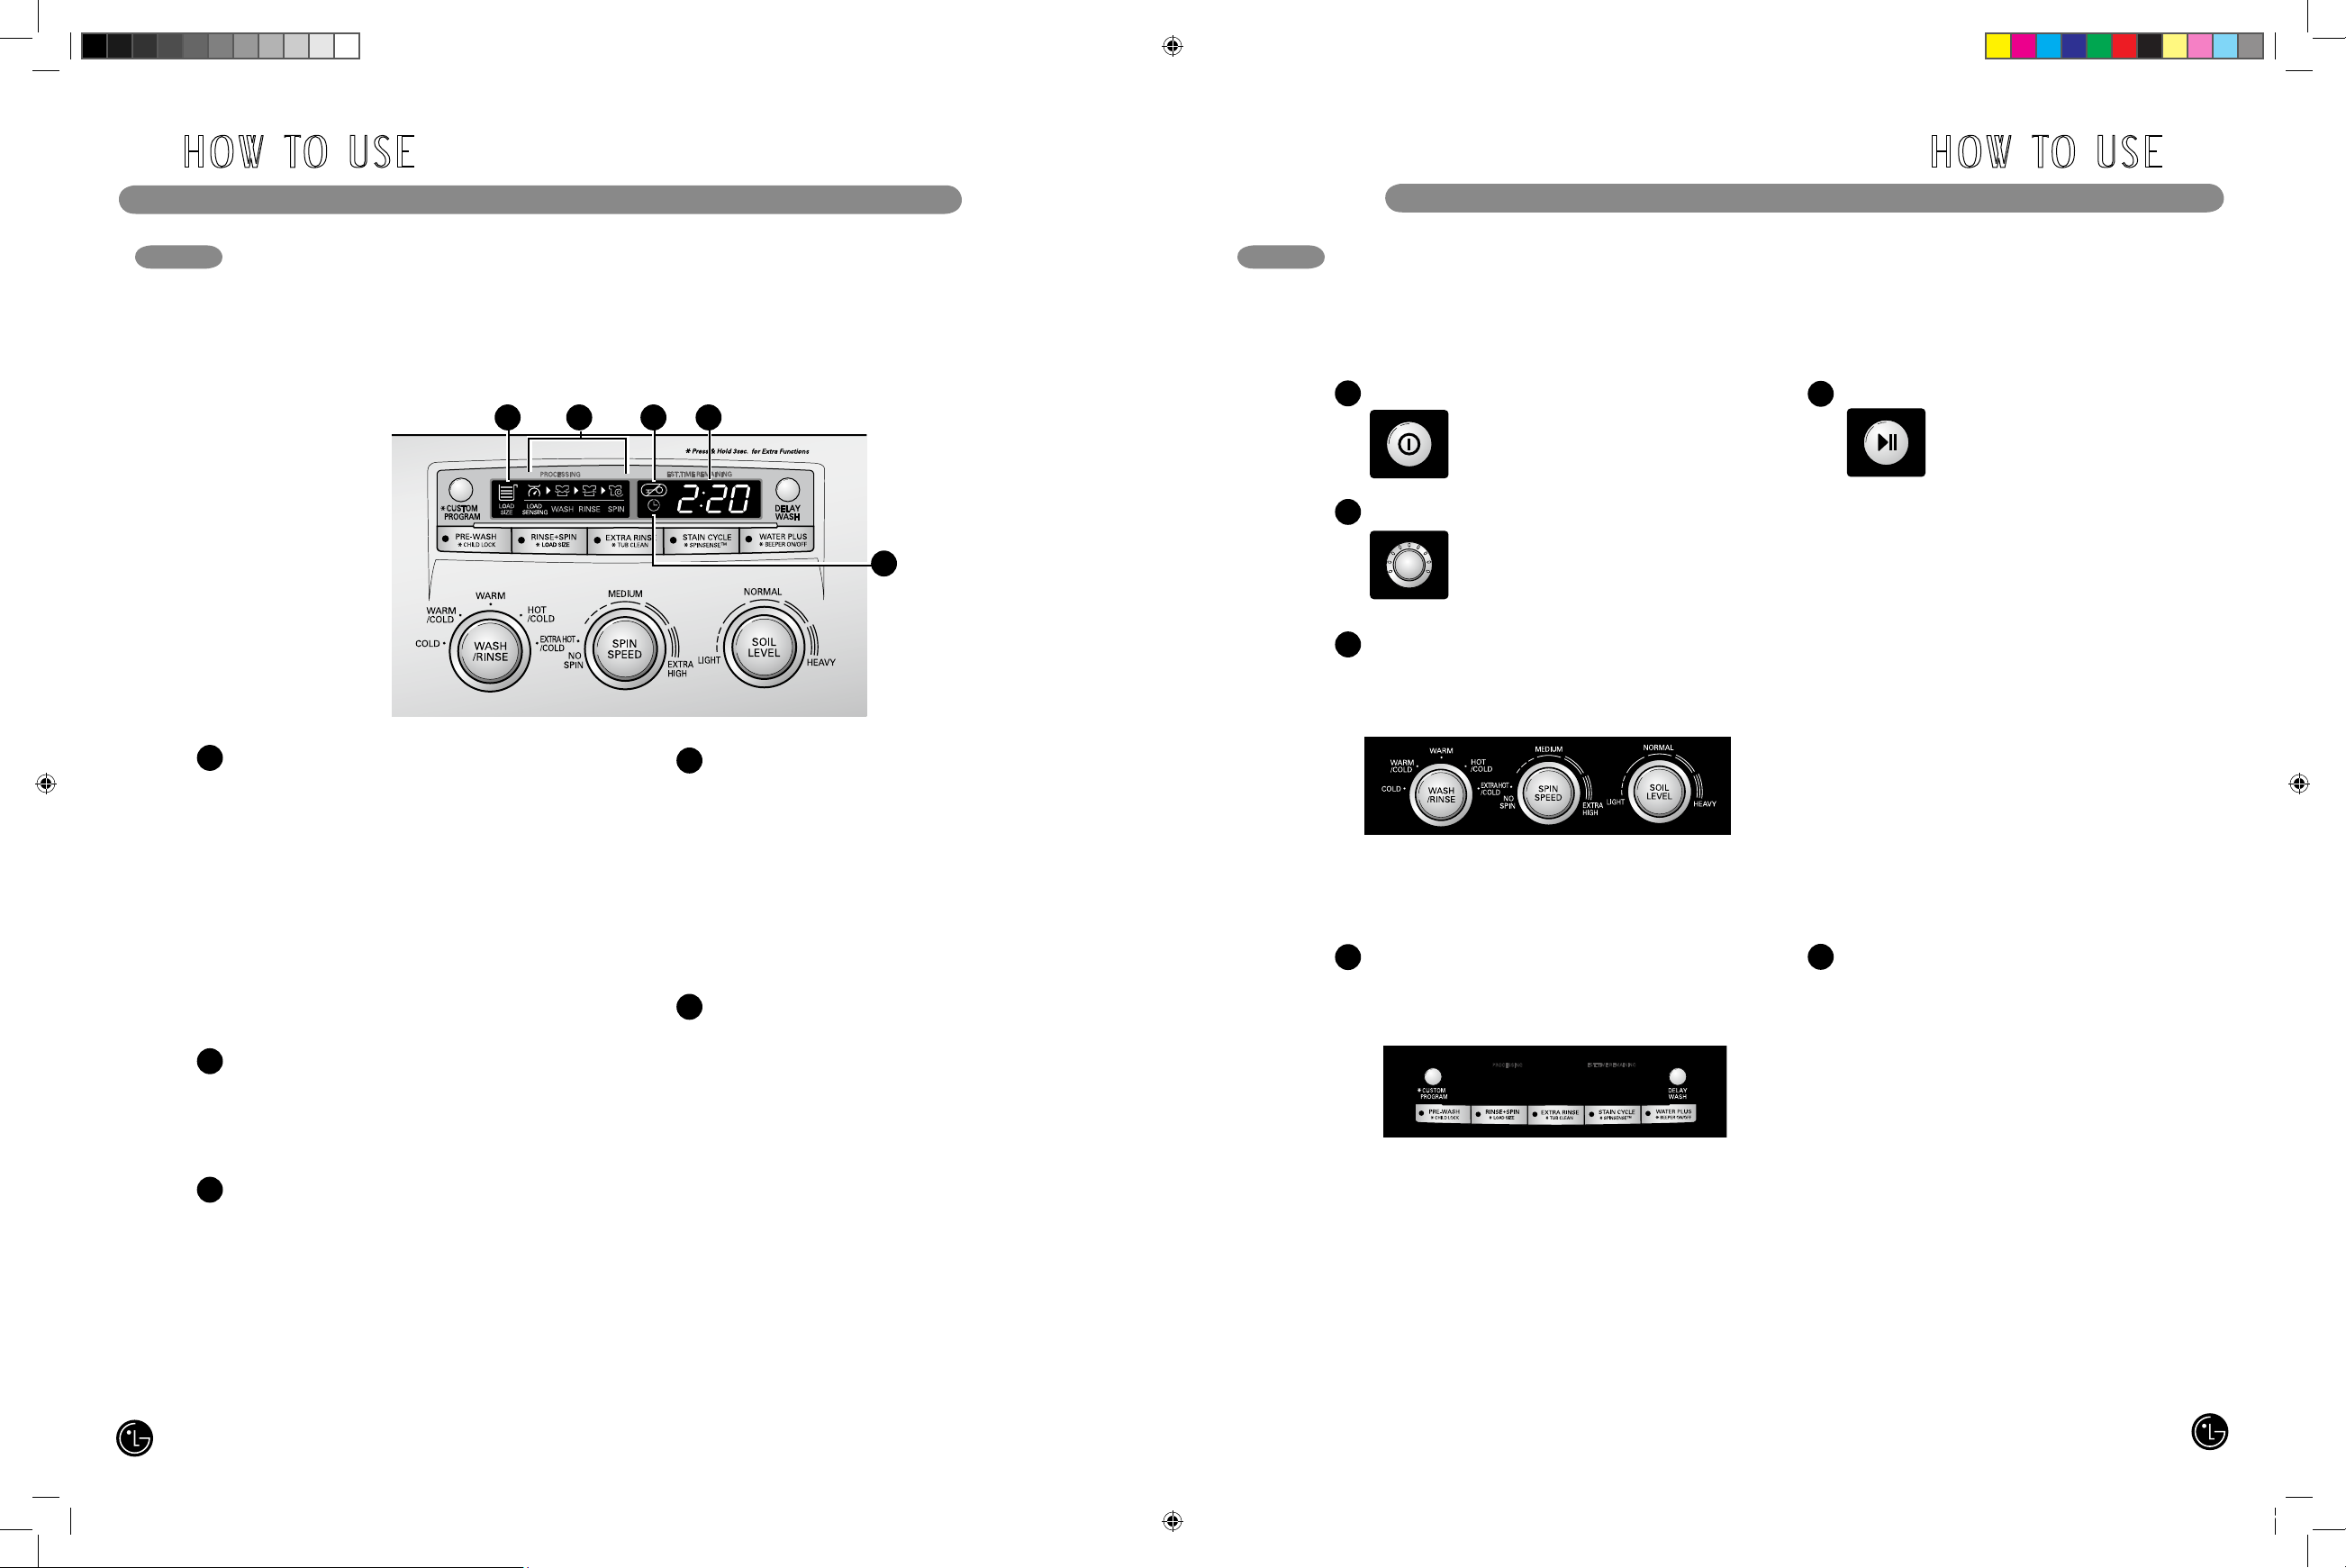
SPIN SPEED
The washer drum spins at up to 1,200 RPM. This
extracts more water from
clothes, reducing drying time
and saving energy.
Press the SPIN SPEED
button until the indicator
light for the desired setting
is lit. Some fabrics, such as delicates, require a
slower spin speed.
The Drain & Spin cycle:
The Spin Speed button also activates the Drain
& Spin cycle to drain the tub and spin clothes;
for example, if you want to remove clothes before
the cycle has ended.
H O W TO U S E
CYCLE SETTING BUTTONS
Each cycle has preset settings that are selected
automatically. You may also customize the
settings using the cycle setting buttons. Press the
button for that setting until the indicator light for
the desired value is lit.
The washer automatically adjusts the water level
for the type and size of wash load for best results
and maximum efficiency. It may seem there is no
water inside the drum in some cycles, but this is
normal.
NOTE: To protect your garments, not every wash/
rinse temperature, spin speed, soil level, or option
is available with every cycle. See the Cycle Guide
for details.
SOIL LEVEL
Adjusts the selected cycle to allow more time
for heavily soiled clothes or
less time for lightly soiled
clothes. Press the SOIL
LEVEL button until the
indicator light for the
desired setting is lit.
WASH/RINSE
Selects the wash and rinse temperature
combination for the selected
cycle. Press the WASH/
RINSE button until the
indicator light for the desired
setting is lit.
• Your washer features a heating element to
boost the hot water temperature for Extra
Hot† settings. This provides improved wash
performance at normal water heater settings.
• Select the water temperature suitable for the
type of load you are washing. Follow the fabric
care label for best results.
• Warm rinses are regulated at approximately
86°F (30°C).
• Warm rinses leave the loads drier than cold
rinses. Warm rinses can increase wrinkling.
• In cold climates, a warm rinse makes the load
more comfortable to handle.
• Cold rinses use less energy, and the rinse
temperature depends on the cold water at the
faucet.
H O W TO U S E
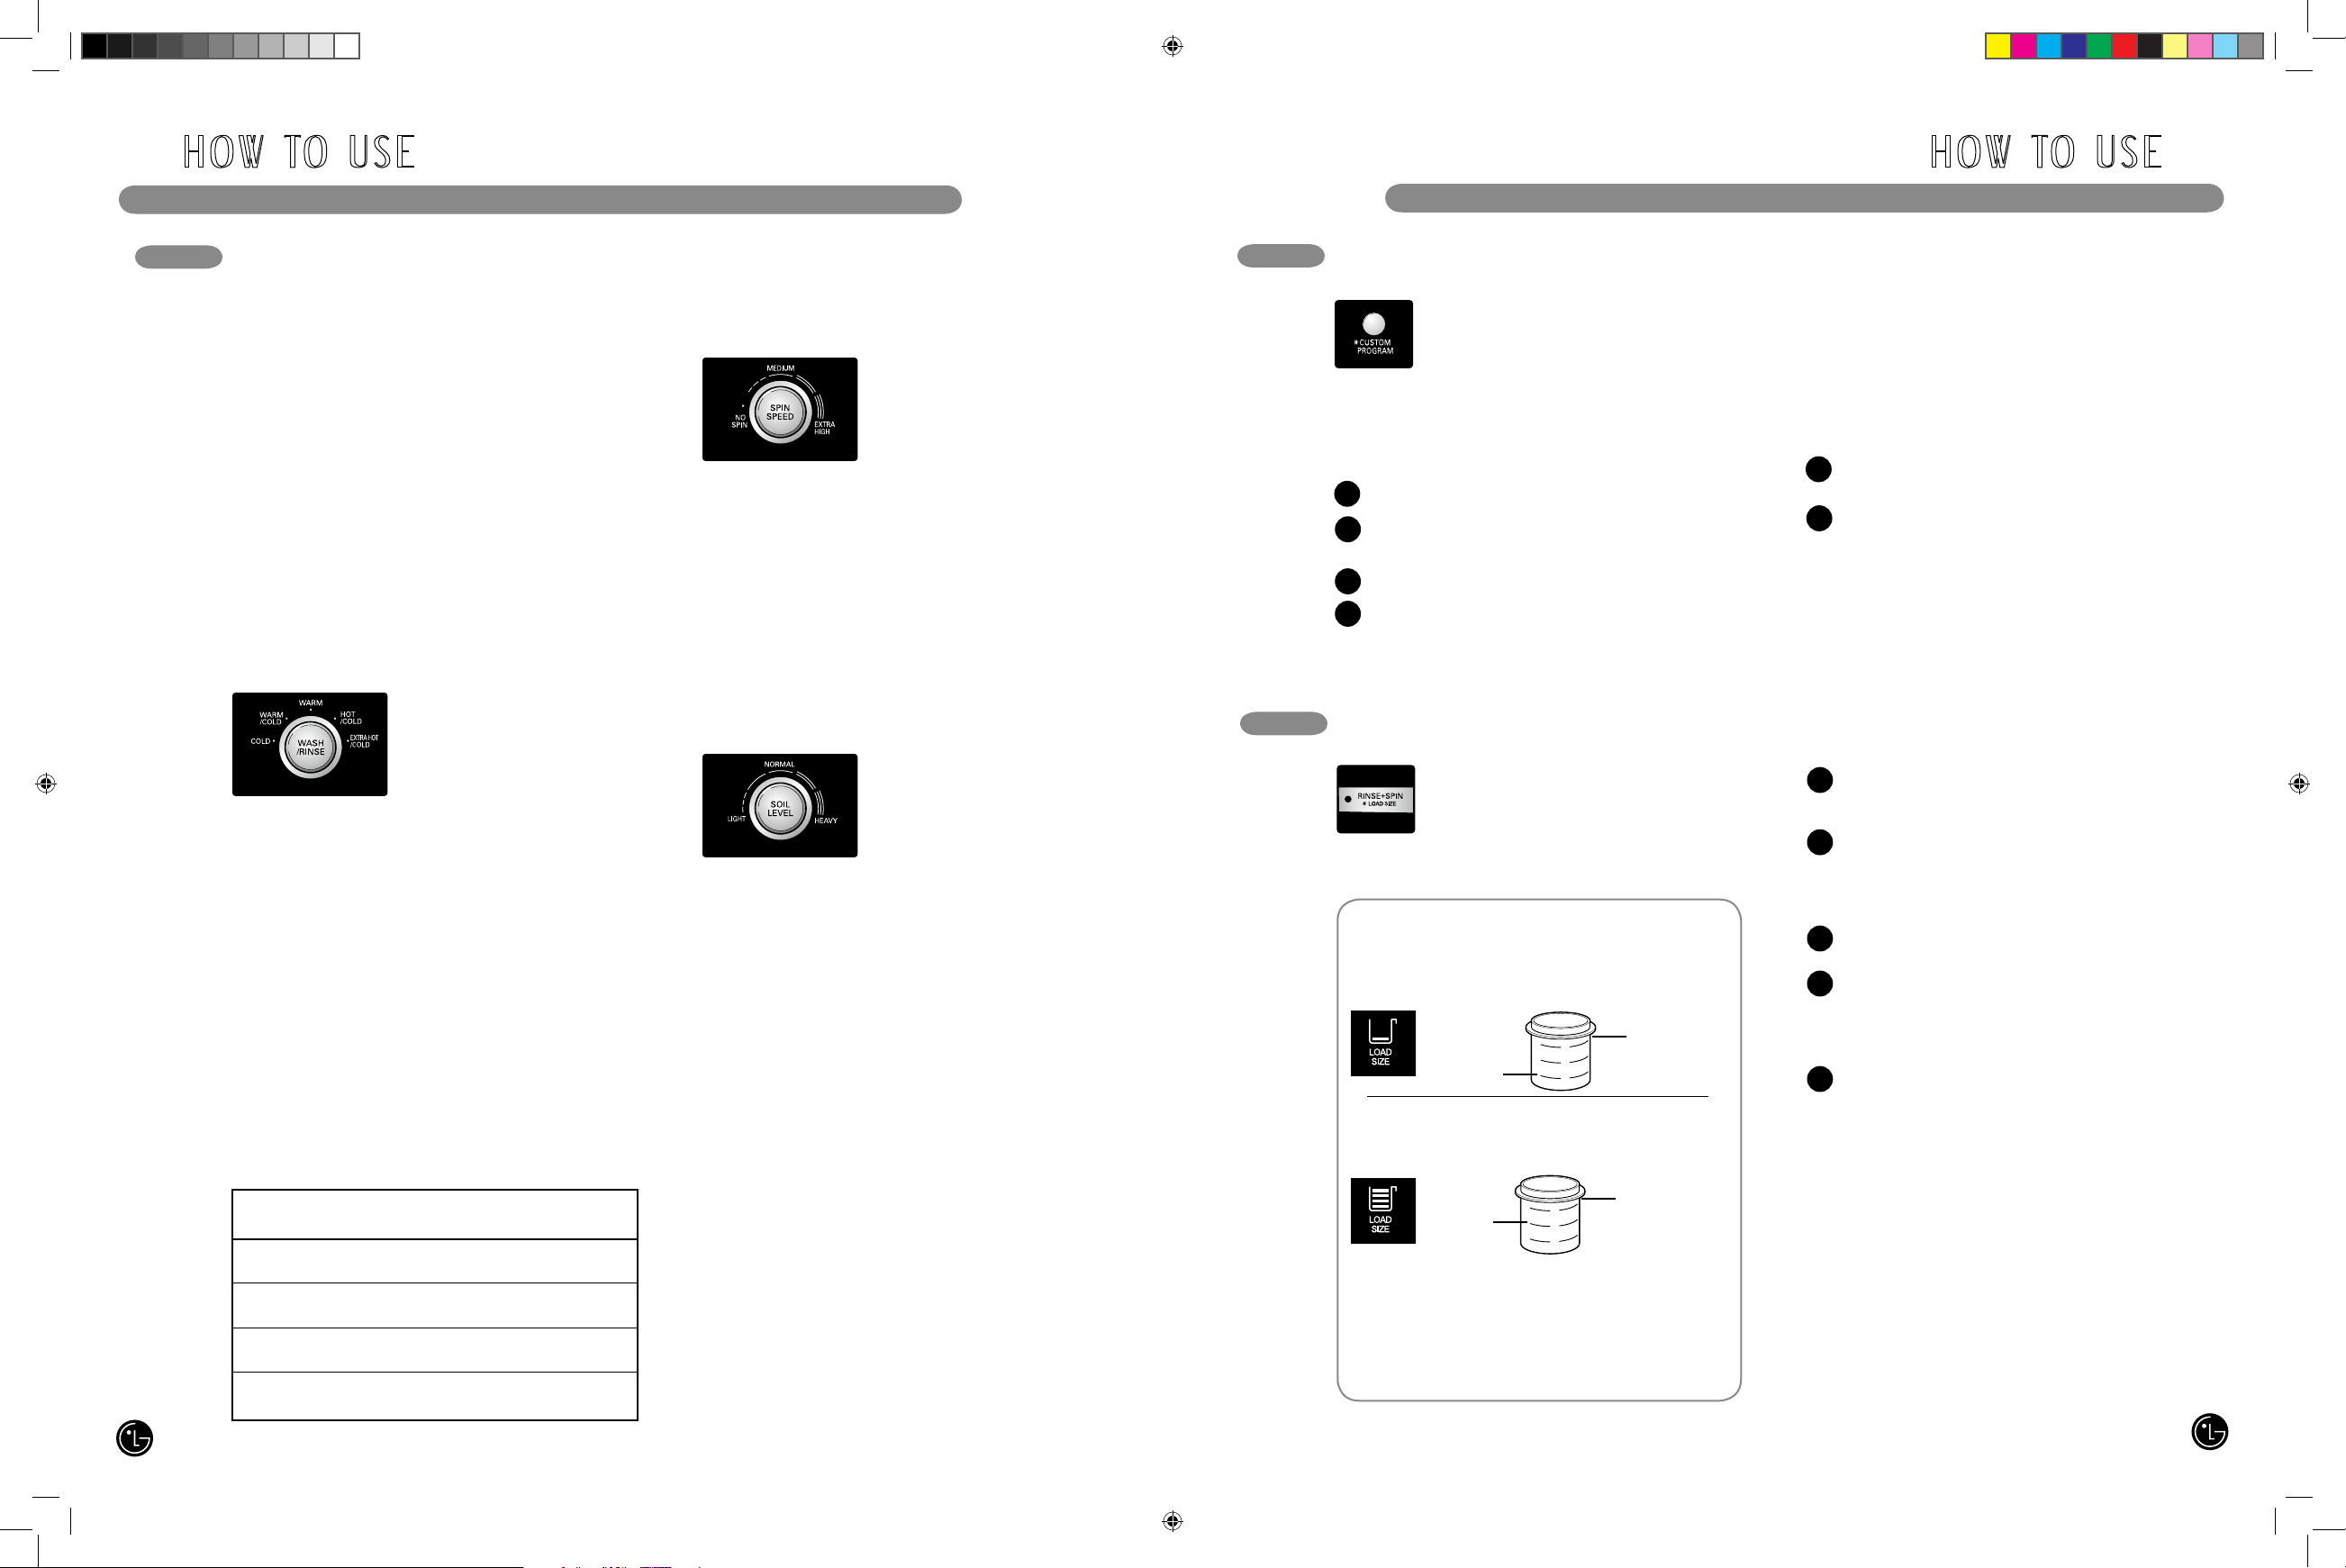
CUSTOM PROGRAM
CUSTOM PROGRAM allows you
to store a customized wash cycle
for future use. It allows you to save
favorite temperature, spin speed, soil
level, and other options for a cycle, and then
recall them at the touch of a button.
To store a Custom Program:
Select a cycle.
Adjust the Wash/Rinse Temperature, Spin
Speed, and Soil Level to the desired settings.
Set any other desired options.
Press and hold the CUSTOM PROGRAM
button for 3 seconds. You will hear two
beeps to confirm the settings have been
stored.
1
2
3
4
To recall a Custom Program:
Press and release the CUSTOM PROGRAM
button. The stored settings will be displayed.
Press and release the START/PAUSE button
to start the cycle. The washer will start
automatically.
1
2
Suggested
Wash Temp. Load Type
Extra Hot Kitchen towels, sheets,
167°F (75°C) and baby garments
Hot Whites and heavily soiled
122°F (50°C) color-fast items
Warm Most loads
104°F (40°C)
Cold Brightly colored items,
77°F (25°C) washable woolens
At the beginning of the cycle, the washer tumbles
the load and detects the weight of the
clothes. The display will indicate the
approximate load size in the LOAD SIZE
display. This allows you to adjust the
amount of detergent and other additives for best
results and improved efficiency.
1
2
3
4
5
To use Automatic Load Size Sensing:
Load the washer, select the desired cycle and
options, and then start the cycle by pressing the
START/PAUSE button.
The washer will tumble for a short time to detect
the size of the load. After the washer detects
the load size, the washer will show the detected
size in the LOAD SIZE display for 10 seconds
before it continues with the cycle.
During the 10 second delay in step three, press
the START/PAUSE button to pause the cycle.
Fill the detergent and additive compartments
of the detergent drawer with detergent/additive
amounts based on the load size the machine
has detected. Following these guidelines can
save detergent.
Press the START/PAUSE button again to resume
the cycle.
To check the load size during the wash portion of the
cycle, press and hold the RINSE+SPIN button for 3
seconds. The LOAD SIZE display will be activated for
10 seconds.
NOTE: The load detection routine only works with
dry clothes. Since the detection system is detecting
the WEIGHT of the load, it will be affected by
unusually heavy articles in the load. For example,
a garment that is already wet that is loaded with
other items will cause the LOAD SIZE reading to
be inaccurate.
If you do not desire to take advantage of the load
size detection feature, simply load the desired
amount of detergent and additives in the dispenser
and start the washer in the usual manner.
LOAD SIZE SENSING SYSTEM
Example 1: If the washer has detected a small load size, the
display may only show one lighted bar. Only a small amount of
detergent should be used, because the amount of clothing and
the quantity of water that will be used is small.
Example 2: If the washer has detected a large load size,
the display may show all four bars lighted. More detergent
should be used, because the amount of clothing and the
quantity of water that will be used is greater.
The LOAD SIZE display:
Detergent
manufacturer’s
recommended
amount for a
full load
Recommended
amount for
this load
Detergent
manufacturer’s
recommended
amount for a
full load
Recommended
amount for
this load
NOTE: Because the washer uses a very small amount of
water, care should be taken when deciding how much
detergent to use. Normal loads only need about half the
detergent manufacturer’s recommended amount. This
saves detergent by using it in a more concentrated manner.
However, for heavily soiled loads, additional detergent should
be added. Never exceed manufacturer’s recommendations!
IMPORTA NT: If you press and hold the
CUSTOM PROGRAM button for 3 seconds, you
will overwrite any previously stored CUSTOM
PROGRAM.
22
23
MFL31245113_ENG.indd 22-23 2007.10.4 2:31:51 PM
Page 13
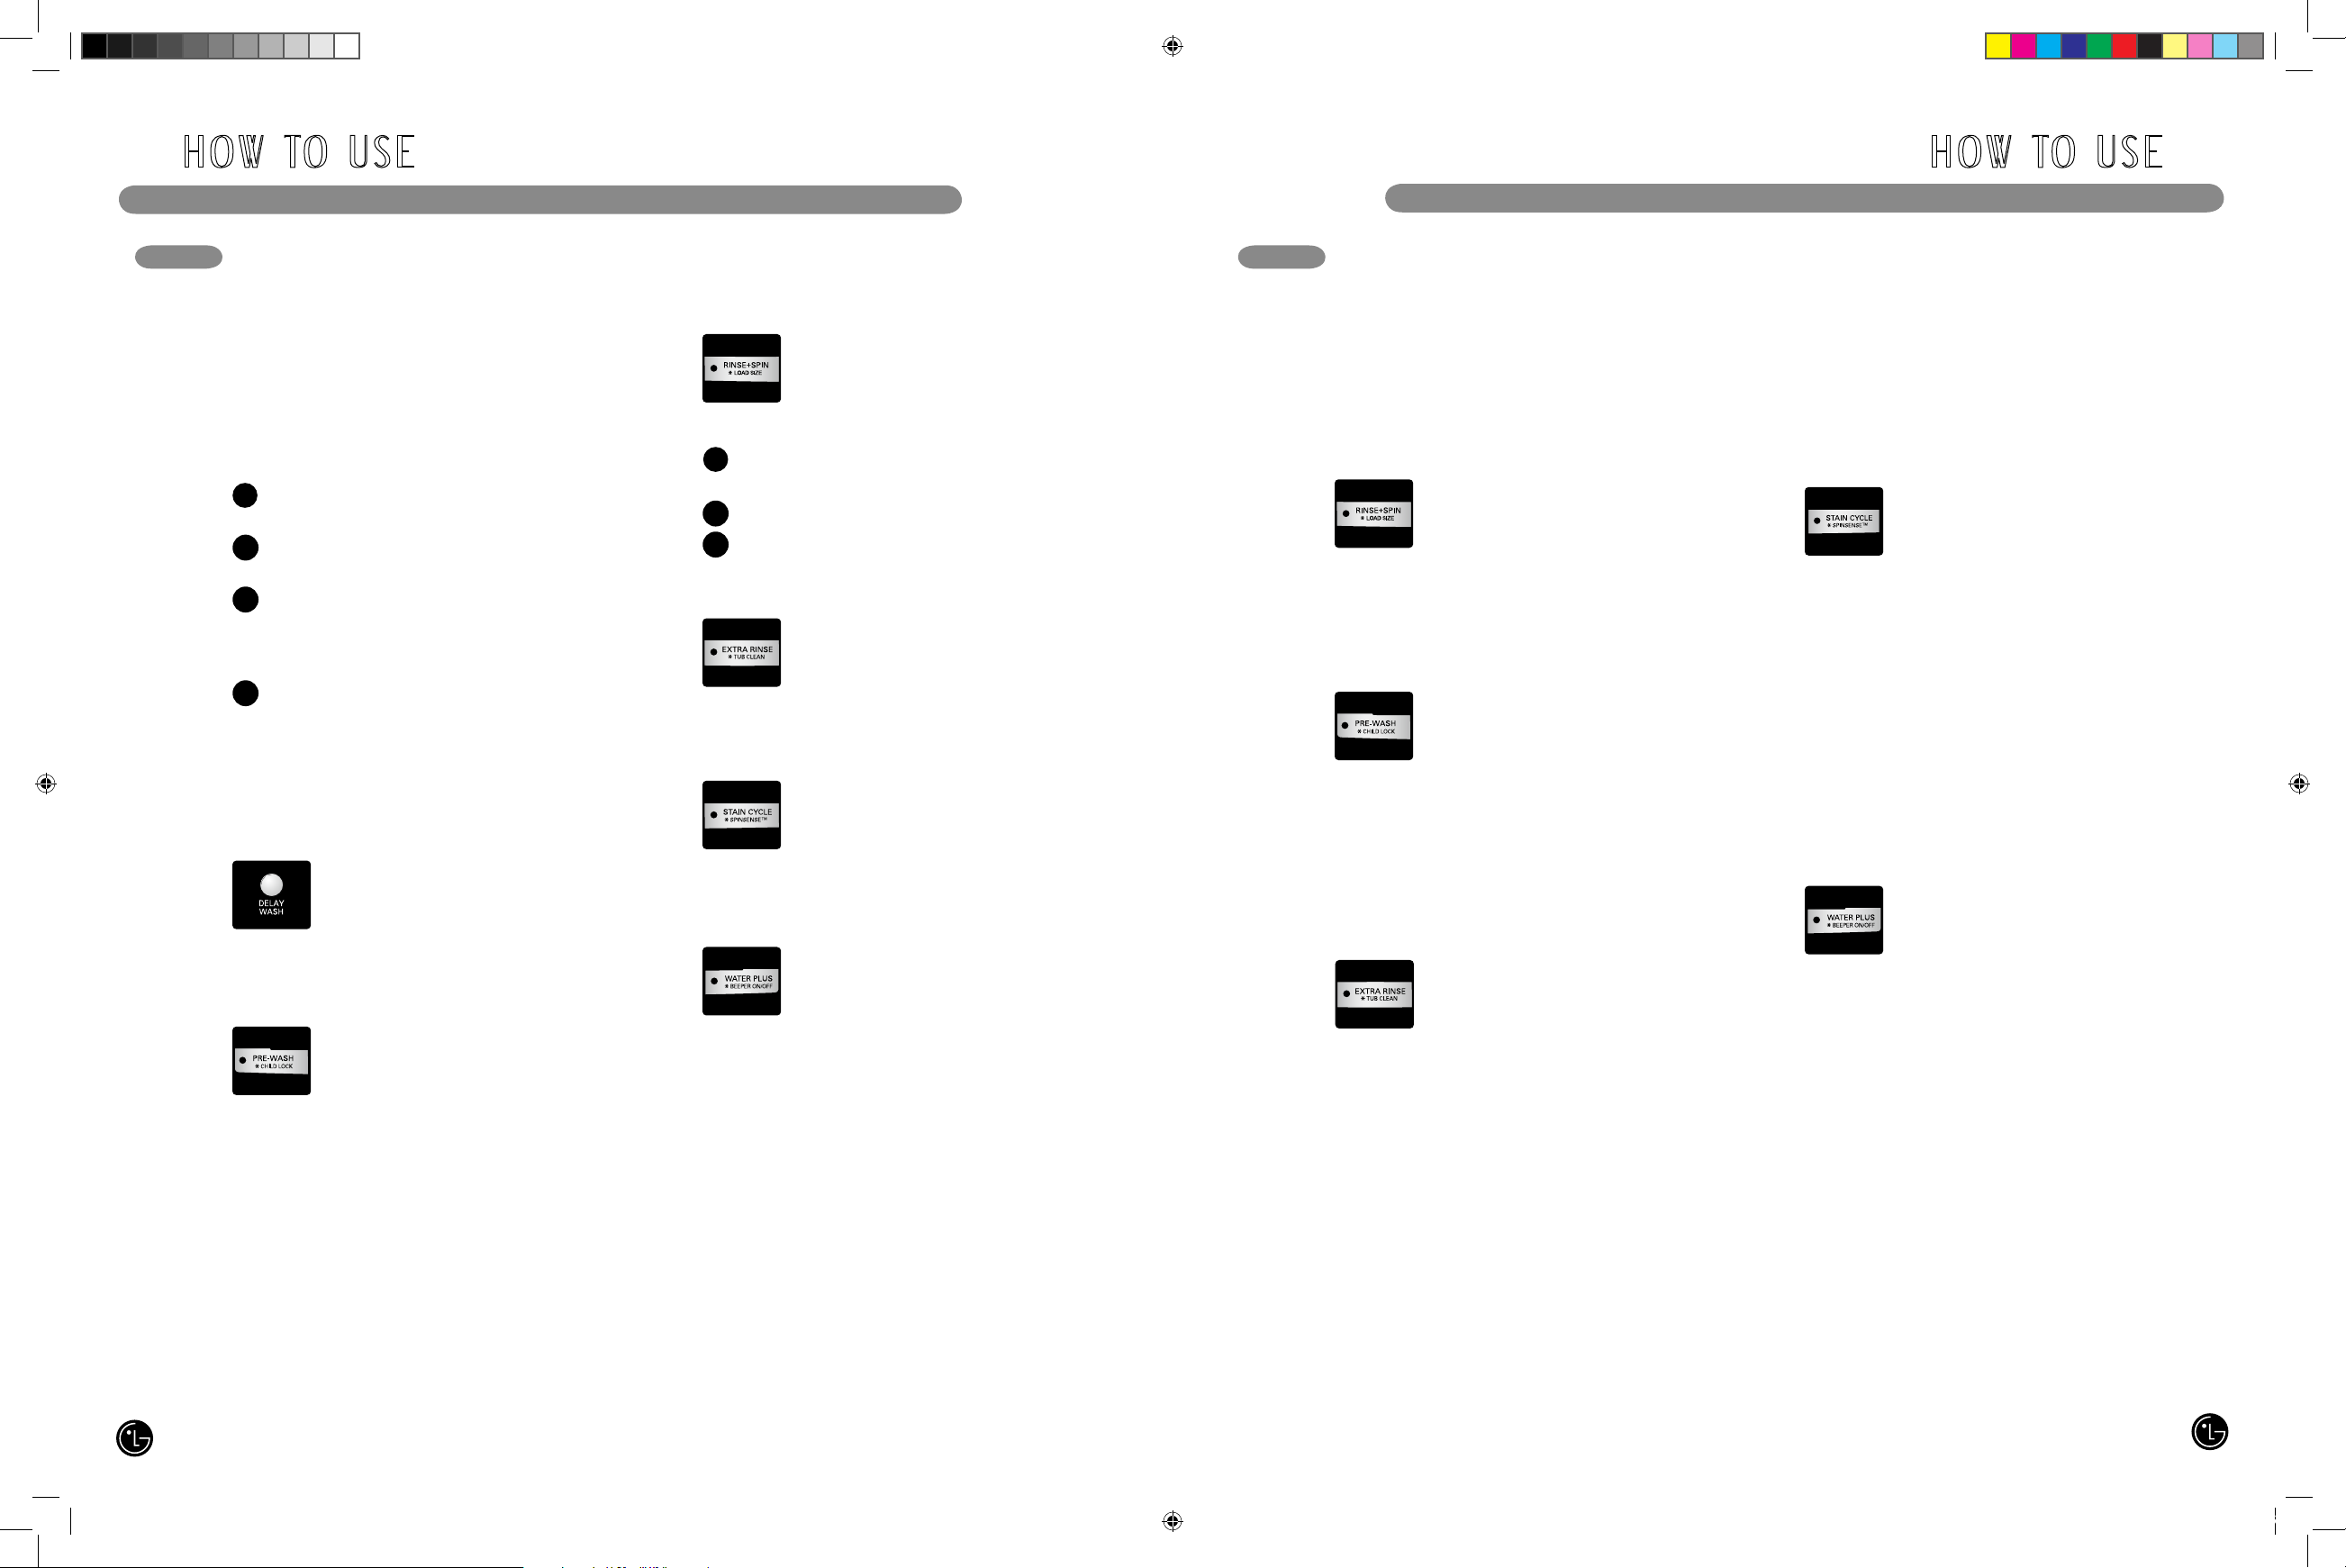
SPECIAL FUNCTIONS
The option buttons also activate special
functions, including CHILD LOCK, TUB CLEAN,
and SPINSENSE™. Press and hold the option
button marked with the special function for 3
seconds to activate.
SPINSENSE
™
SPINSENSE can be used to help reduce or
eliminate vibrations, especially on wood
floor installations.
To activate SPINSENSE
™
:
While the washing machine is running in any cycle,
press and hold the STAIN CYCLE button for 3
seconds.
The SPIN SPEED button light will blink while
the washer is running to show that SPINSENSE
is active. The SPINSENSE function will remain
active for every cycle, even after a power failure.
To cancel SPINSENSE
™
:
Press and hold the STAIN CYCLE button for 3
seconds to turn off the SPINSENSE function.
BEEPER ON/OFF
You may turn the end-of-cycle beeper on or off
with the WATER PLUS button during the
cycle.
Press and hold the WATER PLUS
button for 3 seconds to turn the beeper
OFF. Press and hold the WATER PLUS button
again for 3 seconds to turn the beeper back on.
TUB CLEAN
A buildup of detergent residue can occur in the
wash tub over time and can lead to
a mildewy or musty smell. The TUB
CLEAN cycle is specially designed to
remove this buildup. Press and hold
the EXTRA RINSE button for 3 seconds to activate
this cycle. The display will show a message to add
liquid bleach to the dispenser. After the cycle has
ended, open the door and allow the drum interior
to dry completely.
NOTE: Do NOT use this cycle with clothes,
and do NOT add detergent or fabric softener.
CHILD LOCK
Use this option to prevent unwanted use of the
washer or to keep cycle settings
from being changed while the washer
is operating. Press and hold the
PREWASH button for 3 seconds to
activate or deactivate CHILD LOCK.
The lock icon will be shown in the display, and all
controls are disabled. The washer can be locked
during a cycle. Once CHILD LOCK is selected, the
display will alternate between CL and the
time remaining.
LOAD SIZE
At the beginning of the cycle, the washer tumbles
the load and detects the weight of the
clothes. The display will indicate the
approximate load size in the LOAD SIZE
display. This allows you to adjust the
amount of detergent and other additives for best
results and improved efficiency. See page 23 for
details.
EXTRA RINSE
This option will add an extra rinse
cycle to the selected cycle. Use this
option to help ensure the removal
of detergent or bleach residue from
fabrics.
STAIN CYCLE
Select this option for heavily stained
clothes, such as play clothes or work
clothes. Stain Cycle will add extra
wash time to the selected cycle, as
well as an additional rinse cycle.
WATER PLUS
Select this option to add extra water
to the wash and rinse cycles for
superior results, especially with large
or bulky items.
RINSE+SPIN
Select this option to rinse and spin a
load separately from a regular cycle.
This can be helpful in preventing fresh
stains from setting in fabrics.
To activate the Rinse+Spin cycle:
Press the ON/OFF button to turn on
the washer.
Press the RINSE+SPIN button.
Press the START/PAUSE button.
H O W TO U S E
CYCLE OPTION BUTTONS
Your washing machine features several additional
cycle options to customize cycles to meet your
individual needs. Certain option buttons also
feature a special function (see the following page
for details) that can be activated by pressing and
holding that option button for 3 seconds.
To Add Cycle Options to a Cycle:
Turn on the washer and turn the cycle
selector knob to select the desired cycle.
Use the cycle settings buttons to adjust the
settings for that cycle.
Press the cycle option button(s) for the
option you would like to add. The cycle
option buttons, except DELAY, will light
when selected.
Press the START/PAUSE button to start the
cycle. The washer will start automatically.
NOTE: To protect your garments, not every wash/
rinse temperature, spin speed, soil level or option
is available with every cycle. See the Cycle Guide
for details.
1
2
3
4
DELAY WASH
Once you have selected the cycle and
other settings, press this button to
delay the start of the wash cycle. Each
press of the button increases the delay
time by one hour, up to 19 hours.
PREWASH
Select this option to add a 16-minute
prewash and spin cycle to the chosen
cycle. This is especially useful for
heavily soiled items.
1
2
3
H O W TO U S E
24
25
MFL31245113_ENG.indd 24-25 2007.10.4 2:31:55 PM
Page 14

CLEANING THE WASHER
C A R E A N D C L E A N I N G
wWARNING:
• Unplug the washer before cleaning to avoid the risk of electric shock. Failure to follow this warning
can cause serious injury,fire, electrical shock or death.
• Never use harsh chemicals, abrasive cleaners, or solvents to clean the washer.
They will damage the finish.
Cleaning the Dispenser
The dispenser should be cleaned periodically
to remove buildup from detergent and other
laundry products.
Pull out the dispenser drawer until it stops.
Press the button in the center of the drawer
and pull to remove the drawer.
1
Remove the inserts from the drawer, and
clean them with warm water and a soft cloth
or brush to remove any residue or buildup.
Wipe out the inside of the drawer opening
with a damp cloth. Reassemble the drawer
and reinstall in the drawer opening.
NOTE: Do not use anything other than water
to clean the drawer, inserts, and drawer
opening. If any sort of household cleaner
drains into the interior of the washer, run a
RINSE+SPIN cycle before washing clothes.
2
C A R E A N D C L E A N I N G
Cleaning the Exterior
Proper care of your washer can extend its life.
The outside of the machine can be cleaned with
warm water and a mild, nonabrasive household
detergent.
Immediately wipe off any spills with a soft, damp
cloth.
IMPORTANT: Do not use methylated spirits,
solvents, or similar products.
Never use steel wool or abrasive cleansers; they
can damage the surface.
REGULAR CLEANING
Care and Cleaning of the Interior
Use a towel or soft cloth to wipe around the
washer door opening, door seal, and door glass.
These areas should be kept clean to ensure a
watertight seal. Be sure to wipe under the inside
rubber seal to remove any moisture or soil.
Always remove items from the washer as soon
as the cycle is completed. Leaving damp items
in the washer can cause wrinkling, color transfer,
and odor.
Run the TUB CLEAN cycle regularly to remove
detergent buildup and other residue.
Removing Lime Buildup
If you live in an area with hard water, lime scale
can form on internal components of the washer.
Use of a water softener is recommended in areas
with hard water. If a descaler is used, make sure
that it is suitable for use in a washer, and run the
TUB CLEAN cycle before washing clothing.
Lime scale and other spots may be removed
from the stainless steel drum using a stainless
steel cleaner. Do NOT use steel wool or abrasive
cleansers; they can damage the surface.
Storing the Washer
If the washer will not be used for an extended
period of time and is in an area that could be
exposed to freezing temperatures:
Turn off water supply tap.
Disconnect hoses from water supply and
drain water from hoses.
Plug the power cord into a properly grounded
electrical outlet.
Add 1 gallon of nontoxic recreational vehicle
(RV) antifreeze to the empty wash drum.
Close door.
Select the spin cycle and let washer spin
for 1 minute to drain out all the water.
NOTE: Not all of the RV antifreeze will be
expelled.
Unplug the power cord, dry the drum interior
with a soft cloth, and close the door.
Remove the inserts from the dispenser. Drain
any water in compartments and dry the
compartments.
Store the washer in an upright position.
To remove the antifreeze from the washer
after storage, run washer through a complete
cycle using detergent. Do not add laundry!
1
2
3
4
5
6
7
8
9
26
27
MFL31245113_ENG.indd 26-27 2007.10.4 2:31:57 PM
Page 15

Cleaning the Drain Pump Filter
Lint and other objects may accumulate and clog
the drain pump filter. If the washer fails to drain
properly, unplug the washer and allow the water
to cool, if necessary, before proceeding.
Open the drain pump filter access panel.
1
Unclip the drain hose and pull it out. Place
the end of the drain hose in a pan, bucket, or
floor drain to catch water.
2
C A R E A N D C L E A N I N G
Remove the plug from the drain hose, and
allow the water to drain completely.
Twist the pump filter counterclockwise to
remove. Remove any lint and foreign objects
from the pump filter.
Reverse the above steps to reinstall the drain
pump filter and drain hose. Be sure to close
the cover panel when finished.
3
MAINTENANCE (cont.)
Drain Hose
Plug
Pump
Filter
C A R E A N D C L E A N I N G
Cleaning the Water Inlet Filters
If the washer detects that water is not entering
the dispenser, an error message will show on the
display. If you live in an area with hard water, this
may be caused by clogged inlet filters.
Turn off both water taps completely. Unscrew
the hot and cold water lines from the back of
the washer.
1
Carefully remove the filters from the water
inlets, and soak them in white vinegar
or a lime scale remover, following the
manufacturer’s instructions. Rinse thoroughly
before reinstalling.
Press the filters back into place and reattach
the water lines. Do NOT operate the washer
without the inlet filters.
2
IMPORTANT: Use extreme care when removing
and cleaning the filters. If the filters cannot be
cleaned or are damaged, do NOT operate the
washer without the inlet filters. Contact LG
Customer Service or a qualified LG servicer.
Inlet Filter
MAINTENANCE
IMPORTANT: Use ONLY the inlet hoses provided
by LG with this laundry product. Aftermarket
hoses are not guaranteed to fit or function
correctly. Other hoses may not tighten correctly
and could cause leaks. Subsequent damage to
product or property will not be covered under the
terms of LG's warranty.
28
29
MFL31245113_ENG.indd 28-29 2007.10.4 2:32:0 PM
Page 16

T R O U B L E S H O OT I N G
NORMAL SOUNDS YOU MAY HEAR
Problem Possible Causes Solutions
Rattling and
clanking noise
Thumping sound
Water leaking
around washer
• Foreign objects, such as
keys, coins, or safety pins,
may be in drum or pump.
• Heavy wash loads may
produce a thumping sound.
• Washer load may be out
of balance.
• Shipping bolts and/or
packaging materials not
removed.
• Wash load may be unevenly
distributed in the drum.
• Not all leveling feet are resting
firmly on the floor.
• Floor not rigid enough.
• Fill hose connection is loose
at tap or washer.
• House drain pipes are
clogged.
• Stop washer and check drum and drain filter for
foreign objects. If noise continues after washer is
restarted, call for service.
• This is normal. If sound continues, washer is
probably out of balance. Stop and redistribute
wash load.
• Stop and redistribute wash load.
• See Installation Instructions for removing shipping
bolts and packaging.
• Stop washer and rearrange wash load.
• Adjust the leveling feet. Make sure all four feet are in
firm contact with the floor while the washer is in the
spin cycle with a load.
• Make sure that the floor is solid and does not flex.
Refer to “Flooring” in the Installation section.
• Check hoses. Check and tighten hose connections.
• Unclog drain pipe. Contact a plumber if necessary.
The following sounds may be heard while the
washer is operating. They are normal.
Clicking:
Door lock relay when the door locks and unlocks.
Spraying or hissing:
Water spraying or circulating during the cycle.
Humming or gurgling:
Drain pump pumping water from the washer at
the end of a cycle.
Splashing:
Clothes tumbling in the drum during the wash
and rinse cycles.
BEFORE CALLING FOR SERVICE
Your washing machine is equipped with an automatic error-monitoring system to detect and diagnose
problems at an early stage. If your washer does not function properly or does not function at all, check the
following before you call for service.
Vibrating noise
Excessive sudsing
• Too much detergent or
incorrect detergent.
• Reduce detergent amount or use low-sudsing
detergent.
Only use detergent with the HE
(High-Efficiency) logo.
BEFORE CALLING FOR SERVICE (cont.)
Problem Possible Causes Solutions
Washer fills with
water slowly or not
at all, or the display
shows:
Washer will not
turn on
Musty or mildewy
odor in washer
• Water supply taps are not
open fully.
• Water line hoses are kinked,
pinched, or bent.
• Water inlet filters are clogged.
• Water pressure to tap or
house is too low.
• Power cord is not properly
plugged in.
• House fuse is blown, circuit
breaker has tripped, or power
outage has occurred.
• The door is not closed
properly.
• Incorrect or too much
detergent has been used.
• Inside of tub not cleaned
properly.
• Make sure that the water taps are open fully.
• Make sure the hoses are not kinked or pinched. Be
careful when moving the washer.
• Clean the inlet filters. See the
Care and Cleaning
section.
• Check another faucet in the house to make sure that
household water pressure is adequate.
• Make sure that the plug is plugged securely into a
grounded, 3-prong, 120-VAC, 60-Hz. outlet.
• Reset circuit breaker or replace fuse. Do not increase
fuse capacity. If the problem is a circuit overload,
have it corrected by a qualified electrician.
• Make sure that the door is closed properly and press
the START/PAUSE button. After starting a cycle, it
may take a few moments before the drum begins to
turn or spin. The washer will not spin unless the door
is locked (DOOR LOCK will appear in the display).
• If the door is closed and locked and the open door
error message is displayed, call for service.
• Use only HE (High-Efficiency) detergent in
accordance with the manufacturer’s instructions.
• Run the TUB CLEAN cycle regularly. Be sure to wipe
around and under the door seal frequently.
Washer won’t
spin, or the display
shows:
• The washer automatically
adjusts the wash time for
the amount of laundry, water
pressure, water temperature,
and other operating
conditions.
• This is normal. The washer adjusts cycle time
automatically to provide optimal results for the
selected cycle.
Wash cycle time is
longer than usual
Door will not
unlock when cycle
is stopped or
paused
• Interior temperature of
washer is too high.
• Water level in washer is too
high.
• The washer door has a safety lock to prevent burns.
Allow the washer to cool until the DOOR LOCK
indicator turns off in the display.
• Allow the washer to complete the programmed cycle,
or run the DRAIN & SPIN cycle to drain the water.
Water in the washer
drains slowly or not
at all, or the display
shows:
• Drain hose is bent, pinched,
or clogged.
• The drain filter is clogged.
• Make sure the drain hose is free of clogs, kinks, etc.,
and is not pinched behind or under the washer.
• Clean the drain filter. See the
Care and Cleaning
section.
T R O U B L E S H O OT I N G
Staining
• Add laundry products to the
washer drum.
• Washer not unloaded
promptly.
• Does not properly sort the
clothes.
• Load the laundry products into the dispenser.
• Always remove items from the washer as soon as
the cycle is completed.
• Always wash dark colors separately from light colors
and whites to prevent discoloration. If possible, do
not wash heavily soiled items with lightly soiled
ones.
Wrinkling
• Wa s h e r no t un l oa d e d
promptly.
• Washer overloaded.
• Hot and cold water inlet
hoses are reversed.
• Always remove items from the washer as soon as
the cycle is completed.
• The washer can be fully loaded, but the drum
should not be tightly packed with items. The door of
the washer should close easily.
• Hot water rinse can set wrinkles in garments. Check
the inlet hose connections.
30
31
MFL31245113_ENG.indd 30-31 2007.10.4 2:32:2 PM
Page 17

T R O U B L E S H O OT I N G
BEFORE CALLING FOR SERVICE (cont.)
Problem Possible Causes Solutions
The display shows:
• Load is too small.
• Load is out of balance.
• The washer has an imbalance
detection and correction
system. If individual heavy
articles are loaded (bath
mat, bath robe, etc.) and the
imbalance is too great, the
washer will make several
attempts to restart the spin
cycle. If an imbalance is still
detected, the washer will stop
and the error code will be
displayed.
• Add 1 or 2 similar items to help balance the load.
• Rearrange items to help balance the load.
• Control error.
• Unplug the washer and call for service.
The display shows:
• Water level is too high due to
a faulty water valve.
• Close the water taps, unplug the washer, and call
for service.
The display shows:
• The water level sensor is not
working correctly.
• Close the water taps, unplug the washer, and call
for service.
The display shows:
• Thermal overload protection
circuit in the motor has been
tripped.
• Allow the washer to stand for 30 minutes to allow the
motor to cool; then restart the cycle. If the LE error
code still appears, unplug the washer and call
for service.
The display shows:
• A power failure has occurred.
• Restart the cycle.
The display shows:
KEY DIMENSIONS AND SPECIFICATIONS
The appearance and specifications listed in this guide may vary due to constant product improvements.
S P E C I F I C AT I O N S / O P T I O N A L A C C E S S O R I E S
OPTIONAL ACCESSORIES
For these and other LG products, contact your local LG dealer,
or visit our Web site at us.lge.com.
Pedestal
Give your LG washer and dryer a boost
with matching 14-inch high pedestals.
They feature a storage drawer for
added convenience.
14" Pedestal Color
WDP3W White
WDP3B Black
WDP3S Titanium
WDP3N Navy Blue
WDP3R Wild Cherry Red
WDP3G Pearl Gray
Stacking Kit
If space is at a premium, use this kit to
securely stack your LG front-load
washer and dryer.
Bracket Kit Color
WSTK1 White
BSTK1 Black
SSTK1 Titanium
NSTK1 Navy Blue
RSTK1 Wild Cherry Red
GSTK1 Pearl Gray
Model WM2455H*
Description TROMM™ Series Front-Loading Washer
Electrical Requirements 120 VAC @ 60 Hz.
Max. Water Pressure 14.5~116 PSI (100~800 kPa)
Dimensions 27"(W) X 293/4"(D) X 3811/16"(H), 51"(D with door open)
68.6 cm (W) X 75.6 cm (D) X 98.3 cm (H), 129.5 cm (D with door open)
Net Weight 192 lb. (87 kg)
Max. Spin Speed 1,200 RPM
32
33
MFL31245113_ENG.indd 32-33 2007.10.4 2:32:6 PM
Page 18

O P T I O N A L A C C E S S O R I E S O P T I O N A L A C C E S S O R I E S
PEDESTAL ACCESSORY
The pedestal accessory includes:
• Pedestal base • Eight (8) screws
• One (1) drawer divider • Wrench
• Four (4) brackets
wWARNING
• Incorrect installation can cause serious
accidents.
• The appliances are heavy. Two or more
people are required when installing the
pedestal. There is a risk of serious back injury
or other injuries.
• Do not allow children to play in or on the
drawer. There is a risk of suffocation or injury.
• Do not step on the handle. There is a risk of
serious injury.
• If appliances are already installed,
disconnect them from all power, water, or
gas lines and from draining or venting
connections. Failure to do so can result in
electrical shock, fire, explosion, or death.
To ensure safe and secure installation, please
thoroughly follow the instructions below.
PEDESTAL INSTALLATION
Tools Needed for Installation:
• Phillips-head screwdriver
• Wrench (supplied)
1
Make sure the leveling feet of the appliance
are fully retracted (see detail for leveling
washer feet in Step 2); then position the
appliance on top of the pedestal.
The washer feet will fit into the outermost
corner positions and the dryer feet will fit into
the innermost positions as shown.
NOTE: The appliance and pedestal assembly
must be placed on a solid, sturdy, level floor
for proper operation.
2
Once the leveling feet of the washer are fully
retracted, tighten all locknuts securely.
NOTE: The leveling feet on the dryer do not
have locknuts.
Tighten all 4
locknuts securely
For washer/combo
For dryer
PEDESTAL INSTALLATION (cont.)
5
Install 2 screws to securely attach the bracket
to the pedestal.
Once properly attached, firmly press the top
part of the bracket with the double-sided
tape to the side of the appliance. Repeat
steps 2–4 to attach the other brackets.
NOTE: If the brackets are not installed
properly, noise and vibration may result. Be
sure to remove paper backing and to use all
screws to install the brackets.
Move the appliance to the desired location.
3
Make sure the side surface of the appliance
is clean and dry. Remove paper backing from
the tape on the bracket.
4
Position the bracket as shown. The bent part
of the bracket should rest along the edge
of the pedestal, and the holes in the bottom
part of the bracket should align with the
holes in the pedestal.
6
Loosen the locknuts on all 4 leveling feet
of the pedestal until you can turn them
with the wrench. Turn clockwise to raise
or counterclockwise to lower. Once the
pedestal is level and all 4 feet are solidly
against the floor, securely tighten all locknuts
by hand.
NOTE: Noise and vibration may result if
locknuts are not tightened.
Be sure to connect the appliances to all
water, power, or gas lines and draining or
venting connections before operation.
If there is excessive vibration during the
first operation after installation, slightly
adjust the leveling feet.
Raise
Lower
34
35
MFL31245113_ENG.indd 34-35 2007.10.4 2:32:11 PM
Page 19

O P T I O N A L A C C E S S O R I E S O P T I O N A L A C C E S S O R I E S
STACKING KIT
This stacking kit includes:
• Two (2) side rails
• One (1) front rail
• Four (4) screws
To ensure safe and secure installation, please
observe the following instructions.
1
Make sure the surface of the washer is clean
and dry. Remove paper backing from the
tape on one of the stacking kit side brackets.
2
Fit the side bracket to the side of the washer
top as shown in the above illustration. Firmly
press the adhesive area of the bracket to the
washer surface. Secure the side bracket to
the washer with a screw on the back side of
the bracket. Repeat steps 1 and 2 to attach
the other side bracket.
STACKING KIT INSTALLATION
Tools Needed for Installation:
• Phillips-head screwdriver
STACKING KIT INSTALLATION (cont.)
3
Place the dryer on top of the washer by
fitting the dryer feet into the side brackets as
illustrated. Avoid finger injuries; do not allow
fingers to be pinched between the washer
and dryer. Slowly slide the dryer toward the
back of the washer until the side bracket
stoppers catch the dryer feet.
4
Insert the front rail between the bottom of
the dryer and the top of the washer. Push the
front rail toward the back of the washer until it
comes in contact with the side rail stoppers.
Install the two remaining screws to secure the
front rail to the side rails.
wWARNING
• Incorrect installation can cause serious
accidents.
• The weight of the dryer and the height of
installation make this stacking procedure
too risky for one person. Two or more
people are required when installing the
stacking kit. There is a risk of serious back
injury or other injuries.
• Do not use the stacking kit with a gas dryer
in potentially unstable conditions such as a
mobile home. Failure to follow this warning can
result in serious injury.
• Place the washer on a solid, stable, level
floor capable of supporting the weight of
both appliances. Failure to follow this warning
can result in serious injury.
• Do NOT stack the washer on top of the dryer.
Failure to follow this warning can result in
serious injury.
• If appliances are already installed,
disconnect them from all power, water, or
gas lines and from draining or venting
connections. Failure to do so can result in
electrical shock, fire, explosion, or death.
Washer
Dryer
36
37
MFL31245113_ENG.indd 36-37 2007.10.4 2:32:14 PM
Page 20

N OT E S
Your LG Washing Machine will be will repaired or replaced, at LG’s option, if it proves to be defective in material or workmanship under normal use, during the warranty period (“Warranty Period”) set forth below, effective from the date (“Date
of Purchase”) of original consumer purchase of the product. This warranty is good only to the original purchaser of the
product and effective only when used in the United States, including Alaska, Hawaii, and U.S. Territories.
THIS WARRANTY IS IN LIEU OF ANY OTHER WARRANTY, EXPRESS OR IMPLIED, INCLUDING WITHOUT LIMITATION,
ANY WARRANTY OF MERCHANTABILITY OR FITNESS FOR A PARTICULAR PURPOSE. TO THE EXTENT ANY IMPLIED
WARRANTY IS REQUIRED BY LAW, IT IS LIMITED IN DURATION TO THE EXPRESS WARRANTY PERIOD ABOVE.
NEITHER THE MANUFACTURER NOR ITS U.S. DISTRIBUTOR SHALL BE LIABLE FOR ANY INCIDENTAL, CONSEQUENTIAL,
INDIRECT, SPECIAL, OR PUNITIVE DAMAGES OF ANY NATURE, INCLUDING WITHOUT LIMITATION, LOST REVENUES OR
PROFITS, OR ANY OTHER DAMAGE WHETHER BASED IN CONTRACT, TORT, OR OTHERWISE. Some states do not allow
the exclusion or limitation of incidental or consequential damages or limitations on how long an implied warranty lasts, so the above
exclusion or limitation may not apply to you. This warranty gives you specific legal rights and you may also have other rights that vary
from state to state.
THIS LIMITED WARRANTY DOES NOT APPLY TO:
• Service trips to your home to deliver, pick up, and/or install the product, instruct, or replace house fuses or correct wiring, or
correction of unauthorized repairs.
• Damages or operating problems that result from misuse, abuse, operation outside environmental specifications or contrary to the
requirements of precautions in the Operating Guide, accident, vermin, fire, flood, improper installation, acts of God, unauthorized
modification or alteration, incorrect electrical current or voltage, or commercial use, or use for other than intended purpose.
The cost of repair or replacement under these excluded circumstances shall be borne by the consumer.
CUSTOMER INTERACTIVE CENTER NUMBERS
TO CONTACT LG ELECTRONICS
BY MAIL:
LG Customer Interactive Center
P. O. Box 240007
201 James Record Road
Huntsville, Alabama 35824
ATTN: CIC
WARRANTY PERIOD:
LABOR: One Year from the Date of Purchase.
PARTS (except as listed below): One Year from the Date
of Purchase.
Electronic Control Board: Two Years from the Date
of Purchase.
Drum Motor: Seven Years from the Date of Purchase.
Stainless Steel Drum: Lifetime
Replacement Units and Repair Parts may be new or
remanufactured.
Replacement Units and Repair Parts are warranted for the
remaining portion of the original unit’s warranty period.
LG ELECTRONICS, INC.
LG WASHING MACHINE LIMITED WARRANTY - USA
HOW SERVICE IS HANDLED:
In-Home Service:
Please retain dealer’s dated bill of sale or delivery
ticket as evidence of the Date of Purchase for proof of
warranty, and submit a copy of the bill of sale to the
service person at the time warranty service is provided.
Please call 1-800-243-0000 and choose the
appropriate option to locate your nearest LG
Authorized Service Center.
Or visit our Web site at: http://www.lgservice.com.
Call 1-800-243-0000 (24 hours a day, 365 days a
year), and select the appropriate option from the menu.
Or visit our Web site at: http://www.lgservice.com.
To obtain Customer Assistance, Product
Information, or Dealer or Authorized Service
Center location:
Product Registration Information
Model:
Serial Number:
Date of Purchase:
The model and serial number can be located on the rating
plate on the back of the washer.
38
39
MFL31245113_ENG.indd 38-39 2007.10.4 2:32:15 PM
Page 21

I N S T R U C C I O N E S I M P O R TA N T E D E S E G U R I DA D
Su Seguridad y la de los demás son de suma importancia.
En este manual y en su electrodoméstico figuran muchos mensajes importantes de seguridad. Lea y
cumpla siempre con todos los mensajes de seguridad.
Éste es el símbolo de alerta de seguridad.
El mismo alerta sobre potenciales riesgos de muerte o heridas tanto para usted como para
otras personas.
Todos los mensajes de seguridad estarán a continuación del símbolo de alerta de seguridad y con la
palabra PELIGRO o ADVERTENCIA. Estas palabras significan:
wPELIGRO: Corre riesgo de muerte o de sufrir heridas serias si no sigue las instrucciones
inmediatamente.
wADVERTENCIA: Corre riesgo de muerte o de sufrir heridas serias si no sigue las
instrucciones.
Todos los mensajes de seguridad le indicarán cuál es el riesgo potencial, le dirán cómo reducir las
posibilidades de sufrir heridas y qué puede suceder si no se siguen las instrucciones.
wADVERTENCIA Por su seguridad, debe seguir la información indicada
en este manual para minimizar el riesgo de incendio o explosión, descarga eléctrica,
o para prevenir daños a la propiedad, lesiones personales o muerte.
LEA TODAS LA INSTRUCCIONES ANTES DE USAR
I N T RO D U C C I Ó N
Escoja el lugar adecuado ..................................... 47
Espacios de instalación ........................................ 47
Tipo de piso .......................................................... 48
Instalaciones con la base pedestal
o kit de apilado opcionales .................................. 48
Desembalaje y retiro de los pernos de embalaje ... 49
Conexión de las tuberías de agua ........................ 50
Conexión de la tubería de drenaje ....................... 51
Nivelación de la lavadora .....................................52
CÓMO USAR
Clasificación de las cargas de lavado .................. 53
Selección de detergente ...................................... 54
Detalles sobre el depósito .................................... 54
Carga del depósito ............................................... 55
Características del panel de control ..................... 56
Guía de ciclos ....................................................... 57
Pantalla de hora y estado ..................................... 58
Funcionamiento de la lavadora ............................ 59
Botones de ajuste de ciclo ................................... 60
Programa personalizado ...................................... 61
Botones de opción de ciclo ................................. 62
Funciones especiales ........................................... 63
PIEZAS Y CARACTERÍSTICAS
Características especiales.................................... 45
Piezas y componentes clave ................................ 46
RESOLUCIÓN DE PROBLEMAS
Sonidos normales que podría escuchar .............. 68
Antes de llamar a mantenimiento ................... 68–70
MANTENIMIENTO Y LIMPIEZA
Limpieza regular ................................................... 64
Limpieza de la lavadora ........................................ 65
Mantenimiento ................................................ 66, 67
GARANTÍA
Información de registro del producto ................... 76
ESPECIFICACIONES/ACCESORIOS OPCIONALES
INSTRUCCIONES IMPORTANTES DE
SEGURIDAD
Precauciones básicas de seguridad .............. 41–44
Dimensiones y especificaciones clave ................. 71
Accesorios opcionales ......................................... 71
Instalación del pedestal .................................. 72, 73
Instalación del kit de apilado ............................ 74, 75
Felicitaciones por su compra
y bienvenido a la familia LG.
Su nueva lavadora LG combina
la tecnología de lavado más
avanzada con funcionamiento
sencillo y alta eficiencia. Al seguir
las instrucciones de funcionamiento
y mantenimiento de este manual,
su lavadora le brindará muchos
años de servicio confiable.
¡GRACIAS!
INSTRUCCIONES PARA LA INSTALACIÓN
40
41
MFL31245113_SPN.indd 40-41 2007.10.4 2:32:46 PM
Page 22

• Consulte las INSTRUCCIONES DE INSTALACIÓN
para un procedimiento detallado de conexión a
tierra. Junto con la lavadora se encuentran las
instrucciones de instalación como referencia.
Si cambiará de lugar la lavadora, contrate a una
persona del servicio calificada para que la controle
y reinstale. Si no se cumple con esta advertencia se
podrán producir heridas graves, incendios, descargas
eléctricas o muerte.
•
Nunca, bajo ninguna circunstancia, corte o elimine
el tercer cable (tierra) del cable de corriente. Si no se
cumple con esta advertencia se podrán producir heridas
graves, incendios, descargas eléctricas o muerte.
•
Para su seguridad personal, este
electrodoméstico debe estar adecuadamente
conectado a tierra. Si no se cumple con esta
advertencia se podrán producir heridas graves,
incendios, descargas eléctricas o muerte.
•
El cable de corriente de este electrodoméstico
contiene un enchufe de 3 cables (conexión a
tierra) que se conecta a un tomacorriente de
pared estándar de 3 cables (conexión a tierra) para
minimizar la posibilidad de riesgos
de descargas eléctricas por parte del mismo.
•
La lavadora deberá estar conectada a un
tomacorriente con conexión a tierra de 120VAC, 60
Hz. Si no se cumple con esta advertencia se podrán
producir heridas graves, incendios, descargas eléctricas
o muerte.
•
Contrate a un electricista calificado para que
controle el tomacorriente y el circuito eléctrico
con el fin de asegurar que el enchufe esté
correctamente conectado a tierra. Si no se cumple
con esta advertencia se podrán producir heridas graves,
incendios, descargas eléctricas
o muerte.
•
En caso de contar con un tomacorriente de pared
de 2 cables, es su responsabilidad y obligación
reemplazarlo por un tomacorriente de pared de 3
cables correctamente conectado a tierra. Si no se
cumple con esta advertencia se podrán producir heridas
graves, incendios, descargas eléctricas o muerte.
•
No instalar sobre alfombra. Instale la lavadora sobre
un suelo firme. Si no se cumple con esta advertencia se
podrán producir daños por filtraciones.
•
No elimine el cable de conexión a tierra. No
use un adaptador o prolongador. Enchufe en un
tomacorriente con conexión a tierra de 3 cables. Si
no se cumple con esta advertencia se podrán producir
heridas graves, incendios, descargas eléctricas o
muerte.
•
La lavadora debería estar siempre conectada a
un enchufe específico con un índice de voltaje
equivalente al que figura en su etiqueta de
características técnicas. Esto garantiza el mejor
funcionamiento y además previene la sobrecarga de los
circuitos del hogar, lo cual podría ocasionar riesgos de
incendio debido al recalentamiento de cables.
•
Nunca desenchufe su lavadora empujando el cable
de corriente. Siempre tome su enchufe firmemente y
empuje el mismo hacia fuera para retirarlo. Si no se
cumple con esta advertencia se podrán producir heridas
graves, incendios, descargas eléctricas o muerte.
•
Repare o reemplace de inmediato todos los cables
de corriente pelados o con cualquier tipo de daño.
No use un cable con cortaduras o abrasión sobre su
extensión o extremos.
Si no se cumple con esta advertencia se podrán
producir heridas graves, incendios, descargas eléctricas
o muerte.
•
Al instalar o cambiar de lugar la lavadora, evite todo
tipo de cortes u otros daños en el cable de corriente.
Si no se cumple con esta advertencia se podrán
producir heridas graves, incendios, descargas eléctricas
o muerte.
•
La lavadora debe ser instalada y conectada a tierra
por una persona especializada del servicio técnico
cumpliendo con los códigos locales para prevenir
riesgos de descargas y asegurar la estabilidad durante
el funcionamiento.
•
La lavadora es pesada. Se necesitan dos
o más personas para instalar y trasladar el
electrodoméstico. Si esto no se cumple se podrán
producir diversas heridas.
•
Ubique e instale la lavadora evitando su exposición
a temperaturas bajo cero o a condiciones climáticas
en áreas exteriores. Si no se cumple con esta
advertencia se podrán producir daños por filtraciones.
•
Con el fin de reducir el riesgo de descargas
eléctricas no instale la lavadora en espacios
húmedos. Si no se cumple con esta advertencia se
podrán producir heridas graves, incendios, descargas
eléctricas o muerte.
wADVERTENCIA Por su seguridad, debe seguir la información indicada
en este manual para minimizar el riesgo de incendio o explosión, descarga eléctrica,
o para prevenir daños a la propiedad, lesiones personales o muerte.
LEA TODAS LA INSTRUCCIONES ANTES DE USAR
INSTRUCCIONES BÁSICAS DE SEGURIDAD
wADVERTENCIA Para minimizar el riesgo de incendio o explosión, descarga eléctrica,
o para prevenir lesiones personales cuando use electrodomésticos, se deben seguir precauciones
básicas de seguridad, incluyendo las siguientes:
I N S T R U C C I O N E S I M P O R TA N T E D E S E G U R I DA D I N S T R U C C I O N E S I M P O R TA N T E D E S E G U R I DA D
wADVERTENCIA Por su seguridad, debe seguir la información indicada
en este manual para minimizar el riesgo de incendio o explosión, descarga eléctrica,
o para prevenir daños a la propiedad, lesiones personales o muerte.
LEA TODAS LA INSTRUCCIONES ANTES DE USAR
INSTRUCCIONES DE SEGURIDAD PARA LA INSTALACIÓN
wADVERTENCIA Para minimizar el riesgo de incendio o explosión, descarga eléctrica,
o para prevenir lesiones personales cuando use electrodomésticos, se deben seguir precauciones
básicas de seguridad, incluyendo las siguientes:
• Antes de usar, la lavadora debe estar correctamente
instalada como se describe en este manual.
• No lave artículos que han sido limpiados,
lavados, remojados o salpicados previamente
con gasolina, disolventes de limpieza en seco,
u otras substancias inflamables o explosivas,
ya que emanan vapores que podrían
encenderse o explotar.
• No agregue gasolina, disolventes de limpieza en seco u
otras substancias explosivas al agua de lavado. Estas
substancias emanan vapores que podrían encenderse o
explotar.
• Bajo ciertas condiciones, se puede producir gas
hidrógeno en un sistema de agua caliente que no
se haya usado por un plazo de 2 semanas o más.
EL GAS HIDRÓGENO ES EXPLOSIVO. Si no se ha
usado el sistema de agua caliente durante tal período,
antes de utilizar la lavadora, abra todas las llaves
de agua caliente y deje que el agua fluya durante
algunos minutos. Esto liberará cualquier gas hidrógeno
acumulado. Ya que el gas es inflamable, no fume ni use
ninguna llama abierta durante este período.
• No deje que los niños jueguen en la lavadora o dentro
de ella. Cuando se usa la lavadora cerca de los niños se
necesita supervisión minuciosa.
• Antes de poner la lavadora fuera de servicio o de tirarla,
quite la puerta para prevenir que los niños se metan
dentro.
• No instale ni guarde la lavadora cuando esté expuesta a
la intemperie o temperaturas de congelamiento.
• No toquetee los controles.
• No repare ni cambie ninguna pieza de la lavadora ni
intente dar un mantenimiento diferente al descrito en
este manual. Recomendamos enfáticamente que el
mantenimiento lo brinde una persona calificada.
• Vea las Instrucciones de instalación para referirse a los
requisitos de puesta a tierra.
• Siga SIEMPRE las instrucciones de
mantenimiento de fábrica provistas por el fabricante de
las prendas.
• No coloque artículos expuestos a aceite comestible en
su lavadora. Los artículos contaminados con aceites
comestibles podrían contribuir a la formación de una
reacción química que cause que una carga de lavado se
incendie.
• Use suavizadores de tela o productos para eliminar
estática únicamente del modo recomendado por el
fabricante.
• Esta lavadora no está diseñada para uso marino o
instalaciones móviles tales como vehículos recreativos,
aeronaves, etc.
• Cierre las llaves de agua y desenchufar la lavadora
si ha dejado la lavadora sin funcionar por un período
prolongado de tiempo, como durante las vacaciones.
• El material de embalaje podría resultar peligroso
para los niños. ¡Existe el peligro de sufrir sofocación!
Mantenga todos los elementos de embalaje fuera del
alcance de los niños.
• Antes de cargar la lavadora, siempre revise que no haya
objetos extraños en su interior. Mantenga la puerta
cerrada cuando no se use.
INSTRUCCIONES PARA LA CONEXIÓN A TIERRA
• Este aparato debe ser conectado a tierra. Dado el caso de descompostura ó mal funcionamiento, la conexión a tierra
reduce el riesgo de recibir una descarga eléctrica proveyendo una vía de menor resistencia a la corriente eléctrica. Este
aparato esta equipado con un cable que tiene un conductor de equipo a tierra y una clavija de tierra. La clavija debe ser
conectada en una toma de corriente adecuada que esté propiamente instalada y conectada a tierra de acuerdo con los
códigos y ordenanzas locales.
w
ADVERTENCIA
Una conexión inapropiada del conductor de equipo a tierra
puede resultar en riesgo de recibir una descarga eléctrica. Verifique con un electricista calificado si tiene dudas sobre si el
aparato esta correctamente conectado a tierra. No modifique la clavija provista con el aparato. Si no encaja con la toma de
corriente, haga instalar una toma de corriente adecuada por un electricista calificado.
42
43
MFL31245113_SPN.indd 42-43 2007.10.4 2:32:47 PM
Page 23

I N S T R U C C I O N E S I M P O R TA N T E D E S E G U R I DA D
• Desenchufe la lavadora antes de limpiar la misma
para evitar el riesgo de descargas eléctricas.
•
Al limpiar la lavadora nunca utilice químicos
de corte, limpiadores abrasivos o solventes.
Los mismos dañarán su aspecto.
•
No coloque trapos grasosos o aceitosos sobre la
lavadora. Estas sustancias despiden vapores que
podrían prender fuego los materiales.
•
No lave prendas que estén sucias con aceite
vegetal o de cocina. Las mismas pueden quedar con
algo de aceite luego del lavado. Debido al aceite que
permanece, la tela puede despedir humo o prenderse
fuego por sí sola.
•
Desconecte este electrodoméstico del
tomacorriente antes de realizar cualquier función
de mantenimiento. Colocar los controles en la posición
OFF (apagado) no desconecta el electrodoméstico de la
toma de corriente. Si no se cumple con esta advertencia
se podrán producir heridas graves, incendios,
descargas eléctricas o muerte.
•
No combine diferentes productos de lavandería en
1 misma carga a menos que esto se especifique
en la etiqueta. No mezcle blanqueador con cloro
junto con amoníaco o ácidos tales como vinagre.
Al usar productos de lavandería siga las instrucciones
del envoltorio. Un uso indebido puede producir gases
venenosos, lo que puede resultar en heridas graves
o muerte.
•
No coloque las manos dentro de la lavadora cuando
sus partes estén en movimiento. Antes de cargar,
descargar o agregar prendas, presione la perilla
selectora de ciclos y espere hasta que el tambor
se detenga totalmente antes de colocar las manos
dentro. Si no se cumple con esta advertencia se podrán
producir heridas graves, incendios, descargas eléctricas
o muerte.
•
No permita que los niños jueguen sobre o dentro
de la lavadora. Si hay niños cerca mientras la lavadora
está en funcionamiento es necesario supervisarlos
de cerca. A medida que los niños crezcan, enséñeles
sobre el uso adecuado y seguro de todos los
electrodomésticos. Si estas advertencias no se cumplen
se podrían producir heridas graves.
•
Destruya la bolsa plástica y otros materiales de
embalaje una vez retirada la lavadora. Es posible
que los niños deseen usarlas para jugar. Los cartones
cubiertos con alfombra, colchas o láminas de plástico
se pueden convertir en cámaras herméticas. Si estas
advertencias no se cumplen se podrían producir
heridas graves o muerte.
•
Mantenga los productos de lavandería fuera del
alcance de los niños. Para evitar heridas, cumpla con
todas las advertencias que figuran en las etiquetas de
los productos. Si estas advertencias no se cumplen se
podrían producir heridas graves.
•
Retire la puerta del compartimiento de lavado
para evitar el riesgo de que los niños o animales
pequeños queden atrapados dentro, si dejará de
usar definitivamente o se deshará de su lavadora.
Si no se cumple con esto se podrán producir heridas
o muerte.
P I E Z A S Y C A R AC T E R Í S T I C A S
CARACTERÍSTICAS ESPECIALES
INSTRUCCIONES DE SEGURIDAD PARA LA UTILISACIÓN,
CUIDADO Y LIMPIEZA, Y LA DISPOSICIÓN
wADVERTENCIA Para minimizar el riesgo de incendio o explosión, descarga eléctrica,
o para prevenir lesiones personales cuando use electrodomésticos, se deben seguir precauciones
básicas de seguridad, incluyendo las siguientes:
2
1
4
3
3
2
1
4
CAJÓN DE DEPÓSITO DE DETERGENTE
Este cajón de cuatro secciones provee
depósitos separados para el prelavado y
detergente principal de lavado, así como
suavizante líquido de telas.
COMPUERTA DE SEGURIDAD DE
FÁCIL ACCESO
La compuerta extra-grande se asegura durante
el funcionamiento y consta de un bloqueo
demorado para prevenir que la compuerta se
abra hasta que el interior de la lavadora se haya
enfriado y haya bajado el nivel del agua.
CHORROS DE RODILLO
El sistema de chorros de rodillo mejora el
desempeño de lavado, a la vez que reduce el
desgaste de la tela. Los chorros integrados
rocían las prendas para mejorar aún más la
eficiencia de lavado.
MOTOR DE ACCIÓN DIRECTA
El motor de acción directa elimina la correa
y las poleas incluidas en la mayoría de las
lavadoras para brindar desempeño y confiabilidad
mejorados, a la vez que aumenta el ahorro
de energía.
44
45
GUARDE ESTAS INSTRUCCIONES
LEA TODAS LA INSTRUCCIONES ANTES DE USAR
wADVERTENCIA Por su seguridad, debe seguir la información indicada
en este manual para minimizar el riesgo de incendio o explosión, descarga eléctrica,
o para prevenir daños a la propiedad, lesiones personales o muerte.
MFL31245113_SPN.indd 44-45 2007.10.4 2:32:49 PM
Page 24

P I E Z A S Y C A R AC T E R Í S T I C A S I N S TA L A C I Ó N
ESCOJA EL LUGAR ADECUADO
ESPACIOS DE INSTALACIÓN
Deje por lo menos 61,2 cm (24 pulgadas) al frente
de la lavadora para poder abrir la compuerta.
293/4"
(75,6 cm)
4"
(10 cm)
51"
(129,5 cm)
211/4"
(54 cm)
Para asegurar que se haya dotado de suficiente
espacio para las tuberías de agua y flujo de aire,
deje espacios mínimos de por lo menos 2,5 cm
(1 pulgada) en los lados y 10 cm (4 pulgadas)
detrás de la unidad. No olvidar prever espacio
para las molduras de pared, puerta o piso que
podrían aumentar los espacios de instalación
requeridos.
•
No elimine el cable de conexión a tierra. No
use un adaptador o prolongador. Enchufe en
un tomacorriente con conexión a tierra de 3
cables. Si no se cumple con esta advertencia
se podrán producir heridas graves, incendios,
descargas eléctricas o muerte
Tomacorriente
• El tomacorriente debe estar dentro de un área
mínima de 1,5 m (60 pulgadas) a cualquiera de
los lados de la lavadora.
• El electrodoméstico y el tomacorriente deben
estar colocados de forma tal que se pueda
acceder al enchufe fácilmente.
• No sobrecargar el tomacorriente con más de un
electrodoméstico.
• El tomacorriente deberá estar puesto a tierra de
acuerdo con los códigos y las regulaciones de
cableado actuales.
• Se recomienda utilizar un fusible de demora de
tiempo o disyuntor.
NOTA: Es responsabilidad y obligación personal
del dueño del producto pedir a un electricista
calificado que instale el tomacorriente adecuado.
2
1
3
4
PIEZAS Y COMPONENTES CLAVE
Además de los componentes y las características
descritos en la sección de Características
especiales, hay varios componentes importantes
adicionales a los cuales se hace referencia en
este manual.
TAMBOR DE ACERO INOXIDABLE DE
ULTRA CAPACIDAD
El tambor de acero inoxidable ultra grande ofrece
una durabilidad extraordinaria y está inclinado
para mejorar la eficiencia y permitir el acceso fácil
para prendas grandes.
PANTALLA CON INDICADOR DE TAMAÑO
DE CARGA
El tamaño de la carga se ajusta automáticamente
en base al peso y tamaño de cada carga para un
óptimo lavado y cuidado de las telas.
PATAS NIVELADORAS
Cuatro patas niveladoras (dos en la parte frontal
y dos en la trasera) ajustables para mejorar la
estabilidad de la lavadora en pisos desnivelados.
PANEL DE ACCESO AL DRENAJE
Brinda acceso a la tubería de drenaje y al filtro
de la bomba de drenaje.
wADVERTENCIA
• La lavadora es pesada. Se necesitan dos
o más personas para instalar y trasladar el
electrodoméstico. Si esto no se cumple se
podrán sufrir heridas en la espalda u
otras herida.
• Almacene e instale la lavadora en un lugar
no expuesto a temperaturas inferiores a
las de congelación ni a la intemperie. Si no
se cumple con esta advertencia se podrán
producir heridas graves, incendios, descargas
eléctricas o muerte
• Para su seguridad personal, este
electrodoméstico debe ser conectado a
tierra adecuadamente.
• Conecte a tierra la lavadora siguiendo
todos los códigos y ordenanzas legales. Si
no se cumple con esta advertencia se podrán
producir heridas graves, incendios, descargas
eléctricas o muerte.
• La apertura de la base no debe estar obstruida
por una alfombra cuando la lavadora se instale
en un piso alfombrado.
1
4
3
2
Accesorios incluidos
Mangueras de
agua fría y caliente
Llave (para
sacar los pernos de
embalaje y ajustar las
patas niveladoras)
Correa de amarre
(para asegurar
la manguera de
drenaje)
Entradas de agua
caliente y fría
Manguera
de drenaje
Parte trasera de la lavadora
Abrazadera
de codo (para
asegurar la
manguera de
drenaje)
Tapón (4)
(para tapar los agujeros de
los pernos para transporte)
27"
(68,6 cm)1"(2.5 cm)
1"
(2,5 cm)
1"
(2,5 cm)
46
47
MFL31245113_SPN.indd 46-47 2007.10.4 2:32:55 PM
Page 25

I N S TA L A C I Ó N
TIPO DE PISO
I N S TA L A C I Ó N
Al retirar la lavadora de la base de cartón,
asegúrese de quitar el soporte de base de
espuma colocado en la mitad de la base
de cartón.
Si debe asentar la lavadora hacia abajo para
quitar los materiales de embalaje de la base,
hágalo siempre cuidadosamente sobre su parte
lateral. NO asiente la lavadora sobre su parte
frontal o posterior.
IMPORTANTE: Para prevenir daños en el interior
durante el transporte, la lavadora está equipada
con cuatro pernos de embalaje y sujetadores
plásticos. Se DEBEN quitar estos pernos y
sujetadores antes de poner en funcionamiento
la lavadora.
• De lo contrario se podría causar vibración
y ruido severos, que podrían causar daños
permanentes a la lavadora. El cable está
asegurado a la parte posterior de la lavadora
con un perno de embalaje para prevenir el
funcionamiento con los pernos colocados.
Quite los sujetadores haciéndolos girar
levemente mientras tira. Gire y apriete las
tapas de orificio en los orificios de los
pernos de embalaje.
NOTA: Guarde los pernos y sujetadores
para su uso futuro. Para prevenir daños
a los componentes internos, los pernos y
sujetadores internos deben ser instalados
cuando se transporte la lavadora.
Comenzando por los 2 pernos de embalaje
inferiores, use la llave incluida para quitar los
4 pernos de embalaje rotándolos en sentido
contrario a las agujas del reloj.
1
Pernos de
embalaje
2
NOTA: Tome en cuenta que el piso debe ser
lo suficientemente fuerte y rígido para soportar
el peso de la lavadora cuando se encuentra
completamente cargada, sin flexionarse ni
rebotar. Si su piso tiene mucha flexión, podría
necesitar reforzarlo para hacerlo más rígido. Un
piso adecuado para una lavadora de carga por
la parte superior podría no ser lo suficientemente
rígido para una de carga frontal debido a
la diferencia en la dirección y velocidad del
centrifugado. Si el piso no es sólido, su lavadora
podría vibrar y la vibración podría sentirse en
toda la casa.
INSTALACIONES CON LA BASE
PEDESTAL O KIT DE APILADO
OPCIONALES
IMPORTANTE: Si se encuentra instalando la
lavadora con una base pedestal o un kit de
apilado opcionales, consulte la sección de
Accesorios opcionales incluida en este manual o
las instrucciones de su pedestal o kit de apilado
antes de continuar con la instalación.
Sujetador
Tapa de
agujero
30"
(76,1 cm)
4"
(10 cm)
Dimensiones requeridas para la
instalación con pedestal
Dimensiones requeridas para la
instalación con el kit de apilado
Base de
cartón
Soporte de base
de espuma
• Para minimizar el ruido y vibración, se DEBE
instalar la lavadora en un piso sólidamente
construido. Ver la NOTA a la derecha.
• La pendiente permitida debajo de toda la
lavadora es de 1°.
• No se recomiendan las superficies alfombradas
o de baldosas blandas.
• Nunca instale la lavadora en una plataforma o
estructura soportada con poca solidez. Utilice
un pedestal accesorio aprobado únicamente
como se describe más abajo.
DESEMBALAJE Y RETIRO DE LOS PERNOS DE EMBALAJE
27"
(68,6 cm)
1"
(2,54 cm)
1"
(2,54 cm)
771/2"
(190,5 cm)
48
49
MFL31245113_SPN.indd 48-49 2007.10.4 2:33:0 PM
Page 26

I N S TA L A C I Ó N IN S TA L A C I Ó N
CONEXIÓN DE LAS TUBERÍAS DE AGUA CONEXIÓN DE LA TUBERÍA DE DRENAJE
Inserte el extremo de la manguera de drenaje en
el drenaje del piso. Asegure la manguera en su
lugar para prevenir su movimiento.
Manguera
de drenaje
Drenaje
del piso
Opción 3: Drenaje del piso
Stand
Pipe
Tie Strap
Enganche el extremo de la manguera en la
abrazadera del codo. Inserte el extremo de la
manguera de drenaje en el tubo vertical. Utilice la
correa para asegurar la manguera en su lugar.
NOTA: La altura total del extremo de la manguera
no deberá sobrepasar 2,44 m (96 pulgadas)
desde la parte inferior de la lavadora.
Opción 1: Tubo vertical
Abrazadera
del codo
Manguera
de drenaje
Enganche el extremo de la manguera en la
abrazadera del codo. Cuelgue el extremo de la
manguera sobre el lado del lavadero. Utilice la
correa para asegurar la manguera en su lugar.
NOTA: La altura total del extremo de la manguera
no deberá sobrepasar 2,44 m (96 pulgadas)
desde la parte inferior de la lavadora.
Lavadero
Opción 2: Lavadero
Abrazadera
del codo
Correa
Manguera
de drenaje
Inserte un sello de caucho en las conexiones
roscadas en cada manguera.
1
Sello de caucho
Manguera
de agua
(a la llave)
Sello de caucho
Manguera de agua (a
la conexión de agua
en la lavadora)
3
Conecte la tubería de agua caliente a la llave
de agua caliente. Conecte la tubería de agua
fría a la llave de agua fría.
Ajuste las conexiones con firmeza. Abra las
llaves de agua completamente para revisar
que no haya fugas.
Llave de agua
NOTA: No dañe la rosca de las conexiones
de manguera.
Conecte la tubería de agua caliente a la
entrada roja de agua caliente en la parte
posterior de la lavadora. Conecte la tubería
de agua fría a la entrada azul de agua fría en
la parte posterior de la lavadora. Ajuste las
conexiones con firmeza.
2
Entradas
de agua
• IMPORTANTE: Cuando instale la lavadora
use mangueras nuevas. NO reutilice
mangueras viejas.
•
IMPORTANTE: Usar SOLAMENTE las mangueras de la
entrada proporcionadas por LG de este producto del
lavadero. Las mangueras del mercado de accesorios
no están garantizadas para caber o para funcionar
correctamente. Otras mangueras pueden no apretar
correctamente y podrían causar los escapes. El daños
subsecuente al producto o a la propiedad no serán
cubiertos de conformidad con la garantía de LG.
• La presión de suministro de agua debe estar entre 14,5
libras por pulgada cuadrada y 116 libras por pulgada
cuadrada (100~800 kPa). Si la presión de suministro
de agua es superior a 116 libras por pulgada
cuadrada, debe instalar una válvula reductora de
presión.
• Revise periódicamente que la manguera no tenga
rajaduras, fugas y desgaste, y reemplácela de ser
necesario.
• Asegúrese de que las tuberías de agua no se
encuentren extendidas, apretadas, aplastadas
o curvadas.
• Nunca se debe instalar ni almacenar la lavadora en un
lugar expuesto a temperaturas de congelamiento.
Pueden dañarse las tuberías de agua y mecanismos
internos de la lavadora.Si se expone la lavadora
a temperaturas de congelamiento antes de la
instalación, deje que permanezca a una temperatura
ambiente por varias horas antes de usar.
• La manguera de drenaje siempre debe estar
asegurada adecuadamente. No asegurar
adecuadamente la manguera de drenaje puede
resultar en inundación o daños a la propiedad.
• No instalar el extremo de la manguera a una
altura de más de 2,44 m (96 pulgadas) sobre la
parte inferior de la lavadora.
• El drenaje debe instalarse según todos los
códigos y regulaciones locales vigentes.
• Asegúrese de que las tuberías de agua no se
encuentren extendidas, apretadas, aplastadas
o curvadas.
50
51
MFL31245113_SPN.indd 50-51 2007.10.4 2:33:6 PM
Page 27

3
I N S TA L A C I Ó N
CLASIFICACIÓN DE LAS CARGAS DE LAVADO
C Ó M O U S A R
NIVELACIÓN DE LA LAVADORA
Afloje las tuercas de seguridad en las 4 patas
niveladoras hasta que pueda girar la pata con
la llave incluida. Gire en la dirección de las
agujas del reloj para levantar la lavadora o al
contrario para bajarla.
2
Una vez que la lavadora se encuentre nivelada
de lado a lado y atrás y adelante, ajuste todas
las tuercas de seguridad con firmeza.
Asegúrese de que las 4 patas niveladoras se
encuentran haciendo contacto firme con el
piso.
NOTA: Para asegurar que la lavadora
está nivelada adecuadamente, hágala
funcionar con una carga de prueba: coloque
aproximadamente 3 kilos de ropa en la
máquina. Luego, apriete POWER (encendido),
RINSE+SPIN (enjuague+centrifugado), y
el botón de START/PAUSE (inicio/pausa).
Vea las siguientes secciones para obtener
información adicional sobre la selección y el
funcionamiento de ciclos.
Verifique que la lavadora no se meza o
vibre excesivamente durante el ciclo de
centrifugado. Si la lavadora vibra o se sacude,
ajuste las patas niveladoras hasta que se
encuentre estable y vuelva a comprobar.
Etiquetas de cuidado de las telas
La mayoría de las prendas de vestir tienen
etiquetas de cuidado de las telas para lograr un
cuidado adecuado.
Agrupamiento de prendas similares
Para obtener los mejores resultados, clasifique
las prendas en cargas que puedan lavarse con
el mismo ciclo de lavado.
Telas diferentes tienen requisitos de
mantenimiento distintos.
Siempre lave las prendas de colores oscuros
separadas de las de colores claros y ropa blanca
para evitar manchas. De ser posible, no lave
prendas muy sucias con otras menos sucias.
El cuadro indicado más abajo muestra los
agrupamientos recomendados.
Símbolos del
blanqueador
Cualquier blanqueador
(cuando se necesita)
Cualquier blanqueador
sin cloro (cuando se necesita)
No blanquear
Normal
Suave/
Delicado
Lavado manual
No lavar No escurrir
Ciclo de
lavado a
máquina
Planchado permanente/
Antiarrugas
Temperatura
del agua
Caliente
(50°C/120°F)
Tibia
(40°C/105°F)
Fría
(30°C/85°F)
Etiquetas de cuidado de las telas
Carga de la lavadora
• Revise todos los bolsillos para asegurarse
de que estén vacíos. Artículos como clips,
cerillos, plumas, monedas y llaves pueden
dañar su lavadora o sus prendas.
• Cierre las cremalleras, ganchos y cordones para
prevenir que estos artículos se enganchen o
enreden en otras prendas.
• Trate previamente las áreas muy manchadas
para obtener los mejores resultados.
• Combine prendas grandes y pequeñas en una
carga. Cargue primero las prendas grandes.
• Las prendas grandes no deberán ser más de
la mitad de la carga de lavado total.
• Se puede cargar la lavadora completamente,
pero el tambor no puede quedar colmado de
prendas. La compuerta de la lavadora deberá
cerrar con facilidad.
• Para prevenir una carga fuera de balance, no
lave prendas solas. Añada una o das prendas
similares a la carga. Las prendas grandes,
que requieren mucho espacio, tales como
sábanas, cubrecamas o colchas se deben lavar
individualmente.
• No lave ni centrifugue prendas impermeables.
• Cuando descargue la lavadora, revise debajo
del sello de la compuerta para controlar que
no haya artículos pequeños.
Coloque la lavadora en el lugar final,
tomando la precaución especial de no
apretar, forzar ni aplastar las tuberías de
drenaje y agua. Coloque un nivelador en la
parte superior de la lavadora.
1
Nivelador
Patas
niveladoras
Patas
niveladoras
El tambor de su nueva lavadora centrifuga a
velocidades muy altas, de hasta 1.200 r.p.m.
Para minimizar la vibración, el ruido y movimiento
no deseados, el piso deberá ser una superficie
perfectamente nivelada y sólida.
NOTA: Fije las patas niveladoras solo en la
medida necesaria para nivelar la lavadora. La
extensión de las patas niveladoras más de lo
necesario puede causar vibración de la lavadora.
• Las 4 patas niveladoras deberán apoyarse
firmemente en el piso. Mueva la lavadora
suavemente de esquina a esquina para
asegurarse de que no se balancee.
Si está instalando la lavadora en el accesorio
de pedestal opcional, deberá usar las patas
niveladoras para nivelarla. Las patas niveladoras
de la lavadora deberán estar completamente
replegadas y fijas en su posición con las tuercas
de seguridad.
Para levantar
Para bajar
Ajustar firmemente
las 4 tuercas
Clasifique los grupos de lavado...
por nivel por tipo
por colores de suciedad de tela por hilas
Ropa blanca Pesada Delicada Producteur
de peluche
Mantenimiento Recolectora
Liviana Normal fácil de hilachas
Oscura Liviana Resistente
52
53
MFL31245113_SPN.indd 52-53 2007.10.4 2:33:11 PM
Page 28

C Ó M O U S A R
SELECCIÓN DE DETERGENTE
DETALLES SOBRE EL DEPÓSITO
El cajón de suministro automático consiste en
4 compartimentos que almacenan:
• Blanqueador líquido.
• Suavizante líquido de telas.
• Detergente líquido o en polvo para el prelavado.
• Detergente líquido o en polvo y cloro a prueba
de decoloramiento para el lavado principal.
Se pueden añadir todos los productos de
lavado al mismo tiempo en sus respectivos
compartimientos de suministro. Serán
suministrados en el momento adecuado para
brindar el lavado más eficaz.
Después de añadir los productos de lavado al
depósito, cierre el cajón de depósito.
Para añadir detergente, blanqueador, y suavizante
al cajón de suministro automático:
Abra el cajón de depósito.
Cargue los productos de lavado en los
compartimientos adecuados.
Cierre lentamente el cajón de depósito para
evitar la salida temprana de los productos.
NOTA: Es normal que una cantidad pequeña de
agua permanezca en los compartimientos de
suministro al final del ciclo.
1
2
3
Compartimiento del
blanqueador líquido
Compartimiento del
suavizante líquido
de telas
Compartimiento de
detergente para el
lavado principal
Taza para
medida de
detergente
líquido
Inserto
CARGA DEL DEPÓSITO
C Ó M O U S A R
Compartimiento de detergente
para prelavado
Agregue el detergente líquido o en polvo
a este compartimiento para suministrar
automáticamente cuando se usa la opción de
Prewash (prelavado). Use siempre detergente tipo
HE (de alta eficiencia) con su lavadora.
• La cantidad de detergente agregado para la
opción de prelavado es la mitad de la cantidad
recomendada para el ciclo de lavado principal.
Por ejemplo, si el ciclo de lavado principal
requiere una taza de detergente, añada media
taza para la opción de prelavado.
NOTA: Si usted use el detergente l quido
para ele lavado principal cuando se usa la
opci n de prelavado, el accessorio de la taza
de detergente debe ser usado en el dep
sito del lavado principal para evitar que el
detergente l quido de lavado principal est
suministrado inmediatamente.
Compartimiento de detergente
para el lavado principal
Este compartimiento alberga el detergente para
el ciclo de lavado principal, el cual se agrega
a la carga al principio del ciclo. Use siempre
detergente tipo HE (de alta eficiencia) con
su lavadora.
Cuando agregue detergente siga siempre
las recomendaciones del fabricante. Utilizar
demasiado detergente puede resultar en la
acumulación del mismo en las prendas y en
la lavadora. Se puede utilizar tanto detergente
líquido como en polvo.
• Cuando usa detergente líquido, asegúrese de
que la taza e inserto se encuentran colocados
en su sitio. No exceda la línea de llenado
máxima.
• Cuando utiliza detergente en polvo, quite el
inserto y la taza de detergente líquido del
compartimiento. El detergente en polvo no
se suministrará si están colocados la taza de
detergente líquido y el inserto.
NOTA: Se puede agregar el blanqueador a
prueba de decoloramiento líquido o en polvo al
compartimiento de lavado principal utilizando
detergente del mismo tipo.
Compartimiento de
blanqueador líquido
Este compartimiento alberga blanqueador líquido,
que se suministrará automáticamente en el
momento adecuado del ciclo de lavado.
• No agregue blanqueador a prueba de
decoloramiento líquido o en polvo a este
compartimiento.
• Siga siempre las recomendaciones del
fabricante cuando agregue blanqueador.
No exceda la línea de llenado máxima. Usar
demasiado blanqueador puede dañar las telas.
• Nunca descargue blanqueador líquido no diluido
directamente en la carga o en el tambor. Puede
dañar las telas.
Compartimiento del suavizante
Este compartimiento alberga el suavizante líquido
de telas, que se suministrará automáticamente
durante el ciclo de enjuague final.
• Siga siempre las recomendaciones del
fabricante cuando agregue suavizante. No
exceda la línea de llenado máxima. Usar
demasiado suavizante puede causar que las
telas se manchen.
• Diluir los suavizadores de tela concentrados
junto con agua caliente. No exceda la línea de
llenado máxima.
• Nunca agregue suavizador de tela directamente
en la carga o en el tambor.
IMPORTANTE: No coloque o almacene
productos de lavado como detergente,
blanqueador o suavizante líquido en la parte
superior de su lavadora o secadora. Limpie
inmediatamente cualquier derrame. Estos
productos pueden dañar el acabado y los
controles.
Diseñada específicamente para
usar con el detergente tipo HE
(Alta eficiencia)
Diseñada específicamente para
usar con el detergente tipo HE
(Alta eficiencia)
IMPORTANTE: Su lavadora está diseñada para
usarse exclusivamente con detergentes de alta
eficiencia (HE). Los detergentes de alta eficiencia
están formulados específicamente para las
lavadores de carga frontal y contienen agentes
reductores de espuma. Busque siempre el símbolo
de alta eficiencia (HE) cuando compra detergente.
Los detergentes de alta eficiencia producen
menos espuma, se disuelven más eficientemente
para mejorar el desempeño de lavado y enjuague,
y ayudan a mantener limpio el interior de su
lavadora.
Utilizar un detergente regular puede causar
demasiada espuma y desempeño insatisfactorio.
Compartimiento
de detergente
para prelavado
54
55
MFL31245113_SPN.indd 54-55 2007.10.4 2:33:13 PM
Page 29

C Ó M O U S A R C Ó M O U S A R
GUÍA DE CICLOS—WM2455H*
CARACTERÍSTICAS DEL PANEL DE CONTROL—WM2455H*
BOTÓN DE ENCENDIDO/APAGADO
Apriete el botón para ENCENDER la lavadora.
Apriete nuevamente para APAGAR la lavadora.
NOTA: Apretar el botón de ENCENDIDO/
APAGADO durante un ciclo cancelará ese ciclo
y borrará cualquier programación de carga.
PERILLA SELECTORA DE CICLOS
Gire esta perilla para seleccionar el ciclo
deseado. Una vez que se haya seleccionado
el ciclo deseado, los preajustes estándar
se mostrarán en la pantalla. Se pueden
programar estos ajustes usando los botones de
programación de ciclos en cualquier momento
antes del inicio.
BOTÓN DE INICIO/PAUSA
Apriete el botón para INICIAR el ciclo
seleccionado. Si la lavadora está funcionando,
utilice este botón para PAUSAR el ciclo sin perder
la programación actual.
NOTA: Si no aprieta el botón de INICIO/PAUSA
en un plazo de 4 minutos después de
seleccionar un ciclo, la lavadora se apagará
automáticamente.
BOTÓN DEL PROGRAMA PERSONALIZADO
Presione el botón PROGRAMA PERSONALIZADO
para grabar y poder usar nuevamente un ciclo de
lavado personalizado.
Puede grabar el Ciclo, la Temperatura de
Lavado/Enjuague, la Velocidad de Giro y ajustes
del Nivel de Suciedad, como también otras
opciones de ciclos.
1
2
BOTONES DE PROGRAMACIÓN DE CICLOS
Utilice estos botones para seleccionar las
opciones de ciclo deseadas para el ciclo
seleccionado.
BOTÓN DE DELAY (DEMORA)
Apriete el botón de DELAY (demora) para
demorar el inicio del ciclo de lavado. Cada vez
que se aprieta este botón se aumenta el tiempo
de demora en lapsos de 1 hora, hasta 19 horas.
HORA Y ESTADO
La pantalla muestra los ajustes, tiempo restante
estimado, opciones y mensajes del estado
actual de su lavadora.
BOTONES DE OPCIONES
Los botones de opciones le permiten
seleccionar opciones adicionales de ciclo y se
encenderán cuando se seleccionan. Ciertos
botones también le permitirán activar funciones
especiales apretando y manteniendo apretado el
botón por 3 segundos.
Para obtener información detallada sobre
las opciones individuales, consulte las
siguientes páginas.
5
6
3
4
7
La guía de ciclos indicada más abajo muestra las opciones y tipos de telas recomendadas para cada ciclo.
8
2
1
3
6
5
74
8
NOTA: Para proteger sus prendas de vestir, no todas las temperaturas de lavado/enjuague,
velocidades de centrifugado, niveles de suciedad u opciones están disponibles en cada ciclo.
Ciclo
Normal
Alto
Bajo
Normal
Tibia/Fría
Tipo de tela
Temp. Lavado/
Enjuague
Nivel de
suciedad
Enguaje
+ giro
Enjuague
adicional
Ciclo de
manchas
Prelavado
Velocidad
de giro
Agua
plus
Baja (---)
Alto
Bajo
Normal
Alto
Bajo
Normal
Alto
Bajo
Normal
Normal
Bajo
Normal
Alto
Alto
Bajo
Bajo
Tibia/Fría
Tibia/Tibia
Caliente/Fría
Fría/Fría
Tibia/Tibia
Caliente/Fría
Fría/Fría
Tibia/Fría
Tibia/Tibia
Caliente/Fría
Fría/Fría
Fría/Fría
Tibia/Fría
Tibia/Tibia
Fría/Fría
Tibia/Fría
Tibia/Tibia
Prendas grandes tales
como mantas y edredones
Camisas de etiqueta/
pantalones, ropa
antiarrugas, ropas
de mezcla poliéster/
algodón, manteles
Algodón, lino, toallas,
camisas, vaqueros, jeans,
cargas mixtas
Camisas de etiqueta/
blusas, prendas de nylon,
muy finas o de encaje
Prendas etiquetadas
como “lavables a mano
(hand-washable)”
Voluminoso/
Grande
Planchado
permanente
Algodón/
Normal
Delicado
Lavado
manual/
lana
Caliente/Fría
Fría/Fría
Tibia/Fría
Tibia/Tibia
Ropa ligeramente
sucia y cargas
Lavado
veloz
Media (—)
Sin giro (•)
Alta (==)
Sin giro (•)
Baja (---)
Media (—)
Extra alto (==)
Media (—)
Alta (==)
Sin giro (•)
Baja (---)
Alta (==)
Sin giro (•)
Baja (---)
Media (—)
Extra alto (==)
Extra caliente/Fría
Ropa de bebé
ligeramente sucia
Ropa de
bebé
Ropa interior muy sucia,
ropa de trabajo,
pañales, etc.
Extra caliente/Fría
Sanitario
Alta (==)
Sin giro (•)
Baja (---)
Media (—)
Extra alto (==)
Caliente/Fría
Normal
Bajo
Media (—)
Sin giro (•)
Baja (---)
Drenaje
+ giro
Drenaje, giro solanmente
Media (—)
Sin giro (•)
Baja (---)
Alta (==)
Sin giro (•)
Baja (---)
Media (—)
Extra alto (==)
Extra alto (==)
Sin giro (•)
Baja (---)
Media (—)
Alta (==)
56
57
MFL31245113_SPN.indd 56-57 2007.10.4 2:33:16 PM
Page 30

C Ó M O U S A RC Ó M O U S A R
LA PANTALLA DE HORA Y ESTADO FUNCIONAMIENTO DE LA LAVADORA
Apriete el botón de ENCENDIDO/APAGADO
para encender la lavadora. Las
luces alrededor de la perilla
selectora de ciclos se iluminarán.
Gire la perilla selectora al ciclo deseado.
La pantalla mostrará el preajuste
programado de Rinse/Wash
Temperature (temperatura de
enjuague/lavado), Spin Speed
(velocidad de centrifugado), Soil
Level (nivel de suciedad), y Option
(opción) para ese ciclo.
Si desea cambiar los ajustes para ese ciclo,
presione el botón(es) de ajuste de ciclo
adecuado hasta que la luz que indica el
ajuste deseado se encienda.
NOTA: Para proteger sus prendas de
vestir, no todas las temperaturas de lavado/
enjuague, velocidades de centrifugado,
niveles de suciedad u opciones están
disponibles en cada ciclo.
1
2
3
Apriete el botón de INICIO/PAUSA para
iniciar el ciclo. La compuerta se
asegurará, la pantalla cambiará,
y la lavadora calculará el tiempo
restante estimado. Una vez que
la lavadora haya calculado el tiempo de
ciclo total estimado, comenzará a trabajar.
Para pausar el ciclo en cualquier momento,
apriete PAUSE (pausa).
NOTA: El tiempo de ciclo mostrado puede
mostrarse mucho más largo que el de una
lavadora de carga superior.
El tiempo mostrado corresponde al ciclo
completo, no solo la porción de agitación del
ciclo, como se muestra típicamente en una
lavadora de carga superior.
NOTA: Si la temperatura en la lavadora
es demasiado alta, no se podrá liberar la
compuerta hasta que se haya enfriado la
lavadora. Si el nivel de agua es demasiado
alto, seleccione el ciclo DRAIN & SPIN
(drenaje y centrifugado) para drenar el
exceso de agua. No intente forzar la
apertura de la compuerta.
Se puede reducir significativamente el
tiempo de lavado para cargas pequeñas
o poco sucias seleccionando el ciclo de
Speed Wash (lavado rápido) y programando
el botón de Soil Level (nivel de suciedad) a
Light (ligero).
5
Una vez que ha cargado la lavadora y añadido los
productos de lavado (detergente, blanqueador y/o
suavizante):
Cuando se ha terminado la carga, la alarma
(de haberse programado) sonará y se
desasegurará la compuerta.
Quite las prendas húmedas fuera de la
lavadora inmediatamente. Revise debajo del
sello de la compuerta observando que no
haya artículos pequeños.
6
Seleccione cualquier opción(es) de
ciclo adicional(es), tales como PROGRAMA
PERSONALIZADO, RETRASAR LAVADO,
ENJUAGUE EXTRA o CICLO DE MANCHAS,,
apretando el botón para tal opción.
NOTA: Para proteger sus prendas de
vestir, no todas las temperaturas de lavado/
enjuague, velocidades de centrifugado,
niveles de suciedad u opciones están
disponibles en cada ciclo.
4
ESTIMATED TIME REMAINING (TIEMPO
RESTANTE ESTIMADO)
Cuando se aprieta el botón INICIO/PAUSA, la
lavadora detecta automáticamente la carga de
lavado (peso) y optimiza el tiempo de lavado, en
base al ciclo y las opciones seleccionados. Luego
la pantalla indicará el tiempo restante estimado
para dicho ciclo.
NOTA: El tiempo de ciclo mostrado puede
mostrarse mucho más largo que el de una
lavadora de carga superior. El tiempo mostrado
corresponde al ciclo completo, y no solo la
porción de agitación del ciclo, como se muestra
típicamente en una lavadora de carga superior.
IDICADOR DE COMPLETACIÓN DE CICLO
Esta parte de la pantalla muestra qué etapa
del ciclo de lavado se está realizando
actualmente (SENSOR DE CARGA, LAVADO,
ENJUAGUE o GIRO).
SENSOR AUTOMÁTICO DEL TAMAÑO
DE CARGA
Al comenzar el ciclo, la lavadora vuelca la carga
y detecta el peso de la ropa. La pantalla indicará
el tamaño de carga aproximado en la pantalla
de TAMAÑO DE CARGA. Esto le permite ajustar
la cantidad de detergente y otros aditivos para
obtener mayor eficacia y mejores resultados.
1
2
INDICADOR DE SEGURO DE LA
COMPUERTA
Indica que la compuerta está asegurada.
La compuerta de la lavadora se asegurará
mientras la lavadora se encuentra funcionando.
Se puede liberar la compuerta apretando el
botón INICIO/PAUSA ubicado en la parte
superior de la lavadora.
NOTE: Si la temperatura en la lavadora
es demasiado alta, no se podrá liberar la
compuerta hasta que se haya enfriado la
lavadora. Si el nivel de agua es demasiado alto,
seleccione el ciclo DRAIN & SPIN (drenaje y
centrifugado) para drenar el exceso de agua.
No intente forzar la apertura de la compuerta.
INDICADOR DE DELAY WASH (LAVADO
DEMORADO)
Este indicador muestra que la lavadora ha sido
programada para un DELAY WASH (lavado
demorado). La lavadora comenzará a funcionar
automáticamente después de que se ha
completado el tiempo de espera fijado.
5
3
4
La pantalla de hora y estado muestra el progreso del ciclo y el tiempo restante estimado,
opciones de ciclos y otros mensajes del estado actual de su lavadora.
13 2 4
5
58
59
MFL31245113_SPN.indd 58-59 2007.10.4 2:33:20 PM
Page 31

C Ó M O U S A R
BOTONES DE AJUSTE DE CICLO
Cada ciclo tiene ajustes preprogramables que se
seleccionan automáticamente. También puede
personalizar los ajustes utilizando los botones de
programación de ciclos. Presione el botón para
dicho ajuste hasta que la luz que indica el valor
deseado se encienda.
La lavadora ajusta automáticamente el nivel
de agua según el tipo y tamaño de la carga de
lavado para proporcionar los mejores resultados
y eficiencia máxima. Puede parecer que no hay
agua dentro del tambor en algunos ciclos, pero
esto es normal.
NOTA: Para proteger sus prendas de vestir, no
todas las temperaturas de lavado/enjuague,
velocidades de centrifugado, niveles de suciedad
u opciones están disponibles en cada ciclo. Vea
la Guía de ciclos para obtener más detalles.
WASH/RINSE (lavado/enjuague)
Selecciona la combinación de temperatura de
lavado y enjuague para el
ciclo seleccionado. Apriete
el botón WASH/RINSE
(lavado/enjuague) hasta que
la luz que indica el ajuste
deseado se encienda.
• Su lavadora contiene un elemento de
calentamiento que propulsa la temperatura del
agua caliente para ajustes extra calientes (Extra
Hot). Esto brinda un desempeño de lavado
mejorado que con los ajustes de calefactor de
agua normales.
• Seleccione la temperatura de agua adecuada
para el tipo de carga que se encuentra
lavando. Siga las instrucciones de la etiqueta
de mantenimiento de la tela para obtener los
mejores resultados.
• Los enjuagues tibios se regulan en
aproximadamente 86ºF (30ºC).
• Los enjuagues calientes dejan las cargas más
secas que los fríos. Los enjuagues calientes
pueden aumentar las arrugas.
• En climas fríos, un enjuague caliente
permite mayor comodidad en la manipulación
de la carga.
• Los enjuagues fríos ahorran energía, y la
temperatura del enjuague depende del agua fría
de la canilla.
C Ó M O U S A R
SOIL LEVEL (nivel de suciedad)
Ajusta el ciclo seleccionado para permitir
más tiempo de lavado
para prendas muy sucias
o menos tiempo para
prendas levemente sucias.
Presione el botón NIVEL DE
SUCIEDAD hasta que la luz
que indica el ajuste deseado
se encienda.
Temp. de Lavado
Sugerido Tipo de Carga
Extra Caliente Repasadores, sábanas,
167°F (75°C) y prendas de bebés
Caliente Prendas blancas y muy
122°F (50°C) sucias que no se descoloran
Tibio La mayoría de los lavados
104°F (40°C)
Frío Prendas con colores
77°F (25°C) brillantes, lanas lavables
SPIN SPEED (velocidad de centrifugado)
El tambor de la lavadora centrifuga a 1.200 r.p.m.
Esto extrae mayor cantidad
de agua de la ropa, reduce
el ciclo de secado y ahorra
energía.
Apriete el botón SPIN
SPEED (velocidad de
centrifugado) until the indicator light for the
desired setting is lit. Algunas telas, como
las delicadas, requieren una velocidad de
centrifugado más lenta.
El ciclo de Drain & Spin (drenaje y
centrifugado):
El botón de Spin Speed (velocidad de
centrifugado) también activa el ciclo de Drain
& Spin (drenaje y centrifugado) para drenar el
lavado y centrifugar las prendas; por ejemplo, si
desea sacar las prendas antes de que el ciclo
haya terminado.
PROGRAMA PERSONALIZADO
El PROGRAMA PERSONALIZADO le permite
guardar un ciclo de lavado personalizado
para volver a usarlo. Le permite grabar la
temperatura, velocidad de giro, nivel de
suciedad y otras opciones según usted desee para un
ciclo, y luego volver a usarlo con sólo presionar un botón.
Para almacenar un Programa
Personalizado:
Seleccione un ciclo
Ajuste la Temperatura de Lavado/Enjuague,
Velocidad de Giro y Nivel de Suciedad en
la configuración deseada.
Ajuste cualquier otra opción deseada.
Presione y sostenga el botón PROGRAMA DE
AJUSTE durante 3 segundos. Escuchará dos
pitidos que confirmarán que los ajustes fueron
almacenados.
1
2
3
4
IMPORTANTE: Si presiona y sostiene el botón
PROGRAMA PERSONALIZADO durante 3
segundos, sobrescribirá cualquier PROGRAMA
PERSONALIZADO que haya almacenado
previamente.
Para volver a usar un Programa
Personalizado:
Presione y suelte el botón PROGRAMA
PERSONALIZADO. Visualizará los ajustes
almacenados.
Presione y suelte el botón INICIO/PAUSA
para comenzar el ciclo. La lavadora
comenzará automáticamente.
1
2
Para usar el Sensor Automático
de Tamaño de Carga:
Cargue la lavadora, seleccione el ciclo y opciones
que desee y luego comience el ciclo
presionando el botón INICIO/PAUSA.
La lavadora volcará la carga por un momento para
detector su tamaño. Luego de detectar el tamaño
de carga, la lavadora mostrará el tamaño detectado
en la pantalla de TAMAÑO DE CARGO durante 10
segundos antes de continuar con el ciclo.
Durante el retraso de 10 segundo en el paso
tres, presione el botón INICIO/PAUSA para
detener el ciclo
.
Llene los compartimientos de detergente y aditivos
del cajón de detergente con cantidades de los
mismos en relación al tamaño de carga que la
máquina detectó. Para seguir estas pautas de
tamaño de carga puede ahorrar el detergente.
Presione el botón INICIO/PAUSA otra vez para
reanudar el ciclo.
Para controlar el tamaño de carga durante la parte
del lavado en el ciclo, presione y sostenga el botón
ENJUAGUE+GIRO durante 3 segundos. La pantalla de
TAMAÑO DE CARGA se activará por 10 segundos.
NOTA: La rutina de detección de carga sólo funciona
con ropa seca. Debido a que el sistema de detección se
encuentra detectando el PESO de la carga, éste se verá
afectado por artículos atípicamente pesados en la carga.
Por ejemplo, una prenda que ya está mojada y que se
carga junto con las otras prendas hará que la lectura del
TAMAÑO DE CARGA sea inexacta.
Si no desea aprovechar las ventajas de la función de
detección del tamaño de carga, simplemente cargue
la cantidad deseada de detergentes y aditivos en el
contenedor y encienda la lavadora del modo usual.
Al comenzar el ciclo, la lavadora vuelca la carga y
detecta el peso de la ropa. La pantalla
indicará el tamaño de carga aproximado
en la pantalla de TAMAÑO DE CARGA.
Esto le permite ajustar la cantidad de
detergente y otros aditivos para obtener
mayor eficacia y mejores resultados.
1
2
3
4
5
SENSOR AUTOMÁTICO DE TAMAÑO DE CARGA
Ejemplo 1: Si la máquina detecta un tamaño de carga
pequeño, la pantalla puede mostrar uno barra iluminada. En
este ejemplo, una cantidad pequeña de detergente debe ser
usado, ya que la cantidad de la ropa y la cantidad de agua
son pequeñas.
Ejemplo 2: Si la máquina detecta un tamaño de carga grande,
la pantalla puede mostrar cuatros barras iluminadas. En este
ejemplo, aumente la cantidad de detergente, ya que la cantidad
de la ropa y la cantidad de agua son más grandes.
La pantalla de TAMAÑO DE CARGA:
Cantidad
recomendada por
el fabricante de
detergente para
una carga grande
Cantidad
recomendada
para esta
carga
Cantidad
recomendada por
el fabricante de
detergente para
una carga grande
Cantidad
recomendada
para esta
carga
NOTA: Debido a que el máquina utilice una cantidad muy
pequeña de agua, aun para cargas grandes, tenga cuidado
para determinar la cantidad de detergente usado. Cargas
normales requiere la mitad de la cantidad recomendada por
el fabricante del detergente, porque la cantidad de agua
usado es pequeña. Esta eficacia ahorra detergente, porque
el detergente es usado en una manera concentrada. Si la
carga de ropa se encuentra demasiado sucia, la cantidad de
detergente usado se debería incrementar para eliminación del
suciedad. No sobrepase la cantidad recommendada!
60
61
MFL31245113_SPN.indd 60-61 2007.10.4 2:33:24 PM
Page 32

EXTRA RINSE (enjuague adicional)
Esta opción añadirá un ciclo de
enjuague extra al ciclo seleccionado.
Use esta opción para ayudar a
asegurar la eliminación de residuos de
detergente o blanqueador de las telas.
STAIN CYCLE (ciclo para manchas)
Seleccione esta opción para prendas
muy sucias, tales como prendas
de juego o de trabajo. El Ciclo para
manchas añadirá tiempo de lavado al
ciclo seleccionado, así como un ciclo
de enjuague adicional.
WATER PLUS (agua adicional)
Seleccione esta opción para añadir
agua adicional a los ciclos de lavado
y enjuague para la obtención de
resultados superiores, especialmente
con artículos grandes o voluminosos.
C Ó M O U S A R
BOTONES DE OPCIÓN DE CICLO
Su lavadora dispone de varias opciones de ciclo
adicionales, las cuales personalizan los ciclos
para cumplir con sus necesidades individuales.
Ciertos botones de opción también incorporan
una función especial (vea la siguiente página para
obtener mayor información) que puede activarse
apretando y manteniendo apretado ese botón de
opción por 3 segundos.
Para añadir opciones de ciclo al ciclo:
Encienda la lavadora y gire la perilla
selectora de ciclos para seleccionar el ciclo
deseado.
Use los botones de programación de ciclo
para fijar los ajustes para ese ciclo.
Apriete el(los) botón(es) de opción de
ciclo para la opción que desea añadir. Los
botones de opción de ciclo, a excepción de
DELAY (demora), se encenderán cuando se
seleccionan.
Apriete el botón INICIO/PAUSA para
iniciar el ciclo. La lavadora se iniciará
automáticamente.
NOTA: Para proteger sus prendas de vestir, no
todas las temperaturas de lavado/enjuague,
velocidades de centrifugado, niveles de suciedad
u opciones están disponibles en cada ciclo. Vea
la Guía de ciclos para obtener más detalles.
1
2
3
4
DELAY (demora)
Una vez que haya seleccionado
el ciclo y otros ajustes, apriete este
botón para demorar el inicio del ciclo de
lavado. Cada vez que se aprieta este
botón se aumenta el tiempo de demora
en lapsos de 1 hora, hasta 19 horas.
RINSE+SPIN (enjuague+centrifugado)
Seleccione esta opción para enjuagar y
centrifugar una carga separadamente
de un ciclo regular. Esto puede ser útil
para prevenir que manchas frescas
permanezcan en las telas.
Para activar el ciclo Rinse+Spin
(enjuague+centrifugado):
Apriete el botón ENCENDIDO/APAGADO
para encender la lavadora.
Apriete el botón RINSE+SPIN
(enjuague+centrifugado).
Apriete el botón INICIO/PAUSA.
C Ó M O U S A R
PREWASH (prelavado)
Seleccione esta opción para añadir un
prelavado de 16 minutos y un ciclo de
centrifugado al ciclo escogido. Esta
opción es especialmente útil para
artículos muy sucios.
1
2
3
PROGRAMA PERSONALIZADO
El programa Personalizado le permite
almacenar un ciclo de lavado
personalizado para volver a usarlo.
Para crear un Programa Personalizado:
Seleccione un ciclo.
Seleccione la Temperatura de Lavado/
Enjuague, Velocidad de Giro y Nivel de
Suciedad.
Seleccione otras Opciones que desee.
Presione y sostenga el botón Programa
Personalizado durante 3 segundo (2 pitidos).
El programa Personalizado ya está almacenado
para un uso futuro. Para volver a usar el
programa, seleccione Programa Personalizado y
presione Inicio/Pausa.
1
2
3
4
FUNCIONES ESPECIALES
CHILD LOCK (seguro infantil)
Use esta función para prevenir el uso no deseado de
la lavadora o para impedir cambiar los
ajustes de un ciclo mientras la lavadora
se encuentra en funcionamiento. Apriete y
mantenga apretado el botón de PREWASH
(prelavado) por 3 segundos para activar o
desactivar el CHILD LOCK (seguro infantil).
Se mostrará el símbolo de CHILD LOCK en la pantalla,
y todos los controles permanecerán desactivados. Se
puede bloquear a la lavadora durante un ciclo. Cuando
CHILD LOCK este seleccionado, la pantalla alterna entre
CL y el tiempo restante.
TUB CLEAN (limpieza de lavadero)
Puede ocurrir la acumulación de residuos de detergente
en el lavadero después de algún tiempo,
lo que puede causar un olor a humedad
o moho. El ciclo TUB CLEAN (limpieza de
lavadero) está especialmente diseñado
para eliminar esta acumulación. Apriete y
mantenga apretado el botón EXTRA RINSE (enjuague
adicional) por 3 segundos para activar este ciclo. La
pantalla mostrará un mensaje de añadir blanqueador
líquido en el cajón de depósito. Después que haya
terminado el ciclo, abra la compuerta y permita que el
interior del tambor se seque completamente.
NOTA: NO use este ciclo con prendas, NI añada
detergente o suavizante.
Los botones de función también activan funciones
especiales, incluyendo CHILD LOCK (seguro
infantil), TUB CLEAN (LIMPIEZA DEL LAVADERO), e
SPINSENSE™. Apriete y mantenga apretado el botón
de opción marcado con la función especial por 3
segundos para activar.
LOAD SIZE (sensor automático de
tamaño de carga)
Al comenzar el ciclo, la lavadora vuelca la carga y
detecta el peso de la ropa. La pantalla
indicará el tamaño de carga aproximado
en la pantalla de TAMAÑO DE CARGA.
Esto le permite ajustar la cantidad de
detergente y otros aditivos para obtener mayor eficacia
y mejores resultados. Por detalles adicionales, vea la
página 61.
SPINSENSE™ (SENSOR DE GIRO)
SPINSENSE se puede utilizar para reducir o eliminar
vibraciones, especialmente sobre
instalaciones en pisos de madera.
Para activar SPINSENSE™:
Mientras la lavadora está realizando un ciclo,
presione y sostenga el botón CICLO DE MANCHAS
durante 3 segundos.
La luz del botón de VELOCIDAD DE GIRO titilará
mientras la lavadora está funcionando para mostrar
que SPINSENSE está activo. La función SPINSENSE
permanecerá activa durante cada ciclo, incluso si se
produjera un corte de luz.
Para desactivar SPINSENSE™:
Presione y sostenga el botón de CICLO DE
MANCHAS durante 3 segundos para apagar la función
SPINSENSE.
ALARMA ENCENDIDA/APAGADA
Puede encender o apagar la alarma del fin del ciclo
con el botón AGUA PLUS durante el ciclo.
Presione y sostenga el botón AGUA PLUS
durante 3 segundos para APAGAR la
alarma. Presione y sistema el botón
AGUA PLUS nuevamente durante 3
segundos para volver a encender la alarma.
62
63
MFL31245113_SPN.indd 62-63 2007.10.4 2:33:29 PM
Page 33

LIMPIEZA DE LA LAVADORA
M A N T E N I M I E N TO Y L I M P I E Z A
wADVERTENCIA:
• Desenchufe la lavadora antes de limpiar la misma para evitar el riesgo de descargas eléctricas. Si no se
cumple con esta advertencia se podrán producir heridas graves, incendios, descargas eléctricas o muerte.
• Al limpiar la lavadora nunca utilice químicos de corte, limpiadores abrasivos o solventes.
Los mismos
dañarán su aspecto.
Limpieza del depósito
Se debe limpiar el depósito periódicamente para
eliminar la acumulación de detergente y otros
productos de lavandería.
Tire del cajón de depósito hasta que se
detenga. Apriete el botón en el centro del
cajón tire para quitar el vapor.
1
Quite los insertos del cajón, y límpielos
con agua caliente y un trapo o cepillo
suaves para eliminar cualquier residuo o
acumulación.
Limpie el interior de la apertura del cajón
con un trapo húmedo. Vuelva a montar el
cajón y reinstale la apertura del mismo.
NOTA: No use ninguna otra cosa que no
sea agua caliente para limpiar el cajón,
insertos y aperturas del mismo. Si
cualquier tipo de limpiador del hogar drena
al interior de la lavadora, ejecute un ciclo
RINSE+SPIN (enjuague+centrifugado)
antes de guardar ropas.
2
M A N T E N I M I E N TO Y L I M P I E Z A
Limpieza del exterior
El mantenimiento adecuado de su lavadora
podría prolongar su vida útil. El exterior de la
unidad puede limpiarse con agua tibia y un
detergente de jabón medio, no abrasivo.
Limpie inmediatamente cualquier clase de fuga,
con un trapo suave húmedo.
IMPORTANTE: No use alcohol desnaturalizado,
disolventes o productos similares.
Nunca use limpiadores abrasivos o de lana
metálica; pueden dañar la superficie.
LIMPIEZA REGULAR
Mantenimiento y limpieza del interior
Use una toalla o trapo suave para pasar por
la apertura de la compuerta de la lavadora, el
burlete y/o la compuerta de vidrio. Estas áreas
deben mantenerse limpias para asegurar la
impermeabilidad. Asegúrese de limpiar debajo del
sello de caucho interior para eliminar cualquier
resto de humedad o suciedad.
Siempre remueva artículos de la lavadora tan
pronto como se complete el ciclo. De lo contrario
se podrían causar arrugas, transferencias de
color y mal olor.
Ejecute el ciclo TUB CLEAN (limpieza de tubo)
regularmente para eliminar la acumulación de
detergente y otros residuos.
Eliminación de la acumulación de cal
Si vive en un área con agua dura, se pueden
formar depósitos calcáreos a partir de los
componentes internos de la lavadora. Se
recomienda el uso de ablandador de agua
en áreas con agua dura. Si se utiliza un
desincrustante, asegúrese de que sea el
adecuado para usar con una lavadora, y active
el ciclo TUB CLEAN (limpieza de tubo) antes de
lavar prendas.
Se pueden eliminar los depósitos calcáreos y
otras manchas del tambor de acero inoxidable
utilizando un limpiador para acero inoxidable.
NO use lana de acero ni limpiadores abrasivos;
pueden dañar la superficie.
Almacenamiento de la lavadora
Si no se utilizará la lavadora por un período
prolongado de tiempo y se encuentra en un área
que puede estar expuesta a temperaturas de
congelamiento:
Cierre la llave de suministro de agua.
Desconecte las mangueras del suministro de
agua y drene el agua de las mangueras.
Conecte el cable eléctrico a un tomacorriente
conectado a tierra correctamente.
Añada 3,8 litros de anticongelante para
vehículo recreacional en el tambor vacío de
la lavadora. Cierre la compuerta.
Seleccione el ciclo de centrifugado y deje
que la lavadora centrifugue por 1 minuto
para drenar el agua.
NOTA: NO todo el anticongelante para
vehículo recreacional será expulsado.
Desconecte el cable eléctrico, seque el
interior del tambor con un trapo suave, y
cierre la compuerta.
Quite los insertos del depósito. Drene
cualquier resto de agua en los
compartimientos y séquelos.
Almacene la lavadora en posición vertical.
Para eliminar el anticongelante de la lavadora
después del almacenamiento, active la
lavadora por un ciclo completo utilizando
detergente. ¡No añada prendas para lavar!
1
2
3
4
5
6
7
8
9
64
65
MFL31245113_SPN.indd 64-65 2007.10.4 2:33:31 PM
Page 34

Limpieza del filtro de la bomba de drenaje
Se pueden acumular pelusas y otros objetos y
taponar el filtro de la bomba de drenaje. Si la lavadora
no drena adecuadamente, desconéctela y deje
enfriar el agua, de ser necesario, antes de continuar.
Abra el filtro del panel de acceso de la
bomba de desagüe.
1
Desenganche la manguera de drenaje y
tírela hacia fuera. Coloque el extremo de la
manguera de drenaje en una cacerola, balde,
o drenaje de piso para recoger el agua.
2
M A N T E N I M I E N TO Y L I M P I E Z A
Quite el tapón de la manguera de drenaje, y
deje que el agua drene completamente.
Gire el filtro de la bomba en sentido contrario
a las agujas del reloj para quitarlo. Quite
cualquier depósito de pelusa o objetos
extraños del filtro de la bomba.
Siga las indicaciones anteriores (pero a la
inversa) para reinstalar el filtro de la bomba
de drenaje y la manguera de drenaje.
Asegúrese de cerrar el panel de cubierta
cuando haya terminado.
3
MANTENIMIENTO (cont.)
Manguera de
drenaje
Tapón
Filtro
de la
bomba
M A N T E N I M I E N TO Y L I M P I E Z A
Limpieza de los filtros de entrada de agua
Si la lavadora detecta que el agua no está
ingresando al cajón de depósito, se mostrará un
mensaje de error en la pantalla. Si vive en una
zona de agua dura, esto puede ser el motivo del
taponamiento de los filtros de entrada.
Cierre ambas llaves de agua completamente.
Desatornille las tuberías de agua caliente y
fría de la parte posterior de la lavadora.
1
Quite cuidadosamente los filtros de las
entradas de agua, luego remójelas en
vinagre blanco o un eliminador de depósitos
calcáreos, siguiendo las instrucciones del
fabricante. Enjuague profundamente antes
de reinstalar.
Apriete los filtros nuevamente en su lugar y
vuelva a conectar las tuberías de agua. NO
ponga en funcionamiento la lavadora sin los
filtros de entrada.
2
IMPORTANTE: Ponga mucho cuidado al
quitar y limpiar los filtros. Si no se pueden
limpiar los filtros o están dañados, NO ponga
en funcionamiento la lavadora sin los filtros
de entrada. Póngase en contacto con el
Departamento de Atención al Cliente de
LG o llame a un técnico de mantenimiento
calificado de LG.
Filtro de entrada
MANTENIMIENTO
IMPORTANTE: Usar SOLAMENTE las
mangueras de la entrada proporcionadas por LG
de este producto del lavadero. Las mangueras
del mercado de accesorios no están garantizadas
para caber o para funcionar correctamente. Otras
mangueras pueden no apretar correctamente
y podrían causar los escapes. El daños
subsecuente al producto o a la propiedad no
serán cubiertos de conformidad con la garantía
de LG.
66
67
MFL31245113_SPN.indd 66-67 2007.10.4 2:33:33 PM
Page 35

R E S O L U C I Ó N D E P RO B L E M A S
SONIDOS NORMALES QUE PODRÍA ESCUCHAR
Problema Causas posibles Soluciones
Ruidos de traqueteo
Sonido de golpes
Fugas de agua
alrededor de la
lavadora
• Objetos extraños, tales
como llaves, monedas,
o imperdibles, pueden
encontrarse en el tambor o
bomba.
• Las cargas pesadas pueden
producir sonidos de golpes.
• La lavadora podría estar
desbalanceada.
• No se han quitado los
pernos y/o los materiales de
embalaje.
• La carga de lavado podría
estar distribuida de manera
desigual en el tambor.
• No todas las patas
niveladoras se encuentran
apoyadas firmemente en el
piso.
• El piso no es lo
suficientemente rígido.
• La conexión de la manguera
de llenado está floja en la
llave o en la lavadora.
• Las tuberías de drenaje del
hogar están taponadas.
• Detenga la lavadora y revise que no se encuentren
objetos extraños en el tambor y el filtro de drenaje.
Si el ruido continúa después de que se vuelva a
encender la lavadora, llame a mantenimiento.
• Esto es normal. Si el sonido continúa, la lavadora
probablemente está desbalanceada. Detenga la
lavadora y vuelva a distribuir la carga de lavado.
• Detenga la lavadora y vuelva a distribuir la carga de
lavado.
• Vea las Instrucciones de instalación para referirse a
cómo quitar los pernos de embalaje y el embalaje.
• Detenga la lavadora y vuelva a distribuir la carga de
lavado.
• Ajuste las patas niveladoras. Asegúrese de que las
cuatro patas se encuentren haciendo contacto firme
con el piso mientras la lavadora se encuentra en el
ciclo de centrifugado con una carga.
• Asegúrese que el piso es sólido y no flexiona.
Refiérase a la sección de instalación “Piso”.
• Revise las mangueras. Revise y ajuste las conexiones
de la manguera.
• Destape la tubería de drenaje. Póngase en contacto
con un plomero de ser necesario.
Se pueden escuchar los siguientes sonidos
mientras la lavadora se encuentra en
funcionamiento. Son normales.
Chasquido:
El seguro de la compuerta se vuelve a colocar
cuando la misma se cierra y abre.
Sonido de chorro o sibilante:
Chorro de agua o en circulación durante el ciclo.
Zumbido o gorgoteo:
La bomba de drenaje bombea agua de la
lavadora al final de un ciclo.
Salpicadura:
Las prendas dan vueltas en el tambor durante los
ciclos de lavado y enjuague.
ANTES DE LLAMAR A MANTENIMIENTO
Su lavadora está equipada con un sistema de monitoreo de error automático para la detección y el
diagnóstico de problemas en una etapa temprana. Si su lavadora no funciona adecuadamente o no
funciona del todo, revise lo siguiente antes de llamar a mantenimiento.
Ruido de vibración
Cantidades
excesivas de
espuma
• Demasiado detergente o
detergente incorrecto.
• Reduzca la cantidad de detergente o utilice detergente
con baja producción de espuma.
Utilice detergente que porta el logotipo
HE (Alta eficiencia) únicamente.
ANTES DE LLAMAR A MANTENIMIENTO (cont.)
Problema Causas posibles Soluciones
La lavadora se llena
con agua lentamente
o no se llena del todo,
o la pantalla muestra:
La lavadora no se
enciende
Olor a humedad o
moho en la lavadora
• Las llaves de agua no están
completamente abiertas.
• Las mangueras de la tubería de
agua están curvadas, apretadas
o dobladas.
• Los filtros de la entrada de agua
están taponados.
• La presión de agua hacia la
llave u hogar es muy baja.
• El cable eléctrico no está
enchufado adecuadamente.
• El fusible del hogar está
quemado, el cortacircuitos se
ha accionado, o ha ocurrido
una interrupción eléctrica.
• La compuerta no está cerrada
adecuadamente.
• Se ha utilizado demasiado
detergente o el detergente
incorrecto.
• El interior del lavadero no se ha
limpiado adecuadamente.
• Asegúrese de que las llaves de agua están abiertas
completamente.
• Asegúrese de que las mangueras de agua no están
agarradas o curvadas. Tenga cuidado al transportar la
lavadora.
• Limpie los filtros de entrada. Vea la sección de
Mantenimiento y limpieza.
• Revise otra llave en el hogar para asegurar que la
presión de agua del hogar es adecuada.
• Asegúrese de que el enchufe está conectado de
manera segura a un tomacorriente de 3 patas, con conexión
a tierra de 120 V AC, 60 Hz.
• Reactive el disyuntor o cambie el fusible. No aumente
la capacidad del fusible. Si el problema se debe a una
sobrecarga de circuito, pida a un electricista calificado que
solucione el problema.
• Asegúrese de que la compuerta está adecuadamente
cerrada y apriete el botón INICIO/PAUSA. Después
de iniciar un ciclo, puede demorar algunos momentos
antes que el tambor empiece a girar o centrifugar.
La lavadora no centrifuga a menos que la compuerta
esté cerrada (el mensaje DOOR LOCK (seguro de la
compuerta) aparecerá en la pantalla).
• Si la compuerta está cerrada y asegurada y se muestra
el mensaje de error de compuerta abierta, llame a
mantenimiento.
• Utilice detergente de alta eficiencia HE (High-Efficiency)
únicamente, según las instrucciones del fabricante.
• Active el ciclo TUB CLEAN (limpieza de tubo) de manera
regular. Asegúrese de limpiar alrededor y debajo del sello
de la compuerta con frecuencia.
Si la lavadora no
centrifuga, o el
mensaje indica:
• La lavadora programa
automáticamente el tiempo de
lavado según la cantidad de
prendas de lavado, presión del
agua, temperatura del agua y otras
condiciones de funcionamiento.
• Esto es normal. La lavadora programa automáticamente
el ciclo de tiempo para brindar resultados óptimos para
el ciclo seleccionado.
El tiempo de ciclo
de lavado toma más
tiempo de lo normal
La compuerta no
se abre cuando se ha
detenido o pausado
el ciclo
• La temperatura interior de la
lavadora es demasiado elevada
• El nivel del agua en la lavadora
es demasiado alto.
• La compuerta de la lavadora dispone de un seguro para
prevenir quemaduras. Deje que la lavadora se enfríe
hasta que el indicador del DOOR LOCK (seguro de la
compuerta) se apague en la pantalla.
• Deje que la lavadora complete el ciclo programado, o
ejecute el ciclo DRAIN & SPIN (drenaje/centrifugado)
para drenar el agua.
El agua en la
lavadora drena
demasiado lento o
no drena, o la
pantalla muestra:
• La manguera de drenaje está
doblada, apretada o taponada.
• El filtro de drenaje está
taponado.
• Asegúrese de que la manguera de drenaje esté libre
de taponamientos, dobladuras, etc., y no está apretada
debajo de la lavadora.
• Limpie el filtro de drenaje. Vea la sección de
Mantenimiento y limpieza.
R E S O L U C I Ó N D E P RO B L E M A S
68
69
MFL31245113_SPN.indd 68-69 2007.10.4 2:33:36 PM
Page 36

R E S O L U C I Ó N D E P RO B L E M A S
ANTES DE LLAMAR A MANTENIMIENTO (cont.)
Problema Causas posibles Soluciones
La pantalla muestra:
• La carga es demasiado
pequeña.
• La carga está desbalanceada.
• La lavadora cuenta con
un sistema de detección y
corrección de desbalances. Si
se cargan artículos pesados
individuales (alfombra de
baño, bata de baño, etc.) y
hay demasiado desbalance,
la lavadora realizará algunos
intentos para reiniciar el
ciclo de centrifugado. Si aún
se detecta desbalance, la
lavadora se detendrá y se
mostrará el código de error.
• Añada 1 ó 2 prendas similares para ayudar a
balancear la carga.
• Vuelva a acomodar las prendas para ayudar a
balancear la carga.
DIMENSIONES Y ESPECIFICACIONES CLAVE
Modelo WM2455H*
Descripción Lavadora de carga frontal Serie TROMM™
Requisitos eléctricos 120 V CA a 60 Hz.
Presión de agua máx. 14,5~116 libras por pulgada cuadrada (100~800 kPa)
Dimensiones 68,6 cm (anchura) X 75,6 cm (prof.) X 98,3 cm (altura),
129,5 cm (profundidad con la compuerta abierta)
27" (anchura) X 293/4" (prof.) X 3811/16" (altura),
51" (profundidad con la compuerta abierta)
Peso neto 87 Kg (192 libras)
Presión de agua máx. 1.200 r.p.m.
El aspecto y las especificaciones enumeradas en esta guía podrían variar debido a mejoras constantes
del producto.
E S P E C I F I C A C I O N E S / A C C E S O R I O S O P C I O N A L E S
• Error de control.
• Desconecte la lavadora y llame a mantenimiento.
La pantalla muestra:
• El nivel del agua es
demasiado alto debido a una
válvula de agua con falla.
• Cierre las llaves de agua, desconecte la lavadora, y
llame a mantenimiento.
La pantalla muestra:
• El sensor de nivel del
agua no está funcionando
correctamente.
• Cierre las llaves de agua, desconecte la lavadora, y
llame a mantenimiento.
La pantalla muestra:
• El circuito de protección
termal de carga en el motor
se ha activado.
• Deje la lavadora en espera por 30 minutos para
permitir que se enfríe el motor; luego reinicie el ciclo.Si
aparece el código de error LE, desenchufe la lavadora
y llame a mantenimiento.
La pantalla muestra:
• Ha ocurrido un corte de
corriente.
• Reinicie el ciclo.
La pantalla muestra:
ACCESORIOS OPCIONALES
Para estos y otros productos LG, llame a su distribuidor LG
local, o visite nuestro sitio Web en us.lge.com.
Pedestal
Incremente el desempeño de su lavadora
LG con los pedestales de 35,5 centímetros
(14 pulgadas) de alto correspondientes.
Proveen un cajón de almacenamiento para
brindar mayor comodidad.
Pedestal 14" Color
WDP3W Blanco
WDP3B Negro
WDP3S Titanio
WDP3N Azul Marino
WDP3R Rojo Cereza
WDP3G Gris Perla
Kit de apilado
Si no se dispone de espacio,
utilice este kit para apilar de
manera segura su lavadora de
carga frontal y secadora LG.
Kit de
abrazadera Color
WSTK1 Blanco
BSTK1 Negro
SSTK1 Titanio
NSTK1 Azul Marino
RSTK1 Rojo Cereza
GSTK1 Gris Perla
Telas manchadas
• Agregue detergente en el
tambor de la lavadora.
• No ha descargado la lavadora
con rapidez.
• No han sido clasificadas las
prendas correctamente.
• Cargue los productos de lavado en los
compartimientos adecuados.
• Siempre remueva artículos de la lavadora tan pronto
termine el ciclo.
• Siempre lave las prendas de colores oscuros
separadas de las de colores claros y de color blanco
para evitar manchas. De ser posible, no lave prendas
muy sucias con otras menos sucias.
Prendas arrugadas
• No ha descargado la
lavadora con rapidez.
• Ha sobrecargado la lavadora.
• Las mangueras de agua han
sido invertidas de entrada.
• Siempre remueva artículos de la lavadora tan pronto
termine el ciclo.
• Se puede cargar la lavadora completamente, pero
el tambor no puede quedar colmado de prendas. La
compuerta de la lavadora deberá cerrar con facilidad.
• El ciclo de enjuague con agua caliente puede aumentar
las arrugas. Verifique la conexión de las mangueras.
70
71
MFL31245113_SPN.indd 70-71 2007.10.4 2:33:39 PM
Page 37

INSTALACIÓN DEL PEDESTAL (cont.)
AC C E S O R I O S O P C I O N A L E S AC C E S O R I O S O P C I O N A L E S
El accesorio de pedestal incluye:
• Base de pedestal • Ocho (8) tornillos
• Un (1) divisor de cajón • Llave
• Cuatro (4) abrazaderas
Para asegurar la instalación segura, siga
cuidadosamente las siguientes instrucciones.
Herramientas necesarias para la
instalación:
• Destornillador Phillips
• Llave (provista)
1
Asegúrese de que las patas niveladoras
del electrodoméstico están replegadas
completamente (ver los detalles de nivelación
de la lavadora en el Paso 2); luego coloque
el electrodoméstico encima del pedestal.
Las patas de la lavadora coincidirán en las
posiciones esquineras extremas y las de
la secadora coincidirán con las posiciones
extremas interiores como indicado.
NOTA: El conjunto del electrodoméstico y el
pedestal deben estar colocados en un piso
sólido, resistente y nivelado para obtener el
funcionamiento adecuado.
2
Una vez que las patas niveladoras de la
lavadora estén completamente replegadas,
ajustar todas las tuercas de manera segura.
NOTA: Las patas niveladores de la secadora
no contienen tuercas.
Ajuste firmemente
las 4 tuercas
Para la lavadora/combinación
Para la secadora
3
Asegúrese de que la superficie lateral de la
lavadora esté limpia y seca. Quite el papel de
respaldo de la cinta en la abrazadera.
4
Coloque la abrazadera la manera indicada.
La parte doblada de la abrazadera deberá
reposar en todo el borde del pedestal, y los
orificios en la parte inferior de la abrazadera
deberán alinearse con los orificios en el
pedestal.
5
Instale los 2 tornillos para conectar
firmemente la abrazadera al pedestal.
Una vez que se han conectado
adecuadamente, apretar firmemente la parte
superior de la abrazadera con la cinta de
doble lado a un lado del electrodoméstico.
Repita los pasos 2 al 4 para conectar las
demás abrazaderas.
NOTA: Si las abrazaderas no están
adecuadamente instaladas, podría
ocurrir vibración y ruido. Asegúrese de
quitar el respaldo de papel y utilizar todos
los tornillos para instalar las abrazaderas.
Transporte el electrodoméstico al sitio
deseado.
6
Afloje las tuercas en las 4 patas niveladoras
del pedestal hasta que pueda girarlos con la
llave. Gire en el sentido de las manecillas del
reloj o al contrario para bajar. Una vez que
el pedestal esté nivelado y todas las 4 patas
estén apoyadas firmemente en el piso, asegure
de manera segura las tuercas manualmente.
NOTA: Puede haber ruido y vibración si las
tuercas no están aseguradas.
Asegúrese de conectar los electrodomésticos
a todas las tuberías de agua o gas o a la
fuente de poder o conexiones de ventilación
antes de poner en funcionamiento.
Si hay vibración excesiva durante el primer
ciclo de funcionamiento después de la
instalación, ajuste levemente las patas
niveladoras.
Levantar
Bajar
INSTALACIÓN DEL PEDESTAL
wADVERTENCIA
• La instalación incorrecta puede causar
accidentes graves.
• Los electrodomésticos son muy pesados.
Se requiere de dos o más personas para
instalar del pedestal. Si esto no se cumple se
podrán sufrir daños en la espalda u otras heridas.
• No permita que los niños jueguen en el cajón.
Existe riesgo de asfixia y heridas.
• Nunca se debe parar sobre la manija. Si lo hace
se podrán producir heridas graves.
•
Si los electrodomésticos ya se encuentran
instalados, desconéctelos de cualquier fuente
de alimentación, tuberías de gas o agua y de
las conexiones de drenaje o ventilación. Si no
se cumple con esta advertencia se podrán
producir incendios, explosión, descargas
eléctricas o muerte.
Pata niveladora de
la lavadora
72
73
MFL31245113_SPN.indd 72-73 2007.10.4 2:33:44 PM
Page 38

AC C E S O R I O S O P C I O N A L E S
INSTALACIÓN DEL KIT DE APILADO (cont.)
AC C E S O R I O S O P C I O N A L E S
Este kit de apilado incluye:
• Dos (2) rieles laterales.
• Un (1) riel frontal.
• Cuatro (4) tornillos.
Para asegurar la instalación segura, siga las
siguientes instrucciones.
1
Asegúrese de que la superficie de la
lavadora esté limpia y seca. Quite el papel
de respaldo de la cinta ubicado en una de
las abrazaderas laterales del kit de apilado.
2
Haga coincidir la abrazadera lateral del
lado de la parte superior de la lavadora
como se indica en la ilustración anterior.
Apriete firmemente el área adhesiva de la
abrazadera a la superficie de la lavadora.
Asegure la abrazadera lateral a la lavadora
con un tornillo en su lado trasero. Repita los
pasos 1 y 2 para conectar la abrazadera del
otro lado.
INSTALACIÓN DEL KIT DE APILADO
Herramientas necesarias para la
instalación:
• Destornillador Phillips
3
Coloque la secadora sobre la lavadora
haciendo coincidir las patas en las
abrazaderas laterales como se indica.
Evite lesionarse los dedos; no deje que los
dedos queden atrapados entre la lavadora
y la secadora. Deslice despacio la secadora
hacia la parte trasera de la lavadora hasta
que los topes de la abrazadera lateral
coincidan con las patas de la secadora.
4
Insterte el riel frontal entre la parte inferior
de la secadora y la parte superior de la
lavadora. Empuje el riel frontal hacia la parte
trasera de la lavadora hasta que entre en
contacto con los topes del riel lateral. Instale
los dos tornillos restantes para asegurar el
riel frontal a los laterales.
Lavadora
Secadora
wADVERTENCIA
• La instalación incorrecta puede causar
accidentes graves.
• El peso de la secadora y la altura de la instalación
hacen que el procedimiento de apilado sea
demasiado riesgoso para que lo realice una sola
persona. Si esto no se cumple se podrán sufrir
daños en la espalda u otras heridas.
• No utilizar el kit de apilado con un secadora a gas
en condiciones potencialmente inestables tales
como una casa rodante. Si lo hace se podrán
producir heridas graves.
• Nunca coloque una lavadora sobre la secadora.
Si no se cumple con esta advertencia se podrán
producir heridas graves
• Coloque la lavadora sobre un piso sólido,
estable y nivelado para soportar el peso de
ambos electrodomésticos. Si lo hace se podrán
producir heridas graves.
• Si los electrodomésticos ya se encuentran
instalados, desconéctelos de cualquier fuente
de alimentación, tuberías de gas o agua y de las
conexiones de drenaje o ventilación. Si no se
cumple con esta advertencia se podrán producir
incendios, explosión, descargas eléctricas o muerte.
74
75
MFL31245113_SPN.indd 74-75 2007.10.4 2:33:48 PM
Page 39

Su máquina lavadora LG será reparada o reemplazada, a discreción de LG, si se comprueba que existe un defecto en
el material o la mano de obra bajo condiciones de uso normales, durante el período de garantía (“Período de garantía”)
establecido más abajo, vigente desde la fecha (“Fecha de compra”) de la compra del cliente original de producto.
Esta garantía es válida únicamente para el comprador original del producto y cuando se usa en EE. UU., incluyendo
Alaska, Hawaii, y los territories de los EE. UU., exclusivamente.
ESTA GARANTÍA REEMPLAZA CUALQUIER OTRA, EXPRESA O IMPLÍCITA, INCLUYENDO SIN LIMITACIÓN, CUALQUIER
GARANTÍA DE COMERCIALIZACIÓN O ADECUACIÓN PARA UN PROPÓSITO DETERMINADO. EN LA MEDIDA REQUERIDA
POR LA LEY, CUALQUIER GARANTÍA IMPLÍCITA SE LIMITA EN SU VIGENCIA AL PERÍODO DE GARANTÍA EXPRESA INDICADO
MÁS ARRIBA. NI EL FABRICANTE NI EL DISTRIBUIDOR DE LOS EE. UU. SERÁN RESPONSABLES POR DAÑOS INCIDENTALES,
CONSECUENCIALES, INDIRECTOS, ESPECIALES O PUNITIVOS DE CUALQUIER NATURALEZA INCLUYENDO SIN LIMITACIÓN,
PÉRDIDA DE GANACIAS O INGRESOS, O CUALQUIER OTRA CLASE DE DAÑOS, CONTRACTUALES, EXTRACONTRACTUALES,
O DE CUALQUIER TIPO. Algunos estados no permiten la exclusión o limitación de daños incidentales o consecuenciales o limitación
en la duración de una garantía implícita, de modo que la exclusión o limitación indicada anteriormente podría no aplicar en su caso. Esta
garantía le brinda derechos legales específicos y podría también tener otros derechos que varían según el estado.
ESTA GARANTÍA LIMITADA NO APLICA A:
• Viajes de mantenimiento desde su hogar para entrega, recepción y/o instalación del producto, instrucción o reemplazo de fusibles
del hogar o cableado adecuado o corrección de reparaciones no autorizadas.
• Los daños o problemas operativos que resulten de la negligencia en el uso, el abuso, el funcionamiento fuera de las
especificaciones medioambientales o inconsistentes con los requisitos de precauciones establecidos en la Guía de funcionamiento,
accidente, insectos, incendio, inundación, instalación inadecuada, casos de fuerza mayor, modificación o alteración no autorizada,
corriente o voltaje incorrectos, o uso comercial, o uso diferente al indicado.
El costo de reparación o reemplazo bajo estas circunstancias excluidas será responsabilidad del cliente.
NÚMEROS DE CENTROS INTERACTIVOS DE CLIENTE
PERÍODO DE GARANTÍA:
MANO DE OBRA: Un año desde la Fecha de compra.
PIEZAS (excepto como se indica más abajo): Un año
desde la Fecha de compra.
Tablero electrónico de control: Dos años desde la
Fecha de compra.
Motor del tambor: Siete años desde la Fecha de
compra.
Tambor de acero inoxidable: Para toda la vida.
Las unidades de reemplazo y piezas de reparación podrían
ser nuevas o refabricadas.
Las unidades de reemplazo o piezas de reparación están
garantizadas por la porción restante del período de garantía
de la unidad original.
LG ELECTRONICS, INC.
GARANTÍA LIMITADA DE LA LAVADORA LG – EE. UU.
CÓMO SE ADMINISTRA EL MANTENIMIENTO:
Mantenimiento en el hogar “In-Home”:
Guarde la factura fechada del distribuidor o la boleta de
entrega como evidencia de la Fecha de compra como
prueba para la garantía, y entregue una copia de la
factura al técnico de mantenimiento al momento que se
presta el mantenimiento.
Llame al 1-800-243-0000 y escoja la opción adecuada
para ubicar a su Centro de Mantenimiento Autorizado
LG más cercano.
O visite nuestro sitio Web en: http://www.lgservice.com.
PARA CONTACTAR A LG ELECTRONICS
POR CORREO:
LG Customer Interactive Center
P. O. Box 240007
201 James Record Road
Huntsville, Alabama 35824
ATTN: CIC
Llame al 1-800-243-0000 (24 horas al día, 365 días al año),
y seleccione la opción adecuada a partir del menú.
O visite nuestro sitio Web en: http://www.lgservice.com.
Para obtener Asistencia para el cliente,
información del producto o mantenimiento o
distribuidor autorizado:
Información de registro del producto
Modelo:
Número de serie:
Fecha de compra:
Se puede encontrar el número de serie y el modelo en la
placa de clasificación en la parte posterior de la lavadora.
76
N OT E S • N TO A S
77
MFL31245113_SPN.indd 76-77 2007.10.4 2:33:48 PM
Page 40

N OT E S • N OTA S
78
MFL31245113_SPN.indd 78-79 2007.10.4 2:33:49 PM
Page 41

P/No. MFL31245113
MFL31245113_SPN.indd 80 2007.10.4 2:33:49 PM
 Loading...