

LG WM2442HW, WM2042CW Owner’s Manual
WashingMachine
WM2442H*
WM2042CW
Pleaseread this manual carefuly. It provides
instructions on safe installation, use,and maintenance°
Retainit for future reference.
Recordthe model and serial numbers of your machine
and report thisinformalion to your dealer iFyour machine
requires service.

PRODUCT FEATURESi:
r* t
El
Direct Drive System
The advanced Brushless DC motor directly drives the drum without
belt and pulley,
Tilted Drum and Extra ]Large Door Opening
Tilted drum and extra large opening make it possible to Ioad
and un!oad clothing more easily
Water Circulation (WM2442H')
Spray detergent sotution and water onto the load over and over
Clothes are soaked more quickly and thoroughly during wash cycle
The detergent suds can be removed more easily by the water shower
during rinse cycle, The water circulation system uses both water and
detergent more efficiently
Roller Jets
Washing bali enhances the wash performance and reduces damage
to the clothing, The jets spray and help tumble clothes to enhance
washing performance while maintaining fabric care
Bui]t-ln Heater (WM2442H*)
internalheater automatically heats the water to the best temperatt_re on
selected cycies
Child lock
The Child lock prevents children from pressing any button to change the
settings during operation
Important Safety Information .............................................................................................................................................. 3
Specifications ..................................................................... 4
installation Instructions............................................................................................................................ 5
Preparation Before Washing ............................................................................... 10
Using the Dispenser ..........................................................................................................................................................................11
Cycles .................................................................................................................................................................. 13
Howto Use the Washer ....................................................................................................................................... 14
Maintenance ................................................................................................................... 17
Troubleshooting Guide ........................................................................................................................................................ 20
Warranty ................................................................... 23
2

IMPORTANTSAFETYINFORMATION
READALL INSTRUCTIONS BEFOREUSE
,A WARNING!
Foryour safe_ the information in this manual must be followed to minimize the risk of fire or
explosion, eleclTicshock, or to prevent property damage, personal injury, or loss of tife.
IMPORTANT SAFETY INSI UCTIONS
,A WARNING: To reduce the risk of fire, electric shock, or injury to persons when using the washer, follow basic
precautions, including the following:
•Read all Instructions before using the washer.
•Do not wash articles that have beenpreviously
cleaned in, washed in, soaked In, or spotted with
gasoline, dry cleaning solvents, or other
flammable or explosive substances, as they give
off vapors that could ignite or explode,
•Do not add gasoline, dry cleaning solvents, or
other flammable or explosive substances to the
wash water.. These substances give off vapors that
could ignite or explode.
• Under certain conditions, hydrogen gas may be
produced In a hot water system that has not been
used for2 weeks or more, HYDROGEN GAS tS
EXPLOSIVE, ff the hot water system has not been
used for such a period, before using the washing
machine, turn on all hot water faucets and let the
water flow from each for several minutes, This will
release any accumulated hydrogen gas_As the gas
is flammable, do not smoke or use an open flame
during this time.
. Do not allow children toplay onor in the washer.
Close supervision of children isnecessary when
the washer is used near children.
. Before the washer is removed from service or
discarded, remove the door to prevent children
from hiding inside.
• Do not install or store the washer where it will be
exposed to the weather.
• Do not tamper with controls.
. Do not repair or replace anypart of the washer or
attempt any servicing unless specifically
recommended in the user-maintenance
instructions or published user-repair instructions
that you understand and have the skills to carry
out,
• See Installation Instructions for grounding
requirements,
• ALWAYS follow the fabric cure instructions
supplied by the garment manufacturer,
• Do not place items exposed to cooking oil in your
washer. Items contaminated with cooking oils may
contribute to a chemical reaction that could cause
a load to catch fire°
. Do not use fabric softeners orproducta to
eliminate static unless recommended by the
manufacturer of the fabric softener or producL
SAVE THESE INSTRUCTIONS
GROUNDING INSTRUCTIONS
This appliance must be grounded, tn the event of malfunction or breakdownj grounding will reduce the risk of
electric shock by providing a path of least resistance for electric current, This appliance Is equipped with a
cord having an equipment-grounding conductor and grounding plug, Theplug must be plugged into an
appropriate outlet that is properly installed and grounded in accordance withall local codes and ordinances,.
• Do not use an adapter or extension cord,
. Do not remove ground prong.
• ff you don't have the proper outlet, consult an electrician.
,_ WARNING: Improper connection of the equipment-grounding condt_ctorcan result in risk ofelectric shock
Check with a qualified electrician or serviceman if you are indoubtas to whether the appliance is
properly grounded Do not modily the plug providedwilhthe appliance- if _1does not fit the outlet.
havea properoutlet installed bya qualified electrician

SPECIFICATIONS
Control Panel
Dispenser
Drum
Lower Cover
Drain Pump Filter
Drain Plug Adjustable Feet
N Name:
= Power supply:
= Size:
Front-loading Washing Machine
120V- 60Hz
686 cm (W)X 750 cm (D)X 1115 cm (H),126 5cm (D, dooropen)
27"(W) X 291/2"(D) X 44"(H), 49t3/16"(D, door open)
= Weight:
[] Wash capacity:
[] Spin speed:
190 Ibs, (86 kg)
3,32 cu, ft (IEC: 3.83 cu, ft) _>
1200 rpm max, (WM2442H*)
1000 rpm max° (WM2042CW)
[] Permissible water pressure: 4,5 - 145 PSI (30 - 1000 kPa)
Shipping Bolts
Plug
• if _hesupplycord is dm°naged,
itmust bereplacedbythe
manufacturer or itsauthorized
servicetechnicianin orderto
avoid s hazard
Water Circulation Nozzle
(WMZ442H')
* Specifications subject to change by manufacturer,
....[] Accessories
Hot/Cold (1 each) Wrench to secure drain hose to standpipe,
Hose inlet hose, or laundry tub
1) Per IEC 60456, washes the equivalent of a 3,83 cu, ft. agitator washeL
I
-fie strap
INSTALLATIONINSTRUCTIONS :::
Install or store unit where it will not be exposed to temperatures below ff'eezing or
exposed In outside weather ¢onditious_
Properly ground washer to cmfform with all governing codes and errdinanceso
]_) reduce tlne risk or elecffic shock_ do not install the washer in humid spaces.
The base opening must not be obstructed by carpeting when the washing machine is installed on n carpeted f[ooro
In countries wlnere there are areas which may be suhject to in[eslalion by cockroaches or other vermin, pay
parlicular attention to keeping the appliance and ils surroundings in clean condition at all times,
Any damage which may because by cuckroaches or other vermin will not be c_wered by the appliance guaran|ee.
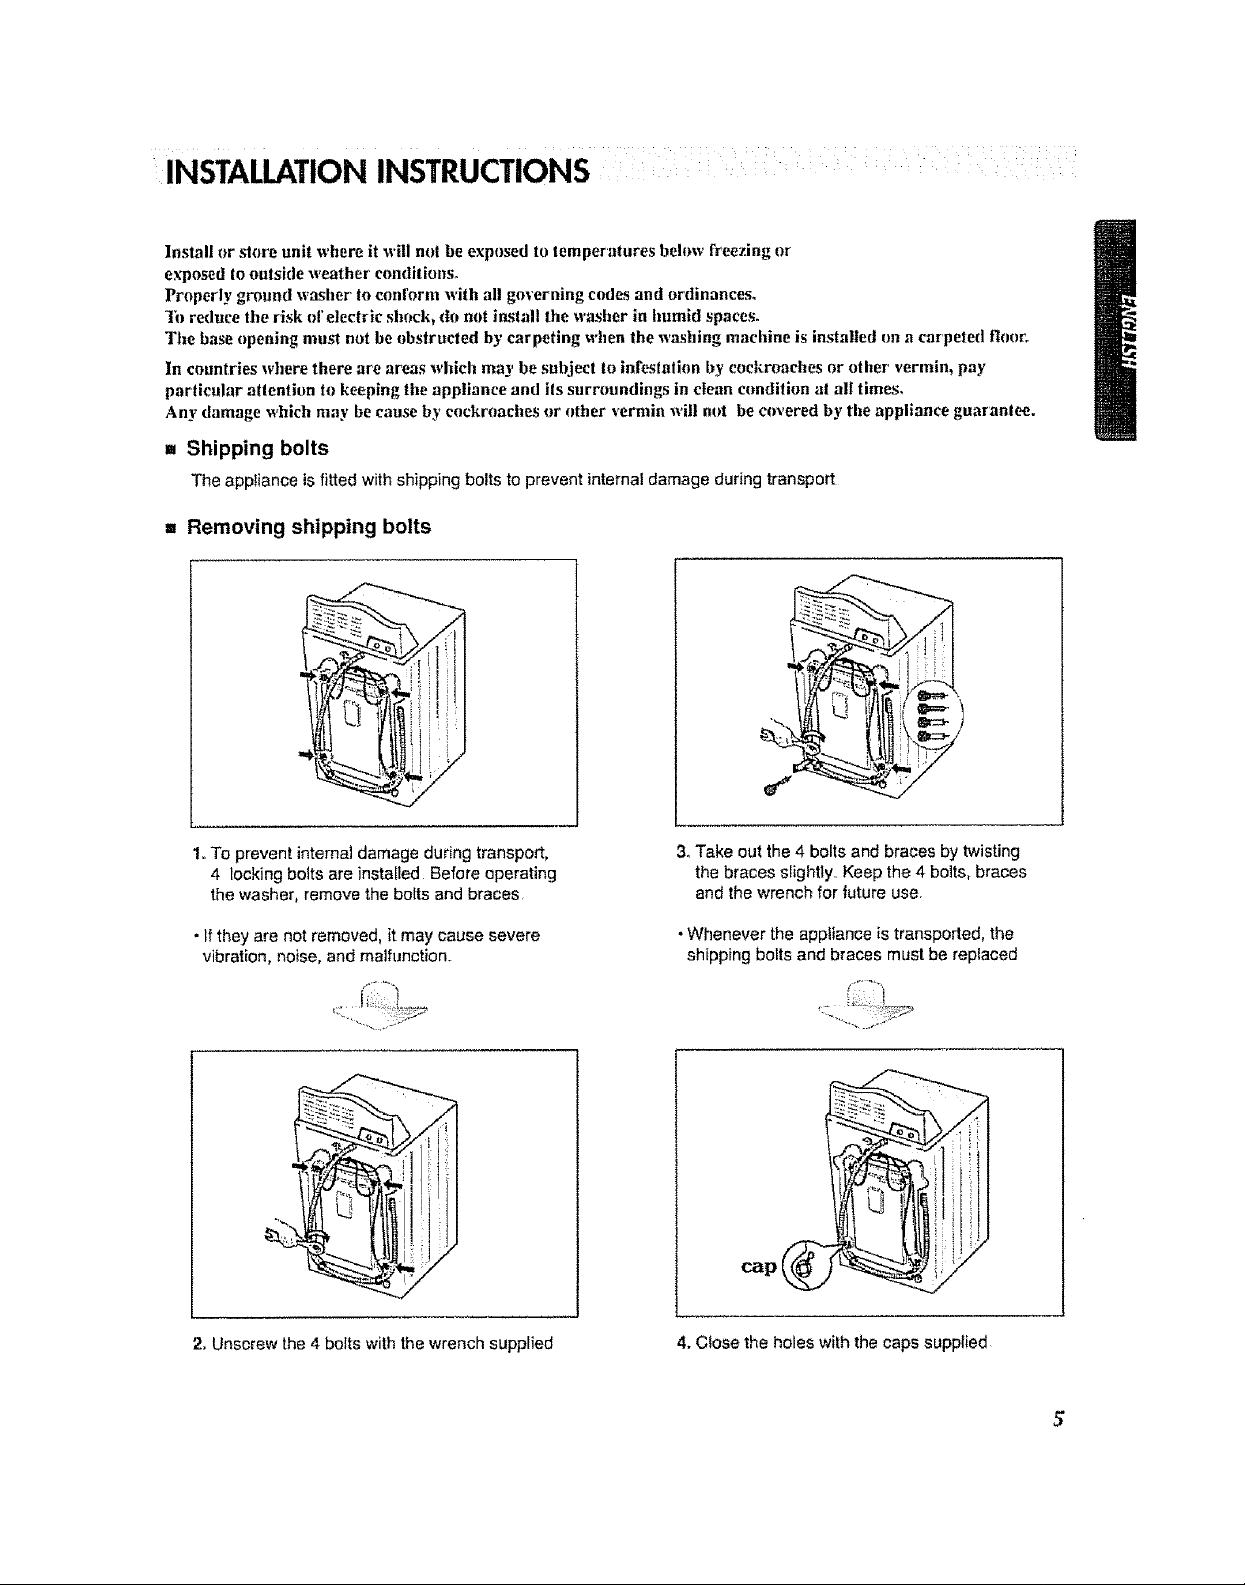
= Shipping bolts
The appliance is fitted with shipping bolts to prevent internal damage during transport
,. Removing shipping bolts
1oTo prevent internal damage during transport,
4 locking bolts are installed Before operating
the washer, remove the bolts and braces
•tf they are not removed, it may cause severe
vibration, noise, and malfunction,
2, Unscrew the 4 bolts with the wrench supplied 4, Close the holes with the caps supplied
3_Take out the 4 bolts and braces by twisting
the braces slightly. Keep the 4 bolts, braces
and the wrench for future use,
• Whenever the appliance is transported, the
shipping bolts and braces must be replaced
INSTALLATION INSTRUCTIONS
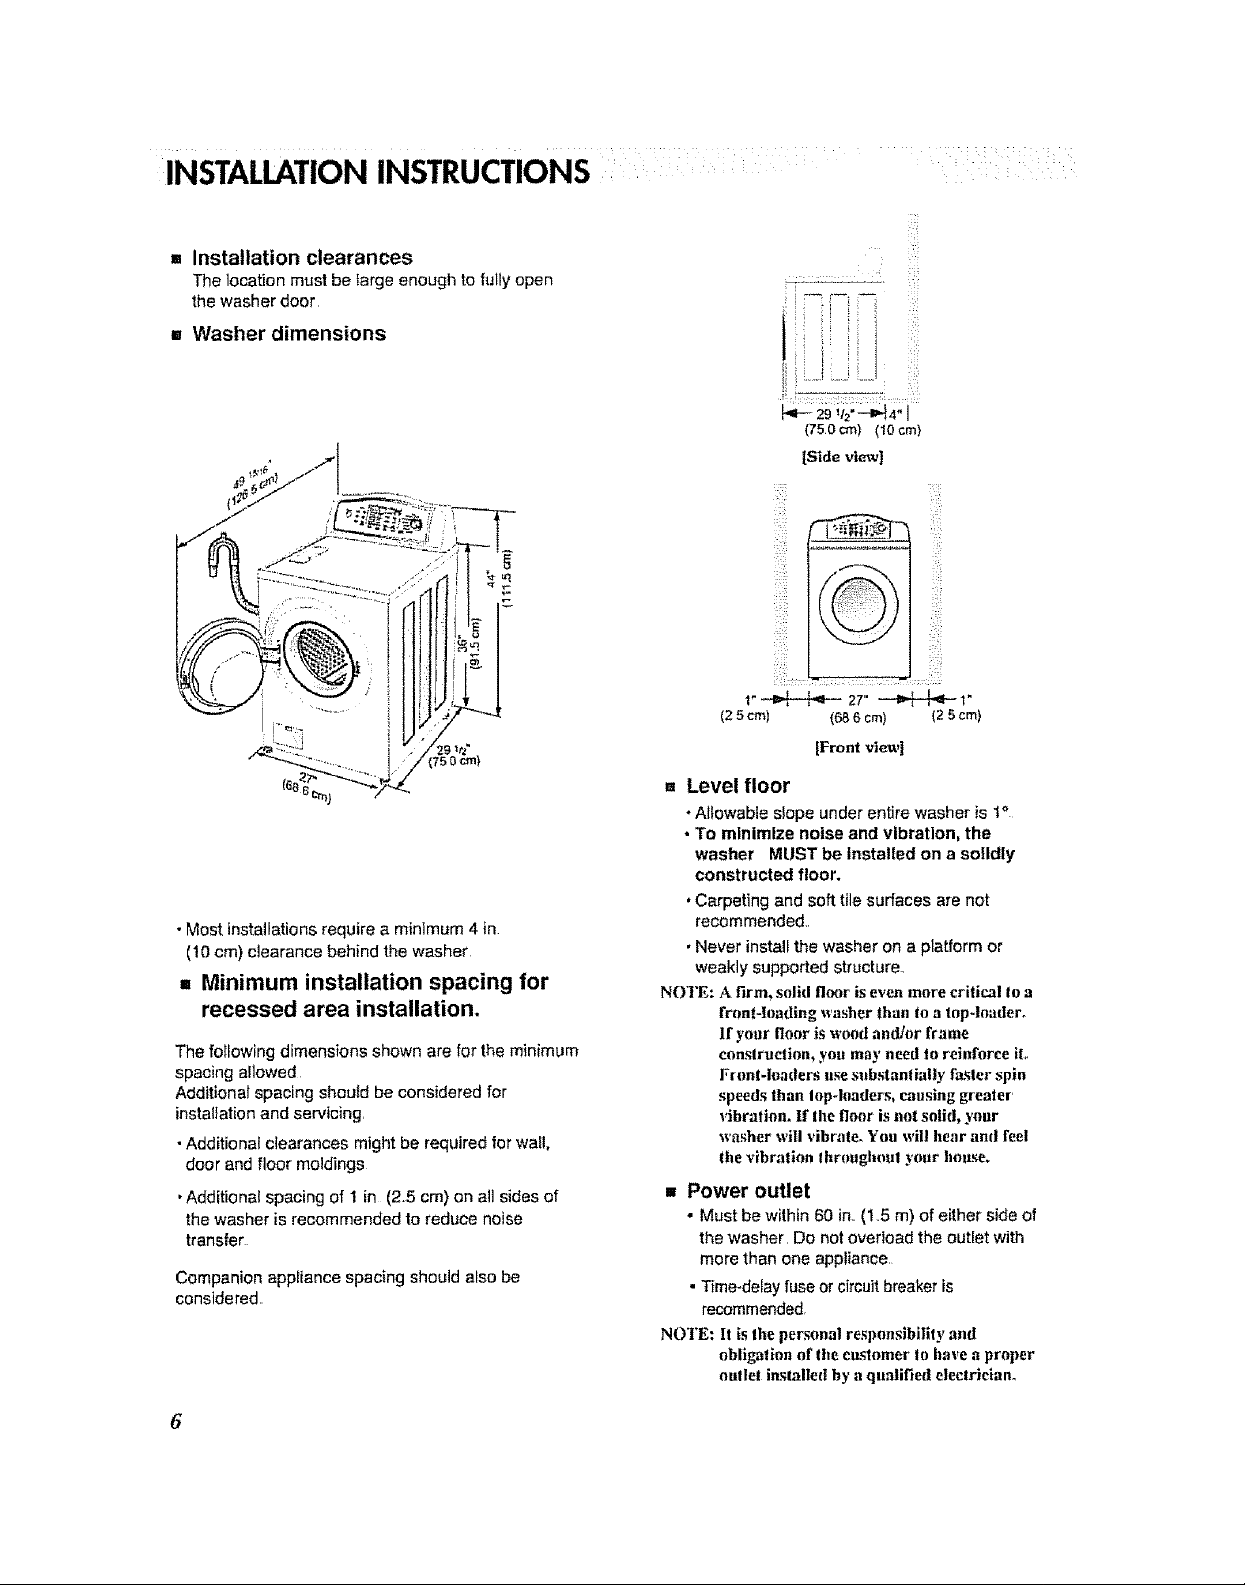
= Installation clearances
The location must be large enough to fully open
the washer door
= Washer dimensions
(750cm) (10cm}
[Side view]
_!ili
_! :iii:
::_i :::ii
• Most installations require a minimum 4 in
(10 cm) clearance behind the washer
,, Minimum installation spacing for
recessed area installation.
The following dimensions shown are for the minimum
spacing allowed
Additional spacing shoutd be considered for
installation and servicing,
•Additional clearances might be required for wa!!,
door and floor moldings
• Additional spacing of I in (25 cm) on all sides of
the washer is recommended to reduce noise
transfer
Companion appliance spacing should also be
considered
(25 cm) (686 cm)
[Front vtm_,]
(2 5cm}
- Level floor
• Allowable slope under entire washer is t*
• To minimize noise and Vibration, the
washer MUST be Installed on a sotldly
constructed floor.
•Carpeting and soft tile surfaces are not
recommended,r
• Never install the washer on a platform or
weakly supported structure.,
NOTE: A firm, solid floor is even more critical In a
front-loading washer than to a top-loader_
If your floor is wood andtor frame
conslractioa_ you may need to reinforce it.
Front-hhadcrs use substantially faster spin
speeds than lop-loaders, causing greater'
vibration, If the floor is not solid, your
washer will vibrate. You will hear and feel
the vibration throughout y(mr house.
•, Power outlet
• Must be within 60 in. (1,.5 m) of either side of
the washer, Do not overload the outlet with
more than one appliance,
• T_me-delay fuse or circuit breaker is
recommended_
NOTE: It is the personal re._ponsibilily ant[
obligation of tlte customer to have a proper
outlet installed by a qualified electrician.
6

INSTALLATION INSTRUCTIONS
[] Electrical connection
- Do not use an extension cord or double adapter
- [f the supply cord is damaged, it must be replaced by a qualified person in order to avoid a hazard
- if the machine will not be used for an extended time. unplug it and shut off the water supply
- Connect the machine to a grounded outlet in accordance with current wiring regulations
• The appliance must be positioned so that the plug is easily accessible
CAUTIONJ Concerning the Power Cord
Most appffances recommend they be placed upon a dedicated circuit;that is, a single outMt circuit which powers only that
applMnce and has no additional outfets or branch circu_ Check the specificaffon page of this owner's manual to be
certaln r
Do not overload wall outlets Overloaded wail outlets, loose or damaged walt outlets, extension cords, frayed power cords,
or damaged or cracked wire insulation are dangerous. Any of these conditions could result in electric shock or fire.
Periodically examine the cord of your appliance, and ifits appearance indicates damage or deterioration, unplug it.
discontinue use of the appliance, and have the cord replaced with an exact replacement part by an authorized servicer
Protect the power cord from physical or mechanical abuse, such as being twisted, kinked, pinched, closed in a door, or
walked upon Pay particular attention to plugs, wall outIets, and the pointwhere the cord exits the appliance,
m=Connecting water supply hose
• Water supply pressure must be between
45 and 145 PS! (30.-1000 kPa)
•Do not crossthread when connecting inlet hose to
the valve
• If the water supply pressure is more than 145 PSI,
a pressure reducing device shouM be instaffed
. Two Sealing washers are supplied with the water
inlet hoses to prevent water leaks
•Check for leakage of washing machine connections
by tt,rning the tap compMtely on
• Periodically check the condition of the hose and
replace the hose if necessary
. Make sure that there Isno kink inthe hose and that
it is not crushed
. Be sure that the two water input ports are connected
to the correct water faucets The connector for hot
water is co_ored red
NOTE: Washing Machine is to be connected to the water mains using new hoses.
Old hoses shouhl not be used.
Repairs to 1he washing machine must (rely he carried out by qualified personneL Repairs carried out by
inexperienced persons may cause iejtiry or serious malfunctioning. Contact your local service center.
Do not install your washing maddne in a reem where temperatures below freezing may occur.
Frozen lnxses may burst under pressure. The reliability of the electronic control trait may be impaired
at temperatures below the freezing point.
If the appliance is delivered in the winter monllLs and temperatures are belnw freezing,
store the washing machine at room temperature for a few hours before putting it into operation°
7

INSTALLATION INSTRUCTIONS .......
,, Installation of drain hose
\
• Place the end of the drain hose in the hole of the
floor drain system
Laundrytub
[ 7 _
. Hose
•The drain hose should not be placed higher than
96 in. from the bottom of the washer.
oProperly securing the drain hose will protect the
floor from damage due to water leakage.
This equipment is not designed for maritime use or Ibr mobile installations such as in RV's, aircrah, etc.
]'urn off the faucet if the machine is to be tort for an extended period of time (e_goholiday)°
When disposing of the appliance, cut off the power cable, and destroy the plug.
Disable the door lock to prevent young children being trapped inside.
Packaging material (e@ Films, Styrofoam) can be dangerous t_r children. There is a risk o1"sulTocation! Keep all
packaging from children.
• When installing the drain hose at a sink, secure it
so it cannot break away and cause flooding and
damage
• Properly securing the drain hose willprotect the
floor from damage due to water leakage
8
INSTALLATION INSTRUCTIONS
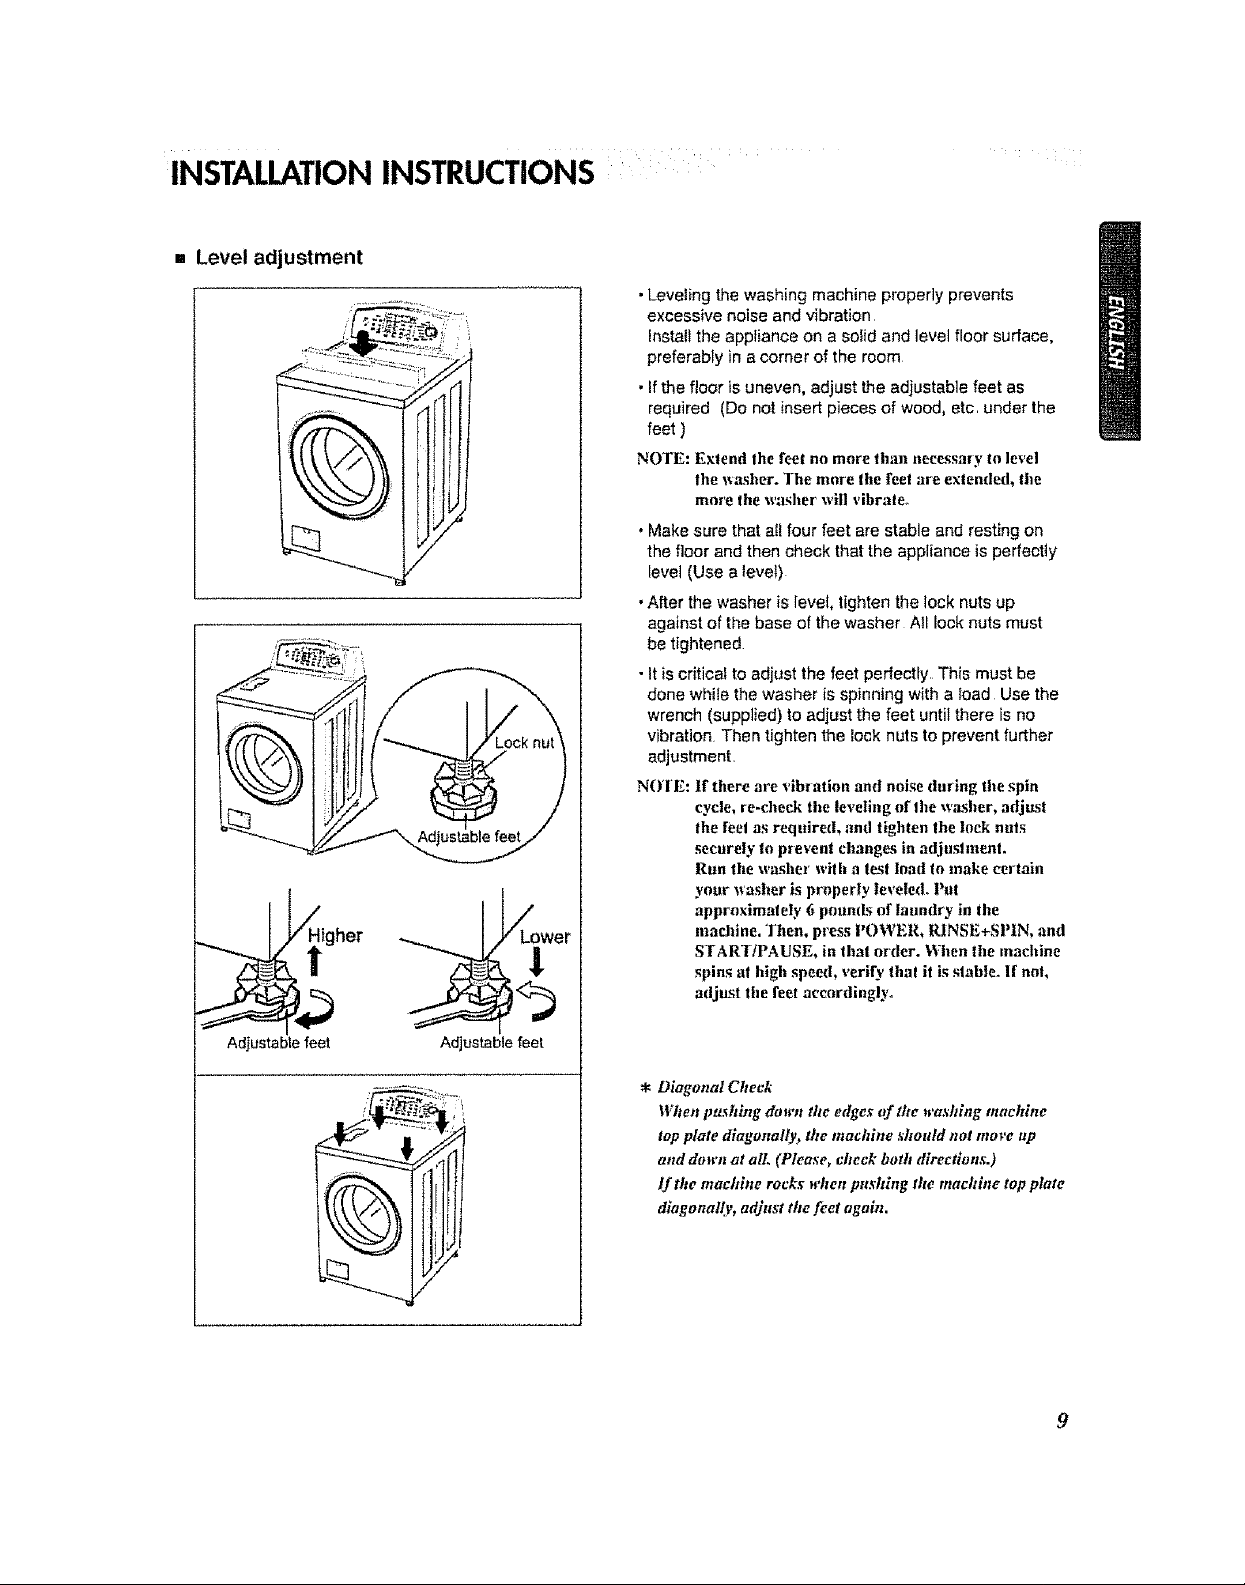
[] Level adjustment
/_gher
•Leveling the washing machine properly prevents
excessive noise and vibration
Installthe appliance on a solid and level floor surface,
preferably in a corner of the room
• If the floor is uneven, adjust the adjustable feet as
required (Do not insert pieces of wood, etc, under the
feet )
NOTE: Extend the feet no more than necessary to level
the _xasher. The mine the feet are extended, file
more the washer will vibrate°
• Make sure that all four feet are stable and resting on
the floor and then check that the appliance is perfectly
level (Use a level)
• After the washer is level, tighten the lock nuts up
against of the base of the washer All lock nuts must
be tightened
• It is critical to adjust the feet perfectly, This must be
dene while the washer is spinning with a load Use the
wrench (supplied) to adjust the feet until there is no
vibration Then tighten the lock nuts to prevent further
adjustmenL
N(Yl E: If there are vibration and noise during the spin
cycle, re-cheek the leveling *ff the w=L,cber, adjust
the feet as required, and tighten the lock nuts
securely to prevent changes in adjust merit.
Run tile washer with a test toad to make certain
your washer is properly leveled. Put
approximately 6 potlmls nf laundry in the
machine. Then, press POWER, RINSE+SPIN, alto
START!PAUSE, in that order. When the macbine
spins at high speed, verify thai it is stable, if not,
adjust tile feet accordingly°
Adjustable feet Adjustable feet
* Diagonal Check
When pushing down ate edges of the washing mocldne
top plate diagonally, the machine should not move up
and down at all (Please, cbcek both tb_rectlons.)
If the machine rocks when pusblng the machine top plate
diagonally, adjust the feet ogaln.
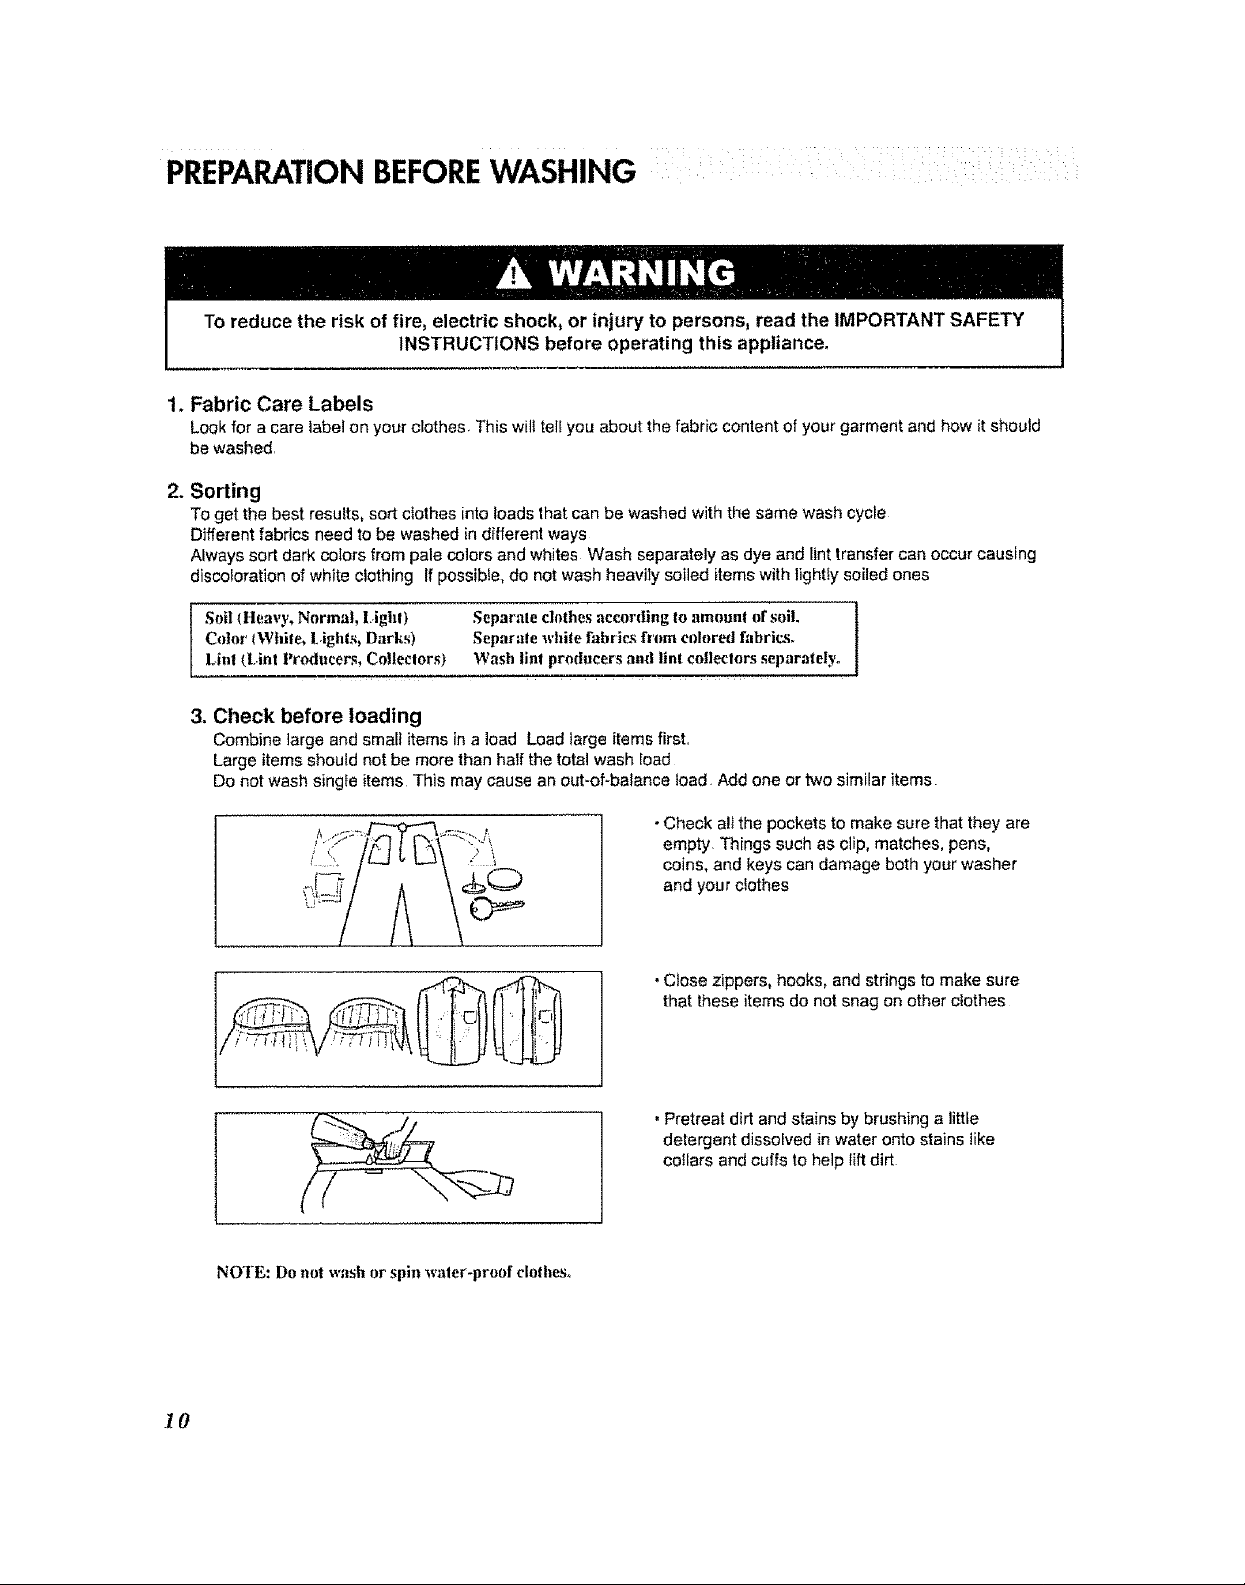
PREPARATIONBEFOREWASHING
To reduce the risk of fire, electric shock, or injury to persons, read the IMPORTANT SAFETY
INSTRUCTIONS before operating this appliance.
1. Fabric Care Labels
Look for a care label on your clothes. This will tell you about the fabric content of your garment and how it should
be washed.
2. Sorting
To get the best results, sort clothes into loads that can be washed with the same wash cycle
Different fabrics need to be washed in different ways
Always sort dark colors from pale colors and whites Wash separately as dye and lint transfer can occur causing
discoloration of white clothing If possible, do not wash heavily soiled items with lightly soiled ones
Soil {Heavy, Norma!, Lighl) Separate ch_thes according Io amount of soil.
Color IWhite, [.ights, Darks) Separale white fabric._ h'_m colored fabric._.
Lint (Lint Prodttee_, Collectors) Wash lint producers and lint colleclors separately°
3. Check before loading
Combine large and small items in a load Load large items first,
Large items should not be more than half the total wash load
Do not wash singfe items This may cause an out-of-balance load Add one or two similar items
NOTE: Do not wash or spin water-proof clothes.
•Check a!tthe pockets to make sure that they are
empty Things such as clip, matches, pens,
coins, and keys can damage both your washer
and your clothes
•Close zippers, hooks, and strings to make sure
that these items do not snag on other clothes
, Pretreat dirt and stains by brushing a little
detergent dissolved in water onto stains like
collars and cuffs to help lift dirt
10

USING THE DISPENSER
The automatic dispenser consists of four compartments which httld 1) liqukl chlorine bleach, 2) liquid fabric
soflener, 3) liquid or powdered delergent h)r prewash and 4) liquid or powdered detergent
and color sate blead_ h_r main wash.,
All laundry products can be added at once in their respective dispenser compartments.
Tho' will be dispensed at the appropriate lime fiw most effective cleaning, After loading the laundo'
additives inte the dispenser; close the dispenser lld,
Add detergent, bleach and fabric softener to the automatic dispenser following these steps:
1 Open the dispenser lid
2 Load the laundry products into the appropriate compartments
3, Close the dispenser lid
= About detergent
Lowsudsing detergent is recommended for this washer, Use the manufactureCs recommended amount
If low sudsing detergent is not available, a reduced amount of regular detergent may be used
Because reducing the amount of detergent may reduce cleaning, it is important to pretreat stains,
sort carefully by cotor and soil level, and avoid overloading
Detergent usage may need to be adjusted for water temperature, water hardness, size and soil level of the load.,
For best results, avoid using too much detergent
NOTE : Liquid detergent will drain into the washer drum as it is added,
_ .. Liquid Chlorine
//" Bleach
Compartment
Liquid Fabric
Softener
Compartment
Prewash
Compartment
Main Wash
Compartment
1oPrewash Detergent Compartment
•Add detergent to this compartment when using
the Prewash optiOnr Liquid or powdered
detergent may be used in this compartment The
detergent will automatically bedispensed during
Prewash if the Prewash option is selected
•Add 1/2 the recommended amount of detergent
to the Prewash compartment and the
recommended amount of detergent to the main
wash compartment
11

USING THE DISPENSER
2_ Main Wash Detergent Compartment
•Add measured detergent to this compartment for
Main wash. Detergent is flushed from the
dispenser at the beginning of the cyc}e, Either
powdered or liquid detergent can be used.,
• Liquid or powdered color-safe bleach may be
added to the main wash compartment along with
the same type of liquid or powdered detergent,
NOT E: If you are usin B the Prewash option,
powdered detergent must he used in Ihe
main wash eomparlmenl.
liquid detergen! will drain into the w=lsher
drum as it is addecL
3. Liquid Bleach Compartment
-Add measured liquid chlorine bleach to this
compartment The bleach will be automatically
dispensed at the propertime during the wash
cycle.
•Do not exceed the maximum fill line Overfilling can
cause early dispensing of the bleach which could
result in damaged clothes.,
• Do not pour undiluted liquid chlorine bleach directly
onto the load or into the drum Fabric damage can
OCCur
•Do not use powdered bleach in this compartment
4. Fabric Softener Compartment
• Add recommended amount of fabric softener to
this compartment
, Dilute concentrated softeners with warm water to
the fill !ine
• Do not exceed the maximum fill line Overfilling can
cause early dispensing of the fabric softener which
could result in stained clothes
• Do not pour fabric softener directly on the wash
load
• The fabric softener will be automatically dispensed
during the last rinse cycle
NOTE: Do not place, ._tore, or spill lauml_y products
(soup, detergent, blcach, softener, etc.) on
the top of your washer or dryer. These
products can damage the finish or controls if
left there tno long.
12

WM2042CW WM2442H"
l
O3
Cycle F_br_lype
LorgeH_r_
Butyl s_ _sbiankeLs
_je endoomt_ers.
Co,on,linen, WB_'Cokt
Coitont b'_'eLS,shi_. WarmMann
Normal ahead,leans, H#JC_d
m_ lads Cold/CokJ
Dressshidd Wem_Co_d
Pemt panls,,atri_e(me
press cbP_r_,pdyI Wa_Narm
r,_onbI_nd Hot!Co{_
cblhi_j,[ab_clo_
j Dressshi_ CQId,'CokJ
i[_imles blmsss,nylons, Wam_r_._l
sl'_r_or Warr_#a_
lacygarmen!
H_m,d liemslabeg-_d War_ZCdd
Wash ;"t_a_dwasheb_"WamCCCa_
W_h,_nse Spinspeed Soil Pre. Quick
Temp. LevelWashCycle
WanT_CC_ Go_e Normal
W_mlMatm LOw Heavy
HeI!Cdd Medium lkjL4
Cok_fCo_d N_S_n
Coi_Co_d
C_CoU
H_gh Normal
Nospin HeB_
Lmv L_h_
M_um
Mnmum Normal
High He_W
Nospln Lkjhl
O_nlb
L_V
Low _om_l
MediUm He_.,y
No_,pm L_jh_
Gen_e
GenlIe Normal
Low Li_bl
M_oium
Nospm
0 0
O O O O O
O O O O O
O O O O
O O O
Cycle Fabrktype
cb_es,d_pers,
elf..
Lar_items
Bu_kT/su_asblar_ts
Large andcorNorte__
i
i Coflm,lmen,
C_IoN Io'e,_s.shirls,
N_m,_ sh_tS,leans,
_ed k_ds
OmssshirL_
Pem_ pan_s,,,,rankle_ree
Pm.ss _bthbg,_vt
cot_anblend
clolh_Aabln_btt,s
Drossahi_
Dm_s blouses,nylo,qs,
a_r e.r
l_cygam'_nl
Hand llerr_labe_I
W_sfl "hand'_._able"
Wash,'RinseSpinspeedSoil Pre- QuickStain _tra _n_e+
TemF Level_sh Cycl_ Cycle_nse Spin
F_mHigh Heavy
,t,toSp_n L,ghl 0 0 0 0
L_',x
Med,,urn
Wam';C_d GenlIe Nom_al
Warm_Narm L(t,v Hem_, _I.
HoPC-._d M_iam L_JhI 0 0
TapCo1_Cokl
Cok_Co_d I,ioSpin O.
Wam_Co_ High Nom'_I
Wa.m_Varm ExL_hL3h He_w
Hotigoki I_ospir_ L_hl 0 0 0 0 0
TapCe_dCdd LO',_ "_
Cok_Coid Medium
Wan_Cdd Mc_um f,_orrn_I
Warmt_garm High Heaw
Hol;Cdd fiespin L_ghl O O O O O O
TBpC_l_Cdd Genie _..
Cdd/C_ Lmv Or
C_C_ Low Normal "_
Waml/Co_d Me,urn Ho_H 0 0 0 0
Wann_a_ Nospm L_]hI _r
tapColc_'Co_d OenI_e t'_
Cd_Co_ GenlIe ffermal 0
Wam'.,tCold Low Li._ O 0 O --
W_mv_%rm Medium _"
TepCo_'Co_d Nospin ..............................
0
$-
F;
Speed Lig',1_yssi_
Wash ;_o_hi_
TapCc_d,'Cddt'_ospin Nomml
C_Co_d Lmv Heavy O O
WarmJCdd Medium
WarmMann High
• i
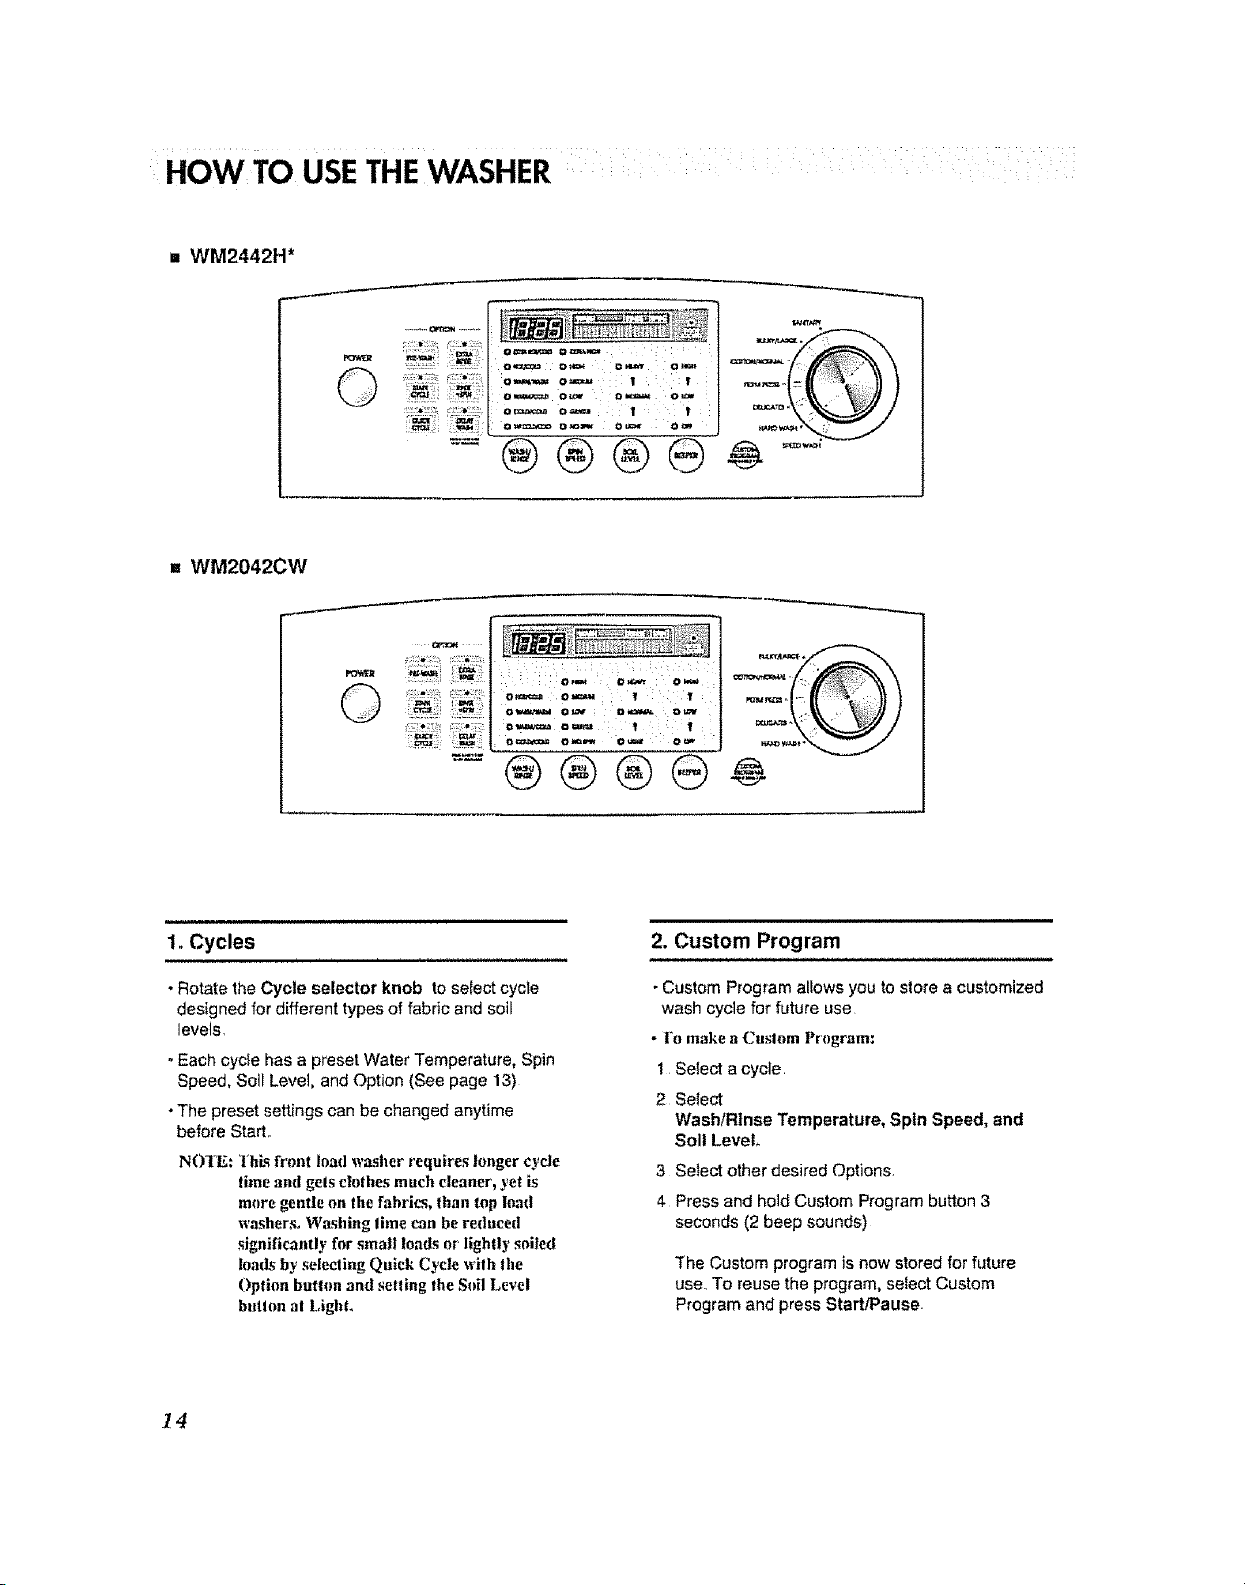
HOWTO USETHE WASHER
" WM2442H*
..... oPm,_ .....
Q ;: :_F_:: L::_::o
= WM2042CW
©
==: o-- o==, o=- ._
=®®®@÷
Io Cycles
•Rotate the Cycle selector knob to se[ect cycle
designed for different typesof fabric and soil
levels.
-Each cycle has a preset Water Temperature, Spin
Speed, Soil Level, and Option (See page 13)
. The preset settings can be changed anytime
before Start,.
NOTE: l'hL_ front load washer requires longer cycle
time and gels clothes much cleaner, yet is
more gentle on the fahrim, than top Inad
washers, Washing lime can be reduced
significantly for small loads or lightly soiled
loads by selecting Quick Cycle with the
Option butlnn and setting the Soil Level
button at LighL
2. Custom Program
• Custom Program allows you to store a customized
wash cycle for future use
• ro make a Custom Program:
1 Select a cycle
2 SeIect
Wash/Rinse Temperature, Spin Speed, and
Soil Level
3 Select other desired Options,
4 Press and hold Custom Program button 3
seconds (2 beep sounds)
The Custom program is now stored for future
usel To reuse the program, select Custom
Program and press Start/Pause.
14

HOW TO USE THEWASHER
3, Beeper
* Press repeatedly to adjustthe volume of the
Beeper
4. Wash!Rinse Temperature
• Select a water temperature based onthe type of
load you are washing
• Follow the fabric care fabel and chart below for
best results
ExtraHot Kitchentowels, sheets,
...... :t Whitesand Heavy iii
Hot soiledcolor-fastitems :
Warm Mostloads
: : :: Brightlycoiored items
:: Cod::::: :;washabewooens :
•Warm rinses leave the loads dryer than cold
rinses Warm rinses increasewrinkling.
•In cold climates, a warm rinse makes the load
more comfortable to handle
•Cotd rinses save energy
•The Cold rinse temperatures depend on the cold
water at your faucet
•For the Tap ColdlCo_d setting, both wash and rinse
temperatures depend on the cold water at your
faucet
andbaby garmenLs
5. Spin speed
*To change the spin speed, press the Spin Speed
button repeatedly to cycle through available
options
- To start DraintSpin cycle:
1 Press Power button to turn on
2 Press Spin Speed button only
3 Press Start/Pause button
6. Soil Level
•TO change the soil level, press the Soil Level
button repeatedly until the desired setting is on.
I3
 Loading...