

Page 1

websitehttp://www.lgservice.com
e-maii http://www.lgeservice.com/techsup.html
ER
M£NLEL
eLI T
V(?uiii®z iiile -' ..... "_;_ i-,, e,-_s _.... _:'=
_,>tOS 'l,,c,_,A'_:8d(?
..... []i ...... I =ip....... '¢_ = =' QI :'_Q pFOOl_CJ @I
JitISiS,lli8iOl @i t,i iotIcliiotIilorrilrl de voiFI-) 31iii/fis!isouI,
D°_TILIS£TION
EU FE lET
e: :,_...........c_i;{_.,::_s
oc ............ C,-L I_,A£:,:: ,_, @V'tilll CIO _]
E
AC.©NDOIONADOPDEA:R,ED:
U L P PIET
PO" faro lea./sS i[]S I )cio'185_ (e .... :_..........':,_ ........ c . _.
' _ (!9 I),-, ,de sei:i_sidad ::uiidaS!os8 y t}taih's-ente a _1;:==_. !issta!a y o _, i,
S., de ;:, ,a:sl.......de v@Iitl:Iiqil,
MODELS,MODELES,MODELOS:M5404R,M6004R,KG5200ER,KG6000R,
WG500ER,WG5200R,WG6000R,
Page 2
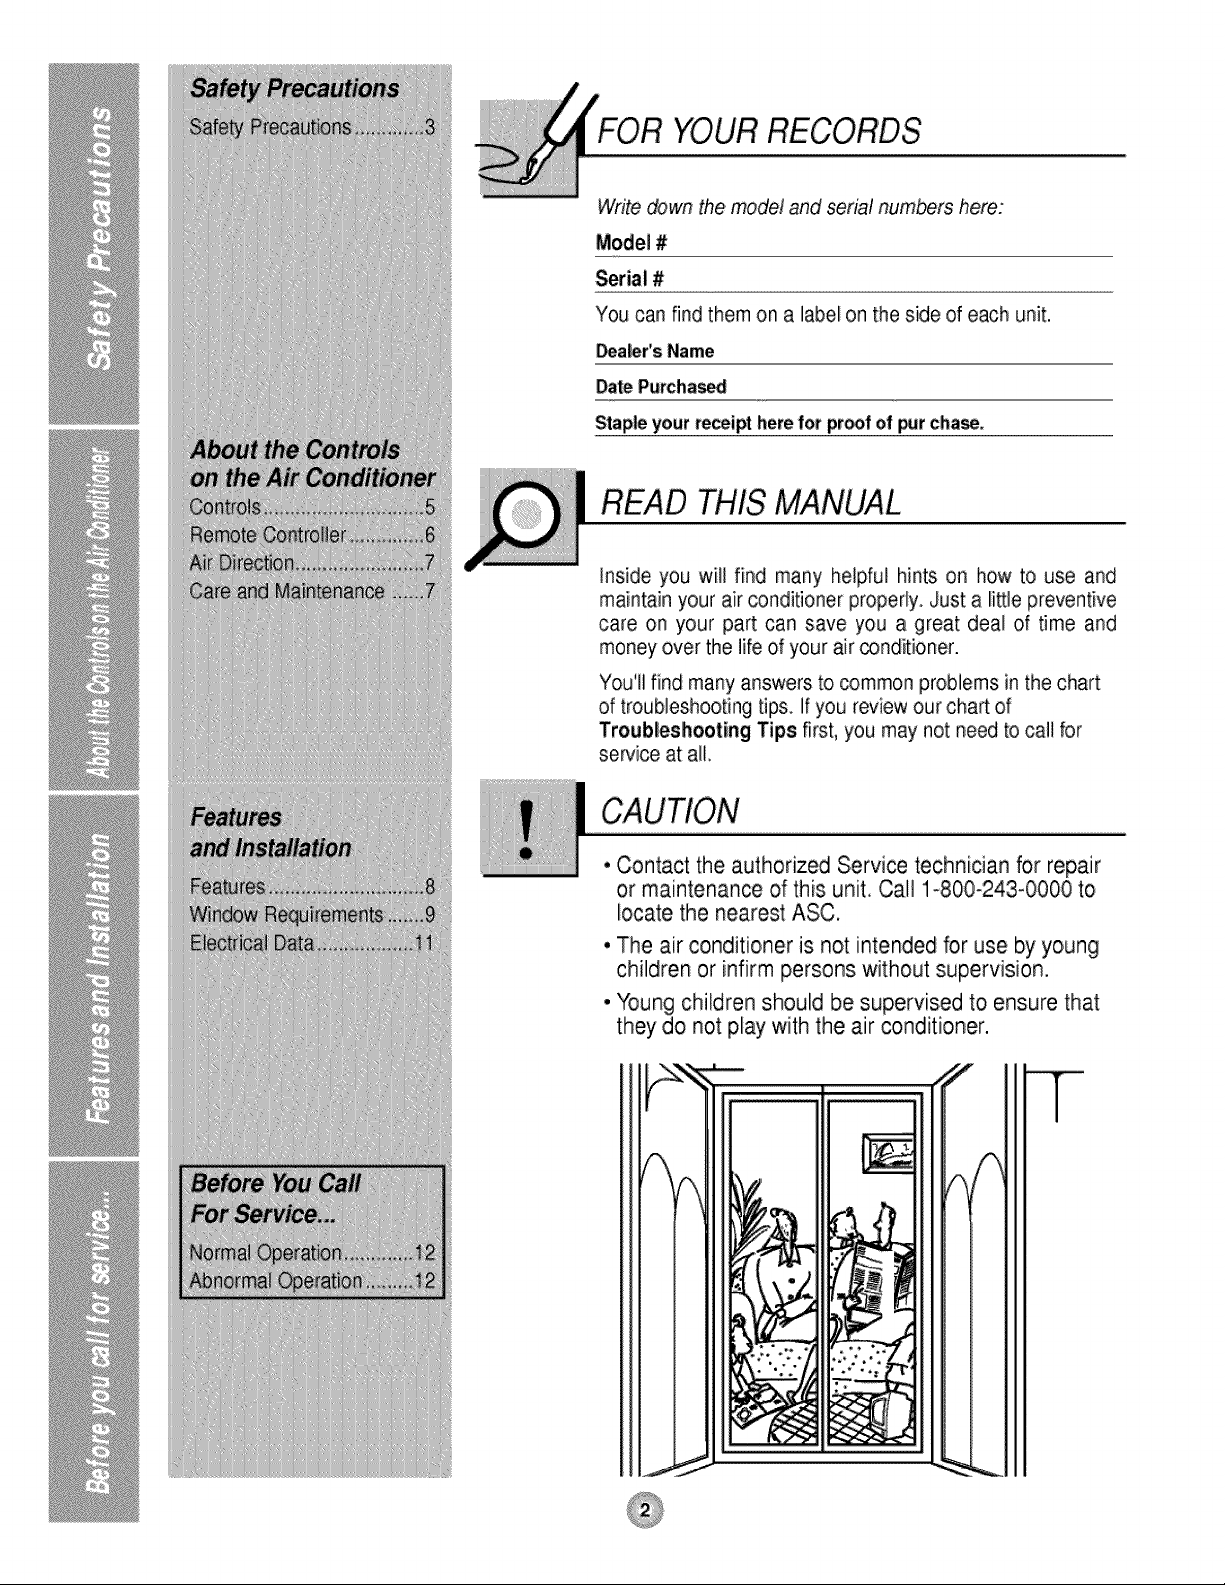
FOR YOUR RECORDS
Write down the model and serial numbers here:
Model #
Seria! #
You can find them on a label on the side of each unit.
_aler's Name
DatePurchased
Stapleyour receipt herefor proofof pJr cha_.
READ THIS MANUAL
inside you will find many helpful hints on how to use and
maintain your air conditioner properly. Just a little preventive
care on your part can save you a great deal of time and
money over the life of your air conditioner.
You'll find many answers to common problems in the chart
of troubleshooting tips If you review our cha_ of
Troubleshooting Tips first, you may not need to call for
service at all.
° Contact the authorized Service technician for repair
or maintenance of this unit. Call 1.-800-243-0000 to
locate the nearest ASC.
• The air conditioner is not intended for use by young
children or infirm persons without supervision.
• Young children should be supervised to ensure that
they do not play with the air conditioner.
T
Page 3
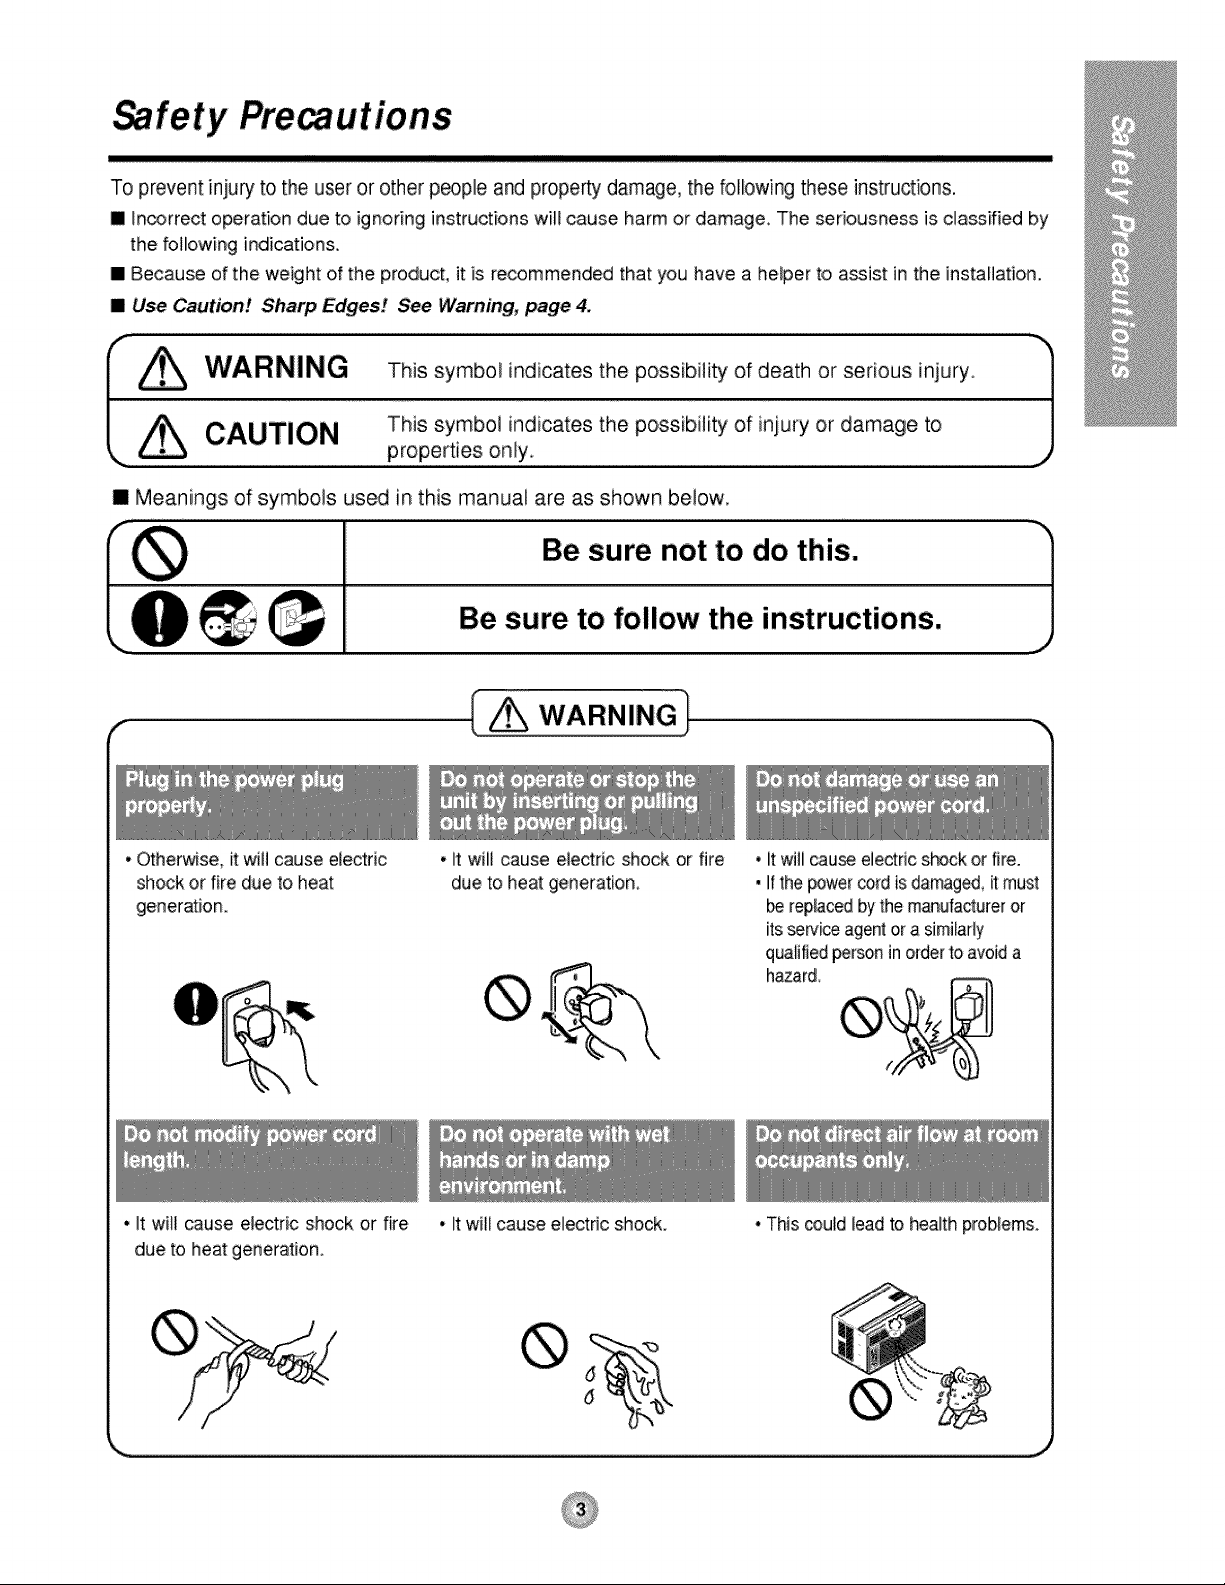
Safety Pre utions
To prevent injury to the user or other people and property damage, the following these instructions.
m _n_rrect operation due to ignoring instructions will cause harm or damage, The seriousness is classified by
the following indications,
[] Because of the weight of the product, it is recommended that you have a helper to assist in the installation.
[] Use Caution! Sharp Edges! See Warning, p_ge 4.
(-_ This symbol indicates the possibifity of death or serious injury _']
.. ,4"\ CAUTION This symbol indicates the possibility of injury or damage to
\ properties on!y _.)
I Meanings of symbols used in this manual are as shown below,
Ill Be sure not to do this.
_ _.,_, Be sure to follow the instructions.
I w.,,RN,NG!
• Otherwise, it will cause electric
shock or fire due to heat
generation.
• It will cause electric shock or fire
due to heat generation.
• it will _use electricshockor fire.
• Itthepowercord isdamaged,it must
bereplacedbythe manulactureror
itsserviceagentora similarly
qualifiedpersonin orderto avoida
hazard.
J
• It will cause electrc shock or fire
due to heat generation.
• it wil_cause electric shock.
• This _uld _eadto health problems.
®
Page 4
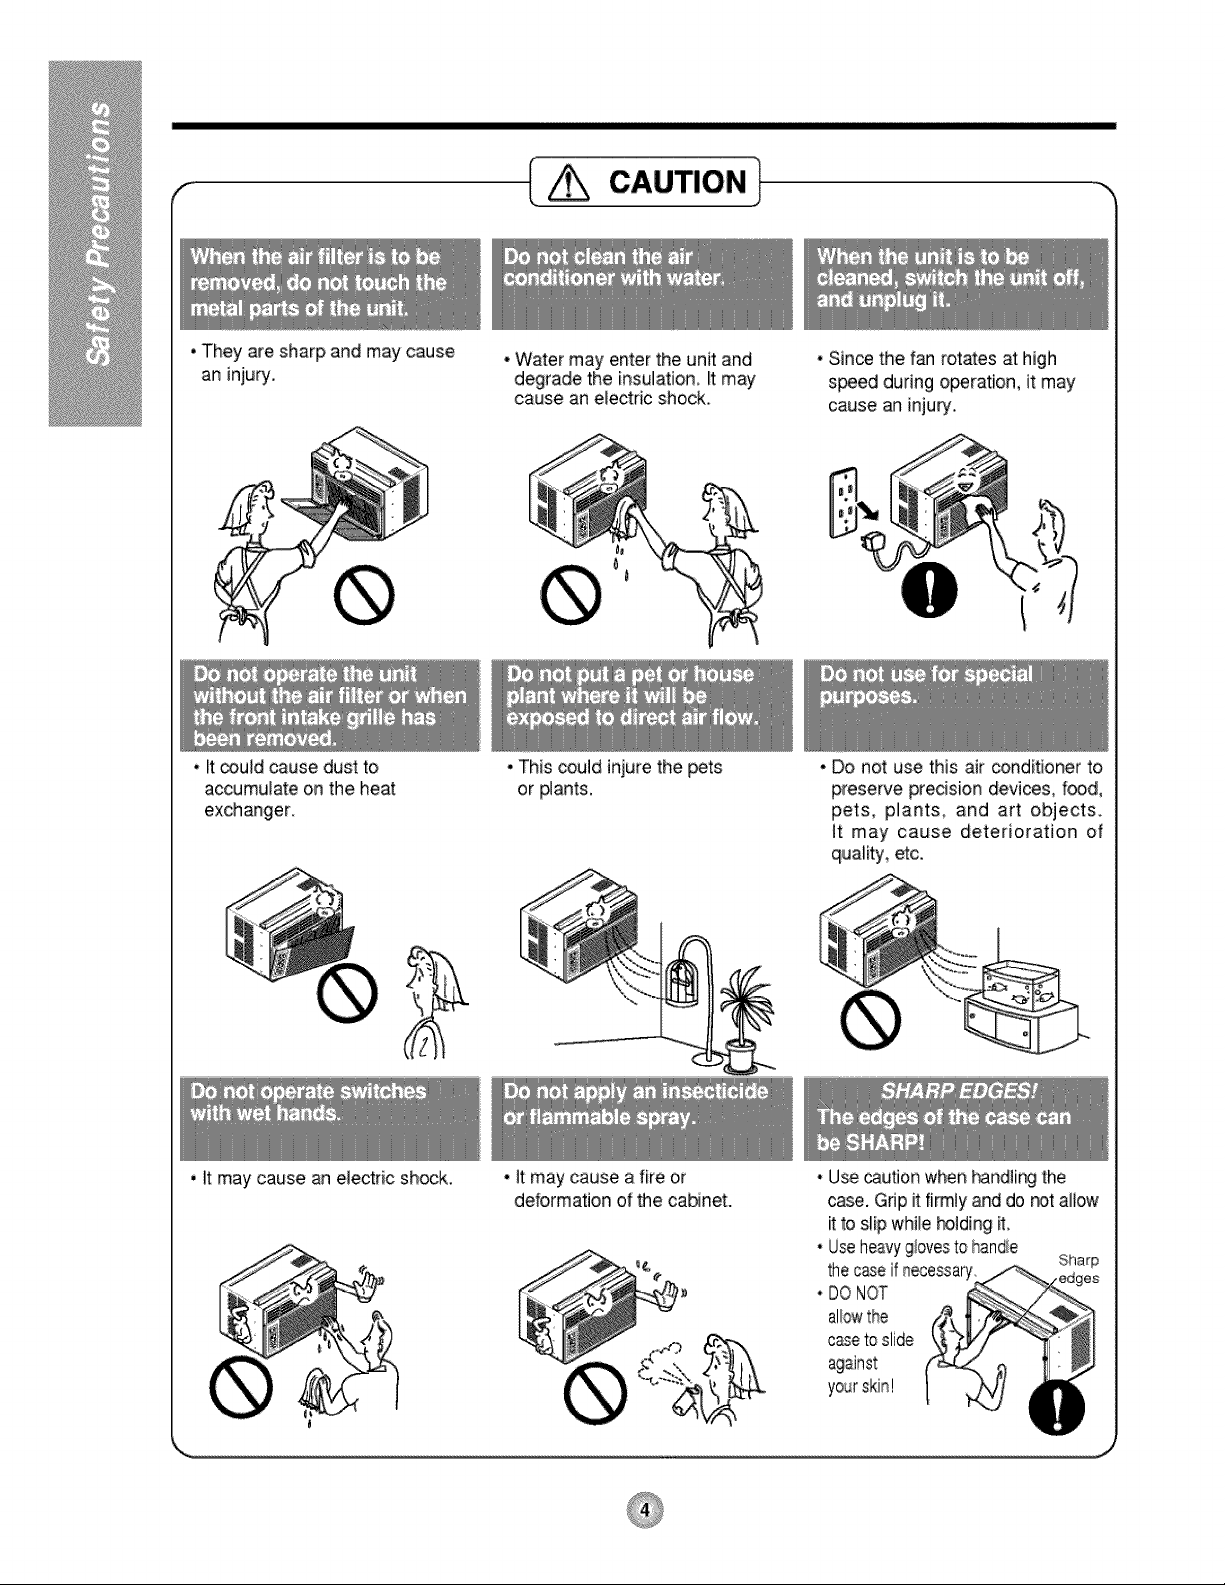
c io.l
•They are sharp and maycause
an injury,
• _tcould cause dust to
accumulate on the heat
exchanger.
*Water may enter the unit and
degrade the insulation, _tmay
cause an e_ectricshock,
•This could injure the pets
or #ants.
• Since the f_ rotates athigh
s_ed during o_ration, it may
cause an injury.
• Do not use this air conditioner to
preserve precision devices, food,
pets, pilants, and art objects,
it may cause deterioration of
quality, etc.
• _tmay cause an electric shock, • it may cause a fire or
deformation of _e cabinet.
• Usecaution when _ndl[ng the
case. Gdpit firmly and do r#t allow
itto slip while hoJdingit.
• Useheavyg/orestohandie
thecaseif necessary
• DONOT
allowthe
c_e toslide
against
Sharp
Page 5
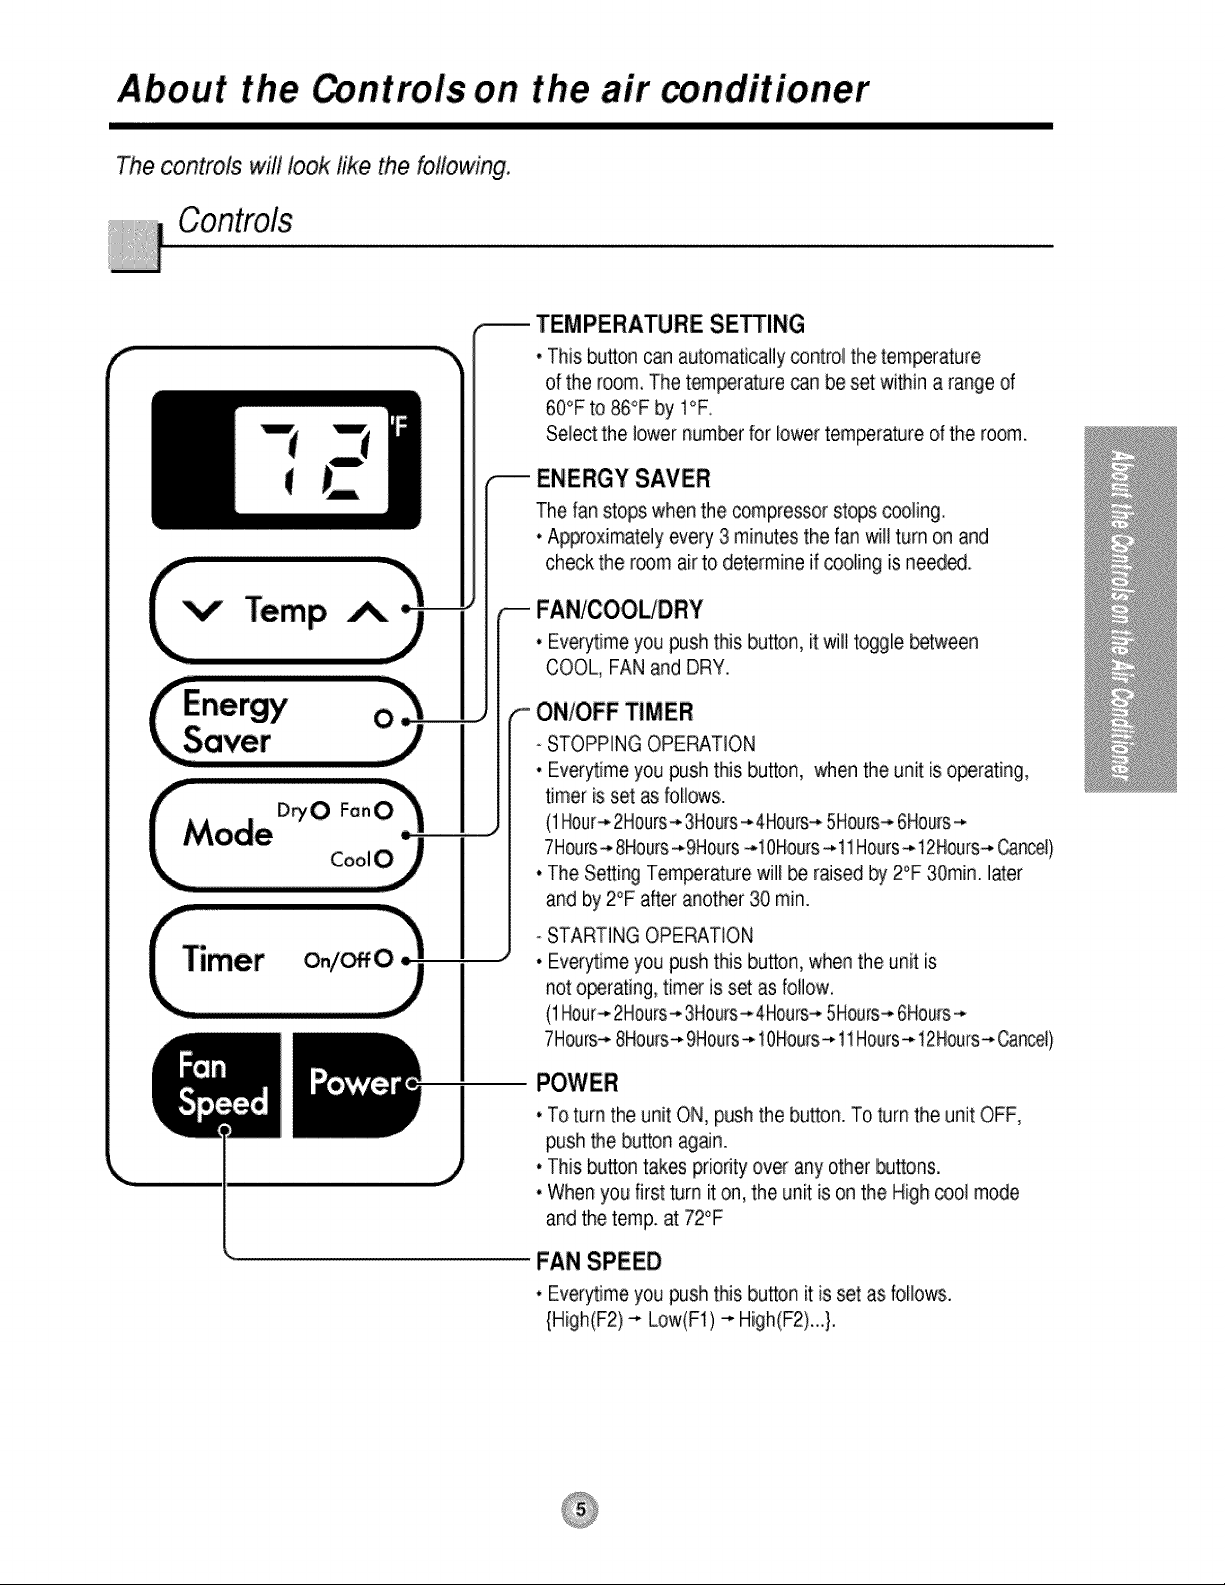
About the ntro, ls on the air conditioner
The controls will look like the following.
TEMPERATURE SETTING
• This button can automatically control the temperature
of the room, The temperature _n beset wi_in a range of
60°F to 86°F by I°F
Select the lower number for lowertemperature of the room.
ENERGY SAVER
The fan stops when the compressor stops _oIing.
• Approximately every 3minutes the fan will turn on and
check the r_m airto determine if cooling is need_.
FAN/OOOLtDRY
V" Temp
• Everytime you push this button, it wilt toggie between
COOL, FAN and DRY.
f,.-
ON/OFF TIMER
- STOPPING OPERATION
• Every,time you push this button, when the unit is operating,
timer is set as followsi.
(1Hour-,-2Hours--,-3Hou_s--,.4Hours---5Hours--,.6Hours--*
7Hours_ 8Hours-,.9Hours-,.10Hours-,.11Hours-,-12Hours-,.Cancel)
• The Setting Temperature will _ rased by 2°F 30rain. later
and by 2°F after another 30 rain.
- STARTING OPERATION
• Everytime you push this button, when the unit is
not operating, timer is set as follow.
(1Hour_2Hours-*3Hours_4Hours-*5Hours-,6Hours-*
7Hours-*8Hours-*9Hours-*10Hours--*11Hours-*12Hours_Cancel)
• To turn the unit ON, pushthe button. To turn the unit OFF,
push the button again.
• This button takes priodty over any other buttons.
• When you first turn it on, the unit is on the High cool mode
and the temp. at 72°F
FAN SPEED
• Everytime you push this button it is set as foliows.
{High(F2) _ Low(Ft) _ High(F2)...}.
Page 6
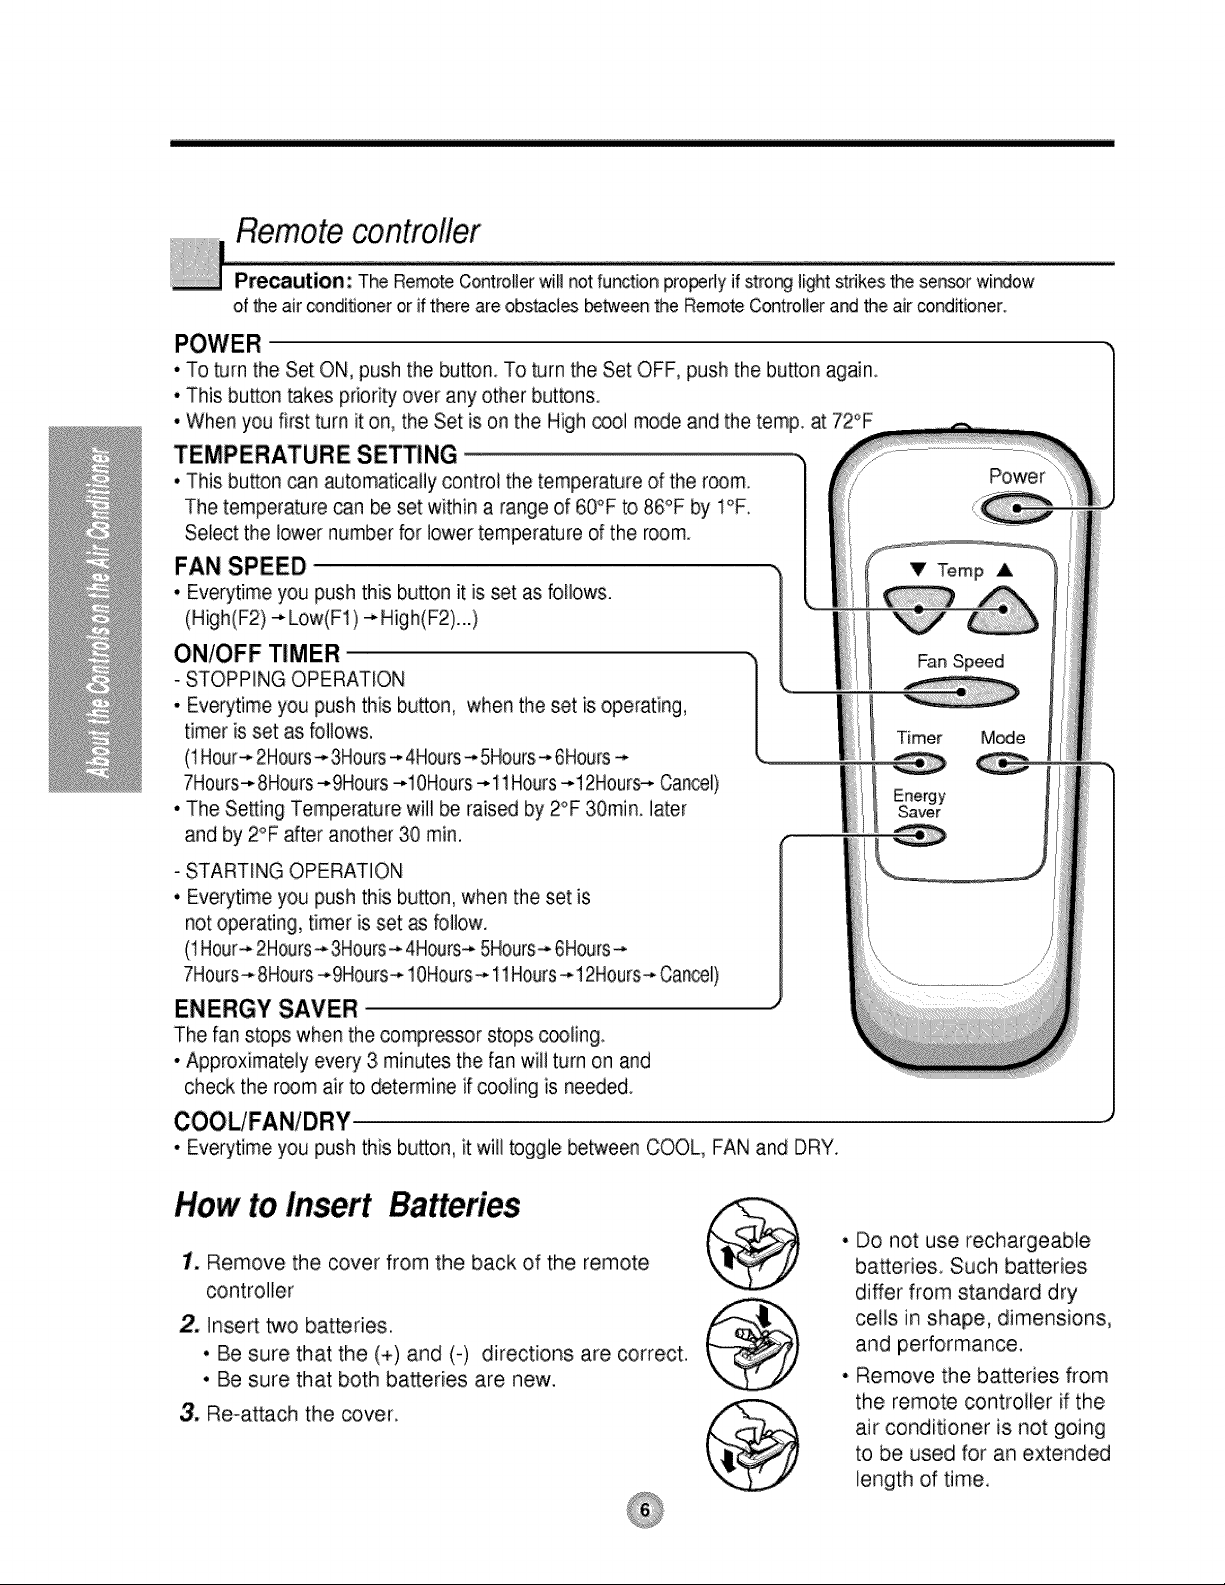
Remote controfler
Precaution: The RemoteControllerwirl notfunction properly Jfstror_g_ightstnkesthe sensorwir_ow
of theair conditioneror ifthere are obstacJesbetweenthe RemoteControllerand theair condRioner.
•To turn the Set ON, push the button. To turn the Set OFF, push the button again
•This button takes priority over any other buttons.
•When you first turn it on, the Set is on the High _ol mode and the temp. at 72°F
TEMPERATURE SETTING
•This button can automatically control the temperature of the room
The temperature can be set within a range of 60°F to 86°F by I°R
Select the lower number for lower temperature of the room.
FAN SPEED
• Everytime you push this button it is set as follows.
(High (IF2)---Low(F1 )-_Hig h(F2)...)
Power
V Temp A
- STOPPING OPERATION
• Everytime you push this bu_on, when the set is operating,
ON/OFF TIMER ,[
timer is set as follows.
(1Hour-*2Hours-* 3Hours-*4Hours-*5Hours-* 6Hours-*
7Hours-*8Hours-*9Hours -*lOHours -*11Hours-*12Hours-,-Cancel)
•The Setting Temperature will be raised by 2°F 30rain. later
and by 2°F alter another 30 min,
- STARTING OPERATION
• Everytime you push this button, when the set is
not operating, timer is set as follow.
(1Hour-*2Hours_.3H0urs-,.4Hours-,-5Hours--,.6Hours-_
7Hours-*8Hours---9Hours-,,10Hours--*11Hours-*!2Hours-* Cancel)
ENERGY SAVER
The fan stops when the compressor stops c_ling
•Approximately every 3 minutes the fan will turn on and
check the room air to determine if cooling is needed
• Everytime you push this button, it will toggle between COOL, FAN and DRY.
How to Insert
1. Remove the cover from the back of the remote
controller
2. Inse_ two batteries.
• Be sure that the (+) and (-) directions are correct.
• Be sure that both batteries are new.
3. Re-attach the cover.
Fan Speed
Timer M_e
• Do not use rechargeable
batteries Such batteries
differ from standard dry
ceils in shape, dimensions,
and performance.
• Remove the batteries from
the remote controller if the
air conditioner is not going
to be used for an extended
length of time.
Page 7
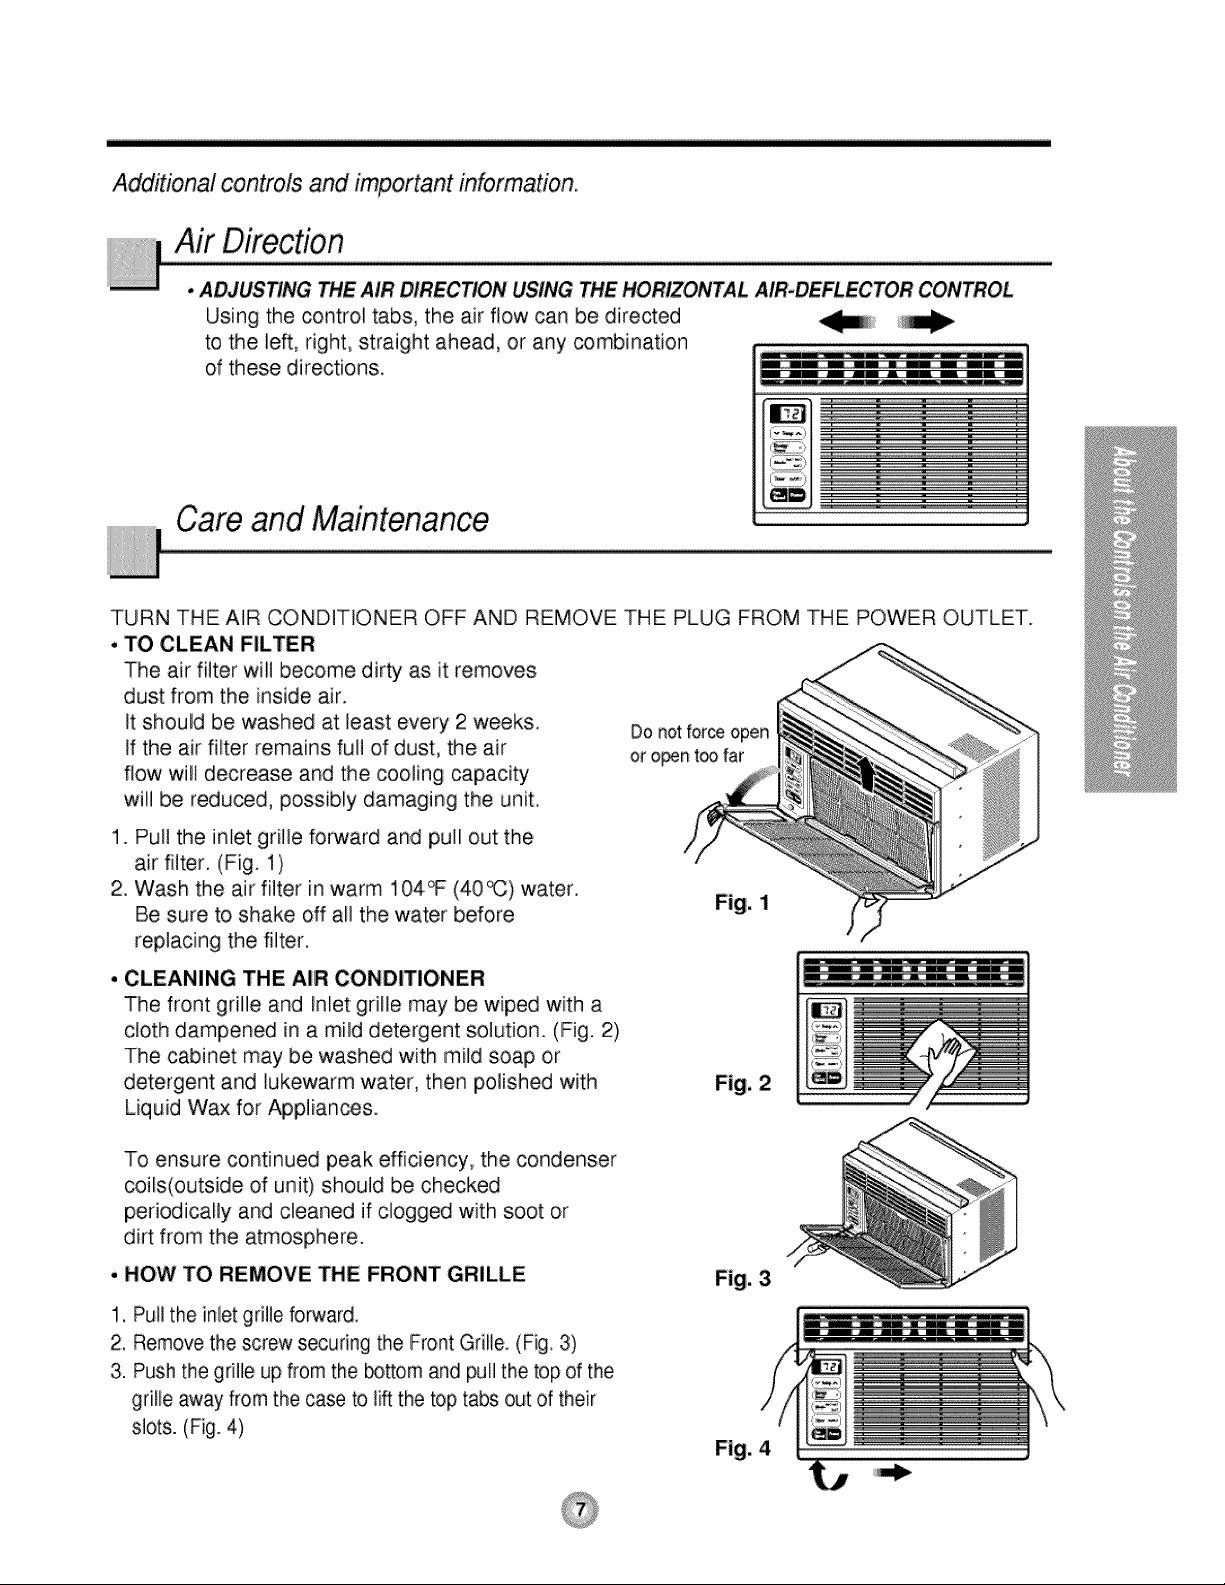
Additional controls and important information.
Air Direction
• ADJUSTING THE AIR DIRECTION USING THE HORIZONTAL AIR.DEFLECTOR CONTROL
Using the control tabs, the air flow can be directed
to the le_, right, straight ahead, or any combination
of these directions.
Care and Maintenance
TURN THE AIR CONDITIONER OFF AND REMOVE THE PLUG FROM THE POWER OUTLET.
. TO CLEAN FILTER
The air filter will become dirty as it removes
dust from the inside air.
It should be washed at least every 2 weeks. Donot forceopen
If the air filter remains full of dust, the air
flow will decrease and the cooling capacity
will be redu_d, possibly damaging the unit.
or opent_ far
1. Pull the inlet grille forward and pull out the
air filter. (Fig. 1)
2. Wash the air filter in warm 104_ (40_) water.
Be sure to shake off all the water before
replacing the filter.
• CLEANING THE AIR CONDITIONER
The front grille and Inlet grille may be wiped with a
cloth dampened in a mild detergent solution. (Fig. 2)
The cabinet may be washed with mild soap or
detergent and lukewarm water, then polished with
Liquid Wax for Appliances.
To ensure continued peak efficiency, the condenser
coils(outside of: unit) should be checked
periodically and cleaned if clogged with soot or
dirt from the atmosphere.
• HOW TO REMOVE THE FRONT GRILLE
1, Pull the inlet grille forward,
2, Remove the screw securing the Front Grille. (Fig. 3)
3. Push the grille up from the _ttom and pull the top of the
gdlle away from the case to lift the top tabs out of their
slots. (Fig. 4)
Fig. 1
Fig, 2
Fig, 3
Fig. 4
Page 8
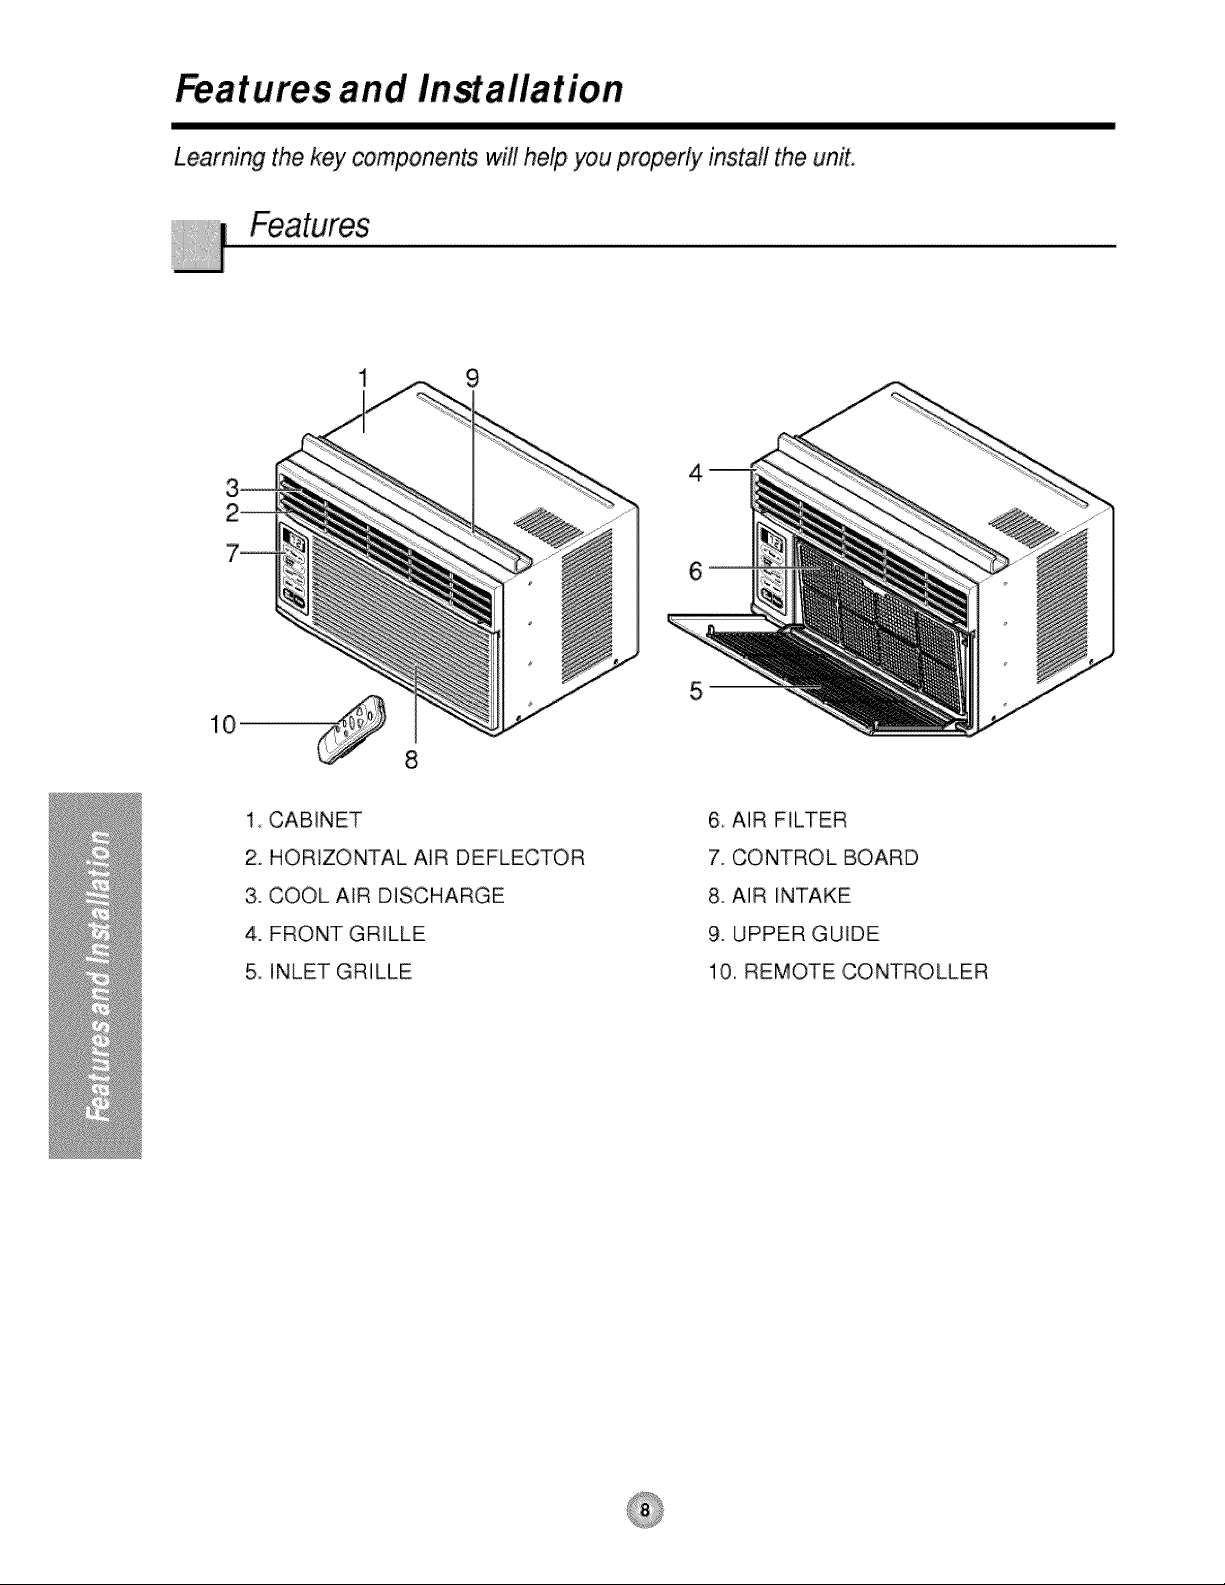
Features and InMallation
Learning the key components will help you properly install the unit.
1 9
1, CABINET
2. HORIZONTAL AiR DEFLECTOR
3. COOL AiR DISCHARGE
4. FRONT GRILLE
5, INLET GRILLE
6 AIR FILTER
7. CONTROL BOARD
8. AiR iNTAKE
9. UPPER GUIDE
10, REMOTE CONTROLLER
Page 9
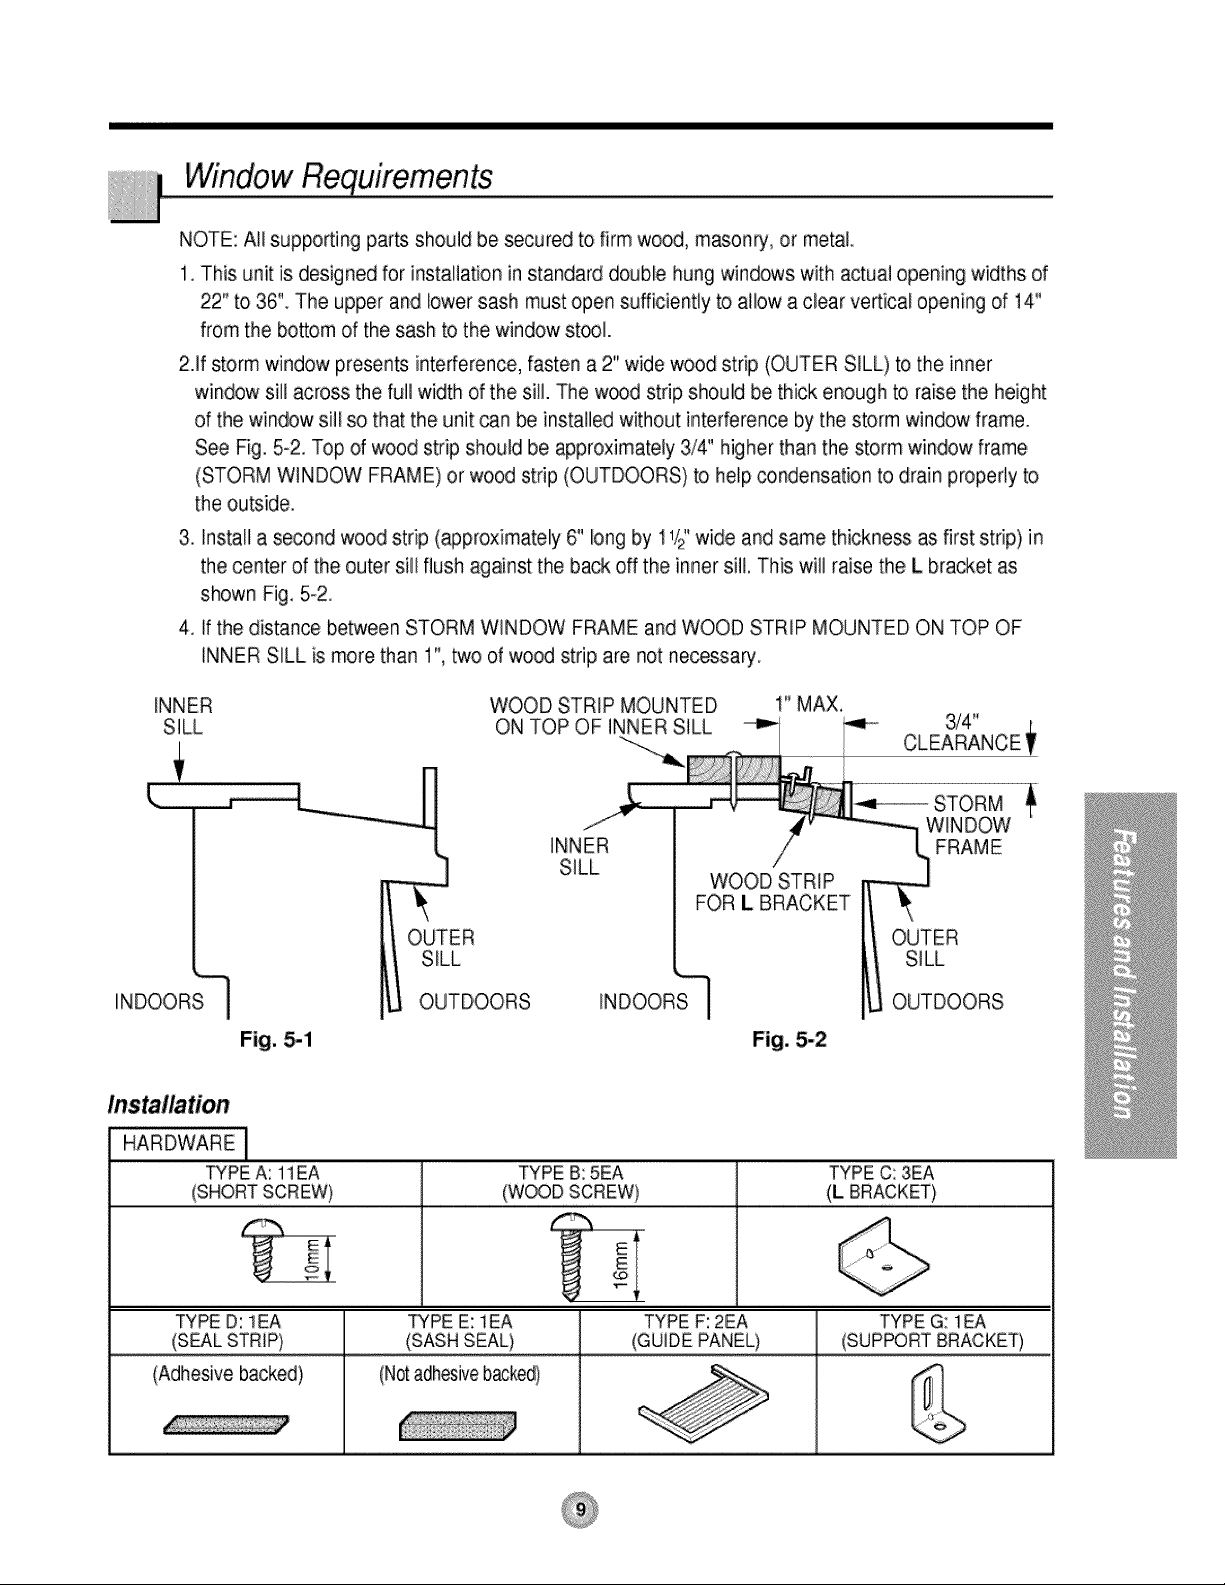
WindowRequirements
NOTE: All supporting parts should be secured to firm wood, masonry, or metal.
1. This unit is designed for installation in standard double hung windows with actual opening widths of
22" to 36" The upper and lower sash must open sufficiently to allow a clear vertical opening of 14"
from the bottom of the sash to the window st_l.
2Jf storm window presents interference, fasten a 2" wide wood strip (OUTER SILL) to the inner
window sill across the full width of the sill. The w_d strip should be thick enough to raise the height
of the window sill so that the unit can be installed without interference by the storm window frame.
See Rg. 5-2. Top d wood strip should be approximately 3/4" higher than the storm window frame
(STORM WINDOW FRAME) or wood strip (OUTDOORS) to help condensation to drain properly to
the outside.
3. install a se_nd wood strip (_proximate[y 6" long by 11iz"wide and same thickness as first strip} in
the center of the outer sill flush against the back off the inner sill. This will raise the L bra_et as
shown Fig, 5-2,
4. If the distance between STORM WINDOW FRAME and WOOD STRIP MOUNTED ON TOP OF
INNER SiLL is more than 1", two of wood strip are not necessa_,
INNER WOOD STRIP MOUNTED 1" MAX.
HARDWARE [
TYPE A: 11EA TYPE B: 5EA TYPE C: 3EA
(SHORTSCREW) _ (WOODSCREW) _ (L BRACKET)
TYPE D: lEA
(SEALSTRIP)
(Adhesive backed)
Fig. 5-1 Fig. 5-2
. E
_ E
TYPE E: lEA
(SASHSEAL}
(Notadhesivebacked)
TYPE F: 2EA
(GUIDEPANEL}
TYPEG: lEA
(SUPPORTBRACKET)
Page 10
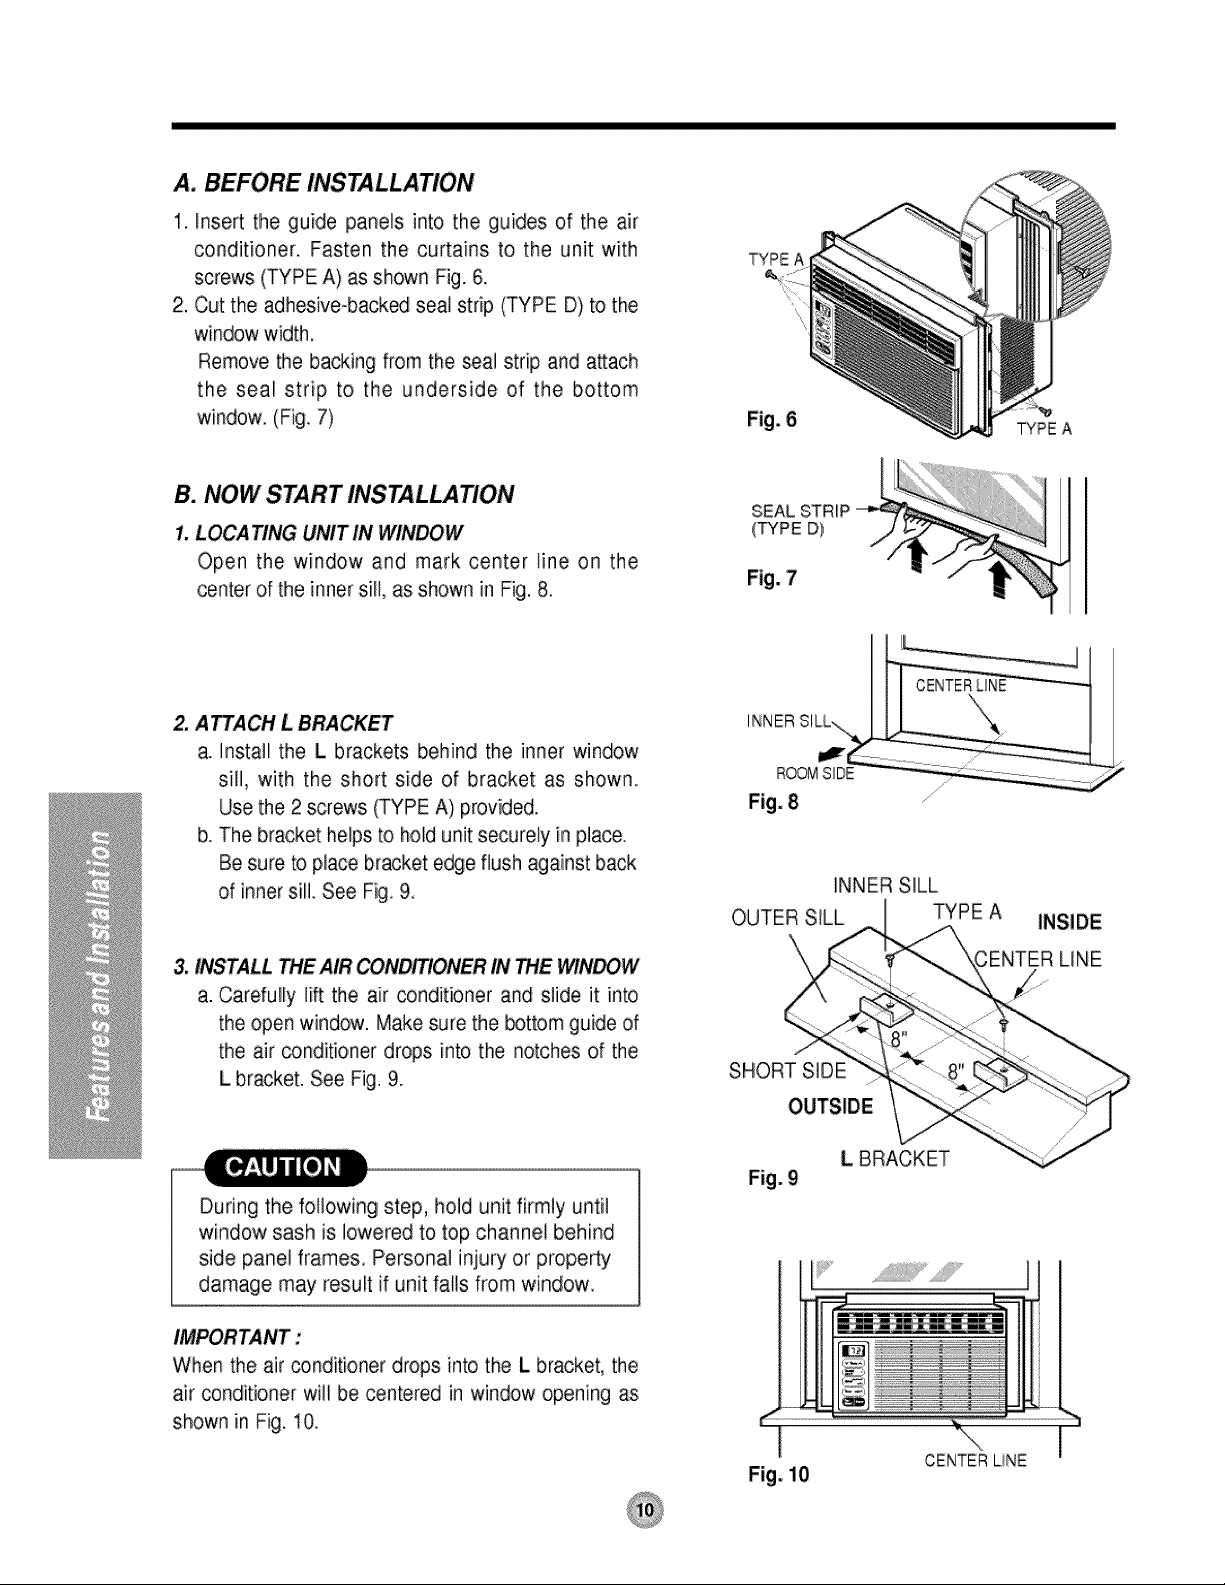
A. BEFORE INSTALLATION
1. Insert the guide panels into the guides of the air
conditioner. Fasten the curtains to the unit with
screws (TYPE A) as shown Fig. 6.
2. Cut the adhesive-back_ seal strip (TYPE D) to the
window width,
Remove the bacJ<.ingfrom the seal strip and a_ach
the seal strip to the underside of the bottom
window. (Fig. 7)
B. NOW START INSTALLATION
1. LOCA TING UNIT IN WINDOW
Open the window and mark center line on the
center of the inner sill, as shown in Fig. 8.
2. ATTACH L BRACKET
a. install the L brackets behind the inner window
sill, with the short side of bracket as shown.
Use the 2 screws (TYPE A) provided.
b. The bracket helps to hold unit securely in place.
Be sure to place bracket edge flush against back
of inner sill See Fig. 9.
TYPEA
Fig. 8
INNER SILL
OUTER SILL TYPE A INSIDE
& INSTALL THE AIR IN THE WINDOW
a. Carefully lift the air conditioner and slide it into
the open window. Make sure the bottom guide of
the air conditioner drops into the notches of the
L bracket. See Fig. 9.
During the following step, hold unit firmly until
window sash is lowered to top channel behind
side panel frames. Personal iniury or prope_y
damage may result if unit falls from window.
IMPORTANT:
When the air conditioner drops into the L bracket, the
air conditioner will be centered in window opening as
shown in Fig. 10.
\'\ LINE
SHORT SIDE
L BRACKET
Fig. 9
I
i
CENTERLiNE
Fig. i0
Page 11
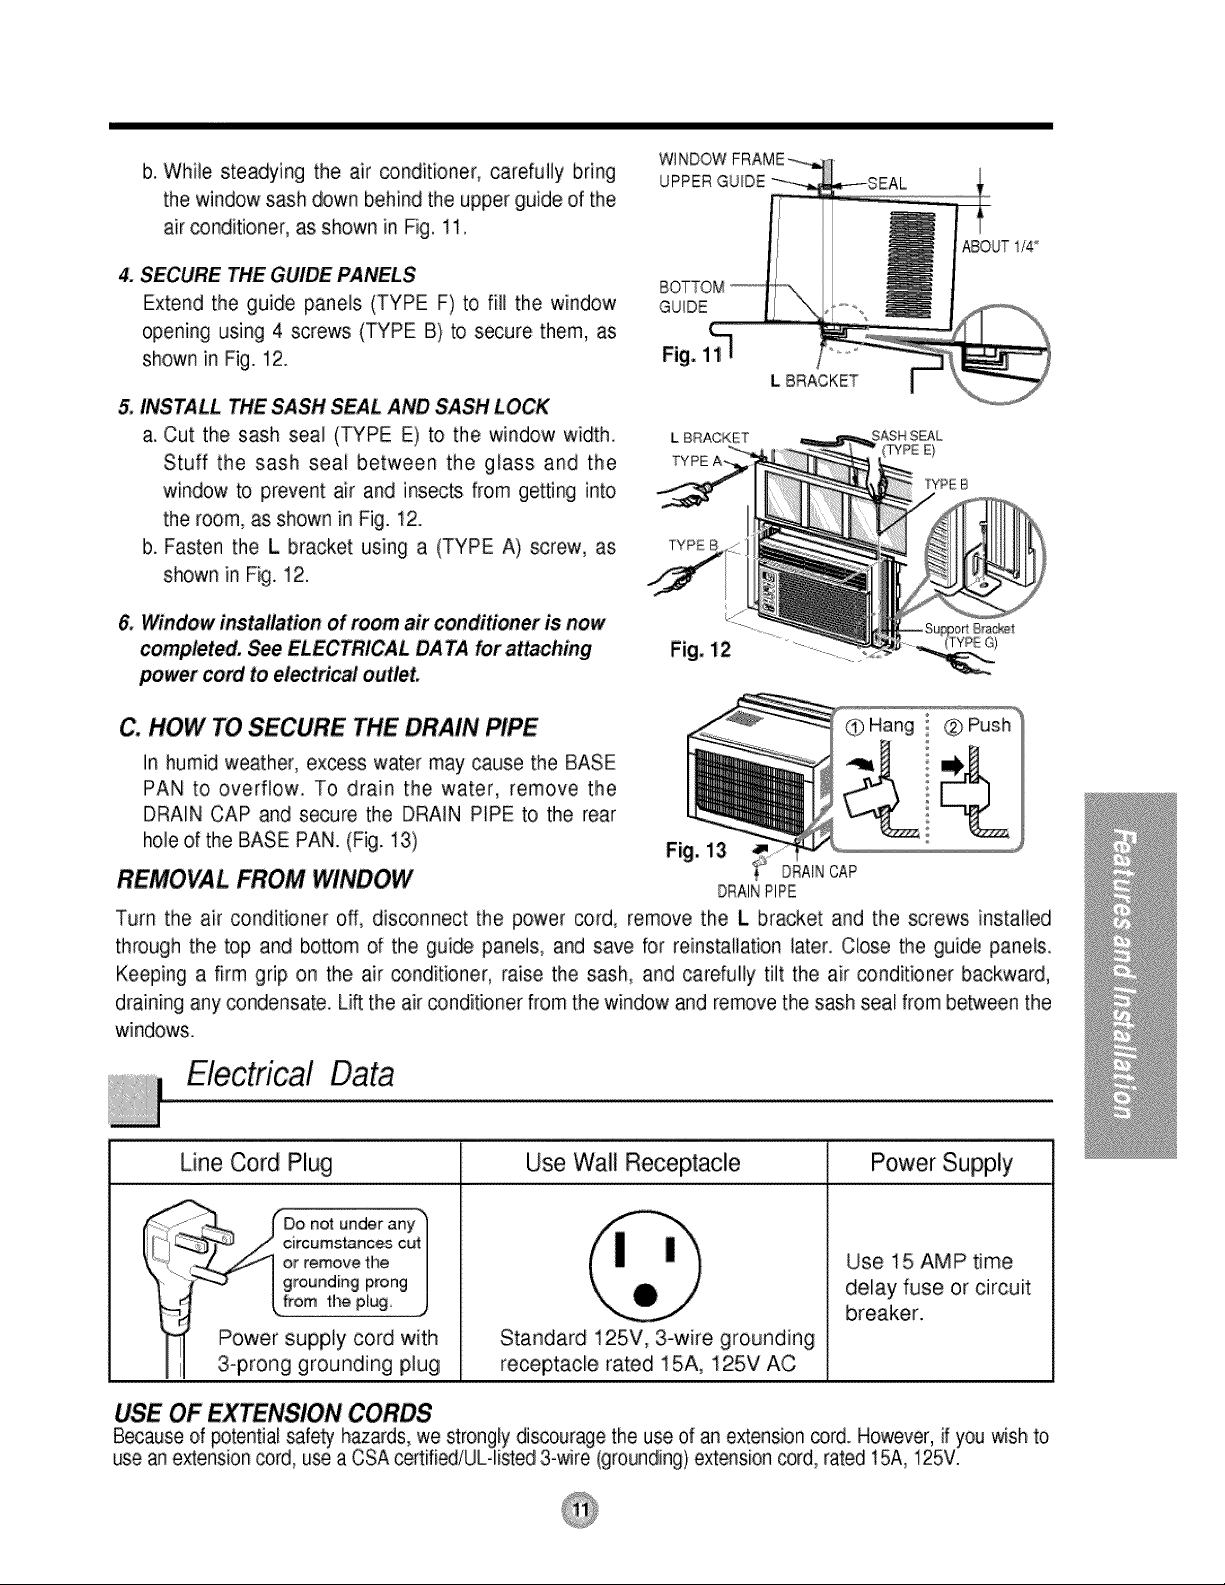
b. While steadying the air conditioner, carefully bring
the window sash down behind the upper guide of the
air conditioner, as shown in Fig, 11.
4. SECURE THE GUIDE PANELS
Extend the guide panels (TYPE F) to fill the window
opening using 4 screws (TYPE B) to secure them, as
shown in Fig. 12.
5. INSTALL THE SASH SEAL AND SASH LOCK
a. Cut the sash seal (TYPE E) to the window width
Stuff the sash seal between the glass and the
window to prevent air and insects from getting into
the room, as shown in Fig. 12.
b. Fasten the L bracket using a (TYPE A) screw, as
shown in Fig. 12.
& Window installation of room air conditioner is now
completed. See ELECTRICAL DATA for attaching
_wer cord to electrical outlet.
WlNDOWFRAME_-_
_-SEAL
]
L BRACKET I
L BRACKET EAL
.... (TYPE E}
TYPE B
C. HOW TO SECURE THE DRAIN PIPE Hang l ®
ABOUT I/4
In humid weather, excess water may cause the BASE
PAN to overflow. To drain the water, remove the
DRAIN CAP and secure the DRAIN PIPE to the rear
hole of the BASE PAN. (Fig. 13)
REMOVAL FROM WINDOW
Turn the air conditioner off, disconnect the power cord, remove the L bracket and the screws installed
through the top and bottom of the guide panels, and save for reinstallation later. Close the guide panels.
Keeping a firm grip on the air conditioner, raise the sash, and carefully tilt the air conditioner backward,
draining any condensate. Lift the air conditioner from the window and remove the sash seal from be_een the
windows.
Line Cord Plug
" _,_ (-Do not under any"
clrcumstance,_ cut
_.._/"--_ or remove the
I grounding prong
Use Wall Receptacle Power Supply
u
Standard 125V, 3-wire grounding
Power supply cord with
3-prong grounding plug
receptacle rated 15A, 125V AC
Fig. 13
DRAINCAP
DRAINPIPE
Use 15 AMP time
delay fuse or circuit
breaker.
USE OF EX N CORDS
Because of potential safety hazards, we strongly discourage the use of an extension cord. However, if you wish to
use an extension cord, use a CSA certified/UL-listed 3-wire (grounding)extension cord, rated 15A, 125V.
Page 12
fore you for servia...
Troubleshooting TiPs save time and money!
Review the chart below first and you may not need to call for service.
Normal Operation
• You may hear a pinging noise caused by water being picked up and thrown against the condenser
on rainy days or when the humidity is high. This design feature helps remove moisture and improve
efficiency.
• Water will collect in the base pan during high humidity or on rainy days. The water may overflow
and drip from the outdoor side of the unit.
• The fan may run even when the compressor does not.
Abnormal OPeration
Air conditioner
does not start
Air conditioner
does not coolas it
should
• Make sure the air conditioner plug is pushed
completely into the outlet,
• Check the house Dseicircuit breaker box and
replace the fuse or reset the breaker.
• When power is restored, wait 3 minutes to restart the
air conditioner to prevent tripping of the compressor
overload.
• Make sure there are no curtains, blinds or furniture
blocking the front of:the air conditioner.
• Set TEMP Control to a lower number.
• Clean the filter at least every 2 weeks.
See the Care and Maintenance section.
•When the air conditioner is first turn_ on, you need
to allow time for the room to cool down,
• Check for open furnace floor registers and cold air
returns.
• See Air Conditioner Freezing Up below
Air conditioner
freezingup
• Set the mode control at High Fan or ffigh Cool with
thermostat at I or 2.
Page 13

Page 14

Reportezicilesnumerosde modeleetdeserierespectifs
desunitesinterieureetexterieure:
Unit_int_ieure
N°de serie
Ces numeros sont inscrits sur i'etiquette apposee sur le
flanc de chaque unite.
Raison sociale du vendeur
Date d'achat
L'agrafe votre re_:u ici pour la preuve d'achat.
LISEZ CE MANUEL
• Le present manuel communique de nombreuses et
precieuses informations quant a I'utilisation eta la
maintenance de ce climatiseur. Un entretien preventif
simple se traduit par une Iongevite accrue du climatiseur,
d'oO une importante economie de temps et d'argent.
• Les conseils de d6pannage permettent de r6soudre les
roblemes les plus courants. La _nsultation prealable des
onseils de depannage peut eviter le recours a un
techniden de reparation,
, Toute intervention (r_paration ou maintenance)de cet
appareil do.it _tre confiee a un technicien agr66.
• Ce climatiseur West pas destine a _tre utilise sans
surveillance par de jeunes enfants ou des personnes
• Veiller _ ne pas laisser de jeunes enfants joiuer avec le
climatiseur.
Page 15

Mesums de curite
Les instructions ci-apres doivent etre observ6es dans ie but de pr6venir tout risque de dommages corpore]s
ou mat6fiels.
I L'utilisation non conforme, r6sultant de [a n6g]igence des instructions, est su_epflble de prov_uer des
dommages _rpore[s ou materiels dont la gravite est signalee par les indications suivantes :
II A cause du poids Iourd du produiL il est recommande que vous ayez un aide a I'aide dans I'i[nsta]]ation.
m Faites Attention! Bords Pointus! Voir Avertissem_t, page 14,
-_ AVERTISSEMENT Ce symbole signale un risque de blessure grave, voire morteMle. /
/ |
t Ca symbo,e signa,e un risqueHmiteaux dommages materiels.
I Les significations respectives des symboles util[ses darts ce manuel sont indiquees ci-dessous.
f Pratique b eviter imperativement. -')
€_ Instruction b observer imp, rativement. ,,,J
,1
f
• Tout mauva[s branchement peut
entrainer une surchauffe de votre
appareil et causer eiectrocution
ou incendie.
• Ceci pourrait provoquer un
electrique ou un incendie, dO
une surchauffe.
• Ceci provoquera une surchauffe
et un risque d'electrocution ou
d'[ncendie.
. IIy a risque d'electrocu_on,
, Ceci pourra_ causer
electrocution ou incendie.
• _ci _urrait mener au prob_eme
de sant&
®
Page 16

ATTENTION i]
,Vousdsquezdevousblesser.
• De _a_ussiere pourrait
s'accumuler sur Fechangeur
thermique.
• Ueau peut s'infiltrer dans
appareil et affecter Iisolement.
Cela peut 6galernent provoquer
un choc electrique.
• L'animai comme la plante
peuvent en souffrir.
• Le ventiEateurde refroidissement
toumant &grande vitesse darts
Fappareil,cela peut provoquer un
accident.
• Ledimatiseurnedoitp3s¢treu_iiisepour
prot6gercertainsa_areils depr6cisiondes
a_imentsdesanimauxdesplant_ etdes
objetsd'art.Laqualiterisqued'en_ouffdr.
• II y a risque de choc electrique.
• L'appareil risque de prendre feu
ou _ecoffret risque d'etre
deform&
, Fatesatten_onenmanipulantlebottler.
Saisissezle bottierfermementetne/e
laissezpasglissertouten letenant
,.Er@loyezlesgantsIourds[pour
manipu_erleboftieraubesoin. _
, Nelaissezpas
leboi'tier
Page 17

Instructions de Fon ionnement
Les commandes ressembleron,t rune des suivantes.
Les Commandes
R#GLAGE DE LA TEMPERATURE
f
• Ce _uton peut contr61erautomatiquement la temperature de
la pie_, On peut regler la tem_rature dans une gamme de
60°Fa 86°F par tranche de I_R
Choisir un chiffre plus bas pour une tem_rature de lapiece
plus basse,
ECONOMIE D'I_NERGIE,
Le ventJlateurs'arr_te Iorsque le com_essur cesse de refroidir.
• Environ routes les3 minutes, leventlateur se mettra
en marche et verifiera l'_r de la piece pour determiner si un
refroidissement e_ necessair&
REFROIDISSEMENTNENTILATEUR/SEC
• Chaque foesque vous appuyez sur ce bouton, ii va passer entre
COOL, FAN et DRY.
MINUTERIE MARCHFJARRET
-ARRET DU FONCTIONNEMENT
° Chaque lois quevous pressez ce bouton, Iorsque I'appareil
fonctionne, la minuterie se r_gle comme suit: (t Heure-*
2 Heures-*3 Heures-*4 Heures--*5Heures_,6 Heures--,'7Heures
-*8 Heures-+9 Heures_10 Heures-*11 Heures-*12 Heures _,
annulaion)
° Latem_rature de r6glage augmentera de 2°F 30 mn plus
tard et encore de 2°F 30mn plustard.
- DIEBUTDU FONCTIONNEMENT
° Chaque fois que vous pressez ce _uton, Iorsque I'a_areil
foncIionne, la min_erie se regle comme suit: (1 Heure-,
2 Heures-,,3 Heures_4 Heures-,,5 Heures-*6 Heures _7 Heures
--*8Heures---9 Heures-.,10 Heures.-,11 Heures--,12 Heures--,.
annulation)
° Latem_rature de r6glage augme_era de2'F 30 mn plus tard
et encore de 2°F 30ran plus tar&
ALIMENTATION
• Pour mettre I'a_are,il en maJ'che(ON), pressez ce bouton.
Pour eteindre I'appareil (OFF) pressez de nouveau sur le _uton.
° Ce _uton a pdorite sur tousles a_res.
• Quand vous met;tez Pappareilen marche la premiere fois,
il est r6gle au mode Highcool eta la tem_rature de 72°F.
VITESSE DE VENTILATEUR
° Chaque foesque vous appuyez sur ce bouton, le r6glage se
fait _mme suit. {High(F2)-+Low(F1) --,High(F2)...}.
Page 18

• Pour mettre I'appareil en marche (ON), pressez _ bouton. Pour eteindre Fappareil (OFF),
pressez de nouveau sur le bouton.
• C:ebouton a priorite sur tous les autres.
• Quand vous mettez I'appareil en marche Ilapremiere lois,
il est regle au mode High cool eta ia temperature de 72 F
REGLAGE DE LA TEMPERATURE
• Ce bouton peut _ntreler automatiquement la temperature de la piece.
On peut regler la temperature dans une gamme
de 60 F a 86°F par tranche de i°F.
Choisir un chiffre plus bas pour une temperature de la piece plus basse,
VlTESSE DE VENTILATEUR
• Chaque fois que vous appuyez sur ce _uton, le reglage se
fait _mme suit. (High(F2)_-Low(F1).*High(F2)._)
MINUTERI E MARCH E/ARRET ,,
- ARRET DU FONCTIONNEMENT
• Chaque lois que vous pressez ce bouton, Iorsque rappareil
fonctionne, la minuterie se regle cornme suit: (1 Heure.*
2 Heures.*3 Heures_4 Heures.*5 Heures.*6 Heures.*7 Heures
.*8 Heures.*9 Heures.*l 0 Heures-*l 1 Heures.*12 Heures.*
annulatbn
• La tern de reglage augmentera de 2°F 30 mn plus r
tard et entre de 2°F 30ran plus tar&
- DEBUT DU FONCTIONNEMENT
• Chaque fois que vous pressez _ bouton, Iorsque fappareill
fonctionne, la minuterie se r_gle comme suit: (1 Heure.*
2 Heures.*3 Heures.*4 Heures.*5 Heures.*6 Heures.*7 Heures
.*8 Heures.*9 Heures.*l 0 Heures.*l 1 Heures.*12 Heures.* annulation)
• La temperature de reglage augmentera de 2°F 30 mn plus tard
et encore de 2°F 30ran plus tard.
Timer M_e
ECONOIVIIE D'ENERGiE
Le ventilateur s'arrete Ior_ue le compressur cesse de reffoidir.
• Environ routes les 3 minutes, le ventlateur se mettra en marche et verifiera fair
de la piece pour determiner si un refroidissement est n_essaire.
REFROIDISSEMENTIVENTILATEURISEC
• C:haque lois que vous pressez ce bourn COOL, FAN et DRY altemeront.
i
Comment insemr les piles
1, Retire la trappe pile en la faisant gfisser vers bas.
2, Me_e deux piles neuves dans leur Iogement en
respectant la F_larit&
3, Remettre la trappe pile dans sa glissiCre.
• Ne pas utiliser de piles
rechargeable darts la
telecommande,
• Si vous comptez ne pas
utiiiser fappareil pour une
Iongue pedode, reflrer les
piles de la t_lecommande.
Page 19

Commanides supplentaires et renseignements importants.
La Direction de L'air
. POUR AJUSTER LA DIRECTION DE L'AIR A L'AIDE DE LA COMMAiNDE DE DIRECTION
HORIZONTALE DE L"AIR
Envous servant des langue_es de contr61e, vous
pouvez diriger la circulation d'air vers la gauche,
la droite, droit devant ou n'importe quel_e
combinaison de ces directions.
NettqyageetEntretien
FERMEZ LE CLIMATISEUR ET DEBRANCHEZ LA FICHE DE _ PRISE DE COURANT.
. NETTOYER LE FILTRE
Le filtre & air se salira in6vitablement puisqu'iUle les
particules de poussiere de YairambianL Vous devdez
le nettoyer & toutes les 2 semaines. Si le filtre
demeure sale, la circulation d'air diminuera et la
capacite de refroidissement en sera serieusement
diminuee, pouvant m6me endommager I'appareil.
1,Tirez sur le grillage d'admission vers vous en prenant
les deux _anguettes;retirez le filtre & air (Schema 1).
2.Nettoyez le fitlre dans reau tiede (environ
104 _40 °C). Assurez-vous de bien secouer le filtre et
de retirer route I'eau avant de le remettre en place
. NETTOYER LE CLIMATISEUR
Vous pouvez nettoyer le grillage frontal et le grillage
d'admission & I'aided'un chiffon humecte d'un detergent
doux (_hema 2).
Vous pouvez egalement nettoyer le bottier en utilisant
un savon ou detergent doux et de reau ti¢de, puis
faites-le brilier a l'aide de cire liquide pour appareils
electromenagers.
Afin de maintenir une performance constante de
I'appareil, les bobines de condensateur (du c8t6
ext6rieur) doivent 6tre v6ifi6es refulierement;
nettoyez-les si elles sont bloques par Jasuie ou par
les saEetesprovenant du dehors.
Neforcezpas
pourourvriret
ne I'ouvrez
pastroploin
Schema 1
Schema 2
, COMMENT ENLEVER LE GRILLAGE FRONTAL
1,Retirez les _utons du thermostat et des fonctions en
tirant dessus.
2. Retirez la vis quitient le grillage frontal (Schema 3)_
3. Poussez sur le grillage vers le haut, a partir du bas, et
tirez sur le dessus de fagon _ I'eloigner du bo°Itier; les
languettes sup6deures sortiront de leurs fentes
(Schema 4).
Schema 3
Schema 4
Page 20

In ructions d'installation
Apprendre le nom des pieces avant I°installation vous aidera a mieux comprendre le
processus d'installation
1 9
1. BO]TIER
2. DEFLECTEUR D'AIR HORIZONTAL
3. De:CHARGE D'AIR FROiD
4, GRILLAGE FRONTAL
5. GRILLAGE D'ADMISSION
6. FILTRE A AiR
7. TABLERO DE CONTROL
8. PRISE D'ADMISSION
9. GUIDE SUPERIEUR
10. TELECOMMANDE
Page 21

Instructionsd'installation
REMARQUE: Toutes les pieces pieces de support dovient 6tre ancr6es solidement dans
du bois franc, de la magonnerie ou du m6tal.
1. Cet appareil a 6t6 congu pour etre install6 dans des fenetres doubles & guillotine dont la
largeur d'ouverture varie entre 22 po.et 36 pc. Le ch&ssis du haut et celui du bas dovient
s'ouvrir suffisamment pour permettre une ouverture verticale de t4" & partir du bas de la
glissiere jusqu'au rebord de la fenetre (voir le Schema 5-2).
2. Si le cadre de la fenetre ext6rieure gene I'installation en n'offrant pas une pente de
drainage suffisante, fixez une tale de bois de 2 po/5Omm de large sur toute la largeur du
rebord interieur de la fenetre. La cale de bois dolt 6tre assez 6paisse pour remonter la
hauteur du rebord interieur de la fen6tre, de maniere & ce que le climatiseur puisse etre
installe sans probleme. Voir le Schema 5-2. Le dessus de la caie de bois doit depasser
le cadre de la fenetre d'environ 3/4 pc afin de creer une pente qui facilitera le drainage
de la condensation vers I' exterieur.
3. Fixez une deuxieme cale de bois (de 6 po/150mm de long, 1 1/2 po/38 mm de large et
de la meme epaisseur que la premiere) au centre du rebord exterieur de la fenetre, en la
coingant contre I' arriere du rebord interieur. Vous souleverez ainsi le support en L ou
celui pour le rebord de la fenetre selon le cas, tel qu'illlsustre au Schema 5-2.
4. Si la distance entre "CALE DE BOIS MONTEE SUR LE DESSUS DU REBORD INTERIEUR" et
"CADRE DE LA DOUBLE FENETRE" est plus de 1", deux bande en bois ne sont pas n6cessaires.
REBORD 1" MAX.
INTERIEUR CALEDE BOISMONTEE JEUDE
_' DU REBORDINTERIEUR
_hema 5-i
SUR LE DESSUS 3/4 PO i
DOUBLE
R_BORD
INTERIEUR
INTERIEUR
CALEDEBOIS
SURLAQUELLE
SERONT
LESUPPORTEN
LOU LESUPPORT
DEREBORD
DEFENETRE
FENETRE
REBORD
EXTERIEUR
Schema 5-2
DE
MATERIEL REQUIS POUR L'INSTALLATION ]
TYPEA: Qte:l i TYPEB:Qt_:5 TYPEC: @6:3
(Vis courte) . (Vis& _! s) _ (L Crochet)
TYPE D:Qte:l
(Ban_ d'6tanch_it_)
(En_s adhesif)
TYPE E:@6:i
(Banded'etanch6ite)
(Sals endosadhesif)
E
E
!
TYPE F:Qt6:2
(Panneauxcoulis_nts)
TYPE G: Qte:l
(Soutenir le crochet)
Page 22

A. AVANT L' INSTALLATION
1. Inserez les panneaux coulissants dans les guides
du climatiseur, Attechez les panneaux coulissants
& I'appareil en vous servant des vis de type, A, tel
qu'iHustre au Schema 6.
2. Coupez la bande d'etancheite autocollante (Type
D) sebn la largeur de la fenetre.
Retirez I'en®s autocotlant de la bande et collez-la
sur ie dessous de la fenetre du bas. (Voir le
Schema 7)
B. CO CEZ L'INSTALLATION
1,PLACEZ L'APPAREIL DANS LA FENETRE
Ouverz la fenetre et faites une marque Ngne au
centre du interieur_ tel qu'iltustre au Schema 8,
2. A_AGHEZ LE SUPPORT EN L
a, InstaHezles consoles L derriere le seuil de la
fenetre interieure, avec le cSte court de la
console somme montr& UflHsez les 2 vis (Type
A) foarni& Le support sert& maintenir I'appareil
en place de fagon plus se_ritaire,
b. Assurez-vous de le fixer contre i'arriere du
rebord intedeur,, Voir Schema 9_
]FYPEA
Schema 6
Schema 7
TYPE A
3. INSTALLEZ LE CLIMA TISEUR A LA FENETRE
a. Levez doucement le climatiseur et glissez-le
dans la fenetre ouverte. Assurez-vous que le
guide sous le climatiseur tombe dans les coches
du support en L Voir le Schema 9.
Durant les etapes qui suivent, tenez le
climatiseur fermement jusqu'& _ que le cadre
de la fenetre soit descendu et fermement
appuy6 sur la rainure superieure, qui se
trouve derriere les panneaux lateraux. La
chute de rappareil pourrait causer des
blessures ou des dommages & la propriete.
Lorsque le climatiseur tombe dans le mensula en
Lle dimatiseur sera maintenant centre dans la
fenetre, tel qu'iHustre au Schema 10.
REBORD
DEINTERIEUR
REBORD TYPEA
DE EXTERIEUR
EXTER|EUR
SUPPORT EN L
Schema 9
_hema 10
|NT_RIEUR
CENTRALE
UGNE CENTRALE
Page 23

b. Pendant que vous stabilisez le climatiseur.
descendez tranquilement la glissiere de la fenetre en
arriere du guide superieur du climatiseur, te_
qu1I_ustreau Schema 11.
4. ATTACHEZ LES PANNEAUX COULISSANTS
Ethez _espanneaux coulissants de fa£:on& ce qu'ils
occupent toute _'ouverture de la fenetre et attachez-ies
I'aide des 4 vis (Type B), tel qu'iHustre au Schema 12.
5. INSTALLZ LA BANDE ET LE VERROU DE LA
CADRE DE
BANDE D_ EIIIFAN c H E HIIE
APPROXI
_AATIVEMEN"F1,4°
a. Coupez Jabande d'etancheJte de la glissiere sebn _a
largeur de la fenetre. Bourrez I'espace entre la
fenet:re et le verre avecla bande de la glissiere de
fagon & empecher I'air et les insectes d'entrer dans
la piu_e tel qu'illustre au Schema 12,
b, Vissez _everrou de la glissiere en vous servant
d'une vis de type C, tel qu'illustre au Schema 12,
VERROU DE
LA GLISSI_B/E
Type A
8ANDE
& Vous avez maintenant complet# rinstallation de
vorte climatiseur. Consultez ia section sur la LES
MESURES DE SE:CURIT_:ELECTRIQUES pour tous
les d6taiis du branchement du fi/ d'almentation _ la
Schema 12
prise de couranL
C. CO TFIXERLE TUYAUD'EVACUA770N
En temp humide, I'eau peut causer le debordement du
BAC DE BASE. Pour 6vacuer Yeau, enlevez le
couverc_e d'evacuation et fixez _etuyau d'evacuation
rorifice arriere du BAC DE _ BASE. (Schema 13)
LE RETRAIT DE LA FENETRE
To,umez le bouton des fonctions & la position "Off" (hors tension), debranchez ie fil d'alimentation et reflrez le
verrou de la giissiere et les vis installees au haut et au bas des panneaux coulissants. Conservez ces vis
pour toute installation ulterieure. Refermez les panneaux coulissants.. En tenant solidement le cDmatiseur,
soulevez la glissiere de la fenere & guillotione et penchez lentement rappareil par en arriere en prenant soin
de recolter i'ecedent d'eau qui _urrait _uler. GHssez le climatiseur vers la droite et so[tez-le de la fenetre;
retirez ensuite la banded' etancheite de la glissiere qui se trouve entre, les fen_tres.
Schema 13
TUYAU
D'EVACUAT©N
CAPUCHON D'EVACUAT!ON
Donnees sur I ele,triclte
Fiche du cordon d'alimentation Utilisez ce type de prise rnurale Source d'alimentation
Necoupezn_nenlevez
"-_ enaucun_s la _oche
_Z:_" deraise&lamassede Utilisez un fusible &
r .!.afiche. _ retardement de 15 AMP
2 ou un disjoncteur
i Fil d'alimentation avecfiche & 3 broches de type
mise & la masse
L'UTILISATION DE CORDONS D'EXTENSION
A ca_e desdangers£otentiels_us vousdeconseillonsfortementrutilisationde cordonsd'exte_ion. Toutefois si voustenez
& lesutiliser,servez-vousd'uncordond'extension&3 illshomologuepar I'AONOR,dont_acapaciteest_ 15A,125V,
Receptacle standard de 125V
3 fills avec raise & la masse,
capacit6 de 15A,125V CA
Page 24

Avant de pla r un appel de
Quelques conseits pour vous depunner:
Epargnez temps et argent! Revisez le tableau d-dessous et vous eviterez
peut-#tre un appel de service coOteux.
Fonctionnement normal
• II se peut que vous entendiez un cliquettement cause par I'eau qui est soulevee et pr_etee contre
le condensateur lots des jours de pluie ou Iorsque le taux d'humidite est elev& Cette caractedstque
se_ a reduire I'humidite et ameliorer refficacite de I'appareil.
• L'eau s'a_umulera dans le bac du fond Iors des jours tres humides ou des jours de pluie. L'eau
peut deborder et s'egoutter a rexterieur de rappareil.
• Le ventilateur peut fonctionner meme si le compresseur est inactif.
Fonctionnement anormal
• Assurez-vousde bienenfoncerla fiche duclimatiseurclans
la prise decouranL
Le climatiseur
, V6rifiezle fusibleou ledi_oncteur, remplacezle fusiHe ou
reme_ezle disjoncteuren fonction,
Leclimatiseur
tie refroiditpas
maniere
efficace.
Le climatiscur
• Apres avoir ramene le co,urant, attendez 3 minutes avant
de repair le climatiseur, ce qui emp_chera de d_clencher
la _rcharge du com#"esseur.
• Assurez-vous d'61oigr_r tout rideau, store ou meuble
_uvant obst_er l'avant du dimatiseur.
• Regler la commande TEMP & un chiffre _s.
• Nettoyez r6guli_rementlefiltre (aumoins &routesles
deuxsemaines),Consultezla sectiondes instructionsde
fonctionnement&cesuiet,
•Lorsque vous mettezle climatiseuren marchepour la
premierefob, vous devezlui laissersuffi_mment de
temps pour refroidirla pi6ce.
•Vedfiezsi les registresdu systeme dechauffageau
plancheret les retoursd'air froidsont fermes.
• Consultez la rubdque "Le ctimatiseur est geW' d-des_us.
• R6glez la commande des modes & I& position elevee du
ver_tilateur High Fan ou de refroidissement _lev_ High
Cool en ajusta_ le thermostat a 1 ou 2.
Page 25

Page 26

PARA SU INFORMACION
Escdba aqui los n_meros de serie y modelo de las
unidades exterior e interior:
N_ de Mode|o
N_ Serie
Los nOmeros figuran en una etiqueta en el lateral de cada
unidad.
Distribuidor
Fecha de comma
Cosa con una grapa sur_ibo aquipara prue_ de la compra,
LEA ESTE MANUAL
• Aqui encontrara numerosas sugerencias sobre como
utilizar y mantener adecuadamente su acondicionador de
aire. Con unos cuantos cuidados preventivos se puede
ahorrar mucho tiempo y dinero a Io largo de la vida Otil de
su acondicionador de aire.
• En la tabla de sugerencias para la resoluci6n de
problemas encontrara respuestas a la mayor[a de los
problemas m_s comunes. Si _nsulta pr[mero ]a tabla de
Sugerencias para la resolucibn de problemas, quiz_ ni
siquiera necesite avisar al servicio t6cni_.
• Consulte _n el servicio t_nico autorizado sobre la
reparacion o el mantenimiento de esta unidad.
• Et acondicionador de aire no de_ ser utilizado pot
niSos pequeSos o personas inestables sin
sup.ervisibn.
, Es preciso vigilar a los nifios pequefios para
a_gurarse de que no juegart con el acondicionador
de aire.
Page 27

Precauciones Importantes de Seguridad
Para prevenirtanto lesions al usuadou otras _rsonas como _5os matedales,es precisoseguir estas instrucciones.
II El man,ejoin_rrecto debido a la inobserJanciade est_s instrucdonespu_e _usar lesions o daSos cuyagravedad
esta clasificadaen lassiguientes indicacion.es.
I A _use delpesopesadodel producto,se recomiendaque ustedtenga a un ayudantea partidpa en la in_alaci6n.
II TengaPrecaution! Bordes Afilados! Vet Advertencia, p_ina 24.
-- Este simbolo indica la posibilidad de lesiones mortales o grave& |
/
L Este simbolo indica la posibilidad de lesiones o da_os |
I El significado de los sim_los utiliza_s en este manual se indica a continuaci6n.
materiales+
Asegt_rese de no hacerlo. -')
€_ Asegurese de seguir las instrucciones. ,,,J
r [ _ ADVERTENOIAj
• De otra forma, ello _asionaria
una descarga electrica o
incendio a causa de la
generaci6n de calor,
• EIIo ocasionaria una descarga
electrica o incendio a causa
la generaci6n de calor,
1
•EHoocasionaria una descarga
electrica o incendio,
J
, Etlo ocasionaria una descarga
el_trica o incendio a causa de
la generaci6n _ calor.
®
.Puede ocasionar una descarga
electric&
®
• Esto _dria dirigir al #°oblema
de la salud,
Page 28

I PRECAUClON ]
• Esto _dda causar heridas • El agua podrla entrar en la
unidad y degradar el aislamiento.
Tambien podria causar una
sacudida ei_ctricm
• Podria causar acumulamiento de
_lvo en el intercambiador de
caJor.
• Esto F_oddadaSara_animal o a
la pranta.
• Puesto que el ventilador gira a
alta ve_ocidaddurante la
operaci6n, podrla ocasionar
heridas.
• No utilice e_e acondicio_dor de
aire para consewar dispositivosde
precision,alime_os y obietosde,
arte; noponga tampocoanimalesy
plantas cerca de 61.oEstopodria
deteriorarla caEidad,etc.
• Esto podria caus_ una sacudida
el6ctric&
• Esto _dria causar un incendio o
deformar la caia,
•TengaprecauciSna!maienarla
c£rcasaAgArrebfirmemen_yno
_rmita quese desilicemientrasfo
mantiene,
. _ilice guantesg_esasparamane_ar/a
carcasaseg_nla, Bo_'d_
necesidad,
quela
ca_casase
_slice
contrasu
piel!
Page 29

In ruccionnes de Funcionamiento
La apariencia de los controles sera como uno de los siguientes.
AJUSTE DE LA TEMPERATURA
• Este _t6n puede _ntro]ar ]atem_ratura del cuarto
automaticamente. La tem_ratda se puede ajustar de grado
en grade, desde 60°F hasta 86°F cada! °R Se]eccione el
numero mas bajo _ra la tem_ratura mas baja enel cuarto.
AHORRADOR DE ENERGiA
EJvent[]adorse det[ene cuando e] compressor no s[gue enfrian_.
• Aprox[madamente cada 3 m[nutos ellvent[lador se encender&
y necesitar_ verificar ]a temperatura @l cuarto para sa_r si
es ne_sario m;{s enfdamiento.
' I" Temp
FRiO/VENTILADOR/SECO
• Carla vez que usted presione este bot0n, este seSalara entre
COOL, FAN y DRY
,- MARCADOR DE ENCENDIDO/APAGADO
- OPERAC]ON DE PARADA:
•Cada vez que presione este _t6n, cuan_ el sistema este
o_rando, e] marcador de tiempo se ajustara de ia siguiente
manera (1Horn- 2 Horas_ 3 Horas--- 4 Horas-,. 5 Horas -*
6 Horns --,-7 Horas_ 8 Horas-,.9 Horns-,. 10Horas --.*11 Horas
12 Horas --,Cance]ar).
• La tem_ratura de ajuste se elevara 2°F,30 minutos ®spues,
y otros 2"F media hora despues.
- OPERACION DE ]N]CIACION:
•Cada vez que presione este _t0n, cuan_ el sistema este
o_rando, el marcador de tiempo se ajustara de lasiguiente
manera: (1Horn-* 2 Horas--,.3 Horas-,. 4 Horas_ 5 Horns -*
6 Hor_ -.-7 Horns-.-8 Horns--.-9 Horns.-,.10 Horas-.-11 Horas
12 Horas ---.Cancelar),
ENECNDIDOtAPAGADO
• Para ENCENDER el sistema presione el _t6n,
y para APAGARLO presione el bot6n otra vez.
• Este _t6n tiene prior[dad sobre todos losotros botones.
• Cuando Ud. Io enc[ende pot primera vez, el sistema est&en
el y latemperatura es de 72°F.
VELOCIDAD'DEL VENTILADOR
•Cada vez que presione este _t0n, el ajuste es como sigue
{Alto(F2)-," Bajo(F1)--*Nto(F2)._}.
Page 30

ControlRemoto
ENECNDIDO!APAGADO
• Para ENCENDER el sistema presione el boton, y para APAGARLO presione el bot6n otra vez.
• Este boton tiene priofidad _bre todos los otros botone&
• Cuando Ud. Io enciende pot primera vez, el sistema esta en el y la temperatura es de 72°R
AJUSTE DE LA TEMPERATU RA
• Este bot6n puede controlar la temperatura del cuarto autom_ticamente.
La temperatura se puede ajustar de grado en grado, desde 60°F
hasta 86°R Sebccione el n_mero m_s bajo para la temperatura m&s
baja en el cuarto.
VELOCIDAD DEL VENTILADOR
• Cada vez que presione este bot6n, el ajuste es como sigue.
(Alto(F2) -- Bajo(F1) -,,Nto(F2)...)
MARCADOR DE ENCENDIDO/APAGADO
-OPERACION DE PARADA:
• Cada vez que presione este botOn, cuando el sistema este
operando, el matador de tiempo se ajustara de ]a siguiente
manera: (1Hora_ 2 Horas--,,3 Horas-* 4 Horas-* 5 Horas
6 Horas _*7 Horas _*8 Horas_ 9 Horas_ 10 Horas _- 11 Horas
12 Horas _ Cancelar).
• La temperatura de ajuste se elevar_ 2°F, 30 minutos despu6s,
y otros 2°F media hora des#ues.
- OPERACION DE INICIACION:
•Cada vez que presione este boton, cuando el sistema este
operando, el marcador de tiempo se ajustara de la siguiente
manera: (1Hora _*2 Horas_ 3 Horas4 4 Horas-* 5 Horas
6 Horas-,. 7 Horas _ 8 Horas-,. 9 Horas-_ 10 Horas _ 11 Horas
12 Horas 4 Cancela0.
AHORRADOR DE ENERGiA
El ventilador se detiene cuando el compressor no sigue enfriando_
•Aproximadamente cada 3 minutos el venti]ador se encender&
y necesitar_ verificar la temperatura del cuarto para saber si
es necesario m_s enfriamiento.
Fan Speed
Timer Mode
Energy
Saver
Power
•Cada vez que presione este bot:6n, ]as palabras COOL, FAN y DRY aparecer_n alternadamente.
ComoPoner/as Bate#as
1. Quite ]a tapa de la pa_e posterior del
telemando. Para eHo haga deslizar la tapa
segOn la direccion della fiecha.
2. Introduzca las dos baterias, asegur_ndose
de que las direcciones (+) y (-) est6n
colocadas correctament. Use baterias
nuevas.
3. Volver a _rrar, resbalando la tapa hasta la
posiciOn iniciaL
• No utilice bateris recargables,
estas son diferentes de forma, de
dimensi6n y uso respecto alas
batedas secas usuaies
• Seque las baterias del telemando
cuando el acondicionador no vaya
a ser usado durante un largo
periodo.
Page 31

Controles adicionales e,informacion importante.
La dreccidn del aire
. PARA AJUSTAR LA DIRECCION DEL AIRE USANDO CONTROL DE LA DIRECCION DEL AIRE
Las dos lengOetas hodzontales para el control
de tas rejillas le permiten descargar el aire hacia
la izquJerda, o algo de aire a la izquierda y otro a
La derecha, o todo el aire hacia el frente, o
cualquier combinaciOn de las posiciones
mencionadas.
Cuidado y Mantenimiento
APAGUE EL AUREA_NDICIONADO Y SAQUE EL ENCHUFE DEL TOMA CORRJENTEDE LA PARED.
• PARA LIMPIAREL FILTRO
Limpie el Fittro del Aire, que extrae eJpolvo interior del
cuarto_
Debe ser lavado por Io menos cada dos semanas.
Un filtro de Aire sucio disminuye el fluio de aire y la
capacidad de enfriamiento se reduce.
1. Saque el Filtro de Aire de la parrilfa frontal
halando hacia la izquierda (vet Fig. 1).
2. Lave el Filtro de Aire con agua tibia.
Sac0adalo bien cuando est6 limpio para sacar la
humedad completamente.
Cobquelo en su lugar.
, LIMPIEZA DEL AIRE ACONDICINADO
No debe forzar
a abrir o a_ir a
lo Lejos.
Fig. 1
La parrilla frontal puede ser limpiada con un trapo
h0medo mojado en un detergente suave (ver Fig. 2). Fig, 2
El gabinete puede set lavado con jabon suave o
detergente y agua tibia, entonces pulido Cera Liquida
para aparatos.
Para asegurarse una eficiencia continua, las bobinas del
condensador (del lado expuesto al exterior) debe ser
revisado y lavado periOdicamente sea por que se tranque
con basura o polvo de la atmosferico.
• COMO REMOVER LA PARILLA FRONTAL Fig. 3
1. Saque el Filtro de Aire halando hacia la izquierda.
2. Saque el tomillo que asegura la Parrilla Frontal (vet Fig. 3).
3. Suelte el lado izquierdo pdrnero.
Despues cuidadosamente hale desde la parte de
ardba y empuje hacia la derecha. Las lengOetas est_n
aseguradas (vet Fig. 4).
Fig. 4
Page 32

Requerimientos de la
Aprender el nombre de las partes antes de la instalaci6n le ayudara a ente,nder el proceso
de instalaci6n.
1 9
1. GABINETE
2. DEFLECTOR HORIZONTAL DE AIRE
(VENTANI LLAS VERTICAKLES)
3. SALIDA DE AIRE
4. REJILLA FRONTAL
5. RECOLECTOR DE AIRE
(BANDEJA DE ENTRADA)
6. FILTRO DE AIRE
7. TABLEAU DE CONTROLE
8. TOMA DE AIRE
9, GUiA SUPERIOR
10 CONTROL REMOTO
Page 33

Requerimientos de la ventana
NOTA: Todas las partes que soportan la ventana deben de estar bien fijas a madera,
metal, o cemento+
1+La unidad esta diseMada para ser instalada en una ventana doble con anchos entre 22"
y 36"+ El borde superior e inferior deben de estar Io suficientemente abierto para permitir
un espacio vertical de pot Io menos 14" de la parte inferior de la ventana hasta la parte
superior de la ventana.
2+Si la sobre-ventana estorba coIOquese una tira de madera de 2 pulg de ancho a Io largo
de+ descanso de la ventana pot la parte que de internamente al cuarto, yen toda su
extensi6n. La tira de madera debe ser Io suficientemente gruesa para elevar el descanso
de la ventana, de tal manera que la unidad de aire acondicionado pueda ser intalada sin
interferencia del marco de la sobre-ventana (storm window). Vet Fig. 5-2+ La parte
superior de la tira de madera debe estar aproximadamente a 3/4 de pulg mAs alta que el
marco de la sobre ventana, (storm window) para ayudar a que el agua de condensaciOn
de la unidad fluya hacia afuera+
3. Instale una segunda tira de madera (aproximadamente 6 pulg+ de largo, 1+1/2 pulg de
ancho y mismo espesor que la primeratira de madera) en el centro del descanso
exterior, p6ngala contra la parte posterior del descanso interior. Esto elevarA la m6nsula
L como en la Fig. 5-2+
4, Si la distancia entre "FRANJA DE MADERA MONTADA SOBRE LA PARTE SUPERIOR
DEL DESCANSO INTERIOR" y +'TIRA DE MADERA PARA LA MENSULA L Y
MENSULA DE ANTEPECHO" es masque 1+',dos tiras de modetra no son necessarias.
ANTEPECHO
INTERIOR FRANJADE MADERA
i MONTADASOBRE
[ fl DEL DESCANSO
_ INTERIOR
"-+7 t|_AN:TEPECHO
INTERIORq lU EXTERIOR
Fig. 5-1
MATERIALES !
Tin A: 11 Tin B: 5 T+PQ C: 3
(TORNILLOCORTO) (TORNILLOMEDIANO) (ELPARENTESlSL)
TIPO D: 1 TIPO E: 1 TIPO F: 2 Tin G: 1
(BANDA ADHESIVA} (BANDA DEL MARCO) (PANEL GUIA} (SOSTENGAPARENTESIS)
(Adhesivo posterior) (Noadhesivoposterior)
LA PARTESUPERIOR
TIRA DEMADERA
PARALA MENSULA
L Y MENSU_ DE
INTERIOR EXTERIOR
Y
1"MAX.
ANTEPECHO
Fig, 5-2
_t- 3i4°PULG
DESEPARAQON i
HOJA DOBLE
ANTEPECHO
DE
Page 34

A. ANTES DE INSTALAR
1. Introduzca los paneles en los guias del aire
acondicionado. Las cortinas atorniflelas con los
tornillos (TIPO A), como en ia Fig. 6.
2. Corte la banda adhesiva (TIPO D) y coi_uela
del ancho de la ventana.
Remueva el pl_stico de la banda adhesiva y
col6quela en la parte superior de el marco
inferior de la ventana. (Vet Fig. 7)
B. _ INSTLACION
1. COLOCANDO LA L#VIDAD EN LA VENTANA
Abra la ventana y marque LINEA en el centro esta.
2, COLOQUE EL MENSULA EN L
a, Instale los sopo_es L detr_s de alf6izar interno
de la ventana con el lado corto del soporte
como esta ilustrado, Utilice 2 tomiflos (TI POA)
proveidos,
b La m6nsula ayuda a que la unidad se encuentre
firme, AsegrL_rese de porter la m6nsula en L
contra la parte posterior del descanso interior,
3. INSTALE EL AIRE A DO AiLA
VENTANA
a. Cuidadosamente levante el aire a_ndicionado y
cobquelo en el hoyo de la ventana. AsegOrese
de que la guia inferior dei aire acondicionado
caiga en lugar correcto del m6nsula en L Ver
Fig. 9.
TiPO A
Fig, 6
Fig. 8
DESCANSO
EXTERIOR
,\
Ti PO A
DESCANSO
INTERIOR
TIPO A
LINEADELCENTRO
En las siguientes instru_iones, sostenga la
unidad firmemente hasta que ia parte
corrediza de la ventana descanse sobre la
pa£e superior del canal y por detras del
marco de los paneles corredizo& Puede
haber lesiones o daSos si la unidad se cae de
la ventana.
IMPORTANTE :
Cuando el aire acondicionado sea fijado en el
support en L, el aire acondicionado ser& centrado
como pueden observar en la Fig. 10.
EXTERIOR
MENSULAEN L
Fig. 9
UNEA DEL CENTRO
Fig. 10
Page 35

b.Mientrasmantieneel aire acondicionadoen
posici6n,cuidadosamentebajeel bordede la
ventanasuperiorhastalaguiasuperiordel aire
acondicionado,comoenlaFig.11.
4. ASEGURE LOS PANELES
Exfienda los paneles para rellenar tos orificios de la
ventana usando los 4 torniiios (TIPO B) como en la
Fig. 12.
5, INSTALE LA BANDA
& Corte la banda dei
ventana. Coloque
vidrio y la ventana para prevenir la penetracion ai
cuarto de insectos y aire, _mo en la Fig. 12.
b. Atornille la cerradura del marco usando un tornillo
TIPO A, como en la Fig. 12.
6. La instalaci6n de/aire acondicionado de ventana
no estar_ completa. Vea SEGURIDAD ELECTPJCA
para conectar la extensi6n el6ctrica al toma
corriente.
DEL MARCO
marco del mismo ancho de la
la banda del marco entre el
BORDEDELAVENTANA
SUPER!OR
GUiAINFERIOR
Fig, 11 SUPPORTENL
CERRADURA
DEL MARCO
APROX/-
MADAMENT1/4'
BANDA DEL
MARCO
TIPO B
C: COMO INSTALAR EL TUBO DE DESAGUE
En clirnas h0medos, es posible que la BANDEJA
EVAPORADORA se Ilenne de agua. Para quitar el
agua acumulado, es preciso conectar el tubo de
desagQe. Quite la TAPA DEL DESAGOE y conecte el
TUBO a la BANDEJA EVAPORADORA. (Fig, 13)
REMOVERLO DE LA VENTANA TAPADELDESAGOE
Apague el aire acondicionado, de_necte el cordon el_trico del toma cordente, remueva la cerradura del
marco y los tornillos instalados en la pa_e supedor e inferior de los paneles, y guardelos para reinstalaci6n.
Cierre los paneles. Manteniendo el aire acondicionado fuertemente, levante el marco de la ventana, y
cuidadosamente, incline el aire acondicionado hacia alras, botando cualquier agua condensada. Deslice el aire
acondicionado 1" a la derecha_luego levantelo de la ventana y remuevale la banda del marco de la ventana.
Fig. 13
Cuelgue
InformacionElectrica
Corc6n Electrico Utilice el enchufe de la pared Consume de Energia
rNoIoco_ebajo
ninguna circuns_ncia
o remuevalapun_
del enchufe.
H Cordon electrico con
puntas para enchufar
Standard 125V, enchufe de 3
Lineas de 15A, 125V AC
Utilice un fusible de
15AMP o un
interruptor
USO DE CORDONES DE EXTENSION
Debido al potencial de peligro a su seguridad baio ciertas circunstancias recomendamos encaredidamente no
utiliar _rdones de extensi6n. Sin embargo, si usted decide usar un _rd6n de extensi6n, es absolutamente
necesario que este sea un cord6n listado bajo UL de tres espigas con conexi6n atierra calificado 15A, 125V.
Page 36

Antes de avi r al rvicio
Tips para solucionar probtemas
(Ahorre temopo y dinero) Cuando tenga algtJn problema primero consulte el cuadro que se
encuentra abajo y tal vez no he, site llamar para solicitar servicio tecnico.
Operacidn normal
• Durar te dias Iluviosos o cuando ta humedad es alta usted puede escuchar un ruido met&lico causa
por agua recogida y arrojada contra el condensador. Esta caracteristica ayuda a remover la
humedad y mejorar [a eficiencia.
• Durar te dias iluviosos o cuando la humedad es alta ei agua sera recolectada on la base deq
aparato. Esta agua podra fluir y sera eliminada por el lado externo de la unidad
• El ventilaear podra correr aOncuando el compresor no este encendido.
Operacidn anormal
El aire
acondicionadono
en¢iende
El aire
acon,dicionadono
enfria corno
debiera
, Asegurese que no haya co,has, persianas o muebies
, b!oqueando el frente del aJreacondicionado.
mas b_o.
, la seociOnde instrucciones de operaciOn.
, esperar un momento para que la habitacbn se enffie.
..... Xseg resequeiociasiassaii&sdeaiiees &.................
, cerradas para que el aire regrese.
Est_lezca una temperatura mas a_a.
El aire
aconidicionado
entria, demasiado
• Elija el modo alto del vent[lladorHigh Fan o enfriado
alto High Cool con el termostato en el numero 1 o 2.
Page 37

Page 38

Page 39

visit our web site/http://www.lgse_wice.com LG Electronics
LIMITED WARRANTY
United Statt_ of America
LG Electronk_ will repairor atits option replace, without charge, your productwhich p_ves to be def_mtive
in material or workmanship under normal use during the warranty Nriod listc_lbelow from the date of
ori_nal purcha_.
This warranty is good onlyto the originalpu_haser of the p_uct during the warranty periodas long as itis
inthe ILSincludingAlaska,Hawaii,and IJ.S.li_rritork_.
LG Room Air Conditioner Warranty Period
Pr.o.d.u._!...
Aii Parts
Compressor
No other exppess wamnty is @plicable to this product+ THE DIJR;gFR)N OF ANY IMPI,IED WARRANTIES.
NCLUDING TIIE IMPLIEJ) WARRANFY OF MERCHAN'IABILITY, IS LIMrI_iD TO THE DURATION OF
TI[E EXPR]iSS WARRANTY I[ERI:_N+ l,G ELF_CTRONICS SHALL NOT BE LIABLE F()R THE I,OSS OF
USE OF TIlE PRODUC% INCONVIENCE, LOSS OR ANY OTHER DAMAGES, DIRECT OR
CONSEQUENTIAL, ANSNG OUT OF TIlE [SE OF OR NAB{I.I'IT *I_)USE, THIS PROD[ICT OR FOR
ANY BREACH OF ANY EXPRESS OR IMPLII_D WARRANT'L NCI,IJDING TllE IMPMED WARRANTY
OF MERCHAN%,\BILrFY APPMCABEE TO THIS PRODIJCIL
Some States do not allow the exclusion or limitation of incidental or consequential damages o:r limitations
on how long ml implied warranty lasts; so these lfinitations or exclusions may not apply to you.
This warranty gives you specific legal fights m_d you may also have other rights which vary :[}om state to
state.
1Year 1Year (In-Home Service)
5 Years 1Year (h>Home Service)
THE ABOVE WARRANTY DOES NOT APPLY TO:
1 Service trips to your home to deliver and pickup, install, insrmct, or replace house fuses or correct
house wiring or plumbing, or correction of unauthorized repairs.
2 Damage to the product cat, seal by accident, t_sts_ fire_ fl_x_ls, or acts of God
3. Repairs when your LG product is used in other than normal, single-family household use.
4. Damage resulting from accident, alteration, misuse, abuse, or improper installation.
ThereNre, these costs arc paid by the consumer.
if the product is installed outside the normal service area, any cost of transportation involved in the
repair of the pr_Muct, or the r*eplacemellt of a defective parts_ shall be borne by the owner.
CUSTOMER ASSISTANCE NUMBERS:
"lb obtain Warranty Coverage:
:Retain your Bill of Sales to pruve date of purcha_.
A Copy oi"your Sales Receipt must be submitted at the time
warranty,service is provided.
"1_obtain Ihroductor Customer
Service Assistance:
Call 1-800-243-0000 (Mon.~ FrL 7AM ~ 8 PM C'D
(Sat.8 AM ~ 5 PM CT)
Press the appropriate me_moption, and have your product
type (R(×)mAir Conditione:0, model number, serial number, and
"1_obtain the nearest Authorized
Service Center:
ZiP Code ready.
Call 1_0!)-243-01)01)(24hrs aday',7 days per week)
15-essthe appropfiam option, and have your product tyg_
(R(×-_mAir Conditioner), m(_el number, serial aurae:r, and ZIP
P/No.: 3828A20133G Printed in Korea
 Loading...