

LG WF-T1068TH Service Manual

NOV . 2001 PRINTED IN KOREA P/No.:3828EA3013S

WASHING MACHINE
SERVICE MANUAL
MODELS : WF-T(S,C,F)1003TP(H,C)
WF-T1068TH
CAUTION
Before servicing the washer, Read the safety precautions in the manual.

2
SAFETY PRECAUTION!
DISASSEMBLE POWER CORD BEFORE SERVING
RECONNECT ALL GROUNDING DEVICES
IMPORTANT SAFETY NOTICE !
This service information is intended for individuals
possessing adequate backgrounds of electrical,
electronic and mechanical experience.
Any attempt to repair this appliance may result in
personal injury or property damage.
The manufacturer or seller can not be responsible
for the interpretation of this information, nor can it
assume any liability in connection with its use.
CONTENTS
1. Specifications..................................................................................................................................................3
2. Installation Instructions....................................................................................................................................4
3. Operating Instructions
3-1. Identification of Parts...........................................................................................................................10
3-2. Before Starting to Wash......................................................................................................................11
3-3. Function of Each Button......................................................................................................................16
3-4. Washing Programs..............................................................................................................................18
3-5. Other Functions...................................................................................................................................20
3-6. Care and Maintenance........................................................................................................................23
4. Service Information
4-1. Schematic Diagram.............................................................................................................................24
4-2. Wiring Diagram ...................................................................................................................................25
4-3. Program Time Chart............................................................................................................................26
4-4. Adjustment..........................................................................................................................................28
4-5. Disassembly Instruction......................................................................................................................29
4-6. Test Running without water.................................................................................................................32
4-7. Trouble Shooting against Common Washing Problems .....................................................................33
4-8. Trouble Shooting According to Error Message...................................................................................34
4-9. How to Diagnose and Repair by Symptom.........................................................................................36
5. Exploded View .............................................................................................................................................48
6. Replacement Part List...................................................................................................................................52
Model
Power Sourse
Input
Capacity
Inner Tub
Inlet Water Pressure
Spin Speed
Dim.
Weight
Program
Water Level
Reservation
Unbalance Switch
Lid Interlock Switch
Child Lock
Lint Filter
Softener Dispenser
Detergent Dispenser
Bleach Inlet
Auto Power Off
3
1. SPECIFICATIONS
WF-T(S,C,F)1003TP(H,C)
WF-T1068TH
Refer to rating label on the back of Washer
Refer to rating label on the back of Washer
Refer to rating label on the back of Washer
Stainless
0.3kgf/cm
2
~ 8kgf/cm
2
50Hz : 700 50 / 60Hz : 730 50
Refer to rating label on the back of Washer
Refer to rating label on the back of Washer
Fuzzy, Economy, Jean, Wool or Normal, Speed, Heavy, Wool
4 Stages
Available for 3 ~ 48 Hr
B.P Sensor
Magnet Sensor
Applied
Double
Applied
Applied
Applied
Applied
2. INSTALLATION INSTRUCTIONS
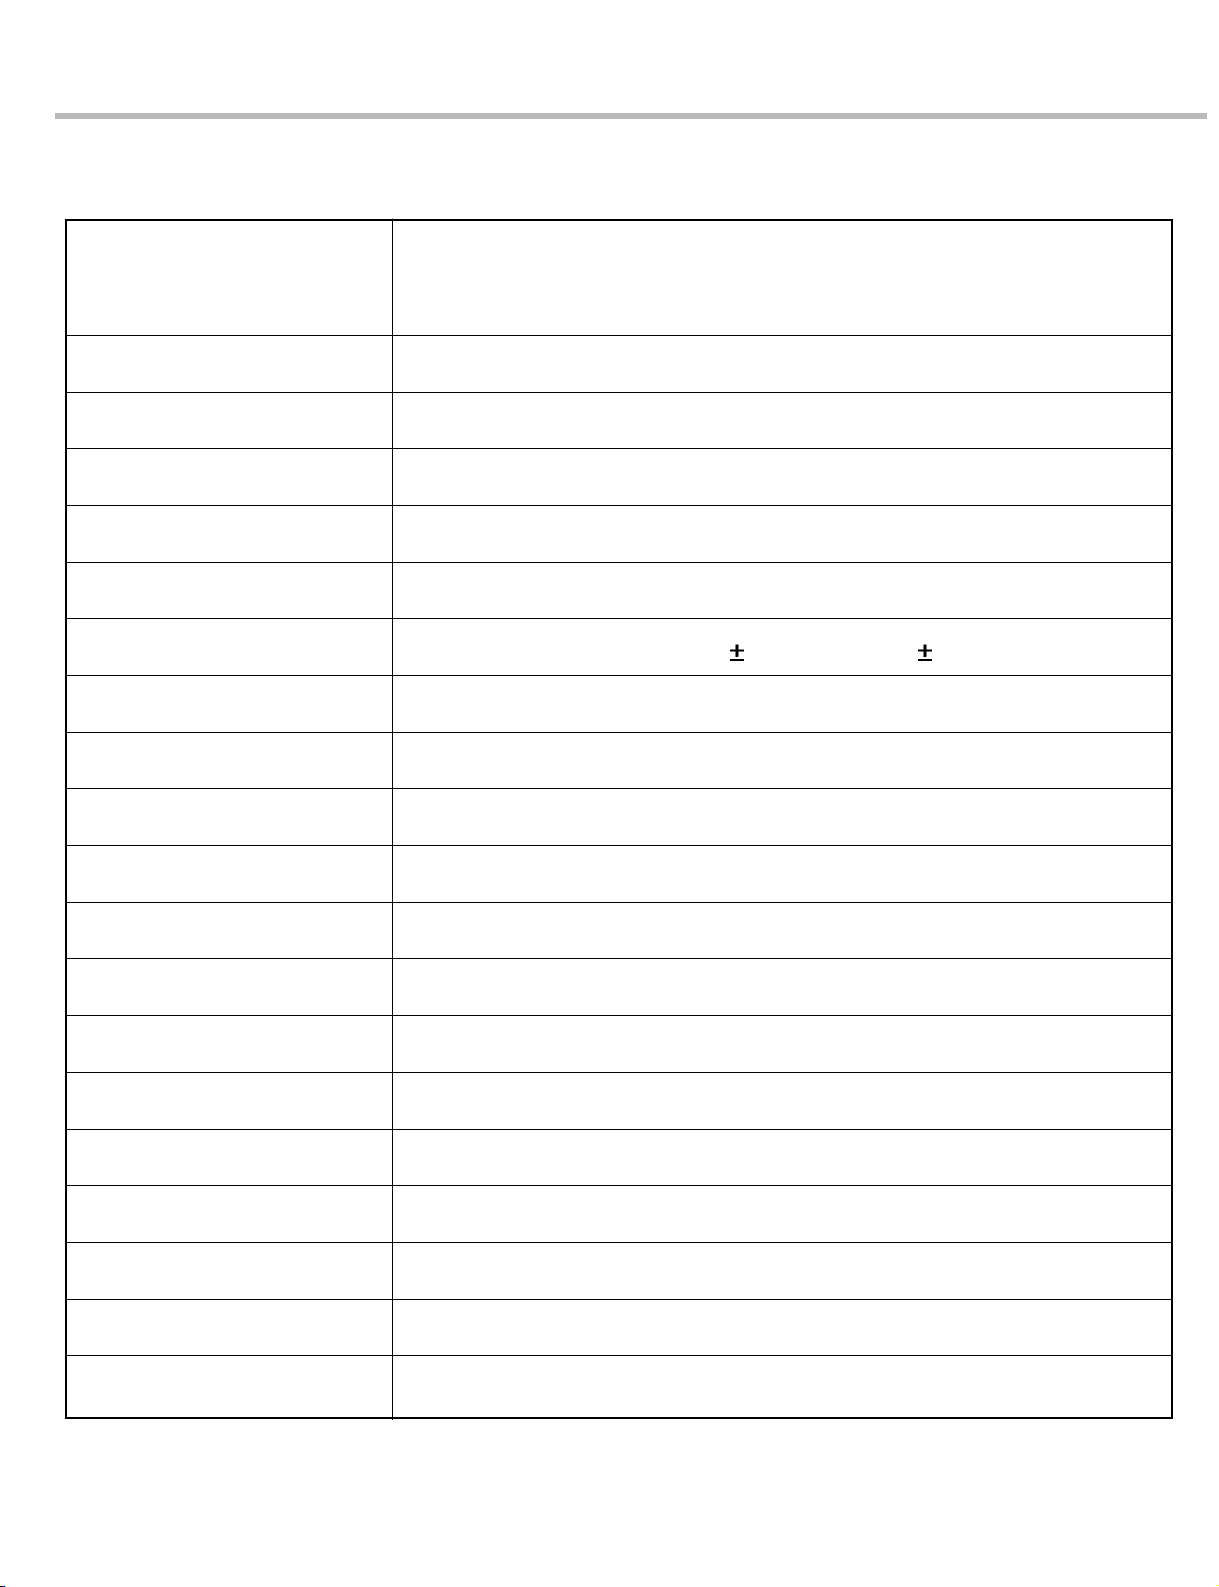
2-1. HOW TO ADJUST LEVEL
4
How to use the adjusting plates
∙ Use the adjusting plates to level the washer when
the adjustable legs cannot cover the gap.
1
2
Adjustable leg
Turn the adjustable legs to set the washer
horizontal (2 EA).
Installation area
∙Install the washer on flat and firm
surface.
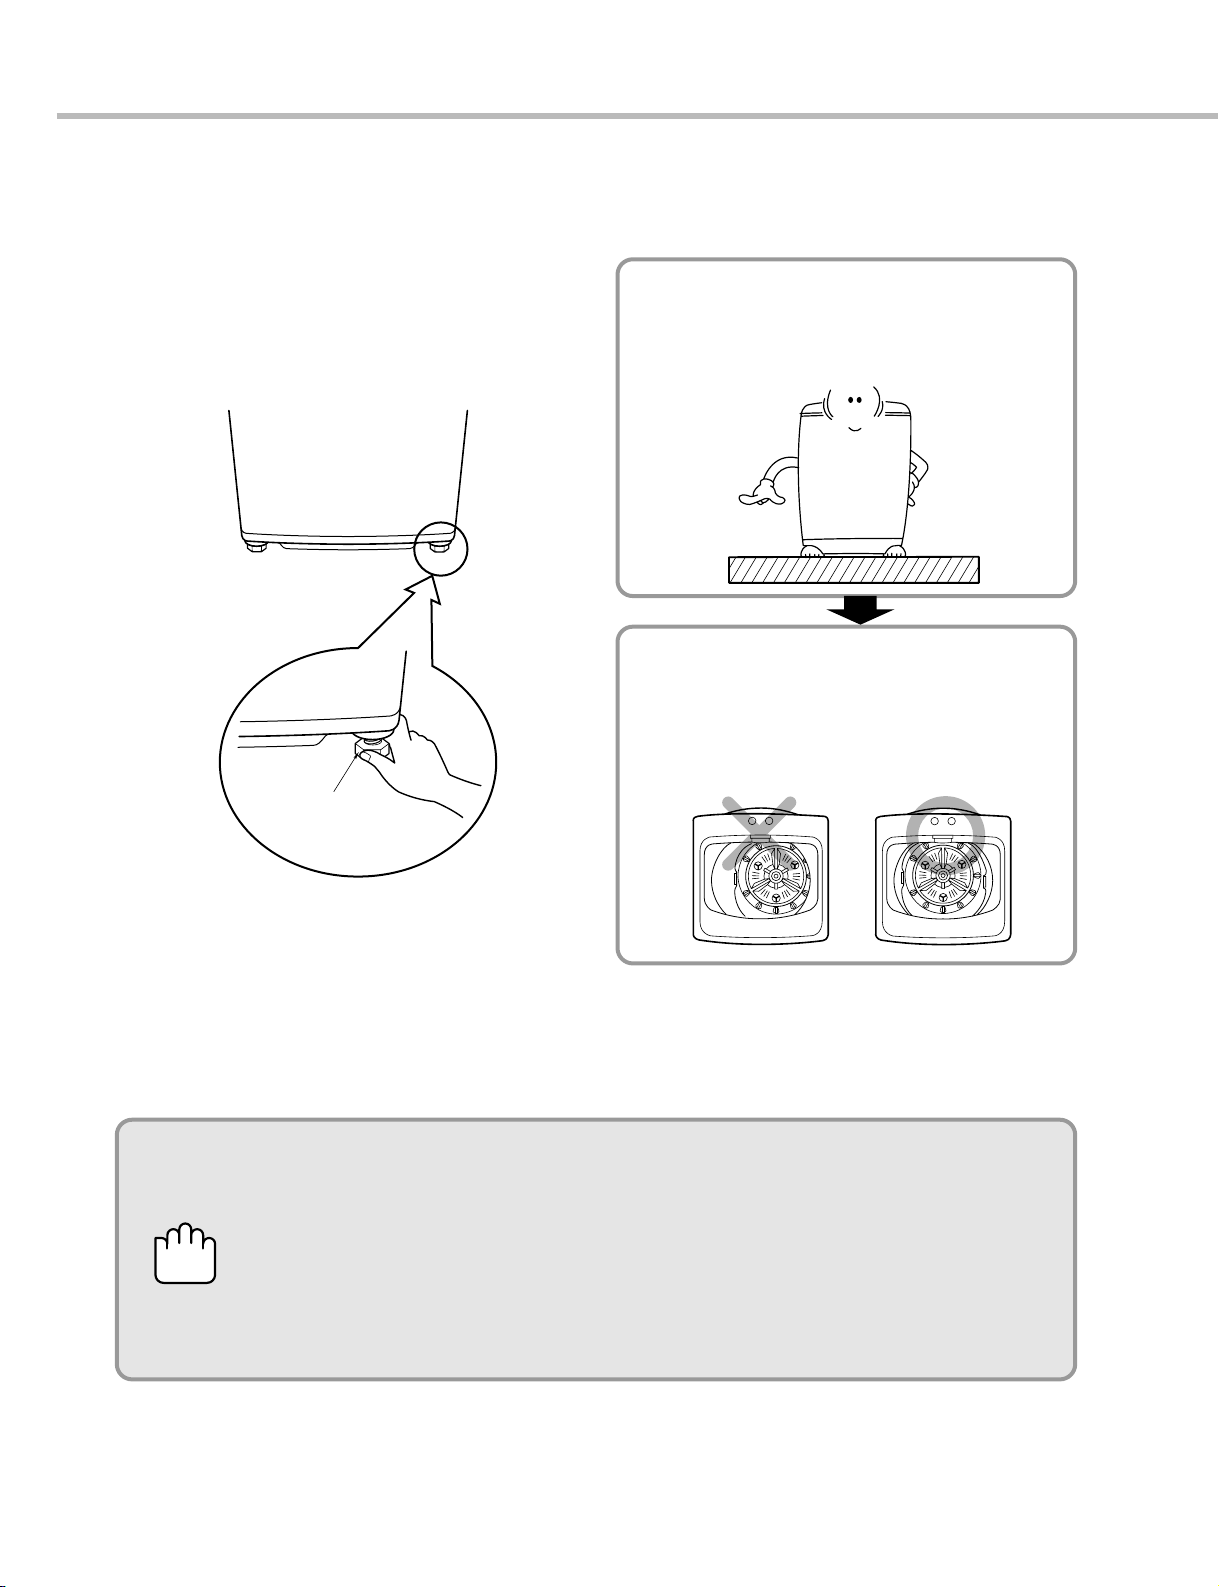
Improper installation of the washer may cause noise and malfunctioning.
1. The ventilating openings in the base area must not be obstructed be
carpeting
when the washing machine is installed on a carpeted floor.
2. Install the washing machine on a level and firm surface, any tilt
should be less than 1��.
CAUTION
Checking level
∙Open the lid, and check if the washer
is correctly leveled by looking down
from the top.
5
More than 10cm
More than 2cm
More than 2cm
35
4
Horizontal setting
∙Lift up the front of the washer and
adjust level by turning the adjustable
legs clockwise or using the adjusting
plate.
Confirming level
Distance between drain hose and the wall
Checking slope
∙ If installation surface is tilted, the
washer will be shaken.
∙ Place the washer to original position
and confirm the level.
∙ Distance between drain hose and the wall
should be more than 10 cm, and the
distance between the other part and the
wall should be more than 2 cm.
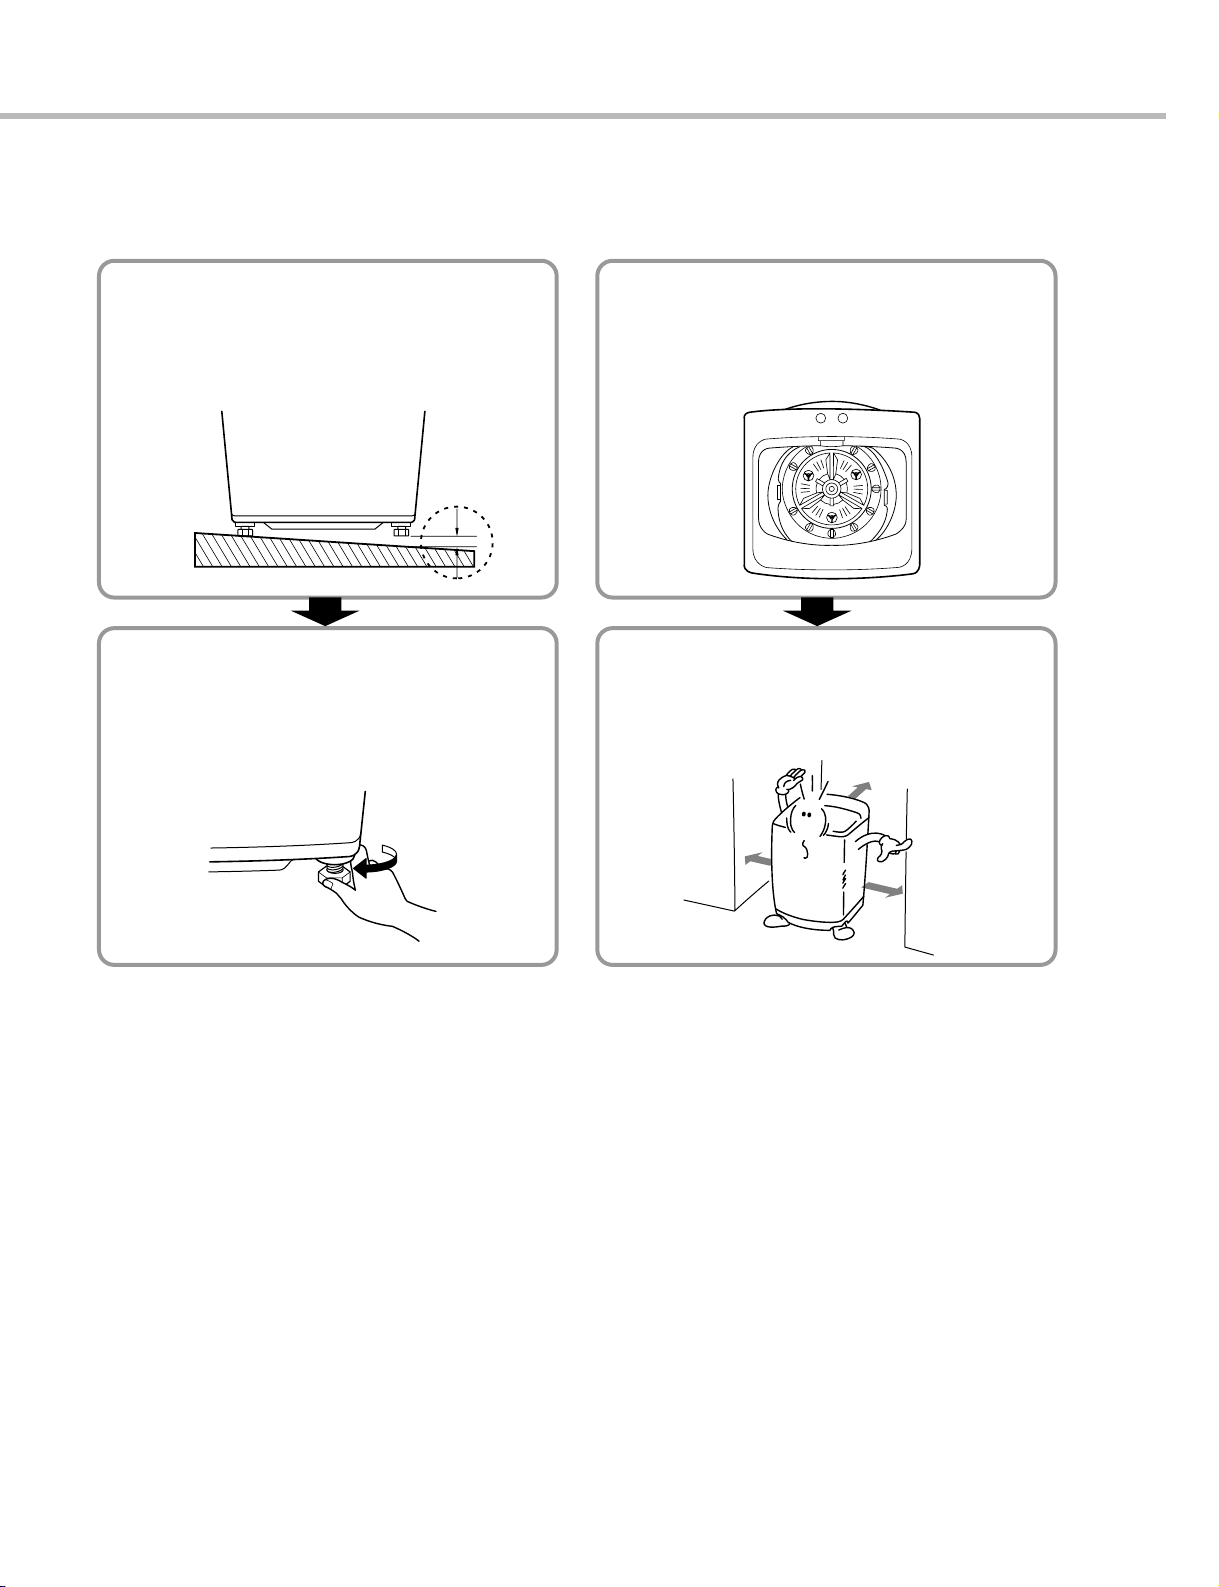
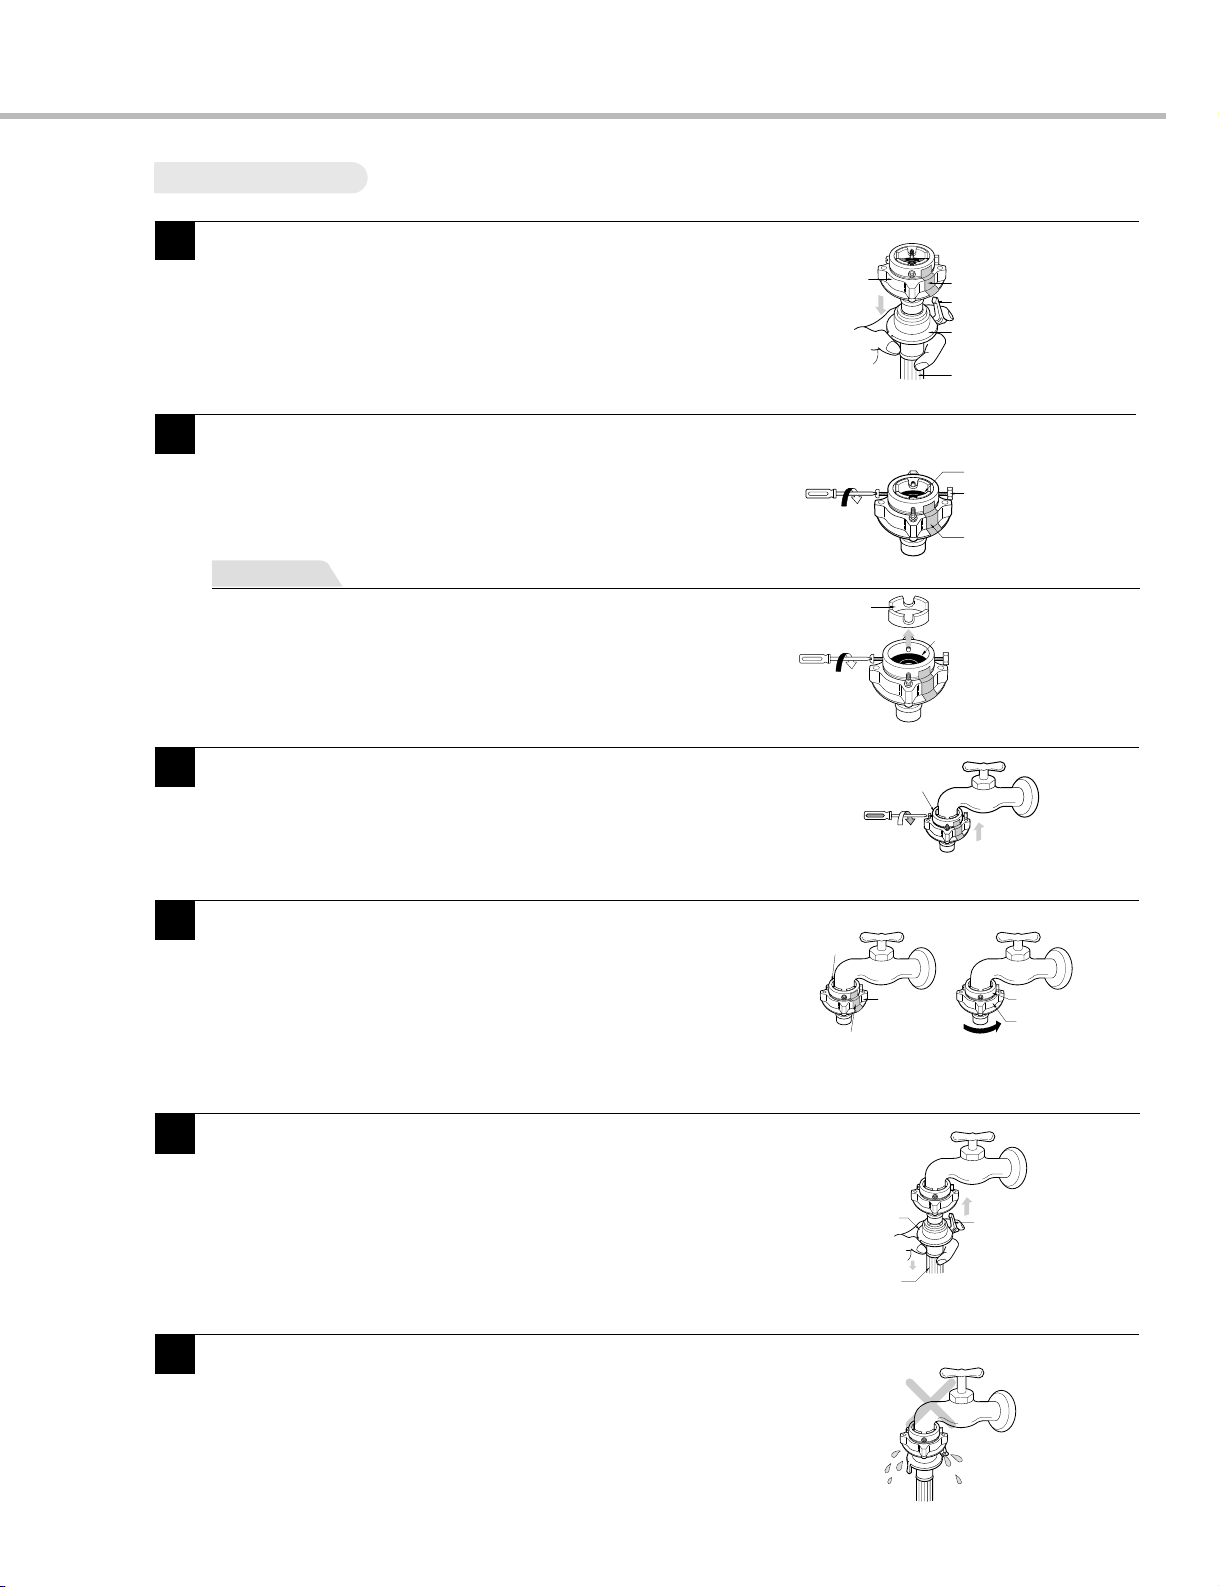
2-2. CONNECTING WATER SUPPLY HOSE
6
Before connecting Water Supply Hose to water tap, check your hose type and choose
correct instruction. Water Supply Hose may vary according to the country.
Make sure connect blue inlet hose to cold water tab, and orange inlet hose to hot water tab.
Connecting Water Supply Hose to water tap
Rubber packing
Water supply hose
Connector
Untighten the screw
Untighten the screw of the connector so
that the tap can be placed in the middle.
Fixing the connector to the tap
Push the upper connector up till the
rubber packing is in tight contact with the
tap. Then tighten the 4 screws.
Attach the water supply hose to the connector
Push the water supply hose vertically
upwards so that the rubber seal within the
hose can adhere completely to the tap.
Check the connection of water supply hose and
the connector
After connecting the hose, open the tap
to check for any water leakage.
In case of water leakage, close the tap
and start again from step 1
Fixing the connector of connector and water
supply hose
Attach the water supply hose to the
connector and then tighten it by screwing
it to the right.
Normal Type
Normal tab without thread & screw type inlet hose.)
1
2
3
4
5
7
Rubber packing
Screw
Fixed sticker
Rubber packing
Guide plate
Connector
Connector
Fixed sticker
Middle
Connector
Middle
Connector
Water Supply Hose
Pressing rod
Pressing handle
Connector
Middle
connector
Fixed Stiicker
Pressing Handle
Pressing Rod
Water Supply Hose
Separate Middle connector from Water
Supply Hose
Separate Middle connector from the Water Supply
Hose by pulling the Pressing Rod and the Pressing
Handle that is attached to the Water Supply Hose
while pressing them.
Loosen the fixed nuts to connect the connector to the tap
Untighten the screw of the connector so that the
tap can be placed in the middle.
Fixing Connectors to the Tap
Push the upper connector up till the rubber
packing is in tight contact with the tap. Then
tighten the 4 screws.
Fixing Upper Connector and Middle
Connector
Remove the fixed sticker in between the Upper
and Middle Connectors. Tighten the connectors
by holding one connector and twist middle
connector to the right.
Connecting Middle Connector and
Water Supply Hose
Press down the pressing rod of the Water
Supply Hose which was separated from middle
connector(refer to Step1) and then join it to the
middle connector.
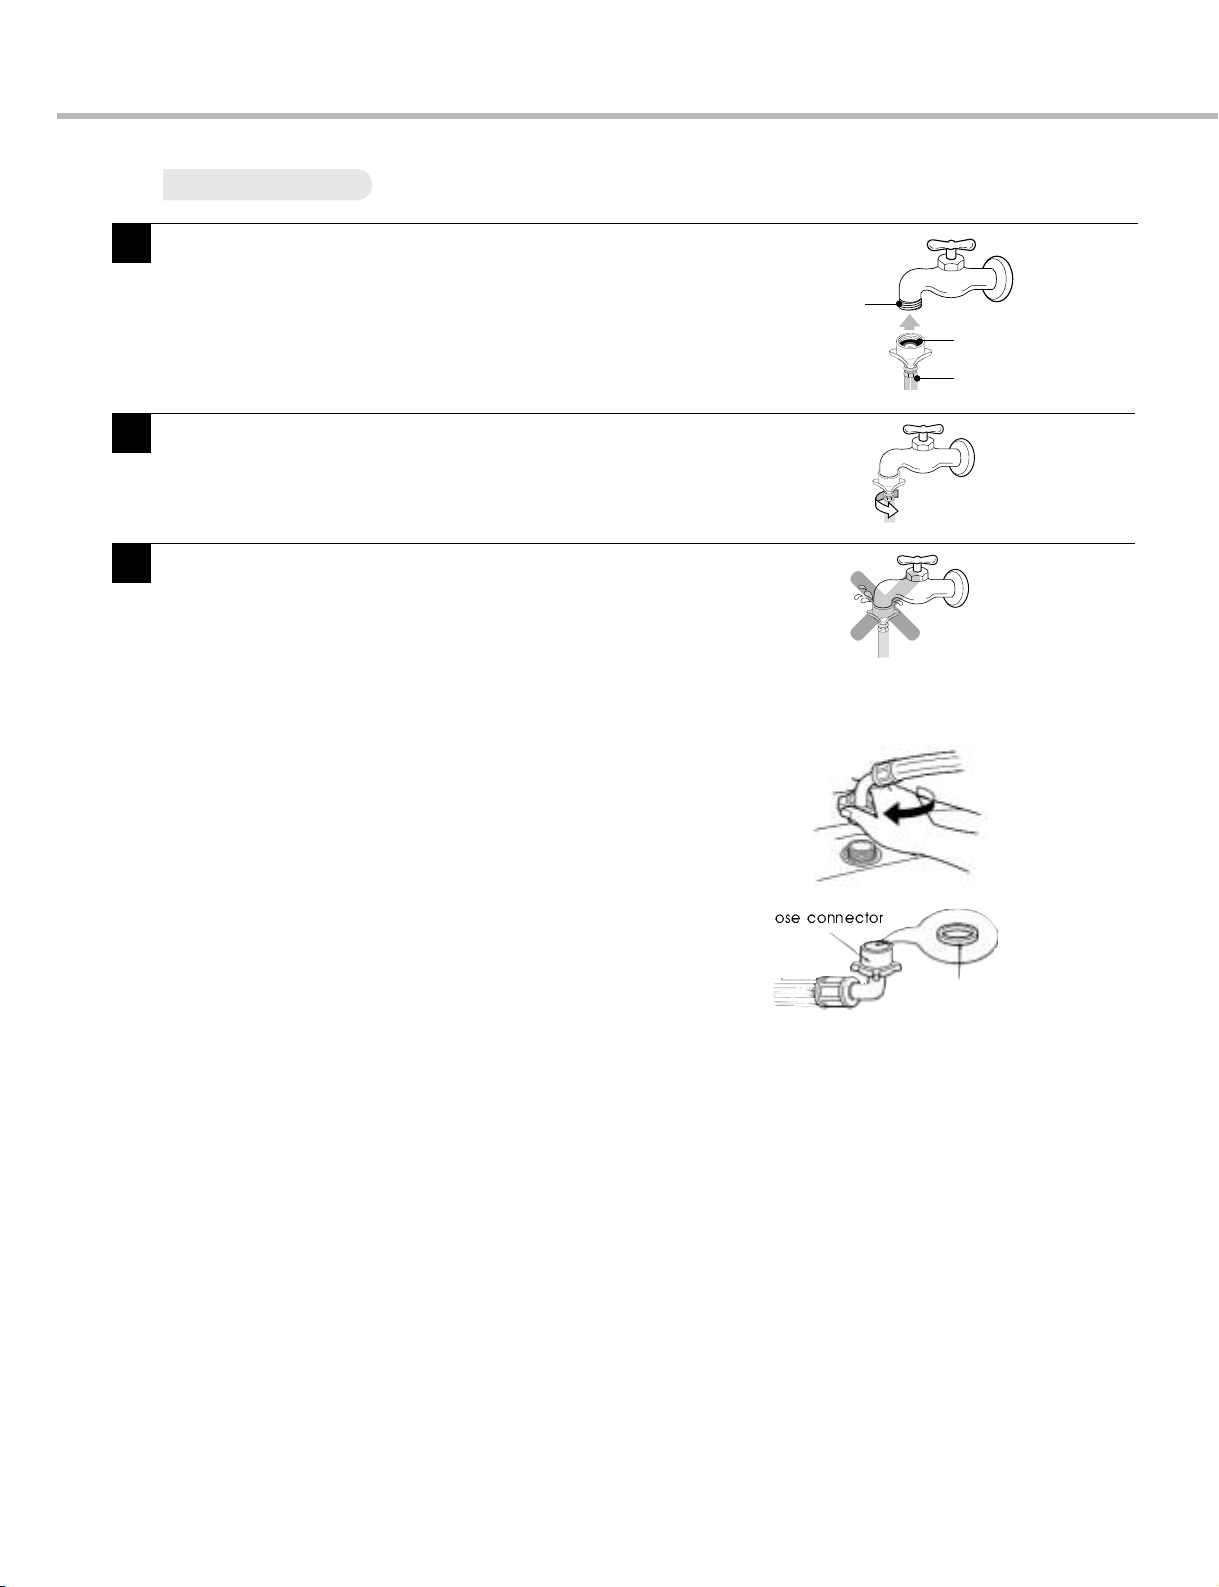
One Touch Type
If the tap diameter is too large or is square, open
the 4 screw and take out the guide plate and
follow step 1.
In case the tap is large.
Note
Checking the water leakage
After connecting the hose, open the tap to check for
any water leakage.
In case of water leakage, close the tap and start again
from step 1.
If you skip step1, it may cause water leakage.
(NORMAL TAB WITHOUY THREAD & ONE TOUCH TYPE INLET HOSE.)
1
2
3
4
5
6
8
Attach the water supply hose to the tap.
Push the water supply hose up so that
the rubber packing within the hose can
adhere completely to the tap.
Connect the water supply hose to the tap.
Connect the water supply hose to the tap and
then tighten it by screwing it to the right.
Check water leakage.
After connecting the hose, open the
faucet to check for any water leakage.
Connect the water supply hose to inlet valve of
the washing machine, and then lock it by turning
the hose connecting part.
Check to see if there is a rubber seal inside
the connector.
Screw Type
Water Supply Hose
Rubber Packing
H
Rubber seal
Water
tap
Connecting Water Supply Hose to the machine
1
2
3
9
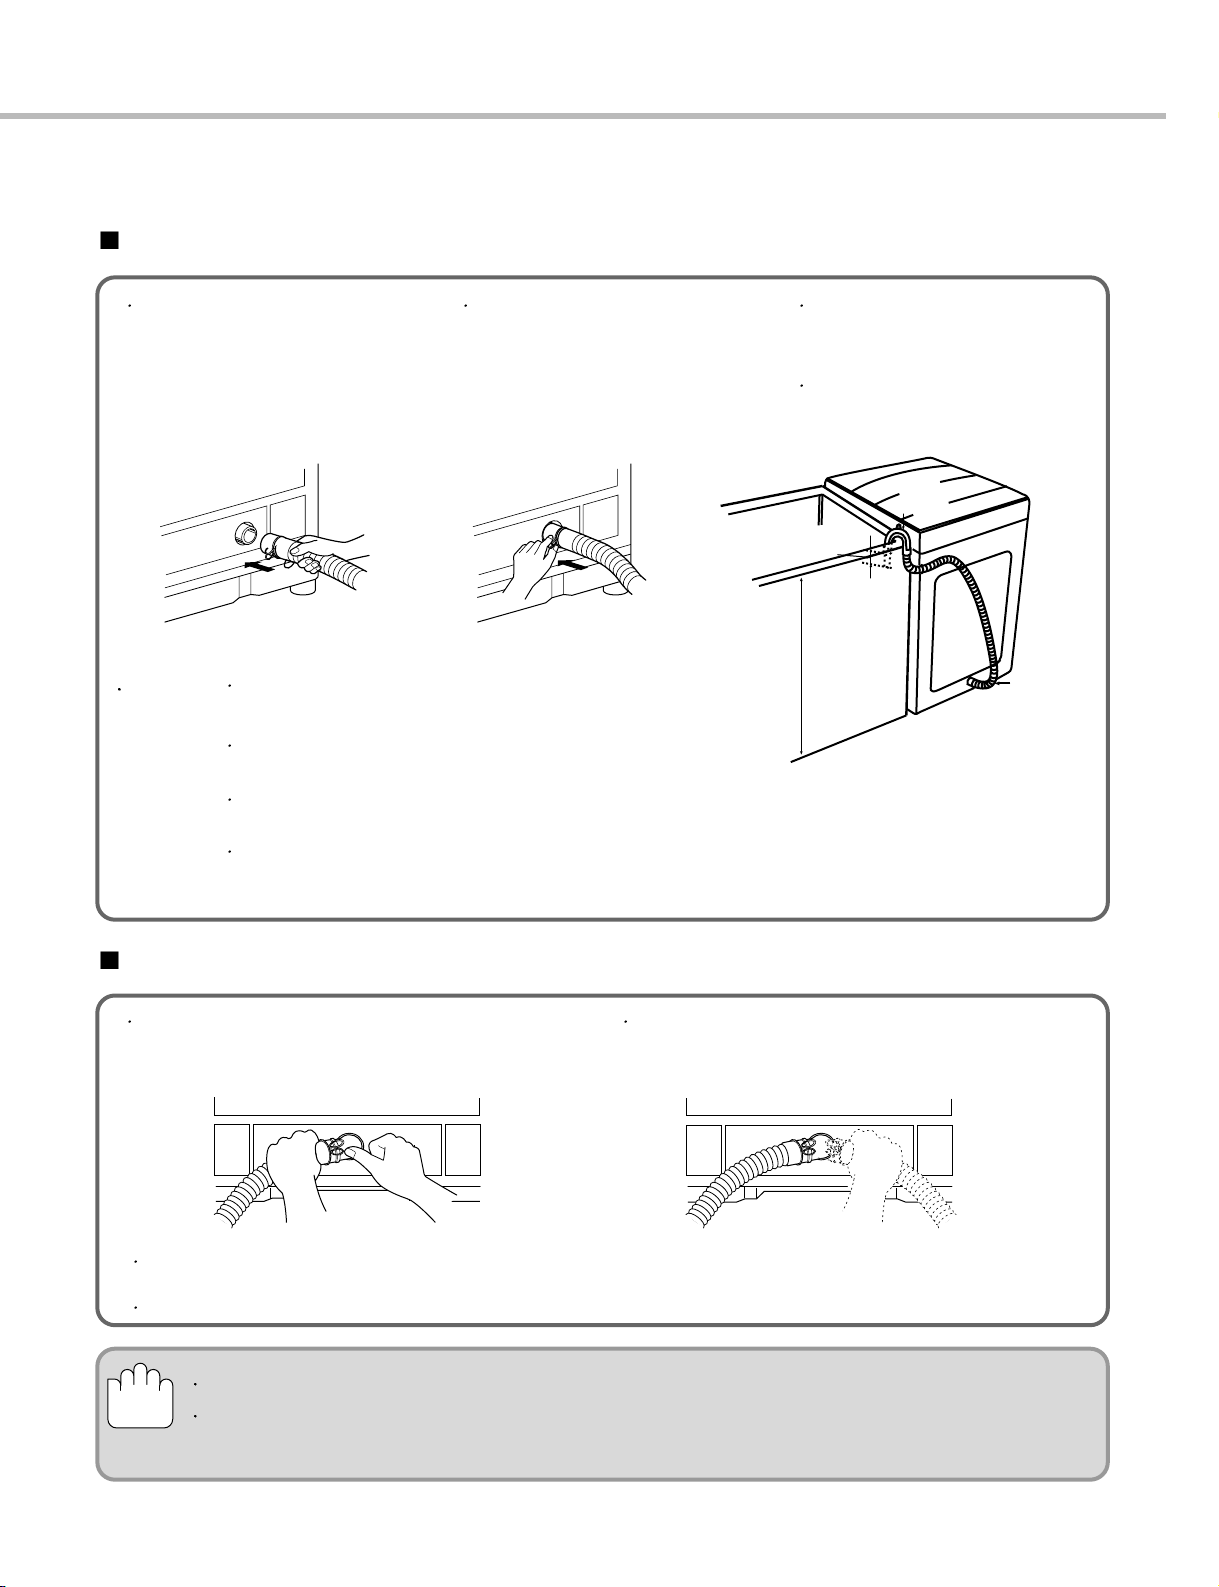
2-3. CONNECT THE DRAIN HOSE
CAUTION
Hose
Guide
0.9~1.2m
Drain Hose
W
ithin 50m
m
Connect the drain hose to
the outlet of the drain pump
located at the rear of the
washing machine.
Attach the clip to the drain
hose. And then push it toward
the body of the washing
machine as indicated by the
arrow.
Check that the drain hose is
hung up over the edge of the
laundry tub.
Do not use an extension
hose.
Connect the drain hose to the outlet of the
drain located at the back side of the
washing machine.
Fix the drain hose with the clip.
And then push it toward the body as in the
figure.
Keep it downward while the washing machine
is working.
Ensure the hose is free from kinking.
Never lay down the drain hose, as water will be
discharged.
Be sure the drain hose is properly routed so it will not
kink or lift from the sink.
The discharge height should be approximately 0.9~1.2m from
the floor.
Connect the drain hose adjusting the length of it not to be
dropped. If drain hose is dropped the drainage could be poor
because of blockage in the hose.
NOTE :
Do not install the washer where it is directly exposed to sunlight, wind, rain etc.
Plug the power cord of this washer into a properly installed standard electrical outlet
that is switched & earthed.
For pump model
For non - pump model
3. OPERATING INSTRUCTION
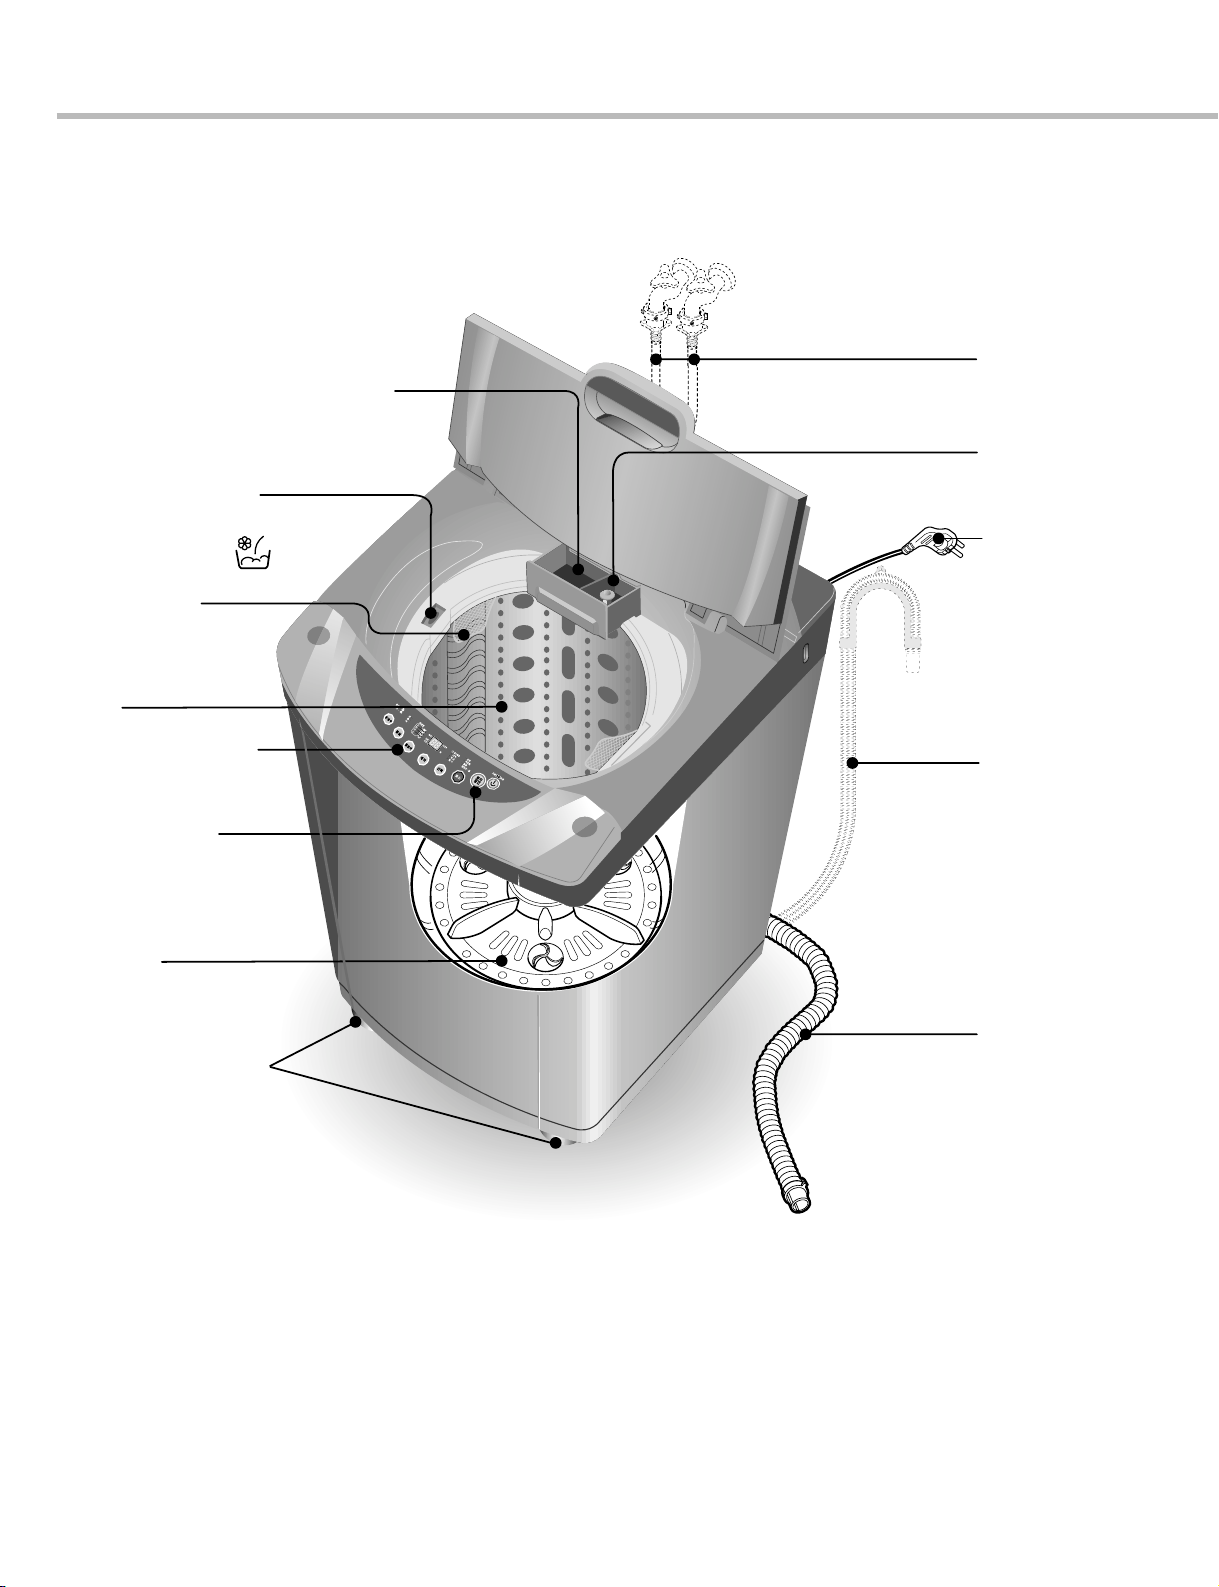
3-1. IDENTIFICATION OF PARTS
10
WATER SUPPLY
HOSE
Make sure the water
does not leak.
DISPENSOR FOR
LIQUID DETERGENT
& BLEACH
FUNCTION SELECTOR
PULSATOR
TUB
ADJUSTABLE LEGS
Use to level the washing
machine for correct balance
& spin operation.
Check if the drain hose
is hung up before
operating the
washing machine.
DRAIN HOSE
for pump model
DRAIN HOSE
for non pump model
POWER PLUG
If the supply cord is
damaged, it must 1be
replaced by the
manufacturer
or its service agents
or similarly qualified
person in order to
avoid a hazard.
LINT FILTER
Clean regularly to stop
linting on the clothes
load.
*
*
*
*
Softener will automatically
flow into the tub.
*
SOFTENER
INLET
POWDER DETERGENT & BLEACH
BOX FOR DELAYED
WASHING
START/PAUSE
BUTTON
Use to start or stop the
washing machine
temporarily.
( )
11
3-2. BEFORE STARTING TO WASH
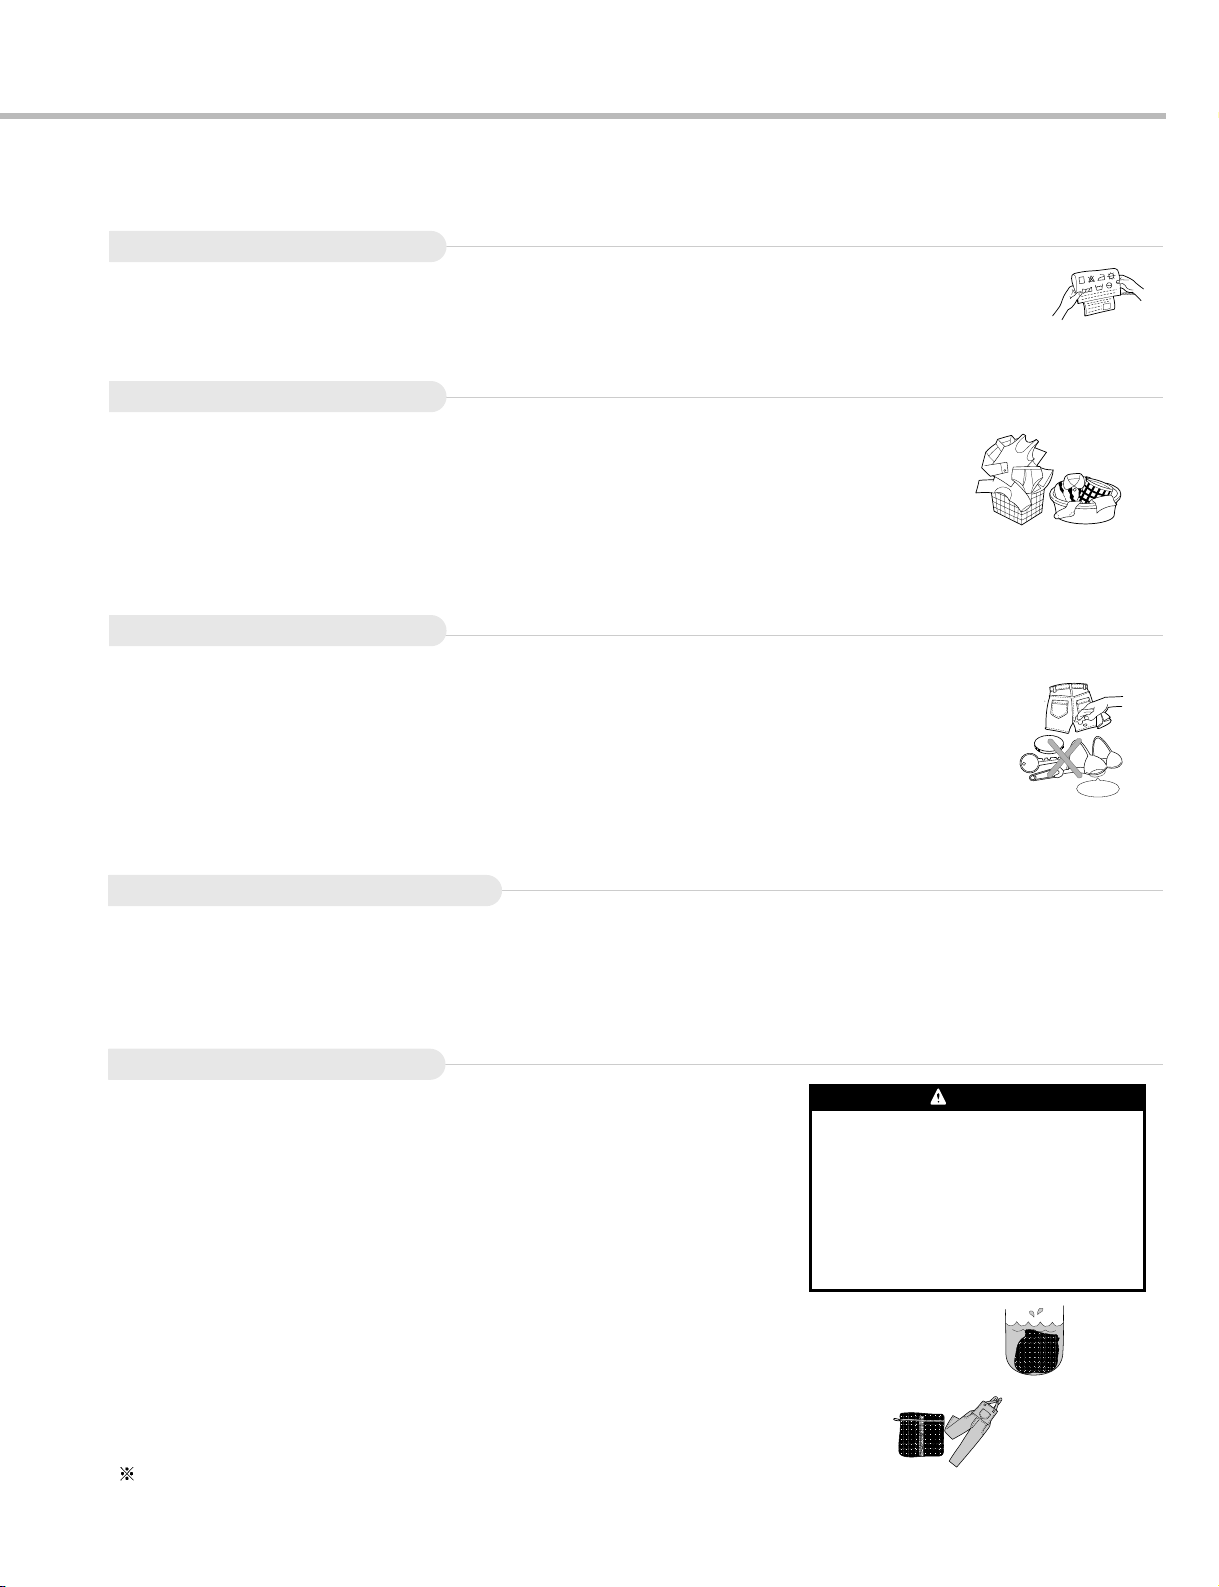
• Check all pockets to make sure that they are empty. Things such as nails, hairclips, matches, pens,
coins, and keys can damage both your washer and your clothes.
• Mend any torn garments or loose buttons. Tears or holes may become larger during washing.
• Remove belts, underwires, etc. to prevent damage to the machine or your clothes.
• Pretreat any dirt and stains.
• Make sure the clothes are washable in water.
• Check the washing instructions.
• Remove tissue in pockets.
To get the best results, different fabrics need to be washed in different ways.
• SOIL (Heavy, Normal, Light) Separate clothes according to the type and amount of soil.
• COLOR (Whites, Lights, Darks) Separate white fabrics from colored fabrics.
• LINT (Lint producers, Collectors) Separate lint producers and lint collectors.
Lint Producers Terry cloth, Chenile, T owels, Nappies, Diapers
Lint Collectors Synthetics, Corduroy , Permanent Press, Socks
WIRE
Sorting
Check before Loading
* Look for a care label on your clothes. This will tell you about the fabric content of your garment
and how it should be washed.
Sort clothes into loads that can be washed with the same wash cycle, water temperature and spin speed.
Care Labels
Use nylon nets for long, delicate items. For laundry with long strings or long length , a net
will prevent tangling during washing.
Fasten zippers, hook, and strings to make sure that
these items don't snag on other clothes.
Nylon net is not supplied by LG.
Clothes like downs and woollens are light weight, large and float easily .
Use a nylon net and wash them in a small amount of water. If the laundry floats during the wash
cycle, it may become damaged. Use dissolved detergent to prevent the detergent from clumping.
Light and Large-sized clothing
Long laundry items
Do not wash fabrics containing flammable materials (waxes, cleaning fluids, etc.).
Load Size
The water level should just cover the clothes. Adjust the load size accordingly .
Loosely load clothes no higher than the top row of holes in the washer tub. To
add items after washer has started, press Start button and submerge additional
items. Close the lid and press Start button again to restart.
Loading
• Pretreat shirt collars and cuffs with a pre-wash product or liquid detergent when placing them in the washer .
Before washing treat special stains with bar soaps, liquid detergent or a paste of water and granular detergent.
• Use a pretreat soil and stain remover.
Treat stains AS SOON AS POSSIBLE. The longer they are left the harder they are to remove.
Pretreatment on stains or heavy soil
Fire Hazard
Never place items in the washer that are
dampened with gasoline or other
flammable fluids.
No washer can completely remove oil.
Do not dry anything that has ever had any
type of oil on it (including cooking oils).
Doing so can result in death, explosion, or
fire.
WARNING

12
• The temperature of the water impacts the effectiveness of all laundry additives and therefore, the cleaning
results. We recommend temperatures of:
- HOT 49~60°C…(120-140˚F) White items, diapers, underclothing and heavily soiled, colorfast items.
- WARM 29~40°C…(85-105˚F) Most items
- COLD* 18~24°C…(65-75˚F) Only very bright colors with light soil.
• When washing in cold water additional steps may be needed:
- Adjust detergent amount and pre-dissolve detergent in warm water
- Pretreat spots and stains
- Soak heavily soiled items
- Use appropriate bleach
* Temperature below 18°C…(65˚F) will not activate laundry additives and may cause lint, residue, poor cleaning,
etc. In addition, detergent manufactures and care labels define cold water as 26~29°C…(80-85˚F).
If the temperature of the water in the tub is too cold for your hands, the detergent will not activate and clean
effectively.
Using Detergent
Detergent
Follow the detergent package directions. Using too little detergent is a common cause of laundry problems.
Use more detergent if you have hard water, large loads, greasy or oily soils or lower water temperature.
Choosing the right detergent
We recommend the use of domestic detergent, (powder , liquid or concentrated). Soap flakes or granulated
soap powders should not be used in your washing machine. When washing woolens remember to use
detergent suitable for washing woolens.
Water temperature
Using Water
• The machine sets the appropriate temperature automatically according to the wash program .
• You can change the water temperature by pressing the WATER TEMP button.
• This machine detects the quantity of laundry automatically, then sets the water
level and proper amount of detergent.
• When you select a wash program, the water level and amount of detergent (to be
used) will be shown on the control panel.
• The following table shows the amount of water.
• When the water level is automatically detected, it may differ depending on the
quantity of laundry even though the same water level is indicated on the control
panel.
• The amount of a cup in the diagram is about 40g for concentrated detergent.
Amount of Water Level
Attention
If iron is present in the water the clothes may become an all-over yellow or they may be stained with brown
or orange spots or streaks. Iron is not always visible. Installation of water softener or an iron filter may be
necessary for severe cases.
START
PAUSE
Water Detergent
Ex-Large
Medium
Small
Large
13
Attentión
Using Detergent
How much detergent
When you select a wash program the water level and the amount of detergent (to be used) will be shown on the
control panel. The amount of a cup in the diagram is about 40g for concentrated detergent.
The correct amount of detergent will vary depending on the amount of soil in your clothes (Jeans and work
cloches may need more detergent, while bath towels usually need less.).
For liquid and concentrated detergents, follow the recommendations of the detergent manufacturer.
Note: To check you are using the correct amount of detergent, lift the lid of your machine about halfway through the wash. There should be a thin layer of foam over the surface of the water. Lots of foam
may look good, but it does not contribute to cleaning your clothes. No foam means not enough
detergent has been used; soil and lint can settle back on the clothes or the washing machine.
If excess detergent is used, the rinse will not be as clean and efficient. Also, it could cause
environmental pollution, so use it accordingly.
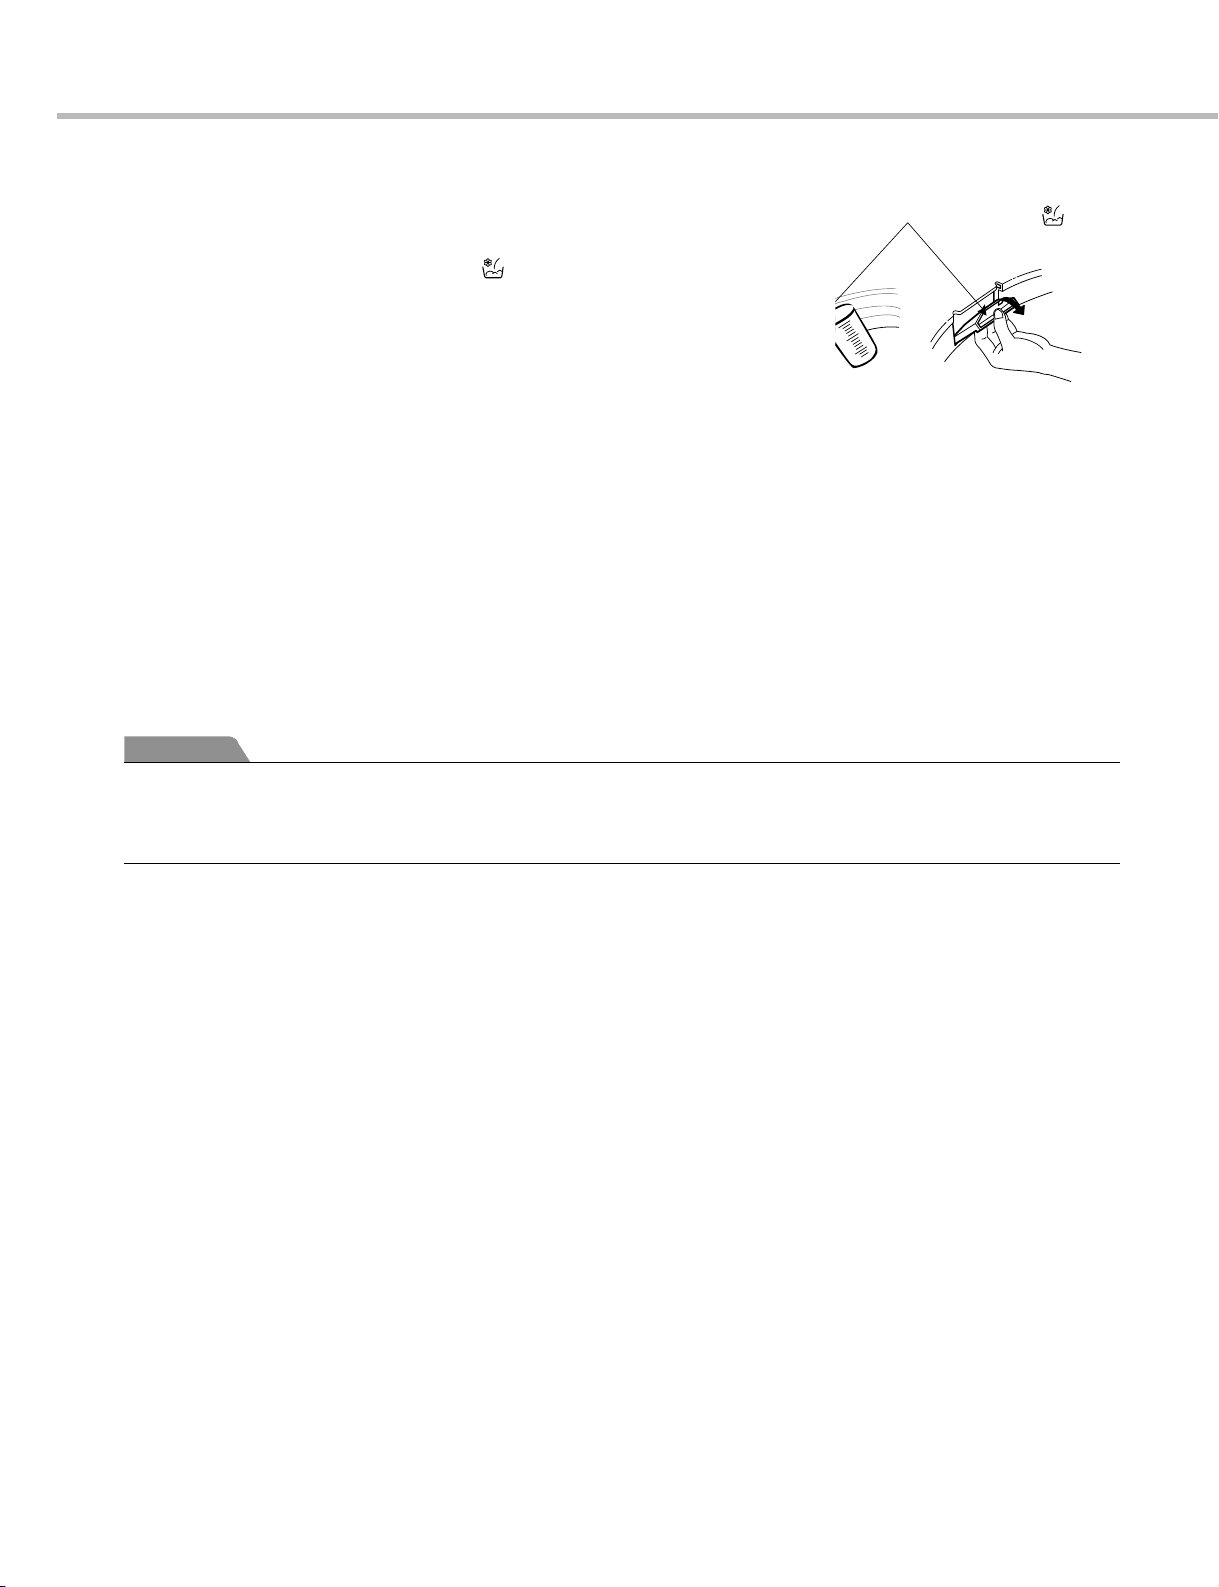
Open the detergent dispenser and deposit the appropriate amount
of detergent where you deposit the detergent Powder
Detergent dispenser. Some detergents MUST be fully
dissolved before adding to your machine to get the best
wash results. Check the instructions on the detergent packet.
If you use powdered detergent it is essential that the required
amount be fully dissolved in very hot water before being added to warm or hot water for the actual wash.
Pre-dissolving detergent in warm water when washing in cold water can improve its performance.
Attention
n
Never pour undiluted liquid bleach directly onto clothes or into the wash basket.
This may cause change of color or damage the laundry .
n
Do not mix chlorine bleach with ammonia or acids such as vinegar and/or rust remover.
Mixing can reduce a toxic gas which may cause death.
Detergent / Bleach dispenser
Adding the detergent
Where you
deposit
liquid detergent
& Bleach
Where you
deposit the
Powder detergent
& Bleach
Depositing Bleach
• Separate the laundry to be bleached.
• Measure powdered bleach carefully , following instructions on the box.
• Before starting the washer, pour measured amount of bleach directly into bleach dispenser.
Available Bleach Type
Using Bleach
• Use oxygenated bleach.
• Must dilute liquid bleach.
• For more details refer to the products instruction for use.
Check fabric care labels for special instructions.
Depositing liquid detergent and bleach
Cap
c If the detergent & bleach is over
filled, it can overflow.
Limit Line
Depositing detergent
and bleach don’t fill it
above the limit line.
Liquid Detergent / Liquid Bleach
• When using dispenser, dilute bleach (25ml) with
fresh water (25ml)
• When filling dispenser, do not splash or overfill. It
may stain clothes.
• Never pour bleach directly on clothes. It may stain
them
Where you deposit liquid
detergent & bleach
14
If you wish to use fabric softener we recommend
Attention
n Do not mix with detergent or bleach.
n Never pour fabric softener directly on clothes. It may stain them.
n Do not stop the washer during the first spin for timely dispensing.
n Option washing is not designed to be used with fabric softener dispenser.
Scrud(Waxy Build up)
Scrud is the name given to the waxy build-up that can occur within any washer when the fabric softener
comes into contact with detergent. This build-up is not brought about by a fault in the machine.
If scrud is allowed to build-up in the machine it can result in stains on your clothes or an unpleasant
smell in your washer.
• Using fabric softener sparingly.
• When filling the dispenser, do not splash or overfill.
• Clean dispenser as soon as the cycle is finished.
• Clean your machine regularly. (refer to page 23)
• Cold water washing increases the chance of this build-up occurring. We recommend a regular warm or hot
wash e.g. every 5th wash should be at least a warm one.
• Fabric softener of thinner consistency is less likely to leave residue on the dispenser and contribute to a
build-up.
Using Fabric Softener
• Dilute fabric softener with water.
Undiluted fabric softener may result in spots that look like oil stains.
• Measure and add the recommended amount of fabric softener into the
compartment marked with this symbol( ).
Follow manufacturer’s direction.
F Fabric softener is automatically dispensed in the final rinse with indication
beep.
F If you want extra rinse, you must add fabric softener manually when
indication beep rings in the final rinse. This maximize the fabric softener function.
• Do not overfill. The dispenser hold max 35mL.
Never add more than 35mL.
Overfilling can cause early dispensing of the fabric softener
which could result in stained clothes. A cup with a pouring spout will help you avoid spilling.
• The effect of adding fabric softener may vary according to its viscosity. The stickier fabric softener makes its
effect the lower. For a sticky fabric softener it is recommended that it be diluted with water, then be
manually put during the time when the washer beeps several times before the final rinse. This function
informing correct time to dispense manually is optionally applied to some models. Please keep it in mind
that fabric softener has to be diluted with water before dispensed and never poured directly on clothes.
Softener dispenser ( )
15
• Remove stains promptly.
• Determine the kind of stain, then follow the recommended treatment in the
stain removal chart below.
• To pretreat stains, use a prewash product, liquid detergent, or a paste made
from granular detergent and water.
• Use cold water on unknown stains because hot water can set stains.
• Check care label instructions for treatments to avoid on specific fabrics.
• Check for colorfastness by testing stain remover on an inside seam.
• Rinse and wash items after stain removal.
For successful stain removal:
Follow fabric care label
instructions
n
Do not use or mix liquid chlorine bleach with other household chemicals such as toilet cleaners, rust removers, acid or products
containing ammonia. These mixtures can produce dangerous fumes which can cause serious injury or death.
n
To reduce the risk of fire or serious injury to persons or property, comply with the basic warnings listed below:
• Read and comply with all instructions on stain removal products.
• Keep stain removal products in their original labeled containers and out of children’s reach.
• Thoroughly wash any utensil used.
• Do not combine stain removal products, especially ammonia and chlorine bleach. Dangerous fumes may result.
• Never wash items which have been previously cleaned in, washed in, soaked in or spotted with gasoline, dry cleaning
solvents or other flammable or explosive substances because they give off vapors that could ignite or explode.
• Never use highly flammable solvents, such as gasoline, inside the home. Vapors can explode on contact with flames or
sparks.
WARNING
Stain Removal
STAIN
Adhesive tape, chewing gum,
rubber cement
Baby formula, dairy products, egg
Beverages (coffee, tea, soda,
juice, alcoholic beverages)
Blood
Candle wax, crayon
Chocolate
Collar or cuff soil, cosmetics
Dye transfer on white fabric
Grass
Grease, oil, tar (butter, fats, salad
dressing, cooking oils, car grease,
motor oils)
Ink
Mildew, scorch
Mud
Mustard, tomato
Nail polish
Paint, varnish
Rust, brown or yellow
discoloration
Shoe polish
Apply ice. Scrape off excess. Place stain face down on paper towels. Saturate with prewash stain remover or
nonflammable dry cleaning fluid.
Use product containing enzymes to pretreat or soak stains.
Pretreat stain. Wash using cold water and bleach safe for fabric.
Rinse with cold water. Rub with bar soap. Or pretreat or soak with product containing enzymes. Wash using
bleach safe for fabric.
Scrape off surface wax. Place stain face down between paper towels. Press with warm iron until wax is
absorbed. Replace paper towels frequently. Treat remaining stain with prewash stain remover or
nonflammable dry cleaning fluid. Hand wash to remove solvent. Wash using bleach safe for fabric.
Pretreat or soak in warm water using product containing enzymes. Wash using bleach safe for fabric.
Pretreat with prewash stain remover or rub with bar soap.
Use packaged color remover. Wash using bleach safe for fabric.
Pretreat or soak in warm water using product containing enzymes. Wash using bleach safe for fabric.
Scrape residue from fabric. Pretreat. Wash using hottest water safe for fabric. For heavy stains and tar, apply
nonflammable dry cleaning fluid to back of stain. Replace towels under stain frequently. Rinse throughly.
Wash using hottest water safe for fabric.
Some inks may be impossible to remove. Washing may set some inks. Use prewash stain remover,
denatured alcohol or nonflammable dry cleaning fluid.
Wash with chlorine bleach if safe for fabric. Or, soak in oxygen bleach and hot water before washing. Badly
mildewed fabrics may be permanently damaged.
Brush off dry mud. Pretreat or soak with product containing enzymes.
Pretreat with prewash stain remover. Wash using bleach safe for fabric.
May be impossible to remove. Place stain face down on paper towels. Apply nail polish remover to back of
stain. Repeat, replacing paper towels frequently. Do not use on acetate fabrics.
WATER BASED : Rinse fabric in cool water while stain is wet. Wash. Once paint is dry, it cannot be removed,
OIL BASED AND VARNISH : Use solvent recommended on can label. Rinse throughly before washing.
For spots, use rust remover safe for fabric. For discoloration of an entire load, use phosphate detergent and
nonchlorine bleach. Do not use chlorine bleach because it may intensify discoloration.
LIQUID : Pretreat with a paste of granular detergent and water. PASTE : Scrape residue from fabric. Pretreat
with prewash stain remover or nonflammable dry cleaning fluid. Rub detergent into dampened area, Wash
using bleach safe for fabric.
TREATMENT
Special Guide for Stain Removal
16
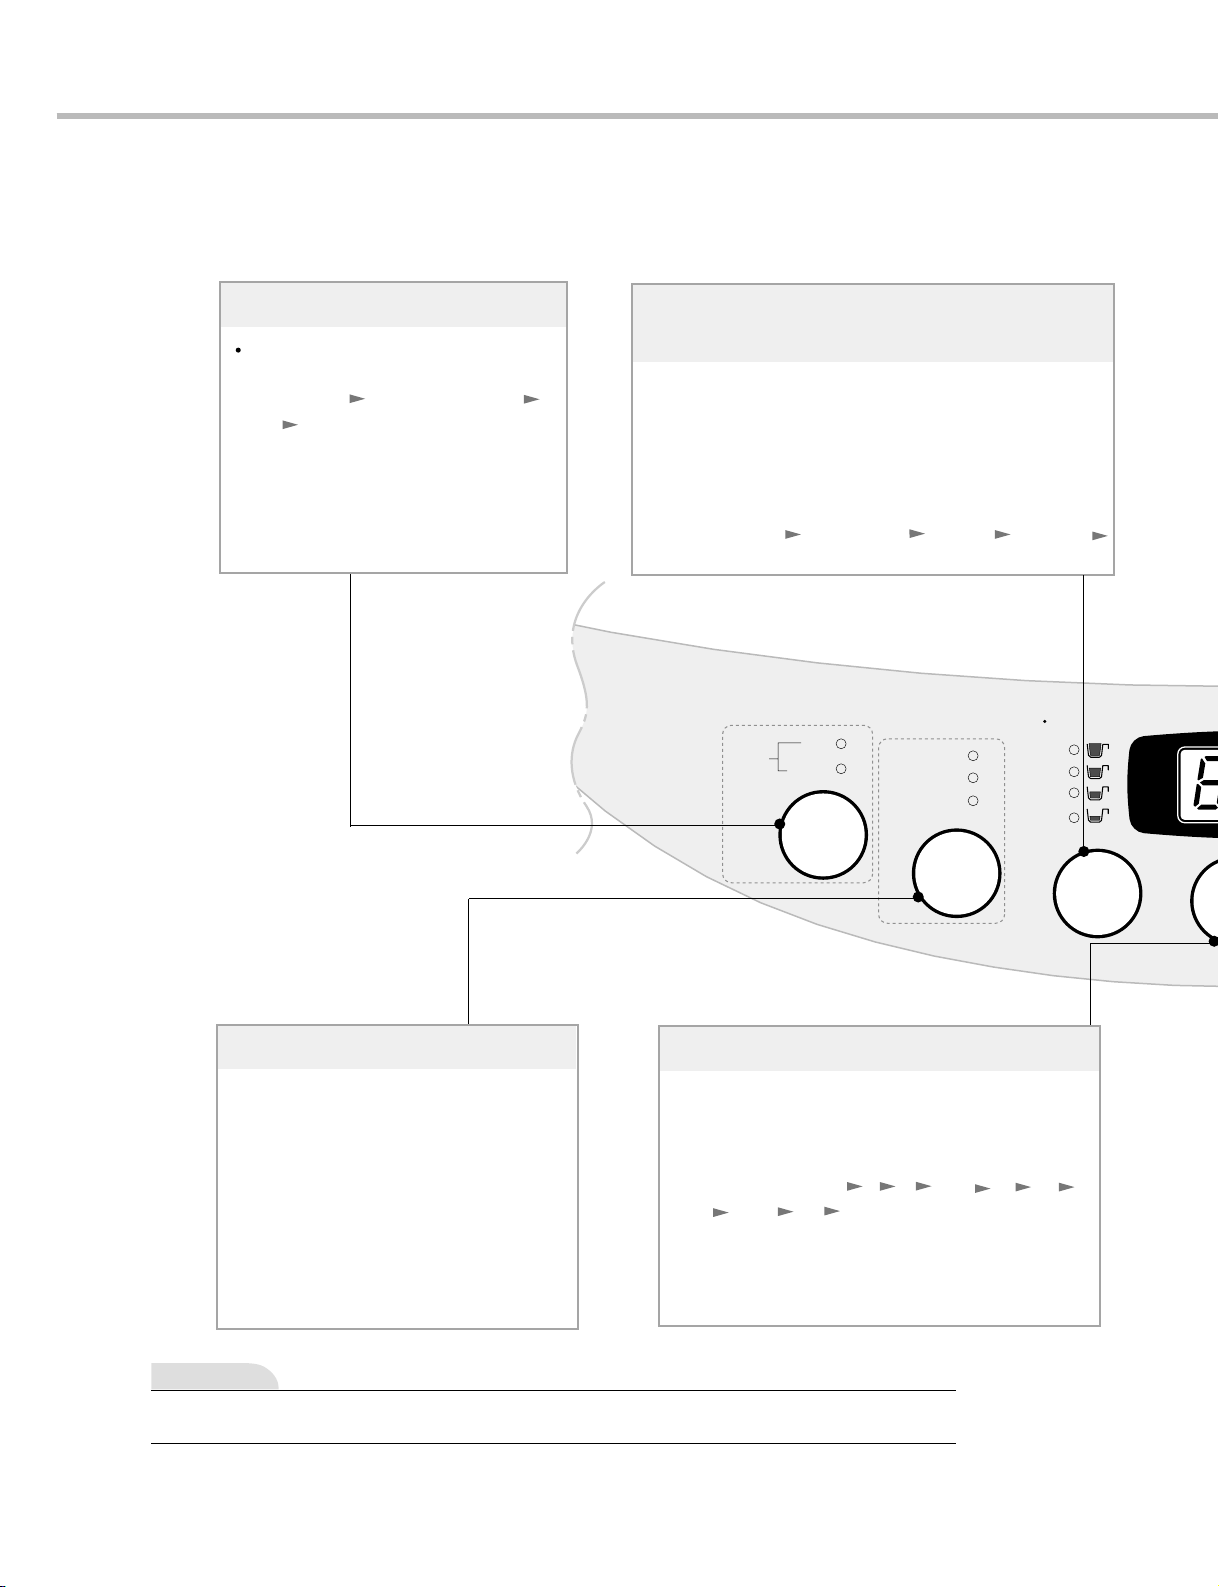
3-3. FUNCTION OF EACH BUTTON
WASH
OPTION
DDELAY
SSTART
WATER
LEVEL
Water Detergent
Ex-Large
Medium
Small
Large
Extra Wash
Extra Rinse
Gentle Spin
WATER
TEMP.
Hot
Cold
Warm
Time
Left
Delay
Water temperature button (option)
Delay Start (Reservation) button
• Use to set a delayed finishing time.
• The time increases when the button is
pushed.
• The following settings are indicated as the
button is pushed 3 4 5 ...1 1 12 14
16 ...46 48 3 HOUR.
• To cancel delay time, turn the power switch
off.
Water level button
(indication of detergent amount)
• Use to adjust the water level as required. The
appropriate amount of detergent is shown next to the
water level in the Water-Detergent diagram
• Water level is automatically selected for Fuzzy
(normal) program.
The following settings are indicated as the button is
pushed Large Ex-Large Small Medium
Large
(refer to page 18)
Use to select water temperature.
Pressing the button allows you to
select Cold Warm (Hot&Cold)
Hot Cold respectively . Default
setting is Cold.
Wash option button(option)
Note
* The control panel may differ according to different models
• According to kinds of laundry , soiled
extent or washing habit you can
select suitable wash option manually .
• By pressing the button wash option is
changed.
 Loading...