

Page 1

MFL67708678_hk
用戶手冊
冷凝式乾衣機
(2P~25P)
使用前請先仔細閱讀本用戶手冊。
請妥善保存,以備日後參考之用。
請記下產品型號及產品序號。
預約客戶服務時,請先準備上述資料。
OWNER’S MANUAL
LG DRYER
Please read this manual carefully prior to use.
Keep it for future reference.
Write down model name and serial number of your product.
Have all these details ready when you call for service.
(26P~49P)
WF-D90PW
MFL67708678
Page 2
MFL67708678_hk MFL67708678_hk
特
點
省時
節能
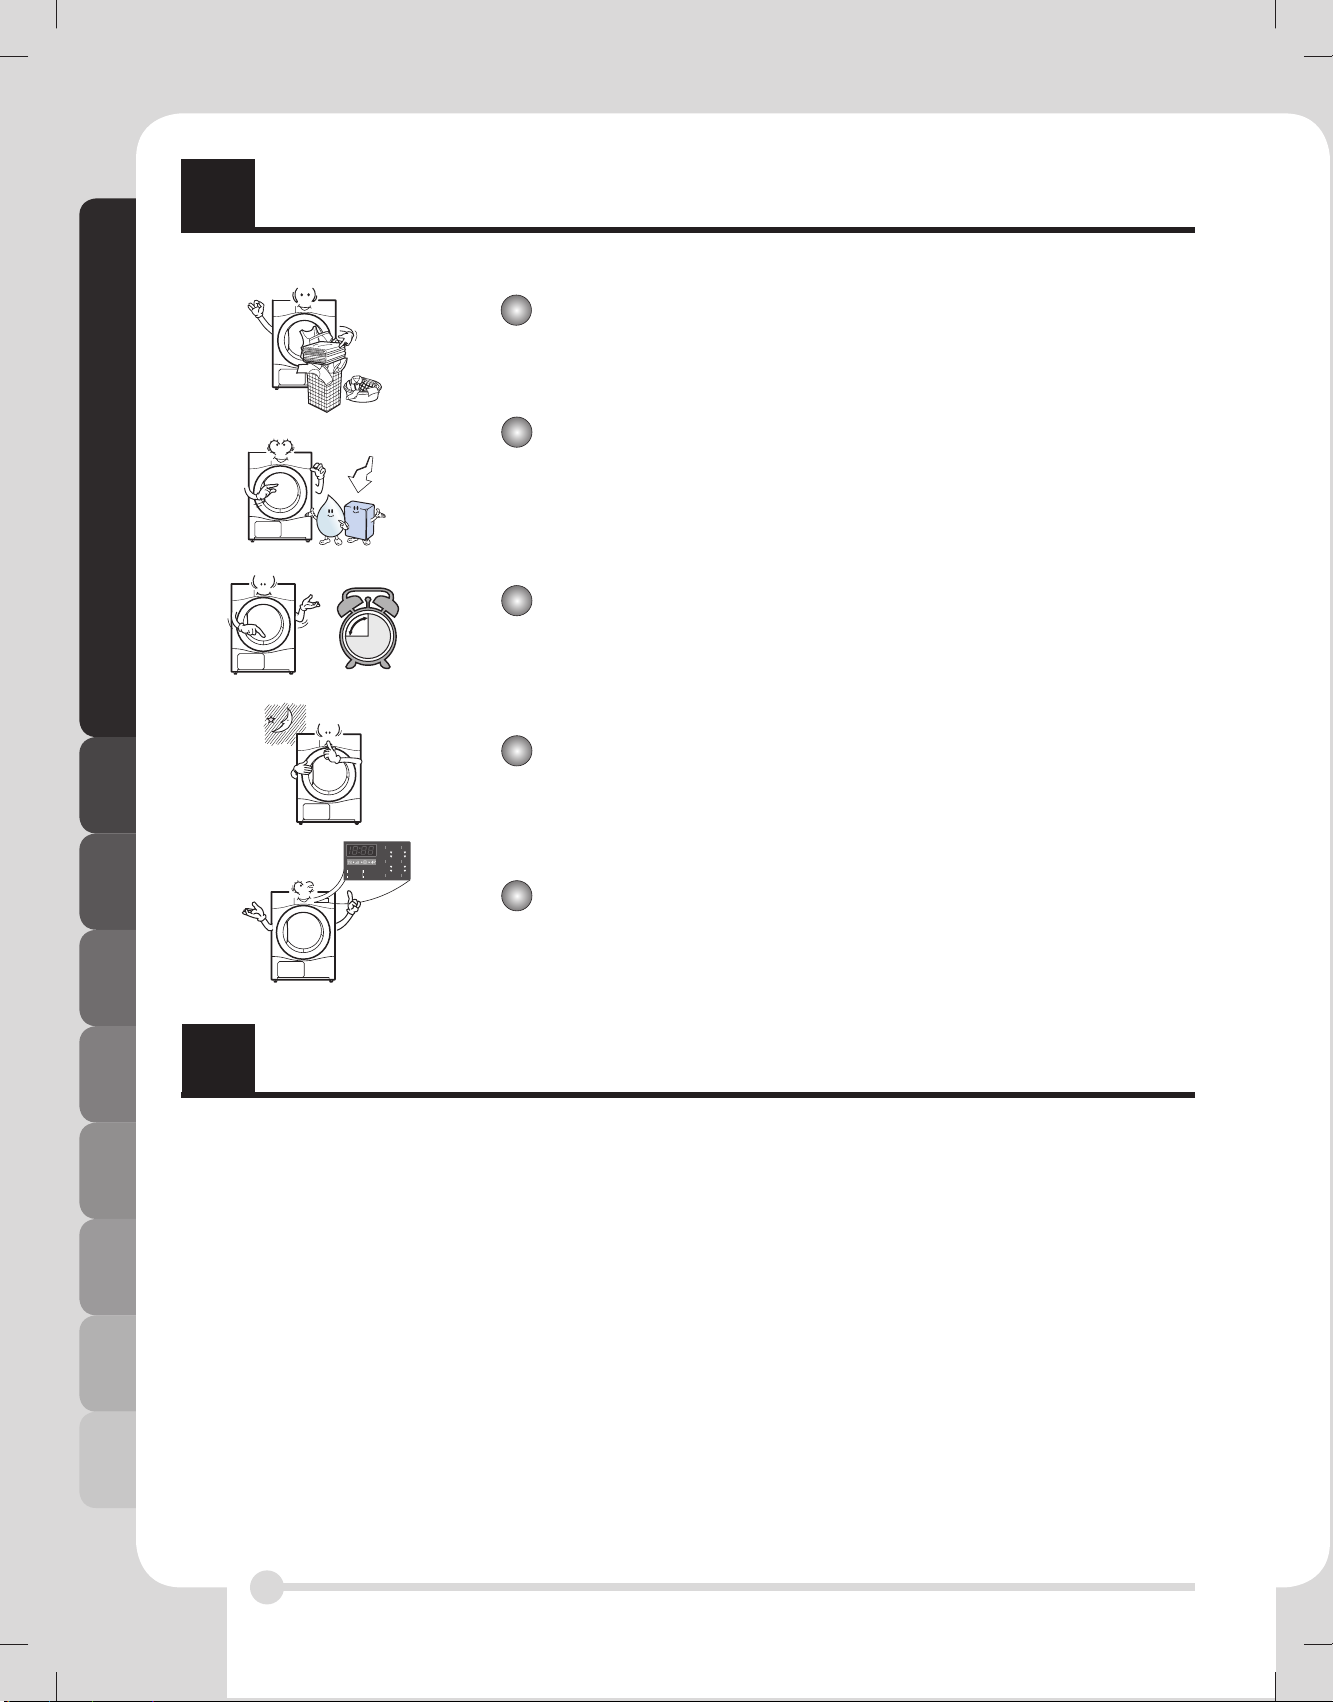
超大滾桶容量
LG 乾衣機具有 9 公斤超大容量,讓你可一次烘乾更多衣物。
減少電力消耗
LG 乾衣機在乾衣系統及溫度控制上,採用了尖端技術和全新設
計,能較一般乾衣機使用更少電力。
縮短乾衣時間
使用高效率的通風設備和優化的加熱器,令乾衣時間大大縮短。
減低噪音水平
LG 乾衣機採用創新吸音及隔音技術,減低了操作時的噪音,令
LG 乾衣機較傳統乾衣機更寧靜。
目
容易使用
本乾衣機配備了偌大的電子控制LED 顯示屏,操作簡便。你只需選
擇所需程序,LG 乾衣機便會輕鬆幫你完成乾衣工作。
錄
安全指引 .............................................................................................. 3
安裝指引 .............................................................................................. 6
外觀和設計 ........................................................................................ 10
運作你的乾衣機 ............................................................................... 11
附加功能 ............................................................................................ 15
乾衣機的保養 .................................................................................... 17
智能使用的附加提示 ....................................................................... 20
疑難排解指南 .................................................................................... 22
技術數據 ............................................................................................ 24
保養 ..................................................................................................... 25
2
Page 3
安
全指引
使用乾衣機時,請遵從以下基本安全指引,以免引致觸電、火災、受傷或其他財物損失。
警告
如不遵從以下守則,可引致嚴重受傷或死亡。
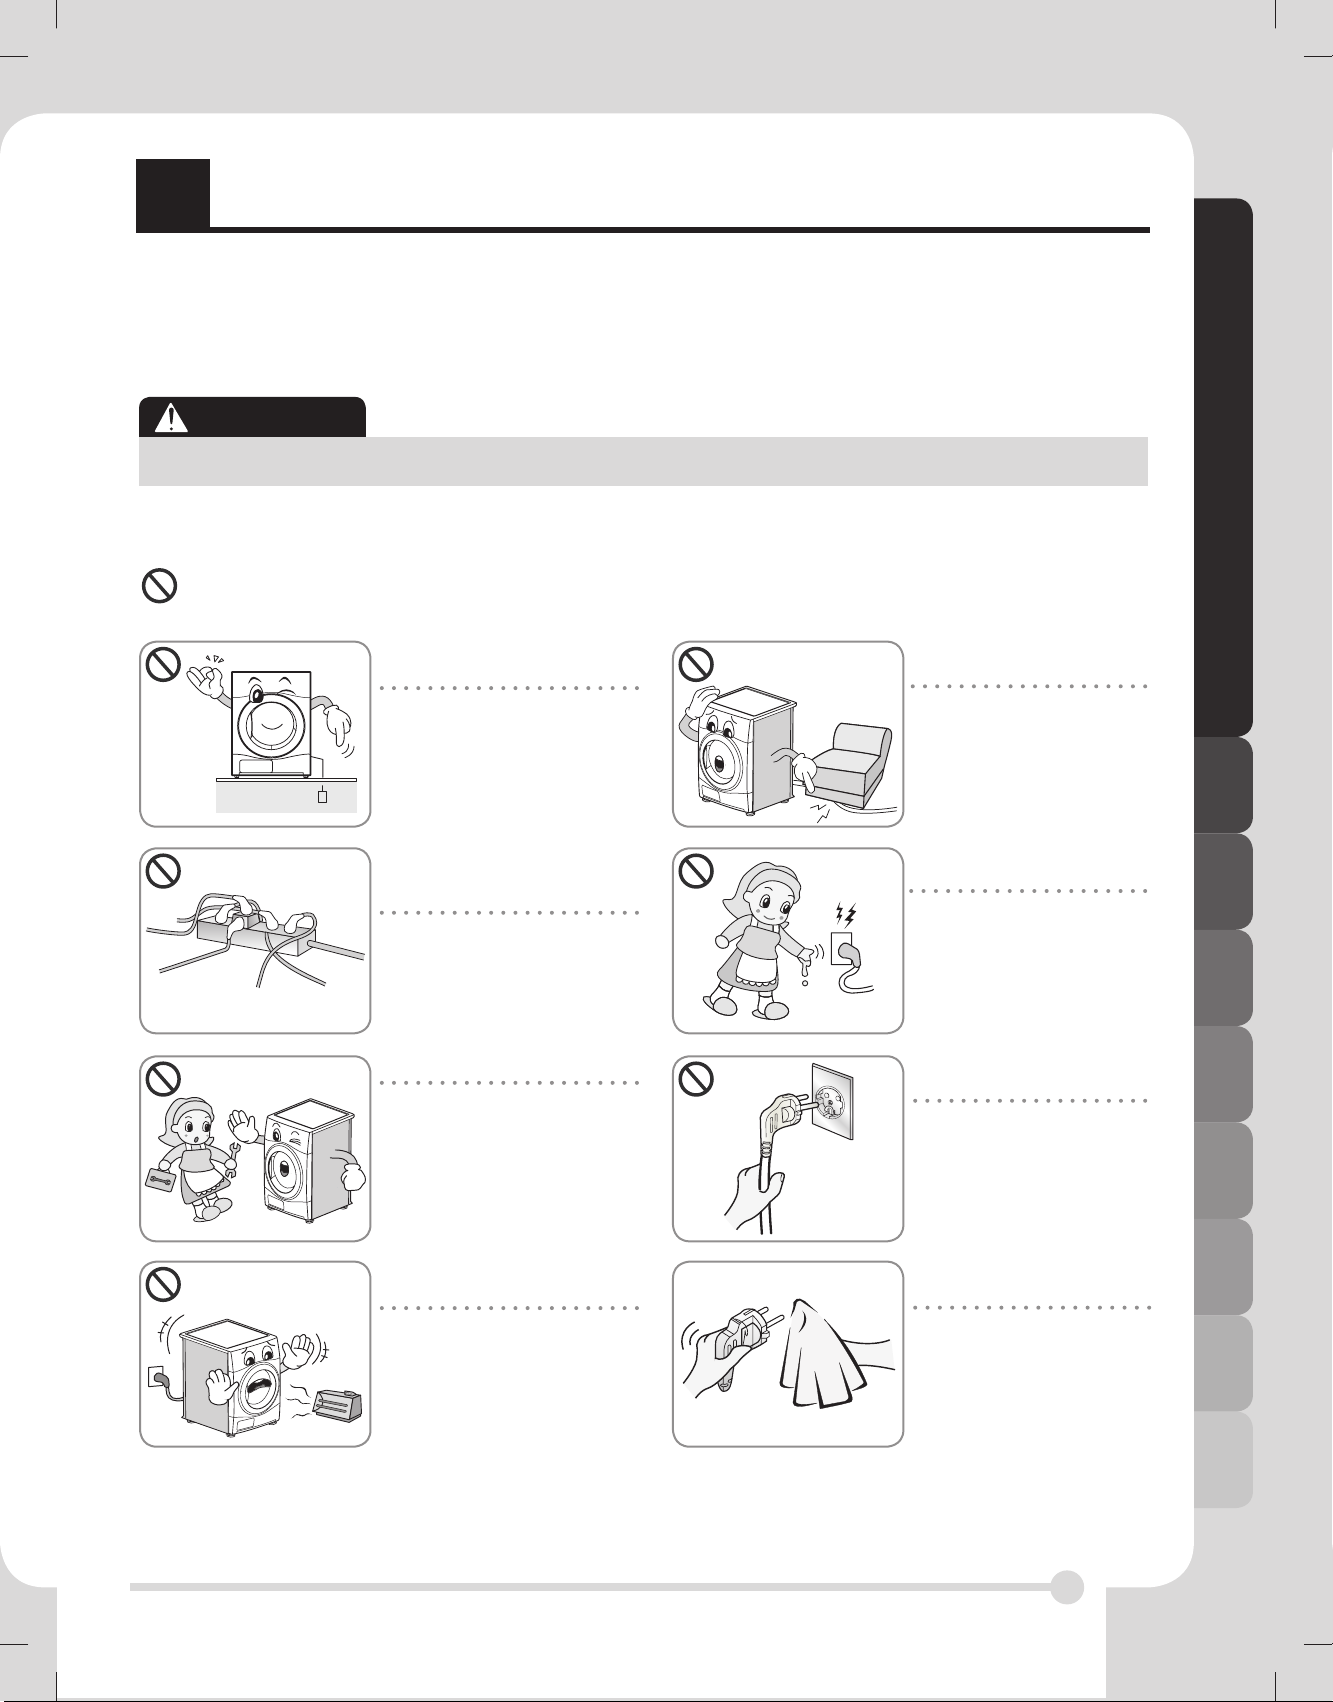
×禁止事項
• 插入電源線前,請確認電源線已
接地並接駁到斷路器。
沒有接地可能引致故障或短路。
• 切勿與其他電器共同使用一個電
源插座。
切勿使用拖板。
插座過熱可能引致火災。
安全指引
• 切勿使用損壞的電源線或以重
物壓住電源線。
損壞的電源線可能引致火災或短
路。
• 手濕時切勿抓住電源線或按動
開關。
此舉可能引致觸電。
• 安裝時請勿拆除頂板。
此舉可能引致故障、火災或短路。
• 請把乾衣機安裝在遠離電爐、
蠟燭或其他易燃物品的地方。
這些物品可能會令零件溶解並引
致火災。
• 拔出電源線時,請握住插頭拔
出,切勿抓住電線拔出。
此舉可能令電線斷裂並引致熱或
火災。
• 請抹去電源線上的污漬,並穩固
地插回電源插座。
電源線上的污髒,或不正確連
接,都可能引致火災。
3
Page 4
MFL67708678_hk MFL67708678_hk
安
安全指引
全指引
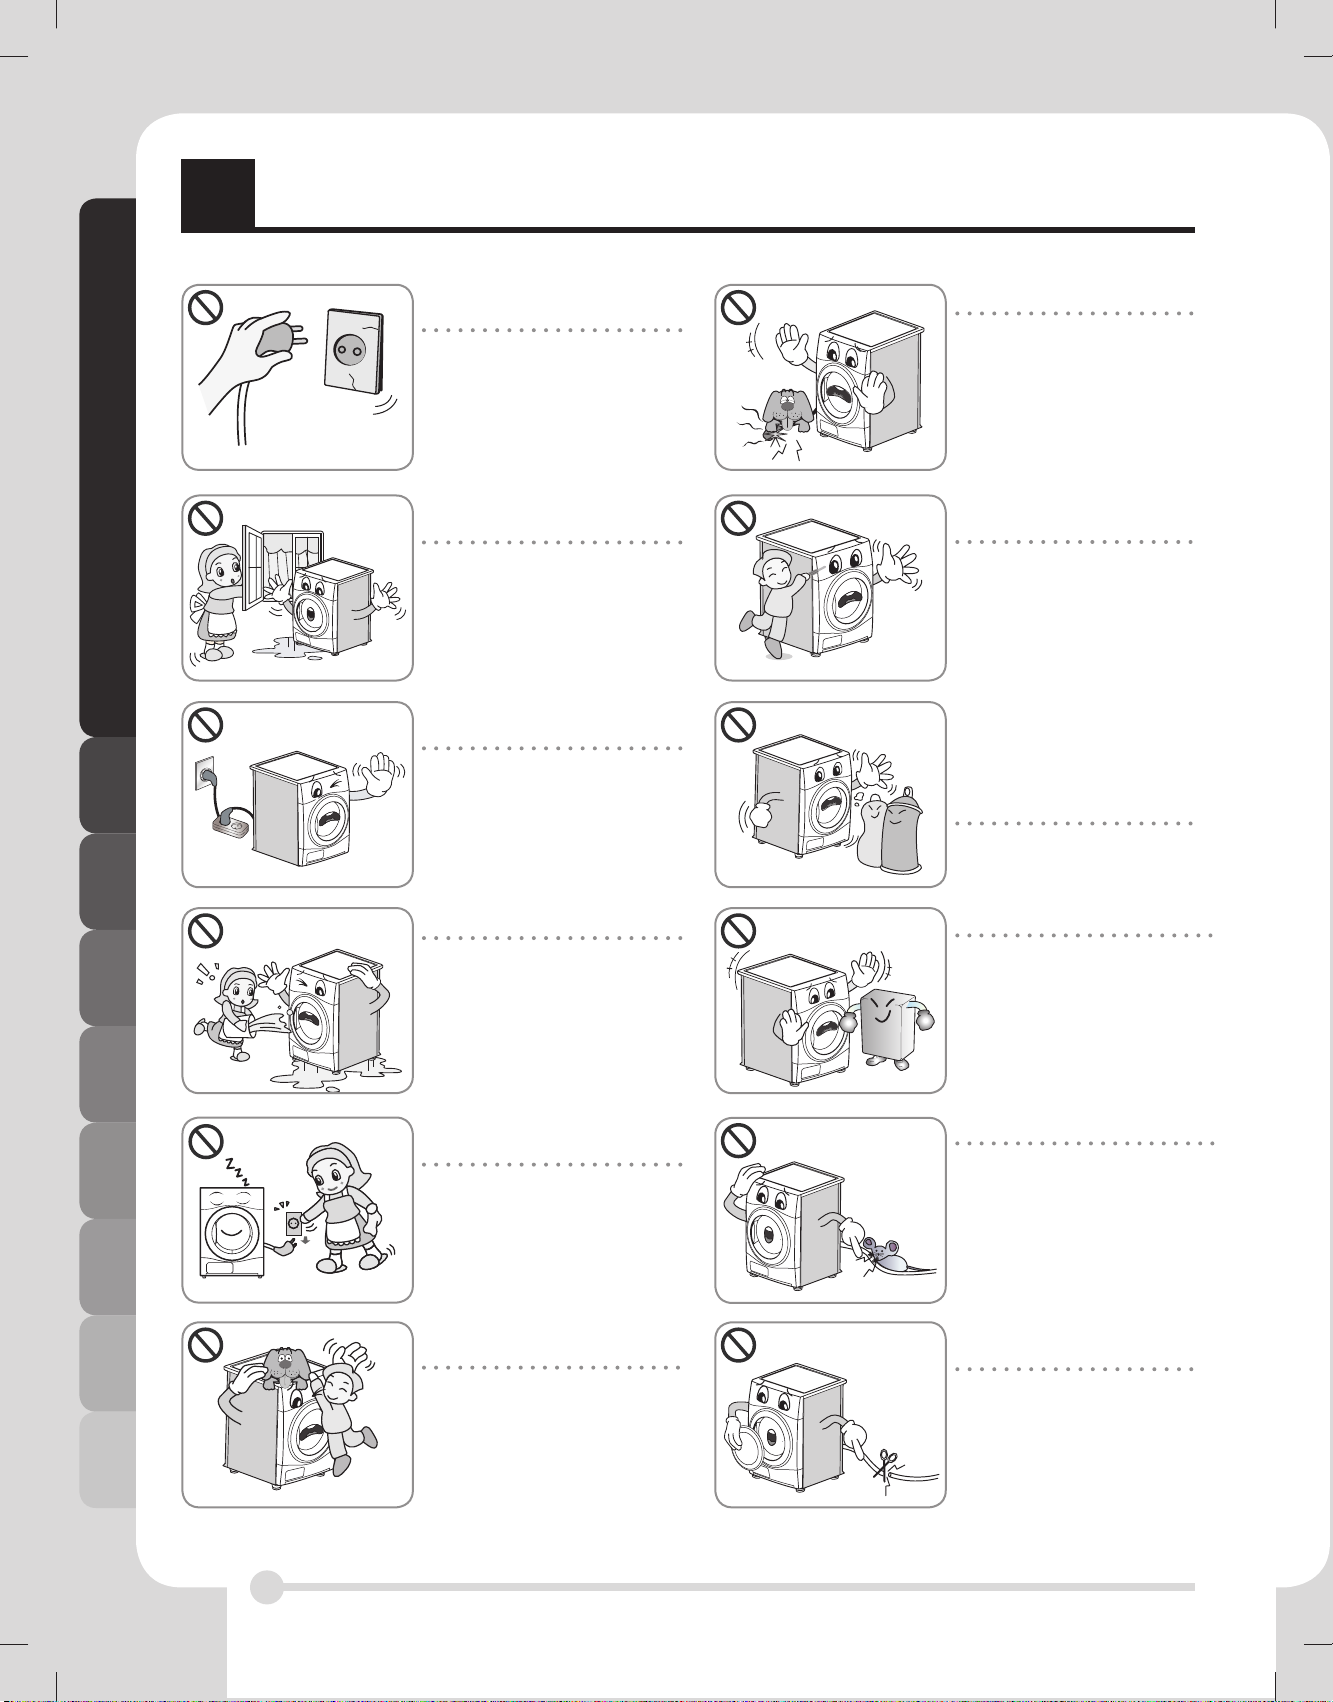
• 切勿使用損壞的電源線、插頭
或插座。
此舉可能引致火災或觸電。
• 切勿把乾衣機安裝或暴露在室
外地方。
此舉可能引致觸電、火災、故障
或變形。
• 切勿將電源線連接到拖板或萬
能蘇。
此舉可能引致觸電或火災。
• 避免寵物啃咬乾衣機。
寵物可能因觸電致死,或損毀乾
衣機機身。
• 切勿使用尖銳物件按動按鈕,
例如螺絲批或大頭針。
此舉可能引致觸電。
• 切勿對那些已使用易燃或易爆物質
的衣物(如蠟、油、漆、汽油、脫
脂劑、乾洗溶劑、煤油等)進行清
潔、清洗、
浸泡,或對這些沾有易燃物質的衣
物進行烘乾。
• 切勿將水灑到乾衣機上。
此舉可能引致火災或短路。
• 乾衣機停止使用或在清潔時,請
拔掉電源插頭。
水或污漬可能引致觸電。
• 切勿讓小孩或寵物在乾衣機上
或機內玩耍。
小孩可能會從機上墮下。寵物或
小孩可能因轉動的零件而受傷,
或在滾桶內導致窒息。
此舉可能引致爆炸或火災。
• 切勿在乾衣機附近放置易燃物件。
此舉可能產生毒氣,引致零件損
毀、爆炸或火災。
• 避免蟑螂或其他昆蟲接近乾衣機。
這些昆蟲可能會啃咬並損毀電源
線。
• 棄置乾衣機前,請拆除機門,
並將電源線剪成一半。
這是為避免小孩在滾桶內玩耍或
其他人對乾衣機進行不當處理而
引致受傷。
4
Page 5

安
全指引
• 應監督幼童,確保他們不會在乾衣機玩耍。
• 此機並不適合幼童或體弱多病者在沒有人監督的情況下使用。
小孩可能會從機上墮下。寵物或小孩可能因轉動的零件而受傷,或在滾桶內導致窒息。
安全指引
• 如果本產品是使用延長電線組件或手提電力插座供電,則必須對手提電器插座上的延長電線組
件,進行適當安裝,使其不會被濺濕或讓濕氣滲入。
此舉可能引致觸電、火災、故障或變形。
• 沾上或浸泡過植物油或煮食油的物件,如放進滾桶乾衣機,可引致火災。
• 應先用熱水加入額外洗衣劑清洗沾了煮食油、丙酮、酒精、汽油、煤油、除污劑、松節油、蠟或除蠟
劑的物品,然後才放進滾桶乾衣機烘乾。
此舉可能引致爆炸及/或自燃起火。
• 沾上、清洗或浸泡過汽油、乾洗溶劑或其他易燃或爆炸性物質的物件,不應放進滾
桶乾衣機內烘乾。
此舉可能引致爆炸及/或自燃起火。
• 不應啟動滾桶式乾衣機的發熱功能烘乾發泡膠、橡膠、塑膠或其他對熱產生敏感的物件,
例如浴室地毯、防滑墊或雨衣。
• 不應使用滾桶乾衣機烘乾泡沫橡膠(泡沫乳膠)、浴帽、防水布、含橡膠物料的製品及裝有
泡沫橡膠墊的衣服或枕頭。
此舉可能引致爆炸及/或自燃起火。
• 不應把塑膠物件如浴帽或嬰兒防水尿布放進滾桶乾衣機內。
此舉可能引致爆炸及/或自發起火。
• 如在地毯上安裝乾衣機,通風氣體可能會損壞地毯。
此舉可能引致爆炸及/或自燃起火。
• 使用衣物柔順劑或類似產品時,應遵照衣物柔順劑的指示使用。
5
Page 6
MFL67708678_hk MFL67708678_hk
安
以下指引將說明安裝乾衣機的起始步驟。
請明白本手冊的每一部份,均提供了安裝及使用乾衣機的重要信息。在安裝或使用前,請仔細閱讀全本手冊。
請遵守所有警告及注意事項。本安裝指引是為專業安裝人員而設。請細心閱讀以下所有安裝指引。
安全資訊
受傷風險
本乾衣機非常沈重,切勿嘗試獨自抬起。
切勿抓住乾衣機的突起部份(如撥輪或機門)抬起,
以免折斷。
安裝指引
跳閘風險
懸吊水喉或電線可能引致跳閘。請確保所有水喉或
電線已繫好。
請檢查乾衣機在運送過程中有沒有損毀
如乾衣機機身有明顯損壞,切勿插上電源。
如不確定乾衣機在運送過程中有沒有損毀,請向本
地代理查詢。
在運送前,請先清空你的乾衣機。
裝指引
乾衣機不應安裝在煤氣爐、爐灶、加熱器或視線水
平的燒烤爐附近,因為火爐的火焰可能損毀你的乾
衣機。將乾衣機安裝在工作台下面時,請在每邊預
留30厘米-50厘米的空間,讓空氣可經後方格柵排
出。在烘乾期間,這氣流對冷凝水份十分重要。
如乾衣機安裝在洗衣機之上或附近地方,請使用獨
立的插頭及插座。切勿使用雙向萬能蘇或拖板。
乾衣機可安裝在洗衣機之上以節省空間。疊裝工具
套裝在本地店舖有售。
疊裝指引
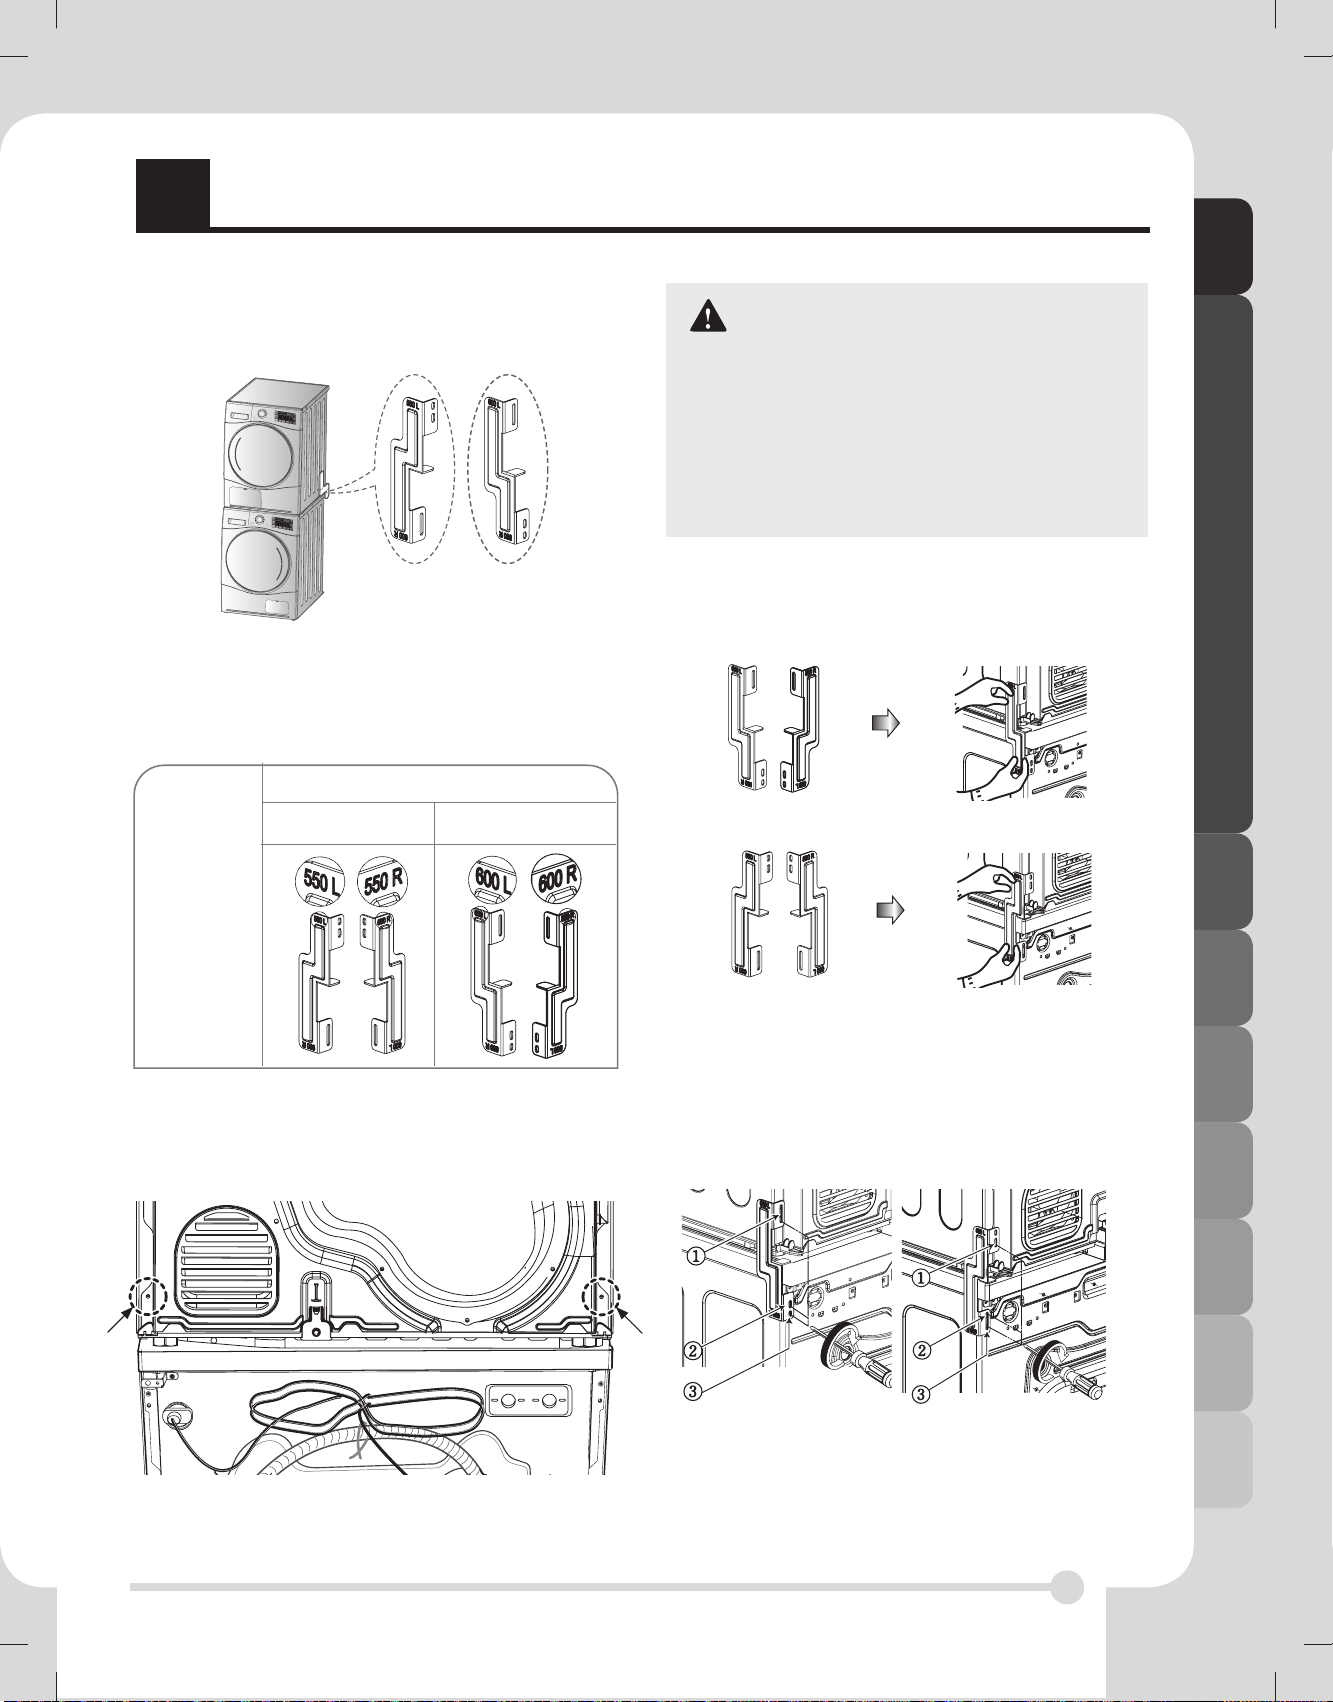
LG 乾衣機可使用疊裝工具套裝(請看下一頁),安裝在前置式洗衣機之上。安裝須由有經驗的技師進行,以
確保洗衣機及乾衣機疊裝妥當。如不小心安裝,乾衣機有可能在運作時翻倒。
請注意某些洗衣機型號具備配對的疊裝乾衣機,詳情請向本地代理查詢。
小心
電源線的注意事項
大部份的電器均建議使用專用電路,即單一插座對應單一電器,並且沒有其他額外的插座或分支電路。請翻閱本
手冊的產品規格頁以作確認。
切勿在電源插座中,接駁過多的電器。電源插座中接駁過多電器,插座會鬆脫或損壞,而使用延長電線、電源線
磨損、或者電線絕緣損壞或龜裂都很危險。任何其中一項情況,均可能導致觸電或火災的危險。定期檢查本產品
的電源線,如果電線外表出現損壞或破損,請將電源線拔掉,停止使用本產品,然後請合資格的維修人員,使用
正確的配件更換。
保護電源線,使其免受物理或機械損毀,如扭曲、打結、夾持、被門夾住、或被踐踏。須特別注意電源插頭、電
源插座、以及本產品電源線的出口位置。
6
Page 7
安
裝指引
組合架
如要疊起此乾衣機,您需要一套 LG 組合架。
乾衣機
洗衣機
此乾衣機只可疊在 LG 洗衣機上。 請勿試圖將此乾衣
機疊在其他洗衣機上,這樣可造成損壞、損傷或財物
損壞。
警告
•不正確安裝可釀成嚴重意外。
• 由於乾衣機的重量和安裝的高度,如只有一
人進行疊起程序會過於危險。疊起程序應該
由兩位或以上有經驗的維修人員進行。
• 此乾衣機不適用於嵌入式裝置。 請勿作為嵌
入式電器安裝。
•如乾衣機已拆卸,請勿使用。
3. 將組合架孔和後蓋孔對齊。
3-1) 23.6 吋(600 毫米)
安裝指引
洗衣機頂板大小
21.7 吋
(550 毫米)
23.6 吋
(600 毫米)
形狀及裝
配方向
安裝程序
1. 將 LG 乾衣機放在 LG 洗衣機上。
2. 依照下圖,將後蓋底部兩邊的兩顆螺絲移除。
3-2) 21.7 吋(550 毫米)
• 將較早前從乾衣機移除的兩顆螺絲扭緊於組合架
上。
• 用配件盒內的四顆螺絲 [0.6 吋(16 毫米)] 將洗
衣機後蓋和組合架裝配在一起。
• 另一邊的裝配程序一樣。
7
Page 8
MFL67708678_hk MFL67708678_hk
安
連接地線說明
本產品必須連接地線。如果發生故障或損壞,地線
為電流提供一條最小的電阻路徑,從而降低觸電風
險。本產品配有一條擁有接地導體和接地插頭的電
源線。必須將電源插頭,插入到根據當地法規,正
確安裝和接地的合適電源插座中。
安裝指引
額外的接地線步驟
有些地方法規規定要獨立的連接設備。在這種情況
下,有關的接地電線配件、夾具和螺絲釘,必須另外
購買。
裝指引
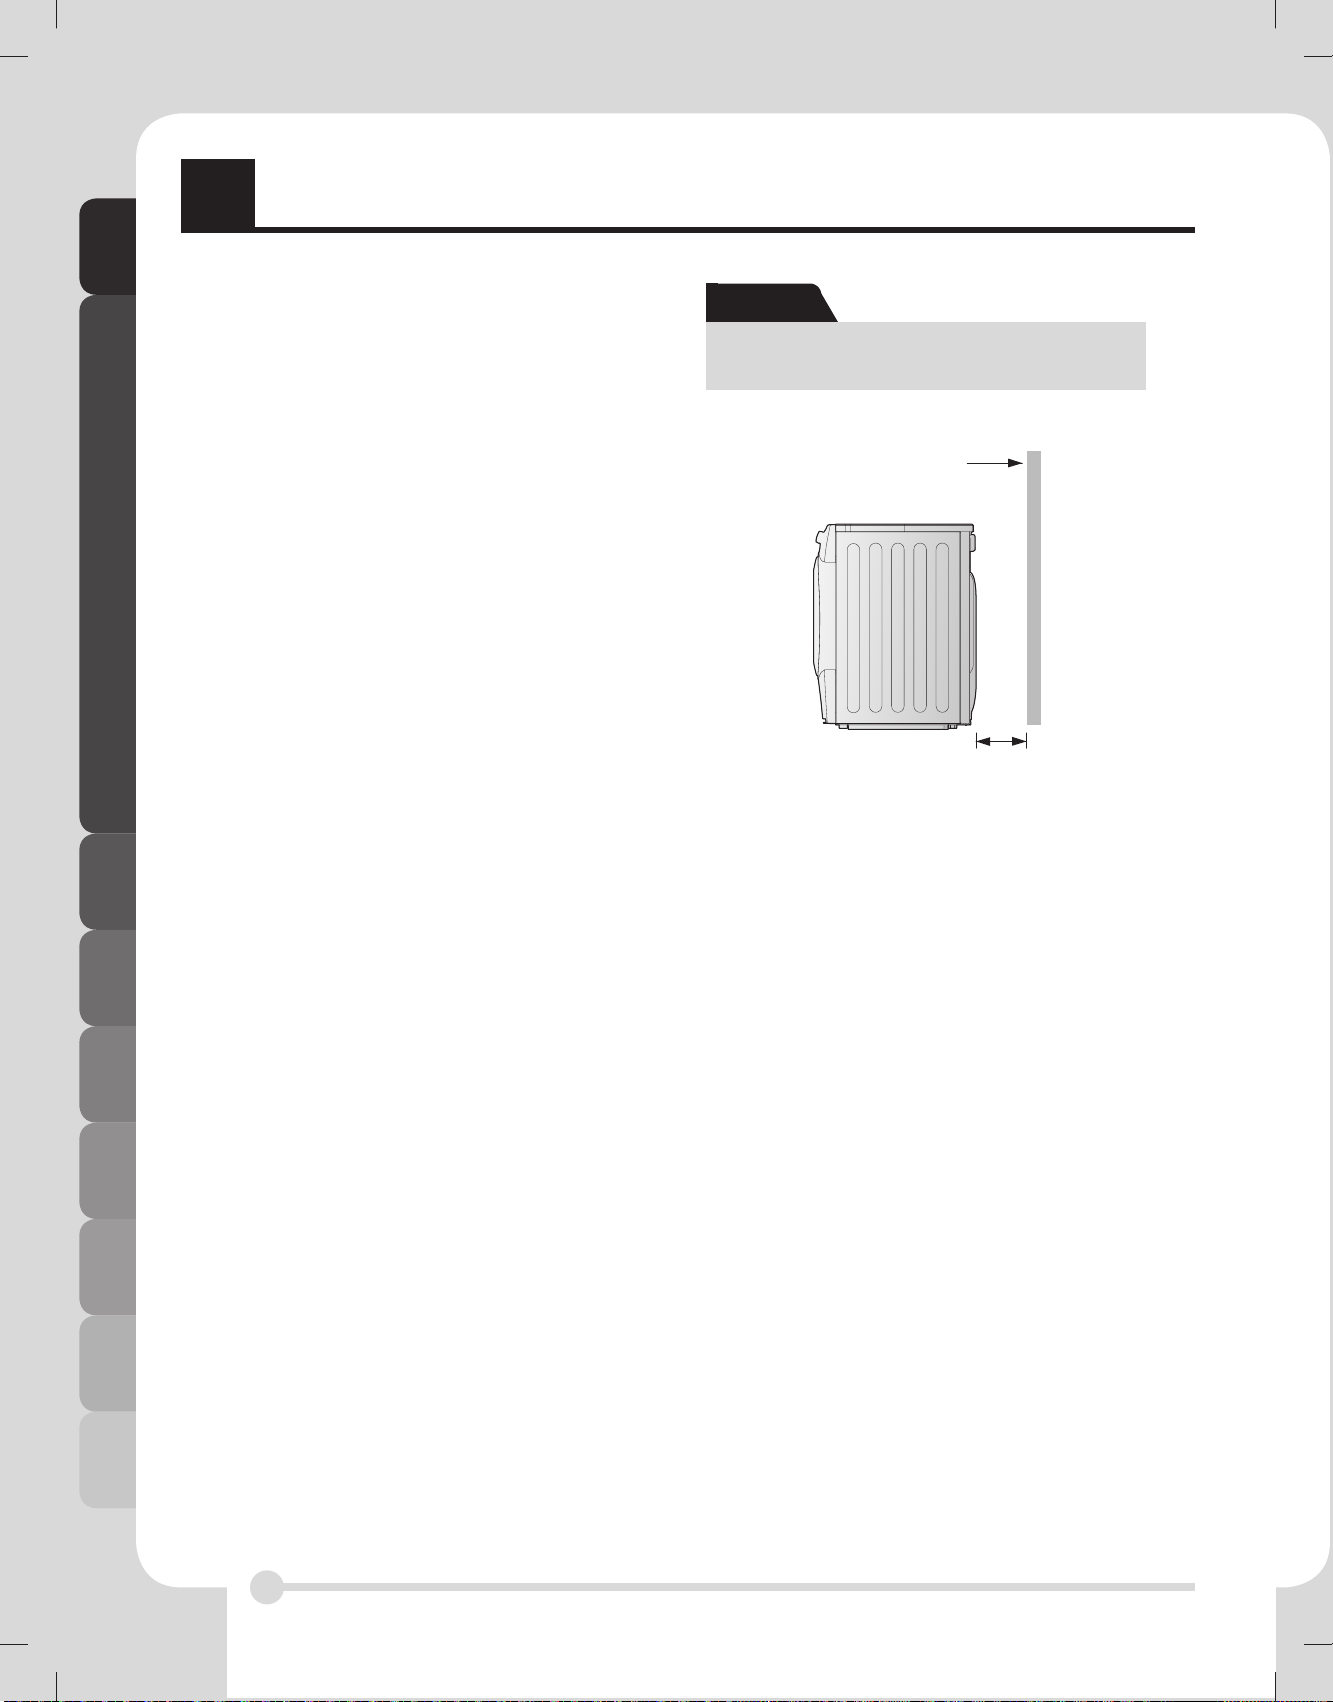
注意
為了獲得最佳的乾衣效果,請勿把本產品的背部貼
近牆邊。
牆壁
30 厘米-50 厘米
冷凝排水系統
乾衣機可不經儲水器排水,水可從乾衣機直接排出。
8
Page 9
安
裝指引
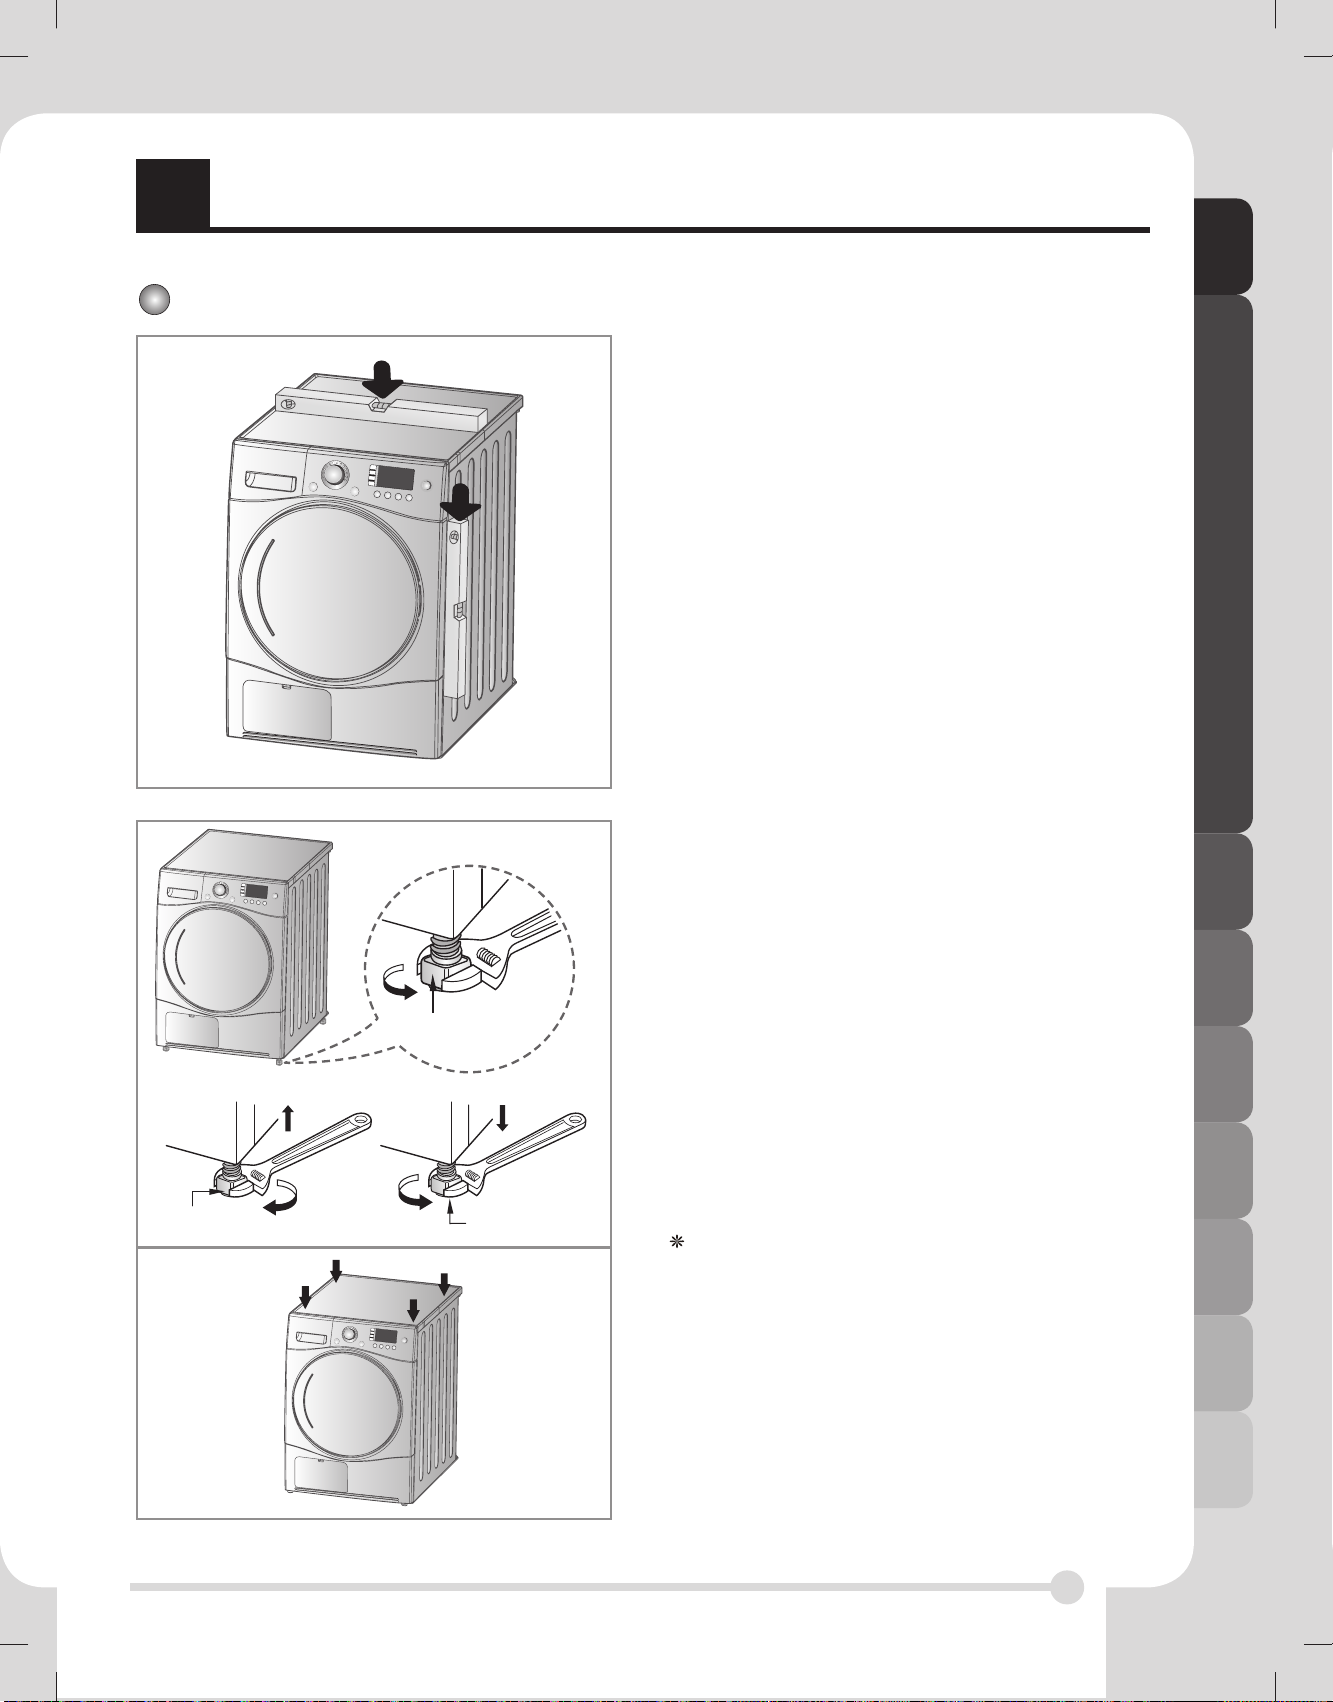
調較乾衣機至水平位置
1. 調節乾衣機至水平位置以防止出現噪音和震動情
況。
當把乾衣機放置在沒有水滴和結冰的穩固平坦
表面時,也須確保附近沒有貯存易燃物品。
安裝指引
可調較機腳
2. 如乾衣機不是在適當的水平位置,可按需要調較
前機腳。
如想調高乾衣機高度,可順時針轉動機腳; 如想
調低,可逆時針轉動,直至前後左右四邊平衡為
止。
可調較機腳
調低乾衣機調高乾衣機
可調較機腳
對角檢查
當將洗衣機頂板對角壓下時,洗衣機應不會上下
搖晃(請檢查兩個對角方向)。當對角壓下洗衣
機頂板時,如果洗衣機搖晃,請再次調校機腳。
9
Page 10
MFL67708678_hk MFL67708678_hk
外
外觀和設計
觀和設計
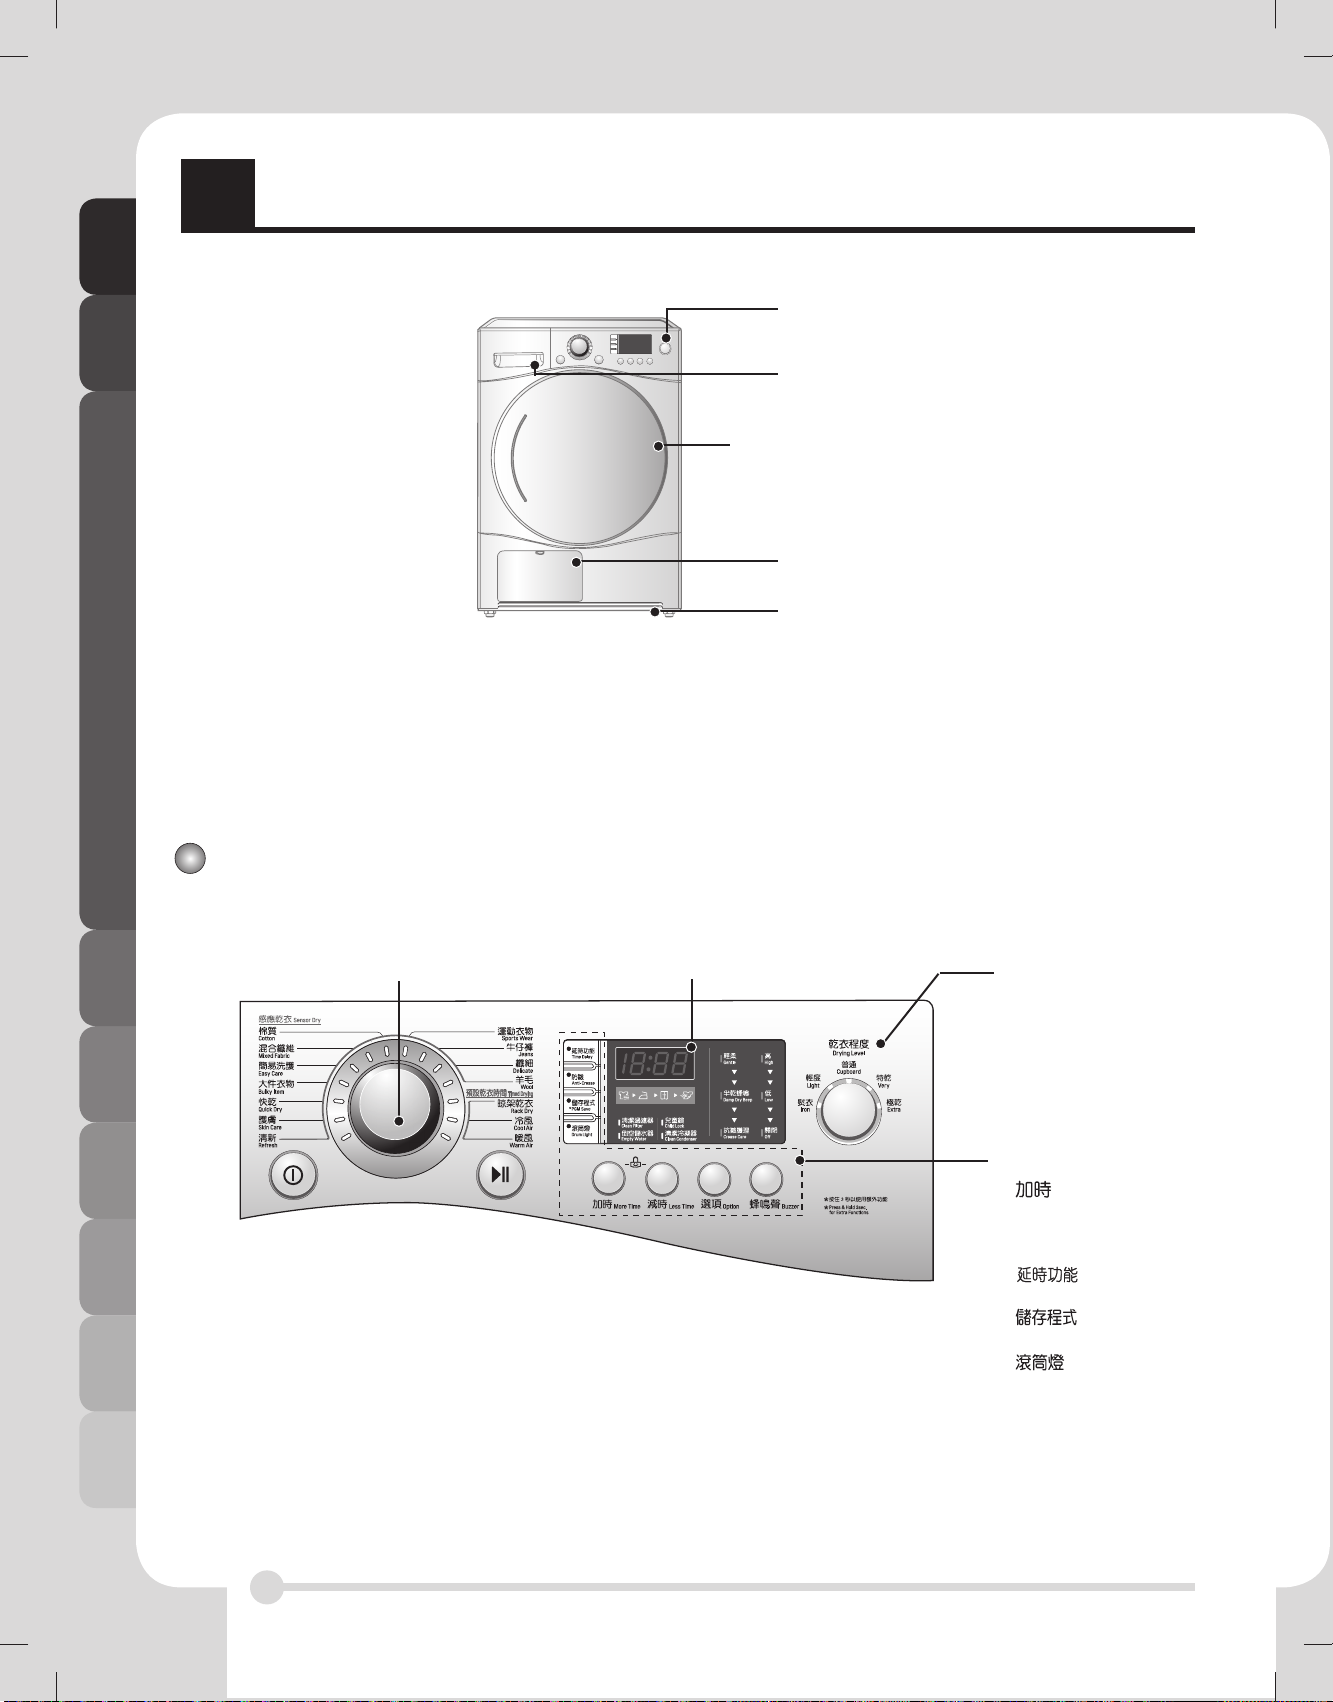
控制板面
儲水器
玻璃門
冷凝器蓋
通風格柵
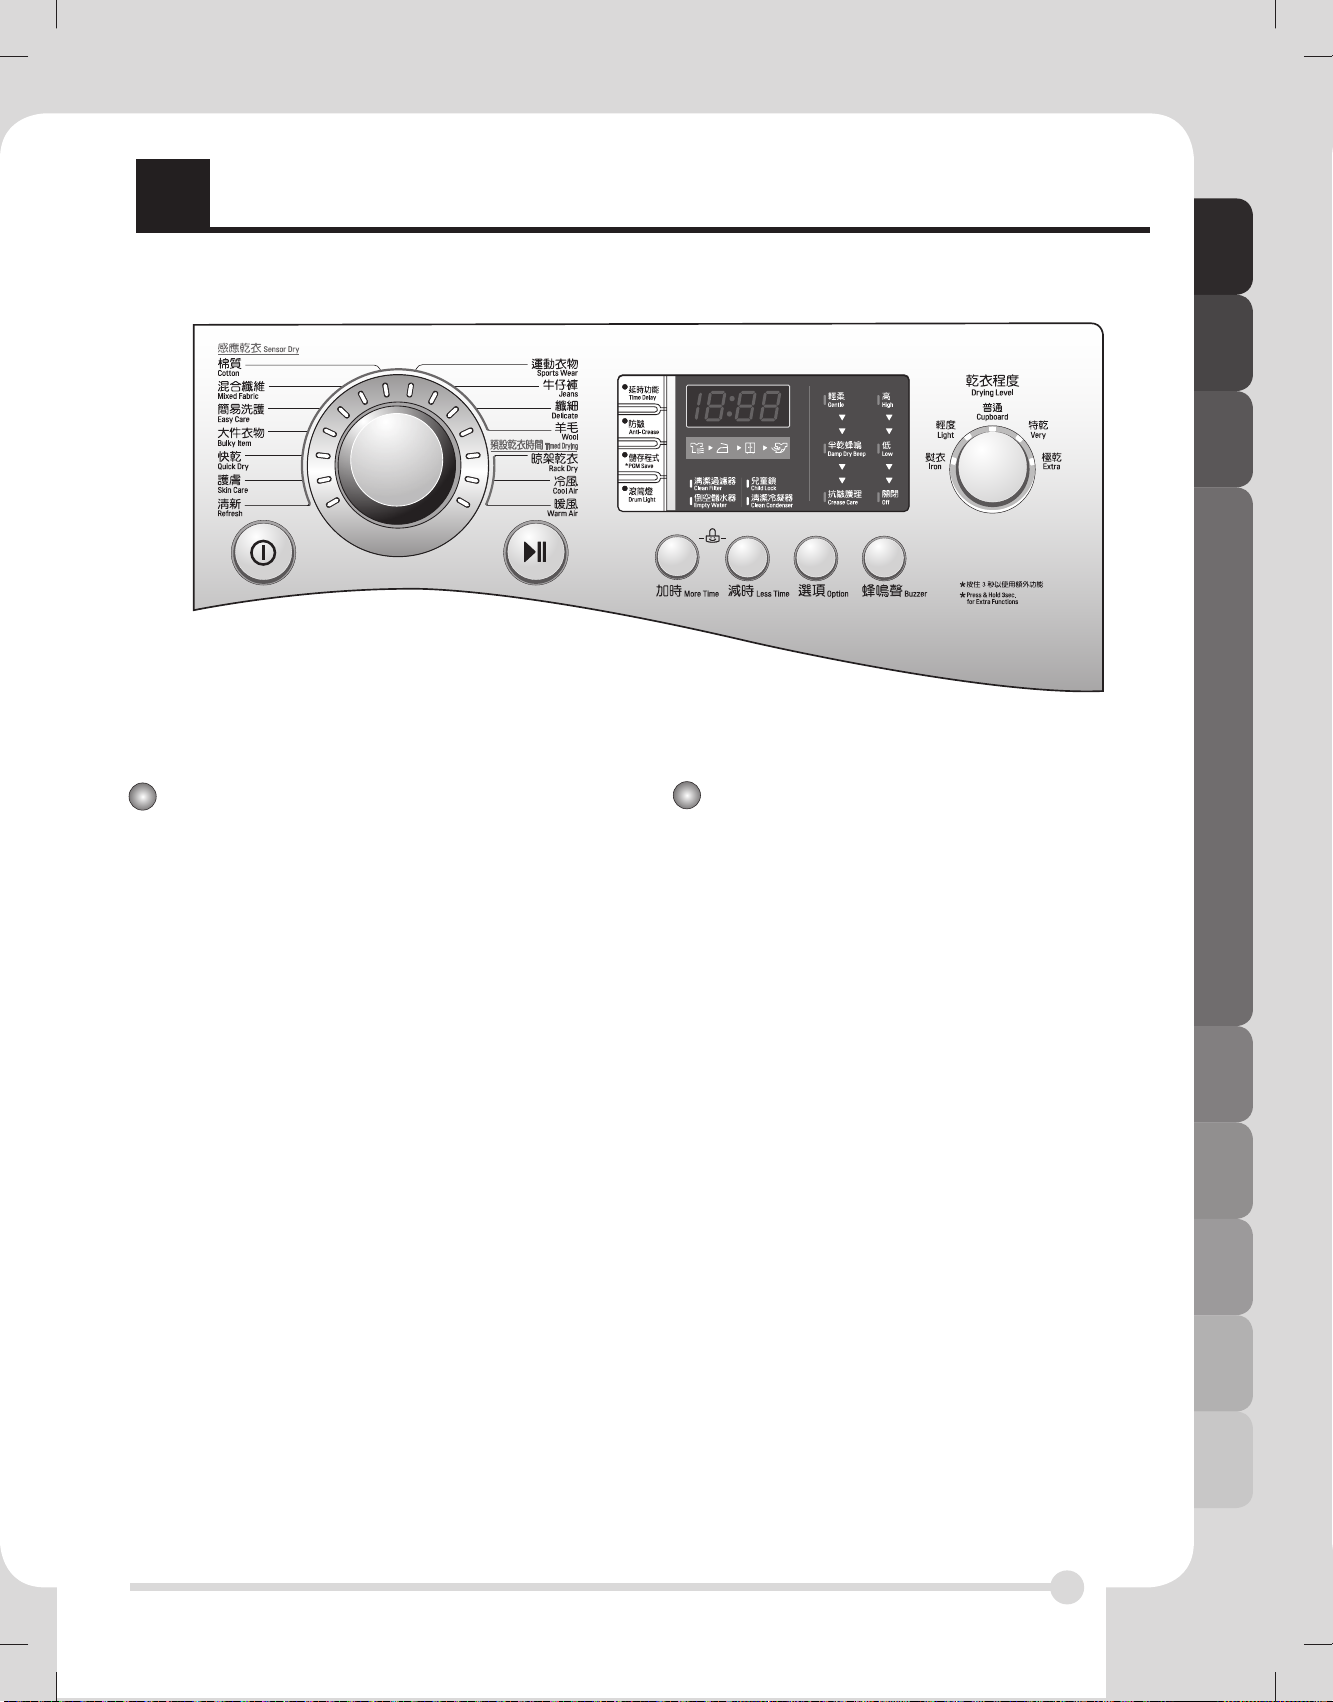
控制板面
程序選擇器
LED 顯示
• 時間顯示
• 指示燈和剩餘時間
乾衣程度
• 熨衣(iron)
• 輕度(light)
• 普通(cupboard)
• 特乾(very)
• 極乾(extra)
額外功能按鈕
(more time)
•
• 減時(less time)
• 選項(option)
• 蜂鳴聲(buzzer)
• (Time Delay)/
防皺(Anti-Crease)/
(*PGM Save),
(Favourite)/
(Drum Light)
10
Page 11
運
作你的乾衣機
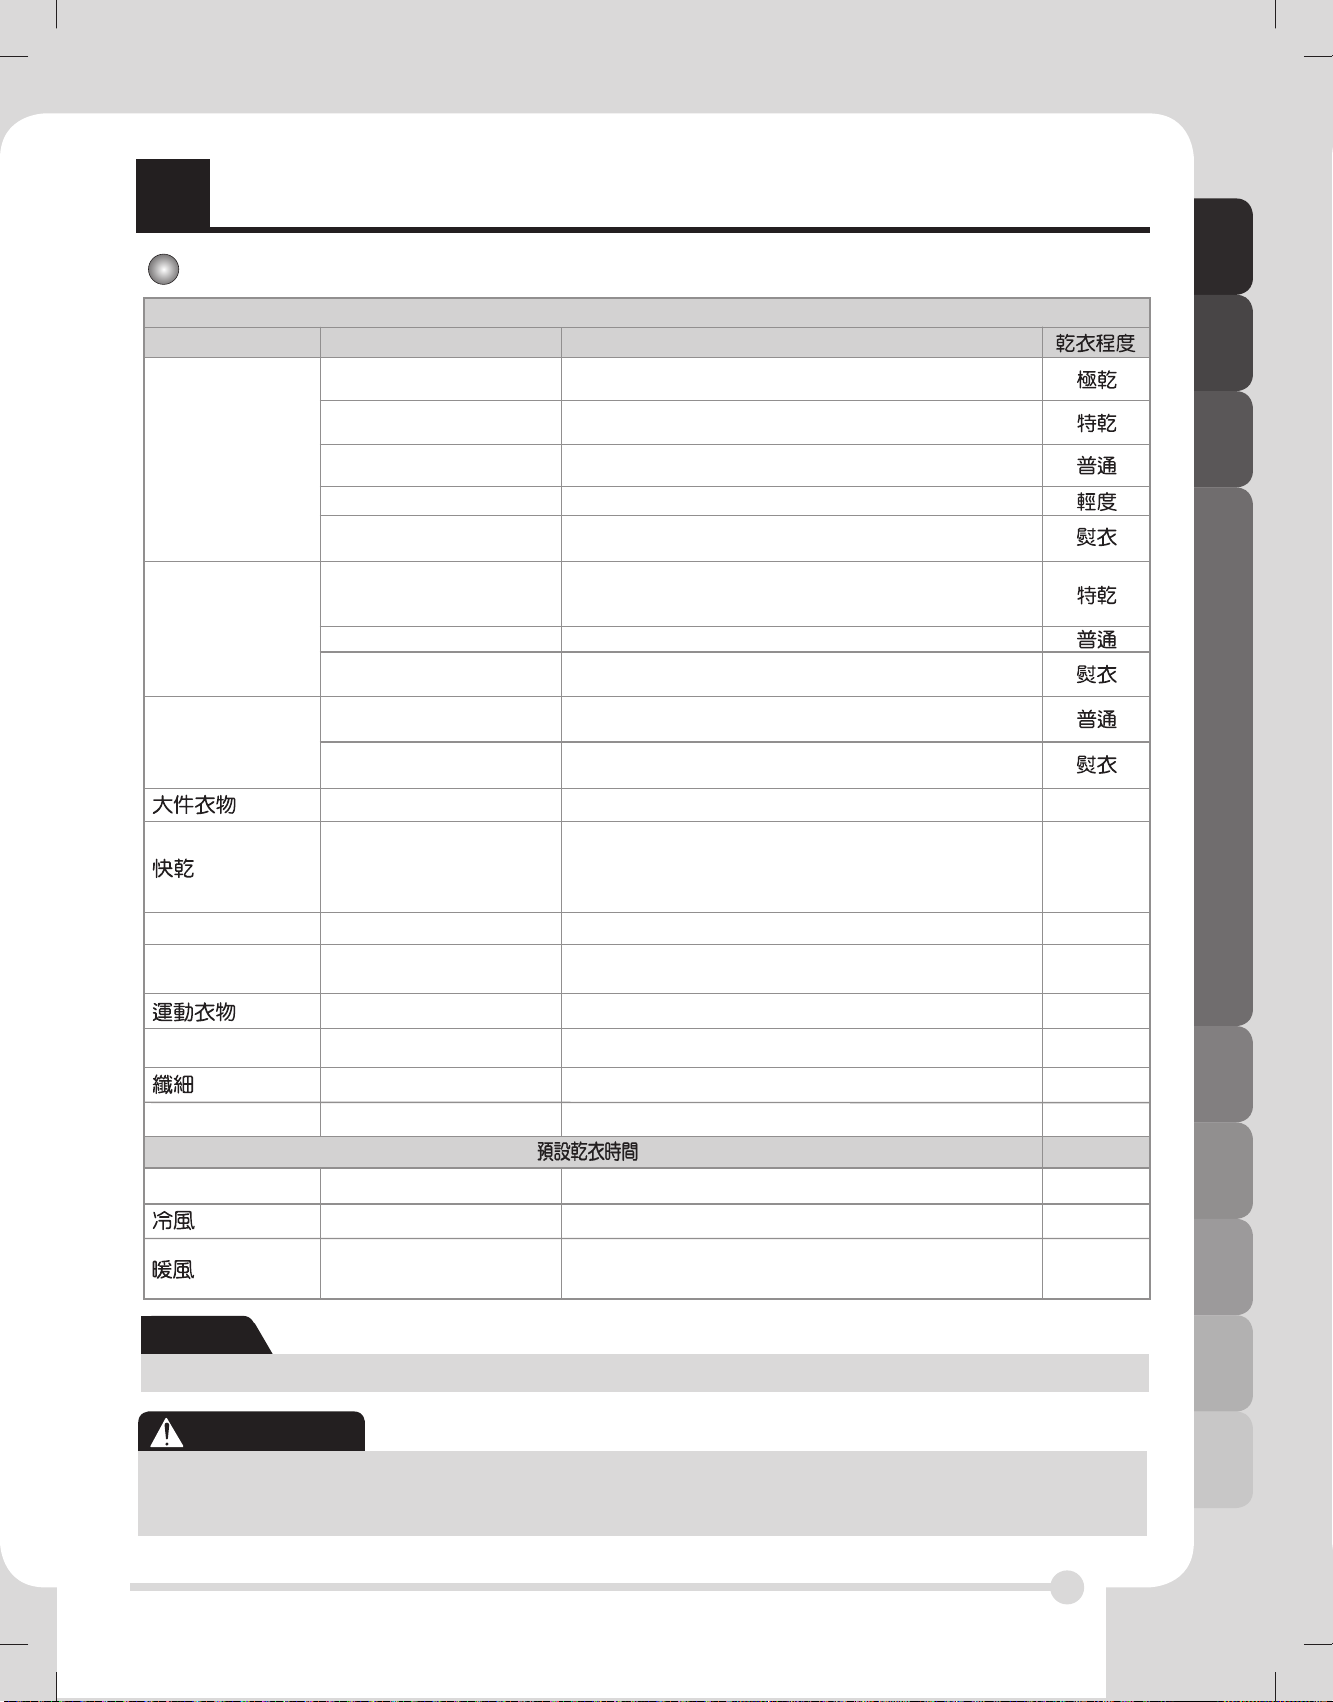
程序選擇表
程序時
衣物類型
自動感應乾衣程序
詳情
棉質程序
(注意)按下選項按
鈕,選擇專為輕柔
衣物使用的熱力感
應項目
混合程序
(注意) 按下選項按
鈕,選擇專為輕柔
衣物使用的熱力感
應項目
簡易洗護
清新(請參閱注
意)
毛巾、睡袍和亞麻床單
毛圈毛巾、抹布、毛巾和
亞麻床單
浴巾、抹布、內衣和棉襪
床單、枕套和毛巾
亞麻床單、桌布、毛巾、T
恤和 Polo 衫
亞麻床單、桌布、運動
服、厚夾克和毯子
襯衫及女裝襯衫
長褲、連身裙、短裙和女
裝襯衫
襯衫、T 恤、長褲、內衣
和襪
襯衫、T 恤、內衣、厚夾
克和襪
被褥、床單
亞麻布和毛巾,適用於纖
細衣物、運動服、厚重衣
物程序的衣物除外。
T 恤、枕套和毛巾護膚
襯衫及女裝襯衫
適合多層厚衣物
適合無需熨燙的多層厚衣物
適合無需熨燙的衣物
適合無需熨燙的衣物
適合需要熨燙的衣物
適合無需熨燙的多層厚衣物
適合無需熨燙的衣物
適合需要熨燙的衣物
適合無需熨燙的聚酰胺、丙烯酸和聚酯纖維
適合需要熨燙的聚酰胺、丙烯酸和聚酯纖維
適合厚重衣物
適合小量乾衣時間短的衣物
適合無需熨燙的棉質衣物
衣物除臭(適合需要除臭的衣物)
運作你的乾衣機
-
-
-
-
-
-牛仔褲和腿色衣物。牛仔褲 適合無需熨燙的牛仔褲
-
-羊毛羊毛 適合羊毛衣物
-
-
-
晾架乾衣
足球套裝和訓練服 適合聚酯物料
絲質、細緻衣料和貼身衣物
絲質、羊毛、纖細貼身衣物
浴巾、浴袍、抹布及由丙
烯酸製成的多層厚衣物
適合不可用熱水洗滌的衣物,如合成纖維
序
不使用翻滾烘乾,令衣物更清新。
無熱翻滾所有需要清新的衣物
小型衣物及潮濕衣服
適合熱力烘乾的日用衣物
注意
使用「清新」程序時,請對衣物噴灑冷水或暖水,令衣物更清新。 (建議水量為每件衫 20cc。)
小心
如洗衣量少於 1 公斤,請使用定時乾衣程序的「暖風乾衣」程序。
羊毛衣物應使用「羊毛」程序烘乾,不可用熱水洗滌的衣物(包括絲質、內衣和貼身衣物)應使用「纖細衣物」
程序烘乾。 選擇想要使用的程序時,請遵照建議的洗衣量,可見於第 二十 頁。否則,您的衣物可能損壞。
11
Page 12
MFL67708678_hk MFL67708678_hk
運
作你的乾衣機
首次使用 LG 乾衣機前,請先閱讀以下說明
移除包裝後,請先根據以下檢查程序,確保 LG 乾衣機安裝正確及可供使用。
1. 使用水平儀檢查乾衣機是否水平安放,若不是,請調較 LG 乾衣機機腳以達致機身平衡。
2. 檢查儲水器、冷凝器、控制面板及滾桶是否一切正常,安裝正確。
3. 將乾衣機設定為 5分鐘的乾衣程序以預熱滾桶
4. 在首數次使用 LG 乾衣機後,在放入和取出衣物時,請打開機門,讓機內的異味散發。
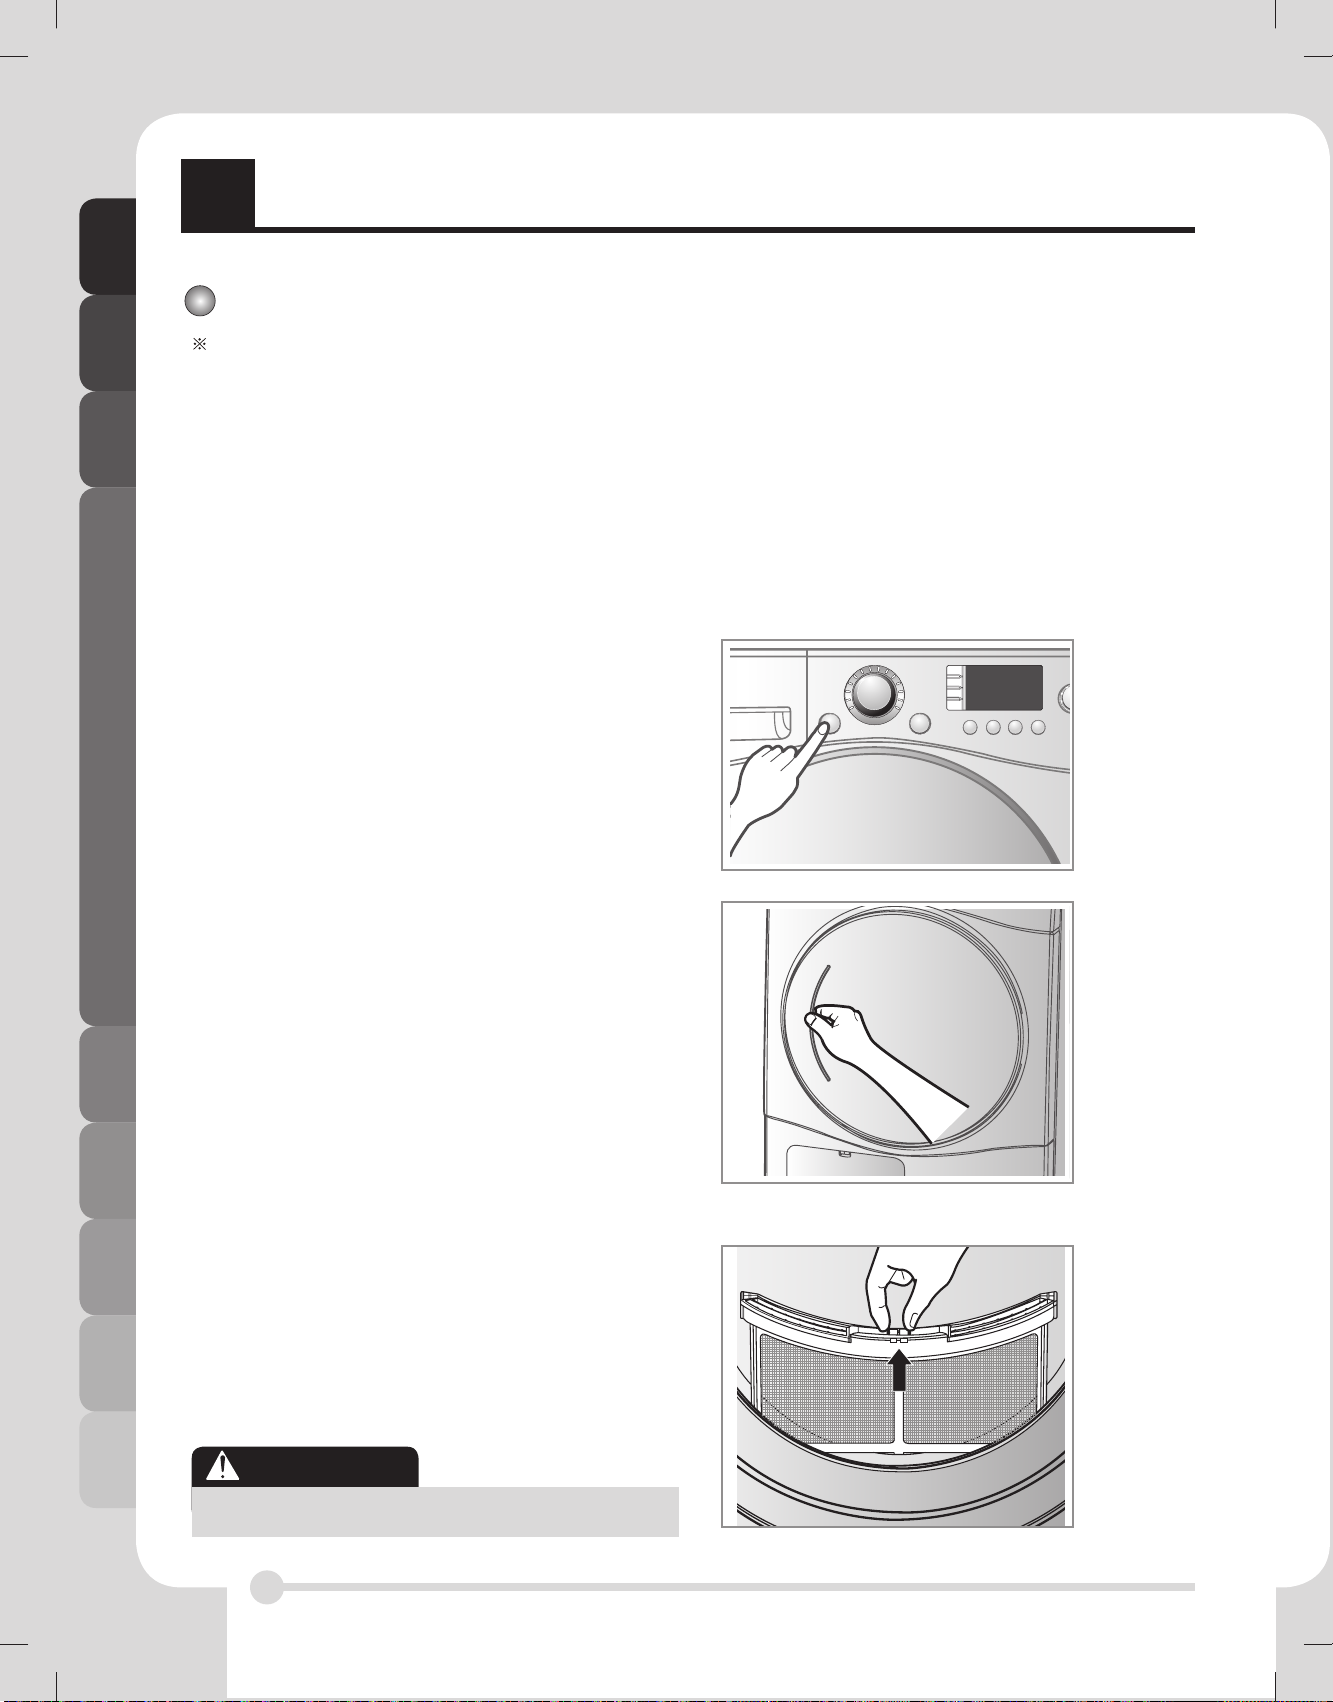
1. 啟動開關
首先按“POWER.(電源)按鈕。按鈕上的顯示燈
會亮起,表示乾衣機正在操作。
啟動電源
2. 打開機門
運作你的乾衣機
3. 檢查絨毛過濾器、儲水器及冷凝器
在乾衣操作前後,需清空靠近機門的絨毛過濾
器。
打開機門,檢查絨毛過濾器是否清潔。否則,請
根據第17 頁指引清理。
檢查儲水器及冷凝器是否清潔,以達致最佳的乾
衣效果。
4. 把衣物分類後放進滾桶
衣物需根據其衣物纖維及乾透程度分類,把衣物放
進滾桶前,必須繫緊所有衣物的繩子及腰帶。
把衣物盡量推入滾桶內,並遠離機門塑膠封邊。否
則可能會損壞機門塑來膠封邊及衣物。
拉
打開機門
玻璃門
檢查絨毛過
濾器
小心
請勿把未清洗的衣物,放進乾衣機烘乾。
12
Page 13
運
作你的乾衣機
5. 把門關上.
把機門關上之前, 請確保已將衣物妥善放置在機
內, 並確認沒有任何異物卡在機門周圍的地方, 特
別是易燃物品。
小心
注意不要讓衣物夾在機門和橡膠密封圈之間。
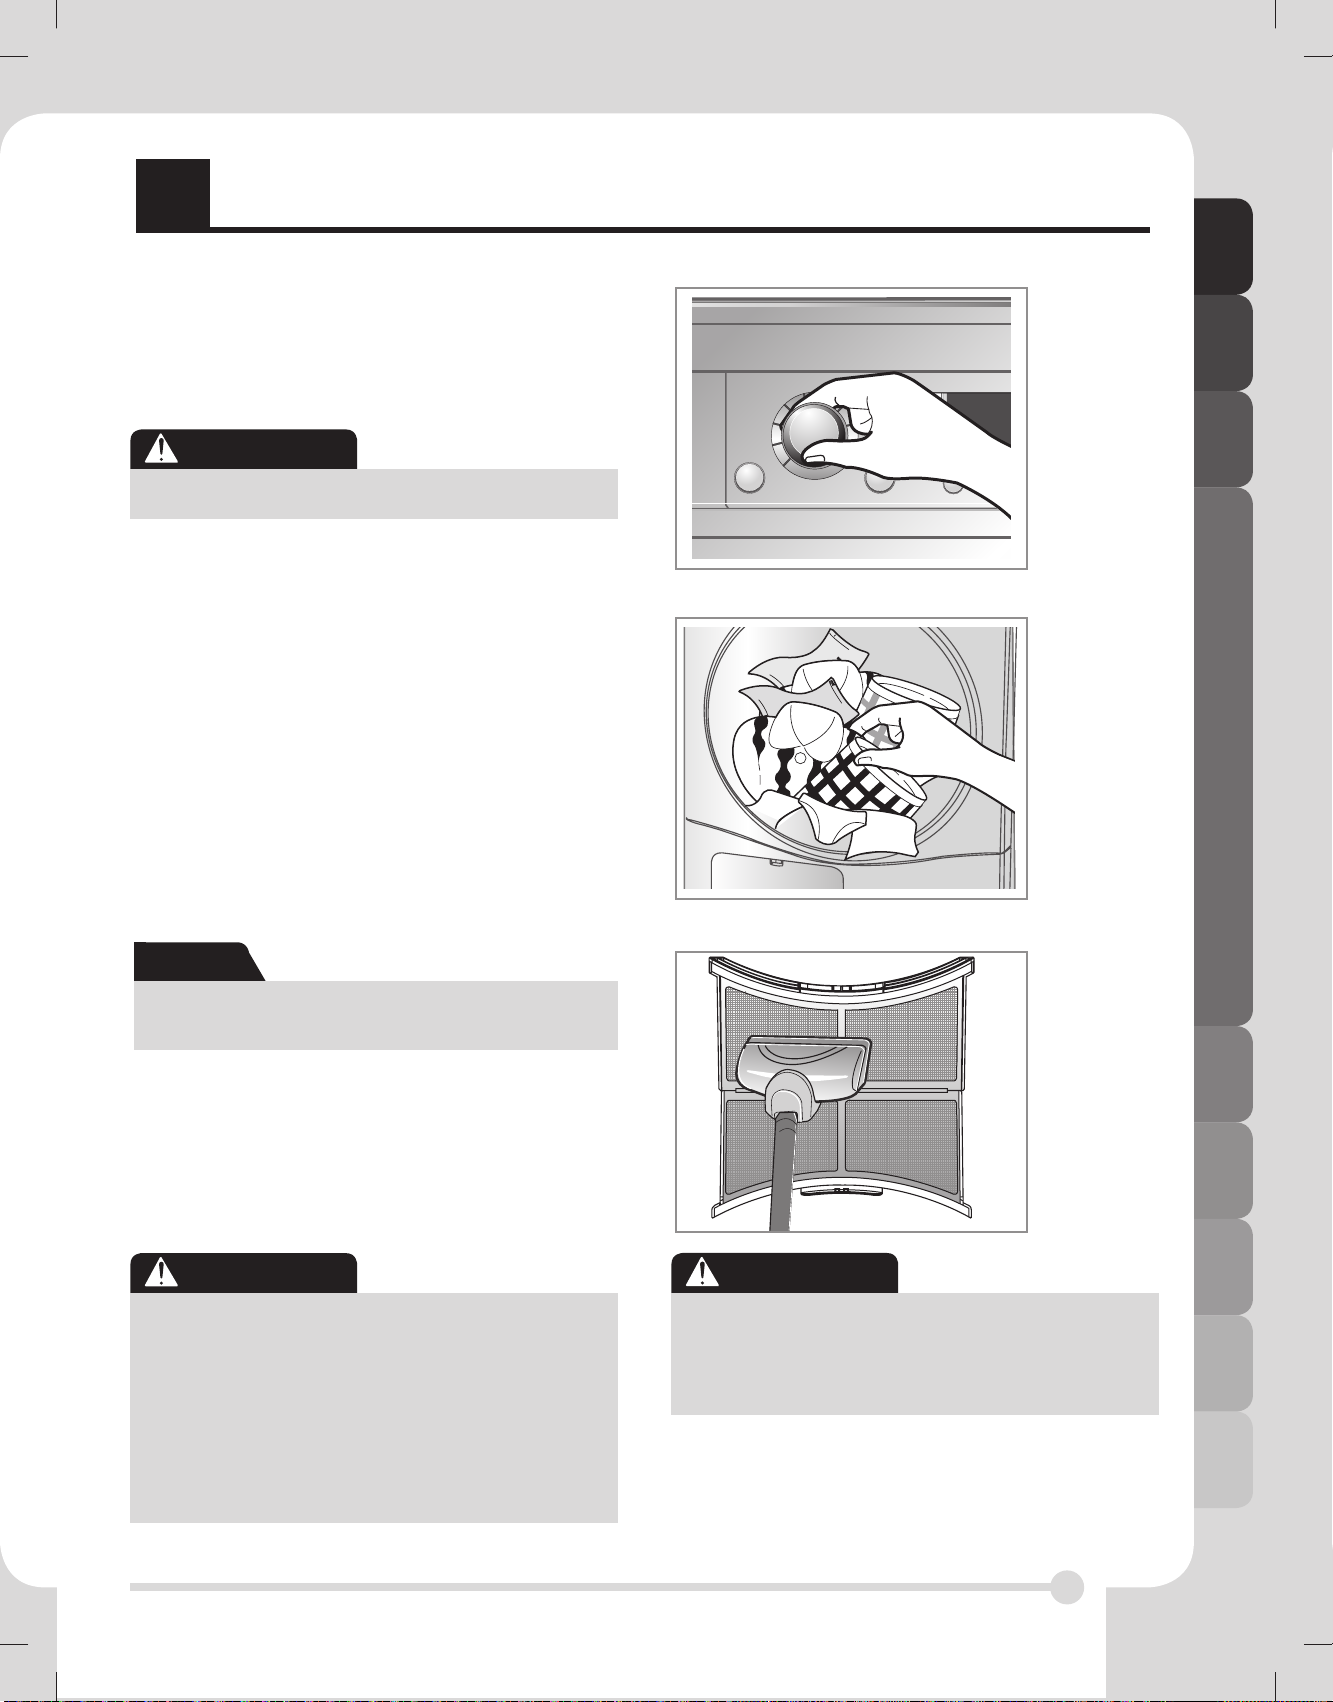
6. 選擇乾衣程序.
您可以轉動程序控制器,選擇所需的程序,直至程序指示器
到達所需的程序。如果在沒有選擇任何程序的情況下,按
下"Start/Pause."(啟動/暫停)按鈕,本機將進行普通乾衣程
序。[如需更詳細的資料,請參閱以下程序選擇表(第11 頁)]
7. 按下開始按鈕。
您可以聽到滾桶轉動的聲音。
8. 當操作完成後,請打開機門並取出衣物。
小心! 滾桶可能仍然熨手。
(操作時間視乎選擇的乾衣程序選項而定。)
選擇所需程
序。
取出衣物。
運作你的乾衣機
注意
滾桶乾衣程序的最後一部分不會加熱(冷卻程序),
以確保衣物保持在不會被損壞的溫度程序下。
9. 清潔絨毛過濾器和儲水器。
每次使用乾衣機後,都應該清潔絨毛過濾器。
10.關掉乾衣機。
按下 "Power."(電源)按鈕。
小心
- 請確保在使用吸塵機清潔絨毛過濾器時,不會
將它損毀。如果仍有殘留物積聚,請用刷子
擦洗過濾器的絨毛篩網。
- 如要在乾衣機運作途中打開機門,請先按
下"Start/Pause."(啟動/暫停)按鈕,等到滾桶
完全停定,然後再打開機門。
清潔絨毛過
濾器。
警告
除非所有衣物都被迅速取出並攤開,否則,切
勿在乾衣程序結束之前,停止滾筒乾衣機,阻
礙熱量流散。
13
Page 14
MFL67708678_hk MFL67708678_hk
運
作你的乾衣機
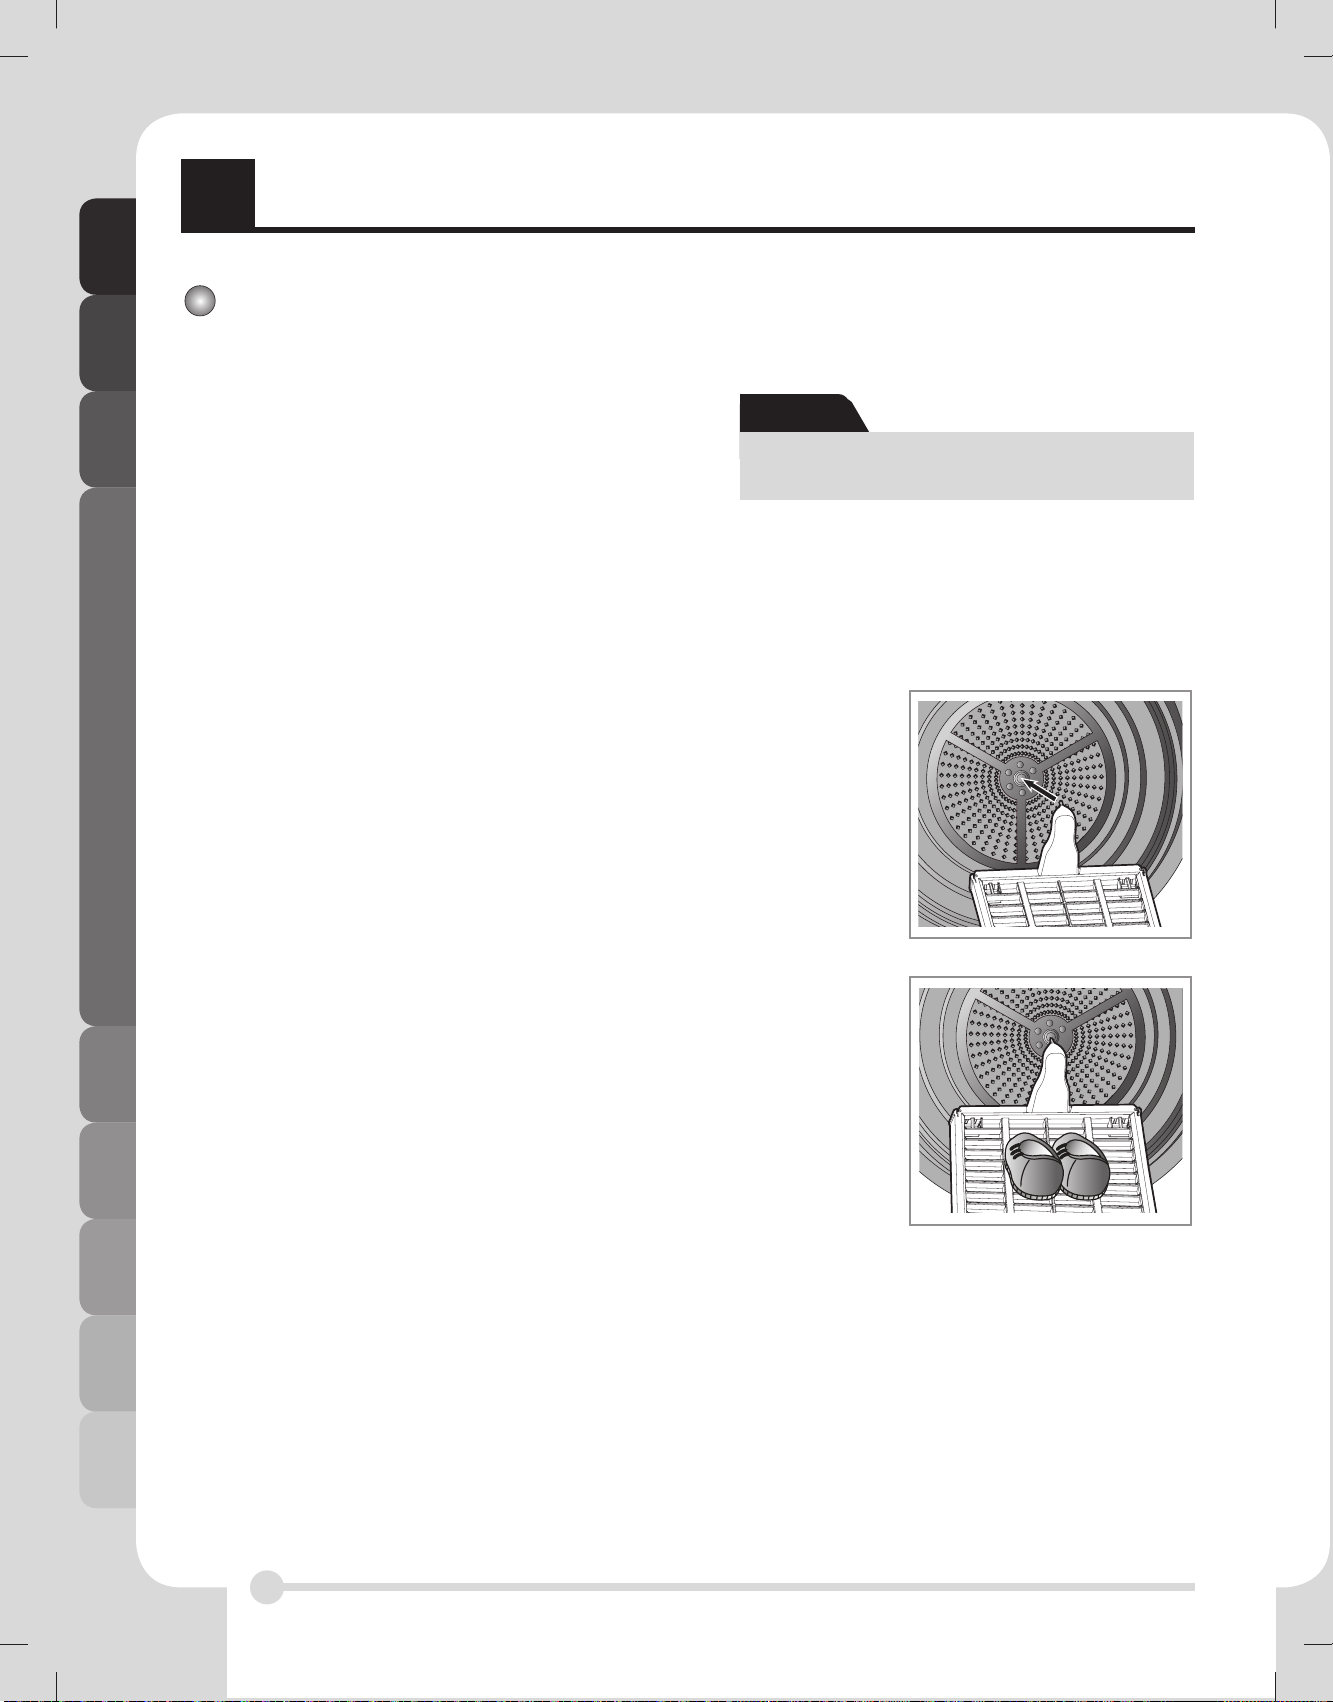
晾架乾衣
乾衣機晾架設於乾衣機內,如下圖所示。使用前請拆除並
丟棄包裝物料。
晾架乾衣適用於不得翻滾、必須平放晾乾的衣物,包括毛
衣和纖細衣物。
使用晾架乾衣:
1. 開啟機門。
2. 請勿拆除濾網。
3. 將晾衣架放在乾衣機機門底部。
將晾架重置在乾衣機後部。
推下支架前方以穩固濾網。
注意
檢查濾網,移除從架上晾乾的衣物所積聚的棉
絮。
1. 將金屬架邊緣
插入滾筒中心
位置。
運作你的乾衣機
4. 將濕衣物放在架上。保持衣物周圍空氣流
通。晾架不會移動,但滾筒會轉動。
5. 關閉機門。
6. 開啟電源並選擇晾架乾衣。
2. 放置纖細衣物
或運動鞋。
14
Page 15
附
加功能
附加功能
延時功能
閣下可使用延時功能,延遲烘乾程序的完成時間。
最長時間延遲為19 小時。
最短時間延遲為3 小時。
1. 啟動乾衣機
2. 選擇烘乾程序
3. 設定延遲小時時間
4. 按下"Start/Pause."(啟動/暫停)按鈕。
防皺
防皺功能用於防止衣物在烘乾程序結束時,沒有迅
速取出形成的摺痕和皺褶。在此功能模式下,乾衣
機會重複運行和暫停,直到防皺程序結束。
如果機門在防皺處理過程中打開,此功能會被取
消。
15
Page 16
MFL67708678_hk MFL67708678_hk
附
附加功能
加功能
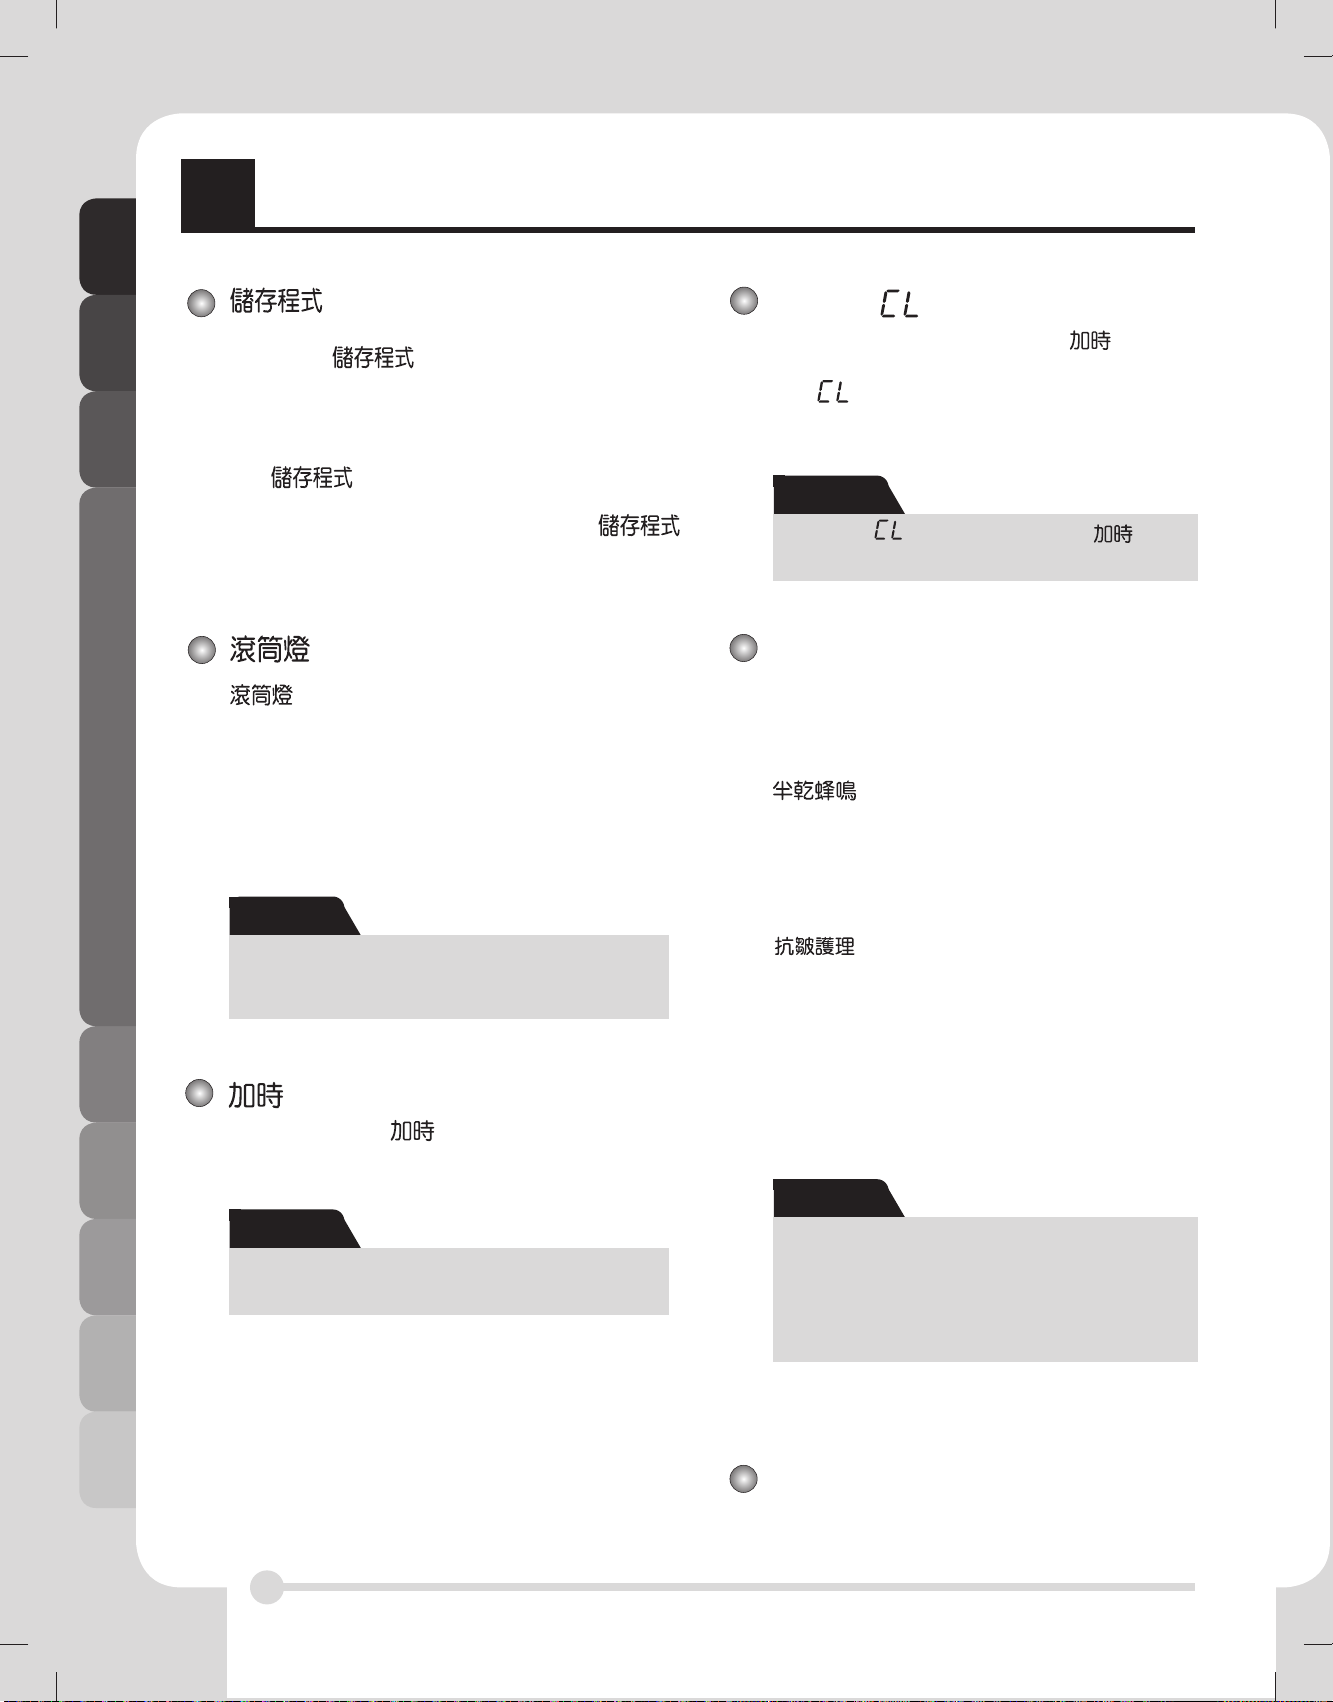
如果閣下想要根據自己的烘乾習慣,選擇烘乾程
序,請使用
次更改此儲存的設定之前,便可重複使用此程序。
例如:閣下啟動電源,按序選擇棉Extra Dry in
Cotton Cycle(在棉質程序的極乾模式)、Low
temp (低溫)、以及 Anti-Crease(防皺),然後
按下
聲為止。此過程約為3 秒鐘。這就是閣下所需做的
全部事情。下一次,當啟動乾衣機並按下
預設程序時,便可以在控制面板上,看到上述選項
顯示。
(玻璃門)
-
在操作程序期間,閣下通過選擇滾桶燈功能,
便可看到滾桶的內部情況。此功能有助於查看
烘乾程序。
預設程序按鈕,直至乾衣機發出蜂鳴
注意
此功能只有在Cotton-Iron(棉質衣物熨燙)程
序和 Mixed-Iron(混合熨燙)程序時才有效。
。當儲存好預設程序後,在下
兒童鎖 ( )
為了小孩的人身安全,請同時按住 間和減時
間按鈕約 3 秒鐘。閣下此時會看到 LED 視窗出
現“ ”字樣。
注意
如果要使“ ”字樣消失,請同時按住 間和
減時
間按鈕約 3 秒鐘。
選項
輕柔
- 此功能通過升高或降低溫度,縮短或延長乾衣程
序時間。
- 此選項只對棉質衣物和混紡衣物程序有效。
- 此功能用於通知何時才是熨燙的最佳時間(伴隨
蜂鳴聲)。
- 此選項只對棉質衣物和混紡衣物程序有效。
- 當閣下選擇熨燙烘乾程度時,‘半乾蜂鳴’功能
不可使用。
- 此功能用於減少皺褶。
- 當閣下只選擇了混紡衣物程序時,此功能會自
設定,但是此功能無法取消。
/減時
按下More Time( )或Less Time(減時)按
鈕,直至所需烘乾時間設定完成。
注意
在閣下按下Start/Pause(啟動/暫停)按鈕之前,
這些按鈕只有在預設烘乾時間下才有效。
16
注意
此選項可通過按下選項按鈕的次數進行更改。
- 1 次:選擇輕柔。
- 2 次:選擇半乾蜂鳴選項。
- 3 次:同時選擇輕柔和半乾蜂鳴選項。
- 4 次:沒有選擇。
蜂鳴聲
此功能能夠調較蜂鳴器的音量。
Page 17

乾
衣機的保養
保養與清潔的重要性~
乾衣機的保養並不是非常困難。閣下只須按照以下資訊操
作即可。
絨毛過濾器
每次使用後,請清潔絨毛過濾器,而且在每次使用前,請
檢查絨毛過濾器。在乾衣機運行期間,如果“Clean Filter
(清潔過濾器)”燈亮起,而且在蜂鳴器發出叫聲時,應
該對絨毛過濾器進行清潔:清潔或清空此過濾器,會縮短
烘乾時間、降低耗電量、延長乾衣機的使用壽命。
小心
- 如果可以,絨毛過濾器需要經常進行清潔。
- 滾桶式乾衣機周圍不得堆積絨毛。
1.打開機門
2.取出過濾器
倒空儲水器
儲水器收集了冷凝水,閣下應該在每次使用後,將
儲水器倒空。如果沒有倒空儲水器,可能會使烘乾
性能不正常。
如果儲水器已滿,在乾衣機工作的同時,“Empty
Water(水倒空)”燈會亮起,蜂鳴器會發出蜂鳴
聲。
在此情況下,必須在 1小時內將儲水器內的水倒出。
1.將儲水器拉出。
2.將儲水器的水倒
入池盤。
乾衣機的保養
3.使用真空吸塵器
清潔過慮器,或
將其放在水龍頭
下沖洗。
4.將過濾器裝回原
位。
- 將過濾器一直推
到底,避免防礙
機門開關。
5.關閉機門。
小心
將“絨毛過濾器”放在溫熱的肥皂水中清洗。完
全弄乾,然後再裝回原位。
程序運行期間清潔絨毛過濾器
如果“清潔過濾器”指示燈在乾衣機運行期間閃亮,請
立即清潔過濾器。
1. 冷卻乾衣機,並按照上述的步驟操作。
2. 按下Start/Pause(啟動/暫停)按鈕。
3.將儲水器裝回原位。
4.按下 Start/Pause(啟動/暫停)按鈕。
注意
洗滌期間高速脫水,會使耗電量更低。
高的環境溫度和和小的空間,可能會延長烘乾時間、以
及增加耗電量。
警告
絕對不可以飲用冷凝水。
小心
如果在洗滌期間,衣物沒高速脫水,會增加
耗電量,並會延長烘乾時間。在某些情況
下,“Empty Water(水倒空)”衣物燈
會閃亮,然後乾衣機可能會停止操作。
17
Page 18

MFL67708678_hk MFL67708678_hk
乾
衣機的保養
冷凝器
冷凝器對高效烘乾性能同樣非常重要,所以閣下需要對其進行特別保養。建議閣下一年清潔冷凝器三次
或四次,或當冷凝器清潔燈閃亮時,請進行清潔。
1.使用一個硬幣或一字螺絲刀打開冷凝蓋。
2.轉動鎖緊杆,將密封蓋打開。
4.將冷凝器放在水龍頭下,讓水沖洗,使其
完全清洗乾淨。
< 正面 >
< 側面 >
乾衣機的保養
3.把1 根手指插入冷凝器正面的孔中,將冷凝器
拉出。(切勿用力拉冷凝器。)
頂部
底部
密封蓋
5.按照上述的相反程序,將冷凝器裝入,並關閉
好密封蓋和冷凝蓋。
小心
- 當冷凝器被絨毛堵塞時,啟動乾衣機會損壞
機件。這樣做也會增加耗電量。
- 切勿使用尖銳物體清潔熱交換器。可能會損
壞它,造成泄漏。
- 在沒有安裝熱交換器的情況下,切勿操作乾
衣機。
18
Page 19

乾
衣機的保養
通風格柵和冷氣通風格柵
每年對通風格柵進行真空吸塵三至四次,確保此處沒
有堆積防礙空氣流入的絨毛或污垢。
注意
- 熱空氣通過此通風格柵排出。
- 必須提供充分通風,以避免因電器產品燃燒其
它燃料(包括明火)所產生的氣體回流到房
間。
3. 將排水喉
連接到配
件。
濕度感應器?
此設備用於感測烘乾期間,衣物殘留的含水量。
這表示應感器必須經常清潔。清潔此設備的主要
原因是清除感應器表面上堆積的水垢。請定期擦
拭滾桶 面的感應器 (如圖所示)。
乾衣機的保養
冷凝水排出
冷凝水通常被抽到儲水器中。儲水器收集水,直至再被
倒空為止。用戶不單可以使用儲水器收集水,而且還可
將水直接排入排水喉,特別是在乾衣機安放在洗衣機頂
部的情況下,可將水直接排入排水喉。使用排水喉連接
配件,閣下可以輕鬆地更改排水路徑,將水重新接入到
排水設施。請按照以下步驟操作。
1. 取出連接配
件。
2. 將儲水器水
管和配件分
開
19
Page 20

MFL67708678_hk MFL67708678_hk
智
能使用的附加提示
不同衣物的烘乾指南與容量
程式 乾衣機容量
9 kg
棉質
簡易洗護
護膚 2 kg
清新 禮服襯衫最多 4EA
牛仔褲 4.5 kg
羊毛 1 kg
羊毛衣物
在“羊毛”程式中將羊毛衣物烘乾。首先要確保遵守
衣物護理標簽的“符號”。在此程序中,羊毛不會完
全乾透,所以切勿重複烘乾程式。將羊毛衣物拉伸至
其原始形狀,然後再放平,將它們烘乾。
9 kg
9 kg
4 kg
2 kg
2 kg
1.5 kg
1.5 kg
1.5 kg
2 kg
以下為衣物護理標簽。
符號 說明
烘乾
滾桶烘乾
機織和針織衣物
某些機織和針織衣物會縮水,視乎質料而定。
免燙和合成纖維衣物
切勿在乾衣機中放入過多的衣物。
乾衣機停止操作時,請立即將免燙衣物取出,以減少皺褶。
智能使用的附加提示
嬰兒衣物和睡袍
請經常檢查製造商的說明。
橡膠與塑膠衣物
切勿將含有橡膠或塑膠物料製成的衣物進行烘乾:
a) 圍裙、圍巾、以及椅套
b) 窗簾和桌布
c) 浴室地墊
玻璃纖維衣物
切勿將玻璃纖維衣物放入乾衣機內。
當下次使用乾衣機時,留在乾衣機的玻璃粒子,可能會
被衣物吸取,從而刺激閣下的皮膚。
衣物護理標簽
衣物都有其自身的洗滌標簽,所以請按照推薦的洗滌
護理標簽進行烘乾。不單如此,衣物必須按照它們的
大小和類型進行分類。
為了節省電量、時間、以及獲得最佳烘乾效果,切勿
放入過多衣物。
免燙/抗皺
輕柔/纖細衣物
切勿滾桶烘乾
切勿烘乾
高溫烘乾
中溫烘乾
低溫烘乾
無加熱/無空氣
晾乾/懸掛晾乾
滴乾
平放晾乾
放在陰處
20
Page 21

智
能使用的附加提示
備用配件
根據保養條款為閣下提供了所需的備用配件。
保養期內的零件,屬免費更換的零件。如過了
保養期,備用配件必須從客戶服務部購買。
棄置乾衣機
最好是將乾衣機進行安全棄置,使小孩免受傷
害。
必須將機門和機蓋,以及其它突出物件拿走,
以及必須將電源線切斷,避免日後使用。完成
這些步驟後,便可以安全棄置乾衣機了。
零配件
• 閣下的乾衣機附送如下的配件:
1. 冷凝排水喉
2. 管子托架
3. 晾架乾衣
智能使用的附加提示
服務聯絡
如果閣下的乾衣機出現故障,首先須參考疑難
排解一節。如果閣下無法找到相同的故障,而
且無法自行處理,請與客戶服務中心聯絡。
服務主任會詢問閣下一些如下的問題:
1. 姓名、地址、以及郵政編碼。
2. 電話號碼。
3. 故障說明。
4. 乾衣機的型號和序號。
5. 購買日期。
疊裝配件
支架:2EA,螺絲:4EA
另行購買。
• 組合架適用於 500 毫米和 600 毫米的洗衣
機頂板。
如需疊起,乾衣機必須放在 LG 洗衣機之
上。 組合架分開發售。
21
Page 22

MFL67708678_hk MFL67708678_hk
疑
難排解指南
疑難排解提示
為了節省閣下的時間和金錢,請在聯絡客戶服務中心前,細閱下表的內容。
故障 解決方法
乾衣機不操作
烘乾需要很長時間。
1. 檢查乾衣機的電源插頭是否插入。
2. 檢查是否按下了“Start(啟動)”按鈕。
3. 檢查機門是否正確關閉。
4. 檢查房間溫度是否低於 5℃。
5. 檢查保險絲是否熔斷或斷路器是否跳閘,如須要,請更換它們。
(小心:乾衣機通常使用兩條保險絲或兩個斷路器)
操作期間,在倒空儲水器和清潔過濾器後,閣下必須按下 Start(啟動)按
鈕,然後乾衣機才會再次運行。
1. 每次放入衣物後,均需清潔過濾器。
2. 檢查儲水器是否被倒空。
3. 檢查冷凝器是否清潔。
4. 檢查不同衣物類型所需的正確乾衣程序。
5. 檢查乾衣機的通風格柵或後通風孔是否被堵塞。
6. 檢查衣物是否“過濕”。
7. 檢查是否已選擇正確的程序。
8. 檢查乾衣機是否過載。
“清潔過濾器”燈閃亮
衣服起毛粒
烘乾時間不一致
疑難排解指南
漏水
衣物出現皺褶
衣物縮水
1. 檢查是否已清潔過濾器。
2. 檢裝冷凝器是否堵塞。
1. 檢查絨毛過濾器是否被清空。
2. 檢查乾衣機是否只有清潔衣物。
3. 檢查衣物是否在滾桶中正確分類。
4. 檢查是否放入過多衣物。
5. 檢查衣物的口袋中是否有紙張、紙巾或類似的物品。
衣物的烘乾時間會因加熱設定、衣物大小、衣物類型、衣物的濕度、以及絨毛過濾
器的情況而變化。
檢查機門和密封蓋是否髒污及損壞。
檢查是否放入過多衣物。嘗試縮短烘乾時間。如果衣物仍然有點濕潤,請移除
一些衣物。
為了避免縮水,請仔細遵守閣下衣物的護理和使用說明操作,因為某些衣物在洗滌
時,會自然收縮。其它衣物是可以洗滌的,但在乾衣機烘乾時,便會收縮。
22
Page 23

疑
錯誤模式
難排解指南
• :
•
如果機門打開,LED 會顯示“ ”字樣。必須將機門關緊,然後按下啟動按鈕重新操作。
: 如果錯誤繼續出現,請拔掉電源線,然後再聯絡客戶服務中心。
滾桶燈不亮
• 請聯絡客戶服務中心。
疑難排解指南
23
Page 24

MFL67708678_hk MFL67708678_hk
技
術數據
600 毫米
850 毫米
640 毫米
重量 : 46.6 公斤
1”
2.5 厘米
6 平方英寸
387 平方厘米
6 平方英寸
387 平方厘米
24”
61.0 厘米1”2.5 厘米
3寸
8 厘米
3寸
8 厘米
櫥櫃門通風要
技術數據
電源要求 通風要求
伏特 赫茲 瓦特
220-240 V 50 Hz 2600 W
請確保乾衣機連接到正確的電壓。
乾衣機上的額定標牌顯示應使用的電壓。
凹室或櫃台下
確保整部乾衣機
每分鐘有 112 立
方尺的空氣流通
量
壁櫥
壁櫥門必須設有 2 個(百
葉)開口,面積各為最少
60 平方寸(387 平方厘
米),位於距離門的上方
和下方 3 寸(8 厘米)的
位置。
24
Page 25

MFL67708678_hk
保
養
以下各項,均不在保養範圍內:
上門教授如何使用本產品。
將本產品連接至規格標牌以外的電壓。
因意外、疏忽、誤用或天災所引致的故障。
正常使用或根據使用說明書操作以外的其它因素所引致的故障。
因有害動物或昆蟲,如老鼠、蟑螂等所引致的故障。
正常的噪音或震動情況,如排水聲、脫水聲或警示用的蜂鳴聲。
安裝的修正工作。例如:調較產品水平度、排水量調整等。
使用說明書中建議的正常保養工作。
從乾洗衣機內,包括水泵及入水喉過濾器,清除異物/物質,如砂礫、釘子、胸罩金屬
絲、鈕扣等。
更換保險絲或修正房屋的電路或水喉系統。
修正未獲授權的維修。
由本產品潛在的瑕疵所造成的附帶或引起個人財物損失。
本產品如果用於商業用途,將不會給予保養。
(例如:公共浴室、宿舍、訓練中心、宿舍等公共場所)。
如本產品安裝在正常服務區域範圍外,任何包括產品修理、或更換損壞零件等所產生的
運送成本,均由產品所有人負擔。
25
保養
Page 26

26
F
eatures
Ultra Big Capacity Drum
LG ultra big 9 kg dryer allows you to dry more of your wash load
at one time.
Energy
save
Lower Energy Consumption
LG dryers use less energy than conventional dryers due to the
cutting-edge technology we have applied to the drying system
and to the heat control mechanism. This LG Dryer has been
designed to save you money.
Reduced Drying Times
Drying times are now shorter because of efficient air flow
mechanism and optimised heater.
Reduced Noise Levels
We have reduced the operating noise of this LG Dryer by using
innovative sound-absorbing and noise-screening technologies,
making it much quieter than conventional drvers.
Easy to Use
The wide, electronically controlled LED display on this machine
is very easy to use. Simply select the programme you require
and your LG Dryer will do the rest.
C
ontents
Safety Instructions 27
Installation Instructions 30
Appearance & Design 34
Operating Your Dryer 35
Additional Functions 39
Caring for Your Dryer 41
Additional Tips for Smart Use 44
Troubleshooting Guidelines 46
Technical Data 48
Warranty 49
MFL67708678_en
Page 27

Safety Instructions
27
S
afety Instructions
To help reduce any risk of electric shock, fire, or other personal or property injury
when using your dryer, please follow the basic safety instructions.
WARNING
Serious injury or death may occur when not observing the following rules.
Not allowed actions.
• Before plugging in the power
cord, make sure the cord is
grounded and connected to
the circuit breaker.
No grounding may cause
breakdowns or Short circuit.
• Do not share the electrical
socket with other applianses.
Do not use extension power
socket.
Over heating of outlet may
cause fire.
• Do not disassemble the top
plate during installation.
It may cause breakdowns, fire
or short circuit.
• Keep the dryer away from
electric stove, candle and any
inflammable objects.
These items may melt come
of the parts and result a fire.
• Do not use a damaged power
cord or place heavy objects
on the cord.
The damaged power cord
may cause fire or short circuit.
• Do not grasp power cord or
switch on/off with wet hands.
It may cause electric shock.
• Disconnect the power cord by
grasping the plug, not the
cord.
It may cause cutting off
wires so results in hot heat or
a fire. I don’t understand this
sentence.
• Wipe the dirts and stains
around the power cord and
insert firmly back to the socket.
Dirts around it and improper
connection may cause fire.
MFL67708678_en
Page 28

Safety Instructions
28
S
afety Instructions
• Do not use damaged power
cord, plug and socket.
It may cause fire or an electric shock.
• Prevent pets biting the dryer.
Pets may die from an
electric shock or
damage the surface of the
dryer.
• Do not install or store the
dryer where it will be exposed
to the weather.
It may cause an electric
shock, fire, malfunction or
deformation.
• Do not press the button with
sharp edged devices like a
screwdriver or a pin.
It may cause electric shock.
• Do not use an extension cord
or an adaptor to connect the
power cord.
It may cause an electric
shock or fire.
• Do not splash water on to the
dryer.
It may cause fire or short circuit.
• Do not dry articles that have been
cleaned in, washed in, soaked in,
or spotted with combustible of
explosive substances (such as
wax, oil, paint, gasoline,
degreasers, dry-cleaning solvents,
kerosene, etc.)
It may cause explosion or
fire.
• Do not place flammable items
near the dryer.
It may cause toxic gas, parts
damage, an explosion or fire.
• Unplug the power cord when
cleaning or not using the
dryer.
Water or dirts may cause electric shock.
• Keep the dryer away from the
reach of the cockroach and
other insects.
These pest might bite and
damage the power cord.
• Do not allow children or pets
to play on or inside the dryer.
Children may fall off. Pets or
children may be wounded by
the rotating parts or suffocated inside the drum.
• Before disposing off the dryer,
dismantle the door and cut
the power cord in half.
This is to prevent children
playing inside the drum and
others mishandle the dryer;
and get injury.
MFL67708678_en
Page 29

Safety Instructions
29
S
afety Instructions
• Young children should be supervised to ensure that they do not play with the appliance.
• The appliance is not intended for use by young children or infirm persons without supervision.
• Young Children should be supervised to ensure that they do not play with appliance.
Children may fall off. Pets or children may be wounded by rotating parts or
suffocated inside drum.
• If this appliance is supplied from a cord extension set or an electrical connector, portable
outlet device must be positioned so that it is not subject to splashing or ingress of
moisture.
It may cause an electric shock, a fire, malfunction and deformation.
• Items that have been spotted or soaked with vegetable or cooking oil constitute a fire hazard and
should not be placed in a tumble dryer.
• Items that have been soiled with substances such as cooking oil, acetone, alcohol, petrol,
kerosene, spot removers, turpentine, waxes and wax removers should be washed in hot water with
an extra amount of detergent before being dried in the tumble dryer.
It may cause explosion and/or fire by spontaneous combustion.
• Items that have been previously cleaned in washed in, soaked in, or spotted with
petrol/gasoline, dry cleaning solvents or other flammable or explosive substances
should not be used in a tumble dryer.
It may cause explosion and/or fire by spontaneous combustion.
• Items made of foam, rubber, plastic, or other heat-sensitive fabrics (such as bathroom
rugs,nonslip mats or raincoats) should not be dried in a tumble dryer on a heat setting.
• Items such as foam rubber (latex foam), shower caps, waterproof textiles, rubber
backed articles and clothes or pillows fitted with foam rubber pads should not be dried in
the tumble dryer.
It may cause explosion and/or fire by spontaneous combustion.
• Plastic articles such as shower caps or babies waterproof napkin covers should not be
placed in a tumble dryer.
It may cause an explosion and a fire by spontaneous combustion.
• If the dryer is installed on the carpet, it might cause some damages by the
ventilated air.
• Fabric softeners, or similar products, should be used as specified by the fabric softener
instructions.
It may cause explosion and/or fire by spontaneous combustion.
MFL67708678_en
Page 30

Installation Instructions
Safety Information
Risk of Injury
The dryer is very heavy so you shouldn’t try to
lift it alone.
Do not lift the dryer by grasping any of the
protruding parts e.g. the jog dial or the door,
they may break off.
Risk of Tripping
Risk of tripping caused by hoses hanging down or
cables. Ensure there are no loose hoses or cables.
Check the dryer for damage occurred
during transportation.
Do not connect the dryer if it has visible signs of
damage.
If you are not sure, contact your local agent.
Always empty the dryer completely
before transporting it.
Stacking Installation Instructions
The LG Dryer can be placed on the top of a front loading washing machine. They are to be fixed with
stacking kit (See the next page). This installation must be conducted by an experienced installer to
ensure both washer and dryer are properly fixed together. If this work is done carelessly, dryer may fall
off during operation.
More importantly, certain washer model has matching dryer for stacking, please check with local agent
for advice.
The following instructions will guide you through the initial steps of installing your dryer.
Please note that every section of this manual provides important information regarding the installing and use
of your dryer, and it is important that you review this entire manual before proceeding with any
installation or use. Be sure to observe all listed warnings and cautions. These installation instructions are
intended for use by qualified installers. Read these installation instructions completely and carefully.
Your dryer should not be located near gas hob,
cooker, heater or eye level grill as flames from the
burners could cause damage to your dryer. When
the dryer is fitted under a work surface, allow
30cm~50cm space from each side of the dryer for
air to exit the rear grille. This airflow is critical to
condense the water during drying.
If you use this dryer near or stacked on top of a
washing machine, separate main plugs and
sockets must be used for each appliance.
Do not use 2-way adaptor or extension socket.
You can stack the dryer on top of washing
machine to save the space. A stacking kit is
available from your local shop.
30
I
nstallation Instructions
CAUTION
CAUTION Concerning the power cord
Most appliances recommend they be placed upon a dedicated circuit; that is, a single outlet circuit which
powers only that appliance and has no additional outlets or branch circuits. Check the specification page of
this owner's manual to be certain.
Do not overload wall outlets. Overloaded wall outlets, loose or damaged wall outlets, extension cords, frayed
power cords, or damaged or cracked wire insulation are dangerous. Any of these conditions could result in
electric shock or fire. Periodically examine the cord of your appliance, and if its appearance indicates damage
or deterioration, unplug it, discontinue use of the appliance, and have the cord replaced with an exact
replacement part by an authorized servicer.
Protect the power cord from physical or mechanical abuse, such as being twisted, kinked, pinched, closed in a
door, or walked upon. Pay particular attention to plugs, wall outlets, and the point where the cord exits the
appliance.
MFL67708678_en
Page 31

Installation Instructions
31
I
nstallation Instructions
Shape
and
assembly
direction
21.7 inch
(550mm)
Washer Top plate size
23.6 inch
(600mm)
Stacking Kit
In order to stack this dryer an LG stacking kit is
required.
This dryer may only be stacked on top of an LG washer. DO NOT attempt to stack this dryer on any other
washer, as damage, injury or property damage could
result.
Installation Procedure
1. Place the LG dryer on the LG washing machine.
2. Remove the two screws from the bottom of the
rear cover on each side as illustrated below.
3. Align the stacking kit holes and the rear cover
holes.
3-1) 23.6 inch(600mm)
3-2) 21.7 inch(550mm)
• Fasten the 2 screws that were removed earlier
from dryer to stacking kit.
• Use 4 screws in accessory box [0.6inch(16mm)]
to assemble washer rear cover and stacking kit.
• The procedure for the opposite side will be the
same.
WARNING
• Incorrect installation can cause serious
accidents.
• The weight of the dryer and the height of
installation makes the stacking procedure
too risky for one person. This procedure
should be performed by 2 or more experienced service personnel.
• The dryer is not suitable for a built-in installation. Please do not install as a built-in
appliance.
• Do not operate if the dryer is disassembled.
Dryer
Washer
MFL67708678_en
Page 32

Installation Instructions
32
I
nstallation Instructions
Grounding Instruction
This appliance must be grounded. In the event of
malfunction or breakdown, grounding will reduce
the risk of electric shock by providing a path of
least resistance for the electric current.
This appliance is equipped with a cord having an
equipment grounding conductor and a grounding
plug. The plug must be plugged into an appropriate
outlet that is properly installed and grounded in
accordance with all local codes and ordinances.
Condensed Water Drain
The dryer can drain water without delivering to
water container. Water is directly pumped out of
the dryer.
Additional Grounding Procedure
Some local codes may require a separate ground. In
such cases, the required accessory ground wire,
clamp and screw must be purchased separately.
Note
For better drying performance, Please keep the
rear of product distance from wall.
MFL67708678_en
Page 33

Installation Instructions
33
I
nstallation Instructions
Level the Dryer
1. Leveling the dryer is to prevent undesirable
noise and vibration.
When placing your dryer in an solid and level
area where water is not dripping and freezing,
flammable materials are not stored.
2. If the dryer is not properly level, adjust the front
leveling legs up and down as necessary.
Turn them clockwise to raise and
counterclockwise to lower until the dryer is not
wobbling both front-to-back and side-to-side.
Diagonal Check
When pushing down the edges of the machine, the
machine should not move up and down at all.
(Please, check both of two directions)
If machine rocks when pushing the machine top
plate diagonally, adjust the feet again.
Adjustable Feet
Adjustable Feet
Adjustable Feet
Dryer is loweredDryer is raised
MFL67708678_en
Page 34

Appearance & Design
34
A
ppearance & Design
Control Panel
Water Container
Control Panel
Condenser Cover
Air Ventilation Grill
Glass Door
Program Selector
LED Display
• Time Display
• Indicator Lamps & Left Time
Drying Level
• Iron
• Light
• Cupboard
• Very
• Extra
Additional Function
Buttons
• More Time
• Less Time
• Option
• Buzzer
• Time Delay/
Anti-Crease/
Favourite ( ),
(*PGM Save)/
Drum Light
MFL67708678_en
Page 35

Operating Your Dryer
35
O
perating Your Dryer
Cycle Selection Table
CAUTION
If the load is less than 1kg, please use “Warm Air” Cycle in timed drying Cycle.
Wool items should be dried using “Wool” Cycle and heat-sensitive fabrics including silk, underwear and
lingerie should be dried using “Delicates” Cycle. Please comply with the recommended laundry load when you
use the Assigned Cycle. Otherwise, your clothes may be damaged.
Note
When using the “Refresh” course, please spray cold or warm water on the fabric for a fresher
outcome. (The recommend amount is 20cc of water per shirt.)
Extra
Towels, dressing gowns
and bed linen
For thick and quilted fabrics
Very
Terry towels, tea towels,
towels and bed linen
For thick and quilted fabrics that do not need to be
ironed
Cupboard
Bath towels, tea towels,
underwear and cotton socks
For fabrics that do not need to be ironed
Light
Sheets, pillowcase and towels
For fabrics that do not need to be ironed
Iron
Bed linen, table linen, towels, Tshirts, Polo shirts and work clothes
For fabrics that do need to be ironed
Mixed Fabric
Cycles
Select the
gentle cycle by
pressing the option
button for heatsensitive items
Bed linen, table linen,
tracksuits, anorak and
blankets
For thick and quilted fabrics that do not need to be
ironed
Very
Shirts and blouses
For fabrics that do not need to be ironed
Cupboard
Trousers, dressers, skirts
and blouses
For fabrics that do need to be ironed
Iron
Iron
-
Cupboard
-
-
-
-
-
-
Tumbles without heat
All fabrics that need refreshing
Cool Air
T-shirts, pillowcase, and towels
Skin Care
Shirts and blouses
Refresh
(Refer to the Note)
For cotton fabrics which do not need to be ironed
Odor removal of fabric
(For fabrics in need of odor removal)
Bath towels, bath robes,
dishclothes and quilted
fabrics made of acrylic
Warm Air
Small Items & damp clothing
Everyday items suitable for heat drying
Silk, wool. delicate lingerie
Rack Dry
Refresh clothes without tumble drying
Shirts, T-shirts, trousers,
under wear and socks
For polyamide, acrylic, and polyester that do not
need to be ironed
Easy care
Shirts, T-shirts, under
wear, anoraks and socks
For polyamide, acrylic, polyester that do need to be
ironed
Soccer kit and training wear
Sports Wear For polyester material
-Jeans and Color fadingJeans For jeans which do not need to be ironed
-
Silk, Fine fabrics and lingerie
Delicate
For fabrics that are heat-sensitive like synthetic fabrics
-WoolWool For wool fabrics
Sensor Dry Cycle
Course
Laundry type
Detail
Drying Level
Timed Drying Cycle
-
Bed clothes, sheets
Bulky Item
For bulky items
Linen and towels, excluding
fabrics applied to Delicate,
Sports wear, Wool and
Bulky Item course.
For small loads of suitable fabrics with short drying
times
Quick Dry
NoteNote
Cotton Cycles
Select the
gentle cycle by
pressing the
option button for
heat-sensitive
items
NoteNote
MFL67708678_en
Page 36

36
Operating Your Dryer
36
O
perating Your Dryer
Please read before using your LG Dryer for the first time
After removing the packaging, please carry out the following checks to ensure the LG Dryer is
correctly installed and ready for use.
1. Check the dryer is well balanced by using a spirit level. If not, adjust the feet of the LG Dryer until
the machine is balanced.
2. Check the water container, condenser, control panel and drum to make sure everything is in place.
3. Set the machine to dry for 5 minutes to warm up the drum.
4. Open the door between loads the first few times you use the machine to allow any odours from the
.interior of the LG Dryer to escape.
1. Turn the power on.
First, press the ‘‘Power’’ button. The indicator
light above the button will become illuminated
indicating that the machine is all set to run.
2. Open the door.
3. Check the lint filter, water
container and condenser.
The lint filter near the door, should be emptied
after or before drying operation.
Open the door and check if lint filter is cleaned.
If not, please clean it referring to page 41.
Water container and condenser are also
checked to be emptied and cleaned for better
drying result.
4. Place laundry into the drum after
sorting.
The clothes should be sorted by its fabric type
and dryness level and all the strings and belts of
clothes should be well tied and fixed before
being put into the drum.
It is desired that you push laundry all the way
back to keep it away from the door seal.
If not, door seal and clothes may be damaged.
Turn the
power on.
Open the
Door.
Glass Door
Check the
lint filter.
Pull
Do not dry unwashed items in the tumble dryer.
CAUTION
MFL67708678_en
Page 37

Operating Your Dryer
37
O
perating Your Dryer
5. Close the door.
Before you close the door, make sure fabrics
are well placed inside and that foreign objects,
especially flammable ones, are not caught
around door.
6. Select the drying cycle you want.
You can choose a cycle by turning the program control
knob until the required program reaches to its indicator.
If you only press Start/Pause button without choosing any
cycle, the dryer will proceed with the Cupboard program.
[Please refer to following Cycle Selection table (page 35) for
the detailed information]
7. Press the start button.
You can hear drum rotating sound.
8. After operation is completed, open the
door and remove the laundry.
Careful! the drum inside could be still hot.
(Operation time varies depending on your cycle
selection or options.)
9. Clean the lint filters and
empty water container.
The lint filter should be cleaned after each load.
10. Turn off the dryer.
Press the ‘‘Power’’ button.
Select the
desired
cycle.
Take out
the laundry.
Clean the
door lint
filter.
Be careful not to trap laundry in between the
loading door and rubber seal.
CAUTION
- Be careful of the fact that filter should not be
torn when using a vacuum cleaner. If there
is a little residue buildup on filter, you can
scrub lint screen with the brush to remove.
- If you want to open the door while dryer is
operating, please press the Start/Pause
button first, wait until drum completely stops
and then open the door.
CAUTION
Never stop a tumble dryer before the end of
the drying cycle unless all items are quickly
removed and spread out so that the heat is
dissipated.
WARING
Note
The final part of a tumble dryer cycle occurs
without heat (cool down cycle) to ensure that the
items are left at a temperature that ensures that
the items will not be damaged.
MFL67708678_en
Page 38

Operating Your Dryer
38
O
perating Your Dryer
Rack Dry
The drying rack is placed inside the dryer as seen in the
picture below. Remove and discard packing material
before use.
The Rack Dry is designed for use with items that
you do not want to tumble dry including sweaters and
delicate fabrics.
To use the Drying rack :
1.Open the door.
2.Do not remove the filter.
3.Place drying rack over the bottom of
the dryer door opening.
Reset the rack on the dryer back
lodge.
Push down on the frame front to
secure over filter.
4.Place wet items on top of the rack.
Allow space around items for air to
circulate.
The rack does not move, but the drum
will rotate.
5.Close the door.
6.Turn power on and select Rack Dry.
1. Insert wire
edge to the
drum centre.
2. Place delicate
fabrics or
sportshoes.
Note
Check the lint filter and remove any lint
accumulated from items dried on the rack.
MFL67708678_en
Page 39

Additional Functions
39
A
dditional Functions
Time Delay
You can use the Time Delay function to delay the
finishing time of drying cycle.
Maximum Time Delay is 19 hours.
Minimum Time Delay is 3 hours.
1. Turn the dryer on
2. Select cycle
3. Set time delay hour
4. Press Start/Pause button
Anti-Crease
Anti-Crease is functioning to prevent creases
and rumples that are formed when the laundry
is not unloaded promptly at the end of drying
cycle. In this function, the dryer repeatedly
runs and
pauses to the cycle end.
If the door is open during Anti-Crease
process, this function is cancelled.
MFL67708678_en
Page 40

Additional Functions
40
A
dditional Functions
More Time/Less Time
Press More Time or Less Time until the desired
drying time is set.
Buzzer
This is a function to able to adjust volume of
beeper sound.
Option
Gentle
- This is a function to shorten or lengthen the
cycle time by increasing or decreasing
temperature.
- This option only is used with the Cotton and
Mixed Fabrics cycles.
Damp Dry Beep
- This is a function to inform when is the most
suitable for ironing with beeper sound.
- This option only is used with the Cotton and
Mixed Fabrics cycles.
- You can not use the ‘Damp Dry Beep’ when
you select iron drying level.
Crease Care
- This is a function to reduce wrinkles.
- This is a function to set up automatically when
you only select the Mixed Fabrics cycle, but
cancellation is impossible.
Drum Light
Drum Light (Glass Door)
-
During operating cycle, you can see the
drum inside by choosing drum light function.
It helps easy viewing the drying cycle.
Child Lock ( )
For the safety of your children, press More Time
and Less Time buttons at the same time for
about 3 seconds. You can see “ ” sign on
LED window.
Note
These buttons are available only with Timed
Drying, before you push Start/Pause button.
Note
For “ ” off, press More Time and Less Time
buttons at the same time for about 3 seconds.
Note
This function is available only with
Cotton-Iron and Mixed-Iron cycles.
Note
The option might be changed by the number of
pressing the option button.
- Once : Gentle is selected.
- Twice : Damp Dry Beep option is selected.
- 3 Times : Gentle and Damp Dry Beep options
are selected.
- 4 Times : No selected.
Favourite ( )
If you have a series of settings that you
always seem to come back to, you can store
this as a unique drying programme. For
example, if your favorite setting is normally
Extra Dry Cotton, with Low Temp and AntiCrease, just select these settings and press
“Favorite” until the dryer beeps. This
programme is now stored as your Favorite
and ready to be used again and again.
MFL67708678_en
Page 41

Caring for Your Dryer
41
C
aring for Your Dryer
How important care and cleaning is~
It’s not very difficult to care for your dryer. All you have
to do is to follow the information below.
Clean Lint Filter
Clean lint filter after each use and check it before each use. It
should also be cleaned if the ‘‘Clean Filter’’ light becomes illuminated and the buzzer sounds during operation of the dryer:
Cleaning or emptying the filter will reduce drying times and
energy consumption and lengthen the dryer life.
Clean lint filter during a cycle
If “Clean Filter ” indicator lamp flashes during
operation, clean the filter promptly.
1. Cool the dryer down and follow the mentioned steps.
2. Press the start/Pause button.
Empty Water Container
Condensed water is collected to water container
You should empty the water container after every
use. Not doing this may result in improper drying
performance.
If water container is full, “Empty Water”
Lamp glows and a buzzer sounds while the dryer is
operating. In this case, water container must be
emptied in 1 hour
2. Pull the filter out.
1. Open the door.
3.
Clean the filter by
using a vacuum
cleaner or rinsing
under the tap.
1. Draw water
container out.
2. Empty water
container to
sink.
4.
Replace the filter.
- Push the filter all
the way down to
avoid
Interference with
the door.
5. Close the door.
3. Push it back.
4. Press the Start/Pause button.
CAUTION
Wash the “Lint Filter” in warm, soapy
water. Dry thoroughly and replace.
CAUTION
- The lint trap has to be cleaned frequently, if
applicable.
- Lint must not to be allowed to accumulate
around the tumble dryer.
WARNING
Don’t drink the condensed water, absolutely.
CAUTION
If the laundry is not spun at high speed,
while washing, energy consumption and the
Drying time will increase.
In some case,the laundry lamp flashes
“Empty Water ”,then the dryer might stop.
Note
High speed spinning, while washing, makes
better energy consumption.
A high surrounding temperature & a small room
might increase the drying time as well as energy
consumption.
MFL67708678_en
Page 42

Caring for Your Dryer
42
C
aring for Your Dryer
Condenser
Condenser is also a very important part for efficient drying performance result so it needs a special care from you.
It is recommended that condenser be cleaned three or four times a year or when the condenser clean lamp blinks.
1. Open condensing cover by using a coin or
flat blade screwdriver.
2. Open sealing cover by turning
a locking lever.
4. Clean the condenser completely under
the tap letting water to flow through.
3. Draw the condenser out by inserting a finger
into a hole down the front of condenser.
(Don’t forcefully treat condenser.)
Sealing cover
< Front >
< Side >
To p
Bottom
5. Close all with the reverse order of opening.
CAUTION
- Operating when the condenser is clogged
with lint can damage the dryer.
This also increases energy consumption.
- Do not use sharp objects to clean the heat
exchanger. You could damage it an cause
leaks.
- Never operate the dryer without the heat
exchanger.
MFL67708678_en
Page 43

Caring for Your Dryer
43
C
aring for Your Dryer
1. Take
connecting
kit out.
Ventilation Grille and Cool Air
Inlet Grille
Vacuum the front ventilation grill 3~4 time a year to
make sure there must be no build-up of lints or dirts
which cause improper intake air flow.
Moisture Sensor?
This device functions to sense the moisture
remaining contents of the laundry during
operation which means it must be cleaned all
the time. The main reason of cleaning this part
is to remove the build-up of lime scale on the
surface of sensor. Wipe the sensors inside drum
(Shown in the picture).
2. Separate
water
container
hose from
the kit.
3. Connect
drain hose
to the kit.
Condensed Water Drain-out
Normally, condensed water is pumped up to water
container where water is collected until emptied.
Not only using water container, but water can be
drained out directly to drain hose especially when
dryer is stacked on top of washing machine.
With connecting kit for drain hose, you can simply
change water path and water reroute to the drainage
facility. Please follow the below steps.
Note
- The warm air is exhausted through the
ventilation grill.
- Adequate ventilation has to be provided
to avoid the back flow of gases into the
room from appliance’s burning other
fuels, including open fires.
MFL67708678_en
Page 44

Additional Tips for Smart Use
44
A
dditional Tips for Smart Use
Drying Guide & Capacity for laundry type
Woolen Article
Dry woolens in "wool" cycle. Be sure to follow
fabric care label "symbols", first. Wool is not
completely dried from the program so don't repeat drying.
Pull woolens to their original shape and dry them flat.
Woven and Loopknit Materials
Some woven and loopknit materials may shrink,
depending on its quality.
Permanent Press and Synthetics
Do not overload your dryer.
Take out permanent press article as soon as the
dryer stops to reduce wrinkles.
Baby Clothes and Night Gowns
Always check the manufacturer’s instructions.
Rubber and Plastics
Do not dry any items made from or containing
rubber or plastics such as:
a) Aprons, Bibs and Chair Covers
b) Curtains and Table Clothes
c) Bathmats
Fiber Glass
Do not dry fiberglass articles in your dryer.
Glass particles left in the dryer could be picked up by your
clothes the next time you use the dryer and irritate your skin.
Fabric Care Labels
Clothes have its own wash care labels so drying according to wash care labels is recommended.
Not only that, the laundry must be sorted according to size
and fabric type.
Do not overload in order to save you energy, time and
best dry performance.
Below are fabric care labels.
Symbols Instructions
Dry
Tumble dry
Permanent Press /
Wrinkle resistant
Gentle / Delicate
Do not tumble dry
Do not dry
High heating
Medium heating
Low heating
No heat / air
Line Dry / hang to dry
Drip dry
Dry flat
In the shade
PROGRAMME
Cotton
Mixed Fabric
Quick Dry
Easy Care
Iron
Iron
Cupboard
Bulky Item
Skin Care
Refresh
Sports Wear
Jeans
Delicate
Wool
Light
Cupboard
Cupboard
Ca. of Dryer
9 kg
9 kg
9 kg
4 kg
2 kg
2 kg
1.5 kg
2 kg
Dress Shirts Max.4EA
1.5 kg
4.5 kg
1.5 kg
1 kg
2 kg
MFL67708678_en
Page 45

Additional Tips for Smart Use
45
A
dditional Tips for Smart Use
Spare Parts
Spare parts in your need are provided under the
terms of warranty. Components covered by
warranty is provided free of charge. If coverage
is expired, spare parts must be purchased from
service center.
Accessory Parts
• Your dryer comes with accessories such as
Disposal of the Dryer
It is desirable for you to dispose the dryer safely
to keep your children away from the possible
injury.
The door and lid and other protruded items must
be taken away and power cord must be cut off
to avoid future use. After that, the dryer is to be
disposed safely.
Service Contact
If there is something wrong with your dryer, first
you must be through the troubleshooting table.
In case that you can’t find the same trouble and
you can not handle by yourself, please contact
the service centre.
A service person will ask you some questions
like followings:
1. Your name, address and postcode.
2. Your phone number.
3. Description of trouble.
4. The model No. and the serial No.
of your dryer.
5. The date of purchase.
1. Condensing Drain Hose
2. Hose Holder
3. Dryer Rack
Stacking Kit
If stacking is needed, you must stack
the dryer upon an LG washing
machine.
A stacking kit is sold separately.
• The stacking kit can be used for washer
top plate size 550mm and 600mm for
both.
Holder : 2EA, Screw : 4EA
Purchased Separately
MFL67708678_en
Page 46

Troubleshooting Guidelines
46
T
roubleshooting Guidelines
Troubleshooting Tips
To save you time and money, the following page will help answer your questions before service call.
Questions What to do
Dryer doesn't work
1. Check dryer is plugged in.
2. Check "Start" button is pressed.
3. Check door is properly closed.
4. Check Room temperature is below 5°C.
5.
Check a fuse is not blown or the circuit breaker is tripped and replace them.
(Caution : electric dryers generally use two fuses or breakers)
After emptying the water container and Cleaning filter during operation, you must
press Start button, then the dryer operates again.
It takes a long time
to dry
1. Filter should be cleaned after each load.
2. Check water container is emptied.
3. Check cleanness of condenser.
4. Check to select correct program setting for fabric type.
5. Check air ventilation grille or rear vents of the dryer to be obstructed.
6. Check the clothes is "excessively wet".
7. Check correct program selected.
8. Check dryer is overloaded.
"Clean Filter" lamp
flashes
1. Check filter is cleaned.
2. Check condenser unit is clogged.
Clothes are covered
in Fluff
1. Check lint filter is empty.
2. Check dryer has only clean items.
3. Check laundry is properly sorted in the drum.
4. Check laundry is overloaded.
5. Check there is any paper, tissue,or similar item in the pockets of laundry.
The drying time is
not consistent
The drying time for a load will vary depending on the heat setting, the size of the load,
the type of fabrics, the wetness of the clothes and the condition of the lint filter.
Water is leaking
Check the door and sealing cover is dirty and damaged.
The clothes are
wrinkled
Check the laundry is overloaded. Try a shorter drying time
and remove items while they still retain a slight amount moisture.
The clothes shrinked
To avoid shrinkage, please carefully follow the care and use
instructions for your garment, because some fabrics will naturally shrink when washed.
Other fabrics can be washed but will shrink when dried in a dryer.
MFL67708678_en
Page 47

Troubleshooting Guidelines
47
roubleshooting Guidelines
Error Mode
• : LED displays “ ” in case of the door open. The door must be closed and start
Button must be pressed for re-operation.
Drum light does not work
• Connect customer service
• : If display errors continues to occur, unplug the power cords and then call
to the Service Center.
T
MFL67708678_en
Page 48

Technical Data
48
echnical Data
T
Ensure you connect the dryer to the correct
electricity voltage. The ratings plate on your
dryer shows you what the voltage should be.
Electrical Requirements
Volts Hertz Watts
220-240 V 50 Hz 2600 W
Ventilation Requirement
Alcove or
undercounter
Closet
Ensure air flow of
112 cu.ft./min
through dryer
Closet door must have
2(louvered) openings,
each having a minimum
area of 60 sq. inches
(387 sq.cm), located 3
inches (8 cm) from
bottom and top of door.
Weight : 46.6 kg
60 in.
2
(387 cm2)
60 in.
2
(387 cm2)
3”
(8cm)
1”
(2.5 cm)
850mm
640mm
600mm
24”
(61.0 cm)1”(2.5 cm)
3”
(8cm)
MFL67708678_en
Page 49

Warranty
49
W
arranty
What is not covered.
Service trips to your home to instruct you on the product.
If the product is connected to any voltage other than that shown on the rating plate.
If the fault is caused by accidents, neglects, misuses of Acts of God.
If the fault is caused by reasons except for normal domestic use or use in
accordance with the owner's manual.
If the fault is caused by pests, for example, rats or cockroaches etc..
Noise or vibration that is considered normal,for example, water drain sound, spin
sound or warning beeps.
Correcting the installation for example, leveling the product, adjustment of drain.
Normal maintenance recommended by the owner's manual.
Removal of foreign objects/substances from the machine including the pump and
inlet hose filter, for example, grit,nails, bra wires and buttons etc..
Replace fuses in or correct wiring or correct house plumbing.
Correction of unauthorized repairs.
Incidental or consequential damage to personal property caused by possible defects
with this appliance.
If this product is used for commercial purposes, it is not warranted.
(Example:Public places such as public bathroom, lodging house, training center,
dormitory)
If the product is installed outside the normal service area, any cost of transportation
involved in the repair of the products, or the replacement of a defective part, shall be
borne by the owner.
MFL67708678_en
Page 50

50
M
emo
MFL67708678_en
Page 51

51
M
emo
MFL67708678_en
Page 52

MFL67708678_en
 Loading...