

LG WD-R8012 Owner’s Manual

Washing Machine
OWNER’S MANUAL
WD-R8012
Thank you for buying a
LG Fully Automatic Washing machine.
Please read your owner’s manual carefully, it provides
instructions on safe installation, use and maintenance.
Retain it for future reference.
Record the model and serial numbers of your washing machine.
roduct Features
추가선택, 예약,
P
■ More economical by Intelligent Wash System
Intelligent Wash System detects the amount of load and water
temperature, and then determines the optimum water level and
washing time to minimize energy and water consumption.
■ Child-Lock
The child-lock system is to be used for preventing children from
pressing any button to change the program during operation.
■ Low noise speed control system
By sensing the amount of load and balance, it evenly distributes
load to minimize the spinning noise level.
■ Direct Drive System
The advanced Brushless DC motor rotates the drum directly
without belt and pulley.
ontents
C
2
Warnings...............................................................................3
Installation.............................................................................4
Specifications........................................................................5
Installation.............................................................................6
Care before washing...........................................................12
Adding detergent ................................................................13
Function ..............................................................................15
How to use washer .............................................................16
Maintenance .......................................................................25
Troubleshooting guide ........................................................29
Terms of Warranty ..............................................................32

arnings
!
W
READ ALL INSTRUCTIONS BEFORE USE
WARNING!
For your safety, the information in this manual must be followed to minimize
the risk of fire or explosion, electric shock, or to prevent property damage,
personal injury, or loss of life.
IMPORTANT SAFETY INSTRUCTIONS
WARNING : To reduce the risk of fire, electric shock, or injury to persons when using
the washer, follow basic precautions, including the following:
• Do not install or store the washer where it will
be exposed to the weather.
• Do not tamper with controls.
• Do not repair or replace any part of the
washer
or attempt any servicing unless specifically
recommended in the user-maintenance
instructions or published user-repair
instructions that you understand and have the
skills to carry out.
• Keep the area underneath and around your
appliances free of combustible materials such
as lint, paper, rags, chemicals, etc.
• Close supervision is necessary if this
appliances is used by or near children or
infirm persons. Do not allow them to play on,
with, or inside this or any other appliance .
• Keep washer away from fire.
• Do not leave the washer door open.
An open door could entice children to hang on
the door or crawl inside the washer.
• Never reach into washer while it is moving.
Wait until the drum has completely stopped.
• The laundry process can reduce the flame
retardant of fabrics.
• Do not wash or dry articles that have been
cleaned in, washed in, soaked in, or spotted
with combustible or explosive substances
(such as wax, oil, paint, gasoline, degreasers,
dry-cleaning solvents, kerosene, etc.) which
may ignite or explode. Oil may remain in the
tub after a whole cycle resulting in fire
during drying. So, do not load oiled clothes.
• To avoid such a result, carefully follow the
garment manufacturer’s wash and care
instructions.
• Do not slam the washer door closed or try to
force the door open when locked. This could
result in damage to the washer.
• To minimize the possibility of electric shock,
unplug this appliance from the power supply
or disconnect the washer at the household
distribution panel by removing the fuse or
switching off the circuit breaker before
attempting any maintenance or cleaning.
• Never attempt to operate this appliance if it is
damaged, malfunctioning, partially
disassembled, or has missing or broken parts,
including a damaged cord or plug.
• dryer is intend only for drying textile material
in water.
• When a product was under water, Please
call service center. The risk of electric shock
and fire.
SAVE THESE INSTRUCTIONS
GROUNDING INSTRUCTIONS
This appliance must be grounded. In the event of malfunction or breakdown, grounding will reduce the risk
of electric shock by providing a path of least resistance for electric current. This appliance is equipped with
a cord having an equipment-grounding conductor and grounding plug. The plug must be plugged into an
appropriate outlet that is properly installed and grounded in accordance with all local codes and ordinance.
• Do not use an adapter or otherwise defeat the grounding plug.
• If you don’t have the proper outlet, consult an electrician.
WARNING : Improper connection of the equipment-grounding conductor can result in risk of electric
shock. Check with a qualified electrician or serviceman if you are in doubt as to whether the appliance is
properly grounded. Do not modify the plug provided with the appliance - if it does not fit the outlet, have a
proper outlet installed by a qualified electrician.
3

nstallation
I
To minimize the risk of fire in a tumble dryer, the following should be observed:
• Items that have been spotted or soaked with vegetable or cooking oil constitute a fire
hazard and should not be placed in a tumble dryer.
Oil-affected items can ignite spontaneously, especially when exposed to heat
sources Such as in a tumble dryer. The items become warm, causing an oxidation
reaction in the oil. Oxidation creates heat. If the heat cannot escape, the items can
become hot enought to catch fire. Piling, stacking or storing oil-affected items can
prevent heat from escaping and so create a fire hazard.
If it is unavoidable that fabrics that contain vegetable or cooking oil or have been
contaminated by hair care products be placed in a tumble dryer they should first be
washed in hot water with extra detergent-this will reduce, but not eliminate, the
hazard. Washed in hot water with extra detergent-this will reduce, but not
eliminate, the hazard. The ‘cool down’ cycle of tumble dryers should be used to
reduce the temperature of the items. They should not be removed from the tumble
dryer or piled or stacked while hot.
• Items that have been previously cleaned in, washed in, soaked in or spotted with
petro/gasoline, dry-cleaning solvents or other flammable or explosive substances
should not be placed in a tumble dryer.
Highly flammable substances commonly used in domestic environments include
acetone, denatured alcohol, petrol/gasoline, kerosene, spot removers (some
brands), turpentine, waxes and was removers.
• Items containing foam rubber (also known as latex foam) or similarly testured
rubber. like materials should not be dried in a tumble dryer on a heat setting.
Foam rubber materials can, when heated, produce fire by spontaneous combustion.
• Fabric softeners or similar products should not be used in a tumble dryer to eliminate
the effects of static electricity unless this practice is specifically recommended by the
manufacturer of the fabric softener or product.
• Undergarments that contain metal reinforcements should not be placed in a tumble
dryer.
Damage to the tumble dryer can result if metal reinforcements come loose during
drying. When available a drying rack could be used for such items.
• Plastic articles such as shower caps or babies waterproof napkin covers should not
be placed in a tumble dryer.
• Rubber-backed articles, clothes fitted with foam rubber pads, pillows, galoshes and
rubber-coated tennis shoes should not be placed in a tumble dryer.
4

Spanner
Inlet hose(1EA)
pecifications
S
Name : Front loading washing machine
Power supply : 240
Size : 600mm(W) x 550mm(D) x 850mm(H)
Weight : 61 kg
Wash capacity/Max. Watt : Refer to the Rating Label
Dry capacity/Max. Watt : Refer to the Rating Label
Water consumption : 147ℓ
Spin speed : No Spin/400/600/800/1000/1200
Permissible water pressure: 0.3-10 kgf/
V~,
50 Hz
㎠ (30-1000 kPa)
❋ The appearance and specifications may be varied without notice to raise the units
quality.
■
Accessories
5
nstallation
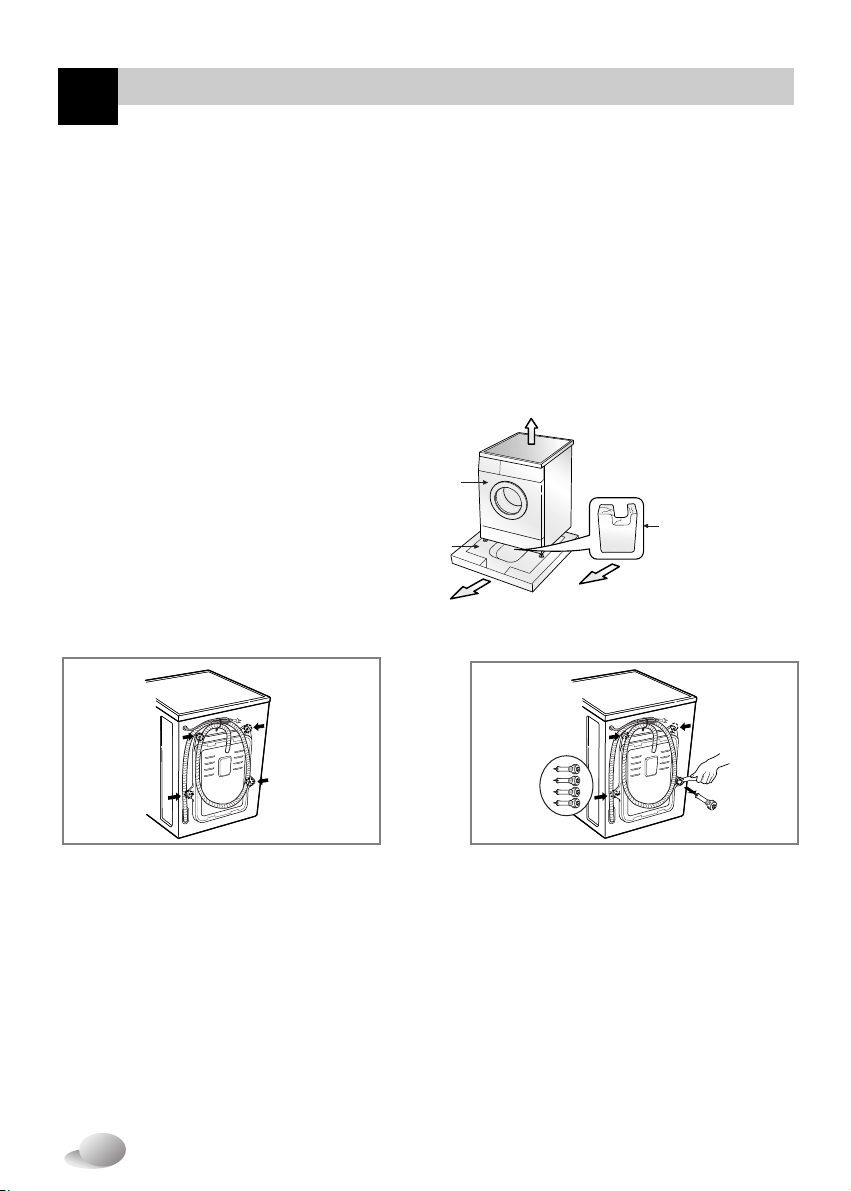
Base Packing
Washer
Packing Support
(Packing support may not
be used depending on
models.)
I
Install or store where it will not be exposed to temperatures below freezing or exposed to the weather.
Properly ground washer to conform with all governing codes and ordinances.
The base opening must not be obstructed by carpeting when the washing machine is installed on a
carpeted floor.
In countries where there are areas which may be subject to infestation by cockroaches or other vermin,
pay particular attention to keeping the appliance and its surroundings in clean condition at all times.
Any damage which may be cause by cockroaches or other vermin will not be covered by the appliance
guarantee.
Transit bolts
The appliance is fitted with transit bolts to prevent internal damage during transport.
• Packing and all transit bolts must
be removed before using the
washer.
When unpacking the base, be
sure to remove the additional
packing support in the middle
of the base packing.
Removing transit bolts
1. To prevent internal damage during
transport, the special 4 bolts are
locked. Before operating the washer,
remove the bolts along with the rubber
bungs.
• If they are not removed, it may cause
heavy vibration, noise and malfunction.
2. Unscrew the 4 bolts with
the spanner supplied.
6
3. Take out the 4 bolts along with the
rubber bungs by slightly twisting the
bung. Keep the 4 bolts and the
spanner for future use.
• Whenever the appliance is transported,
the transit bolts must be refitted.
4. Close the holes with the caps supplied.
nstallation
Laundry
Tub
Washer
approx.
2cm
Drain Hose
I
Installation place requirement
Level floor :
Allowable slope under entire washer is 1˚
Power outlet :
Must be within 1.5 meters of either side of location of
washer. Do not overload the outlet with more than one
appliance.
Additional Clearance :
For wall, door and floor modeling is required.
(10cm : rear /2cm:right & left side)
Do not place or store laundry products on top of washer at
any times.
They can damage the finish or controls.
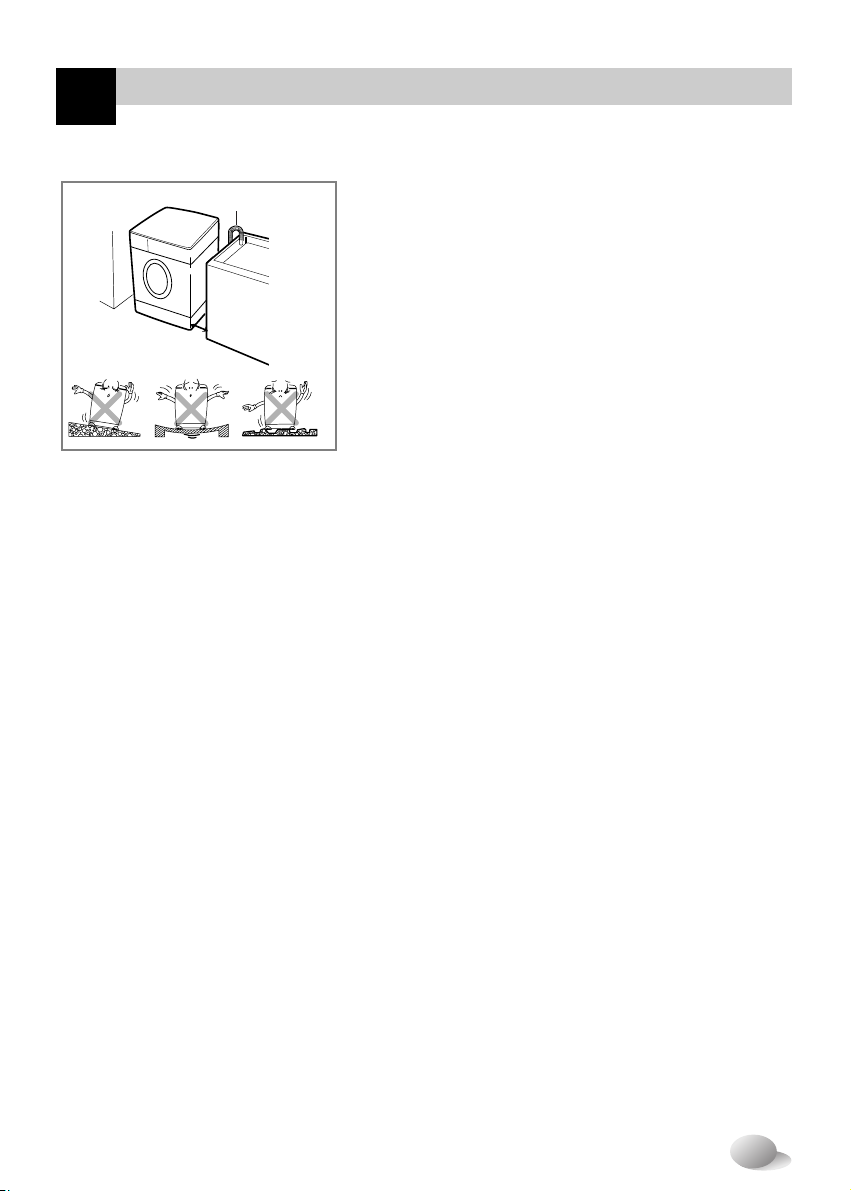
Positioning
Install the washer on a flat hard floor.
Make sure that air circulation around the washer is not impeded by carpets,rug etc.
• Never try to correct any unevenness in the floor with pieces of wood, cardboard or similar materials under
the washer.
• If it is impossible to avoid positioning the washer next to a gas cooker or coal burning stove,an insulating
covered with aluminum foil on the side facing the cooker or stove,must be inserted between the two
appliance.
• The washer must not be installed in rooms where the temperature can drop below 0°C.
• Please ensure that when the washer is installed, it is easily accessible for the engineer in the event of a
breakdown.
• With the washer installed adjust all four feet using the transit bolt spanner provided ensuring the appliance
is stable, and a clearance of approximately 20mm is left between the top of the washer and the underside
of the work-top.
7
nstallation
NOTE
I
■
Electrical connection
1. Do not use an extension cord or double adapter.
2. If the supply cord is damaged, it must be replaced by the manufacturer or its service agents or similarly
qualified person in order to avoid a hazard.
3. Always unplug the machine and turn off the water supply after use.
4. Connect the machine to an earthed socket in accordance with current wiring regulations.
5. The appliance must be positioned so that the plug is easily accessible.
• Repairs to the washing machine must only be carried out by qualified personnel. Repairs carried out by
inexperienced persons may cause injury or serious malfunctioning. Contact your local service center
• Do not install your washing machine in rooms where temperature below freezing may occur. Frozen hoses may burst
under pressure. The reliability of the electronic control unit may be impaired at temperatures below freezing point.
• If the appliance is delivered in the winter months and temperatures are below freezing : Place the washing
machine at room temperature for a few hours before putting it into operation.
CAUTION
CAUTION concerning the Power Cord
Most appliances recommend they be placed upon a dedicated circuit; that is, a single outlet circuit
which powers only that appliance and has no additional outlets or branch circuits. Check the
specification page of this owner's manual to be certain.
Do not overload wall outlets. Overloaded wall outlets, loose or damaged wall outlets, extension cords,
frayed power cords, or damaged or cracked wire insulation are dangerous. Any of these conditions
could result in electric shock or fire. Periodically examine the cord of your appliance, and if its
appearance indicates damage or deterioration, unplug it, discontinue use of the appliance, and have
the cord replaced with an exact replacement part by an authorized servicer.
Protect the power cord from physical or mechanical abuse, such as being twisted, kinked, pinched,
closed in a door, or walked upon. Pay particular attention to plugs, wall outlets, and the point where
the cord exits the appliance.
■
Washing Machine is to be connected to the water mains using new hose-sets and old hose-sets should
not be used.
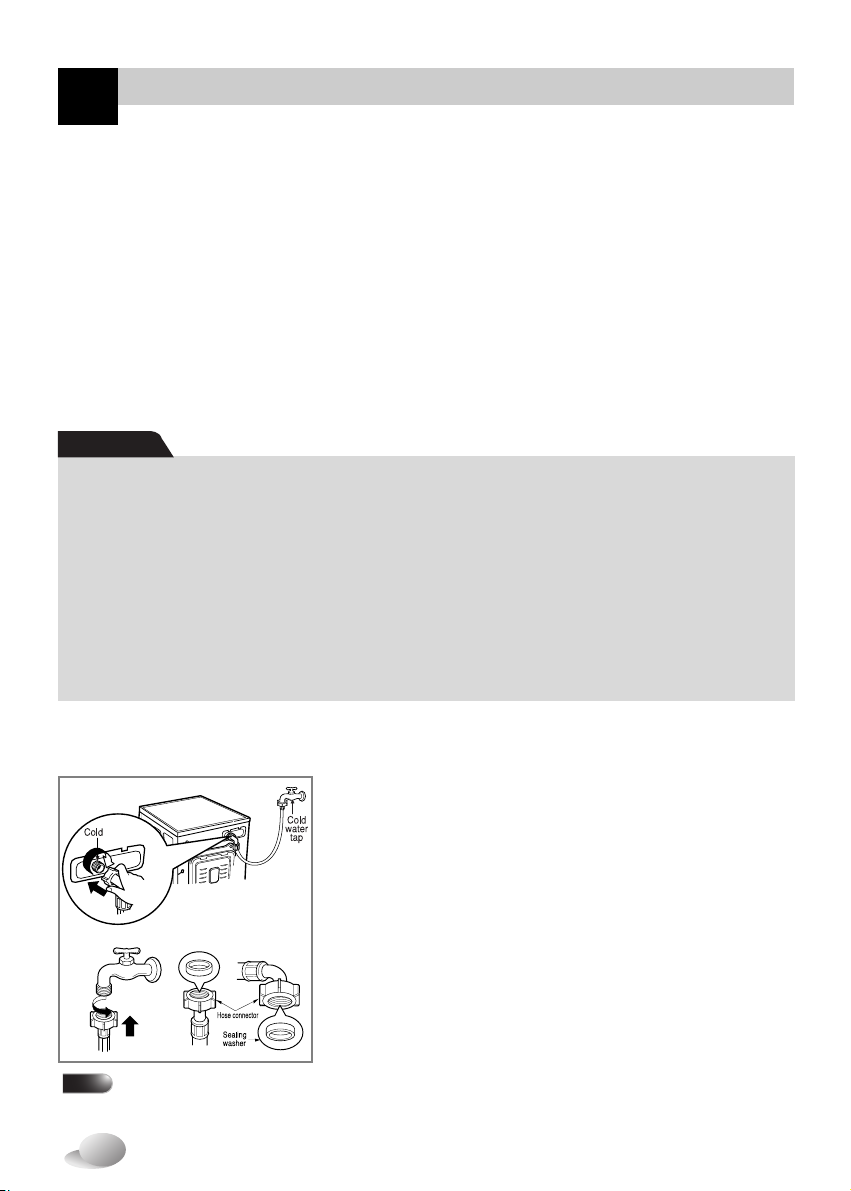
■
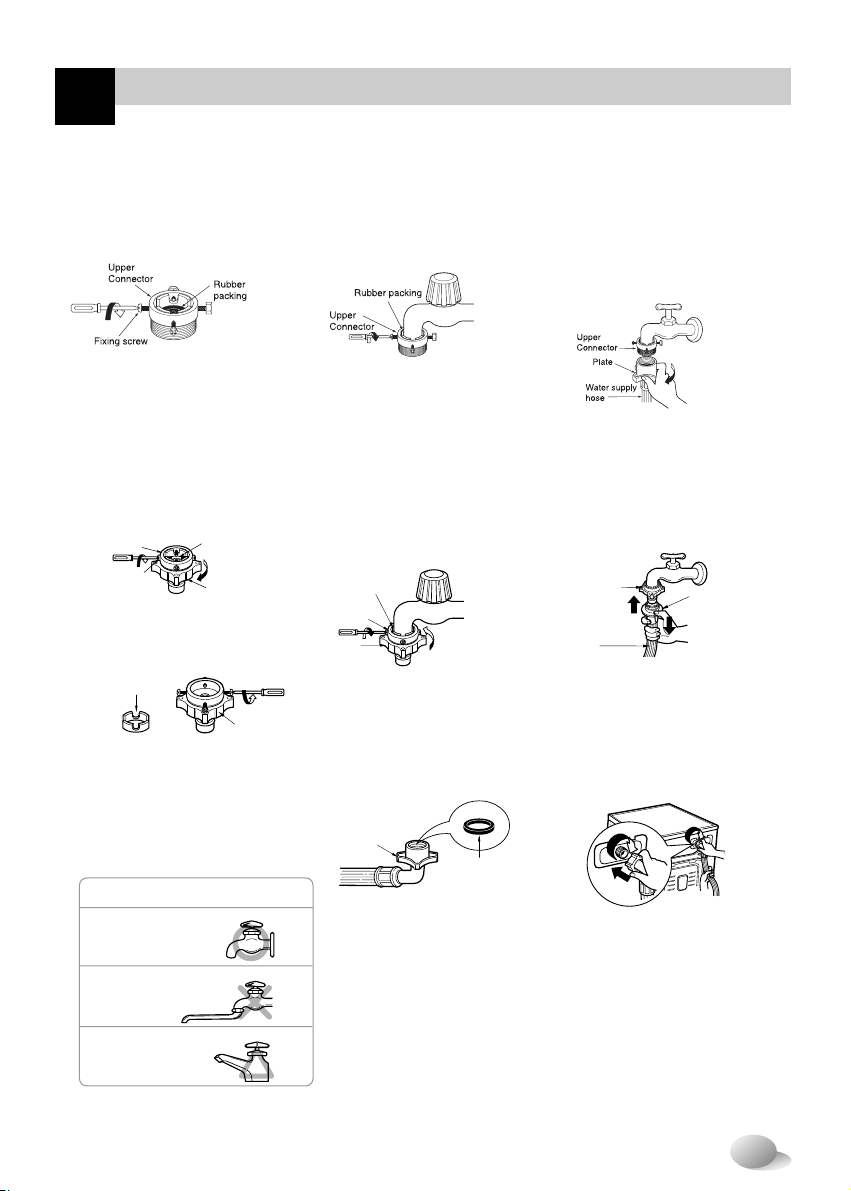
Connecting water supply hose
▶Water supply pressure must be between 30kPa and 1000kPa (0.3~10kgf/cm
▶Don’t strip or crossthread when connecting Inlet hose to the valve.
▶If the water supply pressure is more than 1000kPa, a decompression device
should be installed.
• Two rubber seals are supplied with the water inlet hoses. They are
used for preventing water leaks.
• Make sure the connection to taps is tight enough.
• Periodically check the condition of the hose and replace the hose if
necessary.
• Make sure that there is no kink on the hose and that it is not crushed.
valve.
After completing connection, if water leaks from the hose, repeat the same steps. Use the most conventional type
of faucet for water supply. In case the faucet is square or too big, remove the spacing ring before inserting the
faucet into the adaptor.
2
)
8
nstallation
Upper
Connector
Rubber
packing
Middle
connector
Fixing screw
Guide plate
Connector
Rubber seal
Hose connector
Used the horizontal tap
Horizontal tap
Extension tap
Square tap
Rubber packing
Upper
Connector
Middle
connector
Plate
Upper
Connector
Water supply
hose
I
Normal Tap without thread & screw type inlet hose
1. Unscrew the fixing screw to
attach the tap.
Normal Tap without thread & one touch type inlet hose
1. Untighten the upper connector
screw.
• In case the diameter of the tap is
large remove the guide plate.
2. Push the connector up till the
rubber packing is in tight contact
with the tap. Then tighten the 4
screws.
2. Push the upper connector up till
the rubber packing is in tight
contact with the tap. Then
tighten the 4 screws.
• Turn the middle connector not
to have water leaked.
• Make sure that the rubber seal
is inside the hose connector.
3. Push the water supply hose
vertically upwards so that the
rubber packing within in the
hose can adhere completely to
the tap and then tighten it by
screwing it to the right.
3. Connect the water supply hose
to the middle connector,
pushing the plate down.
• To separate the water supply
hose from the middle connector
shut off the tap. Then pull the
inlet hose down, pushing the
plate down.
• Make sure that there are no
kinks in the hose and that it is
not crushed.
9
nstallation
I
This equipment is not designed for maritime use or for use mobile installations such as
caravans, aircraft etc.
Turn off the stopcock if the machine is to be left for any length of time (e.g. holiday),
especially if there is no floor drain(gully) in the immediate vicinity.
When disposing of the appliance, cut off the mains cable, and destroy the Plug.
Disable the door lock to prevent young children being trapped inside.
Packaging material (e.g. Films, Styrofoam) can be dangerous for children. There is a risk
of suffocation !
Keep all packaging well away from children
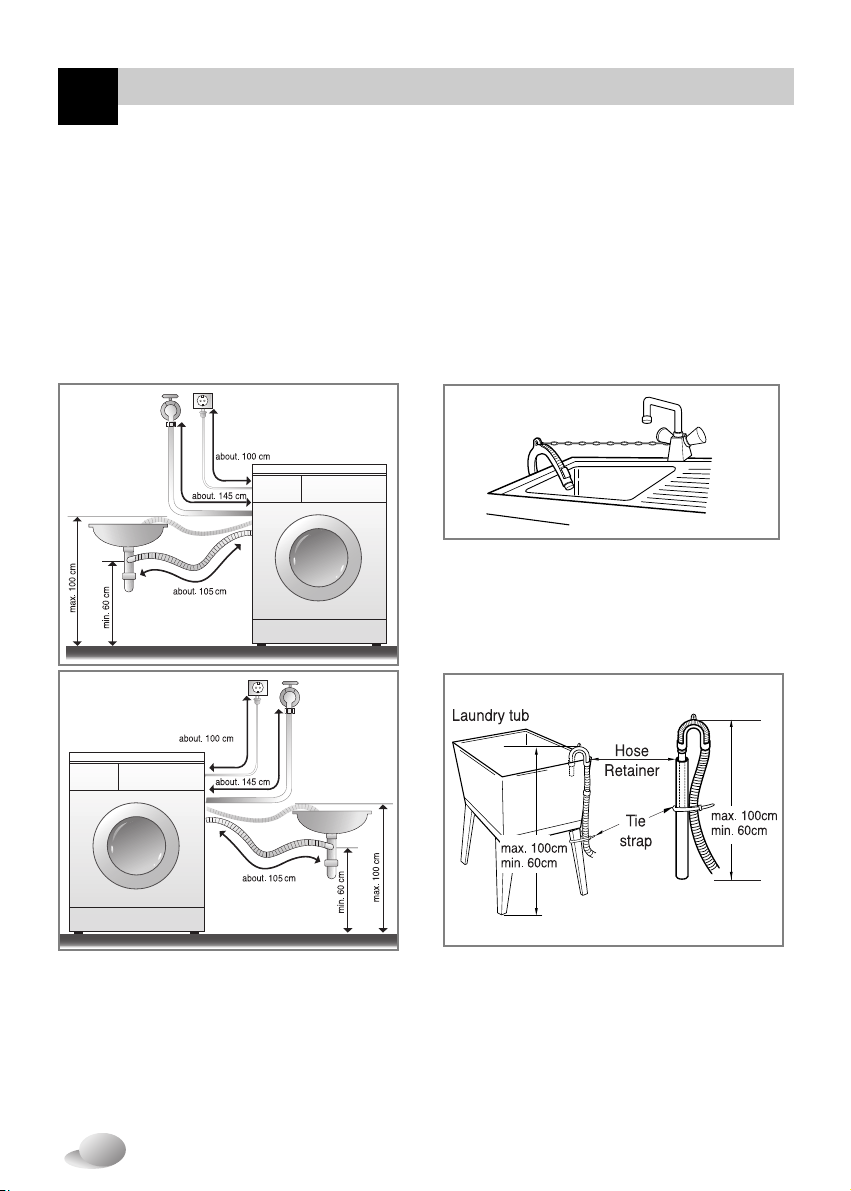
Installation of drain hose
• When installing the drain hose to a sink,
secure it tightly with a string.
• Proper securing of the drain hose will
protect the floor from damage due to
water leakage.
• The drain hose should not be placed higher than
100 cm above the floor. Water in the washer does
not drain or drains slowly.
• Proper securing of the drain hose will protect the
floor from damage due to water leakage.
• When the drain hose is too long, do not force
back into the washer. This will cause abnormal
noise.
10
nstallation
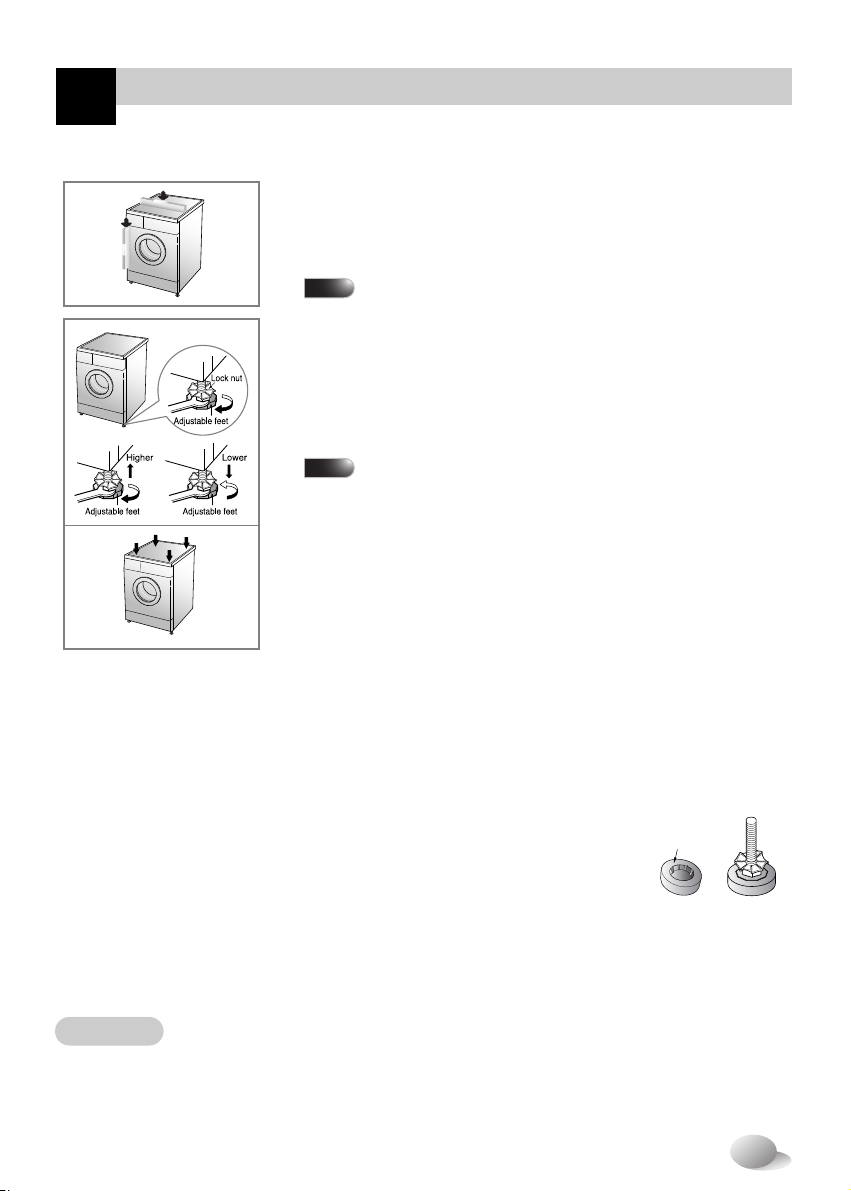
NOTE
Rubber Cup
I
Level adjustment
1. Adjusting the washing machine level properly prevents excessive
noise and vibration.
Install the appliance on a solid and level floor surface, preferably
in a corner of the room.
Timber or suspended type flooring may contribute to
NOTE
excessive vibration or load balance errors.
2. If the floor is uneven, adjust the adjustable feet as required.
(do not insert pieces of wood etc. under the feet)
Make sure that all four feet are stable and resting on the floor and
then check that the appliance is perfectly level. (use a spirit level)
※※
After the washer is level, tighten the lock nuts up towards of the base
of the washer. All lock nuts must be tightened.
In the case that the washing machine is installed on a raised
platform, it must be securely fastened in order
to eliminate the risk that it might fall off.
❊ Diagonal Check
When pushing down the edges of the washing machine top plate
diagonally, the machine should not move up and down at all.
(Please, check both of two directions)
If machine rocks when pushing the machine top plate diagonally,
adjust the feet again.
Concrete floors
• The installation surface must be clean, dry and level.
• Install washer on a flat hard floor.
Tile floors (Slippery floors)
• Position each foot on the Tread Mate and level the machine to suit. (Cut Tread Mate into 70x70 mm
sections and stick the pieces on to the dry tile where machine is to be placed.)
※※
Tread Mate is a self adhesive material used on ladders & steps that prevents slipping.
Wooden floors (Suspended floors)
• Wooden floors are particularly susceptible to vibration.
• To prevent vibration we recommend you place rubber cups under each foot,
at least 15mm thick under the washer, secured to at least 2 floor beams with screws.
• If possible install the washer in one of the corners of the room, where the floor is more stable.
※※
Insert the rubber cups to reduce vibration.
※※
Rubber cups ( p/no. 4620ER4002B ) can be purchased from the LG spare parts department.
It can be purchased from
※
hardware suppliers.
Important!
• Proper placement and levelling of the washer ensures long, regular and reliable operation.
• The washer must be absolutely horizontal and stand firmly in position.
• It must not “Seesaw” across corners under load.
• The installation surface must be clean, free from floor wax and other lubricant coatings.
•
Do not let the feet of the washer get wet. If feet of the washer get wet, slipping may occur.
11
 Loading...