

Page 1
PEDESTALKiT
INSTALLATIONINSTRUCTIONS
Before beginning Installatlon, read these
Instructlons carefully. This will simpll_ installation
and ensure that the pedestal Is Installed correctly
and safely. Leave these instructions near the
pedestal after Installation for future reference.
lor _7" washer, dryer,
and combina[ion
JUEGODEPEDESTAL
INSTBUCCIONESDEINSTALACION
Antes de comenzar la Instalacl0rl, lea aterltamente
estas Instrucclones. Esto simpllflcara la Instalaclon
y asegurara que el pedestal esta Instalado
erl forma correcta y segura, conserve estas
Instrucclones cerca del pedestal luego de la
Instalaclon para futuras consultas.
TflOUSSEDEPIEDESTAL
DIBECTIvESD'INSTALLATION
Avant de commencer I'lnstallatlon, Ilsez atten-
tlvement ces instructions. Cela slmpllflera votre
installation et assurera que le pledestal est Installe
correctement et en route securlte. Conservez ces
Instructions a proxlmlte du pledestal apres son
Installation, pour reference future.
Para lavadora, secadora.
y combo de 27"
Pour machine a laver, secheuse,
e[ combo de ?7 po
P/NO. 3828ER4001G
Page 2

PEDESTALKIT
iNTRODUCTiON
The pedestal accessory Includes:
• Drawer divider (1) • Wrench
• Screws (18) 1- • Retainers (4)1-1-
Floor Pads(4)
11 For dryer only
To ensure safe and secure installation, please
thoroughly follow the instructions below.
WARNING
• incorrect installation can cause serious
accidents.
• The appliances are heavy. Two or more
people are required when installing the
pedestal. There is a risk of serious back injury
or other injuries.
• Do not allow children to play in or on the
drawer. There is a risk of suffocation or injury.
• Do not step on the handle. There is a risk of
serious injury.
• If appliances are already installed,
disconnect them from all power, water, or
gas lines and from draining or venting
connections. Failure to do so can result in
electrical shock, fire, explosion, or death.
• Wear gloves during installation.
Tools Needed for Installation:
• Phillips-head screwdriver
• Wrench (supplied)
02
Page 3
PEDESTAL iNSTALLATiON - WASHER
PEDESTALKIT
For dryer
Tighten all 4
Iocknuts securely
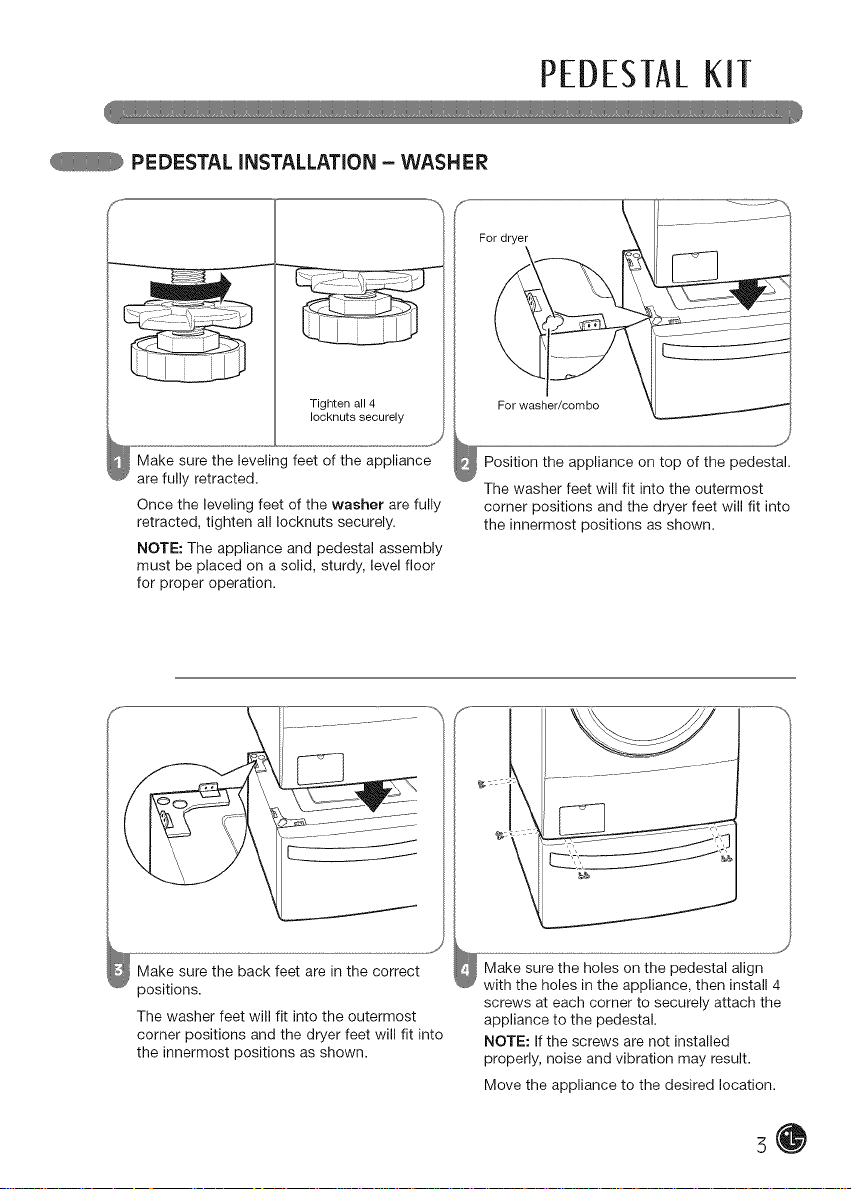
Make sure the levelin( feet of the appliance
are fully retracted.
Once the leveling feet of the washer are fully
retracted, tighten all Iocknuts securely.
NOTE: The appliance and pedestal assembly
must be placed on a solid, sturdy, level floor
for proper operation.
Make sure the back feet are in the correct
positions.
The washer feet will fit into the outermost
corner positions and the dryer feet will fit into
the innermost positions as shown.
For washer/combo
Position the appliance on top of the pedestal.
The washer feet will fit into the outermost
corner positions and the dryer feet will fit into
the innermost positions as shown.
............................................... J
Make sure the holes on the pedestal align
with the holes in the appliance, then install 4
screws at each corner to securely attach the
appliance to the pedestal.
NOTE: If the screws are not installed
properly, noise and vibration may result.
Move the appliance to the desired location.
3@
Page 4
PEDESTALKIT
PEDESTAL iNSTALLATiON - DRYER
f, ..........................................................
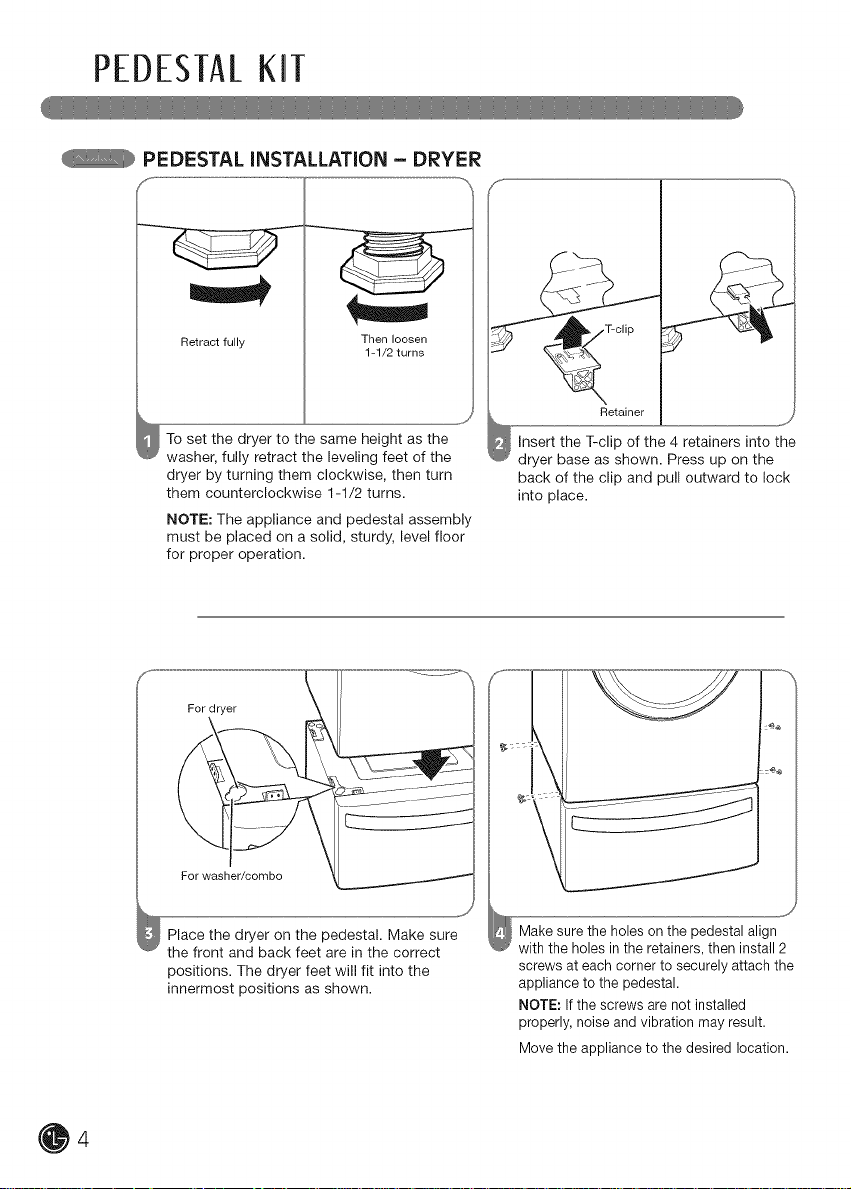
Retract fully
To set the dryer to the same height as the
washer, fully retract the leveling feet of the
dryer by turning them clockwise, then turn
them counterclockwise 1-1/2 turns.
NOTE: The appliance and pedestal assembly
must be placed on a solid, sturdy, level floor
for proper operation.
Then loosen
1-1/2 turns
Fclip
Retainer
Insert the T-clip of the 4 retainers into the
dryer base as shown. Press up on the
back of the clip and pull outward to lock
into place.
O4
Place the dryer on the pedestal. Make sure
the front and back feet are in the correct
positions. The dryer feet will fit into the
innermost positions as shown.
Make sure the holes on the pedestal align
with the holes in the retainers, then install 2
screws at each corner to securely attach the
appliance to the pedestal.
NOTE: If the screws are not installed
properly, noise and vibration may result.
Move the appliance to the desired location.
Page 5

PEDESTALKIT
PEDESTAL INSTALLATION - FINAL INSTALLATION
Lower
Loosen the Iocknuts on all 4 leveling feet
of the pedestal until you can turn them
with the wrench. Turn clockwise to raise or
counterclockwise to lower until the pedestal
is level and all 4 feet are solidly against
the floor.
Using the Floor Pads
When installing the pedestal on a wooden
floor, place the floor pads included with your
appliance under the legs of the pedestal. This
will help reduce vibration when the appliance
is operating.
Locknut
.... J
Securely tighten all Iocknuts by hand.
NOTE: Noise and vibration may result if
Iocknuts are not tightened.
Be sure to connect the appliances to all
water, power, or gas lines and draining or
venting connections before operation.
If there is excessive vibration during the
first operation after installation, slightly
adjust the leveling feet.
To make sure the appliance is well set on
the pedestal.
Please adjust all four adjustable feet and lock
nuts of the appliance accordingly.
5@
Page 6

JUEGODE/ PEDES]A/
INTRODUCCION
O6
El accesofio de pedestal incluye:
• Divisor de caj6n (1) • Llave (1)
• Tornillos (18) i- • Sujetadores (4) 1-1-
• AImohadillas para piso(4)
1-se necesita 16 tornillos para la lavadora, 8 tornillos para la secado_ _
tt Para secadorasolamente
Para asegurar la instalaci6n segura, siga
cuidadosamente las siguientes instrucciones.
Herramientas necesarias papa la
instalacion:
Destomillador Phillips _'_-__
Llave (provista)
ADVIERTENCIA
• La instalaci6n incorrecta puede causar
accidentes graves.
• Los electrodom_sticos son muy pesados.
Se requiere de dos o m_s personas para
instalar del pedestal. Si esto no se cumple
se podran sufrir dar_os en la espalda u
otras heridas.
• No permita que los ni_os jueguen en el
caj6n. Existe riesgo de asfixia y heridas.
= Nunca se debe dar ub paso sobre la manija.
Si Io hace se podran producir heridas graves.
= Si los electrodom_sticos ya se encuentran
instalados, descon_ctelos de cualquier fuente
de alimentaci6n, tuberias de gas o agua y de
las conexiones de drenaje o ventilaci6n. Si no
se cumple con esta advertencia se podran
producir incendios, explosi6n, descargas
electricas o muerte.
• Si no cumple con estas instrucciones
puede resultar en muerte o incendio
Page 7

JUEGODE[ PEDESTAL
INSTALACl0N DEL PEDESTAL- LAVADORA
Para la secadora
Ajuste firmemente
las 4 tuercas
Asegurese de que las patas niveladoras
del electrodomestico estan replegadas
completamente.
Una vez que las patas niveladoras de la
lavadora esten completamente replegadas,
ajustar todas las tuercas de manera segura.
NOTA: El conjunto del electrodomestico y el
pedestal deben estar colocados en un piso
s61ido, resistente y nivelado para obtener el
funcionamiento adecuado.
Para la lavadora/combinaci6r
Coloque el electrodomestico encima del
pedestal.
Las patas de la lavadora coincidiran en las
posiciones esquineras extremas y las de
la secadora coincidiran con las posiciones
extremas interiores come indicado.
Asegurese que las patas traseros se
encuentren en las posiciones correctas.
Las patas de la lavadora se podran insertar
en las posiciones de las esquinas mas
alejadas y las patas de la secadora se
podran insertar en las posiciones mas
cercanas come se muestra.
AsegOrese de que los orificios del pedestal
se alinean con los orifiicios del electro-
domestico, luego instale 4 tornillos en cada
esquina para ajustar en forma segura el
electrodomestico al pedestal.
NOTA: si los tornillos no se instalan de
manera adecuada, es posible que se
produzcan ruidos y vibraciones.
Mueva el electrodomestico hacia la
ubicaci6n deseada. 7
Page 8

JUEGODE[ PEDESTAL
INSTALAClON DEL PEDESTAL - SECADORA
Replagade
completamente
Para ajustar la secadora a la misma altura
come la lavadora, asegurese de que las
patas niveladoras de la secadora estan
replegadas completamente girandolas
en sentido de las agujas del reloj, luego
girandolas en sentido contrario de las agujas
del reloj 1-1/2 revoluciones.
NOTA: El conjunto del electrodomestico y el
pedestal deben estar colocados en un piso
s61ido, resistente y nivelado para obtener el
funcionamiento adecuado.
Coloque el electrodomestico encima del
pedestal. AsegOrese que las patas frentes
y traseras se encuentren en las posiciones
correctas. Las patas de la secadora
coincidiran con las posiciones extremas
interiores como indicado.
Luego afloje
1-1/2 revoluciones
............................................................................................................................................................J
Inserte el extremo en T de los 4 sujetadores
dentro de la base de la secadora como se
muestra. Presione el extreme trasera hacia
arriba y tire hacia el exterior para asegurar
en su lugar.
AsegQrese de que los orificios del
pedestal se alinean con los orifiicios de los
sujetadores, luego instale 2 tornillos en cada
esquina para ajustar en forma segura el elec-
trodomestico al pedestal.
NOTA: Si los tornillos no se instalan de
manera adecuada, es posible que se
produzcan ruidos y vibraciones.
Mueva el electrodomestico hacia
la ubicaci6n deseada.
O8
Page 9

JUEGODE[ PEDESTAL
INSTALACION DEL PEDESTAL - INSTALACION FINAL
Levantar
Afloje las tuercas en las 4 patas niveladoras
del pedestal hasta que pueda girarlas con la
Ilave. Gire en el sentido de las agujas del reloj
para levantar o al contrario para bajar hasta
vez que el pedestal este nivelado y todas
las 4 patas esten apoyadas firmemente
en el piso.
Como usar las almohadillas
para piso
Si instalara el pedestal en un piso de madera,
coloque las almohadillas para piso debajo de
las patas del pedestal. Esto ayudara a reducir
la vibraci6n cuando el electrodomestico este
en funcionamiento.
Asegure de manera segura las tuercas
manualmente.
NOTA: Puede haber ruide y vibraci6n si las
tuercas no estAn aseguradas.
AsegOrese de conectar los electrodomesticos
a todas las tuberias de agua o gas o a la
fuente de poder o conexiones de ventilaci6n
antes de poner en funcionamiento.
Si hay vibraci6n excesiva durante el primer
ciclo de funcionamiento despues de la
instalaci6n, ajuste levemente las patas
niveladoras.
Para asegurar que su aparato este colocado
correctamente en el pedestal, per favor ajuste
las cuatro patas ajustables y tornillos de
seguro del aparato
9@
Page 10

TROUSSEDE PIEDESTAL
iNTRODUCTiON
Le piedestal accessoire comprend :
• Diviseur a tiroir (1) • Cle (1)
• Vis (18) 1- . Supports (4) 1-1-
• Coussinets (4)
1 L'installation de la machine & laver utilise 16 vis, et la
secheuse utilise 8 vis
1"1"Seulement pour la s_cheuse
..............................................................................................................................................................................................................................................................................................................................................................................................................................................................................................................................................................................................................................................................................J
Pour vous assurer que I'installation est securitaire
et sore, conformez-vous aux directives suivantes.
Outils requis pour I'installation :
. Tournevis & t_te ,'C__
cruciforme (Phillips)
• Cle (fournie)
AVERT|SSEMIENT
• Une installation incorrecte peut entraTner des
accidents graves.
• Les appareils 61ectrom6nagers sent Iourds.
Deux personnes ou plus sent n_cessaires
une installation s6curitaire du pi_destal. Tout
non-respect de ces instructions peut entrafner
des blessures du dos ou d'autres blessures.
• Le tiroir peut 6tre dangereu× pour les
enfants. II fait courir un risque d'etouffement
et de blessures.
• Ne montez jamais sur la poign_e. Tout
non-respect de ces instructions peut entraTner
des accidents graves.
• Si les 61ectrom6nagers sent d6j_ install6s,
d6branchez tousles conduits d'alimentation
61ectrique, d'eau ou de gaz de m_me que les
connexions de vidange ou de ventilation.
Tout non-respect de ces instructions peut
entra_ner des blessures, un incendie, une
electrocution ou la mort.
• Si ces instructions ne sont pas observees
cela peut causer un incendie ou la mort.
Page 11

TROUSSEDE PIEDESTAL
INSTALLATION DU PIEDESTAL - MACHINE A LAVER
Pourla secheuse
Serrez solidement
les 4 contre-6crous
Pour la machine
laver/combo
Assurez-vous que les pieds de nivellement
de I'appareil sont entierement retractees.
Une fois les pieds de nivellement de la
machine _ laver enti@ement retractees,
serrez solidement tous les contre-ecrous.
REMARQUE : L'ensemble appareil et
piedestal dolt _tre place sur un plancher
solide, robuste et de niveau pour un
fonctionnement adequat.
Assurez-vous que les pieds & I'arriere de
la machine se Iogeront en les positions
correctes.
Les pieds de la machine & laver se Iogeront
dans les positions de coin les plus ext@ieures
et celles de la secheuse dans les positions
les plus int@ieures tel qu'illustr&
Positionnez I'appareil sur le piedestal.
Les pieds de la machine & laver se Iogeront
dans les positions de coin les plus ext@ieures
et celles de la secheuse dans les positions
les plus int@ieures tel qu'illustr&
Assurez-vous que les trous du piedestal sont
alignes avec les trous de I'appareil. Inserez
et serrez 4 visa chaque coin pour fixer
solidement I'appareil au piedestal.
REMARQUE : Si les supports ne sont pas
correctement installes, vous pourriez
entendre du bruit et sentir des vibrations.
Placez I'appareil & I'endroit desire.
110
Page 12

TROUSSEDE PIEDESTA/
INSTALLATION DU PII_DESTAL - SI_CHEUSE
Retractez
completement
Pour mettre la s&cheuse & la m_me
hauteur que la machine a laver, retractez
completement les pieds de nivellement de
la s6cheuse en les tournant dans le sens des
aiguilles d'une montre, puis tournez-les 1-1/2
tournes contre le sens des aiguilles d'une
montre.
REMARQUE : Uensemble appareil et
piedestal dolt _tre place sur un plancher
solide, robuste et de niveau pour un
fonctionnement adequat.
f.
Pourla secheuse
Pour la machine
& laver/combo
Positionnez la secheuse sur le piedestal.
Assurez-vous que les pieds & I'avant et
I'arriere de la machine se Iogeront en les
positions correctes. Les pieds de la secheuse
se Iogeront dans les positions les plus
int@ieures tel qu'illustr&
Puis deserrez
1-1/2 tournes
.... J
Souteneur
Inserez I'extremite en forme de T des 4
souteneurs darts la base de la secheuse
comme illustr& Em appuyant sur I'arri@e
des souteneurs, tirez-les vers I'exterieur
pour les fixer en place.
........ J
Assurez-vous que les trous du piedestal sont
alignes avec les trous des souteneurs.
Inserez et serrez 2 vis & chaque coin pour
fixer solidement I'appareil au piedestal.
REMARQUE : Si les supports ne sent pas
correctement installes, vous pourriez
entendre du bruit et sentir des vibrations.
Placez I'appareil & I'endroit desir&
Page 13

TROUSSEDE PIEDESTAL
INSTALLATION DU PIEDESTAL- INSTALLATION FINALE
_J
Serrez solidement a la main tousles contre-
ecrous.
REMARQUE : Si les contre-ecrous ne sont
pas serres, vous pourriez entendre du bruit
et sentir des vibrations.
Assurez-vous de branchez les 61ectrom6nagers
tousles conduits d'alimentation _lectrique,
d'eau ou de gaz de m_me qu'aux connexions
Udlisation des ¢oussinets
Lors de I'installation du pi&destal sur un
plancher en bois, placez les coussinets
fournis sous les pattes du piedestal. Cela
contribuera a r&duire les vibrations Iors du
fonctionnement de la machine.
de vidange ou de ventilation avant de mettre
en marche.
Si la vibration est excessive a la premiere
utilisation apres I'installation, ajustez
legerement les pieds de nivellement.
Contre-ecrou
Pour vous assurer que I'appareil menager
repose bien sur le piedestal, veuillez regler
les 4 pieds de nivellement et les contre-ecrous
de cet appareil.
Page 14

NOTES• NOTAS- REMAROUES
Page 15

NOTES • NOTAS • REMARQUES
Page 16

In the U.S.A. /En los EE-UU
To contact LG Electronics, 24 hours a day,
7 days a week:
1-800-243=0000
Or visit us on the Web at: usJge.com
In Canada / Au Canada
To contact LG Electronics, 24 hours a day,
7 days a week:
1-888-542-2623
Or visit us on the Web at: ca.lge.com
NQmero telef6nico de LG Electronics, las 24
horas del dia, 7 dfas a la semana:
1-800-243=0000
O visftenos en la Web en: us.lge.com
Pour contacter LG Electronics, 24 heures par jour,
7 jours par semaine :
1-888-542-2623
Ou visitez notre site Web a I'adresse : ca.lge.com
P/No. 3828ER4001G
 Loading...