

LG WDP3S, WDP3U, WDP3V, WDP3N, WDP3P Installation Guide
...
PEDESTAlKIT
INSTAllATIONINSTRUCTIONS
Before beginning installation, read these
instructions carefully. This will simplify installation
and ensure that the pedestal Jsinstalled correctly
and safely. Leave these instructions near the
pedestal after installation for future reference.
For 27" washer, dryer,
and combination
TROUSSEDE PII:DESTA/
DIRECTIVESD'INSTALLATION
Avant de commencer rinstallation, lisez atten-
tivement ces instructions. Cela simplifiera votre
installation et assurera que le piedestal est installe
correctement et en toute securite. Conservez ces
instructions a proxJmite du piedestal apres son
installation, pour reference future.
JUEGODEPEDESTAl
INSTBUCCIONESDE INSTALACION
Antes de comenzar la instalacion, lea atentamente
estas instrucciones, Esto sJmplificara la instalacion
y asegurara que el pedestal esta instalado
en forma correcta y segura. Conserve estas
instrucciones cerca del pedestal luego de la
Jnstalacion para futuras consultas.
Pour machine a laver, secheuse,
et combo de 27 po
Paralavadora, secadora,
y combo de 27 _
P/No. 3828ER4001L
iMPORTANT: Read and follow these instructions.
The installer must have electrical and mechanical training and acceptable knowledge in the |
required work.
Safety is foremost---both your own and that of other
people. Many important safety instructions are provided
in this instruction and your appliance. Always read and
observe all safety instructions.
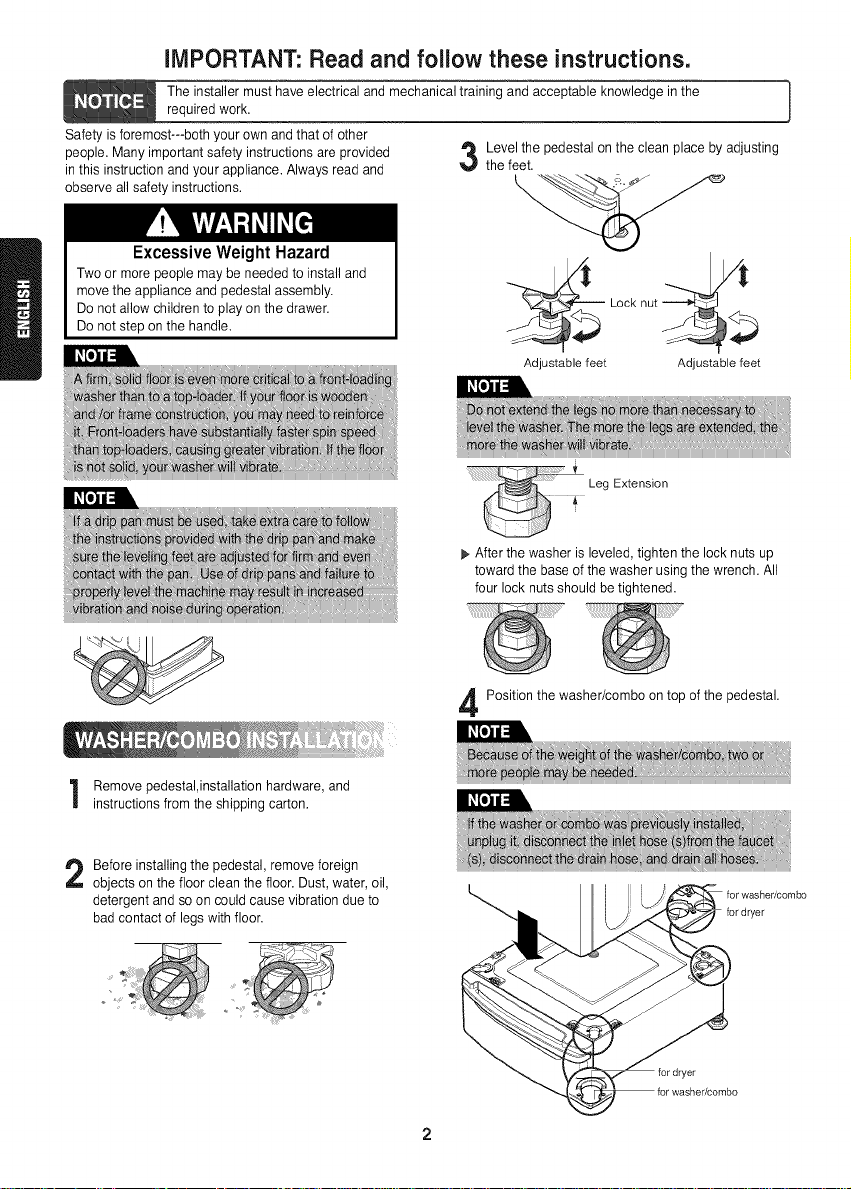
Excessive Weight Hazard
Two or more people may be needed to install and
move the appliance and pedestal assembly.
Do not allow children to play on the drawer.
Do not step on the handle.
J
Level the pedestal on the clean place by adjusting
the feet.
ocknut
Adjustable feet Adjustable feet
Leg Extension
After the washer is leveled, tighten the lock nuts up
toward the base of the washer using the wrench. All
four lock nuts should be tightened.
Remove pedestal,installation hardware, and
instructions from the shipping carton.
Before installing the pedestal, remove foreign
objects on the floor clean the floor. Dust, water, oil,
detergent and so on could cause vibration due to
bad contact of legs with floor.
Position the washer/combo on top of the pedestal.
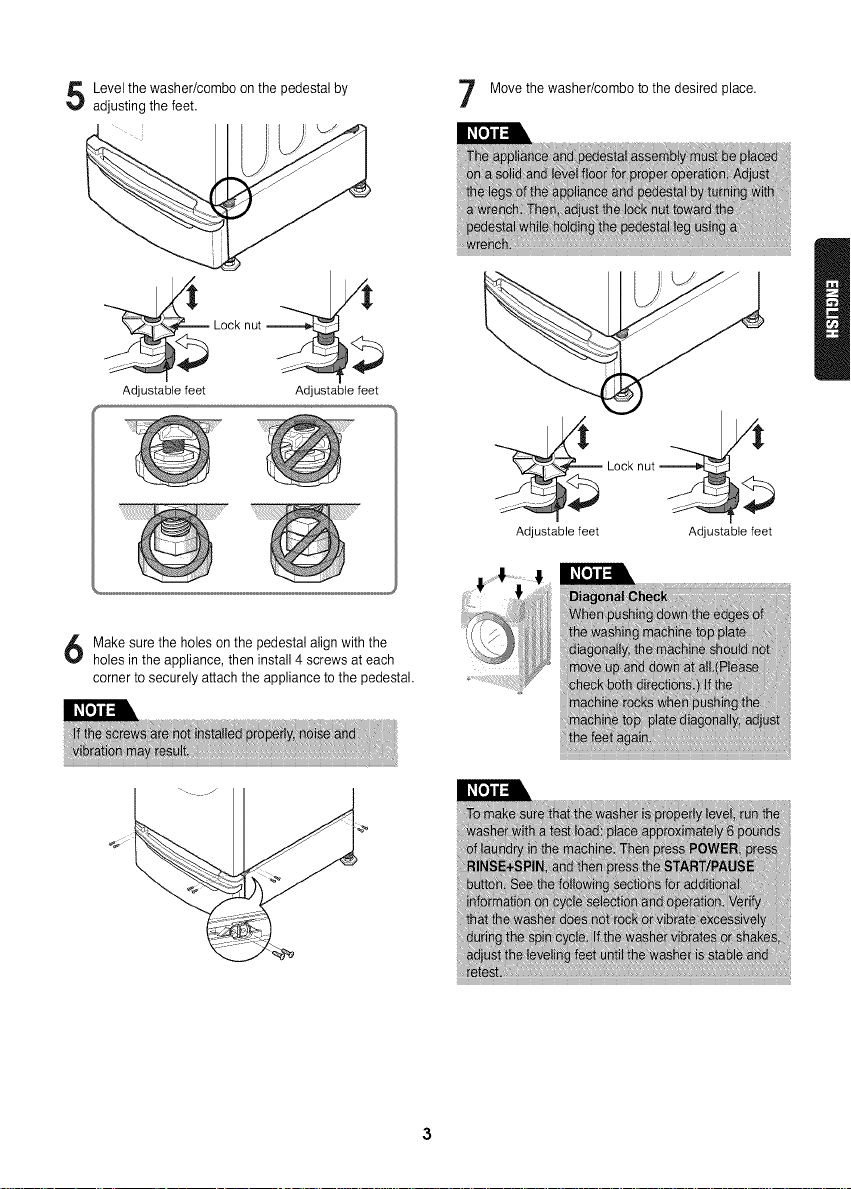
Levelthe washer/comboonthe pedestalby
adjustingthefeet.
_l_ocknut _
Adjustable feet Adjustable feet
Make sure the holes onthe pedestal align with the
holes inthe appliance, then install 4 screws at each
corner to securely attach the appliance to the pedestal.
Move the washer/combo to the desired place.
7
Lock nut __
Adjustable feet Adjustable feet
3

Remove pedestal,installation hardware, and
instructions from the shipping carton.
Insert the T-clip of the 4 retainers into the dryer base
as shown. Press up on the back of the clip and pull
outward to lock into place.
G i::_
Position dryer on top of the pedestal.
A. Uninstallingan electric dryer:
1) Unplug the power supply cord,
2) Pull the dryer away from the wall enough to loosen
the vent clamp. Loosen the clamp and carefully
remove the exhaust vent from the dryer exhaust
outlet.
Make sure the holes on the pedestal align with the
holes in the appliance, then install 2 screws at each
corner to securely attach the appliance to the
pedestal.
Move the dryer to the desired place.
B. Uninstallinga gas dryer:
1) Unplug power supply cord.
2) Turn off the gas supply.
3) Pull the dryer away from the wall enough to loosen
the vent clamp. Loosen the clamp and carefully
remove the exhaust vent from the dryer exhaust
outlet.
combo
washer/
combo
for dryer
iher
t
Adjustable
feet
4
Adjustable
feet
LGElectronicsInc.,Willrepairoratitsoptionreplace,withoutcharge,yourproductifitprovestobedefectivematerial
orworkmanshipundernormaluseduringthewarrantyperiodsetforthbelow,effective from the date of original consumer
purchase of the product. This limited warranty is good only to the original purchaser of the product and effective only
when used in the United states including Alaska, Hawaii, and U.S. Territories; and Canada.
WARRANTY PERIOD:
1Yearfromthe Dateof Purchase.
THIS WARRANTY IS IN LIEU OF ANY OTHER WARRANTIES, EXPRESS OR IMPLIED, INCLUDING WITHOUT
LIMITATION, ANY WARRANTY OF MERCHANTABILITY OR FITNESS FOR A PARTICULAR PURPOSE. TO THE
EXTENT ANY IMPLIED WARRANTY IS REQUIRED BY LAW, IT IS LIMITED IN DURATION TO THE EXPRESS
WARRANTY PERIOD ABOVE. LG WILL NOT BE LIABLE FOR ANY CONSEQUENTIAL, INDIRECT, OR
INCIDENTAL DAMAGES OF ANY KIND, INCLUDING LOST REVENUSE OR PROFITS, IN CONNECTION WITH THE
PRODUCT.
SOME STATES DO NOT ALLOW LIMITATION ON HOW LONG AN IMPLIED WARRANTY LASTS OR THE
EXCLUSION OF INCIDENTAL OR CONSEQUENTIAL DAMAGES, SO THE ABOVE LIMITATIONS OR EXCLUSIONS
MAY NOT APPLY TO YOU.
THIS LIMITED WARRANTY DOES NOT APPLY TO:
1. Service trips to your home to deliver, pick up, and!or install the product, instruct, or replace house fuses or correct
wiring, or correction of unauthorized repairs; and
2. Damages or operating problems that result from misuse, abuse, operation outside environmental specifications or
contrary to the requirements or precautions in the Operating Guide, accident, vermin, fire, flood, improper installation,
acts of God, unauthorized modification or alteration, incorrect electrical current or voltage, or commercial use, or use
for other than intended purpose.
3. Therefore, the cost of repair or replacement of such a defective product shall be borne by the consumer.
HOW SERVICE IS HANDLED:
Call 1-800-243-0000 (USA) or 1-888-LGCANADA and choose the
appropriate prompt. Please have product type, model number, serial number,
and ZIP code ready.
CUSTOMER INTER-ACTIVE CENTER NUMBERS:
Retain your Sales Receipt to prove date of purchase.
ToProveWarrantyCoverage
A copy of your Sales Receipt must be submitted at the time warranty service
is provided.
ToObtainNearestAuthorized
ServiceCenterorSalesDealer,
orto ObtainProduct,Customer,
orServiceAssistance
Call 1-800-243-0000 or 1-888-LGCANADA and choose the appropriate prompt
from the menu, and have your product type, model number,
serial number, and ZIP Code; or visit our website at
http://www.lgservice.com
5
 Loading...