

LG WD14030RD User Manual
@
1 2 3 4 5
1 2 3 4 5
ca. 100 cm ca. 100 cm
ca. 145 cm ca. 145 cm
ca. 105 cm ca. 105 cm
min. 60 cm
max. 100 cm
min. 60 cm
max. 100 cm
60 – 100 cm
Hose
Retainer
Tie
strap
max. 100 cm
min. 60 cm
N
Owner‘s Manual
WD14030RD
Safety instructions for use
Read all instructions and explanations of the installation before use. Follow the instructions carefully. Keep the operating instructions handy for later use. If the appliance is sold or passed on then ensure that the new owner always receives these operating
instructions. The following warnings must be strictly observed for safety reasons. They must be read before installing the appliance and putting it into operation.
• Intended use: This appliance has been designed exclusively for use in dry-interior households. It has not been designed for
use in commercial or industrial applications, (for example, Beauty salons Laundromats etc). Use the appliance only with cold
drinking grade water and only for washing textiles with washing detergents designed for washing machines. Every other use
is improper and may lead to injuries, whereby the liability of the manufacturer will cease.
• This appliance may only be used by adults. Do not allow children to touch the controls or to play with the product.
• This appliance is not intended for use by persons (including children) with reduced physical, sensory or mental capabilities,
or lack of experience and knowledge, unless they have been given supervision or instruction concerning use of the appliance
by a person responsible for their safety.
• Never modify the appliance as this is dangerous.
• This appliance is heavy. Transport with care and ensure that the transit bolts are re fi tted during the machines delivery to
any new location.
• Remove all packaging and transport bolts before using the appliance. Otherwise serious damage may result.
• All installation work must be carried out by a qualifi ed fi tter or technician.
• Have electrical connections done by a qualifi ed electrician.
• Never place the appliance on the power cord.
• If the appliance is placed on a carpet then place the feet so that air can circulate underneath the appliance.
• Always unplug the machine and turn off the water supply after use. Disconnect appliance by pulling only the plug - never
disconnect by pulling the power cord. Never touch the plug with wet fi ngers or hands.
• Do not overload the appliance.
• Wash only machine-washable textiles. If you have doubts regarding this, then observe the markings on the label.
• Never place electrical heaters, candles etc. in the vicinity of the appliance. They could cause the appliance to ignite or parts
to warp.
• Protect the appliance from wet and damp. Otherwise, there is danger of electric shock and fi re.
• Connect the appliance to a suitable wall socket for 240V. Never use an extension cord or double adapter.
• Empty all pockets. Hard or sharp objects such as coins, needles, nails, screws or stones may cause serious damage.
Unbalanced mass may create heavy vibrations. If heavy vibrations remain also without load, call for an authorized customer
service.
• Do not wash or dry articles that have been cleaned in, washed in, soaked in, or dabbed with combustible or explosive
substances (such as wax, oil, paint, gasoline, degreasers, dry-cleaning solvents, kerosene, etc.). This may result in fi re or
explosion. Do not spray or use stain remover products near or directly on the machine as it can damage the machines fi nish.
• Never insert products coated with mineral oils (e.g. nylon coating, plastic belts, etc. ) into the machine. If a stain remover has
been used then make sure that the solvent has been carefully washed out before inserting the clothes into the appliance. Do
not load oily clothes in to the machine as the oil may remain in the tub after a whole cycle resulting in fi re during drying.
• Do not operate the appliance at locations where fl ammable substances are present such as oil, benzene or highly infl ammable gas. Such materials may cause fi re or explosion. Never use combustible detergents.
• Only add the prescribed amount of softener. Excessive amounts may damage or stain the clothes
• After washing, keep the drum door open to protect the door seal.
• Make sure that all water has run off before opening the door. Never open the door if water still remains. There may be a
danger of scalding.
• Animals and children may get into the washing machine. So always check the appliance before using it.
• During washing, the glass door becomes very hot. Keep children away from the appliance when in operation.
• Never try to repair the machine yourself. Incorrect repairs may result in injuries and/or serious defects to the machine.
• The product should be serviced and repaired only by the authorised customer service using original replacement parts.
• When disposing of your old machine, the power cable must be capped or cut off, and the door lock must be made unusable
in order to protect children.
• When placing on a carpeted fl oor, make sure that the opening in the socket is not blocked.
• If the appliance has been under water then contact the customer service. Do not use the machine as it may impose an
electric shock or fi re hazard.
• The lower fi lter cover as well as the dispenser drawer may not be opened during the operation.
• Keep all washing powder and detergents away from children. There is a danger of poisoning
Please read safety instructions carefully before operating the machine.
Thank you for buying an LG fully automatic washing machine.
Please read this owner‘s manual carefully, it provides instructions on safe installation, use and maintenance.
Keep it handy for future reference of this machine. Make a note of the model and serial numbers of your washing machine.
Safety instuctions for the installation
Install or store the appliance where it will not be exposed to sub-zero temperatures or exposed to the weather. Fit the power plug
to a grounded wall socket that complies with all statutory regulations and ordinances. Ensure that the base opening is free from
obstruction by carpeting if the washing machine is installed on a carpeted fl oor. In countries where there is a risk of cockroach
infestation or other vermin, pay particular attention to keep the appliance and its surroundings in a clean condition at all times.
Any damage which may be caused by cockroaches or other vermin is not covered by the appliance guarantee.
CAUTION about positioning the appliance
Install the washing machine on a fl at hard fl oor. Make sure that air circulation around the washing machine is
not impeded by carpets, rug etc.
•
Never try to correct any unevenness in the fl oor using pieces of wood, cardboard or similar materials under the washing machine.
•
If it is not possible to position the washing machine away from a gas cooker or coal burning stove, an insulation panel
(85x60cm) covered with aluminum foil on the side facing the cooker or stove, must be inserted between the two appliances.
•
The washing machine must not be installed in rooms where the temperature may drop below 0°C.
•
Please ensure that when the washing machine is installed , that a Service Technician can gain easy access in the event of a
breakdown.
•
Adjust all four feet using the transit bolt spanner provided to ensure that the appliance is stable, with 20mm clearnace between
the top of the washing machine and underside of the worktop.
CAUTION about the power cord
We recommend connecting most appliances to a dedicated circuit which is protected by a mains fuse. That is, a single outlet
supplying power only to the appliance concerned, without any additional outlets or branch circuits. Check the specifi cations
of this owner‘s manual. Do not overload wall sockets. Overloaded wall sockets, loose or damaged wall sockets or extension
cords, frayed power cords, damaged or cracked wire insulation are dangerous. Any of these conditions could result in electric
shock or fi re. Periodically examine the cord of your appliance, and if its appearance indicates damage or deterioration, unplug it,
discontinue use of the appliance, and have the cord replaced with an exact replacement part by an authorized servicer. Protect
the power cord from physical or mechanical abuse, such as being twisted, kinked, pinched, squashed in a jamb of a door, or
walked upon. Pay particular attention to plugs, wall outlets, and the point where the cord exits the appliance.
CAUTION about location and moving
This equipment is not designed for maritime use or for use mobile installations such as caravans, aircraft etc. Turn off the
stopcock if the machine is to be left for any length of time (e.g. if you are going on holiday), especially if there is no fl oor drain
(gully) in the immediate vicinity. If relocating the appliance use the original packing material. Packaging material (e.g. plastic fi lm,
Styrofoam) can be dangerous for children. There is a risk of suffocation! Keep all packaging well away from children and do not
allow children to play inside the bowl as they may become trapped.
CAUTION about the fl oor surface
• The installation surface must be clean, dry and level.
• Install washing machine on a fl at hard fl oor. Poorly constructed timber base fl oors can contribute to excessive noise and
vibration.
• Proper placement and levelling of the washing machine ensure long, regular and reliable operation.
• The washing machine must be perfectly level and fi rmly in position.
• It must not “see-saw” across corners under load.
• The installation surface must be clean, free from fl oor wax and other lubricant coatings.
• Do not allow the feet of the washing machine to get wet. If feet of the washing machine get wet, slipping may occur.
Name of product Front loading washing machine
Power supply 240 V~, 50 Hz
Size WxDxH mm: 600 x 640 x 850
Weight 72 kg
Max. Watt
2400 W (Wash) / 1700 W (Dry)
Capacity 8.5 kg
(Wash) /
4.5 kg
(Dry)
Water consumption 73 l (8.6 l / kg)
Permissible water pressure 1.0-8 bar (100-800kPa)
Technical Specifi cation
P/No. :MFL59755504
1 3
5
2 4
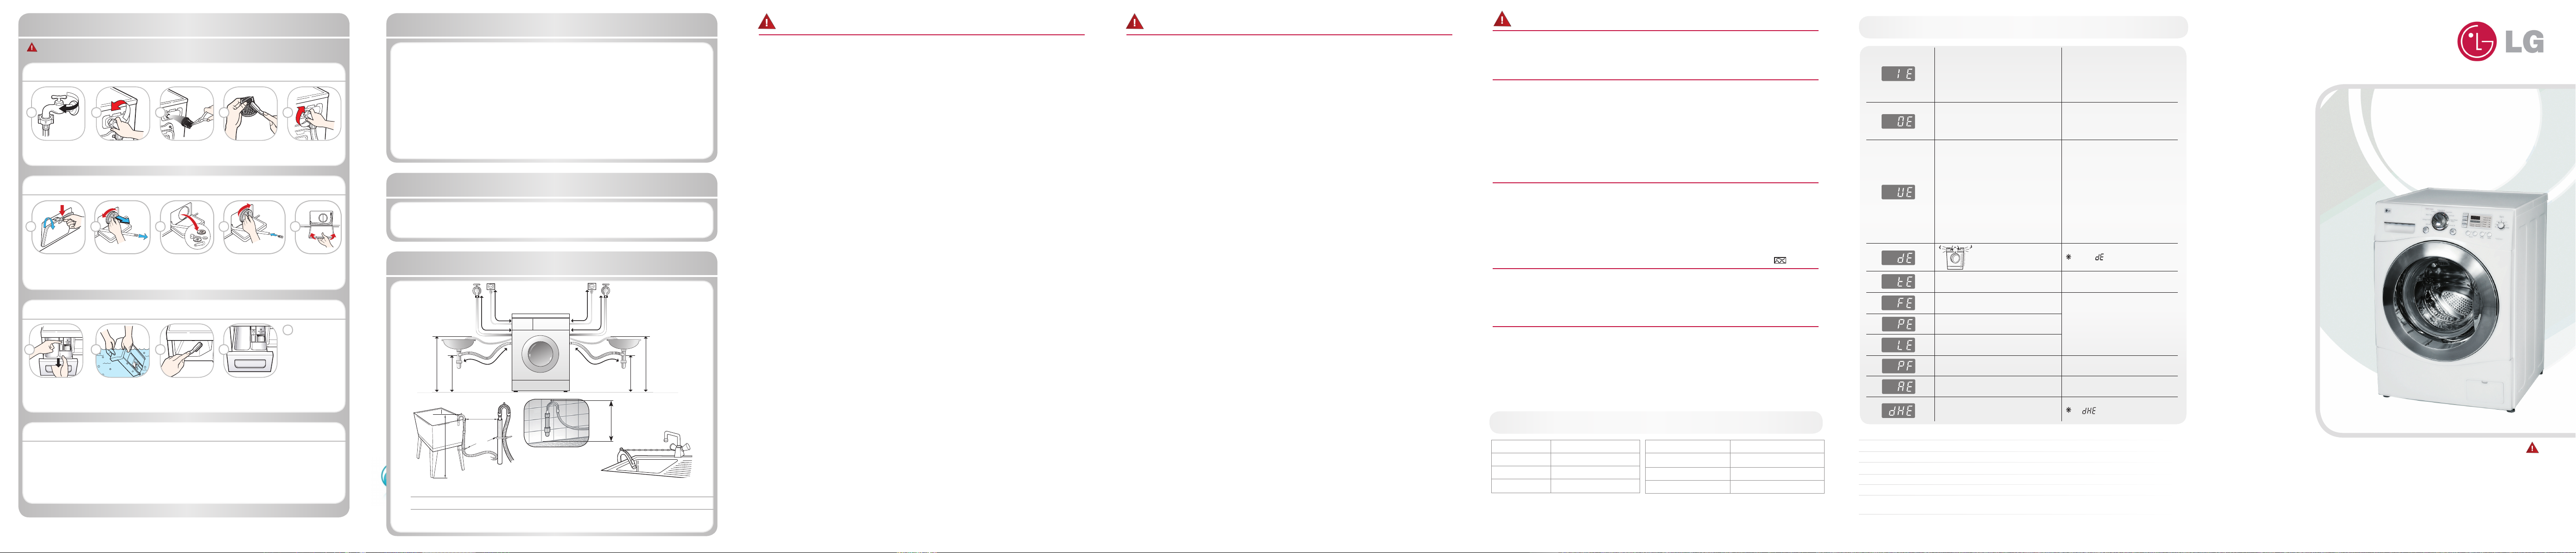
Turn off the water
tap
Unscrew the water
inlet hose
Pull out the water
inlet filter
Clean the filter using
a ha rd bristle br us h
Pull out the
dispenser drawer
Clean the dispenser
drawer under flowing water
Clean inside t he
recess with an old
toothbrush
Inser t the dispenser
drawer
Cleaning the water inlet filter
Cleaning the dispenser drawer
Open t he lower filter
cover and pull out
the drain hose.
Unplug the dra in hose
plug
Then open the
filter by turning to
the left
Remove any
ext ra neous matter
from the pump f ilter
After cleaning, refit the
drain filter c ap and t ighten it
by t ur ning it clock wise. and
inser t the drain plug
Tighten up t he inlet
hose
Close the lower
cover
Once you
have finished
cleaning, replace
the drawer and
run a rinse cycle
without laundry or
soap.
Warning: Before cleaning the washing machine interior, unplug the electrical power cord to avoid the risk of electric
shock.
Exterior
Proper care of your washing machine can extend its service life.
The outside of the machine c an be cleaned with warm water and
a neut ral non-a brasive household detergent. Immediately wipe
off any spillage. Wipe wit h damp clot h. Avoid strik ing t he surface
wit h sha rp objects. Never hose down the machine!
Interior
Dry around the washing machine door
opening, flexible gasket and door gla ss.
Run washing machine through a complete
cycle using hot water. Repeat process if
neces sary.
Cleaning in general
Important: Do not use methylated spirits, solvents or similar products.
Safety instructions for use
To minimize the risk of fi re within the inner bowl, the following should be observed:
• Items that have been spotted or soaked with vegetable or cooking oil constitute a fi re hazard and should not be
placed in a tumble dryer.
Oil-affected items can ignite spontaneously, especially when exposed to heat sources Such as in a tumble dryer.
The items become warm, causing an oxidation reaction in the oil. Oxidation creates heat. If the heat cannot
escape, the items can become hot enough to catch fi re. Piling, stacking or storing oil-affected items can prevent
heat from escaping and so create a fi re hazard.
If it is unavoidable that fabrics that contain vegetable or cooking oil or have been contaminated by hair care products be placed in a tumble dryer they should fi rst be washed in hot water with extra detergent-this will reduce,
but not eliminate, the hazard. The ‘cool down’ cycle of tumble dryers should be used to reduce the temperature
of the items. They should not be removed from the tumble dryer or piled or stacked while hot.
• Items that have been previously cleaned in, washed in, soaked in or spotted with petrol/gasoline, dry-cleaning
solvents or other fl ammable or explosive substances should not be placed in a tumble dryer.
Highly fl ammable substances commonly used in domestic environments include acetone, denatured alcohol,
petrol/gasoline, kerosene, spot removers (some brands), turpentine, waxes and wax removers.
• Items containing foam rubber (also known as latex foam) or similarly testured rubber like materials should not be
dried in a tumble dryer on a heat setting.
Foam rubber materials can, when heated, produce fi re by spontaneous combustion.
• Fabric softeners or similar products should not be used during a drying cycle, to eliminate the effects of static
electricity unless this practice is specifi cally recommended by the manufacturer of the fabric softener or product.
• Undergarments that contain metal reinforcements should not be placed in a tumble dryer.
Damage to the tumble dryer can result if metal reinforcements come loose during drying.
When available a drying rack could be used for such items.
• Plastic articles such as shower caps or babies waterproof napkin covers should not be placed in a tumble dryer.
• Rubber-backed articles, clothes fi tted with foam rubber pads, pillows, rubber boots and rubber-coated tennis
shoes should not be placed in a tumble dryer.
Cleaning and Maintenance
Cleaning the drain pump filter
n The external hot water supply MUST NOT exceed 70 deg C
n Permissible cold water temperature : 4-25˚C
n No further backfl ow protection required for connection to the water supply.
e The appearance and specifi cations may be varied without notice to lmprove the units quality.
e Specifi cations subject to change by manufacturer.
Installation of drain hose
• The drain hose should not be placed higher than 100 cm above the fl oor.
• Proper securing of the drain hose will protect the fl oor from damage due to any water leakage.
• If the drain hose is too long do not force back into the washing machine. This will cause abnormal
noise and cause the machine to malfunction and leak.
Electrical connection
1. Do not use an extension cord or double adapter.
2. Have damaged supply cords replaced by the manufacturer or its service agents or a similarly qualifi ed
person to prevent danger.
3. Always unplug the machine and turn off the water supply after use.
4. Connect the machine to an earthed socket in accordance with current wiring regulations.
5. The appliance must be positioned so that the plug is easily accessible.
• Repairs to the washing machine must only be carried out by qualifi ed personnel. Repairs carried out by inexperienced persons may cause injury or serious malfunctioning. Contact your local service centre.
•
Do not install your washing machine in rooms where temperature below freezing may occur. Frozen hoses may
burst under pressure. The electronic control unit may become unreliable at temperatures below freezing point.
• If the appliance is delivered in the winter months and temperatures are below freezing: Leave the washing
machine standing at room temperature for a few hours before putting it into operation.
Rattling and clanking noise Extraneous objects such as coins or safety pins maybe in drum or pump.
Thumping sound Heavy wash loads may produce a thumping sound. This is usually normal.
Vibrating noise Have all transit bolts and packing been removed?
Water leaks. Check and tighten hose connections. Unclog drain pipe. Contact plumber if necessary.
Excessive suds Too much detergent or unsuitable detergent.
Washing machine does not start Power cord may not be plugged in or connection may be loose.
Washing machine won’t spin Check that the door is shut.
Check that foreign objects may be blocking the drain causing the water not to drain out.
Door does not open Once started, the door can not be opened for safety reasons.
At the end of the cycle or when Start Pause is pressed, wait one or two minutes before opening the door to
allow the electric locking mechanism time to release.
Troubleshooting
• Water supply is not adequate in area
• Water supply taps are not completely
open.
• Water inlet hose(s) are kinked.
• The fi lter of the inlet hose(s) are
clogged.
Check another tap in the house.
Fully open tap.
Straighten hose(s).
Check the filter of the inlet hose(s).
• Drain hose is kinked or clogged.
• The drain fi lter is clogged.
Clean and straighten the drain hose.
Clean the drain filter.
For more detailed information, please
refer to “Cleaning the drain pump filter”
• Load is too small.
• Load is out of balance.
• The appliance has an unbalance detection
and correction system. If individual heavy
articles are loaded (ex. bath mat, both
robe, etc.), this system may stop spinning
or even interrupt the spin cycle altogether.
• If the laundry is still too wet at the end of
the cycle, add smaller articles of laundry
to balance the load and repeat the spin
cycle. Floor is unstable.
Feet are not adjusted
Add 1 or 2 similar items to help balance
the load.
Rearrange load to allow proper spinning
• Is the door opened or not
completely closed?
Close the door completely.
If the " " does not clear, call for
service.
Unplug the power plug and call for
service.
• Water overfi lls due to the faulty water
valve.
Close the water tap.
Unplug the power plug.
Call for service.
Restart the cycle.
• Water level sensor has malfunctioned.
• Over load in motor.
• The washer experienced a power
failure.
Turn the tap on.
If “ ” is not released, unplug
power plug and call for service.
• Check water supply.
Call for service.• Water leaks
CAUTION
This appliance is not intended for use by persons (including children) with reduced physical, sensory or mental
capabilities, or lack of experience and knowledge, unless they have been given supervision or instruction concerning use of the appliance by a person responsible for their safety.
The fl oor should be a solid surface.
Adjust the feet so that the machine
does not rock from side to side or front
to back.
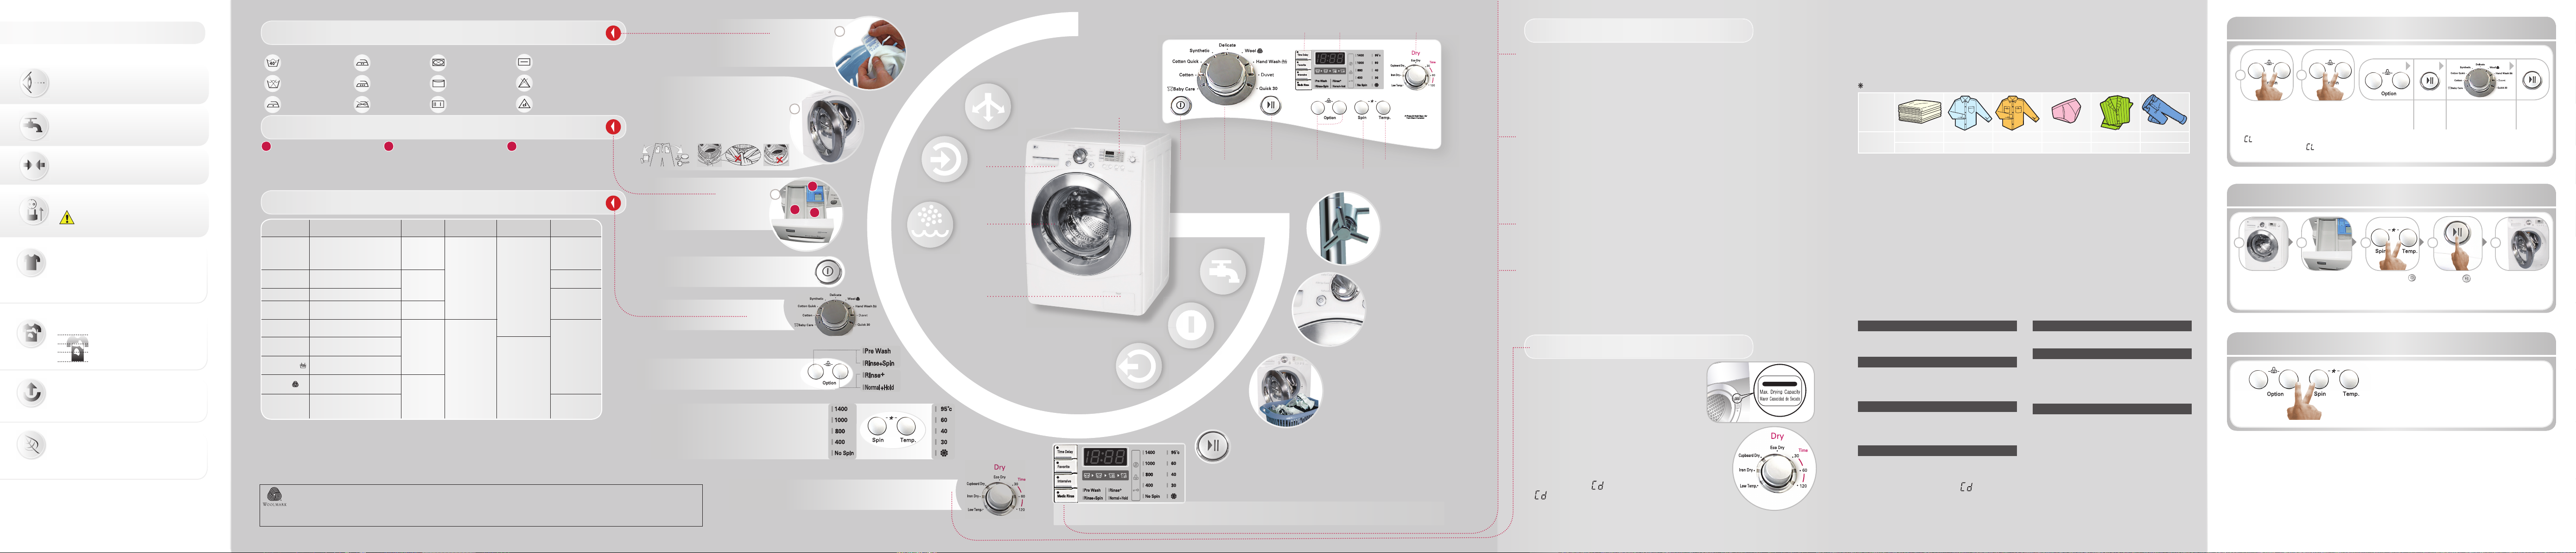
1
2
3
B
A
C
1 2
1 2 3 4 5
6 3 se c.
INSERT PLUS IN TO THE MA INS SOCKET
Never touch the plug with wet hands!
Never remove the plug from the
socket by pulling on the cord.
POSITION DR A IN HOSE.
Position Drain hose as per t he installat ion instructions in this manual
WATE R C ONNECTION
Turn on the water tap
CHECKING TH E MACHINE
Never use a defective machine! In case of any
failure, f irst unplug t he machine and turn off the
water
tap.
PREPA RING L AUNDRY AND US ING MACHINE
WITH CA RE
- empt y a ll pockets
- remove all met al pa rts
- place the delicate text iles into t he laundry net
- close zippers
DRUM CA RE
- remove extraneous objects
- leave door open to dry t he drum when not in use.
- check the rubber sea ls regularly
ECOLOGI CAL WASHING
- ma ke use of the max. washing quantity Please note
the wa shing capaci ties for each cycle as ment ioned
in t he Washing program table.
- do not “pre wash” if possible
- us e short program if possible
LAUNDRY WITH DIFF ERENT AM OU NTS OF
SOILING
- wash new textiles separately
- do not prewash
- pret reat dir t y spots
- pre was h
Sor t the laundry
note wa shing inst ruct ion symbols -
Degree of soiling -
Type of textile / colour -
Loading the Drum
Check the folds of the flexible gasket (grey) -
and remove any small ar ticles or foreign objects that may
have fallen from items in the previous wash .
Check all garments for loose items before loading and
ensure that clothes are clear of t he door gasket before
closing the door so that the clothes or door gasket a re not
damaged during the wash. .
Fill detergent
Refer to t he
written information
on t he detergent's pack aging
Turn the machine ON
by pressing the Power but ton
Select a
Program
Select the
Dry mode
Select an Option
Pre Wash / Rinse+Spin / Rinse+ / Normal+Hold
Select Spinning speed
and Wa shing temperature
4 additional programs
Time Delay / Favorite / Intensive / Medic Rinse
Press Star t / Pause
to sta rt or pause t he washing
process
B
Main Wash
For Laundry requiring detergent,
place recommended dosage in to this
compartment. Please note that liquid
detergent will enter the tub as it is poured
and may not be suitable for a delay start.
C
Sof tener
Do not exceed the MA X-Level.
Highly densed softeners are to be
diluted with some water.
Excessive softener can cause brown
or grey spotting on the clothes.
A
Pre Wash
The Pre wash compartment can be used
for Normal to heavy soiled clothes, by
adding a prewash or normal detergent to
this compartment before selecting this
wash option with the Cycle.
Dry fl at
Do not bleach
Handy to bleach
Do not
tumble dry
Hang to dry
Drip dry
Medium hot
ironing
Hot ironing
Do not iron
Washing
temperature
Do not wash
Luke warm ironing
Time Delay
Allows you to set the cycle's ending time (by hourly increments) in advance.
How to set “Time Delay”
- Press Power button.
- Turn the Program dial to select the program you require.
- Press Time Delay but ton and set the finishing time. T he machine will t hen automatically work out the turn on
time based on the chosen cycle.
- Press the Start/Pause but ton.
Favorite
- Favorite program allows you to store a customized wash cycle for future use.
- To make a Favorite program:
(1) Select a cycle.
(2) Select
The course, washing method, number of rinses, spin spe ed, water temperature etc.
(3) Pre ss and hold Favorite program but ton 3 ec onds (2 beep sounds).
The Favorite program is now stored for future use.
To reuse the program, sele ct Favor ite program and press St art /Pause.
Intensive
If the laundry is heavily soiled “Intensive”option is effective.
- By selecting the Intensive option, the was hing duration may be extended, depending on the program selected.
- To use this option, press t he intensive button once before the wash program is st ar ted.
Medic Rinse
For best results or for cleaner rinsing, select the “Medic Rinse” option.
This allows the final rinse to be heated to 40 degrees.
Available in the Cot ton, Cot ton Quick, Sy nthetic and Baby Care programs.
Medic Rinse is set by default in the Baby Care program.
The respective temperature indicator will light up.
Dryin g cycle
Temperature
Spin
Options
Sta rt / PauseProg ram Cycle
Powe r bu tt on
Drum
Dispenser
drawer
Filter cover.
Control panel
Washing program table
Additional programs
Preparation
lightly
heavily
Washing symbols
Dispenser drawer
DisplayAdditi ona l progr ams
Water Temperature: Select water temperature to suit wash cycles. Always follow garment manufact ure’s care label or instructions when washing.
Intensive: If the laundry is he avily soiled “Intensive” option is effective.
Set program at “Cot ton 40°C + intensive + 1400rpm + Eco Dr y” option for test in accordance or in conformit y wit h AS/NZS 2442.2.
For best washing results, we recommend to mix dr y detergent with warm water.
Pre Wash: If the laundr y is heavily soiled, “Pre Wash” C ot ton is recommended. Pre Wash is available in t he Cotton, Cotton Quick, Synthetic and Baby Care program.
Crease Care: If you want to prevent creasing, select Crease Care option.
Medic Rinse: For best results or for cleaner r insing, you ca n choose this heated Rinse option. M edic Rinse is automatically selected on Baby Care program.
The wool wash cycle of this machine has been approved by Woolma rk for the washing of machine washable Woolmark products provided that the
products are washed according to the inst ruct ions on the garment label and those issued by the manufacturer of this washing machine M0806.
Notes
Neutral detergent is recommended. The wool c ycle features gentle tumbling and low-spe ed spin for garment care.
Warning: Keep all washing powder and detergents away from children. Danger of poiso ning
Note: The ma ximum drying capacit y for this model is 4.5kg.
When loading, please use t he ma ximum dry ing capacit y
indicator behind the door as show n below.
• This washer-dr yer’s automatical process f rom washing to dr ying can be
selected ea sily.
• For most even dr ying, ma ke sure a ll clothes are similar in material and
thick ne ss.
• Do not overload dryer by st uffing too many articles into dr um. Items must
be a ble to tumble freely.
• Af ter the end of dry, “ ” is displayed.
“ ” operates for around 4 hours, but can be cancelled at any time by
pressing the Star t/Pause but ton. It's purpose is to reduce wrinkles in t he
event that t he clothes are left in the machine after the wash & dr y cycle
has ended.
1. Drying Automatic guide
• Use t he automat ic Dr ying Cycles to dr y most loads. Electronic sensors measure the temperature of the internal airflow in
order to increase or decrease drying temperatures dr ying time.
• If a load is not as dry as you like, complete drying using a time cycle.
Note: The Estimated dr ying time varies from t he actual dr ying time when using the Auto Dr y selections. The type of
fabric, size of the load, and the dry ness selected affect and dr ying time.
The standard laundry weight which shows how much laundr y to put into t he washer.
2. Drying Time Guide (Manual operation)
• By turnning the Dry dial, the drying t ime can be selected.
• Drying course can last up to 150min. When selecting drying only, dry ing course will star t after 15min spining.
The spin operation can be bypassed in a Dry only mode if it is not required by continually pressing the spin but ton until
"no spin" appears.
• These drying times are given as a guide to help you set your dr yer for manual drying. Drying times can vary greatly
depending on dampne ss, room temperature and type of fabric and your own experienc e will be your be st guide.
• Low Temp. : For Synthetics select
• Iron Dr y : If you want to iron clot he s
• Cupboard D ry : For Cottons select
• Eco Dry : A spec ial cycle to redu ce water us age duri ng the dry cy cle.
• Time (30/60/120 minutes) - 30 min : Cot ton 1.5kg
- 60 min : Cot ton 3kg
- 120 min : Towel 4.5kg
• Your dryer can handle a load of up to 4.5kg dr y weight of ar ticles.
• When loading, shake out each handful of clot hes so t hat they can tumble freely. Items should not be loaded in a
tangled condition, as this will lengt hen the dr ying time.
Woolen Articles
- Do not tumble dr y woolen art icles. Pull them to their
original shape, and Air dry them on a flat surface.
Woven and Loopknit Materials
- Some woven and loopknit materia ls may shrink, by va ry-
ing amounts, depending on their qualit y.
- Always stretch them out immediately after drying.
Permanent Press and Synthetics
- Do not overload your dryer.
- Take out permanent press ar ticles as soon as the dryer
stops in order to reduce wrinkles.
Fibre or Leather Materials
- Always check the manufacture’s instr uctions.
Baby Clothes and Night Gowns
- Always check the manufacture’s instr uctions.
Rubber and Plastics
- Do not dry any items made f rom or containing rubber or
plastics, such as:
a) aprons, bibs, chair covers
b) cur tains and tablec loths
Fiberglass
- Do not dry fiberglass articles in your dryer. Glass part icles left in the dr yer could be picked up by your clothes
the next time you use t he dr yer a nd irritate your skin.
3. Completion of Drying
• When dr ying cycle is completed, “ ” [COOL DOWN] is displayed on t he Multi display.
• The C OOL DOWN begins automatica lly when a dr ying cycle is complete.
• The COOL DOWN function periodically tumbles, rearranges and f luffs the load to avoid wrinkles without heat for up to
4 hours.
• The C OOL DOWN mess age will continue to display until the clothes are removed or the Star t /Pause but ton is pressed.
Program Fabric Type
Water Temp.
(Option)
Dry (Option) Maximum Load
Cotton
Cotton
Quick
Synthetic
Baby Care
Delicate
Hand Wash
Wool
Color fast garments (shirts,
nightdresses, pajamas...)and
lightly soiled white cotton
(underwear)
Lightly soiled clothing and
small loads
Polyamide, Acrylic, Polyester
Lightly soiled baby wear
Delicate laundry easily
damaged
“Hand wash” marked delicate
and wool laundry
Machine washable woolens
with pure new wool only
40°C
(Cold, 30°C,
60°C, 95°C)
40°C
(Cold, 30°C,
60°C)
60°C
(40°C, 95°C)
Duvet
Cotton bedding with fi lling
duvet, pillow, blanket, sofa
cover with light fi lling
40°C
(Cold, 30°C)
30°C
(Cold, 40°C)
Quick 30
Colored laundry which is
lightly soiled fast
- Time Delay
- Intensive
- Medic Rinse
- Pre Wash
- Rinse
+
- Rinse+Spin
- Normal+Hold
- Time Delay
- Intensive
- Rinse
+
- Rinse+Spin
- Normal+Hold
Option
- Low Temp.
- Iron Dry
- Cupboard Dry
- Eco Dry
- Time
–
Wash: Rating
Dryer: 4.5Kg
Wash: Less than 7 Kg
Dryer: 4.5Kg
Wash: Less than 4.5Kg
Dryer: 4.5Kg
1 king size
(9 Tog)
Less than 2.0kg
Dry
To activate:
press and hold
the Option buttons
simultaneously until
" " a ppears in
the display.
To deactivate:
press and hold
the Option buttons
simultaneously for 3
sec onds until the
" " is removed
from the display.
Change to the desired program, whilst in child lock mode:
Empty the drum
completly and close
the door
Add anti-limescale
(Calgon) to t he main
wash compartment.
Close the disp. drawer
Power ON wit h
Then press and
hold Spin and
Temp. but ton
Press the
Star t/Pause
but ton to sta rt Tub
Clean proce ss
After the cycle is
complete, leave the
door open to dr y
Select this function to lock the buttons on the control panel and to prevent tampering.
Press and hold
the Option buttons
simultaneously
Press
Star t/Pause
Select the desired
program
Press
Star t/Pause
6 3 se c.
6 3 se c.
The Beep on/off function can be set by pressing and
holding t he Option and Spin button simulta neously.
The Beep on/off function can be set at any time and it is
automatically c ancelled in t he event of a power cut.
The Beep on/off function also works when power is off.
Child Lock
6 3 se c.
TUB CLEA N is special cycle to clean the inside of the washing machine.
A higher water level is used in this cyle at higher spin speed. Perform this cycle regularly.
Tub Clean
Beep on / of f
Cold water tap must be left on during drying cycles.
Sorts of
laundry
Single
weight
Diaper Shir t Short-sleeved Underwear Nightclothes Jean
100 g 200 g 300 g 50 g 500 g 1200 g
 Loading...