

Page 1
WD-1255(0~9)RD
WD-1255ARD
WD-1255ERD
P/No.: MFL41480183
34
Page 2
roduct Feature
P
ontents
C
2
Warnings ......................................................................................................................3
Specification...................................................................................................................5
Installation......................................................................................................................6
Care before washing....................................................................................................12
Adding detergent..........................................................................................................13
Function ....................................................................................................................15
How to use washer ......................................................................................................16
Maintenance ................................................................................................................26
Troubleshooting guide .................................................................................................30
Terms of Warranty .......................................................................................................34
Direct Drive System
The advanced Brushless DC motor directly drives the drum without
belt and pulley.
Water Circulation
Sprays detergent solution and water onto the load over and over.
Clothes are soaked more quickly and thoroughly during wash cycle.
The detergent suds can be removed more easily by the water shower during rinse
cycle. The water circulation system uses both water and detergent more efficiently.
Tilted Drum and Extra Large Door Opening
Tilted drum and extra large opening make it possible to load
and unload clothing more easily.
Steam Washing and Refresh
Steam Washing features upgraded washing performance with low energy and
water consumption. Refresh cycle removes wrinkles from dry clothes.
RollerJets
Washing ball enhances the wash performance and reduces damage
to the clothing. The jets spray and help tumble clothes to enhance
washing performance while maintaining fabric care.
Automatic Wash Load Detection
Automatically detects the load and optimizes the washing time.
Built-in Heater
Internal heater helps to maintain water temperature at its optimum level for selected
cycles.
Child Lock
The Child lock prevents children from pressing any button to change the settings
during operation.
추가선택, 예약,
Page 3
arnings
W
3
For your safety, the information in this manual must be followed to minimize
the risk of fire or explosion, electric shock, or to prevent property damage,
personal injury, or loss of life.
!
READ ALL INSTRUCTIONS BEFORE USE
WARNING!
• Do not install or store the washer where it will
be exposed to the weather.
• Do not tamper with controls.
• Do not repair or replace any part of the washer
or attempt any servicing unless specifically
recommended in the user-maintenance
instructions or published user-repair instructions
that you understand and have the skills to carry
out.
• Keep the area underneath and around your
appliances free of combustible materials such as
lint, paper, rags, chemicals, etc.
• Close supervision is necessary if this appliance
is used by or near children or infirm persons.
Do not allow them to play on, with, or inside this
or any other appliance.
• Keep washer away from fire.
• Do not leave the washer door open.
An open door could entice children to hang on
the door or crawl inside the washer.
• Never reach into washer while it is moving. Wait
until the drum has completely stopped.
• The laundry process can reduce the flame
retardant of fabrics.
• Do not wash or dry articles that have been
cleaned in, washed in, soaked in, or spotted with
combustible or explosive substances (such as
wax, oil, paint, gasoline, degreasers, dry
cleaning solvents, kerosene, etc.) which may
ignite or explode.
Oil may remain in the tub after
a whole cycle resulting in fire during drying. So,
do not load oiled clothes.
• Always follow the fabric care instructions
supplied by the garment manufacturer.
• Do not slam the washer door closed or try to
force the door open when locked. This could
result in damage to the washer.
• To minimize the possibility of electric shock,
unplug this appliance from the power supply or
disconnect the washer at the household
distribution panel by removing the fuse or
switching off the circuit breaker before
attempting any maintenance or cleaning.
• Never attempt to operate this appliance if it is
damaged, malfunctioning, partially
disassembled, or has missing or broken parts,
including a damaged cord or plug.
• Dryer is intended for only drying textile material.
• If the washer has been exposed to water, call an
authorized service provider to avoid any risk of
fire or electric shock.
GROUNDING INSTRUCTIONS
This appliance must be grounded. In the event of malfunction or breakdown, grounding will reduce the risk
of electric shock by providing a path of least resistance for electric current. This appliance is equipped with
a cord having an equipment-grounding conductor and grounding plug. The plug must be plugged into an
appropriate outlet that is properly installed and grounded in accordance with all local codes and ordinance.
• Do not use an adapter or otherwise defeat the grounding plug.
• If you don’t have the proper outlet, consult an electrician.
IMPORTANT SAFETY INSTRUCTIONS
WARNING : To reduce the risk of fire, electric shock, or injury to persons when using
the washer, follow basic precautions, including the following:
SAVE THESE INSTRUCTIONS
WARNING : Improper connection of the equipment-grounding conductor can result in risk of electric
shock. Check with a qualified electrician or serviceman if you are in doubt as to whether the appliance is
properly grounded. Do not modify the plug provided with the appliance - if it does not fit the outlet, have a
proper outlet installed by a qualified electrician.
Page 4
arnings
W
4
To minimize the risk of fire in a tumble dryer, the following should be observed:
• Items that have been spotted or soaked with vegetable or cooking oil constitute a fire
hazard and should not be placed in a tumble dryer.
Oil-affected items can ignite spontaneously, especially when exposed to heat
sources Such as in a tumble dryer. The items become warm, causing an oxidation
reaction in the oil. Oxidation creates heat. If the heat cannot escape, the items can
become hot enough to catch fire. Piling, stacking or storing oil-affected items can
prevent heat from escaping and so create a fire hazard.
If it is unavoidable that fabrics that contain vegetable or cooking oil or have been
contaminated by hair care products be placed in a tumble dryer they should first be
washed in hot water with extra detergent-this will reduce, but not eliminate, the
hazard. Washed in hot water with extra detergent-this will reduce, but not
eliminate, the hazard. The ‘cool down’ cycle of tumble dryers should be used to
reduce the temperature of the items. They should not be removed from the tumble
dryer or piled or stacked while hot.
• Items that have been previously cleaned in, washed in, soaked in or spotted with
petrol/gasoline, dry-cleaning solvents or other flammable or explosive substances
should not be placed in a tumble dryer.
Highly flammable substances commonly used in domestic environments include
acetone, denatured alcohol, petrol/gasoline, kerosene, spot removers (some
brands), turpentine, waxes and was removers.
• Items containing foam rubber (also known as latex foam) or similarly testured
rubber. like materials should not be dried in a tumble dryer on a heat setting.
Foam rubber materials can, when heated, produce fire by spontaneous combustion.
• Fabric softeners or similar products should not be used in a tumble dryer to eliminate
the effects of static electricity unless this practice is specifically recommended by the
manufacturer of the fabric softener or product.
• Undergarments that contain metal reinforcements should not be placed in a tumble
dryer.
Damage to the tumble dryer can result if metal reinforcements come loose during
drying. When available a drying rack could be used for such items.
• Plastic articles such as shower caps or babies waterproof napkin covers should not
be placed in a tumble dryer.
• Rubber-backed articles, clothes fitted with foam rubber pads, pillows, galoshes and
rubber-coated tennis shoes should not be placed in a tumble dryer.
Page 5

5
pecification
S
Ir
o
n
Iron
Name : Front loading washing machine
Power supply : 220-240V~, 50Hz
Size : 686mm(W) x 767mm(D) x 982(H)
Weight : 94kg
Wash capacity : 12kg
Dry capacity : 6kg
Max. Watt : 2200W (Wash) / 2150W (Dry) / 1900W (Steam)
Spin speed : No Spin/400/800/1000/1200
Water consumption : 85ℓ
Permissible water pressure :
0.3-10kgf/㎠ (30-1000kPa)
❋ The appearance and specifications may be varied without notice to improve the units quality.
Spanner
Inlet hose(2EA)
Accessories
Page 6
6
nstallation
I
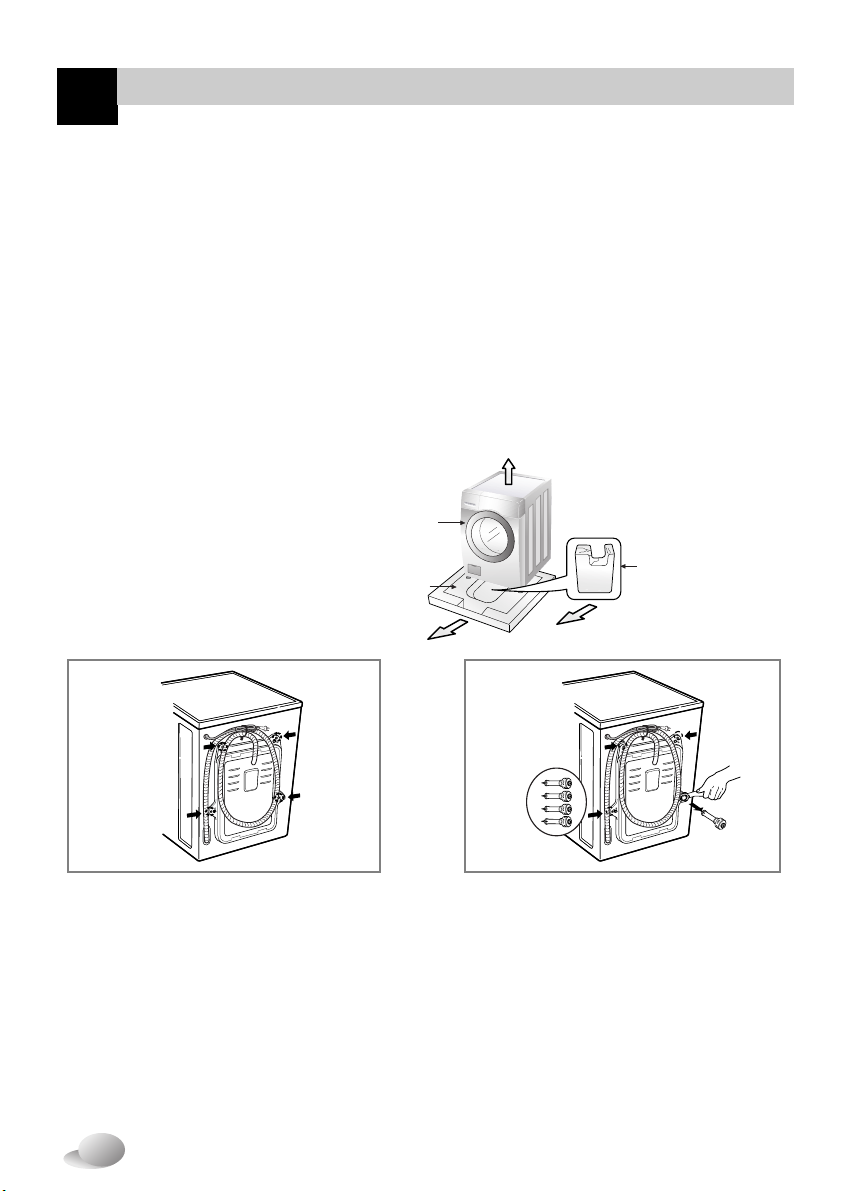
1. To prevent internal damage during
transport, the special 4 bolts are locked.
Before operating the washer, remove
the bolts along with the rubber bungs.
• If they are not removed, it may cause heavy
vibration, noise and malfunction.
3. Take out the 4 bolts along with the rubber
bungs by slightly twisting the bung. Keep
the 4 bolts and the spanner for future use.
• Whenever the appliance is transported, the
transit bolts must be refitted.
The appliance is fitted with transit bolts to prevent internal damage during transport.
• Packing and all transit bolts
must be removed before using
the washer.
When unpacking the base, be
sure to remove the additional
packing support in the middle
of the base packing.
2. Unscrew the 4 bolts with
the spanner supplied.
4. Close the holes with the caps supplied.
Transit bolts
Install or store where it will not be exposed to temperatures below freezing or exposed to
the weather.
Properly ground washer to conform with all governing codes and ordinances.
The base opening must not be obstructed by carpeting when the washing machine is
installed on a carpeted floor.
In countries where there are areas which may be subject to infestation by cockroaches or
other vermin, pay particular attention to keeping the appliance and its surroundings in
clean condition at all times.
Any damage which may be cause by cockroaches or other vermin will not be covered by
the appliance guarantee.
Removing transit bolts
Base Packing
Washer
Packing Support
Page 7
7
nstallation
I
Level floor :
Allowable slope under entire washer is 1°
Power outlet :
Must be within 1.5 meters of either side of location of
washer. Do not overload the outlet with more than one
appliance.
Additional Clearance :
For wall, door and floor modeling is required.
(10cm : rear / 2cm : right & left side)
Do not place or store laundry products on top of washer at
any times.
They can damage the finish or controls.
Installation place requirement
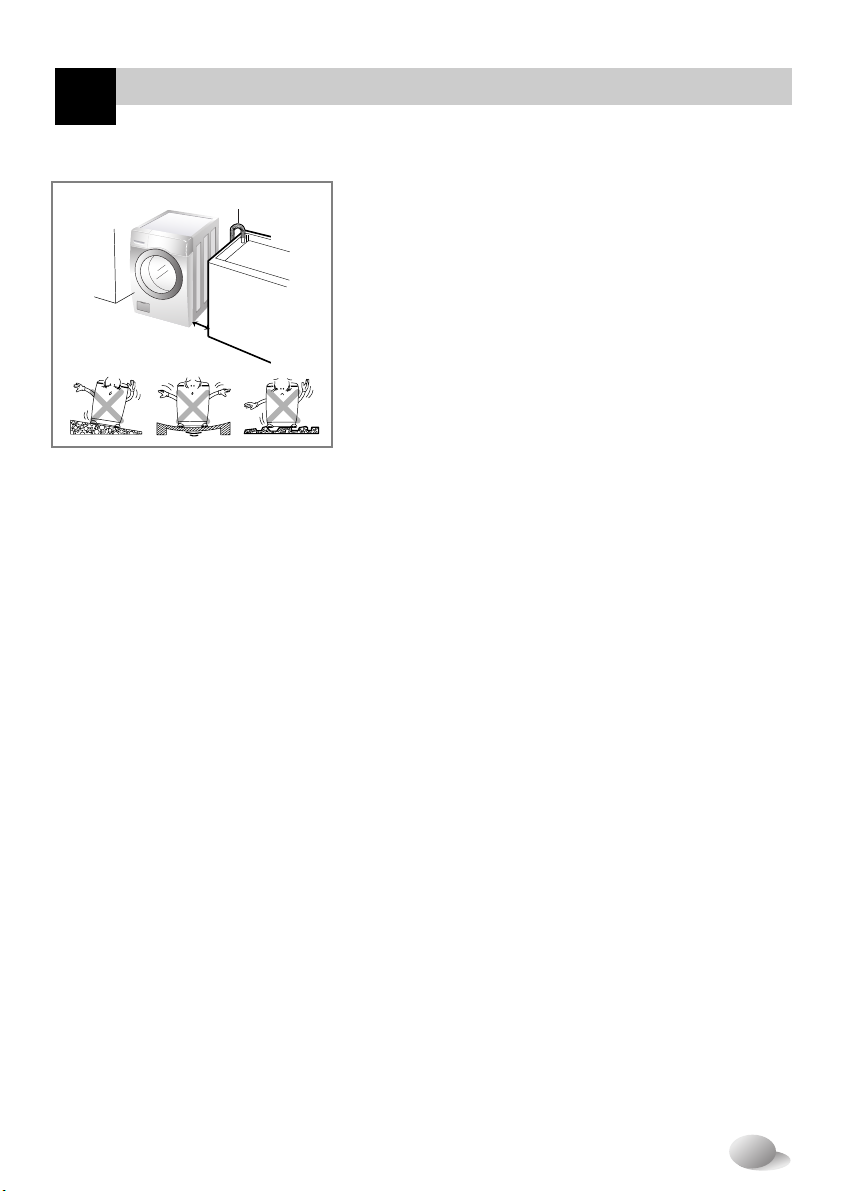
Positioning
Install the washer on a flat hard floor.
Make sure that air circulation around the washer is not impeded by carpets,rug etc.
• Before placing the washer on tiles, apply a rubber mat under the feet.
• Never try to correct any unevenness in the floor with pieces of wood, cardboard or similar
materials under the washer.
• If it is impossible to avoid positioning the washer next to a gas cooker or coal burning
stove,an insulating(85x60cm) covered with aluminum foil on the side facing the cooker or
stove,must be inserted between the two appliance.
• The washer must not be installed in rooms where the temperature can drop below 0°C.
• Please ensure that when the washer is installed, it is easily accessible for the engineer in
the event of a breakdown.
• With the washer installed adjust all four feet using the transit bolt spanner provided
ensuring the appliance is stable, and a clearance of approximately 20mm is left between
the top of the washer and the underside of the work-top.
Washer
approx.
2cm
Drain Hose
Laundry
Tub
Page 8
8
nstallation
I
▶
Water supply pressure must be between 30kPa and 1000kPa
(0.3~10kgf/cm2)
▶
Don’t strip or crossthread when connecting Inlet hose to the valve.
▶
If the water supply pressure is more than 1000kPa, a decompression
device should be installed.
• Two rubber seals are supplied with the water inlet hoses these are in
order to prevent water leaks.
• Check water tightness of washing machine connections by turning
the tap completely on.
• Periodically check the condition of the hose and replace the hose if
necessary.
• Make sure that there is no kink on the hose and that it is not crushed.
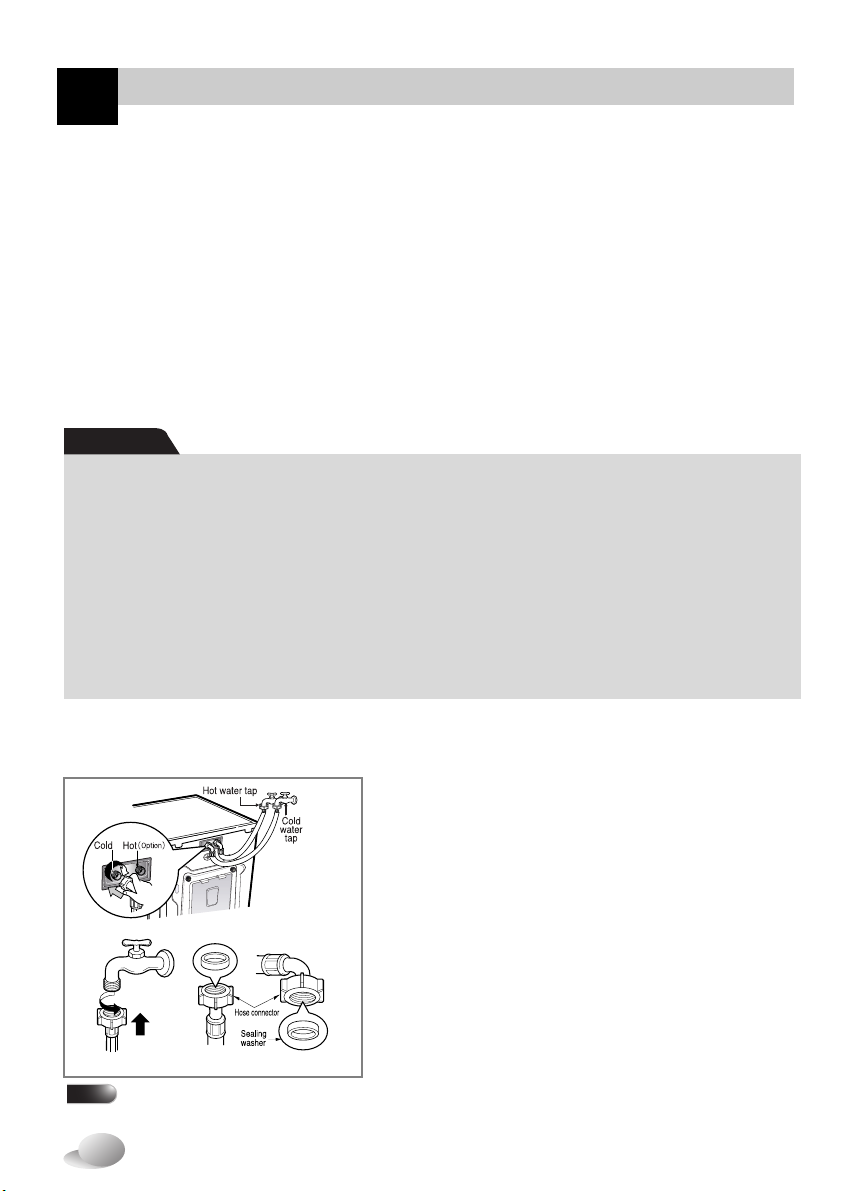
▶
When your washer has two valves,
• The Inlet hose which has red connector is for the hot water tap.
• If the washer has two valves, the energy is saved by using hot valve.
Washing Machine is to be connected to the water mains using new hose-sets and that old
hose-sets should not be used.
Connecting water supply hose
1. Do not use an extension cord or double adapter.
2. If the supply cord is damaged, it must be replaced by the manufacturer or its service agents or
similarly qualified person in order to avoid a hazard.
3. Always unplug the machine and turn off the water supply after use.
4. Connect the machine to an earthed socket in accordance with current wiring regulations.
5. The appliance must be positioned so that the plug is easily accessible.
• Repairs to the washing machine must only be carried out qualified personnel. Repairs carried out by inexperienced
persons may cause injury or serious malfunctioning. Contact your local service center
• Do not install your washing machine in rooms where temperatures below freezing may occur. Frozen hoses may
burst under pressure. The reliability of the electronic control unit may be impaired at temperatures below freezing
point.
• If the appliance is delivered in the winter months and temperatures are below freezing : Store the washing machine at
room temperature for a few hours before putting it into operation.
Electrical connection
CAUTION concerning the Power Cord
Most appliances recommend they be placed upon a dedicated circuit; that is, a single outlet circuit
which powers only that appliance and has no additional outlets or branch circuits. Check the
specification page of this owner's manual to be certain.
Do not overload wall outlets. Overloaded wall outlets, loose or damaged wall outlets, extension cords,
frayed power cords, or damaged or cracked wire insulation are dangerous. Any of these conditions
could result in electric shock or fire. Periodically examine the cord of your appliance, and if its
appearance indicates damage or deterioration, unplug it, discontinue use of the appliance, and have
the cord replaced with an exact replacement part by an authorized servicer.
Protect the power cord from physical or mechanical abuse, such as being twisted, kinked, pinched,
closed in a door, or walked upon. Pay particular attention to plugs, wall outlets, and the point where
the cord exits the appliance.
CAUTION
NOTE
After completing connection, if water leaks from the hose, the repeat the same steps. Use the most conventional
type of faucet for water supply. In case the faucet is square or too big, remove the spacing ring before inserting
the faucet into the adaptor.
Page 9
9
nstallation
I
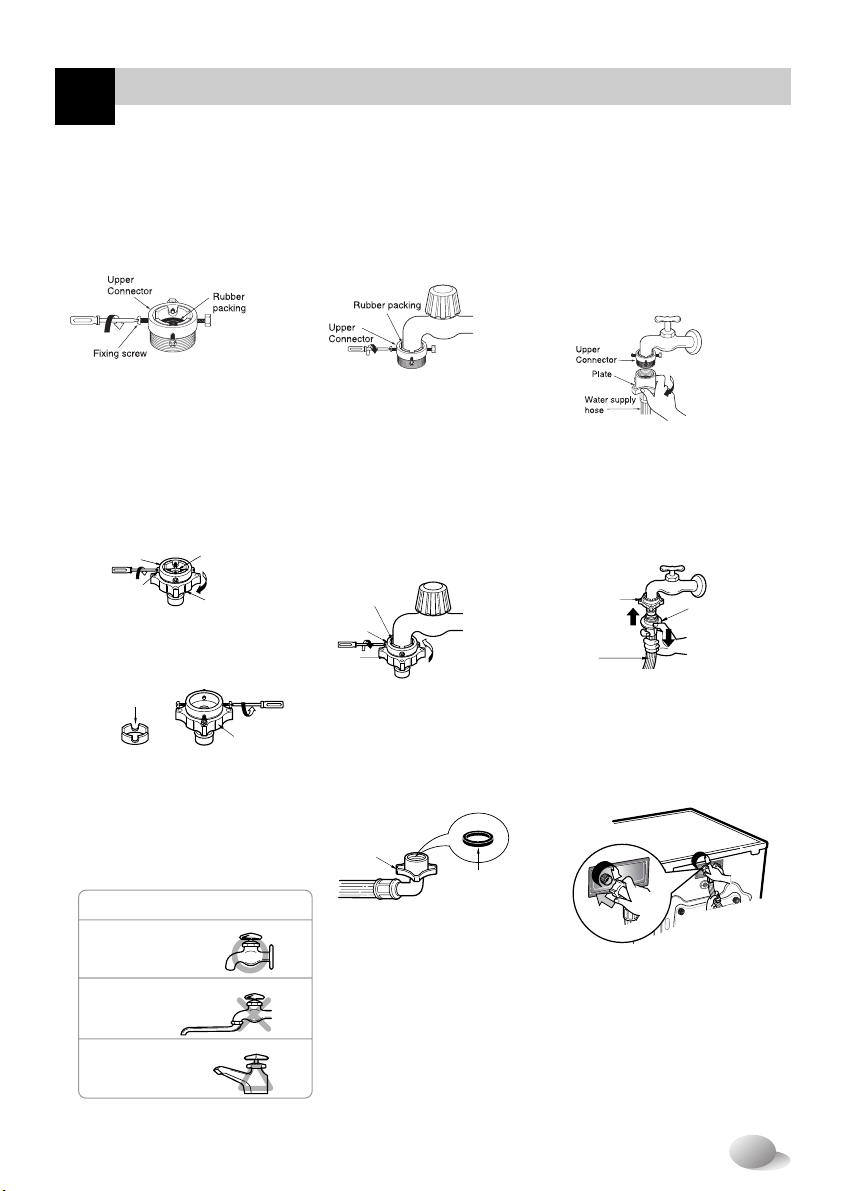
Normal Tap without thread & screw type inlet hose
Normal Tap without thread & one touch type inlet hose
1. Unscrew the fixing screw to
attach the tap.
2. Push the connector up till the
rubber packing is in tight contact
with the tap. Then tighten the 4
screws.
3. Push the water supply hose
vertically upwards so that the
rubber packing within in the
hose can adhere completely to
the tap and then tighten it by
screwing it to the right.
1. Un tighten the upper connector
screw.
2. Push the upper connector up till
the rubber packing is in tight
contact with the tap. Then
tighten the 4 screws.
3. Connect the water supply hose
to the middle connector,
pushing the plate down.
• Make sure that there are no
kinks in the hose and that it is
not crushed.
• Make sure that the rubber seal
is inside the hose connector.
Upper
Connector
Rubber
packing
Middle
connector
Fixing screw
Guide plate
Connector
Rubber seal
Hose connector
Used the horizontal tap
Horizontal tap
Extension tap
Square tap
Rubber packing
Upper
Connector
Middle
connector
Plate
Upper
Connector
Water supply
hose
• In case the diameter of the tap is
large remove the guide plate.
• Turn the middle connector not
to have water leaked.
• To separate the water supply
hose from the middle connector
shut off the tap. Then pull the
inlet hose down, pushing the
plate down.
Page 10
10
nstallation
I
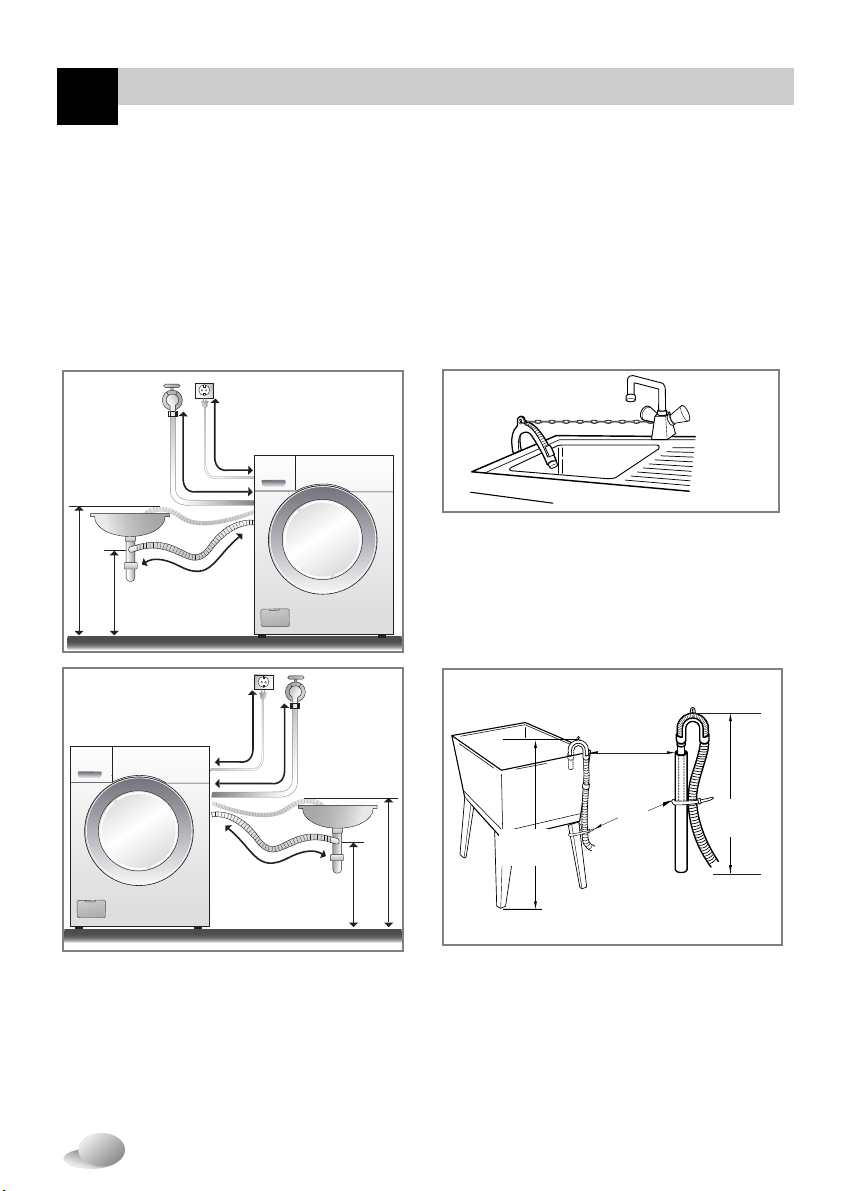
Installation of drain hose
• The drain hose should not be placed higher than
100 cm above the floor. Water in the washer does
not drain or drains slowly.
• Proper securing of the drain hose will protect the
floor from damage due to water leakage.
• When the drain hose is too long, do not force back
into the washer. This will cause abnormal noise.
• When installing the drain hose to a sink,
secure it tightly with a string.
• Proper securing of the drain hose will
protect the floor from damage due to
water leakage.
This equipment is not designed for maritime use or for use mobile installations such as
caravans, aircraft etc.
Turn off the stopcock if the machine is to be left for any length of time (e.g. holiday),
especially if there is no floor drain(gully) in the immediate vicinity.
When disposing of the appliance, cut off the mains cable, and destroy the Plug.
Disable the door lock to prevent young children being trapped inside.
Packaging material (e.g. Films, Styrofoam) can be dangerous for children. There is a risk
of suffocation ! Keep all packaging well away from children
max. 100 cm
min. 60 cm
about 105 cm
about 145 cm
about 100 cm
about 100 cm
about 145 cm
about 105 cm
min. 60 cm
max. 100 cm
Laundry tub
max. 100cm
min. 60cm
Hose
Retainer
Tie
strap
max. 100cm
min. 60cm
Page 11

11
nstallation
I
Concrete floors
Wooden floors (Suspended floors)
• The installation surface must be clean, dry and level.
• Install washer on a flat hard floor.
Tile floors (Slippery floors)
• Position each foot on the Tread Mate and level the machine to suit. (Cut Tread Mate into 70x70 mm
sections and stick the pieces on to the dry tile where machine is to be placed.)
※※
Tread Mate is a self adhesive material used on ladders & steps that prevents slipping.
• Wooden floors are particularly susceptible to vibration.
• To prevent vibration we recommend you place rubber cups under each foot,
at least 15mm thick under the washer, secured to at least 2 floor beams with screws.
• If possible install the washer in one of the corners of the room, where the floor is more stable.
※※
Insert the rubber cups to reduce vibration.
※※
Rubber cups ( p/no. 4620ER4002B ) can be purchased from the LG spare parts department.
Important!
• Proper placement and levelling of the washer ensures long, regular and reliable operation.
• The washer must be absolutely horizontal and stand firmly in position.
• It must not “Seesaw” across corners under load.
• The installation surface must be clean, free from floor wax and other lubricant coatings.
• Do not let the feet of the washer get wet. If feet of the washer get wet, slipping may occur.
Rubber Cup
※
It can be purchased from
hardware suppliers.
Level adjustment
1. Adjusting the washing machine level properly prevents excessive
noise and vibration.
Install the appliance on a solid and level floor surface, preferably in
a corner of the room.
2. If the floor is uneven, adjust the adjustable feet as required. (do
not insert pieces of wood etc. under the feet)
Make sure that all four feet are stable and resting on the floor and
then check that the appliance is perfectly level. (use a spirit level)
※※
After the washer is level, tighten the lock nuts up towards of the base of
the washer. All lock nuts must be tightened.
❊ Diagonal Check
When pushing down the edges of the washing machine top plate diagonally, the
machine should not move up and down at all. (Please, check both of two directions)
If machine rocks when pushing the machine top plate diagonally, adjust the feet again.
NOTE
Timber or suspended type flooring may contribute to
excessive vibration and unblance errors.
NOTE
In the case that the washing machine is installed on a raised
platform, it must be securely fastened in order
to eliminate the risk that it might fall off.
Page 12
12
are before washing
C
1. Care Labels
Look for a care label on your clothes. This will tell you about the fabric content of your garment and
how it should be washed.
2. Sorting
To get the best results, Sort clothes into loads that can be washed with the same wash cycle.
Water temperature and spin speed and different fabrics need to be washed in different ways.
Always sort dark colors from pale colors and whites. Wash separately as dye and lint transfer can
occur causing discoloration of white etc. If possible, do not wash heavily soiled items with lightly
soiled one.
Soil (Heavy, Normal, Light) Separate clothes according to amount of soil.
Color (White, Lights, Darks) Separate white fabrics from colored fabrics.
Lint (Lint producers, Collectors) Wash lint producers and lint collectors
separately.
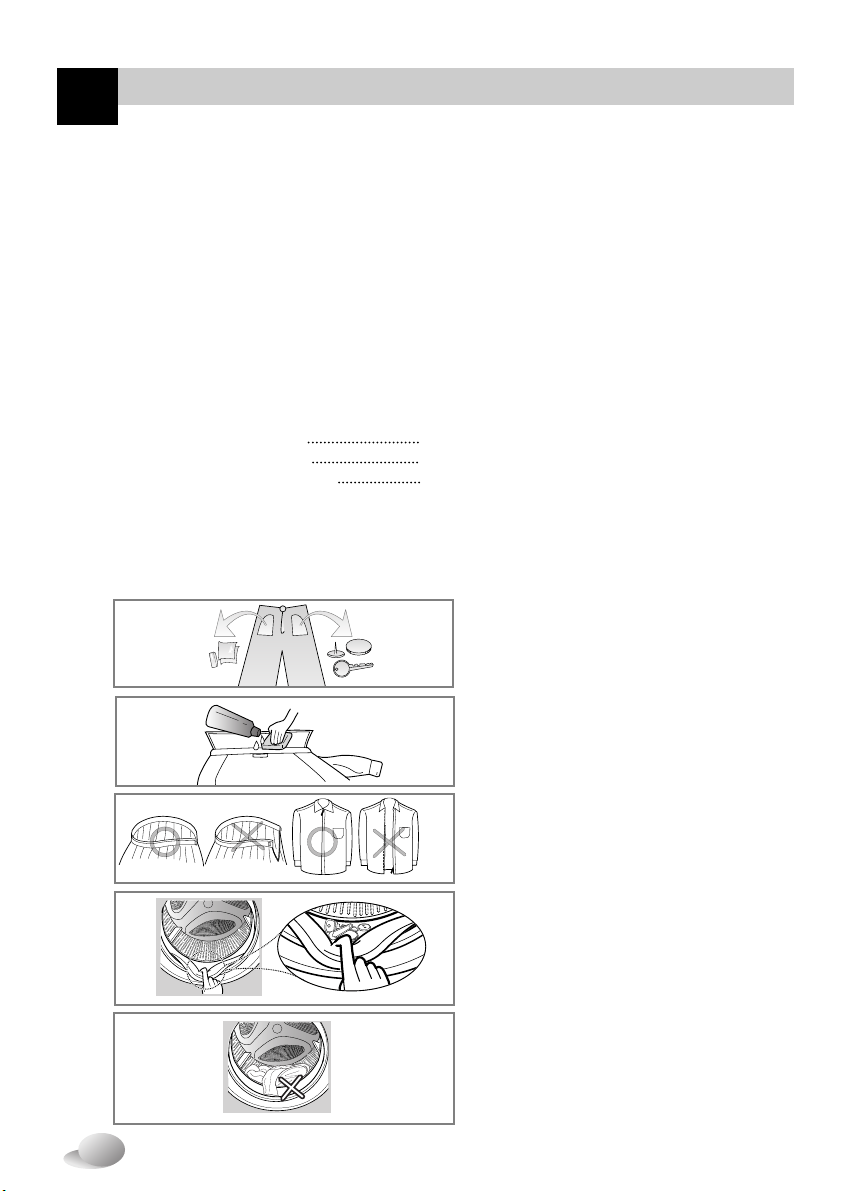
3. Caring before loading
Caring before washing
Before the first washing
Combine large and small items in a load. Load large items first. Large items should not be more than half
the total wash load.
Do not wash single items. This may cause an out-of-balance load. Add one or two similar items.
• Check all pockets to make sure that they
are empty. Items such as nails, hair clip,
matches, pens, coins and keys can damage
both your washer and your clothes.
• Close zippers, hooks and strings to
make sure that these items don’t
snag on other clothes.
• Pre treat dirt and stains by brushing a little
detergent dissolved in water onto stains like
collars and cuffs to help shift dirt.
Select a cycle (COTTON 60°C, add a half load of detergent) allow the unit to wash
without clothing. This will remove residues and water from the drum that may have been left
during manufacturing.
• Check the folds of the flexible gasket (gray) and
remove any small articles,if any.
• Check inside of the drum and remove any left
items in it for next wash cycle.
• Remove any clothing or items on the flexible
gasket to prevent clothing and the gasket
damages.
Page 13
13
dding detergent
A
• Main wash only
➔
• Pre Wash + Main Wash
➔
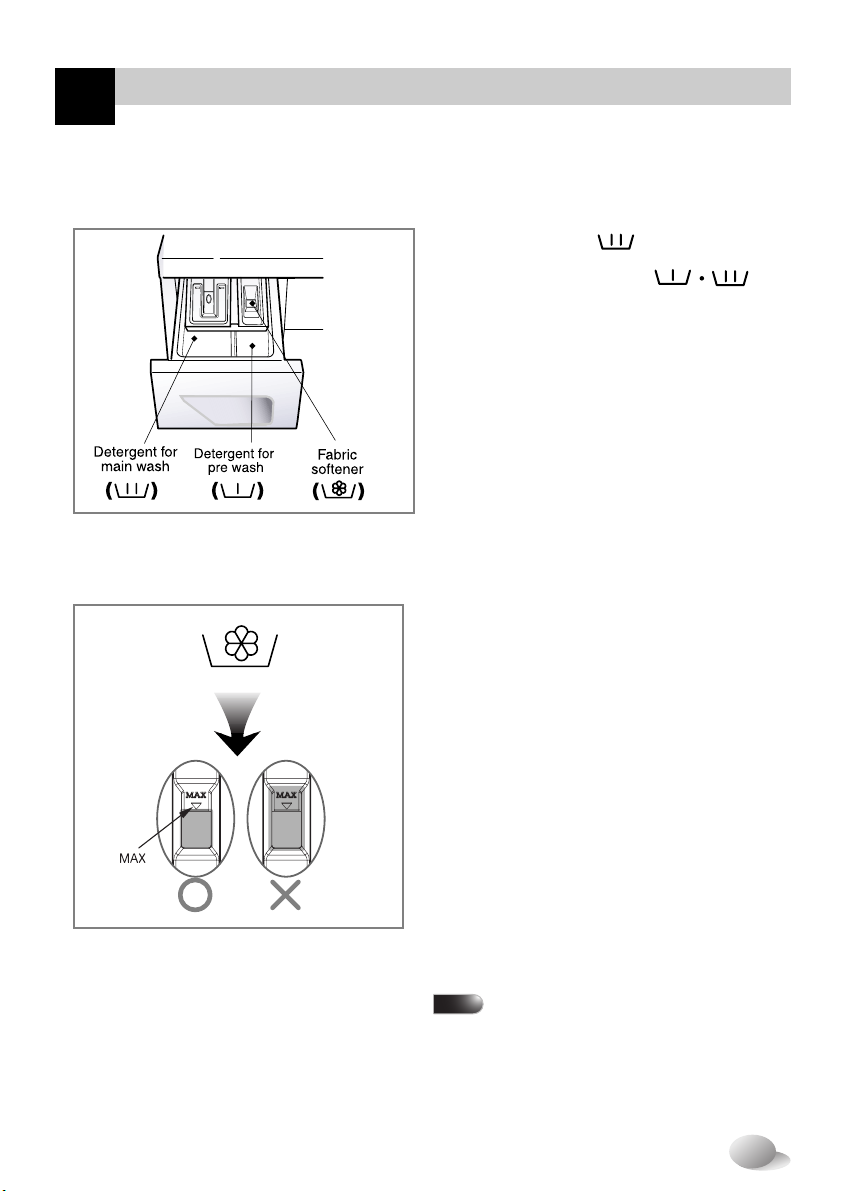
• Do not exceed the maximum fill line.
Close the dispenser drawer slowly.
Overfilling can cause early dispensing
of the fabric softener which could stain
clothes.
• Do not leave the fabric softener in the
detergent drawer for more than 2 days.
(Fabric softener could harden)
• Softener will automatically be added
during the last rinse cycle.
• Do not open the drawer when water is
supplied.
• Solvents(benzene, etc) are not
allowable.
1. The Dispenser Drawer
2. Adding Fabric Softener
Adding detergent and fabric softener
Do not pour fabric softener
directly on the cloths
NOTE
( )
Page 14
dding detergent
A
14
• The detergent should be used according to the
instruction of the detergent manufacture.
• If too much detergent is used, too many suds
can occur and this will decrease the washing
result or cause heavy load to the motor.
• Use powder detergent only for the front
loading washer.
❇
If suds occur too much, pleas reduce the
detergent amount.
• Detergent usage may need to be adjusted
for water temperature, water hardness,
size and soil level of the load. For best
results, avoid oversudsing.
4. Water softener
• A water softener, such as Anti limescale
(Clagon) can be used to cut down on the
use of detergent in extremely hard water
areas. Dispense according to the amount
specified on the packaging.
First add detergent and then the water
softener.
• Use the quantity of detergent as for soft
water.
❋
Tips
Full load : according to
manufacturer’s recommendation.
Part load : 3/4 of the normal
amount.
Minimum load : 1/2 of full load.
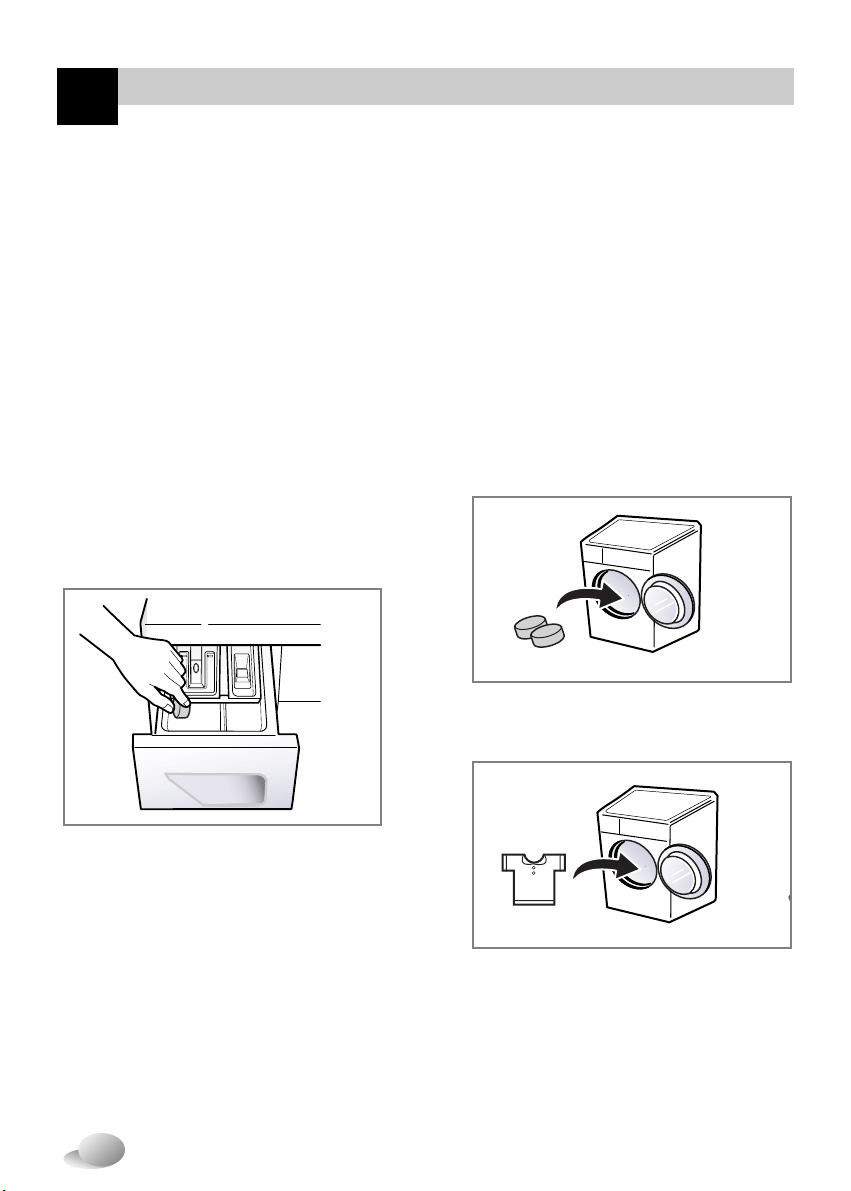
• Detergent is flushed from the dispenser
at the beginning of the cycle.
1) Open the door and Tablets into the
drum.
3. Detergent dosage
5. Using the Tablets
2) Load the laundry into the drum.
3) Close the door.
Page 15
15
unction
F
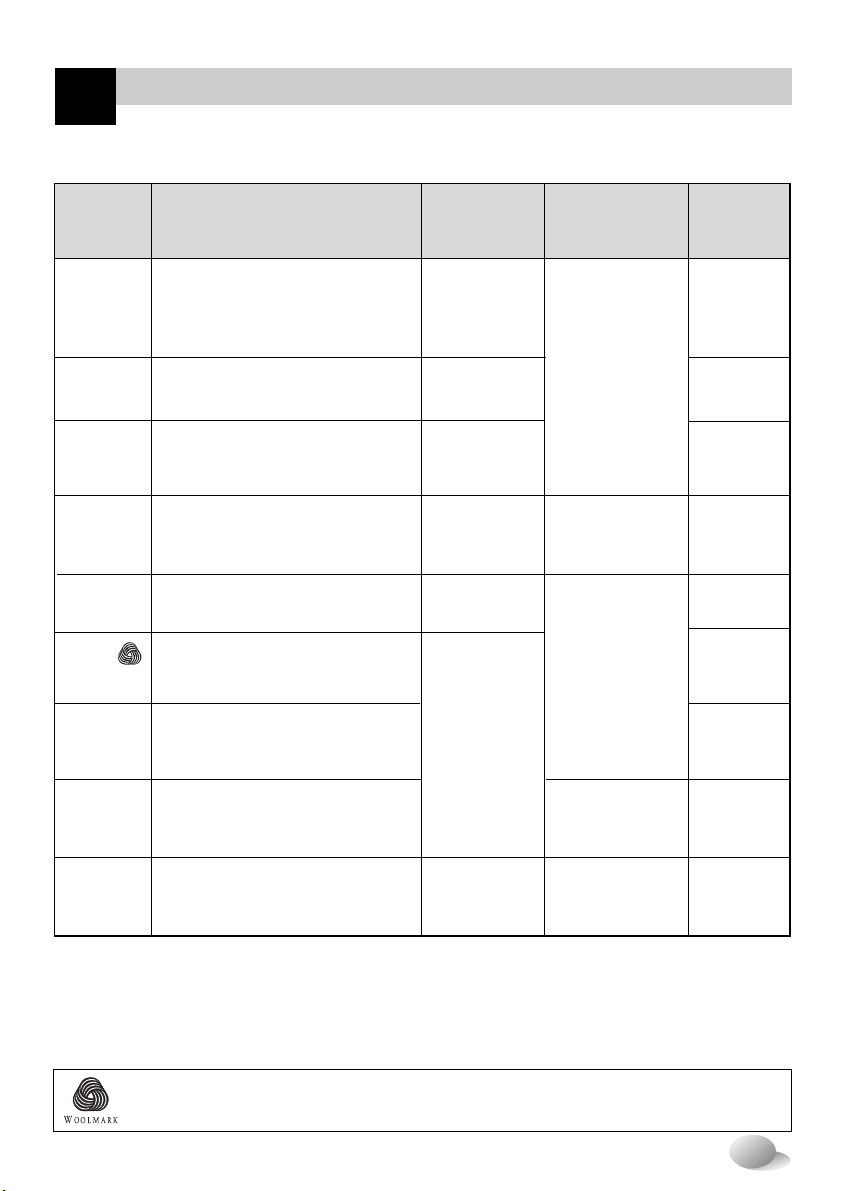
Recommended courses according to the laundry type
❋ Water Temperature : Select the water temperature to the wash cycles.
Always follow garment manufacture’s care label or instructions when laundering.
❋ Intensive : When washing full load or heavily soiled laundry, you can increase effectiveness by
choosing intensive option.
❋ Pre Wash : If the laundry is heavily soiled, “Pre Wash” option is recommended.
Pre Wash is available in Cotton, Synthetic and Allergy Care Program.
Cotton
Synthetic
Allergy
Care
Refresh
Delicate
Wool
/Silk
Hand
Wash
Quick 30
Duvet
Color fast garments
(shirts, night dresses,
pajamas...)and lightly soiled
white cotton (underwear...)
- Pre Wash
- Rinse+Spin
- Dry Only
- Less Steam
- Eco Steam
- Turbo Steam
- Intensive
- Rinse+Spin
- Intensive
- Turbo Steam
- Rinse+Spin
- Dry Only
- Intensive
- Rinse+Spin
- Intensive
Polyamide, Acrylic, Polyester.
Delicate laundry easily damaged.
Machine washable woolens with
pure new wool only.
“Hand Wash” marked delicate
and wool laundry.
Colored Landry which is lightely
soiled fast.
Cotton bedding with filling, duvet,
pillow, blanket, sofa cover with
light filling.
The wool wash cycle of this machine has beenapproved by Woolmark for the washing of machine
washable Woolmark products provided that the products are washed according to the instructions
on the garment label and those issued by the manufacturer of this washing machine, M0708.
60˚C
(Cold,
30˚C, 40˚C,
95˚C)
40˚C (Cold,
30˚C, 60˚C)
95°C
(Cold, 30°C,
40°C, 60°C)
–
40˚C
(Cold, 30˚C)
30°C
(Cold,40˚C)
40˚C
(Cold, 30˚C)
Rating
5.0kg
6.0kg
5 items
4.0kg
3.0kg
3.0kg
5.0kg
1 king size
(9 Tog)
Maximum
Load
Additional
Option
Program
Fabric Type
Proper
Temp.
(Option)
Allergy care is made for cotton
clothes because of high
temperature.
Cotton mixed, Polyeter mixed
Dress shirts, blouses (It just makes
wrinkled clothes easy to iron)
Page 16
16
ow to use washer
H
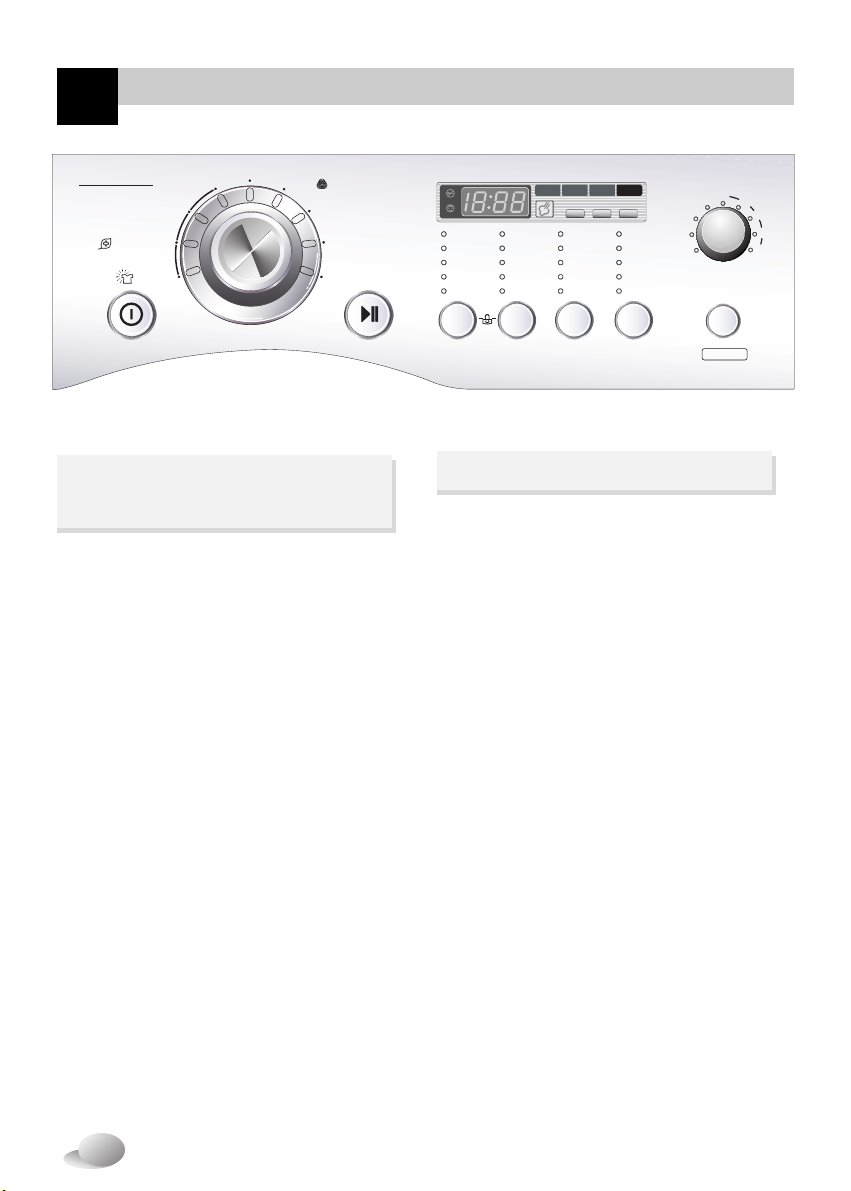
• Press the Power button to start.
• Press the Start/Pause button.
• Initial condition
- Rinse : Normal
- Water temperature : 60°C
- Spin : 1200 rpm
- Program : Cotton
• Press the Power button to turn the
washer on.
• Select the desired cycle with the
program dial and if required, make any
changes to the washing conditions by
pressing the buttons accordingly.
For selecting the each conditions, please
refer to the page17~page25
• Press the Start/Pause button to
commence the cycle.
1. Cotton automatically
selected upon power on.
2. Manual Selecting
DryDry
Refresh
AllergyCare
Cotton
Synthetic
Eco Steam
Less Steam
Dry OnlyDry Only
Rinse+Spin
Pre Wash
Rinse++Hold
Normal+HodNormal+Hod
Medic RinseMedic Rinse
Rinse
+
NormalNormal
Wool /Silk
Hand Wash
Duvet
Quick 30
Delicate
More
Normal
Iron
Low Temp.
Time Dry
Power
Start/Pause
OptionOption RinseRinse Temp.emp. SpinSpin
Turbo Steamurbo Steam
*STEAM CYCLE
Cold
30
40
60
95
(°C)
No Spin
400
30
60
90
120
150
800
1000
1200
Wash
IntensiveIntensive Tub Cleanub Clean Time Delayme Delay
Rinse Spin Dry
Page 17
17
ow to use washer
H
Program
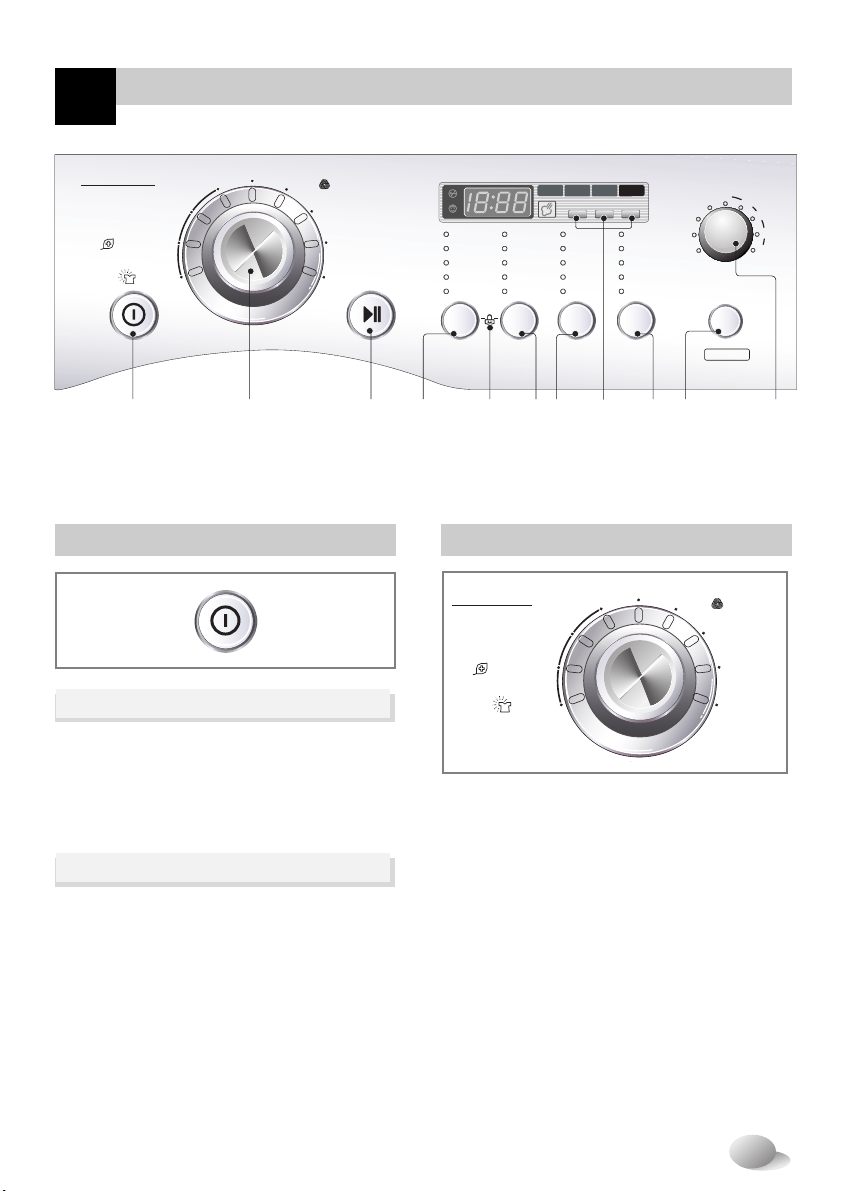
1. Power
2. Initial Program
Power
• Press the Power button to turn power on
and off.
• To cancel the Time Delay function, the
Power button must be pressed.
• When the Power button is pressed, the
washer is ready for Cotton program. And
the other initial conditions as follows.
• So, if you want to advance into the
washing cycle without changing the
program, just press Start/Pause button
and then the washer will proceed.
■
Initial program
- Cotton Program / Rinse:Normal / 60°C/
1200rpm
DryDry
Refresh
AllergyCare
Cotton
Synthetic
Eco Steam
Less Steam
Dry Only
Rinse+Spin
Pre Wash
Rinse++Hold
Normal+HodNormal+Hod
Medic RinseMedic Rinse
Rinse
+
NormalNormal
Wool /Silk
Hand Wash
Duvet
Quick 30
Delicate
More
Normal
Iron
Low Temp.
Time Dry
Power
Start/Pause
OptionOption RinseRinse Temp.emp. SpinSpin
Turbo Steamurbo Steam
*STEAM CYCLE
Cold
30
40
60
95
(°C)
No SpinNo Spin
400
30
60
90
120
150
800
1000
1200
Wash
IntensiveIntensive Tub Cleanub Clean Time Delayme Delay
Rinse Spin Dry
(1) (2) (3) (4) (5) (6) (7) (11) (12) (13)(8, 9, 10)
(1)Button: Power
(2)Dial: Program
(3)Button: Start/Pause
(4)Button: Option
(5)Child lock
(6)Button: Rinse
(7)Button: Temperature
(8)Button: Intensive
(9)Button: Tub Clean
(10)Button: Time Delay
(11)Button: Spin
(12)Button: Turbo Steam
(13)Dial: Dry
Refresh
AllergyCare
Cotton
Synthetic
Wool /Silk
Hand Wash
Duvet
Quick 30
Delicate
Eco Steam
Less Steam
Dry Only
Rinse+Spin
Pre Wash
Option
Rinse++Hold
Normal+Hod
Medic Rinse
Rinse
+
Normal
Rinse
*STEAM CYCLE*STEAM CYCLE
Temp.
Cold
30
40
60
95
(°C)
Spin
No Spin
400
800
1000
1200
• 9 programs are available according to the
laundry type.
• Dial lamp will light up to indicate selected
program.
• When Start/Pause button is pressed, the
Cotton program is automatically selected.
- By turning the Program dial, the program is
selected in order of “Cotton – Synthetic –
Delicate – Wool/Silk – Hand Wash – Duvet
– Quick 30 – Refresh – Allergy Care”.
For information regarding laundry type for
each program, please refer to page 15.
AllergyCare
Cotton
Synthetic
Wool /Silk
Hand Wash
Duvet
Delicate
Eco Steam
Less Steam
Dry Only
Rinse+Spin
Pre Wash
Rinse
Normal+Hod
Medic Rinse
Rinse
Normal
*STEAM CYCLE
Page 18
18
ow to use washer
H
Option
• By pressing the option
button, only one option
function may be selected.
NOTE:
Depending on the selected
program cycle, not all
Options may be selectable.
1. Pre Wash
• Use this option for loads that need
pretreatment. This adds 17 minutes of pre
washing before draining.
- When using Pre Wash option, do not use
a liquid detergent for the main wash.
Use powder for the main wash.
• Available in Cotton, Synthetic and
Allergy Care.
2. Rinse + Spin
• Use this option to rinse and then spin
3. Dry Only
• When you want dry only, select the this
option. Available in Allergy Care, Cotton,
Synthetic and Quick30.
4. Less Steam
• When you want to do a steam wash for
only a small amount of laundry, select the
this opton.
5. Eco Steam
• When you want to do a steam wash to
reduce the electricity consumption, select
this opton.
Wash
Intensive Tub Clean Time Delay
Rinse Spin Dry
Wash
Intensive Tub Clean Time Delay
Rinse Spin Dry
Eco Steam
Less Steam
Dry Only
Rinse+Spin
Pre Wash
Option
Rinse++Hold
Normal+Hod
Medic Rinse
Rinse
+
Normal
Rinse
Temp.
Cold
30
40
60
95
(°C)
Spin
No Spin
400
800
1000
1200
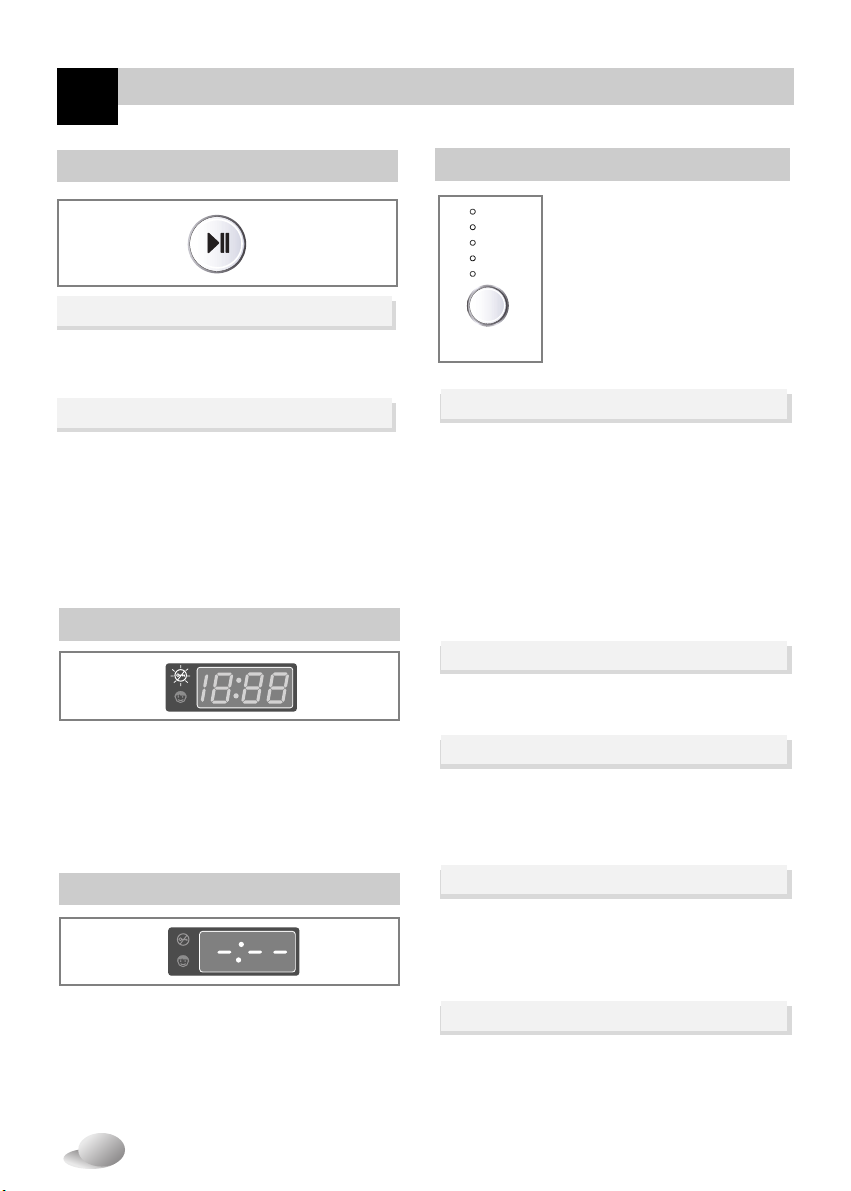
Start/Pause
• This Start/Pause button is used to start
wash cycle or pause the wash cycle.
• If temporary stop of wash cycle is needed,
press “Start/Pause” button.
• When in Pause, the power is turned off
automatically after 4 minutes.
• NB. The door will not open before 1 to 2
minutes when Pause is selected,
or at the end of the wash cycle.
1. Start
2. Pause
Refresh
AllergyCare
Cotton
Synthetic
Wool /Silk
Hand Wash
Duvet
Quick 30
Delicate
Eco Steam
Less Steam
Dry Only
Rinse+Spin
Pre Wash
Option
Rinse
Normal+Hod
Medic Rinse
Rinse
Normal
Rinse
*STEAM CYCLE
• Lights whenever the door of the washer is
locked.
• The door can be unlocked by pressing the
Start/Pause button to stop the washer.
• The door can be opened after a short delay.
• While the "Detecting" is shown in the
display the machine rotates slowly and
detects how many laundries are loaded in
the drum. It will take a few seconds.
• Available in Cotton and Synthetic program.
Door Lock
Detecting
Wash
Intensive Tub Clean Time Delay
Rinse Spin Dry
Wash
Intensive Tub Clean Time Delay
Rinse Spin Dry
Wash
Intensive Tub Clean Time Delay
Rinse Spin Dry
Wash
Intensive Tub Clean Time Delay
Rinse Spin Dry
Wash
Intensive Tub Clean Time Delay
Rinse Spin Dry
Wash
Intensive Tub Clean Time Delay
Rinse Spin Dry
Wash
Intensive Tub Clean Time Delay
Rinse Spin Dry
Wash
Intensive Tub Clean Time Delay
Rinse Spin Dry
Page 19
19
ow to use washer
H
1. Normal
2. Rinse+& Medic Rinse
3. Rinse Hold
Rinse
• By pressing the Rinse
button, the Rinse type can
be selected.
- Normal
- Rinse
+
- Medic Rinse
- Normal+Hold
- Rinse++Hold
• Cotton (for full load), Synthetic, Duvet,
Allergy Care performs 3 Rinses
• Cotton (for part load), Delicate, Wool/Silk,
Hanwash, Quick 30 performs 2 Rinses.
• Used to additional rinse, which may assist
in removing traces of detergent residue.
• By selecting Rinse+or Medic Rinse
function, the Rinse Time and the Rinse
water are increased.
• Medic Rinse heats the water to 40 Deg in
the last rinse.
• Is selected by pressing the Rinse button
repeatedly this function leaves clothes in the
washer; suspended in the water after a rinse
without entering into spin.
• To proceed to a Drain or Spin function after
a Rinse hold, select Drain on the program
dial or press the Spin button for the desired
speed, then press the Start/Pause button.
The matching indicator lamp will light up for
identification.
Wash
Intensive Tub Clean Time Delay
Rinse Spin Dry
Wash
Intensive Tub Clean Time Delay
Rinse Spin Dry
Wash
Rinse Spin Dry
Rinse++Hold
Normal+Hod
Medic Rinse
Rinse
+
Normal
Rinse
Temp.
Cold
30
40
60
95
(°C)
Spin
No Spin
400
800
1000
1200
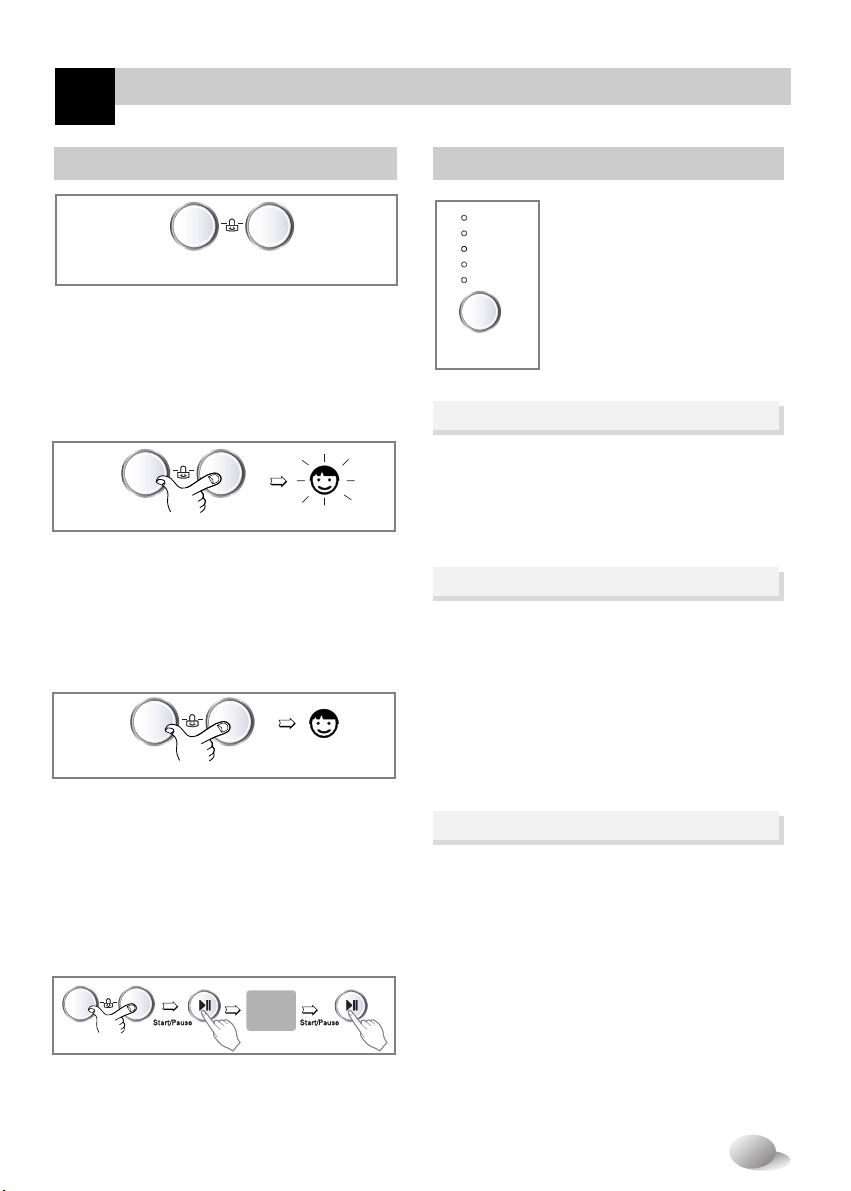
Child lock
If you choose to lock the buttons on the
control assembly to prevent tampering, this
function may be selected.
• Child lock can be set by pressing and
holding the Option and Rinse button
simultaneously.
(About three seconds)
• When child lock is set, all buttons are
inoperable except for power button.
• To deactivate Child lock system, press
and hold the
Option
and Rinse button
simultaneously again.
(About three seconds)
• To change to the desired program, whilst in
child lock mode.
1. Press and hold both
Option
and Rinse
button to cancel the child lock.
(About three seconds)
2. Press the Start/Pause button.
3. Select the desired program and press the
Start/Pause button again.
• The child lock can be set at any time and it
is automatically canceled when operational
errors occur.
Option Rinse
Cotton
Synthetic
Wool /Silk
Hand Wash
Duvet
Quick 30
Delicate
Eco Steam
Less Steam
Dry Only
Rinse+Spin
Pre Wash
Option
Rinse++Hold
Normal+Hod
Medic Rinse
Rinse
+
Normal
Rinse
Temp.
Cold
30
40
60
95
(°C)
More
Normal
Iron
Time Dry
30
60
90
120
Spin
No Spin
400
800
1000
1200
Wash
Wash
Wash
Wash
Hand Wash
Duvet
Quick 30
Eco Steam
Less Steam
Dry Only
Rinse+Spin
Pre Wash
Option
Rinse++Hold
Normal+Hod
Medic Rinse
Rinse
+
Normal
Rinse
Temp.
Cold
30
40
60
95
(°C)
More
Normal
Iron
Time Dry
30
60
90
120
Spin
No Spin
400
800
1000
1200
Wash
Wash
Wash
Wash
Option Rinse
Hand Wash
Duvet
Quick 30
Eco Steam
Less Steam
Dry Only
Rinse+Spin
Pre Wash
Option
Rinse++Hold
Normal+Hod
Medic Rinse
Rinse
+
Normal
Rinse
Temp.
Cold
30
40
60
95
(°C)
Dry
More
Normal
Iron
Low Temp.
Time Dry
30
60
90
120
150
Spin
No Spin
400
800
1000
1200
Wash
Intensive Tub Clean Ti me Delay
Rinse Spin Dry
Wash
Intensive Tub Clean Ti me Delay
Rinse Spin Dry
Wash
Intensive Tub Clean Ti me Delay
Rinse Spin Dry
Wash
Intensive Tub Clean Ti me Delay
Rinse Spin Dry
Option Rinse
Option Rinse
Option
Rinse
Eco Steam
Less Steam
Dry Only
Rinse+Spin
Pre Wash
Option
Rinse++Hold
Normal+Hod
Medic Rinse
Rinse
+
Normal
Rinse
Temp.
Cold
30
40
60
95
(°C)
Dry
More
Normal
Iron
Low Temp.
Time Dry
Turbo Steam
30
60
90
120
150
Spin
No Spin
400
800
1000
1200
Option Rinse
Option Rinse
Option
Rinse
Option Rinse
Change
the desired
program
Page 20

20
ow to use washer
H
1. Spin selection
Spin
• Spin speed is available according to the program
as follows.
- Cotton & Quick30
No Spin – 400 – 800 – 1000 – 1200
- Allergy Care & Synthetic & Wool/Silk &
Handwash & Duvet
No Spin – 400 – 800 – 1000
- Delicate
No Spin – 400 – 800
• By pressing the Spin button,
the spin speed can be
chosen.
Wash
Intensive Tub Clean Time Delay
Rinse Spin Dry
Wash
Intensive Tub Clean Time Delay
Rinse Spin Dry
Temp.
Cold
30
40
60
95
(°C)
SpinSpin
No SpinNo Spin
400
800
1000
1200
2. No spin
• If “No Spin” is selected, the washer stops after
draining the water from the last spin.
The matching indicator lamp will light up for
identification.
Water Temperature
• By pressing the Temp. button,
the water temperature can be
selected.
- Cold
- 30˚C / 40˚C / 60˚C / 95˚C
• Water temperature can be selected as below
according to the program.
- Cotton & Allergy Care
Cold – 30°C – 40°C – 60°C – 95°C
- Synthetic
Cold – 30°C – 40°C – 60°C
- Delicate & Wool/Silk & Handwash & Quick30
& Duvet
Cold – 30˚C – 40˚C
The required temperature lamp will light up for
identification.
For the more detailed information, please refer to the
page15.
Wash
Intensive Tub Clean Time Delay
Rinse Spin Dry
Wash
Intensive Tub Clean Time Delay
Rinse Spin Dry
Temp.emp.
ColdCold
30
40
60
95
(°C)
Tub Clean
Tub Clean course can be set by pressing
and holding Tub Clean button
simultaneously.
When Tub Clean course is set, display
“”, and all buttons are inoperable.
TUB CLEAN is special cycle to clean the
inside of the washer. This cycle uses higher
water level with higher spin speed. Perform
this cycle regularly.
How to use the Tub Clean cycle:
1. Remove any clothing or items from the
washer and close the door.
2. Open the dispenser drawer and add Anti
limescale (Calgon) to the Main wash
compartment.
NOTE: Do not add any detergent to the
detergent compartments. Excessive
suds may generate and leak from the
washer.
3. Close the dispenser drawer slowly.
4. Power On and then press and hold
Tub Clean button for 3 seconds. then
“”
is displayed in LED.
5. Press the Start/Pause button to start.
6. After the cycle is complete, leave the door
open to dry around the washer door
opening, flexible gasket and door glass.
CAUTION: If there is a small child, be
careful not to leave the door
open for too long.
!
Wash
Intensive Tub Clean Time Delay
Rinse Spin Dry
Wash
Intensive Tub Clean Time Delay
Rinse Spin Dry
Wash
Intensive Tub Clean Time Delayme Delay
Rinse Spin Dry
Wash
Intensive Tub Clean Time Delay
Rinse Spin Dry
Wash
Intensive Tub Clean Time Delay
Rinse Spin Dry
Wash
Intensive Tub Clean Time Delay
Rinse Spin Dry
Wash
Intensive Tub Clean Time Delay
Rinse Spin Dry
me Delay
Wash
Rinse Spin Dry
Intensive Tub Clean Time Delay
Page 21
21
ow to use washer
H
Intensive
• When washing full load or heavily soiled
laundry, you can increase effectiveness
by choosing intensive option.
• By selecting the Intensive option, the
wash time may be extended, depending
on the program selected.
• To use this option press the Intensive
button once before the wash program is
started.
Wash
Intensive Tub Clean Time Delay
Rinse Spin Dry
Wash
Intensive Tub Clean Time Delay
Rinse Spin Dry
Wash
Intensive Tub Clean Time Delay
Rinse Spin Dry
me Delay
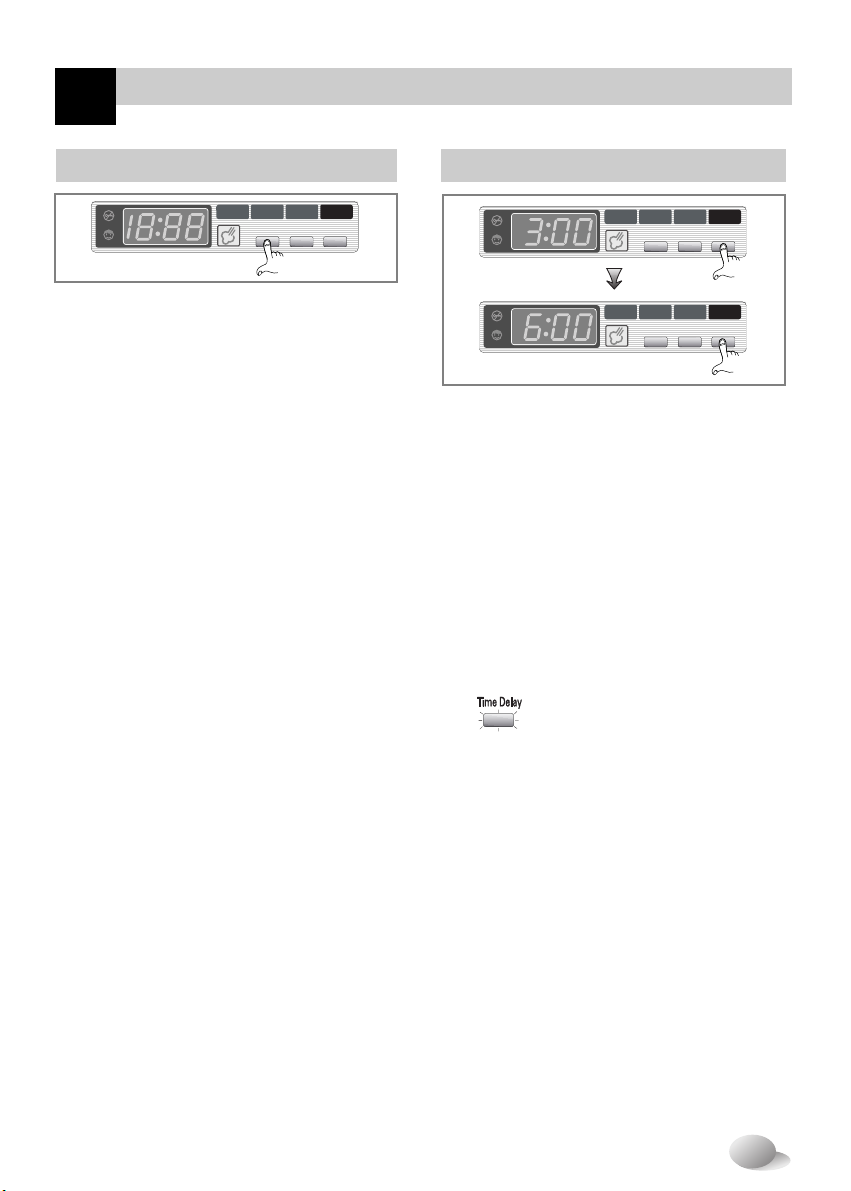
Time Delay
Preparing washing before starting “Time Delay”
- Turn on the water tap.
- Load laundry and close the door.
- Place the detergent and fabric softener in
the drawer.
• How to set “Time Delay”
- Press Power button.
- Turn the Program dial to select
the program you require.
- Press Time Delay button and set the
desired time.
- Press the Start/Pause button.
(“ ” lamp is blink)
• If Time Delay button is pressed, “3:00” is
displayed. The maximum delayed time is
19:00 hours and the minimum time is 3:00
hours.
• Each pressing of the button advances time
delay by one hour.
• To cancel the time delay, press the
Power button.
• Time Delay is ‘expected time’ from the
present to the completion of washing cycle
or selected process (Wash, Rinse, Spin).
• According to the condition of water supply and
temperature, the delayed time and the actual
washing time may vary.
Wash
Intensive Tub Clean Time Delayme Delay
Rinse Spin Dry
Wash
Intensive Tub Clean Time Delayme Delay
Rinse Spin Dry
Wash
Rinse Spin Dry
Intensive Tub Clean Time Delay
Page 22

22
ow to use washer
H
Refresh
■ Refresh cycle
• For slightly wrinkled clothes which have
been stored for an extended time.
This cycle makes wrinkled clothes easy to
iron (Do not load wet clothes).
• Wrinkles will be reduced.
■ How to use Refresh cycle
1. Turn on the washer and select the
Refresh program.
2. Load 5 items or less and close the door.
3. Press the Start/Pause button.
CAUTION:
- Do not reach into the washer while operating.
Steam can cause severe burns.
- Keep pets away from the washer.
[Precautionary Notes]
- The Refresh cycle is not like other washing or
drying cycles.
- After the Refresh cycle is complete, the washer
will tumble the clothes for up to 30 minutes to
prevent rewrinkling.
- Due to the characteristic of cotton fibers, this
cycle is not recommended for 100% cotton
clothing.
- Remove stains from clothing before using the
Refresh cycle to prevent permanently setting
the stains by high heat.
- Be sure that the tap is open. This cycle uses a
little water to produce steam.
- Be careful not to touch the door. It can be very
hot.
- Do not open the door while operating.
Steam can cause severe burns.
- After removing clothes from the Refresh cycle
they may feel slightly damp wait at least 10
minutes before putting the clothes on.
- Best result are achieved when articles are of
similar size and fabric type. Do not overload
(avoid loading more than 3 dress shirts if
loading up to 5 Items.)
!
Turbo Steam
• For tough stained clothes, underwear, or
baby clothes.
• Steam Wash is available with Allergy Care,
Cotton, Synthetic, Refresh.
• This option features upgraded washing
performance with low energy and water
consumption.
• Do not load delicates such as wool, silk,
and easily discolored clothes.
NOTE:
- The concentrated steam wash function is
highly efficient. There should be no visible
water level during the Steam Wash
function.
- Steam spray may not be seen clearly
through the door; however, the washer is
spraying steam strongly inside.
- During the steam operation, a spraying
sound will be heard. This is not a
malfunction.
Wash
Intensive Tub Clean Time Delay
Rinse Spin Dry
Wash
Intensive Tub Clean Time Delay
Rinse Spin Dry
Wash
Intensive Tub Clean Time Delay
Rinse Spin Dry
Wash
Intensive Tub Clean Time Delay
Rinse Spin Dry
Temp.
Cold
30
40
60
95
(°C)
Dry
Time Dry
Turbo Steam
30
60
90
120
150
CAUTION
Do not reach into the washer while operating.
Steam can cause severe burns.
!
Page 23

23
1.Drying Automatic guide
• Use your Automatic Cycles to dry most
loads.
Electronic sensors measures the
temperature of the exhaust to increase or
decrease drying temperatures for faster
reaction time and tighter temperature
control.
• Recommend Automatic drying course for
clothes type.
a) For Synthetics select - Low Temp.
b) If you want to iron clothes-Iron.
c) For Cottons select - Normal.
d) For washable nappies select - More
NOTE: The estimated drying time varies
from the actual drying time when in the
Automatic mode. The type of fabric, size of
the load, and the dryness selected, do affect
the drying times.
ow to use washer
H
Dry
• This washer-dryer’s automatical process
from washing to drying can be selected
easily.
• For most even drying,make sure all articles
in the clothes load are similar in material
and thickness.
• Do not overload dryer by stuffing too many
articles into drum. Items must be able to
tumble freely
• If you open door and remove load before
dryer has finished its cycle, remember to
press the Start/Pause button.
• By pressing the DRY button, you can select
Normal ➔ More ➔ 30 ➔ 60 ➔ 90 ➔ 120 ➔
150 ➔ Low Temp. ➔ Iron
• "When drying and cooling cycle is
completed, will be on the Multi
display. means that both drying and
cooling cyles are completed".
Wash
Intensive Tub Clean Time Delay
Rinse Spin Dry
Wash
Intensive Tub Clean Time Delay
Rinse Spin Dry
Wash
Intensive Tub Clean Time Delay
Rinse Spin Dry
Wash
Intensive Tub Clean Time Delay
Rinse Spin Dry
Temp.
Cold
30
40
60
95
(°C)
More
Normal
Iron
Low T
emp.
ime Dry
Time Dry
30
More
Normal
Iron
Low T
emp.
60
90
120
150
Dry
Page 24

24
ow to use washer
2.Drying time guide
• By press the Dry button, the drying time
can be selected.
• Drying course can last up to 150min. When
selecting drying only, drying course will
start after spining.
• These drying times are given as a guide to
help you set your dryer for manual drying.
Drying times can vary greatly depending on
dampness, room temperature and type of
fabric and your own experience will be your
best guide.
- Do not tumble dry woolen articles. Pull them
to their original shape and dry them flat.
Woolen Articles
- Some woven and loopknit materials may
shrinks, by varying amounts, depending on
their quality.
- Always stretch them out immediately after
drying.
Woven and Loopknit Materials
- Do not overload your dryer
- Take out permanent press articles as soon
as the dryer stops to reduce wrinkles.
Permanent Press and Synthetics
- Always check the manufacture’s instructions.
Fiber or Leather Materials
- Always check the manufacture’s instructions.
Baby clothes and Night Gowns
- Do not dry any items mode from or
containing rubber or plastics, such as:
a) aprons, bibs, chair covers
b) curtains and table cloths
c) bathmats
Rubber and Plastics
- Do not dry fiberglass articles in your dryer.
Glass particles left in the dryer could be
picked up by your clothes the next time
you use the dryer and irri tate your skin.
Fiber glass
•
"Cooling Down" is to prevent wrinkles from
forming caused by not removing the
laundry from the tub after cycle is done.
So you can unload the laudnry at any
moment after " " displays.
•
"Cooling Down" periodically tumbles and
fluffs the load up to 4 hours without
heating.
H
Page 25

25
ow to use washer
H
1. Special function display
2. Self diagnose display
3. Completion of washing
4. Time left
• If the washer encounters a fault during
operation, the associated fault will be
displayed.
“ ” : Water pressure sensing error
“ ” : Problem of overfilling water
“ ” : Door is not closed
“ ” : Over load in motor
“ ” : Water inlet trouble
“ ” : Drainage trouble
“ ” : Unbalanced load
“ ” : Water temperature trouble
“ ” : Dry heater or thermostat
trouble.
If these error letters are displayed, please
refer to the troubleshooting page30 and
follow the guide.
• When Child lock is selected, the
“” lamp is on.
• After the end of dry, “ ” is displayed.
• When time delay is selected, it shows
the remaining time before the finish of
the selected program.
• When washing cycle is completed,
“ ” is displayed on the “Multi
display”.
• During washing cycle, the remaining
washing time is displayed.
• Recommended program by
manufacturer.
- Refresh : around 20 minutes
- Allergy Care :
around 3 hours and 2 minutes
- Cotton : around 2 hours and 14 minutes
- Synthetic :
around 1 hour and 38 minutes
- Delicate : around 1 hour and 2 minutes
- Wool/Silk :
around 1 hour and 1 minute
- Hand Wash :
around 1 hour and 1 minute
- Duvet : around 1 hour and 25 minutes
- Quick 30 : around 30 minutes
• The washing time may vary by the
amount of laundry, water pressure,
water temperature and other washing
conditions.
• If an unbalanced load is detected or if
the suds removing program operates,
the wash time may be extended.
(Max. increasing time is 45 minutes.)
Display
Wash
Intensive Tub Clean Time Delay
Rinse Spin Dry
Wash
Intensive Tub Clean Time Delay
Rinse Spin Dry
Wash
Intensive Tub Clean Time Delay
Rinse Spin Dry
Wash
Intensive Tub Clean Time Delay
Rinse Spin Dry
Wash
Intensive Tub Clean Time Delay
Rinse Spin Dry
Wash
Intensive Tub Clean Time Delay
Rinse Spin Dry
Wash
Intensive Tub Clean Time Delay
Rinse Spin Dry
Wash
Intensive Tub Clean Time Delay
Rinse Spin Dry
Rinse++Hold
Normal+Hod
Medic Rinse
Rinse
+
Normal
Rinse
Temp.
Cold
30
40
60
95
(°C)
More
Normal
Time Dry
30
60
90
Spin
No Spin
400
800
1000
1200
Page 26

26
aintenance
M
The water inlet filter
- " " error message will blink on the control panel when water does not enter the
detergent drawer.
- If water is very hard or contains traces of lime deposit, the water inlet filter may
become clogged.
It is therefore a good idea to clean it from time to time.
❋ Before cleaning the washer interior, unplug the electrical power cord to avoid electrical
shock to avoid electrical shock hazards.
❋ When disposing of the appliance, cut off the mains cable, and destroy the plug Disable
the door lock to prevent young children being trapped inside.
1. Turn off the water tap.
2. Unscrew the water inlet hose.
3. Clean the filter using a hard bristle
brush.
4. Tighten up the inlet hose.
Page 27

aintenance
M
27
The drain pump filter
❋ The drain filter collects threads and small objects left in the laundry.
Check regularly that the filter is clean to ensure smooth running of your machine.
CAUTION First drain using the drain hose and then open the pump filter to
remove whatever any threads or objects.
Be careful when draining if the water is hot.
❋ Allow the water to cool down before cleaning the drain pump, carrying out
emergency emptying or opening the door in an emergency.
!
1. Open the lower cover cap () by using
a finger. Turn the drain plug () to pull
out the hose.
2. Unplug the drain plug (), allowing the
water to flow out. At this time use a
vessel to prevent water flowing on to the
floor. When water does not flow any
more, turn the pump filter () open to
the left.
3. Remove out any foreign material from
the pump filter ().
4. After cleaning, turn the pump filter ()
clockwise and insert the drain plug ()to
the original place. close the lower cover
cap.
3
2
1
3
2
Page 28

28
aintenance
M
Dispenser drawer
❋ After a while detergents and fabric softeners leave a deposit in the drawer.
• It should be cleaned from time to time with a jet of running water.
• If necessary it can be removed completely from the machine by pressing the catch
downward and by pulling it out.
• To facilitate cleaning, the upper part of the fabric softener compartment can be removed.
The drawer recess
❋ Detergent can also accumulate inside the recess which should
be cleaned occasionally with an old toothbrush.
• Once you have finished cleaning, replace the drawer and run a
rinse cycle without laundry.
The washing drum
• If you live in a hard water area, lime scale may continuously build up in places where it cannot be
seen and thus not easily removed.
Over time the build up of scale clogs appliances, and if it is not kept in check, expensive
maintenance or repairs may result.
• Although the washing drum is made of Stainless steel, specks of rust can be caused by small metal
articles (paper clips, safety pins) which have been left in the drum.
• The washing drum should be cleaned from time to time.
• If you use descalling agents, dyes or bleaches, make sure they are suitable for washing machine
use.
❋ Descaler may contain chemicals that may damage part of your washing machine.
❋ Remove any spots with a stainless steel cleaning agent.
❋ Never use steel wool.
Page 29

29
aintenance
M
The water circulation nozzle & steam nozzle
• Clean the water circulation nozzle, if clogged.
Cleaning your washer
1. Exterior
Proper care of your washer can extend its life.
The outside of the machine can be cleaned with warm water and a neutral non abrasive
household detergent.
Immediately wipe off any spills. Wipe with damp cloth.
Try not to hit surface with sharp objects.
❋
IMPORTANT: Do not use methylated spirits, diluents or similar products.
2. Interior
Dry around the washer door opening, flexible gasket and door glass.
Run washer through a complete cycle using hot water.
Repeat process if necessary.
Winterizing instructions
If the washer is stored in an area where freezing may occur or moved in freezing
temperatures, follow these instructions to prevent damage to the washer:
1. Turn off water supply tap.
2. Disconnect hoses from water supply and drain water from hoses.
3. Plug electrical cord into a properly grounded electrical outlet.
4. Add 1gallon(3.8L) of nontoxic recreational vehicle(RV) antifreeze into an empty wash drum.
Close the door.
5. Set spin cycle and let washer spin for 1minute to drain out all water.
Not all of the RV antifreeze will be expelled.
6. Unplug electrical power cord, dry the drum interior, and close the door.
7. Remove dispenser drawer, drain and dry excessive water from the compartments.
8. Store washer in an up right position.
9. To remove antifreeze from washer after storage, run empty washer
through a complete cycle using detergent. Do not add wash load.
NOTE
Remove hard water deposits using only cleaners labeled as safe for washing
machine.
Page 30

30
roubleshooting guide
❋ This washing machine is equipped with automatic safety functions which detect and
diagnose faults at an early stage and react appropriately.
When the machine does not function properly or does not function at all, check the
following points before you contact your service provider.
Symptom Possible Cause Solution
Rattling and
clanking noise
Thumping sound
Vibrating noise
Water leaks.
Over sudsing
Water does not enter
washer or it enters
slowly
• Foreign objects such as coins or
safety pins maybe in drum or
pump.
• Heavy wash loads may produce
a thumping sound. This is usually
normal.
• Have all the transit bolts and
packing been removed?
• Are all the feet resting firmly on
the ground?
• Fill hoses or drain hose are loose
at tap or washer.
• House drain pipes are clogged.
• There is something between
the gasket and the glass.
• Water supply is not adequate in
area.
• Water supply tap is not
completely open.
• Water inlet hose(s) are kinked.
• The filter of the inlet hose(s)
clogged.
Stop washer and check drum
and drain filter.
If noise continues after washer
is restarted, call your authorised
service centre.
If sound continues, washer is
probably out of balance. Stop and
redistribute wash load.
If not removed during
installation. Refer to Installation guide
for removing transit bolts.
Wash load may be unevenly
distributed in drum. Stop washer and
rearrange wash load.
Check and tighten hose connections.
Unclog drain pipe. Contact plumber
if necessary.
Clean the gasket and
the glass with the towel.
Too much detergent or unsuitable
detergent may cause excessive
foaming which may result in water
leaks, and vibration during spin.
Check another tap in the house.
Fully open tap.
Straighten hose.
Check the filter of the inlet hose.
T
Page 31

31
roubleshooting guide
Symptom Possible Cause Solution
Water in the washer
does not drain or
drains slowly.
Washer does not start
Washer will not spin
Door does not open
Display stuck
on 6min left.
• Drain hose is kinked or clogged.
• The drain filter is clogged.
• Electrical power cord may not be
plugged in or connection may be
loose.
• House fuse blown, circuit breaker
tripped,or a power outage has
occurred.
• Water supply tap is not turned
on.
❋ Check that the door is firmly
shut.
This washing machine checks
the condition of the clothes at
6min left to evaluate if they are
dried or not. If the clothes are not
dried, the washing machine will
further dry for 30min. The 6min
display will then continue to count
down after 30min.
Clean and straighten the drain hose.
Clean the drain filter.
Make sure plug fits tightly in wall
outlet.
Reset circuit breaker or replace fuse.
Do not increase fuse capacity.
If problem is a circuit overload, have
it corrected by a qualified electrician.
Turn on water supply tap.
Close the door and press the
Start/Pause button. After pressing the
Start/Pause button, it may take
a few moments before the clothes
washer begins to spin. The door must
lock before spin can be achieved.
Once started, the door can not be
opened for safety reasons.
Wait one or two minutes before
opening the door to give the electric
locking mechanism time to release.
Check the weight of clothes.
The weight of the clothes
should be less then 6kg.
T
Page 32

32
roubleshooting guide
Wash cycle time
delayed
Dry problem • Does not dry
• It takes time to balance the
laundry before the spin cycle
Do not overload.
Check that the washer is draining
properly to extract adequate water
from the load.
Clothes load is too small to tumble
property. Add a few towels.
The washing time may vary by the
amount of laundry, water
pressure, water temperature and
other usage conditions.
If the imbalance is detected or if the
suds removing program works, the
wash time shall be increased.
Stop the wash and pull out the
laundry then put it again to untwist
Symptom Possible Cause Solution
T
Page 33

33
roubleshooting guide
Symptom Possible Cause Solution
• Water supply is not adequate in area
• Water supply taps are not completely
open.
• Water inlet hose(s) are kinked.
• The filter of the inlet hose(s) are
clogged.
• Drain hose is kinked or clogged.
• The drain filter is clogged.
• Load is too small.
• Load is out of balance.
• The appliance has an unbalance
detection and correction system. If
individual heavy articles are loaded (ex.
bath mat, both robe, etc.), this system
may stop spinning or even interrupt the
spin cycle altogether.
• If the laundry is still too wet at the end
of the cycle, add smaller articles of
laundry to balance the load and repeat
the spin cycle.
• Is the door opened or
not completely closed?
• Water overfills due to the faulty water
valve.
• Water level sensor has malfunctioned.
• Over load in motor.
• Check water supply.
Check another tap in the house.
Fully open tap.
Straighten hose(s).
Check the filter of the inlet hose(s).
Clean and straighten the drain hose.
Clean the drain filter.
Add 1 or 2 similar items to help
balance the load.
Rearrange load to allow proper
spinning
Close the door completely.
❋ If “ ”is not released, call for service.
Unplug the power plug and call for service.
Close the water tap.
Unplug the power plug.
Call for service.
Turn the tap on
I f “ ” is not released, unplug power
plug and call service.
T
Page 34

34
erms of Warranty
T
What Is Not Covered:
• Service trips to your home to teach you how to use the product.
• If the product is connected to any voltage other than that shown on the rating plate.
• If the fault is caused by accident, neglect, misuse or Act of God.
• If the fault is caused by factors other than normal domestic use or use in accordance
with the owner's manual.
• Provide instruction on use of product or change the set-up of the product.
• If the fault is caused by pests for example, rats or cockroaches etc..
• Noise or vibration that is considered normal for example water drain sound, spin
sound, or warming beeps.
• Correcting the installation for example, levelling the product, adjustment of drain.
• Normal maintenance which recommended by the owner's manual.
• Removal of foreign objects / substances from the machine, including the pump and
inlet hose filter for example, grit, nails, bra wires, buttons etc.
• Replace fuses in or correct house wiring or correct house plumbing.
• Correction of unauthorized repairs.
• Incidental or consequential damage to personal property caused by possible defects
with this appliance.
• If this product is used for commercial purpose, it is not warranted.
(Example : Public places such as public bathroom, lodging house, training
center, dormitory)
If the product is installed outside the normal service area, any cost of
transportation involved in the repair of the product, or the replacement of a
defective part, shall be borne by the owner.
Page 35

ﻦﻋ تﺎﻤﻴﻠﻌﺘﻟا م
ﺔﻟﺎﺴﻐﻟا زﺎﻬﺟﺔﻟﺎﺴﻐﻟا زﺎﻬﺟ
ﺔﻟﺎﺴﻐﻟا زﺎﻬﺟ
ﺔﻟﺎﺴﻐﻟا زﺎﻬﺟﺔﻟﺎﺴﻐﻟا زﺎﻬﺟ
ﻚﻟﺎﳌا ﻞﻴﻟد
WD-1255(0~9)RD
WD-1255ARD
WD-1255ERD
ﺮﻜﺷﺮﺸﻟ اوﻷا ﺔﻟﺎﺴﻐﻟا زﺎﻬﺟ ءاﻮﺗ.ﻲﺟ لإ ﻦﻣ ﻞﻣﺎﻜﻟا ﻲﻜﻴﺗﺎﻣ
ّ
ﺮﻤﻛ ﻪﺑ ﻆﻔﺘﺣا.ﻞﺒﻘﺘﺴﳌا ﻲﻓ ﻊﺟ
ﺮﻳﺮﻗ ﻰﺟو ،ﺔﻳﺎﻨﻌﺑ ﻚﻟﺎﳌا ﻞﻴﻟد ةءاﺪﻘﻳ اﺬﻫ
ﺮﺘﻟاو ﺔﻣﻼﺴﺑ ﺐﻴﻛو ﻞﻴﻐﺸﺘﻟا.ﺔﻧﺎﻴﺼﻟا
ﺠﺳ
ر ﻞﻮﳌا ﻢﻗو ﻞﻳدﺮﻟا.ﺔﻟﺎﺴﻐﻟا زﺎﻬﳉ ﻞﺴﻠﺴﳌا ﻢﻗ
ّ
35
Page 36

ﺞﺘﻨﳌا ﺎﻳاﺰﻣﺞﺘﻨﳌا ﺎﻳاﺰﻣ
ﺞﺘﻨﳌا ﺎﻳاﺰﻣ
ﺞﺘﻨﳌا ﺎﻳاﺰﻣﺞﺘﻨﳌا ﺎﻳاﺰﻣ
ﺮﺷﺎﺒﳌا ﻊﻓﺪﻟا مﺎﻈﻧ ﺮﺷﺎﺒﳌا ﻊﻓﺪﻟا مﺎﻈﻧ
ﺮﺷﺎﺒﳌا ﻊﻓﺪﻟا مﺎﻈﻧ
ﺮﺷﺎﺒﳌا ﻊﻓﺪﻟا مﺎﻈﻧ ﺮﺷﺎﺒﳌا ﻊﻓﺪﻟا مﺎﻈﻧ
ﺮﻓ ﻼﺑ مﺮﺷﺎﺒﻣ ﺔﻠﳊا ﺮﻳﺪﻳ شاﺰﺣ نوﺪﺑ ةو ماﺮﻜﺑ.ة
ﺮﺴﺑ ﺲﺑﻼﳌا ﻊﻘﻧ ﻢﺘﻳ ﺎﻫﺪﻨﻋو ﺮﺜﻛأ ﺔﻋرود ءﺎﻨﺛأ ﺎﻣﺎﲤ.ﻞﻴﺴﻐﻟا ة
اﺪﺟ ﺾﻳﺮﻌﻟا ﻪﺤﺘﻔﺑ بﺎﺒﻟاو ﺔﻠﺋﺎﳌا ﺔﻠﳊا اﺪﺟ ﺾﻳﺮﻌﻟا ﻪﺤﺘﻔﺑ بﺎﺒﻟاو ﺔﻠﺋﺎﳌا ﺔﻠﳊا
اﺪﺟ ﺾﻳﺮﻌﻟا ﻪﺤﺘﻔﺑ بﺎﺒﻟاو ﺔﻠﺋﺎﳌا ﺔﻠﳊا
اﺪﺟ ﺾﻳﺮﻌﻟا ﻪﺤﺘﻔﺑ بﺎﺒﻟاو ﺔﻠﺋﺎﳌا ﺔﻠﳊا اﺪﺟ ﺾﻳﺮﻌﻟا ﻪﺤﺘﻔﺑ بﺎﺒﻟاو ﺔﻠﺋﺎﳌا ﺔﻠﳊا
و ﺔﻠﺋﺎﳌا ﺔﻠﳊا ﻞﻀﻔﺑﺮﻌﻟا ﺢﺘﻔﻟاو ﺲﺑﻼﳌا ﻞﻤﺣ ﻦﻜﳝ ،اﺪﺟ ﺾﻳﺮﺧإﻮﻬﺴﺑ ﺎﻬﺟا.ﺮﺜﻛأ ﺔﻟ
ﺾﻔﺨﻨﻣ ﺞﻴﺠﻀﺑ ﺔﻋﺮﺴﻟا ﻲﻓ ﻢﻜﺤﺘﻟا مﺎﻈﻧ ﺾﻔﺨﻨﻣ ﺞﻴﺠﻀﺑ ﺔﻋﺮﺴﻟا ﻲﻓ ﻢﻜﺤﺘﻟا مﺎﻈﻧ
ﺾﻔﺨﻨﻣ ﺞﻴﺠﻀﺑ ﺔﻋﺮﺴﻟا ﻲﻓ ﻢﻜﺤﺘﻟا مﺎﻈﻧ
ﺾﻔﺨﻨﻣ ﺞﻴﺠﻀﺑ ﺔﻋﺮﺴﻟا ﻲﻓ ﻢﻜﺤﺘﻟا مﺎﻈﻧ ﺾﻔﺨﻨﻣ ﺞﻴﺠﻀﺑ ﺔﻋﺮﺴﻟا ﻲﻓ ﻢﻜﺤﺘﻟا مﺎﻈﻧ
و ﻞﻴﺴﻐﻟا ﺔﻴﻤﻜﺑ رﺎﻌﺷﻹﺎﺑﻮﺗزازﻮﺗ ﻢﺘﻳ ،ﻪﻧﻮﺘﺴﻣ ﺾﻴﻔﺨﺘﻟ ﻞﻴﺴﻐﻟا ﻊﻳﺞﻴﺠﺿ ى
ﻲﺋﺎﻘﻠﺘﻟا ﻞﻴﺴﻐﻟا ﻞﻤﺣ ﻒﺸﻛ ﻲﺋﺎﻘﻠﺘﻟا ﻞﻴﺴﻐﻟا ﻞﻤﺣ ﻒﺸﻛ
ﻲﺋﺎﻘﻠﺘﻟا ﻞﻴﺴﻐﻟا ﻞﻤﺣ ﻒﺸﻛ
ﻲﺋﺎﻘﻠﺘﻟا ﻞﻴﺴﻐﻟا ﻞﻤﺣ ﻒﺸﻛ ﻲﺋﺎﻘﻠﺘﻟا ﻞﻴﺴﻐﻟا ﻞﻤﺣ ﻒﺸﻛ
و ﻞﻤﳊا زﺎﻬﳉا ﻒﺸﻜﻳو ﻞﺜﻣأ.ﺎﻴﺋﺎﻘﻠﺗ ﻞﻴﺴﻐﻠﻟ ﺖﻗ
ﻲﻠﺧاﺪﻟا ﲔﺨﺴﺘﻟا زﺎﻬﺟ ﻲﻠﺧاﺪﻟا ﲔﺨﺴﺘﻟا زﺎﻬﺟ
ﻲﻠﺧاﺪﻟا ﲔﺨﺴﺘﻟا زﺎﻬﺟ
ﻲﻠﺧاﺪﻟا ﲔﺨﺴﺘﻟا زﺎﻬﺟ ﻲﻠﺧاﺪﻟا ﲔﺨﺴﺘﻟا زﺎﻬﺟ
رد ﻞﻀﻓأ ﻰﻠﻋ ﺎﻴﺋﺎﻘﻠﺗ ءﺎﳌا ﻞﺨﺴﻳ ﻲﳋاﺪﻟا ﲔﺨﺴﺘﻟا زﺎﻬﺟ ﺮﺣ ﺔﺟراروﺪﻟا ﻲﻓ ةرﺎﺘا ة.ة
ّ
ءﺎﳌا ةرود ءﺎﳌا ةرود
ءﺎﳌا ةرود
ءﺎﳌا ةرود ءﺎﳌا ةرود
وﺪﺘﻟا ﻦﻋ ﻢﺟﺎﻧﺮﻳ
نﺎﻣﺮﻬﻜﻟا نﺎﻣﺮﻬﻜﻟا
نﺎﻣﺮﻬﻜﻟا
نﺎﻣﺮﻬﻜﻟا نﺎﻣﺮﻬﻜﻟا
■
ﺮﺤﻣ كDCﺪﻘﺘﳌا
■
رو ﻞﻴﺴﻐﻟا ﻞﺋﺎﺳ شو ﺲﺑﻼﳌا ﻰﻠﻋ ءﺎﳌاﻮﻓ اﺪﺣا.ﺪﺣا
وزإ ﻚﻨﻜﳝﻮﻬﺴﺑ ﻞﻴﺴﻐﻟا ﻞﺋﺎﺳ ﻊﻴﻗﺎﻘﺻ ﺔﻟاﺮﺑ ﺮﺜﻛأ ﺔﻟرود ءﺎﻨﺛأ ءﺎﳌا ش.ﻒﻄﺸﻟا ة
ورود مﺎﻈﻧو ءﺎﳌا ﻲﻠﻛ مﺪﺨﺘﺴﻳ ءﺎﳌا نا.ﺮﺜﻛأ ﺔﻴﻟﺎﻌﻔﺑ ﻞﻴﺴﻐﻟا ﻞﺋﺎﺳ
■
■
■
ﺮﻛو ﻞﻴﺴﻐﻟا ةءﺎﻔﻛ ﻦﺴﲢ ﻞﻴﺴﻐﻟا ةو .ﺲﺑﻼﳌا رﺮﺿ ﺾﻔﺨﺗﺮﻬﻜﻟاﺮﻳ نﺎﻣش
و.شﺎﻤﻘﻟا ﺔﻳﺎﻨﻋ ءﺎﻨﺛأ ﺎﻬﻠﻴﺴﻏ ةءﺎﻔﻛ ﲔﺴﲢ ﻲﻓ ﺔﻄﻠﺘا ﺲﺑﻼﳌا ﺪﻋﺎﺴﻳ
■
■
ﻞﻔﻄﻟا قﻼﻏإ ﻞﻔﻄﻟا قﻼﻏإ
ﻞﻔﻄﻟا قﻼﻏإ
ﻞﻔﻄﻟا قﻼﻏإ ﻞﻔﻄﻟا قﻼﻏإ
ﺮﺒﻟا ﺮﻴﻴﻐﺘﻟ رز يأ ﻰﻠﻋ ﻂﻐﻀﻟا ﻦﻋ لﺎﻔﻃﻷا ﻊﻨﳌ مﺪﺨﺘﺴﻳ ﻞﻔﻄﻟا قﻼﻏإ مﺎﻈﻧﺞﻣﺎﻧ
.ﻞﻴﻐﺸﺘﻟا ءﺎﻨﺛأ
■
➡➮❾➙➤➡✄ ➝➣➜➱✄
تﺎﻳﻮﺘﶈاتﺎﻳﻮﺘﶈا
تﺎﻳﻮﺘﶈا
تﺎﻳﻮﺘﶈاتﺎﻳﻮﺘﶈا
تﺎﻬﻴﺒﻨﺘﻟا.............................................................3
ﻮﳌاتﺎﻔﺻا..............................................................5
ﺮﺘﻟاﺐﻴﻛ................................................................6
ﻞﻴﺴﻐﻟا ﻞﺒﻗ ﺔﻳﺎﻨﻌﻟا..............................................12
ﻒﻴﻈﻨﺘﻟا ةدﺎﻣ ﺔﻓﺎﺿإ............................................13
ﻮﻟاﺔﻔﻴﻇ...............................................................15
ﺔﻟﺎﺴﻐﻟا ماﺪﺨﺘﺳا ﺔﻴﻔﻴﻛ.........................................16
ﺔﻧﺎﻴﺼﻟا...............................................................26
ﺮﲢ ﻞﻴﻟدو ﻞﻠﳋا ىﻪﺣﻼﺻإ.......................................30
وﺮﺷﺔﻧﺎﻤﻀﻟا ط....................................................33
2
Page 37

ماﺪﺨﺘﺳﻻا ﻞﺒﻗ تﺎﻤﻴﻠﻌﺘﻟا ﻊﻴﻤﺟ أﺮﻗاماﺪﺨﺘﺳﻻا ﻞﺒﻗ تﺎﻤﻴﻠﻌﺘﻟا ﻊﻴﻤﺟ أﺮﻗا
ماﺪﺨﺘﺳﻻا ﻞﺒﻗ تﺎﻤﻴﻠﻌﺘﻟا ﻊﻴﻤﺟ أﺮﻗا
ماﺪﺨﺘﺳﻻا ﻞﺒﻗ تﺎﻤﻴﻠﻌﺘﻟا ﻊﻴﻤﺟ أﺮﻗاماﺪﺨﺘﺳﻻا ﻞﺒﻗ تﺎﻤﻴﻠﻌﺘﻟا ﻊﻴﻤﺟ أﺮﻗا
ﺮﻄﺧ ﻒﻴﻔﺨﺘﻟ ﻞﻴﻟﺪﻟا اﺬﻫ ﻲﻓ ﺔﺤﺿﻮﳌا تﺎﻤﻴﻠﻌﺘﻟا عﺎﺒﺗإ ﻦﻣ ﺪﺑ ﻻ ،ﺔﻣﻼﺴﻟا ﻞﺟأ ﻦﻣﺮﻄﺧ ﻒﻴﻔﺨﺘﻟ ﻞﻴﻟﺪﻟا اﺬﻫ ﻲﻓ ﺔﺤﺿﻮﳌا تﺎﻤﻴﻠﻌﺘﻟا عﺎﺒﺗإ ﻦﻣ ﺪﺑ ﻻ ،ﺔﻣﻼﺴﻟا ﻞﺟأ ﻦﻣ
ﺮﻄﺧ ﻒﻴﻔﺨﺘﻟ ﻞﻴﻟﺪﻟا اﺬﻫ ﻲﻓ ﺔﺤﺿﻮﳌا تﺎﻤﻴﻠﻌﺘﻟا عﺎﺒﺗإ ﻦﻣ ﺪﺑ ﻻ ،ﺔﻣﻼﺴﻟا ﻞﺟأ ﻦﻣ
ﺮﻄﺧ ﻒﻴﻔﺨﺘﻟ ﻞﻴﻟﺪﻟا اﺬﻫ ﻲﻓ ﺔﺤﺿﻮﳌا تﺎﻤﻴﻠﻌﺘﻟا عﺎﺒﺗإ ﻦﻣ ﺪﺑ ﻻ ،ﺔﻣﻼﺴﻟا ﻞﺟأ ﻦﻣﺮﻄﺧ ﻒﻴﻔﺨﺘﻟ ﻞﻴﻟﺪﻟا اﺬﻫ ﻲﻓ ﺔﺤﺿﻮﳌا تﺎﻤﻴﻠﻌﺘﻟا عﺎﺒﺗإ ﻦﻣ ﺪﺑ ﻻ ،ﺔﻣﻼﺴﻟا ﻞﺟأ ﻦﻣ
حﺮﺟ ،ﺔﻳدﺎﳌا ﺮﺋﺎﺴﳋا ﻊﻨﳌ وأ ، ﺔﻴﺋﺎﺑﺮﻬﻜﻟا تﺎﻣﺪﺼﻟاو ، رﺎﺠﻔﻧﻻا وأ قاﺮﺘﺣﻻاحﺮﺟ ،ﺔﻳدﺎﳌا ﺮﺋﺎﺴﳋا ﻊﻨﳌ وأ ، ﺔﻴﺋﺎﺑﺮﻬﻜﻟا تﺎﻣﺪﺼﻟاو ، رﺎﺠﻔﻧﻻا وأ قاﺮﺘﺣﻻا
حﺮﺟ ،ﺔﻳدﺎﳌا ﺮﺋﺎﺴﳋا ﻊﻨﳌ وأ ، ﺔﻴﺋﺎﺑﺮﻬﻜﻟا تﺎﻣﺪﺼﻟاو ، رﺎﺠﻔﻧﻻا وأ قاﺮﺘﺣﻻا
حﺮﺟ ،ﺔﻳدﺎﳌا ﺮﺋﺎﺴﳋا ﻊﻨﳌ وأ ، ﺔﻴﺋﺎﺑﺮﻬﻜﻟا تﺎﻣﺪﺼﻟاو ، رﺎﺠﻔﻧﻻا وأ قاﺮﺘﺣﻻاحﺮﺟ ،ﺔﻳدﺎﳌا ﺮﺋﺎﺴﳋا ﻊﻨﳌ وأ ، ﺔﻴﺋﺎﺑﺮﻬﻜﻟا تﺎﻣﺪﺼﻟاو ، رﺎﺠﻔﻧﻻا وأ قاﺮﺘﺣﻻا
ﺔﻣﻼﺴﻟا ﻞﺟأ ﻦﻣ ﺔﻤﻬﳌا تﺎﻤﻴﻠﻌﺘﻟاﺔﻣﻼﺴﻟا ﻞﺟأ ﻦﻣ ﺔﻤﻬﳌا تﺎﻤﻴﻠﻌﺘﻟا
ﺔﻣﻼﺴﻟا ﻞﺟأ ﻦﻣ ﺔﻤﻬﳌا تﺎﻤﻴﻠﻌﺘﻟا
ﺔﻣﻼﺴﻟا ﻞﺟأ ﻦﻣ ﺔﻤﻬﳌا تﺎﻤﻴﻠﻌﺘﻟاﺔﻣﻼﺴﻟا ﻞﺟأ ﻦﻣ ﺔﻤﻬﳌا تﺎﻤﻴﻠﻌﺘﻟا
ﻲﺘﻟا ءﺎﻴﺷﻷا ﻒﻔﲡ وأ ﻞﺴﻐﺗ ﻻ ٪ .ﺔﺸﻤﻗﻸﻟ
و وأ ﺎﻬﻌﻘﻧ ، ﺎﻬﻠﻴﺴﻏ ، ﺎﻬﻔﻴﻈﻨﺗ ﻢﺘﻳطﺎﻘﻨﻟا ﻊﺿ
ﻮﳌﺎﺑ ﺎﻬﻴﻠﻋﻞﺜﻣ) رﺎﺠﻔﻧﻻا وأ لﺎﻌﺘﺷﻼﻟ ﺔﻠﺑﺎﻘﻟا دا
و ، ﻊﻤﺸﻟاﺰﻟاو ، ﺖﻳو، نﺎﻫﺪﻟاوزﺎﻐﻟاو ،ﲔﻟﺰﻣﻞﻳ
و ،ﻢﺤﺸﻟا، فﺎﳉا ﻒﻴﻈﻨﺘﻟا لﻮﻠﺤﻣ
.رﺎﺠﻔﻧا وأ
و ﻞﻴﺴﻐﻟاﺲﺑﻼﳌا ﻊﻧﺎﺻ ﻞﺒﻗ ﻦﻣ ﺔﻧﺎﻴﺼﻟا
.ﺔﻳﺎﻨﻌﺑ
ﻮﻘﺑ بﺎﺒﻟا ﺢﺘﻓو ةﺆﻳ ﺪﻗ اﺬﻫ .ﻖﻠﻐﻣ ﻮﻫﻰﻟا يد
.ﺔﻟﺎﺴﻐﻟا ﻲﻓ رﺮﺿ ثاﺪﺣإ
زﺎﻬﺟ ﻞﺼﻓا وأ رﺎﻴﺘﻟا جﺮﺨﻣ ﻦﻋ زﺎﻬﳉا ﺲﺑﺎﻗ
ﺮﻬﻜﻟا عزﻮﻣ ﻦﻋ ﺔﻟﺎﺴﻐﻟاﻮﺑ ﺖﻴﺒﻟا ﻲﻓ ءﺎﺑﺔﻄﺳا
وﺎﺤﻣ.ﻒﻴﻈﻨﺗ وأ ﺔﻧﺎﻴﺻ يأ ﺔﻟ
ﺰﺟ ﻚﻓ ، ﻞﻄﻋ ، رﺮﺿوأ ﺔﻌﻄﻗ ﺪﻘﻓ وأ ،ﻲﺋ
.رﺮﻀﺘﻣ ﺲﺑﺎﻗ وأ ﻚﻠﺳ ﺎﻬﻴﻓ ﺎﲟ ،ﻊﻄﻗ رﺎﺴﻜﻧا
.ﺮﻤﻌﻟا ﺮﻴﺼﻘﺗ وأ ،ﺺﺨﺸﻟا.ﺮﻤﻌﻟا ﺮﻴﺼﻘﺗ وأ ،ﺺﺨﺸﻟا
.ﺮﻤﻌﻟا ﺮﻴﺼﻘﺗ وأ ،ﺺﺨﺸﻟا
.ﺮﻤﻌﻟا ﺮﻴﺼﻘﺗ وأ ،ﺺﺨﺸﻟا.ﺮﻤﻌﻟا ﺮﻴﺼﻘﺗ وأ ،ﺺﺨﺸﻟا
●وﺎﻘﻣ ﺾﻔﺨﺗ ﺪﻗ ﻞﻴﺴﻐﻟا تﺎﻴﻠﻤﻋ بﺎﻬﺘﻟﻻا ﺔﻣ
ووﺮﻴﻜﻟاﺆﻳ ﺪﻗ ﺮﻣﻷا (....و ، ﲔﺳلﺎﻌﺘﺷا ﻰﻟا يد
●تﺎﻤﻴﻠﻌﺗ ﻊﺒﺗا ، ﺔﺠﻴﺘﻨﻟا هﺬﻫ ﺐﻨﺠﺘﻟ
●ﺮﻀﺗ ﻻ لوﺎﲢ ﻻ وأ ﻒﻨﻌﺑ ﺔﻟﺎﺴﻐﻟا بﺎﺑ ب
●ﺮﻬﻛ تﺎﻣﺪﺻ لﺎﻤﺘﺣا ﻒﻴﻔﺨﺘﻟ ﻞﺼﻓا ،ﺔﻴﺋﺎﺑ
زإﺮﻴﻬﺻ ﺔﻟاﺮﺋاﺪﻟا ﻊﻃﺎﻗ فﺎﻘﻳإ وأ ةﻞﺒﻗ ة
●وﺪﺣ ﺔﻟﺎﺣ ﻲﻓ زﺎﻬﳉا اﺬﻫ ﻞﻴﻐﺸﺗ لوﺎﲢ ﻻ ث
ﺎﻬﺑ ﻰﺻﻮﳌا ﺔﻟﺎﳊا ءﺎﻨﺜﺘﺳﺎﺑ حﻼﺻإ يأ لوﺎﲢ ﻻ
وأ مﺪﺨﺘﺴﻤﻠﻟ ﺔﻧﺎﻴﺼﻟا تﺎﻤﻴﻠﻌﺗ ﻲﻓ ﺔﺻﺎﺧ
اﺬﻫ ﻞﺧاد وأ ، ﻊﻣ ، ﻰﻠﻋ ﺐﻌﻠﻟﺎﺑ لﺎﻔﻃﻸﻟ ﺢﻤﺴﺗ ﻻ
ردﺎﺼﻟا مﺪﺨﺘﺴﳌا حﻼﺻإ تﺎﻤﻴﻠﻌﺗﺎﻬﻤﻬﻔﺗ ﻲﺘﻟا ة
و ، نﺎﺘﻜﻟا ﻞﺜﻣ لﺎﻌﺘﺷﻼﻟ ﺔﻠﺑﺎﻘﻟاو ، قرﻮﻟاةدﺎﺠﺴﻟا
تﺎﻬﻴﺒﻨﺘﻟاتﺎﻬﻴﺒﻨﺘﻟا
تﺎﻬﻴﺒﻨﺘﻟا
تﺎﻬﻴﺒﻨﺘﻟاتﺎﻬﻴﺒﻨﺘﻟا
! ﻪﻴﺒﻨﺗ! ﻪﻴﺒﻨﺗ
! ﻪﻴﺒﻨﺗ
! ﻪﻴﺒﻨﺗ! ﻪﻴﺒﻨﺗ
ﻪﻴﺒﻨﺗ ﻪﻴﺒﻨﺗ
ﻪﻴﺒﻨﺗﺮﺘﺣﻻا ﺮﻄﺧ ﺾﻔﳋ :و ، قاﺮﻬﻜﻟا تﺎﻣﺪﺼﻟا،ﺔﻟﺎﺴﻐﻟا زﺎﻬﺟ ماﺪﺨﺘﺳا ﺪﻨﻋ ﺺﺨﺸﻟا حﺮﺟ وأ ، ﺔﻴﺋﺎﺑ
ﻪﻴﺒﻨﺗ ﻪﻴﺒﻨﺗ
ﺮﻳﺬﺤﺘﻟا ﻊﺒﺗا:ﺔﻴﻟﺎﺘﻟا رﻮﻣﻷا ﺎﻬﻴﻓ ﺎﲟ ﺔﻴﺳﺎﺳﻷا تا
و ﺮﻄﻤﻠﻟﺮﻟاﻮﻃ.ﺔﺑ
و ﺮﻄﻤﻠﻟﺮﻟاﻮﻃ.ﺔﺑ
ﻮﳌا ،.ﺦﻟا ... ﺔﻴﺋﺎﻤﻴﻜﻟا دا
ﺮﻗ وأ ﻞﺒﻗ ﻦﻣ ﻞﻤﻌﻳ.لﺎﻔﻃﻷا ﻦﻣ ﺎﺒﻳ
.ﺮﺧآ زﺎﻬﺟ يأ وأ زﺎﻬﳉا
ﺮﻐﻳ حﻮﺘﻔﳌا بﺎﺒﻟاوأ بﺎﺒﻟﺎﺑ ﻖﻠﻌﺘﻠﻟ لﺎﻔﻃﻷا ي
.زﺎﻬﳉا ﻞﺧاد ﻰﻟا لﻮﺧﺪﻟا
ﻮﺘﺗ ﻰﺘﺣ.ﺎﻣﺎﲤ ﻞﻤﻌﻟا ﻦﻋ ﺔﻠﳊا ﻒﻗ
●ﺮﺗ ﻻ ﻛّﺮﻌﻣ نﺎﻜﻣ ﻲﻓ ﺔﻟﺎﺴﻐﻟا زﺎﻬﺟ ﻆﻔﲢ وأ ﺐض
●ﺮﺗ ﻻ ﻛّﺮﻌﻣ نﺎﻜﻣ ﻲﻓ ﺔﻟﺎﺴﻐﻟا زﺎﻬﺟ ﻆﻔﲢ وأ ﺐض
●ﻮﻠﺑ ﺚﺒﻌﺗ ﻻ .ﻢﻜﺤﺘﻟا ﺔﺣ
●وأ ﺔﻟﺎﺴﻐﻟا زﺎﻬﺟ ﻦﻣ ﺔﻌﻄﻗ يأ لﺪﺒﺗ وأ ﺢﻠﺼﺗ ﻻ
وﻮﻘﺗرﺎﻬﲟ ﺎﻬﺑ م.ة
●ﺮﺗا و زﺎﻬﳉا ﺖﲢ كﻮﳌا ﻦﻣ ﺎﻴﻟﺎﺧ زﺎﻬﳉا لﻮﺣدا
●ﺮﺷﻹا ﻮﻠﻄﻣ ﻖﻴﻗﺪﻟا فازﺎﻬﳉا اﺬﻫ نأ ﺔﻟﺎﺣ ﻲﻓ ب
●ﺮﺘﺗ ﻻ ﻮﺘﻔﻣ ﺔﻟﺎﺴﻐﻟا زﺎﻬﺟ بﺎﺑ ك.ﺎﺣ
●ﺮﻈﺘﻧا .ﻞﻴﻐﺸﺘﻟا ءﺎﻨﺛأ ﺔﻟﺎﺴﻐﻟا زﺎﻬﺟ ﺲﻣﻼﺗ ﻻ
تﺎﻤﻴﻠﻌﺘﻟا هﺬﻫ ﻆﻔﺣاتﺎﻤﻴﻠﻌﺘﻟا هﺬﻫ ﻆﻔﺣا
تﺎﻤﻴﻠﻌﺘﻟا هﺬﻫ ﻆﻔﺣا
تﺎﻤﻴﻠﻌﺘﻟا هﺬﻫ ﻆﻔﺣاتﺎﻤﻴﻠﻌﺘﻟا هﺬﻫ ﻆﻔﺣا
ﻲﺿرﻷا ﻞﻴﺻﻮﺘﻟا تﺎﻤﻴﻠﻌﺗﻲﺿرﻷا ﻞﻴﺻﻮﺘﻟا تﺎﻤﻴﻠﻌﺗ
ﻲﺿرﻷا ﻞﻴﺻﻮﺘﻟا تﺎﻤﻴﻠﻌﺗ
ﻲﺿرﻷا ﻞﻴﺻﻮﺘﻟا تﺎﻤﻴﻠﻌﺗﻲﺿرﻷا ﻞﻴﺻﻮﺘﻟا تﺎﻤﻴﻠﻌﺗ
رﻷا ﻞﻴﺻﻮﺘﻟا ﻦﻣ ﺪﺑ ﻻوﺪﺣ ﺔﻟﺎﺣ ﻲﻓ .زﺎﻬﳉا اﺬﻬﻟ ﻲﺿرﻷا ﻞﻴﺻﻮﺘﻟا ،ﻞﻠﺧ وأ ﻞﻄﻋ ثﺮﻄﺧ ﺾﻔﺨﻳ ﻲﺿ
ﺮﻬﻜﻟا تﺎﻣﺪﺼﻟاوﺎﻘﻣ روﺮﻣ ﱘﺪﻘﺘﺑ ﺔﻴﺋﺎﺑﺮﻬﻜﻟا رﺎﻴﺘﻠﻟ ﻞﻗأ ﺔﻣوﺰﻣ زﺎﻬﳉا اﺬﻫ .ﻲﺋﺎﺑةادأ يذ ﻚﻠﺴﺑ د
رﻷا ﻞﻴﺻﻮﺘﻟاو زﺎﻬﺠﻠﻟ ﻲﺿرﻷا ﻞﻴﺻﻮﺘﻟا ﺲﺑﺎﻗﰎ ﺐﺳﺎﻨﻣ رﺎﻴﺗ جﺮﺨﻣ ﻰﻟا ﺲﺑﺎﻘﻟا ﻞﺻو ﻦﻣ ﺪﺑ ﻻ .ﻲﺿ
ﺮﺗو ﻪﺒﻴﻛرﻷا ﻪﻠﻴﺻﻮﺗو ﺢﻴﺤﺻ ﻞﻜﺸﺑ ﻲﺿﺮﻟا ﻊﻴﻤﳉ ﺎﻘﻓو ﺔﻴﻠﶈا زﻮﻣ.مﺎﻜﺣﻷا
●ﻮﺤﻣ مﺪﺨﺘﺴﺗ ﻻ رﻷا ﻞﻴﺻﻮﺘﻟا ﺲﺑﺎﻗ ﺢﻠﺼﻳ ﻻ ،ﻻإ وأ ﻻ.ﻲﺿ
●ﺮﻬﻛ ﻲﻨﻔﺑ ﻞﺼﺗا ، ﺐﺳﺎﻨﳌا رﺎﻴﺘﻟا جﺮﺨﻣ ﻚﻳﺪﻟ ﻦﻜﻳ ﻢﻟ اذإ .ﻲﺋﺎﺑ
ﻪﻴﺒﻨﺗﻪﻴﺒﻨﺗ
ﻪﻴﺒﻨﺗرﻷا ﻞﻴﺻﻮﺘﻟا ةادﻹ ﺢﻴﺤﺼﻟا ﺮﻴﻏ ﻞﻴﺻﻮﺘﻟا : ﺆﻳ ﺪﻗ زﺎﻬﺠﻠﻟ ﻲﺿتﺎﻣﺪﺼﻟا ﺮﻄﺧ ثاﺪﺣإ ﻰﻟا يد
ﻪﻴﺒﻨﺗﻪﻴﺒﻨﺗ
ﺮﻬﻜﻟاﺮﻬﻛ ﻲﻨﻓ ﻞﺒﻗ ﻦﻣ ﺢﻴﺤﺼﻟا ﻞﻴﺻﻮﺘﻟا ﻦﻣ ﺪﻛﺄﺗ .ﺔﻴﺋﺎﺑﺆﻣ ﻲﺋﺎﺑﻚﻧأ ﺔﻟﺎﺣ ﻲﻓ تﺎﻣﺪﺨﻠﻟ ﻲﻨﻓ وأ ﻞﻫ
رﻷا ﻞﻴﺻﻮﺘﻟا ﻲﻓ ﻚﺸﺗوﺰﳌا ﺲﺑﺎﻘﻟا لﺪﻌﺗ ﻻ .زﺎﻬﺠﻠﻟ ﻲﺿﺮﻴﻏ رﺎﻴﺘﻟا جﺮﺨﻣ نﺎﻛ اذإ - زﺎﻬﳉﺎﺑ د
ر ،ﺐﺳﺎﻨﻣﻛّﺮﻬﻛ ﻲﻨﻓ ﻞﺒﻗ ﻦﻣ ﺐﺳﺎﻨﳌا رﺎﻴﺘﻟا جﺮﺨﻣ ﺐﺆﻣ ﻲﺋﺎﺑ.ﻞﻫ
3
Page 38

.را
تﺎﻬﻴﺒﻨﺘﻟاتﺎﻬﻴﺒﻨﺘﻟا
تﺎﻬﻴﺒﻨﺘﻟا
تﺎﻬﻴﺒﻨﺘﻟاتﺎﻬﻴﺒﻨﺘﻟا
ﻔﺠﻣ ﻲﻓ ﻖﻳﺮﳊا ﻦﻣ ﺮﻄﳋا ﻒﻴﻔﺨﺘﻟ ﻔﺠﻣ ﻲﻓ ﻖﻳﺮﳊا ﻦﻣ ﺮﻄﳋا ﻒﻴﻔﺨﺘﻟ
:ﺔﻴﻟﺎﺘﻟا رﻮﻣﻷا ةﺎﻋاﺮﻣ ﻦﻣ ﺪﺑ ﻻ ، را:ﺔﻴﻟﺎﺘﻟا رﻮﻣﻷا ةﺎﻋاﺮﻣ ﻦﻣ ﺪﺑ ﻻ ، را
:ﺔﻴﻟﺎﺘﻟا رﻮﻣﻷا ةﺎﻋاﺮﻣ ﻦﻣ ﺪﺑ ﻻ ، را
:ﺔﻴﻟﺎﺘﻟا رﻮﻣﻷا ةﺎﻋاﺮﻣ ﻦﻣ ﺪﺑ ﻻ ، را:ﺔﻴﻟﺎﺘﻟا رﻮﻣﻷا ةﺎﻋاﺮﻣ ﻦﻣ ﺪﺑ ﻻ ، را
. را
ّ
ﺆﻳ يﺬﻟا ﺮﻣﻷا ﻞﻴﺴﻐﻟا قﻮﺤﺴﻣ ﻊﻣ ﻦﺧﺎﺴﻟا ءﺎﳌﺎﺑ ﺎﻬﻠﻴﺴﻏ ﻦﻣ ﺪﺑ ﻻ ، راﺮﻄﳋا ﻒﻴﻔﺨﺗ ﻰﻟا يد
رد ﺾﻔﳋ ﺎﻬﻣاﺪﺨﺘﺳا ﻦﻣ ﺪﺑ ﻻ راﺮﳊا ﺔﺟراة
ّ
ﺰﻟا ﻲﻓ ةﺪﺴﻛﻷا ﻞﻋﺎﻔﺗ ﺐو .ﺖﻳﺮﳊا ثﺪﲢ ةﺪﺴﻛﻷاراجﺮﺨﺗ ﻢﻟ اذإ . ة
ّ
ود ﻒود ﻒ
ﻔﺠﻣ ﻲﻓ ﻖﻳﺮﳊا ﻦﻣ ﺮﻄﳋا ﻒﻴﻔﺨﺘﻟ
ود ﻒ
ﻔﺠﻣ ﻲﻓ ﻖﻳﺮﳊا ﻦﻣ ﺮﻄﳋا ﻒﻴﻔﺨﺘﻟ ﻔﺠﻣ ﻲﻓ ﻖﻳﺮﳊا ﻦﻣ ﺮﻄﳋا ﻒﻴﻔﺨﺘﻟ
ود ﻒود ﻒ
ّّ
ّ
ّّ
ّّ
ّ
ّّ
.را
ّ
ّ
ﺮﺘﺗ وأ راﺮﺣ ءﺎﻨﺛأ ﺎﻬﻈﻔﲢ وأ ﺎﻬﻤﻛارا.ﺎﻬﺗ
ّ
ﺮﺠﻔﺘﳌا وأ لﺎﻌﺘﺷﻼﻟ ﺔﻠﺑﺎﻘﻟاو تاو ﺎﻬﻠﻴﺴﻏ ﻢﺘﻳو وأ ﺎﻬﻌﻘﻧو مﺪﻋ ﻦﻣ ﺪﺑ ﻻ ﺎﻬﺑ ﺎﻬﺨﺳود ﻒﻔﺠﻣ ﻲﻓ ﺎﻬﻌﺿ
وزﺎﳉا/لوﺮﺘﺒﻟا ، ﻞﻳﺪﺒﻟا لﻮﺤﻜﻟاﺰﻣ ،ﺾﻴﺑﻷا ﻂﻔﻨﻟا ، ﲔﻟﺮﺘﻟا ، (تﺎﻣﻼﻌﻟا ﺾﻌﺑ) ﻊﻘﺒﻟا تﻼﻳ، ﲔﺘﻨﺑ
ﺮﺣ ﻂﺒﺿ ﻰﻠﻋ رارا.ة
ﻮﳌاو ﺎﻬﻴﻓ ﻊﻘﺑ كﺎﻨﻫ ﻲﺘﻟا داﺰﻟﺎﺑ ﺔﻌﻗﺎﻨﻟاز وأ ﻲﺗﺎﺒﻨﻟا ﺖﻳﺆﺗ ﺪﻗ ﺦﺒﻄﻟا ﺖﻳﺮﳊا ﺮﻄﺧ ثاﺪﺣإ ﻰﻟا يدﻖﻳ
ﻮﳌاﺰﻟﺎﺑ ﺔﺨﺴﺘﳌا دارﻮﻓ ﻞﻌﺘﺸﺗ ﺪﻗ ﺖﻳﺮﻌﺗ ﺪﻨﻋ ﺔﺻﺎﺧ ، اﺮﳊا ردﺎﺼﳌ ﺎﻬﺿراود ﻒﻔﺠﻣ ﻲﻓ ﻞﺜﻣ ة
ﺮﳊاراﻮﳌا ﺢﺒﺼﺗ ﺪﻗ ، ةﺮﺣ ثﺪﺣ ﺚﻴﺤﺑ ﺔﻴﻓﺎﻛ ﺔﻨﺧﺎﺳ داﺮﺗ .ﻖﻳﻮﳌا ﻆﻔﺣ وأ ﻢﻛاﺰﻟﺎﺑ ﺔﺨﺴﺘﳌا داﺪﻗ ﺖﻳ
ﺮﳊا ﻊﻨﲤراﺆﻴﻓ جوﺮﳋا ﻦﻣ ةﺮﳊا ﺮﻄﺧ ﻰﻟا يد.ﻖﻳ
ﺮﻄﺿأ اذإو ﻰﻟا تﺰﺑ ﺔﺨﺴﺘﳌا ﺔﺸﻤﻗﻷا ﻊﺿز وأ ﻲﺗﺎﺒﻧ ﺖﻳﻲﻓ ﺮﻌﺸﻟا ﺔﻳﺎﻨﻋ تﺎﺠﺘﻨﻣ وأ ﺦﺒﻄﻟا ﺖﻳ
ود ﻒﻔﺠﻣ
ّ
ﻮﻤﻠﻟو .داﺮﺨﺗ ﻻوﺪﻟا ﻒﻔا ﻦﻣ ﺎﻬﺟ
ﻮﳌاوزﺎﳉا/لوﺮﺒﺘﻟﺎﺑ ﺎﻘﺒﺴﻣ ﺎﻬﻔﻴﻈﻨﺗ ﻢﺘﻳ ﻲﺘﻟا دا ﲔﻟ,ﺮﺧﻻا ءﺎﻴﺷﻷا وأ فﺎﳉا ﻒﻴﻈﻨﺘﻟا لﻮﻠﺤﻣ ى
زإ ﺖﲤ، نﻮﺘﻴﺳﻷا ﺎﻬﻴﻓ ﺎﲟ ﺔﻴﻠﶈا ﺔﺌﻴﺒﻟا ﻲﻓ ةدﺎﻋ مﺪﺨﺘﺴﺗ ﻲﺘﻟا ﻲﻟﺎﻌﻟا لﺎﻌﺘﺷﻼﻟ ﺔﻠﺑﺎﻘﻟا ءﺎﻴﺷﻷا ﺔﻟا
.ﻊﻤﺸﻟا
ﻮﳌاﻮﺘﶈا داﺮﻟا طﺎﻄﳌا ﻰﻠﻋ ﺔﻳﻮﻏﺮﻌﻳ ﺎﻤﻛ) يﺮﻟا طﺎﻄﳌﺎﺑ فﻮﻏﻲﻓ ﺎﻬﻔﻴﻔﲡ ﻦﻣ ﺪﺑ ﻻ ﻞﻴﺜﳌا طﺎﻄﳌا وأ (ي
ود ﻒﻔﺠﻣ
ّ
ﻮﳌاﺮﻟا طﺎﻄﳌا ﻦﻣ داﻮﻏﺮﳊا ثﺪﲢ ﺪﻗ ﺎﻬﻨﻴﺨﺴﺗ ﺔﻟﺎﺣ ﻲﻓ يﺮﺘﺣﻻﺎﺑ ﻖﻳ.ﻲﺋﺎﻘﻠﺘﻟا قا
وو مﺪﻋ ﻦﻣ ﺪﺑ ﻻود ﻒﻔﺠﻣ ﻲﻓ ﺎﻬﻌﺿ
وﻮﳌاو ، ﺔﺌﻓاد ﺢﺒﺼﺗ داﺒﺴﺗ ﻲﻫ
وﺰﻳ ﻻو .ﺮﻄﳋا ﻞﻳرودرﺎﺒﻟا « ةوﺪﻟا ﻒﻔﺠﻤﻠﻟ « ﺾﻔﺨﻨﳌا د
.را
ود ﻒ
ّ
ود ﻒﻔﺠﻣ ﻲﻓ ﺎﻬﻣاﺪﺨﺘﺳا مﺪﻋ ﻦﻣ ﺪﺑ ﻻ ﺎﻬﻟ ﺔﻠﻴﺜﳌا تﺎﺠﺘﻨﳌا وأ شﺎﻤﻘﻟا ﲔﻠﻣ
زﻹ راﺮﻬﻜﻟا ﺔﻟاءﺎﺑ
ّ
.را
ّ
ﻮﻘﳌا ندﺎﻌﳌا نأ ﺔﻟﺎﺣ ﻲﻓ راﺮﻣ ﺢﺒﺼﺗ ةاءﺎﻨﺛأ ﺔﻴﺨﺗ
ّ
وﺪﻟا ﻒ
ّ
ﻮﳌا هﺬﻫ ﻞﺜﳌ ﺮ.دا
ّ
ّ
ود ﻒ
.را
ّ
ّ
ﻮﺘﲢ ﻲﺘﻟا ﺔﻴﻠﺧاﺪﻟا ﺲﺑﻼﳌاﻮﻘﳌا ندﺎﻌﳌا ﻰﻠﻋ يو مﺪﻋ ﻦﻣ ﺪﺑ ﻻ ةاود ﻒﻔﺠﻣ ﻲﻓ ﺎﻬﻌﺿ
و مﺪﻋ ﻦﻣ ﺪﺑ ﻻ طﺎﻄﳌﺎﺑﻔﺠﻣ ﻲﻓ ﺎﻬﻌﺿ
ﻮﻜﺴﻟا.زﺎﻬﳉا وأ شﺎﻤﻘﻟا ﲔﻠﻣ ﻊﻧﺎﺻ ﻞﺒﻗ ﻦﻣ ﻪﺑ ﻲﺻﻮﻣ ﺔﺻﺎﺧ شﺎﻤﻘﻟا ﲔﻠﻣ نأ ءﺎﻨﺜﺘﺳﺎﺑ ﺔﻴﻧ
ﺆﻳ ﺪﻗ ﺮﻣﻷارﺮﻀﻟا ثاﺪﺣإ ﻰﻟا يدﻔا ﻲﻓ
و .ﻒﻴﻔﺠﺘﻟار مﺪﺨﺘﺴﻳ ﺪﻗﻮﺘﻣ ﻒﻴﻔﲡ فﻓ
ﻮﳌاو مﺪﻋ ﻦﻣ ﺪﺑ ﻻ ءﺎﻤﻠﻟ دﺎﻀﳌا ﻞﻔﻄﻟا ﻞﻳﺪﻨﻣ وأ شﺪﻟا ءﺎﻄﻏ ﻞﺜﻣ ﺔﻴﻜﻴﺘﺳﻼﺒﻟا داﻔﺠﻣ ﻲﻓ ﺎﻬﻌﺿ
ﻮﳌاو طﺎﻄﳌﺎﺑ ةﺎﻄﻐﳌا داﺮﻟا ﺔﻴﻃﺎﻄﳌا ﺔﻴﺸﳊا ﻊﻣ ﺲﺑﻼﳌاﻮﻏو ﺔﻳﻮﻟاو ةدﺎﺳﻮﻟﺎﻜﻟاو شةﺎﻄﻐﳌا ﺲﻴﻨﺘﻟا ﺔﻳﺬﺣأ
ﺮﺗ ﺔﻟﺎﺣ ﻲﻓ ﺮﻣ ﺔﺼﻨﻣ ﻲﻓ ﺔﻟﺎﺴﻐﻟا زﺎﻬﺟ ﺐﻴﻛﺚﻴﺤﺑ ﺮﻄﳋا ﻊﻨﻣ ﻞﺟأ ﻦﻣ مﺎﻜﺣﺈﺑ ﻪﺘﻴﺒﺜﺗ ﻦﻣ ﺪﺑ ﻻ ، ﺔﻌﻔﺗ
. ﻂﻘﺴﻳ ﺪﻗ
ﺮﺗ ﺎﻣﺪﻨﻋ .رﺰﻟا اﺬﻫ ﺮﺘﺧا ،ﻒﻴﻔﺠﺘﻟا ﺪﻳ
4
Page 39

تﺎﻔﺻاﻮﳌاتﺎﻔﺻاﻮﳌا
تﺎﻔﺻاﻮﳌا
تﺎﻔﺻاﻮﳌاتﺎﻔﺻاﻮﳌا
ﻦﺤﺸﻟا ﺮﻴﻣﺎﺴﻣ
عزﻮﳌا
بﺎﺒﻟا
ﺮﺼﺘﻟا ﺲﺑﺎﻗﻒﻳ
ﺮﺧﻮﻃﺮﺼﺘﻟا مﻒﻳ
رﺎﺨﺒﻟﺎﺑ
(
ﻒـﻴﻔﺠﺘﻟا
، ( 1900و )طا
ﺔﻗﺎﻄﻟا ﺲﺑﺎﻗ
ﻞﺒﻗ ﻦﻣ ﺪﻳﺪﺠﺑ ﻪﻠﻳﺪﺒﺗ ﻦﻣ ﺪﺑ ﻻ
و وأ ﻊﻧﺎﺼﻟاوأ ﻪﻟ تﺎﻣﺪﳋا ﻞﻴﻛ
ﻞﻔﺳأ فﻼﻏ ءﺎﻄﻏ
ﺮﺼﺘﻟا ﺔﺨﻀﻣ ةﺎﻔﺼﻣﻒﻳ
2200و ، (ﻞﻴﺴﻐﻟا)طا 2150و )طا
●،رﺎﻴﺘﻟا ﻚﻠﺳ ﻲﻓ رﺮﺿ ثﺪﺣ اذإ
ﺆﻣ ﻲﻨﻓﺐﻨﲡ ﻞﺟأ ﻦﻣ ﻪﻴﺒﺷ ﻞﻫ
.ﺮﻄﺧ
ﻮﻟﻢﻜﺤﺘﻟا ﺔﺣ
ﺮﺧﻮﻃﺮﺼﺘﻟا مﻒﻳ
رﻞﻳﺪﻌﺘﻠﻟ ﻞﺑﺎﻗ ﻞﺟ
■ﻢﺳﻻا :ﻲﻣﺎﻣﻷا ﻞﻤﳊﺎﺑ ﺔﻟﺎﺴﻐﻟا زﺎﻬﺟ
■ﺮﻬﻜﻟا ﺔﻗﺎﻄﻟا : ﺔﻴﺋﺎﺑ220-240ﻮﻓ ، - ﺖﻟ50ﺮﻴﻫ ﺰﺗ
■دﺎﻌﺑﻷا :686ﺮﻋ) ﻢﻠﻣ × (ض767 × (ﻖﻤﻋ) ﻢﻠﻣ 982را)ﻢﻠﻣ (عﺎﻔﺗ
■نزﻮﻟا :94ﻢﺠﻛ
■ﻞﻴﺴﻐﻟا ﺔﻌﺳ :12ﻢﺠﻛ
■ﻒﻴﻔﺠﺘﻟا ﺔﻌﺳ :6ﻢﺠﻛ
■ﻮﻟاﻰﺼﻗﻷا طا :
■ﺮﺳ وﺪﺘﻟا ﺔﻋﺮﻳ:/ﻒﻴﻔﲡ ﻻ400/800/1000/ 1200
■ءﺎﳌا كﻼﻬﺘﺳا :85ﺮﺘﻟ
■حﻮﻤﺴﳌا ءﺎﳌا ﻂﻐﺿ :0,3 - 10ﻮﻗ.ﻢﺠﻛ ) ٢ ﻢﺳ/ة30 -1000 kPa(
و ﺮﻈﻨﳌا ﺮﻴﻐﺘﻳ ﺪﻗ ٭ﻮﳌاﻮﺟ ﲔﺴﺤﺘﻟ رﺎﻌﺷإ نوﺪﺑ تﺎﻔﺻاﺰﻬﺟﻷا ةد.ة
تﺎﻘﺤﻠﳌا تﺎﻘﺤﻠﳌا
تﺎﻘﺤﻠﳌا
تﺎﻘﺤﻠﳌا تﺎﻘﺤﻠﳌا
ﻮﻤﺼﻟا حﺎﺘﻔﻣﺔﻟ
ﺮﺧﻮﻃ) ءﺎﳌا لﻮﺧد م2EA٭ (
■
5
Page 40

ﺐﻴﻛﺮﺘﻟاﺐﻴﻛﺮﺘﻟا
ﺐﻴﻛﺮﺘﻟا
ﺐﻴﻛﺮﺘﻟاﺐﻴﻛﺮﺘﻟا
ﻛرﻛر
ضﺮﻌﻣ وأ ﺪﻴﻤﺠﺘﻟا ﺔﺟرد ﻦﻣ ﻞﻗأ ةراﺮﳊا ﺔﺟرﺪﻟ ضﺮﻌﻣ ﺮﻴﻏ نﺎﻜﻣ ﻲﻓ ﺎﻬﻈﻔﺣا وأ ﺔﻟﺎﺴﻐﻟا زﺎﻬﺟ ﺐضﺮﻌﻣ وأ ﺪﻴﻤﺠﺘﻟا ﺔﺟرد ﻦﻣ ﻞﻗأ ةراﺮﳊا ﺔﺟرﺪﻟ ضﺮﻌﻣ ﺮﻴﻏ نﺎﻜﻣ ﻲﻓ ﺎﻬﻈﻔﺣا وأ ﺔﻟﺎﺴﻐﻟا زﺎﻬﺟ ﺐ
ضﺮﻌﻣ وأ ﺪﻴﻤﺠﺘﻟا ﺔﺟرد ﻦﻣ ﻞﻗأ ةراﺮﳊا ﺔﺟرﺪﻟ ضﺮﻌﻣ ﺮﻴﻏ نﺎﻜﻣ ﻲﻓ ﺎﻬﻈﻔﺣا وأ ﺔﻟﺎﺴﻐﻟا زﺎﻬﺟ ﺐ
ضﺮﻌﻣ وأ ﺪﻴﻤﺠﺘﻟا ﺔﺟرد ﻦﻣ ﻞﻗأ ةراﺮﳊا ﺔﺟرﺪﻟ ضﺮﻌﻣ ﺮﻴﻏ نﺎﻜﻣ ﻲﻓ ﺎﻬﻈﻔﺣا وأ ﺔﻟﺎﺴﻐﻟا زﺎﻬﺟ ﺐضﺮﻌﻣ وأ ﺪﻴﻤﺠﺘﻟا ﺔﺟرد ﻦﻣ ﻞﻗأ ةراﺮﳊا ﺔﺟرﺪﻟ ضﺮﻌﻣ ﺮﻴﻏ نﺎﻜﻣ ﻲﻓ ﺎﻬﻈﻔﺣا وأ ﺔﻟﺎﺴﻐﻟا زﺎﻬﺟ ﺐ
.مﺎﻜﺣﻷاو ﺔﻴﻣﻮﻜﳊا زﻮﻣﺮﻟا ﻊﻴﻤﺟ ﻦﻣ ﺪﻴﻛﺄﺘﻟﺎﺑ ﺐﺳﺎﻨﳌا ﻲﺿرﻷا ﻞﻴﺻﻮﺘﻟا ﻞﻤﻋا.ﺲﻘﻄﻠﻟ.مﺎﻜﺣﻷاو ﺔﻴﻣﻮﻜﳊا زﻮﻣﺮﻟا ﻊﻴﻤﺟ ﻦﻣ ﺪﻴﻛﺄﺘﻟﺎﺑ ﺐﺳﺎﻨﳌا ﻲﺿرﻷا ﻞﻴﺻﻮﺘﻟا ﻞﻤﻋا.ﺲﻘﻄﻠﻟ
.مﺎﻜﺣﻷاو ﺔﻴﻣﻮﻜﳊا زﻮﻣﺮﻟا ﻊﻴﻤﺟ ﻦﻣ ﺪﻴﻛﺄﺘﻟﺎﺑ ﺐﺳﺎﻨﳌا ﻲﺿرﻷا ﻞﻴﺻﻮﺘﻟا ﻞﻤﻋا.ﺲﻘﻄﻠﻟ
.مﺎﻜﺣﻷاو ﺔﻴﻣﻮﻜﳊا زﻮﻣﺮﻟا ﻊﻴﻤﺟ ﻦﻣ ﺪﻴﻛﺄﺘﻟﺎﺑ ﺐﺳﺎﻨﳌا ﻲﺿرﻷا ﻞﻴﺻﻮﺘﻟا ﻞﻤﻋا.ﺲﻘﻄﻠﻟ.مﺎﻜﺣﻷاو ﺔﻴﻣﻮﻜﳊا زﻮﻣﺮﻟا ﻊﻴﻤﺟ ﻦﻣ ﺪﻴﻛﺄﺘﻟﺎﺑ ﺐﺳﺎﻨﳌا ﻲﺿرﻷا ﻞﻴﺻﻮﺘﻟا ﻞﻤﻋا.ﺲﻘﻄﻠﻟ
.ةدﺎﺠﺴﻟﺎﺑ ةﺎﻄﻐﻣ ضرأ ﻰﻠﻋ ﺔﻟﺎﺴﻐﻟا زﺎﻬﺟ ﺐﻴﻛﺮﺗ ﺔﻟﺎﺣ ﻲﻓ ةدﺎﺠﺴﻟﺎﺑ زﺎﻬﳉا ﺖﲢ تﺎﺤﺘﻔﻟا ﺪﺳ مﺪﻋ ﻦﻣ ﺪﺑ ﻻ.ةدﺎﺠﺴﻟﺎﺑ ةﺎﻄﻐﻣ ضرأ ﻰﻠﻋ ﺔﻟﺎﺴﻐﻟا زﺎﻬﺟ ﺐﻴﻛﺮﺗ ﺔﻟﺎﺣ ﻲﻓ ةدﺎﺠﺴﻟﺎﺑ زﺎﻬﳉا ﺖﲢ تﺎﺤﺘﻔﻟا ﺪﺳ مﺪﻋ ﻦﻣ ﺪﺑ ﻻ
.ةدﺎﺠﺴﻟﺎﺑ ةﺎﻄﻐﻣ ضرأ ﻰﻠﻋ ﺔﻟﺎﺴﻐﻟا زﺎﻬﺟ ﺐﻴﻛﺮﺗ ﺔﻟﺎﺣ ﻲﻓ ةدﺎﺠﺴﻟﺎﺑ زﺎﻬﳉا ﺖﲢ تﺎﺤﺘﻔﻟا ﺪﺳ مﺪﻋ ﻦﻣ ﺪﺑ ﻻ
.ةدﺎﺠﺴﻟﺎﺑ ةﺎﻄﻐﻣ ضرأ ﻰﻠﻋ ﺔﻟﺎﺴﻐﻟا زﺎﻬﺟ ﺐﻴﻛﺮﺗ ﺔﻟﺎﺣ ﻲﻓ ةدﺎﺠﺴﻟﺎﺑ زﺎﻬﳉا ﺖﲢ تﺎﺤﺘﻔﻟا ﺪﺳ مﺪﻋ ﻦﻣ ﺪﺑ ﻻ.ةدﺎﺠﺴﻟﺎﺑ ةﺎﻄﻐﻣ ضرأ ﻰﻠﻋ ﺔﻟﺎﺴﻐﻟا زﺎﻬﺟ ﺐﻴﻛﺮﺗ ﺔﻟﺎﺣ ﻲﻓ ةدﺎﺠﺴﻟﺎﺑ زﺎﻬﳉا ﺖﲢ تﺎﺤﺘﻔﻟا ﺪﺳ مﺪﻋ ﻦﻣ ﺪﺑ ﻻ
ﻦﻣ ﺔﺻﺎﺧ ﺔﻳﺎﻨﻋ ﺬﺧ ،ىﺮﺧﻷا تاﺮﺸﳊا وأ رﻮﺻﻮﺼﻟا ةﺮﺜﻜﻟ ضﺮﻌﺗ ﺪﻗ ﻖﻃﺎﻨﻣ ﺎﻬﻴﻓ كﺎﻨﻫ ﻲﺘﻟا ناﺪﻠﺒﻟا ﻲﻓ ﻦﻣ ﺔﺻﺎﺧ ﺔﻳﺎﻨﻋ ﺬﺧ ،ىﺮﺧﻷا تاﺮﺸﳊا وأ رﻮﺻﻮﺼﻟا ةﺮﺜﻜﻟ ضﺮﻌﺗ ﺪﻗ ﻖﻃﺎﻨﻣ ﺎﻬﻴﻓ كﺎﻨﻫ ﻲﺘﻟا ناﺪﻠﺒﻟا ﻲﻓ
ﻦﻣ ﺔﺻﺎﺧ ﺔﻳﺎﻨﻋ ﺬﺧ ،ىﺮﺧﻷا تاﺮﺸﳊا وأ رﻮﺻﻮﺼﻟا ةﺮﺜﻜﻟ ضﺮﻌﺗ ﺪﻗ ﻖﻃﺎﻨﻣ ﺎﻬﻴﻓ كﺎﻨﻫ ﻲﺘﻟا ناﺪﻠﺒﻟا ﻲﻓ
ﻦﻣ ﺔﺻﺎﺧ ﺔﻳﺎﻨﻋ ﺬﺧ ،ىﺮﺧﻷا تاﺮﺸﳊا وأ رﻮﺻﻮﺼﻟا ةﺮﺜﻜﻟ ضﺮﻌﺗ ﺪﻗ ﻖﻃﺎﻨﻣ ﺎﻬﻴﻓ كﺎﻨﻫ ﻲﺘﻟا ناﺪﻠﺒﻟا ﻲﻓ ﻦﻣ ﺔﺻﺎﺧ ﺔﻳﺎﻨﻋ ﺬﺧ ،ىﺮﺧﻷا تاﺮﺸﳊا وأ رﻮﺻﻮﺼﻟا ةﺮﺜﻜﻟ ضﺮﻌﺗ ﺪﻗ ﻖﻃﺎﻨﻣ ﺎﻬﻴﻓ كﺎﻨﻫ ﻲﺘﻟا ناﺪﻠﺒﻟا ﻲﻓ
.تﺎﻗوﻷا ﻊﻴﻤﺟ ﻲﻓ ﻪﻟﻮﺣو زﺎﻬﳉا ﺔﻓﺎﻈﻨﺑ ظﺎﻔﺘﺣﻻا ﻞﺟأ.تﺎﻗوﻷا ﻊﻴﻤﺟ ﻲﻓ ﻪﻟﻮﺣو زﺎﻬﳉا ﺔﻓﺎﻈﻨﺑ ظﺎﻔﺘﺣﻻا ﻞﺟأ
.تﺎﻗوﻷا ﻊﻴﻤﺟ ﻲﻓ ﻪﻟﻮﺣو زﺎﻬﳉا ﺔﻓﺎﻈﻨﺑ ظﺎﻔﺘﺣﻻا ﻞﺟأ
.تﺎﻗوﻷا ﻊﻴﻤﺟ ﻲﻓ ﻪﻟﻮﺣو زﺎﻬﳉا ﺔﻓﺎﻈﻨﺑ ظﺎﻔﺘﺣﻻا ﻞﺟأ.تﺎﻗوﻷا ﻊﻴﻤﺟ ﻲﻓ ﻪﻟﻮﺣو زﺎﻬﳉا ﺔﻓﺎﻈﻨﺑ ظﺎﻔﺘﺣﻻا ﻞﺟأ
.ىﺮﺧﻷا تاﺮﺸﳊا وأ رﻮﺻﻮﺼﻟا ﻪﺛﺪﲢ ﺪﻗ رﺮﺿ يأ زﺎﻬﳉا اﺬﻫ ﺔﻧﺎﻤﺿ ﻲﻄﻐﺗ ﻻ.ىﺮﺧﻷا تاﺮﺸﳊا وأ رﻮﺻﻮﺼﻟا ﻪﺛﺪﲢ ﺪﻗ رﺮﺿ يأ زﺎﻬﳉا اﺬﻫ ﺔﻧﺎﻤﺿ ﻲﻄﻐﺗ ﻻ
.ىﺮﺧﻷا تاﺮﺸﳊا وأ رﻮﺻﻮﺼﻟا ﻪﺛﺪﲢ ﺪﻗ رﺮﺿ يأ زﺎﻬﳉا اﺬﻫ ﺔﻧﺎﻤﺿ ﻲﻄﻐﺗ ﻻ
.ىﺮﺧﻷا تاﺮﺸﳊا وأ رﻮﺻﻮﺼﻟا ﻪﺛﺪﲢ ﺪﻗ رﺮﺿ يأ زﺎﻬﳉا اﺬﻫ ﺔﻧﺎﻤﺿ ﻲﻄﻐﺗ ﻻ.ىﺮﺧﻷا تاﺮﺸﳊا وأ رﻮﺻﻮﺼﻟا ﻪﺛﺪﲢ ﺪﻗ رﺮﺿ يأ زﺎﻬﳉا اﺬﻫ ﺔﻧﺎﻤﺿ ﻲﻄﻐﺗ ﻻ
ّّ
ﻛر
ّ
ﻛرﻛر
ّّ
ﺔﻟﺎﺴﻏ
قوﺪﻨﺻ ةﺪﻋﺎﻗ
.ﻦﺤﺸﻟا
.ﻦﺤﺸﻟا قوﺪﻨﺻ ﺔﻣﺎﻋد
(ﺪﻋﺎﺴﻣ مﺪﺨﺘﺴﻳ ﻻ ﺪﻗ
ﻮﳌا ﺐﺴﺣ ﺔﻴﺸﳊا).ﻞﻳد
ﻞﻘﻨﻟا ﺮﻴﻣﺎﺴﻣ ﻞﻘﻨﻟا ﺮﻴﻣﺎﺴﻣ
ﻞﻘﻨﻟا ﺮﻴﻣﺎﺴﻣ
ﻞﻘﻨﻟا ﺮﻴﻣﺎﺴﻣ ﻞﻘﻨﻟا ﺮﻴﻣﺎﺴﻣ
ﻮﺑ زﺎﻬﳉا ﺖﻴﺒﺜﺗ ﰎوﺪﺣ ﻦﻋ زﺎﻬﳉا ﻊﻨﳌ ﻞﻘﻨﻟا ﺮﻴﻣﺎﺴﻣ ﺔﻄﺳا.ﻞﻘﻨﻟا ءﺎﻨﺛأ زﺎﻬﳉا ﻞﺧاد رﺮﻀﻟا ث
و ﻲﻓ ﻦﺤﺸﻟا .ﻦﺤﺸﻟا قوﺪﻨﺻ ةﺪﻋﺎﻗ ﻂﺳ
ﻞﻘﻨﻟا ﺮﻴﻣﺎﺴﻣ ﺔﻟازإ ﻞﻘﻨﻟا ﺮﻴﻣﺎﺴﻣ ﺔﻟازإ
ﻞﻘﻨﻟا ﺮﻴﻣﺎﺴﻣ ﺔﻟازإ
ﻞﻘﻨﻟا ﺮﻴﻣﺎﺴﻣ ﺔﻟازإ ﻞﻘﻨﻟا ﺮﻴﻣﺎﺴﻣ ﺔﻟازإ
■
●و ﻦﺤﺸﻟا قوﺪﻨﺻ عﺰﻧ ﺐﺠﻳﺮﺘﻟا ﺮﻴﻣﺎﺴﻣ.ﺔﻟﺎﺴﻐﻟا لﺎﻤﻌﺘﺳا ﻞﺒﻗ ﺎﻬﻠﻛ ﻞﻴﺣ
قوﺪﻨﺻ تﺎﻣﺎﻋد ﻞﻛ عﺰﻧ ﻦﻣ ﺪﻛﺄﺗ،ﻦﺤﺸﻟا قوﺪﻨﺻ ةﺪﻋﺎﻗ ﺾﻓ ﺪﻨﻋ
■
3.تاداﺪﺴﻟا ﻊﻣ ﺮﻴﻣﺎﺴﻣ ٤ ﺐﺤﺳا
ﻮﻠﺑ قﻮﺜﻠﻟ ﺔﻴﻃﺎﻄﳌاﻆﻔﺣا .ﻞﻴﻠﻘﺑ ةداﺪﺴﻟﺎﻳ
و ﺮﻴﻣﺎﺴﻣ ٤ﻮﻠﻣﻮﻤﺼﻟا يﻲﻓ ﺎﻬﻣاﺪﺨﺘﺳﻻ ﺔﻟ
.ﻞﺒﻘﺘﺴﳌا
●زﺎﻬﳉا ﺖﻴﺒﺜﺗ ﻦﻣ ﺪﺑ ﻻ ،زﺎﻬﳉا ﺖﻠﻘﻧ ﺎﻤﻠﻛ
ﺮﻣ ﺮﻴﻣﺎﺴﳌﺎﺑ.ﺔﻴﻧﺎﺛ ة
4وﺰﳌا ﺔﻴﻄﻏﻷﺎﺑ تﺎﺤﺘﻔﻟا ﻖﻠﻏا ..ةد
ﻞﺒﻗ . ﺔﺻﺎﺧ ﺮﻴﻣﺎﺴﻣ ٤ ـﺑ زﺎﻬﳉا ﺖﻴﺒﺜﺗ
تاداﺪﺴﻟا ﻊﻣ ﺮﻴﻣﺎﺴﳌا لزا ، زﺎﻬﳉا ﻞﻴﻐﺸﺗ
ﻮﻘﺜﻠﻟ ﺔﻴﻃﺎﻄﳌا.ب
و ، ﺪﻳﺪﺷو ﺞﻴﺠﺿ.ﻞﻄﻋ
.زﺎﻬﳉﺎﺑ
1.ﻮﺣ ﻊﻨﳌﰎ ،ﻞﻘﻨﻟا ءﺎﻨﺛأ زﺎﻬﳉا ﻞﺧاد رﺮﺿ ثد
●ﺰﺗ ﻢﻟ اذإﺆﻳ ﺪﻗ اﺬﻫ ،ﺎﻬﻟﺰﺘﻫا ثاﺪﺣإ ﻰﻟا يدزا
2.ﻮﺑ ﺮﻴﻣﺎﺴﻣ ٤ خراﻮﻤﺻ حﺎﺘﻔﻣ ﺔﻄﺳاوﺰﻣ ﺔﻟد
6
Page 41

ﺐﻴﻛﺮﺘﻟاﺐﻴﻛﺮﺘﻟا
ﺐﻴﻛﺮﺘﻟا
ﺐﻴﻛﺮﺘﻟاﺐﻴﻛﺮﺘﻟا
: ﺔﻳﻮﺘﺴﳌا ضرﻷا: ﺔﻳﻮﺘﺴﳌا ضرﻷا
: ﺔﻳﻮﺘﺴﳌا ضرﻷا
: ﺔﻳﻮﺘﺴﳌا ضرﻷا: ﺔﻳﻮﺘﺴﳌا ضرﻷا
ﻪﻠﻛ ﺔﻟﺎﺴﻐﻟا زﺎﻬﺟ ﺖﲢ حﻮﻤﺴﳌا راﺪﺤﻧﻻا1رد . ﺔﺟ
: رﺎﻴﺘﻟا جﺮﺨﻣ: رﺎﻴﺘﻟا جﺮﺨﻣ
: رﺎﻴﺘﻟا جﺮﺨﻣ
: رﺎﻴﺘﻟا جﺮﺨﻣ: رﺎﻴﺘﻟا جﺮﺨﻣ
و ﻦﻣ ﺪﺑ ﻻﻮﺟ ﻦﻤﺿ ﻲﻓ هد1.5ﻻ .ﺔﻟﺎﺴﻐﻟا ﻲﺒﻧﺎﺟ ﻦﻣ ﺮﺘﻣ
زﺎﻬﺟ ﻻإ ﻞﺻﻮﺗو ا.رﺎﻴﺘﻟا جﺮﺨﻣ ﻰﻟا اﺪﺣا
: ﺔﻴﻓﺎﺿﻹا ﺔﻓﺎﺴﳌا: ﺔﻴﻓﺎﺿﻹا ﺔﻓﺎﺴﳌا
: ﺔﻴﻓﺎﺿﻹا ﺔﻓﺎﺴﳌا
: ﺔﻴﻓﺎﺿﻹا ﺔﻓﺎﺴﳌا: ﺔﻴﻓﺎﺿﻹا ﺔﻓﺎﺴﳌا
و ، راﺪﳉا ﻦﻣو ،بﺎﺒﻟارﻷاﻮﻠﻄﻣ ةدﺪﶈا ﺔﻓﺎﺴﳌا ض.ﺔﺑ
زﺎﻬﺟ ﻰﻠﻋأ ﻰﻠﻋ ﺎﻬﻈﻔﲢ وأ ﺎﻬﻠﺴﻐﺗ ﻲﺘﻟا ﺲﺑﻼﳌا ﻊﻀﺗ ﻻ
و يأ ﻲﻓ ﺔﻟﺎﺴﻐﻟا.ﺖﻗ
ﺆﺗ ﻲﻫ.ﻪﻴﻓ ﻢﻜﺤﺘﻟا وأ ﻞﻴﺴﻐﻟا ءﺎﻬﺘﻧا ﻰﻠﻋ ﺮﺛ
ﺐﻴﻛﺮﺘﻟا نﺎﻜﻣ ﻲﻓ تﺎﺒﻠﻄﺘﻣ ﺐﻴﻛﺮﺘﻟا نﺎﻜﻣ ﻲﻓ تﺎﺒﻠﻄﺘﻣ
ﺐﻴﻛﺮﺘﻟا نﺎﻜﻣ ﻲﻓ تﺎﺒﻠﻄﺘﻣ
ﺐﻴﻛﺮﺘﻟا نﺎﻜﻣ ﻲﻓ تﺎﺒﻠﻄﺘﻣ ﺐﻴﻛﺮﺘﻟا نﺎﻜﻣ ﻲﻓ تﺎﺒﻠﻄﺘﻣ
)10 / ﻒﻠﺧ : ﻢﺳ 2و ﲔﳝ ﲔﺒﻧﺎﺟ : ﻢﺳ (رﺎﺴﻳ
ﻮﳌأ قرﻮﺑ ﻰﻄﻐﻣ لزﺎﻋﻮﻴﻧﻮﻓ)مﻮﳌا ﺐﻧﺎﳉا ﻰﻠﻋ (ﻞﻳﻮﳌا وأ نﺮﻔﻠﻟ ﻪﺟا،ﺪﻗ
زﺎﻬﳉا ﲔﺑ ﻪﻟﺎﺧدإ ﻢﺘﻳ نأ ﻰﻠﻋ.ﻦﻳ
نﺎﻜﳌا ﺪﻳﺪﲢ نﺎﻜﳌا ﺪﻳﺪﲢ
نﺎﻜﳌا ﺪﻳﺪﲢ
نﺎﻜﳌا ﺪﻳﺪﲢ نﺎﻜﳌا ﺪﻳﺪﲢ
رود نأ ﻦﻣ ﺪﻛﺄﺗﻮﻬﻟا ناﺮﻴﻏ وأ طﺎﺴﺑ،دﺎﺠﺴﻟا ﻪﻘﻴﻌﻳ ﻻ ﺔﻟﺎﺴﻐﻟا لﻮﺣ ءا.ه
.ﺔﻟﺎﺴﻐﻟا ﻞﻔﺳأ
■
■
•ﻮﺘﺴﻣ يأ ﺢﻴﺤﺼﺗ اﺪﺑأ لوﺎﲢ ﻻﺮﻃ ﻦﻋ طﻼﺒﻟا ﻰﻠﻋ ىﻮﻟأ،ﺔﻴﺒﺸﺧ ﻊﻄﻗ ﻖﻳﻮﻣ وأ ﺔﻴﺒﺸﺧ حاﻚﻟﺬﺑ ﻪﻴﺒﺷ دا
•و ﺐﻨﲡ لﺎﺤﺘﺳا اذإﺮﻘﻟﺎﺑ ﺔﻟﺎﺴﻐﻟا ﻊﺿﻮﻣ ﻦﻣ بﻮﻣ وأ(نﺮﻓ)زﺎﻏ ﺪﻗو ﺐﺠﻳ،ﻢﺤﻔﻟﺎﺑ ﻞﻤﻌﻳ ﺪﻗﻊﺿ
•ﺮﺗ مﺪﻋ ﺐﺠﻳﺮﻏ ﻲﻓ ﺔﻟﺎﺴﻐﻟا ﺐﻴﻛرد ﺾﻔﺨﻨﺗ نأ ﻦﻜﳝ فﺮﺣ ﺔﺟرارد ﺮﻔﺼﻟا نود ﻰﻟإ ﺎﻬﺗﻮﺌﻣ ﺔﺟ.ﺔﻳ
•ﺮﻟاﺮﺗ ﺪﻨﻋ ﺪﻛﺄﺘﻟا ءﺎﺟﻮﻬﺳ ﺔﻟﺎﺴﻐﻟا ﺐﻴﻛ.ﺎﻬﻠﻄﻌﺗ ﺔﻟﺎﺣ ﻲﻓ ﺔﻧﺎﻴﺼﻟا ﻲﻨﻓ لﻮﺻو ﺔﻟ
•ﺮﺗ ﻊﻣرﻷا ماﺪﻗﻻا ﻞﻳﺪﻌﺘﺑ ﻢﻗ ﺔﻟﺎﺴﻐﻟا ﺐﻴﻛﺮﺘﻟا رﺎﻤﺴﻣ حﺎﺘﻔﻣ لﺎﻤﻌﺘﺳﺎﺑ ﺔﻌﺑوﺰﳌا ﻞﻴﺣﺮﻘﺘﺳا ﻦﻣ ﺪﻛﺄﺘﻠﻟ درا
و و ﺔﻟﺎﺴﻐﻟاﻮﺟﻮﻠﺧ دو ﺔﻟﺎﺴﻐﻟا ﺔﻤﻗ ﲔﺑ ﻢﻠﻣ ٢٠ راﺪﻘﲟ صﺮﺤﻤﻠﻟ ﻞﻔﺳﻷا ﺐﻧﺎﳉا.ﺎﻴﻠﻌﻟا تﺎﻛ
7
Page 42

ﺐﻴﻛﺮﺘﻟاﺐﻴﻛﺮﺘﻟا
ﺐﻴﻛﺮﺘﻟا
ﺐﻴﻛﺮﺘﻟاﺐﻴﻛﺮﺘﻟا
ﻲﺋﺎﺑﺮﻬﻜﻟا ﻞﻴﺻﻮﺘﻟا ﻲﺋﺎﺑﺮﻬﻜﻟا ﻞﻴﺻﻮﺘﻟا
ﻲﺋﺎﺑﺮﻬﻜﻟا ﻞﻴﺻﻮﺘﻟا
ﻲﺋﺎﺑﺮﻬﻜﻟا ﻞﻴﺻﻮﺘﻟا ﻲﺋﺎﺑﺮﻬﻜﻟا ﻞﻴﺻﻮﺘﻟا
و .ﻪﻴﻠﻋ ﻂﻐﻀﻟﺎﺑ ﺮﺴﻜﻨﻳ ﺪﻗ ﺪﻤﺠﺘﳌاو ﻞﻄﻌﺘﺗ ﺪﻗوﺮﺘﻜﻟﻹا ﻢﻜﺤﺘﻟا ةﺪﺣرد ﻲﻓ ﻲﻧﺮﳊا ﺔﺟراﺔﻄﻘﻧ ﺖﲢ ة
ﺆﻳ ﺪﻗ ﺺﺘاﺮﲟ ﻞﺼﺗا .ﺮﻴﻄﳋا ﻞﻄﻌﻟا وأ حﺮﳉﺎﺑ ﺺﺨﺸﻟا ﺔﺑﺎﺻإ ﻰﻟا يد.ﻚﻟ ﻲﻠﶈا تﺎﻣﺪﳋا ﺰﻛ
رد ﻲﻓ ﺔﻟﺎﺴﻐﻟاﺮﺣ ﺔﺟراﺮﻐﻟا ة.ﻪﻠﻴﻐﺸﺗ ﻞﺒﻗ تﺎﻋﺎﺳ ﺾﻌﺑ ةﺪﳌ ﺔﻓ
■
1ﻮﺤﻣ وأ ﺎﻴﻓﺎﺿإ ﺎﻜﻠﺳ مﺪﺨﺘﺴﺗ ﻻ .ﺰﻣ ﻻود.ﺎﺟ
2رﺮﻀﻣ رﺎﻴﺘﻟا ﻚﻠﺳ نﺎﻛ اذإ .و وأ ﻊﻧﺎﺼﻟا ﻞﺒﻗ ﻦﻣ ﺪﻳﺪﳉﺎﺑ ﻪﻠﻳﺪﺒﺗ ﻦﻣ ﺪﺑ ﻻ ، اﻲﻨﻓ وأ ﻪﻟ تﺎﻣﺪﳋا ﻞﻴﻛ
ﺆﻣ.ﺮﻄﺧ ﺐﻨﲡ ﻞﺟأ ﻦﻣ ﻪﻴﺒﺷ ﻞﻫ
3و ﺎﻤﺋاد زﺎﻬﳉا ﺲﺑﺎﻗ عﺰﻧا ..زﺎﻬﳉا ماﺪﺨﺘﺳا ﺪﻌﺑ ءﺎﳌا ﺔﻴﻔﻨﺣ ﻖﻠﻏا
4رأ لﻮﺻﻮﳌا رﺎﻴﺘﻟا جﺮﺨﻣ ﻰﻟا ﺔﻟﺎﺴﻐﻟا زﺎﻬﺟ ﻞﺻ .و ﺎﻴﺿ.كﻼﺳﻷا ﻞﻴﺻﻮﺗ مﺎﻜﺣﻷ ﺎﻘﻓ
5و ﻦﻣ ﺪﺑ ﻻ .ﻮﻬﺴﺑ رﺎﻴﺘﻟا جﺮﺨﻣ ﻰﻟا ﺲﺑﺎﻘﻟا ﻞﻴﺻﻮﺗ ﻦﻜﳝ ﺚﻴﺤﺑ زﺎﻬﳉا ﻊﺿ.ﺔﻟ
❖ﺆﳌا ﻲﻨﻔﻟا ﻞﺒﻗ ﻦﻣ ﻪﺑ مﺎﻴﻘﻟا ﻦﻣ ﺪﺑ ﻻ ﺔﻟﺎﺴﻐﻟا زﺎﻬﺟ حﻼﺻإ ﺮﻴﻏ ﻲﻨﻔﻟا ﻞﺒﻗ ﻦﻣ حﻼﺻﻹﺎﺑ مﺎﻴﻘﻟا . ﻞﻫ
❖ﺮﺗ ﻻ ﻛّﺮﻐﻟا ﻲﻓ ﺔﻟﺎﺴﻐﻟا زﺎﻬﺟ ﺐرد نﻮﻜﺗ ﻲﺘﻟا فﺮﳊا ﺔﺟرارد ﻦﻣ ﻞﻗأ ﺎﻬﻴﻓ ةﺮﳋا .ﺪﻴﻤﺠﺘﻟا ﺔﺟﻮﻃم
.ﺪﻴﻤﺠﺘﻟا
❖و ﺔﻴﺋﺎﺘﺸﻟا ﺮﻬﺷﻷا ﻲﻓ زﺎﻬﳉا ﻞﻘﻧ ﰎ اذإ رد ﺖﻧﺎﻛﺮﳊا ﺔﺟرازﺎﻬﺟ ﻆﻔﺣا :ﺪﻴﻤﺠﺘﻟا ﺔﻄﻘﻧ ﻦﻣ ﻞﻗأ ﺎﻬﻴﻓ ة
ﺮﻳﺬﲢ
tﺮﻬﻜﻟا رﺎﻴﺘﻟا ﻚﻠﺴﻟ ﺔﺒﺴﻨﻟﺎﺑ :ﺮﻳﺬﲢ.ﺰﻬﺟﻷا ﻢﻈﻌﻣ ﻲﻓ ﻰﺻﻮﻳ ،ﻲﺑﻮﺑ ةﺮﺋاد ﻊﺿو يدﺎﺣأ ﺬﻔﻨﻣ تاذ ،ﺔﺼﺼﺨﻣ ةيﺬﻟا
ﻮﳌا ﺔﺤﻔﺻ ﺮﻈﻧا.ﺪﻛﺄﺘﻠﻟ ﻚﻟﺎﳌا ﻞﻴﻟد ﻲﻓ تﺎﻔﺻا
ﺮﳌا وأ ﺔﻔﻟﺎﺘﻟا وأ ،ﺔﻴﻟﺎﻌﻟا لﺎﻤﺣﻷا تاذ ﻂﺋﺎﳊا ﺬﻓﺎﻨﻣ ﻦﻣ ﻞﻜﻓﺮﻬﻜﻟا كﻼﺳﻷا وأ ﺪﻳﺪﻤﺘﻟا كﻼﺳأ وأ ﺔﻴﺨﺗوأ ﺔﻴﻟﺎﺒﻟا ﺔﻴﺑ
.ﺔﳝﺪﻗ ﻢﻴﻃاﺮﺧ ﺔﻋﻮﻤﺠﻣ مﺪﺨﺘﺴﺗ ﻻو ةﺪﻳﺪﺟ ﻢﻴﻃاﺮﺧ ﺔﻋﻮﻤﺠﻣ ﺔﻄﺳاﻮﺑ ءﺎﳌا ﺔﻴﻔﻨﺣ ﻰﻟا ﻪﻠﻴﺻﻮﺗ ﻦﻣ ﺪﺑ ﻻ ﺔﻟﺎﺴﻐﻟا زﺎﻬﺟ .ﺔﳝﺪﻗ ﻢﻴﻃاﺮﺧ ﺔﻋﻮﻤﺠﻣ مﺪﺨﺘﺴﺗ ﻻو ةﺪﻳﺪﺟ ﻢﻴﻃاﺮﺧ ﺔﻋﻮﻤﺠﻣ ﺔﻄﺳاﻮﺑ ءﺎﳌا ﺔﻴﻔﻨﺣ ﻰﻟا ﻪﻠﻴﺻﻮﺗ ﻦﻣ ﺪﺑ ﻻ ﺔﻟﺎﺴﻐﻟا زﺎﻬﺟ
.ﺔﳝﺪﻗ ﻢﻴﻃاﺮﺧ ﺔﻋﻮﻤﺠﻣ مﺪﺨﺘﺴﺗ ﻻو ةﺪﻳﺪﺟ ﻢﻴﻃاﺮﺧ ﺔﻋﻮﻤﺠﻣ ﺔﻄﺳاﻮﺑ ءﺎﳌا ﺔﻴﻔﻨﺣ ﻰﻟا ﻪﻠﻴﺻﻮﺗ ﻦﻣ ﺪﺑ ﻻ ﺔﻟﺎﺴﻐﻟا زﺎﻬﺟ
.ﺔﳝﺪﻗ ﻢﻴﻃاﺮﺧ ﺔﻋﻮﻤﺠﻣ مﺪﺨﺘﺴﺗ ﻻو ةﺪﻳﺪﺟ ﻢﻴﻃاﺮﺧ ﺔﻋﻮﻤﺠﻣ ﺔﻄﺳاﻮﺑ ءﺎﳌا ﺔﻴﻔﻨﺣ ﻰﻟا ﻪﻠﻴﺻﻮﺗ ﻦﻣ ﺪﺑ ﻻ ﺔﻟﺎﺴﻐﻟا زﺎﻬﺟ .ﺔﳝﺪﻗ ﻢﻴﻃاﺮﺧ ﺔﻋﻮﻤﺠﻣ مﺪﺨﺘﺴﺗ ﻻو ةﺪﻳﺪﺟ ﻢﻴﻃاﺮﺧ ﺔﻋﻮﻤﺠﻣ ﺔﻄﺳاﻮﺑ ءﺎﳌا ﺔﻴﻔﻨﺣ ﻰﻟا ﻪﻠﻴﺻﻮﺗ ﻦﻣ ﺪﺑ ﻻ ﺔﻟﺎﺴﻐﻟا زﺎﻬﺟ
.ﺮﻄﺧ قﻮﻘﺸﳌا وأ ﺔﻔﻟﺎﺘﻟا كﻼﺳﻷا لﺰﻋ
و ،زﺎﻬﳉا ﻚﻠﺳ ﺺﺤﻓاﺰﻧﺎﻓ ،كﻼﻫإ وأ ﻒﻠﺗ يأ ﻪﻴﻠﻋ ﺮﻬﻇ اذإو ،ﺲﺑﺎﻘﻟا ﻦﻣ ﻪﻋوأو ،زﺎﻬﳉا ﻞﻴﻐﺸﺗ ﻒﻗﻚﻠﺴﻟا لﺪﺒﺘﺳا
ﻮﺑ ﻞﺛﺎﳑ ﺮﺧأ ﻚﻠﺴﺑ.ﺪﻤﺘﻌﻣ ﺔﻧﺎﻴﺻ ﻲﻨﻓ ﺔﻄﺳا
ﺮﻬﻜﻟا رﺎﻴﺘﻟا ﻚﻠﺳ ﻲﻤﺣاﻮﺳ ﻦﻣ ﻲﺑﻮﺘﻟا ﻢﺘﻳ نﺄﻛ ﻲﻜﻴﻧﺎﻜﻴﳌا وأ يدﺎﳌا ماﺪﺨﺘﺳﻻا ءﺮﺧ وأ ﻪﺋاوأ ﻪﻴﻠﻋ بﺎﺒﻟا قﻼﻏإ وأ ﻪﻗ
ءﺎﳌا ﺪﻳوﺰﺗ مﻮﻃﺮﺧ ﻞﻴﺻﻮﺗ ءﺎﳌا ﺪﻳوﺰﺗ مﻮﻃﺮﺧ ﻞﻴﺻﻮﺗ
ءﺎﳌا ﺪﻳوﺰﺗ مﻮﻃﺮﺧ ﻞﻴﺻﻮﺗ
ءﺎﳌا ﺪﻳوﺰﺗ مﻮﻃﺮﺧ ﻞﻴﺻﻮﺗ ءﺎﳌا ﺪﻳوﺰﺗ مﻮﻃﺮﺧ ﻞﻴﺻﻮﺗ
❖ ﲔﺑ ﻦﻣ ءﺎﳌا ﻂﻐﺿ ﻦﻣ ﺪﺑ ﻻ 30 kPa و 1000 kPa
2
(
)10-0,3 ﻮﻗ.ﻢﺠﻛﻢﺳ/ة
❖ﻠﺼﺗ وأ ﺮﺸﻘﺗ ﻻ ّﺮﺧ ﻞﻴﺻﻮﺗ ﺪﻨﻋ ﻂﻴﳋا ﺐﻮﻃم
زﻮﺗ.لﻮﺧﺪﻟا مﺎﻤﺻ ﻰﻟا ءﺎﳌا ﺪﻳ
❖ ﻦﻣ ﺮﺜﻛأ ءﺎﳌا ﻂﻐﺿ نﺎﻛ اذإ 1000 kPaﺪﺑ ﻻ ،
ﺮﺗ ﻦﻣ.ﻂﻐﻀﻟا ﺾﻔﺧ ةادإ ﺐﻴﻛ
●وﺰﻣ نﺎﻴﻃﺎﻄﳌا نﺎﻤﺘﳋاﺮﺨﺑ نادﻮﻃوﺰﺗ مءﺎﳌا ﺪﻳ
وﺮﺴﺗ ﻊﻨﻣ ﻞﺟأ ﻦﻣ ناﺬﻫ.ءﺎﳌا ب
●ﺢﺘﻔﺑ مﺎﻜﺣﺈﺑ ﺔﻟﺎﺴﻐﻟا زﺎﻬﺟ تﻼﻴﺻﻮﺗ ﻦﻣ ﺪﻛﺄﺗ
.ﺎﻣﺎﲤ ءﺎﳌا ﺔﻴﻔﻨﺣ
ﺮﳋا لﻮﻃم
ّ
●ﺮﳋا ﺔﻟﺎﺣ ﺺﺤﻓا ﻮﻃﺮﺘﻓ ﻰﻠﻋ مو تاﺪﺑ
.ﺔﺟﺎﳊا ﺪﻨﻋ ﺪﻳﺪﺠﺑ
●و مﺪﻋ ﻦﻣ ﺪﻛﺄﺗ ﻮﺟﺮﳋا ﻲﻓ ﻲﻟ دﻮﻃو مﻂﻐﺿ مﺪﻋ
ﺮﳋاﻮﻃ.م
ﺔﻈﺣﻼﻣ
:ﺮﺴﺗ ﺔﻟﺎﺣ ﻲﻓ ،ﻞﻴﺻﻮﺘﻟا لﺎﻤﺘﻛا ﺪﻌﺑءﺎﳌا ب
ﻮﻄﳋا ﺲﻔﻧ رمﺪﺨﺘﺳا .تا
ﻮﻬﺳ ﺔﻴﻔﻨﳊا ﻦﻣ عﻮﻧ ﺮﺜﻛأ و .ءﺎﳌا داﺪﻣﻹ ﺔﻟﻲﻓ
ﺮﳋا ﻦﻣ ﻮﻃﺮﻛ ،م
ّ
ﺮﺧ ﺔﻠﻴﺻﻮﺗﻮﻃم
ﻲﻃﺎﻄﻣ ﻢﺘﺧ
ﺮﻣ ﺔﻴﻔﻨﳊا نأ ﺔﻟﺎﺣ ﺮﻴﺒﻛ وأ ﺔﻌﺑعﺰﻧا ،اﺪﺟ ة
.لﻮﶈا ﻰﻟا ﺔﻴﻔﻨﳊا لﺎﺧدإ ﻞﺒﻗ دﺎﻌﺑﻹا ﺔﻘﻠﺣ
وﺰﻳﺮﻬﻜﻟا رﺎﻴﺘﻟا دو ﻂﻘﻓ زﺎﻬﺠﻠﻟ ﻲﺑﻮﻳ ﻻود وأ ﺔﻴﻓﺎﺿإ ﺬﻓﺎﻨﻣ ﺔﻳأ ﻪﺑ ﺪﺟﺮﻓ ﺮﺋا.ﺔﻴﻋ
ﺰﺗ ﻻ.ﻂﺋﺎﳊا ﺬﻓﺎﻨﻣ ﻞﻤﺣ ﺪﻳ
ووﺮﻈﻟا هﺬﻫ ﻦﻣ يﻷ ﻦﻜﳝﺮﻬﻛ ﻖﻌﺻ ﺐﺒﺴﺗ نأ فرﺎﻨﻟا لﺎﻌﺘﺷا وأ ﻲﺑ.
ﻮﻓ ﻲﺸﳌاﻪﻗ.
ﺮﻳﺮﻣ ﻰﺟﻮﻘﻟا ﻊﻣ ﻞﻣﺎﻌﺘﻟا ﺪﻨﻋ هﺎﺒﺘﻧﻻا ةﺎﻋاو ﺲﺑارﺪﳉا ﺬﻓﺎﻨﻣو نا.زﺎﻬﳉا ﻦﻣ ﺎﻬﻨﻣ ﻚﻠﺴﻟا جﺮﺨﻳ ﻲﺘﻟا ﺔﻄﻘﻨﻟا
■
■
8
Page 43

ﺐﻴﻛﺮﺘﻟاﺐﻴﻛﺮﺘﻟا
ﺐﻴﻛﺮﺘﻟا
ﺐﻴﻛﺮﺘﻟاﺐﻴﻛﺮﺘﻟا
3ﺮﺧ ﻊﻓدا .ﻮﻃوﺰﺗ مﻰﻟا ءﺎﳌا ﺪﻳ
ﻮﻤﻋ ﻰﻠﻋﻷاﻞﺼﺘﺗ ﺚﻴﺤﺑ ﺎﻳد
ﻮﳌا ﺔﻴﻃﺎﻄﳌا ﺔﻴﺸﳊاﻮﺟﻞﺧاد ةد
ﺮﳋاﻮﻃﻪﺘﺒﺛ ﻢﺛ مﺎﻜﺣﺈﺑ ﺔﻴﻔﻨﳊﺎﺑ م
وﺪﺘﺑﺮﺒﻟا ﺮﻳ.ﲔﻤﻴﻟا ﻰﻟا ﻰﻏ
ﻰﻠﻋأ ﺔﻠﻴﺻﻮﺗ
ﺔﺤﻴﻔﺻ
ةﺪﺣاو ﺔﺴﳌ عﻮﻧ ﻦﻣ ءﺎﻣ ﺪﻳوﺰﺗ مﻮﻃﺮﺧو ﻂﻴﺧ نوﺪﺑ ﺔﻳدﺎﻋ ﺔﻴﻔﻨﺣ ةﺪﺣاو ﺔﺴﳌ عﻮﻧ ﻦﻣ ءﺎﻣ ﺪﻳوﺰﺗ مﻮﻃﺮﺧو ﻂﻴﺧ نوﺪﺑ ﺔﻳدﺎﻋ ﺔﻴﻔﻨﺣ
ةﺪﺣاو ﺔﺴﳌ عﻮﻧ ﻦﻣ ءﺎﻣ ﺪﻳوﺰﺗ مﻮﻃﺮﺧو ﻂﻴﺧ نوﺪﺑ ﺔﻳدﺎﻋ ﺔﻴﻔﻨﺣ
ةﺪﺣاو ﺔﺴﳌ عﻮﻧ ﻦﻣ ءﺎﻣ ﺪﻳوﺰﺗ مﻮﻃﺮﺧو ﻂﻴﺧ نوﺪﺑ ﺔﻳدﺎﻋ ﺔﻴﻔﻨﺣ ةﺪﺣاو ﺔﺴﳌ عﻮﻧ ﻦﻣ ءﺎﻣ ﺪﻳوﺰﺗ مﻮﻃﺮﺧو ﻂﻴﺧ نوﺪﺑ ﺔﻳدﺎﻋ ﺔﻴﻔﻨﺣ
3ﺮﺧ ﻞﺻ .ﻮﻃوﺰﺗ مﺪﻳ
ﺔﻠﻴﺻﻮﺘﻟا ﻰﻟا ءﺎﳌا
.مﺎﻜﺣﺈﺑ ﺔﻴﻔﻨﳊﺎﺑ ﺔﻴﻃﺎﻄﳌا ﺔﻴﺸﳊا ﻞﺼﺘﺗ
ﻮﻟاﻊﻓﺪﺑ ، ﻰﻄﺳ
ﻰﻟا ﺔﺤﻴﻔﺼﻟا
.ﻞﻔﺳﻷا
ﺔﺤﻴﻔﺻ
ﻰﻠﻋأ ﺔﻠﻴﺻﻮﺗ
ﻮﻟا ﺔﻠﻴﺻﻮﺘﻟاﺔﻴﻔﻨﺣ ﻖﻠﻏا ﻰﻄﺳ
ﺮﺧ ﺐﺤﺳا ﻢﺛ .ءﺎﳌاﻮﻃوﺰﺗ مءﺎﳌا ﺪﻳ
ﻰﻟا ﺔﺤﻴﻔﺼﻟا ﻊﻓﺪﺑ ، ﻞﻔﺳﻷا ﻰﻟا
.ﻞﻔﺳﻷا
ﻰﻏﺮﺑ عﻮﻨﻨﻣ ءﺎﻣ ﺪﻳوﺰﺗ مﻮﻃﺮﺧو ﻂﻴﺧ نوﺪﺑ ﺔﻳدﺎﻋ ﺔﻴﻔﻨﺣ ﻰﻏﺮﺑ عﻮﻨﻨﻣ ءﺎﻣ ﺪﻳوﺰﺗ مﻮﻃﺮﺧو ﻂﻴﺧ نوﺪﺑ ﺔﻳدﺎﻋ ﺔﻴﻔﻨﺣ
ﻰﻏﺮﺑ عﻮﻨﻨﻣ ءﺎﻣ ﺪﻳوﺰﺗ مﻮﻃﺮﺧو ﻂﻴﺧ نوﺪﺑ ﺔﻳدﺎﻋ ﺔﻴﻔﻨﺣ
ﻰﻏﺮﺑ عﻮﻨﻨﻣ ءﺎﻣ ﺪﻳوﺰﺗ مﻮﻃﺮﺧو ﻂﻴﺧ نوﺪﺑ ﺔﻳدﺎﻋ ﺔﻴﻔﻨﺣ ﻰﻏﺮﺑ عﻮﻨﻨﻣ ءﺎﻣ ﺪﻳوﺰﺗ مﻮﻃﺮﺧو ﻂﻴﺧ نوﺪﺑ ﺔﻳدﺎﻋ ﺔﻴﻔﻨﺣ
ﺔﻴﻔﻨﳊﺎﺑ ﺔﻴﻃﺎﻄﳌا ﺔﻴﺸﳊا ﻞﺼﺘﺗ
ﺮﺑ ٤ ﺖﺒﺛ ﻢﺛ .مﺎﻜﺣﺈﺑ.ﻲﻏا
ﻰﻠﻋأ ﺔﻠﻴﺻﻮﺗ
ﺔﻴﻃﺎﻄﻣ ﺔﻴﺸﺣ
ﻰﻠﻋأ ﺔﻠﻴﺻﻮﺗ
ﺮﺧﻮﻃوﺰﺗ مءﺎﳌا ﺪﻳ
ﺮﺑ ٤ ﺖﺒﺛ ﻢﺛ.ﻲﻏا
ﺔﻴﻃﺎﻄﻣ ﺔﻴﺸﺣ
ﻰﻠﻋأ ﺔﻠﻴﺻﻮﺗ
ﺮﺧﻮﻃوﺰﺗ مءﺎﳌا ﺪﻳ
●ﺮﺧ ﻞﺼﻔﻟ ﻮﻃوﺰﺗ مﻦﻋ ءﺎﳌا ﺪﻳ
ﻮﻟا ﺔﻠﻴﺻﻮﺘﻟا رﻲﻜﻟ ﻰﻄﺳ
و ﺔﻠﻴﺻﻮﺗﻰﻄﺳ
ّ
ﺔﻴﻃﺎﻄﻣ ﺔﻴﺸﺣ
و ﺔﻠﻴﺻﻮﺗﻰﻄﺳ
●ود
ﺮﺴﺘﻳ ﻻ.ءﺎﳌا ب
ﺔﻴﻃﺎﻄﻣ ﺔﻴﺸﺣ
.ﻞﻴﻟﺪﻟا ﺔﺤﻴﻔﺻ ﻦﻣ
●ﻲﻃﺎﻄﳌا ﻢﺘﳋا نأ ﻦﻣ ﺪﻛﺄﺗ
ﻮﻣﻮﺟﺮﳋا ﺔﻠﻴﺻﻮﺗ ﻞﺧاد دﻮﻃ.م
ﻞﻴﻟد ﺔﺤﻴﻔﺻ
ﺮﺧ ﺔﻠﻴﺻﻮﺗﻮﻃم
ﻲﻃﺎﻄﻣ ﻢﺘﺧ
ﺔﻠﻴﺻﻮﺗ
ﺔﻣﺪﺨﺘﺴﻣ ﺔﻴﻘﻓﻷا ﺔﻴﻔﻨﳊا
■
1ﺮﺒﻟا خرا ..ﺔﻴﻔﻨﳊا ﺖﻴﺒﺜﺘﻟ ﻰﻏ2ﻰﺘﺣ ﻰﻠﻋﻷا ﻰﻟا ﺔﻠﻴﺻﻮﺘﻟا ﻊﻓدا .
ﺮﺑﺖﻴﺒﺜﺘﻟا ﻰﻏ
■
1ﺮﺑ خرا .ﻰﻠﻋﻷا ﺔﻠﻴﺻﻮﺘﻟا ﻰﻏ2ﻰﺘﺣ ﻰﻠﻋﻷا ﻰﻟا ﻰﻠﻋﻷا ﺔﻠﻴﺻﻮﺘﻟا ﻊﻓدا .
ﻰﻠﻋأ ﺔﻠﻴﺻﻮﺗ
ﺮﺑﺖﻴﺒﺜﺘﻟا ﻰﻏ
●ﺮﺒﻛأ ﺔﻴﻔﻨﳊا ﺮﻄﻗ نأ ﺔﻟﺎﺣ ﻲﻓ
ﺔﻴﻘﻓأ ﺔﻴﻔﻨﺣ
ﺔﻴﻓﺎﺿإ ﺔﻴﻔﻨﺣ
ﺮﻣ ﺔﻴﻔﻨﺣﺔﻌﺑ
●و مﺪﻋ نأ ﻦﻣ ﺪﻛﺄﺗ ﻮﺟﻲﻓ ﻲﻟ د
ﺮﳋاﻮﻃو مﺮﳋا نأﻮﻃﻮﻐﻀﻣ ﺮﻴﻏ م.ط
9
Page 44

ﺐﻴﻛﺮﺘﻟاﺐﻴﻛﺮﺘﻟا
ﺐﻴﻛﺮﺘﻟا
ﺐﻴﻛﺮﺘﻟاﺐﻴﻛﺮﺘﻟا
ﺮﻌﻟا ﻲﻓ ماﺪﺨﺘﺳﻼﻟ وأ ﺮﺤﺒﻟا ﱳﻣ ﻰﻠﻋ ماﺪﺨﺘﺳﻼﻟ ﻢﻤﺼﻣ ﺮﻴﻏ زﺎﻬﳉا اﺬﻫ تﺎﺑ
ﺮﺤﺘﳌاو ﺔﻠﻓﺎﻘﻟا ﻞﺜﻣ ﺔﻛﺮﺋﺎﻄﻟا.ﺦﻟا ... ة
واﻮﻃ ةﺪﳌ زﺎﻬﳉا ماﺪﺨﺘﺳا مﺪﻋ ﺔﻟﺎﺣ ﻲﻓ ﺔﻴﻔﻨﳊا ﻒﻗزﺎﺟﻹا ﻞﺜﻣ) ﺔﻠﻳﺲﻴﻟ ﺔﺻﺎﺧ ، (ة
ﺮﺼﺘﻠﻟ ﺔﺤﺘﻔﻟا كﺎﻨﻫوﺪﺧﻷا ) ﻒﻳﺮﻘﻟﺎﺑ (د.ب
و ﻞﺑﺎﻘﻟا ﺮﻦﻣ ﺮﻐﺼﻟا ﻊﻨﳌ بﺎﺒﻟا ﻞﻔﻗ ﺮﺴﻛا
ّ
ﺮﻃ ﺪﻨﻋ ﺮﻟا ﻞﺑﺎﻜﻟا ﻊﻄﻗا ،زﺎﻬﳉا دو ﻲﺴﻴﺋﻣد
ﻮﻘﺳ.زﺎﻬﳉا ﻞﺧاد ﻲﻓ ﻢﻬﻃ
و مﻼﻓﻷا ﻞﺜﻣ) ﺔﻴﺸﳊا ةدﺎﻣ وﺮﻴﺘﺴﻟاﻮﻓﺮﻴﻄﺧ نﻮﻜﺗ ﺪﻗ (مﺮﻄﺧ كﺎﻨﻫ .لﺎﻔﻃﻸﻟ ة
ﺮﺗا ! قﺎﻨﺘﺧﻻا.لﺎﻔﻃﻷا ﻦﻋ ﺪﻌﺒﻟا ﻰﻠﻋ اﺪﻴﺟ تﺎﻔﻴﻠﻐﺘﻟا ﻊﻴﻤﺟ ك
60ﻞﻗﻷا ﻰﻠﻋ ﻢﺳ
100ﻰﺼﻗﻷا ﻰﻠﻋ ﻢﺳ
ﻒﻳﺮﺼﺘﻟا مﻮﻃﺮﺧ ﺐﻴﻛﺮﺗ ﻒﻳﺮﺼﺘﻟا مﻮﻃﺮﺧ ﺐﻴﻛﺮﺗ
ﻒﻳﺮﺼﺘﻟا مﻮﻃﺮﺧ ﺐﻴﻛﺮﺗ
ﻒﻳﺮﺼﺘﻟا مﻮﻃﺮﺧ ﺐﻴﻛﺮﺗ ﻒﻳﺮﺼﺘﻟا مﻮﻃﺮﺧ ﺐﻴﻛﺮﺗ
100ﻢﺳ
145ﻢﺳ
■
●ﺮﺗ ﺪﻨﻋ ﺮﺧ ﺐﻴﻛﻮﻃﺮﺼﺘﻟا مﻮﻟﺎﺒﻟا ﻲﻓ ﻒﻳ،ﺔﻋ
ﻮﺑ مﺎﻜﺣﺈﺑ ﻪﺘﺒﺛ.ﻞﺒﺣ ﺔﻄﺳا
●ﺮﺧ ﺖﻴﺒﺜﺗ ﻮﻃﺮﺼﺘﻟا مﻲﻤﺤﻳ ﺐﺳﺎﻨﳌا ﻒﻳ
رﻷاﺮﺴﺗ ﺐﺒﺴﺑ رﺮﻀﻟا ﻦﻣ ض.ءﺎﳌا ب
ﻮﺣض
ﺮﺧﻮﻃم
ﺰﺘﺤﻣﺔﺟ
ﺰﺣر ماﻂﺑ
ﻞﻴﺴﻐﻟا
60ﻞﻗﻷا ﻰﻠﻋ ﻢﺳ
100ﻰﺼﻗﻷا ﻰﻠﻋ ﻢﺳ
100ﻰﺼﻗﻷا ﻰﻠﻋ ﻢﺳ
60ﻞﻗﻷا ﻰﻠﻋ ﻢﺳ
145ﻢﺳ
105ﻢﺳ
100ﻢﺳ
105ﻢﺳ
100ﻰﺼﻗﻷا ﻰﻠﻋ ﻢﺳ
60ﻞﻗﻷا ﻰﻠﻋ ﻢﺳ
ﻦﻣ ﻰﻠﻋأ100رﻷا ﻦﻣ ﻢﺳ .ض
رﻷاﺮﺴﺗ ﺐﺒﺴﺑ رﺮﻀﻟا ﻦﻣ ض.ءﺎﳌا ب
ﺮﻳﺆﻳ ﺪﻗ اﺬﻫ .ﺔﻟﺎﺴﻐﻟا ءﻞﻣ مﺪﻋ ﻰﺟﻰﻟا يد
.يدﺎﻋ ﺮﻴﻏ ﺞﻴﺠﺿ ثاﺪﺣإ
10
●و ﻦﻣ ﺪﺑ ﻻ ﺮﺧ ﻊﺿﻮﻃﺮﺼﺘﻟا مرﺎﺑ ﻒﻳعﺎﻔﺗ
●ﺮﺧ ﺖﻴﺒﺜﺗ ﻮﻃﺮﺼﺘﻟا مﻲﻤﺤﻳ ﺐﺳﺎﻨﳌا ﻒﻳ
●ﺮﺧ نأ ﺔﻟﺎﺣ ﻲﻓ ﻮﻃﺮﺼﺘﻟا مﻮﻃ ﻒﻳ،اﺪﺟ ﻞﻳ
Page 45

ﺐﻴﻛﺮﺘﻟاﺐﻴﻛﺮﺘﻟا
ﺐﻴﻛﺮﺘﻟا
ﺐﻴﻛﺮﺘﻟاﺐﻴﻛﺮﺘﻟا
ءاﻮﺘﺳﻻا ﻂﺒﺿ ءاﻮﺘﺳﻻا ﻂﺒﺿ
ءاﻮﺘﺳﻻا ﻂﺒﺿ
ءاﻮﺘﺳﻻا ﻂﺒﺿ ءاﻮﺘﺳﻻا ﻂﺒﺿ
1ﻮﺘﺳا .و ﺞﻴﺠﻀﻟا ﻊﻨﳝ ﺢﻴﺤﺼﻟا ﺔﻟﺎﺴﻐﻟا زﺎﻬﺟ ءاﺰﺘﻫﻻازا
ر .ﺪﻳﺪﺸﻟاﻛّرأ ﻰﻠﻋ ﺔﻟﺎﺴﻐﻟا زﺎﻬﺟ ﺐﻮﺘﺴﻣ ضو ﺔﻳ، ﺔﺘﺑﺎﺛ
وز ﻲﻓ ﻞﻀﻓﻷاواﺮﻐﻟا ﺔﻳ.ﺔﻓ
رﻷا:ﺔﻈﺣﻼﻣ ٭ﺆﻳ ﺪﻗ دﺎﻨﺳﻹا عﻮﻧ ﻦﻣ وأ ﺐﺸﳋا ﻦﻣ ضﻰﻟا يد
ثاﺪﺣإ
ﺰﺘﻫﻻا ﺰﻟا زاﻮﺗ ﻲﻓ ﺄﻄﳋا وأ ﺪﺋا.ﻞﻤﳊا نزا
2رﻷا ﺖﻧﺎﻛ اذإ .ﻮﺘﺴﻣ ﺮﻴﻏ ضﺮﻟا ﻂﺒﺿا ،ﺔﻳﻞﻳﺪﻌﺘﻠﻟ ﻞﺑﺎﻘﻟا ﻞﺟ
ﺮﺗ ﺎﻤﻛﺮﻟا ﺖﲢ ﺦﻟا .. ﺐﺸﳋا ﻦﻣ ﺔﻌﻄﻗ ﻞﺧﺪﺗ ﻻ ) .ﺪﻳﺪﻛﺄﺗ (ﻞﺟ
رأ ﻊﻴﻤﺟ تﺎﺒﺛ ﻦﻣرأ ﺔﻌﺑوو ﻞﺟرﻷا ﻰﻠﻋ ﺎﻬﻌﺿنأ ﻦﻣ ﺪﻛﺄﺗ ﻢﺛ ض
ﻮﺘﺴﻣ زﺎﻬﳉاﺰﻴﻣ مﺪﺨﺘﺳا) .ﺎﻣﺎﲤ يﻮﺴﺘﻟا نا(ﺔﻳ
٭ر ﻢﻜﺣأ،مﺪﻘﻟا ﻞﻳﺪﻌﺗ ﺪﻌﺑﻮﻤﺻ ﻂﺑﺮﻟا ﺔﻟﺮﻃ ﻦﻋ ﻂﺑوﺪﺗ ﻖﻳﺮﻳﺎﻫ
رود هﺎﲡا ﺲﻜﻋ.ﺔﻋﺎﺴﻟا نا
٭ﺮﺗ ﺔﻟﺎﺣ ﻲﻓﺮﻣ ﺔﺼﻨﻣ ﻰﻠﻋ ﺔﻟﺎﺴﻐﻟا زﺎﻬﺟ ﺐﻴﻛﻦﻣ ﺪﺑ ﻻ ،ﺔﻌﻔﺗ
رﻷا ﻰﻠﻋ ﻂﻘﺴﻴﻟ ﺮﻄﳋا ﺐﻨﲡ ﻞﺟأ ﻦﻣ مﺎﻜﺣﺈﺑ ﻪﺘﻴﺒﺜﺗ.ض
ﺮﻄﻘﻟا ﺺﺤﻔﻟا ٭ي
ﺮﻄﻗ ﺔﻟﺎﺴﻐﻟا زﺎﻬﺟ ﻰﻠﻋأ ﺔﻓﺎﺣ ﻰﻠﻋ ﻂﻐﻀﻟا ﺪﻨﻋمﺪﻋ ﻦﻣ ﺪﺑ ﻻ ،ﺎﻳ
ﺮﲢو ﻰﻠﻋﻷا ﻰﻟا ﺔﻟﺎﺴﻐﻟا زﺎﻬﺟ ك.اﺪﺑأ ﻞﻔﺳﻷا
ﺮﻳ)(ﲔﻫﺎﲡﻻا ﻼﻛ ﺺﺤﻓ ﻰﺟ
ﺮﲢ اذإﺔﻟﺎﺴﻐﻟا زﺎﻬﺟ ﻰﻠﻋأ ﻰﻠﻋ ﻂﻐﻀﻟا ﺪﻨﻋ ﺔﻟﺎﺴﻐﻟا زﺎﻬﺟ ك
ﺮﻄﻗرﻷا ﻂﺒﺿا ،ﺎﻳ.ﺪﻳﺪﺟ ﻦﻣ ﻞﺟ
(ﺔﻘﻟاﺰﻟا ضرﻷا) ﺪﻴﻣاﺮﻘﻟا ﻦﻣ ضرﻷا(ﺔﻘﻟاﺰﻟا ضرﻷا) ﺪﻴﻣاﺮﻘﻟا ﻦﻣ ضرﻷا
(ﺔﻘﻟاﺰﻟا ضرﻷا) ﺪﻴﻣاﺮﻘﻟا ﻦﻣ ضرﻷا
(ﺔﻘﻟاﺰﻟا ضرﻷا) ﺪﻴﻣاﺮﻘﻟا ﻦﻣ ضرﻷا(ﺔﻘﻟاﺰﻟا ضرﻷا) ﺪﻴﻣاﺮﻘﻟا ﻦﻣ ضرﻷا
ﻮﺘﺳا ل ـﺑ مﺪﻗ ﺪﻨﺴﻣ ﻊﻄﻗا) ﺎﺒﺳﺎﻨﻣ زﺎﻬﳉا ءا70 × 70و (ﻢﻠﻣ ﻰﻠﻋ ﻊﻄﻘﻟا ﻖﺼﻟا
ﻮﻛﻲﻃﺎﻄﻣ ب
.ﺮﻴﻣﺎﺴﻣ ﻊﻣ ﺢﻠﺴﻣ طﻼﺑ ﻦﻣ ﲔﻨﺛﺎﺑ ﺖﻴﺒﺜﺘﻟا ﻢﺘﻳ نأ ﻰﻠﻋ،ﺔﻟﺎﺴﻐﻟا ﻞﻔﺳأ ﻞﻗﻷا ﻰﻠﻋ ﻢﻠﻣ ١٥
ﻲﺟ لا رﺎﻴﻏ ﻊﻄﻗ ﻢﺴﻗ ﻦﻣ (
4620ER4002B
و ﺎﻬﻟ ﺪﻨﺴﻣ ﻞﻛ ﻰﻠﻋ زﺎﻬﳉا ﻦﻣ مﺪﻗ ﻞﻛ ﻊﺿﺪﻋ
ّ
ﻰﻠﻋأ ﻞﻔﺳأ
رﻞﻳﺪﻌﺘﻠﻟ ﻞﺑﺎﻗ ﻞﺟ رﻞﻳﺪﻌﺘﻠﻟ ﻞﺑﺎﻗ ﻞﺟ
ﺔﻴﺒﺸﺧ ﺔﻴﺿرأﺔﻴﺒﺸﺧ ﺔﻴﺿرأ
ﺔﻴﺒﺸﺧ ﺔﻴﺿرأ
ﺔﻴﺒﺸﺧ ﺔﻴﺿرأﺔﻴﺒﺸﺧ ﺔﻴﺿرأ
ﻮﻛﻷا ﻰﻠﻋ لﻮﺼﳊا ﻚﻨﻜﳝر/ﻲﺑ) .ﺔﻴﻃﺎﻄﳌا با ﻢﻗ
ﺢﻠﺴﻣ طﻼﺑﺢﻠﺴﻣ طﻼﺑ
ﺢﻠﺴﻣ طﻼﺑ
ﺢﻠﺴﻣ طﻼﺑﺢﻠﺴﻣ طﻼﺑ
ﻮﻤﺻﺔﻟ
ﻮﻛﻷا ﻞﺧدأﺰﺘﻫﻹا ﺾﻔﳋ ﺔﻴﻃﺎﻄﳌا با.زا
■
رﻂﺑ
رﻞﻳﺪﻌﺘﻠﻟ ﻞﺑﺎﻗ ﻞﺟ
■
•ﺮﺘﻟا ﺢﻄﺳ نﻮﻜﻳ نأ ﺐﺠﻳو ﺎﻓﺎﺟ،ﺎﻔﻴﻈﻧ ﺐﻴﻛﻮﺘﺴﻣ.ﺎﻳ
•ر.ﺢﻄﺴﻣ ﺪﻠﺻ طﻼﺑ ﻰﻠﻋ ﺔﻟﺎﺴﻐﻟا ﺐﻛ
■
•
ﺮﻘﻟاﻮﻣ زﺎﻬﳉا ﺚﻴﺤﺑ ﺔﻓﺎﳉا ةﺪﻣﻮﺟ(.د
٭و ﻢﻴﻟﻼﺴﻟا ﻰﻠﻋ مﺪﺨﺘﺴﺗ ﻲﺘﻟا ﺪﻴﺗاﺬﻟا ﺔﻘﺻﻼﻟا ةدﺎﳌا ﻦﻣ ﻊﻨﺻ مﺪﻘﻟا ﺪﻨﺴﻣ ﻮﻄﳋاﺰﻠﻟ ةدﺎﻀﳌا تا. ﻖﻟ
■
•رﻷاﺆﺗ نأ ﻦﻜﳝ ﺔﻴﺒﺸﳋا ﺔﻴﺿﺰﺘﻫﻻا ﻰﻟإ يد.زا
•ﺰﺘﻫﻻا ﻊﻨﳌﻮﺑ ﻚﻴﺻﻮﻧ زاﻮﻛأ ﻊﺿﻚﻤﺴﺑ،مﺪﻗ ﻞﻛ ﻞﻔﺳأ ﺔﻴﻃﺎﻄﻣ با
•ر،ﺎﻨﻜﳑ نﺎﻛ اذإوز ىﺪﺣإ ﻰﻠﻋ ﺔﻟﺎﺴﻐﻟا ﺐﻛﺮﻐﻟا ﺎﻳا.ﺎﺗﺎﺒﺛ ﺮﺜﻛأ طﻼﺒﻟا نﻮﻜﻳ ﺚﻴﺣ،ﺔﻓ
٭
٭
11
Page 46

ﻞﻴﺴﻐﻟا ﻞﺒﻗ ﺔﻳﺎﻨﻌﻟاﻞﻴﺴﻐﻟا ﻞﺒﻗ ﺔﻳﺎﻨﻌﻟا
ﻞﻴﺴﻐﻟا ﻞﺒﻗ ﺔﻳﺎﻨﻌﻟا
ﻞﻴﺴﻐﻟا ﻞﺒﻗ ﺔﻳﺎﻨﻌﻟاﻞﻴﺴﻐﻟا ﻞﺒﻗ ﺔﻳﺎﻨﻌﻟا
لوﻷا ﻞﻴﺴﻐﻟا ﻞﺒﻗ لوﻷا ﻞﻴﺴﻐﻟا ﻞﺒﻗ
لوﻷا ﻞﻴﺴﻐﻟا ﻞﺒﻗ
لوﻷا ﻞﻴﺴﻐﻟا ﻞﺒﻗ لوﻷا ﻞﻴﺴﻐﻟا ﻞﺒﻗ
ﻞﻴﺴﻐﻟا ﻞﺒﻗ ﺔﻳﺎﻨﻌﻟا ﻞﻴﺴﻐﻟا ﻞﺒﻗ ﺔﻳﺎﻨﻌﻟا
ﻞﻴﺴﻐﻟا ﻞﺒﻗ ﺔﻳﺎﻨﻌﻟا
ﻞﻴﺴﻐﻟا ﻞﺒﻗ ﺔﻳﺎﻨﻌﻟا ﻞﻴﺴﻐﻟا ﻞﺒﻗ ﺔﻳﺎﻨﻌﻟا
ﺔﻳﺎﻨﻌﻟا ﺔﻌﻗر .ﺔﻳﺎﻨﻌﻟا ﺔﻌﻗر .
ﺔﻳﺎﻨﻌﻟا ﺔﻌﻗر .
ﺔﻳﺎﻨﻌﻟا ﺔﻌﻗر .ﺔﻳﺎﻨﻌﻟا ﺔﻌﻗر .
روﺪﺑ ﺎﻬﻠﻴﺴﻏ ﻦﻜﳝ عﻮﻧ ﻰﻟا ﺲﺑﻼﳌا زﺮﻓا ،ﺞﺋﺎﺘﻧ ﻞﻀﻓأ ﻰﻠﻋ لﻮﺼﺤﻠﻟ.ﻞﻴﺴﻐﻟا ﺲﻔﻧ نا
و ﻒﻴﻔﳋا نﻮﻠﻟﺎﺑ ﺲﺑﻼﳌا ﻦﻣ ﻖﻣﺎﻐﻟا نﻮﻠﻟﺎﺑ ﺲﺑﻼﳌا ﺎﻤﺋاد زﺮﻓاﺲﺑﻼﳌا ﲔﺑ ﺔﻠﺼﻔﻨﻣ ﺲﺑﻼﳌا ﻞﺴﻏا .ءﺎﻀﻴﺒﻟا ﺲﺑﻼﳌا
ﻮﻟا ﺔﻔﻴﻔﳋا ﺲﺑﻼﳌا ﻊﻣ.ﺦﺳ
و ﺲﺑﻼﳌا زﻮﺘﺴﳌ ﺎﻘﻓﻮﻟا ي.ﺦﺳ
ّ
(ﻖﻣﺎﻏ ، ﻒﻴﻔﺧ ، ﺾﻴﺑأ) نﻮﻟﻮﻠﳌا ﺔﺸﻤﻗﻷا ﻦﻋ ءﺎﻀﻴﺒﻟا ﺲﺑﻼﳌا ﻞﺼﻓاﺔﻧ
ر ﻦﻋ ﺚﺤﺑاﻮﳌا ﺔﻳﺎﻨﻌﻟا ﺔﻌﻗﻮﺟﺮﻟا هﺬﻫ .ﻚﺴﺑﻼﻣ ﻲﻓ ةدﺮﻌﺗ ﺔﻌﻗﻮﺘﺤﻣ ﻚﻓو ﻚﺴﺑﻼﳌ ﺔﺸﻤﻗﻷا تﺎﻳ.ﺎﻬﻠﻴﺴﻏ ﺔﻴﻔﻴﻛ
رود ﺮﺘﺧا ﻦﻄﻗ) ة60 ْﻮﻠﻟ ﺢﻤﺴﺗ (ﻞﻴﺴﻐﻟا قﻮﺤﺴﻣ ﻦﻣ ﻞﻤﺣ ﻒﺼﻧ ﻒﺿا و م و نوﺪﺑ ﻞﻴﺴﻐﻟﺎﺑ ةﺪﺣﺰﻳ اﺬﻫ .ﺲﺑﻼﻣ ﻊﺿﻞﻳ
زﺮﻔﻟا .زﺮﻔﻟا .
زﺮﻔﻟا .
زﺮﻔﻟا .زﺮﻔﻟا .
ﻮﺒﺼﳌاو ﺔﻏو ﺔﻴﻧﺎﺘﻜﻟا ﺲﺑﻼﳌاﻮﲢ ثﺪﺤﻳ ﺪﻗﻮﻟا ةﺪﻳﺪﺸﻟا ﺲﺑﻼﳌا ﻞﺴﻐﺗ ﻻ ، ﻦﻜﻣأ اذإ .ﺦﻟا ... ءﺎﻀﻴﺒﻟا ﺲﺑﻼﻤﻠﻟ نﻮﻠﻟا ﻞﻳﺦﺳ
■
وﺮﻟا.زﺎﻬﳉا جﺎﺘﻧإ ءﺎﻨﺛأ ﻰﻘﺒﺗ ﺪﻗ ﻲﺘﻟا ﻞﺒﻄﻟا ﻦﻣ ﺐﺳا
■
1
2
ردﺮﺣ ﺔﺟراو ءﺎﳌا ةﺮﺳوﺪﺘﻟا ﺔﻋو ﺮﻳﻮﻠﻄﻣ ﺔﻔﻠﺘا ﺔﺸﻤﻗﻷا.ﺔﻔﻠﺘﺨﻣ قﺮﻄﺑ ﺎﻬﻠﻴﺴﻐﻟ ﺔﺑ
و(ﻒﻴﻔﺧ ، يدﺎﻋ ، ﺪﻳﺪﺷ) ﺦﺳﺮﻓ
(نﺎﺘﻛ ﻊﻣﺎﺟ، ﺔﻴﻧﺎﺘﻛ تﺎﺠﺘﻨﻣ) نﺎﺘﻛو ﺔﻴﻧﺎﺘﻛ تﺎﺠﺘﻨﻣ ﻞﺴﻏابﺎﺘﻜﻟا ﻊﻤﺠﻳ ﺲﺑﻼﻣ
.ﻻﺎﺼﻔﻧا
ﻞﻤﳊا ﻞﺒﻗ ﺔﻳﺎﻨﻌﻟا .ﻞﻤﳊا ﻞﺒﻗ ﺔﻳﺎﻨﻌﻟا .
ﻞﻤﳊا ﻞﺒﻗ ﺔﻳﺎﻨﻌﻟا .
ﻞﻤﳊا ﻞﺒﻗ ﺔﻳﺎﻨﻌﻟا .ﻞﻤﳊا ﻞﺒﻗ ﺔﻳﺎﻨﻌﻟا .
.ﻞﻤﳊا ﻞﻛ ﻒﺼﻧ ﻦﻣ
ﺮﻔﻟا ﺲﺑﻼﳌا ﻞﺴﻐﺗ ﻻﺆﻳ ﺪﻗ اﺬﻫ .ﺔﻳدﻮﺘﻟا مﺪﻋ ﻰﻟا يد.ﲔﺘﻬﺑﺎﺸﺘﻣ ﲔﺘﻌﻄﻗ وأ ﺔﻌﻄﻗ ﻒﺿا .ﻞﻤﳊا ﻲﻓ نزا
3
■ﺮﻴﺒﻜﻟا ﺲﺑﻼﳌا ﻊﺿ و ةﺮﻴﻐﺼﻟاﺮﻴﺒﻜﻟا ﺲﺑﻼﳌا ﻊﺿ ،ﺔﻟﺎﳊا هﺬﻫ ﻲﻓ .ﺎﻌﻣ ةوأ ةو مﺪﻋ ﻦﻣ ﺪﺑ ﻻ .ﻻﺮﻴﺒﻜﻟا ﺲﺑﻼﳌا ﻊﺿﺮﺜﻛأ ة
●ﻮﻴﳉا ﻊﻴﻤﺟ ﺺﺤﻓا رﺎﻓ ﺎﻬﻧأ ﻦﻣ ﺪﻛﺄﺘﻠﻟ ب.ﺔﻏ
و ، ﺮﻴﻣﺎﺴﳌا ﻞﺜﻣ ءﺎﻴﺷﻷاو ، ﺮﻌﺸﻟا ﻚﺒﺸﻣﻮﻋ، بﺎﻘﺜﻟا د
و ،مﻼﻗﻷاو ﺔﻴﻧﺪﻌﳌا ﻊﻄﻘﻟاﺆﺗ ﺪﻗ ﺢﻴﺗﺎﻔﳌاثاﺪﺣإ ﻰﻟا يد
و ﺔﻟﺎﺴﻐﻟا زﺎﻬﺟ ﻲﻠﻛ ﻲﻓ رﺮﺿ.ﺲﺑﻼﳌا
●و ،فﺎﻄﳋا ،بﺎﺤﺴﻟا ﻖﻠﻏا هﺬﻫ نأ ﻦﻣ ﺪﻛﺄﺘﻠﻟ ﻞﺒﳊا
ﻮﳌاﺮﺧﻷا ﺲﺑﻼﳌﺎﺑ ﻖﻠﻌﺗ ﻻ دا.ى
●ﻮﻟا ﺢﺴﻣا و ﺦﺳﻮﺑ ﻊﻘﺒﻟاﺮﻓ ﺔﻄﺳاﻞﺋﺎﺳ ﻊﻣ ةﺎﺷ
ﻮﻟا ﻰﻠﻋ ءﺎﳌﺎﺑ ﻞﻴﻠﻘﻟا ﻞﻴﺴﻐﻟاو ﺔﻗﺎﻴﻟا ﻞﺜﻣ ﺦﺳﻢﻜﻟا
زإ ﻲﻓ ةﺪﻋﺎﺴﻤﻠﻟﻮﻟا ﺔﻟا.ﺦﺳ
●ﺮﳌا ﺔﻴﺸﺤﻠﻟ تﺎﻴﻄﻟا ﺺﺤﻓا ر)ﺔﻧو (ﺔﻳدﺎﻣيأ عﺰﻧا
ﺮﻴﻐﺻ ءﺎﻴﺷأﻮﻣ ﺖﻧﺎﻛ اذإ ةﻮﺟ.ةد
●ﻮﳊا ﻞﺧاد ﺺﺤﻓا و ضﻮﻣ ءﺎﻴﺷأ يأ عﺰﻧاﻮﺟﻪﻠﺧاد ةد
رود ﻞﺟأ ﻦﻣ.ﺔﻣدﺎﻘﻟا ﻞﻴﺴﻐﻟا ة
●ﺮﳌا ﺔﻴﺸﳊا ﻲﻓ ءﺎﻴﺷأ وأ ﺲﺑﻼﻣ يأ جﺮﺧا ﻊﻨﳌ ﺔﻧ
و ﺲﺑﻼﳌاﺮﺿﻷا ﻦﻣ ﺔﻴﺸﳊا.را
12
Page 47

ﻒﻴﻈﻨﺘﻟا ةدﺎﻣ ﺔﻓﺎﺿإﻒﻴﻈﻨﺘﻟا ةدﺎﻣ ﺔﻓﺎﺿإ
ﻒﻴﻈﻨﺘﻟا ةدﺎﻣ ﺔﻓﺎﺿإ
ﻒﻴﻈﻨﺘﻟا ةدﺎﻣ ﺔﻓﺎﺿإﻒﻴﻈﻨﺘﻟا ةدﺎﻣ ﺔﻓﺎﺿإ
شﺎﻤﻘﻟا ﲔﻠﻣو ﻒﻴﻈﻨﺘﻟا ةدﺎﻣ ﺔﻓﺎﺿإ شﺎﻤﻘﻟا ﲔﻠﻣو ﻒﻴﻈﻨﺘﻟا ةدﺎﻣ ﺔﻓﺎﺿإ
شﺎﻤﻘﻟا ﲔﻠﻣو ﻒﻴﻈﻨﺘﻟا ةدﺎﻣ ﺔﻓﺎﺿإ
شﺎﻤﻘﻟا ﲔﻠﻣو ﻒﻴﻈﻨﺘﻟا ةدﺎﻣ ﺔﻓﺎﺿإ شﺎﻤﻘﻟا ﲔﻠﻣو ﻒﻴﻈﻨﺘﻟا ةدﺎﻣ ﺔﻓﺎﺿإ
ﻊﻳزﻮﺘﻟا بﻻود .ﻊﻳزﻮﺘﻟا بﻻود .
ﻊﻳزﻮﺘﻟا بﻻود .
ﻊﻳزﻮﺘﻟا بﻻود .ﻊﻳزﻮﺘﻟا بﻻود .
●ﺮﻟا ﻞﻴﺴﻐﻟا ﻂﻘﻓ ﻲﺴﻴﺋ
.ءﻞﻤﻠﻟ
ﺮﻓﻹاﺆﻳ ﺪﻗ ءﻞﳌا ﻲﻓ طازﻮﺗ ﻰﻟا يدﲔﻠﻣ ﻊﻳ
●
ﻒﻴﻈﻨﺘﻟا ةدﺎﻣ
ﺮﻟا ﻞﻴﺴﻐﻠﻟﻲﺴﻴﺋ
●ﻰﺼﻗﻷا ﻂﳋا ﻦﻣ ﺮﺜﻛأ شﺎﻤﻘﻟا ﲔﻠﻣ ﻸﲤ ﻻ
●ﺮﺘﺗ ﻻ ود ﻲﻓ شﺎﻤﻘﻟا ﲔﻠﻣ كةدﺎﻣ بﻻ
●رود ﺮﺧآ ءﺎﻨﺛأ شﺎﻤﻘﻟا ﲔﻠﻣ ﺔﻓﺎﺿإ ﻢﺘﺗ نا
●وﺪﻟا ﺢﺘﻔﺗ ﻻ زﻮﺗ ءﺎﻨﺛأ بﻻ.ءﺎﳌا ﺪﻳ
●ﻮﻠﶈا ﺰﻨﺑ) تﻻﻮﻤﺴﻣ ﺮﻴﻏ (ﺦﻟا ... ﻦﻳ.ﺔﺣ
ﻒﻴﻈﻨﺘﻟا ةدﺎﻣ
وﻷا ﻞﻴﺴﻐﻠﻟﻲﻟ
شﺎﻤﻘﻟا ﲔﻠﻣ ﺔﻓﺎﺿإ .شﺎﻤﻘﻟا ﲔﻠﻣ ﺔﻓﺎﺿإ .
شﺎﻤﻘﻟا ﲔﻠﻣ ﺔﻓﺎﺿإ .
شﺎﻤﻘﻟا ﲔﻠﻣ ﺔﻓﺎﺿإ .شﺎﻤﻘﻟا ﲔﻠﻣ ﺔﻓﺎﺿإ .
شﺎﻤﻘﻟا ﲔﻠﻣ
وﻷا ﻞﻴﺴﻐﻟاﺮﻟا ﻞﻴﺴﻐﻟا + ﻲﻟﻲﺴﻴﺋ
ﻮﻳ يﺬﻟا شﺎﻤﻘﻟا.ﺲﺑﻼﳌا ﺦﺳ
ﻮﻳ ﻦﻣ ﺮﺜﻛأ ةﺪﳌ ﻒﻴﻈﻨﺘﻟا.ﲔﻣ
ﻠﺼﺘﻳ ﺪﻗ شﺎﻤﻘﻟا ﲔﻠﻣ)ّ(ﺐ
وأ ﻒﻄﺸﻟا ﻦﻣﻮﺗ.ﺎﻴﻜﻴﺗﺎﻣ
■
1
2
13
ﺔﻈﺣﻼﻣ ﺲﺑﻼﳌا ﻰﻠﻋ شﺎﻤﻘﻟا ﲔﻠﻣ ﺐﺼﺗ ﻻ :
ﺮﺷﺎﺒﻣ .ة
Page 48

ﻒﻴﻈﻨﺘﻟا ةدﺎﻣ ﺔﻓﺎﺿإﻒﻴﻈﻨﺘﻟا ةدﺎﻣ ﺔﻓﺎﺿإ
ﻒﻴﻈﻨﺘﻟا ةدﺎﻣ ﺔﻓﺎﺿإ
ﻒﻴﻈﻨﺘﻟا ةدﺎﻣ ﺔﻓﺎﺿإﻒﻴﻈﻨﺘﻟا ةدﺎﻣ ﺔﻓﺎﺿإ
تﺎﺤﻤﻠﻟا ٭تﺎﺤﻤﻠﻟا ٭
تﺎﺤﻤﻠﻟا ٭
تﺎﺤﻤﻠﻟا ٭تﺎﺤﻤﻠﻟا ٭
.ﻊﻧﺎﺼﻟا ﺢﺋﺎﺼﻨﻟ ﺎﻘﻓو : ﻞﻣﺎﻜﻟا ﻞﻤﳊا.ﻊﻧﺎﺼﻟا ﺢﺋﺎﺼﻨﻟ ﺎﻘﻓو : ﻞﻣﺎﻜﻟا ﻞﻤﳊا
.ﻊﻧﺎﺼﻟا ﺢﺋﺎﺼﻨﻟ ﺎﻘﻓو : ﻞﻣﺎﻜﻟا ﻞﻤﳊا
.ﻊﻧﺎﺼﻟا ﺢﺋﺎﺼﻨﻟ ﺎﻘﻓو : ﻞﻣﺎﻜﻟا ﻞﻤﳊا.ﻊﻧﺎﺼﻟا ﺢﺋﺎﺼﻨﻟ ﺎﻘﻓو : ﻞﻣﺎﻜﻟا ﻞﻤﳊا
ﺔﻳدﺎﻌﻟا ﺔﻴﻤﻜﻟا ﻦﻣ ﺔﻳدﺎﻌﻟا ﺔﻴﻤﻜﻟا ﻦﻣ
ﺔﻳدﺎﻌﻟا ﺔﻴﻤﻜﻟا ﻦﻣ
ﺔﻳدﺎﻌﻟا ﺔﻴﻤﻜﻟا ﻦﻣ ﺔﻳدﺎﻌﻟا ﺔﻴﻤﻜﻟا ﻦﻣ
ﻞﻣﺎﻜﻟا ﻞﻤﳊا ﻦﻣ ﻞﻣﺎﻜﻟا ﻞﻤﳊا ﻦﻣ
ﻞﻣﺎﻜﻟا ﻞﻤﳊا ﻦﻣ
ﻞﻣﺎﻜﻟا ﻞﻤﳊا ﻦﻣ ﻞﻣﺎﻜﻟا ﻞﻤﳊا ﻦﻣ
: ﻲﺋﺰﳉا ﻞﻤﳊا : ﻲﺋﺰﳉا ﻞﻤﳊا
: ﻲﺋﺰﳉا ﻞﻤﳊا4/3
: ﻲﺋﺰﳉا ﻞﻤﳊا : ﻲﺋﺰﳉا ﻞﻤﳊا
: ﻰﻧدﻷا ﻞﻤﳊا : ﻰﻧدﻷا ﻞﻤﳊا
: ﻰﻧدﻷا ﻞﻤﳊا2/1
: ﻰﻧدﻷا ﻞﻤﳊا : ﻰﻧدﻷا ﻞﻤﳊا
روﺪﻟا ﺔﻳاﺪﺑ.نا
.صاﺮﻗﻷا ماﺪﺨﺘﺳا.صاﺮﻗﻷا ماﺪﺨﺘﺳا
.صاﺮﻗﻷا ماﺪﺨﺘﺳا
.صاﺮﻗﻷا ماﺪﺨﺘﺳا.صاﺮﻗﻷا ماﺪﺨﺘﺳا
و بﺎﺒﻟا ﺢﺘﻓا (١ﺮﻗﻷا ﻊﺿﻮﳊا ﻲﻓ صا.ض
ﻮﳊا ﻲﻓ ﺲﺑﻼﳌا ﻊﺿ (٢.ض
ﻒﻴﻈﻨﺘﻟا ةدﺎﻣ ﺔﻋﺮﺟ .ﻒﻴﻈﻨﺘﻟا ةدﺎﻣ ﺔﻋﺮﺟ .
ﻒﻴﻈﻨﺘﻟا ةدﺎﻣ ﺔﻋﺮﺟ .
ﻒﻴﻈﻨﺘﻟا ةدﺎﻣ ﺔﻋﺮﺟ .ﻒﻴﻈﻨﺘﻟا ةدﺎﻣ ﺔﻋﺮﺟ .
.ﻊﻧﺎﺼﻟا ﻞﺒﻗ ﻦﻣ ﻒﻴﻈﻨﺘﻟا ةدﺎﻣ تﺎﻤﻴﻠﻌﺘﻟ
●ﻲﻓ عزﻮﳌا ﻦﻣ ﻒﻴﻈﻨﺘﻟا ةدﺎﻣ ﻖﻓﺪﺘﺗ
. .
5
.
. .
ثﺪﲢ ﺪﻗ ، ﺎﻬﺑ ﻰﺻﻮﳌا ﺔﻴﻤﻜﻟا ﻦﻣ ﺮﺜﻛأ
ﺆﻳ وأ ﻞﻴﺴﻐﻟاﻮﻤﻠﻟ ﻞﻴﻘﺜﻟا ﻞﻤﳊا ﻰﻟا يد.رﻮﺗ
.ﻲﻣﺎﻣﻷا ﻞﻤﳊﺎﺑ ﺔﻟﺎﺴﻐﻟا زﺎﻬﳉ
و ،ﺲﺑﻼﳌاﻮﺘﺴﻣﻮﻟا ىﻞﺟأ ﻦﻣ .ﺲﺑﻼﻤﻠﻟ ﺦﺳ
ﺮﻟا ﺐﻨﲡ ،ﺞﺋﺎﺘﻧ ﻞﻀﻓأﻮﻏﺰﻟا ة.ةﺪﺋا
ءﺎﳌا ﻲﻘﻨﻣءﺎﳌا ﻲﻘﻨﻣ
ءﺎﳌا ﻲﻘﻨﻣ
ءﺎﳌا ﻲﻘﻨﻣءﺎﳌا ﻲﻘﻨﻣ
3
●و ﻒﻴﻈﻨﺘﻟا ةدﺎﻣ ماﺪﺨﺘﺳا ﻦﻣ ﺪﺑ ﻻ ﺎﻘﻓ
●ﻒﻴﻈﻨﺘﻟا ةدﺎﻣ ﻦﻣ ﺔﻴﻤﻛ ﺖﻣﺪﺨﺘﺳا اذإ
ﺮﻟاﻮﻏﺮﻴﺜﻜﻟا ةو اﺪﺟ ةةءﺎﻔﻛ ﺾﻔﺨﻳ اﺬﻫ
ﺆﻳ)(ﻞﻄﻌﻟا ﻰﻟا يد
●ﻂﻘﻓ ﻒﻴﻈﻨﺘﻟا ةدﺎﻣ قﻮﺤﺴﻣ مﺪﺨﺘﺳا
●ﺐﺴﺣ ﺎﻬﻠﻳﺪﻌﺗ ﻦﻜﳝ ﻒﻴﻈﻨﺘﻟا ةدﺎﻣ ﺔﻴﻤﻛ
ردﺮﺣ ﺔﺟراو ، ءﺎﳌا ةو ، ءﺎﳌا عﻮﻧﺔﻴﻤﻛ
. .
4
.
. .
.بﺎﺒﻟا ﻖﻠﻏا (٣
ﻖﻃﺎﻨﻣ ﻲﻓ ﻞﻴﺴﻐﻟا قﻮﺤﺴﻣ ﻦﻣ ﺔﻴﻤﻛ ﺾﻔﳋ
.ﺔﻳﺎﻐﻠﻟ ﺮﻴﺴﻌﻟا ءﺎﳌا ﺎﻬﻴﻓ
زو
و ﻪﻋو .ﺔﺒﻠﻌﻟا ﻲﻓ ﺔﻨﻴﺒﳌا ﺔﻴﻤﻜﻠﻟ ﺎﻘﻓﻒﺿا
ّ
وأ ﻞﻴﺴﻐﻟا قﻮﺤﺴﻣ.ءﺎﳌا ﻲﻘﻨﻣ ﻢﺛ ﻻ
.ءﺎﳌا
14
●ﻪﻣاﺪﺨﺘﺳا ﻦﻜﳝ نﻮﳉﺎﻜﻟا ﻞﺜﻣ ءﺎﳌا ﻲﻘﻨﻣ
●ﺔﻴﻘﻨﺘﻟ ﻞﻴﺴﻐﻟا قﻮﺤﺴﻣ ﻦﻣ ﺔﻴﻤﻛ مﺪﺨﺘﺳا
Page 49

ﺔﻔﻴﻇﻮﻟاﺔﻔﻴﻇﻮﻟا
ﺔﻔﻴﻇﻮﻟا
ﺔﻔﻴﻇﻮﻟاﺔﻔﻴﻇﻮﻟا
ﻰﺼﻗأ ﻞﻤﺣﻰﺼﻗأ ﻞﻤﺣ
ﻰﺼﻗأ ﻞﻤﺣ
ﻰﺼﻗأ ﻞﻤﺣﻰﺼﻗأ ﻞﻤﺣ
رﺪﻘﻣ
٠ﻦﻣ ﻞﻗأ
٠ﻦﻣ ﻞﻗأ
ﻮﻣ ٥دا
٠ﻦﻣ ﻞﻗأ
٠ﻦﻣ ﻞﻗأ
٠ﻦﻣ ﻞﻗأ
3ﻢﺠﻛ
٠ﻦﻣ ﻞﻗأ
5ﻢﺠﻛ
ﺮﻴﺒﻛ ﻢﺠﺣ
ﻦﻣ ﻊﻄﻗ ٩ )
(ﺲﺑﻼﳌا
يرﺎﻴﺘﺧايرﺎﻴﺘﺧا
يرﺎﻴﺘﺧا
يرﺎﻴﺘﺧايرﺎﻴﺘﺧا
وﻷا ﻞﻴﺴﻐﻟا -ﻲﻟ
ﻒﻴﻔﺠﺘﻟا + ﻒﻄﺸﻟا -
5ﻢﺠﻛ
6ﻢﺠﻛ
4ﻢﺠﻛ
3ﻢﺠﻛ
ﻂﻘﻓ ﻒﻴﻔﺠﺘﻟا -
رﺎﺨﺑ ﻞﻗأ -
رﺎﺨﺒﻟا دﺎﺼﺘﻗا -
ﻒﻴﻔﺠﺘﻟا + ﻒﻄﺸﻟا -
ﻒﻴﻔﺠﺘﻟا + ﻒﻄﺸﻟا -
ﻂﻘﻓ ﻒﻴﻔﺠﺘﻟا -
ﻒﻴﻔﺠﺘﻟا + ﻒﻄﺸﻟا -
ﻒﻴﺜﻜﻟا -
رﻮﺗ - رﺎﺨﺒﻟا ﻮﺑ
رﻮﺗ - رﺎﺨﺒﻟا ﻮﺑ
ﻒﻴﺜﻜﻟا -
ﻒﻴﺜﻜﻟا -
ﻒﻴﺜﻜﻟا -
ةراﺮﺣ ﺔﺟردةراﺮﺣ ﺔﺟرد
ةراﺮﺣ ﺔﺟرد
ةراﺮﺣ ﺔﺟردةراﺮﺣ ﺔﺟرد
ﺔﺒﺳﺎﻨﻣﺔﺒﺳﺎﻨﻣ
ﺔﺒﺳﺎﻨﻣ
ﺔﺒﺳﺎﻨﻣﺔﺒﺳﺎﻨﻣ
_
ﻞﻴﺴﻐﻟا عﻮﻨﻟ ﺎﻘﻓو ﻪﺑ ﻰﺻﻮﳌا ناروﺪﻟا ﻞﻴﺴﻐﻟا عﻮﻨﻟ ﺎﻘﻓو ﻪﺑ ﻰﺻﻮﳌا ناروﺪﻟا
ﻞﻴﺴﻐﻟا عﻮﻨﻟ ﺎﻘﻓو ﻪﺑ ﻰﺻﻮﳌا ناروﺪﻟا
ﻞﻴﺴﻐﻟا عﻮﻨﻟ ﺎﻘﻓو ﻪﺑ ﻰﺻﻮﳌا ناروﺪﻟا ﻞﻴﺴﻐﻟا عﻮﻨﻟ ﺎﻘﻓو ﻪﺑ ﻰﺻﻮﳌا ناروﺪﻟا
ﻮﺑ، ﻚﻴﻠﻴﻠﻛا ،ﺪﻳﺎﻤﻴﻟ
ﻮﺑﺮﻴﺘﺴﻴﻟ
وو ﺔﻔﻴﻇ
ردﺮﳊا ﺔﺟراﺮﳌا ةﺪﻨﻋ ﺔﻌﻔﺗ
ﺰﻣﻮﺑ ، ﺞﻳﺰﻣ ﺮﻴﺘﺴﻴﻟﺞﻳ
ﻮﻣﻮﺿﻮﺼﻟا ﺲﺑﻼﻤﻠﻟ ﺔﻋﺔﻴﻓ
ﺮﻟا.ﺔﻘﻴﻗ
ﺞﻣﺎﻧﺮﺒﻟاﺞﻣﺎﻧﺮﺒﻟا
ﺞﻣﺎﻧﺮﺒﻟا
ﺞﻣﺎﻧﺮﺒﻟاﺞﻣﺎﻧﺮﺒﻟا
ﻲﻋﺎﻨﻄﺻﻻاﻲﻋﺎﻨﻄﺻﻻا
ﻲﻋﺎﻨﻄﺻﻻا
ﻲﻋﺎﻨﻄﺻﻻاﻲﻋﺎﻨﻄﺻﻻا
ﺪﺿ ﺔﻳﺎﻨﻌﻟاﺪﺿ ﺔﻳﺎﻨﻌﻟا
ﺪﺿ ﺔﻳﺎﻨﻌﻟا
ﺪﺿ ﺔﻳﺎﻨﻌﻟاﺪﺿ ﺔﻳﺎﻨﻌﻟا
ﺔﻴﺳﺎﺴﳊاﺔﻴﺳﺎﺴﳊا
ﺔﻴﺳﺎﺴﳊا
ﺔﻴﺳﺎﺴﳊاﺔﻴﺳﺎﺴﳊا
شﺎﻌﻧﻹاشﺎﻌﻧﻹا
شﺎﻌﻧﻹا
شﺎﻌﻧﻹاشﺎﻌﻧﻹا
/فﻮﺼﻟا/فﻮﺼﻟا
/فﻮﺼﻟا
/فﻮﺼﻟا/فﻮﺼﻟا
ﻞﻴﺴﻐﻟا
٣٠ ﻊﻳﺮﺴﻟا٣٠ ﻊﻳﺮﺴﻟا
٣٠ ﻊﻳﺮﺴﻟا
٣٠ ﻊﻳﺮﺴﻟا٣٠ ﻊﻳﺮﺴﻟا
ﲔﺘﻓﺪﻟاﲔﺘﻓﺪﻟا
ﲔﺘﻓﺪﻟا
ﲔﺘﻓﺪﻟاﲔﺘﻓﺪﻟا
شﺎﻤﻘﻟا عﻮﻧشﺎﻤﻘﻟا عﻮﻧ
شﺎﻤﻘﻟا عﻮﻧ
شﺎﻤﻘﻟا عﻮﻧشﺎﻤﻘﻟا عﻮﻧ
60 ْم
ﺎﻨﻜﳑ زﺎﻬﳉﺎﺑ ﻞﻴﺴﻐﻟا نﺎﻛ اذإ ﺺﺤﻓا
رﺎﺑ) ،د30 ْ،م
، ﺔﻴﻧﺎﺘﻛ ﺔﻔﺸﻨﻣ ،ﺾﻴﺑأ ﻦﻄﻗ) .ﻻ مأ
40 ْ ،م 95 ْ(م
40 ْم
رﺎﺑ) ،د30 ْ،م 60 ْ(م
ﺔﻴﺳﺎﺴﳊا ﺪﺿ ﺔﻳﺎﻨﻌﻟا
95 ْرﺎﺑ) م ،د30 ْ،م
نﻷ ﺔﻴﻨﻄﻘﻟا ﺲﺑﻼﳌا ﻰﻠﻋ ﻖﺒﻄﻨﺗ
40 ْ ،م 60 ْ(م
40 ْم
رﺎﺑ) ،د30 ْ(م
ﻊﻣ ﺔﻟﺎﺴﻐﻟا زﻮﺼﻟا ﺮﳊا/فﺮﻳ
ﺪﻳﺪﳉا ﺺﻟﺎﳋاﻂﻘﻓ
30 ْم
رﺎﺑ) ،د40 ْ(م
40 ْم
رﺎﺑ) ،د30 ْ(م
وﺪﻴﻟا ﻞﻴﺴﻐﻟا « ﺔﻣﻼﻋ« ي
ﻮﻠﳌا ﺲﺑﻼﳌاﻮﻟا ﺔﻔﻴﻔﳋا ﺔﻧﺦﺳ
ﻮﻟا ، ﲔﺘﻓﺪﻟا، ﺔﻧﺎﻄﺒﻟا ، ةدﺎﺳ
(ﺔﻴﻄﻏأ
ﻮﻟا ماﺪﺨﺘﺳا.ﺔﻔﻴﻇ
و نﺎﺼﻤﻘﻟازﻮﻠﺒﻟاﻦﻄﻗ ﻦﻣ تا
ر ﺲﺑﻼﻣو ﺔﻘﻴﻗرﺮﻀﻟا ﺔﻠﻬﺳ
ﻮﺼﻟاﺎﻬﺟ ﻲﻓ ﻞﻴﺴﻐﻠﻟ ﻞﺑﺎﻘﻟا ف
ﺮﺴﻟا ءﺎﻄﻏ، ﻦﻄﻘﻟﺎﺑ ﺊﻠﺘﻤﳌا ﺮﻳ
رﻷا ءﺎﻄﻏاءﻼﺘﻣا ﺊﻠﺘﻤﳌا ﺔﻜﻳ
.ﺎﻔﻴﻔﺧ
■
ﻦﻄﻘﻟاﻦﻄﻘﻟا
ﻦﻄﻘﻟا
ﻦﻄﻘﻟاﻦﻄﻘﻟا
ةدﺎﻋإةدﺎﻋإ
ةدﺎﻋإ
ةدﺎﻋإةدﺎﻋإ
ﻖﻴﻗﺮﻟاﻖﻴﻗﺮﻟا
ﻖﻴﻗﺮﻟا
ﻖﻴﻗﺮﻟاﻖﻴﻗﺮﻟا
ﺮﻳﺮﳊاﺮﻳﺮﳊا
ﺮﻳﺮﳊا
ﺮﻳﺮﳊاﺮﻳﺮﳊا
ﻞﻴﺴﻐﻟاﻞﻴﺴﻐﻟا
ﻞﻴﺴﻐﻟاﻞﻴﺴﻐﻟا
يوﺪﻴﻟايوﺪﻴﻟا
يوﺪﻴﻟا
يوﺪﻴﻟايوﺪﻴﻟا
15
: ءﺎﳌا ةراﺮﺣ ﺔﺟرد ٭ : ءﺎﳌا ةراﺮﺣ ﺔﺟرد ٭
: ءﺎﳌا ةراﺮﺣ ﺔﺟرد ٭رد ﺮﺘﺧاﺮﺣ ﺔﺟراروﺪﻟ ءﺎﳌا ة.ﻞﻴﺴﻐﻟا ﺪﻨﻋ تﺎﻤﻴﻠﻌﺘﻟا وأ ﺔﺸﻤﻗﻷا ﻊﻧﺎﺻ تﺎﻴﺻﻮﺗ ﺎﻤﺋاد ﻊﺒﺗا .ﻞﻴﺴﻐﻟا ة
: ءﺎﳌا ةراﺮﺣ ﺔﺟرد ٭ : ءﺎﳌا ةراﺮﺣ ﺔﺟرد ٭
: ﻒﻴﺜﻜﻟا ٭ : ﻒﻴﺜﻜﻟا ٭
: ﻒﻴﺜﻜﻟا ٭ﻮﻟﺎﺑ ﺔﺨﺴﺘﻣ ﺲﺑﻼﳌا ﺖﻧﺎﻛ اذإرﺎﻴﺘﺧﻻا »ﻒﻴﺜﻜﻟا« ماﺪﺨﺘﺳا ﻞﻀﻓﻷا ﻦﻣ ، ﻞﻴﻘﺜﻟا ﺦﺳ.ي
: ﻒﻴﺜﻜﻟا ٭ : ﻒﻴﺜﻜﻟا ٭
: ﻲﻟوﻷا ﻞﻴﺴﻐﻟا ٭: ﻲﻟوﻷا ﻞﻴﺴﻐﻟا ٭
: ﻲﻟوﻷا ﻞﻴﺴﻐﻟا ٭ﻮﻟا ﺔﻠﻴﻘﺛ ﺲﺑﻼﻤﻠﻟ رود ،ﺦﺳوﻷا ﻞﻴﺴﻐﻟا« نا.ﺪﻴﻔﻣ «ﻲﻟ
: ﻲﻟوﻷا ﻞﻴﺴﻐﻟا ٭: ﻲﻟوﻷا ﻞﻴﺴﻐﻟا ٭
ﺮﻌﻟاﺔﻴﺑ
ﺮﺷ ﺪﻤﺘﻋا ﺔﻛWoolmarkرود ﻮﺼﻟا ﻞﻴﺴﻏ ةﺮﺷ تﺎﺠﺘﻨﻣ ﻞﻴﺴﻐﻟ ﺔﻟﺎﺴﻐﻟا هﺬﻫ ﻲﻓ ف ﺔﻛWoolmarkﻲﺘﻟا
ﺮﺸﺑ ،ﺔﻴﻟﻹا تﻻﺎﺴﻐﻟا ﻲﻓ ﺎﻬﻠﺴﻏ ﻦﻜﳝو تﺎﺠﺘﻨﳌا ﻚﻠﺗ ﻞﻴﺴﻏ ﻢﺘﻳ نأ طﻮﳌا تﺎﻤﻴﻠﻌﺘﻠﻟ ﺎﻘﻓﻮﺟﻰﻠﻋ ةد
و ﺲﺑﻼﳌا ﺔﻗﺎﻄﺑرﺪﺼﳌا ﻚﻠﺗﺮﺸﻟا ﻞﺒﻗ ﻦﻣ ة ،ﺔﻴﻟﻵا ﺔﻟﺎﺴﻐﻠﻟ ﺔﻌﻨﺼﳌا ﺔﻛM0708
Page 50

ﺔﻟﺎﺴﻐﻟا ماﺪﺨﺘﺳا ﺔﻴﻔﻴﻛﺔﻟﺎﺴﻐﻟا ماﺪﺨﺘﺳا ﺔﻴﻔﻴﻛ
ﺔﻟﺎﺴﻐﻟا ماﺪﺨﺘﺳا ﺔﻴﻔﻴﻛ
ﺔﻟﺎﺴﻐﻟا ماﺪﺨﺘﺳا ﺔﻴﻔﻴﻛﺔﻟﺎﺴﻐﻟا ماﺪﺨﺘﺳا ﺔﻴﻔﻴﻛ
*STEAM CYCLE
AllergyCare
Refresh
Synthetic
Cotton
Power
Delicate
Wool /Silk
Hand Wash
Duvet
Quick 30
Start/Pause
يوﺪﻴﻟا رﺎﻴﺘﺧﻻا .يوﺪﻴﻟا رﺎﻴﺘﺧﻻا .
يوﺪﻴﻟا رﺎﻴﺘﺧﻻا .
يوﺪﻴﻟا رﺎﻴﺘﺧﻻا .يوﺪﻴﻟا رﺎﻴﺘﺧﻻا .
ﺔﻗﺎﻄﻟاﺔﻗﺎﻄﻟا
ﺔﻗﺎﻄﻟا.زﺎﻬﳉا ﻞﻴﻐﺸﺘﻟ
ﺔﻗﺎﻄﻟاﺔﻗﺎﻄﻟا
ﺮﺒﻟا ﺔﻘﻠﺣو ﺞﻣﺎﻧ.رز ﻞﻛ ﻰﻠﻋ ﻂﻐﻀﻟا
ﺔﻌﺟاﺮﻣ ﻰﺟﺮﻳ ،ﻞﻴﺴﻐﻟا تﻻﺎﺣ ﻞﻛ رﺎﻴﺘﺧﻻﺔﻌﺟاﺮﻣ ﻰﺟﺮﻳ ،ﻞﻴﺴﻐﻟا تﻻﺎﺣ ﻞﻛ رﺎﻴﺘﺧﻻ
ﺔﻌﺟاﺮﻣ ﻰﺟﺮﻳ ،ﻞﻴﺴﻐﻟا تﻻﺎﺣ ﻞﻛ رﺎﻴﺘﺧﻻ
ﺔﻌﺟاﺮﻣ ﻰﺟﺮﻳ ،ﻞﻴﺴﻐﻟا تﻻﺎﺣ ﻞﻛ رﺎﻴﺘﺧﻻﺔﻌﺟاﺮﻣ ﻰﺟﺮﻳ ،ﻞﻴﺴﻐﻟا تﻻﺎﺣ ﻞﻛ رﺎﻴﺘﺧﻻ
ﻰﺘﺣو ﻰﺘﺣو
ﻰﺘﺣو 25.
ﻰﺘﺣو ﻰﺘﺣو
.ﺖﻗﺆﳌا ﻒﻗﻮﺘﻟا/ﻞﻴﻐﺸﺘﻟا.ﺖﻗﺆﳌا ﻒﻗﻮﺘﻟا/ﻞﻴﻐﺸﺘﻟا
.ﺖﻗﺆﳌا ﻒﻗﻮﺘﻟا/ﻞﻴﻐﺸﺘﻟا
.ﺖﻗﺆﳌا ﻒﻗﻮﺘﻟا/ﻞﻴﻐﺸﺘﻟا.ﺖﻗﺆﳌا ﻒﻗﻮﺘﻟا/ﻞﻴﻐﺸﺘﻟا
ﻦﻣ تﺎﺤﻔﺻ ﻦﻣ تﺎﺤﻔﺻ
ﻦﻣ تﺎﺤﻔﺻ17
ﻦﻣ تﺎﺤﻔﺻ ﻦﻣ تﺎﺤﻔﺻ
Wash
Rinse Spin Dry
Intensive Tub Clean Time Delay
Rinse++Hold
Normal+Hod
Medic Rinse
+
Rinse
Normal
95 (°C)
60
40
30
Cold
ﺔﻗﺎﻄﻟا ﺔﻗﺎﻄﻟا
ﺔﻗﺎﻄﻟا.زﺎﻬﳉا ﻞﻴﻐﺸﺘﻟ
ﺔﻗﺎﻄﻟا ﺔﻗﺎﻄﻟا
Pre Wash
Rinse+Spin
Dry Only
Less Steam
Eco Steam
Option Rinse Temp. Spin
.ﻞﻴﻐﺸﺘﻟﺎﺑ ءﺪﺒﻟا ﺪﻨﻋ ﻦﻄﻘﻟا ةرود رﺎﻴﺘﺧا ﻢﺘﻳ.ﻞﻴﻐﺸﺘﻟﺎﺑ ءﺪﺒﻟا ﺪﻨﻋ ﻦﻄﻘﻟا ةرود رﺎﻴﺘﺧا ﻢﺘﻳ
.ﻞﻴﻐﺸﺘﻟﺎﺑ ءﺪﺒﻟا ﺪﻨﻋ ﻦﻄﻘﻟا ةرود رﺎﻴﺘﺧا ﻢﺘﻳ
2
.ﻞﻴﻐﺸﺘﻟﺎﺑ ءﺪﺒﻟا ﺪﻨﻋ ﻦﻄﻘﻟا ةرود رﺎﻴﺘﺧا ﻢﺘﻳ.ﻞﻴﻐﺸﺘﻟﺎﺑ ءﺪﺒﻟا ﺪﻨﻋ ﻦﻄﻘﻟا ةرود رﺎﻴﺘﺧا ﻢﺘﻳ
● رز ﻰﻠﻋ ﻂﻐﺿا
ﺖﻗﺆﳌا ﻒﻗﻮﺘﻟا/ﻞﻴﻐﺸﺘﻟاﺖﻗﺆﳌا ﻒﻗﻮﺘﻟا/ﻞﻴﻐﺸﺘﻟا
ﺖﻗﺆﳌا ﻒﻗﻮﺘﻟا/ﻞﻴﻐﺸﺘﻟا.
●ﻮﺣﻷا ﺮﺘﺧا ﺮﺗ ﻲﺘﻟا لاوﺪﺘﺑ ،ﺎﻬﻣاﺪﺨﺘﺳا ﺪﻳﺮﻳ
ﺖﻗﺆﳌا ﻒﻗﻮﺘﻟا/ﻞﻴﻐﺸﺘﻟاﺖﻗﺆﳌا ﻒﻗﻮﺘﻟا/ﻞﻴﻐﺸﺘﻟا
1200
1000
800
400
No Spin
Normal
Low Temp.
Time Dry
30
60
More
Iron
90
120
150
Dry
Turbo Steam
.1
● رز ﻰﻠﻋ ﻂﻐﺿا
● رز ﻰﻠﻋ ﻂﻐﺿا
●ﺔﻴﺳﺎﺳﻷا ﺔﻟﺎﳊا
ﺮﻟا ﻞﻴﺴﻐﻟا : ﻞﻴﺴﻐﻟا -ﻲﺴﻴﺋ
: ﻒﻄﺸﻟا -3ﺮﻣ تا
روﺪﻟا -: ة1200 رود ﺔﻘﻴﻗﺪﻟا ﻲﻓ ة
● رز ﻰﻠﻋ ﻂﻐﺿا
رد -ﺮﺣ ﺔﺟرا : ءﺎﳌا ة60 ْم
ﺮﺒﻟا -ﻦﻄﻘﻟا : ﺞﻣﺎﻧ
16
Page 51

ﺔﻟﺎﺴﻐﻟا ماﺪﺨﺘﺳا ﺔﻴﻔﻴﻛﺔﻟﺎﺴﻐﻟا ماﺪﺨﺘﺳا ﺔﻴﻔﻴﻛ
Wash
Intensive Tub Clean Time Delay
Rinse Spin Dry
Wash
Intensive Tub Clean Time Delay
Rinse Spin Dry
Wash
Intensive Tub Clean Time Delay
Rinse Spin Dry
Eco Steam
Less Steam
Dry Only
Rinse+Spin
Pre Wash
Option
Rinse++Hold
Normal+Hod
Medic Rinse
Rinse
+
Normal
Rinse
Temp.
Cold
30
40
60
95
(°C)
Spin
No Spin
400
800
1000
1200
AllergyCare
Cotton
Synthetic
Wool /Silk
Hand Wash
Duvet
Delicate
Eco Steam
Less Steam
Dry Only
Rinse+Spin
Pre Wash
Rinse
+
Normal+Hod
Medic Rinse
Rinse
+
Normal
*STEAM CYCLE
ﺔﻟﺎﺴﻐﻟا ماﺪﺨﺘﺳا ﺔﻴﻔﻴﻛ
ﺔﻟﺎﺴﻐﻟا ماﺪﺨﺘﺳا ﺔﻴﻔﻴﻛﺔﻟﺎﺴﻐﻟا ماﺪﺨﺘﺳا ﺔﻴﻔﻴﻛ
*STEAM CYCLE
ﻒﻴﻔﺠﺘﻟا
Synthetic
Cotton
AllergyCare
Refresh
Power
(1) (2) (3) (4) (5) (6) (7) (11) (12) (13)(8, 9, 10)
)13 (
Delicate
Wool /Silk
Hand Wash
Duvet
Quick 30
Start/Pause
ﻮﳊا ﻒﻴﻈﻨﺗ ض
ﻮﻟا ﻞﻴﺟﺄﺗﺖﻗ
روﺪﻟاة
)9: رﺰﻟا (
)10( : رﺰﻟا
)11 : رﺰﻟا (
)12: رﺰﻟا ( رﻮﺗ رﺎﺨﺒﻟا ﻮﺑ
ﺞﻣﺎﻧﺮﺒﻟاﺞﻣﺎﻧﺮﺒﻟا
ﺞﻣﺎﻧﺮﺒﻟا
ﺞﻣﺎﻧﺮﺒﻟاﺞﻣﺎﻧﺮﺒﻟا
*STEAM CYCLE
Cotton
AllergyCare
Refresh
Synthetic
Delicate
Wool /Silk
Hand Wash
Duvet
Quick 30
● مﺪﺨﺘﺴﺗ9ﺮﺑ و ﺞﻣا.ﺲﺑﻼﳌا عﻮﻨﻟ ﺎﻘﻓ
●ﺆﳌا ءﺎﻀﻴﺳرﺎﺷﻺﻟ ﺮﺷﺮﺒﻟا ﻰﻟا ة.رﺎﺘا ﺞﻣﺎﻧ
ﻒﻗﻮﺘﻟا/ﻞﻴﻐﺸﺘﻟاﻒﻗﻮﺘﻟا/ﻞﻴﻐﺸﺘﻟا
ﻒﻗﻮﺘﻟا/ﻞﻴﻐﺸﺘﻟا
ﻒﻗﻮﺘﻟا/ﻞﻴﻐﺸﺘﻟاﻒﻗﻮﺘﻟا/ﻞﻴﻐﺸﺘﻟا
ﺖﻗﺆﳌا ﺖﻗﺆﳌا
ﺖﻗﺆﳌاﺮﺑ رﺎﻴﺘﺧا ﻢﺘﻳ ،ﻦﻄﻘﻟا ﺞﻣﺎﻧ
ﺖﻗﺆﳌا ﺖﻗﺆﳌا
وأﻮﺗ.ﺎﻴﻜﻴﺗﺎﻣ
ﺮﺒﻟاﺮﺘﻟﺎﺑ ﺞﻣﺎﻧ « ﺐﻴﺗ _ ﻲﻋﺎﻨﻄﺻﻻا _ ﻦﻄﻘﻟا
ﺮﻟاﻮﺼﻟا _ ﻖﻴﻗﺮﳊا/فوﺪﻴﻟا ﻞﻴﺴﻐﻟا _ ﺮﻳ_ ي.
ﺮﺴﻟا _ ﲔﺘﻓﺪﻟا_ شﺎﻌﻧﻹا ةدﺎﻋإ _ ٣٠ ﻊﻳ
ﺔﻴﺳﺎﺴﳊا ﺪﺿ ﺔﻳﺎﻨﻌﻟا
ﺔﻌﺟاﺮﻣ ﻰﺟﺮﻳ ،ﺞﻣﺎﻧﺮﺑ ﻞﻜﻟ ﺲﺑﻼﳌا عﻮﻧ ﺔﻓﺮﻌﳌﺔﻌﺟاﺮﻣ ﻰﺟﺮﻳ ،ﺞﻣﺎﻧﺮﺑ ﻞﻜﻟ ﺲﺑﻼﳌا عﻮﻧ ﺔﻓﺮﻌﳌ
ﺔﻌﺟاﺮﻣ ﻰﺟﺮﻳ ،ﺞﻣﺎﻧﺮﺑ ﻞﻜﻟ ﺲﺑﻼﳌا عﻮﻧ ﺔﻓﺮﻌﳌ
ﺔﻌﺟاﺮﻣ ﻰﺟﺮﻳ ،ﺞﻣﺎﻧﺮﺑ ﻞﻜﻟ ﺲﺑﻼﳌا عﻮﻧ ﺔﻓﺮﻌﳌﺔﻌﺟاﺮﻣ ﻰﺟﺮﻳ ،ﺞﻣﺎﻧﺮﺑ ﻞﻜﻟ ﺲﺑﻼﳌا عﻮﻧ ﺔﻓﺮﻌﳌ
ﺔﺤﻔﺻ ﺔﺤﻔﺻ
..
ﺔﺤﻔﺻ15
.
ﺔﺤﻔﺻ ﺔﺤﻔﺻ
..
17
Pre Wash
Rinse++Hold
Normal+Hod
Rinse+Spin
Dry Only
Medic Rinse
Less Steam
Rinse
Eco Steam
Normal
Option Rinse Temp. Spin
ﻞﻔﻄﻟا قﻼﻏإ
ﻒﻄﺸﻟا
ردﺮﺣ ﺔﺟراءﺎﳌا ة
● رز ﻰﻠﻋ ﻂﻐﻀﻟا ﺪﻨﻋ
●ﺮﺒﻟا رز ﻰﻠﻋ ﻂﻐﻀﻟﺎﺑ رﺎﻴﺘﺧا ﻢﺘﻳ ،ﺞﻣﺎﻧ
Wash
Rinse Spin Dry
Intensive Tub Clean Time Delay
1200
95
(°C)
60
1000
40
+
30
Cold
800
400
No Spin
)5 : رﺰﻟا (
)6( : رﺰﻟا
)7 : رﺰﻟا (
)8: رﺰﻟا ( ﻒﻴﺜﻜﻟا
ﺔﻗﺎﻄﻟاﺔﻗﺎﻄﻟا
ﺔﻗﺎﻄﻟا
ﺔﻗﺎﻄﻟاﺔﻗﺎﻄﻟا
ﺖﻗﻮﻟا ﻞﻴﺟﺄﺗ ﺖﻗﻮﻟا ﻞﻴﺟﺄﺗ
ﺖﻗﻮﻟا ﻞﻴﺟﺄﺗماﺪﺨﺘﺳا ﻚﻨﻜﳝ ،
ﺖﻗﻮﻟا ﻞﻴﺟﺄﺗ ﺖﻗﻮﻟا ﻞﻴﺟﺄﺗ
ﻲﺳﺎﺳﻷا ﺞﻣﺎﻧﺮﺒﻟا .ﻲﺳﺎﺳﻷا ﺞﻣﺎﻧﺮﺒﻟا .
ﻲﺳﺎﺳﻷا ﺞﻣﺎﻧﺮﺒﻟا .
ﻲﺳﺎﺳﻷا ﺞﻣﺎﻧﺮﺒﻟا .ﻲﺳﺎﺳﻷا ﺞﻣﺎﻧﺮﺒﻟا .
ﺖﻗﺆﳌا ﻒﻗﻮﺘﻟا/ﻞﻴﻐﺸﺘﻟا ﺖﻗﺆﳌا ﻒﻗﻮﺘﻟا/ﻞﻴﻐﺸﺘﻟا
ﺖﻗﺆﳌا ﻒﻗﻮﺘﻟا/ﻞﻴﻐﺸﺘﻟازﺎﻬﺟ أﺪﺒﻳ ﻢﺛ ﻂﻘﻓ
ﺖﻗﺆﳌا ﻒﻗﻮﺘﻟا/ﻞﻴﻐﺸﺘﻟا ﺖﻗﺆﳌا ﻒﻗﻮﺘﻟا/ﻞﻴﻐﺸﺘﻟا
Time Dry
30
60
Normal
Iron
Low Temp.
More
150
Dry
Turbo Steam
ﺔﻗﺎﻄﻟا .ﺔﻗﺎﻄﻟا .
ﺔﻗﺎﻄﻟا .
ﺔﻗﺎﻄﻟا .ﺔﻗﺎﻄﻟا .
90
120
.رﺰﻟا اﺬﻫ
روﺪﻟ ﺪﻌﺘﺴﻣﻮﻠﳌا ﺲﺑﻼﳌا ناو .ﺔﻧتﻻﺎﳊا
ﺮﺧﻷا ﺔﻴﺳﺎﺳﻷا.ﻲﻠﻳ ﺎﻤﻛ ى
ﺮﺑ رﺎﻴﺘﺧا نوﺪﺑرز ﻰﻠﻋ ﻂﻐﺿا ،ﺞﻣﺎﻧ
.ﻞﻤﻌﻟﺎﺑ ﺔﻟﺎﺴﻐﻟا
ﻲﺳﺎﺳﻷا ﺞﻣﺎﻧﺮﺒﻟاﻲﺳﺎﺳﻷا ﺞﻣﺎﻧﺮﺒﻟا
ﻲﺳﺎﺳﻷا ﺞﻣﺎﻧﺮﺒﻟا
ﻲﺳﺎﺳﻷا ﺞﻣﺎﻧﺮﺒﻟاﻲﺳﺎﺳﻷا ﺞﻣﺎﻧﺮﺒﻟا
ﺮﺑ -ﺮﻟا ﻞﻴﺴﻐﻟا / ﻦﻄﻘﻟا ﺞﻣﺎﻧ/ ﻲﺴﻴﺋ
/ يدﺎﻌﻟا ﻒﻄﺸﻟا1200رود / ﺔﻘﻴﻗﺪﻟا ﻲﻓ ة
)1ﺔﻗﺎﻄﻟا : رﺰﻟا (
)2( ﺮﺑﺞﻣﺎﻧ
)3ﻮﺘﻟا/ﻞﻴﻐﺸﺘﻟا : رﺰﻟا (ﺆﳌا ﻒﻗﺖﻗ
)4: رﺰﻟا ( رﺎﻴﺘﺧﻻاي
1
●.زﺎﻬﳉا فﺎﻘﻳإ/ﻞﻴﻐﺸﺘﻟ ﺔﻗﺎﻄﻟا رز ﻰﻠﻋ ﻂﻐﺿا
●و ءﺎﻐﻟﻹ ﺔﻔﻴﻇ
2
●ﺔﻟﺎﺴﻐﻟا زﺎﻬﺟ ،ﺔﻗﺎﻄﻟا رز ﻰﻠﻋ ﻂﻐﻀﻟا ﺪﻨﻋ
●رأ اذإ ﺮﻤﺘﺳﻻا تدرود ﻲﻓ راﻞﻴﺴﻐﻟا نا
■
60 ْم
Page 52

يرﺎﻴﺘﺧﻻايرﺎﻴﺘﺧﻻا
Wash
Intensive Tub Clean Time Delay
Rinse Spin Dry
Wash
Intensive Tub Clean Time Delay
Rinse Spin Dry
Rinse++Hold
Normal+Hod
Medic Rinse
Rinse
+
Normal
Rinse
Temp.
Cold
30
40
60
95
(°C)
Spin
No Spin
400
800
1000
1200
Refresh
AllergyCare
Cotton
Synthetic
Wool /Silk
Hand Wash
Duvet
Quick 30
Delicate
Eco Steam
Less Steam
Dry Only
Rinse+Spin
Pre Wash
Option
*STEAM CYCLE
Wash
Intensive Tub Clean Time Delay
Rinse Spin Dry
Wash
Intensive Tub Clean Time Delay
Rinse Spin Dry
Wash
Intensive Tub Clean Time Delay
Rinse Spin Dry
Wash
Intensive Tub Clean Time Delay
Rinse Spin Dry
Wash
Intensive Tub Clean Time Delay
Rinse Spin Dry
Wash
Intensive Tub Clean Time Delay
Rinse Spin Dry
Wash
Intensive Tub Clean Time Delay
Rinse Spin Dry
Wash
Intensive Tub Clean Time Delay
Rinse Spin Dry
يرﺎﻴﺘﺧﻻا
يرﺎﻴﺘﺧﻻايرﺎﻴﺘﺧﻻا
ﺔﻟﺎﺴﻐﻟا ماﺪﺨﺘﺳا ﺔﻴﻔﻴﻛﺔﻟﺎﺴﻐﻟا ماﺪﺨﺘﺳا ﺔﻴﻔﻴﻛ
ﺔﻟﺎﺴﻐﻟا ماﺪﺨﺘﺳا ﺔﻴﻔﻴﻛ
ﺔﻟﺎﺴﻐﻟا ماﺪﺨﺘﺳا ﺔﻴﻔﻴﻛﺔﻟﺎﺴﻐﻟا ماﺪﺨﺘﺳا ﺔﻴﻔﻴﻛ
ﺖﻗﺆﳌا ﻒﻗﻮﺘﻟا/ﻞﻴﻐﺸﺘﻟاﺖﻗﺆﳌا ﻒﻗﻮﺘﻟا/ﻞﻴﻐﺸﺘﻟا
ﺖﻗﺆﳌا ﻒﻗﻮﺘﻟا/ﻞﻴﻐﺸﺘﻟا
ﺖﻗﺆﳌا ﻒﻗﻮﺘﻟا/ﻞﻴﻐﺸﺘﻟاﺖﻗﺆﳌا ﻒﻗﻮﺘﻟا/ﻞﻴﻐﺸﺘﻟا
ﺪﺿ ﺔﻳﺎﻨﻌﻟا
●رﺰﻟا ﻰﻠﻋ ﻂﻐﻀﻟﺎﺑ
رﺎﻴﺘﺧﻻاﻢﺘﻳ ﺪﻗ ،ي
ىﺪﺣا رﺎﻴﺘﺧا
ﻮﻟارﺎﻴﺘﺧﻻا ﻒﺋﺎﻇﺔﻳ
.ﻂﻘﻓ
Option
ﻲﻟوﻷا ﻞﻴﺴﻐﻟا .ﻲﻟوﻷا ﻞﻴﺴﻐﻟا .
ﻲﻟوﻷا ﻞﻴﺴﻐﻟا .
ﻲﻟوﻷا ﻞﻴﺴﻐﻟا .ﻲﻟوﻷا ﻞﻴﺴﻐﻟا .
ﻮﻟا هﺬﻫ مﺪﺨﺘﺳا رﺎﻴﺘﺧﻻا ﺔﻴﻌﺿﻮﻠﻄﳌا ﺲﺑﻼﻤﻠﻟ ﺔﻳﻞﻴﺴﻐﻠﻟ ﺔﺑ
وﻷا ﻞﻴﺴﻐﻟا ماﺪﺨﺘﺳا ﺪﻨﻋ -رﺎﻴﺘﺧﻻا ﻲﻟﻞﺋﺎﺳ مﺪﺨﺘﺴﺗ ﻻ ،ي
و ﻲﻓ ماﺪﺨﺘﺳﻼﻟ ﻞﺑﺎﻗ ، ﻦﻄﻘﻟا تﺎﻴﻌﺿ
ﻒﻴﻔﺠﺘﻟا + ﻒﻄﺸﻟا .ﻒﻴﻔﺠﺘﻟا + ﻒﻄﺸﻟا .
ﻒﻴﻔﺠﺘﻟا + ﻒﻄﺸﻟا .
ﻒﻴﻔﺠﺘﻟا + ﻒﻄﺸﻟا .ﻒﻴﻔﺠﺘﻟا + ﻒﻄﺸﻟا .
ﻂﻘﻓ ﻒﻴﻔﺠﺘﻟا .ﻂﻘﻓ ﻒﻴﻔﺠﺘﻟا .
ﻂﻘﻓ ﻒﻴﻔﺠﺘﻟا .
ﻂﻘﻓ ﻒﻴﻔﺠﺘﻟا .ﻂﻘﻓ ﻒﻴﻔﺠﺘﻟا .
.ﻒﻴﻔﺠﺘﻟا ﻢﺛ
ﺮﺗ ﺎﻣﺪﻨﻋ.رﺰﻟا اﺬﻫ ﺮﺘﺧا ،ﻒﻴﻔﺠﺘﻟا ﺪﻳ
رﺎﺨﺑ ﻞﻗأ .رﺎﺨﺑ ﻞﻗأ .
رﺎﺨﺑ ﻞﻗأ .
رﺎﺨﺑ ﻞﻗأ .رﺎﺨﺑ ﻞﻗأ .
ﺮﺗ ﺎﻣﺪﻨﻋﺮﻴﻐﺻ ﺔﻴﻤﻛ ﻞﺴﻏ ﺪﻳﻦﻣ ة
ﻮﺑ ﺲﺑﻼﳌاهﺬﻫ ﻞﻤﻌﺘﺳا ،رﺎﺨﺒﻟا ﺔﻄﺳا
ﺮﻬﻜﻟا ﺔﻗﺎﻄﻟا ﻲﻓ دﺎﺼﺘﻗﻻا ﻊﻣ،ﺔﻴﺋﺎﺑ
.ﺔﻴﺻﺎﳋا هﺬﻫ ﻞﻤﻌﺘﺳا
رﺎﺨﺒﻟا دﺎﺼﺘﻗا .رﺎﺨﺒﻟا دﺎﺼﺘﻗا .
رﺎﺨﺒﻟا دﺎﺼﺘﻗا .
رﺎﺨﺒﻟا دﺎﺼﺘﻗا .رﺎﺨﺒﻟا دﺎﺼﺘﻗا .
ﺮﺗ ﺎﻣﺪﻨﻋرﺎﺨﺒﻟا ﻞﺴﻐﻟا لﺎﻤﻌﺘﺳا ﺪﻳي
Pre Wash
Rinse+Spin
Dry Only
Less Steam
Eco Steam
ﻮﺣ ﻲﻓ ﻞﻴﺴﻐﻟاﺮﻟا ﻞﻴﺴﻐﻟا ض.ﻲﺴﻴﺋ
ﺔﻴﺳﺎﺴﳊا
و ، .ﻲﻋﺎﻨﻄﺻﻻا
.ﺔﻴﺻﺎﳋا
1
●
وﻷاوﻷا ﻞﻴﺴﻐﻠﻟ ﺔﻴﻓﺎﺿإ ﺔﻘﻴﻗد ١٧ ﻂﺒﺿا .ﻲﻟو ﻲﻟﺮﺼﺘﻟا.ﻒﻳ
●
2
●ﻮﻟا هﺬﻫ مﺪﺨﺘﺳا رﺎﻴﺘﺧﻻا ﺔﻴﻌﺿﻒﻄﺸﻠﻟ ﺔﻳ
3
●
4
●
5
●
ﻞﻴﻐﺸﺘﻟا .ﻞﻴﻐﺸﺘﻟا .
ﻞﻴﻐﺸﺘﻟا .
ﻞﻴﻐﺸﺘﻟا .ﻞﻴﻐﺸﺘﻟا .
ﺖﻗﺆﳌا ﻒﻗﻮﺘﻟا/ﻞﻴﻐﺸﺘﻟاﺖﻗﺆﳌا ﻒﻗﻮﺘﻟا/ﻞﻴﻐﺸﺘﻟا
ﺖﻗﺆﳌا ﻒﻗﻮﺘﻟا/ﻞﻴﻐﺸﺘﻟامﺪﺨﺘﺴﻳ اﺬﻫ
ﺖﻗﺆﳌا ﻒﻗﻮﺘﻟا/ﻞﻴﻐﺸﺘﻟاﺖﻗﺆﳌا ﻒﻗﻮﺘﻟا/ﻞﻴﻐﺸﺘﻟا
رود ﻞﻴﻐﺸﺘﻟﻮﺘﻟا وأ ﻞﻴﺴﻐﻟا ناﺆﳌا ﻒﻗﻦﻣ ﺖﻗ
روﺪﻟا اﺬﻫ.نا
ﺖﻗﺆﳌا ﻒﻗﻮﺘﻟا .ﺖﻗﺆﳌا ﻒﻗﻮﺘﻟا .
ﺖﻗﺆﳌا ﻒﻗﻮﺘﻟا .
ﺖﻗﺆﳌا ﻒﻗﻮﺘﻟا .ﺖﻗﺆﳌا ﻒﻗﻮﺘﻟا .
رز ﻰﻠﻋ ﻂﻐﺿا ،ﻞﻴﺴﻐﻟا
ﺖﻗﺆﳌا ﻒﻗﻮﺘﻟا/ﻞﻴﻐﺸﺘﻟاﺖﻗﺆﳌا ﻒﻗﻮﺘﻟا/ﻞﻴﻐﺸﺘﻟا
ﺖﻗﺆﳌا ﻒﻗﻮﺘﻟا/ﻞﻴﻐﺸﺘﻟا.
ﺖﻗﺆﳌا ﻒﻗﻮﺘﻟا/ﻞﻴﻐﺸﺘﻟاﺖﻗﺆﳌا ﻒﻗﻮﺘﻟا/ﻞﻴﻐﺸﺘﻟا
ﻮﺘﻳ ،رز يأ ﻰﻠﻋ ﻂﻐﺿ نوﺪﺑﻦﻋ زﺎﻬﳉا ﻒﻗ
وأ ﻞﻤﻌﻟاﻮﺗ.ﻖﺋﺎﻗد ٤ ﺪﻌﺑ ﺎﻴﻜﻴﺗﺎﻣ
بﺎﺒﻟا ﻞﻔﻗبﺎﺒﻟا ﻞﻔﻗ
بﺎﺒﻟا ﻞﻔﻗ
بﺎﺒﻟا ﻞﻔﻗبﺎﺒﻟا ﻞﻔﻗ
ﺖﻗﺆﳌا ﻒﻗﻮﺘﻟا/ﻞﻴﻐﺸﺘﻟا ﺖﻗﺆﳌا ﻒﻗﻮﺘﻟا/ﻞﻴﻐﺸﺘﻟا
ﺖﻗﺆﳌا ﻒﻗﻮﺘﻟا/ﻞﻴﻐﺸﺘﻟاﻦﻋ ﺔﻟﺎﺴﻐﻟا فﺎﻘﻳﻹ
ﺖﻗﺆﳌا ﻒﻗﻮﺘﻟا/ﻞﻴﻐﺸﺘﻟا ﺖﻗﺆﳌا ﻒﻗﻮﺘﻟا/ﻞﻴﻐﺸﺘﻟا
ﻒﺸﻜﻟاﻒﺸﻜﻟا
ﻒﺸﻜﻟا
ﻒﺸﻜﻟاﻒﺸﻜﻟا
و ءﻂﺒﺑ زﺎﻬﳉاﻮﳌا ﺲﺑﻼﳌا ﻦﻣ ادﺪﻋ ﻢﻛ ﻒﺸﻜﻳﻮﺿﺔﻋ
و ﺔﻴﺳﺎﺴﳊاﺮﺑ.ﺞﻣﺎﻧ
1
● رز
2
●رأ اذإ ﻮﺗ تدﺆﻣ زﺎﻬﳉا ﻒﻗرود ﻦﻋ ﺎﺘﻗنا
●ﻮﺘﻟا رز ﻰﻠﻋ ﻂﻐﻀﻟا ﺪﻌﺑ ﺆﳌا ﻒﻗﺖﻗ
●.ﺔﻟﺎﺴﻐﻠﻟ بﺎﺒﻟا ﻞﻔﻗ ﻢﺘﻳ ﺎﻤﻠﻛ ءﺎﻀﻳ
●رز ﻰﻠﻋ ﻂﻐﻀﻟﺎﺑ بﺎﺒﻟا ﻞﻔﻗ ءﺎﻐﻟإ ﻚﻨﻜﳝ
.ﻞﻤﻌﻟا
●ﺮﻴﺼﻗ ةﺪﳌ ﻞﻴﺟﺄﺗ ﺪﻌﺑ بﺎﺒﻟا ﺢﺘﻓ ﻚﻨﻜﳝ .ة
●ﺮﻌﻟا ﺔﺷﺎﺷ ﻰﻠﻋ " ﻒﺸﻜﻟا " رﻮﻬﻇ ءﺎﻨﺛأ روﺪﻳ ،ض
ﻮﳊا ﻲﻓو .ضﻮﻟا قﺮﻐﺘﺴﻳﻮﺛ ﺾﻌﺑ ﺖﻗ.نا
●ﻰﻠﻋ ﺔﻳﺎﻨﻌﻟا ، ﻲﻋﺎﻨﻄﺻﻻا ، ﻦﻄﻘﻟا ﻲﻓ مﺪﺨﺘﺴﻳ
18
Page 53

ﺔﻟﺎﺴﻐﻟا ماﺪﺨﺘﺳا ﺔﻴﻔﻴﻛﺔﻟﺎﺴﻐﻟا ماﺪﺨﺘﺳا ﺔﻴﻔﻴﻛ
Wash
Intensive Tub Clean Time Delay
Rinse Spin Dry
Wash
Intensive Tub Clean Time Delay
Rinse Spin Dry
Temp.
Cold
30
40
60
95
(°C)
Spin
No Spin
400
800
1000
1200
Option Rinse
Wool /Silk
Hand Wash
Duvet
Quick 30
Delicate
Eco Steam
Less Steam
Dry Only
Rinse+Spin
Pre Wash
Option
Rinse++Hold
Normal+Hod
Medic Rinse
Rinse
+
Normal
Rinse
Temp.
More
Normal
Iron
Spin
No Spin
400
800
1000
1200
Wash
Intensive Tub Clean Time Delay
Rinse Spin Dry
Wash
Intensive Tub Clean Time Delay
Rinse Spin Dry
Wash
Intensive Tub Clean Time Delay
Rinse Spin Dry
Wash
Intensive Tub Clean Time Delay
Rinse Spin Dry
Hand Wash
Duvet
Quick 30
Eco Steam
Less Steam
Dry Only
Rinse+Spin
Pre Wash
Option
Rinse++Hold
Normal+Hod
Medic Rinse
Rinse
+
Normal
Rinse
Temp.
Cold
30
40
60
95
(°C)
More
Normal
Iron
Time Dry
30
60
90
120
Spin
No Spin
400
800
1000
1200
Wash
Wash
Wash
Wash
Option Rinse
Hand Wash
Duvet
Quick 30
Eco Steam
Less Steam
Dry Only
Rinse+Spin
Pre Wash
Option
Rinse++Hold
Normal+Hod
Medic Rinse
Rinse
+
Normal
Rinse
Temp.
Cold
30
40
60
95
(°C)
Dry
More
Normal
Iron
Low Temp.
Time Dry
30
60
90
120
150
Spin
No Spin
400
800
1000
1200
Wash
Intensive Tub Clean Time Delay
Rinse Spin Dry
Wash
Intensive Tub Clean Time Delay
Rinse Spin Dry
Wash
Intensive Tub Clean Time Delay
Rinse Spin Dry
Wash
Intensive Tub Clean Time Delay
Rinse Spin Dry
Option Rinse
Option Rinse
Eco Steam
Less Steam
Dry Only
Rinse+Spin
Pre Wash
Option
Rinse++Hold
Normal+Hod
Medic Rinse
Rinse
+
Normal
Rinse
Temp.
Cold
30
40
60
95
(°C)
Dry
More
Normal
Iron
Low Temp.
Time Dry
Turbo Steam
30
60
90
120
150
Spin
No Spin
400
800
1000
1200
ﺔﻟﺎﺴﻐﻟا ماﺪﺨﺘﺳا ﺔﻴﻔﻴﻛ
ﺔﻟﺎﺴﻐﻟا ماﺪﺨﺘﺳا ﺔﻴﻔﻴﻛﺔﻟﺎﺴﻐﻟا ماﺪﺨﺘﺳا ﺔﻴﻔﻴﻛ
ﻒﻄﺸﻟاﻒﻄﺸﻟا
ﻒﻄﺸﻟا
ﻒﻄﺸﻟاﻒﻄﺸﻟا
●رز ﻰﻠﻋ ﻂﻐﻀﻟﺎﺑ
رﺎﻴﺘﺧا ﻚﻨﻜﳝ ،ﻒﻄﺸﻟا
.ﻒﻄﺸﻟا عﻮﻧ
، ﻲﻋﺎﻨﻄﺻﻻا ، ﻦﻄﻘﻟا ، ﺔﻴﺳﺎﺴﳊا ﺪﺿ ﺔﻳﺎﻨﻌﻟا
بﻼﳌا ﻒﻄﺷ رﺎﻴﳋا رﺎﻴﺘﺧا ﻦﻜﳝ ،ﻒﻄﺸﻟا ﻞﻴﻐﺸﺗ
ﻦﻣ ﺎﻬﻌﻨﳌ ﻒﻄﺸﻟا ﺪﻌﺑ ﻒﻴﻔﲡ نوﺪﺑ
.ﻒﻴﻔﺠﺘﻟا رز ﻰﻠﻋ ﻂﻐﻀﻟﺎﺑ ﻒﻄﺸﻟا
19
ﻒﻄﺸﻟا رﺎﻈﺘﻧا .ﻒﻄﺸﻟا رﺎﻈﺘﻧا .
ﻒﻄﺸﻟا رﺎﻈﺘﻧا .
ﻒﻄﺸﻟا رﺎﻈﺘﻧا .ﻒﻄﺸﻟا رﺎﻈﺘﻧا .
و رﺎﻴﺘﺧا ﻚﻨﻜﳝ ،ﺪﻴﻌﻋﺎﺠﺘﻟارﺎﻈﺘﻧا ﺔﻔﻴﻇ
ﻲﺒﻄﻟا ﺲﺑﻼﳌا ﻒﻄﺷ ﻲﺒﻄﻟا ﺲﺑﻼﳌا ﻒﻄﺷ
ﻲﺒﻄﻟا ﺲﺑﻼﳌا ﻒﻄﺷ
ﻲﺒﻄﻟا ﺲﺑﻼﳌا ﻒﻄﺷ ﻲﺒﻄﻟا ﺲﺑﻼﳌا ﻒﻄﺷ
Rinse++Hold
Normal+Hod
Medic Rinse
+
Rinse
Normal
Rinse
يدﺎﻋ .يدﺎﻋ .
يدﺎﻋ .
يدﺎﻋ .يدﺎﻋ .
ﲔﺘﻓﺪﻟا
/
ﺮﳊاوﺪﻴﻟا ﻞﻴﺴﻐﻟا ، ﺮﻳﺮﺴﻟا ، ي، ٣٠ ﻊﻳ
+ ﻒﻄﺷ .+ ﻒﻄﺷ .
+ ﻒﻄﺷ .
+ ﻒﻄﺷ .+ ﻒﻄﺷ .
.ﻒﻄﺸﻟا
و لﺎﻤﺘﻛا ﺪﻨﻋماﺪﺨﺘﺳﺎﺑ ﻒﻄﺸﻟا رﺎﻈﺘﻧا ﺔﻔﻴﻇ
ﺮﺒﻟا ﺔﻘﻠﺣﺮﺠﻳ ﺞﻣﺎﻧﺮﺒﻟا يﻮﻠﻄﳌا ﺞﻣﺎﻧ.ب
.ﺔﻴﺒﻄﻟ
ﻞﻔﻄﻟا قﻼﻏإﻞﻔﻄﻟا قﻼﻏإ
ﻞﻔﻄﻟا قﻼﻏإ
ﻞﻔﻄﻟا قﻼﻏإﻞﻔﻄﻟا قﻼﻏإ
Option Rinse
رأ اذإرزﻷا ﻊﻴﻤﺟ قﻼﻏإ تدﻮﻌﻣ وأ ﻞﻔﻃ ﻊﻨﳌ راﻦﻋ ﲔﻗ
ﻮﻟا هﺬﻫ ماﺪﺨﺘﺳا ﻚﻨﻜﳝ ، ﻞﻴﻐﺸﺗ.ﺔﻔﻴﻇ
●رد رز ﻰﻠﻋ ﻂﻐﻀﻟﺎﺑ ﻞﻔﻄﻟا قﻼﻏإ ﻂﺒﺿ ﻚﻨﻜﳝ ﺔﺟ
Option رزو
Rinse ﻮﻟا ﺲﻔﻧ ﻲﻓﺖﻗ.
1
ﻮﺣ)ﻮﺛ ثﻼﺛ ﻲﻟا(نا
●ﺮﺠﻳﺮﻣ ثﻼﺛ ﻒﻄﺸﻟا يﺮﺒﻟ تاﺞﻣا
Option Rinse
●ﺮﺠﻳ ﺮﻣ ﻒﻄﺸﻟا يﺮﺒﻟ ﲔﺗﺞﻣا
ﻮﺼﻟاف
رزﻷا ﻊﻴﻤﺟ. ﺔﻗﺎﻄﻟا رز ءﺎﻨﺜﺘﺳﺎﺑ را
ﺮﻟاﻖﻴﻗ
Option
رزو
2
3
..
4
.
..
● زإ ﻰﻠﻋ ﺪﻋﺎﺴﻳ ﺪﻗ ﻲﻓﺎﺿﻹا ﻄﺸﻟا ماﺪﺨﺘﺳاور ﺔﻟا.ﻞﻴﺴﻐﻟا قﻮﺤﺴﻣ ﺐﺳا
●و رﺎﻴﺘﺧﺎﺑ ﺰﻳ ، + ﻒﻄﺷ ﺔﻔﻴﻇو ﺪﻳو ﻒﻄﺸﻟا ﺖﻗءﺎﻣ
●رأ اذإ ﺮﺘﺗ نأ تدﺔﻟﺎﺴﻐﻟا زﺎﻬﺟ ﻲﻓ ﺲﺑﻼﳌا ك
●ﺮﺼﺘﻟا تﺎﻴﻠﻤﻋ ﻞﺟأ ﻦﻣ ، ﻒﻴﻔﺠﺘﻟا وأ ﻒﻳ
● ﺪﻨﻋ ﻞﻀﻓأ ءﺎﻘﻧ وأ ﺔﻴﻟﺎﻋ ﺔﻴﻟﺎﻌﻓ ﻰﻠﻋ لﻮﺼﺤﻠﻟ
ﻮﻟا ﺲﻔﻧ ﻲﻓ ﺖﻗ
ﺖﻗﺆﳌا ﻒﻗﻮﺘﻟا/ﻞﻴﻐﺸﺘﻟاﺖﻗﺆﳌا ﻒﻗﻮﺘﻟا/ﻞﻴﻐﺸﺘﻟا
ﺖﻗﺆﳌا ﻒﻗﻮﺘﻟا/ﻞﻴﻐﺸﺘﻟا.
ﺖﻗﺆﳌا ﻒﻗﻮﺘﻟا/ﻞﻴﻐﺸﺘﻟاﺖﻗﺆﳌا ﻒﻗﻮﺘﻟا/ﻞﻴﻐﺸﺘﻟا
Option Rinse
رزو
Option Rinse
Rinse
ردﺔﺟ
Option
ﺖﻗﺆﳌا ﻒﻗﻮﺘﻟا/ﻞﻴﻐﺸﺘﻟاﺖﻗﺆﳌا ﻒﻗﻮﺘﻟا/ﻞﻴﻐﺸﺘﻟا
ﺖﻗﺆﳌا ﻒﻗﻮﺘﻟا/ﻞﻴﻐﺸﺘﻟا.
ﺖﻗﺆﳌا ﻒﻗﻮﺘﻟا/ﻞﻴﻐﺸﺘﻟاﺖﻗﺆﳌا ﻒﻗﻮﺘﻟا/ﻞﻴﻐﺸﺘﻟا
Change
the desired
program
ﻮﺣ) .ﺎﻌﻣ ﻮﺛ ثﻼﺛ ﻲﻟا(نا
● و ﻂﺒﺿ ﺪﻨﻋﻞﻤﻌﺗ ﻻ ، ﻞﻔﻄﻟا قﻼﻏإ ﺔﻔﻴﻇ
●ﻰﻠﻋ ﺎﻄﻏﺎﺿ ﻖﺑا ،ﻞﻔﻄﻟا قﻼﻏإ مﺎﻈﻧ ءﺎﻐﻟﻹ
رز
ردﺔﺟ
ﺮﻣﻮﺣ) .ﺔﻴﻧﺎﺛ ةﻮﺛ ثﻼﺛ ﻲﻟا(نا
●رأ اذإ ﺮﺒﻟا ﺮﻴﻴﻐﺗ تدﻞﻤﻋ ﺔﻟﺎﺣ ﻲﻓ ﺞﻣﺎﻧ
Rinse
●و ﻂﺒﺿ ﻚﻨﻜﳝ يأ ﻲﻓ ﻞﻔﻄﻟا قﻼﻏإ ﺔﻔﻴﻇ
وﺪﺣ ﺔﻟﺎﺣﻞﻤﻌﺗ ﺎﻤﻛ .ﻞﻴﻐﺸﺘﻟا ﻲﻓ ﺄﻄﳋا ث
و.ﻞﻔﻄﻟا قﻼﻏإ ﺔﻔﻴﻇ
1رز ﻰﻠﻋ ﺎﻄﻏﺎﺿ ﻖﺑا .
2 رز ﻰﻠﻋ ﻂﻐﺿا .
3ﺮﺒﻟا ﺮﻴﻏ .ﻮﻠﻄﳌا ﺞﻣﺎﻧو برز ﻰﻠﻋ ﻂﻐﺿا
وو ﺖﻗوأ ﻞﻔﻄﻟا قﻼﻏإ ءﺎﻐﻟإ ﻢﺘﻳﻮﺗﻲﻓ ﺎﻴﻜﻴﺗﺎﻣ
و.ﺔﻗﺎﻄﻟا ءﺎﻔﻄﻧا ﺔﻟﺎﺣ ﻲﻓ ﻞﻔﻄﻟا قﻼﻏإ ﺔﻔﻴﻇ
Page 54

Wash
Intensive Tub Clean Time Delay
Rinse Spin Dry
Wash
Intensive Tub Clean Time Delay
Rinse Spin Dry
Wash
Rinse Spin Dry
Temp.
Cold
30
40
60
95
(°C)
Wash
Intensive Tub Clean Time Delay
Rinse Spin Dry
Wash
Intensive Tub Clean Time Delay
Rinse Spin Dry
ضﻮﳊا ﻒﻴﻈﻨﺗضﻮﳊا ﻒﻴﻈﻨﺗ
Wash
Intensive Tub Clean Time Delay
Rinse Spin Dry
Wash
Intensive Tub Clean Time Delay
Rinse Spin Dry
Wash
Intensive Tub Clean Time Delay
Rinse Spin Dry
Wash
Intensive Tub Clean Time Delay
Rinse Spin Dry
Wash
Intensive Tub Clean Time Delay
Rinse Spin Dry
Wash
Intensive Tub Clean Time Delay
Rinse Spin Dry
ضﻮﳊا ﻒﻴﻈﻨﺗ
ضﻮﳊا ﻒﻴﻈﻨﺗضﻮﳊا ﻒﻴﻈﻨﺗ
ﺔﻟﺎﺴﻐﻟا ماﺪﺨﺘﺳا ﺔﻴﻔﻴﻛﺔﻟﺎﺴﻐﻟا ماﺪﺨﺘﺳا ﺔﻴﻔﻴﻛ
ﺔﻟﺎﺴﻐﻟا ماﺪﺨﺘﺳا ﺔﻴﻔﻴﻛ
ﺔﻟﺎﺴﻐﻟا ماﺪﺨﺘﺳا ﺔﻴﻔﻴﻛﺔﻟﺎﺴﻐﻟا ماﺪﺨﺘﺳا ﺔﻴﻔﻴﻛ
ةروﺪﻟاةروﺪﻟا
ةروﺪﻟا
ةروﺪﻟاةروﺪﻟا
Wash
Rinse Spin Dry
Intensive Tub Clean Time Delay
رود ﻂﺒﺿ ﻦﻜﳝﻮﳊا ﻒﻴﻈﻨﺗ ةﺮﻤﺘﺴﳌا ﻂﻐﻀﻟﺎﺑ ض
ﻮﻟا ﺲﻔﻧ ﻲﻓ .ﺖﻗ
ﻮﳊا ﻒﻴﻈﻨﺗض
ﻞﻴﺴﻐﻟا رز ﺮﻠﻋ
رود ﻂﺒﺿ ﺪﻨﻋﻮﳊا ﻒﻴﻈﻨﺗ ةﺮﻌﻳ ،ضو " ٣ " ضﻻ
رزﻷا ﻊﻴﻤﺟ ﻞﻤﻌﺗ.را
Wash
Rinse Spin Dry
Intensive Tub Clean Time Delay
رودﻮﳊا ﻒﻴﻈﻨﺗ ة.ﺔﻟﺎﺴﻐﻟا ﻞﺧاد ﻒﻴﻈﻨﺘﻟ ﺔﺻﺎﺧ ض
وروﺪﻟا هﺬﻫﻮﺘﺴﻣ مﺪﺨﺘﺴﺗ ةﻰﻠﻋ ﻰﻠﻋﻷا ءﺎﳌا ى
ﺮﺳوﺪﺘﻟا ﺔﻋو .ﻰﻠﻋﻷا ﺮﻳروﺪﻟا هﺬﻫ مﺪﺨﺘﺳارود ة.ﺎﻳ
:ضﻮﳊا ﻒﻴﻈﻨﺗ ةرود ماﺪﺨﺘﺳا ﺔﻴﻔﻴﻛ:ضﻮﳊا ﻒﻴﻈﻨﺗ ةرود ماﺪﺨﺘﺳا ﺔﻴﻔﻴﻛ
:ضﻮﳊا ﻒﻴﻈﻨﺗ ةرود ماﺪﺨﺘﺳا ﺔﻴﻔﻴﻛ
:ضﻮﳊا ﻒﻴﻈﻨﺗ ةرود ماﺪﺨﺘﺳا ﺔﻴﻔﻴﻛ:ضﻮﳊا ﻒﻴﻈﻨﺗ ةرود ماﺪﺨﺘﺳا ﺔﻴﻔﻴﻛ
ﻮﻣ وأ ﺲﺑﻼﻣ يأ عﺰﻧا .١و ﺔﻟﺎﺴﻐﻟا ﻦﻣ دا.بﺎﺒﻟا ﻖﻠﻏا
ود ﺢﺘﻓا .٢و عزﻮﳌا بﻻﺲﻠﻜﻠﻟ ةدﺎﻀﻣ ةدﺎﻣ ﻒﺿا
ﺮﻴﺠﺣ ﻲﻓ (نﻮﳉﺎﻛ)ﺮﻟا ﻞﻴﺴﻐﻟا ة.ﺔﻴﺴﻴﺋ
: ﺔﻈﺣﻼﻣ : ﺔﻈﺣﻼﻣ
: ﺔﻈﺣﻼﻣﺮﻴﺠﺣ ﻲﻓ ﻞﻴﺴﻏ قﻮﺤﺴﻣ يأ ﻒﻀﺗ ﻻة
و .ﻞﻴﺴﻐﻟا قﻮﺤﺴﻣﺮﻟا ثﺪﲢ ﺪﻗﻮﻏﺰﻟا ةةﺪﺋا
: ﺔﻈﺣﻼﻣ : ﺔﻈﺣﻼﻣ
وﺮﺴﺘﺗ.ﺔﻟﺎﺴﻐﻟا ﻦﻣ ب
ﻞﻴﺴﻐﻟا رز ﻰﻠﻋ ﺎﻄﻏﺎﺿ ﻖﺑا ﻢﺛ ﺔﻟﺎﺴﻐﻟا ﻞ
ﻮﺛ ٣ ةﺪﳌ و ﺎﻫﺪﻨﻋ .ناﺮﻌﺗ" ٣ " ض
ﻐﺷ .٤
ّ
ﻮﳊا ﻒﻴﻈﻨﺗض
ﺆﳌﺎﺑﻮﻀﻟا ﻲﺋﺎﻨﺜﻟا ﺮﺷ.ء
ﻮﺘﻟا/ﻞﻴﻐﺸﺘﻟا رز ﻰﻠﻋ ﻂﻐﺿا .٥ﺆﳌا ﻒﻗﺖﻗ
.ﻞﻴﻐﺸﺘﻠﻟ
روﺪﻟا لﺎﻤﺘﻛا ﺪﻌﺑ .٦ﺮﺗا ،ةﻮﺘﻔﻣ بﺎﺒﻟا كﻒﻴﻔﺠﺘﻟ ﺎﺣ
ﺮﳌا ﺔﻴﺸﳊا ،حﻮﺘﻔﳌا ﺔﻟﺎﺴﻐﻟا بﺎﺑزو ﺔﻧ.بﺎﺒﻟا جﺎﺟ
ﺢﺘﻔﻳ ﻻ ﻲﻜﻟ ﺔﻳﺎﻨﻋ ﺬﺧ ،ﺮﻴﻐﺻ ﻞﻔﻃ كﺎﻨﻫ نﺎﻛ اذإ
: ﻪﻴﺒﻨﺗ : ﻪﻴﺒﻨﺗ
: ﻪﻴﺒﻨﺗ
: ﻪﻴﺒﻨﺗ : ﻪﻴﺒﻨﺗ
ﻮﻃ ةﺪﳌ بﺎﺒﻟا.ﺔﻠﻳ
رﺎﻴﺘﺧا ﻚﻨﻜﳝ ،ﻒﻴﻔﺠﺘﻟا
ﺮﺳ.ﻒﻴﻔﺠﺘﻟا ﺔﻋ
ةروﺪﻟا رﺎﻴﺘﺧا .ةروﺪﻟا رﺎﻴﺘﺧا .
ةروﺪﻟا رﺎﻴﺘﺧا .
ةروﺪﻟا رﺎﻴﺘﺧا .ةروﺪﻟا رﺎﻴﺘﺧا .
ﺮﻳﺮﳊا/فﻮﺼﻟاﺮﻳﺮﳊا/فﻮﺼﻟا
ﺮﻳﺮﳊا/فﻮﺼﻟا
,
ﺮﻳﺮﳊا/فﻮﺼﻟاﺮﻳﺮﳊا/فﻮﺼﻟا
ﺮﻳﺮﳊا/فﻮﺼﻟا ﺮﻳﺮﳊا/فﻮﺼﻟا
ﺮﻳﺮﳊا/فﻮﺼﻟا ,
ﺮﻳﺮﳊا/فﻮﺼﻟا ﺮﻳﺮﳊا/فﻮﺼﻟا
يوﺪﻴﻟا ﻞﻴﺴﻐﻟا يوﺪﻴﻟا ﻞﻴﺴﻐﻟا
يوﺪﻴﻟا ﻞﻴﺴﻐﻟا,
يوﺪﻴﻟا ﻞﻴﺴﻐﻟا يوﺪﻴﻟا ﻞﻴﺴﻐﻟا
ﺔﻴﺳﺎﺴﳊا ﺪﺿ ﺔﻳﺎﻨﻌﻟاﺔﻴﺳﺎﺴﳊا ﺪﺿ ﺔﻳﺎﻨﻌﻟا
ﺔﻴﺳﺎﺴﳊا ﺪﺿ ﺔﻳﺎﻨﻌﻟا
ﺔﻴﺳﺎﺴﳊا ﺪﺿ ﺔﻳﺎﻨﻌﻟاﺔﻴﺳﺎﺴﳊا ﺪﺿ ﺔﻳﺎﻨﻌﻟا
ﺮﺼﺗ ﺪﻌﺑ ﻞﻤﻌﻟا ﻦﻋ ﺔﻟﺎﺴﻐﻟا.ءﺎﳌا ﻒﻳ
ءﺎﳌا ةراﺮﺣ ﺔﺟردءﺎﳌا ةراﺮﺣ ﺔﺟرد
ءﺎﳌا ةراﺮﺣ ﺔﺟرد
ءﺎﳌا ةراﺮﺣ ﺔﺟردءﺎﳌا ةراﺮﺣ ﺔﺟرد
ﺮﳊارارد رﺎﻴﺘﺧا ﻚﻨﻜﳝ ،ةﺔﺟ
ﺮﺣرا.ءﺎﳌا ة
رﺎﺑ -د
30 ْ / م 40 ْ / م 60ْ / م 95 ْم
ﺔﻴﺳﺎﺴﳊا ﺪﺿ ﺔﻳﺎﻨﻌﻟا ﺔﻴﺳﺎﺴﳊا ﺪﺿ ﺔﻳﺎﻨﻌﻟا
ﺔﻴﺳﺎﺴﳊا ﺪﺿ ﺔﻳﺎﻨﻌﻟا
ﺔﻴﺳﺎﺴﳊا ﺪﺿ ﺔﻳﺎﻨﻌﻟا ﺔﻴﺳﺎﺴﳊا ﺪﺿ ﺔﻳﺎﻨﻌﻟا
يوﺪﻴﻟا ﻞﻴﺴﻐﻟايوﺪﻴﻟا ﻞﻴﺴﻐﻟا
يوﺪﻴﻟا ﻞﻴﺴﻐﻟا
,
يوﺪﻴﻟا ﻞﻴﺴﻐﻟايوﺪﻴﻟا ﻞﻴﺴﻐﻟا
●رز ﻰﻠﻋ ﻂﻐﻀﻟﺎﺑ
٣٠ ﻊﻳﺮﺴﻟا٣٠ ﻊﻳﺮﺴﻟا
٣٠ ﻊﻳﺮﺴﻟا,
٣٠ ﻊﻳﺮﺴﻟا٣٠ ﻊﻳﺮﺴﻟا
ﻒﻴﻔﲡ ﻻ .ﻒﻴﻔﲡ ﻻ .
ﻒﻴﻔﲡ ﻻ .
ﻒﻴﻔﲡ ﻻ .ﻒﻴﻔﲡ ﻻ .
●رد رز ﻰﻠﻋ ﻂﻐﻀﻟﺎﺑ ﺔﺟ
-
ﲔﺘﻓﺪﻟا ﲔﺘﻓﺪﻟا
ﲔﺘﻓﺪﻟا
ﲔﺘﻓﺪﻟا ﲔﺘﻓﺪﻟا
1200
1000
800
400
No Spin
Spin
1
ﻦﻄﻘﻟاﻦﻄﻘﻟا
ﻦﻄﻘﻟا ,
ﻦﻄﻘﻟاﻦﻄﻘﻟا
- ﻒﻴﻔﲡ ﻻ 400 - 800 - 1000 -1200
ﻲﻋﺎﻨﻄﺻﻻاﻲﻋﺎﻨﻄﺻﻻا
ﻲﻋﺎﻨﻄﺻﻻا,
ﻲﻋﺎﻨﻄﺻﻻاﻲﻋﺎﻨﻄﺻﻻا
ﲔﺘﻓﺪﻟا ﲔﺘﻓﺪﻟا
ﲔﺘﻓﺪﻟا ,
ﲔﺘﻓﺪﻟا ﲔﺘﻓﺪﻟا
- ﻒﻴﻔﲡ ﻻ 400 - 800 - 1000
ﻖﻴﻗﺮﻟاﻖﻴﻗﺮﻟا
ﻖﻴﻗﺮﻟا
ﻖﻴﻗﺮﻟاﻖﻴﻗﺮﻟا
- ﻒﻴﻔﲡ ﻻ 400 - 800
2
95
(°C)
60
40
30
Cold
Temp.
ﻦﻄﻘﻟاﻦﻄﻘﻟا
ﻦﻄﻘﻟا ,
ﻦﻄﻘﻟاﻦﻄﻘﻟا
رﺎﺑ - د30 ْ - م 40 ْ - م 60 ْ - م 95 ْم
ﻲﻋﺎﻨﻄﺻﻻاﻲﻋﺎﻨﻄﺻﻻا
ﻲﻋﺎﻨﻄﺻﻻا
ﻲﻋﺎﻨﻄﺻﻻاﻲﻋﺎﻨﻄﺻﻻا
رﺎﺑ - د30 ْ - م 40 ْ - م 60 ْم
ﻖﻴﻗﺮﻟاﻖﻴﻗﺮﻟا
ﻖﻴﻗﺮﻟا,
ﻖﻴﻗﺮﻟاﻖﻴﻗﺮﻟا
٣٠ ﻊﻳﺮﺴﻟا ٣٠ ﻊﻳﺮﺴﻟا
٣٠ ﻊﻳﺮﺴﻟا ,
٣٠ ﻊﻳﺮﺴﻟا ٣٠ ﻊﻳﺮﺴﻟا
رﺎﺑ - د30 ْ - م 40 ْم
ﺆﻣ ءﺎﻀﻳرد ﺮﺷﺮﺣ ﺔﺟرارﺎﺘا ءﺎﳌا ة.ة
20
●ﺮﺳ و ﻒﻠﺘﺨﺗ ﻒﻴﻔﺠﺘﻟا ﺔﻋﺮﺒﻠﻟ ﺎﻘﻓ. ﻲﻠﻳ ﺎﻤﻛ ﺞﻣﺎﻧ
-
-
-
●ﻮﺘﻳ ، «ﻒﻴﻔﲡ ﻻ « رﺎﻴﺘﺧا ﰎ اذإ زﺎﻬﺟ ﻒﻗ
●رد رﺎﻴﺘﺧا ﻚﻨﻜﳝ ﺮﺣ ﺔﺟراو ءﺎﳌا ةﺮﺒﻠﻟ ﺎﻘﻓ.ﻲﻠﻳ ﺎﻤﻛ ﺞﻣﺎﻧ
--
-
--
--
-
--
--
-
--
ﺰﳌﻮﻠﻌﳌا ﻦﻣ ﺪﻳﺮﻳ ،ﻞﻴﺻﺎﻔﺘﺑ تﺎﻣﺮﻣ ﻰﺟ ﺔﺤﻔﺻ ﺔﻌﺟا15.
Page 55

ﺖﻗﻮﻟا ﻞﻴﺟﺄﺗﺖﻗﻮﻟا ﻞﻴﺟﺄﺗ
Wash
Intensive Tub Clean Time Delay
Rinse Spin Dry
Wash
Intensive Tub Clean Time Delay
Rinse Spin Dry
Wash
Intensive Tub Clean Time Delay
Rinse Spin Dry
ﺖﻗﻮﻟا ﻞﻴﺟﺄﺗ
ﺖﻗﻮﻟا ﻞﻴﺟﺄﺗﺖﻗﻮﻟا ﻞﻴﺟﺄﺗ
Wash
Rinse Spin Dry
Intensive Tub Clean Time Delay
ﺔﻟﺎﺴﻐﻟا ماﺪﺨﺘﺳا ﺔﻴﻔﻴﻛﺔﻟﺎﺴﻐﻟا ماﺪﺨﺘﺳا ﺔﻴﻔﻴﻛ
ﺔﻟﺎﺴﻐﻟا ماﺪﺨﺘﺳا ﺔﻴﻔﻴﻛ
ﺔﻟﺎﺴﻐﻟا ماﺪﺨﺘﺳا ﺔﻴﻔﻴﻛﺔﻟﺎﺴﻐﻟا ماﺪﺨﺘﺳا ﺔﻴﻔﻴﻛ
ﻒﻴﺜﻜﻟاﻒﻴﺜﻜﻟا
ﻒﻴﺜﻜﻟا
ﻒﻴﺜﻜﻟاﻒﻴﺜﻜﻟا
Wash
Rinse Spin Dry
Intensive Tub Clean Time Delay
Wash
Rinse Spin Dry
Intensive Tub Clean Time Delay
.ءﺎﳌا ﺔﻴﻔﻨﺣ ﺢﺘﻓا -
و ﻒﻴﻈﻨﺘﻟا ةدﺎﻣ ﻊﺿ -ﻲﻓ شﺎﻤﻘﻟا ﲔﻠﻣ
ﺔﻗﺎﻄﻟاﺔﻗﺎﻄﻟا
رز ﻰﻠﻋ ﻂﻐﺿا -
ﺔﻗﺎﻄﻟا.
ﺔﻗﺎﻄﻟاﺔﻗﺎﻄﻟا
ﺞﻣﺎﻧﺮﺒﻟا ﺞﻣﺎﻧﺮﺒﻟا
ﺞﻣﺎﻧﺮﺒﻟاﺮﺒﻟا رﺎﻴﺘﺧﻻﺞﻣﺎﻧ
ﺞﻣﺎﻧﺮﺒﻟا ﺞﻣﺎﻧﺮﺒﻟا
ﺖﻗﻮﻟا ﻞﻴﺟﺄﺗﺖﻗﻮﻟا ﻞﻴﺟﺄﺗ
ﺖﻗﻮﻟا ﻞﻴﺟﺄﺗو ﻮﻟا ﻂﺒﺿاﺖﻗ
ﺖﻗﻮﻟا ﻞﻴﺟﺄﺗﺖﻗﻮﻟا ﻞﻴﺟﺄﺗ
ﺖﻗﺆﳌا ﻒﻗﻮﺘﻟا/ﻞﻴﻐﺸﺘﻟاﺖﻗﺆﳌا ﻒﻗﻮﺘﻟا/ﻞﻴﻐﺸﺘﻟا
ﺖﻗﺆﳌا ﻒﻗﻮﺘﻟا/ﻞﻴﻐﺸﺘﻟا.
ﺖﻗﺆﳌا ﻒﻗﻮﺘﻟا/ﻞﻴﻐﺸﺘﻟاﺖﻗﺆﳌا ﻒﻗﻮﺘﻟا/ﻞﻴﻐﺸﺘﻟا
ﺖﻗﻮﻟا ﻞﻴﺟﺄﺗﺖﻗﻮﻟا ﻞﻴﺟﺄﺗ
ﺖﻗﻮﻟا ﻞﻴﺟﺄﺗﺮﻌﺗ ، « ض
ﺖﻗﻮﻟا ﻞﻴﺟﺄﺗﺖﻗﻮﻟا ﻞﻴﺟﺄﺗ
رز ﻰﻠﻋ ﻂﻐﺿا -
رز ﻰﻠﻋ ﻂﻐﺿا -
رز ﻰﻠﻋ ﻂﻐﺿا -
و ﺔﻋﺎﺳ ١٩ ﻞﻴﺟﺄﺘﻠﻟو ﻰﻧدأ٣ ﻞﻴﺟﺄﺘﻟا ﻦﻣ ﺖﻗ
●ﻮﻟﺎﺑ ﺔﺨﺴﺘﻣ ﺲﺑﻼﳌا ﺖﻧﺎﻛ اذإ ، ﻞﻴﻘﺜﻟا ﺦﺳ
رﺎﻴﺘﺧﻻا »ﻒﻴﺜﻜﻟا« ماﺪﺨﺘﺳا ﻞﻀﻓﻷا ﻦﻣ.ي
●رﺎﻴﺘﺧﻻا ﻒﻴﺜﻜﻟا رﺎﻴﺘﺧﺎﺑ ﺰﻳ ﺪﻗ ،يو ﺪﻳﺖﻗ
ﺮﺒﻟا ﺐﺴﺣ ﻞﻴﺴﻐﻟا.رﺎﺘا ﺞﻣﺎﻧ
ﺮﺟﻹا« ﻞﻴﻐﺸﺗ ﻞﺒﻗ ﻞﻴﺴﻐﻠﻟ ﺔﻳداﺪﻌﺘﺳﻻا تاءا
ﻮﻟا ﻞﻴﺟﺄﺗ«ﺖﻗ
و ﺲﺑﻼﳌا ﻊﺿ -.بﺎﺒﻟا ﻖﻠﻏا
وﺪﻟا.بﻻ
●ﻮﻟا ﻞﻴﺟﺄﺗ « ﻂﺒﺿ ﺔﻴﻔﻴﻛ «ﺖﻗ
ﻮﻠﻄﳌا.ب
ﺮﳌاﻮﻏ.ﻪﻴﻓ ب
● رز ﻰﻠﻋ ﺖﻄﻐﺿ اذإ
3:00ز ﻰﻠﻋ « ﺮﻌﻟا جﺎﺟو .ضو ﻰﺼﻗأﺖﻗ
.تﺎﻋﺎﺳ
●ﺰﻳ رﺰﻟا ﻰﻠﻋ ﺖﻄﻐﺿ ﺎﻤﻠﻛ و ﺪﻳﻞﻴﺟﺄﺘﻟا ﺖﻗ
ﻮﺑ.ﺔﻋﺎﺳ ﻊﻗا
●ﻮﻟا ﻞﻴﺟﺄﺗ ءﺎﻐﻟﻹ رز ﻰﻠﻋ ﻂﻐﺿا ، ﺖﻗ
ﺔﻗﺎﻄﻟاﺔﻗﺎﻄﻟا
ﺔﻗﺎﻄﻟا.
ﺔﻗﺎﻄﻟاﺔﻗﺎﻄﻟا
●و و « ﻮﻫ ﻞﻴﺟﺄﺘﻟا ﺖﻗءﺎﻬﺘﻧا ﻦﻣ « رﺪﻘﻣ ﺖﻗ
رودرﺎﺘا تﺎﻴﻠﻤﻌﻟا وأ ﻞﻴﺴﻐﻟا نا.ة
21
وزﻮﺗ ﺔﻟﺎﳊ ﺎﻘﻓو ءﺎﳌا ﺪﻳردﺮﳊا ﺔﺟراﻞﻴﺟﺄﺗ ،ة
ﻮﻟاوو ﺖﻗ.ﻒﻠﺘﺨﻳ ﺪﻗ ﻲﻘﻴﻘﳊا ﻞﻴﺴﻐﻟا ﺖﻗ
Page 56

شﺎﻌﻧﻹا ةدﺎﻋإشﺎﻌﻧﻹا ةدﺎﻋإ
Wash
Intensive Tub Clean Time Delay
Rinse Spin Dry
Wash
Intensive Tub Clean Time Delay
Rinse Spin Dry
Wash
Intensive Tub Clean Time Delay
Rinse Spin Dry
Wash
Intensive Tub Clean Time Delay
Rinse Spin Dry
Temp.
Cold
30
40
60
95
(°C)
Dry
More
Normal
Iron
Low Temp.
Time Dry
30
60
90
120
150
شﺎﻌﻧﻹا ةدﺎﻋإ
شﺎﻌﻧﻹا ةدﺎﻋإشﺎﻌﻧﻹا ةدﺎﻋإ
ﺔﻟﺎﺴﻐﻟا ماﺪﺨﺘﺳا ﺔﻴﻔﻴﻛﺔﻟﺎﺴﻐﻟا ماﺪﺨﺘﺳا ﺔﻴﻔﻴﻛ
ﺔﻟﺎﺴﻐﻟا ماﺪﺨﺘﺳا ﺔﻴﻔﻴﻛ
ﺔﻟﺎﺴﻐﻟا ماﺪﺨﺘﺳا ﺔﻴﻔﻴﻛﺔﻟﺎﺴﻐﻟا ماﺪﺨﺘﺳا ﺔﻴﻔﻴﻛ
رﺎﺨﺒﻟا ﻮﺑرﻮﺗرﺎﺨﺒﻟا ﻮﺑرﻮﺗ
رﺎﺨﺒﻟا ﻮﺑرﻮﺗ
رﺎﺨﺒﻟا ﻮﺑرﻮﺗرﺎﺨﺒﻟا ﻮﺑرﻮﺗ
شﺎﻌﻧﻹا ةدﺎﻋإ ةرود شﺎﻌﻧﻹا ةدﺎﻋإ ةرود
شﺎﻌﻧﻹا ةدﺎﻋإ ةرود
شﺎﻌﻧﻹا ةدﺎﻋإ ةرود شﺎﻌﻧﻹا ةدﺎﻋإ ةرود
■
ةﺪﳌ ﺎﻬﻈﻔﺣ ﰎ ﻲﺘﻟا ﺲﺑﻼﻤﻠﻟ ﺪﻴﻋﺎﺠﺘﻟا ﺾﻔﺧ ﻞﺟأ ﻦﻣ ٭
ﻮﻃ.ﺔﻠﻳ
ﻮﻜﻠﻟ ﺔﻠﻬﺳ ةﺪﻌﺠﺘﳌا ﺲﺑﻼﳌا ﻞﻌﺠﻳ ﺎـﻫﺲﺑﻼﳌا ﻞﻌﺠﻳ ﻻ) ه
.(ﺔﻠﻠﺒﻣ
.ﺪﻴﻋﺎﺠﺘﻟا ﺾﻔﺨﻨﺘﺳ ٭
شﺎﻌﻧﻹا ةدﺎﻋإ ةرود ماﺪﺨﺘﺳا ﺔﻴﻔﻴﻛ شﺎﻌﻧﻹا ةدﺎﻋإ ةرود ماﺪﺨﺘﺳا ﺔﻴﻔﻴﻛ
شﺎﻌﻧﻹا ةدﺎﻋإ ةرود ماﺪﺨﺘﺳا ﺔﻴﻔﻴﻛ
شﺎﻌﻧﻹا ةدﺎﻋإ ةرود ماﺪﺨﺘﺳا ﺔﻴﻔﻴﻛ شﺎﻌﻧﻹا ةدﺎﻋإ ةرود ماﺪﺨﺘﺳا ﺔﻴﻔﻴﻛ
و ﺔﻟﺎﺴﻐﻟا ﻞﺮﺑ ﺮﺘﺧا.شﺎﻌﻧﻹا ةدﺎﻋإ ﺞﻣﺎﻧ
■
ﻐﺷ .١
ّ
و ﻞﻗأ وأ ﺲﺑﻼﳌا ﻦﻣ ﻊﻄﻗ ٥ ﻊﺿ .٢.بﺎﺒﻟا ﻖﻠﻏا
ﻮﺘﻟا/ﻞﻴﻐﺸﺘﻟا رز ﻰﻠﻋ ﻂﻐﺿا .٣ﺆﳌا ﻒﻗ.ﺖﻗ
ﺔﻴﻟوﻷا تﺎﻬﻴﺒﻨﺘﻠﻟ تﺎﻈﺣﻼﻣ ﺔﻴﻟوﻷا تﺎﻬﻴﺒﻨﺘﻠﻟ تﺎﻈﺣﻼﻣ
ﺔﻴﻟوﻷا تﺎﻬﻴﺒﻨﺘﻠﻟ تﺎﻈﺣﻼﻣ
[
ﺔﻴﻟوﻷا تﺎﻬﻴﺒﻨﺘﻠﻟ تﺎﻈﺣﻼﻣ ﺔﻴﻟوﻷا تﺎﻬﻴﺒﻨﺘﻠﻟ تﺎﻈﺣﻼﻣ
]
رود -رود ﻦﻋ ﻒﻠﺘﺨﺗ شﺎﻌﻧﻹا ةدﺎﻋإ ةوأ ﻞﻴﺴﻐﻟا ة
رود.ﻒﻴﻔﺠﺘﻟا ة
روﺪﻟا هﺬﻫ ،ﺔﻴﻨﻄﻘﻟا فﺎﻴﻟﻸﻟ ﺺﺋﺎﺼﳋا ﺐﺒﺴﺑ -ة
.ﻦﻄﻘﻟا ﻦﻣ ٪١٠٠ ﻦﻣ ﺲﺑﻼﻤﻠﻟ ﺎﻬﺑ ﻰﺻﻮﻣ ﺮﻴﻏ
وﻷا عﺰﻧا -رود ماﺪﺨﺘﺳا ﻞﺒﻗ ﺲﺑﻼﳌا ﻦﻣ عﺎﺳة
.ﺎﻨﺧﺎﺳ نﻮﻜﻳ ﺪﻗ .بﺎﺒﻟا ﺲﻣﻼﺗ ﻻ ﻲﻜﻟ ﺔﻳﺎﻨﻋ ﺬﺧ -
و .ﺔﻴﻔﻨﳊا ﺢﺘﻓ ﻦﻣ ﺪﻛﺄﺗ -روﺪﻟا ةﺬﻫمﺪﺨﺘﺴﺗ ة
.ﺮﻴﺨﺒﺘﻠﻟ ءﺎﳌا ﻦﻣ ﺔﻠﻴﻠﻗ ﺔﻴﻤﻛ
و .ﻞﻴﻐﺸﺘﻟا ءﺎﻨﺛأ بﺎﺒﻟا ﺢﺘﻔﺗ ﻻ -ﺆﻳ ﺪﻗ رﺎﺨﺒﻟايد
وﻷا ﺖﻴﺒﺜﺗ ﻊﻨﳌ شﺎﻌﻧﻹا ةدﺎﻋإﻢﺋاد ﻞﻜﺸﺑ خﺎﺳ
ﺮﳊﺎﺑرا.ﺔﻴﻟﺎﻌﻟا ة
ﺮﺘﺣﺎﺑ ﻚﺘﺑﺎﺻإ ﻰﻟا.قا
ﺮﺧإ ﺪﻌﺑ -رود ﻦﻣ ﺲﺑﻼﳌا جاوﺪﺒﻳ ،شﺎﻌﻧﻹا ةدﺎﻋإ ة
ﻞﺒﻗ ﻞﻗﻷا ﻰﻠﻋ ﻖﺋﺎﻗد ١٠ لﻼﺧ ﺔﻠﻠﺒﻣ نﻮﻜﺗ ﺪﻗ ﺎﻬﻧأ
را.ﺎﻬﺋاﺪﺗ
ﺮﻔﺗ ﺪﻨﻋ ﺞﺋﺎﺘﻧ ﻞﻀﻓأ ﻰﻠﻋ ﻞﺼﲢ نأ ﻦﻜﳝ -ﺰﻳ
و ﻪﻴﺒﺷ ﻢﺠﺣ ﺐﺴﺣ ﺲﺑﻼﳌاو .شﺎﻤﻘﻟا عﻮﻧﻊﻀﺗ ﻻ
(نﺎﺼﻤﻗ ٣ ﻦﻣ ﻞﻗأ ﺲﺑﻼﳌا ﻊﺿ).ﺮﺜﻛﻷا ﺲﺑﻼﳌا
Turbo Steam
.لﺎﻔﻃﻸﻟ بﺎﻴﺛ وأ ﺔﻴﻠﺧاد
ﺮﺴﻟاو ﻲﺤﺼﻟا ،ﻊﻳئدﺎﻬﻟا
و ﺔﻗﺎﻄﻟا ﻲﻓ دﺎﺼﺘﻗﻻا ﻊﻣ.ءﺎﳌا
:ﺔﻈﺣﻼﻣ:ﺔﻈﺣﻼﻣ
:ﺔﻈﺣﻼﻣ
:ﺔﻈﺣﻼﻣ:ﺔﻈﺣﻼﻣ
و ﻞﻴﺴﻐﻟا ﺔﻠﺣ.يدﺎﻋ ﻚﻟذ ﻦﻜﻟ
و بﺎﺒﻟاﻮﻘﺑ ﻞﻤﻌﻳ مﺎﻈﻨﻟا اﺬﻫ ﻦﻜﻟﻦﻣ ة
.ﻞﺧاﺪﻟا
ﻮﻗو مﺎﻈﻨﻟا اﺬﻬﻟ ي.ﺐﻄﻋ اﺬﻫ ﺮﺒﺘﻌﻳ ﻻ
: ﻪﻴﺒﻨﺗ : ﻪﻴﺒﻨﺗ
: ﻪﻴﺒﻨﺗ
: ﻪﻴﺒﻨﺗ : ﻪﻴﺒﻨﺗ
ﺪﻗ رﺎﺨﺒﻟﺎﻓ .ﻞﻴﻐﺸﺘﻟا ءﺎﻨﺛأ ﺔﻟﺎﺴﻐﻟا ﺲﻣﻼﺗ ﻻ -
ﺆﻳﺮﺘﺣﺎﺑ ﻚﺘﺑﺎﺻإ ﻰﻟا يد.قا
● بﺎﻴﺛ ،ﺲﺑﻼﳌا ﻲﻓ ﺔﻴﺼﻌﺘﺴﳌا ﻊﻘﺒﻠﻟ
● رﺎﺨﺒﻟا ﻞﺴﻐﻟا ،ﻦﻄﻘﻟا ﻊﻣ ﻦﻜﳑ ،ي
● ﻮﺟ ﻦﻣ ﻦﺴﲢ ﺔﻴﺻﺎﳋا هﺬﻫ ﻞﻴﺴﻐﻟا ةد
● ﻮﺼﻟﺎﻛ ﺔﺳﺎﺴﺣ ﺲﺑﻼﻣ ﻞﻤﲢ ﻻ ف
وﺮﳊاو ﺮﻳﻮﻠﳌا ﺲﺑﻼﳌا.ﺔﻧ
● ﺮﳊا را ـﺑ ةدﺪﺤﻣ ة60رد ﻮﺌﻣ ﺔﺟ.ﺔﻳ
● رﺎﺨﺒﻟا ﻞﻴﺴﻐﻟا ﺔﻴﻠﻋﺎﻔﻟا ﻲﻟﺎﻋ ي
وﻞﺧاد ءﺎﻣ كﺎﻨﻫ نﻮﻜﻳ ﻻ نأ ﻦﻜﳝ .لﻮﻌﻔﳌا
● ؤر ﻚﻨﻜﳝ ﻻ ﺮﻟا مﺎﻈﻧ ﺔﻳلﻼﺧ ﻦﻣ ش
● رﺎﺨﺒﻟا ﺔﻴﻠﻤﻌﻟا هﺬﻫ ﻲﻓ ﻮﺻ ﻊﻤﺴﻳ ،ﺔﻳت
22
Page 57

ﺔﻟﺎﺴﻐﻟا ماﺪﺨﺘﺳا ﺔﻴﻔﻴﻛﺔﻟﺎﺴﻐﻟا ماﺪﺨﺘﺳا ﺔﻴﻔﻴﻛ
Wash
Intensive Tub Clean Time Delay
Rinse Spin Dry
Wash
Intensive Tub Clean Time Delay
Rinse Spin Dry
Wash
Intensive Tub Clean Time Delay
Rinse Spin Dry
Wash
Intensive Tub Clean Time Delay
Rinse Spin Dry
Temp.
Cold
30
40
60
95
(°C)
ﺔﻟﺎﺴﻐﻟا ماﺪﺨﺘﺳا ﺔﻴﻔﻴﻛ
ﺔﻟﺎﺴﻐﻟا ماﺪﺨﺘﺳا ﺔﻴﻔﻴﻛﺔﻟﺎﺴﻐﻟا ماﺪﺨﺘﺳا ﺔﻴﻔﻴﻛ
ﻲﺋﺎﻘﻠﺘﻟا ﻒﻴﻔﺠﺘﻟا ﻞﻴﻟد .ﻲﺋﺎﻘﻠﺘﻟا ﻒﻴﻔﺠﺘﻟا ﻞﻴﻟد .
ﻲﺋﺎﻘﻠﺘﻟا ﻒﻴﻔﺠﺘﻟا ﻞﻴﻟد .
ﻲﺋﺎﻘﻠﺘﻟا ﻒﻴﻔﺠﺘﻟا ﻞﻴﻟد .ﻲﺋﺎﻘﻠﺘﻟا ﻒﻴﻔﺠﺘﻟا ﻞﻴﻟد .
1
.ﺲﺑﻼﳌا
وﺮﺘﻜﻟﻹا ﺮﻌﺸﳌارﺪﺑ ﺮﻌﺸﺘﺴﻳ ﻲﻧﺮﳊا ﺔﺟراﺮﻟ ةﻊﻓ
رد ﺾﻔﺧ وأﺮﳊا ﺔﺟراو ﻞﺟأ ﻦﻣ ﻒﻴﻔﺠﺘﻠﻟ ةﺖﻗ
.ﺲﺑﻼﳌا ﻦﻣ عﻮﻧ
رد - ﻲﻋﺎﻨﻄﺻﻻا (أﺮﳊا ﺔﺟراﺔﻀﻔﺨﻨﳌا ة
رأ اذإ (بﻮﻛ تدﻮﻜﳌا - ﺲﺑﻼﳌا يةا
ﻮﺼﻟا - ﻦﻄﻘﻟا (جنا
اﺪﺟ - ضﺎﻔﳊا (د
ﻦﻣ ﻒﻠﺘﺨﻳ ﻢﻴﻘﳌا ﻒﻴﻔﺠﺘﻟا ﺖﻗو : ﺔﻈﺣﻼﻣ ﻦﻣ ﻒﻠﺘﺨﻳ ﻢﻴﻘﳌا ﻒﻴﻔﺠﺘﻟا ﺖﻗو : ﺔﻈﺣﻼﻣ
ﻦﻣ ﻒﻠﺘﺨﻳ ﻢﻴﻘﳌا ﻒﻴﻔﺠﺘﻟا ﺖﻗو : ﺔﻈﺣﻼﻣ
ﻦﻣ ﻒﻠﺘﺨﻳ ﻢﻴﻘﳌا ﻒﻴﻔﺠﺘﻟا ﺖﻗو : ﺔﻈﺣﻼﻣ ﻦﻣ ﻒﻠﺘﺨﻳ ﻢﻴﻘﳌا ﻒﻴﻔﺠﺘﻟا ﺖﻗو : ﺔﻈﺣﻼﻣ
ﻢﺘﻳو .ﻲﺋﺎﻘﻠﺗ ﺞﻣﺎﻧﺮﺒﺑ ﻲﻘﻴﻘﳊا ﻒﻴﻔﺠﺘﻟا ﺖﻗوﻢﺘﻳو .ﻲﺋﺎﻘﻠﺗ ﺞﻣﺎﻧﺮﺒﺑ ﻲﻘﻴﻘﳊا ﻒﻴﻔﺠﺘﻟا ﺖﻗو
ﻢﺘﻳو .ﻲﺋﺎﻘﻠﺗ ﺞﻣﺎﻧﺮﺒﺑ ﻲﻘﻴﻘﳊا ﻒﻴﻔﺠﺘﻟا ﺖﻗو
ﻢﺘﻳو .ﻲﺋﺎﻘﻠﺗ ﺞﻣﺎﻧﺮﺒﺑ ﻲﻘﻴﻘﳊا ﻒﻴﻔﺠﺘﻟا ﺖﻗوﻢﺘﻳو .ﻲﺋﺎﻘﻠﺗ ﺞﻣﺎﻧﺮﺒﺑ ﻲﻘﻴﻘﳊا ﻒﻴﻔﺠﺘﻟا ﺖﻗو
ﺪﻌﺑ فﺎﻔﳉاو ﻞﻤﳊا ﻢﺠﺣو شﺎﻤﻘﻟا عﻮﻧ رﺎﻴﺘﺧاﺪﻌﺑ فﺎﻔﳉاو ﻞﻤﳊا ﻢﺠﺣو شﺎﻤﻘﻟا عﻮﻧ رﺎﻴﺘﺧا
ﺪﻌﺑ فﺎﻔﳉاو ﻞﻤﳊا ﻢﺠﺣو شﺎﻤﻘﻟا عﻮﻧ رﺎﻴﺘﺧا
ﺪﻌﺑ فﺎﻔﳉاو ﻞﻤﳊا ﻢﺠﺣو شﺎﻤﻘﻟا عﻮﻧ رﺎﻴﺘﺧاﺪﻌﺑ فﺎﻔﳉاو ﻞﻤﳊا ﻢﺠﺣو شﺎﻤﻘﻟا عﻮﻧ رﺎﻴﺘﺧا
.ﻒﻴﻔﺠﺘﻟا ﺖﻗو.ﻒﻴﻔﺠﺘﻟا ﺖﻗو
.ﻒﻴﻔﺠﺘﻟا ﺖﻗو
.ﻒﻴﻔﺠﺘﻟا ﺖﻗو.ﻒﻴﻔﺠﺘﻟا ﺖﻗو
●روﺪﻟا مﺪﺨﺘﺳا ﻢﻈﻌﻣ ﻒﻴﻔﺠﺘﻟ ﺔﻴﺋﺎﻘﻠﺘﻟا ة
رو عﺮﺳأ ﻞﻌﻓ درد ﻲﻓ قدأ ﻢﻜﲢﺮﳊا ﺔﺟرا.ة
●رود ﺐﺴﺣ ﺎﻬﺑ ﻰﺻﻮﳌا ﻲﺋﺎﻘﻠﺘﻟا ﻒﻴﻔﺠﺘﻟا ة
Normal
Iron
Low Temp.
ﻒـﻴﻔﺠﺘﻟاﻒـﻴﻔﺠﺘﻟا
ﻒـﻴﻔﺠﺘﻟا
ﻒـﻴﻔﺠﺘﻟاﻒـﻴﻔﺠﺘﻟا
More
30
Dry
Time Dry
60
90
120
150
وأﻮﺗرود ﻦﻣ ﺎﻴﻜﻴﺗﺎﻣو ﻞﻴﺴﻐﻟا ةرود ﻰﺘﺣة
ﻮﻬﺴﺑ ﻒﻴﻔﺠﺘﻟا.رﺎﻴﺘﺧا ﺔﻟ
ةدﺎﳌا ﻲﻓ ﺔﻬﺑﺎﺸﺘﻣ ﺲﺑﻼﳌا ﻦﻣ ﻊﻄﻘﻟا ﻊﻴﻤﺟ
ﺮﲢ ﻦﻣ ﺪﺑ ﻻ .ﺔﻟﺎﺴﻐﻟاﺮﺣ ﺲﺑﻼﳌا ﻚﻳ.ة
روﺪﻟ ﻒﻴﻔﺠﺘﻟا زﺎﻬﺟﻰﻠﻋ ﻂﻐﻀﻟا ﺲﻨﺗ ﻻ ،ﻪﺗ
ﻮﺘﻟا/ﻞﻴﻐﺸﺘﻟا رزﺆﳌا ﻒﻗ.ﺖﻗ
رﺎﻴﺘﺧا
➔
150
120
90 60 30
➔ ➔ ➔ ➔ ➔
More
Normal
Iron Low Temp.
ﺮﻌﻟا ﻰﻠﻋ "(ﺔﻳﺎﻬﻨﻟا) " " .دﺪﻌﺘﳌا ض
●ﻒﻴﻔﺠﺘﻟا- ﺔﻟﺎﺴﻐﻟا زﺎﻬﺟ ﻞﻤﻌﻳ
●وﺎﺴﺘﳌا ﻒﻴﻔﺠﺘﻠﻟ نأ ﻦﻣ ﺪﻛﺄﺗ ،ﺮﺜﻛﻷا ي
و.ﺔﻛﺎﻤﺴﻟا
●ﺮﻴﺒﻛ ﺔﻴﻤﻛ ﻊﻀﺗ ﻻ ﺔﻠﺣ ﻲﻓ ﺲﺑﻼﳌا ﻦﻣ ة
●و بﺎﺒﻟا ﺖﺤﺘﻓ اذإ ﺮﺧاءﺎﻬﻧإ ﻞﺒﻗ ﺲﺑﻼﳌا ﺖﺟ
● رز ﻰﻠﻋ ﻂﻐﻀﻟﺎﺑDRYﻚﻨﻜﳝ ، (ﻒﻴﻔﺠﺘﻟا)
➔ ➔
●رود ءﺎﻬﺘﻧا ﺪﻨﻋ ﺮﻬﻈﻳ ،ﻒﻴﻔﺠﺘﻟا ة
●رود ءﺎﻬﺘﻧا ﻲﻨﻌﻳ "(ﺔﻳﺎﻬﻨﻟا) " " ﺔﻠﻣﺎﻛ ة
وﺮﺒﺘﺑ ﺔﻟﺎﺴﻐﻟا زﺎﻬﺟ أﺪﺒﻳﺮﳊا ﺪﻳرا.ﺎﻴﺋﺎﻘﻠﺗ ة
23
Page 58

ﺔﻟﺎﺴﻐﻟا ماﺪﺨﺘﺳا ﺔﻴﻔﻴﻛﺔﻟﺎﺴﻐﻟا ماﺪﺨﺘﺳا ﺔﻴﻔﻴﻛ
ﺔﻟﺎﺴﻐﻟا ماﺪﺨﺘﺳا ﺔﻴﻔﻴﻛ
ﺔﻟﺎﺴﻐﻟا ماﺪﺨﺘﺳا ﺔﻴﻔﻴﻛﺔﻟﺎﺴﻐﻟا ماﺪﺨﺘﺳا ﺔﻴﻔﻴﻛ
ﺔﻴﺟﺎﺟﺰﻟا ﺔﻴﻔﻴﻠﻟا ﺲﺑﻼﳌاﺔﻴﺟﺎﺟﺰﻟا ﺔﻴﻔﻴﻠﻟا ﺲﺑﻼﳌا
ﺔﻴﺟﺎﺟﺰﻟا ﺔﻴﻔﻴﻠﻟا ﺲﺑﻼﳌا
ﺔﻴﺟﺎﺟﺰﻟا ﺔﻴﻔﻴﻠﻟا ﺲﺑﻼﳌاﺔﻴﺟﺎﺟﺰﻟا ﺔﻴﻔﻴﻠﻟا ﺲﺑﻼﳌا
ﺰﻟا ﺔﻴﻔﻴﻠﻟا ﺲﺑﻼﳌا ﻒﻔﲡ ﻻ -زﺎﻬﺟ ﻲﻓ ﺔﻴﺟﺎﺟ
.ﻒﻴﻔﺠﺘﻟا
ﺰﳉاﺰﻟا تﺎﺌﻳزﺎﻬﺟ ﻲﻓ ﺔﻴﻗﺎﺒﻟا ﺔﻴﺟﺎﺟ
ﻢﺘﻳ ﻲﺘﻟا ﺲﺑﻼﳌﺎﺑ ﻖﺼﺘﻠﺗ ﺪﻗ ﻒﻴﻔﺠﺘﻟا
ﻲﻓ ﺔﻔﻴﻔﲡ
ﺮﺧإ مﺪﻋ ﺪﻨﻋ يﺪﺑﻷا ﺎﻬﺋﺎﻘﺑ ﻦﻣﺲﺒﻠﳌا جا
ﻮﳊا ﻦﻣروﺪﻟا ءﺎﻬﺘﻧا ﺪﻌﺑ ض.ة
ﺮﺧإ ﻚﻨﻜﻤﻴﻓو يأ ﻲﻓ ﺲﺑﻼﳌا جاﺪﻌﺑ ﺖﻗ
ﺮﻋ."(ﺔﻳﺎﻬﻨﻟا) " ض
ﻒﻴﻔﺠﺘﻟا ﺖﻗو ﻞﻴﻟد . ﻒﻴﻔﺠﺘﻟا ﺖﻗو ﻞﻴﻟد .
ﻒﻴﻔﺠﺘﻟا ﺖﻗو ﻞﻴﻟد .
زﺎﻬﳉا أﺪﺒﻳ ،ﻂﻘﻓ ﻒﻴﻔﺠﺘﻟا رﺎﻴﺘﺧا ﺪﻨﻋ .ﺔﻘﻴﻗد
●و ﺮﺒﺗ" ﺔﻔﻴﻇﺮﳊا ﺪﻳراﺪﻴﻋﺎﺠﺘﻟا ﻊﻨﲤ " ة
●و ﺮﺒﺗ " ﺔﻔﻴﻇﺮﳊا ﺪﻳراﻮﺘﺗ "ةﺆﻣ ﻒﻗﺎﺘﻗ
ﻒﻴﻔﺠﺘﻟا ﻞﺟأ ﻦﻣ ﻒﻴﻔﺠﺘﻟا زﺎﻬﺟ ﻂﺒﺿ ﻰﻠﻋ
و.ﲔﺨﺴﺗ نوﺪﺑ تﺎﻋﺎﺳ ٤ ﻰﺘﺣ ﻞﻤﻌﺗ
ﻒﻴﻔﺠﺘﻟا ﺖﻗو ﻞﻴﻟد . ﻒﻴﻔﺠﺘﻟا ﺖﻗو ﻞﻴﻟد .
.ﻚﻟ ﻞﻴﻟد ﻞﻀﻓأ نﻮﻜﺗ اﺬﻫ
ﺔﻴﻓﻮﺼﻟاﺔﻴﻓﻮﺼﻟا
ﺔﻴﻓﻮﺼﻟا
ﺔﻴﻓﻮﺼﻟاﺔﻴﻓﻮﺼﻟا
ﻮﺼﻟا ﺲﺑﻼﳌا ﺰﻬﺗ ﻻ -ﺮﺧا .ﺔﻴﻓﺎﻬﻠﻜﺸﺑ ﺎﻬﺟ
رﻷا ﻰﻠﻋ ﺎﻬﻔﻮﺘﺴﳌا ض.ﺔﻳ
ﺔﻛﻮﺒﶈاو ﺔﻴﻓﻮﺼﻟا ﺲﺑﻼﳌاﺔﻛﻮﺒﶈاو ﺔﻴﻓﻮﺼﻟا ﺲﺑﻼﳌا
ﺔﻛﻮﺒﶈاو ﺔﻴﻓﻮﺼﻟا ﺲﺑﻼﳌا
ﺔﻛﻮﺒﶈاو ﺔﻴﻓﻮﺼﻟا ﺲﺑﻼﳌاﺔﻛﻮﺒﶈاو ﺔﻴﻓﻮﺼﻟا ﺲﺑﻼﳌا
ﻮﺼﻟا ﺲﺑﻼﳌا ﺪﻌﺑ ﺮﺼﺘﻘﺗ ﺪﻗ -و ﺔﻴﻓﻮﺒﶈا،ﺔﻛ
ﻲﻋﺎﻨﻄﺻﻹاو ﻢﺋاﺪﻟا ﻂﻐﻀﻟﺎﺑ ﺲﺑﻼﳌا ﻲﻋﺎﻨﻄﺻﻹاو ﻢﺋاﺪﻟا ﻂﻐﻀﻟﺎﺑ ﺲﺑﻼﳌا
ﻲﻋﺎﻨﻄﺻﻹاو ﻢﺋاﺪﻟا ﻂﻐﻀﻟﺎﺑ ﺲﺑﻼﳌا
ﻲﻋﺎﻨﻄﺻﻹاو ﻢﺋاﺪﻟا ﻂﻐﻀﻟﺎﺑ ﺲﺑﻼﳌا ﻲﻋﺎﻨﻄﺻﻹاو ﻢﺋاﺪﻟا ﻂﻐﻀﻟﺎﺑ ﺲﺑﻼﳌا
ﺮﻴﺜﻛ ﺲﺑﻼﳌا هﺬﻫ ﻊﻀﺗ ﻻ -.ﺔﻟﺎﺴﻐﻟا زﺎﻬﺟ ﻲﻓ ة
رﻮﻓ ﻢﺋاﺪﻟا ﻂﻐﻀﻟﺎﺑ ﺲﺑﻼﳌا جﺮﺧا -ﺪﻨﻋ ا
ﺾﻔﺧ ﻞﺟأ ﻦﻣ ﻒﻴﻔﺠﺘﻟا زﺎﻬﺟ فﺎﻘﻳإ
ّ
رﻮﻓ ﺎﻤﺋاد ﺎﻫد.ﻒﻴﻔﺠﺘﻟا ﺪﻌﺑ ا
2
.ﻒﻴﻔﺠﺘﻟا
روﺪﺑوﺪﺘﻟا ﺪﻌﺑ ﻒﻴﻔﺠﺘﻟا ة.ﺮﻳ
وﺪﻴﻟا.ي
ﺲﺑﻼﳌا ﺲﺑﻼﳌا
ﺲﺑﻼﳌا
ﺲﺑﻼﳌا ﺲﺑﻼﳌا
و ، ﻲﻠﺻﻷاﻔﺟ
ﺪﻣ -
ّ
.ﺪﻴﻋﺎﺠﺘﻟا
●و رﺎﻴﺘﺧا ﻚﻨﻜﳝ ،ﻒﻴﻔﺠﺘﻟا رز ﻰﻠﻋ ﻂﻐﻀﻟﺎﺑ ﺖﻗ
●ﺮﻤﺘﺳا ﻦﻜﳝرود را١٥٠ ﻰﺘﺣ ةﺪﳌ ﻒﻴﻔﺠﺘﻟا ة
●وأ ﻚﺗﺪﻋﺎﺴﳌ ﻞﻴﻟد ﻲﻓ ﲔﺒﺘﺗ هﺬﻫ ﻒﻴﻔﺠﺘﻟا تﺎﻗ
ووأ ﻒﻠﺘﺨﺗ ﺪﻗو ﻒﻴﻔﺠﺘﻟا تﺎﻗرﺪﻟ ﺎﻘﻓﺮﻟا ﺔﺟ، ﺐﻃ
وردﺮﺣ ﺔﺟراﺮﻐﻟا ةو ﺔﻓو شﺎﻤﻘﻟا عﻮﻧﺮﺒﺧﻲﻓ ﻚﺗا
2
وو ﺎﻬﺘﻴﻤﻛ ﻒﻠﺘﺨﺗﻮﻨﻟ ﺎﻘﻓ.ﺎﻬﺘﻴﻋ
ﺔﻳﺪﻠﳉا وأ ﺔﻴﻔﻴﻠﻟا ﺲﺑﻼﳌاﺔﻳﺪﻠﳉا وأ ﺔﻴﻔﻴﻠﻟا ﺲﺑﻼﳌا
ﺔﻳﺪﻠﳉا وأ ﺔﻴﻔﻴﻠﻟا ﺲﺑﻼﳌا
ﺔﻳﺪﻠﳉا وأ ﺔﻴﻔﻴﻠﻟا ﺲﺑﻼﳌاﺔﻳﺪﻠﳉا وأ ﺔﻴﻔﻴﻠﻟا ﺲﺑﻼﳌا
.ﺎﻤﺋاد ﻊﻧﺎﺼﻟا تﺎﻤﻴﻠﻌﺗ ﻦﻣ ﺪﻛﺄﺗ -
ﺔﻣﺎﻨﳌاو لﺎﻔﻃﻷا ﺲﺑﻼﻣ ﺔﻣﺎﻨﳌاو لﺎﻔﻃﻷا ﺲﺑﻼﻣ
ﺔﻣﺎﻨﳌاو لﺎﻔﻃﻷا ﺲﺑﻼﻣ
ﺔﻣﺎﻨﳌاو لﺎﻔﻃﻷا ﺲﺑﻼﻣ ﺔﻣﺎﻨﳌاو لﺎﻔﻃﻷا ﺲﺑﻼﻣ
.ﺎﻤﺋاد ﻊﻧﺎﺼﻟا تﺎﻤﻴﻠﻌﺗ ﻦﻣ ﺪﻛﺄﺗ -
ﺔﻴﻜﻴﺘﺳﻼﺒﻟا ﺔﻴﻃﺎﻄﳌا ﺲﺑﻼﳌا ﺔﻴﻜﻴﺘﺳﻼﺒﻟا ﺔﻴﻃﺎﻄﳌا ﺲﺑﻼﳌا
ﺔﻴﻜﻴﺘﺳﻼﺒﻟا ﺔﻴﻃﺎﻄﳌا ﺲﺑﻼﳌا
ﺔﻴﻜﻴﺘﺳﻼﺒﻟا ﺔﻴﻃﺎﻄﳌا ﺲﺑﻼﳌا ﺔﻴﻜﻴﺘﺳﻼﺒﻟا ﺔﻴﻃﺎﻄﳌا ﺲﺑﻼﳌا
ﻮﺘﺤﻣ وأ عﻮﻨﺼﻣ ﺲﺑﻼﻣ يأ ﻒﻔﲡ ﻻ -ﻰﻠﻋ ي
رﺪﺼﻟا ، رﺰﺌﳌا (أﺮﻜﻟا ءﺎﻄﻏ ، ﺔﻳ.ﻲﺳ
و ﺮﺋﺎﺘﺴﻟا (بوﺎﻄﻟا ﺔﻴﻄﻏأﺔﻟ
مﺎﻤﳊا ﺮﻴﺼﺣ(ج
ﺰﺟ: ﻞﺜﻣ ﻚﻴﺘﺳﻼﺒﻟا وأ طﺎﻄﳌا ﻦﻣ ء
24
Page 59

ضﺮﻌﻟاضﺮﻌﻟا
More
Normal
Time Dry
30
60
90
ضﺮﻌﻟا
ضﺮﻌﻟاضﺮﻌﻟا
ﺔﻟﺎﺴﻐﻟا ماﺪﺨﺘﺳا ﺔﻴﻔﻴﻛﺔﻟﺎﺴﻐﻟا ماﺪﺨﺘﺳا ﺔﻴﻔﻴﻛ
ﺔﻟﺎﺴﻐﻟا ماﺪﺨﺘﺳا ﺔﻴﻔﻴﻛ
ﺔﻟﺎﺴﻐﻟا ماﺪﺨﺘﺳا ﺔﻴﻔﻴﻛﺔﻟﺎﺴﻐﻟا ماﺪﺨﺘﺳا ﺔﻴﻔﻴﻛ
ﻞﻴﺴﻐﻟا ءﺎﻬﺘﻧا .ﻞﻴﺴﻐﻟا ءﺎﻬﺘﻧا .
ﻞﻴﺴﻐﻟا ءﺎﻬﺘﻧا .
ﻞﻴﺴﻐﻟا ءﺎﻬﺘﻧا .ﻞﻴﺴﻐﻟا ءﺎﻬﺘﻧا .
ﻲﻘﺒﺘﳌا ﺖﻗﻮﻟا .ﻲﻘﺒﺘﳌا ﺖﻗﻮﻟا .
ﻲﻘﺒﺘﳌا ﺖﻗﻮﻟا .
ﻲﻘﺒﺘﳌا ﺖﻗﻮﻟا .ﻲﻘﺒﺘﳌا ﺖﻗﻮﻟا .
ﺮﻌﻟا ﻰﻠﻋ ﻞﻴﺴﻐﻟا ﺔﻴﻠﻤﻌﻟ.ض
: شﺎﻌﻧﻹا: شﺎﻌﻧﻹا
: شﺎﻌﻧﻹاﻮﺣ ٢٠ ﻲﻟا ﺔﻘﻴﻗد
: شﺎﻌﻧﻹا: شﺎﻌﻧﻹا
ﺔﻴﺳﺎﺴﳊا ﺪﺿ ﺔﻳﺎﻨﻌﻟاﺔﻴﺳﺎﺴﳊا ﺪﺿ ﺔﻳﺎﻨﻌﻟا
::
ﺔﻴﺳﺎﺴﳊا ﺪﺿ ﺔﻳﺎﻨﻌﻟا
:ﻮﺣﺔﻘﻴﻗد ٢و ٣ ﻲﻟا
ﺔﻴﺳﺎﺴﳊا ﺪﺿ ﺔﻳﺎﻨﻌﻟاﺔﻴﺳﺎﺴﳊا ﺪﺿ ﺔﻳﺎﻨﻌﻟا
::
: ﺮﻳﺮﳊا/فﻮﺼﻟا -: ﺮﻳﺮﳊا/فﻮﺼﻟا -
: ﺮﻳﺮﳊا/فﻮﺼﻟا -ﻮﺣ ﺔﻘﻴﻗد ١و ﺔﻋﺎﺳ ﻲﻟا
: ﺮﻳﺮﳊا/فﻮﺼﻟا -: ﺮﻳﺮﳊا/فﻮﺼﻟا -
يوﺪﻴﻟا ﻞﻴﺴﻐﻟا -يوﺪﻴﻟا ﻞﻴﺴﻐﻟا -
::
يوﺪﻴﻟا ﻞﻴﺴﻐﻟا -
:ﻮﺣ ﺔـﻘﻴﻗد ١و ﺔﻋﺎﺳ ﻲﻟا
يوﺪﻴﻟا ﻞﻴﺴﻐﻟا -يوﺪﻴﻟا ﻞﻴﺴﻐﻟا -
::
٤٥
(ﺔﻘﻴﻗد
3
●رود ءﺎﻬﺘﻧا ﺪﻨﻋ ﺮﻌﻳ ،ﻞﻴﺴﻐﻟا ناض
4
●رود ءﺎﻨﺛأ ﻮﻟا ﺮﻬﻈﻳ ،ﻞﻴﺴﻐﻟا ةﻲﻘﺒﺘﳌا ﺖﻗ
●ﺮﺒﻟا .ﻊﻧﺎﺼﻟا ﻦﻣ ﻪﺑ ﻰﺻﻮﳌا ﺞﻣﺎﻧ
- -
ةدﺎﻋإ ةدﺎﻋإ
-
ةدﺎﻋإ
- -
ةدﺎﻋإ ةدﺎﻋإ
- -
-
- -
: ﻦﻄﻘﻟا - : ﻦﻄﻘﻟا -
: ﻦﻄﻘﻟا -ﻮﺣﺔﻘﻴﻗد ١٤و ﲔﺘﻋﺎﺳ ﻲﻟا
: ﻦﻄﻘﻟا - : ﻦﻄﻘﻟا -
: ﻲﻋﺎﻨﻄﺻﻻا -: ﻲﻋﺎﻨﻄﺻﻻا -
: ﻲﻋﺎﻨﻄﺻﻻا -ﻮﺣ ﺔﻘﻴﻗد ٣٨و ﺔﻋﺎﺳ ﻲﻟا
: ﻲﻋﺎﻨﻄﺻﻻا -: ﻲﻋﺎﻨﻄﺻﻻا -
: ﻖﻴﻗﺮﻟا: ﻖﻴﻗﺮﻟا
: ﻖﻴﻗﺮﻟاﻮﺣ ﺔﻘﻴﻗد ٢و ﺔﻋﺎﺳ ﻲﻟا
: ﻖﻴﻗﺮﻟا: ﻖﻴﻗﺮﻟا
: ﲔﺘﻓﺪﻟا -: ﲔﺘﻓﺪﻟا -
: ﲔﺘﻓﺪﻟا -ﻮﺣ ﺔﻘﻴﻗد ٢٥و ﺔﻋﺎﺳ ﻲﻟا
: ﲔﺘﻓﺪﻟا -: ﲔﺘﻓﺪﻟا -
: ٣٠ ﻊﻳﺮﺴﻟا -: ٣٠ ﻊﻳﺮﺴﻟا -
: ٣٠ ﻊﻳﺮﺴﻟا -ﻮﺣ ﺔﻘﻴﻗد ٣٠ ﻲﻟا
: ٣٠ ﻊﻳﺮﺴﻟا -: ٣٠ ﻊﻳﺮﺴﻟا -
ﺮﺧﻷا ﻞﻴﺴﻐﻟا.ى
- -
-
- -
●و ﻒﻠﺘﺨﻳ ﺪﻗ ﻞﻤﺣ ﻢﺠﳊ ﺎﻌﺒﺗ ﻞﻴﺴﻐﻟا ﺖﻗ
و ﻞﻴﺴﻐﻟاو ، ءﺎﳌا ﻂﻐﺿردﺮﺣ ﺔﺟراو ءﺎﳌا ةوﺮﻇف
●ﻮﺘﻟا ﻲﻓ لﻼﺘﺧا ﺮﻬﻇ اذإ ﺮﺑ ﻞﻤﻋ اذإ وأ نزاﺞﻣﺎﻧ
زإﺮﻟا ﺔﻟاﻮﻏﺰﻳ ، ةﺮﺘﻓ لﻮﻃ ﺪﻳو) .ﻞﻴﺴﻐﻟا ةﺖﻗ
ﺰﻟا ﻰﺼﻗﻷا ﻰﻠﻋ ةدﺎﻳ
Wash
Rinse Spin Dry
Intensive Tub Clean Time Delay
” ”ﺮﻌﻟا ﻰﻠﻋ . دﺪﻌﺘﳌا ض
ﺔﺻﺎﳋا ﺔﻔﻴﻇﻮﻟا ضﺮﻋ .ﺔﺻﺎﳋا ﺔﻔﻴﻇﻮﻟا ضﺮﻋ .
ﺔﺻﺎﳋا ﺔﻔﻴﻇﻮﻟا ضﺮﻋ .
ﺔﺻﺎﳋا ﺔﻔﻴﻇﻮﻟا ضﺮﻋ .ﺔﺻﺎﳋا ﺔﻔﻴﻇﻮﻟا ضﺮﻋ .
ﻲﺗاﺬﻟا ﺺﻴﺨﺸﺘﻟا ضﺮﻋ .ﻲﺗاﺬﻟا ﺺﻴﺨﺸﺘﻟا ضﺮﻋ .
ﻲﺗاﺬﻟا ﺺﻴﺨﺸﺘﻟا ضﺮﻋ .
ﻲﺗاﺬﻟا ﺺﻴﺨﺸﺘﻟا ضﺮﻋ .ﻲﺗاﺬﻟا ﺺﻴﺨﺸﺘﻟا ضﺮﻋ .
ﺮﺜﻟا ﻮﻣ.تﺎﺘﺳ
1
●ﺆﻣ ﺮﻬﻈﻳ ،ﻞﻔﻄﻟا قﻼﻏإ رﺎﻴﺘﺧا ﺪﻨﻋﺮﺷ
« ز ﻰﻠﻋ «ﺮﻌﻟا جﺎﺟ.ض
●ﻮﻟا ﻞﻴﺟﺄﺗ رﺎﻴﺘﺧا ﺪﻨﻋ ﻰﻟا ﺮﻴﺸﻳ اﺬﻫ ،ﺖﻗ
ﻮﻟاﺮﺒﻟا ءﺎﻬﺘﻧﻻ ﻲﻘﺒﺘﳌا ﺖﻗ.رﺎﺘا ﺞﻣﺎﻧ
2
●ﺮﻌﻳ ، ﺔﻟﺎﺴﻐﻟا ﻲﻓ ﺔﻠﻜﺸﻣ ﺖﺛﺪﺣ اذإ عﻮﻧ ض
.ﺔﻠﻜﺸﳌا
ءﺎﳌا ﻂﻐﻀﺑ رﺎﻌﺷﻹا ﻲﻓ ﺄﻄﺧ :
: ءﺎﳌا نﺎﻀﻴﻓ ﺔﻠﻜﺸﻣ
ﻖﻠﻐﻣ ﺮﻴﻏ بﺎﺒﻟا :
ﺰﻟا ﻞﻤﳊا :ﻮﳌا ﻰﻠﻋ ﺪﺋارﻮﺗ
ءﺎﳌا ﻞﺧﺪﻣ ﻲﻓ ﺔﻠﻜﺸﳌا :
ﺮﺼﺘﻟا ﻲﻓ ﺔﻠﻜﺸﳌا : ﻒﻳ
ﻮﺘﻟا مﺪﻋ ﺔﻠﻜﺸﻣ : نزا
رد ﺔﻠﻜﺸﻣ : ﺮﺣ ﺔﺟراءﺎﳌا ة
وأ ﻒﻴﻔﺠﺘﻟا زﺎﻬﺟ نﺎﺨﺳ ﻲﻓ ﺔﻠﻜﺸﻣ :
ﺮﻋ اذإوﺮﺣ ﺖﺿﺮﻳ ، هﺬﻫ ءﺎﻄﺧﻷا فﻰﺟ
ﺮﻣﺮﲢ ﻞﻴﻟد ﺔﻌﺟاو ﻞﻠﳋا ىﻮﳌا ﻪﺣﻼﺻإﻮﺟﻲﻓ د
ﺔﺤﻔﺻ30و .ﻞﻴﻟﺪﻟا ﻊﺒﺗا
25
Page 60

ﺔﻧﺎﻴﺼﻟاﺔﻧﺎﻴﺼﻟا
ﺔﻧﺎﻴﺼﻟا
ﺔﻧﺎﻴﺼﻟاﺔﻧﺎﻴﺼﻟا
ﺮﻬﻜﻟا رﺎﻴﺘﻟا جﺮﺨﻣ ﻦﻣ زﺎﻬﳉا ﺲﺑﺎﻗ ﻞﺼﻓا ،ﺔﻟﺎﺴﻐﻟا زﺎﻬﳉ ﺔﻴﻠﺧاﺪﻟا ﺢﻄﺳﻷا ﻒﻴﻈﻨﺗ ﻞﺒﻗ ٭تﺎﻣﺪﺻ ﺐﻨﺠﺘﻟ ﻲﺋﺎﺑ
ﺮﻬﻛو ﺔﻴﺋﺎﺑﺮﻬﻛ تﺎﻣﺪﺻ ﺮﻄﺧ.ﺔﻴﺋﺎﺑ
و ﻞﺑﺎﻘﻟا ﺮﻮﻘﺳ ﻦﻣ ﺮﻐﺼﻟا ﻊﻨﳌ بﺎﺒﻟا ﻞﻔﻗ ﺮﺴﻛا.زﺎﻬﳉا ﻞﺧاد ﻲﻓ ﻢﻬﻃ
ّ
ﺮﻃ ﺪﻨﻋ ٭ﺮﻟا ﻞﺑﺎﻜﻟا ﻊﻄﻗا ،زﺎﻬﳉا دو ﻲﺴﻴﺋﻣد
ءﺎﳌا ﻞﺧﺪﻣ ةﺎﻔﺼﻣ ءﺎﳌا ﻞﺧﺪﻣ ةﺎﻔﺼﻣ
ءﺎﳌا ﻞﺧﺪﻣ ةﺎﻔﺼﻣ
ءﺎﳌا ﻞﺧﺪﻣ ةﺎﻔﺼﻣ ءﺎﳌا ﻞﺧﺪﻣ ةﺎﻔﺼﻣ
ﺮﺴﻋ ءﺎﳌا نﺎﻛ اذإ -ﻮﺘﺣا وأ اﺪﺟ ا.ءﺎﳌا ﻞﺧﺪﻣ ةﺎﻔﺼﻣ دﺪﺴﺘﺗ ﺪﻗ ،ﻞﻔﺜﻟا ﻰﻠﻋ ى
1.ءﺎﳌا ﺔﻴﻔﻨﺣ ﻖﻠﻏا .
2ﺮﺑ خرا .ﺮﺧ ﻰﻏﻮﻃءﺎﳌا ﻞﺧﺪﻣ م
3ﻈﻧ .ّﻮﺑ ةﺎﻔﺼﳌا ﻒﺮﻔﻟا ﺔﻄﺳاﺔﻨﺸﳋا ةﺎﺷ
و.ﺔﺒﻠﺼﻟا
■
ﻮﺗ -ر ﺾﻣ ﺄﻄﺧ ﺔﻟﺎﺳ” ”ﻮﻟ ﻰﻠﻋ ود ﻰﻟا ﻞﺧﺪﻳ ﻻ ءﺎﳌا نأ ﺔﻟﺎﺣ ﻲﻓ ﻢﻜﺤﺘﻟا ﺔﺣ.ﻒﻴﻈﻨﺘﻟا ةدﺎﻣ بﻻ
ﺮﻜﻓ ﻚﻟﺬﻟ.ﺮﺧآ ﻰﻟا ﲔﺣ ﻦﻣ ةﺎﻔﺼﳌا ﻒﻈﻨﺗ نأ ﺔﻠﻴﻤﺟ ة
4ﺮﺧ ﺖﺒﺛ .ﻮﻃ.مﺎﻜﺣﺈﺑ ءﺎﳌا ﻞﺧﺪﻣ م
26
Page 61

ﺔﻧﺎﻴﺼﻟاﺔﻧﺎﻴﺼﻟا
ﺔﻧﺎﻴﺼﻟا
ﺔﻧﺎﻴﺼﻟاﺔﻧﺎﻴﺼﻟا
ﻒﻳﺮﺼﺘﻟا ﺔﺨﻀﻣ ةﺎﻔﺼﻣ ﻒﻳﺮﺼﺘﻟا ﺔﺨﻀﻣ ةﺎﻔﺼﻣ
ﻒﻳﺮﺼﺘﻟا ﺔﺨﻀﻣ ةﺎﻔﺼﻣ
ﻒﻳﺮﺼﺘﻟا ﺔﺨﻀﻣ ةﺎﻔﺼﻣ ﻒﻳﺮﺼﺘﻟا ﺔﺨﻀﻣ ةﺎﻔﺼﻣ
■
ﺮﺼﺘﻟا ةﺎﻔﺼﻣ ٭ﻮﻴﳋا ﻊﻤﲡ ﻒﻳو طﺮﻴﻐﺼﻟا ءﺎﻴﺷﻷا.ﺲﺑﻼﳌا ﻲﻓ ﺔﻴﻘﺒﺘﳌا ة
.ﺔﻟﺎﺴﻐﻟا زﺎﻬﳉ ﻢﻋﺎﻨﻟا ﻞﻴﻐﺸﺘﻟا ﻦﻤﻀﺘﻟ ﺔﻔﻴﻈﻧ ةﺎﻔﺼﳌا نأ مﺎﻈﺘﻧﺎﺑ ﺺﺤﻓا
ﺮﻳﺬﲢ ﺮﻳﺬﲢ
ﺮﻳﺬﲢ
ﺮﻳﺬﲢ ﺮﻳﺬﲢ
ﻮﺑ ءﺎﳌا فﺮﺧ ﺔﻄﺳاﻮﻃﺮﺼﺘﻟا مﺮﺼﺘﻟا ﺔﺨﻀﻣ ةﺎﻔﺼﻣ ﺢﺘﻓا ﻢﺛ ﻒﻳزﻹ ﻒﻳوﺪﺴﻣ ءﻲﺷ يأ ﺔﻟا.د
وأﺮﺻ ﻻ
ّ
ﺮﺼﺗ ﺪﻨﻋ ﺔﻳﺎﻨﻋ ﺬﺧرﺎﺣ ءﺎﳌا نﺎﻛ اذإ ءﺎﳌا ﻒﻳ.ا
*ﺮﺗا رﺎﺑ ﺢﺒﺼﻴﻟ ءﺎﳌا كﺮﺼﺘﻟا ﺔﺨﻀﻣ ﻒﻴﻈﻨﺗ ﻞﺒﻗ ادﺮﻔﺗ ﻊﻣ ،ﻒﻳرﺎﻃ ﻎﻳوأ ئ
رﺎﻃ ﺔﻟﺎﺣ ﻲﻓ بﺎﺒﻟا ﺢﺘﻓ.ﺔﺋ
1) ﻲﻠﻔﺴﻟا ءﺎﻄﻐﻟا ﺔﺒﻠﻋ ﺢﺘﻓا .1ماﺪﺨﺘﺳﺎﺑ (
ﺮﺼﺘﻟا حﺎﺘﻔﻣ ردأ .ﻊﺒﺻﻷا) ﻒﻳ2ﺐﺤﺴﻟ (
ﺮﳋاﻮﻃ.م
1
2ﺮﺼﺘﻟا ﺲﺑﺎﻗ ﻞﺼﻓا .)ﻒﻳ2ءﺎﳌا ﻞﻴﺴﻴﻟ ، (
و مﺪﺨﺘﺳا ،ﺔﻟﺎﳊا هﺬﻫ ﻲﻓ .جرﺎﳋا ﻰﻟاﻊﻨﳌ ءﺎﻋ
3
رﻷا ﻰﻠﻋ ءﺎﳌا ﻞﻴﺳ.ض
2
) ﺔﺨﻀﳌا ةﺎﻔﺼﻣ ر3(
ّ
3ود ، ءﺎﳌا ﻞﺴﻳ ﻢﻟ اذإ .
.ﺢﺘﻔﻠﻟ رﺎﺴﻴﻟا ﻰﻟا
) ﺔﺨﻀﳌا ةﺎﻔﺼﻣ رود ،ﻒﻴﻈﻨﺘﻟا ﺪﻌﺑ3هﺎﲡﺎﺑ (
ﺮﻘﻋو ﺔﻋﺎﺴﻟا بﺮﺼﺘﻟا ﺲﺑﺎﻗ ﻞﺧدا)ﻒﻳ2ﻰﻟا (
.ﻞﻔﺳﻷا فﻼﻐﻟا ءﺎﻄﻏ ﻖﻠﻏا . ﻲﻠﺻﻷا ﻪﻧﺎﻜﻣ
27
4ﺮﻏ ءﻲﺷ يأ لزا .) ﺔﺨﻀﳌا ةﺎﻔﺼﻣ ﻦﻣ ﺐﻳ3.(
3
2
Page 62

ﺔﻧﺎﻴﺼﻟاﺔﻧﺎﻴﺼﻟا
MAX
ﺔﻧﺎﻴﺼﻟا
ﺔﻧﺎﻴﺼﻟاﺔﻧﺎﻴﺼﻟا
عزﻮﳌا بﻻود عزﻮﳌا بﻻود
عزﻮﳌا بﻻود
عزﻮﳌا بﻻود عزﻮﳌا بﻻود
بﻻوﺪﻠﻟ ﻲﻠﺧاد نﺎﻜﻣ ف!بﻻوﺪﻠﻟ ﻲﻠﺧاد نﺎﻜﻣ ف!
بﻻوﺪﻠﻟ ﻲﻠﺧاد نﺎﻜﻣ ف!
بﻻوﺪﻠﻟ ﻲﻠﺧاد نﺎﻜﻣ ف!بﻻوﺪﻠﻟ ﻲﻠﺧاد نﺎﻜﻣ ف!
ﺮﻔﺑ ﺎﻧﺎﻴﺣأ ﻪﻔﻴﻈﻨﺗ.نﺎﻨﺳﻷا ةﺎﺷ
.ﺲﺑﻼﻣ نوﺪﺑ ﻒﻄﺸﻟا
ﻞﻴﺴﻐﻟا ﺔﻠﺣ ﻞﻴﺴﻐﻟا ﺔﻠﺣ
ﻞﻴﺴﻐﻟا ﺔﻠﺣ
ﻞﻴﺴﻐﻟا ﺔﻠﺣ ﻞﻴﺴﻐﻟا ﺔﻠﺣ
ﺮﺗ نأ ﻦﻜﳝ ﻻ ﻲﺘﻟا ﻦﻛﺎﻣﻷاوﺎﻫاﺰﺗ ﻻﻮﻬﺴﺑ ﺎﻬﻠﻳ.ﺔﻟ
ﺰﻬﺟﻷا ﺪﺴﻳ ﺲﻠﻜﻟا ﺔﺤﻴﻔﺻ نﻮﻜﺗو ةو ﻪﺼﺤﻔﺗ ﻢﻟ اذإﺮﻴﺧأ ﻪﻠﻳﺪﺒﺗ ﻦﻣ ﺪﺑ ﻻ.ا
ﺮﻴﻐﺼﻟا ﺔﻴﻧﺪﻌﳌا ءﺎﻴﺷﻷا ﺐﺒﺴﺑو ، قرﻮﻟا ﻚﺒﺸﻣ ) ةﺖﻧﺎﻛ ﻲﺘﻟا (نﺎﻣﻷا ﺲﺑﺎﺑد
.ﺔﻠﳊا ﻲﻓ ﻰﻘﺒﺗ
.ﺔﻟﺎﺴﻐﻟا زﺎﻬﺟ ﻲﻓ ماﺪﺨﺘﺳﻼﻟ ﺔﺒﺳﺎﻨﻣ ﺎﻬﻧأ ﻦﻣ ﺪﻛﺄﺗ
ﻮﻔﻟﺎﺑ صﺎﳋا ﻒﻴﻈﻨﺘﻟا ﻞﺋﺎﺴﺑ ﻊﻘﺒﻟا لزا ٭.أﺪﺼﻳ ﻻ يﺬﻟا ذﻻ
ﻮﺻ مﺪﺨﺘﺴﺗ ﻻ ٭ﻮﻔﻟا ف.اﺪﺑأ ذﻻ
■
ﺪﻌﺑ ٭و و ﻒﻴﻈﻨﺘﻟا ةدﺎﻣ ﻊﺿوﺪﻟا ﻲﻓ شﺎﻤﻘﻟا ﲔﻠﻣ.بﻻ
●وﺪﻟا ﻒﻴﻈﻨﺗ ﻦﻣ ﺪﺑ ﻻ رﺎﳉا ءﺎﳌﺎﺑ ﺮﺧآ ﻰﻟا ﲔﺣ ﻦﻣ بﻻ.ي
●وﺪﻟا ﺐﺤﺳ ﻚﻨﻜﳝ ﺔﺟﺎﳊا ﺪﻨﻋ وﺪﻟا ﻰﻠﻋ ﻂﻐﻀﻟﺎﺑ ﺔﻟﺎﺴﻐﻟا زﺎﻬﺟ ﻦﻣ ﺎﻣﺎﲤ بﻻﻞﻔﺳﻷا ﻰﻟا بﻻ
و.جرﺎﳋا ﻰﻟا ﻪﺒﺤﺳ
●زإ ﻚﻨﻜﳝ ،ﻞﻬﺴﻟا ﻒﻴﻈﻨﺘﻟا ﻞﺟأ ﻦﻣ ﺰﳉا ﺔﻟاﺮﻴﺠﺣ ﻦﻣ ﻰﻠﻋﻷا ء.شﺎﻤﻘﻟا ﲔﻠﻣ ة
ﺮﺘﺗ ﺪﻗ ٭ﻦﻣ ﺪﺑ ﻼﻓ ﻲﻠﺧاﺪﻟا نﺎﻜﳌا ﻞﺧاد ﻒﻴﻈﻨﺘﻟا ةدﺎﻣ ﻢﻛا
●وﺪﻟا ﺪﻋا ،ﻒﻴﻈﻨﺘﻟا ءﺎﻬﺘﻧا ﺪﻨﻋ و ﻪﻧﺎﻜﻣ ﻰﻟا بﻻرود ﺮﺟانا
■
●ﺮﺴﻌﻟا هﺎﻴﳌا ﺔﻘﻄﻨﻣ ﻲﻓ ﺖﺸﻋ اذإ ﺮﻤﺘﺳﺎﺑ ﺲﻠﻜﻟا ﺔﺤﻴﻔﺻ نﻮﻜﺘﺗ ، ةﻲﻓ را
●ﺮﻟﺎﺑ ﻮﻨﺼﻣ ﻞﻴﺴﻐﻟا ﺔﻠﺣ نأ ﻦﻣ ﻢﻏﻮﻔﻟا ﻦﻣ ﺔﻋأﺪﺼﻟا ثﺪﺤﻳ ﺪﻗ ،أﺪﺼﻳ ﻻ يﺬﻟا ذﻻ
●.ﺮﺧآ ﻰﻟا ﲔﺣ ﻦﻣ ﻞﻴﺴﻐﻟا ﺔﻠﺣ ﻒﻴﻈﻨﺗ ﻦﻣ ﺪﺑ ﻻ
●، ﺔﻴﺳﺎﻴﻘﻟا ﺮﻴﻏ ﺾﻴﻴﺒﺘﻟا ةدﺎﻣ وأ ﻎﺒﺼﻟا ةدﺎﻣ و ﻒﻴﻈﻨﺘﻟا ةدﺎﻣ ﺖﻣﺪﺨﺘﺳا اذإ
ﻮﳌا ٭ﻮﺘﲢ ﺔﻴﺳﺎﻴﻘﻟا ﺮﻴﻏ داﻮﻜﳌا ﻰﻠﻋ ىﺆﺗ ﺪﻗ ﻲﺘﻟا تﺎﻧزﺎﻬﺟ ﻲﻓ رﺮﺿ ﻰﻟا يد
.ﺔﻟﺎﺴﻐﻟا
28
Page 63

ﺔﻧﺎﻴﺼﻟاﺔﻧﺎﻴﺼﻟا
ﺔﻧﺎﻴﺼﻟا
ﺔﻧﺎﻴﺼﻟاﺔﻧﺎﻴﺼﻟا
ءﺎﳌا نارود ﺔﻫﻮﻓ ءﺎﳌا نارود ﺔﻫﻮﻓ
ءﺎﳌا نارود ﺔﻫﻮﻓ
ءﺎﳌا نارود ﺔﻫﻮﻓ ءﺎﳌا نارود ﺔﻫﻮﻓ
ﻈﻧّﻮﻓ ﻒرود ﺔﻫوﺪﺴﻣ ﺖﻧﺎﻛ اذإ ، ءﺎﳌا نا.ةد
ﺔﻟﺎﺴﻐﻟا ﻒﻴﻈﻨﺗ ﺔﻟﺎﺴﻐﻟا ﻒﻴﻈﻨﺗ
ﺔﻟﺎﺴﻐﻟا ﻒﻴﻈﻨﺗ
ﺔﻟﺎﺴﻐﻟا ﻒﻴﻈﻨﺗ ﺔﻟﺎﺴﻐﻟا ﻒﻴﻈﻨﺗ
ﺔﻴﺟرﺎﳋا ﺢﻄﺳﻷا .ﺔﻴﺟرﺎﳋا ﺢﻄﺳﻷا .
ﺔﻴﺟرﺎﳋا ﺢﻄﺳﻷا .
ﺔﻴﺟرﺎﳋا ﺢﻄﺳﻷا .ﺔﻴﺟرﺎﳋا ﺢﻄﺳﻷا .
.زﺎﻬﳉا ﺮﻤﻋ ﺪﻳﺪﲤ ﻊﻴﻄﺘﺴﺗ ﺔﻟﺎﺴﻐﻟا زﺎﻬﳉ ﺔﺒﺳﺎﻨﳌا ﺔﻧﺎﻴﺼﻟا
رﺎﳋا ﺢﻄﺳﻷا ﻒﻴﻈﻨﺗ ﻚﻨﻜﳝو ﺊﻓاﺪﻟا ءﺎﳌﺎﺑ ﺔﻟﺎﺴﻐﻟا زﺎﻬﳉ ﺔﻴﺟﺮﻴﻏ ةﺪﻳﺎﶈا ﻒﻴﻈﻨﺘﻟا ةدﺎﻣ
.لﺰﻨﻤﻠﻟ ﺔﻄﺷﺎﻜﻟا
ﻮﺒﺼﻣ ﻞﺋﺎﺳ يأ ﺢﺴﻣارﻮﻓ بو .اﺮﻟا شﺎﻤﻘﻟﺎﺑ ﺎﻬﺤﺴﻣا.ﺐﻃ
ﺮﺿ لوﺎﲢ ﻻ.ةدﺎﳊا ءﺎﻴﺷﻷﺎﺑ زﺎﻬﺠﻠﻟ ﺢﻄﺳﻷا ب
. ﺔﻬﻴﺒﺸﻟا تﺎﺠﺘﻨﳌا وأ ﺔﻌﻴﺸﻌﺸﳌاو ، تﻼﻴﺸﻴﳌا مﺪﺨﺘﺴﺗ ﻻ : مﺎﻫ ٭. ﺔﻬﻴﺒﺸﻟا تﺎﺠﺘﻨﳌا وأ ﺔﻌﻴﺸﻌﺸﳌاو ، تﻼﻴﺸﻴﳌا مﺪﺨﺘﺴﺗ ﻻ : مﺎﻫ ٭
. ﺔﻬﻴﺒﺸﻟا تﺎﺠﺘﻨﳌا وأ ﺔﻌﻴﺸﻌﺸﳌاو ، تﻼﻴﺸﻴﳌا مﺪﺨﺘﺴﺗ ﻻ : مﺎﻫ ٭
. ﺔﻬﻴﺒﺸﻟا تﺎﺠﺘﻨﳌا وأ ﺔﻌﻴﺸﻌﺸﳌاو ، تﻼﻴﺸﻴﳌا مﺪﺨﺘﺴﺗ ﻻ : مﺎﻫ ٭. ﺔﻬﻴﺒﺸﻟا تﺎﺠﺘﻨﳌا وأ ﺔﻌﻴﺸﻌﺸﳌاو ، تﻼﻴﺸﻴﳌا مﺪﺨﺘﺴﺗ ﻻ : مﺎﻫ ٭
ﺔﻴﻠﺧاﺪﻟا ﺢﻄﺳﻷا .ﺔﻴﻠﺧاﺪﻟا ﺢﻄﺳﻷا .
ﺔﻴﻠﺧاﺪﻟا ﺢﻄﺳﻷا .
ﺔﻴﻠﺧاﺪﻟا ﺢﻄﺳﻷا .ﺔﻴﻠﺧاﺪﻟا ﺢﻄﺳﻷا .
ﺮﺟﻹا رﺮﻛ.ﺔﺟﺎﳊا ﺪﻨﻋ تاءا
ﺔﻈﺣﻼﻣﺔﻈﺣﻼﻣ
ﺔﻈﺣﻼﻣ ﺮﺑ ﻂﻘﻓ ﻒﻴﻈﻨﺗ ةدﺎﻣ ماﺪﺨﺘﺳﺎﺑ ﺮﺴﻴﻟا ءﺎﳌا ﻞﻔﺛ لزا :ماﺪﺨﺘﺳﻻا ﺔﻌﻗ
ﺔﻈﺣﻼﻣﺔﻈﺣﻼﻣ
رد ﻰﻟاﺮﳊا ﺔﺟرالﻮﻠﺣ ﺪﻨﻋ تﺎﻤﻴﻠﻌﺘﻟا هﺬﻫ ﻊﺒﺗا ،ءﺎﳌا ﺪﻤﺠﺘﻳ ﻰﺘﺣ ﺔﻀﻔﺨﻨﳌا ة
ﻔﺟ
ّ
و حﻮﺘﻔﳌا ﺔﻟﺎﺴﻐﻟا بﺎﺑ لﻮﺣ ﻒو ﻰﻨﺜﻠﻟ ﺔﻠﺑﺎﻘﻟا ﺔﻴﺸﳊاﺰﻟا بﺎﺒﻟاهﺬﻫ .ﻲﺟﺎﺟ
.مﺎﻜﺣﺈﺑ ءﺎﳌا ﻢﺘﻛ نﺎﻤﻀﻟ ﺎﻬﻔﻴﻈﻨﺗ ﻦﻣ ﺪﺑ ﻻ ﻖﻃﺎﻨﳌا
روﺪﺑ ﺔﻟﺎﺴﻐﻟا زﺎﻬﺟ ﻞﻤﻋا.رﺎﳊا ءﺎﳌا ماﺪﺨﺘﺳﺎﺑ ﻞﻣﺎﻛ نا
.ﺔﻟﺎﺴﻐﻟا زﺎﻬﳉ ﺔﻴﻨﻣﻷا
ءﺎﺘﺸﻟا ﻞﺼﻓ لﻮﻠﺣ ﺪﻨﻋ تﺎﻤﻴﻠﻌﺗ ءﺎﺘﺸﻟا ﻞﺼﻓ لﻮﻠﺣ ﺪﻨﻋ تﺎﻤﻴﻠﻌﺗ
ءﺎﺘﺸﻟا ﻞﺼﻓ لﻮﻠﺣ ﺪﻨﻋ تﺎﻤﻴﻠﻌﺗ
ءﺎﺘﺸﻟا ﻞﺼﻓ لﻮﻠﺣ ﺪﻨﻋ تﺎﻤﻴﻠﻌﺗ ءﺎﺘﺸﻟا ﻞﺼﻓ لﻮﻠﺣ ﺪﻨﻋ تﺎﻤﻴﻠﻌﺗ
ﺎﻬﻴﻓ ﺲﻘﻄﻟا ﺮﻴﻐﺘﻳ وأ ﺎﻬﻴﻓ ءﺎﳌا ﺪﻤﺠﺘﻳ ﺪﻗ ﺔﻘﻄﻨﻣ ﻲﻓ ﺔﻟﺎﺴﻐﻟا زﺎﻬﺟ ﺖﻈﻔﺣ اذإ
.ﺔﻟﺎﺴﻐﻟا زﺎﻬﺟ ﻲﻓ رﺮﺿ ﻊﻨﻣ ﻞﺟأ ﻦﻣ ءﺎﺸﺘﻟا ﻞﺼﻓ
■
■
1
2
■
29
1.ءﺎﳌا ﺔﻴﻔﻨﺣ ﻖﻠﻏا .
ﺮﳋا ﻦﻣ ءﺎﳌا فﻮﻃ.م
ّ
.ﺔﻟﺎﺴﻐﻟا ﻦﻣ ءﺎﳌا
ﻮﺴﻟا ﻊﻴﻤﺟ جﺮﺨﻳ وﺎﻘﻣ ﻞﺋا ﺪﻴﻤﺠﺘﻟا ﺔﻣRV.ﺎﻣﺎﲤ
ﺮﻴﺠﺣ ﻦﻣ ءﺎﻣ يأ فو تاﺮﻴﺠﺣ ﻒﻔﺟو تاوﺪﻟا ﺪﻋاﻰﻟا بﻻ
ّ
رود لﻼﺧ ﻦﻣ.ﺲﺑﻼﳌا ﻒﻀﺗ ﻻ .ﻒﻴﻈﻨﺘﻟا ةدﺎﻣ ماﺪﺨﺘﺳﺎﺑ ﻞﻣﺎﻛ نا
2ﺮﳋا ﻞﺼﻓا .ﻮﻃﺮﺻو ءﺎﳌا ﺔﻴﻔﻨﺣ ﻦﻣ م
3ﺮﻬﻜﻟا رﺎﻴﺘﻟا ﺲﺑﺎﻗ ﻞﺻ .رﻷا ﻪﻠﻴﺻﻮﺗ ﰎ يﺬﻟا رﺎﻴﺘﻟا جﺮﺨﻣ ﻰﻟا ﻲﺋﺎﺑ.ﺐﺳﺎﻨﳌا ﻲﺿ
4) نﻮﻟﺎﺟ ١ ﻒﺿا .3,8وﺎﻘﻣ ﻞﺋﺎﺳ ﻦﻣ (ﺮﺘﻟ رﺎﻴﺴﻠﻟ صﺎﳋا ﺪﻴﻤﺠﺘﻟا ﺔﻣﻢﻤﺴﺘﳌا ﺮﻴﻏ ة
)RVﺮﻔﺘﻟ (.بﺎﺒﻟا ﻖﻠﻏا .ﻞﻴﺴﻐﻟا ﺔﻠﺣ ﻎﻳ
5رود ﻂﺒﺿا .و ﻒﻴﻔﺠﺘﻟا ناﺮﺗاو ﺔﻘﻴﻗد ةﺪﳌ روﺪﻳ ﺔﻟﺎﺴﻐﻟا زﺎﻬﺟ كﺮﺼﺘﻟ ةﺪﺣاﻊﻴﻤﺟ ﻒﻳ
6ﺮﻬﻜﻟا رﺎﻴﺘﻟا ﺲﺑﺎﻗ عﺰﻧا .و ﻲﺋﺎﺑو ﺔﻠﺤﻠﻟ ﺔﻴﻠﺧاﺪﻟا ﺢﻄﺳﻷا ﻒﻔﲡ.بﺎﺒﻟا ﻖﻠﻏا
7ود لزا .ﺮﺻ .عزﻮﳌا بﻻ
.ﻪﻧﺎﻜﻣ
8ﻮﻣ ﻲﻓ ﺔﻟﺎﺴﻐﻟا زﺎﻬﺟ ﻆﻔﺣا .ﻮﻤﻋ ﻊﺿ.يد
9زﻹ .وﺎﻘﻣ ﻞﺋﺎﺳ ﺔﻟاﺮﻓ ﺔﻟﺎﺴﻐﻟا زﺎﻬﺟ ﻞﻤﻋا ،ﻪﻈﻔﺣ ﺪﻌﺑ ﺔﻟﺎﺴﻐﻟا زﺎﻬﺟ ﻦﻣ ﺪﻴﻤﺠﺘﻟا ﺔﻣﺎﻏا
Page 64

ﻪﺣﻼﺻإو ﻞﻠﳋا ىﺮﲢ ﻞﻴﻟد ﻪﺣﻼﺻإو ﻞﻠﳋا ىﺮﲢ ﻞﻴﻟد
ﻪﺣﻼﺻإو ﻞﻠﳋا ىﺮﲢ ﻞﻴﻟد
ﻪﺣﻼﺻإو ﻞﻠﳋا ىﺮﲢ ﻞﻴﻟد ﻪﺣﻼﺻإو ﻞﻠﳋا ىﺮﲢ ﻞﻴﻟد
وﺰﻣ اﺬﻫ ﺔﻟﺎﺴﻐﻟا زﺎﻬﺟ ٭ﻮﺑ دوﻷا ﺔﻣﻼﺴﻟا ﻒﺋﺎﻇﻮﺗو ﻒﺸﻜﺗ ﻲﺘﻟا ﺔﻴﻜﻴﺗﺎﻣﻲﻓ ءﺎﻄﺧﻷا ﺺﺨﺸﺗ
ﻮﺑ ﺔﻟﺎﺴﻐﻟا زﺎﻬﺟ ﻞﻤﻌﻳ ﻻ ﺎﻣﺪﻨﻋلﺎﺼﺗﻻا ﻞﺒﻗ ﺔﻴﻟﺎﺘﻟا رﻮﻣﻷا ﺺﺤﻓا ،اﺪﺑأ ﻞﻤﻌﻳ ﻻ ﺔﺒﺳﺎﻨﻣ ﺔﻔﻴﻇ
ﺮﻣرود ﺔﻠﺣرو ناود.ﺔﺒﺳﺎﻨﻣ ﻞﻌﻓ د
ﺮﲟ.تﺎﻣﺪﳋا ﺰﻛ
لﻮﻠﳊا
و ﺔﻠﳊاﺮﺼﺘﻟا ةﺎﻔﺼﻣ.ﻒﻳ
ﻞﻴﻐﺸﺗ ةدﺎﻋإ ﺪﻌﺑ ﺞﻴﺠﻀﻟا ﺮﻤﺘﺳا اذإ
،زﺎﻬﳉا
ﺮﲟ ﻞﺼﺗا.تﺎﻣﺪﳋا ﺰﻛ
ﻮﺼﻟا ﺮﻤﺘﺳا اذإﺔﻟﺎﺴﻐﻟا زﺎﻬﺟ ،ت
ﻮﺘﻟا جرﺎﺧوا .نزاﻒﻗ
.ﺪﻳﺪﺟ ﻦﻣ ﺲﺑﻼﳌا ع
ﺮﺘﻟا ءﺎﻨﺛأ ﺮﻴﻣﺎﺴﳌا لﺰﺗ ﻢﻟ اذإ،ﺐﻴﻛ
ﺮﳋا تﻼﻴﺻﻮﺗ ﺺﺤﻓاﻮﻃو م. ﺎﻬﺘﺒﺛ
وﺪﺴﻣ ﺎﺌﻴﺷ لزاﻮﺒﻧأ ﻲﻓ ادب
.ﺔﺟﺎﳊا ﺪﻨﻋ ﻲﻨﻔﻟﺎﺑ
ﺮﻴﺜﻜﻟا ﻒﻴﻈﻨﺘﻟا ةدﺎﻣةدﺎﻣ وأ اﺪﺟ ة
ﺮﻴﻏ ﻒﻴﻈﻨﺘﻟا
و ؟ ﺔﺒﺳﺎﻨﳌاوﺪﺣﺮﻟا ثﻮﻏﺆﻳ ةﻰﻟا يد
ﺮﺧﻷا ﺔﻴﻔﻨﳊا ﺺﺤﻓا.لﺰﻨﳌا ﻲﻓ ى
.ﻼﻣﺎﻛ ﺔﻴﻔﻨﳊا ﺢﺘﻓا
ﺮﺧ ﻲﻓ ةﺎﻔﺼﳌا ﺺﺤﻓاﻮﻃ.ءﺎﳌا لﻮﺧد م
زو
ّ
ﺮﺘﻟازإ ﻞﺟأ ﻦﻣ ﺐﻴﻛ.ﻞﻘﻨﻟا ﺮﻴﻣﺎﺴﻣ ﺔﻟا
و ﻞﻤﻌﻟا ﻦﻣﺮﺗ ﺪﻋا.ﺲﺑﻼﳌا ﺐﻴﺗ
ﺮﺼﺘﻟاو .ﻒﻳﻞﺼﺗا
ﺮﺴﺗ.ءﺎﻣ ب
ﺮﳋا ﻢﻘﺘﺳاﻮﻃ.م
ﻈﻧّو ﻒﺮﺧ ﻢﻘﺘﺳاﻮﻃﺮﺼﺘﻟا م.ﻒﻳ
ﻈﻧّﺮﺼﺘﻟا ةﺎﻔﺼﻣ ﻒ.ﻒﻳ
ﻞﻤﺘﶈا ﺐﺒﺴﻟا
واو ﻞﻤﻌﻟا ﻦﻣ ﺔﻟﺎﺴﻐﻟا زﺎﻬﺟ ﻒﻗﺺﺤﻓا
ﻮﺗ ﺪﻗ ﺔﻣﻼﺴﻟا ﺲﻴﺑﺎﺑد وأﺔﻠﳊا ﻲﻓ ﺪﺟ
. ﺔﺨﻀﳌا وأ
.يدﺎﻋ ﺮﻣأ اﺬﻫ
رتﺎﻤﻴﻠﻌﺗ ﻊﺟا
وﻮﺘﻣ ﺮﻴﻏ ﺲﺑﻼﳌا ﻊﺿ.ﺔﻠﳊا ﻲﻓ نزا
واﺔﻟﺎﺴﻐﻟا زﺎﻬﺟ ﻒﻗ
.ﺔﻟﺎﺴﻏ زﺎﻬﺟ وأ ءﺎﻣ ﺔﻴﻔﻨﺣ ﻲﻓ
●ﺮﻐﻟا ءﺎﻴﺷﻷا ﺔﻴﻧﺪﻌﳌا ﻊﻄﻘﻟا ﻞﺜﻣ ﺔﺒﻳ
●و ﺔﻠﻴﻘﺜﻟا ﺲﺑﻼﳌا ﺮﻴﺒﻜﻟارﺪﺼﺗ ﺪﻗ ة
ﻮﺻﺮﻴﺒﻛ ﺎﺗ.ا
●زأ ﻞﻫ و ﻞﻘﻨﻟا ﺮﻴﻣﺎﺴﻣ ﺖﻟ؟ ﻒﻴﻠﻐﺘﻟا
●رﻷا ﻊﻴﻤﺟ ﻞﻫ ﻮﻣ ﻞﺟﻮﺿﻰﻠﻋ ﺔﻋ
رﻷا؟ تﺎﺒﺜﺑ ض
●ﺮﺧ ﻮﻃو ءﺎﳌا ﺔﻳﺬﻐﺗ مﺮﺧﻮﻃم
ﺮﺼﺘﻟاﺮﻣ ﻒﻳﲔﺨﺗ
●ﺮﺼﺘﻟا ﺐﻴﺑﺎﻧأ وﺪﺴﻣ ﺔﻴﻠﺧاﺪﻟا ﻒﻳ.ةد
●وﺰﺗ .ﻲﻓﺎﻛ ﺮﻴﻏ ﺔﻘﻄﻨﳌا ﻲﻓ ءﺎﳌا ﺪﻳ
●. ﻼﻣﺎﻛ ءﺎﳌا ﺔﻴﻔﻨﺣ ﺢﺘﻔﺗ ﻻ
●ﺮﺧ ﻮﻃوﺰﺗ مﻮﺘﻠﻣ ءﺎﳌا ﺪﻳ.ي
●ﺮﺧ ةﺎﻔﺼﻣ ﻮﻃوﺪﺴﻣ ءﺎﳌا لﻮﺧد م.ةد
●ﺮﺧ ﻮﻃﺮﺼﺘﻟا مﻮﻠﺘﻣ ﻒﻳوﺪﺴﻣ وأ ي.د
●ﺮﺼﺘﻟا ةﺎﻔﺼﻣ وﺪﺴﻣ ﻒﻳ.ةد
ﺔﻠﻜﺸﳌا
ﻮﺻﺶﺨﺸﳋا ت
وﻞﺼﻠﺼﻟا ﺞﻴﺠﺿ
ﻮﺻﻢﺨﺿ ت
ﺰﺘﻫﻻا ﺞﻴﺠﺿزا
ﺮﺴﺗءﺎﳌا ب
ﺮﻟاﻮﻏﺰﻟا ةةﺪﺋا
ءﺎﳌا ﻞﺧﺪﻳ ﻻ
وأ ﺔﻟﺎﺴﻐﻟا ﻰﻟا
ءﻂﺒﺑ ﻪﻠﺧﺪﻳ
ﺮﺼﺗ ﻻﻦﻣ ءﺎﳌا ف
وأ ﺔﻟﺎﺴﻐﻟا زﺎﻬﺟ
ﺮﺼﺘﻟا ﻢﺘﻳءﻂﺒﺑ ﻒﻳ
30
Page 65

ﻪﺣﻼﺻإو ﻞﻠﳋا ىﺮﲢ ﻞﻴﻟد ﻪﺣﻼﺻإو ﻞﻠﳋا ىﺮﲢ ﻞﻴﻟد
ﻪﺣﻼﺻإو ﻞﻠﳋا ىﺮﲢ ﻞﻴﻟد
ﻪﺣﻼﺻإو ﻞﻠﳋا ىﺮﲢ ﻞﻴﻟد ﻪﺣﻼﺻإو ﻞﻠﳋا ىﺮﲢ ﻞﻴﻟد
لﻮﻠﳊا ﺔﻠﻜﺸﳌاﻞﻤﺘﶈا ﺐﺒﺴﻟا
جﺮﺨﻣ ﻰﻟا ﺲﺑﺎﻘﻟا ﻞﻴﺻﻮﺗ ﻦﻣ ﺪﻛﺄﺗ
.مﺎﻜﺣﺈﺑ رﺎﻴﺘﻟا
ﺮﺋاﺪﻟا ﻊﻃﺎﻗ ﻂﺒﺿ ﺪﻋاﺪﺑ وأ ة
ل
ّ
ﺮﻬﻴﺼﻟا ﺔﻌﺳ.ة
ﺮﺋاﺪﻟا ﻞﻤﺣ ﻦﻋ ﺔﻤﺟﺎﻧ ﺔﻠﻜﺸﻣ ﺖﻧﺎﻛ اذإة
ﺮﻬﻛ ﻲﻨﻓ ﻞﺒﻗ ﻦﻣ ﺎﺤﻴﺤﺻﺆﻣ ﻲﺋﺎﺑ.ﻞﻫ
.ءﺎﳌا ﺔﻴﻔﻨﺣ ﺢﺘﻓا
و بﺎﺒﻟا ﻖﻠﻏارز ﻰﻠﻋ ﻂﻐﺿا
ﻮﺘﻟا/ﻞﻴﻐﺸﺘﻟاﺆﳌا ﻒﻗ.ﺖﻗ
ﻮﺘﻟا/ﻞﻴﻐﺸﺘﻟا رز ﻰﻠﻋ ﻂﻐﻀﻟا ﺪﻌﺑﻒﻗ
ﻞﺒﻗ بﺎﺒﻟا قﻼﻏإ
.ﻒﻴﻔﺠﺘﻟﺎﺑ ءﺪﺒﻟا
بﺎﺒﻟا ﺢﺘﻓ ﻚﻨﻜﳝ ﻻ ،ﻞﻴﻐﺸﺘﻟا ﺪﻨﻋ
.ﺔﻣﻼﺴﻠﻟ ﺎﺒﺒﺳ
ﺢﺘﻓ ﻞﺒﻗ ﲔﺘﻘﻴﻗد وأ ﺔﻘﻴﻗد ﺮﻈﺘﻧا
و ءﺎﻄﻋﻹ بﺎﺒﻟاﺖﻗ
ﺮﻬﻜﻟا ﺔﻴﻟﻵا قﻼﻏإ ﺢﺘﻔﻟ.ﺔﻴﺋﺎﺑ
و ، ﺲﺑﻼﳌاﻂﻐﺿ
ﻮﺘﻣ ﺮﻴﻏ ﺲﺑﻼﳌا ﺖﻧﺎﻛ اذإزااذإ وأ ﺔﻧ
ﺮﻴﻬﺼﻟاو .ةﺰﺗ ﻻد
ﺰﻟاﻦﻛ ،ﺪﻳا
ﺆﳌاقﺮﻐﺘﺴﻳ ،ﺖﻗ
و ، ءﺎﳌاردﺮﺣ ﺔﺟراو ءﺎﳌا ةﺮﺧﻷا تﻻﺎﳊاى
.ﻞﻴﺴﻐﻠﻟ
ﺮﺑ ﻞﻤﻋزإ ﺞﻣﺎﻧﺔﻟا
ﺔﻟﺎﺴﻐﻟا زﺎﻬﺟ ﻞﻤﻌﻳ ﻻ●جﺮﺨﻣ ﻰﻟا زﺎﻬﳉا ﺲﺑﺎﻗ ﻞﺼﻳ ﻻ
وأ رﺎﻴﺘﻟا
ﺮﻣ ﻞﻴﺻﻮﺘﻟا.ﺦﺗ
●ﺮﻴﻬﺻ و ،ﺔﻌﻄﻘﻨﻣ ﺖﻴﺒﻟا ةﻊﻃﺎﻗ ﺮﻔﻄﻳ
رذاﺪﻟاوأ ، ة
.ﺔﻗﺎﻃ عﺎﻄﻘﻧا ثﺪﺣ
●.ءﺎﳌا ﺔﻴﻔﻨﺣ ﺢﺘﻔﺗ ﻻ
.مﺎﻜﺣﺈﺑ ﻖﻠﻐﻣ بﺎﺒﻟا نأ ﻦﻣ ﺪﻛﺄﺗ ٭
وﻦﻣ ﺪﺑ ﻻ .ﻒﻴﻔﺠﺘﻟﺎﺑ ءﺪﺒﻠﻟ ﻞﻴﻠﻗ ﺖﻗ
وﺔﻴﻤﻛ ﺐﺴﺣ ﻒﻠﺘﺨﻳ ﺪﻗ ﻞﻴﺴﻐﻟا ﺖﻗ
ﺮﻟاﻮﻏﺰﻳ ، ةو ﺪﻳ. ﻞﻴﺴﻐﻟا ﺖﻗ
ﺔﻟﺎﺴﻐﻟا ﻲﻓ ﻒﻴﻔﲡ ﻻ
بﺎﺒﻟا ﺢﺘﻓ ﻦﻜﳝ ﻻ
و ﻞﺟﺄﺘﻳرود ﺖﻗنا
ﻞﻴﺴﻐﻟا
ز ﻞﻴﺴﻐﻟا ﻊﻀﺗ ﻻاﺪﺋا
ﺮﺼﺘﻟ ﻲﻐﺒﻨﻳ ﺎﻤﻛ ﺔﻟﺎﺴﻐﻟاﺔﻴﻤﻜﻟا ﻒﻳ
.ﺲﺑﻼﳌا ﻦﻣ ءﺎﳌا ﻦﻣ ﺔﻴﻓﺎﻜﻟا
و ﻲﺘﻟا ﺲﺑﻼﳌا زﺎﻬﳉا ﻲﻓ ﺎﻬﺘﻌﺿ
ﺎﻤﻛ زﺎﻬﳉا ﻞﻤﻌﻳ ﻲﻜﻟ اﺪﺟ ﺔﻠﻴﻠﻗ
ﻦﻣ ﻊﻄﻘﻟا ﺾﻌﺑ ﺎﻬﻴﻟا ﻒﺿا ، ﻲﻐﺒﻨﻳ
.ﻒﺷﺎﻨﳌا
31
ﻛﺄﺗ ّﺮﺼﺘﻟا ﻦﻣ ﺪزﺎﻬﺟ ﻦﻣ ﻒﻳ
ﺮﺠﻳ ﻻ.ﻒﻴﻔﺠﺘﻟا ي
ﻒﻴﻔﺠﺘﻟا ﻲﻓ ﺔﻠﻜﺸﻣ
Page 66

لﻮﻠﳊا ﺔﻠﻜﺸﳌاﻞﻤﺘﶈا ﺐﺒﺴﻟا
.ﻼﻣﺎﻛ ءﺎﳌا ﺔﻴﻔﻨﺣ ﺢﺘﻓا
ﺮﳋا ﻢﻘﺘﺳاﻮﻃ.م
ﺮﺧ ةﺎﻔﺼﻣ ﺺﺤﻓاﻮﻃ.ءﺎﳌا لﻮﺧد م
ﻈﻧّو ﻒﺮﺧ ﻢﻘﺘﺳاﻮﻃﺮﺼﺘﻟا م.ﻒﻳ
ﻈﻧّﺮﺼﺘﻟا ةﺎﻔﺼﻣ ﻒ.ﻒﻳ
ﻲﻓ ةﺪﻋﺎﺴﻤﻠﻟ ﲔﺘﻌﻄﻗ وأ ﺔﻌﻄﻗ ﻒﺿا
ﺮﺗ ﺪﻋاوﺪﺘﻠﻟ ﻞﻤﳊا ﺐﻴﺗ.ﺐﺳﺎﻨﳌا ﺮﻳ
.بﺎﺒﻟا ﻖﻠﻏا
شﻼﺘﻳ ﻢﻟ اذإ ٭ ﺮﲟ ﻞﺼﺗا ، ﺰﻛ
.تﺎﻣﺪﳋا
رﺎﻴﺘﻟا جﺮﺨﻣ ﻦﻣ رﺎﻴﺘﻟا ﺲﺑﺎﻗ ﻞﺼﻓا
ﻪﺣﻼﺻإو ﻞﻠﳋا ىﺮﲢ ﻞﻴﻟد ﻪﺣﻼﺻإو ﻞﻠﳋا ىﺮﲢ ﻞﻴﻟد
ﻪﺣﻼﺻإو ﻞﻠﳋا ىﺮﲢ ﻞﻴﻟد
ﻪﺣﻼﺻإو ﻞﻠﳋا ىﺮﲢ ﻞﻴﻟد ﻪﺣﻼﺻإو ﻞﻠﳋا ىﺮﲢ ﻞﻴﻟد
●وﺰﺗ .ﻒﻴﻌﺿ ﺔﻘﻄﻨﳌا ﻲﻓ ءﺎﳌا ﺪﻳﺮﺧأ ءﺎﻣ ﺔﻴﻔﻨﺣ ﺺﺤﻓا.لﺰﻨﳌا ﻲﻓ ى
●.ﻼﻣﺎﻛ ءﺎﳌا ﺔﻴﻔﻨﺣ ﺢﺘﻔﺗ ﻻ
●ﺮﺧ ﻮﻃﻮﺘﻠﻣ ءﺎﳌا لﻮﺧد م. ي
●ﺮﺧ ةﺎﻔﺼﻣ ﻮﻃوﺪﺴﻣ ءﺎﳌا لﻮﺧد م.د
●ﺮﺧ ﻮﻃﺮﺼﺘﻟا مﻮﺘﻠﻣ ﻒﻳوﺪﺴﻣ وأ ي.د
●ﺮﺼﺘﻟا ةﺎﻔﺼﻣ وﺪﺴﻣ ﻒﻳ.ةد
●.اﺪﺟ ﻞﻴﻠﻗ ﻞﻤﳊا
ﻮﺗ.ﻞﻤﳊا نزا
ﻮﺗ.ﻞﻤﳊا نزا
ﻮﺘﻣ ﺮﻴﻏ ﻞﻤﳊا نأ ﺔﻟﺎﺣﺪﻌﺑ ﻰﺘﺣ اﺪﺟ نزا
وﺪﺘﻟﺎﺑ ءﺪﺒﻟاﺮﻣ ةﺪﻋ ﺮﻳ.تا
وﺮﲟ ﻞﺼﺗا.تﺎﻣﺪﳋا ﺰﻛ
●ﻮﺘﻣ ﺮﻴﻏ ﻞﻤﳊا .نزا
●وﺰﻣ زﺎﻬﳉا ﻮﺘﻟا مﺪﻋ ﻒﺸﻛ مﺎﻈﻨﺑ دنزا
و.ﻪﺤﻴﺤﺼﺗ
و اذإﺔﻴﻧﺎﻄﺑ ﻞﺜﻣ ﺔﻠﻴﻘﺜﻟا ءﺎﻴﺷﻷا ﺖﻌﺿ
ر ،مﺎﻤﳊاﺪﻗ مﺎﻈﻨﻟا اﺬﻫ .ﺦﻟا ... مﺎﻤﳊا ءاد
ﻮﺘﻳوﺪﺘﻟا ﻦﻋ ﻒﻗوﺪﺘﻟا ﺔﻗﺎﻋإ وأ ﺮﻳﻲﻓ ، ﺮﻳ
●ز ﺎﻣ اذإ ﺔﻳﺎﻬﻧ ﻲﻓ ﺔﻠﻠﺒﺘﻣ ﺲﺑﻼﳌا ﺖﻟا
روﺪﻟاﺲﺑﻼﳌا ﻦﻣ ﺮﻔﺻﻷا ﻊﻄﻘﻟا ﻒﺿا ،نا
ﻮﺘﻟو ﻞﻤﳊا نزارود رﺮﻛ.ﻒﻴﻔﺠﺘﻟا نا
●؟ حﻮﺘﻔﻣ بﺎﺒﻟا ﻞﻫ
. ءﺎﳌا ﺔﻴﻔﻨﺣ ﻖﻠﻏا
.رﺎﻴﺘﻟا ﺲﺑﺎﻗ ﻞﺼﻓا
ﺮﲟ ﻞﺼﺗا.تﺎﻣﺪﳋا ﺰﻛ
.ءﺎﳌا ﺔﻴﻔﻨﺣ ﺢﺘﻓا
« ﺔﻠﻜﺸﻣ ﻞﲢ ﻢﻟ اذإ dHEﻦﻣ ﺲﺑﺎﻘﻟا عﺰﻧا ، »
و رﺎﻴﺘﻟا جﺮﺨﻣﺮﲟ ﻞﺼﺗا.تﺎﻣﺪﳋا ﺰﻛ
●، ءﺎﳌا مﺎﻤﺻ ﻞﻠﺧ ﺐﺒﺴﺑ ءﺎﳌا ضﺎﻓ اذإ
ﺮﻌﻳﺆﻣ ضس ﺮﺷ ز ﻰﻠﻋ سﺮﻌﻟا جﺎﺟ.ض
●ﺮﻌﻳ ﺆﻣ ض ﺮﺷ وﺪﺣ ﺔﻟﺎﺣ ﻲﻓ ث
ﺆﳌا ﻲﻓ ﻞﻄﻋﻮﺘﺴﲟ ﺮﺷ.ءﺎﳌا ى
●ﺰﻟا ﻞﻤﳊا ﻮﳌا ﻲﻓ ﺪﺋا.رﻮﺗ
●رﻮﺗ ﻦﻣ ﺪﻛﺄﺗ .ءﺎﳌا ﺪﻳ
32
Page 67

ﺔﻧﺎﻤﻀﻟا طوﺮﺷﺔﻧﺎﻤﻀﻟا طوﺮﺷ
ﺔﻧﺎﻤﻀﻟا طوﺮﺷ
ﺔﻧﺎﻤﻀﻟا طوﺮﺷﺔﻧﺎﻤﻀﻟا طوﺮﺷ
ﺔﻧﺎﻤﻀﻟا ﻪﻴﻄﻐﺗ ﻻ ﺎﻣ
ﻮﻟ. ﺐﺴﻨﻟا ﺔﺣ
. ﺔﻴﻌﻴﺒﻃ
. ﻚﻟﺎﳌا ﻞﻴﻟد ﺐﺴﺣ ماﺪﺨﺘﺳا وأ يدﺎﻌﻟا
ﺰﻨﻣو ﺔﻴﻟﺮﻴﻏ. ﺎﻫ
ﻮﺻ ، ءﺎﳌارود تﻮﺻ وأ نا. ( ﺐﻴﺑ) ﺔﺌﻓﺪﺘﻟا ت
و ﺔﺨﻀﳌاﺮﳋا ةﺎﻔﺼﻣﻮﻃ، لﺎﺜﳌا ﻞﻴﺒﺳ ﻰﻠﻋ ﻞﺧاﺪﻟا م
رزأ ،كﻼﺳأ ﻊﻄﻗ ،ﺮﻴﻣﺎﺴﻣ ، ﻰﺼﺣ و راﺮﻴﻏ. ه
. ﺖﻴﺒﻟا
. زﺎﻬﳉا اﺬﻫ ﻲﻓ ﻞﻠﺧ ﺐﺒﺴﺑ
،قدﺎﻨﻓ ، تﺎﻣﺎﻤﳊا ﻞﺜﻣ ﺔﻣﺎﻌﻟا ﻞﺒﻗ ﻦﻣ مﺪﺨﺘﺴﺗ ﻦﻛﺎﻣأ / لﺎﺜﻣ)
ﺮﻣرﺪﺗ ﺰﻛﺮﻏ ﻪﺑ ﺖﻴﺑ ،ﺐﻳ( رﺎﺠﻳﻼﻟ ف
●ر . ﺞﺘﻨﳌا ماﺪﺨﺘﺳا ﺔﻴﻔﻴﻛ ﻚﻤﻴﻠﻌﺘﻟ ﻚﺘﻴﺑ ﻰﻟا ﺔﻣﺪﳋا تﻼﺣ
● يأ ﻊﻣ ﺞﺘﻨﳌا ﻞﻴﺻﻮﺗ ﰎ اذا ﻮﻓﺔﻴﻄﻟﻰﻠﻋ ﺎﻬﻴﻟا ﺮﻴﺷا ﻲﺘﻟا ﺮﻴﻏ
● ﺮﻃ ﻦﻋ ﺄﻄﳋا ﺐﺒﺳ نﺎﻛ اذا .ﻮﻛ وأ ،لﺎﻤﻫإ ، ثدﺎﺣ ﻖﻳراث
● ﺮﻃ ﻦﻋ ﺄﻄﳋا ﺐﺒﺳ نﺎﻛ اذا ﻮﻋ ﻖﻳﻲﻠﶈا ماﺪﺨﺘﺳﻻا ﺮﻴﻏ ﻞﻣا
● . ﺞﺘﻨﳌا ﻂﺒﺿ ﺮﻴﻴﻐﺗ وأ ﺞﺘﻨﳌا ماﺪﺨﺘﺳا لﻮﺣ تﺎﻤﻴﻠﻌﺗ ﱘﺪﻘﺗ
● ﺮﺌﻓ،لﺎﺜﳌا ﻞﻴﺒﺳ ﻰﻠﻋ ﺎﻣ ﺔﻓآ ﺄﻄﳋا ﻲﻓ ﺐﺒﺴﺗ اذا ﺮﺸﺣ وأ ناتا
● و ﺞﻴﺠﻀﻟا ﺰﺘﻫﻻاﻮﺻ لﺎﺜﻣ ، يدﺎﻋ ﺮﺒﺘﻌﻳ يﺬﻟا زاﺮﺼﺗ تﻒﻳ
● ﺮﺘﻟا ﺢﻴﺤﺼﺗ ﻼﺜﻣ ﺐﻴﻛًر ، ﺮﺼﺘﻟا ﻞﻳﺪﻌﺗ ، ﺞﺘﻨﳌا ﻊﻓ. ﻒﻳ
● . ﻚﻟﺎﳌا ﻞﻴﻟد ﺎﻬﺑ ﻰﺻوأ ﻲﺘﻟا ﺔﻳدﺎﻌﻟا ﺔﻧﺎﻴﺼﻟا
● ﺮﻐﻟا ءﺎﻴﺷﻻا ﻦﻣ ﺺﻠﺨﺘﻟا ﻮﻣ/ ﺔﺒﻳﻚﻟذ ﻞﻤﺸﻳ ،تﺎﻨﻴﻛﺎﳌا ﻦﻣ دا
● وﺔﻛﺎﺒﺳ ﺢﻴﺤﺼﺗ وأ ﺖﻴﺒﻟا كﻼﺳا ﺢﻴﺤﺼﺗ وأ ﻲﻓ زﻮﻴﻔﻟا ﻊﺿ
● . ﺎﻬﺑ حﺮﺼﻣ ﺮﻴﻏ تﺎﻤﻴﻠﻌﺗ ﺢﻴﺤﺼﺗ
● ﺔﺻﺎﳋا تﺎﻜﻠﺘﻤﳌا ﻲﻓ ﻒﻠﺗ ﻪﻨﻋ ﺞﺘﻧ وأ ثدﺎﺣ ﺐﺒﺴﺑ رﺮﺿ
● ﺮﻏﻻ ﺞﺘﻨﳌا اﺬﻫ مﺪﺨﺘﺳأ اذإ رﺎﲡ ضا. ﺔﻧﺎﻤﻀﻟا ﻪﻴﻄﻐﺗ ﻻ ، ﺔﻳ
33
 Loading...