

Page 1

LG
Washing Machine
OWNER’S MANUAL
WD-1238(0~9)S/N/T(U)P
WD-1038(0~9)S/N/T(U)P
WD-8038(0~9)S/N/T(U)P
Thank you for buying a
LG Fully Automatic Washing machine.
Please read your owner's manual carefully, it provides
instructions on safe installation, use and maintenance.
Retain it for future reference.
Record the model and serial numbers of your washing machine.
Page 2
product Feature
Protection against Crease Care
With the alternate rotation of the drum, wrinkling in the laundry is
minimized.
More economical by Intelligent Wash System
Intelligent Wash System detects the amount of load and water
temperature, and then determines the optimum water level and
washing time to minimize energy and water consumption.
Child-Lock
The Child-Lock system has been used to prevent children from
pressing any button to change the program during operation.
Low noise speed control system
By sensing the amount of load and balance, it evenly distributes
load to minimize the spinning noise level.
Auto Restart
If the washing machine is turned off by a power failure, it will restart
&
automatically from the position it stopped at adjusting accordingly.
ontents
Warnings
Specification.................................................................................4
Installation....................................................................................5
Care before washing
Adding detergent........................................................................12
Function......................................................................................13
How to use washer.....................................................................14
Maintenance..............................................................................21
Troubleshooting guide................................................................24
Terms of Warranty......................................................................27
......................................................................................
.................................................................
11
3
Page 3

arnings
READ ALL INSTRUCTIONS BELORE USE
A WARNING!
WARNING ! To reduce the risk of fire, electric shock, or injury to persons when using
the washer, follow basic precautions, including the following:
• Do not install or store the washer where it will
be exposed to the weather.
• Do not tamper with controls.
• Do not repair or replace any part of the washer
or attempt any servicing unless specifically
recommended in the user-maintenance
instructions or published user-repair instructions
that you understand and have the skills to carry
out.
• Keep the area underneath and around your
appliances free of combustible materials such as
lint, paper, rags, chemicals, etc.
• Close supervision is necessary if this appliances
is used by or near children or infirm persons.
• Do not allow them to play on, with, or inside
this or any other appliance .
• Do not leave the washer door open.
An open door could entice children to hang on
the door or crawl inside the washer.
• Never reach into washer while it is moving. Wait
until the drum has completely stopped.
• The laundry process can reduce the flame
retardant of fabrics.
• Do not wash or dry articles that have been
cleaned in, washed in, soaked in, or spotted with
GROUNDING INSTRUCTIONS
This appliance must be grounded. In the event of malfunction or breakdown, grounding will reduce the risk
of electric shock by providing a path of least resistance for electric current. This appliance is equipped with
a cord having an equipment-grounding conductor and grounding plug. The plug must be plugged into an
appropriate outlet that is properly installed and grounded in accordance with all local codes and ordinance.
• Do not use an adapter or otherwise defeat the grounding plug.
• If you don’t have the proper outlet, consult an electrician.
WARNING ! Improper connection of the equipment-grounding conductor can result in risk of electric
shock. Check with a qualified electrician or serviceman if you are in doubt as to whether the appliance is
properly grounded. Do not modify the plug provided with the appliance - if it does not fit the outlet, have a
proper outlet installed by a qualified electrician.
• Once your washing machine fumes or emits peculiar smell, please cut off the power and contact our
service center.
For your safety, the information in this manual must be followed to minimize
the risk of fire or explosion, electric shock, or to prevent property damage,
personal injury, or loss of life.
IMPORTANT SAFETY INSTRUCTIONS
combustible or explosive substances (such as
wax, oil, paint, gasoline, degreasers, drycleaning solvents, kerosene, etc.) which may
ignite or explode. Oil may remain in the tub after
a whole cycle resulting in fire during drying. So,
do not load oiled clothes.
• To avoid such a result, carefully follow the
garment manufacturer’s wash and care
instructions.
• Do not slam the washer door closed or try to
force the door open when locked. This could
result in damage to the washer.
• To minimize the possibility of electric shock,
unplug this appliance from the power supply or
disconnect the washer at the household
distribution panel by removing the fuse or
switching off the circuit breaker before
attempting any maintenance or cleaning.
• Never attempt to operate this appliance if it is
damaged, malfunctioning, partially
disassembled, or has missing or broken parts,
including a damaged cord or plug.
• When a product was underwater, please call
service center. The risk of electric shock and
fire.
SAVE THESE INSTRUCTIONS
Page 4
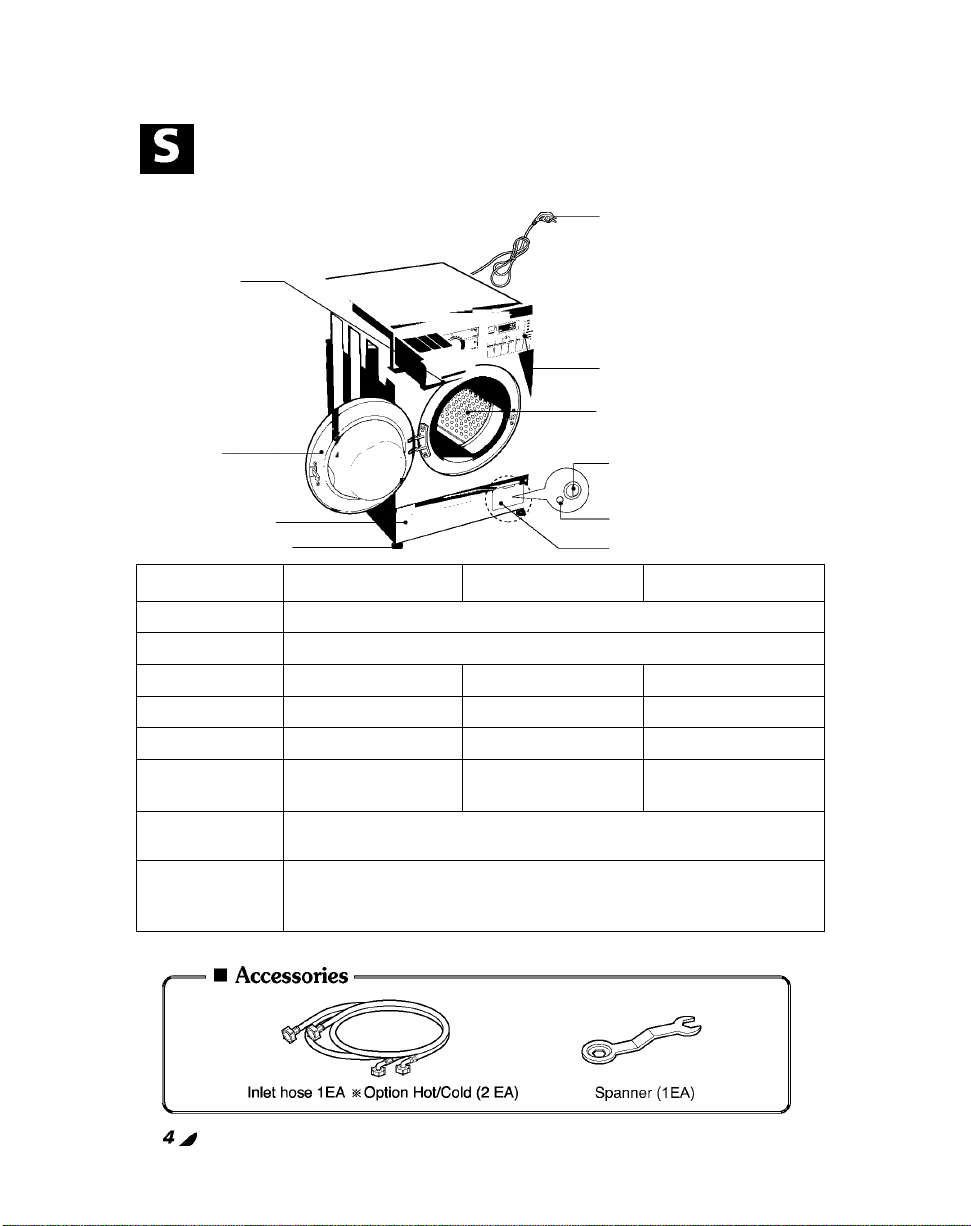
pedfication
Drawer
(For detergent and
fabric softener)
Power plug
If the supply cord is damaged,
it must be replaced by the
manufacturer or its service agents
or a similarly qualified person in
order to avoid a hazard.
Control panel
Drum
Door
Lower cover
Adjustable feet
Name
Power supply
Size
Weight / Max. Watt
Wash capacity
Water
consumption
Permissible water
Pressure
WD-80/10/1238(0~9)S(U)P WD-80/10/1238(0~9)N(U)P WD-80/10/1238(0~9)T(U)P
Front loading washing machine
220-240V-, 50Hz
600mm(W)x360mm(D)x850mm(H)
600ttim(W)x440ttim(D)x 850mm(H)
55 kg/2100 W 60 kg/2100 W 65 kg/2100 W
3.5 kg
5 kg
42L 55L 69 L
0.3-10 kgf / cm2 (30-1 OOOkPa)
Drain pump filter
Drain plug
Lower cover cap
600mm(W)x 550mm(D)x850mm(H)
7 kg
/ 400 / 500 / 600 / 800 [WD-8038(0~9)S/N/T(U)P]
Spin Speed
/400/600/800/ 1000 [WD-1038(0~9)S/N/T{U)P]
/ 400 /800/ 1000 / 1200 [WD-1238(0~9)S/N/T(U)P]
^ The appearance and specifications may be varied without notice to raise the units quality.
Page 5
nstallation
Install or store where it will not be exposed to temperatures below freezing or exposed to the
weather.
Properly ground washer to conform with all governing codes and ordinances.
The base opening must not be obstructed by carpeting when the washing machine is installed on a
carpeted floor.
In countries where there are areas which may be subject to infestation by cockroaches or other
vermin, pay particular attention to keeping the appliance and its surroundings in clean condition at
all times.
Any damage which may be cause by cockroaches or other vermin will not be covered by the
appliance guarantee.
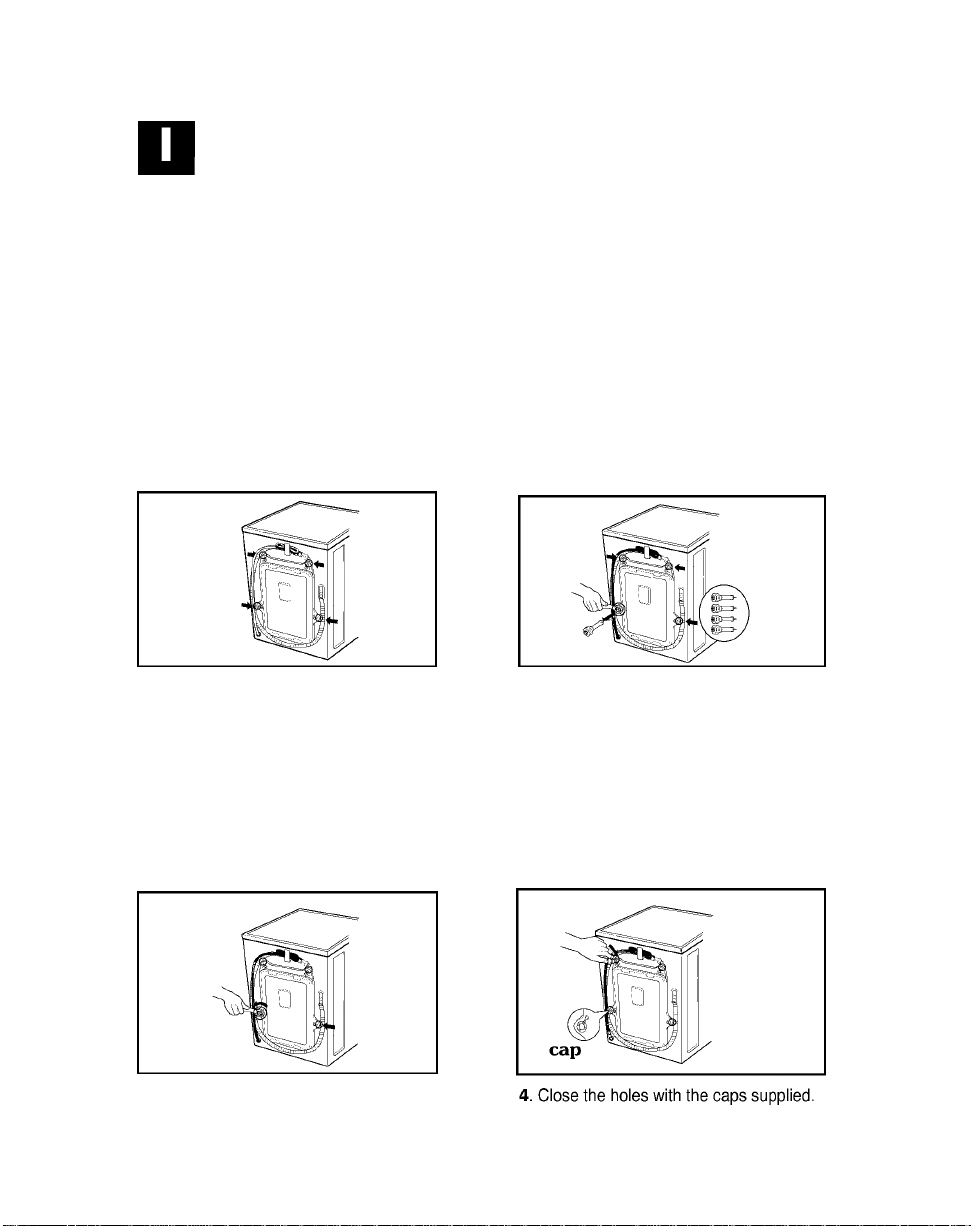
■ Transit bolts
The appliance is fitted with transit bolts to prevent internal damage during transport.
■ Removing transit bolts
1. To prevent internal damage during
transport, the special 4 bolts are locked.
Before operating the washer, remove
the bolts along with the rubber bungs.
• If they are not removed, it may cause heavy
vibration, noise and malfunction.
2. Unscrew the 4 bolts with
the spanner supplied.
3. Take out the 4 bolts along with the rubber
bungs by slightly twisting the bung. Keep
the 4 bolts and the spanner for future use.
• Whenever the appliance is transported, the
transit bolts must be refitted.
Page 6
nstallation
Installation place requirement
Level floor:
Allowable slope under entire washer Is 1°
Power outlet:
Must be within 1.5 meters of either side of location
of washer. Do not overload the outlet with more
than one appliance.
Additional Clearance :
For wall, door and floor modeling Is required.
(10cm : rear /2cm:rlght & left side)
Do not place or store laundry products on top of
washer at any times.
They can damage the finish or controls.
■ Positioning
Install the washer on a flat hard floor.
Make sure that air circulation around the washer Is not Impeded by carpets,rug etc.
• Never try to correct any unevenness in the floor with pieces of wood, cardboard or similar materials under the
washer.
• If it is impossible to avoid positioning the washer next to a gas cooker or coal burning stove,an insulating(85x60cm)
covered with aluminum foil on the side facing the cooker or stove,must be inserted between the two appliance.
• The washer must not be installed in rooms where the temperature can drop below 0°C.
• Please ensure that when the washer is installed, it is easily accessible for the engineer in the event of a breakdown.
• With the washer installed adjust all four feet using the transit bolt spanner provided ensuring the appliance is stable,
and a clearance of approximately 20mm is left between the top of the washer and the underside of the work-top.
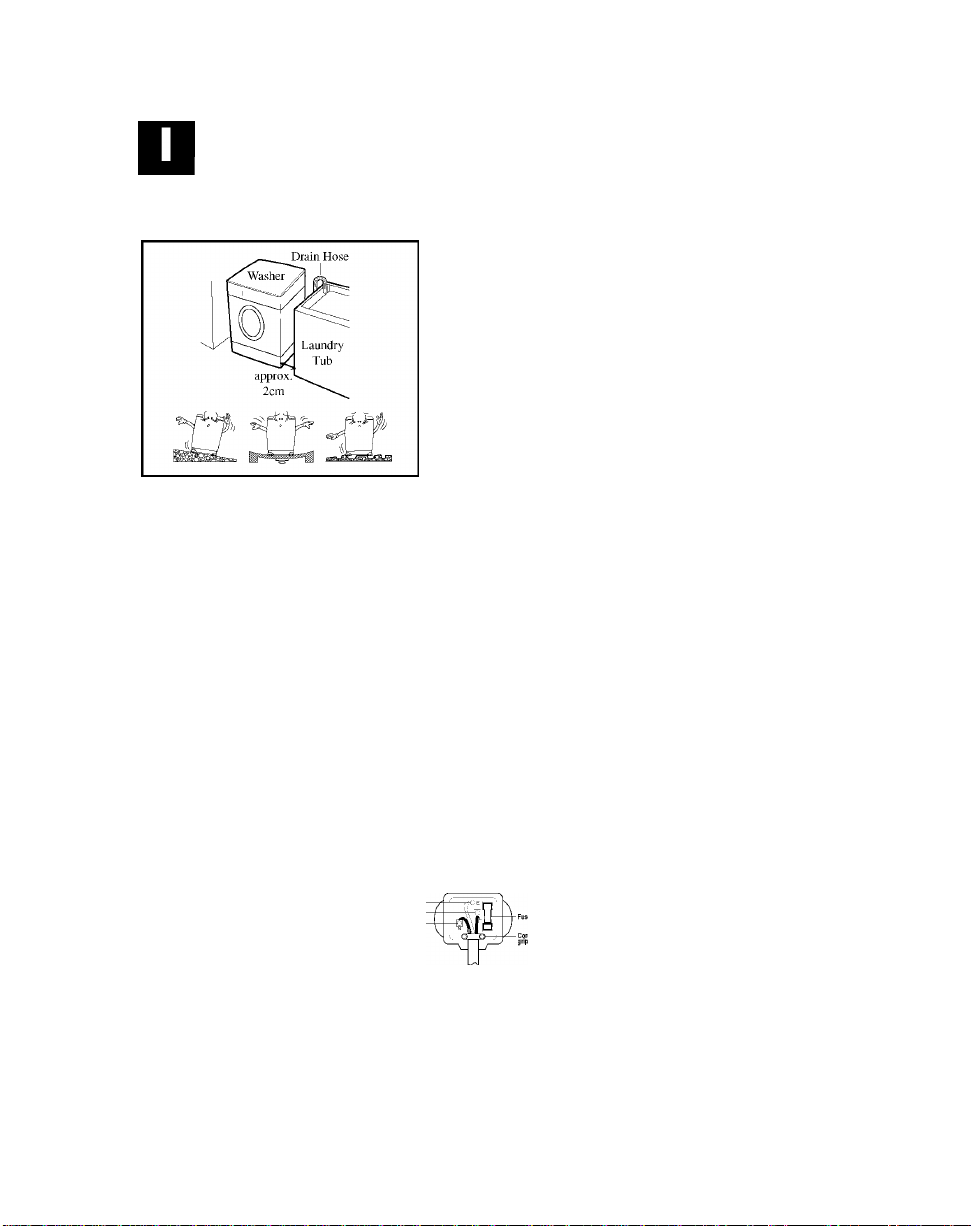
BS Plug Safety Details (For U.K. User)
THE WIRES IN THIS MAINS LEAD ARE COLOURED IN
ACCORDANCE WITH THE FOLLOWING CODE:
GREEN AND YELLOW: EARTH
Green and Yellow(Earth)
As the colours of the wires in the mains lead of this apparatus may not correspond with the coloured markings
identifying the terminals in your plug, proceed as follows:
The wire which is coloured Green and Yellow must be connected to the terminal in the plug which is marked with the
letter E or by the earth symbol ^or coloured Green or Green and Yellow.
The wire which is coloured Blue must be connected to the terminal which is marked with the letter N or coloured Black.
The wire which is coloured Brown must be connected to the terminal which is marked with the letter L or coloured Red.
If a 13 amp (BS 1363) plug is used, fit a 13 amp BS 1362 fuse.
IMPORTANT
BLUE:NEUTRAL
BROWN: LIVE
This appliance must be earthed
Brown(Live)
Bluef Neutral)
Page 7
nstallation
■ Electrical connection
1. Do not use an extension cord or double adapter.
2. If the supply cord is damaged, it must be replaced by the manufacturer or its service agents or
similarly qualified person in order to avoid a hazard.
3. Always unplug the machine and turn off the water supply after use.
4. Connect the machine to an earthed socket in accordance with current wiring regulations.
5. The appliance must be positioned so that the plug is easily accessible.
• Repairs to the washing machine must only be carried out qualified personnel. Repairs carried out by
inexperienced persons may cause injury or serious malfunctioning. Contact your local service center
• Do not install your washing machine in rooms where temperatures below freezing may occur. Frozen hoses
may burst under pressure. The reliability of the electronic control unit may be impaired at temperatures below
freezing point.
• If the appliance is delivered in the winter months and temperatures are below freezing : Store the washing
machine at room temperature for a few hours before putting it into operation.
CAUTION concerning the Power Cord
Most appliances recommend they be placed upon a dedicated circuit; that is, a single outlet circuit
which powers only that appliance and has no additional outlets or branch circuits. Check the
specification page of this owner's manual to be certain.
Do not overload wall outlets. Overloaded wall outlets, loose or damaged wall outlets, extension cords,
frayed power cords, or damaged or cracked wire insulation are dangerous. Any of these conditions
could result in electric shock or fire. Periodically examine the cord of your appliance, and if its
appearance indicates damage or deterioration, unplug it, discontinue use of the appliance, and have
the cord replaced with an exact replacement part by an authorized servicer.
Protect the power cord from physical or mechanical abuse, such as being twisted, kinked, pinched,
closed in a door, or walked upon. Pay particular attention to plugs, wall outlets, and the point where
the cord exits the appliance.
I Washing Machine is to be connected to the water mains using new hose-sets and that old
hose-sets should not be used.
I Connecting water supply hose
► Water supply pressure must be between SOkPu and lOOOkPa
(0.d~IOkgflcnp)
► Don’t strip or crossthread when connecting Inlet hose to the valve.
► If the water supply pressure is more than lOOOkPa, a decompression
device should be Installed.
• Two rubber seals are supplied with the water inlet hoses these
are in order to prevent water leaks.
• Check water tightness of washing machine connections by
turning the tap completely on.
• Periodically check the condition of the hose and replace the hose
if necessary.
• Make sure that there is no kink on the hose and that it is not
crushed.
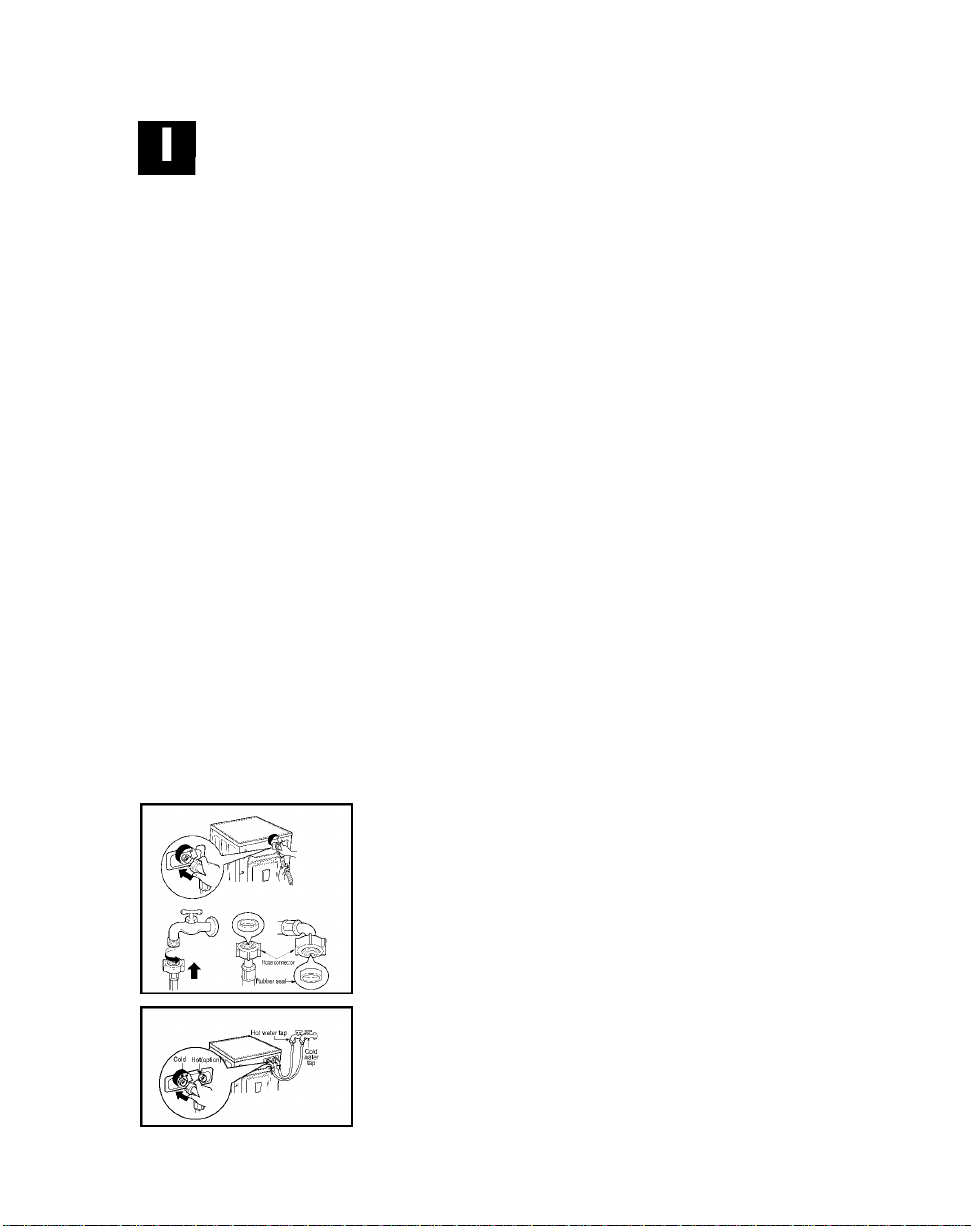
► When your washer has two valves.
• The Inlet hose which has red connector is for the hot water tap.
• If the washer has two valves, the energy is saved by using hot
valve.
Page 8

nstallation
Normal Tap without thread & screw type inlet hose
1. Unscrew the fixing screw to
attach the tap.
Upper
Connector
Fixing screw
Rubber
-X packing
2. Push the connector up till the
rubber packing is in tight contact
with the tap. Then tighten the 4
screws.
Rubber pac
Upper \ \ I
Connector^
3. Push the water supply hose
vertically upwards so that the
rubber packing within in the
hose can adhere completely to
the tap and then tighten it by
screwing it to the right.
Normal Tap without thread & one touch type inlet hose (Single inlet models)
1. Untighten the upper connector
screw.
• In case the diameter of the tap is
large remove the guide plate.
Guide plate
Connector
2. Push the upper connector up t
the rubber packing is in tight
contact with the tap. Then
tighten the 4 screws.
• Turn the middle connector not
to have water leaked.
■ Make sure that the rubber seal
is inside the hose connector.
3. Connect the water supply hose
to the middle connector,
pushing the plate down.
Plate
Water supply
hose
---------
•To separate the water supply
hose from the middle connector
shut off the tap. Then pull the
inlet hose down, pushing the
plate down.
• Your machine comes with only
cold water connection.
• Make sure that there are no
kinks in the hose and that it is
not crushed.
Page 9

nstallation
This equipment is not designed for maritime use or for use mobiie instaiiations such as
caravans, aircraft etc.
Turn off the stopcock if the machine is to be ieft for any iength of time (e.g. hoiiday),
especiaiiy if there is no fioor drain(guiiy) in the immediate vicinity.
When disposing of the appiiance, cut off the mains cabie, and destroy the piug Disable the
door iock to prevent young chiidren being trapped inside.
Packaging materiai (e.g. Fiims, Styrofoam) can be dangerous for chiidren. There is a risk
of suffocation i
Keep aii packaging weii away from chiidren
Installation of drain hose
■ When instaiiing the drain hose sink,
secure it tightiy with a string.
■ Proper securing of the drain hose wiii
protect the fioor from damage due to
water ieakage.
■ The drain hose shouid not be piaced
higher than 100 cm above the fioor.
■ Proper securing of the drain hose wiii
protect the fioor from damage due to
water ieakage.
■ When the drain hose is too iong, do
not force back into the washer. This
wiii cause abnormai noise.
Page 10

nstallation
Level adjustment
1. Adjusting the washing machine level properly prevents excessive
noise and vibration.
Install the appliance on a solid and level floor surface, preferably in a
corner of fhe room.
Timber or suspended type flooring may contribute to
excessive vibration and unblance errors.
2. If the floor is uneven, adjust the adjustable feet as required, (do not
insert pieces of wood etc. under the feet)
Make sure that all four feet are stable and resting on the floor and
then check that the appliance is perfectly level, (use a spirit level)
After the washer is level, tighten the lock nuts up towards of the base of
the washer. All lock nuts must be tightened.
In the case that the washing machine is installed on a raised
platform, it must be securely fastened in order
to eliminate the risk that it might fall off.
ij:- Diagonal Check
When pushing down the edges of the washing machine top plate diagonally, the maehine
should not move up and down at all. (Please, eheck both of two directions)
If machine rocks when pushing the machine top plate diagonally, adjust the feet again.
■ Concrete floors
• The installation surface must be clean, dry and level.
• Install washer on a flat hard floor.
■ Tile floors (Slippery floors)
• Position each foot on the Tread Mate and level the machine to suit. (Cut Tread Mate into 70x70 mm
sections and stick the pieces on to the dry tile where machine is to be placed.)
iK Tread Male is a self adhesive material used on ladders & steps that prevents slipping.
■ Wooden floors (Suspended floors)
• Wooden floors are particularly susceptible to vibration.
• To prevent vibration we recommend you place rubber cups under each foot, f
at least 15mm thick under the washer, secured to at least 2 floor beams with screws.
• if possible install the washer in one of the corners of the room, where the floor is more stable,
iff Insert the rubber cups to reduce vibration.
IK You can obtain the rubber cups (p/no.4620ER4002B) from the LG spares dept.
Q Important!
• Proper placement and levelling of the washer ensure long,regular and reliable operation.
• The washer must be absolutely horizontal and stand firmly in position.
• it must not "Seesaw" across corners under load.
• The installation surface must be clean, free from floor wax and other lubricant coatings.
• Do not let the feet of the washer get wet. If feet of the washer get wet, slipping may occur.
Rubber Cup
10
Page 11

are before washing
Before the first washing
Select a cycle (COTTON 60°C, add a half load of detergent) allow the unit to wash
without clothing.
This will remove residues from the drum that may have been left during manufacturing.
Caring before washing
1. Care Labels
Look for a care label on your clothes. This will tell you about the fabric content of your
garment and how It should be washed.
2. Sorting
To get the best results, Sort clothes Into loads that can be washed with the same wash cycle.
Water temperature and spin speed and different fabrics need to be washed In different ways.
Always sort dark colors from pale colors and whites. Wash separately as dye and lint
transfer can occur causing discoloration of white etc. If possible, do not wash heavily
soiled Items with lightly soiled one.
Soil (Heavy, Normal, Light)
Color (White, Lights, Darks)
Lint (Lint producers. Collectors)
Separate clothes according to amount of soil.
Separate white fabrics from colored fabrics.
Wash lint producers and lint collectors
separately.
3. Caring before loading
Combine large and small items in a load. Load large items first. Large items should not be more
than half the total wash load.
Do not wash single items. This may cause an out-of-baiance load. Add one or two similar items.
• Check all pockets to make sure
that they are empty. Items such as
nails, hair clip, matches, pens,
coins and keys can damage both
your washer and your clothes.
• Close zippers, hooks and strings to
make sure that these Items don’t
snag on other clothes.
■ Pre treat dirt and stains by brushing
a little detergent dissolved In water
onto stains like collars and cuffs to
help shift dirt.
Page 12

ddìng detergent
Adding detergent and fabric softener
1. The Dispenser Drawer
' Pre Wash + Main Wash \_L/ • \_LL/
2. Adding Fabric Softener
• Do not exceed the maximum fiii iine.
Overfiiiing can cause eariy dispensing
of the fabric softener which couid stain
ciothes.
• Do not ieave the fabric softener in the
detergent drawer for more than 2 days.
(Fabric softener couid harden)
• Softener wiii automaticaiiy be added
during the iast rinse cycie.
• Do not open the drawer when water is
suppiied.
• Soivents(benzene, etc) are not
aiiowabie.
3. Detergent dosage
• The detergent should be used according to the
instruction of the detergent manufacture.
• If .suds occur too much, please reduce the
detergent amount.
• Use powder detergent only for the front
loading washer.
• Detergent usage may need to be adjusted
for water temperature, water hardness,
size and soii ievei of the ioad. For best
resuits, avoid oversudsing.
4. Water softener
• A water softener, such as Caigon can be
used to cut down on the use of detergent
in extremeiy hard water areas. Dispense
according to the amount specified on the
packaging. First add detergent and then
the water softener.
• Use a quantity of detergent as for soft
water.
• Tips
Full load : according to
manufacturer’s recommendation.
Part load : 3/4 of the normal amount.
Minimum load : 1/2 of full load.
• Detergent is fiushed from the dispenser at
the beginning of the cycie.
12p
Do not pour fabric softener
directiy on the ciothes
Page 13

unction
Recommended courses according to the laundry type
Fabric
Program
Type
Cotton Color fast garments
(shirts, night dresses,
pajamas...)and lightly
soiled white
cotton(underwear...)
Eco
Synthetic
Delicate
Hand Wash/
Wool
Laundry type is the
same in Cotton
Polyamide, Acryic,
Polyester
Delicate laundry
easily damaged
"Hand Wash”
marked delicate and
wool laundry
Proper
Temp.
60°C
(30°C, 40°C,
9ffC)
60°C
40°C
(30°C, 60°C)
30°C
(Cold, 40°C)
Cold
(30°C, 40°C)
Option
Medic Rinse
Time save
Rinse+
Pre Wash
Crease Care
Time save
Rinse+
Crease Care
Maximum Load
WD-80/10/12
38(0~9)S(U)P
3.5kg 5kg
Less than
1.5 kg
Less than
1.0 kg
Less than
1.0 kg
Less than
1.0 kg
WD-80/10/12
38(0~9)N(U)P
Less than
2.0 kg
Less than
1.5 kg
Less than
1.5 kg
Less than
1.5 kg
WD-80/10/12
38(0~9)T(U)P
7kg
Less than
3.0 kg
Less than
2.0 kg
Less than
2.0 kg
Less than
2.0 kg
Quick 30
Baby Care
* Medic Rinse : For high effectiveness or more purity in rinse operation you can choose Medic Rinse option.
* Pre Wash : If the laundry is heavily soiled, “Pre Wash” course is recommended. Pre Wash is available in
* Rinse+ : Used to introduce an additional rinse, which may assist in removing traces of detergent residue.
* Crease Care : If you want to prevent crease, select Crease Care option.
Colored Laundry
which is lightly soiled
fast.
Laundry for infant
Cotton, Ecoand Synthetic Program.
30°C
95°C
(60°C)
Medic Rinse
Time save
Rinse+
Crease Care
Less than
1.0 kg
Less than
1.0 kg
Less than
1.5 kg
Less than
1.5 kg
Less than
2.0 kg
Less than
2.0 kg
13
Page 14

ow to use washer
Baby Care
Synthetic
______________ 60
Hand Wash/ \
Wool 40
Ф
Ò
1. Cotton automatically
selected upon power on.
• Press the Power(Ò) button to start.
• Press the Start/Pause(HI) button.
• Initial condition
- Wash : main wash
- Rinse : 3 times
- Spin :
1200 rpm ¡WD-1238(0~9)S/N/T(U)P]
1000 rpm [WD-1038(0~9)S/N/T(U)PJ
800 rpm ¡WD-8038(0~9)S/N/T(U)Pj
- Water temperature : 60°C
- Program : Cotton
О 1200
О 1000
800
О
О 400
О No Spin
Medic Rinse Time Save Rlnso'*' PreWash Crease Core Spin
О Rinse Hold
2. Manual Selecting
• Press the Power((!)) button to start.
• Select the conditions which you want to
use, by turning the program dial and
pressing each button.
For selecting the each conditions, please
refer to the pagel5~page20
• Press the Start/Pause(MI) button.
14
Page 15

(1) (2) (3) (4) (5)
(1) Button : Power (5) Button : Medic Rinse
(2) Diai : Program (6) Button : Time Save
(3) Button : Start/Pause (7) Button : Rinse+
(4) Button : Time Deiay (8) Button : Pre Wash
Option
(6) (7) (8) (9) (10) (11
(9) Button : Crease Care
(10) Button : Spin
(11) Chiid Lock
o o o
Medic Rinse lime Save Rinse'*'
O O
Pre Wash Crease Care
• By pressing the Option button, all
Option functions may be selected.
- Medic Rinse - Pre Wash
- Time Save ■ Crease Care
- Rinse+
1. Medic Rinse
• For high effectiveness or more purity in
rinse operation you can choose Medic
Rinse option.
• It can be chosen in all course with the
exception of Delicate, Hand Wash/
Wool and Spin.
2. Time Save
• This option can be used to reduce the
time of a wash program.
• To use this option press the Time button
once before the wash program is started.
• This option is not available with Quick 30,
Rinse+Spin and Spin program.
3. Rinse+
• Used to additional rinse, which may assist
in removing traces of detergent residue.
• By selecting Rinse"*" function, the rinse
time and the rinse water are increased.
4. Pre Wash
• If the laundry is heavily soiled, “Pre Wash”
course is effective.
• Pre Wash is available in Cotton, Eco and
Synthetic.
5. Crease Care
• If you want to prevent crease, select this
button with spin speed.
The required lamp will light up for identification.
15
Page 16

ow to use washer
Spin
О 1200
О 1000
О 800
О 400
О No Spin
О Rinse Hold
Spin
О 1000
О 800
О 600
О 400
О No Spin
О Rinse Hold
Spin
_____
О 800
О 600
О 500
О 400
О No Spin
О Rinse Hold
Spin
WD1238(0'9)S/N^(U)P WD1038(0-9)S/N/T(U)P WD8038(0-9)S/N/T(U)P
1. Spin selection 2. No Spin
" By pressing the Spin button, the
spin speed can be chosen.
' Spin Speed is available according to the
program as follows.
■ WD-1238(0~9)S/N/T(U)P
- Cotton, Eco, Quick 30, Rinse+Spin
Rinse Hold - No Spin - 400 - 800 - 1000 - 1200
- Synthetic, Hand Wash/ Wooi,
Baby Care
Rinse Hold - No Spin - 400 - 800 - 1000
- Delicate
Rinse Hold - No Spin - 400 - 800
- Spin
No Spin-400-800-1000-1200
• WD-1038(0~9)S/N/T(U)P
- Cotton, Eco, Quick 30, Rinse+Spin
Rinse Hold - No Spin - 400 - 600 - 800 - 1000
- Synthetic, Hand Wash/ Wooi,
Baby Care
Rinse Hold - No Spin - 400 - 600 - 800
- Delicate
Rinse Hold - No Spin - 400 - 600
- Spin
No Spin-400-600-800- 1000
■ WD-8038(0~9)S/N/T(U)P
- Cotton, Eco, Quick 30, Rinse+Spin
Rinse Hold - No Spin - 400 - 600 - 800 - 1000
- Synthetic, Hand Wash/ Wooi,
Baby Care
Rinse Hold - No Spin - 400 - 600 - 800
- Delicate
Rinse Hold - No Spin - 400 - 600
- Spin
No Spin- 400-600-800- 1000
• If you choose the Cotton or Synthetic
course,spin happens after Wash and Rinse
except the last Rinse.After the last Rinse,
program will stop after Drain.
• There is no Spin during the whole process
of the other Course.
3. Rinse Hold
• Is selected by pressing the spin button
repeatedly this function leaves clothes in
the machine; suspended in the water after
a rinse without entering into spin.
• To proceed through to a drain or spin,
once the rinse hold function is completed
using to program dial scroll to the required
program.
(Spin)
The required lamp will light up for
identification.
16
Page 17

ow to use washer
Water Temp.
• By turning the Program Dial, the water
temperature can be selected.
-Cold
- 30°C /40°C 160°C 195°C
1. Water Temperature
• Water temperature can be selected
according to the program.
The required temperature lamp will light up
for identification.
For the more detailed information, please
refer to the pagel3.
•
Child Lock
If you choose to lock
the buttons on the
control assembly to
prevent tampering this
function may be
selected.
1. Child Lock
• Child Lock can be set by pressing the Rinse+
button and Pre Wash button simultaneously.
(About three seconds)
• When child lock is set, all buttons are inoperable
except power button.
• To deactivate Child Lock system, press
Rinse+ and Pre Wash button simultaneously
again. (About three seconds)
• To change to the desired program, whilst in
child lock mode.
1. Press both Rinse+ and Pre Wash together
once again. (About three seconds)
2. Press the Start/Pause button.
3. Select the desired program and press the
Start/Pause button again.
• The child lock can be set at any time and it
is automatically canceled when operational
errors occur. Also Child Lock works when
power is off. Y7
Page 18

ow to use washer
Time Delay
1. Time Delay
Preparing washing before starting
“Time Delay”
- Turn on the water tap.
- Load laundry and close the door.
- Place the detergent and fabric softener In
the drawer.
• How to set “Time Delay”
- Press Power button.
- Turn the Program dial to select
the program you require.
- Press Time Delay button and set the
desired time.
- Press the Start/Pause button.
• If Time Delay button is pressed, “3:00” is
displayed. The maximum delayed time is
19:00 hours and the minimum time is 3:00
hours.
• Each pressing of the button advances on
time delay by one hour.
• To cancel the time delay, press the Power
((!)) button.
• Time Delay is ‘expected time’ from the
present to the completion of washing cycle
or selected process (Wash, Rinse, Spin).
• According to the condition of water supply and
temperature, the delayed time and the actual
washing time may vary.
blinks.)
•
Program
■ 9 progranns are available according to the
laundry type.
■ Lamp will light up to indicate selected
program.
1. Program
•When Start/Pause button is pressed, the
Cotton program is automatically selected.
- By turning the Program dial, the program is
selected in order of “ "Cotton - Eco -
Delicate - Quick 30 - Rinse+Spin - Spin Hand Wash/Wool - Synthetic Baby Care".”.
Regarding to the laundry type for each program
Please refer to the pagel3.
2. Course
- Cotton
-Eco
- Delicate
■ Quick 30
- ^Rinse+Spin
- Baby Care
- Synthetic
- Hand WashlWool
■ ®'Spin
18
Page 19

ow to use washer
Start/Pause
1. Start
• This Start/Pause button is used to start
wash cycie or pause the wash cycie.
2. Pause
• if temporary stop of wash cycie is
needed, press the Start/Pause button.
• When in Pause, the power is turned off
automaticaiiy after 4 minutes.
• NB. The door wiii not open before 1 to 2
minutes when Pause is seiected,
or at the end of the wash cycie.
•
Door Lock
• Lights whenever the door of the washer
is iocked.
• The door can be uniocked by pressing the
Start/Pause button to stop the washer.
• The door can be opened after a short
deiay.
1. Power
• Press the Power button to turn power on
and off
• To cancei the Time Deiay function, if the
power button shouid be pressed.
2. Initial Program
• When the Power button is pressed, the
washer is ready for Cotton program. And
the other initiai conditions as foiiows.
• So, if you want to advance into the
washing cycie without changing the
program, just press the Start/Pause
button and then the washer wiii proceed.
Initial program
[WD-1238(0~9)S/N/T(U)P]
- Cotton Program / Main wash /
Normal Rinse /1200 rpm / 60 °C
[WD-1038(0~9)S/N/T(U)P]
- Cotton Program / Main wash /
Normal Rinse /1000 rpm / 60 °C
[WD-8038(0~9)S/N/T(U)P]
- Cotton Program / Main wash /
Normal Rinse / 800 rpm / 60°C
19
Page 20

ow to use washer
1. Special function display
Display
3. Completion of washing
• When washing cycle is completed,
“ t no* ” is displayed on the “Multi
display”.
• When child lock is selected, the
“ ” is displayed.
• When time delay is selected, it shows
the remaining times to finish the selected
program.
2. Self diagnosis display
• If the machine encounters a fault during
operation, the associated fault will be
displayed.
“PE ”
“PE ”
“ dE ”
“LE”
“EE”
“ 1 C ”
“ n C ”
» M C ”
“ L C ”
If these error letters are displayed, please
refer to the troubleshooting page24 and
follow the guide.
Water pressure sensing error
Problem of overfilling water
Door is not closed
Over load in motor.
Over load in motor.
Water inlet trouble
1 L
Drainage trouble
UL
Unbalanced load
uc
Water temperature trouble
C C
4. Time left
• During washing cycle, the remaining
washing time is displayed.
• Recommended program by manufacturer.
WD-1238*TP (+10%)
Cotton 60°C
Cotton 95°C 3:05
Synthetic 40°C 1:31
Delicate 40°C 1:03
Hand Wash / Wool 40°C 1:05
Baby Care 60°C 2:43
Quick 30
Rinse + Spin 22'
The washing time may vary by the
amount of laundry, water pressure, water
temperature and other washing
conditions.
If an unbalanced load is detected or if the
suds removing program operates, the
wash time may be extended.
3:05
30'
20
Page 21

aintenance
^ Before cleaning the washer interior, unplug the electrical power cord to avoid electrical
shock to avoid electrical shock hazards.
^ When disposing of the appliance, cut off the mains cable, and destroy the plug Disable the
door lock to prevent young children being trapped inside.
■ The water inlet filter
-" " error message will blink on the control panel when water does not enter the
detergent drawer.
- If your water is very hard or contains traces of lime deposit, the water inlet filter may
become clogged.
It is therefore a good idea to clean it from time to time.
2. Unscrew the
water inlet
hose.
4. Tighten up
the inlet
hose.
■ The drain pump filter
* The drain filter collects threads and small objects left in the laundry.
Check regularly that the filter is clean to ensure smooth running of your machine.
^ CAUTION First drain using the drain and then open the pump filter to remove whatever
any threads or objects.
Be careful when draining if the water is hot.
1. Open the lower cover
cap (d)) by using a
coin. Turn the drain
plug ((2)) to pull out
the hose.
2. Unplug the drain plug (@),
allowing the water to flow out. At
this time use a vessel to prevent
water flowing on to the floor. When
water does not flow any more, turn
the pump filter (®) open to the left.
3. Remove any foreign material
from the pump filter (@). After
cleaning, turn the pump filter ((I
clockwise and insert the drain
plug (® )to the original place,
close the lower cover cap.
Page 22

aintenance
■ Dispenser drawer
^ After a while detergents and fabric softeners leave a deposit in the drawer.
• It should be cleaned from time to time with a jet of running water.
• If necessary it can be removed completely from the machine by pressing the catch
downwards and by pulling it out.
• To facilitate cleaning, the upper part of the fabric softener compartment can be removed.
■ The drawer recess
^ Detergent can also accumulate inside the recess which should
be cleaned occasionally with an old toothbrush.
• Once you have finished cleaning, replace the drawer and run a
rinse cycle without laundry.
■ The washing drum
• If you live in a hard water area, limescale may continuously build up in places where it cannot be
seen and thus not easily removed.
Over time the build up of scale clogs appliances, and if it is not kept in check these may have to
be replaced.
• Although the washing drum is made of Stainless steel, specks of rust can be caused by small
metal articles (paper clips, safety pins) which have been left in the drum.
• The washing drum should be cleaned from time to time.
• If you use descaling agents, dyes or bleaches, make sure they are suitable for washing machine
use.
^ Descaler may contain chemicals that may damage part of your washing machine.
^ Remove any spots with a stainless steel cleaning agent.
^ Never use steel wool.
22
Page 23

aintenance
■ Cleaning your washer
1. Exterior
Proper care of your washer can extend its life.
The outside of the machine can be cleaned with warm water and a neutral non abrasive
household detergent.
Immediately wipe off any spills. Wipe with damp cloth.
Try not to hit surface with sharp objects.
^ IMPORTANT: Do not use methylated spirits, diluents or similar products.
2. Interior
Dry around the washer door opening, flexible gasket and door glass.
Run washer through a complete cycle using hot water.
Repeat process if necessary.
CS&j) Remove hard water deposits using only cleaners labeled as washer safe.
■ Cold condition
If the washer is stored in an area where freezing may occur or moved in freezing
temperatures, follow these instructions to prevent damage to the washer:
1. Turn off water supply tap.
2. Disconnect hoses from water supply and drain water from hoses.
3. Plug electrical cord into a properly grounded electrical outlet.
4. Add 1gallon(3.8L) of nontoxic recreational vehicle(RV) antifreeze into an empty wash drum.
Close the door.
5. Set spin cycle and let washer spin for 1 minute to drain out all water.
Not all of the RV antifreeze will be expelled.
6. Unplug electrical power cord, dry the drum interior, and close the door.
7. Remove dispenser drawer drain and dry excessive water from the compartments.
8. Store washer in an uprignt position.
9. To remove antifreeze from washer after storage, run empty washer
through a complete cycle using detergent. Do not add wash load.
23
Page 24

roubleshooting guide
r This washing machine is equipped with automatic safety functions which detect and diagnose fauits at an
eariy stage and react appropriateiy
When the machine does not function properiy or does not function at aii, check the foiiowing points before
you contact your service provider.
Symptom
Rattling and
clanking noise
Thumping sound
Vibrating noise
Water leaks. • Fill hoses or drain hose are loose
Oversudsing
Water does not enter
washer or it enters
slowly
Water in the washer
does not drain or
drains slowly.
Possible Cause
• Foreign objects such as coins or
safety pins maybe in drum or
pump.
• Heavy wash loads may produce
a thumping sound. This is usually
normal.
• Have all the transit bolts and
packing been removed?
• Are all the feet resting firmly on
the ground?
at tap or washer.
• House drain pipes are clogged. Unclog drain pipe. Contact plumber
• Water supply is not adequate in
area.
• Water supply tap is not
completely open.
• Water inlet hose(s) are kinked.
• The filter of the inlet hose(s)
clogged.
• Drain hose is kinked or clogged.
• The drain filter is clogged.
Solution
Stop washer and check drum
and drain filter.
If noise continues after washer
is restarted, call your authorised
service centre.
If sound continues, washer is
probably out of balance. Stop and
redistribute wash load.
If not removed during
installation. Refer to Installation guide
for removing transit bolts.
Wash load may be unevenly
distributed in drum. Stop washer and
rearrange wash load.
Check and tighten hose connections.
if necessary.
Too much detergent or unsuitable
detergent may cause excessive
foaming which may result in water
leaks.
Check another tap in the house.
Fully open tap.
Straighten hose.
Check the filter of the inlet hose.
Clean and straighten the drain hose.
Clean the drain filter
24
Page 25

roubleshooting guide
Symptom Possible Cause Solution
Washer does not start
Washer will not spin
Door does not open
Wash cycle time
delayed
• Electrical power cord may not
be plugged in or connection
may be loose.
• House fuse blown, circuit
breaker tripped,or a power
outage has occurred.
• Water supply tap is not turned
on.
^ Check that the door is firmly
shut.
Make sure plug fits tightly in wall
outlet.
Reset circuit breaker or replace fuse.
Do not increase fuse capacity.
If problem is a circuit overload, have
it corrected by a qualified electrician.
Turn on water supply tap.
Close the door and press the
Start/Pause button. After pressing
the Start/Pause button, it may take
a few moments before the clothes
washer begins to spin. The door
must lock before spin can be
achieved.
Once started, the door can not be
opened for safety reasons.
Wait one or two minutes before
opening the door to give the electric
locking mechanism time to release.
The washing time may vary by the
amount of laundry, water
pressure, water temperature and
other usage conditions.
If the imbalance is detected or if the
suds removing program works, the
wash time shall be increased.
25
Page 26

roubleshooting guide
Symptom Possible Cause Solution
• Water supply is not adequate in area
• Water supply taps are not completely
open.
• Water inlet hose(s) are kinked.
• The filter of the inlet hose(s) are clogged.
• Drain hose is kinked or clogged.
• The drain filter is clogged.
• Load is too small.
• Load is out of balance.
• The appliance has an imbalance
detection and correction system. If
individual heavy articles are loaded
(ex. bath mat, both robe, etc.) this system
may stop spinning or even interrupt the
spin cycle altogether.
• If the laundry is still too wet at the end of
the cycle, add smaller articles of laundry
to balance the load and repeat the spin
cycle.
• Is the door
opened?
Check another tap in the house.
Fully open tap.
Straighten hose(s).
Check the filter of the inlet hose.
Clean and straighten the drain hose.
Clean the drain filter.
Add 1 or 2 similar items to help
balance the load.
Rearrange load to allow proper
spinning
Close the door.
* If
Unplug the power plug and call for
service.
“dE
”is not released, call for service.
■26
• Water overfills due to the faulty water
valve.
• Water level sensor has malfunctioned.
• Over load in motor.
• Over load in motor.
Close the water tap.
Unplug the power plug.
Call for service.
Page 27

erms of Warranty
Disposal of your old appliance
1. When this crossed-out wheeled bin symbol is attached to a
product it means the product is covered by the European
Directive 2002/96/EC.
2. All electrical and electronic products should be disposed of
separately from the municipal waste stream via designated
collection facilities appointed by the government or the local
authorities.
3. The correct disposal of your old appliance will help prevent
potential negative consequences for the environment and
human health.
4. For more detailed information about disposal of your old
appliance, please contact your city office, waste disposal
service or the shop where you purchased the product.
What Is Not Covered:
• Service trips to your home to teach you how to use the product.
• If the product is connected to any voltage other than that shown on the rating plate.
• If the fault is caused by accident, neglect, misuse or Act of God.
• If the fault is caused by factors other than normal domestic use or use in accordance
with the owner's manual.
• Provide instruction on use of product or change the set-up of the product.
• If the fault is caused by pests for example, rats or cockroaches etc..
• Noise or vibration that is considered normal for example water drain sound, spin
sound, or warming beeps.
• Correcting the installation for example, levelling the product, adjustment of drain.
• Normal maintenance which recommended by the owner's manual.
• Removal of foreign objects / substances from the machine, including the pump and
inlet hose filter for example, grit, nails, bra wires, buttons etc.
• Replace fuses in or correct house wiring or correct house plumbing.
• Correction of unauthorized repairs.
• Incidental or consequential damage to personal property caused by possible defects
with this appliance.
• If this product is used for commercial purpose, it is not warranted.
(Example : Public places such as public bathroom, lodging house, training
center, dormitory)
If the product is installed outside the normal service area, any cost of
transportation involved in the repair of the product, or the replacement of a
defective part, shall be borne by the owner.
27
Page 28

P/No.: MFL35347793
LG Electronics Inc.
 Loading...