

LG WD100C series, WD200C series Owner's Manual

OWNER’S MANUAL
ENGLISH
FRANÇAIS
WASHING
MACHINE
Read this owner’s manual thoroughly before operating the appliance and
keep it handy for reference at all times
WD100C*
WD200C*
MFL68267007
www.lg.com
Copyright © 2015 - 2017 LG Electronics Inc. All Rights Reserved.
INSTALLATION INSTRUCTIONS
8
INSTALLATION INSTRUCTIONS
CHOOSE THE PROPER LOCATION
WARNING
y Two or more people are required when moving, unpack-
ing, and stacking the washer. Failure to follow this warning
may result in damage to property or serious bodily harm.
y Store and install the washer where it will not be exposed
to weather or to temperatures below freezing. Failure to
follow this warning can cause serious injury, fire, electric
shock, or death.
y Properly ground the washer to conform with all electric
governing codes and ordinances. Failure to follow this
warning can cause serious injury, fire, electric shock, or
death.
y To reduce the risk of electric shock, do not install the wash-
er in humid spaces. Failure to follow this warning can cause
serious injury, fire, electric shock, or death.
y To ensure proper air flow, do not block the large opening on
the bottom of the washer with carpeting or other materials.
y Do not remove the ground prong. Do not use a 2-prong
adapter or 2-wire extension cord. Failure to follow these
warnings can cause serious injury, fire, electric shock, or
death.
CAUTION
y This pedestal washer must be installed underneath
a matching front-loading LG washing machine manufactured after 2009. (The 29" wide machine must be
stacked under a 29" wide LG front-loading washer. The
27" wide machine must be stacked under a 27" wide
LG front-loading washer.)
y The pedestal washer will not work as a standalone unit.
y The pedestal washer must be stacked under an LG
brand appliance in order to operate properly.
POWER OUTLET
y The power outlet must be within 60 in. (1.5 m) of
either side of the washer.
y The appliance and outlet must be positioned so
that the plug is easily accessible.
FLOORING
y To minimize noise and vibration, the washer MUST be
installed on a solidly constructed floor.
y Allowable slope under the entire washer is a maximum 1
inch. difference from side to side or from front to back.
y Installing on carpeting and soft tile surfaces is not
recommended.
y Never install the washer on a platform or weakly supported
structure.
NOTE: The washer must be installed on firm flooring to minimize
vibration during the spin cycle. Concrete flooring is best, but a
wood floor is sufficient, provided it is built to FHA standards. The
washer should not be installed on rugs or exposed to weather.
Do not use a drip pan as it can block the drawer. Using the drip
pan may result in increased vibration and noise during operation.
5
52
/16" (132.9 cm)
1
54
/4" (137.8 cm)
1”
(2.5 cm)
27" (68.9 cm)
29" (73.7 cm)
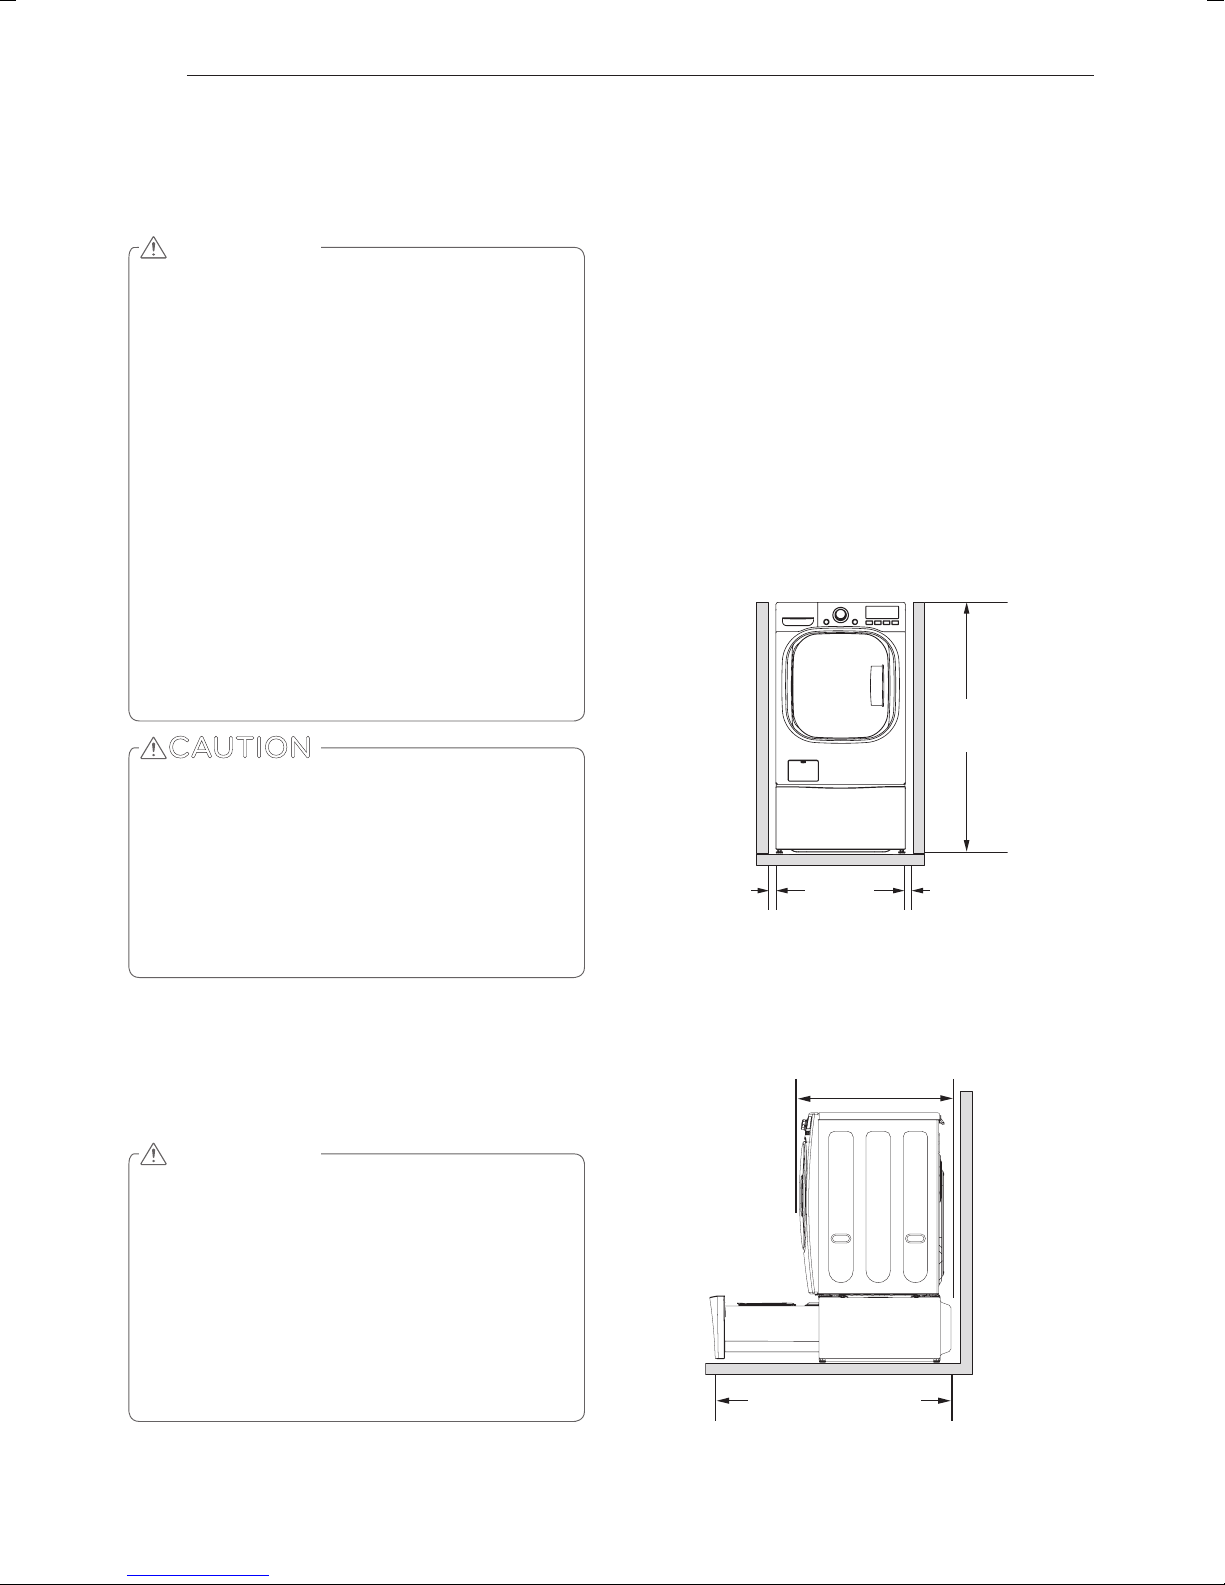
To ensure sufficient clearance for water lines and airflow, allow
minimum clearances of at least 1 in. (2.5 cm) at the sides and
4 in. (10 cm) behind the unit. Be sure to allow for wall, door, or
floor moldings that may increase the required clearances.
29 3/4" (75.6 cm)
32" (82.1 cm)
1”
(2.5 cm)
WARNING
y For best performance, plug the washer into its own
individual outlet. If necessary, use a new, UL-listed
3-prong adapter or 3-wire extension cord with a 3-prong
(grounding) plug rated at no less than the branch circuit.
Do not use an extension cord longer than three feet.
Failure to follow these warnings can result in serious
injury, fire, electric shock, or death
y The outlet must be grounded in accordance with current
wiring electric codes and regulations.
y Time-delay fuse or circuit breaker is recommended.
NOTE: It is the personal responsibility and obligation
of the product owner to have a proper outlet installed
by a qualified service technician.
50 1/2" (128.3 cm)
3
52
/4" (134 cm)
(20 in. [50.8 cm] additional
needed for service)
INSTALLATION INSTRUCTIONS
9
UNPACKING AND REMOVING
SHIPPING MATERIAL
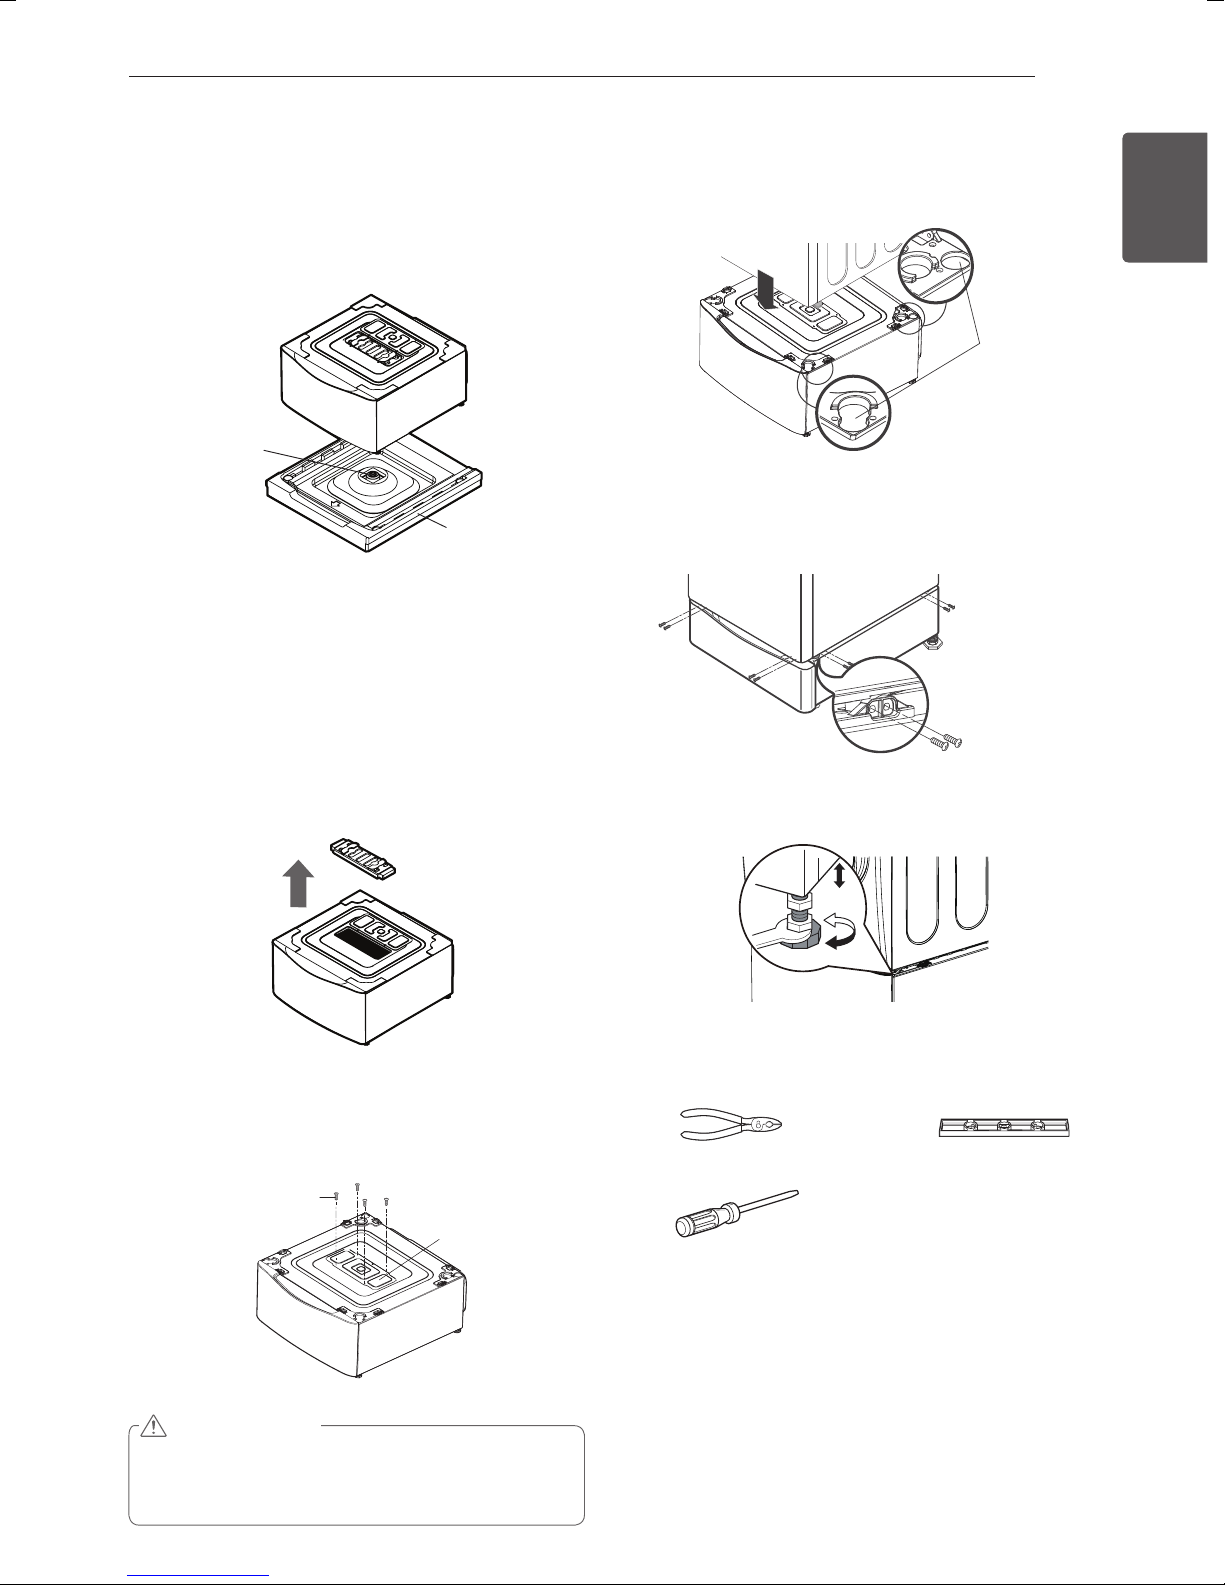
1. After removing the carton and shipping material,
lift the washer off the foam base. Make sure the
plastic tub support comes off with the base and
is not stuck to the bottom of the washer.
Plastic Tub
Support
Carton Base
If you must lay the washer down to remove the base
packaging materials, always protect the side of the
washer and lay it carefully on its side. DO NOT lay
the washer on its front or back.
2. Save the foam block for future use. If the washer
must be moved in the future, the foam block
will help prevent damage to the washer during
transportation.
NOTE: To prevent damage, do not remove
the foam block until the washer is at the final
location.
4. Make sure the leveling legs on the front-loading
washer are fully retracted before stacking it
on top of the pedestal washer. Position the
appliance on top of the pedestal washer.
Washer legs
5. Make sure the holes on the pedestal washer
align with the holes in the front-loading washer,
then install 4 long screws (included in box) at
each corner to securely attach the front-loading
washer to the pedestal washer.
Long screws
6. Extend the legs of the front-loading washer
slightly until it is snugged up against the pedestal
washer.
ENGLISH
3. Turn the top cover about 180 degrees. Cover the
upper hole with the top cover and install 4 short
screws (included in packing box) to fix it in place.
Short screws
WARNING
y The top cover must be installed to avoid the risk of
electric shock or short circuit. Failure to do so can
cause serious injury, fire, electric shock or death.
Top cover
TOOLS YOU WILL NEED
y Adjustable Pliers • Carpenter's Level
y Screwdriver
 Loading...