


P/NO : MMBB0071319
ISSUE 1.0
PRINTED IN KOREA
T•E•L•E•F•O•N•W•A•P•T•E•L•E•F•O•N•W•A•P
MALAY
ENGLISH
Telefon WAP
BUKU PANDUAN PENGGUNA
MODEL : W3000
Sila baca buku penduan ini dengan teliti
sebelum menggunakan telefon anda.
Simpan ia untuk rujukan pada masa
hadapan.

ENGLISH
WAP Phone
USER’S MANUAL
MODEL: W3000
Please read this manual carefully
before operating your set.
Retain it for future reference.


ENGLISH
3
W3000 Phone
W3000 has a polished style which provides
users’ a better feel and convenience.

For Your Safety
ENGLISH
4
All radio transmitters carry risks of interference with electronics in close
proximity.
GSM Phones must be switched off at all times in an aircraft.
Do not activate near petrol stations, fuel depots, chemical
plants or blasting operations.
Switch off the phone in any area where are forced by special
regulations. For example, the phone does not allow to be
used in hospital because pacemakers and hearing aids can
be affected.
Minor interference may affect TVs, radios, PCs, etc.
Do not hold the phone in your hand while driving.
Do not dismantle phone or battery.
Keep the phone in a safe place out of children’s reach since
it contains the detachable small parts and create a choking
hazard.
Do not touch the charger with wet hands.
ENGLISH
5
Please note:
Unusable batteries should be disposed of in accordance with
relevant legislation.
Only use ORIGINAL accessories to avoid damage to your
phone.
Emergency call may not be available under all cellular
networks. Therefore, you should never depend solely on the
phone for essential communications such as medical
emergencies.
Important Information
This user's guide contains important information on the use and
operation of this phone. Please read all the information carefully for
optimal performance and to prevent any damage to or misuse of the
phone. Any changes or modifications not expressly approved in this
user's guide could void your warranty for this equipment.
For your safety, use ONLY specified ORIGINAL batteries
and chargers.

ENGLISH
6
Overview
Accessories
....................................................................................
9
Part of the Phone
.........................................................................
10
• Front of the Phone
.....................................................................
10
• Rear of the Phone
......................................................................
11
Key Description
............................................................................
12
• Alphanumeric Keys
....................................................................
13
Display Information
Display Information
.....................................................................
14
• On-Screen Icons
........................................................................
14
Getting Started
Installation
....................................................................................
16
• Inserting the SIM Card
...............................................................
16
• Installing the Battery
...................................................................
16
• Charging the Battery
..................................................................
17
• Disconnecting the charger
..........................................................
17
• Instructions for changing the front colour cover
.........................
18
Powering On Sequence
...............................................................
19
• To get started with the phone
....................................................
19
• To turn off the phone
.................................................................
19
Access Codes
.............................................................................
20
• PIN code (4 to 8 digits)
..............................................................
20
• PIN2 code (4 to 8 digits)
............................................................
20
• PUK code (4 to 8 digits)
.............................................................
20
• PUK2 code (4 to 8 digits)
...........................................................
20
• Security code (4 to 8 digits)
......................................................
20
Accessing the Menu
Phonebook
...................................................................................
21
• Search [Names 1]
......................................................................
21
• Add new [Names 2]
...................................................................
22
• Speed dial [Names 3]
................................................................
23
• Voice list [Names 4]
....................................................................
23
• Caller groups [Names 5]
............................................................
24
Contents

ENGLISH
7
• Copy all [Names 6]
....................................................................
25
• Delete all [Names 7]
..................................................................
25
• Settings [Names 8]
....................................................................
25
• Information [Names 9]
................................................................
26
Menu Tree
.....................................................................................
27
Messages [Menu 1]
......................................................................
29
• Write message [Menu 1-1]
.........................................................
29
• Inbox [Menu 1-2]
........................................................................
32
• Outbox [Menu 1-3] ......................................................................33
• Info Service [Menu 1-4]
..............................................................
34
• Voice messages [Menu 1-5]
......................................................
35
• Namecard [Menu 1-6]
................................................................
36
• Templates [Menu 1-7]
................................................................
36
• Settings [Menu 1-8]
....................................................................
37
• Check memory [Menu 1-9]
........................................................
37
Call Register [Menu 2]
...................................................................
38
• Missed calls [Menu 2-1]
..............................................................
38
• Received calls [Menu 2-2]
..........................................................
38
• Dialled calls [Menu 2-3]
..............................................................
38
• Clear recent calls [Menu 2-4]
.......................................................
38
• Call charge [Menu 2-5]
...............................................................
39
Profiles [Menu 3]
...........................................................................
41
• Vibrate only [Menu 3-1]
..............................................................
41
• Quiet [Menu 3-2]
.........................................................................
41
• General [Menu 3-3]
....................................................................
41
• Loud [Menu 3-4]
.........................................................................
42
• Headset [Menu 3-5]
....................................................................
42
• Car [Menu 3-6]
...........................................................................
42
Settings [Menu 4]
.........................................................................
44
• Alarm clock [Menu 4-1]
..............................................................
44
• Date & Time [Menu 4-2]
.............................................................
45
• Phone settings [Menu 4-3]
.........................................................
46
• Call settings [Menu 4-4]
.............................................................
47
• Security settings [Menu 4-5]
......................................................
49
• Network settings [Menu 4-6]
......................................................
52
• Restore factory settings [Menu 4-7]
...........................................
52

ENGLISH
8
Call Divert [Menu 5]
......................................................................
53
• All voice calls [Menu 5-1]
............................................................
53
• If busy [Menu 5-2]
.......................................................................
53
• If no reply [Menu 5-3]
.................................................................
53
• If unreachable [Menu 5-4]
...........................................................
53
• All data calls [Menu 5-5]
.............................................................
53
• All fax calls [Menu 5-6]
...............................................................
54
• Cancel all [Menu 5-7]
.................................................................
54
Scheduler [Menu 6]
......................................................................
55
• Add new [Menu 6-1]
...................................................................
55
• View day [Menu 6-2]
..................................................................
56
• View all [Menu 6-3]
....................................................................
56
• Delete passed [Menu 6-4]
..........................................................
56
• Delete all [Menu 6-5]
...................................................................
56
Fun & Tools [Menu 7]
...................................................................
57
• Game [Menu 7-1]
.......................................................................
57
• Unit convert [Menu 7-2]
.............................................................
58
• Calculator [Menu 7-3]
.................................................................
58
• World time [Menu 7-4]
................................................................
59
Internet [Menu 8]
..........................................................................
60
• Home [Menu 8-1]
.......................................................................
60
• Bookmarks [Menu 8-2]
...............................................................
60
• Profiles [Menu 8-3]
....................................................................
60
• Go to URL [Menu 8-4]
................................................................
62
• Cache settings [Menu 8-5]
.........................................................
63
• Security certifications [Menu 8-6]
...............................................
63
• Reset profiles [Menu 8-7]
...........................................................
63
Internet On- line menu
.................................................................
64
Additional Functions
How to Use Data and Fax call
.....................................................
65
• Sending Data or Fax Calls
.........................................................
65
• Receiving Data or Fax Calls
......................................................
65
In call Menu
..................................................................................
67
• 1 During a call
............................................................................
67
• 2 Multiparty or Conference Calls
...............................................
69
Care and Maintenance
.................................................................
71
Technical Data
..............................................................................
73
ENGLISH
9
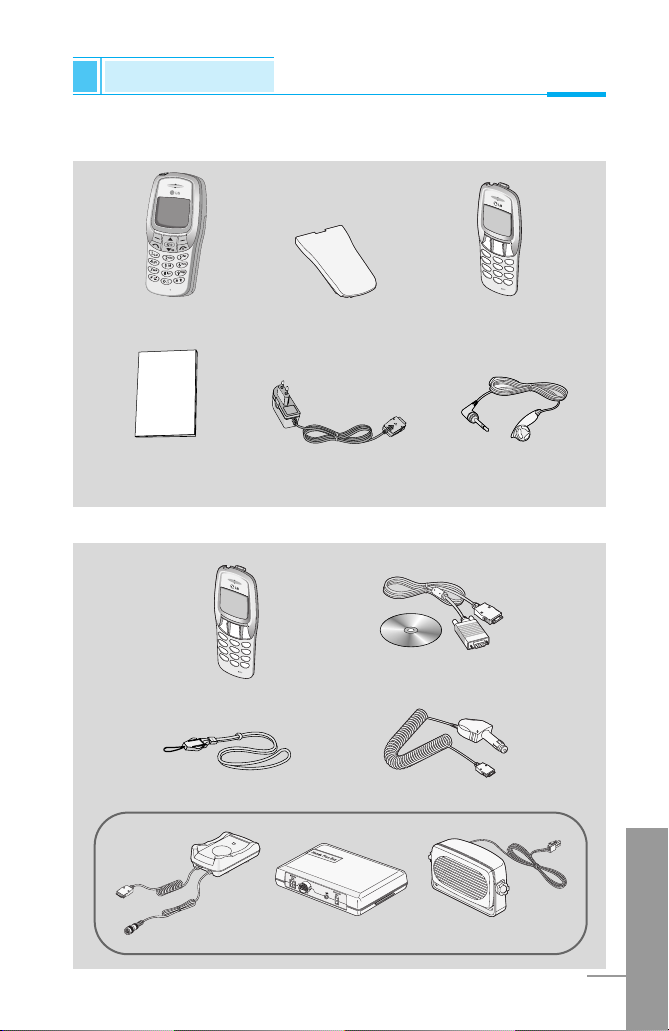
Accessories
Overview
Check to make sure that you have all the parts shown below.
Handset
Travel Adapter
User’s manual
Standard Battery
(BSL-15GA)
<Optional Accessories>
Data Kit/CD
Changeable front cover
Cigar Lighter Adapter
Handsfree Kit
Changeable
front cover
Portable Handsfree
(EM-LG416B)
Neckstrap
ENGLISH
10
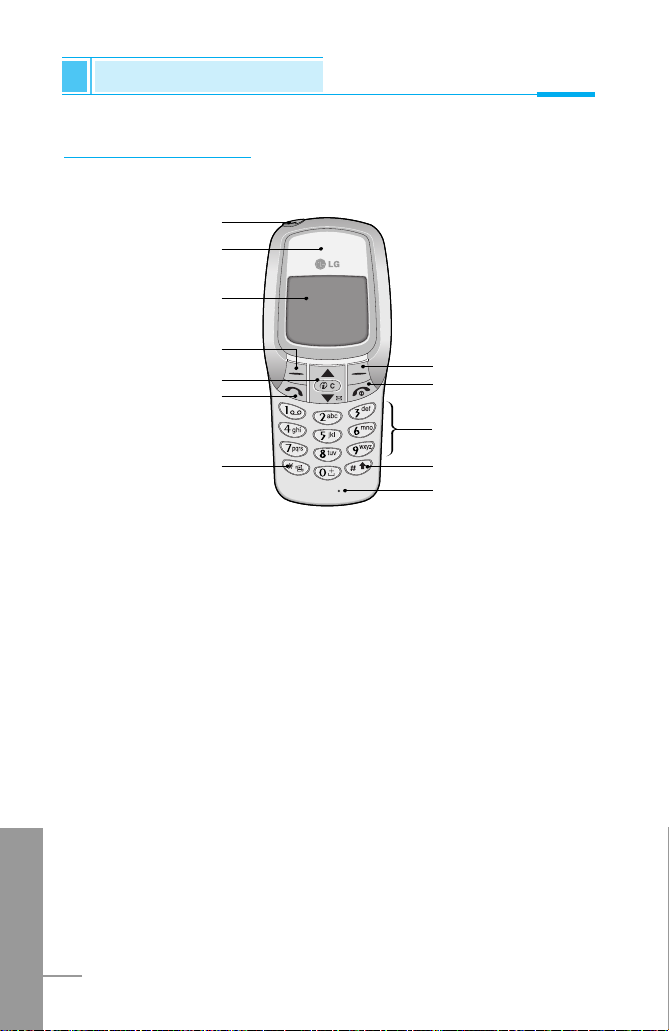
Part of the Phone
Overview
Front of the Phone
1 Earpiece
2 Display Screen
3 Soft Left Key
4 Navigation Keys
5 Send Key
6 Star Key
7 Soft Right Key
8 END/PWR keys
9 Numeric Keys
10 Hash Key
11 Microphone
12 Ear Microphone
Connector
1
2
5
4
3
7
8
10
11
6
9
12
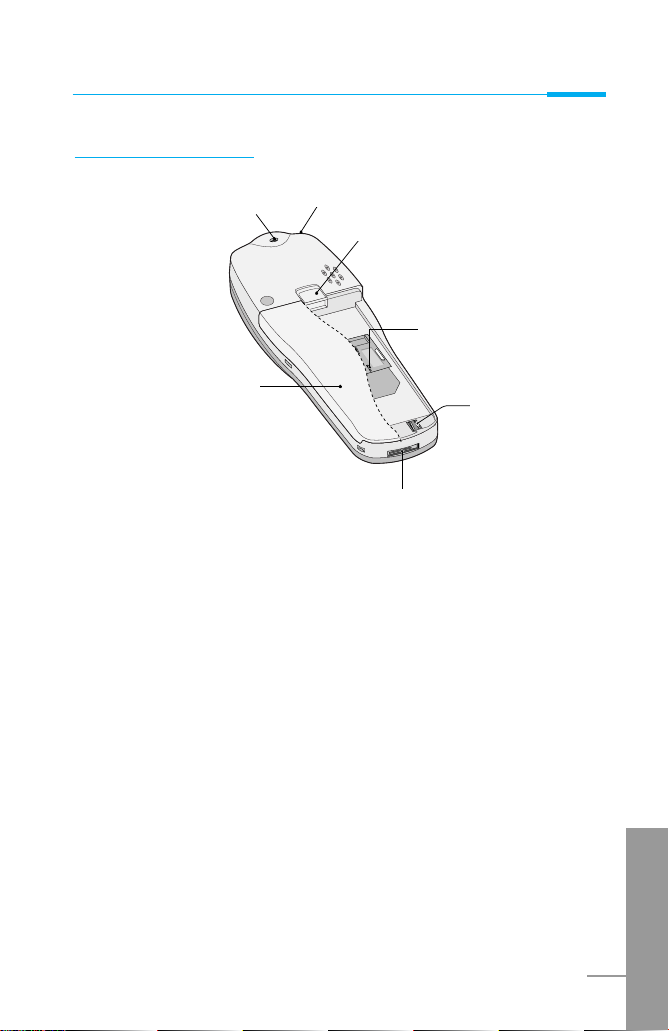
Rear of the Phone
Overview
ENGLISH
11
1 Battery
2 Cable Connector/
Battery Charging Connector/
Hands-Free Car kit Connector/
3 Battery Terminals
4 SIM Card Socket
5 Handstrap Hole
6 Battery Lock
7 Ear Microphone Connector
5
7
6
4
3
2
1
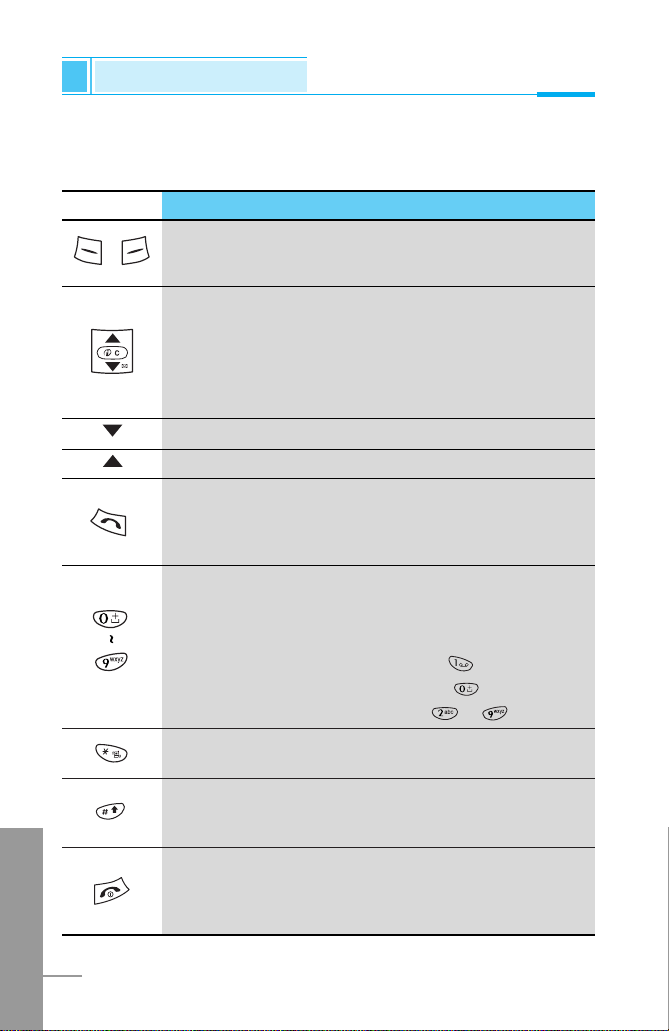
The following shows key components of the phone.
Keypad Description
Key Description
Soft Left Key / Soft Right Key
Each of these keys performs the function indicated
by the text on the display immediately above it.
WAP Hotkey
Used to connect to WAP directly by pressing this key.
Used to delete character(s).
Navigation Keys
Used to scroll through name, phone numbers, menus or
setting options.
Used to enter Message menu directly.
Used to scroll through names, phone numbers.
Send Key
You can dial a phone number and answer a call.
If you press this key without entering a number,
your phone shows the most recently dialed number.
Numeric Keys
These keys are used mainly to dial in standby mode
and enter numbers or characters in editing mode.
When you press these keys for a long time.
• Used to call your voicemail box by .
• Used to call for international call by .
• Used to call Speed dials by from to .
Used to enter the vibration mode by pressing this key for
a long time
Used to call by voice dial with long pressing this key.
This key is also used as Ear mic. hook key when
connecting Ear mic.
END/PWR Key
Used to end or reject a call. This key is also used as
Power Key. Pressing and holding this key for a few
seconds.
Key Description
Overview
ENGLISH
12
ENGLISH
13
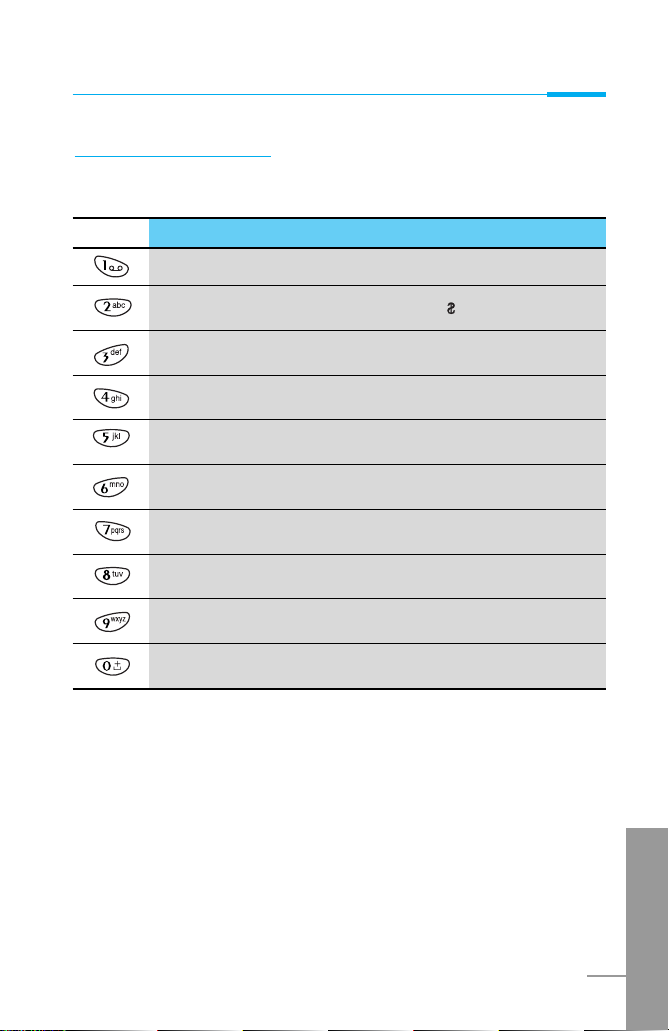
Alphanumeric Keys
The alphabet and numerical keypad mapping relation are listed as the
following table.
Key Description
. , ' ? ! - & 1
A B C 2 Ä À Á Â Ã Æ Ç a b c ä à á â ã ç
D E F 3 È É Ë Ê d e f è é ë ê
G H I 4 Î Ï Ì Í g h i î ï ì í
J K L 5 j k l
M N O 6 Ö Ô Ò Ó Ø Ñ m n o ö ô ò ó ø ñ
P Q R S 7 p q r s
T U V 8 Ü Ù Û Ú t u v ü ù û ú
W X Y Z 9 w x y z
0 [Space Key]
Overview
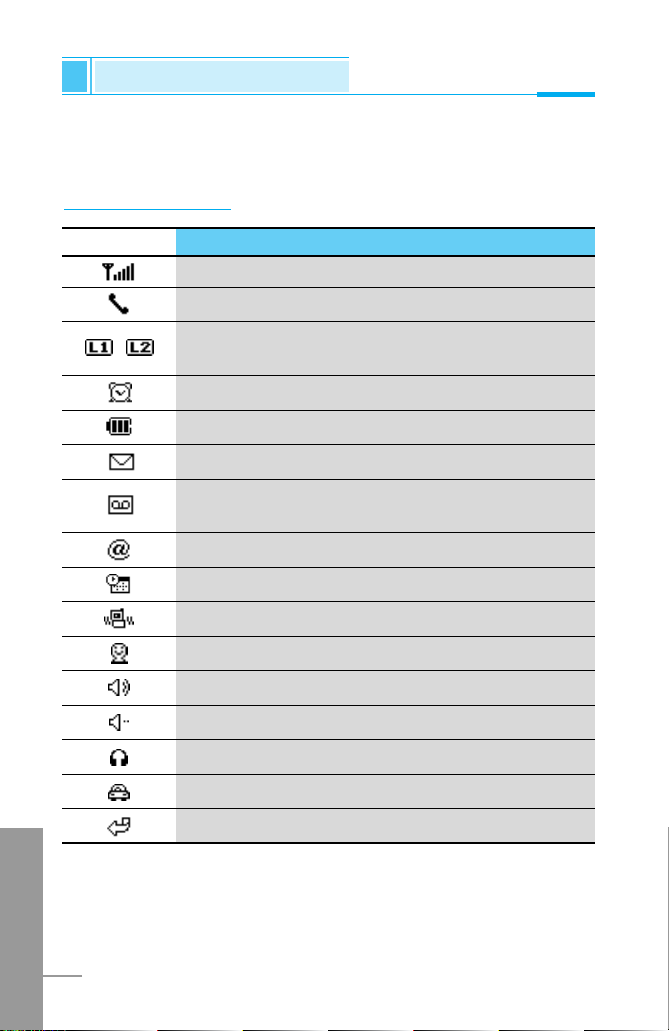
The screen displays several icons the following describe each of them you
may see on the phone.
On-Screen Icons
Icon/Indicator
Description
Tells you the strength of the network signal.
Call is connected.
Line 1/2 is in use for outgoing calls - If you subscribe to
the Two Line Service.
The alarm has been set and is on.
Tells you the status of the battery.
You have received a text message.
You have received a voice message depending on your
subscription.
You have received an E-mail.
You can view your schedule.
All audible signals are turned off.
General menu in profiles.
Loud menu in profiles.
Quiet menu in profiles.
Headset menu in profiles.
Handsfree menu in profiles.
You can divert a call.
Display Information
Display Information
ENGLISH
14
ENGLISH
15
Display Information
Icon Description
Messages
Call register
Profiles
Settings
Call divert
Scheduler
Fun & Tools
Internet
Sim service
Top Menu Icons
ENGLISH
16
Installation
Getting Started
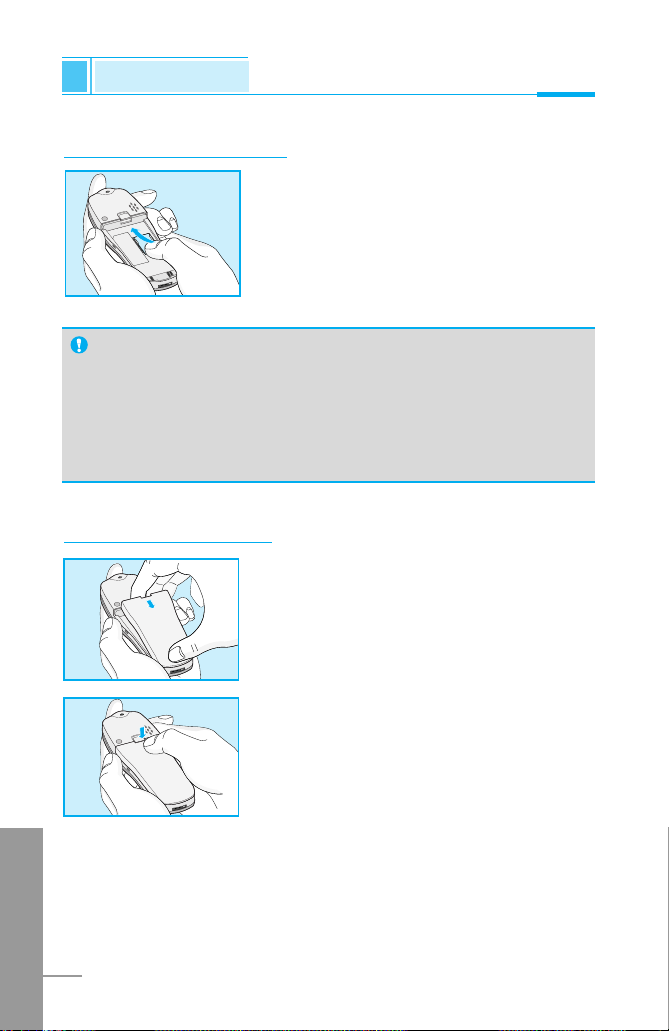
Inserting the SIM Card
Locate the SIM card socket in the back of the
phone.
Follow the steps below to install the SIM card.
1. Remove the battery if attached.
2. Slide the SIM card into the slot, under the
silvery holders, with the golden connectors
facing down and the cut corner to the right.
Installing the Battery
Notice
• Before installing always make sure that the phone is switched off
and remove the battery.
• The metal contact of the SIM card can be easily damaged by
scratches. Pay special attention to the SIM card when you
handle and install. Follow the instructions supplied with the SIM
card.
➊
➋
1. Place the battery on the back of the phone.
2. Push it until you hear a click.
ENGLISH
17
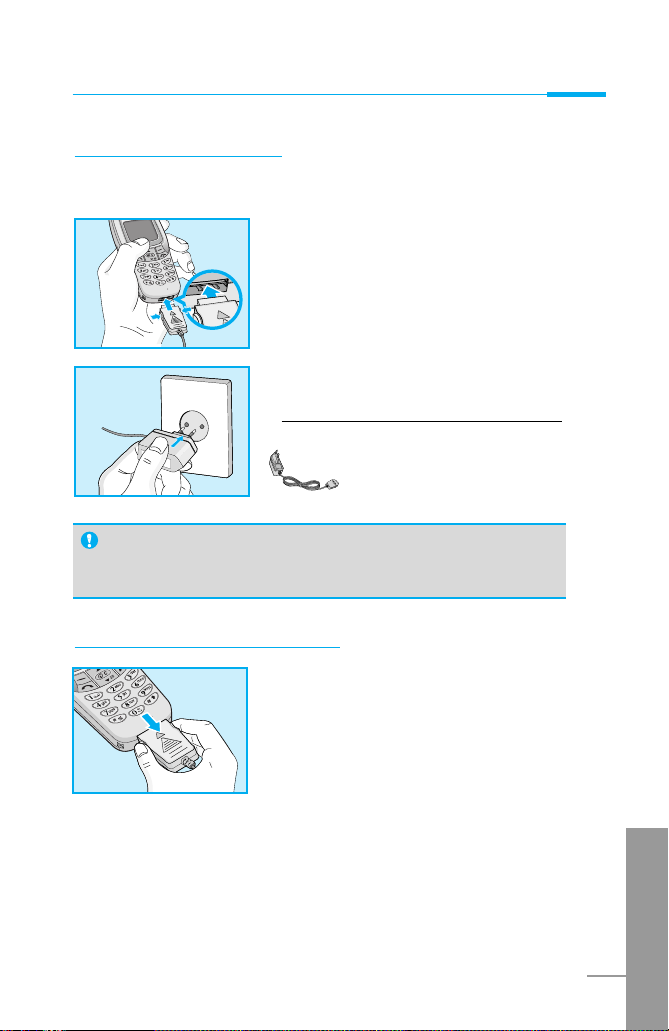
Charging the Battery
To connect the travel adapter to the phone, you must have installed
the battery.
1. Insert one end of the travel adapter into
the bottom of the phone.
2. Connect the other end of the travel
adapter to an AC wall outlet.
Use only the included packing charger.
Warning
• Do not force the connector as this may damage the phone
and/or the travel adapter.
➌
Disconnecting the charger
Disconnect the travel adapter from the
phone by pressing its side buttons.
➍
Getting Started
ENGLISH
18
Installation
Getting Started
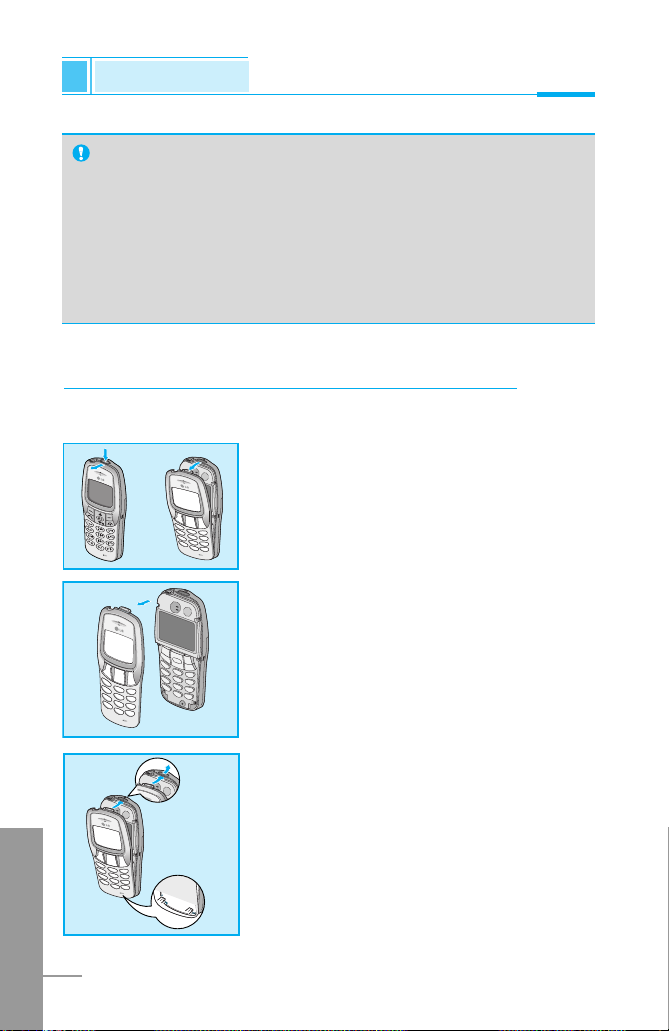
Instructions for changing the front colour cover
Before changing the cover, always switch off the power and disconnect
the phone from the charger or any other device.
➎
1. To remove the cover, press the locking catch
of the cover for example with a coin, Start to
open the cover from its upper part.
2. To replace the cover, first place and close
the catch in the lower part of the cover into
the corresponding hole in the phone and
then gently close the whole cover.
Notice
• The battery delivered with your phone has to be fully charged
before using it.
• Do not remove your battery or the SIM card while charging.
• “Battery Charging” is displayed on the screen after connecting the
travel adapter. Only if the battery is totally empty, Back light is on
without displaying “Battery Charging”.
•
The moving bars of battery icon will stop after charging completely.
ENGLISH
19
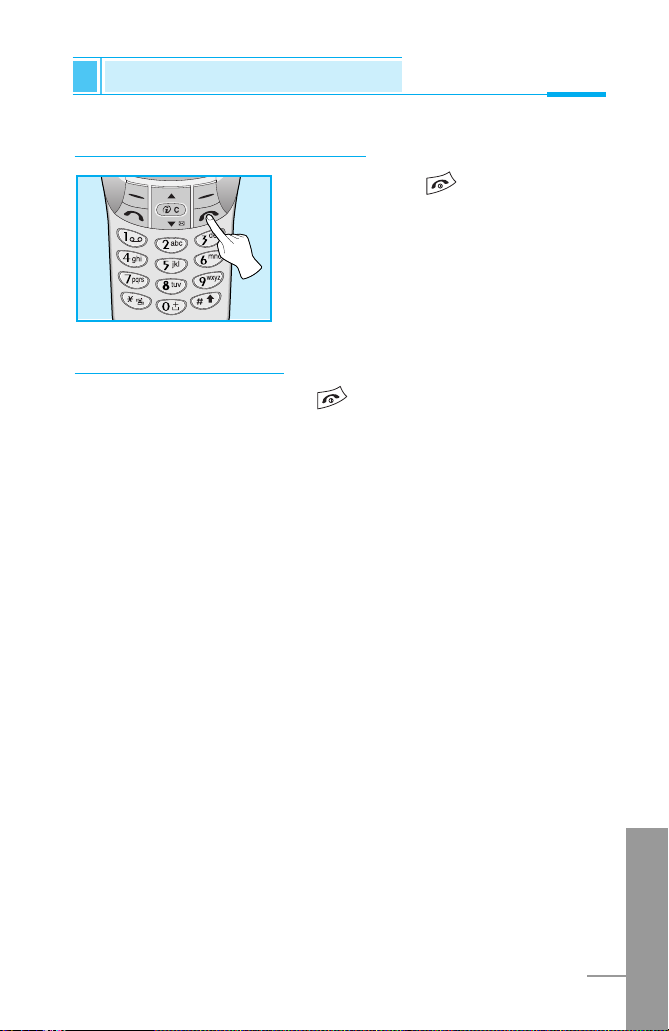
Powering On Sequence
Getting Started
To get started with the phone
1. Press and hold key until you hear a
tone.
2. Depending on setting PIN Code [Menu
4-5-1], you can enter PIN code or not.
3. If your phone connects to a network, the
network name will be displayed shortly.
To turn off the phone
In stand by mode, press and hold key until you hear a tone.
➊
➋

You can use the access codes described in this section to avoid
unauthorized use of your phone. The access codes (except PUK and
PUK2 codes) can be changed by using [Menu 4-5-6].
PIN code (4 to 8 digits)
The PIN (Personal Identification Number) code protects your SIM card
against unauthorized use. The PIN code is usually supplied with the SIM
card. When PIN code is set Enable, your phone will request the PIN code
every time it is switched on. On the contrary, when PIN code is set
Disable, your phone connects to the network directly without the request
PIN code.
PIN2 code (4 to 8 digits)
The PIN2 code, supplied with some SIM cards, is required to access some
functions such as Advice of call charge, Fixed Dial number. These
functions are only available if supported by your SIM card.
PUK code (4 to 8 digits)
The PUK(Personal Unblocking Key) code is required to change a blocked
PIN code. The PUK code may be supplied with the SIM card. If not,
contact your local service provider for the code. If you lose the code, also
contact your service provider.
PUK2 code (4 to 8 digits)
The PUK2 code, supplied with some SIM cards, is required to change a
blocked PIN2 code. If you lose the code, also contact your service
provider.
Security code (4 to 8 digits)
The security code protests the unauthorized use of your phone. It is
usually supplied with the phone. This code is required to delete all phone
entries and to activate “Factory reset” menu. The default number of
Security code is “0000”. You can also change it in Security menu.
ENGLISH
20
Access Codes
Getting Started

ENGLISH
21
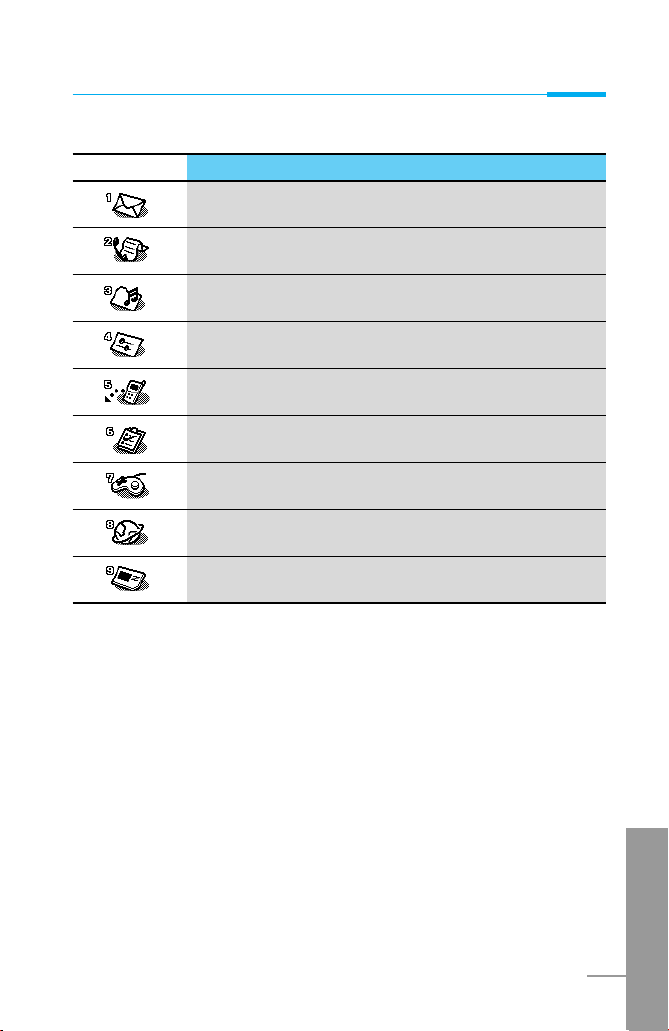
Phonebook
Accessing the Menu
To select a menu in phonebook, press
[Names] in standby mode and then
scroll to a desired item.
Name Description
1 Search Allows you to search for a specific name, number.
2 Add new Allows you to add new names and numbers.
3 Speed dial Allows you to assign up to 8(2-9) one-touch dial
allocations.
4 Voice list Allows you to list phone numbers which is attached
voice.
5 Caller groups Allows you to show group list.
6 Copy all Allows you to copy entries from your Phone
memory to SIM card or from SIM card to Phone
memory.
7 Delete all Allows you to erase all the data in either your
phonebook or the SIM card to the phone memory.
8 Settings Allows you to set the memory and to search item
by Variable, name and number.
9 Information Allows you to check the status of memory,
SDN(Service Dial Number), and Own number.
Name Description
Search [Names 1]
(Calling from phonebook)
1. Open the phonebook first by pressing [Names] in a standby mode.
2. Search by Pressing [Select] to enter.
3. Depending on setting Search by, the below menu may not appear.
• Name
• Number
4. You can find an entry by name and number.
5. Select [Search].
6. You can check the names and numbers by pressing [List].
 Loading...